Használati útmutató EC Line EC-80320
EC Line
cimkenyomtató
EC-80320
Olvassa el alább 📖 a magyar nyelvű használati útmutatót EC Line EC-80320 (48 oldal) a cimkenyomtató kategóriában. Ezt az útmutatót 11 ember találta hasznosnak és 2 felhasználó értékelte átlagosan 4.5 csillagra
Oldal 1/48

EC-80320 User’s Manual
- i -
The Guide
Be sure to have read the manual seriously before your operation. Neither EC PRINTER nor
its affiliates shall be liable to the purchaser of this product or third parties for damages,
losses, costs, or expenses incurred by purchaser or third parties as a result of: accident,
misuse, or abuse of this product or unauthorized modifications, repairs, or alterations to
this product, or failure to strictly comply with EC PRINTER’s operating and maintenance
instructions.
Follow the notices and warnings carefully to avoid seriously bodily injury.
Don’t touch the thermal head with your hand and other solid object at any moment to
avoid your body burned or the thermal head damaged.
Be careful the dentate cutter when you replace the paper.
You are forbidden to clean the printer with alcohol or other liquid when the printer is
connected to the power, pull the plug out when which is processed, using the soft cloth
instead of the hard object.
Please don’t use the printer near the liquid.
Make sure that the printer is connected to a reliable power outlet. It should not be on the
same electric circuit as copiers, refrigerators, or other appliances that cause power
spikes.
Make sure the printer is far away from the appliance that can arouse electromagnetic jam,
such as loudhailer.
The power outlet you plan to connect to should be nearby and unobstructed.
Make sure that the surrounding area is clean, dry, free of dust and not exposed to direct
sunlight.
Don’t remove the printer’s out-cover and repair the printer。
。
。
。。When needed, call or take it
to the professional.
Make sure to set the power switch OFF when connects the printer to the power or
computer.
When the following error or problem occurred, please contact the professional or dealer:
A:
:
:
::The power cable is damaged or broken.
B:
:
:
::The printer is sloppy by some liquid.
C:
:
:
::The printer didn’t work when you operate according the manual.
D:
:
:
::The printer out-cover is broken.
E:
:
:
::The specification or print quality is going wrong obviously, need repaired.
Warning: In order to ensure the use life of printer, strictly prohibit printing full line full
black exceed than 2 CM.
Notice: The contents of this manual are subject to change without notice.
*All the part of the printer can be recycled. When it is abandoned, we can callback it
freely. Please contact us when you abandon it.

EC-80320 User’s Manual
- ii -
Table of contents
The Guide.................................................................................................................................................i
Chapter 1 Introduction...........................................................................................................................1
1.1 Features..........................................................................................................................................1
1.2 Part Description ..............................................................................................................................1
1.3 Parts Identification ..........................................................................................................................1
Chapter 2 Connecting Cables ...............................................................................................................3
2.1 Unpacking.......................................................................................................................................3
2.2 Unpack the Protect Materials ..........................................................................................................3
2.3 Connecting to Your Computer or Other Equipment.........................................................................3
2.3.1 Connecting the Parallel Interface Cable ...................................................................................3
2.3.2 Connecting the Serial Interface Cable (Optional) .....................................................................4
2.3.3 Connecting the USB Interface Cable........................................................................................4
2.3.4 Connecting the Drawer Cable ..................................................................................................5
2.3.5 Connecting the Ethernet Cable ................................................................................................5
2.4 Connecting the Adapter ..................................................................................................................6
2.5 Setup the Print Driver and Select the Cutter ...................................................................................6
2.6 Network Settings.............................................................................................................................9
2.6.1 Connecting Printer....................................................................................................................9
2.6.2 Setting IP Address....................................................................................................................9
2.6.3 Installing Printer Network Driver.............................................................................................12
Chapter 3 Base Control Panel Operations .........................................................................................19
3.1 Control Panel ................................................................................................................................19
3.1.1 Indicator .................................................................................................................................19
3.1.2 KEY........................................................................................................................................19
3.2 Self-Printing ..................................................................................................................................19
3.3 HEX DUMP PRINTING.................................................................................................................20
3.4 Restoring Factory Printer Settings ................................................................................................20
3.5 Setting Slip Stitch ..........................................................................................................................20
3.6 Online-aptitude Parameter Settings..............................................................................................20
Chapter 4 Install and Replace the Roll Paper.....................................................................................22
4.1 Paper Installed Steps ....................................................................................................................22
Chapter 5 Features...............................................................................................................................24
5.1 General Specification....................................................................................................................24
5.2 Interface Features.........................................................................................................................25
5.2.1 Parallel Interface ....................................................................................................................25
5.2.2 Serial Interface (Optional) ......................................................................................................26
5.2.3 USB Interface.........................................................................................................................27
5.2.4 Drawer Connector ..................................................................................................................27
5.2.5 Power Supply Connector........................................................................................................28
5.2.6 Ethernet Connector ................................................................................................................28
Chapter6 Troubleshooting and Maintenance.....................................................................................29
6.1 Maintenance .................................................................................................................................29
6.2 Error Message on the Control Panel.............................................................................................29
6.3 Cutter Jammed or Error ................................................................................................................29
Chapter 7 Control Commands.............................................................................................................31
7.1 General .........................................................................................................................................31
7.2. Explanation of Terms ...................................................................................................................31
Appendix Commands List ...................................................................................................................44
EC-80320 User’s Manual
- 1 -
Chapter 1 Introduction
1.1 Features
EC80320 printer is a kind of high-speed mini thermal printer. It is a high-quality, high-reliability
and low-noise POS printer and operated easily, which can be widely used in ECR, PC-POS and
BANK POS for printing variety of receipt.
1.2 Part Description
According different data port (interface), EC80320 serials are divided into several different names:
EC80320 is the printer equipped with parallel interface, EC80320US is equipped with serial
interface and USB interface, EC80320U is equipped with USB interface and EC80320UE with
Ethernet interface and USB interface.
EC80320 serials printer is equipped with auto cutter, It have two kinds of cutter for the consumer
to selected: partial cutter can only cut the paper with one point left while full cutter cuts the paper
fully.
Note: Please contact with the dealer for changing the interface if needed.
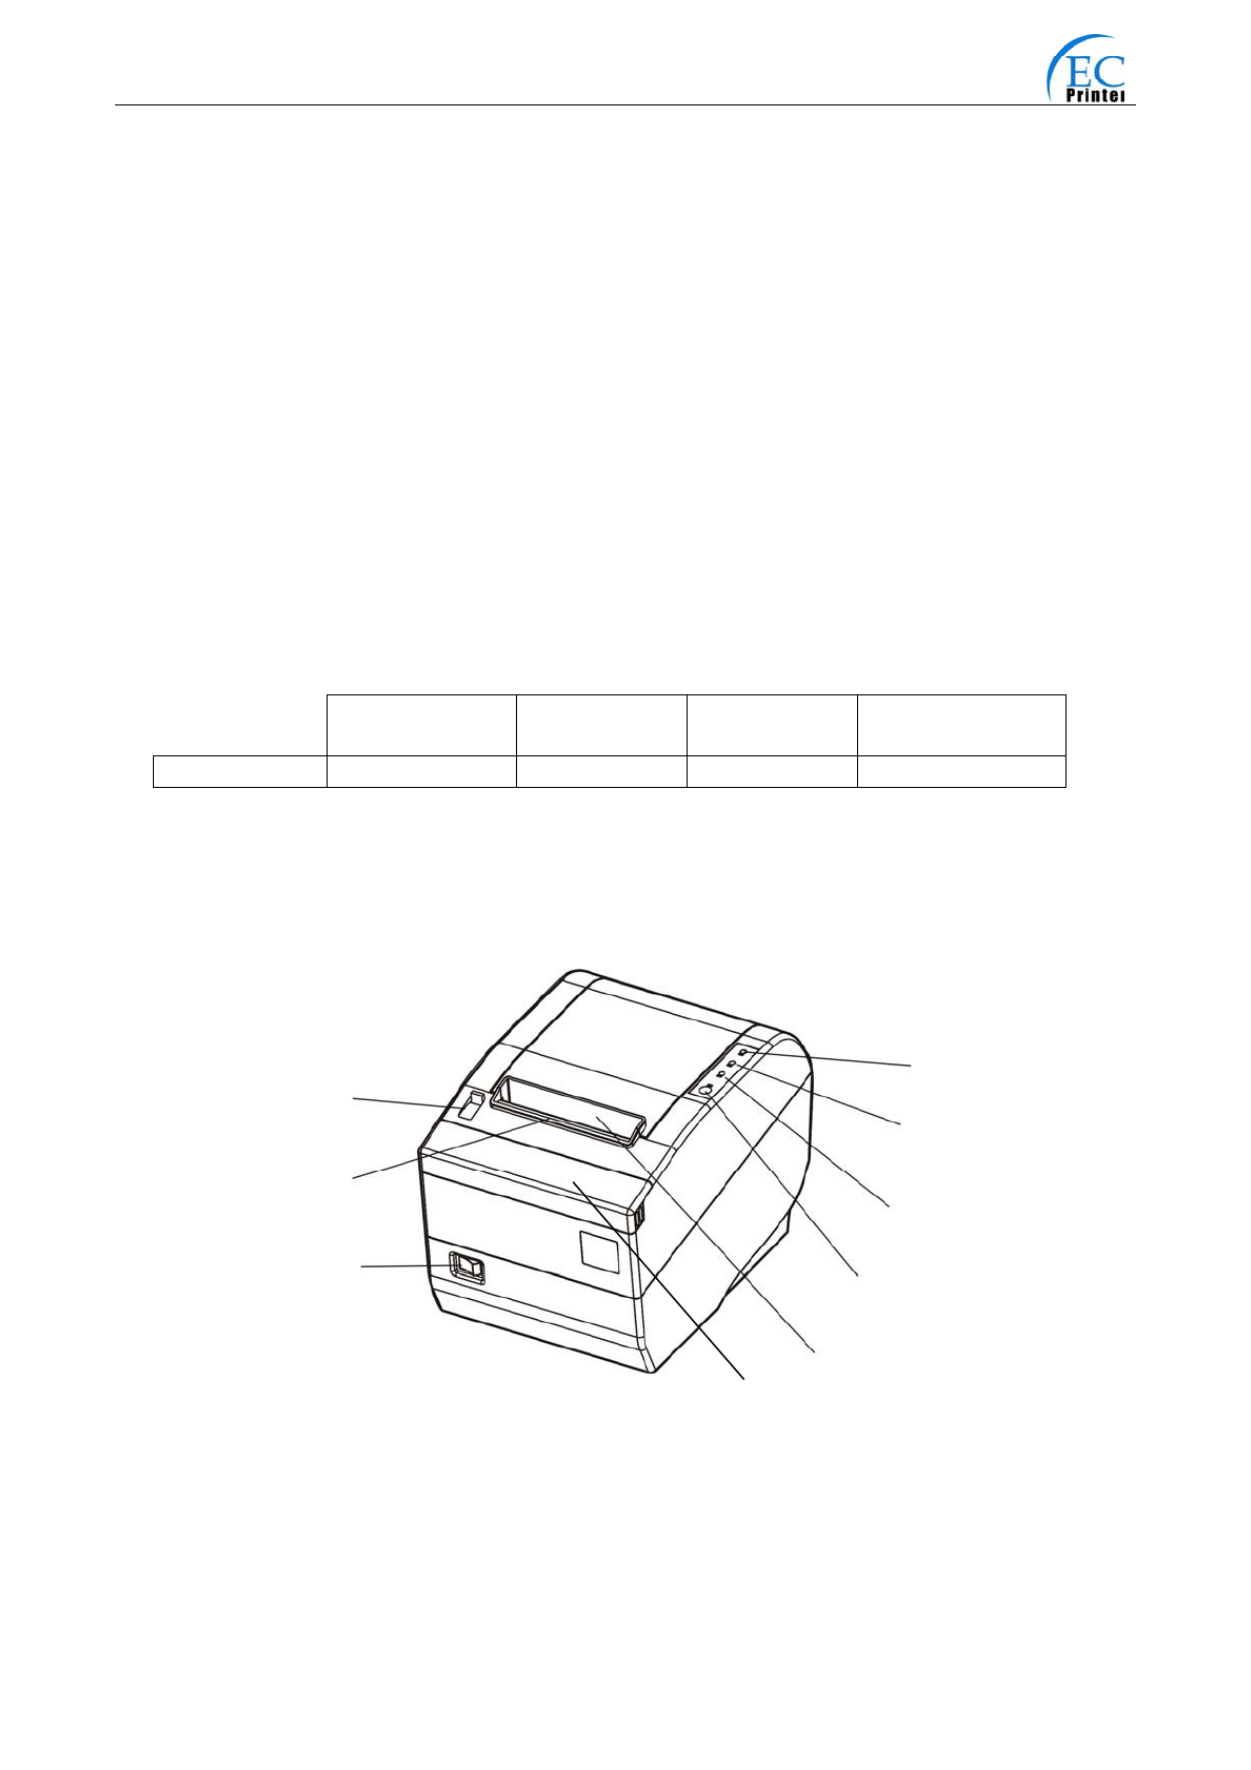
1.3 Parts Identification
Parallel interface USB interface USB + Serial
interface
USB + Ethernet
interface.
MODEL EC80320 EC80320U EC80320US EC80320UE
Cover Open Lever
Power Switch
Power Indicator (Green)
Error Indicator (Red)
Paper out Indicator (Red)
FEED Key
Paper out Tunnel
(
Dentate
)
Manual Cutte
r
Small Cover
Fig1-1 Main part of the printer
Termékspecifikációk
| Márka: | EC Line |
| Kategória: | cimkenyomtató |
| Modell: | EC-80320 |
Szüksége van segítségre?
Ha segítségre van szüksége EC Line EC-80320, tegyen fel kérdést alább, és más felhasználók válaszolnak Önnek
Útmutatók cimkenyomtató EC Line

19 Augusztus 2024
18 Augusztus 2024
18 Augusztus 2024
18 Augusztus 2024
17 Augusztus 2024
17 Augusztus 2024
Útmutatók cimkenyomtató
- cimkenyomtató Casio
- cimkenyomtató Toshiba
- cimkenyomtató Zebra
- cimkenyomtató Primera
- cimkenyomtató Epson
- cimkenyomtató Renkforce
- cimkenyomtató Godex
- cimkenyomtató Brother
- cimkenyomtató Citizen
- cimkenyomtató Dymo
- cimkenyomtató Datamax O'Neil
- cimkenyomtató Honeywell
- cimkenyomtató TSC
- cimkenyomtató Leitz
- cimkenyomtató 3M
- cimkenyomtató CUSTOM
- cimkenyomtató Panduit
- cimkenyomtató Brady
- cimkenyomtató Bixolon
- cimkenyomtató Seiko
- cimkenyomtató Argox
- cimkenyomtató Phoenix
- cimkenyomtató Olivetti
- cimkenyomtató Intermec
- cimkenyomtató POSline
- cimkenyomtató Kroy
- cimkenyomtató Metapace
- cimkenyomtató Datacard
- cimkenyomtató Labelmate
- cimkenyomtató Star Micronics
- cimkenyomtató Dascom
- cimkenyomtató DULA
- cimkenyomtató Tach-It
- cimkenyomtató Colop
- cimkenyomtató Qoltec
- cimkenyomtató SATO
- cimkenyomtató SII
- cimkenyomtató Start International
- cimkenyomtató Ruggard
Legújabb útmutatók cimkenyomtató
12 Január 2025
12 Január 2025
12 Január 2025

6 Január 2025
5 Január 2025

30 December 2025
28 December 2024
28 December 2024
15 December 2024

15 December 2024