Használati útmutató Denon MC3000
Olvassa el alább 📖 a magyar nyelvű használati útmutatót Denon MC3000 (82 oldal) a DJ Gear kategóriában. Ezt az útmutatót 10 ember találta hasznosnak és 2 felhasználó értékelte átlagosan 4.5 csillagra
Oldal 1/82

Professional DJ Controller
MC3000
Owner’s Manual


I
CAUTION
RISK OF ELECTRIC SHOCK
DO NOT OPEN
CAUTION:
TO REDUCE THE RISK OF ELECTRIC SHOCK, DO NOT REMOVE COVER (OR BACK).
NO USER-SERVICEABLE PARTS INSIDE. REFER SERVICING TO QUALIFIED SERVICE
PERSONNEL.
The lightning flash with arrowhead symbol, within an equilateral triangle, is intended to
alert the user to the presence of uninsulated “dangerous voltage” within the product’s
enclosure that may be of sufficient magnitude to constitute a risk of electric shock to
persons.
The exclamation point within an equilateral triangle is intended to alert the user to
the presence of important operating and maintenance (servicing) instructions in the
literature accompanying the appliance.
IMPORTANT TO SAFETY
WARNING:
To reduce the risk of fire and electric shock, this apparatus should not be exposed
to rain or moisture and objects filled with liquids, such as vases, should not be
placed on this apparatus.
CAUTION
1. Handle the power supply cord carefully
Do not damage or deform the power supply cord. If it is damaged or deformed, it may cause electric
shock or malfunction when used. When removing from wall outlet, be sure to remove by holding the
plug attachment and not by pulling the cord.
2. Do not open the rear cover
In order to prevent electric shock, do not open the top cover.
If problems occur, contact your DENON DEALER.
3. Do not place anything inside
Do not place metal objects or spill liquid inside the system.
Electric shock or malfunction may result.
Please, record and retain the Model name and serial number of your set shown on the rating label.
Model No. MC3000
Serial No.
FCC INFORMATION
(For US customers)
1. COMPLIANCE INFORMATION
Product Name: Professional DJ Controller
Model Number: MC3000
This product complies with Part 15 of the FCC Rules. Operation is subject to the following two
conditions: (1) this product may not cause harmful interference, and (2) this product must accept
any interference received, including interference that may cause undesired operation.
Denon Professional div. D&M Professional
1100 Maplewood Drive Itasca, IL 60143
Tel. 630-741-0330
2. IMPORTANT NOTICE: DO NOT MODIFY THIS PRODUCT
This product, when installed as indicated in the instructions contained in this manual, meets FCC
requirements. Modification not expressly approved by DENON may void your authority, granted by
the FCC, to use the product.
3. NOTE
This product has been tested and found to comply with the limits for a Class B digital device,
pursuant to Part 15 of the FCC Rules. These limits are designed to provide reasonable protection
against harmful interference in a residential installation.
This product generates, uses and can radiate radio frequency energy and, if not installed and used
in accordance with the instructions, may cause harmful interference to radio communications.
However, there is no guarantee that interference will not occur in a particular installation. If this
product does cause harmful interference to radio or television reception, which can be determined
by turning the product OFF and ON, the user is encouraged to try to correct the interference by
one or more of the following measures:
• Reorientorrelocatethereceivingantenna.
• Increasetheseparationbetweentheequipmentandreceiver.
• Connect the product into an outlet on a circuit different from that to which the receiver is
connected.
• Consult the local retailer authorized to distribute this type of product or an experienced radio/TV
technician for help.
For Canadian customers:
This Class B apparatus complies with Canadian ICES-003.
Cet appareil numérique de la classe B est conforme à la norme NMB-003 du Canada.


II
IMPORTANT SAFETY INSTRUCTIONS
READ BEFORE OPERATING EQUIPMENT
This product was designed and manufactured to meet strict quality and safety standards. There are, however,
some installation and operation precautions which you should be particularly aware of.
1. Read these instructions.
2. Keep these instructions.
3. Heed all warnings.
4. Follow all instructions.
5. Do not use this apparatus near water.
6. Clean only with dry cloth.
7. Do not block any ventilation openings. Install in accordance with the manufacturer’s instructions.
8. Do not install near any heat sources such as radiators, heat registers, stoves, or other apparatus
(including amplifiers) that produce heat.
9. Do notdefeatthesafety purposeofthepolarizedorgrounding-typeplug.A polarized plughastwo
blades with one wider than the other. A grounding type plug has two blades and a third grounding
prong. The wide blade or the third prong are provided for your safety. If the provided plug does not fit
into your outlet, consult an electrician for replacement of the obsolete outlet.
10. Protect the power cord from being walked on or pinched particularly at plugs, convenience
receptacles, and the point where they exit from the apparatus.
11.
Onlyuseattachments/accessoriesspecifiedbythemanufacturer.
12. Use only with the cart, stand, tripod, bracket, or table specified by the
manufacturer, or sold with the apparatus. When a cart is used, use caution
whenmovingthecart/apparatuscombinationtoavoidinjuryfromtip-over.
13. Unplug this apparatus during lightning storms or when unused for long
periods of time.
14. Refer all ser vicing to qualified service personnel. Servicing is required when the apparatus has been
damaged in any way, such as power-supply cord or plug is damaged, liquid has been spilled or objects
have fallen into the apparatus, the apparatus has been exposed to rain or moisture, does not operate
normally, or has been dropped.
CAUTION: (English)
To completely disconnect this product from the mains, disconnect the plug from the wall socket
outlet.
The mains plug is used to completely interrupt the power supply to the unit and must be within
easy access by the user.
VORSICHT: (Deutsch)
Um dieses Gerät vollständig von der Stromversorgung abzutrennen, trennen Sie bitte den
NetzsteckervonderWandsteckdoseab.
DieHauptsteckerwerdenverwendet,umdieStromversorgungzumGerätvölligzuunterbrechen;er
mussfürdenBenutzergutundeinfachzuerreichensein.
PRECAUTION: (Français)
Pour déconnecter complètement ce produit du courant secteur, débranchez la prise de la prise
murale.
La prise secteur est utilisée pour couper complètement l’alimentation de l’appareil et l’utilisateur
doit pouvoir y accéder facilement.
ATTENZIONE: (Italiano)
Per scollegaredefinitivamentequestoprodottodallaretedialimentazioneelettrica,toglierelaspina
dalla relativa presa.
Laspinadiretevieneutilizzataperinterromperecompletamentel’alimentazioneall’unitàedeve
essere facilmente accessibile all’utente.
PRECAUCIÓN: (Español)
Para desconectar completamente este producto de la alimentación eléctrica, desconecte el
enchufe del enchufe de la pared.
Elenchufedelaalimentaciónseutilizaparainterrumpirporcompletoelsuministrodealimentación
a la unidad y debe de encontrarse en un lugar al que el usuario tenga fácil acceso.
VOORZICHTIGHEID: (Nederlands)
Om de voeding van dit product volledig te onderbreken moet de stekker uit het stopcontact
worden getrokken.
De netstekker wordt gebruikt om de stroomtoevoer naar het toestel volledig te onderbreken en
moetvoordegebruikergemakkelijkbereikbaarzijn.
FÖRSIKTIHETSMÅTT: (Svenska)
Kopplalossstickproppenfråneluttagetförattheltskiljaproduktenfrånnätet.
Stickproppenanvändsförattheltbrytaströmförsörjningentillapparaten,ochdenmåstevara
lättillgängligföranvändaren.


III
nNOTE ON USE/HINWEISE ZUM GEBRAUCH/OBSERVATIONS RELATIVES A L’UTILISATION/
NOTE SULL’USO/NOTAS SOBRE EL USO/ALVORENS TE GEBRUIKEN/OBSERVERA
WARNINGS WARNHINWEISE AVERTISSEMENTS AVVERTENZE ADVERTENCIAS WAARSCHUWINGEN VARNINGAR
•Handle the power cord carefully.
Hold the plug when unplugging
the cord.
•Keep the unit free from
moisture, water, and dust.
•Unplug the power cord when
not using the unit for long
periods of time.
•Do not let foreign objects into
the unit.
•Do not let insecticides,
benzene,andthinnercomein
contact with the unit.
•Never disassemble or modify
the unit in any way.
•Naked flame sources such as
lighted candles should not be
placed on the unit.
•Do not expose the unit to
dripping or splashing fluids.
•Do not place objects filled with
liquids, such as vases, on the
unit.
•Do not handle the mains cord
with wet hands.
•When the switch is in the OFF
position, the equipment is not
completely switched off from
MAINS.
•The equipment shall be
installed near the power supply
so that the power supply is
easily accessible.
•Gehen Sie vorsichtig mit dem
Netzkabelum.
Halten Sie das Kabel am
Stecker, wenn Sie den Stecker
herausziehen.
•Halten Sie das Gerät von
Feuchtigkeit, Wasser und Staub
fern.
•Wenn das Gerät längere Zeit
nicht verwendet werden soll,
trennenSiedasNetzkabelvom
Netzstecker.
•Lassen Sie keine fremden
Gegenstände in das Gerät
kommen.
•Lassen Sie das Gerät nicht
mitInsektiziden,Benzinoder
VerdünnungsmittelninBerührung
kommen.
•VersuchenSieniemalsdasGerät
auseinanderzunehmenoderzu
verändern.
•Auf dem Gerät sollten keinerlei
direkte Feuerquellen wie
beispielsweiseangezündete
Kerzenaufgestelltwerden.
•Das Gerät sollte keiner tropfenden
oderspritzendenFlüssigkeit
ausgesetztwerden.
•Auf dem Gerät sollten keine mit
Flüssigkeit gefüllten Behälter wie
beispielsweiseVasenaufgestellt
werden.
•DasNetzkabelnichtmitfeuchten
oder nassen Händen anfassen.
•Wenn der Schalter ausgeschaltet
ist (OFF-Position), ist das Gerät
nichtvollständigvomStromnetz
(MAINS) abgetrennt.
•Das Gerät sollte in der Nähe einer
Netzsteckdoseaufgestelltwerden,
damitesleichtandasStromnetz
angeschlossen werden kann.
•Manipuler le cordon
d’alimentation avec précaution.
Tenir la prise lors du
débranchement du cordon.
•Protéger l’appareil contre
l’humidité, l’eau et la poussière.
•Débrancher le cordon
d’alimentation lorsque l’appareil
n’est pas utilisé pendant de
longues périodes.
•Ne pas laisser des objets
étrangers dans l’appareil.
•Ne pas mettre en contact des
insecticides,dubenzèneetun
diluant avec l’appareil.
•Ne jamais démonter ou
modifier l’appareil d’une
manière ou d’une autre.
•Ne jamais placer de flamme
nue sur l'appareil, notamment
des bougies allumées.
•L’appareil ne doit pas être
exposé à l’eau ou à l’humidité.
•Ne pas poser d’objet contenant
du liquide, par exemple un
vase, sur l’appareil.
•Ne pas manipuler le cordon
d’alimentation avec les mains
mouillées.
•Lorsque l’interrupteur est sur
la position OFF, l’appareil n’est
pas complètement déconnecté
du SECTEUR (MAINS).
•L’appareil sera installé près de
la source d’alimentation, de
sorte que cette dernière soit
facilement accessible.
•Manneggiate il cavo di
alimentazioneconattenzione.
Tenete ferma la spina quando
scollegate il cavo dalla presa.
•Tenete l’unità lontana
dall’umidità, dall’acqua e dalla
polvere.
•Scollegate il cavo di
alimentazionequando
prevedetedinonutilizzare
l’unità per un lungo periodo di
tempo.
•Non inserite corpi estranei
all’interno dell’unità.
•Assicuratevi che l’unità non
entri in contatto con insetticidi,
benzoloosolventi.
•Non smontate né modificate
l’unità in alcun modo.
•Nonposizionatesull’unità
fiamme libere, come ad
esempio candele accese.
•L’apparecchiatura non deve
essere esposta a gocciolii o
spruzzi.
•Nonposizionatesull’unitàalcun
oggetto contenente liquidi,
come ad esempio i vasi.
•Non toccare il cavo di
alimentazioneconlemani
bagnate.
•Quando l’interruttore
ènellaposizioneOFF,
l’apparecchiatura non è
completamente scollegata da
MAINS.
•L’apparecchio va installato
in prossimità della fonte di
alimentazione,inmodoche
quest’ultima sia facilmente
accessibile.
•Maneje el cordón de energía
con cuidado.
Sostenga el enchufe cuando
desconecte el cordón de
energía.
•Mantenga el equipo libre de
humedad, agua y polvo.
•Desconecte el cordón de
energía cuando no utilice el
equipo por mucho tiempo.
•No deje objetos extraños
dentro del equipo.
•No permita el contacto
de insecticidas, gasolina y
diluyentes con el equipo.
•Nunca desarme o modifique el
equipo de ninguna manera.
•No deberán colocarse sobre
el aparato fuentes inflamables
sin protección, como velas
encendidas.
•No exponer el aparato al goteo
o salpicaduras cuando se
utilice.
•No colocar sobre el aparato
objetos llenos de líquido, como
jarros.
•No maneje el cable de
alimentación con las manos
mojadas.
•Cuando el interruptor está en la
posición OFF, el equipo no está
completamente desconectado
de la alimentación MAINS.
•El equipo se instalará cerca
de la fuente de alimentación
de manera que resulte fácil
acceder a ella.
•Hanteer het netsnoer
voorzichtig.
Houd het snoer bij de stekker
vastwanneerdezemoet
worden aan- of losgekoppeld.
•Laat geen vochtigheid,
water of stof in het apparaat
binnendringen.
•Neem altijd het netsnoer uit
het stopkontakt wanneer het
apparaat gedurende een lange
periode niet wordt gebruikt.
•Laat geen vreemde
voorwerpen in dit apparaat
vallen.
•Voorkomdatinsecticiden,
benzeenofverfverdunnermet
dit toestel in contact komen.
•Dit toestel mag niet
gedemonteerd of aangepast
worden.
•Plaats geen open vlammen,
bijvoorbeeld een brandende
kaars, op het apparaat.
•Stel het apparaat niet bloot aan
druppels of spatten.
•Plaats geen voorwerpen gevuld
met water, bijvoorbeeld een
vaas, op het apparaat.
•Raak het netsnoer niet met
natte handen aan.
•Als de schakelaar op OFF
staat, is het apparaat niet
volledig losgekoppeld van de
netspanning (MAINS).
•De apparatuur wordt in de
buurt van het stopcontact
geïnstalleerd,zodatditaltijd
gemakkelijk toegankelijk is.
•Hantera nätkabeln varsamt.
Håll i kabeln när den kopplas
från el-uttaget.
•Utsättinteapparatenförfukt,
vatten och damm.
•Koppla loss nätkabeln om
apparaten inte kommer att
användas i lång tid.
•Setillattfrämmandeföremål
inte tränger in i apparaten.
•Se till att inte insektsmedel
på spraybruk, bensen och
thinner kommer i kontakt med
apparatenshölje.
•Ta inte isär apparaten och
försökintebyggaomden.
•Placerainteöppeneld,t.ex.
tända ljus, på apparaten.
•Apparatenfårinteutsättasför
vätska.
•Placerainteföremålfyllda
med vätska, t.ex. vaser, på
apparaten.
•Hantera inte nätsladden med
våta händer.
•Ävenomströmbrytarenstår
i det avstängda läget OFF,
så är utrustningen inte helt
bortkopplad från det elektriska
nätet (MAINS).
•Utrustningen ska vara
installeradnäraströmuttaget
såattströmförsörjningenärlätt
att tillgå.


IV
•DECLARATION OF CONFORMITY (English)
We declare under our sole responsibility that this product, to which this declaration relates, is
in conformity with the following standards:
EN60950-1, EN55022, EN55024, EN61000-3-2 and EN61000-3-3.
Following the provisions of LowVoltage Directive 2006/95/EC and EMC Directive 2004/108/
EC,theECregulation1275/2008anditsframeworkDirective2009/125/ECforEnergy-related
Products (ErP).
•ÜBEREINSTIMMUNGSERKLÄRUNG (Deutsch)
Wir erklären unter unsererVerantwortung, daß dieses Produkt, auf das sich diese Erklärung
bezieht,denfolgendenStandardsentspricht:
EN60950-1, EN55022, EN55024, EN61000-3-2 und EN61000-3-3.
Gemäß den Bestimmungen der Niederspannungsrichtlinie 2006/95/EG und EMV Richtlinie
2004/108/EG,derVerordnung(EG)Nr.1275/2008derKommissionundderenRahmenrichtlinie
2009/125/EGzuenergieverbrauchsrelevantenProdukten(ErP).
•DECLARATION DE CONFORMITE (Français)
Nous déclarons sous notre seule responsabilité que l’appareil, auquel se réfère cette
déclaration, est conforme aux standards suivants:
EN60950-1, EN55022, EN55024, EN61000-3-2 et EN61000-3-3.
Selon la directive2006/95/ECconcernant la bassetensionetla directiveCEM 2004/108/EC,
laréglementationeuropéenne1275/2008 etladirective2009/125/ECétablissantuncadrede
travail applicable aux produits liés à l’énergie (ErP).
•DICHIARAZIONE DI CONFORMITÀ (Italiano)
Dichiariamocon piena responsabilità chequesto prodotto, al quale la nostra dichiarazione si
riferisce, è conforme alle seguenti normative:
EN60950-1, EN55022, EN55024, EN61000-3-2 e EN61000-3-3.
Facendo seguito alle disposizioni della direttivasul basso voltaggio 2006/95/EC alla direttiva
EMC 2004/108/EC, alla norma EC 1275/2008 e alla relativa legge quadro 2009/125/EC in
materia di prodotti alimentati ad energia (ErP).
QUESTO PRODOTTO E’ CONFORME
ALD.M.28/08/95N.548
•DECLARACIÓN DE CONFORMIDAD (Español)
Declaramos bajo nuestra exclusiva responsabilidad que este producto al que hace referencia
esta declaración, está conforme con los siguientes estándares:
EN60950-1, EN55022, EN55024, EN61000-3-2 y EN61000-3-3.
Deacuerdoconladirectivasobrebajatensión2006/95/CEyladirectivasobreCEM2004/108/
CE,lanormativaCE1275/2008ysudirectivamarco2009/125/ECparaproductosrelacionados
con la energía (ErP).
•EENVORMIGHEIDSVERKLARING (Nederlands)
Wijverklarenuitsluitendoponzeverantwoordelijkheiddatditprodukt,waaropdezeverklaring
betrekking heeft, in overeenstemming is met de volgende normen:
EN60950-1, EN55022, EN55024, EN61000-3-2 en EN61000-3-3.
Volgens de voorzieningen van lage spanningsrichtlijn 2006/95/EC en EMC-richtlijn 2004/108/
EC, de EU-richtlijn 1275/2008 en de kaderrichtlijn 2009/125/EC voor energieverbruikende
producten (ErP).
•ÖVERENSSTÄMMELSESINTYG (Svenska)
Härmed intygas helt på eget ansvar att denna produkt, vilken detta intyg avser, uppfyller
följandestandarder:
EN60950-1, EN55022, EN55024, EN61000-3-2 och EN61000-3-3.
Uppfyller reglerna i lågspänningsdirektivet 2006/95/EC och EMC-direktivet 2004/108/
EC, EU-förordningen 1275/2008 och ramverksdirektivet 2009/125/EC för energirelaterade
produkter (ErP).
D&M Professional Europe
A division of D&M Europe B.V.
Beemdstraat 11
5653 MA Eindhoven
The Netherlands


V
A NOTE ABOUT RECYCLING:
This product’s packaging materials are recyclable and can be reused. Please dispose of any
materials in accordance with the local recycling regulations.
When discarding the unit, comply with local rules or regulations.
Batteries should never be thrown away or incinerated but disposed of in accordance with the
local regulations concerning battery disposal.
This product and the supplied accessories, excluding the batteries, constitute the applicable
product according to the WEEE directive.
HINWEIS ZUM RECYCLING:
Das Verpackungsmaterial dieses Produktes ist zum Recyceln geeignet und kann wieder
verwendetwerden. Bitte entsorgenSie alleMaterialienentsprechend der örtlichen Recycling-
Vorschriften.
BeachtenSiebeiderEntsorgungdesGerätesdieörtlichenVorschriftenundBestimmungen.
DieBatteriendürfennichtindenHausmüllgeworfenoderverbranntwerden;bitteentsorgenSie
dieBatteriengemäßderörtlichenVorschriften.
Dieses Produkt und das im Lieferumfang enthaltene Zubehör (mit Ausnahme der Batterien!)
entsprechen der WEEE-Direktive.
UNE REMARQUE CONCERNANT LE RECYCLAGE:
Lesmatériauxd’emballagedeceproduitsontrecyclablesetpeuventêtreréutilisés.Veuillezdisposer
des matériaux conformément aux lois sur le recyclage en vigueur.
Lorsquevousmettezcetappareilaurebut,respectezlesloisouréglementationsenvigueur.
Les piles ne doivent jamais être jetées ou incinérées, mais mises au rebut conformément aux lois en vigueur sur la
mise au rebut des piles.
Ce produit et les accessoires inclus, à l’exception des piles, sont des produits conformes à la directive DEEE.
NOTA RELATIVA AL RICICLAGGIO:
I materiali di imballaggiodi questo prodotto sono riutilizzabili e riciclabili. Smaltire i materiali conformemente alle
normative locali sul riciclaggio.
Per lo smaltimento dell’unità, osservare le normative o le leggi locali in vigore.
Non gettare le batterie, né incenerirle, ma smaltirle conformemente alla normativa locale sui rifiuti chimici.
Questoprodottoegliaccessoriinclusinell’imballaggiosonoapplicabilialladirettivaRAEE,adeccezionedellebatterie.
ACERCA DEL RECICLAJE:
Los materiales de embalaje de este producto son reciclables y se pueden volver a utilizar. Disponga de estos
materiales siguiendo los reglamentos de reciclaje de su localidad.
Cuando se deshaga de la unidad, cumpla con las reglas o reglamentos locales.
Las pilas nunca deberán tirarse ni incinerarse. Deberá disponer de ellas siguiendo los reglamentos de su localidad
relacionados con los desperdicios químicos.
Este producto junto con los accesorios empaquetados es el producto aplicable a la directiva RAEE excepto pilas.
EEN AANTEKENING MET BETREKKING TOT DE RECYCLING:
Hetinpakmateriaalvanditproductisrecycleerbaarenkanopnieuwgebruiktworden.Erwordtverzochtomzichvan
elk afvalmateriaal te ontdoen volgens de plaatselijke voorschriften.
Volgvoorhetwegdoenvandespelerdevoorschriftenvoordeverwijderingvanwit-enbruingoedop.
Batterijen mogen nooit worden weggegooid of verbrand, maar moeten volgens de plaatselijke voorschriften
betreffende chemisch afval worden verwijderd.
Op dit product en de meegeleverde accessoires, m.u.v. de batterijen is de richtlijn voor afgedankte elektrische en
elektronische apparaten (WEEE) van toepassing.
OBSERVERA ANGÅENDE ÅTERVINNING:
Produktens emballage är återvinningsbart och kan återanvändas. Kassera det enligt lokala återvinningsbestämmelser.
Närdukasserarenhetenskadugöradetiöverensstämmelsemedlokalareglerochbestämmelser.
Batterierfårabsolutintekastasisopornaellerbrännas.Kasserademenligtlokalabestämmelserförkemisktavfall.
DennaapparatochdetillbehörsomlevererasmeddenuppfyllergällandeWEEE-direktiv,medundantagavbatterierna.


1
Before use Part names and
functions
Connections Basic
operations
Installing and setting up
supplied software
USB settings
Troubleshooting Index
Specifications
Signal system chart Before use
Accessories
Check that the following parts are supplied with the product.
q Quick setup guide 1 ...................................................................
w Mapping guide 1 .........................................................................
e Power cord 1 ..............................................................................
r AC adaptor 1 ...............................................................................
t USB cable 1 ................................................................................
y CD-ROM
•MC3000 Resource CD-ROM 1 ................................................
•DJ software (U.S.A and Canada models)
VirtualDJLE ......................................................................... 1
uDVD-ROM(European,U.KandAsia/Pacicmodels)
•DJ software (TRAKTOR LE 2) 1 ...............................................
i Warranty (for North America model only) 1 ................................
t
e
r
or
U.S.A and Canada models European,U.KandAsia/
Pacific models
NOTE
Conduction noise or interference noise may cause the unit to
malfunction. Therefore, when connecting this device to a computer,
connect using the USB cable included.
Before use ·················································································1
Accessories ····················································································1
About this manual ········································································2
Main features ·················································································2
Cautions on handling ····································································2
Connections ·············································································3
Preparations ··················································································3
Cables used for connection 3 ··························································
Input terminal connection ···························································· 3
Connectingamicrophone/externaldevices ··································3
Output terminal connections ······················································· 3
Outputtingtoanamplier/poweredspeakersand
recording devices ·········································································3
Connecting to a computer ···························································4
Connecting the power cord ·························································4
Installing and setting up supplied software ············5
Installing the ASIO driver (Windows only) ·································5
Starting up 7 ····················································································
About the control panel screen·····················································7
Installing TRAKTOR LE 2 ······························································8
Installation onto a Mac computer 8 ·················································
Installation onto a Windows computer 8 ·········································
Installing Virtual DJ LE ·································································9
Installation into Mac computers 9 ···················································
Installation into Windows computer 9 ·············································
Basic operation ·····································································10
Basic operation ············································································10
Turning the power on 10 ·································································
Turning the power off 10 ·································································
Adjusting the volume of the master level 10 ··································
Microphone input ········································································10
Adjusting the microphone input level 10 ········································
Headphone monitor ··································································· 10
LINE TO MASTER function ························································ 11
Adjustingthelevelbalanceoflines1/2 ······································11
Adjustingthevolumeoflines1/2 ···············································11
Adjusting the sensitivity of the touch sensor ·························11
Jog wheel lock function ····························································12
Locking the jog wheel ································································12
Cancelling the jog wheel lock 12 ····················································
USB settings ··········································································12
USB AUDIO Input/Output ··························································12
MIDI command input/output ···················································· 13
MIDI channel assignment 13 ··························································
SwitchingMIDIinput/outputchannels ······································14
Setting the MIDI command transmission interval time 14 ··············
MIDI command list 15 ····································································
Part names and functions ···············································18
Before use
Top panel ····················································································18
qAudioinput/outputpart ·························································· 18
wTRAKTORLE2/PRO2 ··························································· 19
eVirtualDJLE/PRO ··································································24
Front panel ···················································································29
Rear panel ····················································································29
Troubleshooting···································································30
Specifications ········································································31
Index ··························································································32
Contents
Signal system chart ··························································33


3
Before use Part names and
functions
Connections Basic
operations
Installing and setting up
supplied software
USB settings
Troubleshooting Index
Specifications
Signal system chart
Connections
NOTE
•Do not plug in the power cord until all connections have been
completed.
•When making connections, also refer to the operating instructions of
the other components.
•Insert the plugs securely. Loose connections will result in the
generation of noise.
•Be sure to connect the left and right channels properly (left with left,
right with right).
•Connect the cables to the correct input and output terminals.
•Do not bundle power cords together with connection cables. Doing
so can result in humming or noise.
Preparations
Cables used for connection
Select the cables according to the equipment being connected.
nFor RCA input/output terminals
R
L
R
L
RCA pin plug cable (sold separately)
nFor USB terminal
USB cable (supplied)
nFor coaxial microphone input
Coaxial cable for microphone (sold separately)
nFor master output terminals
Balanced phone plug cable (sold separately)
Connections
Input terminal connection
Connecting a microphone/external devices
RL
RL
RL
RL
AUDIO
RL
OUT
AUDIO
RL
OUT
CD player CD player
Coaxial
Microphone
Output terminal connections
Outputting to an amplifier/powered
speakers and recording devices
RL
RL
AUDIO
RL
IN
RL
AUDIO
IN
Balanced
main
amplifier
Unbalanced
main
amplifier


4
Before use Part names and
functions
Connections Basic
operations
Installing and setting up
supplied software
USB settings
Troubleshooting Index
Specifications
Signal system chart
Connections
Connecting to a computer
Use the supplied USB cable to connect the unit with a computer so
that USB MIDI and USB AUDIO signals can be sent and received.
nCompatible computers
•Computers running the following computer OS versions can be
connected to this unit.
•Mac OS X 10.6 or later
•Windows XP SP3 or later (32 Bit only)
•WindowsVistaSP2orlater(32or64Bit)
•Windows 7 (32 or 64 Bit)
Computers running other OS versions may not be compatible
with the USB MIDI. For this reason, such computers may function
abnormally after connecting by USB to this unit.
•Mac, Mac OS is a registered trademark or trademark of Apple Inc.
intheUnitedStatesand/orothercountries.
•Windows is a registered trademark or trademark of Microsoft
CorporationintheUnitedStatesand/orothercountries.
.
nAutomatic driver installation
When you connect the unit to a computer, drivers for the unit are
automatically installed in the computer.
When this unit is connected to a Windows computer, the following
message is shown at the bottom right of the screen.
Total Track Control
Found New Hardware
USB AUDIO Device
Once installation is completed, a message “Your new hardware
is installed and ready to use.” appears as shown, and you can
operate the unit.
Your new hardware is installed and ready to use.
Found New Hardware
•For Mac OS, the unit can be used immediately after connecting.
Insert the supplied AC adapter DC plug into the DC IN jack of the unit
and then insert the power plug to the outlet.
NOTE
Insert the plug fully and securely into the socket. Incomplete
connection to the power supply may cause damage to the unit, or
noise.
To AC outlet
(AC120V,60Hz)
AC adapter (supplied)
DC plug
AC adapter
cable holder
To AC outlet
(AC230V,50Hz)
U.S.A and Canada models
European,U.KandAsia/
Pacific models
To prevent the DC plug from disconnecting, it is recommended that
you should anchor the power cord to the AC adapter cable holder. Use
a Phillips screwdriver to secure it.
Connecting the power cord


5
Before use Part names and
functions
Connections Basic
operations
Installing and setting up
supplied software
USB settings
Troubleshooting Index
Specifications
Signal system chart
Installing and setting up
supplied software
Installing and setting up supplied software
Installing the ASIO driver (Windows only)
1Insert the supplied “MC3000 Resource CD-ROM”
into the computer.
The browse screen for the disc drive is displayed.
•If the browse screen is not displayed, click the disc drive on My
Computer.
2Click “Asio Driver Installation”.
TheASIODriverSetupWizardislaunched.
Click “Next >”.
3The license agreement screen appears. If you agree,
select “I Agree”.
The “Next >” can now be selected.
Click “Next >”.
4A screen for verifying the folder in which the ASIO
driver is to be installed appears.
Click “Next >”.
By default, the ASIO driver is installed in “C\Program Files\DENON_
DJ\DDJASIO\”.
To change this location, click “Browse” and select a different folder.
Choose “Everyone” if everyone uses the computer on which the
update program is to be installed, “Just me” if you are the only user.
Use the following steps to install the supplied ASIO drivers.
•When using a Mac, no installation is required.


7
Before use Part names and
functions
Connections Basic
operations
Installing and setting up
supplied software
USB settings
Troubleshooting Index
Specifications
Signal system chart
Installing and setting up
supplied software
Installing the ASIO driver (Windows only)
Starting up
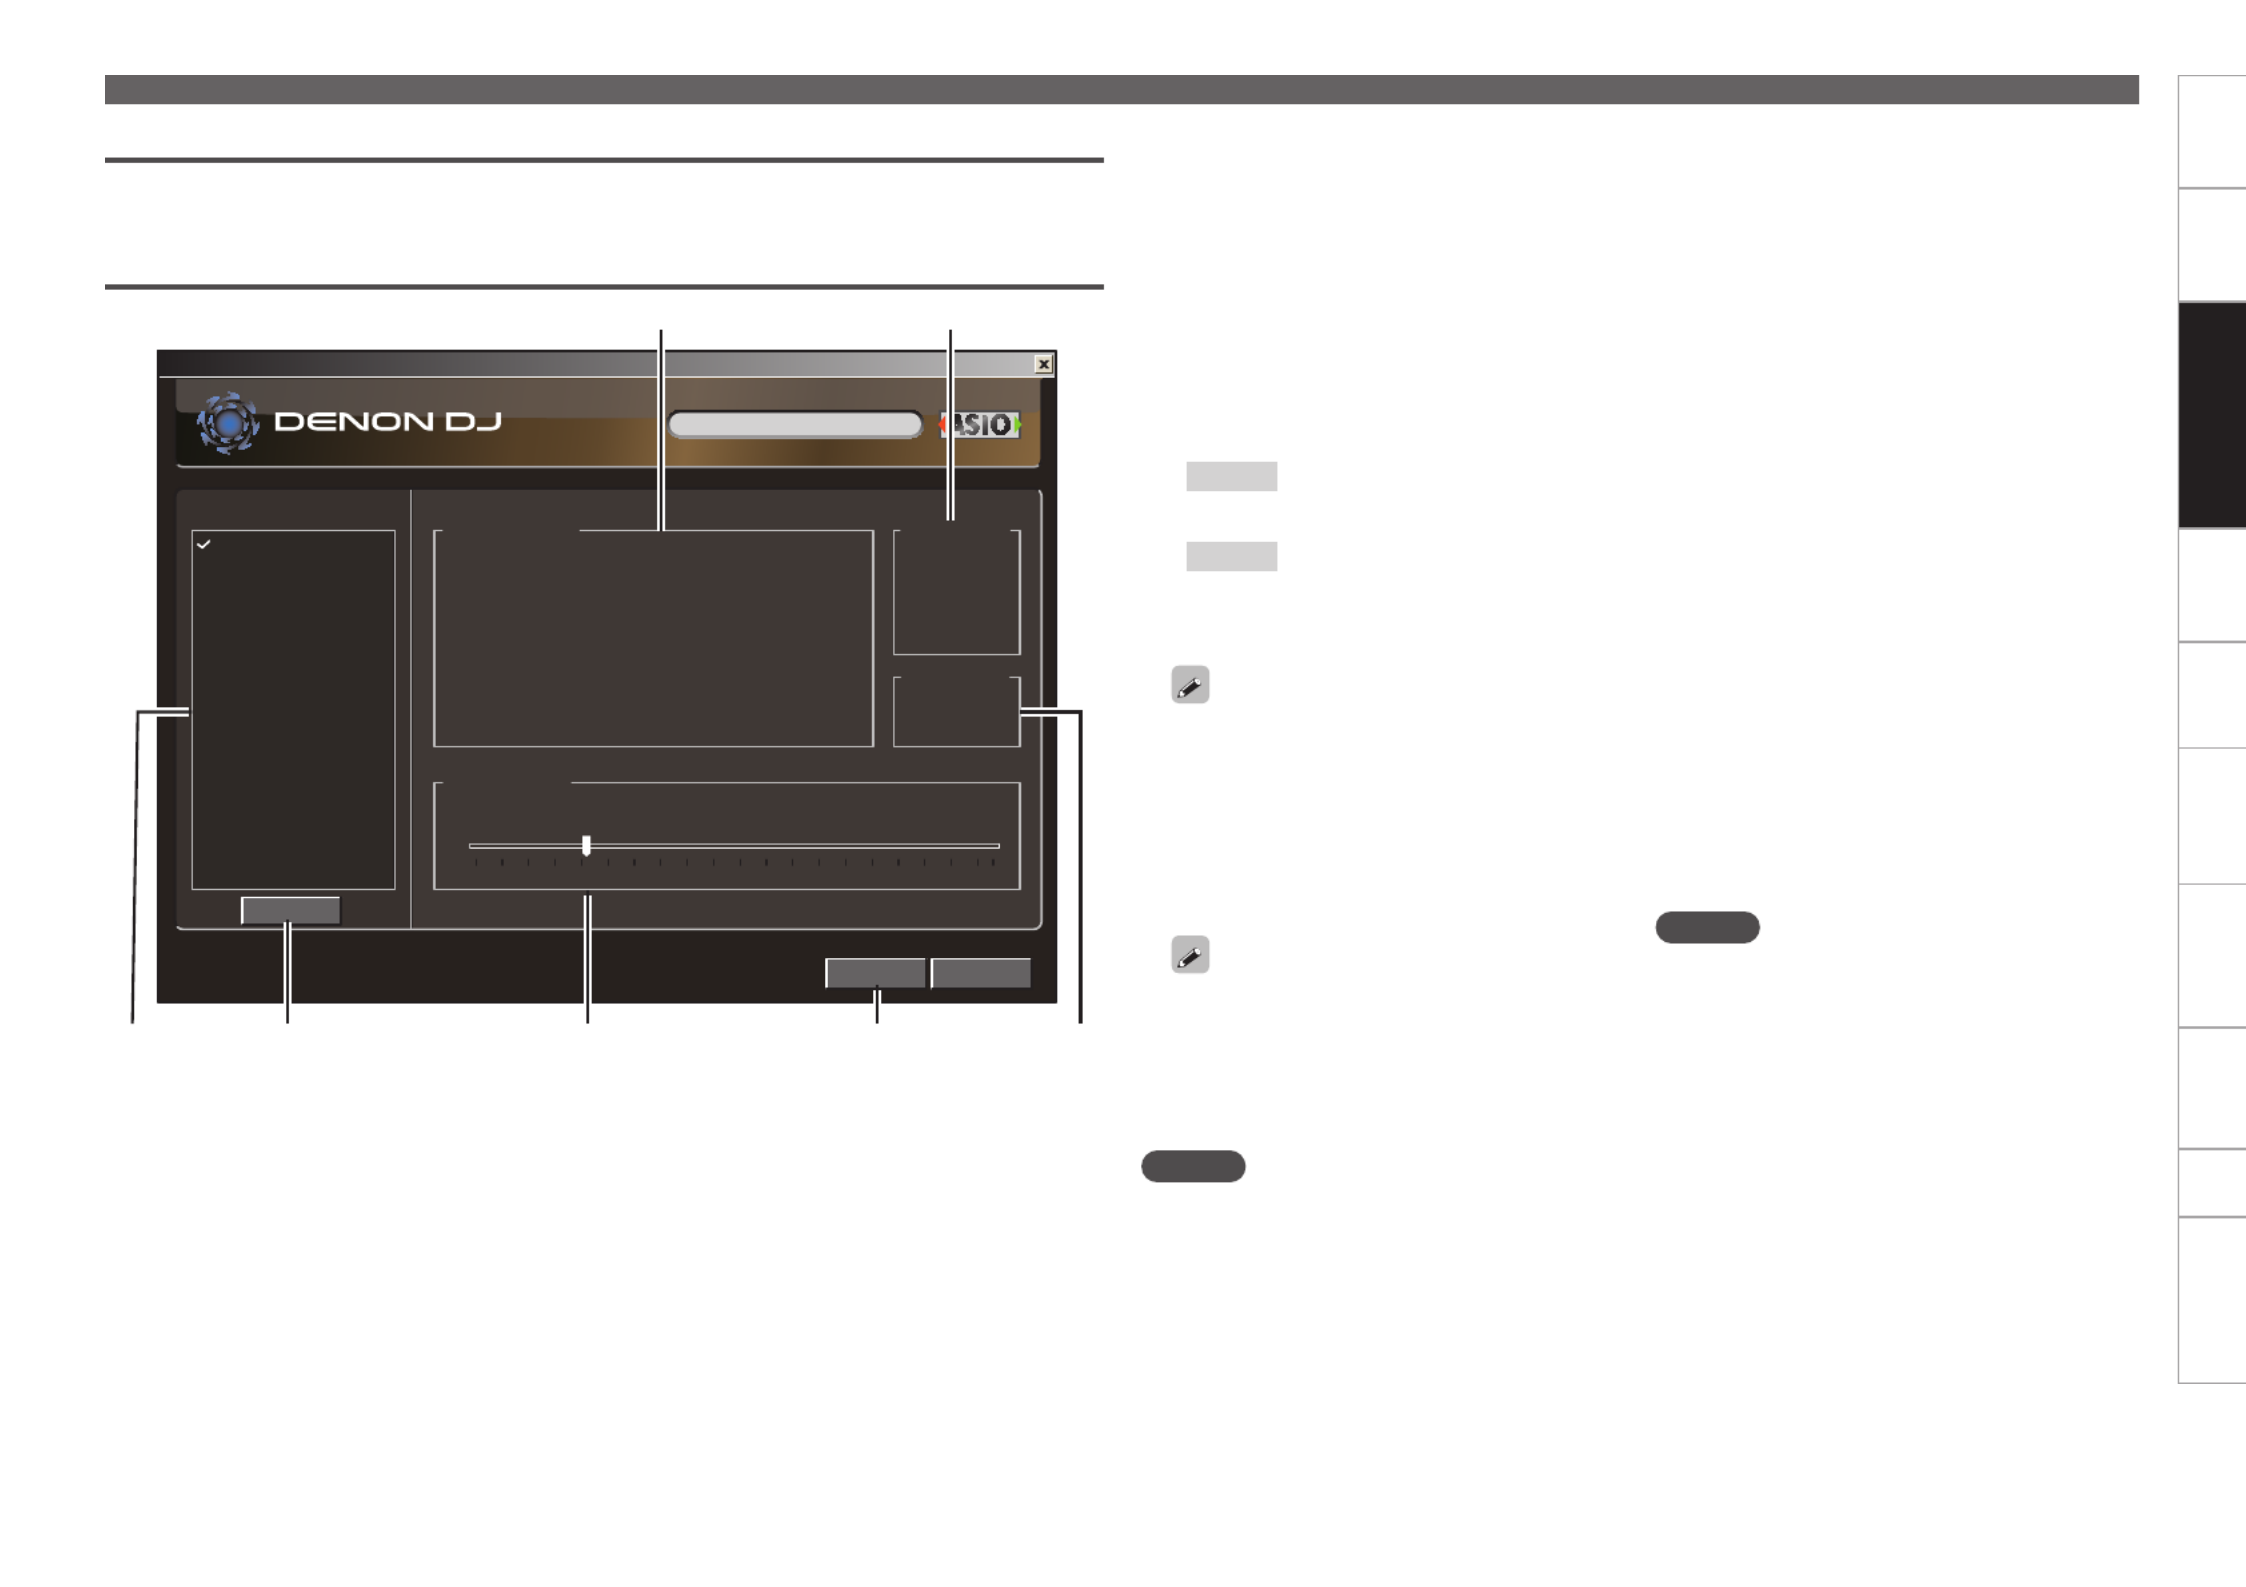
When the DENON DJ ASIO driver “ASIO Control Panel” is opened from the DJ software or desktop icon,
the DENON DJ ASIO driver appears in the ASIO Control Panel.
About the control panel screen
DENON DJ ASIO Driver Ver.2.2.1
OK
Disable
Cancel
Device Description
Device Name:
Unit Number.
Software Version:
Audio input channels:
Audio output channels:
Sampling frequency:
Bit resolution:
Audio buffer size:
Audio Buffer Size
512sample(10ms)
MC3000
1
-
4
4
48 kHz
16 bit
512
Devices
48.0kHz
MC3000
16 bit
24 bit
44.1kHz
88.2kHz
96.0kHz
Sampling Rate
Bit Resolution
u y
rew tq
q Devices (Device list)
This window is used for automatically displaying
all connected DENON DJ devices in a list.
(Example: MC3000)
•When you select a device you want to set
from this list, the current settings of the
selected device appear in a window u
(“Device Description”).
•If you double-click a device, the ASIO device
status is switched from “Enable” to “Disable”
or vice versa.
•ASIO device status
Enable : A check mark appears on the left
side of a device name and the
name is highlighted (bold).
Disable : The check mark on the left side
of a device name is removed and
the device name is displayed in
lightface.
•Youcanselectonedeviceatatime.
•Youcansetmultipledevicestoenableatthe
same time.
w Enable/Disable
This button is used for switching a device
selected in (Devices) to enable or disable as q
an ASIO device.
The ASIO device status can also be switched
by double-clicking the device name displayed in
q (Devices).
e Audio Buffer Size
Usethisslidertoadjustthebuffersize.
NOTE
•The range of values is 88 to 2048 (sample units),
in steps of 1 ms.
•When you set multiple devices to enable as ASIO
devices, the same setting values apply to all ASIO
devices.
r OK/Cancel
OK:
Use this button to close the ASIO control panel,
reflecting the changes to the settings.
Cancel:
Use this button to close the ASIO control panel
without reflecting the changes to the settings.
t Bit Resolution
Selected bit resolution is displayed.
y Sampling Rate
The sampling rate selection is displayed here.
The frequencies with which the DENON DJ
ASIO driver is compatible are as follows:
•44.1kHz/48kHz/88.2kHz/96kHz
•Thisdeviceonlysupports48kHz.
u Device Description
This is the area in which information for the
device selected in the device information list is
displayed.
The following are displayed:
•Device Name
•Unit Number
•SoftwareVersion
•Audio input channels
•Audio output channels
•Sampling frequency
•Max bit resolution
•Audiobuffersize
NOTE
If the device’s information cannot be acquired, “–”
(hyphens) are displayed for all items.


8
Before use Part names and
functions
Connections Basic
operations
Installing and setting up
supplied software
USB settings
Troubleshooting Index
Specifications
Signal system chart
Installing and setting up
supplied software
Installation onto a Windows computer
1Insert DVD-ROM “TRAKTOR LE 2” into your
computer.
The browse screen for the disc drive is displayed.
•If the browse screen is not displayed, click the disc drive on My
Computer.
2Double-click “Traktor Setup.exe” .
A window opens and the TRAKTOR LE 2 installation starts.
•Select Complete installation or Custom installation to start
installation. If you are unsure about the Custom installation, select
the Complete installation option.
3Follow each step in the installation screen for
installation.
4
When the installation completes, close the
installation screen.
•After the installation, activate the software. For information about
how to activate the software, see Service Center Manual, which
is located in the Documentation folder under the Service Center
folder that is created during the installation.
•It is recommended that you use the latest version of the TRAKTOR
LE 2 software.
•For information about how to use the DJ software, see the
instruction manual for the DJ software or the help menu.
•TheserialnumberisprintedonthebackoftheDVD-ROMcase.
•TRAKTOR LE 2 is an NI software. To install and use the software,
you have to accept the software license agreement.
D&M shall not be responsible for any problems with your computer
and other software that may arise from the installation and use of
TRAKTOR LE 2.
Installing TRAKTOR LE 2
UsethefollowingstepstoinstalltheDJsoftware“TRAKTORLE2”inthesuppliedDVD-ROM.
Installation onto a Mac computer
1Insert DVD-ROM “TRAKTOR LE 2” into your
computer.
The TRAKTOR LE 2 disc icon is displayed on the desktop.
2Double-click the TRAKTOR LE 2 disc icon.
Files contained in the TRAKTOR LE 2 DVD are displayed for
browsing.
3Double-click “Traktor Installer” .
A window opens and the TRAKTOR LE 2 installation starts.
•Select Complete installation or Custom installation to start
installation. If you are unsure about the Custom installation, select
the Complete installation option.
4Follow each step in the installation screen for
installation.
5When the installation completes, close the
installation screen.
•After the installation, activate the software. For information about
how to activate the software, see Service Center Manual, which
is located in the Documentation folder under the Service Center
folder that is created during the installation.
•It is recommended that you use the latest version of the TRAKTOR
LE 2 software.
•For information about how to use the DJ software, see the
instruction manual for the DJ software or the help menu.
•TheserialnumberisprintedonthebackoftheDVD-ROMcase.
•TRAKTOR LE 2 is an NI software. To install and use the software,
you have to accept the software license agreement.
D&M shall not be responsible for any problems with your computer
and other software that may arise from the installation and use of
TRAKTOR LE 2.


9
Before use Part names and
functions
Connections Basic
operations
Installing and setting up
supplied software
USB settings
Troubleshooting Index
Specifications
Signal system chart
Installing and setting up
supplied software
Installation into Windows computer
1Insert CD-ROM “Virtual DJ LE” into your
computer.
The browse screen for the disc drive is displayed.
•When the browse screen is not displayed, click the disc drive on
My Computer.
2Double-click “install_virtualdj_le_mc3000_vxxx.
msi” .
AwindowopensandtheVirtualDJLEinstallationstarts.
•“xx” represents the version number.
G HExample
Ver.7.0.5:install_virtualdj_le_mc3000_v7.0.5.msi
3Follow each step in the installation screen for
installation.
4When the installation completes, close the installation
screen.
TheVirtualDJLEiconiscreatedonthedesktop.
•WhenyoustartVirtualDJLEforthersttimeafterinstallation,
follow the instructions on the screen to enter the product serial
number.
•ItisrecommendedthatyouusethelatestversionofVirtualDJ.
•For information about how to use the DJ software, see the
instruction manual for the DJ software or the help menu.
•The serial number is printed on the back of the CD-ROM case.
•VirtualDJisanAtomixProductionssoftware.Toinstallandusethe
software, you have to accept the software license agreement.
D&M shall not be responsible for any problems with your computer
and other software that may arise from the installation and use of
VirtualDJLE.
Installing Virtual DJ LE
UsethefollowingstepstoinstalltheDJsoftware“VirtualDJLE”inthesuppliedCD-ROM.
Installation into Mac computers
1Insert CD-ROM “Virtual DJ LE” into your
computer.
TheVirtualDJiconisdisplayedonthedesktop.
2Double-click the Virtual DJ LE icon.
FilescontainedintheVirtualDJLEaredisplayedforbrowsing.
3Double-click “install_virtualdj_le_mc3000_vxxx.
pkg” .
AwindowopensandtheVirtualDJLEinstallationstarts.
•“xx” represents the version number.
G HExample
Ver.7.0.5:install_virtualdj_le_mc3000_v7.0.5.pkg
4Follow each step in the installation screen for
installation.
5When the installation completes, close the installation
screen.
•WhenyoustartVirtualDJLEforthersttimeafterinstallation,
follow the instructions on the screen to enter the product serial
number.
•ItisrecommendedthatyouusethelatestversionofVirtualDJ.
•For information about how to use the DJ software, see the
instruction manual for the DJ software or the help menu.
•The serial number is printed on the back of the CD-ROM case.
•VirtualDJisanAtomixProductionssoftware.Toinstallandusethe
software, you have to accept the software license agreement.
D&M shall not be responsible for any problems with your computer
and other software that may arise from the installation and use of
VirtualDJLE.


10
Before use Part names and
functions
Connections Basic
operations
Installing and setting up
supplied software
USB settings
Troubleshooting Index
Specifications
Signal system chart
Basic
operations
Basic operation
Turning the power on
Press .POWER
DECK CHG. lights, and the power switches on.
Turning the power off
Press .POWER
DECK CHG. goes out, and the power switches off.
NOTE
There is no function on this device for automatically switching off the
power supply when the unit is not used for a prolonged period.
If you do not intend to use this device for a prolonged period, for
safety either switch off the power supply, or remove the AC adaptor
plug from the wall socket.
Adjusting the volume of the master level
Turn . MASTER LEVEL
Basic operation
Microphone input
Adjusting the microphone input level
Turn . MIC LEVEL
nEnabling the ducking function
The ducking function detects the microphone input and attenuates
the audio signal level of the master output. This prevents
microphone audio from being inaudible under loud music.
Press .DUCKING
DUCKING lights up.
Headphone monitor
Make sure that your headphone plug is already inserted in the
Headphone jack.
1Press CUE for each channel to select the source to
monitor.
The selected lights up.CUE
2Turn MONITOR PAN to adjust the balance of the
cue volume and master volume.
3Turn to adjust the headphone volume.PHONES
NOTE
When using headphones, be careful not to turn the volume too high.
This section describes operations of the unit without using the DJ software.
•For information about how to operate the DJ software, see the instruction manual for the DJ software or the help menu.
•For information about the buttons on the unit for operating the DJ software and their functions, see the following pages.
•TRAKTOR LE 2/PRO 2······Page 19 – 23
•Virtual DJ LE/PRO······Page 24 – 28
POWER
MIC LEVEL DUCKING MASTER LEVEL
PHONESDECK CHG.
DECK CHG.
MONITOR PAN
CUECUE
Top panel
Front panel
Rear panel
Headphone jack

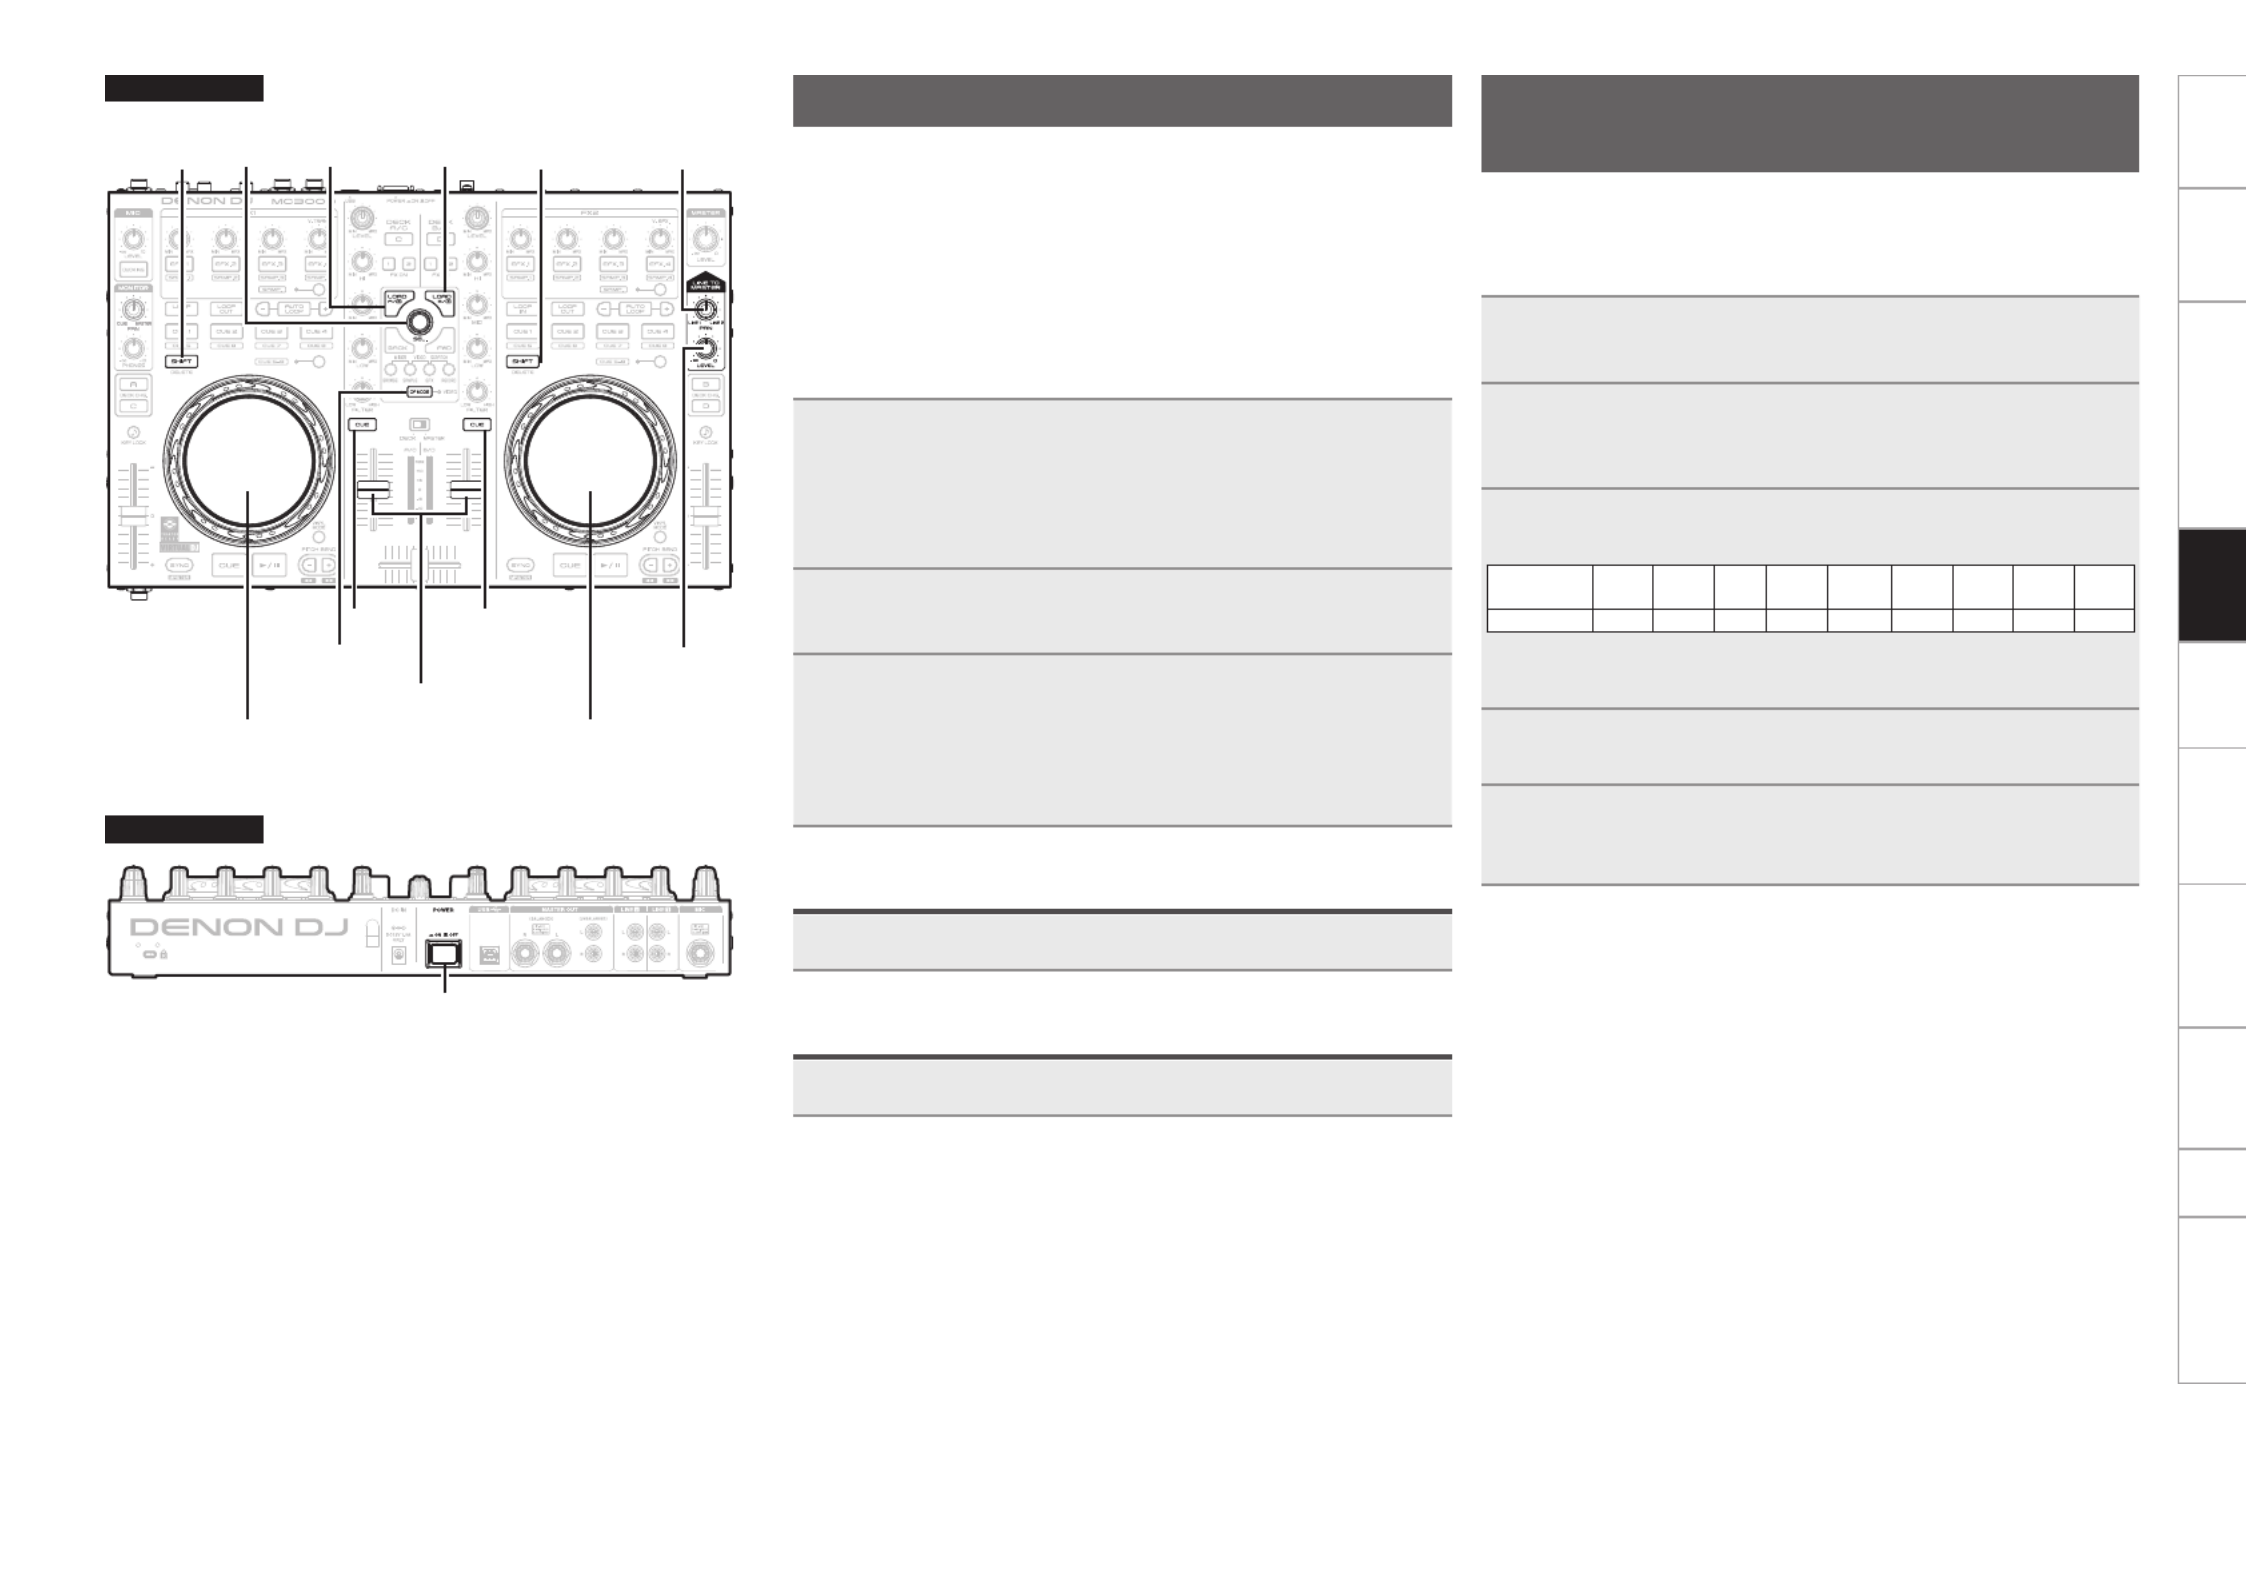
11
Before use Part names and
functions
Connections Basic
operations
Installing and setting up
supplied software
USB settings
Troubleshooting Index
Specifications
Signal system chart
Basic
operations
LINE TO
MASTER PAN
LINE TO
MASTER LEVEL
LOAD A/C LOAD B/DSEL. SHIFTSHIFT
CF MODE
POWER
CUE CUE
Channel fader knob
Jog wheel Jog wheel
Top panel
Rear panel
LINE TO MASTER function
Even if this device is not connected to a computer, the audio from
externaldevicessuchasCDplayersconnectedtotheline1/2input
terminals can be output as the master level. Therefore, sound can be
output without interruption if the computer needs to be replaced or
restartedbecauseofacrashorfreeze,orwhenchangingDJ’s.
•DJ changeover can be done smoothly by using this function.
•DJ software audio and audio such as CD player audio can be mixed
and output.
G HExample
1After the DJ has nished performing, lower the
channel fader knob while rotating LINE TO MASTER
LEVEL to the right.
The volume of the audio being output from the computer
lowers, and audio from an external device is output.
2Replace the computer while the audio from the
external device is being output.
3When the next DJ is ready, turn the LINE TO
MASTER LEVEL to the left, and raise the channel
fader knob.
The volume of the audio being output from the external device
lowers, and audio from the computer is output.
Adjusting the level balance of lines 1/2
Turn . LINE TO MASTER PAN
Adjusting the volume of lines 1/2
Turn . LINE TO MASTER LEVEL
Adjusting the sensitivity of the
touch sensor
The unit can control the sensitivity of the touch sensor for the Jog
wheel in 9 steps (–4 – 0 – +4).
•“–4” is the lowest sensitivity, and “+4” is the highest sensitivity.
•The default setting is “0”.
1While holding down and LOAD A/C, LOAD B/D CF
MODE, press to turn on the power supply. POWER
2Press CF MODE, and switch the jog wheel that you
want to adjust.
CUE lights on the selected jog wheel side.
3Turn to adjust the sensitivity. SEL.
The button lights according to the set sensitivity.
Buttons
CUE1 CUE2 CUE3 CUE4 AUTO
LOOP EFX.1 EFX.2 EFX.3 EFX.4
Sensitivity -4 -3 -2 -1 0 +1 +2 +3 +4
•If the jog wheel on the DECK side being adjusted detects a touch,
the jog wheel changes from red to blue.
4Press SEL.
The adjusted sensitivity is saved.
5Press for DECK A or B.SHIFT
The mode switches back from the sensitivity adjustment mode
to the normal mode.

12
Before use Part names and
functions
Connections Installing and setting up
supplied software
USB settings
Troubleshooting Index
Specifications
Signal system chart
USB settings
Basic
operations
VINYL
MODE
VINYL
MODE
SHIFTSHIFT
Jog wheel Jog wheel
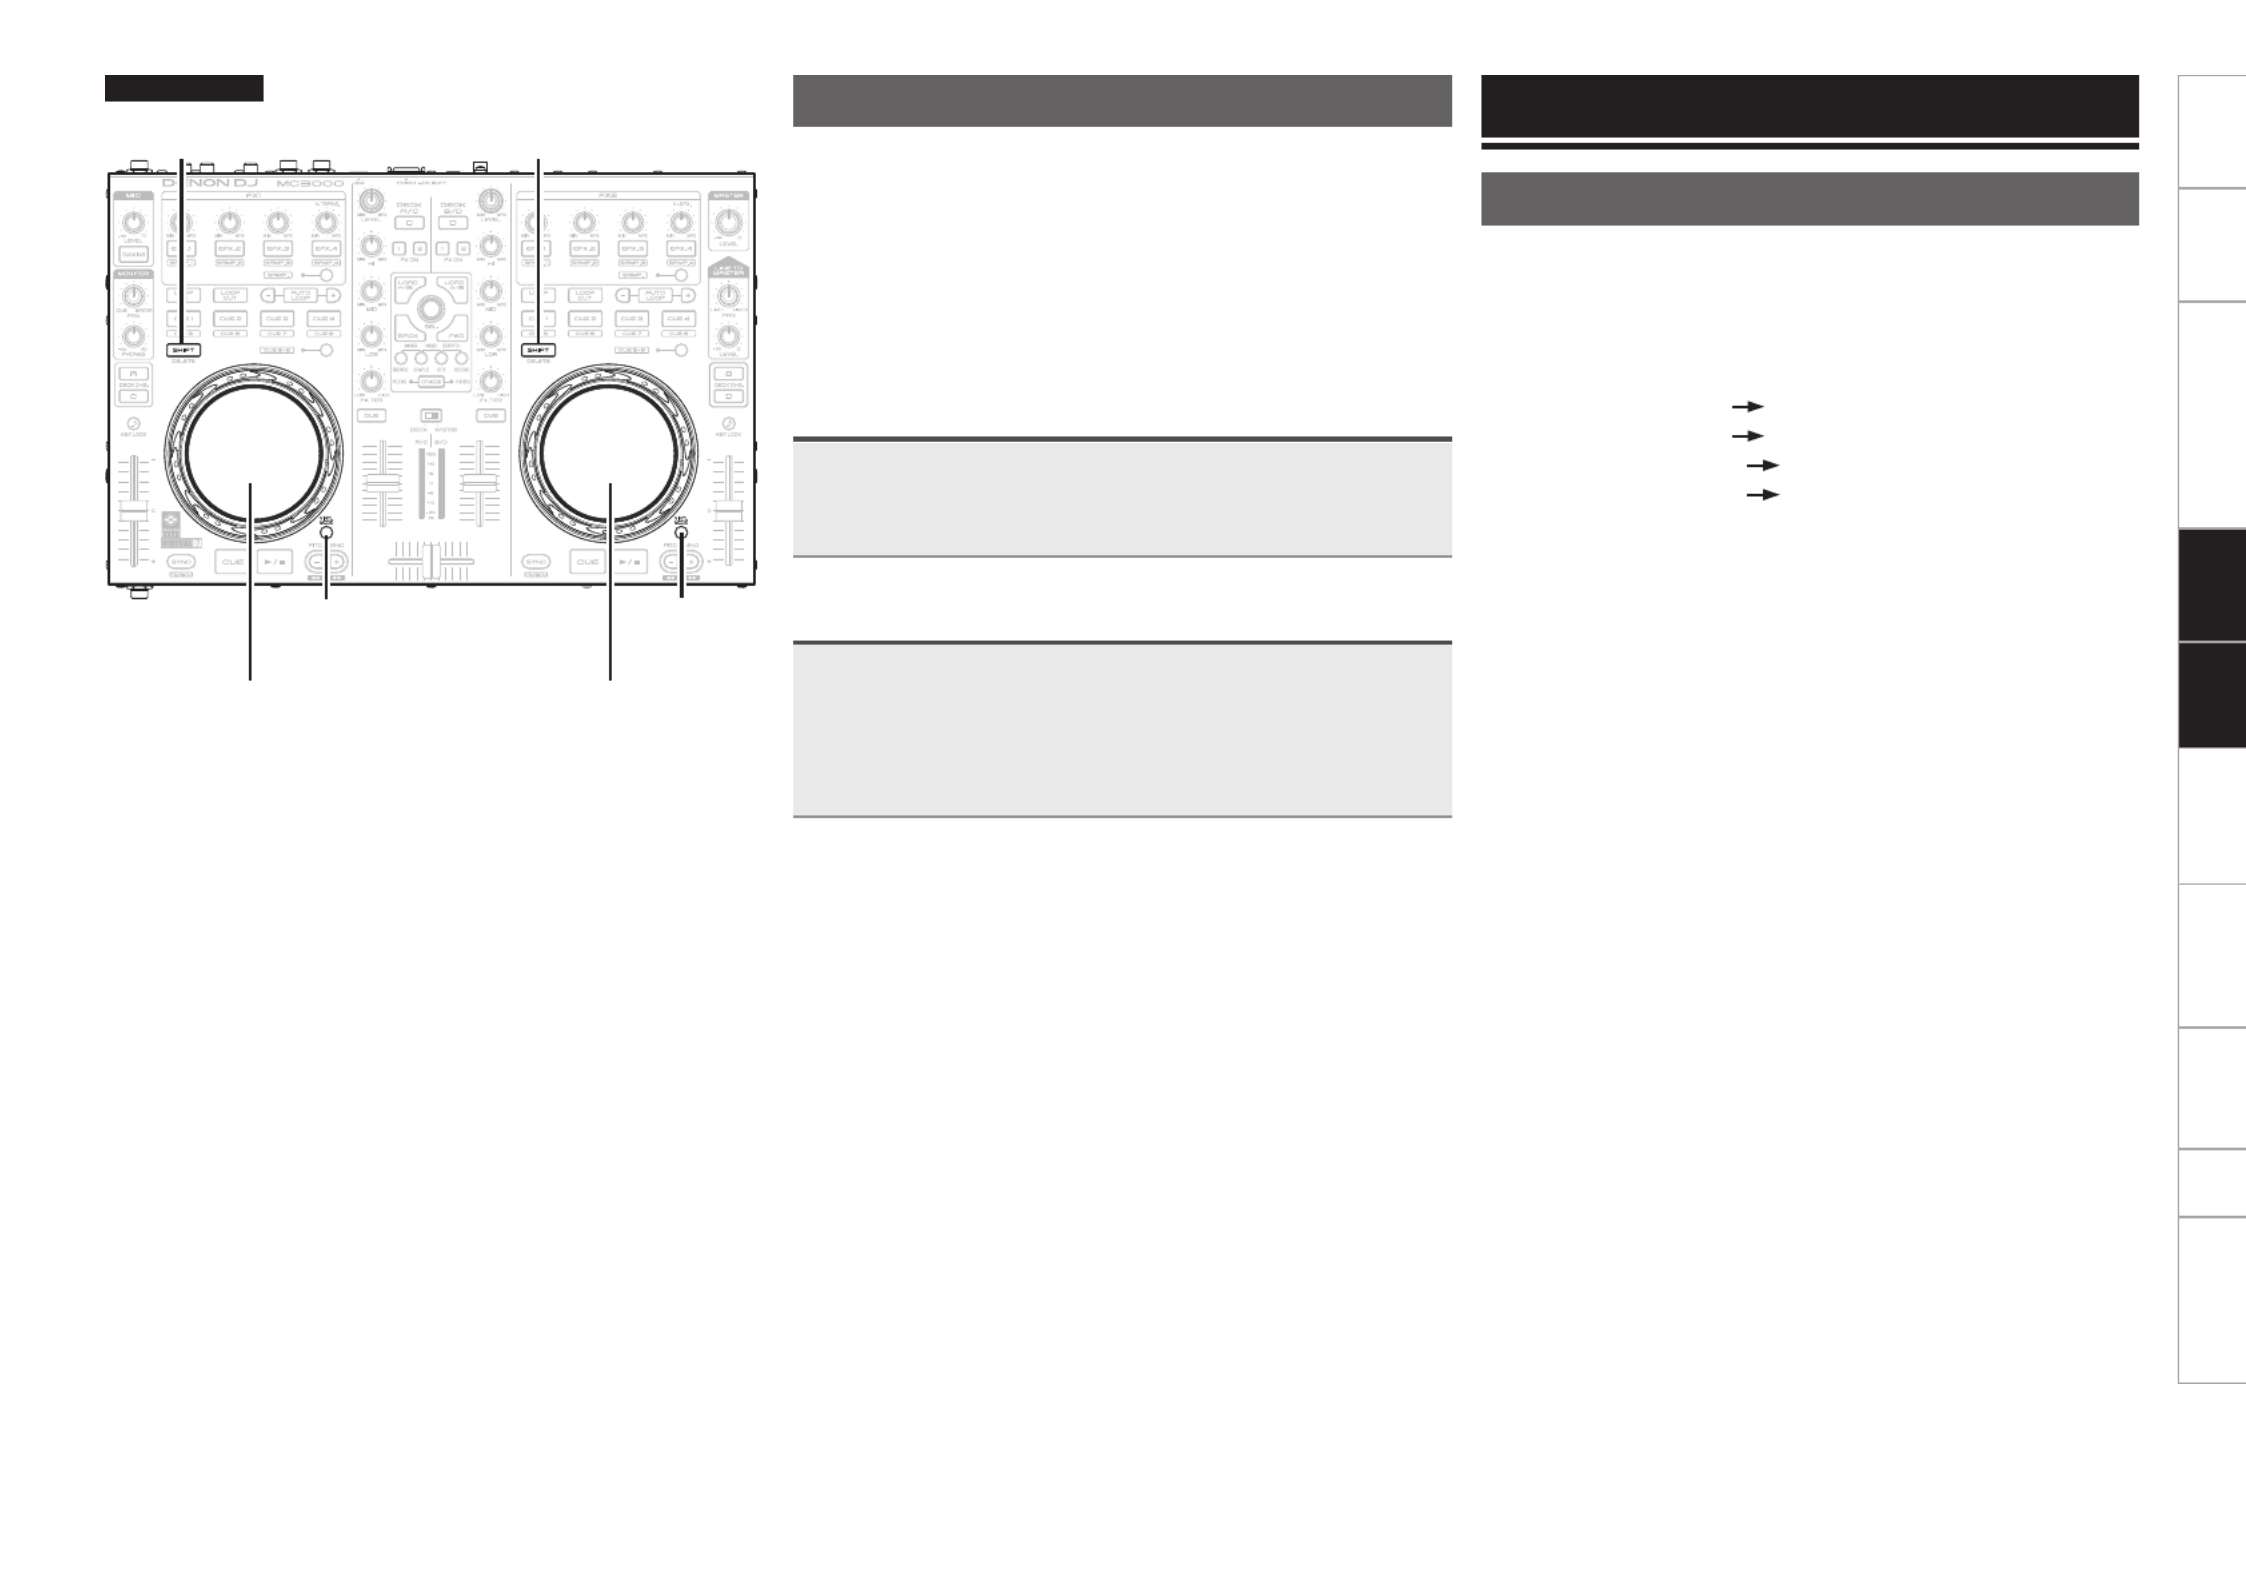
Top panel Jog wheel lock function
Some DJ’s prefer not to play using the jog wheel. This function can
also be used to prevent accidental operation of the jog wheel while
the DJ is playing.
In this case, use the following steps to lock the jog wheel. During
playback, the touch sensor and rotation operation are disabled.
•Even if the jog wheel is locked using this function, the touch sensor
and rotation operation are enabled when there is nothing being
played back. Therefore, the jog wheel can be used for searching
when tracks are not being played back.
Locking the jog wheel
Hold down for DECK A or B, and press SHIFT VINYL
MODE for the jog wheel that you want to lock.
VINYL MODE flashes, and the jog wheel is locked.
Cancelling the jog wheel lock
When the jog wheel is locked, hold down for SHIFT
DECK A or B, and press for the jog wheel VINYL MODE
that you want to release.
The jog wheel lock is released, and the jog wheel returns to the
previousstate(eitherVINYLmodeorBENDmode).
USB settings
USB AUDIO Input/Output
This device is equipped with a sound card function that enables a
maximum of 4 channels (stereo, 2 input 2 output) of USB AUDIO input
and output.
Theaudiosignalsfromlines1/2areoutputtoacomputer.
Further, the DJ software mixer output is output from the master
output terminal or headphone terminal of this device.
•USB 1/2 channel input DJ software master
•USB 3/4 channel input DJ software cue monitor
•USB 1/2 channel output MC3000 line 1 audio signal
•USB 3/4 channel output MC3000 line 2 audio signal


13
Before use Part names and
functions
Connections Basic
operations
Installing and setting up
supplied software
USB settings
Troubleshooting Index
Specifications
Signal system chart
USB settings
MIDI command input/output
ThisunitisequippedwithaUSBMIDIcommandinput/outputfunction.ThisfunctionenablestheunittocontroltheDJsoftwareinthecomputer,andlightsthemainunitdisplay(LEDs).
•If TRAKTOR LE 2/PRO 2 and Virtual DJ LE/PRO are used normally, there is no need to switch MIDI command settings or the MIDI channel. Doing so may cause undesired operation or no operation at all.
SetwhenTRAKTORLE2/PRO2andVirtualDJLE/PROarecustomizedforexpandedoperation,orwhenotherDJsoftwareisused.
Range of CH1, CH5, CH9 and CH13
•When is lit, it is enabledDECK CHG. A
DECK CHG. A
•When is lit, it is enabledDECK A/C
DECK A/C
MIDI channel assignment
Most of the controls in this device support the MIDI control function.
Each control is assigned to a MIDI channel as shown in the following block.
•The MIDI channel is made up of 4 channels.
Range of CH2, CH6, CH10 and CH14
•When is lit, it is enabledDECK CHG. C
DECK CHG. C
•When is lit, it is enabledDECK A/C
DECK A/C
Range of CH3, CH7, CH11 and CH15
•When is lit, it is enabledDECK CHG. B
DECK CHG. B
•When is lit, it is enabledDECK B/D
DECK B/D
Range of CH4, CH8, CH12 and CH16
•When is lit, it is enabledDECK CHG. D
DECK CHG. D
•When is lit, it is enabledDECK B/D
DECK B/D

14
Before use Part names and
functions
Connections Basic
operations
Installing and setting up
supplied software
USB settings
Troubleshooting Index
Specifications
Signal system chart
USB settings
Switching MIDI input/output channels
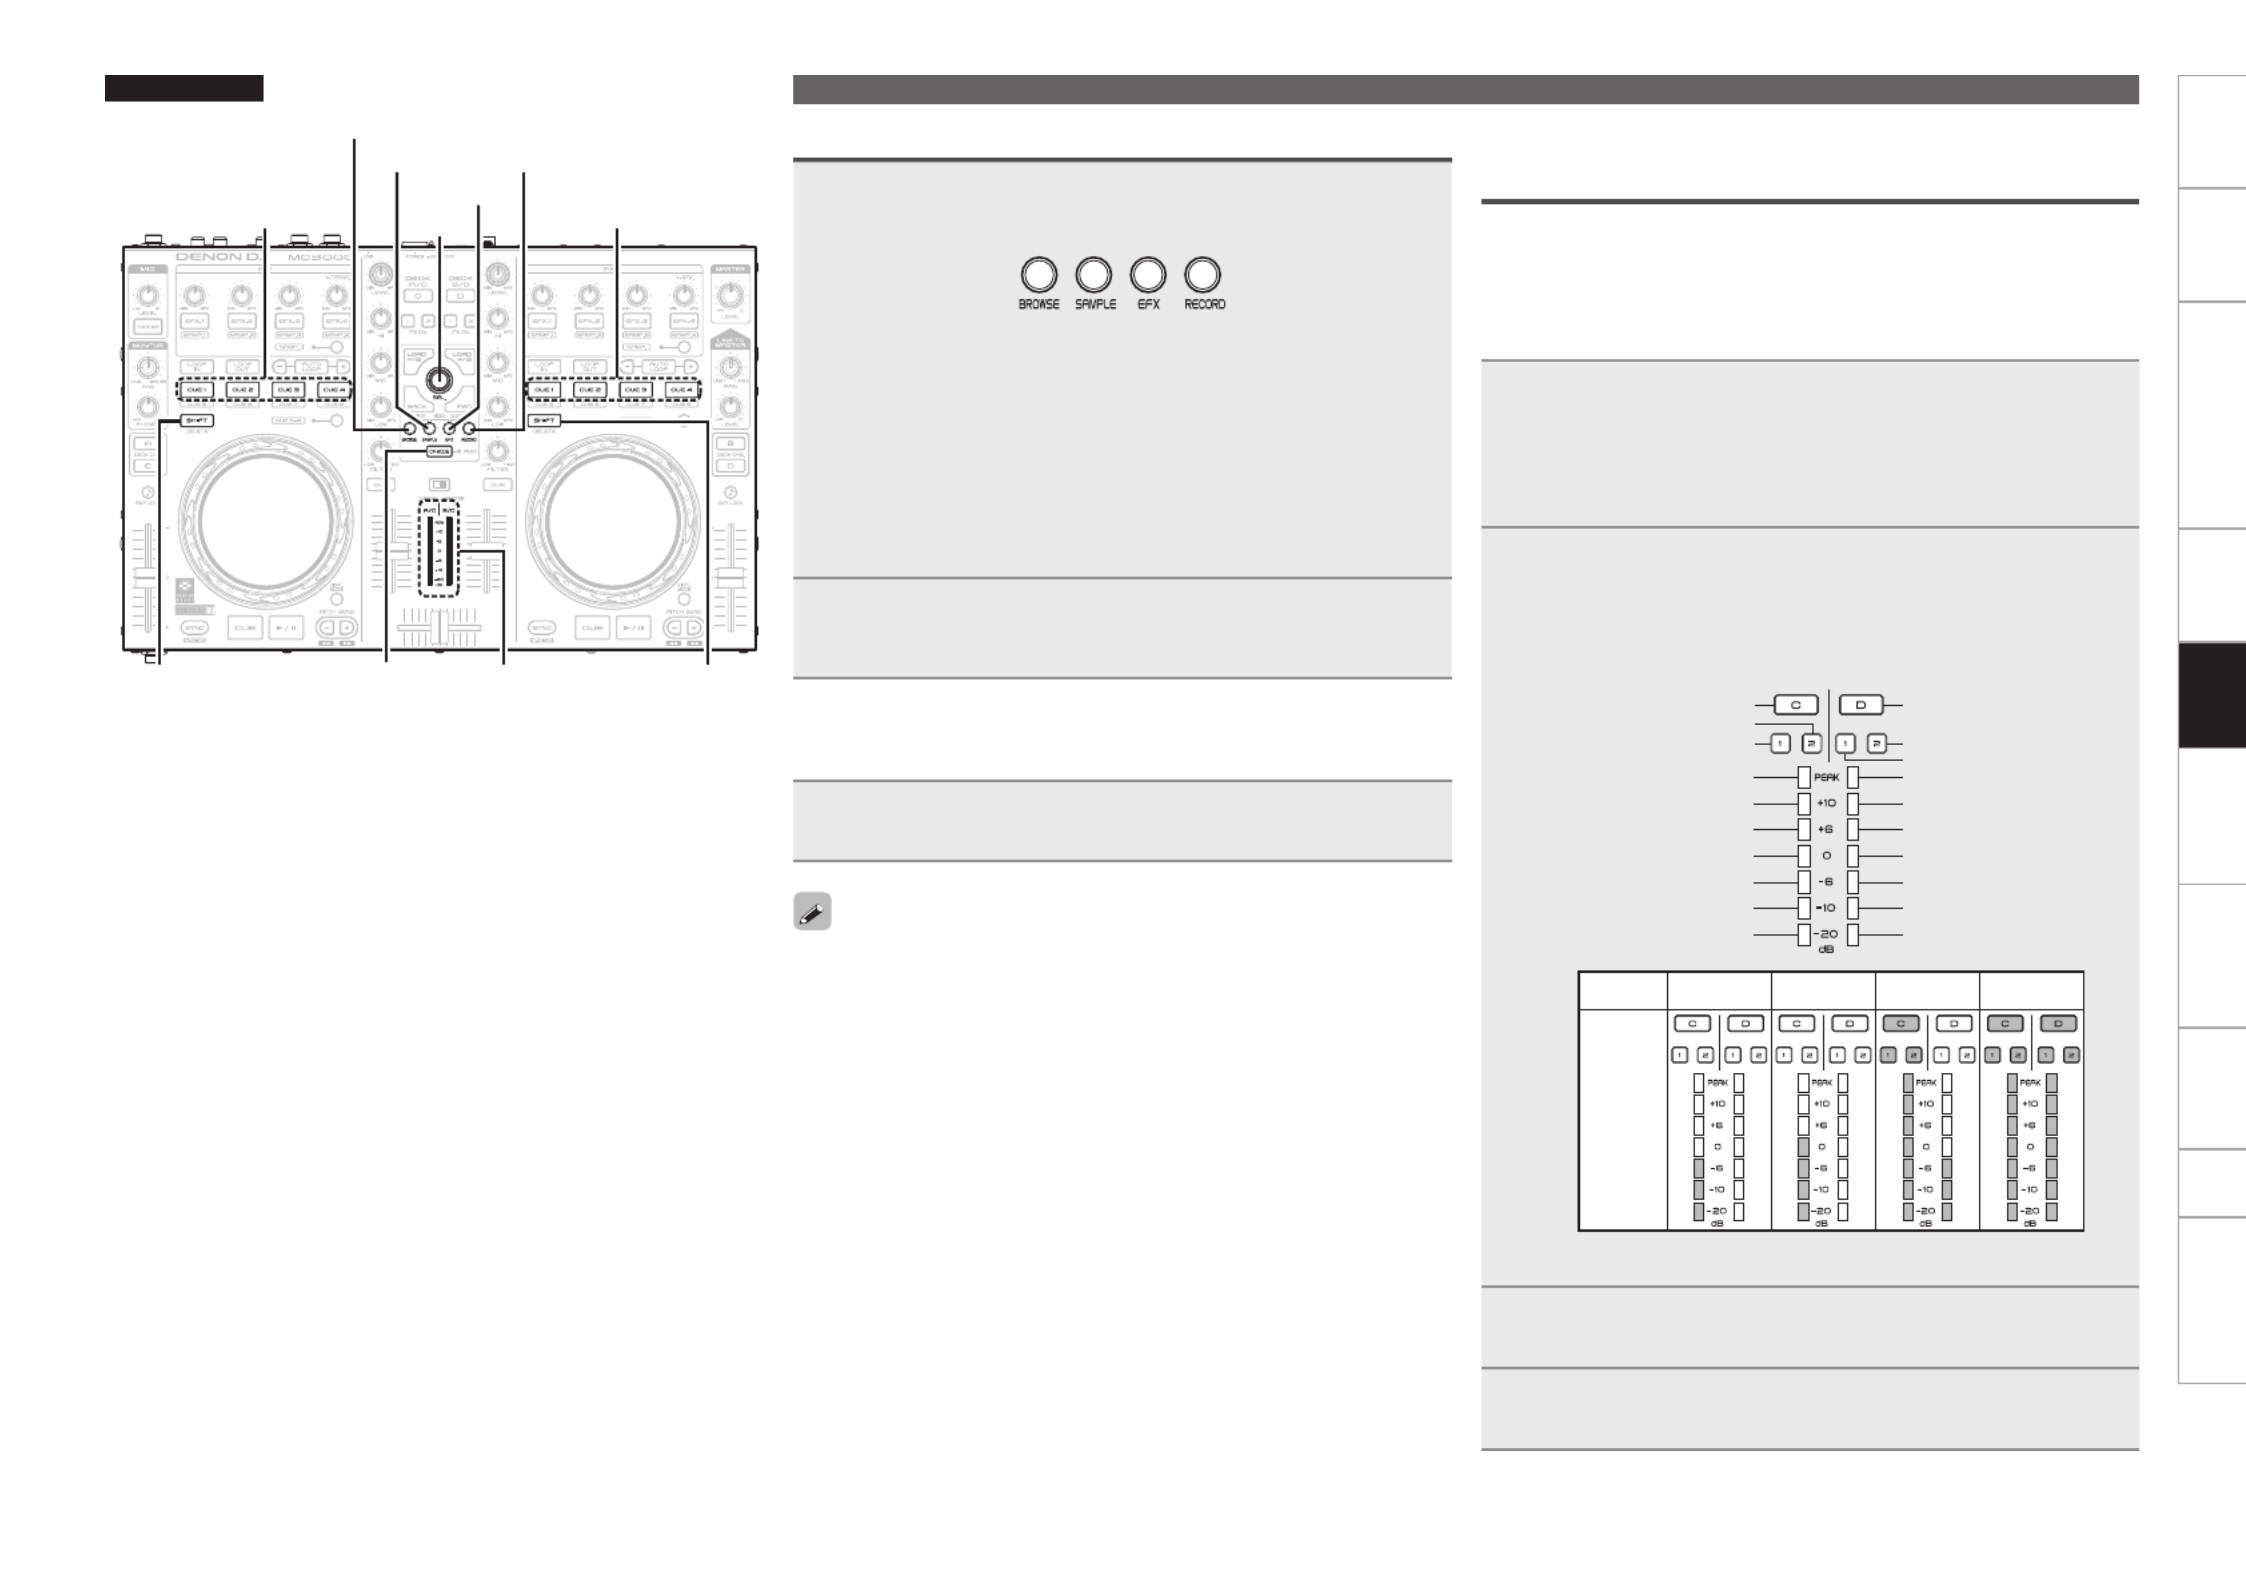
1Press one of while BROWSE/SAMPLE/EFX/RECORD
holding down . SHIFT
The CUE that corresponds to the MIDI channel lights, and the MIDI
channel is switched as shown below.
•The MIDI channel is made up of 4 channels.
GLights CUEH
CUE 1 : CH 1 – 4
CUE 3 : CH 9 – 12
CUE 2 : CH 5 – 8
CUE 4 : CH 13 – 16
GMIDI channel switchingH
BROWSE : CH 1 – 4
EFX : CH 9 – 12
SAMPLE : CH 5 – 8
RECORD : CH 13 – 16
2Release .SHIFT
The mode returns to normal mode from the channel setting
mode.
nChecking the settings
Press while holding down .CF MODE SHIFT
The corresponding to the current MIDI channel flashes.CUE
The following buttons and switches do not support MIDI output.
•MIC LEVEL
•MONITOR PAN
•MONITOR PHONES
•LINE TO MASTER PAN
•LINE TO MASTER LEVEL
•MASTER LEVEL
•DECK/MASTER
MIDI command input/output
LEVEL
METER
SHIFT SHIFT
CF MODE
BROWSE
SAMPLE
EFX
SEL.
CUE 1 – 4 CUE 1 – 4
RECORD
Top panel
Setting the MIDI command transmission
interval time
Depending on the computer specifications and OS type, the computer
may not be able to receive the MIDI commands transmitted from this
unit correctly.
In this case, use the following operation to set the MIDI command
transmission interval time to a suitable value.
1While pressing and BROWSE, RECORD CF MODE
together, press .POWER
The power switches on, the lights, and the unit LEVEL METER
switches to the setting mode for MIDI command transmission
interval time.
2Turn SEL.
The relationship between the level display position of the
LEVEL METER and the MIDI command transmission interval
time is as shown in the diagram on the left.
LEVEL METER
3 msec
20 msec10 msec
18 msec
9 msec
19 msec8 msec
17 msec7 msec
16 msec6 msec
15 msec5 msec
14 msec4 msec
13 msec3 msec
12 msec-
11 msec-
4 msec 13 msec 20 msec送信間隔時間
GSetting valueH
GExampleH
Transmission
interval time
•The factory setting is 4 msec.
3Press SEL.
The MIDI command transmission interval time is entered.
4Press on DECK A or B.SHIFT
The settings are completed, and unit exits the setting mode.


15
Before use Part names and
functions
Connections Basic
operations
Installing and setting up
supplied software
USB settings
Troubleshooting Index
Specifications
Signal system chart
USB settings
MIDI command input/output
nSend command
Items
MIDI command
Command Number Value
1 CUE (DECK A)
NOTE ON : 0x9n
NOTE OFF : 0x8n
1 C# -1
NOTE ON : 64
NOTE OFF : 0
2 CUE (DECK C) 2 D -1
3 DECK CHG. A 3 D# -1
4 4 E -1VINYLMODE
5 CUE (DECK B) 5 F -1
6 6 F# -1KEYLOCK
7 CUE (DECK D) 7 G -1
8 DECK CHG. B 8 G# -1
9 DECK CHG. C 9 A -1
10 DECK CHG. D 10 A# -1
11 BEND + 12 C 0
12 BEND - 13 C# 0
13 14 D 0DECKA/C
14 15 D# 0DECKB/D
15 EFX.2 SW (FX1) 18 F# 0
16 EFX.3 SW (FX1) 19 G 0
17 EFX.4 SW (FX1) 20 G# 0
18 EFX.1 SW (FX1) 21 A 0
19 CUE1 23 B 0
20 CUE2 24 C 1
21 CUE3 25 C# 1
22 SAMP. MODE 26 D 1
23 CF MODE 27 D# 1
24 CUE5-8 MODE 30 F# 1
25 CUE4 32 G# 1
26 SAMP.1 (LEFT) 33 A 1
27 SAMP.2 (LEFT) 34 A# 1
28 SAMP.3 (LEFT) 35 B 1
29 SAMP.4 (LEFT) 36 C 2
30 AUTO LOOP 29 F 1
31 DUCKING 42 F# 2
32 TRACK SELECT KNOB
SW 40 E2
33 FWD 41 F2
34 BCK 48 C 3
35 SAMP.1 (RIGHT) 49 C# 3
36 SAMP.2 (RIGHT) 50 D 3
37 SAMP.3 (RIGHT) 51 D# 3
38 SAMP.4 (RIGHT) 52 E 3
39 LOOP IN 55 G 3
40 LOOP OUT 57 A 3
41 CUE 66 F# 4
42 67 G 4PLAY
43 CUE5 72 C 5
44 CUE6 73 C# 5
45 CUE7 74 D 5
Items
MIDI command
Command Number Value
46 CUE8
NOTE ON : 0x9n
NOTE OFF : 0x8n
75 D# 5
NOTE ON : 64
NOTE OFF : 0
47 JOG WHEEL TOUCH 81 A 5
48 EFX.2 SW (FX2) 82 A# 5
49 EFX.3 SW (FX2) 83 B 5
50 EFX.4 SW (FX2) 84 C 6
51 EFX.1 SW (FX2) 85 C# 6
52 FX ON 1 86 D 6
53 FX ON 2 87 D# 6
54 SHIFT (LEFT DECK) 96 C 7
55 SHIFT (RIGHT DECK) 97 C# 7
56 LOAD A 98 D 7
57 LOAD B 99 D# 7
58 BROWSER 100 E 7
59 RECORD 101 F 7
60 SAMPLE 76 E 5
61 EFX 77 F 5
62 LOOP CUT - 105 A 7
63 LOOP CUT + 106 A# 7
64 107 B 7SYNC
65 JOGWHEELFWD/REV
CC : 0xBn
81
Reverse 63 – 1
Foward 65 – 127
slow->fast
•relativedata
66 FILTER. KNOB (DECK B)
Increment/Decrement 82
67
FILTER. KNOB (DECK
D)
Increment/Decrement
83
68 TRACK SELECT KNOB
Increment/Decrement 84 Increment 0
Decrement 127
69 EFX1 KNOB (FX1)
Increment/Decrement 85
0 – 127
70 EFX2 KNOB (FX1)
Increment/Decrement 86
71 EFX3 KNOB (FX1)
Increment/Decrement 87
72 EFX4 KNOB (FX1)
Increment/Decrement 88
73 EFX1 KNOB (FX2)
Increment/Decrement 89
74 EFX2 KNOB (FX2)
Increment/Decrement 90
75 EFX3 KNOB (FX2)
Increment/Decrement 91
76 FEFX4 KNOB (FX2)
Increment/Decrement 92
77 FILTER. KNOB (DECK A)
Increment/Decrement 93
78 FILTER. KNOB (DECK C)
Increment/Decrement 94
MIDI command list


16
Before use Part names and
functions
Connections Basic
operations
Installing and setting up
supplied software
USB settings
Troubleshooting Index
Specifications
Signal system chart
USB settings
MIDI command input/output
nReception commands
Items
(Lit display (LED))
MIDI command
Command Number Value
1VINYLMODE
CC : 0xBn
ON TRG : 74
OFF TRG : 75
Blink ON TRG : 76
6
2 8KEYLOCK
3 9SYNC
4 CUE1 17
5 CUE1 Dimmer 18
6 CUE2 19
7 CUE2 Dimmer 20
8 CUE3 21
9 CUE3 Dimmer 22
10 CUE4 23
11 CUE4 Dimmer 24
12 SAMP.1 (LEFT) 25
13 SAMP.1 Dimmer (LEFT) 26
14 SAMP.2 (LEFT) 27
15 SAMP.2 Dimmer (LEFT) 28
16 SAMP.3 (LEFT) 29
17 SAMP.3 Dimmer (LEFT) 31
18 SAMP.4 (LEFT) 32
19 SAMP.4 Dimmer (LEFT) 33
20 SAMP.1 (RIGHT) 65
21 SAMP.1 Dimmer (RIGHT) 66
22 SAMP.2 (RIGHT) 67
23 SAMP.2 Dimmer (RIGHT) 68
24 SAMP.3 (RIGHT) 69
25 SAMP.3 Dimmer (RIGHT) 70
26 SAMP.4 (RIGHT) 71
27 SAMP.4 Dimmer (RIGHT) 72
28 CUE5 48
29 CUE5 Dimmer 49
30 CUE6 50
31 CUE6 Dimmer 51
32 CUE7 52
33 CUE7 Dimmer 53
34 CUE8 54
35 CUE8 Dimmer 55
36 CUE 38
Items MIDI command
Command Number Value
79 EFX.1 KNOB (LEFT)
in SAMP mode
CC : 0xBn
48
0 – 127
80 EFX.2 KNOB (LEFT)
in SAMP mode 49
81 EFX.3 KNOB (LEFT)
in SAMP mode 50
82 EFX.4 KNOB (LEFT)
in SAMP mode 51
83 EFX.1 KNOB (RIGHT)
in SAMP mode 52
84 EFX.2 KNOB (RIGHT)
in SAMP mode 53
85 EFX.3 KNOB (RIGHT)
in SAMP mode 54
86 EFX.4 KNOB (RIGHT)
in SAMP mode 55
87 1INPUTLEVEL(DECKA)
88 2EQHIGHVR(DECKA)
89 3EQMIDVR(DECKA)
90 4EQLOWVR(DECKA)
91 FADER (for DECK A) 5
92 7INPUTLEVEL(DECKC)
93 8EQHIGHVR(DECKC)
94 9EQMIDVR(DECKC)
95 10EQLOWVR(DECKC)
96 FADER (DECK C) 11
97 12INPUTLEVEL(DECKB)
98 13EQHIGHVR(DECKB)
99 14EQMIDVR(DECKB)
100 15EQLOWVR(DECKB)
101 FADER (DECK B) 16
102 17INPUTLEVEL(DECKD)
103 18EQHIGHVR(DECKD)
104 19EQMIDVR(DECKD)
105 20EQLOWVR(DECKD)
106 FADER (DECK D) 21
107 CROSS FADER (AUDIO) 22
108 23CROSSFADER(VIDEO)
109 Pitch Slider 0xEn 0xll LSB)(0xmm (MSB)
zn=MIDI CH = 0 – 15


17
Before use Part names and
functions
Connections Basic
operations
Installing and setting up
supplied software
USB settings
Troubleshooting Index
Specifications
Signal system chart
USB settings
Items
(Lit display (LED))
MIDI command
Command Number Value
37 PLAY
CC : 0xBn
ON TRG : 74
OFF TRG : 75
Blink ON TRG : 76
39
38 LOOP IN 36
39 LOOP IN Dimmer 62
40 LOOP OUT 64
41 LOOP OUT Dimmer 42
42 AUTO LOOP 43
43 AUTO LOOP Dimmer 83
44 EFX.1 Dimmer (FX1) 44
45 EFX.2 Dimmer (FX1) 45
46 EFX.3 Dimmer (FX1) 46
47 EFX.4 Dimmer (FX1) 47
48 EFX.1 Dimmer (FX2) 58
49 EFX.2 Dimmer (FX2) 59
50 EFX.3 Dimmer (FX2) 60
51 EFX.4 Dimmer (FX2) 61
52 FX ON 1 90
53 FX ON 2 91
54 EFX 1 (FX1) 92
55 EFX 2 (FX1) 93
56 EFX 3 (FX1) 94
57 EFX 4 (FX1) 95
58 EFX 1 (FX2) 96
59 EFX 2 (FX2) 97
60 EFX 3 (FX2) 98
61 EFX 4 (FX2) 99
62 74 57ALLSLIDER/VOLUME/FADERREQUEST
63 CUE (DECK A)
ON TRG : 80
OFF TRG : 81
69
64 CUE Dimmer (DECK A) 70
65 CUE (DECK C) 75
66 CUE Dimmer (DECK C) 76
67 CUE (DECK B) 81
68 CUE Dimmer (DECK B) 82
Items
(Lit display (LED))
MIDI command
Command Number Value
69 CUE (DECK D)
CC : 0xBn ON TRG : 80
OFF TRG : 81
87
70 CUE Dimmer (DECK D) 88
71 DUCKING 99
72 CF MODE (AUDIO) 97
73 98CFMODE(VIDEO)
74 METER 4 (DECK A) 10
75 METER 5 (DECK A) 11
76 METER 6 (DECK A) 12
77 METER 7 (DECK A) 13
78 METER 8 (DECK A) 14
79 METER 9 (DECK A) 15
80 METER PEAK (DECK A) 16
81 METER 4 (DECK C) 26
82 METER 5 (DECK C) 27
83 METER 6 (DECK C) 28
84 METER 7 (DECK C) 29
85 METER 8 (DECK C) 30
86 METER 9 (DECK C) 31
87 METER PEAK (DECK C) 32
88 METER 4 (DECK B) 42
89 METER 5 (DECK B) 43
90 METER 6 (DECK B) 44
91 METER 7 (DECK B) 45
92 METER 8 (DECK B) 46
93 METER 9 (DECK B) 47
94 METER PEAK (DECK B) 48
95 METER 4 (DECK D) 58
96 METER 5 (DECK D) 59
97 METER 6 (DECK D) 60
98 METER 7 (DECK D) 61
99 METER 8 (DECK D) 62
100 METER 9 (DECK D) 63
101 METER PEAK (DECK D) 64
zn=MIDI CH = 0 – 15
MIDI command input/output


18
Before use Connections Basic
operations
Installing and setting up
supplied software
USB settings
Troubleshooting Index
Specifications
Signal system chart
Part names and
functions
Part names and functions
Top panel
q Audio input/output part
This section describes the top panel in the following sections: q w eAudioinput/outputpart, TRAKTORLE2/PRO2and VirtualDJLE/PRO.ReaddescriptionsforyourDJsoftware.
For buttons not explained here, see the page indicated in parentheses ( ).
q
w
e
r
t
y
u
q Microphone input level adjustment knob
(MIC LEVEL) ············································································· (10)
w Ducking ON/OFF switch button
(DUCKING) ··············································································· (10)
When microphone input is detected, the volume other than the
microphone volume output from the master is automatically
attenuated.
e PAN adjustment knob
(MONITOR PAN) ······································································ (10)
Adjusts the balance between the cue output from the headphones
and master volume.
r Headphone output volume adjustment knob
(MONITOR PHONES) ······························································ (10)
t Master output volume adjustment knob
(MASTER LEVEL) ···································································· (10)
Adjusts the volume output from the master output terminal.
y LINE TO MASTER PAN adjustment knob
(LINE TO MASTER PAN) ························································ (11)
Adjusts the volume balance between line 1 and line 2.
u LINE TO MASTER Master output volume adjustment knob
(LINE TO MASTER LEVEL) ····················································· (11)
Adjusts the volume of line 1 and line 2.


19
Before use Connections Basic
operations
Installing and setting up
supplied software
USB settings
Troubleshooting Index
Specications
Signal system chart
Part names and
functions
w TRAKTOR LE 2/PRO 2
Q3 Q6 Q9Q4 Q5 Q7
E4
E0
E3
E1
E2
W9
Q8
W7
W5
W6
W4
W0
W1
W2
W3
W8
q
w
r
e
t
i
o
Q0
Q2
Q1
y
u
q Effects/sample adjustment knob
(EFX.1/EFX.2/EFX.3/EFX.4)
e the following operations differ SAMP
depending on whether this is ON or OFF.
OFF: Uses the effects.
The operations differ depending on the
TRAKTORmode(ADVANCEDEFX/CHAINED
EFX).
EFX.1 : Adjusts the effect balance.
•Hold down and turn the knob, and u SHIFT
the mode switches to the following setting
mode.
•In the SINGLE FX MODE:
Selects the effect type.
•In the GROUP FX MODE:
Not available.
EFX.2/EFX.3/EFX.4:
•In the SINGLE FX mode:
Adjusts effect parameters.
•In the GROUP FX mode:
Adjusts the effect level.
•Hold down and turn the knob, and u SHIFT
the mode switches to the following setting
mode.
•In the SINGLE FX MODE:
Not available.
•In the GROUP FX MODE:
Selects the effect type.
ON: Uses the sampler.
EFX.1/EFX.2/EFX.3/EFX.4:
Adjusts the level of the sample slot.
•Hold down and turn the knob to u SHIFT
adjust the cut off frequency of the sample slot.
w Effects ON/OFF switch button
(EFX.1/EFX.2/EFX.3/EFX.4)
e the following operations differ SAMP
depending on whether this is ON or OFF.
OFF: Uses the effects.
The operations differ depending on the
TRAKTORmode(ADVANCEDEFX/CHAINED
EFX).
EFX.1:
•In the SINGLE FX MODE:
SwitchestheeffectsON/OFF.
•In the GROUP FX MODE:
Not available.
EFX.2/EFX.3/EFX.4:
•In the SINGLE FX MODE:
SwitcheseffectparametersON/OFF.
•In the GROUP FX MODE:
SwitchestheeffectON/OFF.
Top panel


20
Before use Connections Basic
operations
Installing and setting up
supplied software
USB settings
Troubleshooting Index
Specications
Signal system chart
Part names and
functions
ON: Uses the sampler.
(This function is enabled when the upgraded
version TRAKTOR PRO 2 (sold separately) is
used.)
EFX.1/EFX.2/EFX.3/EFX.4:
Plays back the sample.
•Hold down and press this button to e SAMP.
playback the sample slot trigger.
•Hold down and press this button to u SHIFT
switchthesampleslotlterON/OFF.
•Press and hold and e SAMP. u SHIFT
together and press this button to switch one
shotorloopplaybackON/OFF.
•Hold down and press this button to W5 SEL.
load the le selected in the browser to the
sample slot.
•Hold down and press this button W7 RECORD
to copy the audio recorded in the lop recorder
to the sample slot.
•Hold down and press this button W9 SAMPLE
to load the loop from DECK A (B) to the sample
slot.
e Sample mode switching button (SAMP.)
OFF: Switches to the effect mode. qw EFX.
1 – 4
are used to operate the effects.
ON: Switches to the sample deck mode. qw
EFX. 1 – 4
are used to operate the sample deck.
r Loop point setting button
(LOOP IN/LOOP OUT)
Sets the loop in point and loop out point.
t Auto loop and loop size adjustment buttons
(AUTO LOOP –/+)
•AUTO LOOPswitchesautoloopON/OFF.
•Use –/+toadjusttheloopsize.
•Hold down u SHIFT and press this button to
move the loop position left or right.
y Hot cue button (CUE1/CUE2/CUE3/CUE4)
The operations differ as follows depending on
whether deck A (B) or C (D) are selected using
o DECK CHG.
When DECK A is selected: Up to 8 cue points
can be set. iCUE 5 – 8 turnON/OFFtoselect
the registered cue point. (This function is
enabled when the upgraded version TRAKTOR
PRO 2 (sold separately) is used.)
•ON: Sets CUE 1 – 4 points or cue playback.
•OFF: Sets CUE 5 – 8 points or cue playback.
•Hold down u SHIFT and press this button to
delete each of the cue point settings.
When DECK C is selected: Uses the sampler.
The following operations differ depending on
whether are ON or OFF. iCUE 5 – 8
(This function is enabled when the upgraded
version TRAKTOR PRO 2 (sold separately) is
used.)
•ON: Hold down and press this uSHIFT
button to clear the sample slot.
•OFF: Switches mute for the sample slot ON
or OFF.
•Hold down u SHIFT and press this button to
clear the sample slot.
Top panel
Q3 Q6 Q9Q4 Q5 Q7
E4
E0
E3
E1
E2
W9
Q8
W7
W5
W6
W4
W0
W1
W2
W3
W8
q
w
r
e
t
i
o
Q0
Q2
Q1
y
u


22
Before use Connections Basic
operations
Installing and setting up
supplied software
USB settings
Troubleshooting Index
Specifications
Signal system chart
Part names and
functions
W1 Mixer control channel selection button
(DECK A/C , DECK B/D)
Sets the mixer control channel to A(C) or B(D).
•When is pressed, the control oDECK CHG.
channelswitchesinsynchronization.This
button can also be used to select individual
control channels.
W2 FX ON/OFF switching button (FX ON 1/2)
Assigns the deck to effect slot 1 or 2.
W3 Channel isolator EQ adjustment knob
(HI/MID/LOW)
Adjusts the input signal frequency response for
each channel.
•TurntothelefttocutthesoundattheHI/MID/
LOW frequency band (isolator function).
W4 Load button (LOAD A/C, LOAD B/D)
Loads the file selected using to either W5 SEL.
DECK A or DECK B.
•Hold down and press this button to u SHIFT
load the track on the deck to the other deck
(duplicate function).
•The following functions are enabled when
the upgraded version TRAKTOR PRO 2 (sold
separately) is used.
LOAD A: Hold down and press W7 RECORD
thisbuttontochangethelooprecordingsize.
LOAD B: Hold down and press W7 RECORD
thisbuttontoundo/redothelooprecording.
•Hold down and uSHIFT W7 RECORD
together and press this button to clear the
loop recorder.
W5 Track selection knob (SEL.)
Turn the knob to scroll through the browser list,
and press the knob to select a file.
Turn the track selection knob:
Scrolls through the browser list.
•Hold down and turn to scroll through u SHIFT
the browser tree.
Press the track selection knob:
•Hold down and press this button u SHIFT
toopenor closethedirectories/foldersinthe
browser tree.
W6 Window switch button (BACK/FWD)
SwitchthedisplayedFAVORITESwindows.
•Hold down and press to load u SHIFT BACK
the file selected with to the preview W5 SEL.
player.
•Press to play back or pause the preview FWD
player.
The following functions are enabled when
the upgraded version TRAKTOR PRO 2 (sold
separately) is used.
BACK: Hold down W7 RECORD and press this
button to start or stop loop recording.
FWD: Hold down W7 RECORD and press this
button to start or stop loop recorder playback.
Top panel
Q3 Q6 Q9Q4 Q5 Q7
E4
E0
E3
E1
E2
W9
Q8
W7
W5
W6
W4
W0
W1
W2
W3
W8
q
w
r
e
t
i
o
Q0
Q2
Q1
y
u


23
Before use Connections Basic
operations
Installing and setting up
supplied software
USB settings
Troubleshooting Index
Specications
Signal system chart
Part names and
functions
W7 RECORD window switch button
(RECORD)
Hold down and press this button for u SHIFT
more than 1 second to assign each DECK to the
following MIDI channels.
•DECK A MIDI CHANNEL 13 ............
•DECK B MIDI CHANNEL 15 ............
•DECK C MIDI CHANNEL 14 ............
•DECK D MIDI CHANNEL 16 ............
W8 EFX window switch button (EFX)
Hold down and press this button for u SHIFT
more than 1 second to assign each DECK to the
following MIDI channels.
•DECK A MIDI CHANNEL 9 ............
•DECK B MIDI CHANNEL 11 ............
•DECK C MIDI CHANNEL 10 ............
•DECK D MIDI CHANNEL 12 ............
W9 SAMPLE window switch button
(SAMPLE)
Hold down and press this button for u SHIFT
more than 1 second to assign each DECK to the
following MIDI channels.
•DECK A MIDI CHANNEL 5 ............
•DECK B MIDI CHANNEL 7 ............
•DECK C MIDI CHANNEL 6 ............
•DECK D MIDI CHANNEL 8 ............
E0 BROWSE window switch button
(BROWSE)
Hold down and press this button for u SHIFT
more than 1 second to assign each DECK to the
following MIDI channels.
•DECK A MIDI CHANNEL 1 ............
•DECK B MIDI CHANNEL 3 ............
•DECK C MIDI CHANNEL 2 ............
•DECK D MIDI CHANNEL 4 ............
E1 Level meter display switching switch
(DECK, MASTER)
Channels displayed by the level master can be
selected from the following display modes.
DECK:
On the left channel, when A is selected using W1
DECK A/C, the volume level of control channel
A is displayed. When C is selected, the volume
level of control channel C is displayed.
On the right channel, when B is selected using
W1 , the volume level of control DECK B/D
channel B is displayed. When D is selected, the
volume level of control channel D is displayed.
MASTER:
The volume level of the master output volume
(L/R)isdisplayed.
E2 Filter cut off adjustment knob (FILTER)
Adjusts the lter cut off frequency for each
channel.
E3 Channel cue button (CUE DECK A/B/C/D)
The source of the channel selected using y
CUE is mixed with the monitor, and output to
the headphones.
E4 Channel/master level meter
Displays the volume level of the channel
selected with the level meter display E1
switching switch.
Top panel
Q3 Q6 Q9Q4 Q5 Q7
E4
E0
E3
E1
E2
W9
Q8
W7
W5
W6
W4
W0
W1
W2
W3
W8
q
w
r
e
t
i
o
Q0
Q2
Q1
y
u


24
Before use Connections Basic
operations
Installing and setting up
supplied software
USB settings
Troubleshooting Index
Specifications
Signal system chart
Part names and
functions
Top panel
e Virtual DJ LE/PRO
Q3 Q6 Q9Q4 Q5 Q7
E5
E1
E4
E2
W9
E3
E0
Q8
W7
W5
W6
W4
W0
W1
W2
W3
W8
q
w
r
t
i
o
Q0
Q2
Q1
y
u
e
q Effects/sample adjustment knob
(EFX.1/EFX.2/EFX.3/EFX.4)
The following operations differ depending on
whether is ON or OFF. eSAMP.
OFF: Uses the effects.
EFX.1: Selects the effect.
EFX.2: Adjusts parameter 1.
•Hold down and turn this knob to u SHIFT
adjust parameter 3.
EFX.3: Adjusts the level of parameter 2.
•Hold down and turn this knob to u SHIFT
adjust parameter 4.
EFX.4:
FX1: Selects the video transition type.
FX2: Selects the video effect.
•Hold down and turn this knob to u SHIFT
adjust the video effect parameter.
ON: Uses the sampler.
EFX.1: Adjusts the level of sample slot 1.
EFX.2: Adjusts the level of sample slot 2.
EFX.3: Adjusts the level of sample slot 3.
EFX.4: Adjusts the level of sample slot 4.
w FX ON/OFF switch button
(EFX.1/EFX.2/EFX.3/EFX.4)
The following operations differ depending on
whether is ON or OFF. eSAMP.
ON: Uses the sampler.
EFX.1/EFX.2/EFX.3/EFX.4:
Plays back the sample slot.
•Hold down or e SAMP. u SHIFT and press
this button to playback the sample slot.
When the sample is being played back, this
plays back the sample again from the start
(stutter function).
•Press and hold and eSAMP. uSHIFT
together and press this button to switch one
shot for the sample slot or loop playback
ON/OFF.
OFF: Uses the effects.
EFX.1:SwitchestheeffectON/OFF.
EFX.2/EFX.3:Switcheseffect1/2.
•Enabled when the selected plugin effects are
supported.
•Hold down u SHIFT and press this button to
switcheffect3/4.
•Only available in selected plugin effects.
EFX.4:
FX1: Switches the video transition function
ON/OFF.
FX2:SwitchesthevideoeffectON/OFF.
e Sample mode switching button (SAMP.)
OFF: Switches to the effect mode. qw EFX.
1 – 4 are used to operate the effects.
ON: Switches to the sample deck mode. qw
EFX. 1 – 4 are used to operate the sample deck.


25
Before use Connections Basic
operations
Installing and setting up
supplied software
USB settings
Troubleshooting Index
Specifications
Signal system chart
Part names and
functions
Top panel
r Loop point setting button
(LOOP IN/LOOP OUT)
Sets the loop in point and loop out point.
•Hold down u SHIFT and operate to erase the
loop settings.
t Auto loop and loop size adjustment buttons
(AUTO LOOP –/+)
AUTO LOOPswitchesautoloopON/OFF.
•Hold down and operate to switch u SHIFT
thesmartloopON/OFF.
•Hold down and press this button to e SAMP.
switchthesampleloopON/OFF.
–/+adjusttheloopsize.
•Hold down and press this button to u SHIFT
move the loop position in 4-beat units to the
left or right.
•Hold down and press this button e SAMP.
toadjustthesamplelengthtoeither1/2or2x.
y Hot cue button (CUE1/CUE2/CUE3/CUE4)
Selects the cue point registered by turning i
CUE 5 – 8ON/OFF.
ON: Sets CUE 1 – 4 points or cue playback.
OFF: Sets CUE 5 – 8 points or cue playback.
•Hold down and press this button to u SHIFT
delete each of the cue point settings.
u Shift button (SHIFT)
i Hot cue switch button and display
(CUE 5 – 8)
ThebuttonswitchesCUE1–4/CUE5–8.
•When CUE 5 – 8 is selected, the display lights
up.
o Deck switch button (DECK CHG.)
Selects the deck.
Q0 Key lock button (KEY LOCK)
With this ON, the key does not change even if
you adjust the tempo during playback.
Q1 Jog wheel
Performs the search operation or bend operation.
•Hold down and turn to scroll search u SHIFT
through the list.
Q2 Pitch fader slider
Adjusts the playback pitch.
•Move the knob toward the “–” direction to
slow down the pitch and the “+” direction to
speed up the pitch.
Q3 Beat sync button (SYNC)
Performs auto beat matching.
•Hold and press this button to set uSHIFT
the currently selected deck to the beat sync
master deck.
Q4 Hot cue button (CUE)
Sets the current cue point and locates the cue
point.
Q5 Play/pause button ( )1 3/
Plays back when pressed while playback is
stopped. Pauses playback when pressed during
playback.
Q6 Pitch bend adjustment buttons
(PITCH BEND –/+)
Adjust the pitch temporarily.
•Hold down and press this button to u SHIFT
fastforward/rewind.
Q3 Q6 Q9Q4 Q5 Q7
E5
E1
E4
E2
W9
E3
E0
Q8
W7
W5
W6
W4
W0
W1
W2
W3
W8
q
w
r
t
i
o
Q0
Q2
Q1
y
u
e


26
Before use Connections Basic
operations
Installing and setting up
supplied software
USB settings
Troubleshooting Index
Specifications
Signal system chart
Part names and
functions
Top panel
Q7 VINYL switching button (VINYL MODE)
ON:SwitchestoVINYLmode.
•The touch sensor is enabled when in VINYL
mode.
OFF: Switches to BEND mode.
•The touch sensor is disabled when in BEND
mode.
•Hold down and press this button to u SHIFT
disable the jog wheel operation (jog wheel lock
function).
Q8 Channel fader knob
Adjusts the mixing level for each deck.
Q9 Crossfader knob
Adjusts the output balance of the channel level.
W0 Channel input level adjustment knob
(LEVEL)
W1 Mixer control channel selection button
(DECK A/C , DECK B/D)
Sets the mixer control channel to A (C) or B (D).
•When is pressed, the control oDECK CHG.
channelswitchesinsynchronization.This
button can also be used to select individual
control channels.
W2 FX ON/OFF switching button (FX ON 1/2)
FX1:SwitchestheFlangerfunctionON/OFF.
•Hold down and press this button to u SHIFT
switchtheBrakefunctionON/OFF.
FX2:SwitchestheBeatGridfunctionON/OFF.
•Hold down and press this button to u SHIFT
switchtheBackspinfunctionON/OFF.
W3 Channel isolator EQ adjustment knob
(HI/MID/LOW)
Adjusts the input signal frequency response for
each channel.
•When aligned at the central position, the
frequency response is flat.
W4 Load button (LOAD A/C, LOAD B/D)
Functions differ depending on the window.
BROWSER: When DECK A (C) is selected using
o DECK CHG., the file selected using W5 SEL. is
loaded to DECK A (C).
When DECK B (D) is selected using o DECK
CHG., the file selected using is loaded W5 SEL.
to DECK B (D).
•Hold down and press the button to u SHIFT
load to either DECK C (A) or DECK D (B).
SAMPLER: Selects the SAMPLER DECK.
EFFECTS: Selects the EFFECT DECK.
RECORD: Not available.
Q3 Q6 Q9Q4 Q5 Q7
E5
E1
E4
E2
W9
E3
E0
Q8
W7
W5
W6
W4
W0
W1
W2
W3
W8
q
w
r
t
i
o
Q0
Q2
Q1
y
u
e
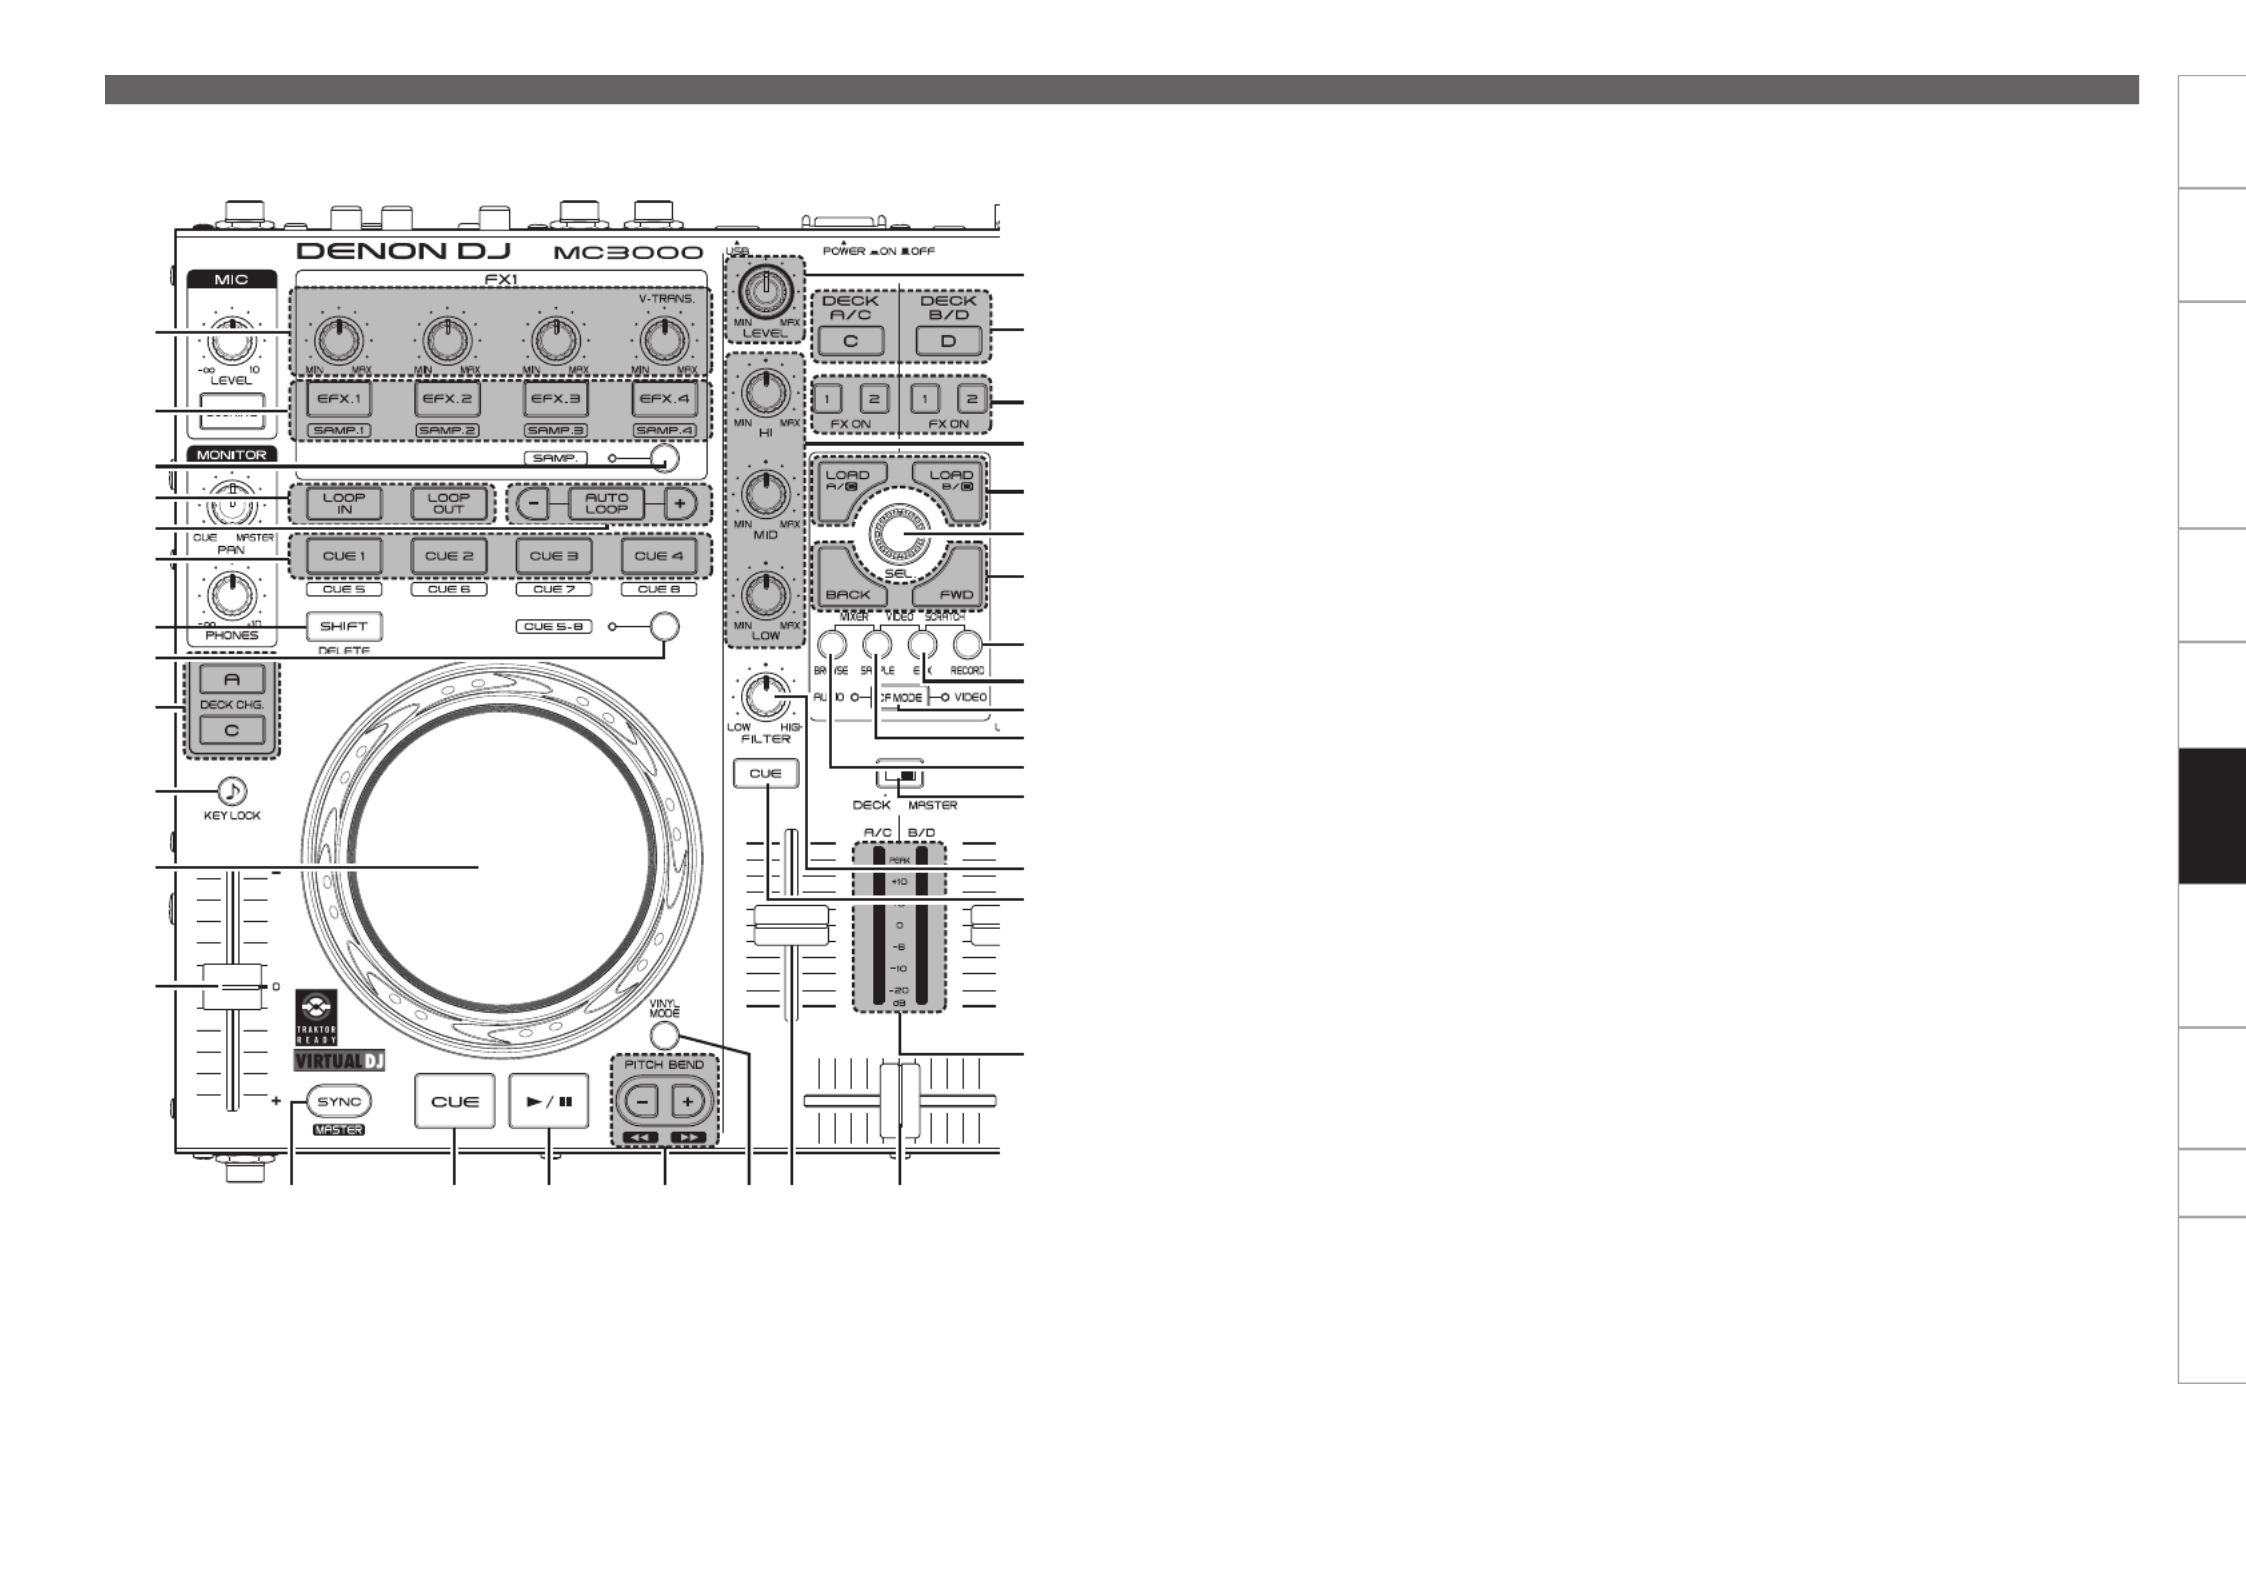
27
Before use Connections Basic
operations
Installing and setting up
supplied software
USB settings
Troubleshooting Index
Specifications
Signal system chart
Part names and
functions
W5 Track selection knob (SEL.)
Turn the knob or press to select a file. Functions
differ depending on the window.
Turn the track selection knob:
BROWSER:Scrollsthele/folderlist.
SAMPLER: Selects the sample slot.
EFFECTS: Selects the effect.
RECORD: Not available.
•Hold down and turn this knob to eSAMP
select the sample.
Press the track selection knob:
BROWSER:
File/search results panel:
Adds songs to the play list.
•Hold down and press this button u SHIFT
to add a track to the side list.
(This function is enabled when Virtual DJ
PRO (sold separately) is used. )
File system/
folder structure panel: Selects the folders.
•Hold down and turn this knob to u SHIFT
open or close the directory folder within the
browser tree when there are subfolders.
SAMPLER: Plays back the samples.
•Hold down and turn this knob to uSHIFT
play back the sample again from the start
when the sample is being played back
(stutter function).
EFFECTS:SwitchestheeffectON/OFF.
RECORD: Starts or stops recording.
•Hold down u SHIFT and press this button to
start or stop recording the next track.
W6 Window switch button (BACK/FWD)
The function differs according to the window.
BROWSER: Moves between folders, tracks,
playback lists and side lists.
InVirtualDJLE,thisonlymovesbetween
folders and tracks.
SAMPLER: Selects the sample.
EFFECTS: Moves between sound effects, video
effects and video transitions.
RECORD: Not available.
W7 RECORD window switch button
(RECORD)
Hold down and press this button for u SHIFT
more than 1 second to assign each DECK to the
following MIDI channels.
•DECK A MIDI CHANNEL 13 ............
•DECK B MIDI CHANNEL 15 ............
•DECK C MIDI CHANNEL 14 ............
•DECK D MIDI CHANNEL 16 ............
W8 EFX window switch button (EFX)
Hold down and press this button for u SHIFT
more than 1 second to assign each DECK to the
following MIDI channels.
•DECK A MIDI CHANNEL 9 ............
•DECK B MIDI CHANNEL 11 ............
•DECK C MIDI CHANNEL 10 ............
•DECK D MIDI CHANNEL 12 ............
W9 CF MODE button
The following operations differ depending on
whether the button is ON or OFF.
AUDIO ON: Uses the cross fader for audio.
VIDEO ON: Uses the cross fader for video.
•When both are lit, they can be used
simultaneously.
Q3 Q6 Q9Q4 Q5 Q7
E5
E1
E4
E2
W9
E3
E0
Q8
W7
W5
W6
W4
W0
W1
W2
W3
W8
q
w
r
t
i
o
Q0
Q2
Q1
y
u
e
Top panel


28
Before use Connections Basic
operations
Installing and setting up
supplied software
USB settings
Troubleshooting Index
Specifications
Signal system chart
Part names and
functions
E0 SAMPLE window switch button
(SAMPLE)
Hold down and press this button for u SHIFT
more than 1 second to assign each DECK to the
following MIDI channels.
•DECK A MIDI CHANNEL 5 ............
•DECK B MIDI CHANNEL 7 ............
•DECK C MIDI CHANNEL 6 ............
•DECK D MIDI CHANNEL 8 ............
E1 BROWSE window switch button
(BROWSE)
Hold down and press this button for u SHIFT
more than 1 second to assign each DECK to the
following MIDI channels.
•DECK A MIDI CHANNEL 1 ............
•DECK B MIDI CHANNEL 3 ............
•DECK C MIDI CHANNEL 2 ............
•DECK D MIDI CHANNEL 4 ............
E2 Level meter display switching switch
(DECK, MASTER)
Channels displayed by the level master can be
selected from the following display modes.
DECK:
DECKA/Clevelisdisplayedintheleftchannel,
and DECK B/D level is displayed in the right
channel.
MASTER:
The volume level of the master output volume
(L/R)isdisplayed.
E3 Filter cut off adjustment knob (FILTER)
Adjusts the filter cut off frequency for each
channel.
E4 Channel cue button (CUE DECK A/B/C/D)
The source of the channel selected using y
CUE is mixed with the monitor.
E5 Channel/master level meter
Displays the volume level of the channel
selected with the level meter display E2
switching switch.
Q3 Q6 Q9Q4 Q5 Q7
E5
E1
E4
E2
W9
E3
E0
Q8
W7
W5
W6
W4
W0
W1
W2
W3
W8
q
w
r
t
i
o
Q0
Q2
Q1
y
u
e
Top panel

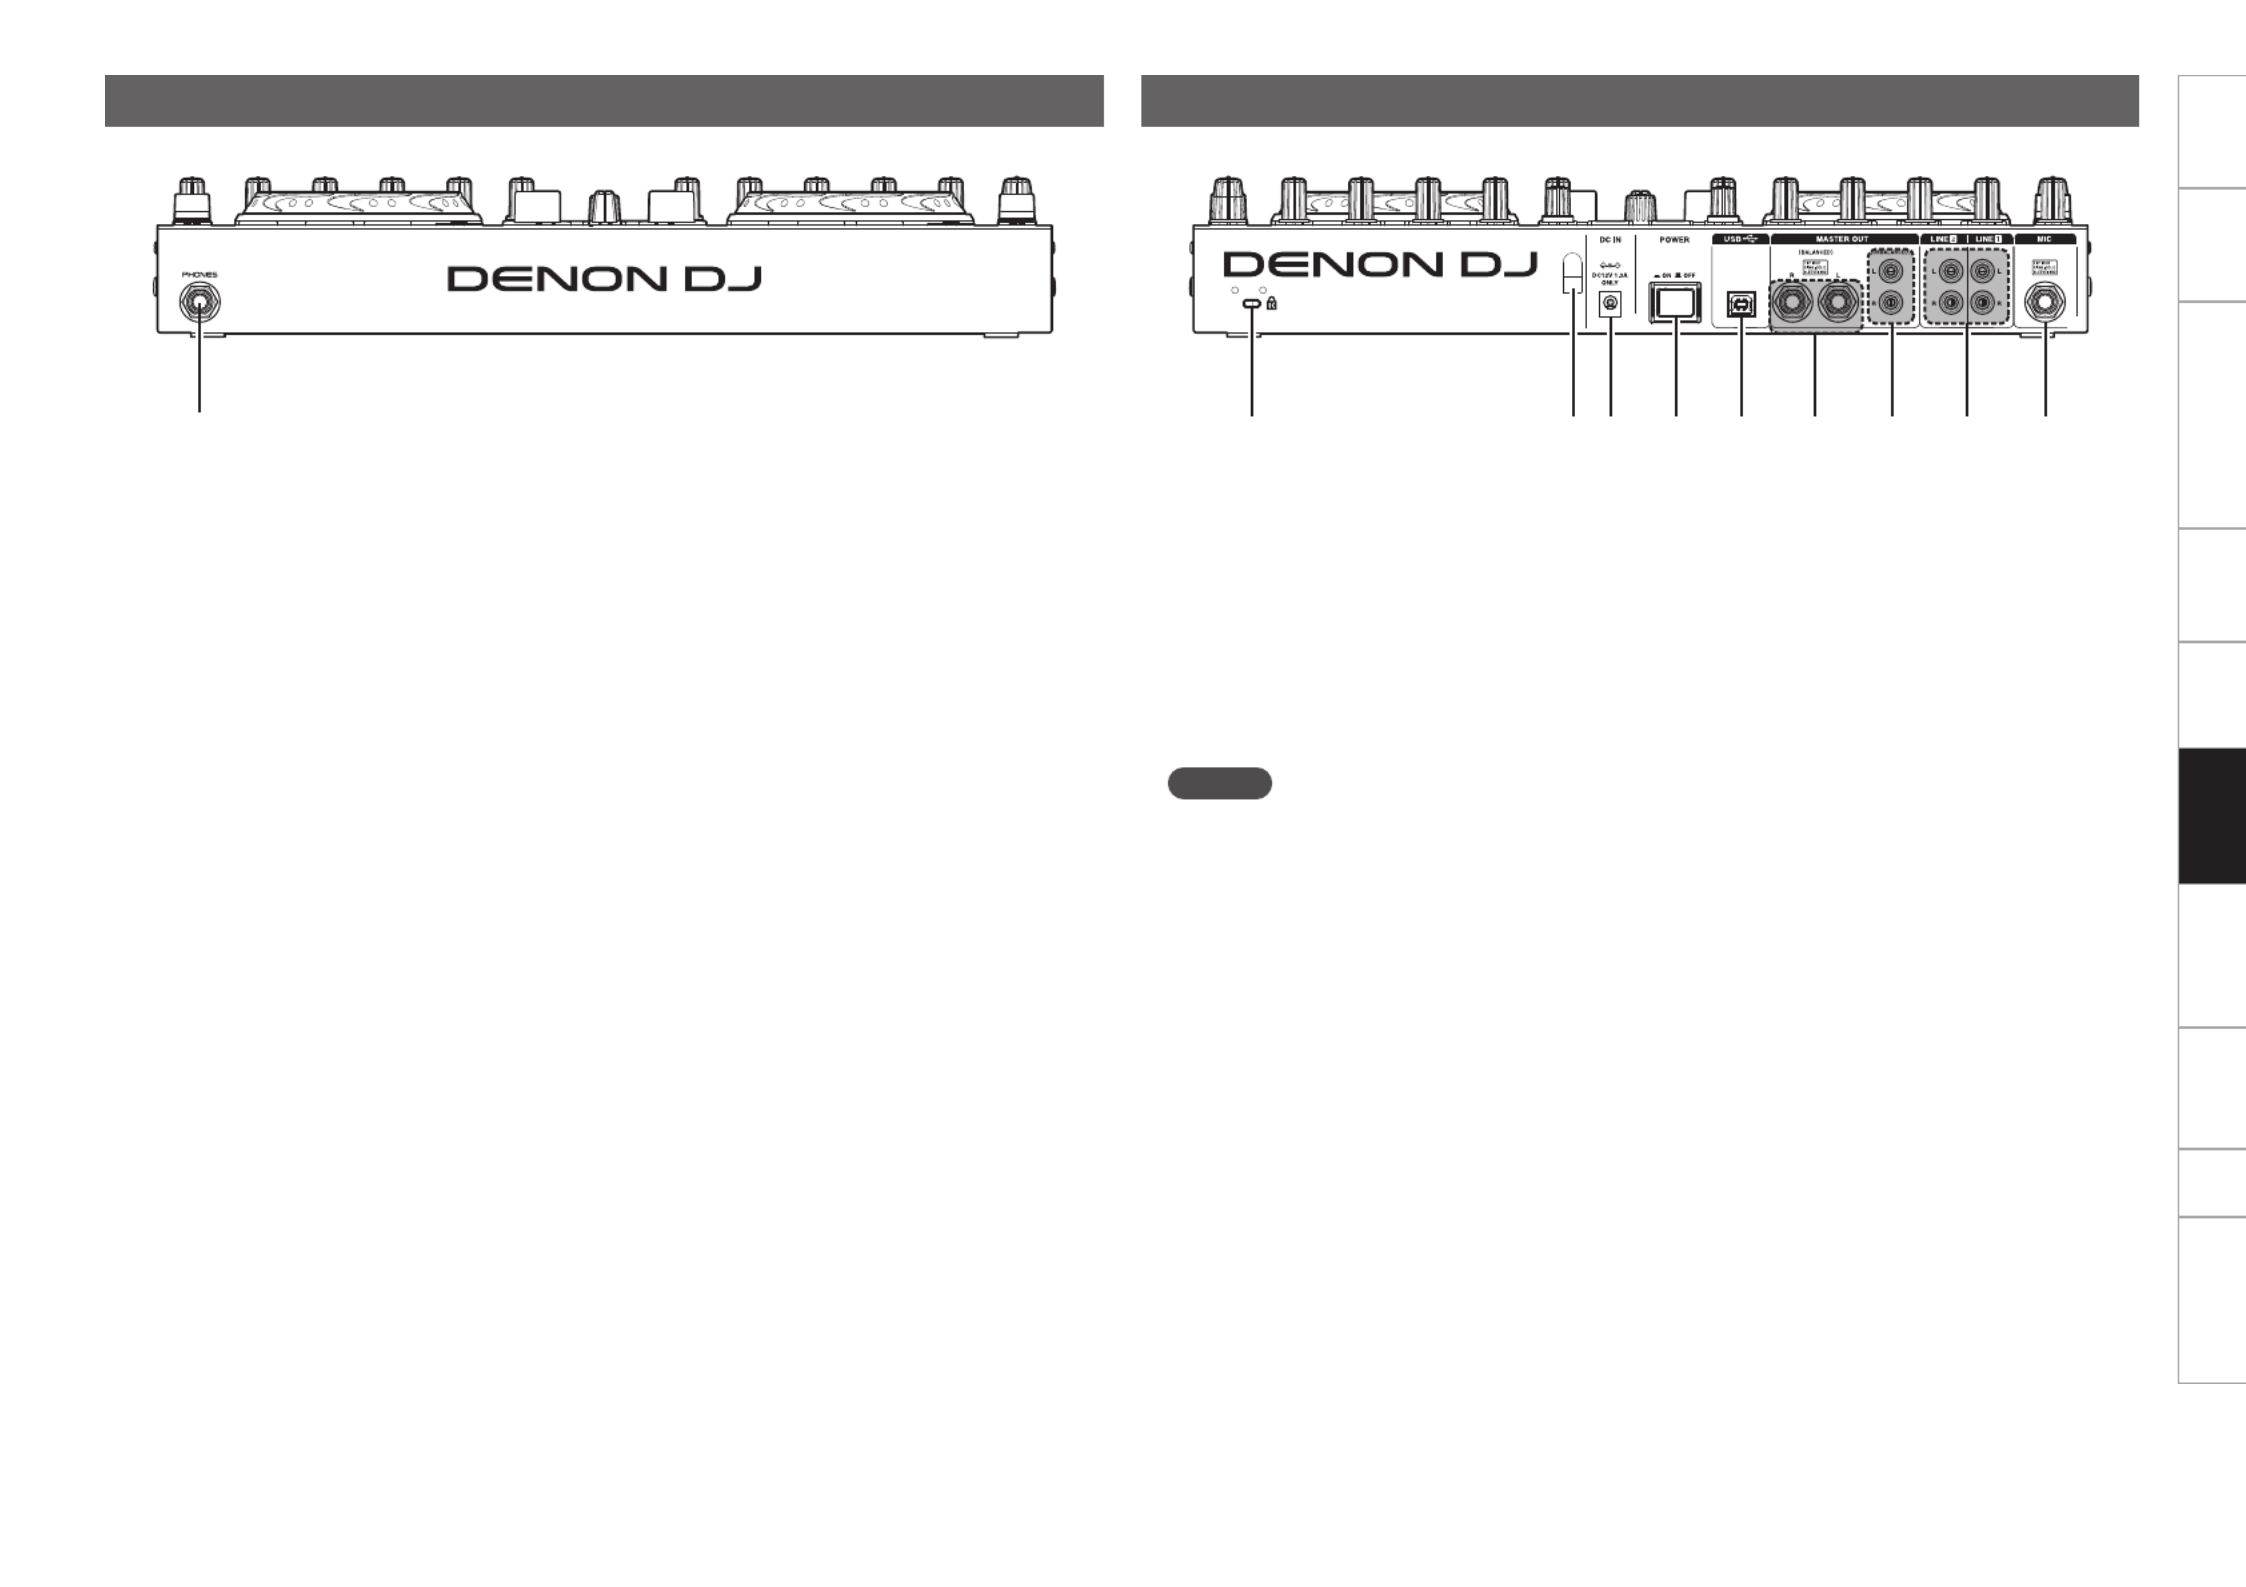
29
Before use Connections Basic
operations
Installing and setting up
supplied software
USB settings
Troubleshooting Index
Specifications
Signal system chart
Part names and
functions
Front panel
For buttons not explained here, see the page indicated in parentheses ( ).
q
q Headphone jack (PHONES) ························ (10)
Rear panel
For buttons not explained here, see the page indicated in parentheses ( ).
trewq oiuy
q Theft protection lock hole
Connect to an anti-theft wire.
w AC adapter cord holder ································ (4)
This prevents the AC adapter plug from
disconnecting.
Use a Phillips screwdriver to anchor the AC
adapter cable to this holder.
e DC IN jack (DC IN) ········································· (4)
r Power switch (POWER) ····························· (10)
NOTE
There is no function on this device for
automatically switching off the power supply
when the unit is not used for a prolonged
period.
If you do not intend to use this device for a
prolonged period, for safety either switch off the
power supply, or remove the AC adaptor plug
from the wall socket.
t USB terminal (USB) ····································· (4)
y Master output terminal
(MASTER OUT BALANCED) ························ (3)
u Master output terminal
(MASTER OUT UNBALANCED) ··················· (3)
i Line 1/2 input terminal
(LINE 1/2) ······················································ (3)
o Balanced microphone input terminal
(MIC) ······························································ (3)

30
Before use Part names and
functions
Connections Basic
operations
Installing and setting up
supplied software
USB settings
Troubleshooting Index
Specifications
Signal system chart
Troubleshooting
If a problem should arise, first check the following:
1. Are the connections correct?
2. Is the set being operated as described in this owner’s manual?
3. Is the external device (player or effects processor) operating correctly?
If this unit does not operate properly, check the items listed in the table below.
If the symptom is not covered on the check list, contact your dealer or service centers.
Service centers are listed at or .http://www.d-mpro.com http://www.denondj.com
Symptom Cause/Solution Page
Power does not turn
on.
•Check the connection of the power plug to the outlet and the
connection of the DC plug to the unit.
4
There is no sound, or
the sound is too quiet.
•Check the connections for all devices.
•The microphone ducking function is operating. Set the DUCKING
button to off.
3, 4
10
The sound is distorted.
•Adjust the master output level adjustment knob.
•Adjust the channel input level adjustment knob.
10
10
This unit does not
operate properly, or
there is no sound.
•Check the connections for all devices.
•Check that the volume settings for the connected devices and DJ
software on the computer are properly adjusted.
•Match the settings on the unit to those on DJ software.
•WAVlesbecomemixedifthesamplingfrequencyandbit
number are different. Depending on the audio application used,
WAVlesthathavedifferentsamplingfrequenciesorbitnumbers
cannot be played simultaneously.
•When other USB devices are connected to the computer, connect
only the unit to the computer and check if this works.
3, 4
10
12, 13
–
–
Sound cuts out or is
distorted.
•Exit any other applications.
•WhenmultipleWAVlesareplayedbacksimultaneously,
the playback sound may cut out depending on the computer
specications.Tryplayingback1WAVle.
–
–
The button lights are
dim.
•The dimmer is in operation. Check the dimmer settings on the
computer.
–
Troubleshooting


31
Before use Part names and
functions
Connections Basic
operations
Installing and setting up
supplied software
USB settings
Troubleshooting Index
Specifications
Signal system chart
Specifications
nAudio (0dBu=0.775Vrms,0dBV=1Vrms)
•LINE inputs 2 Stereo
Unbalanced RCA terminal
Input impedance: 51 kΩ
Level: 0dBV
Signal to Noise ratio: Over 87 dB
•Microphone inputs 1 Monaural
Microphone : Balanced1/4in.TRSterminal
(Tip: hot, Ring: cold, Sleeve: ground)
Input impedance: 10 kΩ
Level: –52 – –20 dBu (Unity = –40 dBu)
•USB AUDIO inputs 2Stereo(4Monaural)16bit,Fs:48kHzUSBB
•MASTER output
Balanced: Stereo,balanced1/4in.TRSterminal
(Tip: hot, Ring: cold, Sleeve: ground)
Load impedance: Over 600 Ω
Level: +4 dBu (Max +24 dBu)
•When RL = 10 kΩ
Frequency response: 20Hz–20kHz(±0.5dB)
THD: Less than 0.05 %
Crosstalk: Lessthan–85dB(1kHz)
Unbalanced: Stereo RCA terminal
Load impedance: 10 kΩ
Level: 0 dBu (Max +20 dBu)
•Headphone output Stereo1/4in.(1mm)
Load impedance: 40 Ω
Level: Over 100 mW
•USB AUDIO output 2Stereo(4Monaural)16bit,FS:48kHzUSBB
nGeneral
USB MIDI input/output: IN: 1ch, OUT: 1ch MIDI 1.0, USB B
MASTER meter: PPM 7 Point LED –20 – +10 dB, Peak
CH fader: 11/4in.(45mm)slimtypefader
Cross fader: 11/4in.(45mm)fader
•Power voltage: DC12V(theunit)
AC adapter input:
U.S.A. and Canada models: AC120V,60Hz
European,U.K. and Asia/
Pacific models:
AC230V,50Hz
AC adapter output: DC12V2A
Power consumption: 16 W
Operating temperature: +5 °C – +35 °C
Operating humidity: 25 % – 85 %
Storage temperature: –20 °C – 60 °C
Specifications
zFor the purpose of improvement, the specifications and design are subject to change without notice.


32
Before use Part names and
functions
Connections Basic
operations
Installing and setting up
supplied software
USB settings
Troubleshooting
Specifications
Signal system chart Index
ENGLISH
Index
vA
AC adapter 4 ···························································
ASIO driver 5 ···························································
vC
Cable 3 ····································································
Balanced phone plug cable 3 ································
Coaxial cable for microphone 3 ·····························
RCA pin plug cable············································· 3
USB cable 3 ··························································
Connection 3 ···························································
Balanced main amp 3 ···········································
CD player 3 ···························································
Coaxial microphone 3 ···········································
Computer 4 ···························································
Power cord 4 ························································
Unbalanced main amp 3 ·······································
vD
Ducking 10 ······························································
vF
Front panel 29 ·························································
vH
Headphone monitor 10 ···········································
vJ
Jog wheel lock function 12 ·····································
vL
LINE TO MASTER function 11 ································
vM
Microphone 10 ························································
MIDI command 13, 14, 15 ······································
MIDIinput/outputchannels ································ 14
vP
Poweron/off ······················································ 10
vR
Rear panel 29 ··························································
vT
Top panel
··············· 18, 19, 20, 21, 22, 23, 24, 25, 26, 27, 28
Touch sensor 11 ······················································
TRAKTOR LE 2 8, 19 ···············································
vU
USB AUDIO 12 ························································
USB settings 12 ······················································
vV
VirtualDJ ························································ 9, 24


33
Before use Part names and
functions
Connections Basic
operations
Installing and setting up
supplied software
USB settings
Troubleshooting Index
Specifications
Signal system chart
Signal system chart
Master Level for METER


Unit: in. (mm)
153/4(400.0)
5/16(8.0)
27/32(21.6)
131/32
(50.0)
103/64(255.0)
5/16(8.0)
Weight: 6 lbs 9.8 oz (3.0 kg) (AC Adaptor 10.6 oz (0.3 kg))
Dimensions


V00 3520 10061 00AP

Termékspecifikációk
| Márka: | Denon |
| Kategória: | DJ Gear |
| Modell: | MC3000 |
Szüksége van segítségre?
Ha segítségre van szüksége Denon MC3000, tegyen fel kérdést alább, és más felhasználók válaszolnak Önnek
Útmutatók DJ Gear Denon

21 Szeptember 2024
20 Augusztus 2024
10 Augusztus 2024
8 Augusztus 2024
5 Augusztus 2024
29 Július 2024
28 Július 2024
25 Július 2024
21 Július 2024
20 Július 2024
Útmutatók DJ Gear
- DJ Gear Yamaha
- DJ Gear Marantz
- DJ Gear Pioneer
- DJ Gear Kärcher
- DJ Gear SilverCrest
- DJ Gear Saramonic
- DJ Gear Technics
- DJ Gear Roland
- DJ Gear Allen & Heath
- DJ Gear Technaxx
- DJ Gear Kenwood
- DJ Gear Eurolite
- DJ Gear Arturia
- DJ Gear Zoom
- DJ Gear Korg
- DJ Gear Sencor
- DJ Gear Focusrite
- DJ Gear M-Audio
- DJ Gear BeamZ
- DJ Gear Nevir
- DJ Gear Cambridge
- DJ Gear Roadstar
- DJ Gear Omnitronic
- DJ Gear SPL
- DJ Gear Pro-Ject
- DJ Gear American DJ
- DJ Gear Denver
- DJ Gear Power Dynamics
- DJ Gear Trevi
- DJ Gear Audio-Technica
- DJ Gear Konig & Meyer
- DJ Gear Muse
- DJ Gear Native Instruments
- DJ Gear Auna
- DJ Gear Behringer
- DJ Gear Chauvet
- DJ Gear PreSonus
- DJ Gear Alesis
- DJ Gear Velleman
- DJ Gear Universal Audio
- DJ Gear Teac
- DJ Gear TC Helicon
- DJ Gear Røde
- DJ Gear Monacor
- DJ Gear IK Multimedia
- DJ Gear McIntosh
- DJ Gear ION
- DJ Gear Vonyx
- DJ Gear UDG Gear
- DJ Gear AKAI
- DJ Gear Konig
- DJ Gear TechniSat
- DJ Gear Fenton
- DJ Gear Serato
- DJ Gear Line 6
- DJ Gear Pyle
- DJ Gear Lenco
- DJ Gear Victrola
- DJ Gear Steinberg
- DJ Gear Martin
- DJ Gear Krüger&Matz
- DJ Gear Dual
- DJ Gear Novation
- DJ Gear Vocopro
- DJ Gear Elektron
- DJ Gear Swann
- DJ Gear Gravity
- DJ Gear Numark
- DJ Gear AlphaTheta
- DJ Gear Tascam
- DJ Gear Nektar
- DJ Gear Thorens
- DJ Gear Reloop
- DJ Gear Newstar
- DJ Gear American Audio
- DJ Gear Gemini
- DJ Gear Brigmton
- DJ Gear Sunstech
- DJ Gear Marquant
- DJ Gear AVerMedia
- DJ Gear Envivo
- DJ Gear Bigben Interactive
- DJ Gear Faderfox
- DJ Gear Apogee
- DJ Gear Pyle Pro
- DJ Gear Festo
- DJ Gear EVO
- DJ Gear QTX
- DJ Gear Ricatech
- DJ Gear Mpman
- DJ Gear Swissonic
- DJ Gear ESI
- DJ Gear Apart
- DJ Gear Audient
- DJ Gear Skytec
- DJ Gear Beyerdynamic
- DJ Gear AudioQuest
- DJ Gear RME
- DJ Gear Stanton
- DJ Gear Citronic
- DJ Gear Keith MCmillen
- DJ Gear MWM
- DJ Gear Hercules
- DJ Gear Motu
- DJ Gear Suonobuono
- DJ Gear Formula Sound
- DJ Gear IConnectivity
- DJ Gear Ortofon
- DJ Gear Kenton
- DJ Gear Ecler
- DJ Gear Icon
- DJ Gear Fuzzix
- DJ Gear DB Technologies
- DJ Gear Fun Generation
- DJ Gear Cheetah
- DJ Gear ANT
- DJ Gear IMG Stage Line
- DJ Gear Denon DJ
- DJ Gear Sirus
- DJ Gear Rane
- DJ Gear Zomo
- DJ Gear Flexson
- DJ Gear Fluid
- DJ Gear Genki Instruments
- DJ Gear JTS
- DJ Gear Mixars
- DJ Gear Pangea Audio
- DJ Gear Glorious
- DJ Gear Adam Hall
- DJ Gear Meris
- DJ Gear PLAYdifferently
- DJ Gear The T.mix
- DJ Gear Monkey Banana
Legújabb útmutatók DJ Gear
15 Március 2025
12 Január 2025
12 Január 2025
8 Január 2025
6 Január 2025
6 Január 2025
6 Január 2025
6 Január 2025
6 Január 2025
6 Január 2025