Használati útmutató Dahua Technology VTH8641KMS-WP
Dahua Technology
Intercomsysteem
VTH8641KMS-WP
Olvassa el alább 📖 a magyar nyelvű használati útmutatót Dahua Technology VTH8641KMS-WP (99 oldal) a Intercomsysteem kategóriában. Ezt az útmutatót 5 ember találta hasznosnak és 2 felhasználó értékelte átlagosan 4.5 csillagra
Oldal 1/99

Digital VTH (4.6 version)
User's Manual
V1.0.0
I
Foreword
General
This manual introduces the installation, functions and operations of the digital indoor monitor
device (hereinafter referred to as "the Device"). Read carefully before using the device, and keep the
manual safe for future reference.
Safety Instructions
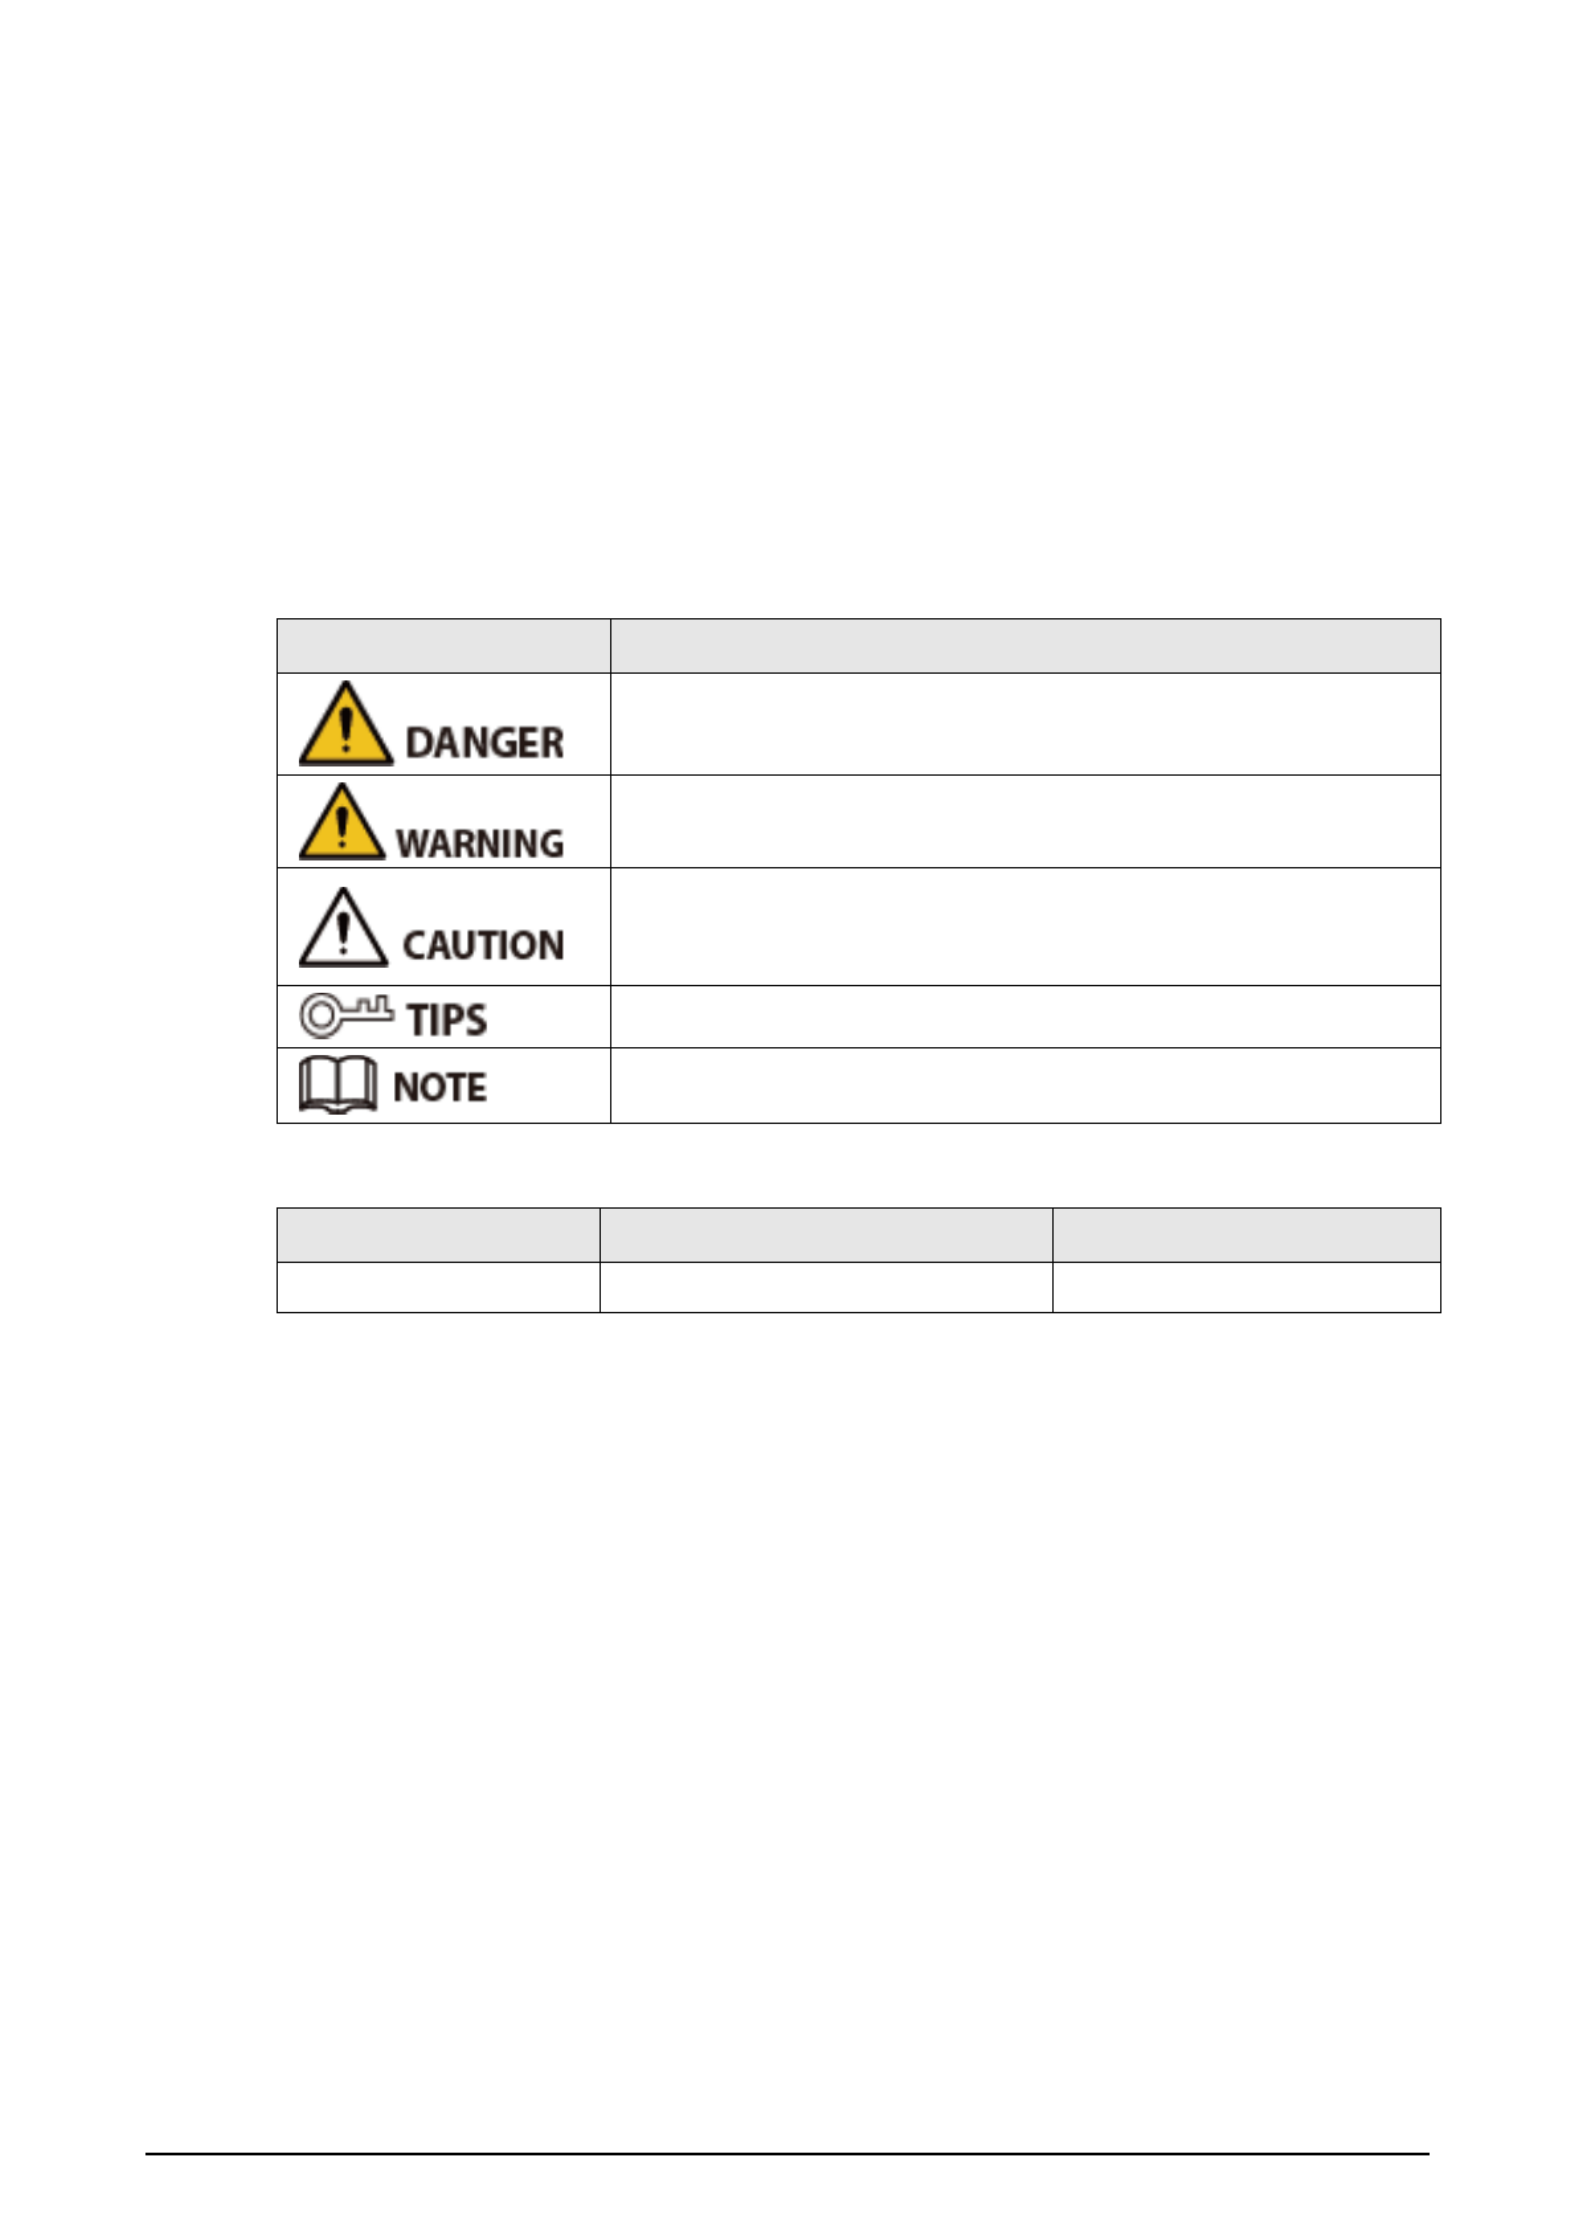
The following signal words might appear in the manual.
Signal Words Meaning
Indicates a high potential hazard which, if not avoided, will result in
death or serious injury.
Indicates a medium or low potential hazard which, if not avoided,
could result in slight or moderate injury.
Indicates a potential risk which, if not avoided, could result in
property damage, data loss, reductions in performance, or
unpredictable results.
Provides methods to help you solve a problem or save time.
Provides additional information as a supplement to the text.
Revision History
Version Revision Content Release Time
V1.0.0 2022 First release. September
Privacy Protection Notice
As the device user or data controller, you might collect the personal data of others such as their face,
fingerprints, and license plate number. You need to be in compliance with your local privacy
protection laws and regulations to protect the legitimate rights and interests of other people by
implementing measures which include but are not limited: Providing clear and visible identification
to inform people of the existence of the surveillance area and provide required contact information.
About the Manual
● The manual is for reference only. Slight differences might be found between the manual and the
product.
● We are not liable for losses incurred due to operating the product in ways that are not in
compliance with the manual.
● The manual will be updated according to the latest laws and regulations of related jurisdictions.
For detailed information, see the paper user’s manual, use our CD-ROM, scan the QR code or visit
our official website. The manual is for reference only. Slight differences might be found between
the electronic version and the paper version.
● All designs and software are subject to change without prior written notice. Product updates

II
might result in some differences appearing between the actual product and the manual. Please
contact customer service for the latest program and supplementary documentation.
● There might be errors in the print or deviations in the description of the functions, operations
and technical data. If there is any doubt or dispute, we reserve the right of final explanation.
● Upgrade the reader software or try other mainstream reader software if the manual (in PDF
format) cannot be opened.
● All trademarks, registered trademarks and company names in the manual are properties of their
respective owners.
● Please visit our website, contact the supplier or customer service if any problems occur while
using the device.
● If there is any uncertainty or controversy, we reserve the right of final explanation.

III
Important Safeguard and Warnings
This section introduces content covering the proper handling of the device, hazard prevention, and
prevention of property damage. Read carefully before using the device, and comply with the
guidelines when using it.
Operation Requirements
● Check whether the power supply is correct before use.
● Do not unplug the power cord on the side of the device while the adapter is powered on.
● Operate the device within the rated range of power input and output.
● Transport, use and store the device under allowed humidity and temperature conditions.
● Do not drop or splash liquid onto the device, and make sure that there is no object filled with
liquid on the device to prevent liquid from flowing into it.
● Do not disassemble the device without professional instruction.
Installation Requirements
● Do not connect the power adapter to the device while the adapter is powered on.
● Strictly comply with the local electric safety code and standards. Make sure the ambient voltage
is stable and meets the power supply requirements of the device.
● Do not connect the device to two or more kinds of power supplies, to avoid damage to the
device.
● Improper use of the battery might result in a fire or explosion.
● Personnel working at heights must take all necessary measures to ensure personal safety
including wearing a helmet and safety belts.
● Do not place the device in a place exposed to sunlight or near heat sources.
● Keep the device away from dampness, dust, and soot.
● Install the device on a stable surface to prevent it from falling.
● Install the device in a well ventilated place, and do not block its ventilation.-
● Use an adapter or cabinet power supply provided by the manufacturer.
● Use the power cords that are recommended for the region and conform to the rated power
specifications.
● The power supply must conform to the requirements of ES1 in IEC 62368-1 standard and be no
higher than PS2. Please note that the power supply requirements are subject to the device label.
● The device is a class I electrical appliance. Make sure that the power supply of the device is
connected to a power socket with protective earthing.

V
2.6.1.4 Other Ring Settings ........................................................................................................................................... 23
2.6.2 Card Information ........................................................................................................................................................... 24
2.6.3 Alarm Setting .................................................................................................................................................................. 25
2.6.3.1 Wired Zone ............................................................................................................................................................ 25
2.6.3.2 Wireless Zone ....................................................................................................................................................... 27
2.6.3.3 Alarm Output ....................................................................................................................................................... 28
2.6.4 Mode Setting ................................................................................................................................................................... 29
2.6.5 Forward Setting ............................................................................................................................................................. 31
2.6.6 General Setting .............................................................................................................................................................. 32
2.6.6.1 Time Setting and DND ..................................................................................................................................... 32
2.6.6.2 Display Setting .................................................................................................................................................... 33
2.6.6.3 QR Code .................................................................................................................................................................. 34
2.6.6.4 Other Settings ..................................................................................................................................................... 36
2.6.7 WLAN .................................................................................................................................................................................. 39
2.6.8 User Password Setting ............................................................................................................................................... 41
2.6.9 Network Password Setting....................................................................................................................................... 42
2.6.9.1 Creating Network Password ......................................................................................................................... 42
2.6.9.2 Changing Network Password ...................................................................................................................... 44
2.6.9.3 Resetting Network Password ....................................................................................................................... 45
2.6.10 Product Information ................................................................................................................................................. 45
2.7 Project Settings ........................................................................................................................................................................ 46
2.7.1 Forget Password ............................................................................................................................................................ 46
2.7.2 Network Settings .......................................................................................................................................................... 47
2.7.3 VTH Configuration ....................................................................................................................................................... 48
2.7.4 VTO Configuration ....................................................................................................................................................... 49
2.7.5 Factory Reset ................................................................................................................................................................... 50
2.7.6 Adding Device ................................................................................................................................................................ 51
2.7.7 Reset MSG ......................................................................................................................................................................... 53
2.8 Unlock Function ....................................................................................................................................................................... 54
2.9 Arm and Disarm Function .................................................................................................................................................... 54
2.9.1 Arm ....................................................................................................................................................................................... 54
2.9.2 Disarm ................................................................................................................................................................................ 55
3 DSS Agile VDP ...................................................................................................................................................................................... 57
3.1 Downloading the App ........................................................................................................................................................... 57
3.2 Registration and Login ......................................................................................................................................................... 57
3.3 Call Functions ............................................................................................................................................................................ 60
3.3.1 Forwarding Calls ........................................................................................................................................................... 60
3.3.2 Calling Operations ....................................................................................................................................................... 62

VI
3.4 Monitoring .................................................................................................................................................................................. 63
3.5 Call Records ................................................................................................................................................................................ 65
3.6 Message ........................................................................................................................................................................................ 66
3.7 Visitor ............................................................................................................................................................................................ 69
3.7.1 Creating Pass................................................................................................................................................................... 69
3.7.2 Visit Records .................................................................................................................................................................... 72
3.8 Setting ........................................................................................................................................................................................... 73
4 DMSS ......................................................................................................................................................................................................... 75
4.1 Downloading DMSS ................................................................................................................................................................ 75
4.2 Registration and Login ......................................................................................................................................................... 75
4.3 Adding VTH to DMSS ............................................................................................................................................................. 77
4.4 Configuring Arm and Disarm ............................................................................................................................................. 79
4.5 DMSS Calling VTH .................................................................................................................................................................... 81
4.6 DMSS Calling VTO .................................................................................................................................................................... 82
4.7 DMSS Unlocking Door ........................................................................................................................................................... 83
4.8 DMSS Monitoring VTO .......................................................................................................................................................... 84
4.9 Viewing Alarm Information ................................................................................................................................................ 86
4.10 Device Sharing........................................................................................................................................................................ 87
Appendix 1 Cybersecurity Recommendations ........................................................................................................................ 91

1
1 Product Overview
1.1 Introduction
A digital VTH is a device that can perform monitoring, voice/video call, and door unlock.
1.2 Function
Wi- Fi Networking
Connect to Wi-Fi networks.
Video/Voice Call
Make video or voice call to other VTOs and VTHs.
Monitoring
Monitor fence station, VTO and IPC devices (only supported by certain models).
Concierge
Make calls to the Management Center.
Auto Snapshot
Take snapshots when calling or monitoring, and store them in the SD card.
DND (Do Not Disturb)
Mute all message and call notifications.
Remote Unlock
Unlock doors remotely.
Arm and Disarm
Arm and disarm 6 alarm devices.
Playback
Play back videos and pictures in the SD card.
Alarm
Alarms will trigger linkage and be sent to the Call Center.
Record
View call and alarm records.

2
Message
View messages, including videos, pictures and announcements.
3
2 VTH Screen Operation
2.1 Home Screen
There are two kinds of main screens.
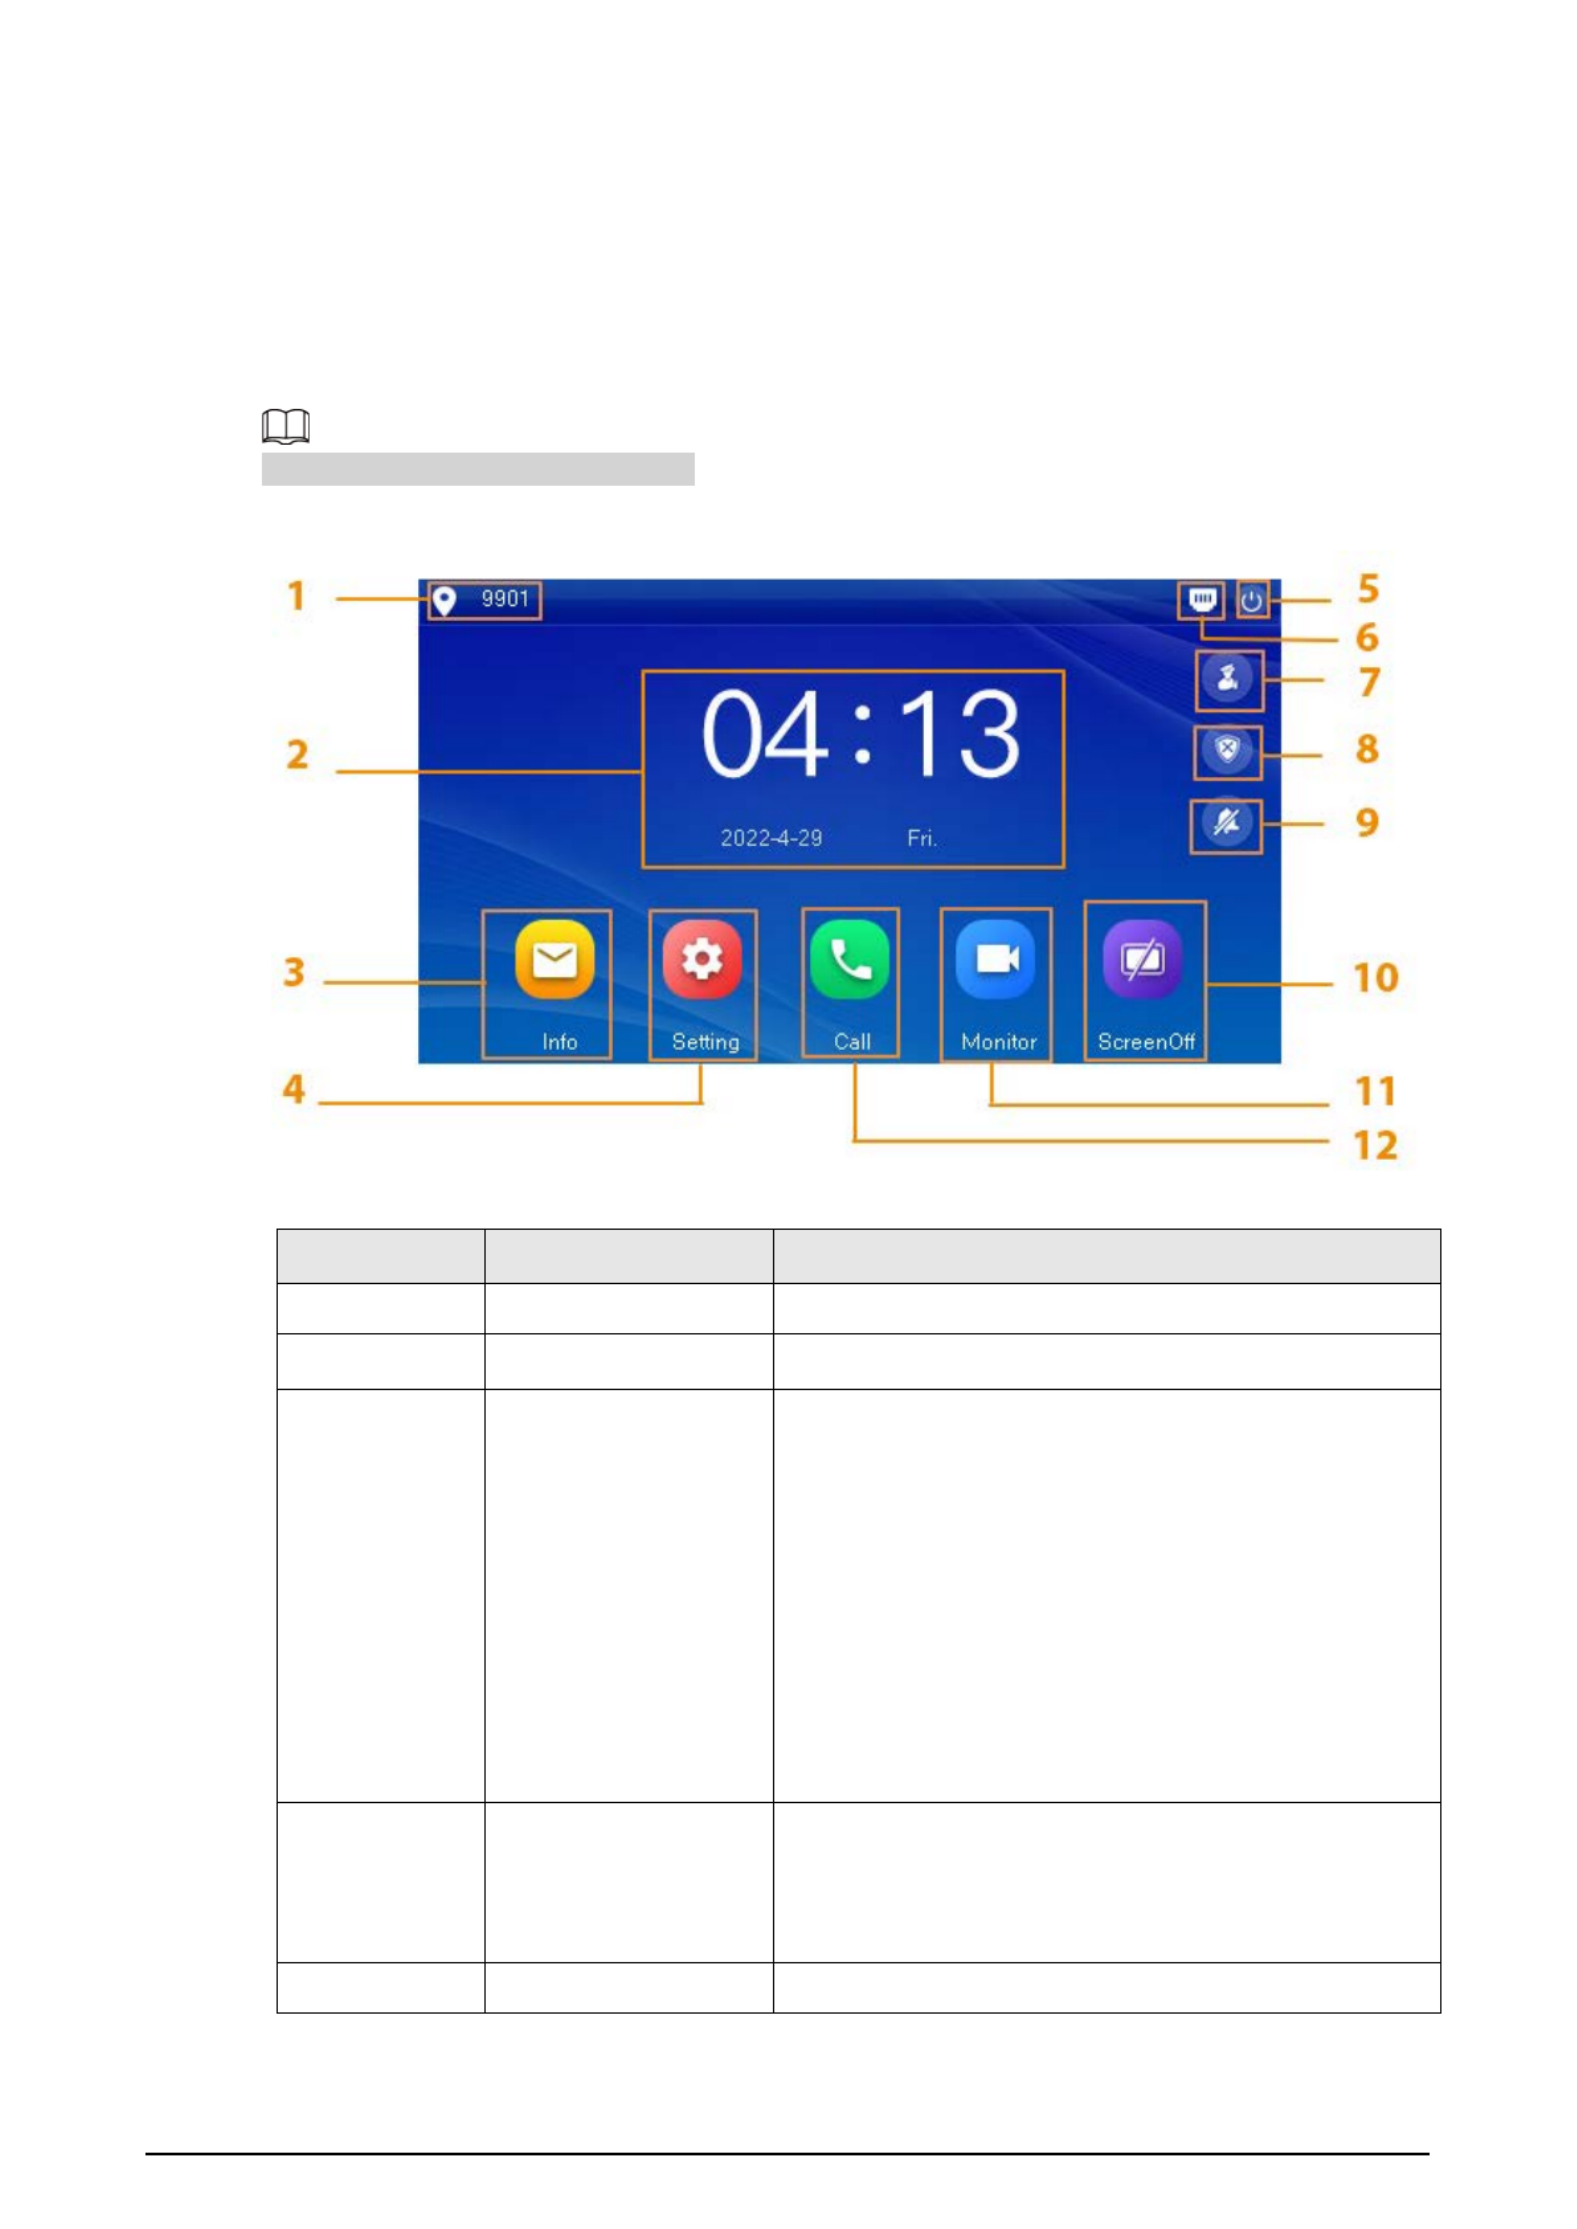
Figure 2-1 Home screen-type 1
Table 2- 1 Home screen description (1)
No. Name Description
1 Room number Number of the room where the VTH is located.
2 Time and Date —
3 Info
● View, delete and clear announcements or security
alarm information.
● When the VTH does not have an SD card, and the
video-audio message uploading function is
enabled on the VTO, three tabs will be displayed,
Guest MSG, Guest Snap and Guest Video. You
can view, delete and clear the messages.
● When the VTH has an SD card, the Video Pic tab
will be displayed. View, delete and clear the
videos and pictures.
4 Setting
● Tap to enter system setting.
● Tap the icon, and then select Project Setting.
Enter the password you set during initialization,
and then go to the project setting screen.
5 Restart Tap the icon to restart the VTH.
4
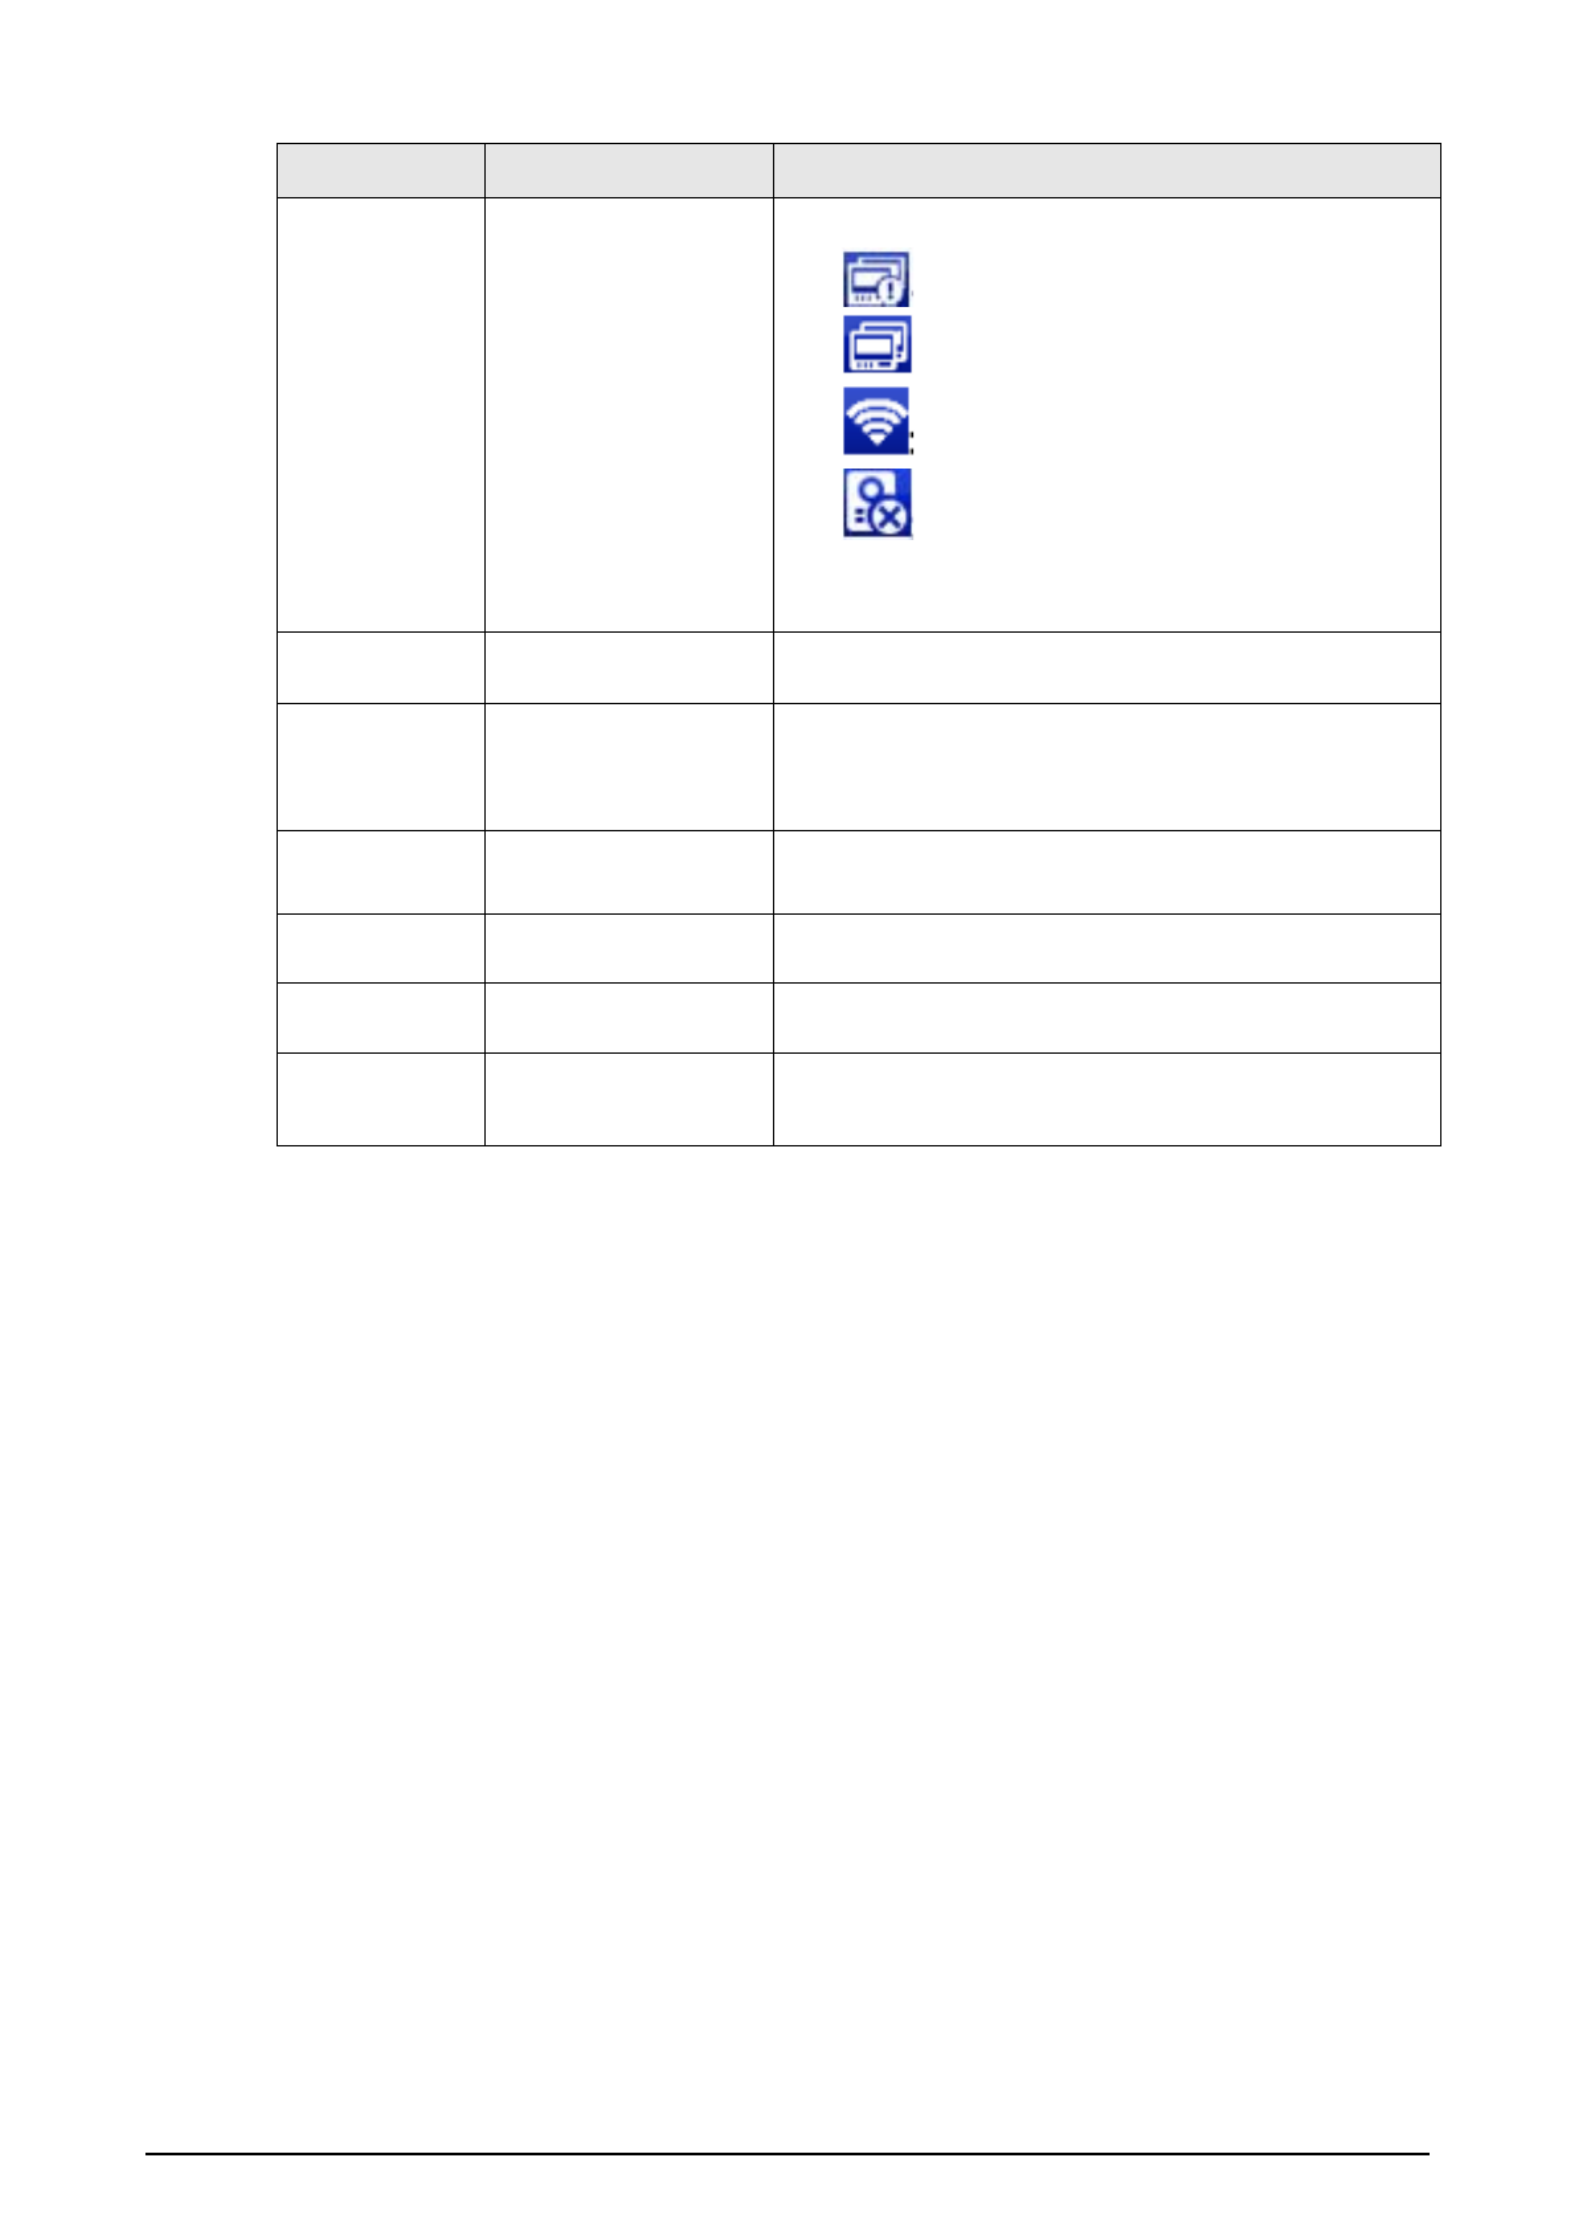
No. Name Description
6 Status
Network connection status is displayed.
● :Not connected to the network.
● : Connected to the network through a cable.
● :Wirelessly connected to the network.
● :Failed to connect to the main VTO, when
disappeared, the device has connected to the
main VTO.
7 Concierge Make calls to the Call Management Center.
8 Arm/disarm
● Display unread alarm information.
● Tap to select an arm mode from Sleep, Away,
Home and Custom.
9 Do not disturb Enable to not receive any call or message.
10 Screen Off Tap to screen off the current screen.
11 Monitor Monitor VTOs, fence stations, IPCs and NVRs.
12 Call
● Call other VTOs and VTHs.
● View and manage the contacts and call records.
5
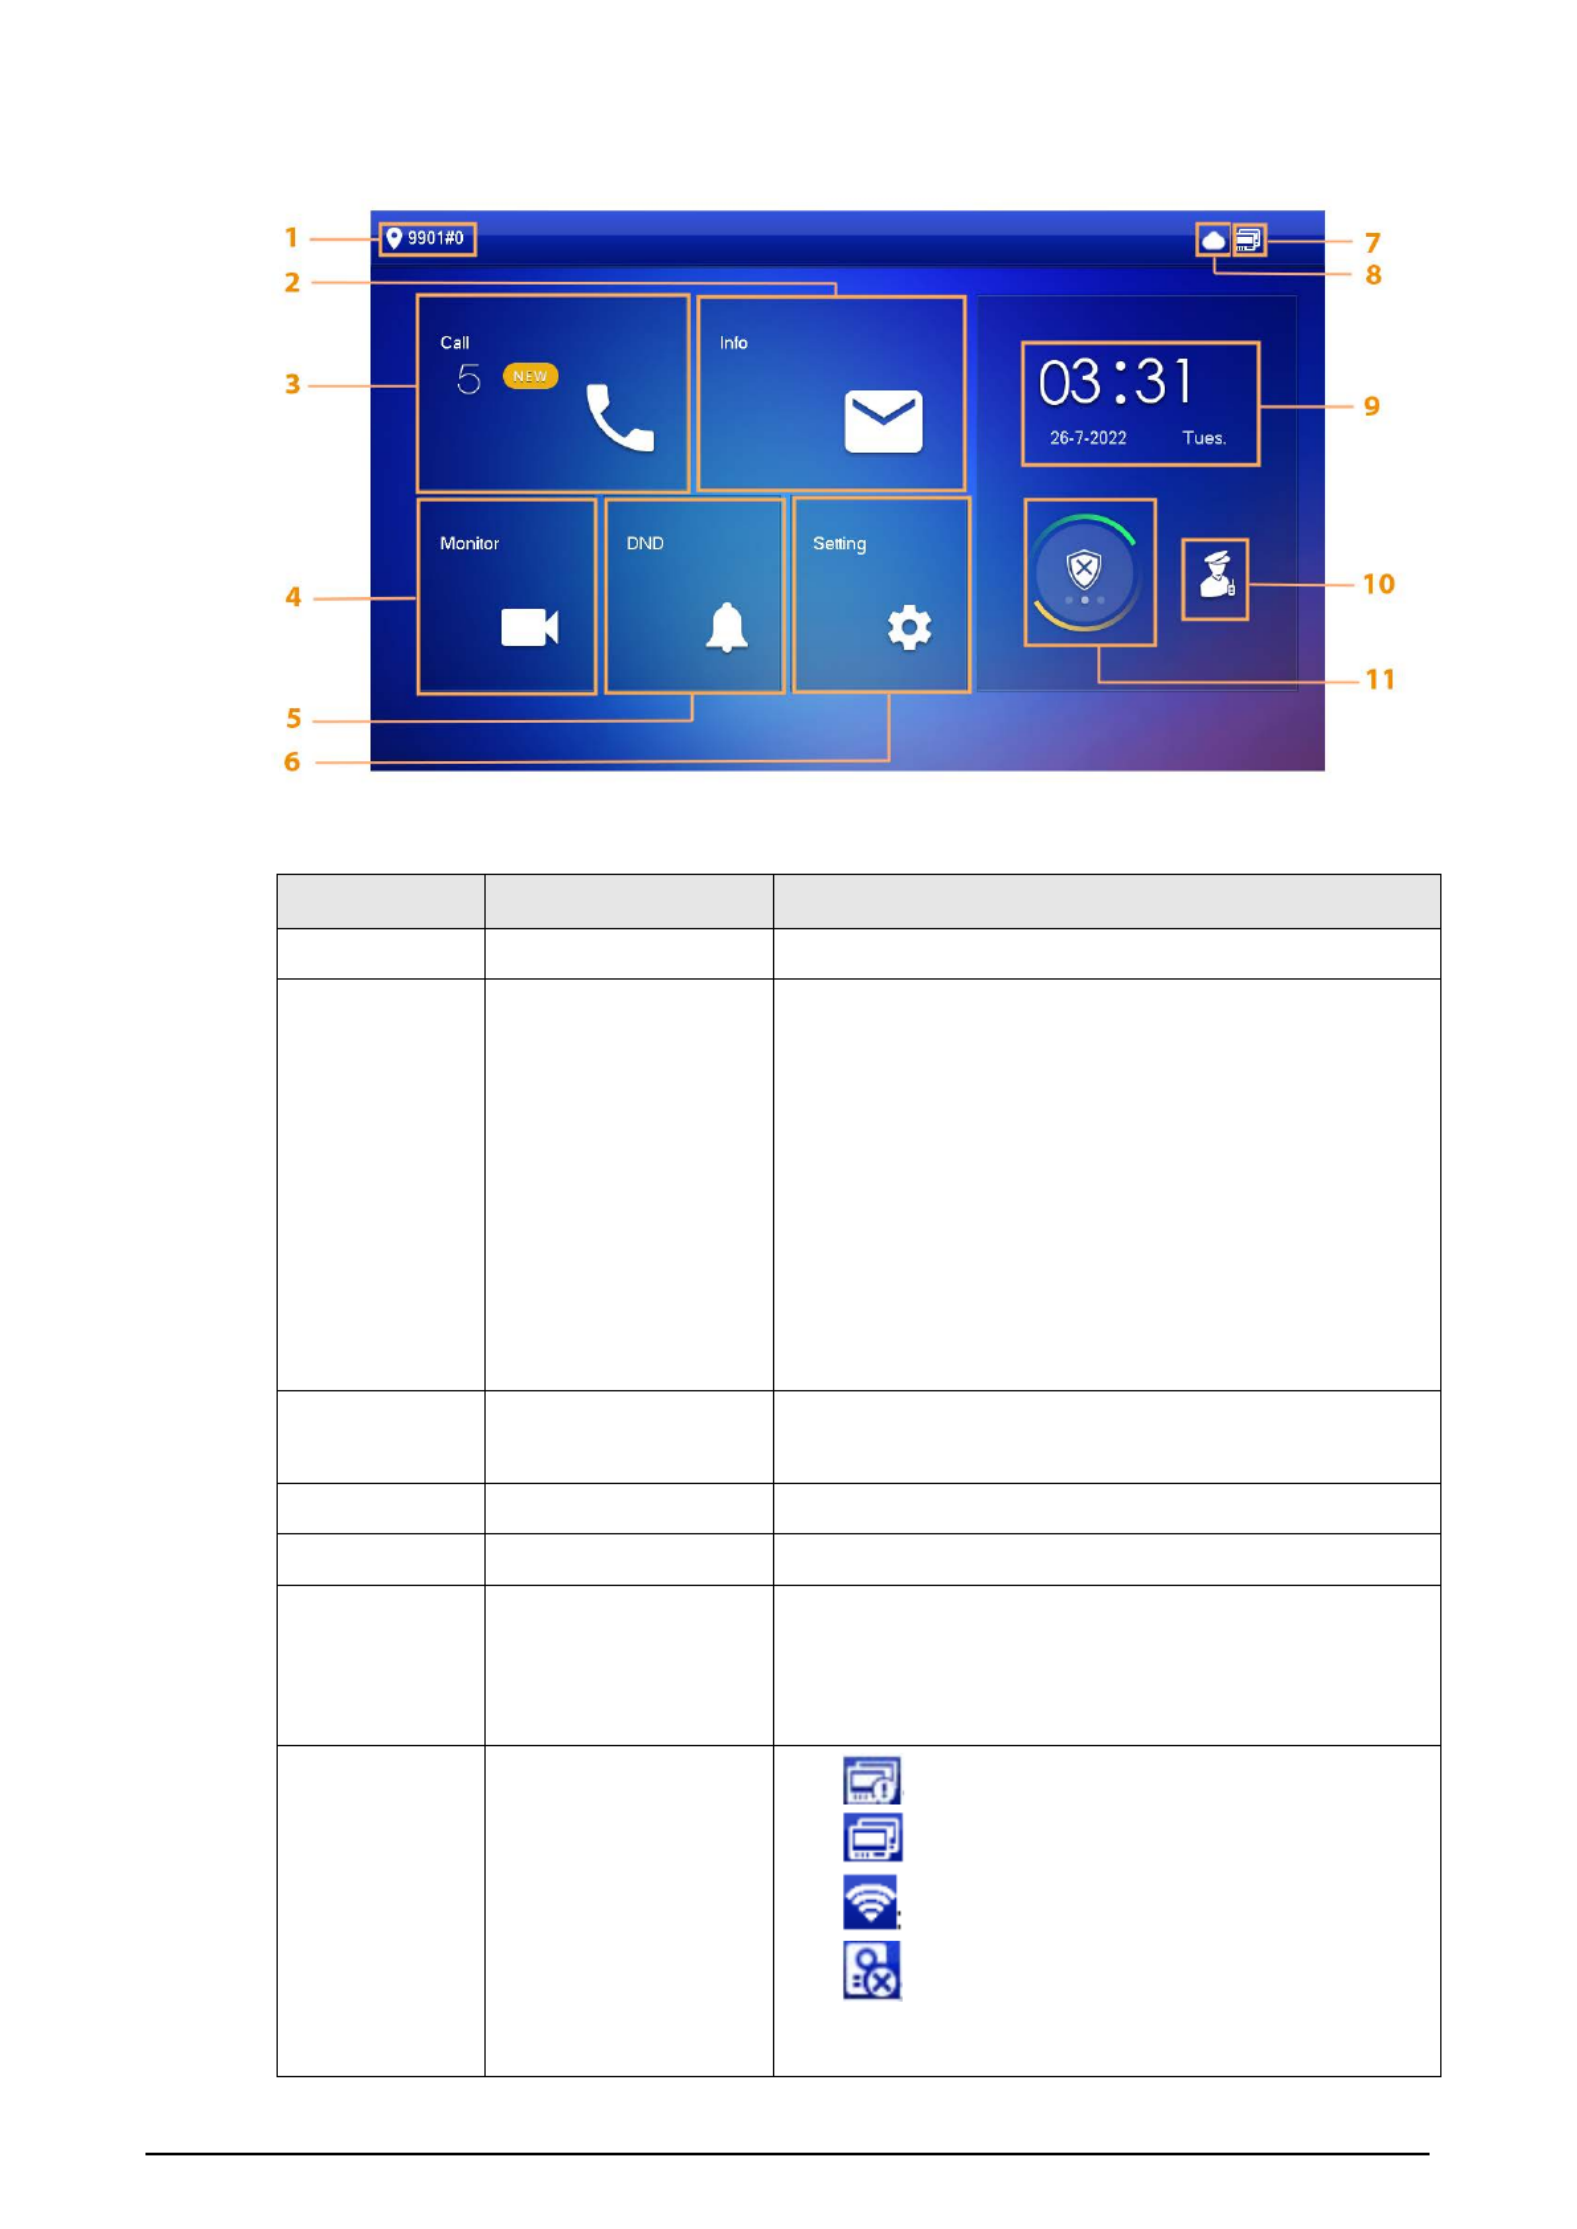
Figure 2-2 Home screen (2)
Table 2- 2 Home screen description (2)
No. Name Description
1 Room number Number of the room where the VTH is located.
2 Info
● View, delete and clear announcements or security
alarm information.
● When the VTH does not have an SD card, and the
video-audio message uploading function is
enabled on the VTO, three tabs will be displayed,
Guest MSG, Guest Snap and Guest Video. You
can view, delete and clear the messages.
● When the VTH has an SD card, the Video Pic tab
will be displayed. View, delete and clear the
videos and pictures.
3 Call
● Call other VTOs and VTHs.
● View and manage the contacts and call records.
4 Monitor Monitor VTOs, fence stations, IPCs and NVRs.
5 DND Enable to not receive any call or message.
6 Setting
● Tap to enter system setting.
● Tap the icon, and then select Project Setting.
Enter the password you set during initialization,
and then go to the project setting screen.
7 Status
● :Not connected to the network.
● : Connected to the network through a cable.
● :Wirelessly connected to the network.
● :Failed to connect to the main VTO, when
disappeared, the device has connected to the
main VTO.
6
No. Name Description
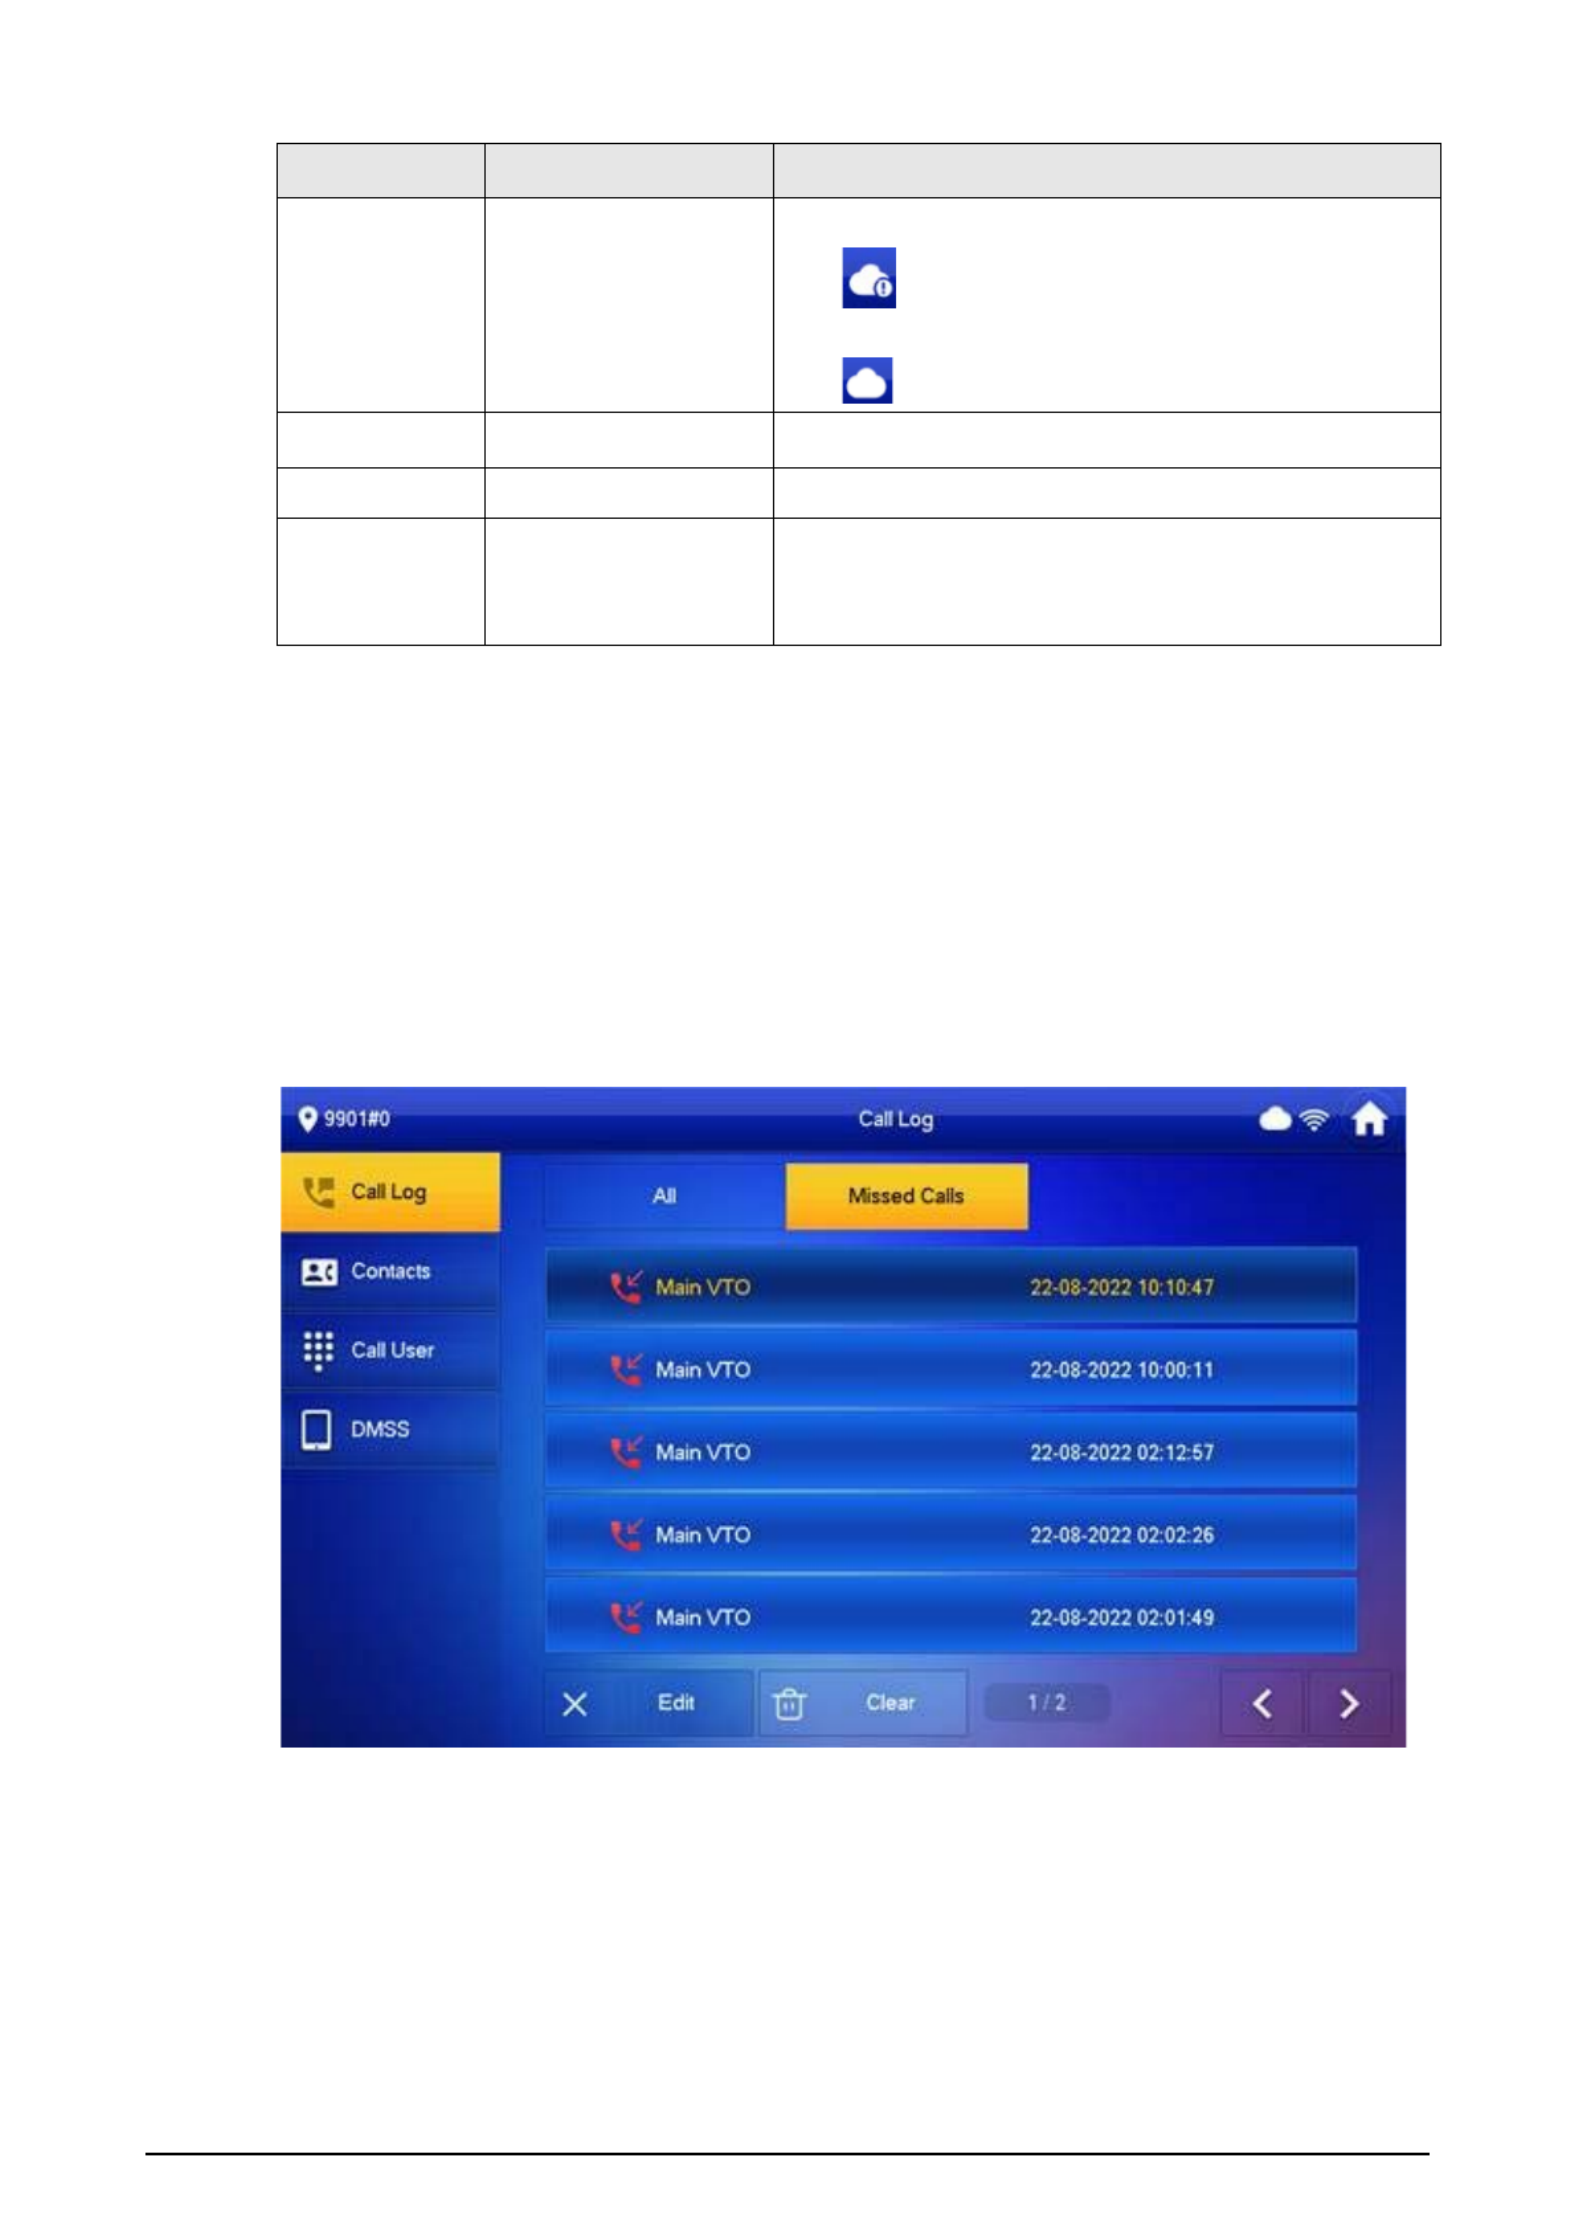
8 Cloud Connection
The network connection status.
● : Cloud function not enabled or in abnormal
status.
● : Cloud function enabled.
9 Time and Date —
10 Concierge Make calls to the Call Management Center.
11 Arm/Disarm
● Display unread alarm information.
● Tap to select an arm mode from Sleep, Away,
Home and Custom.
2.2 Call
Manage contact, call and view call records.
2.2.1 Call Log
Tap Call > Call Log to view and manage call records.
Figure 2-3 Call log
● Call back : Tap a call record to call back.
● Delete: Tap Edit, and then tap Delete to delete a record.
● Clear: Clear all record in the current tab (All or Missed Call).

7
If storage is full, the oldest records will be overwritten. Back up the records as needed.
2.2.2 Contacts
Viewing Contacts
Tap Call > Contacts, and then add or edit the users.
Figure 2- 4 Contacts
Add ing User
Figure 2-5 User information
1. Tap Add .
2. Enter the information.
8
3. Tap OK.
Related Operations
● Edit user information: Tap a user and tap Edit.
● Delete a user: Tap Edit, select a user, and then tap Delete.
You can select multiple contacts at the same time.
2.2.3 Calling User
● Make sure that resident- -to resident call function has been enabled.
● Call function is used by VTH to call VTH.
● If both VTHs have a camera, bilateral video call can be provided.
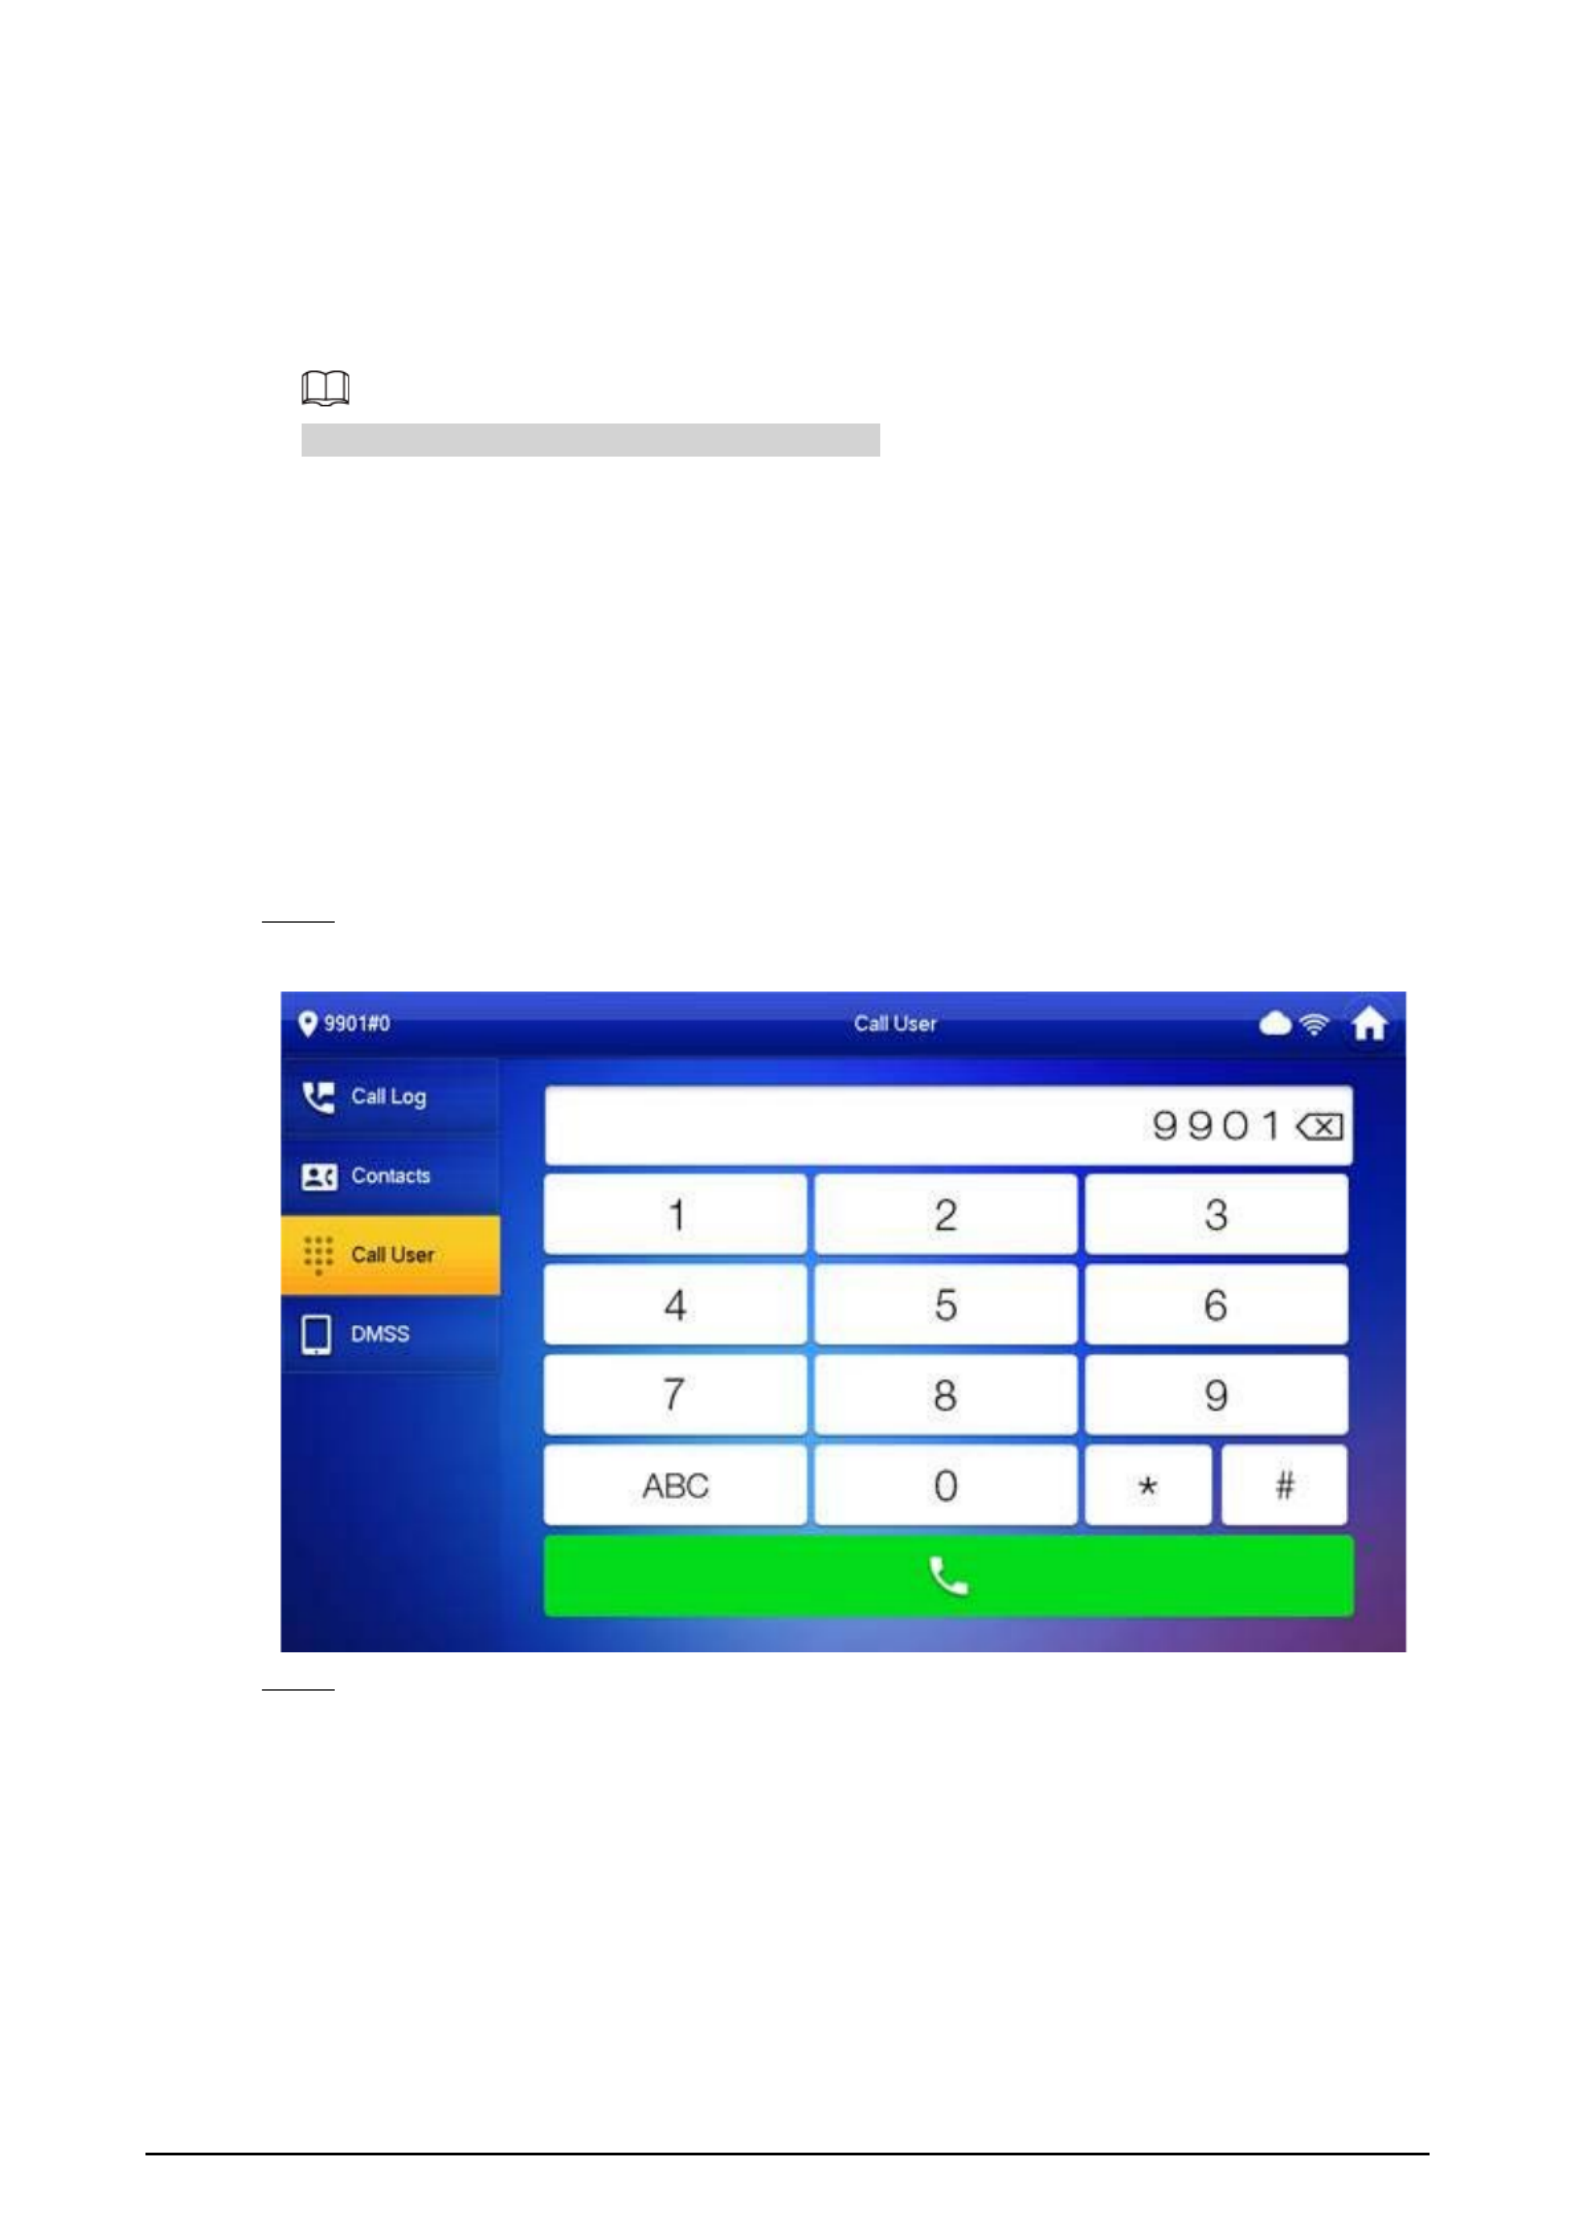
2.2.3.1 By Room Number
On the Call User screen, dial and call the user.
Step 1 Select Call > Call User.
Figure 2- 6 Call user
Step 2 Enter the room number (VTH room number).
● If VTO works as SIP server, dial room number directly.
● If the platform works as SIP server:
◇ Call a user in the same unit and the same building, dial room number directly.
◇ Call a user in other buildings or units, add the building number. For example, dial
1#1#101 to call Building 1 Unit 1 Room 101.

9
If main VTH (101#0) calls extension (101#1), please enter room no.: #1; if the extension calls
main VTH, please enter room number.: #0.
Step 3 Tap .
If the VTH has a camera, there will be videos after answering the call.
Figure 2- 7 Calling
Figure 2-8 Call in progress
2.2.3.2 From Contact
Step 1 Select Call > Contact.

10
Step 2 Select the one you want to call.
Step 3 to start. Tap
2.2.4 Call from User
When receiving calls from other VTHs, the following interface will be displayed.
Figure 2- 9 Call screen (1)
● : Answer.
● : Hang up.

11
Figure 2- 10 Call screen (2)
2.2.5 Call from VTO
Step 1 Dial VTH room number (such as 9901) at VTO, to call VTH.
Step 2 On the VTH screen, tap Answer.
Figure 2- 11 Call from VTO
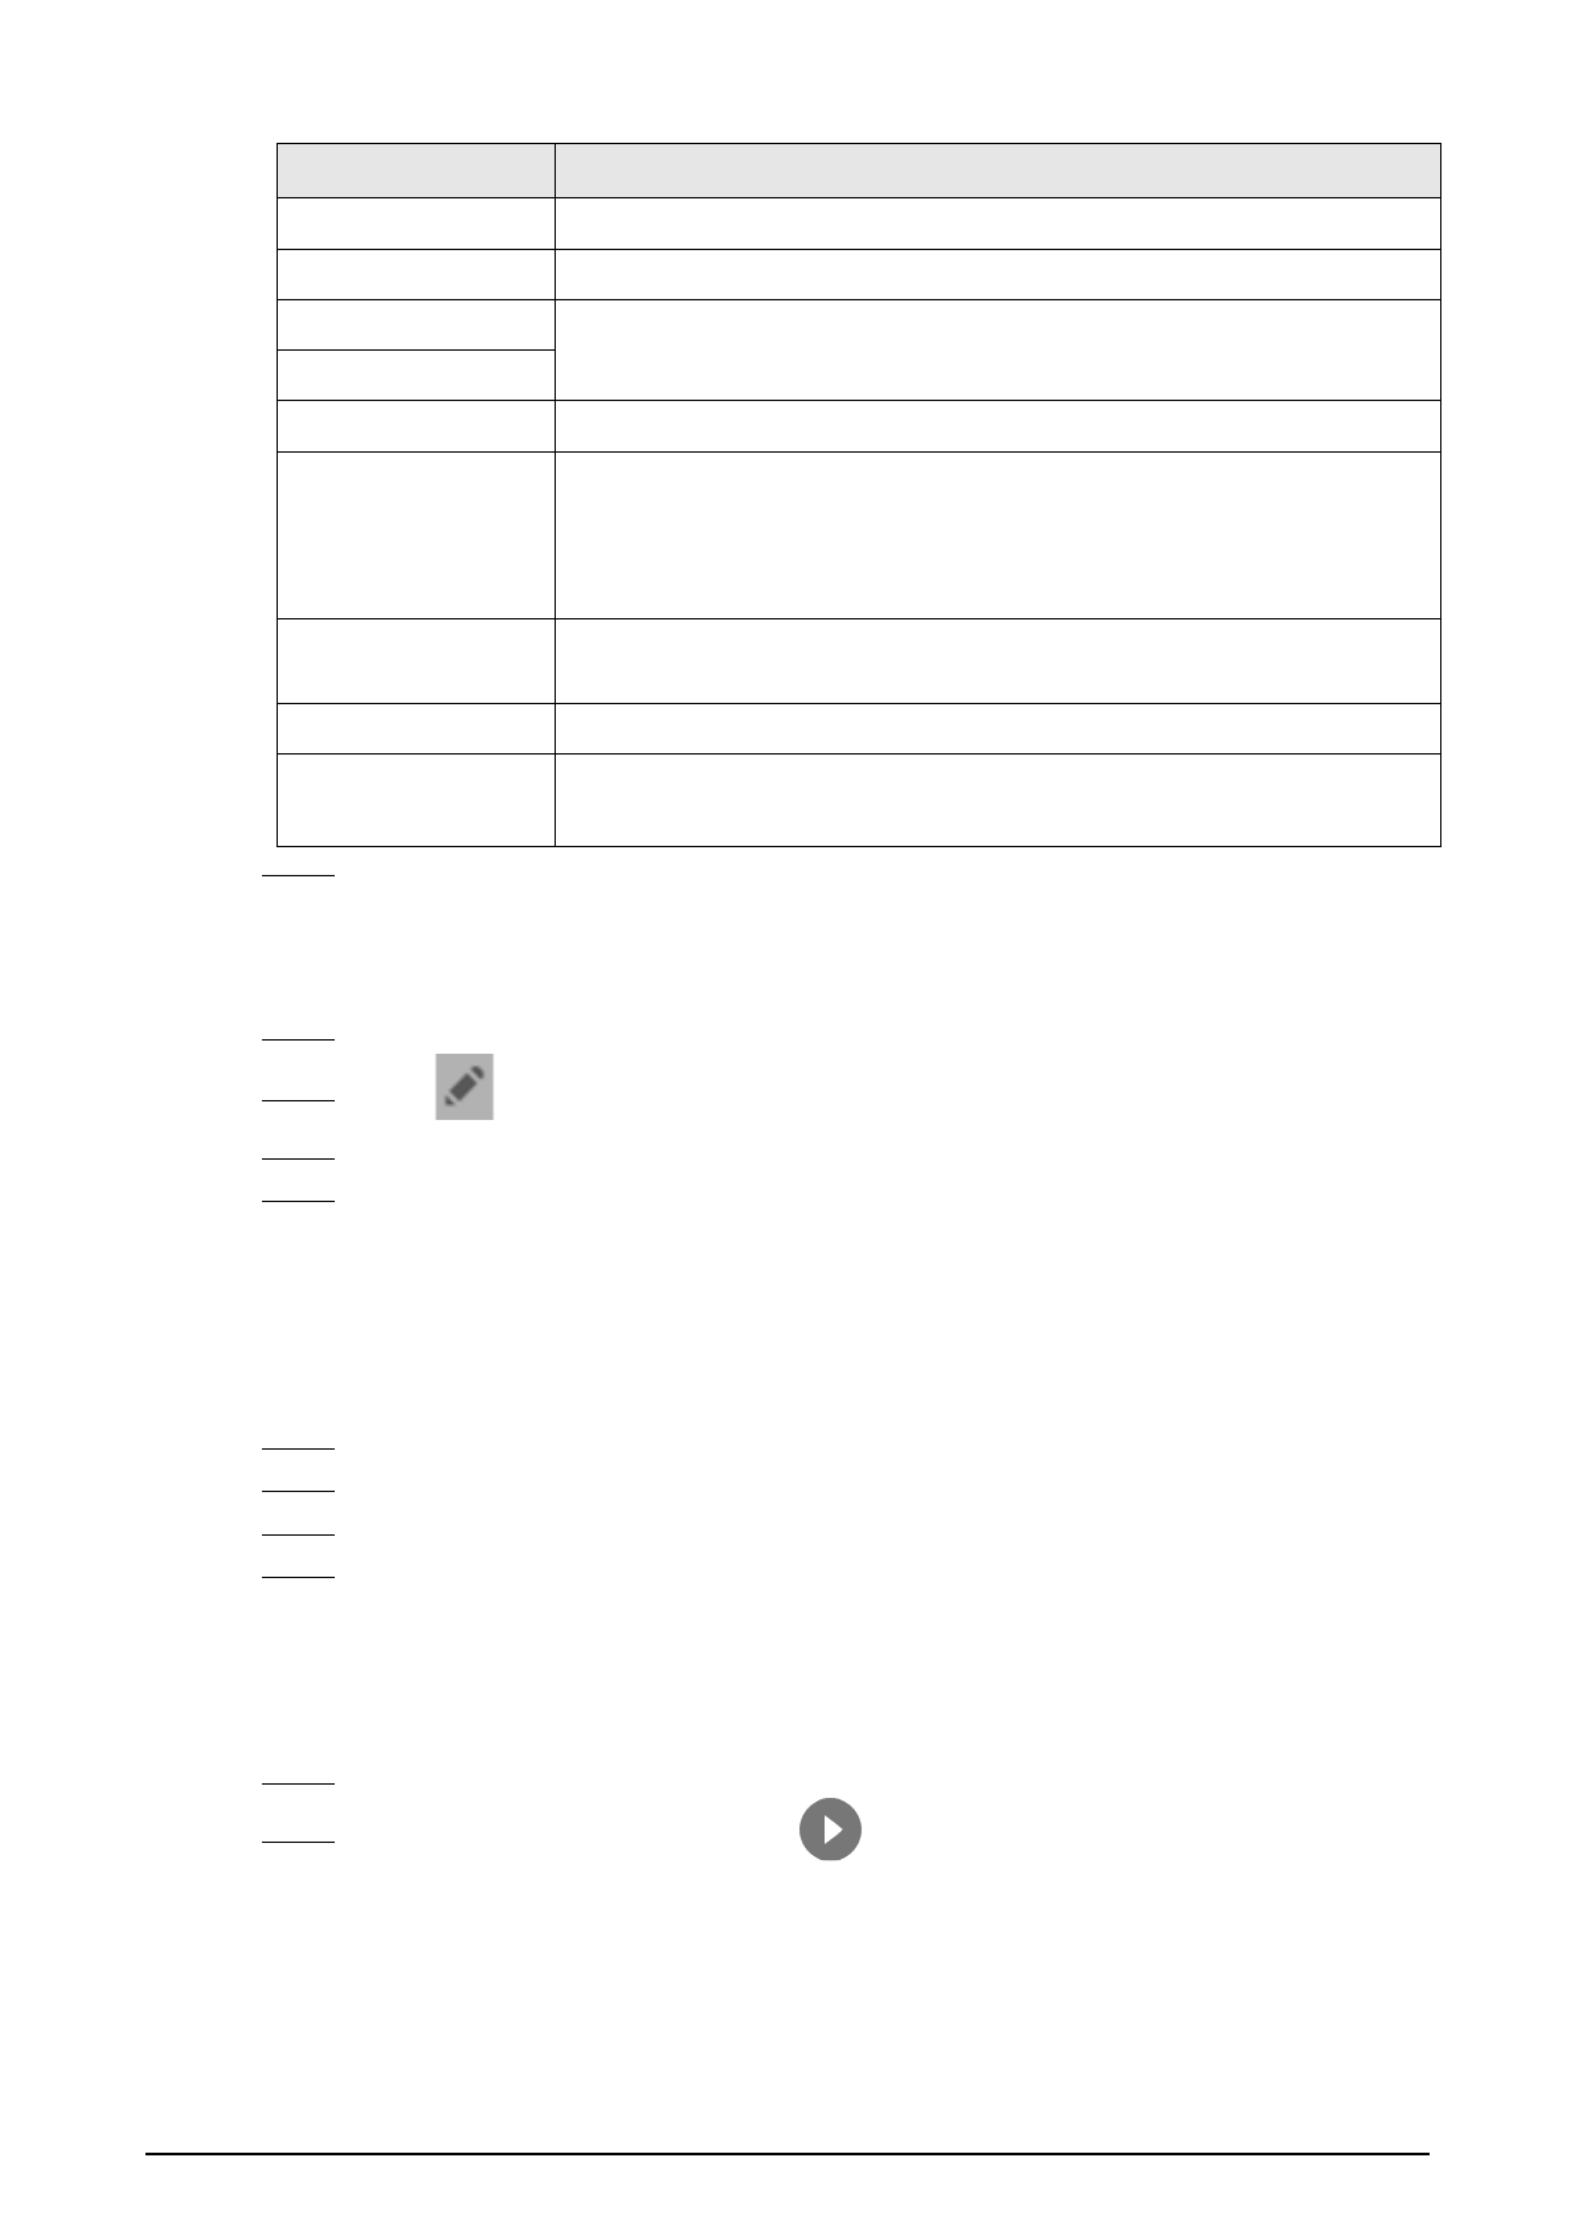
Table 2- 3 Call screen description
Key Description
/
Remotely unlock the door where the VTO is installed.
The system provides 2-channel unlock. If the icon is gray, it means that the
unlock function of this channel is not available.
Tap to talk to the VTO.

12
Key Description
Select an IPC in Favorite to monitor.
Take snapshot.
This key will be gray if SD card is not inserted.
Take recording. Complete recording when the call is completed or by tapping
.
● This key is gray if SD card is not installed.
● Videos are stored in SD card of this VTH. If SD card is full, the earlier videos
will be covered.
Mute.
Reduce volume.
Increase volume.
Answer calls.
Hang up.
2.2.6 Calling DMSS
Tap Call > DMSS to make calls to DMSS.
Figure 2- 12 DMSS
Tap to call the DMSS app account that the VTH has bonded with.

13
2.3 Information
You can view and manage different kinds of information.
● Information in Security Alarm and Publish Info is stored in the device, and the one in Guest
Message and Video Pictures is stored in the SD card, which means you need an SD card for
these two functions.
● Only certain models support SD card.
● If the storage in the Device or SD card is full, the oldest records will be overwritten. Back up the
records as needed.
2.3.1 Security Alarm
When an alarm is triggered, there will be 15s alarm sound, and the interface below will be displayed.
The alarm information will be uploaded to the alarm record interface and management platform.
Figure 2- 13 Message
Select Info > Security Alarm, and then you can view and manage all alarm records.

14
Figure 2- 14 Security alarm
2.3.2 Guest Message
Select Info > Guest Message ,and then you can view and manage all messages.
Figure 2-15 Guest message
2.3.3 Publish Information
Select Info > Publish Info, and then you can view and manage all messages.

16
2.4.1 Monitoring VTO
When adding VTOs, make sure that the username and password of each device is consistent with the
web login username and password. Otherwise, monitoring will not work properly.
Step 1 Select Monitor > VTO.
Figure 2- 18 Door
Table 2-4 Function description
Icon Description
Add the VTO or fence station to Favorite.
Select an IPC, and when this VTO or fence station calls, you will see the
monitoring image from this IPC.
Display the serial number of the VTO or fence station in QR code. Scan the
QR code in the app to add it to the app, and then you can monitor the VTO
from your smart phone.
Step 2 Tap .
19
Parameter Description
IPC32 Name Name of the IPC/NVR.
IP IP address of the IPC/NVR.
User Name The login username and password of the web page of the IPC/NVR.
Password
Port 554 by default.
Stream Type
● Main stream: High definition that needs large amount of bandwidth.
Applicable to local storage.
● Extra stream: Relatively smooth image that needs small amount of
bandwidth. Applicable to network with insufficient bandwidth.
Protocol It includes local protocol and Onvif protocol. Please select according to
the protocol of the connected device.
Encryption Enable it if the IPC to be added is encrypted.
Channel
● If IPC is connected, default setting is 1.
● If NVR is connected, set channel number of IPC on NVR.
Step 4 Tap OK.
2.4.2.2 Modifying IPC
Step 1 Select Monitor > IPC.
Step 2 Tap of IPC.
Step 3 Modify IPC parameters. Please refer to Table 2-6 for details.
Step 4 Tap OK.
2.4.2.3 Deleting IPC
Delete IPC that has been added. However, IPC synchronized from VTO or the platform cannot be
deleted.
Step 1 Select Monitor > IPC.
Step 2 Tap Edit.
Step 3 Select IPC.
Step 4 Tap Delete to delete the selected IPC.
2.4.2.4 Monitoring IPC
Monitor the IPC.
Step 1 Select Monitor > IPC.
Step 2 Select IPC to be monitored, and tap .
22
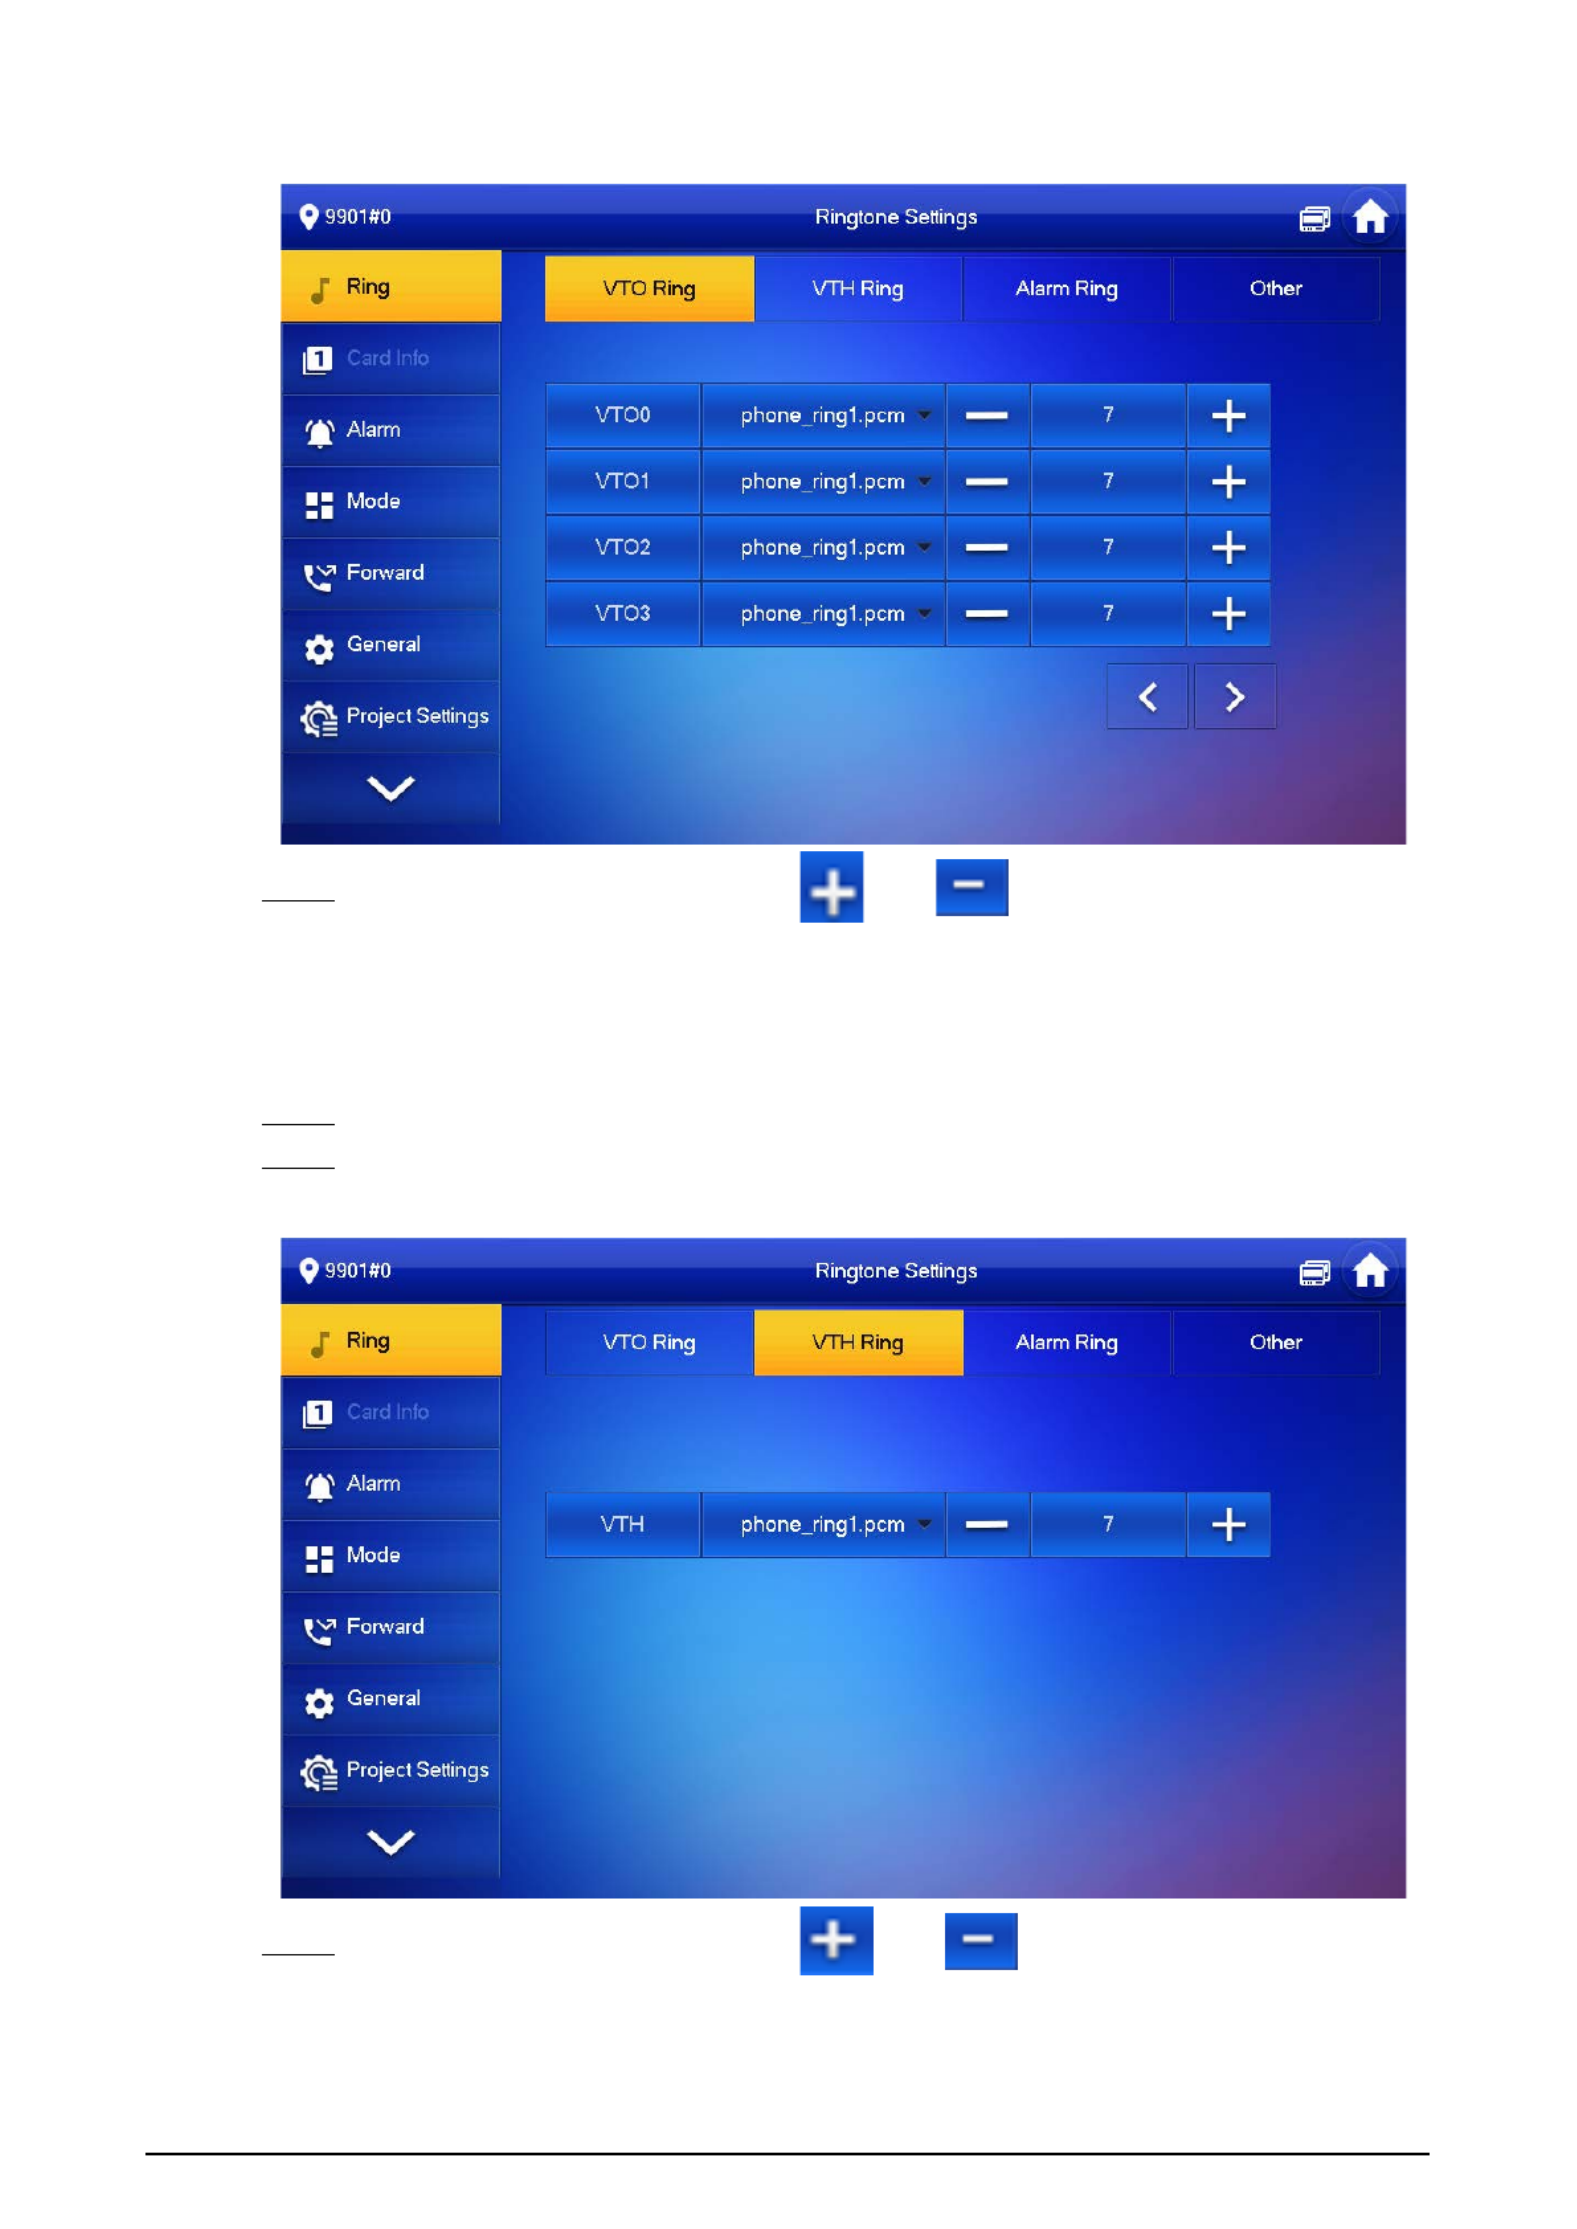
Figure 2-24 VTO ring setup
Step 3 Tap text box to select rings, and tap and to adjust the volume.
2.6.1.2 VTH Ring
Set the ring for this VTH.
Step 1 Tap Setting.
Step 2 Select Ring > VTH Ring.
Figure 2-25 VTH ring setup
Step 3 Tap text box to select rings, and tap and to adjust the volume.

25
This function is only available under Villa mode.
Figure 2- 28 Card management
Step 1 Click Issue Card.
Step 2 Swipe the card on the corresponding VTO.
Step 3 The card information will be added to the VTH. Assign unlock permission by selecting Lock
1 and Lock 2 as needed.
Step 4 Click Confirm.
Click Delete to delete the card information.
2.6.3 Alarm Setting
Set wire zone, wireless zone and alarm output.
Zones can be set under disarm mode.
2.6.3.1 Wired Zone
Set zone type, NO/NC, alarm status and delay. It supports to set 8 zones at most.
Step 1 Tap Setting.
Step 2 Select Alarm > Wired Zone.

28
Step 1 Tap Setting.
Step 2 Select Alarm > Wireless Zone.
Figure 2-30 Wireless zone
Step 3 Tap Add.
Step 4 Tap wireless code button of wireless device. See wireless device user’s manual for details.
After successful coding, display area info.
Step 5 Tap corresponding positions to set alarm status, enter delay and exit delay.
Tap Edit to select a zone and Delete to delete the selected area.
2.6.3.3 Alarm Output
After enabling alarm output, when other devices call this VTH, the alarm output device will output
alarm information.
Step 1 Tap Setting.
Step 2 Select Alarm > Output.
Termékspecifikációk
| Márka: | Dahua Technology |
| Kategória: | Intercomsysteem |
| Modell: | VTH8641KMS-WP |
Szüksége van segítségre?
Ha segítségre van szüksége Dahua Technology VTH8641KMS-WP, tegyen fel kérdést alább, és más felhasználók válaszolnak Önnek
Útmutatók Intercomsysteem Dahua Technology

11 Január 2025
2 Szeptember 2024
2 Szeptember 2024
26 Augusztus 2024
26 Augusztus 2024
26 Augusztus 2024
26 Augusztus 2024
26 Augusztus 2024
26 Augusztus 2024
26 Augusztus 2024
Útmutatók Intercomsysteem
- Intercomsysteem Philips
- Intercomsysteem SilverCrest
- Intercomsysteem Panasonic
- Intercomsysteem HQ
- Intercomsysteem Emos
- Intercomsysteem Vimar
- Intercomsysteem Alcatel
- Intercomsysteem Crestron
- Intercomsysteem ORNO
- Intercomsysteem Hikvision
- Intercomsysteem Midland
- Intercomsysteem Fibaro
- Intercomsysteem DiO
- Intercomsysteem Planet
- Intercomsysteem Viking
- Intercomsysteem Chamberlain
- Intercomsysteem Foscam
- Intercomsysteem Alecto
- Intercomsysteem Russound
- Intercomsysteem Monacor
- Intercomsysteem Chacon
- Intercomsysteem Elro
- Intercomsysteem Busch-Jaeger
- Intercomsysteem ZKTeco
- Intercomsysteem Abus
- Intercomsysteem Konig
- Intercomsysteem Marmitek
- Intercomsysteem DataVideo
- Intercomsysteem Fanvil
- Intercomsysteem M-e
- Intercomsysteem Somfy
- Intercomsysteem Axis
- Intercomsysteem Becken
- Intercomsysteem Swann
- Intercomsysteem Schwaiger
- Intercomsysteem WHD
- Intercomsysteem Smartwares
- Intercomsysteem Byron
- Intercomsysteem Steren
- Intercomsysteem Siedle
- Intercomsysteem Valcom
- Intercomsysteem Bticino
- Intercomsysteem Sygonix
- Intercomsysteem Extel
- Intercomsysteem DoorBird
- Intercomsysteem Gira
- Intercomsysteem Comelit
- Intercomsysteem Aiphone
- Intercomsysteem Sonifex
- Intercomsysteem RTS
- Intercomsysteem Estom
- Intercomsysteem Nortek
- Intercomsysteem Akuvox
- Intercomsysteem Bitron
- Intercomsysteem Hollyland
- Intercomsysteem Hanwha
- Intercomsysteem Leviton
- Intercomsysteem EtiamPro
- Intercomsysteem Pentatech
- Intercomsysteem Ritto
- Intercomsysteem Arenti
- Intercomsysteem Syscom
- Intercomsysteem Elcom
- Intercomsysteem Pentatron
- Intercomsysteem CyberData Systems
- Intercomsysteem COMMAX
- Intercomsysteem Bintec-elmeg
- Intercomsysteem Eartec
- Intercomsysteem Gewiss
- Intercomsysteem TCS
- Intercomsysteem Seco-Larm
- Intercomsysteem NuTone
- Intercomsysteem GEV
- Intercomsysteem Tador
- Intercomsysteem Mobotix
- Intercomsysteem FlyingVoice
- Intercomsysteem Vibell
- Intercomsysteem Toucan
Legújabb útmutatók Intercomsysteem
28 Március 2025

27 Március 2025
27 Március 2025
27 Március 2025
27 Március 2025

14 Január 2025
14 Január 2025
12 Január 2025
11 Január 2025
4 Január 2025