Használati útmutató D-Link DSL-224
Olvassa el alább 📖 a magyar nyelvű használati útmutatót D-Link DSL-224 (168 oldal) a router kategóriában. Ezt az útmutatót 2 ember találta hasznosnak és 2 felhasználó értékelte átlagosan 4.5 csillagra
Oldal 1/168

User Manual
DSL-224
Wireless VDSL2 Router with ASDL2+ Support
January 2018

DSL-224 Wireless VDSL2 Router with ASDL2+ Support
User Manual
Contents
Chapter 1. Introduction..........................................4
Contents and Audience.......................................................4
Conventions.................................................................4
Document Structure..........................................................4
Chapter 2. Overview..............................................5
General Information.........................................................5
Specifications*.............................................................6
Product Appearance..........................................................9
Front Panel...............................................................9
Side Panel...............................................................10
Back Panel...............................................................11
Delivery Package...........................................................12
Chapter 3. Installation and Connection..........................13
Before You Begin...........................................................13
Connecting to PC...........................................................14
PC with Ethernet Adapter.................................................14
Obtaining IP Address Automatically in OS Windows XP......................15
Obtaining IP Address Automatically in OS Windows 7.......................18
PC with Wi-Fi Adapter....................................................23
Configuring Wi-Fi Adapter in OS Windows XP...............................24
Configuring Wi-Fi Adapter in OS Windows 7................................25
Connecting to Web-based Interface..........................................27
Web-based Interface Structure..............................................29
Summary Page.............................................................29
Home Page................................................................31
Menu Sections............................................................32
Notifications............................................................33
Chapter 4. Configuring via Web-based Interface..................34
Initial Configuration Wizard...............................................34
Selecting Operation Mode.................................................36
Creating WAN Connection..................................................37
Static IPv4 or IPoA Connection.........................................38
Static IPv6 Connection.................................................39
PPPoE, PPPoA, IPv6 PPPoE, PPPoE Dual Stack Connections.................40
Configuring Wireless Network.............................................41
Configuring LAN Ports for IPTV/VoIP......................................42
Changing Web-based Interface Password....................................44
Connection of Multimedia Devices...........................................46
Statistics.................................................................50
Network Statistics.......................................................50
DHCP.....................................................................51
Routing Table............................................................52
Clients..................................................................53
Multicast Groups.........................................................54
Clients and Session......................................................55
DSL Status...............................................................56
Page of 1682

DSL-224 Wireless VDSL2 Router with ASDL2+ Support
User Manual
Connections Setup..........................................................57
WAN......................................................................57
Creating Dynamic IPv4, Static IPv4, or IPoA WAN Connection.............59
Creating Dynamic IPv6 or Static IPv6 WAN Connection....................66
Creating PPPoE or PPPoA WAN Connection.................................73
Creating PPPoE IPv6 or PPPoE Dual Stack WAN Connection.................81
Creating Bridge WAN Connection.........................................90
LAN......................................................................95
IPv4...................................................................95
IPv6...................................................................98
Wi-Fi.....................................................................100
Basic Settings..........................................................100
Client Management.......................................................108
WPS.....................................................................109
Using WPS Function via Web-based Interface............................111
Using WPS Function without Web-based Interface........................112
WMM.....................................................................113
Additional..............................................................116
MAC Filter..............................................................118
Advanced..................................................................120
Interface Grouping......................................................121
DNS.....................................................................123
DDNS....................................................................125
Routing.................................................................127
TR-069 Client...........................................................129
Remote Access...........................................................131
UPnP IGD................................................................133
xDSL....................................................................134
IGMP/ALG/Passthrough....................................................135
Firewall..................................................................137
IP Filter...............................................................137
Virtual Servers.........................................................141
DMZ.....................................................................144
MAC Filter..............................................................145
URL Filter..............................................................147
System....................................................................148
Configuration...........................................................149
Firmware Update.........................................................151
Local Update..........................................................152
Remote Update.........................................................153
Log.....................................................................154
Ping....................................................................156
Traceroute..............................................................157
Telnet..................................................................158
System Time.............................................................159
Yandex.DNS................................................................161
Settings................................................................161
Devices and Rules.......................................................163
Chapter 5. Operation Guidelines................................165
Safety Rules and Conditions...............................................165
Wireless Installation Considerations......................................166
Chapter 6. Abbreviations and Acronyms..........................167
Page of 1683

DSL-224 Wireless VDSL2 Router with ASDL2+ Support
User Manual Introduction
CHAPTER 1. INTRODUCTION
Contents and Audience
This manual describes the router DSL-224 and explains how to configure and operate it.
This manual is intended for users familiar with basic networking concepts, who create an in-home
local area network, and system administrators, who install and configure networks in offices.
Conventions
Example Description
text The body text of the manual.
Before You Begin A reference to a chapter or section of this manual.
“Quick Installation Guide” A reference to a document.
Change A name of a menu, menu item, control (field, checkbox, drop-
down list, button, etc.).
192.168.1.1 Data that you should enter in the specified field.
!
!
!
!! Information An important note.
Document Structure
Chapter 1 describes the purpose and structure of the document.
Chapter 2 gives an overview of the router's hardware and software features and describes its
appearance and the package contents.
Chapter 3 explains how to install the wireless router DSL-224 and configure a PC in order to access
its web-based interface.
Chapter 4 describes all pages of the web-based interface in detail.
Chapter 5 includes safety instructions and tips for networking.
Chapter 6 introduces abbreviations and acronyms used in this manual.
Page of 1684

DSL-224 Wireless VDSL2 Router with ASDL2+ Support
User Manual
Overview
CHAPTER 2. OVERVIEW
General Information
DSL-224 is an affordable high-end VDSL/ADSL router with Wi-Fi and built-in switch.
The router is equipped with a DSL port to connect to a high-speed VDSL line and 4 Ethernet ports
to connect workstations. Due to this feature, DSL-224 represents a moderate-priced solution for
creating wired networks without an additional switch.
DSL-224 can operate as a base station for connecting wireless devices of the standards 802.11b,
802.11g, and 802.11n. The router supports multiple functions for the wireless interface: several
security standards (WEP, WPA/WPA2), MAC address filtering, and the WPS function.
In addition, the device is equipped with a button for switching the Wi-Fi network off/on. If needed,
for example, when you leave home, you can easily switch the router’s WLAN by pressing the
button, and devices connected to the LAN ports of the router will stay online.
Support of guest Wi-Fi network allows you to create a separate wireless network with individual
security settings and maximum rate limitation. Devices connected to the guest network will be able
to access the Internet, but will be isolated from the devices and resources of the router's LAN.
The wireless router DSL-224 includes a built-in firewall. The advanced security functions minimize
threats of hacker attacks, prevent unwanted intrusions to your network, and block access to
unwanted websites for users of your LAN.
Built-in Yandex.DNS service protects against malicious and fraudulent web sites and helps to block
access to adult content on children's devices.
You can configure and manage the settings of the wireless router DSL-224 via the user-friendly
web-based interface (the interface is available in two languages – in Russian and in English).
The fast and easy configuration wizard allows you to specify all needed parameters in several
simple steps.
Now you can simply update the firmware: the router itself finds approved firmware on D-Link
update server and notifies when ready to install it.
Page of 1685

DSL-224 Wireless VDSL2 Router with ASDL2+ Support
User Manual Overview
Specifications*
Hardware
Processor ·RTL8685S
RAM ·32 MB, SDRAM
Flash ·8 MB, SPI
Interfaces ·RJ-11 DSL port
·4 10/100BASE-TX LAN ports
LEDs ·POWER
·DSL
·INTERNET
·WLAN
·4 LAN LEDs
·WPS
Buttons ·ON/OFF button to power on/power off
·RESET button to restore factory default settings
·WPS button to set up wireless connection
·WLAN button to enable/disable wireless network
Antenna ·Two internal omnidirectional antennas (2dBi gain)
MIMO ·2 x 2
Power connector ·Power input connector (DC)
DSL Parameters
VDSL/ADSL Standards ·VDSL2: ITU G.993.2, support of 8a, 8b, 8c, 8d, 12a, 12b, 17a, 30a profiles
·ADSL: Multi-mode, ANSI T1.413 Issue 2, ITU-T G.992.1 (G.dmt) Annex A, ITU-
T G.992.2 (G.lite) Annex A, ITU-T G.994.1 (G.hs)
·ADSL2: ITU-T G.992.3 (G.dmt.bis) Annex A/L/M, ITU-T G.992.4 (G.lite.bis)
Annex A
·ADSL2+: ITU-T G.992.5 Annex A/L/M
ATM/PPP Protocols ·Bridged and routed Ethernet encapsulation
·VC-based or LLC-based multiplexing
·ATM Forum UNI3.1/4.0 PVC (up to 8 PVCs)
·ATM Adaptation Layer Type 5 (AAL5)
·ITU-T I.610 OAM F4/F5 loopback
·ATM QoS
·PPP over ATM (RFC 2364)
·PPP over Ethernet (PPPoE)
·Keep-alive for PPP connections
Software
WAN connection types ·PPPoA
·PPPoE
·IPv6 PPPoE
·PPPoE Dual Stack
·IPoA
·Static IP / Dynamic IP
·Static IPv6 / Dynamic IPv6
* The device features are subject to change without notice. For the latest versions of the firmware and relevant
documentation, visit www.dlink.ru.
Page of 1686
DSL-224 Wireless VDSL2 Router with ASDL2+ Support
User Manual Overview
Software
Network functions ·DHCP server/relay
·Stateful/Stateless mode for IPv6 address assignment, IPv6 prefix delegation
·DNS relay
·Dynamic DNS
·Static IP routing
·Static IPv6 routing
·IGMP Proxy
·IGMP snooping
·RIP
·Support of UPnP IGD
·Support of VLAN
·WAN ping respond
·Support of SIP ALG
·Support of RTSP
Firewall functions ·Network Address Translation (NAT)
·Stateful Packet Inspection (SPI)
·IP filter
·IPv6 filter
·MAC filter
·URL filter
·DMZ
·Prevention of ARP and DDoS attacks
·Virtual servers
·Built-in Yandex.DNS web content filtering service
VPN ·IPSec/PPTP/L2TP/PPPoE pass-through
QoS ·Interface grouping
·VLAN priority (802.1p)
Management ·Local and remote access to settings through TELNET/WEB (HTTP/HTTPS)
·Multilingual web-based interface for configuration and management
·Firmware update via web-based interface
·Automatic notification on new firmware version
·Saving/restoring configuration to/from file
·Support of remote logging
·Automatic synchronization of system time with NTP server and manual
time/date setup
·Ping function
·Traceroute utility
·TR-069 client
Wireless Module Parameters
Standards ·IEEE 802.11b/g/n
Frequency range ·2400 ~ 2483.5MHz
Wireless connection security ·WEP
·WPA/WPA2 (Personal/Enterprise)
·МАС filter
·WPS (PBC/PIN)
Advanced functions ·WMM (Wi-Fi QoS)
·Information on connected Wi-Fi clients
·Advanced settings
·Guest Wi-Fi / support of MBSSID
·Limitation of wireless network rate
·Periodic scan of channels, automatic switch to least loaded channel
Wireless connection rate ·IEEE 802.11b: 1, 2, 5.5, and 11Mbps
·IEEE 802.11g: 6, 9, 12, 18, 24, 36, 48, and 54Mbps
·IEEE 802.11n: from 6.5 to 300Mbps (from MCS0 to MCS15)
Page of 1687

DSL-224 Wireless VDSL2 Router with ASDL2+ Support
User Manual Overview
Wireless Module Parameters
Transmitter output power
The maximum value of the transmitter
output power depends upon the radio
frequency regulations applied in your
country
·802.11b (typical at room temperature 25 °C)
16dBm (+/-1dB)
·802.11g (typical at room temperature 25 °C)
14dBm (+/-1dB)
·802.11n (typical at room temperature 25 °C)
14dBm (+/-1dB)
Receiver sensitivity ·802.11b (typical at room temperature 25 °C)
-86dBm
·802.11g (typical at room temperature 25 °C)
-72dBm
·802.11n (typical at room temperature 25 °C)
HT20
-67dBm
HT40
-65dBm
Physical Parameters
Dimensions (L x W x H) ·160 x 59 x 121 mm (6.3 x 2.32 x 4.76 in)
Weight ·215 g (0.47 lb)
Operating Environment
Power ·Output: 12V DC, 1A
Temperature ·Operating: from 0 to 40 °C
·Storage: from -20 to 70 °C
Humidity ·From 5% to 95% (non-condensing)
Page of 1688
DSL-224 Wireless VDSL2 Router with ASDL2+ Support
User Manual Overview
Product Appearance
Front Panel
Figure 1. Front panel view.
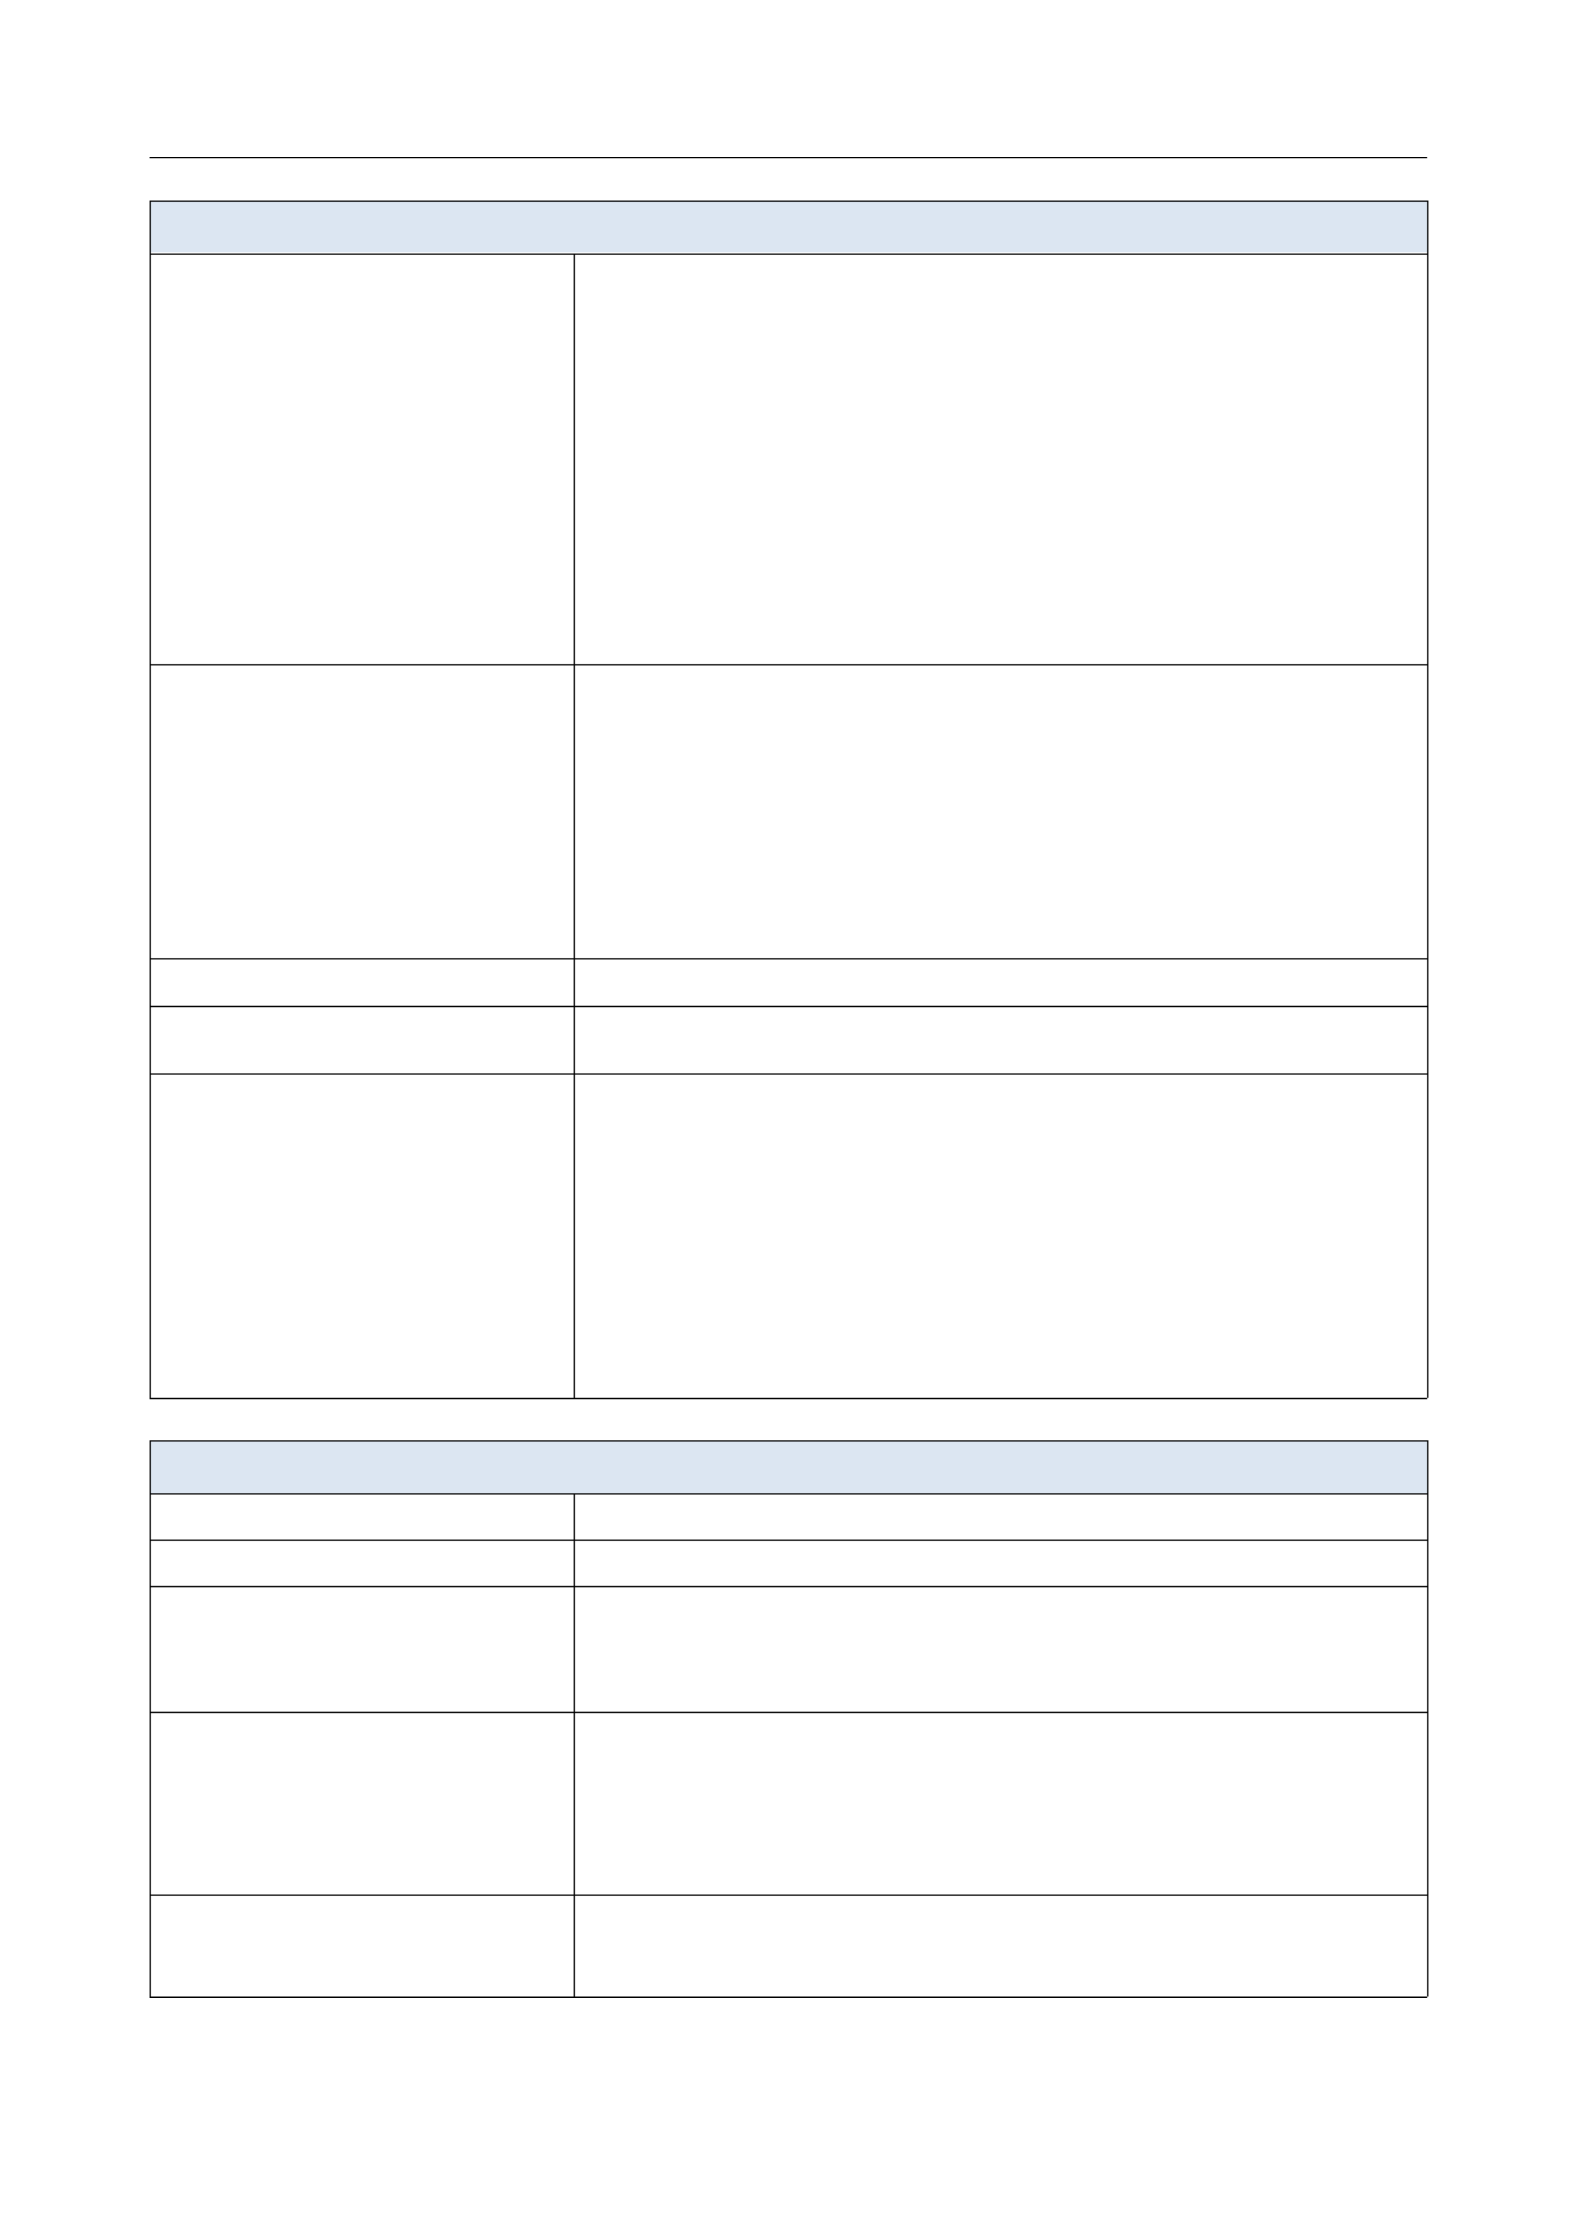
LED Mode Description
POWER
Solid green The router is powered on.
No light The router is powered off.
DSL
Solid green DSL has been synchronized.
Blinking green Detecting a carrier signal and synchronizing DSL.
No light No carrier signal.
INTERNET
Solid green The default WAN connection is active.
Solid red The router is in the crash recovery mode.
No light The default WAN connection is not active.
Page of 1689

DSL-224 Wireless VDSL2 Router with ASDL2+ Support
User Manual Overview
LED Mode Description
WLAN
Solid green A client has connected to the WLAN.
Blinking green The router's WLAN is on.
No light The router's WLAN is off.
LAN 1-4
Solid green A device is connected to the port of the router.
Blinking green The relevant LAN port is active (upstream or downstream traffic).
No light The cable is not connected to the relevant port.
WPS
Blinking green Attempting to add a wireless device via the WPS function.
No light The WPS function is not in use.
Side Panel
Figure 2. Side panel view.
Name Description
RESET
A button to restore the factory default settings.
To restore the factory defaults, push the button (with the device turned on),
hold it for 10 seconds, and then release the button.
Page of 16810

DSL-224 Wireless VDSL2 Router with ASDL2+ Support
User Manual Overview
Back Panel
Figure 3. Back panel view.
Port Description
DSL A DSL port to connect the router to the telephone line.
LAN 1-4 4 Ethernet ports to connect Ethernet devices.
WPS
A button to set up a wireless connection (the WPS function).
To use the WPS function: with the device turned on, push the button and
immediately release it. The LED should start blinking.WPS
WLAN A button to enable/disable the router's wireless network.
Press the button and immediately release it.
12VDC IN Power connector.
ON/OFF A button to turn the router on/off.
Page 11 of 168

DSL-224 Wireless VDSL2 Router with ASDL2+ Support
User Manual
Overview
Delivery Package
The following should be included:
•Router DSL-224
•Power adapter DC 12V/1A
•RJ-11 telephone cable
•Ethernet cable
•Splitter
•“ ” (brochure).Quick Installation Guide
The “ ” and “ ” documents are available on D-Link website User Manual Quick Installation Guide
(see www.dlink.ru).
!
!
!
!! Using a power supply with a different voltage rating than the one included will cause
damage and void the warranty for this product.
Page of 16812

DSL-224 Wireless VDSL2 Router with ASDL2+ Support
User Manual
Installation and Connection
CHAPTER 3. INSTALLATION AND CONNECTION
Before You Begin
Please, read this manual prior to installing the device. Make sure that you have all the necessary
information and equipment.
Operating System
Configuration of the VDSL/ADSL router DSL-224 with Wi-Fi and built-in switch (hereinafter
referred to as “the router”) is performed via the built-in web-based interface. The web-based
interface is available from any operating system that supports a web browser.
Web Browser
The following web browsers are recommended:
•Apple Safari 8 and later
•Google Chrome 48 and later
•Microsoft Internet Explorer 10 and later
•Microsoft Edge 20.10240 and later
•Mozilla Firefox 44 and later
•Opera 35 and later.
For successful operation, JavaScript should be enabled on the web browser. Make sure that
JavaScript has not been disabled by other software (such as virus protection or web user security
packages) running on your computer.
Wired or Wireless NIC (Ethernet or Wi-Fi Adapter)
Any computer that uses the router should be equipped with an Ethernet or Wi-Fi adapter (NIC). If
your computer is not equipped with such a device, install an Ethernet or Wi-Fi adapter prior to using
the router.
Wireless Connection
Wireless workstations from your network should be equipped with a wireless 802.11b, g, or n NIC
(Wi-Fi adapter). In addition, you should specify the values of SSID, channel number and security
settings defined in the web-based interface of the router for all these wireless workstations.
Page of 16813

DSL-224 Wireless VDSL2 Router with ASDL2+ Support
User Manual
Installation and Connection
Connecting to PC
PC with Ethernet Adapter
1. Make sure that your PC is powered off.
2. Connect a phone cable between the DSL port of the router and the port of the MODEM
splitter. Connect your phone to the port of the splitter. Then connect another phone PHONE
cable between a phone jack and the port of the splitter.LINE
3. Connect the power cord to the power connector port on the back panel of the router, then
plug the power adapter into an electrical outlet or power strip.
4. Turn on the router by pressing the button on the back panel.ON/OFF
5. Connect an Ethernet cable between an available Ethernet port of the router and the Ethernet
port of your PC.
6. Turn on your PC and wait until your operating system is completely loaded.
Page of 16814

DSL-224 Wireless VDSL2 Router with ASDL2+ Support
User Manual Installation and Connection
Obtaining IP Address Automatically in OS Windows XP
1. Click the button and proceed to the Start Control Panel > Network and Internet
Connections > Network Connections window.
2. In the window, right-click the relevant Network Connections Local Area Connection
icon and select the line in the menu displayed.Properties
Figure 4. The window.Network Connections
Page of 16815
DSL-224 Wireless VDSL2 Router with ASDL2+ Support
User Manual Installation and Connection
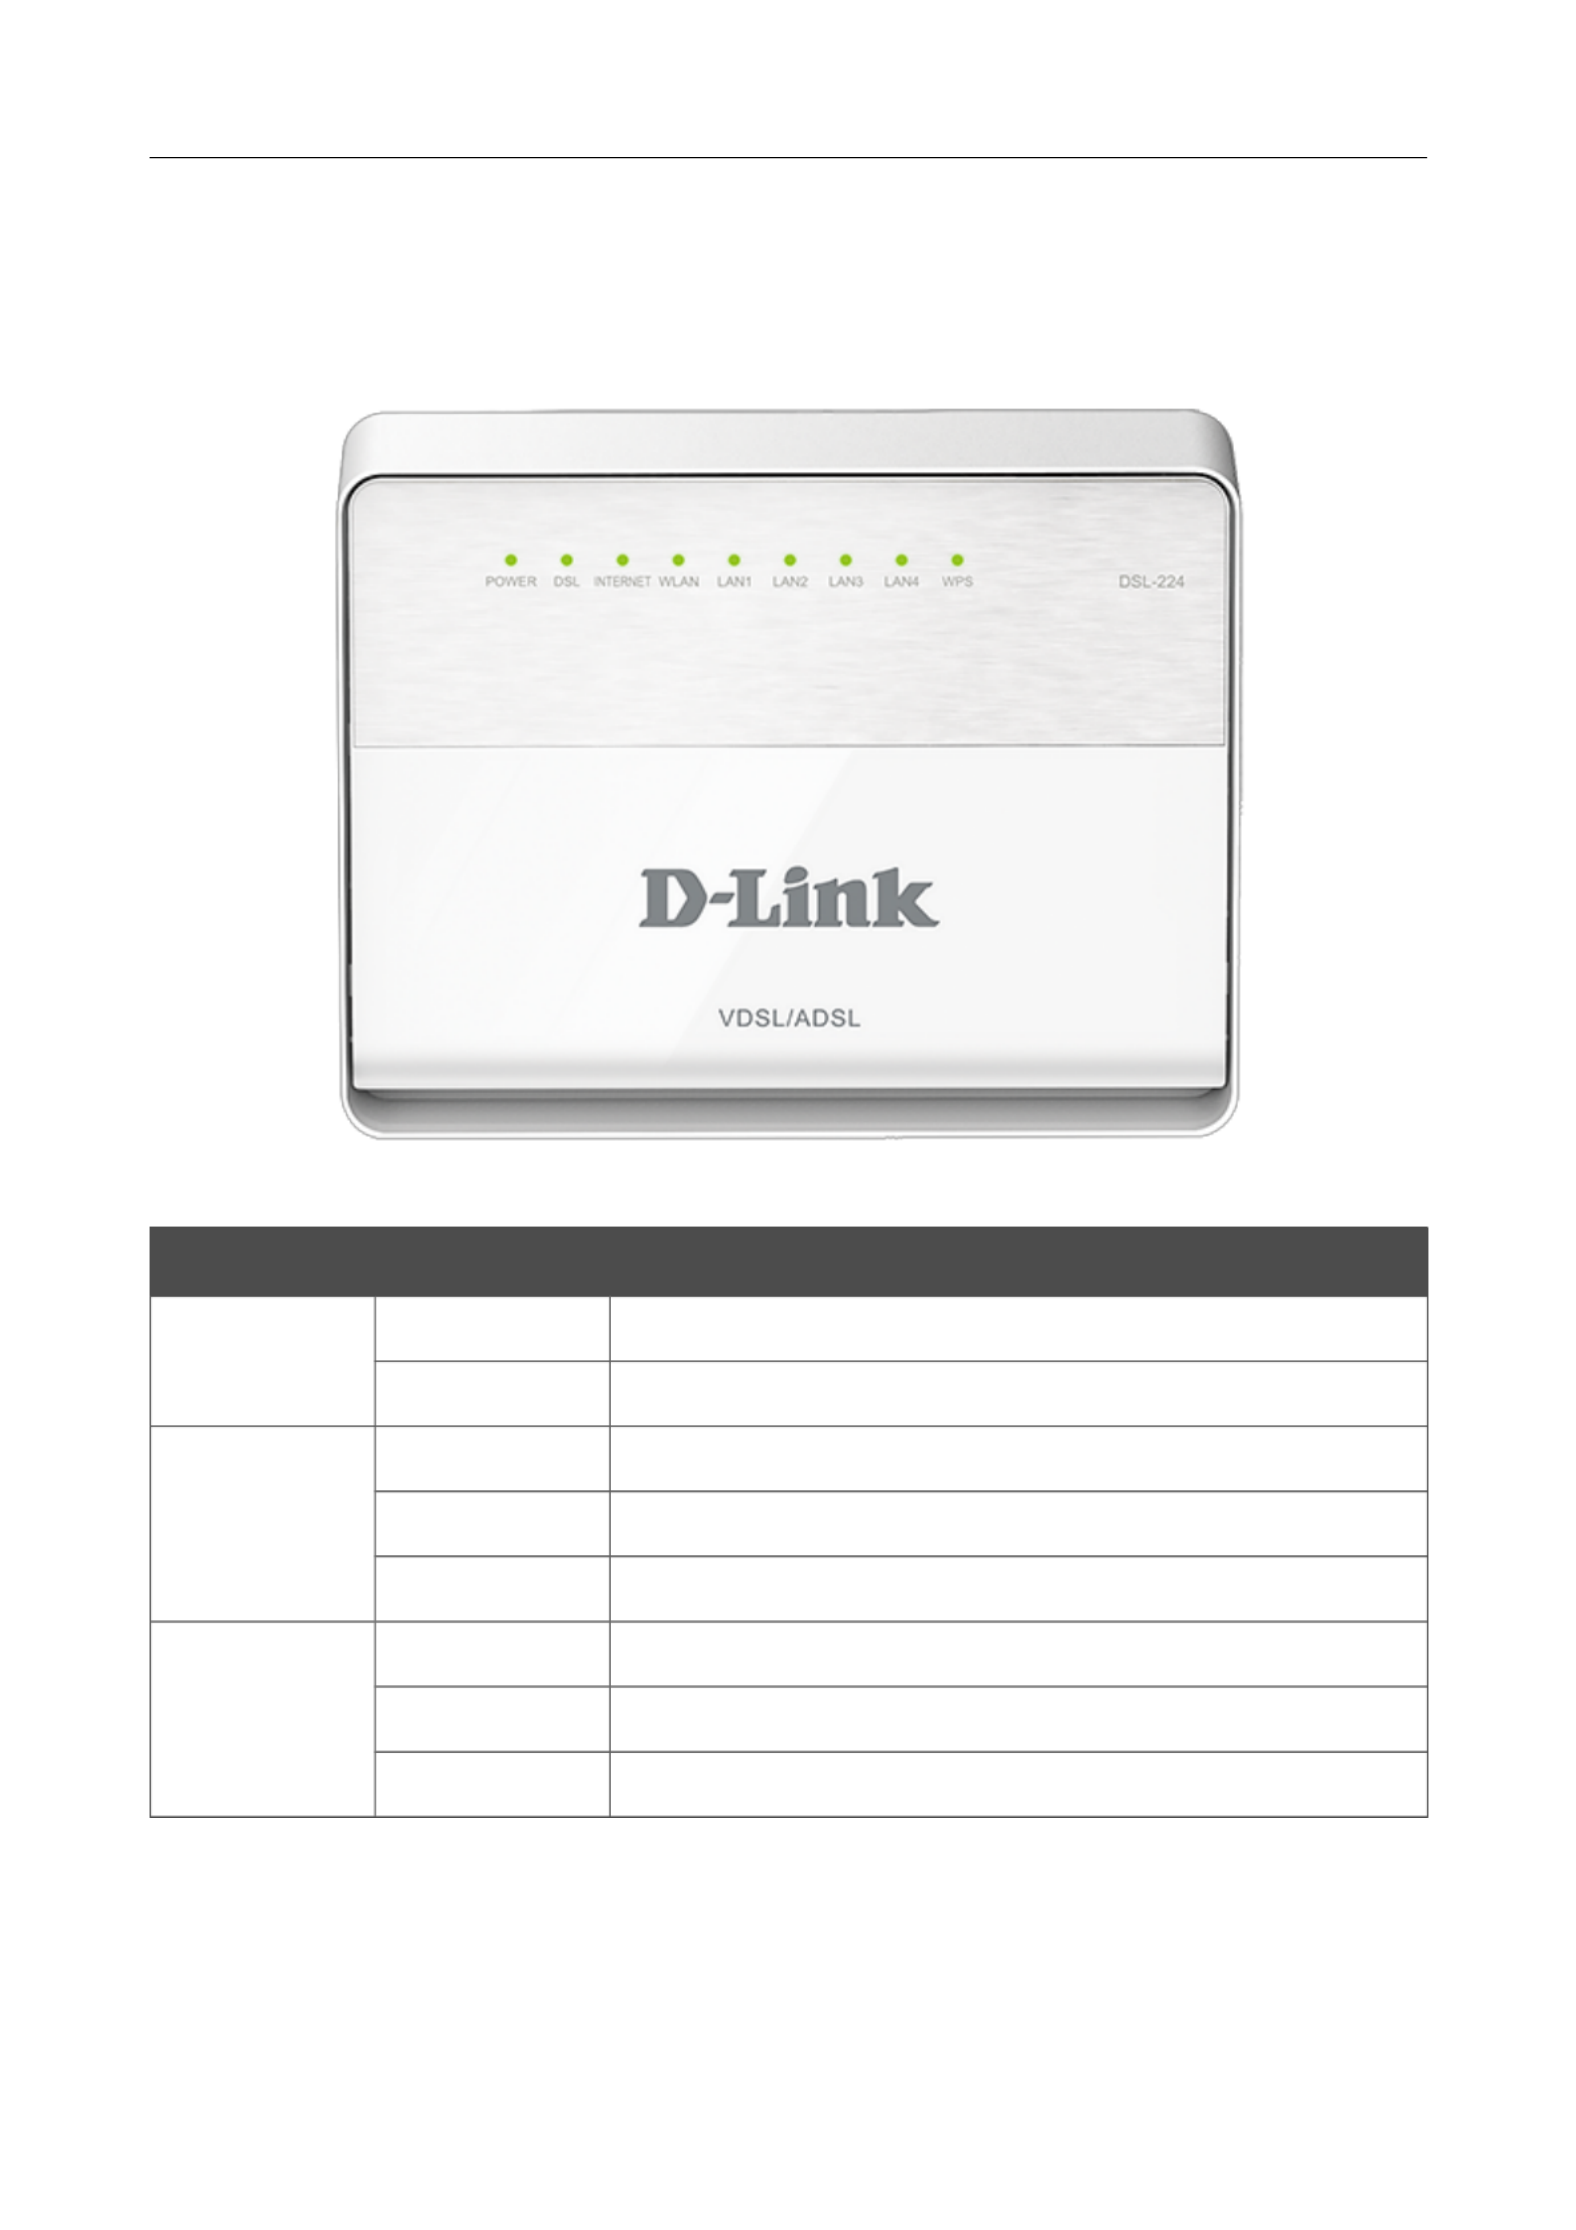
3. In the Local Area Connection Properties window, on the tab, select the General
Internet Protocol (TCP/IP) Propertiesline. Click the button.
Figure 5. The Local Area Connection Properties window.
Page of 16816

DSL-224 Wireless VDSL2 Router with ASDL2+ Support
User Manual Installation and Connection
4. Select the and Obtain an IP address automatically Obtain DNS server address
automatically OK radio buttons. Click the button.
Figure 6. The window.Internet Protocol (TCP/IP) Properties
5. Click the button in the connection properties window.ОК
Now your computer is configured to obtain an IP address automatically.
Page of 16817
DSL-224 Wireless VDSL2 Router with ASDL2+ Support
User Manual Installation and Connection
Obtaining IP Address Automatically in OS Windows 7
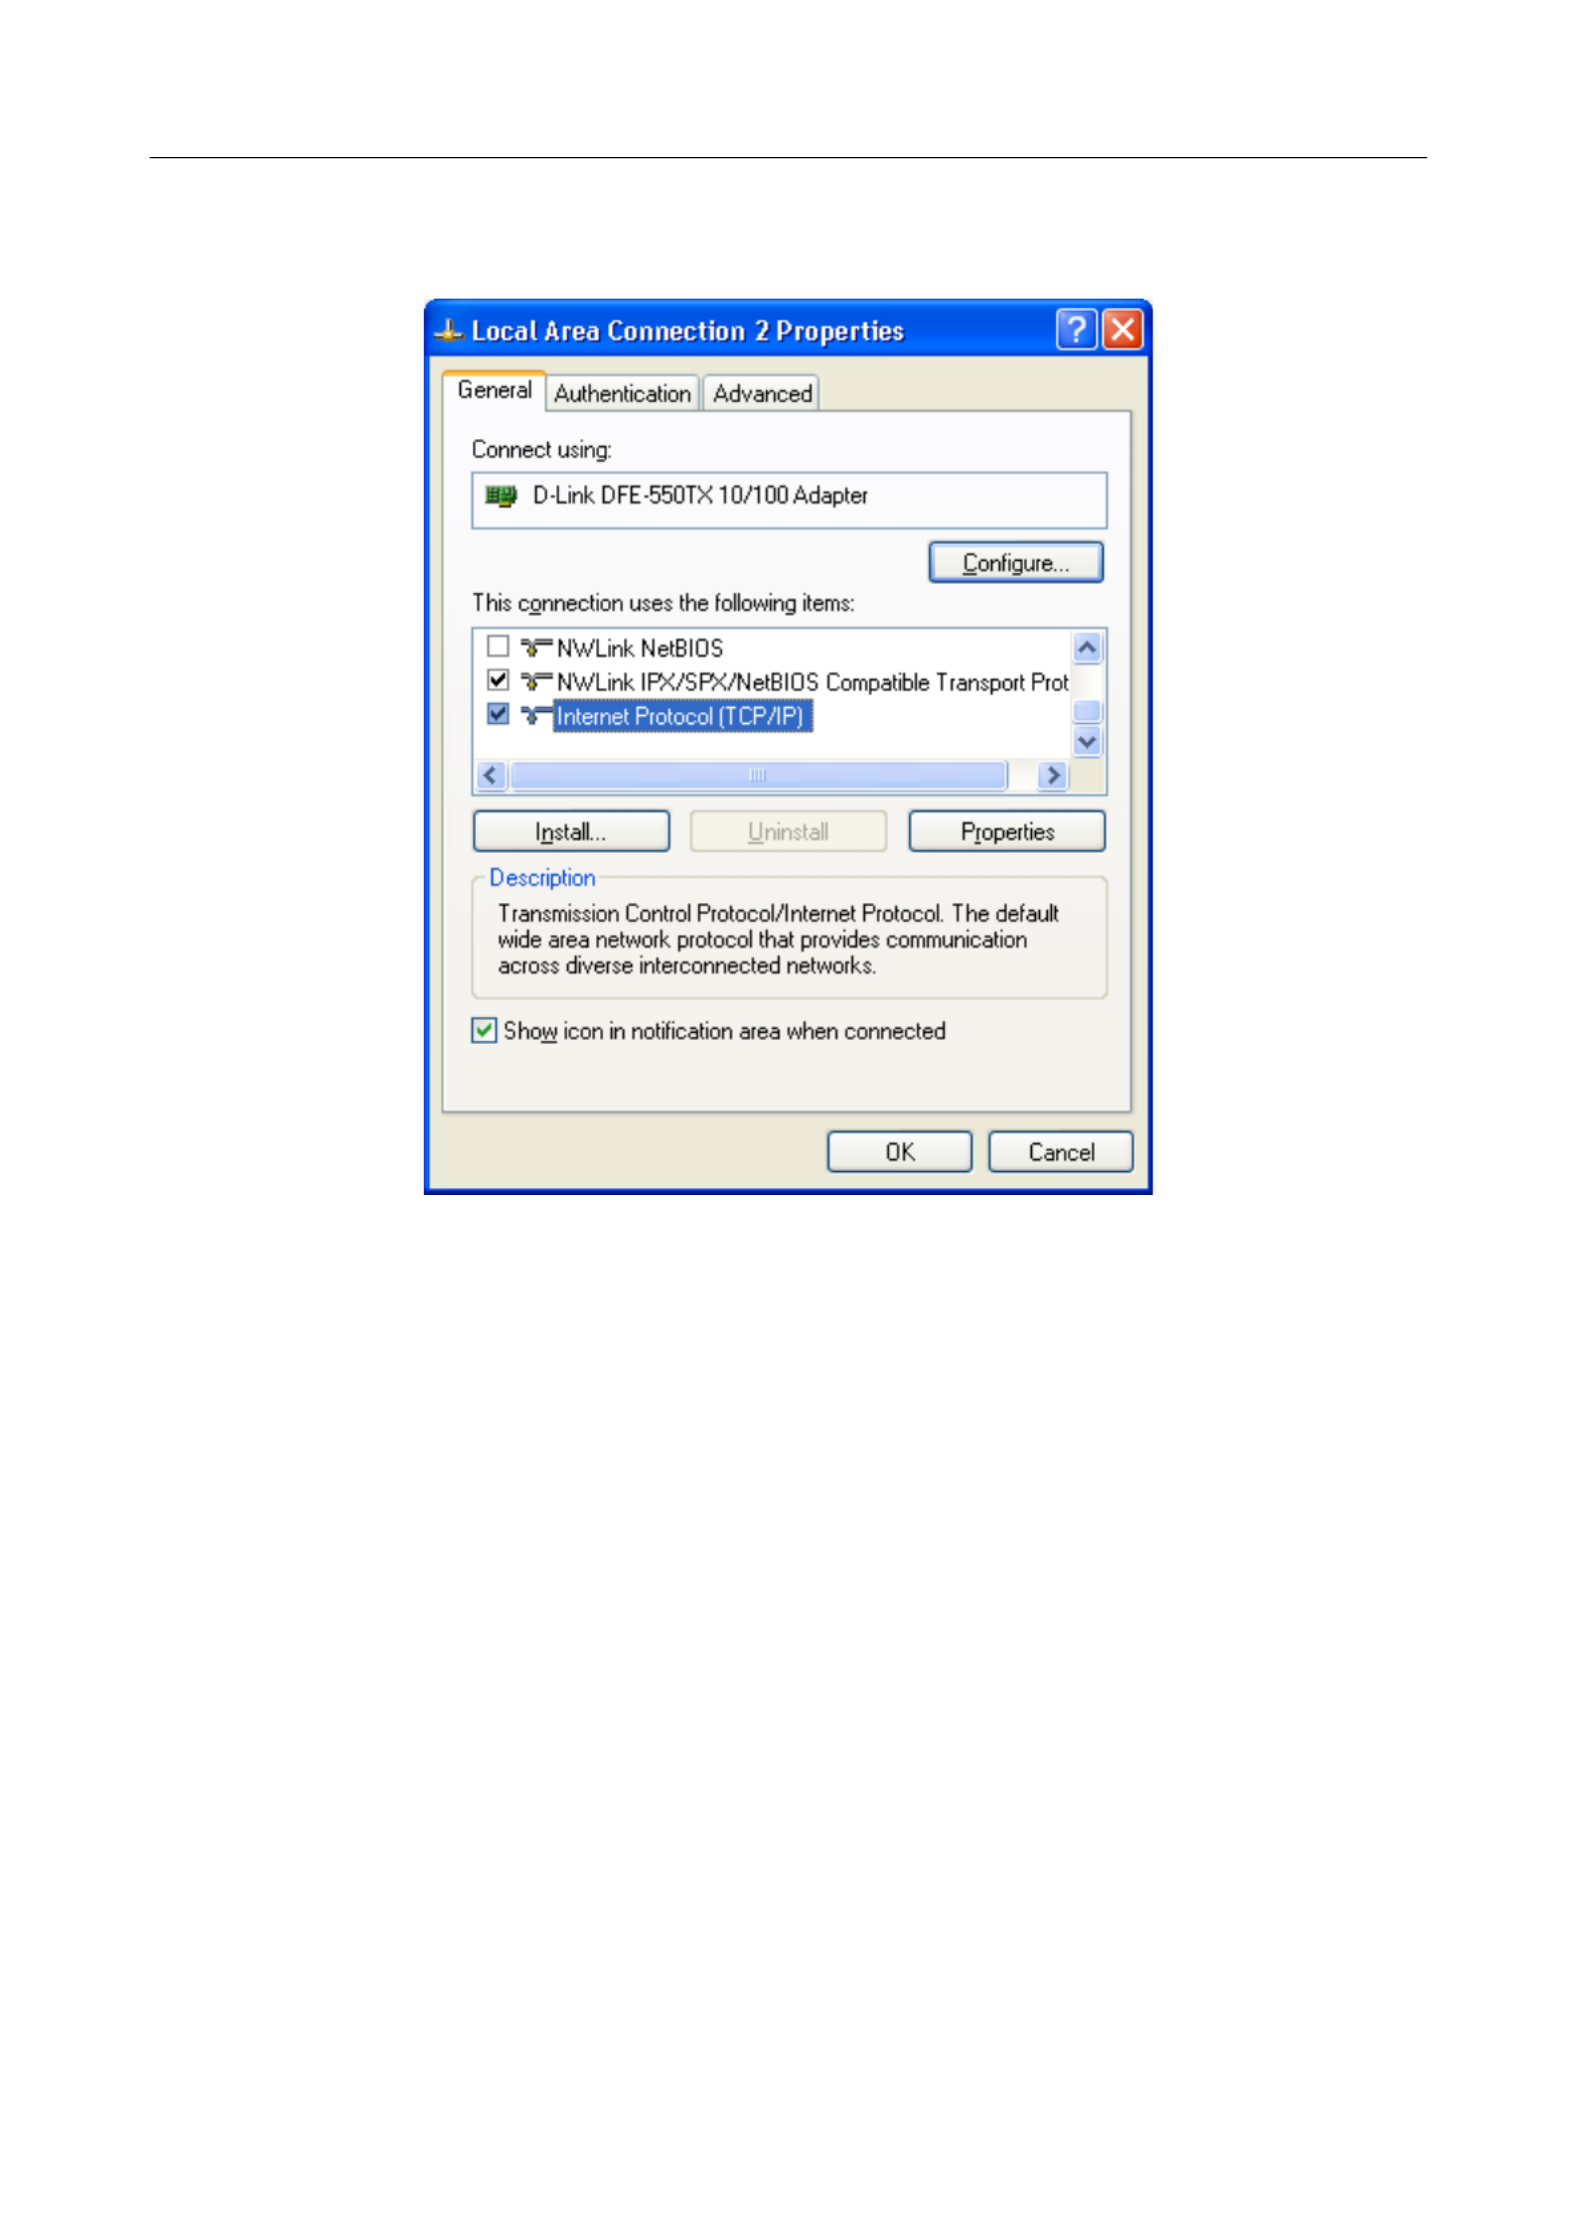
1. Click the button and proceed to the window.Start Control Panel
2. Select the section. (If the Control Panel has the category Network and Sharing Center
view (the value is selected from the drop-down list in the top right Category View by
corner of the window), choose the line under the View network status and tasks
Network and Internet section.)
Figure 7. The window.Control Panel
Page of 16818

DSL-224 Wireless VDSL2 Router with ASDL2+ Support
User Manual Installation and Connection
3. In the menu located on the left part of the window, select the Change adapter settings
line.
Figure 8. The window.Network and Sharing Center
Page of 16819

DSL-224 Wireless VDSL2 Router with ASDL2+ Support
User Manual Installation and Connection
4. In the opened window, right-click the relevant icon and select Local Area Connection
the line in the menu displayed.Properties
Figure 9. The window.Network Connections
Page of 16820

DSL-224 Wireless VDSL2 Router with ASDL2+ Support
User Manual Installation and Connection
5. In the window, on the tab, select the Local Area Connection Properties Networking
Internet Protocol Version 4 (TCP/IPv4) Properties line. Click the button.
Figure 10. The Local Area Connection Properties window.
Page of 16821

DSL-224 Wireless VDSL2 Router with ASDL2+ Support
User Manual Installation and Connection
PC with Wi-Fi Adapter
1. Connect a phone cable between the DSL port of the router and the port of the MODEM
splitter. Connect your phone to the port of the splitter. Then connect another phone PHONE
cable between a phone jack and the port of the splitter.LINE
2. Connect the power cord to the power connector port on the back panel of the router, then
plug the power adapter into an electrical outlet or power strip.
3. Turn on the router by pressing the button on its back panel.ON/OFF
4. Turn on your PC and wait until your operating system is completely loaded.
5. Turn on your Wi-Fi adapter. As a rule, modern notebooks with built-in wireless NICs are
equipped with a button or switch that turns on/off the wireless adapter (refer to your PC
documents). If your PC is equipped with a pluggable wireless NIC, install the software
provided with your Wi-Fi adapter.
Page of 16823

DSL-224 Wireless VDSL2 Router with ASDL2+ Support
User Manual Installation and Connection
Con#guring Wi-Fi Adapter in OS Windows XP
1. Click the button and proceed to the Start Control Panel > Network and Internet
Connections > Network Connections window.
2. Select the icon of the wireless network connection and make sure that your Wi-Fi adapter is
on.
Figure 12. The window.Network Connections
3. Search for available wireless networks.
4. In the opened window, select the wireless network Wireless Network Connection DSL-
224 and click the button.Connect
5. In the opened window, enter the network key (see WPS PIN on the barcode label on the
back panel of the device) in the and fields and click Network key Confirm network key
the button.Connect
After that the window appears.Wireless Network Connection Status
!
!
!
!! If you perform initial configuration of the router via Wi-Fi connection, note that
immediately after changing the wireless default settings of the router you will need to
reconfigure the wireless connection using the newly specified settings.
Page of 16824
DSL-224 Wireless VDSL2 Router with ASDL2+ Support
User Manual Installation and Connection
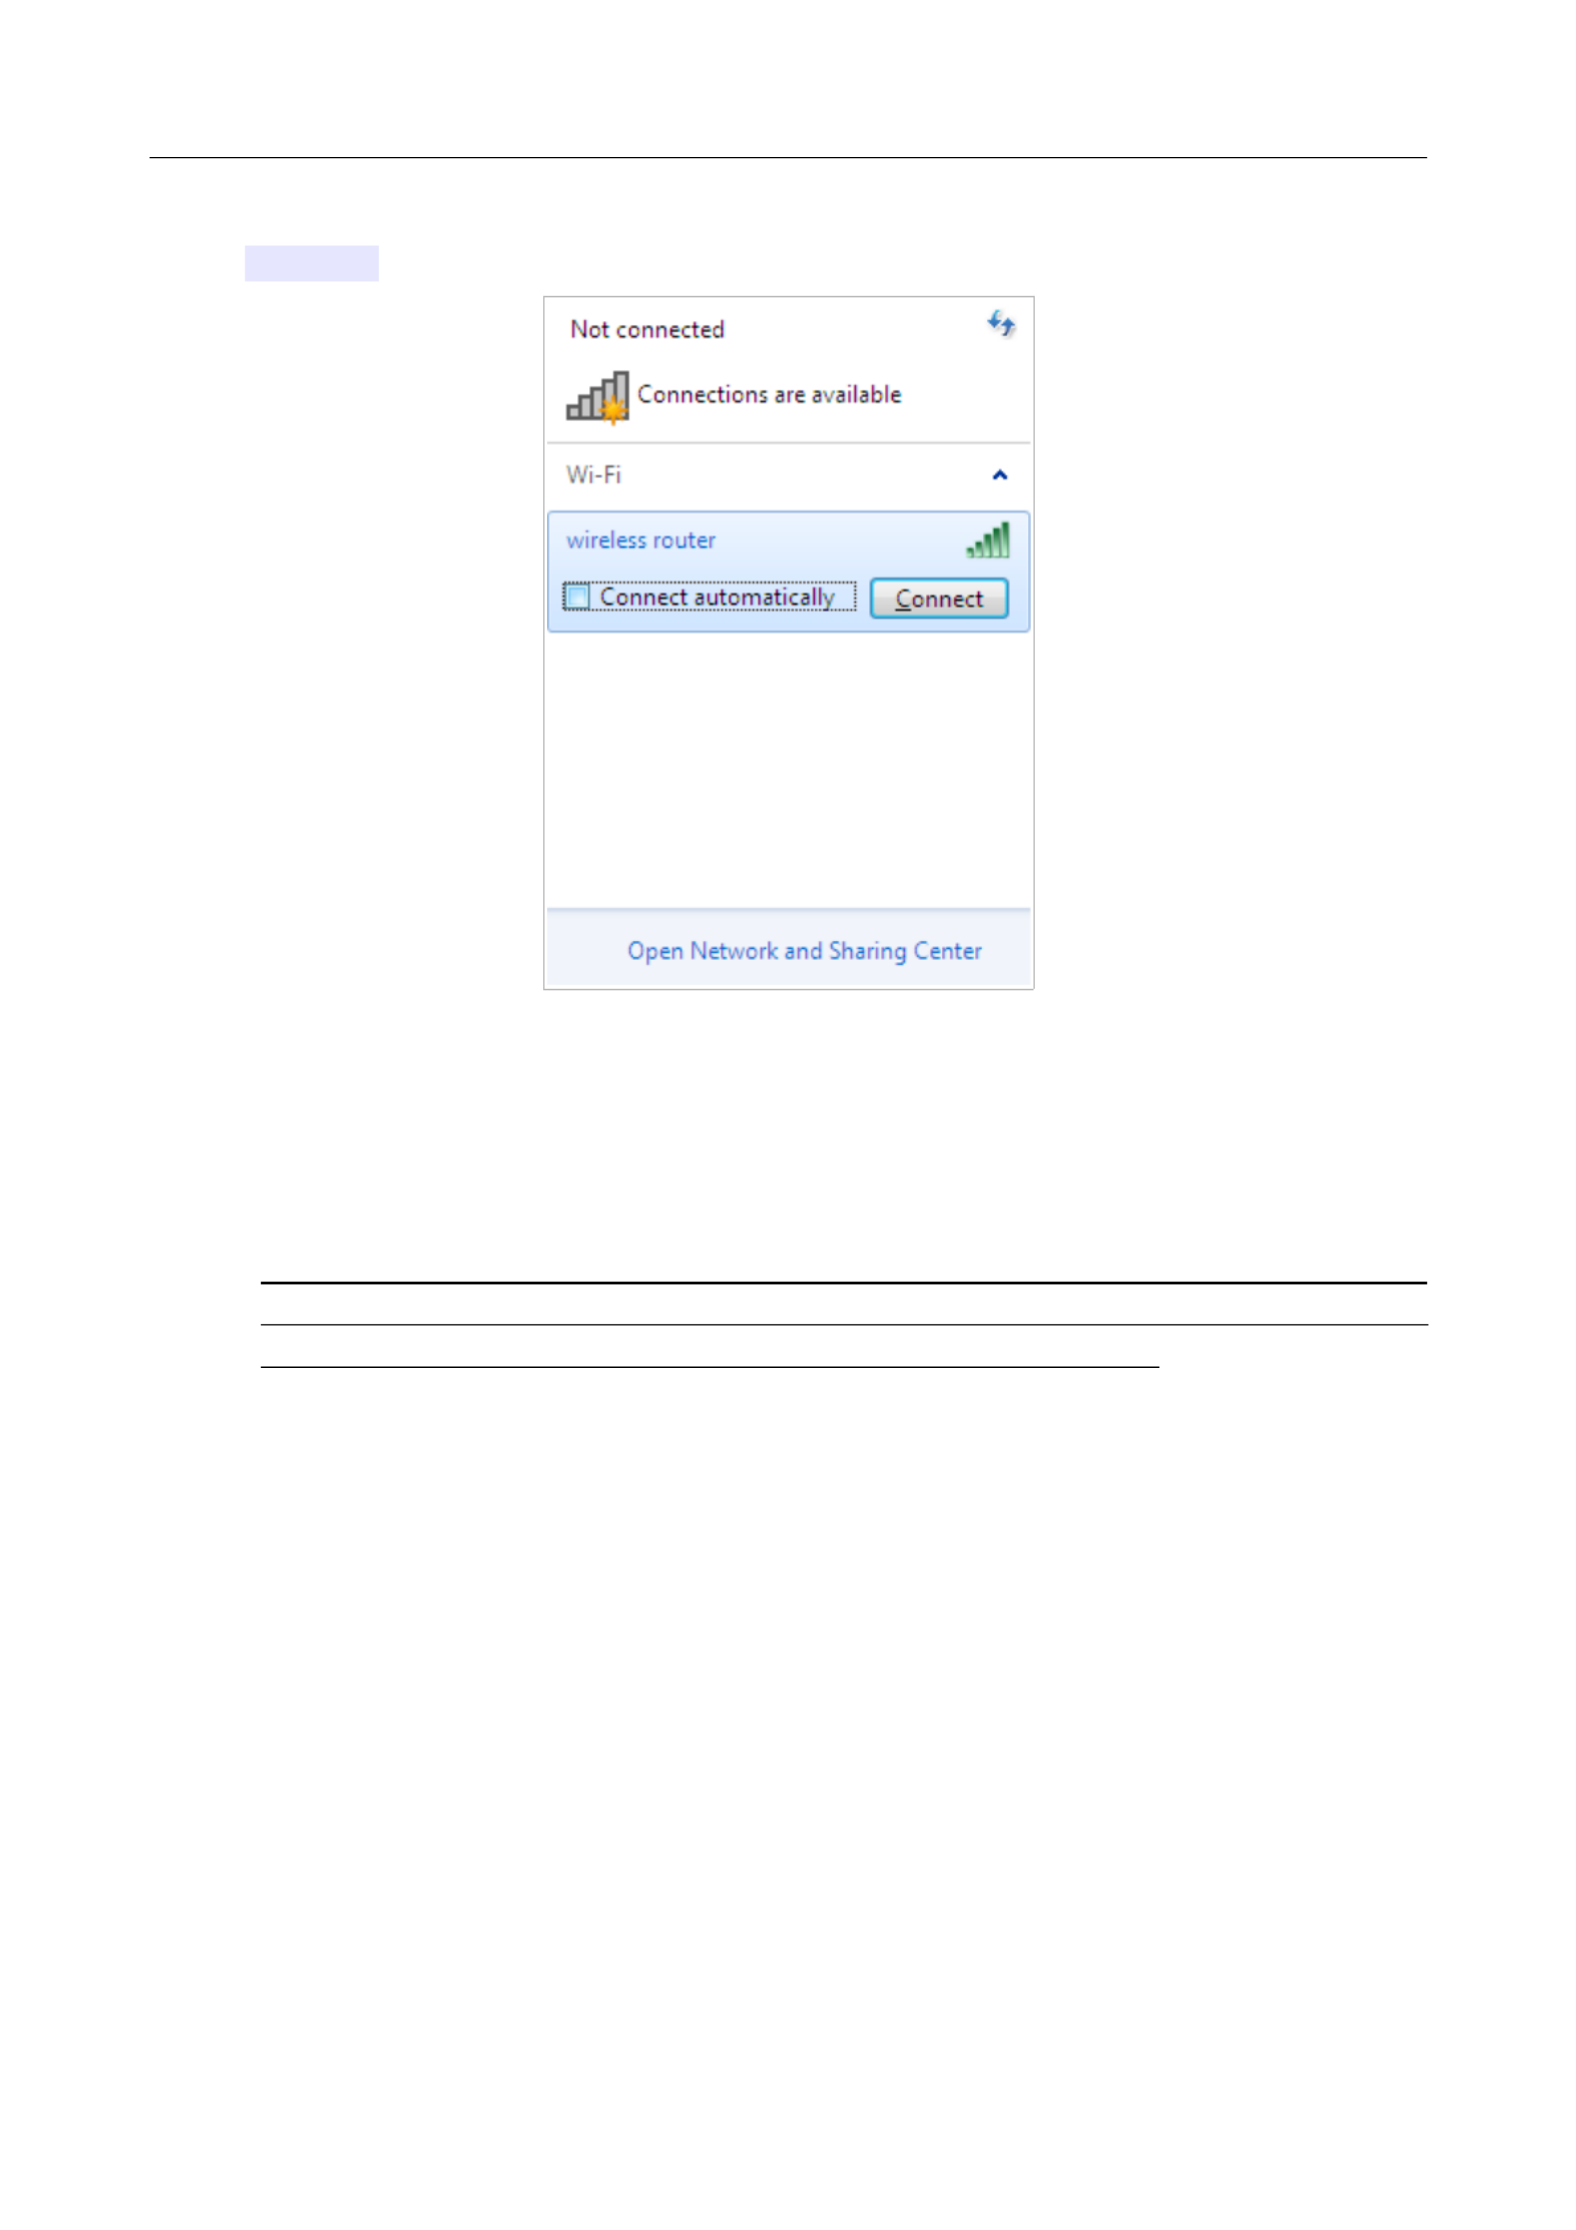
6. In the opened window, in the list of available wireless networks, select the wireless network
DSL-224 and click the button.Connect
Figure 15. The list of available networks.
7. In the opened window, enter the network key (see WPS PIN on the barcode label on the
back panel of the device) in the field and click the button.Security key OK
8. Wait for about 20-30 seconds. After the connection is established, the network icon will be
displayed as the signal level scale.
!
!
!
!! If you perform initial configuration of the router via Wi-Fi connection, note that
immediately after changing the wireless default settings of the router you will need to
reconfigure the wireless connection using the newly specified settings.
Page of 16826

DSL-224 Wireless VDSL2 Router with ASDL2+ Support
User Manual Installation and Connection
Connecting to Web-based Interface
When you have configured your computer, you can access the web-based interface and configure
needed parameters (create a WAN connection, change the parameters of the wireless network,
specify the settings of the firewall, etc.)
Start a web browser (see the Before You Begin section, page 13). In the address bar of the web
browser, enter the IP address of the router (by default, the following IP address is specified:
192.168.1.1). Press the key.Enter
Figure 16. Connecting to the web-based interface of the DSL-224 device.
!
!
!
!! If the error “ The page cannot be displayed ” (or “ Unable to display the page ”/“ Could not
connect to remote server ”) occurs upon connecting to the web-based interface of the router,
make sure that you have properly connected the router to your computer.
If the device has not been configured previously or the default settings have been restored, after
access to the web-based interface the Initial Configuration Wizard opens (see the Initial
Configuration Wizard section, page 34).
Figure 17. The page for running the Initial Configuration Wizard.
Page of 16827

DSL-224 Wireless VDSL2 Router with ASDL2+ Support
User Manual Installation and Connection
Web-based Interface Structure
Summary Page
On the page, detailed information on the device state is displayed.Summary
Figure 19. The summary page.
Page of 16829

DSL-224 Wireless VDSL2 Router with ASDL2+ Support
User Manual Installation and Connection
The section displays the model and hardware version of the router, the Device Information
firmware version, and other data.
To contact the technical support group (to send an e-mail), left-click the support e-mail address.
After clicking the line, the e-mail client window for sending a new letter to the specified address
opens.
The section displays data on the state of the device's wireless network, its 2.4 GHz Access Point
name and the authentication type.
In the WAN section, data on the type and status of the existing WAN connection are displayed.
In the section, the IPv4 and IPv6 address of the router and the number of wired and wireless LAN
clients of the device are displayed.
The section displays the state of the device's LAN ports and data transfer mode of LAN Ports
active ports.
The Yandex.DNS section displays the Yandex.DNS service state and operation mode. To enable
the Yandex.DNS If needed, change the operation service, move the switch to the right.Enable
mode of the service.
Page of 16830

DSL-224 Wireless VDSL2 Router with ASDL2+ Support
User Manual Installation and Connection
Menu Sections
To configure the router use the menu in the left part of the page.
In the section you can run the Initial Configuration Wizard. The Wizard Initial Configuration
allows you to configure the router for operation in the needed mode and specify all parameters
necessary for getting started (for the description of the Wizard, see the Initial Configuration
Wizard section, page 34).
The pages of the section display data on the current state of the router (for the Statistics
description of the pages, see the section, page 50).Statistics
The pages of the section are designed for configuring basic parameters of Connections Setup
the LAN interface of the router and creating a connection to the Internet (for the description of the
pages, see the section, page 57).Connections Setup
The pages of the Wi-Fi section are designed for specifying all needed settings of the router's
wireless network (for the description of the pages, see the Wi-Fi section, page 100).
The pages of the section are designed for configuring additional parameters of the Advanced
router (for the description of the pages, see the section, page 120).Advanced
The pages of the section are designed for configuring the firewall of the router (for the Firewall
description of the pages, see the section, page 137).Firewall
The pages of the section provide functions for managing the internal system of the router System
(for the description of the pages, see the section, page 148).System
The pages of the Yandex.DNS section are designed for configuring the Yandex.DNS web content
filtering service (for the description of the pages, see the Yandex.DNS section, page 161).
To exit the web-based interface, click the line of the menu.Logout
Page of 16832

DSL-224 Wireless VDSL2 Router with ASDL2+ Support
User Manual Installation and Connection
Noti#cations
The router's web-based interface displays notifications in the top right part of the page.
Figure 21. The web-based interface notifications.
Click the icon displaying the number of notifications to view the complete list and click the relevant
button.
Page of 16833

DSL-224 Wireless VDSL2 Router with ASDL2+ Support
User Manual Configuring via Web-based Interface
CHAPTER 4. CONFIGURING VIA WEB-BASED
INTERFACE
Initial Configuration Wizard
To start the Initial Configuration Wizard, go to the section. On the opened Initial Configuration
page, click the button and wait until the factory default settings are restored.OK
Figure 22. Restoring the default settings in the Wizard.
Click the START button.
Figure 23. Starting the Wizard.
On the opened page, click in order to leave the current language of the web-based interface or YES
click to select the other language.NO
Figure 24. Selecting a language.
Page of 16834

DSL-224 Wireless VDSL2 Router with ASDL2+ Support
User Manual Configuring via Web-based Interface
You can finish the wizard earlier and go to the menu of the web-based interface. To do this, click the
ADVANCED SETTINGS button. On the opened page, change the default settings: specify the
administrator password in the field and the name of the wireless network in the Admin password
Network name (SSID) APPLY field. Then click the button.
Figure 25. Changing the default settings.
To continue the configuration of the router via the Wizard, click the button.CONTINUE
Page of 16835
DSL-224 Wireless VDSL2 Router with ASDL2+ Support
User Manual Configuring via Web-based Interface
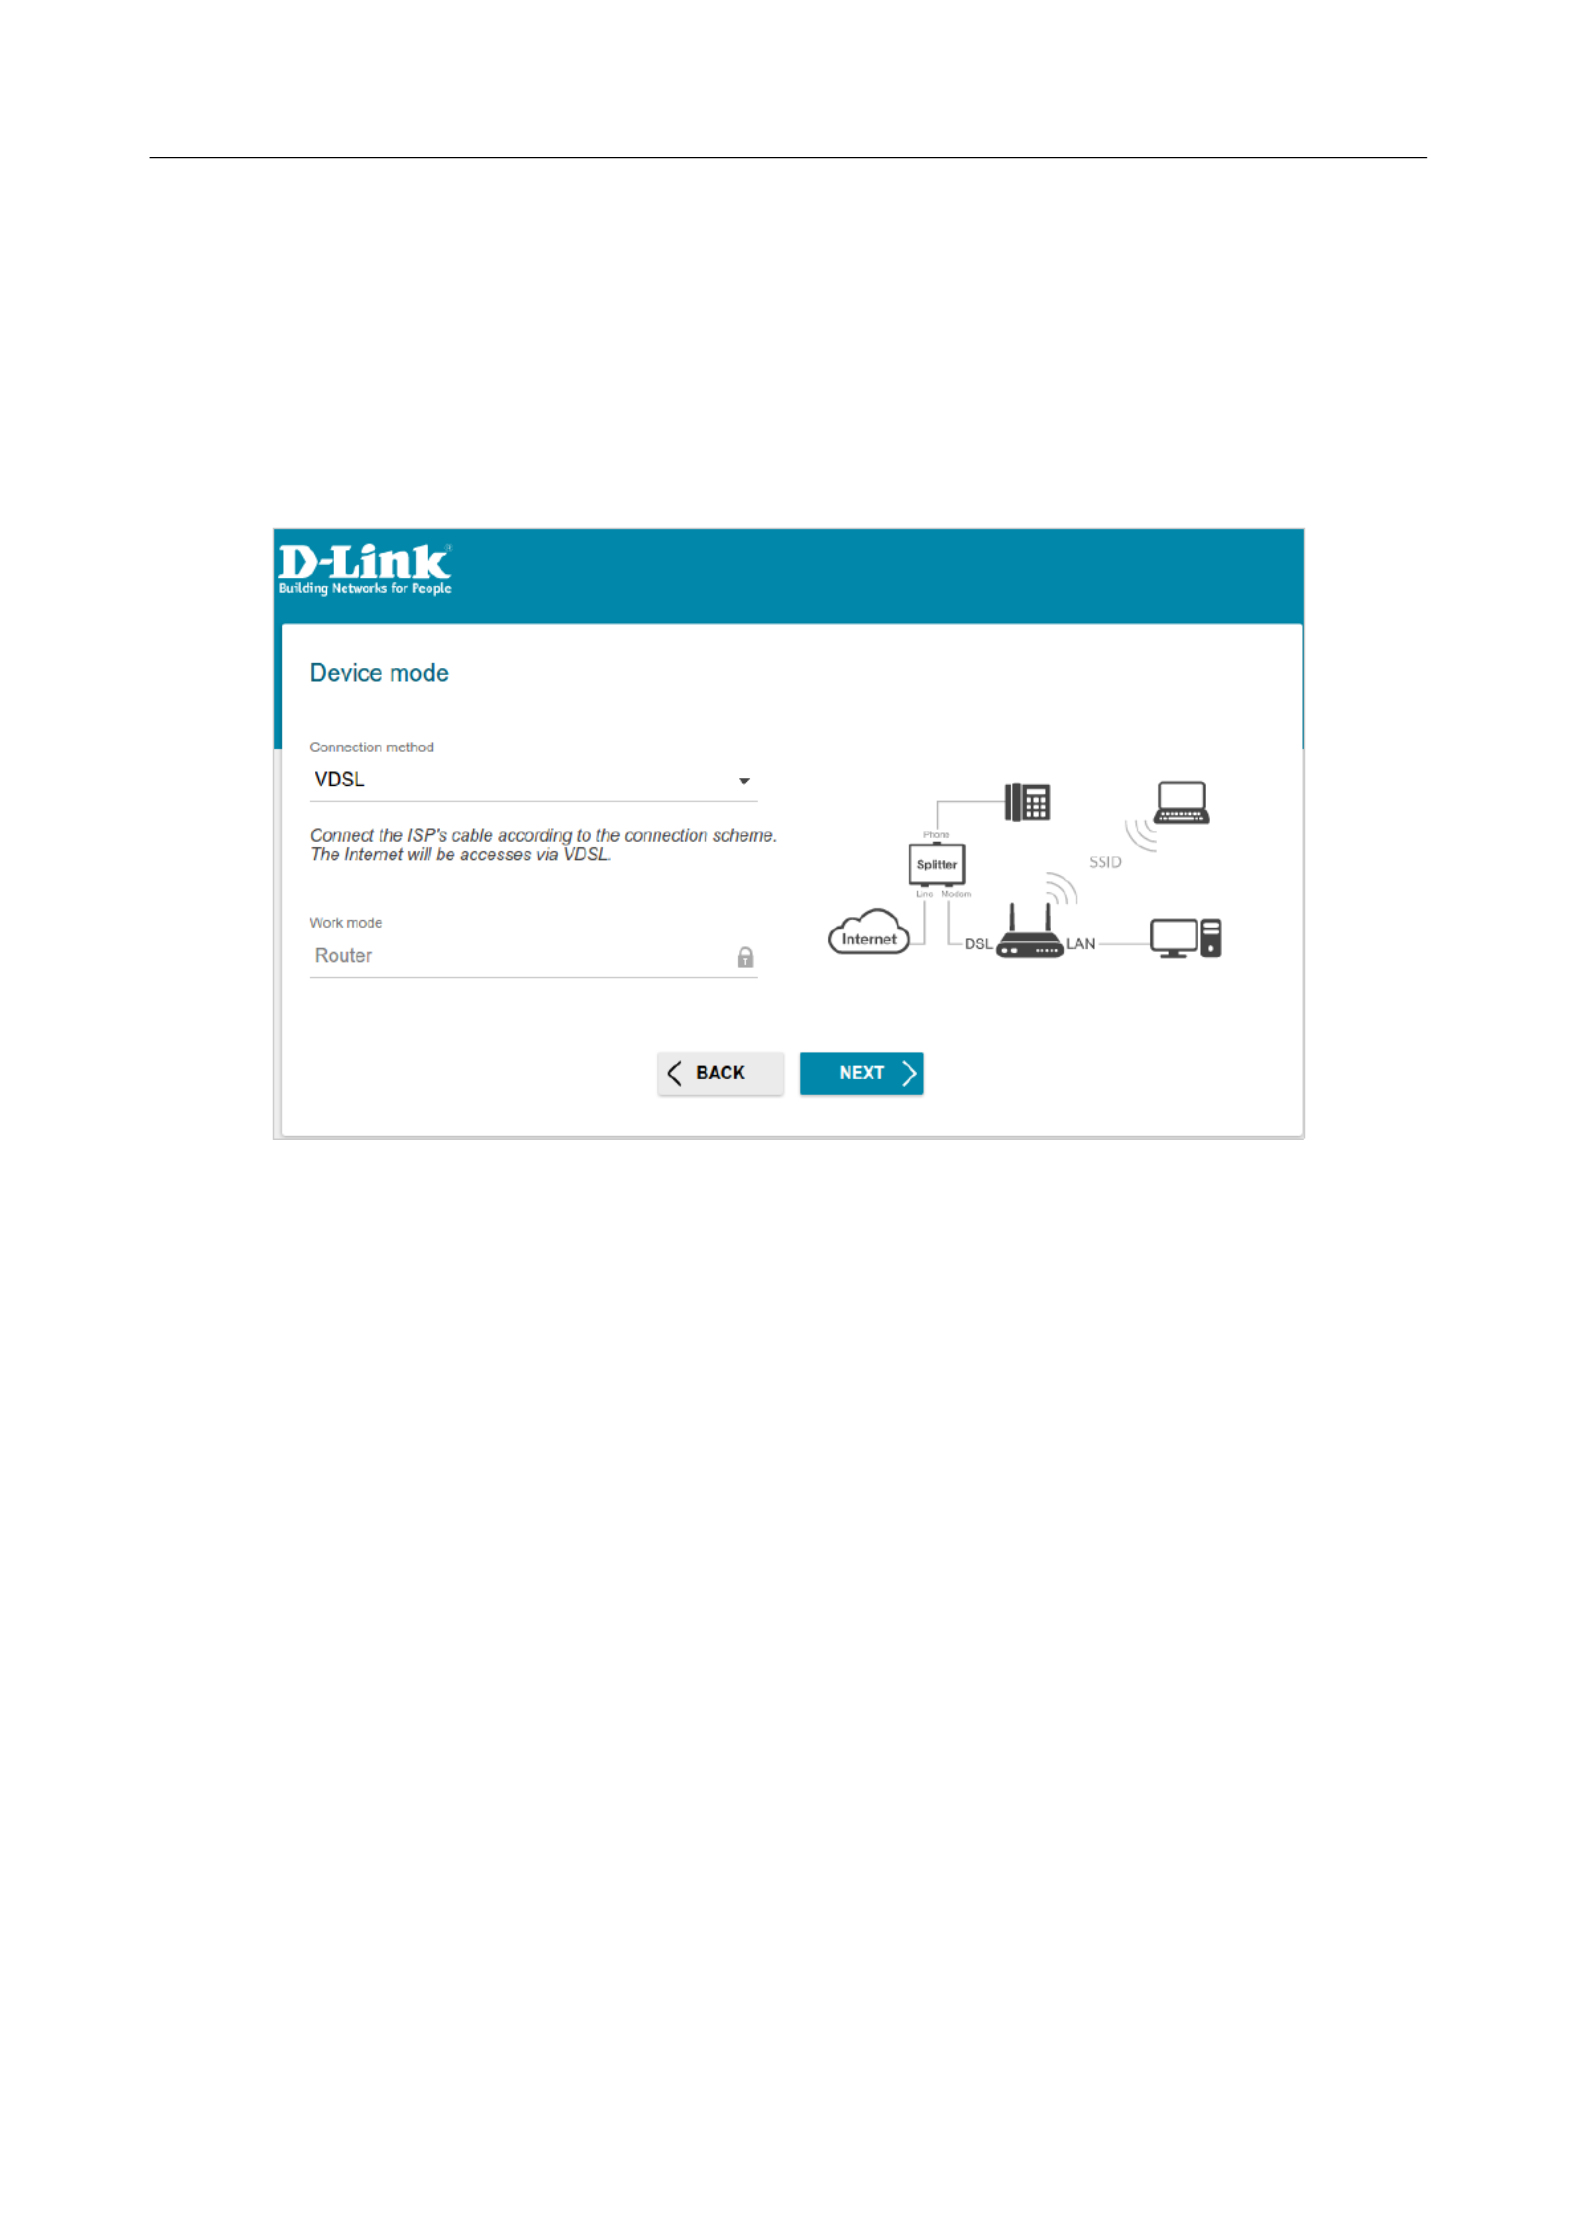
Selecting Operation Mode
In order to connect your device to a VDSL or ADSL line, on the page, from the Device mode
Connection method VDSL ADSL list, select the or value correspondingly. In this mode you can
configure a WAN connection, set your own settings for the wireless network, configure LAN ports
to connect an STB or VoIP phone, and set your own password for access to the web-based interface
of the device.
Figure 26. Selecting an operation mode. The connection method.VDSL
When the operation mode is selected, click the button.NEXT
Page of 16836

DSL-224 Wireless VDSL2 Router with ASDL2+ Support
User Manual Configuring via Web-based Interface
Creating WAN Connection
!
!
!
!! You should configure your WAN connection in accordance with data provided by your
Internet service provider (ISP). Make sure that you have obtained all necessary information
prior to configuring your connection. Otherwise contact your ISP.
1. On the page, from the list, select the Internet connection type Connection type
connection type used by your ISP and fill in the fields displayed on the page.
2. Specify the settings necessary for the connection of the selected type.
3. For the connection methodVDSL : If your ISP uses MAC address binding, select the Clone
MAC address of your device checkbox.
4. For the connection methodVDSL : If the Internet access is provided via a VLAN channel,
select the checkbox and fill in the field.Use VLAN VLAN ID
5. For the connection methodADSL : Specify the VPI and VCI values in the relevant fields.
6. Click the button to continue or click the button to return to the previous page.NEXT BACK
Page of 16837

DSL-224 Wireless VDSL2 Router with ASDL2+ Support
User Manual Configuring via Web-based Interface
Static IPv4 or IPoA Connection
Figure 27. The page for configuring Static IPv4 WAN connection.
The connection type is available for the connection method only.IPoA ADSL
Fill in the following fields: , , IP address Netmask Gateway IP address DNS IP , and
address.
Page of 16838

DSL-224 Wireless VDSL2 Router with ASDL2+ Support
User Manual Configuring via Web-based Interface
Static IPv6 Connection
Figure 28. The page for configuring Static IPv6 WAN connection.
Fill in the following fields: , and .IP address Prefix Gateway IP address
Page of 16839
DSL-224 Wireless VDSL2 Router with ASDL2+ Support
User Manual Configuring via Web-based Interface
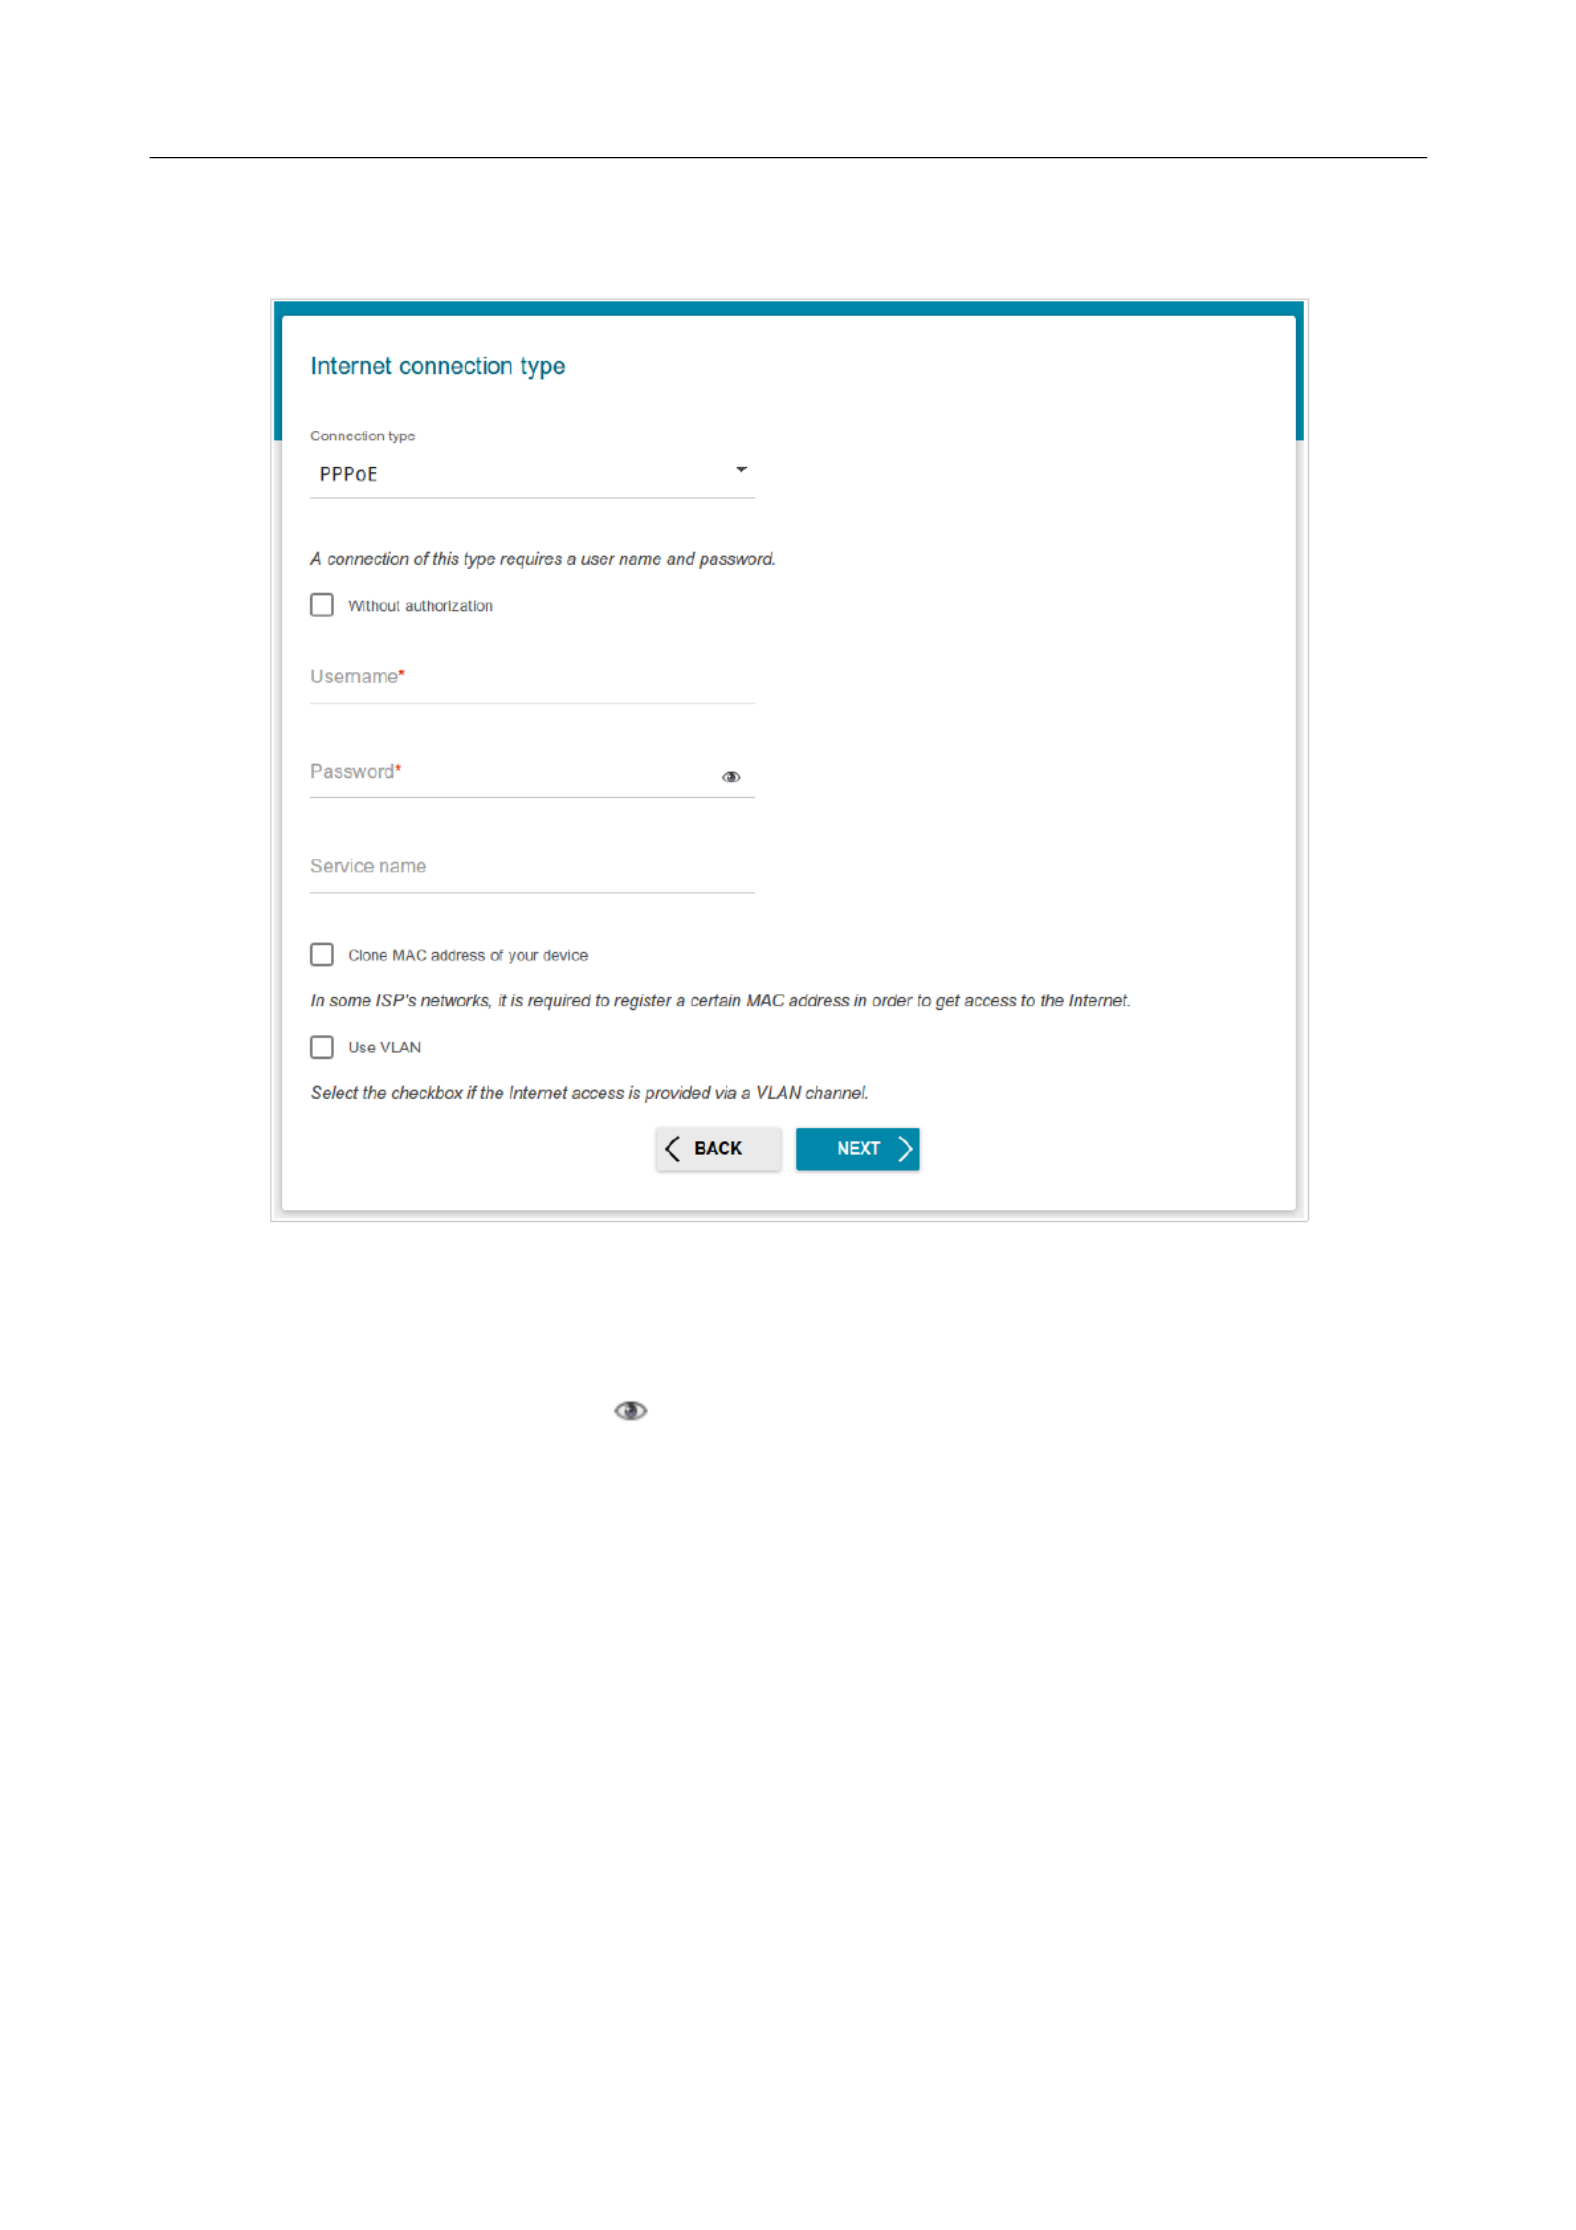
PPPoE, PPPoA, IPv6 PPPoE, PPPoE Dual Stack Connections
Figure 29. The page for configuring PPPoE WAN connection.
The connection type is available for the connection method only.PPPoA ADSL
In the field enter the login and in the field enter the password provided Username Password by
your ISP. Click the icon ( ) to display the entered password. If authorization is not Show
required, select the checkbox.Without authorization
Page of 16840

DSL-224 Wireless VDSL2 Router with ASDL2+ Support
User Manual Configuring via Web-based Interface
Con#guring Wireless Network
1. On the page, in the field, specify your own Wireless Network 2.4 GHz Network name
name for the wireless network or leave the value suggested by the router.
2. In the field, specify your own password for access to the wireless network or Password
leave the value suggested by the router (WPS PIN of the device, see the barcode label).
3. You can restore the parameters of the wireless network specified before resetting to factory
defaults. To do this, click the RESTORE button.
Figure 30. The page for configuring the wireless network.
4. If you want to create an additional wireless network isolated from your LAN, select the
Enable guest network checkbox.
Figure 31. The page for configuring the wireless network.
5. In the field, specify your own name for the guest wireless network or leave Network name
the value suggested by the router.
6. If you want to create a password for access to the guest wireless network, deselect the Open
network Password checkbox and fill in the field.
7. If you want to limit the bandwidth of the guest wireless network, select the Enable
shaping Shaping checkbox and fill in the field.
8. Click the button or click the button to specify other settings.NEXT to continue BACK
Page of 16841

DSL-224 Wireless VDSL2 Router with ASDL2+ Support
User Manual Configuring via Web-based Interface
Con#guring LAN Ports for IPTV/VoIP
1. On the page, select the checkbox.IPTV Is an STB connected to the device
Figure 32. The page for selecting a LAN port to connect an IPTV set-top box.
2. Select a free LAN port for connecting your set-top box.
3. For the connection methodVDSL : If the IPTV service is provided via a VLAN channel,
select the checkbox and fill in the field.Use VLAN ID VLAN ID
4. For the connection methodADSL : Specify the VPI and VCI values in the relevant fields.
5. Click the button to continue or click the button to specify other settings.NEXT BACK
Page of 16842
DSL-224 Wireless VDSL2 Router with ASDL2+ Support
User Manual Configuring via Web-based Interface
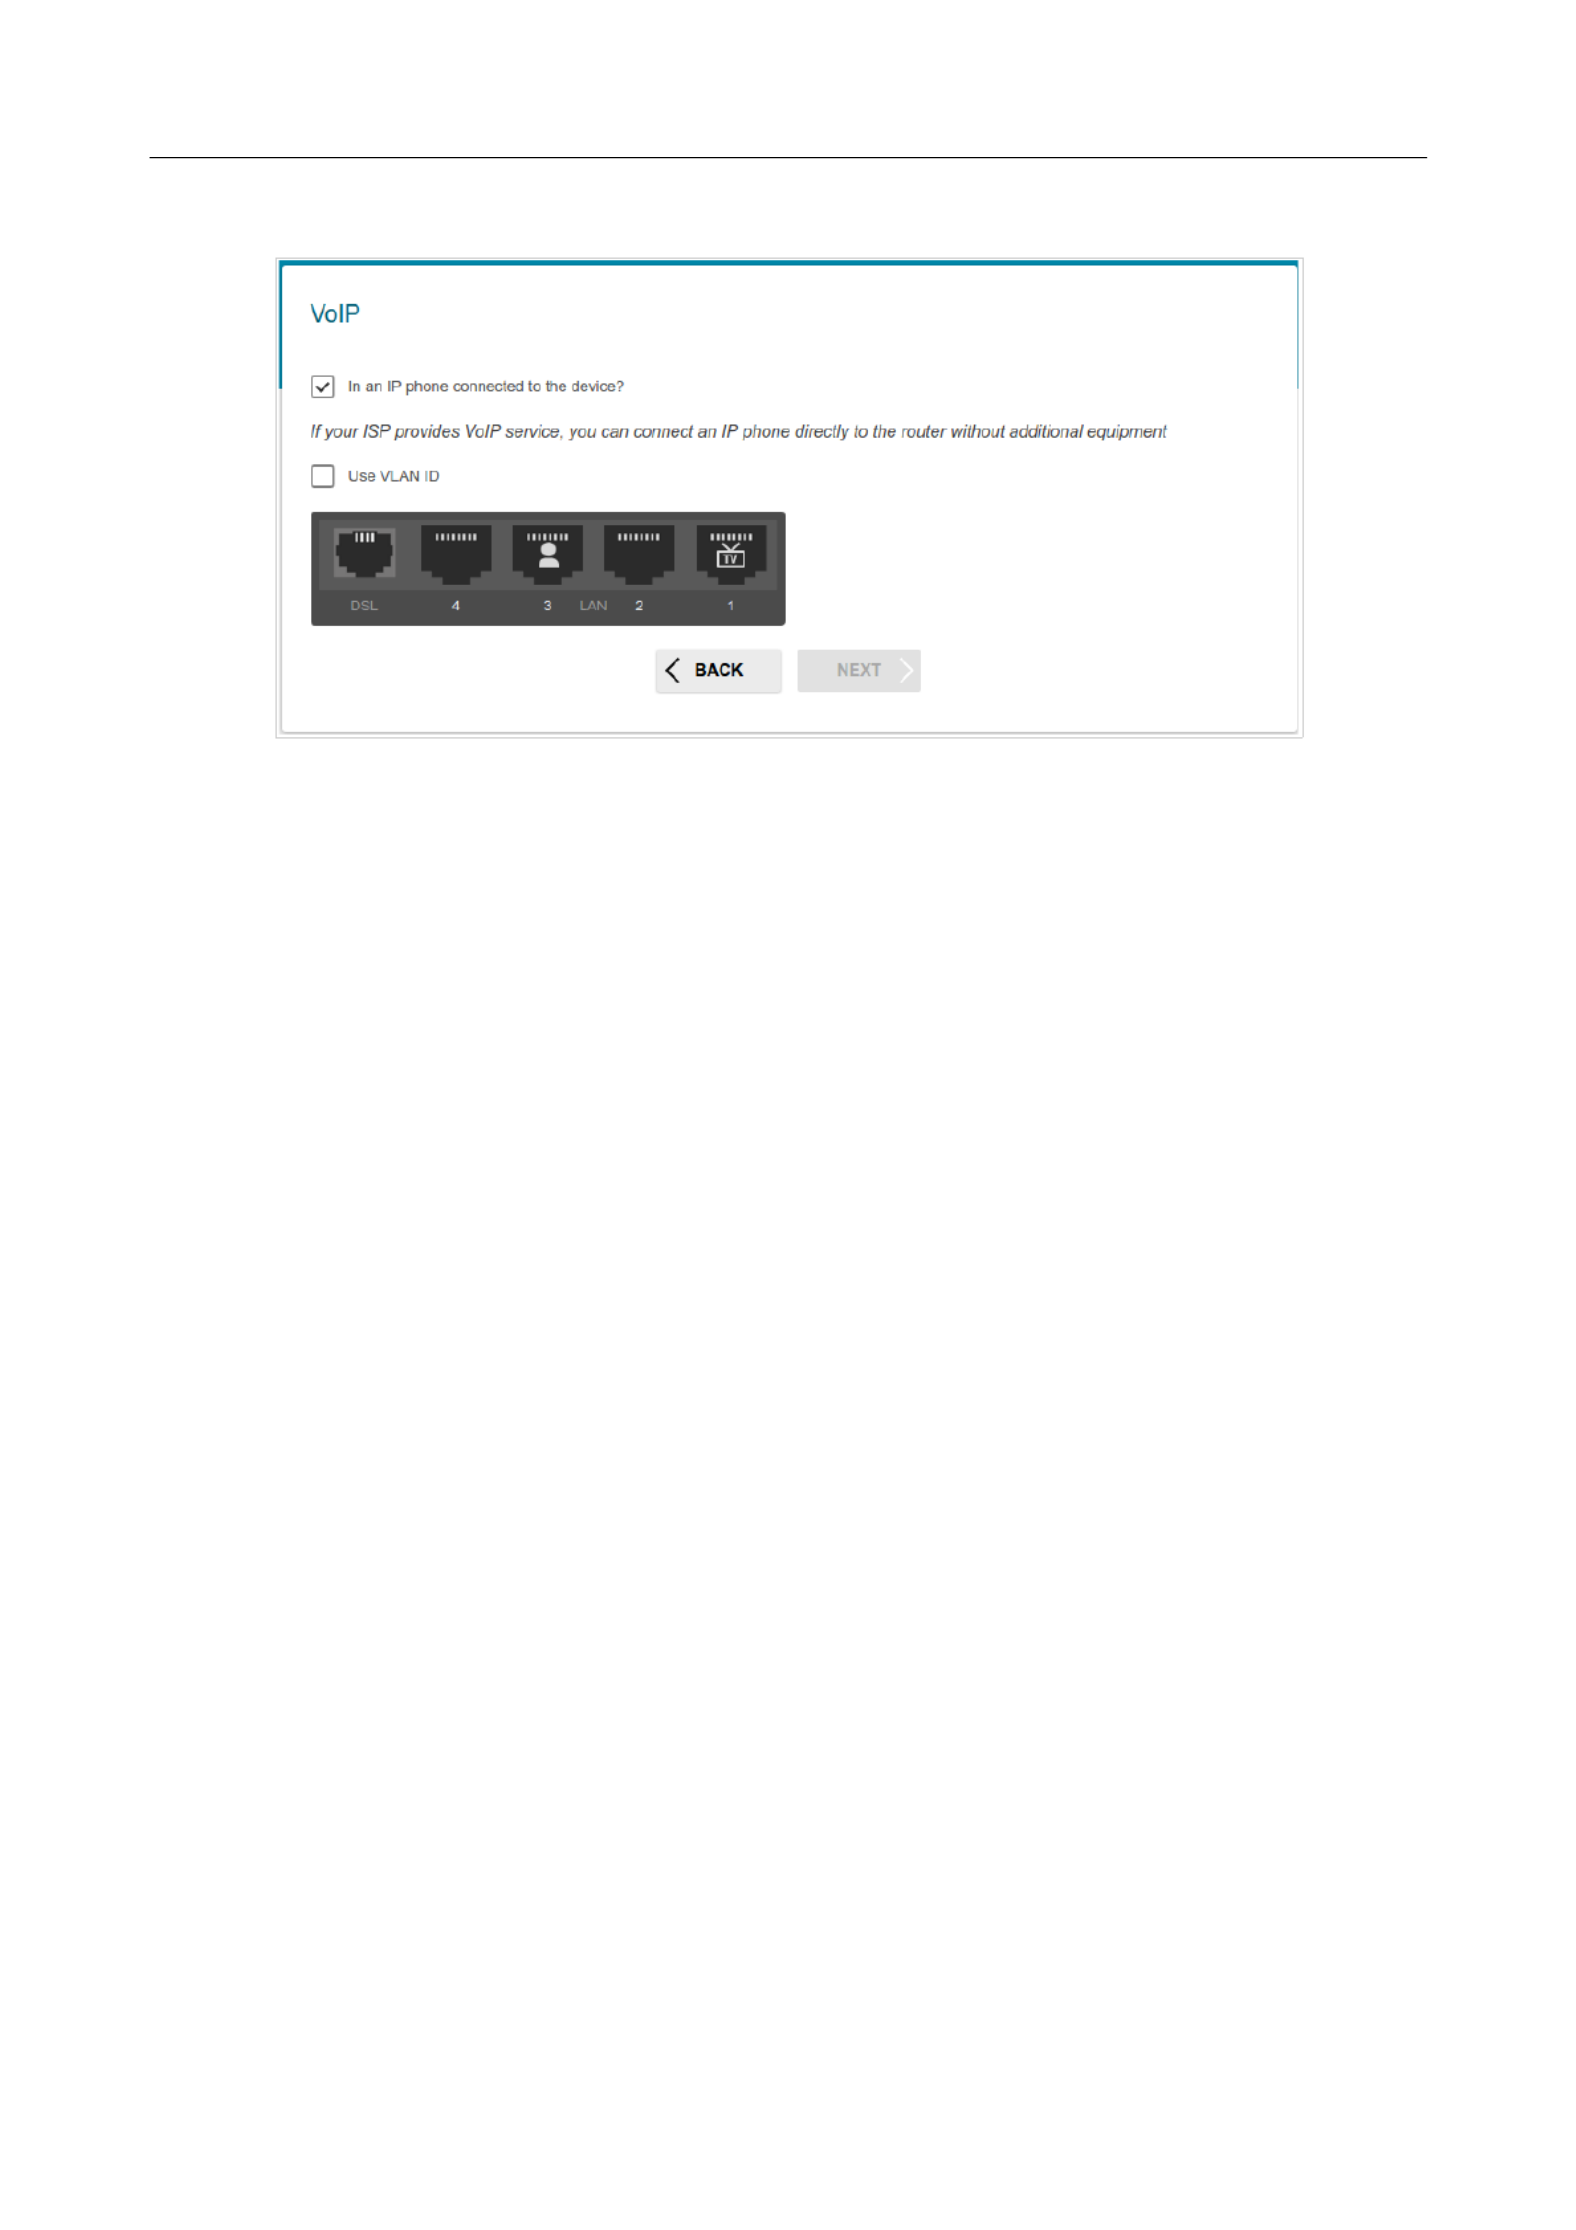
6. On the VoIP In an IP phone connected to the device page, select the checkbox.
Figure 33. The page for selecting a LAN port to connect an VoIP phone.
7. Select a free LAN port for connecting your IP phone.
8. For the connection methodVDSL : If the VoIP service is provided via a VLAN channel,
select the checkbox and fill in the field.Use VLAN ID VLAN ID
9. For the connection methodADSL : Specify the VPI and VCI values in the relevant fields.
10. Click the button to continue or click the button to specify other settings.NEXT BACK
Page of 16843
DSL-224 Wireless VDSL2 Router with ASDL2+ Support
User Manual Configuring via Web-based Interface
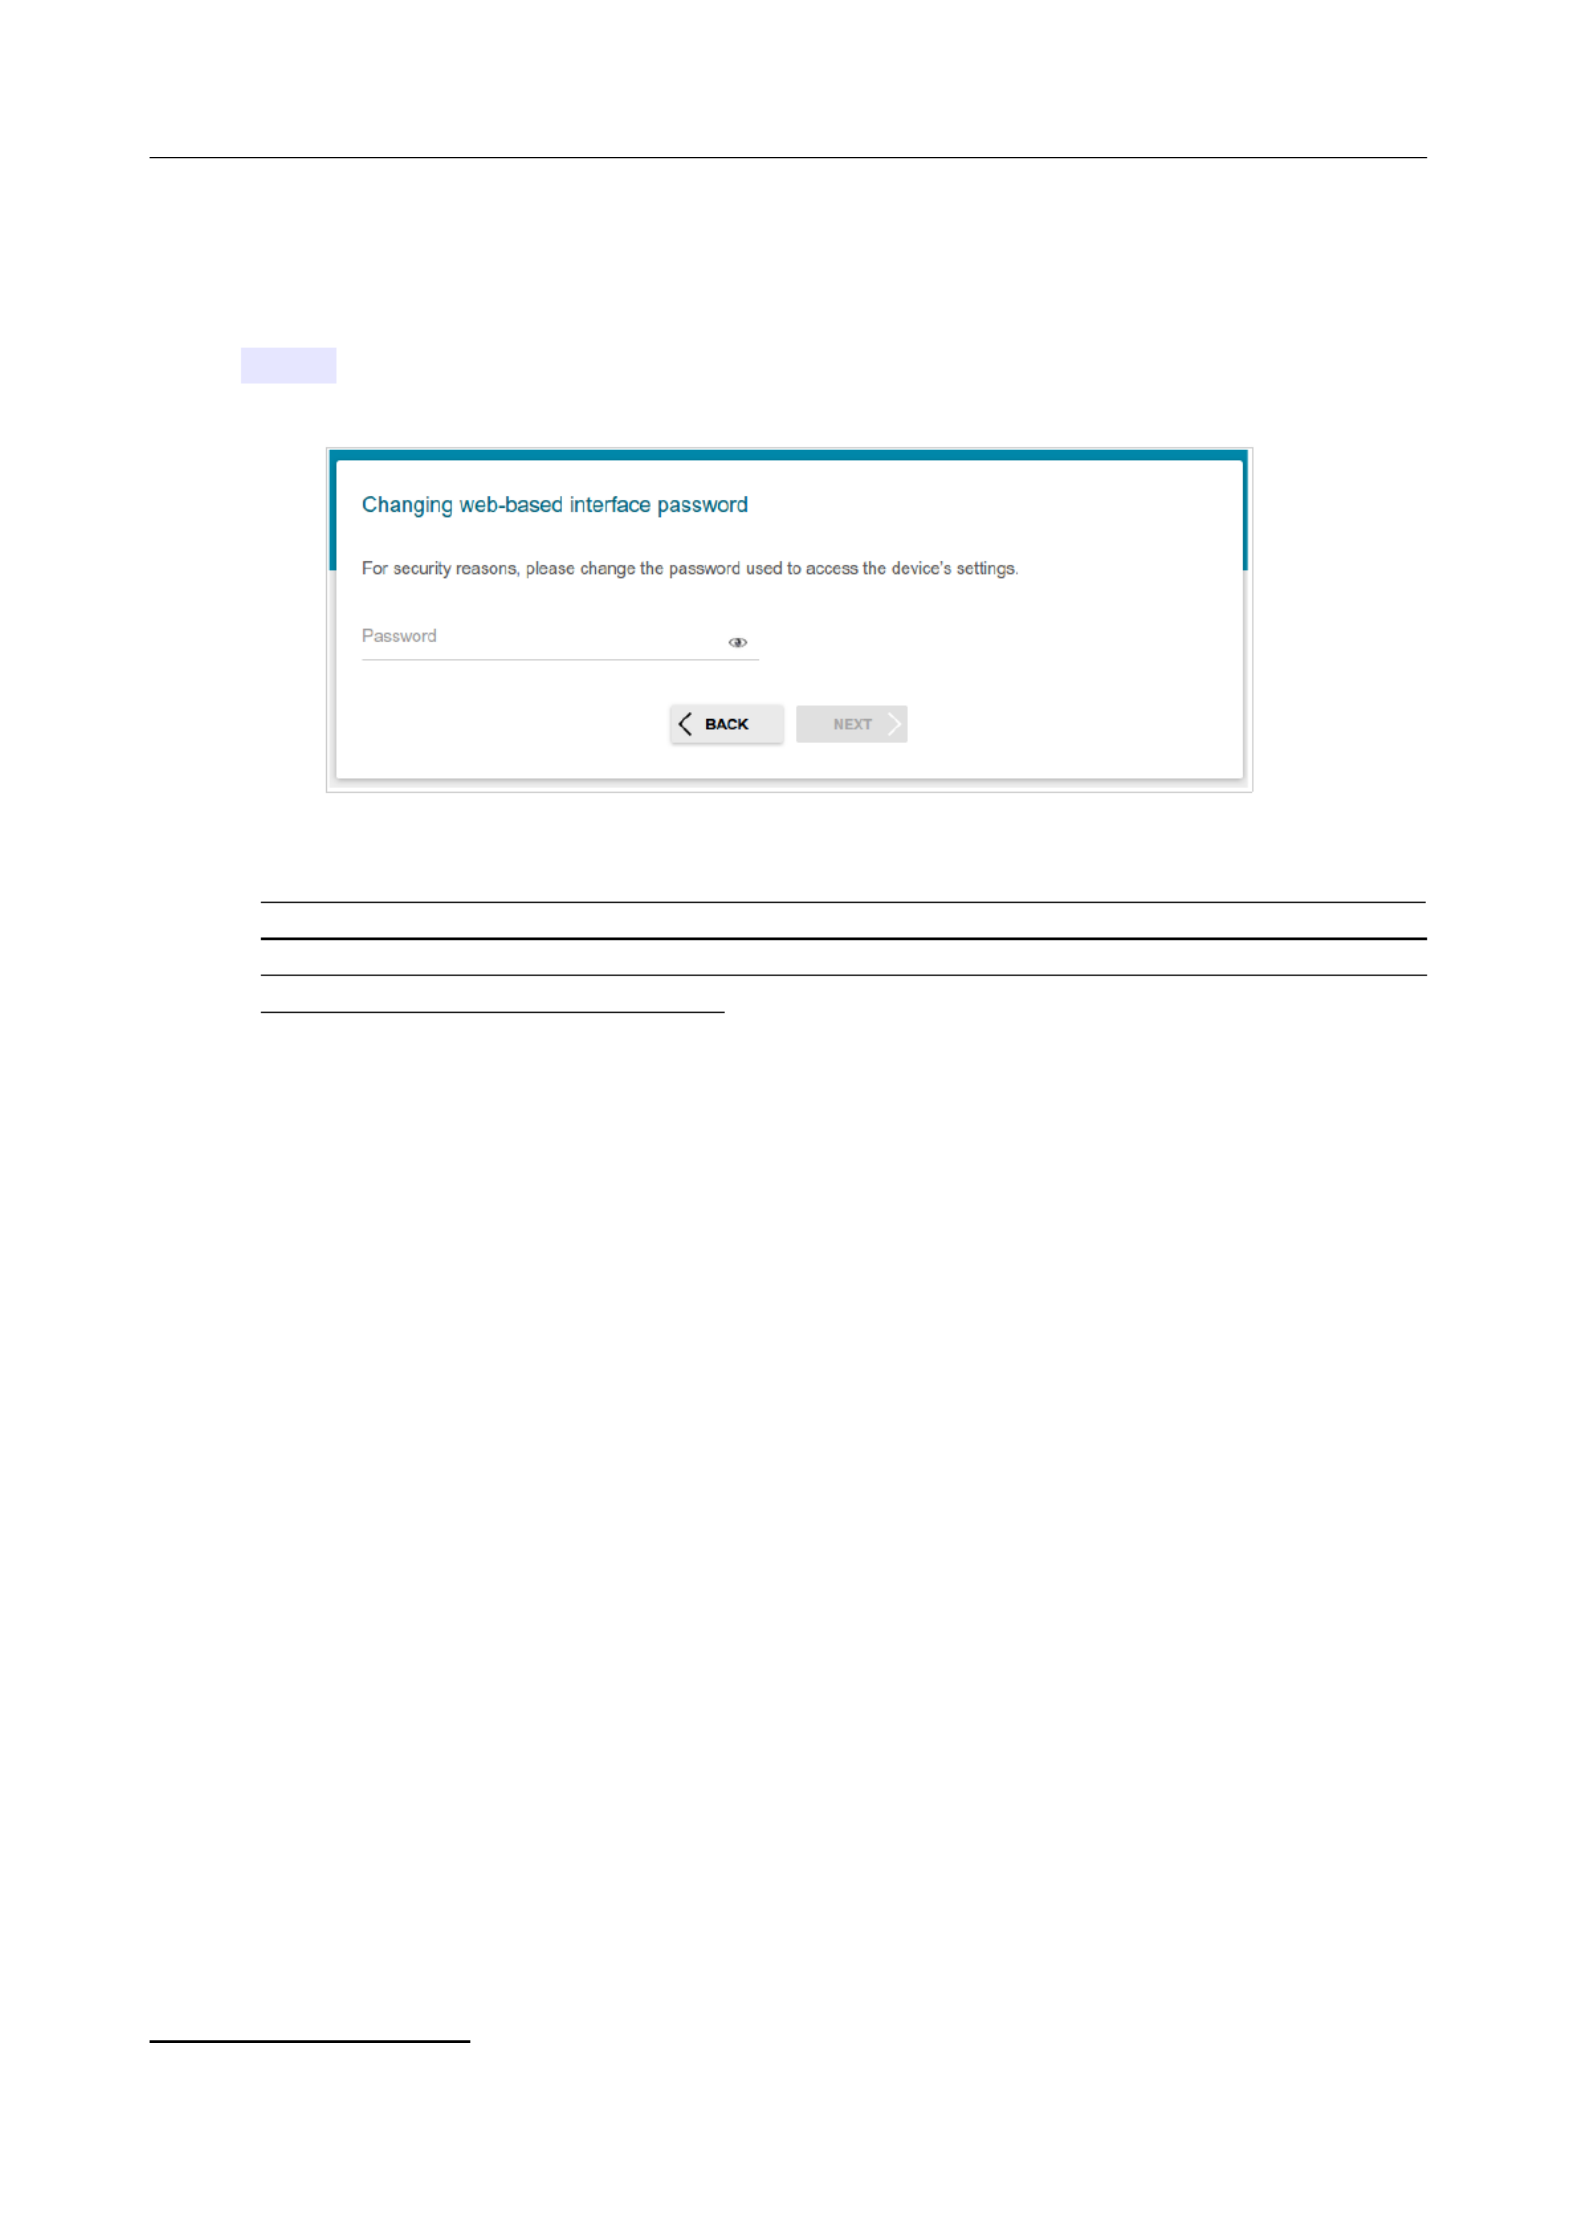
Changing Web-based Interface Password
On this page, you should change the default administrator password. You may set any password
except . Use digits, Latin letters (uppercase and/or lowercase), and other characters available admin
in the US keyboard layout.1
Figure 34. The page for changing the web-based interface password.
!
!
!
!!
Remember or write down the new password for the administrator account. In case of losing
the new password, you can access the settings of the router only after restoring the factory
default settings via the hardware RESET button. This procedure wipes out all settings that
you have configured for your router.
Click the button to continue or click the button to return to the previous page.NEXT BACK
On the next page, check all specified settings.
Also you can save a text file with parameters set by the Wizard to your PC. To do this, click the
SAVE CONFIGURATION FILE button and follow the dialog box appeared.
To finish the Wizard, click the APPLY button. The router will apply settings and reboot. Click the
BACK button to specify other settings.
1 0-9, A-Z, a-z, space, !"#$%&'()*+,-./:;<=>?@[\]^_`{|}~.
Page of 16844

DSL-224 Wireless VDSL2 Router with ASDL2+ Support
User Manual Configuring via Web-based Interface
If the Wizard has configured a WAN connection, after clicking the APPLY button, the page for
checking the Internet availability opens.
Figure 35. Checking the Internet availability.
If the router has been successfully connected to the Internet, click the button.FINISH
If problems appeared when connecting to the Internet, click the button to recheck CHECK AGAIN
the state of the WAN connection.
If problems of connection have not been solved, contact the technical support of your ISP (as a rule,
the technical support phone is provided with the agreement) or the D-Link technical support (the
phone number will be displayed on the page after several attempts of checking the connection).
To specify other settings, click the ADVANCED SETTINGS button. After clicking the
ADVANCED SETTINGS Summary button, the page opens (see the section, Summary Page
page 29).
Page of 16845

DSL-224 Wireless VDSL2 Router with ASDL2+ Support
User Manual Configuring via Web-based Interface
Connection of Multimedia Devices
The Multimedia Devices Connection Wizard helps to configure LAN ports or available wireless
interfaces of the router for connecting additional devices, for example, an IPTV set-top box or IP
phone. Contact your ISP to clarify if you need to configure DSL-224 in order to use these devices.
To start the Wizard, on the page, select the section.Home Connection of Multimedia Devices
Figure 36. The Multimedia Devices Connection Wizard.
Page of 16846
DSL-224 Wireless VDSL2 Router with ASDL2+ Support
User Manual Configuring via Web-based Interface
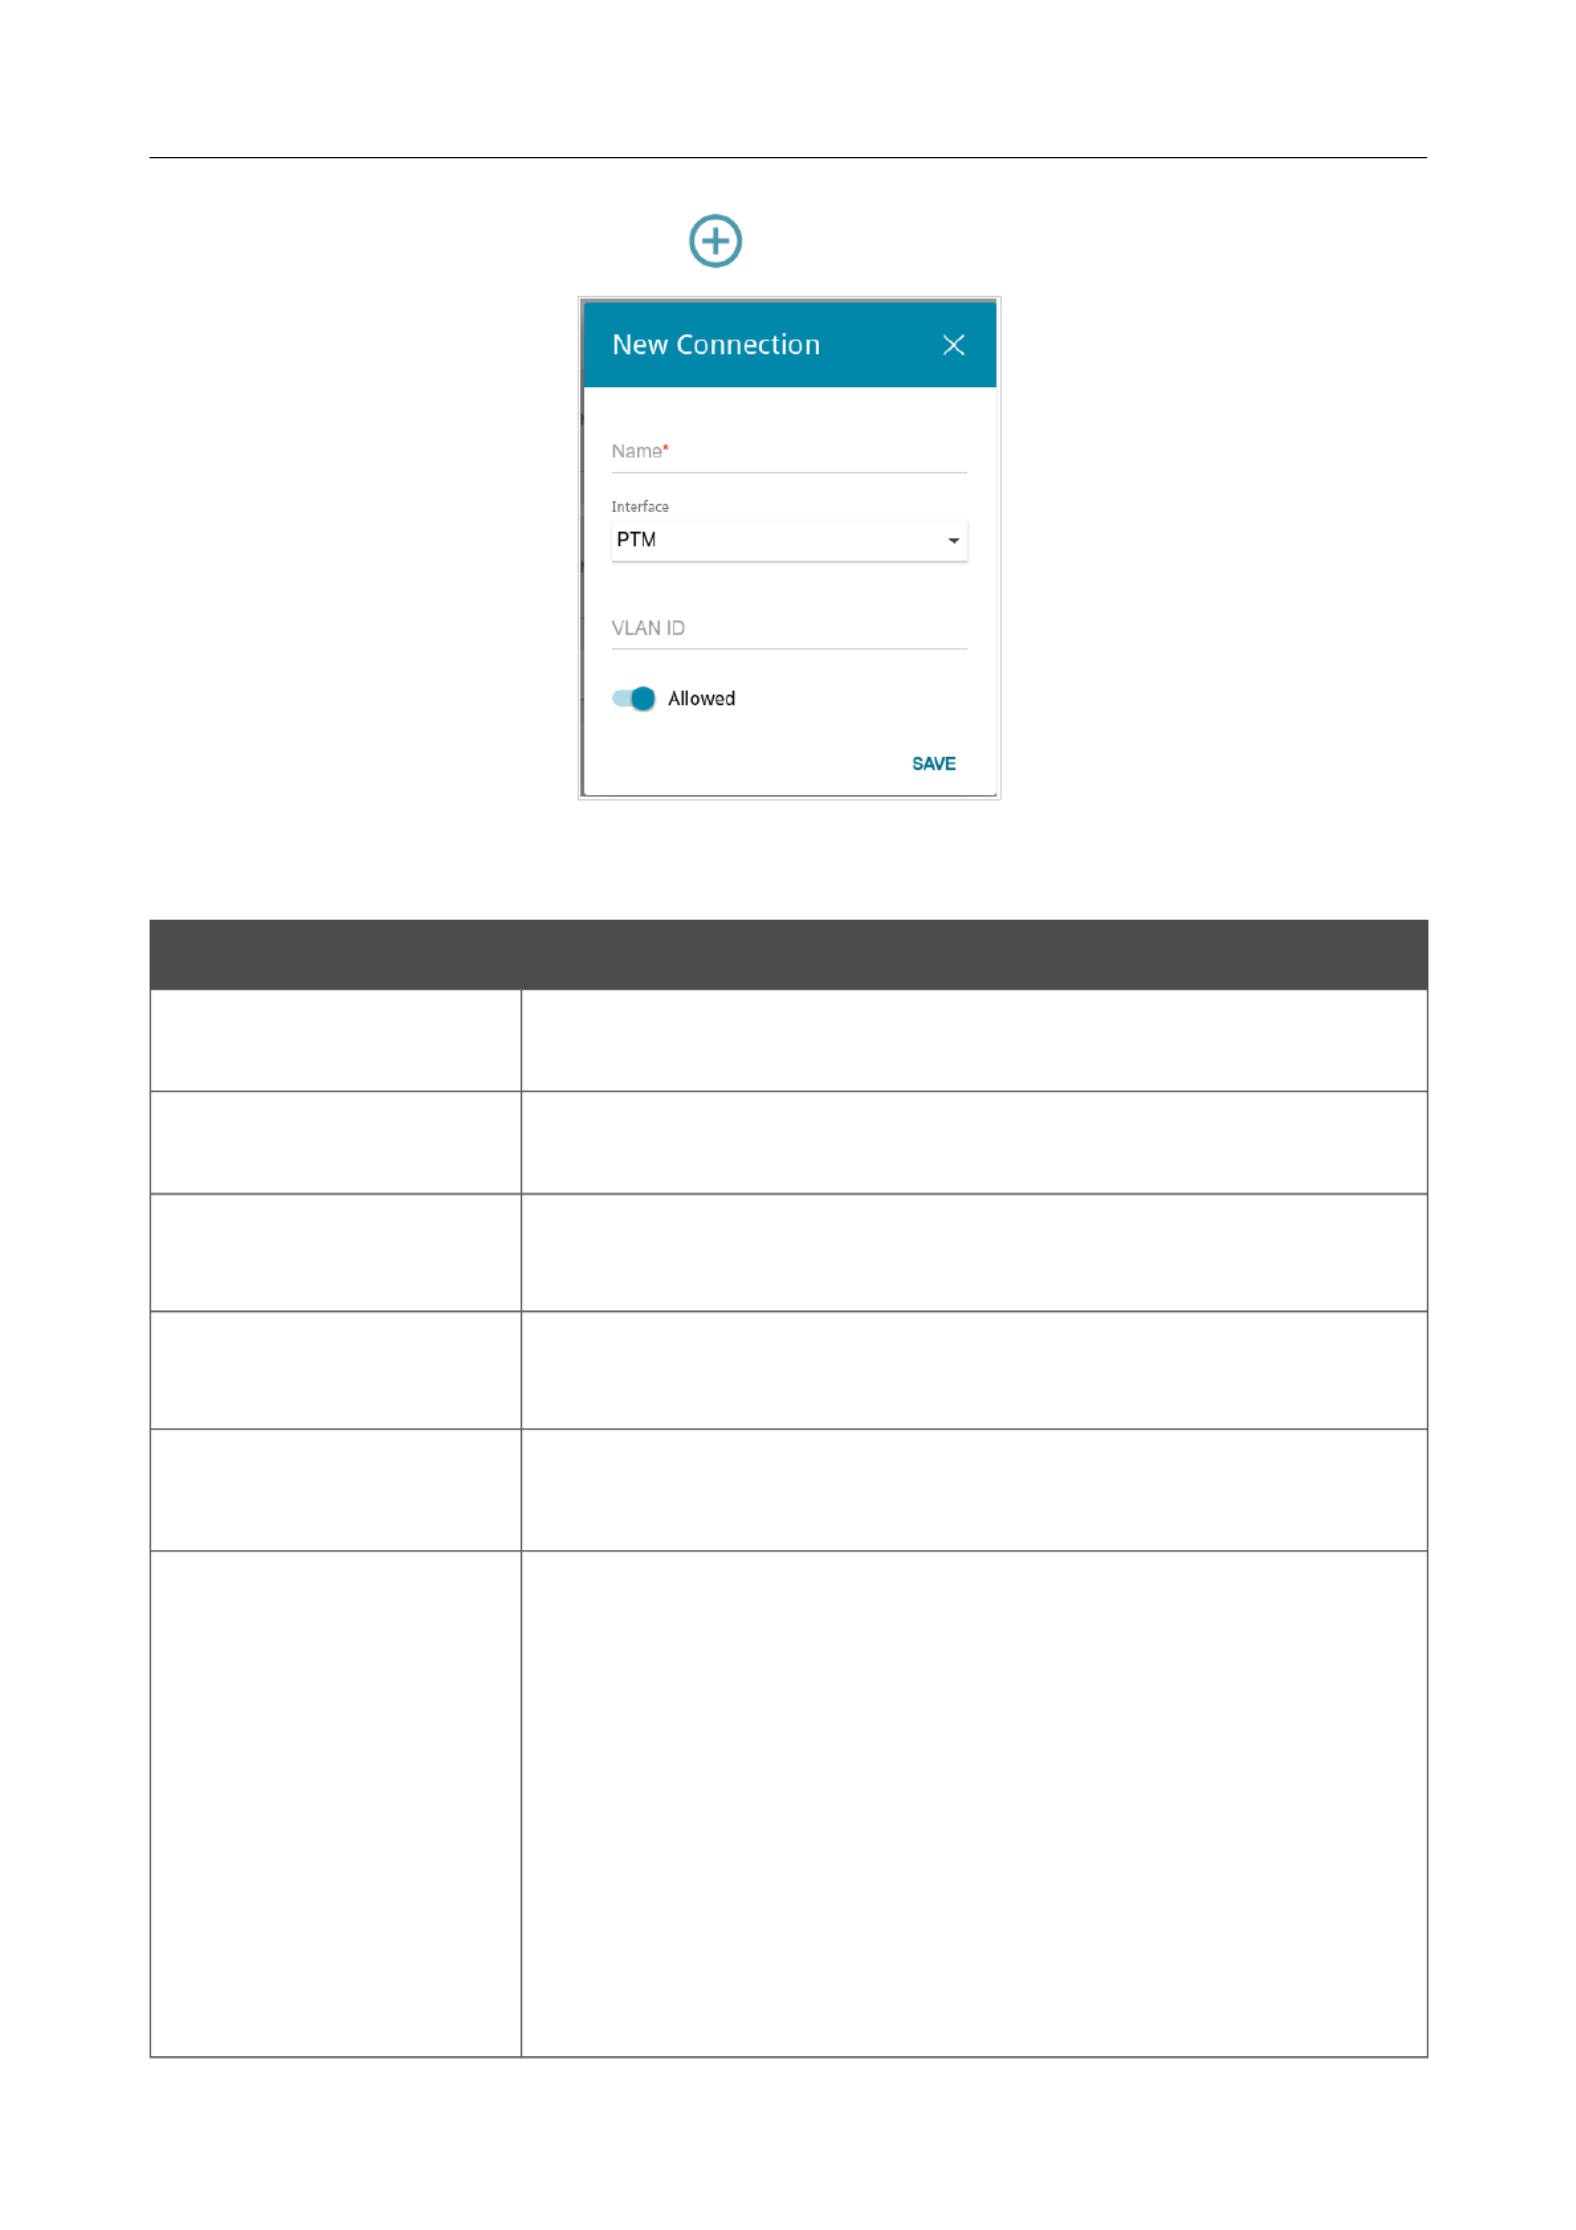
In the WAN Add section, click the icon ( ).
Figure 37. Adding a connection.
You can specify the following parameters:
Parameter Description
Name A name for the connection for easier identification (you can specify
any name).
Interface Select the value for connection to a VDSL line or the PTM DSL
value for connection to an ADSL line.
VPI For the value only.DSL
Virtual Path Identifier. The valid range is from 0 to 255.
VCI For the value only.DSL
Virtual Circuit Identifier. The valid range is from 32 to 65535.
Encapsulation For the value only.DSL
Select or from the drop-down list.LLC VCMUX
QoS class
For the value only.DSL
A class of traffic for this connection.
UBR
( ): The UBR service is used for applications that Unspecified Bit Rate
allow various delays and losses of packets. It is appropriate to use
the UBR service for text/data/image transfer applications, as well as
messaging, distribution, retrieval, and remote terminal applications.
UBR with PCR
( ): The UBR service is used Unspecified Bit Rate with Peak Cell Rate
for applications that allow various delays and losses of packets. The
Page of 16847

DSL-224 Wireless VDSL2 Router with ASDL2+ Support
User Manual Configuring via Web-based Interface
Parameter Description
Peak Cell Rate is a determining factor in how often cells are sent in
an effort to minimize lag or jitter caused by traffic inconsistencies.
When you select this value from the drop-down list, the Peak cell
rate field is displayed. Specify a required value (in cells per second).
CBR
( ): This service is used for applications that require Constant Bit Rate
a constant data rate. It is mostly used for transferring uncompressed
audio and video, e.g. videoconferencing, interactive audio
(telephony), audio/video distribution (television, distance education,
e-shops), and retrieval (video-on demand, audio libraries). When you
select this value from the drop-down list, the field is Peak cell rate
displayed. Specify a required value (in cells per second).
Non Realtime VBR
(Non-Real-time Variable Bit Rate): This service can be used for
transferring data that have critical response-time requirements, e.g.
air ticket booking, bank transactions, and process monitoring. When
you select this value from the drop-down list, the , Peak cell rate
Sustainable cell rate Maximum burst size, and fields are
displayed. Specify required values.
Realtime VBR
(Real-time Variable Bit Rate): This service is used for delay-sensitive
applications such as real time video. The Rt-VBR provides higher
network flexibility than the CBR service. When you select this value
from the drop-down list, the , Peak cell rate Sustainable cell
rate Maximum burst size, and fields are displayed. Specify
required values.
VLAN ID If the service used by your additional equipment is provided via a
VLAN channel with a tag (VLAN ID), specify the needed value.
Allowed Move the switch to the right to enable the connection.
Move the switch to the left to disable the connection.
Click the SAVE button.
Then in the section, from the drop-down list of the element corresponding to LAN Bridged with
the LAN port or wireless interface to which the additional device is connected, select the created
connection. Click the APPLY button.
!
!
!
!! The selected port or wireless interface cannot use the default connection to access the
Internet.
Page of 16848

DSL-224 Wireless VDSL2 Router with ASDL2+ Support
User Manual Configuring via Web-based Interface
To deselect the port or wireless interface, select the value from the drop-down No Bridged with
list of the element corresponding to the needed LAN port or interface. Then in the WAN section,
select the connection which will not be used any longer and click the button. Then click REMOVE
the APPLY button.
Page of 16849

DSL-224 Wireless VDSL2 Router with ASDL2+ Support
User Manual Configuring via Web-based Interface
Statistics
The pages of this section display data on the current state of the router:
• network statistics
• IP addresses leased by the DHCP server
• the routing table
• data on devices connected to the router's network and its web-based interface
• addresses of active multicast groups
• active sessions
•DSL connection status.
Network Statistics
On the page, you can view statistics for all connections existing Statistics / Network Statistics
in the system (WAN connections, LAN, WLAN). For each connection the following data are
displayed: name and state (when the connection is on, its name is highlighted in green, when the
connection is off, its name is highlighted in red), IP address and subnet mask, gateway (if the
connection is established), MAC address, and volume of data received and transmitted (with
increase of the volume the units of measurement are changed automatically: byte, Kbyte, Mbyte,
Gbyte).
Figure 38. The page.Statistics / Network Statistics
To view data on a connection, click the line corresponding to this connection.
Page of 16850

DSL-224 Wireless VDSL2 Router with ASDL2+ Support
User Manual Configuring via Web-based Interface
DHCP
The page displays the information on computers that have been identified by Statistics / DHCP
hostnames and MAC addresses and have got IP addresses from the DHCP server of the device, as
well as the IP address expiration periods (the lease time).
Figure 39. The page.Statistics / DHCP
Page of 16851

DSL-224 Wireless VDSL2 Router with ASDL2+ Support
User Manual Configuring via Web-based Interface
Routing Table
The Statistics / Routing Table page displays the information on routes. The table contains
destination IP addresses, gateways, subnet masks, and other data.
Figure 40. The Statistics / Routing Table page.
Page of 16852

DSL-224 Wireless VDSL2 Router with ASDL2+ Support
User Manual Configuring via Web-based Interface
Clients
On the Statistics / Clients page, you can view the list of devices connected to the local network
of the router.
Figure 41. The page.Statistics / Clients
For each device the following data are displayed: the IP address, the MAC address, and the network
interface to which the device is connected.
Page of 16853
DSL-224 Wireless VDSL2 Router with ASDL2+ Support
User Manual Configuring via Web-based Interface
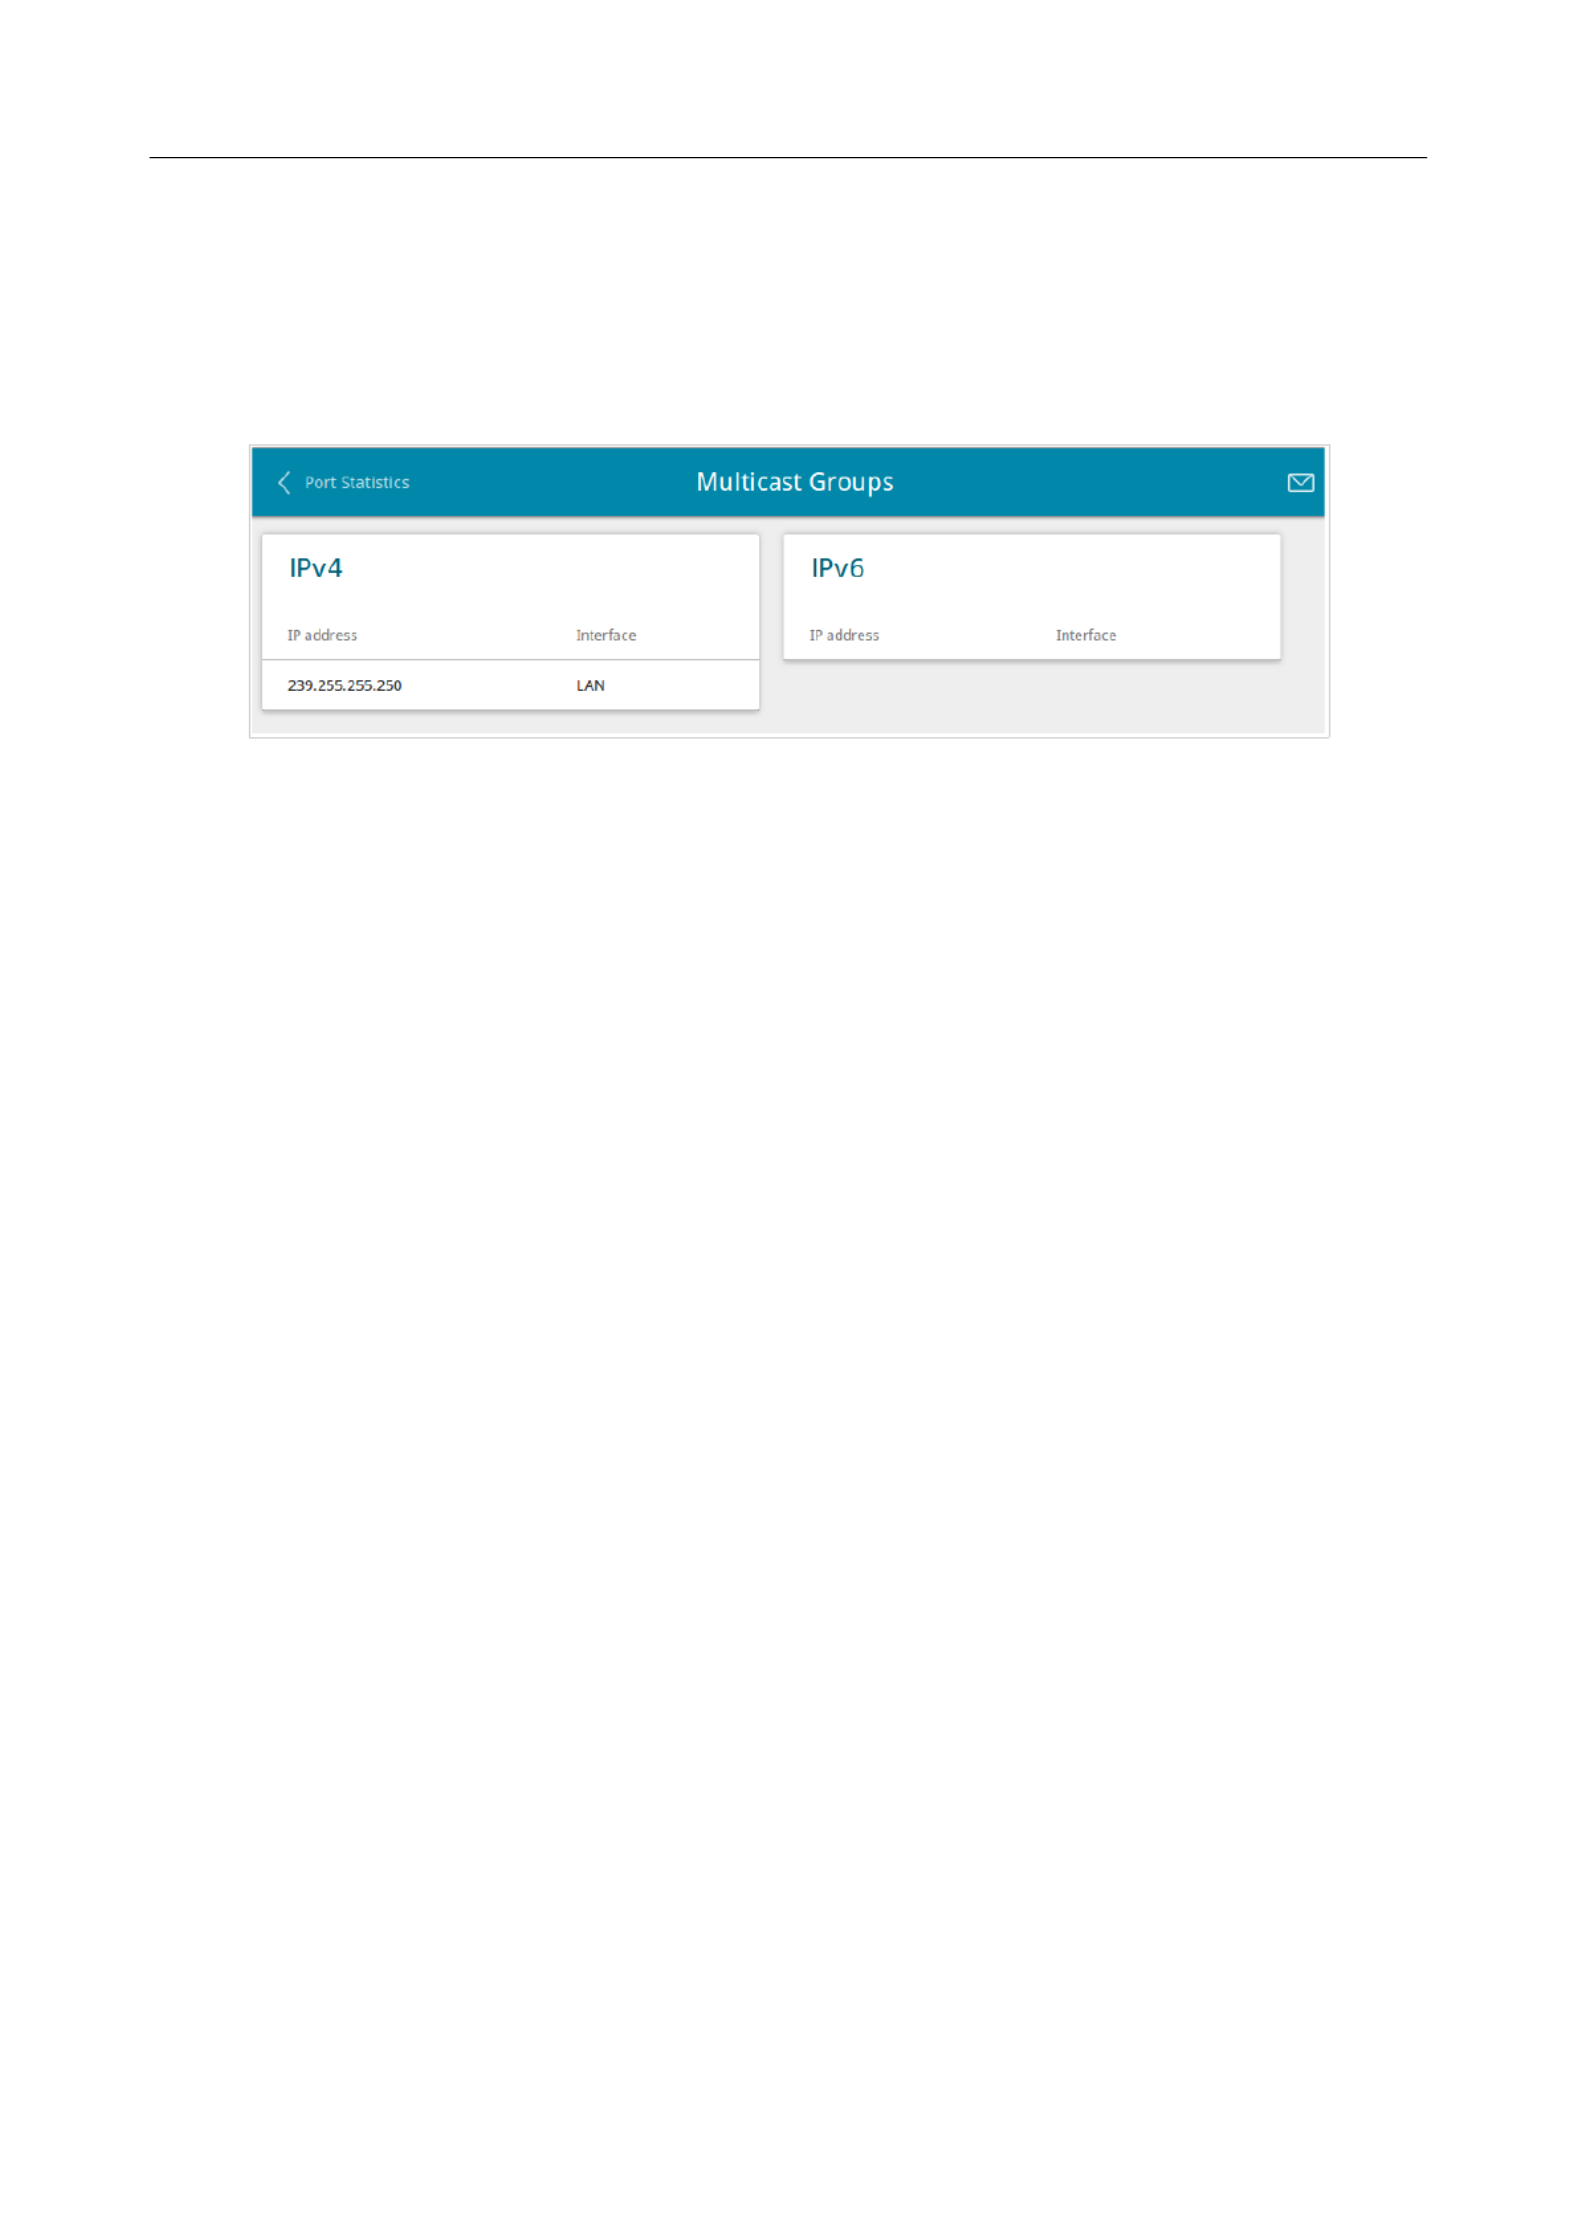
Multicast Groups
The page displays addresses of active multicast groups (including Statistics / Multicast Groups
IPTV channels and groups for transferring service information) to which the device is subscribed,
and the interface through which the device is subscribed.
Figure 42. The page.Statistics / Multicast Groups
Page of 16854

DSL-224 Wireless VDSL2 Router with ASDL2+ Support
User Manual Configuring via Web-based Interface
Clients and Session
On the page, you can view information on current sessions in Statistics / Clients and Session
the router's network. For each session the following data are displayed: the protocol for network
packet transmission, the source IP address and port, and the destination IP address and port.
Figure 43. The page.Statistics / Clients and Session
To view the latest data on current sessions in the router's network, click the button.Refresh
Page of 16855

DSL-224 Wireless VDSL2 Router with ASDL2+ Support
User Manual Configuring via Web-based Interface
DSL Status
The information shown on the page can be used for troubleshooting and Statistics / DSL Status
diagnosing connection problems.
In the and sections you can view data on your DSL line: the line state, data DSL status Line
transfer rate (downstream/upstream traffic), physical parameters of the line (SNR, output power).
The section displays information on transmitted DSL frames.Framing
Figure 44. The page.Statistics / DSL Status
Page of 16856
DSL-224 Wireless VDSL2 Router with ASDL2+ Support
User Manual Configuring via Web-based Interface
Connections Setup
In this menu you can configure basic parameters of the router's local area network and configure
connection to the Internet (a WAN connection).
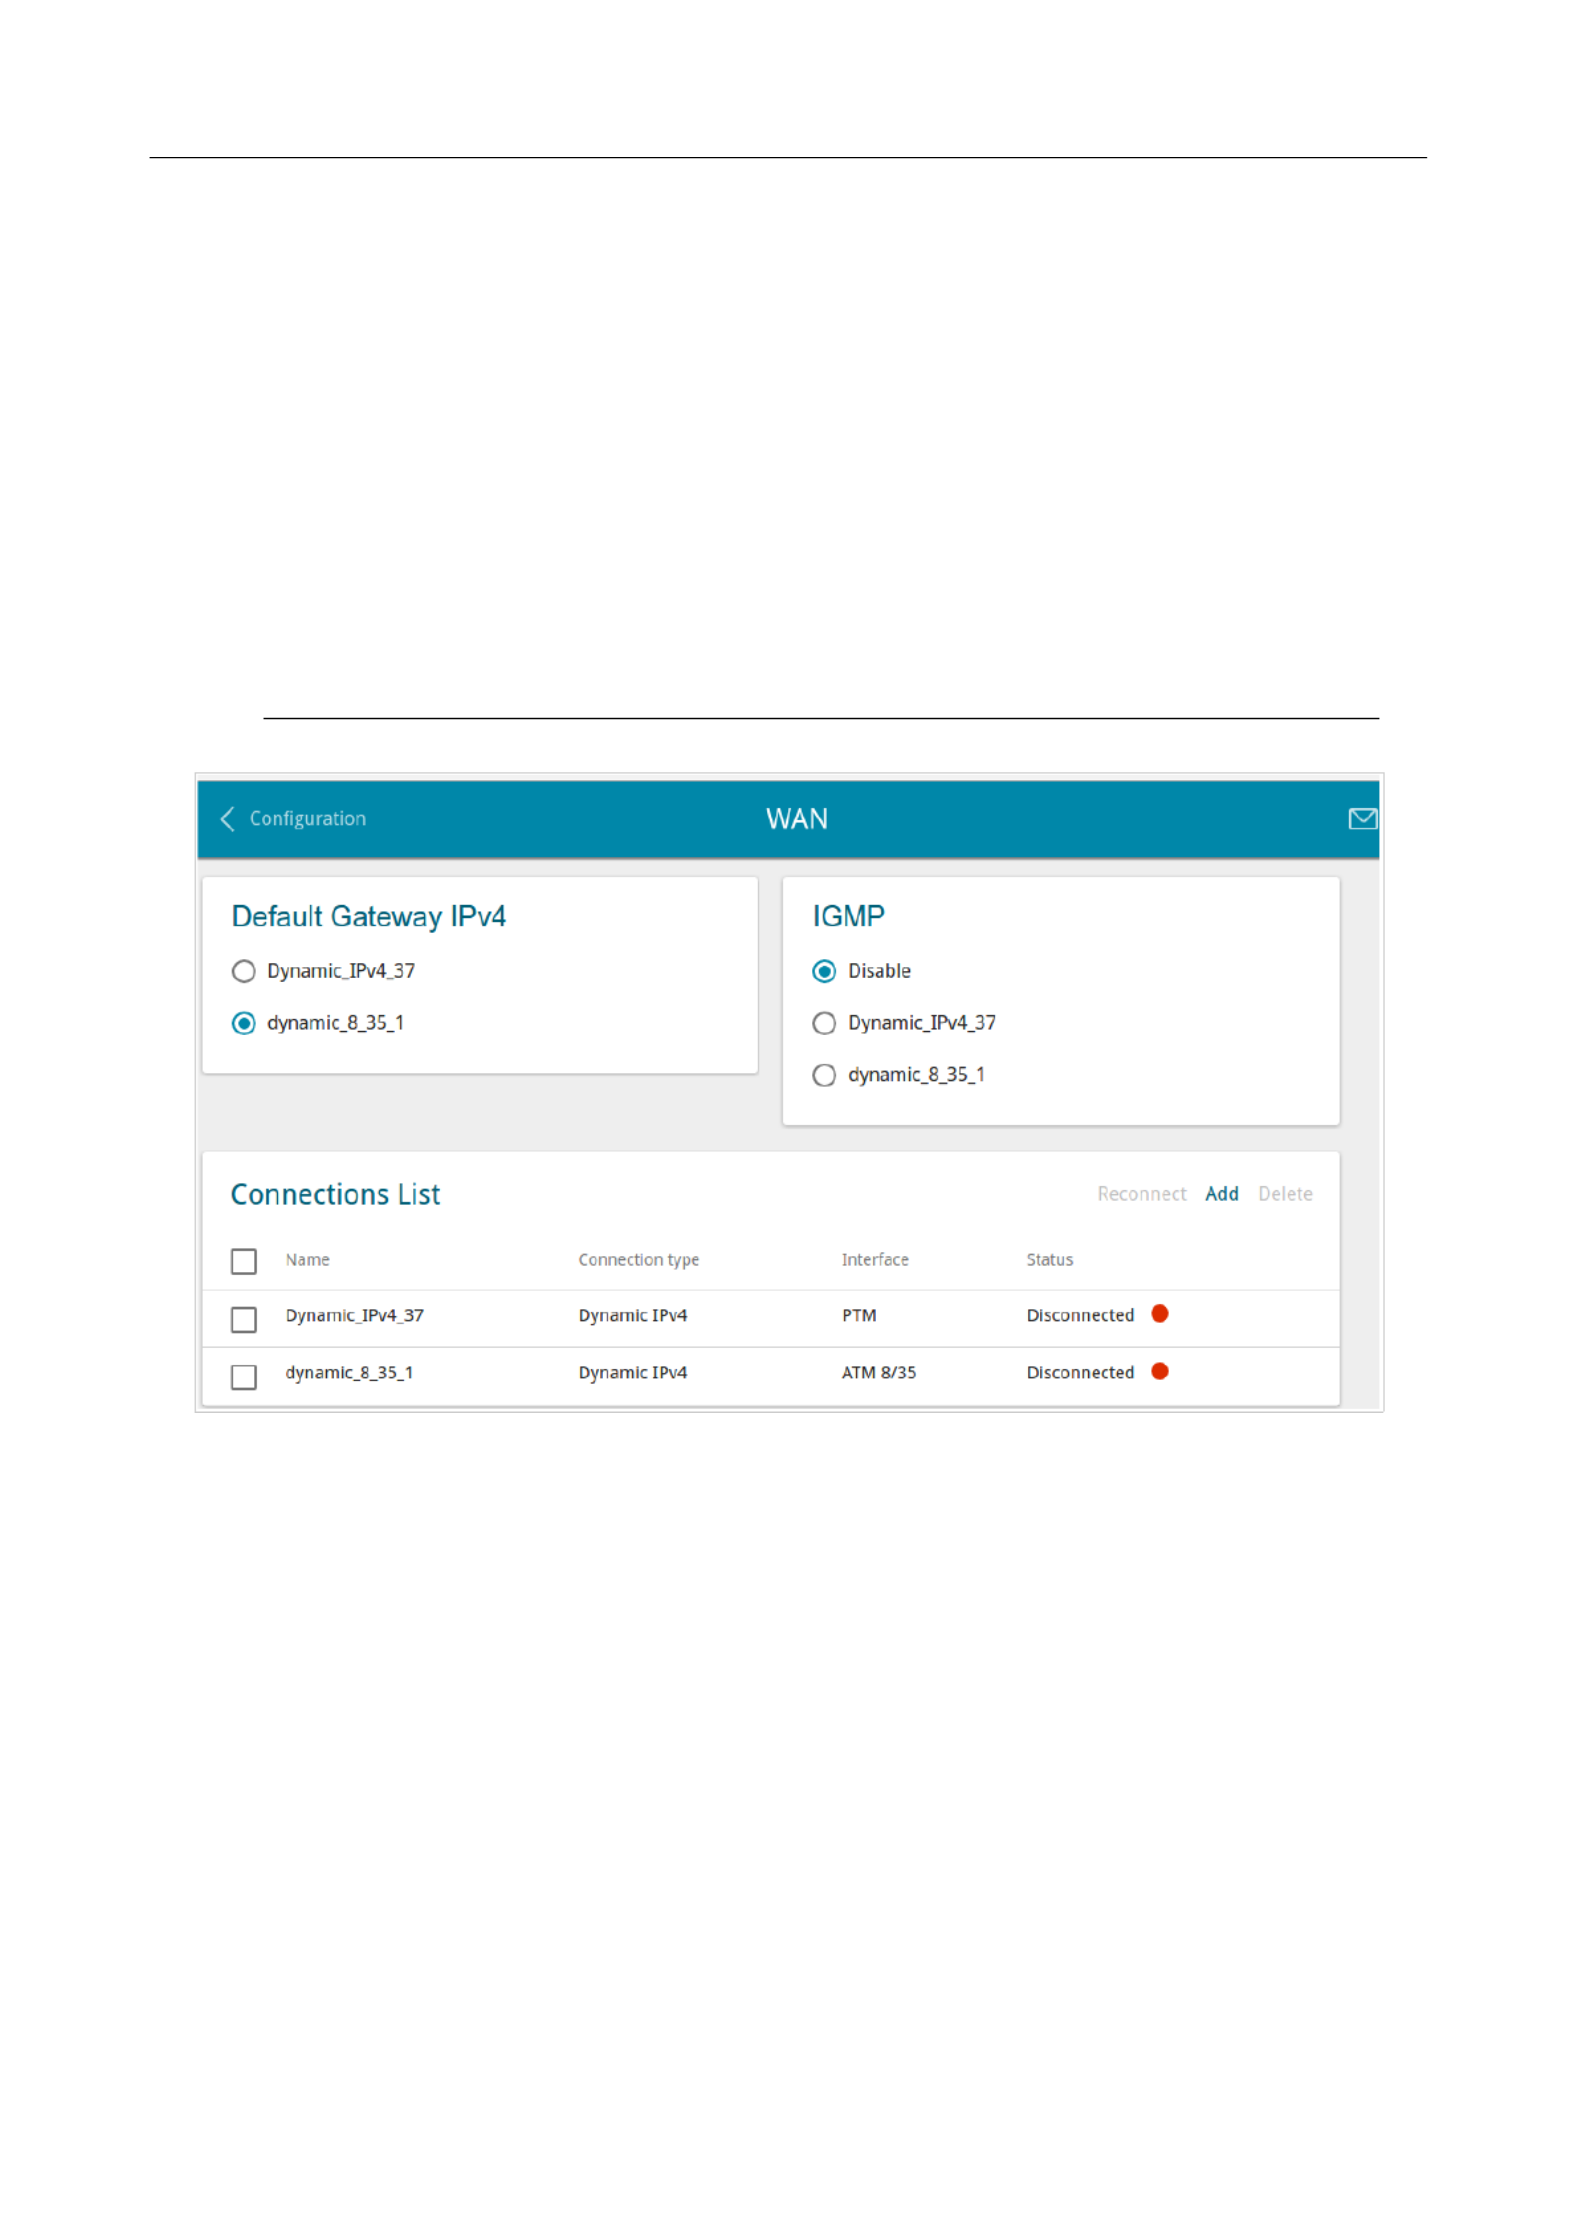
WAN
On the Connections Setup / WAN page, you can create and edit connections used by the router.
By default, VDSL and ADSL connections of the type are configured in the system. Dynamic IP
They are assigned to the DSL port of the router. You can edit these connections or delete them.
!
!
!
!! Please reboot the router after creating, editing, or removing an ADSL WAN connection.
Figure 45. The Connections Setup / WAN page.
To create a new connection, click the button in the section. On the opened Add Connections List
page, specify relevant parameters.
To edit an existing connection, in the section, left-click the relevant line in the Connections List
table. On the opened page, change the parameters and click the APPLY button.
To disconnect a connection and establish it again, select the checkbox located to the left of the
relevant line in the table and click the button.Reconnect
On the tab, mandatory settings of a WAN connection are displayed. To view all available Basic
settings of the needed WAN connection, go to the tab.All Settings
To remove a connection, in the section, select the checkbox located to the left Connections List
of the relevant line in the table and click the button. Also you can remove a connection on Delete
the editing page.
Page of 16857

DSL-224 Wireless VDSL2 Router with ASDL2+ Support
User Manual Configuring via Web-based Interface
To allow multicast traffic (e.g. streaming video) for a connection, in the section, select the IGMP
choice of the radio button which corresponds to this connection (only for connections of the
Dynamic IPv4 or Static IPv4 type).
To forbid multicast traffic for all WAN connections, select the choice of the radio button.Disable
To use one of existing WAN connections as the default IPv4 or IPv6 connection, in the Default
gateway section, select the choice of the radio button which corresponds to this connection.
Page of 16858

DSL-224 Wireless VDSL2 Router with ASDL2+ Support
User Manual Configuring via Web-based Interface
Creating Dynamic IPv4, Static IPv4, or IPoA WAN Connection
To create a connection of the Dynamic IPv4, Static IPv4 or IPoA type, click the button on the Add
Connections Setup / WAN Connections List page in the section. On the opened page, go to
the tab. Then select the relevant value from the All Settings Connection Type drop-down list
and specify the needed values.
Figure 46. The page for creating a new connection. Selecting a connection type.Static IPv4
Parameter Description
Interface
For the Dynamic IPv4 Static IPv4 and types only.
A physical interface to which the new connection will be assigned.
In order to create a VDSL WAN connection, select the value.PTM
In order to create an ADSL WAN connection, select the value
corresponding to the existing interface or the Add new ATM PVC
value for creating a new interface at the physical layer.
Enable connection Move the switch to the right to enable the connection.
Move the switch to the left to disable the connection.
Connection name A name for the connection for easier identification.
Page of 16859
DSL-224 Wireless VDSL2 Router with ASDL2+ Support
User Manual Configuring via Web-based Interface
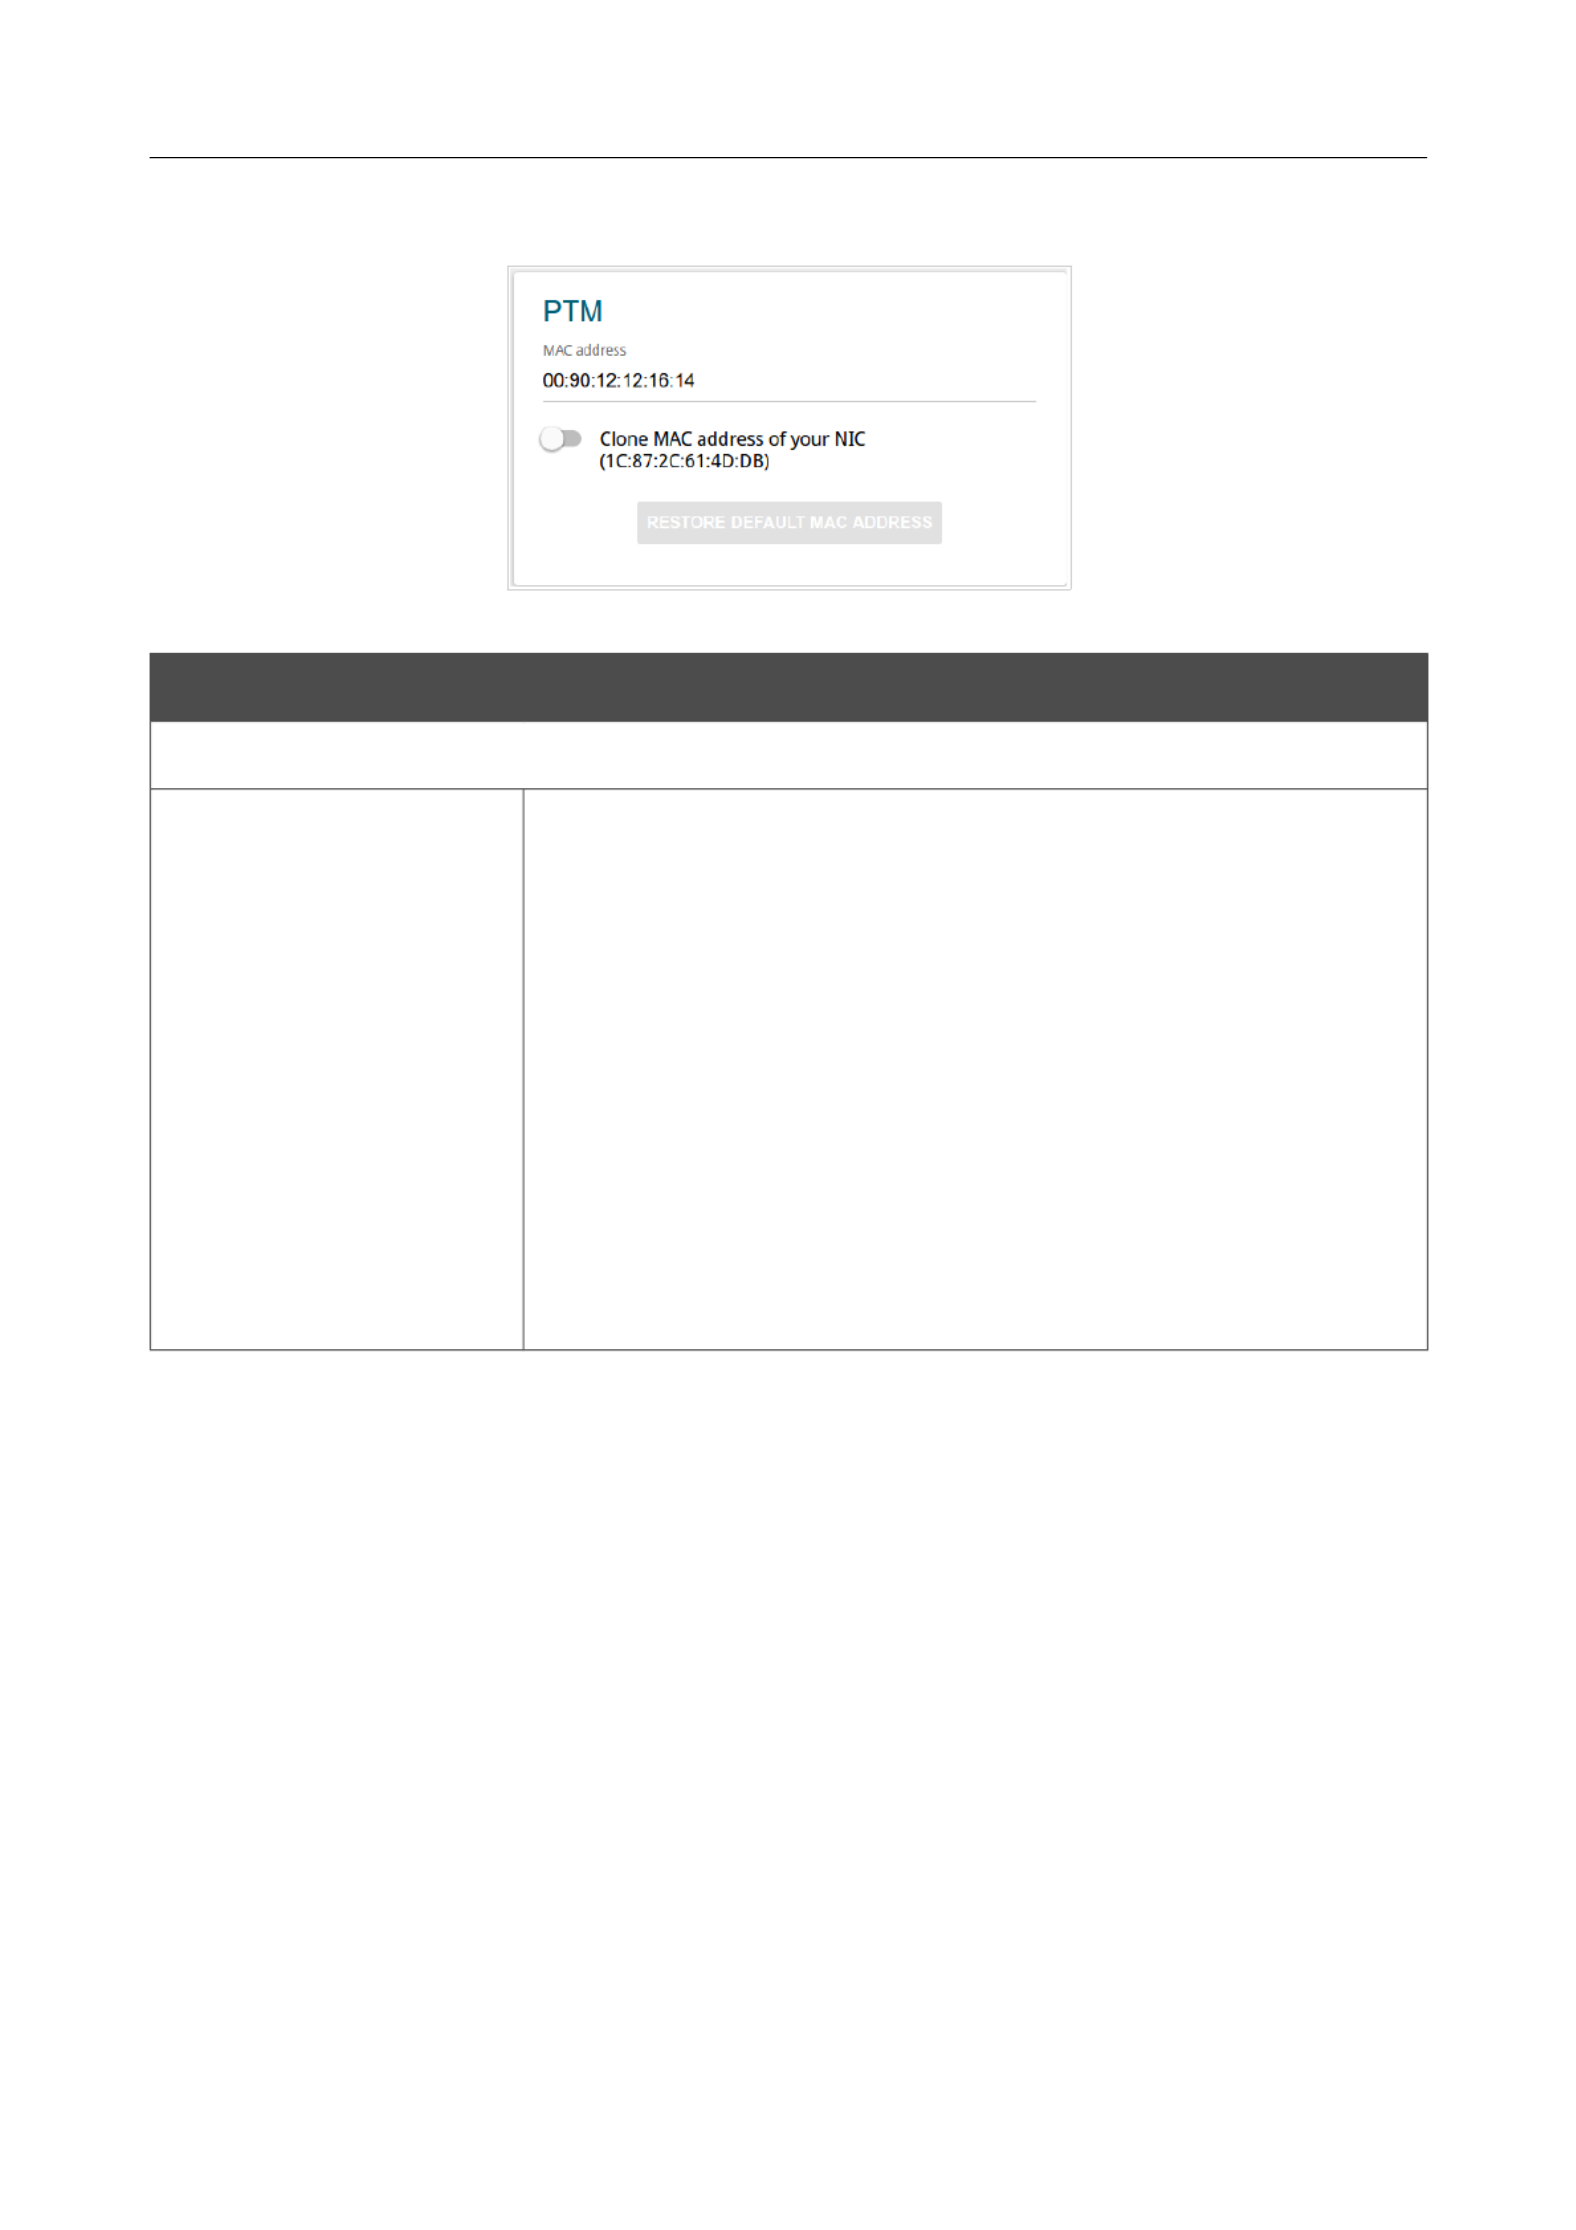
The section is displayed for VDSL WAN connections.PTM
Figure 47. The page for creating a new connection. The section.Static IPv4 PTM
Parameter Description
PTM
MAC address
A MAC address assigned to the interface. This parameter is
mandatory if your ISP uses MAC address binding. In the field, enter
the MAC address registered by your ISP upon concluding the
agreement.
To set the MAC address of the network interface card (of the
computer that is being used to configure the router at the moment)
as the MAC address of the WAN interface, move the Clone MAC
address of your NIC switch to the right. When the switch is
moved to the right, the field is unavailable for editing.
To set the router's MAC address, click the RESTORE DEFAULT
MAC ADDRESS button (the button is available when the switch is
moved to the right).
Page of 16860
DSL-224 Wireless VDSL2 Router with ASDL2+ Support
User Manual Configuring via Web-based Interface
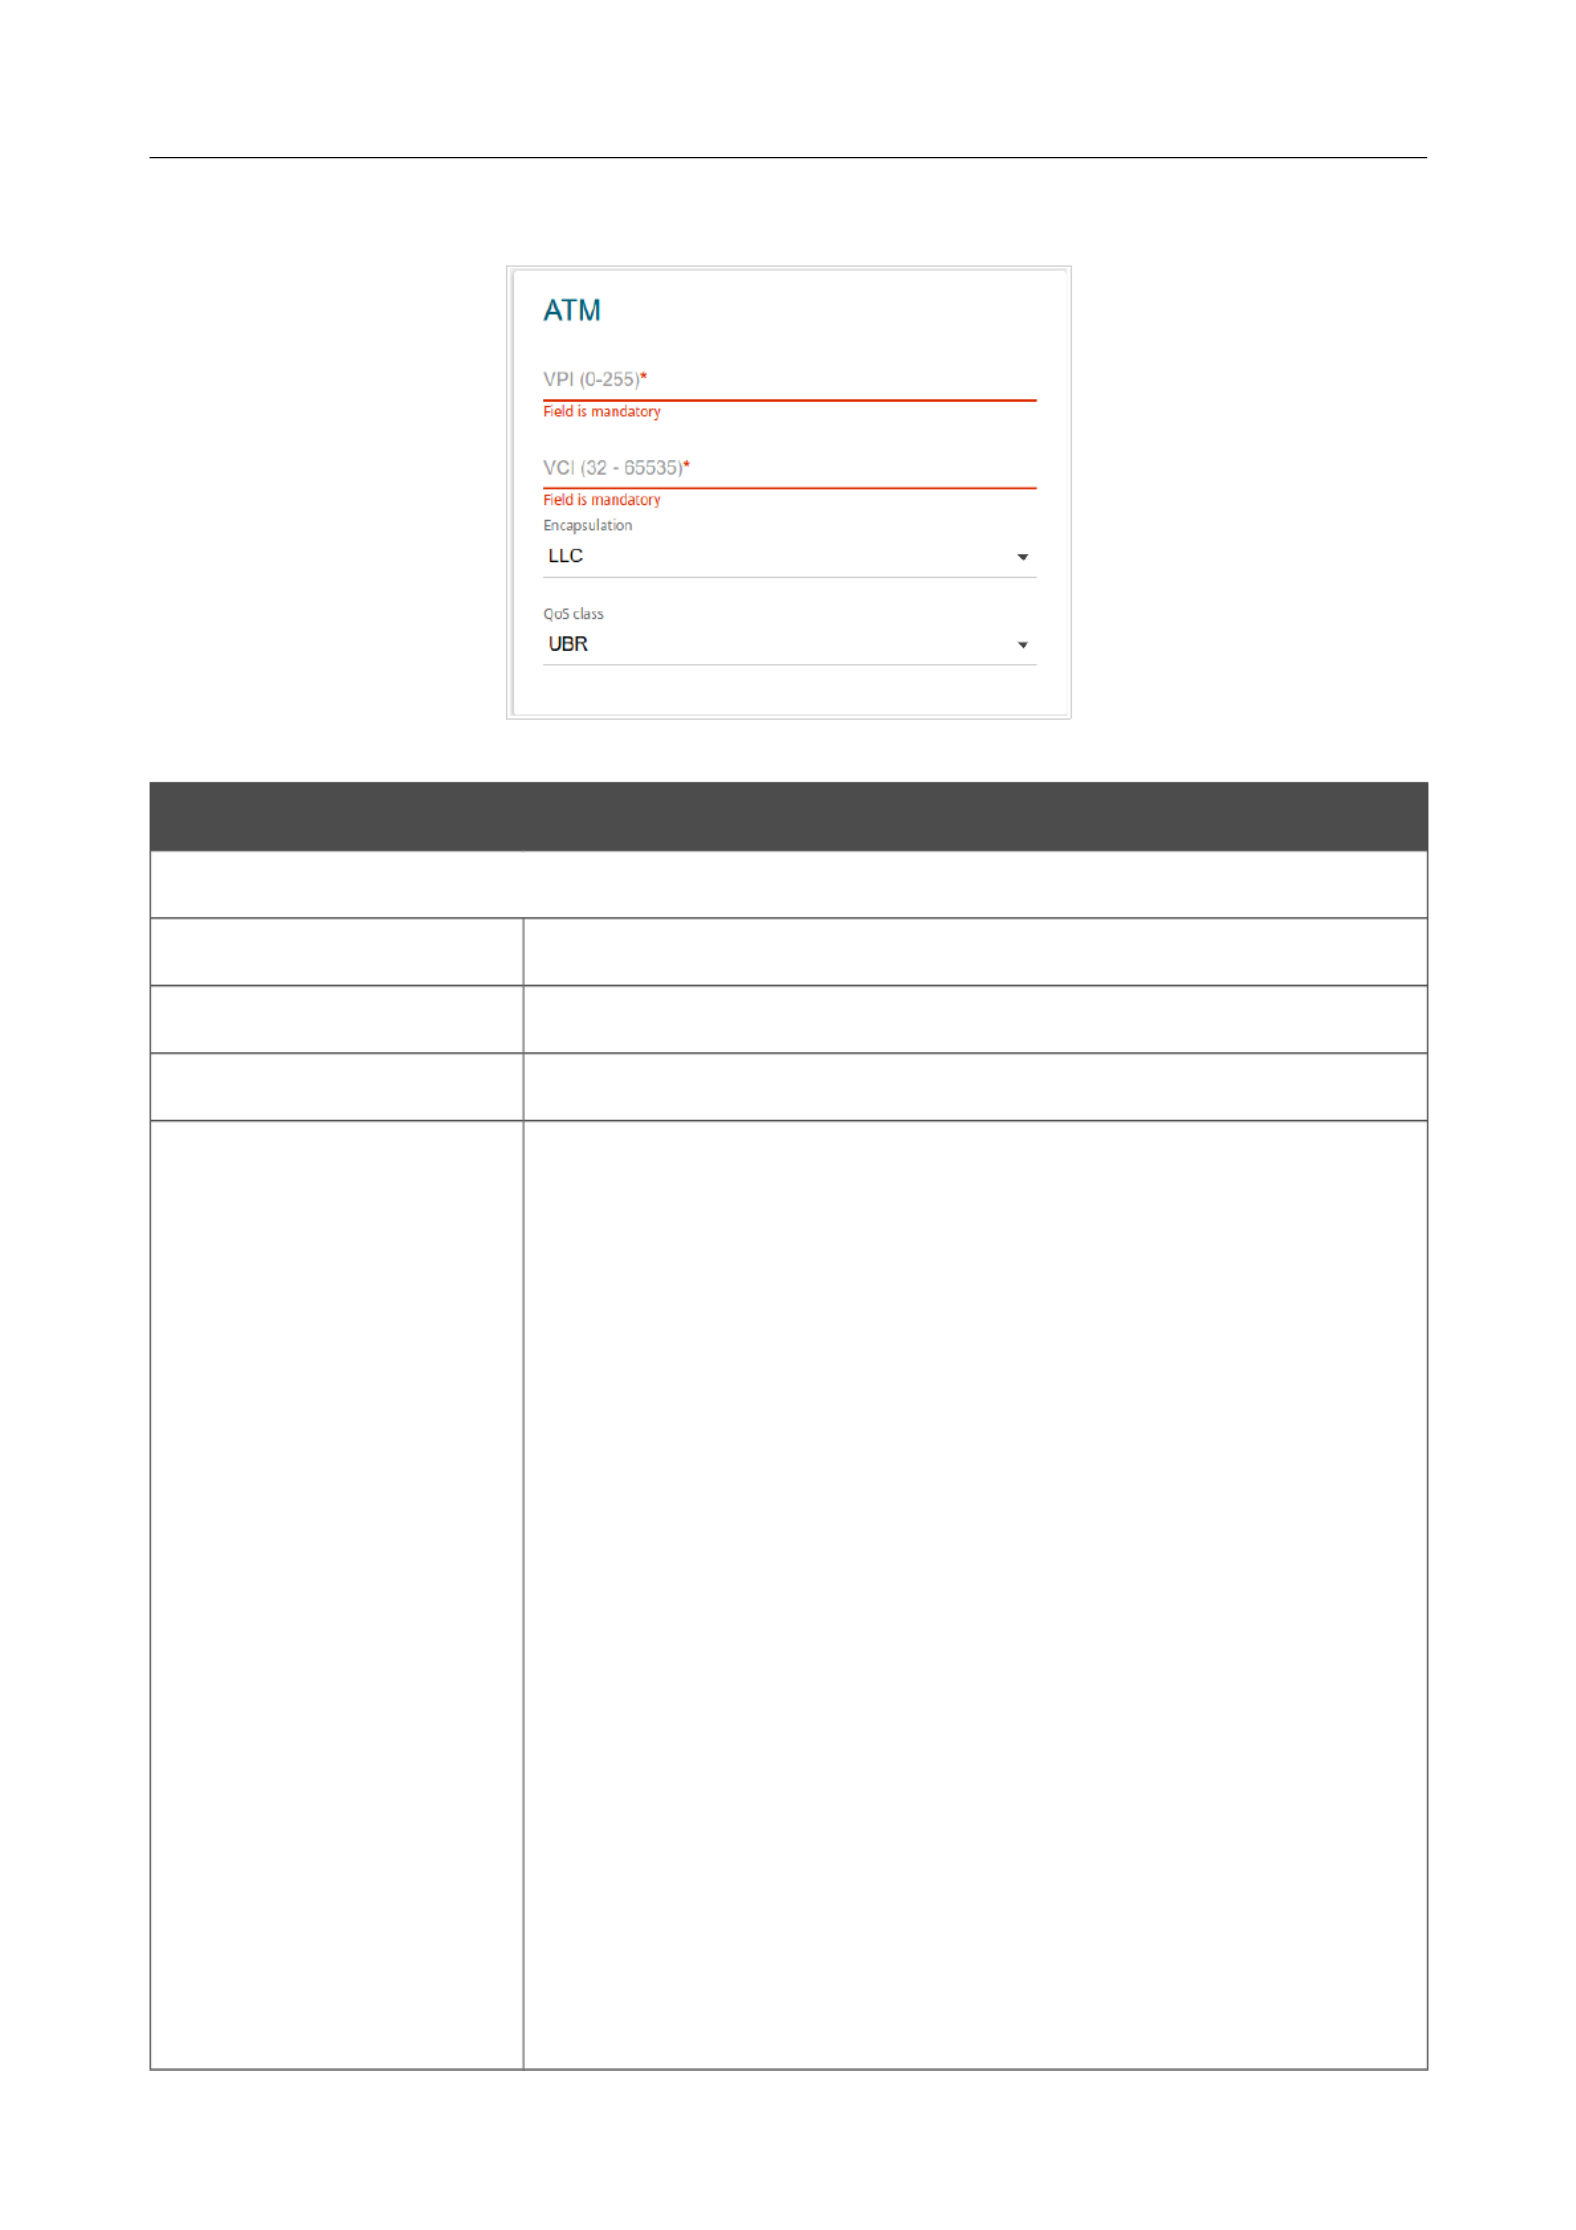
The ATM section is displayed for ADSL WAN connections.
Figure 48. The page for creating a new connection. The Static IPv4 ATM section.
Parameter Description
ATM
VPI Virtual Path Identifier. The valid range is from 0 to 255.
VCI Virtual Circuit Identifier. The valid range is from 32 to 65535.
Encapsulation Mode LLC VCMUXSelect or from the drop-down list.
QoS A class of traffic for this connection.
UBR
( ): The UBR service is used for applications Unspecified Bit Rate
that allow various delays and losses of packets. It is appropriate to
use the UBR service for text/data/image transfer applications, as
well as messaging, distribution, retrieval, and remote terminal
applications.
UBR with PCR
( ): The UBR service is Unspecified Bit Rate with Peak Cell Rate
used for applications that allow various delays and losses of packets.
The Peak Cell Rate is a determining factor in how often cells are
sent in an effort to minimize lag or jitter caused by traffic
inconsistencies. When you select this value from the drop-down list,
the field is displayed. Specify a required value (in Peak Cell Rate
cells per second).
CBR
( ): This service is used for applications that Constant Bit Rate
require a constant data rate. It is mostly used for transferring
uncompressed audio and video, e.g. videoconferencing, interactive
audio (telephony), audio/video distribution (television, distance
Page of 16861

DSL-224 Wireless VDSL2 Router with ASDL2+ Support
User Manual Configuring via Web-based Interface
Parameter Description
education, e-shops), and retrieval (video-on demand, audio
libraries). When you select this value from the drop-down list, the
Peak Cell Rate field is displayed. Specify a required value (in
cells per second).
Non Realtime VBR
(Non-Real-time Variable Bit Rate): This service can be used for
transferring data that have critical response-time requirements, e.g.
air ticket booking, bank transactions, and process monitoring. When
you select this value from the drop-down list, the , Peak Cell Rate
Sustainable Cell Rate Maximum Burst Size, and fields are
displayed. Specify required values.
Realtime VBR
(Real-time Variable Bit Rate): This service is used for delay-
sensitive applications such as real time video. The Rt-VBR provides
higher network flexibility than the CBR service. When you select
this value from the drop-down list, the , Peak Cell Rate
Sustainable Cell Rate Maximum Burst Size, and fields are
displayed. Specify required values.
Page of 16862

DSL-224 Wireless VDSL2 Router with ASDL2+ Support
User Manual Configuring via Web-based Interface
Figure 49. The page for creating a new connection. The section.Static IPv4 IPv4
Parameter Description
IPv4
For and typesStatic IPv4 IPoA
IP Address Enter an IP address for this WAN connection.
Netmask Enter a subnet mask for this WAN connection.
Gateway IP address Enter an IP address of the gateway used by this WAN connection.
Primary DNS server/
Secondary DNS server
Enter addresses of the primary and secondary DNS servers in the
relevant fields.
For typeDynamic IPv4
Obtain DNS server
addresses
automatically
Move the switch to the right to configure automatic assignment of
DNS server addresses. Upon that the and Primary DNS server
Secondary DNS server fields are not available for editing.
Primary DNS server/
Secondary DNS server
Enter addresses of the primary and secondary DNS servers in the
relevant fields.
Vendor ID The identifier of your ISP. .Optional
Host name A name of the router specified by your ISP. .Optional
Page of 16863

DSL-224 Wireless VDSL2 Router with ASDL2+ Support
User Manual Configuring via Web-based Interface
Figure 50. The page for creating a new connection. The section.Static IPv4 Miscellaneous
Parameter Description
Miscellaneous
NAT
If the switch is moved to the right, the network address translation
function is enabled. Do not disable the function unless your ISP
requires this.
Firewall
If the switch is moved to the right, protection against external
connections for the LAN devices is enabled (for example, against
attempts to get information about the LAN devices or to hack a
device from the LAN). For security reasons, it is recommended not
to disable this function.
RIP Move the switch to the right to allow using RIP for this connection.
Ping
If the switch is moved to the right, the router responds to ping
requests from the external network through this connection. For
security reasons, it is recommended to disable this function.
Page of 16864

DSL-224 Wireless VDSL2 Router with ASDL2+ Support
User Manual Configuring via Web-based Interface
Creating Dynamic IPv6 or Static IPv6 WAN Connection
To create a connection of the Dynamic IPv6 or Static IPv6 type, click the button on the Add
Connections Setup / WAN Connections List page in the section. On the opened page, go to
the tab. Then select the relevant value from the All Settings Connection Type drop-down list
and specify the needed values.
Figure 52. The page for creating a new connection. Selecting a connection type.Static IPv6
Parameter Description
Interface
A physical interface to which the new connection will be assigned.
In order to create a VDSL WAN connection, select the value.PTM
In order to create an ADSL WAN connection, select the value
corresponding to the existing interface or the Add new ATM PVC
value for creating a new interface at the physical layer.
Enable connection Move the switch to the right to enable the connection.
Move the switch to the left to disable the connection.
Connection name A name for the connection for easier identification.
Page of 16866

DSL-224 Wireless VDSL2 Router with ASDL2+ Support
User Manual Configuring via Web-based Interface
The section is displayed for VDSL WAN connections.PTM
Figure 53. The page for creating a new connection. The section.Static IPv6 PTM
Parameter Description
PTM
MAC address
A MAC address assigned to the interface. This parameter is
mandatory if your ISP uses MAC address binding. In the field, enter
the MAC address registered by your ISP upon concluding the
agreement.
To set the MAC address of the network interface card (of the
computer that is being used to configure the router at the moment)
as the MAC address of the WAN interface, move the Clone MAC
address of your NIC switch to the right. When the switch is
moved to the right, the field is unavailable for editing.
To set the router's MAC address, click the RESTORE DEFAULT
MAC ADDRESS button (the button is available when the switch is
moved to the right).
Page of 16867

DSL-224 Wireless VDSL2 Router with ASDL2+ Support
User Manual Configuring via Web-based Interface
The ATM section is displayed for ADSL WAN connections.
Figure 54. The page for creating a new connection. The Static IPv6 ATM section.
Parameter Description
ATM
VPI Virtual Path Identifier. The valid range is from 0 to 255.
VCI Virtual Circuit Identifier. The valid range is from 32 to 65535.
Encapsulation Mode LLC VCMUXSelect or from the drop-down list.
QoS A class of traffic for this connection.
UBR
( ): The UBR service is used for applications Unspecified Bit Rate
that allow various delays and losses of packets. It is appropriate to
use the UBR service for text/data/image transfer applications, as
well as messaging, distribution, retrieval, and remote terminal
applications.
UBR with PCR
( ): The UBR service is Unspecified Bit Rate with Peak Cell Rate
used for applications that allow various delays and losses of packets.
The Peak Cell Rate is a determining factor in how often cells are
sent in an effort to minimize lag or jitter caused by traffic
inconsistencies. When you select this value from the drop-down list,
the field is displayed. Specify a required value (in Peak Cell Rate
cells per second).
CBR
( ): This service is used for applications that Constant Bit Rate
require a constant data rate. It is mostly used for transferring
uncompressed audio and video, e.g. videoconferencing, interactive
audio (telephony), audio/video distribution (television, distance
Page of 16868

DSL-224 Wireless VDSL2 Router with ASDL2+ Support
User Manual Configuring via Web-based Interface
Parameter Description
education, e-shops), and retrieval (video-on demand, audio
libraries). When you select this value from the drop-down list, the
Peak Cell Rate field is displayed. Specify a required value (in
cells per second).
Non Realtime VBR
(Non-Real-time Variable Bit Rate): This service can be used for
transferring data that have critical response-time requirements, e.g.
air ticket booking, bank transactions, and process monitoring. When
you select this value from the drop-down list, the , Peak Cell Rate
Sustainable Cell Rate Maximum Burst Size, and fields are
displayed. Specify required values.
Realtime VBR
(Real-time Variable Bit Rate): This service is used for delay-
sensitive applications such as real time video. The Rt-VBR provides
higher network flexibility than the CBR service. When you select
this value from the drop-down list, the , Peak Cell Rate
Sustainable Cell Rate Maximum Burst Size, and fields are
displayed. Specify required values.
Page of 16869

DSL-224 Wireless VDSL2 Router with ASDL2+ Support
User Manual Configuring via Web-based Interface
Figure 55. The page for creating a new connection. The section.Static IPv6 IPv6
Parameter Description
IPv6
For typeStatic IPv6
IPv6 address Enter an IPv6 address for this WAN connection.
Prefix The length of the subnet prefix. The value 64 is used usually.
Gateway IPv6 address Enter an IPv6 address of the gateway used by this WAN connection.
Primary IPv6 DNS
server/Secondary IPv6
DNS server
Enter addresses of the primary and secondary IPv6 DNS servers in
the relevant fields.
For typeDynamic IPv6
Get IPv6 Select a method for IPv6 address assignment from the drop-down
list or leave the value.Automatically
Gateway by SLAAC
Move the switch to the right to automatically assign the IPv6
gateway address with help of SLAAC (Stateless Address
Autoconfiguration).
Gateway IPv6 address The address of the IPv6 gateway. The field is available for editing,
if the switch is moved to the left.Gateway by SLAAC
Obtain DNS server
addresses
automatically
Move the switch to the right to configure automatic assignment of
IPv6 DNS server addresses. Upon that the Primary IPv6 DNS
server Secondary IPv6 DNS server and fields are not available
for editing.
Page of 16870

DSL-224 Wireless VDSL2 Router with ASDL2+ Support
User Manual Configuring via Web-based Interface
Parameter Description
Primary IPv6 DNS
server/Secondary IPv6
DNS server
Enter addresses of the primary and secondary IPv6 DNS servers in
the relevant fields.
Figure 56. The page for creating a new connection. The section.Static IPv6 Miscellaneous
Parameter Description
Miscellaneous
Firewall
If the switch is moved to the right, protection against external
connections for the LAN devices is enabled (for example, against
attempts to get information about the LAN devices or to hack a
device from the LAN). For security reasons, it is recommended not
to disable this function.
RIP Move the switch to the right to allow using RIP for this connection.
Ping
If the switch is moved to the right, the router responds to ping
requests from the external network through this connection. For
security reasons, it is recommended to disable this function.
Page of 16871

DSL-224 Wireless VDSL2 Router with ASDL2+ Support
User Manual Configuring via Web-based Interface
The section is displayed for VDSL WAN connections.PTM
Figure 59. The page for creating a new connection. The section.PPPoE PTM
Parameter Description
PTM
MAC address
A MAC address assigned to the interface. This parameter is
mandatory if your ISP uses MAC address binding. In the field, enter
the MAC address registered by your ISP upon concluding the
agreement.
To set the MAC address of the network interface card (of the
computer that is being used to configure the router at the moment)
as the MAC address of the WAN interface, move the Clone MAC
address of your NIC switch to the right. When the switch is
moved to the right, the field is unavailable for editing.
To set the router's MAC address, click the RESTORE DEFAULT
MAC ADDRESS button (the button is available when the switch is
moved to the right).
Page of 16874

DSL-224 Wireless VDSL2 Router with ASDL2+ Support
User Manual Configuring via Web-based Interface
Parameter Description
education, e-shops), and retrieval (video-on demand, audio
libraries). When you select this value from the drop-down list, the
Peak Cell Rate field is displayed. Specify a required value (in
cells per second).
Non Realtime VBR
(Non-Real-time Variable Bit Rate): This service can be used for
transferring data that have critical response-time requirements, e.g.
air ticket booking, bank transactions, and process monitoring. When
you select this value from the drop-down list, the , Peak Cell Rate
Sustainable Cell Rate Maximum Burst Size, and fields are
displayed. Specify required values.
Realtime VBR
(Real-time Variable Bit Rate): This service is used for delay-
sensitive applications such as real time video. The Rt-VBR provides
higher network flexibility than the CBR service. When you select
this value from the drop-down list, the , Peak Cell Rate
Sustainable Cell Rate Maximum Burst Size, and fields are
displayed. Specify required values.
Page of 16876
Termékspecifikációk
| Márka: | D-Link |
| Kategória: | router |
| Modell: | DSL-224 |
Szüksége van segítségre?
Ha segítségre van szüksége D-Link DSL-224, tegyen fel kérdést alább, és más felhasználók válaszolnak Önnek
Útmutatók router D-Link

6 Január 2025
6 Január 2025
6 Január 2025
3 Január 2025
3 Január 2025
29 December 2024
25 December 2024
15 December 2024
8 December 2024
16 Október 2024
Útmutatók router
- router Samsung
- router Acer
- router Milwaukee
- router Bosch
- router AEG
- router StarTech.com
- router Einhell
- router Nokia
- router HP
- router Makita
- router BenQ
- router Apple
- router Ubiquiti Networks
- router Siemens
- router TP-Link
- router Medion
- router Motorola
- router Vimar
- router LogiLink
- router Alcatel
- router Roland
- router TCL
- router Digitus
- router Zebra
- router Xiaomi
- router TRENDnet
- router Mercusys
- router AVM
- router EZVIZ
- router Dell
- router Lancom
- router Strong
- router Gigabyte
- router Conceptronic
- router Thomson
- router Juniper
- router Kyocera
- router Hikvision
- router Keewifi
- router Vivanco
- router Netgear
- router Huawei
- router Asus
- router Vtech
- router Hama
- router Zoom
- router Renkforce
- router Synology
- router Draytek
- router Iogear
- router Güde
- router Hitachi
- router Mikrotik
- router Toolcraft
- router ZyXEL
- router SPL
- router Dahua Technology
- router Smart-AVI
- router Black & Decker
- router Devolo
- router Planet
- router Tenda
- router BT
- router Black Box
- router MSI
- router Gembird
- router Cisco
- router PowerPlus
- router ATen
- router Google
- router Metabo
- router Bea-fon
- router ZTE
- router Edimax
- router Vodafone
- router ModeCom
- router HiKOKI
- router Foscam
- router Milan
- router Manhattan
- router Kogan
- router Festool
- router EnGenius
- router Sigma
- router Western Digital
- router Media-Tech
- router Blustream
- router Milesight
- router Moxa
- router Sagem
- router Razer
- router Trust
- router Porter-Cable
- router Konig
- router Alfa
- router MuxLab
- router DeWalt
- router AVMATRIX
- router IFM
- router A-NeuVideo
- router Atlona
- router Schneider
- router AJA
- router Lindy
- router Cudy
- router Barco
- router QNAP
- router NEC
- router Silverline
- router Cotech
- router Siig
- router Gefen
- router Kathrein
- router Avenview
- router Lantronix
- router Technicolor
- router FSR
- router Topcom
- router Holzmann
- router Arris
- router Anker
- router I-TEC
- router Keenetic
- router Linksys
- router Teltonika
- router Sitecom
- router Intelix
- router Comprehensive
- router Ocean Matrix
- router Digitalinx
- router Alfatron
- router Belkin
- router RGBlink
- router Kopul
- router KanexPro
- router Key Digital
- router Kramer
- router BZBGear
- router UPC
- router Allnet
- router Allied Telesis
- router Airlive
- router Actiontec
- router Proximus
- router Skil
- router Eminent
- router Nilox
- router Sonos
- router Patton
- router Techly
- router Totolink
- router KPN
- router Netis
- router Envivo
- router Buffalo
- router Nest
- router LevelOne
- router ICIDU
- router Clas Ohlson
- router AT&T
- router Sweex
- router Aruba
- router Phicomm
- router Kasda
- router Jung
- router Digi
- router Verizon
- router Billion
- router T-Mobile
- router RAVPower
- router Hawking Technologies
- router Nexxt
- router Beafon
- router Kraun
- router LTS
- router Zolid
- router Sagemcom
- router Telstra
- router Eero
- router Advantech
- router Mercku
- router Hercules
- router Xantech
- router Intellinet
- router Arcadyan
- router Digiconnect
- router Ubee
- router SMC
- router Tele 2
- router Peak
- router CradlePoint
- router Davolink
- router Sixnet
- router 7inova
- router AVPro Edge
- router F-Secure
- router Rosewill
- router Digicom
- router Sabrent
- router On Networks
- router PENTAGRAM
- router Leoxsys
- router Readynet
- router OneAccess
- router Accelerated
- router Nexaira
- router Hamlet
- router Approx
- router T-com
- router Amped Wireless
- router Cambium Networks
- router 3Com
- router WyreStorm
- router Ruckus Wireless
- router Dovado
- router Mach Power
- router EXSYS
- router NetComm
- router Comtrend
- router Premiertek
- router GL.iNet
- router Shinybow
- router Edgewater
- router Atlantis Land
- router Lumantek
- router Starlink
- router PulseAudio
- router Predator
- router Evolution
- router Luxul
- router StarIink
- router Silentwind
- router Keezel
- router United Telecom
- router Wisetiger
Legújabb útmutatók router

9 Április 2025

9 Április 2025
9 Április 2025

31 Március 2025
30 Március 2025
30 Március 2025
30 Március 2025
30 Március 2025
30 Március 2025
23 Március 2025