Használati útmutató Crestron PP-100-W
Crestron
okos otthon
PP-100-W
Olvassa el alább 📖 a magyar nyelvű használati útmutatót Crestron PP-100-W (2 oldal) a okos otthon kategóriában. Ezt az útmutatót 6 ember találta hasznosnak és 2 felhasználó értékelte átlagosan 4.5 csillagra
Oldal 1/2
1
quickstart guide
www.crestron.com
Specifications subject to
change without notice.
QUICKSTART DOC. 7676B (2043124) 04.16
Crestron Home Beacon Setup App
CRESTRON-PINPOINT
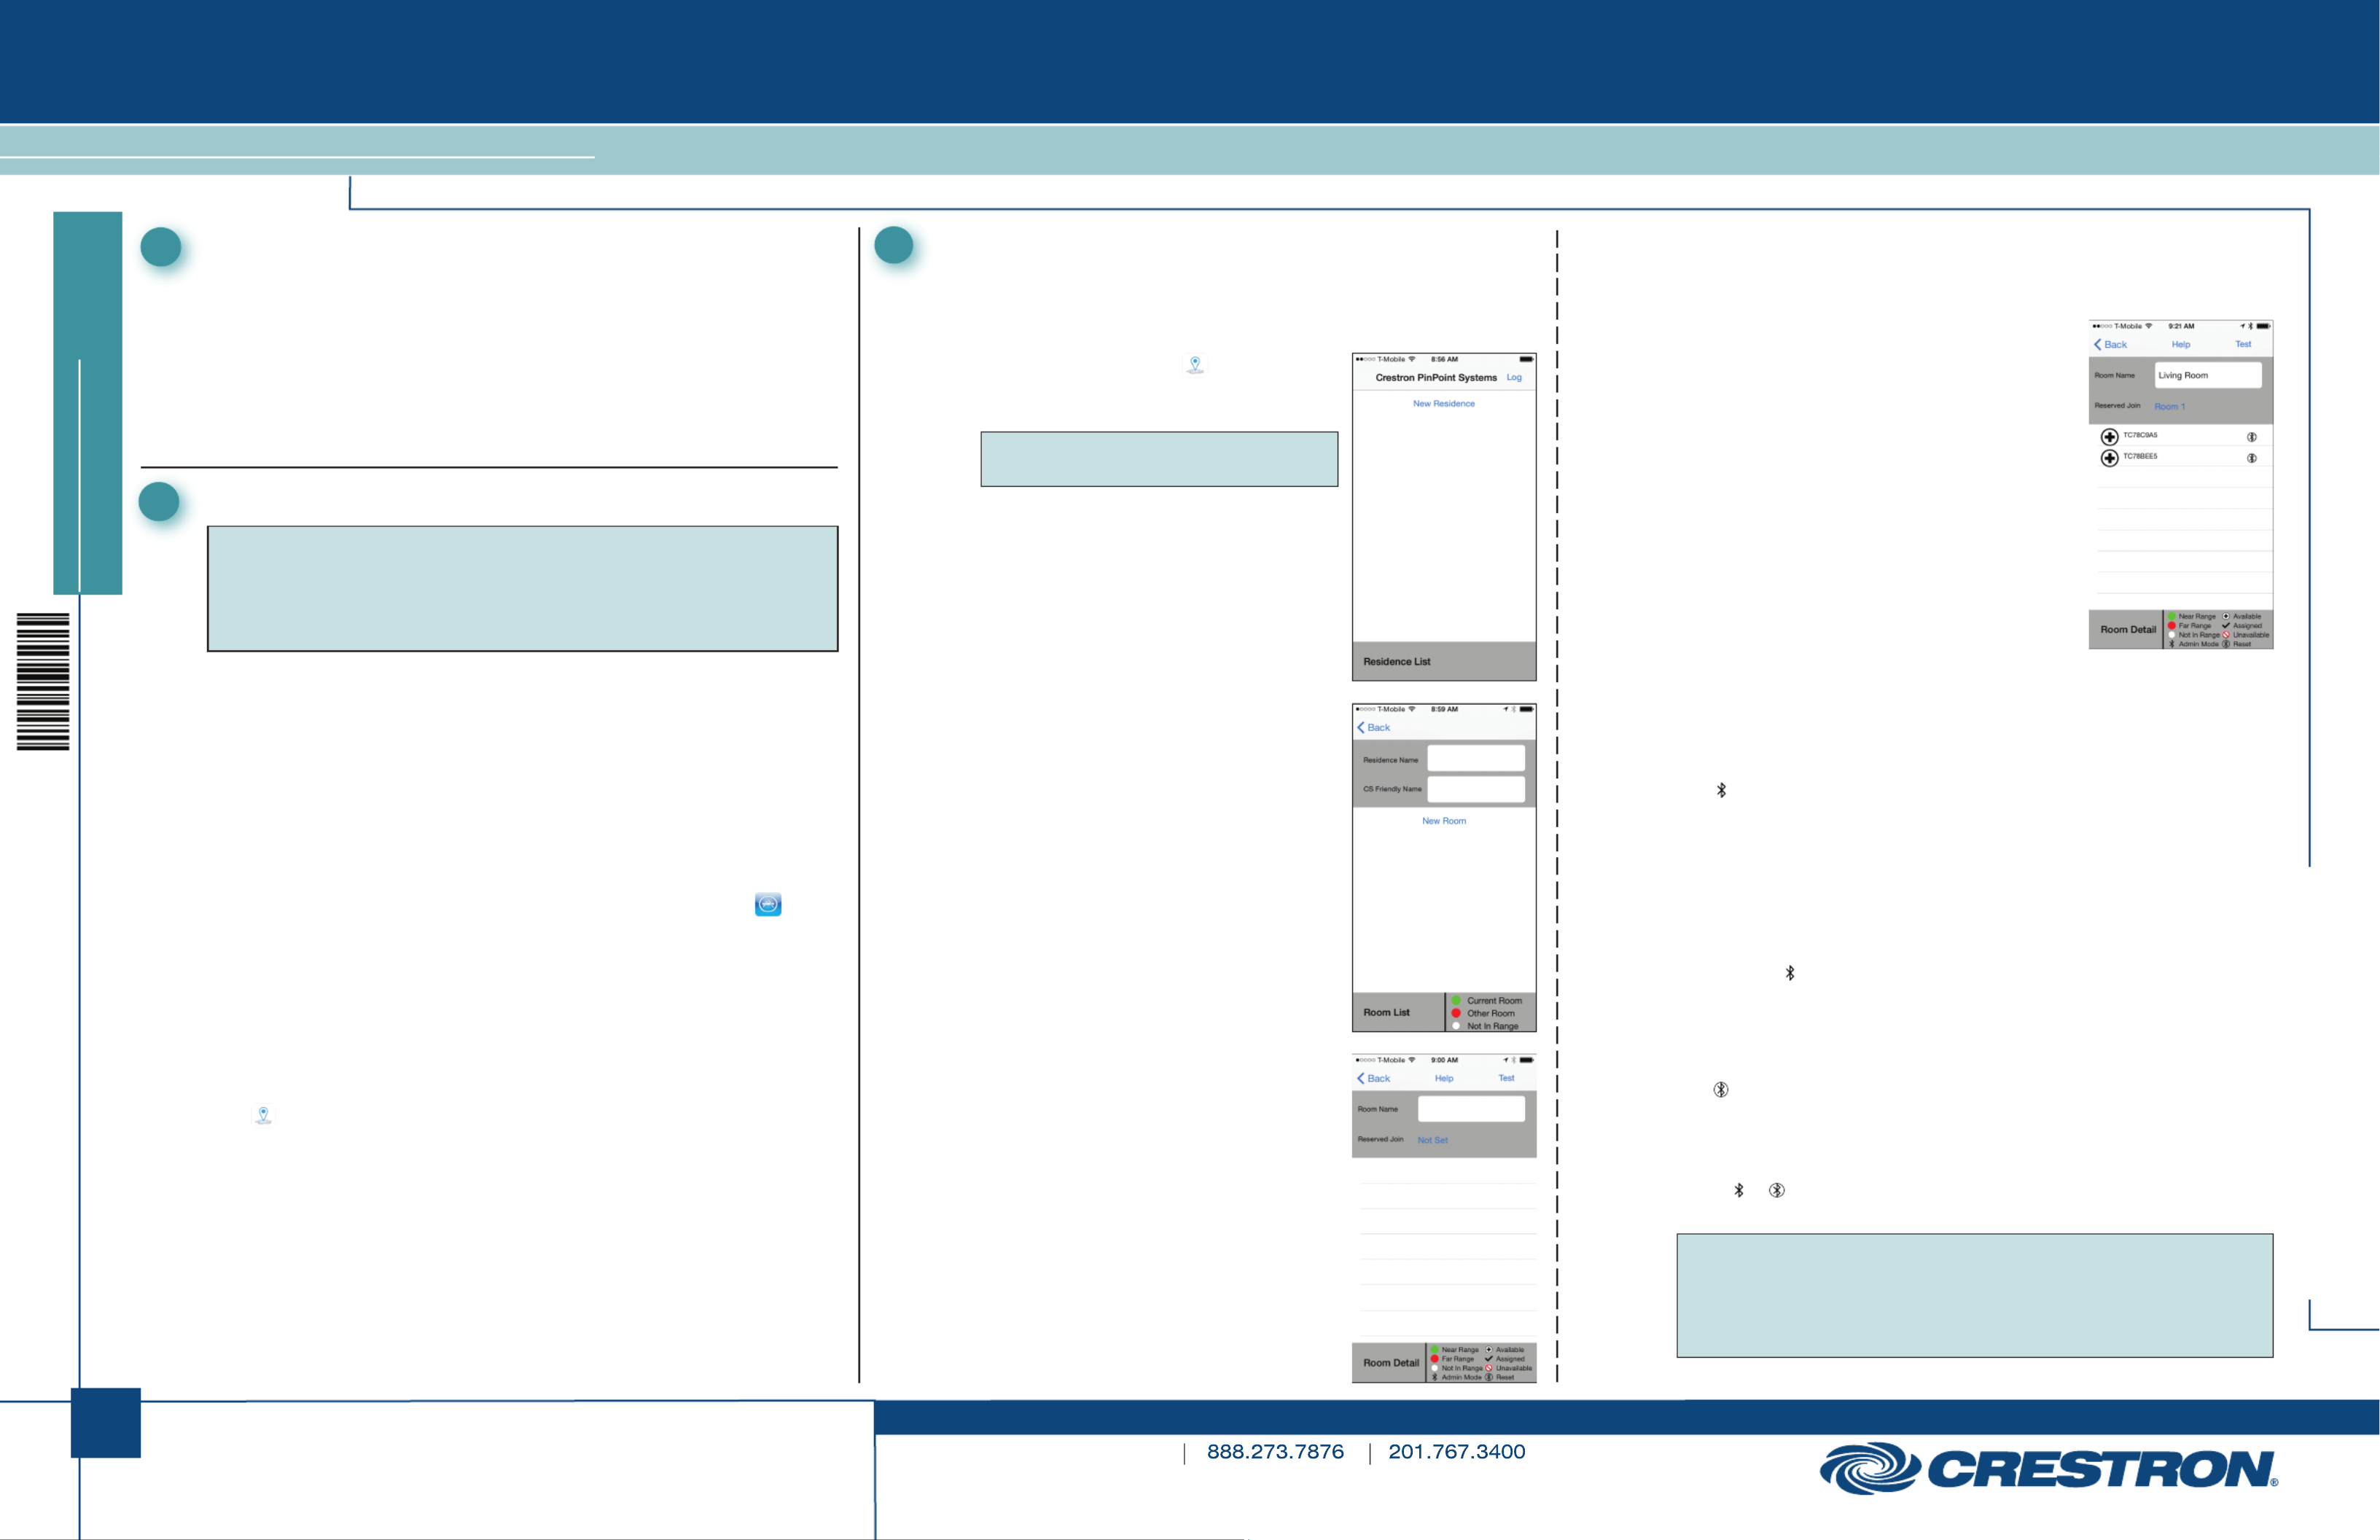
1Introduction
The CRESTRON-PINPOINT app configures PP-100 PinPoint™
Proximity Detection Beacons for use with a Crestron® system.
Configuration includes pairing PinPoint beacons with rooms and
adjusting the beacons’ range for optimal room coverage. Once
configuration is complete, the app generates a configuration file that is
imported into the CRESTRON-APP and CRESTRON-APP-PAD Control
Apps for Apple® iOS® operating system on the device(s) that will be used
with the PinPoint beacons.
2Download the App
3Create a PinPoint System
Create a PinPoint System for a residence by specifying rooms and
pairing a beacon to each room.
Create a System
1. On the iOS device, tap to start the
app. The Residence List screen is
displayed.
NOTE: If prompted to use your
current location, tap .Yes
2. Tap New Residence. The Room List
screen is displayed.
3. Tap the field and enter Residence Name
the name of the residence where the
system is installed. This field is for user
reference only.
4. Tap the field and CS Friendly Name
enter the information found in the
field of the Friendly Name/Location
CRESTRON-APP or
CRESTRON-APP-PAD app.
Create Rooms
1. Tap New Room to create a room that is
to be configured for PinPoint use. Its
screen is displayed.Room Detail
2. Tap the field and enter the Room Name
name of the room that contains the
PinPoint beacon. Tap Done when
complete.
3. Tap and select the room number Not Set
from the list that matches the SIMPL
Windows program. A system can contain
up to 100 joins; each join connects
with a beacon.
4. Tap Back Room List . The screen is
displayed with the newly created room
entry and the status of its beacon
connection.
5. Repeat steps 1 through 4 for each room
that contains one or more PinPoint
beacons.
Pair Beacons with a Room
Once all of the rooms have been added to the PinPoint system, they are
ready to be paired with the beacons.
1. From the screen, tap a room you Room List
want to pair with a beacon to display its
Room Detail Room Detail screen. When the
screen is displayed, the app begins scanning
for beacons. Any beacon that is discovered
through Bluetooth or that is sending proximity
updates that are received by the app is listed
on the screen. Previously Room Detail
added beacons are also on the list but are
grayed out if they are not detected. Beacons
are displayed with one of the following icons.
● The white icon indicates that the beacon
is unplugged or out of range of the iOS
device.
● The red icon indicates that the iOS device
can see the beacon but is not in the beacon detection area.
● The green icon indicates that the iOS device is within the beacon
detection area.
indicates that the beacon is in Admin mode. When Admin ●
mode times out, the icon changes to a white, red, or green icon if
the beacon has already been paired with the room, or the icon
disappears from the list if it is already paired with another room.
● X indicates that the beacon is available for pairing with the
selected room.
● indicates that the beacon is already paired with the selected
room. If is displayed (Admin mode), tap the beacon to change
its properties. Refer to section ∫ for more information.
indicates that the beacon is already assigned to another room ●
and cannot be added to the current room.
indicates that a beacon has never been configured or has ●
been reset to the factory settings.
2. While in Bluetooth range of the beacon, plug the beacon into a wall
outlet. The beacon is displayed on the screen with Room Detail
either or shown as its status. Refer to the list of icon definitions in
step 1 for details.
NOTE: The beacon appears on the screen within 15 seconds.
NOTE: To avoid confusion, plug only one beacon in at a time.
NOTE: If the beacon is already plugged in, unplug it and plug it in
again to place it in Admin mode.
CRESTRON-PINPOINT
NOTE: This section provides instructions for downloading the app from
the App Store® online store that is available on an iOS device. The
application can also be downloaded from the App Store using iTunes ®
software on a computer. For detailed information, refer to
www.apple.com/support/itunes/store/apps.
Prerequisites
● Cellular data network (iPhone® and cellular-equipped devices only)
or Wi-Fi® network that is connected to the Internet (Refer to
support.apple.com/kb/TS1398 for Wi-Fi network information.)
● iTunes account (Refer to support.apple.com/kb/HT2731 for
information about setting up an account.)
● Bluetooth® communications enabled on the iOS device
Download the App from the App Store
1. On the iOS device’s home screen, tap the icon ( ). App Store
2. Search for the app:
a. Tap Search.
b. Tap the search field and enter the search term .Crestron
c. Tap Search. The Crestron apps are listed.
3. Tap the Crestron Home® Beacon Setup App and follow the prompts
to download it. The iOS device downloads the app. The app’s icon
( ) appears on the home screen and shows the status of the
download and installation.

Pair Beacons with a Room (Continued)
3. Tap an available beacon (indicated with ) X
to add it to the room. When a beacon is
selected, its configuration screen is displayed.
● Tap the field PinPoint Name/Location
and enter the name or location of the
beacon for easy identification.
● PinPoint Range Move the slider control
to adjust the signal transmission range of
the beacon. To reset to the factory setting,
double-tap the slider control.
● Tap to remove the Remove from room
beacon from the room.
4. Tap Back to return to the previous screen.
5. Repeat the procedure to add each beacon to a room.
A PinPoint beacon’s properties can be edited to update the beacon’s
identification information and range. While the properties are being
edited, the beacon can also be removed from a room. Perform the
following to edit a beacon.
1. From the screen, tap a room to display its Room List Room Detail
screen.
2. Unplug and then plug in the beacon to be edited. The beacon is
placed in Admin mode and is displayed next to the beacon to
be edited.
3. Tap the beacon to be edited. The beacon’s
configuration screen is displayed.
4. Edit the beacon’s properties.
● Tap the field PinPoint Name/Location
and enter the name or location of the
beacon for easy identification.
● PinPoint Range Move the slider control
to adjust the signal transmission range of
the beacon. To reset to the factory setting,
double-tap the slider control.
● Tap to remove the Remove from room
beacon from the room.
5. Repeat steps 1 through 4 to edit each
beacon's properties.
4 Edit a Beacon’s Properties
2
quickstart guide
www.crestron.com
Specifications subject to
change without notice.
QUICKSTART DOC. 7676B (2043124) 04.16
Crestron Home Beacon Setup App
CRESTRON-PINPOINT
CRESTRON-PINPOINT
5Evaluate a PinPoint System Configuration
Once the system rooms are configured and PinPoint beacons have been
added to the rooms, check for proper coverage.
1. In the app, navigate to the screen to display the list of Room List
configured rooms.
2. While holding the iOS device, walk slowly through each room that
has been configured with a PinPoint beacon. The room list reorders
itself in real time as the iOS device moves in and out of PinPoint
rooms so that the current room (indicated with a green icon) is
always at the top of the list.
3. While walking through the residence, check for the following:
Verify that multiple PinPoint rooms are not showing a green ●
icon at one time. If there is overlap, reduce the range of one
of the beacons as described in section ∫.
Verify that each PinPoint room is correctly detected as the ●
current room when the iOS device is in the desired coverage
area. If a room is not correctly detected, increase the range of
the beacon as described in section ∫ or add additional PinPoint
beacons to the room.
7Program PinPoint
To add PinPoint functionality to a SIMPL Windows or Crestron
Studio™ program, add the PinPoint device extender to the Crestron
App programming symbol of the iOS device that will be interacting
with PinPoint.
8PinPoint Reset
To clear pairing information from a PinPoint beacon, it must be reset
to the factory default settings. For details, refer to the PP-100
Installation Guide (Doc. 7735) at www.crestron.com/manuals.
Beacons that have been reset to their factory default settings are
displayed on the screen with a when operating in Room List
Admin mode. If is displayed, the reset procedure should be
repeated.
6Export and Import a PinPoint System
Export a PinPoint System File
Once a PinPoint system has been created, it must be exported to be
used by the CRESTRON-APP or CRESTRON-APP-PAD Control Apps
for Apple iOS. Perform the following to export a PinPoint system.
1. From the in the PinPoint Setup App, tap Residence List Email. An
e-mail message opens with the settings attached in an IBC file.
2. Address the e-mail to an e-mail account on the target iOS device.
3. Send the e-mail message.
Import a PinPoint System File
NOTE: The CRESTRON-APP or CRESTRON-APP-PAD app must be
installed and configured on the iOS device.
PinPoint system files are received via e-mail as an attached IBC file. To
import a PinPoint system file, open the e-mail, and then open the
attachment. The PinPoint System file is automatically imported into the
control app.
NOTE: The CRESTRON-APP or CRESTRON-APP-PAD app must be
restarted after the PinPoint system file has been imported.
Product warranty can be found at www.crestron.com/warranty.
The specic patents that cover Crestron products are listed at patents.crestron.com.
Certain Crestron products contain open source software. For specic information, please visit
www.crestron.com/opensource.
Crestron, the Crestron logo, Crestron Studio, and PinPoint are either trademarks or registered trademarks
of Crestron Electronics, Inc. in the United States and/or other countries. Apple, App Store, iPhone, and
iTunes are in the United States and/or other either trademarks or registered trademarks of Apple Inc.
countries. Bluetooth is either a trademark or registered trademark of Bluetooth SIG, Inc. in the United
States and/or other countries. IOS is either a trademark or registered trademark of Cisco Systems, Inc. in
the United States and/or other countries. Wi-Fi is of Wi-Fi either a trademark or registered trademark
Alliance in the United States and/or other countries. Other trademarks, registered trademarks, and trade
names may be used in this document to refer to either the entities claiming the marks and names or their
products. Crestron disclaims any proprietary interest in the marks and names of others. Crestron is not
responsible for errors in typography or photography.
This document was written by the Technical Publications department at Crestron.
©2016 Crestron Electronics, Inc.
Termékspecifikációk
| Márka: | Crestron |
| Kategória: | okos otthon |
| Modell: | PP-100-W |
Szüksége van segítségre?
Ha segítségre van szüksége Crestron PP-100-W, tegyen fel kérdést alább, és más felhasználók válaszolnak Önnek
Útmutatók okos otthon Crestron

19 Augusztus 2024
18 Augusztus 2024
18 Augusztus 2024
18 Augusztus 2024
17 Augusztus 2024
17 Augusztus 2024
27 Május 2024
20 Május 2024
Útmutatók okos otthon
- okos otthon Ikea
- okos otthon August
- okos otthon Acer
- okos otthon Nedis
- okos otthon Philips
- okos otthon Reolink
- okos otthon Oregon Scientific
- okos otthon Bosch
- okos otthon Theben
- okos otthon Panasonic
- okos otthon Lenovo
- okos otthon Evolveo
- okos otthon TP-Link
- okos otthon Emos
- okos otthon Vimar
- okos otthon Xiaomi
- okos otthon EZVIZ
- okos otthon Strong
- okos otthon Klarstein
- okos otthon Gigaset
- okos otthon Vivax
- okos otthon Hikvision
- okos otthon Cleanmaxx
- okos otthon Netgear
- okos otthon Asus
- okos otthon Rain Bird
- okos otthon Hama
- okos otthon Renkforce
- okos otthon Gossen Metrawatt
- okos otthon Bose
- okos otthon Ring
- okos otthon V-TAC
- okos otthon Logitech
- okos otthon Denver
- okos otthon Fibaro
- okos otthon Trevi
- okos otthon Devolo
- okos otthon Gardena
- okos otthon DiO
- okos otthon Burg Wächter
- okos otthon Tenda
- okos otthon Aluratek
- okos otthon NGS
- okos otthon Livoo
- okos otthon Tesla
- okos otthon Cisco
- okos otthon Sungrow
- okos otthon ATen
- okos otthon Niceboy
- okos otthon SPC
- okos otthon Sanus
- okos otthon Osram
- okos otthon Speed-Link
- okos otthon Nobo
- okos otthon Nexa
- okos otthon Edimax
- okos otthon Eufy
- okos otthon CyberPower
- okos otthon REV
- okos otthon Intertechno
- okos otthon Kogan
- okos otthon Alecto
- okos otthon Honeywell
- okos otthon Imou
- okos otthon Velleman
- okos otthon FireAngel
- okos otthon D-Link
- okos otthon EQ-3
- okos otthon TFA
- okos otthon One For All
- okos otthon Manta
- okos otthon Blaupunkt
- okos otthon Easy Home
- okos otthon Chacon
- okos otthon Elro
- okos otthon Busch-Jaeger
- okos otthon Delta Dore
- okos otthon Abus
- okos otthon KKT Kolbe
- okos otthon Trust
- okos otthon TechniSat
- okos otthon Laica
- okos otthon Danfoss
- okos otthon Fanvil
- okos otthon Dormakaba
- okos otthon Audac
- okos otthon Krüger&Matz
- okos otthon Salus
- okos otthon Homematic IP
- okos otthon Somfy
- okos otthon Brilliant
- okos otthon Swann
- okos otthon Eltako
- okos otthon Linksys
- okos otthon RADEMACHER
- okos otthon Smartwares
- okos otthon Aqara
- okos otthon SwitchBot
- okos otthon Ajax
- okos otthon Airlive
- okos otthon Brennenstuhl
- okos otthon Caliber
- okos otthon KlikaanKlikuit
- okos otthon ABB
- okos otthon Energenie
- okos otthon Byron
- okos otthon Totolink
- okos otthon Profile
- okos otthon Steren
- okos otthon Perel
- okos otthon LevelOne
- okos otthon Hive
- okos otthon Netatmo
- okos otthon Inkbird
- okos otthon Hager
- okos otthon Bticino
- okos otthon Hombli
- okos otthon Naxa
- okos otthon Logicom
- okos otthon Blumfeldt
- okos otthon Niko
- okos otthon Veho
- okos otthon Gira
- okos otthon Jung
- okos otthon Sommer
- okos otthon Digi
- okos otthon Ranex
- okos otthon Popp
- okos otthon Qnect
- okos otthon Aiphone
- okos otthon EQ3
- okos otthon Home Easy
- okos otthon X-Sense
- okos otthon Chuango
- okos otthon ETiger
- okos otthon Berker
- okos otthon Swisstone
- okos otthon Drayton
- okos otthon LSC Smart Connect - Action
- okos otthon Ferguson
- okos otthon MAC
- okos otthon Redmond
- okos otthon Shelly
- okos otthon Silvergear
- okos otthon Paulmann
- okos otthon EKO
- okos otthon Schellenberg
- okos otthon Aeotec
- okos otthon Adurosmart
- okos otthon Nous
- okos otthon SEC24
- okos otthon Athom
- okos otthon Casambi
- okos otthon Tellur
- okos otthon TELE System
- okos otthon Iungo
- okos otthon Tjilla
- okos otthon WiZ
- okos otthon Nanoleaf
- okos otthon Mach Power
- okos otthon Sonoff
- okos otthon Airthings
- okos otthon Blebox
- okos otthon Lutron
- okos otthon Meross
- okos otthon Middle Atlantic
- okos otthon Origin Acoustics
- okos otthon Winland
Legújabb útmutatók okos otthon
29 Március 2025
29 Március 2025
29 Március 2025
27 Március 2025
19 Március 2025
18 Március 2025
15 Január 2025
14 Január 2025
14 Január 2025
14 Január 2025