Használati útmutató Cobra DC150
Olvassa el alább 📖 a magyar nyelvű használati útmutatót Cobra DC150 (23 oldal) a kamera kategóriában. Ezt az útmutatót 7 ember találta hasznosnak és 2 felhasználó értékelte átlagosan 4.5 csillagra
Oldal 1/23

COBRA DC125
Contents
Profile……………………………………………………………………... 1
Overview……………………………………………………………….. 1
Product Package Contents…………………………………………… 1
System Requirements………………………………………………… 1
Know Your Digital Camera……………………………………………. 1
Install Batteries…………………………………………………………. 2
Software Installation…………………………………………………… 3
How to Take Photos......................................................................... 3
Camera Functions Control ………………………………..…………. 4
Instructions for the LCD Diagram …………………………………… 4
Camera Functions Control……………...……………………………. 5
Compression Ratio Selection………………………………………… 7
Download Photos……………………………………………………….. 8
PC Camera Function .………………………………………………….11
Browse Live……………………………………………………………. 11
Take video……………………………………………………………. 14
Video Conference ……………………………………………………... 15
Troubleshooting………………………………………………………… 17

- 1 -
Profile
Overview
Thank you for purchasing the digital camera. It not only can take photos
but also has built-in PC camera functions. This camera is equipped with
1 x 16Mb SDRAM. If you want the photos in the camera to be
downloaded to your computer, you only need to connect the USB cable
between your computer and your camera. It is also possible to use the
built-in PC camera to hold a video conference via the internet, enabling
you to have a face to face online conversation with other people.
Product Package Contents
● Digital Camera ●User’s Manual
●Software CD ●USB cable
System Requirements
¾ Microsoft Win98 Se/2000/ME/XP
¾ 125MB free hard disk space or above, 32MB or more RAM
¾ Color Monitor (we suggest at least 800 x 600 24 bit or above)
¾ Available USB Interface and CD-ROM Drive
Know Your Digital Camera
A. Viewfinder
B. Shutter Release Button
C. Lens
D. USB Socket
E. Start/Function Button
F. LCD
G. Battery Box

- 2 -
Installing The Batteries
1. Open the battery box.
2. Load the batteries correctly: when you load the batteries, please
place both batteries according to the pole directions inscribed on the
battery box.
3. Close the battery box cover.
Note: When you use the USB cable to connect the camera to a
computer, is unnecessary to use the batteries because the camera uses
the power provided by the computer through the USB interface.
Warning
1. Don’t open the battery box unless necessary. The interruption of
power may cause you to lose the photos in the camera.
2. If you don’t use the camera for a long time, please take out the
batteries to avoid accidental discharging or corrosion of the terminals.
3. Please don’t throw any battery into a fire. It may explode.
4. Please download photos to your computer promptly to make sure
you don’t lose any of them.
The energy saving mode is automatically activated
If the camera is not used for 30 seconds, the camera will automatically
enter the energy saving mode.

- 3 -
Software Installation
Please insert the CD into the CD-ROM drive, this dialog box will appear:
1. Install PhotoImpression
2. Install Funhouse
3. Install Driver
4. Browse CD
5. Exit
Prompt:
For details regarding PhotoImpression and Funhouse, please refer to
separate instructions included on the CD.
You need to install both the application and the driver. During the
installation process, you will be able to select the language of your choice.
If the auto installation failed, you must install the programs manually.
1. Place the included CD into the CD-ROM drive
2. Enter E:\autorun.exe (If E is the letter for the drive)
3. Follow the directions of the installation wizard
How to Take Photos
1. Press the function button to turn on the camera and “Hi” will show on
the LCD at the back of the camera. The camera will sound out two
“beeps” indicating that it is ready to work.
2. Select the required mode to take your photo. (Please refer to the
instructions under “Camera Functions Control”)
- 4 -
3. Hold the camera steadily, and press the shutter release button to take
photos.
4. The camera sounds a buzzer, indicating that the photo was taken and
that you can proceed to the next one.
5. When the camera’s memory is fully loaded with photos, “0” will show
on the LCD, if you press the shutter release again, the buzzer will sound
continuously as a warning.
Prompt
1. When taking photos, the weaker sound indicates that you failed to
take the photo.
2. Please hold the camera steadily when you are taking photos.
3. The availability of light will affect the quality of the picture.
Camera Functions Control
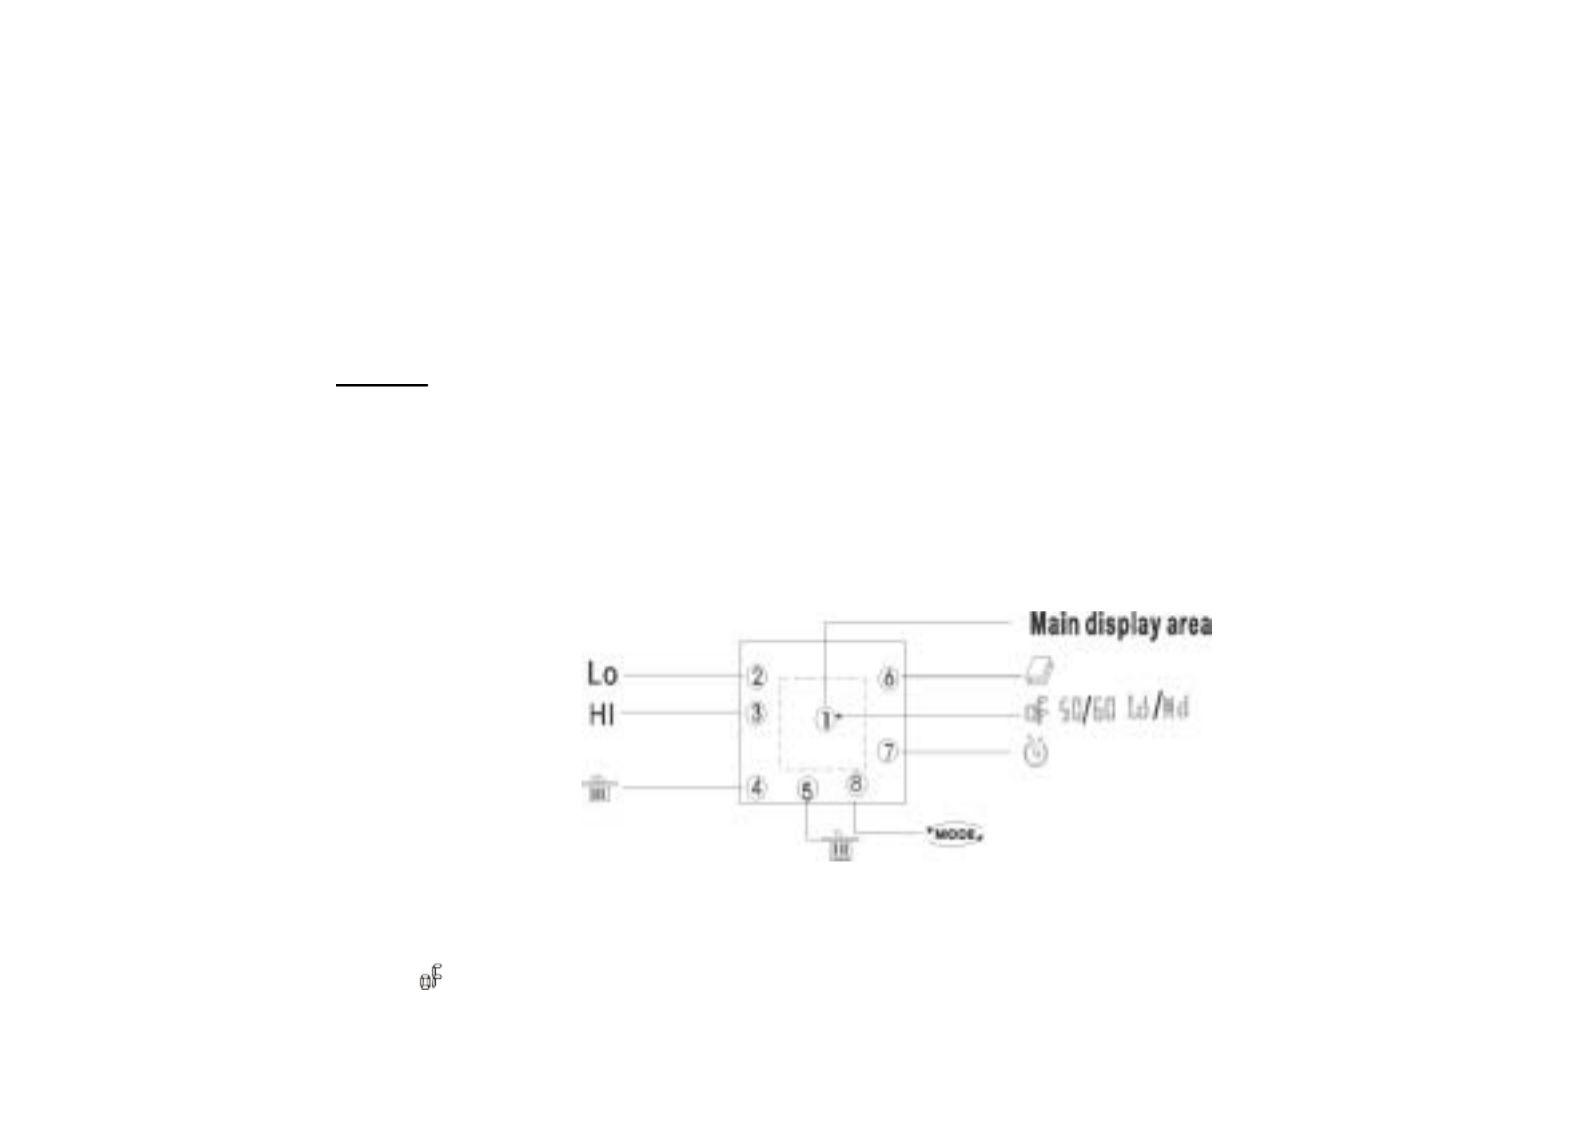
Instructions for the LCD Diagram
Press the Function button to select the functions of the digital camera.
The function diagram will show on the LCD display on the back of the
digital camera, as follows:
¾ – Power off the camera.

- 5 -
¾ – Auto shoot
¾ – Continuous shoot.
¾ – Delete all photos in the memory
¾ – Delete the last photo from memory
¾ – Hi means CIF mode (100k pixels resolution).
-- Lo means QCIF mode (25K pixels resolution).
¾ “50” or “60” – “50” or “60” to select the frequency of light used
indoors. “50” means 50Hz and “60”means 60Hz.
¾ “Hd” or “Ld”– The photo compression ratios. “Hd” Means high
compression and “Ld” means low compression. Higher
compression ratio means you may store more photos.
Camera Functions Control
Power off the camera
1. Press the Function button to select the “ ” icon shown on the LCD
display.
2. Press the Shutter release button within 5 seconds to power off the
camera.
Auto-Shoot Mode
1. Press the Function button to select the “ ” icon shown on the LCD
display.
2. Press the Shutter release button within 5 seconds to activate the 10
second timer. The digital camera will beep once every second.
3. After 10 seconds, the camera will beep twice to indicate that the photo
has been taken.

- 6 -
Continuous Shoot Mode
1. Press the Function button to select the “ ” icon shown on the LCD
display.
2. Press the Shutter release button within 5 seconds to activate the
continuous shooting mode and do not release the button until you want
to stop shooting. The camera will beep once for each photo taken until
you release the Shutter button or the memory is full.
3. Under the continuous shooting mode, the photos are taken in CIF &
QCIF modes and saved in a video format.
4. Under the continuous photo shooting mode, the shooting may fail due
to poor lighting. If so, the continuous shooting will stop.
Note: The photos taken under the continuous mode will be saved in AVI
format. You may open it directly from the photo downloading software.
Delete All Photos
1. Press the Function button to select the “ ” icon shown on the LCD
display.
2. Press the Shutter release, the photo counter will flash. Press the
Shutter Button again within 5 seconds to delete all the photos stored in
memory.
Delete the Last Photo Taken
1. Press the Function button to select the “ ” icon shown on the LCD
display.
2. Press the Shutter button once within 5 seconds to delete the last
photo taken.

- 7 -
Photo Resolution Selection
Note: The resolution status will always show on the LCD display in small
characters.
1. Press the Function button to select the “ ” icon shown on the LCD
display.
2. “Hi” means CIF mode 352 x 288 Pixels, “Lo” means QCIF mode 176 x
144 pixels
3. When you select the Mode function, press the shutter release once to
switch between the Hi mode and the Lo mode. The Hi mode will allow
you to take 19 photos and the Lo mode will allow you to take 76 photos.
Frequency Selection
1. Generally speaking, 60Hz fluorescent lamp frequency is used in the
United States and Asia. And 50Hz is used in Japan and Europe. If
the wrong frequency is selected, the photos or the video will be
distorted.
2. Press the Function button to select either 50 Hz or 60 Hz as shown
on the LCD display.
Photo Compression Ratio Selection
The compression ratios available are either “Hd” or “Ld” for the photos
stored in memory. The higher the compression, the more photos you
can take without having to download them to your PC. You can take up
to 152 photos in the “Hd” mode when you select the low resolution (Lo)
setting preset on your camera (see the photo resolution section above).
Photo Storage
The number of photos that can be taken will vary depending on the

- 8 -
resolution and compression ratio. The LCD display will always show the
status of the resolution and the number of photos left that you may take
unless the Function Button is pressed. The highest storage of photos will
be
19 photos --- “Hi” resolution + “Ld” compression
76 photos --- “Lo” resolution + “Ld” compression
38 photos --- “Hi” resolution + “Hd” compression
152 photos --- “Lo” resolution + “Hd” compression
Press the Shutter release to take a photo and the balance of the photos
you have remaining in memory (based on the mode you have set) will be
displayed as a digit on the LCD display. Each consecutive photo taken
will reduce the counter by one digit. Each time you change the resolution,
the number of photos remaining to be taken will change. If some photos
were taken in a low resolution mode, then later you switch to a higher
resolution, the lower resolution photos will remain in low resolution.
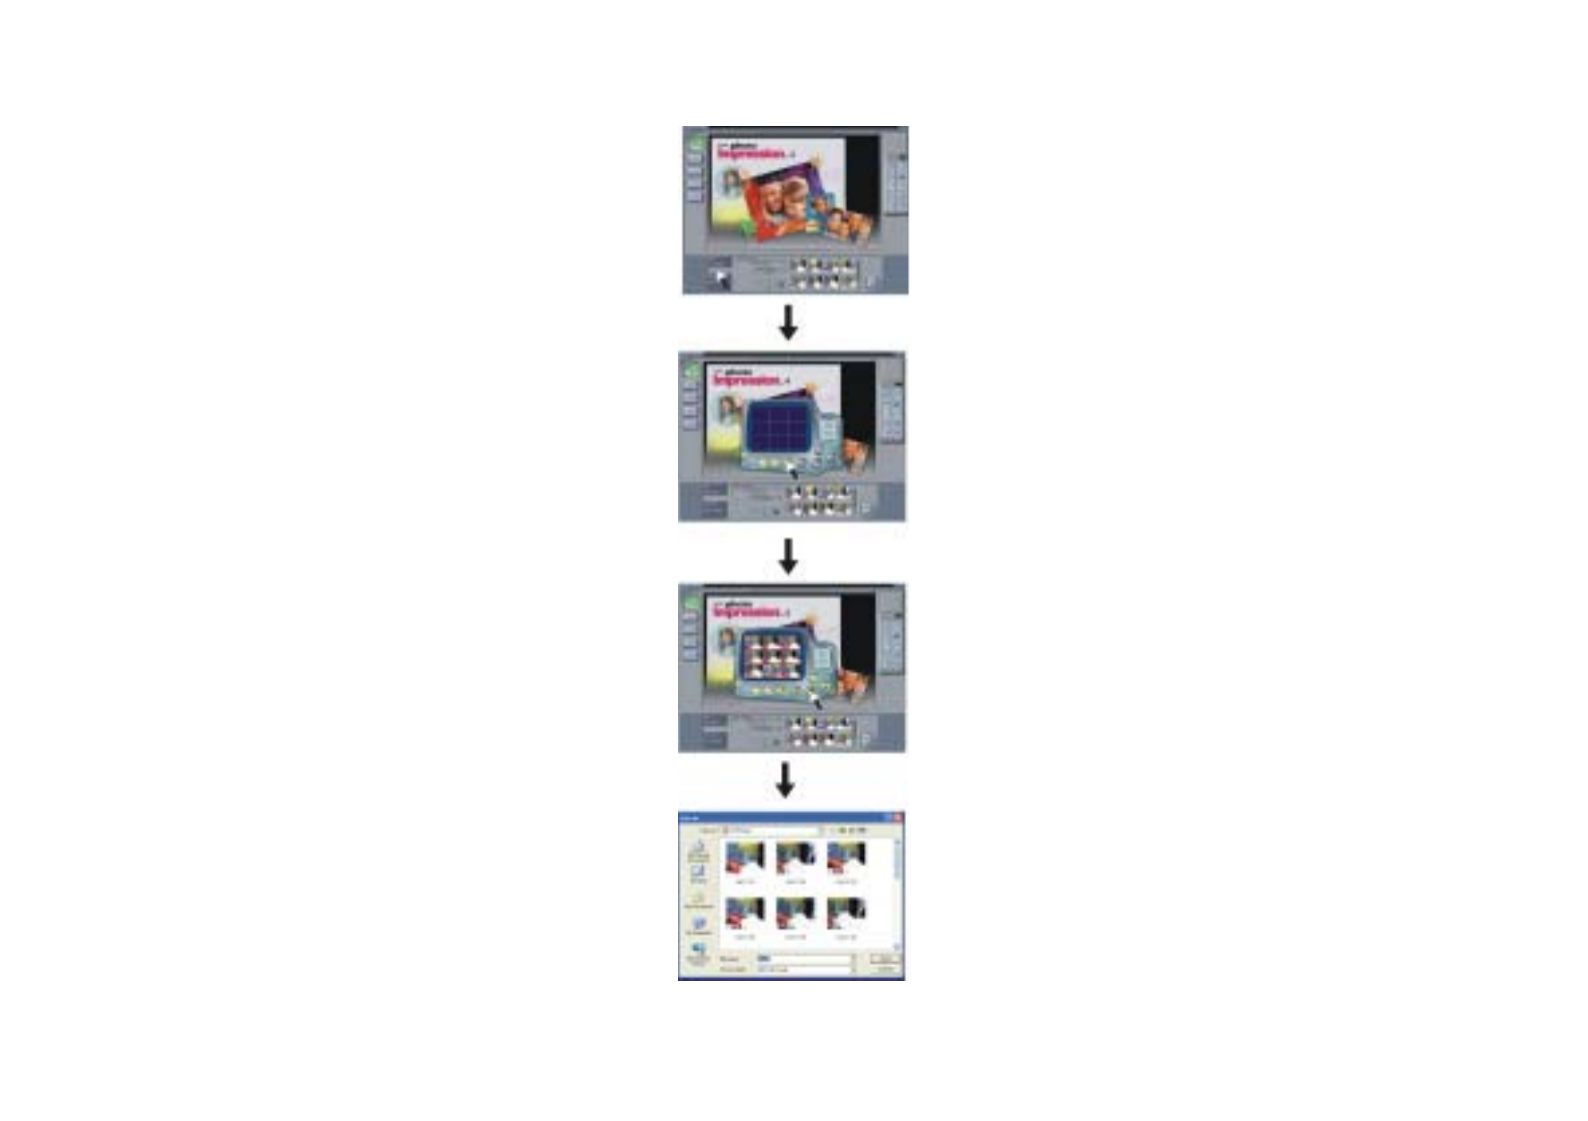
Download Photos
Please take the following steps to download the photos.
1. Connect your camera to computer with USB cable correctly.
2. Double-click the PhotoImpression icon on your desktop.

- 9 -
3. Click the Camera/Scanner button.Select Source" JL2005A
Camera"
4. Click the icon
5. Click the icon
6. Click to save as (You can select the photos to save
on the blue screen).
7. Input the file name and select the file type. Click to save Save
your photo.
- 10 -
- 11 -
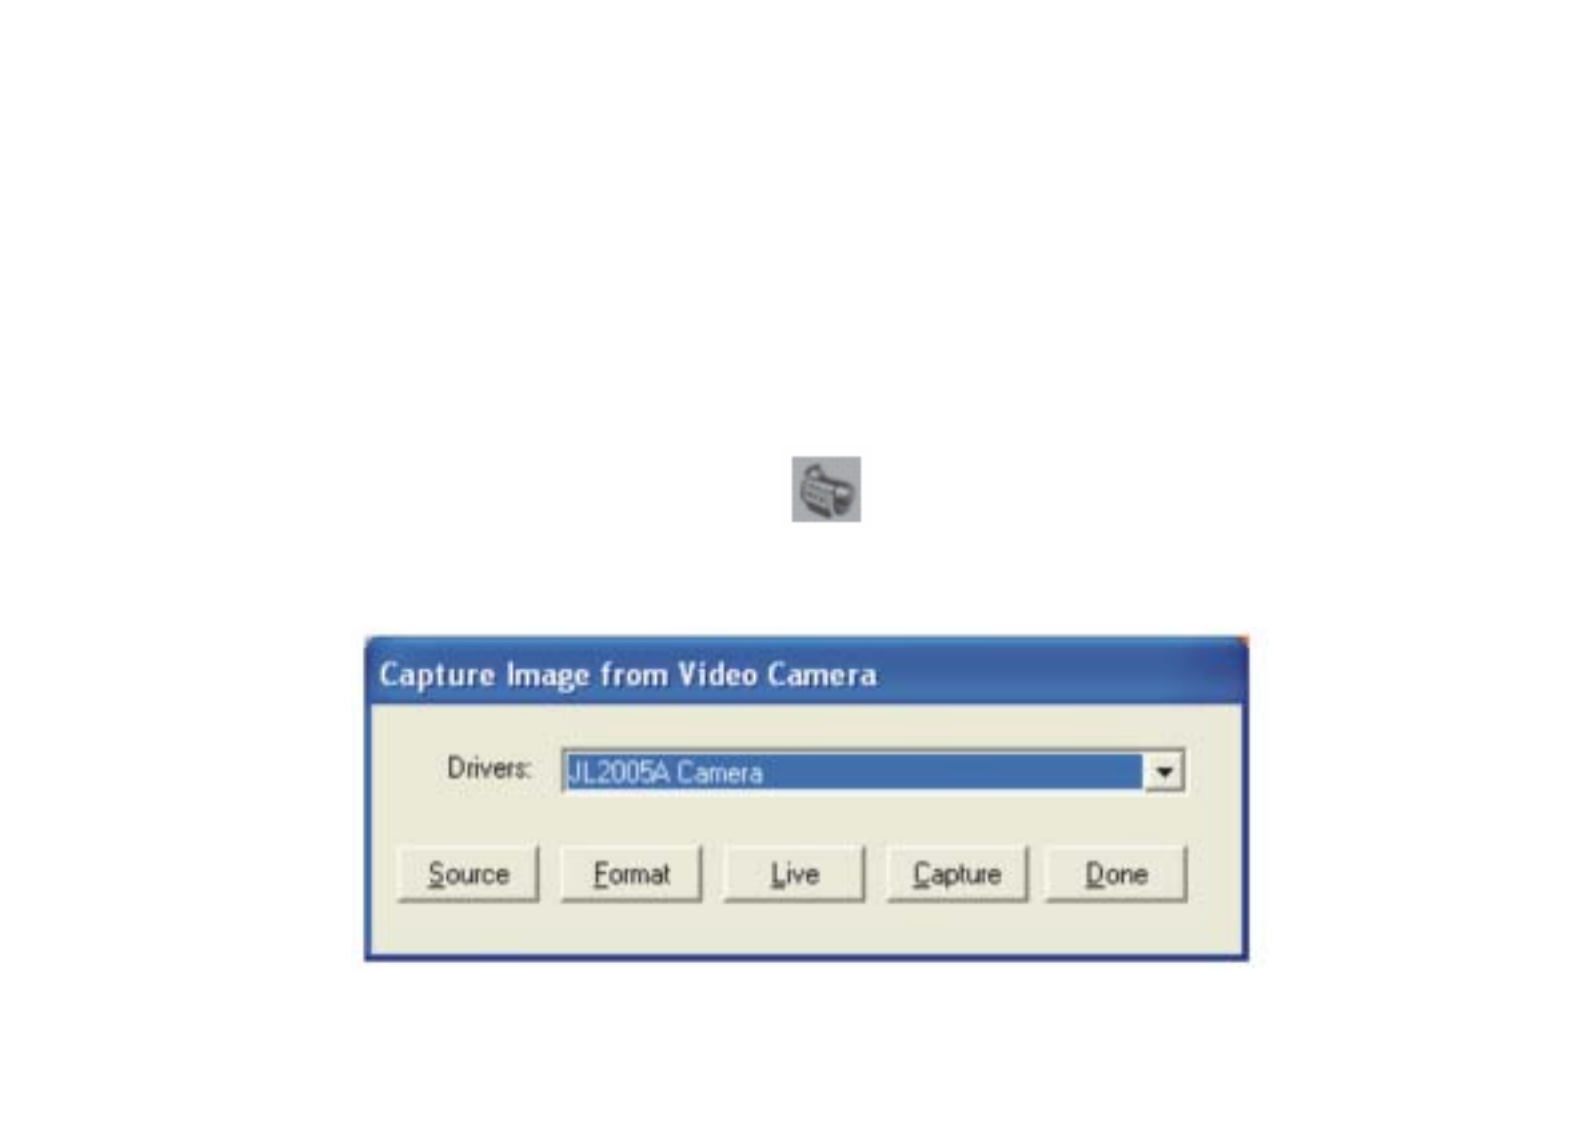
PC Camera Function
Browse Live
1. Connect your camera to the computer with the USB cable correctly.
2. Double-click the PhotoImpression icon on your desktop.
3. Click the icon Camera/Scanner.
4. Click the Video Camera symbol . You will see the dialog box
displayed as below.

- 12 -
Functions Introduction
Sources: You can set the Brightness, Contrast —— device origin,
device set and camera control; and please select Default.
Format: You can adjust the resolution and the color mode of images; the
color mode is suggested to select [RGB-24].
Live: You can browse real-time videos or images.
Capture: When you play live videos, click and select this function to
acquire the single picture and store it in the album.
Done: Finish the PC Camera Functions
1. Click Live to start browsing.
2. Click Done to finish browsing.
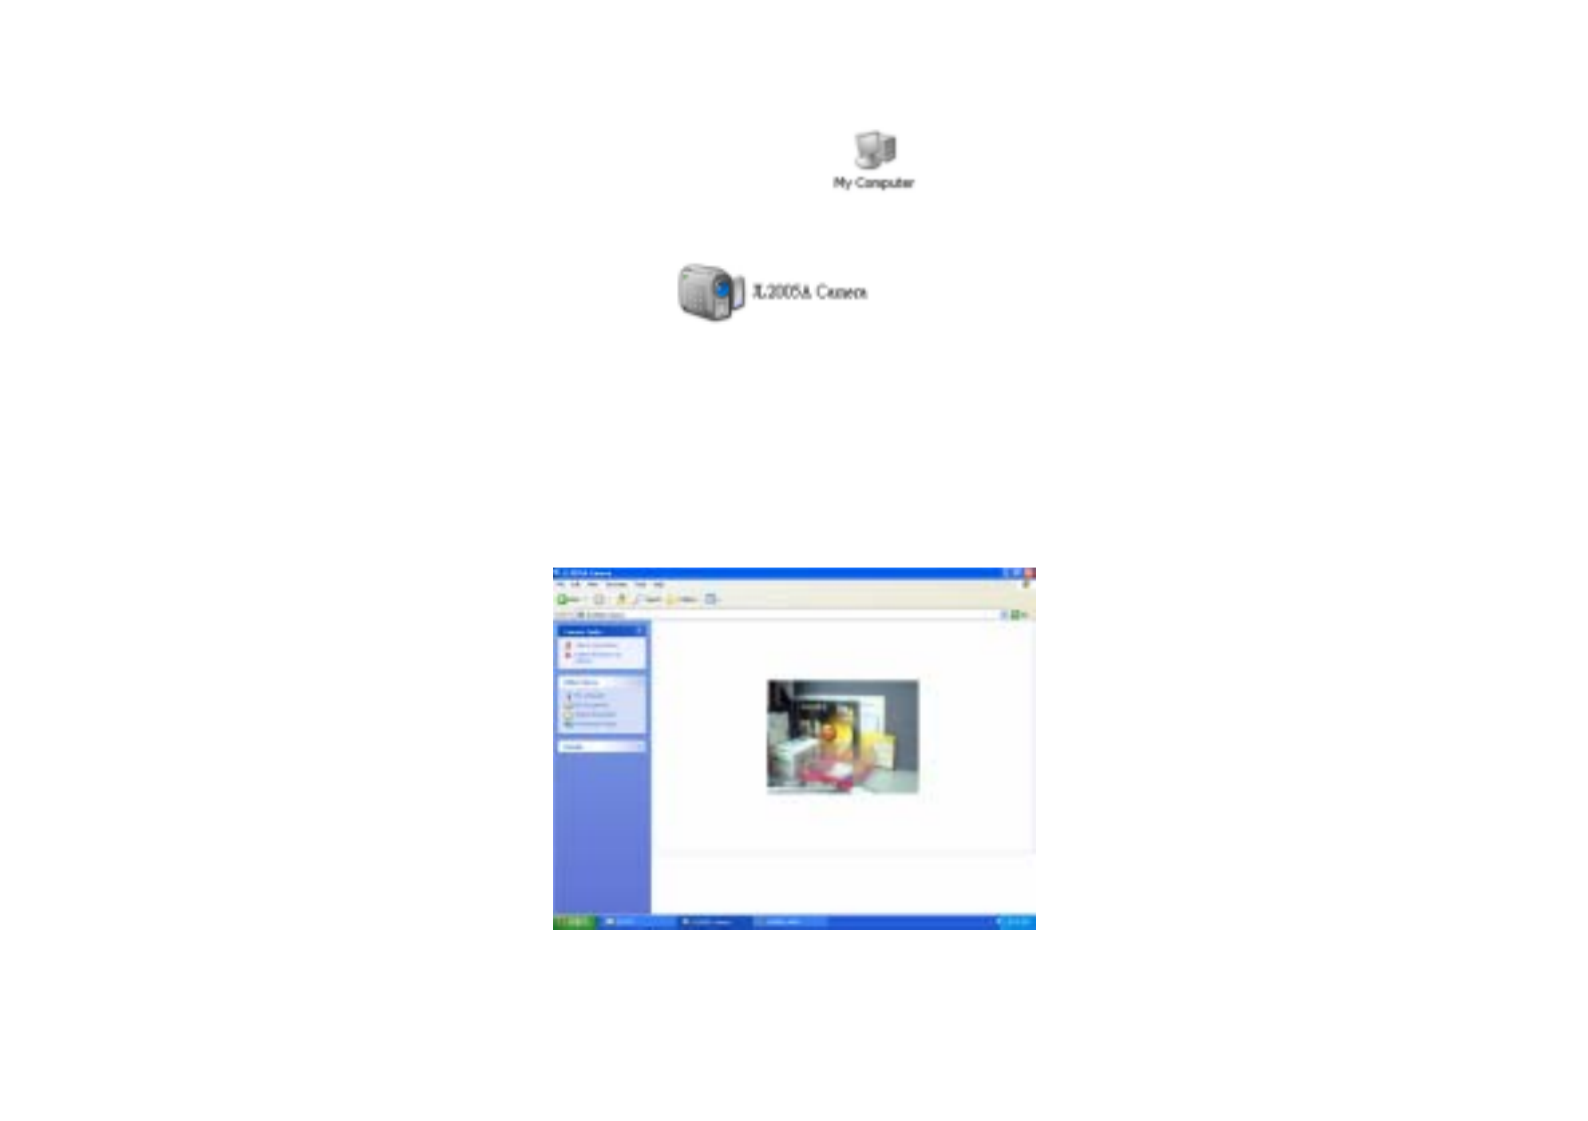
If your operation system is Windows XP, you may take the following
steps optionally.
1. Connect your camera to the computer with the USB cable correctly.
- 13 -
2. Double-click My Computer icon on the desktop.
3. Double-click icon . You can browse live
via your camera now.
4. Click Take a New Picture button. The picture you are browsing will
be captured.
Termékspecifikációk
| Márka: | Cobra |
| Kategória: | kamera |
| Modell: | DC150 |
Szüksége van segítségre?
Ha segítségre van szüksége Cobra DC150, tegyen fel kérdést alább, és más felhasználók válaszolnak Önnek
Útmutatók kamera Cobra

31 Augusztus 2024
24 Május 2024
17 Május 2024
14 Május 2024
13 Május 2024
8 Május 2024
Útmutatók kamera
- kamera Samsung
- kamera Sony
- kamera Braun
- kamera National Geographic
- kamera Acer
- kamera Nedis
- kamera Philips
- kamera Reolink
- kamera Olympus
- kamera Oregon Scientific
- kamera SilverCrest
- kamera Panasonic
- kamera Canon
- kamera JVC
- kamera Lenovo
- kamera Casio
- kamera Toshiba
- kamera Ozito
- kamera HP
- kamera BenQ
- kamera TP-Link
- kamera Medion
- kamera Vimar
- kamera Xiaomi
- kamera Fujifilm
- kamera EZVIZ
- kamera Prixton
- kamera Polaroid
- kamera Kyocera
- kamera Technaxx
- kamera GoPro
- kamera Speco Technologies
- kamera Ricoh
- kamera Hikvision
- kamera Epson
- kamera Netgear
- kamera Vtech
- kamera Rollei
- kamera Agfa
- kamera Lamax
- kamera Hitachi
- kamera Kodak
- kamera Ring
- kamera Nikon
- kamera Alpine
- kamera Optoma
- kamera Logitech
- kamera Bresser
- kamera Dahua Technology
- kamera Viewsonic
- kamera Scosche
- kamera Denver
- kamera Minox
- kamera Trevi
- kamera Joy-It
- kamera Daewoo
- kamera Gembird
- kamera GE
- kamera SPC
- kamera Powerfix
- kamera Eufy
- kamera Avaya
- kamera Levenhuk
- kamera Konica Minolta
- kamera Mamiya
- kamera Lorex
- kamera Foscam
- kamera Kogan
- kamera SJCAM
- kamera Imou
- kamera AgfaPhoto
- kamera Sigma
- kamera Pentax
- kamera Velleman
- kamera D-Link
- kamera Blaupunkt
- kamera InfiRay
- kamera Fluke
- kamera Arlo
- kamera Trust
- kamera Konig
- kamera ARRI
- kamera Pyle
- kamera Emerson
- kamera MuxLab
- kamera Lumens
- kamera Sanyo
- kamera DataVideo
- kamera Lenco
- kamera Leica
- kamera Azden
- kamera Vemer
- kamera Burris
- kamera Marshall Electronics
- kamera Getac
- kamera AViPAS
- kamera Creative
- kamera EverFocus
- kamera SereneLife
- kamera Swann
- kamera Anker
- kamera Microtek
- kamera Linksys
- kamera Elmo
- kamera UniView
- kamera Laserliner
- kamera IGET
- kamera Vivitar
- kamera PTZ Optics
- kamera BZBGear
- kamera Argus
- kamera Lexibook
- kamera Bushnell
- kamera Easypix
- kamera Maginon
- kamera AVerMedia
- kamera Celestron
- kamera Yashica
- kamera Flir
- kamera Daitsu
- kamera Nest
- kamera Ansco
- kamera Sygonix
- kamera Intel
- kamera Zenit
- kamera EVE
- kamera Fuji
- kamera Minolta
- kamera Zorki
- kamera RunCam
- kamera SeaLife
- kamera FIMI
- kamera Liiv360
- kamera Watec
- kamera Meade
- kamera Contax
- kamera Sinji
- kamera Traveler
- kamera Exakta
- kamera Digital Watchdog
- kamera ZeissIkon
- kamera Silvergear
- kamera Dorr
- kamera Spypoint
- kamera HOLGA
- kamera Praktica
- kamera Hasselblad
- kamera Moto Mods (Motorola)
- kamera Fantasea Line
- kamera Brinno
- kamera Z CAM
- kamera General
- kamera Ergoguys
- kamera Strex
- kamera General Electric
- kamera Berger & Schröter
- kamera Leitz Focomat IIc
- kamera Syrp
- kamera Cosina
- kamera Hanwha
- kamera Videology
- kamera Pelco
- kamera Videotec
- kamera Cambo
- kamera Kobian
- kamera Kyocera Yashica
- kamera Red Digital Cinema
- kamera Bauhn
- kamera Konica
- kamera Akaso
- kamera Seek Thermal
- kamera Aida
- kamera Ikegami
- kamera Ikelite
- kamera Adeunis
- kamera Hoppstar
- kamera IOptron
- kamera Moultrie
- kamera PatrolEyes
- kamera Camouflage
- kamera HuddleCamHD
- kamera Aplic
- kamera Linhof
- kamera GoXtreme
- kamera KanDao
- kamera Aquapix
Legújabb útmutatók kamera
3 Április 2025
1 Április 2025
29 Március 2025
29 Március 2025
28 Március 2025
27 Március 2025
27 Március 2025

20 Március 2025

14 Január 2025

14 Január 2025