Használati útmutató Clas Ohlson EF700ET - 32-8934
Clas Ohlson
kapcsoló
EF700ET - 32-8934
Olvassa el alább 📖 a magyar nyelvű használati útmutatót Clas Ohlson EF700ET - 32-8934 (20 oldal) a kapcsoló kategóriában. Ezt az útmutatót 4 ember találta hasznosnak és 2 felhasználó értékelte átlagosan 4.5 csillagra
Oldal 1/20

English
GREAT BRITAIN • customer service
tel: 08545 300 9799 customerservice@clasohlson.co.uk www.clasohlson.com/uke-mail: internet:
Ver. 20131212
a. AM (morning, before 1200)
b. PM (afternoon, after 1200)
c. Clock
d. Hour
e. Programme
f. Minutes
g. [ CD ] Countdown
h. Seconds
i. [ RND ] Random
j. No power supply to the wall socket
k. Programme is activated
l. [ S ] Daylight Saving Time
m. Power on
n. Mo–Su Days of the week
Setting theTime and Day
1. Press [ SET ] when “CLOCK” appears in thedisplay. The days
of theweek will start to flash and thesetup can begin.
2. Select theday using theup/down arrows [ ] and [ ▲ ▼ ].
3. Press [ SET ] when thecorrect day appears on thedisplay.
4. The hour digit will now start to flash, select thecorrect hour
using theup/down arrows [ ], press [ SET ] to save ▲ ] and [ ▼
thesetting when thecorrect hour is shown on thedisplay.
5. The minute digits will start to flash, select thecorrect minute
using theup/down arrows [ ] and [ ▲ ▼ ], press [ SET ] to
save thesetting when thecorrect time is shown on thedisplay.
Programming theTimer
1. Press [ P ] when “CLOCK” appears on thedisplay, 1
and “PROGRAM” are shown, thesymbols mean:
• The number represents theprogramme group (1–10).
• This symbol indicates when theprogramme comes on.
• This symbol indicates when theprogramme goes off.
• “PROGRAM” indicates that thedisplay is in programme
mode.
2. To select programme group and on/off time: Press [ ▲ ] to
advance in theprogramme groups and on/off time. Press
[ ] (first come on time) press [ ] (first go off time) and ▲ → ▲
so on for as many programmes as are required (up to 10).
1 → → → 1 , 2 → 2 ... 9 9 10 →
Press [ ] to go backwards in programme group and on/off time. ▼
Press [ press [ ] (10-on) and so on. ▼ ] (10-off) → ▼
10 → → → → → → 10 , 9 9 ......2 2 1 1
3. Press [ SET ] to confirm when thesettings appear on
the display.
4. The weekly display will flash, complete thesettings by
pressing [ ] to advance in thefollowing order: ▲
• Mo Tu We Th Fr Sa Su
The programmes are valid from Monday to Sunday.
• Mo Th Fr Sa Su→ Tu→ We→ → → →
The programmes are valid from Monday to Sunday.
• Mo Tu We Th Fr
The programmes are valid from Monday to Friday.
• Sa Su
The programmes are valid from Saturday to Sunday.
• Mo Tu We Th Fr Sa
The programmes are valid from Monday to Saturday.
• Mo We Fr
The programme is valid on Monday, Wednesday and
Friday.
• Tu Th Sa
The programme is valid on Tuesday, Thursday and
Saturday.
• Mo Tu Wed
The programmes are valid from Monday to Wednesday.
• Th Fr Sa
The programmes are valid from Thursday to Saturday.
Digital Time Switch
Art.no 32-8934 Model EF700ET
Features
• Programmable on/off switching of electrical devices, ideal
for lighting.
• Ideal for automation, saving energy and for home safety.
• Can be switched on/off manually like anormal on/off switch.
• Up to 70 on/off operations per week (10 programmes,
10 on, 10 off).
• Countdown or random function.
• Simple conversion to Summer Time.
Description
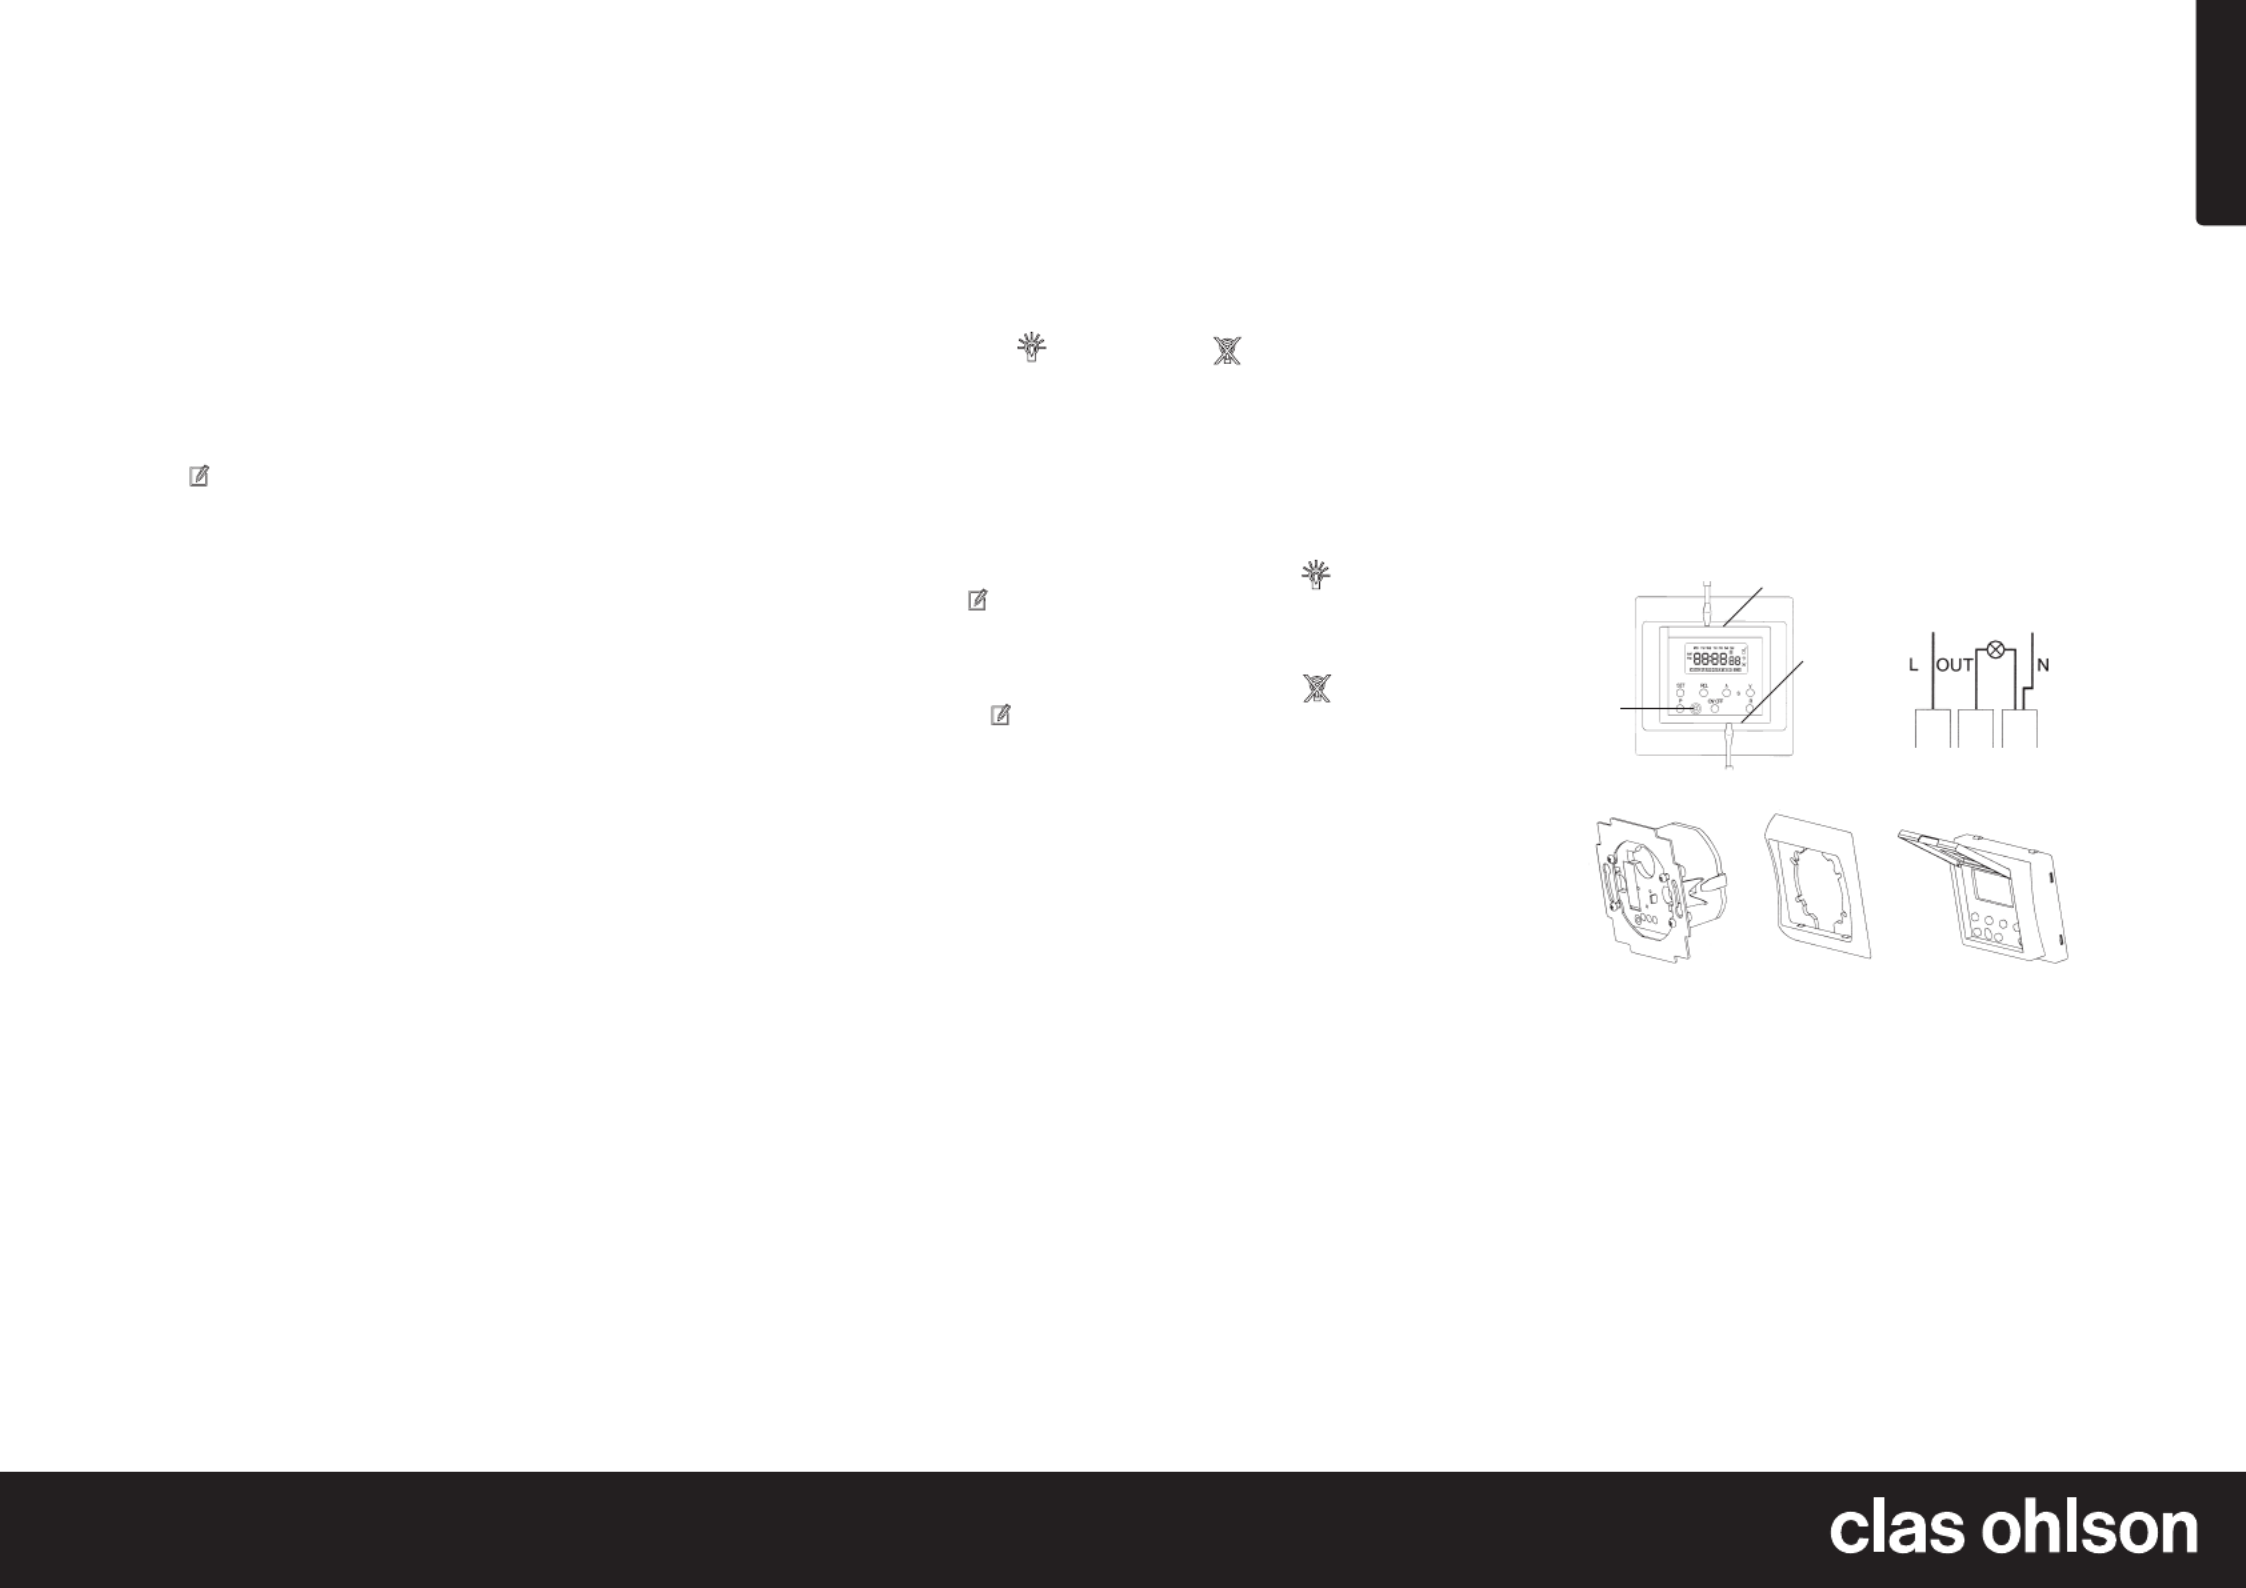
1. LCD Display - Displays time and programme setting.
2. [ SET ] - Starts and confirms programme.
3. [ RCL ] - Push and hold in to pause/continue programmes.
4. [ P ] - Select programme mode: Programme, Countdown,
Random on/off or Clock.
5. [ ON/OFF ] - On/Off
6. [ ] - Increase setting when programming. ▲
7. [ ] - Decrease setting when programming. ▼
8. [ R ] - (Reset) deletes all settings.
Symbols on theDisplay
a
b
c
d e f g h i
n
m
l
k
j
1
6
7
8
2
3
4
5

English
GREAT BRITAIN • customer service
tel: 08545 300 9799 customerservice@clasohlson.co.uk www.clasohlson.com/uke-mail: internet:
Ver. 20131212
Battery change
If thedigits in thedisplay disappear when thetimer is removed
from thepower point, thebatteries need to be changed. Remove
thedisplay according to point 3 below. The battery Connection
compartment is on theback of thedisplay. Change the2 batteries
to new ones of SR69 type.
Connection
1. Programme in thedesired ON/OFF times in thetimer as
explained above.
2. Remove thefuse from thepower point. Make sure there is
no power.
3. Disassemble thetime switch: Loosen thescrew (A) and
insert ascrewdriver at (B) and carefully bend.
4. Connect thecables to thetime switch according to fig. 3.
5. Mount thetime switch in thesocket moulding, and tighten. (Fig 4)
6. Mount theinner cover plate (fig. 5) with thescrews.
7. Fasten theexternal cover on inner cover plate.
8. Replace thefuse and test.
Specifications
Rated Voltage 230 V AC, 50 Hz
Max load 500 W or 3.15 A (resistive)
Batteries 2×1.5 V (SR69, V371)
5. Use [ ] to move backwards in reverse order, press [ SET ] ▼
to save thesettings when thecorrect day is shown.
6. The hour digit will now start to flash, select thecorrect hour
using theup/down arrows [ ] and [ ▲ ▼ ], press [ SET ] to
save thesetting when thecorrect hour is shown on thedisplay.
7. The minute digits will start to flash, select thecorrect minute
using theup/down arrows [ ] and [ ▲ ▼ ], press [ SET ] to
save thesetting when thecorrect time is shown on thedisplay.
8. Other programmes can be set or set programmes can be
changed by: repeating steps 2 to 7 described above.
Manual Function
NOTE: The symbol appears in thedisplay when thetime switch is
activated in either theon or off mode according to theprogramme:
• Press [ RCL ] and hold until thesymbol disappears, in order
to override thepre-programmed settings and control
the ON/OFF activation manually.
• Press [ RCL ] one more time in order to return to
the pre-programmed settings. The icon will reappear.
• The display automatically returns to displaying thetime
if no button is pushed within 15 seconds.
Countdown function
1. Press [ P ] when ”CLOCK” is shown on thedisplay until
the ”CD” symbol appears.
2. Press [ SET ] in order to begin programming. The hour display
begins to flash.
3. Select thecorrect hour using theup/down arrows [ ▲ ] and
[ ], press [ SET ] to save thesetting when thecorrect hour ▼
is shown on thedisplay.
4. The minute digits will start to flash, select thecorrect minute
using theup/down arrows [ ] and [ ], press [ SET ] to save ▲ ▼
thesettings. The countdown function can be set from 1 min.
up to 99 hrs. and 59 min.
5. The display must be in CD mode in order to start
the countdown function. Push [ ON/OFF ] in order to start.
”CD” flashes as areminder that acountdown is in progress
when thedisplay is in theCLOCK mode.
6. Press [ ON/OFF ] in order to stop acoundown (this only
works when ”CLOCK” shows on thedisplay.)
7. When thecountdown programme is active it is themain
programme. Even if there are other programme settings,
the countdown will continue for its set time and
subsequently turn off thepower.
Random function
1. Press [ P ] when ”CLOCK” is shown on thedisplay until
the ”RND” symbol appears.
2. Press [ ON/OFF ] in order to start/stop therandom function.
3. ”RND” flashes to when therandom function is active when
”CLOCK” is shown on thedisplay.
Example:
The set time is 06:00 (on) and 18:00 (off). When theran-
dom function is activated, thepower will be turned on approx.
16–24 minutes after 06:00 and is turned off approx. 24–42 minutes
before 18:00.
Other functions
Manual to/from operation
• Press once on thecover to turn on thepower. is shown in
thedisplay. If is also shown in thedisplay, this means that
thepre-programmed setting will dictate when thepower will
be shut off.
• Press once on thecover to turn on thepower. is shown
in thedisplay. If is also shown in thedisplay, this means
that thepre-programmed setting will dictate when thepower
will be shut off.
Daylight Savings Time
• Press theup/down arrows simultaneously [ ] and [ ▲ ▼ ] in
order to transition to Daylight Savings Time when ”CLOCK”
is shown on thedisplay. The time and theprogrammed
setting are now synchronised to Daylight Savings Time.
”S” now shows on thedisplay.
• Press theup/down arrows simultaneously [ ] and [ ▲ ▼ ]
in order to transition to standard time when ”CLOCK” is
shown on thedisplay. The time and theprogrammed
setting are now synchronised to standard time.
Reset
• Press [ R ] once in order to clear all programmed settings.
12/24 hour display
• When you have changed batteries or have pressed [ R ]
the 24 H will begin to flash, change to a12 hour clock
display by pressing [ ] or press [ ] to return to a24 hour ▲ ▼
display. Confirm by pressing [ SET ].
Fig. 1. Fig. 2.
Fig. 3. Fig. 4.
A
B
B
Fig. 5.
Termékspecifikációk
| Márka: | Clas Ohlson |
| Kategória: | kapcsoló |
| Modell: | EF700ET - 32-8934 |
Szüksége van segítségre?
Ha segítségre van szüksége Clas Ohlson EF700ET - 32-8934, tegyen fel kérdést alább, és más felhasználók válaszolnak Önnek
Útmutatók kapcsoló Clas Ohlson

16 Július 2024
Útmutatók kapcsoló
- kapcsoló Yamaha
- kapcsoló Nedis
- kapcsoló Worx
- kapcsoló Philips
- kapcsoló SilverCrest
- kapcsoló Bosch
- kapcsoló Theben
- kapcsoló Panasonic
- kapcsoló Doepke
- kapcsoló StarTech.com
- kapcsoló HP
- kapcsoló Ubiquiti Networks
- kapcsoló SunBriteTV
- kapcsoló TP-Link
- kapcsoló Emos
- kapcsoló Vimar
- kapcsoló LogiLink
- kapcsoló Alcatel
- kapcsoló Digitus
- kapcsoló TRENDnet
- kapcsoló Mercusys
- kapcsoló Boss
- kapcsoló Crestron
- kapcsoló Lancom
- kapcsoló ORNO
- kapcsoló Tripp Lite
- kapcsoló Suevia
- kapcsoló Hikvision
- kapcsoló Vivanco
- kapcsoló Netgear
- kapcsoló Asus
- kapcsoló Jabra
- kapcsoló Hama
- kapcsoló Renkforce
- kapcsoló Iogear
- kapcsoló Mercury
- kapcsoló Mikrotik
- kapcsoló Alpine
- kapcsoló Omnitronic
- kapcsoló Toolcraft
- kapcsoló ZyXEL
- kapcsoló Dahua Technology
- kapcsoló Smart-AVI
- kapcsoló Fibaro
- kapcsoló IPGARD
- kapcsoló Planet
- kapcsoló Ernitec
- kapcsoló Tenda
- kapcsoló Black Box
- kapcsoló Tesla
- kapcsoló Eberle
- kapcsoló Extech
- kapcsoló Gembird
- kapcsoló Cisco
- kapcsoló ATen
- kapcsoló SPC
- kapcsoló Unify
- kapcsoló Behringer
- kapcsoló Nexa
- kapcsoló Powerfix
- kapcsoló BaseTech
- kapcsoló Edimax
- kapcsoló Chamberlain
- kapcsoló APC
- kapcsoló CyberPower
- kapcsoló Ei Electronics
- kapcsoló Fantini Cosmi
- kapcsoló Electro Harmonix
- kapcsoló PreSonus
- kapcsoló Intertechno
- kapcsoló Manhattan
- kapcsoló Plantronics
- kapcsoló Alecto
- kapcsoló Honeywell
- kapcsoló EnGenius
- kapcsoló Adder
- kapcsoló Velleman
- kapcsoló Grandstream
- kapcsoló D-Link
- kapcsoló Blustream
- kapcsoló Monacor
- kapcsoló Shimano
- kapcsoló Epiphan
- kapcsoló One For All
- kapcsoló Trotec
- kapcsoló Chacon
- kapcsoló Elro
- kapcsoló Delta Dore
- kapcsoló Abus
- kapcsoló GAO
- kapcsoló Tiptel
- kapcsoló Finder
- kapcsoló Konig
- kapcsoló Marmitek
- kapcsoló Pyle
- kapcsoló Emerson
- kapcsoló Kemo
- kapcsoló IFM
- kapcsoló DataVideo
- kapcsoló Atlona
- kapcsoló Schneider
- kapcsoló Lindy
- kapcsoló Cudy
- kapcsoló QNAP
- kapcsoló Vemer
- kapcsoló Kaiser
- kapcsoló Grässlin
- kapcsoló Dormakaba
- kapcsoló Cotech
- kapcsoló Audac
- kapcsoló Siig
- kapcsoló Eaton
- kapcsoló Gefen
- kapcsoló Kathrein
- kapcsoló Homematic IP
- kapcsoló Elation
- kapcsoló Provision-ISR
- kapcsoló Vacmaster
- kapcsoló Brilliant
- kapcsoló Rex
- kapcsoló Equip
- kapcsoló H-Tronic
- kapcsoló Victron Energy
- kapcsoló PCE
- kapcsoló IVT
- kapcsoló Vivolink
- kapcsoló Linksys
- kapcsoló Intelix
- kapcsoló Heitronic
- kapcsoló Alfatron
- kapcsoló Smartwares
- kapcsoló Kopp
- kapcsoló CSL
- kapcsoló Speaka
- kapcsoló Belkin
- kapcsoló RGBlink
- kapcsoló KanexPro
- kapcsoló Kramer
- kapcsoló BZBGear
- kapcsoló Generac
- kapcsoló Ansmann
- kapcsoló Intermatic
- kapcsoló Flamingo
- kapcsoló Brennenstuhl
- kapcsoló Eminent
- kapcsoló KlikaanKlikuit
- kapcsoló Elektrobock
- kapcsoló Sylvania
- kapcsoló Tork
- kapcsoló Techly
- kapcsoló Sonance
- kapcsoló Totolink
- kapcsoló Profile
- kapcsoló Matrox
- kapcsoló Steren
- kapcsoló Perel
- kapcsoló AV:link
- kapcsoló Buffalo
- kapcsoló Audiovox
- kapcsoló LevelOne
- kapcsoló Merten
- kapcsoló Goobay
- kapcsoló Hager
- kapcsoló Sygonix
- kapcsoló EVE
- kapcsoló UPM
- kapcsoló DoorBird
- kapcsoló Gira
- kapcsoló Jung
- kapcsoló WHALE
- kapcsoló PAC
- kapcsoló Wentronic
- kapcsoló Wago
- kapcsoló Monoprice
- kapcsoló OSD Audio
- kapcsoló Berker
- kapcsoló Aeon Labs
- kapcsoló Advantech
- kapcsoló Merlin Gerin
- kapcsoló Micro Connect
- kapcsoló Extron
- kapcsoló Avocent
- kapcsoló Shelly
- kapcsoló Intellinet
- kapcsoló Ebode
- kapcsoló Robbe
- kapcsoló ICasa
- kapcsoló B-tech
- kapcsoló Legrand
- kapcsoló Kraus & Naimer
- kapcsoló Noble
- kapcsoló Ecler
- kapcsoló Inverto
- kapcsoló Triax
- kapcsoló Rule
- kapcsoló CYP
- kapcsoló Phoenix Contact
- kapcsoló Seuthe
- kapcsoló Maclean Energy
- kapcsoló SmartAVI
- kapcsoló DEHN
- kapcsoló SEC24
- kapcsoló Cooking Performance Group
- kapcsoló Adviti
- kapcsoló Flic
- kapcsoló IB Connect
- kapcsoló Liberty
- kapcsoló PureTools
- kapcsoló Hamlet
- kapcsoló Paladin
- kapcsoló Noark
- kapcsoló Cambium Networks
- kapcsoló 2USB
- kapcsoló Roline
- kapcsoló KVM-TEC
- kapcsoló STI
- kapcsoló Ebara
- kapcsoló Mach Power
- kapcsoló Axing
- kapcsoló ConnectPro
- kapcsoló Atlantis Land
- kapcsoló GEV
- kapcsoló Pizzato Elettrica
- kapcsoló Baco
- kapcsoló SEADA
- kapcsoló Comet
- kapcsoló Setti+
- kapcsoló PureLink
- kapcsoló INOGENI
- kapcsoló Luxul
Legújabb útmutatók kapcsoló
9 Április 2025
9 Április 2025
5 Április 2025
5 Április 2025
5 Április 2025
5 Április 2025
3 Április 2025
3 Április 2025
2 Április 2025
2 Április 2025