Használati útmutató Clarion VRX775VD
Olvassa el alább 📖 a magyar nyelvű használati útmutatót Clarion VRX775VD (76 oldal) a autórádió kategóriában. Ezt az útmutatót 4 ember találta hasznosnak és 2 felhasználó értékelte átlagosan 4.5 csillagra
Oldal 1/76

DVD MULTIMEDIA STATION WITH CeNET & 7-inch
TOUCH PANEL CONTROL
STATION MULTIMEDIA DVD AVEC COMMANDE
PAR ECRAN TACTILE 7 pouces & CeNET
EQUIPO DVD MULTIMEDIA CON CeNET Y PANEL
DE CONTROL TÁCTIL DE 7 pulgadas
Owner’s manual & Installation manual
Mode d’emploi et manuel d’installation
Manual de instrucciones y de instalación
VRX775VD

2VRX775VD
English
Owner’s manual
Thank you for purchasing the Clarion VRX775VD.
*This owner’s manual is for the VRX775VD.
*Please read this manual thoroughly before operating this equipment.
*After reading this manual, be sure to keep it in a handy place (e.g., glove compartment).
*Check the contents of the enclosed warranty card and keep it carefully with this manual.
*This manual includes the operating procedures of the 2-ZONE control, iPod control, CD changer, DVD changer, TV
tuner, Satellite Radio, 5.1 ch surround decoder. The CD changer, DVD Changer, TV tuner, Navigation System and
5.1 ch surround decoder have their own manuals, but no explanations for operating them are described.
■CLARION PRODUCT REGISTRATION INFORMATION
For USA and Canada only
www.clarion.com
Dear Customer:
Congratulations on your purchase of a Clarion mobile electronic products. We are confident that you’ll enjoy
your Clarion experience.
There are many benefits to registering your product. We invite you to visit our website at www.clarion.com to
register your Clarion product.
We have made product registration simple with our easy to use website. The registration form is short and easy
to complete. Once you’re registered, we can keep you informed of important product information.
Register at www.clarion.com - it’s easy to keep your Clarion product up to date.
Contents
1. FEATURES .................................................................................................................... 3
Expanding Systems........................................................................................................ 3
2. PRECAUTIONS ............................................................................................................. 4
3. CONTROLS/COMMANDES/CONTROLES................................................................... 5
4. NOMENCLATURE......................................................................................................... 6
Names of Buttons........................................................................................................... 6
5. OUTLINE OF BUTTON AND TOUCHKEY OPERATION ............................................. 7
6. REMOTE CONTROL ................................................................................................... 13
Functions of Remote Control Unit Buttons ................................................................... 14
7. DCP .............................................................................................................................. 17
8. CAUTIONS ON HANDLING ........................................................................................ 18
Liquid crystal panel/Generalities................................................................................... 18
Cleaning ....................................................................................................................... 18
Handling Discs ............................................................................................................. 19
9. DVD VIDEO SYSTEM .................................................................................................. 20
DVD Video Features .................................................................................................... 20
Discs............................................................................................................................. 21
About the registered marks etc. ................................................................................... 21
10. OPERATIONS.............................................................................................................. 22
Basic Operations .......................................................................................................... 22
Radio Operations ......................................................................................................... 32
DVD Video Player Operations...................................................................................... 34
Other Functions ............................................................................................................ 47
11. OPERATIONS OF ACCESSORIES............................................................................. 49
iPod Operations............................................................................................................ 49
VISUAL Operations ...................................................................................................... 52
CD Changer Operations............................................................................................... 52
DVD Changer Operations ............................................................................................ 54
TV Operations .............................................................................................................. 54
Satellite Radio Operations............................................................................................ 57
NAVI Operations .......................................................................................................... 60
5.1 ch Surround Decoder Operations........................................................................... 62
12. IN CASE OF DIFFICULTY ........................................................................................... 66
13. ERROR DISPLAYS...................................................................................................... 68
14. SPECIFICATIONS ....................................................................................................... 69
INSTALLATION AND WIRE CONNECTION MANUAL.................................................... 70

3
VRX775VD
English
Owner’s manual
1. FEATURES
■Fully-Motorized 7" Widescreen LCD
■Touch Panel Control
■DVD Video/Video CD/CD-DA/MP3/WMA
Play Capability
■RCA 6(+2)-Channel (2-zone) Output
■Built-in 50 W × 4 Amplifier
■CeNET with Balanced Audio Line
Transmission and Dynamic Noise
Canceling
■CD-R/CD-RW/DVD± ±R/DVD RW Compatible
■5.1 Channel Decoder for DTS and Dolby
Digital Ready
■Optical Digital Output
■2-ZONE Control
■iPod® Control
“iPod” is a trademark of Apple Computer, Inc.,
registered in the U.S. and other countries.
Expanding Systems
iPod
VTR etc.
4-Channel Amplifier
Expanding audio features Expanding visual features
Expanding navigation features Expanding sound features
Note:
The items listed outside of the
frames are the commercial
products generally sold.
CeNET CD Changer
Satellite Radio
CeNET DVD Changer
TV Tuner
5.1 ch Surround
Decoder
CCD Camera
Rear monitor
(DCZ625/CDC655Tz)
2. PRECAUTIONS
1
2
3
4
5
F
w
p
e

5VRX775VD
English Français Español
English
Owner’s manual
3. CONTROLS/COMMANDES/
CONTROLES
[
BAND
]
[
E
][ ]e
[
ISR
]
Sensor
[
P
]
[
ADJ
]
[
SRC
]
[
MONI
]
[
iPod
]
[
MENU
]
[
MAP
]
Note: Be sure to unfold this page and refer to the front diagrams as you read each chapter.
The control panel can be detached to prevent theft. For details, see the pages entitled “7. DCP”.*
Remarque: Veuillez déplier cette page et vous référer aux schémas quand vous lisez chaque chapitre.
Le panneau de commande peut être détaché de l’unité pour éviter tout vol. Pour plus d’informations, *
reportez-vous au chapitre “7. CLAVIER DE COMMANDE AMOVIBLE”.
Nota: Cuando lea los capítulos, despliegue esta página y consulte los diagramas.
Puede extraer el panel de control para evitar que lo roben. Para obtener más información, consulte las páginas *
del apartado “7. Panel de CONTROL DESMONTABLE (DCP)”.
4. NOMENCLATURE

7
VRX775VD
English
Owner’s manual
5. OUTLINE OF BUTTON AND
TOUCHKEY OPERATION
Turning the power on
∗1
∗2
System check
The CeNET format utilized on this unit is
provided with a system check function. When
the system check function is performed
under the following conditions, the power is
automatically turned off. Press the [ ] SRC
button again.
•When power is first turned on after initial
installation.
•When an external device is connected or
disconnected.
•When Reset button is pressed.
∗In addition to the above conditions, the
system check function can be performed
from the GENERAL menu in the ADJUST
mode.
•You can change the media
sources.
Engine ON
position
When the liquid crystal panel is closed
When the liquid crystal panel is open
or
(OPEN)

English
Owner’s manual
8VRX775VD
TUNER mode operation
1 0 7 9 ENT ∗3
(Source menu)
•Enters desired
frequency.
(Preset List screen)
(Title input screen)
(Key Pad screen)
Note:
∗1:These images indicate the buttons to press or
keys to touch.
∗2:External equipment not connected with
CeNET is not displayed.
∗3:This shows an example entering 107.9 MHz.
•Selects desired
station.

9
VRX775VD
English
Owner’s manual
DVD Video mode operation
∗4
(Source menu)
Screen during DVD mode∗
when automobile moving.
(DVD PLAYER mode screen)
(Option menu)
(DVD SETUP menu)
Note:
∗
4:
When displaying movies in DVD video mode, touching the screen surface will cause
the DVD PLAYER mode screen to be displayed.

10 VRX775VD
English
Owner’s manual
Adjusting audio feature settings
●When no surround decoder is connected
(ADJUST mode menu)
(AUDIO menu)
(BAL/FAD screen)
(BAL/FAD)
(AUDIO EXT. menu)

11
VRX775VD
English
Owner’s manual
●When the 5.1 ch Surround Decoder is connected
(AUDIO menu)
(STATUS screen) (SPEAKER SEL menu)
(STATUS) (SPEAKER SEL)
(AUDIO EXT. menu)
(ADJUST mode menu)
12 VRX775VD
English
Owner’s manual
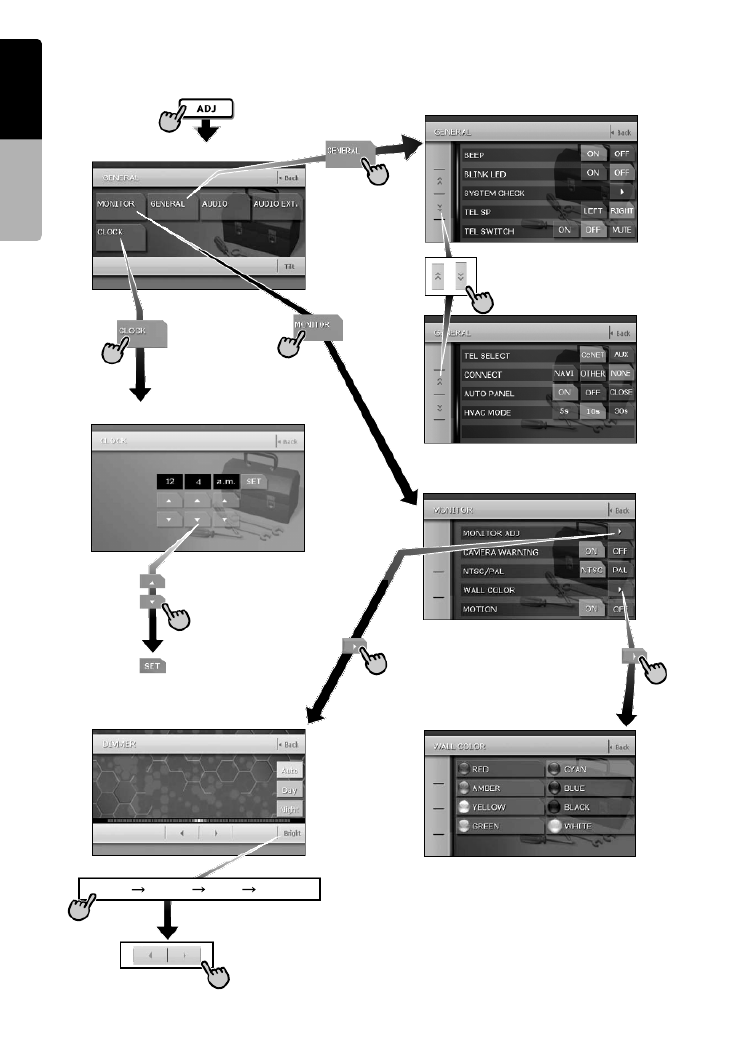
Adjusting the other system settings
Bright Color Hue Dimmer
(ADJUST mode menu)
(MONITOR menu)
(Hour, Minute, a.m./p.m.)
(CLOCK screen)
(MONITOR ADJ)
(Monitor Adjust screen)
(GENERAL menu)
(WALL COLOR screen)
(WALL COLOR)
•Switched by touching this
key repeatedly.

13
VRX775VD
English
Owner’s manual
6. REMOTE CONTROL
Remote control unit
Inserting the Batteries
1. Slide the rear cover in the direction of the
arrow, and remove it.
2. Insert the AA (SUM-3, IECR-6/1.5V) batteries
bundled with the remote control unit in the
directions shown in the figure, then close the
rear cover.
Note:
Using batteries improperly can cause them to
explode. Take note of the following points:
•When replacing batteries, replace both batteries
with new ones.
•Do not short-circuit, disassemble or heat batteries.
•Do not dispose of batteries into fire or flames.
•Dispose of spent batteries properly.
[MUTE]
[VOLUME]
[P.TIME]
[BAND]
[SRC]
[0-9]
[DISC SEL]
[SEARCH MODE]
[MENU][RTN]
[SET UP][TOP MENU]
[2-ZONE]
[PBC
]
[RDM]
[SLOW
]
[ANGLE
]
[SCN]
[RPT]
[AUDIO]
[SUB TITLE]
[ ],[ ]
[ENT][ ],[ ]
[ISR
]
Signal transmitter
Operating range: 30˚ in all directions
Signal transmitter
Operating range: 30˚ in all directions
Rear side
AA (SUM-3, IECR-6/1.5V)
Batteries
Rear cover

14 VRX775VD
English
Owner’s manual
Functions of Remote Control Unit Buttons
You can use the remote control unit to control the VRX775VD. When the 2-ZONE function is ON, the
controls work upon the selected zone.
Note:
•The steering wheel remote control operations work upon the MAIN zone even when the SUB zone is selected.
Shared modes
[SRC] button
• Press this button to turn on the power. Keep
pressing this button more than 1 second to turn
off the power.
• Press this button to switch the modes such as
TUNER mode, DVD PLAYER mode.
[VOLUME] buttons
• Increase and decrease volume.
[MUTE] button
• Turns mute on and off.
[RTN] button
• Returns to the previous screen from the list or
menu screens.
• Displays the menu screen when playing a
Video CD.
[2-ZONE] button
• Keep pressing more than 1 second to turn on
the 2-ZONE, and keep pressing again to turn
off 2-ZONE.
• Press to switch between the MAIN zone and
SUB zone when the 2-ZONE is turned on.
TUNER/TV/Satellite Radio mode
[BAND] button
• Switches reception band.
• Keep pressing more than 1 second to switch
the Seek/Manual tuning modes.
[0 - 9] button
• Use in the Key Pad screen to set the radio
frequency or TV/Satellite Radio channels.
• Use to select the preset number in the Preset
List screen.
[DISC SEL] button
• Press to show/hide the Preset List screen.
[SEARCH MODE] button
• Press to show/hide the Key Pad screen.
[ENT] button
• Press to fix the entered data in the Key Pad
screen.
[r], [f] buttons
• Press to select the next higher or lower preset
station in TUNER and TV/Satellite Radio
modes.
[SCN] button
• Press to perform preset scans in the TUNER
and TV/Satellite Radio modes. For the Satellite
Radio mode, keep pressing more than 1
second.
• Press to perform category scans in the Satellite
Radio mode.
• Keep pressing more than 1 second to perform
the auto store operation in the TUNER and TV
modes.
[ISR] button
• Recall ISR radio station in memory.
• Keep pressing more than 2 seconds to store
current station into ISR memory (radio mode
only).
[RDM] button
• Press to switch between TV mode and VTR
mode.
DVD PLAYER mode
[BAND] button
• Press to return to the first chapter in DVD video
mode.
• Press to return to the first track in CD and Video
CD modes when playing back.
• Press to move to the next folder when more
than 1 folder are played back in MP3/WMA
mode.
[P.TIME] button
• Press to turn on and off the playtime display in
the DVD video/Video CD modes.
[6] button
• Press to play or pause video and audio media.
• Keep pressing more than 1 second to stop
video playback in DVD video.
[0 - 9] buttons
• Press to enter DVD video chapters/titles in the
Key Pad screen.
• Press to set the track/folder number of the CD,
Video CD or MP3/WMA in the Key Pad screen.
[DISC SEL] button
• Press to show/hide the Track List screen in the
CD mode.
• Press to show/hide the Folder List screen in the
MP3/WMA mode.

Functions of Remote Control Unit Buttons
15
VRX775VD
English
Owner’s manual
[SEARCH MODE] button
• Press to display the Key Pad operation screen.
• Keep pressing more than 1 second to switch
the search mode.
[RTN] button
• Press to switch to the menu screen while a
Video CD is being played back. Press to switch
to the previous screen display while the Menu
screen is being displayed. However, it may
occur that this button operation dose not work
on some discs.
[MENU] button
• Press to display menu stored on video disc.
[SET UP] button
• Press to show the DVD SETUP menu screen
during DVD video playback.
[TOP MENU] button
• Press to display the Top Menu screen stored
on DVD video disc. Some discs do not display
the top menu screen.
[E], [e], [T], [t] buttons
• Press to select button items on the menu
screen of a DVD video.
• Press [E e], [ ] to scroll the Track/Folder List
screen in the CD and MP3/WMA modes.
[ENT] button
• Press to fix the entered data in the Key Pad
screen.
• Press to fix the selected item in the menu
screens.
[r], [f] buttons
• Press to select the next higher or lower chapter
number in DVD video mode.
• Press to select the next higher or lower track in
CD, Video CD and MP3/WMA modes.
• Keep pressing to perform fast-forward and fast-
backward.
• Keep pressing to perform slow playback while
pausing a DVD video/Video CD play.
[SCN] button
• Press to perform chapter scans in the DVD
video mode, and track scans in CD and MP3/
WMA modes.
• Keep pressing more than 1 second to perform
folder scans in MP3/WMA mode.
[RPT] button
• Press to perform chapter repeat in the DVD
video mode, and track repeat in CD and MP3/
WMA modes.
• Keep pressing more than 1 second to perform
folder repeat in MP3/WMA mode.
[RDM] button
• Press to play tracks at random in CD and MP3/
WMA modes.
• Keep pressing more than 1 second to play
folders at random in MP3/WMA mode.
[PBC] button
• Press to turn on and off the PBC function in the
Video CD mode.
[AUDIO] button
• Press to switch the AUDIO function in the DVD
video/Video CD modes.
[SUB TITLE] button
• Press to display subtitles in the DVD video
mode.
[ANGLE] button
• Press to switch the ANGLE function in the DVD
video mode when the Angle mark is displayed.
(This button is available only on multiple angles
DVDs and when the ANGLE function in the
SET UP menu is set to ON.)
[SLOW] button
• While the button is kept pressed, slow play is
performed.
iPod mode
[BAND] button
• Press to return to the first track in the current
play list.
• Keep pressing more than 1 second to change
to the All play mode. All tracks in the Song list
will be played back.
[6] button
• Press to play or pause the selected media.
[E], [e] buttons
• Press to scroll the list screens.
[r], [f] buttons
• Press to select the next higher or lower track
numbers.
• Keep pressing to perform fast-forward or fast-
backward.
CD changer mode
[BAND] button
• Press to switch discs.
[DISC SEL] button
• Press to show/hide the Disc List screen.
[6] button
• Press to play and pause the selected media.

Functions of Remote Control Unit Buttons
16 VRX775VD
English
Owner’s manual
[0 - 9] buttons
• Press to enter track numbers in the Key Pad
screen.
• Press to select the disc number in the Disc List
screen.
[E], [e] buttons
• Press to scroll the Disc/Track List screen.
[r], [f] buttons
• Press to select the next higher or lower track
numbers.
• Keep pressing to perform fast-forward or fast-
backward.
[SCN] button
• Press to perform track scan.
• Keep pressing more than 1 second to perform
disc scan.
[RPT] button
• Press to perform track repeat.
• Keep pressing more than 1 second to perform
disc repeat.
[RDM] button
• Press to play tracks of all discs at random.
• Keep pressing more than 1 second to play
folders of all discs at random.
DVD changer mode
*For details on DVD changer precautions, refer to
the instruction manual of the DVD changer.
[BAND] button
• Press to switch discs.
[P.TIME] button
• Keep pressing more than 1 second to switch
between the time progress and remaining time
to be displayed.
[DISC SEL] button
• Press to show/hide the Disc List screen.
[0 - 9] buttons
• Press to enter track numbers in the Key Pad
screen.
• Press to select the disc number in the Disc List
screen.
[E], [e], [T], [t] buttons
• Press to scroll the Disc/Track List screen.
[SCN] button
• Press to perform track scan.
• Keep pressing more than 1 second to perform
disc scan.
[RPT] button
• Press to perform track repeat.
• Keep pressing more than 1 second to perform
disc repeat.
• Other button operations in this mode are the
same as those in DVD PLAYER mode.
When SUB zone is selected
SUB zone operations are supported, but button
functions are limited as follows:
Shared modes
[VOLUME] buttons
• Controls sound volume for MAIN zone source.
[MUTE] button
• Controls audio mute function for MAIN zone
source.
[ISR] button
Not supported.
CD changer mode
• This mode is disabled when MAIN zone is set
to an external equipment other than the CD
changer.
DVD changer mode
• This mode is disabled when MAIN zone is set
to an external equipment other than the DVD
changer.
17
VRX775VD
English
Owner’s manual
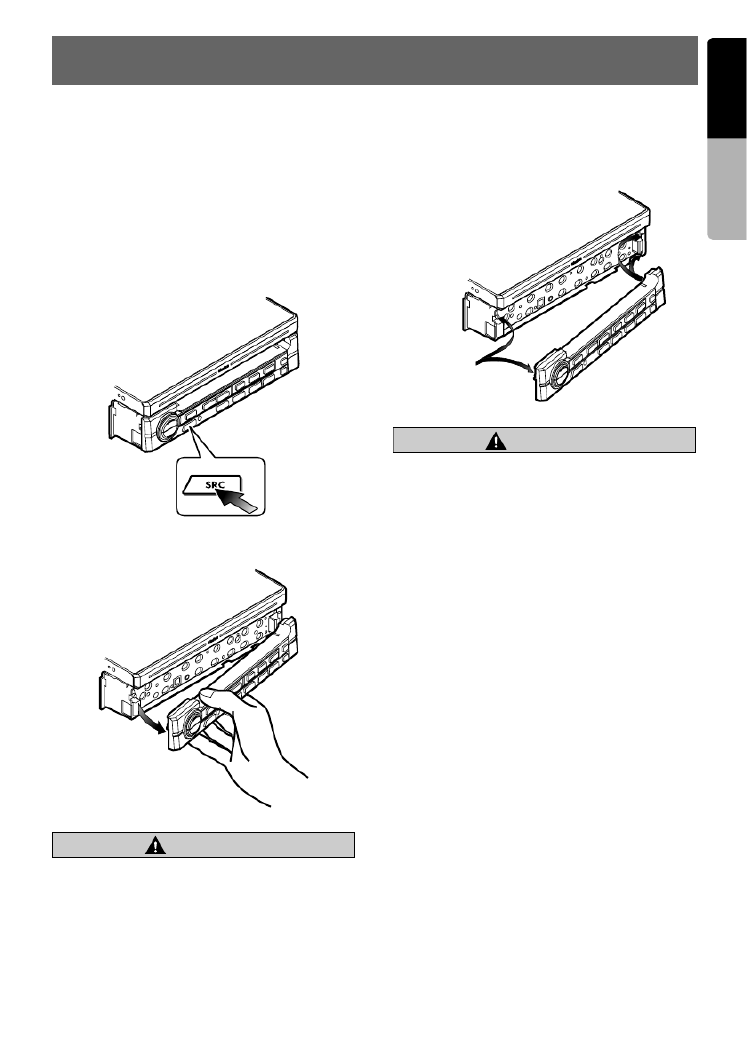
7. DCP
The control panel can be detached to prevent
theft. When detaching the control panel, store it
in the DCP (Detachable Control Panel) case to
prevent scratches.
We recommend taking the DCP with you when
leaving the car.
Removing the DCP
1. Keep pressing the [ ] button more than 1 SRC
second to turn off the power.
2. Pull the left side of the DCP toward you, and
remove it.
CAUTION
CAUTION
When the Auto Panel function (see page 29) is
set to “OFF”, be sure to close the liquid
crystal panel for safe before removing the
DCP.
Attaching the DCP
1. Hook the right side of the DCP to the right side
of the main unit.
2. Settle the left side of the DCP to the main unit.
CAUTION
CAUTION
•This unit uses a magnet to fix the DCP. For
the items that can be affected by
magnetism, such as magnetic cards, be
sure to keep them away from this unit.
•The DCP can easily be damaged by impact.
After removing it be careful not to drop it
nor subject it to strong impact.
•Remote control unit cannot be used when
the DCP is removed.
Note:
• If the DCP is dirty, wipe it off by using a soft dry
cloth.
[SRC]
button
Magnet
Termékspecifikációk
| Márka: | Clarion |
| Kategória: | autórádió |
| Modell: | VRX775VD |
Szüksége van segítségre?
Ha segítségre van szüksége Clarion VRX775VD, tegyen fel kérdést alább, és más felhasználók válaszolnak Önnek
Útmutatók autórádió Clarion

12 Január 2025
12 Január 2025
17 Augusztus 2024
16 Augusztus 2024
14 Augusztus 2024
14 Augusztus 2024
14 Augusztus 2024
14 Augusztus 2024
14 Augusztus 2024
13 Augusztus 2024
Útmutatók autórádió
- autórádió Sony
- autórádió Nedis
- autórádió LG
- autórádió Grundig
- autórádió Philips
- autórádió Pioneer
- autórádió SilverCrest
- autórádió Panasonic
- autórádió JVC
- autórádió Opel
- autórádió AEG
- autórádió Volvo
- autórádió Harman Kardon
- autórádió Hyundai
- autórádió Mercedes-Benz
- autórádió Hifonics
- autórádió Medion
- autórádió JBL
- autórádió VDO
- autórádió Ford
- autórádió Boss
- autórádió Fiat
- autórádió Conceptronic
- autórádió Technaxx
- autórádió Aiwa
- autórádió Skoda
- autórádió Kenwood
- autórádió Clatronic
- autórádió Renkforce
- autórádió Sencor
- autórádió Xblitz
- autórádió Telefunken
- autórádió Alpine
- autórádió Roadstar
- autórádió Smart
- autórádió Parrot
- autórádió Cobra
- autórádió Nextbase
- autórádió Crunch
- autórádió Denver
- autórádió Trevi
- autórádió Elta
- autórádió Ground Zero
- autórádió Audio-Technica
- autórádió Daewoo
- autórádió Muse
- autórádió SPC
- autórádió Auna
- autórádió Mac Audio
- autórádió Overmax
- autórádió Mini
- autórádió Ultimate
- autórádió Scott
- autórádió McIntosh
- autórádió Manta
- autórádió Blaupunkt
- autórádió Deaf Bonce
- autórádió Magnat
- autórádió AKAI
- autórádió Jensen
- autórádió Pyle
- autórádió Sanyo
- autórádió Telestar
- autórádió Lenco
- autórádió Stinger
- autórádió ECG
- autórádió Hertz
- autórádió Zenec
- autórádió Rockford Fosgate
- autórádió Krüger&Matz
- autórádió Dual
- autórádió Orion
- autórádió Varta
- autórádió Kicker
- autórádió Focal
- autórádió MB Quart
- autórádió OneConcept
- autórádió Xomax
- autórádió Orava
- autórádió Emphaser
- autórádió Majestic
- autórádió REVO
- autórádió Audison
- autórádió Tevion
- autórádió Caliber
- autórádió Brigmton
- autórádió Maginon
- autórádió Marquant
- autórádió Audiosonic
- autórádió Vieta
- autórádió Pure
- autórádió Audiovox
- autórádió Tokai
- autórádió Clas Ohlson
- autórádió Naxa
- autórádió Boston Acoustics
- autórádió Adcom
- autórádió Autovision
- autórádió Lanzar
- autórádió MT Logic
- autórádió Kunft
- autórádió Shuttle
- autórádió Fusion
- autórádió Norauto
- autórádió Axton
- autórádió Soundstream
- autórádió DLS
- autórádió VDO Dayton
- autórádió Macrom
- autórádió Becker
- autórádió Watssound
- autórádió Tamashi
- autórádió Scion
- autórádió Sendai
- autórádió Phonocar
- autórádió US Blaster
- autórádió Eltax
- autórádió RTO
- autórádió Sevic
- autórádió Cartronix
- autórádió Spectron
- autórádió Mtx Audio
- autórádió Dension
- autórádió Multilaser
- autórádió Raveland
- autórádió ESX
- autórádió RetroSound
- autórádió Lark
- autórádió Planet Audio
- autórádió VW
- autórádió Rodek
- autórádió Toxic
- autórádió Eclipse
- autórádió Voxx
- autórádió SoundMAX
- autórádió Impulse
- autórádió Twister
- autórádió Mystery
Legújabb útmutatók autórádió

10 Április 2025

6 Április 2025

30 Március 2025

28 Március 2025

21 Március 2025
21 Március 2025
16 Január 2025

16 Január 2025
16 Január 2025
16 Január 2025