Használati útmutató Canon PowerShot A100
Canon
videókamera
PowerShot A100
Olvassa el alább 📖 a magyar nyelvű használati útmutatót Canon PowerShot A100 (4 oldal) a videókamera kategóriában. Ezt az útmutatót 6 ember találta hasznosnak és 2 felhasználó értékelte átlagosan 4.5 csillagra
Oldal 1/4

CDI-E061
CDI-E061-010 © 2002 CANON INC. PRINTED IN MALAYSIA
Step 1 Preparing the Camera
A. Install the batteries.
Slide the CF card slot/battery cover. Press the lock in the middle of the
battery cover to open it.
Insert two (2) AA-size alkaline batteries and close the battery cover.
CF card slot /
battery cover
Battery cover (+) Positive end
(-) Negative end
B. Install the CF card.
Insert the CF card with the label facing up and slide it firmly to the end.
Close the CF card slot / battery cover.
Step 2 Shooting
A. Turn on the power.
Slide the lens cover lever down. The lens cover opens and the camera
powers up in Shooting mode.
B. Set the date and time. (first time the camera is powered on)
The Set Date/Time menu will appear on the LCD monitor when the camera
is first turned on.
Use the buttons to select the items you wish to set, and the
buttons to change the value.
To put the settings into effect, press the button.SET
C. Focus.
Point the camera in the direction of the subject you wish to shoot and press
the shutter button halfway. The camera beeps twice when the subject is in
focus.
D. Shoot.
Press the shutter button fully. The camera beeps once, and an image is
shot.
The recorded image is displayed for approximately 3 seconds on the LCD
monitor.
Turn off the power.
Slide the lens cover lever upward. The lens cover closes and the camera’s
power turns off.
Even if the lens cover lever is not operated, the power will automatically
shut down 3 minutes after the last control is accessed.
Step 3 Reviewing an Image
A. Turn on the power.
Press the button.
The last recorded image appears in the LCD monitor.
B. View the images.
Use the buttons to display the image you wish to see.
Erasing Images
Display the unwanted image with the
buttons and press the button. When
the confirmation screen appears, check
that [Erase] is selected and press the SET
button.
Printing Images without Using a Computer
This camera is compatible with the direct print function. By connecting it with a
single cable to a direct print function compatible printer (optional), you can
easily print beautiful images with simple procedures.
Interface cable*
Card Photo Printer CP-100
Interface cable*
Card Photo Printer CP-10
c.
When [Select Components] appears, select your camera
model name and click [Next].
d.
Follow the onscreen instructions.
The software required for the camera will be installed.
e.
When the Installer Panel displays again, after the
installation is complete, click [Exit].
For the USB driver to install correctly the Canon Digital Camera
Solution Disk must be removed.
B. Connect the camera to the computer.
• When installing the driver, turn the camera’s power off
before connecting the cable to the computer.
a.
Connect the USB cable to the computer.
If the computer has two USB ports, you can use either one of them.
USB Port
USB Cable
b.
Connect the USB cable to the camera.
Open the terminal cover.
Insert the connector into the DIGITAL terminal until it clicks into
place.
Terminal cover
Continued on the reverse page.
ENGLISH
* The interface cable is included with the direct print function compatible
printer.
Step 4 Installing the Software on the
Windows Platform
Macintosh users, please refer to the reverse page.
A. Install the software.
• Do not connect the camera to the computer before the
software is installed.
• The USB driver will start its installation procedures after the
camera has been connected to the computer.
• For more information about the system requirements, please
refer to the Software Starter Guide.
• Users of Windows 2000 and Windows XP Professional must
first log in as an Administrator (computer system
administrator) to install programs.
• Close any programs that are running.
a.
Set the Canon Digital Camera Solution Disk in the
computer’s CD-ROM drive.
The installer panel will display automatically.
If the installer panel does not appear automatically, double-click the
CD-ROM icon from [My Computer] and double-click the [Setup] icon.
b.
Click [Software Installation] and follow the onscreen
instructions that appear.
This guide explains the required operations the first time
the camera is used, as well as how to install the software
and download images to a computer.
For more information about usage precautions and detailed
instructions, please refer to the manuals listed below.
Usage precautions .............................. Camera User Guide
Camera’s detailed operations ............ Camera User Guide
Simple software operations ............... Software Starter Guide
Detailed software operations (Windows®)
ZoomBrowser EX Software User Guide
(A PDF file on the supplied CD-ROM)
Detailed software operations (Macintosh)
ImageBrowser Software User Guide
(A PDF file on the supplied CD-ROM)
Please refer to the Troubleshooting section of the Software Starter Guide if
you have trouble installing the software or downloading images.
Do not connect the camera to the computer before the software is
installed.
*EC115usQSGE,vGM 3/27/02, 1:29 PM1

Step 4 Installing the Software on the Windows Platform (continued)
C. Install the driver.
The TWAIN or WIA driver is required when the camera is connected to
the computer. The installation procedures vary between Windows
versions.
a.
Turn the camera’s power on.
Double-click the drive (usually the [C:\] drive) on which you
installed the software to display all of its folders.
Double-click the following folders in the order [Program Files],
[Canon], [PowerShot A100 TWAIN].
Press the button.
Windows 98
b.
Install the TWAIN driver.
The Insert Disk dialog appears. Click [OK] without inserting
the Canon Digital Camera Solution Disk.
Click the [Browse] button.
Click [OK]. When the Insert Disk dialog reappears, click [OK].
The driver will install itself automatically and the Event dialog will
display, allowing you to select a program to start.
c.
Select a program to start.
Select [Canon ZoomBrowser EX] and click [OK]. ZoomBrowser EX
will start.
Confirm that [Display images in the Camera Window] is selected
and click the [Finish] button.
Windows 2000
b.
Install the TWAIN driver.
The Add New Hardware Wizard will appear and automatically install
the TWAIN driver.
Once the installation is complete, the Event dialog will display,
allowing you to select a program to start.
If you are prompted to restart the computer, restart the computer
according to the onscreen messages.
c.
Select a program to start.
Select [Canon ZoomBrowser EX] and click [OK]. ZoomBrowser EX
will start.
Confirm that [Display images in the Camera Window] is selected
and click the [Finish] button.
Step 4 Installing the Software on the Windows Platform (continued)
Windows Me
b.
Install the WIA driver.
The Add New Hardware Wizard will appear and automatically install the
WIA driver.
Once the installation is complete, the Scanners and Cameras Wizard
event dialog appears. Click [Cancel].
c.
Start ZoomBrowser EX.
Double-click the [Canon ZoomBrowser EX] icon on the desktop.
ZoomBrowser EX starts.
A confirmation message will appear the first time ZoomBrowser EX
starts, asking whether you wish to register the [My Pictures] folder in
ZoomBrowser EX. Click [Yes] or [No].
d.
Select a camera.
In the Tree View Area, click [Canon Camera].
Windows XP
b.
Install the WIA driver.
The Found New Hardware Wizard will appear and automatically install
the WIA driver.
Once the installation is complete, The ZoomBrowser start-up event
dialog and the Scanners and Cameras Wizard start-up event dialog will
both display.
c.
Select a program to start.
Click [OK] in the ZoomBrowser EX start-up event dialog.
ZoomBrowser EX will start.
Confirm that [Display images in the Camera Window] is selected and
click the [Finish] button.
Step 5 Downloading Images to a
Computer (Windows)
A. Create a new folder for saving images from the camera.
In the Tree View Area, right-click the [Image Library One] folder, select [New
Folder] from the pop-up menu and input a folder name. (For example,
[Travel] or [Wedding])
Select the newly created folder.
Step 5 Downloading Images to a Computer (Windows) (continued)
B. Download the images from the camera.
Selected images
Select the images you wish to download from the Camera window and
click the [Download] button.
The selected images are saved to the computer disk and appear in the
Browser Display Area.
•The folder you created above normally appears within the
[C:\Program Files\Canon\ZoomBrowser EX\Image Library One]
folder. The downloaded image files are saved to the folder you
created.
Step 4 Installing the Software on the
Macintosh Platform
A. Install the software.
•For more information about the system requirements, please
refer to the Software Starter Guide.
•Close any programs that are running.
a.
Set the Canon Digital Camera Solution Disk in the computer’s
CD-ROM drive.
Mac OS 8.6 – 9.2: Double-click the CD-ROM icon, followed by the
[Mac OS 8/9] and [Canon Digital Camera Installer]
icons.
Mac OS X: Double-click the CD-ROM icon, followed by the
[Mac OS X] and [Canon Digital Camera Installer]
icons.
b.
Click [Digital Camera Software Installation].
Mac OS 8.6 9.2 screen shot shown.–
c.
Follow the onscreen instructions.
The software required for the camera will be installed.
Step 5 Downloading Images to a
Computer (Macintosh)
A. Connect the USB cable to the computer.
If the computer has two USB ports, you can use either one of them.
USB Port
USB Cable
Step 5 Downloading Images to a Computer (Macintosh) (continued)
B. Connect the USB cable to the camera.
Terminal cover
Open the terminal cover.
Insert the connector into the DIGITAL terminal until it clicks into place.
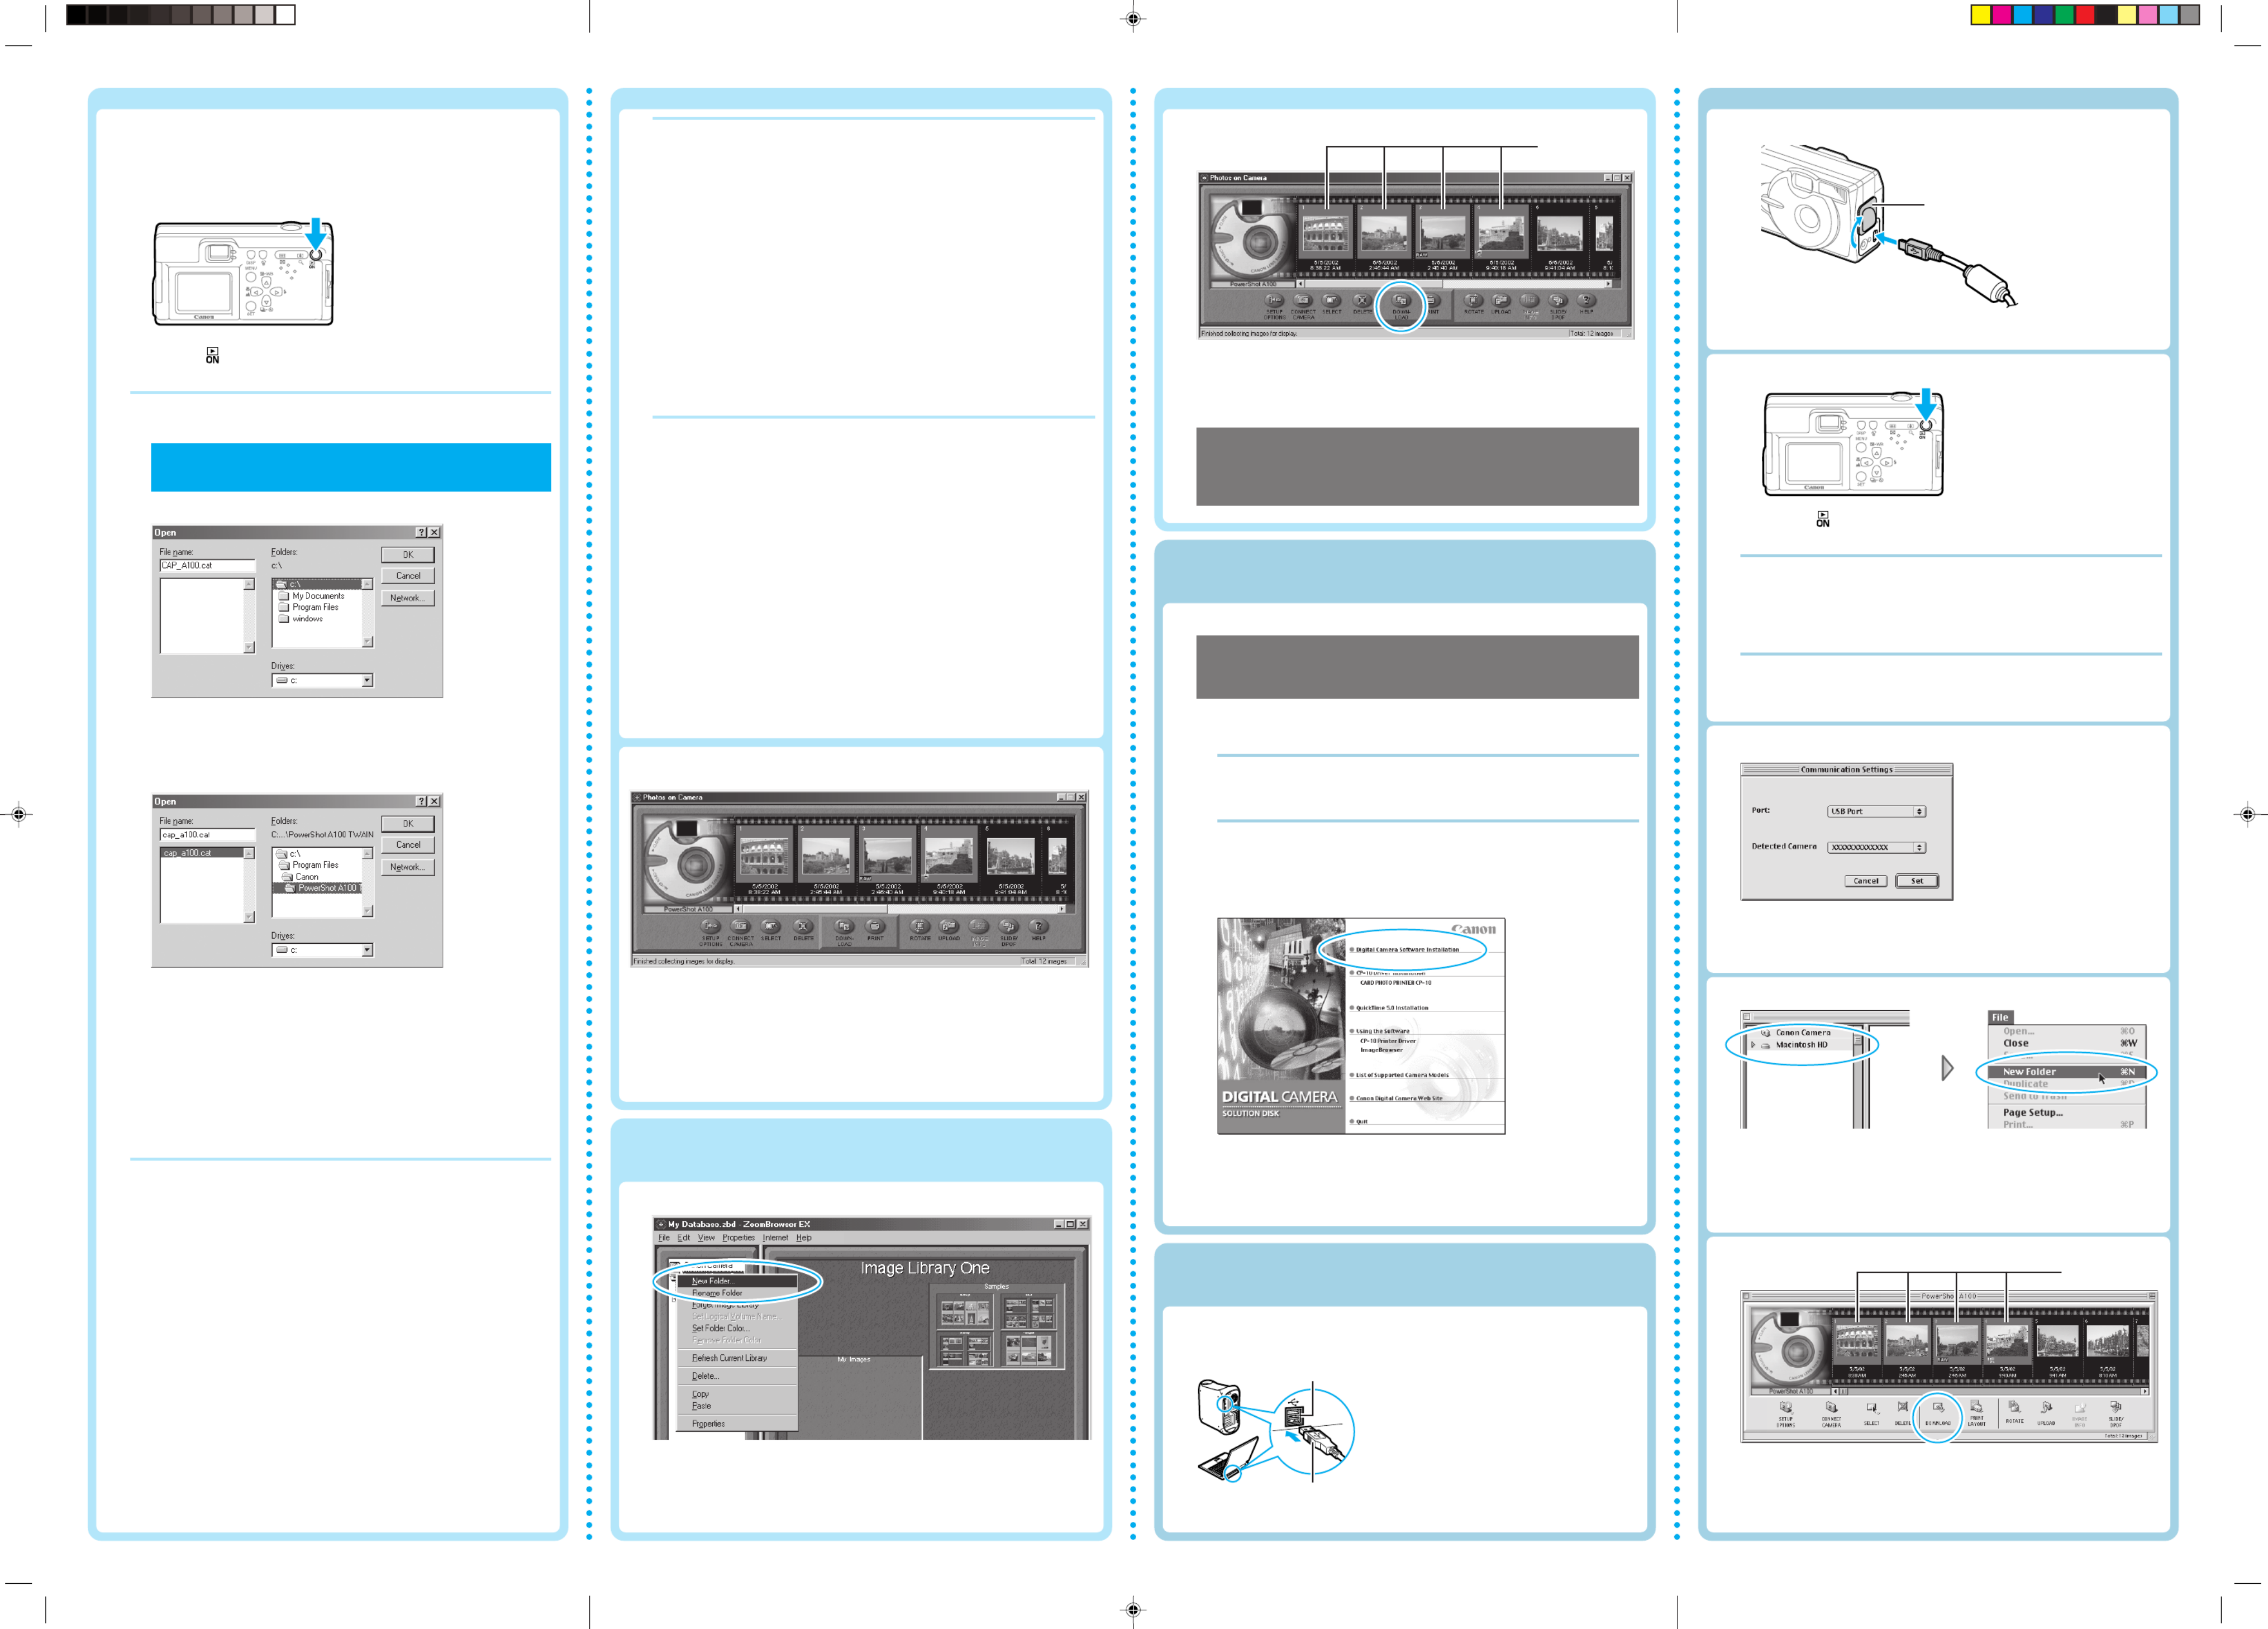
C. Turn the camera’s power on.
Press the button.
Mac OS 8.6 – 9.2 ImageBrowser will start and open the
ImageBrowser Automation Wizard dialog.
Confirm that [Display Images] is selected and click
the [OK] button.
Mac OS X Double-click the [Canon ImageBrowser] icon on
the desktop. Once ImageBrowser is started, click
[Canon Camera] in the Explorer View section.
Confirm that [USB Port] and your camera model name are selected and
click the [Set] button.
The Camera window will open and display the camera images.
E. Create a new folder for saving images from the camera.
D. Set the communication settings (first time connection only)
Mac OS 8.6 9.2 screen shot shown.–
In the Explorer View section, select [Macintosh HD]. From the [File]
menu, select [New Folder] and input a folder name. (For example,
[Travel] or [Wedding])
Select the newly created folder.
F. Download the images from the camera.
Mac OS 8.6 9.2 screen shot shown.–
Select the images you wish to download in the Camera window and
click the [Download] button.
The selected images are saved to the computer and appear in the
Browser area.
Selected images
The Camera Window will open and display the camera images.
*EC115usQSGE,vGM 3/27/02, 1:29 PM2
Termékspecifikációk
| Márka: | Canon |
| Kategória: | videókamera |
| Modell: | PowerShot A100 |
Szüksége van segítségre?
Ha segítségre van szüksége Canon PowerShot A100, tegyen fel kérdést alább, és más felhasználók válaszolnak Önnek
Útmutatók videókamera Canon

13 Január 2025
5 Január 2025
12 Október 2024
2 Október 2024
23 Szeptember 2024
22 Szeptember 2024
13 Szeptember 2024
27 Augusztus 2024
25 Augusztus 2024
25 Augusztus 2024
Útmutatók videókamera
- videókamera Samsung
- videókamera Sony
- videókamera Braun
- videókamera Nedis
- videókamera Milwaukee
- videókamera Philips
- videókamera Olympus
- videókamera Oregon Scientific
- videókamera SilverCrest
- videókamera Garmin
- videókamera Panasonic
- videókamera JVC
- videókamera Sharp
- videókamera Toshiba
- videókamera HP
- videókamera Hyundai
- videókamera BenQ
- videókamera Voltcraft
- videókamera Medion
- videókamera Vimar
- videókamera SBS
- videókamera Insignia
- videókamera Fujifilm
- videókamera Polaroid
- videókamera Kyocera
- videókamera GoPro
- videókamera Speco Technologies
- videókamera Blackmagic Design
- videókamera Ricoh
- videókamera Kenwood
- videókamera Rollei
- videókamera Hama
- videókamera Zoom
- videókamera Renkforce
- videókamera Agfa
- videókamera Midland
- videókamera Lamax
- videókamera Sencor
- videókamera Hitachi
- videókamera Xblitz
- videókamera Kodak
- videókamera Nikon
- videókamera Logitech
- videókamera Bresser
- videókamera Klein Tools
- videókamera Viewsonic
- videókamera Cobra
- videókamera Denver
- videókamera Minox
- videókamera Trevi
- videókamera DJI
- videókamera Extech
- videókamera Gembird
- videókamera Cisco
- videókamera Energy Sistem
- videókamera OK
- videókamera Konica Minolta
- videókamera Mamiya
- videókamera Overmax
- videókamera Kogan
- videókamera SJCAM
- videókamera Intenso
- videókamera AgfaPhoto
- videókamera Marshall
- videókamera Trotec
- videókamera ION
- videókamera Mio
- videókamera DOD
- videókamera Samson
- videókamera TomTom
- videókamera Jay-Tech
- videókamera Trust
- videókamera Konig
- videókamera ARRI
- videókamera Pyle
- videókamera Sanyo
- videókamera Salora
- videókamera DataVideo
- videókamera Lenco
- videókamera Uniden
- videókamera Best Buy
- videókamera Leica
- videókamera Thinkware
- videókamera Soundmaster
- videókamera Steinberg
- videókamera GoClever
- videókamera RCA
- videókamera Insta360
- videókamera Genius
- videókamera Swann
- videókamera Elmo
- videókamera Vitek
- videókamera Laserliner
- videókamera Hazet
- videókamera Vivitar
- videókamera Aiptek
- videókamera AEE
- videókamera Airis
- videókamera ATN
- videókamera Lexibook
- videókamera Bushnell
- videókamera Easypix
- videókamera Nilox
- videókamera Maginon
- videókamera Magellan
- videókamera Flir
- videókamera Coby
- videókamera Envivo
- videókamera TacTic
- videókamera Macally
- videókamera Transcend
- videókamera Bauer
- videókamera Naxa
- videókamera Ricatech
- videókamera Tronje
- videókamera Mpman
- videókamera Nikkei
- videókamera T'nB
- videókamera Ematic
- videókamera Tracer
- videókamera Minolta
- videókamera Zagg
- videókamera Veho
- videókamera Dnt
- videókamera Zorki
- videókamera Contour
- videókamera RunCam
- videókamera Drift
- videókamera SeaLife
- videókamera Sakar
- videókamera Jobo
- videókamera Dragon Touch
- videókamera Mediacom
- videókamera Kreator
- videókamera Contax
- videókamera EE
- videókamera Traveler
- videókamera Contour Design
- videókamera Kaiser Baas
- videókamera Bluetech
- videókamera Braun Phototechnik
- videókamera Spypoint
- videókamera Kitvision
- videókamera Praktica
- videókamera MMTC
- videókamera Flip
- videókamera Brinno
- videókamera BlackVue
- videókamera Storex
- videókamera DXG
- videókamera MD 80
- videókamera Berger & Schröter
- videókamera Vupoint Solutions
- videókamera Whistler
- videókamera Curve
- videókamera PCE Instruments
- videókamera CamOne
- videókamera Mobius
- videókamera ISAW
- videókamera Beaulieu
- videókamera Revier Manager
- videókamera Kobian
- videókamera FHD 1080P
- videókamera RSC
- videókamera Stealth Cam
- videókamera Aqua-Vu
- videókamera Hamlet
- videókamera Qoltec
- videókamera Leotec
- videókamera Replay
- videókamera Akaso
- videókamera Hamilton Buhl
- videókamera Aida
- videókamera Rexing
- videókamera IOPLEE
- videókamera Moultrie
- videókamera Bolex
- videókamera Teslong
- videókamera Izzo
Legújabb útmutatók videókamera

30 Március 2025
30 Március 2025
30 Március 2025
30 Március 2025
28 Március 2025
28 Március 2025
28 Március 2025
28 Március 2025

16 Január 2025
16 Január 2025