Használati útmutató Avid Complete Production Toolkit
Avid
Audio szoftver
Complete Production Toolkit
Olvassa el alább 📖 a magyar nyelvű használati útmutatót Avid Complete Production Toolkit (119 oldal) a Audio szoftver kategóriában. Ezt az útmutatót 8 ember találta hasznosnak és 2 felhasználó értékelte átlagosan 4.5 csillagra
Oldal 1/119

Complete Production Toolkit 2
Version 9.0

Legal Notices
This guide is copyrighted ©2010 by Avid Technology, Inc.,
(hereafter “Avid”), with all rights reserved. Under copyright
laws, this guide may not be duplicated in whole or in part
without the written consent of Avid.
003, 96 I/O, 96i I/O, 192 Digital I/O, 192 I/O, 888|24 I/O,
882|20 I/O, 1622 I/O, 24-Bit ADAT Bridge I/O, AudioSuite,
Avid, Avid DNA, Avid Mojo, Avid Unity, Avid Unity ISIS, Avid
Xpress, AVoption, Axiom, Beat Detective, Bomb Factory,
Bruno, C|24, Command|8, Control|24, D-Command, D-Control,
D-Fi, D-fx, D-Show, D-Verb, DAE, Digi 002, DigiBase,
DigiDelivery, Digidesign, Digidesign Audio Engine, Digidesign
Intelligent Noise Reduction, Digidesign TDM Bus, DigiDrive,
DigiRack, DigiTest, DigiTranslator, DINR, DV Toolkit, EditPack,
Eleven, EUCON, HD Core, HD Process, Hybrid, Impact,
Interplay, LoFi, M-Audio, MachineControl, Maxim, Mbox,
MediaComposer, MIDI I/O, MIX, MultiShell, Nitris, OMF, OMF
Interchange, PRE, ProControl, Pro Tools M-Powered, Pro Tools,
Pro Tools|HD, Pro Tools LE, QuickPunch, Recti-Fi, Reel Tape,
Reso, Reverb One, ReVibe, RTAS, Sibelius, Smack!,
SoundReplacer, Sound Designer II, Strike, Structure, SYNC
HD, SYNC I/O, Synchronic, TL Aggro, TL AutoPan, TL Drum
Rehab, TL Everyphase, TL Fauxlder, TL In Tune, TL
MasterMeter, TL Metro, TL Space, TL Utilities, Transfuser,
Trillium Lane Labs, Vari-Fi, Velvet, X-Form, and XMON are
trademarks or registered trademarks of Avid Technology, Inc.
Xpand! is Registered in the U.S. Patent and Trademark Office.
All other trademarks are the property of their respective
owners.
Product features, specifications, system requirements, and
availability are subject to change without notice.
Guide Part Number 9329-65037-00 REV A 9/10
Documentation Feedback
At Avid, we are always looking for ways to improve our
documentation. If you have comments, corrections, or
suggestions regarding our documentation, email us at
techpubs@avid.com.

Contents iii
contents
Chapter 1. Introduction . . . . . . . . . . . . . . . . . . . . . . . . . . . . . . . . . . . . . . . . . . . . . . . . . . . . . . 1
Complete Production Toolkit 2 Overview . . . . . . . . . . . . . . . . . . . . . . . . . . . . . . . . . . . . . . . . 1
System Requirements and Compatibility . . . . . . . . . . . . . . . . . . . . . . . . . . . . . . . . . . . . . . . . 3
Registration . . . . . . . . . . . . . . . . . . . . . . . . . . . . . . . . . . . . . . . . . . . . . . . . . . . . . . . . . . . . 3
Conventions Used in This Guide . . . . . . . . . . . . . . . . . . . . . . . . . . . . . . . . . . . . . . . . . . . . . . 3
About www.avid.com . . . . . . . . . . . . . . . . . . . . . . . . . . . . . . . . . . . . . . . . . . . . . . . . . . . . . . 4
Chapter 2. Installation and Authorization . . . . . . . . . . . . . . . . . . . . . . . . . . . . . . . . . . . . . . 5
Installing Complete Production 2 Toolkit . . . . . . . . . . . . . . . . . . . . . . . . . . . . . . . . . . . . . . . . 5
Authorizing Complete Production Toolkit 2 . . . . . . . . . . . . . . . . . . . . . . . . . . . . . . . . . . . . . . 6
Uninstalling Complete Production Toolkit 2 Software Option and Included Plug-Ins . . . . . . . . . . 7
Chapter 3. Session and Track Features . . . . . . . . . . . . . . . . . . . . . . . . . . . . . . . . . . . . . . . . 9
Increased Voice and Track Counts. . . . . . . . . . . . . . . . . . . . . . . . . . . . . . . . . . . . . . . . . . . . . 9
VCA Master Tracks . . . . . . . . . . . . . . . . . . . . . . . . . . . . . . . . . . . . . . . . . . . . . . . . . . . . . . 10
Advanced Group Dialog . . . . . . . . . . . . . . . . . . . . . . . . . . . . . . . . . . . . . . . . . . . . . . . . . . . 13
Momentary Solo Latch Option . . . . . . . . . . . . . . . . . . . . . . . . . . . . . . . . . . . . . . . . . . . . . . 16
Setting Playback Location with Back and Forward Commands . . . . . . . . . . . . . . . . . . . . . . . 17
Custom Shuttle Lock Speed . . . . . . . . . . . . . . . . . . . . . . . . . . . . . . . . . . . . . . . . . . . . . . . . 18
Numeric Keypad Set to Shuttle. . . . . . . . . . . . . . . . . . . . . . . . . . . . . . . . . . . . . . . . . . . . . . 19
AutoFades . . . . . . . . . . . . . . . . . . . . . . . . . . . . . . . . . . . . . . . . . . . . . . . . . . . . . . . . . . . . 19
Preferences . . . . . . . . . . . . . . . . . . . . . . . . . . . . . . . . . . . . . . . . . . . . . . . . . . . . . . . . . . . 20
Chapter 4. Advanced Editing Features . . . . . . . . . . . . . . . . . . . . . . . . . . . . . . . . . . . . . . . . 23
Continuous Scrolling During Playback . . . . . . . . . . . . . . . . . . . . . . . . . . . . . . . . . . . . . . . . . 23
Scrub Trimmer Tool . . . . . . . . . . . . . . . . . . . . . . . . . . . . . . . . . . . . . . . . . . . . . . . . . . . . . . 23
Replacing Audio Regions . . . . . . . . . . . . . . . . . . . . . . . . . . . . . . . . . . . . . . . . . . . . . . . . . . 24
TCE (Time Compression and Expansion) Edit To Timeline Selection . . . . . . . . . . . . . . . . . . . . 27
Expanding Alternate Channels to New Playlists or Tracks . . . . . . . . . . . . . . . . . . . . . . . . . . . 28

Complete Production Toolkit 2 Guideiv
Chapter 5. Advanced Automation Features . . . . . . . . . . . . . . . . . . . . . . . . . . . . . . . . . . . 31
AutoJoin with Latch Mode . . . . . . . . . . . . . . . . . . . . . . . . . . . . . . . . . . . . . . . . . . . . . . . . . 31
Touch/Latch Mode . . . . . . . . . . . . . . . . . . . . . . . . . . . . . . . . . . . . . . . . . . . . . . . . . . . . . . 32
Trim Mode . . . . . . . . . . . . . . . . . . . . . . . . . . . . . . . . . . . . . . . . . . . . . . . . . . . . . . . . . . . . 33
Composite Automation Playlist . . . . . . . . . . . . . . . . . . . . . . . . . . . . . . . . . . . . . . . . . . . . . 35
Copy Track Automation to Sends . . . . . . . . . . . . . . . . . . . . . . . . . . . . . . . . . . . . . . . . . . . . 36
AutoMatch. . . . . . . . . . . . . . . . . . . . . . . . . . . . . . . . . . . . . . . . . . . . . . . . . . . . . . . . . . . . 37
Prime Controls for Writing Automation in Latch Mode . . . . . . . . . . . . . . . . . . . . . . . . . . . . . 38
Glide Automation . . . . . . . . . . . . . . . . . . . . . . . . . . . . . . . . . . . . . . . . . . . . . . . . . . . . . . . 40
Trim Automation . . . . . . . . . . . . . . . . . . . . . . . . . . . . . . . . . . . . . . . . . . . . . . . . . . . . . . . 42
Write Automation to the Start, End, or All of a Track or Selection . . . . . . . . . . . . . . . . . . . . . 45
Write Automation to the Next Breakpoint or to the Punch Point . . . . . . . . . . . . . . . . . . . . . . 47
Overwrite or Extend Mute Automation . . . . . . . . . . . . . . . . . . . . . . . . . . . . . . . . . . . . . . . . 51
Snapshot Automation . . . . . . . . . . . . . . . . . . . . . . . . . . . . . . . . . . . . . . . . . . . . . . . . . . . . 54
Preview Automation . . . . . . . . . . . . . . . . . . . . . . . . . . . . . . . . . . . . . . . . . . . . . . . . . . . . . 57
Capture Automation . . . . . . . . . . . . . . . . . . . . . . . . . . . . . . . . . . . . . . . . . . . . . . . . . . . . . 60
VCA Master Track Automation . . . . . . . . . . . . . . . . . . . . . . . . . . . . . . . . . . . . . . . . . . . . . . 64
Chapter 6. Surround Features . . . . . . . . . . . . . . . . . . . . . . . . . . . . . . . . . . . . . . . . . . . . . . . 67
Pro Tools Audio Connections for 5.1 Mixing . . . . . . . . . . . . . . . . . . . . . . . . . . . . . . . . . . . . 67
Configuring Pro Tools for Multichannel Sessions . . . . . . . . . . . . . . . . . . . . . . . . . . . . . . . . . 68
Default I/O Selectors in I/O Setup . . . . . . . . . . . . . . . . . . . . . . . . . . . . . . . . . . . . . . . . . . . 73
5.1 Track Layouts, Routing, and Metering . . . . . . . . . . . . . . . . . . . . . . . . . . . . . . . . . . . . . . 74
Routing Audio for Surround Mixing. . . . . . . . . . . . . . . . . . . . . . . . . . . . . . . . . . . . . . . . . . . 74
Multichannel Audio Tracks . . . . . . . . . . . . . . . . . . . . . . . . . . . . . . . . . . . . . . . . . . . . . . . . 75
Multichannel Signal Routing . . . . . . . . . . . . . . . . . . . . . . . . . . . . . . . . . . . . . . . . . . . . . . . 77
Paths in Surround Mixes . . . . . . . . . . . . . . . . . . . . . . . . . . . . . . . . . . . . . . . . . . . . . . . . . . 81
Example Paths and Signal Routing for a Surround Mix . . . . . . . . . . . . . . . . . . . . . . . . . . . . . 83
Introduction to Pro Tools Surround Panning . . . . . . . . . . . . . . . . . . . . . . . . . . . . . . . . . . . . 87
Output Windows. . . . . . . . . . . . . . . . . . . . . . . . . . . . . . . . . . . . . . . . . . . . . . . . . . . . . . . . 88
Surround Panner Controls . . . . . . . . . . . . . . . . . . . . . . . . . . . . . . . . . . . . . . . . . . . . . . . . . 89
Panning Modes . . . . . . . . . . . . . . . . . . . . . . . . . . . . . . . . . . . . . . . . . . . . . . . . . . . . . . . . 92
Divergence and Center Percentage . . . . . . . . . . . . . . . . . . . . . . . . . . . . . . . . . . . . . . . . . . 95
LFE Faders in Multichannel Panners. . . . . . . . . . . . . . . . . . . . . . . . . . . . . . . . . . . . . . . . . . 97
Pan Playlists . . . . . . . . . . . . . . . . . . . . . . . . . . . . . . . . . . . . . . . . . . . . . . . . . . . . . . . . . . 98
Surround Scope Plug-In. . . . . . . . . . . . . . . . . . . . . . . . . . . . . . . . . . . . . . . . . . . . . . . . . . . 98

Contents v
Chapter 7. Video Features . . . . . . . . . . . . . . . . . . . . . . . . . . . . . . . . . . . . . . . . . . . . . . . . . . . 99
Video Track Support . . . . . . . . . . . . . . . . . . . . . . . . . . . . . . . . . . . . . . . . . . . . . . . . . . . . . 99
Support for Video Import Options . . . . . . . . . . . . . . . . . . . . . . . . . . . . . . . . . . . . . . . . . . . 100
Video Regions. . . . . . . . . . . . . . . . . . . . . . . . . . . . . . . . . . . . . . . . . . . . . . . . . . . . . . . . . 100
General Video Editing . . . . . . . . . . . . . . . . . . . . . . . . . . . . . . . . . . . . . . . . . . . . . . . . . . . 101
Video Region Groups . . . . . . . . . . . . . . . . . . . . . . . . . . . . . . . . . . . . . . . . . . . . . . . . . . . . 104
Browsing Video in the Video Universe Window . . . . . . . . . . . . . . . . . . . . . . . . . . . . . . . . . . 104
Chapter 8. Included Plug-Ins . . . . . . . . . . . . . . . . . . . . . . . . . . . . . . . . . . . . . . . . . . . . . . . . 107
SoundCode Stereo. . . . . . . . . . . . . . . . . . . . . . . . . . . . . . . . . . . . . . . . . . . . . . . . . . . . . . 107
X-Form . . . . . . . . . . . . . . . . . . . . . . . . . . . . . . . . . . . . . . . . . . . . . . . . . . . . . . . . . . . . . . 107
Index . . . . . . . . . . . . . . . . . . . . . . . . . . . . . . . . . . . . . . . . . . . . . . . . . . . . . . . . . . . . . . . . . . . . 109

Chapter 1: Introduction 1
chapter 1
Introduction
The Complete Production Toolkit 2 for
Pro Tools ® provides additional features,
plug-ins, and software options for music cre-
ation and post production.
Complete Production Toolkit 2 provides in-
creased voice and track counts, and surround
mixing, editing, and automation capabilities
that are equal to Pro Tools HD.
Complete Production Toolkit 2
Overview
Complete Production Toolkit 2 enables the fol-
lowing features in Pro Tools:
• Surround mixing, editing, and automation up
to 7.1 (depending on the output capabilities
of your audio interface)
• Up to a total of 192 voiced audio tracks (up to
512 voiceable audio tracks)
• Playback of up to or a combination of play-
ing back and recording up to 192 mono
tracks or 96 stereo tracks (192 available
voices) at 44.1 kHz and 48 kHz
• Playback of up to or a combination of play-
ing back and recording up to 96 mono
tracks or 48 stereo tracks (96 available
voices) at 88.2 kHz and 96 kHz
• Playback of up to or a combination of play-
ing back and recording up to 48 mono
tracks or 24 stereo tracks (48 available
voices) at 176.4 kHz and 192 kHz
• Ability to use QuickPunch ™ on up to 64 tracks
• Up to 160 Auxiliary Input tracks per session
• Up to 128 Instrument tracks
• Advanced Group dialog:
• VCA assignments
• Attributes tab
• Follow globals
• Momentary Solo Latch Back/Forward com-
mands
• Custom Shuttle Lock speeds
For information on standard Pro Tools
features, refer to the Pro Tools Reference
Guide (Help > Pro Tools Reference Guide).
Use the Neyrinck SoundCode™ Stereo down
mixer plug-in for monitoring surround ses-
sions in stereo with audio interfaces that
have fewer than six outputs.
Pro Tools with Complete Production Toolkit
2 displays of up to 512 tracks (192 voice-
able)—tracks in excess the 192 voice limit
are set to inactive.

Complete Production Toolkit 2 Guide2
• Numeric Keypad set to Shuttle mode
• AutoFades
• Advanced editing features:
• Continuous Scrolling
• Scrub Trim tool
• Replace Region command
• TCE Edit to Timeline Selection command
• Selection of alternate field recorder audio
channels in the Pro Tools Timeline
• Expanding alternate field recorder chan-
nels to new tracks
• Advanced automation features:
• AutoJoin with Latch mode
• Touch/Latch mode
• Trim mode
• Composite automation playlist
• Copy track automation to sends
• AutoMatch
• Prime controls for writing automation in
Latch mode
• Glide automation
• Trim automation
• Write automation to Start, End, or All
• Write automation to next breakpoint or
punch point
• Overwrite or extend Mute automation
• Snapshot automation
• Preview automation
• Capture automation
• VCA Master track automation
• Advanced video features:
• Multiple video tracks
• Multiple video playlists
• Video editing
• Preferences
• Back/Forward Amount
• Shuttle
• Auto Region Fade In/Out Length
• Use Absolute Pan Linking
• Suppress Automation “Write To” Warning
• Allow Latch Prime in Stop
• Coalesce when Removing Slaves from VCA
Group
• Standard VCA Logic for Group Attributes
• Include Sends in Trim Mode
• AutoGlide Time
• Coalesce Trim Automation Options
• D-Control support
• D-Command support
Additional Software
Complete Production Toolkit includes addi-
tional software for working with Pro Tools:
Neyrinck SoundCode Stereo For monitoring up
to 7.1 surround sessions (down mixed to stereo)
with all Pro Tools interfaces including 2 channel
interfaces (such as the Mbox Mini). This plug-in
also lets you quickly and easily create stereo
mixes from up to 7.1 surround sessions.
X-Form™ Plug-In For high-quality time compres-
sion and expansion, and formant corrected
pitch-shifting (based on the Radius® algorithm
from iZotope).
For information about using D-Control and
D-Command worksurfaces with Pro Tools,
refer to the D-Command and D-Controls
Guides, and the Pro Tools Reference Guide.

Chapter 1: Introduction 3
System Requirements and
Compatibility
To use Complete Production Toolkit 2, you
need:
An iLok USB Smart Key (an iLok.com account
is also required for managing iLok licenses)
– and –
An Avid-qualified Pro Tools system
Avid can only assure compatibility and provide
support for hardware and software it has tested
and approved.
For complete system requirements and a list of
Avid-qualified computers, operating systems,
hard drives, and third-party devices, visit:
www.avid.com/compatibility.
Registration
Your software purchase is automatically regis-
tered when you activate your iLok license (see
“Authorizing Complete Production Toolkit 2”
on page 6).
Registered users are eligible to receive software
update and upgrade notices.
For information on technical support, visit:
www.avid.com.
Conventions Used in This
Guide
All our guides use the following conventions to
indicate menu choices and key commands:
:
The names of Commands, Options, and Settings
that appear on-screen are in a different font.
The following symbols are used to highlight im-
portant information:
Convention Action
File > Save Choose Save from the
File menu
Control+N Hold down the Control
key and press the N key
Control-click Hold down the Control
key and click the mouse
button
Right-click Click with the right
mouse button
User Tips are helpful hints for getting the
most from your Pro Tools system.
Important Notices include information that
could affect your Pro Tools session data or
the performance of your Pro Tools system.
Shortcuts show you useful keyboard or
mouse shortcuts.
Cross References point to related sections in
this guide or other Avid Guides.

Complete Production Toolkit 2 Guide4
About www.avid.com
The Avid website (www.avid.com) is your best
online source for information to help you get
the most out of your Pro Tools system. The fol-
lowing are just a few of the services and features
available.
Product Registration Register your purchase
online.
Support and Downloads Contact Avid Customer
Success (technical support); download software
updates and the latest online manuals; browse
the Compatibility documents for system re-
quirements; search the online Knowledge Base
or join the worldwide Pro Tools community on
the User Conference.
Training and Education Study on your own using
courses available online or find out how you can
learn in a classroom setting at a certified
Pro Tools training center.
Products and Developers Learn about Avid
products; download demo software or learn
about our Development Partners and their
plug-ins, applications, and hardware.
News and Events Get the latest news from Avid
or sign up for a Pro Tools demo.

Complete Production Toolkit 2 Guide6
Authorizing Complete
Production Toolkit 2
Complete Production Toolkit 2 and its addi-
tional software components must be authorized
before they can be used in Pro Tools.
Complete Production Toolkit 2 and
Additional Software Components
Each Complete Production Toolkit 2 compo-
nent must be authorized before it can be used in
Pro Tools. Authorization includes activating
your software licenses online, then transferring
your licenses to an iLok USB Smart Key (iLok).
An iLok can hold hundreds of licenses for all of
your iLok-enabled software. Once a license for a
given piece of software is placed on an iLok, you
can use the iLok to authorize that software on
any computer.
The following Complete Production Toolkit 2
software components must be authorized before
they can be used in Pro Tools:
• Complete Production Toolkit 2 (includes
Pro Tools features)
• Neyrinck SoundCode Stereo
• X-Form
Authorizing Downloaded Software
If you downloaded software from the Avid Store
(http://shop.avid.com), you authorize it by
downloading licenses from iLok.com to an iLok.
Authorizing Boxed Versions of
Software
If you purchased a boxed version of Complete
Production Toolkit 2, it comes with an Activa-
tion Code (on the included Activation Card).
To authorize Complete Production Toolkit 2 using
an Activation Code:
1 If you do not have an iLok.com account, visit
www.iLok.com and sign up for an account.
2 Transfer the license for your toolkit option
and plug-ins to your iLok.com account by doing
the following:
• Visit www.avid.com/activation.
– and –
• Input your Activation Code (listed on your
Activation Card) and then your iLok.com
User ID. Your iLok.com User ID is the name
you create for your iLok.com account.
3 Transfer the licenses from your iLok.com ac-
count to your iLok USB Smart Key by doing the
following:
• Insert the iLok into an available USB port
on your computer.
• Go to www.iLok.com and log in.
• Follow the on-screen instructions for trans-
ferring your licences to your iLok.
4 Launch Pro Tools.
5 If you have any installed unauthorized
plug-ins or software options, you are prompted
to authorize them. Follow the on-screen instruc-
tions to complete the authorization process.
iLok USB Smart Key
An iLok USB Smart Key is not supplied
with plug-ins or software options, but
comes with new Pro Tools 9.0 systems or
can be purchased separately.
For more information, visit www.iLok.com.

Chapter 2: Installation and Authorization 7
Uninstalling Complete
Production Toolkit 2 Software
Option and Included Plug-Ins
Plug-ins included with Complete Production
Toolkit 2 software can be removed from your
system. The Complete Production Toolkit 2 fea-
ture set for Pro Tools is automatically enabled if
a valid Complete Production Toolkit 2 authori-
zation is detected on your iLok. To disable Com-
plete Production Toolkit 2 on your system,
transfer your Complete Production Toolkit 2 au-
thorization to another iLok (or simply remove
the authorized iLok from your system).
Uninstalling Complete Production
Toolkit 2 Components
Mac
To remove Complete Production Toolkit 2 plug-ins:
1 Locate and open the Plug-Ins folder on your
Startup drive (Library/Application Support
/Digidesign/Plug-Ins).
2 Drag the following plug-ins to the Trash:
• Neyrinck SoundCode Stereo
• X-Form
3 Empty the Trash.
Windows
To remove Complete Production Toolkit 2 plug-ins:
1 Choose Start > Control Panel.
2 Under Programs, click Uninstall a program.
3 Select the following plug-ins to uninstall from
the list of installed applications:
• Neyrinck SoundCode Stereo
• X-Form
4 Click Uninstall.
5 Follow the on-screen instructions to remove
the selected plug-ins.
For information about transferring iLok li-
censes, see www.iLok.com.

Complete Production Toolkit 2 Guide8

Complete Production Toolkit 2 Guide10
For the track that was originally higher num-
bered than the total allowed number of voiced
audio tracks, its voice assignment was set to Off.
When bringing it into the range of total allowed
voiced tracks, it automatically resets to DYN.
Support for Up to 64 QuickPunch
Tracks
With Complete Production Toolkit, up to 64
mono or stereo audio tracks at 44.1 or 48 kHz,
and up to 48 tracks at 88.1 or 96 kHz can be si-
multaneously recorded with QuickPunch.
Additional Enhanced Session and
Track Features
In addition to the increased audio track count
(using up to 192 voices), Pro Tools with the
Complete Production Toolkit 2 option includes
the following:
• Support for up to 160 Auxiliary Input
tracks
• Support for up to 128 Instrument tracks
• Display of up to 512 tracks (192 voice-
able)—tracks in excess the 192 voice limit
are set to inactive
VCA Master Tracks
VCA Master tracks emulate the operation of
voltage-controlled amplifier channels on analog
consoles, where a VCA channel fader would be
used to control, group, or offset the signal levels
of other channels on the console.
VCA Master tracks do not pass audio, so they do
not have inputs, outputs, inserts or sends. A Mix
group is assigned to a VCA Master track, which
appears in the VCA track’s Group Assignment
selector. The controls of the tracks in that Mix
group, called the slave tracks, are modified by
the controls on the VCA Master.
VCA Slave Track Control Indications
Unlike VCAs on traditional analog consoles,
VCA Master tracks in Pro Tools directly affect
their slave tracks, so that the controls on each
slave track always show their actual values:
• The output level of each slave track is indi-
cated by the position of its fader.
• The solo, mute, and record enable status of
each slave track are indicated by the corre-
sponding controls on the track.
Setting a track voice assignment to Off
For more information on track priority and
voice assignments, see the Pro Tools Refer-
ence Guide.
VCA Master track
Group Assignment
selector
VCA Track Type indicator
Mute
Volume
Solo
Record
Level meter

Chapter 3: Session and Track Features 11
This ensures that even when a VCA Master track
is not visible, the true state of its slave tracks is
accurately displayed.
VCA Slave Track Controls and Group Behavior
When a group is assigned to a VCA Master, the
VCA-modifiable controls (Volume, Mute, Solo,
and Record Enable) on its slave tracks, by de-
fault, do not follow any grouped behavior that
may be set in the Attributes page of the Groups
dialog. This lets you control the output levels of
the group’s member tracks while retaining the
ability to adjust individual member track levels.
Slave tracks can be set to follow normal grouped
behavior. See “Assigning Groups to VCA Mas-
ters” on page 12.
Common Uses for VCA Master Tracks
By grouping tracks in a Mix group and assigning
that group to a VCA Master track, you can:
• Control the output levels of all the VCA
group’s member tracks without the need to
bus them to an Auxiliary Input track or to
the same output path
• Create multiple, nested VCA groups and
control the output levels of multiple sub-
mixes at the same time
• Automate a submix by automating its VCA
Master track
VCA Master Track Controls
The controls on a VCA Master track affect the
corresponding controls on the slave tracks in its
assigned Mix group. VCA Master tracks have the
following controls:
Volume
The VCA Volume fader controls the Volume
fader on audio, Auxiliary Input, Instrument,
Master Fader, and other VCA Master tracks in a
VCA-controlled group. (Volume faders on MIDI
tracks are not affected.) Volume faders on slave
tracks move to show the composite level, or the
level on each track resulting from the position
of the VCA Master Volume fader.
Mute
The VCA Mute button controls the mute state of
audio, Auxiliary Input, Instrument, MIDI, and
other VCA Master tracks in a VCA-controlled
group. Muting a VCA-controlled group does not
change the underlying mute state of slave
tracks. (Mute buttons on slave tracks that were
previously unmuted show an implicit mute.)
Solo
The VCA Solo button controls the solo state of
audio, Auxiliary Input, Instrument, MIDI, and
other VCA Master tracks in a VCA-controlled
group.
• Soloing a VCA Master will implicitly mute
all tracks except its slave tracks, thereby in-
directly soloing the slave tracks.
• Soloing a VCA Master will clear any explicit
solos on its slave tracks, leaving them indi-
rectly soloed, and implicitly mute all other
tracks.
• Explicitly soloing a slave track while its
VCA Master track is soloed will override the
VCA Master solo.
Complete Production Toolkit 2 Guide12
Record Enable
The VCA Record Enable button toggles the Re-
cord Enable status of only those audio, Instru-
ment, and other VCA tracks that have already
been record-enabled individually. You can then
toggle record enable on and off for those tracks
using the VCA Master Record Enable.
To temporarily force all slave tracks to toggle their
record enable status:
Option-click (Mac) or Alt-click (Windows) the
Record Enable button on the VCA Master.
Level Meter
On VCA Master tracks, level meters indicate the
highest level occurring on any of its individual
tracks, not a summed level of all slave tracks.
The channel format of level meters on the VCA
Master is set according to the channel formats of
its slave tracks, as follows:
• If all slave tracks are the same channel for-
mat (mono, stereo or a multichannel for-
mat), the number of level meters on the
VCA Master track is identical to that of the
slave tracks.
• If the slave tracks are different formats, the
number of level meters on the VCA Master
track is set to one.
Record Enable and Slave Tracks
When a slave track is record-enabled (the Record
Enable button is lit) or set to Input Only mode
(the TrackInput button is lit), its automation is
temporarily turned off, and its Volume fader is
no longer affected by the VCA Master.
Assigning Groups to VCA Masters
An existing Mix group can be assigned to a VCA
Master, or a new Mix group can be assigned to a
VCA Master while it is being created. Only one
group can be assigned to a VCA Master at a time.
A VCA Master cannot control a group that in-
cludes itself.
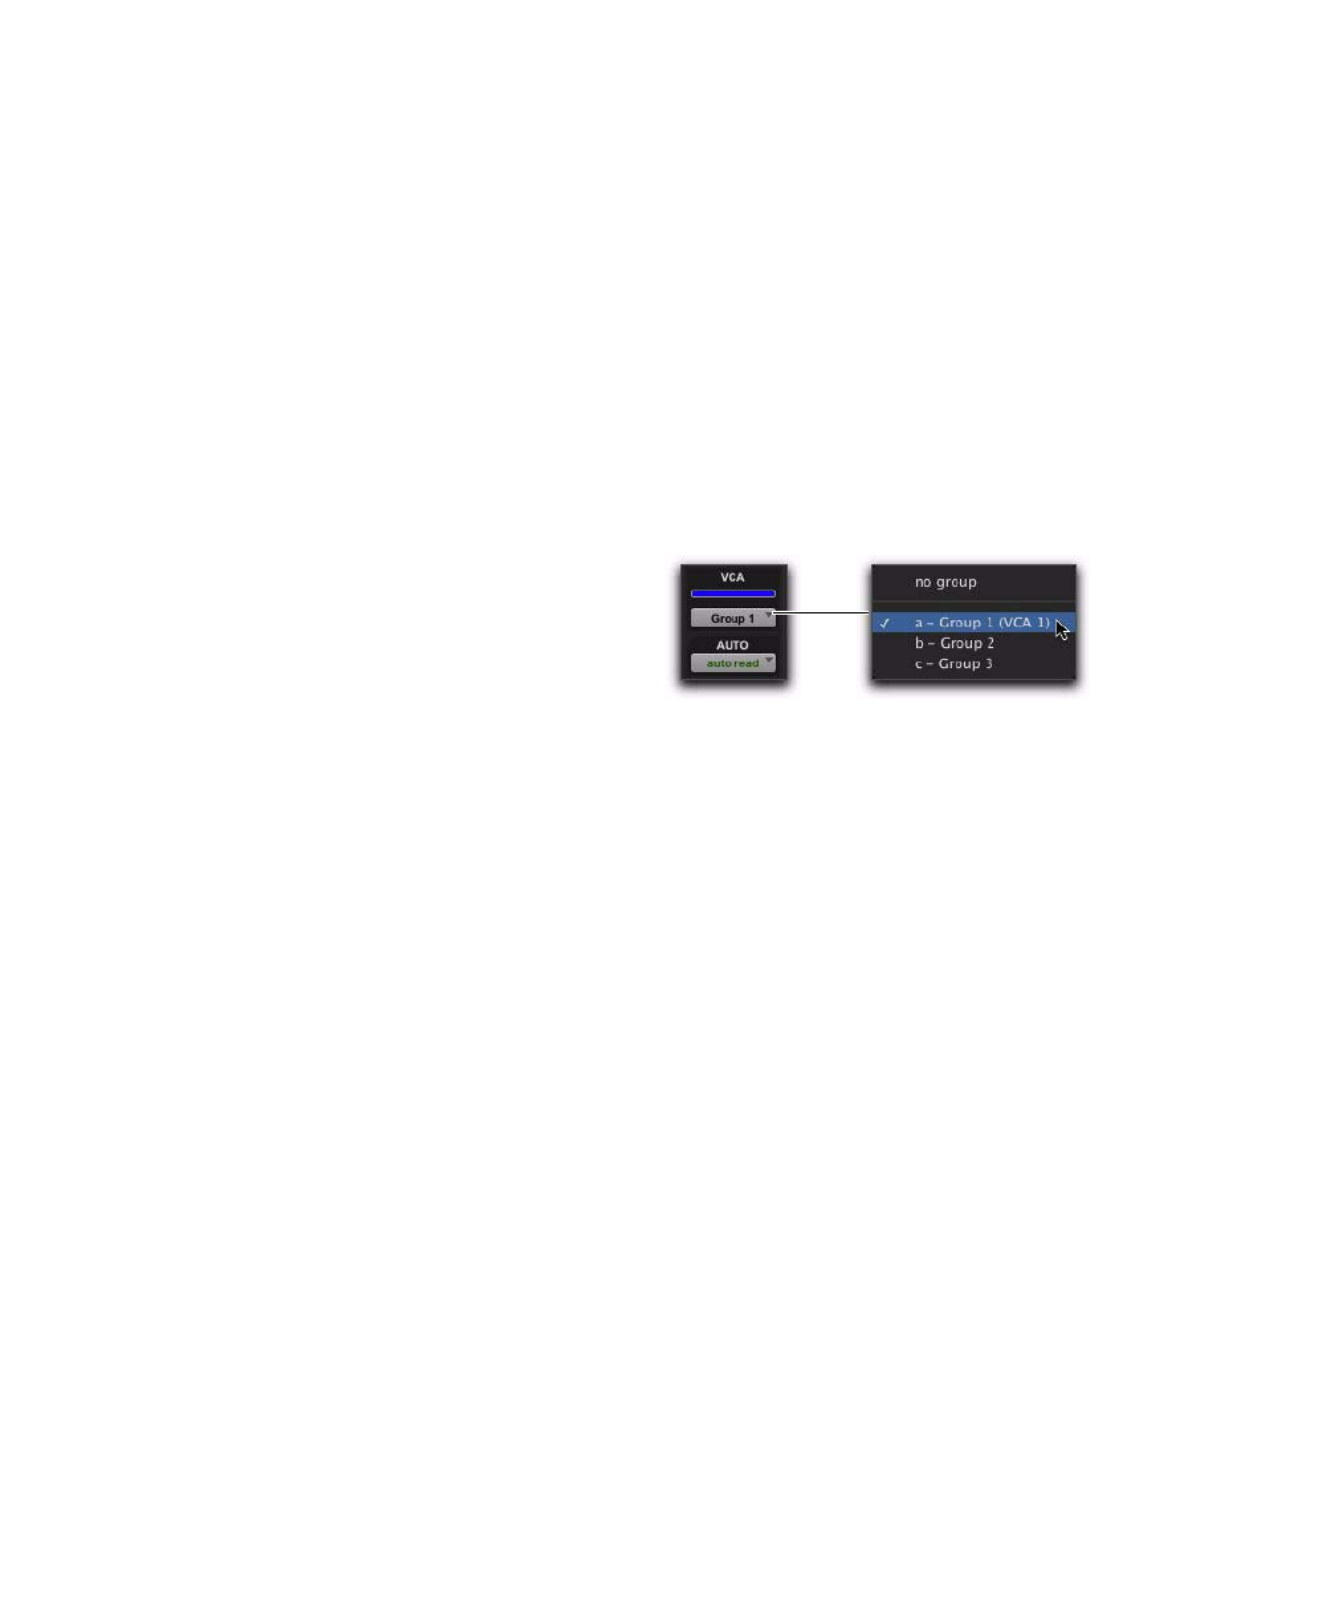
To assign an existing group to a VCA Master:
Click the Group Assignment selector on the
VCA Master track and choose an available group
from the pop-up menu.
To assign a new group to a VCA Master:
1 While creating a new group, select Mix or
Mix/Edit as the Group type.
2 In the Group dialog, choose an available VCA
Master track from the VCA pop-up menu.
Track Membership in Multiple VCA Groups
It is possible for a single slave track to be a mem-
ber of more than one VCA-controlled group. In
this case, the contribution of all VCA Master
Volume faders is summed on the slave track.
Mute, Solo, Record Enable, and TrackInput fol-
low the same rules for enabling or disabling
slave tracks.
Assigning an existing group to a VCA Master

Chapter 3: Session and Track Features 13
Allowing Grouped Behavior of VCA
Slave Track Controls
When a track is a VCA slave track, its Volume,
Mute, Solo, Record Enable, and TrackInput con-
trols follow VCA functions, and normally do
not follow Mix group behavior.
However, these slave track controls can be set to
allow Mix group behavior in addition to their
VCA functions.
To allow grouped behavior of VCA-related controls
on slave tracks:
1 Choose Setup > Preferences and click the Mix-
ing tab.
2 In the Automation section, deselect the Stan-
dard VCA Logic for Group Attributes option.
3 Click OK.
Volume, Mute, Solo, Record Enable, and Track-
Input are made available as Mix group attributes
in the Group dialog.
Advanced Group Dialog
Whether you are creating or modifying groups
with the Group List, a tracks’s Group ID indica-
tor, or the Track > Group menu command, you
use the Groups dialog.
The Group dialog lets you create new groups
and assign attributes to groups. In Pro Tools HD
and Pro Tools with Complete Production Tool-
kit 2, the Group dialog has three pages:
Tracks Lets you add and remove tracks from the
current group.
Attributes Lets you select which parameters are
linked for the current Mix or Mix/Edit Group.
Globals Lets you select parameters to use as a
template that can be applied to individual
groups by selecting the Follow Globals option.
Group dialog (Pro Tools with Complete Production
Toolkit 2)
Complete Production Toolkit 2 Guide14
Mix Groups
Mix Groups can be set to affect the following
items:
• Main Mute
• Solo
• Send Level
• Send Mute
• Main Volume
• Main Pan
• Main LFE Level
• Record Enable
• Input Monitoring
• Automation Mode
• Send Pan
• Send LFE Level
• Plug-In Controls
• Plug-In Bypass
Mix Groups and VCA Masters
An existing Mix Group can be assigned to a VCA
Master, or a new Mix Group can be assigned to a
VCA Master while it is being created. Only one
group can be assigned to a VCA Master at a time.
A VCA Master cannot control a group that in-
cludes itself.
Setting Group Attributes
When creating a Mix Group or a Mix/Edit
Group, you can select the Mix window parame-
ters that will be linked for that group. These
linked parameters are the attributes of the group.
You can select attributes in the Globals page and
then set individual groups to follow the Global
settings, or you can select attributes for groups
individually.
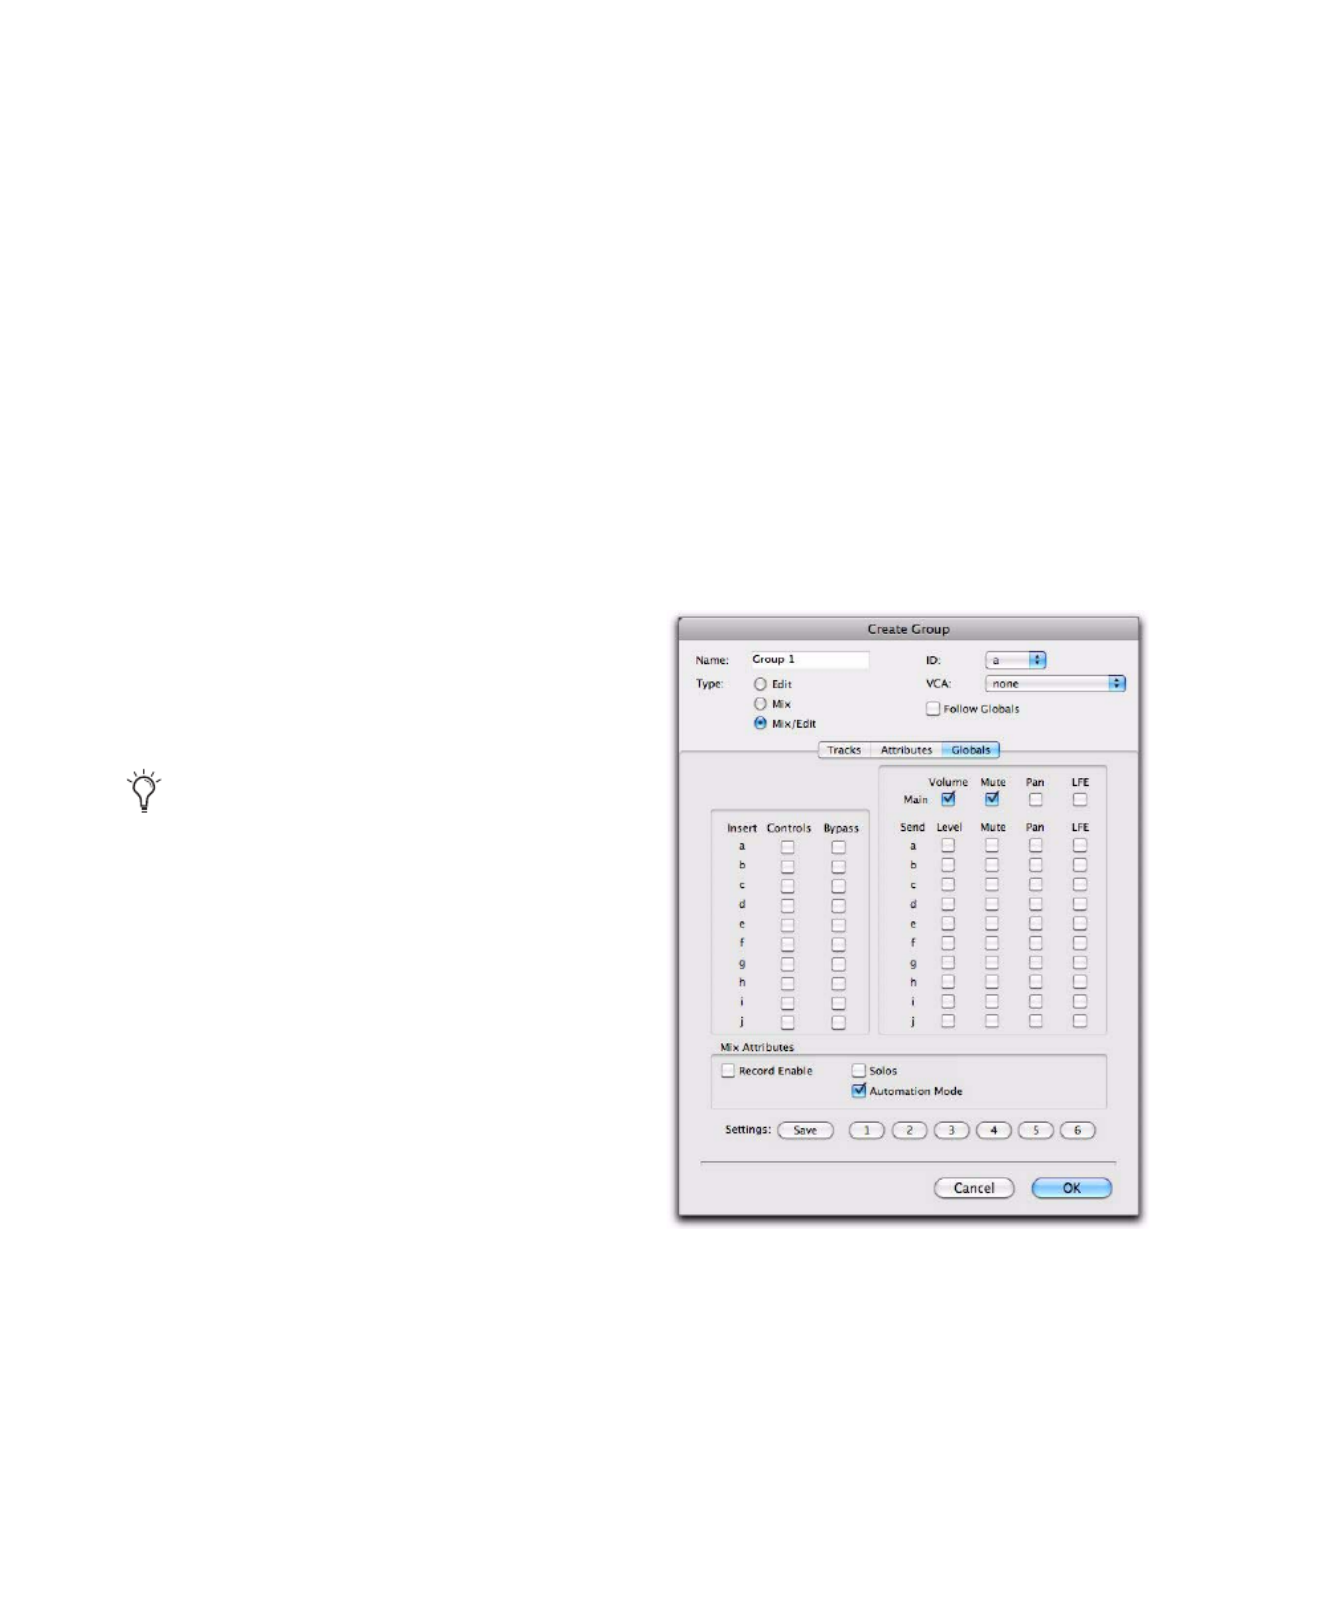
To select attributes in the Global page:
1 While creating or modifying a group, click
Globals in the Group dialog.
2 Select the base set of attributes for groups in
your session.
3 Click OK to save the group and the new
Globals settings.
When the Main Pan attribute is enabled for
groups, grouped behavior applies to the Link,
Front inverse, Rear inverse and Front/Rear
inverse controls in stereo and multichannel
panner windows.
Globals page of Group dialog (Pro Tools with Complete
Production Toolkit 2)

Chapter 3: Session and Track Features 15
To select attributes for an individual group:
1 While creating or modifying a Mix Group or a
Mix/Edit Group, do one of the following:
• Click Attributes in the Group dialog, and
select the attributes you want to link.
– or –
• Enable Follow Globals to follow the base set
of attributes. The Attributes page grays out
to indicate that the group is following the
selections in the Globals page.
2 Click OK to save the settings.
Selecting Group Attributes
The following attributes can be selected for
Global settings and for individual groups.
Track controls:
• Main Volume
• Main Mute
• Main Pan
• Main LFE Level
• Record Enable
• Solo
• Automation Mode
Send controls (Sends A–J):
• Send Level
• Send Mute
• Send Pan
• Send LFE Level
Insert controls (Inserts A–J):
• Plug-In Controls
• Insert Bypass
To select the attributes for a group, do any of the
following:
Select individual attributes by clicking their
checkboxes.
To select or deselect all attributes, Alt-Shift-
click (Windows) or Option-Shift-click (Mac) any
attribute.
To select or deselect all attributes for a single
Send or Insert (across a row), Start-click (Win-
dows) or Control-click (Mac) any attribute in
that row.
To select or deselect attributes for a single con-
trol across all Sends, all Inserts, or for the four
track controls (down a column), Alt-click (Win-
dows) or Option-click (Mac) any attribute in
that column.
Attributes page of Group dialog (Pro Tools with
Complete Production Toolkit 2)

Complete Production Toolkit 2 Guide16
Saving Group Attribute Presets
You can define six Group presets that can be re-
called on either the Attributes or Globals page
whenever you are creating or modifying a Mix
or Mix/Edit Group.
To save the current attribute settings as a Group
preset:
1 In the Groups dialog, click Save. (Follow
Globals must be unchecked to save a setting
from the Attributes page.)
2 In the Save Group Settings dialog, select one
of the six preset locations from the Location pop-
up menu, and click Save.
To recall a Group preset:
Click the corresponding Preset button (1–6) in
the Groups dialog. (Follow Globals must be un-
checked to recall a setting in the Attributes
page.)
Momentary Solo Latch Option
With Momentary Solo Latch enabled, Solo but-
tons are not sticky. A track is soloed only when
its Solo switch is held down.
With a qualified control surface, additional
tracks can be soloed by pressing their SOLO
switches (as long as at least one Solo button is
held down). When no SOLO switch is held
down, all soloed tracks will unsolo.
To temporarily latch solos:
1 Choose Options > Solo Mode > Momentary.
2 Press and hold the Solo button on the first
track that will be soloed.
3 While still holding the first Solo button, press
additional Solo buttons. Solo buttons will re-
main soloed as long as one Solo button is held.
Saving a Group preset
Selecting a Group Settings Location
To save the current attribute settings
directly to a preset location, Control-click
(Windows) or Command-click (Mac) the
preset button.
Recalling a Group preset
As long as at least one Solo button is held
down, all the solos will remain latched.

Chapter 3: Session and Track Features 17
Setting Playback Location
with Back and Forward
Commands
Pro Tools provides four Back/Forward com-
mands (sometimes called “rollback”) for mov-
ing the playback location in the Edit window.
You can also move the playback location in
multiple increments by repeating the command
(See “Repeating Back/Forward Commands” on
page 18).
Back Moves the playback location backward by
the Back/Forward Amount.
Back and Play Moves the current playback loca-
tion backward by the Back/Forward Amount and
automatically begins playback.
Forward Moves the playback location forward by
the Back/Forward Amount.
Forward and Play Moves the current playback lo-
cation forward by the Back/Forward Amount
and automatically begins playback.
Setting the Back/Forward Amount
The length of the Back/Forward move is deter-
mined by the Back/Forward Amount preference
in the Operation page (Setup > Preferences).
To configure the Back/Forward Amount:
1 Choose Setup > Preferences and click the Oper-
ation tab.
The timebase of the Back/Forward Amount set-
tings follows the Main Time Scale by default, or
you can deselect Follow Main Time and select
any of the following timebase formats:
• Bars|Beats
• Min:Sec
• Time Code
• Feet+Frames
• Samples
2 Do one of the following:
• Select a preset amount in the Back/Forward
Amount pop-up menu.
– or –
• In the Back/Forward Amount field, enter a
custom amount.
Using Back or Forward Commands
To move the playback location backward by the
Back/Forward Amount:
Press Command (Mac) or Control (Windows),
and click Rewind in the Transport window.
To move the playback location forward by the
Back/Forward Amount:
Press Command (Mac) or Control (Windows),
and click Fast Forward in the Transport window.
To move the playback location backward by the
Back/Forward Amount and then begin playback:
Press Command+Option (Mac) or Con-
trol+Alt (Windows), and click Rewind in the
Transport window.
To move the playback location forward by the
Back/Forward Amount and then begin playback:
Press Command+Option (Mac) or Con-
trol+Alt (Windows), and click Fast Forward in
the Transport window.

Complete Production Toolkit 2 Guide18
Repeating Back/Forward Commands
All the Back/Forward commands can be repeated
in order to increase the amount of the total Back
or Forward move.
To repeat Back/Forward moves:
1 Press and hold Command (Mac) or Control
(Windows).
2 Click Rewind or Fast Forward the number of
times you want to repeat moving the playback
location backwards or forwards by the specified
Back/Forward Amount.
Extending Selections with Back or Back and
Play Commands
The Back or Back and Play commands can be
used to extend a selection backwards by the
length of the specified Back/Forward Amount.
To extend a selection with Back or Back and Play
commands:
1 Specify the Back/Forward Amount. (See “Set-
ting the Back/Forward Amount” on page 17.)
2 With the Selector tool, drag within a track to
make a selection.
3 Do one of the following:
• To extend the selection backwards by the
Back/Forward Amount, press Shift+Com-
mand (Mac) or Shift+Control (Windows)
and click Rewind in the Transport window.
– or –
• To extend the selection backwards by the
Back/Forward Amount and then begin
playback, press Shift+Command+Option
(Mac) or Shift+Control+Alt (Windows) and
click Rewind in the Transport window.
Custom Shuttle Lock Speed
Use the Custom Shuttle Lock Speed preference
to customize the highest fast-forward Shuttle
Lock speed (key 9) to better match your editing
and auditioning needs.
To configure Custom Shuttle Lock Speed:
1 In Pro Tools, select Setup > Preferences and
click the Operation tab.
2 Be sure that the Numeric Keypad mode is set
to Transport or Classic.
3 Enter a percentage for the Custom Shuttle Lock
Speed setting. The range for this setting is
50–800%. You can use the Up and Down Arrow
keys to increase or decrease the setting.
4 Click OK.
The Custom Shuttle Lock Speed setting is saved
with your Pro Tools system preferences (not
with the session).
To enable Custom Shuttle Lock Speed:
Press Start+9 (Windows) or Control+ 9 (Mac)
on the numeric keypad.
Although you cannot extend a selection
with the Forward or Forward and Play com-
mands, you can use the following proce-
dures with Forward or Forward and Play to
move the start point of a current selection.

Chapter 3: Session and Track Features 19
Numeric Keypad Set to
Shuttle
Pro Tools offers another form of shuttling, dif-
ferent from that of Shuttle Lock mode. With the
Numeric Keypad mode set to Shuttle, playback
of the current Edit selection is triggered by press-
ing and holding the keys on the numeric key-
pad—playback stops once the keys are released.
Various playback speeds are available in both
forward and reverse. In this mode, pre- and post-
roll are ignored.
To shuttle with the Numeric Keypad mode set to
Shuttle:
1 Choose Setup > Preferences and click the Oper-
ation tab.
2 Set the Numeric Keypad mode to Shuttle and
click OK.
3 With the Selector tool, click in the track where
you want playback to begin. To shuttle on two
tracks, Shift-click in a second track.
4 Press and hold any of the following keys (or
key combinations) on the numeric keypad to
trigger playback.
5 Press a different key to switch the playback di-
rection or speed. Release to stop.
AutoFades
Pro Tools can automatically apply real-time
fade-ins and fade-outs to all region boundaries
in the session. Specify the duration (0 to 10 ms)
for automatic real-time fades with the Auto Re-
gion Fade In/Out Length preference in the Opera-
tion Preferences page). These fade-ins and fade-
outs are performed during playback and do not
appear in the Edit window, and are not written
to disk.
The automatic fade-in/out option also has an ef-
fect on Voice borrowing in a session. Whenever
a lower-priority virtual track “pops thru” a si-
lence in a higher-priority track on the same
voice, a fade-in and fade-out is applied to the
transition.
This feature is especially useful in post produc-
tion situations such as dialogue tracking. For ex-
ample, you can assign both a dialogue track and
a “room tone” track with matching background
to the same voice. You can then set the AutoFade
option to a moderate length (4 ms or so) so that
whenever a silence occurs in the dialog, play-
back switches smoothly to and from the back-
ground track without clicks or pops.
Using automatic fade-ins/outs saves you the
trouble of editing to zero-crossings or creating
numerous rendered fades in order to eliminate
clicks or pops in playback. However, since these
autofades are not written to disk, those clicks or
pops still exist in the underlying sound file.
Consequently, those anomalies still appear if
the Duplicate AudioSuite plug-in or the Export
Regions As Files command (from the Region
List) are used to duplicate multiple regions as a
continuous file. To render these real-time auto
fades to disk, choose File > Bounce to > Disk.
Shuttle Speed Rewind Key Forward Key
1 X Speed 4 6
4 X Speed 7 9
1/4 X Speed 1 3
1/2 X Speed 4+5 5+6
2 X Speed 7+8 8+9
AutoFades are not applied to AudioSuite
processing.

Complete Production Toolkit 2 Guide20
To set the length of automatic fade-ins/outs:
1 Choose Setup > Preferences and click the
Operation tab.
2 Type a value between 0 and 10 ms for the Auto
Region Fade In/Out Length. A value of zero (the
default) means that no auto-fading will occur.
3 Click OK. The AutoFade value is saved with the
session, and is automatically applied to all free-
standing region boundaries until you change it.
Preferences
Operation Preferences
Back/Forward Amount Sets the default length of
Back, Back and Play, Forward and Forward and Play.
The timebase of the Back/Forward Amount set-
tings follows the Main Time Scale by default, or
you can deselect the Follow Main Time Scale op-
tion and select another timebase format:
Bars|Beats, Min:Sec, Time Code, Feet+Frames, or
Samples.
Shuttle Selects a type of shuttling different from
that of Shuttle Lock mode. With the Numeric
Keypad mode set to Shuttle, playback is triggered
by pressing and holding the keys on the nu-
meric keypad—playback stops once the keys are
released. Various playback speeds are available
in both forward and reverse. You can also recall
Memory Locations by typing Period (.), the
Memory Location number, and Period (.) again.
Auto Region Fade In/Out Length Sets a default
length for fade-ins and fade-outs automatically
applied to region boundaries. Using automatic
fade-ins and fade-outs saves you the trouble of
editing to zero-crossings or creating numerous
rendered fades in order to eliminate clicks or
pops in playback. Autofades are not written to
disk. Value range is from 0–10 ms for the Auto
Region Fade In/Out Length setting. A value of zero
means that no auto-fading will occur. The Auto
Fade value is saved with the session, and is auto-
matically applied to all free-standing region
boundaries until you change it.
Mixing Preferences
Setup Section
Use Absolute Pan Linking This option affects be-
havior of grouped pan controls.
• When selected, grouped pan controls do
not maintain relative offsets when any of
the grouped pan controls is adjusted. All
grouped pan controls snap to the absolute
value of the adjusted control.
• When not selected, grouped pan controls
maintain relative offsets when any of the
linked controls is adjusted.

Chapter 3: Session and Track Features 21
Automation Section
Suppress Automation “Write To” Warnings When
selected, Pro Tools suppresses the warnings that
appear after invoking any of the Write Automa-
tion To Start, Selection, End, or Punch commands
and then stopping the transport.
Allow Latch Prime in Stop When selected and
any tracks are in Latch mode, any automation-
enabled controls on those tracks can be set to
new values while the transport is stopped by
touching or moving controls, to prepare for the
next automation pass.
Coalesce when Removing Slaves from VCA
Group This option determines the behavior
when removing slave tracks from a VCA-con-
trolled group.
• When selected, any automation on the
VCA Master is automatically coalesced
(without confirmation) to its slave tracks
when the tracks are removed from the
group.
• When not selected, a confirmation dialog
lets you choose whether or not to coalesce
the VCA Master automation to the slave
tracks.
Standard VCA Logic for Group Attributes This op-
tion determines which Mix group attributes
may be selected in the Group dialog when the
group is assigned to a VCA Master.
• When selected, the Main Volume, Mute,
Solo, and Record Enable controls on slave
tracks follow the VCA Master only and are
not available to be independently linked.
(This emulates the behavior of analog con-
sole VCA masters.)
• When deselected, the Main Volume, Mute,
Solo, and Record Enable controls follow the
VCA Master, but also remain available for
independent linking with groups.
Include Sends in Trim Mode This option deter-
mines the Trim status of Send faders when a
track is put in Trim mode.
• When selected, Send faders go into Trim
mode along with the Main Volume fader.
• When deselected, the Main Volume fader
goes into Trim mode, but the Send fader
stays in the corresponding standard Auto-
mation mode.
AutoGlide Time Specifies how quickly Pro Tools
transitions (glides) from one automation value
to another, when AutoGlide mode is used.
Coalesce Trim Automation Options
These options determine when Trim automa-
tion is committed to the main automation play-
list on a track.
After Every Pass Sets Trim automation to co-
alesce when the transport is stopped at the end
of each Trim automation pass. No Composite
Playlist is indicated.
On Exiting Trim Mode Sets Trim Automation to
coalesce on a track when the track is taken out of
Trim mode. A Composite Playlist can be viewed
before committing Trim moves.
Manually Trim Automation can be coalesced
only with the Coalesce Trim Automation com-
mand. A Composite Playlist can be viewed be-
fore committing Trim moves.

Complete Production Toolkit 2 Guide22

Complete Production Toolkit 2 Guide24
This action creates a new region. Note that the
Scrub Trimmer tool changes into a “right trim”
or “left trim” shape as it is placed over the right
or left side of a region. To reverse the direction
of the Scrub Trimmer tool, press Alt (Windows)
or Option (Mac) before you click the region.
Scrub playback speed and direction vary with
controller movement. Scrubbed audio is routed
through the track signal path, so you hear any
effects in the signal path.
To scrub trim a track:
1 Do one of the following:
• Click the Trimmer tool pop-up menu and
select Scrub.
– or –
• Right-click on any track and select Tools >
Trimmer Tools > Scrub.
The tool changes to a speaker with a bracket.
2 Drag within a track to the left or right. Audio
from a scrubbed track is routed through the
track signal path, including any TDM effects.
When you locate the trim point, release the
mouse button to trim the region.
To scrub trim two tracks, click with the Scrub
Trimmer tool between two adjacent tracks and
drag.
To scrub with finer resolution (without having
to zoom in), press Control (Windows) or Com-
mand (Mac) while scrubbing.
Replacing Audio Regions
Use the Replace Region function to replace mul-
tiple instances of an audio region in a playlist
with another region. This is useful in post pro-
duction if you use a sound effect, room noise, or
atmosphere region many times in a session, and
later decide to replace one or all of the original
regions with a different region.
This is also useful in music production if you
want to replace a certain loop or sample (for ex-
ample, a drum beat) with a new one. You can
use this compositionally, if you know the tempo
of a section or session, to create a scratch piece
with “rough” regions of the correct length, and
later replace them with “final” regions of the
same length.
To replace regions by dragging and dropping:
1 Select a region in a track’s playlist that you
want to replace. The selection can extend be-
yond the region’s end point, to include material
from the replacement region that is longer than
the original region.
2 Control-Shift-drag (Windows) or Command-
Shift-drag (Mac) the replacement region from
the Region List to the selected region. The Re-
place Region dialog opens.
3 Configure the Replace Region dialog (see “Re-
place Region Dialog” on page 25).
4 Click OK.
Scrub Trimmer tool over a region
Control-Shift-drag (Windows) or Com-
mand-Shift-drag (Mac) any region from the
Region List to any unselected region on a
track to open the Replace Region dialog
without first making a selection.
Chapter 4: Advanced Editing Features 25
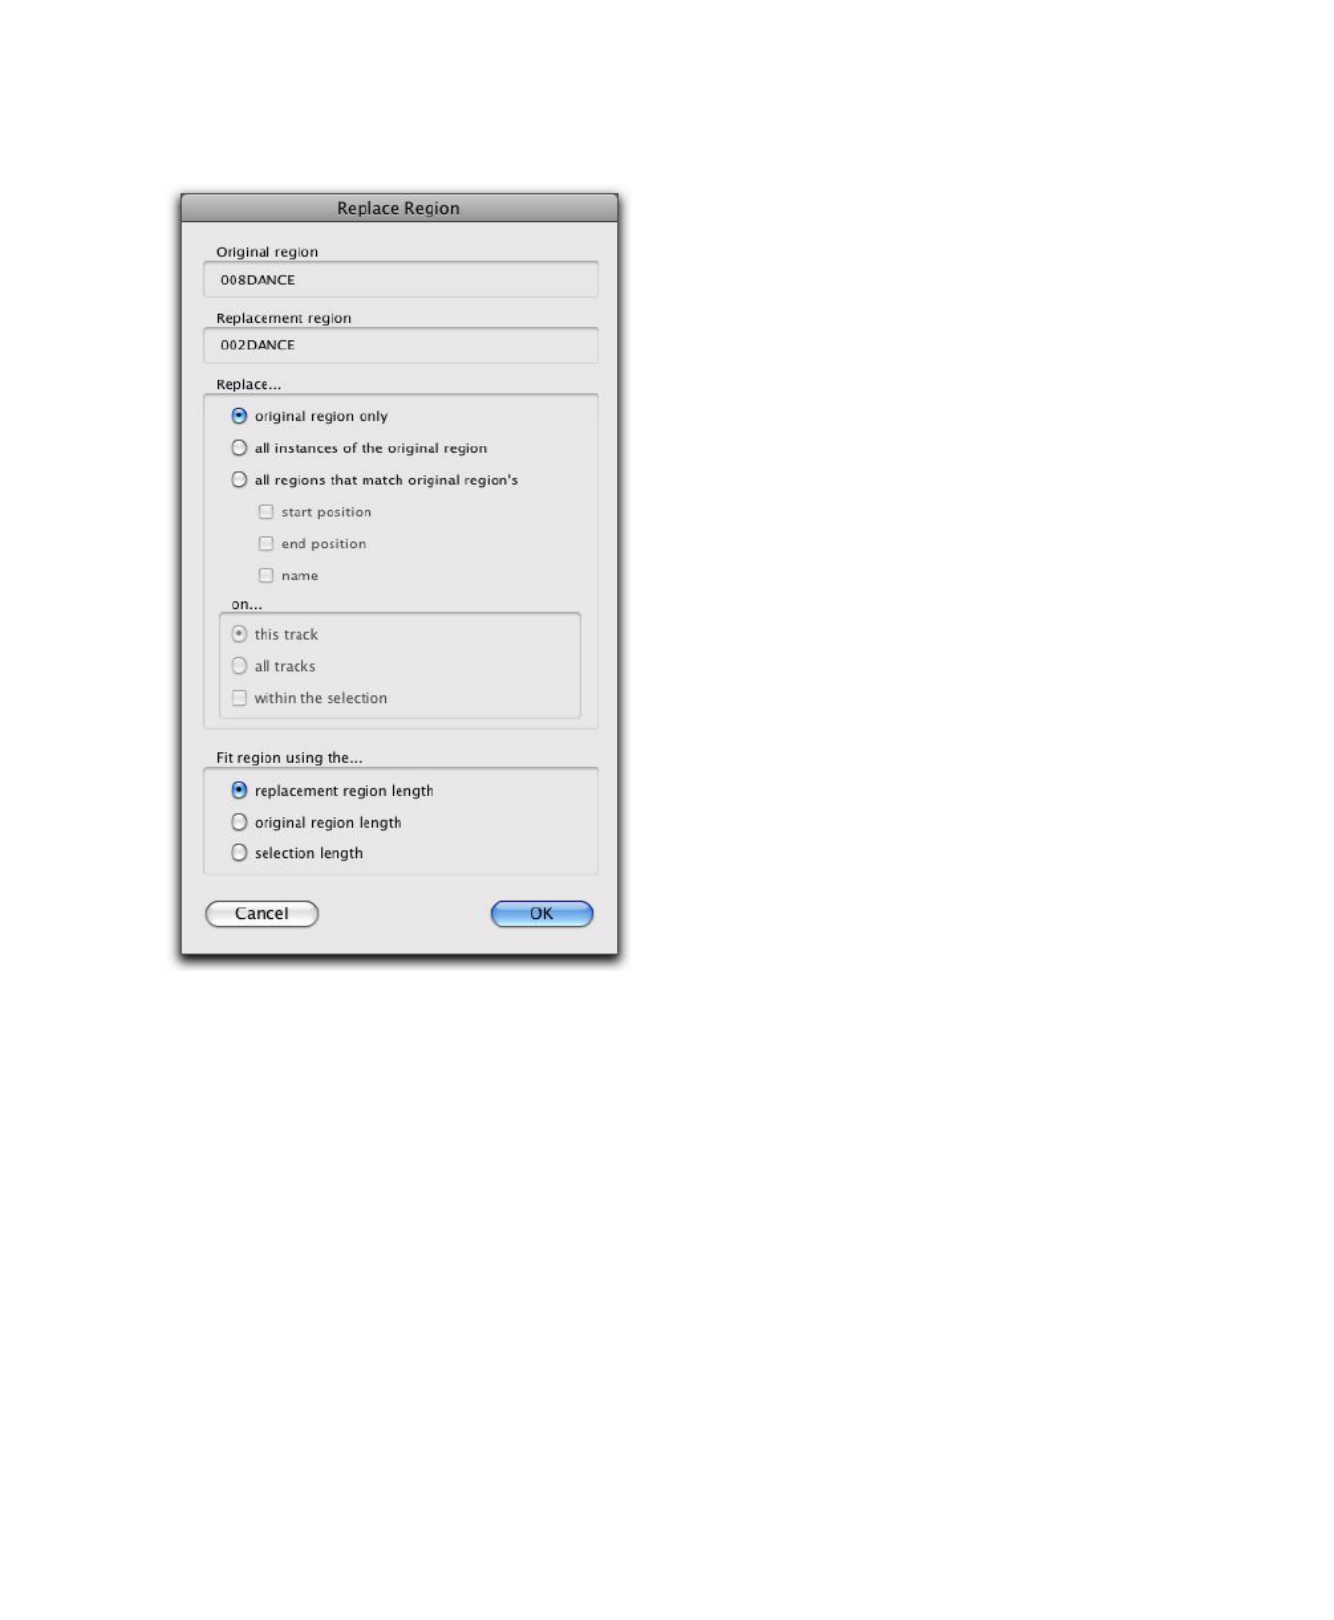
Replace Region Dialog
The following options are available in the Re-
place Region dialog:
Replace: Original Region Only Replaces only the
selected region with the replacement region
dragged from the Region List.
Replace: All Instances of the Original Region Re-
places all instances of the selected region that fit
the On criteria with the replacement region
from the Region List.
•On This Track: replaces regions that fit the
Match criteria and are on the same track as
the original region.
•On All Tracks: replaces regions that fit the
Match criteria for all tracks in the session.
•On Within the Selection: replaces regions
that fit the Match criteria within the cur-
rent selection.
Replace: All Regions That Match Original Re-
gion’s Replaces all regions that fit the Match cri-
teria and the On criteria with the replacement
region from the Region List.
•Start Position: replaces all regions that have
the same original start time as the selected
region. This includes regions that may have
been auto-created when trimming end
points.
•End Position: replaces all regions that have
the same original end time as the selected
region. This includes regions that may have
been auto-created when trimming start
points.
•Name: replaces all regions that come from
the same audio file and have been renamed
to the same name
•On This Track: replaces regions that fit the
Match criteria and are on the same track as
the original region.
•On All Tracks: replaces regions that fit the
Match criteria for all tracks in the session.
•On Within the Selection: replaces regions
that fit the Match criteria within the cur-
rent selection.
Replace Region dialog

Complete Production Toolkit 2 Guide26
Region matching uses all specified Match crite-
ria. For example, if you select Start Position and
End Position, all regions from the same original
audio file as your selection with the same origi-
nal start and end times will be replaced.
Fit Region Using The: Original Region Length If
the replacement region is smaller than the orig-
inal region, the region is placed in the playlist
and any remaining audio from the original re-
gion is removed.
If the replacement region is larger than the se-
lection, it is placed in the playlist and trimmed
to fit within the length of the original region.
Fit Region Using The: Original Selection
Length When the playlist selection extends be-
yond the original region, the replacement re-
gion (if larger than the original region) is
trimmed to fit within the selection.
Fit Region Using The: Replacement Region
Length The replacement region is placed in its
entirety, regardless of the length of the original
region or selection.
Replacing Regions from the Region List
The Replace Regions command is also available
in the Region List menu. To use this command,
make sure there is a region selected in a track
and a different (replacement) region selected in
the Region List.
To replace regions using the Region List menu:
1 Select a region in a track to be replaced.
2 Do one of the following:
• Right-click the desired replacement region
in the Region List and choose Replace Re-
gions from the pop-up menu.
• Select the desired replacement region in
the Region List and choose Replace Regions
from the Region List menu. (If the Region
List Selection Follows Edit Selection prefer-
ence is enabled, Control-click (Windows)
or Command-click (Mac) the selected re-
gion to deselect it, then Control-click
(Windows) or Command-click (Mac) the
desired replacement region to select it, and
then choose Replace Regions from the Re-
gion List menu.)
3 Configure the Replace Region dialog (see “Re-
place Region Dialog” on page 25).
4 Click OK.
Replace Region and Multichannel
Tracks
The Replace Region command supports drag-
ging multichannel regions from the Region List
to multichannel tracks, provided they are the
same channel format. For example, you can re-
place a selected stereo region in a stereo audio
track with another stereo region from the Re-
gion List. However, you cannot replace it with
two mono audio regions. Additionally, you can-
not replace regions in multiple mono tracks
with multichannel regions.

Chapter 4: Advanced Editing Features 27
TCE (Time Compression and
Expansion) Edit To Timeline
Selection
When the Edit and Timeline selections are un-
linked, you can compress or expand an audio se-
lection to fit the Timeline selection. On audio
tracks, TCE Edit to Timeline Selection uses the TCE
AudioSuite™ Plug-In selected in the Processing
preferences. On Elastic Audio–enabled tracks,
TCE Edit To Timeline Selection uses the track’s se-
lected Elastic Audio plug-in.
To fit an Edit selection to the Timeline:
1 Deselect Options > Link Timeline and Edit Selec-
tion.
2 With the Selector tool, select the audio mate-
rial to be compressed or expanded.
3 In any Timebase ruler, select the time range
where you want to fit the audio material.
4 Choose Edit > TCE Edit to Timeline Selection.
The Edit selection is compressed or expanded to
the length of the Timeline selection.
TCE Edit to Timeline Selection on
Multiple Tracks and Channels
The TCE Edit to Timeline command can be used
on multichannel selections, and selections
across multiple tracks. All regions are com-
pressed or expanded equally by the same per-
centage value, based on Edit selection range.
This ensures that the rhythmic relationship be-
tween the different channels or tracks is main-
tained.
Fitting an Audio Region to an Edit
Selection
Regions can be dragged from the Region List to
fit within an Edit selection. The dragged region
is compressed or expanded to fit within the se-
lection. On audio tracks, fitting an audio region
to the Edit selection uses the TCE AudioSuite
Plug-In selected in the Processing preferences.
On Elastic Audio–enabled tracks, it uses the
track’s selected Elastic Audio plug-in.
To fit an audio region to an Edit selection:
1 With the Selector tool, make an Edit selection
in an audio track.
2 Control-Alt-drag (Windows) or Command-
Option-drag (Mac) the region from the Region
List to the track with the selection. The start of
the region is positioned at the selection start,
and the region is compressed or expanded to
match the length of the selection.
Fit to Selection on Multiple Tracks and
Channels
The Fit to Selection command supports dragging
multiple regions from the Region List to multi-
ple tracks, or multichannel tracks.
However, all dragged regions are compressed or
expanded equally by the same percentage value,
based on length of the region last clicked before
dragging.

Complete Production Toolkit 2 Guide28
Expanding Alternate Channels
to New Playlists or Tracks
When working with a mono region that is part
of a multichannel recording imported from a
field recorder, you can expand that region (or a
selected portion of it) to new playlists that re-
flect its matching alternate channels while pre-
serving any edits or fades.
Conditions for Alternate Channel
Availability
An alternate channel is available to replace the
original channel (represented by the region or
portion of a region selected on the Timeline) if
all of the following are true:
• Both channels are part of a multichannel
recording made simultaneously on one or
more field recorders.
• Certain metadata matches between the
original channel and the alternate channel.
• The metadata embedded during shooting
and recording has been preserved prior to
import into Pro Tools.
With multichannel recordings from one or
more field recorders, both channels must over-
lap at least once between their start time code
and end time code positions, and must also
meet one of the following conditions:
• Matching Scene and Take
• Matching Shoot Date (applies only if Scene
and Take contain any information for both
channels)
• Matching Tape name
• Matching Sound Roll name
• Alternate channel Sound Roll name
matches current channel Tape name
• Alternate channel Tape name matches cur-
rent channel Sound Roll name
Expanding Channels to New
Playlists
To expand alternate channels to new playlists:
1 In the Timeline, do one of the following:
• To expand only a portion of the regions on
the track, make a selection that includes or
overlaps any number of regions on a track,
and Right-click (Windows or Mac) or Con-
trol-click (Mac) the selection.
– or –
• To expand all of the regions on the track,
Right-click (Windows or Mac) or Control-
click (Mac) the track name.
2 Choose the Expand to New Playlists pop-up
menu, and select one of the following methods
by which to expand alternate channels for the
selection to new tracks:
• By Channel Name
• By Channel Number
• By Channel Name and Number
• By Time Code Only
For detailed information on working with
multichannel recordings made with field re-
corders, see the Field Recorder Workflow
Guide.

Chapter 4: Advanced Editing Features 29
If alternate channels are available, Pro Tools ex-
pands them to new playlists (including the
channel represented in the original track) ac-
cording to the selected option.
Expanding Channels to New Tracks
To expand alternate channels to new tracks:
1 In the Timeline, do one of the following:
• To expand only a portion of the regions on
the track, make a selection that includes or
overlaps any number of regions on a track,
and Right-click (Windows or Mac) or Con-
trol-click (Mac) the selection.
– or –
• To expand all of the regions on the track,
Right-click (Windows or Mac) or Control-
click (Mac) the track name.
2 Choose the Expand Channels to New Tracks
pop-up menu, and select one of the following
methods by which to expand alternate channels
for the selection to new tracks:
• By Channel Name
• By Channel Number
• By Channel Name and Number
• By Time Code Only
If alternate channels are available, Pro Tools ex-
pands them to new tracks (including the chan-
nel represented in the original track) according
to the chosen parameters.
Expanding Channels by Time Code
Only
The Expand To New Tracks By Time Code Only
command lets you expand an entire track or
only selected regions to new playlists on the
same track or to new separate tracks, thus reveal-
ing all other regions recorded at the same time
code location, regardless of channel name or
number. This is especially useful when expand-
ing edited guide tracks to original source audio
that was recorded while referenced to time code,
but where channel names or numbers were not
written to the audio files.
Example Workflow: Working with a Guide Track for
Live Concert Videos
1 Multitrack audio is recorded in Pro Tools
while chasing time code. A mono or stereo mix
is recorded simultaneously as a guide track for
the video editor.
2 The picture and audio guide tracks are edited
in a video editing application.
3 The edited audio guide tracks are exported
from the video editor as an AAF (or OMF) se-
quence, including handles of at least 2 frames.
4 The AAF (or OMF) sequence is imported into
Pro Tools as a new session. The original source
audio files and unedited guide track are also im-
ported into the session.
5 The original unedited guide track is relinked
to the session (see “Relinking the Original
Unedited Guide Track” on page 30).
6 The Pro Tools editor Right-clicks the name of
the guide track and selects Expand Channels to
New Tracks > By Time Code Only. The original
source tracks expand to new tracks with edits
and fades that match the guide track.
It is not possible to rename files encoded
with XML metadata. The file extension will
always be .A1 and .A2 (even for stereo
files). Also, it is not possible to rename files
with a .L/.R suffix. As a result, Pro Tools
does not always recognize these channels as
a stereo pair.

Complete Production Toolkit 2 Guide30
Relinking the Original Unedited Guide Track
After importing the AAF (or OMF) sequence and
original source audio files into the session, it is
recommended that you relink the edited guide
track to the original unedited source audio.
To relink the original unedited guide track:
1 Open the Project Browser for the session and
open the Audio Files folder.
2 Right-click the edited guide track audio file in
the browser and choose Relink Selected.
3 In the upper pane of the Relink window, nav-
igate to the original unedited guide track audio
file that was recorded in Pro Tools.
4 In the Select Files To Relink pane, select the
edited guide track file.
5 Drag the original unedited guide track audio
file into the Candidates pane. If a dialog appears
stating that one or more files are shorter than
the media file you are trying to relink, click Yes
to select it for relinking anyway.
6 Check the box to the left of the file in the Can-
didates pane so that the Link icon appears.
7 Click Commit Links at the top of the Relink
window and then close the Relink window.
8 You can now Right-click the name of the guide
track and select Expand To New Tracks > By Time
Code Only. All expanded tracks should be syn-
chronous with the guide track.
If the original unedited file is not available,
you can relink to any of the source audio
files as long as they have the same start and
end times as the guide track.

Chapter 5: Advanced Automation Features 31
chapter 5
Advanced Automation Features
Complete Production Toolkit 2 enables addi-
tional mixing and automation features in
Pro Tools.
AutoJoin with Latch Mode
Pro Tools provides two different methods to re-
sume writing automation on controls that were
active at the point where the transport stopped:
AutoJoin Lets you automatically resume writing
automation in Latch mode.
Join Lets you manually resume writing automa-
tion in Latch mode. Join is available only with
supported control surfaces.
To enable AutoJoin from Pro Tools:
1 Choose Window > Automation.
2 Click the AutoJoin button.
For more information on mixing and work-
ing with automation in Pro Tools, see the
Pro Tools Reference Guide.
AutoJoin Enable button in the Automation window
See your control surface guide for details on
using Join and AutoJoin with a control surface.
AutoJoin button
Complete Production Toolkit 2 Guide32
AutoJoin Indicator
After a Latch automation pass with AutoJoin en-
abled, the AutoJoin indicator appears in the
Pro Tools Edit window.
The AutoJoin indicator is a vertical line that sig-
nifies the point where the last automation pass
was stopped, and the point where the “join” will
automatically occur on all tracks that were writ-
ing during that previous pass. When automa-
tion writing is resumed from this point, the line
disappears.
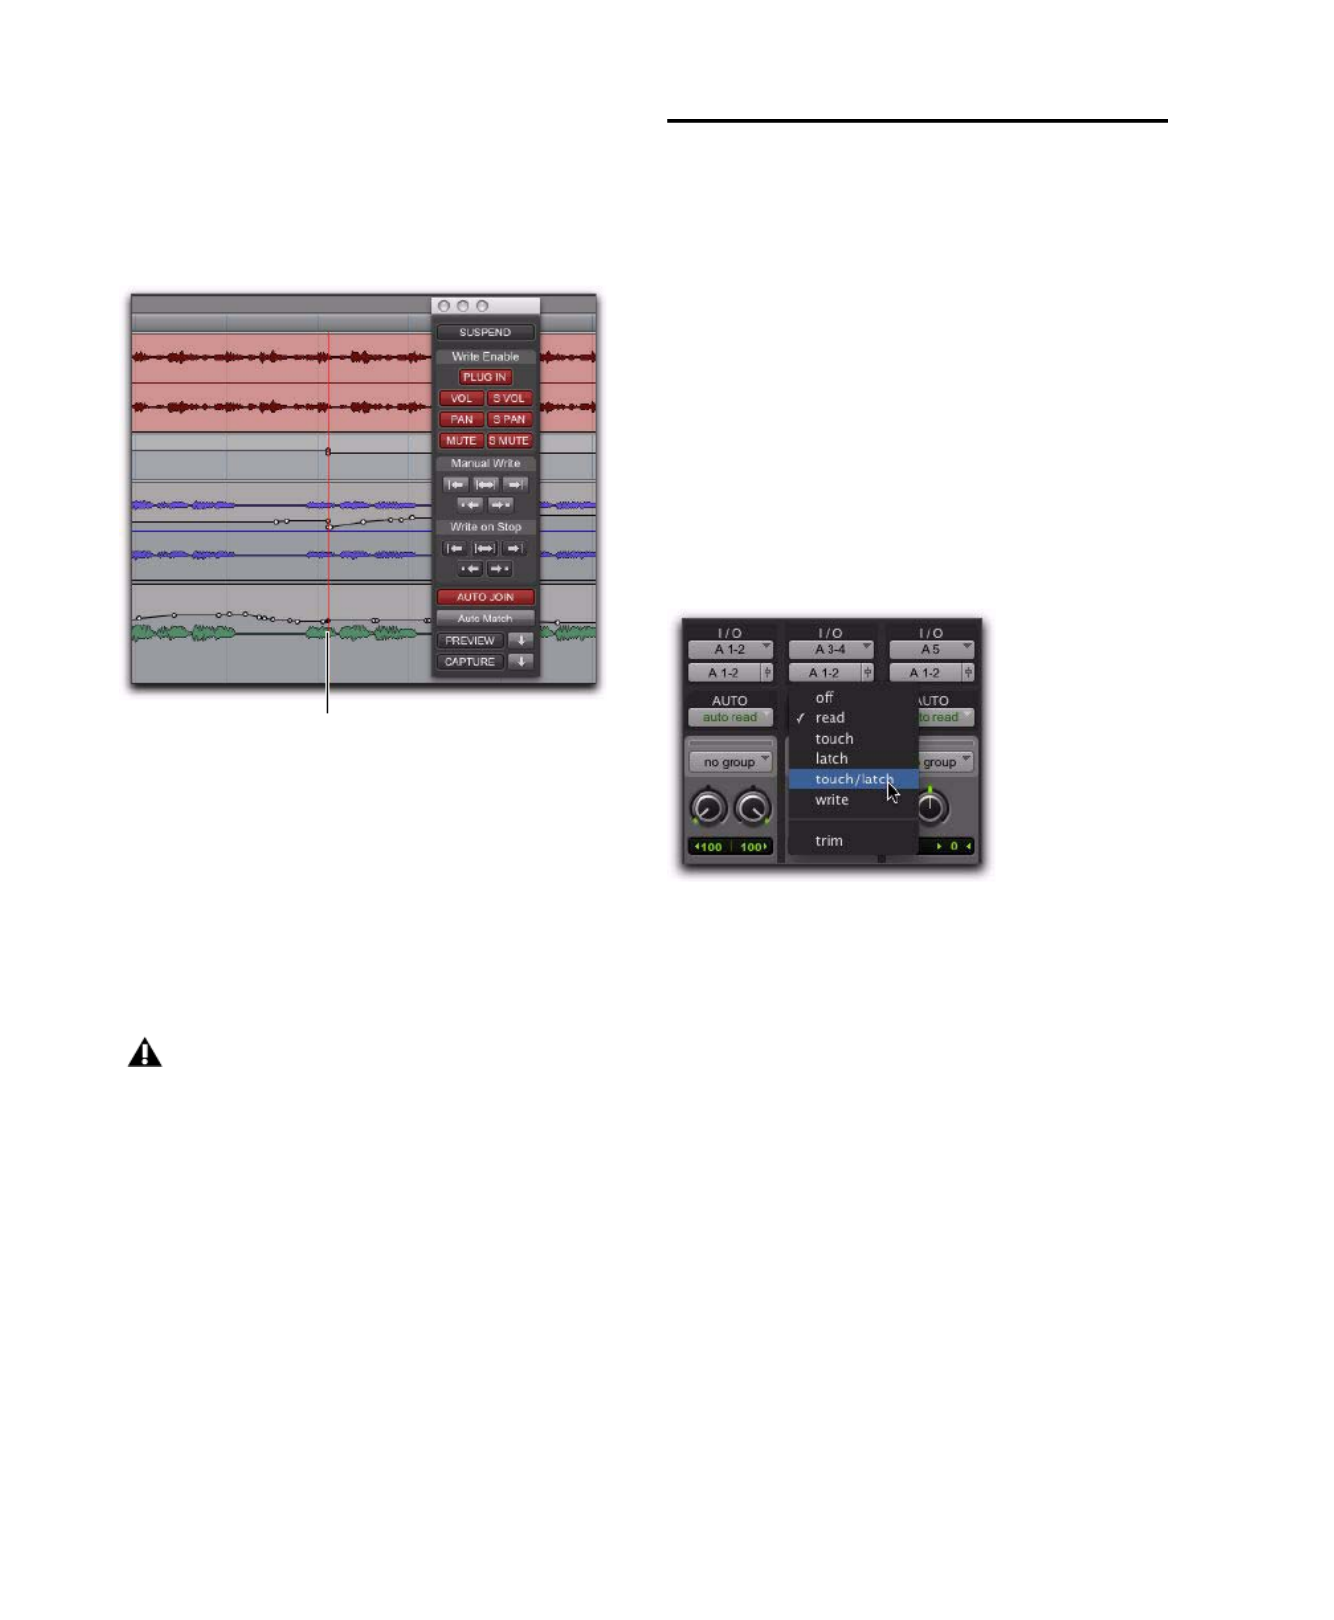
Touch/Latch Mode
Touch/Latch Automation mode places a track’s
Volume control in Touch mode and all other au-
tomatable controls in Latch mode.
In Touch/Latch mode, the Volume control fol-
lows Touch behavior, writing automation when
touched and returning to previously written lev-
els when released.
All other controls follow Latch behavior, writing
automation when touched and continuing until
playback stops, or until you punch out of writ-
ing automation.
AutoJoin indicator in the Edit window
To use Join or AutoJoin to resume writing on
controls that were writing when the trans-
port stopped, restart the transport before the
AutoJoin indicator.
AutoJoin indicator
Selecting Touch/Latch mode

Chapter 5: Advanced Automation Features 33
Trim Mode
You can adjust (or trim) existing track volume
and send level automation data in real time.
Pan, mute and plug-in automation cannot be
trimmed in this manner. Trim mode works in
combination with the other Automation modes
(Read, Touch, Latch, Touch/Latch, and Write)
and is useful when you want to preserve all of
your volume automation moves, but need to
make levels a bit louder or softer to balance a
mix.
When writing automation in Trim mode, fader
moves write relative rather than absolute values.
The existing automation data is changed by the
amount of increase or decrease (or the delta
value) indicated by the faders.
When Trim mode is enabled, non-trimmable
controls behave in the same manner as in the
standard Automation modes, with the excep-
tion of Write/Trim mode, where non-trimmable
controls operate as in Touch mode.
Trim Automation Modes
When a track is in a Trim automation mode (ex-
cept for Trim Off) its main Volume faders and all
Send level faders are displayed in yellow. When
trimming, a track’s Volume indicator or Send
Level indicator shows the delta value being writ-
ten rather than the absolute value.
Behavior of the Trim Automation modes also
depends on the Coalesce Trim Automation pref-
erence setting. See “Coalescing Trim Automa-
tion” on page 42.
Trim Off
Trim Off turns off reading and writing of all au-
tomation (main and trim) for a track. All auto-
mation moves are ignored during playback.
Trim faders are temporarily set to zero when a
track is set to Trim Off mode.
Depending on the Coalesce Trim Automation
preference setting, changing a track to Trim Off
can coalesce Trim automation on that track. See
“Coalescing Trim Automation” on page 42.
Automation can be switched from Trim Off to
another Automation mode during playback or
record.
Read Trim
In Read Trim mode, Volume and Send level
Trim faders are disengaged from the main auto-
mation playlist and follow any existing Trim au-
tomation. You can move a Trim fader during
playback to audition new trim values, but no au-
tomation is written. When the Trim fader is re-
leased, it returns to any previously written Trim
automation values.
If a track does not contain Trim automation,
you can move a Trim fader during playback to
audition new trim values, but no automation is
written. The Trim fader retains its position until
the track is removed from Trim mode, or if you
manually coalesce the Trim level.
When this mode is enabled, non-trimmable
controls (all controls other than track volume
and send level) behave as if they are in regular
Read mode—no automation data is written.

Complete Production Toolkit 2 Guide34
Touch Trim
In Touch Trim mode, Volume and Send level
Trim faders are disengaged from the main auto-
mation playlist and follow any existing Trim au-
tomation. When a Trim fader is touched, writ-
ing of Trim automation begins. When the fader
is released, writing stops and the fader returns to
any previously written Trim automation values.
The rate of the fader’s return to previous trim
values is determined by the AutoMatch Time
specified in the Automation Preferences page.
When this mode is enabled, non-trimmable
controls (all controls other than track volume
and send level) behave as if they are in regular
Touch mode—they follow the previously writ-
ten automation until touched. When they are
touched, their absolute positions are written un-
til the control is released or until playback stops.
Latch Trim
In Latch Trim mode, Volume and Send level
Trim faders are disengaged from the main auto-
mation playlist and follow any existing Trim au-
tomation. When a Trim fader is touched, writ-
ing of Trim automation begins. Writing of Trim
automation continues until playback stops, or
until you punch out of writing automation.
When this mode is enabled, non-trimmable
controls (all controls other than track volume
and send level) behave as if they are in regular
Latch mode—they follow the previously written
automation until touched. When they are
touched, their absolute positions are written un-
til playback is stopped.
Touch/Latch Trim
In Touch/Latch Trim mode, Volume and Send
level faders are disengaged from the main auto-
mation playlist and follow any existing Trim au-
tomation. The main Volume Trim fader follows
Touch Trim behavior, and Send level Trim fad-
ers follow Latch Trim behavior.
Write Trim
In Write Trim mode, as soon as playback begins,
writing of Trim automation begins for Volume
and Send levels, and continues until playback
stops, or until you punch out of writing automa-
tion.
When Write Trim mode is enabled, non-trim-
mable controls (all controls other than track vol-
ume and send level) are not in Write mode, but
behave as if they are in regular Touch mode (no
automation is written unless a control is
touched). This is to prevent the controls from
overwriting all of their automation data on ev-
ery pass in Write Trim mode.
The “After Write Pass, Switch To” prefer-
ence affects Write Trim mode. After an au-
tomation pass in Write/Trim mode, tracks
automatically switch to the Trim mode ver-
sion of the setting specified by this prefer-
ence.

Chapter 5: Advanced Automation Features 35
Send Levels and Trim Mode
You can set Pro Tools to exclude Send levels
from Trim mode, so that only the Main Volume
goes into Trim when a track is put into Trim
mode. This gives you more flexibility in setting
Send levels while in Trim mode.
To exclude Send levels from Trim mode:
1 Choose Setup > Preferences and click Mixing.
2 Under Automation, deselect Include Sends in
Trim Mode.
3 Click OK.
Composite Automation
Playlist
If automation is not set to coalesce after every
automation pass, you can display a composite
automation playlist that shows the contribution
of the Trim automation to the main Volume or
Send Level automation data. This composite
playlist display cannot be directly edited.
The composite playlist is shown in both the
main automation playlist and the Trim automa-
tion playlist.
To display the composite playlist:
Select View > Automation > Composite Playlist.
Any uncoalesced automation on a Send will
still coalesce when the other automation on
its track is coalesced, even if “Include Sends
in Trim Mode” is deselected.
Display of Trim automation and the composite playlist
in a main Volume playlist
Volume
data
Volume
Trim
data
Composite
playlist

Complete Production Toolkit 2 Guide36
Copy Track Automation to
Sends
There may be times where you want a track’s
send settings or automation to mirror the set-
tings or automation in the track itself, for exam-
ple, when creating a headphone mix based on
the main mix, or when an effect level needs to
follow the levels in a main mix. You can copy
the current settings or the entire automation
playlist for the selected controls to the corre-
sponding playlist for the send.
To copy a track’s settings or automation to one of
its sends:
1 Select the tracks you want to edit by clicking
on the track names to highlight them.
2 Choose Edit > Automation > Copy to Send.
3 In the Copy to Send dialog, do any of the fol-
lowing:
• Select Current Value to copy the current set-
tings of the corresponding controls.
• Select Automation to copy the entire auto-
mation playlist for the corresponding con-
trols.
4 Select the controls you want to copy.
5 Select the sends to which to copy the automa-
tion, and click OK.
You can undo the results of the Copy to Send
command.
Copy To Send dialog
When overwriting automation, Pro Tools
presents a confirmation dialog. To suppress
this dialog, press Alt (Windows) or Option
(Mac) while clicking OK.

Chapter 5: Advanced Automation Features 37
AutoMatch
AutoMatching All Controls
You can AutoMatch all currently writing con-
trols to their existing automation levels.
To AutoMatch all currently writing controls:
1 Choose Window > Automation.
2 Make sure the automation types you want to
AutoMatch are write-enabled.
3 Start playback.
4 When you reach a point in the track where
you want to return control to their previously
written values, click the AutoMatch button in
the Automation window.
5 All currently writing controls stop writing au-
tomation and return to any previously written
values according to the AutoMatch Time setting
in the Mixing preferences.
AutoMatching Individual Tracks
You can invoke AutoMatch on individual tracks.
All controls currently writing automation on
the track stop writing and return to existing au-
tomation levels.
To AutoMatch all controls on a track:
Control-click (Windows) or Command-click
(Mac) the Automation Mode selector on the
track.
AutoMatching Individual Automation
Types
You can invoke AutoMatch on individual auto-
mation types across a session.
To AutoMatch all controls of one automation type:
In the Automation window, Control-click
(Windows) or Command-click (Mac) the button
for the automation type (Volume, Pan, Mute,
Plug-In, Send level, Send pan, or Send mute).
AutoMatching Individual Controls
(D-Control and D-Command Only)
On ICON worksurfaces, you can invoke Au-
toMatch on individual controls or control types
on single channels.
To AutoMatch all controls of a type on a channel:
Hold Control (Windows) or Command (Mac)
and press any of the following in the Channel
Strip Mode controls for the track whose controls
you want to AutoMatch:
• Inserts
• Sends
• Pan
• Dyn (D-Control only)
• EQ (D-Control only)
AutoMatch button in the Automation window
AutoMatch button

Complete Production Toolkit 2 Guide38
To AutoMatch a pan control or the controls for an
individual insert or send:
1 Press the switch in the Channel Strip Mode
controls to display the Pan controls or the top
level of Inserts or Sends for the channel.
2 Hold Control (Windows) or Command (Mac)
and press the Rotary Encoder Select switch for
the control you want to AutoMatch:
• For Sends, the Send level, pan, and mute
will AutoMatch.
• For Inserts, all automated controls will Au-
toMatch.
• For Pan, all pan sliders on the channel will
AutoMatch.
To AutoMatch all controls for a plug-in displayed in
the Dynamics or EQ section:
Hold Control (Windows) or Command (Mac)
and press the Auto switch in the Dyn or EQ sec-
tion of the console.
Prime Controls for Writing
Automation in Latch Mode
If a track is in Latch or Touch/Latch automation
mode, you can prime individual controls for
writing automation while the transport is
stopped. This Latch Prime capability lets you pre-
pare for an automation pass before starting play-
back.
To prime controls for writing automation in Latch
mode while the transport is stopped:
1 Choose Setup > Preferences and click Mixing.
2 Under Automation, select Allow Latch Prime in
Stop.
3 Click OK to close the Preferences window.
4 In the Automation window, make sure the
controls you want to automate are write-en-
abled.
5 Click the Automation Mode selector on the
track where you want to write automation and
do one of the following:
• Choose Latch mode to allow priming of all
automation-enabled controls on the track.
– or –
• Choose Touch/Latch mode to leave the
main Volume fader in Touch mode and al-
low priming of all other automation-en-
abled controls.
6 While the transport is stopped, touch or move
the controls you want to start writing at the be-
ginning of the automation pass. When at least
one control on a track is primed, the Automa-
tion Mode selector displays in red.
7 Start playback. All primed controls begin writ-
ing automation at their primed values.
8 Stop playback to finish the automation pass.
All tracks are taken out of their Latch Prime
state.
Automation mode indicator before (left) and after
priming of latched controls (right)
You can use the Write to Punch command
at the end of your automation pass to write
the current value back to the start of the
pass.
Automation
Mode
selector

Chapter 5: Advanced Automation Features 39
Taking Tracks and Controls Out of Latch
Prime
You can take individual tracks or automation
types out of their Latch Prime state before or
during an automation pass.
When you take a track or automation type out
of Latch Prime before starting playback, it stays
in Latch mode but the corresponding controls
are not primed to write when playback starts.
When you take a track or automation type out
of Latch Prime during an automation pass, the
corresponding controls AutoMatch to their cur-
rently written values.
If you AutoMatch a control that is in a Latch
Prime state, the control will no longer be
primed.
To take a track out of Latch Prime:
Control-click (Windows) or Command-click
(Mac) the Automation Mode selector on the
track.
The selector button unbolds to indicate that the
track is no longer primed.
To take all tracks out of Latch Prime, do one of the
following:
Alt-Control-click (Windows) or Option-Com-
mand-click (Mac) the Automation Mode selec-
tor on a track.
– or –
Click the AutoMatch button in the Automation
window.
To take all selected tracks out of Latch Prime, do
one of the following:
Alt-Control-Shift-click (Windows) or Option-
Command-Shift-click (Mac) the Automation
Mode selector on a track.
– or –
Alt-Shift-click (Windows) Option-Shift-click
(Mac) the AutoMatch button in the Automation
window.
AutoMatch button in the Automation window
AutoMatch button

Complete Production Toolkit 2 Guide40
To take an automation type out of Latch Prime on
all tracks, do one of the following:
In the Automation window, Control-click
(Windows) or Command-click (Mac) the button
for the automation type (Volume, Pan, Mute,
Plug-In, Send level, Send pan, or Send mute).
Rolling Through Automation Punch
Points in Latch Prime
After you prime controls for writing automation
while the transport is stopped, you can set
Pro Tools to automatically punch in at that
point after issuing a back and play command, or
after rolling back and locking to time code.
To set Pro Tools to automatically punch in
automation writing on a track:
1 Locate the cursor where you want to punch in
automation.
2 Prime controls for writing while the transport
is stopped. (See “Prime Controls for Writing Au-
tomation in Latch Mode” on page 38.)
3 In the Automation window, click the AutoJoin
button.
4 In the Automation window, click the Capture
button and then click the Punch Capture button.
The AutoJoin marker (a vertical red line) appears
on-screen at the punch point.
5 Issue a Back and Play command, roll back the
external machine to before the punch in point,
or enable pre-roll.
6 Start playback. When the transport reaches
the punch-in point, automation writing begins.
Glide Automation
The Glide Automation commands let you manu-
ally create an automation transition (or glide)
from an existing automation value to a new one,
over a selected area.
Automation types in the Automation window
Automation
type buttons
Capture and Punch Capture buttons in the Automation
window
When gliding multiple parameters at the
same time, such as with the Surround Pan-
ner or plug-ins, use the Edit > Automation >
Glide to All Enabled option.
For MIDI automation, Glide To commands
only apply to MIDI Volume, MIDI Pan, and
MIDI Mute. MIDI parameters cannot use
the Write To commands.
Punch Capture button
Capture button

Chapter 5: Advanced Automation Features 41
To apply a Glide Automation to the current
automation parameter type:
1 In the Automation window, make sure the au-
tomation type is write-enabled.
2 Click the Track View selector to choose the au-
tomation type you want to automate.
3 Drag with the Selector tool in the track to se-
lect the area you want to write the glide to.
4 Change the automation parameter to the
value you want at the end of the selection. For
example, to glide automation volume to –Infin-
ity, move the Volume fader to –Infinity.
5 Choose Edit > Automation > Glide to Current.
To do a Glide Automation to all current enabled
parameters:
1 In the Automation window, make sure the au-
tomation types are write-enabled.
2 In each track you want to automate, click the
Track View selector and select from the pop-up
menu the automation type you want to auto-
mate.
3 With the Selector tool, drag horizontally to in-
clude all the tracks you want to automate in a se-
lection (drag vertically to define the time range).
4 In each track you want to automate, change
the automation parameter to the value you
want at the end of the selection.
5 Choose Edit > Automation > Glide to All Enabled.
Glide Automation Considerations
When Glide Automation is applied to automa-
tion data, it behaves as follows:
• When a selection is made, automation break-
points are written at the start and end points
of the Glide Automation. The automation
value at the start of the selection is the start
point of the Glide Automation and the end of
the selection is the end point of the Glide Au-
tomation. The Glide Automation that is cre-
ated between the two is based on the length of
the selection and the end value that is se-
lected.
• If automation breakpoints follow the selec-
tion, they are not changed, but the value se-
lected for the end of the selection is written
from the end point up until the next break-
point.
• If no automation breakpoints follow the selec-
tion, the value selected for the end of the se-
lection is written to the end of the track.
• If no selection is made, a breakpoint is written
to the current location, and the value selected
for the Glide Automation is written to the
next breakpoint.
You can also press Alt+Forward Slash (/)
(Windows) or Option+Forward Slash (/)
(Mac).
You can also press Alt+Shift+Forward Slash
(/) (Windows) or Option+Shift+Forward
Slash (/) (Mac).

Complete Production Toolkit 2 Guide42
Trim Automation
If you have already written automation, you can
modify automation data for track volume and
send levels in real time by using Trim mode.
When a track is trim-enabled, you are not re-
cording absolute fader positions, but relative
changes in the existing automation. See “Trim
Mode” on page 33 for more information.
To enable Trim mode:
In the Mix or Edit window, click the Automa-
tion Mode selector of the track where you want
to trim automation, and select Trim.
When a track’s Trim mode is enabled, its Vol-
ume and Send Level faders turn yellow, and its
Automation Mode selector is outlined in yellow.
This outline appears solid if the track is trim-en-
abled, and flashes whenever trimming is occur-
ring on the track’s volume or send levels.
Writing Trim Automation
The writing of Trim automation depends on
how it is set to be coalesced. See “Coalescing
Trim Automation” on page 42. If automation is
not set to coalesce after every automation pass,
Trim automation moves are written to a sepa-
rate Trim playlist.
To trim track Volume or Send levels:
1 In the Automation window, make sure the au-
tomation type (Volume or Send level) is write-
enabled.
2 Click the Automation Mode selector of the
track where you want to write automation and
choose the automation mode (Touch, Latch,
Touch/Latch, or Write).
3 Click the Automation Mode selector and se-
lect Trim.
4 Start playback, and adjust the Volume or Send
levels.
5 Stop playback to finish the Trim pass.
Coalescing Trim Automation
You can set Pro Tools to commit, or coalesce,
Trim automation to the main automation play-
list by the following methods:
After Every Pass Trim moves are automatically
applied when the transport is stopped at the end
of an automation pass. Trim automation play-
lists are cleared, and Trim faders are returned to
zero.
On Exiting Trim Mode Trim moves are stored sep-
arately in the Trim automation playlist until
they are coalesced. Trim automation is automat-
ically coalesced on a track only when you take
the track out of Trim mode. You can repeat an
automation pass, edit Trim automation manu-
ally on any of the Trim playlists, or clear Trim
automation before coalescing with this method.
Enabling Trim mode
Even when automation is set to coalesce on
exiting Trim mode, you can use the
Coalesce Trim Automation command to
commit Trim moves at any time.

Chapter 5: Advanced Automation Features 43
Manually Trim moves are stored separately in
the Trim automation playlist until they are co-
alesced. With this setting, the only way to co-
alesce Trim moves is with the Coalesce Trim Au-
tomation command. You can repeat an
automation pass, edit Trim automation manu-
ally on any of the Trim playlists, or clear Trim
automation before coalescing with this method.
To set the method by which Trim Automation is
coalesced:
1 Choose Setup > Preferences and click Mixing.
2 Under Coalesce Trim Automation, select one
of the following:
• After Every Pass
• On Exiting Trim Mode
• Manually
To coalesce Trim automation on a track when
exiting Trim mode:
1 Choose Setup > Preferences and click Mixing.
2 Under Coalesce Trim Automation, select On
Exiting Trim Mode.
3 Click OK to close the Preferences window.
4 Make sure the Pro Tools transport is stopped.
5 On the track where you want to coalesce Trim
automation, click the Automation Mode selec-
tor and deselect Trim.
The Trim automation is applied to the main au-
tomation playlist, Trim automation playlists are
cleared, and Trim faders are returned to zero.
To manually coalesce Trim automation on a track:
1 Select the track where you want to coalesce
the Trim automation.
2 Do one of the following:
• Choose Track > Coalesce Trim Automation.
– or –
• Right-click the track name and choose Co-
alesce Trim Automation.
The Trim automation is applied to the main au-
tomation playlist, Trim automation playlists are
cleared, and Trim faders are returned to zero.
Trim Automation with the Main
Playlist
The appearance of Trim automation depends on
how it is set to be coalesced. See “Coalescing
Trim Automation” on page 42.
If automation is not set to coalesce after every
automation pass, you can display Trim automa-
tion data along with the main Volume or Send
level automation data in the same automation
view. This Trim automation display cannot be
directly edited.
To display the Trim automation playlist along with
main automation playlist on tracks:
Select View > Automation > Trim Playlist.
If transport is playing and you are writing
automation, you cannot directly enter or
exit Trim mode. You must AutoMatch be-
fore exiting Trim mode. This prevents any
abrupt jumps in automation values.
Display of Trim automation in a main Volume playlist
Volume
data
Volume
Trim
data

Complete Production Toolkit 2 Guide44
Suspending Trim Automation
To suspend Trim automation on all tracks:
In the Automation window, Command-click
(Mac) or Control-click (Windows) the Suspend
button.
The Suspend button highlights yellow to indi-
cate that Trim automation is suspended.
To suspend Trim automation for individual controls
on a track:
1 In the Edit window, set the Track View selector
to show the automation playlist for the Trim
control you want to suspend (Volume Trim or
Send level Trim).
2 Do one of the following:
• To suspend only the displayed Trim control
on a single track, Control-click (Windows)
or Command-click (Mac) the control name
in the Track View selector.
– or –
• To suspend the displayed Trim control on
all tracks, Control-Alt-click (Windows) or
Command-Option-click (Mac) the control
name in the Track View selector.
Clearing Trim Automation
If Trim automation has not been coalesced on a
track, you can clear it. When you clear Trim au-
tomation, automation breakpoints on all Trim
playlists are deleted and all Trim faders are reset
to zero.
To clear Trim automation:
1 Select the track where you want to clear the
Trim automation.
2 Do one of the following:
• Choose Track > Clear Trim Automation.
– or –
• Right-click the track name and choose
Clear Trim Automation.

Chapter 5: Advanced Automation Features 45
Write Automation to the
Start, End, or All of a Track or
Selection
Pro Tools lets you write current automation val-
ues from any insertion point forward (or back-
ward) to the end (or beginning) of a track or Edit
selection in a track, or to an entire track or Edit
selection, while performing an automation pass.
The standard Write Automation to Start, All End, or
commands do not operate when the Pro Tools
transport is stopped. It only affects automation
for those parameters that are currently write-en-
abled and currently writing automation data.
Optionally, Write Automation to Start, All, and End
can be configured to always be applied automat-
ically (see “Writing Automation to the Start,
End or All of a Track or Selection on Stop” on
page 46).
Requirements for Standard Write
Automation Commands
For automation data to be written for a specific
parameter, the associated track must be in one
of the following Automation modes and meet
the following conditions:
Latch Mode The control for the parameter must
be changed (touched) during the automation
pass.
Touch Mode The control for the parameter must
be changed (touched).
Write Mode All controls on that track must be in
Write mode.
This command can be undone.
To write current automation values to the start,
end, or all of a track or Edit selection:
1 Choose Window > Automation.
2 Make sure that the automation type is write-
enabled.
3 Do one of the following:
• Click in a track at an insertion point.
– or –
• Drag with the Selector tool to select a por-
tion of the track.
4 Start playback.
5 Make sure you are actively writing on the ap-
propriate track if you are in Latch or Touch
mode.
6 When you reach a point in the track or selec-
tion that contains the automation data you
want to apply, click the Write Automation to Start,
All, or End button in the Automation window.
7 Stop playback. The current values of all write-
enabled automation at that point are written to
the corresponding area of the track/selection.
Write Automation to Start, End, and All buttons in the
Automation window
For MIDI automation, the Write To com-
mands only apply to MIDI Volume, MIDI
Pan, and MIDI Mute.
Automation Write to
Start/End All buttons

Complete Production Toolkit 2 Guide46
Write to Start, End or All and Trim Mode
While in Trim mode, it is also possible to write
trim delta values for track volume and send lev-
els to the start, end or all of a track or Edit selec-
tion.
To write current trim delta values to the start, end,
or all of a track or selection:
1 Choose Window > Automation.
2 Make sure the automation type (track volume
or send level) is write-enabled.
3 In the Mix or Edit window, click the Automa-
tion Mode selector of the track you want to trim
automation, and select Trim. The track Volume
and Send Level faders turn yellow.
4 Do one of the following:
• Click in a track at an insertion point.
– or –
• Drag with the Selector tool to select a por-
tion of the track.
5 Click Play to begin playback.
6 When you reach a point in the track or selec-
tion that contains the trim setting (delta value)
you want to apply, click the Write Automation to
Start, All, or End button in the Automation win-
dow.
7 Stop playback.
The relative changes to the track volume and
send levels at that point are written to the corre-
sponding area of the track/selection.
Writing Automation to the Start,
End or All of a Track or Selection
on Stop
The Automation window provides options for
writing automation on any automation playlist
(including Trim playlists) after a valid automa-
tion pass has been performed.
The Write Automation to Start, End, or All
modes can be configured to disable or remain
enabled after a valid automation pass.
See “Requirements for Standard Write Automa-
tion Commands” on page 45.
To configure Write on Stop modes to disable after
an automation pass:
1 Choose Window > Automation.
2 Click to enable one of the Write On Stop
modes (Start, All, End).
The enabled Write on Stop arrow appears in
blue.
Write On Stop controls in the Automation window
Automation Write On
Stop buttons

Chapter 5: Advanced Automation Features 47
To configure Write on Stop modes to remain
enabled after an automation pass:
1 Choose Window > Automation.
2 Alt-click (Windows) or Option-click (Mac) one
of the Write On Stop buttons (Start, All or End)
to enable the Write On Stop mode.
The enabled Write on Stop arrow appears in red.
Write Automation to the Next
Breakpoint or to the Punch
Point
While performing an automation pass,
Pro Tools lets you write current automation val-
ues from the current insertion point forward to
the next automation breakpoint, or back to the
punch point (the location in the track where au-
tomation writing started).
Write Automation to Next Breakpoint lets you
update automation within a track without over-
writing automation located earlier or later in the
Timeline, and without having to define a selec-
tion before editing automation.
Write Automation to Punch Point lets you fill
back an automation value within a track after
finding the right level or setting during an auto-
mation pass, without having to go back and re-
peat the pass.
Like the standard Write Automation to Start, End,
and All commands, the Write Automation to Next
Breakpoint and Write Automation to Punch Point
commands do not operate when the Pro Tools
transport is stopped. They only affect automa-
tion for those parameters that are currently
write-enabled and currently writing automation
data.
Optionally, the Write Automation to Next Break-
point and Write Automation to Punch Point com-
mands can be configured to be applied automat-
ically after a valid automation pass has been
performed. See“Writing Automation to the Next
Breakpoint or to the Punch Point on Stop” on
page 49.
To write current automation values to the next
breakpoint:
1 Choose Window > Automation.
2 Make sure that the automation type is write-
enabled.
3 Click in a track to define an insertion point.
4 Start playback.
5 Make sure you are actively writing on the ap-
propriate track if you are in Touch, Latch, or
Touch/Latch mode.
For MIDI automation, the Write To com-
mands only apply to MIDI Volume, MIDI
Pan, and MIDI Mute. Other MIDI parame-
ters cannot use the Write To commands.
Write Automation to Next Breakpoint and
Write Automation to Punch Point have the
same requirements as Write Automation to
Start, End and All commands. See “Write
Automation to the Start, End, or All of a
Track or Selection” on page 45.

Complete Production Toolkit 2 Guide48
6 When you reach a point in the track where
you want to apply the current settings, click the
Write Automation to Next Breakpoint button.
7 Stop Playback.
The current values of all controls being written
at that point are written up to the next break-
point.
To write current automation values back to the
automation punch point:
1 Choose Window > Automation.
2 Make sure the automation type is write en-
abled.
3 Click in a track to define an insertion point.
4 Start playback.
5 Make sure you are actively writing on the ap-
propriate track if you are in Touch, Latch, or
Touch/Latch mode.
6 When you reach a point in the track where
you want to apply the current settings, click the
Write Automation to Punch Point button.
The current values of all write-enabled parame-
ters are written back to the point where the first
control began writing automation.
Write To Next Breakpoint buttons in the Automation
window
Write Automation to Next Breakpoint re-
mains enabled after a valid automation
pass. Unlike standard Write Automation
commands, it cannot be configured to dis-
able after an automation pass.
Write to Next Breakpoint
Write to Next Breakpoint
on Stop
button
button
Write To Punch Point buttons in the Automation window
Write to Punch Point
Write to Punch Point
on Stop
button
button

Chapter 5: Advanced Automation Features 49
Write To Next Breakpoint or Punch
Point and Trim Mode
While in Trim mode, it is also possible to write
trim values for track volume and send levels to
the next written breakpoint or back to the auto-
mation punch-in point.
To write current trim values to the next breakpoint
or to the punch point:
1 Choose Window > Automation.
2 Make sure that the automation type (track vol-
ume or send level) is write-enabled.
3 In the Mix or Edit window, click the Automa-
tion Mode selector and select Trim. The track
Volume and Send Level faders turn yellow.
4 Click in a track to define an insertion point.
5 Start playback.
6 When you reach a point in the track where
you want to apply the current trim values, click
the Write Automation to Next Breakpoint but-
ton in the Automation window.
To write current trim values to the punch point:
1 Choose Window > Automation.
2 Make sure that the automation type (track vol-
ume or send level) is write-enabled.
3 In the Mix or Edit window, click the Automa-
tion Mode selector and select Trim. The track
Volume and Send Level faders turn yellow.
4 Click in a track to define an insertion point.
5 Start playback.
6 When you reach a point in the track where
you want to apply the current trim values, click
the Write Automation to Punch Point button in
the Automation window.
Writing Automation to the Next
Breakpoint or to the Punch Point
on Stop
The Automation window provides an option for
automatic Write Automation to Next Break-
point on Stop or Write Automation to Punch
Point on Stop.
To configure Write Automation to Next Breakpoint
on Stop:
1 Choose Window > Automation.
2 Click the Write Automation to Next Break-
point on Stop button or the Write Automation
to Punch Point button.
When this option is enabled, automation writ-
ing will be performed automatically forward to
the next breakpoint after a valid automation
pass has been performed.
To configure Write Automation to Punch Point on
Stop:
1 Choose Window > Automation.
2 Click the Write Automation to Punch Point
on Stop button.
When this option is enabled, automation writ-
ing will be performed automatically back to the
automation punch-in point after a valid auto-
mation pass has been performed.
Write Automation to Next Breakpoint
remains enabled after a valid automation
pass. Unlike standard Write Automation
commands, it cannot be configured to
disable after an automation pass.

Complete Production Toolkit 2 Guide50
Guidelines for “Write To”
Commands
Using “Write To” Commands During
Playback
You can carry out any of the Write Automation To
commands without stopping the Pro Tools
transport. On supported control surfaces, the
corresponding “Write To” button flashes until
you stop the transport.
While the Pro Tools transport is moving, issuing
Write Automation To commands affects writing of
automation in the following ways:
• Write to Start/Selection Start: Currently
writing controls continue writing automa-
tion
• Write to All/Selection: Currently writing
controls (except controls in Write mode)
punch out of writing automation
• Write to End/Selection End: Currently writ-
ing controls (except controls in Write
mode) punch out of writing automation
• Write to Next Breakpoint: Currently writ-
ing controls (except controls in Write
mode) punch out of writing automation
• Write to Punch point: Currently writing
controls continue writing automation
Applying “Write To” Commands to
Selected Tracks
The Write Automation To commands normally ap-
ply to all tracks currently writing automation. It
is possible to apply these commands to selected
tracks only.
To apply any of the “Write Automation To”
commands to currently selected tracks:
1 Select the tracks where you want to apply the
Write To commands.
2 Alt-Shift-click (Windows) or Option-Shift-
click the corresponding “Write Automation To”
button.
Suppressing Warnings when Using
“Write To” Commands
When you carry out any of the Write Automation
To commands (except Write to Next Break-
point), Pro Tools posts a dialog warning that au-
tomation values will be changed in the session.
You can suppress these warnings.
To suppress “Write To” warning dialogs:
1 Choose Setup > Preferences and click Mixing.
2 Under Automation, select Suppress Automa-
tion “Write To” Warnings.
For MIDI automation, the Write To com-
mands only apply to MIDI Volume, MIDI
Pan, and MIDI Mute. MIDI parameters
cannot use the Write To commands.

Chapter 5: Advanced Automation Features 51
Overwrite or Extend Mute
Automation
Pro Tools lets you overwrite or extend an exist-
ing mute event in real time, without changing
the current mute state.
A mute event can be overwritten when the auto-
mation pass begins before the first mute event
and ends after the second event. In this case, the
current on/off state of the mute is maintained.
A mute event can be extended when the auto-
mation pass begins before an on or off event and
stops before the end of the second event.
Mute Overwrite/Extend is supported in Touch
and Latch mode, as follows:
Touch Mode Writes the current state as long as
the Mute button is held.
Latch Mode Writes the current state until you
stop or AutoMatch out.
Overwriting a mute automation event
Mute on event overwritten
Original mute automation
(mute off, mute on, mute off)
Extending a mute automation event
Mute off event extended (up to automation pass end)
Original mute automation
(mute off, mute on, mute off)

Complete Production Toolkit 2 Guide52
To overwrite a mute state on one or more tracks:
1 Choose Window > Automation.
2 Make sure Mute is write-enabled.
3 In the Mix or Edit window, click the Automa-
tion Mode selector of the track where you want
to overwrite the mute state, and set the Automa-
tion mode to Touch or Latch mode.
4 In each track you want to automate, click the
Track View selector and select mute.
5 Place the cursor before the start of the mute
event you want to overwrite.
6 Start playback.
7 Press Control (Windows) or Command (Mac)
and the track Mute button before the start of the
mute event you want to overwrite.
8 After the end of the second mute event, re-
lease the key and the Mute button.
9 When you have finished the automation pass,
stop playback.
Mute enable button in the Automation window
To overwrite mute states on multiple tracks,
set all tracks to the same Automation mode.
Placing the cursor before the start of a mute event
Mute automation
enabled
Example: Place cursor here, before start of mute event
To overwrite mute states on multiple tracks,
press Alt+Control (Windows) or Op-
tion+Command (Mac) and the Mute button
on one of the tracks to be automated.
With Touch mode, you have to hold the
Mute button for the duration of the write.
Stopping automation after the end of a mute event
Example of mute state overwritten
Example: Stop automation pass here, after end of mute event
Mute on state overwritten

Chapter 5: Advanced Automation Features 53
To extend a mute state on a track:
1 Choose Window > Automation.
2 Make sure mute is write-enabled.
3 In the Mix or Edit window, click the Automa-
tion Mode selector of the track you want to au-
tomate, and select Touch or Latch mode.
4 In each track you want to automate, click the
Track View selector and select mute.
5 Place the cursor before the start of the mute
event you want to extend.
6 Start playback.
7 Press Control (Windows) or Command (Mac)
and the track Mute button before the start of the
mute event you want to extend.
8 Before the end of the second mute event, re-
lease the key and the Mute button.
9 When you have finished the automation pass,
click Stop.
To extend mute states on multiple tracks,
set all tracks to the same Automation mode.
Placing the cursor before the start of a mute event
To extend mute states on multiple tracks,
press Alt+Control (Windows) or Op-
tion+Command (Mac) and the Mute button
on the track.
If you extend past the subsequent on or off
event, the entire event will be changed.
Example: Place cursor here, before start of mute event
Stopping automation before the end of a mute event
Example of mute state extended
Example: Stop automation pass here, before end of mute event
mute off state extended (up to automation pass end)

Complete Production Toolkit 2 Guide54
Snapshot Automation
You can write automation data values for multi-
ple parameters in a single step. You can write
snapshot automation in two ways:
To a Selection Automation data is written to the
Timeline selection (as well as the Edit selection if
linked). Anchor breakpoints are placed just be-
fore and after the selection so that data outside
the selection is not affected.
To a Cursor Location Automation data is written
at the insertion point. After the insertion point,
the automation ramps to the next breakpoint
value, or if no breakpoints exist, remains at the
newly written value for the remainder of the
session.
For more information on cutting, copying, and
pasting automation data within a session, see
“Write Automation to the Start, End, or All of a
Track or Selection” on page 45.
To write snapshot automation:
1 In the Automation window, make sure that
the parameters you want to edit are write-en-
abled. Deselect any parameters whose automa-
tion you want to preserve.
2 In the Edit window, click the Track View selec-
tor to show the automation you want to edit.
3 Write a breakpoint in the playlist if none cur-
rently exists, as follows:
• Place the cursor in the playlist (or make an
Edit selection), then choose Control+For-
ward Slash (/) (Windows) or Com-
mand+Forward Slash (/) (Mac).
– or –
• Select the Grabber tool and click anywhere
in the playlist.
4 Do one of the following:
• Select an area in the track’s playlist (or
within multiple tracks) where you want to
apply the automation.
– or –
• Place the cursor at an Edit insertion point.
5 Adjust the controls you want to automate.
You can also change a plug-in preset.
6 Choose Edit > Automation and do one of the
following:
• To write the current value to only the cur-
rently displayed automation parameter,
choose Write to Current.
– or –
• To write the current settings for all automa-
tion parameters enabled in the Automation
window, choose Write to All Enabled.
For MIDI automation, the Write To, Trim
To, and Glide To commands only apply to
MIDI Volume, MIDI Pan, and MIDI Mute.
MIDI parameters cannot use the Write To
commands.

Chapter 5: Advanced Automation Features 55
Adding Snapshot Automation to Empty
Automation Playlists
When you use a Write Automation command on
an automation playlist with no previously writ-
ten automation data, the selected value is writ-
ten to the entire playlist and not just the se-
lected area.
This is because a playlist with no automation
data contains only a single automation break-
point that corresponds to the current position of
the control for the parameter. The position of
the breakpoint is updated whenever the param-
eter value is changed.
If you do not want the Write Automation com-
mand to write the selected automation value to
the entire playlist, you can:
• Anchor the automation data by placing the
cursor at the end of the session (or any other
end point) and choosing Write to Current.
– or –
• Click with any Grabber tool on each side of
the selection.
This lets the Write Automation command write
only to the selected area.
Writing Snapshot Automation over
Existing Automation Data
When you move the playback cursor, the auto-
mated controls in Pro Tools update to reflect the
automation data that is already on the track. To
keep the settings you have made for a snapshot,
you can suspend automation parameters to pre-
vent them from updating.
To write snapshot automation over existing data:
1 In the Automation window, make sure that
the automation parameters you want to edit are
write-enabled. Deselect any parameters whose
automation you want to preserve.
2 Adjust the controls for the parameters you
want to automate.
3 Click the Automation Mode selector and se-
lect Off mode for the tracks where you want to
apply the automation.
4 With the Selector, select the range where you
want to apply the automation.
5 Choose Edit > Automation and select one of the
following from the submenu:
• To write the current value to only the auto-
mation parameter currently displayed in
the Edit window, choose Write to Current.
– or –
• To write the current settings for all automa-
tion parameters enabled in the Automation
window, choose Write to All Enabled.
6 Click the Automation Mode selector and se-
lect Read mode for the tracks you want to play
back with automation.

Complete Production Toolkit 2 Guide56
Capturing Automation and Applying it
Elsewhere
The Write Automation commands can also be
used to capture automation states at specific lo-
cations in a track and apply them to other loca-
tions in the track.
To capture and apply automation:
1 In the Automation window, make sure that
the automation parameters you want to edit are
write-enabled. Deselect any parameters whose
automation you want to preserve.
2 Click the Automation Mode selector and se-
lect Read mode for the tracks that have automa-
tion you want to capture.
3 Ensure that Options > Link Timeline and Edit Se-
lection is selected.
4 With the Selector tool, select the location
where you want to capture automation. All au-
tomated controls update to reflect the automa-
tion at that location. (If you make a selection,
the controls update to reflect the automation at
the beginning of the selection.)
5 In each track you want to apply the captured
automation, click the track’s Automation Mode
selector and set the Automation mode to Off.
6 With the Selector tool, select the location
where you want to apply the automation.
7 Enable the automation parameters previously
suspended.
8 Choose Edit > Automation and select one of the
following from the submenu:
• To write the current value to only the auto-
mation parameter currently displayed in
the Edit window, choose Write To Current.
– or –
• To write the current settings for all automa-
tion parameters enabled in the Automation
Enable window, choose Write To All Enabled.
9 Click the Automation Mode selector and se-
lect Read mode for the tracks you want to play
back with automation.

Chapter 5: Advanced Automation Features 57
Snapshot Automation and
Trimming of Automation Data
Pro Tools lets you use trim values as snapshots
and apply the relative changes (delta values) to
the selected automation by using the Trim Auto-
mation command. This works in much the same
way as the Write Automation command, except
that it writes delta values instead of absolute val-
ues to automation data.
You can use trim values in writing snapshot au-
tomation to any automatable parameter.
To create a snapshot of relative changes in
automation data:
1 In the Automation window, make sure that
the automation parameters you want to edit are
write-enabled. Deselect any parameters whose
automation you want to preserve.
2 Select the area of the track you want to edit.
All automated controls update to reflect the au-
tomation at the beginning of the selection.
3 Move the controls for the parameter up or
down by the amount you want to change the
data.
4 Choose Edit > Automation and do one of the
following:
• To write the current delta value to only the
currently displayed automation parameter,
choose Trim to Current.
– or –
• To write the current delta value for all auto-
mation parameters enabled in the Automa-
tion window, choose Trim to All Enabled.
Preview Automation
Automation Preview mode lets you audition
changes to a mix and compare them to existing
automation values without committing them to
the automation playlist.
When you put Pro Tools in Automation Preview
mode, you can preview values for automation-
enabled controls on any track that is in a writ-
able automation mode.
While in Automation Preview mode, when you
touch or move a control, it isolates the control,
disengaging it from its automation playlist. The
control stops reading or writing automation, al-
lowing you to freely audition changes.
When you have found a level or state that you
want to use, you can then commit or punch the
previewed value to the automation playlist for
the isolated controls.
If you punch during playback, the automa-
tion mode is set to Latch and writing begins at
the preview value.
If you punch while the transport is stopped,
the automation mode is set to Latch and the
control is primed at the preview value.
It is not necessary for the Allow Latch Prime
in Stop preference to be enabled for Preview
to put a control into Latch Prime.

Complete Production Toolkit 2 Guide58
Previewing New Automation
Values
To preview a new automation value for a control:
1 Make sure the track where you want to pre-
view the value is enabled for automation
(Touch, Latch, Touch/Latch or their correspond-
ing Trim modes).
2 Make sure the automation type you want to
preview is enabled in the Automation window
(Volume, Pan, Mute, Send level, Send pan, Send
mute, or Plug-In).
3 Click the Preview button in the Automation
window. The button lights green to indicate that
Preview mode is active.
4 To isolate a control, touch or move an auto-
mation-enabled control.You can isolate controls
during playback or while the transport is
stopped.
The Automation Mode indicator on the track
lights green to indicate that at least one of its
controls is isolated, and the Punch Preview but-
ton in the Automation window lights to indi-
cate a preview value is available to punch.
5 Start playback and adjust the isolated control
to audition the changes.
Taking Controls Out of Isolated
State
You can take controls out of their isolated state
without leaving Preview mode.
To take all controls on a track out of their isolated
state, do one of the following:
Control-click (Windows) or Command-click
(Mac) the automation mode selector on the
track.
– or –
Change the track automation mode to Read or
Off.
To take all controls of an automation type out of
their isolated state:
In the Automation window, disable the auto-
mation type.
Preview controls in the Automation window
Preview
Punch
Preview

Chapter 5: Advanced Automation Features 59
Isolating Multiple Controls
In some cases, such as when starting a new mix,
you may want to isolate multiple controls at the
same time.
To isolate all currently write-enabled controls:
Alt-click (Windows) or Option-click (Mac) the
Preview button.
To isolate all write-enabled controls on all selected
tracks:
Alt-Shift-click (Windows) or Option-Shift
click (Mac) the Preview button.
Suspending Preview Mode
You can temporarily suspend Preview mode, al-
lowing you to toggle between preview values
and existing automation.
To suspend Preview mode:
Control-click (Windows) or Command-click
(Mac) the Preview button.
Punching Preview Values
After you have isolated a control and auditioned
a new value, you can punch (write) the value to
the automation playlist.
To punch a preview value to the automation
playlist:
Click the lit Punch Preview button.
Preview Mode and “Write To”
Commands
The Write Automation To commands work as fol-
lows with Preview mode:
Before Punching Preview Values The Write Auto-
mation To commands (except Write to Next Break-
point) can be used to extend previewed values.
The Write Automation To command will only ap-
ply to isolated controls. Pro Tools remains in
Preview mode.
After Punching Preview Values The Write Automa-
tion To commands (except Write to Next Break-
point) can be used to extend the punched value
in the same manner as other automation.
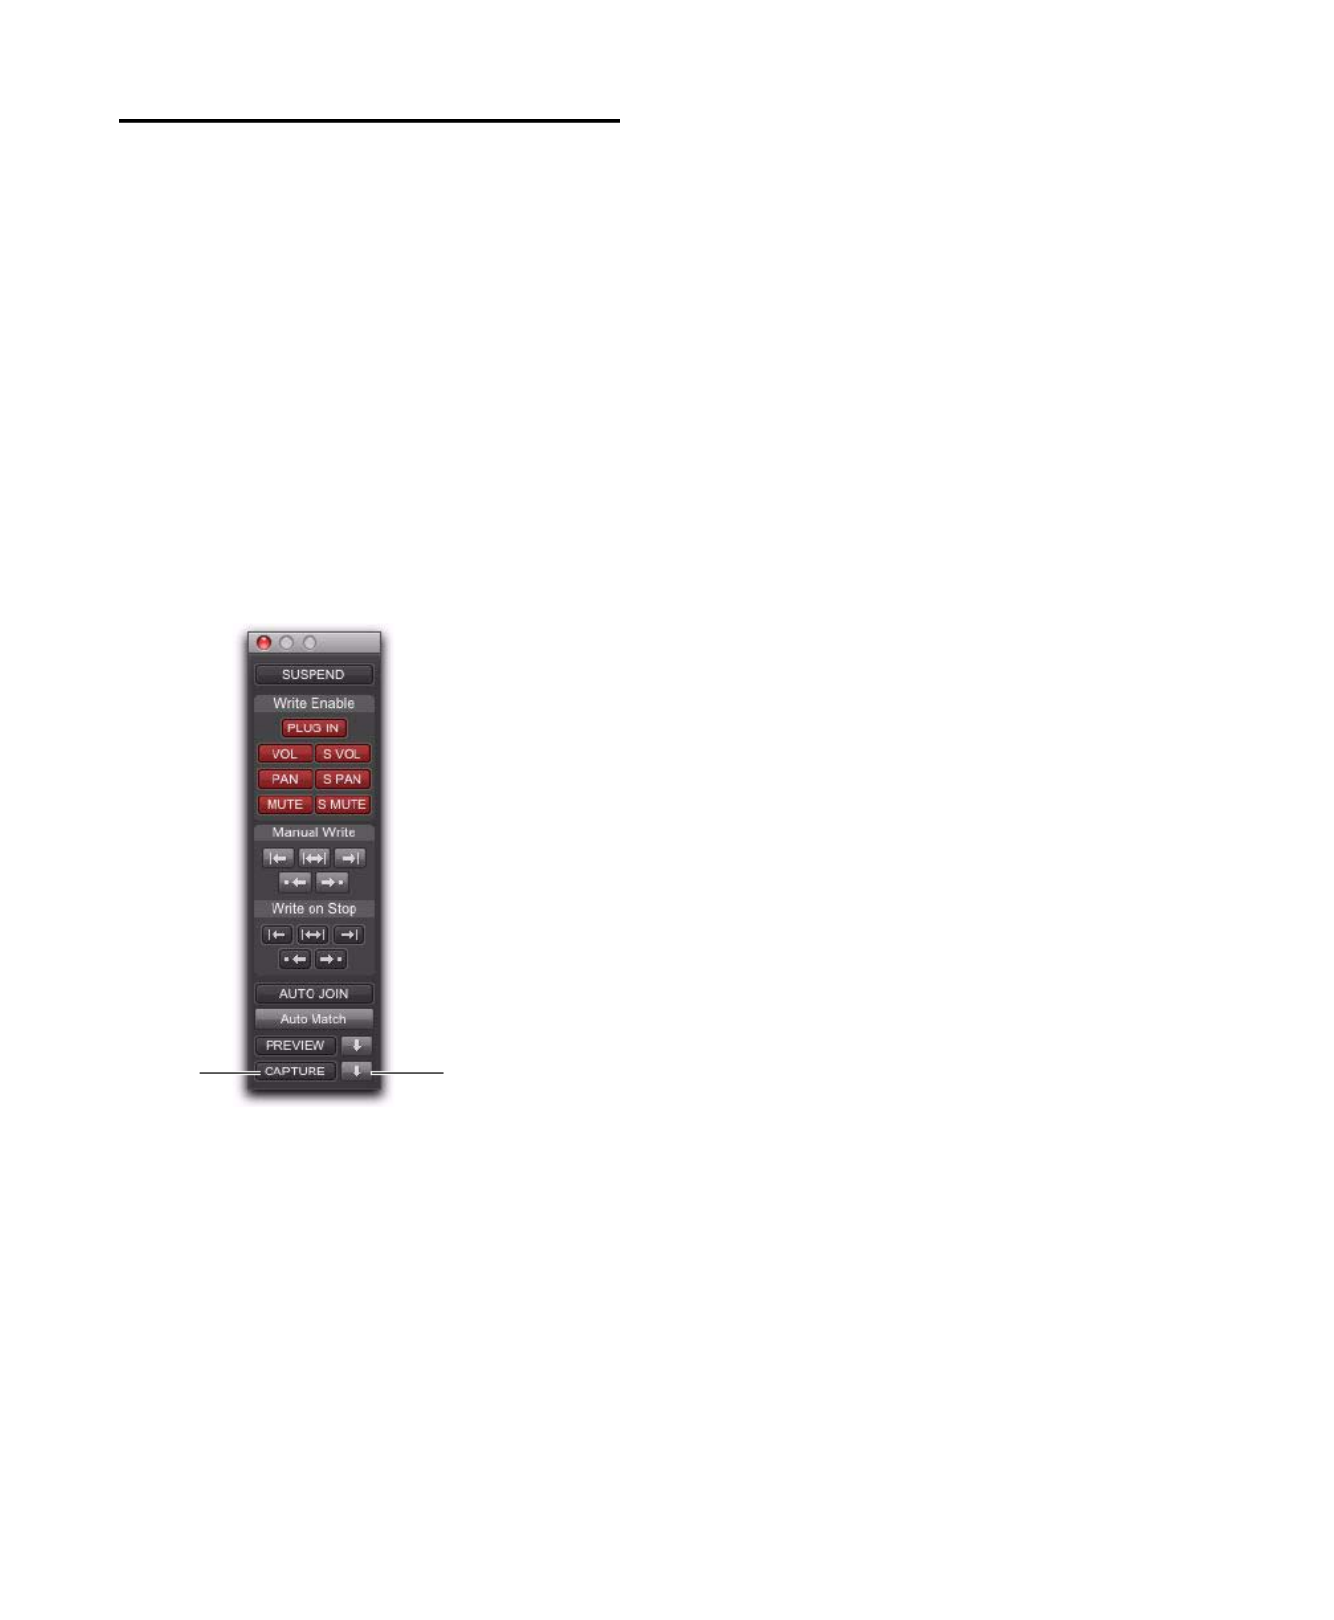
Complete Production Toolkit 2 Guide60
Capture Automation
You can capture current automation values at
one location in a session and quickly apply
them in another location with the Capture and
Punch Capture commands. The Capture com-
mand temporarily stores the value of all controls
currently writing automation, and the Punch
Capture commands writes those stored values to
all enabled automation types.
ICON Systems allow for the capture of up to
48 different values, or snapshots.
All other systems allow for the capture of a
single value.
Capturing Automation Values
You can capture the current automation values
of actively writing controls.
To capture automation values:
1 Make sure all tracks whose automation values
you want to capture are in a write-enabled state
(Write, Touch, Latch, Touch/Latch or Latch).
2 Make sure the automation types you want to
capture are enabled in the Automation window
(Volume, Pan, Mute, Send level, Send pan, Send
mute, or Plug-In).
3 Start playback. When you reach a location
where you want to capture the current automa-
tion states, click the Capture button in the Auto-
mation window.
The Punch Capture button in the Automation
window lights to indicate a captured value is
available to punch.
Capture controls in the Automation window
Capture
Punch
Capture

Complete Production Toolkit 2 Guide62
Punching Automation Values for
All Controls
You can punch all captured automation values
to another location on their corresponding
tracks (except those tracks with their Automa-
tion Mode set to Off).
To punch the automation values of all controls:
When you reach a location where you want to
apply the captured automation states, Alt-click
(Windows) or Option-click (Mac) the Punch
Capture button. Any track set to Read or Touch
are set to Latch. Any tracks set to Off are unaf-
fected.
To punch the automation values of all controls on
selected tracks only:
When you reach a location where you want to
apply the captured automation states, Alt-Shift-
click (Windows) or Option-Shift-click (Mac) the
Punch Capture button. Any selected tracks set to
Read or Touch are set to Latch. Any selected
tracks set to Off are unaffected.
Capture and Trim Mode
The Capture and Punch Capture commands
work with Trim automation in the same way as
regular automation. Pro Tools saves Trim status
when capturing, so if you attempt to punch cap-
tured Trim values while displaying a non-Trim
automation playlist, Pro Tools will automati-
cally apply the values to the corresponding Trim
playlist.
Punch Capture and “Write To”
Commands
After issuing a Punch Capture command, the af-
fected controls are writing automation (in Latch
mode), so any of the Write Automation To com-
mands can be used to extend the punched value
in the same manner as other automation.

Chapter 5: Advanced Automation Features 63
Capture and Preview Mode
Loading Captured Values into Preview
You can preview and modify captured automa-
tion values in Preview mode before punching
the values to the automation playlist.
To capture an automation value and use it to
preview:
1 Make sure the track where you want to pre-
view the value is enabled for automation
(Touch, Latch, Touch/Latch or their correspond-
ing Trim modes).
2 Make sure the automation type you want to
preview is enabled in the Automation window
(Volume, Pan, Mute, Send level, Send pan, Send
mute, or Plug-In).
3 Capture an automation value that you want to
preview in another location on a track. (See
“Capturing Automation Values” on page 60.)
4 Go to a location where you want to preview
the captured automation states, and click the
Preview button in the Automation window.
5 Click the Punch Capture button.
The affected controls are isolated and updated
to the captured values. The Punch Preview but-
ton in the Automation window lights to indi-
cate the preview value is available to punch.
6 Start playback and adjust the isolated control
to audition the changes.
7 When you are ready to punch the preview
value to the automation playlist, click the lit
Punch Preview button.
Capturing Values While in Preview
Mode
When you are in Preview mode, you can capture
the values of isolated controls and apply them
elsewhere on a track. By capturing preview val-
ues, you can leave the underlying automation
unchanged at the place where you capture.
On ICON systems, you can use preview mode to
capture multiple snapshots without changing
automation.
To capture a preview value:
1 Activate Preview mode and isolate a control.
(See “Previewing New Automation Values” on
page 58).
2 Start playback and adjust the isolated control
to audition the changes.
3 When you are ready to capture preview value,
click the Capture button in the Automation
window.
The Punch Capture button in the Automation
window lights to indicate a captured value is
available to punch.

Complete Production Toolkit 2 Guide64
VCA Master Track Automation
Displaying Automation on VCA
Master Tracks
The following controls on VCA Master tracks
can be automated and have separate automa-
tion playlists:
• Volume
• Volume trim
• Mute
These automation playlists follow the same be-
havior as automation playlists on other track
types.
Displaying the Composite
Automation Playlist on Slave
Tracks
When a track is a VCA slave, you can display a
composite automation playlist that shows the
contribution of the VCA Master to the Volume
or Mute automation data on the slave track. This
composite playlist reflects the actual position of
the Volume fader on the slave track.The com-
posite playlist display cannot be directly edited.
To display the composite playlist on VCA slave
tracks:
Select View > Automation > Composite Playlist.
Excluding VCA Slave Tracks from
VCA Master Automation
When you are writing automation on a VCA
Master track, the corresponding moves will ap-
pear on the composite automation playlist of
each of its slave tracks. If you want to exclude a
slave track from an automation pass, write-en-
able the slave track for automation.
To exclude a slave track from VCA Master track
automation pass:
1 Write-enable the VCA Master track for auto-
mation (Write, Touch or Latch mode).
2 Write-enable the slave track you want to ex-
clude for automation (Write mode).
3 Make sure other slave tracks that you want to
include in the pass are not write-enabled for au-
tomation.
4 Start playback.
5 Move the fader on the VCA Master track.
6 Stop playback.
Automation is written on the excluded slave
track such that the fader moves on the VCA
Master track are canceled out, and the fader on
the excluded slave track does not move on sub-
sequent playback.
Viewing composite automation on a VCA slave track
Volume
automation
Composite
playlist
playlist
Automation for excluded VCA slave track, canceling
VCA Master automation
VCA Master
included slave
excluded slave

Chapter 5: Advanced Automation Features 65
Coalescing VCA Automation
There are several ways to commit, or coalesce,
the contribution of a selected VCA Master
track’s Volume and Mute automation to the au-
tomation playlists of its slave tracks.
Clearing the VCA Master
You can use a VCA Master to write grouped au-
tomation, coalesce the VCA automation to all of
the slave tracks, and clear the automation on the
VCA Master. The coalesced tracks will play back
exactly as they did when they were in the VCA
group.
To coalesce automation from a VCA Master to all
of its slave tracks and retain the VCA Master:
1 Select the VCA Master track whose automa-
tion you want to coalesce.
2 Do one of the following:
• Choose Track > Coalesce VCA Master Auto-
mation.
– or –
• Right-click the VCA Master track name and
choose Coalesce VCA Master Automation.
The composite Volume level and Mute state are
coalesced to each of the slave tracks. The VCA
Master Volume fader is reset to zero, the VCA
Mute is set to unmuted, and any automation on
the VCA Master is cleared.
Deleting the VCA Master
You can temporarily use a VCA Master to write
grouped automation, then coalesce the VCA au-
tomation to all of the slave tracks by deleting
the VCA Master. The coalesced tracks will play
back exactly as they did when they were in the
VCA group.
To coalesce automation from a VCA Master to all
of its slave tracks and delete the VCA Master
track:
1 Select the VCA Master track whose automa-
tion you want to coalesce.
2 Choose Track > Delete.
The composite Volume level and Mute state are
committed to each of the slave tracks.
Removing a Slave Track from a VCA
Group
You can remove an individual slave track from a
VCA group, which commits the VCA automa-
tion to that track, leaving the VCA Master and
the other slave tracks untouched. The coalesced
slave track plays back exactly as it did when it
was in the VCA group.
To coalesce automation from a VCA Master to an
individual slave track:
1 Do one of the following:
• Choose Modify Groups from the Group List
menu.
• Click the Group ID indicator on the track
and choose Modify.
• Right-click the Group name in the Group
List and choose Modify.
2 In the Groups dialog, select the VCA-con-
trolled group that includes the slave track.
3 In the Groups dialog, click Tracks and remove
the slave track from the group.
4 Click OK.
The slave track is removed from the VCA group,
and the composite Volume level and Mute state
are coalesced to the track.
This action cannot be undone.

Complete Production Toolkit 2 Guide66
Duplicating a Slave Track
When you duplicate a slave track without dupli-
cating its group assignments, the VCA automa-
tion is coalesced to the duplicate track. The co-
alesced duplicate plays back exactly as if it were
in the VCA group.
To coalesce automation from a VCA Master to a
single slave track by duplicating the track:
1 Select the slave track whose automation you
want to coalesce.
2 Choose Track > Duplicate.
3 In the Duplicate Track dialog, deselect Group
Assignments.
4 Click OK.
The composite Volume level and Mute state are
coalesced to the duplicate track. The original
slave track is preserved, and the VCA group is
unchanged.
Coalescing Automation Across an Edit
Selection
You can commit VCA automation across an Edit
selection in a VCA Master track, without com-
mitting the automation on the entire length of
the track.
To coalesce automation in an Edit selection on a
VCA Master track:
1 Select the VCA Master track whose automa-
tion you want to coalesce.
2 Make an Edit selection in the VCA Master
track that includes the range of automation you
want to coalesce.
3 Do one of the following:
• Hold Start (Windows) or Control (Mac) and
choose Track > Coalesce VCA Master Automa-
tion.
– or –
• Hold Start (Windows) or Control (Mac) and
Right-click the VCA Master track name and
choose Coalesce VCA Master Automation.
The composite Volume level and Mute state are
committed to each of the slave tracks over the
Edit selection. The VCA Master Volume is set to
zero, the VCA Mute state is set to unmuted, and
any automation on the VCA Master is cleared
for the selected area only.

Chapter 6: Surround Features 67
chapter 6
Surround Features
Pro Tools with Complete Production Toolkit 2
supports surround mixing. Pro Tools supports
mixing in the following multichannel (greater
than stereo) formats: LCR, Quad, LCRS, 5.0, 5.1,
6.0, 6.1, 7.0, 7.0 SDDS, 7.1, and 7.1 SDDS.
Pro Tools with the Complete Production
Toolkit2 option and 003, 003 Rack, 003 Rack+,
Digi 002, or Digi 002 Rack can monitor discrete
mixing in surround up to 7.1.
Pro Tools with the Complete Production Toolkit
2 option and Mbox Pro or Mbox 2 Pro can only
monitor discrete mixing in surround up to 5.1.
With Complete Production Toolkit 2, you can
open surround sessions on any Pro Tools sys-
tem. Use the Neyrinck SoundCode Stereo down
mixer plug-in for monitoring surround sessions
in stereo with audio interfaces that have fewer
than six outputs. For more information, see the
SoundCode Stereo Guide.
Pro Tools Audio Connections
for 5.1 Mixing
While all 5.1 mixing formats provide the same
speaker arrangement, there are three primary
standards in use for the track layout of the indi-
vidual channels that comprise the 5.1-format
multichannel mix.
In the following table, it is assumed that sur-
round channels are assigned to outputs 1–6 of a
Pro Tools audio interface. Use channels 7–8 to
monitor a stereo mix for a stereo version, or for
cue mixes and monitoring.
Low Latency Monitoring (003 and 002
family interfaces only) is unavailable in
surround sessions.
For information on fundamental surround
concepts, see the Pro Tools Sync & Surround
Concepts Guide.
Table 1. Track Layouts for 5.1 Formats
Formats Track Layout
123456
Film
(Pro Tools
default)
or C24
L C R Ls Rs LFE
SMPTE/ITU
for Dolby
Digital (AC3) or
Control|24
L R C LFE Ls Rs
DTS
or ProControl
L R Ls Rs C LFE

Complete Production Toolkit 2 Guide68
To connect your audio interfaces for 5.1 format
mixing and monitoring:
1 Determine the 5.1 format and track layout
you want to use.
2 Connect the output channels of your audio
interface to the corresponding input channels of
your monitoring system according to the assign-
ments listed in Table 1 on page 67.
Configuring Pro Tools for
Multichannel Sessions
Configuring Pro Tools and sessions for multi-
channel mixing can be done in any (or all) of
the ways described in this section.
New Sessions
You can create a new session and choose a sur-
round mix I/O Settings file as the default
I/O Setup. See “New Sessions and I/O Settings”
on page 68.
Remixing Sessions in Surround (Importing
Multichannel I/O Setups)
By creating or importing a surround mix I/O Set-
tings file in the I/O Setup dialog, multichannel
paths can be made available in any stereo (or
other format) session. You can then reassign
track routing from the original stereo paths to
multichannel paths. Inactive and active paths
simplify reassignment. See “Importing Multi-
channel I/O Setups” on page 70.
Custom Multichannel Paths
You can customize and redefine existing paths
in the I/O Setup dialog. For more information,
see “Custom Multichannel Paths” on page 71.
Importing Session Data
By using the Import Session Data command
(File > Import > Session Data), you can import
tracks and media from other sessions plus their
associated paths and track assignments. After
importing session data, you can use the
I/O Setup dialog to configure main and sub-
paths for the requirements of the session.
For more information, see the Pro Tools Reference
Guide.
New Sessions and I/O Settings
When you create a new session, you can specify
a surround format that you want to use as your
I/O Setup. Default path configurations are pro-
vided as I/O Settings files, for stereo and sur-
round mixing.
Once you create the new session, you can create
and import tracks, import audio, and assign sig-
nal routing to set up your mix.
If you use an Pro Tools control surface, see
its guide for more information.

Chapter 6: Surround Features 69
To create a new session for multichannel mixing:
1 Choose File > New Session.
2 Select the Create Blank Session option.
3 Select the Audio File Type, Sample Rate, and Bit
Depth as desired.
4 From the I/O Settings menu, select one of the
following options:
• 5.1 Film Mix
• SMPTE/ITU
• DTS/ProControl Monitoring
5 Click OK.
6 In the Save dialog, name the session, navigate
to the location where you want to save the new
session, and click Save.
The surround presets preconfigure the I/O Setup
for the new session with default 5.1 format out-
put paths and main and sub-paths for output
busses.
New Session dialog, 5.1 Film Mix I/O setting selected
Standard 5.1 format (film) output paths
Standard 5.1 format (film) output bus paths
Termékspecifikációk
| Márka: | Avid |
| Kategória: | Audio szoftver |
| Modell: | Complete Production Toolkit |
Szüksége van segítségre?
Ha segítségre van szüksége Avid Complete Production Toolkit, tegyen fel kérdést alább, és más felhasználók válaszolnak Önnek
Útmutatók Audio szoftver Avid

15 Augusztus 2024
Útmutatók Audio szoftver
- Audio szoftver Kuassa
- Audio szoftver Native Instruments
- Audio szoftver PSP Audioware
- Audio szoftver Cherry Audio
- Audio szoftver Antares
- Audio szoftver IK Multimedia
- Audio szoftver Atomix
- Audio szoftver Corel
- Audio szoftver Steinberg
- Audio szoftver Best Service
- Audio szoftver Audio Modeling
- Audio szoftver Nomad
- Audio szoftver Air
- Audio szoftver Eventide
- Audio szoftver Waves
- Audio szoftver Magix
- Audio szoftver Xils Lab
- Audio szoftver MixVibes
- Audio szoftver MIA Laboratories
- Audio szoftver SONORIS
- Audio szoftver Audified
- Audio szoftver Slate Digital
- Audio szoftver Blue Cat Audio
- Audio szoftver Overloud
- Audio szoftver FabFilter
- Audio szoftver IZotope
- Audio szoftver Metric Halo
- Audio szoftver Audiomodern
- Audio szoftver MeldaProduction
- Audio szoftver Sonible
- Audio szoftver Chocolate Audio
- Audio szoftver Sound Particles
- Audio szoftver Playfair Audio
- Audio szoftver Dear Reality
- Audio szoftver Tek'it Audio
- Audio szoftver MAAT
- Audio szoftver Bome
- Audio szoftver Nugen Audio
- Audio szoftver TAL Software
- Audio szoftver BABY AUDIO
- Audio szoftver Wave Arts
- Audio szoftver Ujam
- Audio szoftver D16 Group
Legújabb útmutatók Audio szoftver
3 Április 2025
3 Április 2025
2 Április 2025
2 Április 2025
2 Április 2025
2 Április 2025
2 Április 2025
2 Április 2025
2 Április 2025
2 Április 2025