Használati útmutató ZTE Zmax
ZTE
okostelefon
Zmax
Olvassa el alább 📖 a magyar nyelvű használati útmutatót ZTE Zmax (171 oldal) a okostelefon kategóriában. Ezt az útmutatót 3 ember találta hasznosnak és 2 felhasználó értékelte átlagosan 4.5 csillagra
Oldal 1/171

User Manual and Safety Information


1
User Manual and
Safety information

2
About This Manual
LEGAL INFORMATION
Copyright © 2014 ZTE CORPORATION
All rights reserved.
Approved Firmware Versions: No part of this publication may be
quoted, reproduced, translated or used in any form or by any means,
electronic or mechanical, including photocopying and microlm, without
the prior written permission of ZTE Corporation.
ZTE Corporation reserves the right to correct typographical errors,
misprints or update specications in this guide without prior notice.
The Bluetooth® trademark and logos are owned by the Bluetooth SIG,
Inc. and any use of such trademarks by ZTE Corporation is under license.
Other trademarks and trade names are the property of their respective
owners.

3
Manufactured under license from Dolby Laboratories. Dolby and the
double-D symbol are trademarks of Dolby Laboratories.
We offer self-service for our smart terminal device users. Please visit
ZTE ofcial website (at www.ztedevice.com) for more information on
self-service and supported product models. Information subject to the
website.
Version No.: R1.0
Edition Time: August, 2014
Manual No.: 081704100323

4
Contents
Getting Started 13 ...........................................................................
Getting to Know Your Phone ............................................................. 13
Knowing the Keys ............................................................................. 14
Installing the micro-SIM Card ........................................................... 15
Installing the microSDHC™ Card ..................................................... 16
Charging the Battery ......................................................................... 17
Extending the Battery Life ................................................................. 19
Restarting the Phone ........................................................................ 19
Setting Up for the First Time ............................................................. 19
Powering On/Off ............................................................................... 20
Locking/Unlocking the Screen and Keys .......................................... 20
Using the Touch Screen .................................................................... 21
Getting to Know the Home Screen ................................................... 22
Personalizing 24 .............................................................................
Changing the System Language ...................................................... 24
Setting the Date and Time ................................................................ 24
Changing Ringtone and Notication Sound ...................................... 24
Turning On/Off Touch Sounds........................................................... 25
Adjusting Volumes ............................................................................ 25

6
Connecting to Virtual Private Networks ............................................ 56
Phone Calls 59 ................................................................................
Placing and Ending Calls .................................................................. 59
Answering or Rejecting Calls ............................................................ 60
Working With the Call Log ................................................................ 60
Calling Your Contacts ....................................................................... 62
Checking Voicemail .......................................................................... 63
Using Options During a Call ............................................................. 63
Managing Multi-party Calls ............................................................... 64
Adjusting Your Call Settings .............................................................. 66
Contacts 72 .....................................................................................
Checking Contact Details ................................................................. 72
Adding a New Contact ...................................................................... 72
Setting Up Your Own Prole ............................................................. 73
Importing, Exporting, and Sharing Contacts ..................................... 73
Working With Favorite Contacts ....................................................... 75
Working With Groups ........................................................................ 75
Searching for a Contact .................................................................... 77
Editing Contacts ................................................................................ 77

7
Accounts 79 ....................................................................................
Adding or Removing Accounts .......................................................... 79
Conguring Account Sync ................................................................. 80
Email ..........................................................................................82
Set Up the First Email Account ......................................................... 82
Checking Your Emails ....................................................................... 82
Responding to an Email .................................................................... 83
Writing and Sending an Email........................................................... 84
Adding Signature to Your Emails ...................................................... 85
Adding and Editing Email Accounts .................................................. 86
Changing General Email Settings ..................................................... 87
GmailTM .......................................................................................88
Opening Your Gmail Inbox ................................................................ 88
Switching Accounts ........................................................................... 88
Writing and Sending a Message ....................................................... 89
Adding Signature to Your Gmail Messages ...................................... 89
Replying to or Forwarding a Message .............................................. 90
Working With Received Attachments ................................................ 90
Searching for Messages ................................................................... 91
Working With Labels ......................................................................... 91
Changing Gmail Settings .................................................................. 93

8
Messaging 94 ..................................................................................
Opening the Messaging Screen ....................................................... 94
Sending a Text Message................................................................... 94
Sending a Multimedia Message ........................................................ 95
Replying to a Message ..................................................................... 95
Forwarding a Message ..................................................................... 96
Viewing Details About a Message..................................................... 96
Deleting Messages or Threads ......................................................... 97
Changing Messaging Settings .......................................................... 97
Calendar 98 .....................................................................................
Viewing Your Calendars and Events ................................................. 98
Creating an Event ............................................................................. 99
Editing or Deleting an Event ........................................................... 100
Changing Calendar Settings ........................................................... 100
Google+™ 101 ................................................................................
Getting Started With Google+ ......................................................... 101
Chrome 103 .....................................................................................
Opening the Internet ....................................................................... 103
Downloading Files .......................................................................... 104
Changing Chrome Settings ............................................................. 104

10
Music ........................................................................................118
Copying Music Files to Your Phone .................................................118
Viewing Your Music Library ..............................................................119
Playing Music .................................................................................. 120
Managing Playlists .......................................................................... 121
Play Music 122 ................................................................................
Playing Your Music ......................................................................... 122
Managing Playlists .......................................................................... 124
Video Player 125 .............................................................................
Opening the Video Library .............................................................. 125
Playing and Controlling Videos ....................................................... 125
Managing Video Files ..................................................................... 125
Sound Recorder 127 .......................................................................
Recording a Voice Memo ................................................................ 127
Playing a Voice Memo .................................................................... 128
More Apps ................................................................................129
File Manager ................................................................................... 129
Calculator ........................................................................................ 129
Clock ............................................................................................... 129
Downloads ...................................................................................... 130

12
Troubleshooting 146 ......................................................................
For Your Safety ........................................................................152
General Safety ................................................................................ 152
Distraction ....................................................................................... 153
Product Handling ............................................................................ 154
Electrical Safety .............................................................................. 158
Radio Frequency Interference ........................................................ 159
Explosive Environments ................................................................. 161
Radio Frequency (RF) Exposure .................................................... 161
FCC Compliance ............................................................................ 163
Hearing Aid Compatibility (HAC) regulations for Mobile phones .... 165
CTIA Requirements ........................................................................ 167
13
Getting Started
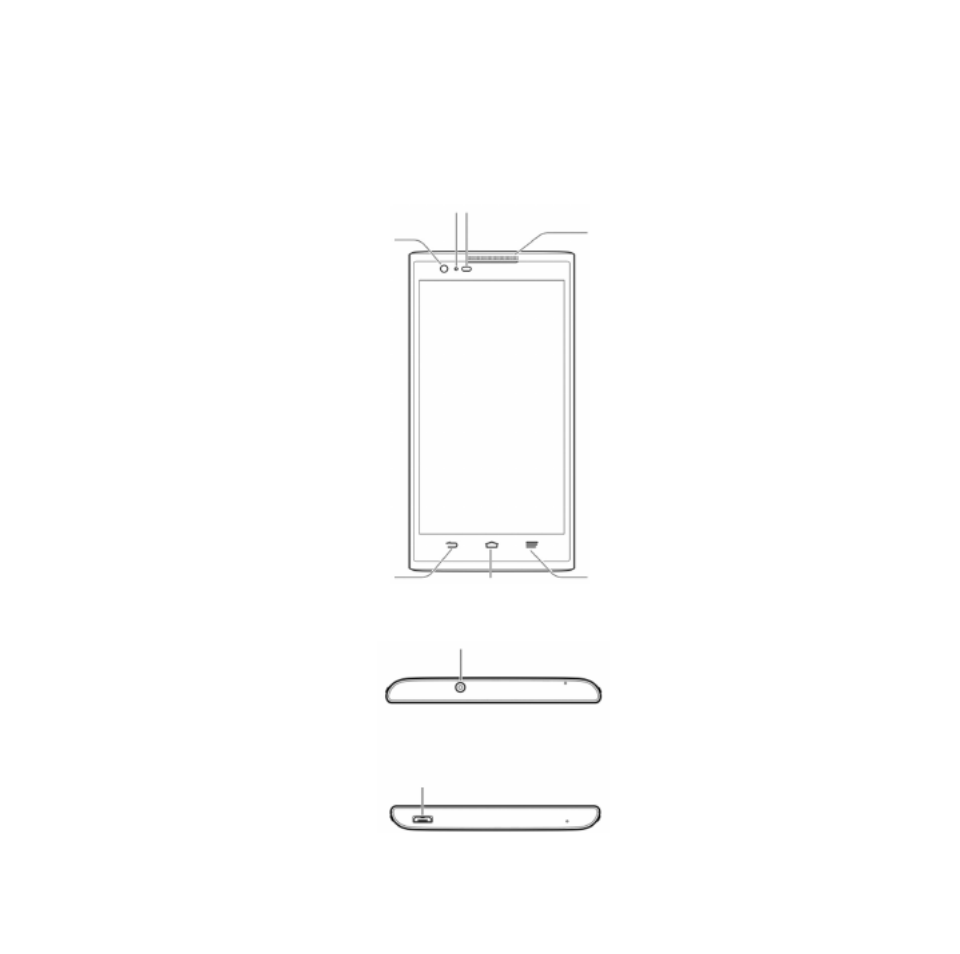
Getting to Know Your Phone
Earpiece
Menu key
Home key
Back key
Indicator light Proximity & light sensor
Front camera
Charger /micro-USB Jack
Headset jack

14
microSDHC
card slot
Volume key
Speaker
Power key
micro-SIM
card slot
Flash
Back camera
Knowing the Keys
Key Function
Power Key
• Press and hold to turn on your phone.
• Press and hold to restart your phone, turn on or off
Airplane mode, enable silent mode, vibration mode
or sound, or to power off your phone.
• Press to switch your phone to Sleep mode.
• Press to wake up your phone.

15
Home Key
• Touch to return to the Home Screen from any
application or screen.
• Touch and hold to use Google search.
Menu Key • Touch to get the options for the current screen.
• Touch and hold to see recently used applications.
Back Key Touch to go to the previous screen.
Volume Keys Press or hold to turn the volume up or down.
Installing the micro-SIM Card
Switch off your phone before installing and removing the micro-SIM card.
1. Use the tray eject tool to take out the card tray.
2. Put the micro-SIM card into the card tray with the cut corner oriented
as shown and slip it into the card slot.

16
CAUTION: To avoid damage to the phone, please do not use other kinds
of SIM cards, and do not use a non-standard micro-SIM card cut from
a SIM card. You can get the standard micro-SIM card from your service
provider.
Installing the microSDHC™ Card
The microSDHC card (sold separately) can be installed and removed
while the phone is turned on. See Remove the microSDHC Card From
Your Phone.
1. Use the tray eject tool to take out the card tray.
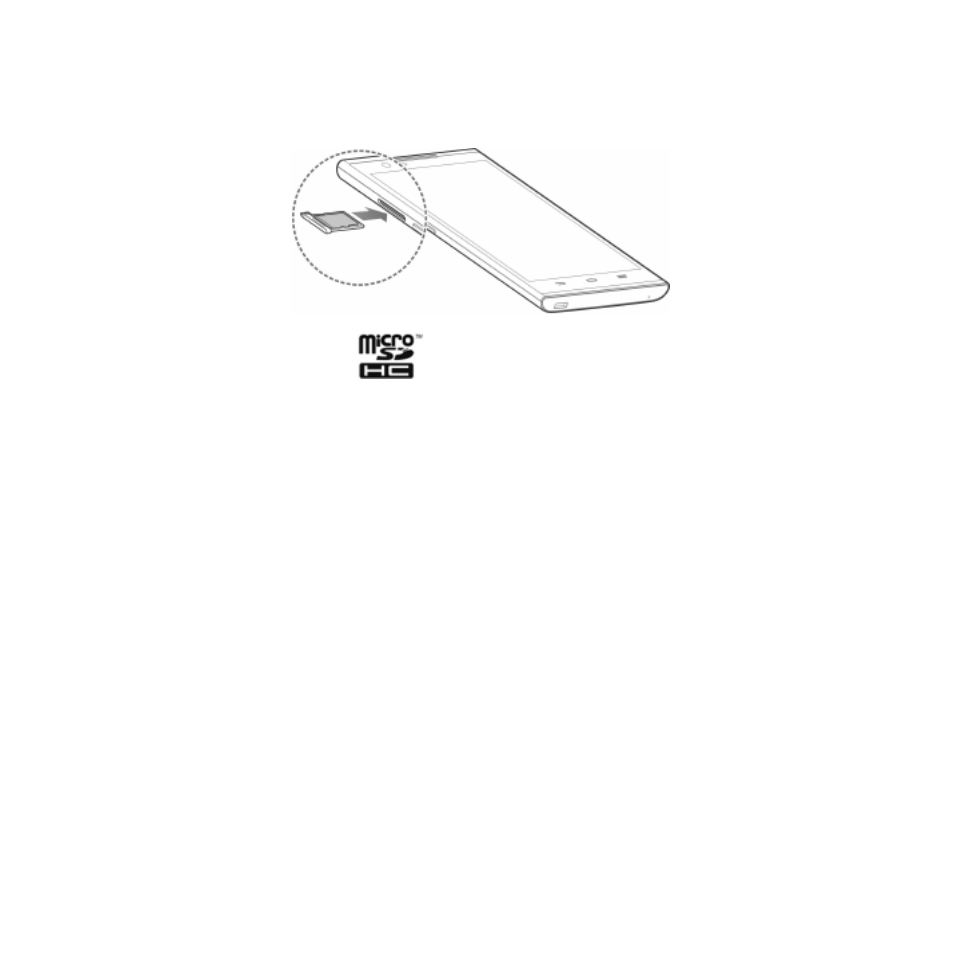
17
2. Put the microSDHC card into the card tray as shown and slip it into
the card slot.
NOTE: microSDHC logo is a trademark of SD-3C, LLC.
Charging the Battery
When you get your new phone, you’ll need to charge the battery.
If the battery is low, there will be a pop-up message on the screen. As
you charge your phone, the screen will tell you the exact battery level
each time you wake up your phone.
WARNING! Use only ZTE approved chargers and cables. The use of
unapproved accessories could damage your phone or cause the battery
to explode.
CAUTION: Do not change the built-in rechargeable battery in your phone
by yourself. The battery can only be changed by ZTE or ZTE authorised
service provider.
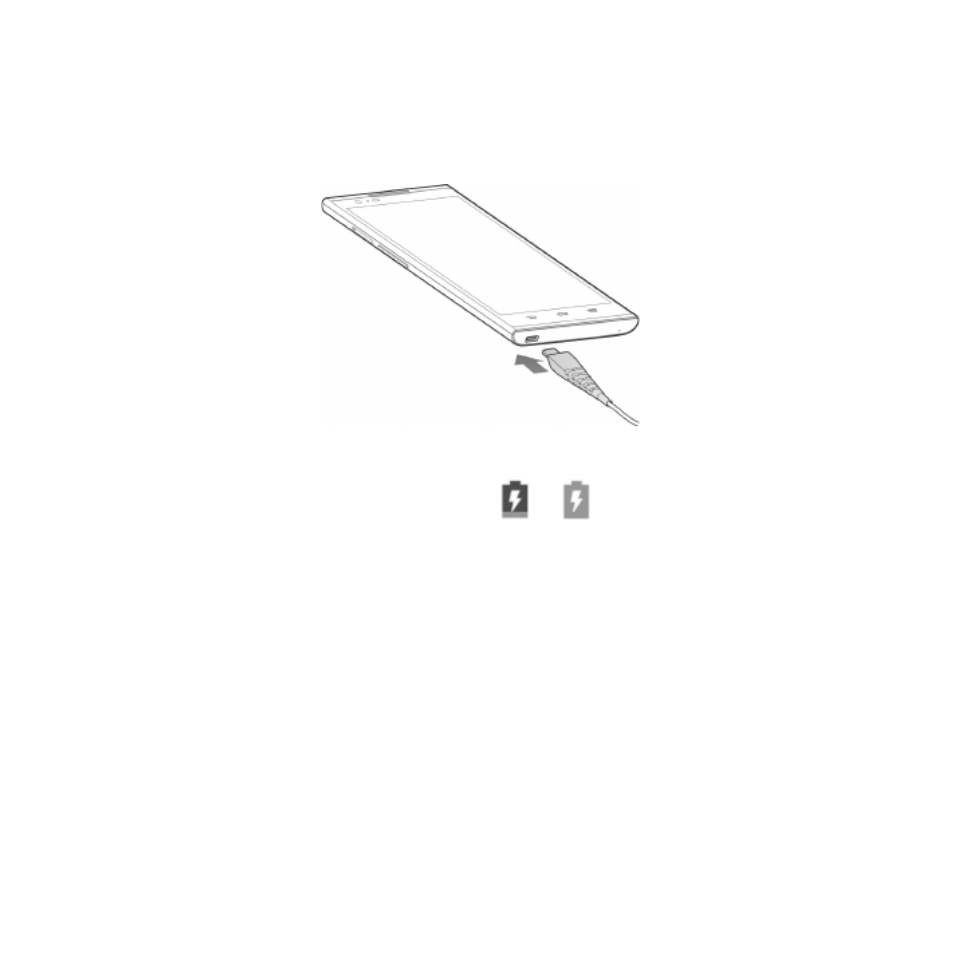
18
1. Connect the adapter to the charging jack. Ensure that the adapter is
inserted with the correct orientation. Do not force the connector into
the charging jack.
2. Connect the charger to a standard AC wall outlet. If the phone is on,
you’ll see a charging icon, such as or , appear on the status
bar.
3. Disconnect the charger when the battery is fully charged.
NOTE: If the battery is extremely low, you may be unable to power on
the phone even when it is being charged. In this case, try again after
charging the phone for at least 10 minutes. Contact customer service if
you still cannot power on the phone after prolonged charging.

19
Extending the Battery Life
Active applications, screen brightness levels, Wi-Fi usage and GPS
functionality and other certain features can all drain your battery. You can
follow the helpful tips below to conserve your battery power:
• Reduce the screen backlight time.
• Lower the screen brightness.
• Turn auto-sync, portable hotspot, Wi-Fi, and Bluetooth off when not in
use.
• Disable the GPS function when not in use. Most applications using
this function will periodically query the GPS satellites for your current
location; each query drains your battery.
Restarting the Phone
If the screen freezes or takes too long to respond, try pressing and
holding the Power Key for about 8 seconds to restart the phone.
Setting Up for the First Time
When you rst power on your phone after you purchase it or reset it to
factory settings (see Backup and Reset), you need to set some settings
before using it.

20
Flick the language eld to select the language and touch . Then follow
the prompts to download applications, select theme, and other options.
Powering On/Off
Make sure the micro-SIM card is in your device and the battery is
charged.
• Press and hold the to turn on your phone.Power Key
• To turn it off, press and hold the Power Key to open the options
menu. Touch .Power off OKand then touch
Locking/Unlocking the Screen and Keys
Your phone allows you to quickly lock the screen and keys (put the phone
to sleep mode) when not in use, and to turn the screen back on and
unlock it when you need it.
To lock the screen and keys:
To quickly turn the screen off and lock the keys, press the .Power Key
NOTE: To save battery power, the phone automatically turns off the
screen after a certain period of time when you leave it idle. You will still
be able to receive messages and calls while the phone screen is off.

21
To unlock the screen and keys:
1. Press the to turn the screen on.Power Key
2. Touch and hold any blank area of the screen to unlock it.
NOTE: If you have set a face unlock, unlock pattern, PIN or password
for your phone (see chapter Protecting Your Phone With Screen Locks),
you’ll need to look at the front camera, draw the pattern or enter the PIN/
password to unlock your screen.
Using the Touch Screen
Your phone’s touch screen lets you control actions through a variety of
touch gestures.
• Touch
When you want to type using the onscreen keyboard, select onscreen
items such as application and settings icons, or press onscreen
buttons, simply touch them with your nger.
• Touch and Hold
To open the available options for an item (for example, a message or
link in a Web page), touch and hold the item.
• Swipe or Slide
To swipe or slide means to quickly drag your nger vertically or
horizontally across the screen.

22
• Drag
To drag, press and hold your nger with some pressure before you
start to move your nger. While dragging, do not release your nger
until you have reached the target position.
• Pinch
In some apps (such as Maps, Browser, and Gallery), you can zoom
in and out by placing two ngers on the screen at once and pinching
them together (to zoom out) or spreading them apart (to zoom in).
• Rotate the screen
For most screens, you can automatically change the screen
orientation from portrait to landscape by turning the phone sideways.
Getting to Know the Home Screen
The home screen is the starting point for your phone’s applications,
functions, and menus. You can customize your home screen by adding
application icons, shortcuts, folders, widgets, and more. Your home
screen extends beyond the initial screen. Swipe the screen left or right to
display additional screens.

23
Status & Notications
Shortcuts
Chrome
MessagingPeople
Phone
Google Search
All apps
Extended Home Screens
Your home screen extends beyond the initial screen, providing more
space to add icons, widgets, and more. Simply swipe left or right on the
screen to see the extended Home Screens.

24
Personalizing
Changing the System Language
1. Touch the Home Key > Menu Key > System settings > Language
& input > Language.
2. Select the language you need.
Setting the Date and Time
1. Touch the Home Key > Menu Key > System settings > Date &
time.
2. Uncheck Automatic date & time Automatic time zone and if you
want to set the date, time and time zone by yourself.
3. Set the date, time, time zone, and time/date format.
Changing Ringtone and Notication Sound
You can customize the default ringtone for incoming calls and default
notication sound quickly.
1. Touch the .Home Key > Menu Key > System settings > Sound
2. Touch .Phone ringtone or Default notication sound
3. Scroll through the ringtone list and select the ringtone you want to
use.

25
4. Touch .OK
TIP: See chapter People – Editing Contacts – Set a Ringtone for a
Contact for how to assign a special ringtone to an individual contact.
Turning On/Off Touch Sounds
1. Touch the .Home Key > Menu Key > System settings > Sound
2. Check or uncheck Touch sounds.
Adjusting Volumes
1. Touch the Home Key > Menu Key > System settings > Sound >
Volumes.
2. Adjust the volume for music, video, games, and other media, the
ringtone and notication volume, and the alarm volume.
3. Touch to save.OK
TIP: You can adjust the media volume when a media application is in
use by pressing the Volume Up/Down Key. If no media application is
active, press the Volume Up/Down Key to adjust ringtone volume (or the
earpiece volume during a call).

26
Switching to Silent Mode
You can set the phone to silent mode by using one of the following
methods.
• Press and hold the Power Key and then touch to enable
silent mode, touch to enable silent mode with vibration, or touch
to disable silent mode.
• Keep pressing the Volume Down Key when no media application is
active. When the icon appears in the status bar, the phone is set
to silent mode with vibration. When the icon appears in the status
bar, the phone is in silent mode.
• Touch the Home Key > Menu Key > System settings > Sound >
Silent mode Vibrate Mute, and touch or .
Applying New Wallpapers
You can set the wallpaper for the Home Screen or Lock Screen.
1. Touch the Home Key > Menu Key > Wallpaper.
2. Select a wallpaper source from Gallery Live Wallpapers Photos, , or
Wallpapers and choose the image or animation you want to use as
the wallpaper. Some cropping may be needed for images.Gallery

27
3. For Gallery images, touch . For Photos images, touch OK SET
WALLPAPER. For Live wallpapers or Wallpapers, touch Set
wallpaper.
Changing Screen Brightness
1. Touch the Home Key > Menu Key > System settings > Display >
Brightness.
2. Touch to make the phone adjust the screen brightness AUTO
automatically, or adjust the brightness manually.
Protecting Your Phone With Screen Locks
You can protect your phone by creating a screen lock. When enabled,
you need to touch and hold the screen, look at the front camera, draw a
pattern or enter a numeric PIN or password to unlock the phone’s screen
and keys.
1. Touch the .Home Key > Menu Key > System settings > Security
2. Touch .Screen lock
3. Touch . Long press Face Unlock, Pattern PIN Password, , or
u Touch to enable screen lock and allow unlock with a Long press
‘touch and hold’ gesture. You can unlock the screen by touching
and holding any blank area of the screen to unlock it.

28
u Touch to let the phone capture your face. You can Face Unlock
unlock the screen by looking at the front camera. You also need
to set a pattern or PIN in case the phone cannot recognize your
face.
u If you touch , you’re guided to create a pattern you must Pattern
draw to unlock the screen. The rst time you do this, a short
tutorial about creating an unlock pattern appears. Then you’re
prompted to draw and redraw your own pattern.
u If you touch , you’re prompted to set a numeric PIN Password or
PIN or a password you must enter to unlock your screen.
IMPORTANT: Screen lock options are listed in the approximate order of
the strength of their security, starting with , which None Long pressand
provide no security. A pattern provides minimal security, although it can
be more convenient than the stronger options.
Protecting Your Phone With Encryption
You can encrypt all the data on your phone: Google Accounts, application
data, music and other media, downloaded information, and so on. If you
do, you must enter a numeric PIN or password each time you power on
your phone.

29
WARNING! Encryption is irreversible. The only way to revert to an
unencrypted phone is to perform a factory data reset, which erases all
your data.
Encryption provides additional protection in case your phone is stolen,
and may be required or recommended in some organizations. Consult
your system administrator before turning it on. In many cases the PIN or
password you set for encryption is controlled by the system administrator.
Before turning on encryption, prepare as follows:
1. Set a lock screen PIN or password.
2. Charge the battery.
3. Keep the phone connected to the charger.
4. Schedule an hour or more for the encryption process: you must not
interrupt it or you will lose some or all of your data.
When you're ready to turn on encryption:
5. Touch the Home Key > Menu Key > System settings > Security >
Encrypt phone.
6. Read the information about encryption carefully.
The Encrypt phone button is dimmed if your battery's not charged or
your phone's not plugged in.
If you change your mind about encrypting your phone, touch the Back
Key.

30
WARNING! If you interrupt the encryption process, you will lose data.
7. Touch .Encrypt phone
8. Enter your lock screen PIN or password and touch . Next
9. Touch e again.Encrypt phon
The encryption process starts and displays its progress. Encryption can
take an hour or more, during which time your phone may restart several
times.
When encryption is completed, you're prompted to enter your PIN or
password.
Subsequently, you must enter your PIN or password each time you power
on your phone, to decrypt it.

31
Knowing the Basics
Monitoring the Phone Status
The status bar at the top of the home screen provides phone and service
status icons on the right side. Below are some of the icons you may see.
GPRS connected No signal
EDGE connected Signal strength
3G connected Mobile data in use
HSPA connected No micro-SIM card
installed
4G connected Alarm set
Flight mode Ringer off
Vibrate modeBattery dead
Battery low Bluetooth on
/ Battery charging Connected to a Wi-Fi
network
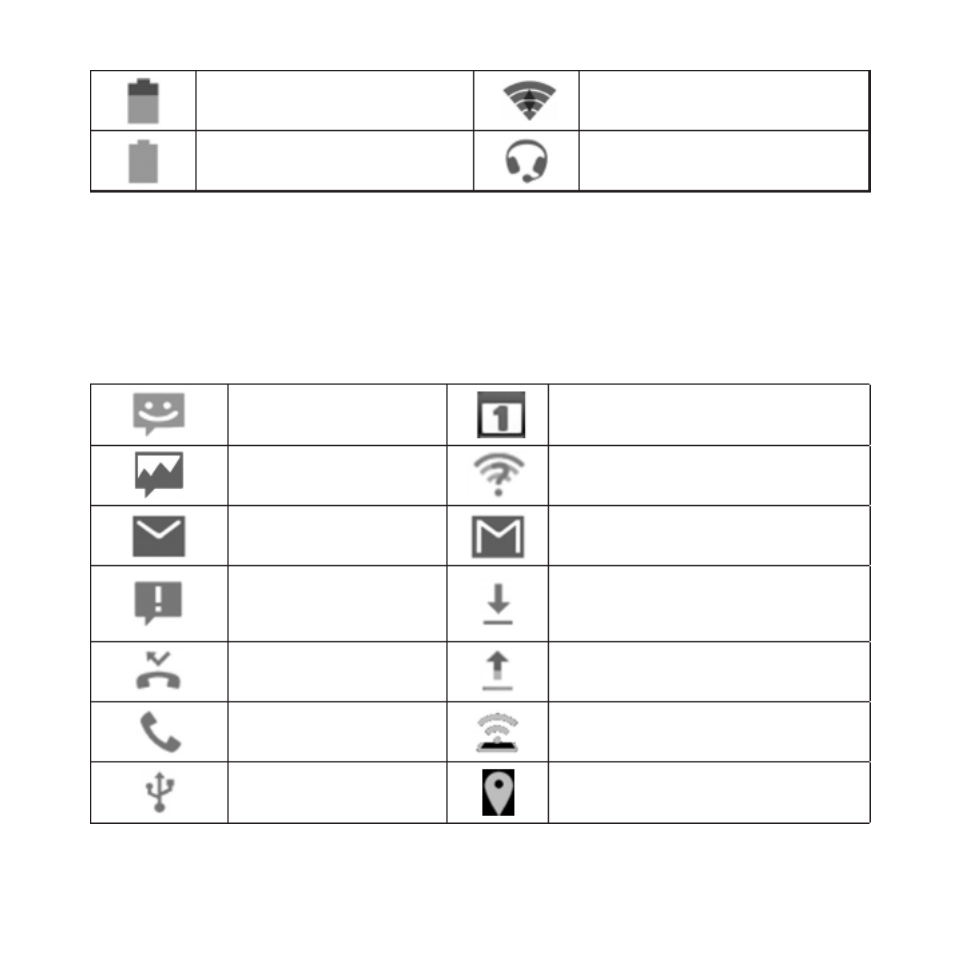
32
Battery partially drained Wi-Fi in use
Wired headset connectedBattery full
Managing Notications
Notication Icons
The status bar at the top of the home screen provides notication icons
on the left. Below are some of the icons you may see.
New SMS Upcoming event
New MMS New Wi-Fi network detected
New Email New Gmail message
Problem with SMS/
MMS delivery
Downloading data
Missed call Sending data
Call in progress Tethering or HotSpot active
USB connected GPS on

34
NOTE: If you turn off notications for an app, you may miss its important
alerts and updates. The notications of some apps cannot be turned off.
Use Quick Settings
The Quick Settings in the notication panel make it convenient to view or
change the most common settings for your phone.
Open the notication panel and touch to nd the following Quick
Settings.
• Touch to view owner’s information.OWNER:
• Touch to turn on or off automatic adjustment of the BRIGHTNESS:
screen brightness.
• Touch to open the Settings menu. See Settings for more SETTINGS:
information.
• Touch to turn on or off the Wi-Fi feature.WI-FI:
• DATA: Touch to turn on or off data access over mobile networks.
• AUTO ROTATE: Touch to turn on or off the Auto-rotate feature.
• Display the current battery status. Touch to open the CHARGED:
Battery menu in Settings.
• Touch to turn on or off the aeroplane mode.AIRPLANE MODE:
• Touch to turn on or off Bluetooth.BLUETOOTH:
• LOCATION: Touch to turn on or off location services.

35
• Touch to switch between vibration and sound.SOUND:
• Touch to turn on or off account synchronization.SYNC:
• MOBILE HOTSPOT: Touch to turn on or off Wi-Fi hotspot.
• FLASHLIGHT: Touch to turn on or off ashlight.
Managing Shortcuts and Widgets
Add Shortcuts and Widgets
1. Touch the .Home Key >
2. Touch to view the available shortcuts and APPS or WIDGETS
widgets.
3. Touch and hold a shortcut or widget and drag it to the Home Screen.
Move Shortcuts or Widgets
1. Touch and hold a shortcut or widget on the Home Screen.
2. Drag it to the place you need.
Remove Shortcuts or Widgets
1. Touch and hold a shortcut or widget on the Home Screen.
2. Drag it to to remove it.

37
Remove Shortcuts From a Folder
1. Touch a folder to open it.
2. Touch and hold the shortcut you want to remove and then drag it to
the Home Screen.
3. Release the shortcut and it will be removed from the folder.
Rearranging the Favorites Tray
The Home Screen includes a customizable favorites tray at the bottom
visible from all Home Screens. You can drag apps, shortcuts, folders, and
other priority items in or out of the favorites tray for instant access from
any Home Screen.
To remove items from the favorites tray:
Touch and hold an item in the favorites tray and drag it out of the tray.
To add items to the favorites tray:
Touch and hold an item on the Home Screen and drag it into the favorites
tray.
If the favorites tray is full, you need to remove an item in the tray.
38
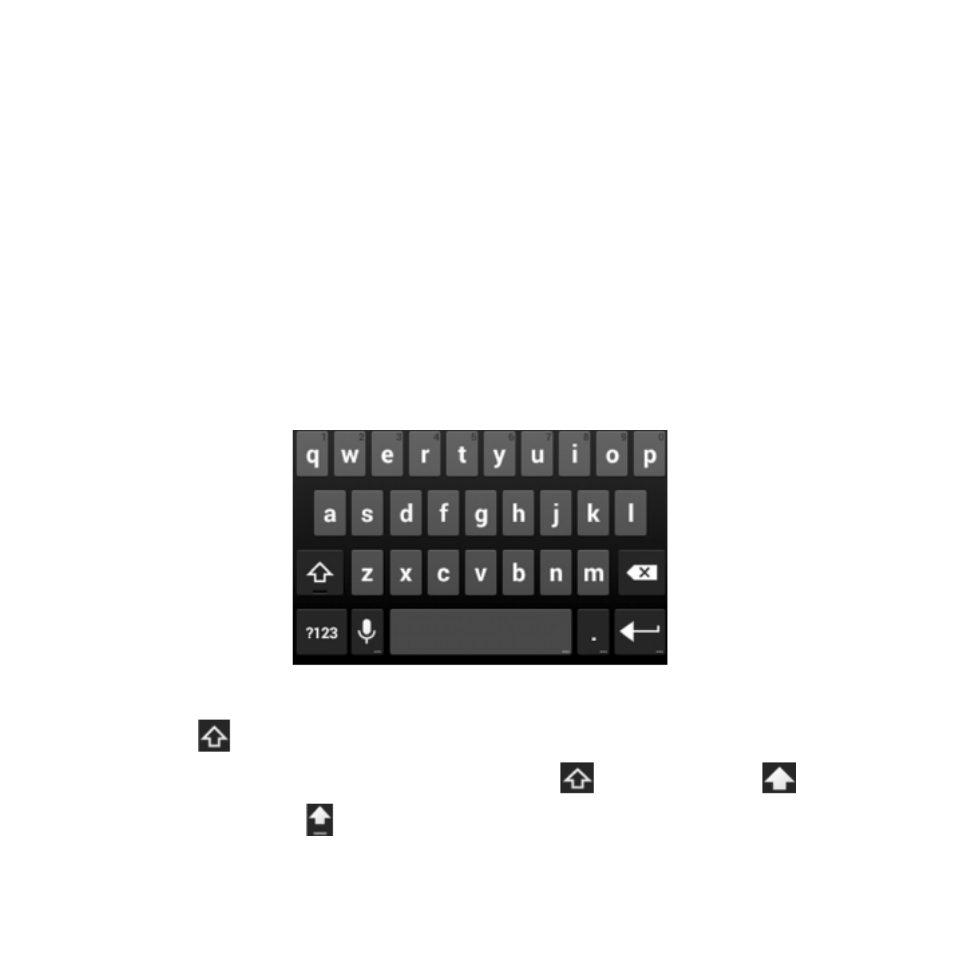
Entering Text
You can enter text using the onscreen keyboard. Some apps open it
automatically. In others, you open it by touching where you want to type.
You can touch the to hide the onscreen keyboard.Back Key
Google Keyboard
The Google Keyboard provides a layout similar to a desktop computer
keyboard. Turn the phone sideways and the keyboard will change from
portrait to landscape. The landscape keyboard is not supported in all
applications.
• Touch the alphabetic keys to enter letters.
• Touch to use uppercase or lowercase. This key also changes to
indicate the current case you are using: for lowercase, for
uppercase, and when locked in uppercase.

39
• Touch to delete the text before the cursor.
• Touch to select numbers and symbols. You can then touch to
nd more.
• Touch to start a new line.
• Touch to use Google voice typing.
• Touch and hold and then release it to change the input languages
or set up the Google keyboard.
Input Settings
Choose input settings by touching the Menu Key > System settings >
Language & input from the Home Screen.
In the KEYBOARD & INPUT METHODS section, you can set the default
input method and choose the settings for input methods.
Editing Text
• Touch where you want to type.Move the insertion point:
The cursor blinks in the new position, and a tab appears below it.
Drag the tab to move the cursor.
• Touch and hold or double-tap within the text. The nearest Select text:
word highlights, with a tab at each end of the selection. Drag the tabs
to change the selection.

40
• Select the text you want to manipulate. Then touch the Cut or copy:
Cut or Copy button to cut or copy the text to the clipboard.
• Select the text you want to Replace text with the clipboard text:
replace. Then touch paste or PASTE.
• Move cursor to the insertion point Insert text from the clipboard:
and then touch and hold the tab below the cursor. Release the nger
and touch PASTE.

41
Opening and Switching apps
Open an App
1. Touch the .Home Key >
2. Slide left or right on the screen and touch an app to open it.
Switch Between Recently Opened Apps
1. Touch and hold the . Menu Key
A list of the names and thumbnails of apps you’ve used recently
opens. If you’ve been using more apps recently than can t on the
screen, you can scroll the list up and down.
2. Touch a thumbnail to open that app.
NOTE: You can swipe a thumbnail sideways to remove it from the list.

42
Connecting to Networks and Devices
Connecting to Mobile Networks
Select Network Operator
1. Touch the Home Key > Menu Key > System settings > Mobile
networks > Network operators.
2. Touch to search for all available networks. Search networks
3. Touch a network in the network list to register manually. You can
also touch Choose automatically to select preferred network
automatically.
Control Mobile Data Use
To enable or disable data access:
1. Touch the Home Key > Menu Key > System settings > Mobile
networks.
2. Check to enable data access over the mobile network. Data enabled
Clear the check box to disable data access.
To get data services when roaming:
1. Touch the Home Key > Menu Key > System settings > Mobile
networks.
2. Check .Data roaming

43
IMPORTANT: Data roaming may incur signicant roaming charges.
Use 2G Network Only to Save Power
1. Touch the Home Key > Menu Key > System settings > Mobile
networks.
2. Check to save battery power.Use only 2G networks
Set Access Point Names
To connect to the Internet you can use the default Access Point Names
(APN). And if you want to add a new APN, please contact the service
provider to get the necessary information.
1. Touch the Home Key > Menu Key > System settings > Mobile
networks > Access Point Names.
2. Touch .
3. Touch each item to enter the information you get from your service
provider.
4. Touch the to complete.Menu Key > Save
TIP: To set the APN to default settings, touch the Menu Key > Reset to
default.

44
Connecting to Wi-Fi®
Wi-Fi is a wireless networking technology that can provide Internet
access at distances of up to 100 meters, depending on the Wi-Fi router
and your surroundings.
Turn Wi-Fi On and Connect to a Wi-Fi Network
1. Touch the .Home Key > Menu Key > System settings > Wi-Fi
2. Slide the switch to the position to turn on Wi-Fi. Wi-Fi ON
3. Touch a network name to connect to it.
4. If the network is secured, enter the password and touch .Connect
NOTE: Your phone automatically connects to previously used Wi-Fi
networks when they are in range.
Get Notied of Open Networks
1. Touch the .Home Key > Menu Key > System settings > Wi-Fi
2. Slide the switch to the position.Wi-Fi ON
3. Touch the Menu Key > Advanced.
4. Check . Network notication
When Wi-Fi is on, you receive notications in the Status bar when your
phone detects an open Wi-Fi network. Uncheck the option to turn off
notications.

45
Add a Wi-Fi Network
You can add a Wi-Fi network if the network does not broadcast its name
(SSID), or to add a Wi-Fi network when you are out of range.
To connect to a secured network, you rst need to get the security details
from the network's administrator.
1. Touch the Home Key > Menu Key > System settings > Wi-Fi.
2. Slide the switch to the position.Wi-Fi ON
3. Touch .+
4. Enter the network SSID (name). If necessary, enter security or other
network conguration details.
5. Touch .Save
Forget a Wi-Fi Network
You can make your phone forget about the details of a Wi-Fi network
that you added - for example, if you don’t want the phone to connect to it
automatically or if it is a network that you no longer use.
1. Touch the Home Key > Menu Key > System settings > Wi-Fi.
2. Slide the switch to the position.Wi-Fi ON
3. Touch the Wi-Fi network name and then touch .Forget

46
Connect to a WPS Network
WPS (Wi-Fi Protected Setup) is a feature that makes it easy to add your
phone to access points which support WPS.
You can use one of the following two methods to connect your phone to a
wireless network using WPS.
Method one: WPS button
1. Touch the Home Key > Menu Key > System settings > Wi-Fi.
2. Slide the switch to the position.Wi-Fi ON
3. Touch .
4. Press the WPS button on the access point and the access point will
recognize your phone and add it to the network.
Method two: PIN number
1. Touch the Home Key > Menu Key > System settings > Wi-Fi.
2. Slide the switch to the position.Wi-Fi ON
3. Touch the .Menu Key > WPS Pin Entry
4. The WPS Pin number displays on the screen. Enter the Pin number
into the access point’s setup page.
After entering the Pin number, your phone automatically nds the access
point and congures the connection.
NOTE: For detailed information about the WPS feature of the access
point, please refer to its user documents.

47
Adjust Advanced Wi-Fi Settings
1. Touch the .Home Key > Menu Key > System settings > Wi-Fi
2. Touch the Menu Key > Advanced to adjust the following settings.
u Network notication: Get notications in the status bar when Wi-
Fi is on and an open network is available.
u Keep Wi-Fi on during sleep: Set whether to keep Wi-Fi on in
sleep mode.
u Scanning always available: Allow Google location services and
other apps to scan for networks even when Wi-Fi is turned off.
u Avoid no Internet connections: Only use Wi-Fi network when it
has Internet connection.
u Wi-Fi frequency band: Set the Wi-Fi frequency band.
u Install certicates: Install certicates needed for connecting to
certain Wi-Fi networks.
u Wi-Fi optimization: Minimize battery usage when Wi-Fi is on.
u MAC address: Check the MAC address.
u IP address: Check the phone’s IP address.

49
3. Touch a device the phone has connected with or wait for it to search
for new devices and touch one of them.
Receive Data via Wi-Fi
When an attempt to transfer data via Wi-Fi is received, you can see a
notication in the status bar. Touch to start receiving the data.Accept
Received les are stored automatically in a dedicated folder (WiFiShare,
for instance). You can access them with the app.File Manager
Connecting to Bluetooth® Devices
Bluetooth® is a short-range wireless communication technology. Phones
or other devices with Bluetooth capabilities can exchange information
wirelessly within a distance of about 10 meters. The Bluetooth devices
must be paired before the communication is performed.
Turn Bluetooth On/Off
1. Touch the .Home Key > Menu Key > System settings > Bluetooth
2. Slide the switch to the position.Bluetooth ON OFF or
When Bluetooth is on, the icon will appear in the status bar.

50
Make Your Phone Visible
In order to work with other phones or devices that have Bluetooth, you
need to make your phone ‘visible’ to them.
1. Touch the .Home Key > Menu Key > System settings > Bluetooth
2. Slide the switch to the position.Bluetooth ON
3. Touch your device name on the top of the screen to make your phone
visible or invisible.
NOTE: Touch the Menu Key > Visibility timeout to set the Bluetooth
visibility timeout of your phone.
Change the Device Name
1. Touch the .Home Key > Menu Key > System settings > Bluetooth
2. Slide the switch to the position if Bluetooth is off. Bluetooth ON
3. Touch the .Menu Key > Rename phone
4. Edit the name and touch .Rename
Pair With Another Bluetooth Device
1. Touch the .Home Key > Menu Key > System settings > Bluetooth
2. Slide the switch to the position if Bluetooth is off.Bluetooth ON
Your phone automatically scans for and displays the IDs of all
available Bluetooth devices in range. You could touch SEARCH FOR
DEVICES if you want to scan again.

52
Receive Data via Bluetooth
1. Turn Bluetooth on before trying to receive data via Bluetooth.
NOTE: If the phone has not been paired with the sending device, you
may need to check your phone’s device name in the Bluetooth menu
in Settings to keep the phone detectable through Bluetooth.
2. When a pop-up box appears, indicating an incoming le via Bluetooth,
touch Accept to start receiving the data.
Depending on your storage setting, received les are stored automatically
in a dedicated folder (Bluetooth, for instance) in the phone storage. You
can access them with the app. Received contacts (vCard File Manager
les) are automatically imported to your contact list.
Connecting to Your Computer via USB
You can connect your phone to a computer with a USB cable and transfer
music, pictures, and other les in both directions. Your phone stores
these les in internal storage or on a removable microSDHC card.
If you are using USB tethering, you must turn that off before you can use
USB to transfer les between your phone and computer.

55
2. Touch the Home Key > Menu Key > System settings > More… >
Tethering & Mobile HotSpot.
3. Check . Your computer is now sharing your phone's USB tethering
data connection.
4. To stop sharing your data connection, uncheck .USB tethering
Share Your Mobile Data Connection as a Wi-Fi Hotspot
You can share your phone’s data connection with other devices by turning
your phone into a portable Wi-Fi hotspot. You must have qualifying
service on your account in order to use the Mobile HotSpot feature.
NOTE: When the portable Wi-Fi hotspot feature is enabled, you cannot
use your phone’s applications to access the Internet via its Wi-Fi
connection. You still remain connected to the Internet via your mobile
data network.
1. Touch the Home Key > Menu Key > System settings > More… >
Tethering & Mobile HotSpot.
2. Check .Mobile HotSpot
After a moment, the phone starts broadcasting its Wi-Fi network
name (SSID).
3. On another device, locate your phone via Wi-Fi and connect with it to
start using the phone’s mobile data.
NOTE: To stop sharing your data connection, uncheck .Mobile HotSpot

58
Modify a VPN
1. Touch the Home Key > Menu Key > System settings > More… >
VPN.
2. Touch and hold the VPN that you want to modify.
3. Touch and edit the VPN settings you want.Edit prole
4. Touch . Save
Delete a VPN
1. Touch the Home Key > Menu Key > System settings > More… >
VPN.
2. Touch and hold the VPN that you want to delete.
3. Touch .Delete prole

71
To congure your phone to receive Internet calls:
By default, your phone is congured to make Internet calls, but not to
ensure that you will receive them. But you can congure your phone to
listen for Internet calls made to an Internet calling account you added to
your phone.
1. Touch the Home Key > > > Settings > Accounts.
2. Check . Checking this setting will reduce Receive incoming calls
your battery life between charges.
Termékspecifikációk
| Márka: | ZTE |
| Kategória: | okostelefon |
| Modell: | Zmax |
Szüksége van segítségre?
Ha segítségre van szüksége ZTE Zmax, tegyen fel kérdést alább, és más felhasználók válaszolnak Önnek
Útmutatók okostelefon ZTE

23 December 2024
9 Október 2024
2 Október 2024
24 Szeptember 2024
19 Szeptember 2024
17 Szeptember 2024
11 Szeptember 2024
8 Szeptember 2024
8 Szeptember 2024
1 Szeptember 2024
Útmutatók okostelefon
- okostelefon Samsung
- okostelefon Sony
- okostelefon Acer
- okostelefon Nedis
- okostelefon LG
- okostelefon Realme
- okostelefon Philips
- okostelefon SilverCrest
- okostelefon Garmin
- okostelefon Panasonic
- okostelefon AEG
- okostelefon Sharp
- okostelefon Nokia
- okostelefon Lenovo
- okostelefon Evolveo
- okostelefon Toshiba
- okostelefon Oppo
- okostelefon Hyundai
- okostelefon Hisense
- okostelefon BenQ
- okostelefon Apple
- okostelefon TP-Link
- okostelefon Medion
- okostelefon MyPhone
- okostelefon Motorola
- okostelefon Geemarc
- okostelefon Alcatel
- okostelefon TCL
- okostelefon Xiaomi
- okostelefon CAT
- okostelefon Dell
- okostelefon Gigaset
- okostelefon Cyrus
- okostelefon Gigabyte
- okostelefon Vivax
- okostelefon Thomson
- okostelefon Intex
- okostelefon Polaroid
- okostelefon Kyocera
- okostelefon Aiwa
- okostelefon Huawei
- okostelefon Microsoft
- okostelefon Asus
- okostelefon Haier
- okostelefon Mitsubishi
- okostelefon Sencor
- okostelefon Telefunken
- okostelefon Nevir
- okostelefon Kodak
- okostelefon Doro
- okostelefon Denver
- okostelefon Bush
- okostelefon TAG Heuer
- okostelefon Trevi
- okostelefon Amazon
- okostelefon NGS
- okostelefon Tesla
- okostelefon Energy Sistem
- okostelefon OK
- okostelefon Google
- okostelefon Honor
- okostelefon SPC
- okostelefon Bea-fon
- okostelefon ESTAR
- okostelefon Vodafone
- okostelefon O2
- okostelefon Hammer
- okostelefon Overmax
- okostelefon OnePlus
- okostelefon Archos
- okostelefon MaxCom
- okostelefon Kogan
- okostelefon Alecto
- okostelefon Honeywell
- okostelefon Prestigio
- okostelefon Media-Tech
- okostelefon Bury
- okostelefon Sony Ericsson
- okostelefon Manta
- okostelefon Blaupunkt
- okostelefon Mio
- okostelefon Facom
- okostelefon Oukitel
- okostelefon Sagem
- okostelefon Razer
- okostelefon Ulefone
- okostelefon Olympia
- okostelefon Tiptel
- okostelefon Sanyo
- okostelefon CRUX
- okostelefon Micromax
- okostelefon NEC
- okostelefon Audioline
- okostelefon CUSTOM
- okostelefon GoClever
- okostelefon Krüger&Matz
- okostelefon Allview
- okostelefon RCA
- okostelefon HTC
- okostelefon Bluebird
- okostelefon Majestic
- okostelefon IGET
- okostelefon Tecdesk
- okostelefon Lava
- okostelefon Cubot
- okostelefon CSL
- okostelefon I.safe Mobile
- okostelefon Fysic
- okostelefon Wiko
- okostelefon Yarvik
- okostelefon Aligator
- okostelefon Amplicomms
- okostelefon AQISTON
- okostelefon Amplicom
- okostelefon Ecom
- okostelefon Lexibook
- okostelefon Trekstor
- okostelefon Vestel
- okostelefon Sonim
- okostelefon Blu
- okostelefon Easypix
- okostelefon Konrow
- okostelefon Brigmton
- okostelefon Sunstech
- okostelefon Aspera
- okostelefon Swissvoice
- okostelefon Sunny
- okostelefon Nordmende
- okostelefon Binatone
- okostelefon Blackberry
- okostelefon KPN
- okostelefon Vivo
- okostelefon Wolder
- okostelefon NGM
- okostelefon Profoon
- okostelefon Switel
- okostelefon InFocus
- okostelefon GreatCall
- okostelefon XD
- okostelefon Pantech
- okostelefon Alba
- okostelefon RugGear
- okostelefon Umidigi
- okostelefon Intermec
- okostelefon AT&T
- okostelefon Mpman
- okostelefon Kazam
- okostelefon Logicom
- okostelefon Karbonn
- okostelefon Palm
- okostelefon Emporia
- okostelefon Hannspree
- okostelefon Phicomm
- okostelefon Crosscall
- okostelefon Plum
- okostelefon Lumigon
- okostelefon Infinix
- okostelefon Keneksi
- okostelefon Klipad
- okostelefon T-Mobile
- okostelefon JCB
- okostelefon Casper
- okostelefon Unnecto
- okostelefon Wileyfox
- okostelefon ITT
- okostelefon Yota
- okostelefon Avus
- okostelefon Spice
- okostelefon M3 Mobile
- okostelefon Wolfgang
- okostelefon BQ
- okostelefon ORA
- okostelefon Danew
- okostelefon Echo
- okostelefon Primux
- okostelefon UTStarcom
- okostelefon Zipy
- okostelefon Mediacom
- okostelefon Beafon
- okostelefon BGH
- okostelefon Billow
- okostelefon Telstra
- okostelefon ToughGear
- okostelefon Benefon
- okostelefon Komu
- okostelefon Doogee
- okostelefon Energizer
- okostelefon Tremay
- okostelefon Kurio
- okostelefon Piranha
- okostelefon Coolpad
- okostelefon Mobistel
- okostelefon Itel
- okostelefon Garmin-Asus
- okostelefon Handheld
- okostelefon Fero
- okostelefon AT Telecom
- okostelefon General Mobile
- okostelefon Mustang
- okostelefon Syco
- okostelefon Pharos
- okostelefon Storex
- okostelefon Fairphone
- okostelefon Xtreamer
- okostelefon Freeman
- okostelefon HomTom
- okostelefon Auro
- okostelefon Maxx
- okostelefon ITTM
- okostelefon Posh Mobile
- okostelefon THL
- okostelefon NGM-Mobile
- okostelefon Nothing
- okostelefon Lark
- okostelefon NUU Mobile
- okostelefon Senifone
- okostelefon Tecno
- okostelefon Telme
- okostelefon UMi
- okostelefon Olitech
- okostelefon Mobiola
- okostelefon Meizu
- okostelefon Neffos
- okostelefon Gionee
- okostelefon TIM
- okostelefon Leotec
- okostelefon Leagoo
- okostelefon NTech
- okostelefon Nubia
- okostelefon LeEco
- okostelefon GSmart
- okostelefon Saiet
- okostelefon POCO
- okostelefon Verykool
- okostelefon Aplic
- okostelefon HMD
- okostelefon Opis
- okostelefon Volla
Legújabb útmutatók okostelefon

10 Április 2025
2 Április 2025

30 Március 2025

16 Január 2025
16 Január 2025

15 Január 2025
14 Január 2025
13 Január 2025
12 Január 2025
12 Január 2025