Használati útmutató Whirlpool WRFA32SMHZ
Whirlpool
hűtőszekrény
WRFA32SMHZ
Olvassa el alább 📖 a magyar nyelvű használati útmutatót Whirlpool WRFA32SMHZ (75 oldal) a hűtőszekrény kategóriában. Ezt az útmutatót 2 ember találta hasznosnak és 2 felhasználó értékelte átlagosan 4.5 csillagra
Oldal 1/75

W10597601D
THANK YOU for purchasing this high-quality product. Register your new refrigerator at www.whirlpool.com. In Canada, register your
refrigerator at www.whirlpool.ca.
For future reference, please make a note of your product model and serial numbers. These can be located on the inside wall of the
refrigerator compartment.
Model Number Serial Number ___________________________ _____________________________
REFRIGERATOR USER INSTRUCTIONS
Para obtener acceso a “Instrucciones para el usuario del refrigerador” en español, o para obtener información adicional acerca de
su producto, visite: www.whirlpool.com.
Necesitará su número de modelo y de serie, ubicado en el interior del compartimiento del refrigerador.
REFRIGERATOR USER INSTRUCTIONS
REFRIGERATOR SAFETY .............................................................. 2
INSTALLATION INSTRUCTIONS ................................................... 3
Unpack the Refrigerator ............................................................... 3
Location Requirements ................................................................4
Electrical Requirements ...............................................................4
Water Supply Requirements ........................................................4
Connect the Water Supply ...........................................................5
Refrigerator Door(s) and Drawer ..................................................6
Door Closing and Door Alignment .............................................12
REFRIGERATOR USE ..................................................................12
Opening and Closing Doors .......................................................12
Using the Controls .....................................................................13
Ice Maker ....................................................................................14
Water Dispenser .........................................................................15
Water Filtration System ..............................................................15
REFRIGERATOR CARE ...............................................................15
Cleaning 15 .....................................................................................
Changing the Light Bulb ............................................................16
Vacation and Moving Care .........................................................16
TROUBLESHOOTING 17 ..................................................................
Refrigerator Operation ...............................................................17
Temperature and Moisture .........................................................18
Ice and Water .............................................................................18
PERFORMANCE DATA SHEETS .................................................20
WARRANTY 23 ..................................................................................
Table of Contents
SÉCURITÉ DU RÉFRIGÉRATEUR...............................................24
INSTRUCTIONS D’INSTALLATION .............................................26
Déballage du réfrigérateur..........................................................26
Exigences d’emplacement .........................................................27
Spécications électriques ..........................................................27
Spécications de l’alimentation en eau .....................................28
Raccordement à la canalisation d’eau ......................................28
Porte et tiroir du réfrigérateur .....................................................30
Fermeture et alignement de la porte ..........................................36
UTILISATION DU RÉFRIGÉRATEUR ..........................................36
Ouverture et fermeture des portes .............................................36
Utilisation des commandes .......................................................37
Machine à glaçons .....................................................................38
Distributeur d’eau .......................................................................39
Système de ltration d’eau ........................................................39
ENTRETIEN DU RÉFRIGÉRATEUR ............................................40
Nettoyage 40 ...................................................................................
Remplacer l’ampoule d’éclairage ..............................................40
Précautions à prendre pour
lesvacances ou le déménagement ...........................................41
DÉPANNAGE 42 .................................................................................
Fonctionnement du réfrigérateur ...............................................42
Température et humidité ............................................................43
Glaçons et eau ...........................................................................43
FEUILLES DE DONNÉES SUR LA PERFORMANCE ................45
GARANTIE .....................................................................................47
Tables des Matières
Índice
SEGURIDAD DEL REFRIGERADOR ...........................................50
INSTRUCCIONES DE INSTALACIÓN .........................................52
Desembale el refrigerador ..........................................................52
Requisitos de ubicación .............................................................53
Requisitos eléctricos ..................................................................53
Requisitos de suministro de agua .............................................53
Conexión del suministro de agua ..............................................54
Puerta(s) y cajón del refrigerador ...............................................55
Cierre y alineamiento de las puertas..........................................62
USO DE SU REFRIGERADOR .....................................................62
Cómo abrir y cerrar las puertas .................................................62
Uso de los controles ..................................................................63
Fábrica de hielo ..........................................................................64
Despachador de agua ................................................................65
Sistema de ltración de agua ....................................................65
CUIDADO DEL REFRIGERADOR ...............................................66
Limpieza 66 .....................................................................................
Cómo cambiar el foco ................................................................66
Cuidado durante las vacaciones ylasmudanzas .....................67
SOLUCIÓN DE PROBLEMAS......................................................68
Funcionamiento del refrigerador ................................................68
Temperatura y humedad ............................................................69
Hielo y agua ................................................................................69
HOJAS DE DATOS DEL PRODUCTO .........................................71
GARANTÍA.....................................................................................74

2
You can be killed or seriously injured if you don't immediately
You can be killed or seriously injured if you don't follow
All safety messages will tell you what the potential hazard is, tell you how to reduce the chance of injury, and tell you what can
happen if the instructions are not followed.
Your safety and the safety of others are very important.
We have provided many important safety messages in this manual and on your appliance. Always read and obey all safety
messages.
This is the safety alert symbol.
This symbol alerts you to potential hazards that can kill or hurt you and others.
All safety messages will follow the safety alert symbol and either the word “DANGER” or “WARNING.”
These words mean:
follow instructions.
instructions.
DANGER
WARNING
REFRIGERATOR SAFETY
State of California Proposition 65 Warnings:
WARNING: This product contains one or more chemicals known to the State of California to cause cancer.
WARNING: This product contains one or more chemicals known to the State of California to cause birth defects or other
reproductive harm.
IMPORTANT SAFETY INSTRUCTIONS
WARN G:IN To ce redu the fire, elerisk of ctric shock, or injur whey n using your refrig ater or, follo these c w basi precautions:
SAVE THESE INSTRUCTIONS
■ Plug o ed .into a gr und (earthed) outlet
■ Do not remove gr ong.ound pr
■ Do not use an adapter.
■ Do not use an extension cord.
■ Disc seo nnect power before rvicing.
■ Replace all nels parts and pa before operating.
■ Remove doors omfr eratyour old refrig or.
■ Use nonflammable cleaner.
■ Do not store or use petrol, flammable liquids or gas in the
vicinity of this or other electrical appliances. The fumes can
cause fires or explosions.
■ Do not store explosive substances such as aerosol cans
with a flammable propellant in this refrigerator.
■ Do not use or place electrical devices inside the refrigerator
compartments if they are not of the type expressly
authorized by the manufacture.
■ Use two or more people to move and install frre igerator.
■ Dis nect wecon po r before in listal ng i r (on ice maker ce make
kit ready models only).
■ A qualified service technician must install the water line and
ice maker. See installation instruction supplied with
ice maker kit IC13B for complete details.
■ Connect to a potable water supply only.
■ Use a sturdy glass when dispens ic n ing e (o some models).
■ This appliance is not intended for use by persons (including
children) with reduced physical, sensory or mental
capabilities, or lack of experience and knowledge, unless
they have been given supervision or instruction concerning
use of the appliance by a person responsible for their safety.
■ Children should be supervised to ensure that they do not
play with the appliance.
■ To avoid the risk of children becoming trapped and
suffocating, do not allow them to play or hide inside the
refrigerator.
■ If the power supply cord is damaged, it must be replaced by
the manufacturer or its service agent or a similarly qualified
person.

3
Proper Disposal of Your Old Refrigerator
WARNING
Suffocation Hazard
Remove doors from your old refrigerator.
Failure to do so can result in death or
brain damage.
IMPORTANT: Child entrapment and suffocation are not problems
of the past. Junked or abandoned refrigerators are still dangerous
– even if they will sit for “just a few days.” If you are getting rid of
your old refrigerator, please follow these instructions to help
prevent accidents.
Before You Throw Away Your Old Refrigerator or Freezer:
Take off the doors.
Leave the shelves in place so that children may not easily
climb inside.
INSTALLATION INSTRUCTIONS
Unpack the Refrigerator
Remove the Packaging
Remove tape and glue residue from surfaces before turning
on the refrigerator. Rub a small amount of liquid dish soap
over the adhesive with your ngers. Wipe with warm water
and dry.
Do not use sharp instruments, rubbing alcohol, ammable
uids, or abrasive cleaners to remove tape or glue. These
products can damage the surface of your refrigerator. For
more information, see “Refrigerator Safety.”
Dispose of/recycle all packaging materials.
Clean Before Using
After you remove all of the package materials, clean the inside of
your refrigerator before using it. See the cleaning instructions in
“Refrigerator Care.”
Important information to know about disposal of
refrigerants:
Dispose of refrigerator in accordance with Federal and Local
regulations Refrigerants must be acuated a licensed, . ev by
EPA certified refrigerant technician in accordance with
established procedures.
WARNING
Excessive Weight Hazard
Use two or more people to move and install
refrigerator.
Failure to do so can result in back or other injury.
When Moving Your Refrigerator:
Your refrigerator is heavy. When moving the refrigerator for
cleaning or service, be sure to cover the oor with
cardboard or hardboard to avoid oor damage. Always pull
the refrigerator straight out when moving it. Do not wiggle or
“walk” the refrigerator when trying to move it, as oor
damage could occur.
Important information to know about glass shelves and
covers:
Do not clean glass shelves or covers with warm water when
they are cold. Shelves and covers may break if exposed to
sudden temperature changes or impact, such as bumping.
Tempered glass is designed to shatter into many small,
pebble-sized pieces. This is normal. Glass shelves and
covers are heavy. Use both hands when removing them to
avoid dropping.

4
Location Requirements
IMPORTANT: This refrigerator is designed for indoor, household
use only.
This appliance is intended to be used in household and similar
applications such as:
Staff kitchen areas in shops, ofces and other working
environments.
Farm houses and by clients in hotels, motels and other
residential type environments.
Bed and breakfast type environments.
Catering and similar non-retail applications.
To ensure proper ventilation for your refrigerator, allow for ¹⁄ " 2
(1.25 cm) of space on each side and at the top. Allow for 1"
(2.54 cm) of space behind the refrigerator. If your refrigerator has
an ice maker, allow extra space at the back for the water line
connections. When installing your refrigerator next to a xed wall,
leave 2 ¹⁄ " (6.3 cm) minimum on the hinge side (some models 2
require more) to allow for the door to swing open.
NOTE: This refrigerator is intended for use in a location where
the temperature ranges from a minimum of 55°F (13°C) to a
maximum of 110°F (43°C). The preferred room temperature
range for optimum performance, which reduces electricity usage
and provides superior cooling, is between 60°F (15°C) and 90°F
(32°C). It is recommended that you do not install the refrigerator
near a heat source, such as an oven or radiator.
2 " (6.3 cm)¹⁄2
¹⁄2 " (1.25 cm)
Electrical Requirements
Before you move your refrigerator into its nal location, it is
important to make sure you have the proper electrical
connection.
If the supply cord is damaged, it must be replaced by the
manufacturer or its service agent or a similarly qualied person.
Do not use a cord that shows cracks or abrasion damage along
its length or at either the plug or connector end.
Recommended Grounding Method
A 115 Volt, 60 Hz, AC only 15 or 20 A fused, grounded electrical
supply is required. It is recommended that a separate circuit
serving only your refrigerator be provided. Use an outlet that
cannot be turned off by a switch. Do not use an extension cord.
NOTE: Before performing any type of installation, cleaning, or
removing a light bulb, turn the refrigerator to OFF. Depending
on your model, either turn the freezer control to the word OFF,
or press the Minus sign touch pads repeatedly until a dash (–)
appears in both the Freezer and Refrigerator displays as shown.
Disconnect the refrigerator from the electrical source. When you
are nished, reconnect the refrigerator to the electrical source
and reset the temperature controls to the desired setting. See
“Using the Controls.”
Water Supply Requirements
Gather the required tools and parts before starting installation. Read
and follow the instructions provided with any tools listed here.
TOOLS NEEDED:
Flat-blade screwdriver ¹⁄ " Nut driver4
7⁄ " and ¹⁄ " Open-end or two 16
adjustable wrenches
¹⁄ " Drill bit4
Cordless drill
IMPORTANT:
Connect to a potable water supply only.
WARNING
Explosion Hazard
Keep flammable materials and vapors, such as
gasoline, away from refrigerator.
Failure to do so can result in death, explosion, or fire.
Electrical Shock Hazard
Plug into a grounded 3 prong outlet.
Do not remove ground prong.
Do not use an adapter.
Do not use an extension cord.
Failure to follow these instructions can result in death,
fire, or electrical shock.
WARNING
Do not use with water that is microbiologically unsafe or
of unknown quality without adequate disinfection before
or after the system. Systems certified for cyst reduction
may be used on disinfected waters that may contain
filterable cysts.

5
All installations must meet local plumbing code requirements.
Do not use a piercing-type or ³⁄ " (4.76 mm) saddle valve 16
which reduces water ow and clogs more easily.
Use copper tubing and check for leaks. Install copper tubing
only in areas where the household temperatures will remain
above freezing.
For models with water lters, the disposable water lter
should be replaced at least every 6 months.
Water Pressure
A cold water supply with water pressure of between 35 and 120
psi (241 and 827 kPa) is required to operate the water dispenser
and ice maker. If you have questions about your water pressure,
call a licensed, qualied plumber.
Reverse Osmosis Water Supply
IMPORTANT: The pressure of the water supply coming out
of a reverse osmosis system going to the water inlet valve
of the refrigerator needs to be between 35 and 120 psi (241
and 827 kPa).
If a reverse osmosis water ltration system is connected to your
cold water supply, the water pressure to the reverse osmosis
system needs to be a minimum of 40 to 60 psi (276 to 414 kPa).
If the water pressure to the reverse osmosis system is less than
40 to 60 psi (276 to 414 kPa):
Check to see whether the sediment lter in the reverse
osmosis system is blocked. Replace the lter if necessary.
Allow the storage tank on the reverse osmosis system to rell
after heavy usage.
If your refrigerator has a water lter, it may further reduce
the water pressure when used in conjunction with a reverse
osmosis system. Remove the water lter. See “Water
Filtration System.”
If you have questions about your water pressure, call a licensed,
qualied plumber.
Connect the Water Supply
Read all directions before you begin.
IMPORTANT:
Plumbing shall be installed in accordance with the
International Plumbing Code and any local codes and
ordinances.
The gray water tubing on the back of the refrigerator (which
is used to connect to the household water line) is a PEX
(cross-linked polyethylene) tube. Copper and PEX tubing
connections from the household water line to the refrigerator
are acceptable, and will help avoid off-taste or odor in your
ice or water. Check for leaks.
If PEX tubing is used instead of copper, we recommend the
following part numbers:
W10505928RP (7 ft [2.14 m] jacketed PEX),
8212547RP (5 ft [1.52 m] PEX), or
W10267701RP (25 ft [7.62 m] PEX).
Install tubing only in areas where temperatures will remain
above freezing.
If you turn on the refrigerator before the water line is
connected, turn off the ice maker to avoid excessive noise or
damage to the water valve.
Connect to Water Line
1. Unplug refrigerator or disconnect power.
2. Turn OFF main water supply. Turn ON nearest faucet long
enough to clear line of water.
3. Find a ¹⁄ " to 1¹⁄ " (12.7 mm to 31.8 mm) vertical cold water 2 4
pipe near the refrigerator.
IMPORTANT:
Make sure it is a cold water pipe.
Horizontal pipe will work, but the following procedure
must be followed: Drill on the top side of the pipe, not the
bottom. This will help keep water away from the drill. This
also keeps normal sediment from collecting in the valve.
4. Determine the length of copper tubing you need. Measure
from the connection on the lower right rear of the refrigerator
to the water pipe. Add 7 ft (2.1 m) to allow for cleaning. Use
¹⁄ " (6.35 mm) O.D. (outside diameter) copper tubing. Be sure 4
both ends of copper tubing are cut square.
5. Using a cordless drill, drill a ¹⁄ " hole in the cold water pipe 4
you have selected.
F
G
A
B
C
D
E
6. Fasten the shutoff valve to the cold water pipe with the pipe
clamp. Be sure the outlet end is solidly in the ¹⁄ " drilled hole 4
in the water pipe and that the washer is under the pipe clamp.
Tighten the packing nut. Tighten the pipe clamp screws
slowly and evenly so the washer makes a watertight seal. Do
not overtighten.
7. Slip the compression sleeve and compression nut on the
copper tubing as shown. Insert the end of the tubing into the
outlet end squarely as far as it will go. Screw compression nut
onto outlet end with adjustable wrench. Do not overtighten or
you may crush the copper tubing.
8. Place the free end of the tubing in a container or sink, and
turn ON the main water supply. Flush the tubing until water is
clear. Turn OFF the shutoff valve on the water pipe.
A. Cold water pipe
B. Pipe clamp
C. Copper tubing
D. Compression nut
E. Compression sleeve
F. Shutoff valve
G. Packing nut

6
Connect to Refrigerator
Depending on your model, the water line may come down from
the top or up from the bottom. Follow the connection instructions
for your model.
Style 1
1. Remove plastic cap from water valve inlet port. Attach the
copper tube to the valve inlet using a compression nut
and sleeve as shown. Tighten the compression nut. Do not
overtighten. Conrm copper tubing is secure by pulling on
copper tubing.
2. Create a service loop with the copper tubing. Avoid kinks
when coiling the copper tubing. Secure copper tubing to
refrigerator cabinet with a “P” clamp.
B
A
C
D
3. Turn on water supply to refrigerator and check for leaks.
Correct any leaks.
Style 2
1. Create a service loop (minimum diameter of 2 ft [61 cm])
with the copper tubing. Avoid kinks when coiling the copper
tubing.
2. Remove the plastic cap from water valve inlet port. Place a
compression nut and sleeve on the copper tubing.
3. Insert the end of the copper tubing into the water valve inlet
port. Shape tubing slightly so that the tubing feeds straight
into the port to avoid kinks.
4. Slide the compression nut over the sleeve and screw into the
water valve inlet port.
B
A
C
D
5. Using an adjustable wrench, hold the nut on the plastic water
line to keep it from moving. Then, with a second wrench turn
the compression nut on the copper tubing counterclockwise
to completely tighten. Do not overtighten.
B
C
D
A
6. Check connection by pulling on copper tubing. Attach the
plastic water line to the refrigerator cabinet with a “P” clamp.
7. Turn on water supply to the refrigerator and check for leaks.
Correct any leaks.
Complete the Installation
Electrical Shock Hazard
Plug into a grounded 3 prong outlet.
Do not remove ground prong.
Do not use an adapter.
Do not use an extension cord.
Failure to follow these instructions can result in death,
fire, or electrical shock.
WARNING
1. Plug into a grounded 3 prong outlet.
NOTE: Allow 24 hours to produce the rst batch of ice.
Discard the rst three batches of ice produced. Allow 3 days to
completely ll the ice storage bin.
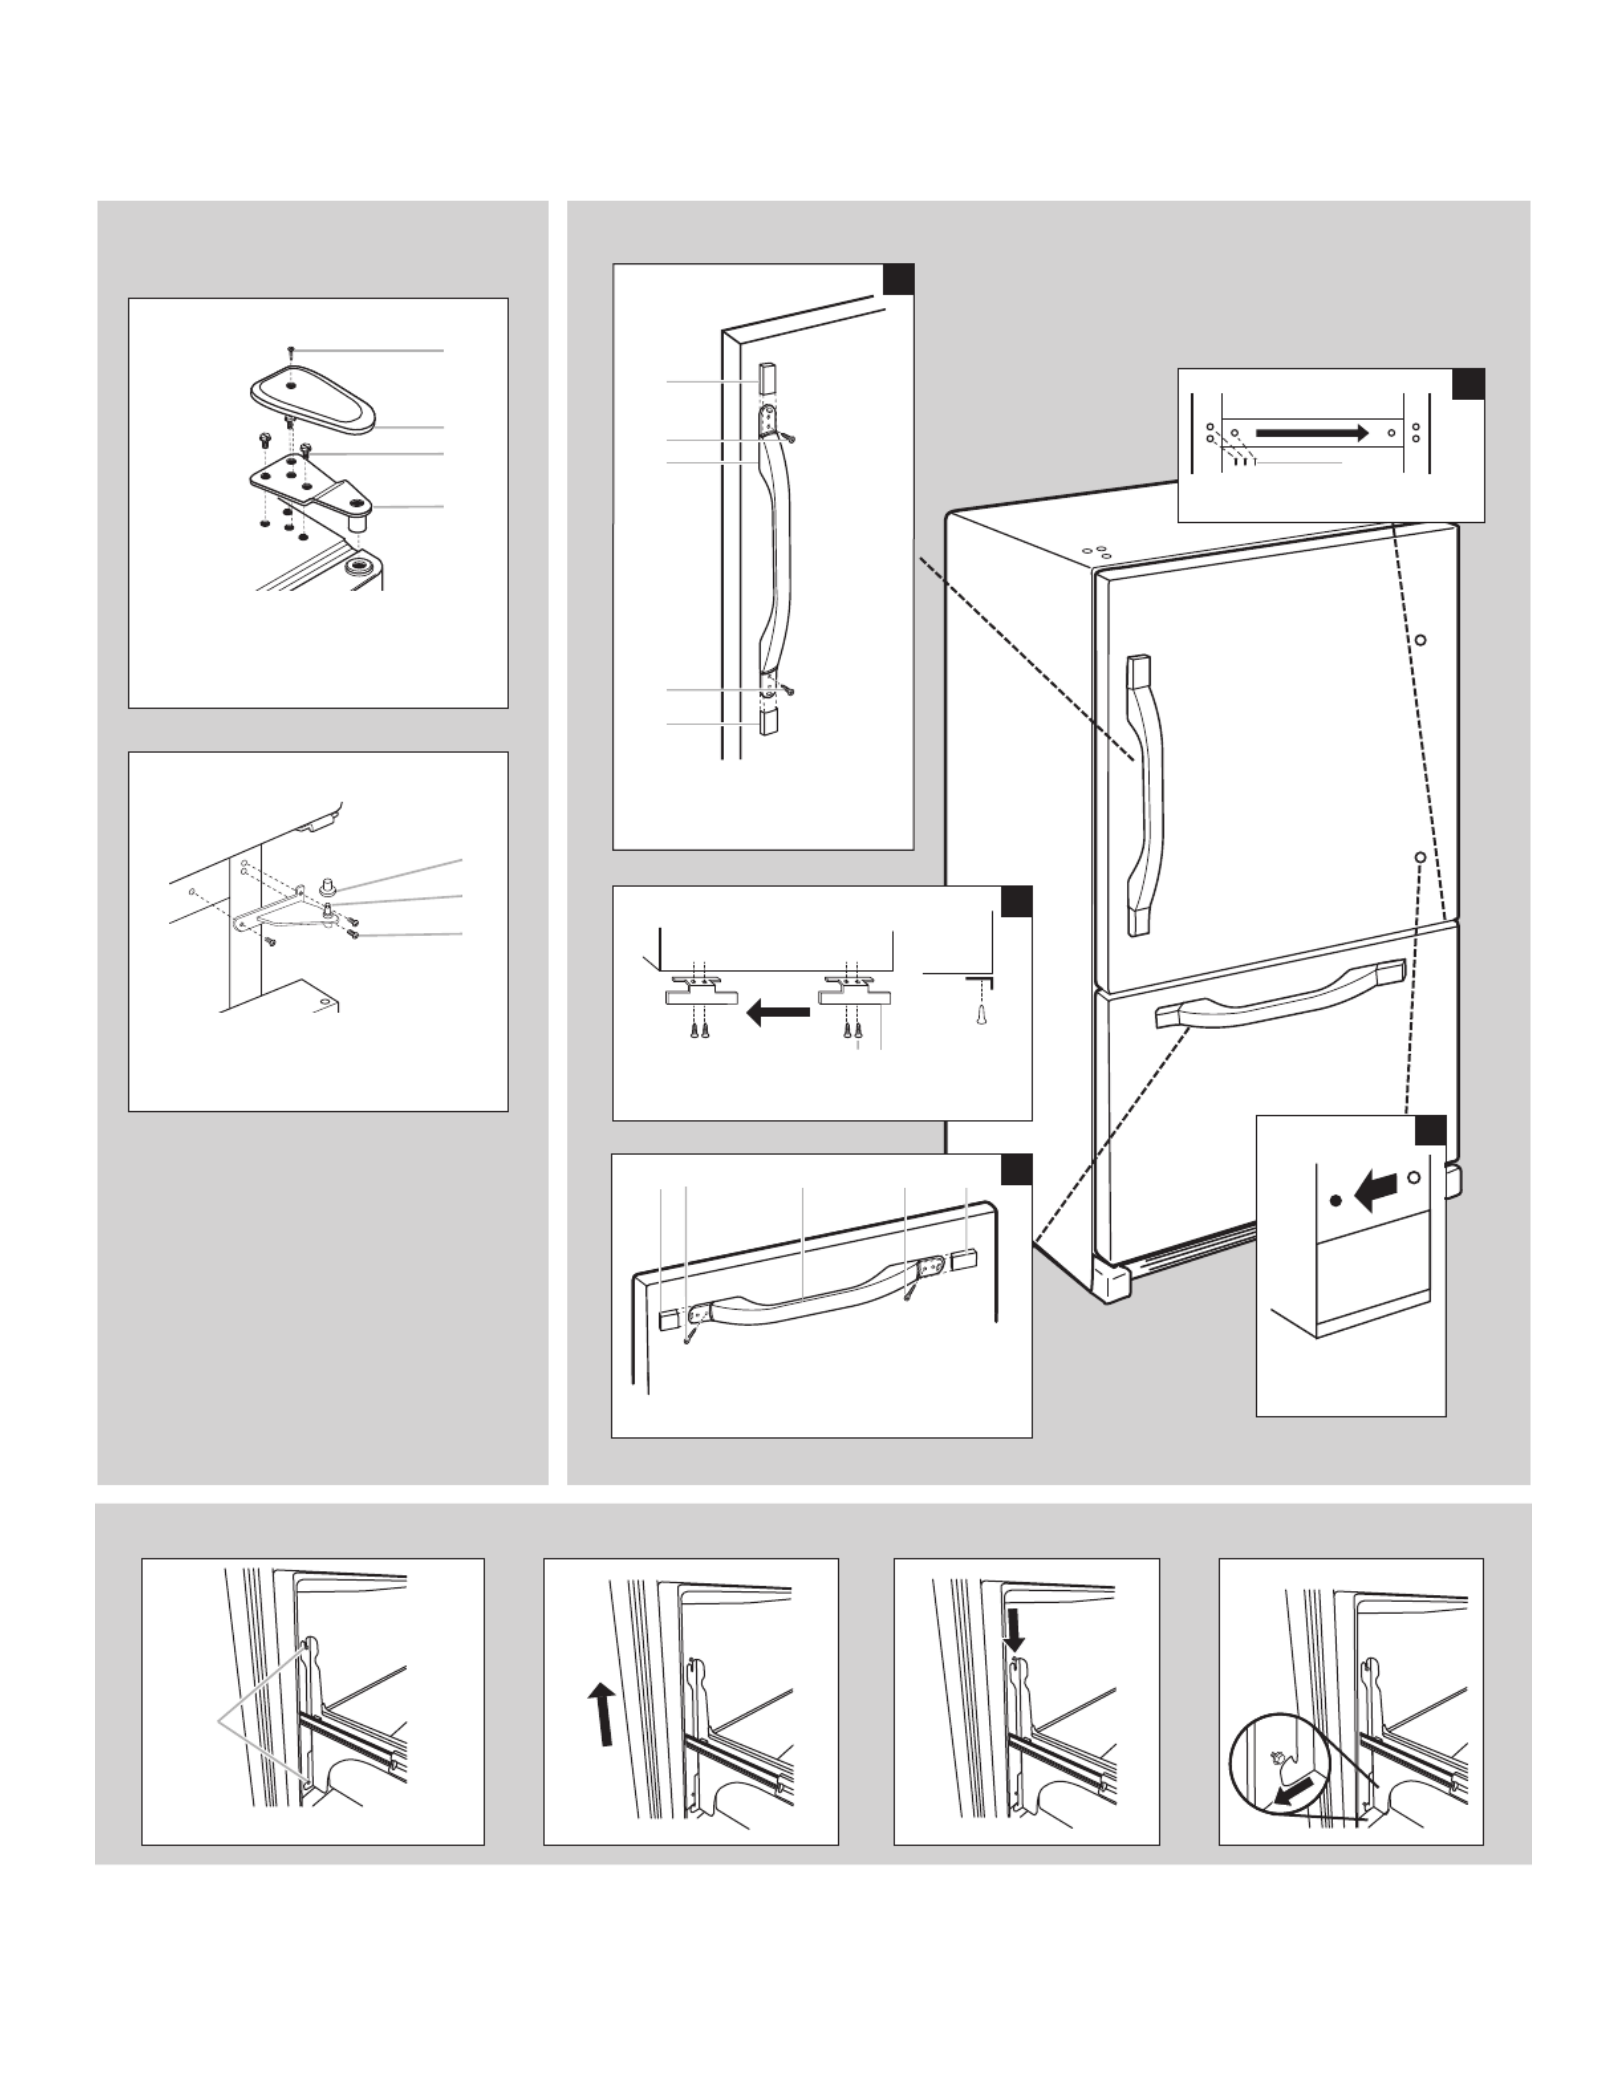
Refrigerator Door(s) and Drawer
TOOLS NEEDED: 5⁄ ", 16 3⁄ ", ¹⁄ " hex head socket wrenches, a8 4
#2 Phillips screwdriver, and a at-blade screwdriver.
IMPORTANT:
Your refrigerator has a standard reversible refrigerator door
with either a freezer door or freezer drawer, or French doors.
Follow the instructions specic to the door style of your
model.
All graphics referenced in the following instructions are
included later in this section after “Final Steps.” The graphics
shown for the standard door are for a right-hand swing
refrigerator (hinges factory installed on the right).
If you only want to remove and replace the doors see
“Remove Doors and Hinges” and “Replace Doors and
Hinges.”
A. Copper tubing
B. “P” clamp
C. Compression nut
D. Compression sleeve
A. Plastic water tubing
B. Sleeve
C. Compression nut
D. Copper tubing
A. “P” clamp
B. Plastic water line
C. Compression nut
D. Copper tubing

7
Before you begin, turn the refrigerator control OFF, and
remove food and adjustable door or utility bins from the
doors. Replace and Remove Handles.
Replace and Remove Handles
Standard Door
To replace the handle, align the handle on the door or drawer
as shown. Using a Phillips screwdriver, attach the handle with
the handle screws.
To replace the handle trim pieces, using your hand, apply
rm pressure on the face of the trim and slide the trim piece
toward the center of the handle.
To remove handles, reverse directions.
French Doors
To remove the handle, use a ³⁄ " hex key to loosen the two 32
setscrews located on the side of each handle. Pull the handle
straight out from the door or drawer. Make sure you keep the
screws for reattaching the handles. See Handle graphics 1
and 2.
To replace the handles, reverse the directions.
Remove Doors and Hinges
Standard Door
Freezer drawer models
1. Unplug refrigerator or disconnect power.
2. Keep the refrigerator door closed until you are ready to lift it
free from the cabinet.
NOTE: Provide additional support for the door while the
hinges are being moved. Do not depend on the door gasket
magnets to hold the door in place while you are working.
3. Remove the parts for the top hinge as shown in Top Hinge
graphic. Lift the refrigerator door free from the cabinet.
4. Remove the parts for the bottom hinge as shown in Bottom
Hinge graphic.
Freezer door models
1. Unplug refrigerator or disconnect power.
2. Keep the freezer door closed until you are ready to lift it free
from the cabinet.
NOTE: Provide additional support for the door while the
hinges are being moved. Do not depend on the door gasket
magnets to hold the door in place while you are working.
3. Remove the parts for the top hinge as shown in Top Hinge
graphic. Lift the refrigerator door free from the cabinet.
4. Remove the center hinge pin and remove the hinge screws as
shown in the Center Hinge graphic. Lift the freezer door free
from the cabinet.
5. Remove the base grille by grasping the grille rmly with both
hands and pulling it toward you.
6. Remove the parts for the bottom hinge as shown in Bottom
Hinge graphic.
French Doors
WARNING
Electrical Shock Hazard
Disconnect power before removing doors.
Failure to do so can result in death or electrical shock.
1. Unplug refrigerator or disconnect power.
2. Keep the refrigerator doors closed until you are ready to lift
them free from the cabinet.
NOTE: Provide additional support for the refrigerator door
while the hinges are being removed. Do not depend on the
door gasket magnets to hold the door in place while you are
working.
3. Starting with the right-hand side door, remove the parts
for the top hinge as shown in Top Hinge graphic. Lift the
refrigerator door from the bottom hinge pin.
4. Remove the hinge pin cover from the bottom hinge pin and
keep it for later use. See Bottom Hinge graphic.
5. Before removing the left-hand side door, disconnect the
wiring plug located on top of the top hinge by wedging a
atblade screwdriver or your ngernail between the two
sections. See Wiring Plug graphic.
NOTE: The green, ground wire remains attached to the hinge.
6. Remove the parts for the left-hand side door top hinge as
shown in the Top Hinge graphic. Lift the door from the bottom
hinge pin.
NOTE: Remove the hinge pin cover from the bottom hinge
pin and keep it for later use. See Bottom Hinge graphic.
Reverse Door - Standard Door (optional)
IMPORTANT: If you want to reverse your door so it opens from
the opposite side, follow these steps. If you are not reversing the
door, see “Replace Door(s) and Hinges.”
Cabinet
1. Remove hinge screws from handle side and move them to
opposite side. See Graphic 1.
Refrigerator door
1. Remove the refrigerator handle assembly as shown in
Graphic 2. Keep all parts together.
2. Remove door handle seal screw front. Move to opposite side
of refrigerator door as shown in Graphic 5.
3. Remove the door stop. Move it to the opposite side of the
refrigerator door as shown in Graphic 3.
4. Attach refrigerator handle on opposite side of the refrigerator
door with the two screws as shown in Graphic 2. Replace
handle trim, as shown.
Hex Head Top Hinge Screw
Door Stop Screw Door Handle Seal Screw Front
Flat-Head Handle Screw Cabinet Hinge Hole Plug

8
5. Tighten all screws. Set aside the door until hinges and freezer
compartment drawer are in place.
Freezer door
1. Remove the freezer handle assembly as shown in Graphic 4.
Keep all parts together.
2. Remove door stop. Move to opposite side of freezer door as
shown in Graphic 3.
3. Attach handle to opposite side of freezer door.
4. Tighten all screws. Set the door aside.
5. Remove the base grille by grasping the grille rmly with both
hands and pulling it toward you.
NOTE: Place a shim under the bottom front edge of the
refrigerator cabinet to take the weight off the roller brackets.
6. Remove the screws from both roller brackets. See Graphic 6.
7. Remove the hinge plate located behind the roller bracket
and move it to the opposite side of the refrigerator. Move the
hinge pin and shim to the outside hole on the hinge plate. See
Graphic 6.
Replace Doors and Hinges
Standard Door
NOTE: Graphics may be reversed if door swing is reversed.
Freezer drawer models
1. Replace the parts for the bottom hinge as shown. Tighten
screws.
NOTE: Provide additional support for the door while the
hinges are being moved. Do not depend on the door gasket
magnets to hold the door in place while you are working.
2. Assemble the parts for the top hinge as shown in Top Hinge
graphic. Do not tighten screws completely.
3. Adjust the door so that the bottom of the refrigerator door is
aligned with the top of the freezer drawer. Tighten all screws.
Freezer door models
1. Make sure the hinge plate is securely fastened behind the
roller bracket and that the hinge pin is inserted into the
outside hole. Fully tighten all roller bracket screws. See
Graphic 6.
2. Remove the shim that you placed under the front edge of the
refrigerator cabinet. Replace the freezer door.
NOTE: Provide additional support for the door while the
hinges are being moved. Do not depend on the door gasket
magnets to hold the door in place while you are working.
3. Assemble the parts for the center hinge as shown in the
Center Hinge graphic, and tighten all the screws. Replace the
refrigerator door.
4. Assemble the parts for the top hinge as shown in the Top
Hinge graphic. Do not tighten the screws completely.
5. Adjust the doors so that the bottom of the refrigerator door is
aligned with the top of the freezer door. Tighten all screws.
French Doors
1. Assemble the parts for the top hinges as shown in Top Hinge
graphic. Do not tighten the screws completely.
2. Replace the parts for the bottom hinges as shown in Bottom
Hinge graphic. Tighten screws. Replace the refrigerator
doors.
NOTE: Provide additional support for the refrigerator doors
while the hinges are being moved. Do not depend on the
door gasket magnets to hold the doors in place while you are
working.
3. Align each door so that the bottom of the refrigerator door
aligns evenly with the top of the freezer drawer. Tighten all
screws.
4. Reconnect the wiring plug on top of the left-hand side
refrigerator door.
5. Replace the top hinge covers.
Remove and Replace Freezer Drawer
IMPORTANT:
Two people may be required to remove and replace the
freezer drawer.
All graphics are included later in this section after “Final
Steps.”
Remove Drawer Front
1. Open the freezer drawer to full extension.
2. Loosen the four screws attaching the drawer glides to the
drawer front. See Drawer Front Removal graphic.
NOTE: Loosen screws three to four turns. Keep the screws in
the drawer front.
3. Lift drawer front upward and off the screws. See Drawer Front
Removal graphic.
Replace Drawer Front
1. Slide the drawer glides out of the freezer compartment. Insert
the screws in the top of the drawer front into the slots in the
drawer brackets. See Drawer Front Replacement graphic.
2. Pull the drawer brackets toward you to insert the two screws
in the bottom of the drawer front into the brackets. See
Drawer Front Replacement graphic.
3. Completely tighten the four screws.
Final Steps
1. Check all holes to make sure that hole plugs and screws are
in place. Reinstall top hinge cover as shown in Top Hinge
graphic.
2. Replace the base grille.
Electrical Shock Hazard
Plug into a grounded 3 prong outlet.
Do not remove ground prong.
Do not use an adapter.
Do not use an extension cord.
Failure to follow these instructions can result in death,
fire, or electrical shock.
WARNING
3. Plug into a grounded 3 prong outlet.
4. Return all removable door parts to door and food to
refrigerator

9
Standard Door - Freezer Door
A
B
C
D
E
B
A
C
D
A
B
C
3
AB
1
1
A
5
4
2
A
B
C
A
A
C
6
A
B
C
D
E
A. Hinge Cover Screw
B. Top Hinge Cover
C. 5/ " Hex-Head Hinge Screws16
D. Top Hinge
A. Hinge Pin Cover
B. Center Hinge
C. Hinge Screws
A. Hinge Pin Shim
B. Bottom Hinge
C. Hinge Plate
D. Roller Bracket
E. ³⁄ " Hex-Head Hinge Screws8
A. Handle Trim
B. Refrigerator Door Handle
C. Flat-Head Handle Screws
A. Door Stop Screws
B. Door Stop
A. Flat-Head Handle
Screws
Door Handle
Seal Screw
Front
A. Hinge Pin Shim
B. Bottom Hinge
C. Hinge Plate
D. Roller Bracket
E. ³⁄ " Hex-Head Hinge Screws8
Front View Side View
Top Hinge
Center Hinge
Bottom Hinge
Door Swing Reversal (optional)Door Removal &
Replacement
A. 5⁄ " Hex-Head Hinge Screw16
10
Standard Door - Freezer Drawer
3
A B
A
1
A
5
2
C
B
A
A
B
B
A
C
D
A
B
C
4
C B AA B
A
A. Hinge Cover Screw
B. Top Hinge Cover
C. 5/ " Hex-Head Hinge Screws16
D. Top Hinge
Top Hinge
Door Removal &
Replacement
A. Hinge Pin Cover
B. Bottom Hinge
C. Hinge Screws
Bottom Hinge
Door Swing Reversal (optional)
A. Handle Trim
B. Flat-Head Handle Screws
C. Refrigerator Door Handle
A. Door Stop Screws
B. Door Stop
Front View Side View
A. Handle Trim
B. Flat-Head Handle Screws
C. Freezer Drawer Handle
Door Handle
Seal Screw
Front
Drawer Front Removal Drawer Front Replacement
A. Loosen 4 Door Bracket Screws
A. Hinge Screws

11
French Doors
A
1
B
A
C
D
A
B
C
A
A
2
Door Removal and Replacement
Top Hinge
Wiring Plug
Bottom Hinge
A. 3⁄ " or 32 1⁄ " Setscrew8
A. 3⁄ " or 32 1⁄ " Setscrew8
Drawer Front Removal Drawer Front Replacement
A. Hinge Cover Screw
B. Top Hinge Cover
C. 5/16" Hex-Head Hinge Screws
D. Top Hinge
A. Hinge Pin Cover
B. Bottom Hinge
C. Hinge Screws
A. Loosen 4 Door Bracket Screws
WARNING
Electrical Shock Hazard
Disconnect power before removing doors.
Failure to do so can result in death or electrical shock.

13
Using the Controls
The control center is located at the top front of the refrigerator
compartment.
Temperature Controls
For your convenience, your temperature controls are preset at
the factory. When you rst install your refrigerator, make sure the
controls are still set to the recommended set points as shown.
Recommended Settings
IMPORTANT:
The recommended settings should be correct for normal
household refrigerator use. The controls are set correctly
when milk or juice is as cold as you like and when ice cream
is rm.
When the power is on, the temperature display shows the set
point temperature of the compartment.
Wait 24 hours for your refrigerator to cool completely before
adding food. If you add food before the refrigerator has
cooled completely, your food may spoil.
NOTE: Adjusting the refrigerator and freezer temperature
controls to a colder than recommended setting will not cool
the compartments any faster.
If the temperature is too warm or too cold in the refrigerator
or freezer, rst check the air vents to be sure they are not
blocked before adjusting the controls.
To Turn Your Refrigerator Off/On:
Press the freezer (+) touch pad repeatedly until “OFF”
appears in the freezer display. Allow a few seconds for the
refrigerator to shut off. Neither compartment will cool.
Press either the refrigerator or freezer (-) touch pad to turn on
the refrigerator.
Adjusting Controls
The REFRIGERATOR control adjusts the refrigerator
compartment temperature. The FREEZER control adjusts the
freezer compartment temperature.
If you need to adjust the temperature in either the refrigerator
or freezer compartment, use the settings listed in the chart as a
guide.
To Adjust Set Point Temperatures:
The rst touch of the (+) or (-) touch pad displays the current
temperature set point.
Press the (+) or (-) touch pads until the desired temperature
set point is displayed.
NOTE: Except when rst turning on the refrigerator, do not
adjust either temperature control more than one setting at a time.
Wait 24 hours between adjustments for the temperature to
stabilize.
CONDITION/REASON: ADJUSTMENT:
REFRIGERATOR too warm REFRIGERATOR Control
1° lower
FREEZER too warm/too little ice Adjust FREEZER Control
1° lower
REFRIGERATOR too cold Adjust REFRIGERATOR
Control 1° higher
FREEZER too cold Adjust FREEZER Control
1° higher
Additional Control Center Features
Max Ice
The Max Ice feature assists with temporary periods of heavy ice
use by increasing ice production.
Press the Max Ice feature touch pad to set the freezer to the
lowest temperature setting. Press the Max Ice feature touch
pad again to return to the normal freezer set point.
NOTE: The Max Ice feature will automatically shut off in
approximately 24 hours.
Humidity Control
The Humidity Control feature turns on a heater to help reduce
moisture on the door hinge seal. Use in humid environments
or when you notice moisture on the door hinge seal. The
refrigerator uses more energy when Humidity Control is on.
Press Humidity Control when the environment is warm and
more humid, or if you notice moisture on the door hinge seal.
The indicator light will be lit when humidity control is ON.
Press Humidity Control to save energy when the environment
is less humid.
Temp Alarm
The Temp Alarm feature provides temperature information in the
event of a power outage.
Power outage: During a power outage, if the temperatures
in the refrigerator and freezer compartments exceed normal
operating temperatures, the highest temperature reached will be
displayed.

14
Press the Temp Alarm touch pad until the indicator light is
lit, to turn on this feature. Press and hold Temp Alarm for
3 seconds until the indicator light goes off to turn off this
feature.
Temperature alarm: An alarm will sound repeatedly if the
freezer or refrigerator compartment temperatures exceed normal
operating temperatures for an hour or more.
The temperature displays will alternately show the current
temperatures and the highest temperatures the compartments
reached.
Press the Temp Alarm touch pad once to stop the audible
alarm and alternating temperature displays. The Temp Alarm
light will continue to ash until the refrigerator returns to the
set temperature.
Door Alarm
The Door Alarm feature sounds a chime every few seconds
when the refrigerator door has been left open for 5 continuous
minutes.
The chime will sound until the door is closed or Door Alarm is
turned off.
Press the Door Alarm touch pad to turn this feature on or off.
The indicator light will be lit when the Door Alarm feature is
on.
Max Cool
The Max Cool feature assists with periods of high refrigerator
use, full grocery loads, or temporarily warm room temperatures.
Press Max Cool to set the freezer and refrigerator to the
lowest temperature settings. Press Max Cool again to return
to the normal refrigerator set point.
NOTE: The Max Cool feature will automatically shut off in
approximately 12 hours.
Filter Reset
The Filter Reset control allows you to restart the water lter
status tracking feature each time you replace your water lter.
See
“Water Filtration System.”
Press and hold the Filter Reset touch pad for 3 seconds, until
the Order or Replace light turns off.
User Preferences
The control center allows you to set user preferences, if desired.
Temperature Display (F_C)
This preference allows you to change the temperature display.
F - Temperature in degrees Fahrenheit
C - Temperature in degrees Celsius
Alarm (AL)
This preference allows you to turn off the sound of all alarms.
ON - You will hear the alarm sound.
OFF - You will not hear the alarm sound.
To Access the User Preferences Menu:
1. Press and hold the Door Alarm touch pad for 3 seconds. The
preference name will appear in the Freezer display and the
preference status (F or C) or (ON or OFF) will appear in the
Refrigerator display.
2. Use the Freezer (+) or (-) touch pads to scroll through the
preference names. When the desired preference name is
displayed, press the Refrigerator (+) or (-) touch pads to
change the preference status.
3. Set your preferences by pressing and holding the Door Alarm
touch pad for 3 seconds, or by shutting the refrigerator
compartment door.
Ice Maker
IMPORTANT: Flush the water system before turning on the ice
maker. See “Water Dispenser.”
Turning the Ice Maker On/Off
To turn the ice maker ON, simply lower the wire shutoff arm.
To manually turn the ice maker OFF, lift the wire shutoff arm to
the OFF (arm up) position and listen for the click.
NOTE: Your ice maker has an automatic shutoff. As ice is made,
the ice cubes will ll the ice storage bin and the ice cubes will
raise the wire shutoff arm to the OFF (arm up) position. Do not
force the wire shutoff arm up or down.
NOTE: Turn off the ice maker before removing the ice storage
bin to serve ice or to clean the bin. This will keep the ice
cubes from dropping out of the ice maker and into the freezer
compartment. After replacing the ice storage bin, turn on the ice
maker.
Ice Production Rate
The ice maker should produce a complete batch of ice
approximately every 3 hours.
To increase ice production, lower the freezer and refrigerator
temperature. See “Using the Controls.” Wait 24 hours
between adjustments.
Remember
Allow 24 hours to produce the rst batch of ice. Allow 3 days
to completely ll the ice storage bin. Discard the rst three
batches of ice produced.
The quality of your ice will be only as good as the quality
of the water supplied to your ice maker. Avoid connecting
the ice maker to a softened water supply. Water softener
chemicals (such as salt) can damage parts of the ice
maker and lead to poor quality ice. If a softened water
supply cannot be avoided, make sure the water softener is
operating properly and is well maintained.

15
Do not store anything on top of the ice maker or in the ice
storage bin.
Water Dispenser
IMPORTANT:
After connecting the refrigerator to a water source or
replacing the water lter, ush the water system. Use a
sturdy container to depress and hold the water dispenser
lever for 5 seconds, then release it for 5 seconds. Repeat
until water begins to ow. Once water begins to ow,
continue depressing and releasing the dispenser lever (5
seconds on, 5 seconds off) until a total of 4 gal. (15 L) has
been dispensed. This will ush air from the lter and water
dispensing system, and prepare the water lter for use.
Additional ushing may be required in some households. As
air is cleared from the system, water may spurt out of the
dispenser.
NOTE: After 5 minutes of continuous dispensing, the
dispenser will stop dispensing water to avoid ooding. To
continue dispensing, press the dispenser button again.
Allow 24 hours for the refrigerator to cool down and chill
water. Dispense enough water every week to maintain a fresh
supply.
Dispensing Water
1. Hold a container under the dispenser while pressing the
button.
2. Release the button to stop dispensing.
Water Filtration System
The water lter is located in the upper right-hand corner of the
refrigerator compartment.
IMPORTANT: The disposable water lter should be replaced at
least every 6 months. If the water ow to the water dispenser or
ice maker decreases noticeably before 6 months have passed,
replace the water lter more often.
Replacing the Water Filter
To purchase replacement water lters, model UKF8001AXX-750
or model UKF8001AXX-200, contact your dealer or call
1-800-253-1301 1-800-807-6777 U.S.A. or Canada.
IMPORTANT: Air trapped in the water system may cause water
and lter to eject. Always dispense water for at least 2 minutes
before removing the lter or blue bypass cap.
1. Turn lter counterclockwise to remove.
2. Remove sealing label from replacement lter and insert the
lter end into the lter head.
3. Turn the lter clockwise until it stops. Snap the lter cover
closed.
4. Flush the water system. See “Water and Ice Dispenser(s).”
NOTE: The dispenser feature may be used without a water lter
installed. Your water will not be ltered. If this option is chosen,
replace the lter with the blue bypass cap.
REFRIGERATOR CARE
Cleaning
Both the refrigerator and freezer sections defrost automatically.
However, clean both sections about once a month to avoid
buildup of odors. Wipe up spills immediately.
IMPORTANT:
Because air circulates between both sections, any odors
formed in one section will transfer to the other. You must
thoroughly clean both sections to eliminate odors. To avoid
odor transfer and drying out of food, wrap or cover foods
tightly.
For stainless steel models, stainless steel is corrosion-
resistant and not corrosion-proof. To help avoid corrosion of
your stainless steel, keep your surfaces clean by using the
following cleaning instructions.
To Clean Your Refrigerator:
NOTE: Do not use abrasive or harsh cleaners such as window
sprays, scouring cleansers, ammable uids, muriatic acid,
cleaning waxes, concentrated detergents, bleaches or cleansers
containing petroleum products on exterior surfaces (doors and
cabinet), plastic parts, interior and door liners or gaskets. Do not
use paper towels, scouring pads, or other harsh cleaning tools.
1. Unplug refrigerator or disconnect power.
2. Hand wash, rinse, and dry removable parts and interior
surfaces thoroughly. Use a clean sponge or soft cloth and a
mild detergent in warm water.
Do not use with water that is microbiologically unsafe or
of unknown quality without adequate disinfection before
or after the system. Systems certified for cyst reduction
may be used on disinfected waters that may contain
filterable cysts.
WARNING
Explosion Hazard
Use non-ammable cleaner.
Failure to do so can result in death, explosion, or re.

16
3. Clean the exterior surfaces.
Painted metal: Wash painted metal exteriors with a clean,
soft cloth or sponge and a mild detergent in warm water.
Rinse surfaces with clean, warm water and dry immediately
to avoid water spots.
Stainless steel: Wash stainless steel surfaces with a clean,
soft cloth or sponge and a mild detergent in warm water.
Rinse surfaces with clean, warm water and dry immediately
to avoid water spots.
NOTE: When cleaning stainless steel, always wipe in the
direction of the grain to avoid cross-grain scratching.
4. There is no need for routine condenser cleaning in normal
home operating environments. If the environment is
particularly greasy or dusty, or there is signicant pet trafc
in the home, the condenser should be cleaned every 2 to 3
months to ensure maximum efciency.
If you need to clean the condenser:
Remove the base grille.
Use a vacuum cleaner with a soft brush to clean the grille, the
open areas behind the grille and the front surface area of the
condenser.
Replace the base grille when nished.
5. Plug in refrigerator or reconnect power.
Changing the Light Bulb
IMPORTANT: The light bulbs in both the refrigerator and
freezer compartments of your new refrigerator use LED bulbs,
incandescent bulb or a combination of the two. If the lights do
not illuminate when the refrigerator and/or freezer door is opened,
call for assistance or service. See “Warranty” for phone numbers.
1. Unplug the refrigerator or disconnect power.
2. Remove the light shield (on some models).
Top of the refrigerator compartment - Slide the light shield
toward the back of the compartment to release it from the
light assembly.
3. Replace the burned-out bulb(s) with a bulb of the same size,
shape and wattage.
To replace the burned-out LED bulb with an LED bulb,
order Part Number W10565137 (3.6 watts).
NOTE: Some LED replacement bulbs are not recommended
for wet/damp environments. The refrigerator and freezer
compartments are considered to be wet/damp environments.
If using a brand of LED bulb other than the recommended
LED bulb, before installation, read and follow all instructions
on the LED packaging.
When replacing an incandescent bulb, use only
incandescent bulbs for household appliances with a
maximum of 40 watts. Replace bulb sheild/shroud after
replacing incandescent bulb.
4. Replace the light shield.
5. Plug in refrigerator or reconnect power.
Vacation and Moving Care
Vacations
If You Choose to Leave the Refrigerator On While
You’re
Away:
1. Use up any perishables and freeze other items.
2. If your refrigerator has an automatic ice maker, and is
connected to the household water supply, turn off the water
supply to the refrigerator. Property damage can occur if the
water supply is not turned off.
3. If you have an automatic ice maker, turn off the ice maker.
NOTE: Depending on your model, raise the wire shutoff arm
to OFF (arm up) position, or press the switch to OFF.
4. Empty the ice bin.
Models with Vacation Mode Feature
Turn on Vacation mode. See “Using the Controls.”
NOTE: Activating Vacation mode does not turn off the ice
maker.
If You Choose to Turn Off the Refrigerator Before
You Leave:
1. Remove all food from the refrigerator.
2. If your refrigerator has an automatic ice maker:
Turn off the water supply to the ice maker at least one day
ahead of time.
When the last load of ice drops, raise the wire shutoff
arm to the OFF (up) position or press the switch to OFF,
depending on your model.
3. Empty the ice bin.
4. Turn off the Temperature control(s). See “Using the
Control(s).”
5. Clean refrigerator, wipe it, and dry well.
6. Tape rubber or wood blocks to the tops of both doors to prop
them open far enough for air to get in. This stops odor and
mold from building up.
Moving
When you are moving your refrigerator to a new home, follow
these steps to prepare it for the move.
1. If your refrigerator has an automatic ice maker:
Turn off the water supply to the ice maker at least one day
ahead of time.
Disconnect the water line from the back of the refrigerator.
When the last load of ice drops, raise the wire shutoff
arm to the OFF (up) position or press the switch to OFF,
depending on your model.
2. Remove all food from the refrigerator and pack all frozen food
in dry ice.
3. Empty the ice bin.
4. Turn off the Temperature control(s). See “Using the
Control(s).”
5. Unplug refrigerator.
6. Clean, wipe, and dry thoroughly.

17
7. Take out all removable parts, wrap them well, and tape them
together so they don’t shift and rattle during the move.
8. Depending on the model, raise the front of the refrigerator so
it rolls more easily OR raise the leveling screws so they don’t
scrape the oor. See “Adjust the Door(s)” or “Door Closing
and Door Alignment.”
9. Tape the doors closed and tape the power cord to the back of
the refrigerator.
When you get to your new home, put everything back and refer to
the “Installation Instructions” section for preparation instructions.
Also, if your refrigerator has an automatic ice maker, remember to
reconnect the water supply to the refrigerator.
TROUBLESHOOTING
First try the solutions suggested here. If you need further assistance or more recommendations that may help you avoid a service call,
refer to the warranty page in this manual and scan the code with your mobile device, or visit www.whirlpool.com/product_help.
In Canada, visit www.whirlpool.ca.
Contact us by mail with any questions or concerns at the address below:
In the U.S.A.:
Whirlpool Brand Home Appliances
Customer eXperience Center
553 Benson Road
Benton Harbor, MI 49022-2692
Please include a daytime phone number in your correspondence.
Refrigerator Operation
The refrigerator will not operate
■Power cord unplugged? Plug into a grounded 3 prong
outlet.
■Is outlet working? Plug in a lamp to see if the outlet is
working.
■Household fuse blown or circuit breaker tripped? Replace
the fuse or reset the circuit breaker. If the problem continues,
call an electrician.
■Are controls on? Make sure the refrigerator controls are on.
See “Using the Control(s).”
■New installation? Allow 24 hours following installation for the
refrigerator to cool completely.
NOTE: Adjusting the temperature controls to coldest setting
will not cool either compartment more quickly.
In Canada:
Whirlpool Brand Home Appliances
Customer eXperience Centre
200 – 6750 Century Ave.
Mississauga, Ontario L5N 0B7
The motor seems to run too much
Your new refrigerator may run longer than your old one due to
its high-efciency compressor and fans. The unit may run even
longer if the room is warm, a large food load is added, doors are
opened often, or if the doors have been left open.
The refrigerator seems noisy
Refrigerator noise has been reduced over the years. Due to
this reduction, you may hear intermittent noises from your new
refrigerator that you did not notice from your old model. Below
are listed some normal sounds with explanations.
■Buzzing - heard when the water valve opens to ll the ice
maker
■Pulsating - fans/compressor adjusting to optimize
performance
■Hissing/Rattling - ow of refrigerant, movement of water
lines, or from items placed on top of the refrigerator
■Sizzling/Gurgling - water dripping on the heater during
defrost cycle
■Popping - contraction/expansion of inside walls,
especially during initial cool-down
■Water running - may be heard when ice melts during the
defrost cycle and water runs into the drain pan
■Creaking/Cracking - occurs as ice is being ejected from
the ice maker mold.
The doors will not close completely
■Door blocked open? Move food packages away from
door.
■Bin or shelf in the way? Push bin or shelf back in the
correct position.
Electrical Shock Hazard
Plug into a grounded 3 prong outlet.
Do not remove ground prong.
Do not use an adapter.
Do not use an extension cord.
Failure to follow these instructions can result in death,
fire, or electrical shock.
WARNING

18
The doors are difcult to open
■ Gaskets dirty or sticky? Clean gaskets and contact surfaces
with mild soap and warm water. Rinse and dry with soft cloth.
Temperature and Moisture
Temperature is too warm
■ New installation? Allow 24 hours following installation for the
refrigerator to cool completely.
■ Door(s) opened often or left open? Allows warm air to enter
refrigerator. Minimize door openings and keep doors fully
closed.
■ Large load of food added? Allow several hours for
refrigerator to return to normal temperature.
■ Controls set correctly for the surrounding conditions?
Adjust the controls a setting colder. Check temperature in 24
hours. See “Using the Control(s).”
There is interior moisture buildup
NOTE: Some moisture buildup is normal.
■ Humid room? Contributes to moisture buildup.
■ Door(s) opened often or left open? Allows humid air to
enter refrigerator. Minimize door openings and keep doors
fully closed.
Ice and Water
The ice maker is not producing ice or not enough ice
■ Refrigerator connected to a water supply and the supply
shutoff valve turned on? Connect refrigerator to water
supply and turn water shutoff valve fully open.
■ Kink in the water source line? A kink in the line can reduce
water ow. Straighten the water source line.
■ Ice maker turned on? Make sure wire shutoff arm or switch
(depending on model) is in the ON position.
■ New installation? Wait 24 hours after ice maker installation
for ice production to begin. Wait 72 hours for full ice
production.
■ Freezer door closed completely? Firmly close the freezer
compartment door. If the freezer compartment door will not
close all the way, see “The doors will not close completely,”
earlier in this section.
■ Large amount of ice recently removed? Allow 24 hours for
ice maker to produce more ice.
■ Ice cube jammed in the ice maker ejector arm?
Remove ice from the ejector arm with a plastic utensil.
■ Water lter installed on the refrigerator? Remove lter and
operate ice maker. If ice volume improves, then the lter may
be clogged or incorrectly installed. Replace lter or reinstall it
correctly.
■ Reverse osmosis water ltration system connected to
your cold water supply? This can decrease water pressure.
See “Water Supply Requirements.”
The ice cubes are hollow or small
NOTE: This is an indication of low water pressure.
■ Water shutoff valve not fully open? Turn the water shutoff
valve fully open.
■ Kink in the water source line? A kink in the line can reduce
water ow. Straighten the water source line.
■ Water lter installed on the refrigerator? Remove lter and
operate ice maker. If ice quality improves, then the lter may
be clogged or incorrectly installed. Replace lter or reinstall it
correctly.
■ Reverse osmosis water ltration system connected to
your cold water supply? This can decrease water pressure.
See “Water Supply Requirements.”
■ Questions remain regarding water pressure? Call a
licensed, qualied plumber.
Off-taste, odor or gray color in the ice
■ New plumbing connections? New plumbing connections
can cause discolored or off-avored ice.
■ Ice stored too long? Discard ice. Wash ice bin. Allow 24
hours for ice maker to make new ice.
■ Odor transfer from food? Use airtight, moisture proof
packaging to store food.
■ Are there minerals (such as sulfur) in the water? A water
lter may need to be installed to remove the minerals.
■ Water lter installed on the refrigerator? Gray or dark
discoloration in ice indicates that the water ltration system
needs additional ushing. Flush the water system before
using a new water lter. Replace water lter when indicated.
See “Water Filtration System.”
The water dispenser will not operate properly
■ Refrigerator connected to a water supply and the supply
shutoff valve turned on? Connect refrigerator to water
supply and turn water shutoff valve fully open.
■ Kink in the water source line? Straighten the water source
line.
■ New installation? Flush and ll the water system. See “Water
Dispenser.”
■ Is the water pressure at least 35 psi (241 kPa)? The water
pressure to the home determines the ow from the dispenser.
See “Water Supply Requirements.”
■ Water lter installed on the refrigerator? Remove lter and
operate dispenser. If water ow increases, the lter may be
clogged or incorrectly installed. Replace lter or reinstall it
correctly.
■ Refrigerator door closed completely? Close the door rmly.
If it does not close completely, see “The doors will not close
completely,” earlier in this section.
WARNING
Explosion Hazard
Use non-ammable cleaner.
Failure to do so can result in death, explosion, or re.

19
■ Recently removed the doors? Make sure the water
dispenser wire/tube assembly has been properly
reconnected. See “Refrigerator Door(s) and Drawer.”
■ Reverse osmosis water ltration system connected to your
cold water supply? This can decrease water pressure. See
“Water Supply Requirements.”
Water is leaking from the dispenser system
NOTE: One or two drops of water after dispensing is normal.
■ Glass not being held under the dispenser long enough?
Hold the glass under the dispenser 2 to 3 seconds after
releasing the dispenser lever.
■ New installation? Flush the water system. See “Water
Dispenser.”
■ Recently changed water lter? Flush the water system.
■ See “Water Dispenser.”
■ Water on the oor near the base grille? Make sure the
water dispenser tube connections are fully tightened.
See “Refrigerator Door(s) and Drawer.”
Water from the dispenser is warm
NOTE: Water from the dispenser is only chilled to 50°F (10°C).
■ New installation? Allow 24 hours after installation for the
water supply to cool completely.
■ Recently dispensed large amount of water? Allow 24 hours
for water supply to cool completely.
■ Water not been recently dispensed? The rst glass of water
may not be cool. Discard the rst glass of water.
■ Refrigerator connected to a cold water pipe? Make sure
the refrigerator is connected to a cold water pipe.
See “Water Supply Requirements.”

20
PERFORMANCE DATA SHEETS
Interior Water Filtration System
Model UKF8001AXX-750 Capacity 750 Gallons (2839 Liters)
This system has been tested according to NSF/ANSI Standards 42, 53, 401 and CSA B483.1 for the reduction of the substances listed
below. The concentration of the indicated substances in water entering the system was reduced to a concentraion less than or equal
to the permissible limit for water leaving the system, as specied in NSF/ANSI Standards 42, 53, 401 and CSA B483.1.
Substance Reduction
Aesthetic Effects
NSF
Reduction
Requirements
Average
Inuent
Inuent Challenge
Concentration
Maximum
Efuent
Average
Efuent
Minimum%
Reduction
Average%
Reduction
Chlorine Taste/Odor
Particulate Class I*
50% reduction
85% reduction
2.00 mg/L
14,000,000 #/mL
2.0 mg/L ± 10%
At least
10,000 particles/mL
0.06 mg/L
370,000 #/mL**
0.050625 mg/L
196,666 #/mL
97.00%
97.40%
97.52%
99.00%
Contaminant
Reduction
NSF Reduction
Requirements
Average Inuent Inuent Challenge
Concentration
Maximum
Efuent
Average
Efuent
Minimum%
Reduction
Average%
Reduction
Lead: @ pH 6.5
Lead: @ pH 8.5
0.010 mg/L
0.010 mg/L
0.150 mg/L †
0.150 mg/L †
0.15 mg/L ± 10%
0.15 mg/L ± 10%
< 0.001 mg/L
< 0.001 mg/L
< 0.001 mg/L
< 0.001 mg/L
>99.30%
>99.30%
>99.30%
>99.30%
Mercury: @ pH 6.5
Mercury: @ pH 8.5
0.002 mg/L
0.002 mg/L
0.006 mg/L
0.0059 mg/L
0.006 mg/L ± 10%
0.006 mg/L ± 10%
0.0005 mg/L
0.0018 mg/L
0.0003 mg/L
0.00073 mg/L
91.70%
69.20%
95.00%
88.10%
Benzene 0.005 mg/L 0.0133 mg/L 0.015 mg/L ± 10% 0.0005 mg/L 0.0005 mg/L 96.10% 96.30%
p-Dichlorobenzene 0.075 mg/L 0.210 mg/L 0.225 mg/L ± 10% < 0.0005 mg/L < 0.0005 mg/L >99.80% >99.80%
Carbofuran 0.040 mg/L 0.0753 mg/L 0.08 mg/L ± 10% 0.027 mg/L 0.008 mg/L 64.60% 73.45%
Toxaphene 0.003 mg/L 0.015 mg/L 0.015 ± 10% < 0.001 mg/L < 0.001 mg/L >93.3% >93.3%
Atrazine 0.003 mg/L 0.0102 mg/L 0.009 mg/L ± 10% 0.0027 mg/L 0.00105 mg/L 76.30% 89.40%
Asbestos >99% 126.5 MF/L 107 to 108 bers/L †† < 0.17 MF/L < 0.17 MF/L >99.99% >99.99%
Live Cysts ‡
Turbidity
>99.95%
0.5 NTU
122,500 #/L
10.5 NTU
50,000/L min.
11 ± 1 NTU
< 1 #/L ‡
0.30 NTU
< 1 #/L ‡
0.125 NTU
>99.99%
97.30%
>99.99%
98.80%
Lindane 0.0002 mg/L 0.0019 mg/L 0.002 ± 10% < 0.00016 mg/L 0.000035 mg/L 91.80% 97.90%
Tetrachloroethylene 0.005 mg/L 0.015 mg/L 0.015 mg/L ± 10% < 0.0005 mg/L < 0.0005 mg/L >96.6% >96.6%
Test Parameters: pH = 7.5 ± 0.5 unless otherwise noted. Flow = 0.78 gpm (2.9 Lpm). Pressure = 60 psig (413.7 kPa). Temp. = 68°F ± 5°F (20°C ± 3°C).
■ It is essential that operational, maintenance, and lter replacement
requirements be carried out for the product to perform as advertised.
■ The disposable water lter should be replaced at least every 6
months.
■ The lter monitor system measures the amount of water that passes
through the lter and alerts you to replace the lter. When 90% of
the lter’s rated life is used, the yellow (Order) light comes on. When
100% of the lter’s rated life is used, the red (Replace) light comes
on, and it is recommended that you replace the lter. For models
without lter status lights, replace the lter every 6 months. Use
replacement lter model UKF8001. 2015 suggested retail price of
$44.99 U.S.A./ $49.95 Canada. Prices are subject to change without
notice.
■ The product is for cold water use only.
■ Do not use with water that is microbiologically unsafe or of unknown
quality without adequate disinfection before or after the system.
Systems certied for cyst reduction may be used on disinfected
waters that may contain lterable cysts.
*Class I particle size: >0.5 to <1 um
**Test requirement is at least 100,000 particles/mL of AC Fine Test Dust.
†These contaminants are not necessarily in your water supply
Performance may vary based on local water conditions.
†Fibers greater than 10 um in length
‡Based on the use of Cryptosporidium parvum oocysts
®NSF is a registered trademark of NSF International.
■ Refer to the “Water Filtration System” section for the Manufacturer’s
name and telephone number.
■ Refer to the “Warranty” section for the Manufacturer’s limited
warranty.
Application Guidelines/Water Supply Parameters
Water Supply
Water Pressure
Water Temperature
Service Flow Rate
Potable City or Well
35 - 120 psi (241 - 827 kPa)
33° - 100°F (1° - 38°C)
0.78 gpm (2.9 L/min.) @ 60 psi
System tested and certied by NSF International against NSF/ANSI
Standard 42, 53, 401 and CSA B483.1 for the reduction of
contaminants specied on the Performance Data Sheet.

22
■It is important that operational, maintenance, and lter replacement
requirements be carried out for the product to perform as advertised.
Property damage can occur if all instructions are not followed.
■The disposable cartridge must be changed at least every 6 months.
■Use replacement lter UKF8001, Part #EDR4RXD1/EDR4RXD1B.
2015 suggested retail price of $49.99 U.S.A./$49.95 Canada. Prices
are subject to change without notice.
■The lter monitor system measures the amount of water that passes
through the lter and alerts you when it is time to replace the lter. To
learn how to check the water lter status, see “Using the Controls” or
“Water FiltrationSystem” in the User Instructions or User Guide.
■After changing the water lter, ush the water system. See “Water
and Ice Dispensers” or “Water Dispenser” in the User Instructions or
User Guide.
■These contaminants are not necessarily in your water supply. While
testing was performed under standard laboratory conditions, actual
performance may vary.
■The product is for cold water use only.
■The water system must be installed in compliance with state and
local laws and regulations.
* Class I particle size: >0.5 to <1 um
*** Compliant for Lead reduction requirements under NSF/ANSI Standard
53 as tested by Pace Analytical Services, Inc.
†Based on the use of Cryptosporidium parvum oocysts
†† Fibers greater than 10 um in length
® NSF is a registered trademark of NSF International.
■Do not use with water that is microbiologically unsafe or of unknown
quality without adequate disinfection before or after the system.
Systems certied for cyst reduction may be used on disinfected
waters that may contain lterable cysts. EPA Est. No. 10350-MN-005.
■Refer to the “Warranty” section (in the User Instructions or User
Guide) for the Manufacturer’s limited warranty, name and telephone
number.
Application Guidelines/Water Supply Parameters
Water Supply
Water Pressure
Water Temperature
Service Flow Rate
Potable City or Well
35 - 120 psi (241 - 827 kPa)
33° - 100°F (1° - 38°C)
0.78 gpm (2.9 L/min.) @ 60 psi

23
02/17
IF YOU NEED SERVICE:
1. Before contacting us to arrange service, please determine whether your product requires repair. Some questions can be addressed without
service. Please take a few minutes to review the Troubleshooting section of the Use and Care Guide or visit producthelp.whirlpool.com.
2. All warranty service is provided exclusively by our authorized Whirlpool Service Providers. IntheU.S.and Canada, direct all requests for
warranty service to:
Whirlpool Customer eXperience Center
In the U.S.A., call 1-800-253-1301. In Canada, call 1-800-807-6777.
If outside the 50 United States or Canada, contact your authorized Whirlpool dealer to determine whether another warranty applies.
WHIRLPOOL®
REFRIGERATION LIMITED
WARRANTY
ATTACH YOUR RECEIPT HERE. PROOF OF PURCHASE IS
REQUIRED TO OBTAIN WARRANTY SERVICE.
Please have the following information available when you call the
Customer eXperience Center:
Name, address, and telephone number
Model number and serial number
A clear, detailed description of the problem
Proof of purchase, including dealer or retailer name and address
FIVE YEAR LIMITED WARRANTY
WHAT IS COVERED WHAT IS NOT COVERED
ONE YEAR LIMITED WARRANTY
For one year from the date of purchase, when this major
appliance is installed, operated, and maintained according
to instructions attached to or furnished with the product,
Whirlpool Corporation or Whirlpool Canada LP (hereafter
“Whirlpool”) will pay for factory specied replacement parts
and repair labor to correct defects in materials or workmanship
that existed when this major appliance was purchased or,
at its sole discretion, replace the product. In the event of
product replacement, your appliance will be warranted for the
remaining term of the original unit’s warranty period.
SECOND THROUGH FIFTH YEAR LIMITED WARRANTY ON
CAVITY LINER AND SEALED REFRIGERATION SYSTEM
In the second through fth years from the date of purchase,
when this major appliance is installed, operated, and
maintained according to the instructions attached to or
furnished with the product, Whirlpool brand will pay for factory
specied replacement parts and repair labor for the following
components to correct non-cosmetic defects in materials
and workmanship in this part that prevent function of the
refrigerator and that existed when this major appliance was
purchased:
Refrigerator/freezer cavity liner if the part cracks due
to defective materials or workmanship
Sealed Refrigeration system (includes compressor,
evaporator, condenser, dryer, and connecting tubing)
YOUR SOLE AND EXCLUSIVE REMEDY UNDER THIS
LIMITED WARRANTY SHALL BE PRODUCT REPAIR AS
PROVIDED HEREIN. Service must be provided by a Whirlpool
designated service company. This limited warranty is valid
only in the United States or Canada and applies only when
the major appliance is used in the country in which it was
purchased. This limited warranty is effective from the date of
original consumer purchase. Proof of original purchase date is
required to obtain service under this limited warranty.
1. Commercial, non-residential, or multiple-family use, or use inconsistent with
published user, operator, or installation instructions.
2. In-home instruction on how to use your product.
3. Service to correct improper product maintenance or installation, installation
not in accordance with electrical or plumbing codes, or correction of
household electrical or plumbing (e.g., house wiring, fuses, or water
inlet hoses).
4. Consumable parts (e.g., light bulbs, batteries, air or water lters, preservation
solutions, etc.).
5. Defects or damage caused by the use of non-genuine Whirlpool parts
or accessories.
6. Damage from accident, misuse, abuse, re, oods, acts of God, or use with
products not approved by Whirlpool.
7. Repairs to parts or systems to correct product damage or defects caused
by unauthorized service, alteration, or modication of the appliance.
8. Cosmetic damage, including scratches, dents, chips, and other damage to
the appliance nishes, unless such damage results from defects in materials
and workmanship and is reported to Whirlpool within 30 days.
9. Discoloration, rust, or oxidation of surfaces resulting from caustic or
corrosive environments including, but not limited to, high salt concentrations,
high moisture or humidity, or exposure to chemicals.
10. Food or medicine loss due to product failure.
11. Pickup or delivery. This product is intended for in-home repair.
12. Travel or transportation expenses for service in remote locations where
an authorized Whirlpool servicer is not available.
13. Removal or reinstallation of inaccessible appliances or built-in xtures
(e.g., trim, decorative panels, ooring, cabinetry, islands, countertops,
drywall, etc.) that interfere with servicing, removal, or replacement of
the product.
14. Service or parts for appliances with original model/serial numbers removed,
altered, or not easily determined.
The cost of repair or replacement under these excluded circumstances
shall be borne by thecustomer.
DISCLAIMER OF IMPLIED WARRANTIES
IMPLIED WARRANTIES, INCLUDING ANY IMPLIED WARRANTY OF MERCHANTABILITY OR IMPLIED WARRANTY OF FITNESS FOR A
PARTICULAR PURPOSE, ARE LIMITED TO FIVE YEARS OR THE SHORTEST PERIOD ALLOWED BY LAW. Some states and provinces do
not allow limitations on the duration of implied warranties of merchantability or tness, so this limitation may not apply to you. This warranty
gives you specic legal rights, and you also may have other rights that vary from state to state or province to province.
DISCLAIMER OF REPRESENTATIONS OUTSIDE OF WARRANTY
Whirlpool makes no representations about the quality, durability, or need for service or repair of this major appliance other than the
representations contained in this warranty. If you want a longer or more comprehensive warranty than the limited warranty that comes with this
major appliance, you should ask Whirlpool or your retailer about buying an extended warranty.
LIMITATION OF REMEDIES: EXCLUSION OF INCIDENTAL AND CONSEQUENTIAL DAMAGES
YOUR SOLE AND EXCLUSIVE REMEDY UNDER THIS LIMITED WARRANTY SHALL BE PRODUCT REPAIR AS PROVIDED HEREIN.
WHIRLPOOL SHALL NOT BE LIABLE FOR INCIDENTAL OR CONSEQUENTIAL DAMAGES. Some states and provinces do not allow the
exclusion or limitation of incidental or consequential damages, so these limitations and exclusions may not apply to you. This warranty gives
you specic legal rights, and you also may have other rights that vary from state to state or province to province.

24
Risque possible de décès ou de blessure grave si vous ne
suivez pas immédiatement les instructions.
Risque possible de décès ou de blessure grave si vous
ne suivez pas les instructions.
Tous les messages de sécurité vous diront quel est le danger potentiel et vous disent comment réduire le risque de blessure et
ce qui peut se produire en cas de non-respect des instructions.
Votre sécurité et celle des autres est très importante.
Nous donnons de nombreux messages de sécurité importants dans ce manuel et sur votre appareil ménager. Assurez-vous de
toujours lire tous les messages de sécurité et de vous y conformer.
AVERTISSEMENT
DANGER
Voici le symbole d’alerte de sécurité.
Ce symbole d’alerte de sécurité vous signale les dangers potentiels de décès et de blessures graves à vous
et à d’autres.
Tous les messages de sécurité suivront le symbole d’alerte de sécurité et le mot “DANGER” ou
“AVERTISSEMENT”. Ces mots signifient :
Nous vous REMERCIONS d’avoir acheté ce produit de haute qualité. Enregistrer votre nouveau réfrigérateur au www.whirlpool.com.
Au Canada, enregistrer votre réfrigérateur au www.whirlpool.ca.
Pour référence ultérieure, consignez par écrit les numéros de modèle et de série de votre produit. Ceux-ci se trouvent sur la paroi
interne du compartiment de réfrigération.
Numéro de modèle Numéro de série ___________________________ _____________________________
REFRIGERATOR USER INSTRUCTIONS
Para obtener acceso a “Instrucciones para el usuario del refrigerador” en español, o para obtener información adicional acerca de
su producto, visite: www.whirlpool.com.
Necesitará su número de modelo y de serie, ubicado en el interior del compartimiento del refrigerador.
INSTRUCTIONS D’UTILISATION
DURÉFRIGÉRATEUR
SÉCURITÉ DU RÉFRIGÉRATEUR

25
Avertissements de la proposition 65 de l'État de Californie :
AVERTISSEMENT : Ce produit contient au moins un produit chimique connu par l’État de Californie pour être à l’origine de
cancers.
AVERTISSEMENT : Ce produit contient au moins un produit chimique connu par l’État de Californie pour être à l’origine de
malformations et autres déficiences de naissance.
AVERTISSEMENT :
Pour réduire le risque d’incendie, de choc électrique ou de blessure dans le cadre de l’utilisation du
réfrigérateur, suivre les consignes de base suivantes :
IMPORTANTES INSTRUCTIONS DE SÉCURITÉ
CONSERVEZ CES INSTRUCTIONS
■
Brancher sur une prise de terre (reliée à la masse).
■
Ne pas retirer la broche de terre.
■
Ne pas utiliser d’adaptateur.
■
Ne pas utiliser de rallonge.
■ Débrancher la source de courant électrique avant l'entretien.
■ Replacer pièces et panneaux avant de faire la remise en marche.
■ Enlever les portes de votre vieux réfrigérateur.
■ Utiliser un produit de nettoyage ininflammable.
■
Ne pas utiliser ou conserver d’essence ni de liquides ou gaz
inflammables à proximité de cet ou d’autres appareils électriques. Les
fumées peuvent causer des incendies ou des explosions.
■
Ne pas conserver de substances explosives, par exemple des bombes
aérosols contenant un agent propulseur, dans ce réfrigérateur.
■
Ne pas utiliser ni placer dans les compartiments du réfrigérateur des
dispositifs électriques d’un type autre que celui expressément autorisé
par le fabricant.
■ Utiliser deux ou plus de personnes pour déplacer et installer le
réfrigérateur.
■ Débrancher le réfrigérateur avant l'installation de la machine à
glaçons (seulement pour modèles prêts à recevoir une machine
à glaçons).
■
Un technicien qualifié doit installer le tuyau d’eau et le
distributeur de glaçons.
Consulter les instructions
d’installation fournies avec la trousse de machine à
glaçons IC13B pour tous les détails.
■
Raccorder uniquement à une arrivée d’eau potable.
■ Utiliser un verre robuste pour prendre des glaçons (sur
certains modèles).
■ Cet appareil ne convient pas à une utilisation par des
personnes (y compris des enfants) à capacités physiques,
sensorielles ou mentales réduites, ou possédant un
manque d'expérience et de connaissances, à moins
qu'elles ne soient placées sous supervision ou qu'elles
aient reçu des instructions concernant l’utilisation de
l'appareil par une personne responsable de leur sécurité.
■ Les enfants doivent être placés sous surveillance afin de
s'assurer qu'ils ne jouent pas avec l'appareil.
■
Pour éviter le risque que des enfants restent enfermés à
l’intérieur et s’asphyxient, ne pas les laisser jouer ou se cacher
dans le réfrigérateur.
■
Si le cordon d’alimentation est endommagé, il doit être remplacé
par le fabricant ou son technicien d’entretien ou une personne
présentant une qualification similaire.

26
Mise au rebut de votre vieux réfrigérateur
AVERTISSEMENT
Risque d’asphyxie
Retirer les portes de votre vieux réfrigérateur.
Le non-respect de cette instruction peut entraîner la
mort ou une lésion cérébrale.
IMPORTANT: Le risque qu’un enfant puisse se retrouver coincé
et suffoquer n’est pas chose du passé. Les réfrigérateurs jetés
ou abandonnés restent dangereux, même s’ils ne restent à
l’extérieur que pour “quelques jours seulement”. Si vous vous
débarrassez de votre ancien réfrigérateur, veuillez suivre les
instructions suivantes an d’éviter les accidents.
Avant de jeter votre vieux réfrigérateur ou congélateur :
Enlever les portes.
Laisser les tablettes en place de sorte que les enfants ne
puissent pas y pénétrer facilement.
INSTRUCTIONS D’INSTALLATION
Déballage du réfrigérateur
Retrait des matériaux d’emballage
Enlever tout résidu de ruban adhésif et de colle des surfaces
du réfrigérateur avant de le mettre en marche. À l’aide de
votre doigt, frotter une petite quantité de savon liquide à
vaisselle sur l’adhésif. Rincer à l’eau tiède et sécher.
Ne pas utiliser d’instruments coupants, d’alcool à friction,
de liquides inammables ou de nettoyants abrasifs pour
enlever le ruban adhésif ou la colle. Ces produits peuvent
endommager la surface du réfrigérateur. Pour plus de
renseignements, voir la section “Sécurité du réfrigérateur”.
Éliminer/recycler tous les matériaux d’emballage.
Lors du déplacement de votre réfrigérateur :
Votre réfrigérateur est lourd. Lors du déplacement de votre
réfrigérateur pour un nettoyage, un entretien ou une réparation,
veiller à recouvrir le plancher avec du carton ou un panneau
de bre dur pour éviter qu’il ne subisse tout dommage.
Toujourstirer le réfrigérateur tout droit lors du déplacement.
Nepas incliner le réfrigérateur d’un côté ou de l’autre ni le
“fairemarcher” en essayant de le déplacer, car le sol pourrait
être endommagé.
Informations importantes à propos des tablettes et des
couvercles en verre :
Ne pas nettoyer les tablettes ou les couvercles de verre
avec de l’eau tiède lorsqu’ils sont froids. Les tablettes
et couvercles peuvent se briser s’ils sont exposés à un
changement de températures ou impact soudain, tel qu’une
chute. Le verre trempé est conçu pour se briser en de
multiples petits morceauxde la taille de gravillons. Ceci est
normal. Lestablettes en verre et les couvercles sont lourds.
Employerles deux mains lorsqu’on les retire an d’éviter de
lesfaire tomber.
Nettoyage avant utilisation
Après avoir enlevé tous les matériaux d’emballage, nettoyer
l’intérieur du réfrigérateur avant de l’utiliser. Voir les instructions
de nettoyage dans “Entretien du réfrigérateur”.
Renseignements importants à propos de la mise au
rebut des fluides réfrigérants :
Mettre le réfrigérateur au rebut conformément à la
réglementation fédérale et locale Les fluides réfrigérants .
doivent être acués par un technicien certifié et agréé par év
l’EPA conformément aux procédures établies.
AVERTISSEMENT
Risque de poids excessif
Utiliser au moins deux personnes pour déplacer et
installer le réfrigérateur.
Le non-respect de cette instruction peut entraîner une
blessure au dos ou d’autres blessures.

27
Exigences d’emplacement
IMPORTANT: Ce réfrigérateur est conçu pour un usage
domestique, à l’intérieur uniquement.
Cet appareil est destiné à un usage domestique et à d’autres
usages similaires tels que:
Espace de cuisine pour personnel de boutiques, bureaux et
autres environnements professionnels.
Résidences fermières et utilisation par les clients d’hôtels,
demotels et d’autres types de résidences.
Environnements de type chambres d’hôtes.
Banquets et autres utilisations non commerciales semblables.
Pour obtenir une aération appropriée pour votre réfrigérateur,
laisser un espace de 1/2 po (1,25cm) de chaque côté et
au sommet. Laisser un espace de 1po (2,54cm) derrière
le réfrigérateur. Si le réfrigérateur comporte une machine
à glaçons, s’assurer qu’un espace additionnel est prévu à
l’arrière pour permettre les raccordements des conduits d’eau.
Encas d’installation du réfrigérateur près d’un mur xe, laisser
un minimum de 2 1/2 po (6,3cm) du côté de la charnière
(certainsmodèles nécessitent davantage d’espace) pour
permettre à la porte de s’ouvrir sans obstruction.
REMARQUE: Ce réfrigérateur est conçu pour être utilisé dans
un endroit où la température est comprise entre un minimum
de 55°F (13°C) et un maximum de 110°F (43°C). La plage de
température ambiante idéale pour un rendement optimal est
comprise entre 60°F (15°C) et 90°F (32°C). Respecter cette
plage de température permet aussi de réduire la consommation
d’électricité et d’optimiser l’efcacité du refroidissement. Il est
recommandé de ne pas installer le réfrigérateur près d’une source
de chaleur comme un four ou un radiateur.
2 " (6,3 cm)¹⁄₂
¹⁄₂" (1,25 cm)
Spécications électriques
Avant de déplacer le réfrigérateur à son emplacement nal, ilest
important de s’assurer qu’une prise électrique adéquate est
accessible.
Si le cordon d’alimentation est endommagé, il doit être remplacé
par le fabricant, son agent de service ou toute autre personne
qualiée. Ne pas utiliser un cordon craquelé ou qui présente des
dommages d’abrasion sur la gaine, la che ou le connecteur.
Méthode recommandée de liaison à la terre
Chaque appareil doit être alimenté par un circuit à 115V CA à
60Hz relié à la terre et protégé par un fusible de 15A ou 20A.
Il est recommandé d’utiliser un circuit distinct pour alimenter
le réfrigérateur uniquement. Utiliser une prise de courant dont
l’alimentation ne peut pas être interrompue par un interrupteur.
Ne pas utiliser de rallonge.
REMARQUE: Avant de procéder à tout type d’installation, de
nettoyage ou de changement d’ampoule, mettre le réfrigérateur
àl’arrêt. Selon votre modèle, placer la commande du congélateur
à OFF ou appuyer sur sur le symbole moins jusqu’à ce qu’un tiret
(–) apparaisse sur l’afchage du réfrigérateur et du congélateur
– voir l’illustration. Déconnecter le réfrigérateur de la source de
courant électrique. Une fois l’opération terminée, reconnecter
le réfrigérateur à la source de courant électrique et remettre la
commande de température au réglage désiré. Voir la section
“Utilisation des commandes”.
Risque d'explosion
Garder les matériaux et les vapeurs inflammables, telle
que l'essence, loin du réfrigérateur.
Le non-respect de cette instruction peut causer
un décès, une explosion ou un incendie.
AVERTISSEMENT
AVERTISSEMENT
Risque de choc électrique
Brancher sur une prise à 3 alvéoles reliée à la terre.
Ne pas enlever la broche de liaison à la terre.
Ne pas utiliser un adaptateur.
Ne pas utiliser un câble de rallonge.
Le non-respect de ces instructions peut causer
un décès, un incendie ou un choc électrique.

28
Spécications de l’alimentation en eau
Rassembler les outils et pièces nécessaires avant d’entreprendre
l’installation. Lire et observer les instructions fournies avec
chacun des outils de la liste ci-dessous.
OUTILS REQUIS:
Tournevis à lame plate Tourne-écrou de ¹⁄ po4
Clés plates de 7⁄ po et ½po 16
ou deux clés à molette
Foret de ¹⁄ po4
Perceuse sans l
IMPORTANT:
Raccorder à la canalisation d’arrivée d’eau potable
uniquement.
Toutes les installations doivent être conformes aux exigences
des codes locaux de plomberie.
Ne pas employer de robinet d’arrêt à étrier de ³⁄ po (4,76mm) 16
ou de type à percer – ils réduisent le débit d’eau ets’obstruent
plus facilement.
Utiliser un tube en cuivre et vérier qu’il n’y a pas de
fuites. Installer seulement des tuyaux en cuivre là où les
températures resteront au-dessus du point de congélation.
Pour les modèles avec ltre à eau, le ltre à eau jetable doit
être remplacé au moins tous les 6 mois.
Pression d’eau
Une alimentation en eau froide avec une pression entre 35 et
120lb/po² (241 à 827kPa) est nécessaire pour faire fonctionner
le distributeur d’eau et la machine à glaçons. Si vous avez des
questions au sujet de la pression de votre eau, faire appel à un
plombier qualié agréé.
Alimentation en eau par osmose inverse
IMPORTANT: La pression de l’alimentation en eau entre
le système d’osmose inverse et la valve d’arrivée d’eau du
réfrigérateur doit être entre 30 et 120lb/po² (207-827kPa).
Si un système de ltration de l’eau par osmose inverse est
raccordé à votre alimentation en eau froide, la pression de l’eau au
système doit être d’un minimum de 40 à 60lb/po² (276 à 414kPa).
Si la pression d’eau au système de ltration par osmose inverse
est inférieure à 40 - 60lb/po² (276 - 414kPa):
Vérier que le ltre à sédiment dans le système à osmose
inverse n’est pas obstrué. Remplacer le ltre si nécessaire.
Laisser le réservoir du système d’osmose inverse se remplir
après une utilisation intense.
Si votre réfrigérateur comporte un ltre à eau, celui-ci peut
réduire la pression de l’eau lorsqu’il est utilisé avec un
système d’osmose inverse. Enlever le ltre à eau. Voir la
section “Système de ltration de l’eau”.
Si vous avez des questions au sujet de la pression de votre eau,
faire appel à un plombier qualié agréé.
Raccordement à la canalisation d’eau
Lire toutes les instructions avant de commencer.
IMPORTANT:
Réaliser l’installation de plomberie conformément aux
prescriptions du International Plumbing Code et des normes
et codes locaux en vigueur.
Le tuyau d’eau gris situé à l’arrière du réfrigérateur (et utilisé
pour raccorder l’appareil à la canalisation d’eau du domicile)
est un tuyau en polyéthylène réticulé. Il est possible d’utiliser
des raccords en cuivre ou en polyéthylène réticulé pour
le raccordement de la canalisation d’eau du domicile au
réfrigérateur – ils contribuent à éviter que l’eau ait un goût
ouune odeur désagréable. Vérier qu’il n’y a pas de fuites.
Si l’on utilise un tuyau en polyéthylène réticulé au lieu d’un
tuyau de cuivre, nous recommandons les numéros de pièce
suivants:
W10505928RP (PEX chemisé de 7pi [2,14m]),
8212547RP (PEX de 5pi [1,52m]) ou
W10267701RP (PEX de 25pi [7,62m]).
Installer des tuyaux seulement là où les températures
resteront au-dessus du point de congélation.
Si l’on met en marche le réfrigérateur avant que la
canalisation d’eau ne soit raccordée, éteindre la machine
à glaçons pour éviter tout bruit excessif ou éviter
d’endommager le robinet d’eau.
Raccordement à la canalisation d’eau
1. Débrancher le réfrigérateur ou déconnecter la source de
courant électrique.
2. FERMER le robinet principal d’alimentation en eau.
OUVRIRle robinet le plus proche pendant une période
sufsante pour purger toute l’eau de la canalisation.
3. Identier une canalisation d’eau froide verticale de ¹⁄ po à 2
1¹⁄ po (12,7cm à 31,8cm) à proximité du réfrigérateur. 4
IMPORTANT:
Vérier qu’il s’agit d’une canalisation d’eau froide.
Un conduit horizontal fonctionnera, mais on doit
observer le procédé suivant: Percer par le dessus de
la canalisation et non pas par le dessous. Ainsi, l’eau
ne risquera pas d’arroser la perceuse. Ceci empêche
également les sédiments qu’on trouve normalement dans
l’eau de s’accumuler dans le robinet d’arrêt.
4. Déterminer la longueur de tube de cuivre à utiliser.
Mesurerdepuis le point de connexion (angle inférieur arrière
droit du réfrigérateur) et la canalisation d’eau. Ajouter7pi
(2,1m) pour permettre les opérations de nettoyage.
Utiliserunconduit de cuivre exible de ¹⁄ po (6,35mm) 4
de diamètre extérieur. Veiller à ce que le tube soit coupé
d’équerre aux deux extrémités.
5. À l’aide d’une perceuse à piles, percer un trou de ¹⁄ po 4
(6,35mm) dans la canalisation d’eau froide sélectionnée.
Ne pas utiliser pour le filtrage d'une eau
microbiologiquement polluée ou de qualité inconnue en
l'absence d'un dispositif de désinfection adéquat ant ouav
après le système Les systèmes certifiés pour la réduction .
de kyste peuvent être utilisés pour l'eau désinfectée qui
peut contenir des kystes filtrables.

29
F
G
A
B
C
D
E
6. Fixer le robinet d’arrêt sur la canalisation d’eau froide avec
la bride de tuyau. Vérier que le raccord du robinet est bien
engagé dans le trou de ¹⁄ po percé dans la canalisation 4
d’eau et que la rondelle d’étanchéité se trouve sous la bride
du tuyau. Serrer l’écrou de serrage. Serrer lentement et
uniformément les vis xant la bride de tuyau sur le tuyau an
d’assurer l’étanchéité du joint. Ne pas serrer excessivement.
7. Enler la bague et l’écrou de compression sur le tube en cuivre
comme illustré. Insérer l’extrémité du tube directement dans
l’extrémité de sortie, aussi loin que possible. Visserl’écrou de
compression sur l’extrémité de sortie du raccord à l’aide d’une
clé à molette. Ne pas serrer excessivement, car ceci pourrait
provoquer l’écrasement du tube en cuivre.
8. Placer le bout libre du tube dans un contenant ou évier
et OUVRIR le robinet principal d’alimentation en eau.
Laisserl’eau s’écouler par le tube jusqu’à ce qu’elle soit
limpide. Fermer le robinet d’arrêt de la canalisation d’eau.
Raccordement au réfrigérateur
Selon votre modèle, la canalisation d’eau peut être orientée
de bas en haut ou de haut en bas. Suivre les instructions de
raccordement de votre modèle.
Style1
1. Ôter le bouchon de plastique de l’orice d’entrée d’eau.
Raccorder le tube de cuivre au robinet d’arrivée d’eau à l’aide
d’un écrou et d’une bague de compression, comme illustré.
Serrer l’écrou de compression. Ne pas serrer excessivement.
Vérier la solidité du raccordement en tirant sur le tube en
cuivre.
2. Créer une boucle de service avec le tube en cuivre. Éviterde
déformer le tube de cuivre en l’enroulant. Fixer le tube en
cuivre à la caisse du réfrigérateur à l’aide d’une bride “P”.
B
A
C
D
3. Ouvrir l’arrivée d’eau alimentant le réfrigérateur et vérier
l’absence de fuites. Éliminer toute fuite détectée.
Style 2
1. Créer une boucle de service (diamètre minimum de 2pi
[61cm]) avec le tube en cuivre. Éviter de déformer le tube
decuivre en l’enroulant.
2. Ôter le capuchon de plastique de l’orice d’entrée d’eau.
Placer un écrou et un manchon à compression sur le tube
decuivre.
3. Insérer l’extrémité du tube de cuivre dans l’orice d’entrée
d’eau. Mettre doucement en forme le tube de façon à ce
qu’il pénètre directement dans l’orice an d’éviter les
déformations.
4. Faire glisser l’écrou de compression sur le manchon et
levisser sur l’orice d’entrée d’eau.
B
A
C
D
5. À l’aide d’une clé à molette, immobiliser l’écrou sur la
canalisation d’eau en plastique pour l’empêcher de se
déplacer. Puis, à l’aide d’une deuxième clé, tourner l’écrou
de compression sur le tube en cuivre dans le sens antihoraire
pour serrer complètement. Ne pas serrer excessivement.
A. Canalisation d’eau froide
B. Bride de tuyau
C. Tube en cuivre
D. Écrou de compression
E. Bague de compression
F. Robinet d’arrêt
G. Écrou de serrage
A. Tube en cuivre
B. Bride en “P”
C. Écrou à compression
D. Bague de compression
A. Canalisation d’eau
enplastique
B. Manchon
C. Écrou à compression
D. Tube en cuivre

30
B
C
D
A
6. Vérier le raccordement en tirant sur le tube en cuivre. Fixer la
canalisation d’eau en plastique à la caisse du réfrigérateur à
l’aide d:une bride en “P”.
7. Ouvrir l’arrivée d’eau alimentant le réfrigérateur et vérier
l’absence de fuites. Éliminer toute fuite détectée.
Achever l’installation
AVERTISSEMENT
Risque de choc électrique
Brancher sur une prise à 3 alvéoles reliée à la terre.
Ne pas enlever la broche de liaison à la terre.
Ne pas utiliser un adaptateur.
Ne pas utiliser un câble de rallonge.
Le non-respect de ces instructions peut causer
un décès, un incendie ou un choc électrique.
1. Brancher sur une prise de courant à 3 alvéoles, reliée à la terre.
REMARQUE: Prévoir un délai de 24 heures pour la production
du premier lot de glaçons. Jeter les trois premiers lots de glaçons
produits. Prévoir un délai de 3jours pour le remplissage complet
du bac d’entreposage.
Porte et tiroir du réfrigérateur
OUTILS REQUIS: Clé à douille à tête hexagonale de 5⁄16po, 3⁄8po
et ¹⁄ po Tournevis cruciforme no2 et un tournevis à lame plate.4
IMPORTANT:
Votre réfrigérateur est muni d’une porte réversible normale
avec une porte ou un tiroir de congélateur ou des portes
françaises. Suivre les instructions suivantes selon le style
deporte de votre modèle.
Toutes les illustrations mentionnées dans les instructions
suivantes sont incluses plus loin dans cette section après
“Étapes nales”. Les illustrations correspondent à une porte
normale s’ouvrant à droite (charnières installées à droite à
l’usine).
Si vous désirez seulement enlever et réinstaller les portes,
voir les sections “Démontage – Portes et charnières” et
“Réinstallation - Portes et charnières”.
Avant de commencer, tourner la commande du réfrigérateur
à OFF (arrêt) et retirer les aliments et tout balconnet réglable
ou compartiment utilitaire des portes. Replacer et enlever
lespoignées.
Replacer et enlever les poignées
Porte standard
Pour replacer la poignée, aligner la poignée sur la porte ou le
tiroir comme indiqué. À l’aide d’un tournevis cruciforme, xer
la poignée à l’aide des vis de la poignée.
Pour replacer la garniture de poignée, à l’aide de vos mains,
appliquer une pression ferme à la surface de la garniture et
laglisser vers le centre de la poignée.
Pour enlever les poignées, reprendre ces instructions en sens
inverse.
Portes à double battant
Pour retirer la poignée, desserrer les deux vis de blocage
situées sur le côté de la poignée à l’aide d’une clé
hexagonale de 3⁄ po. Tirer sur la poignée tout droit pour 32
l’extraire de la porte ou du tiroir. Veiller à conserver les vis
pour la réinstallation des poignées. Voir les illustrations1
et2de la poignée.
Pour remettre les poignées en place, inversion les directions.
Démontage – Portes et charnières
Porte standard
Modèle avec tiroir de congélateur
1. Débrancher le réfrigérateur ou déconnecter la source de
courant électrique.
2. Laisser le réfrigérateur fermé jusqu’à ce vous soyez prêt à
lesoulever de la caisse.
REMARQUE: Prévoir un support additionnel de la porte
pendant le déplacement des charnières. La force d’attraction
des aimants de la porte ne suft pas à la maintenir en place
pendant la manutention.
3. Enlever les pièces de la charnière supérieure – voir l’illustration
de la charnière supérieure. Soulever la porte duréfrigérateur
pour la séparer de la caisse.
4. Réinstaller les pièces pour la charnière inférieure comme
indiqué sur l’illustration de la charnière inférieure.
Modèle avec porte de congélateur
1. Débrancher le réfrigérateur ou déconnecter la source de
courant électrique.
2. Laisser la porte du congélateur fermée jusqu’à ce que vous
soyez prêt à la soulever pour la dégager de la caisse.
REMARQUE: Prévoir un support additionnel de la porte
pendant le déplacement des charnières. La force d’attraction
des aimants de la porte ne suft pas à la maintenir en place
pendant la manutention.
3. Enlever les pièces de la charnière supérieure - voir l’illustration
de la charnière supérieure. Soulever la porte du réfrigérateur
pour la séparer de la caisse.
4. Enlever l’axe de la charnière centrale et les vis de la charnière
comme indiqué sur l’image de la charnière du centre.
Soulever la porte du congélateur pour la séparer de la caisse.
A. Bride en “P”
B. Canalisation d’eau
enplastique
C. Écrou à compression
D. Tube en cuivre
Vis de charnière supérieure à tête hexagonale

31
5. Retirer la grille de la base en la saisissant fermement à deux
mains et en la tirant vers soi.
6. Réinstaller les pièces pour la charnière inférieure comme
indiqué sur l’illustration de la charnière inférieure.
Portes à double battant
AVERTISSEMENT
Risque de choc électrique
Couper l’alimentation avant de retirer les portes.
Le non-respect de cette instruction peut entraîner la
mort ou un choc électrique.
1. Débrancher le réfrigérateur ou déconnecter la source de
courant électrique.
2. Laisser les portes du réfrigérateur fermées jusqu’à ce vous
soyez prêt à les détacher de la caisse.
REMARQUE: Prévoir un support supplémentaire pour
laporte du réfrigérateur pendant le retrait des charnières.
Laforce d’attraction des aimants de la porte ne suft pas
àlamaintenir en place pendant la manutention.
3. En commençant par la porte du côté droit, ôter les pièces
de la charnière supérieure – voir l’illustration de la charnière
supérieure. Soulever la porte du réfrigérateur de l’axe de la
charnière inférieure.
4. Ôter le bouchon d’obturation d’axe de charnière de l’axe
de la charnière inférieure et le conserver pour utilisation
ultérieure. Voir l’illustration de la charnière inférieure.
5. Avant de retirer la porte du côté gauche, déconnecter la
prise de câbles située sur la partie supérieure de la charnière
supérieure en coinçant un tournevis à lame plate ou un ongle
entre les deux sections. Voir l’illustration de la che de câblage.
REMARQUE: Les conducteurs vert et de liaison à la terre
restent xés à la charnière.
6. Enlever les pièces de la charnière du côté gauche comme
indiqué dans l’illustration de la charnière supérieure.
Souleverla porte de l’axe de la charnière inférieure.
REMARQUE: Ôter le bouchon d’obturation d’axe de
charnière de l’axe de la charnière inférieure et le conserver
pour utilisation ultérieure. Voir l’illustration de la charnière
inférieure.
Inversion du sens d’ouverture de la porte –
portestandard (optionnel)
IMPORTANT: Si on souhaite inverser le sens d’ouverture d’une
porte pour pouvoir l’ouvrir du côté opposé, procéder comme suit.
S’il n’est pas nécessaire de changer l’orientation de la porte, voir
la section “Réinstallation – porte et charnières”.
Armoire
1. Enlever les vis de charnière du côté poignée et les transférer
du côté opposé. Voir l’illustration1.
Porte du réfrigérateur
1. Enlever la poignée du réfrigérateur (voir l’illustration2).
Conserver toutes les pièces ensemble.
2. Enlever l’avant de la vis d’obturation de la poignée de porte.
La transférer du côté opposé de la porte du réfrigérateur
(voirillustration5).
3. Enlever la butée de porte. La transférer du côté opposé de
laporte du réfrigérateur (voir illustration3).
4. Fixer la poignée de porte du réfrigérateur sur le côté
opposé de la porte à l’aide des deux vis (voir l’illustration2).
Repositionner la garniture de poignée (voir illustration).
5. Serrer toutes les vis. Conserver la porte à part jusqu’à la mise
en place des charnières et du tiroir de congélateur.
Porte du congélateur
1. Enlever la poignée du congélateur (voir l’illustration4).
Conserver toutes les pièces ensemble.
2. Enlever la butée de porte. La transférer du côté opposé de
laporte du congélateur (voir illustration3).
3. Fixer la poignée du côté opposé de la porte du congélateur.
4. Serrer toutes les vis. Mettre la porte de côté.
5. Retirer la grille de la base en la saisissant fermement à deux
mains et en la tirant vers soi.
REMARQUE: Placer une cale sous la rive avant inférieure du
réfrigérateur pour libérer le poids des brides de roulettes
6. Ôter les vis des deux brides de roulettes. Voir l’illustration6.
7. Retirer la plaque de charnière située derrière la bride de
roulette et la placer sur le côté opposé du réfrigérateur.
Placerl’axe de charnière et la cale dans le trou externe
delaplaque de charnière. Voir l’illustration6.
Vis de butée de porte Poignée de porte Vis de
scellement Avant
Vis de poignée à tête plate Bouchon d'obturation de
charnière de caisse
Termékspecifikációk
| Márka: | Whirlpool |
| Kategória: | hűtőszekrény |
| Modell: | WRFA32SMHZ |
Szüksége van segítségre?
Ha segítségre van szüksége Whirlpool WRFA32SMHZ, tegyen fel kérdést alább, és más felhasználók válaszolnak Önnek
Útmutatók hűtőszekrény Whirlpool

20 Március 2025
16 Január 2025
16 Január 2025
16 Január 2025
15 Január 2025
15 Január 2025
12 Január 2025
11 Január 2025
11 Január 2025
11 Január 2025
Útmutatók hűtőszekrény
- hűtőszekrény Mestic
- hűtőszekrény Ikea
- hűtőszekrény Samsung
- hűtőszekrény Yamaha
- hűtőszekrény Beko
- hűtőszekrény Hoshizaki
- hűtőszekrény Dometic
- hűtőszekrény Electrolux
- hűtőszekrény Moulinex
- hűtőszekrény Nedis
- hűtőszekrény LG
- hűtőszekrény Grundig
- hűtőszekrény Ariston Thermo
- hűtőszekrény Husqvarna
- hűtőszekrény Candy
- hűtőszekrény Lamona
- hűtőszekrény Worx
- hűtőszekrény Philips
- hűtőszekrény Gorenje
- hűtőszekrény Euro Appliances
- hűtőszekrény Adler
- hűtőszekrény Princess
- hűtőszekrény SilverCrest
- hűtőszekrény Garmin
- hűtőszekrény Bosch
- hűtőszekrény Indesit
- hűtőszekrény NewAir
- hűtőszekrény Panasonic
- hűtőszekrény Zanussi
- hűtőszekrény MPM
- hűtőszekrény AEG
- hűtőszekrény Emerio
- hűtőszekrény Sharp
- hűtőszekrény Teka
- hűtőszekrény Hoover
- hűtőszekrény Neff
- hűtőszekrény Toshiba
- hűtőszekrény Ardo
- hűtőszekrény Bartscher
- hűtőszekrény Hyundai
- hűtőszekrény Hisense
- hűtőszekrény Cookology
- hűtőszekrény Siemens
- hűtőszekrény Medion
- hűtőszekrény Exquisit
- hűtőszekrény Corbero
- hűtőszekrény Miele
- hűtőszekrény Camry
- hűtőszekrény TCL
- hűtőszekrény V-Zug
- hűtőszekrény Danby
- hűtőszekrény DeLonghi
- hűtőszekrény Insignia
- hűtőszekrény Liebherr
- hűtőszekrény Heinner
- hűtőszekrény Infiniton
- hűtőszekrény Klarstein
- hűtőszekrény Amica
- hűtőszekrény VOX
- hűtőszekrény Gourmetmaxx
- hűtőszekrény Vivax
- hűtőszekrény Omega
- hűtőszekrény Thomson
- hűtőszekrény Smeg
- hűtőszekrény Fagor
- hűtőszekrény Unold
- hűtőszekrény Bifinett
- hűtőszekrény Ardes
- hűtőszekrény Cuisinart
- hűtőszekrény Baumatic
- hűtőszekrény Orima
- hűtőszekrény Kenwood
- hűtőszekrény AEG-Electrolux
- hűtőszekrény Jocel
- hűtőszekrény Etna
- hűtőszekrény Café
- hűtőszekrény Dunavox
- hűtőszekrény Bomann
- hűtőszekrény Bauknecht
- hűtőszekrény Amana
- hűtőszekrény Hotpoint
- hűtőszekrény Haier
- hűtőszekrény Frigidaire
- hűtőszekrény Mitsubishi
- hűtőszekrény Cecotec
- hűtőszekrény Dacor
- hűtőszekrény Pelgrim
- hűtőszekrény Privileg
- hűtőszekrény Benavent
- hűtőszekrény Küppersbusch
- hűtőszekrény CATA
- hűtőszekrény Summit
- hűtőszekrény Westinghouse
- hűtőszekrény Hitachi
- hűtőszekrény Inventum
- hűtőszekrény Mercury
- hűtőszekrény FrigeluX
- hűtőszekrény Continental Edison
- hűtőszekrény Eta
- hűtőszekrény Atag
- hűtőszekrény Telefunken
- hűtőszekrény Nevir
- hűtőszekrény Wellington
- hűtőszekrény Hiberg
- hűtőszekrény Domo
- hűtőszekrény Russell Hobbs
- hűtőszekrény Helkama
- hűtőszekrény Thor
- hűtőszekrény Caso
- hűtőszekrény Culinair
- hűtőszekrény JennAir
- hűtőszekrény Coyote
- hűtőszekrény CHiQ
- hűtőszekrény Create
- hűtőszekrény Edesa
- hűtőszekrény Mora
- hűtőszekrény Denver
- hűtőszekrény Bush
- hűtőszekrény Cooluli
- hűtőszekrény G3 Ferrari
- hűtőszekrény Severin
- hűtőszekrény BeefEater
- hűtőszekrény Orbegozo
- hűtőszekrény Wisberg
- hűtőszekrény Respekta
- hűtőszekrény Hanseatic
- hűtőszekrény Daewoo
- hűtőszekrény GYS
- hűtőszekrény Livoo
- hűtőszekrény Viking
- hűtőszekrény Gram
- hűtőszekrény Elica
- hűtőszekrény Balay
- hűtőszekrény Hotpoint Ariston
- hűtőszekrény OK
- hűtőszekrény GE
- hűtőszekrény Guzzanti
- hűtőszekrény Concept
- hűtőszekrény Whynter
- hűtőszekrény DCS
- hűtőszekrény SVAN
- hűtőszekrény Turbo Air
- hűtőszekrény Bellini
- hűtőszekrény Caple
- hűtőszekrény CDA
- hűtőszekrény KitchenAid
- hűtőszekrény Asko
- hűtőszekrény Rosieres
- hűtőszekrény Consul
- hűtőszekrény TriStar
- hűtőszekrény Rocktrail
- hűtőszekrény ELIN
- hűtőszekrény Novy
- hűtőszekrény Rommer
- hűtőszekrény Ignis
- hűtőszekrény Wolkenstein
- hűtőszekrény Koenic
- hűtőszekrény Nodor
- hűtőszekrény Daikin
- hűtőszekrény Fridgemaster
- hűtőszekrény Artusi
- hűtőszekrény Midea
- hűtőszekrény Trisa
- hűtőszekrény Electroline
- hűtőszekrény Polar
- hűtőszekrény Heller
- hűtőszekrény Blomberg
- hűtőszekrény Progress
- hűtőszekrény Kogan
- hűtőszekrény Profilo
- hűtőszekrény Honeywell
- hűtőszekrény PKM
- hűtőszekrény Stirling
- hűtőszekrény Marshall
- hűtőszekrény Furrion
- hűtőszekrény Gardenline
- hűtőszekrény Dimplex
- hűtőszekrény Aspes
- hűtőszekrény Avanti
- hűtőszekrény ProfiCook
- hűtőszekrény Fisher & Paykel
- hűtőszekrény Kenmore
- hűtőszekrény Cylinda
- hűtőszekrény DCG
- hűtőszekrény Hestan
- hűtőszekrény Melissa
- hűtőszekrény Zephyr
- hűtőszekrény Manta
- hűtőszekrény Blaupunkt
- hűtőszekrény U-Line
- hűtőszekrény Chefman
- hűtőszekrény SIBIR
- hűtőszekrény Veripart
- hűtőszekrény Ilve
- hűtőszekrény Bertazzoni
- hűtőszekrény Mobicool
- hűtőszekrény Foster
- hűtőszekrény Hansa
- hűtőszekrény Thetford
- hűtőszekrény Elektra Bregenz
- hűtőszekrény Comfee
- hűtőszekrény Signature
- hűtőszekrény Airflo
- hűtőszekrény Logik
- hűtőszekrény NEO Tools
- hűtőszekrény Junker
- hűtőszekrény Finlux
- hűtőszekrény Maytag
- hűtőszekrény LeCavist
- hűtőszekrény Fulgor Milano
- hűtőszekrény AKAI
- hűtőszekrény H.Koenig
- hűtőszekrény Seiki
- hűtőszekrény Pyle
- hűtőszekrény Sôlt
- hűtőszekrény Kalorik
- hűtőszekrény Sanyo
- hűtőszekrény Constructa
- hűtőszekrény Frilec
- hűtőszekrény Salora
- hűtőszekrény Rangemaster
- hűtőszekrény Vedette
- hűtőszekrény Schneider
- hűtőszekrény Arktic
- hűtőszekrény Linarie
- hűtőszekrény Philco
- hűtőszekrény ECG
- hűtőszekrény Gaggenau
- hűtőszekrény Romo
- hűtőszekrény Kaiser
- hűtőszekrény Esatto
- hűtőszekrény Franke
- hűtőszekrény Element
- hűtőszekrény Meireles
- hűtőszekrény Silverline
- hűtőszekrény BlueStar
- hűtőszekrény Galanz
- hűtőszekrény Scandomestic
- hűtőszekrény New Pol
- hűtőszekrény AYA
- hűtőszekrény MBM
- hűtőszekrény Brandt
- hűtőszekrény RCA
- hűtőszekrény Icecool
- hűtőszekrény Electra
- hűtőszekrény Marvel
- hűtőszekrény Rhino
- hűtőszekrény Ravanson
- hűtőszekrény Rex
- hűtőszekrény Schaub Lorenz
- hűtőszekrény Lavorwash
- hűtőszekrény Vintec
- hűtőszekrény Luxor
- hűtőszekrény Flavel
- hűtőszekrény Scancool
- hűtőszekrény Becken
- hűtőszekrény Sub-Zero
- hűtőszekrény Haeger
- hűtőszekrény Premium Levella
- hűtőszekrény Zerowatt
- hűtőszekrény De Dietrich
- hűtőszekrény SanGiorgio
- hűtőszekrény Belling
- hűtőszekrény Orava
- hűtőszekrény Arçelik
- hűtőszekrény Zenith
- hűtőszekrény Magic Chef
- hűtőszekrény Climadiff
- hűtőszekrény Sauber
- hűtőszekrény IFB
- hűtőszekrény Thorens
- hűtőszekrény Sogo
- hűtőszekrény Crosley
- hűtőszekrény United
- hűtőszekrény Techwood
- hűtőszekrény Glem Gas
- hűtőszekrény Euromaid
- hűtőszekrény Fhiaba
- hűtőszekrény Lemair
- hűtőszekrény Matsui
- hűtőszekrény Quigg
- hűtőszekrény Zanker
- hűtőszekrény Airlux
- hűtőszekrény Aldi
- hűtőszekrény Ariston
- hűtőszekrény Salton
- hűtőszekrény Tricity Bendix
- hűtőszekrény Palsonic
- hűtőszekrény Arthur Martin
- hűtőszekrény Nordland
- hűtőszekrény Tomado
- hűtőszekrény Kernau
- hűtőszekrény Thermador
- hűtőszekrény Vestel
- hűtőszekrény Swan
- hűtőszekrény John Lewis
- hűtőszekrény Mabe
- hűtőszekrény Monogram
- hűtőszekrény Iberna
- hűtőszekrény Valberg
- hűtőszekrény Accucold
- hűtőszekrény Scholtes
- hűtőszekrény Berg
- hűtőszekrény Castor
- hűtőszekrény Eldom
- hűtőszekrény Jocca
- hűtőszekrény Juno
- hűtőszekrény Nabo
- hűtőszekrény Defy
- hűtőszekrény Igloo
- hűtőszekrény Premium
- hűtőszekrény White Knight
- hűtőszekrény Sunny
- hűtőszekrény Nordmende
- hűtőszekrény CaterCool
- hűtőszekrény Friac
- hűtőszekrény Boretti
- hűtőszekrény Perel
- hűtőszekrény GOTIE
- hűtőszekrény Kubo
- hűtőszekrény Costway
- hűtőszekrény Elba
- hűtőszekrény Proline
- hűtőszekrény WLA
- hűtőszekrény True
- hűtőszekrény Kelvinator
- hűtőszekrény Everglades
- hűtőszekrény Steel Cucine
- hűtőszekrény Jenn-Air
- hűtőszekrény Limit
- hűtőszekrény Freggia
- hűtőszekrény Carpigiani
- hűtőszekrény Listo
- hűtőszekrény Milectric
- hűtőszekrény Leonard
- hűtőszekrény Osprey
- hűtőszekrény New World
- hűtőszekrény Leisure
- hűtőszekrény WhiteLine
- hűtőszekrény Bompani
- hűtőszekrény Blaze
- hűtőszekrény Viva
- hűtőszekrény M-System
- hűtőszekrény Changhong
- hűtőszekrény Primo
- hűtőszekrény Goddess
- hűtőszekrény Saro
- hűtőszekrény Godrej
- hűtőszekrény Matrix
- hűtőszekrény Juno-electrolux
- hűtőszekrény Napoleon
- hűtőszekrény Waeco
- hűtőszekrény Essentiel B
- hűtőszekrény Stoves
- hűtőszekrény Edy
- hűtőszekrény Edgestar
- hűtőszekrény Parmco
- hűtőszekrény Eurotech
- hűtőszekrény Avintage
- hűtőszekrény Carrefour Home
- hűtőszekrény Equator
- hűtőszekrény Vestfrost
- hűtőszekrény Kunft
- hűtőszekrény Electrolux-Rex
- hűtőszekrény Upo
- hűtőszekrény Brandy Best
- hűtőszekrény Lynx
- hűtőszekrény AVEA
- hűtőszekrény Optimum
- hűtőszekrény Bluesky
- hűtőszekrény Tecnolux
- hűtőszekrény Cobal
- hűtőszekrény Marynen
- hűtőszekrény La Germania
- hűtőszekrény Lec
- hűtőszekrény Oranier
- hűtőszekrény CombiSteel
- hűtőszekrény Husky
- hűtőszekrény Unic Line
- hűtőszekrény Gastro-Cool
- hűtőszekrény Tisira
- hűtőszekrény Maxx Cold
- hűtőszekrény Wells
- hűtőszekrény Paulmann
- hűtőszekrény Kucht
- hűtőszekrény Avantco
- hűtőszekrény Norlake
- hűtőszekrény Arctic Air
- hűtőszekrény Snaigė
- hűtőszekrény Merax
- hűtőszekrény Sam Cook
- hűtőszekrény Blucher
- hűtőszekrény Silhouette
- hűtőszekrény ColdTech
- hűtőszekrény ONYX
- hűtőszekrény Magic Cool
- hűtőszekrény Khind
- hűtőszekrény LERAN
- hűtőszekrény Le Chai
- hűtőszekrény Gamko
- hűtőszekrény IOMABE
- hűtőszekrény APW Wyott
- hűtőszekrény General Electric
- hűtőszekrény SPT
- hűtőszekrény Kolpak
- hűtőszekrény Hatco
- hűtőszekrény High One
- hűtőszekrény Les Petits Champs
- hűtőszekrény Moa
- hűtőszekrény Master-Bilt
- hűtőszekrény Hydra Kool
- hűtőszekrény XO
- hűtőszekrény Curtiss
- hűtőszekrény Nemco
- hűtőszekrény Beverage-Air
- hűtőszekrény Winia
- hűtőszekrény Delfield
- hűtőszekrény Traulsen
- hűtőszekrény Alto-Shaam
- hűtőszekrény Simfer
- hűtőszekrény Federal
- hűtőszekrény Structural Concepts
- hűtőszekrény Vinata
- hűtőszekrény Avallon
- hűtőszekrény Emperor's Select
- hűtőszekrény Fisher Paykel
- hűtőszekrény Wine Klima
- hűtőszekrény Marbor
- hűtőszekrény Engel
- hűtőszekrény Americana
- hűtőszekrény Koolatron
- hűtőszekrény Cosmo
- hűtőszekrény Adventure Kings
- hűtőszekrény EvaKool
- hűtőszekrény FAURE
- hűtőszekrény Coldtainer
- hűtőszekrény Orien
- hűtőszekrény Enofrigo
- hűtőszekrény BSK
- hűtőszekrény Techfrost
- hűtőszekrény Irinox
- hűtőszekrény Azure
- hűtőszekrény Gecko
- hűtőszekrény Bromic
- hűtőszekrény Kuhla
- hűtőszekrény Adora
- hűtőszekrény Newpol
- hűtőszekrény Brastemp
- hűtőszekrény Royal Catering
- hűtőszekrény Haden
- hűtőszekrény Perlick
- hűtőszekrény Sedona
- hűtőszekrény Atosa
- hűtőszekrény Cool Head
- hűtőszekrény Gladiator
- hűtőszekrény Vinotemp
- hűtőszekrény Norpole
- hűtőszekrény Gasmate
- hűtőszekrény Arthur Martin-Electrolux
- hűtőszekrény Triomph
- hűtőszekrény Schmick
- hűtőszekrény Dellware
- hűtőszekrény InAlto
- hűtőszekrény HABAU
- hűtőszekrény Tuscany
- hűtőszekrény TESLA Electronics
- hűtőszekrény Pando
- hűtőszekrény Smart Brand
- hűtőszekrény Brass Monkey
- hűtőszekrény Waltham
- hűtőszekrény DAYA
- hűtőszekrény Lec Medical
- hűtőszekrény Kalamazoo
- hűtőszekrény Yolco
- hűtőszekrény Aconatic
- hűtőszekrény Kluge
- hűtőszekrény Hoover-Grepa
- hűtőszekrény Coca-Cola
- hűtőszekrény Acros
- hűtőszekrény HomeCraft
- hűtőszekrény Koldfront
- hűtőszekrény Eqtemp
- hűtőszekrény Uniprodo
- hűtőszekrény Corona
- hűtőszekrény Coors Light
- hűtőszekrény Miller Lite
- hűtőszekrény Lanbo
- hűtőszekrény Pitsos
- hűtőszekrény Landmark
- hűtőszekrény Momcube
- hűtőszekrény Richome
Legújabb útmutatók hűtőszekrény

1 Április 2025
1 Április 2025
1 Április 2025

1 Április 2025

1 Április 2025
1 Április 2025

31 Március 2025
31 Március 2025
31 Március 2025

31 Március 2025