Használati útmutató Vimar ELVOX 7559
Vimar
Intercomsysteem
ELVOX 7559
Olvassa el alább 📖 a magyar nyelvű használati útmutatót Vimar ELVOX 7559 (64 oldal) a Intercomsysteem kategóriában. Ezt az útmutatót 4 ember találta hasznosnak és 2 felhasználó értékelte átlagosan 4.5 csillagra
Oldal 1/64

Use and Configuration Manual
TAB
7559
TAB 4.3 Due Fili Plus hands-free video entryphone

2
7559 Tab 4.3

3
7559 Tab 4.3
General information 4
Description 4
Warnings and advice 4
Keys and status LEDs 5
Status LED 6
Operation 7
Actuations menu 7
Intercom menu 8
First power up 9
Functions 12
Answering a call from an Outdoor Station 12
Answering a call from an Indoor Station or Reception switchboard 15
Audio/video settings 17
Volume adjustment 17
Image brightness control 18
Pan/Zoom adjustment 18
Self-start (Calling an Outdoor Station) 21
Calling an Indoor Station (Intercom) 23
Calling a Reception switchboard 25
Professional firm function 28
Alert Function 32
User configurations 34
Ringtone exclusion 36
Ringtone selection 37
Ringtone volume control 37
Brightness control 38
Contrast control 38
Key tone 39
Keypad cleaning 39
Installer configuration 40
Actuations 43
Intercom 47
Assignment of main and secondary ID 52
Changing the PIN 54
Reset factory configuration 55
Enabling Professional Firm 56
System information 57
Configuration with SaveProg 58
Index

4
7559 Tab 4.3
Surface mounting Tab series hands-free video entryphone for Due Fili Plus system with 4.3" LCD colour display,
loudspeaker for calls, capacitive keypad for entryphone functions (unlocking, self-starting, auxiliary services, volume,
brightness and contrast controls) and intercom calls.
Can be used by hearing aid wearers.
Audio frequency function for hearing aids (Teleloop)
The video entryphone can be used by people wearing hearing aids.
For correct functioning of the hearing aid, please refer to its instruction manual.
Any metal objects or electronic equipment in the vicinity may affect the quality of the sound received by the hearing aid.
Maintenance
Clean using a soft cloth.
Do not pour water onto the appliance and do not use any type of chemical product.
Cleaning must be done with the device powered off (disconnected from the bus) or after activating the Keypad cleaning
procedure
Warnings for the user
Do not open or tamper with the appliance.
In the event of faults, contact specialized personnel.
For installation, refer to the instruction sheet in the package.
Driver for PC
The drivers are the same as for the other devices in the TAB family.
The first time a device is connected to a USB port, the PC must associate the drivers to the peripheral device even if a
TAB device has already been associated.
The Indoor Station is identified in SaveProg as ELVOX_P129A.
FW updates
SaveProg manages Art. 7559 from version 3.7.0.0 onwards.
General information
Description
Warnings and advice
Professional firm
Door release
of the calling
Outdoor Station
Outdoor Station
Self-start
Call from
Outdoor
Station
Intercoms
Auxiliary
services
activation
Call to/from reception
switchboard
Alert

5
7559 Tab 4.3
The TAB 7559 video entryphone be operated using the touch keys described below.
Keys and status LEDs
1. 4.3” LCD 16:9 display, resolution 480x272 pixels
2. Programmable key T1: Self-start, it activates the main Outdoor Station
3. Programmable key T2: It activates the second relay of the Due Fili Plus system (Aux 2) or, in certain conditions,
it opens the Intercoms menu (see )Operation
4. It opens the menuUser configuration
5. Programmable key T3: ringtone exclusion for all calls (in stand-by, press and hold down for 2 s to deactivate/
activate the ringtone), ringtone mute (during an incoming call, press to deactivate the ringtone, the ringtone is also
simultaneously deactivated for subsequent calls).
6. Programmable key T4: It activates the first relay of the Due Fili Plus system (Aux 1) or, in certain conditions, it
opens the Actuations menu*
7. It activates the lock of the calling Outdoor Station
8. Speaker
9. Depending on the context, it activates several functions:
– When on stand-by, it calls the Reception switchboard (only if the management with reception switchboard is
active)
– It answers a call from Outdoor Station, Indoor Station or from the Reception Switchboard.
– It ends a call
– It resets the missed calls counter (press for 2 sec)
When lit, it indicates that there was a missed call from the switchboard.
The missed called indicator can be reset by pressing the related key for more than 2 sec
10. Microphone
N.B.: Programmable keys T1 –T2 –T3 –T4:
the functions to activate depend on the usage context and on the programming (see ).Operation
The functions illustrated in the key are the default ones (without programming).
1
6
5
10
2
4
3
7
8
9

6
7559 Tab 4.3
LED DESCRIPTION
When lit, it indicates that there was a missed call from the switchboard.
The missed called indicator can be reset by pressing the related key for more than 2 sec.
When lit, it indicates the door open status
Flashing: user away (the Indoor Station rejects the call from an Outdoor Station and
consequently the call is unsuccessful).
Permanently lit: ringtone disabled (the Indoor Station does not ring for calls from an Outdoor
Station)
Some of the LEDs illustrated below only come on in certain conditions.
Keys
Status LED
The keys on the TAB 7559 use a safety system, so to avoid accidental activation, when the Indoor Station is on stand-by,
the keys must be held down for a certain amount of time.
HOLD DOWN TO
HOLD DOWN TO
HOLD DOWN TO
HOLD DOWN TO HOLD DOWN TO
ACTIV
ACTIV
ACTIV
ACTIVA
A
A
ATE THE
TE THE
TE THE
TE THE ACTIVATE THE
FUNCTIONS!
FUNCTIONS!
FUNCTIONS!
FUNCTIONS!FUNCTIONS!

7
7559 Tab 4.3
Actuations menu
Operation
The TAB 7559 Video Entryphone is designed to receive calls from Outdoor Stations, to make intercom calls with Outdoor
Stations, Indoor Stations and Reception Switchboard, to make audio/video settings as well as to activate the Alert and
Professional Firm functions
Calls can be answered using the or by opening the lock on the Outdoor Station using the Communication key Lock
key.
4 programmable keys are also available to activate other functions such as relay actuation or intercom calls.
The programmable keys have been assigned four functions by default, and there are no functions, Actuations Intercom
which will only be available after programming.
For each key, in addition to the function, you can also define the icon representing it.
Example of programming functions and customised icons
N.B.: F1/F2 are 2 controls/functions which can be sent to Outdoor Stations.
The type of function performed depends on the Outdoor Station connected.
If the installer has programmed at least key in the Actuations section (see or using the 1 Installer configuration
SaveProg software), if you press the key, the related menu is displayed, where you can select up to 4 functions,
including:
• Relay actuation
• Outdoor Station lock actuation
• Transmission of F1/F2 controls to Outdoor Stations
Garden
sprinkler
system
activation
Driveway
gate opening
Garage opening Stair lighting
The Actuations menu is also available during self-start, a call, a conversation with Outdoor Stations and Indoor Stations
and Reception Switchboards.
In these cases, a new icon appears ( ) and, if you press key T4, the Actuations menu is opened.A
Press ( ) to return to the main communication menuB
A B

8
7559 Tab 4.3
For each key, in addition to the function, you can also define the icon representing it.
Example of programming functions and customised icons
Intercom menu
If the installer has programmed at least keys in the Actuations section (see or using the 2 Installer configuration
SaveProg software), if you press the key, the related menu is displayed, where you can select up to 4 intercom
functions, including:
• Call to Indoor Station
• Call to Reception switchboard
• Alert function (sending of a notification to all Switchboards)
Call to Indoor
Station 1
Call to
Reception
switchboard 2
Call to
Reception
switchboard 3
Send Alert

9
7559 Tab 4.3
First power up
Perform the device installation (according to the assembly instructions and the installation instructions provided in the
printed instruction sheet supplied) and power it.
The TAB 7559 video entryphone by default has not been identified yet, so the first operation required is to define whether
it is main or secondary
Two icons appear:
Caution: installation must be carried out by qualified persons in compliance with the current regulations regarding the
installation of electrical equipment in the country where the products are installed;
N.B.: If no operations are performed, the display is switched off after about 10 seconds
1. Press any of the programmable keys to activate the display
Main Indoor Station: it is the single Indoor Station receiving the call, or it is the first (master) of a
group with the contemporary call from an Outdoor Station.
Secondary Indoor Station: it is the Indoor Station associated with a master Indoor Station of a group
with the contemporary call from an Outdoor Station.
1

10
7559 Tab 4.3
The Indoor Station starts communicating with the Outdoor Station
N.B.: this procedure applies for entrance panels with push buttons and may vary according to the Outdoor Station used.
For Outdoor Stations with a keypad and display, type in the ID code and confirm with the call key.
2. Press to select the main type
3. Press the key on the Master Outdoor Station you wish to receive the call from
2
3

11
7559 Tab 4.3
After a few seconds, the identification of the Video entryphone appears on the display ( )A
You can now use all the of the TAB 7559 Video entryphoneFunctions
N.B.: in the case of a secondary Indoor Station, the ID is not that selected, but one is assigned, by means of a certain
algorithm, among the three possible IDs deduced from the main one
4. Press the corresponding key on the Outdoor Station to send the call to the Indoor Station.
A
4

12
7559 Tab 4.3
The video door entry functions illustrated in the following paragraphs refer to audio/video calls from Outdoor Stations.
With audio-only Outdoor stations, the display will be black, and when accessing the controls menu, only the audio
controls will be available.
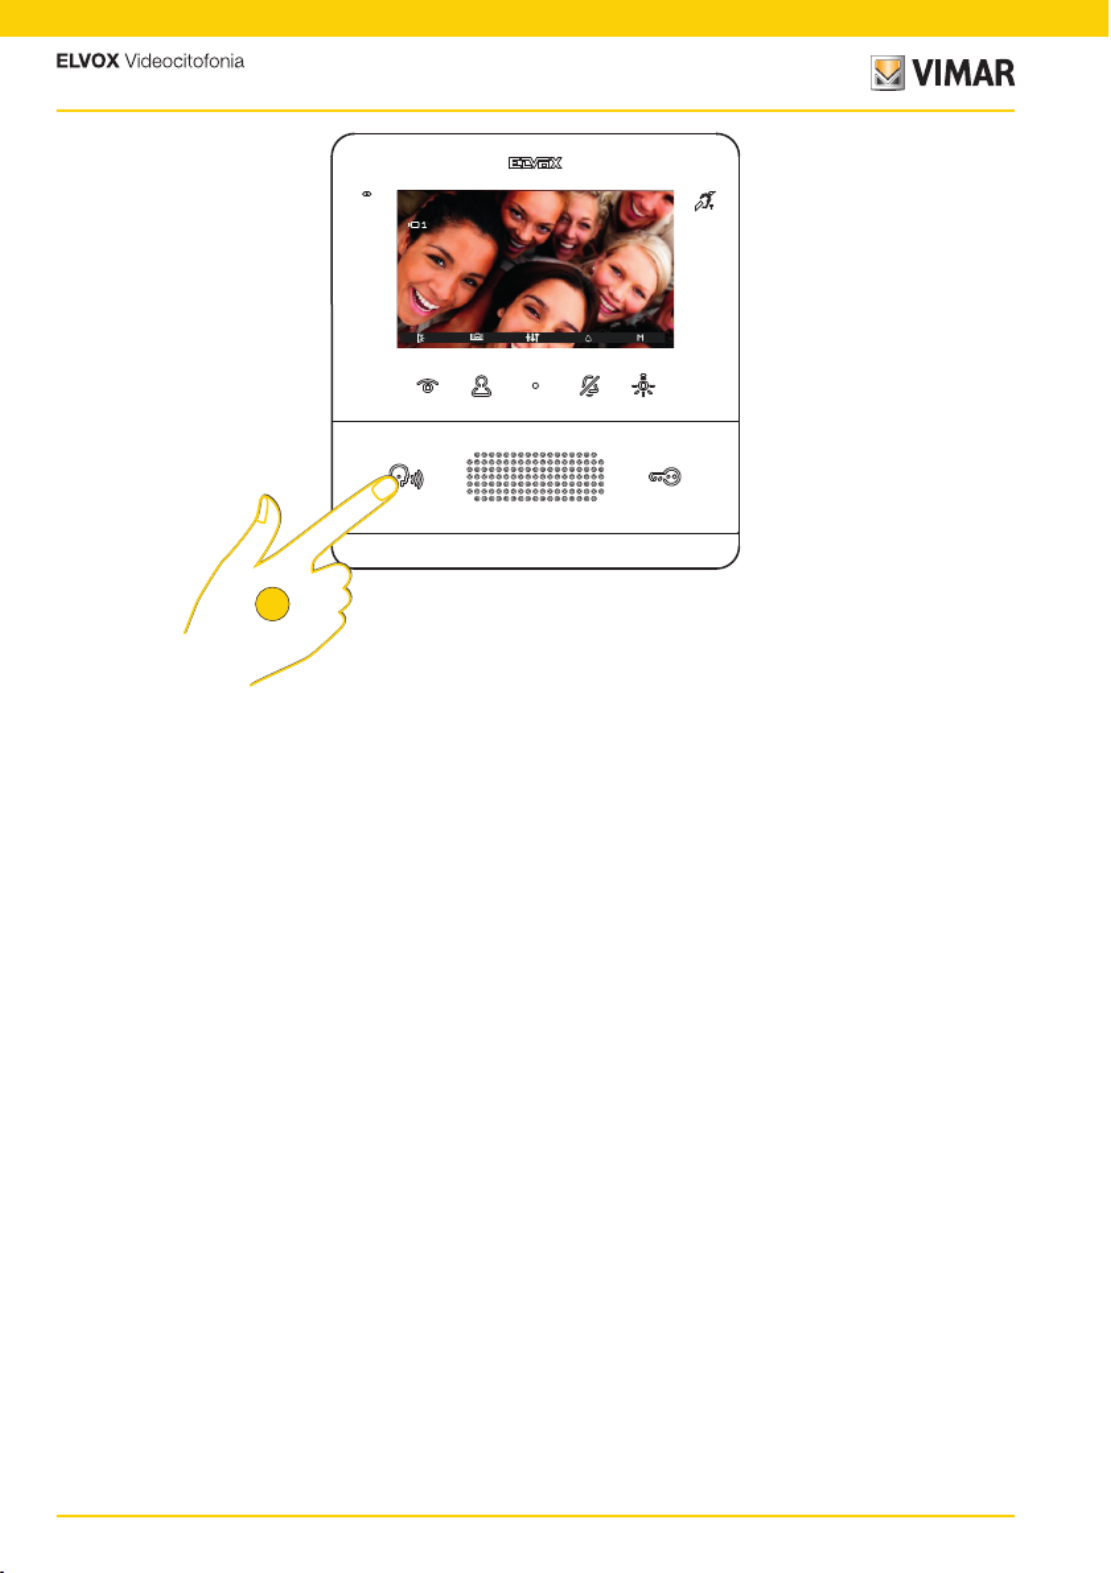
Following a call from an Outdoor Station, the display shows the images filmed (default setting. It can be modified using
the SaveProg software).
N.B.: before connecting the audio channels with any other device, the Indoor Station determines the best possible
communication parameters.
During this stage, which lasts approximately 1 second, a waiting tone is transmitted to the user.
1. Press to answer the call
Functions
Answering a call from an Outdoor Station
A menuAudio/video settings
B Ringtone exclusion
C Other actuations (if more than one actuation has been configured)
D Actuations
E Identification of the calling Outdoor Station
E
DA
B
C

13
7559 Tab 4.3
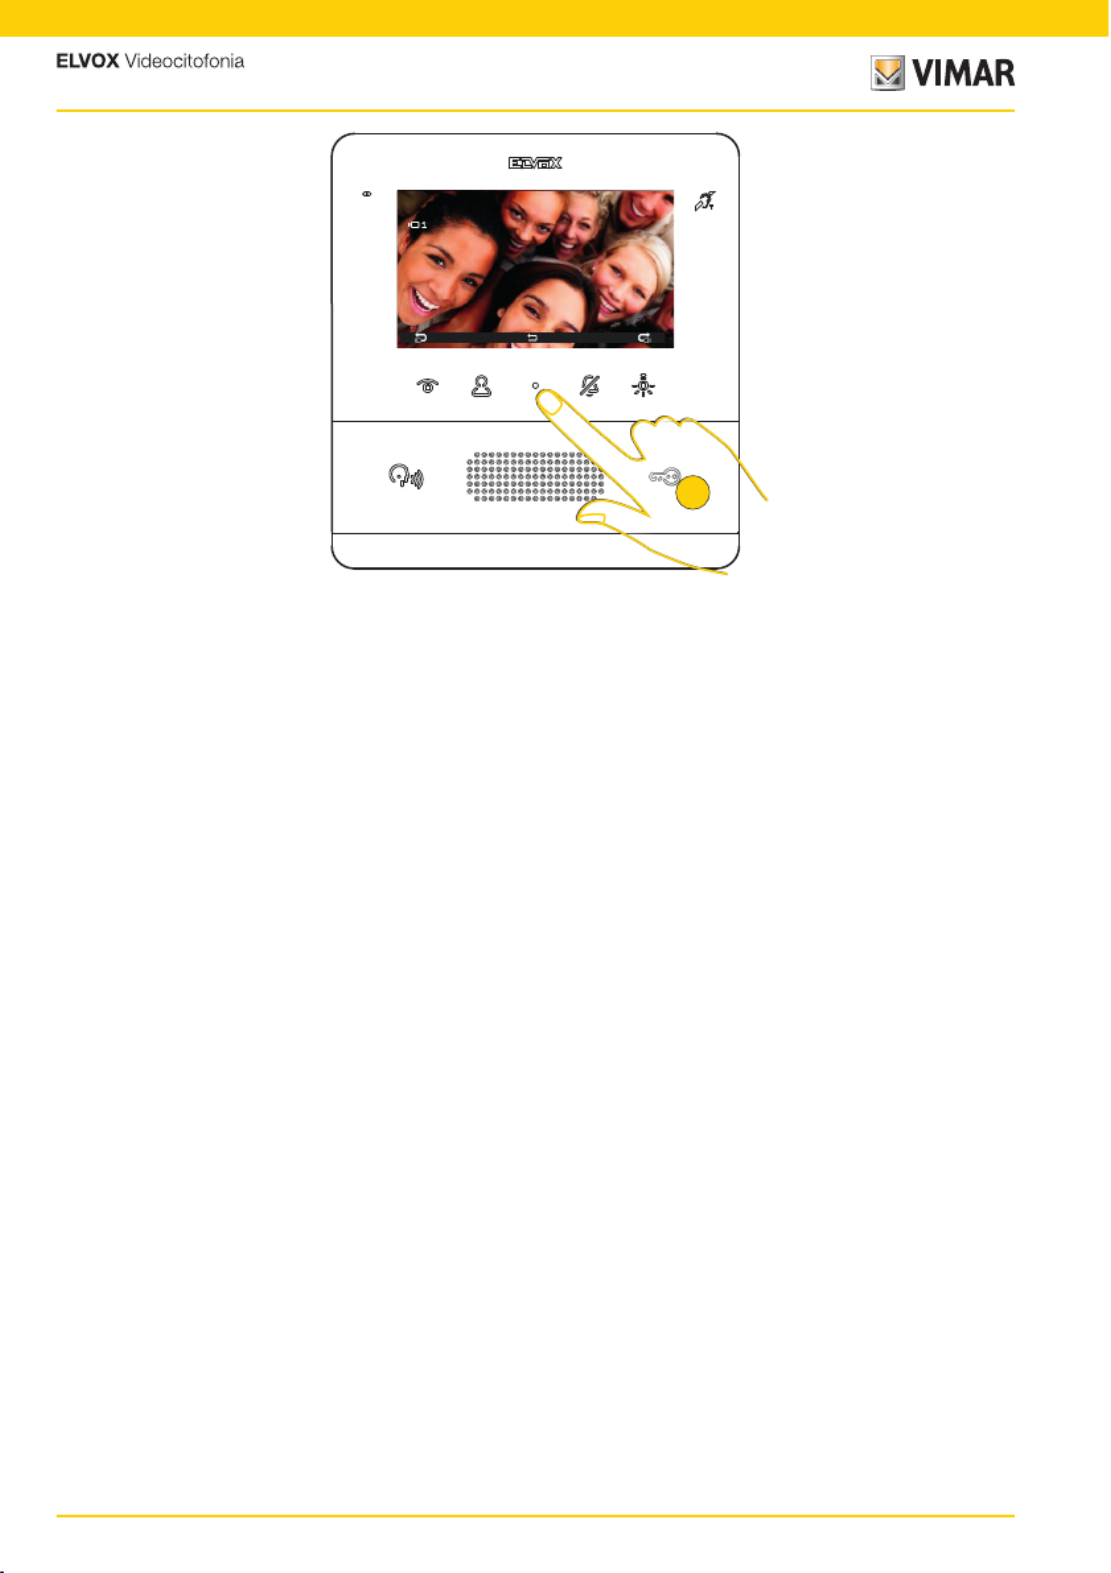
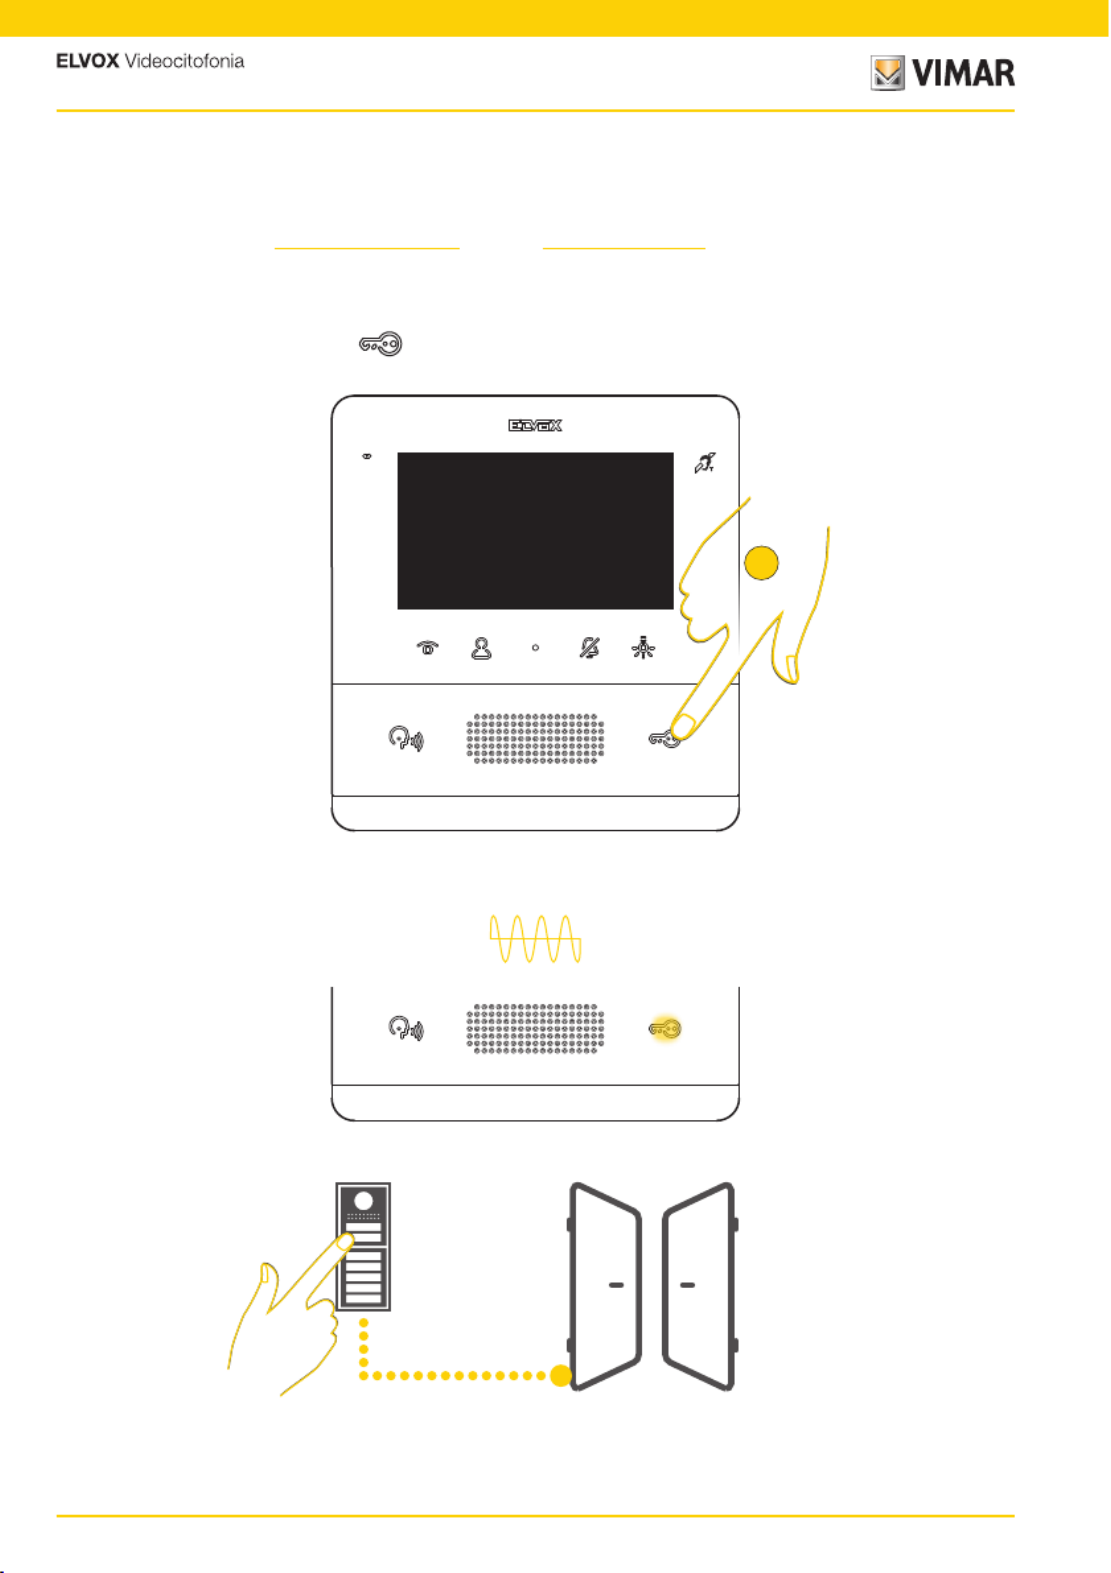
The lit communication key and the active microphone ( ) indicate that communication with the Outdoor Station is active.A
In addition to communicating, actuations can be activated and/or can be madeaudio/video settings
2. Press to release the lock on the Outdoor Station connected
3. Press to activate an actuation among those programmed
A
2
3
14
7559 Tab 4.3
4. Press to end communication
4
15
7559 Tab 4.3
Following a call from an Indoor Station, the display shows the indication ( ).A
If the calling Indoor Station is in the list of Intercom menu, its identification number is also displayed.
The communication methods are the same as those illustrated in paragraph Calling an Indoor Station
2. Press to end communication
1. Press to answer the call
N.B.: for intercom calls, the ringtone can only be muted when the call is in progress and not before
N.B.: before connecting the audio channels with any other device, the Indoor Station determines the best possible
communication parameters.
During this stage, which lasts approximately 1 second, a waiting tone is transmitted to the user.
N.B.:
if the Reception switchboard is configured to operate with a camera, then the receiver will be able to see the video
signal from the camera.
Other video calls are possible (Due Fili Plus call button 20577, 19577) suitably configured and associated with an "Audio/
video selector for 4 cameras 69AM” or “Video selector for 4 cameras 69AM/T”
Answering a call from an Indoor Station or Reception switchboard
A
1
2

16
7559 Tab 4.3
If there is no answer to one or more calls from the Reception switchboard, the LED remains permanently lit until stand-by
(if the function was enabled from SaveProg).
The LED stops flashing after the Indoor Station has answered and returned to stand-by or:
– after the ringtone has been reactivated;
– after a self-start;
– making any intercom call
4. Press for a prolonged amount of time to delete the signalling
N.B.: the missed call signal remains also in the case of a power outage.
4

17
7559 Tab 4.3
Audio/video settings
Volume adjustment
During an audio/video communication with Outdoor Stations or Indoor Stations, a series of settings can be made,
including: adjusting the audio volume, the brightness of the image recorded and zooming.
1. During a communication, press to adjust the audio/video settings
2. Press to raise the audio level and to reduce it.
The level set is displayed in the indicator ( )A
1
A
2

18
7559 Tab 4.3
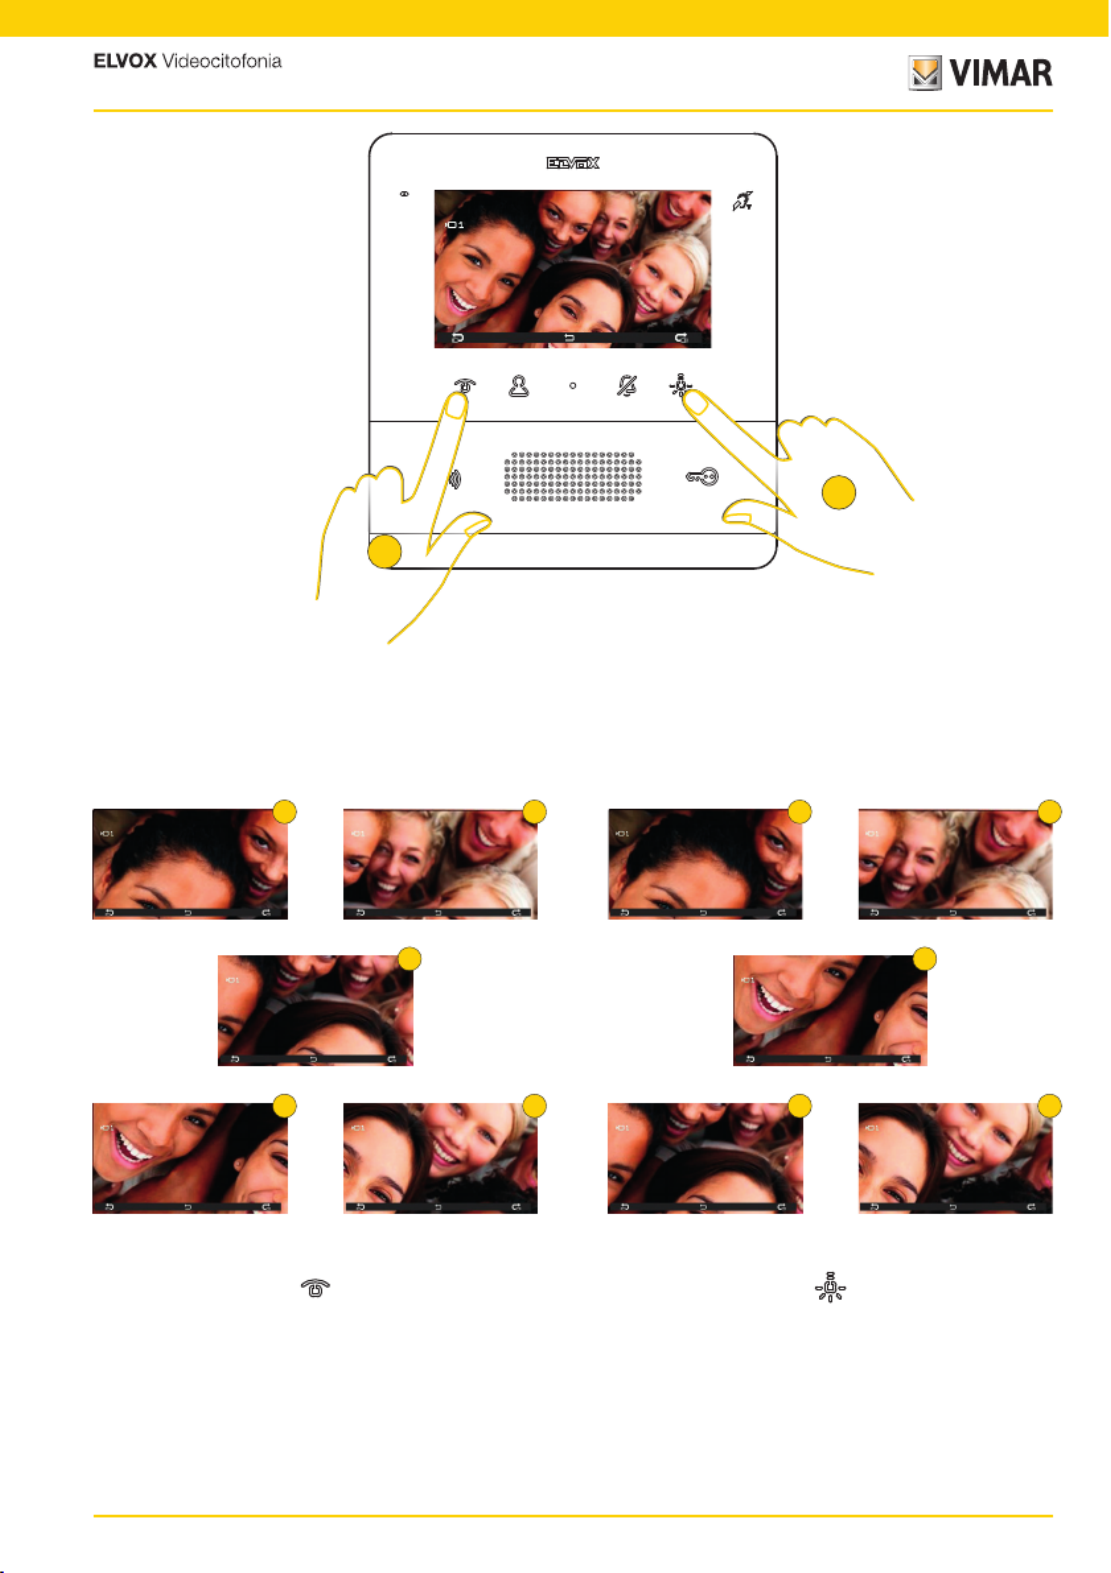
Pan/Zoom adjustment
In the event that the TAB 7559 Video entryphone is paired with a Pixel Outdoor Station with appropriate characteristics
(Art. 41004 e 41005, with FW version that supports the function), a central icon appears, with which the function can be
actuated.
3. Press to increase the image brightness and to reduce it.
The level set is displayed in the indicator ( )B
4. Press to complete the adjustments and return to the previous screen
1. Press to zoom the image filmed by the Outdoor Station
B
3
4
1
Image brightness control
19
7559 Tab 4.3
The device performs a zoom divided up into 5 zones
2. Press to display the zones in sequence anti-clockwise
3. Press to display the zones in sequence clockwise
1
34
5
2
3
4
2
1
5
3
2
20
7559 Tab 4.3
In both cases, once the sequence is finished, press the key again to return to the normal display.
4. Press to exit the settings menu
4

21
7559 Tab 4.3
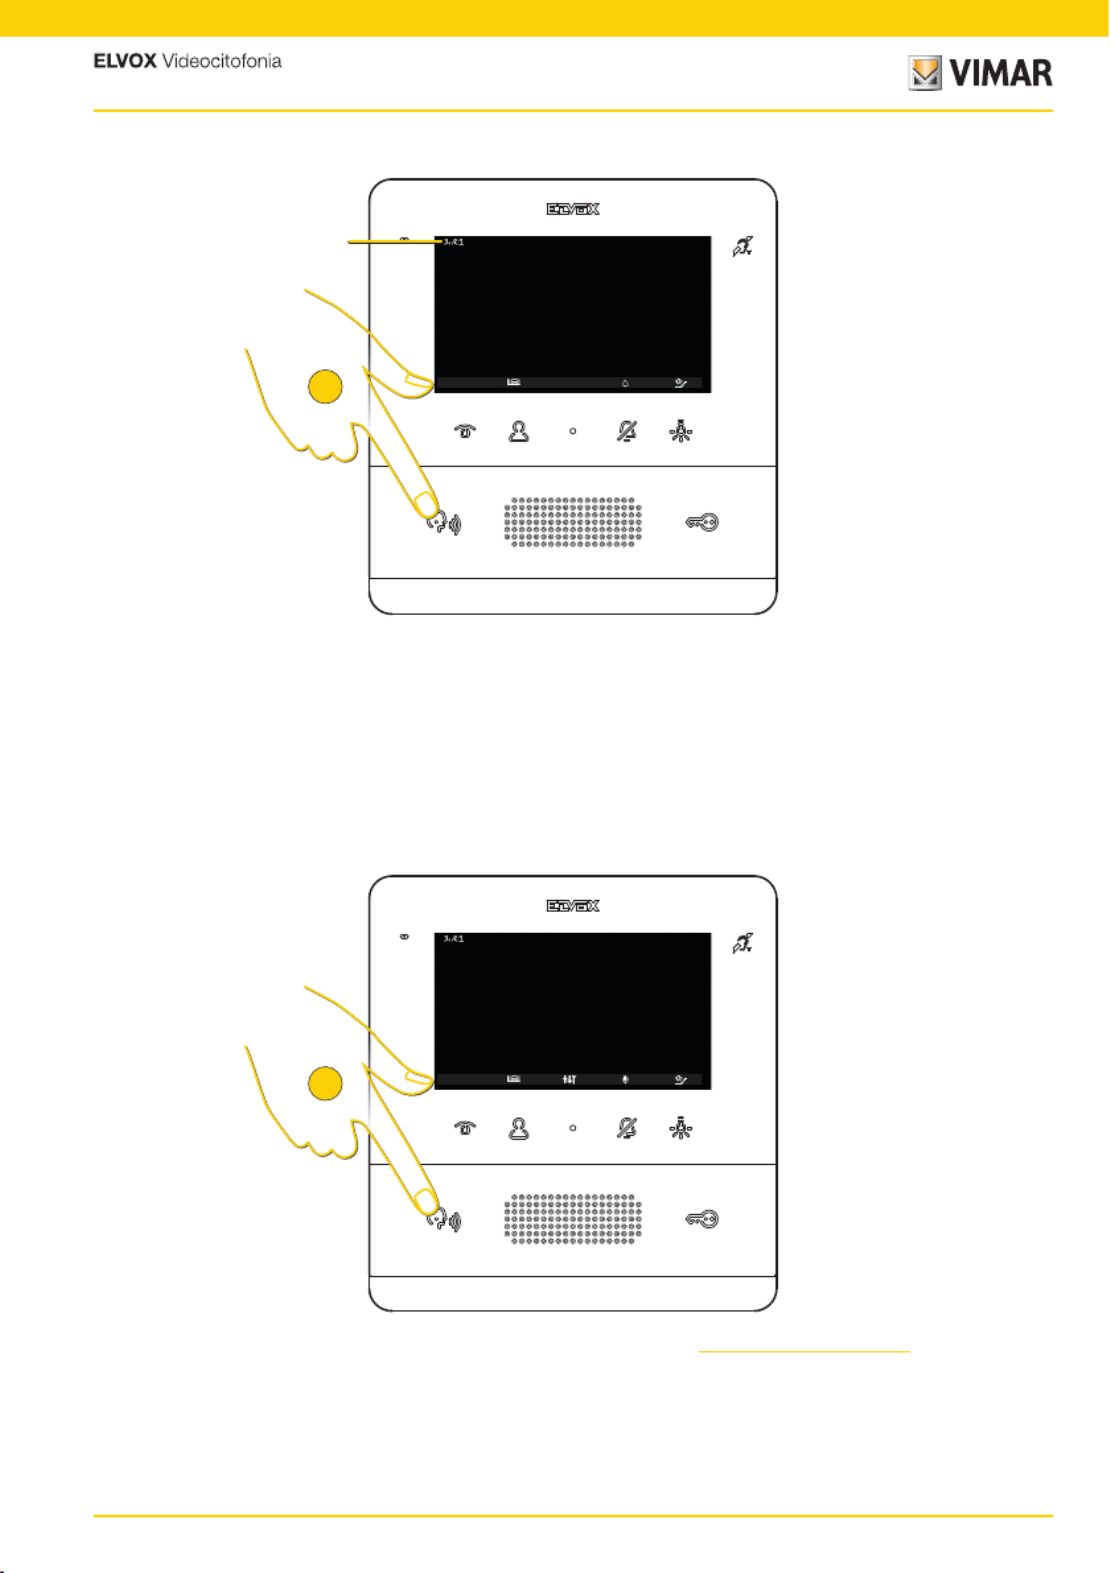
Self-start (Calling an Outdoor Station)
1. Press to perform the self-start of the Outdoor Station
The video entryphone shows the image filmed, the audio is active (audio monitoring) but the microphone is muted as
shown by the related icon ( ). You can now:A
Press the key for activating audio and communicating with the Outdoor Station
Press the key to release the lock
A
1

22
7559 Tab 4.3
2. Press to end
The actuations menu can also be used to activate other actuations and/or make adjustments to the audio/video
settings ( )A
A
2

23
7559 Tab 4.3
Calling an Indoor Station (Intercom)
Where appropriately configured (see or using the Installer configuration SaveProg spftware), the video entryphone
allows you to communicate with other Indoor Stations and Switchboards.
If at least 2 programmable keys have been programmed as intercom, the specific menu appears.
If only one key has been programmed, press it directly.
1. Press to display the Intercom menu
2. Press to call the Indoor Station programmed in position 1 for example
1
2

24
7559 Tab 4.3
The display indicates that the call is in progress towards the Indoor Station in position 1.
In the meantime, you can activate other actuations by pressing the related keys (e.g. stair lights, etc..)
When the other Indoor Station answers, the icons for the and the mute function appearaudio settings
3. Press to end communication
N.B.: before connecting the audio channels with any other device, the Indoor Station Art. 7559 determines the best
possible communication parameters.
During this stage, which lasts approximately 1 second, a waiting tone is transmitted to the user.
A
3

25
7559 Tab 4.3
Calling a Reception switchboard
One or more Switchboards can be called using the Intercom menu, or - if the call to a Reception switchboard has been
activated - via the SaveProg software, using the
key directly
1. Press to display the Intercom menu
2. Press to call the Reception switchboard 2 for example
1
2

26
7559 Tab 4.3
The display indicates that the call is in progress towards the Reception switchboard 2 ( )A
When the Reception switchboard answers, the icons for the audio settings and the microphone mute function appear.
A

27
7559 Tab 4.3
Now other scenarios are possible, depending on how the Reception switchboard works.
For example, the switchboard operator could connect another Indoor Station/Outdoor Station/Reception switchboard.
While it does this, it may put you on hold.
During this hold, the display shows the audio disabled icon. Hold can be interrupted the by pressing the
key
When communication with the other Indoor/Outdoor Station/Reception switchboard is activated, the related icon
appears ( ). The microphone remains muted to ensure the other Indoor/Outdoor Station/Reception switchboard hears A
nothing until the audio is activated.
3. Press to end communication
N.B.: the methods of interaction with the Reception switchboard illustrated above are also valid when the indoor station
has been called by the reception switchboard.
A
3
28
7559 Tab 4.3
Professional firm function
This function, when active, following a call from an Outdoor Station, automatically activates the lock.
The professional firm function must be enabled and, subsequently, it can be activated or deactivated according to need.
To enable the function, see or via the )Installer configuration SaveProg software
There are two ways to activate it:
Activating professional firm via the
key
1. In stand-by press for more than 5 seconds. A high-tone beep is emitted and the lock LED starts flashing.
BEEP
Now, when calling from an Outdoor Station, the lock connected to it is automatically activated and the call is ended
1

29
7559 Tab 4.3
2. To disable the function, in stand-by press for more than 5 seconds.
A low-tone beep is emitted and the lock LED stops flashing
N.B.: the automatic ending of the call can be avoided using the SaveProg software
BEEP
2

30
7559 Tab 4.3
Activating professional firm from the User menu
When the function is enabled, an icon appears in the user menu.
Press the related key to enable/disable the function
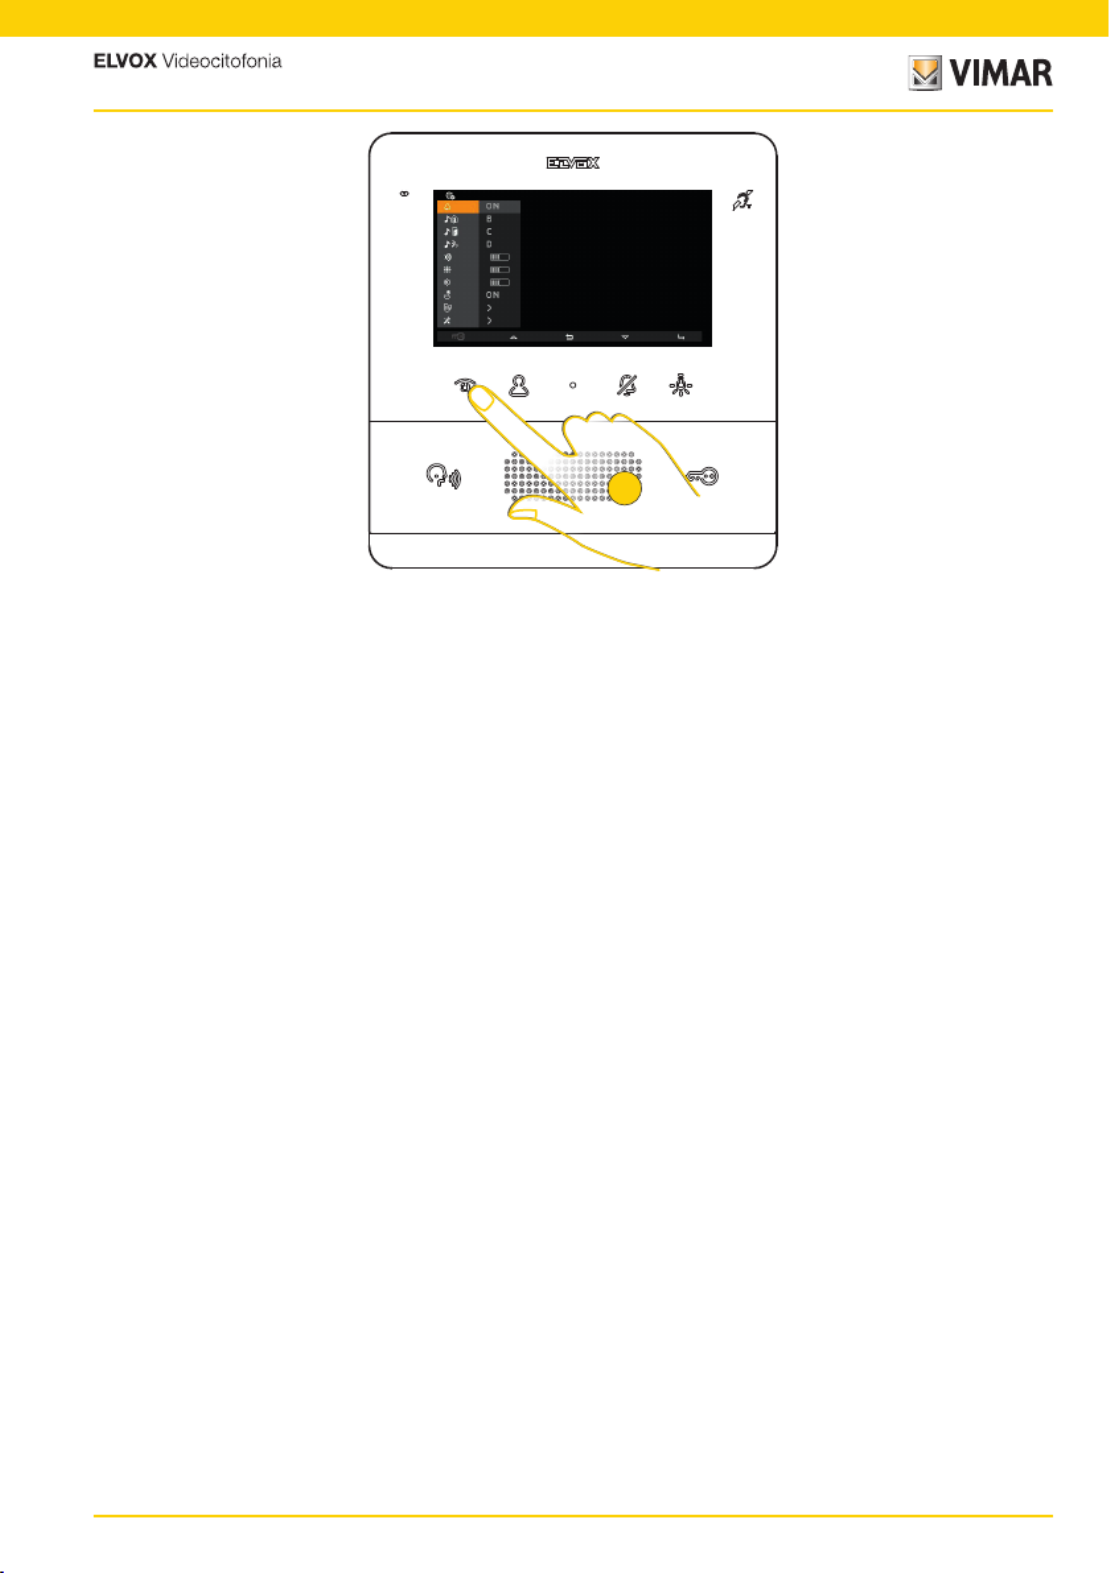
1. Press to display the User menu
2. Press to enable the function
2
1
31
7559 Tab 4.3
3. Now the function is active, press it again to disable it
3

32
7559 Tab 4.3
Alert Function
This function is used to send a notice to the Reception Switchboard art 40510 even if the Due Fili Plus bus is busy.
To enable this function, one of the programmable keys must be configured as Alert.
See or via the Installer configuration SaveProg software).
1. Press to display the Intercom menu
2. Press to send an Alert notification
2
1

33
7559 Tab 4.3
Now the video entryphone goes in stand-by and receives various answers depending on the actions of the Reception
switchboard.
These answers may be visual or acoustic depending on the configuration set via the SaveProg software
If the bus is busy and the indoor station cannot be turned on, the intercom menu is available, but the LEDs of the keys
configured as Alert flash.
Press the flashing key to start the alert function.
The video entryphone is pending an answer from the Reception switchboard
The video entryphone has received confirmation of receipt of the notification from the Reception switchboard
Slow flashing
or
Rapid flashing
or
High and fast
sound
BEEP
Low and slow
sound
BEEP
34
7559 Tab 4.3
User configurations
Certain parameters of the TAB 7559 Video entryphone can be adjusted using the User Configurations menu.
This menu can be used to modify certain and set the .audio/video settings keypad cleaning
You can also access (only where enabled via a code) the sectionInstaller configurations
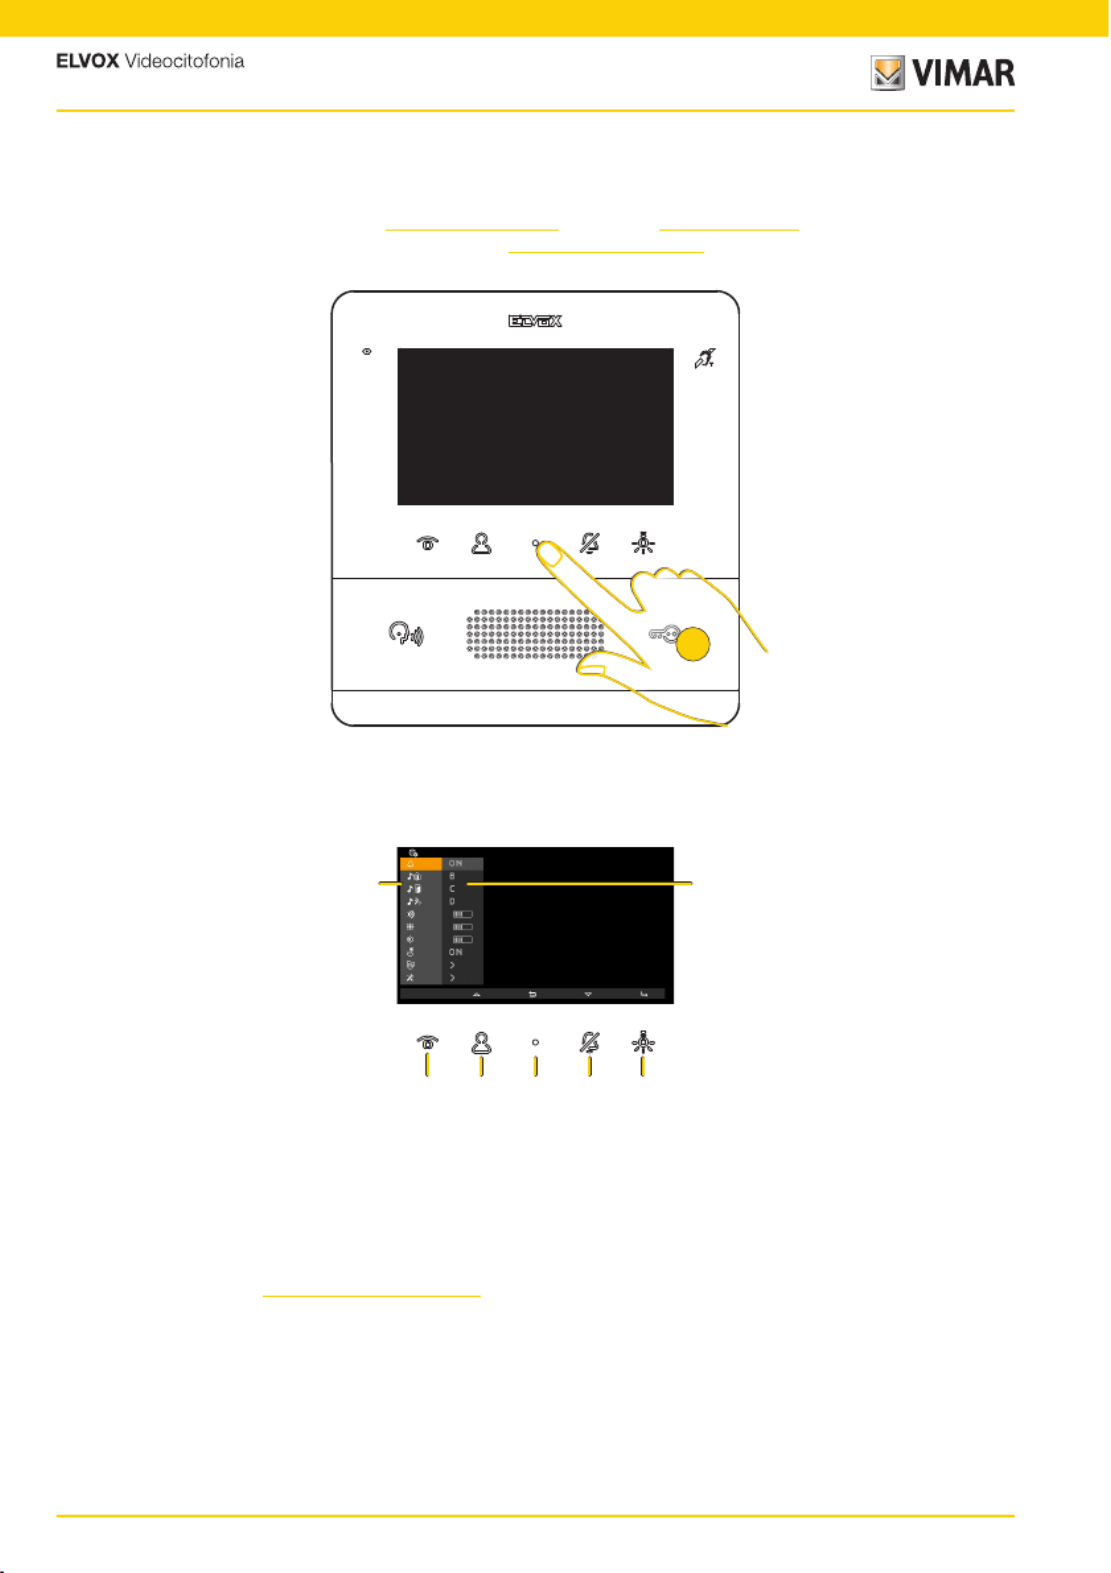
1. In stand-by press to display the User menu
A Press to confirm
B Press to move down in the menu
C Press to return to the previous step
D Press to move up in the menu
E Enables/disables the (where enabled)professional firm function
F Adjustments available
G Current parameters.
E
F
D C B A
G
1

35
7559 Tab 4.3
2. Press to move up or down in the settings menu and select the desired setting
ICON FUNCTION DESCRIPTION DEFAULT VALUE
Ringtone
exclusion
It activates/deactivates the ringtone. It also sets the user
away status where enabled via SaveProg Ringtone on
Call from Outdoor
Station ringtone
It selects the ringtone that is reproduced in the event of a
call from an Outdoor Station Melody B
Landing call
ringtone
It selects the ringtone that is reproduced in the event of a
call from a landing Melody C
Call from
Indoor Station
or Reception
switchboard
ringtone
It selects the ringtone that is reproduced in the event of a
call from an Indoor Station or Reception switchboard Melody D
Ringtone volume It adjusts the volume of the ringtones Level 5
Brightness It adjusts the brightness level of the image filmed by the
Outdoor Station Level 5
Contrast It adjusts the contrast level of the image filmed by the
Outdoor Station Level 5
Key tone It enables/disables the acoustic signalling whenever a key
is touched On
Keypad cleaning It blocks the video entryphone keys for the amount of time
necessary to clean them
Installer
configurations
It displays the menu where you can perform the advanced
video entryphone configurations. Access is protected by a
PIN number
1
2

36
7559 Tab 4.3
Ringtone exclusion
This section is used to enable/disable the ringtone or set the User away status (where enabled from )SaveProg
1. Press to modify
2. Press left or right to select the option among:
3. Press to confirm
Ringtone on
Ringtone off: the video entryphone does not ring but turns on
User away: the video entryphone does not ring and is not switched on (configurable via the SaveProg
software)
N.B.: “Ringtone exclusion” does not apply to calls received from an Indoor Station or Reception switchboard.
If the ringtone off has been selected, the LED lights up, whereas the LED flashes to indicate the User away status.
If the User away status is active, the calling Outdoor Station obtains a specific sound.
1
3
2 2

37
7559 Tab 4.3
Ringtone selection
This section is used to select the ringtone which is reproduced in the event of a call from:
1 Press to modify
2 Press left or right to select the desired ringtone among the 10 available identified with a letter from A to J
3 Once selected, the ringtones are reproduced; press to confirm the desired selection
An Outdoor Station
Landing (both from local FP-M contact as well as from interface for remote push buttons 6120)
An Indoor Station or Reception Switchboard
N.B.: the selection method is identical for all three settings
1
1
2
2
2
2
3
3
Ringtone volume control
This section is used to adjust the volume of the ringtones. The level set is common for all types of ringtones (Outdoor
Station, landing, Indoor Station and Reception switchboard)
The horizontal bar indicates the volume level
1. Press to modify
2. Press to raise or lower the ringtone volume
3. Press to confirm

38
7559 Tab 4.3
Brightness control
This section is used to adjust the brightness level of the image filmed by the Outdoor Station
The horizontal bar indicates the brightness level
The self-start of the Outdoor Station is performed, allowing you to check the adjustment in real time
1. Press to modify
3. Press to confirm
2. Press to raise or lower the brightness
Contrast control
This section is used to adjust the contrast level of the image filmed by the Outdoor Station
The horizontal bar indicates the contrast level
The self-start of the Outdoor Station is performed, allowing you to check the adjustment in real time
1. Press to modify
3. Press to confirm
2. Press to raise or lower the contrast
1
1
2
2
2
2
3
3

39
7559 Tab 4.3
1 2 2 3
Key tone
This section is used to enable/disable the acoustic signalling produced whenever a key is touched (keystroke feedback)
1. Press to modify
2. Left or right to select the option among:
3. Press to confirm
Key tone enabled
Key tone disabled
Keypad cleaning
This section is used to activate the keypad cleaning function, by allowing you to block the keys of the video entryphone
for the amount of time necessary to clean them.
The keys are now blocked for 20 seconds and you can proceed with cleaning the Video entryphone
Caution: clean using a soft cloth. Do not pour water onto the appliance and do not use any type of chemical product.
Cleaning must be done with the device powered off (disconnected from the BUS) or after activating the keypad cleaning
procedure
1. Press to enable the function
1

40
7559 Tab 4.3
Installer configuration
This section is used to set certain advanced parameters directly from the device. In addition, a larger number of options
can be selected for each parameter, using the ).SaveProg software
For safety reasons, access to this section is permitted only after a PIN number has been entered.
The PIN number is 100 by default
Caution: the modification of these parameters is for the sole use of qualified persons
1. In stand-by press to display the User menu
2. Press to go to the last icon
3. Press to display the Installer configurations menu
1
3
2

41
7559 Tab 4.3
4. Press to select the first digit of the PIN number
5. Press to confirm and move on to the second digit
6. Press to select the second digit of the PIN number
9
4 4 5 6 6
7 8 8
10 10
7. Press to confirm and move on to the third digit
8. Press to select the third digit of the PIN number
9. Press to confirm
10. Press to move up or down in the installer configuration menu and select the desired parameter
0 1 01
1 11 111 0 1

42
7559 Tab 4.3
ICON FUNCTION DESCRIPTION DEFAULT VALUE
Actuations
Sets an actuation for each programmable key of the
Video entryphone. The user can therefore perform
directly, or via selection from a dedicated menu, the
actuation of relays, Outdoor Station locks and send
F1/F2 controls to Outdoor Stations.
empty
Intercom
Sets an Intercom for each programmable key of the
Video entryphone. The user can therefore call directly,
or via selection from a dedicated menu, another
Indoor Station/Reception switchboard or a notification
to all Switchboards (Alert)
empty
Assignment of
main or secondary
ID
It defines whether the video entryphone is Main or
Secondary and consequently assigns an ID to identify
it in the system.
–
Modify PIN
number
It modifies the PIN number to access the installer
configuration. 100
Reset factory
configuration
Deletes the settings and programming of the Indoor
Station, restoring it to the initial default operating
condition.
–
Enabling
Professional Firm Enables/disables the Professional Firm function. Disabled
System
information
Displays useful information for Vimar customer service
(SAC/TSX), including ID, Firmware version, and so on: –

43
7559 Tab 4.3
Actuations
This section is used to set an actuation for each programmable key of the Video entryphone.
It is therefore possible to perform directly, or via selection from a dedicated menu, the actuation of relays, Outdoor
Station locks and send F1/F2 controls to Outdoor Stations.
N.B.: if at least 1 of the programmable keys has been programmed, the user will have a dedicated menu available,
otherwise press one of the default keys directly to activate the default actuation.
A Programmable keys corresponding to the menu reference P1, P2, P3, P4
B Reference to the programmable keys
C Current setting of the customisable icons that appear in the Actuations menu, the first symbol «-» indicates that the
default icon will be displayed
D Current setting of the Actuations, the second symbol «-» indicates that the default actuation is set.
«An.» Indicates the relay or lock actuations
«Fn.» Indicates sending F1/F2 controls
Indicates Outdoor Station self-start
B
A A
C D
44
7559 Tab 4.3
Example 1: no key programmed
Example 2: programming of a single key (P3)
In stand-by (display black) press one of the programmable keys and the default actuation will be actuated:
After pressing the key to display the actuations menu, press to activate relay 3.
The other default actuations can now be activated from the actuations menu until programmed differently
Self-start
Relay 2 activation
Sending F2 control last Outdoor Station
Relay 1 activation

45
7559 Tab 4.3
Programming an actuation (ID and icon)
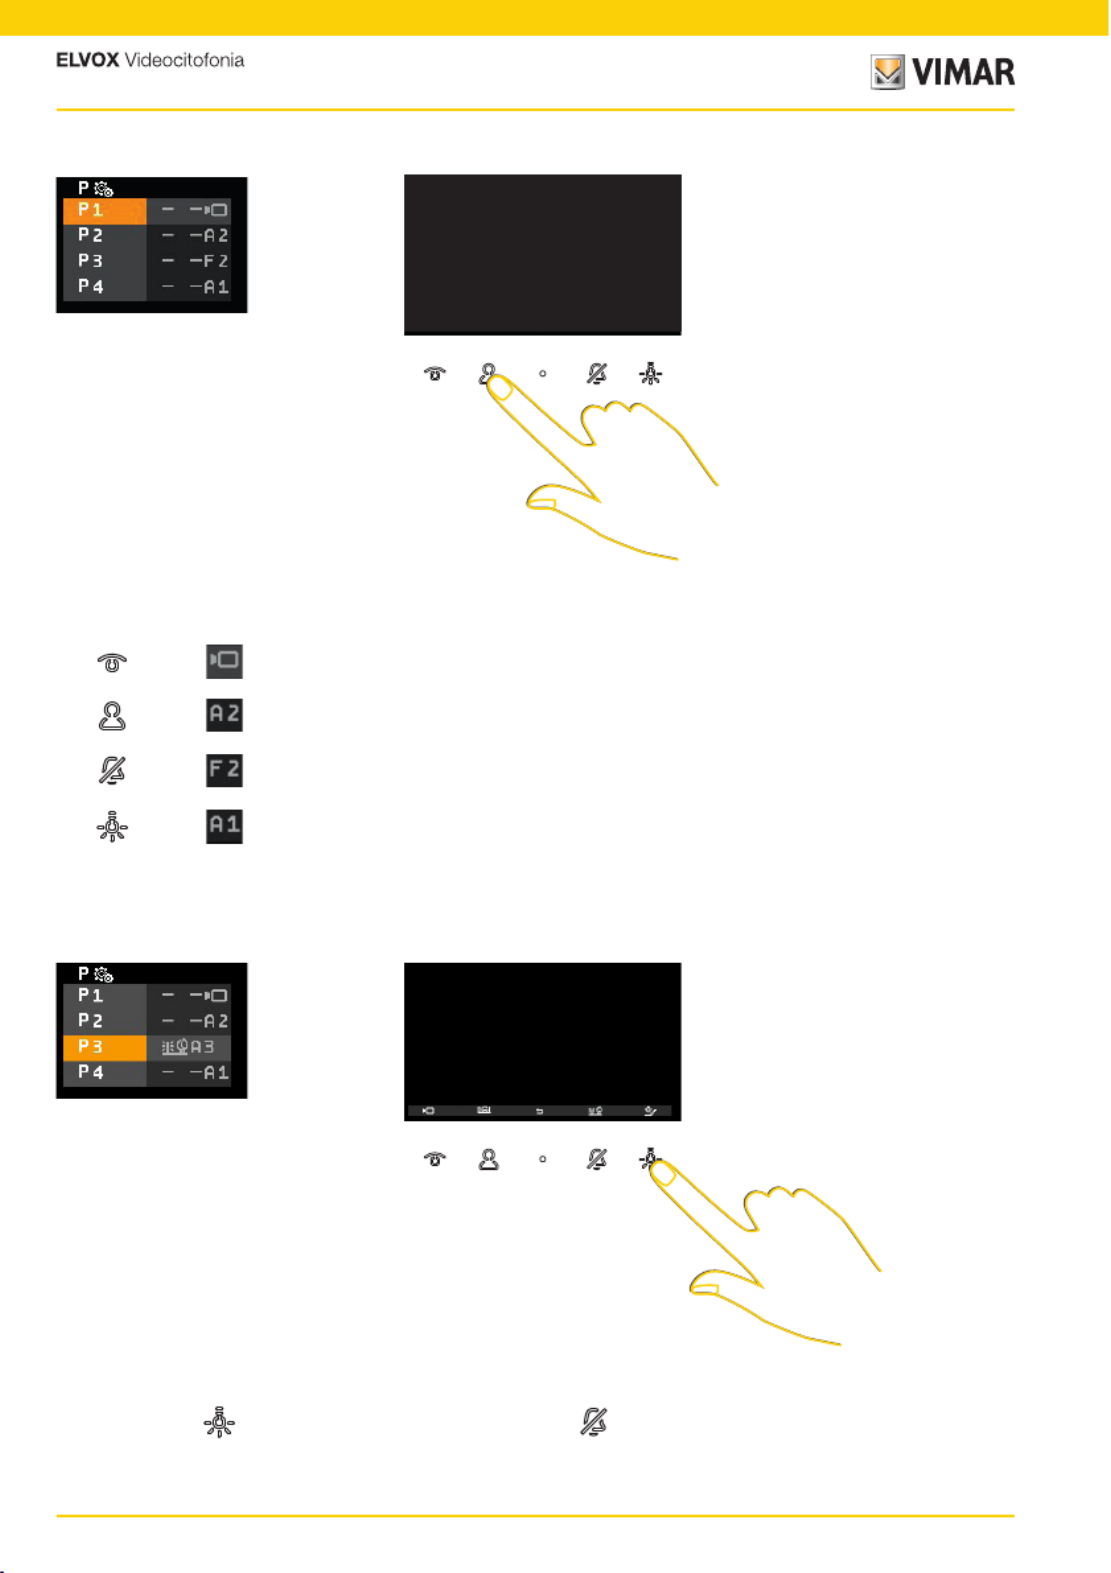
1. Press to program an actuation
2. Press to select the push button to program
3. Press to confirm
4. Press to select the icon that will represent the actuation in the Actuations menu
5. Press to select the icon
6. Press to confirm
7. Press to select the actuation to be associated
8. Press to confirm
1 32 2 4
65 5 7 8
9. Press to select the actuation among those available. 6 actuations are available by default, the first 4 relays and the
F1 – F2 controls on the last Outdoor Station with which the Indoor Station communicated or was called from.
Other actuations can also be selected via the SaveProg software
10. Press to confirm
11. Press to return to the previous screen
12. The actuation programmed can be displayed
109 9 11
12

46
7559 Tab 4.3
Deleting an actuation
1. Press to delete an actuation
2. Press to select the push button on which you wish to delete the actuation
3. Press to confirm
4. Press to select the function to eliminate the actuation
5. Press to confirm
6. Press to delete the actuation
7. Both the icon and the association with the key are restored to their factory values
1 32 2 4 4
5 6
7

47
7559 Tab 4.3
Intercom
This section is used to set an intercom call for each programmable key of the Video entryphone.
Intercom calls can be made to another Indoor Station or to a Reception switchboard.
The Alert function can also be associated, which sends a notification to all Switchboards.
N.B.: no association is present by default. If at least 2 of the programmable keys have been programmed, the user will
have a dedicated menu available, otherwise press one of the programmed keys directly to start the related call.
A Programmable keys corresponding to the menu reference P1, P2, P3, P4
B Reference to the programmable keys
C current setting of the Intercom, the «-» symbol indicates that no intercom has been associated
Call to an Indoor Station (e.g. ID= 4)
Call to a Reception switchboard with ID 3
Alert Function
B
A A
C

48
7559 Tab 4.3
Example 1: programming of an intercom key (1)
Example 2: programming 2 or more intercom keys
In stand-by (black display) press to make the call to a programmed intercom device, whatever its position in the list.
After pressing the key to display the intercom menu, press to call the Indoor Station in position 1.
1
4
Termékspecifikációk
| Márka: | Vimar |
| Kategória: | Intercomsysteem |
| Modell: | ELVOX 7559 |
Szüksége van segítségre?
Ha segítségre van szüksége Vimar ELVOX 7559, tegyen fel kérdést alább, és más felhasználók válaszolnak Önnek
Útmutatók Intercomsysteem Vimar

30 December 2025
16 December 2024
16 December 2024
16 December 2024
18 Augusztus 2024
16 Augusztus 2024
11 Augusztus 2024
11 Augusztus 2024
10 Augusztus 2024
10 Augusztus 2024
Útmutatók Intercomsysteem
- Intercomsysteem Philips
- Intercomsysteem SilverCrest
- Intercomsysteem Panasonic
- Intercomsysteem HQ
- Intercomsysteem Emos
- Intercomsysteem Alcatel
- Intercomsysteem Crestron
- Intercomsysteem ORNO
- Intercomsysteem Hikvision
- Intercomsysteem Midland
- Intercomsysteem Dahua Technology
- Intercomsysteem Fibaro
- Intercomsysteem DiO
- Intercomsysteem Planet
- Intercomsysteem Viking
- Intercomsysteem Chamberlain
- Intercomsysteem Foscam
- Intercomsysteem Alecto
- Intercomsysteem Russound
- Intercomsysteem Monacor
- Intercomsysteem Chacon
- Intercomsysteem Elro
- Intercomsysteem Busch-Jaeger
- Intercomsysteem ZKTeco
- Intercomsysteem Abus
- Intercomsysteem Konig
- Intercomsysteem Marmitek
- Intercomsysteem DataVideo
- Intercomsysteem Fanvil
- Intercomsysteem M-e
- Intercomsysteem Somfy
- Intercomsysteem Axis
- Intercomsysteem Becken
- Intercomsysteem Swann
- Intercomsysteem Schwaiger
- Intercomsysteem WHD
- Intercomsysteem Smartwares
- Intercomsysteem Byron
- Intercomsysteem Steren
- Intercomsysteem Siedle
- Intercomsysteem Valcom
- Intercomsysteem Bticino
- Intercomsysteem Sygonix
- Intercomsysteem Extel
- Intercomsysteem DoorBird
- Intercomsysteem Gira
- Intercomsysteem Comelit
- Intercomsysteem Aiphone
- Intercomsysteem Sonifex
- Intercomsysteem RTS
- Intercomsysteem Estom
- Intercomsysteem Nortek
- Intercomsysteem Akuvox
- Intercomsysteem Bitron
- Intercomsysteem Hollyland
- Intercomsysteem Hanwha
- Intercomsysteem Leviton
- Intercomsysteem EtiamPro
- Intercomsysteem Pentatech
- Intercomsysteem Ritto
- Intercomsysteem Arenti
- Intercomsysteem Syscom
- Intercomsysteem Elcom
- Intercomsysteem Pentatron
- Intercomsysteem CyberData Systems
- Intercomsysteem COMMAX
- Intercomsysteem Bintec-elmeg
- Intercomsysteem Eartec
- Intercomsysteem Gewiss
- Intercomsysteem TCS
- Intercomsysteem Seco-Larm
- Intercomsysteem NuTone
- Intercomsysteem GEV
- Intercomsysteem Tador
- Intercomsysteem Mobotix
- Intercomsysteem FlyingVoice
- Intercomsysteem Vibell
- Intercomsysteem Toucan
Legújabb útmutatók Intercomsysteem
28 Március 2025

27 Március 2025
27 Március 2025
27 Március 2025
27 Március 2025

14 Január 2025
14 Január 2025
12 Január 2025
11 Január 2025
11 Január 2025