Használati útmutató Vaddio EasyIP 30 ePTZ
Vaddio
videokonferencia-rendszer
EasyIP 30 ePTZ
Olvassa el alább 📖 a magyar nyelvű használati útmutatót Vaddio EasyIP 30 ePTZ (76 oldal) a videokonferencia-rendszer kategóriában. Ezt az útmutatót 7 ember találta hasznosnak és 2 felhasználó értékelte átlagosan 4.5 csillagra
Oldal 1/76

Complete Manual for the
EasyIP 30 ePTZ
AV-over-IP ePTZ Camera
Document 411-0055-30 Rev A
May 2022

ii
Contents
Overview 1
EasyIP 30 ePTZ Camera Features 1
The EasyIP Ecosystem 1
A Quick Look at the EasyIP 30 ePTZ Camera 2
Front View 2
Connector Panel 2
Installation 3
Don’t Void Your Warranty! 3
Before You Start 3
Cabling Notes 4
Connecting EasyIP Products 4
Basic Connections for Cameras and Audio with EasyIP Decoder 5
Basic Connections for Cameras and Audio with EasyIP Mixer 6
Installing the Wall Mount 7
Installing the Camera 7
About Inverted Cameras 7
Powering Up the EasyIP System 8
Next Steps 8
Initial Set-Up and Access to Administrative Controls 9
Browser Support 9
Access and Initial Device Set-Up Using the Vaddio Device Controller 9
Initial Device Set-Up and Access Using the Vaddio Deployment Tool 10
Manual Access and Initial Device Set-Up 11
Access the Web Interface of an EasyIP Camera Manually 11
System Administration 12
Configuring Access and Other Security Settings 12
Changing Device Hostname 13
Other Network Settings 13
Specifying Time Zone and NTP Server 13
Adding Room Information to the Device's Web Interface 14
Configuring and Adjusting Cameras 15
Fine-Tuning Autoframing Behavior 15
How It Works: Digital Pan/Tilt/Zoom 15
How It Works: Autoframing 16
Basic Autoframing Adjustments 17
Advanced Autoframing Adjustments 18
Masking Unwanted Motion 19
Autoframing Adjustment Quick Reference 20
Setting the Home Position and Other Preset Shots 21
Renaming Presets 21

Initial Lighting and Color Settings 22
Color and Image Quality Adjustments 23
Saving Color and Lighting Settings 24
Lighting and Image Quality Quick Reference 24
Color Adjustment Quick Reference 25
Setting the Speeds for Manual Camera Movements 26
Setting the Direction for Camera Movements 26
Adjusting the Focus 27
About Pairing Cameras and Configuring Streaming 28
Video and Control Settings 28
Indicator Light Behavior 28
System Maintenance 29
Saving (Exporting) or Restoring (Importing)a Configuration 29
Installing a Firmware Update 30
Rebooting the Device 31
Operating the Camera 32
Installing the Batteries 32
Pairing the Remote to the Camera 32
Other Things to Know About the Remote 32
RF Remote cheat sheet 33
Unpairing the Remote 33
Serial Command API 34
Camera Commands 35
camera home 35
camera pan 36
camera tilt 37
camera zoom 38
camera ptz-position 39
camera focus 40
camera preset 41
camera ccu get 42
camera ccu set 43
camera ccu scene 44
camera led 44
video mute 45
camera standby 46
Autoframing commands 47
autoframer enabled 47
autoframer paused 48
autoframer default-wide 48
autoframer buffer-zone 49
iii
Complete Manual for the EasyIP 30 ePTZ AV-over-IP ePTZ Camera

iv
autoframer shot-margin 49
autoframer sensitivity 50
autoframer responsiveness 50
autoframer initial-persistence 51
autoframer persistence 51
autoframer max-electronic-zoom 52
autoframer max-speed 52
autoframer noise-threshold 53
autoframer tri-sync-motion 53
autoframer history 54
autoframer forced-wait-time 54
Maintenance and Troubleshooting Commands 55
network settings get 55
network ping 55
system reboot 56
system factory-reset 56
version 57
Information and Session Management Commands 58
history 58
help 58
exit 58
Troubleshooting and Care 59
Status Indicator Light 59
System and Power Issues 59
Camera Issues 60
Restoring Factory Default Settings 61
Contacting Vaddio Technical Support 62
Viewing Diagnostic Logs 62
Operation, Storage, and Care 63
Glossary 64
Photo Credits 67
Index 68
Complete Manual for the EasyIP 30 ePTZ AV-over-IP ePTZ Camera

1
Overview
This manual covers:
EasyIP 30 ePTZ AV-over-IP ePTZ camera, 999-30250-000 (black, worldwide)
EasyIP 30 ePTZ AV-over-IP ePTZ camera, 999-30250-000W (white, worldwide)
What's in this manual:
nFeatures
nInstallation
nSystem administration and performance/behavior configuration
nOperation and maintenance
nTelnet API reference
nTroubleshooting
EasyIP 30 ePTZ Camera Features
nIdeal for small to medium conference rooms
nPairs with an EasyIP Decoder or EasyIP Mixer; may be paired to two host devices
nIntelliFrameTM intelligent framing algorithm keeps participants in view reliably, without facial
recognition
n30x zoom, horizontal field of view of 70.2°
nUp to 1080p/30 video
nIntegration-ready Telnet control
nFull administrative control via web interface
nPresenter-friendly RF remote control
The EasyIP Ecosystem
Vaddio®EasyIP products are designed to be used together.
nEasyIP cameras deliver video in Vaddio's proprietary EasyIP format. A host device is required to
convert the cameras' output signal to an IP and/or USB stream.
nEasyIP host devices can control EasyIP cameras but not other cameras.
nEasyIP host devices automatically detect EasyIP cameras on the host device's subnet.
nEasyIP products require PoE+ power. Typically the EasyIP system is powered by a PoE+ switch such
as the EasyIP Switch.
nEasyIP microphones and speakers use Dante networked audio.
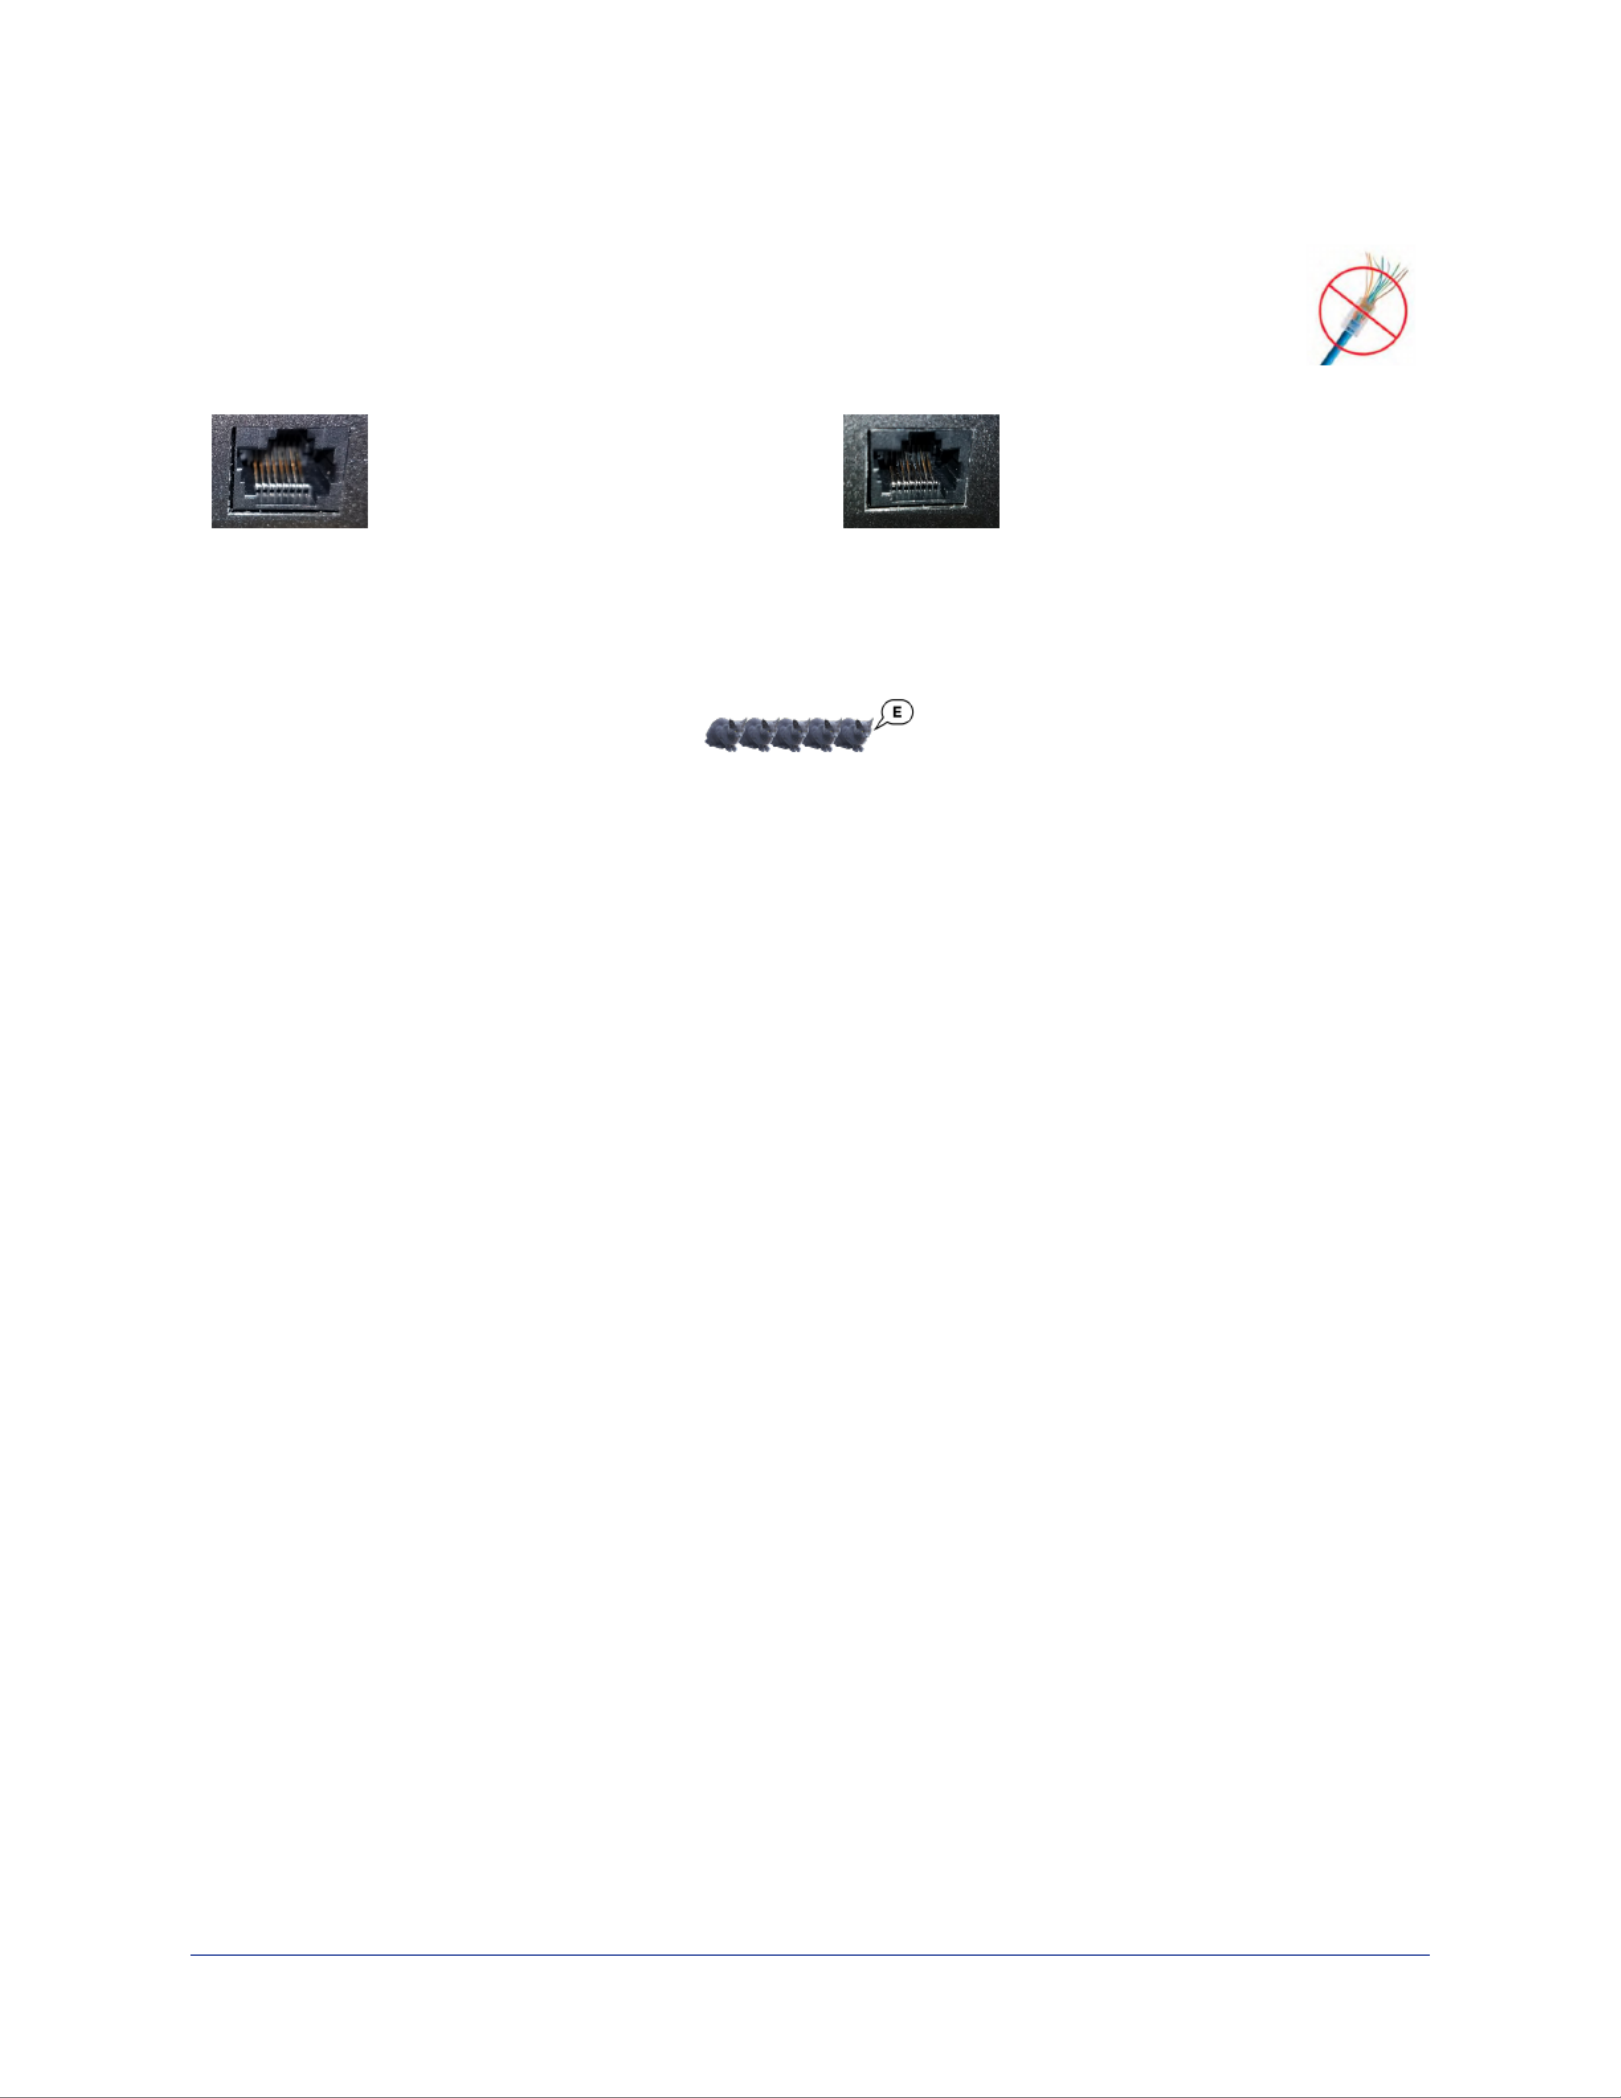
Cabling Notes
Caution
When building cables for Vaddio products, do not use pass-through RJ-45 connectors.
Incorrectly crimped pass-through connectors can damage the connectors on the product,
which will void your warranty.
Intact – will make reliable contact
with cable connector
Damaged – Bent contact fingers
will NOT make reliable contact
with cable connector
Use Cat-5e or better cable. We recommend using high-quality connectors and a high-quality crimping
tool. If connectors are crimped incorrectly, they can cause intermittent connections and degrade signal
quality.
We recommend shielded cabling if the cables will be coiled, run tightly with other cables, or routed near
sources of electromagnetic interference such as power lines or fluorescent light fixtures.
Caution
Check your cables. Connecting a cable to the wrong port or using the wrong pin-out can result in
equipment damage and will void the warranty.
Pro Tip
Label all cables at both ends.
Connecting EasyIP Products
EasyIP cameras and audio products require an EasyIP host device to decode the AV-over-IP signal and
originate a USB stream.
EasyIP devices can be powered using mid-span PoE+ power injectors (sold separately), or they can be
connected to a PoE+ switch such as the EasyIP Switch, which ensures that the room's EasyIP
installation is on its own subnet. The EasyIP Switch is preconfigured for use with Vaddio EasyIP
products. The connection diagrams in this section each show an EasyIP Switch powering the installation.
Make all connections while the PoE+ switch is turned off.
Caution
The EasyIP Switch serves DHCP addresses. Do not connect the EasyIP Switch to the network without
guidance from an on-site network specialist.
4
Complete Manual for the EasyIP 30 ePTZ AV-over-IP ePTZ Camera

5
Basic Connections for Cameras and Audio with EasyIP Decoder
Here is an example of a simple EasyIP deployment.
nEach camera connects to a PoE+ port on the switch. This is the only connection that the cameras
require.
nThe EasyIP Decoder manages up to four EasyIP cameras and provides hard-wired audio
connections for two EasyMic microphones and an analog speaker with amplifier.
nThe EasyIP Decoder connects directly to a computer as a USB conferencing device.
nAny model of EasyIP camera may be used.
nThe microphones may be Vaddio TableMIC or CeilingMIC microphones.
This diagram shows EasyIP 30 ePTZ cameras and TableMIC microphones.
Complete Manual for the EasyIP 30 ePTZ AV-over-IP ePTZ Camera

Basic Connections for Cameras and Audio with EasyIP Mixer
Here is an example of an EasyIP deployment using an EasyIP Mixer.
nEach camera connects to a PoE+ port on the switch. This is the only connection that the cameras
require.
nThe EasyIP Mixer manages up to four EasyIP cameras.
nThe EasyIP Mixer is paired to two network-connected EasyIP CeilingMIC D microphones. It also
provides hard-wired audio connections for two microphones and two amplified analog speakers.
nAny model of EasyIP camera may be used.
nEasyIP CeilingMIC D and EasyIP TableMIC D microphones can pair with the EasyIP Mixer.
nAcomputer connects to the system as a USB conferencing device, and can be connected to the
HDMI input as an HDMI content source.
This diagram shows EasyIP 20 and EasyIP 30 ePTZ cameras with EasyIP CeilingMIC D microphones.
6
Complete Manual for the EasyIP 30 ePTZ AV-over-IP ePTZ Camera

Powering Up the EasyIP System
Vaddio recommends making all connections while the EasyIP Switch is turned off. To power the system,
turn on the EasyIP Switch.
nSystems built around an EasyIP Decoder: The device’s status light turns blue when the device is
ready.
nSystems built around an EasyIP Mixer: The power light in the Reset button illuminates immediately
when power is connected. The device's web interface is available after it finishes booting. This takes
about 20 seconds.
nThe EasyIP cameras initialize if they are powered from the same PoE+ switch. This takes a few
seconds. The cameras are ready to accept control information when they finish initializing.
Note
If a camera has already been in use and is paired with the host device, its indicator light may change to
red when it finishes booting. This happens if the camera is the selected video input and is using the pro
A/V color scheme. Pro A/V is the default color scheme for EasyIP 20 and EasyIP 30 ePTZ cameras.
Note
No video is available from the EasyIP system until it is configured and at least one camera is paired to the
host device.
Next Steps
Refer to the Complete Manual for the EasyIP System for information on initial device set-up and pairing
cameras to the host device.
8
Complete Manual for the EasyIP 30 ePTZ AV-over-IP ePTZ Camera

9
Initial Set-Up and Access to Administrative Controls
EasyIP cameras and host devices have a web interface for initial device set-up, administrative control,
and operation. Initially, no password is set and the controls are not available. Initial device set-up
includes setting the password for the account, and may include additional tasks. Theadmin admin
account then has access to password-protected pages for administrative access to tasks such as
configuring network and security settings, customizing device behaviors, and installing firmware
updates. The administrator can configure access to the operator's pages.
Note
Because restoring factory defaults returns the product to a "like new" condition, you will need to do the
initial device set-up again if you restore factory defaults.
After initial device set-up is complete, you will need to complete system administration tasks to define
how each device behaves as an element of your network.
Note
Many pages of the web interface are nearly the same across large groups of Vaddio products. Some of
the screen shots in this section may be from other EasyIP products.
Browser Support
We have tested this product with these web browsers:
nChrome®
nFirefox®
nMicrosoft® Edge and Internet Explorer®
nSafari®
We test using the browser version available from the vendor at that time. Other browsers (including older
versions of the ones on this list) are likely to work also.
Access and Initial Device Set-Up Using the Vaddio Device Controller
The Vaddio Device Controller provides a shortcut to Vaddio products' web interfaces.
To complete the initial device set-up with the Vaddio Device Controller:
1. Be sure the touch-panel is installed on the same subnet as the products you need to work with – for
example, connect both to the same PoE+ switch.
2. Go to the touch-panel's Configuration page and select Scan. You will need to enter the Vaddio Device
Controller's PIN to access the Configuration page.
3. Locate the device you need to work with, and select Use.
4. Select Exit to leave the Configuration page and open the device's web interface.
Note
The first time you access a device at a specific IP address, the Vaddio Device Controller's screen
may remain blank for 20 seconds or more.
5. Complete the initial set-up.
Complete Manual for the EasyIP 30 ePTZ AV-over-IP ePTZ Camera

Initial Device Set-Up and Access Using the Vaddio Deployment Tool
As Vaddio introduces new products, we issue updates to the Vaddio Deployment Tool. Be sure you have
the latest version of the tool, to ensure that it supports the products you are working with. This tool is
available as a free download at .https://info.legrandav.com/VaddioDeploymentTool
To complete the initial device set-up with the Vaddio Deployment Tool:
1. Power up the EasyIPsystem if you have not done so already.
2. On the Find Devices page of the Vaddio Deployment Tool, click Scan. If the scan does not locate the
EasyIP devices, click Advanced and specify the appropriate portion of the network to scan – your
computer may be on a different subnet from the EasyIP devices.
3. In the list of equipment that the scan discovers, locate the EasyIP devices marked Not Set Up.
4. For each device, click the Not Set Up button. The device detail page opens.
5. Set the admin password. If there are other initial set-up tasks, they are also available here.
The device now shows up as unlocked.
Pro tip
On the Groups page of the Vaddio Deployment Tool, you can create a group containing only the EasyIP
products.
To access EasyIP devices' web interfaces from the Vaddio Deployment Tool:
Select the device's IP address from any page where it appears. The Vaddio Deployment Tool logs you in
to the web interface as .admin
10
Complete Manual for the EasyIP 30 ePTZ AV-over-IP ePTZ Camera

11
Manual Access and Initial Device Set-Up
For EasyIP installations, you will need to complete the initial set-up for the host device. Then you can use
the device to access the cameras' web interfaces.
Access the Web Interface of an EasyIP Camera Manually
After you have done the initial device set-up for the host device, you will be able to use its web interface
to locate and browse to your EasyIP cameras.
To access a camera's web interface from an EasyIP Decoder:
1. Go to the Directory page.
2. If the system is already in service and cameras are paired to it, select their IP addresses to go directly
to their web interfaces.
3. If the device does not yet have paired cameras, follow the instructions for .setting up the directory
To access a camera's web interface from an EasyIP Mixer:
1. Go to the Video Inputs page.
2. If the system is already in service and you need to discover a paired camera's IP address or access
its web interface, select the appropriate EasyIP tab to display its information.
3. If the camera is not already paired to the device (for example, if you are in the process of doing initial
set-up and system administration for a new installation), select an EasyIP tab.
4. Select Settings to open the pairing dialog.
5. Select Discover Devices.
The web interface returns a list of EasyIP cameras on the EasyIP Mixer's subnet.
6. Select the camera's IP address to go directly to its web interface.
Complete Manual for the EasyIP 30 ePTZ AV-over-IP ePTZ Camera
Termékspecifikációk
| Márka: | Vaddio |
| Kategória: | videokonferencia-rendszer |
| Modell: | EasyIP 30 ePTZ |
Szüksége van segítségre?
Ha segítségre van szüksége Vaddio EasyIP 30 ePTZ, tegyen fel kérdést alább, és más felhasználók válaszolnak Önnek
Útmutatók videokonferencia-rendszer Vaddio

25 Augusztus 2024
17 Augusztus 2024
17 Augusztus 2024
13 Augusztus 2024
11 Augusztus 2024
10 Augusztus 2024
1 Augusztus 2024
1 Augusztus 2024
30 Július 2024
29 Július 2024
Útmutatók videokonferencia-rendszer
- videokonferencia-rendszer Sony
- videokonferencia-rendszer Yamaha
- videokonferencia-rendszer Marantz
- videokonferencia-rendszer Philips
- videokonferencia-rendszer HP
- videokonferencia-rendszer Roland
- videokonferencia-rendszer Crestron
- videokonferencia-rendszer Hikvision
- videokonferencia-rendszer Asus
- videokonferencia-rendszer Jabra
- videokonferencia-rendszer Vtech
- videokonferencia-rendszer Bose
- videokonferencia-rendszer Sennheiser
- videokonferencia-rendszer Logitech
- videokonferencia-rendszer TOA
- videokonferencia-rendszer Viewsonic
- videokonferencia-rendszer Black Box
- videokonferencia-rendszer Aluratek
- videokonferencia-rendszer Cisco
- videokonferencia-rendszer Newline
- videokonferencia-rendszer Plantronics
- videokonferencia-rendszer Grandstream
- videokonferencia-rendszer Yealink
- videokonferencia-rendszer Iiyama
- videokonferencia-rendszer Chief
- videokonferencia-rendszer MuxLab
- videokonferencia-rendszer Lumens
- videokonferencia-rendszer AVer
- videokonferencia-rendszer DataVideo
- videokonferencia-rendszer Atlona
- videokonferencia-rendszer Marshall Electronics
- videokonferencia-rendszer Gefen
- videokonferencia-rendszer Ipevo
- videokonferencia-rendszer Legamaster
- videokonferencia-rendszer Neat
- videokonferencia-rendszer Alfatron
- videokonferencia-rendszer Heckler
- videokonferencia-rendszer Kramer
- videokonferencia-rendszer BZBGear
- videokonferencia-rendszer Tork
- videokonferencia-rendszer Totolink
- videokonferencia-rendszer Da-Lite
- videokonferencia-rendszer PanaCast
- videokonferencia-rendszer AVerMedia
- videokonferencia-rendszer InFocus
- videokonferencia-rendszer AT&T
- videokonferencia-rendszer Anchor Audio
- videokonferencia-rendszer Monoprice
- videokonferencia-rendszer JPL
- videokonferencia-rendszer TAIDEN
- videokonferencia-rendszer Polycom
- videokonferencia-rendszer Extron
- videokonferencia-rendszer ClearOne
- videokonferencia-rendszer B-tech
- videokonferencia-rendszer Legrand
- videokonferencia-rendszer KONFTEL
- videokonferencia-rendszer Owl Labs
- videokonferencia-rendszer Huddly
- videokonferencia-rendszer WyreStorm
- videokonferencia-rendszer Middle Atlantic
- videokonferencia-rendszer Angekis
- videokonferencia-rendszer VDO360
- videokonferencia-rendszer VFI
- videokonferencia-rendszer PulseAudio
- videokonferencia-rendszer HuddleCamHD
- videokonferencia-rendszer KanDao
Legújabb útmutatók videokonferencia-rendszer
1 Április 2025
12 Január 2025
11 Január 2025

5 Január 2025
4 Január 2025
27 December 2024
27 December 2024
27 December 2024
26 December 2024
21 December 2024