Használati útmutató Toshiba Tecra S4
Olvassa el alább 📖 a magyar nyelvű használati útmutatót Toshiba Tecra S4 (238 oldal) a laptop kategóriában. Ezt az útmutatót 4 ember találta hasznosnak és 2 felhasználó értékelte átlagosan 4.5 csillagra
Oldal 1/238

User’s Manual
TECRA S4

ii User’s Manual

User’s Manual iii
Table of Contents
Preface
General Precautions
Chapter 1 Introduction
Equipment checklist. . . . . . . . . . . . . . . . . . . . . . . . . . . . . . . . . . . . . . . 1-1
Features. . . . . . . . . . . . . . . . . . . . . . . . . . . . . . . . . . . . . . . . . . . . . . . . . 1-3
Special features . . . . . . . . . . . . . . . . . . . . . . . . . . . . . . . . . . . . . . . . . 1-10
Utilities. . . . . . . . . . . . . . . . . . . . . . . . . . . . . . . . . . . . . . . . . . . . . . . . . 1-13
Options . . . . . . . . . . . . . . . . . . . . . . . . . . . . . . . . . . . . . . . . . . . . . . . . 1-17
Chapter 2 The Grand Tour
Front with the display closed . . . . . . . . . . . . . . . . . . . . . . . . . . . . . . . 2-1
Left side. . . . . . . . . . . . . . . . . . . . . . . . . . . . . . . . . . . . . . . . . . . . . . . . . 2-3
Right side . . . . . . . . . . . . . . . . . . . . . . . . . . . . . . . . . . . . . . . . . . . . . . . 2-5
Back side . . . . . . . . . . . . . . . . . . . . . . . . . . . . . . . . . . . . . . . . . . . . . . . . 2-6
Underside . . . . . . . . . . . . . . . . . . . . . . . . . . . . . . . . . . . . . . . . . . . . . . . 2-7
Front with the display open. . . . . . . . . . . . . . . . . . . . . . . . . . . . . . . . . 2-9
System indicators. . . . . . . . . . . . . . . . . . . . . . . . . . . . . . . . . . . . . . . . 2-12
Keyboard indicators. . . . . . . . . . . . . . . . . . . . . . . . . . . . . . . . . . . . . . 2-13
USB floppy disk drive (optional) . . . . . . . . . . . . . . . . . . . . . . . . . . . . 2-14
Optical disc drives . . . . . . . . . . . . . . . . . . . . . . . . . . . . . . . . . . . . . . . 2-15
AC adaptor . . . . . . . . . . . . . . . . . . . . . . . . . . . . . . . . . . . . . . . . . . . . . 2-17
Chapter 3 Getting Started
Connecting the AC adaptor . . . . . . . . . . . . . . . . . . . . . . . . . . . . . . . . . 3-2
Opening the display . . . . . . . . . . . . . . . . . . . . . . . . . . . . . . . . . . . . . . . 3-4
Turning on the power . . . . . . . . . . . . . . . . . . . . . . . . . . . . . . . . . . . . . . 3-5
Starting up for the first time . . . . . . . . . . . . . . . . . . . . . . . . . . . . . . . . 3-5
Turning off the power . . . . . . . . . . . . . . . . . . . . . . . . . . . . . . . . . . . . . . 3-6
Restarting the computer . . . . . . . . . . . . . . . . . . . . . . . . . . . . . . . . . . . 3-9
Restoring the preinstalled software . . . . . . . . . . . . . . . . . . . . . . . . . 3-10

iv User’s Manual
Chapter 4 Operating Basics
TOSHIBA Dual Pointing Device . . . . . . . . . . . . . . . . . . . . . . . . . . . . . .4-1
Using the Fingerprint Sensor . . . . . . . . . . . . . . . . . . . . . . . . . . . . . . . .4-3
Using the optional USB floppy disk drive . . . . . . . . . . . . . . . . . . . . .4-10
Changing Ultra Slim Bay modules . . . . . . . . . . . . . . . . . . . . . . . . . . .4-11
Using optical disc drives . . . . . . . . . . . . . . . . . . . . . . . . . . . . . . . . . . .4-13
Writing CDs on DVD-ROM / CD-R/RW drive. . . . . . . . . . . . . . . . . . . .4-16
Writing CD/DVDs on DVD Super Multi drive . . . . . . . . . . . . . . . . . . .4-18
Media care. . . . . . . . . . . . . . . . . . . . . . . . . . . . . . . . . . . . . . . . . . . . . . .4-27
Sound system. . . . . . . . . . . . . . . . . . . . . . . . . . . . . . . . . . . . . . . . . . . .4-28
Modem. . . . . . . . . . . . . . . . . . . . . . . . . . . . . . . . . . . . . . . . . . . . . . . . . .4-29
Wireless communications . . . . . . . . . . . . . . . . . . . . . . . . . . . . . . . . . .4-32
LAN . . . . . . . . . . . . . . . . . . . . . . . . . . . . . . . . . . . . . . . . . . . . . . . . . . . .4-35
Cleaning the computer . . . . . . . . . . . . . . . . . . . . . . . . . . . . . . . . . . . .4-37
Moving the computer . . . . . . . . . . . . . . . . . . . . . . . . . . . . . . . . . . . . . .4-37
Using Hard Disk Drive (HDD) Protection . . . . . . . . . . . . . . . . . . . . . .4-38
Heat dispersal. . . . . . . . . . . . . . . . . . . . . . . . . . . . . . . . . . . . . . . . . . . .4-41
Chapter 5 The Keyboard
Typewriter keys . . . . . . . . . . . . . . . . . . . . . . . . . . . . . . . . . . . . . . . . . . .5-1
Function keys: F1 … F12 . . . . . . . . . . . . . . . . . . . . . . . . . . . . . . . . . . . .5-2
Soft keys: Fn key combinations . . . . . . . . . . . . . . . . . . . . . . . . . . . . . .5-2
Hot keys . . . . . . . . . . . . . . . . . . . . . . . . . . . . . . . . . . . . . . . . . . . . . . . . .5-3
Windows special keys . . . . . . . . . . . . . . . . . . . . . . . . . . . . . . . . . . . . . .5-7
Keypad overlay. . . . . . . . . . . . . . . . . . . . . . . . . . . . . . . . . . . . . . . . . . . .5-7
Generating ASCII characters. . . . . . . . . . . . . . . . . . . . . . . . . . . . . . . . .5-9
Chapter 6 Power and Power-Up Modes
Power conditions . . . . . . . . . . . . . . . . . . . . . . . . . . . . . . . . . . . . . . . . . .6-1
Power indicators . . . . . . . . . . . . . . . . . . . . . . . . . . . . . . . . . . . . . . . . . .6-2
Battery types. . . . . . . . . . . . . . . . . . . . . . . . . . . . . . . . . . . . . . . . . . . . . .6-3
Care and use of the battery pack . . . . . . . . . . . . . . . . . . . . . . . . . . . . .6-6
Replacing the battery pack . . . . . . . . . . . . . . . . . . . . . . . . . . . . . . . . .6-11
TOSHIBA Password Utility . . . . . . . . . . . . . . . . . . . . . . . . . . . . . . . . .6-13
Power-up modes . . . . . . . . . . . . . . . . . . . . . . . . . . . . . . . . . . . . . . . . .6-16
Panel power on/off . . . . . . . . . . . . . . . . . . . . . . . . . . . . . . . . . . . . . . . .6-16
System Auto Off . . . . . . . . . . . . . . . . . . . . . . . . . . . . . . . . . . . . . . . . . .6-16
Chapter 7 HW Setup & BIOS Setup
Accessing HW Setup . . . . . . . . . . . . . . . . . . . . . . . . . . . . . . . . . . . . . . .7-1
HW Setup window . . . . . . . . . . . . . . . . . . . . . . . . . . . . . . . . . . . . . . . . .7-1
BIOS Setup Program . . . . . . . . . . . . . . . . . . . . . . . . . . . . . . . . . . . . . . .7-8

User’s Manual x

User’s Manual xi
Preface
Congratulations on your purchase of the Tecra S4 computer. This powerful
notebook computer provides excellent expansion capability, including
multimedia devices, and it is designed to provide years of reliable,
high-performance computing.
This manual tells how to set up and begin using your Tecra S4 computer. It
also provides detailed information on configuring your computer, basic
operations and care, using optional devices and troubleshooting.
If you are a new user of computers or if you’re new to portable computing,
first read over the Introduction and The Grand Tour chapters to familiarize
yourself with the computer’s features, components and accessory devices.
Then read Getting Started for step-by-step instructions on setting up your
computer.
If you are an experienced computer user, please continue reading the
preface to learn how this manual is organized, then become acquainted
with this manual by browsing through its pages. Be sure to look over the
Special features section of the Introduction, to learn about features that are
uncommon or unique to the computer and carefully read HW Setup & BIOS
Setup.
If you are going to install PC cards or connect external devices such as a
monitor, be sure to read Chapter 8, Optional Devices.
Conventions
This manual uses the following formats to describe, identify, and highlight
terms and operating procedures.
Abbreviations
On first appearance, and whenever necessary for clarity, abbreviations are
enclosed in parentheses following their definition. For example: Read Only
Memory (ROM). Acronyms are also defined in the Glossary.
Icons
Icons identify ports, dials, and other parts of your computer. The indicator
panel also uses icons to identify the components it is providing information
on.

xii User’s Manual
Preface
Keys
The keyboard keys are used in the text to describe many computer
operations. A distinctive typeface identifies the key top symbols as they
appear on the keyboard. For example, Enter identifies the Enter key.
Key operation
Some operations require you to simultaneously use two or more keys. We
identify such operations by the key top symbols separated by a plus sign
(+). For example, Ctrl + C means you must hold down Ctrl and at the same
time press C. If three keys are used, hold down the first two and at the
same time press the third.
Display
Messages
Messages are used in this manual to bring important information to your
attention. Each type of message is identified as shown below.
ABC When procedures require an action such as
clicking an icon or entering text, the icon’s name
or the text you are to type in is represented in the
type face you see to the left.
SABC Names of windows or icons or text generated by
the computer that appear on its display screen
are presented in the type face you see to the left.
Pay attention! A caution informs you that improper use of equipment or
failure to follow instructions may cause data loss or damage your
equipment.
Please read. A note is a hint or advice that helps you make best use of
your equipment.
Indicates a potentially hazardous situation, which could result in death or
serious injury, if you do not follow instructions.

User’s Manual xiii
General Precautions
TOSHIBA computers are designed to optimize safety, minimize strain and
withstand the rigors of portability. However, certain precautions should be
observed to further reduce the risk of personal injury or damage to the
computer.
Be certain to read the general precautions below and to note the cautions
included in the text of the manual.
Creating a computer-friendly environment
Place the computer on a flat surface that is large enough for the computer
and any other items you are using, such as a printer.
Leave enough space around the computer and other equipment to provide
adequate ventilation. Otherwise, they may overheat.
To keep your computer in prime operating condition, protect your work area
from:
■Dust, moisture, and direct sunlight.
■Equipment that generates a strong electromagnetic field, such as
stereo speakers (other than speakers that are connected to the
computer) or headphones.
■Rapid changes in temperature or humidity and sources of temperature
change such as air conditioner vents or heaters.
■Extreme heat, cold, or humidity.
■Liquids and corrosive chemicals.
Stress injury
Carefully read the Instruction Manual for Safety and Comfort. It contains
information on prevention of stress injuries to your hands and wrists that
can be caused by extensive keyboard use.

xiv User’s Manual
General Precautions
Heat injury
■Avoid prolonged physical contact with the computer. If the computer is
used for long periods, its surface can become very warm. While the
temperature will not feel hot to the touch, if you maintain physical
contact with the computer for a long time (if you rest the computer on
your lap, or if you keep your hands on the palm rest, for example) your
skin might suffer low-heat injury.
■If the computer has been used for a long time, avoid direct contact with
the metal plate supporting the I/O ports. It can become hot.
■The surface of the AC adaptor can become hot when in use. This
condition does not indicate a malfunction. If you need to transport the
AC adaptor, disconnect it and let it cool before moving it.
■Do not lay the AC adaptor on a material that is sensitive to heat. The
material could be damaged.
Pressure or impact damage
Do not apply heavy pressure to the computer or subject it to any form of
strong impact as this can damage the computer’s components or otherwise
cause it to malfunction.
PC card overheating
Some PC Cards can become hot during prolonged use which may result in
errors or instability in the operation of the device in question. In addition,
you should also be careful when you remove a PC Card that has been
used for a long time.
Mobile phones
Please be aware that the use of mobile phones can interfere with the audio
system. The operation of the computer will not be impaired in any way, but
it is recommended that a minimum distance of 30cm is maintained between
the computer and a mobile phone that is in use.
Instruction Manual for Safety and Comfort
All important information on the safe and proper use of this computer is
described in the enclosed Instruction Manual for Safety and Comfort. Be
sure to read it before using the computer.
User’s Manual 1-1
Chapter 1
Introduction
This chapter provides an equipment checklist, and it identifies the
computer’s features, options and accessories.
Equipment checklist
Carefully unpack your computer, taking care to save the box and packing
materials for future use.
Hardware
Check to make sure you have all the following items:
■Tecra S4 Portable Personal Computer
■AC adaptor and power cord
■Modular cable for modem (optional)
Some of the features described in this manual may not function properly if
you use an operating system that was not preinstalled by TOSHIBA.

1-2 User’s Manual
Introduction
Software
Microsoft® Windows XP Professional
■The following software is preinstalled:
■Microsoft® Windows XP Professional
■Microsoft Internet Explorer
■TOSHIBA Utilities
■TOSHIBA SD Memory Boot Utility
■DVD Video Player
■TOSHIBA Dual Pointing Device Utility
■TOSHIBA Power Saver
■TOSHIBA Mobile Extension
■TOSHIBA Assist
■TOSHIBA ConfigFree
■TOSHIBA Zooming Utility
■TOSHIBA PC Diagnostic Tool
■TOSHIBA Controls
■TOSHIBA Mic Effect
■TOSHIBA Password Utility
■Fingerprint Utility
■TOSHIBA SD Memory Card Format Utility
■TOSHIBA HDD Protection
■TOSHIBA Hotkey Utility for Display Devices
■TOSHIBA Display Device Change Utility
■Wireless Hotkey Utility
■InterVideo WinDVD Creator 2 Platinum
■CD/DVD Drive Acoustic Silencer
■Record Now! Basic for TOSHIBA
■DLA for TOSHIBA
■Bluetooth Stack for Windows by Toshiba
■Infineon Trusted Platform Module Utility (preinstalled in some
models)
■Online Manual
Documentation and Backup Media
■Tecra S4 Portable Personal Computer User’s Manual
■Tecra S4 Quickstart
■Instruction Manual for Safety and Comfort
■Warranty information
■Product Recovery DVD-ROM
If any of the items are missing or damaged, contact your dealer
immediately.

User’s Manual 1-3
Introduction
Features
The computer extensively uses TOSHIBA’s advanced Large Scale
Integration (LSI), Complementary Metal-Oxide Semiconductor (CMOS)
technology to provide compact size, minimum weight, low power usage,
and high reliability, and incorporates the following features and benefits:
Processor
Built-in The computer is equipped with one of the
following Intel® processors.
■Intel® Core™ Duo processor, which
incorporates 2MB Level-2 cache memory and
supports Enhanced Intel® SpeedStep®
Technology.
■Intel® Core™ 2 Duo processor, which
incorporates 2MB Level-2 cache memory and
supports Enhanced Intel® SpeedStep®
Technology.
■Intel® Core™ 2 Duo processor, which
incorporates 4MB Level-2 cache memory and
supports Enhanced Intel® SpeedStep®
Technology.
Some models in this series use Intel® Centrino® Duo Mobile Technology
which is based on three separate components, the Intel
® Core™ Duo
processor, Intel® PRO/Wireless network connection and the Mobile Intel
®
945 Express Chipset family.
Some models in this series use Intel® Centrino® Duo Mobile Technology
which is based on three separate components, the Intel
® Core™ 2 Duo
processor, Intel® PRO/Wireless network connection and the Mobile Intel
®
945 Express Chipset family.
Legal Footnote (CPU)
For more information on the CPU, please refer to Chapter 10, Legal
Footnotes.

1-4 User’s Manual
Introduction
Memory
Power
Slots 256, 512, 1,024 or 2,048MB memory modules
can be installed in the computer’s two memory
slots for a maximum of 4,096MB system memory.
Video RAM The graphics controller is equipped with 128MB
external video RAM, and may use up to 128MB
of main system memory as additional video
memory for a combined total of up to 256MB
video memory.
Legal Footnote (Memory (Main System))
For more information regarding Main Memory, please refer to Chapter 10,
Legal Footnotes.
Battery pack The computer is powered by one rechargeable
lithium-ion battery pack.
Legal Footnote (Battery Life)
For more information regarding Battery Life, please refer to Chapter 10,
Legal Footnotes.
RTC battery The internal RTC battery backs up the Real Time
Clock (RTC) and calendar.
AC adaptor The AC adaptor provides power to the system
and recharges the batteries when they are low. It
comes with a detachable power cord which will
either have a 2-pin or 3-pin plug enclosure.
Because it is universal, it can receive a range of
AC voltage from 100 to 240 volts; however, the
output current varies among different models.
Using the wrong model can damage your
computer. Refer to the AC adaptor section in
Chapter 2, The Grand Tour.

User’s Manual 1-5
Introduction
Disks
Optical disc drive
Hard disk drive Available in the following sizes:
■40.0 billion bytes (37.26 GB)
■60.0 billion bytes (55.89 GB)
■80.0 billion bytes (74.53 GB)
■100.0 billion bytes (93.16 GB)
■120.0 billion bytes (111.79 GB)
Please note that part of the hard disk drive’s
overall capacity is reserved as administration
space.
Legal Footnote (Hard Disk Drive (HDD) Capacity)
For more information regarding Hard Disk Drive (HDD) Capacity, please
refer to Chapter 10, Legal Footnotes.
Your computer is configured with an optical disc drive installed in the Ultra
Slim Bay. The available optical disc drives are described below.
DVD-ROM and
CD-R/RW drive
Some models are equipped with a full-size,
DVD-ROM and CD-R/RW drive module that lets
you run CD/DVDs without using an adaptor. It
reads DVD-ROMs at maximum 8 speed and
CD-ROMs at maximum 24 speed. It writes CD-R
at maximum 24 speed and CD-RW at maximum
24 speed. The drive supports the following
formats:
■CD-R
■CD-RW
■DVD-ROM
■DVD-Video
■CD-DA
■CD-Text
■Photo CD™ (single/multi-session)
■CD-ROM Mode 1, Mode 2
■CD-ROM XA Mode 2 (Form1, Form2)
■Enhanced CD (CD-EXTRA)
■Addressing Method 2

1-6 User’s Manual
Introduction
Display
The computer’s LCD display panel supports high-resolution video graphics.
The LCD screen can be set at a wide range of viewing angles for maximum
comfort and readability.
DVD Super Multi
drive
Some models are equipped with a full-size DVD
Super Multi drive module that lets you record
data to rewritable CD/DVDs as well as run
12cm (4.72") or 8cm (3.15") CD/DVDs. It reads
DVD-ROMs at maximum 8 speed and CD-ROMs
at maximum 24 speed. It writes CD-R at up to
24 speed, CD-RW at up to 16 speed, DVD-R and
DVD+R at up to 8 speed, DVD-RW and
DVD+RW at up to 4 speed, DVD-R DL at up to
2 speed, DVD+R DL at up to 2.4 speed,
DVD-RAM at maximum 3 speed. This drive
supports the following formats in addition to the
DVD-ROM and CD-R/RW drive.
■DVD-R
■DVD-R DL
■DVD-RW
■DVD+R
■DVD+R DL
■DVD+RW
■DVD-RAM
Built-in 15" TFT LCD screen, 16 M colors, with one of the
following resolutions:
■XGA, 1024 horizontal × 768 vertical pixels
■SXGA+, 1400 horizontal × 1050 vertical
pixels
Legal Footnote (LCD)
For more information regarding the LCD, please refer to Chapter 10, Legal
Footnotes.
Graphics controller The graphics controller maximizes display
performance. Refer to Display Controller and
Modes section in Appendix B for more
information.
Legal Footnote (Graphics Processor Unit (“GPU”))
For more information regarding Graphics Processor Unit (“GPU”), please
refer to Chapter 10, Legal Footnotes.

1-8 User’s Manual
Introduction
Slots
Multimedia
Communications
PC Card The internal PC Card slot accommodates a
single Type II (5mm) card.
ExpressCard The internal ExpressCard slot accommodates a
single ExpressCard.
SD Card This slot allows you to easily transfer data from
devices such as digital cameras and Personal
Digital Assistants (PDAs) that use SD card flash
memory.
Refer to Chapter 8, Optional Devices.
Sound system The integrated sound system provides internal
speakers and a microphone, as well as allowing
an external microphone and headphones to be
connected via the appropriate jacks.
S-Video out port The S-Video out port allows you to transfer video
data to external devices using an optional
S-Video cable. Please note that the data output
will depend on the type of device that is
connected.
Headphone jack A 3.5mm mini headphone jack enables
connection of stereo headphones.
Microphone jack A 3.5mm mini microphone jack enables
connection of a three-conductor microphone for
monaural input.
Modem The integrated modem provides capability for
data and fax communications that support the
V.90 (V.92) standards and includes a modem
jack for connection to a telephone line. Please
note that both the V.90 and V.92 standards are
only supported in the USA, Canada, UK, France,
Germany and Australia. Only the V.90 standard
is supported in other regions. You should also be
aware that the speed of data and fax transfer will
depend on analog telephone line conditions.
LAN The computer has built-in support for Ethernet
LAN (10 megabits per second, 10BASE-T), Fast
Ethernet LAN (100 megabits per second,
100BASE-TX) and Gigabit Ethernet LAN
(1000 megabits per second, 1000BASE-T).

1-10 User’s Manual
Introduction
Ultra Slim Bay
Security
Special features
The following features are either unique to TOSHIBA computers or are
advanced features which make the computer more convenient to use.
Wireless
communication
switch
This switch turns the Wireless LAN and
Bluetooth functions on and off.
Please note that all
models are provided with a Wireless
communication switch and some models are
equipped with both Wireless LAN and Bluetooth
functionality.
Ultra Slim Bay
Modules
The integrated Ultra Slim Bay is a single-drive
bay that can accommodate either a DVD-ROM
and CD-R/RW drive, DVD Super Multi drive or
secondary hard disk drive. The TOSHIBA Mobile
Extension enables the hot insertion of these
modules when you are using an operating
system that supports Plug-and-Play.
Security lock slot Connects security lock to anchor the computer to
a desk or other large object.
Ultra Slim Bay latch When this latch is in its “locked” position, the
installed Ultra Slim Bay module is secured into
the computer. In addition, removal of the module
can be prevented by securing the latch in its
“locked” position with a “lock screw”. Please note
that this screw is located in the latch’s “unlock”
position at the time of purchase.
TOSHIBA Assist
button
Press this button to launch an application
automatically. The default is TOSHIBA Assist.
TOSHIBA
Presentation button
Press this button to change internal display,
external display, simultaneous display, or
multi-monitor display.
Hot keys Key combinations let you quickly change the
system configuration directly from the keyboard
without running a system configuration program.

User’s Manual 1-11
Introduction
Display automatic
power off
This feature automatically cuts off power to the
computer’s LCD display panel when there is no
keyboard input for a time specified. Power is
restored when any key is pressed. You can
specify the time in the Monitor power off item of
the Basic Setup tab in TOSHIBA Power Saver.
HDD automatic
power off
This feature automatically cuts off power to the
hard disk drive when it is not accessed for a time
specified. Power is restored when the hard disk is
accessed. You can specify the time in the HDD
power off item of the Basic Setup tab in TOSHIBA
Power Saver.
System automatic
Standby/Hibernation
This feature automatically shuts down the system
into Standby Mode or Hibernation Mode when
there is no input or hardware access for a time
specified. You can specify the time and select
either the System Standby or System Hibernation
item of the Basic Setup tab in TOSHIBA Power
Saver.
Keypad overlay A ten-key pad is integrated into the keyboard.
Refer to the Keypad overlay section in Chapter 5,
The Keyboard, for instructions on using the
keypad overlay.
Power on password Two levels of password security, supervisor and
user, are available to prevent unauthorized
access to your computer.
Instant security A hot key function blanks the LCD screen and
disables the computer providing data security.
Intelligent power
supply
A microprocessor in the computer’s intelligent
power supply detects the battery’s charge and
calculates the remaining battery capacity. It also
protects electronic components from abnormal
conditions, such as voltage overload from an AC
adaptor. You can monitor remaining battery
capacity by using the Battery remaining item in
TOSHIBA Power Saver.
Battery save mode This feature lets you save battery power. You can
specify the Power Save Mode in the Profile item
in TOSHIBA Power Saver.
Panel power on/off This feature turns power to the computer off
when the computer’s LCD display panel is closed
and turns it back on when the computer’s LCD
display panel is opened. You can specify the
setting in the When I close the lid item of the
Setup Actions tab in TOSHIBA Power Saver.

User’s Manual 1-13
Introduction
Utilities
This section describes preinstalled utilities and tells how to start them. For
details on operations, refer to each utility’s online manual, help files or
readme.txt files.
TOSHIBA Power
Saver
To access the power management utility, click
start followed by Control Panel followed by
Performance and Maintenance and then click
the TOSHIBA Power Saver icon.
HW Setup This utility allows you to customize your
hardware settings according to the way you work
with the computer and the peripherals you use.
To access this utility, click start followed by
Control Panel followed by Printers and Other
Hardware and then click the TOSHIBA
HWSetup icon.
TOSHIBA Controls This utility has a section that lets you do the
following:
■Buttons: Assign applications or functions to
the TOSHIBA Presentation button (default
setting is the simultaneous display on LCD
and CRT with resolution of 1024 × 768) and
to the TOSHIBA Assist button (default setting
is the TOSHIBA Assist).
Fingerprint utility This product has a fingerprint utility installed for
the purpose of enrolling and recognizing
fingerprints which can then be linked to a
username and password in order to remove the
need to input these details from the keyboard.
Just by swiping an enrolled finger against the
fingerprint sensor, the following functions will be
enabled:
■Logon to Windows and access a security
enabled homepage through Internet Explorer.
■Files and folders can be encrypted/decrypted
and third party access to them prevented.
■Disable the password-protected screen-saver
when returning from a power-saving mode
such as Standby Mode.
■Authentication of the User Password (and, if
applicable, the HDD(Hard Disk Drive)
Password) when booting up the computer
(Power-on Security).
■Single Sign-on feature

1-14 User’s Manual
Introduction
DVD Video Player The DVD Video Player is used to play
DVD-Video. It has an on-screen interface and
functions. Click start, point to All Programs,
point to InterVideo WinDVD, then click
InterVideo WinDVD.
Bluetooth Stack for
Windows by Toshiba
This software enables communication between
the computer and external Bluetooth devices
such as printers and mobile phones.
Bluetooth cannot be used in models that do not have a Bluetooth module
installed.
TOSHIBA SD
Memory Boot Utility
The TOSHIBA SD memory boot utility allows you
to create a bootable SD memory card that can be
used to start the system. To access this utility,
click start followed by All Programs followed by
TOSHIBA followed by Utilities and then click SD
Memory Boot Utility.
TOSHIBA Zooming
Utility
This utility allows you to enlarge or reduce the
icon size on the Windows Desktop, or the zoom
factor associated with specific supported
applications.
RecordNow! Basic
for TOSHIBA
You can create CDs and DVDs in a number of
formats including audio CDs that can be played
on a standard CD player, and data CDs/DVDs
which can store copies of the files and folders on
your notebook’s hard disk drive. This software
can be used on models with either a
DVD-ROM / CD-R/RW drive, or a DVD Super
Multi drive.
TOSHIBA Assist TOSHIBA Assist is a graphical user interface that
provides access to specific tools, utilities and
applications that make the use and configuration
of the computer easier.
TOSHIBA PC
Diagnostic Tool
The TOSHIBA PC Diagnostic Tool will display
basic system configuration information and allow
the functionality of some of the computer’s
built-in hardware devices to be tested. To access
this utility, click start followed by All Programs
followed by TOSHIBA followed by Utilities and
then click PC Diagnostic Tool.

User’s Manual 1-15
Introduction
TOSHIBA Mobile
Extension
The TOSHIBA Mobile Extension utility enhances
the functionality of your notebook when it is used
in conjunction with an optional Advanced Port
Replicator III Plus. To access this utility, launch
the TOSHIBA Assist application and then select
TOSHIBA Mobile Extension.
TOSHIBA ConfigFree TOSHIBA ConfigFree is a suite of utilities that
improve the ease and control of communication
devices and network connections, help in the
identification of communication problems and
allow the creation of profiles if you need to switch
between different locations and communication
networks. To access this utility, click start
followed by All Programs followed by TOSHIBA
followed by Networking and then click
ConfigFree.
TOSHIBA Dual
Pointing Device
utility
The TOSHIBA Dual Pointing Device utility allows
the functionality of the integrated pointing
devices (AccuPoint mouse and Touch Pad) to be
customized, and also supports the Fn + F9
function to quickly and easily disable/enable their
operation.
TOSHIBA Mic Effect The TOSHIBA Mic Effect utility can be used to
remove or reduce any harsh echoes or “howling”
sounds that may occur when playing audio
sounds recorded with a microphone through the
speakers. Please note that this echo cancellation
function is only available when you use
telephony software, such as Windows
Messenger, that includes a voice conversation
function.
For further information on this utility, click start
followed by All Programs followed by TOSHIBA
followed by Utilities and then click Mic Effect
Help.
TOSHIBA RAID
Utility
TOSHIBA RAID Utility is used to create or
manage RAID array.
To access this utility, click start followed by All
Programs followed by TOSHIBA followed by
RAID and then click RAID Console.
NVIDIA Rotation
Settings
This utility lets you easily rotate the desktop by
180 degrees and back. You can rotate by clicking
the icon in the taskbar or pressing the Ctrl + Alt +
Up (↑) and Ctrl + Alt + Down(↓) key
combinations. In a multi-monitor setup, the
display that contains the cursor is effective.

1-16 User’s Manual
Introduction
TOSHIBA Password
Utility
The TOSHIBA Password utility allows you to set
a password in order to restrict access to the
computer.
TOSHIBA
Accessibility
The TOSHIBA Accessibility utility provides
support to movement impaired users when they
need to use the TOSHIBA Hote-key functions. In
use, the utility allows you to make the Fn key
“sticky”, that is you can press it once, release it,
and then press one of the “F” keys in order to
access its specific function. When set, the Fn key
will remain active until another key is pressed.
DLA for TOSHIBA DLA (Drive Letter Access) is the packet writing
software which provides the function, which
writes files and/or folders to DVD-RW, CD-RW
and DVD+RW discs via a drive letter like a floppy
disk or other removable disks.
TOSHIBA Hotkey
Utility for Display
Devices
This utility allows you to change both the active
display device and its associated display
resolution - you should use this utility in
conjunction with the Fn + F5 keys (to change the
active display device) and the Fn + Space keys
(to change the display resolution).
TOSHIBA SD
Memory Card Format
The TOSHIBA SD Memory Card Format utility
allows you to format an SD memory card device
ready for use.
CD/DVD Drive
Acoustic Silencer
The CD/DVD Drive Acoustic Silencer utility
allows you to configure the read speed at which
the optical disc drive will operate. In use you can
select either Normal Mode, which will operate
the drive at its maximum speed for quick data
access, or Quiet Mode, which operates the drive
at single speed for audio CD playback and which
can lessen the operational noise. This utility does
not have any function when using DVDs.

User’s Manual 1-17
Introduction
Options
You can add a number of options to make your computer even more
powerful and convenient to use. The following options are available:
Memory expansion A 256MB, 512MB, 1,024MB, or 2048MB memory
module (DDR2-667/533) can easily be installed
in the computer.
Battery pack An additional battery pack can be purchased
from your TOSHIBA dealer as either a spare or
replacement.
Extended capacity
battery pack
An additional battery pack can be purchased
from your TOSHIBA dealer as either a spare or
replacement.
High capacity battery
pack
An additional battery pack can be purchased
from your TOSHIBA dealer as either a spare or
replacement.
Universal AC
adaptor
If you frequently use your computer at more than
one site, it may be convenient to purchase an
additional AC adaptor to be kept at each site in
order to remove the need to always carry the
adaptor with you.
Battery charger The optional battery charger allows you to
charge extra battery packs outside of having to
use the computer.
Security lock A slot is available into which you can attach a
security cable in order to deter theft of the
computer.
USB FDD Kit The USB floppy diskette drive accommodates
either a 1.44MB or 720KB floppy diskette through
connection to one of the computer’s USB ports.
In use, please be aware that, while you cannot
format 720KB floppy diskettes under Windows
XP, you are able to read and write to diskettes
that have already been formatted.
Advanced Port
Replicator III Plus
The Advanced Port Replicator III Plus provides a
desktop docking solution that contains all of the
ports available on the computer, including
separate PS/2 mouse and PS/2 keyboard ports,
a Digital Visual Interface (DVI) port, i.LINK™
(IEEE1394) port, line-in and line-out jacks,
external monitor port, USB 2.0 ports (× 4),
network jack, Modem jack, serial port and parallel
port.

1-18 User’s Manual
Introduction
Ultra Slim Bay options
The following modules can be installed in the Ultra Slim Bay. All other
modules are options.
HDD Kit You can increase your computer’s data storage
capacity with additional hard disk drives which
are currently available in the following capacities:
■80 billion bytes (74.53 GB)
■100.0 billion bytes (93.16 GB)
Bluetooth Kit This option enables Bluetooth wireless
communications in computers that do not have
Bluetooth preinstalled. It is installed by dealers
only.
Bluetooth Wireless
Mouse
The Bluetooth Wireless Mouse is a wireless
optical mouse compatible with Bluetooth.
You can buy the Bluetooth Wireless Mouse from
a TOSHIBA dealer.
Bluetooth Wireless
Stereo
The Bluetooth Wireless Stereo is a wireless
stereo headphone set compatible with Bluetooth.
You can buy the Bluetooth Wireless Stereo from
a TOSHIBA dealer.
DVD-ROM and
CD-R/RW Kit
Refer to the Features section for details.
DVD Super Multi
Drive Kit
Refer to the Features section for details.
Ultra Slim Bay HDD
adaptor
The Ultra Slim Bay HDD adaptor allows you to
install an optional hard disk drive and is
described in more detail within Chapter 8,
Optional Devices.
HDD Kit (Serial-ATA) You can increase your computer’s data storage
capacity with an additional 80 billion bytes
(74.53 GB) and 100.0 billion bytes (93.16 GB)
hard disk drive in the Ultra Slim Bay HDD
adaptor.

User’s Manual 2-1
Chapter 2
The Grand Tour
This chapter identifies the various components of your computer. Become
familiar with each component before you operate the computer.
Front with the display closed
The following figure shows the computer’s front with its LCD display panel
in the closed position.
Front of the computer with LCD display panel closed
Legal Footnote (Non-applicable Icons)
For more information on the Legal Footnote regarding Non-applicable
Icons, please refer to Chapter 10, Legal Footnotes.
Display latch
System
indicators
Wireless communication
switch Infrared port
Volume control
Microphone jack Headphone jack
Microphone
i.LINK (IEEE1394) port
System indicators These LEDs let you monitor the status of various
computer functions. Details are given in the
System indicators section.

2-2 User’s Manual
The Grand Tour
Wireless
communication
switch
Slide this switch to the left to turn off Wireless
LAN and Bluetooth functions. Slide it to the right
to turn on the functions.
All models are provided with a Wireless
Communication switch although only some
models are equipped with both Wireless LAN
and Bluetooth functions.
■Turn Wi-Fi ® and Bluetooth functionalities off when near a person who
may have a cardiac pacemaker implant or other medical electric
device. Radio waves may affect pacemaker or medical device
operation, possibly resulting in serious injury. Follow the instruction of
your medical device when using any Wi-Fi or Bluetooth functionality.
■Always turn off Wi-Fi or Bluetooth functionality if the PC is near
automatic control equipment or appliances such as automatic doors or
fire detectors. Radio waves can cause malfunction of such equipment,
possibly resulting in serious injury.
■Do not use the Wi-Fi or Bluetooth functionalities near a microwave
oven or in areas subject to radio interference or magnetic fields.
Interference from a microwave oven or other source can disrupt Wi-Fi
or Bluetooth operation.
i.LINK (IEEE1394)
port
This port allows you to connect an external
device, such as a digital video camera for
high-speed data transfer.
Microphone jack A 3.5 mm mini microphone jack enables
connection of a three-conductor mini jack for
monaural microphone input.
Headphone jack A 3.5 mm mini headphone jack enables
connection of stereo headphones.
Volume control Use this dial to adjust the volume of the internal
monaural speakers and optional external stereo
headphones (if connected).
Move the Volume control to the right to increase
the volume and to the left to decrease the
volume.
Press the Volume control to Mute the sound.
Press the Volume control again to turn Mute off.
The mute icon will be displayed when the Volume
control is pressed. The same function can be
performed by pressing the Fn + Esc keys. Refer
to the Hot keys section in Chapter 5, The
Keyboard, for details on the Fn + Esc keys.

2-4 User’s Manual
The Grand Tour
Link indicator
(green)
This indicator glows green when the computer is
connected to a LAN and the LAN is functioning
properly.
LAN active indicator
(orange)
This indicator glows orange when data is being
exchanged between the computer and the LAN.
Cooling vents Cooling vents help CPU keep from overheating.
Do not block the cooling vents. Never allow metal objects, such as screws,
staples and paper clips, to enter the PC or keyboard. Foreign metal objects
can create a short circuit, which can cause PC damage and fire, possibly
resulting in serious injury.
External monitor
port
This external monitor port lets you connect an
external video display.
Video-out jack Plug an S-Video cable into this jack for video-out.
The S-Video cable carries video signal.
ExpressCard slot The ExpressCard slot can accommodate an
ExpressCard.
ExpressCard eject
button
This is a button for taking out ExpressCard from
ExpressCard slot.
PC card slot The PC card slot can accommodate a Type II
card. The slot supports 16-bit PC cards and
CardBus PC cards.
PC card eject button This is a button for taking out PC card from a PC
card slot.
Keep foreign objects out of the ExpressCard slot and PC card slot. Never
allow metal objects, such as screws, staples and paper clips, to enter the
PC or keyboard. Foreign metal objects can create a short circuit, which can
cause PC damage and fire, possibly resulting in serious injury.
SD card slot SD cards are used in a wide variety of external
devices. This slot lets you transfer data from the
device to your computer.
Keep foreign objects out of the SD card slot. A pin or similar object can
damage the computer’s circuitry.

User’s Manual 2-5
The Grand Tour
Right side
The following figure shows the computer’s right side.
The right side of the computer
Ultra Slim Bay
Serial port
USB ports
Modem jack
Universal Serial Bus
(USB 2.0) ports
Two Universal Serial Bus ports are on the right
side. The ports comply with the USB 2.0
standard.
Keep foreign objects out of the USB connectors. Never allow metal
objects, such as screws, staples and paper clips, to enter the PC or
keyboard. Foreign metal objects can create a short circuit, which can
cause PC damage and fire, possibly resulting in serious injury.
Operation of all functions of all USB devices has not been confirmed.
Some functions might not execute properly.
Modem jack The modem jack allows you use to attach a
modular cable in order to connect the internal
modem directly to a telephone line.
■Connection to any communication line other than an analog phone line
could cause a PC system failure.
■Connect the built-in modem only to ordinary analog phone lines.
■Never connect the built-in modem to a digital line (ISDN).
■Never connect the built-in modem to the digital connector on a
public telephone or to a digital private branch exchange (PBX).
■Never connect the built-in modem to a key telephone system for
residences or offices.
■Never operate your PC on AC power during a thunderstorm. If you see
lightning or hear thunder, immediately turn off the PC. An electric surge
caused by the storm, may result in a system failure, loss of data or
hardware damage.

2-6 User’s Manual
The Grand Tour
Back side
The following figure shows the computer’s back side.
The back side of the computer
Ultra Slim Bay A DVD-ROM and CD-R/RW drive, DVD Super
Multi drive and Ultra Slim Bay HDD adaptor can
be installed in the Ultra Slim Bay.
Serial port Use this 9-pin port to connect serial devices such
as an external modem, serial mouse or serial
printer.
Parallel port
DC IN 15V jack
USB port
Universal Serial Bus
(USB 2.0) port
One Universal Serial Bus port is on the back
side. Refer to Right side section, for details.
DC IN 15V jack The AC adaptor connects to this jack. Use only
the model of AC adaptor that comes with the
computer. Using the wrong adaptor can damage
your computer.
Parallel port This Centronics-compatible, 25-pin parallel port
is used to connect a parallel printer or other
parallel device. This port supports Extended
Capabilities Port (ECP) standard.
User’s Manual 2-7
The Grand Tour
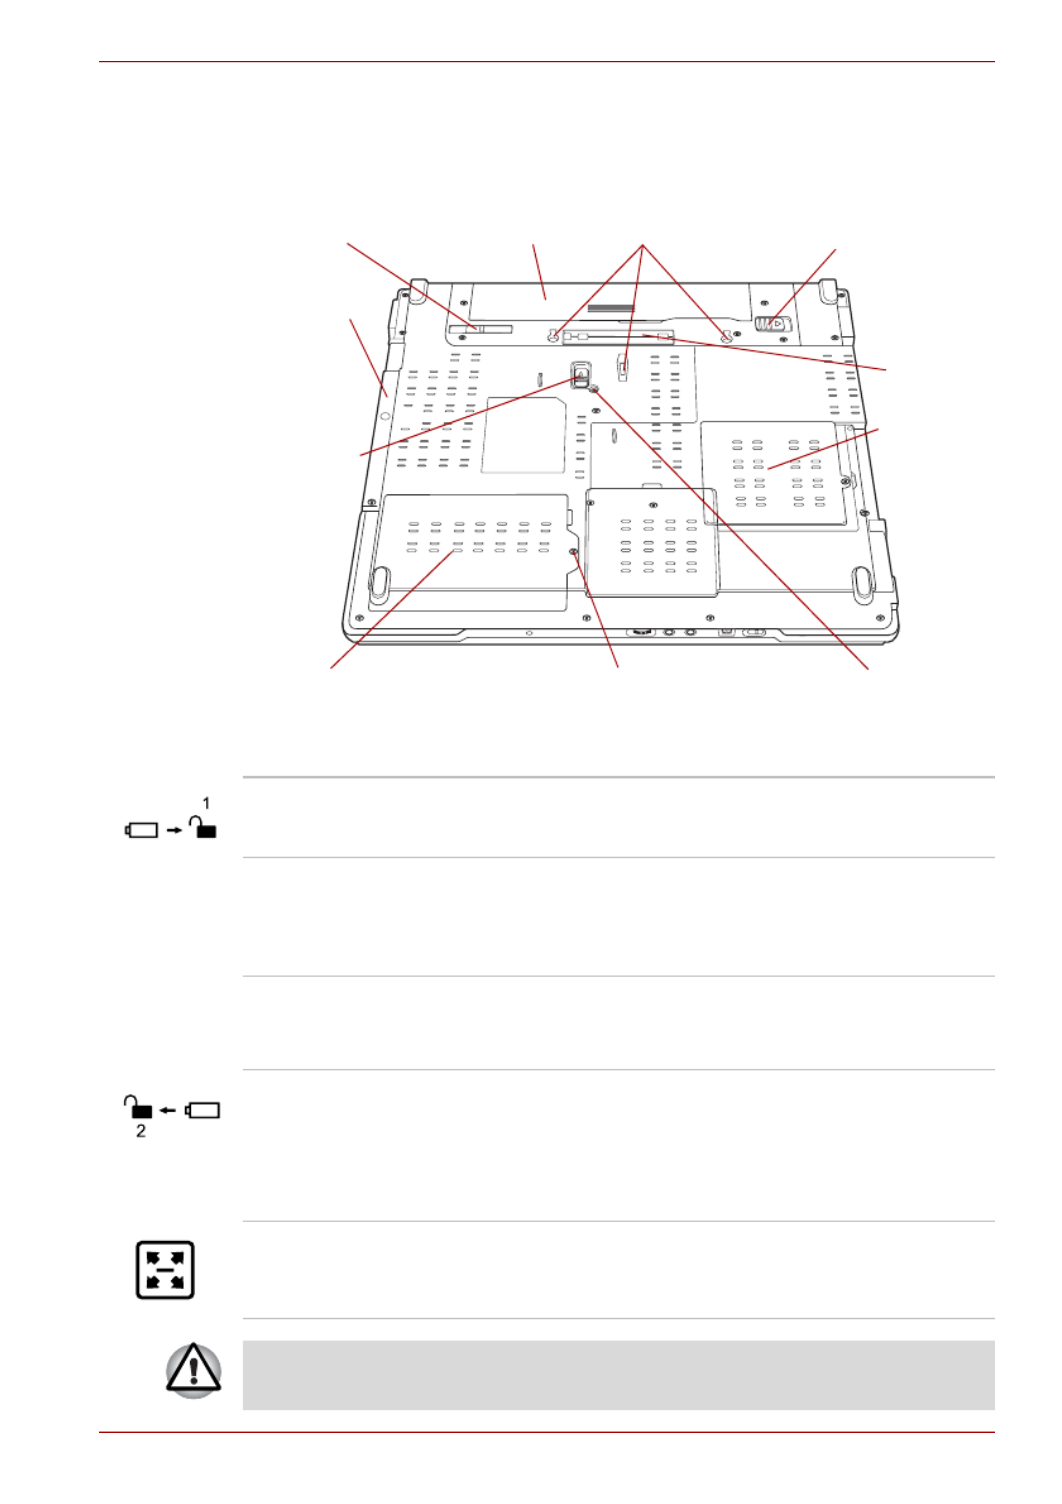
Underside
The following figure shows the underside of the computer. Make sure the
display is closed before turning over your computer.
The underside of the computer
Notches
Battery lock
Ultra Slim Bay lock screw
HDD pack cover screw
Ultra Slim Bay
latch
Docking
port
Memory
module cover
Battery release
latch
Ultra Slim Bay
Battery pack
Hard disk drive
Battery lock Slide the battery lock to release the battery pack
for removal.
Battery pack The battery pack powers the computer when the
AC adaptor is not connected. For detailed
information on the battery pack, refer to
Chapter 6, Power and Power-Up Modes.
Notches Notches on the computer engage hooks on the
Advanced Port Replicator III Plus to ensure a
secure connection.
Battery release latch Slide and hold this latch to release the battery
pack for removal.
For detailed information on removing the battery
pack, refer to Chapter 6, Power and Power-Up
Modes.
Docking port This port enables connection of an optional
Advanced Port Replicator III Plus described in
Chapter 8, Optional Devices.
Keep foreign objects out of the docking port. A pin or similar object can
damage the computer’s circuitry. A plastic shutter protects the connector.
Termékspecifikációk
| Márka: | Toshiba |
| Kategória: | laptop |
| Modell: | Tecra S4 |
Szüksége van segítségre?
Ha segítségre van szüksége Toshiba Tecra S4, tegyen fel kérdést alább, és más felhasználók válaszolnak Önnek
Útmutatók laptop Toshiba

1 Január 2025
13 Október 2024
3 Október 2024
2 Szeptember 2024
1 Szeptember 2024
22 Augusztus 2024
18 Augusztus 2024
18 Augusztus 2024
16 Augusztus 2024
15 Augusztus 2024
Útmutatók laptop
- laptop Samsung
- laptop Sony
- laptop Fujitsu
- laptop Acer
- laptop LG
- laptop Oregon Scientific
- laptop Panasonic
- laptop Lenovo
- laptop HP
- laptop Hyundai
- laptop Apple
- laptop Fellowes
- laptop Medion
- laptop Zebra
- laptop Xiaomi
- laptop Dell
- laptop Gigabyte
- laptop Tripp Lite
- laptop Prixton
- laptop Thomson
- laptop Huawei
- laptop Microsoft
- laptop Asus
- laptop PEAQ
- laptop Haier
- laptop Viewsonic
- laptop Denver
- laptop MSI
- laptop Honor
- laptop SPC
- laptop ADATA
- laptop Kogan
- laptop Razer
- laptop Jay-Tech
- laptop Pyle
- laptop Schneider
- laptop Micromax
- laptop NEC
- laptop Siig
- laptop GoClever
- laptop Getac
- laptop ECS
- laptop Packard Bell
- laptop TechBite
- laptop Alienware
- laptop Airis
- laptop Lexibook
- laptop Emachines
- laptop Trekstor
- laptop Hähnel
- laptop Sylvania
- laptop Coby
- laptop Evga
- laptop Ricatech
- laptop Mpman
- laptop Vizio
- laptop Targa
- laptop Ematic
- laptop Hannspree
- laptop XPG
- laptop Inovia
- laptop Odys
- laptop Ergotron
- laptop Ibm
- laptop Atdec
- laptop Compaq
- laptop Hercules
- laptop Vulcan
- laptop System76
- laptop General Dynamics Itronix
- laptop CTL
- laptop Everex
- laptop Olidata
- laptop Dynabook
- laptop Hamilton Buhl
- laptop AORUS
- laptop Humanscale
- laptop Aplic
- laptop Schenker
Legújabb útmutatók laptop

3 Április 2025

28 Március 2025

28 Március 2025
27 Március 2025

20 Március 2025

18 Március 2025
16 Január 2025
13 Január 2025

13 Január 2025
13 Január 2025