Használati útmutató StarTech.com SDOCK4U33E
StarTech.com
Bölcső/dokkoló állomás
SDOCK4U33E
Olvassa el alább 📖 a magyar nyelvű használati útmutatót StarTech.com SDOCK4U33E (2 oldal) a Bölcső/dokkoló állomás kategóriában. Ezt az útmutatót 9 ember találta hasznosnak és 2 felhasználó értékelte átlagosan 4.5 csillagra
Oldal 1/2
Quick start guide
FR: Guide de l’utilisateur - fr.startech.com
DE: Bedienungsanleitung - de.startech.com
ES: Guía del usuario - es.startech.com
NL: Gebruiksaanwijzing - nl.startech.com
PT: Guia do usuário - pt.startech.com
IT: Guida per l’uso - it.startech.com
Manual Revision: 10/14/2015
For the latest information, technical specications, and support for
this product, please visit www.startech.com/SDOCK4U33E.
Packaging contents
• 1 x 4-bay drive docking station
• 1 x universal power adapter
• 4 x power cords (NA/UK/EU/AU)
• 1 x USB A to B cable
• 1 x eSATA cable
• 1 x quick start guide
System requirements
• Computer system with an available USB or eSATA port
Note: The eSATA port needs to support port-multiplier technology.
• Up to four 2.5 in. or 3.5 in. SATA hard drives (HDD) or solid-state
drives (SSD)
The SDOCK4U33E is OS independent and doesn’t require any
additional drivers or software.
SDOCK4U33E
4-Bay Docking Station - eSATA, USB 3.0 to SATA (6Gbps)
*actual product may vary from photos
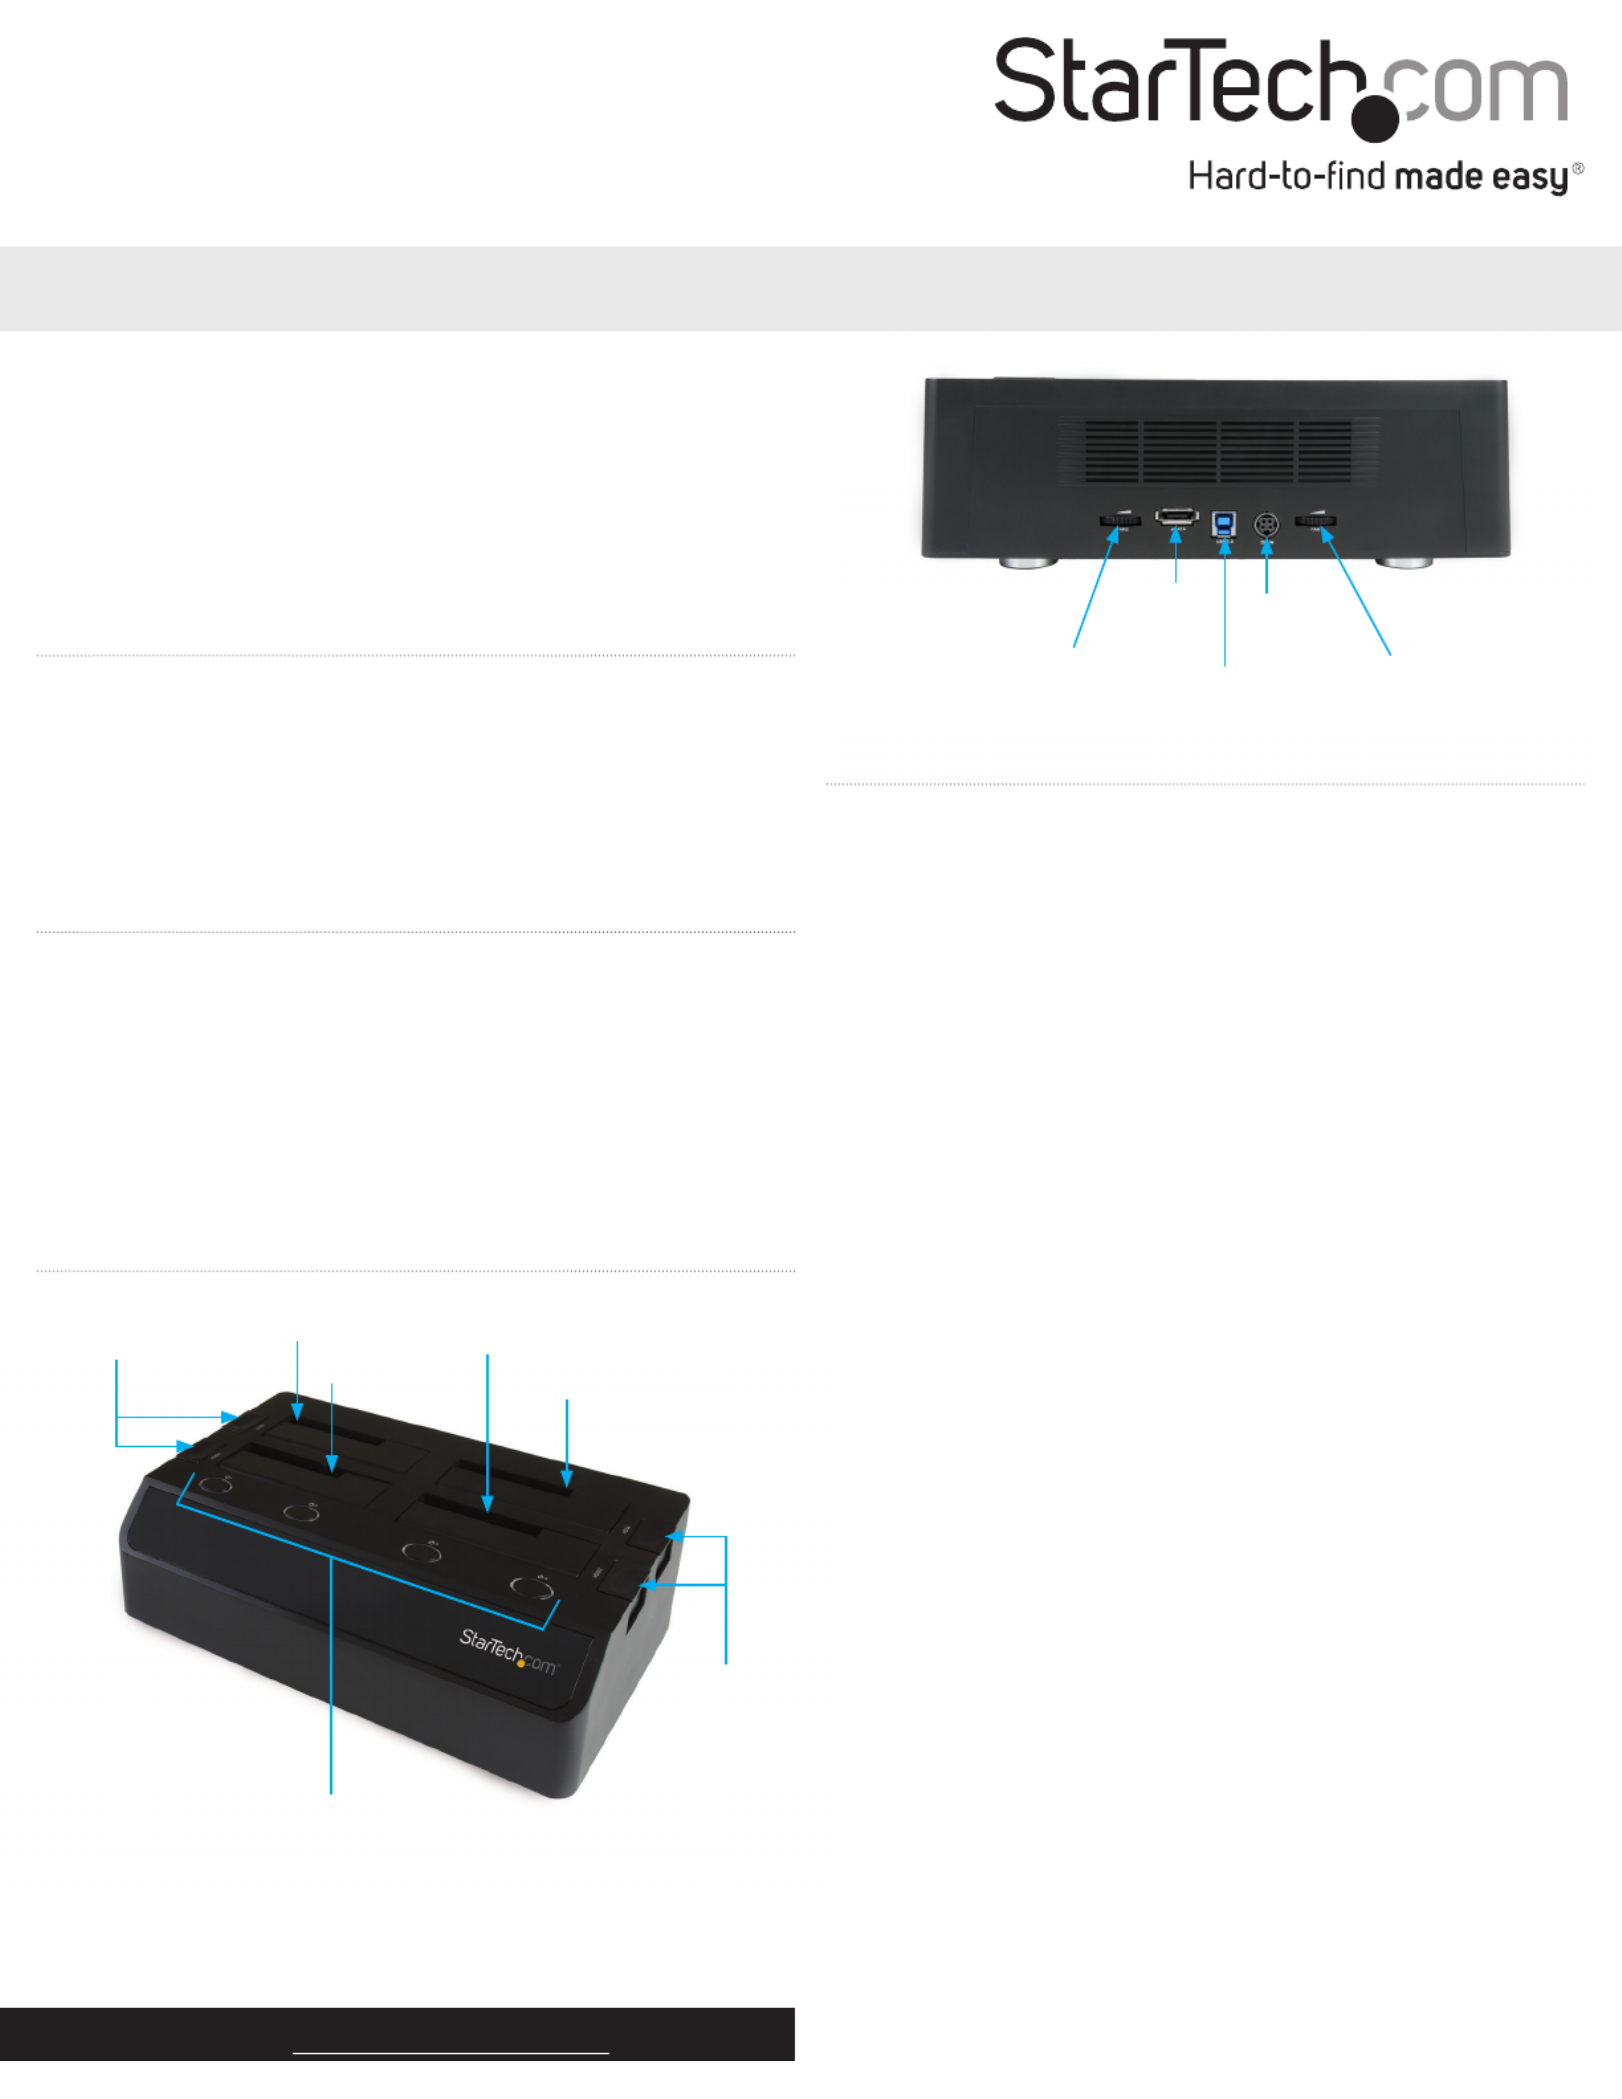
Product diagram
Rear view
Fan 2 speed
control
eSATA
connector
USB 3.0
connector
DC power
connector
Fan 1 speed
control
Installation
Connect the dock
Warning! Drives and storage enclosures should be handled carefully,
especially when they’re transported. If you’re not careful with your
drives, you may lose data as a result. Always handle storage devices
with caution.
1. Connect the external power adapter from the dock to a power
outlet.
2. Do one of the following:
• Connect the included USB cable from the dock to a USB port on
your computer system. Your computer can either be turned on
or turned o when you connect the USB cable.
• Connect the included eSATA cable from the dock to an eSATA
port on your computer system. Your computer can either be
turned on or turned o when you connect the USB cable.
Note: The host eSATA port needs to support port-multiplier
technology. If the eSATA port doesn’t support port multiplication,
only one of the installed SATA drives will be accessible.
3. Press the Power button on the top of the dock for each of the
slots that contain a drive. The LED indicator should light up to
indicate that the dock is turned on.
Install a drive
1. Carefully align a 2.5 in. or 3.5 in. SATA drive with a drive slot on the
dock, so that the SATA power and data connectors on the drive
are aligned with the corresponding connectors that are inside of
the drive slot.
2. Insert the 2.5 in. or 3.5 in. SATA drive into one of the drive slots.
3. Press the Power button to turn on the duplicator dock. The LED
indicator should light up to indicate that the dock is turned on.
After the drive is installed and the dock is turned on, your computer
automatically recognizes the drive and it’s accessible as though the
drive is installed internally in the system. If your computer doesn’t
automatically recognize the drive, see the Prepare a drive for use
topic.
Eject buttons
Eject buttons Drive 2 slot
Drive 1 slot
Drive 4 slot
Drive 3 slot
Drive power buttons and LEDs

FCC Compliance Statement
This equipment has been tested and found to comply with the limits for a Class B digital device, pursuant to part 15 of the FCC Rules. These limits are designed to provide reasonable protection against
harmful interference in a residential installation. This equipment generates, uses and can radiate radio frequency energy and, if not installed and used in accordance with the instructions, may cause
harmful interference to radio communications. However, there is no guarantee that interference will not occur in a particular installation. If this equipment does cause harmful interference to radio or
television reception, which can be determined by turning the equipment o and on, the user is encouraged to try to correct the interference by one or more of the following measures:
• Reorient or relocate the receiving antenna.
• Increase the separation between the equipment and receiver.
• Connect the equipment into an outlet on a circuit dierent from that to which the receiver is connected.
• Consult the dealer or an experienced radio/TV technician for help
This device complies with part 15 of the FCC Rules. Operation is subject to the following two conditions: (1) This device may not cause harmful interference, and (2) this device must accept any
interference received, including interference that may cause undesired operation. Changes or modications not expressly approved by StarTech.com could void the user’s authority to operate the
equipment.
Industry Canada Statement
This Class B digital apparatus complies with Canadian ICES-003.
Cet appareil numérique de la classe [B] est conforme à la norme NMB-003 du Canada.
CAN ICES-3 (B)/NMB-3(B)
Use of Trademarks, Registered Trademarks, and other Protected Names and Symbols
This manual may make reference to trademarks, registered trademarks, and other protected names and/or symbols of third-party companies not related in any way to
StarTech.com. Where they occur these references are for illustrative purposes only and do not represent an endorsement of a product or service by StarTech.com, or an endorsement of the product(s)
to which this manual applies by the third-party company in question. Regardless of any direct acknowledgement elsewhere in the body of this document, StarTech.com hereby acknowledges that all
trademarks, registered trademarks, service marks, and other protected names and/or symbols contained in this manual and related documents are the property of their respective holders.
Technical Support
StarTech.com’s lifetime technical support is an integral part of our commitment to provide industry-leading solutions. If you ever need help with your product, visit www.startech.com/support and
access our comprehensive selection of online tools, documentation, and downloads.
For the latest drivers/software, please visit www.startech.com/downloads
Warranty Information
This product is backed by a two-year warranty.
StarTech.com warrants its products against defects in materials and workmanship for the periods noted, following the initial date of purchase. During this period, the products may be returned for
repair, or replacement with equivalent products at our discretion. The warranty covers parts and labor costs only. StarTech.com does not warrant its products from defects or damages arising from
misuse, abuse, alteration, or normal wear and tear.
Limitation of Liability
In no event shall the liability of StarTech.com Ltd. and StarTech.com USA LLP (or their ocers, directors, employees or agents) for any damages (whether direct or indirect, special, punitive, incidental,
consequential, or otherwise), loss of prots, loss of business, or any pecuniary loss, arising out of or related to the use of the product exceed the actual price paid for the product. Some states do not
allow the exclusion or limitation of incidental or consequential damages. If such laws apply, the limitations or exclusions contained in this statement may not apply to you.
About driver installation
No driver or software installation is required for this product because
the drive dock is natively supported and the drivers are already
installed.
Prepare a drive for use
If you install a drive that already has data on it, after you plug in the
drive, it appears under My Computer Computer or with a drive letter
assigned to it.
If you install a brand-new drive that doesn’t contain any data, you
must prepare the drive for use.
If you use a computer that’s running a version of Windows®, do the
following:
1. On the taskbar, click the Windows icon.
2. In the eld, type .Search disk management
3. In the search results, click .Disk Management
4. Locate the disk that is labeled . To conrm that the Unallocated
drive is the correct one, check the drive capacity.
5. Right-click the section of the window that says and Unallocated
click .New Partition
6. To initialize the drive in the format of your choice, complete the
on-screen instructions.
When the drive is successfully installed, it appears under My
Computer Computer or with a drive letter assigned to it.
Remove a drive
Note: Make sure that the drive isn’t being accessed by the computer
before you proceed.
1. To remove the drive from the operating system, do one of the
following:
• On computers running a version of Windows, click Safely
Remove Device.
• On computers running a version of Mac OS, drag the drive to
the icon.trash can
For more information, see the documentation that came with your
operating system.
2. Press the button on the top of the dock and wait for the Power
dock to nish powering down.
3. To release the disk drive, press the corresponding Eject button on
the top of the dock.
4. Pull the disk drive from the drive slot.
Warning! Pressing the power button to turn o a drive will
momentarily restart the other drive bays. Make sure that the other
drives are not being accessed when you power o any other drives.
About LED indicators
The SDOCK4U33E includes a power and activity LED indicator for
each of the four drive slots. If the LED is illuminated blue, it means
that the drive slot is powered on. If the LED is blinking red, it means
that the drive is currently reading or writing.
Warning! If the LED is blinking red on one of the drive slots, don’t
interrupt the process by turning o the power or trying to remove
the drive from the slot.
Termékspecifikációk
| Márka: | StarTech.com |
| Kategória: | Bölcső/dokkoló állomás |
| Modell: | SDOCK4U33E |
Szüksége van segítségre?
Ha segítségre van szüksége StarTech.com SDOCK4U33E, tegyen fel kérdést alább, és más felhasználók válaszolnak Önnek
Útmutatók Bölcső/dokkoló állomás StarTech.com

21 Szeptember 2024
21 Szeptember 2024
21 Szeptember 2024
21 Szeptember 2024
21 Szeptember 2024
21 Szeptember 2024
21 Szeptember 2024
21 Szeptember 2024
19 Augusztus 2024
19 Augusztus 2024
Útmutatók Bölcső/dokkoló állomás
- Bölcső/dokkoló állomás Samsung
- Bölcső/dokkoló állomás Sony
- Bölcső/dokkoló állomás Yamaha
- Bölcső/dokkoló állomás Sharkoon
- Bölcső/dokkoló állomás Nedis
- Bölcső/dokkoló állomás LG
- Bölcső/dokkoló állomás Marantz
- Bölcső/dokkoló állomás Philips
- Bölcső/dokkoló állomás Pioneer
- Bölcső/dokkoló állomás Sharp
- Bölcső/dokkoló állomás Harman Kardon
- Bölcső/dokkoló állomás Nokia
- Bölcső/dokkoló állomás Lenovo
- Bölcső/dokkoló állomás Sven
- Bölcső/dokkoló állomás BenQ
- Bölcső/dokkoló állomás Bestway
- Bölcső/dokkoló állomás Onkyo
- Bölcső/dokkoló állomás Vimar
- Bölcső/dokkoló állomás LogiLink
- Bölcső/dokkoló állomás SBS
- Bölcső/dokkoló állomás JBL
- Bölcső/dokkoló állomás Rocstor
- Bölcső/dokkoló állomás Digitus
- Bölcső/dokkoló állomás Zebra
- Bölcső/dokkoló állomás LC-Power
- Bölcső/dokkoló állomás Infiniton
- Bölcső/dokkoló állomás Dell
- Bölcső/dokkoló állomás Boss
- Bölcső/dokkoló állomás Crestron
- Bölcső/dokkoló állomás Tripp Lite
- Bölcső/dokkoló állomás Conceptronic
- Bölcső/dokkoló állomás Datalogic
- Bölcső/dokkoló állomás Klipsch
- Bölcső/dokkoló állomás Technaxx
- Bölcső/dokkoló állomás Aiwa
- Bölcső/dokkoló állomás Kenwood
- Bölcső/dokkoló állomás V7
- Bölcső/dokkoló állomás Jabra
- Bölcső/dokkoló állomás Hama
- Bölcső/dokkoló állomás PEAQ
- Bölcső/dokkoló állomás Renkforce
- Bölcső/dokkoló állomás Lamax
- Bölcső/dokkoló állomás Sencor
- Bölcső/dokkoló állomás GPX
- Bölcső/dokkoló állomás Bose
- Bölcső/dokkoló állomás Iogear
- Bölcső/dokkoló állomás Telefunken
- Bölcső/dokkoló állomás Nevir
- Bölcső/dokkoló állomás Tangent
- Bölcső/dokkoló állomás Cambridge
- Bölcső/dokkoló állomás Monster
- Bölcső/dokkoló állomás Roadstar
- Bölcső/dokkoló állomás Logitech
- Bölcső/dokkoló állomás Parrot
- Bölcső/dokkoló állomás Scosche
- Bölcső/dokkoló állomás Sonoro
- Bölcső/dokkoló állomás Denver
- Bölcső/dokkoló állomás Trevi
- Bölcső/dokkoló állomás Ewent
- Bölcső/dokkoló állomás Aluratek
- Bölcső/dokkoló állomás NGS
- Bölcső/dokkoló állomás Livoo
- Bölcső/dokkoló állomás Gembird
- Bölcső/dokkoló állomás Denon
- Bölcső/dokkoló állomás ATen
- Bölcső/dokkoló állomás Muse
- Bölcső/dokkoló állomás Energy Sistem
- Bölcső/dokkoló állomás Electro-Voice
- Bölcső/dokkoló állomás Soundcore
- Bölcső/dokkoló állomás Niceboy
- Bölcső/dokkoló állomás SPC
- Bölcső/dokkoló állomás Speed-Link
- Bölcső/dokkoló állomás Akasa
- Bölcső/dokkoló állomás Klip Xtreme
- Bölcső/dokkoló állomás Edifier
- Bölcső/dokkoló állomás Behringer
- Bölcső/dokkoló állomás Edimax
- Bölcső/dokkoló állomás Lotronic
- Bölcső/dokkoló állomás BlueAnt
- Bölcső/dokkoló állomás Jane
- Bölcső/dokkoló állomás Terratec
- Bölcső/dokkoló állomás DreamGEAR
- Bölcső/dokkoló állomás Deltaco
- Bölcső/dokkoló állomás Manhattan
- Bölcső/dokkoló állomás Peavey
- Bölcső/dokkoló állomás Kogan
- Bölcső/dokkoló állomás Alecto
- Bölcső/dokkoló állomás Acme
- Bölcső/dokkoló állomás Alesis
- Bölcső/dokkoló állomás Media-Tech
- Bölcső/dokkoló állomás Scott
- Bölcső/dokkoló állomás ION
- Bölcső/dokkoló állomás Jamo
- Bölcső/dokkoló állomás Blaupunkt
- Bölcső/dokkoló állomás Samson
- Bölcső/dokkoló állomás Leitz
- Bölcső/dokkoló állomás Magnat
- Bölcső/dokkoló állomás Trust
- Bölcső/dokkoló állomás AKAI
- Bölcső/dokkoló állomás Konig
- Bölcső/dokkoló állomás Marmitek
- Bölcső/dokkoló állomás TechniSat
- Bölcső/dokkoló állomás Fenton
- Bölcső/dokkoló állomás Pyle
- Bölcső/dokkoló állomás Salora
- Bölcső/dokkoló állomás Telestar
- Bölcső/dokkoló állomás Lenco
- Bölcső/dokkoló állomás Maxell
- Bölcső/dokkoló állomás Roberts
- Bölcső/dokkoló állomás Lindy
- Bölcső/dokkoló állomás ECG
- Bölcső/dokkoló állomás JLab
- Bölcső/dokkoló állomás Best Buy
- Bölcső/dokkoló állomás Vorago
- Bölcső/dokkoló állomás Arctic Cooling
- Bölcső/dokkoló állomás Bowers & Wilkins
- Bölcső/dokkoló állomás KEF
- Bölcső/dokkoló állomás Soundmaster
- Bölcső/dokkoló állomás Monitor Audio
- Bölcső/dokkoló állomás Fresh 'n Rebel
- Bölcső/dokkoló állomás Siig
- Bölcső/dokkoló állomás Dual
- Bölcső/dokkoló állomás Inter-Tech
- Bölcső/dokkoló állomás Canton
- Bölcső/dokkoló állomás Axis
- Bölcső/dokkoló állomás Imperial
- Bölcső/dokkoló állomás Creative
- Bölcső/dokkoló állomás JAYS
- Bölcső/dokkoló állomás Gamber-Johnson
- Bölcső/dokkoló állomás Adj
- Bölcső/dokkoló állomás Anker
- Bölcső/dokkoló állomás I-TEC
- Bölcső/dokkoló állomás Gabor
- Bölcső/dokkoló állomás Havis
- Bölcső/dokkoló állomás ILive
- Bölcső/dokkoló állomás Rapoo
- Bölcső/dokkoló állomás Sitecom
- Bölcső/dokkoló állomás Schwaiger
- Bölcső/dokkoló állomás Orava
- Bölcső/dokkoló állomás Majestic
- Bölcső/dokkoló állomás Enermax
- Bölcső/dokkoló állomás Sogo
- Bölcső/dokkoló állomás Xcellon
- Bölcső/dokkoló állomás Elgato
- Bölcső/dokkoló állomás Aiptek
- Bölcső/dokkoló állomás Altec Lansing
- Bölcső/dokkoló állomás Icy Box
- Bölcső/dokkoló állomás Lexibook
- Bölcső/dokkoló állomás BeeWi
- Bölcső/dokkoló állomás GPO
- Bölcső/dokkoló állomás Caliber
- Bölcső/dokkoló állomás SilverStone
- Bölcső/dokkoló állomás Trekstor
- Bölcső/dokkoló állomás Targus
- Bölcső/dokkoló állomás Boynq
- Bölcső/dokkoló állomás Aukey
- Bölcső/dokkoló állomás Gemini
- Bölcső/dokkoló állomás Sonos
- Bölcső/dokkoló állomás Kensington
- Bölcső/dokkoló állomás Brigmton
- Bölcső/dokkoló állomás Sunstech
- Bölcső/dokkoló állomás DeLock
- Bölcső/dokkoló állomás Techly
- Bölcső/dokkoló állomás Swissvoice
- Bölcső/dokkoló állomás BlueBuilt
- Bölcső/dokkoló állomás Connect IT
- Bölcső/dokkoló állomás Steren
- Bölcső/dokkoló állomás KitSound
- Bölcső/dokkoló állomás Polk
- Bölcső/dokkoló állomás Audiosonic
- Bölcső/dokkoló állomás Sandberg
- Bölcső/dokkoló állomás Seg
- Bölcső/dokkoló állomás Bigben Interactive
- Bölcső/dokkoló állomás Jam
- Bölcső/dokkoló állomás Pure
- Bölcső/dokkoló állomás Audiovox
- Bölcső/dokkoló állomás Bunn
- Bölcső/dokkoló állomás Bigben
- Bölcső/dokkoló állomás IDance
- Bölcső/dokkoló állomás Simplecom
- Bölcső/dokkoló állomás Laser
- Bölcső/dokkoló állomás Naxa
- Bölcső/dokkoló állomás Fantec
- Bölcső/dokkoló állomás Boston Acoustics
- Bölcső/dokkoló állomás Sweex
- Bölcső/dokkoló állomás Ices
- Bölcső/dokkoló állomás Vakoss
- Bölcső/dokkoló állomás Natec
- Bölcső/dokkoló állomás Pure Acoustics
- Bölcső/dokkoló állomás T'nB
- Bölcső/dokkoló állomás Ematic
- Bölcső/dokkoló állomás Tracer
- Bölcső/dokkoló állomás Zagg
- Bölcső/dokkoló állomás Gira
- Bölcső/dokkoló állomás Audio Pro
- Bölcső/dokkoló állomás Difrnce
- Bölcső/dokkoló állomás Gear4
- Bölcső/dokkoló állomás Manu
- Bölcső/dokkoló állomás Celly
- Bölcső/dokkoló állomás Parat
- Bölcső/dokkoló állomás Wentronic
- Bölcső/dokkoló állomás Urban Revolt
- Bölcső/dokkoló állomás IHome
- Bölcső/dokkoló állomás Stereoboomm
- Bölcső/dokkoló állomás Brydge
- Bölcső/dokkoló állomás Tivoli Audio
- Bölcső/dokkoló állomás Satechi
- Bölcső/dokkoló állomás Iluv
- Bölcső/dokkoló állomás Monoprice
- Bölcső/dokkoló állomás Ibiza Sound
- Bölcső/dokkoló állomás Avanca
- Bölcső/dokkoló állomás MIPRO
- Bölcső/dokkoló állomás Raikko
- Bölcső/dokkoló állomás Clint
- Bölcső/dokkoló állomás Xoro
- Bölcső/dokkoló állomás I.Sound
- Bölcső/dokkoló állomás Billow
- Bölcső/dokkoló állomás Block
- Bölcső/dokkoló állomás Icy Dock
- Bölcső/dokkoló állomás Boompods
- Bölcső/dokkoló állomás WowWee
- Bölcső/dokkoló állomás Sonnet
- Bölcső/dokkoló állomás Twelve South
- Bölcső/dokkoló állomás Verbatim
- Bölcső/dokkoló állomás Zalman
- Bölcső/dokkoló állomás HMDX
- Bölcső/dokkoló állomás Soundfreaq
- Bölcső/dokkoló állomás CRU
- Bölcső/dokkoló állomás Kreafunk
- Bölcső/dokkoló állomás Music Angel
- Bölcső/dokkoló állomás HyperJuice
- Bölcső/dokkoló állomás Braven
- Bölcső/dokkoló állomás Vantec
- Bölcső/dokkoló állomás Laney
- Bölcső/dokkoló állomás Esselte
- Bölcső/dokkoló állomás Auray
- Bölcső/dokkoló állomás Logic3
- Bölcső/dokkoló állomás Novus
- Bölcső/dokkoló állomás Cabstone
- Bölcső/dokkoló állomás Promate
- Bölcső/dokkoló állomás Ministry Of Sound
- Bölcső/dokkoló állomás Divacore
- Bölcső/dokkoló állomás Merlin
- Bölcső/dokkoló állomás Goal Zero
- Bölcső/dokkoló állomás Karma
- Bölcső/dokkoló állomás X-Zero
- Bölcső/dokkoló állomás Magnavox
- Bölcső/dokkoló állomás Highpoint
- Bölcső/dokkoló állomás Perfect Choice
- Bölcső/dokkoló állomás White Shark
- Bölcső/dokkoló állomás Wavemaster
- Bölcső/dokkoló állomás XXODD
- Bölcső/dokkoló állomás X-MINI
- Bölcső/dokkoló állomás Socket Mobile
- Bölcső/dokkoló állomás TooQ
- Bölcső/dokkoló állomás Alogic
- Bölcső/dokkoló állomás Proclip
- Bölcső/dokkoló állomás Hamlet
- Bölcső/dokkoló állomás Microlab
- Bölcső/dokkoló állomás OWC
- Bölcső/dokkoló állomás Dolphin
- Bölcső/dokkoló állomás Raidsonic
- Bölcső/dokkoló állomás Approx
- Bölcső/dokkoló állomás Leotec
- Bölcső/dokkoló állomás Voxx
- Bölcső/dokkoló állomás Cabasse
- Bölcső/dokkoló állomás SACK It
- Bölcső/dokkoló állomás Acme Made
- Bölcső/dokkoló állomás AmpliVox
- Bölcső/dokkoló állomás Urban Factory
- Bölcső/dokkoló állomás VisionTek
- Bölcső/dokkoló állomás EXSYS
- Bölcső/dokkoló állomás J5 Create
- Bölcső/dokkoló állomás Ryght
- Bölcső/dokkoló állomás Axagon
- Bölcső/dokkoló állomás ICreation
- Bölcső/dokkoló állomás IOPLEE
- Bölcső/dokkoló állomás Divoom
- Bölcső/dokkoló állomás CLUB3D
- Bölcső/dokkoló állomás Voxicon
- Bölcső/dokkoló állomás Defender
- Bölcső/dokkoló állomás FoneStar
- Bölcső/dokkoló állomás SMK-Link
Legújabb útmutatók Bölcső/dokkoló állomás
1 Április 2025
27 Március 2025

24 Március 2025
16 Január 2025

12 Január 2025
8 Január 2025
8 Január 2025

4 Január 2025
3 Január 2025
2 Január 2025