Használati útmutató Sharp LC-70LE847U
Olvassa el alább 📖 a magyar nyelvű használati útmutatót Sharp LC-70LE847U (90 oldal) a televízió kategóriában. Ezt az útmutatót 2 ember találta hasznosnak és 2 felhasználó értékelte átlagosan 4.5 csillagra
Oldal 1/90

ENGLISHFRANÇAISESPAÑOL
IMPORTANT : Please read this operation manual before starting operating the equipment.
IMPORTANT : Veuillez lire ce mode d'emploi avant de commencer à utiliser l'appareil.
IMPORTANTE : Lea este manual de operación antes de comenzar a operar el equipo.
LC-70LE847U
LC-60LE847U
LC-70LE745U
LC-60LE745U
LIQUID CRYSTAL TELEVISION
TÉLÉVISEUR ACL
TELEVISOR CON PANTALLA
DE CRISTAL LÍQUIDO
OPERATION MANUAL
MODE D’EMPLOI
MANUAL DE OPERACIÓN
ENGLISHFRANÇAISESPAÑOL

Dimensional Drawing
Skype will be available for the USB terminals. For details, refer to the following:
• http://www.sharpusa.com (for the operation manual)
• http://freetalk.me/product/sharp/ (for information on the communication camera)
• http://www.skype.com (for details on Skype)
Skype sera disponible uniquement pour les prises USB. Pour les détails, reportez-vous à :
•http://www.sharpusa.com (pour le mode d’emploi)
•http://freetalk.me/product/sharp/ (pour des informations sur la caméra de communication)
•http://www.skype.com (pour les détails sur Skype)
Skype estará disponible para los terminales USB. Para conocer más detalles, consulte:
•http://www.sharpusa.com (para el manual de operación)
•http://freetalk.me/product/sharp/ (para obtener más información sobre la cámara de comunicación)
•http://www.skype.com (para conocer detalles de Skype)

TO REDUCE THE RISK OF FIRE OR ELECTRIC SHOCK, DO
NOT EXPOSE THIS PRODUCT TO RAIN OR MOISTURE.
WARNING:
The lightning flash with arrow-head
symbol, within an equilateral triangle,
is intended to alert the user to the
presence of uninsulated “dangerous
voltage” within the product's
enclosure that may be of sufficient
magnitude to constitute a risk of
electric shock to persons.
The exclamation point within a
triangle is intended to alert the user
to the presence of important
operating and maintenance
(servicing) instructions in the
literature accompanying the product.
CAUTION
RISK OF ELECTRIC SHOCK
DO NOT OPEN
CAUTION: TO REDUCE THE RISK OF ELECTRIC SHOCK,
DO NOT REMOVE COVER (OR BACK).
NO USER-SERVICEABLE PARTS INSIDE.
REFER SERVICING TO QUALIFIED SERVICE
PERSONNEL.
TO PREVENT ELECTRIC SHOCK, MATCH WIDE BLADE OF PLUG TO WIDE
SLOT, FULLY INSERT.
CAUTION:
WARNING: FCC Regulations state that any unauthorized changes or modifications to this equipment not expressly
approved by the manufacturer could void the user's authority to operate this equipment.
1
OPERATION MANUAL
IMPORTANT:
To aid reporting in case of loss or theft, please record the
TV's model and serial numbers in the space provided. The
numbers are located at the rear and right side of the TV.
Model No.:
Serial No.:
LIQUID CRYSTAL TELEVISION
ENGLISH
IMPORTANT INFORMATION
ENGLISH
LC-70LE847U
LC-60LE847U
LC-70LE745U
LC-60LE745U

DECLARATION OF CONFORMITY:
SHARP LIQUID CRYSTAL TELEVISION, MODEL LC-70LE847U/LC-60LE847U/LC-70LE745U/LC-60LE745U
This device complies with Part 15 of the FCC Rules. Operation is subject to the following two conditions:
(1) This device may not cause harmful interference, and (2) this device must accept any interference
received, including interference that may cause undesired operation.
RESPONSIBLE PARTY:
SHARP ELECTRONICS CORPORATION
Sharp Plaza, Mahwah, New Jersey 07495-1163
TEL: 1-800-BE-SHARP
For Business Customers: URL http://www.sharpusa.com
CAUTION:
This product satisfies FCC regulations when shielded cables and connectors are used to connect the unit to other
equipment. To prevent electromagnetic interference with electric appliances such as radios and televisions, use shielded
cables and connectors for connections.
INFORMATION:
This equipment has been tested and found to comply with the limits for a Class B digital device, pursuant to Part 15 of the FCC
Rules. These limits are designed to provide reasonable protection against harmful interference in a residential installation. This
equipment generates, uses and can radiate radio frequency energy and, if not installed and used in accordance with the
instructions, may cause harmful interference to radio communications. However, there is no guarantee that interference will not
occur in a particular installation. If this equipment does cause harmful interference to radio or television reception, which can be
determined by turning the equipment off and on, the user is encouraged to try to correct the interference by one or more of the
following measures:
Reorient or relocate the receiving antenna.
Increase the separation between the equipment and receiver.
Connect the equipment into an outlet on a circuit different from that to which the receiver is connected.
Consult the dealer or an experienced radio/TV technician for help.
“Note to CATV system installer: This reminder is provided to call the CATV system installer's attention to Article 820 of the National
Electrical Code that provides guidelines for proper grounding and, in particular, specifies that the cable ground shall be connected to the
grounding system of the building, as close to the point of cable entry as practical.”
This product qualifies for ENERGY STAR when "Home" is selected for "TV Location".
Setting "TV Location" to "Home" allows the TV to achieve an energy-saving status for household use.
FCC Compliance Statement
This device complies with part 15 of the FCC Rules. Operation is subject to the following two conditions:
(1) This device may not cause harmful interference, and (2) this device must accept any interference received, including
interference that may cause undesired operation.
Wireless Radio
For product available in the USA/Canada market, only channel 1–11 can be operated. Selection of other channels is not possible.
This device is going to be operated in 5.15–5.25GHz frequency range, it is restricted in indoor environment only.
Important: Any changes or modifications not expressly approved by the party responsible for compliance could void the user’s
authority to operate the equipment.
FCC Radiation Exposure Statement: This equipment complies with FCC radiation exposure limits set forth for an uncontrolled
environment. This equipment should be installed and operated with minimum distance 20cm between the radiator & your body.
Industry Canada Statement
This Class B digital apparatus complies with Canadian ICES-003.
Cet appareil numérique de la classe B est conforme à la norme NMB-003 du Canada.
Wireless Radio
For product available in the USA/Canada market, only channel 1–11 can be operated. Selection of other channels is not possible.
The device could automatically discontinue transmission in case of absence of information to transmit, or operational failure.
Note that this is not intended to prohibit transmission of control or signaling information or the use of repetitive codes where
required by the technology.
Important: Any changes or modifications not expressly approved by the party responsible for compliance could void the user’s
authority to operate the equipment.
IC Radiation Exposure Statement: This equipment complies with IC RSS-102 radiation exposure limits set forth for an
uncontrolled environment. This equipment should be installed and operated with minimum distance 20 cm between the radiator
& your body.
2
IMPORTANT INFORMATION

Electricity is used to perform many useful functions, but it can also cause personal injuries and property damage
if improperly handled. This product has been engineered and manufactured with the highest priority on safety.
However, improper use can result in electric shock and/or fire. In order to prevent potential danger, please
observe the following instructions when installing, operating and cleaning the product. To ensure your safety
and prolong the service life of your Liquid Crystal Television, please read the following precautions carefully
before using the product.
1) Read these instructions.
2) Keep these instructions.
3) Heed all warnings.
4) Follow all instructions.
5) Do not use this apparatus near water.
6) Clean only with dry cloth.
7) Do not block any ventilation openings. Install in accordance with the manufacturer's instructions.
8) Do not install near any heat sources such as radiators, heat registers, stoves, or other apparatus (including
amplifiers) that produce heat.
9) Do not defeat the safety purpose of the polarized or grounding-type plug. A polarized plug has two blades
with one wider than the other. A grounding type plug has two blades and a third grounding prong. The
wide blade or the third prong are provided for your safety. If the provided plug does not fit into your outlet,
consult an electrician for replacement of the obsolete outlet.
10) Protect the power cord from being walked on or pinched particularly at plugs, convenience receptacles,
and the point where they exit from the apparatus.
11) Only use attachments/accessories specified by the manufacturer.
12) Use only with the cart, stand, tripod, bracket, or table specified by the manufacturer, or sold
with the apparatus. When a cart is used, use caution when moving the cart/apparatus
combination to avoid injury from tip-over.
13) Unplug this apparatus during lightning storms or when unused for long periods of time.
14) Refer all servicing to qualified service personnel. Servicing is required when the apparatus has been
damaged in any way, such as power-supply cord or plug is damaged, liquid has been spilled or objects
have fallen into the apparatus, the apparatus has been exposed to rain or moisture, does not operate
normally, or has been dropped.
Additional Safety Information
15) Power Sources—This product should be operated only from the type of power source indicated on the
marking label. If you are not sure of the type of power supply to your home, consult your product dealer or
local power company. For products intended to operate from battery power, or other sources, refer to the
operating instructions.
16) Overloading—Do not overload wall outlets, extension cords, or integral convenience receptacles as this
can result in a risk of fire or electric shock.
17) Object and Liquid Entry—Never push objects of any kind into this product through openings as they may
touch dangerous voltage points or short-out parts that could result in a fire or electric shock. Never spill
liquid of any kind on the product.
18) Damage Requiring Service—Unplug this product from the wall outlet and refer servicing to qualified
service personnel under the following conditions:
a) When the AC cord or plug is damaged,
b) If liquid has been spilled, or objects have fallen into the product,
c) If the product has been exposed to rain or water,
d) If the product does not operate normally by following the operating instructions.
Adjust only those controls that are covered by the operating instructions as an improper adjustment
of other controls may result in damage and will often require extensive work by a qualified technician
to restore the product to its normal operation,
e) If the product has been dropped or damaged in any way, and
f) When the product exhibits a distinct change in performance - this indicates a need for service.
19) Replacement Parts—When replacement parts are required, be sure the service technician has used
replacement parts specified by the manufacturer or have the same characteristics as the original part.
Unauthorized substitutions may result in fire, electric shock, or other hazards.
20) Safety Check—Upon completion of any service or repairs to this product, ask the service technician to
perform safety checks to determine that the product is in proper operating condition.
21) Wall or ceiling mounting—When mounting the product on a wall or ceiling, be sure to install the product
according to the method recommended by the manufacturer.
3
DEAR SHARP CUSTOMER
Thank you for your purchase of the Sharp Liquid Crystal Television. To ensure safety and many years
of trouble-free operation of your product, please read the Important Safety Instructions carefully before
using this product.
IMPORTANT SAFETY INSTRUCTIONS

IMPORTANT SAFETY INSTRUCTIONS
4
• Outdoor Antenna Grounding — If an outside antenna is
connected to the television equipment, be sure the antenna
system is grounded so as to provide some protection against
voltage surges and built-up static charges.
Article 810 of the National Electrical Code, ANSI/NFPA 70,
provides information with regard to proper grounding of the
mast and supporting structure, grounding of the lead-in wire
to an antenna discharge unit, size of grounding conductors,
location of antenna-discharge unit, connection to grounding
electrodes, and requirements for the grounding electrode.
EXAMPLE OF ANTENNA GROUNDING AS PER
NATIONAL ELECTRICAL CODE, ANSI/NFPA 70
ANTENNA
LEAD IN WIRE
GROUND
CLAMP
NEC — NATIONAL ELECTRICAL CODE
GROUNDING
CONDUCTORS
(NEC SECTION 810-21)
GROUND CLAMPS
POWER SERVICE GROUNDING
ELECTRODE SYSTEM
(NEC ART 250)
ELECTRIC
SERVICE
EQUIPMENT
ANTENNA
DISCHARGE UNIT
(NEC SECTION 810-20)
• Water and Moisture — Do not use this product near water - for example, near a bath tub, wash bowl, kitchen sink, or
laundry tub; in a wet basement; or near a swimming pool; and the like.
• Stand — Do not place the product on an unstable cart, stand, tripod or table. Placing the product on an unstable base
can cause the product to fall, resulting in serious personal injuries as well as damage to the product. Use only a cart,
stand, tripod, bracket or table recommended by the manufacturer or sold with the product. When mounting the product
on a wall, be sure to follow the manufacturer's instructions. Use only the mounting hardware recommended by the
manufacturer.
• Selecting the location — Select a place with no direct sunlight and good ventilation.
• Ventilation — The vents and other openings in the cabinet are designed for ventilation. Do not cover or block these vents
and openings since insuffi cient ventilation can cause overheating and/or shorten the life of the product. Do not place
the product on a bed, sofa, rug or other similar surface, since they can block ventilation openings. This product is not
designed for built-in installation; do not place the product in an enclosed place such as a bookcase or rack, unless proper
ventilation is provided or the manufacturer's instructions are followed.
• The front panel used in this product is made of glass. Therefore, it can break when the product is dropped or applied with
impact. Be careful not to be injured by broken glass pieces in case the panel breaks.
• Heat — The product should be situated away from heat sources such as radiators, heat registers, stoves, or other
products (including amplifi ers) that produce heat.
• The Liquid Crystal panel is a very high technology product with 2,073,600 pixels, giving you fi ne picture details.
Occasionally, a few non-active pixels may appear on the screen as a fi xed point of blue, green, red or yellow (LC-70LE847U/
LC-60LE847U); blue, green or red (LC-70LE745U/LC-60LE745U). Please note that this does not affect the performance of
your product.
• Lightning — For added protection for this television equipment during a lightning storm, or when it is left unattended and
unused for long periods of time, unplug it from the wall outlet and disconnect the antenna. This will prevent damage to
the equipment due to lightning and power-line surges.
• Power Lines — An outside antenna system should not be located in the vicinity of overhead power lines or other electric
light or power circuits, or where it can fall into such power lines or circuits. When installing an outside antenna system,
extreme care should be taken to keep from touching such power lines or circuits as contact with them might be fatal.
• To prevent fi re, never place any type of candle or fl ames on the top or near the TV set.
• To prevent fi re or shock hazard, do not place the AC cord under the TV set or other heavy items.
• Do not display a still picture for a long time, as this could cause an afterimage to remain.
• To prevent fi re or shock hazard, do not expose this product to dripping or splashing.
No objects fi lled with liquids, such as vases, should be placed on the product.
• Do not insert foreign objects into the product. Inserting objects in the air vents or other openings may
result in fi re or electric shock. Exercise special caution when using the product around children.
Precautions when transporting the TV
• When transporting the TV, never carry it by holding or otherwise putting pressure onto the display. Be sure to always
carry the TV by two people holding it with two hands — one hand on each side of the TV.
Caring for the cabinet
• Use a soft cloth (cotton, fl annel, etc.) and gently wipe the surface of the cabinet.
• Using a chemical cloth (wet/dry sheet type cloth, etc.) may deform the components of the main unit cabinet or cause
cracking.
• Wiping with a hard cloth or using strong force may scratch the surface of the cabinet.
• If the cabinet is very dirty, wipe with a soft cloth (cotton, fl annel, etc.) soaked in neutral detergent diluted with water and
thoroughly wrung out, and then wipe with a soft dry cloth.
• Avoid using benzene, thinner, and other solvents, as these may deform the cabinet and cause the paint to peel off.
• Do not apply insecticides or other volatile liquids.
Also, do not allow the cabinet to remain in contact with rubber or vinyl products for a long period of time. Plasticizers
inside the plastic may cause the cabinet to deform and cause the paint to peel off.
IMPORTANT SAFETY INSTRUCTIONS
5
Caring for the front panel
• Turn off the main power and unplug the AC cord from the wall outlet before handling.
• Gently wipe the surface of the front panel with a soft cloth (cotton, fl annel, etc.).
To protect the front panel, do not use a dirty cloth, liquid cleaners, or a chemical cloth (wet/dry
sheet type cloth, etc.). This may damage the surface of the front panel.
• Wiping with a hard cloth or using strong force may scratch the surface of the front panel.
• Use a soft damp cloth to gently wipe the front panel when it is really dirty.
(It may scratch the surface of the front panel when wiped strongly.)
• If the front panel is dusty, use an anti-static brush, which is commercially available, to clean it.
• To avoid scratching the frame or screen, please use a soft, lint free cloth for cleaning. Approved cleaning cloths are
available directly from Sharp in single (00Z-LCD-CLOTH) or triple (00Z-LCD-CLOTH-3) packs. Call 1-800-BE-SHARP for
ordering, or VISIT http://www.sharpusa.com/SharpDirect.
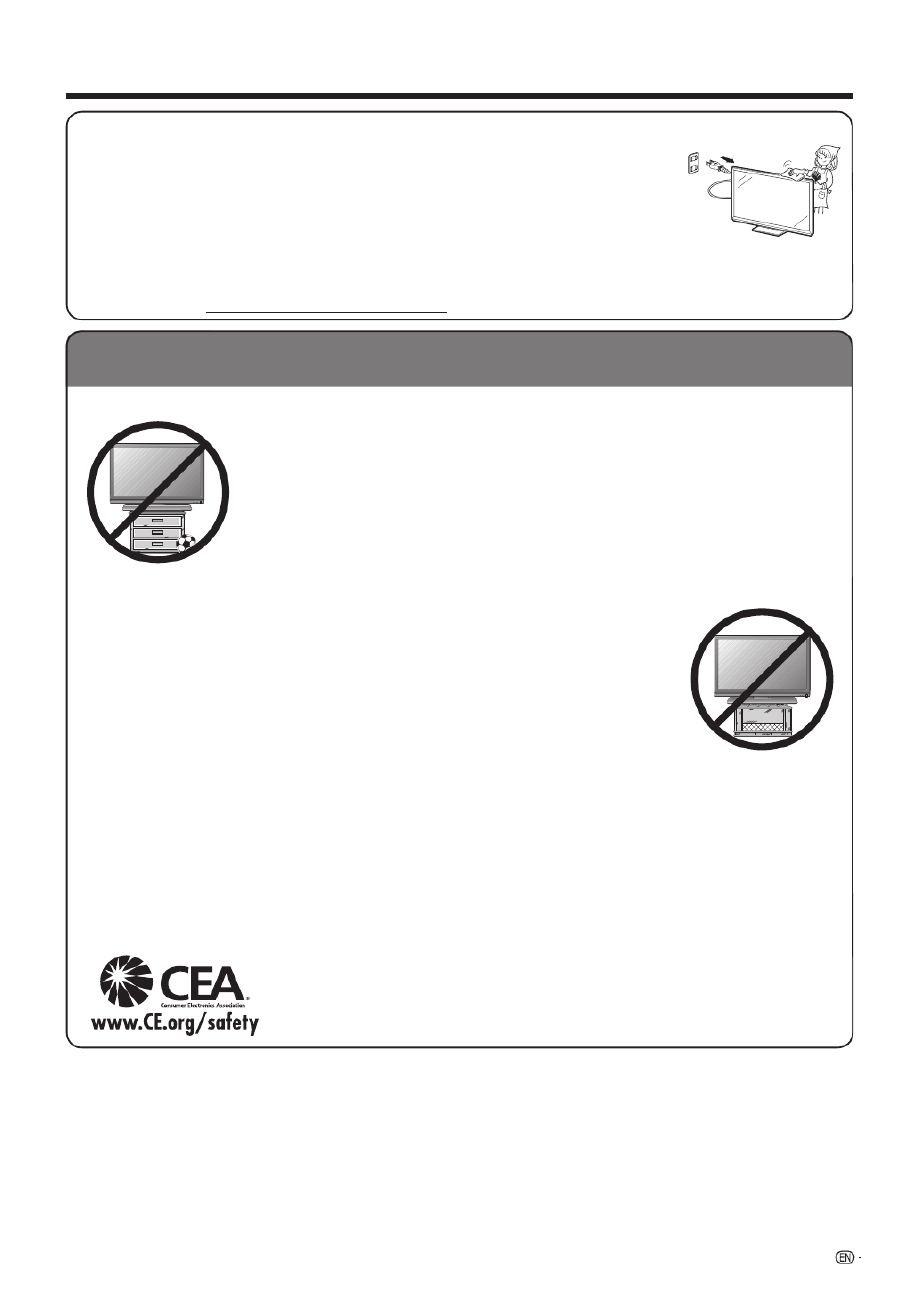
CHILD SAFETY:
It Makes A Difference How and Where You Use Your Flat Panel Display
Congratulations on your purchase! As you enjoy your new product, please keep these safety tips in mind:
THE ISSUE
• The home theater entertainment experience is a growing trend and larger fl at panel displays
are popular purchases. However, fl at panel displays are not always supported on the proper
stands or installed according to the manufacturer’s recommendations.
• Flat panel displays that are inappropriately situated on dressers, bookcases, shelves, desks,
speakers, chests or carts may fall over and cause injury.
THIS MANUFACTURER CARES!
• The consumer electronics industry is committed to making home entertainment enjoyable
and safe.
TUNE INTO SAFETY
• One size does NOT fi t all. Follow the manufacturer’s recommendations for the safe installation
and use of your fl at panel display.
• Carefully read and understand all enclosed instructions for proper use of this product.
• Don’t allow children to climb on or play with furniture and television sets.
• Don’t place fl at panel displays on furniture that can easily be used as steps, such as a chest
of drawers.
• Remember that children can become excited while watching a program, especially on a
“larger than life” fl at panel display. Care should be taken to place or install the display where it
cannot be pushed, pulled over, or knocked down.
• Care should be taken to route all cords and cables connected to the fl at panel display so that
they cannot be pulled or grabbed by curious children.
WALL MOUNTING: IF YOU DECIDE TO WALL MOUNT YOUR FLAT PANEL DISPLAY, ALWAYS:
• Use a mount that has been recommended by the display manufacturer and/or listed by an independent laboratory (such
as UL, CSA, ETL).
• Follow all instructions supplied by the display and wall mount manufacturers.
• If you have any doubts about your ability to safely install your fl at panel display, contact your retailer about professional
installation.
• Make sure that the wall where you are mounting the display is appropriate. Some wall mounts are not designed to be
mounted to walls with steel studs or old cinder block construction. If you are unsure, contact a professional installer.
• A minimum of two people are required for installation. Flat panel displays can be heavy.
Note: CEA is the preeminent trade association promoting growth in the $161 billion U.S.
consumer electronics industry. More than 2,200 companies enjoy the benefi ts of CEA
membership, including legislative advocacy, market research, technical training and
education, industry promotion and the fostering of business and strategic relationships.

6
3D Glasses
Prevention of accidental ingestion
• Keep the accessory out of the reach of small children. Small children can accidentally swallow these parts.
– If a child accidentally swallows any of these parts, seek immediate medical attention.
Do not disassemble
• Do not disassemble or modify the 3D Glasses except when recycling the batteries. Do not modify the 3D Glasses.
Caution for lithium ion polymer rechargeable battery
• Do not expose the 3D Glasses to excessive heat, such as direct sunlight, fi re or in an area with high humidity.
Handling the 3D Glasses
• Do not drop, exert pressure on, or step on the 3D Glasses. Doing so may damage the glass section, which may result in
the risk of injury.
• Be careful not to trap your fi nger in the hinge section of the 3D Glasses. Doing so may result in injury.
– Pay special attention when children are using this product.
Using the 3D Glasses
• Use of the 3D Glasses should be limited to a maximum of 3 hours, and in any case no more than one movie.
• Use only the 3D Glasses recommended for this TV.
• Use the 3D Glasses only for the specifi ed purpose.
• Do not move around while wearing the 3D Glasses. The surrounding area may appear dark, which may result in falling or
other accidents that may cause injury.
Viewing 3D images
• If you experience dizziness, nausea, or other discomfort while viewing 3D images, discontinue use and rest your eyes.
• Do not use the 3D Glasses if they are cracked or broken.
Caution regarding rechargeable battery
• Use the supplied USB cable to connect to a USB terminal of a 3D compatible SHARP TV when recharging. Recharging
using other devices may lead to battery damage.
Caution regarding the power supply
• Use the USB cable to connect to a USB terminal of a 3D compatible SHARP TV for supplying power. Supplying power
using other devices may lead to heat generation or battery damage.
• During a thunderstorm, to avoid getting an electric shock, do not use the 3D Glasses that are power-supplied via USB,
and do unplug the USB cable from both the USB terminal on the TV and the USB terminal on the 3D Glasses.
IMPORTANT SAFETY INSTRUCTIONS
8
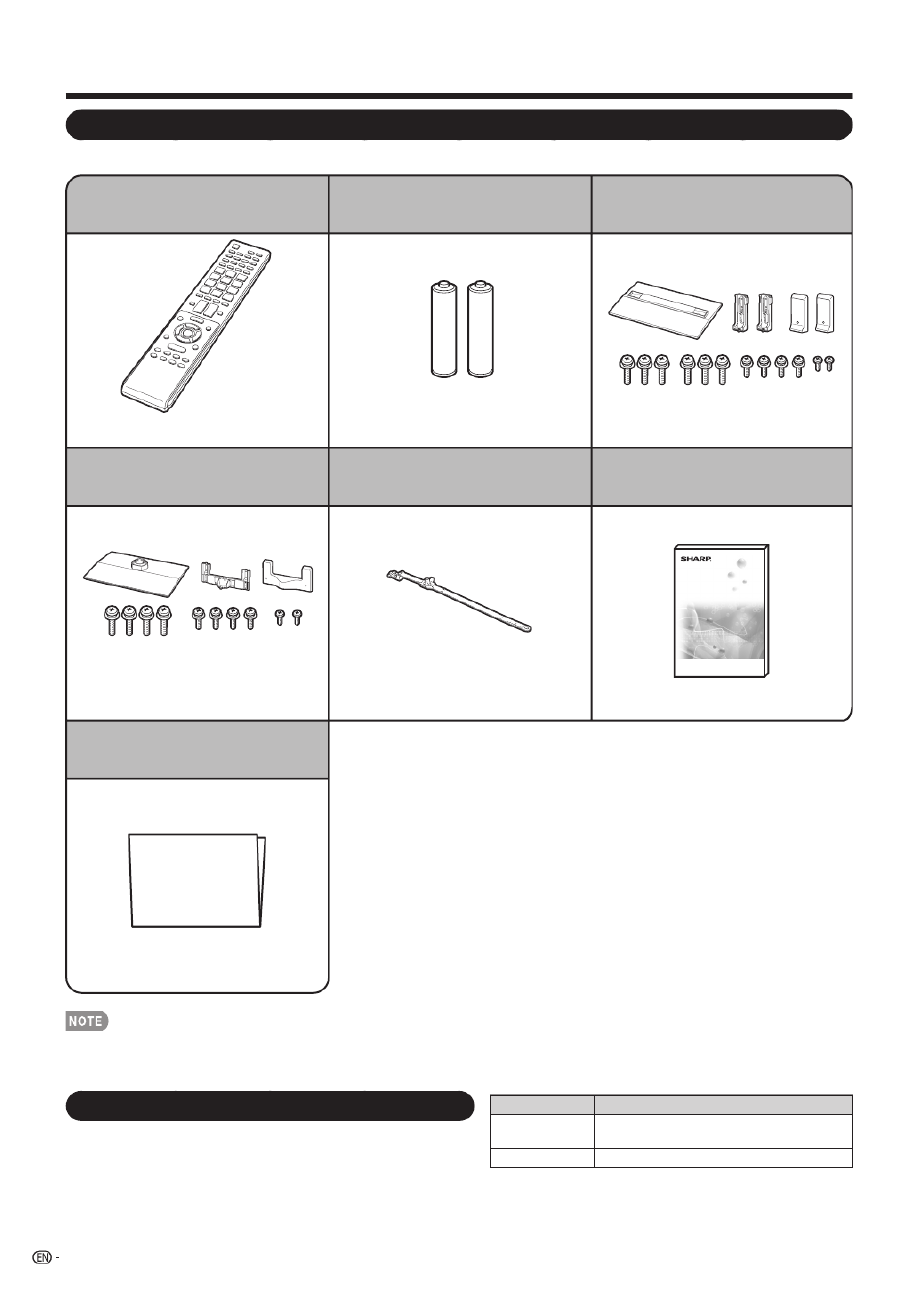
Accessories
Supplied Accessories
Make sure the following accessories are provided with the product.
Remote control unit (x1)
Page 10 Page 11 Page 9
Page 9
“AAA” size battery (x2) Stand unit (x1)
(for LC-70LE847U/LC-70LE745U)
Stand unit (x1)
(for LC-60LE847U/LC-60LE745U) Operation manual (x1)
Connection guide (x1)
Page 10
Cable tie (x1)
• Always use the AC cord supplied with the TV.
• The illustrations above are for explanation purposes and may vary slightly from the actual accessories.
Optional Accessories
The listed optional accessories are available for the Liquid
Crystal Television. Please purchase them at your nearest
shop.
• Additional optional accessories may be available in the near
future. When purchasing, please read the newest catalogue for
compatibility and check the availability.
Part name Model number
Wall mount
bracket AN-52AG4
3D Glasses AN-3DG20

9
QUICK REFERENCE
Attaching the Stand
• Before attaching (or detaching) the stand, unplug the AC cord.
• Before performing work spread cushioning over the base area to lay the TV on. This will prevent it from being damaged.
CAUTION
• Be sure to follow the instructions. Incorrect installation of the stand may result in the TV falling over.
■ LC-60LE847U/LC-60LE745U
1
Conrm that there are 10 screws (4 long screws, 4 middle
screws and 2 short screws) supplied with the stand unit.
21Attach the supporting post for the stand unit
onto the base.
2Insert and tighten the 4 screws into the 4 holes
on the top of the supporting post.
• The supporting post attaches to the base at an off-
centered location on the base. Be sure to attach the
supporting post in the direction indicated below and
attach the stand to the TV with the wider side of the
base facing forward.
Forward
1
2
Long screws
3
Insert the stand into the openings on the rear of the TV.
• Make sure that the stand is rmly inserted into the TV.
Improper installation may result in tilting of the TV set.
Soft cushion
4Insert and tighten the 4 screws into the 4 holes on
the rear of the stand unit.
Middle screws
51 Insert the stand cover.
2 Insert the 2 screws to secure the stand cover.
1
2
Short screws
■ LC-70LE847U/LC-70LE745U
1Conrm that there are 12 screws (6 long screws,
4 middle screws and 2 short screws) supplied with
the stand unit.
21Set the post for the stand unit onto the
polystyrene foam.
2Attach the base to the post.
3Insert and tighten the 6 screws into the 6 holes
on the bottom of the base.
• Hold the stand unit securely with one hand, and then
tighten the screws.
FRONT
3
2
1
1
Long screws
3
Insert the stand into the openings on the rear of the TV.
• Make sure that the stand is rmly inserted into the TV.
Improper installation may result in tilting of the TV set.
Soft cushion
4Insert and tighten the 4 screws into the 4 holes on
the rear of the stand unit.
Middle screws
51 Insert the stand cover.
2 Insert the 2 screws to secure the stand cover.
1
1
2
Short screws
• In the installation procedure, be careful not to catch your ngers between the TV set and the
oor.
•
Do not remove the stand from the TV unless using an optional wall mount bracket to mount it.
• After attaching the stand to the TV, do not hold the stand when you put up, set up,
move or lay down the TV. (For LC-70LE847U/LC-70LE745U)

10
QUICK INSTALLATION TIPS
1Attach your antenna to the back of the television.
(See page 11.)
2
Connect the AC plug for the television into the AC outlet.
2
1
1
AC outlet
• Place the TV close to the AC outlet, and keep the power
plug within reach.
• TO PREVENT RISK OF ELECTRIC SHOCK, DO NOT
TOUCH UN-INSULATED PARTS OF ANY CABLES
WITH THE AC CORD CONNECTED.
3Bundle the cords properly with the cable tie.
4When turning on the TV for the rst time, press
POWER on the television.
POWER
5Insert the batteries into the remote control unit. (See
page 11.)
• Speakers cannot be detached from the TV.
• The TV angle cannot be adjusted. (For LC-70LE847U/LC-
70LE745U)
• The TV can be rotated up to 20 degrees to right and left.
(For LC-60LE847U/LC-60LE745U)
QUICK REFERENCE
Experiencing HD Images
An HDTV without an HD source is just an ordinary
TV.
To enjoy HD images on the TV, you should get
HD programming from the following:
• Over-the-air broadcasting via HD quality antenna
• HD cable/satellite subscription
• HD compatible external equipment
• For information on updating to HD programming, ask your
cable/satellite service provider.
Using the Remote Control Unit
Use the remote control unit by pointing it towards the
remote control sensor on the TV. Objects between the
remote control unit and the remote control sensor may
prevent proper operation.
30º 30º
30º
30º
17´ (5 m) Remote control sensor
■ Cautions regarding the remote control unit
• Do not expose the remote control unit to shock. In addition,
do not expose the remote control unit to liquids, and do not
place in an area with high humidity.
• Do not install or place the remote control unit under direct
sunlight. The heat may cause deformation of the remote
control unit.
• The remote control unit may not work properly if the remote
control sensor on the TV is under direct sunlight or strong
lighting. In such cases, change the angle of the lighting
or the TV, or operate the remote control unit closer to the
remote control sensor.
IMPORTANT:
IF THE UNIT DOES NOT POWER ON - UNPLUG THE
TELEVISION FROM THE OUTLET AND REPEAT THE
INSTALLATION STEPS.
IF YOU STILL ENCOUNTER NO POWER, PLEASE CONTACT
US AT 1-800-BE-SHARP.

11
Antennas
To enjoy a clearer picture, use an outdoor antenna. The following is a brief explanation of the types of connections
that are used for a coaxial cable. If your outdoor antenna uses a 75-ohm coaxial cable with an F-type connector,
plug it into the antenna terminal at the rear of the TV set. For connecting the antenna cable to the TV, use
commercially available cables.
300-ohm twin-lead cable
75-ohm coaxial cable (round)
75-ohm coaxial cable
IN OUT
300-ohm
twin-lead cable
VHF
A
NTENNA
UHF
ANTENNA
Combiner To TV antenna
terminal
300/75-ohm adapter
300-ohm twin-lead cable (flat)
75-ohm coaxial cable (round)
Cable TV lead-In
Coaxial cable
Coaxial cable
Home Antenna
terminal (75-ohm)
Home Antenna
terminal (75-ohm)
or
or
Installing Batteries in the Remote Control Unit
If the remote control fails to operate TV functions, replace the batteries in the remote control unit.
1Open the battery cover. 2 Insert two “AAA” size batteries (supplied with
the product).
• Place the batteries
with their terminals
corresponding to the (e)
and (f) indications in the
battery compartment.
3 Close the battery cover.
CAUTION
Improper use of batteries can result in chemical leakage or explosion. Be sure to follow the instructions below.
• Do not mix batteries of different types. Different types of batteries have different characteristics.
• Do not mix old and new batteries. Mixing old and new batteries can shorten the life of new batteries or cause chemical leakage
in old batteries.
• Remove batteries as soon as they are worn out. Chemicals that leak from batteries that come in contact with skin can cause a
rash. If you fi nd any chemical leakage, wipe thoroughly with a cloth.
• The batteries supplied with this product may have a shorter life expectancy due to storage conditions.
• If you will not be using the remote control unit for an extended period of time, remove batteries from it.
Preparation
Connecting Antenna Cable
•Connect the antenna cable to the TV using one of the methods in the illustration as shown ( 1,2,3 or 4).
1 Cable without a CATV
converter
3 Combination VHF/
UHF antenna
4 Separate VHF/UHF
antenna
2 VHF/UHF antenna
1. A 75-ohm system is generally a round cable with F-type connector
that can easily be attached to a terminal without tools.
2. A 300-ohm system is a fl at “twin-lead” cable that can be attached
to a 75-ohm terminal through a 300/75-ohm adapter.
F-type connector
300-ohm twin-lead cable (fl at)
F-type connector
75-ohm coaxial cable (round)
75-ohm coaxial cable
NOTICE
When connecting the RF cable to the TV set, do not tighten F-type
connector with tools.
If tools are used, it may cause damage to your TV set. (The breaking
of internal circuit, etc.)
F-type connector should be nger-tightened only.

12
Part Names
TV (Front/Side)
Center Icon illumination
(See page 35.) Remote control sensor
*1 See pages 14, 19 and 27 for button operations.
*2 This panel emits the infrared signal towards the 3D Glasses you wear when you view 3D images.
Do not place anything between the 3D infrared emitter on the TV and the infrared receiver on the 3D Glasses.
When the TV is in 3D mode, the emitter may look reddish.
*3 OPC: Optical Picture Control (See page 29.)
3D infrared emitter *2
OPC sensor *3
POWER
button
MENU
button
INPUT
button
Channel
buttons
(CHU/V)
Volume
buttons
(VOLk/
l)
*1
TV (Rear)
RS-232C terminal
Antenna/
Cable in
COMPONENT
terminals
DIGITAL AUDIO
OUTPUT terminal
HDMI 3 terminal
HDMI 4 terminal
MHL: Mobile High-Definition Link
(See page 61.)
HDMI 1 terminal
ARC: Audio Return Channel
(See pages 57 and 58.)
VIDEO 2 terminals
VIDEO 1 terminals
AUDIO OUT terminal
USB 1 terminal *3
USB 2 *3
terminal
ETHERNET
terminal
HDMI 2 terminal
PC IN terminal
*1
*1
*1
AUDIO IN terminal
(shared for PC IN
and HDMI 2) *2
*1 See pages 14 to 18 and 57 for external equipment connection.
*2 See page 63 for details on the Audio Select function.
*3 Skype will be available for the USB terminals. For details, refer to the following:
• http://www.sharpusa.com (for the operation manual)
• http://freetalk.me/product/sharp/ (for information on the communication camera)
• http://www.skype.com (for details on Skype)

13
1
18
19
20
21
4
3
2
5
23
24
8
7
6
9
25
26
28
29
15
14
13
12
11
10
16
17
27
22
30
1 POWER: Switch the TV power on or enter standby. (See
page 19.)
2 TV, , , Switches the remote STB DVD•VCR AUDIO:
control for TV, STB, BD, DVD, VCR and AUDIO operation.
(See pages 55 to 56 for details.)
* To enter the code registration mode, you need to press
an appropriate button ( , or ) and STB DVD VCR•AUDIO
DISPLAY at the same time.
3 External equipment operational buttons: Operate the
external equipment.
4 OPTION: Display the Link Operation Menu screen. This
button will function only when AQUOS LINK is used. (See
pages 57 to 60 for details.)
5 SLEEP: Set the sleep timer. (See page 23.)
6 0– Set the channel. (See page 23.)9:
7 • (DOT): (See pages 23 and 55.)
8 CC: Display captions from a closed-caption source. (See
page 25.)
9
AV MODE: Select an audio or video setting. (See page 24.)
10 MUTE: Mute the sound. (See page 23.)
11 VOLk/l: Set the volume. (See page 23.)
12 MENU: Display the menu screen. (See page 27.)
13 3D: Select between 3D and 2D image viewing. (See
pages 44 to 45 for details.)
14 a/b/c/d, ENTER: Select a desired item on the screen.
15 EXIT: Turn off the menu screen.
16 FAVORITE CH: Set the favorite channels. (See page 37.)
17 A B C D:, , , Select 4 preset favorite channels in 4 different
categories. (See page 37.)
While watching, you can toggle the selected channels by
pressing , , and .A B C D
18 DISPLAY: Display the channel information.
19 POWER (SOURCE): Turns the power of the external
equipment on and off.
20 FREEZE: Set the still image. Press again to return to
normal screen. (See page 23.)
21 AUDIO: Selects the MTS/SAP or the audio mode during
multichannel audio broadcasts. (See pages 24 to 25.)
22 ENT: 0 9 Jumps to a channel after selecting with the –
buttons.
23 FLASHBACK: Return to the previous channel or external
input mode. (See page 24.)
24 VIEW MODE: Select the screen size. (See pages 26 and
62.)
25 INPUT: Select a TV input source. (TV, HDMI1, HDMI2,
HDMI3, HDMI4, COMPONENT, VIDEO1, VIDEO2, PC IN,
Home Network (DLNA), USB) (See pages 14 and 23.)
26 CHU/V: Select the channel. (See page 23.)
27 SmartCentral: Display the application window. (See
page 24.)
28 RETURN: Return to the previous menu screen.
29 NETFLIX: Display the Netfl ix screen. (See page 24.)
30 FAV APP 1, 2, 3: You can assign your favorite
applications to these buttons. (See page 72.)
Remote Control Unit
• When using the remote control unit, point it at the TV.
Part Names
14
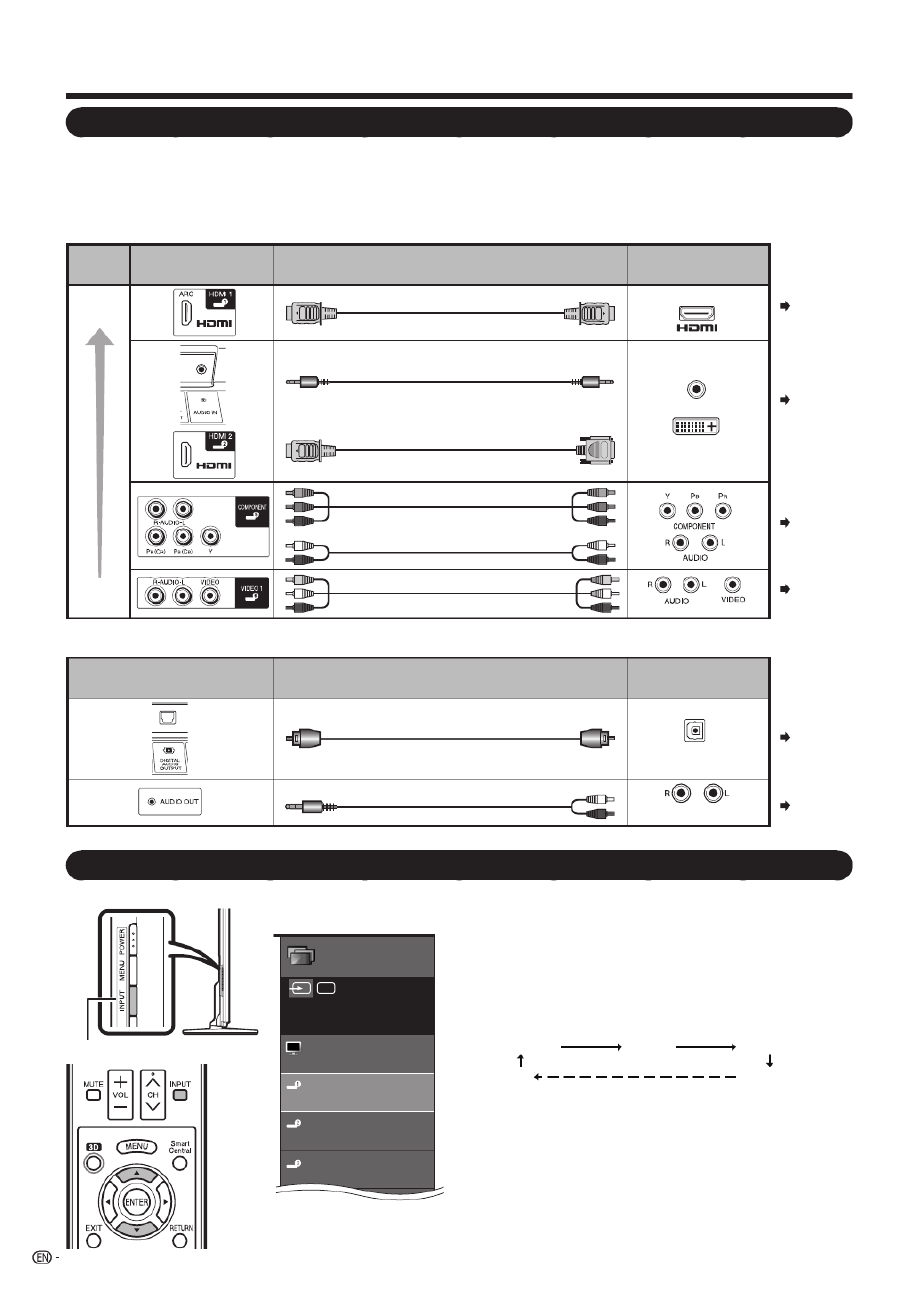
Introduction to Connections
Types of Connection
For connecting the TV to external equipment, use commercially available cables.
• The illustrations of the terminals are for explanation purposes and may vary slightly from the actual products.
■ Connecting to video equipment or PC
Image quality differs depending on the terminal used. To enjoy clearer images, check the output terminals of your
external equipment and use its appropriate terminals for higher quality images.
Pages
15, 17, 18
Terminal
on the TV Cable Terminal on external
equipment
Image
Quality
AV cable
Component video cable
Audio cable
HDMI-certified cable
Ø 3.5 mm stereo minijack cable
DVI-HDMI conversion cable
HD
Quality
Standard
Quality
AUDIO
DVI OUT
Pages
15, 18
Page 16
Page 16
■ Connecting to audio equipment
Cable Terminal on external
equipment
Optical fiber cable
Ø3.5 mm stereo minijack to RCA audio cable
Terminal on the TV
DIGITAL AUDIO INPUT
OPTICAL
ANALOG AUDIO IN
Page 17
Page 17
1 Press INPUT.
• The INPUT list screen displays.
2 Press a/b to select the input source.
• You can also select the input source by pressing
INPUT INPUT. Each time is pressed, the input source
toggles.
HDMI
4
TV
HDMI1 HDMI2 HDMI
3
• An image from the selected source automatically
displays.
• If the corresponding input is not plugged in, you
cannot change the input. Be sure to connect the
equipment beforehand.
INPUT
INPUT
TV
HDMI1
HDMI2
HDMI3
Menu
AIR
Input
Example
Displaying an External Equipment Image
To view external source images, select the input source by pressing on the remote control unit or on the TV.INPUT

15
Connecting to External Equipment
You can connect many types of external equipment to your TV. To view external source images, select the input
source from on the remote control unit or on the TV. (See pages 14 and 23.)INPUT
For connecting the TV to external equipment, use commercially available cables.
CAUTION
• To protect equipment, always turn off the TV before connecting any external equipment.
• Please read the relevant operation manual (Blu-ray disc player, etc.) carefully before making connections.
Connecting a Blu-ray Disc/DVD Player or HD Cable/Satellite Set-top Box
■ When using HDMI cable (HDMI 1, 2, 3 or 4):
The HDMI (High Defi nition Multimedia Interface) terminal is an audio-video interface that enables a connection for audio and
video signals using a single cable. The HDMI terminal supports high-resolution video input.
• Blu-ray disc player • DVD player
• HD cable/satellite set-top box
HDMI OUT
HDMI-certified cable
• To enjoy 1080p display capability, connect your external equipment using an HDMI-certifi ed cable or a component cable
and set the equipment to 1080p output.
• Supported Audio format: Linear PCM/Dolby Digital, sampling rate 32/44.1/48kHz.
• When you connect ARC-compatible equipment, use HDMI 1.
■ When using DVI-HDMI conversion cable (HDMI 2):
•Blu-ray disc player •DVD player
• HD cable/satellite set-top box
AUDIO DVI OUT
Ø 3.5 mm stereo minijack cable
DVI-HDMI conversion cable
• When using a DVI-HDMI conversion cable, you should make an analog audio connection. In this case, in addition to
connecting a DVI-HDMI conversion cable to the HDMI 2 terminal, connect a Ø 3.5 mm stereo minijack cable to the AUDIO
IN terminal and set "Audio Select" to "HDMI+Analog". (See page 63.)

16
Connecting to External Equipment
■ When using Component cable (COMPONENT):
• Blu-ray disc player • DVD player
• HD cable/satellite set-top box
COMPONENT OUT
AUDIO-L (White)
AUDIO-R (Red)
Y (Green)
PB (Blue)
PR (Red)
Audio cable
Component video cable
• To enjoy 1080p display capability, connect your external equipment using an HDMI-certifi ed cable or a component cable and
set the equipment to 1080p output.
• See page 15 for connecting a Blu-ray disc player, DVD player or an HD cable/satellite set-top box to the HDMI terminal.
Connecting a VCR, Game Console, Camcorder or Cable/Satellite Set-top Box
■ When using Composite cable (VIDEO 1 or 2):
• Game console • VCR
• Camcorder • Cable/Satellite set-top box
AV cable
VIDEO (Yellow)
AUDIO-L (White)
AUDIO-R (Red)
17
Connecting to External Equipment
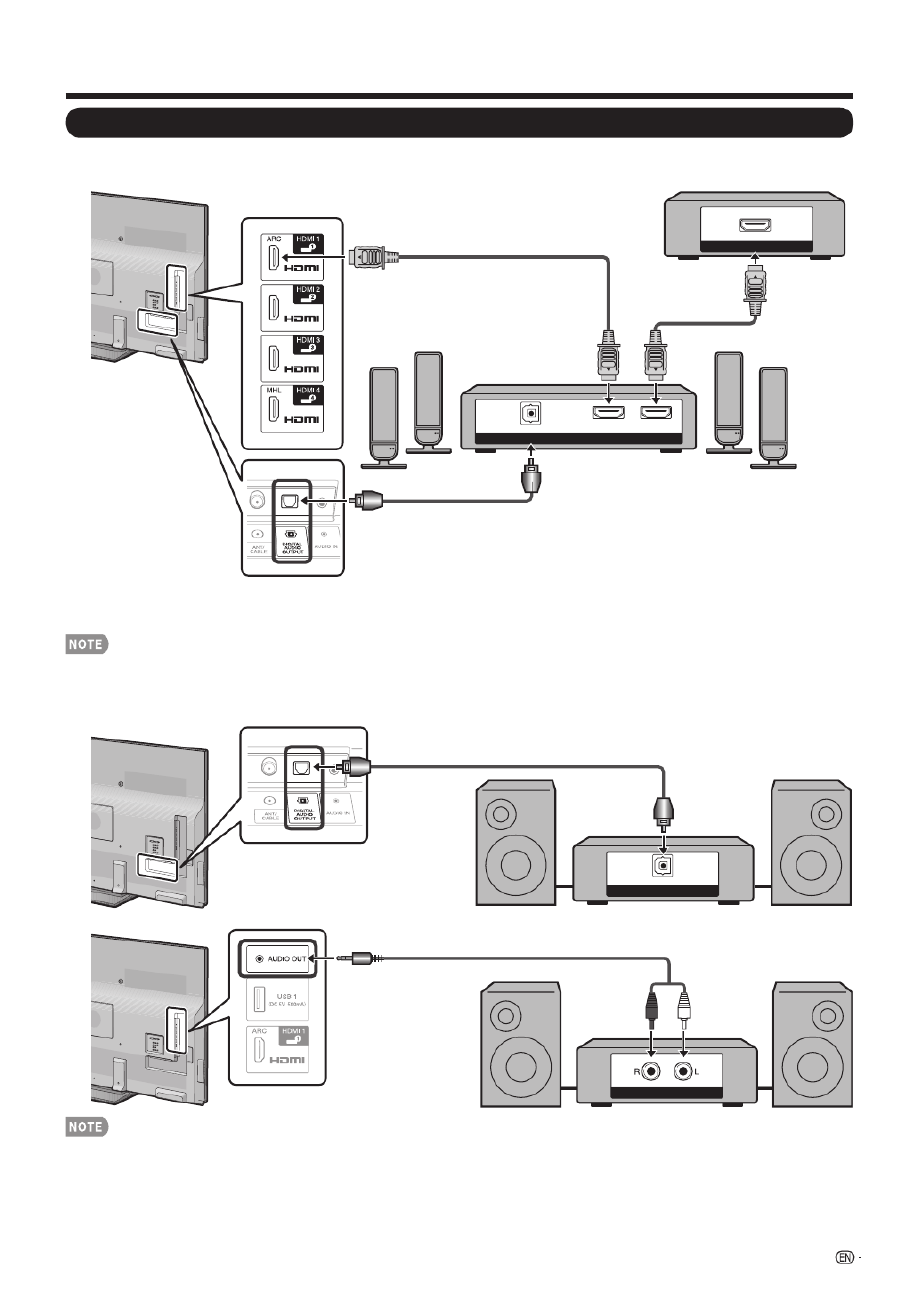
Connecting a Surround System/Audio System
■ When connecting an AV amplifi er for surround system
DIGITAL AUDIO INPUT
OPTICAL
HDMI INHDMI OUT
HDMI OUT
HDMI-certified cable *1
HD Cable/Satellite set-top box
Optical fiber cable *2
• Letting the TV output the audio to an AV amplifi er:
*1 When you connect ARC-compatible equipment, use the HDMI 1 terminal.
*2 If the equipment to be connected is not compatible with the ARC, connect an optical fi ber cable.
• If the image is not in sync with the audio, check the settings of the connected surround system.
■ When connecting an Audio amplifi er
It is possible to output audio through the DIGITAL AUDIO OUTPUT terminal. (See page 33 for details.)
DIGITAL AUDIO INPUT
OPTICAL
Optical fiber cable
ANALOG AUDIO IN
Ø3.5 mm stereo minijack to RCA audio cable
• See page 34 for details on the Output Select function.

18
Connecting a PC
Refer to page 63 for a list of PC signals compatible with the TV.
■ When using HDMI cable (HDMI 1, 2, 3 or 4):
HDMI OUT
HDMI-certified cable
• Depending on the board, only video signals may be output. In this case, in addition to connecting an HDMI-certifi ed cable
to the HDMI 2 terminal, connect a Ø 3.5 mm stereo minijack cable to the AUDIO IN terminal and set "Audio Select" to
"HDMI+Analog". (See page 63.)
•The HDMI terminals only support digital signal.
■ When using DVI-HDMI conversion cable (HDMI 2):
DVI OUT
AUDIO
DVI-HDMI conversion cable
Ø 3.5 mm stereo minijack cable
• When using a DVI-HDMI conversion cable, you should make an analog audio connection. In this case, in addition to
connecting a DVI-HDMI conversion cable to the HDMI 2 terminal, connect
a Ø 3.5 mm stereo minijack cable
to the AUDIO IN
terminal and set "Audio Select" to "HDMI+Analog". (See page 63.)
■ When using analog RGB cable (PC IN):
Ø 3.5 mm stereo minijack cable
RGBAUDIO
Analog RGB cable
(D-sub 15-pin cable or VGA cable)
• When using an analog RGB cable, input the audio signal to the AUDIO IN terminal of PC IN.
• When connecting a PC to the PC IN, set "Audio Select" to "Video+Audio". (See page 63.)
Connecting to External Equipment

19
Turning On/Off the Power
POWER
POWER (On/Standby)
Press on the TV or on the remote control unit POWER
to turn the power on.
• The Initial Installation starts when the TV powers on for the
fi rst time. If the TV has been turned on before, the Initial
Installation will not be invoked. For changing the settings of
the Initial Installation, perform "EZ setup" on the Initial Setup
menu on page 36.
Press on the TV or on the remote control unit POWER
again to turn the power off.
• The TV enters standby and the image on the screen
disappears.
• If you are not going to use this TV for a long period of time,
be sure to remove the AC cord from the AC outlet.
• Weak electric power is still consumed even when the TV is
turned off.
Watching TV
Initial Installation
When you turn on the TV for the fi rst time, it will
automatically memorize the broadcasting channels
available in the region where you live. Perform the
following steps before you press on the POWER
remote control unit.
1.
Insert the batteries into the remote control unit. (See page 11.)
2. Connect the antenna cable to the TV. (See page 11.)
3. Plug in the AC cord to the AC outlet. (See page 10.)
Language (Language setting)
Select from among 3 languages: English, French and
Spanish.
1 Press a/b to select the desired language listed
on the screen, and then press .ENTER
Language
Location & Time
TV Location
Antenna & Cable/STB
Air/Cable
English
Español
Français
CH Search
Network
Completed
Location & Time
Make settings for the country, area and time zone
where you use the TV.
2 Press a/b to select "United States", "Canada" or
"Mexico", and then press .ENTER
Canada
United States
Mexico

20
3 Press a/b to select the time zone where you are
using the TV, and then press .ENTER
Example
CST
MST
PST
AKST
HAST
EST
• The time zone differs depending on the selected
country.
• The factory preset value is the time zone for the capital
of the selected country.
4 Press a/b to select the Daylight Savings Time,
and then press .ENTER
Manual
Off
Auto
• “Auto” is the default selection.
TV Location
Select "Home" or "Store" for the location where
you plan to install the TV. This product qualifi es for
ENERGY STAR in Home mode default setting.
5 Press c/dto select "Home" or "Store".
Press ENTER to enter the setting.
Select
StoreHome
Home: "Power Saving" is set to "Advanced", and AV
MODE is set to "STANDARD".
Store: "Power Saving" is set to "Off" and AV MODE is
set to "DYNAMIC (Fixed)". Picture Reset and Feature
Demo can be set.
Picture Reset: AV MODE will be set to "DYNAMIC (Fixed)"
regardless of whether Picture Reset is "On" or "Off".
• If you select "On" and there is no operation for 30 minutes:
-
AV MODE will be reset to "DYNAMIC (Fixed)" and, when a
3D signal is detected, 3D images will switch to 2D images.
• When "Off" is selected:
- AV MODE will be set to "DYNAMIC (Fixed)".
Feature Demo: When "On" is selected, after all the settings
are completed, the Feature Demo screen is displayed if there
is no operation for several minutes.
• ENERGY STAR qualifi cation is based on AV MODE
"STANDARD".
Antenna & Cable/STB
Select the type of connection you will use to
watch TV.
6 Press c/d to select "Antenna & Cable" or "Set-
top box", and then press .ENTER
Set-top boxAntenna & Cable
To watch TV via an antenna or cable
connection (without using a set-top box):
Select "Antenna & Cable", and then go to step 4.
To watch TV via a set-top box:
1Select "Set-top box", and then press .ENTER
2To watch TV, select the input source
corresponding to the terminal connected to the
set-top box. When doing so, you must make
the setting to skip "TV". Press
c/d to select
"On", and then press .ENTER
Off
On
• When this is set to "On", the channel on the TV
cannot be changed using the remote control unit or
menu. (e.g. CH U/V, Favorite CH, etc.)
• See page 34 for details on the Input Skip function.
3Press to select the input source INPUT
corresponding to the terminal connected to the
set-top box. Make the necessary settings on
the connected external equipment.
• See the operation manual of the connected
equipment for setting up the equipment.
Air/Cable (Antenna setting)
Make sure what kind of connection is made with your
TV when selecting "Air" or "Cable".
7 Press c/dto select "Air" or "Cable".
Press ENTER to enter the setting.
CableAir
Watching TV

21
CH Search (Channel search)
Channel auto search makes the TV look for all
channels viewable in the set area.
8When "Air" is selected in Antenna setting:
Press c/d to select "Start", and then press
ENTER.
CancelStart
When "Cable" is selected in Antenna setting:
1Press a/b to select "Analog & Digital Search
Start" to search both analog and digital
broadcasts, or to select "Analog Search Start"
to search only analog broadcasts, and then
press .ENTER
Analog Search Start
Cancel
Analog & Digital Search Start
• The Channel search will start automatically.
• To exit the Channel search screen, select "Cancel",
and then press .ENTER
2The Channel search results may include
scrambled channels or channels that are not
viewable in the set area. Press c/d to select
"Yes", and then press to remove ENTER
scrambled channels.
NoYes
Watching TV
Network
When you connect to the Internet on the TV, select the
desired connection method and follow the instructions
shown on the display.
• Wireless LAN connection is possible only when the WPS
(push button) method is used. If any other method is used,
make settings by Initial Setup > Internet Setup > Network
Setup. (See page 67.)
9 Press c/d to select "Yes", and then press
ENTER.
NoYes
10 Press a/b to select "Wired" or "Wireless", and
then press .ENTER
Wireless
Wired
Connection using an ETHERNET cable:
1Select "Wired" and press .ENTER
2Con rm that the TV is properly connected
with the router, and then press "Next". Follow
the instructions on the display to perform the
connection test.
Wireless LAN connection by the WPS method:
1Select "Wireless" and press .ENTER
2Follow the instructions on the display, and
nalize the connection after testing its viability.
• When you change the network settings, refer to Initial
Setup > Internet Setup > Network Setup. (See page 67.)

22
Completed
11 The settings con rmation screen is displayed.
Con rm the information displayed on the screen,
and then press .ENTER
Examples of the settings con rmation screen
When one or more channel is received after
"Antenna & Cable" was selected in step 6 and a
search was carried out.
OK
Language : English
Location & Time : United States/EST/Auto
TV Location : Home
Antenna & Cable/STB : Antenna & Cable
Air/Cable : Air
Search Result : Digital 4ch
Analog 7ch
Network Connection : Not completed
Press the INPUT button,
then the right arrow ,d
to see the list of channels found.
When no channel is received after "Antenna &
Cable" was selected in step 6 and a search was
carried out.
OK
Language : English
Location & Time : United States/EST/Auto
TV Location : Home
Antenna & Cable/STB : Antenna & Cable
Air/Cable : Cable
Search Result : No channel
Network Connection : Not completed
Channel not found.
Antenna/Cable are not properly connected
or Air/Cable setup is incorrect.
Please check your Antenna/Cable connection
and Air/Cable setup.
When "Set-top box" was selected in step 6 and a
search was carried out.
OK
Language : English
Location & Time : United States/EST/Auto
TV Location : Home
Antenna & Cable/STB : Set-top box
TV Input Skip : On
Network Connection : Not completed
Please make sure to change INPUT to the
specic input terminal you are connecting
your set-top box to get the picture.
Closed caption, sub-channel audio
and channel selection need to be selected
with your set-top box.
When you have made network settings in step 9.
OK
Language : English
Location & Time : United States/EST/Auto
TV Location : Home
Antenna & Cable/STB : Set-top box
TV Input Skip : On
Network Connection : OK
Please make sure to change INPUT to the
specic input terminal you are connecting
your set-top box to get the picture.
Closed caption, sub-channel audio
and channel selection need to be selected
with your set-top box.
•If no channel is found, con rm the type of connection
made with your TV and try "EZ Setup" again.
(See page 36.)
•For changing the settings of the Initial Installation, perform
"EZ setup" on the Initial Setup menu on page 36.
•To see the list of channels found during Channel search,
press , and then press INPUT d.
Watching TV

23
Direct Button Operation
Changing Volume
You can change the volume by pressing VOL k/l on
the TV or on the remote control unit.
•To increase the volume, press VOL k.
•To decrease the volume, press VOL l.
20
Audio status
Output device Output Select
Fixed Variable
Speaker Variable sound Mute
•When “Output Select” is set to “Variable”, the indicator on
the screen changes as shown below.
60
•See page 34 for details on the Output Select function.
MUTE
Mutes the current sound output.
Press .MUTE
•“ ” will be displayed on the screen for 30 minutes, and
the sound is silenced.
•Within 30 minutes of pressing , mute can be MUTE
canceled by pressing VOL k/l or .MUTE
•Mute will be canceled after 30 minutes have passed.
However, the TV will not suddenly output a loud sound as
the volume level is set to 0 automatically.
Sleep Timer
Allows you to set a time when the TV automatically
switches to standby.
Press .SLEEP
•
The remaining time displays when the sleep timer has been set.
•Each time you press , the remaining time switches SLEEP
as shown below.
Off 30 60 90 120
•When set, the time automatically starts counting down.
•If you want to adjust the sleep timer, you can press SLEEP
twice then change the time setting.
•When it is 5 minutes before the time expires, the remaining
time will start to keep appearing every minute.
•Select “Off” by pressing to cancel the sleep timer.SLEEP
•
The TV will enter standby when the remaining time reaches 0.
FREEZE
Allows you to capture and freeze a moving image that
you are watching.
Press .FREEZE
•A moving image is captured.
•Press again to cancel the function.FREEZE
•When this function is not available, “No displaying still
image available.” will display.
•The still image automatically goes out after 30 minutes.
•If you are using the freeze function and a broadcast
activates the V-CHIP BLOCK, the freeze function will be
canceled and a V-CHIP BLOCK message will appear.
• You can have the same settings by choosing “Freeze” on
the menu items. (See page 33.)
INPUT
To view external source images, select the input source by
pressing on the remote control unit or on the TV.INPUT
1 Press INPUT.
• The INPUT list screen displays.
2 Press a/b or press again to select the INPUT
input source.
• An image from the selected source automatically
displays.
• Each time INPUT is pressed, the input source toggles.
• If the corresponding input is not plugged in, you cannot
change the input. Be sure to connect the equipment
beforehand.
•See pages 14 to 18 and 57 for external equipment
connection.
Changing Channels
You can change channels in several ways.
Method 1
Using CH U/V on the remote control unit or on the TV.
Method 2
Using remote control buttons - , • (DOT).0 9
Examples:
To select a 1 or 2-digit channel number (e. g., Channel 5):
Press 5 ENT.
To select a 3-digit channel number (e. g., Channel 115):
Press 1 1 5 ENT.
To select a 4-digit channel number (e. g., Channel 22.1):
Press 2 2 (DOT) 1 ENT • .
Method 3
Selecting the program from Channel list.
1 Press INPUT on the remote control unit.
• The INPUT list displays.
2 Press c/d to select “AIR” or “CABLE”.
• The Channel list displays.
3 Press a/b to select the desired channel, and then
press .ENTER
•When selecting a 1-digit channel number, it is not
necessary to press before the number.0
•When you enter - only, channel selection will be made if 0 9
there is no operation within a few seconds.
•If you push “0” by itself, nothing will happen.
•Complete the above steps within a few seconds.
•When you enter - and • (DOT), channel selection will be 0 9
made if there is no operation within a few seconds.

24
FLASHBACK
Press to switch to the previously tuned FLASHBACK
channel or previous input mode.
•Press again to switch back to the currently FLASHBACK
tuned channel.
•FLASHBACK will not work if no channel has been
changed after the TV is turned on.
SmartCentral
Allows you to directly activate various types of
applications.
1 Press SmartCentral to display the application
window.
• Press SmartCentral again to display a list of
applications by category.
2 Press c/d(or a/b) to select the desired
application, and then press .ENTER
• If you changed the display to the list of applications in
step 1, select a category and then an application. See
page 72 for details.
• If “ ” is displayed after you switch to USB mode,
check the USB connection.
• If “ ” or “ ” is displayed after you switch to
Home Network (DLNA) mode or after you connect to
the Internet, check your TV’s network settings and
connection.
• See pages 49, 68 and 72 for details of viewable
applications.
• You can display the application window by choosing “APPS”
on the menu items. (See page 33.)
• When this function is not available, “Can not operate this
function now” will display.
NETFLIX
Displays the Net ix screen.
Press .NETFLIX
• To enjoy Net ix, you need to make:
—a broadband Internet connection (See page 66.)
—settings of Internet Setup (See pages 67 and 68.)
—adjustments for Net ix (See page 72.)
AV MODE
AV MODE gives you several viewing options to choose
from to best match the surrounding environment of the
TV, which can vary due to factors like room brightness,
type of program watched or the type of image input
from external equipment.
Press . Current AV MODE displays.AV MODE
•Press again before the mode displayed on the AV MODE
screen disappears. The mode changes as shown below:
Example:
When the input source is TV, COMPONENT,
VIDEO 1 or 2
DYNAMICDYNAMIC (Fixed)
AUTO STANDARD MOVIE GAME
USER [TV]
Direct Button Operation
Example:
When the input source is PC IN or HDMI 1 to 4
■ LC-70LE847U/LC-60LE847U
STANDARD MOVIE GAME PC
x.v.Color* USER[ ]
AUTO
DYNAMIC (Fixed) DYNAMIC
* “x.v.Color” can only be selected when an x.v.Color
signal is input using HDMI 1 to 4.
■ LC-70LE745U/LC-60LE745U
STANDARD MOVIE GAME PC
USER[ ]
AUTO
DYNAMIC (Fixed) DYNAMIC
AUTO: Optimizes the image quality automatically based
on the room brightness and image signal.
STANDARD:
For a highly de ned image in a normal
lighting.
MOVIE: For a movie.
GAME: Lowers image brightness for easier viewing.
PC: For PC.
USER: Allows the user to customize settings as desired.
You can set the mode for each input source.
x.v.Color: Supports the x.v.Color international standard
for wide color space. The x.v.Color signal allows you
to experience colors that conventional color signals
cannot reproduce.
DYNAMIC: For a clear-cut image emphasizing high
contrast, useful for sports viewing.
DYNAMIC (Fixed): Changes the image and sound
settings to the factory preset values. No adjustments
are allowed.
•You can select a different AV MODE item for each input
mode. (For example, select STANDARD for TV input and
DYNAMIC for COMPONENT.)
•When you play games, “GAME” is recommended for AV
MODE.
•
You cannot set “GAME” or “PC” when the TV is connected
to the Internet or when the input source is “Home Network
(DLNA)” or “USB”.
• You can have the same settings by choosing “AV MODE”
on the menu items. (See page 29.)
AUDIO
■ MTS/SAP stereo mode
The TV has a feature that allows reception of sound
other than the main audio for the program. This feature
is called Multi-channel Television Sound (MTS). The TV
with MTS can receive mono sound, stereo sound
and Secondary Audio Programs (SAP). The SAP feature
allows a TV station to broadcast other information,
which could be audio in another language or something
completely different like weather information.
You can enjoy Hi-Fi stereo sound or SAP broadcasts
where available.
• View programs like live sporting Stereo broadcasts:
events, shows and concerts in dynamic stereo sound.
• Receive TV broadcasts in either MAIN SAP broadcasts:
or SAP sound.
MAIN sound: The normal program soundtrack (either in
mono or stereo).
SAP sound: Listen to a second language, supplementary
commentary or other information. (SAP is mono sound.)

25
If stereo sound is dif cult to hear.
• Obtain a clearer sound by manually switching to xed
mono-sound mode.
You can change MTS as shown below to match the
television broadcast signal.
Press to toggle between audio modes.AUDIO
Examples: when receiving MTS and SAP
STEREO mode: STEREO MONO
STEREO + SAP mode: ST(SAP) SAP(ST) MONO
MAIN + SAP mode: MAIN SAP
MONO mode: MONO
■ Digital broadcasting audio mode
The types of audio transmitted in a digital broadcast include
SURROUND as well as MONO and STEREO. In addition, it
is possible for multiple audio tracks to accompany a single
video track.
Press to toggle between audio modes.ENTER
Example: when receiving Digital broadcasting
STEREO (Audio1) STEREO (Audio2)
SURROUND (Audio3)
• MTS only operates while in TV mode.
• You can have the same settings by choosing “Change
Audio” on the menu items. (See page 33.)
Closed Captions and Digital Closed Captions
Your TV is equipped with an internal Closed Caption
decoder. It allows you to view conversations, narration
and sound effects as subtitles on your TV. Closed
Captions are available on some TV programs and on
some VHS home video tapes at the discretion of the
program provider.
Digital Closed Caption service is a new caption service
available only on digital TV programs (also at the
discretion of the service provider). It is a more exible
system than the original Closed Caption system,
because it allows for a variety of caption sizes and font
styles. When the Digital Closed Caption service is in
use, it will be indicated by the appearance of a 3-letter
abbreviation that also indicates the language of the
Digital Closed Captions: ENG (English), SPA (Spanish),
FRA (French) or other language codes.
Not all programs and VHS videotapes offer closed
captions. Please look for the “ 1” symbol to ensure
that captions will be shown.
In the Closed Caption system, there can be more than
one caption service provided. Each is identi ed by its
own number. The “CC1” and “CC2” services display
subtitles of TV programs superimposed over the
program’s picture.
In the Closed Caption system, the “Text1” or “Text2”
services display text that is unrelated to the program
being viewed (e.g., weather or news). These services
are also superimposed over the program currently
being viewed.
Direct Button Operation
1 Press CC.
•
This will present the Closed Caption information display.
2 Press CC while the Closed Caption information is
still on the screen.
• Press repeatedly until you select the desired closed
caption service.
Closed Caption
information
22.1
Air
DIGITAL
Audio : STEREO
:
CC 1/2 CC1:
Video 480p (4:3)
Ratings : NONE: NONE
• Depending on the number of caption services in the
signal being received, you will see information such as
1/2 or 1/4 displayed.
1/2 means “the rst of two services”.
Example:
If a program has three services (Digital CC(ENG), CC1
and Text1), the closed caption display will toggle in this
sequence:
1/3 ENG 2/3 CC1 3/3 Text1 Off
• The CC button keeps a record of the last service
selected in its memory.
If the last closed caption mode (e.g. 1/3 ENG) you
selected is not available for the next program, or on
another channel, the closed caption service that is
available is automatically selected, and this service
appears in parentheses, e.g. “1/3(CC1)”.
Closed Caption services that appear in parentheses will
not be stored in the button’s memory as your last CC
selected service. Only services that you have selected
with the button are stored.CC
Examples:
In a case where there are two closed caption
services provided (for instance, Digital CC(ENG)
and CC1), and Digital CC(ENG) is displayed
as your current selection, if Digital CC(ENG) is
not broadcast for the next program, the other
closed caption service, CC1, will be displayed in
parentheses.
A closed caption service appears in parentheses
because the service you selected is not available
and a different service is displayed on your screen.
“1/1(CC1)” is displayed instead of “1/2/ENG”.
• When “Power Saving” is set to “Standard” or “Advanced”,
the Power Saving leaf icon appears on the channel
information window. See page 32 for details of Power
Saving settings.
• See page 34 for detailed closed caption settings.
• When the program contains no closed caption, “--”
displays in the closed caption information.
• If the language code, e.g. “ENG”, is not found on Digital TV
programs, “--” will be shown.
• Four kinds of closed caption service (CC1, CC2, Text1,
Text2) are potentially available, but a broadcast may
contain none or only some of these services at the
discretion of the program provider.
• When a web page is displayed, Closed Captions are not
available.
• You can have the same settings by choosing “Change CC”
on the menu items. (See page 33.)

26
Direct Button Operation
VIEW MODE
You can select the screen size.
1 Press VIEW MODE.
•The View Mode menu displays.
•The menu lists the View Mode options selectable for the type of video signal currently
being received.
2 Press VIEW MODE or a/b while the View Mode menu is displayed to select a
desired item on the menu.
• You can sequentially select a View Mode that has its own aspect ratio.
•
You can have the same settings by choosing "View Mode" on the menu items. (See page 33.)
•
You may not be able to change the View Mode while in 3D mode.
■ For HD programs
Stretch Dot by Dot (Full Screen) S.Stretch (Smart stretch) Zoom
Suitable for viewing wide-
screen 1.78:1 aspect ratio
program, stretch mode will still
show very thin black bands
at the top and bottom of the
screen.
Dot by Dot (1080i/p only):
Detects the resolution of the
signal and displays an image
with the same number of
pixels on the screen.
Full Screen (720p only): You
can select "Full Screen" only
when receiving a 720p signal.
Suitable for stretching 4:3
programs to ll the screen.
Suitable for viewing wide-
screen 2.35:1 aspect-ratio
programs in full screen.
•
When using Dot by Dot or Full Screen, it is possible to see noise or bars around different outer portions of the screen. Please
change view mode to correct this.
■ For 4:3 programs
Example: Screen size images
Side Bar S.Stretch (Smart stretch) Zoom Stretch
Suitable for viewing
conventional 4:3 programs in
their normal format.
Suitable for stretching 4:3
programs to ll the screen.
Suitable for viewing wide-
screen 2.35:1 anamorphic
DVDs in full screen.
This mode is useful for 1.78:1
DVDs. When viewing 1.85:1
DVDs, stretch mode will still show
very thin black bands at the top
and bottom of the screen.
■ For USB-Video, DLNA-Video or Internet applications
Example: Screen size images
Input signal Auto Original
Keeps the original
aspect ratio in a full
screen display.
Displays an image by
an original size.

27
1Guide display
• This indicates the buttons that can be operated on the
displayed screen. The guide display varies depending
on the menu setting screen.
•
The operations for some selected items may be displayed
in the operational guide bar at the bottom of the screen.
2Item displayed in blue
• This indicates the item currently selected.
•
Press to go to the adjustment screen for this item.ENTER
3 Item in brackets
• This indicates the current setting for the item.
4 Item displayed in white
• This indicates that the item can be selected.
5 Item displayed in gray
• This indicates that the item cannot be selected.
There are various reasons why the items cannot be
selected, but the main reasons are as follows:
—Nothing is connected to the selected input terminal.
—
The function is not compatible with the current input signal.
On-Screen Display Menu
On-Screen Display Menu Operation
Menu Operation Buttons
Using the control panel of the main unit
You can also operate the menu with the control panel
of the main unit.
Button operations on the control panel correspond to
the ones on the remote control as shown below.
MENU: MENU on the
remote control.
INPUT: ENTER on the
remote control.
CHU/V: Cursor a/b
on the remote
control.
VOLk/l: Cursor c/d
on the remote
control.
Using the remote control
Use the following buttons on the remote control to
operate the menu.
MENU: Press to open or close the menu screen.
a/b/c/d: Press to select a desired item on the screen or
adjust a selected item.
ENTER: Press to go to the next step or complete the
setting.
RETURN: Press to return to the previous step.
• Menu options differ in the selected input modes, but the operating procedures are the same.
• The screens in the operation manual are for explanation purposes (some are enlarged, others cropped) and may vary slightly
from the actual screens.
• The order of explanations for each menu item in the following pages is not necessarily in accordance with the alignment of
the items on the screen.
LCFONT:
• This product is embedded with LC Font technology, which was developed by SHARP Corporation for clearly displaying easy-
to-read characters on LCD screens.
Example
Menu
Information
Initial
Setup
System
Options
Picture
Settings
AV MODE (Changing Pic.Quality)
[STANDARD]
3D Brightness Boost
[Middle]
OPC
Backlight
[ 16b5] a b16
Contrast
[ 40b30] 0 b
Brightness
[ 0] a b30 30
Color
[ 30 30b2] a b
Tint
[ 0] a b30 30
Sharpness
[ 10 10b2] a b
Advanced
Picture Settings
ENTER
: Select : Enter MENU : Exit
RETURN
: Back
Example
LCFONT embedded
Menu
Information
Initial
Setup
System
Options
Picture
Settings
AV MODE (Changing Pic.Quality)
[STANDARD]
OPC
[On:Display]
3D Brightness Boost
[Middle]
Backlight
[ 5] 16b a b16
Contrast
[ 30] 0b b40
Brightness
[ 0] a b30 30
Color
[ 2] 30 30b a b
Tint
[ 0] a b30 30
Sharpness
[ 2] 10b a b10
Advanced
Picture Settings
ENTER
: Select : Enter MENU : Exit
RETURN
: Back
1 Press MENU to display the MENU screen.
21Press c/d to select the desired menu.
2Press a/b to select a speci c adjustment item,
and then press .ENTER
• Additional related adjustment items may be
displayed. Press a/b to select the desired item.
3 Adjust the item while referring to the guide
display.
• Operations vary depending on the function or item.
Refer to the guide display corresponding to the
menu setting screen for button operations.
3 Press MENU to exit.

28
On-Screen Display Menu
Menu Items
Terminal Setting ................. Pages 33-34, 63
Audio Setup .......................... Page 33
PC input ................................ Page 63
Audio Select .......................... Page 63
Input Skip.............................. Page 34
Input Label ............................ Page 34
HDMI Setup .......................... Page 34
Output Select ........................ Page 34
Color System ........................ Page 34
Menu Design ................................... Page 34
Channel Selecting Effect ....... Page 34
Program Title Display ............ Page 34
Position ................................. Page 34
Caption Setup ....................... Page 34
Game Play Time .............................. Page 35
Operation Lock Out ......................... Page 35
Icon Light Up Setting ....................... Page 35
Demo Mode .................................... Page 35
Initial Setup
EZ Setup ......................................... Page 36
Language .............................. Page 36
Location & Time .................... Page 36
TV Location ........................... Page 36
Antenna & Cable/STB ........... Page 36
Air/Cable ............................... Page 36
CH Search ............................ Page 36
Network ................................ Page 36
Completed ............................ Page 36
Broadcasting Setup.................. Pages 36-37
CH Setup .............................. Page 36
Favorite CH ........................... Page 37
Antenna Setup-DIGITAL ........ Page 37
Internet Setup .............. Pages 54, 64, 67-68
Language ........................................ Page 37
DivX® Setup ..................................... Page 54
Individual Setup ........................ Pages 37-39
Secret No. ............................ Page 37
Parental CTRL ................ Pages 37-39
Wall Mount Audio Setup .................. Page 37
Reset .............................................. Page 37
Information
Identifi cation .................................... Page 40
Digital Caption Info. ........................ Page 40
Software Update ...................... Pages 40-42
Manual Update .............. Pages 40-42
Auto Update Setting .............. Page 40
Netfl ix Help ...................................... Page 73
VUDU Help ...................................... Page 73
Picture Settings
AV MODE
(Changing Pic.Quality) ........Pages 29 and 45
OPC ................................................ Page 29
Backlight ......................................... Page 29
3D Brightness Boost
(For LC-70LE847U/LC-60LE847U) ... Page 45
Contrast .......................................... Page 29
Brightness ....................................... Page 29
Color ............................................... Page 29
Tint .................................................. Page 29
Sharpness ....................................... Page 29
Advanced ................................. Pages 29-30
C.M.S.-Hue ........................... Page 29
C.M.S.-Saturation ................. Page 29
C.M.S.-Value......................... Page 29
Color Gamut Range
(For LC-70LE847U/LC-60LE847U)
... Page 30
Color Temp. ......................... Page 30
Motion Enhancement ............ Page 30
Quad Pixel Plus 2
(For LC-70LE847U/LC-60LE847U)
... Page 30
Active Contrast ..................... Page 30
Gamma Adjustment .............. Page 30
Black Level............................ Page 30
Film Mode ............................. Page 30
Digital Noise Reduction ......... Page 30
Monochrome ........................ Page 30
Range of OPC ....................... Page 30
Reset .............................................. Page 29
Audio Settings
Auto Volume ................................... Page 31
Treble .............................................. Page 31
Bass................................................ Page 31
Balance ........................................... Page 31
3D Surround ................................... Page 31
Bass Enhancer ................................ Page 31
Clear Voice ...................................... Page 31
Reset .............................................. Page 31
Power Control
Audio Only ...................................... Page 32
Power Saving .................................. Page 32
No Signal Off ................................... Page 32
No Operation Off ............................. Page 32
System Options
View Option ..............................Pages 33, 53
APPS .................................... Page 33
USB Operation Panel ............ Page 53
Home Network (DLNA)
Operation Panel .................... Page 53
View Mode ............................ Page 33
Freeze ................................... Page 33
Change Audio ....................... Page 33
Change CC ........................... Page 33
3D Setup ......................................... Page 46
AQUOS LINK Setup ........................ Page 58
• When AV MODE is set to "AUTO", part of the menu may not be displayed correctly or the setting range of the menu may be
changed.
• Some menu items may not be displayed depending on the selected input source.

29
On-Screen Display Menu
AV MODE (Changing Pic.Quality)
The audio and video settings can be changed to suit
the program or input content being watched.
Select from the following AV modes.
■
When the input source is TV, COMPONENT,
VIDEO 1 or 2:
AUTO/STANDARD/MOVIE/GAME/USER/DYNAMIC/
DYNAMIC(Fixed)
■
When the input source is PC IN or HDMI 1 to 4:
LC-70LE847U/LC-60LE847U
AUTO/STANDARD/MOVIE/GAME/PC/USER/x.v.Color/
DYNAMIC/DYNAMIC(Fixed)
LC-70LE745U/LC-60LE745U
AUTO/STANDARD/MOVIE/GAME/PC/USER/DYNAMIC/
DYNAMIC(Fixed)
• The selectable items vary depending on the input source.
• For details of the selectable items in 3D mode, see page
45.
• You can select AV MODE by pressing on the AV MODE
remote control unit. See page 24 for details of AV MODE
settings.
OPC Setting
Automatically adjusts the brightness of the screen.
Off: The brightness is fi xed at the value set in "Backlight".
On: Automatically adjusts.
On:Display: Displays the OPC effect on the screen while
adjusting the brightness of the screen.
•When set to "On", the Optical Picture Control (OPC)
senses the surrounding light and automatically adjusts
the backlight brightness. Make sure nothing obstructs
the OPC sensor, which could affect its ability to sense
surrounding light.
•When set to "On:Display", OPC effect displays on the
screen while the OPC adjusts the screen brightness.
OPC:
OPC:
Advanced Picture Settings
This TV provides various advanced functions for
optimizing the picture quality.
C.M.S.
(Color Management System)
Color tone is managed using the six-color adjustment
setting.
C.M.S.-Hue: This is a standard to adjust the color either
more reddish or more bluish in tone.
C.M.S.-Saturation: Increases or decreases the
saturation of a selected color.
C.M.S.-Value: A higher value makes the image brighter.
A lower value makes the image darker.
•
For resetting all adjustment items to the factory preset
values, press
a/b
to select "Reset", and then press
ENTER
.
Picture Settings
Adjusts the picture to your preference with the
following picture settings.
Menu
Picture
Settings
AV MODE (Changing Pic.Quality)
[STANDARD]
OPC
[On:Display]
[Middle]
Backlight
[ 5] 16b a b16
Contrast
[ 30] 0b b40
Brightness
[ 0] a b30 30
Color
[ 2] 30 30b a b
Tint
[ 0] a30 b30
Sharpness
[ 2] 10b a b10
Advanced
Picture Settings
3D Brightness Boost
Example
1 Press MENU to display the MENU screen, and then
press c/d to select "Picture Settings".
2 Press a/bto select a specifi c adjustment item.
• Select "Advanced" and then press to set ENTER
"C.M.S.-Hue", "C.M.S.-Saturation", "C.M.S.-Value",
"Color Gamut Range" (For LC-70LE847U/
LC-60LE847U), "Color Temp.", "Motion Enhancement",
"Quad Pixel Plus 2" (For LC-70LE847U/LC-60LE847U),
"Active Contrast", "Gamma Adjustment", "Black Level",
"Film Mode", "Digital Noise Reduction", "Monochrome"
or "Range of OPC".
3 Press a/b(or c/d) to select the desired setting,
and then press .ENTER
4 Press MENU to exit.
Selected item cbutton dbutton
Backlight The screen dims The screen
brightens
Contrast For less contrast For more contrast
Brightness For less
brightness
For more
brightness
Color For less color
intensity
For more color
intensity
Tint Skin tones
become reddish
Skin tones
become greenish
Sharpness For less
sharpness
For more
sharpness
• You can select "3D Brightness Boost" while in 3D mode.
(See page 45.)
• For resetting all Picture adjustment items to the factory
preset values, press a/b to select "Reset", press ENTER,
press a/
b to select "Yes", and then press .ENTER

30
Color Gamut Range (For LC-70LE847U/LC-60LE847U)
You can set the color gamut range.
Standard: Standard color gamut.
Expanded:
More vivid colors with expanded color gamut.
• "Color Gamut Range" is only available when AV MODE is
set to "MOVIE" or "MOVIE (3D)".
Color Temp.
(Color Temperature)
For a better white balance, use color temperature correction.
High: White with bluish tone
Mid-High:
Middle:
Mid-Low:
Low: White with reddish tone
White balance can be adjusted between a maximum of
+30 and a minimum of –30 for each color temperature.
R Gain (LO/HI)/G Gain (LO/HI)/B Gain (LO/HI)
■
Fine tuning the color temperature
To fi ne tune the color temperature, set "10 Point Setting"
to "On".
You can adjust the "Position" setting. Adjust the set color
temperature from +1 to +10.
White balance can be adjusted between a maximum of
+30 and a minimum of –30 for each color temperature.
• When "Position" is set to "10", you can adjust the white
balance between –30 and 0.
•
For resetting all adjustment items to the factory preset
values, press
a/b
to select "Reset", and then press
ENTER
.
Motion Enhancement
Use Motion Enhancement to view fast-action video
more clearly.
■ LC-70LE847U/LC-60LE847U
240Hz: Turn the LED backlight on or off for 240Hz drive
display.
AquoMotion240: Turn the LED backlight on or off for
120Hz drive display.
120Hz High/120Hz Low: For obtaining a clearer image.
Off: Normal image.
■ LC-70LE745U/LC-60LE745U
120Hz High/120Hz Low: For obtaining a clearer image.
Off: Normal image.
• "Motion Enhancement" may cause image noise. If this
occurs, turn the function "Off".
• When AV MODE is set to "GAME" or "PC", or PC format is
being input, "Motion Enhancement" is not available.
Quad Pixel Plus 2 (For LC-70LE847U/LC-60LE847U)
Smoothes diagonal lines by detailed dot control.
Advanced:
Produces smoother diagonal lines by jaggy
removal process.
Standard:
Produces smooth diagonal lines.
Off: No adjustment.
Active Contrast
Automatically adjusts the image contrast according to
the scene.
On: Automatically adjusts the image contrast.
Off: No adjustment.
On-Screen Display Menu
Gamma Adjustment
Adjusts the differences of picture tones between bright
parts and dark parts. The adjustment range of the
gamma can be set to a maximum of +2 and a minimum
of –2 by pressing c or d.
Black Level
Adjusts on-screen black level to your preferred level.
High: The black level gets brighter.
Low: The black level gets darker.
•"Black Level" is available for input signal from Composite
Video, Component 480i and analog broadcasts (air and
cable).
Film Mode (3:2 pull-down)
Automatically detects a fi lm-based source (originally
encoded at 24 frames/second), analyzes it then recreates
each still fi lm frame for high-defi nition picture quality.
Advanced: Adjust effect to reduce judder from fi lm
contents. Select a desired level of judder reduction
from 0 to +10.
Standard: Detects, analyzes, converts fi lm source.
Off: Normal viewing mode.
•"Film Mode" does not function depending on input signal
type.
• "Film Mode" does not function when you set AV MODE to
"GAME" or "PC".
•"Standard" does not function when channel display shows
an input signal resolution of 480p, 720p, or 1080p.
Digital Noise Reduction
Produces a clearer video image.
Auto: Automatically adjusts the level of noise reduction.
High/Middle/Low: Select a desired level for viewing a
clearer video image.
Off: No adjustment.
• "Digital Noise Reduction" is not available when you set AV
MODE to "PC" or PC format is being input.
• When AV MODE is set to "GAME", "Auto" is not available.
Monochrome
For viewing a video in monochrome.
On: For viewing in monochrome.
Off: Normal color.
Range of OPC
The brightness level range of the OPC sensor's automatic
adjustments can be set according to your preferences.
The adjustment range of the OPC sensor can be set to
a maximum of +16 and a minimum of –16.
Max.: –15 through +16
Min.: –16 through +15
•The "Range of OPC" settings are active only when "OPC"
is set to "On".
•The maximum setting cannot be set to a smaller number
than the minimum setting.
•The minimum setting cannot be set to a bigger number
than the maximum setting.
•Depending on the brightness of the surrounding light, the
OPC sensor might not operate if the adjustment range is
small.

31
On-Screen Display Menu
Audio Settings
You can adjust the sound quality to your preference
with the following settings.
Example
[Off]
Clear Voice
Menu
Audio
Settings
Auto Volume
[Off]
Bass
[ 0] a15 b15
Treble
[ 0] a b15 15
Balance
[ 0] L R
3D Surround
[Off]
Bass Enhancer
[On]
Reset
Audio Settings
1 Press MENU to display the MENU screen, and then
press c/d to select "Audio Settings".
2 Press a/b to select a speci c adjustment item.
• Select "Auto Volume", "3D Surround", "Bass Enhancer"
or "Clear Voice", and then press to set each ENTER
item.
3 Press a/b (or c/d) to select the desired setting,
and then press .ENTER
4 Press MENU to exit.
Selected item cbutton dbutton
Treble For weaker treble For stronger treble
Bass For weaker bass For stronger bass
Balance Decrease audio
from the right
speaker
Decrease audio
from the left
speaker
•Audio menu is grayed out when "Output Select" is set to
"Variable". (See page 34.)
•For resetting Audio adjustment items to the factory preset
values, press a/b to select "Reset", press , press ENTER
a/b to select "Yes", and then press .ENTER
Auto Volume
Different sound sources sometimes do not have the
same loudness level, such as a program and its
commercial breaks. The Automatic Volume Control
(Auto Volume) reduces this problem by equalizing
levels.
High: Reducing the loudness gaps among different
sound sources strongly.
Middle:
Low: Reducing the loudness gaps among different
sound sources slightly.
•Audio Settings menu is grayed out when "Output Select" is
set to "Variable". (See page 34.)
3D Surround
The surround function produces Surround effect from
the speakers.
3D Stadium: Reproducing lifelike experience of
excitements such that live sports or concert
performances in a stadium create.
3D Hall: Reproducing concert hall experience with
realistic live surround sound using measured
reverberant sound in the concert hall.
3D Movie: Reproducing movie theater experience
with realistic live surround sound using measured
reverberant sound in the movie theater.
3D Standard: Creating 3 dimensional surround sound
with detailed control of the signal phase.
Normal: Providing mild surround sound.
Off: Outputs the normal sound.
•Audio Settings menu is grayed out when "Output Select" is
set to "Variable". (See page 34.)
•For some discs, setup may be required on your BD/DVD
player. In this case, please refer to the operation manual of
your BD/DVD player.
Bass Enhancer
This function allows you to enjoy bass-enhanced sound.
On: Bass Enhancer function is on.
Off: Normal sound.
•Audio Settings menu is grayed out when "Output Select" is
set to "Variable". (See page 34.)
Clear Voice
This function emphasizes speech against background
noise for greater clarity.
•Audio Settings menu is grayed out when "Output Select" is
set to "Variable". (See page 34.)

32
Power Control
Power control setting allows you to save energy.
Power
Control
Menu
Audio Only
No Signal Off
Power Saving
No Operation Off
[Disable]
[Enable]
[ Standard]
Power Control
Example
1 Press MENU to display the MENU screen, and then
press c/d to select "Power Control".
2 Press a/b to select a speci c adjustment item,
and then press .ENTER
3 Press a/b (or c/d) to select the desired setting,
and then press .ENTER
4 Press MENU to exit.
• Skip this step for "Audio Only".
Audio Only
When listening to music from a music program, you
can turn the screen off and enjoy audio only.
On: Audio is output without screen image.
Off: Both screen images and audio are output.
•The screen image will return to normal when a button
(except those for audio adjustment, such as , )VOL MUTE
is pressed.
On-Screen Display Menu
Power Saving
This function allows you to set the Power Saving level
in order to decrease the power consumption and
increase the backlight lifespan.
Standard: Optimizes power reduction based upon video
content. When set to "Standard", " " appears on the
screen.
Advanced: Optimizes power reduction based upon video
content and engages OPC. When set to "Advanced",
" " appears on the screen.
Off: This function does not work.
•"Power Saving" does not function when you set AV MODE
to "AUTO" or
"DYNAMIC (Fixed)".
•You cannot select a different Power Saving item for each
AV MODE.
When "Power Saving" is set, the "OPC" settings for all AV
Modes will automatically change.
—If you set "OPC" to "On" when "Power Saving" is set to
"Standard", then the "Power Saving" setting will change
to "Advanced".
—When you change the "Power Saving" setting from
"Advanced" to "Off" or to "Standard", "OPC" will be set
to "Off".
—"AUTO" and "DYNAMIC (Fixed)" will remain set to "Off".
•When "Power Saving" is set to "Standard" or "Advanced",
the Power Saving leaf icon appears to the left of "OPC" in
the Picture Settings menu screen.
• "Power Saving" is not available when the TV is in 3D mode.
No Signal Off
This function allows the TV to automatically shut the
power down when there is no signal received.
Enable: The power will automatically shut down if there is
no signal for 15 minutes.
Disable: This function does not work.
A conrmation screen appears.
Yes: The setting will be changed.
No: The setting will not be changed.
•When it is 5 minutes before the power shuts down, the
remaining time will start to keep appearing every minute.
•
When a TV program nishes, this function may not operate.
No Operation Off
This function allows the TV to automatically shut the
power down when there is no operation.
Enable: The power will automatically shut down if there is
no operation for 3 hours.
Disable: This function does not work.
A conrmation screen appears.
Yes: The setting will be changed.
No: The setting will not be changed.
•When it is 5 minutes before the power shuts down, the
remaining time will start to keep appearing every minute.

33
On-Screen Display Menu
System Options
Menu
View Option
System Options
3D Setup
Terminal Setting
AQUOS LINK Setup
Menu Design
Operation Lock Out
[Off]
Icon Light Up Setting
Demo Mode
System
Options
[On]
Example
1 Press MENU to display the MENU screen, and then
press c/d to select "System Options".
2 Press a/b to select a speci c adjustment item and
then press .ENTER
3 Press a/b (or c/d) to select the desired setting,
and then press .ENTER
4 Press MENU to exit.
View Option
These functions are useful for adjusting the audio
and video settings. The View Option functions can be
operated with the remote control unit.
APPS
The application window can be displayed by selecting
"APPS" on the MENU screen.
• You can display the application window by pressing
SmartCentral on the remote control unit. (See page 24.)
View Mode
This function changes the screen size.
Select "View Option" on the menu to display the View
Mode menu screen.
The View Mode menu varies depending on the input source.
• You can select View Mode by pressing on VIEW MODE
the remote control unit.
— See page 26 for adjusting the video being input from a
TV, other audiovisual equipment, USB-Video, DLNA-
Video or Internet applications.
—
See page 62 for adjusting the video being input from a PC.
Freeze
Allows you to capture and freeze a moving image that
you are watching.
• You can select Freeze by pressing on the remote FREEZE
control unit. See page 23 for details of Freeze function.
Change Audio
Allows you to change the audio when multiple audio is
available for the program you are watching.
• You can change Audio by pressing on the remote AUDIO
control unit. See pages 24 to 25 for details of Audio
function.
Change CC
Allows you to change the Closed Caption display.
Select "Change CC" on the menu to display the Closed
Caption information.
• The information displayed varies depending on the program
you are watching.
• You can change Closed Caption by pressing on the CC
remote control unit. See page 25 for details of Closed
Caption function.
Terminal Setting
Audio Setup
You can output digital audio to an AV ampli er or
similar device whose DIGITAL AUDIO INPUT terminal
is connected to the DIGITAL AUDIO OUTPUT terminal
on the TV. Please select an audio output format
compatible with the audio format of the program you
are watching and the equipment connected.
PCM: Set to "PCM" when connecting to equipment that
does not support Dolby Digital. The same audio (main,
sub, or main/sub) as the audio of the program being
viewed is output.
2-channel audio with a sampling rate of 48 kHz or less
is output as linear PCM audio.
Bitstream: Set to "Bitstream" when connecting to an
audio system that supports Dolby Digital. Audio is
output through both the main and sub channels.
• Analog channel audio and video input audio are output in
PCM mode even when "Bitstream" is selected.
• PCM digital input signals are output in PCM mode even
when "Bitstream" is selected.

34
Input Skip
This setting allows you to skip the TV, HDMI or PC IN
Input ("TV", "PC IN", "HDMI 1", "HDMI 2", "HDMI 3"
and "HDMI 4") on the Input Selection operation.
Yes: Skips the input.
No: Does not skip input.
Input Label
Lets you set the input terminal displayed when using
the INPUT list or channel display. Press
a/b/c/d
to
select the new name for the input mode.
• Using the software keyboard, you can enter up to
10 characters for text. (See page 69.)
•You cannot change labels if the input source is TV, Home
Network (DLNA) or USB.
HDMI Setup
To watch an HDMI or PC IN equipment image, select
"HDMI 1", "HDMI 2", "HDMI 3" or "HDMI 4" from the
INPUT list using on the remote control unit or INPUT
on the TV.
Auto View:
Enable: To use View Mode based on signal
recognition, including an HDMI signal.
Disable: No function.
•Refer to your external equipment operation manual for the
signal type.
•When connecting a DVI-HDMI conversion adapter/cable to
the HDMI terminal, the image may not come in clearly.
Output Select
Allows you to select what controls the audio output.
Fixed: VOLSound via speaker is adjusted with k/l on
the remote control unit or on the TV.
Sound via the AUDIO OUT terminal is not adjustable
and outputs at a consistent level.
Variable: Sound via the AUDIO OUT terminal is adjusted
with VOLk/l on the remote control unit or on the TV.
Sound via speaker is muted.
Color System
Select the video signal system compatible with your
equipment from the list below:
Auto/NTSC/PAL-M/PAL-N
•"Color System" can only be set for the VIDEO 1 or 2.
•If you have already set the Secret No., input the 4-digit
secret number here. See page 37 for setting a secret
number.
Menu Design
Channel Selecting Effect
You can select whether to use transition effects when
changing channels.
Yes: A transition effect is used when the channel is
changed.
No: No function.
• In some cases, "Channel Selecting Effect " does not work.
Program Title Display
Select the CH display when changing channels for
digital broadcasting.
Yes: "Program Info." displays.
No: "Program Info." does not display.
Position
For adjusting a picture's horizontal and vertical
position.
H-Pos.: Centers the image by moving it to the left or
right.
V-Pos.: Centers the image by moving it up or down.
•For resetting adjustments to the factory preset values,
press a/b to select "Reset", and then press .ENTER
•When connecting a PC to the HDMI terminal, the image
position will be automatically adjusted. It cannot be
manually adjusted.
•The screen position variable ranges depend on the View
Mode or the signal type. The ranges can be seen on the
position-setting screen.
•Adjustments are stored separately according to input
source.
• "Position" does not work when USB mode, Home Network
(DLNA) mode or an Internet application is used.
• You may not be able to adjust the position while in 3D
mode.
Caption Setup
This function allows you to adjust the closed caption
screen appearance to suit your preference. You can
adjust 7 items: "Caption Size", "Font Style", "Foreground
Color", "Foreground Opacity", "Background Color",
"Background Opacity" and "Character Edge".
Example:
Selectable items available for "Font Style".
Default: The font speci ed by broadcasting station or
default font.
Type 0: Proportional font used in the MENU screen.
Type 1: Monospaced with serifs.
Type 2: Proportionally spaced with serifs.
Type 3: Monospaced without serifs.
Type 4: Proportionally spaced without serifs.
Type 5: Casual font type.
Type 6: Cursive font type.
Type 7: Small capitals.
•For resetting adjustments to the factory preset values,
press a/b to select "Reset", and then press .ENTER
•The default value depends on the broadcasting station.
On-Screen Display Menu
35
Game Play Time
This function displays the elapsed game time so you
do not lose track of the time. To display the elapsed
time, select "GAME" for the AV MODE before starting
the game.
On: The elapsed time is displayed every 30 minutes when
you switch to GAME mode in external input mode.
Off: No adjustment.
Operation Lock Out
This function locks the operation buttons on the TV
and the remote control.
Off: No adjustment.
RC Control Lock: All buttons on the remote control are
locked.
Button Control Lock: All buttons on the TV, except
POWER, are locked.
When “RC Control Lock” or “Button Control Lock” is
selected, a con rmation screen appears.
On: Locks the operation buttons.
Off: No adjustment.
• To unlock the buttons on the remote control by using the
control panel of the main unit (see page 27):
1Press to display the MENU screen, pressMENU
VOLk/l to select "System Options", and then press
INPUT.
2Press CH U/V to select "Operation Lock Out", and
then press INPUT.
3 Press CHU/V to select "Off" , and then press INPUT .
4 Press to exit.MENU
•To unlock the buttons on the TV, press on the MENU
remote control, and then select "Off" in "Operation Lock
Out".
Icon Light Up Setting
When this function is set to "On", the LED on the front
of the TV turns on.
• The LED lights white in 2D mode.
• The LED lights blue in 3D mode.
• "On" is the factory preset value. If you want to turn off the
LED, set the function to "Off".
Demo Mode
You can select the image from several types of demo
mode.
■ LC-70LE847U/LC-60LE847U
Quattron/Quad Pixel Plus 2/240Hz Panel/
SmartCentral/3D/Feature Demo/Auto Play
■ LC-70LE745U/LC-60LE745U
SmartCentral/Feature Demo/Auto Play
If you have selected "Auto Play", you need to select the
desired playback type(s), and then set the playback time.
Continuous: Play Demos continuously.
10 min.: Play Demos every 10 minutes.
20 min.: Play Demos every 20 minutes.
•This function will be canceled when you press on the EXIT
remote control unit.
•When "Demo Mode" is set to "Quattron" or "Feature
Demo", pressing pauses/restarts demo.FREEZE
•"Demo Mode" may not be selected depending on input
signal type or application status.
•"Demo Mode" may be automatically canceled depending
on input signal type.
On-Screen Display Menu

36
Initial Setup
Example
Menu
EZ Setup
Internet Setup
Language
DivX
® Setup
Broadcasting Setup
Individual Setup
Wall Mount Audio Setup
Initial Setup
Initial
Setup
[No]
[English]
Reset
1 Press MENU to display the MENU screen, and then
press c/d to select "Initial Setup".
2 Press a/b to select a speci c adjustment item,
and then press .ENTER
• When you select "EZ Setup", "CH Setup", "Parental
CTRL" or "Reset", you can enter the 4-digit secret
number here. See page 37 for setting a secret number.
3 Press a/b (or c/d) to select the desired setting,
and then press .ENTER
4 Press MENU to exit.
EZ Setup
You can run EZ Setup again, even after setting up the
preset channels.
Language: Select from among 3 languages (English,
French and Spanish).
Location & Time: Make settings for the country, area
and time zone where you use the TV.
Select your country: Select either "United States", "Canada"
or "Mexico".
Select your time zone: Select your time zone. The available
settings differ depending on the selected country.
Select DST (Daylight Savings Time): Select "Auto", "Manual"
or "Off".
TV Location: Select "Home" or "Store" for the location
where you plan to install the TV. This product quali es
for ENERGY STAR in Home mode default setting.
Home: "Power Saving" is set to "Advanced", and AV MODE is
set to "STANDARD".
Store:
"Power Saving" is set to "Off" and AV MODE is set to
"DYNAMIC (Fixed)". Picture Reset and Feature Demo can be set.
Picture Reset: AV MODE will be set to "DYNAMIC (Fixed)"
regardless of whether Picture Reset is "On" or "Off". If you
select "On", AV MODE will be reset to "DYNAMIC (Fixed)"
if there is no operation for 30 minutes. When "Off" is
selected, AV MODE will be set to "DYNAMIC (Fixed)".
Feature Demo: When "On" is selected, after all the settings
are completed, the Feature Demo screen is displayed if
there is no operation for several minutes.
• ENERGY STAR quali cation is based on AV MODE
"STANDARD".
Antenna & Cable/STB: Select the type of connection
you will use to watch TV.
Air/Cable: Make sure what kind of connection is made
with your TV when selecting "Air" or "Cable".
CH Search: Channel auto search makes the TV look for
all channels viewable in the set area.
• If "Cable" is selected for Antenna setting, scrambled
channels are removed after the Channel search has been
completed.
Network: When you connect to the Internet on the TV,
con rm the connection method and make adjustments.
• Wireless LAN connection is possible only when the WPS
(push button) method is used. If any other method is used,
make settings by Initial Setup > Internet Setup > Network
Setup. (See page 67.)
Completed:
The settings con rmation screen is displayed.
Con rm the information displayed on the screen.
•
See Initial Installation on pages 19 to 22 for setting each item.
•If no channel is found, con rm the type of connection
made with your TV and try "EZ Setup" again.
•If you select "Analog Search Start" and initiate the channel
search, the CH Memory for Cable Digital will be deleted.
Broadcasting Setup
CH Setup
If Initial Installation does not memorize all the channels
in your region, follow the instructions below to manually
memorize the channels.
Air/Cable: Make sure what kind of connection is made
with your TV when selecting "Air" or "Cable".
CH Search: Channel auto search makes the TV look for
all channels viewable in the set area.
CH Memory: You can select the channels to skip in each
ANALOG (Air), ANALOG (Cable), DIGITAL (Air) and
DIGITAL (Cable).
On: CHSkips channels. (Channel selection disabled using
U/V.)
Off: Does not skip channels. (Channel selection enabled using
CH U/V.)
Remove Scrambled CH: This function makes the TV
look for and then delete digital cable channels that
are scrambled and so unavailable in the set area. The
process may take more than 20 minutes.
Yes: Starts to remove scrambled channels.
No: This function does not work.
•
See Initial Installation on pages 19 to 22 for setting each item.
•If no channel is found, con rm the type of connection
made with your TV and try channel search again.
•If you select "Analog Search Start" and initiate the channel
search, the CH Memory for Cable Digital will be deleted.
On-Screen Display Menu

37
Favorite CH (Favorite Channel Setting)
This function allows you to program 4 favorite
channels, in 4 different categories. By setting the
favorite channels in advance, you can select your
favorite channels easily.
To register your favorite channel:
Select "Register" and then press . Press ENTER a/b/c/
d to select the position in the category, and then press
ENTER to register.
To delete your favorite channel:
Select "1 Data Clear" and then press . Press ENTER
a/b/c/d to select the channel you want to delete, and
then press . Select "Yes" and then press .ENTER ENTER
To delete all the favorite channels, select "All Data Clear".
•Before setting the channel, select the channel you want to
register as a favorite channel.
•You can display the "Favorite CH" screen by pressing
FAVORITE CH on the remote control.
Antenna Setup-DIGITAL
In order to receive digital air broadcasts, you need
a digital broadcast antenna. You can con rm the
antenna con guration through the "Antenna Setup-
DIGITAL" screen. If necessary, adjust the direction of
the antenna to obtain the maximum signal strength.
Signal Strength: The signal strength of DIGITAL channel
is displayed. The signal information is based on the
current channel.
Channel Strength: Input the 2-digit channel number
to check the signal strength of the selected channel.
Make sure the signal is strong enough for each
channel.
• This function is available for DIGITAL (Air) only.
Language
You can also select a language from the Initial Setup
menu. Select from among 3 languages: English,
French and Spanish.
Wall Mount Audio Setup
This selects the optimal audio for the program you are
currently watching even when the TV is mounted to a
wall.
Yes: Selects the optimal audio.
No: No adjustment.
Reset
If complex adjustments are made and the settings
cannot be restored to normal, you can reset the
settings to the factory preset values.
•If you have already set the Secret No., input the 4-digit
secret number here.
•The Channel Setup settings will not be changed.
•The Language settings will not be changed.
•The Secret number settings will not be changed.
•The TV Location settings will not be changed.
Individual Setup
Secret No.
Allows you to use a secret number to protect certain
settings from being accidentally changed.
IMPORTANT:
Three conditions must be met to enable the V-Chip (see
pages 38 to 39):
1.
Secret No. is registered.
2.
V-Chip/V-Chip (DTV Only) settings have been made.
• The “V-Chip (DTV Only)” will only be selectable when a new
rating system can be downloaded via digital broadcasting in the
U.S.
3. "
Status
"
is set to
"
On
"
.
■
Setting the Secret No.
You can set and change the secret number by using
0 9- .
Yes: Changes or sets the Secret No.
No: The con rmation screen to clear the Secret No.
appears when the Secret No. has been set. When the
Secret No. has not been set, the previous screen will
be displayed.
■
Secret No. Clear
You can clear your secret number.
Yes: Your secret number is cleared.
No: Your secret number is not cleared.
•As a precautionary measure, make a note of your secret
number and keep it in a familiar place.
•If the secret number is cleared, the Status setting
automatically sets to "Off". "V-Chip" and "Status" will not
be selectable from the menu.
Parental CTRL
(Parental Control Setting)
Status
Used to enable or disable the parental control function.
This function will not be selectable from the menu if
you do not rst con gure your secret number.
On: Enables Parental CTRL.
Off: Disables Parental CTRL.
On-Screen Display Menu
38
V-Chip
V-CHIP is an electronic ltering device built into your
TV. This tool gives parents a great degree of control
over broadcasts accessed by their children. It allows
parents to select programs judged suitable for child
viewing while blocking ones judged not suitable. It
does so automatically once you activate the V-CHIP
feature in your TV. "V-Chip" and "Status" will not be
selectable from the menu if you do not rst con gure
your secret number.
•The U.S. has two rating systems for viewing content: TV
Parental Guidelines and movie ratings.
•The TV Parental Guidelines work in conjunction with the
V-CHIP to help parents screen out inappropriate television
shows from their children.
•Movie ratings are used for original movies rated by the
Motion Picture Association of America (MPAA) as watched
on cable TV and not edited for television. The V-CHIP can
also be set to block MPAA-rated movies.
•The setting automatically enters "Block" for any ratings
below your selection.
•If Status is not set to "On", the con guration settings will
not work.
■
MPAA (Voluntary movie rating system)
Example
MPAA
TV Guidelines
Can. English Ratings
Can. French Ratings PG-13
R
NC-17
X
NONE
PG
G
Press a/b to adjust the item to your desired position.
" " indicates the item is blocked. Press to exit.MENU
G: General audiences. All ages admitted.
PG: Parental guidance suggested. Some material may not be
suitable for children.
PG-13: Parents strongly cautioned. Some material may be
inappropriate for children under 13.
R: Restricted. Under 17 requires accompanying parent or
adult guardian (age varies in some jurisdictions).
NC-17: No one 17 and under admitted.
X: X is an older rating that is uni ed with NC-17 but may be
encoded in the data of older movies.
•Voluntary movie rating system only uses an age-based
rating.
■ TV Parental Guidelines
Example
MPAA
TV Guidelines
Can. English Ratings
Can. French Ratings TV-G
TV-PG
TV-14
TV-MA
NONE
TV-Y7
TV-Y
L
S
V
FV
D
Press a/b to adjust the item to your desired position.
"" indicates the item is blocked. Press to exit.MENU
Suggested age
TV-Y: All children.
TV-Y7: Directed to older children.
TV-G: General audience.
TV-PG: Parental Guidance suggested.
TV-14: Parents strongly cautioned.
TV-MA: Mature audience only.
Example
MPAA
TV Guidelines
Can. English Ratings
Can. French Ratings TV-G
TV-PG
TV-14
TV-MA
NONE
TV-Y7
TV-Y
L
S
V
FV
D
When setting an individual content-based rating item:
1 Press d or to access blocked content ENTER
items from the currently selected age-based rating
item.
2 Press a/b to select an individual item, and then
press to unblock it (" " is removed). Repeat ENTER
the same steps for the other items.
3 Press c or to register after all individual RETURN
content rating items are set.
Content
FV: Fantasy violence.
V: Violence.
S: Sexual situation.
L: Adult language.
D: Sexually suggestive dialog.
Rating
Content
FV V S L
D
Suggested
age
TV-Y
TV-Y7
TV-G
TV-PG
TV-14
TV-MA
: The content rating can be set, but this rating is not
normally broadcast by TV stations.
: Content rating can be set.
On-Screen Display Menu

39
Canadian Rating Systems (Canadian English ratings
and Canadian French ratings)
•The TV rating systems in Canada are based on the
Canadian Radio-Television and Telecommunications
Commission (CRTC) policy on violence in television
programming.
•While violence is the most important content element to
be rated, the structure developed takes into consideration
other program content like language, nudity, sexuality and
mature themes.
•When setting the V-CHIP on the Canadian system you
can choose either the Canadian English ratings or the
Canadian French ratings.
■ Canadian English Ratings
Example
MPAA
TV Guidelines
Can. French Ratings
E
C
C8+
G
PG
14+
18+
NONE
Can. English Ratings
Press a/b to adjust the item to your desired position.
"" indicates the item is blocked. Press to exit.MENU
E: Exempt: Includes news, sports, documentaries and other
information programming; talk shows, music videos, and
variety programming.
C: Children: Intended for younger children under the age of 8
years. Pays careful attention to themes that could threaten
their sense of security and well-being.
C8+: Children over 8 years old: Contains no portrayal
of violence as the preferred, acceptable, or only way
to resolve con ict; nor encourage children to imitate
dangerous acts which they may see on the screen.
G: General: Considered acceptable for all age groups.
Appropriate viewing for the entire family, contains very little
violence, physical, verbal or emotional.
PG: Parental Guidance: Intended for a general audience, but
may not be suitable for younger children (under the age of 8)
because it could contain controversial themes or issues.
14+: Over 14 years: Could contain themes where violence
is one of the dominant elements of the storyline, but it
must be integral to the development of plot or character.
Language usage could be profane and nudity present
within the context of the theme.
18+: Adults: Intended for viewers 18 years and older and
might contain depictions of violence, which while related to
the development of plot, character or themes, are intended
for adult viewing. Could contain graphic language and
portrayals of sex and nudity.
■ Canadian French Ratings
Example
MPAA
TV Guidelines
Can. French Ratings
Can. English Ratings
8ans+
13ans+
16ans+
18ans+
NONE
G
E
Press a/b to adjust the item to your desired position.
"" indicates the item is blocked. Press to exit.MENU
E: Exempt programming.
G: General: All ages and children, contains minimal direct
violence, but may be integrated into the plot in a humorous
or unrealistic manner.
8ans+: General but inadvisable for young children: May
be viewed by a wide public audience, but could contain
scenes disturbing to children under 8 who cannot
distinguish between imaginary and real situations.
Recommended for viewing with parent.
13ans+: Over 13 years: Could contain scenes of frequent
violent scenes and therefore recommended for viewing with
parent.
16ans+: Over 16 years: Could contain frequent violent scenes
and intense violence.
18ans+: Over 18 years: Only for adult viewing. Could contain
frequent violent scenes and extreme violence.
■ How to temporarily release the V-CHIP BLOCK
When the V-CHIP BLOCK is working and censors a
broadcast, "V-CHIP HAS BEEN ACTIVATED." displays.
1 Press ENTER while the V-CHIP is working, and
then the secret number setting menu displays.
2 Input the 4-digit secret number by using – . At this 0 9
time V-CHIP BLOCK temporarily releases.
■ Reactivating the temporarily released V-CHIP
BLOCK
You can reactivate the temporarily released V-CHIP
BLOCK as shown below.
•Select "Status" setting from the Parental CTRL menu to
reactivate BLOCK. (See page 37.)
•Select "V-Chip" setting ("MPAA", "TV Guidelines", "Can.
English Ratings" or "Can. French Ratings") from the
Parental CTRL to reactivate BLOCK. (See pages 38 to 39.)
•Switch off the TV power.
•Performing any of the three above will activate the V-CHIP
BLOCK.
On-Screen Display Menu

40
On-Screen Display Menu
Information
Example
Menu
Identication
Software Update
Digital Caption Info.
Netix Help
VUDU Help
Information
Information
1 Press MENU to display the MENU screen, and then
press c/d to select "Information".
2 Press a/b to select a speci c adjustment item,
and then press .ENTER
3 Press a/b (or c/d) to select the desired setting,
and then press .ENTER
4 Press MENU to exit.
Identi cation
The current version of the TV software is displayed.
Digital Caption Info.
(Digital Caption Information)
This function allows viewing of digital closed caption
information for the digital broadcast program being viewed.
•This list is not displayed for analog broadcasts or external
input audio/video.
•This information is not included in CC1, CC2, Text1, or
Text2, and is not displayed in a list.
Software Update
This is used to upgrade the system software to
enhance the TV functions.
1 Press MENU to display MENU screen, and then
press c/d to select “Information”.
2 Press a/b to select “Software Update”, and then
press .ENTER
• If you have already set the Secret No., go to step 3.
Menu
Identication
Software Update
Digital Caption Info.
Information
Information
Example
3 Input the 4-digit secret number by using - .0 9
Software Update
Enter your Secret No.
4 Press a/b to select “Manual Update” or “Auto
Update Setting”, and then press .ENTER
• The operations thereafter vary depending on the setting.
Manual Update
Select the method for manually updating the software.
USB Update: Updates the software using a USB memory
device containing the update le. (See pages 41 to 42.)
Network Update: Downloads the update le via the
network and then updates the software. (See page 41.)
• A broadband connection and Internet Setup are required to
update the software using the network. (See pages 66 to
68.)
• It may take time to access and download the update
depending on the Internet connection and other factors.
Auto Update Setting
When the TV is on, or when an Internet application
is being accessed, this function enables the TV
to connect to the network and check for updates
automatically.
Yes: Enables Auto Update Setting.
No: Disables Auto Update Setting.
When an update is available, a message is displayed.
Press c/d to select "Yes", and then press to ENTER
display the download screen. (See page 41.)
No
Yes
• This function does not work when a broadband connection
or Internet Setup is not available.
• A message may also be displayed when an application is
running.
The message varies depending on the application.

41
■
Updating the Software via the Network
1 Press a/bon the Manual Update screen to select
"Network Update", and then press .ENTER
• The TV connects to the network and checks for updates.
• To cancel, press .ENTER
Abort
Connecting to Internet..
Checking for the latest software version..
Accessing..
2 The current version of the TV and the latest version
of software are displayed. To update the TV
software, select “Yes”, and then press .ENTER
Latest software version has been found.
A software update is available.
Proceed with update?
Update time may change depending on the network environment
Current Version
XXXXXXXX
Latest Version
XXXXXXXX
Estimated Update Time
XX
NoYes
• When a server connection cannot be established or an
update is not available, a message is displayed.
If a server connection cannot be established, check the
broadband connection and Internet Setup.
Cannot reach the server.
Check the network settings and try again.
OK
OK
The TV does not need to be updated.
3 After the update le is downloaded, the software
update process begins.
Downloading the latest software..
30%
Abort
Update Version
XXXXXXXX
50%
Do not unplug AC cord.
Remote control operation is disabled during update process.
Updating to the latest software..
Update Version
XXXXXXXX
CAUTION
• Do not unplug the AC cord while the software is
being updated.
4 When the software is successfully updated, a
screen is displayed indicating that the update
process is completed.
A screen indicating that the update is completed
is displayed. 4 seconds later, the TV restarts
automatically.
Software update is complete.
Update Version
XXXXXXXX
• If the software was not updated successfully, check the
broadband connection and Internet Setup, and then try
updating the software again.
OK
Failed to complete update.
Please retry from Software Update menu.
■
Updating the Software with a USB Memory Device
To check for the availability of a software update, visit
http://www.sharpusa.com/products/support/. If you
have any questions, please
call 1-800-BE-SHARP (800-237-4277).
CAUTION
• Do not remove the USB memory device or unplug
the AC cord while the software is being updated.
• Be sure to properly follow the whole procedure
described below, step by step. Otherwise, for
example, the TV cannot read the data in the USB
memory device and software updating will fail.
1 Insert the USB memory device with the update le
into the USB 1 or USB 2 terminal on the TV.
• When you update the software, use only one USB
terminal. Either USB 1 or USB 2 is usable.
or
2 Press a/b on the Manual Update screen to select
"USB Update", and then press .ENTER
On-Screen Display Menu

42
3 Press ENTER to start checking the data in the USB
memory device.
Insert the USB memory device
containing the software update le.
OK
4 During the data checking, “Checking” blinks.
Now checking the data
in the USB memory device.
Checking
• The current version of the TV software and the version
of the update le on the USB memory device are
displayed.
Example
Software update le is detected
in the USB memory device.
Start update?
NoYes
Current Version : UXXXXXX1
Update Version : UXXXXXX2
• If the USB memory device is not properly installed or
the correct update le cannot be found on the USB
memory device, an error message is displayed.
Check the le on the USB memory device, and then
reinsert the USB memory device correctly.
Software update le is not detected in the USB memory device.
Conrm that you have transferred the le
to the USB memory device and retry software update.
OK
There is more than one software le in the USB memory device.
Conrm that only the software update le is
in the USB memory device.
OK
On-Screen Display Menu
5 To update the TV software with the update le,
select “Yes”, and then press .ENTER
Software update le is detected
in the USB memory device.
Start update?
NoYes
Current Version : UXXXXXX1
Update Version : UXXXXXX2
Example
30%
Now updating
Update Version : UXXXXXX2
Do not unplug AC cord.
Remote Control operation is disabled during Update process.
CAUTION
• Do not remove the USB memory device or unplug
the AC cord while the software is being updated.
6 When the software is successfully updated, a
screen is displayed indicating that the update
process is completed.
After this screen is displayed, the TV automatically
turns off and then turns on again.
Example
Software update is complete.
OK
Update Version : UXXXXXX2
• If the update has failed, check the le in the USB
memory device and try Software Update again.
Failed to complete update.
Retry Software Update.
If system Update fails again,
contact the customer service center.
OK
Update Version : UXXXXXX2
7 After the screen shown below is displayed, press
ENTER.
System software was
successfully updated.
Remove the USB memory device.
OK
8 Remove the USB memory device.

43
CAUTION
• The 3D Glasses are precision equipment. Handle them with care.
• Improper use of the 3D Glasses or failure to follow these instructions can result in eye strain.
• If you experience dizziness, nausea, or other discomfort while viewing 3D images, immediately discontinue use
of the 3D Glasses. Using the 3DTV with incompatible 3D broadcasts or software can make images appear blurry
or create overlapping images.
• When viewing 3D images continuously, be sure to take a break periodically to prevent eye strain.
• If you are nearsighted or farsighted or have astigmatism or a different level of eyesight between the left and right
eyes, you should take the necessary steps, such as wearing eyeglasses, to correct your eyesight before viewing
3D images. The 3D Glasses can be worn over eyeglasses.
• When viewing 3D images, keep the 3D Glasses horizontally level with the TV screen. If you tilt the 3D Glasses
with respect to the TV screen, the images viewed by the left and right eyes may appear signi cantly different or
images may appear overlapping.
• View 3D images at the appropriate distance from the TV screen. The recommended distance is three times the
effective height of the TV screen.
Examples of recommended distances
70-inch screen: Approx. 8.5 ft (2.6 m)
60-inch screen: Approx. 7.2 ft (2.2 m)
Viewing should not be done closer than the recommended distance.
• Be careful of your surroundings when viewing 3D images. When you view 3D images, objects may appear
closer or farther than they are. This may cause you to misjudge the distance and possibly result in injury if you
accidentally hit the screen or surrounding objects.
• The 3D Glasses are not recommended for people aged less than 6.
• When children are viewing 3D images, be sure a parent or guardian is present. Monitor children viewing 3D
images, and if they show signs of discomfort, immediately discontinue use of the 3D Glasses.
• People with a known history of photosensitivity and people with heart problems or poor health should not use
the 3D Glasses. This can worsen existing health conditions.
• Do not use the 3D Glasses for other purposes (such as general eyeglasses, sunglasses, or protective goggles).
• Do not use the 3D function or 3D Glasses while walking or moving around. This may result in injuries due to
running into objects, tripping, and/or falling.
•
When using the 3D Glasses, take care not to accidentally strike the TV screen or other people. Viewing 3D images may
cause you to misjudge the distance to the TV screen and accidentally strike the screen, resulting in possible injury.
• It is recommended that you do not view 3D images if you are sleep deprived or if you have been drinking alcohol.
Display Methods for 3D and 2D Images
Display method Example display Description
3D mode
(using the 3D
Glasses)
2D ➝ 3D • Converts normal 2D images into 3D images.
Side by Side
• Creates 3D images from 3D images displayed side
by side. The image is split into a left and right image,
and then the images are stretched and displayed
sequentially to create a 3D image.
Top and Bottom
• Creates 3D images from 3D images displayed on
the top and bottom. The image is split into a top and
bottom image, and then the images are stretched and
displayed sequentially to create a 3D image.
2D mode
(without using
the 3D Glasses)
Side by Side ➝ 2D
• Creates 2D images from 3D images displayed side by
side. Only the left image is stretched and displayed. The
image does not appear in 3D.
Top and Bottom ➝ 2D
• Creates 2D images from 3D images displayed on the
top and bottom. Only the top image is stretched and
displayed. The image does not appear in 3D.
Enjoying 3D Image Viewing
You can use special 3D Glasses to watch 3D-supported images on this TV.
• You can enjoy 3D movies on this TV by viewing the movie through SHARP 3D Glasses sold separately.
• To produce 3D images, liquid crystal shutters in the 3D Glasses alternately open and close imperceptibly fast to exactly
match alternating left and right video images displayed by the TV.
• Not all consumers can experience and enjoy 3DTV. Some people suffer from stereo blindness which prevents them from
perceiving the intended depth of 3D entertainment. Also, some people who watch 3D programming may experience initial
feelings of motion sickness as they adjust to the picture. Others may experience headaches, eye fatigue or motion sickness.
Some viewers might also experience epileptic seizures. Like a roller coaster, the experience is not for everyone.
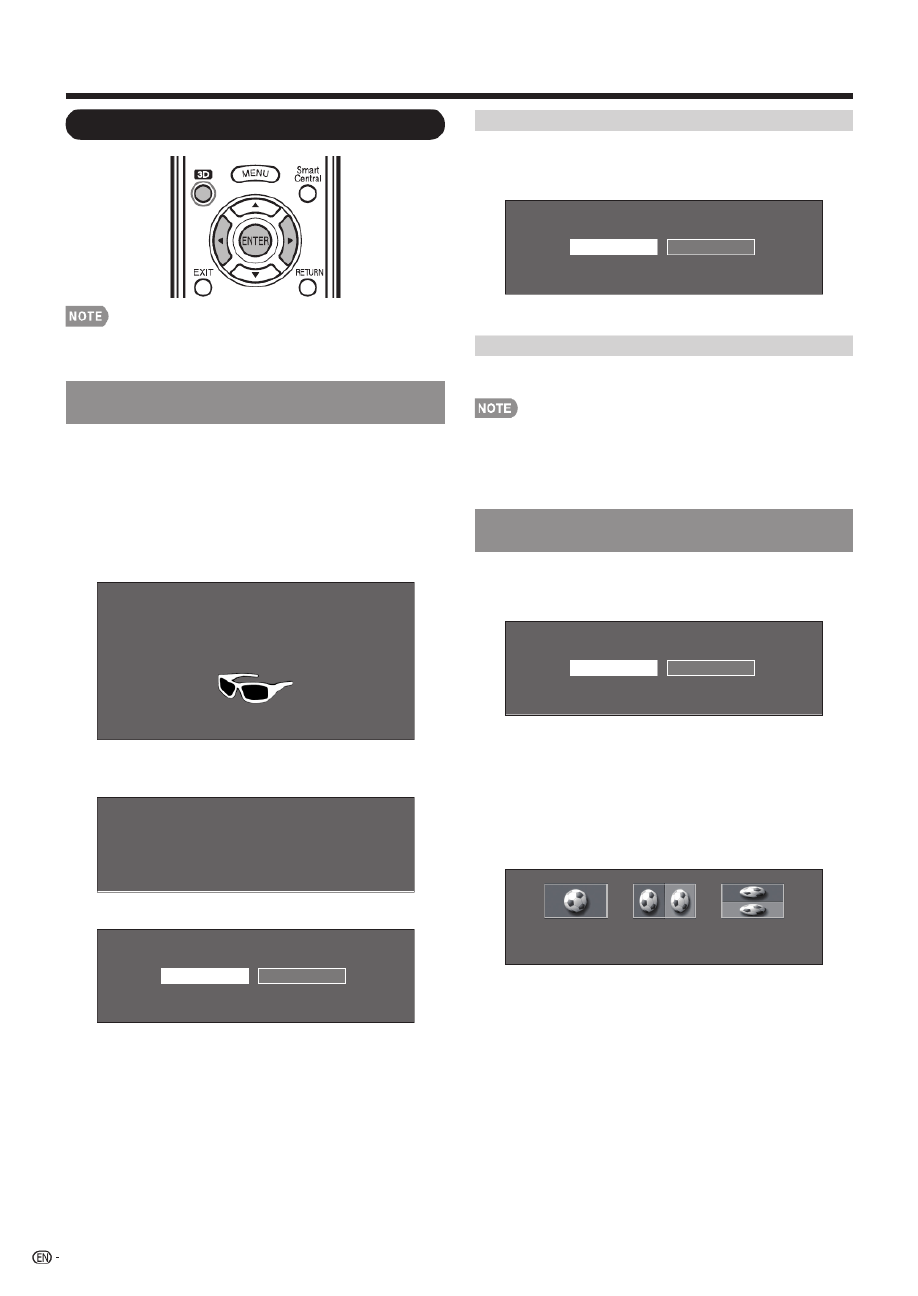
44
Switching from 3D to 2D Mode
4 Press 3D during the 3D mode.
Select “Yes” and press to switch to 2D ENTER
mode.
NoYes
• Take off the 3D Glasses and turn off the power.
Ending 3D Image Viewing
5 Take off the 3D Glasses and turn off the power.
• If the input signal switches to 2D, 2D images are displayed
automatically.
• 3D mode is canceled automatically when the setting is
changed, input selection is changed, or the power is
turned off.
Receiving a 3D Image Signal That Cannot
Be Detected Automatically
1 Press 3D.
• A screen appears prompting you to select between 3D
and 2D image viewing.
2D3D
2 Press c/d to select “3D” or “2D”, and then press
ENTER.
•
To view in 3D mode: Select “3D”, and then go to step 3.
•
To view in 2D mode: Select “2D”, and then go to step 6.
3 Press c/d to select the 3D signal type ( “2D ➝3D”,
“Side by Side” or “Top and Bottom”) and then press
ENTER.
Select to convert regular 2D picture to 3D.
2D -> 3D Side by Side Top and Bottom
• If you select the same system as that of the input signal,
3D images are displayed.
4 Turn on the 3D Glasses and place them on your
head.
5 You can now view 3D images.
Viewing 3D Images
• The TV screen may temporarily become black when the TV
is trying to detect a 3D image signal and when switching
from 3D to 2D mode.
Receiving a 3D Image Signal That Can Be
Detected Automatically
The image signal may contain a 3D identi cation
signal. You can enable the TV to automatically detect
the 3D image type by selecting “System Options” > “3D
Setup” > “3D Auto Change” on the TV. (See page 46.)
1When “3D Auto Change” is set to “Mode 1” or
“Mode 2”
•The 3D image type is detected automatically and the
appropriate 3D image is displayed.
Changed to 3D mode. Put on 3D glasses
and press the power button on the glasses.
If you are in bad physical conditions
or feel uncomfortable watching 3D picture
please stop watching TV.
3D
When “3D Auto Change” is set to “Off”
•The following message is displayed. Press .3D
3D picture is detected.
Press the power button on the 3D glasses.
(Need to wear the 3D glasses to watch 3D picture)
•Press c/d to select the "Yes", and then press .ENTER
No
Yes
2 Turn on the 3D Glasses and place them on your
head.
3 You can now view 3D images.
Enjoying 3D Image Viewing

45
Switching from 3D to 2D Mode
6 Press c/d to select the 2D signal type ( “Side by
Side” or “Top and Bottom”) and then press ENTER.
Select when two images are displayed next to each other.
Side by Side Top and Bottom
• If you select the same system as that of the input signal,
2D images are displayed.
• Take off the 3D Glasses and turn off the power.
Ending 3D Image Viewing
7Take off the 3D Glasses and turn off the power.
Watching 2D Images in 3D
You can convert normal 2D images into 3D images.
1 Press 3D.
2 Press c/d to select “2D ➝3D convert”, and then
press .ENTER
3 Turn on the 3D Glasses and place them on your
head.
• The TV returns to 2D mode after 1 hour has passed.
Switching to the Previous Mode
You can switch back to the previous mode by pressing .3D
1 Press 3D.
• A con rmation screen is displayed.
NoYes
2 Select “Yes” and then press .ENTER
• The TV returns to the previous mode.
3D Menu
Pressing in 3D mode displays the 3D menu. Press 3D
the colored buttons to make the necessary settings.
A: 3D Brightness Boost (For LC-70LE847U/LC-60LE847U)
B: 3D Surround (See page 31.)
The surround mode changes each time you press .B
C: 2D ➝3D Convert Effect (See page 46.)
D: 3D Setup (See page 46.)
Con guring the TV Settings to
Enhance 3D Image Viewing
Menu
Picture
Settings
AV MODE (Changing Pic.Quality)
[STANDARD (3D)]
OPC
[Off]
3D Brightness Boost
[Middle]
Backlight
[ 5] 16b a b16
Contrast
[ 30] 0b b40
Brightness
[ 0] a b30 30
Color
[ 2] 30 30b a b
Tint
[ 0] a b30 30
Sharpness
[ 2] 10 10b a b
Advanced
Picture Settings
Example
1 Press MENU to display the MENU screen, and then
press c/d to select “Picture Settings”.
2 Press a/b to select a speci c adjustment item,
and then press .ENTER
3 Press a/b (or c/d) to select the desired item,
and then press .ENTER
4 Press MENU to exit.
• Which items can be selected/adjusted differs depending
on whether the TV is in 2D mode or in 3D mode.
AV MODE
The audio and video settings can be changed to suit
the program or input content being watched.
STANDARD(3D): For a highly de ned image in a normal
lighting.
MOVIE(3D): For a movie.
GAME(3D): Lowers image brightness for easier viewing.
• You can select AV MODE by pressing on the AV MODE
remote control unit.
3D Brightness Boost
(For LC-70LE847U/LC-60LE847U)
You can adjust the backlight of the TV for 3D image
viewing.
High/Middle/Low: Select a desired level of 3D
Brightness Boost.
• When "High" or "Low" is selected, "OPC", "Backlight" and
"Range of OPC" are not available.
Enjoying 3D Image Viewing

46
3D Setup
You can make various settings to enhance 3D image viewing.
Menu
View Option
System Options
System
Options
3D Setup
Terminal Setting
AQUOS LINK Setup
Example
1 Press MENU to display the MENU screen, and then
press c/d to select “System Options”.
2 Press a/b to select “3D Setup”, and then press
ENTER.
3 Press a/b to select a speci c item, and then press
ENTER.
4 Press a/b (or c/d) to select the desired setting,
and then press .ENTER
5 Press MENU to exit.
3D Auto Change
This setting can be used to switch to 3D mode
automatically when a 3D identi cation signal is
detected.
Set the desired mode according to the type of media
you are viewing, such as video from a connected
device or video from an internet application.
Mode 1: 3D mode is selected automatically when a 3D
signal is detected while viewing video from a VOD
service or HDMI-connected equipment.
Mode 2: 3D mode is selected automatically when, in
addition to detecting a 3D signal while viewing video
from a VOD service or HDMI-connected equipment, a
video pattern with "Side by Side" or "Top and Bottom"
format is also detected.
Off: Auto change is not performed.
• This function does not work when the input source is
Composite, Component, RGB or Analog/Digital tuner.
3D Depth Control
Select the method for adjusting the 3D depth.
Auto: Adjusts the depth automatically.
Manual: Manually adjusts the depth using the function
"Depth Change".
• This function is only available when the input signal is 3D.
• This function is not displayed depending on the type of 3D
signal. (For the LC-70LE745U/LC-60LE745U)
Depth Change
Adjusts the depth manually. "0" is the level where no
adjustment is made.
• This function is only available when "3D Depth Control" is
"Manual".
2D➝3D Convert Effect
You can adjust the 3D effect when converting images
from 2D mode to 3D mode.
Select a desired level of convert effect from +1 to +16.
• This function is only available when converting 2D images
to 3D images.
• When you use this function, image conversion on the TV
will result in some differences in the original images and
how they appear.
• 2D images that have been converted to 3D images may be
viewed only for personal use.
Viewing Time Info
This displays the elapsed time of 3D image viewing.
Yes: Displays the elapsed viewing time on the screen
every hour.
No: Does not display the elapsed viewing time.
3D Test
This displays 3D images for testing the 3D operation.
Clicking "Start" on the screen plays back 3D test
images.
• If you press during playback, the previous RETURN
screen will be displayed.
3D Glasses Control
To enable this function, set "TV Location" to "Store".
Selecting "Yes" prevents the 3D Glasses from receiving
3D signals from other TVs.
Enjoying 3D Image Viewing

47
Enjoying 3D Image Viewing
• Appropriate 3D Glasses (sold separately) are required to view 3D images. Purchase 3D Glasses for use with Sharp brand 3D
LCD TVs.
■3D Glasses lenses
• Do not apply pressure to the lenses of the 3D Glasses. Also, do not drop or bend the 3D Glasses.
• Do not scratch the surface of the lenses of the 3D Glasses with a pointed instrument or other object. Doing so may damage
the 3D Glasses and reduce the quality of the 3D image.
• Use only the cloth provided with the optional 3D Glasses to clean the lenses.
■3D Glasses infrared receiver
•Do not allow the infrared receiver to become dirty, and do not attach stickers to or otherwise cover the infrared receiver. Doing
so may prevent the receiver from operating normally.
•If the 3D Glasses are affected by other infrared data communication equipment, the 3D images may not be displayed correctly.
■Caution during viewing
•Do not use devices that emit strong electromagnetic waves (such as cellular phones or wireless transceivers) near the 3D
Glasses. Doing so may cause the 3D Glasses to malfunction.
•The 3D Glasses cannot operate fully at extreme high or low temperatures. Please use them within the specifi ed usage
temperature range.
•If the 3D Glasses are used in a room with fl uorescent lighting (60 Hz), the light within the room may appear to fl icker. In this
case, either darken or turn off the fl uorescent lights when using the 3D Glasses.
•Wear the 3D Glasses correctly. 3D images will not be correctly visible if the 3D Glasses are worn upside down or back-to-front.
•Other displays (such as computer screens, digital clocks, and calculators) may appear dark and diffi cult to view while wearing
the 3D Glasses. Do not wear the 3D Glasses when watching anything other than 3D images.
•If you lie on your side while watching the TV with 3D Glasses, the picture may look dark or may not be visible.
•Be sure to stay within the viewing angle and optimum TV viewing distance when watching 3D images. Otherwise, you may not
be able to enjoy the full 3D effect.
•The 3D Glasses may not work properly if there is any other 3D product or electronic devices turned on near the glasses or TV. If
this occurs, turn off the other 3D product or electronic devices or keep the devices as far away as possible from the 3D Glasses.
•Stop using the 3D Glasses in any of the following situations:
– When images consistently appear doubled while you are wearing the 3D Glasses
– When you have diffi culty perceiving the 3D effect
•If the 3D Glasses are faulty or damaged, stop using them immediately. Continued use of the 3D Glasses may cause eye
fatigue, headaches and illness.
•If you have any abnormal skin reaction, stop using the 3D Glasses. In very rare instances, such reactions may be due to an
allergic reaction to the coating or materials used.
•If your nose or temples become red or you experience any pain or itchiness, stop using the 3D Glasses. Pressure caused by
long periods of use may lead to such reactions and may result in skin irritation.
■Usage range of the 3D Glasses
• The 3D Glasses can be used by receiving an infrared signal sent from the TV.
Operating range:
From directly in front of the 3D infrared emitter on the TV: approx. 17 ft (5 m)
(within approx. 30° horizontally and 20° vertically)
– The 3D infrared emitter lights in 3D mode.
• For further details, refer to the operation manual of your 3D Glasses.
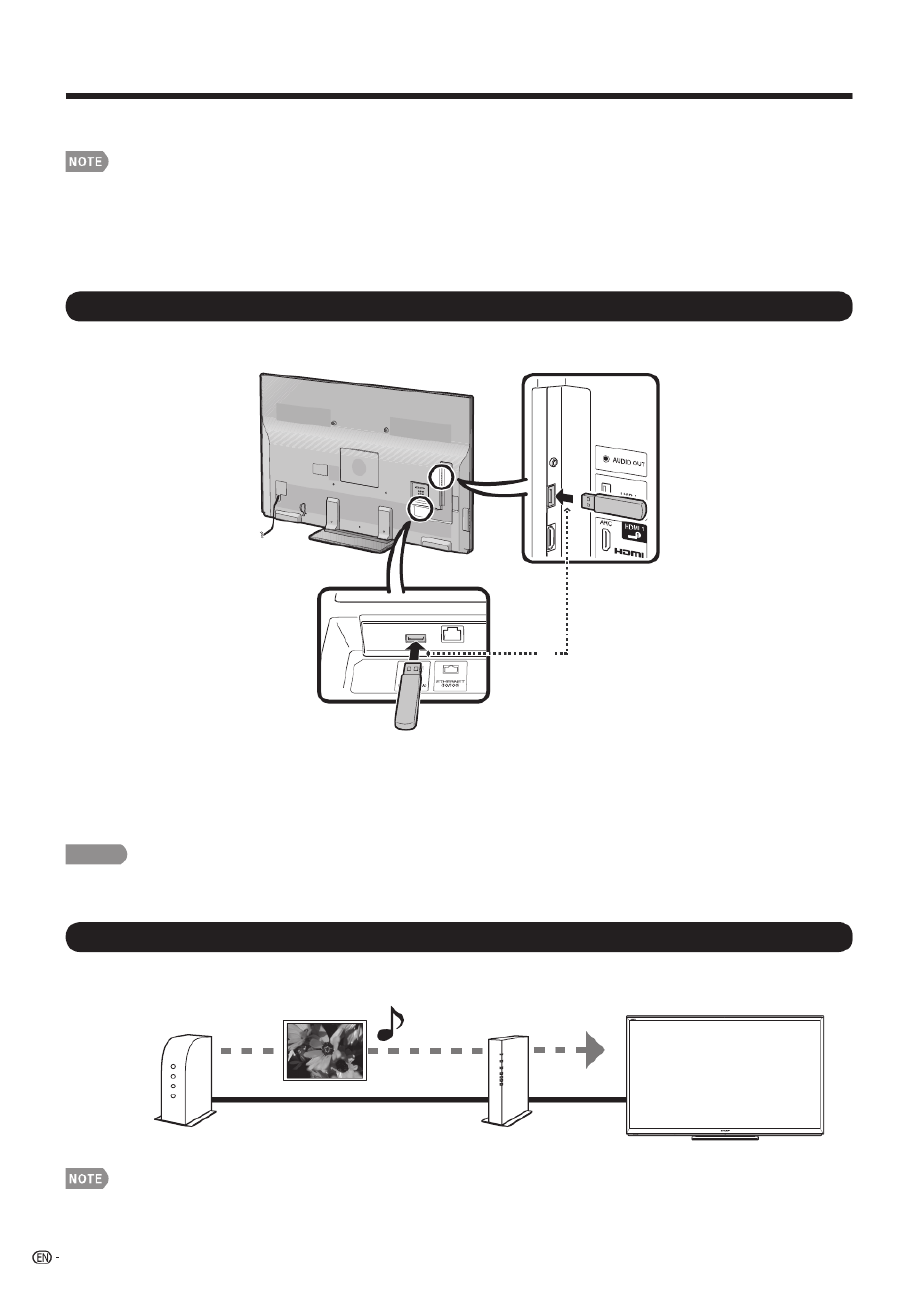
48
Enjoying Photo/Music/Video Playback
You can connect the TV to a USB memory device, USB hard drive or home network (DLNA) server to enjoy
viewing pictures, listening to music, and watching videos.
• Depending on the USB memory device/USB hard drive/home network (DLNA) server, the TV may not be able to recognize the
recorded data.
• It may take time to read the recorded data if the USB memory device/USB hard drive/home network (DLNA) server contains
many fi les or folders.
• Use only alphanumeric characters for naming fi les.
• File names over 80 characters (may vary depending on character set) may not be displayed.
Connecting a USB Memory Device/USB Hard Drive
Insert the USB memory device with recorded photos, music or videos into the USB 1 or USB 2 terminal on the TV.
• If USB memory devices are inserted into both terminals, the USB 1 terminal has priority.
or
• When connecting a USB hard drive, be sure to use a hard drive with an AC adapter.
• Do not remove a USB memory device or memory card from the TV while transferring fi les, using the slide show function, or
switching screens, or before you exit "USB" from the INPUT list.
• Do not insert and remove a USB memory device/USB hard drive to and from the TV repeatedly.
• When using a card reader, be sure to insert Memory fi rst before using the card reader.
• USB input cannot be selected when displaying the browser. Close the browser fi rst.
CAUTION
• Do not use a USB extension cable when connecting a USB memory device to the USB terminal on the TV.
• Using a USB extension cable with the USB memory device may prevent the TV from performing correctly.
Connecting a Home Network (DLNA) Server
Connect the TV to the home network (DLNA) server using an ETHERNET cable.
• You can also connect a Home Network (DLNA) server by using a wireless LAN.
Home network (DLNA) server
ETHERNET cable
Router
• Do not disconnect a home network (DLNA) server from the TV while transferring files, when a screen is switching to another or
before you exit "Home Network (DLNA)" from the INPUT list.
• Do not connect and disconnect a home network (DLNA) server from the TV repeatedly.
49
Selecting the Folders to Play Back
• To play back data on a USB memory device, insert the
USB memory device on the TV. USB mode is selected
automatically. (Go to step 2)
• Use the following procedure to switch back to USB mode
after switching from USB mode to another mode.
1 Select "USB" or "Home Network (DLNA)" from
INPUT list screen.
2 Press .D
3 Press a/b (or c/d) to select the drive/server
where you want to fi nd your fi les, and then press
ENTER.
• For USB mode, select the drive.
• When in DLNA mode, select the server.
4 Press c/d to select "Photo", "Music" or "Video",
and then press .ENTER
Music
Photo
Video
Example
5 Press c/d to select the desired folder, and then
press .ENTER
• The Media screen can be displayed even by using the
application window. To display the application window,
press . (See page 24.)SmartCentral
• You cannot switch the input mode if a USB memory device
is not connected.
• You do not need to select the drive/server in step 2 when
there is only one drive in the connected USB memory
device or there is only one home network (DLNA) server
connected to the TV.
• 16 is the maximum number of USB drives and 10 is the
maximum number of home network (DLNA) servers that
can be displayed.
• If the TV is turned off and then on again, the number
assigned to the USB drive may change.
• "VIEW MODE" is fi xed during the Photo or Music mode.
During "Video mode", you can select "Auto" or "Original".
• The key guide display disappears automatically after a
particular time has elapsed. To display the key guide
display again, press .DISPLAY
USB Device Compatibility
USB device USB Memory, USB card reader (Mass
Storage class), USB hard drive
File system FAT/FAT32/NTFS (USB hard drive only)
Photo fi le
format
JPEG (.jpg) (DCF2.0 compliant)
Multi-Picture Format (.mpo) (CIPA DC-
007 Compliant)
MP Type : Multi view individually image
(stereoscopic view)
Music fi le
format
MP3 (.mp3)
Bitrate: 32k, 40k, 48k, 56k, 64k, 80k,
96k, 112k, 128k, 160k, 192k, 224k,
256k, 320kbps
Sampling frequency: 32k, 44.1k, 48kHz
Video fi le format
File
extension Container Video Audio
.avi AVI
DivX 3.11/4.x/5.1/6.0
XviD
H.264
MPEG4
Motion Jpeg
MP3
Dolby Digital
LPCM
ADPCM
.mkv MKV
DivX 3.11/4.x/5.1/6.0
XviD
H.264
MPEG4
MP3
Dolby Digital
LPCM
ADPCM
.asf
.wmv ASF
DivX 3.11/4.x/5.1/6.0
XviD
MPEG4
VC-1
Windows Media Video v9
MP3
Dolby Digital
LPCM
WMA
.mp4
.mov
.3gp
MP4
(SMP4)
H.264
MPEG4
Motion Jpeg
MP3
AAC
.vro
.mpg
.mpeg
PS MPEG2
MPEG1
Dolby Digital
MPEG
LPCM
• Progressive format jpeg fi les are not supported.
• USB 1.1 devices may not be played properly.
• Operation using USB hubs is not guaranteed.
• Some video fi le formats may not be played depending on
the fi le.
• Some images may not be displayed in the appropriate
aspect ratio depending on the fi le format.
Home Network (DLNA) Server Compatibility
Photo fi le format JPEG
Music fi le format LPCM, MP3
Video fi le format MPEG2-PS, MPEG2-TS,
WMV, ASF, MP4, MOV, AVI
• Progressive format jpeg fi les are not supported.
• Some video fi le formats may not be played depending on
the fi le or the server.
• WMV, ASF, MP4, MOV and AVI are non-DLNA contents.
Enjoying Photo/Music/Video Playback

50
Enjoying Photo/Music/Video Playback
Playing Back Files on a USB Memory
Device/Home Network (DLNA) Server
Photo Mode
Viewing Thumbnails
...... picture 5picture 4picture 2picture 1 picture 3
Example
This screen image is for the USB mode. It may be slightly
different in the Home network (DLNA) mode.
Buttons for thumbnail operations
Buttons Description
a/b/c/dSelect a desired item.
ENTER When selecting a folder icon:
Enter this directory.
When selecting a photo thumbnail:
Enlarge the photo.
RETURN Return to the previous process.
A (red) USB mode:
Select the images to be displayed. Press
this button to add or remove a checkmark.
Home Network (DLNA) mode:
Display the Media screen.
B (green) Display the music list screen. You can select
the background music to be played for the
slide show.
C (blue)*Start the slide show.
D (yellow) Display the USB MENU/Home Network
(DLNA) Menu screen.
* This function is available only for the USB mode.
• When there are invalid photo fi les, the mark will be X
displayed for the fi le. (USB mode only.)
• The icon appears on the thumbnails of 3D images. If
you do not switch to 3D mode for the 3D images, they will
be displayed in 2D. (USB mode only.)
• You can see the fi le name, shooting date, fi le size and pixel
size of the selected photo in the lower-left corner of the
screen (shooting date is only available in the EXIF fi le format).
Viewing Individual Photos
The photo selected on the thumbnail selection screen
is displayed.
Buttons for individual display operation
Buttons Description
c/dGo to the previous/next photo in the same
directory.
RETURN Return to the thumbnail selection screen.
3D Switches between 2D and 3D modes.
A (red) Rotate the photo by 90 degrees to the left.
B (green) Rotate the photo by 90 degrees to the right.
• Rotating photos only applies to the temporarily selected
item and this setting is not saved.
• In 3D mode, you cannot rotate the photos.
• The key guide display disappears automatically after a
particular time has elapsed. To display the key guide
display again, press .DISPLAY
Slide Show
The photos displayed on the thumbnail selection
screen are displayed as a slide show.
Buttons for slide show operation
Buttons Description
RETURN Return to the thumbnail selection screen.
3D Switches between 2D and 3D modes.
D (yellow) Display the USB MENU/Home Network
(DLNA) Menu screen.
• The selected BGM is played repeatedly.
• The slide show continues until you press .RETURN
• For setting the slide show speed, select "Select Slide Show
Interval" on the USB MENU/Home Network (DLNA) Menu screen.
• The key guide display disappears automatically after a
particular time has elapsed. To display the key guide
display again, press .DISPLAY

51
Enjoying Photo/Music/Video Playback
USB Menu
On the menu to be displayed in USB mode, use a/b to
select an item and make settings to your preferences.
Remove USB Device
[10sec]Select Slide Show Interval
Select Slide Show BGM
Set All Slide Show Image
Reset All Slide Show Image
[On]3D Display
USB MENU
Example
■ 3D Display
You can view photos in 3D.
On: Displays the photos in 3D.
Off: Normal viewing mode.
• You can select "3D display" from "USB MENU" only when
the thumbnails screen for the photo mode in USB mode is
displayed on the screen.
• Depending on the fi le, the photos may not be displayed in
3D.
■ Select Slide Show Interval
Specify the length of time before the next image
appears.
Press a/b to select the desired length of the time, and
then press .ENTER
5sec/10sec/30sec/60sec
• For DLNA mode, follow the same procedure.
• Depending on the photo fi les, the length of the slide show
interval may differ from the selected interval time.
■ Select Slide Show BGM
The music list screen appears when you select "Select
Slide Show BGM".
You can select the music to be played in the
background while the slide show is being displayed.
1 Select the music you want to play from the music
list.
• For operations on the music list screen, see "Music
Mode".
2 Press to display the thumbnail selection RETURN
screen, and then press to start the slide show C
and the background music.
• All of the music fi les are selected by default.
■ Set/Reset All Slide Show Image
Selecting "Set All Slide Show Image" or "Reset All
Slide Show Image" will display the thumbnail selection
screen. On the screen, set or reset the images to be
displayed in the slide show.
Set All Slide Show Image: Checkmarks are added to all
the images.
Reset All Slide Show Image: Remove all the
checkmarks from all the images.
■Remove USB Device
To remove the USB device properly, use c/d to
select "Yes" and then press .ENTER
Music Mode
...... music 5music 4music 2music 1 music 3
SONG_01.MP3
SONG_02.MP3
SONG_03.MP3
SONG_04.MP3
SONG_05.MP3
SONG_06.MP3
SONG_07.MP3
3:42
4:55
4:08
4:20
3:55
4:26
4:35
I
I
I
I
I
I
I
SONG_03.MP3
0:14 / 4:35
Example
This screen image is for the USB mode. It may be slightly
different in the Home network (DLNA) mode.
Buttons for music mode
Buttons Description
a/b/c/dSelect a desired item.
ENTER When selecting a folder icon:
Enter this directory.
When selecting a music fi le:
Play music.
RETURN Return to the previous process.
A (red) USB mode:
Select the music to be played back. Press
this button to add or remove a checkmark.
Home Network (DLNA) mode:
Display the Media screen.
B (green) Stop music.
C (blue) Play/Pause music.
D (yellow)*Display the USB MENU screen.
* This function is available only for the USB mode.
• When there are invalid music fi les, the mark will be X
displayed for the fi le. (USB mode only.)
• The displayed play time may differ slightly from the actual
play time depending on the fi les.
52
Enjoying Photo/Music/Video Playback
USB Menu
On the menu to be displayed in USB mode, use
a/b to select an item and make settings to your
preferences.
Set All Auto Play
Reset All Auto Play
USB MENU
Remove USB Device
Example
* See page 51 for details on the Remove USB Device
function.
■ Set/Reset All Auto Play
Selecting "Set All Auto Play" or "Reset All Auto Play"
will display the music list screen. On the screen, set or
reset the music to be played back in the slide show.
Set All Auto Play: Checkmarks are added to all the
music fi les.
Reset All Auto Play: Remove all the checkmarks from
all the music fi les.
Video Mode
...... video 5video 4video 2video 1 video 3
VIDEO_01.avi
VIDEO_02.divx
VIDEO_03.divx
VIDEO_04.avi
VIDEO_05.divx
VIDEO_06.divx
VIDEO_07.avi
3:42
4:55
4:08
4:20
3:55
4:26
4:35
I
I
I
I
I
I
I
Example
This screen image is for the USB mode. It may be slightly
different in the Home network (DLNA) mode.
Buttons for fi le selecting operations
Buttons Description
a
/
b/
c/
dSelect a desired item.
ENTER When selecting a folder icon:
Enter this directory.
When selecting a music fi le: Play the video.
RETURN
Return to the previous process.
A (red) USB mode:
Select/deselect items (checkmarks are added
to the selected items).
Home Network (DLNA) mode:
Display the Media screen.
D
(yellow)
*Display the USB MENU screen.
* This function is available only for the USB mode.
*
Buttons for playing mode
Buttons Description
aGo to the beginning of a fi le by pressing a
once and the previous fi le by pressing a twice.
bGo to the next fi le.
dUSB mode:
The fast forward speed changes every time you
press
d
. After playing to the end, the TV goes
to the next fi le and starts to play.
Home Network (DLNA) mode:
Jump forward in a video. *2
cUSB mode:
The reverse speed changes every time you
press c. After going back to the beginning, the
TV starts to play the same fi le.
Home Network (DLNA) mode:
Jump back in a video. *2
ENTER USB mode:
Pause the video.
Home Network (DLNA) mode:
Play/Pause the video. *2
RETURN
Go back to the fi le selection screen.
3D Switches between 2D and 3D modes.
A (red)*1 Jump to the scene where playback was last
stopped.
B
(green)
Stop a video.
C (blue) Display the USB/home network (DLNA)
operation panel.
D
(yellow)
*1 Display the USB MENU screen.
0-9*1 Jump to a point in the video during playback of
a fi le without chapters.
You can jump to a later point by pressing a
higher number.*3
*1 These functions are available only for the USB mode.
*2 Jump forward/back and play/pause may not be available
depending on the fi les.
*3 During playback of a fi le without chapters, playback points
are set automatically. Playback points are set at intervals of
a one-tenth of playback time.
Example for a fi le with a playback time of 100 minutes:
Pressing jumps 10 minutes forward, and pressing jumps 1 2
20 minutes forward. Pressing returns to the start of the fi le 0
being played back.

53
■ Using the operation panel
You can use the operation panel for video playback
operations.
You can call up this operation panel by pressing
MENU after you press a/b to select "USB Operation
Panel"/"Home Network (DLNA) Operation Panel" from
"System Options" > "View Option".
Example
Resume
Audio CC
Tit le jump
Buttons for using the USB operation panel
Hold down to go in reverse.
dStarts playback.
Hold down to fast forward.
Video without chapters: Press one time to
return to the previous playback point.* Press
two times to return to the previous fi le.
Video with chapters: Press one time to return
to the previous chapter. Press two times to
return to the previous fi le.
)Sets pauses and still pictures.
/Video without chapters: Press one time to
advance to the next playback point.* Press two
times to display the next fi le.
Video with chapters: Press one time to advance to the
next chapter. Press two times to display the next fi le.
Audio Change the audio when multiple audio is
available for the video you are watching.
+Playback stops.
CC Change the Closed Caption display.
Title Displays the title (edition).
Resume
jump
Jump to the scene where playback was last
stopped.
* During playback of a fi le without chapters, playback points
are set automatically. Playback points are set at intervals of a
one-tenth of playback time.
Example for a fi le with a playback time of 100 minutes:
Playback points are set every 10 minutes. Pressing /
one time after viewing the fi le for 15 minutes jumps to the
20-minute playback point.
• Reverse/fast forward continues from one fi le to another
during continuous playback.
• Use "CC" on the operation panel to change the Closed
Caption display. You can also switch the Closed Caption
display by using "System Options" > "View Option" >
"Change CC" or by pressing on the remote control unit.CC
• Use "Audio" on the operation panel to change the audio.
You can also switch the audio by using "System Options" >
"View Option" > "Change Audio".
Buttons for using the Home Network (DLNA)
operation panel
dStarts playback.
Go to the beginning of a fi le by pressing once
or to the previous fi le by pressing twice.
)Sets pauses and still pictures.
/Go to the next fi le.
+Playback stops.
Jump back in a video.
Jump forward in a video.
USB Menu
On the menu to be displayed in USB mode, use
a/b to select an item and make settings to your
preferences.
Menu for fi le selecting operations
Set All Auto Play
Reset All Auto Play
USB MENU
Remove USB Device
Example
* See page 51 for details on the Remove USB Device
function.
■Set/Reset All Auto Play
Selecting "Set All Auto Play" or "Reset All Auto Play"
will display the video list screen. On the screen, set or
reset the video to be played back in the slide show.
Set All Auto Play: Checkmarks are added to all the
video fi les.
Reset All Auto Play: Remove all the checkmarks from
all the video fi les.
Menu for playing mode
Chapter
Show Video Information
Title (Edition)
USB MENU
Remove USB Device
Example
* See page 51 for details on the Remove USB Device
function.
■ Title (Edition)/Chapter
Selecting "Title (Edition)" or "Chapter" will display a list
of titles/chapters contained in the video fi le. Select the
title or chapter you want to play back.
• The selected title or chapter is played back.
• "0-9" is displayed for fi les without chapters. Playback
jumps to the playback point of the selected number.
• If there is Edition information, this screen is displayed when
the title is selected.
• If there is no title or edition, you cannot select "Title
(Edition)".
• "Chapter" cannot be selected when there is no chapter.
■ Show Video Information
The information of the current fi le is displayed.
*
*
Enjoying Photo/Music/Video Playback

54
Example
Menu
EZ Setup
Internet Setup
Language
DivX® Setup
Broadcasting Setup
Individual Setup
Initial Setup
Initial
Setup
[English]
DivX® Setup
This is the function to confi rm your registration code.
You need to register the code at http://www.divx.com.
1Press to display the menu screen.MENU
2Press c/d to select "Initial Setup", and then press
ENTER.
3Press a/b to select "DivX® Setup", and then
press .ENTER
■ DivX®
VOD registration
You can fi nd your registration code on this menu. You
need to register the TV at http://www.divx.com before
playing the DivX content.
■DivX ®
VOD deregistration
You can fi nd your deregistration code on this menu.
You need to deregister the TV at http://www.divx.com
to release the registration.
• This function is available only for the USB mode.
• This function may not work while an Internet application is
being used.
Playing Back Files from a Portable
Device or PC
With the remote playback function, you can use your
portable device to play back pictures, video, and music
on the home network server.
• This TV is a DLNA certifi ed Digital Media Renderer. (DMR)
• To use the remote playback function, your portable device
must be a DLNA Certifi ed Digital Media Controller.
• A wireless access point is required to use a portable
device.
Set Up Home Network
Make the settings for remote playback.
1 Press c/d to select "Initial Setup", and then press
ENTER.
2 Press a/b to select "Internet Setup", and then
press .ENTER
3 Press a/b to select "Set Up Home Network", and
then press .ENTER
4 Press a/b to select the specifi c adjustment item,
and then press to set each item.ENTER
■ Remote Control Play Settings
This setting allows the TV to perform remote playback.
Permitted: Allows remote playback.
Not allowed: Does not allow remote playback.
■ Timeout Setup
This sets the time until the TV returns automatically to
TV mode after remote playback ends.
10 sec./60 sec.: When the set time has elapsed after
remote playback ends, the TV returns automatically to
TV mode.
No: Select this to manually switch the TV after remote
playback ends.
• This function may not work while an Internet application is
being used.
• For information on the compatible formats, see "Home
Network (DLNA) Server Compatibility" on page 49.
•
Enjoying Photo/Music/Video Playback

55
Presetting Remote Control Function
You can operate the connected AV products (AV
receiver, cable box, SAT tuner, DTV, VCR, BD, DVD,
LD) using the presetting manufacturer function of your
remote control unit.
14
12
11
6
13
10
8
9
7
5
4
3
2
1
Presetting manufacturer codes
1 Press an appropriate button ( , STB DVD•VCR or
AUDIO) to operate the connected equipment.
2 Press an appropriate button ( , STB DVD•VCR or
AUDIO) and at the same time to enter DISPLAY
the code registration mode.
3 Press – to enter the manufacturer code. (See 0 9
page 56.)
• Preset mode is fi nished once the LED no longer lights
up.
4 After registering the code, the LED will stop blinking
then turn off after one second. (If you perform an
incorrect operation, the LED will blink quickly then
turn off.)
Operating the Connected Equipment
To operate the connected equipment, press ,STB
DVD•VCR AUDIO or to select your device. (STB
(cable/satellite set-top box), BD, DVD, VCR or AUDIO.)
The remote control unit button will function as follows.
• When you operate VCR, DVD or BD, press INPUT to select
the terminal connected to your device.
• CABLE and SAT cannot be selected at the same time.
1 POWER (SOURCE)
• Turns the connected equipment power on and off.
2,
• Starts playback. (VCR, BD, DVD)
3*
• Rewinds the tape and allows picture search. (VCR)
• Hold down to go in reverse. (BD, DVD)
4+
• Stops the tape transport. (VCR)
• Playback stops when pressed. With some Blu-ray disc/
DVD players, pressing the button twice may open the
disc tray. (BD, DVD)
5.
• Pressing quickly once takes you to the start of the chapter
currently playing. Each time you press it, you move back
to the start of the previous chapter. (BD, DVD)
6 0– , (DOT) (STB)9 •
• Press a button (or buttons) that corresponds to the
channel that you wish to watch.
7-
• Rapidly advances the tape and allows picture search.
(VCR)
• Hold down to fast forward. (BD, DVD)
8)
• Sets pauses and still pictures. (VCR, BD, DVD)
9/
• Pressing quickly once takes you to the start of the next
chapter. Each time you press it, you move ahead to the
start of the next chapter. (BD, DVD)
10 (REC
• Starts recording. (VCR)
11 FLASHBACK
• Press to switch between the current channel and the
channel you were watching immediately before. Some
manufacturers do not preset FLASHBACK. (STB)
12 CHU/V
• Press CHU or CHV to tune in to a higher or lower
channel. (STB)
• Press to select the channel of the TV tuner on the VCR.
(VCR)
13 MENU
• When this button is pressed, the BD/DVD menu will
display. (BD, DVD)
14 a/b/c/d, ENTER
•a
/b/c/
d: Press the button to select items on the STB
GUIDE screen or STB MENU screen. (STB)
Press the button to select items on the BD/DVD menu
screen. (BD, DVD)
• Press to activate the selected function. (STB, ENTER:
BD, DVD)
Other Viewing Options

56
Manufacturer codes
Other Viewing Options
AUDIO DYNAMICS
BROCKSONIC
CANON
CRAIG
CURTIS MATHIS
DBX
EMERSON
GE
INSTANT REOLYA
JC PENNEY
JVC
KENWOOD
MAGNAVOX
MAGNIN
MEMOREX
MONTGOMERY WARD
NEC
PANASONIC
PENTAX
PHILCO
PHILIPS
QUASAR
REALISTIC
SAMSUNG
SHARP
SONY
SYLVANIA
TATUNG
TEAC
TMK
YAMAHA
09
13
04
12
04
09
10, 13, 14
04
04
04
09, 16, 17, 22
09
04, 05, 06
12
04
02
09
04, 18, 19, 20, 21
05
04, 05
04, 05, 06
04
01, 02
11, 12
01, 02, 03
07, 08, 15
04, 05, 06
09
09
10
09
REMOTE CONTROL CODE
NUMBER
VCR BRAND
DENON
JVC
KENWOOD
MAGNAVOX
MARANTZ
MITSUBISHI
PANASONIC
PHILIPS
PIONEER
PROSCAN
RCA
SAMSUNG
SHARP
SONY
TOSHIBA
YAMAHA
ZENITH
24
31
36
26
26
28
24, 37
26, 38
30, 33, 35
25
25, 39
29, 34
23, 32, 41, 42
27, 40
26
24
26
REMOTE CONTROL CODE
NUMBER
BD/DVD/LD BRAND
• Depending on the brand, the codes of some BD players
may not be supported.
ANVISION
CABLE STAR
DISH NETWORK
DIRECTV
EAGLE
G.INSTRUMENT
GERROLD
JERROLD
MAGNAVOX
MOTOROLA
OKA SIGMA
PANASONIC
PHILIPS
PIONEER
RANDTEK
RCA
S.ATLANTA
VIEWSTAR
ZENITH
04, 05
04, 05
39, 40
41
05
02, 03, 10, 11, 17, 20
17
02, 03, 10, 11, 12, 20,
25-34
04, 05, 08, 12, 15, 16,
18, 19, 22, 23
38
07
14, 21
04, 05, 08, 13, 15, 16,
18, 19, 22, 23
07
04, 05
14, 36*, 37*
01, 09, 24
04, 05, 08, 13, 15, 16,
18, 19, 22, 23
06, 35
REMOTE CONTROL CODE
NUMBER
STB BRAND
• Numbers marked with * are SAT codes, all others are STB
codes.
SHARP
SHARP (SOUND BAR)
01
02
AUDIO BRAND REMOTE CONTROL CODE
NUMBER
57
Using AQUOS LINK
Controlling HDMI Equipment Using AQUOS LINK
What’s AQUOS LINK?
• Using the HDMI CEC (Consumer Electronics Control) protocol, with AQUOS LINK you can interactively operate
compatible system equipment (Blu-ray disc equipment, AV amplifi er, DVD).
• By connecting AQUOS LINK-compatible devices with HDMI-certifi ed cables to the TV, you can control a
recorder or AV amplifi er using the remote control of the TV.
• AQUOS LINK allows you to operate the HDMI-connected equipment with one remote control.
Back panel
vertical inputs
Back panel
horizontal inputs
Example
AQUOS LINK-compatible
Audio system
AQUOS BD Player
HDMI-certified cable *
* Use HDMI 1 to connect
ARC-compatible equipment.
HDMI-certified cable Optical fiber cable
Connecting AQUOS
BD Player via AQUOS
LINK-compatible
Audio system
• For connecting the TV to AQUOS LINK-compatible equipment, use commercially available cables.
• Point the remote control toward the TV, not to connected HDMI equipment.
• Video noise may occur depending on the type of HDMI cable used. Make sure to use an HDMI-certifi ed cable.
• Up to 3 pieces of HDMI recording equipment and one AV amplifi er can be connected using this system.
• These operations affect the HDMI equipment selected as the current input source. If the equipment does not operate, turn on
the equipment and select the appropriate input source using .INPUT
• The AQUOS LINK feature may not operate properly when an HDMI splitter or AV selector unit is used. These devices may
cause interruptions to the image and/or sound.
Connected AQUOS LINK-compatible devices can be operated without
changing the settings of the remote control unit.
OPTION button will function only when AQUOS LINK is used.
■ One Touch Play
While the TV is in standby mode, it automatically turns on and plays back the
image from the HDMI source.
■ One Touch Recording
Press (REC while you are viewing a broadcast received with the AQUOS
LINK-compatible recorder. The AQUOS LINK automatically recognizes the
connected HDMI device and starts recording.
■ Single remote control
The AQUOS LINK automatically recognizes the connected HDMI device and
you can control the TV and the devices as if using a universal remote control.
■ Control the AQUOS LINK-compatible audio system
Set the volume of AQUOS LINK-compatible audio system.
• The above description is an example of the AQUOS LINK function.
• The steps in “AQUOS LINK Setup” on page 58 need to be completed beforehand.
• Refer to this operation manual and the operation manual of the AQUOS LINK device
to be used with this TV.
Termékspecifikációk
| Márka: | Sharp |
| Kategória: | televízió |
| Modell: | LC-70LE847U |
Szüksége van segítségre?
Ha segítségre van szüksége Sharp LC-70LE847U, tegyen fel kérdést alább, és más felhasználók válaszolnak Önnek
Útmutatók televízió Sharp

9 Április 2025
6 Április 2025
28 Március 2025
27 Március 2025
18 Március 2025
18 Március 2025
13 Január 2025
13 Január 2025
13 Január 2025
13 Január 2025
Útmutatók televízió
- televízió Samsung
- televízió Sony
- televízió Yamaha
- televízió Beko
- televízió Fujitsu
- televízió Acer
- televízió Nedis
- televízió LG
- televízió Grundig
- televízió Marantz
- televízió Philips
- televízió Pioneer
- televízió SilverCrest
- televízió Panasonic
- televízió JVC
- televízió AEG
- televízió Nokia
- televízió Lenovo
- televízió Casio
- televízió Toshiba
- televízió Oppo
- televízió Hyundai
- televízió Hisense
- televízió BenQ
- televízió SunBriteTV
- televízió Siemens
- televízió Medion
- televízió TCL
- televízió Xiaomi
- televízió GoGen
- televízió Insignia
- televízió Infiniton
- televízió Dell
- televízió Strong
- televízió VOX
- televízió Vivax
- televízió Thomson
- televízió Polaroid
- televízió Aiwa
- televízió Orima
- televízió V7
- televízió Clatronic
- televízió PEAQ
- televízió Qilive
- televízió Haier
- televízió Mitsubishi
- televízió Cecotec
- televízió Sencor
- televízió GPX
- televízió Küppersbusch
- televízió Innoliving
- televízió AOC
- televízió Citizen
- televízió Westinghouse
- televízió Hitachi
- televízió Continental Edison
- televízió Telefunken
- televízió Nevir
- televízió Monster
- televízió Roadstar
- televízió Optoma
- televízió CHiQ
- televízió Viewsonic
- televízió Nextbase
- televízió Denver
- televízió Bush
- televízió Trevi
- televízió Albrecht
- televízió Daewoo
- televízió Funai
- televízió Tesla
- televízió Smart Tech
- televízió Muse
- televízió Energy Sistem
- televízió OK
- televízió SVAN
- televízió Loewe
- televízió RevolutionHD
- televízió Polar
- televízió Manhattan
- televízió Kogan
- televízió Horizon
- televízió Intenso
- televízió Furrion
- televízió Teac
- televízió Aspes
- televízió Digihome
- televízió Manta
- televízió Blaupunkt
- televízió Sagem
- televízió Jay-Tech
- televízió Logik
- televízió Finlux
- televízió Peerless-AV
- televízió Abus
- televízió AG Neovo
- televízió Bang & Olufsen
- televízió Iiyama
- televízió AKAI
- televízió TechniSat
- televízió Seiki
- televízió Jensen
- televízió Pyle
- televízió Emerson
- televízió Sanyo
- televízió Kemo
- televízió Salora
- televízió Lenco
- televízió Schneider
- televízió Philco
- televízió ECG
- televízió Uniden
- televízió Technika
- televízió NEC
- televízió Element
- televízió Soundmaster
- televízió Alphatronics
- televízió AYA
- televízió MBM
- televízió Krüger&Matz
- televízió Dual
- televízió Brandt
- televízió Wharfedale
- televízió Allview
- televízió RCA
- televízió OKI
- televízió Orion
- televízió SereneLife
- televízió Schaub Lorenz
- televízió Luxor
- televízió Metz
- televízió ILive
- televízió Graetz
- televízió Tatung
- televízió Packard Bell
- televízió EasyMaxx
- televízió Orava
- televízió Arçelik
- televízió Planar
- televízió Zenith
- televízió Doffler
- televízió QBell Technology
- televízió SYLVOX
- televízió Majestic
- televízió Reflexion
- televízió FFalcon
- televízió Megasat
- televízió Sogo
- televízió United
- televízió Techwood
- televízió Newstar
- televízió Matsui
- televízió Alden
- televízió Aldi
- televízió Airis
- televízió Aristona
- televízió Apex
- televízió Icy Box
- televízió Lexibook
- televízió Palsonic
- televízió Walker
- televízió Saba
- televízió Antarion
- televízió Kernau
- televízió Tevion
- televízió Proscan
- televízió Vestel
- televízió Tucson
- televízió Sunstech
- televízió Nabo
- televízió Sylvania
- televízió Sunny
- televízió Marquant
- televízió Nordmende
- televízió AudioAffairs
- televízió Magnum
- televízió Audiosonic
- televízió Kubo
- televízió Proline
- televízió Coby
- televízió Seg
- televízió Vivo
- televízió Daitsu
- televízió Terris
- televízió Changhong
- televízió Alba
- televízió Naxa
- televízió Star-Light
- televízió Fantec
- televízió Mpman
- televízió Sweex
- televízió Vizio
- televízió Cello
- televízió Mx Onda
- televízió Nikkei
- televízió Hannspree
- televízió DGM
- televízió Yasin
- televízió Humax
- televízió XD Enjoy
- televízió MT Logic
- televízió Superior
- televízió Kunft
- televízió Difrnce
- televízió ITT
- televízió Grunkel
- televízió Avtex
- televízió Inovia
- televízió Odys
- televízió NPG
- televízió Bluesky
- televízió Videocon
- televízió Xoro
- televízió Durabase
- televízió HKC
- televízió Edenwood
- televízió Woxter
- televízió Premier
- televízió Onn
- televízió Teleco
- televízió Opera
- televízió LTC
- televízió JTC
- televízió Zalman
- televízió Ferguson
- televízió Viewpia
- televízió XS4ALL
- televízió JGC
- televízió Online
- televízió Dyon
- televízió DirecTV
- televízió Tele 2
- televízió Telesystem
- televízió EKO
- televízió E-motion
- televízió Mitsai
- televízió Selfsat
- televízió High One
- televízió Tve
- televízió ISymphony
- televízió Pantel
- televízió Magnavox
- televízió ATYME
- televízió HCI
- televízió Inno-Hit
- televízió Lin
- televízió Engel
- televízió Bang Olufsen
- televízió TechLine
- televízió Elements
- televízió Englaon
- televízió Time
- televízió Reflex
- televízió Astar
- televízió Visco
- televízió Tivax
- televízió H&B
- televízió Norcent
- televízió TELE System
- televízió TIM
- televízió Oyster
- televízió Belson
- televízió Vision Plus
- televízió Sbr
- televízió Bauhn
- televízió Voxx
- televízió Rm 2000
- televízió Hoher
- televízió Felson
- televízió Mach Power
- televízió Elbe
- televízió Axing
- televízió CGV
- televízió Séura
- televízió Mitzu
- televízió Caratec
- televízió JTC24
- televízió Coocaa
- televízió Kivi
- televízió Smart Brand
- televízió Voxicon
- televízió Aconatic
- televízió Mitchell & Brown
- televízió FOX Electronics
- televízió Mystery
Legújabb útmutatók televízió

10 Április 2025

10 Április 2025

10 Április 2025

9 Április 2025
9 Április 2025
9 Április 2025
9 Április 2025

9 Április 2025
9 Április 2025
9 Április 2025