Használati útmutató Sharp LC-50LE650V
Olvassa el alább 📖 a magyar nyelvű használati útmutatót Sharp LC-50LE650V (64 oldal) a televízió kategóriában. Ezt az útmutatót 10 ember találta hasznosnak és 2 felhasználó értékelte átlagosan 4.5 csillagra
Oldal 1/64

LC-39LE650E/V
LC-39LE651E/K/V
LC-39LU651E
LC-39LE652E/V
LC-39LM652E/V
LC-39LK652E
LC-39LX652E
LC-39LE654E/V
LCD COLOUR TELEVISION
LCD-FARBFERNSEHGERÄT
TÉLÉVISEUR COULEUR À ÉCRAN
CRISTAUX LIQUIDES (LCD)
TELEVISORE A COLORI LCD
LCD-KLEURENTELEVISIE
TELEVISIÓN EN COLOR LCD
TELEVISOR DE CRISTAL LÍQUIDO
OPERATION MANUAL
BEDIENUNGSANLEITUNG
MODE D’EMPLOI
MANUALE DI ISTRUZIONI
GEBRUIKSAANWIJZING
MANUAL DE INSTRUCCIONES
MANUAL DE OPERAÇÃO
ENGLISHDEUTSCHFRANÇAISITALIANO
NEDERLANDS
ESPAÑOL
PORTUGUÊS
NET+
LC-50LE650E/V
LC-50LE651E/K/V
LC-50LU651E
LC-50LE652E/V
LC-50LM652E
LC-50LK652E
LC-50LX652E
LC-50LE654E/V
LC-60LE651E/K
LC-60LU651E
LC-60LE652E
LC-60LM652E
LC-60LK652E
LC-60LX652E
LC-60LE654E

SPECIAL NOTE FOR USERS IN THE U.K.
The mains lead of this product is fitted with a non-rewireable (moulded) plug incorporating a 13A fuse. Should the fuse
need to be replaced, a BSI or ASTA approved BS 1362 fuse marked or and of the same rating as above, which is
also indicated on the pin face of the plug, must be used.
Always refit the fuse cover after replacing the fuse. Never use the plug without the fuse cover fitted.
In the unlikely event of the socket outlet in your home not being compatible with the plug supplied, cut off the mains plug
and fit an appropriate type.
DANGER:
The fuse from the cut-off plug should be removed and the cut-off plug destroyed immediately and disposed of in a safe
manner.
Under no circumstances should the cut-off plug be inserted elsewhere into a 13A socket outlet, as a serious electric shock
may occur.
To fit an appropriate plug to the mains lead, follow the instructions below:
IMPORTANT:
The wires in the mains lead are coloured in accordance with the following code:
Blue: Neutral
Brown: Live
As the colours of the wires in the mains lead of this product may not correspond with the coloured markings identifying the
terminals in your plug, proceed as follows:
• The wire which is coloured blue must be connected to the plug terminal which is marked N or coloured black.
• The wire which is coloured brown must be connected to the plug terminal which is marked L or coloured red.
Ensure that neither the brown nor the blue wire is connected to the earth terminal in your three-pin plug.
Before replacing the plug cover make sure that:
• If the new fitted plug contains a fuse, its value is the same as that removed from the cut-off plug.
• The cord grip is clamped over the sheath of the mains lead, and not simply over the lead wires.
IF YOU HAVE ANY DOUBT, CONSULT A QUALIFIED ELECTRICIAN.
DivX®
DivX Certified® to play DivX® video up to HD 1080p, including premium content.
ABOUT DIVX VIDEO: DivX® is a digital video format created by DivX, LLC, a subsidiary of Rovi Corporation. This is an
official DivX Certified® device that plays DivX video. Visit divx.com for more information and software tools to convert your
files into DivX videos.
ABOUT DIVX VIDEO-ON-DEMAND: This DivX Certified® device must be registered in order to play purchased DivX Video-
on-Demand (VOD) movies. To obtain your registration code, locate the DivX VOD section in your device setup menu. Go to
vod.divx. com for more information on how to complete your registration.
Covered by one or more of the following U.S. Patents:
7,295,673; 7,460,668; 7,515,710; 7,519,274
• YouTube and the YouTube logo are trademarks of Google Inc.

OPERATION MANUAL
Contents ....................................................................... 1
Introduction ................................................................ 2
Dear SHARP customer 2..................................................
Important Safety Precautions 2 .......................................
Remote Control unit 3 .....................................................
TV (Front view) ..............................................................4
TV (Side and rear view) 4 .................................................
Preparation ................................................................. 5
Supplied accessories 5 ...................................................
Attaching the stand unit 5 ...............................................
Optional accessory 5.......................................................
Fixing the TV on a wall ................................................... 5
Inserting the batteries 6 ...................................................
Using the remote control unit 6 .......................................
Cautions regarding the remote control unit 6 ................
Quick guide ................................................................. 7
Initial installation overview 7 .............................................
Before turning on the power 8 .........................................
Inserting a CA Card 8 .......................................................
Initial auto installation 9....................................................
Positioning / aligning DVB-T antenna 14..........................
Menu Operation ...................................................... 15
What is the menu? 15 .....................................................
Common operations 15 ................................................
About the Guide Display ........................................... 15
Info display ............................................................... 15
Operation with the TV panel control keys .................. 16
Favourites .................................................................. 16
Watching TV ............................................................. 17
Daily operation 17 ...........................................................
Switching on/off ....................................................... 17
Switching between digital, satellite and analogue
broadcasts ............................................................. 17
Changing channels 17 ..................................................
Selecting an external video source 17 ............................
Selecting audio language 17 ..........................................
Subtitles 17 ..................................................................
EPG 18 ...........................................................................
EPG operation 18.............................................................
Other EPG functions ................................................... 19
Teletext 20 ......................................................................
Using MHEG-5 application (UK only) 20 ..........................
Basic adjustment ..................................................... 21
TV set adjustments ..................................................... 21
Picture settings .......................................................... 21
Sound settings .......................................................... 21
Stations settings ........................................................ 22
Control settings ......................................................... 24
Software update via USB 27 .........................................
Software update via Internet 27 ....................................
Multimedia/Network settings 28....................................
Connections settings ................................................. 28
Channel list .................................................................. 29
Useful viewing options ......................................... 31
Selecting the picture format ........................................ 31
Setting when using external devices 31 ...........................
Connecting a USB device ............................................ 31
TV menu options ..................................................... 32
TV/List function ............................................................ 32
Video function 34 .............................................................
Audio/Radio function 35 ...................................................
Photo function ............................................................. 36
USB/HOME MEDIA device compatibility 36 ..................
AQUOS NET+ function 37 ...............................................
Extras function ............................................................ 39
Setup function ............................................................ 40
Connecting external devices............................. 41
Introduction to connections 41 .........................................
HDMI connection 42 .....................................................
Component connection 42 ...........................................
VIDEO connection 42 ...................................................
SCART connection 43 ..................................................
Speaker/amplifier connector 43 ....................................
HDMI devices ............................................................ 44
Controlling HDMI devices using HDMI CEC ................. 44
HDMI CEC connection ................................................ 44
HDMI CEC menu ........................................................ 44
Operating a HDMI CEC device .................................... 44
Connecting a PC ..................................................... 45
PC connection ............................................................. 45
HDMI (DVI) connection .............................................. 45
Analogue connection ................................................. 45
Adjusting the PC image automatically ...........................46
Adjusting the PC image manually ................................. 46
Multimedia/Network setup ................................ 47
Network Setup ........................................................... 47
Connecting to the network ........................................ 47
Wired installation ..................................................... 47
Wireless installation ................................................. 47
USB REC function ................................................... 49
USB REC function ...................................................... 49
USB REC (Video Recorder) ....................................... 49
Archive playback ...................................................... 49
USB REC settings .................................................... 49
Archive playback settings ......................................... 51
TV viewing with time shift ............................................ 53
Enjoying 3D Image Viewing .............................. 54
Enjoying 3D image viewing ........................................ 54
Viewing 3D images ..................................................... 54
Recharging the 3D glasses battery ...............................55
Display format for 3D and 2D images ......................... 56
Troubleshooting - 3D images ...................................... 56
Appendix .................................................................... 58
Troubleshooting .......................................................... 58
Information on the software license for this product 58 ....
Environmental Specifications 58 ......................................
Specifications 59 .............................................................
End of life disposal 60 .....................................................
Trademarks 60 ................................................................
Contents
1
ENGLISH
ENGLISH
• The illustrations and the OSD in this operation manual are for explanation purposes and may vary slightly from the actual
operations.
• The examples used throughout this manual are based on the LC-39LE650E model.
• The LC-39LE650E, LC-39LE651E/K, LC-39LE652E, LC-39LE654E, LC-50LE650E, LC-50LE651E/K, LC-50LE652E,
LC-50LE654E, LC-60LE650E, LC-60LE651E/K, LC-60LE652E and LC-60LE654Emodels are compatible with high definition
broadcasts, H.264 compressed (MPEG4 H.264, MPEG4 AVC, MPEG4 AVC/H.264).

• Cleaning—Unplug the AC cord from the AC outlet before cleaning the product. Use a damp cloth to clean the product. Do
not use liquid cleaners or aerosol cleaners.
• Use a soft damp cloth to gently wipe the panel when it is dirty. To protect the panel, do not use a chemical cloth to clean
it. Chemicals may cause damage or cracks in the cabinet of the TV.
• Water and moisture—Do not use the product near water, such as a bathtub, washbasin, kitchen sink,
laundry tub, swimming pool or in a wet basement.
• Do not place vases or any other water-filled containers on this product. The water may spill onto the
product causing fire or electric shock.
• Stand—Do not place the product on an unstable trolley, stand, tripod or table. Doing so can cause
the product to fall, resulting in serious personal injuries as well as damage to the product. Use only
a trolley, stand, tripod, bracket or table recommended by the manufacturer or sold with the product.
When mounting the product on a wall, be sure to follow the manufacturer’s instructions. Use only the
mounting hardware recommended by the manufacturer.
• When relocating the product placed on a trolley, it must be moved with utmost care. Sudden stops,
excessive force and uneven floor surface can cause the product to fall from the trolley.
• Ventilation—The vents and other openings in the cabinet are designed for ventilation. Do not cover or
block these vents and openings since insufficient ventilation can cause overheating and/or shorten the
life of the product. Do not place the product on a bed, sofa, rug or other similar surface, since they can
block ventilation openings. This product is not designed for built-in installation; do not place the product in an enclosed
place such as a bookcase or rack, unless proper ventilation is provided or the manufacturer’s instructions are followed.
• The LCD panel used in this product is made of glass. Therefore, it can break when the product is dropped or impact
applied. If the LCD panel is broken, be careful not to be injured by broken glass.
• Heat sources—Keep the product away from heat sources such as radiators, heaters, stoves and other
heat-generating products (including amplifiers).
• Headphones—Do not set the volume at a high level. Hearing experts advise against extended listening at
high volume levels.
• To prevent fire, never place any type of candle or naked flames on the top or near the TV set.
• To prevent fire or shock hazard, do not place the AC cord under the TV set or other heavy items.
• Do not display a still picture for a long time, as this could damage the LCD screen.
• There is always power consumption if main plug is connected. Be aware that only way to disconnect
mains power from your TV is to unplug mains plug from the wall, it shall remain readily operable during
use of your product.
• Servicing—Do not attempt to service the product yourself. Removing covers can expose you to high
voltage and other dangerous conditions. Request a qualified person to perform servicing.
The LCD panel is a high technology product, giving you fine picture details.
Due to the very large number of pixels, occasionally a few non-active pixels may appear on the screen as a fixed point of
blue, green or red. This is within product specifications and does not constitute a fault.
Precautions when transporting the TV
When transporting the TV, never carry it by holding onto the speakers. Be sure to always carry the TV by two people holding
it with two hands—one hand on each side of the TV.
Introduction
Dear SHARP customer
Thank you for your purchase of the SHARP LCD colour TV product. To ensure safety and many years of trouble-
free operation of your product, please read the Important Safety Precautions carefully before using this product.
Important Safety Precautions
Cautions regarding use in high and low temperature environments
• When the TV is used in a low temperature space (e.g. room, office), the picture may leave trails or appear slightly delayed. This
is not a malfunction, and the TV will recover when the temperature returns to normal.
• Do not leave the TV in a hot or cold location. Also, do not leave the TV in a location exposed to direct sunlight or near a heater,
as this may cause the cabinet to deform and the LCD panel to malfunction.
Storage temperature: -20 °C to 60 °C.e
Caution : DANGEROUS VOLTAGE INSIDE !
TO PREVENT ELECTRIC SHOCK, DO NOT REMOVE COVER. NO-USER SERVICEABLE PARTS
INSIDE. REFER SERVICING TO QUALIFIED SERVICE PERSONAL.
2

Introduction
Remote control unit
3
1
2
3
4
5
6
7
23
22
19
18
20
17
16
21
8
13
15
9
10
12
14
11
1 NET (Page 37)
Access “AQUOS NET+” mode.
2 Alphanumeric buttons 0 9_
Set the channel. Enter desired
numbers. Set the page in teletext
mode.
• When the five Nordic countries
(Sweden, Norway, Finland,
Denmark or Iceland) are selected
in the country setting from initial
auto installation (Page 9), DTV
services are four digits. When
another country is selected, DTV
services are three digits.
3 A (Flashback)
Return to the previously selected
channel or external input.
4 (Sound mode) (Page17)7
Select a sound multiplex mode.
f Picture format (Page 31)
Change between different picture
formats.
5 i+/- (Volume)
Increase/decrease TV volume.
6 e (Mute)
TV sound on/off.
7 a/b/c/d (Cursor)
Select a desired item.
;
Execute a command.
ATV/DTV/SAT: Display “CH list” when
no other “MENU” screen is running.
T S V U///
Not used.
8 @
Main menu screen on.
Come back to last option selected
within MENU screen.
9 R/G/Y/B Colour buttons
The coloured buttons are
correspondingly used to select the
coloured items on the screen (e.g.,
EPG, MHEG-5, teletext).
10 m Teletext (Page 20)
ATV: Display analogue teletext.
DTV/SAT: Select MHEG-5 or teletext
for DTV/SAT.
11 [ Subtitle (Pages 17 and 20)
Switch subtitle languages on/off.
14 ATV/DTV
Access TV mode.
RADIO
DTV/SAT: Switch between radio and
data mode.
• When only data broadcasting
(no radio broadcasting) is
transmitted by DVB, the radio
broadcasting will be skipped.
15 6 Back
ATV/DTV/SAT: Return to the previous
“Menu” screen.
NET: Return to the previous page
(This may not function for some
services).
16 Picture adjustment (Page 21)
Select picture settings.
ECO (Page 21)
Activate/deactivate low consumption
mode (ECO).
17 >
ATV/DTV/SAT: Exit the “Menu”
screen.
18 EPG (Page 18)
DTV/SAT: Display the EPG screen.
19 :r/s
ATV/DTV/SAT: Select the TV
channel.
NET: Scrolls pages up/down.
20 3D (Page 54)
Select between 3D and 2D image
viewing.
21 p Channel information (Page 15)
Display the station information
(channel number, signal, etc.) on the
screen.
Within MENU screen shows a hint
about item selected.
FAV
Define active station as favourite.
22 b (AV selection) (Page 17)
Select an input source.
23 a (Standby/On) (Page 17)
12 S/I/J/E/H (Pages 49 and
53)
Video/Music/USB REC files
reproduction buttons.
a SOURCE (Page 44)
Operating HDMI-CEC device.
13 USB REC (
Page 49)
Record a programme you are
watching.
Important information:
Satellite services are only
available for the LE652/654
model series.

TV (Front view)
TV (Side and rear view)
Illumination led*
Introduction
WARNING
• Excessive sound pressure from earphones and headphones can cause hearing loss.
• Do not set the volume at a high level. Hearing experts advise against extended listening at high volume levels.
Power
button
Menu
button
Input
source
button
Volume
buttons
Programme (channel)
buttons
1 Analog AUDIO input for DVI and PC
(Jack 3.5mm connector)
2 PC Input
3 COMPONENTS / AV terminals
4 SERVICE connector (jack 3.5 mm)
5 SCART (AV/RGB, Y/C Input) terminal
6 HDMI 1 (HDMI/DVI/ARC)
7 HDMI 2 (HDMI/DVI)
8 HDMI 3 (HDMI/DVI)
15 HEADPHONES jack
16 COMMON INTERFACE slot
17 LAN terminal
18 AC INPUT terminal
Remote
Control
Sensor
3D infrared
emitter
*TV indicator status (Page 17)
4
SAT
HDMI/PC
ANALOG
AUDIO
INPUT
SERVICE
PC IN
SCART (AV / RGB / S-VIDEO)
ANT
11 12
18
17
16
15
14
13
2
3 54
1
6 7 8 9 10
9 Antenna input terminal
10 SAT (Satellite antenna input) (Only
L*652 series)
11 Digital Audio Output terminal (SPDIF)
12 USB terminal (Wi-Fi use only)
13 USB terminal (USB REC / MEDIA
PLAYER / SOFTWARE / HDD READY
/ 3D GLASSES BATTERY)
14 HDMI 4 (HDMI/DVI)

Inserting the stand
Insert the stand into the openings on the bottom
of the TV (Hold the stand so it will not drop from the
edge of the base area).
Insert and tighten the four screws into the four
holes on the rear of the TV.
NOTE
• To detach the stand unit, perform the above steps in reverse order.
Remote control unit
( 1)g
• Operation manual (This publication)
• “AAA” size battery ( 2) g
Preparation
Supplied accessories
Attaching the stand unit
• Before attaching (or detaching) the stand, unplug the AC cord.
• Before performing work, spread cushioning over the surface on which you will be laying the TV. This will prevent it
from being damaged.
CAUTION
• Attach the stand in the correct direction.
• Be sure to follow the instructions. Incorrect installation of the stand may result in the TV falling over.
Optional accessory
The listed optional accessories are available for this
LCD colour TV. Please purchase them at your nearest
shop.
• Additional optional accessories may be available in the
near future. When purchasing, please read the newest
catalogue for compatibility and check the availability.
• Stand unit (x1)
• This TV should be fixed on a wall only with the wall fix bracket available from SHARP (above table). The use of other
wall fix brackets may result in an unstable installation and may cause serious injuries.
• Fixing the LCD colour TV requires special skills and should only be performed by qualified service personnel.
Customers should not attempt to do the work themselves. SHARP bears no responsibility for improper fixing or
fixing that results in accident or injury.
• You can ask qualified service personnel about using an optional bracket to fix the TV on a wall.
• To use this TV fixed on a wall, first remove the adhesive tape at the two locations on the rear of the TV, and then use the screws
supplied with the wall fix bracket to secure the bracket to the rear of the TV.
• When you fix the TV on a wall, you should attach the supporting post.
Fixing the TV on a wall
• Cable tie (x1)
5
No. Part name Part number
1 Wall mount bracket AN-52AG4
2 Wi-Fi adapter AN-WUD630
3 3D glasses AN-3DG35
4 3D glasses AN-3DG20-B
Soft cushion

Preparation
Inserting the batteries
Before using the TV for the first time, insert the two supplied “AAA” size batteries. When the batteries become
depleted and the remote control unit fails to operate, replace the batteries with new “AAA” size batteries.
1 Open battery cover.
2 Insert two supplied “AAA” size batteries.
• Place batteries with their terminals corresponding to
the (+) and (-) indicators in the battery compartment.
3 Close the battery cover.
CAUTION
Improper use of batteries can result in chemical leakage or explosion. Be sure to follow the instructions below.
• Do not mix batteries of different types. Different types of batteries have different characteristics.
• Do not mix old and new batteries. Mixing old and new batteries can shorten the life of new batteries or cause
chemical leakage in old batteries.
• Remove batteries as soon as they have worn out. Chemicals that leak from batteries can cause a rash. If you fi nd
any chemical leakage, wipe thoroughly with a cloth.
• The batteries supplied with this product may have a shorter life expectancy due to storage conditions.
• If you will not be using the remote control unit for an extended period of time, remove the batteries from it.
• When replacing the batteries, use zinc-carbon batteries instead of alkaline ones.
Note on disposing batteries:
The batteries provided contain no harmful materials such as cadmium, lead or mercury.
Regulations concerning used batteries stipulate that batteries may no longer be thrown out with the household
rubbish. Deposit any used batteries free of charge into the designated collection containers set up at commercial
businesses.
Using the remote control unit
Use the remote control unit by pointing it towards the remote control sensor. Objects between the remote control
unit and sensor may prevent proper operation.
Cautions regarding the remote control unit
• Do not expose the remote control unit to shock. In addition, do not expose the remote control unit to liquids,
and do not place in an area with high humidity.
• Do not install or place the remote control unit under direct sunlight. The heat
may cause deformation of the unit.
• The remote control unit may not work properly if the remote control sensor of
the TV is under direct sunlight or strong lighting. In such cases, change the
angle of the lighting or the TV, or operate the remote control unit closer to the
remote control sensor.
6
Remote control sensor

Quick guide
1 2 3
Initial installation overview
Follow the steps below one by one when using the TV for the first time. Some steps may not be necessary
depending on your TV installation and connection.
Connect an antenna cable to
the antenna terminal (Page 8).
If necessary, insert a CA
card into the CI slot to watch
scrambled broadcasts
(Page 8.)
Plug in the AC cord (Page 8).
Product shape varies in some countries.
Turn on the power using on a
the TV (Page 17).
Run the initial auto installation
(Page 9).
Language, Energy
Efficiency, country, antenna
type settings, etc.
Go to .Next
Congratulations!
Now you can watch TV.
If necessary, adjust the
antenna to attain maximum
signal reception (Page 14).
7
Preparation
Power on and
run the auto
installation
Watch TV
Connect
external devices
Connect external
devices such as a
DVD player/recorder
as instructed (Pages
41, 42 and 43).
Connect external
audio devices such as
speakers/amplifier as
instructed (Pages 41,
42 and 43).
Start searching
channels
Quick guide
Before turning on the power
In order to receive coded digital stations, a Common
Interface Module (CI Module) and a CA Card must be
inserted in the CI slot of the TV.
The CI Module and the CA Card are not supplied
accessories. They are usually available from your
dealers.
Inserting the CA Card into the CI Module
1
With the side with the
gold coloured contact
chip facing the side of
the CI Module marked
with the provider’s
logo, push the CA Card
into the CI Module as far as it will go. Note the
direction of the arrow printed on the CA Card.
Inserting the CI Module in the CI slot
2Carefully insert the CI Module in the CI slot with
the contact side forward. The
logo on the CI Module must be
facing outward from the rear of
the TV. Do not use excessive
force. Make sure the module is
not bent in the process.
Checking CI Module information
1Press and the “MENU” screen is shown.MENU
2Press / to select “Extras” menu.c d
3Press / to select “CA module”, and then c d
press .OK
• The content of this menu depends on the provider of
the CI Module.
●
●
●
●
● Module
General information on CI Module displays.
●
●
●
●
● Menu
Adjustment parameters of each CA Card displays.
●
●
●
●
● Enquiry
You can input numerical values such as passwords here.
NOTE
The content of each screen depends on the provider of
the CI Module.
Inserting a CA Card
NOTE
• Make sure that the CI module is properly inserted.
• This menu is only available for digital stations.
• It takes about 30 seconds to certify the license key when you insert a CA card into the CI+ compatible CI module for the first
time. This process may fail when there is no antenna input or you have never run “Auto installation”.
• The CI+ compatible CI module sometimes upgrades its firmware. You may not receive any TV images before upgrading. You
can only use the power button during upgrading.
• The CI+ compatible CI module does not allow you to output any copy protected programmes using monitor out.
• If the TV displays an update confirmation message for the CA card while receiving CI+ compatible broadcasts, follow the
screen prompts.
AC cord
8
1 Carefully insert the CI
Module in the CI slot
with the contact side
forward.
2 The logo on the CI
Module must be
facing outward from
the rear of the TV.
Place the TV close to the
AC outlet, and keep the
power plug within reach.
Product shape varies
in some countries.
Standard
DIN45325 plug
(IEC 169-2) 75 q
coaxial cable.

Initial auto installation
When the TV is powered on for the first time after
purchase, the initial auto installation wizard appears.
Follow the menus and make the necessary settings one
after another.
1 Press on the TV.a
• The initial auto installation wizard appears.
• The auto installation can also be called in the TV menu,
see on page 40. Repeat initial installation
• The routine of the first installation wizard depends on
the selected settings.
2 Setting the menu language.
Press to select the desired language. /// abcd
Proceed with J button.
3 Setting Energy Efficiency.
Decide how efficiently you want to operate your TV
set.
•Home Mode:
The emphasis for home use is on low energy
consumption.
•Shop Mode:
The picture settings are aligned to operate in the
presentation room. If the ambient brightness diminishes,
the energy consumption is not reduced.
This setting can be changed later in the MENU
Extras Energy Efficiency.→
Proceed with button. J
4 Selecting the TV location.
Press to select your country or area. /// ▲▼◄►
• This setting screen only appears during the initial auto
installation.
Proceed with button. J
Quick guide
5 Select broadcast settings.
Press to move between different tune type. / ▲ ▼
Press to select the desired antenna.OK
Cable analogue: analogue broadcast via cable/
antenna.
DVB-T: Digital broadcast.
DVB-C: Cable digital broadcast.
DVB-S: Satellite broadcast.
(Only 752/754 series)
Proceed with button. J
6 Select subtitles and audio languages.
Press / / / and abcd OK to select the desired
languages and alternative languages for subtitles
and audio for DVB programmes.
Proceed with J button.
•
To set up audio commentary for the visually impaired, please
see on page 25.Audio commentary
If you have not selected DVB-T antenna in the antenna
selection, continue with Setting options for DVB-C
reception on page 10.
7 Selecting tuner settings.
●
●
●
●
●Scrambled stations
You can specify if coded stations are to be searched
for in the search/update.
Select to save all scrambled stations. yes
•
These stations can only be received in connection with a CI
module and the appropriate CA Card.
•
If a CI module with a CA Card is already inserted for the station
search, all the stations which this module can descramble are
also saved when is selected.no
●
●
●
●
●Search method
Select Frequency search if you want to run the
station search independently of the channel grid.
●
●
●
●●
Accept logical channel number
In various countries, digital stations are transmitted
with a preset channel number per station, known as
"Logical Channel Numbers" (LCN).
If you select , these default channel numbers will yes
be used and the channels will be sorted as per LCN.
9
Confirm the following before turning
on the power
EIs the antenna cable connected?
EIs the AC cord plugged in?
Setting options for DVB-T reception
(Only 652/654 series
)

Reception of a single satellite via a connected LNC
(LNB).
1 Select satellite.
Press J to continue.
2 Select Dual Band (low/high) Single Band. or
Here you specify if you use a Dual Band (Universal)
LBN or Single LBN.
Press J to continue.
3 Specify here the oscillator frequency for your LNB.
Normally you do not need to change the values
for high and low band, unless the LNB of your
satellite system uses a different oscillator frequency
(important for the frequency display).
If you use the setting in step Single Band Dual/
Single Band, you only have to define the LNB
frequency for the Low Band.
4 Press J to continue.
See on Setting options for all DVB-S reception
page 13 to continue.
Quick guide
1 Select Satellite1/Satellite2
2 Select satellite name from list and press OK.
Press J to continue.
3 Specify here the oscillator frequency for your LNB.
Normally you do not need to change the values
for high and low band, unless the LNB of your
satellite system uses a different oscillator frequency
(important for the frequency display).
4 Press OK to select frequency and press J to
continue.
See on Setting options for all DVB-S reception
page 13 to continue.
Select DiSEqC multiswitch and adpat settings for this
selection.
11
Setting options for Single satellite
Setting options for Max. 4 satellites on DiSEqC
multiswitch
Setting options for 2 satellites on 22kHz
switchbox / 2 satellites on Toneburst switch

1 Select which DiSEqC single cable system you are
using and press . OK
2 Select satellite name from list and press . Press OK
J to continue.
3 Specify here the oscillator frequency for your LNB
and press OK. Press J to continue.
Normally you do not need to change the values
for high and low band, unless the LNB of your
satellite system uses a different oscillator frequency
(important for the frequency display).
4 Select and adjust settings for DiSEqC single cable
communal installation.
Select the desired transmission channel and the
corresponding transmission frequency.
PIN protection
If your system is designed for it, it is possible to
protect your used transmission data from use by
other subscribers with a PIN.
Define/change PIN
Here you can determine and change the PIN for
PIN protection. Only possible when yes has been
selected for .PIN protection
Continue with Setting options for all types of
reception on page 13.
Quick guide
Press to adopt settings and press to continue. OK J
1 Select Satellite1 Satellite4.to
2 Select satellite name from list and press OK. Press
J to continue.
3 Specify here the oscillator frequency for your LNB.
Normally you do not need to change the values
for high and low band, unless the LNB of your
satellite system uses a different oscillator frequency
(important for the frequency display).
See on Setting options for all DVB-S reception
page 13 to continue.
●
Repeat rate
The refresh rate determines how often a DiSEqC
command is output. A refresh is only necessary with
cascaded system.
●
Control voltage
The control voltage controls the switch of the
polarisation level (horizontal/vertical) in non-DiSEqC
capable components (e.g., control of single LNBs
via DiSEqC multiswitch).
●
22kHz signal
The 22kHz signal controls the switching between
high and low band in the setting. The Band Position
setting controls the selection of the satellites in non-
DiSEqC capable components.
●
Toneburst
The Toneburst controls the selection of the satellites
in non-DiSEqC but Toneburst capable components
with the and settings.Position Option
12
Setting options for
DiSEqC one cable
communal system

What is the menu?
• The MENU view is the central overview page for all of your TV's operating modes.
• The list of options on the bottom of MENU view gives you acces to TV, Video, Audio/Radio, Photo and AQUOS NET+.
• By means of and you have access to more functions and you can configure your TV set.Extras Setup
• On the top of the screen you will find all stations marked as favourites.
• The number of selectable items varies depending on the TV equipment, network connection, available media servers and
connected devices.
• The MENU can be operated with the remote control unit and with the TV panel control keys.
Common operations
NOTE
• MENU options differ in the selected input modes, but the operating procedures are the same.
• The screens in the operation manual are for explanation purposes (some are enlarged, others cropped) and may vary slightly from
the actual screens.
Menu operation
1
3
2
About the Guide Display
The Guide Display at the bottom of the screen shows
the menu bar.
In the initial installation you will see an info text for
operations with the OSD.
Info display
The info display provides an info text appropriate to the
on-screen display that can assist you further with the
operation of your TV set.
The factory setting is that the info display is hidden. It
can be displayed temporarily by pressing key.p
Temporary info display ( ) p
15
Display the menu
screen
Exit the menu
screen
Select an item
Press and the “MENU” MENU
screen displays.
The operation will exit the "MENU"
screen if you press .END
Press / / /abcd to select/adjust the
desired menu, and adjust the item to
the desired level, and then press .OK
Press 6 to return to the previous
MENU page.
ESelecting in the menu
ESelecting options

You will find your favourites on the top of the MENU
screen.
You can create favourites in the operating modes of the
TV set. In this way you get your preferred stations on a
single overview page.
After an initial installation, TV stations will already be
automatically created as favourites independent of the
installation site of the TV set.
Creating favourites
You can define the current station as favourite by means
of your remote control.
The favourite will be added to MENU view and placed
at the end.
1 Press FAV to create a favourite.
If there are more favourites than can be shown on one
page, this will be indicated by rectangular symbols
below favourites in the view.MENU
Manage favourites
You can edit the existing favourites in view. MENU
Change the sequence of your favourites as you wish or
delete favourites you do not need any more.
2 MENU Press to call MENU view.
3 With ▲▼◄►/// select the favourite to be changed.
4 Press FAV to move or delete.
5 Press to end.6
Menu operation
Operation with the TV panel
control keys
This function is useful when there is no remote control
unit within your reach.
1Press to show/hide a menu for direct MENU
control on TV.
2Press to scroll left/right. /CHr s
3Press b(#) to open a new menu level or
accept the settings
NOTE
• The “MENU” screen will disappear if left unattended for
several seconds.
Favourites
The automatic info display can be hidden/shown via a
menu setting.
1 Press to call menu view.@
2 SetupWith select ▲▼◄►/// and press to call OK
settings.
3 ControlWith select ◄ ►/ and press OK.
4 moreWith select ◄ ►/ and press OK.
5 With select ◄ ►/ On-screen displays and press
OK to call settings.
6 Off/With ▲ ▼/ select Automatic info and select
On to hide/show the info display.
7 OKPress to adopt settings.
Permanently display or hide the
automatic info display
16

Other EPG functions
ECalling additional information about the
programmes
1 Press to select the programmes. /// ▲▼◄►
2 Press “p.
If there is more information on the selected programme,
it will be indicated here.
View: Watch selected programme.
The menu item is only available when the selected
programme is on the air.
Memorise: Memorise the programme for later
watching/listening.
This menu is only available when the selected
programme has not yet started.
Delete memo: For programmes being memorised
you can also delete the memo.
Timer: Call up the overview of the timer services.
E(Recording): Schedule the recording of the
selected programme for a time.
3 Press to return to EPG. 6
EMemorising a programme via the EPG
For memorised programmes, the TV set will ask at the
beginning of a programme if it should change the channel
accordingly or switch on from the standby mode if this
is activated in the Setup Control more EPG TV → → → →
on when memorised.
1 Select the program which you want to memorise.
2 Press .p
3 With select /// ▲▼◄► Memorise, and press OK.
4 Press to return to EPG. 6
In the EPG a memorise symbol is placed avobe
the title of the programme.
ETimer programming
You can programme timer recordings of TV programmes.
1 Press to select the programme. /// ▲▼◄►
2 Press USB REC button to programme timer
recording for the TV programme. Timer data
dialogue is opened.
3 Check the timer data and update it if necessary.
In the EPG a recording symbol E is placed avobe the
title of the programme.
Programme information
Watching TV
19

Buttons for standard teletext operations
Buttons Description
P /r s Increase or decrease the page number.
Colour (R/G/
Y/B)
Page selection:
Red: Back to the previously viewed
page.
Green: On to next page.
Yellow: To next topic.
Blue: To next range of topics.
The coloured bars (for TOP) or the
coloured text (for FLOF) in the second
last line indicate which coloured buttons
you can use to page through topic areas
and topics.
0–9 Teletext page displays:
0: Stop updating teletext pages
automatically or release the hold
mode.
9: Enlarge page (press several times).
Additional page selection:
Directly select any page from 100 to 899
by using the numeric buttons.
▲ ▼/ /OK Mark desired page number.
With call the page.OK
pCall overview page 100.
Select it on the screen and press to OK
update the teletext page.
Show hidden information on the TXT
page.
Hide information on the TXT page again.
Call Standard Teletext menu
Select on the screen and press OK.
●
●
●
●●
Special pages
● Preview pages
Input of the first teletext programme preview page if
this deviates from the factory setting.
● Sub-title pages
Input of the teletext subtitle pages for every station if
this deviates from the factory setting.
●
●
●
●●
Character set
Teletext character set can be switched to other
languages (Russian, Greek, Polish and Turkish).
Using the MHEG-5 application
(UK only)
Some services bring you programmes with the MHEG
application encoded, letting you experience DTV/
CADTV interactively.
When provided, the MHEG-5 application will start
when you press .m
NOTE
• MHEG may not be displayed in 3D mode.
Watching TV
Teletext
What is Teletext?
Standard teletext
Teletext broadcasts pages of information and
entertainment to specially equipped TVs. Your TV
receives teletext signals broadcast by a TV network,
and decodes them into graphical format for viewing.
News, weather and sports information, stock exchange
prices and programme previews are among the many
services available.
Turning Teletext on/off
1Select a TV channel or external source providing
a teletext programme.
2Press to display the Teletext.m
• Many stations use the TOP operating system, while
some use FLOF (e.g. CNN). Your TV supports both
these systems. The pages are divided into topic groups
and topics. After switching on the teletext, up to 2,000
pages are stored for fast access.
• Select on the screen and press OK, the scr
een
switches as shown below.
• If you select a programme with no teletext signal, “No
Teletext available” is displayed.
• The same message is displayed during other modes if
no teletext signal is available.
NOTE
• Teletext will not work if the selected signal type is RGB.
• If HbbTV is offered by the channel, then the Media Text/
HbbTV text opens up. In this case, pressing m again opens
the "standard" teletext/videotext.
Other teletext menu functions
HbbTV Text
Pressing twice will display the HbbTV-Text. m
HbbTV text is offered by the selected channel.
Navigation within the HbbTV text and how the coloured
buttons are assigned may vary depending on the
provider.
20
Teletext
Teletext

Explanations of some search settings
Signal source: Selection of range in which you
want to search for the station.
TV stand: If necessary, ask your dealer which
standard to select for specific channels or AV
equipment.
Colour standard: If necessary, ask your dealer
which standard to select for specific channels or AV
equipment.
Channel: Direct entry of channel.
Frequency:
DVB-T/C: Direct input of station frequency.
Range for entry: 044.75 MHz - 859.25 MHz.
DVB-S: Direct input of LNC frequency.
Name: the name of the found station is displayed.
You can change the name of the station.
Symbol rate: You can specify the symbol rate.
DVB-S: Range: 1000-45000.
●
●
●
●●
Manual Scan Radio
The manual search for radio stations is similar to
TV stations search. Please see Manual Scan TV
explanation.
●
●
●
●●
Station lists TV
In this menu you can edit (delete block, move block)
various lists. You can also create and edit new personal
lists.
●
Overall station list
You can delete and move station blocks.
-Delete Block
1 With ▲▼◄►/// select the beginning of block.
Press to mark.OK
2 With ▲▼◄►/// select the end of block. Press
OK to mark.
3 OK Select Execute delete and press to
delete block. (Select to Cancel process
cancel delete).
-Move block
1 With ▲▼◄►/// select the beginning of block.
Press to mark.OK
2 With ▲▼◄►/// select the end of block. Press
OK to mark.
3 With ▲▼◄►/// select insert position. Press
OK to confirm insert position.
4 With select ▲▼◄►/// Execute move and
press OK to move block. (Select Cancel
process to cancel move).
Basic adjustment
-Restore stations
1 With ▲▼◄►/// select the beginning of block.
Press to mark.OK
2 With ▲▼◄►/// select the end of block. Press
OK to mark.
3 With select ▲▼◄►/// Restore stations and
press OK to restore block. (Select Cancel
process to cancel restore).
● DVB-T
Shows available stations to move, delete and rename
stations in the (all) list:
-Add/remove stations
-Move stations
-Delete list
-Rename list
● New personal list
It is possible to compose personal lists to suit
your convenience. It is possible to create up to six
personal lists.
-Adding stations to Personal list
1 OKSelect New personal list and press . A
new personal list (x) will be created.
• x number depends on how many lists were
already created.
2 With select ◄ ►/ Personal list x and press
OK to open (list does not contain any station
yet).
3 Press to open function list. ▼
4 With ◄ ►/ select Add/Delete Stations in the
function list and press to activate.OK
5 With ▲▼◄►/// select the stations you want
to add to the favourite list and press . OK
The new stations will be added at the end of the
favourite list.
6 ENDPress to close station list.
-Deleting stations from Personal list
1 With select ◄ ►/ Personal list x and press
OK to open.
2 With ◄ ►/ select Add/Delete Stations in the
function list and press to activate.OK
3 With ▲▼◄►/// select the station to be
deleted and press to delete.OK
4 ENDPress to close station list.
-Move/reorder stations in Personal list
1 With select ◄ ►/ Personal list x and press
OK to open.
2 With select ◄ ►/ Move stations in the
function list and press to activate.OK
3 With ▲▼◄►/// select the station to be
moved and press to mark.OK
4 With ▲▼◄►/// select insert position and
press to move.OK
5 ENDPress to close station list.
23

Basic adjustment
●
Software update
●
Via USB
Current software version can be downloaded from
the SHARP Internet site and installed on your TV
using a USB memory.
●
Via Internet
The software update wizard appears.
See page 27 for more information.
●
Via antenna
The software update wizard appear.
NOTE
• The file system of USB memory must be FAT32.
• The USB memory must have only one partition.
• If in doubt, the USB memory should be formatted
as "FAT32" without "extended attributes".
• A broadband connection and Network setup are
required to update the software using the internet.
●
●
●
●●
more...
●
●
●
●●
On-screen displays
You can select different settings which affect the on-
screen displays.
●
Display time
You can adjust the duration of the display.
●
Volume display
You can set whether or not the change in the volume
should be displayed visually on the screen.
●
Automatic info
Here you can activate/deactivate the additional help
in the screen while navigating the menu.
●
Permanent clock display
The time can be displayed permanently. It is always
visible as long as no other display is activated.
●
Automatic HDMI-CEC hint
If this option is activated, a message about the
adapted function of the remote control is shown
whenever you switch over to an HDMI port position to
which a compliant device is connected.HDMI-CEC
●
●
●
●●
Time and date
Allows you to enter the time and date manually.
●
Time
Enter the time with the numeric buttons of the remote
control.
●
Deviation from Universal Time
The current time at the Greenwich Meridian 0º is to be
understood as world time. The time shift in relation to
this time must be given in hours (with the ◄ ►/ in the
TV and button of the remote control).OK
●
Date
Enter the date with the numeric buttons of the remote
control.
●
Summer/winter
Set it to yes if you want to activate automatically
summer time.
●
Beginning of daylight-saving time
Enter the date on which the time is switched over
to summer time if it deviates from the automatically
calculated date.
●
End of daylight-saving time
Enter the date on which the summer time ends if it
deviates from the automatically calculated date.
●
●
●
●●
DVB settings
You can make general presettings for DVB stations.
●
Subtitle mode
You can preset whether a subtitle is always to be
displayed as soon as it is offered by the station. A
special subtitle for impaired hearing can also be
selected.
NOTE
• Subtitles are not offered by all stations. Many
stations only broadcast subtitles by teletext.
●
DVB character set
Select the DVB character set so that the title of the
broadcast of your favourite received station or the
texts of your CI module are displayed correctly.
●
Audio commentary
You can activate a special sound for viewer with
impaired vision.
●
●
●
●●
EPG
EPG is a programme list that is displayed on the screen.
With the EPG, you can check the schedule of digital
channels, view detailed information about it, tune to an
event currently on-air and set a timer for future events.
Also recordings can be programmed.
●
Station selection
Here you can determine for which station in the
programme guide information is to be displayed.
●
Data capture
Here you can switch the data entry for the electronic
program guide (EPG) or on off.
If the data capture is switched on, your TV set tries
to update the data base overnight or, if required, two
minutes after switching to stand-by mode. The TV set
must be on stand-by for this and not switched off at
the mains switch.
The indicator on the TV set lights violet during data
capture in stand-by mode.
The data is also updated while you are watching the
EPG station.
●
TV on when memorised
When yes is selected, the switched off TV switches
on automatically in standby mode at the beginning
of a memorised programme. A screen message
appears when switching on. If this is not confirmed
within 5 minutes with the button, the TV switches OK
off again automatically for safety reasons.
●
●
●
●●
USB REC
Is possible to adjust the USB REC to your requirements.
●
Notify hidden sections
If an entry has been hidden in an archive recording
(see page 52) you can be informed by a screen
message when skipping a hidden area, by selecting
yes.
25

Basic adjustment
●
Jump distance
Set the standard jump distance (in minutes) used for
jumping forwards or backwards in the recording.
●
Smart jump
Activate or deactivate function (see Smart Jump
page 52).
●
Recording subtitles
Allows you to select whether subtitles are to be
recorded in continuous operation for DVB stations.
See page 50 for more information.
●
●
●
●●
Standard Teletext
This TV set supports the two operating systems TOP
Text and FLOF. Up to 2,000 pages are stored so that
you have quick access.
●
Special pages
Preview pages: You can input the first teletext
programme preview page if this deviates from the
factory setting.
Subtitle pages: Input of the teletext subtitle pages
for each station if this deviates from the factory
setting .
●
Character set
Teletext character set can be switched to other
languages: Russian, Greek, Polish and Turkish.
●
●
●
●●
HbbTV (Hybrid Broadcast Broadband TV)
Some broadcasters bring you access to new services
from entertainment providers such as broadcasters,
online providers, including catch-up TV, video on
demand (VoD), interactive advertising, personalisation,
voting, games and social networking.
This function requires internet connection through the
ETHERNET or the Wi-Fi adapter AN-WUD630.
See Multimedia/Network on page 47 for more
information.
●
HbbTV mode
Enable/disable this function.
If this item is enabled, when a selected programme
offers HbbTV service it will be seen on screen. Just
press the requested key to activate.
Then, the picture list of available services will appear.
Follow the broadcaster instructions.
●
Start behaviour of HbbTV stations
If HbbTV mode is activated you can specify if
a available HbbTV application should be loaded
automatically() after the channel has been
changed or if this should only occur manually( ). ?
After loading the HbbTV application, an on screen
instruction is displayed (depending on the channel
that is being viewed).
You can also choose between Start all automatically
or .Start all manually
●
Functions of the keym
It is possible to choose between watch Standard
teletext HbbTV.or
See page 20 for more information.
●
Standard teletext first
If this option is selected, with HbbTV function
enabled, it will show standard teletext.
●
HbbTV first
If this option is selected, with HbbTV function
enabled, it will show HbbTV text.
HbbTV text is offered by the selected channel.
Navigation within the HbbTV text and how the
coloured buttons are assigned may vary depending
on the provider.
26

Basic adjustment
The next screen will appear:
The software version that is currently installed is
displayed.
6 Press V button to proceed. The TV searches for
a new software file on the USB stick.
If a new software version is available after the
search, a message appears:
New software Vx.xx
7 Press V button to start loading the new software.
Or press END to end the wizard (the software will
not be updated).
•The updated percentage appears.
8 To make your TV completely ready for use again,
please switch it off and on with the mains switch.
If an Internet connection is available, new software can
be downloaded directly and installed in the TV set.
1 Press button.@
2 Setup OK.With select ◄ ►/ and press
3 Control Software Select → → Software
Update Via Internet.→
A message regarding data protection will be
displayed.
4 If you do not agree with data protection message,
please press G to exit. If you agree, please press
V to continue.
The version of the software that is currently installed
will be displayed.
5 By pressing V the TV connects to the Internet
and scans the update server for new software.
If a new software version is available, a message
appears.
6 Press V to start loading the new software.
If you want to end the wizard, please press .END
7 To make your TV completely ready for use again,
please switch it off and on with the mains switch.
NOTES
• Please do not switch off the TV by the mains switch
during software updating.
• The total programming process can take up to 50 minutes
in total.
Software update via Internet
27
●
●
●
●●
Recording
It is possible to set a pre-record and post-record time
for timer recordings made without auto time control
(DVB).
This minimises the risk that a part of broadcast is not
recorded due to the broadcast starting earlier and/or
finishing later.
●
●
●
●●
Hard disks
● Format external one
It is possible to re-format the hard disk in order to
solve some problems or to delete all data stored on it.
Select this option to start formatting.
Formatting the hard disk will erase all data stored
on it.
●
●
●
●●
DivX VOD®
● DivX VOD Register®
To activated this option you need to register the
code at www.divx.com/vod, download the VOD log
file and reproduce it in TV.
● DivX VOD Der®egister
Displays the deactivation code necessary to wite off
this TV at www.divx.com/vod.
It is possible to update the software on your SHARP TV.
1 Add the binary file to USB memory root.
2 Insert the memory in any USB side TV set
socket.
3 Press button.@
4 Setup OK.With select ◄ ►/ and press
5 Control Select → Software → Software
Update Via USB. →
Software update via USB
Multimedia / Network settings
1 Press MENU.
2 Setup Multimedia/Network, Select →the next
screen appears:
3 Select the option you want to adjust:
●
●
●
●●
Network settings
With this option you can make settings to your network
adapters and the various types of media.
●
Networking
The network wizard starts that guides you through all
necessary settings to your network.
See page 47 for more information.
●
Reset to factory settings
All network settings are reset to factory defaults.
●
Host name
Give your TV set a name so that it can be identified
in the network.
●
Proxy server
Do the settings for using a proxy server. The proxy
server wizard will be shown.
See page 47 for more information.
●
●
●
●●
Multimedia settings
Here you find some settings for Audio.
●
Auto return to music player
The music player will reappear whenever another
dialogue, e.g., music selection is called during play-
back, and no keys are pressed for the set time period.
You can specify when and after which time the music
player reappears (selection options are: no, after 1
min, after 5 min).
Basic adjustment
Connections settings
1 Press MENU.
2 Setup Connections, Select →the next screen
appears:
3 Select the connection you want to adjust:
●
●
●
●●
Antenna DVB
Allows you to make settings for DVB-T antenna and call
the antenna wizard for the DVB-S antenna.
●
Antenna DVB-S
The antenna wizard starts guiding you through all
the settings relevant to the DVB-S antenna. The
settings of the DVB-S antenna wizard are explained
in the procedure of initial installation (see page 10).
●
Antenna DVB-T
Allows you to set whether your DVB-T antenna needs
a supply voltage.
Antennas with an integrated amplifier need a supply
voltage on the antenna line. In this case select Supply
voltage 5V OKand confirm with .
Otherwise, select No supply voltage and confirm
also with .OK
●
●
●
●●
AV connecting settings
In this menu the parameters for the AV and AVS
connection sockets can be adapted.
●
Device at connection AV
Indicate here whether a device is connected and, if
so, which one is connected to the AV socket.
Choose between: No device, DVD player, DVD
recorder, Video recorder, Sat receiver, SetTopBox and
Other equipment.
28

Basic adjustment
●
AV standard
Allows you to set the AV standard of the connected
device to AV or AVS.
Normally you leave the setting to Automatic. If the
standard of the connected device is not detected
automatically, you can select the correct standard.
NOTE
• Ask your dealer or consult the operating manual of the
connected device if necessary.
●
Signal type
Allows you to set the signal type of the device
connected to AV or AVS.
●
Allow switching voltage
If this function is activated, the video and audio of
an external device connected to the AV connector
(not in AVS) will be automatically reproduced on all
TV broadcast sites when reproduction is started up,
provided that the external unit supplies a switching
voltage.
●
●
●
●●
HDMI-CEC
Here you can make further settings for comfortably
linking external devices to the TV sets.
●
Remote TV switch on via HDMI-CEC
Here you can select whether the TV set is to switch
on automatically from standby mode, if HDMI-CEC
capable devices connected to a HDMI input start
playback or display a screen menu.
●
HDMI-CEC functionality
You can allow or forbid the automatic communication
between the TV set and linked external devices.
You can display the channel information that you are
watching at this moment by pressing p on the remote
control unit.
In the left lower corner you can see the number and
name of the channel, the transmission time and (if
available) the title of the current programme. The
bar (if available) indicates the progress of the current
programme.
In the right lower corner, the programme info is displayed
additionally for DVB channels.
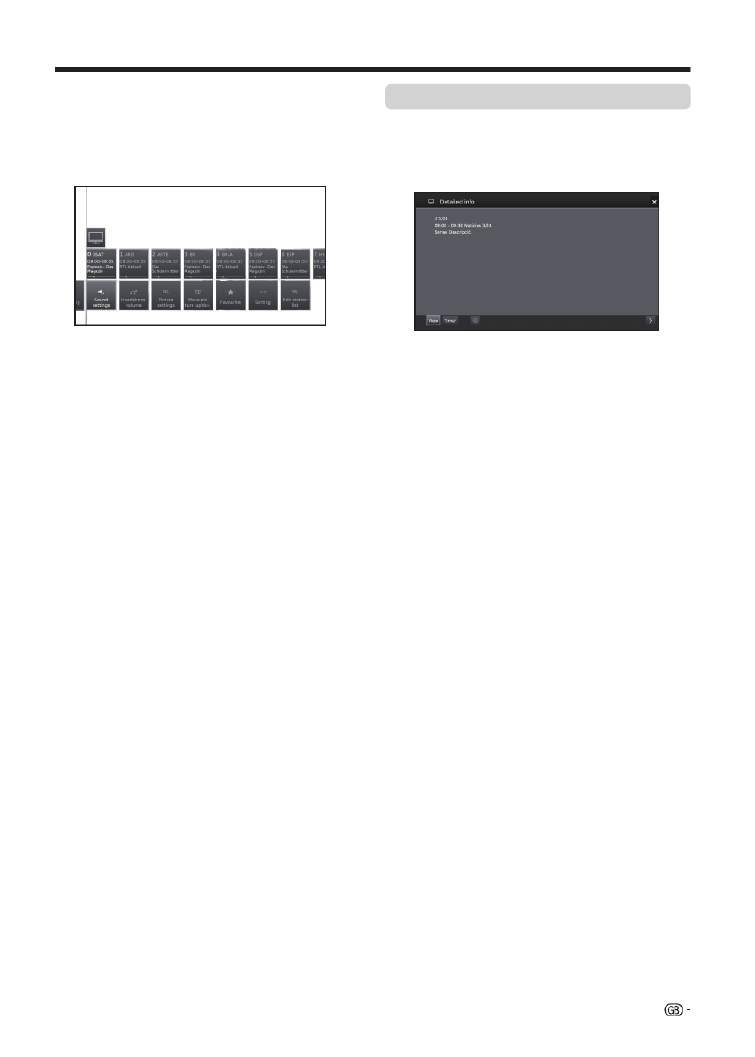
Channel list
Selecting the channel
you want to watch
Channel information display
(DVB-T /DVB-C only)
1 OK Press and the list of tuned channels will be
displayed.
2 / Use ◄ ► to select the channel you want to watch
and press .OK
You can watch overall station list or a personal list of
channels by pressing ▲.
29

Transmitted audio signal:
0RQR Mono audio transmission analogue
Dual channel sound transmission (Sound1
/Sound2) analogue
Dual channel sound transmission (Sound1
/Sound2) digital
Stereo sound transmission analogue
Stereo sound transmission (HEAAC)
Stereo sound transmission digital (PCM)
Dolby digital sound transmission (DD)
Dolby digital sound transmission (DD+)
Dolby digital AAC+ sound transmission
GWV dts sound transmission
03(* MPEG sound transmission
3/,, Dolby Pro Logic II sound transmission
Dolby Virtual Speaker Reference display
Dolby Virtual Speaker Wide
Transmitted audio channels:
DD / dts 1.0 / mono
DD / dts / MPEG 2.0
DD / dts 3.0
DD / dts 4.0
DD / dts 5.0
DD / dts 2.1
DD / dts 3.1
DD / dts 4.1
DD / dts 5.1
(HEAAC)
Basic adjustment
Language/sound selection available
Subtitles available
Channel selection for multi-channel providers
3D mode
HDTV programme
HbbTV mode available from this station
Symbol explanations in the channel
info
Transmitted audio signal:
Transmitted audio channels:
General symbols:
30

For selecting the input type of external equipment.
• If no (colour) image is displayed, try changing to
another signal type.
• Check the operations manual of the external
equipment for the signal type.
Connect a USB or hard disk device to the TV as shown
below.
• Depending on the USB device, the TV may not be
able to recognise the contained data.
• Use only alphanumeric characters for naming files.
• File names over 80 characters (may vary depending
on character set) may not be displayed.
• Do not disconnect a USB device or memory card from
the TV while transferring files, using the slide show
function, when a screen is switching to another or
before you exit Video, Music or Photo menus.
• Do not connect and disconnect a USB device from
the TV repeatedly.
Useful viewing functions
Source list
Setting when using external
devices
Connecting a USB device
Selecting the picture
format manually
You can select the picture format. The selected picture
format varies depending on the type of signal received.
1 Press fon the remote control unit to change
between different kinds of pictures.
NOTE
• Some items do not appear depending on the type of
received signal.
16:9: Proportionally correct display of 16:9
broadcasts.
4:3: Proportionally correct display of 4:3
broadcasts.
Panorama 1: Proportionally correct display of 4:3
broadcasts on the 16:9 screen. Station logo
and subtitles remain visible.
Panorama 2: Format filling display (factory default) of
4:3 broadcasts on the 16:9 screen. Station
logo and subtitles remain visible.
Zoom: Proportionally correct display. Maximum
picture zoom. Displayed text may get lost.
Selecting the picture format
4:3 TV: Proportionally correct display of 4:3 or
16:9 broadcasts. You select this mode
when the signal is not supplied by a PC
(normal case). A small part of the picture
is truncated. This may be necessary to
hide possible interference at the edge of
the picture, which arises from the signal
supplied.
4:3 PC: Proportionally correct display of 4:3
or 16:9 broadcasts without loss of
information. Select this mode when the
signal is supplied by a PC.
4:3
Zoom:
Proportionally correct display. Maximum
picture zoom. Displayed text may get lost.
Sizes for SD Signal (Standard Definition)
Sizes for HD Signal (High Definition) HDMI
31
16:9 TV:
16:9 PC:
16:9
Zoom:

TV/List function
This function contains settings and additional options.
The function list can be opened directly in TV mode or
via the station list.
Via station list:
1 OK Press on R/C.
2 OK.Select station and press
3Press . The next screen appears:▲
4Select the station you want to adjust through
Overall station list Personal list .or and press ▼
In TV mode:
1 MENU Press on R/C.
2 TV OK.Select and press
3Select the station you want to adjust and press . ▼
The next screen appears:
4Select the adjustment you want to adjust.
●
●
●
●●
Expanded station list
Open expanded station list.
Using the on-screen buttons on the bottom line of the
expanded station list it is possible to filter and sort the
station list by various combinations of options.
●
0..9
Allows you to sort stations numerically.
●
A..Z
Allows you to sort stations alphabetically.
TV menu options
●
Search
This allows you to do targeted searches for stations.
The station name is to be entered via the on-screen
keyboard.
●
All sources
You can specify whether the stations from all sources
or only from individual sources/reception networks
(DVB-C, DVB-S, DVB-T, analogue) shall be indicated.
●
All stations
You can specify if all stations, only HD stations, locked
stations, scrambled stations, unscrambled stations,
CI+ protected stations, newly found stations or
stations that cannot be found from selected sources
shall be indicated.
●
●
●
●●
Language/sound
Language/ sound selection.
The sound formats on offer and their designations
depend on the programme being broadcast.
●
●
●
●●
Subtitles
Subtitle selection.
The subtitles available depend on the programme being
broadcast.
●
●
●
●●
Channel/Video
This option only appears if there are more than one
video components available.
●
●
●
●●
Recording
You can programme timer recordings on the TV set
for USB Recording, or for recorders that are otherwise
connected. The recording wizard is integrated for
programming a recording.
● Manual recording:
Programme the recording manually.
● Current programme:
Record currently watched programme.
Menu item will only be indicated when EPG data is
available for the current station.
● Following programme:
Record following programme.
Menu item will only be indicated when EPG data is
available for the current station.
● Recording via EPG:
Programme recording of a programme via the
electronic programme guide (EPG).
32
●
Open USB REC archive
Opens the USB REC archive. See USB REC
explanation.
See page 49 for more information.
●
●
●
●●
Sound Settings
See adjustments on page 21. Sound
●
●
●
●●
Headphone volume
Adjust the headphone volume for current station.
●
●
●
●●
Picture settings
See adjustments on page 21. Picture
●
●
●
●●
Move picture up/down
With some picture formats the text or graphic displays
at the bottom or on top are not (or only partially) visible.
At this adjust you can move the picture up or down with
cursor keys to make the displays visible.
●
●
●
●●
Favourite
Press on R/C to add current station as favourite to OK
MENU view.
●
●
●
●●
Sorting
Allows you to sort stations numerically or alphabetically.
●
●
●
●●
Edit station list
In this menu you can edit (delete block, move block)
various list. For more information see Stations list TV
on page 23.
When you are watching TV, pressing p button twice,
the next screen will appear:
●
●
●
●●
Detailed info
Shows detailed info of current station.
If there is more information on the selected programme,
it will be indicated here. You find further information on
the indicated programme in the bottom line.
●
View
Watch selected TV programme/ listen to selected
radio programme.
The menu item is only available when the selected
programme is on the air.
●
Memorise
Memorise the programme for later watching/
listening.
This menu is only available when the selected
programme has not yet started.
●
Delete memo
For programmes being memorised you can delete
the memo.
This menu is only available when there are
programmes memorised.
●
Timer
Shows the overview of Timer Services (See page
50).
●
(Recording)
Schedule the recording of the selected programme
for a time.
TV menu options
Detailed information
33

TV menu options
Video function
Press MENU button on the R/C and select Video, to
access the video files.
Video mode
Buttons Description
G/J (short) Jump backwards/forward.
H button When playing videos from Media
Home: Stop playback and return to the
media browser.
From time-shifted television: time
offset finish and switch back to the live
image.
In archive playback: Stop playback and
return to the USB archive.
I button Play the reproduction.
G Backwards. Pressing again changes the
speed.
J Fast forwards. Pressing again changes
the speed.
F button Play / Pause the reproduction.
MENU button Shows the menu to adjust the video
image during reproduction.
f button Performs ZOOM operation in films and
videos.
Buttons for video reproduction mode
Symbols on the screen for video reproduction
Symbols on the screen for USB REC archive
reproduction
Symbols Description
Activate/deactivate current playback file
repetition.
Set/delete manual bookmarks.
Jump to next/previous bookmark.
Shows information about current playback
Call function list video settings.
Call video edit menu.
Symbols Description
Repetition (continuous playback) all video
files of the current folder/directory.
Continuous playback of the current file.
Shows information about current playback.
Call function list video settings.
Change video playback formats.
hh:mm Skip to desired position in the reproduction.
This TV allows you to playback multimedia contents
(photos, music files, videos) that are saved on a USB
stick and on your home network and are made available
via a media server. You may also access the internet
and reproduce photos, music and video files.
You can connect your TV to your home network via
wired Ethernet or by a Wireless connection.
See page 47 for TV Network setup.
34
Reproduces films and videos.
1 Select menu and press .Video OK
2 Pressing ◄ ►/ buttons you can change between
different reproduction sources: USB REC archive,
or .USB/DLNA
USB REC archive: recordings made with USB
REC.
USB/DLNA: files from USB or your home network
Press OK to select the device from which you want
to reproduce the files.
3 Select the file you want to reproduce with ◄ ►/
buttons and press to start the reproduction. OK
4 Press to finish the reproduction.H
5 END Video Press to exit the mode.

1 MENU Audio/Press button on the R/C, select
Radio OK on the menu and press .
2 Pressing and ◄ ►/ buttons select DVB radio
press OK.
Buttons Description
H button End reproduction and return to the music
selection.
F button Play / Pause the reproduction.
I (short) button Play / Stops the reproduction.
G (short)
button
DVB radio:
Select the previous channel.
USB storage or Home network:
Go to the top of the track being played,
jump/select previous track.
J (short) Select next station/track.
G (long) Only USB storage or Home network:
Backwards. Pressing again changes the
speed.
J (long) Only USB storage or Home network:
Forwards. Pressing again changes the
speed.
EPG Only DVB radio:
Shows DVB radio programme guide.
Radio mode
Buttons for audio reproduction
TV menu options
Audio/Radio function
Symbols on the screen for audio file reproduction
Symbols Description
Activate/deactivate current playback file
repetition.
Repetition (continuous playback) all audio
files of the current folder/directory.
Random playback of the audio files of a
folder.
Access detailed information about the file
being played.
Call function list audio settings.
Switch off the screen.
Audio mode
Symbols on the screen for radio reproduction
Symbols Description
Shows the EPG details for current
programme.
Call function list audio settings.
Switch off the screen.
35
Music files from your local servers and USB storage
media as well as DVB and Internet radio, can be found
in the section Audio/Radio. The individual sub-items are
described below.
DVB/Online radio
The TV set can receive digital radio stations via DVB.
USB/DLNA
This option gives you access to music files from your
personal storage media, e.g. from storage media
connected via USB, and from media servers in your
home network to which your TV set is connected.
1 MENU Audio/Press button on the R/C, select
Radio OK on the menu and press .
2 USB/DLNAPressing ◄ ►/ buttons select and
press OK.

AQUOS NET+ option allows you to access to AQUOS
NET+ feature and Internet browser.
For this option it is necessary that the TV set is
connected to Internet (See page 47).
1 Press @ button, select AQUOS NET+ and
press . The next screen appears:OK
2 Press to exit. >
AQUOS NET+ is the feature that allows our Internet
connected TV sets to easily reproduce digital media
content coming from the Network. It provides access to
Internet services (Internet browser, YouTube, Facebook
and much more)
AQUOS NET+ provides a variety of services for each
country.
NOTES
• As AQUOS NET + is an online system, it can be modifi ed
over time to better serve its purpose.
• Some AQUOS NET+ services may be added, changed or
discontinued after some time.
• Even in opern web-mode, users cannot download and save
fi les or install plugins.
DISCLAIMERS
• SHARP Corporation bears no responsibility regarding
the content and quality of the content provided by the
content service provider.
AQUOS NET+ function
TV menu options
What is AQUOS NET+?
The illustrations on this page are for explanation
purposes. They are subject to change without notice.
EDisplay the AQUOS NET+ screen
Press NET on remote control or select AQUOS NET+
on main menu to open AQUOS NET+ home page.
Basic Operation
Operations in AQUOS NET+
AQUOS NET+ screen is organised into 8 areas:
AQUOS NET+ title banner
User-defined Favorites
Recommended Apps
Interactive windows for direct brand communications
or maintenance functions
Media window
Widget Area-real-time functions like date and time
or similar
Sharp Service Center
Interactive Search window
ESelect a service
On AQUOS NET+ screen use▲▼◄►/ / / to select the
desired service, and then press to start it.OK
• Press to return to the previous page.6
You can also use "Search" utility to fi nd specifi c services,
related to a search term.
• Select "Search"and press to access the OK
search page or start typing to directly search to
specific terms.
• To search for a specific keyword, the word is
entered using the virtual keyboard (1). The search
is executed by clicking Start Search (2). The history
of tthe last search terms can be found on the right
side (3).
37
TV menu options
Apps can be re-arranged by the user:
1
Move the cursor to the application that shall be moved.
2 Use Yellow color key to enter arrange-mode.
3 Move selected service to the desired position and
press the yellow color key again to confi rm the new
position.
To dismiss an application from the favorite Apps, place
the cursor on the respective app and press the RED
color-key on the remote control.
EExit AQUOS NET+ screen
Press MENU TV button and select to return to tv mode.
You can also press ATV, , DTV SAT RADIO or button
to exit.
NOTES
• When connecting the TV to the Internet, a message which
requests a software update may be displayed in some
cases.
• Some services can request to the user to Login or create a
personal account. In this case, please follow the indication
on the screen.
• PREMIUM Video-on-Demand (VOD) services are available
in some countries.
• The illustrations on this page are for explanation purposes.
They are subject to change without notice.
• AQUOS NET+ screen language is adapted to the TV set
language previously selected.
• While AQUOS NET+ is active some TV menus or options
could be disabled.
NOTES
• The TV does not support hot plug connection of USB
devices like a keyboard. If you wish to connect any other
device, please do it when the TV is Power Off or in Standby.
• Inside AQUOS NET+ services, please use standard US
characters only (Not extended characters or Special
Country Language dependent), in order to avoid problems
with the applications.
• Using external USB keyboard is not possible to exit from
AQUOS NET+. If necessary, use the remote key.END
• Some types of keyboard could show incompatibilities or
try to use functions not supported by the TV.
Advance Operation
After searching for a specific term, the results are
categorized by their type (1), including the number
of search results. Categories can be hidden and
expanded on request by selecting the close button
(2) in the results overview.
Resting the cursor on a search result will bring up a
preview overlay (3) with information of the selected
content.
EUser sections
The Home Screen is devided in 3 functional areas:
1 Interactive Media Area
This segment is used for the audio-visual
presentation of various types of content.
2 Favorite Apps Area
This area presents the top 8 apps of the user-
defi ned favorite applications, including a link to
all user-defi ned favorite applications.
3 Recommended Apps Area
This area presents a selection of recommended
apps and also includes a link to the “all apps”
screen as described below.
In Area 2 and 3, please use ◄►▲▼/ / / to select a
service you want to access and press OK, direction
arrows appear around the service logo.
EFavorite Apps Screen
This screen gives an overview of all user-defi ned
favorites. Favorites can be selected in the all-apps
screen, as described below. The Top row of apps
is presented on the home-screen. The fi rst row
(1) is automatically presented in the favorite apps
section on the home screen.
38
AQUOS NET+ uses alphanumerical characters within
some services, which can be introduced using the
remote numerical keys, in a similar way that people
use a mobile phone keypad. In order to make this
task easier, the LE650 is ready to use an external USB
keyboard (USB wired, USB-to-Wireless or USB-to-
Bluetooth ready) to work only inside .AQUOS NET+
When an external keyboard is installed on TV set and
the user select AQUOS NET+, then the keyboard
mapping is:
1 (ENTER)/INTRO = OK (R/C). Used to enter inside
any service or to fix data once inside.
2◄ ► ▲ ▼/ / / (U/O/I/K, or u/o/i/k for not extended
keyboard). Used to move between services or scroll
pages on Left/Right direction.
3ESCape =6 (Return R/C). Return to previous page
on services.
4 (Backspace). Erase last character entered.
5A..Z,a..z,0..9, and some US symbols (period or dot,
commercial at @, underscore, hyphen, exclamation,
question, colon, opening parenthesis, closing
parenthesis, number, slash, backslash, space).
Used for Login, Passwords, Date, and so.
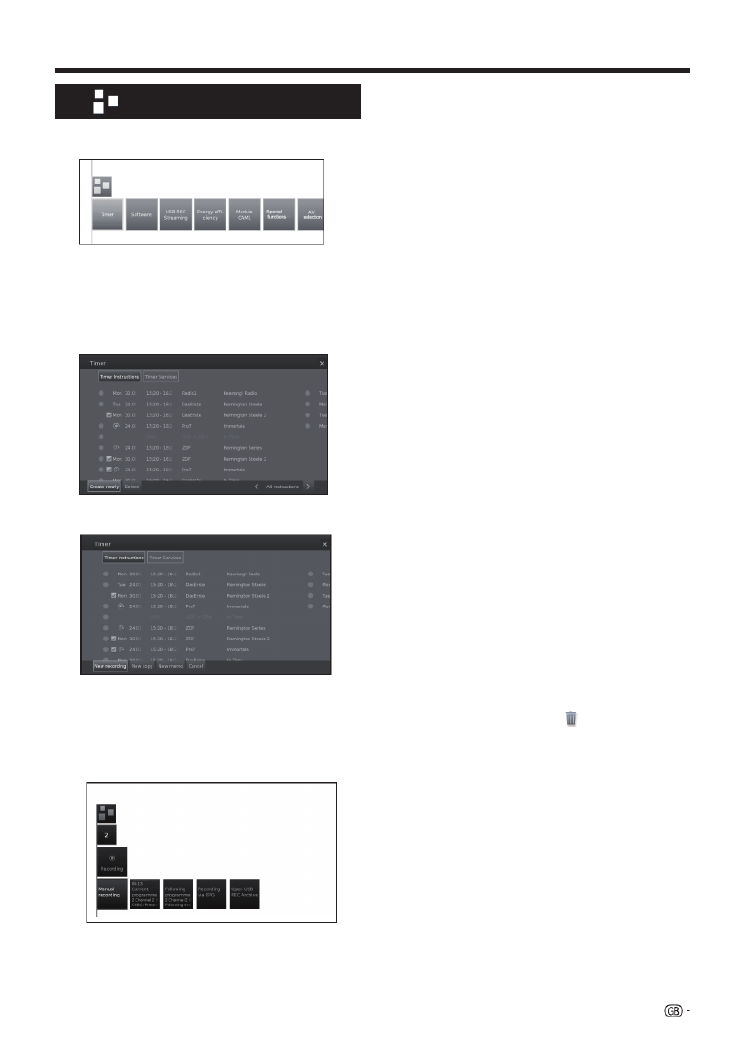
Extras option contains additional functions and
settings:
●
●
●
●●
Timer
In this option you can find your saved Timer Instructions.
●
Timer Instructions
All programmed recordings, programmed
reminders and copies are listed in this screen.
Also it is possible to programme new recordings.
•Create newly
Create new timer instruction.
New recording
1 With select ▲▼◄►/// Create newly and
press OK.
2 With select ▲▼◄►/// New recording and
press OK. The function list for recording will
be opened:
● Manual recording:
Programme the recording manually. See page 51.
Extras function
TV menu options
● Current programme:
Record currently watched programme.
Menu item will only be indicated when EPG data
is available for the current station. See page 50.
● Following programme:
Record following programme.
Menu item will only be indicated when EPG data
is available for the current station. See page 50.
● Recording via EPG:
Programme recording of a programme via the
electronic programme guide (EPG). See page
50.
● Open USB REC archive
Opens the USB REC archive. See page 51.
3 With ▲▼◄►/// select the desired option
and press to proceed. OK
-New copy
You should copy recordings that you want to save
permanently on an external USB hard disk.
1 With select ▲▼◄►/// Cr
eate newly and
press OK.
2 With select ▲▼◄►/// New copy and press
OK. The function list for USB REC archive
will be opened. See page 49.
3 With ▲▼◄►/// select the desired option
and press to proceed. OK
-New memo (EPG event)
You can set a timer as a reminder for programmes
which have not yet started.
1 With select ▲▼◄►/// Cr
eate newly and
press OK.
2 With select ▲▼◄►/// New memo and
press . The EPG will be called.OK
The TV will ask at the beginning of a programme if it
should change the channel accordingly.
-Delete
Use this function in the overview of timer
instructions if you want to delete recordings already
programmed or end a running timer recording.
1 With ▲▼◄►/// select Delete and pr
ess OK.
2 With ▲ ▼/ select the timer instruction to be
deleted and press OK. Ahead of the entry
appears a delete icon .
3 With select ▲▼◄►/// Confirm delete
option and press to delete timer OK
instructions.
Select to rCancel eturn to Timer Instructions.
NOTE
• When you have programmed timer recordings, the TV
can only be switched off in the standby mode.
●
●
●
●●
Software
This option allows you to have the TV software version
always updated. You can download new software from
different sources:
●
Software update
●
Via USB
Current software version can be downloaded from
the SHARP Internet site and installed on your TV
using a USB memory.
39

Here you can find all settings and adaptabilies of the
TV set.
●
●
●
●●
Picture
Allows you to adjust the settings according to the
representation of the picture signal on the TV.
See page 21 for more information.
●
●
●
●●
Sound
Allows you to find the settings for sound playback.
The sub-items of the menu depend on the currently
selected sound component.
See page 21 for more information.
●
●
●
●●
Stations
Move and delete TV and radio stations. In addition to
that you can automatically and manually update the
complete station list. The stations can also be arranged
and optionally sorted in personal lists.
See page 22 for more information.
●
●
●
●●
Control
In this menu you find settings for additional functions of
the TV set such as digital recorder (USB REC) as well as
interfuctional settings like time and date, parental lock
or software update.
See page 24 for more information.
●
●
●
●●
Multimedia/Network
In this menu you can configure your network adapter
and network access. Also you can make settings for
video and music playback here.
See pages 28 and 47 for more information.
●
●
●
●●
Connections
In this menu you can configure external devices that are
connected to the TV.
See page 28 for more information.
Setup function
TV menu options
●
Via Internet
The software update wizard appear.
See page 27 for more information.
●
Via antenna
The software update wizard appear.
●
●
●
●
● Energy Efficiency
Decide how energy efficient the TV shall be.
●Home Mode:
The emphasis for home use is on low energy
consumption.
The automatic dimmer is activated.
●Shop Mode:
The picture settings are aligned to operate in
the presentation room. The automatic dimmer is
deactivated. If the ambient brightness diminishes, the
energy consumption is not reduced.
●
●
●
●●
CA module(s)
In order to receive coded digital stations, a Common
Interface Module (CI Module) and a CA Card must be
inserted in the CI slot of the TV.
See page 8 for more information.
●
●
●
●●
Special functions
●
Integrated features
Shows information about TV's integrated features.
●
Repeat initial installation
This option allows you to repeat all steps for initial
installation. See the procedure at page 9.
NOTE
• All stored stations and all personal lists will be deleted.
●
Reset to factory settings
Allows you to reset Picture/Sound Network and
settings.
●
●
●
●●
AV selection
Allows you to select the AV source.
If the selected AV source provides a signal it should be
visible now.
40

Connecting external devices
EBefore connecting ...
• Be sure to turn off the TV and any devices before making any connections.
• Firmly connect a cable to a terminal or terminals.
• Carefully read the operation manual of each external device for possible connection types. This also helps you get
the best possible audiovisual quality to maximise the potential of the TV and the connected device.
Introduction to connections
The TV is equipped with the terminals as shown below. Find the cable corresponding the TV’s terminal and connect
the device.
NOTE
• The cables illustrated in pages 41, 42 and 43 are commercially available items.
41
Audio device
(Page 43)
Video recording device
(Pages 42 and 43)
Game console or
camcorder (Page 42)
HDMI device
(Page 42)
Audio cable
HDMI-ARC
Audio cable
HDMI-certified cable
DVI/HDMI Cable
ø 3.5 mm stereo mini jack cable
AV cable
SCART cable
Components cable
Audio cable
HDMI-certified cable
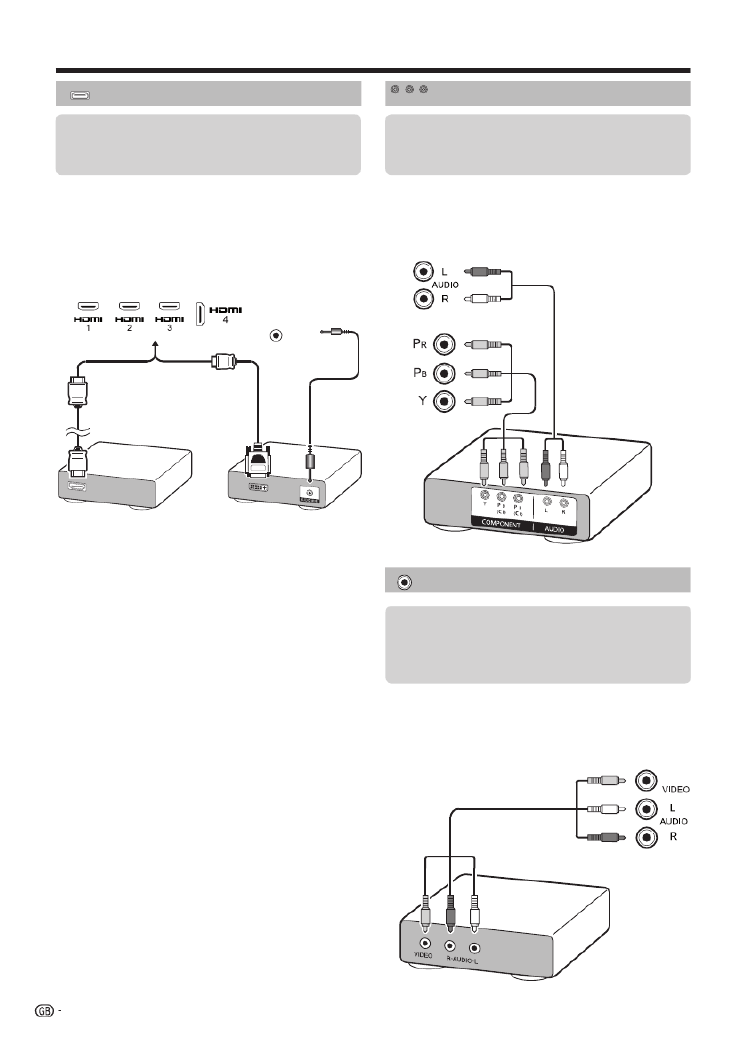
Connecting external devices
The HDMI connections permit digital video and audio
transmission via a connection cable from a player/
recorder. The digital picture and sound data are
transmitted without data compression and therefore
lose none of their quality. Analogue/digital conversion
is no longer necessary in the connected devices, which
also would result in quality losses.
DVI/HDMI conversion
Using a cable DVI/HDMI, the digital signals of a DVD
video, can also be reproduced through a compatible
HDMI connection. The sound should be supplied
additionally.
• On connecting a DVI/HDMI cable to the HDMI terminal, the
picture may not be visualised clearly.
• Both HDMI and DVI use the same method of HDCP
protection against copy.
• For connecting a DVI cable, a commercially available adaptor
(not supplied) is necessary.
NOTE
• Depending on the type of HDMI cable used, a video noise
may appear. Be sure to use a certified HDMI cable.
• On reproducing HDMI picture, the best format is
automatically detected and adjusted for the picture
.
Compatible video signal
576i, 576p, 480i, 480p, 1080i, 720p, 1080p
Component connection
You will enjoy accurate colour reproduction and high
quality images through the INPUT COMPONENTS /
AV terminal when connecting a DVD player/recorder or
other device.
You can use the COMPONENTS/AV terminal when
connecting to a game console, camcorder, a DVD
player / recorder or other device.
VIDEO connection
HDMI connection
Example of connectable devices
●
VCR
●
DVD player/recorder
●
Blu-ray player/recorder
Example of connectable devices
●
DVD player/recorder
●
Blu-ray player/recorder
●
Game console
42
HDMI / PC
ANALOG
AUDIO
INPUT
(ARC)
Audio cable
Components
cable
AV cable
Example of connectable devices
●
VCR
●
DVD player/recorder
●
Blu-ray player/recorder
●
Game console
●
Camcorder
Y PB
(
CB)
PR
(
CR)
RCA / ø 3.5 mm
stereo mini jack cable
DVI/HDMI
cable
HDMI-certified
cable

HDMI devices
Controlling HDMI devices using
HDMI CEC
EWhat is HDMI CEC?
Using the HDMI CEC protocol, you can interactively
operate compatible system devices (AV amplifier, DVD
player/recorder, Blu-ray player/recorder) using a single
remote control unit.
NOTE
• HDMI CEC does not work while using functions.USB REC
EWhat you can do with HDMI CEC
One touch play
When the TV is in standby mode, it will automatically
turn on and play back the image from the HDMI
source.
Single remote control operation
HDMI CEC automatically recognises connected
HDMI devices and you can control the TV and the
devices as if using a universal remote control unit.
Operating title list of external devices
In addition to displaying the TV’s own timer list (Page
36), you can also call up the external player’s top
menu or player’s / recorder’s title list provided that the
devices support HDMI CEC.
NOTE
• When you use HDMI CEC, be sure to use a certified HDMI
cable.
• Point the remote control unit towards the TV, not to the
connected HDMI device.
• Video noise may occur depending on the type of HDMI
cable used. Be sure to use a certified HDMI cable.
• Up to three HDMI recording devices, one AV amplifier and
three players can be connected using this system.
• These operations affect the HDMI device selected as the
current external source. If the device does not operate, turn
on the device and select the appropriate external source
using .b
• When you insert/remove HDMI cables or change
connections, turn on all connected HDMI devices before
turning on the TV. Confirm that picture and audio are
correctly displayed/output by selecting “HDMI 1”, “HDMI 2”,
“HDMI 3” or “HDMI 4” from the “AV selection” menu.
HDMI CEC connection
First connect the speaker system or a player/recorder
that supports the HDMI CEC protocol.
NOTE
• Refer to the operation manual of the device to be connected
for further details.
• After unplugging connection cables or changing the
connection pattern, turn on the power of the TV after all the
power of relevant devices has been turned on. Change the
external input source by pressing , select the appropriate b
external source and verify the audiovisual output.
• The cables illustrated in the following explanation are
commercially available items.
HDMI-certified cable (commercially available)
RCA audio cable (commercially available)
Player / Recorder Speaker
system
Connecting a player/recorder via the
speaker system
Connecting a player/recorder only
Player/Recorder
HDMI-certified cable (commercially available)
HDMI CEC (Consumer Electronics
Control) menu
Go to Menu Setup Connections→ → →HDMI CEC
and select the menu you want to set.
Set to to enable HDMI CEC functions.On
If this is activated, the one touch play function is enabled.
While the TV is in standby mode, it automatically turns
on and plays back the image from the HDMI source.
NOTE
• The factory default for this item is “Off”.
Basic operation
HDMI CEC functionality
Remote TV switch on via HDMI-CEC
(One-touch play)
When a device that supports HDMI CEC is connected,
the R/C of TV does not work.
By short pressing of SOURCE button the R/C will be
operational again and TV goes to TV mode.
By long pressing of button the TV return to SOURCE
HDMI-CEC mode.
Operating a HDMI CEC device
44

HDMI (DVI) Connection
HDMI 1, 2, 3 or 4
PC connection
Connecting a PC
Analogue Connection
VGA cable
You can select the picture size.
1 MENUPress on the remote control.
2 Setup Picture Select → → Picture format, then
press .OK
3 Press ◄ ►/ key to select the desired item, then
press OK.
NOTE
• You can also select an item by pressing on the remote f
control unit.
• Connect the PC before making adjustments.
• Selectable picture size may vary with input signal type.
NOTE
• When using the PC-IN terminal it is necessary to connect
an audio cable.
4:3 PC 16:9 PC
Example
●
●
●
●
● After connection
● If after connecting a PC to the TV through a HDMI
cable, the audio does not run, connect a mini stereo
connector of ø 3.5mm between TV and PC as
indicated in the previous drawing.
● When a PC is connected to the TV with a DVI
cable, it will be necessary to connect a mini stereo
connector of ø 3.5mm of the TV to PC as indicated
in the previous drawing.
Selecting the picture size
45
ø 3,5 mm stereo
mini jack cable
ø 3,5 mm stereo
mini jack cable
DVI/VGA Conversion cable
PC
PC HDMI-certified cable
ø 3,5 mm stereo mini
jack cable
DVI/HDMI Cable
Item
16:9 PC Proportionally correct display of 16:9
4:3 PC Proportionally correct display of 4:3
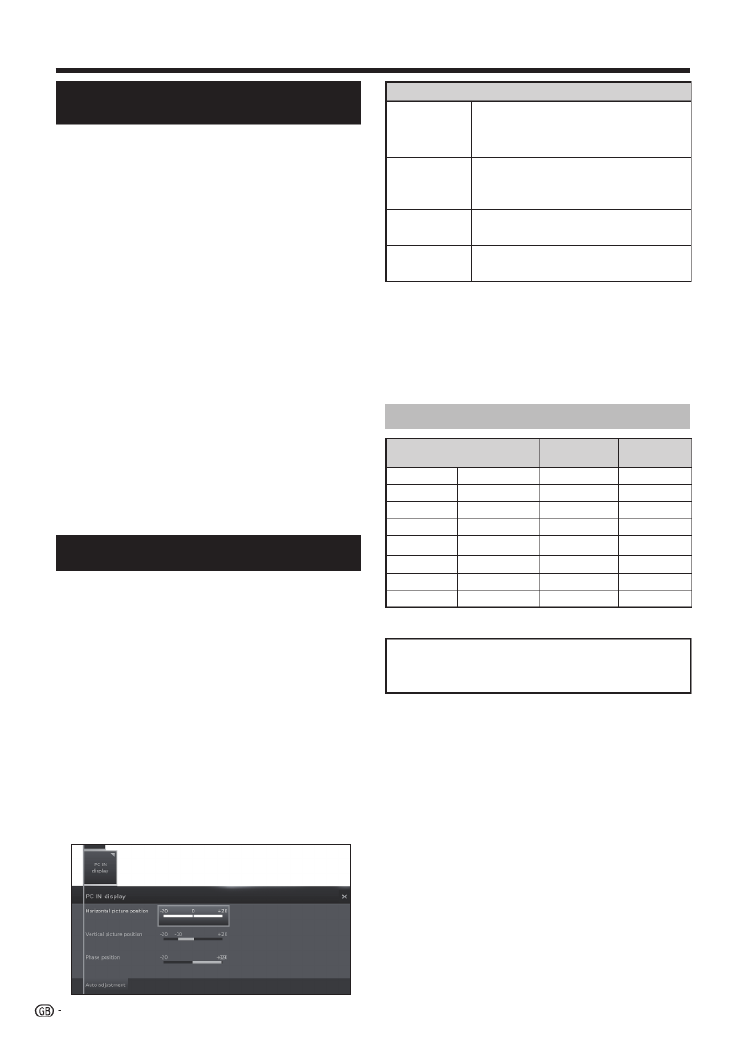
Resolution Horizontal
Frequency
Vertical
Frequency
VGA 640 480g31,5 kHz 60 Hz
SVGA 800 600g37,9 kHz 60 Hz
XGA 1.024 768g48,4 kHz 60 Hz
WXGA 1.360 768g47,7 kHz 60 Hz
SXGA 1.280 1.024g64,0 kHz 60 Hz
SXGA+ 1.400 1.050g65,3 kHz 60 Hz
UXGA 1.600 1.200g75,0 kHz 60 Hz
1080p 1.920 1.080g67,5 kHz 60 Hz
PC compatibility chart
NOTE
• This TV has only limited PC compatibility, correct operation
can only be guaranteed if the video card conforms exactly to
the VESA 60 Hz standard. Any variations from this standard
may result in picture distortions.
VGA, SVGA, XGA, WXGA, SXGA, SXGA+ and UXGA are
registered trademarks of International Business Machines
Corporation.
1
1
This function enables the screen to be automatically
adjusted to its best possible condition when the
analogue terminals of the TV and PC are connected
with a commercially available DVI/VGA conversion
cable, etc.
1 PC-INPress b to select from AV selection,
and then press .OK
2 MENUPress key.
3 SetupPress key to select ► and press .OK
4 Press ▼ key to select Picture
→more... and press
OK.
5 Press ► key to select and pressPC IN display
OK.
6 Press ▼key to select Auto Adjustment and
press OK.
NOTE
• When connecting a PC and select source, the PC-IN “Auto
adjustment” is executed automatically.
• “Auto adjustment” may fail if the PC image has low
resolution, has unclear (black) edges, or is moved while
executing .“Auto adjustment”
• Be sure to connect the PC to the TV and switch it on before
starting “Auto adjustment”.
• “Auto adjustment” can be executed only when inputting
analogue signals through the “PC IN” terminal.
Adjusting the PC image
automatically
Adjusting the PC image manually
Ordinarily you can easily adjust the picture as necessary
to change image position using “Auto Adjustment”.
In some cases, however, manual adjustment is needed
to optimise the image.
1 PC-INPress b to select fr
om AV selection,
and then press .OK
2 MENUPress on the remote control.
3 Setup Picture more...Select → → , then press
OK.
4 “PC IN display” Press key to select► , then
press OK.
5 Press key to select the desired item, then ▲ ▼/
press OK.
6 Press ◄ ►/ to adjust the item to the desired
position.
Item
Horizontal
picture
position.
Centres the image by moving it to the
left or right.
Vertical
picture
position
Centres the image by moving it up or
down.
Phase
position
Adjusts when characters have low
contrast or when the image fl ickers.
Auto
Adjustment
Automatically adjusts the image
Connecting a PC
NOTE
• The “PC IN display” options in the “Picture” menu can be
adjusted only when inputting analogue signals through the
“PC IN” terminal.
• Depending on resolution, the vertical/horizontal manual
range can be different.
46
Termékspecifikációk
| Márka: | Sharp |
| Kategória: | televízió |
| Modell: | LC-50LE650V |
Szüksége van segítségre?
Ha segítségre van szüksége Sharp LC-50LE650V, tegyen fel kérdést alább, és más felhasználók válaszolnak Önnek
Útmutatók televízió Sharp

9 Április 2025
6 Április 2025
28 Március 2025
27 Március 2025
18 Március 2025
18 Március 2025
13 Január 2025
13 Január 2025
13 Január 2025
13 Január 2025
Útmutatók televízió
- televízió Samsung
- televízió Sony
- televízió Yamaha
- televízió Beko
- televízió Fujitsu
- televízió Electrolux
- televízió Acer
- televízió Nedis
- televízió LG
- televízió Grundig
- televízió Marantz
- televízió Philips
- televízió Pioneer
- televízió SilverCrest
- televízió Panasonic
- televízió JVC
- televízió AEG
- televízió Nokia
- televízió Lenovo
- televízió Casio
- televízió Toshiba
- televízió Oppo
- televízió Hyundai
- televízió Hisense
- televízió BenQ
- televízió SunBriteTV
- televízió Siemens
- televízió Medion
- televízió TCL
- televízió Xiaomi
- televízió GoGen
- televízió Insignia
- televízió Infiniton
- televízió Dell
- televízió Strong
- televízió VOX
- televízió Vivax
- televízió Thomson
- televízió Polaroid
- televízió Aiwa
- televízió Orima
- televízió V7
- televízió Clatronic
- televízió PEAQ
- televízió Qilive
- televízió Haier
- televízió Mitsubishi
- televízió Cecotec
- televízió Sencor
- televízió GPX
- televízió Küppersbusch
- televízió Innoliving
- televízió AOC
- televízió Citizen
- televízió Westinghouse
- televízió Hitachi
- televízió Continental Edison
- televízió Telefunken
- televízió Nevir
- televízió Monster
- televízió Roadstar
- televízió Optoma
- televízió CHiQ
- televízió Viewsonic
- televízió Nextbase
- televízió Denver
- televízió Bush
- televízió Trevi
- televízió Albrecht
- televízió Daewoo
- televízió Funai
- televízió Tesla
- televízió Smart Tech
- televízió Muse
- televízió Energy Sistem
- televízió OK
- televízió SVAN
- televízió Loewe
- televízió RevolutionHD
- televízió Polar
- televízió Manhattan
- televízió Kogan
- televízió Horizon
- televízió Intenso
- televízió Furrion
- televízió Teac
- televízió Aspes
- televízió Digihome
- televízió Manta
- televízió Blaupunkt
- televízió Sagem
- televízió Jay-Tech
- televízió Logik
- televízió Finlux
- televízió Peerless-AV
- televízió Abus
- televízió AG Neovo
- televízió Bang & Olufsen
- televízió Iiyama
- televízió AKAI
- televízió TechniSat
- televízió Seiki
- televízió Jensen
- televízió Pyle
- televízió Emerson
- televízió Sanyo
- televízió Kemo
- televízió Salora
- televízió Lenco
- televízió Schneider
- televízió Philco
- televízió ECG
- televízió Uniden
- televízió Technika
- televízió NEC
- televízió Element
- televízió Soundmaster
- televízió Alphatronics
- televízió AYA
- televízió MBM
- televízió Krüger&Matz
- televízió Dual
- televízió Brandt
- televízió Wharfedale
- televízió Allview
- televízió RCA
- televízió OKI
- televízió Orion
- televízió SereneLife
- televízió Schaub Lorenz
- televízió Luxor
- televízió Metz
- televízió ILive
- televízió Graetz
- televízió Tatung
- televízió Packard Bell
- televízió EasyMaxx
- televízió Orava
- televízió Arçelik
- televízió Planar
- televízió Zenith
- televízió Doffler
- televízió QBell Technology
- televízió SYLVOX
- televízió Majestic
- televízió Reflexion
- televízió FFalcon
- televízió Megasat
- televízió Sogo
- televízió United
- televízió Techwood
- televízió Newstar
- televízió Matsui
- televízió Alden
- televízió Aldi
- televízió Airis
- televízió Aristona
- televízió Apex
- televízió Ziggo
- televízió Icy Box
- televízió Lexibook
- televízió Palsonic
- televízió Walker
- televízió Saba
- televízió Antarion
- televízió Kernau
- televízió Tevion
- televízió Proscan
- televízió Vestel
- televízió Tucson
- televízió Sunstech
- televízió Nabo
- televízió Sylvania
- televízió Sunny
- televízió Marquant
- televízió Nordmende
- televízió AudioAffairs
- televízió Magnum
- televízió Audiosonic
- televízió Kubo
- televízió Proline
- televízió Coby
- televízió Seg
- televízió Vivo
- televízió Daitsu
- televízió Terris
- televízió Changhong
- televízió Alba
- televízió Naxa
- televízió Star-Light
- televízió Fantec
- televízió Mpman
- televízió Sweex
- televízió Vizio
- televízió Cello
- televízió Mx Onda
- televízió Nikkei
- televízió Hannspree
- televízió DGM
- televízió Yasin
- televízió Humax
- televízió XD Enjoy
- televízió MT Logic
- televízió Superior
- televízió Kunft
- televízió Difrnce
- televízió ITT
- televízió Grunkel
- televízió Avtex
- televízió Inovia
- televízió Odys
- televízió NPG
- televízió Bluesky
- televízió Videocon
- televízió Xoro
- televízió Durabase
- televízió HKC
- televízió Edenwood
- televízió Woxter
- televízió Premier
- televízió Onn
- televízió Teleco
- televízió Opera
- televízió LTC
- televízió JTC
- televízió Zalman
- televízió Ferguson
- televízió Viewpia
- televízió XS4ALL
- televízió JGC
- televízió Online
- televízió Dyon
- televízió DirecTV
- televízió Tele 2
- televízió Telesystem
- televízió EKO
- televízió E-motion
- televízió Mitsai
- televízió Selfsat
- televízió High One
- televízió Tve
- televízió ISymphony
- televízió Pantel
- televízió Magnavox
- televízió ATYME
- televízió HCI
- televízió Inno-Hit
- televízió Lin
- televízió Engel
- televízió Bang Olufsen
- televízió TechLine
- televízió Elements
- televízió Englaon
- televízió Time
- televízió Reflex
- televízió Astar
- televízió Visco
- televízió Tivax
- televízió H&B
- televízió Norcent
- televízió TELE System
- televízió TIM
- televízió Oyster
- televízió Belson
- televízió Vision Plus
- televízió Sbr
- televízió Bauhn
- televízió Voxx
- televízió Rm 2000
- televízió Hoher
- televízió Felson
- televízió Mach Power
- televízió Elbe
- televízió Axing
- televízió CGV
- televízió Séura
- televízió Mitzu
- televízió Caratec
- televízió JTC24
- televízió Coocaa
- televízió Kivi
- televízió Smart Brand
- televízió Voxicon
- televízió Aconatic
- televízió Mitchell & Brown
- televízió FOX Electronics
- televízió Mystery
Legújabb útmutatók televízió

10 Április 2025

10 Április 2025

10 Április 2025

9 Április 2025
9 Április 2025
9 Április 2025
9 Április 2025

9 Április 2025
9 Április 2025
9 Április 2025