Használati útmutató Samsung SyncMaster 181B
Olvassa el alább 📖 a magyar nyelvű használati útmutatót Samsung SyncMaster 181B (65 oldal) a Monitor kategóriában. Ezt az útmutatót 3 ember találta hasznosnak és 2 felhasználó értékelte átlagosan 4.5 csillagra
Oldal 1/65

SyncMaster 171B/171S/181B
TFT-LCD Monitor
User's Manual

User’s Manual 2
Index
Main Page On-Screen Display
Safety Instructions Troubleshooting
Notational Check List
Power Q & A
Installation Self-Test Feature Check
Cleaning
Other
Introduction Specifications
Unpacking General Specifications
Front PowerSaver
Rear Preset Display Modes
Setup Information
Connecting Your Monitor Service
Installing the Monitor Driver Terms
— Windows XP R gulatorye
— Other Operating System Natural Color
Installing VESA compliant
mounting For Better Display
Authority

User’s Manual 3
Safety Instructions
Failure to follow directions noted by this symbol could result in bodily harm or damage to equipment.
Notational
Warning/Caution
Notation Conventions
Prohibited Important to read and understand at all times
Do not disassemble Disconnect the plug from the outlet
Do not touch Grounding to prevent an electric shock

User’s Manual 4
Safety Instructions
When not used for extended periods of time, set your PC to DPMS. If using a screen saver,
set it to the active screen mode.
If the size of your monitor is small, or if the same image is present for long periods of time, you
may see afterimages due to damage to the flourescent substance on the inside of the
TFT-LCD.
•Do not use a damaged or loose plug.
•This may cause an electric shock or fire.
•Do not pull the plug out by the wire nor touch the plug
with wet hands.
•This may cause an electric shock or fire.
•Use only a properly grounded plug and recepticle.
•An improper ground may cause electric shock or equipment damage
•Do not excessively bend the plug and wire nor place
heavy objects upon them, which could cause damage.
•Failure to do so may cause an electric shock or fire.
Power

User’s Manual 5
Safety Instructions
•Disconnect the plug from the outlet during storms or
lightening or if it is not used for a long period of time.
•Failure to do so may cause an electric shock or fire.
•Do not connect too many extension cords or plugs to an
outlet.
•This may cause a fire.
Power

User’s Manual 6
Safety Instructions
•Do not cover the vents on the monitor cabinet.
•Bad ventilation may cause a breakdown or fire.
•Put your monitor in a location with low humidity and a
minimum of dust.
•An electric shock or fire could result inside the monitor.
•Do not drop the monitor when moving it.
•This may cause damage to the product or human body.
•Place the monitor on a flat and stable surface.
•The monitor can cause injury by falling.
•Set down the monitor carefully.
•It could be damaged or broken.
Installation

User’s Manual 7
Safety Instructions
•Do not place the monitor face down.
•The TFT-LCD surface may be damaged.
Installation

User’s Manual 8
Safety Instructions
•Do not spray detergent directly on the monitor.
•Use the recommended detergent with a smooth cloth.
•If the connector between the plug and the pin is dusty or
dirty, clean it properly with a dry cloth.
•A dirty connector can cause an electric shock or fire
•Do not set a glass of water, chemicals or any small metal
objects on the monitor.
•This may cause damage, electric shock or a fire.
•If a foreign substance gets into the monitor, disconnect the plug and
then contact a service center.
Clean
When cleaning the monitor case or the surface of the TFT-LCD, wipe with a slightly
moistened, soft fabric.

User’s Manual 9
Safety Instructions
•Do not remove cover(or back). No user serviceable parts
inside.
•This may cause an electric shock or a fire.
•Refer servicing to qualified service personnel.
•If your monitor does not operate normally - in particular,
if there are any unusual sounds or smells coming from
it - unplug it immediately and contact an authorized deal-
er or service.
•This may cause an electric shock or a fire.
•Do not place any heavy objects on the monitor.
•This may cause an electric shock or a fire.
•For each hour of looking at the monitor, you should let
your eyes rest for 5 minutes.
•This will reduce eye fatigue.
•Do not use or store inflammable substances near the
monitor.
•This may cause an explosion or fire.
Other
User’s Manual 10
Safety Instructions
•Do not try to move the monitor by pulling on the wire or
the signal cable.
•This may cause a breakdown, electric shock or a fire due to damage
to the cable.
•Do not move the monitor right or left by pulling only the
wire or the signal cable.
•This may cause a breakdown, electric shock or a fire due to damage
to the cable.
•Never insert anything metallic into the monitor openings.
•This may cause an electric shock, fire or injury.
•Keep the monitor away from any magnetic substances.
•This may cause discoloring or distortion of the image.
Other
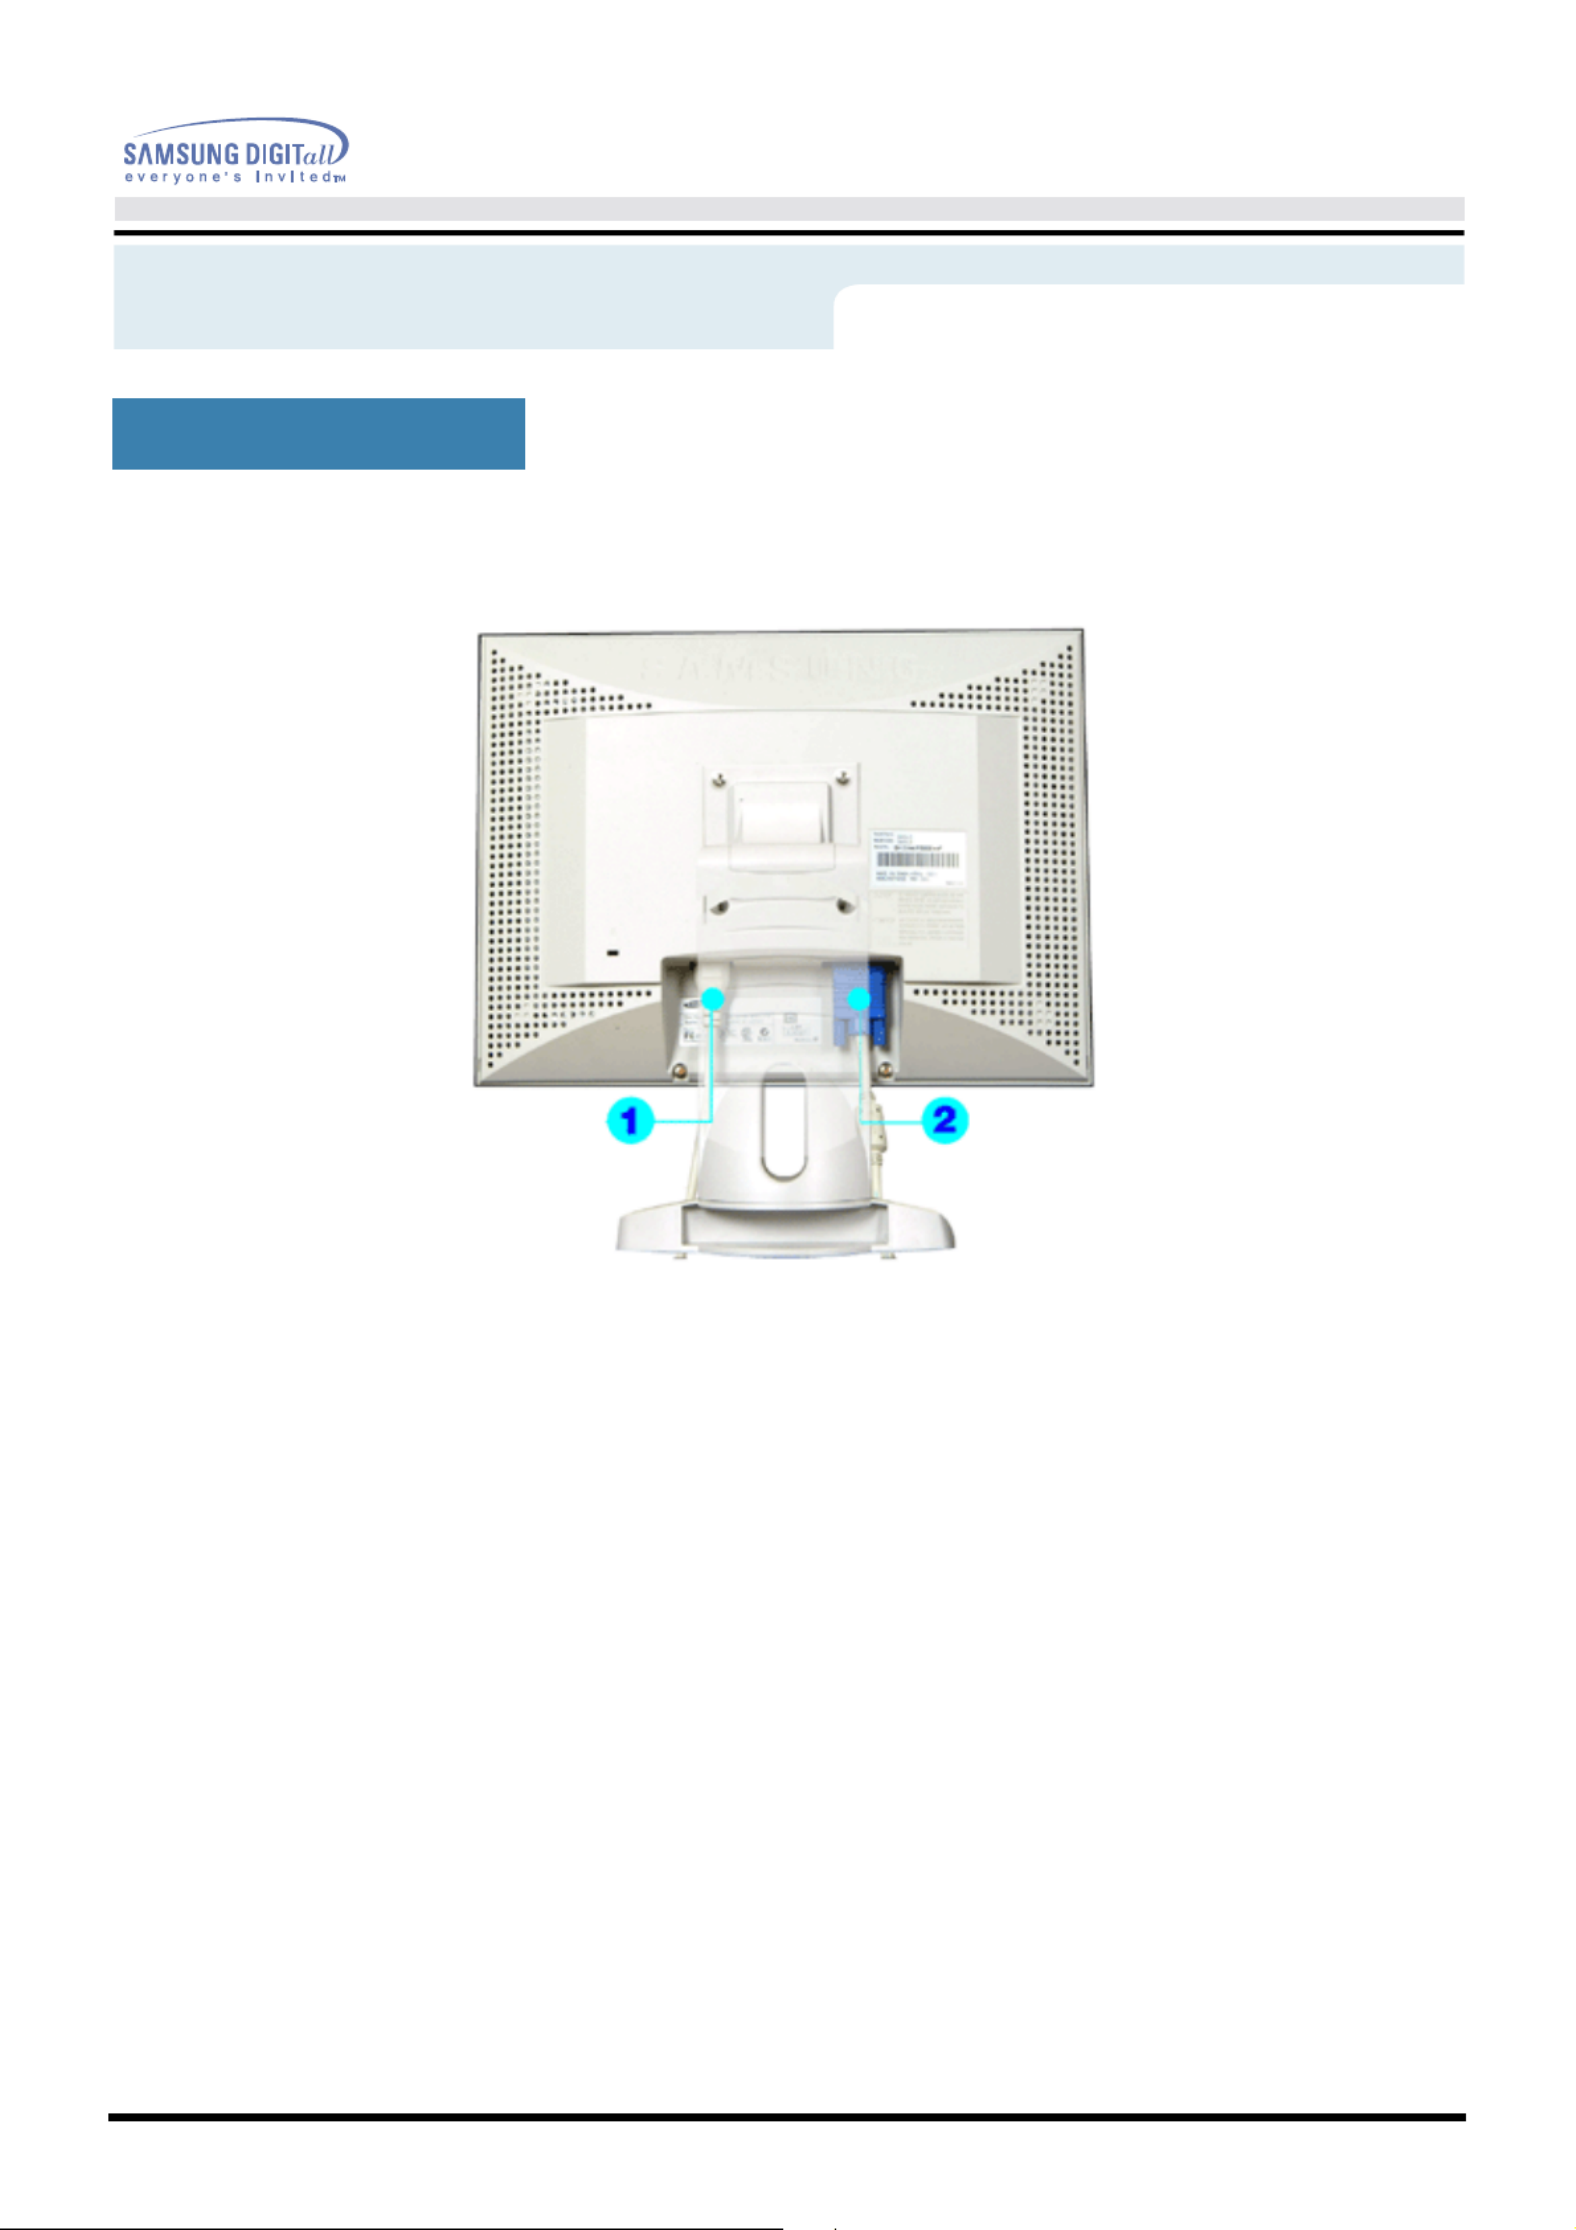
User’s Manual 13
Introduction
(The configuration at the back of the monitor may vary from product to product.)
1. Power port :Connect the power cord for your monitor to the power port
on the back of the monitor.
2. Signal cable :Connect the end of the signal cable to your computer's video port.
(video board, video card or graphics card)
Note :See Connecting Your Monitor for further information regarding cable connections.
Rear

User’s Manual 14
Setup
1. Connect the power cord for your monitor to the power port on the back of the monitor.
Plug the power cord for the monitor into a nearby outlet.
2. Connect the signal cable to the 15-pin, D-sub connector on the back of your monitor.
3. If you are using a Macintosh computer, connect the cable to a Macintosh adapter, and set the
pins on your adapter(Adapter not included). A PC-compatible computer does not need an
adapter.
Note : Turn on your computer and monitor. If your monitor displays an image, installation is
complete.
Connecting Your Monitor

User’s Manual 15
Setup
.
1. Insert CD into the appropriate drive(D:\).
2. For CD-ROM disk,it will be run automatically, if not, double click monsetup.exe file on D:\.
3. Click the Monitor Driver Installation.
4. Choose your monitor model in the model list, then click the "OK" button.
5. Click the "Install" button in the "Warning" window.
6. If you can see following "Message" window, then click the "Continue Anyway" button.
Installing the Monitor Driver
When prompted by the operating system for the monitor driver,
insert the CD-ROM included with this monitor.
Driver installation is slightly different from one operating system to another.
Follow the directions as appropriate for the operating system you have.
Prepare a blank disk and download the driver program file at the Internet web site
shown here.
• Internet web site : http://www.samsung-monitor.com/(Worldwide)
http://www.samsungmonitor.com/ (USA)
http://www.sec.co.kr/ (Korea)
http://www.samsungmonitor.com.cn/ (China)
Auto Monitor Installation Guide

User’s Manual 16
Setup
.
( This monitor driver is under certifying MS Logo, and this installation don't damage your system.)
Then click "OK" button.
*The certified driver will be posted on Samsung Monitor Homepage.
http://www.samsungmonitor.com
7. Monitor Driver installation is completed.
1. Insert CD into the appropriate drive(D:\).
2. Click "Start"-"Control Panel" then click the "Appearance and Themes" icon.
3. Click "Display" icon and choose the "Settings" tab then click "Advanced.."
4. Cl k t e ic h "P r erope ti s" utt n on theb o " Monitor" ab nd e e tt a s l c "Dri ev r" .tab
5. Cl kic "Upd te Dria ver.." a d e e t n s l c "Ins a st ll from a li t o r..." th n k e clic "Next" b tto . u n
6. S le te c "D t sea ch ,I w lon' r i l.. th n k" e clic "Next" a d th n k n e clic "Ha e disv k".
7. Cl k theic "Browse" b tton hen h o e D:\D er and c oo e y ur mo t r m del in t e mo el t and c i k u t c o s riv h s o ni o o h d lis l c
the "Next" button.
8. If c n ee ol ow "you a s f l ing Mess eag " wi dow, then k the n clic "Co untin e A y ayn w " b tto . u n
( This monitor driver is under certifying MS Logo, and this installation don't damage your System.)
Then click "
Finish " button.
*The certified driver will be posted on Samsung Monitor Homepage.
http://www.samsungmonitor.com
9. Cl ck t e i h "Close" utt n th n kb o e clic "OK" butt on in a .on c t u lly
1 .0 Mo it r D er i st at on s c mp et d. n o riv n all i i o l e
Installing the Monitor Driver
Auto Monitor Installation Guide
Manual Monitor Installation Guide

User’s Manual 17
Setup
.
1. If the window include your monitor model, then click the "Yes" button.
2. Choose "OK" button on the "Insert Disk" window.
3. Click the "Browse" button on the "File Needed" window.
4. Choose D:\Win2000 then click the "Open" button and then click the "OK" button.
Installing the Monitor Driver
When prompted by the operating system for the monitor driver,
insert the CD-ROM included with this monitor.
Driver installation is slightly different from one operating system to another.
Follow the directions as appropriate for the operating system you have.
Prepare a blank disk and download the driver program file at the Internet web site
shown here.
• Internet web site : http://www.samsung-monitor.com/(Worldwide)
http://www.samsungmonitor.com/ (USA)
http://www.sec.co.kr/ (Korea)
http://www.samsungmonitor.com.cn/ (China)
When you can see the "Digital Signature Not Found" on your monitor, follow
these steps.

User’s Manual 18
Setup
1. Insert CD-ROM into the driver.
2. Dou le Cl k et p.e e f le on :\b ic S u x i D Driver
3. Choose your monitor model in the model list, then click the "OK" button.
4. Click the "Install" button in the Warning Window.
5. Click the "OK" button.
If you can see the "Digital Signature Not Found" window then click the "Yes" button. And click the "OK" button.
.
1. Click "Start", "Setting", "Control Panel".
2. Dou le Cl k t e i on. b ic h "Di p as l y" c
3. Choose the "Settings" tab then click "Advanced"
4. Choose "Monitor".
Case1:If the "Properties" button is inactive, it means your monitor is properly configured.
Please stop installation.
Case2:If the "Properties" button is Active, click "Properties" button.
Pleae follow next step continually.
5. Click "Driver" and then click on "Update Driver" then click on the "Next" button.
6. Choose "Display a list of the known drivers for this device so that I can choose a specific driver" then click
"Next" and then click "Have disk".
7. Cl kic " w e"Bro s button th n ho e D:\ . e c os Driver
8. Click the "Open" button,then click the "OK" Button.
9. Choose your monitor model and click the "Next" button then click "Next" button.
10. Click "Finish" button then the "Close" button.
If you can see the "Digital Signature Not Found" window then click the "Yes" button. And click the "Finish" button
then the "Close" button.
Auto Monitor Installation Guide
Manual Monitor Installation Guide
User’s Manual 19
Setup
.
1. Insert the CD-ROM into the driver on your computer.
(If it does not run automatically, use Windows Explorer and then double click monsetup.exe located under
the CD-ROM Driver folder.)
2. If a e u ng dows 5/9 /M , kyou r si Win 9 8 E clic Monitor Driver Installation.
3. Click OK after selecting the applicable model.
4. Click Install.
5. If an error message cannot open icm file comes up, select BROWSE.
6. If using Windows 95/98/ME, double click setup.exe(D:\Driver).
7. Click OK.
When prompted by the operating system for the monitor driver, insert the
CD-ROM included with this monitor. Driver installation is slightly different
from one operating system to another. Follow the directions as appropriate
for the operating system you have.
Prepare a blank disk and download the driver program file at the Internet web
site shown here.
• Internet web site : http://www.samsung-monitor.com/(Worldwide)
http://www.samsungmonitor.com/ (USA)
http://www.sec.co.kr/ (Korea)
http://www.samsungmonitor.com.cn/ (China)
Using CD-ROM

User’s Manual 21
Setup
1. Click Start, Settings, Control Panel, and then double-click Display.
2. In Display Registration Information window, click Settings Tab and then click All Display Modes.
3. Select a mode that you wish to use (Resolution, Number of colors and Vertical frequency) and then
click OK.
4. Click Apply button if you see the screen working normally after clicking Test. If the screen is not normal,
change to a different mode (lower mode of resolution, colors or frequency).
Note: If there is no Mode at All Display Modes, select the level of resolution and vertical frequency
by referring to the Preset Display Modes in this guide.
To execute X-Window, you need to make the X86Config file, which is a type of system setting file.
1. Press Enter at the first and the second screen after executing the X86Config file.
2. The third screen is for setting your mouse.
3. Set a mouse for your computer.
4. The next screen is for selecting a keyboard.
5. Set a Keyboard for your computer.
6. The next screen is for setting your monitor.
7. First of all, set a horizontal frequency for your monitor. (You can enter the frequency directly.)
8. Set a vertical frequency for your monitor. (You can enter the frequency directly.)
9. Enter the model name of your monitor. This information will not affect the actual execution of X-Window.
10. You have finished setting up your monitor.
11. Execute X-Window after setting other requested hardware.
Microsoft® Windows® NT Operating System
Linux Operating System

User’s Manual 22
Setup
Removing the base
1 Turn off your monitor and unplug its power cord.
2 Lay the LCD monitor face-down on a flat surface with a cushion beneath it to protect the screen.
3 Remove the four screws and then remove the Stand from the LCD monitor.
Installing VESA compliant mounting

User’s Manual 23
Setup
Attaching a base
NOTE : This monitor accepts a 100mm x 100mm VESA-compliant mounting interface pad.
1. Rear cover mounting pad
2. Mounting interface pad
Align the Mounting Interface Pad with the holes in the Rear Cover Mounting Pad and secure it with
the four screws that came with the arm-type base, wall mount hanger or other base.
Installing VESA compliant mounting

User’s Manual 25
On-Screen Display
Adjust the Brightness.
1. Push the Menu ( ) button.
2. Push the Menu ( ) button to open the Brightness
adjustment screen.
3. Use the + button to increase the brightness or - button to
decrease the brightness.
Direct Access Feature :
When OSD is not on the screen, Push the + or - button to
adjust brightness.
Adjust the Contrast.
1. Push the Menu ( ) button.
2. Push the - button or + button until the Contrast screen
is displayed.
3. Push the Menu ( ) button to open the Contrast
adjustment screen.
4. Use the + button to increase the contrast or - button to
decrease the contrast.
Menu
How to adjust
Brightness
Contrast
User’s Manual 26
On-Screen Display
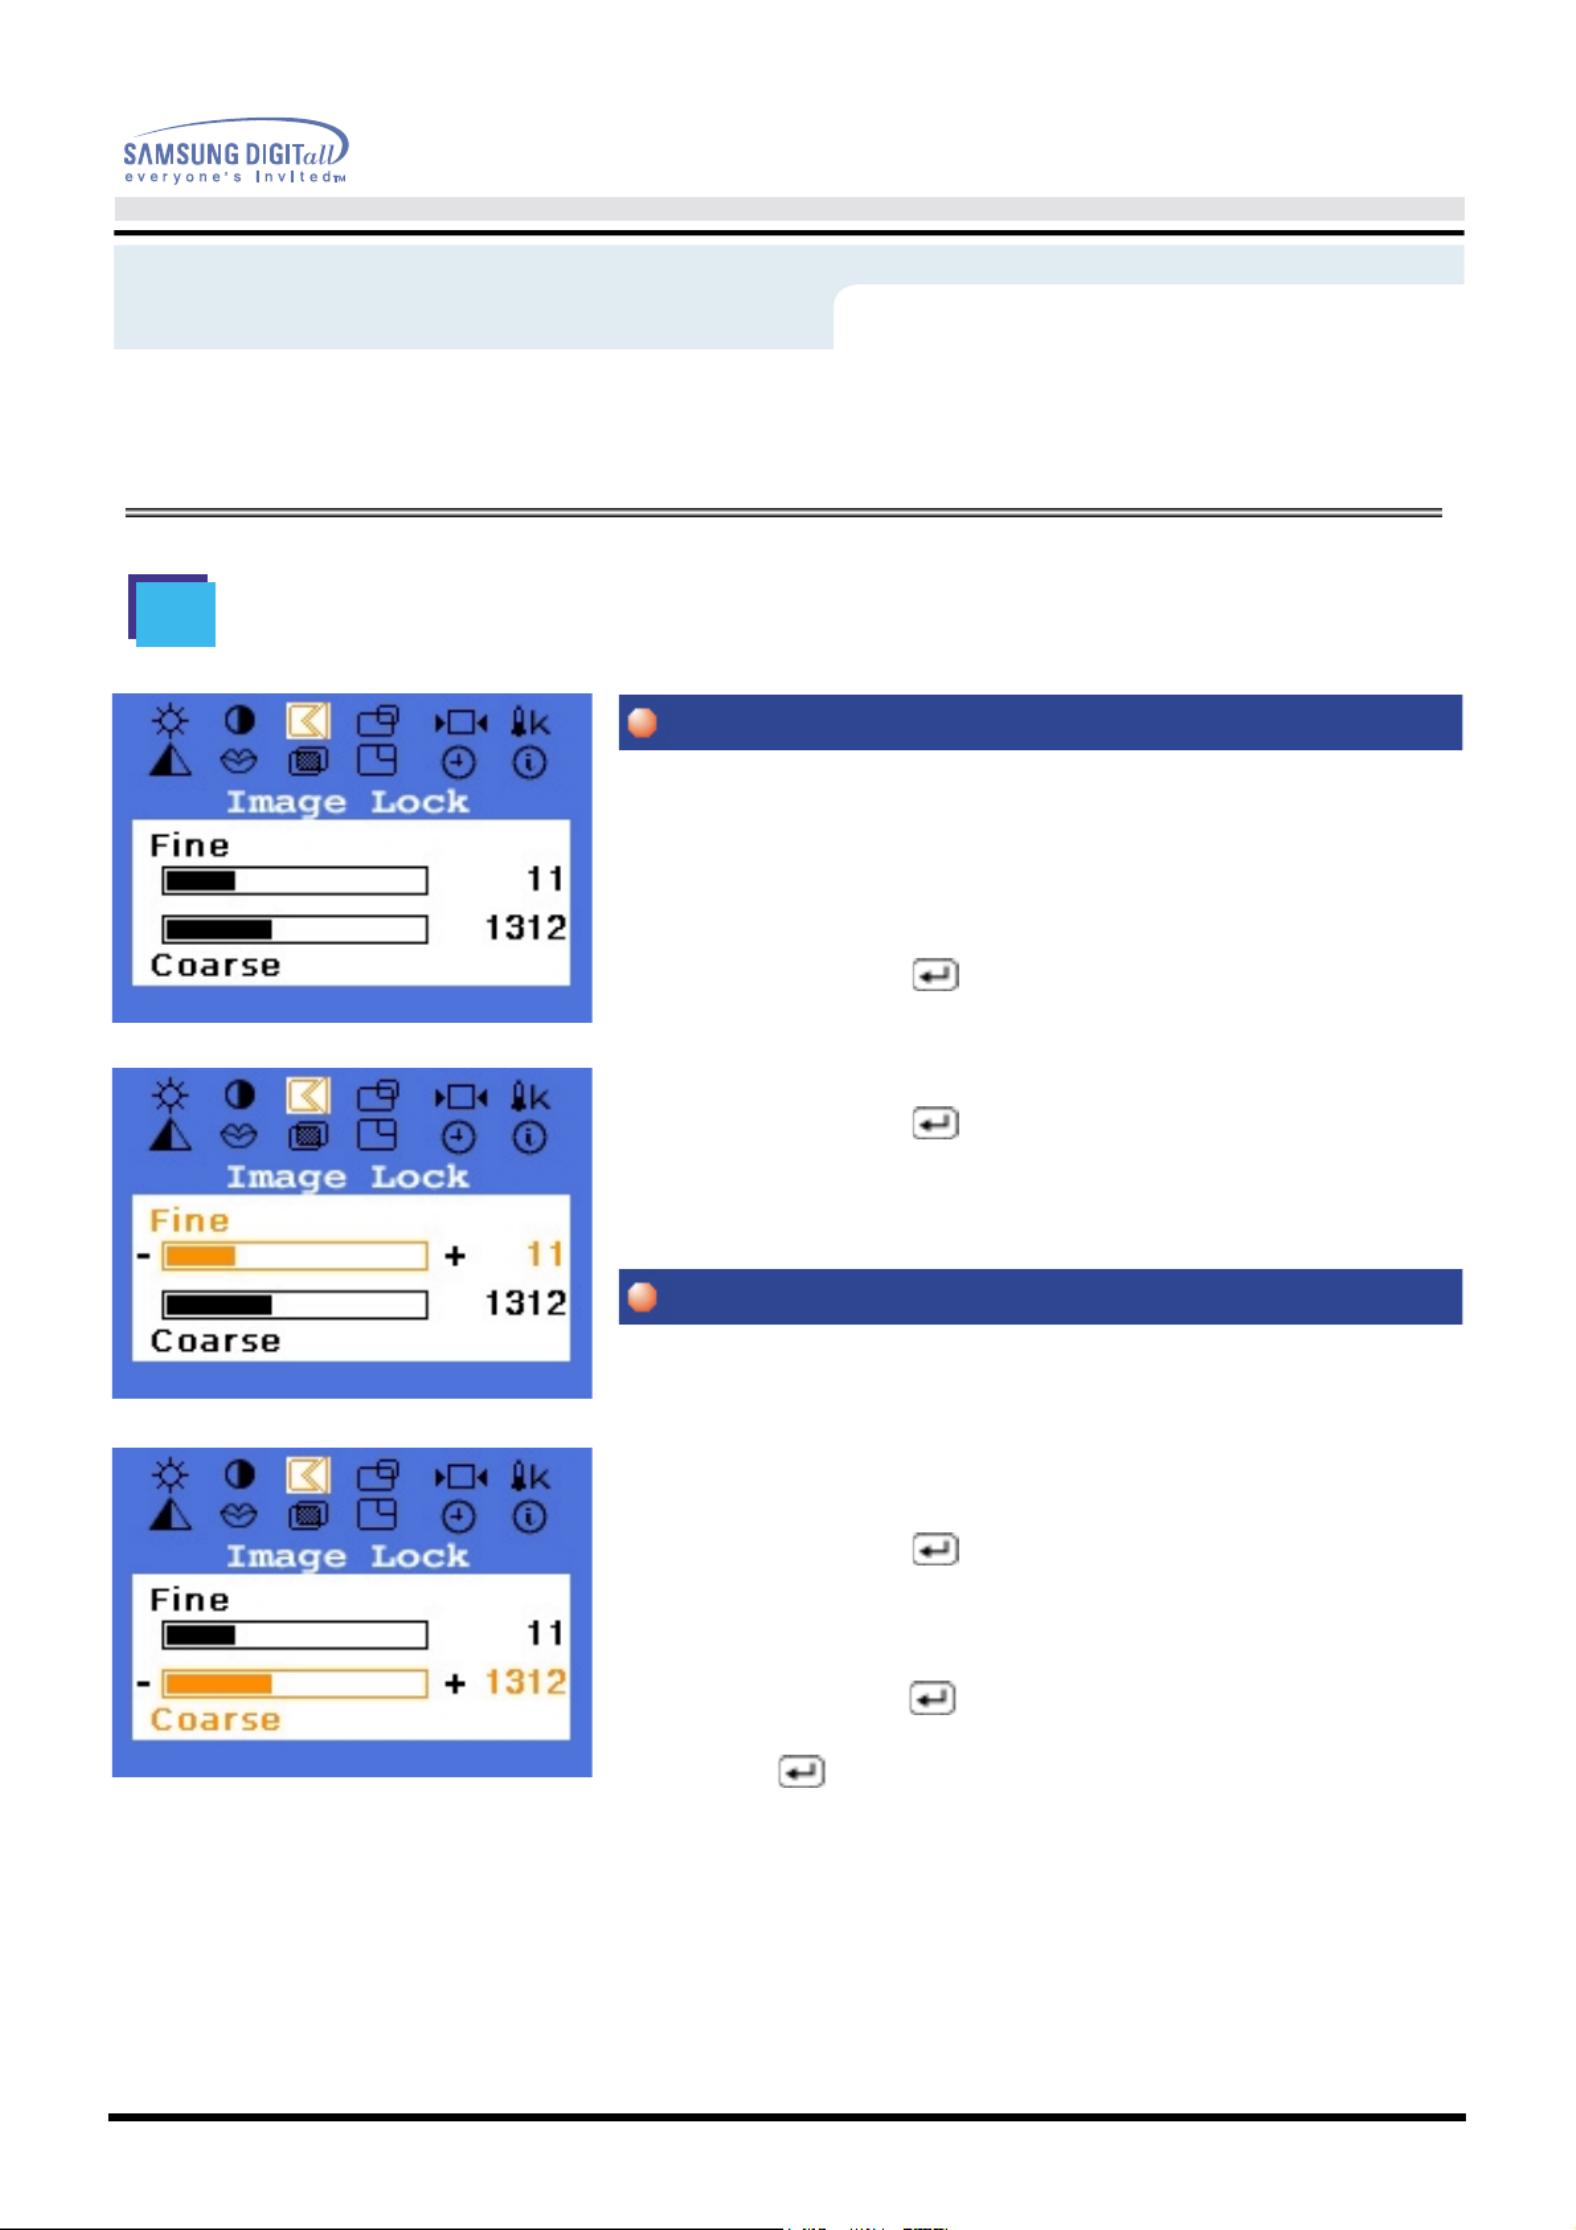
Image Lock is used to fine tune and get the best image
by removing noises that creates unstable images with
jitters and shimmers. If satisfactory results are not
obtained using the Fine adjustment, use the Coarse
adjustment and then use Fine again.
1. Push the Menu ( ) button.
2. Push the - button or + button until the Image Lock screen
is displayed.
3. Push the Menu ( ) button twice to open the Fine
adjustment screen.
4. Use the - or + buttons to remove any noise.
Image Lock is used to fine tune and get the best image
by removing noises that creates unstable images with
jitters and shimmers. If satisfactory results are not
obtained using the Fine adjustment, use the Coarse
adjustment and then use Fine again.
1. Push the Menu ( ) button.
2. Push the - button or + button until the Image Lock screen
is displayed.
3. Push the Menu ( ) button again and then press the -
or + button until the Coarse screen appears. Push the
Menu ( ) button to open the Coarse
adjustment screen.
4. Use the - or + buttons to remove any noise.
Menu
How to adjust
Image Lock
Fine
Coarse

User’s Manual 27
On-Screen Display
Follow these instructions to change the horizontal
position of the monitor's entire display.
1. Push the Menu ( ) button.
2. Push the - button or + button until the Position screen
is displayed.
3. Push the Menu ( ) button twice to open the
H-Position adjustment screen.
4. Use the - and + buttons to change the horizontal position
of the monitor's viewing area.
Follow these instructions to change the vetical position
of the monitor's entire display.
1. Push the Menu ( ) button.
2. Push the - button or + button until the Position screen
is displayed.
3. Push the Menu ( ) button again and then press
the - or + button until the V-Position screen appears.
Push the Menu ( ) button to open the
V-Position adjustment screen.
4. Use the - and + buttons to change the vertical position
of the monitor's viewing area.
Menu
How to adjust
Position
H-Position
V-Position
User’s Manual 28
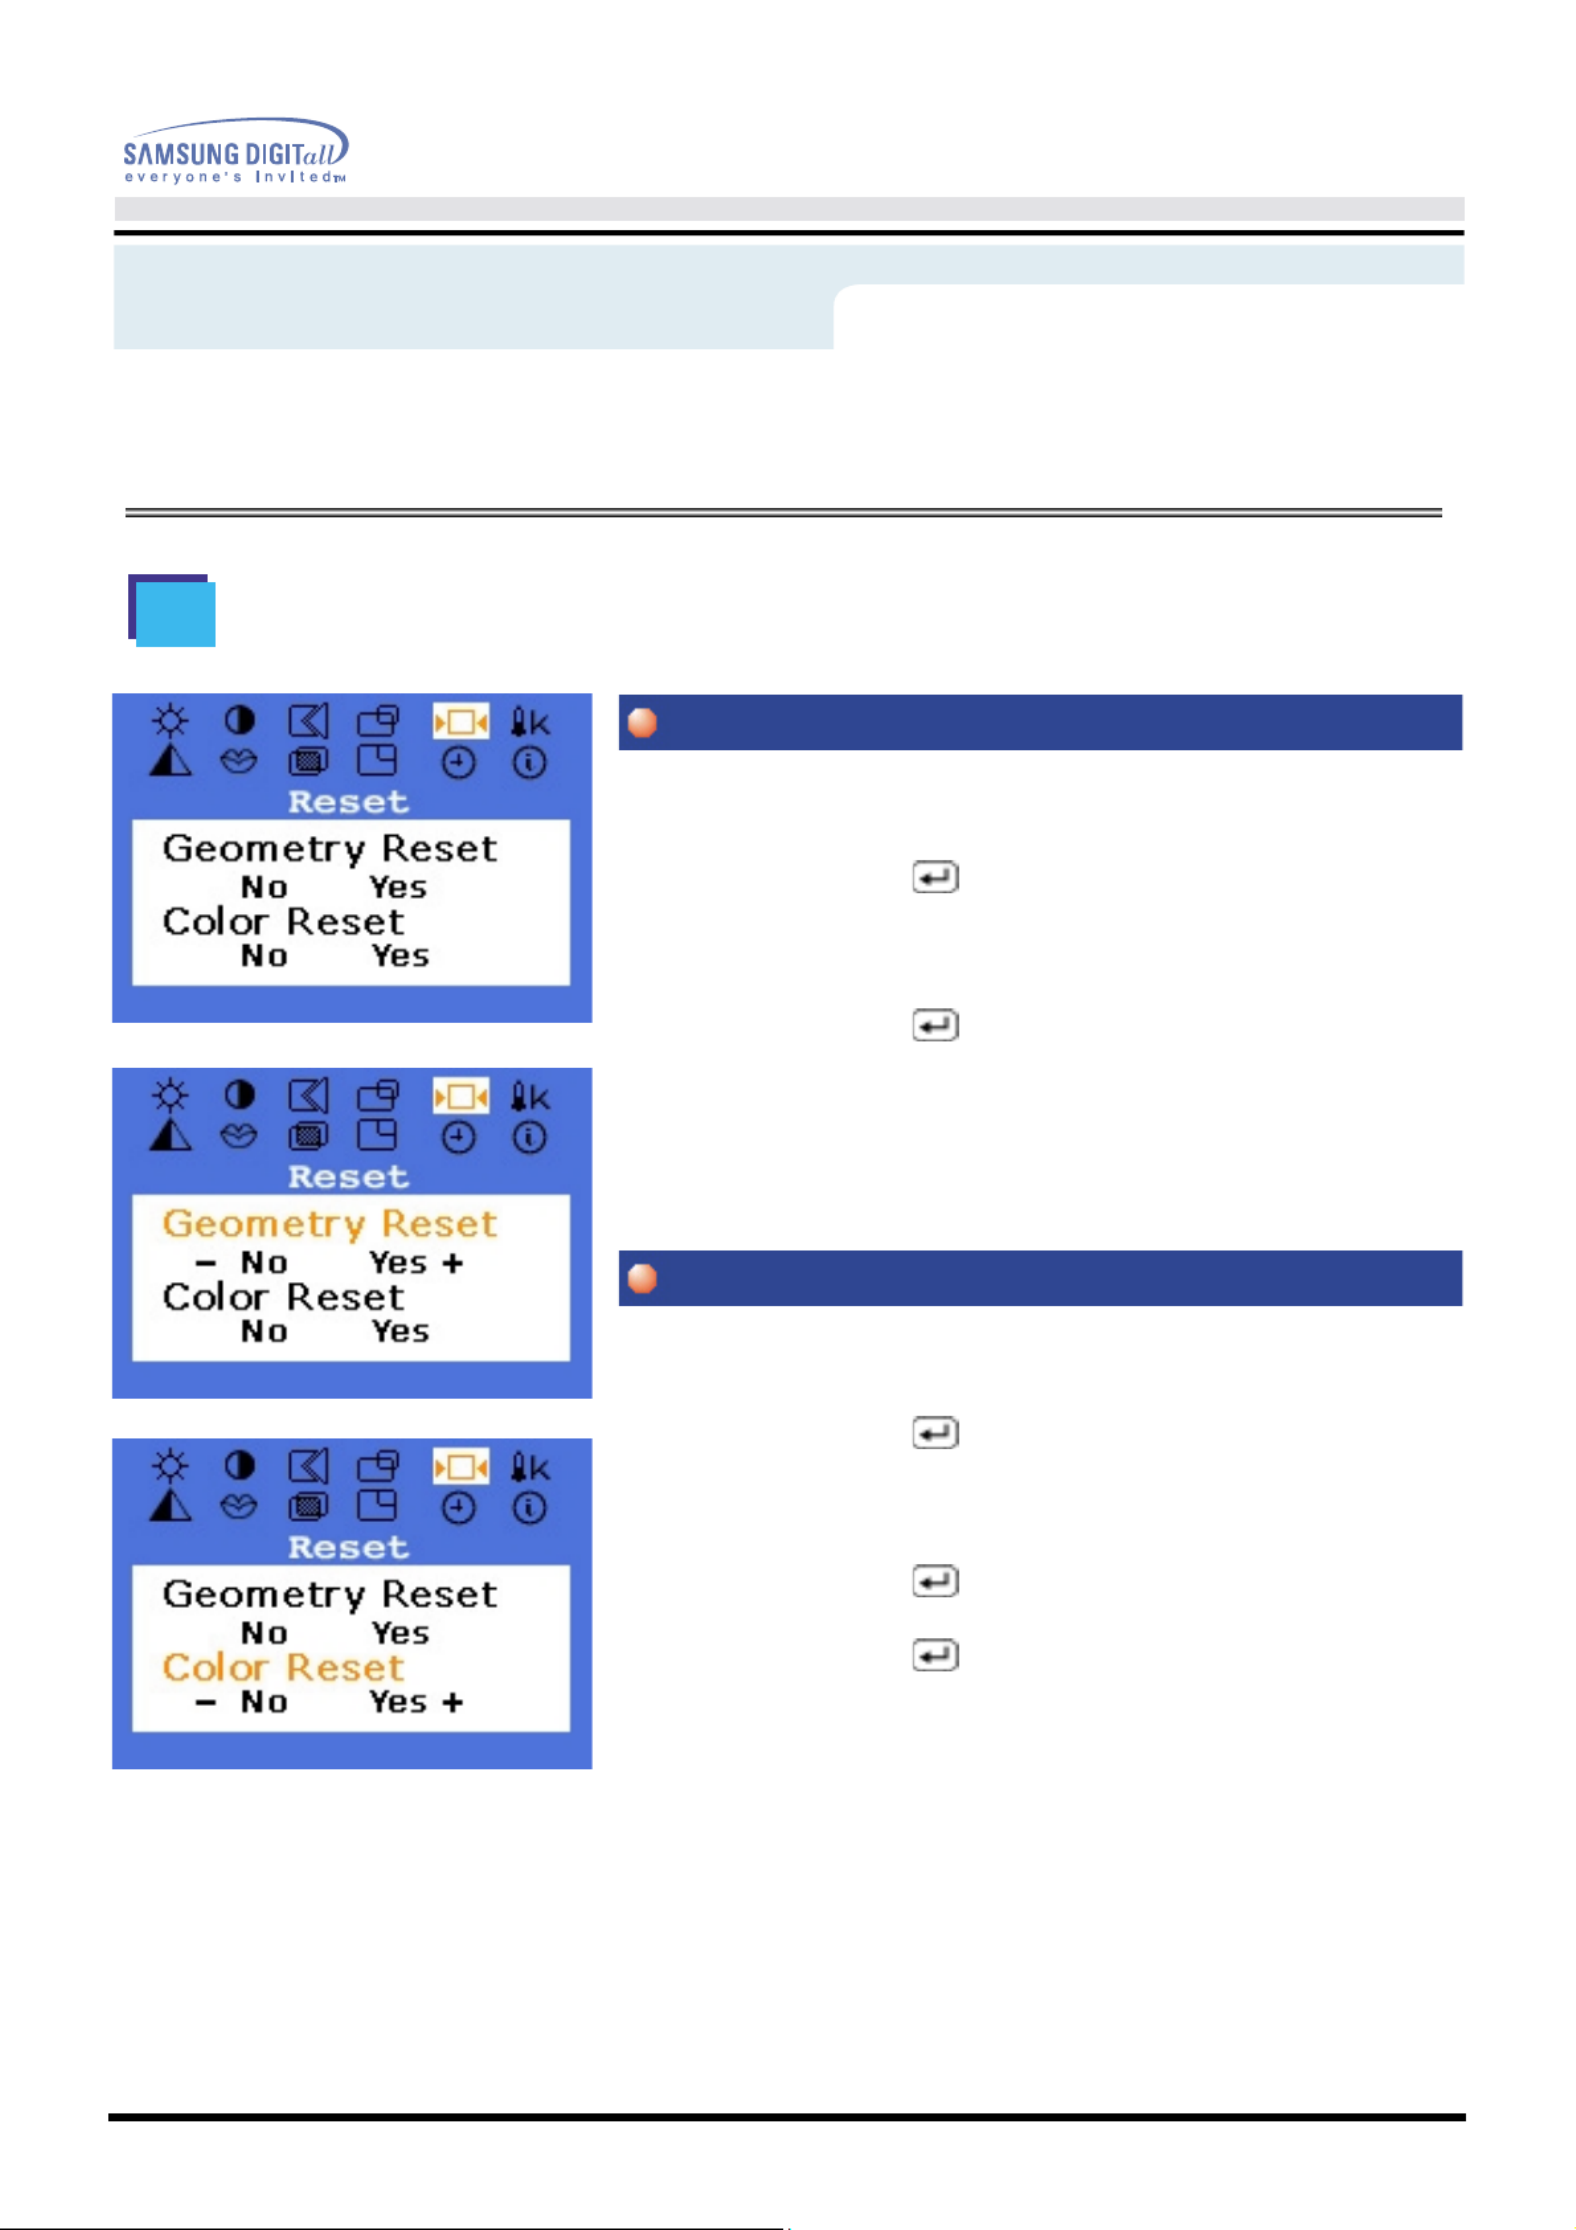
On-Screen Display
Geometry parameters are replaced with the factory
default values.
1. Push the Menu ( ) button.
2. Push the - button or + button until the Reset screen is
displayed.
3. Push the Menu ( ) button twice to open the
Geometry Reset adjustment screen.
4. Push the + button to select Yes.
If you don't want to reset the monitor, use the - button to
select No.
Color parameters are replaced with the factory default
values.
1. Push the Menu ( ) button.
2. Push the - button or + button until the Reset screen
is displayed.
3. Push the Menu ( ) button again and then press
the - or + button until the Color Reset screen appears.
Push the Menu ( ) button to open the Color Reset
adjustment screen.
4. Push the + button to select Yes.
If you don't want to reset the monitor, use the - button to
select No.
Menu
How to adjust
Reset
Geometry Reset
Color Reset
User’s Manual 29
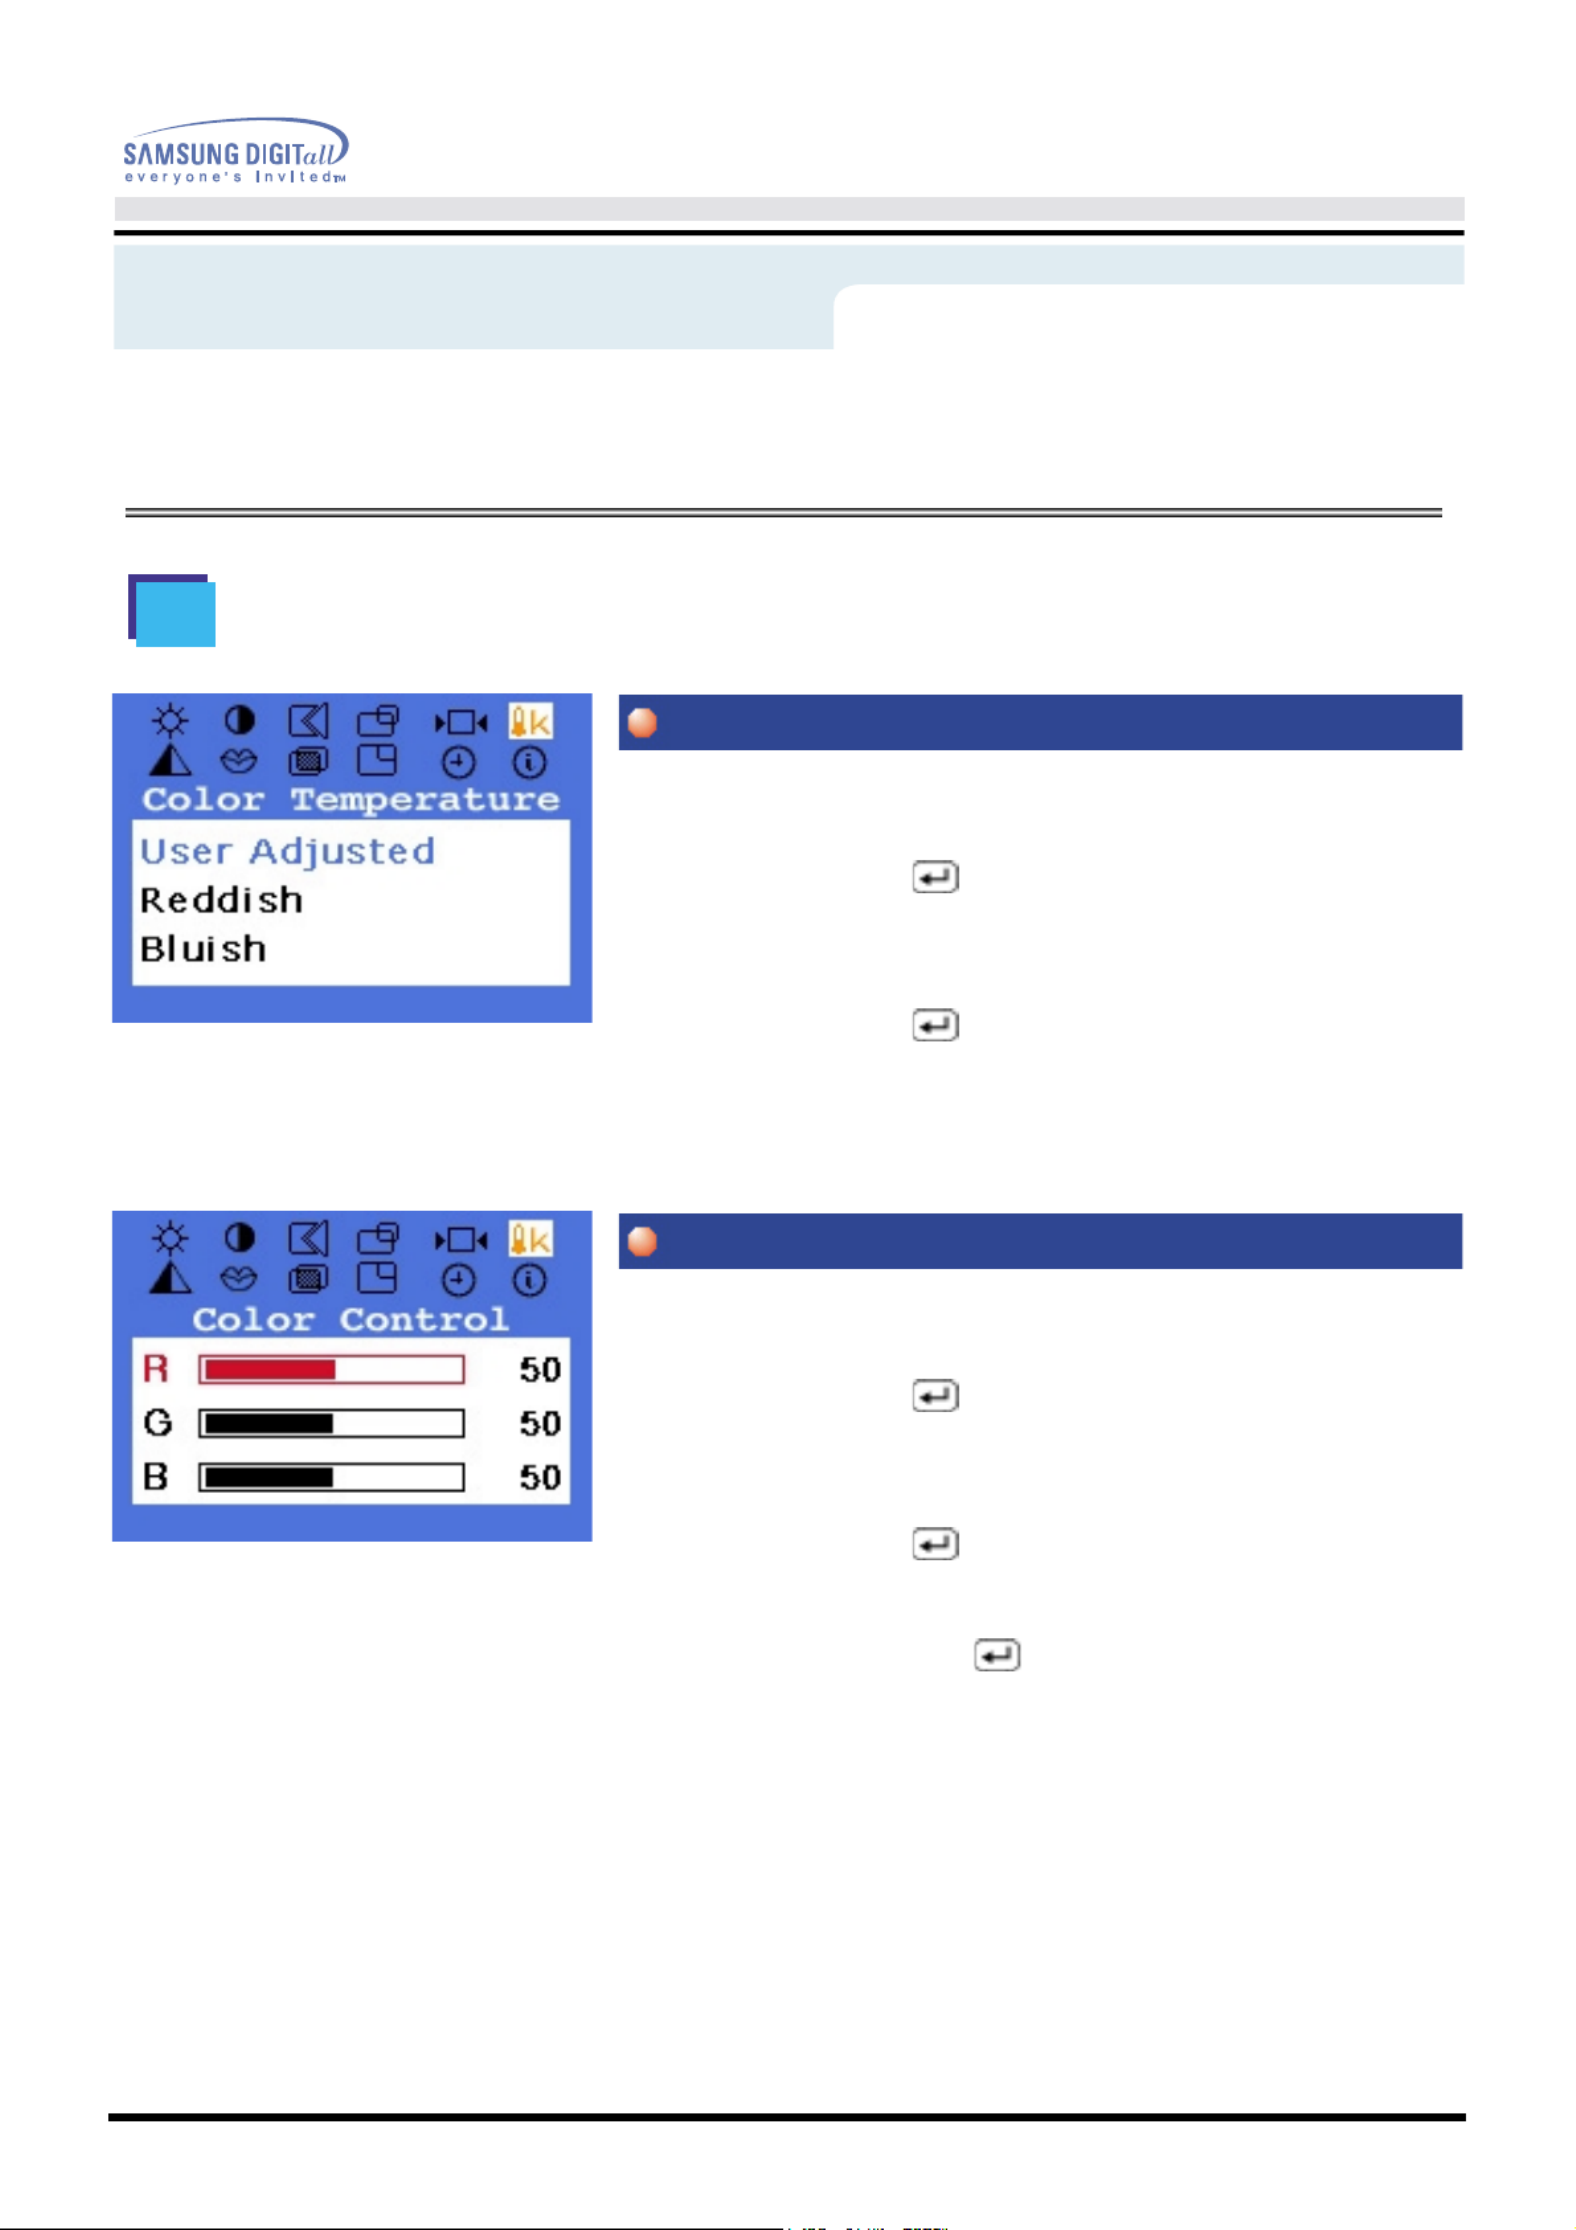
On-Screen Display
Color temperature is a measure of the "warmth" of
the image colors.
1. Push the Menu ( ) button.
2. Push the - button or + button until the Color Temperature
screen is displayed.
3. Push the Menu ( ) button to open the
Color Temperature adjustment screen.
4. Press the - or + button to select User Adjusted,
Reddish or Bluish.
Follow these steps to adjust individual R,G,B color
control.
1. Push the Menu ( ) button.
2. Push the - button or + button until the Color Temperature
screen is displayed.
3. Push the Menu ( ) button twice to open the
Color Control adjustment screen.
Use the - or + button to select R(ed), G(reen) or B(lue)
and Push the Menu ( ) button.
4. Press the - or + button to adjust the color setting.
Menu
How to adjust
Color Temperature
Color Temperature
Color Control
User’s Manual 30
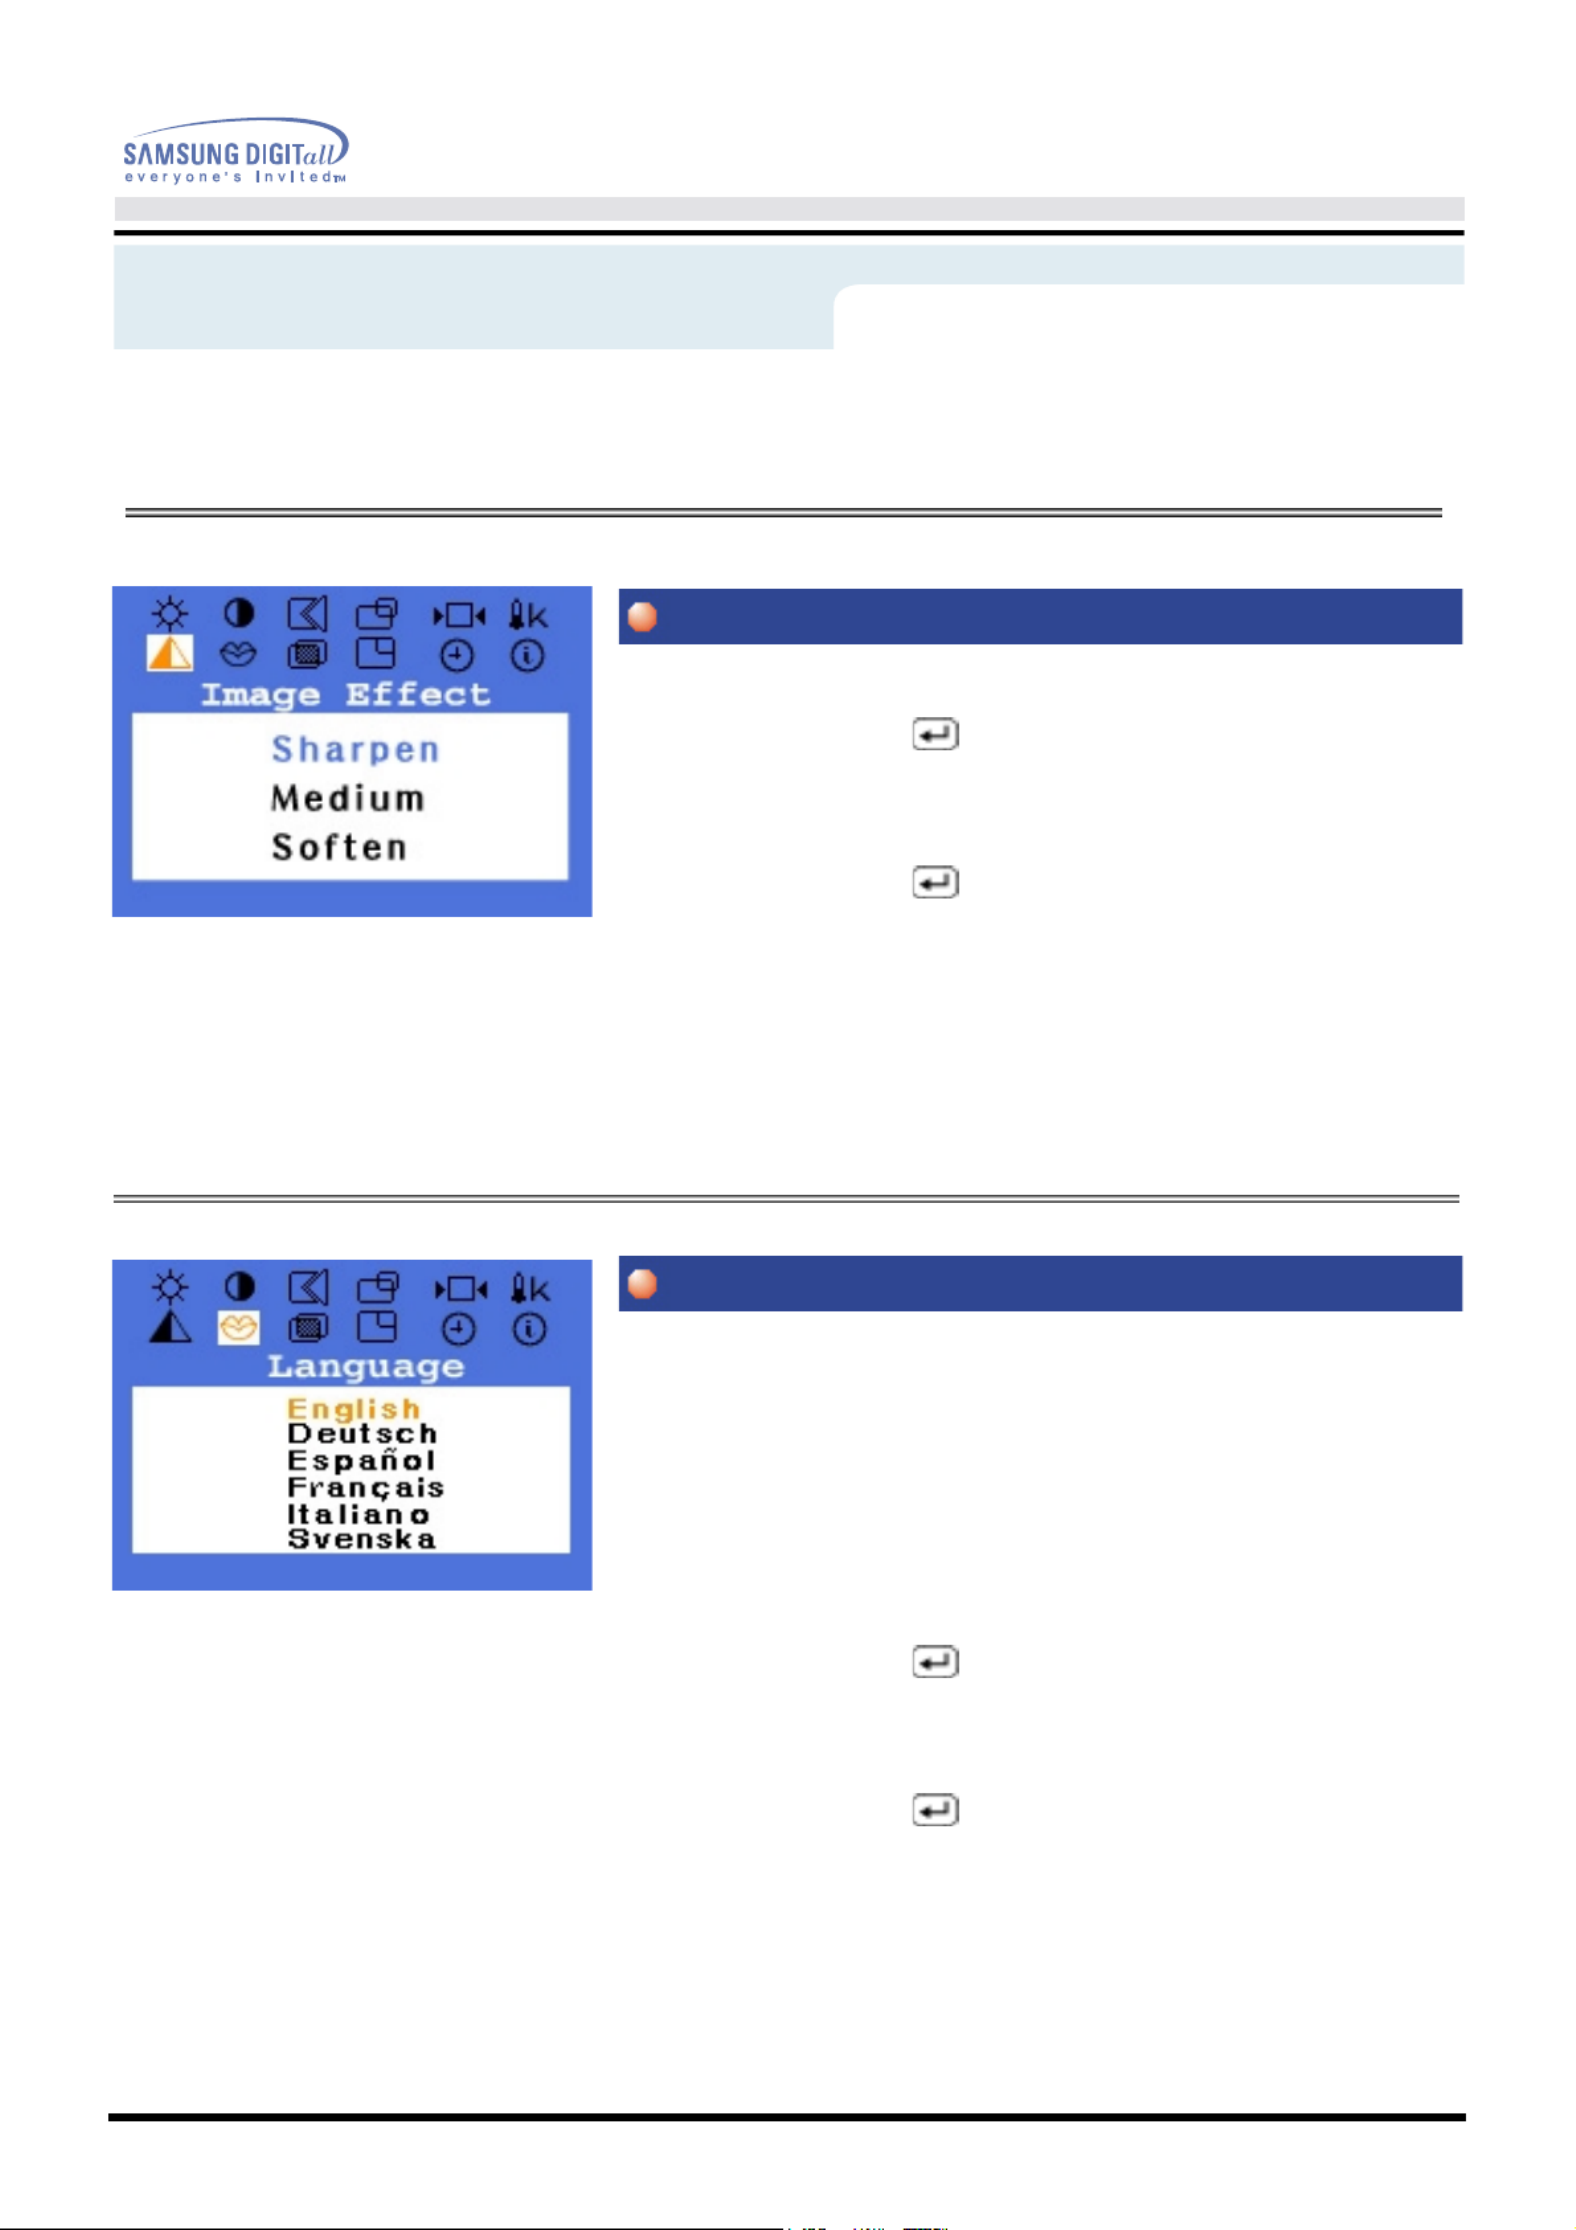
On-Screen Display
Image being displayed can be made softer or sharper.
1. Push the Menu ( ) button.
2. Push the - button or + button until the Image Effect
screen is displayed.
3. Push the Menu ( ) button to open the Image Effect
adjustment screen.
4. Use the - button or + button to select
Sharpen, Medium or Soften.
Follow these steps to change the language used in the
menu.
You can choose one of eleven languages.
English, German, Spanish, French, Italian, Swedish.
Note : The language chosen affects only the language
of the OSD. It has no effect on any software
running on the computer.
1. Push the Menu ( ) button.
2. Push the - button or + button until the
Languages screen is displayed.
3. Push the Menu ( ) button to open the
languages selection screen.
4. Use the - button or + button to select the
language you would like to use.
Menu
How to adjust
Image Effect
Language

User’s Manual 31
On-Screen Display
Change the opaqueness of the background of the OSD.
1. Push the Menu ( ) button.
2. Push the - button or + button until the Menu Halfton
screen is displayed.
3. Push the Menu ( ) button to open the Menu Halfton
selection screen.
4. Use the - button or + button to select On or Off.
Menu
How to adjust
Menu Halfton

User’s Manual 32
On-Screen Display
You can change the horizontal position where the OSD
menu appears on your monitor.
1. Push the Menu ( ) button.
2. Push the - button or + button until the H-Menu Position
screen is displayed.
3. Push the Menu ( ) button twice to open the
H-Position adjustment screen.
4. Use the - and + buttons to place the menu in the
horizontal position you prefer.
You can change the vertical position where the OSD
menu appears on your monitor.
1. Push the Menu ( ) button.
2. Push the - button or + button until the V-Menu Position
screen is displayed
3. Push the Menu ( ) button again and then press the -
or + button until the V-Position screen appears. Push the
Menu ( ) button to open the V-Position
adjustment screen.
4. Use the - and + buttons to place the menu in the vertical
position you prefer.
Menu
How to adjust
Menu Position
H-Position
V-Position

User’s Manual 33
On-Screen Display
The menu will automatically turn off if no adjustments
are made for a certain time period.
You can set the amount of time the menu will wait
before it turns off.
1. Push the Menu ( ) button.
2. Push the - button or + button until the Menu Display Time
screen is displayed.
3. Use the - or + buttons to select 5, 10, 20, 50, 200
seconds. 20 seconds is the default value.
You can see the frequency, the polarity of the
operational signals and the resolution level.
Note : These screens do not allow any changes to the
settings, they are for information only.
1. Push the Menu ( ) button.
2. Push the - button or + button until the Display Mode
screen is displayed.
Menu
How to adjust
Menu Display Time
Display Mode
User’s Manual 34
On-Screen Display
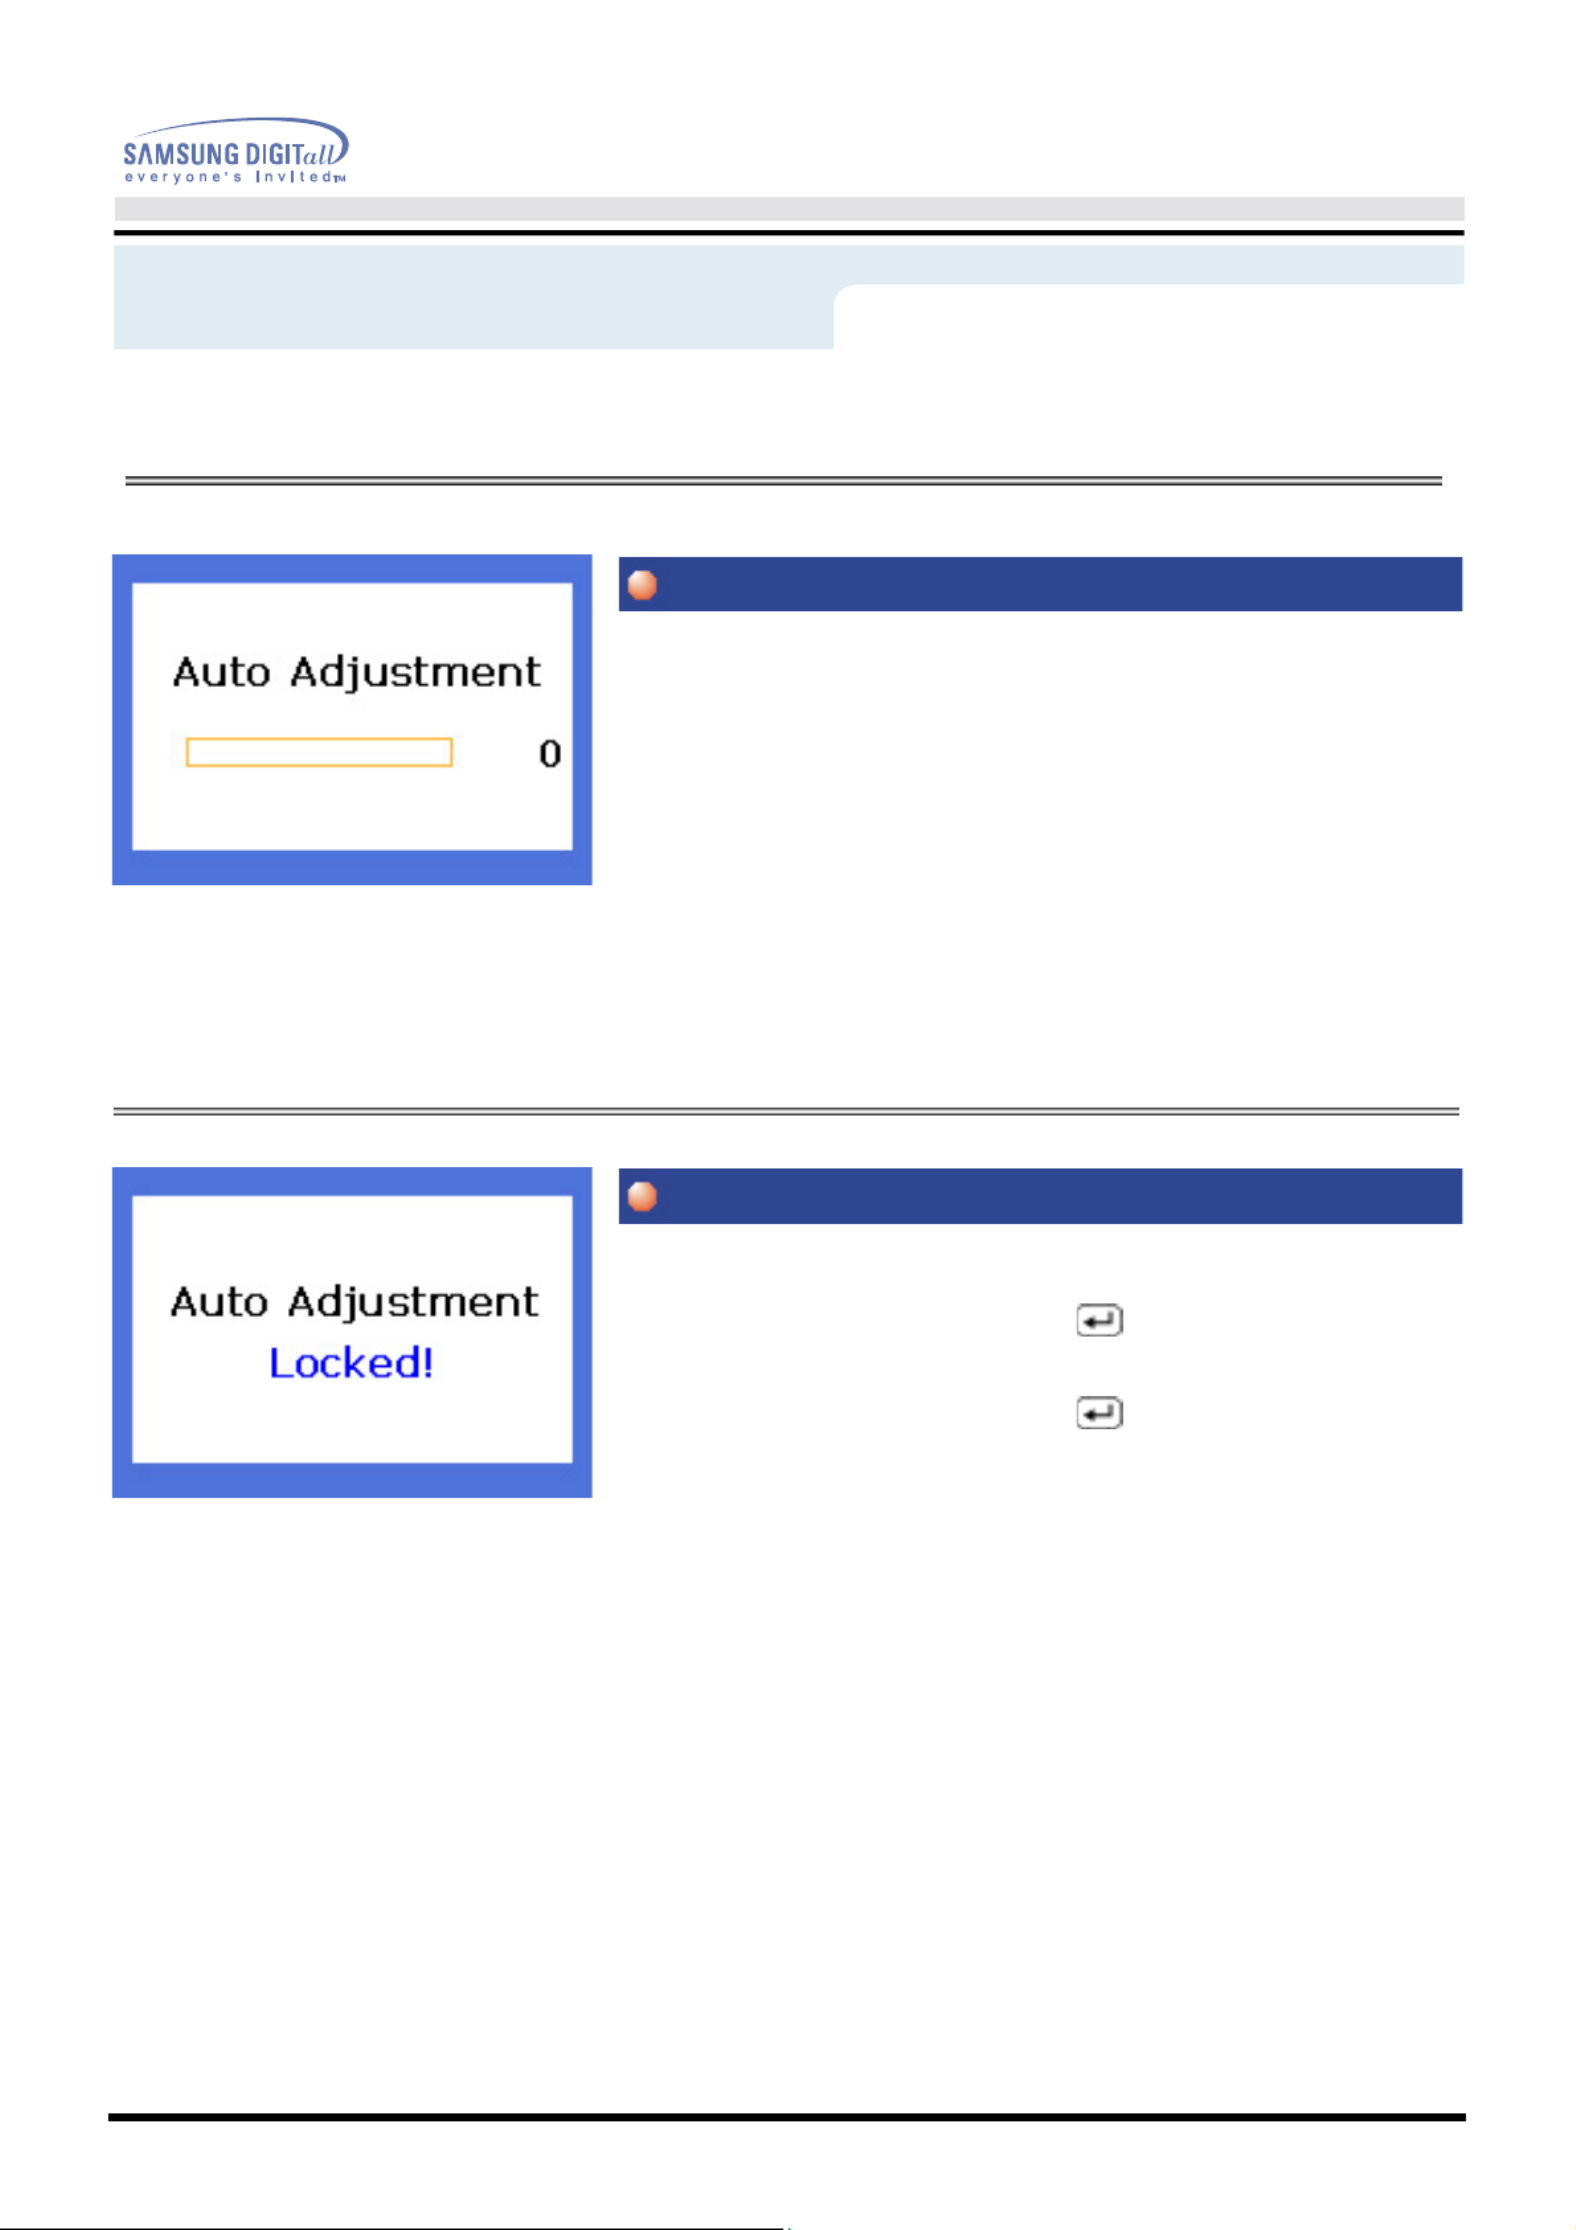
Auto adjustment allows the monitor to self-adjust to the
incoming video signal. The values of fine, coarse and
position are adjusted automatically.
1. Push the Auto button.
To make the automatic adjustment function sharper, execute the 'AUTO' function
while the AUTO PATTERN is on.
1. Push and hold in the Menu ( ) button for 5 seconds
or more to Lock the OSD.
2. Push and hold in the Menu ( ) button for 5 seconds
or more to Unlock the OSD.
Menu
How to adjust
Auto Adjustment
OSD Lock/Unlock

User’s Manual 35
Troubleshooting
Check List
Before calling for service, check the information in this section to see if you
can remedy any problems yourself. If you do need assistance, please call
the phone number on the warranty card, the phone number on the
Information section or contact your dealer.
Symptom Check List Solutions
No images on the
screen. I cannot turn
on the monitor.
Is the power cord connected properly? Check the power cord connection and
supply.
Can you see "No Connection, Check
Signal Cable" on the screen?
Check the signal cable connection.
If the power is on, reboot the computer
to see the initial screen(the login
screen), which can be seen.
If the initial screen (the login screen)
appears, boot the computer in the
applicable mode (the safe mode for
Windows 98/95) and then change the
frequency of the video card.
(Refer to the Preset Display Modes)
Note: If the initial screen (the login
screen) does not appear, contact a
service center or your dealer.
Can you see "Video mode not
supported" on the screen?
You can see this message when the
signal from the video card exceeds the
maximum resolution and frequency that
the monitor can properly handle.
Adjust the maximum resolution and
frequency that the monitor can properly
handle.
There is no image on the screen. Is
the power indicator on the monitor
blinking at 1 second intervals?
The monitor is in PowerSaver mode.
Press a key on the keyboard or move
the mouse to activate the monitor and
restore the image on the screen.
I cannot see the On
Screen Display.
Have you locked the On Screen
Display (OSD) Menu to prevent
changes?
Unlock the OSD by pressing the MENU
button for at least 5 seconds.

User’s Manual 36
Troubleshooting
Check List
Symptom Check List Solutions
The image on the
screen is shaking.
Check the monitor configuration to
see if it is in Interlace Mode. (Interlace
Mode: Vertical frequency 43Hz,
87Hz(i), etc)
The signal from the video card exceeds
the maximum resolution and frequency
of the monitor.
Are there any magnetic products such
as a power adapter, speaker or a high
voltage wire near by?
Move the monitor away from anything
that can create a strong magnetic field.
Is the voltage stable? The screen image can appear to shake
or vibrate at a particular time of day due
to low supply voltage.
The screen image can also appear to shake or vibrate if there is a problem with
the video card or the computer's main board.
The screen shows
strange colors or just
black and white.
Is the screen displaying only one color
as if looking at the screen through a
cellophane paper?
Check the signal cable connection.
Make sure the video card is fully
inserted in it's slot.
Have the screen colors become
strange after running a program or
due to a crash between applications?
Reboot the computer.
Has the video card been set properly? Set the video card by referring to the
video card manual.
The screen suddenly
has become
unbalanced.
Have you changed the video card or
the driver?
Adjust screen image position and size
using the OSD.
Have you adjusted the resolution or
frequency to the monitor?
Adjust the resolution and frequency at
the video card.
(Refer to the Preset Display Modes).
The screen can be unbalanced due to the cycle of the video card signals.
Readjust Position by referring to the OSD.
The screen is out of
focus or OSD cannot
be adjusted.
Have you adjusted the resolution or
frequency on the monitor?
Adjust the resolution and frequency of
the video card.
(Refer to the Preset Display Modes).

User’s Manual 37
Troubleshooting
Check List
Symptom Check List Solutions
LED is blinking but no
images on the screen.
Is the frequency properly adjusted
when checking the Display Timing on
the menu?
Adjust the frequency properly by
referring to the video card manual and
the Preset Display Modes.
(The maximum frequency per
resolution may differ from product to
product.)
There are only 16
colors shown on the
screen. The screen
colors have changed
after changing the
video card.
Have the Windows colors been set
properly?
For Windows 98(95):
Set the colors properly at the Control
Panel, Display, Settings.
For Windows 3.1:
Adjust the colors of the screen using
the VGA utility provided by the video
card.
Has the video card been set properly? Set the video card by referring to the
video card manual.
There is a message
that reads
"Unrecognized
monitor, Plug & Play
(VESA DDC) monitor
found".
Have you installed the monitor driver? Install the monitor driver according to
the Driver Installation Instructions.
See the video card manual to see if
the Plug & Play (VESA DDC) function
can be supported.
Install the monitor driver according to
the Driver Installation Instructions.

User’s Manual 38
Troubleshooting
1. Check if the power cord and the cable are properly connected to the computer.
2. Check if the computer beeps more than 3 times when booting.
(If it does, request an after-service for the main board of the computer.)
3. If you installed a new video card or if you assembled the PC, check if the installed the adapter(video) driver
and the monitor driver.
4. Check if the scanning ratio of the video screen is set at 75Hz or 85Hz.
(Do not exceed 60Hz when using the maximum resolution.)
5. If you have problems in installing the adapter (video) driver, boot the computer in Safe Mode, remove the
Display Adapter at the "Control Panel, System, Device Administrator" and then reboot the computer to
reinstall the adapter (video) driver.
Note: If problems repeatedly occur, contact an authorized service center.
Check List
Check the following items if there is trouble with the monitor.

User’s Manual 39
Troubleshooting
Q&A
Question Answer
How can I change the frequency? Frequency can be changed by reconfiguring the video card.
Note that video card support can vary, depending on the
version of the driver used.
(Refer to the computer or the video card manual for details.)
How can I adjust the resolution? Windows 95/98: Set the resolution at the Control Panel,
Display, Settings.
Windows 3.1: Change the resolution and the colors using the
VGA Utility provided by the video card.
* Contact the video card manufacturer for details.
How can I set the Power Saving
function?
Windows 95/98: Set the function at BIOS-SETUP of the
computer or the screen saver. (Refer to Windows/Computer
Manual).
Windows 3.1: Set the function using the VGA
Utility provided by the video card.
How can I clean the outer
case/LCD Panel?
Disconnect the power cord and then clean the monitor with a
soft cloth, using either a cleaning solution or plain water.
Do not leave any remains of the detergent nor scratch the
case. Do not allow any water to go inside the monitor.

User’s Manual 40
Troubleshooting
Your monitor provides a self test feature that allows you to check whether your monitor is functioning
properly.
1. Turn off both your computer and the monitor.
2. Unplug the video cable from the back of the computer.
3. Turn on the monitor.
.
If the monitor is functioning properly, you will see a box with a border and text inside as
shown in the following illustration:
The three boxes inside the border are red, green and blue.
Failure of any of the boxes to appear indicates a problem with your monitor.
This box also appears during normal operation if the video cable becomes disconnected or damaged.
4. Turn off your monitor and reconnect the video cable; then turn on both your computer and the monitor.
If your monitor screen remains blank after using the previous procedure,
check your video controller and computer system; your monitor is functioning properly.
Self-Test Feature Check
Self-Test Feature Check

User’s Manual 41
Troubleshooting
If there is something wrong with the input signal, a message appears on the screen or the screen goes blank
although the power indicator LED is still on. The message may indicate that the monitor is out of scan range
or that you need to check the signal cable.
If the vertical frequency is set at over 76HZ, this message will appear for 5 seconds and then
disappear.(SyncMaster 171S)
The location and the position of the monitor may influence the quality and other features of the monitor.
1. If there are any woofer speakers near the monitor, unplug and relocate the woofer to another room.
2. Remove all electronic devices such as radios, fans, clocks and telephones that are within 3 feet (one
meter) of the monitor.
.A monitor recreates visual signals received from the PC. Therefore, if there is trouble with the PC
or the video card, this can cause the monitor to become blank, have poor coloring, noise, Video
mode not supported, etc. In this case, first check the source of the problem, and then contact a
service center or your dealer.
.Judging the monitor's working condition
If there is no image on the screen or an "Video mode not supported" message comes up,
disconnect the cable from the computer while the monitor is still powered on.
.If there is a message coming up on the screen or if the screen goes white, this means the
monitor is in working condition.
.In this case, check the computer for trouble.
Self-Test Feature Check
Werning Messages
Environment
Useful Tips

User’s Manual 42
Specifications
General
General
Model Name SyncMaster 171B
LCD Panel
Size 17.0 inch diagonal
Display area 337.92 (H) x 270.336 (V)
Pixel Pitch 0.264 (H) x 0.264 (V)
Type a-si TFT active matrix
Vi iew ng n eA gl 8 p5/85/85/ /8 L R/5( / U D), yT i alc
Synchronization
Horizontal 30 ~ 81 kHz
Vertical 56 ~ 85 Hz
Display Color
16.7M (True)
Resolution
Optimum resolution 1280 x 1024@60Hz
Maximum resolution 1280 x 1024@76Hz
Input Signal, Terminated
RGB Analog 0.7 Vpp positive at 75 ohms
Separate H/V sync, Composite, SOG
TTL level positive or negative
Maximum Pixel Clock
135 MHz
Power Supply
AC 90 ~ 264 VAC rms, 60/50 Hz ± 3Hz
Signal Cable
15pin-to-15pin D-sub cable, detachable

User’s Manual 43
Specifications
Note : Design and specifications are subject to change without prior notice.
General
Power Consumption
40W (Maximum)
Dimensions (WxDxH) / Weight
444.0 X 208.4 X 457.0 mm / 5.4kg (With Simple Stand)
VESA Mounting Interface
100mm x 100mm (for use with Specialty(Arm) Mounting hardware.)
Environmental considerations
Operating Temperature: 50°F ~ 104°F(10°C ~ 40°C)
Humidity: 10% ~ 80%, non-condensing
Storage Temperature: -4°F ~113°F (-20°C ~ 45°C)
Humidity: 5% ~ 95%, non-condensing
Dot Acceptable
TFT LCD panel manufactured by using advanced semiconductor technology with precision of 99.999% above is
used for this product. But the pixels of RED, GREEN, BLUE and WHITE color seem to be bright sometimes or
some of black pixels could be seen. This is not from bad quality and you can use it without uneasiness.
• For example, the no. of TFT LCD pixels that is contained in this product are 3,932,160.
Plug and Play Capability
This monitor can be installed on any Plug & Play compatible system. Interaction of the monitor and computer
systems will provide the best operating conditions and monitor settings. In most cases, monitor installation will
proceed automatically, unless the user wishes to select alternate settings

User’s Manual 44
Specifications
General
General
Model Name SyncMaster 171S
LCD Panel
Size 17.0 inch diagonal
Display area 337.92 (H) x 270.336 (V)
Pixel Pitch 0.264 (H) x 0.264 (V)
Type a-si TFT active matrix
Viewing Angle 75/75/65/60(L/R/T/B),Typical
Synchronization
Horizontal 30 ~ 81 kHz
Vertical 56 ~ 76 Hz
Display Color
16.7M (True)
Resolution
Optimum resolution 1280 x 1024@60Hz
Maximum resolution 1280 x 1024@76Hz
Input Signal, Terminated
RGB Analog 0.7 Vpp positive at 75 ohms
Separate H/V sync, Composite, SOG
TTL level positive or negative
Maximum Pixel Clock
135 MHz
Power Supply
AC 90 ~ 264 VAC rms, 60/50 Hz ± 3Hz
Signal Cable
15pin-to-15pin D-sub cable, detachable
User’s Manual 45
Specifications
Note : Design and specifications are subject to change without prior notice.
General
Power Consumption
40W (Maximum)
Dimensions (WxDxH) / Weight
444.0 X 208.4 X 457.0 mm / 5.4kg (With Simple Stand)
VESA Mounting Interface
100mm x 100mm (for use with Specialty(Arm) Mounting hardware.)
Environmental considerations
Operating Temperature: 50°F ~ 104°F(10°C ~ 40°C)
Humidity: 10% ~ 80%, non-condensing
Storage Temperature: -4°F ~113°F (-20°C ~ 45°C)
Humidity: 5% ~ 95%, non-condensing
Dot Acceptable
TFT LCD panel manufactured by using advanced semiconductor technology with precision of 99.999% above is
used for this product. But the pixels of RED, GREEN, BLUE and WHITE color seem to be bright sometimes or
some of black pixels could be seen. This is not from bad quality and you can use it without uneasiness.
• For example, the no. of TFT LCD pixels that is contained in this product are 3,932,160.
Plug and Play Capability
This monitor can be installed on any Plug & Play compatible system. Interaction of the monitor and computer
systems will provide the best operating conditions and monitor settings. In most cases, monitor installation will
proceed automatically, unless the user wishes to select alternate settings
User’s Manual 46
Specifications
General
General
Model Name SyncMaster 181B
LCD Panel
Size 18.0 inch diagonal
Display area 359.0 (H) x 287.2 (V)
Pixel Pitch 0.2805 (H) x 0.2805 (V)
Type a-si TFT active matrix
Viewing Angle 85/85/85/85(L/R/T/B),Typical
Synchronization
Horizontal 30 ~ 81 kHz
Vertical 56 ~ 85 Hz
Display Color
16.7M (True)
Resolution
Optimum resolution 1280 x 1024@60Hz
Maximum resolution 1280 x 1024@76Hz
Input Signal, Terminated
RGB Analog 0.7 Vpp positive at 75 ohms
Separate H/V sync, Composite, SOG
TTL level positive or negative
Maximum Pixel Clock
135 MHz
Power Supply
AC 90 ~ 264 VAC rms, 60/50 Hz ± 3Hz
Signal Cable
15pin-to-15pin D-sub cable, detachable

User’s Manual 47
Specifications
Note : Design and specifications are subject to change without prior notice.
General
Power Consumption
42W (Maximum)
Dimensions (WxDxH) / Weight
457.3 X 208.4 X 465.5 mm / 6.8kg (With Simple Stand)
VESA Mounting Interface
100mm x 100mm (for use with Specialty(Arm) Mounting hardware.)
Environmental considerations
Operating Temperature: 50°F ~ 104°F(10°C ~ 40°C)
Humidity: 10% ~ 80%, non-condensing
Storage Temperature: -4°F ~113°F (-20°C ~ 45°C)
Humidity: 5% ~ 95%, non-condensing
Dot Acceptable
TFT LCD panel manufactured by using advanced semiconductor technology with precision of 99.999% above is
used for this product. But the pixels of RED, GREEN, BLUE and WHITE color seem to be bright sometimes or
some of black pixels could be seen. This is not from bad quality and you can use it without uneasiness.
• For example, the no. of TFT LCD pixels that is contained in this product are 3,932,160.
Plug and Play Capability
This monitor can be installed on any Plug & Play compatible system. Interaction of the monitor and computer
systems will provide the best operating conditions and monitor settings. In most cases, monitor installation will
proceed automatically, unless the user wishes to select alternate settings

User’s Manual 48
Specifications
This monitor has a built-in power management system called PowerSaver. This system saves energy by switching
your monitor into a low-power mode when it has not been used for a certain amount of time. The monitor automatically
returns to normal operation when you move the computer's mouse or press a key on the keyboard. For energy
conservation, turn your monitor OFF when it is not needed, or when leaving it unattended for long periods. The
PowerSaver system operates with a VESA DPMS compliant video card installed in your computer. Use a software
utility installed on your computer to set up this feature.
SyncMaster 171B/171S
SyncMaster 181B
PowerSaver
State Normal Operation Power saving mode
EPA/ENERGY 2000 Power Switch off
Power Indicator Green Green, Blinking Black
Power
Consumption
Less than 40W Less than 3W Less than 1W
State Normal Operation Power saving mode
EPA/ENERGY 2000 Power Switch off
Power Indicator Green Green, Blinking Black
Power
Consumption
Less than 42W Less than 3W Less than 1W
This monitor is EPA ENERGY STAR® compliant and ENERGY2000 compliant when
used with a computer equipped with VESA DPMS functionality.
As an ENERGY STAR® Partner, SAMSUNG has determined that this product meets
the ENERGY STAR® guidelines for energy efficiency.

User’s Manual 49
Specifications
If the signal transferred from the computer is the same as the following Preset Timing Modes, the screen will be
adjusted automatically. However, if the signal differs, the screen may go blank while the power LED is on.
Refer to the video card manual and adjust the screen as follows.
Table 1. Preset Timing Modes
Preset Timing Modes (SyncMaster 171B)
Display Mode
Horizontal
Frequency
(kHz)
Vertical
Frequency
(Hz)
Pixel Clock
(MHz)
Sync Polarity
(H/V)
IBM, 640 x 350 31.469 70.086 25.175 -/-
IBM, 640 x 480 31.469 59.940 25.175 -/-
IBM, 720 x 400 31.469 70.087 28.322 -/+
VESA, 640 x 480 37.500 75.000 31.500 -/-
VESA, 640 x 480 37.861 72.809 31.500 -/-
VESA, 640 x 480 43.269 85.008 36.000 -/-
MAC., 640 x 480 35.000 66.667 30.240 -/-
MAC., 832 x 624 49.726 74.551 57.284 -/-
VESA, 800 x 600 35.156 56.250 36.000 +,-/+,-
VESA, 800 x 600 37.879 60.317 40.000 +/+
VESA, 800 x 600 46.875 75.000 49.500 +/+
VESA, 800 x 600 48.077 72.188 50.000 +/+
VESA, 800 x 600 53.674 85.061 56.250 +/+
VESA, 1024 x 768 48.363 60.004 65.000 -/-
VESA, 1024 x 768 56.476 56.476 75.000 -/-
VESA, 1024 x 768 60.023 75.029 78.750 +/+
VESA, 1024 x 768 68.677 84.997 94.500 +/+
VESA, 1280 x 1024 63.981 60.020 108.00 +/+
VESA, 1280 x 1024 79.976 75.025 135.00 +/+
SUN, 1280 x 1024 81.129 76.106 135.00 -/-

User’s Manual 50
Specifications
If the signal transferred from the computer is the same as the following Preset Timing Modes, the screen will be
adjusted automatically. However, if the signal differs, the screen may go blank while the power LED is on.
Refer to the video card manual and adjust the screen as follows.
Table 1. Preset Timing Modes
Preset Timing Modes (SyncMaster 171S)
Display Mode
Horizontal
Frequency
(kHz)
Vertical
Frequency
(Hz)
Pixel Clock
(MHz)
Sync Polarity
(H/V)
IBM, 640 x 350 31.469 70.086 25.175 -/-
IBM, 640 x 480 31.469 59.940 25.175 -/-
IBM, 720 x 400 31.469 70.087 28.322 -/+
VESA, 640 x 480 37.500 75.000 31.500 -/-
VESA, 640 x 480 37.861 72.809 31.500 -/-
MAC., 640 x 480 35.000 66.667 30.240 -/-
MAC., 832 x 624 49.726 74.551 57.284 -/-
VESA, 800 x 600 35.156 56.250 36.000 +,-/+,-
VESA, 800 x 600 37.879 60.317 40.000 +/+
VESA, 800 x 600 46.875 75.000 49.500 +/+
VESA, 800 x 600 48.077 72.188 50.000 +/+
VESA, 1024 x 768 48.363 60.004 65.000 -/-
VESA, 1024 x 768 56.476 56.476 75.000 -/-
VESA, 1024 x 768 60.023 75.029 78.750 +/+
VESA, 1280 x 1024 63.981 60.020 108.00 +/+
VESA, 1280 x 1024 79.976 75.025 135.00 +/+
SUN, 1280 x 1024 81.129 76.106 135.00 -/-
User’s Manual 51
Specifications
If the signal transferred from the computer is the same as the following Preset Timing Modes, the screen will be
adjusted automatically. However, if the signal differs, the screen may go blank while the power LED is on.
Refer to the video card manual and adjust the screen as follows.
Table 1. Preset Timing Modes
Preset Timing Modes (SyncMaster 181B)
Display Mode
Horizontal
Frequency
(kHz)
Vertical
Frequency
(Hz)
Pixel Clock
(MHz)
Sync Polarity
(H/V)
IBM, 640 x 350 31.469 70.086 25.175 -/-
IBM, 640 x 480 31.469 59.940 25.175 -/-
IBM, 720 x 400 31.469 70.087 28.322 -/+
VESA, 640 x 480 37.500 75.000 31.500 -/-
VESA, 640 x 480 37.861 72.809 31.500 -/-
VESA, 640 x 480 43.269 85.008 36.000 -/-
MAC., 640 x 480 35.000 66.667 30.240 -/-
MAC., 832 x 624 49.726 74.551 57.284 -/-
VESA, 800 x 600 35.156 56.250 36.000 +,-/+,-
VESA, 800 x 600 37.879 60.317 40.000 +/+
VESA, 800 x 600 46.875 75.000 49.500 +/+
VESA, 800 x 600 48.077 72.188 50.000 +/+
VESA, 800 x 600 53.674 85.061 56.250 +/+
VESA, 1024 x 768 48.363 60.004 65.000 -/-
VESA, 1024 x 768 56.476 56.476 75.000 -/-
VESA, 1024 x 768 60.023 75.029 78.750 +/+
VESA, 1024 x 768 68.677 84.997 94.500 +/+
VESA, 1280 x 1024 63.981 60.020 108.00 +/+
VESA, 1280 x 1024 79.976 75.025 135.00 +/+
SUN, 1280 x 1024 81.129 76.106 135.00 -/-

User’s Manual 53
Information
Service
U.S.A. :
SAMSUNG Computer Products Customer Service
400 Valley Road, Suite 201, Mt. Arlington, NJ 07856
Tel. : (973)601-6000, 1-800-SAMSUNG (1-800-726-7864)
Fax. : (973)601-6001
http://SAMSUNGmonitor.com/
BRAZIL :
SAMSUNG Eletronica da Amazonia Ltda.
R. Prof. Manoelito de Ornellas, 303, Terro B
Chacara Sto. Antonio, CEP : 04719-040
Sao Paulo, SP
SAC : 0800 124 421
http://www.SAMSUNG.com.br/
CANADA :
SAMSUNG Electronics Canada Inc.
7037 Financial Drive
Mississauga, Ontario L5N 6R3
Tel. : 1-800-SAMSUNG (1-800-726-7864)
Fax. : (905) 542-1199
http://www.SAMSUNG.ca/
AUSTRALIA :
SAMSUNG Electronics Australia Pty Ltd.
Customer Response Centre
7 Parkview Drive, Homebush Bay NSW 2127
Tel : 1300 362 603
http://www.SAMSUNG.com.au/
COLOMBIA :
SAMSUNG Electrinics Colombia
Cra 9 No 99A-02 Of. 106
Bogota, Colombia
Tel.: 9-800-112-112
Fax: (571) 618 - 2068
http://www.SAMSUNG-latin.com/
e-mail : soporte@SAMSUNG-latin.com
ITALY :
Samsung Electronics Italia S.p.a.
Via C. Donat Cattin, 5
20063 Cernusco s/Naviglio (MI)
Servizio Clienti: 199.153.153
http://www.samsung-italia.com/
ESPANA :
SAMSUNG Electronics Comercial Iberica, S.A.
Ciencies, 55-65 (Poligono Pedrosa) 08908
Hospitalet de Llobregat (Barcelona)
Tel. : (93) 261 67 00
Fax. : (93) 261 67 50
http://SAMSUNG.es/
GERMANY :
TELEPLAN Rhein-Main GmbH
Feldstr. 16
64331 Weiterstadt
T. 06151/957-1306
F. 06151/957-1732
http://www.SAMSUNG.de/
PERU
Servicio Integral SAMSUNG
Av.Argentina 1790 Lima1. Peru
Tel: 51-1-336-8686
Fax: 51-1-336-8551
http://www.SAMSUNGperu.com/
United Kingdom :
SAMSUNG Electronics (UK) Ltd.
SAMSUNG House, 225 Hook Rise South
Surbiton, Surrey KT6 7LD
Tel. : (0208) 391 0168
Fax. : (0208) 397 9949
< European Service Center & National Service >
Stafford Park 12 Telford, Shropshire, TF3 3BJ
Tel. : (0870) 242 0303
Fax. : (01952) 292 033
http://SAMSUNGservice.co.uk/
THAILAND :
HAI SAMSUNG SERVICE CENTER
MPA COMPLEX BUILDING,1st-2nd Floor
175 SOI SUEKSA VIDHAYA SATHON SOI 12
SILOM ROAD ,SILOM,BANGRAK
BANGKOK 10500
TEL : 0-2635-2567
FAX : 0-2635-2556
SOUTH AFRICA :
SAMSUNG Electronics,5 Libertas Road, Somerset Office
Park,
Bryanston Ext 16. Po Box 70006, Bryanston,2021, South
Africa
Tel : 0027-11-549-1621
Fax : 0027-11-549-1629
http://www.SAMSUNG.co.za/
FRANCE :
SAMSUNG ELECTRONICS FRANCE Service
Paris Nord 2
66 rue des Vanesses
BP 50116 Villepinte
95950 Roissy CDG Cedex
Tel : 08 25 08 65 65
Fax : 01 48 63 06 38
http://www.SAMSUNGservices.com/
Termékspecifikációk
| Márka: | Samsung |
| Kategória: | Monitor |
| Modell: | SyncMaster 181B |
Szüksége van segítségre?
Ha segítségre van szüksége Samsung SyncMaster 181B, tegyen fel kérdést alább, és más felhasználók válaszolnak Önnek
Útmutatók Monitor Samsung

5 Április 2025
21 Március 2025
12 Január 2025
12 Január 2025
11 Január 2025
10 Január 2025
21 December 2024
21 December 2024
21 December 2024
21 December 2024
Útmutatók Monitor
- Monitor PeakTech
- Monitor Sony
- Monitor Yamaha
- Monitor Fujitsu
- Monitor Acer
- Monitor LG
- Monitor Philips
- Monitor Pioneer
- Monitor Olympus
- Monitor SilverCrest
- Monitor Garmin
- Monitor RCF
- Monitor Bosch
- Monitor Panasonic
- Monitor Canon
- Monitor JVC
- Monitor Sharp
- Monitor Lenovo
- Monitor HyperX
- Monitor Toshiba
- Monitor Neumann
- Monitor Omron
- Monitor HP
- Monitor Hyundai
- Monitor Hisense
- Monitor BenQ
- Monitor Apple
- Monitor Emos
- Monitor Medion
- Monitor Vimar
- Monitor JBL
- Monitor TCL
- Monitor OSEE
- Monitor Viessmann
- Monitor Insignia
- Monitor LC-Power
- Monitor Dell
- Monitor Boss
- Monitor Crestron
- Monitor Gigabyte
- Monitor Tripp Lite
- Monitor Xerox
- Monitor Thomson
- Monitor Speco Technologies
- Monitor Hikvision
- Monitor Eurolite
- Monitor Epson
- Monitor V7
- Monitor Huawei
- Monitor Asus
- Monitor PEAQ
- Monitor Renkforce
- Monitor Haier
- Monitor Mitsubishi
- Monitor M-Audio
- Monitor AOC
- Monitor Citizen
- Monitor Westinghouse
- Monitor Hitachi
- Monitor Continental Edison
- Monitor Asrock
- Monitor Ring
- Monitor Alpine
- Monitor Optoma
- Monitor SPL
- Monitor Smart
- Monitor Dahua Technology
- Monitor Viewsonic
- Monitor Denver
- Monitor Dynaudio
- Monitor Ernitec
- Monitor Qian
- Monitor Joy-It
- Monitor MSI
- Monitor Daewoo
- Monitor Tesla
- Monitor Kali Audio
- Monitor Godox
- Monitor Cisco
- Monitor Newline
- Monitor Behringer
- Monitor APC
- Monitor KRK
- Monitor Cooler Master
- Monitor Chauvet
- Monitor Shure
- Monitor PreSonus
- Monitor Archos
- Monitor Deltaco
- Monitor Tannoy
- Monitor Plantronics
- Monitor Kogan
- Monitor Honeywell
- Monitor SMART Technologies
- Monitor Marshall
- Monitor Kindermann
- Monitor Alesis
- Monitor Velleman
- Monitor Prestigio
- Monitor Monacor
- Monitor IK Multimedia
- Monitor Blaupunkt
- Monitor NZXT
- Monitor Yealink
- Monitor Razer
- Monitor Samson
- Monitor Jay-Tech
- Monitor Mackie
- Monitor Posiflex
- Monitor Peerless-AV
- Monitor Abus
- Monitor AG Neovo
- Monitor Iiyama
- Monitor Konig
- Monitor Seiki
- Monitor 3M
- Monitor ARRI
- Monitor GlobalTronics
- Monitor Jensen
- Monitor Pyle
- Monitor AVer
- Monitor Sanyo
- Monitor Salora
- Monitor IFM
- Monitor DataVideo
- Monitor Maxell
- Monitor Atlona
- Monitor Schneider
- Monitor AJA
- Monitor Brandson
- Monitor Danfoss
- Monitor Vorago
- Monitor Barco
- Monitor NEC
- Monitor Element
- Monitor Marshall Electronics
- Monitor Yorkville
- Monitor Elo
- Monitor IStarUSA
- Monitor Provision-ISR
- Monitor Postium
- Monitor Orion
- Monitor Palmer
- Monitor EverFocus
- Monitor Elvid
- Monitor Gamber-Johnson
- Monitor Focal
- Monitor Adj
- Monitor Legamaster
- Monitor Wohler
- Monitor Packard Bell
- Monitor Vitek
- Monitor Planar
- Monitor Mobile Pixels
- Monitor CSL
- Monitor Newstar
- Monitor SWIT
- Monitor RGBlink
- Monitor Kramer
- Monitor ART
- Monitor AMX
- Monitor Alienware
- Monitor Emachines
- Monitor Caliber
- Monitor Maxdata
- Monitor Sunstech
- Monitor Sunny
- Monitor BlueBuilt
- Monitor Marquant
- Monitor Da-Lite
- Monitor ProXtend
- Monitor Kubo
- Monitor GeoVision
- Monitor LaCie
- Monitor InFocus
- Monitor Midas
- Monitor Festo
- Monitor Swissonic
- Monitor Waeco
- Monitor Ikan
- Monitor IHealth
- Monitor QSC
- Monitor Hannspree
- Monitor ESI
- Monitor Avocor
- Monitor Simrad
- Monitor Jung
- Monitor Genelec
- Monitor Interlogix
- Monitor Eizo
- Monitor POSline
- Monitor Peerless
- Monitor Atomos
- Monitor Mad Catz
- Monitor Krom
- Monitor Monoprice
- Monitor Promethean
- Monitor Odys
- Monitor Fostex
- Monitor Prowise
- Monitor Terra
- Monitor Neets
- Monitor Stairville
- Monitor Soundstream
- Monitor Xoro
- Monitor HKC
- Monitor I3-Technologies
- Monitor CTOUCH
- Monitor Ozone
- Monitor HoverCam
- Monitor Ibm
- Monitor BOOX
- Monitor Aputure
- Monitor Drawmer
- Monitor Blue Sky
- Monitor Zalman
- Monitor Iadea
- Monitor Advantech
- Monitor Hercules
- Monitor Sonifex
- Monitor Avantone Pro
- Monitor Ganz
- Monitor Extron
- Monitor Belinea
- Monitor Adam
- Monitor Triton
- Monitor ITek
- Monitor Akuvox
- Monitor Antelope Audio
- Monitor MicroTouch
- Monitor X-Rite
- Monitor EKO
- Monitor ONYX
- Monitor IBoardTouch
- Monitor Mirai
- Monitor Elite Screens
- Monitor Mitsai
- Monitor Skytronic
- Monitor TV One
- Monitor Christie
- Monitor Hanwha
- Monitor COMMBOX
- Monitor Yiynova
- Monitor Pelco
- Monitor Lilliput
- Monitor LightZone
- Monitor AOpen
- Monitor Planet Audio
- Monitor EC Line
- Monitor Datacolor
- Monitor Fluid
- Monitor HELGI
- Monitor Desview
- Monitor Syscom
- Monitor Allsee
- Monitor Alogic
- Monitor Night Owl
- Monitor ProDVX
- Monitor Varad
- Monitor PureTools
- Monitor DoubleSight
- Monitor CTL
- Monitor Game Factor
- Monitor Nixeus
- Monitor Chimei
- Monitor Blue Sea
- Monitor AMCV
- Monitor Faytech
- Monitor Hamlet
- Monitor Wyse - Dell
- Monitor Approx
- Monitor Bauhn
- Monitor TVLogic
- Monitor Feelworld
- Monitor GeChic
- Monitor Oecolux
- Monitor ADS-TEC
- Monitor Satco
- Monitor Casalux
- Monitor Positivo
- Monitor Jupiter
- Monitor Transvideo
- Monitor Innocn
- Monitor KeepOut
- Monitor Shimbol
- Monitor Raysgem
- Monitor Motrona
- Monitor Ikegami
- Monitor AORUS
- Monitor Portkeys
- Monitor Mimo Monitors
- Monitor Enttec
- Monitor American Dynamics
- Monitor AIS
- Monitor Eve Audio
- Monitor Wortmann AG
- Monitor Viotek
- Monitor Vidi-Touch
- Monitor KTC
- Monitor CoolerMaster
- Monitor Atlantis Land
- Monitor HEDD
- Monitor Colormetrics
- Monitor Monkey Banana
- Monitor SmallHD
- Monitor UPERFECT
- Monitor GVision
- Monitor Voxicon
- Monitor Mybeo
- Monitor Bearware
- Monitor IOIO
- Monitor DTEN
- Monitor Cocopar
- Monitor Titan Army
- Monitor Xenarc
- Monitor Delvcam
- Monitor Wimaxit
- Monitor BookIT
Legújabb útmutatók Monitor

9 Április 2025

9 Április 2025

9 Április 2025

8 Április 2025
8 Április 2025

5 Április 2025

4 Április 2025

2 Április 2025
2 Április 2025

30 Március 2025