Használati útmutató Samsung Jitterbug Plus
Samsung
okostelefon
Jitterbug Plus
Olvassa el alább 📖 a magyar nyelvű használati útmutatót Samsung Jitterbug Plus (122 oldal) a okostelefon kategóriában. Ezt az útmutatót 4 ember találta hasznosnak és 2 felhasználó értékelte átlagosan 4.5 csillagra
Oldal 1/122

Welcome to the GreatCall® Family.
Thank you for choosing the Jitterbug®
. At GreatCall, we’ve made it easy for you to
stay connected to friends and family with the simplicity of the Jitterbug, our 24-hour
service professionals, and our innovative Apps designed to keep you connected,
safe and healthy. This helpful guide contains all the information you need to start
using your new cell phone. And if you have any questions or need assistance, you
can count on us to be here for you day and night.
Best Regards,
Your friends at GreatCall
For additional information about GreatCall, visit www.greatcall.com.

Table of Contents
2 Table of Contents

Table of Contents
II Table of Contents
• Turning Your Jitterbug On: .........................................................................26
• Your Main Screen: ....................................................................................27
• Making Your First Call: ..............................................................................32
• To Turn Your Jitterbug Off: .........................................................................33
Personalize Your Jitterbug .................................................................................34
Operator Assistance .........................................................................................36
• To Call An Operator: .................................................................................. 37
Getting More Information ................................................................................. 38
GreatCall Customer Service ..............................................................................39
Emergency 911 Service .................................................................................... 40
• To Make An Emergency Call: .....................................................................40
Section 2: Placing And Receiving Calls .................................................. 43
Placing A Call ................................................................................................... 44
• Dialing Manually: .....................................................................................44
• Using An Operator To Make A Call: ............................................................45
• Using Your Phone Book To Make A Call: .....................................................46
Speakerphone .................................................................................................48
Answering A Call ..............................................................................................50

Table of Contents
IV Table of Contents
– Deleting A Contact Directly On Your Jitterbug : ............................................70
Section 4: Call History ........................................................................... 73
Using Call History To See Recent Calls ..............................................................74
• To Review Call History: .............................................................................. 74
Returning Missed Calls And Redialing ..............................................................76
Section 5: Settings ................................................................................ 79
Using Your Settings ..........................................................................................80
Selecting The Color Of The Inside Display .........................................................81
Changing Ring Tones ........................................................................................83
Turning The Start-Up GreatCall Jingle On And Off ..............................................85
• Turning The Jingle Off: ...............................................................................85
• Turning The Jingle On: ............................................................................... 86
Section 6: Voice Dial .............................................................................. 89
Using Voice Dial ...............................................................................................90
Section 7: Voice Mail .............................................................................93
Setting Up Voice Mail .......................................................................................94
Changing Your Voice Mail Greeting ...................................................................95

Table of Contents
VI Table of Contents
• Abc-W Mode ...........................................................................................119
• abc Mode ...............................................................................................119
Section 9: Jitterbug Camera .................................................................121
Taking A Photo With Your Jitterbug .................................................................122
Viewing A Photo On Your Jitterbug ..................................................................123
Deleting A Photo On Your Jitterbug .................................................................124
Sending A Photo From Your Jitterbug ..............................................................125
Receiving A Photo On Your Jitterbug ...............................................................127
Section 10: Bluetooth
® ........................................................................129
About Bluetooth ............................................................................................130
Using Your Jitterbug With Your Bluetooth Headset ..........................................131
Turning The Bluetooth Feature On Your Jitterbug On And Off ...........................131
• Turning The Bluetooth Feature On: ..........................................................131
• Turning The Bluetooth Feature Off: .......................................................... 133
Setting Your Bluetooth Headset To Pairing Mode ............................................134
Setting Your Jitterbug To Pairing Mode ...........................................................136
Answering A Call When Paired With Your Bluetooth Headset ........................... 140
Ending A Call When Paired With Your Bluetooth Headset ................................140

Activation

Activation
2 Activation
Important: Please do not turn on your phone until a representative or the website
instructs you to do so. If you’ve turned it on, please turn it off until instructed
otherwise.
Step 1: Locate your serial number as you will need it to set up the phone. You
received in the Jitterbug box. It will look like this, featuring an 18 digit number:
Step 2: You can set up your phone in one of two ways:
1. From your home phone or another phone, call us at .1-866-482-1424
2. Visit us at www.greatcall.com/activate and click on the
Activate a product
icon.
MEID-DEC:
123456789012345678

Activation
4 Activation
Screen 2
Activation could take several minutes or in rare cases up to several
hours. It is recommended you charge your phone throughout the
activation process using your wall charger to eliminate any possible
interruptions.
Your phone will now show screen 2,
indicating your phone is ready to begin the
activation process. The website or operator
will instruct you to press the button.

Activation
6 Activation
Step 5: Hit the button one last time to begin using your Jitterbug Plus!
Now that your Jitterbug is ready to go, we encourage you to set up a
mygreatcall.com account. On , you can pay your bill online, view mygreatcall.com
your minute usage, add helpful apps and services, and even add phone numbers
into your Jitterbug Phone Book. Phone numbers will automatcially update and
appear right in your phone!
Mygreatcall.com is your online home for everything you need to get the most out
of your new Jitterbug Plus cell phone. To set up your account, visit
www.mygreatcall.com and follow the online instructions.

Section 1
8 Getting Started
Section 1

Section 1
10 Getting Started
How To Use This Guide
This “How-To Guide” is divided into 10 sections that describe the features of
your Jitterbug and how to use them in a few simple steps. We recommend that
you read the entire guide and keep it handy for easy reference.
You can also skip directly to the section you’re looking for by using the Table of
Contents on page I, the purple side tabs on each page or the on page 225.Index
Throughout this guide, we have included the following illustrations, images and
symbols to highlight useful information:
need assistance, please give us a call anytime, 24 hours a day, seven days a
week, at 1-800-733-6632 www.greatcall.com or visit .

Section 1
12 Getting Started
Using The Battery
your Jitterbug for up to 25 days of standby time or 5 hours of talk time.
Installing And Removing The Battery
To Install The Battery The First Time:
1. With the Samsung logo facing up, slide the battery into the back of your
Jitterbug so the gold contacts on the side of thebattery connect with the gold
pins inside the phone.
2. Push the battery into place.

Section 1
14 Getting Started
2. Turn the phone over. At the bottom of the
battery cover you will see an arrow.
3. Towards the top of the cover, there is a
ridge, under the speaker holes. Push down
just below this ridge and then slide down,
in the direction of the arrow. Remove the cover.
4.
battery, and gently pull the battery out.
The Jitterbug Rechargeable Battery must be fully charged before using
12 hours. Failure to do so may damage your battery. If you use your
Jitterbug without charging the battery, and it is critically low, it will turn
itself off.

Section 1
16 Getting Started
Battery Level Indicator
Jitterbug phones remind you to charge your battery. Reminders appear on the
Inside Display with the following messages:
– a low battery alert and a message will tell you that your battery Battery Low
is beginning to get low.
Battery Critical – a low battery alert and a message will appear when the
battery has approximately 20% of battery life remaining.
phone. Using other batteries could damage your Jitterbug and may void
your warranty.
Section 1
18 Getting Started
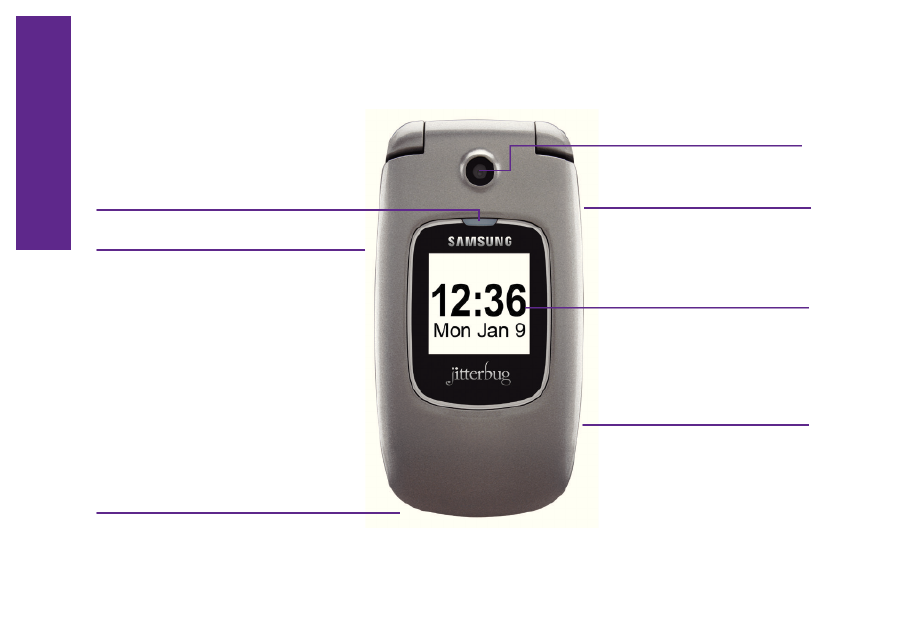
The Front Of Your Jitterbug
3. Internal Antenna
2. Volume Button
1. Indicator Light 5. 3.5mm Headset Jack
4. Camera
7. Power Connector and
Accessory Connector
6. Outside Display

Section 1
20 Getting Started
The Back Of Your Jitterbug
2. Battery Cover
1. External Speaker
3. Lanyard Connector

Section 1
22 Getting Started
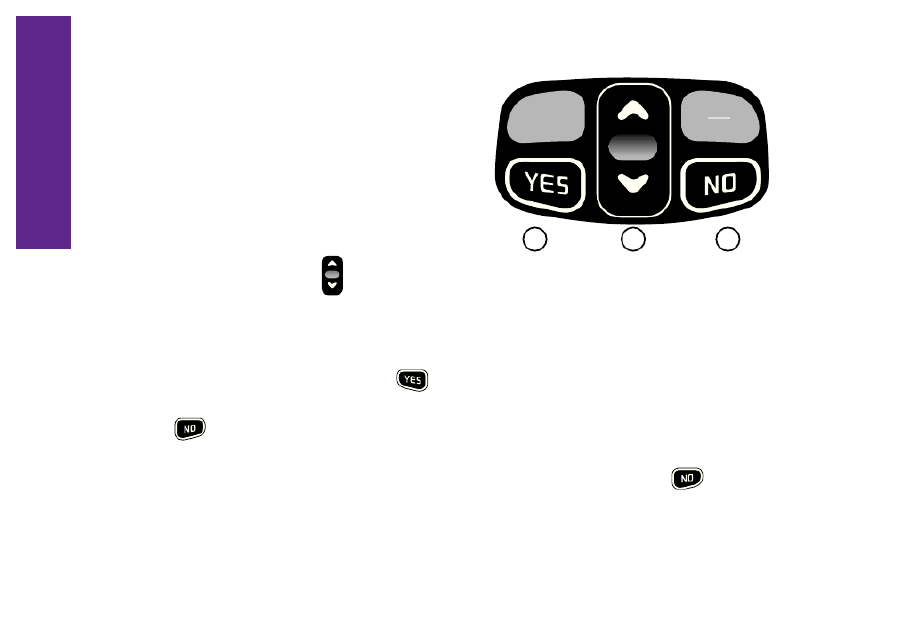
The Inside Of Your Jitterbug
1. Earpiece Speaker
2. Inside Display
6. On/Off Button
5. “Yes” Button 7. “No” Button
3. Up/Down Button
4. Speakerphone Button
Section 1
24 Getting Started
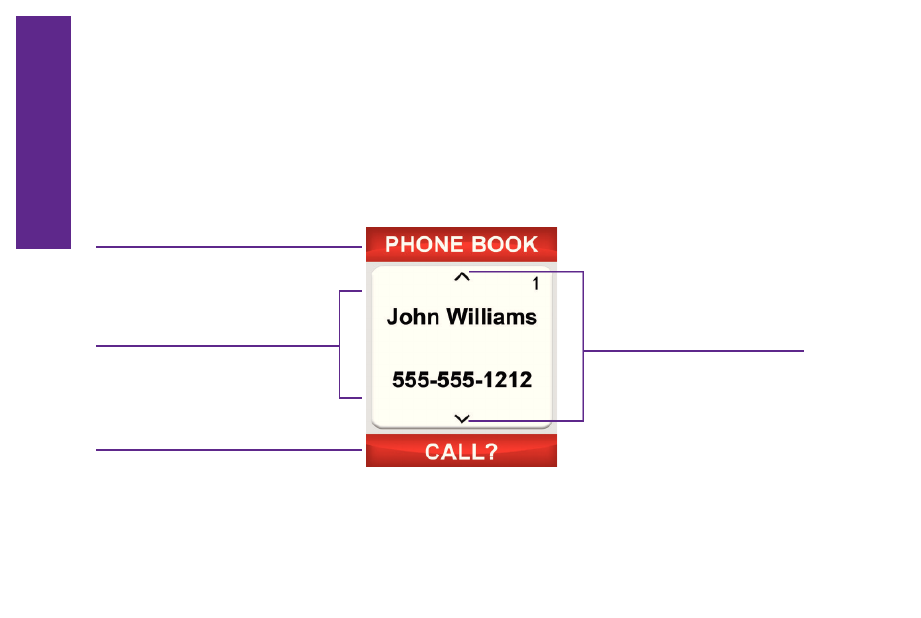
How To Read The Inside Display
Throughout this guide, the screen on the inside of your Jitterbug is referred to as
the Inside Display. The following diagram explains the areas of the Inside Display
and how to use them, using the as an example. Phone Book
1. Feature Area
2. Detail Area
3. Action Line
4. Additional
Information Exists

Section 1
26 Getting Started
Using Your Jitterbug For The First Time
If you have not activated your Jitterbug, please refer to page 1 before
turning your Jitterbug on.
Turning Your Jitterbug On:
1. Open your Jitterbug.
2. Press the on
off button in the upper right corner of the keypad until your Jitterbug
turns on and the GreatCall logo appears on the Inside Display.
3. When you hear a dial tone, your Jitterbug has service and is ready to use.
If a connection is not possible, a message will appear on the “No Service”
Outside Display and a dial tone will not be heard.

Section 1
28 Getting Started
2. Call History – an easy way to review your last ten incoming, outgoing and
Please reference Section 4,
page 73 for more information.
3. Phone Info – gives you the following important points of information about your
Jitterbug.
– the following items can be changed from within the 4. Settings Settings
feature.
Please reference Section 5, page 79 for more information.
Section 1
30 Getting Started
You can easily access all of your features
within the Main Screen using three
simple buttons located at the top of
the keypad.
1. Use the button to scroll through the features of the “Up/Down”
Main Screen.
2. When the feature you want to select is highlighted in gray in the middle of
the Inside Display, press the button to select that feature.
3. The button enables you to answer to questions in the Action Line “No”
and return to a previous screen. If you make a mistake while dialing a
number or typing a Text Message, you can always press the button to
back up and delete what you entered.
Spk
r
on
off
12 3

Section 1
32 Getting Started
Making Your First Call:
1. You can make a call directly from your at any Main Screen
time by using your keypad. Simply enter the ten digit phone
number and press the button to dial.
2. You will see “Calling...” on the Inside Display followed
by “Connected”
displayed on the following screen.
3. button or close
your Jitterbug to end the call.
4. You can also make a call directly from your Phone Book. Starting from the Main
Screen, use the “Up/Down” button to scroll to the and press “Phone Book”
the
button again to make the call.
To learn more about placing and receiving calls, please reference Section 2, page 43.

Section 1
34 Getting Started
Personalize Your Jitterbug
In addition to these six features that come with your new Jitterbug, the following
additional services and features are available to make the most of your Jitterbug
experience:
Voice Mail – callers can leave messages for you when you are unavailable to
answer your Jitterbug. Please reference Section 7, page 93 for more information.
Jitterbug SimpleText – enables you to send short messages to friends and family.
Please reference Section 8, page 101 for more information.
Call Waiting – if another call comes in when you are on a call, you will be
Please
reference Section 2, page 56 for more information.
International Dialing – if you expect to make calls beyond the U.S. or Canada,
consider adding our convenient International Calling option to your account.
Please reference Section 1, page 41 for more information.

Section 1
36 Getting Started
Operator Assistance
Live Operators are available 24 hours a day, seven days a week, and can help you:
Update and manage your 1. Phone Book.
Look up a residential, business or government phone number.2.
Connect you to any number in the U.S. or Canada.3.
Place calls to anyone in your .4. Phone Book
Add events and appointments to your calendar (if MyCalendar is enabled).5.

Section 1
38 Getting Started
Getting More Information
GreatCall customers have access to two unique websites that are easy to
navigate and explore – www.greatcall.com www.mygreatcall.com. and
The main GreatCall website – – is the place to learn more about the greatcall.com
company, read about new services available, shop for Jitterbug accessories or
get answers to frequently asked questions.
As a GreatCall customer, you have exclusive access to www.mygreatcall.com
where you can update your Phone Book, view your remaining monthly minutes,
review and pay your monthly bill, add exclusive apps and services, and update
mygreatcall.com please reference Section
3, page 64.

Section 1
40 Getting Started
Emergency 911 Service
To Make An Emergency Call:
1. Open your Jitterbug and make sure it’s on.
2. Dial 9–1–1 using the keypad.
3. Press the button when you see at the “CALL?”
bottom of the Inside Display.

Section 2
42 Placing And Receiving Calls
Section 2

Section 2
44 Placing And Receiving Calls
Placing A Call
Dialing Manually:
You can dial a phone number directly from almost every screen on your Jitterbug.
1. When you open your Jitterbug, you will hear a dial tone to indicate that service is
available. If service is not available, there will be no dial tone and you will see “No
Service” on the Inside Display.
2. Dial the full ten-digit number using your keypad. You may be required to dial
the number “1”
3. Press the button to place the call.
If you accidentally press a wrong button, press the button to back up and
delete the last number.

Section 2
46 Placing And Receiving Calls
4. Tell the Operator the name of the person in your you want to call Phone Book
or tell them the ten digit number you want to call.
5. button or simply close your Jitterbug to end
the call.
Using Your Phone Book To Make A Call:
To place a call to a number in your Phone Book:
1. Starting from the , use the button Main Screen “Up/Down”
and scroll to the until it appears highlighted in “Phone Book”
gray in the middle of the Inside Display.
2. Press the button to view your “Phone Book.”
3. Your Phone Book
entered in the , as indicated by the number in the top right Phone Book “1”
corner of the Inside Display. You can manage the order of the names and

Section 2
48 Placing And Receiving Calls
Speakerphone
The Speakerphone provides you the convenience to make a call without holding
the phone to your ear.
1. To turn your Speakerphone on, press the Spkr button in the top left corner of
your keypad.
2. You will hear an audible beep indicating that your has turned Speakerphone
on.
3. With the Speak erphone on, you can manually dial phone numbers, use your
Phone Book and other features.
4. With the Speak erphone you do not need to hold the phone to your ear.
Depending on your surroundings, you can enjoy a conversation using your
Speakerphone up to two feet from your Jitterbug.

Section 2
50 Placing And Receiving Calls
Answering A Call
Your Jitterbug rings or vibrates (depending on how you set the ringer volume
level) to indicate an incoming call. Additionally, there are other indications of
incoming calls:
appear on the Outside Display.
Phone Book then
the name and number will appear on the Inside Display, as
shown.
number or you may see “Unavailable” “Restricted.”or

Section 2
52 Placing And Receiving Calls
Receiving A Call When Your Jitterbug Is Open:
1. When the “ANSWER?” question appears on the Inside Display, press the
button to connect.
2. A “Connected” message will appear on the Inside Display and the caller’s
voice will be heard through the earpiece speaker.
Ending A Call
1. To end a call, press the button or close your Jitterbug.
Ignoring A Call
To Ignore A Call When Your Jitterbug Is Closed:
When the phone is ringing you can press the volume button to mute the ringer.
If Voice Mail is active, the caller will be directed to your Voice Mail. If Voice Mail
is not active, callers will get a message that you are not available.

Section 2
54 Placing And Receiving Calls
Vibrate Mode
Turn the ringer off by opening your Jitterbug and pressing the volume button
on the outside of the phone until “Vibrate” appears on the Inside Display. Your
Jitterbug will be set to vibrate to alert you of incoming calls.
Adjusting The Ringer Volume
1.
2. Press the volume button on the upper left-hand side of the
phone. Press the top of the button to increase the volume and
the bottom of the button to decrease the volume.
The available options are:
Volume Button

Section 2
56 Placing And Receiving Calls
Adjusting The Earpiece Speaker Volume
When you’re on a call, press the volume button up or down until the sound
reaches a comfortable level.
Your Jitterbug has three volume options for your earpiece speaker that you can
adjust while on a call as shown below:
Call Waiting
Call Waiting is a feature that allows you to accept a second call if you are already
on a call with another person. The phone does not come with this helpful feature
enabled, but if you would like to turn it on, simply call us at 1-800-733-6632. A
Call Waiting signal alerts you that there is a second caller waiting. The following
steps outline how to use Call Waiting on your Jitterbug:

Section 2
58 Placing And Receiving Calls

Section 3
60 Phone Book
Section 3

Section 3
62 Phone Book
Adding, Changing and Deleting Numbers
Your Jitterbug allows you to store up to 50 names and numbers of the people you
call on a regular basis.
You can manage your by adding, changing or deleting names and Phone Book
numbers.
There are three ways to manage your Phone Book:
1. Call the Operator by pressing the button on your keypad.
2. Use the internet - visit www.mygreatcall.com.
3. Use the keypad on your Jitterbug.

Section 3
64 Phone Book
OPTION 2: Using mygreatcall.com
Create A New Member Account:
mygreatcall.com, you will need to register your
account. Have your GreatCall phone number handy and be prepared to enter your
home address and email address. Simply follow the on-screen instructions to
set up your account.
After setting up your account, you will be able to enter phone numbers online. All
phone numbers you enter will automatically appear on your Jitterbug within four
hours.
is a helpful tool that makes it easy to manage your mygreatcall.com
account online, at your convenience.

Section 3
66 Phone Book
OPTION 3: On Your Jitterbug
Adding A Contact Directly On Your Jitterbug:
1. Starting from the , use the button and scroll to the Main Screen “Up/Down” “Phone
Book” until it appears highlighted in gray in the middle of the Inside Display.
2. Press the button to view your “Phone Book.”
3. Using the “Up/Down” button, scroll to “EDIT PHONE BOOK” and press the
button.
4. Using the “Up/Down” button, scroll to “Add” until it appears highlighted in
gray in the middle of the Inside Display.
5. Press the button to select the item “Add.”

Section 3
68 Phone Book
Modifying A Contact Directly On Your Jitterbug:
1. Starting from the use the button and scroll to theMain Screen, “Up/Down”
“Phone Book” until it appears highlighted in gray in the middle of the Inside
Display.
2. Press the button to select “Phone Book.”
3. Using the “Up/Down” “EDIT PHONE BOOK” button, scroll to and press the
button.
4. Using the “Up/Down” button, scroll to “Modify” until it appears highlighted
in gray in the middle of the Inside Display.
5. Press the button to select “Modify.”
6. Using the “Up/Down” button, scroll to the contact you would like to change.
7. Press the button to select the contact you would like to change.

Section 3
70 Phone Book
Deleting A Contact Directly On Your Jitterbug :
1. Starting from the , use the button and scroll to theMain Screen “Up/Down”
“Phone Book” until it appears highlighted in gray in the middle of the Inside
Display.
2. Press the button to select the feature.“Phone Book”
3. Using the “Up/Down” button, scroll to “EDIT PHONE BOOK” and press the
button.
4. Using the “Up/Down” button, scroll to “Delete” until it appears highlighted
in gray in the middle of the Inside Display.
5. Press the button to select “Delete.”
6. Using the “Up/Down” button, scroll to the contact you would like to delete.
7. Press the button to delete the contact.

72 Call History
Section 4
Section 4

74 Call History
Section 4
Using Call History To See Recent Calls
Your Jitterbug keeps a list of your ten most recent outgoing, incoming and missed calls.
To Review Call History:
1. Starting from the , use the button and scroll to Main Screen “Up/Down” “Call
History” until it appears highlighted in gray in the middle of the Inside Display.
2. Press the button to select “Call History.”
3.Call History will be your most recent
phone call.
4. Using the button, scroll down to view your in “Up/Down” Call History
sequence according to the time of occurrence.
If a call matches a number from your , the name and Phone Book
number of that person will appear on the Inside Display.

76 Call History
Section 4
Returning Missed Calls And Redialing
You can use Call History to directly return missed calls and redial both incoming
and outgoing calls.
1. Starting from the , use the button and scroll to Main Screen “Up/Down” “Call
History” until it appears highlighted in gray in the middle of the Inside Display.
2. Press the button to select “Call History.”
3. Using the button, scroll up and down to see your “Up/Down” Call History.
4. Select the call you would like to return.

Section 5
78 Settings
Section 5

Section 5
80 Settings
Using Your Settings
1. To access Settings, start in the and press the Main Screen “Up/Down” button to
scroll to “Settings” until it appears highlighted in gray in the middle of the Inside
Display.
2. Press the button to select “Settings.”
The following items can be changed using the feature:Settings

Section 5
82 Settings
3. Use the button to scroll through all of the “Up/Down” “Color” options.
4. Press the button once the desired color you would like appears
highlighted in gray in the middle of the Inside Display.
5. A checkmark will appear to the left of that color selection indicating that your
color setting has been changed and you will be returned to the menu.Settings
When you scroll through the color options, you will notice that the
screen will change color according to the color selection highlighted in
gray in the middle of the Inside Display.

Section 5
84 Settings
1. Starting from within the Settings feature, use the button to “Up/Down”
scroll through all of the available options.
2. Press the button once the “Ring Tones” option is highlighted in gray in the
middle of the Inside Display.
3. You will notice that the Ring Tone has a checkmark next to it indicating “Alert”
that this is your current default Ring Tone.
4. Use the button to scroll through all of the Ring Tones options. “Up/Down”
You will hear the sound of each Ring Tone once it is in the middle of the Inside
Display highlighted in gray.
5. Press the button once you hear the Ring Tone you like best. A checkmark
will appear to the left of that Ring Tone selection indicating that your Ring Tone
setting has been changed and you will be returned to the menu.Settings

Section 5
86 Settings
Turning The Jingle On:
1. “Up/Down” Starting from Main Screen, use the button to scroll to
“Settings” and press the button.
2. Use the button to scroll through “Up/Down” Settings and press the
button once is highlighted in gray in the middle of the Inside “Jingle OFF”
Display.
The screen will read indicating that you have successfully 3. “Jingle ON”
turned on the Jingle.

Section 6
88 Voice Dial
Section 6

Section 6
90 Voice Dial
Using Voice Dial
1. Starting from the , use the Main Screen “Up/Down” button and scroll to
“Voice Dial” until it appears highlighted in gray in the middle of the Inside
Display.
2. Press the button to select “Voice Dial.”
3. You will hear an audible prompt to “Say the name” and then a short beep.
After the beep, say the name exactly as it appears in your Phone Book.
4. Voice Dial If
“Did you say ______?”“Yes” after the beep.
5. Voice Dial “Repeat the name” If is unsure it will say followed by a beep.
6. Voice Dial will dial the number of the person whose name you selected.

Section 7
92 Voice Mail
Section 7

Section 7
94 Voice Mail
Setting Up Voice Mail
This section only applies if you have purchased Voice Mail with your
GreatCall service. To purchase Voice Mail service for your Jitterbug,
please call us at 1-800-733-6632.
Follow these steps to set up Voice Mail:
1. Starting from the , use the button and scroll to Main Screen “Up/Down” “Voice
Mail” until it appears highlighted in gray in the middle of the Inside Display.
2. Press the button to dial the GreatCall Voice Mail system.
3. Voice Mail. You will be
guided through your Voice Mail
instructions, pressing the and buttons as prompted.

Section 7
96 Voice Mail
Letting You Know That You Have Voice Mail Messages
If you miss a call and the caller leaves you a message, your Jitterbug will notify
you by:
1. Displaying “New Voice Mail” on the Outside Display.
2. “You have a new voice message” Displaying on the Inside
Display, as shown.
3.
Jitterbug is opened.
4.
30 minutes or until your Jitterbug is opened.

Section 7
98 Voice Mail
Listening To Saved Voice Mail Messages
1. Starting from the use the Main Screen, “Up/Down” button and scroll to
“Voice Mail” until it appears highlighted in gray in the middle of the Inside
Display.
2. Press the button to select “Voice Mail” and listen to the prompts to play
your saved messages.
3. To exit your Voice Mail, simply close your Jitterbug at any time.
To quickly manage multiple messages, press the button at any time
while listening to a message. You will then be given the option to save
or delete your message. Pressing the button will save that message
and advance to your next Voice Mail message.

Section 8
100 Jitterbug SimpleText
Section 8

Section 8
102 Jitterbug SimpleText
Using Jitterbug
SimpleText Service
This section applies if you have asked for SimpleText with your GreatCall
service. To get SimpleText on your Jitterbug, please call us at
1-800-733-6632.
We’ve created an easy to use Text Messaging service that allows you to do the
following:
Section 8
104 Jitterbug SimpleText
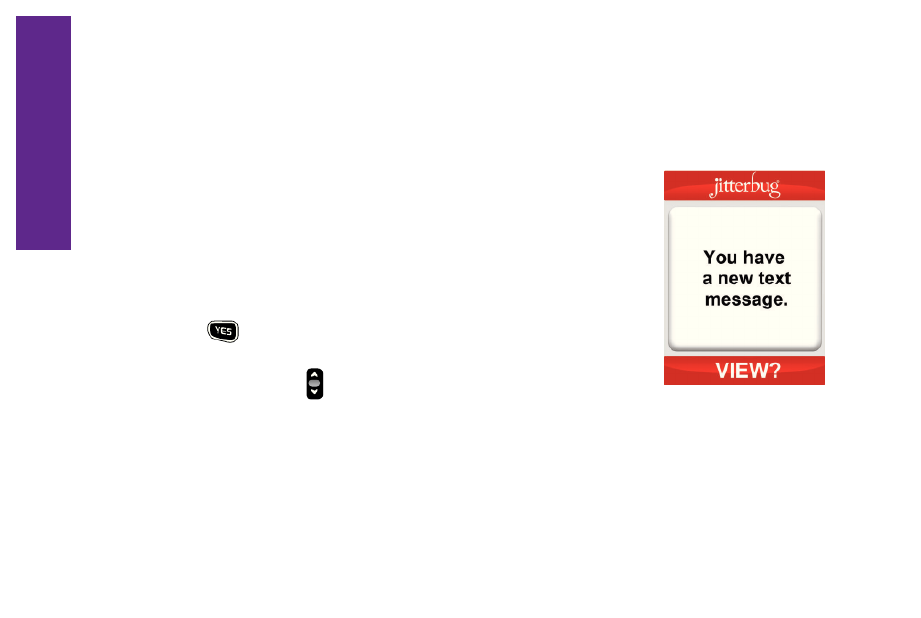
Read A New Text Message
the message:
1. To read the Text Message, open your Jitterbug. You will see
the words “You have a new text message.” on the Inside
Display and the word on the Action Line, as “VIEW?”
shown.
2. Press the button to view the Text Message.
3. Press the button to read the entire Text “Up/Down”
Message.

Section 8
106 Jitterbug SimpleText
5. When the message has been sent, you will see the words “Message
Successfully Sent” on the Inside Display.

Section 8
108 Jitterbug SimpleText
5. Using the button, scroll to the Text Message you would like to “Up/Down”
read.
6. Press the button to read the entire Text Message.
Jitterbug
SimpleText automatically saves the messages you’ve received
from others as well as the messages you’ve sent to others. When
viewing your saved messages, and “From” “To” are clearly labeled at
the top of the Inside Display.

Section 8
110 Jitterbug SimpleText
4.
the
5. “Message Successfully Deleted” will appear on the Inside Display and you will
be returned to your saved messages.

Section 8
114 Jitterbug SimpleText
5. To create your own message use the “Up/Down” button and scroll to
“Customize.” Press the button and use the keypad to type your Text Message.
To use the Jitterbug Library of pre-written Text Messages, use the “Up/Down”
button to scroll to “Library.” Press the button and again, use the “Up/Down”
6. Press the button when you are done typing your message. You will automatically
go to your Phone Book “Up/Down”. Use the button to scroll through your contacts.
Press the button when the contact to whom you wish to send the Text
Message is in the middle of your Inside Display.
If you do not have the contact in your , use the Phone Book “Up/Down”
button to scroll to the option. Press the button and “Enter Number”
enter the phone number using the keypad. Once you have entered the
number, simply press the button to send your message.
7. After you press the button, you will see the words “Sending Message” on the
Inside Display.

Section 8
116 Jitterbug SimpleText
The table below explains how to create a custom Text Message using the number
keys on the keypad to enter letters:
Keyboard Function
Enters the number “0” in any Text Message entry mode
Add a space
Press repeatedly to cycle through the 123, ABC, Abc-S, Abc-W
and abc Modes
Move back a space and delete a character
Press repeatedly to enter characters:
. , – ’ @ : ! ? / 1 cycle through the characters

Section 8
118 Jitterbug SimpleText
ABC Mode
In ABC Mode every letter will be capitalized. To enter ABC Mode,
press the button until you see “ABC” appear in the top
right corner of the Inside Display.
Abc-S Mode
enter Abc-S Mode, press the button until you see “Abc-S”
appear in the top right corner of the Inside Display.

Section 9
120 Jitterbug Camera
Section 9

Section 9
122 Jitterbug Camera
Taking A Photo With Your Jitterbug
1. Starting from the main screen, use the button and scroll to “Up/Down” “Camera”
until it appears highlighted in gray in the middle of the Inside Display.
2. Press the button to open the camera.
3. Make sure that the image you would like to capture appears on the Inside Display.
4. Press the button to capture the image.
5. Press “Yes” to store your photo. “Photo Successfully Saved” will appear on the Inside Display.
6. Press “No” to delete your photo and return to the camera.
Any photo saved on your Jitterbug will be stored in a photo gallery called
“My Photos.”

Section 9
124 Jitterbug Camera
Deleting A Photo On Your Jitterbug
1. Starting from the main screen use the button and scroll to “Up/Down” “My
Photos” until it appears highlighted in gray in the middle of the Inside Display.
2. Press the button to open “My Photos.”
3. Your most recently captured photo will appear on your Inside Display.
4. Use the “Up/Down” button and scroll to the photo you would like to delete.
5. Press the button.
6. Use the “Up/Down” button and scroll to until it appears highlighted in “Delete”
gray in the middle of the Inside Display.
7. Press the button to delete the selected photo.
8.
9. “Photo Successfully Deleted” will appear on the Inside Display.

Section 9
126 Jitterbug Camera
8. Use the “Up/Down” button and scroll to the contact to which you would like to
send your photo.
9. Press the button to send the photo.
10. When the photo has been sent you will see the words “Photo Successfully Sent”
on the Inside Display.
If the contact you would like to send the photo to is not listed in your Phone
Book, use the button and scroll to where “Up/Down” “Enter Recipient,”
you can enter a phone number using your keypad.
You can also share your photos on several websites. To take advantage
of this feature, simply log in to the online portal and mygreatcall.com
register your existing account with any of the available sites. If you have
not registered to use mygreatcall.com, simply visit www.mygreatcall.com
and follow the online instructions.

Section 10
128 Bluetooth
Section 10

Section 10
130 Bluetooth
About Bluetooth
Bluetooth is a technology that allows you to talk on your cell phone without using
your hands. In order to use it, you simply must “pair” your Jitterbug so that it is
connected, without wires, to a Bluetooth device, as described on the following
pages.
For your convenience, your new Jitterbug is equipped to utilize Bluetooth
wireless headsets, hands-free speakers, and other compatible Bluetooth
devices.
Bluetooth devices. Along with improved ease-
of-use and safety by eliminating wires, also offers you plenty of Bluetooth
alternative advantages, such as having the ability to talk hands-free while your
Jitterbug is in your pocket or purse.
Visit www.great.com/jitterbug/accessories or call 1-800-733-6632 to
learn more about the bluetooth headset that’s right for you.

Section 10
132 Bluetooth
1. Starting from the of your Jitterbug, scroll through the options using theMain Screen
“Up/Down” button until highlighted in gray in the middle of the Inside “Settings” is
Display.
2. Press the button on your Jitterbug to select the “Settings.”
3. Scroll through the options using the “Settings” “Up/Down” button until
“Bluetooth” is highlighted in gray in the middle of the Inside Display.
4. Press the button to select the option.“Bluetooth”
5. Scroll through the options using the button until “Bluetooth” “Up/Down”
“Bluetooth OFF” is highlighted in gray in the middle of the Inside Display.
6. Press the button to turn “Bluetooth ON.” You will now see the words
“Bluetooth ON” highlighted in gray in the middle of the Inside Display.
7. When your Jitterbug is set to “Bluetooth ON,” you will see the Bluetooth
symbol in the top right corner of the as shown on page 136.Main Screen

Section 10
134 Bluetooth
Setting Your Bluetooth Headset To Pairing Mode
Bluetooth device is called “Pairing.” This step
is required because there are no wires to link your Jitterbug to your Bluetooth
device. “Pairing” happens when your Jitterbug and your device agree Bluetooth
to communicate with one another. By “Pairing,” your Jitterbug recognizes your
Bluetooth device and the two devices automatically accept communication from
each other.
For step-by-step instructions on setting your Bluetooth headset to pairing mode,
please refer to the instruction guide found in your bluetooth headset packaging.

Section 10
136 Bluetooth
Setting Your Jitterbug To Pairing Mode
1. Starting from the Main Screen of your Jitterbug, use the button and “Up/Down”
scroll to “Settings” until it appears highlighted in gray in the middle of the Inside
Display.
2. Press the button on your Jitterbug to select “Settings.”
3. Use the “Up/Down” button and scroll to until it appears “Bluetooth”
highlighted in gray in the middle of the Inside Display.
4. Press the button to select the feature on your Jitterbug.“Bluetooth”
5. Use the “Up/Down” button and scroll to until it appears highlighted “Pair”
in gray in the middle of the Inside Display of your Jitterbug.
6. Press the button to select the feature on your Jitterbug.“Pair”

Section 10
138 Bluetooth
12. When your Jitterbug is successfully paired with your Bluetooth headset, you
will see the message “(your device name) Connected.” You will also hear a
chime sound notifying you that your Jitterbug is now connected with your
Bluetooth headset.
13. Your Jitterbug is now “Paired” with your Bluetooth headset and ready to
make and receive calls.

Section 10
140 Bluetooth
Answering A Call When Paired With Your Bluetooth Headset
Press the “Talk” Bluetooth button on the headset.
Ending A Call When Paired With Your Bluetooth Headset
To End A Call When Your Jitterbug Is Open:
There are two ways to end a call while using a headset:Bluetooth
•Press the “Talk” Bluetooth button on the headset or
•Press the button on your Jitterbug.
To End A Call When Your Jitterbug Is Closed:
Simply press the “Talk” Bluetooth button on the headset.

Health and Safety
142 Health and Safety
Health And Safety In

Health and Safety
144 Health and Safety
Exposure To Radio Frequency (RF) Signals
The U.S. Food and Drug Administration (FDA) has published information for
consumers relating to Radio Frequency (RF) exposure from wireless phones. The
FDA publication includes the following information:
Do cell phones pose a health hazard?
Many people are concerned that cell phone radiation will cause cancer or other
phones with any health problems.
Cell phones emit low levels of Radio Frequency (RF) energy. Over the past 15
years, scientists have conducted hundreds of studies looking at the biological
effects of the radio frequency energy emitted by cell phones. While some
researchers have reported biological changes associated with RF energy, these
studies have failed to be replicated. The majority of studies published have
failed to show an association between exposure to radio frequency from a cell
phone and health problems.

Health and Safety
146 Health and Safety
forms of electromagnetic radiation with relatively low frequencies.
While RF energy does not ionize particles, large amounts can increase body
temperatures and cause tissue damage. Two areas of the body, the eyes and the
testes, are particularly vulnerable to RF heating because there is relatively little
Research Results to Date:
Is there a connection between RF and certain health problems?
The results of most studies conducted to date say no. In addition, attempts to
evidence does not show an association between exposure to Radio Frequency
community has supported additional research to address gaps in knowledge.
Some of these studies are described below.
Interphone Study
Interphone is a large international study designed to determine whether cell

Health and Safety
148 Health and Safety
International Cohort Study on Mobile Phone Users (COSMOS)
The COSMOS study aims to conduct long-term health monitoring of a large
group of people to determine if there are any health issues linked to long-term
exposure to radio frequency energy from cell phone use. The COSMOS study
will follow approximately 300,000 adult cell phone users in Europe for 20 to 30
years. Additional information about the COSMOS study can be found at http://
www.ukcosmos.org/index.html.
Risk of Brain Cancer from Exposure to Radio Frequency Fields in Childhood and
Adolescence (MOBI-KIDS)
MOBI-KIDS is an international study investigating the relationship between
exposure to radio frequency energy from communication technologies including
cell phones and brain cancer in young people. This is an international multi-
center study involving 14 European and non-European countries. Additional
information about MOBI-KIDS can be found at
http://www.creal.cat/programes-recerca/en_projectes-creal/view.php?ID=39.

Health and Safety
150 Health and Safety
Institute of Electrical and Electronics Engineers (IEEE), the International
Commission on Non-Ionizing Radiation Protection (ICNIRP), and others to assure
that safety standards continue to adequately protect the public.
Reducing Exposure: Hands-Free Kits and Other Accessories
Steps to Reduce Exposure to Radio Frequency Energy
If there is a risk from being exposed to radio frequency energy (RF) from cell
phones - and at this point we do not know that there is - it is probably very small.
But, if you are concerned about avoiding even potential risks, you can take a few
simple steps to minimize your RF exposure.
•Reducetheamountoftimespentusingyourcellphone;
•Usespeakermodeoraheadsettoplacemoredistancebetweenyourhead
and the cell phone.
Hands-Free Kits
Hands-free kits may include audio or Bluetooth® headsets and various types of
body-worn accessories such as belt-clips and holsters. Combinations of these
can be used to reduce RF energy absorption from cell phones.
Headsets can substantially reduce exposure because the phone is held away
Termékspecifikációk
| Márka: | Samsung |
| Kategória: | okostelefon |
| Modell: | Jitterbug Plus |
Szüksége van segítségre?
Ha segítségre van szüksége Samsung Jitterbug Plus, tegyen fel kérdést alább, és más felhasználók válaszolnak Önnek
Útmutatók okostelefon Samsung

30 Március 2025
12 Január 2025
12 Január 2025
20 December 2024
14 Október 2024
9 Október 2024
2 Október 2024
2 Október 2024
1 Október 2024
22 Szeptember 2024
Útmutatók okostelefon
- okostelefon Sony
- okostelefon Acer
- okostelefon Nedis
- okostelefon LG
- okostelefon Realme
- okostelefon Philips
- okostelefon SilverCrest
- okostelefon Garmin
- okostelefon Panasonic
- okostelefon AEG
- okostelefon Sharp
- okostelefon Nokia
- okostelefon Lenovo
- okostelefon Evolveo
- okostelefon Toshiba
- okostelefon Oppo
- okostelefon Hyundai
- okostelefon Hisense
- okostelefon BenQ
- okostelefon Apple
- okostelefon TP-Link
- okostelefon Medion
- okostelefon MyPhone
- okostelefon Motorola
- okostelefon Geemarc
- okostelefon Alcatel
- okostelefon TCL
- okostelefon Xiaomi
- okostelefon CAT
- okostelefon Dell
- okostelefon Gigaset
- okostelefon Cyrus
- okostelefon Gigabyte
- okostelefon Vivax
- okostelefon Thomson
- okostelefon Intex
- okostelefon Polaroid
- okostelefon Kyocera
- okostelefon Aiwa
- okostelefon Huawei
- okostelefon Microsoft
- okostelefon Asus
- okostelefon Haier
- okostelefon Mitsubishi
- okostelefon Sencor
- okostelefon Telefunken
- okostelefon Nevir
- okostelefon Kodak
- okostelefon Doro
- okostelefon Denver
- okostelefon Bush
- okostelefon TAG Heuer
- okostelefon Trevi
- okostelefon Amazon
- okostelefon NGS
- okostelefon Tesla
- okostelefon Energy Sistem
- okostelefon OK
- okostelefon Google
- okostelefon Honor
- okostelefon SPC
- okostelefon Bea-fon
- okostelefon ZTE
- okostelefon ESTAR
- okostelefon Vodafone
- okostelefon O2
- okostelefon Hammer
- okostelefon Overmax
- okostelefon OnePlus
- okostelefon Archos
- okostelefon MaxCom
- okostelefon Kogan
- okostelefon Alecto
- okostelefon Honeywell
- okostelefon Prestigio
- okostelefon Media-Tech
- okostelefon Bury
- okostelefon Sony Ericsson
- okostelefon Manta
- okostelefon Blaupunkt
- okostelefon Mio
- okostelefon Facom
- okostelefon Oukitel
- okostelefon Sagem
- okostelefon Razer
- okostelefon Ulefone
- okostelefon Olympia
- okostelefon Tiptel
- okostelefon Sanyo
- okostelefon CRUX
- okostelefon Micromax
- okostelefon NEC
- okostelefon Audioline
- okostelefon CUSTOM
- okostelefon GoClever
- okostelefon Krüger&Matz
- okostelefon Allview
- okostelefon RCA
- okostelefon HTC
- okostelefon Bluebird
- okostelefon Majestic
- okostelefon IGET
- okostelefon Tecdesk
- okostelefon Lava
- okostelefon Cubot
- okostelefon CSL
- okostelefon I.safe Mobile
- okostelefon Fysic
- okostelefon Wiko
- okostelefon Yarvik
- okostelefon Aligator
- okostelefon Amplicomms
- okostelefon AQISTON
- okostelefon Amplicom
- okostelefon Ecom
- okostelefon Lexibook
- okostelefon Trekstor
- okostelefon Vestel
- okostelefon Sonim
- okostelefon Blu
- okostelefon Easypix
- okostelefon Konrow
- okostelefon Brigmton
- okostelefon Sunstech
- okostelefon Aspera
- okostelefon Swissvoice
- okostelefon Sunny
- okostelefon Nordmende
- okostelefon Binatone
- okostelefon Blackberry
- okostelefon KPN
- okostelefon Vivo
- okostelefon Wolder
- okostelefon NGM
- okostelefon Profoon
- okostelefon Switel
- okostelefon InFocus
- okostelefon GreatCall
- okostelefon XD
- okostelefon Pantech
- okostelefon Alba
- okostelefon RugGear
- okostelefon Umidigi
- okostelefon Intermec
- okostelefon AT&T
- okostelefon Mpman
- okostelefon Kazam
- okostelefon Logicom
- okostelefon Karbonn
- okostelefon Palm
- okostelefon Emporia
- okostelefon Hannspree
- okostelefon Phicomm
- okostelefon Crosscall
- okostelefon Plum
- okostelefon Lumigon
- okostelefon Infinix
- okostelefon Keneksi
- okostelefon Klipad
- okostelefon T-Mobile
- okostelefon JCB
- okostelefon Casper
- okostelefon Unnecto
- okostelefon Wileyfox
- okostelefon ITT
- okostelefon Yota
- okostelefon Avus
- okostelefon Spice
- okostelefon M3 Mobile
- okostelefon Wolfgang
- okostelefon BQ
- okostelefon ORA
- okostelefon Danew
- okostelefon Echo
- okostelefon Primux
- okostelefon UTStarcom
- okostelefon Zipy
- okostelefon Mediacom
- okostelefon Beafon
- okostelefon BGH
- okostelefon Billow
- okostelefon Telstra
- okostelefon ToughGear
- okostelefon Benefon
- okostelefon Komu
- okostelefon Doogee
- okostelefon Energizer
- okostelefon Tremay
- okostelefon Kurio
- okostelefon Piranha
- okostelefon Coolpad
- okostelefon Mobistel
- okostelefon Itel
- okostelefon Garmin-Asus
- okostelefon Handheld
- okostelefon Fero
- okostelefon AT Telecom
- okostelefon General Mobile
- okostelefon Mustang
- okostelefon Syco
- okostelefon Pharos
- okostelefon Storex
- okostelefon Fairphone
- okostelefon Xtreamer
- okostelefon Freeman
- okostelefon HomTom
- okostelefon Auro
- okostelefon Maxx
- okostelefon ITTM
- okostelefon Posh Mobile
- okostelefon THL
- okostelefon NGM-Mobile
- okostelefon Nothing
- okostelefon Lark
- okostelefon NUU Mobile
- okostelefon Senifone
- okostelefon Tecno
- okostelefon Telme
- okostelefon UMi
- okostelefon Olitech
- okostelefon Mobiola
- okostelefon Meizu
- okostelefon Neffos
- okostelefon Gionee
- okostelefon TIM
- okostelefon Leotec
- okostelefon Leagoo
- okostelefon NTech
- okostelefon Nubia
- okostelefon LeEco
- okostelefon GSmart
- okostelefon Saiet
- okostelefon POCO
- okostelefon Verykool
- okostelefon Aplic
- okostelefon HMD
- okostelefon Opis
- okostelefon Volla
Legújabb útmutatók okostelefon

10 Április 2025
2 Április 2025

16 Január 2025
16 Január 2025

15 Január 2025
14 Január 2025
13 Január 2025
12 Január 2025
12 Január 2025

12 Január 2025