Használati útmutató Samsung HG65AD890UK
Olvassa el alább 📖 a magyar nyelvű használati útmutatót Samsung HG65AD890UK (70 oldal) a televízió kategóriában. Ezt az útmutatót 3 ember találta hasznosnak és 2 felhasználó értékelte átlagosan 4.5 csillagra
Oldal 1/70

Thank you for purchasing Samsung product.
To receive more service, please register your
product at
www.samsung.com
Model Serial No.
LED TV
Installation manual

Figures and illustrations in this User Manual are provided for reference only and may differ from actual product
appearance. Product design and specifications may be changed without notice.
Instruction
This TV is provided with interactive functionality through a set-back box (SBB/STB) connected to the TV, and with other TVs in a computer-
controlled system for hotels and other hospitality businesses.
Interactive: When the TV is powered-up initially, it sends a command to identify the SBB/STB; if identified, the TV switches to ONLINE mode
and full control is through the SBB/STB.
If the TV is in ONLINE mode, it stops receiving IR(Samsung remote) commands and acts according to interface protocol.
Stand-Alone: If SBB/STB is not identified, the TV should be switched to STAND-ALONE mode with restricted operation.
Operational Modes
When this TV (in Hotel mode) is operated with a SBB/STB, it is in one of two states :
•ONLINE or STAND-ALONE. In the STAND-ALONE state, the TV will act as a Hotel TV, but without active communication. This is to prevent
guests from trying to cheat the system by disconnecting the SBB/STB.
Power
ON
Hotel TV
Online Mode
Poll Rate 20/sec
Stand-alone Mode
Hotel Mode On SBB/STB Online if
one success within
10 attempts SBB/STB
Online-10
consecutive
fails
SBB/STB
Status-
Attempt every
2secs
To set the details for Stand-alone or interactive mode, refer to pages 22-25(Setting the hotel option data : Stand-alone mode and Interactive
mode)
•Some operations may be restricted to prevents guests from "cheating" the TV system.
•No main menu(Interactive mode) or Channel Menu, Plug & Play in Main Menu (Stand-Alone mode)
•Limited Volume and Panel key lock or unlock
Still image warning
Avoid displaying still images (like jpeg picture files) or still image element (like TV Program logo, panorama or 4:3 image format, stock or news
bar at screen bottom etc.) on the screen. Constant displaying of still picture can cause uneven wear of screen phosphor, which will affect
image quality. To reduce risk of this effect, please follow below recommendations:
•Avoid displaying the same TV channel for long periods.
•Always try do display any image on full screen, use TV set picture format menu for best possible match.
•Reduce brightness and contrast values to minimum required to achieve desired picture quality, exceeded values may speed up the burnout
process.
•Frequently use all TV features designed to reduce image retention and screen burnout. Refer to the relevant user manual section for details.
Securing the Installation Space
Keep required distances between the product and other objects (e.g. walls) to ensure proper ventilation.
Failing to do so may result in fire or a problem with the product due to an increase in the internal temperature.
•When using a stand or wall-mount, use parts provided by Samsung Electronics only.
– Using parts provided by another manufacturer may result in a problem with the product or injuries due to the product falling.
•The appearance may differ, depending on the product.
Installation with a stand. Installation with a wall-mount.
10 cm10 cm
10 cm
10 cm10 cm
10 cm
10 cm

3
Contents
ENGLISH
English
yAccessories 4 .............................................................................................................................................
yInstalling the LED TV Stand 4 ......................................................................................................................
yViewing the Connection Panel 7 ..................................................................................................................
yTV Controller 10 ............................................................................................................................................
yViewing the Remote Control 11 .....................................................................................................................
ySamsung Smart Control 13 ...........................................................................................................................
yConnecting the TV with SBB 16 ....................................................................................................................
yConnecting the Bathroom Speakers 17 ........................................................................................................
yConnecting the MediaHub HD 19 .................................................................................................................
yConnecting the RJP (Remote Jack Pack) 20 .................................................................................................
ySetting the Hotel Option Data 22 ..................................................................................................................
yInstalling the Wall Mount 64 ..........................................................................................................................
ySecuring the TV to the Wall 65 ......................................................................................................................
yAnti-theft Kensington Lock 65 .......................................................................................................................
ySpecifications 66 ..........................................................................................................................................
yDimensions 67 ..............................................................................................................................................
yLicence 69 ....................................................................................................................................................
4
English
Accessories
✎Please make sure the following items are included with your LED TV. If any items are missing, contact your dealer.
✎The items’ colour and shapes may vary depending on the model.
• Remote Control & Batteries (AAA x 2)
• Samsung Smart Control & Batteries (AA x 2)
• Quick Set up Guide
• Power Cord / Data Cable
• Owner’s Instructions
Safety Guide (Not available in all locations)
✎The stand and stand screw may not be included, depending on the model.
✎The Data Cable may not be included, depending on the SI Vendor.
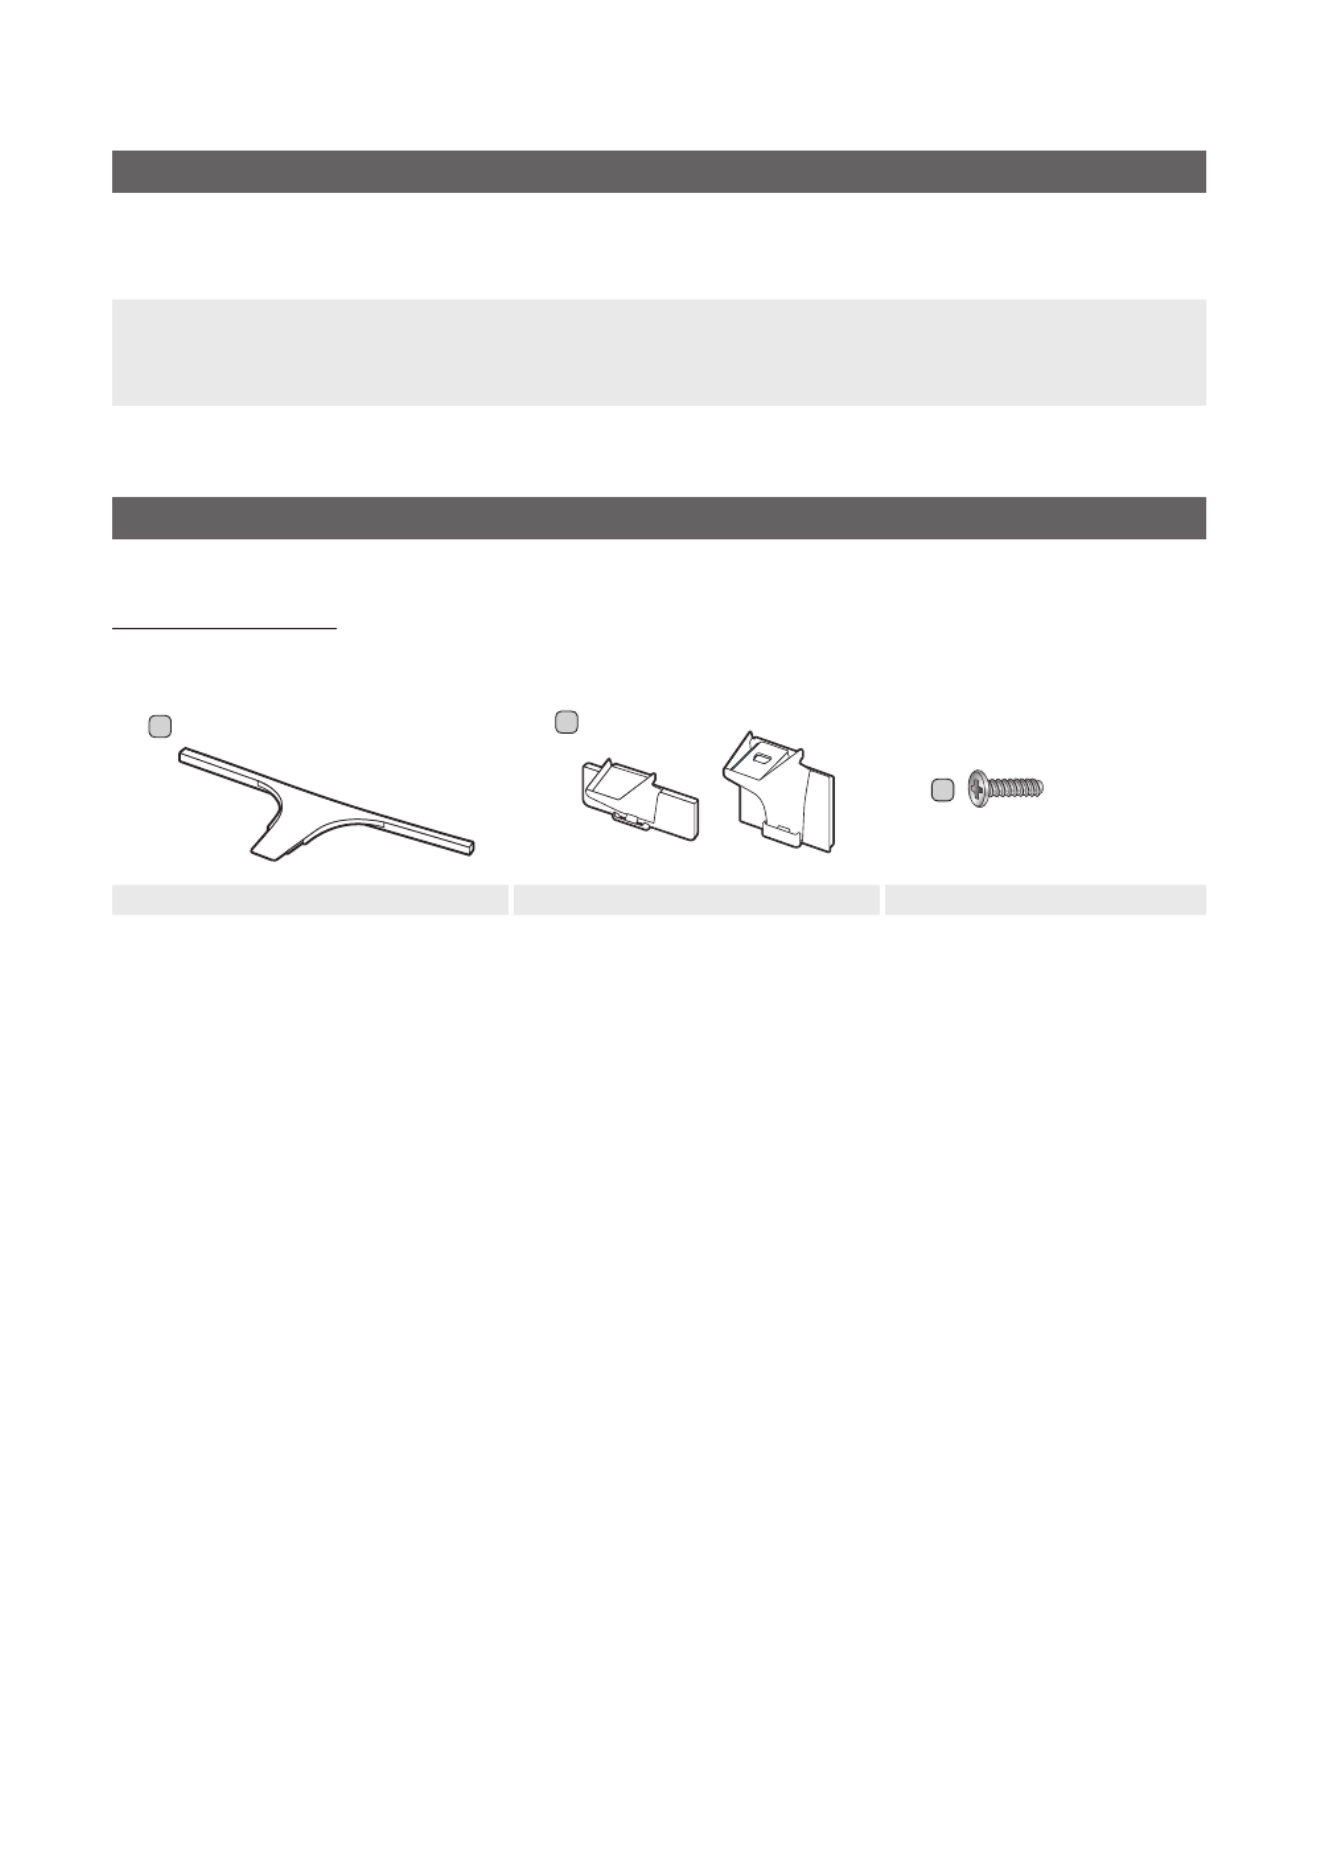
Installing the LED TV Stand
Stand Components
When installing the stand, use the provided components and parts.
1 EA
AB
1 EA
48" ~ 55" 65"
C
x8 (M4 X L14)
Stand Guide Stand Screws

5
English
1
2
✎Place a soft cloth over the
table to protect the TV, and
then place the TV on the
cloth screen-side down.
✎Insert the Stand Guide into
the slot on the bottom of
the TV.
✎Slide and assemble it to the
end line in the direction of
arrow.
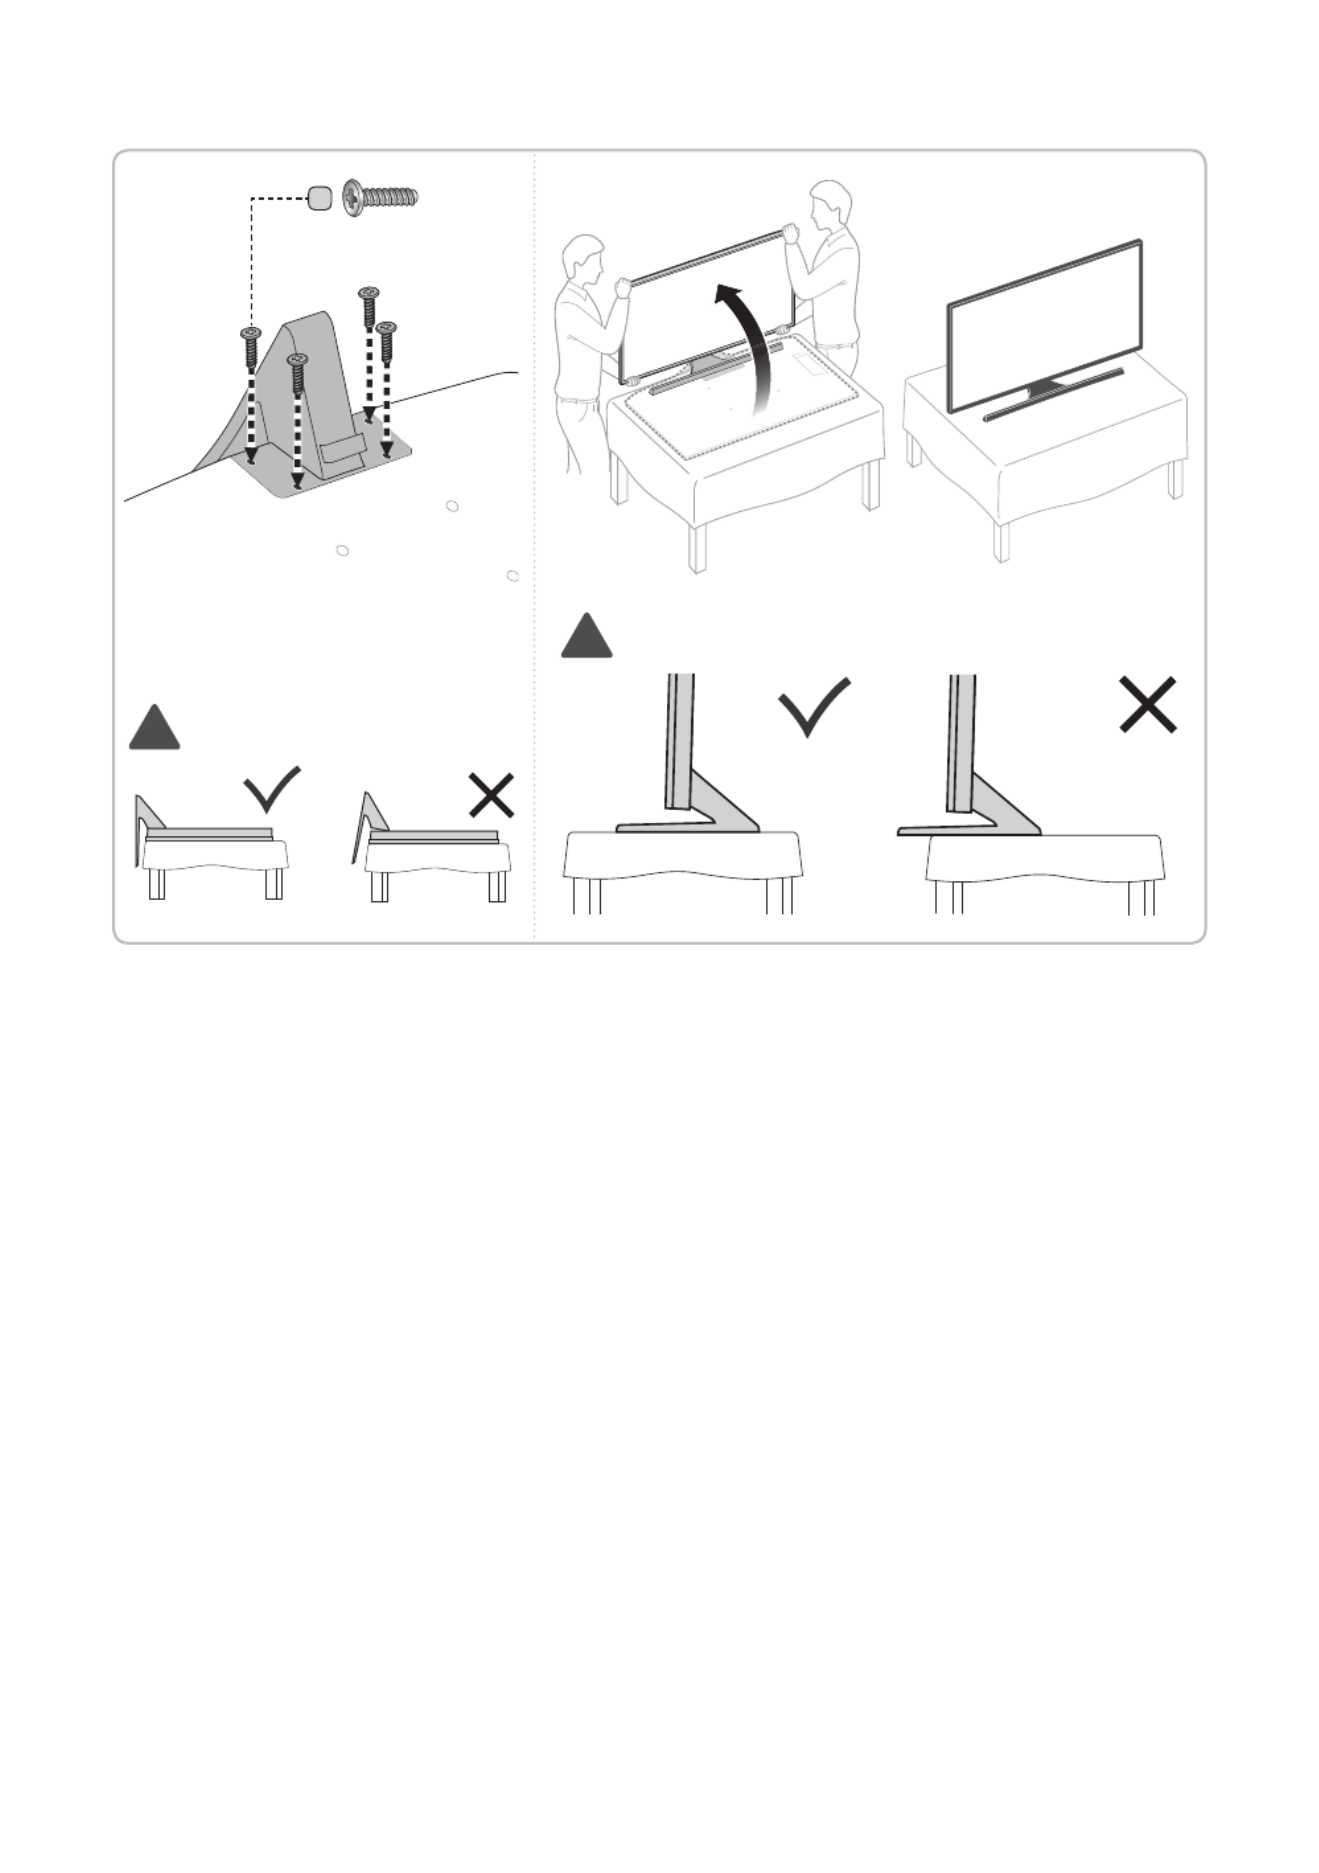
x4 (M4 X L14)
C
6
English
✎Progress the assembly of screw in
the manual’s order.
3 4
C
x4 (M4 X L14)
!
!
✎NOTE
• Make sure to distinguish between the front and back of each component when assembling them.
• Make sure that at least two persons lift and move the TV.

7
English
Viewing the Connection Panel
HDMI IN 2
RJP
VOL-CTRL
LAN
HDMI IN 1
(DVI)
DVI
AUDIO IN
7
1
6
#@!
09
2
4
DIGITAL
A TUDIO OU
( )OPTICAL
HDMI IN 3
(ARC)
3
5
6
8
✎Whenever you connect an external device to your TV, make sure that power on the unit is turned off.
✎When connecting an external device, match the colour of the connection terminal to the cable.
1
RJP
This port is an RJP (Remote Jack Pack) communication port that enables connecting different devices to additional
modules to improve device use and convenience.
2
VARIABLE AUDIO OUT
Used for the audio output to the Bathroom speaker. Connect the Bathroom Wall Box and the Variable port (RCA).
3
VOL-CTRL
Used to control the volume of the Bathroom speaker. Connect the Bathroom Wall Box and the VOLCTRL port.
4
DVI AUDIO IN
Connects to the audio input jacks on an Amplier/Home Theatre.
5
USB (5V 0.5A), USB 3.0 (HDD/1.0A) / CLONING
– Connector for software upgrades and Media Play, etc.
– Service connection.
6
HDMI IN 1(DVI), 2, 3(ARC)
Connects to the HDMI jack of a device with an HDMI output.
✎No sound connection is needed for an HDMI-HDMI connection. HDMI connections carry both audio and video.
✎Use the HDMI IN 1(DVI) jack for a DVI connection to an external device. Use a DVI to HDMI cable or DVI-HDMI
adapter (DVI to HDMI) for the video connection and the DVI AUDIO IN jacks for audio.
✎Use a cable shorter than 10 feet (3m) to get the best UHD viewing quality.
8
English
7
LAN
Connect to a wired LAN using CAT 7 cable.
8
ANT IN (AIR/CABLE)
– To view television channels correctly, the TV must receive a signal from one of the following sources:
– An outdoor antenna / A cable television system
9
DATA
– Used to support data communication between the TV and the SBB.
– Connects using RJ-12 TV type plugs.
0
COMPONENT/ AV IN 1
– Connect audio cables to "R-AUDIO-L" on your TV and the other ends to corresponding audio out jacks on an A/V
device.
– Connect RCA audio cables (optional) to "R - AUDIO - L" on the rear of the TV set and the other ends to
corresponding audio out jacks on the external device.
– When connecting to AV IN 1, the colour of the AV IN 1 [Y/VIDEO] jack (Green) does not match the colour of the
video cable (Yellow).
!
DIGITAL AUDIO OUT (OPTICAL)
Connects to a Digital Audio component.
@
HP-ID
Connect the cable to HP-ID and Headphone Jack simultaneously and connect it to separated Headphone Box. See
page 18. When connecting Headphone to Headphone Box, it works same as Headphone function.
#
HEADPHONE JACK
Headphones may be connected to the headphone jack on your TV. While the headphones are connected, the sound
from the built-in speakers is disabled.
Display Modes
You can also select one of the standard resolutions listed in the Resolution column. The TV will automatically adjust to the
resolution you choose.
After connecting a computer to the TV, set the screen resolution for the TV on the computer. The optimal resolution is 3840
x 2160 @ 60 Hz. If it is set to any other than in the table below, the TV may display nothing. Set the resolution properly,
referring to the user guide of the computer or its graphic card.
The resolutions in the table are recommended.
✎Optimal resolution is 3840 x 2160 @ 60 Hz.
Mode Resolution Display
format
Horizontal
frequency (KHz)
Vertical frequency
(Hz)
Clock frequency
(MHz)
Polarity (horizontal
/ vertical)
IBM 720 x 400 70 Hz 31.469 70.087 28.322 -/+
MAC
640 x 480
832 x 624
1152 x 870
67 Hz
75 Hz
75 Hz
35.000
49.726
68.681
66.667
74.551
75.062
30.240
57.284
100.000
-/-
-/-
-/-

9
English
Mode Resolution Display
format
Horizontal
frequency (KHz)
Vertical frequency
(Hz)
Clock frequency
(MHz)
Polarity (horizontal
/ vertical)
VESA
DMT
640 x 480
640 x 480
640 x 480
800 x 600
800 x 600
800 x 600
1024 x 768
1024 x 768
1024 x 768
1152 x 864
1280 x 720
1280 x 800
1280 x 1024
1280 x 1024
1366 x 768
1440 x 900
1600 x 900RB
1680 x 1050
1920 x 1080
60 Hz
72 Hz
75 Hz
60 Hz
72 Hz
75 Hz
60 Hz
70 Hz
75 Hz
75 Hz
60 Hz
60 Hz
60 Hz
75 Hz
60 Hz
60 Hz
60 Hz
60 Hz
60 Hz
31.469
37.861
37.500
37.879
48.077
46.875
48.363
56.476
60.023
67.500
45.000
49.702
63.981
79.976
47.712
55.935
60.000
65.290
67.500
59.940
72.809
75.000
60.317
72.188
75.000
60.004
70.069
75.029
75.000
60.000
59.810
60.020
75.025
59.790
59.887
60.000
59.954
60.000
25.175
31.500
31.500
40.000
50.000
49.500
65.000
75.000
78.750
108.000
74.250
83.500
108.000
135.000
85.500
106.500
108.000
146.250
148.500
- / -
- / -
- / -
+ / +
+ / +
+ / +
- / -
- / -
+ / +
+ / +
+ / +
- / +
+ / +
+ / +
+ / +
- / +
+ / +
- / +
+ / +
CEA-861
720(1440) x 576i
720(1440) x 480i
720 x 576
720 x 480
1280 x 720
1280 x 720
1920 x 1080i
1920 x 1080i
1920 x 1080
1920 x 1080
1920 x 1080
1920 x 1080
1920 x 1080
3840 x 2160
3840 x 2160
3840 x 2160
3840 x 2160
3840 x 2160
4096 x 2160
4096 x 2160
4096 x 2160
4096 x 2160
4096 x 2160
50 Hz
60 Hz
50 Hz
60 Hz
50 Hz
60 Hz
50 Hz
60 Hz
24 Hz
25 Hz
30 Hz
50 Hz
60 Hz
24 Hz
25 Hz
30 Hz
50 Hz
60 Hz
24 Hz
25 Hz
30 Hz
50 Hz
60 Hz
15.625
15.734
31.250
31.469
37.500
45.000
28.125
33.750
27.000
28.125
33.750
56.250
67.500
54.000
56.250
67.500
112.500
135.000
54.000
56.250
67.500
112.500
135.000
50.000
59.940
50.000
59.940
50.000
60.000
50.000
60.000
24.000
25.000
30.000
50.000
60.000
24.000
25.000
30.000
50.000
60.000
24.000
25.000
30.000
50.000
60.000
27.000
27.000
27.000
27.000
74.250
74.250
74.250
74.250
74.250
74.250
74.250
148.500
148.500
297.000
297.000
297.000
594.000
594.000
297.000
297.000
297.000
594.000
594.000
- / -
- / -
- / -
- / -
+ / +
+ / +
+ / +
+ / +
+ / +
+ / +
+ / +
+ / +
+ / +
+ / +
+ / +
+ / +
+ / +
+ / +
+ / +
+ / +
+ / +
+ / +
+ / +
✎When using an HDMI/DVI cable connection, you must use the HDMI IN 1(DVI) jack.
✎The interlace mode is not supported.
✎The set might operate abnormally if a non-standard video format is selected.
✎Separate and Composite modes are supported. SOG is not supported.

10
English
TV Controller
TV Controller is a multi directional button that helps navigate without using the remote control.
✎Some functions which require a PIN code may not be available.
✎The product colour and shape may vary, depending on the model.
✎Exits the menu when pressing the controller for more than 1 second.
✎When selecting the function by moving the controller to the up/down/left/right directions, do not press the controller. If
the controller is used first, you cannot operate it to move the up/down/left/right directions.
TV Controller
Function menu
Remote control sensor
The image is drawn by facing
the front side of the TV.
Power on Turn the TV on by pressing the controller in standby mode.
Adjusting the volume Adjust the volume by moving the controller from side to side when the power is on.
Selecting a channel Select a channel by moving the controller up and down when the power is on.
Using the function menu Press the controller when the power is on and the function menu appears. If you press
it again, the function menu screen disappears.
Using the Menu Selects the ( ) by moving the controller in the function menu screen. The MENU m
OSD(On Screen Display) of your TV’s feature appears.
Selecting the Source Selects the ( ) by moving the controller in the function menu screen. The Source s
Source list screen appears.
Selecting the SMART HUB
( )™
With the Function menu visible, select ( ) by moving the Controller SMART HUB ™
upwards. The SMART HUB main screen appears. Select an application by moving the
Controller, and then pressing the Controller.
Power Off Selects the ( ) to turn the TV off by moving the controller in the function Power Off P
menu screen.
✎To close the Menu, SMART HUB, or Source, press the Controller for more than 1 second.
Standby mode
Do not leave your TV in standby mode for long periods of time a small amount of electric power is still consumed even when
the power button is such as when on holiday. off. It is best to unplug the power cord.

11
English
Viewing the Remote Control
✎This remote control has Braille points on the Power , Channel , and Volume buttons and can be used by visually
impaired persons.
CONTENT
CLOCK
ALARM
SOURCE
GUIDE
HOME
Turns the TV on and off.
Have direct access to channels.
Alternately selects Teletext, Double
or Mix.
Adjust the volume.
Display channel list on the screen.
Display the main on-screen menu.
Quickly select frequently used
functions.
Select on-screen menu items and
change menu values.
Return to the previous menu.
Buttons in the , Channel list
Contents Home menu, etc.
Use these buttons in the Contents
Home.
Display and select available video
sources.
Electronic Programme Guide (EPG)
display.
Cut off the sound temporarily.
Change channels.
Switch to the HOME Screen.
View the .Contents Home
Press to display information on the
TV screen.
CLOCK INFO: When you press key
in standby mode, TV screen displays
the time.
Exit the menu.
ALARM: Enter the hour you want the
TV to turn on.
X: Turns the 3D image on or off.
( Not available )
SUBT.: Displays digital subtitles.

12
English
Installing batteries (Battery size: AAA)
X
Z
Y
✎NOTE
• Use the remote control within 7m of the TV.
• Bright light may affect the performance of the remote control. Avoid using nearby special uorescent light or neon
signs.
• The colour and shape may vary depending on the model.
• Remote control button 'HOME' & '3D' are not supported. When pressing these buttons, the TV unit does not
respond.
13
English
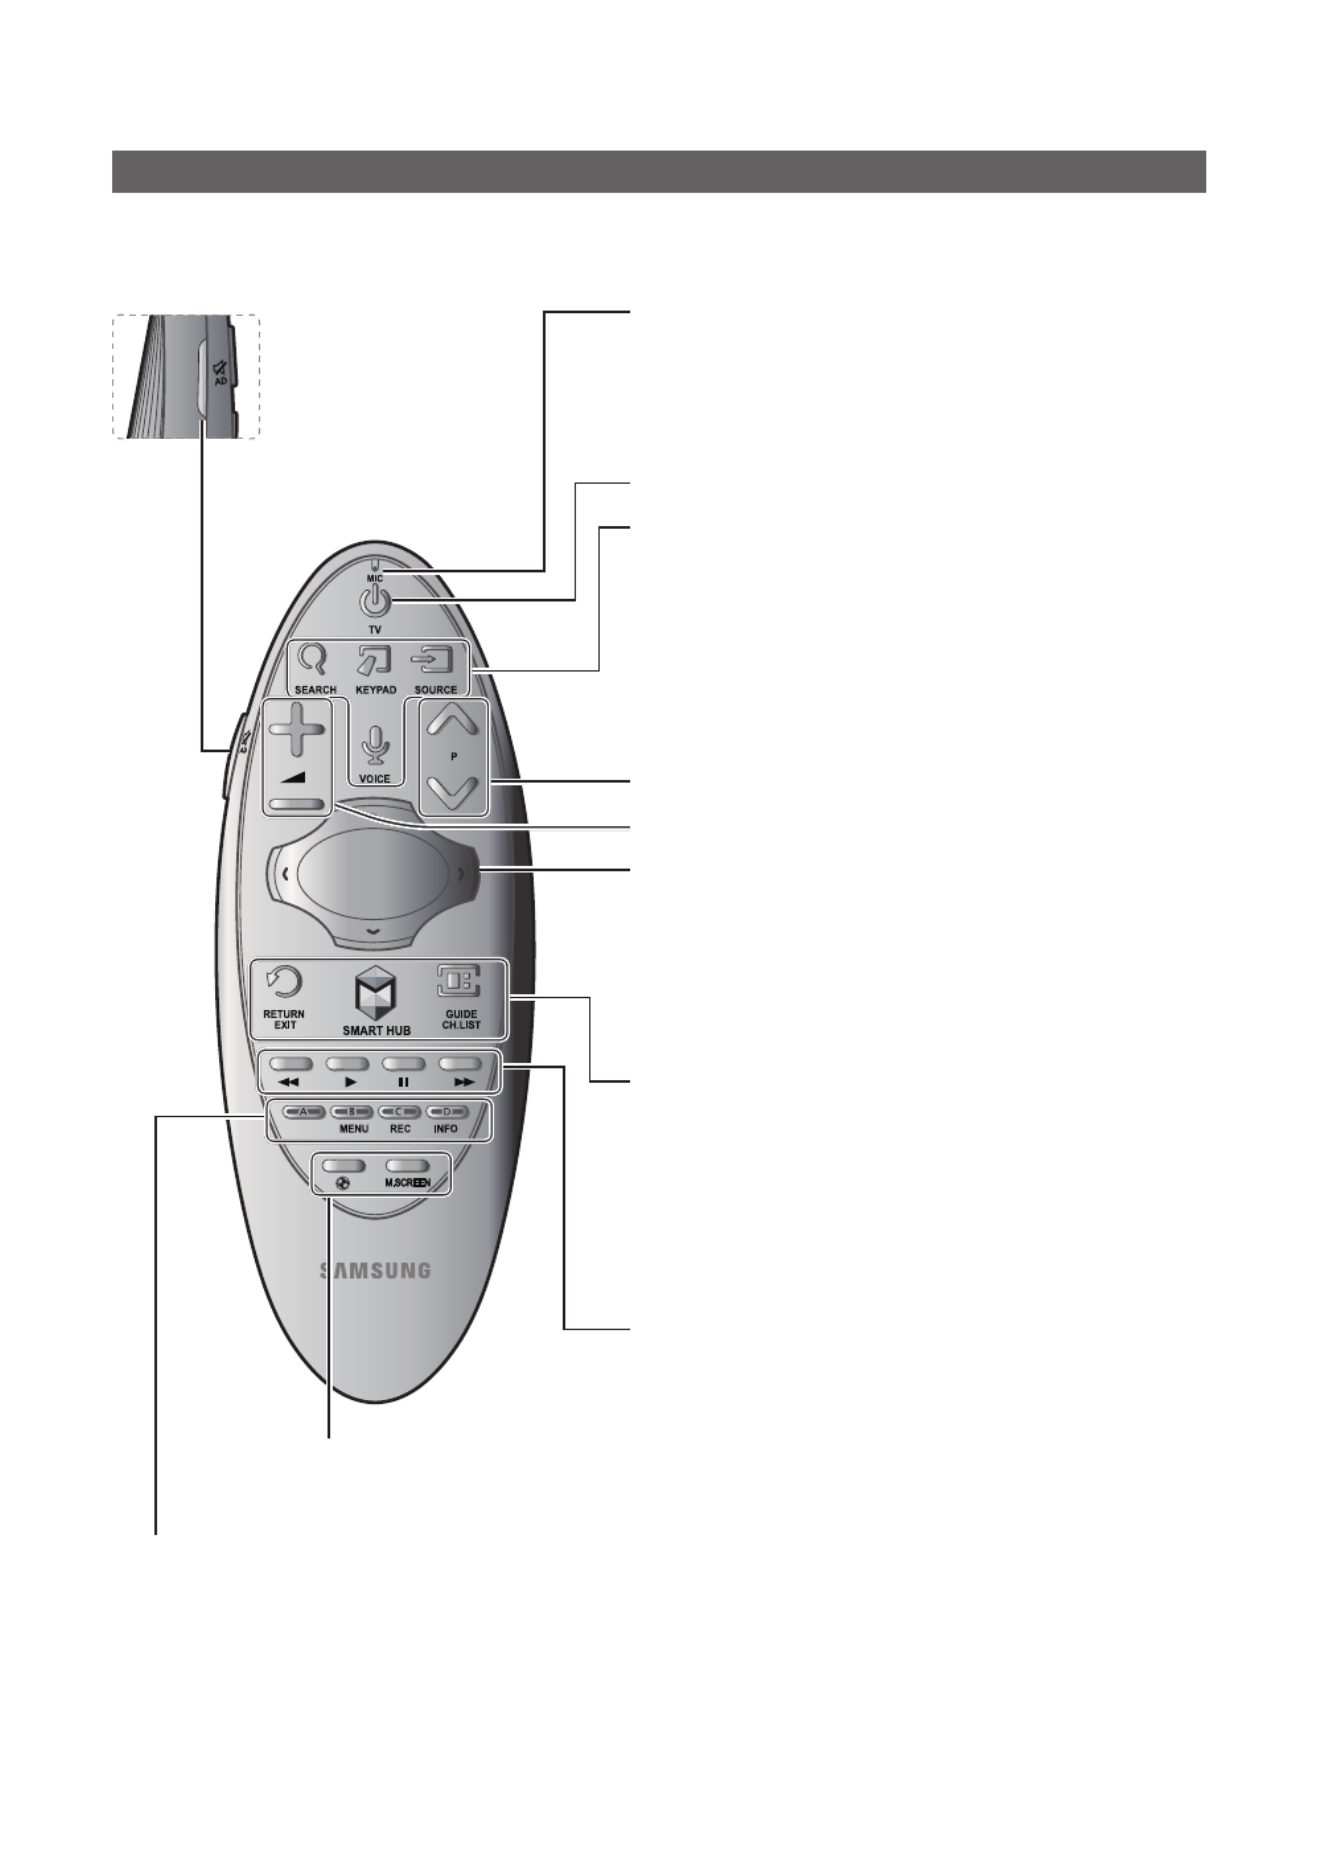
Samsung Smart Control
✎Colours and shape may vary depending on the model.
¢: Turns the sound on/off.
AD: Press and hold this button
to bring up the Accessibility
Shortcuts panel. Select the
options to turn them on or off.
MIC: Use the microphone with the Voice Control and Voice functions.
– The Voice Control function can be affected by unclear pronuncia-
tion, voice level, or surrounding noise.
Turns the TV on/off.
SEARCH: Press this button to use the search window. (Not available)
KEYPAD: With the virtual remote control on the screen, you can easily
enter digits, control content, and use functions.
SOURCE: Changes the source.
VOICE: Starts voice recognition. When the microphone icon appears on
the screen, say a voice command into the microphone. Say " " to Help
learn about basic usage and voice commands.
– Say a voice command 10cm to 15cm from the microphone and at
an appropriate volume.
Changes the channel.
Changes the volume.
– Touchpad: Place a finger on the touch pad and move the Samsung
Smart Control. The pointer on the screen moves in the direction
and as much as the is moved. Press the Samsung Smart Control
touchpad to run the focused item.
– < > ¡ £: Moves the pointer or focus.
RETURN: Returns to the previous menu. Additionally, when you press
this button while watching TV, you can return to the previous channel.
EXIT: Press and hold this button to exit all currently running applications.
SMART HUB Smart Hub: Launches . Pressing while an SMART HUB
application is running terminates the application.
GUIDE: Displays the digital channel broadcasting schedule.
CH.LIST: Press and hold to launch the .Channel List
Use these buttons with specic features. Use these buttons according to
the directions on the TV screen.
Colours button: Use these colour buttons to access additional options specic to the feature in use.
– : Press and hold to display a menu on the screen.MENU
– : Press and hold to record the broadcast.REC
– : Press and hold to view information about the current digital channel or media file.INFO
¥:Enable for an optimal sports viewing experience.Football Mode
M.SCREEN: You can split the TV screen and use various functions such as watching TV, surng the web, watching
video, and so on. For more information, refer to the .e-Manual
Termékspecifikációk
| Márka: | Samsung |
| Kategória: | televízió |
| Modell: | HG65AD890UK |
Szüksége van segítségre?
Ha segítségre van szüksége Samsung HG65AD890UK, tegyen fel kérdést alább, és más felhasználók válaszolnak Önnek
Útmutatók televízió Samsung

29 Március 2025
28 Március 2025
28 Március 2025
26 Március 2025
16 Március 2025
16 Március 2025
16 Március 2025
16 Március 2025
16 Március 2025
15 Január 2025
Útmutatók televízió
- televízió Sony
- televízió Beko
- televízió Fujitsu
- televízió Acer
- televízió Nedis
- televízió LG
- televízió Grundig
- televízió Marantz
- televízió Philips
- televízió Pioneer
- televízió SilverCrest
- televízió Panasonic
- televízió JVC
- televízió AEG
- televízió Sharp
- televízió Nokia
- televízió Lenovo
- televízió Casio
- televízió Toshiba
- televízió Oppo
- televízió Hyundai
- televízió Hisense
- televízió BenQ
- televízió SunBriteTV
- televízió Siemens
- televízió Medion
- televízió TCL
- televízió Xiaomi
- televízió GoGen
- televízió Insignia
- televízió Infiniton
- televízió Dell
- televízió Strong
- televízió VOX
- televízió Vivax
- televízió Thomson
- televízió Polaroid
- televízió Aiwa
- televízió Orima
- televízió V7
- televízió Clatronic
- televízió PEAQ
- televízió Qilive
- televízió Haier
- televízió Mitsubishi
- televízió Cecotec
- televízió Sencor
- televízió GPX
- televízió Küppersbusch
- televízió Innoliving
- televízió AOC
- televízió Citizen
- televízió Westinghouse
- televízió Hitachi
- televízió Continental Edison
- televízió Telefunken
- televízió Nevir
- televízió Monster
- televízió Roadstar
- televízió Optoma
- televízió CHiQ
- televízió Viewsonic
- televízió Nextbase
- televízió Denver
- televízió Bush
- televízió Trevi
- televízió Albrecht
- televízió Daewoo
- televízió Funai
- televízió Tesla
- televízió Smart Tech
- televízió Muse
- televízió Energy Sistem
- televízió OK
- televízió SVAN
- televízió Loewe
- televízió RevolutionHD
- televízió Polar
- televízió Manhattan
- televízió Kogan
- televízió Horizon
- televízió Intenso
- televízió Furrion
- televízió Teac
- televízió Aspes
- televízió Digihome
- televízió Manta
- televízió Blaupunkt
- televízió Sagem
- televízió Jay-Tech
- televízió Logik
- televízió Finlux
- televízió Peerless-AV
- televízió Abus
- televízió AG Neovo
- televízió Bang & Olufsen
- televízió Iiyama
- televízió AKAI
- televízió TechniSat
- televízió Seiki
- televízió Jensen
- televízió Pyle
- televízió Emerson
- televízió Sanyo
- televízió Kemo
- televízió Salora
- televízió Lenco
- televízió Schneider
- televízió Philco
- televízió ECG
- televízió Uniden
- televízió Technika
- televízió NEC
- televízió Element
- televízió Soundmaster
- televízió Alphatronics
- televízió AYA
- televízió MBM
- televízió Krüger&Matz
- televízió Dual
- televízió Brandt
- televízió Wharfedale
- televízió Allview
- televízió RCA
- televízió OKI
- televízió Orion
- televízió SereneLife
- televízió Schaub Lorenz
- televízió Luxor
- televízió Metz
- televízió ILive
- televízió Graetz
- televízió Tatung
- televízió Packard Bell
- televízió EasyMaxx
- televízió Orava
- televízió Arçelik
- televízió Planar
- televízió Zenith
- televízió Doffler
- televízió QBell Technology
- televízió SYLVOX
- televízió Majestic
- televízió Reflexion
- televízió FFalcon
- televízió Megasat
- televízió Sogo
- televízió United
- televízió Techwood
- televízió Newstar
- televízió Matsui
- televízió Alden
- televízió Aldi
- televízió Airis
- televízió Aristona
- televízió Apex
- televízió Icy Box
- televízió Lexibook
- televízió Palsonic
- televízió Walker
- televízió Saba
- televízió Antarion
- televízió Kernau
- televízió Tevion
- televízió Proscan
- televízió Vestel
- televízió Tucson
- televízió Sunstech
- televízió Nabo
- televízió Sylvania
- televízió Sunny
- televízió Marquant
- televízió Nordmende
- televízió AudioAffairs
- televízió Magnum
- televízió Audiosonic
- televízió Kubo
- televízió Proline
- televízió Coby
- televízió Seg
- televízió Vivo
- televízió Daitsu
- televízió Terris
- televízió Changhong
- televízió Alba
- televízió Naxa
- televízió Star-Light
- televízió Fantec
- televízió Mpman
- televízió Sweex
- televízió Vizio
- televízió Cello
- televízió Mx Onda
- televízió Nikkei
- televízió Hannspree
- televízió DGM
- televízió Yasin
- televízió Humax
- televízió XD Enjoy
- televízió MT Logic
- televízió Superior
- televízió Kunft
- televízió ITT
- televízió Grunkel
- televízió Avtex
- televízió Inovia
- televízió Odys
- televízió NPG
- televízió Bluesky
- televízió Videocon
- televízió Xoro
- televízió Durabase
- televízió HKC
- televízió Edenwood
- televízió Woxter
- televízió Premier
- televízió Onn
- televízió Teleco
- televízió Opera
- televízió LTC
- televízió JTC
- televízió Zalman
- televízió Ferguson
- televízió Viewpia
- televízió JGC
- televízió Online
- televízió Dyon
- televízió DirecTV
- televízió Tele 2
- televízió Telesystem
- televízió EKO
- televízió E-motion
- televízió Mitsai
- televízió Selfsat
- televízió High One
- televízió Tve
- televízió ISymphony
- televízió Pantel
- televízió Magnavox
- televízió ATYME
- televízió HCI
- televízió Inno-Hit
- televízió Lin
- televízió Engel
- televízió TechLine
- televízió Elements
- televízió Englaon
- televízió Time
- televízió Reflex
- televízió Astar
- televízió Visco
- televízió Tivax
- televízió H&B
- televízió Norcent
- televízió TELE System
- televízió TIM
- televízió Oyster
- televízió Belson
- televízió Vision Plus
- televízió Sbr
- televízió Bauhn
- televízió Voxx
- televízió Rm 2000
- televízió Hoher
- televízió Felson
- televízió Mach Power
- televízió Elbe
- televízió Axing
- televízió CGV
- televízió Séura
- televízió Mitzu
- televízió Caratec
- televízió JTC24
- televízió Coocaa
- televízió Kivi
- televízió Smart Brand
- televízió Voxicon
- televízió Aconatic
- televízió Mitchell & Brown
- televízió FOX Electronics
- televízió Mystery
Legújabb útmutatók televízió

1 Április 2025

31 Március 2025

31 Március 2025
31 Március 2025

31 Március 2025
30 Március 2025
30 Március 2025
30 Március 2025
29 Március 2025
29 Március 2025