Használati útmutató Salora LCD3231DVX
Olvassa el alább 📖 a magyar nyelvű használati útmutatót Salora LCD3231DVX (123 oldal) a televízió kategóriában. Ezt az útmutatót 2 ember találta hasznosnak és 2 felhasználó értékelte átlagosan 4.5 csillagra
Oldal 1/123

Nederlands - 1 -
Inhoudsopgave
Kenmerken ............................................................. 2
Accessoires ............................................................ 2
Inleiding .................................................................. 2
Voorbereiding ......................................................... 2
Veiligheidsvoorschriften .......................................... 3
Voedingsbron ...................................................... 3
Netsnoer ............................................................. 3
Vocht en Water ................................................... 3
Reinigen.............................................................. 3
Hitte en vlammen ................................................ 3
Bliksem ............................................................... 3
Vervangstukken .................................................. 3
Onderhoud .......................................................... 3
Afvalverwerking .................................................. 3
Informatie voor gebruikers in de
lidstaten van de Europese Unie. ......................... 3
Het toestel loskoppelen ...................................... 4
Volume Hoofdtelefoon ........................................ 4
Installatie............................................................. 4
LCD-Scherm ....................................................... 4
Waarschuwing .................................................... 4
Overzicht van de afstandsbediening ...................... 5
LCD-TT en bedieningstoetsen ................................ 6
De aansluitingen bekijken – Aansluitingen achterin 6
De aansluitingen bekijken –
Zijdelingse aansluitingen ....................................... 7
Antenneaansluiting ................................................. 7
Stroomaansluiting ................................................... 8
De LCD-TT aansluiten op een PC .......................... 8
Aansluiten op een DVD-speler ............................... 8
Het gebruik van de zijdelingse AV-aansluitingen .... 8
Het gebruik van andere aansluitingen .................... 9
Andere apparatuur aansluiten via SCART ............. 9
Batterijen aanbrengen in de afstandsbediening ..... 9
De TV in/uitschakelen ............................................. 9
De TV inschakelen .............................................. 9
De TV uitschakelen ........................................... 10
Eerste installatie ................................................. 10
Ingangselectie ...................................................... 10
Basisbedieningen ................................................. 10
Bediening met de toetsen op de TV ................. 10
Bediening met de afstandsbediening ................11
Menusysteem ........................................................11
Beeldmenu.........................................................11
Geluidsmenu..................................................... 12
Functiemenu ..................................................... 13
Installatiemenu.................................................. 14
Bronmenu ......................................................... 16
PC-modus menusysteem ..................................... 16
PC-positiemenu ................................................ 16
TV-informatie weergeven...................................... 17
Geluid dempen functie.......................................... 17
Beeldmodus selectie ............................................ 17
Beeld bevriezen .................................................... 17
Zoommodi............................................................. 17
Automatisch ...................................................... 17
16:9 ................................................................... 17
4:3 ..................................................................... 17
Panoramisch ..................................................... 17
14:9 ................................................................... 18
Bioscoop ........................................................... 18
Ondertiteling ..................................................... 18
Zoom................................................................. 18
Teletekst ............................................................... 18
Tips ....................................................................... 19
Zorg voor het scherm........................................ 19
Beeldnawerking ................................................ 19
Geen stroom ..................................................... 19
Zwakke beeldkwaliteit ....................................... 19
Geen beeld ....................................................... 19
Geluid ............................................................... 19
Afstandsbediening ............................................ 19
Invoerbronnen................................................... 19
Bijlage A: PC-invoer normale weergavemodi ....... 20
Bijlage B: AV en HDMI-signaalcompatibiliteit
(Ingang signaaltypes) ........................................... 20
Specifi caties ......................................................... 21
01_MB25_[NL]_(01-TV)_COST_1900UK_IDTV_BRONZE9_32883_10064228_50152513.indd 1
01_MB25_[NL]_(01-TV)_COST_1900UK_IDTV_BRONZE9_32883_10064228_50152513.indd 1
01_MB25_[NL]_(01-TV)_COST_1900UK_IDTV_BRONZE9_32883_10064228_50152513.indd 1
01_MB25_[NL]_(01-TV)_COST_1900UK_IDTV_BRONZE9_32883_10064228_50152513.indd 101_MB25_[NL]_(01-TV)_COST_1900UK_IDTV_BRONZE9_32883_10064228_50152513.indd 1 17.08.2009 08:31:42
17.08.2009 08:31:42
17.08.2009 08:31:42
17.08.2009 08:31:4217.08.2009 08:31:42

Nederlands - 2 -
Kenmerken
• Kleuren LCD -TV met afstandsbediening.
• HDMI-aansluitingen voor digitale video en geluid.
Deze verbinding is ook compatibel met hoge defi nitie
signalen.
• 200 zenders van VHF, UHF (analoge).
• OSD-menusysteem.
• Twee scart-aansluitingen voor externe apparaten
(zoals video, videospelletjes, geluidsset, etc.)
• Stereo geluidssysteem. (3D Panorama)
• Teletekst, fastext, TOP-tekst.
• Hoofdtelefoonaansluiting.
• Automatisch programmeersysteem
• Voorwaartse of achterwaartse handmatige
afstemming.
• Sluimertimer.
• Kinderslot.
• Automatisch geluid dempen indien geen
uitzending.
• NTSC-weergave.
• AVL (Automatische volumebegrenzing).
• Indien geen geldig signaal gedetecteerd wordt,
schakelt de TV na vijf minuten automatisch over op
de stand-by modus.
• PLL (Frequentie zoeken)
• PC-ingang.
• Plug&Play voor Windows 98, ME, 2000, XP, Vista.
• Geluid lijnuitgang.
• Spelmodus (optioneel)
• Actieve antennevoeding (optioneel)
• SRS TruSurr XT (optioneel)
Accessoires
MENU
/
INFO
EPG
FAV
PRESETS
SUBT IT L E
RETURN
SOURCESLEEP SCREEN
LANG.
Afstandsbediening
2 X AAA
batterijen
Gebruikshandleiding
Inleiding
Dank u wel dat u dit product hebt gekozen. Deze
handleiding helpt u bij de correcte
bediening van uw TV. Lees deze
handleiding grondig door voor u de TV in
gebruik neemt.
Bewaar deze handleiding op een veilige
plaats voor een eventuele raadpleging in
de toekomst.
Voorbereiding
Voor een correcte ventilatie moet u minimum 10
cm vrije ruimte laten rond het toestel. Om defecten
en onveilige situaties te voorkomen mag u geen
voorwerpen op het toestel plaatsen.
Gebruik dit apparaat in een gematigd klimaat .
10 cm
10 cm
10 cm
01_MB25_[NL]_(01-TV)_COST_1900UK_IDTV_BRONZE9_32883_10064228_50152513.indd 2
01_MB25_[NL]_(01-TV)_COST_1900UK_IDTV_BRONZE9_32883_10064228_50152513.indd 2
01_MB25_[NL]_(01-TV)_COST_1900UK_IDTV_BRONZE9_32883_10064228_50152513.indd 2
01_MB25_[NL]_(01-TV)_COST_1900UK_IDTV_BRONZE9_32883_10064228_50152513.indd 201_MB25_[NL]_(01-TV)_COST_1900UK_IDTV_BRONZE9_32883_10064228_50152513.indd 2 17.08.2009 08:31:44
17.08.2009 08:31:44
17.08.2009 08:31:44
17.08.2009 08:31:4417.08.2009 08:31:44

Nederlands - 3 -
Veiligheidsvoorschriften
Lees deze aanbevolen veiligheidsvoorschriften
zorgvuldig voor uw veiligheid.
Voedingsbron
Dit televisietoestel mag enkel aangesloten worden
op een stroomvoorziening van 220-240V, 50 Hz.
Zorg ervoor dat u de correcte spanning instelling
selecteert.
Netsnoer
Plaats het toestel, meubelstuk etc. niet op het
netsnoer (elektriciteitsnet) of klem het netsnoer niet
af. Hanteer het netsnoer aan de stekker. Verwijder
de stekker niet uit het stopcontact door aan de draad
te trekken en raak het netsnoer nooit met natte
handen aan, dit zou een kortsluiting of elektrische
schok kunnen veroorzaken. Leg geen knopen in het
snoer of bind het niet samen met andere snoeren. De
netsnoeren moeten zo geplaatst worden dat er niet op
gestapt kan worden. Een beschadigd snoer kan brand
veroorzaken of u een elektrische schok geven. Indien
het beschadigd is en vervangen moet worden, moet dit
door een bekwaam persoon uitgevoerd worden.
Vocht en Water
Gebruik dit toestel niet in een vochtige
en natte omgeving (vermijd badkamers,
de gootsteen in de keuken, en in de
buurt van een wasmachine). Stel dit
toestel niet bloot aan water of regen
want dit kan gevaarlijk zijn. U mag
ook geen voorwerpen op het toestel
plaatsen die water bevatten (zoals vazen). Vermijd
druppels of spatten.
Indien er een voorwerp of vloeistof in de kast terecht
komt, moet u de stekker van de TV uit het stopcontact
verwijderen en het toestel door deskundigen laten
nakijken voor u het opnieuw in gebruik neemt.
Reinigen
Voor u het toestel schoonmaakt, moet
u de stekker van de TV verwijderen uit
het wandstopcontact. Geen vloeistof
-of aerosolreinigers gebruiken.
Gebruik een zachte en droge doek.
Ventilatie
De sleuven en openingen in de TV zijn als ventilatie
bedoeld en verzekeren een betrouwbare werking. Om
oververhitting te vermijden, mogen deze openingen
niet geblokkeerd of afgesloten worden.
Hitte en vlammen
Het toestel mag niet in de nabijheid van
open vlammen en intense hitte, zoals
een elektrische verwarmer, geplaatst
worden. Let erop dat er geen open
vlambronnen, zoals aangestoken kaarsen, op de TV
geplaatst worden. Batterijen mogen niet blootgesteld
worden aan warmtebronnen zoals zonlicht, vuur of
andere.
Bliksem
Indien er onweer en bliksem is of
wanneer u op vakantie gaat, moet
u het netsnoer verwijderen uit het
stopcontact.
Vervangstukken
Indien er vervangstukken nodig zijn, moet u controleren
dat de onderhoudstechnicus vervangstukken
gebruikt die aangegeven worden door de fabrikant
of die dezelfde specifi caties hebben als de originele
stukken. Niet-geautoriseerde vervangstukken kunnen
brand, elektrische schokken of andere gevaren
veroorzaken.
Onderhoud
Laat het onderhoud uitvoeren door
een deskundige. Verwijder het deksel
nooit zelf want dit kan elektrische
schokken veroorzaken.
Afvalverwerking
Instructies voor afvalverwerking:
• De verpakking en hulpverpakking zijn recycleerbaar en
gerecycleerd moeten worden. Verpakkingsmateriaal
zoals plastic zakken moeten buiten het bereik van
kinderen gehouden worden.
• Batterijen, inclusief deze die geen zware metalen
bevatten, mogen niet samen met het huishoudelijk
afval afgehandeld worden. Verwijder deze oude
batterij op een milieuvriendelijke wijze. Informeer u
over de toepasselijke wetgeving in uw regio.
• De koude kathode fl uorescerende lamp in het LCD-
paneel bevat een kleine hoeveelheid kwik. U moet
de lokale wetgeving naleven als u zich wilt ontdoen
van het apparaat.
Informatie voor gebruikers in de
lidstaten van de Europese Unie.
Dit symbool op het product of op de
verpakking wijst aan dat uw elektrische
en elektronische apparaten aan het
einde van hun levensduur afzonderlijk
van uw huishoudelijk afval afgehandeld
mo e t e n wo r d e n . E r b e s t a an
afzonderlijke inzamelingsystemen
voor recyclage in de EU.
Voor meer informatie kunt u contact opnemen met
de lokale autoriteit of de verdeler waar u het product
hebt aangekocht.
01_MB25_[NL]_(01-TV)_COST_1900UK_IDTV_BRONZE9_32883_10064228_50152513.indd 3
01_MB25_[NL]_(01-TV)_COST_1900UK_IDTV_BRONZE9_32883_10064228_50152513.indd 3
01_MB25_[NL]_(01-TV)_COST_1900UK_IDTV_BRONZE9_32883_10064228_50152513.indd 3
01_MB25_[NL]_(01-TV)_COST_1900UK_IDTV_BRONZE9_32883_10064228_50152513.indd 301_MB25_[NL]_(01-TV)_COST_1900UK_IDTV_BRONZE9_32883_10064228_50152513.indd 3 17.08.2009 08:31:50
17.08.2009 08:31:50
17.08.2009 08:31:50
17.08.2009 08:31:5017.08.2009 08:31:50

Nederlands - 4 -
Het toestel loskoppelen
De hoofdschakelaar dient om het Tv-toestel los te
koppelen van het elektriciteitsnet en moet daarom
gemakkelijk bedienen zijn.
Volume Hoofdtelefoon
Overtollige geluidsdruk van een
k o p t e l e f o o n kan geh o o r v e r l i e s
veroorzaken.
Installatie
Om het risico op letsels te voorkomen, moet dit
apparaat stevig bevestigd zijn aan de muur volgens
de installatierichtlijnen (indien deze optie beschikbaar
is).
LCD-Scherm
Het LCD-paneel is een spitstechnologisch product
met ongeveer een miljoen dunne fi lmtransistors. Dit
levert heel fi jne beelddetails op. Het is soms mogelijk
dat een aantal inactieve pixels als een onbeweeglijk
blauw, groen of rood punt op het scherm verschijnen.
Merkt u a.u.b. op dat dit geen invloed heeft op de
prestaties van uw toestel.
Waarschuwing
Laat uw TV niet in stand-by of operationele modus
wanneer u uw huis verlaat .
Informatie mbt de licentie (optioneel)
is een handelsmerk van SRS Labs, Inc.
TruSurround technology is als naamloze vennootschap
erkend onder de licentie van SRS Labs, Inc.
LICENTIE KENNISGEVING
Ge p r o d u c e e r d o n d e r l i c e nt i e d o o r Dol b y
Laboratories.
HANDELSMERK BEVESTIGING
“Dolby” en het dubbele-D symbool zijn
handelsmerken van de Dolby Laboratories .
A l s u g e b r u i k m a a k t v a n d e L C D T V
muurbevestigingskit (optioneel) raden we u ten
sterkte aan al uw kabels achter het LCD-scherm
in te voeren in het stopcontact voor u het toestel
aan de muur bevestigt.
01_MB25_[NL]_(01-TV)_COST_1900UK_IDTV_BRONZE9_32883_10064228_50152513.indd 4
01_MB25_[NL]_(01-TV)_COST_1900UK_IDTV_BRONZE9_32883_10064228_50152513.indd 4
01_MB25_[NL]_(01-TV)_COST_1900UK_IDTV_BRONZE9_32883_10064228_50152513.indd 4
01_MB25_[NL]_(01-TV)_COST_1900UK_IDTV_BRONZE9_32883_10064228_50152513.indd 401_MB25_[NL]_(01-TV)_COST_1900UK_IDTV_BRONZE9_32883_10064228_50152513.indd 4 17.08.2009 08:31:51
17.08.2009 08:31:51
17.08.2009 08:31:51
17.08.2009 08:31:5117.08.2009 08:31:51

Nederlands - 5 -
Overzicht van de afstandsbediening
MENU
/
INFO
EPG
FAV
PRESETS
SUBTITLE
RETURN
28
29
SOURCESLEEP SCREEN
LANG.
Stand-by1.
Opnamegrootte2.
Slaap timer3.
Numerieke toetsen4.
Terug / TXT Index5.
Cursor omhoog/ TXT pagina omhoog6.
Cursor links7.
Programma omhoog8.
Programma omlaag9.
Mono-Stereo/Dual I-II10.
Wisselen11.
Geen functie12.
Info / TXT onthul13.
Beeldmodus selectie14.
Bronselectie15.
Rood / GELUID16.
Groen / BEELD17.
Geel / Functie18.
Menu19.
Installeer/Blauw20.
OK / Selecteren / Houden21.
Cursor rechts / TXT subpagina22.
Cursor omlaag / TXT pagina omlaag23.
Volume hoger24.
Volume lager25.
Geluid dempen26.
Teletekst / Mengen27.
Teletekst ondertiteling28.
Geen functie29.
01_MB25_[NL]_(01-TV)_COST_1900UK_IDTV_BRONZE9_32883_10064228_50152513.indd 5
01_MB25_[NL]_(01-TV)_COST_1900UK_IDTV_BRONZE9_32883_10064228_50152513.indd 5
01_MB25_[NL]_(01-TV)_COST_1900UK_IDTV_BRONZE9_32883_10064228_50152513.indd 5
01_MB25_[NL]_(01-TV)_COST_1900UK_IDTV_BRONZE9_32883_10064228_50152513.indd 501_MB25_[NL]_(01-TV)_COST_1900UK_IDTV_BRONZE9_32883_10064228_50152513.indd 5 17.08.2009 08:31:51
17.08.2009 08:31:51
17.08.2009 08:31:51
17.08.2009 08:31:5117.08.2009 08:31:51

Nederlands - 6 -
LCD-TT en bedieningstoetsen
De toets Stand-by1.
TV/AV-toets2.
De toetsen Programma omhoog/3.
omlaag
De toetsen Volume omhoog/4.
omlaag
Opmerking: Druk gelijktijdig op
de “ ”” / “ toetsen om
het hoofdmenu te openen.
De aansluitingen bekijken – Aansluitingen achterin
SCART aansluitingen 1. invoer of uitvoer voor externe toestellen.
Verbind de SCART kabel met een SCART aansluiting op de TV en een SCART aansluiting op uw
extern toestel (zoals een decoder, een VCR of een DVD speler).
Opmerking: Als een extern apparaat aangesloten is via de Scart aansluiting schakelt de TV
automatisch over op de AV modus.
Component video-ingangen (YpBPr)2. worden gebruikt om componente video te verbinden. U kunt de
componente video en geluids-ingangen aansluiten op een toestel dat een componente uitgang heeft.
Verbind de componente videokabels tussen de COMPONENTE VIDEO INGANGEN op de TV en de
componente video-uitgangen van uw toestel. Tijdens de verbinding moet u ervoor zorgen dat de letters
op uw Tv, “ Y ”, “ Pb ”, “ Pr ” overeenkomen met de aansluitingen van uw toestel.
PC/YPbPr geluidsingangen 3. worden gebruikt voor het aansluiten van geluidsignalen van een PC of
toestel dat aangesloten is op de TV via YPbPr.
Sluit de Pc audiokabel aan tussen de GELUIDSINGANGEN op de Tv en de geluidsuitgang van uw PC
om PC-geluid in te schakelen.
01_MB25_[NL]_(01-TV)_COST_1900UK_IDTV_BRONZE9_32883_10064228_50152513.indd 6
01_MB25_[NL]_(01-TV)_COST_1900UK_IDTV_BRONZE9_32883_10064228_50152513.indd 6
01_MB25_[NL]_(01-TV)_COST_1900UK_IDTV_BRONZE9_32883_10064228_50152513.indd 6
01_MB25_[NL]_(01-TV)_COST_1900UK_IDTV_BRONZE9_32883_10064228_50152513.indd 601_MB25_[NL]_(01-TV)_COST_1900UK_IDTV_BRONZE9_32883_10064228_50152513.indd 6 17.08.2009 08:31:53
17.08.2009 08:31:53
17.08.2009 08:31:53
17.08.2009 08:31:5317.08.2009 08:31:53

Nederlands - 7 -
Sluit de geluidskabel aan tussen de GELUIDSINGANGEN op de TV en de geluidsuitvoer van uw
toestel om component geluid mogelijk te maken. U moet ook de SPDIF uit optie op Aan instellen in het
geluidsmenu
S/PDIF uit4. S/PDIF voert digitale geluidsignalen uit naar de huidig weergegeven bron. Gebruik een
coaxkabel om geluidsignalen over te dragen naar een toestel met een S/PDIF-ingang.
RF-ingang5. sluit aan op een antenne of een kabel.
Merk op dat als u gebruik maakt van een decoder of een media recorder het van het allergrootste
belang is dat de antennekabel met een geschikte kabel aangesloten wordt via het toestel op de
televisie, zoals weergegeven op onderstaande afbeelding.
Geluid lijn uit 6. voeren geluidsignalen uit naar een extern toestel zoal een optioneel geluidssysteem.
Om de externe luidsprekers aan te sluiten op uw TV kunt u de AUDIO LIJN UIT van de TV gebruiken
met een geluidskabel. Opmerking: De functie Lijn Uit kan niet gebruikt worden als u in HDMI-bron bent.
U kunt in plaats daarvan SPDIF gebruiken.
PC-ingang7. dient om een computer met het TV toestel te verbinden.
Verbind de PC-kabel tussen de PC-INGANG op de TV en de PC-uitgang op uw PC.
HDMI 2: 8. HDMI-ingang
HDMI 1. 9. HDMI-ingang
HDMI-ingangen dienen voor de aansluiting op een toestel met een HDMI -aansluiting.
Uw LCD Televisie kan Hoge defi nitie afbeeldingen weergeven van op apparaten zoals een Hoge
Defi nitie Satelliet Ontvanger of een DVD speler. Deze apparaten moeten aangesloten worden via de
HDMI-aansluitingen of Component aansluiting. de aansluitingen kunnen 480i, 480p, 576p, 576i, 720p,
1080i, 1080p signalen ontvangen. Er is geen geluidsverbinding nodig voor een HDMI- naar HDMI-
aansluiting.
De aansluitingen bekijken – Zijdelingse aansluitingen
De hoofdtelefoonaansluiting wordt gebruikt om een externe koptelefoon aan te 1.
sluiten op uw systeem. Sluit aan op de KOPTELEFOON aansluiting om geluid van
de TV te beluisteren via de hoofdtelefoon (optioneel).
De Video-ingang wordt gebruikt voor de aansluiting van videosignalen of externe 2.
toestellen. Sluit de videokabel aan tussen de VIDEO IN aansluiting van de TV en de
VIDEO UIT aansluiting op uw apparaat.
De geluidsingangen worden gebruikt om geluidsignalen van externe toestellen aan 3.
te sluiten. Verbind de geluidskabel tussen de GELUIDSINGANGEN van de TV en
de GELUIDSUITGANG aansluitingen van uw toestel. Opmerking: Als u een toestel
aansluit op de TV via VIDEO-INGANG moet u ook uw toestel aansluiten met een
geluidskabel naar de GELUIDSINGANGEN van de TV om geluid in te schakelen.
Antenneaansluiting
• Sluit de antenne of de kabel-TV stekker aan op de ANTENNE INGANG aan de achterzijde van de TV .
01_MB25_[NL]_(01-TV)_COST_1900UK_IDTV_BRONZE9_32883_10064228_50152513.indd 7
01_MB25_[NL]_(01-TV)_COST_1900UK_IDTV_BRONZE9_32883_10064228_50152513.indd 7
01_MB25_[NL]_(01-TV)_COST_1900UK_IDTV_BRONZE9_32883_10064228_50152513.indd 7
01_MB25_[NL]_(01-TV)_COST_1900UK_IDTV_BRONZE9_32883_10064228_50152513.indd 701_MB25_[NL]_(01-TV)_COST_1900UK_IDTV_BRONZE9_32883_10064228_50152513.indd 7 17.08.2009 08:31:55
17.08.2009 08:31:55
17.08.2009 08:31:55
17.08.2009 08:31:5517.08.2009 08:31:55

Nederlands - 8 -
Stroomaansluiting
BELANGRIJK: Het Tv-toestel is ontworpen voor een
bediening met 220-240V wisselstroom, 50 Hz.
• Nadat u de TV uitgepakt hebt, moet u het toestel de
tijd gunnen op kamertemperatuur te komen voor u
het op het elektriciteitsnet aansluit.
• Voer het netsnoer in het stopcontact
De LCD-TT aansluiten op een PC
Om het beeld van uw computer op uw LCD-TV weer
te geven, kunt u uw computer aansluiten op het Tv-
toestel.
• Schakel zowel de computer als het scherm uit voor
u een aansluiting tot stand brengt.
• Gebruik de 15-pin D-sub weergavekabel om een PC
aan te sluiten op de LCD TV.
• Wanneer de verbinding gemaakt werd, schakelt
u over naar PC-bron. Raadpleeg hiervoor de
“Ingangselectie” sectie.
• Stel de gewenste resolutie in. U vindt informatie met
betrekking tot de resolutie in de bijlagen .
PC audio kabel
geleverd) (niet
naar
GELUIDSINGANGEN
van de TV
PC RGB kabel
(niet geleverd)
naar PC-ingang
Geluidsingangen
PC-ingang
Aansluiten op een DVD-speler
Als u een DVD-speler wenst aan te sluiten op
uw LCD-TV, kunt u de aansluitingen van het
Tv -toestel g ebruiken. DVD-spelers kunn en
verschillende aansluitingen hebben. Raadpleeg
de gebruikshandleiding van uw DVD-speler voor
bijkomende informatie. Schakel zowel het toestel als
de TV uit voor u een aansluiting tot stand brengt.
Opmerking: De Kabels in de afbeelding worden
niet geleverd.
• Indien uw DVD-speler een HDMI-aansluiting heeft,
kunt u aansluiten via HDMI. Wanneer u aansluit naar
DVD-speler moet u overschakelen naar HDMI-bron.
Raadpleeg hiervoor de “Ingangselectie” sectie.
• De meeste DVD-spelers worden via COMPONENTE
AANSLUITINGEN verbonden. Gebruik een
componente videokabel om video-ingang te
verbinden. Om het geluid in te schakelen, gebruikt
u een componente geluidskabel, zoals hieronder
weergegeven. Wanneer de verbinding tot stand
gebracht is, schakelt u over naar YPbPr-bron.
Raadpleeg hiervoor de “Ingangselectie” sectie.
• U mag ook via de SCART-aansluiting aansluiten.
Gebruik een SCART-kabel zoals hieronder
weergegeven.
Opmerking : Deze drie verbindingsmethodes voeren
dezelfde functie uit, maar met een verschillend
kwaliteitsniveau. Het is niet nodig een verbinding tot
stand te brengen via al deze drie methoden .
HDMI-ingangen
Scart-aansluitingen
Componente
video-ingangen
Componente
geluidsingangen
DVD-speler
Het gebruik van de zijdelingse
AV-aansluitingen
U kunt uiteenlopende optionele apparaten aansluiten
op uw LCD-TV. Mogelijke verbindingen worden
hieronder weergegeven. Merk op dat de kabels in de
afbeelding niet geleverd worden.
• Om een camcorder aan te sluiten, sluit u aan
op de S-VIDEO of VIDEO-IN aansluiting en de
GELUIDSAANSLUITINGEN. Sluit de camcorder
niet gelijktijdig aan op de S-VIDEO en VIDEO-IN
aansluiting want dit kan beeldstoringen veroorzaken.
Om de betrokken bron te selecteren, verwijzen wij u
naar de “Ingangselectie” in de volgende delen.
• Om geluid van uw hoofdtelefoon te beluisteren,
sluit u aan op de KOPTELEFOON aansluiting van
de TV .
Camcorder
Hoofdtelefoon
01_MB25_[NL]_(01-TV)_COST_1900UK_IDTV_BRONZE9_32883_10064228_50152513.indd 8
01_MB25_[NL]_(01-TV)_COST_1900UK_IDTV_BRONZE9_32883_10064228_50152513.indd 8
01_MB25_[NL]_(01-TV)_COST_1900UK_IDTV_BRONZE9_32883_10064228_50152513.indd 8
01_MB25_[NL]_(01-TV)_COST_1900UK_IDTV_BRONZE9_32883_10064228_50152513.indd 801_MB25_[NL]_(01-TV)_COST_1900UK_IDTV_BRONZE9_32883_10064228_50152513.indd 8 17.08.2009 08:31:58
17.08.2009 08:31:58
17.08.2009 08:31:58
17.08.2009 08:31:5817.08.2009 08:31:58

Nederlands - 9 -
Het gebruik van andere
aansluitingen
U kunt uiteenlopende optionele apparaten aansluiten
op uw LCD-TV. Mogelijke verbindingen worden
hieronder weergegeven. Merk op dat de kabels in de
afbeelding niet geleverd worden.
• Gebruik een geluidskabel om een verbinding te
maken met externe luidsprekers. Haal de GELUID
LINKS en GELUID RECHTS aansluitingen nooit
door elkaar. Schakel de LCD-TV en de externe
luidspreker pas in nadat alle verbindingen uitgevoerd
werden. Raadpleeg de handleiding van uw
luidsprekers voor bijkomende informatie.
• Om een verbinding tot stand te brengen met een
apparaat dat ondersteuning biedt voor SPDIF
moet u een geschikte SPDIF-kabel gebruiken
om de geluidsaansluiting in te schakelen. U moet
ook de SPDIF uit optie op Aan instellen in het
geluidsmenu .
Externe luidsprekers
Een toestel dat
het
SPDIF-signaal
ondersteunt
Andere apparatuur aansluiten via
SCART
De meeste toestellen ondersteunen SCART-
aansluiting. U kunt een DVD-recorder, een
videorecorder of een decoder aansluiten op uw
LCD-TV via de SCART-aansluitingen. Merk op dat de
kabels in de afbeelding niet geleverd worden.
Schakel zowel de toestellen als de TV uit voor u een
aansluiting tot stand brengt.
Raadpleeg de gebruikshandleiding van uw toestel
voor bijkomende informatie .
Scart-aansluitingen
Decoder
DVD-recorder Videorecorder
Batterijen aanbrengen in de
afstandsbediening
• ijder het deksel van het batterijcompartiment aan de
achterzijde van de afstandsbediening door van het
aangeduide deel zachtjes achterwaarts te trekken.
• Voer twee AAA/R3 of equivalente batterijen in.
Plaats de batterijen in de correcte richting en breng
het deksel van het batterijcompartiment opnieuw
aan
Opmerking: Verwijder de batterijen uit de
afstandsbediening als u niet van plan bent ze te
gebruiken gedurende een lange periode. Zo niet,
kan dit schade veroorzaken door lekkage van de
batterijen .
Het bereik van de afstandsbediening is ongeveer
7m
De TV in/uitschakelen
De TV inschakelen
• Sluit het netsnoer aan op 220-240V wisselstroom 50
Hz. De stand-by LED-indicator licht op.
• De TV inschakelen vanuit stand-by modus:
• Druk op “ ” toets, P+ / P- of een cijfertoets van de
afstandsbediening.
• Druk op de stand-by, of van de Tv. -P/CH P/CH+
De Tv schakelt in .
Opmerking : Indien u de Tv inschakelt met de ZENDER
OMHOOG/OMLAAG toetsen van de afstandsbediening
of op de TV zal de laatst weergegeven zender opnieuw
geselecteerd worden.
Op beide manieren kunt u de TV inschakelen.
01_MB25_[NL]_(01-TV)_COST_1900UK_IDTV_BRONZE9_32883_10064228_50152513.indd 9
01_MB25_[NL]_(01-TV)_COST_1900UK_IDTV_BRONZE9_32883_10064228_50152513.indd 9
01_MB25_[NL]_(01-TV)_COST_1900UK_IDTV_BRONZE9_32883_10064228_50152513.indd 9
01_MB25_[NL]_(01-TV)_COST_1900UK_IDTV_BRONZE9_32883_10064228_50152513.indd 901_MB25_[NL]_(01-TV)_COST_1900UK_IDTV_BRONZE9_32883_10064228_50152513.indd 9 17.08.2009 08:32:01
17.08.2009 08:32:01
17.08.2009 08:32:01
17.08.2009 08:32:0117.08.2009 08:32:01

Nederlands - 10 -
De TV uitschakelen
• Druk op de “ ” toets van de afstandsbediening of
de STAND-BY toets van de TV om de TV over te
schakelen naar stand-by modus.
• Om de TV volledig uit te schakelen, verwijdert u
het netsnoer uit het stopcontact .
Opmerking: Wanneer de Tv naar stand-by modus
wordt geschakeld, kan de stand-by LED knipperen
om aan te geven dat functies zoals Stand-by Zoeken,
downloaden over de ether of Timer actief zijn.
Eerste installatie
Wanneer de TV voor de eerste maal wordt
ingeschakeld, wordt volgend menu op het scherm
weergegeven:
Selecteer uw land, taal en teksttaal met de “ ” of “
” en “ ” of “ ” toetsen. Druk op de OK of RODE
toets om door te gaan. Druk op de BLAUWE toets
om te annuleren.
Het volgende menu verschijnt tijdens het automatisch
afstemmen:
Aan het einde van APS, verschijnt de zendertabel op
het scherm. In de zendertabel ziet u de nummers en
namen die toegewezen werden aan de zenders.
Indien u de locaties en/of de namen van de
zenders niet aanvaardt, kunt u deze wijzigen in de
zendertabel.
Schakel de Tv niet uit zonder de Eerste installatie
gestart te hebben.
Ingangselectie
Van zodra u externe systemen hebt aangesloten
op uw Tv kunt u overschakelen naar verschillende
ingangsbronnen.
•Druk op de “ ” toets van uw afstandsbediening SOURCE
om de bronnen rechtsreeks te veranderen.
of,
• Selecteer de “ ” optie in het hoofdmenu met de Bron
“ ” of “ ” toetsen. Gebruik daarna de “ ” of “ ”
toetsen om een ingang te markeren en druk op de
“ ” toets om te selecteren.
Opmerking : U kunt de gewenste signaalbronopties
markeren door de OK toets in te drukken. Om die
reden zijn enkel de gemarkeerde signaalbronopties
beschikbaar als de “SOURCE” toets ingedrukt wordt
(behalve voor de TV-bron) .
Basisbedieningen
U kunt uw TV zowel met de afstandsbediening als
de toetsen op het toestel bedienen.
Bediening met de toetsen op de TV
Volume instelling
• Druk op de “ ” toets om het volume te
verlagen of op de “ ” toets om het volume te
verhogen. Centraal onderin in beeld verschijnt een
schuifregelaar voor het volumeniveau.
Zenderselectie
• Druk op de “ P/CH + ” toets om de volgende zender
te selecteren of op de “ P/CH - ” toets om de vorige
zender te selecteren.
Het hoofdmenu weergeven
• Druk gelijktijdig op de V+/V- toetsen om het
hoofdmenu te openen. In het hoofdmenu kunt u
submenu’s selecteren met de “ P/CH - ” of “ P/CH
+ ” toetsen. Ga naar het submenu met de “
” of “ ” toetsen. Raadpleeg de menusysteem
secties in uw handleiding om het gebruik van de
menu’s aan te leren.
01_MB25_[NL]_(01-TV)_COST_1900UK_IDTV_BRONZE9_32883_10064228_50152513.indd 10
01_MB25_[NL]_(01-TV)_COST_1900UK_IDTV_BRONZE9_32883_10064228_50152513.indd 10
01_MB25_[NL]_(01-TV)_COST_1900UK_IDTV_BRONZE9_32883_10064228_50152513.indd 10
01_MB25_[NL]_(01-TV)_COST_1900UK_IDTV_BRONZE9_32883_10064228_50152513.indd 1001_MB25_[NL]_(01-TV)_COST_1900UK_IDTV_BRONZE9_32883_10064228_50152513.indd 10 17.08.2009 08:32:01
17.08.2009 08:32:01
17.08.2009 08:32:01
17.08.2009 08:32:0117.08.2009 08:32:01

Nederlands - 11 -
AV-modus
• Druk op de “ TV/AV ” toets in het bedieningspaneel
van de TV om de TV over te schakelen naar de
TV- of AV-modi.
Bediening met de afstandsbediening
• De afstandbediening van uw TV is ontworpen alle
functies van het model dat u geselecteerd hebt te
bedienen. De functies worden beschreven op basis
van het menusysteem van uw TV.
• De functies van het menusysteem worden in de
volgende secties beschreven.
Volume instelling
• Druk op de “ ” toets om het volume te verhogen. V+
Druk op de “ ” toets om het volume te verlagen. V-
Een schuifregelaar voor het volumeniveau verschijnt
op het scherm.
Zenderselectie (Voorgaand of volgend
zender)
• Druk op de “ P - ” toets om de vorige zender te
selecteren.
• Druk op de “ P + ” toets om de volgende zender te
selecteren .
Zenderselectie (directe toegang):
• Druk op de numerieke toetsen van de
afstandsbediening om zenders te selecteren tussen
0 en 9. De TV schakelt over op de geselecteerde
zender. Om zenders te selecteren tussen 10-
299 (voor IDTV) of 10-199 (voor analoog), druk
herhaaldelijk op de numerieke toetsen De tijdslimiet
is 3 seconden.
• Druk het zendernummer rechtstreeks in om zenders
met één cijfer opnieuw te selecteren
M enusysteem
Beeldmenu
Modus
Voor uw weergavevereisten kunt u de verwante
modusoptie instellen.
Als u op “ ” of “ ”drukt, selecteert u Modus . Met de
“ ” of “ ” toetsen kunt u één van de volgende opties
selecteren: Cinema , Dynamisch en Natuurlijk .
Helderheid/Contrast/Kleur/Scherpte/
Kleurschakering
Druk op de “ ” of “ ” toetsen om de gewenste optie
te selecteren. Druk op de “ ” of “ ” toetsen om het
niveau in te stellen.
Opmerking : De Tint optie kan enkel zichtbaar zijn
wanneer de TV een NTSC-signaal ontvangt.
Kleurtemp
Als u op “ ” of “ ” drukt, selecteert u Kleurtemp .
Met de “ ” of “ ” “” toets kunt u één van de volgende
opties selecteren: Koel , Normaal en Warm .
Opmerking :
• De Koel optie instellen geeft witte kleuren een
blauwe accentuering.
• De Warm optie instellen geeft witte kleuren een
rode accentuering.
• Voor normale kleuren, selecteert u de Normaal
optie.
Ruisreductie
Indien het uitzendsignaal zwak is en het beeld ruis
bevat, kunt u de Ruisreductie instelling gebruiken
om de hoeveelheid ruis te onderdrukken.
Druk op de “ ” of “ ” toets om Ruisreductie te
selecteren. Druk op de “ ” of “ ” “” toets om u
één van de volgende opties te selecteren: Laag ,
Gemiddeld , Hoog or Uit .
Filmmodus
Films worden aan een ander aantal frames per seconde
opgenomen dan normale televisieprogramma’s.
Druk op de “ ” of “ ” toets om de Filmmodus . te
selecteren.
Druk op de “ ” of “ ” toets om deze functie in of uit
te schakelen.
Schakel deze functie aan wanneer u
fi lms bekijkt om de snelle animatiescènes duidelijk
te kunnen zien.
Spelmodus (optioneel)
Selecteer de Spelmodus met de “ ” of “ ” toets.
Druk op de “ ” of “ ” toets om de Spelmodus In of Uit .
te schakelen. Wanneer de Spel Modus ingeschakeld
is, worden specifi eke instellingen voor de spel modus,
die geoptimaliseerd zijn voor betere videokwaliteit,
geladen.
01_MB25_[NL]_(01-TV)_COST_1900UK_IDTV_BRONZE9_32883_10064228_50152513.indd 11
01_MB25_[NL]_(01-TV)_COST_1900UK_IDTV_BRONZE9_32883_10064228_50152513.indd 11
01_MB25_[NL]_(01-TV)_COST_1900UK_IDTV_BRONZE9_32883_10064228_50152513.indd 11
01_MB25_[NL]_(01-TV)_COST_1900UK_IDTV_BRONZE9_32883_10064228_50152513.indd 1101_MB25_[NL]_(01-TV)_COST_1900UK_IDTV_BRONZE9_32883_10064228_50152513.indd 11 17.08.2009 08:32:03
17.08.2009 08:32:03
17.08.2009 08:32:03
17.08.2009 08:32:0317.08.2009 08:32:03

Nederlands - 12 -
De Beeldmodus, Contrast, Helderheid, Scherpte, Kleur
en Kleurtemperatuur instellingen zijn onzichtbaar en
uitgeschakeld wanneer de Spelmodus ingeschakeld
is.
Opmerking :
De Beeldmodus selectietoets op de afstandsbediening
heeft geen functie wanneer de Spelmodus
ingeschakeld is
Indien de TV overgeschakeld wordt naar de PIP/
PAP-modus wordt de Spelmodus uitgeschakeld en
verwijderd uit het Beeldmenu.
Beeld scherpstellen
Selecteer Beeld scherpstellen met de “ ” of “
” toets.
Met de “ ” of “ ” toetsen kunt u de scherpstelling
van het beeld wijzigen in Automatisch , 16:9 , 4:3 ,
Panoramisch , 14:9 Zoom , Cinema , Ondertiteling
or Zoomen .
Bewaren
Druk op de “ ” of “ ” toets om Bewaren te selecteren.
Druk op “ ” of OK om de instellingen te bewaren.
“ Opgeslagen... ” verschijnt op het scherm.
Reset
Druk op de “ ” of “ ” toets om Reset . te
selecteren. Druk de “ ” of “ ” of de OK toets in
om de fabrieksinstellingen van de beeldmodus te
herstellen.
Geluidsmenu
Volume
Druk op de “ ” of “ ” toets om Volume . te selecteren.
Druk op de “ ” of “ ” toetsen om het volumeniveau
te wijzigen.
Equalizer
Druk op de “ ” of “ ” toets om Equalizer . te
selecteren. Druk op de “ ” toets om het equalizer
menu weer te geven.
.
Druk op de “ ” of “ ” toetsen om de vooraf ingestelde
waarde te wijzigen. In het equalizer menu, kan de
voorinstelling gewijzigd worden in Muziek , Film ,
Spraak , Vlak , Klassiek en Persoonlijk. .
Selecteer de gewenste frequentie met de “ ” of “ ”
toetsen en verhoog of verlaag de frequentie toename
met de “ ” of “ ” toetsen.
Druk op de “ MENU ” toets om terug te keren naar het
vorige menu.
Opmerking : De equalizer menu instellingen kunnen
uitsluitend gewijzigd worden wanneer de Equalizer
modus op Gebruiker . staat.
Balans
Deze instelling wordt gebruikt om de linkse of rechtse
luidspreker meer te benadrukken.
Druk op de “ ” of “ ” toets om . te selecteren. Balans
Gebruik de “ ” of “ ” toetsen om het niveau van de
Balans te wijzigen. Het balansniveau kan aangepast
worden tussen en . -32 +32
Hoofdtelefoon
Druk op de “ ” of “ ” toets om Hoofdtelefoon .
te selecteren. Druk op de “ ” toets om het
hoofdtelefoonmenu weer te geven.
Opmerking: De hoofdtelefoon wordt uitgeschakeld
wanneer de SPDIF optie wordt ingeschakeld.
De hoofdtelefoon submenu-opties worden hier onder
beschreven:
Volume
Druk op de “ ” of “ ” toets om Volume . te
selecteren. Druk op de “ ” om het volumeniveau van
de hoofdtelefoon te verhogen. Druk op “ ” om het
volumeniveau van de hoofdtelefoon te verlagen. Het
volumeniveau van de hoofdtelefoon kan aangepast
worden tussen 0 en 63 .
01_MB25_[NL]_(01-TV)_COST_1900UK_IDTV_BRONZE9_32883_10064228_50152513.indd 12
01_MB25_[NL]_(01-TV)_COST_1900UK_IDTV_BRONZE9_32883_10064228_50152513.indd 12
01_MB25_[NL]_(01-TV)_COST_1900UK_IDTV_BRONZE9_32883_10064228_50152513.indd 12
01_MB25_[NL]_(01-TV)_COST_1900UK_IDTV_BRONZE9_32883_10064228_50152513.indd 1201_MB25_[NL]_(01-TV)_COST_1900UK_IDTV_BRONZE9_32883_10064228_50152513.indd 12 17.08.2009 08:32:04
17.08.2009 08:32:04
17.08.2009 08:32:04
17.08.2009 08:32:0417.08.2009 08:32:04

Nederlands - 13 -
Geluidsmodus (optioneel)
Druk op de “ ” of “ ” toets om de Geluidsmodus
te selecteren. Met de “ ” of “ ” toets kunt u de
Mono, Stereo, Dual I of Dual II modus selecteren,
uitsluitend als de geselecteerde zender deze modus
ondersteunt..
AVL
De Automatische volumebegrenzing (AVL) functie
past het geluid aan om een vast uitvoerniveau
tussen programma’s te krijgen (Bijvoorbeeld, het
volumeniveau van reclame is geneigd luider te zijn
dan dat van programma’s).
Druk op de “ ” of “ ” toets om AVL . te selecteren.
Druk op de “ ” of “ ” toets om de AVL functie İn of
Uit . te schakelen.
SPDIF uit
Druk op de “ ” of “ ” toets om Spdif uit . te
selecteren. Druk op de “ ” of “ ” toets om de Spdif
uit . functie İn of Uit . te schakelen.
Opmerking : Indien Spdif uit ingeschakeld is, wordt
de hoofdtelefoon uitgeschakeld.
SRS TruSurr XT (optioneel)
Druk op “ ” of “ ” om SRS TruSurr XT . te selecteren.
Druk op de “ ” of “ ” toets om SRS TruSurr XT in
of uit te schakelen.
Opmerking : Als u SRS TruSurr XT inschakelt, is het
mogelijk dat sommige functies in het menu Geluid niet
ingesteld kunnen worden.
Dolby Virtual Luidspreker (optioneel)
Deze functie wordt gebruikt om een indruk te creëren
dat het geluid vanuit alle hoeken van de ruimte komt
en niet uit het stel luidsprekers. Druk op de “ ” of “
” toets om deze functie in of uit te schakelen.
Opmerking: Als u Dolby Virtual Speaker inschakelt, is
het mogelijk dat sommige functies in het menu Geluid
niet ingesteld kunnen worden
Effect
Wanneer u een mono uitzending bekijkt, kunt u Effect
inschakelen voor een beter geluidseffect dat meer
stereoachtig is. Als het huidige geluidssysteem in
Stereo staat, geeft het inschakelen van dit effect het
geluid een meer ruimtelijk effect.
Druk op de “ ” of “ ” toets om Effect te selecteren.
Druk op de “ ” of “ ” toets om deze functie in of uit
te schakelen.
Bewaren
Druk op de “ ” of “ ” toets om Bewaren te
selecteren. Druk op “ ” of OK om de instellingen te
bewaren. “ Bewaard... ” verschijnt op het scherm.
Functiemenu
Sluimertimer
Druk op de “ ” of “ ” toets om de Sluimertimer .
te selecteren. Gebruik de “ ” of “ ” toetsen om de
Sluimertime.
De timer kan tussen Uit en 120 minuten
geprogrammeerd worden in stappen van 10
minuten.
Als de SSluimertimer geactiveerd wordt, schakelt
de TV automatisch over op de stand-by modus op het
einde van de geselecteerde tijdsduur.
Kinderslot
Druk op de “ ” toets om ” of “ Kinderslot te
selecteren.
Druk op de “ ” of “ ” toets om de Kinderslot
functie İn of Uit . te schakelen. Als u inschakelen
selecteert, kan de TV enkel bediend worden via de
afstandsbediening. In dat geval werken de toetsen
van het confi guratiepaneel niet.
Als een van deze toetsen ingedrukt wordt, verschijnt
de boodschap Kinderslot AAN op het scherm als het
menuscherm niet zichtbaar is.
Taal
Druk op de “ ” of “ ” toets om Taal . te selecteren.
Gebruik de “ ” of “ ” toetsen om de Taal . te
selecteren.
Standaard zoom
Met de zoommodus ingesteld op AUTOMATISCH
zal de TV de zoommodus volgens het signaal van
de uitzending instellen. Indien er geen WSS of
beelverhoudinginformatie beschikbaar is, zal de
TV deze instelling toepassen. Druk op de “ ” of “
” toets om de Standaard zoom . te selecteren. U
kunt de Standaard zoom instellen op Panoramisch ,
16:9 , 4:3 of als 14:9 zoom instellen met de “ ” of “
” toetsen.
01_MB25_[NL]_(01-TV)_COST_1900UK_IDTV_BRONZE9_32883_10064228_50152513.indd 13
01_MB25_[NL]_(01-TV)_COST_1900UK_IDTV_BRONZE9_32883_10064228_50152513.indd 13
01_MB25_[NL]_(01-TV)_COST_1900UK_IDTV_BRONZE9_32883_10064228_50152513.indd 13
01_MB25_[NL]_(01-TV)_COST_1900UK_IDTV_BRONZE9_32883_10064228_50152513.indd 1301_MB25_[NL]_(01-TV)_COST_1900UK_IDTV_BRONZE9_32883_10064228_50152513.indd 13 17.08.2009 08:32:06
17.08.2009 08:32:06
17.08.2009 08:32:06
17.08.2009 08:32:0617.08.2009 08:32:06

Nederlands - 14 -
Blauwe achtergrond
Indien het signaal zwak of afwezig is, schakelt de TV
automatisch naar een blauw scherm. Om deze functie
in te schakelen, schakelt u de Blauwe achtergrond
in .
Druk op “ ” of “ ” om de Blauwe achtergrond . te
selecteren. Druk op de “ ” of “ ” toets om de Blauwe
achtergrond functie İn of Uit . te schakelen.
Menu achtergrond
Druk op de “ ” of “ ” toets om Menu achtergrond .
te selecteren. U kunt het achtergrondniveau van het
menu instellen met de “ ” of “ ” toets.
Achtergrond verlichting
D e z e i n s t e l l i n g b e d i e n t h e t
achtergrondverlichtingsniveau. Selecteer de
Achtergrondverlichting met de “ ” of “ ” toets. Druk
op de “ ” of “ ” toets om de Achtergrondverlichting
in te stellen op Auto, Gemiddeld , Maximum of
Minimum .
Menu time-out
Om een bepaalde scherm time-out in te stellen voor
menuschermen moet u een waarde instellen voor
deze optie.
Druk op de “ ” of “ ” toets om Menu time-out . te
selecteren. Druk op de “ ” of “ ” toets om de menu
time-out te wijzigen in 15 sec , 30 sec of 60 sec .
Teleteksttaal
Druk op de “ ” of “ ” toets om de Teleteksttaal .
te selecteren. Druk op de “ ” of “ ” toets om de
Teleteksttaal te wijzigen in West,Oost , Turk/Gri ,
Cyrillisch ,Arabisch of Persian.
Ext uit
Druk op de “ ” of “ ” toets om Ext uit te selecteren.
Druk op de “ ” of “ ” toets om de Ext Out functie in
of uit te schakelen.
Opmerking :
Om een kopie te maken van een DVD- of VCR-toestel
moet u de gewenste bron selecteren in het bron menu
en EXT uit inschakelen in het functiemenu.
Ext UIt moet AAN zijn om de Timers functie in de DTV
modus te gebruiken .
HDMI PC Full-Modus (optioneel)
Als u het PC-scherm wilt weergeven in HDMI-
modus via de externe aansluiting moet de HDMI
PC FULL MODE optie ingeschakeld worden om de
beeldverhouding correct bij te regelen. In sommige
resoluties kan het inactief zijn.
Opmerking: Als u een HDMI-apparaat aansluit en
de TV overschakelt op HDMI-modus is deze functie
zichtbaar (behalve voor 1080i/1080P resolutie)
Volledige modus (optioneel)
Als u een apparaat aansluit via HDMI- of YpbPr-
connectoren en 1080i/1080P resoluties instelt, is het
Volledige modus item zichtbaar. U kunt de Volledige
modus instellen als 1:1 of Normaal met “ ” of “ ”.Als
u 1:1 selecteert, wordt de schermverhouding correct
aangepast. Als u Normaal instelt, is het mogelijk dat
de schermverhouding uitgebreid wordt.
Installatiemenu
Programma
Druk op de “ ” of “ ” toets om Programma te
selecteren. Gebruik de “ ” of “ ” toetsen om het
zendernummer te selecteren. U kunt ook een nummer
invoeren met de cijfertoetsen op de afstandsbediening.
Er is ruimte voor 200 zenders tussen 0 en 199.
Band
Band kan geselecteerd worden als C of S. Druk op de
“ ” of “ ” toets om de Band te selecteren.
Kanaal
Het Kanaal kan gewijzigd worden met de “ ” of “ ”
toets of de numerieke toetsen.
Kleursysteem
Druk op de “ ” of “ ” toets om het Kleursysteem
te selecteren. Druk op de “ ” of “ ” toets om het
kleursysteem te wijzigen in PAL, PAL 60, SECAM of
AUTOMATISCH.
Geluidssysteem
Druk op de “ ” of “ ” toets om het Kleursysteem
te selecteren. Druk de “ ” of “ ” toets in om het
geluidsysteem te wijzigen in BG, I, L, L’, DK.
Fijnafstemmen
Druk op de “ ” of “ ” toets om Fijnafstemmen
te selecteren. Druk op de “ ” of “ ” toets om de
afstemming aan te passen.
Zoeken
Druk op de “ ” of “ ” toets om Zoeken te selecteren.
Druk op “ ” of “ ” om de programma zoekopdracht te
01_MB25_[NL]_(01-TV)_COST_1900UK_IDTV_BRONZE9_32883_10064228_50152513.indd 14
01_MB25_[NL]_(01-TV)_COST_1900UK_IDTV_BRONZE9_32883_10064228_50152513.indd 14
01_MB25_[NL]_(01-TV)_COST_1900UK_IDTV_BRONZE9_32883_10064228_50152513.indd 14
01_MB25_[NL]_(01-TV)_COST_1900UK_IDTV_BRONZE9_32883_10064228_50152513.indd 1401_MB25_[NL]_(01-TV)_COST_1900UK_IDTV_BRONZE9_32883_10064228_50152513.indd 14 17.08.2009 08:32:07
17.08.2009 08:32:07
17.08.2009 08:32:07
17.08.2009 08:32:0717.08.2009 08:32:07

Nederlands - 15 -
starten. U kunt ook de gewenste frequentie invoeren
met de numerieke toetsen terwijl het Zoekitem
gemarkeerd is.
Bewaren
Druk op de “ ” of “ ” toets om Bewaren te selecteren.
Druk op “ ” of OK om de instellingen te bewaren.
“ Bewaard... ” verschijnt op het scherm.
Installatiemenu in AV Modi
Het volgende scherm verschijnt in het installatiemenu
wanneer de TV in AV-modi is. Merk op dat er maar
beperkte opties beschikbaar zijn. Schakel over
naar de TV-modus om de volledige versie van het
Installatiemenu te bekijken .
Kleursysteem
Druk op de “ ” of “ ” toets om het Kleursysteem .
te selecteren. Druk op de “ ” of “ ” toets om het
kleursysteem te wijzigen in PAL , SECAM , PAL60,
AUTO, NTSC 4,43 of NTSC 3,58 .
Bewaren
Druk op de “ ” of “ ” toets om Zender bewaren . te
selecteren. Druk op “ ” of OK om de instellingen te
bewaren. “ Bewaard... ” verschijnt op het scherm.
Zendertabel
Selecteer de Zendertabel met de “ ” of “ ” toets.
Druk op “ ” om de zendertabel weer te geven
Als u de cursor in de vier richtingen verplaatst, kunt
u 20 programma’s bereiken op dezelfde pagina.
U kunt doorheen de pagina’s bladeren met de
navigatietoetsen om alle zenders weer te geven
in TV-modus (behalve voor de AV modi). Als de
cursor geactiveerd wordt, wordt de zenderselectie
automatisch uitgevoerd.
Naam
Om de naam van de pagina te wijzigen, selecteer de
zender en druk op de RODE toets.
De eerste letter van de geselecteerde naam wordt
gemarkeerd. Druk op de “ ” of “ ” toets om die letter
te wijzigen en op de “ ” of “ ” toets om de andere
letters te selecteren. Met de RODE toets kunt u de
naam opslaan.
Verplaatsen
Selecteer de zender die u wenst te verplaatsen met
de navigatietoetsen. Druk op de GROENE toets.
Verplaats de geselecteerde zender naar de gewenste
locatie met de navigatietoetsen en druk opnieuw op
de GROENE toets.
Verwijderen
Om een zender te verwijderen, drukt u op de GELE
toets. Als u opnieuw op de GELE toets drukt, kunt u
de geselecteerde zender verwijderen uit de lijst en de
programma’s één lijn omhoog verschuiven.
APS (Automatisch Programmeersysteem)
Als u op de BLAUWE toets drukt om het automatisch
afstemmen te starten. verschijnt het Automatisch
programmeringsysteem menu op het scherm
Land
Druk op de “ ” of “ ” toets om uw land te selecteren.
Indien u de APS functie wilt verlaten, drukt u op de
BLAUWE toets.
Druk op de OK of RODE toets om automatisch
afstemmen te starten, worden alle zenders
verwijderd en de TV zoekt de beschikbare zenders.
01_MB25_[NL]_(01-TV)_COST_1900UK_IDTV_BRONZE9_32883_10064228_50152513.indd 15
01_MB25_[NL]_(01-TV)_COST_1900UK_IDTV_BRONZE9_32883_10064228_50152513.indd 15
01_MB25_[NL]_(01-TV)_COST_1900UK_IDTV_BRONZE9_32883_10064228_50152513.indd 15
01_MB25_[NL]_(01-TV)_COST_1900UK_IDTV_BRONZE9_32883_10064228_50152513.indd 1501_MB25_[NL]_(01-TV)_COST_1900UK_IDTV_BRONZE9_32883_10064228_50152513.indd 15 17.08.2009 08:32:09
17.08.2009 08:32:09
17.08.2009 08:32:09
17.08.2009 08:32:0917.08.2009 08:32:09

Nederlands - 16 -
Tijdens de zoekopdracht wordt de volgende OSD
weergegeven :
Als u op de BLAUWE toets drukt, stopt de APS-functie
en de Zendertabel verschijnt op het scherm.
Als u wacht tot het einde van de APS wordt de
Zendertabel weergegeven op het scherm met een
lijst van de gevonden zenders.
Bronmenu
Druk de “ ” of “ ” toetsen om het zesde pictogram
te selecteren. Druk daarna op de “ ” of OK toets. Het
bronmenu verschijnt op het scherm
In het bronmenu markeert u een bron door op de
“ ” of “ ” toets te drukken en over te schakelen
naar die modus door op de “ ” toets te drukken.
Signaalbronopties zijn: TV, DVD, EXT-1 , FAV ,
HDMI-1 , HDMI-2 , YPbPr of PC-VGA .
Opmerking : Van zodra u optionele toestellen met
uw TV aangesloten heeft, moet u de vereiste invoer
selecteren om de beelden van die bron te kunnen
bekijken.
PC-modus menusysteem
Raadpleeg het gedeelte “De LCD-TV aansluiten
op een PC” om een PC aan te sluiten op het Tv-
toestel.
Om over te schakelen naar bron drukt u op de PC-
“BRON” toets van uw afstandsbediening en selecteert
u PC-ingang. U kunt ook het “ ”menu gebruiken Bron
om over te schakelen naar -modus. PC
Merk op dat PC-modus menu-instellingen enkel
beschikbaar zijn als de TV in PC-bron is.
PC-positiemenu
Selecteer het eerste pictogram door op “ ” of
“ ” te drukken. Het PC-positiemenu verschijnt op
het scherm :
Autopositie
Als u het beeld horizontaal of verticaal naar
een ongewenste positie verschuift, kunt u deze
functie gebruiken om het beeld opnieuw correct te
positioneren. Deze instelling optimaliseert het scherm
automatisch.
Selecteer het Autopositie item met de “ ” of “ ”
toetsen. Druk op de OK of “ ” of “ ” toets.
Waarschuwing : Zorg ervoor dat de automatische
aanpassing wordt uitgevoerd met een volledig scherm
beeld om zo het beste resultaat te verzekeren.
H (Horizontale) positie
Dit item verschuift het beeld horizontaal naar de
rechter of linkerzijde van het scherm.
Selecteer het H-positie item met de “ ” of “ ”
toetsen. Druk de “ ” of “ ” toets in om de waarde
aan te passen.
V (Verticale) positie
Dit item verschuift het beeld verticaal naar de boven
of onderzijde van het scherm.
Selecteer het V-positie item met de “ ” of “ ”
toetsen. Druk de “ ” of “ ” toets in om de waarde
aan te passen.
Fase
Afhankelijk van de resolutie en de scanfrequentie die
u instelt op het TV toestel kan een onzuiver beeld op
het scherm verschijnen. In een dergelijk geval kunt u
dit item gebruiken om een zuiver beeld te ontvangen
via de proefondervindelijke methode.
Selecteer het Fase item met de “ ” of “ ” toetsen.
Druk de “ ” of “ ” toets in om de waarde aan te
passen.
01_MB25_[NL]_(01-TV)_COST_1900UK_IDTV_BRONZE9_32883_10064228_50152513.indd 16
01_MB25_[NL]_(01-TV)_COST_1900UK_IDTV_BRONZE9_32883_10064228_50152513.indd 16
01_MB25_[NL]_(01-TV)_COST_1900UK_IDTV_BRONZE9_32883_10064228_50152513.indd 16
01_MB25_[NL]_(01-TV)_COST_1900UK_IDTV_BRONZE9_32883_10064228_50152513.indd 1601_MB25_[NL]_(01-TV)_COST_1900UK_IDTV_BRONZE9_32883_10064228_50152513.indd 16 17.08.2009 08:32:11
17.08.2009 08:32:11
17.08.2009 08:32:11
17.08.2009 08:32:1117.08.2009 08:32:11

Nederlands - 17 -
Pixelfrequentie
Pixelfrequentie aanpassingen corrigeren de storingen
die zich voordoen als verticale banden in presentaties
met een hoog aantal pixels zoals rekenbladen,
paragrafen of tekst in kleinere lettertypen.
Selecteer het Pixelfrequentie item met de “ ” of “
” toetsen. Druk de “ ” of “ ” toets in om de waarde
aan te passen.
PC-beeldmenu
Ga als volgt te werk om PC-beelditems af te stellen:
Druk de “ ” of “ ” toetsen om het tweede pictogram
te selecteren. Het PC-beeldmenu verschijnt op het
scherm.
C o n t r a s t - , H e l d e r h e i d - e n
Kleurtemperatuurinstellingen in dit menu zijn
identiek aan de instellingen bepaald in het TV-
beeldmenu in “Analoge TV-menusysteem”.
Opmerking : Als u Kleurtemperatuur instelt als
Gebruiker kunt u de R, G, B instellingen handmatig
instellen .
Geluid, Functie en Bron instellingen zijn identiek
aan de instellingen beschreven in het Analoge Tv-
menusysteem.
TV-informatie weergeven
P r o g r a m m a n u m m e r , P r o g r a m m a n a a m ,
Geluidindicator en Zoommodus informatie verschijnt
in de rechter bovenhoek van het scherm wanneer een
nieuw programma ingevoerd worden of de “INFO”
toets ingedrukt wordt.
Geluid dempen functie
Druk op de “ ” toets om het geluid uit te schakelen.
De geluid dempen indicator verschijnt aan de
bovenzijde van het scherm.
Om de geluid dempen functie te annuleren, bestaan
er twee alternatieven: u kunt op “ ” drukken of u kunt
het volumeniveau verhogen.
Beeldmodus selectie
Door op de PRESETS toets te drukken, kunt
u de Beeldmodus instellingen wijzigen in
overeenstemming met uw kijkvereisten. Beschikbare
opties zijn Dynamisch, Natuurlijk en Bioscoop.
Opmerking: Deze functie kan niet ingesteld worden
in de PC-modus.
Beeld bevriezen
U kunt het beeld bevriezen op het scherm door op
“ OK ” te drukken op de afstandsbediening. Druk op
“ OK ” om het beeld te bevriezen. Druk opnieuw om
de bevriezen modus te verlaten.
Zoommodi
U kunt de beeldverhouding (beeldgrootte) van de TV
wijzigen om het beeld in verschillende zoommodi te
bekijken.
Druk op de “ ” toets om de zoommodus SCREEN
rechtstreeks te wijzigen.
De beschikbare zoommodi worden onderaan
weergegeven.
Opmerking:
In de YPbPr en HDMI modi, terwijl in 720p-1080i
resoluties, is enkel de 16:9 modus beschikbaar.
Zoommodus kan in PC-modus niet gewijzigd
worden .
Automatisch
Als een WSS (Breedbeeld signaal) signaal, dat de
beeldverhouding van het beeld weergeeft, omvat is
in het uitzendsignaal of het signaal van een extern
apparaat, wijzigt de TV de ZOOM modus automatisch
volgens het WSS signaal.
• Als de AUTO modus niet correct werkt omwille van
een zwakke WSS signaalkwaliteit of als u de ZOOM
modus wilt wijzigen, wijzigt u handmatig naar een
andere ZOOM modus.
16:9
Hierdoor worden de rechter- en linkerzijden van een
normale afbeelding (4:3 beeldverhouding) gelijkmatig
uitgerekt om het volledige brede televisiescherm te
vullen.
• Voor 16:9 beeldverhouding afbeeldingen die in
een normale afbeelding (4:3 beeldverhouding) zijn
samengedrukt, gebruikt u de 16:9 modus om de
afbeelding te herstellen naar de oorspronkelijke
vorm.
4:3
Gebruik deze optie om een normale afbeelding
(4:3 beeldverhouding) weer te geven. Dit is de
oorspronkelijke grootte.
Panoramisch
Hierdoor worden de rechter- en linkerzijden van een
normale afbeelding (4:3 beeldverhouding) gelijkmatig
uitgerekt om het TV scherm te vullen, zonder dat de
afbeelding onnatuurlijk overkomt.
01_MB25_[NL]_(01-TV)_COST_1900UK_IDTV_BRONZE9_32883_10064228_50152513.indd 17
01_MB25_[NL]_(01-TV)_COST_1900UK_IDTV_BRONZE9_32883_10064228_50152513.indd 17
01_MB25_[NL]_(01-TV)_COST_1900UK_IDTV_BRONZE9_32883_10064228_50152513.indd 17
01_MB25_[NL]_(01-TV)_COST_1900UK_IDTV_BRONZE9_32883_10064228_50152513.indd 1701_MB25_[NL]_(01-TV)_COST_1900UK_IDTV_BRONZE9_32883_10064228_50152513.indd 17 17.08.2009 08:32:12
17.08.2009 08:32:12
17.08.2009 08:32:12
17.08.2009 08:32:1217.08.2009 08:32:12

Nederlands - 18 -
De boven- en onderzijde van de afbeelding worden
lichtjes bijgesneden.
14:9
Hiermee zoomt u in op de brede afbeelding (14:9
beeldverhouding) naar de bovenste en onderste
limieten van het scherm.
Bioscoop
Hiermee zoomt u in op de brede afbeelding (16:9
beeldverhouding) naar het volledige scherm.
Ondertiteling
Hiermee zoomt u in op de brede afbeelding (16:9
beeldverhouding) met ondertiteling naar het volledige
scherm.
Zoom
Deze optie zoomt in op het beeld.
Opmerking: U kunt overschakelen tussen scherm
omhoog of omlaag met de “ ” of “ ”toetsen terwijl
de beeldzoom geselecteerd is als panoramisch, 14:9,
Cinema of Ondertiteling.
Teletekst
Het teletekstsysteem zendt informatie zoals nieuws,
sport en weer naar uw TV. Merk op dat indien
het signaal vermindert, bijvoorbeeld bij slechte
weeromstandigheden, sommige tekstfouten kunnen
voorkomen of de teletekstmodus onderbroken
wordt.
Teletekst functietoetsen worden hieronder
weergegeven:
“ ” Teletekst aan-uit
Activeer de teletekstmodus indien een maal ingedrukt.
Als u de toets een tweede maal indrukt, wordt
de teletekst gemengde functie geactiveerd. Door
opnieuw te drukken verlaat u de teletekstmodus.
“TERUGKEREN” - Index
Selecteert de teletekst inhoudsopgave.
“ ” Subcode pagina’s
Selecteert subcode pagina’s, indien beschikbaar,
wanneer teletekst geactiveerd wordt.
“INFO” - Tonen
Geeft verborgen informatie weer (Bijv. oplossingen
van spelletjes).
“SCHERM” - Openvouwen
Druk een maal in om de bovenste helft van het scherm
te vergroten. Druk opnieuw in om de onderste helft
van de pagina te vergroten. Druk opnieuw om terug
te keren naar de normale weergave..
P+ / P- en cijfers (0-9)
Druk om een pagina te selecteren.
Opmerking :De meeste TV-stations gebruiken code
100 voor hun indexpagina.
Gekleurde toetsen
(ROOD/ GROEN/ GEEL/ BLAUW)
Uw TV ondersteunt zowel FASTEXT en TOP text
systemen. Als deze systemen beschikbaar zijn,
worden de pagina’s in groepen of onderwerpen
verdeeld.
Als het FASTEXT systeem beschikbaar is, worden
delen in een teletekstpagina kleurgecodeerd en
kunnen, door op de gekleurde toetsen te drukken,
geselecteerd worden. Druk op de gewenste gekleurde
toets.
Het gekleurde schrift verschijnt en toont u welke
gekleurde toetsen te gebruiken wanneer TOP text
uitzending beschikbaar is. Door op P - of P + te
drukken gaat u respectievelijk naar de volgende of
vorige pagina.
Teletekst ondertiteling
Als u de toets indrukt, verschijnt ONDERTITELING
teletekst ondertitelinginformatie onderin rechts van
het scherm (indien beschikbaar). U kunt de gewenste
optie instellen door ze te markeren met de “ ” of “ ”
toets en daarna op OK te drukken.
01_MB25_[NL]_(01-TV)_COST_1900UK_IDTV_BRONZE9_32883_10064228_50152513.indd 18
01_MB25_[NL]_(01-TV)_COST_1900UK_IDTV_BRONZE9_32883_10064228_50152513.indd 18
01_MB25_[NL]_(01-TV)_COST_1900UK_IDTV_BRONZE9_32883_10064228_50152513.indd 18
01_MB25_[NL]_(01-TV)_COST_1900UK_IDTV_BRONZE9_32883_10064228_50152513.indd 1801_MB25_[NL]_(01-TV)_COST_1900UK_IDTV_BRONZE9_32883_10064228_50152513.indd 18 17.08.2009 08:32:13
17.08.2009 08:32:13
17.08.2009 08:32:13
17.08.2009 08:32:1317.08.2009 08:32:13

Nederlands - 19 -
Tips
Zorg voor het scherm
Reinig het scherm met een licht vochtige, zachte doek.
Gebruik geen schuurmiddelen want deze kunnen de
beschermlaag van het TV-scherm beschadigen.
Uit veiligheidsoverwegingen raden we aan de stekker
uit het stopcontact te verwijderen wanneer u het
toestel schoonmaakt. Houd de TV stevig vast aan de
onderkant wanneer u het toestel verplaatst.
Beeldnawerking
Spookbeelden kunnen voorkomen tijden de weergave
van een doorlopend beeld. Bij LCD-televisies kan de
beeldnawerking na een korte tijd verdwijnen. Probeer
de TV een poosje uit te schakelen.
Om dit te vermijden, laat geen stilstaand beeld
langdurig op het scherm staan.
Geen stroom
Als uw TV-systeem geen stroom heeft, controleer
dan de voedingskabel en verbindingen naar het
stopcontact.
Zwakke beeldkwaliteit
Hebt u het verkeerde TV-systeem geselecteerd? Is
uw Tv-toestel of antenne te dicht bij niet-geaarde
geluidsapparatuur of neon lichten, etc. geplaatst?
Hoge gebouwen en bergen kunnen dubbele beelden
of spookbeelden veroorzaken. Soms kunt u de
beeldkwaliteit verbeteren door de oriëntering van de
antenne te wijzigen.
Is het beeld of teletekst onherkenbaar? Controleer
of u de correcte frequentie hebt ingevoerd. Stel de
kanalen opnieuw af.
De beeldkwaliteit kan verminderen wanneer twee
randapparaten gelijktijdig aangesloten zijn op de tv.
In dat geval kunt u één van beide loskoppelen.
Geen beeld
Is de antenne correct aangesloten? Zijn de stekkers
stevig aangesloten op de antenne aansluiting? Is
de antennekabel beschadigd? Werden de correcte
stekkers gebruikt voor de aansluiting van de
antenne? Indien u twijfelt, neemt u contact op met
de verdeler.
Geen beeld betekent dat uw TV geen uitzending
ontvangt. Hebt u de juiste knoppen van de
afstandsbediening geselecteerd? Probeer het
opnieuw.
Zorg er ook voor dat de correcte invoerbron
geselecteerd werd.
Geluid
U hoort geen geluid. Is het mogelijk dat u het geluid
hebt onderbroken door op de toets te drukken?
Het geluid komt slechts uit één van de luidsprekers.
Is de balans ingesteld op één uiteinde? Raadpleeg
het Geluidsmenu .
Afstandsbediening
Uw TV reageert niet meer op de afstandsbediening.
Misschien zijn de batterijen leeg. In dat geval kunt u
de lokale toetsen nog gebruiken aan de onderzijde
van de TV.
Invoerbronnen
Indien u geen invoerbronnen kunt selecteren, is het
mogelijk dat het toestel niet is aangesloten.
Controleer de AV-kabels en verbindingen als u
geprobeerd hebt een toestel aan te sluiten .
01_MB25_[NL]_(01-TV)_COST_1900UK_IDTV_BRONZE9_32883_10064228_50152513.indd 19
01_MB25_[NL]_(01-TV)_COST_1900UK_IDTV_BRONZE9_32883_10064228_50152513.indd 19
01_MB25_[NL]_(01-TV)_COST_1900UK_IDTV_BRONZE9_32883_10064228_50152513.indd 19
01_MB25_[NL]_(01-TV)_COST_1900UK_IDTV_BRONZE9_32883_10064228_50152513.indd 1901_MB25_[NL]_(01-TV)_COST_1900UK_IDTV_BRONZE9_32883_10064228_50152513.indd 19 17.08.2009 08:32:13
17.08.2009 08:32:13
17.08.2009 08:32:13
17.08.2009 08:32:1317.08.2009 08:32:13

Nederlands - 20 -
Bijlage A: PC-invoer normale
weergavemodi
Het scherm heeft een maximum resolutie van 1600
x 1200. De onderstaande tabel is een toelichting van
een aantal typische video schermmodi.
Het is mogelijk dat uw TV verschillende resoluties niet
ondersteunt. Ondersteunde resolutiemodi worden
hieronder weergegeven.
Indien u uw PC overschakelt op een niet-ondersteunde
modus verschijnt een waarschuwing OSD op het
scherm .
Inhouds
opgave
Resolutie Frequentie
Standaard
Hor Ver Ver
(Hz)
Hor
(KHz)
1 640 480 60 31.5 VESA
2 640 480 72 37.9 VESA
3 640 480 75 37.5 VESA
4 800 600 56 35.2 VESA
5 800 600 60 37.9 VESA
6 800 600 70 43.8
7 800 600 72 48.1 VESA
8 800 600 75 46.9 VESA
9 832 624 75 49.7 MAC
10 1024 768 60 48.4 VESA
11 1024 768 70 56.5 VESA
12 1024 768 72 57.7
13 1024 768 75 60.0
14 1152 864 70 64.2 VESA
15 1152 864 75 67.5 VESA
16 1152 870 75 68.9 MAC
17 1280 768 60 47.7 VESA
18 1360 768 60 47.7
19 1280 960 60 60.0 VESA
20 1280 1024 60 64.0 VESA
21 1280 1024 75 80.0 VESA
22 1600 1200 60 75.0 VESA
Bijlage B: AV en HDMI-
signaalcompatibiliteit (Ingang
signaaltypes)
Bron Ondersteunde
signalen Beschikbaar
EXT-1
(SCART)
PAL 50/60 O
NTSC 60 O
RGB 50 O
RGB 60 O
FAV PAL 50/60 O
NTSC 60 O
YPbPr
480I 60Hz O
480P 60Hz O
576I 50Hz O
576P 50Hz O
720P 50Hz O
720P 60Hz O
1080I 50Hz O
1080I 60Hz O
1080P 50Hz O
1080P 60Hz O
HDMI1
HDMI2
480I 60Hz O
480P 60Hz O
576I 50Hz O
576P 50Hz O
720P 50Hz O
720P 60Hz O
1080I 50Hz O
1080I 60Hz O
1080P 50Hz O
1080P 60Hz O
1080P 24 HZ O
(X: Niet beschikbaar, O: Beschikbaar)
Opmerking : In bepaalde gevallen kan een signaal
op de LCD-TV incorrect worden weergegeven. Het
probleem kan een onverenigbaarheid zijn met de
standaarden van het brontoestel (DVD, set-top-box,
etc...) Indien een dergelijk probleem zich voordoet,
neemt u contact op met uw verdeler en de fabrikant
van het bronmateriaal
01_MB25_[NL]_(01-TV)_COST_1900UK_IDTV_BRONZE9_32883_10064228_50152513.indd 20
01_MB25_[NL]_(01-TV)_COST_1900UK_IDTV_BRONZE9_32883_10064228_50152513.indd 20
01_MB25_[NL]_(01-TV)_COST_1900UK_IDTV_BRONZE9_32883_10064228_50152513.indd 20
01_MB25_[NL]_(01-TV)_COST_1900UK_IDTV_BRONZE9_32883_10064228_50152513.indd 2001_MB25_[NL]_(01-TV)_COST_1900UK_IDTV_BRONZE9_32883_10064228_50152513.indd 20 17.08.2009 08:32:13
17.08.2009 08:32:13
17.08.2009 08:32:13
17.08.2009 08:32:1317.08.2009 08:32:13

Nederlands - 21 -
Producten
Batterij
Informatie voor gebruikers met betrekking tot het weggooien van
oude apparatuur en batterijen
[Uitsluitend voor de Europese Unie]
Deze symbolen geven aan dat apparatuur met deze symbolen niet als
algemeen huishoudelijk huisvuil mag behandeld worden. Als u zich
van het product of batterij wilt ontdoen, moet u gebruik maken van de
ophaalsystemen of faciliteiten voor de correcte recyclage.
Opmerking: Het Pb-symbool onder het symbool voor batterijen toont
aan dat de batterij lood bevat.
Speci caties
TV-UITZENDING
PAL/SECAM B/G D/K K’ I/I’ L/L’’
KANALEN ONTVANGEN
VHF (BAND I/III)
UHF (BAND U)
HYPERBAND
AANTAL VOORINGESTELDE KANALEN
200
KANAALINDICATOR
Weergave op het scherm
RF ANTENNE INGANG
75 ohm (niet gebalanceerd)
OPERATIONEEL VOLTAGE
220-240V Wisselstroom, 50 Hz.
AUDIO
German + Nicam stereo
GELUIDSUITGANG STROOM (W RMS.
) (10% THD)
2 x 6
STROOMVERBRUIK (W)
150 W (max)
< 1 W (Standby)
PANEEL
32” schermgrootte
AFMETINGEN (mm)
BxLxH (met voet): 212 x 776 x 567
Gewicht (kg): 12,30
BxLxH (zonder voet): 94 x 776 x 524
Gewicht (kg) : 11,60
01_MB25_[NL]_(01-TV)_COST_1900UK_IDTV_BRONZE9_32883_10064228_50152513.indd 21
01_MB25_[NL]_(01-TV)_COST_1900UK_IDTV_BRONZE9_32883_10064228_50152513.indd 21
01_MB25_[NL]_(01-TV)_COST_1900UK_IDTV_BRONZE9_32883_10064228_50152513.indd 21
01_MB25_[NL]_(01-TV)_COST_1900UK_IDTV_BRONZE9_32883_10064228_50152513.indd 2101_MB25_[NL]_(01-TV)_COST_1900UK_IDTV_BRONZE9_32883_10064228_50152513.indd 21 17.08.2009 08:32:14
17.08.2009 08:32:14
17.08.2009 08:32:14
17.08.2009 08:32:1417.08.2009 08:32:14

Nederlands - 22 -
Inhoudsopgave
Kenmerken ........................................................... 23
Algemene eigenschappen ................................ 23
Deze handleiding .............................................. 23
Veiligheidsinformatie ..................................... 23
Opmerkingen Over De Schijven ........................... 24
Over de behandeling van de schijven .............. 24
Over de reiniging van de schijven..................... 24
Licentiemededeling............................................... 24
Hoe een DVD bekijken ......................................... 24
Toetsen Con guratiescherm DVD ........................ 24
Het gebruik van digitale multimedia aansluitingen 26
MC-kaart aansluiting ......................................... 26
USB-geheugen aansluiting ............................... 26
Overzicht van de afstandsbediening .................... 27
USB & MC modi Afspelen..................................... 28
Algemene besturingtoetsen voor Mediamodus 28
Besturingtoetsen voor weergave ...................... 28
EEN DVD AFSPELEN .......................................... 28
Basisweergave ................................................. 28
Voor uw informatie: ....................................... 29
Weergave Stoppen ........................................... 29
Weergave stoppenen terugkeren
naar het menuscherm ................................... 29
Snel vooruit/terug spoelen (Rapid Revers) ....... 29
Vooruit of terugspringen naar hoofdstukken ..... 29
Vooruit springen ............................................ 29
Achteruit springen ......................................... 29
stilstaand beeld (PAUZE) .................................. 29
Frame Advance (STaP voorwaarts) .................. 29
Slow- motion voorwaartse weergave ................ 29
Directe Selectie Uit Scènes .............................. 30
Selecteren Van Scènes Op
Hoofdstuknummer ........................................ 30
Selecteren Van Scènes Op Titelnummer ...... 30
Selecteren Van Scènes op Tijd ..................... 30
Handige Functies .............................................. 31
De Ondertitelingstaal Weergeven
of Veranderen ................................................... 31
De geluidstaal wijzigen ..................................... 32
Bekijken Vanuit Een Ander Camerastandpunt .. 32
Een Dvd Menu Gebruiken .................................... 32
Film CD afspelen .................................................. 33
Basisweergave ................................................. 33
Weergave Stoppen ........................................... 33
Snel Vooruit Spoelen / Snel Achteruit Spoelen . 33
Vooruit of terugspringen naar hoofdstukken ..... 33
Vooruit springen ............................................ 33
Achteruit springen ......................................... 33
stilstaand beeld (PAUZE) .................................. 33
Frame Advance (STAP voorwaarts) .............. 33
Vertraagd Afspelen ........................................... 33
Directe Selectie Uit Scènes .............................. 34
Selecteren Van Scènes op Tijd ..................... 34
CD Menu .............................................................. 34
Basisweergave ................................................. 34
MP3/MPEG/DivX -bestand ............................... 34
PAUZE .............................................................. 35
Weergave Stoppen ........................................... 35
Snel vooruit/terug spoelen (Rapid Revers) ....... 35
ZOOM ............................................................... 35
Herhalen ........................................................... 35
Willekeurig ........................................................ 36
Willekeurige weergave...................................... 36
Display functie .................................................. 36
Setupmenu ........................................................... 36
DVD-menu-items .................................................. 37
VIDEO SETUP PAGE ....................................... 37
TV Type ......................................................... 37
DivX VOD ..................................................... 37
TALEN SETUP ................................................. 37
OSD LANG ................................................... 37
AUDIO .......................................................... 37
SCHIJFMENU ............................................... 37
ONDERTITELING ......................................... 37
VOORKEUREN ................................................ 37
HELDERHEID ............................................... 37
DOWNMIX .................................................... 37
PASSWORD (wachtwoord wijzigen): ............ 37
Probleemoplossing ............................................... 38
De beeldkwaliteit is slecht (DVD)...................... 38
De schijf wordt niet afgespeeld ......................... 38
Verkeerde OSD-taal.......................................... 38
Sommige functies (Camerastandpunt,
Zoom, Etc.) werken niet .................................... 38
Geen beeld ....................................................... 38
Geen geluid ...................................................... 38
Vervormd geluid ................................................ 38
Geen reactie van de afstandsbediening ........... 38
Als er niets werkt .............................................. 38
Voorwaardebepalingen ......................................... 39
Camerastandpunt ............................................. 39
Hoofdstuknummer ............................................ 39
DVD .................................................................. 39
Ondertitels ........................................................ 39
Tijdgetal ............................................................ 39
Titelnummer ...................................................... 39
Getal voor een geluidsnummer......................... 39
Dolby Digital...................................................... 39
Dolby Pro Logic ................................................ 39
LPCM ................................................................ 39
MPEG ............................................................... 39
DivX .................................................................. 39
Ondersteunde bestandsformaten voor de
USB & MC-modi ................................................... 40
Ondersteunde geheugenkaarten .......................... 40
Opmerkingen over de schijven ............................. 41
Technische kenmerken ......................................... 42
B03_[NL]_MB25_(02-DVD)_32883W_1900UK_ANALOG_BRONZE9_DIVX_WOVCD_10064228_50152513.indd 22
B03_[NL]_MB25_(02-DVD)_32883W_1900UK_ANALOG_BRONZE9_DIVX_WOVCD_10064228_50152513.indd 22
B03_[NL]_MB25_(02-DVD)_32883W_1900UK_ANALOG_BRONZE9_DIVX_WOVCD_10064228_50152513.indd 22
B03_[NL]_MB25_(02-DVD)_32883W_1900UK_ANALOG_BRONZE9_DIVX_WOVCD_10064228_50152513.indd 22B03_[NL]_MB25_(02-DVD)_32883W_1900UK_ANALOG_BRONZE9_DIVX_WOVCD_10064228_50152513.indd 22 17.08.2009 08:44:57
17.08.2009 08:44:57
17.08.2009 08:44:57
17.08.2009 08:44:5717.08.2009 08:44:57
Nederlands - 23 -
Kenmerken
Algemene eigenschappen
• DVD / CD / CD-R / CD-RW / MP3 / JPEG /
MPEG / DivX Afspelen.
• USB & MC-ingang.
• Weergave van NTSC/PAL (afhankelijk van de
inhoud van de schijf)
• Gebruikersvriendelijk OSD menu in meerdere
talen
• , LPCM audio via coaxiale en optische
digitale geluidsuitgangen. (optioneel)
• O n d e r s t e u n i n g v o o r m e e r d e r e
aspectverhoudingen (16:9 Breedbeeld, 4:3
Letterbox, 4:3 PAN & SCAN)
• Multi-Audio (tot 8) -ondersteuning (volgens
inhoud van de schijf)
• Multi-Ondertiteling (tot 32) -ondersteuning
(volgens inhoud van de schijf)
• Multi-Angle (tot 9) -ondersteuning (volgens
inhoud van de schijf)
• 8 censuurniveaus
• Snel vooruit en terugspoelen aan 5 verschillende
snelheden. (2x, 4x, 8x, 16x, 32x)
• Vertraagde weergave aan 4 verschillende
snelheden. (1/2x, 1/4x, 1/8x, 1/16x
voorwaarts)
• Beeld per beeld voorwaartse weergave.
• Zoekfunctie voor de tijd
• Herhalen
• A-B herhalen
• Programmeerfunctie voor Audio-CD’s, MP3’s
en JPEG’s
• Coaxiale & Optische digitale geluidsuitgangen
(optioneel)
• Gekopieerde schijven kunnen incompatibel
zijn.
Opmerking:
*** Het is mogelijk dat deze DVD speler bepaalde
MP3 opnames niet weergeeft vanwege het
verschil in opnameformaat of schijftype.
*** Raadpleeg de handleiding i.v.m. de MP3
weergave.
*** CD-R/CD-RW schijven opgenomen met
de CD-DA-methode kunnen weergegeven
worden. Bepaalde CD-R/CD-RW -schijven
kunnen incompatibel zijn vanwege de
laseropname en het ontwerp van de schijf.
*** DVD-R schijven opgenomen met de DVD-
Video-methode kunnen weergegeven worden.
Bepaalde DVD-R/RW-schijven kunnen
incompatibel zijn vanwege de laseropname
en het ontwerp van de schijf.
*** Bepaalde schijven kunnen onuitwisselbaar
zijn met de JPEG-Viewer-functie vanwege
een verschil in opnameformaat of de staat
van de schijf.
Deze handleiding
Veiligheidsinformatie
LET OP!
DVD Player is een klasse 1 laser product. Dit
product gebruikt echter een zichtbare laserstraal
die een schadelijke stralingsblootstelling kan
veroorzaken. Let er op dat u de speler correct
gebruikt zoals in deze handleiding wordt
beschreven.
KLASSE 1 LASER
PRODUCT
• Geproduceerd onder licentie door Dolby
Laboratories. “Dolby” en het dubbele-D
symbool zijn handelsmerken van de Dolby
Laboratories.
RISICO OP ELEKTRISCHE
SCHOKKEN
Het bliksemflits met pijlpunt
symbool binnen een gelijke
driehoek dient om de gebruiker
te wijzen op de aanwezigheid
van niet geïsoleerd “gevaarlijk
voltage” in de behuizing van een
product die voldoende sterk kan
zijn om een risico op elektrische
schokken in te houden.
Het uitroepteken in een gelijke
driehoek dient om de gebruiker
te wijzen op de aanwezigheid
van belangrijke bedienings- en
onderhoudsinstructies in de
begeleidende documentatie van
het apparaat.
B03_[NL]_MB25_(02-DVD)_32883W_1900UK_ANALOG_BRONZE9_DIVX_WOVCD_10064228_50152513.indd 23
B03_[NL]_MB25_(02-DVD)_32883W_1900UK_ANALOG_BRONZE9_DIVX_WOVCD_10064228_50152513.indd 23
B03_[NL]_MB25_(02-DVD)_32883W_1900UK_ANALOG_BRONZE9_DIVX_WOVCD_10064228_50152513.indd 23
B03_[NL]_MB25_(02-DVD)_32883W_1900UK_ANALOG_BRONZE9_DIVX_WOVCD_10064228_50152513.indd 23B03_[NL]_MB25_(02-DVD)_32883W_1900UK_ANALOG_BRONZE9_DIVX_WOVCD_10064228_50152513.indd 23 17.08.2009 08:44:58
17.08.2009 08:44:58
17.08.2009 08:44:58
17.08.2009 08:44:5817.08.2009 08:44:58

Nederlands - 24 -
eigenaars van rechten. Het gebruik van deze
kopieerbeveiligingstechnologie moet worden
toegelaten door Macrovision Corporation, en
is uitsluitend bedoeld voor weergave thuis of
op andere beperkte locaties, tenzij anders
toegelaten door Macrovision Corporation.
Omgekeerde engineering of ontmanteling is
verboden.
Hoe een DVD bekijken
Bij het plaatsen van een schijf in de lader, moet
het label van de schijf naar boven gericht zijn:
Wanneer het Tv-toestel is ingeschakeld, schakel
eerst naar DVD-bron door gebruik van de toets
SOURCE (bron) op de afstandsbediening.
Druk op Play op de afstandsbediening, of druk
op Play op het frontpaneel. Er is geen schijf
in de lader, plaats eerst een DVD en druk op
Afspelen.
Opmerking: U kunt DVD-uitvoer via de scartkabel
krijgen
Toetsen Con guratiescherm
DVD
A. Schij ader
B. Sleuf voor geheugenkaart
C. USB-ingang
D. Afspelen/Onderbreken
Speelt af/pauzeert de schijf. Wanneer het
Dvd-menu (hoofdmenu) actief is, werkt deze
Opmerkingen Over De
Schijven
Over de behandeling van de schijven
• Om de schijf schoon te houden, dient u de
schijf bij de rand vast te pakken. Raak het
oppervlak niet aan.
• Plak geen papier of plakband op de schijf.
• Als er lijm of een vergelijkbare stof op de schijf
zit, verwijder deze dan volledig alvorens de
schijf te gebruiken.
• De schijf nooit blootstellen aan direct zonlicht of
warmtebronnen zoals warme luchtleidingen. De
schijf ook nooit achterlaten in een geparkeerde
wagen in direct zonlicht. De temperatuur kan
namelijk aanzienlijk stijgen en de schijf kan
beschadigd worden.
• Na de weergave van de schijf, dient u de schijf
in het bijbehorende doosje op te bergen.
Over de reiniging van de schijven
• Alvorens de schijf af te spelen, dient u de schijf
te reinigen met een schone doek Veeg de
schijfschoon vanaf het midden naar buiten.
• Maak geen gebruik van oplosmiddelen zoals
benzine, thinner, commercieel beschikbare
reinigingsmiddelen of antistatische spray die
bedoeld is voor vinyl-LP’s.
Licentiemededeling
• Dit product bevat de
kopieerbeveiligingstechnologie die wordt
beschermd door de methodeclaims
van bepaalde V.S.-patenten en andere
intellectuele eigendomsrechten die eigendom
zijn van Macrovision Corporation en andere
B03_[NL]_MB25_(02-DVD)_32883W_1900UK_ANALOG_BRONZE9_DIVX_WOVCD_10064228_50152513.indd 24
B03_[NL]_MB25_(02-DVD)_32883W_1900UK_ANALOG_BRONZE9_DIVX_WOVCD_10064228_50152513.indd 24
B03_[NL]_MB25_(02-DVD)_32883W_1900UK_ANALOG_BRONZE9_DIVX_WOVCD_10064228_50152513.indd 24
B03_[NL]_MB25_(02-DVD)_32883W_1900UK_ANALOG_BRONZE9_DIVX_WOVCD_10064228_50152513.indd 24B03_[NL]_MB25_(02-DVD)_32883W_1900UK_ANALOG_BRONZE9_DIVX_WOVCD_10064228_50152513.indd 24 17.08.2009 08:44:58
17.08.2009 08:44:58
17.08.2009 08:44:58
17.08.2009 08:44:5817.08.2009 08:44:58

Nederlands - 25 -
toets als de “selecteertoets” (selecteert een
gemarkeerd item in het menu) als dit door
de schijf wordt toegelaten.
E. Stoppen/Uitwerpen
Stopt het afspelen van schijven / Uitwerpen
of Laden vand e schijf Opmerking:
• U kunt de schijf niet via de afstandbediening
uitwerpen.
•Tijdens het afspelen van een bestand,
druk driemaal op de toets STOP om uit te
werpen.
B03_[NL]_MB25_(02-DVD)_32883W_1900UK_ANALOG_BRONZE9_DIVX_WOVCD_10064228_50152513.indd 25
B03_[NL]_MB25_(02-DVD)_32883W_1900UK_ANALOG_BRONZE9_DIVX_WOVCD_10064228_50152513.indd 25
B03_[NL]_MB25_(02-DVD)_32883W_1900UK_ANALOG_BRONZE9_DIVX_WOVCD_10064228_50152513.indd 25
B03_[NL]_MB25_(02-DVD)_32883W_1900UK_ANALOG_BRONZE9_DIVX_WOVCD_10064228_50152513.indd 25B03_[NL]_MB25_(02-DVD)_32883W_1900UK_ANALOG_BRONZE9_DIVX_WOVCD_10064228_50152513.indd 25 17.08.2009 08:44:59
17.08.2009 08:44:59
17.08.2009 08:44:59
17.08.2009 08:44:5917.08.2009 08:44:59
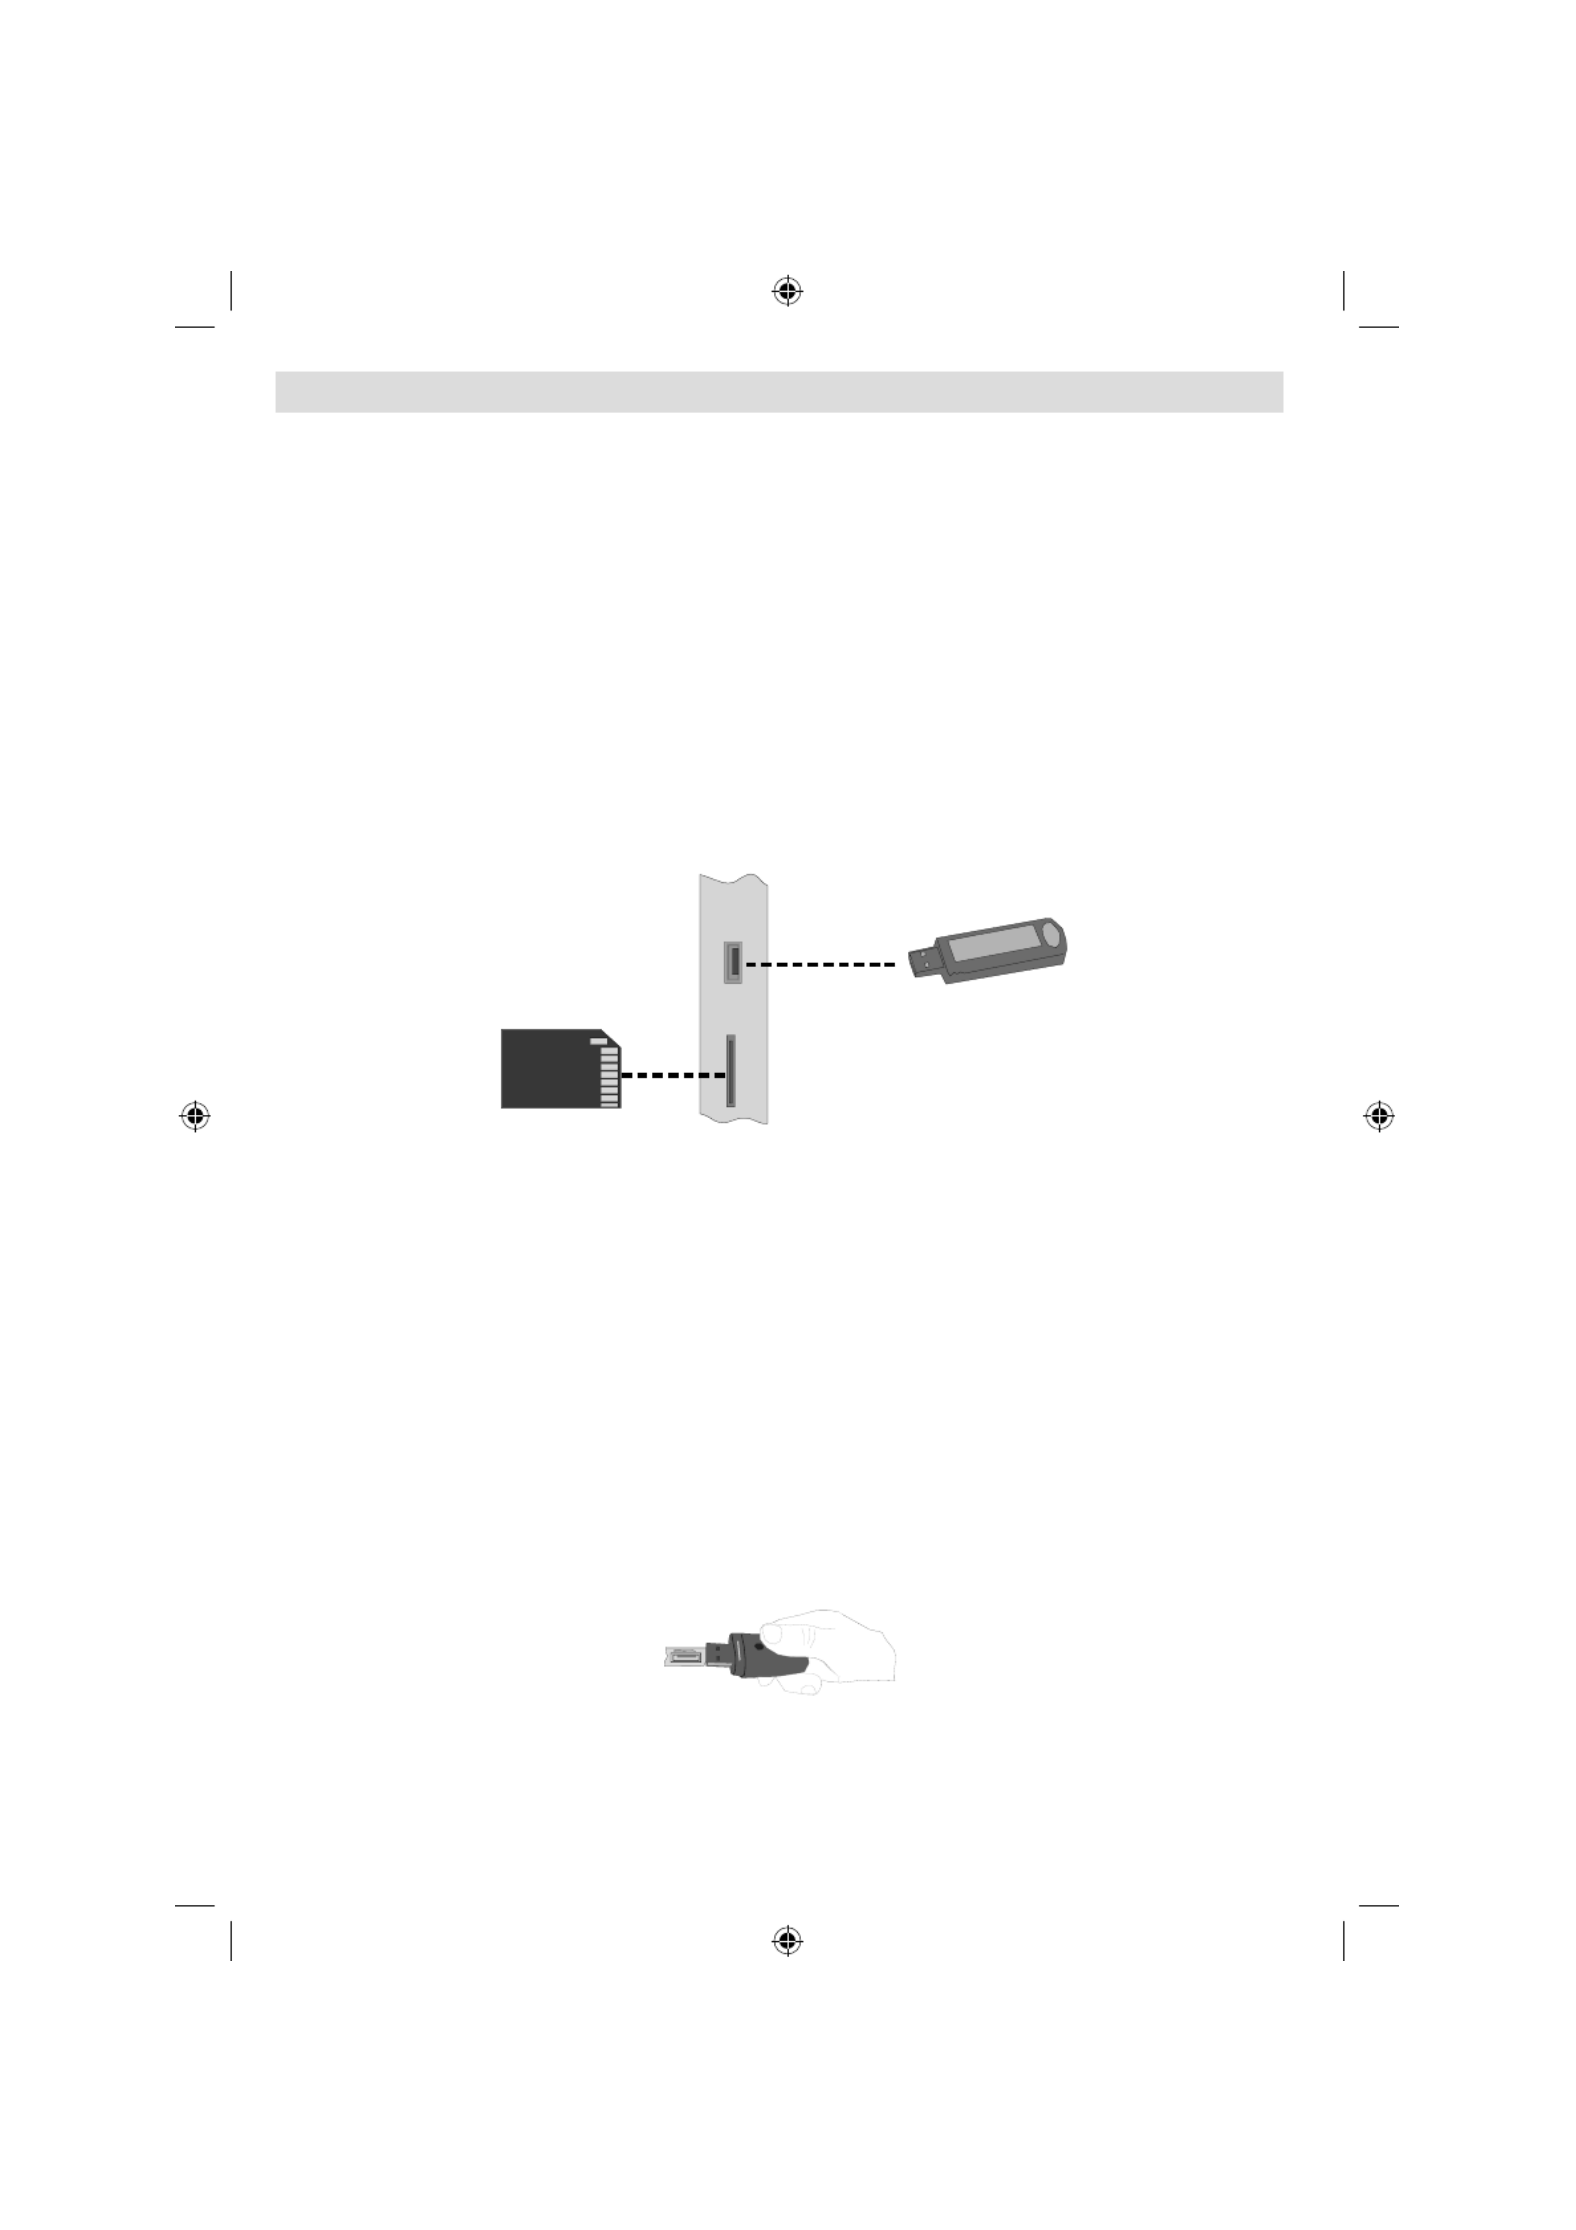
Nederlands - 26 -
Het gebruik van digitale multimedia aansluitingen
• Gebruik de toets SWAP (schakelen) op de afstandsbediening om te schakelen tussen USB en
geheugenkaart.
• U kunt USB/MC-apparaten aansluiten op uw TV via de USB of MC -ingang van de TV. Deze
functie laat u toe om bestanden die op een USB-apparaat of MC-kaart werden opgeslagen af
te spelen/weer te geven.
• Het is mogelijk dat bepaalde soorten USB-apparaten (MP3-spelers) of Multimedia keertinterfaces
niet compatibel zijn met deze TV.
• U kunt een veiligheidskopie maken van uw bestanden voor u aansluitingen uitvoert op het TV-
toestel om eventueel gegevensverlies te vermijden. Merk op dat de producent niet aansprakelijk
is voor eventuele schade aan bestanden of gegevensverlies.
• Verwijder de USB-module of MC-kaart niet tijdens de weergave van een bestand.
LET OP: Het snel in- en uitvoeren van USB-apparaten is een uiterst risicovolle bewerking. U moet bijzonder
opletten het station inet herhaaldelijk snel in en uit te voeren. Dit kan fysieke schade veroorzaken aan de
USB-speler en in het bijzonder aan het USB-apparaat zelf.
USB-GEHEUGEN
GEHEUGENKAART
ZIJAANZICHT
MC-kaart aansluiting
• Breng de MC-kaart in de Geheugenkaartingan van de TV. Zorg ervoor dat het gouden
contactplaatje omhoog gericht is. De kaart werd ontworpen om makkelijk in het systeem te
passen. Forceer de kaart niet in de sleuf. Breng maar een kaart tezelfdertijd in.
• Wanneer u de kaart wenst uit te werpen, neem de kaart dan niet onmiddellijk vast.. Druk zachtje
op de kaart. De kaart zal vervolgens uitspringen.
USB-geheugen aansluiting
• Voer uw USB-apparaat in op de USB-ingang van de TV.
Opmerking: USB harde schijven worden niet ondersteund.*
• Het is aanbevolen het USB-apparaat rechtstreeks aan te sluiten op de USB-ingang van
de TV. Bepaalde compatibiliteitsproblemen kunnen zich voordoen als u een afzonderlijke
kabelaansluiting gebruikt .
Opmerking: In DVD-modus zal het scherm MEDIA automatisch worden weergegeven wanneer
u een USB-kaart of een geldige geheugenkaart aansluit.
B03_[NL]_MB25_(02-DVD)_32883W_1900UK_ANALOG_BRONZE9_DIVX_WOVCD_10064228_50152513.indd 26
B03_[NL]_MB25_(02-DVD)_32883W_1900UK_ANALOG_BRONZE9_DIVX_WOVCD_10064228_50152513.indd 26
B03_[NL]_MB25_(02-DVD)_32883W_1900UK_ANALOG_BRONZE9_DIVX_WOVCD_10064228_50152513.indd 26
B03_[NL]_MB25_(02-DVD)_32883W_1900UK_ANALOG_BRONZE9_DIVX_WOVCD_10064228_50152513.indd 26B03_[NL]_MB25_(02-DVD)_32883W_1900UK_ANALOG_BRONZE9_DIVX_WOVCD_10064228_50152513.indd 26 17.08.2009 08:44:59
17.08.2009 08:44:59
17.08.2009 08:44:59
17.08.2009 08:44:5917.08.2009 08:44:59

Nederlands - 27 -
Overzicht van de afstandsbediening
MENU
/
INFO
EPG
FAV
PRESETS
SUBTITLE
RETURN
SOURCESLEEP SCREEN
6
37
38
39
40
41
42
43
LANG.
Stand-by1.
Opnamegrootte2.
Slaap timer3.
Numerieke toetsen4.
Terugkeren5.
Cursor omhoog6.
Cursor links7.
Programma omhoog8.
Programma omlaag9.
Geen functie in DVD-modus10.
Selectie van Audiotaal11.
Selectie Swap/ DVD media12.
Geen functie in DVD-modus13.
Tijd weergeven / DVD menu14.
Helder15.
Stop16.
Geen functie17.
Snel terug18.
Snel vooruit19.
Informatie20.
Geen functie21.
Beeldmodus selectie22.
Bronselectie23.
Zoom24.
Herhalen25.
Mastersegment26.
Menu27.
Titel28.
OK / Selecteer29.
Cursor rechts30.
Cursor omlaag31.
Volume hoger32.
Volume lager33.
Ondertitel34.
Geluid dempen35.
Geen functie in DVD-modus36.
Geen functie37.
Camerastandpunt38.
Zoekmodus39.
Afspelen40.
Pauze/Afspelen41.
Volgende42.
Vorige43.
B03_[NL]_MB25_(02-DVD)_32883W_1900UK_ANALOG_BRONZE9_DIVX_WOVCD_10064228_50152513.indd 27
B03_[NL]_MB25_(02-DVD)_32883W_1900UK_ANALOG_BRONZE9_DIVX_WOVCD_10064228_50152513.indd 27
B03_[NL]_MB25_(02-DVD)_32883W_1900UK_ANALOG_BRONZE9_DIVX_WOVCD_10064228_50152513.indd 27
B03_[NL]_MB25_(02-DVD)_32883W_1900UK_ANALOG_BRONZE9_DIVX_WOVCD_10064228_50152513.indd 27B03_[NL]_MB25_(02-DVD)_32883W_1900UK_ANALOG_BRONZE9_DIVX_WOVCD_10064228_50152513.indd 27 17.08.2009 08:45:00
17.08.2009 08:45:00
17.08.2009 08:45:00
17.08.2009 08:45:0017.08.2009 08:45:00

Nederlands - 28 -
USB & MC modi Afspelen
Schakel naar DVD-bron door gebruik van de
toetsen SOURCE (Bron) of PLAY (Afspelen)
op de afstandsbediening.
U kunt zowel USB als MC bronnen tezelfdertijd
op uw TV aansluiten. Media selection OSD
verschijnt automatisch op het scherm als
een USB of MC aangesloten is. Druk op de
SWAP knop op de afstandsbediening om af te
sluiten. Iedere maal u de SWAP¨-toets opnieuw
indrukt, verschijnt het mediaselectie OSD op
het scherm.
DVD
MEDIAMEDIA CARD
USB
Selecteer de gewenste invoer door gebruik van
de cursortoets en druk vervolgens op om de OK
inhoud weer te geven. Nadat de OK toets werd
ingedrukt, zal het volgende scherm (afhankelijk
van het merk en inhoud van het toestel) na een
korte tijd verschijnen:
CARD
DIVX
DCIM
TRACK 9
NEW FILE
\
Dir:001
U kunt de inhoud van uw apparaat bekijken of
afspelen door gebruik van de desbetreffende
toetsen op de afstandsbediening. Raadpleeg,
Algemene besturingtoetsen voor Mediamodus
en besturingtoetsen voor videoweergave.
Opmerking:
• Wanneer u op de toets SWAP drukt, worden de
beschikbare mediabronnen weergegeven.
• Als er een actieve weergave is, dient u eerst
op de STOP toets te drukken en vervolgens
op de toets SWAP om de beschikbare DMP
invoeren weer te geven.
• Als u maar een bron heeft aangesloten, zal
enkel die bron als keuze beschikbaar zijn.
• Verwijder de MC-module niet tijdens de
weergave van een bestand.
• Het is mogelijk dat bepaalde soorten MC
of USB-apparaten niet compatibel zijn met
deze TV.
Algemene besturingtoetsen voor
Mediamodus
OK / SELECT > Enter/bekijken
/ > Markeer een item
door naar boven of beneden te bewegen.
> Afspelen
> Pauze
> Stop
RETURN >
Mediabronselectie.
Besturingtoetsen voor weergave
/ > Snel terug/
Snel vooruit/.
SEARCH > zoeken naar een
speci eke tijd.
DISPLAY > G e e f t d e t i j d
weer.
ZOOM > Zoomt beeld.
Weergave van afbeeldingen
/ > Vorige – volgende
afbeelding.
/ > Afbeelding draaien
REPEAT > Herhaalopties van display.
ZOOM > Zoomt beeld.
ROOT > Terug naar hoofdmap.
EEN DVD AFSPELEN
Basisweergave
1. Druk op de aan/uit toets.
2. Breng een Cd in de lader in.
De schijf wordt automatisch geladen en het
afspelen begint automatisch als de schijf geen
menu’s heeft.
Na een paar seconden kan er een menu
verschijnen op het TV scherm of de lm kan
onmiddellijk beginnen na de introductie van
de lmonderneming. Dit is afhankelijk van de
inhoud van de schijf en kan dus variëren.
OPMERKING: Stappen 3 en 4 zijn uitsluitend
beschikbaar indien een menu werd opgeslagen op
de schijf.
B03_[NL]_MB25_(02-DVD)_32883W_1900UK_ANALOG_BRONZE9_DIVX_WOVCD_10064228_50152513.indd 28
B03_[NL]_MB25_(02-DVD)_32883W_1900UK_ANALOG_BRONZE9_DIVX_WOVCD_10064228_50152513.indd 28
B03_[NL]_MB25_(02-DVD)_32883W_1900UK_ANALOG_BRONZE9_DIVX_WOVCD_10064228_50152513.indd 28
B03_[NL]_MB25_(02-DVD)_32883W_1900UK_ANALOG_BRONZE9_DIVX_WOVCD_10064228_50152513.indd 28B03_[NL]_MB25_(02-DVD)_32883W_1900UK_ANALOG_BRONZE9_DIVX_WOVCD_10064228_50152513.indd 28 17.08.2009 08:45:02
17.08.2009 08:45:02
17.08.2009 08:45:02
17.08.2009 08:45:0217.08.2009 08:45:02

Nederlands - 29 -
3. Druk op “ ” / “ ” / / of de cijfertoets(en)
om de gewenst titel te selecteren.
4. Druk op de SELECT toets.
Het afspelen begint. Het afgespeelde item
kan een fi lm zijn, een stil beeld of een andere
submenu afhankelijk van de schijf.
Voor uw informatie:
Als “ ” verschijnt wanneer u op een knop drukt, dan
betekent dat dat de schijf de bijbehorende operatie
niet ondersteunt.
Weergave Stoppen
Druk tweemaal op stop ( ) (enkel voor
video’s).
Om het afspelen defi nitief te stoppen, dient u
twee keer op STOP ( ) te drukken. Als er voor
de eerste keer op de STOP ( ) knop wordt
gedrukt, verschijnt de boodschap “PRESS
PLAY TO CONTINUE” op het scherm om u te
vragen of u door wilt gaan met afspelen. Om
het afspelen te stoppen, dient u nogmaals op
STOP ( ) te drukken u kunt ook op SELECT
drukken om verder te gaan.
Weergave stoppenen terugkeren naar het
menuscherm
(Als een menu beschikbaar is op de schijf)
Druk op of afhankelijk van MENU TITLE
de schijf. Het afspelen wordt onderbroken
en het menuscherm van de schijf wordt
weergegeven..
Snel vooruit/terug spoelen (Rapid
Revers)
Druk tijdens de weergave op SEARCH/SLOW
( ) op de afstandsbediening.
Het normale afspelen wordt hervat, als u op
SELECT drukt of nogmaals op PLAY/PAUSE
( ).
De snelheid van vooruit ( 2x, 4x,
8x, 32x) of achteruit ( 2x, 16x,
4x, 8x, 16x, 32x) verandert elke
keer dat u op of drukt.
Om de normale weergave te hervatten, dient u
opnieuw op PLAY ( ) te drukken.
Opmerking: U zal geen geluid horen tijdens snel
vooruit of terugspoelen.
Vooruit of terugspringen naar
hoofdstukken
Vooruit springen
Dr uk op SKI P/ FRA ME ( ) o p de
afstandsbediening tijdens weergave.
Een hoofdstuk wordt overgeslagen iedere keer
u op de toets drukt.
Achteruit springen
Dr uk op SKI P/ FRA ME ( ) o p de
afstandsbediening tijdens weergave.
Wanneer de toets één maal wordt ingedrukt
in het midden van een hoofdstuk wordt de
weergave hervat bij het vorige hoofdstuk.
stilstaand beeld (PAUZE)
Druk één keer op PAUSE ( ) tijdens het
afspelen.
Het scherm bevriest.
Om de normale weergave te hervatten, dient u
opnieuw op PLAY ( ) te drukken.
Frame Advance (STaP voorwaarts)
Druk één keer op PAUSE ( ) tijdens het
afspelen.
Het scherm bevriest.
Dr uk op SKI P/ FRA ME ( ) o p de
afstandsbediening tijdens weergave.
Het volgende beeld van de film wordt
weergegeven.
U kunt op SKIP/ FRAME ( ) drukken voor
de daarop volgende beelden.
Om de normale weergave te hervatten, dient u
opnieuw op PLAY ( ) te drukken.
OPMERKING: De functie beelden achteruit is niet
beschikbaar.
Slow- motion voorwaartse weergave
Druk één keer op PAUSE ( ) tijdens het
afspelen.
Het scherm bevriest.
D r u k o p S E A R C H ( ) o p d e
afstandsbediening.
De DVD-speler begint nu de fi lm af te spelen
op vier verschillende snelheden ( 1/2,
1/4, 1/8 en 1/16).
B03_[NL]_MB25_(02-DVD)_32883W_1900UK_ANALOG_BRONZE9_DIVX_WOVCD_10064228_50152513.indd 29
B03_[NL]_MB25_(02-DVD)_32883W_1900UK_ANALOG_BRONZE9_DIVX_WOVCD_10064228_50152513.indd 29
B03_[NL]_MB25_(02-DVD)_32883W_1900UK_ANALOG_BRONZE9_DIVX_WOVCD_10064228_50152513.indd 29
B03_[NL]_MB25_(02-DVD)_32883W_1900UK_ANALOG_BRONZE9_DIVX_WOVCD_10064228_50152513.indd 29B03_[NL]_MB25_(02-DVD)_32883W_1900UK_ANALOG_BRONZE9_DIVX_WOVCD_10064228_50152513.indd 29 17.08.2009 08:45:02
17.08.2009 08:45:02
17.08.2009 08:45:02
17.08.2009 08:45:0217.08.2009 08:45:02

Nederlands - 30 -
U kan de snelheid van de slow-motion weergave
verhogen of verlagen door op SEARCH/SLOW
( of ) te drukken.
De snelheid van het vertraagd afspelen wordt
weergegeven op het scherm elke keer wanneer
u deze snelheid verandert.
Om de normale weergave te hervatten, dient u
opnieuw op PLAY ( ) te drukken.
OPMERKING: U zult geen geluid horen tijdens de
langzame weergave.
OPMERKING: De functie vertraagd afspelen achteruit
is niet beschikbaar.
Directe Selectie Uit Scènes
Selecteren Van Scènes Op
Hoofdstuknummer
Druk één keer op SEARCH MODE op de
afstandsbediening tijdens het afspelen.
Het zoekvak voor hoofdstukken/titels wordt
weergegeven op het scherm. U kan de
momenteel weergegeven en het totale aantal
hoofdstukken zien aan de rechterzijde van de
displaybalk als .--/xx
Voer het nummer van het hoofdstuk in door
gebruik te maken van de cijferknoppen.
Het geselecteerde hoofdstuk wordt afgespeeld
nadat u het hoofdstuknummer heeft
ingevoerd.
Voor uw comfort:
• Als het hoofdstuknummer dat u heeft ingevoerd
tussen 0 en 9 ligt, zal de speler automatisch
naar het juiste hoofdstuk springen zonder dat
u een andere toets hoeft in te drukken.
• U kunt het veld leegmaken door op C te
drukken indien u een verkeerd nummer heeft
ingevoerd.
• Indien u een poging doet om een getal in te
toetsen dat groter is dan het totale aantal
hoofdstukken, verdwijnt het zoekveld en
verschijnt het symbool “ [afbeelding] op
het scherm.
• Als u vijf seconden wacht zonder op een
toets te drukken om scènes te selecteren
met het hoofdstuknummer wordt de operatie
geannuleerd.
• Druk op RETURN om het zoeken naar titels
te annuleren
Selecteren Van Scènes Op Titelnummer
Dru k éé n k ee r o p S EA RCH o p d e
afstandsbediening tijdens het afspelen.
Het zoekvak voor hoofdstukken/titels wordt
weergegeven op het scherm. U kunt de
momenteel spelende en het totale aantal titels
afl ezen aan de linkerkant van de displaybalk
als .-- / xx
Voer het nummer van het hoofdstuk in door
gebruik te maken van de cijferknoppen.
De geselecteerde titel wordt afgespeeld nadat
u het titelnummer heeft ingevoerd.
Opmerking: U kunt overschakelen naar de titel
door rechtstreeks de numerieke toetsen in te
drukken. U moet 0 indrukken en daarna de
cijfertoets om over te schakelen op titels met
een cijfer. Bijvoorbeeld: om 5 te selecteren,
drukt u 0 en daarna 5 in)
Selecteren Van Scènes op Tijd
U kunt de DVD vanaf elk gewenst tijdpunt
bekijken.
Druk ”twee” keer op SEARCH MODE op de
afstandsbediening tijdens het afspelen.
Het zoekvak voor de tijd wordt weergegeven op
het scherm als Titel xx/ xx Tijd --: -- : --.
Voer de tijd in door gebruik te maken van de
cijfertoetsen.
De titel wordt afgespeeld vanaf het gewenste
tijdstip nadat u de tijd heeft ingevoerd.
Ondersteund wordt door de DVD.
Druk drie maal op SEARCH MODE op de
afstandsbediening tijdens het afspelen.
Het zoekvak voor de tijd wordt weergegeven op
het scherm als Hoofdstuk xx/ xx Tijd --: -- : --.
Voer de tijd in door gebruik te maken van de
cijfertoetsen.
Het Hoofdstuk wordt afgespeeld vanaf het
gewenste tijdstip nadat u de tijd heeft ingevoerd,
tenzij deze optie niet. Ondersteund wordt door
de DVD.
Voor uw comfort:
• U kunt het veld leegmaken door op C te
drukken indien u een verkeerd nummer heeft
ingevoerd.
• Indien u een poging doet om een getal in te
toetsen dat groter is dan de totale duur van
de huidige titel, verdwijnt het zoekveld voor de
B03_[NL]_MB25_(02-DVD)_32883W_1900UK_ANALOG_BRONZE9_DIVX_WOVCD_10064228_50152513.indd 30
B03_[NL]_MB25_(02-DVD)_32883W_1900UK_ANALOG_BRONZE9_DIVX_WOVCD_10064228_50152513.indd 30
B03_[NL]_MB25_(02-DVD)_32883W_1900UK_ANALOG_BRONZE9_DIVX_WOVCD_10064228_50152513.indd 30
B03_[NL]_MB25_(02-DVD)_32883W_1900UK_ANALOG_BRONZE9_DIVX_WOVCD_10064228_50152513.indd 30B03_[NL]_MB25_(02-DVD)_32883W_1900UK_ANALOG_BRONZE9_DIVX_WOVCD_10064228_50152513.indd 30 17.08.2009 08:45:04
17.08.2009 08:45:04
17.08.2009 08:45:04
17.08.2009 08:45:0417.08.2009 08:45:04

Nederlands - 31 -
tijd en wordt het symbool “ Input Invalid”
weergegeven op het scherm.
• Als u vijf seconden wacht zonder op een toets
te drukken om een tijdsduur in te voeren, wordt
het selecteren van scènes op basis van de
tijdoptie geannuleerd.
• Druk op RETURN om het zoeken naar tijd te
annuleren
Handige Functies
Tijdgegevens Weergeven
Druk op DISPLAY tijdens het afspelen.
Bepaalde informatie verschijnt op het TV
scherm om de huidige status van de schijf aan
te duiden. Op het scherm wordt de volgende
informatie regels :
Lijn 1: Tijd teller modus
Lijn 2: Titelnummer, hoofdstuknummer,
tijdsteller
Lijn 3: Audionummer, geluidsformaat, aantal
uitgangskanalen en geluidstaal
Lijn 4: Nummer van de ondertitelingstaal &
ondertitelingstaal
De modi van de tijdmeter kunnen geselecteerd
worden door achtereenvolgens op INFO te
drukken.
De sequentie voor tijd teller modus is als volgt:
TITLE ELAPSED, TITLE REMAIN, CHAPTER
ELAPSED en CHAPTER REMAIN.
• Als er “TITLE ELAPSED” wordt weergegeven,
dan wordt de verstreken tijd voor de titel
weergegeven.
• Als er “TITLE REMAIN” wordt weergegeven,
dan wordt de resterende tijd voor de titel
weergegeven.
• Als er “CHAPTER ELAPSED” wordt
weergegeven, dan wordt de verstreken tijd
voor het hoofdstuk weergegeven.
• Als er “CHAPTER REMAIN” wordt
weergegeven, dan wordt de resterende tijd
voor het hoofdstuk weergegeven.
Door voor de vijfde keer op DISPLAY te drukken,
wordt het menuscherm gesloten en wordt er
‘’DISPLAY OFF’’ weergegeven.
Een scène vergroten en van dichterbij
weergeven
De ‘zoom in’ functie biedt de mogelijkheid een
scène op het scherm van naderbij te bekijken.
Deze functie is speciaal bedoeld voor science
fi ction of avonturenfi lms.
Druk op ZOOM tijdens het afspelen.
Er wordt 2X” is weergegeven op het
scherm en het beeld is nu groter. Door
telkens opnieuw op ZOOM te drukken, kunt u
respectievelijk [afbeelding] “ 3X”, “ 4X,
1/2x, 1/3x 1/4x” verkrijgen.
OPMERKING: U kan het beeld bewegen, m.a.w.
de ingezoomde plaats veranderen door gebruik
te maken van de pijltoetsen “ ” (Left) of “ ”
(Right) / “ ” (Down) / “ ” (Up).
Om het normale afspelen te hervatten
Druk nogmaals op ZOOM.
De Ondertitelingstaal Weergeven of
Veranderen
Het is mogelijk om de ondertitelingstaal
te veranderen van de taal die bij de
fabrieksinstellingen is geselecteerd naar een
andere taal, indien deze optie beschikbaar is.
(Deze handeling werkt alleen met schijven
waarop meerdere ondertitelingstalen zijn
opgenomen).
Druk op SUBTITLE tijdens het afspelen.
Als er geen ondertitelingstalen zijn opgenomen,
verschijnt “ ” in plaats van de geselecteerde
taal.
Druk herhaaldelijk op SUBTITLE totdat u de
gewenste taal heeft geselecteerd.
Als u één keer op deze knop drukt, wordt de
eerste ondertiteling op de schijf weergegeven.
De andere opgenomen ondertitelingstalen
worden in volgorde weergegeven iedere maal
dat u op de SUBTITLE toets drukt.
OPMERKING:
In sommige gevallen wordt de ondertitelingstaal
niet onmiddellijk in de geselecteerde
ondertitelingstaal veranderd.
Voor uw comfort:
• Als de gewenste taal niet geselecteerd wordt
ook al drukt u meerdere malen op de knop,
dan betekent dat dat de taal niet beschikbaar
is op de schijf.
B03_[NL]_MB25_(02-DVD)_32883W_1900UK_ANALOG_BRONZE9_DIVX_WOVCD_10064228_50152513.indd 31
B03_[NL]_MB25_(02-DVD)_32883W_1900UK_ANALOG_BRONZE9_DIVX_WOVCD_10064228_50152513.indd 31
B03_[NL]_MB25_(02-DVD)_32883W_1900UK_ANALOG_BRONZE9_DIVX_WOVCD_10064228_50152513.indd 31
B03_[NL]_MB25_(02-DVD)_32883W_1900UK_ANALOG_BRONZE9_DIVX_WOVCD_10064228_50152513.indd 31B03_[NL]_MB25_(02-DVD)_32883W_1900UK_ANALOG_BRONZE9_DIVX_WOVCD_10064228_50152513.indd 31 17.08.2009 08:45:04
17.08.2009 08:45:04
17.08.2009 08:45:04
17.08.2009 08:45:0417.08.2009 08:45:04

Nederlands - 32 -
• Als de speler opnieuw opgestart wordt of de
schijf wordt verwisseld, dan verandert de
ondertitelingselectie automatisch naar de
oorspronkelijke instellingen.
• Als er een taal wordt geselecteerd en deze taal
is niet ondersteund door de schijf, dan wordt
de ondertitelingstaal automatisch de favoriete
taal op de schijf.
• Normaal gesproken werkt deze functie in een
bepaalde volgorde, d.w.z. dat u de ondertiteling
kunt stopzetten door meerdere malen op deze
knop te drukken totdat ”Subtitle Off ” op het
scherm verschijnt.
De geluidstaal wijzigen
Het is mogelijk om de geluidstaal te veranderen
van de taal die bij de fabrieksinstellingen is
geselecteerd naar een andere taal, indien deze
optie beschikbaar is.
(Deze handeling werkt alleen met schijven
waarop meerdere geluidstalen zijn opgenomen,
tenzij dit niet door de DVD ondersteund
wordt).
Druk op LANG tijdens het afspelen.
Druk herhaaldelijk op LANG totdat u de
gewenste taal heeft geselecteerd.
Voor uw comfort:
• Als de gewenste taal niet geselecteerd wordt
ook al drukt u meerdere malen op de knop,
dan betekent dat dat de taal niet beschikbaar
is op de schijf.
• Als de speler opnieuw opgestart wordt of
de schijf wordt verwijderd, schakelt de taal
automatisch over naar de oorspronkelijke
instellingen. Als deze taal niet op de schijf
staat, dan wordt alleen de beschikbare taal
op de schijf weergegeven
Bekijken Vanuit Een Ander
Camerastandpunt
* Camerastandpunt functie is beschikbaar op
alle modellen.
Op sommige DVD’s kunnen scènes staan die
op hetzelfde tijdstip vanuit verschillende hoeken
zijn opgenomen. Voor deze schijven geldt, dat
dezelfde scènes bekeken kunnen worden vanuit
al die verschillende hoeken door gebruik te
maken van de ANGLE knop.
Het aantal opgenomen hoeken varieert
afhankelijk van de schijf die gebruikt wordt.
“ y/x ” wordt kort weergegeven op het scherm
tijdens het afspelen. Dit betekent dat de scène
die vanuit meerdere hoeken is opgenomen
nu begint. Vanaf dat moment wordt het y de
camerastandpunt van totaal x standpunten
weergegeven en u kunt de hoek wijzigen van
waaruit u de scène bekijkt tot het einde van de
scène met meerdere camerastandpunten.
Druk op ANGLE tijdens het afspelen.
Het huidige camerastandpunt wordt gewijzigd.
Druk herhaaldelijk op ANGLE tot u de gewenste
hoek hebt geselecteerd.
• Deze functie werkt alleen op schijven
waarop meerdere camerastandpunten zijn
opgenomen.
Een Dvd Menu Gebruiken
Sommige Dvd’s hebben unieke menustructuren
die Dvd-menu’s genoemd worden. Bijvoorbeeld:
DVD’s die geprogrammeerd zijn met een
ingewikkelde inhoud geven gidsmenu’s en DVD’s
die opgenomen zijn in verschillende talen geven
menu’s voor geluids- en ondertitelingstalen.
Hoewel de inhoud en bediening van DVD-
menu’s verschillen van schijf tot schijf, wordt
hierna de basisbediening beschreven indien
deze optie wordt gebruikt.
Druk op TITLE op de afstandsbediening.
Het DVD menu dat beschikbaar is op de schijf
wordt nu weergegeven.
OPMERKING:
• Als u op MENU drukt, wordt het hoofdmenu
van de DVD weergegeven.
• Als u op TITLE drukt, wordt het menu van de
huidige titel weergegeven.
Druk op “ ” / “ ” / “ ” / “ ” om het gewenste
onderdeel te selecteren.
Druk op de SELECT toets.
Het geselecteerde onderdeel wordt nu
uitgevoerd.
Voor uw comfort:
• U kan ook de numerieke toetsen gebruiken
om een onderdeel uit het DVD-menu
te selecteren. De DVD-speler zal dan
automatisch dat onderdeel uitvoeren. Om
B03_[NL]_MB25_(02-DVD)_32883W_1900UK_ANALOG_BRONZE9_DIVX_WOVCD_10064228_50152513.indd 32
B03_[NL]_MB25_(02-DVD)_32883W_1900UK_ANALOG_BRONZE9_DIVX_WOVCD_10064228_50152513.indd 32
B03_[NL]_MB25_(02-DVD)_32883W_1900UK_ANALOG_BRONZE9_DIVX_WOVCD_10064228_50152513.indd 32
B03_[NL]_MB25_(02-DVD)_32883W_1900UK_ANALOG_BRONZE9_DIVX_WOVCD_10064228_50152513.indd 32B03_[NL]_MB25_(02-DVD)_32883W_1900UK_ANALOG_BRONZE9_DIVX_WOVCD_10064228_50152513.indd 32 17.08.2009 08:45:05
17.08.2009 08:45:05
17.08.2009 08:45:05
17.08.2009 08:45:0517.08.2009 08:45:05
Nederlands - 33 -
een onderdeelnummer in te voeren met meer
dan één cijfer, dient u op +10 te drukken
en vervolgens het onderdeelnummer in te
voeren.
Opmerking:
• Sommige DVDs hebben geen hoofd en/of
titelmenus.
• Om het afspelen te hervatten, dient u PLAY te
selecteren in het DVD menu.
Film CD afspelen
Basisweergave
De details verschillen afhankelijk van de
betreffende schijf. Zie ook de instructies bij
de schijf.
Druk op de numerieke toets(en) om het
gewenste item te selecteren. Druk daarna op
de OK-toets.
De DVD-speler begint nu het geselecteerde
onderdeel af te spelen.
Opmerking:
• “ ” / “ ” / “ ” / “ ” pijltoetsen worden niet
gebruikt om onderdelen te selecteren bij
video Cd’s.
Weergave Stoppen
• Om het afspelen defi nitief te stoppen, dient u
twee keer op STOP ( ) te drukken. Als er voor
de eerste keer op de STOP( ) knop wordt
gedrukt, verschijnt de boodschap “PRESS
PLAY KEY TO CONTINUE” (DRUK OP PLAY
OM DOOR TE GAAN) op het scherm om u te
vragen of u door wilt gaan met afspelen. Om
het afspelen te stoppen, dient u nogmaals op
STOP ( ) te drukken u kunt ook op PLAY (
) drukken om verder te gaan.
Snel Vooruit Spoelen / Snel Achteruit
Spoelen
Druk tijdens de weergave op (of) op de
afstandsbediening.
• Het normale afspelen wordt hervat, als u op
SELECT drukt of nogmaals op PLAY/PAUSE
( ).
• De snelheid van vooruit ( 2x, 4x,
8x, 16x, 32x) of achteruit ( 2x,
4x, 8x, 16x, 32x) verandert
elke keer dat u op (of) drukt.
Om de normale weergave te hervatten, dient u
opnieuw op PLAY ( ) te drukken.
Opmerking: U zal geen geluid horen tijdens snel
vooruit of terugspoelen.
Vooruit of terugspringen naar
hoofdstukken
Vooruit springen
Druk op ( ) op de afstandsbediening tijdens
weergave.
Een spoor wordt overgeslagen iedere keer u
op de toets drukt.
Achteruit springen
Druk op ( ) op de afstandsbediening tijdens
weergave.
Een spoor wordt overgeslagen iedere keer u
op de toets drukt
stilstaand beeld (PAUZE)
Druk één keer op PAUSE ( ) tijdens het
afspelen. Het scherm bevriest.
Om de normale weergave te hervatten, dient u
opnieuw op PLAY ( ) te drukken.
Frame Advance (STAP voorwaarts)
Druk één keer op PAUSE ( ) tijdens het
afspelen. Het scherm bevriest.
Druk op ( ) op de afstandsbediening.
Het volgende beeld van de film wordt
weergegeven.
Druk op de SKIP ( ) voor de volgende
frames.
OPMERKING: De functie beelden achteruit is niet
beschikbaar.
Vertraagd Afspelen
Druk één keer op PAUSE ( ) tijdens het
afspelen. Het scherm bevriest.
Druk op ( ) op de afstandsbediening.
U kan de snelheid van de slow-motion weergave
verhogen of verlagen door op SEARCH/SLOW
( (of) ) te drukken. Er zijn 4 modi voor
slowmotion 1/16, 1/8, 1/4,
1/2.
De snelheid van het vertraagd afspelen wordt
weergegeven op het scherm elke keer wanneer
u deze snelheid verandert.
Om de normale weergave te hervatten, dient u
opnieuw op PLAY ( ) te drukken.
B03_[NL]_MB25_(02-DVD)_32883W_1900UK_ANALOG_BRONZE9_DIVX_WOVCD_10064228_50152513.indd 33
B03_[NL]_MB25_(02-DVD)_32883W_1900UK_ANALOG_BRONZE9_DIVX_WOVCD_10064228_50152513.indd 33
B03_[NL]_MB25_(02-DVD)_32883W_1900UK_ANALOG_BRONZE9_DIVX_WOVCD_10064228_50152513.indd 33
B03_[NL]_MB25_(02-DVD)_32883W_1900UK_ANALOG_BRONZE9_DIVX_WOVCD_10064228_50152513.indd 33B03_[NL]_MB25_(02-DVD)_32883W_1900UK_ANALOG_BRONZE9_DIVX_WOVCD_10064228_50152513.indd 33 17.08.2009 08:45:05
17.08.2009 08:45:05
17.08.2009 08:45:05
17.08.2009 08:45:0517.08.2009 08:45:05

Nederlands - 34 -
OPMERKING: U zult geen geluid horen tijdens de
langzame weergave.
OPMERKING: De functie vertraagd afspelen achteruit
is niet beschikbaar.
Directe Selectie Uit Scènes
Selecteren Van Scènes op Tijd
U kunt de video-CD vanaf elk gewenst tijdpunt
bekijken.
Druk één keer op SEARCH MODE op de
afstandsbediening tijdens het afspelen.
Het zoekvak voor de tijd wordt weergegeven op
het scherm als SELECT TRACK:_ _ / xx
De speler gaat naar het ingevoerde spoor op
de schijf.
Druk twee maal op SEARCH MODE op de
afstandsbediening tijdens het afspelen.
Het zoekvak voor de tijd wordt weergegeven op
het scherm als DISC GA NAAR _ : _ _ : _ _
De speler gaat naar het ingevoerde tijdpunt van
het huidige nummer.
Voer de tijd in door gebruik te maken van de
cijfertoetsen.
De titel wordt afgespeeld vanaf het gewenste
tijdstip nadat u de tijd heeft ingevoerd.
Voor uw comfort:
• Indien u een poging doet een getal in te
toetsen dat groter is dan de totale tijdsduur
van de huidige titel verdwijnt het zoekveld
en de boodschap “ verschijnt in de
linkerbovenhoek van het scherm.
• Druk op RETURN of om het invoeren van
de tijd te verlaten en de handeling wordt
afgebroken.
Handige Functies
Tijdgegevens Weergeven
Druk op INFO tijdens het afspelen.
Elke keer dat u op deze knop drukt, wordt er
een ander herhaalvak weergegeven op het
scherm.
• Als “Single elapsed” wordt weergegeven,wordt
de verstreken tijd voor de titel die wordt
afgespeeld weergegeven.
• Als “Single remain” wordt weergegeven,wordt
de overblijvende tijd voor de titel die wordt
afgespeeld weergegeven.
Nogmaals op INFO drukken zal het menuscherm
van de display sluiten. ‘’DISPLAY OFF’’ wordt
weergegeven.
Een scène vergroten en van dichterbij
weergeven
CD Menu
CD Menu wordt gebruikt om de directorystructuur
van dataschijven weer te geven die bestanden
bevatten als JPEG/MPEG/MP3/DivX en om de
nummers van Audio CD’s weer te geven
Basisweergave
1.Breng een CD-R-schijf in de lader in.
“Loading” verschijnt op het scherm. Wacht
enkele seconden.
CD MENU verschijnt Directories en bestanden in
de basismap worden opgegeven. (Bij een audio-
CD worden de tracks als lijst weergegeven.)
2. Druk op “ ” of “ ” om bestanden of registers
te selecteren.
In de stop modus of tijdens de weergave van
MP3 kan de gebruiker in de huidige map
navigeren.
3. Druk op SELECT“ ” of “ ” om te schakelen
tussen registers & bestanden
Indien een map geselecteerd is en SELECT
of de“ ” toets wordt ingedrukt, verschijnt de
geselecteerde map inhoud na het lezen van
de map.
Om over te schakelen van een subdirectory
naar een bovenliggende directory , drukt u op
SELECT of op “ ” terwijl de bovenste optie in
de directory (“...”) geselecteerd is of druk op ““
””.
4. Druk op SELECT op een bestand om deze
af te spelen.
MP3/MPEG/DivX -bestand
De geselecteerde MP3 / MPEG / DivX begint
te spelen.
Verstreken en resterende tijd kunnen
weergegeven worden met de DISPLAY toets en
kunnen gewijzigd wordne met de TIME toets.
JPEG Bestand :
De geselecteerde JPEG wordt op een volledig
scherm weergegeven en de diashow start
automatisch.
B03_[NL]_MB25_(02-DVD)_32883W_1900UK_ANALOG_BRONZE9_DIVX_WOVCD_10064228_50152513.indd 34
B03_[NL]_MB25_(02-DVD)_32883W_1900UK_ANALOG_BRONZE9_DIVX_WOVCD_10064228_50152513.indd 34
B03_[NL]_MB25_(02-DVD)_32883W_1900UK_ANALOG_BRONZE9_DIVX_WOVCD_10064228_50152513.indd 34
B03_[NL]_MB25_(02-DVD)_32883W_1900UK_ANALOG_BRONZE9_DIVX_WOVCD_10064228_50152513.indd 34B03_[NL]_MB25_(02-DVD)_32883W_1900UK_ANALOG_BRONZE9_DIVX_WOVCD_10064228_50152513.indd 34 17.08.2009 08:45:07
17.08.2009 08:45:07
17.08.2009 08:45:07
17.08.2009 08:45:0717.08.2009 08:45:07

Nederlands - 35 -
Tijdens de diavoorstelling kunt u het schuif-effect
wijzigen door de ANGLE-toets in te drukken.
Audio CD Track:
Verstreken en resterende tijd kunnen
weergegeven worden met de DISPLAY toets en
kunnen gewijzigd wordne met de TIME toets.
PAUZE
Druk één keer op PAUSE ( ) tijdens het
afspelen. De weergave stopt.
Er wordt PAUSE weergegeven op het scherm.
Om de normale weergave te hervatten, dient u
opnieuw op PLAY ( ) te drukken.
Weergave Stoppen
Druk op STOP ( ).
De weergave stopt.
OPMERKING: Tijdens de weergave van een JPEG
bestand kunt u de weergave ook stoppen door op
MENU te drukken
MP3/MPEG/DivX -bestand CD MENU wordt
weergegeven.
Snel vooruit/terug spoelen (Rapid
Revers)
MP3/MPEG/DivX CD Track:
Druk op SEARCH/SLOW ( of ) tijdens
het afspelen om de snelheid te verlagen/
verhogen.
32x, 16x, 8x, 4x, 2x,
PLAY, 2x, 4x, 8x, 16x,
32x zijn de afspeelsnelheden.
Om de normale weergave te hervatten, dient u
opnieuw op PLAY ( ) te drukken.
Vooruit of terugspringen naar sporen
Druk op SKIP/ FRAME ( / ) tijdens het
afspelen om naar het vorige/volgende bestand
te springen.
Het volgende of vorige bestand in de huidige
index wordt afgespeeld. Druk op SKIP/ FRAME
(( / ) ) tijdens het afspelen om naar de
vorige/volgende pagina van de huidige map te
springen.
ZOOM
MPEG:
De ‘zoom in’ functie biedt de mogelijkheid een
scène op het scherm van naderbij te bekijken.
Deze functie is speciaal bedoeld voor science
fi ction of avonturenfi lms.
Druk op ZOOM tijdens het afspelen.
Er wordt “ 2X” weergegeven op het scherm
en het beeld is nu groter. Als u de ZOOM toets
blijft indrukken, bereikt u achtereenvolgens de
“ 3X”, “ 4X” modi.
OPMERKING: U kunt het beeld bewegen( ) / (
) / ( ) / ( ) de ingezoomde plaats veranderen door
gebruik te maken van de pijltoetsen.
Om het normale afspelen te hervatten;
Druk nogmaals op ZOOM.
JPEG :
Druk op PLAY ( ) om de diashow te starten
Tijdens de diavoorstelling kunt u het schuif-
effect wijzigen door de ANGLE-toets in te
drukken.
Zowel ZOOM in/out als ZOOM pan functies zijn
voorzien voor JPEG afbeeldingen.
Druk op ZOOM om deze functie in of uit te
schakelen.
Wanneer deze modus ingeschakeld is, zal er
een bericht worden weergegeven dat de huidige
lengte-breedteverhouding weergeeft.
Als zoom aan is:
Druk op / om de verhouding van het
vergroten en verkleinen te bedienen.
De zoomverhoudingen zijn %50 en %75 voor
zoom out en %100, %125, %150 en %200 voor
zoom in. (De volgorde is: %50, %75, %100,
%125, %150, %200)(De initiële verhouding is
%100)
Wanneer de ZOOM modus uitgeschakeld
is, wordt het beeld over het hele scherm
weergegeven.
Opmerking: Slide Show is uitgeschakeld als de ZOOM
modus actief is.
Herhalen
Druk op REPEAT om de huidige herhaalmodus
te wijzigen.
I n h e t CD ME N U i s d it o n d e ra a n
weergegeven.
De beschikbare opties zijn:
MAP: Als deze weergavemodus geselecteerd is,
wordt de huidige map één maal afgespeeld.
B03_[NL]_MB25_(02-DVD)_32883W_1900UK_ANALOG_BRONZE9_DIVX_WOVCD_10064228_50152513.indd 35
B03_[NL]_MB25_(02-DVD)_32883W_1900UK_ANALOG_BRONZE9_DIVX_WOVCD_10064228_50152513.indd 35
B03_[NL]_MB25_(02-DVD)_32883W_1900UK_ANALOG_BRONZE9_DIVX_WOVCD_10064228_50152513.indd 35
B03_[NL]_MB25_(02-DVD)_32883W_1900UK_ANALOG_BRONZE9_DIVX_WOVCD_10064228_50152513.indd 35B03_[NL]_MB25_(02-DVD)_32883W_1900UK_ANALOG_BRONZE9_DIVX_WOVCD_10064228_50152513.indd 35 17.08.2009 08:45:07
17.08.2009 08:45:07
17.08.2009 08:45:07
17.08.2009 08:45:0717.08.2009 08:45:07

Nederlands - 36 -
SINGLE: Als deze weergavemodus geselecteerd
is, wordt het huidige nummer één maal
afgespeeld.
REPEAT ONE: Als deze weergavemodus
geselecteerd is, wordt het huidige nummer
voortdurend herhaald.
REPEAT MAP: Als deze weergavemodus
geselecteerd is, wordt de huidige map
voortdurend herhaald
Willekeurig
Bestanden in de huidige map afspelen in
willekeurige volgorde, na elkaar, zonder
einde.
Willekeurige weergave
Ieder bestand in de huidige map ee maal
afspelen in willekeurige volgorde en daarna
stoppen.
Display functie
Druk op INFO om de weergegeven tijdmodus
te wijzigen.
Er zijn twee tijdsmodi :
• Single Elapsed (Verstreken tijd van het
nummer)
• Overblijvende tijd nummer
De tijd verschijnt tijdens de weergave
van MP3,MPEG/DivX en Audio CD track
weergave.
Setupmenu
Druk op DISPLAY op de afstandsbediening als
de speler niet in de afspeelmodus is.
De hoofdpagina van het setup-menu verschijnt.
Druk op DISPLAY om het setup menu te
sluiten.
HOOFDPAGINA
In de hoofdpagina wordt de eerste pagina
standaard geselecteerd.
Selecteer de pagina’s door gebruik van de /
pijltjestoetsen.
Als deze geselecteerd worden, zal de pagina
gemarkeerd worden en de items van de
geselecteerde pagina worden weergegeven.
Druk op SELECT of de pijltjestoets om de
geselecteerde pagina in te voeren.
Wanneer u een pagina invoert, wordt het
eerste item van de pagina geselecteerd en
de sub-items van dat item worden rechts
weergegeven.
OPMERKING: Om terug te keren naar de hoofdpagina,
drukt u op de pijltjestoets. Druk op DISPLAY om het
setup menu te sluiten.
HET GEBRUIK VAN PAGINA’S
Wanneer u een pagina invoert, wordt het eerste
item van de pagina standaard geselecteerd
en de sub-items van het geselecteerde item
worden rechts weergegeven.
Gebruik de / pijltjestoetsen om het geselecteerde
item opnieuw te wijzigen in de pagina.
De sub-items van het geselecteerde item
verschijnen aan de rechterzijde.
Gebruik SELECT of de pijltjestoets om
het subitem van het geselecteerde item te
selecteren.
Het sub-item wordt in het menu rechts
geselecteerd.
Gebruik de / pijltjestoetsen om het
geselecteerde subitem opnieuw te wijzigen.
Druk op SELECT om het geselecteerde sub-
item in het rechtermenu te selecteren.
B03_[NL]_MB25_(02-DVD)_32883W_1900UK_ANALOG_BRONZE9_DIVX_WOVCD_10064228_50152513.indd 36
B03_[NL]_MB25_(02-DVD)_32883W_1900UK_ANALOG_BRONZE9_DIVX_WOVCD_10064228_50152513.indd 36
B03_[NL]_MB25_(02-DVD)_32883W_1900UK_ANALOG_BRONZE9_DIVX_WOVCD_10064228_50152513.indd 36
B03_[NL]_MB25_(02-DVD)_32883W_1900UK_ANALOG_BRONZE9_DIVX_WOVCD_10064228_50152513.indd 36B03_[NL]_MB25_(02-DVD)_32883W_1900UK_ANALOG_BRONZE9_DIVX_WOVCD_10064228_50152513.indd 36 17.08.2009 08:45:08
17.08.2009 08:45:08
17.08.2009 08:45:08
17.08.2009 08:45:0817.08.2009 08:45:08

Nederlands - 37 -
DVD-menu-items
VIDEO SETUP PAGE
TV Type
TV Type is enkel als ‘PAL’ beschikbaar. Het
Tv-toestel ondersteund ook NTSC-signalen, het
signaal zal, bij het verschijnen op het scherm,
naar PAL omgezet worden.
DivX VOD
Met DivX VOD kunt u kwaliteitsvol video
streamen .
TALEN SETUP
OSD LANG
U kunt de standaardinstelling van de OSD-taal
selecteren uit de menu’s van de DVD-speler
AUDIO
U kunt de standaard geluidstaal selecteren
als dat ondersteund wordt door de betreffende
DVD schijf.
SCHIJFMENU
U kan de taal van DVD schijfmenu selecteren
uit deze talen. Het schijfmenu verschijnt in de
geselecteerde talen, indien dat ondersteund
wordt door de betreffende DVD schijf.
ONDERTITELING
U kunt de standaard ondertitelingstaal
selecteren, indien dat ondersteund wordt door
de betreffende DVD-schijf.
VOORKEUREN
HELDERHEID
Als u RESET selecteert en u drukt op SELECT
worden de fabrieksinstellingen geladen. Het
ouderlijk toezicht en het wachtwoord daarvoor
zijn dan niet veranderd.
DOWNMIX
deze modus kan geselecteerd worden wanneer
de digitale audio-output van de TV gebruikt
wordt.
SURROUND: Surround geluid output.
STEREO: Twee kanalen stereo.
PARENTAL (Ouderlijk Niveau)
De weergave van sommige Dvd’s kan beperkt
worden afhankelijk van de leeftijd van de
gebruiker. De functie ‘’Ouderlijk Toezicht’’ stelt
u als ouder in staat om het niveau van de
afspeelbeperking in te stellen.
Het Censuurniveau kan afgesteld worden op één
van de acht niveaus. Het niveau “8 Volwassene”
instelling geeft u toegang tot alle DVD titels
zonder belang te moeten hechten aan het DVD
censuurniveau. U kunt de DVD’s bekijken die
hetzelfde of een lager censuurniveau hebben
dan het niveau van alleen de DVD-speler.
PASSWORD (wachtwoord wijzigen):
Met deze optie kunt u uw huidige wachtwoord
veranderen.
Om het wachtwoord te veranderen wordt u
gevraagd om uw oude wachtwoord in te voeren.
Nadat u het oude wachtwoord hebt ingevoerd,
B03_[NL]_MB25_(02-DVD)_32883W_1900UK_ANALOG_BRONZE9_DIVX_WOVCD_10064228_50152513.indd 37
B03_[NL]_MB25_(02-DVD)_32883W_1900UK_ANALOG_BRONZE9_DIVX_WOVCD_10064228_50152513.indd 37
B03_[NL]_MB25_(02-DVD)_32883W_1900UK_ANALOG_BRONZE9_DIVX_WOVCD_10064228_50152513.indd 37
B03_[NL]_MB25_(02-DVD)_32883W_1900UK_ANALOG_BRONZE9_DIVX_WOVCD_10064228_50152513.indd 37B03_[NL]_MB25_(02-DVD)_32883W_1900UK_ANALOG_BRONZE9_DIVX_WOVCD_10064228_50152513.indd 37 17.08.2009 08:45:08
17.08.2009 08:45:08
17.08.2009 08:45:08
17.08.2009 08:45:0817.08.2009 08:45:08

Nederlands - 38 -
kan u nu het nieuwe wachtwoord van vier
karakters invoeren.
U kunt met de C toets een onjuiste invoer
wissen.
Opmerking: De fabrieksinstelling van het wachtwoord
is ‘’0000’’ U moet het XXXX digitale paswoord iedere
keer invoeren wanneer u het ouderlijk niveau wenst
te wijzigen. Als u het paswoord vergeten bent, dient u
contact op te nemen met de technische dienst.
Probleemoplossing
De beeldkwaliteit is slecht (DVD)
• Zorg ervoor dat het oppervlak van de
DVD schijf niet beschadigd is. (Krassen,
vingerafdrukken, etc.)
• Reinig de DVD en probeer opnieuw.
Zie de instructies in de handleiding van uw schijf over
hoe uw schijf correct schoon te maken.
• Verifi eer of de DVD in de schijfl ade ligt met het
label naar boven
• Een vochtige DVD of condensatie kunnen
het toestel beïnvloeden. Wacht 1 tot 2 uren in
stand-by om het toestel te laten drogen
De schijf wordt niet afgespeeld
• Er is geen schijf in het toestel.
Plaats een schijf in de lader.
• De schijf is op onjuiste wijze geladen.
Verifi eer of de DVD in de schijfl ade ligt met het label
naar boven.
• Verkeerde schijftype. De DVD speler kan geen
CD-ROMS enz. spelen
• De regiocode van de DVD moet overeenkomen
met de regiocode van de DVD-speler.
Verkeerde OSD-taal
• Selecteer de taal in het setup menu.
• De taal voor het geluid of de ondertiteling van
een DVD kan niet veranderd worden.
• Er werden geen meertalige audio en/of
ondertitelingen op de DVD opgenomen.
• Probeer het geluid of de ondertitels te wijzigen
in het titelmenu van de DVD. Bepaalde DVD’s
laten de gebruiker niet toe deze instellingen
te wijzigen zonder het menu van de schijf te
gebruiken
Sommige functies (Camerastandpunt,
Zoom, Etc.) werken niet
• Deze functies zijn niet beschikbaar op de
DVD.
• De camerahoek kan alleen worden gewijzigd
als het symbool van het camerastandpunt
wordt weergegeven.
Geen beeld
• Hebt u op de juiste knoppen van de
afstandsbediening gedrukt? Probeer het
opnieuw.
Geen geluid
• Controleer of het volume op een hoorbaar
niveau staat.
• Controleer of u het geluid niet per ongeluk
heeft uitgeschakeld.
Vervormd geluid
• Controleer of de bijbehorende instelling voor
de luistermodus juist is.
Geen reactie van de
afstandsbediening
• Controleer of de afstandsbediening in de
correcte modus staat.
• Controleer of de afstandsbediening in de juiste
modus is.
• Vervang de batterijen.
Als er niets werkt
Indien u bovenstaande oplossingen geprobeerd
hebt en niets lijkt te werken, kan u proberen de
DVD speler uit te schakelen en opnieuw aan
te schakelen. Als het niet zou werken, neemt u
contact op met de leverancier of reparateur van
de TV-DVD. Probeer nooit een kapotte TV-DVD
speler zelf te repareren.
B03_[NL]_MB25_(02-DVD)_32883W_1900UK_ANALOG_BRONZE9_DIVX_WOVCD_10064228_50152513.indd 38
B03_[NL]_MB25_(02-DVD)_32883W_1900UK_ANALOG_BRONZE9_DIVX_WOVCD_10064228_50152513.indd 38
B03_[NL]_MB25_(02-DVD)_32883W_1900UK_ANALOG_BRONZE9_DIVX_WOVCD_10064228_50152513.indd 38
B03_[NL]_MB25_(02-DVD)_32883W_1900UK_ANALOG_BRONZE9_DIVX_WOVCD_10064228_50152513.indd 38B03_[NL]_MB25_(02-DVD)_32883W_1900UK_ANALOG_BRONZE9_DIVX_WOVCD_10064228_50152513.indd 38 17.08.2009 08:45:09
17.08.2009 08:45:09
17.08.2009 08:45:09
17.08.2009 08:45:0917.08.2009 08:45:09

Nederlands - 39 -
Voorwaardebepalingen
Camerastandpunt
Op sommige DVD’s zijn scènes opgenomen die
op hetzelfde tijdstip opgenomen zijn vanuit een
aantal verschillende hoeken (dezelfde scène is
opgenomen van de voorkant, van de linkerkant,
van de rechterkant, etc.). Met deze schijven
kan de ANGLE-knop gebruikt worden om de
scène vanuit verschillende camerastandpunten
te zien.
Hoofdstuknummer
Deze nummers zijn op DVD’s opgenomen.
Een titel is onderverdeeld in vele secties,
waarvan elke sectie genummerd is en specifi eke
onderdelen van de videopresentaties kunnen
snel opgezocht worden door gebruik te maken
van deze nummers.
DVD
Dit verwijst naar een optische schijf met een
hoog vermogen waarop beelden en geluid van
hoge kwaliteit zijn opgenomen door middel van
digitale signalen. Dit bevat een technologie voor
videocompressie (MPEG II) en een technologie
voor opnemen met een hoog vermogen. Met de
DVD is het mogelijk een esthetisch aangename
en volledige video op te nemen over een langere
tijdsspanne (er kan bijvoorbeeld een hele fi lm
worden opgenomen)
Een DVD heeft een structuur die bestaat uit
twee 0.6-mm dunne schijven die aan elkaar
geplakt worden. Hoe dunner de schijf, hoe
groter de dichtheid waaraan de informatie
kan opgeslagen worden. Een DVD heeft een
grotere capaciteit dan één enkele 1,2 mm dikke
schijf. Gezien beide dunne schijven aan elkaar
geplakt worden, ziet het er niet naar uit dat we
in de nabije toekomst een dubbelzijdige schijf
zullen kunnen maken voor een nog langere
speelduur.
Ondertitels
Dit is de gedrukte tekst aan de onderkant van
het scherm, waarmee de dialoog vertaald of
weergegeven wordt. Opgenomen op DVD
schijven.
Tijdgetal
Dit geeft de afspeelduur aan die verstreken is
vanaf het begin van een schijf of titel. Dit kan
gebruikt worden om een bepaalde scène snel
te vinden. (Sommige schijven ondersteunen de
tijd zoekfunctie niet). De beschikbaarheid wordt
bepaald door de fabrikant).
Titelnummer
Deze nummers zijn op DVD’s opgenomen.
Indien een schijf twee of meerdere films
bevat, dan zijn deze fi lms als titel 1, titel 2, etc.
genummerd.
Getal voor een geluidsnummer
Deze getallen worden aan de nummers
toegekend die zijn opgenomen op Audio-
CD’s. Middels deze getallen kunnen bepaalde
nummers snel gevonden worden.
Dolby Digital
Veel bioscopen zijn voorzien van 5.1 channel
surround systemen. Deze zelfde technologie
is beschikbaar voor u thuis. Om van deze
surround kwaliteit gebruik te maken dient uw
DVD speler aangesloten te zijn op een externe
Dolby Digital Decoder via de digitale uitgangen
(ofwel coaxiaal ofwel optisch).
Dolby Pro Logic
Dit is technologie van Dolby Laboratories om
Dolby Surround gecodeerde programma’s actief
te decoderen. Dolby Surround programma’s
hebben vier kanalen voor geluid (Links, Rechts,
Midden en Surround) die gecodeerd zijn in een
standaard stereosignaal van 2 kanalen. Het
achterste kanaal is mono.
LPCM
LPCM staat voor Pulse Code Modulation en is
een digitaal geluid.
MPEG
Dit is de afkorting voor Moving Picture Experts
Group Dit is een internationale norm voor de
compressie van filmbeelden. Op sommige
DVD’s is het digitale geluid samengeperst en
in deze format opgenomen.
DivX
DivX is een digitale video compressietechnologie
op basis van MPEG-4 en ontwikkeld door DivX
Networks Inc.
B03_[NL]_MB25_(02-DVD)_32883W_1900UK_ANALOG_BRONZE9_DIVX_WOVCD_10064228_50152513.indd 39
B03_[NL]_MB25_(02-DVD)_32883W_1900UK_ANALOG_BRONZE9_DIVX_WOVCD_10064228_50152513.indd 39
B03_[NL]_MB25_(02-DVD)_32883W_1900UK_ANALOG_BRONZE9_DIVX_WOVCD_10064228_50152513.indd 39
B03_[NL]_MB25_(02-DVD)_32883W_1900UK_ANALOG_BRONZE9_DIVX_WOVCD_10064228_50152513.indd 39B03_[NL]_MB25_(02-DVD)_32883W_1900UK_ANALOG_BRONZE9_DIVX_WOVCD_10064228_50152513.indd 39 17.08.2009 08:45:09
17.08.2009 08:45:09
17.08.2009 08:45:09
17.08.2009 08:45:0917.08.2009 08:45:09

Nederlands - 40 -
Ondersteunde bestandsformaten voor de USB & MC-modi
Media Bestandsextensie Formaat O
p
merkin
g
en
Video Audio (Maximum resolutie/Bitrate etc.)
Film
.mpg/ .dat/
.vob
MPEG1 MPEG Layer 1/2/3
MPEG2 MPEG2
XviD/ 3ivx PCM/MP3/WMA XviD versie tot: 1.1.2
MPEG4 PCM/MP3/WMA
.avi
MS ISO
MPEG4 PCM/MP3/WMA Ondersteuning van SP en ASP
MJPEG PCM 30fps@VGA
te beginnen
- - PCM Sample rate: 8K ~ 48KHz
.mp3 -
MPEG 1/2
Layer 1/ 2/
3 (MP3)
Sample rate: 8K ~ 48KHz, Bitrate:
64K~320Kbps
.wma - WMA Sample Rate: 8K ~ 48KHz, Bit Rate: 5K ~
192Kbps
Photo .jpg
Basislijn
JPEG
WxH = 8902x8902 up to 77Mega-pixel
Ondersteunde formaten: 444/ 440/ 422/ 420/
Grijs schaal
Progressieve
JPEG
Tot 4 Mega-pixel
Ondersteunde formaten: 444/ 440/ 422/ 420/
Grijs schaal
Externe
ondertiteling
.ssa
Ondersteund tekstbestandformaat, maar geen
ondersteuning van fotobestandformaat
.ass
.srt
.smi
.sub
Ondersteunde geheugenkaarten
•SD (Secure Digital ™)
•MMC (Multi Media Card ™)
•MS (Memofy Stick ™)
• MS PRO (Memofy Stick Pro ™)
“Memory Stick” is een handelsmerk van Sony Corporation.
“Secure Digital” is een handelsmerk van SD Card Association.
“MULTIMEDIACARD” is een handelsmerk van MultiMediCard Association (MMCA).
vereniging (MMCA).
B03_[NL]_MB25_(02-DVD)_32883W_1900UK_ANALOG_BRONZE9_DIVX_WOVCD_10064228_50152513.indd 40
B03_[NL]_MB25_(02-DVD)_32883W_1900UK_ANALOG_BRONZE9_DIVX_WOVCD_10064228_50152513.indd 40
B03_[NL]_MB25_(02-DVD)_32883W_1900UK_ANALOG_BRONZE9_DIVX_WOVCD_10064228_50152513.indd 40
B03_[NL]_MB25_(02-DVD)_32883W_1900UK_ANALOG_BRONZE9_DIVX_WOVCD_10064228_50152513.indd 40B03_[NL]_MB25_(02-DVD)_32883W_1900UK_ANALOG_BRONZE9_DIVX_WOVCD_10064228_50152513.indd 40 17.08.2009 08:45:09
17.08.2009 08:45:09
17.08.2009 08:45:09
17.08.2009 08:45:0917.08.2009 08:45:09

Nederlands - 41 -
D I G I T A L A U D I O
D V D
A U D IO -C D
1 2 c m
8 c m
1 2 c m
8 c m
(xx x x . m p 3 )
M P 3 -C D
J P E G
R E A D A B L E
P IC T U R E -C D
•
•
R E A D A B L E
7 4 m in .
2 0 m in .
•
•
•
1 2 c m
8 c m
1 2 c m
8 c m
D iv X
•
1 2 c m
8 c m
Spelersoorten
(Logos) Opslaan
Soorten
Speler
Lengte
Max.
Afspeeltijd
Eigenschappen
Eén - zijdig; 240
min
Dubbel - zijdig;
480 min
Eén - zijdig; 80
min
Dubbel - zijdig;
160 min
Het is
afhankeljik
aan de
MP3
kwaliteit.
Het is
afhankeljik
aan de
JPEG
kwaliteit.
Het is
afhankelijk
van de DivX
kwaliteit.
Video
(stilstaand
beeld)
Audio
+
Video
Audio
+
Video
Audio
Audio
DVD heeft een fantastisch geluid
en video door het Dolby Digital en
MPEG -2 systeem.
Verschillende scherm- en
geluidsfuncties.kunnen
eenvoudig geselecteerd worden
via het menu op het scherm.
Een LP wordt opgeno men als een
analoog signaal met meer
vervorming.
MP3 wordt opg enomen als een
digitaal sign aal met een betere
geluidskwaliteit, minder
vervorming en d e geluidskwaliteit
gaat m inder snel achteruit na
verloop van tijd.
JPEG is opgeslagen als digitaal
signaal met een betere
beeldkwaliteit na verloop van tijd.
Een CD word
opgeno men als een Digital Signal
met een betere geluidskwaliteit,
minder vervorming en de
geluidskwaliteit gaat minder snel
acheruit na verloop van tijd.
Video & Audio met MPEG-4
comprimeringtechnologie.
Opmerkingen over de schijven
Deze DVD-speler kan de volgende schijven afspelen
Baseline Max resolution 2150 X 1432
Progressive Max resolution 1400 X 900
B03_[NL]_MB25_(02-DVD)_32883W_1900UK_ANALOG_BRONZE9_DIVX_WOVCD_10064228_50152513.indd 41
B03_[NL]_MB25_(02-DVD)_32883W_1900UK_ANALOG_BRONZE9_DIVX_WOVCD_10064228_50152513.indd 41
B03_[NL]_MB25_(02-DVD)_32883W_1900UK_ANALOG_BRONZE9_DIVX_WOVCD_10064228_50152513.indd 41
B03_[NL]_MB25_(02-DVD)_32883W_1900UK_ANALOG_BRONZE9_DIVX_WOVCD_10064228_50152513.indd 41B03_[NL]_MB25_(02-DVD)_32883W_1900UK_ANALOG_BRONZE9_DIVX_WOVCD_10064228_50152513.indd 41 17.08.2009 08:45:09
17.08.2009 08:45:09
17.08.2009 08:45:09
17.08.2009 08:45:0917.08.2009 08:45:09
Nederlands - 42 -
Technische kenmerken
DVD / CD / CD-R / CD-RW / MP3 / JPEG / MPEG / DivX Afspelen.
Type schijven
Ondersteund
DVD: SS/SL 4.7” (DVD-5)
SS/DL 4.7” (DVD-9)
DS/SL 4.7” (DVD-10)
DS/DL 4.7” (DVD-18)
CD-DA
CD-R
CD-RW
MP-3/JPEG
Videotype
MPEG-2 Video Standard Decoding (MPEG -1 ondersteund)
Volledig scherm videoweergave van 720 x 576 (PAL) &
720 x 480 (NTSC) pixels
50 en 60 Hz beeldverhoudingen (PAL-NTSC)
Digital bit-stream processing rate tot 108 Mbits/sec
Lijnresolutie meer dan 500 lijnen.
Soort Audio
Dolby Digital Decoding
MPEG Multichannel Decoding
LPCM
Geluidsuitgang Digi tale geluidsuitgan gen:
IEC 958
TOSLINK
Analoge Outputs:
24 bit /48, 44.1kHz down-sampling DAC
B03_[NL]_MB25_(02-DVD)_32883W_1900UK_ANALOG_BRONZE9_DIVX_WOVCD_10064228_50152513.indd 42
B03_[NL]_MB25_(02-DVD)_32883W_1900UK_ANALOG_BRONZE9_DIVX_WOVCD_10064228_50152513.indd 42
B03_[NL]_MB25_(02-DVD)_32883W_1900UK_ANALOG_BRONZE9_DIVX_WOVCD_10064228_50152513.indd 42
B03_[NL]_MB25_(02-DVD)_32883W_1900UK_ANALOG_BRONZE9_DIVX_WOVCD_10064228_50152513.indd 42B03_[NL]_MB25_(02-DVD)_32883W_1900UK_ANALOG_BRONZE9_DIVX_WOVCD_10064228_50152513.indd 42 17.08.2009 08:45:09
17.08.2009 08:45:09
17.08.2009 08:45:09
17.08.2009 08:45:0917.08.2009 08:45:09

English - 85 -
Contents
Features ............................................................... 86
Accessories .......................................................... 86
Introduction ........................................................... 86
Preparation ........................................................... 86
Safety Precautions ............................................... 87
Power Source ................................................... 87
Power Cord ....................................................... 87
Moisture and Water .......................................... 87
Cleaning............................................................ 87
Heat and Flames .............................................. 87
Lightning ........................................................... 87
Replacement Parts ........................................... 87
Servicing ........................................................... 87
Waste Disposal ................................................. 87
Information for Users in European Union
Countries .......................................................... 87
Disconnecting the Device ................................. 87
Disconnecting the Device ................................. 87
Headphone Volume .......................................... 88
Installation......................................................... 88
LCD Screen ...................................................... 88
Warning ............................................................ 88
Overview of the Remote Control .......................... 89
LCD TV and Operating Buttons ............................ 90
Viewing the Connections- Back Connectors ........ 90
Viewing the Connections - Side Connectors ........ 91
Aerial Connection ................................................. 91
Power Connection ................................................ 92
Connecting the LCD TV to a PC ........................... 92
Connecting to a DVD Player................................. 92
Using Side AV Connectors ................................... 92
Using Other Connectors ....................................... 93
Connecting Other Equipment via Scart ................ 93
Inserting Batteries in the Remote
Control Handset.................................................... 93
Switching the TV On/Off ....................................... 93
To Switch the TV On ......................................... 93
To Switch the TV Off ......................................... 93
First Time Installation ........................................ 94
Input Selection ...................................................... 94
Basic Operations .................................................. 94
Operation with the Buttons on the TV ............... 94
Operation with the Remote Control .................. 94
Menu System........................................................ 95
Picture Menu..................................................... 95
Sound Menu ..................................................... 96
Feature Menu ................................................... 97
Install Menu ...................................................... 98
Install Menu in AV Modes ................................. 98
Program Table .................................................. 98
Source Menu .................................................... 99
PC Mode Menu System........................................ 99
PC Position Menu ............................................. 99
Displaying TV Information .................................. 100
Mute Function ..................................................... 100
Picture Mode Selection....................................... 100
Freezing Picture ................................................. 100
Zoom Modes....................................................... 100
Teletext ............................................................... 101
Tips ..................................................................... 102
Appendix A: PC Input Typical Display Modes ..... 103
Appendix B: AV and HDMI Signal Compatibility
(Input Signal Types) ............................................ 103
Specifi cations ..................................................... 104
03_MB25_[GB]_(01-TV)_COST_1900UK_IDTV_BRONZE9_32883_10064228_50152513.indd 85
03_MB25_[GB]_(01-TV)_COST_1900UK_IDTV_BRONZE9_32883_10064228_50152513.indd 85
03_MB25_[GB]_(01-TV)_COST_1900UK_IDTV_BRONZE9_32883_10064228_50152513.indd 85
03_MB25_[GB]_(01-TV)_COST_1900UK_IDTV_BRONZE9_32883_10064228_50152513.indd 8503_MB25_[GB]_(01-TV)_COST_1900UK_IDTV_BRONZE9_32883_10064228_50152513.indd 85 17.08.2009 09:07:23
17.08.2009 09:07:23
17.08.2009 09:07:23
17.08.2009 09:07:2317.08.2009 09:07:23

English - 86 -
Features
• Remote controlled colour LCD TV.
• HDMI connectors for digital video and audio. This
connection is also designed to accept high defi nition
signals.
• 200 programmes from VHF, UHF(analogue).
• OSD menu system.
• Scart socket for external devices (such as video,
video games, audio set, etc.).
• Stereo sound system. (3D Panorama)
• Teletext, fastext, TOP text.
• Headphone connection.
• Automatic programming system.
• Forward or backward manual tuning.
• Sleep timer.
• Child lock.
• Automatic sound mute when no transmission.
• NTSC playback.
• AVL (Automatic Volume Limiting).
• When no valid signal is detected, after 5 minutes the
TV switches itself automatically to standby mode.
• PLL (Frequency Search).
• PC input.
• Plug&Play for Windows 98, ME, 2000, XP, Vista.
• Audio line out.
• Game Mode (optional)
• Active antenna power (optional)
• SRS TruSurround XT (optional)
Accessories
MENU
/
INFO
EPG
FAV
PRESETS
SUBT IT L E
RETURN
SOURCESLEEP SCREEN
LANG.
Remote
Controller
Batteries: 2 X AAA
Instruction Book
Introduction
Thank you for choosing this product. This
manual will guide you for the proper
operation of your TV. Before operating the
TV, please read this manual thoroughly.
Please do keep this manual in a safe place
for future references.
Preparation
For ventilation, leave a free space of at least 10 cm
all around the set. To prevent any fault and unsafe
situations, please do not place any objects on top
of the set.
Use this device in moderate climates.
10 cm
10 cm
10 cm
03_MB25_[GB]_(01-TV)_COST_1900UK_IDTV_BRONZE9_32883_10064228_50152513.indd 86
03_MB25_[GB]_(01-TV)_COST_1900UK_IDTV_BRONZE9_32883_10064228_50152513.indd 86
03_MB25_[GB]_(01-TV)_COST_1900UK_IDTV_BRONZE9_32883_10064228_50152513.indd 86
03_MB25_[GB]_(01-TV)_COST_1900UK_IDTV_BRONZE9_32883_10064228_50152513.indd 8603_MB25_[GB]_(01-TV)_COST_1900UK_IDTV_BRONZE9_32883_10064228_50152513.indd 86 17.08.2009 09:07:23
17.08.2009 09:07:23
17.08.2009 09:07:23
17.08.2009 09:07:2317.08.2009 09:07:23

English - 87 -
Safety Precautions
Please read the following recommended safety
precautions carefully for your safety.
Power Source
The TV set should be operated only from a 220-240
V AC, 50 Hz outlet. Ensure that you select the correct
voltage setting for your convenience.
Power Cord
Do not place the set, a piece of furniture, etc. on the
power cord (mains lead) or pinch the cord. Handle the
power cord by the plug. Do not unplug the appliance
by pulling from the power cord and never touch the
power cord with wet hands as this could cause a short
circuit or electric shock. Never make a knot in the cord
or tie it with other cords. The power cords should be
placed in such a way that they are not likely to be
stepped on. A damaged power cord can cause fi re or
give you an electric shock. When it is damaged and
needs to be replaced, it should be done by qualifi ed
personnel.
Moisture and Water
Do not use this device in a humid and
damp place (avoid the bathroom, the
sink in the kitchen, and near the washing
machine). Do not expose this device to
rain or water, as this may be dangerous
and do not place objects filled with
liquids, such as fl ower vases, on top.
Avoid from dripping or splashing.
If any solid object or liquid falls into the cabinet, unplug
the TV and have it checked by qualifi ed personnel
before operating it any further.
Cleaning
Before cleaning, unplug the TV set
from the wall outlet. Do not use liquid or
aerosol cleaners. Use soft and dry cloth.
Ventilation
The slots and openings on the TV set are intended for
ventilation and to ensure reliable operation. To prevent
overheating, these openings must not be blocked or
covered in anyway.
Heat and Flames
The set should not be placed near to
open fl ames and sources of intense heat
such as an electric heater. Ensure that
no open fl ame sources, such as lighted
candles, are placed on top of the TV. Batteries should
not be exposed to excessive heat such as sunshine,
fi re or the like.
Lightning
In case of storm and lightning or when
going on holiday, disconnect the power
cord from the wall outlet.
Replacement Parts
When replacement parts are required, make sure that
the service technician has used replacement parts,
which are specifi ed by the manufacturer or have the
same specifi cations as the original one. Unauthorized
substitutions may result in fi re, electrical shock or
other hazards.
Servicing
Please refer all servicing to qualifi ed
personnel. Do not remove the cover
yourself as this may result in an electric
shock.
Waste Disposal
Instructions for waste disposal:
• Packaging and packaging aids are recyclable and
should principally be recycled. Packaging materials,
such as foil bag, must be kept away from children.
• Batteries, including those which are heavy metal-
free, should not be disposed of with household
waste. Please dispose of used battery in an
environment friendly manner. Find out about the
legal regulations which apply in your area.
• Cold cathode fluorescent lamp in LCD PANEL
contains a small amount of mercury; please follow
the local laws or regulations for disposal.
Information for Users in European
Union Countries
This symbol on the product or on its packaging means
that your electrical and electronic device should
be disposed at the end of its service
life separately from your household
wastes. There are separate collection
systems for recycling in EU.
For more information, please contact
the local authority or the dealer where
you purchased the product.
Disconnecting the Device
The mains plug is used to disconnect TV set from
the mains and therefore it must remain readily
operable.
Disconnecting the Device
The mains plug is used to disconnect TV set from
the mains and therefore it must remain readily
operable.
03_MB25_[GB]_(01-TV)_COST_1900UK_IDTV_BRONZE9_32883_10064228_50152513.indd 87
03_MB25_[GB]_(01-TV)_COST_1900UK_IDTV_BRONZE9_32883_10064228_50152513.indd 87
03_MB25_[GB]_(01-TV)_COST_1900UK_IDTV_BRONZE9_32883_10064228_50152513.indd 87
03_MB25_[GB]_(01-TV)_COST_1900UK_IDTV_BRONZE9_32883_10064228_50152513.indd 8703_MB25_[GB]_(01-TV)_COST_1900UK_IDTV_BRONZE9_32883_10064228_50152513.indd 87 17.08.2009 09:07:26
17.08.2009 09:07:26
17.08.2009 09:07:26
17.08.2009 09:07:2617.08.2009 09:07:26

English - 88 -
Headphone Volume
Excessive sound pressure from
earphones and headphones can
cause hearing loss.
Installation
To prevent injury, this device must be
securely attached to the wall in accordance with the
installation instructions when mounted to the wall (if
the option is available).
LCD Screen
The LCD panel is a very high technology product with
about a million thin fi lm transistors, giving you fi ne
picture details. Occasionally, a few non-active pixels
may appear on the screen as a fi xed blue, green or
red point. Please note that this does not affect the
performance of your product.
Warning
Do not leave your TV in standby or operating mode
when you leave your house.
Licence Notifi cation (optional)
is a trademark of SRS Labs, Inc. TruSurround
technology is incorporated under license from SRS
Labs, Inc.
LICENSE NOTICE
Ma n u f a c t u r e d u n d e r l i c e n s e f r o m D o l b y
Laboratories.
TRADEMARK ACKNOWLEDGMENT
“Dolby” and the double-D symbol are trademarks of
Dolby Laboratories.
When you use the wall mount kit (optional) with
the LCD TV, we would defi nitely recommend to
plug all your cables into the back of the LCD
before mounting to the wall.
03_MB25_[GB]_(01-TV)_COST_1900UK_IDTV_BRONZE9_32883_10064228_50152513.indd 88
03_MB25_[GB]_(01-TV)_COST_1900UK_IDTV_BRONZE9_32883_10064228_50152513.indd 88
03_MB25_[GB]_(01-TV)_COST_1900UK_IDTV_BRONZE9_32883_10064228_50152513.indd 88
03_MB25_[GB]_(01-TV)_COST_1900UK_IDTV_BRONZE9_32883_10064228_50152513.indd 8803_MB25_[GB]_(01-TV)_COST_1900UK_IDTV_BRONZE9_32883_10064228_50152513.indd 88 17.08.2009 09:07:27
17.08.2009 09:07:27
17.08.2009 09:07:27
17.08.2009 09:07:2717.08.2009 09:07:27

English - 89 -
Overview of the Remote Control
MENU
/
INFO
EPG
FAV
PRESETS
SUBTITLE
RETURN
28
29
SOURCESLEEP SCREEN
LANG.
Standby1.
Image size2.
Sleep timer3.
Numeric buttons4.
Return / TXT Index5.
Cursor up / TXT up page6.
Cursor left 7.
Programme up8.
Programme down9.
Mono-Stereo / Dual I-II10.
Swap11.
No function12.
Info / TXT reveal13.
Picture mode selection14.
Source selection15.
Red / Sound 16.
Green / Picture 17.
Yellow / Feature18.
Menu19.
Blue / Install 20.
OK /Select21.
Cursor righ / TXT Subpage22.
Cursor down / TXT Downpage23.
Volume up24.
Volume down 25.
Mute26.
Teletext / Mix27.
TXT Subtitle28.
No function29.
Note: Buttons that are not indicated with a
number on the remote control illustration are not
functional in TV mode.
03_MB25_[GB]_(01-TV)_COST_1900UK_IDTV_BRONZE9_32883_10064228_50152513.indd 89
03_MB25_[GB]_(01-TV)_COST_1900UK_IDTV_BRONZE9_32883_10064228_50152513.indd 89
03_MB25_[GB]_(01-TV)_COST_1900UK_IDTV_BRONZE9_32883_10064228_50152513.indd 89
03_MB25_[GB]_(01-TV)_COST_1900UK_IDTV_BRONZE9_32883_10064228_50152513.indd 8903_MB25_[GB]_(01-TV)_COST_1900UK_IDTV_BRONZE9_32883_10064228_50152513.indd 89 17.08.2009 09:07:28
17.08.2009 09:07:28
17.08.2009 09:07:28
17.08.2009 09:07:2817.08.2009 09:07:28
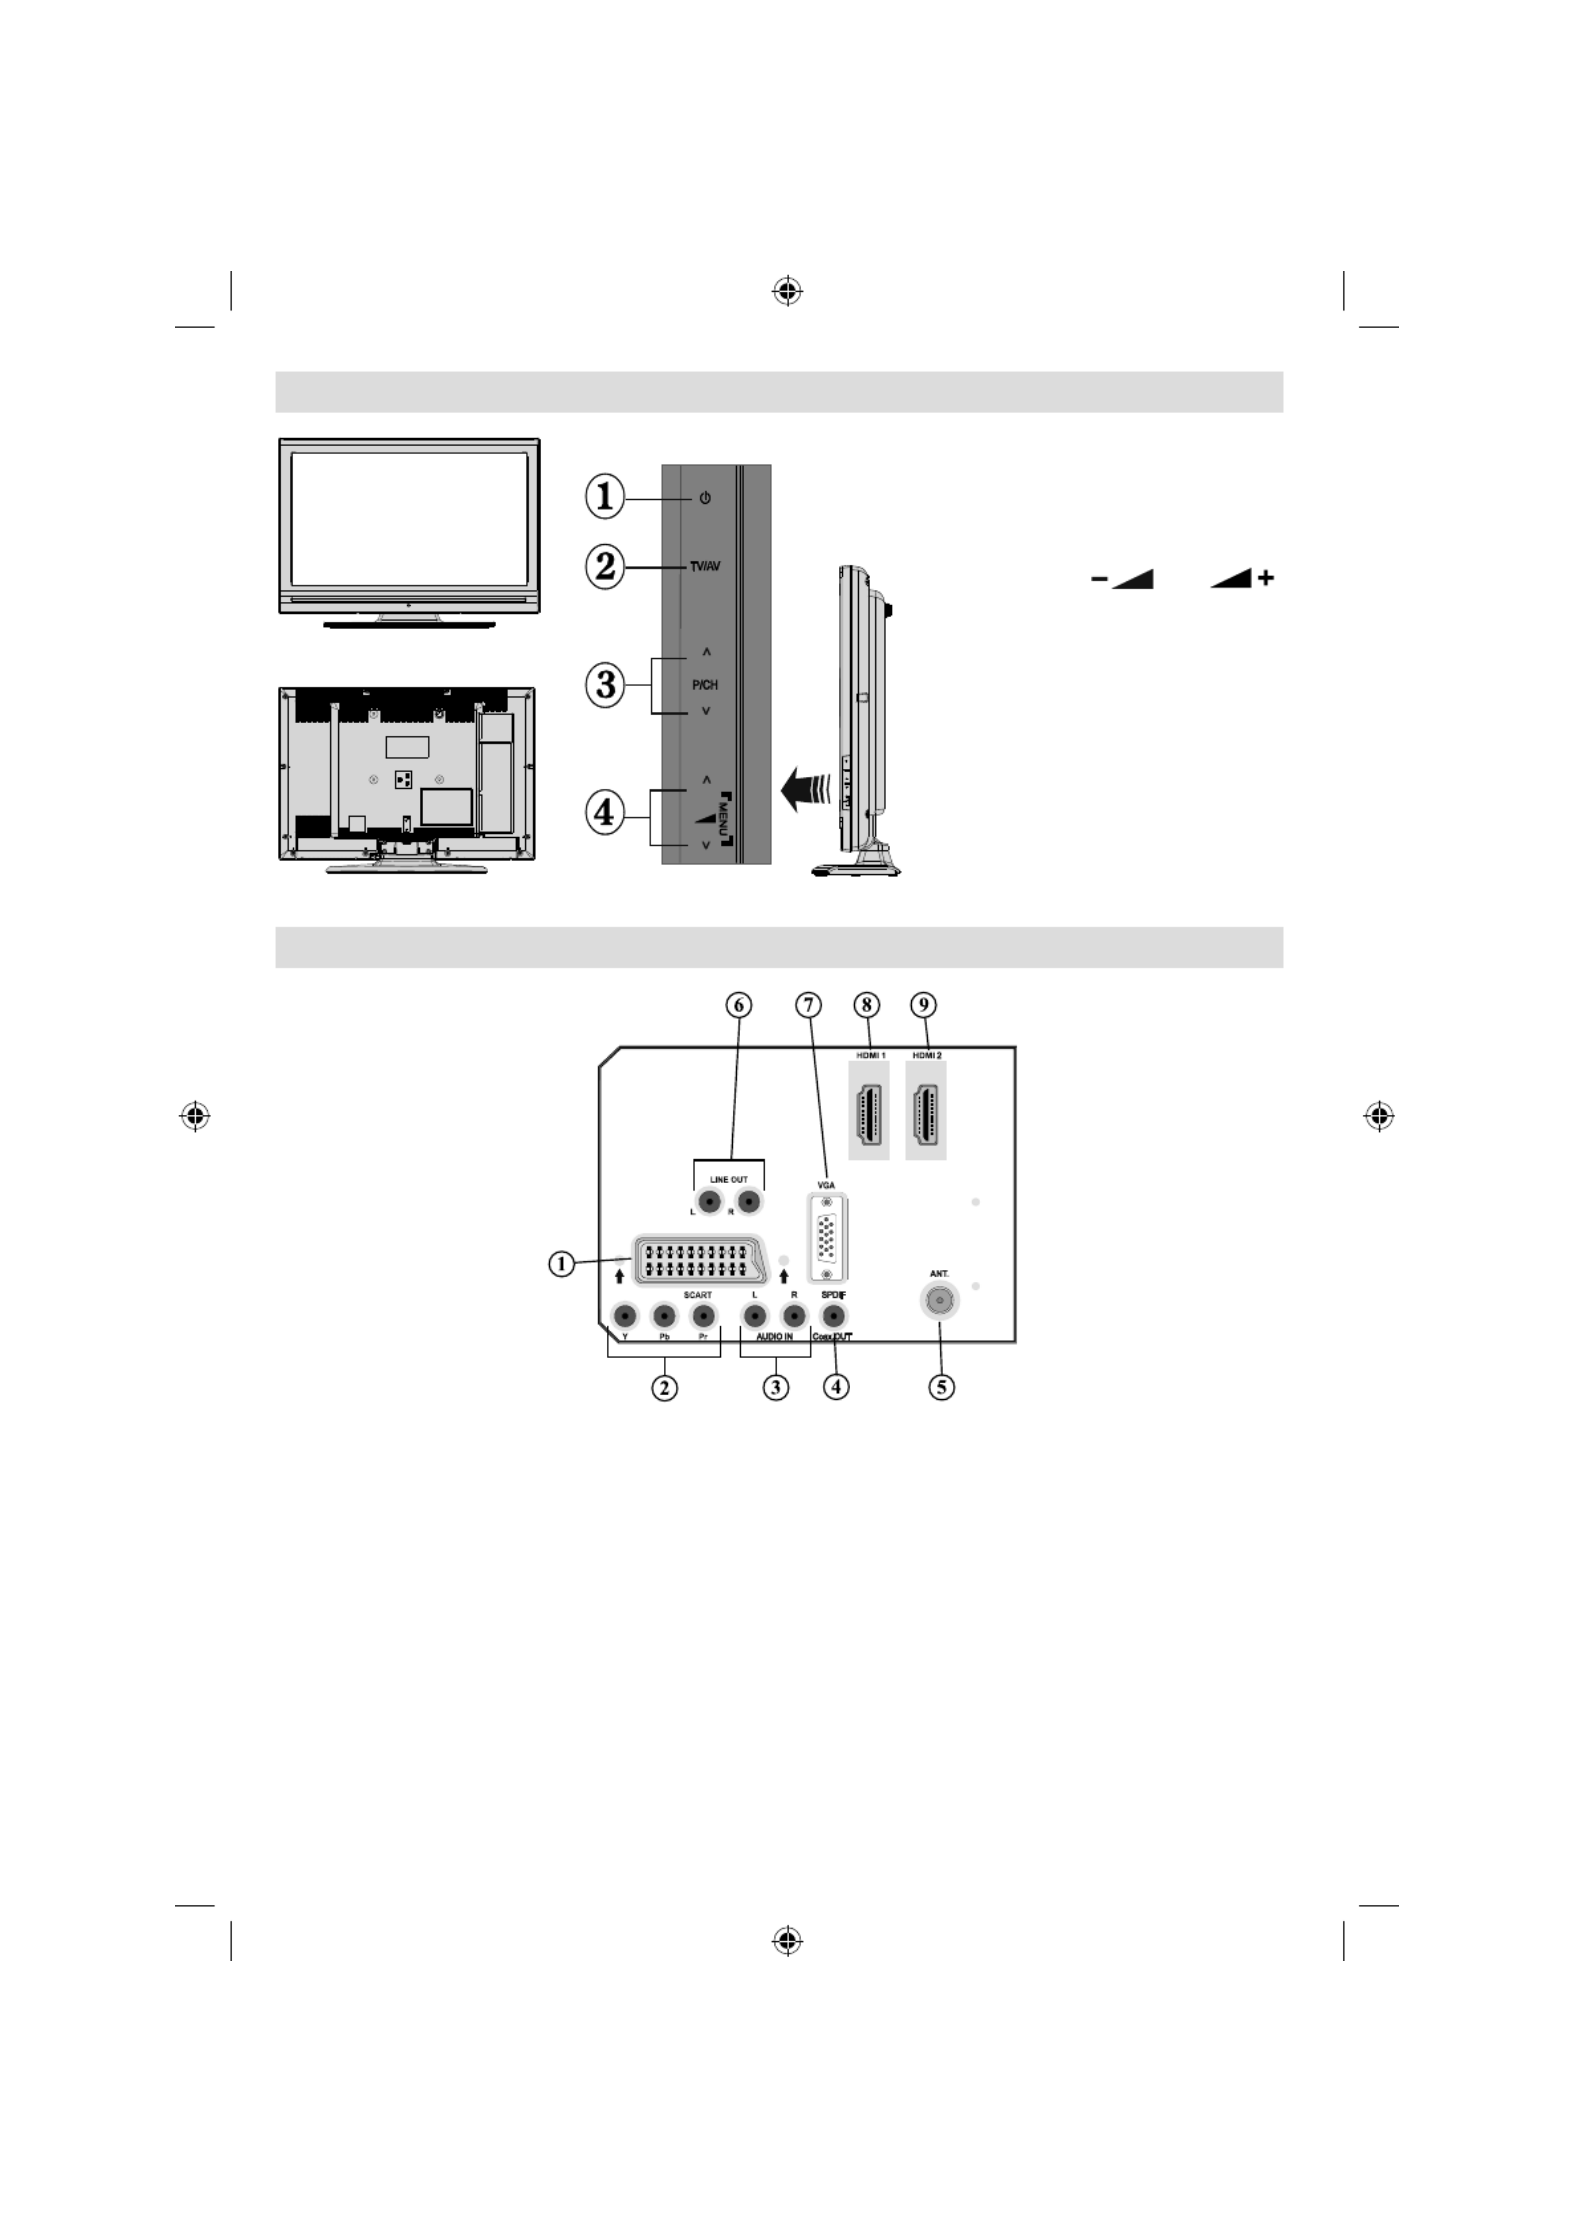
English - 90 -
LCD TV and Operating Buttons
Standby button1.
TV/AV button2.
Programme Up/Down buttons3.
Volume Up/Down buttons4.
Note : Pre ss “ ”” / “
buttons at the same time to view
main menu.
Viewing the Connections- Back Connectors
SCART socket1. inputs or outputs for external devices.
Connect the SCART cable between SCART socket on TV and SCART socket on your external device
(such as a decoder, a VCR or a DVD player).
Note: If an external device is connected via the SCART socket, the TV will automatically switch to AV
mode.
Component Video Inputs (YpBPr)2. are used for connecting component video.
You can connect the component video and audio sockets with a device that has component output.
Connect the component video cables between the COMPONENT VIDEO INPUTS on on the TV and
the component video outputs of your device. While connecting, be sure that the letters on your TV, “ Y ”,
“ Pb ”, “ Pr ” correspond with your device’s connectors.
PC/YPbPr Audio Inputs3. are used for connecting audio signals of a PC or a device that connects to the
TV via YPbPr.
Connect the PC audio cable between the AUDIO INPUTS on the TV and audio output of your PC to
enable PC audio.
Connect the audio cable between AUDIO INPUTS on the TV and audio outputs of your device to
enable component audio.
03_MB25_[GB]_(01-TV)_COST_1900UK_IDTV_BRONZE9_32883_10064228_50152513.indd 90
03_MB25_[GB]_(01-TV)_COST_1900UK_IDTV_BRONZE9_32883_10064228_50152513.indd 90
03_MB25_[GB]_(01-TV)_COST_1900UK_IDTV_BRONZE9_32883_10064228_50152513.indd 90
03_MB25_[GB]_(01-TV)_COST_1900UK_IDTV_BRONZE9_32883_10064228_50152513.indd 9003_MB25_[GB]_(01-TV)_COST_1900UK_IDTV_BRONZE9_32883_10064228_50152513.indd 90 17.08.2009 09:07:30
17.08.2009 09:07:30
17.08.2009 09:07:30
17.08.2009 09:07:3017.08.2009 09:07:30

English - 91 -
S/PDIF Out4. outputs digital audio signals of the currently watched source.
Use an to transfer audio signals to a device that has S/PDIF input.S/PDIF coaxial cable
You should
also set SPDIF Out option in the Sound Menu as On.
RF Input5. connects to an antenna or a cable.
Note that if you use a decoder or a media recorder, you should connect the aerial cable through the
device to the television with an appropriate antenna cable, as shown in the illustrationin the following
pages.
Audio Line Outs 6. output audio signals to an external device such as an optional sound system.
To connect the external speakers to your TV, use AUDIO LINE OUTS of the TV with an audio cable.
Note: Line out feature cannot be used while in HDMI source. You can use SPDIF instead.
PC Input7. is for connecting a personal computer to the TV set.
Connect the PC cable between the PC INPUT on the TV and the PC output on your PC.
HDMI 1: 8. HDMI input
HDMI 2 : 9. HDMI input
HDMI Inputs are for connecting a device that has an HDMI socket.
Your LCD Television is capable of displaying High Defi nition pictures from devices such as a High
Defi nition Satellite Receiver or DVD Player. These devices must be connected via the HDMI sockets
or Component Socket. These sockets can accept either 480i, 480p, 576p, 576i, 720p, 1080i, 1080p
signals. No sound connection is needed for an HDMI to HDMI connection.
Viewing the Connections - Side Connectors
Headphone jack is used for connecting an external headphone to the system. 1.
Connect to the HEADPHONE jack to listen to the TV from headphones (optional).
Video Input is used for connecting video signals of external devices.Connect the 2.
video cable between the VIDEO IN socket on the TV and the VIDEO OUT jack on
your device.
Audio Inputs are used for connecting audio signals of external devices. Connect the 3.
audio cable between the AUDIO INPUTS on the TV and the AUDIO OUTPUT jacks
on your device.
Note: If you connect a device to the TV via the VIDEO INPUT, you should also
connect your device with an audio cable to the AUDIO INPUTS of the TV to enable
audio.
.
Aerial Connection
• Connect the aerial or cable TV plug to the AERIAL INPUT socket located at the rear of the TV.
03_MB25_[GB]_(01-TV)_COST_1900UK_IDTV_BRONZE9_32883_10064228_50152513.indd 91
03_MB25_[GB]_(01-TV)_COST_1900UK_IDTV_BRONZE9_32883_10064228_50152513.indd 91
03_MB25_[GB]_(01-TV)_COST_1900UK_IDTV_BRONZE9_32883_10064228_50152513.indd 91
03_MB25_[GB]_(01-TV)_COST_1900UK_IDTV_BRONZE9_32883_10064228_50152513.indd 9103_MB25_[GB]_(01-TV)_COST_1900UK_IDTV_BRONZE9_32883_10064228_50152513.indd 91 17.08.2009 09:07:34
17.08.2009 09:07:34
17.08.2009 09:07:34
17.08.2009 09:07:3417.08.2009 09:07:34

English - 92 -
Power Connection
IMPORTANT : The TV set is designed to operate on
220-240V AC, 50 Hz.
• After unpacking, allow the TV set to reach the
ambient room temperature before you connect the
set to the mains.
• Plug the power cable to the mains socket outlet.
Connecting the LCD TV to a PC
For displaying your computer’s screen image on
your LCD TV, you can connect your computer to the
TV set.
• Power off both computer and display before making
any connections.
• Use 15-pin D-sub display cable to connect a PC to
the LCD TV.
• When the connection is made, switch to PC source.
See “Input selection” section.
• Set the resolution that suits your viewing requirements.
Resolution information can be found in the appendix
parts.
PC audio cable
(not supplied)
to INPUTS AUDIO
on TV the
PC cableRGB
(not supplied)
to input PC
Audio
Inputs
PC Input
Connecting to a DVD Player
If you want to connect a DVD player to your LCD
TV, you can use connectors of the TV set. DVD
players may have different connectors. Please refer
to your DVD player’s instruction book for additional
information. Power off both the TV and the device
before making any connections.
Note: Cables shown in the illustration are not
supplied.
• If your DVD player has an HDMI socket, you can
connect via HDMI. When you connect to DVD player
as illustrated below, switch to HDMI source. See,
“Input Selection” section.
• Most DVD players are connected through
COMPONENT SOCKETS. Use a component video
cable to connect video input. For enabling audio,
use a component audio cable as illustrated below.
When the connection is made, switch to YPbPr
source. See, “Input selection” section.
• You may also connect through the SCART socket.
Use a SCART cable as shown below.
Note : These three methods of connection perform the
same function but in different levels of quality. It is not
necessary to connect by all three methods.
HDMI
input
Scart socket
Component
video
inputs
Component
audio
inputs
DVD Player
Using Side AV Connectors
You can connect a range of optional equipment
to your LCD TV. Possible connections are shown
below. Note that cables shown in the illustration are
not supplied.
• For connecting a camcorder, connect to the S-VIDEO
or VIDEO IN socket and the AUDIO SOCKETS. Do
not connect the camcoder to S-VIDEO and VIDEO
IN socket at the same time since it can cause noise
in the picture. For selecting the related source, see
the section “Input selection” in the following parts.
• To listen the TV sound from headphones, connect
to the HEADPHONE jack of theTV.
Camcorder
Headphone
03_MB25_[GB]_(01-TV)_COST_1900UK_IDTV_BRONZE9_32883_10064228_50152513.indd 92
03_MB25_[GB]_(01-TV)_COST_1900UK_IDTV_BRONZE9_32883_10064228_50152513.indd 92
03_MB25_[GB]_(01-TV)_COST_1900UK_IDTV_BRONZE9_32883_10064228_50152513.indd 92
03_MB25_[GB]_(01-TV)_COST_1900UK_IDTV_BRONZE9_32883_10064228_50152513.indd 9203_MB25_[GB]_(01-TV)_COST_1900UK_IDTV_BRONZE9_32883_10064228_50152513.indd 92 17.08.2009 09:07:36
17.08.2009 09:07:36
17.08.2009 09:07:36
17.08.2009 09:07:3617.08.2009 09:07:36
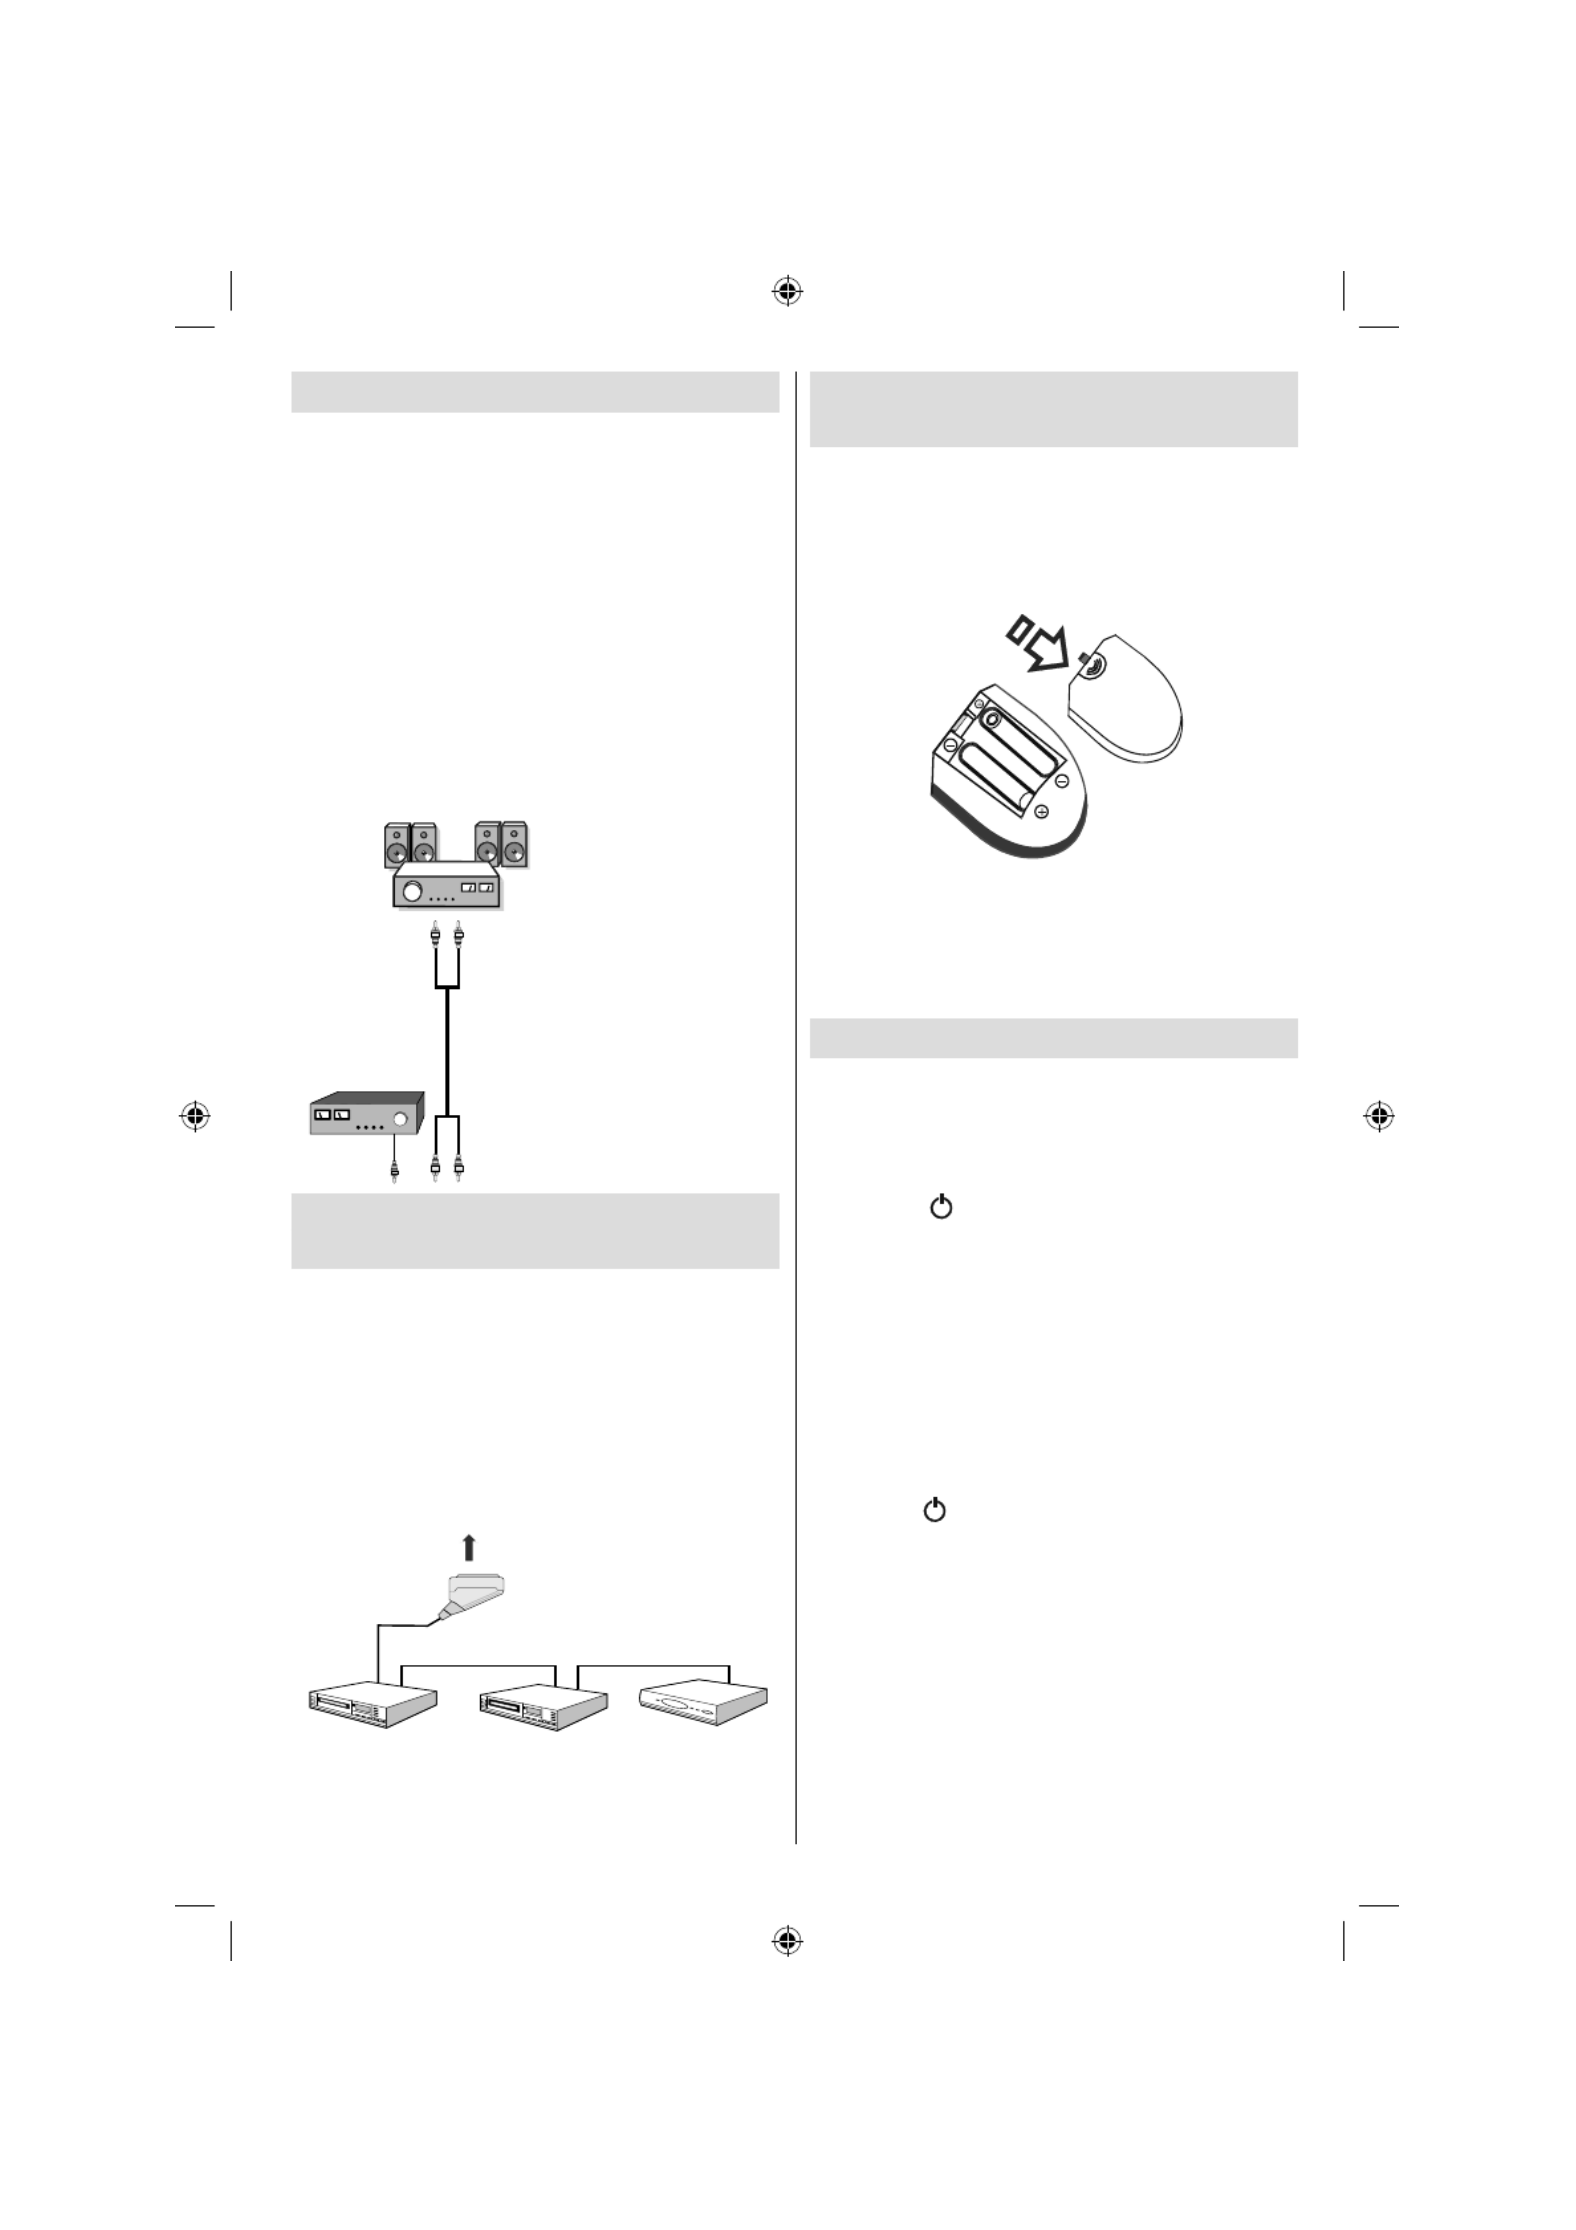
English - 93 -
Using Other Connectors
You can connect a range of optional equipment
to your LCD TV. Possible connections are shown
below. Note that cables shown in the illustration are
not supplied.
• To connect external speakers, use an audio cable.
Do not reverse the AUDIO LEFT and AUDIO RIGHT
jacks. Turn on the LCD TV and external speaker set
after all connections are made. Refer to your speaker
set’s manual for further queries.
• For connecting a to a device that has SPDIF support,
use an appropriate SPDIF cable to enable sound
connection. You should also set SPDIF Out option
in the Sound menu as On.
External Speakers
A device that
supports
SPDIF signal.
Connecting Other Equipment via
Scart
Most devices support SCART connection. You can
connect a; DVD recorder, a VCR or a decoder to your
LCD TV by using the SCART socket. Note that cables
shown in the illustration are not supplied.
Power off both the TV and the devices before making
any connections.
For more information, refer to your device’s own
instruction book.
Scart socket
Decoder
DVD Recorder Video Recorder
Inserting Batteries in the Remote
Control Handset
• Remove the battery cover located on the back of
the handset by gently pulling backwards from the
indicated part.
• Insert two AAA/R3 or equivalent type batteries
inside. Place the batteries in the right directions and
replace the battery cover.
Note : Remove the battery from remote control
handset when it is not to be used for a long period.
Otherwise it can be damaged due to any leakage of
batteries.
Remote range is approximately 7m/23ft.
Switching the TV On/Off
To Switch the TV On
• Connect the power cord to the 220-240V AC 50 Hz.
Then the standby LED lights up.
• To switch on the TV from standby mode either:
• Press the “ ” button, P+ / P- or a numeric button
on the remote control.
• Press the STANDBY button, -P/CH or P/CH+ button
on the TV. The TV will then switch on.
Note : If you switch on your TV via PROGRAMME
UP/DOWN buttons on the remote control or on the
TV set, the programme that you were watching last
will be reselected.
By either method the TV will switch on.
To Switch the TV Off
• Press the “ ” button on the remote control or press
the STANDBY switch on the TV, so the TV will switch
to standby mode.
• To power down the TV completely, unplug the
power cord from the mains socket.
Note: When the TV is switched to standby mode,
standby LED can blink to indicate that features such
as Standby Search, Over Air Download or Timer is
active.
03_MB25_[GB]_(01-TV)_COST_1900UK_IDTV_BRONZE9_32883_10064228_50152513.indd 93
03_MB25_[GB]_(01-TV)_COST_1900UK_IDTV_BRONZE9_32883_10064228_50152513.indd 93
03_MB25_[GB]_(01-TV)_COST_1900UK_IDTV_BRONZE9_32883_10064228_50152513.indd 93
03_MB25_[GB]_(01-TV)_COST_1900UK_IDTV_BRONZE9_32883_10064228_50152513.indd 9303_MB25_[GB]_(01-TV)_COST_1900UK_IDTV_BRONZE9_32883_10064228_50152513.indd 93 17.08.2009 09:07:39
17.08.2009 09:07:39
17.08.2009 09:07:39
17.08.2009 09:07:3917.08.2009 09:07:39
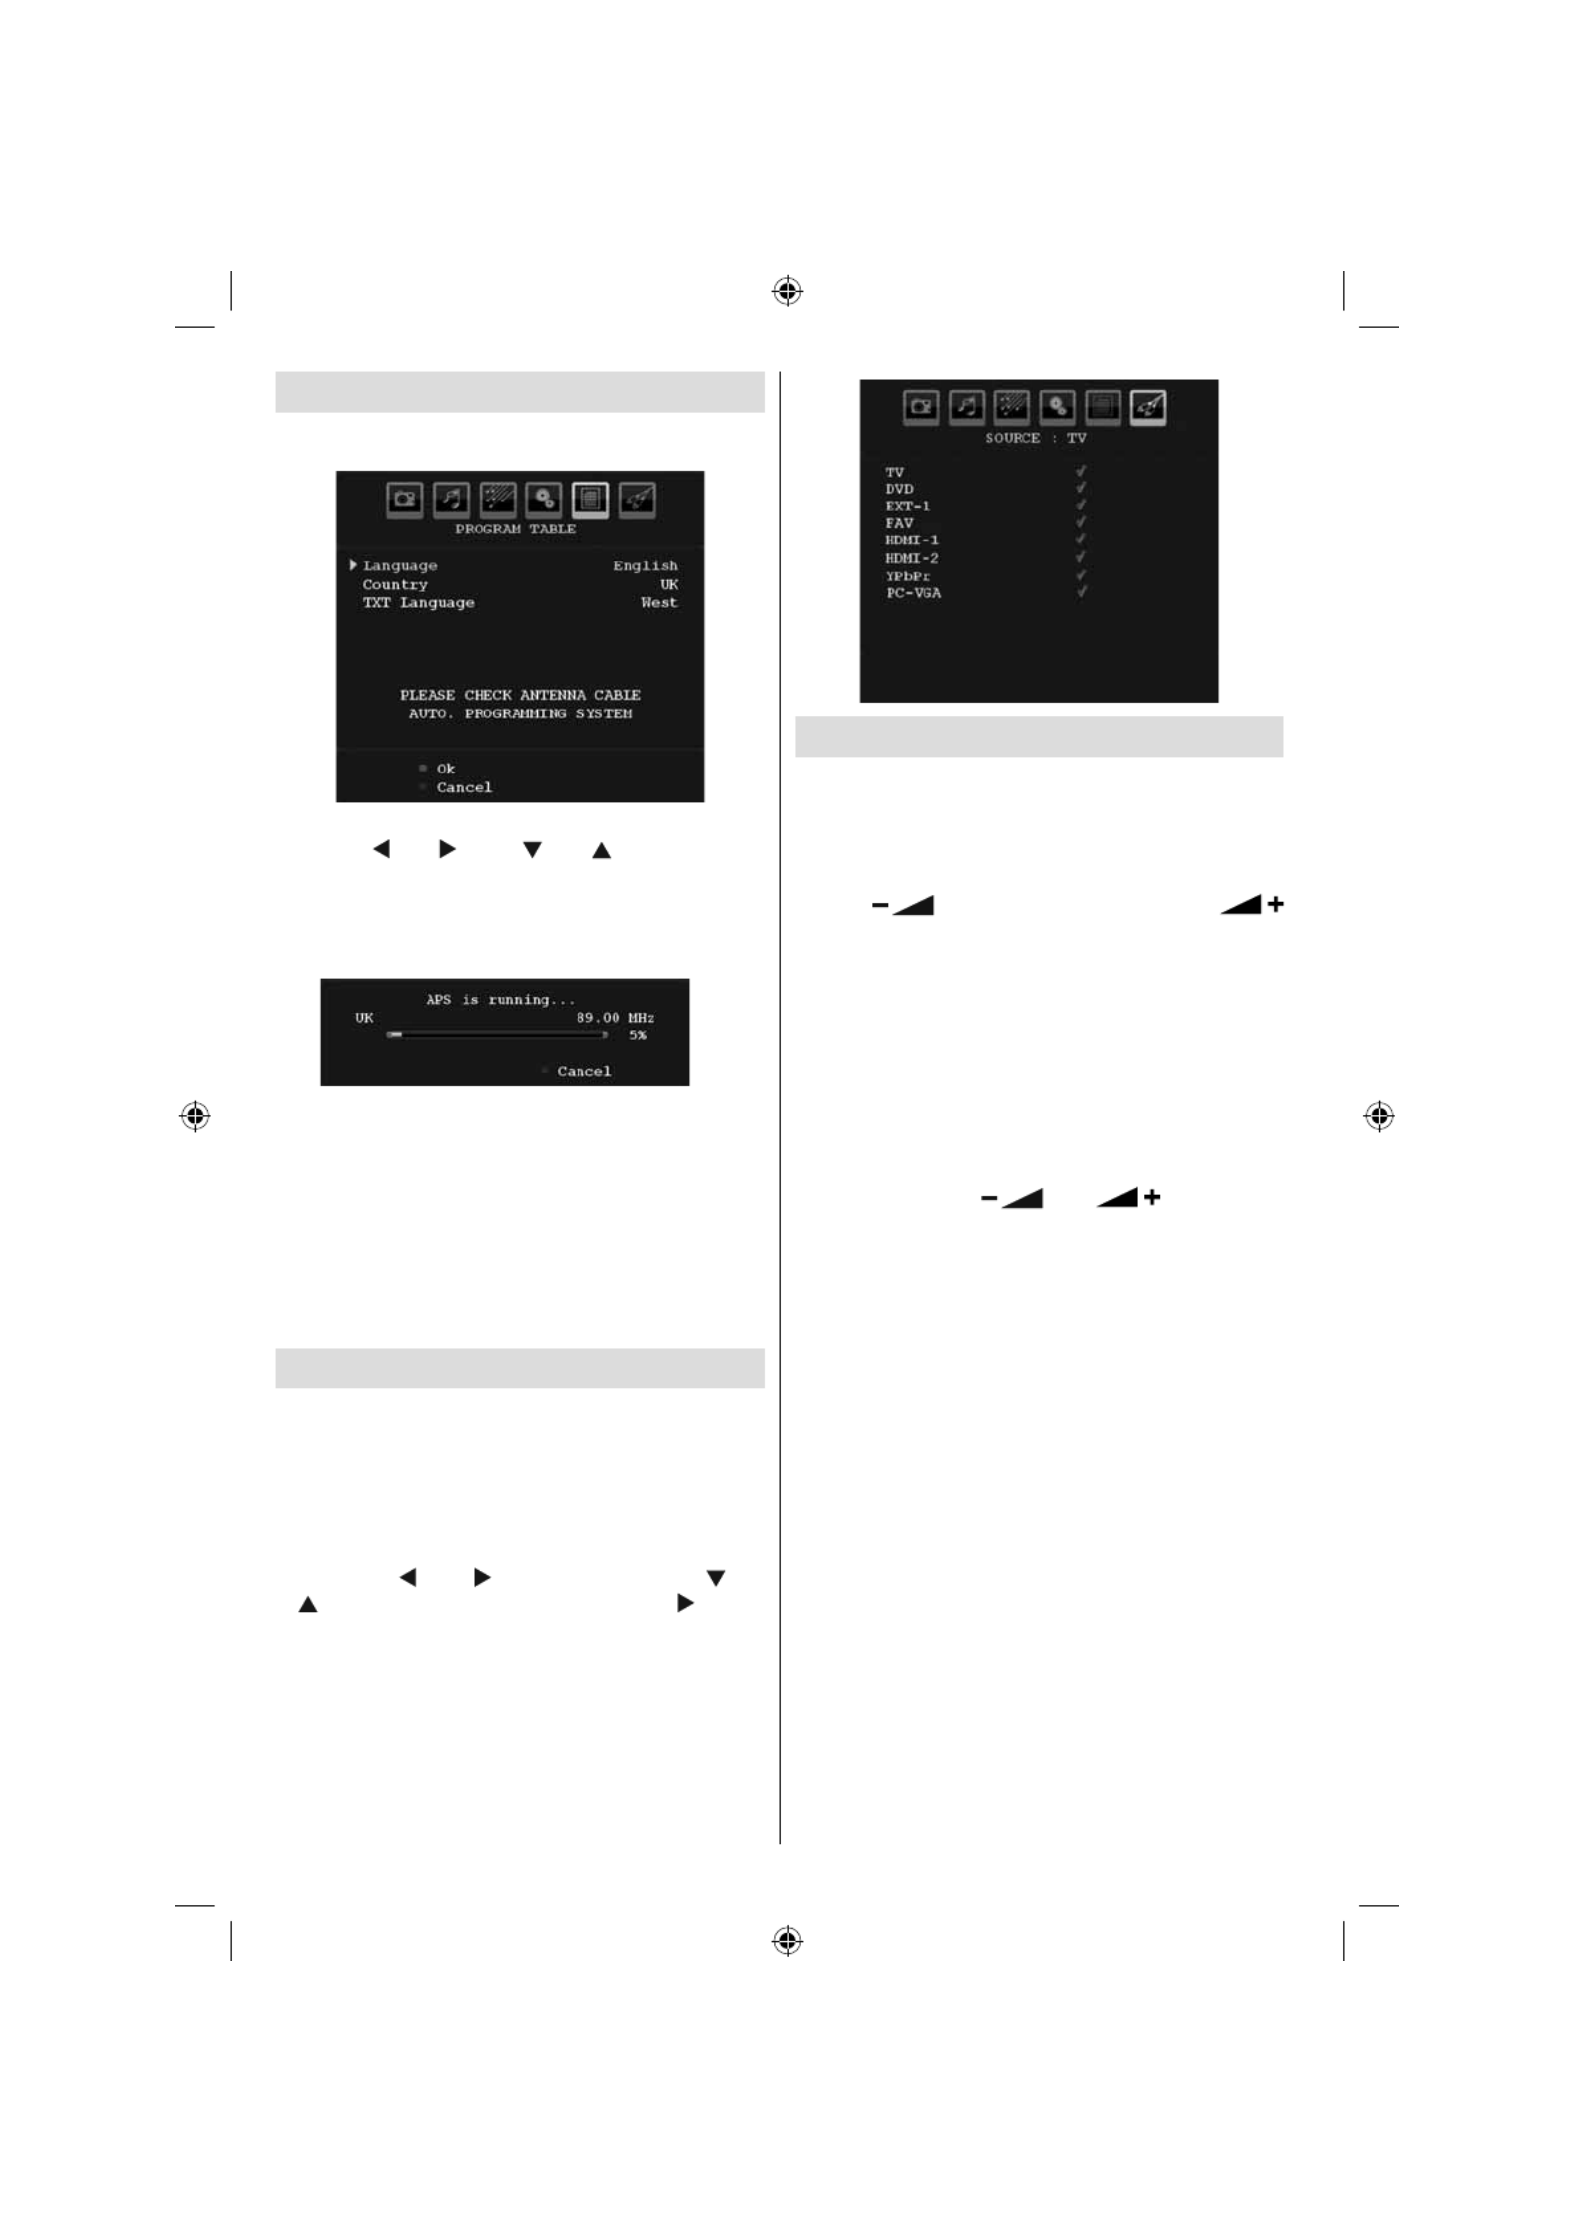
English - 94 -
First Time Installation
When the TV set is operated for the rst time, the
following menu screen will be displayed:
Select your Country, Language and Text language
by using “ ” or “ ” and “ ” or “ ” buttons. Press
OK or RED button to continue. To cancel, press the
BLUE button.
The following menu will be displayed during the
automatic tuning:
After APS is nalized, the programme table will appear
on the screen. In the programme table you will see
the programme numbers and names assigned to the
programmes.
If you do not accept the locations and/or the
programme names, you can change them via the
program table.
Do not turn off the TV while initializing firs time
installation.
Input Selection
Once you have connected external systems to your
TV, you can switch to different input sources.
• Press button on your remote control for SOURCE
directly changing sources.
or,
• Select “ ” option from the main menu Source
by using “ ” or “ ” button. Use then “ ” or
“ ” button to highlight an input and press “ ” button
to select.
Note : You can mark desired source options by
pressing the OK button. Therefore, when SOURCE
button is pressed, only the marked source options will
be available (except for the TV source).
Basic Operations
You can operate your TV using both the remote
control and onset buttons.
Operation with the Buttons on the TV
Volume Setting
• Press “ ” button to decrease volume or
button to increase volume, so a volume level scale
(slider) will be displayed on the screen.
Programme Selection
• Press “ P/CH + ” button to select the next programme or
“ P/CH - ” button to select the previous programme.
Viewing Main Menu
• Note: Press V+/V- buttons at the same time to view
main menu. In the Main menu select sub-menu
using “ P/CH - ” or “ P/CH + ” buttons and enter the
sub-menu using “ ” or “ ” buttons. To
learn the usage of the menus, refer to the menu
system sections.
AV Mode
• Press the “ TV/AV ” button in the control panel on the
TV to switch between AV modes.
Operation with the Remote Control
• The remote control of your TV is designed to control
all the functions of the model you selected. The
functions will be described in accordance with the
menu system of your TV.
• Functions of the menu system are described in the
following sections.
Volume Setting
• Press button to increase the volume. Press V+ V-
button to decrease the volume. A volume level scale
(slider) will be displayed on the screen.
Programme Selection (Previous or Next
Programme)
• Press “ P - ” button to select the previous
programme.
• Press “ P + ” button to select the next programme.
03_MB25_[GB]_(01-TV)_COST_1900UK_IDTV_BRONZE9_32883_10064228_50152513.indd 94
03_MB25_[GB]_(01-TV)_COST_1900UK_IDTV_BRONZE9_32883_10064228_50152513.indd 94
03_MB25_[GB]_(01-TV)_COST_1900UK_IDTV_BRONZE9_32883_10064228_50152513.indd 94
03_MB25_[GB]_(01-TV)_COST_1900UK_IDTV_BRONZE9_32883_10064228_50152513.indd 9403_MB25_[GB]_(01-TV)_COST_1900UK_IDTV_BRONZE9_32883_10064228_50152513.indd 94 17.08.2009 09:07:40
17.08.2009 09:07:40
17.08.2009 09:07:40
17.08.2009 09:07:4017.08.2009 09:07:40

English - 95 -
Programme Selection (Direct Access)
• Press numeric buttons on the remote control to select
programmes between 0 and 9. The TV will switch
to the selected programme. To select programmes
between 10 - 299 (for IDTV) or 10-199 (for analogue),
press the numeric buttons consecutively. The limit
of the delay time is 3 seconds.
• Press directly the programme number to reselect
single digit programmes.
Menu System
Picture Menu
Mode
For your viewing requirements, you can set the related
mode option.
Press “ ” or “ ” button to select Mode . Press “
” or “ ” button to choose from one of these options:
Cinema , Dynamic and Natural .
Brightness/Contrast/Colour/Sharpness/
Hue
Press “ ” or “ ” button to select the desired option.
Press “ ” or “ ” button to set the level.
Note : Hue option can only be visible when the TV
receives an NTSC signal.
Colour Temp
Press “ ” or “ ” button to select Colour Temp . Press
“ ” or “ ” to choose from one of these options: Cool ,
Normal and Warm .
Note :
• Setting Cool option gives white colours a slight
blue stress.
• Setting Warm option gives white colours a slight
red stress.
• For normal colours, select Normal option.
Noise Reduction
If the broadcast signal is weak and the picture is
noisy, use Noise Reduction setting to reduce the
noise amount.
Press “ ” or “ ” button to select Noise Reduction.
Press “ ” or “ ” to choose from one of these options:
Low , Medium , High or Off .
Film Mode
Films are recorded at a different number of frames per
second to normal television programmes.
Press “ ” or “ ” button to select Film Mode .
Press “ ” or “ ” button to set this feature On or Off.
Turn this feature on when you are watching.
lms to see the fast motion scenes clearly.
Game Mode (optional)
Select Game Mode by pressing “ ” or “ ” button.
Use “ ” or “ ” button to set Game Mode as On or
Off . When Game Mode is set to On, speci c game
mode settings, which are optimized for better video
quality, will be loaded.
Also; Picture Mode, Contrast, Brightness, Sharpness,
Colour and Colour Temp settings will be invisible and
disabled while Game Mode is on.
Note :
Picture mode selection button on the remote control
will have no function while Game Mode is on.
Picture Zoom
Select Picture Zoom by pressing “ ” or “ ”
button.
Use “ ” or “ ” buttons, to change picture zoom to
Auto , 16:9 , 4:3 , Panoramic , 14:9 , Cinema , Subtitle
or Zoom .
Store
Press “ ” or “ ” button to select Store. Press “ ”
or OK button to store the settings. “ Stored... ” will be
displayed on the screen.
Reset
Press “ ” or “ ” button to select Reset . Press
“ ” or “ ” or OK button to reset the picture modes to
factory default settings.
03_MB25_[GB]_(01-TV)_COST_1900UK_IDTV_BRONZE9_32883_10064228_50152513.indd 95
03_MB25_[GB]_(01-TV)_COST_1900UK_IDTV_BRONZE9_32883_10064228_50152513.indd 95
03_MB25_[GB]_(01-TV)_COST_1900UK_IDTV_BRONZE9_32883_10064228_50152513.indd 95
03_MB25_[GB]_(01-TV)_COST_1900UK_IDTV_BRONZE9_32883_10064228_50152513.indd 9503_MB25_[GB]_(01-TV)_COST_1900UK_IDTV_BRONZE9_32883_10064228_50152513.indd 95 17.08.2009 09:07:41
17.08.2009 09:07:41
17.08.2009 09:07:41
17.08.2009 09:07:4117.08.2009 09:07:41

English - 96 -
Sound Menu
Volume
Press “ ” or “ ” button to select Volume . Press “ ”
or “ ” button to change the level of the Volume.
Equalizer
Press “ ” or “ ” button to select Equalizer . Press “
” button to view equalizer menu.
Press “ ” or “ ” button to change the preset. In
equalizer menu, the preset can be changed to Music ,
Movie , Speech , Flat , Classic and User .
Select the desired frequency by pressing “ ” or “ ”
button and increase or decrease the frequency gain
by pressing “ ” or “ ” button.
Press the “ M ” button to return to the previous menu.
Note : Equalizer menu settings can be changed only
when the Equalizer Mode is in User .
Balance
This setting is used for emphasizing left or right
speaker balance.
Press “ ” or “ ” button to select . Press “Balance
” or “ ” button to change the level of the balance.
Balance level can be adjusted between -32 and +
32.
Headphone
Press “ ” or “ ” button to select Headphone . Press
“ ” button to view the headphone menu.
Note: Headphone will be disabled when SPDIF option
is set to on.
Headphone sub-menu options are described below:
Volume
Press “ ” or “ ” button to select Volume . Press “
” button to increase headphone volume level. Press
“ ” button to decrease headphone volume level.
Headphone volume level can be adjusted between
0 and 63 .
Sound Mode (optional)
Press “ ” or “ ” button to select Sound Mode . Using
“ ” or “ ” button, you can select Mono, Stereo, Dual I
or Dual II mode, only if the selected channel supports
that mode.
AVL
Automatic Volume Limiting (AVL) function adjusts the
sound to obtain xed output level between programmes
(For instance, volume level of advertisements tend to
be louder than programmes).
Press “ ” or “ ” button to select AVL . Press “ ” or
“ ” button to set the AVL as On or Off .
Spdif Out
Press “ ” or “ ” button to select Spdif Out . Press “ ”
or “ ” button to set the Spdif Out . as On or Off .
Note : If Spdif Out is set to On, headphone will be
disabled.
SRS TruSurr XT (optional)
By pressing “ ” or “ ” select SRS TruSurr XT .
Press “ ” or “ ” button to set SRS TruSurr XT as
on or off.
Note: If you set SRS TruSurr XT as On, some features
in the Sound menu can be unavailable to be set.
Dolby Virtual Speaker (optional)
This feature is used to create the impression that
sound is coming from around the room instead
of the set speakers. Pressing the “ ” or “ ”
buttons will turn the feature on or off.
Note: If you set Dolby Virtual Speaker as On, some
features in the Sound menu can be unavailable to
be set.
Effect
If you are watching a mono broadcast, set Effect on to
obtain a better sound effect which will be more stereo-
like. If the current sound system is stereo, switching
this effect on will give a more spatial effect.
Press “ ” or “ ” button to select Effect. Press “ ”
or “ ” button to set as On or Off .
03_MB25_[GB]_(01-TV)_COST_1900UK_IDTV_BRONZE9_32883_10064228_50152513.indd 96
03_MB25_[GB]_(01-TV)_COST_1900UK_IDTV_BRONZE9_32883_10064228_50152513.indd 96
03_MB25_[GB]_(01-TV)_COST_1900UK_IDTV_BRONZE9_32883_10064228_50152513.indd 96
03_MB25_[GB]_(01-TV)_COST_1900UK_IDTV_BRONZE9_32883_10064228_50152513.indd 9603_MB25_[GB]_(01-TV)_COST_1900UK_IDTV_BRONZE9_32883_10064228_50152513.indd 96 17.08.2009 09:07:42
17.08.2009 09:07:42
17.08.2009 09:07:42
17.08.2009 09:07:4217.08.2009 09:07:42

English - 97 -
Store
Press “ ” or “ ” button to select Store. Press “ ”
or OK button to store the settings. “ Stored... ” will be
displayed on the screen.
Feature Menu
Sleep Timer
Press “ ” or “ ” button to select Sleep Timer . Use
“ ” or “ ” button to set the Sleep Timer.
The timer can be programmed between Off and 120
minutes in steps of 10 minutes.
If Sleep Timer is activated, at the end of the selected
time, the TV goes automatically to standby mode.
Child Lock
Press “ ” or “ ” button to select Child Lock .
Use “ ” or “ ” button to set the Child Lock On or Off .
When On is selected, the TV can only be controlled
by the remote control handset. In this case the control
panel buttons will not work.
Hence, if one of those buttons is pressed, Child Lock
On will be displayed on the screen when the menu
screen is not visible.
Language
Press “ ” or “ ” button to select Language . Use “
” or “ ” button to select the Language .
Default Zoom
While zoom mode is set as AUTO , the TV will set
the zoom mode in accordance with the signal of
the broadcast. If there is no WSS or aspect ratio
information, the TV will then use this setting to adopt.
Press “ ” or “ ” button to select Default Zoom . You
can set Default Zoom to Panoramic , 16:9 , 4:3 or
14:9 by pressing “ ” or “ ” button.
Blue Background
If the signal is weak or absent, the TV will automatically
change to a blue screen. To enable this, set Blue
Background to On .
By pressing “ ” or “ ” button, select Blue
Background . Press “ ” or “ ” button to set Blue
Background as On or Off .
Menu Background
Press “ ” or “ ” button to select Menu Background .
You can set menu background level by pressing “
” or “ ” button.
Backlight
This setting controls the backlight level. Select
Backlight by pressing “ ” or “ ” button. Press“
” or “ ” button to set Backlight to Auto, Medium ,
Maximum or Minimum .
Menu Timeout
To set a speci c display timeout for menu screens,
set a value for this option.
Press “ ” or “ ” button to select Menu Timeout . Use
“ ” or “ ” button to change menu timeout to 15 sec ,
30 sec or 60 sec .
Teletext Language
Press “ ” or “ ” button to select Teletext Language .
Use “ ” or “ ” button to change Teletext Language to
West, East , Turk/Gre , Cyrillic, Arabic or Persian .
Ext Out
Press “ ” or “ ” button to select Ext Out. Use “ ” or
“ ” button to set the Ext Out as On or Off.
Note :
For copying from a DVD or VCR device, you should
choose desired source from source menu and turn
“On” to EXT Out from feature menu.
Ext Out should be On in order to use Timers function
in the DTV mode.
HDMI PC Full Mode (optional)
If you want to view PC screen in HDMI mode by using
external connection, HDMI PC FULL MODE option
should be On to adjust the screen ratio correctly. This
item might be inactive in some resolutions.
Note: If you connect an HDMI device and switch the
TV to HDMI mode, this feature will be visible (except
for 1080i/1080P resolution).
Full Mode (optional)
If you connect a device via HDMI or YPbPr connectors
and set 1080i/1080P resolutions, Full Mode item will
be visible.You can set Full Mode as 1:1 or Normal
by using “ ” or “ ”.If you select 1:1, screen ratio will
be adjusted correctly. If you set Normal, screen ratio
may expand.
03_MB25_[GB]_(01-TV)_COST_1900UK_IDTV_BRONZE9_32883_10064228_50152513.indd 97
03_MB25_[GB]_(01-TV)_COST_1900UK_IDTV_BRONZE9_32883_10064228_50152513.indd 97
03_MB25_[GB]_(01-TV)_COST_1900UK_IDTV_BRONZE9_32883_10064228_50152513.indd 97
03_MB25_[GB]_(01-TV)_COST_1900UK_IDTV_BRONZE9_32883_10064228_50152513.indd 9703_MB25_[GB]_(01-TV)_COST_1900UK_IDTV_BRONZE9_32883_10064228_50152513.indd 97 17.08.2009 09:07:45
17.08.2009 09:07:45
17.08.2009 09:07:45
17.08.2009 09:07:4517.08.2009 09:07:45

English - 98 -
Install Menu
Program
Press “ ” or “ ” button to select Program. Use “ ”
or “ ” button to select the program number. You can
also enter a number using the numeric buttons on the
remote control. There are 200 programme storage
between 0 and 199.
Band
Band can be selected either C or S. Press “ ” or “
” button to set Band.
Channel
Channel can be changed by “ ” or “ ” button or
numeric buttons.
Colour System
Press “ ” or “ ” button to select Colour System. Use
“ ” or “ ” button to change the colour system to PAL,
PAL 60, SECAM or AUTO.
Sound System
Press “ ” or “ ” button to select Sound System.
Press “ ” or “ ” button to change the sound system
to BG,DK, I, L or L’.
Fine Tune
Press “ ” or “ ” button to select Fine Tune. Press “
” or “ ” button to adjust the tuning.
Search
Press “ ” or “ ” button to select Search. Use “ ”
or “ ” button to start programme searching. You can
also enter the desired frequency using the numeric
buttons while Search item is highlighted.
Store
Press “ ” or “ ” button to select Store. Press “ ”
or OK button to store the settings. “ Stored... ” will be
displayed on the screen.
Install Menu in AV Modes
The following screen appears in the install menu when
the TV is in AV modes. Note that limited options will
be available. Switch to TV mode for viewing complete
version of the Install menu.
Colour System
Press “ ” or “ ” button to select Colour System . Use
“ ” or “ ” button to change the colour system to PAL,
SECAM, PAL60, AUTO, NTSC 4,43 NTSC 3,58.or
Store
Press “ ” or “ ” button to select Store Program .
Press “ ” or OK button to store the settings.
“ Stored... ” will be displayed on the screen.
Program Table
Select Program Table by pressing “ ” or “ ” button.
Press “ ” to display Program Table:
By moving the cursor in four directions you can reach
20 programmes in the same page. You can scroll the
pages up or down by pressing the navigation buttons
to see all the programmes in TV mode (except for the
AV modes). By cursor action, programme selection is
done automatically.
Name
To change the name of a programme, select the
programme and press the RED button.
The rst letter of the selected name will be highlighted.
Press “ ” or “ ” button to change that letter and “ ”
03_MB25_[GB]_(01-TV)_COST_1900UK_IDTV_BRONZE9_32883_10064228_50152513.indd 98
03_MB25_[GB]_(01-TV)_COST_1900UK_IDTV_BRONZE9_32883_10064228_50152513.indd 98
03_MB25_[GB]_(01-TV)_COST_1900UK_IDTV_BRONZE9_32883_10064228_50152513.indd 98
03_MB25_[GB]_(01-TV)_COST_1900UK_IDTV_BRONZE9_32883_10064228_50152513.indd 9803_MB25_[GB]_(01-TV)_COST_1900UK_IDTV_BRONZE9_32883_10064228_50152513.indd 98 17.08.2009 09:07:47
17.08.2009 09:07:47
17.08.2009 09:07:47
17.08.2009 09:07:4717.08.2009 09:07:47

English - 99 -
or “ ” button to select the other letters. By pressing
the RED button, you can store the name.
Move
Select the programme which you want to by move
navigation buttons. Press the GREEN button. By
navigation buttons move the selected programme to
the decided programme space and press the GREEN
button again.
Delete
To delete a programme, press the YELLOW button.
Pressing the YELLOW button again erases the
selected programme from the programme list, and
the following programmes shift one line up.
APS (Auto Programming System)
When you press the BLUE button for starting
automatic tuning, Auto Programming System menu
will appear on the screen:
Country
Press “ ” or “ ” button to select your country. If you
want to exit from A.P.S. function, press the BLUE
button.
When you press OK or RED button for starting
automatic tuning, all stored programmes will be erased
and the TV will search for available channels. During
the search, the following OSD will be displayed:
Whenever you press the BLUE button, APS function
stops and Program Table appears on the screen.
If you wait until the end of APS, Program Table will be
displayed with the programmes found and located.
Source Menu
Press “ ” or “ ” button and select the sixth icon.
Then press “ ” or OK button. Source menu appears
on the screen:
In source menu, highlight a source by pressing “ ”
or “ ” button and switch to that mode by pressing “
” button. Source options are; TV , DVD, EXT-1 , FAV ,
HDMI-1 , HDMI-2 , YPbPr and PC-VGA .
Note : Once you have connected optional equipment
systems to your TV, you should select the required
input to view pictures from that source.
PC Mode Menu System
See “ ” section for Connecting the LCD TV to a PC
connecting a PC to the TV set.
For switching to source, press “ ” button PC SOURCE
on your remote control and select PC input. You can
also use “ ” menu to switch to mode. Source PC
Note that PC mode menu settings are available only
while the TV is in PC source.
PC Position Menu
Select the fi r s t icon by press i n g “ ” or
“ ” button. menu appears on the PC Position
screen:
Autoposition
If you shift the picture horizontally or vertically to an
unwanted position, use this item to put the picture
into correct place automatically. This setting therefore
automatically optimizes the display.
03_MB25_[GB]_(01-TV)_COST_1900UK_IDTV_BRONZE9_32883_10064228_50152513.indd 99
03_MB25_[GB]_(01-TV)_COST_1900UK_IDTV_BRONZE9_32883_10064228_50152513.indd 99
03_MB25_[GB]_(01-TV)_COST_1900UK_IDTV_BRONZE9_32883_10064228_50152513.indd 99
03_MB25_[GB]_(01-TV)_COST_1900UK_IDTV_BRONZE9_32883_10064228_50152513.indd 9903_MB25_[GB]_(01-TV)_COST_1900UK_IDTV_BRONZE9_32883_10064228_50152513.indd 99 17.08.2009 09:07:49
17.08.2009 09:07:49
17.08.2009 09:07:49
17.08.2009 09:07:4917.08.2009 09:07:49

English - 100 -
Select Autoposition item by using “ ” or “ ” buttons.
Press or “ ”, “ ” button. OK
Warning : Please ensure auto adjustment is performed
with a full screen image to ensure best results.
H (Horizontal) Position
This item shifts the image horizontally to right hand
side or left hand side of the screen.
Select H Position item by using “ ” or “ ” button.
Use “ ” or “ ” button to adjust the value.
V (Vertical) Position
This item shifts the image vertically towards the top
or bottom of the screen.
Select V Position item by using “ ” or “ ” button.
Use “ ” or “ ” button to adjust the value.
Phase
Depending on the resolution and scan frequency that
you input to the TV set, you may see a hazy or noisy
picture on the screen. In such a case you can use this
item to get a clear picture by trial and error method.
Select Phase item by using “ ” or “ ” buttons. Use
“ ” or “ ” button to adjust the value.
Dot Clock
Dot Clock adjustments correct the interference
that appear as vertical banding in dot intensive
presentations like spreadsheets or paragraphs or
text in smaller fonts.
Select Dot Clock item by using “ ” or “ ” buttons.
Use “ ” or “ ” button to adjust the value.
PC Picture Menu
For adjusting PC picture items, do the following:
Press “ ” or “ ” button to select the second icon. PC
Picture menu appears on the screen.
Brightness Contrast, , Colour Colour and
Temperature settings in this menu are identical to
settings de ned in TV picture menu under “Analogue
TV Menu System”.
Note : If you set Colour Temp as User, you can de ne
R, G, B settings manually.
Sound, Feature and Source settings are identical to
the settings explained in Analog TV menu system.
Displaying TV Information
Programme Number , Programme Name , Sound
Indicator and Zoom Mode information is displayed
on the screen when a new programme is entered or
“ ” button is pressed. INFO
Mute Function
Press “ ” button to disable sound. Mute indicator will
be displayed in the upper side of the screen.
To cancel mute, there are two alternatives; the rst
one is pressing the “ ” button and the second one
is increasing the volume level.
Picture Mode Selection
By pressing PRESETS button, you can change
Picture Mode settings in accordance with your
viewing requirements. Available options are Dynamic,
Natural and Cinema.
Note: This feature cannot be set while in PC mode.
Freezing Picture
You can freeze the picture on the screen by pressing
the “ OK ” button on the remote control. Press the
“ OK ” button to freeze picture. Press again to quit
freeze mode.
Zoom Modes
You can change the aspect ratio (image size) of the TV
for viewing the picture in different zoom modes.
Press SCREEN button to directly change the zoom
mode.
Available zoom modes are listed below.
Note:
In YPbPr and HDMI modes, while in 720p-1080i
resolutions, only 16:9 mode is available.
Zoom mode cannot be changed while in PC mode.
Auto
When a WSS (Wide Screen Signalling) signal, which
shows the aspect ratio of the picture, is included in
the broadcast signal or the signal from an external
device, the TV automatically changes the ZOOM
mode according to the WSS signal.
• When the AUTO mode does not function correctly
due to poor WSS signal quality or when you want to
change the ZOOM mode, change to another ZOOM
mode manually.
16:9
This uniformly stretches the left and right sides of a
normal picture (4:3 aspect ratio) to ll the wide TV
screen.
• For 16:9 aspect ratio pictures that have been
squeezed into a normal picture (4:3 aspect ratio),
use the 16:9 mode to restore the picture to its
original shape.
03_MB25_[GB]_(01-TV)_COST_1900UK_IDTV_BRONZE9_32883_10064228_50152513.indd 100
03_MB25_[GB]_(01-TV)_COST_1900UK_IDTV_BRONZE9_32883_10064228_50152513.indd 100
03_MB25_[GB]_(01-TV)_COST_1900UK_IDTV_BRONZE9_32883_10064228_50152513.indd 100
03_MB25_[GB]_(01-TV)_COST_1900UK_IDTV_BRONZE9_32883_10064228_50152513.indd 10003_MB25_[GB]_(01-TV)_COST_1900UK_IDTV_BRONZE9_32883_10064228_50152513.indd 100 17.08.2009 09:07:50
17.08.2009 09:07:50
17.08.2009 09:07:50
17.08.2009 09:07:5017.08.2009 09:07:50

English - 101 -
4:3
Use to view a normal picture (4:3 aspect ratio) as this
is its original size.
Panoramic
This stretches the left and right sides of a normal
picture (4:3 aspect ratio) to ll the screen, without
making the picture appear unnatural.
The top and bottom of the picture are slightly cut off.
14:9
This zooms up the wide picture (14:9 aspect ratio) to
the upper and lower limits of the screen.
Cinema
This zooms up the wide picture (16:9 aspect ratio) to
the full screen.
Subtitle
This zooms up the wide picture (16:9 aspect ratio)
with subtitles to the full screen.
Zoom
This option zooms to the picture.
Note: You can shift to screen up or down by pressing
“ ” / “ ” buttons while picture zoom is selected as
panaromic, 14:9, Cinema or Subtitle.
Teletext
Teletext system transmits information such as news,
sports and weather on your TV. Note that is the signal
degrades, for example in poor/adverse weather
conditions, some text errors may occur or the teletext
mode may be aborted.
Teletext function buttons are listed below:
“ ” Teletext On-Off
Activates teletext mode when pressed once. Pressing
the button for the second time, activates teletext mix
feature. Pressing again will quit the teletext mode.
“RETURN” - Index
Selects the teletext index page.
“ ” Subcode Pages
Selects subcode pages if available when the teletext
is activated.
“INFO” - Reveal
Shows hidden information (e.g. solutions of games).
“SCREEN” - Expand
Press once to enlarge top half of the page, press again
to enlarge the bottom half of the page. Press again to
revert back to normal size.
P+ / P- and numbers (0-9)
Press to select a page.
Note : Most TV stations use code 100 for their index
pages.
Coloured Buttons
(RED/GREEN/YELLOW/BLUE)
Your TV supports both FASTEXT and TOP text
systems. When these systems are available, the
pages are divided into groups or topics.
When FASTEXT system is available, sections in a
teletext page will become colour-coded and can be
selected by pressing the coloured buttons. Press
a coloured button that corresponds to with your
needs.
The coloured writings will appear, showing you which
coloured buttons to use when TOP text transmission
is present. Pressing P - or P + commands will request
the next or previous page respec tively.
Teletext Subtitle
If you press button, teletext subtitle SUBTITLE
information will be displayed on the bottom right part
of the screen (if available). You can set the desired
option by highlighting it using “ ” or “ ” button and
then by pressing OK button.
03_MB25_[GB]_(01-TV)_COST_1900UK_IDTV_BRONZE9_32883_10064228_50152513.indd 101
03_MB25_[GB]_(01-TV)_COST_1900UK_IDTV_BRONZE9_32883_10064228_50152513.indd 101
03_MB25_[GB]_(01-TV)_COST_1900UK_IDTV_BRONZE9_32883_10064228_50152513.indd 101
03_MB25_[GB]_(01-TV)_COST_1900UK_IDTV_BRONZE9_32883_10064228_50152513.indd 10103_MB25_[GB]_(01-TV)_COST_1900UK_IDTV_BRONZE9_32883_10064228_50152513.indd 101 17.08.2009 09:07:51
17.08.2009 09:07:51
17.08.2009 09:07:51
17.08.2009 09:07:5117.08.2009 09:07:51

English - 102 -
Tips
Screen Care
Clean the screen with a slightly damp, soft cloth. Do
not use abrasive solvents as they may damage the
coating layer of the TV screen.
For your safety, unplug the mains plug when cleaning
the set. When moving the TV, hold it properly from
the bottom part.
Image Persistence
Please note that ghosting may occur while displaying
a persistent image. LCD TVs’ image persistence may
disappear after a short time. Try turning off the TV
for a while.
To avoid this, do not leave the screen in still picture
for extended periods.
No Power
If your TV system has no power, please check the
main power cable and connection to the mains
socket outlet.
Poor Picture
Have you selected the correct TV system? Is your TV
set or house aerial located too close to a non-earthed
audio equipment or neon lights, etc.?
Mountains or high buildings can cause double pictures
or ghost images. Sometimes you can improve the
picture quality by changing the direction of the
aerial.
Is the picture or teletext unrecognisable? Check if you
have entered the correct frequency. Please retune
the channels.
The picture quality may degrade when two peripherals
are connected to the TV at the same time. In such a
case, disconnect one of the peripherals.
No Picture
Is the aerial connected properly? Are the plugs
connected tightly to the aerial socket? Is the aerial
cable damaged? Are suitable plugs used to connect
the aerial? If you are in doubt, consult your dealer.
No Picture means that your TV is not receiving a
transmission. Have you selected the correct button
on the remote control? Try once more.
Also make sure the correct input source has been
selected.
Sound
You can not hear any sound. Did you perhaps interrupt
the sound, pressing the button?
Sound is coming from only one of the speakers. Is the
balance set to one extreme? See Sound Menu .
Remote Control
Your TV no longer responds to the remote control.
Perhaps the batteries are exhausted. If so you can still
use the local buttons at the bottom of the TV.
Input Sources
If you cannot select an input source, it is possible that
no device is connected.
Check the AV cables and connections if you have tried
to connect a device.
03_MB25_[GB]_(01-TV)_COST_1900UK_IDTV_BRONZE9_32883_10064228_50152513.indd 102
03_MB25_[GB]_(01-TV)_COST_1900UK_IDTV_BRONZE9_32883_10064228_50152513.indd 102
03_MB25_[GB]_(01-TV)_COST_1900UK_IDTV_BRONZE9_32883_10064228_50152513.indd 102
03_MB25_[GB]_(01-TV)_COST_1900UK_IDTV_BRONZE9_32883_10064228_50152513.indd 10203_MB25_[GB]_(01-TV)_COST_1900UK_IDTV_BRONZE9_32883_10064228_50152513.indd 102 17.08.2009 09:07:52
17.08.2009 09:07:52
17.08.2009 09:07:52
17.08.2009 09:07:5217.08.2009 09:07:52

English - 103 -
Appendix A: PC Input Typical
Display Modes
The display has a maximum resolution of 1600 X
1200 . The following table is an illustration of some of
the typical video display modes.
Your TV may not support different resolutions.
Supported resolution modes are listed below.
If you switch your PC to an unsupported mode, a
warning OSD will appear on the screen.
Index
Resolution Frequency
Standard
Hor Ver Ver
(Hz)
Hor
(KHz)
1 640 480 60 31.5 VESA
2 640 480 72 37.9 VESA
3 640 480 75 37.5 VESA
4 800 600 56 35.2 VESA
5 800 600 60 37.9 VESA
6 800 600 70 43.8
7 800 600 72 48.1 VESA
8 800 600 75 46.9 VESA
9 832 624 75 49.7 MAC
10 1024 768 60 48.4 VESA
11 1024 768 70 56.5 VESA
12 1024 768 72 57.7
13 1024 768 75 60.0
14 1152 864 70 64.2 VESA
15 1152 864 75 67.5 VESA
16 1152 870 75 68.9 MAC
17 1280 768 60 47.7 VESA
18 1360 768 60 47.7
19 1280 960 60 60.0 VESA
20 1280 1024 60 64.0 VESA
21 1280 1024 75 80.0 VESA
22 1600 1200 60 75.0 VESA
Appendix B: AV and HDMI Signal
Compatibility (Input Signal Types)
Source Supported
Signals Available
EXT-1
(SCART)
PAL 50/60 O
NTSC 60 O
RGB 50 O
RGB 60 O
FAV PAL 50/60 O
NTSC 60 O
YPbPr
480I 60Hz O
480P 60Hz O
576I 50Hz O
576P 50Hz O
720P 50Hz O
720P 60Hz O
1080I 50Hz O
1080I 60Hz O
1080P 50Hz O
1080P 60Hz O
HDMI1
HDMI2
480I 60Hz O
480P 60Hz O
576I 50Hz O
576P 50Hz O
720P 50Hz O
720P 60Hz O
1080I 50Hz O
1080I 60Hz O
1080P 50Hz O
1080P 60Hz O
1080P 24 HZ O
(X: Not Available, O: Available)
Note : In some cases a signal on the LCD TV may
not be displayed properly. The problem may be
an inconsistency with standards from the source
equipment (DVD, Set-top box, etc.). If you do
expereince such a problem please contact your dealer
and also the manufacturer of the source equipment.
03_MB25_[GB]_(01-TV)_COST_1900UK_IDTV_BRONZE9_32883_10064228_50152513.indd 103
03_MB25_[GB]_(01-TV)_COST_1900UK_IDTV_BRONZE9_32883_10064228_50152513.indd 103
03_MB25_[GB]_(01-TV)_COST_1900UK_IDTV_BRONZE9_32883_10064228_50152513.indd 103
03_MB25_[GB]_(01-TV)_COST_1900UK_IDTV_BRONZE9_32883_10064228_50152513.indd 10303_MB25_[GB]_(01-TV)_COST_1900UK_IDTV_BRONZE9_32883_10064228_50152513.indd 103 17.08.2009 09:07:52
17.08.2009 09:07:52
17.08.2009 09:07:52
17.08.2009 09:07:5217.08.2009 09:07:52

English - 104 -
Products
Battery
Information for Users on Disposal of Old Equipment and
Batteries
[European Union only]
These symbols indicate that equipment with these symbols should not
be disposed of as general household waste. If you want to dispose
of the product or battery, please consider the collection systems or
facilities for appropriate recycling.
Notice: The sign Pb below the symbol for batteries indicates that this
battery contains lead.
Speci cations
TV BROADCASTING
PAL/SECAM B/G D/K K’ I/I’ L/L’
RECEIVING CHANNELS
VHF (BAND I/III)
UHF (BAND U)
HYPERBAND
NUMBER OF PRESET CHANNELS
200
CHANNEL INDICATOR
On Screen Display
RF AERIAL INPUT
75 Ohm (unbalanced)
OPERATING VOLTAGE
220-240V AC, 50 Hz.
AUDIO
German+ Nicam Stereo
AUDIO OUTPUT POWER (W RMS. ) (10% THD)
2 x 6
POWER CONSUMPTION (W)
150 W (max)
< 1 W (Standby)
PANEL
32” wide display
DIMENSIONS (mm)
DxLxH (With foot): 212 x 776 x 567
Weight (Kg): 12,30
DxLxH (Without foot): 94 x 776 x 524
Weight (Kg): 11,60
03_MB25_[GB]_(01-TV)_COST_1900UK_IDTV_BRONZE9_32883_10064228_50152513.indd 104
03_MB25_[GB]_(01-TV)_COST_1900UK_IDTV_BRONZE9_32883_10064228_50152513.indd 104
03_MB25_[GB]_(01-TV)_COST_1900UK_IDTV_BRONZE9_32883_10064228_50152513.indd 104
03_MB25_[GB]_(01-TV)_COST_1900UK_IDTV_BRONZE9_32883_10064228_50152513.indd 10403_MB25_[GB]_(01-TV)_COST_1900UK_IDTV_BRONZE9_32883_10064228_50152513.indd 104 17.08.2009 09:07:52
17.08.2009 09:07:52
17.08.2009 09:07:52
17.08.2009 09:07:5217.08.2009 09:07:52

English - 105 -
Contents
Features ............................................................. 106
•General Properties ........................................ 106
About this Manual ........................................... 106
Safety Information ....................................... 106
Notes on Discs ................................................... 107
On handling discs ........................................... 107
On cleaning..................................................... 107
Licence Noti cation ............................................ 107
How to Watch a DVD .......................................... 107
DVD Control Panel Buttons ................................ 107
Using Digital Multimedia Connectors.................. 108
MC Card Connection ...................................... 108
USB Memory Connection ............................... 108
Overview of the Remote Control ........................ 109
USB & MC Modes Playback ................................110
General Control Buttons for Media Mode ........110
Control Buttons for Playback ...........................110
DVD Playback .....................................................110
Basic Play ........................................................110
For your reference: ......................................111
Stopping Play ..................................................111
Stopping Play and Returning To
The Menu Screen ........................................111
Rapid Advance (Rapid Reverse) .....................111
Skipping Ahead or Back to Chapters ...............111
Skipping ahead ............................................111
Skipping back ..............................................111
Still Picture (PAUSE) .......................................111
Frame Advance (STEP FORWARD) ...............111
Slow - motion Play Forward .............................111
Direct Selection of Scenes...............................111
Selecting Scenes by Chapter Number .........111
Selecting Scenes by Title Number ...............112
Selecting Scenes by Time ...........................112
Convenient Functions ......................................112
Displaying / Changing Subtitle Language ........113
Changing Audio Soundtrack Language ...........113
Viewing From Another Angle ...........................113
Using a DVD Menu ..............................................114
Movie CD Playback .............................................114
Basic Play ........................................................114
Stopping play ...................................................114
Rapid Advance / Rapid Reverse ......................114
Skipping Ahead or Back to Chapters ...............114
Skipping ahead ............................................114
Skipping back ..............................................114
Still Picture (PAUSE) .......................................115
Frame Advance (STEP Forward) .................115
Slow- motion Play ............................................115
Direct Selection of Scenes...............................115
Selecting Scenes by Time ...........................115
CD Menu .............................................................115
Basic Play ........................................................115
MP3/MPEG/DivX File ......................................116
PAUSE .............................................................116
Stopping Play...................................................116
Rapid Advance (Rapid Reverse) .....................116
ZOOM ..............................................................116
Repeat .............................................................116
Random ...........................................................117
Shuf e..............................................................117
Display Function ..............................................117
Setup Menu .........................................................117
VIDEO SETUP PAGE ......................................118
TV Type ........................................................118
DivX VOD ....................................................118
LANGUAGE SETUP ........................................118
OSD LANG ..................................................118
AUDIO .........................................................118
DISC MENU .................................................118
SUBTITLE ....................................................118
PREFERENCES ..............................................118
DEFAULT .....................................................118
DOWNMIX ...................................................118
PASSWORD (Change Password): ..............118
Troubleshooting ...................................................119
The picture quality is poor (DVD).....................119
Disc does not play ...........................................119
Wrong OSD language ......................................119
Some functions (Angle, Zoom etc)
do not work ......................................................119
No picture ........................................................119
No sound .........................................................119
Distorted sound................................................119
No response from remote control ....................119
If nothing works................................................119
Angle............................................................... 120
Chapter Number ............................................. 120
DVD ................................................................ 120
Subtitles .......................................................... 120
Time Number .................................................. 120
Title Number ................................................... 120
Track Number ................................................. 120
Dolby Digital.................................................... 120
Dolby Pro Logic .............................................. 120
LPCM .............................................................. 120
MPEG ............................................................. 120
DivX ................................................................ 120
Supported File Formats for USB & MC Modes... 121
Supported Memory Card Types .......................... 121
Disc Types Compatible with This Unit ................ 122
Speci cations ..................................................... 123
03_[GB]_MB25_(02-DVD)_32883W_1900UK_ANALOG_BRONZE9_DIVX_WOVCD_10064228_50152513.indd 105
03_[GB]_MB25_(02-DVD)_32883W_1900UK_ANALOG_BRONZE9_DIVX_WOVCD_10064228_50152513.indd 105
03_[GB]_MB25_(02-DVD)_32883W_1900UK_ANALOG_BRONZE9_DIVX_WOVCD_10064228_50152513.indd 105
03_[GB]_MB25_(02-DVD)_32883W_1900UK_ANALOG_BRONZE9_DIVX_WOVCD_10064228_50152513.indd 10503_[GB]_MB25_(02-DVD)_32883W_1900UK_ANALOG_BRONZE9_DIVX_WOVCD_10064228_50152513.indd 105 17.08.2009 09:11:06
17.08.2009 09:11:06
17.08.2009 09:11:06
17.08.2009 09:11:0617.08.2009 09:11:06
English - 106 -
Features
• General Properties
• DVD / CD / CD-R / CD-RW / MP3 / JPEG /
MPEG / DivX playback.
• USB & MC inputs.
• NTSC/PAL playback (according to disc
content)
• User-friendly multilanguage OSD menu
control.
• , LPCM audio via coaxial and optical
digital audio outputs. (optional)
• Multiple Aspect Ratio support (16:9 Widescreen,
4:3 Letterbox, 4:3 PAN & SCAN)
• Multi-Audio (up to 8) support (According to
disc content)
• Multi-Subtitle (up to 32) support (According to
disc content)
• Multi-Angle (up to 9) support (According to
disc content)
• 8 level parental control
• Fast forward and rewind in 5 different speeds.
(2x, 4x, 8x, 16x, 32x)
• Slow motion playback in 4 different speeds.
(1/2x, 1/4x, 1/8x, 1/16x forward)
• Frame by frame forward playback.
• Time Search
• Repeat
• A B repeat
• Program function for Audio CD, MP3 and
JPEG.
• Coaxial & Optical digital audio outputs
(optional)
• Copied disks may be incompatible.
Note:
*** This DVD player may not support some
MP3 recordings due to differences in recording
formats or disc type.
*** Please read the owner’s manual about MP3
playback.
*** CD-R/CD-RW discs recorded by CD-DA
method can be played. Some CD-R/CD-RW
discs may be incompatible due to laser pick-up
and disc design.
*** DVD-R/RW discs recorded by DVD-Video
method can be played . Some DVD-R/RW
discs may be incompatible due to laser pick-
up and disc design.
*** Some discs may be incompatible with JPEG
Viewer function due to different recording
format or condition of the discs.
About this Manual
Safety Information
CAUTION
DVD Player is a class 1 laser product. However
this product uses a visible laser beam which
could cause hazardous radiation exposure.
Be sure to operate the player correctly as
instructed.
CLASS 1
LASER PRODUCT
• Manufactured under license from Dolby
Laboratories. “Dolby”, and the double-D symbol
are trademarks of Dolby Laboratories.
RISK OF ELECTRIC SHOCK
The lightning ash with arrowhead
symbol, within an equilateral
triangle, is intended to alert
the user to the presence of
uninsulated “dangerous voltage”
within the product’s enclosure that
may be of suf cient magnitude to
constitute a risk of electric shock
of persons.
The exclamation point within
an eq u i l a teral t r i a ngle is
intended to alert the user to the
presence of important operating
and maintenance (servicing)
instructions in the literature
accompanying the appliance.
03_[GB]_MB25_(02-DVD)_32883W_1900UK_ANALOG_BRONZE9_DIVX_WOVCD_10064228_50152513.indd 106
03_[GB]_MB25_(02-DVD)_32883W_1900UK_ANALOG_BRONZE9_DIVX_WOVCD_10064228_50152513.indd 106
03_[GB]_MB25_(02-DVD)_32883W_1900UK_ANALOG_BRONZE9_DIVX_WOVCD_10064228_50152513.indd 106
03_[GB]_MB25_(02-DVD)_32883W_1900UK_ANALOG_BRONZE9_DIVX_WOVCD_10064228_50152513.indd 10603_[GB]_MB25_(02-DVD)_32883W_1900UK_ANALOG_BRONZE9_DIVX_WOVCD_10064228_50152513.indd 106 17.08.2009 09:11:07
17.08.2009 09:11:07
17.08.2009 09:11:07
17.08.2009 09:11:0717.08.2009 09:11:07
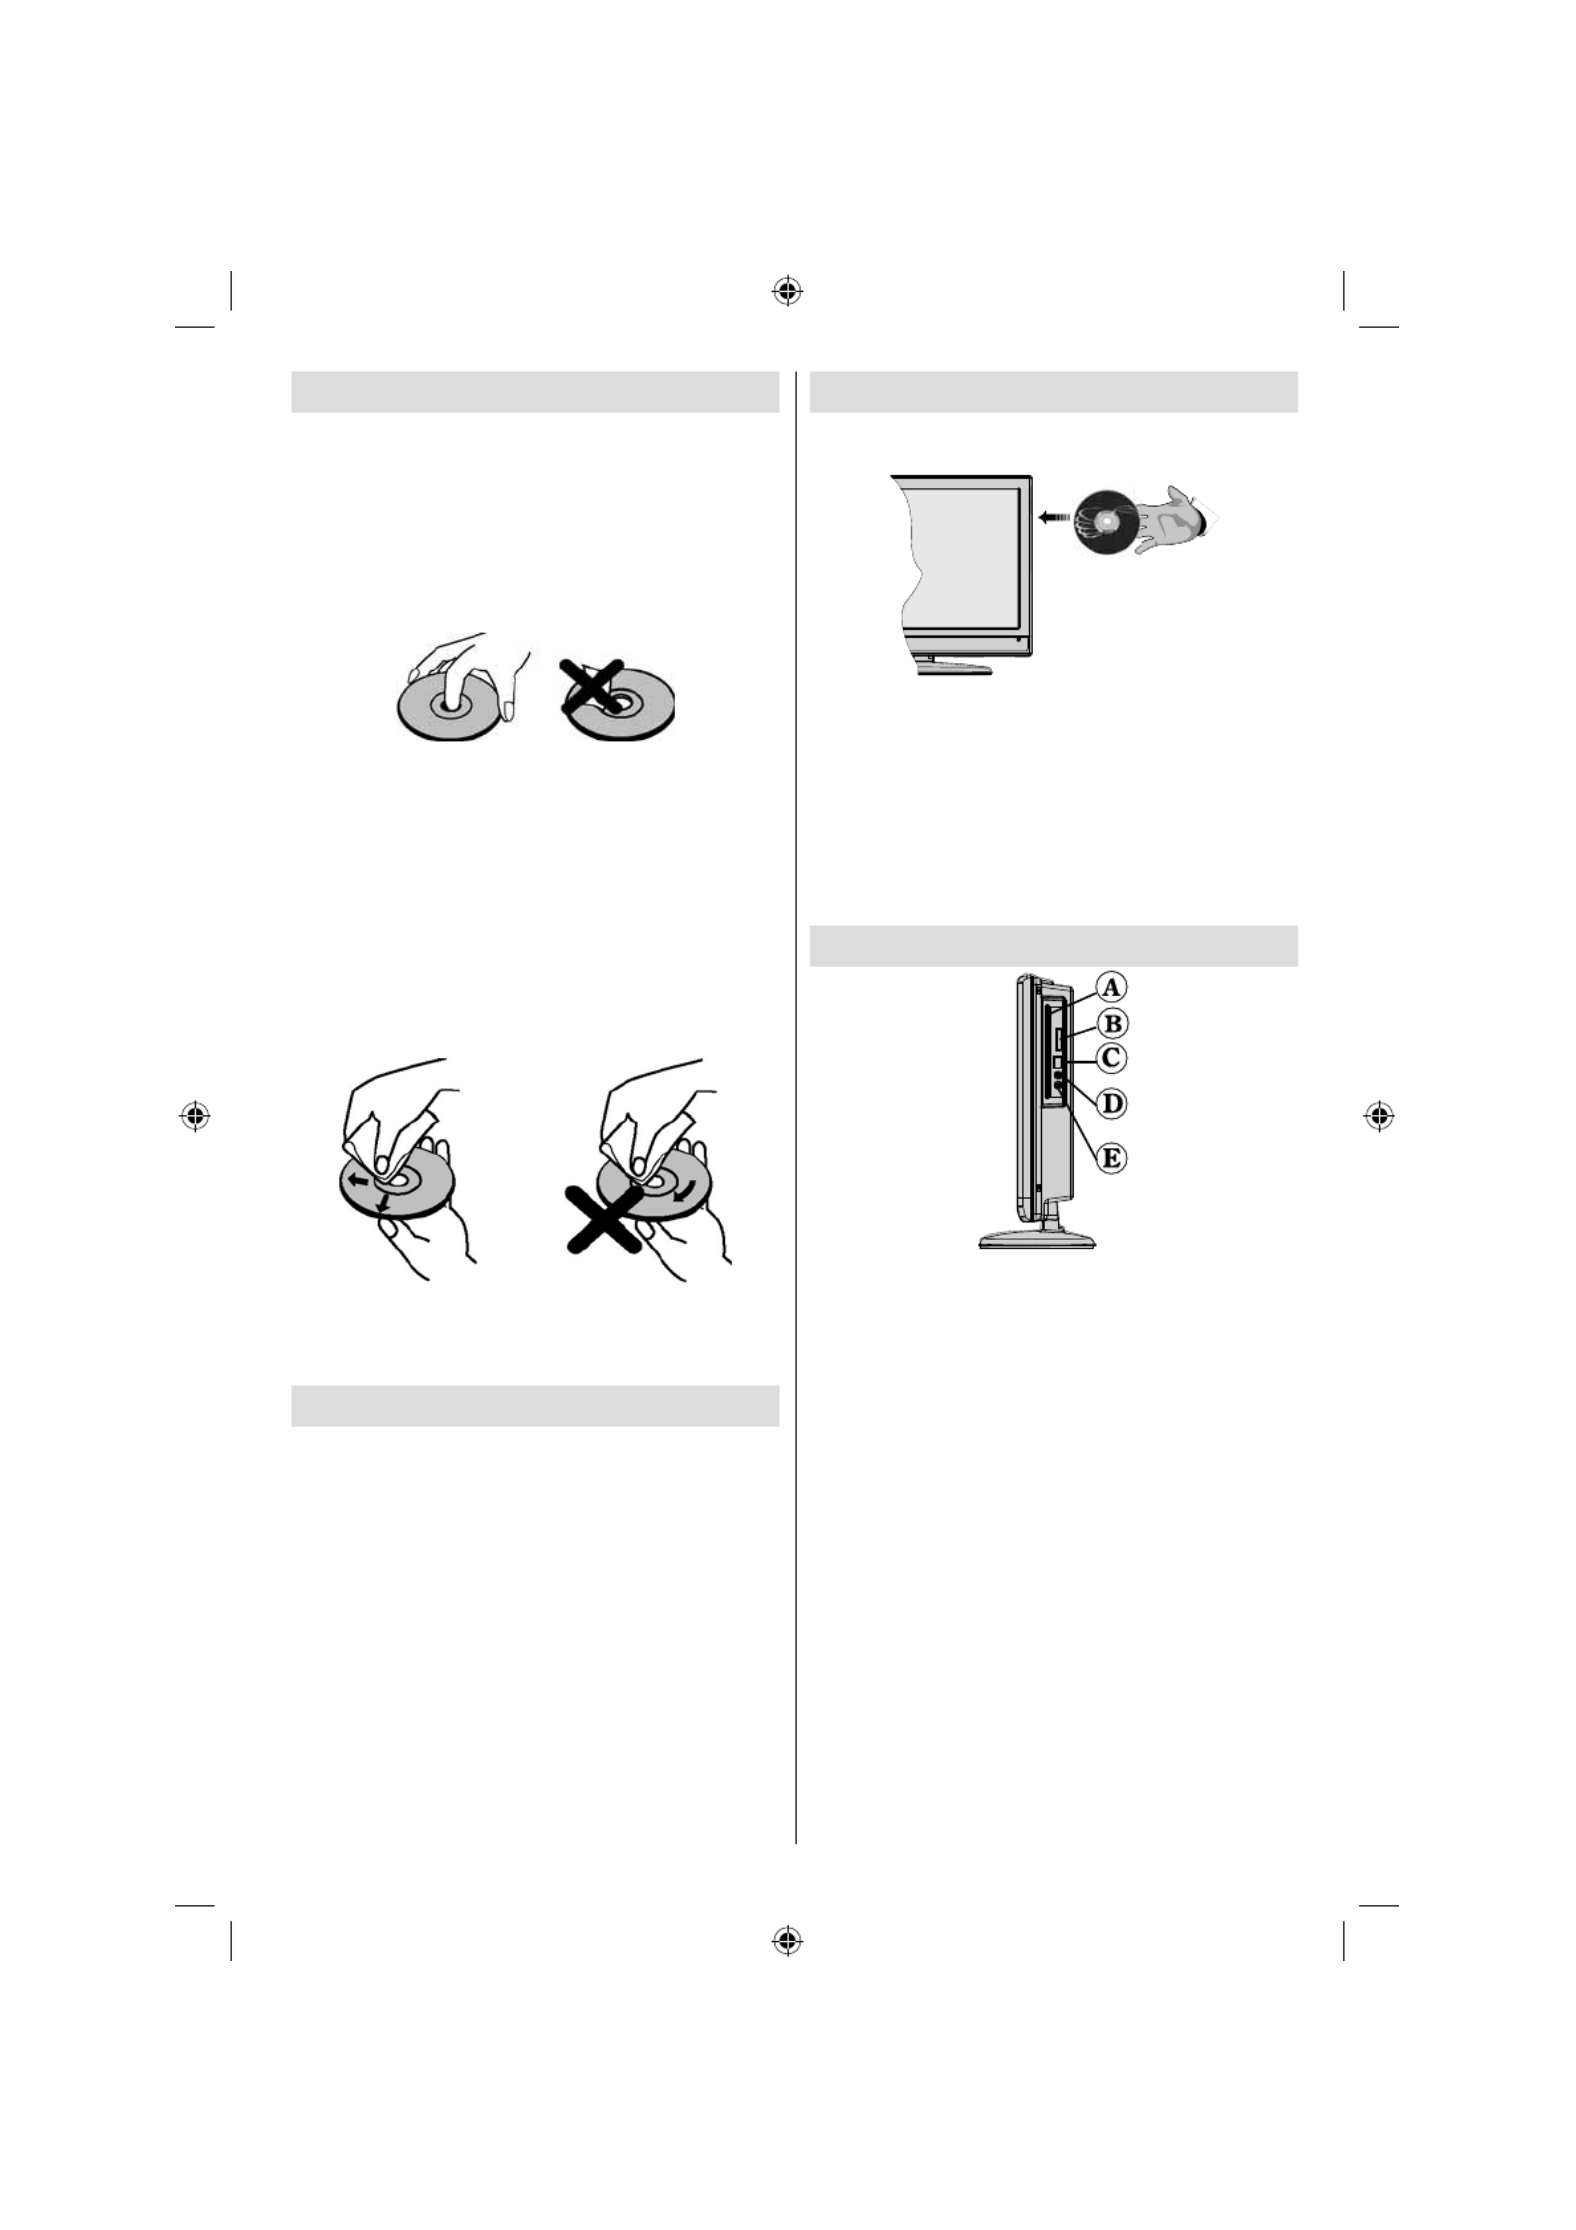
English - 107 -
How to Watch a DVD
When placing a disc into the loader, labeled side
of the disc should be on the front:
When TV set is turned on, rst switch to DVD
source by using the SOURCE button on the
remote control. Press play on the remote
control, or directly press play button at the front
panel. If there is no disc inside the loader, place
a DVD rst and press play.
Note: You can get DVD source output via scart
socket.
DVD Control Panel Buttons
A. Disc loader
B. Memory card slot
C. USB input
D. Play / Pause
Plays/pauses the disc. When DVD menu
(root menu) is active, this button functions
as “button select” (selects the highlighted
item in menu) if this is not prohibited by
the disc.
E. Stop / Eject
Stop playing disc / Eject or Load the disc
Note:
• You cannot eject the disc via the remote
control.
•While playing a le, you should press
STOP button three times to eject.
Notes on Discs
On handling discs
• To keep the disc clean, handle the disc by its
edge. Do not touch the surface.
• Do not stick paper or tape on the disc.
• If the disc is contaminated with any substance
like glue remove before using it.
• Do not expose the disc to direct sunlight or
heat sources such as hot air ducts, or leave
it in a car parked in direct sunlight as the
temperature can rise quickly and damage
the disc.
• After playing, store the disc in its case.
On cleaning
• Before playing, clean the disc with a cleaning
cloth. Wipe the disc from the center out.
• Do not use solvents such as benzine, thinner,
commercially available cleaners or anti-static
spray intended for vinyl LPs.
Licence Noti cation
• This product incorporates copyright protection
technology that is protected by method claims
of certain U.S. patents and other intellectual
property rights owned by Macrovision
Corporation and other rights owners. Use of
this copyright protection technology must be
authorized by Macrovision Corporation, and is
intended for home and other limited viewing
uses only unless otherwise authorized by
Macrovision Corporation. Reverse engineering
or disassembly is prohibited.
03_[GB]_MB25_(02-DVD)_32883W_1900UK_ANALOG_BRONZE9_DIVX_WOVCD_10064228_50152513.indd 107
03_[GB]_MB25_(02-DVD)_32883W_1900UK_ANALOG_BRONZE9_DIVX_WOVCD_10064228_50152513.indd 107
03_[GB]_MB25_(02-DVD)_32883W_1900UK_ANALOG_BRONZE9_DIVX_WOVCD_10064228_50152513.indd 107
03_[GB]_MB25_(02-DVD)_32883W_1900UK_ANALOG_BRONZE9_DIVX_WOVCD_10064228_50152513.indd 10703_[GB]_MB25_(02-DVD)_32883W_1900UK_ANALOG_BRONZE9_DIVX_WOVCD_10064228_50152513.indd 107 17.08.2009 09:11:07
17.08.2009 09:11:07
17.08.2009 09:11:07
17.08.2009 09:11:0717.08.2009 09:11:07

English - 108 -
Using Digital Multimedia Connectors
• Use SWAP button on the remote control to switch between USB and memory card.
• You can connect USB/MC devices to your TV by using USB or MC input of the TV. This feature
allows you to display/play les stored on a USB device or a MC card.
• It is possible that certain types of USB devices (MP3 Players) or Multimedia Card interfaces
may not be compatible with this TV.
• You may back up your les before making any connections to the TV set in order to avoid any
possible data loss. Note that manufacturer will not be responsible for any le damage or data
loss.
• Do not pull out USB module or MC card while playing a le.
CAUTION: Quickly plugging and unplugging USB devices, is a very hazardous operation. Especially, do
not repeatedly quickly plug and unplug the drive. This may cause physical damage to the USB player and
especially the USB device itself.
USB
MEMORY
MEMORY
CARD SIDE
VIEW
MC Card Connection
• Insert the MC card into the Memory Card Input of the TV. Make sure the gold contact area faces
up. The card is designed to t easily into the system one way only. Do not bend the card or force
it into the slot. Insert only one card at a time.
• When you want to eject the card, do not grab the card all at once. Push to the card gently. Then
it will pop out.
USB Memory Connection
• Plug your USB device to the USB input of the TV.
Note: USB hard drives are not supported.*
• It is recommended that you connect your USB device directly to the USB input of the TV. Some
compatibility problems may occur if you use a separate cable connection. .
Note: While in DVD mode, MEDIA screen will be displayed automatically when you plug USB or insert a valid
memory card.
03_[GB]_MB25_(02-DVD)_32883W_1900UK_ANALOG_BRONZE9_DIVX_WOVCD_10064228_50152513.indd 108
03_[GB]_MB25_(02-DVD)_32883W_1900UK_ANALOG_BRONZE9_DIVX_WOVCD_10064228_50152513.indd 108
03_[GB]_MB25_(02-DVD)_32883W_1900UK_ANALOG_BRONZE9_DIVX_WOVCD_10064228_50152513.indd 108
03_[GB]_MB25_(02-DVD)_32883W_1900UK_ANALOG_BRONZE9_DIVX_WOVCD_10064228_50152513.indd 10803_[GB]_MB25_(02-DVD)_32883W_1900UK_ANALOG_BRONZE9_DIVX_WOVCD_10064228_50152513.indd 108 17.08.2009 09:11:08
17.08.2009 09:11:08
17.08.2009 09:11:08
17.08.2009 09:11:0817.08.2009 09:11:08

English - 109 -
Overview of the Remote Control
Standby1.
Image size2.
Sleep timer3.
Numeric buttons4.
Return 5.
Cursor up6.
Cursor left7.
Programme up8.
Programme down9.
No function in DVD mode10.
Audio-Language selection11.
Swap / DVD media selection12.
No function in DVD mode13.
Display time / DVD menu14.
Clear15.
Stop16.
No function17.
Rapid Reverse18.
Rapid advance19.
Info20.
No function21.
Picture mode selection22.
Source selection23.
Zoom24.
Repeat25.
Root26.
Menu27.
Title28.
OK / Select29.
Cursor right30.
Cursor down31.
Volume up32.
Volume down 33.
Subtitle 34.
Mute35.
No function in DVD mode.36.
No function 37.
Angle38.
Search mode39.
Play 40.
Pause / Play41.
Skip next42.
Skip previous43.
03_[GB]_MB25_(02-DVD)_32883W_1900UK_ANALOG_BRONZE9_DIVX_WOVCD_10064228_50152513.indd 109
03_[GB]_MB25_(02-DVD)_32883W_1900UK_ANALOG_BRONZE9_DIVX_WOVCD_10064228_50152513.indd 109
03_[GB]_MB25_(02-DVD)_32883W_1900UK_ANALOG_BRONZE9_DIVX_WOVCD_10064228_50152513.indd 109
03_[GB]_MB25_(02-DVD)_32883W_1900UK_ANALOG_BRONZE9_DIVX_WOVCD_10064228_50152513.indd 10903_[GB]_MB25_(02-DVD)_32883W_1900UK_ANALOG_BRONZE9_DIVX_WOVCD_10064228_50152513.indd 109 17.08.2009 09:11:08
17.08.2009 09:11:08
17.08.2009 09:11:08
17.08.2009 09:11:0817.08.2009 09:11:08
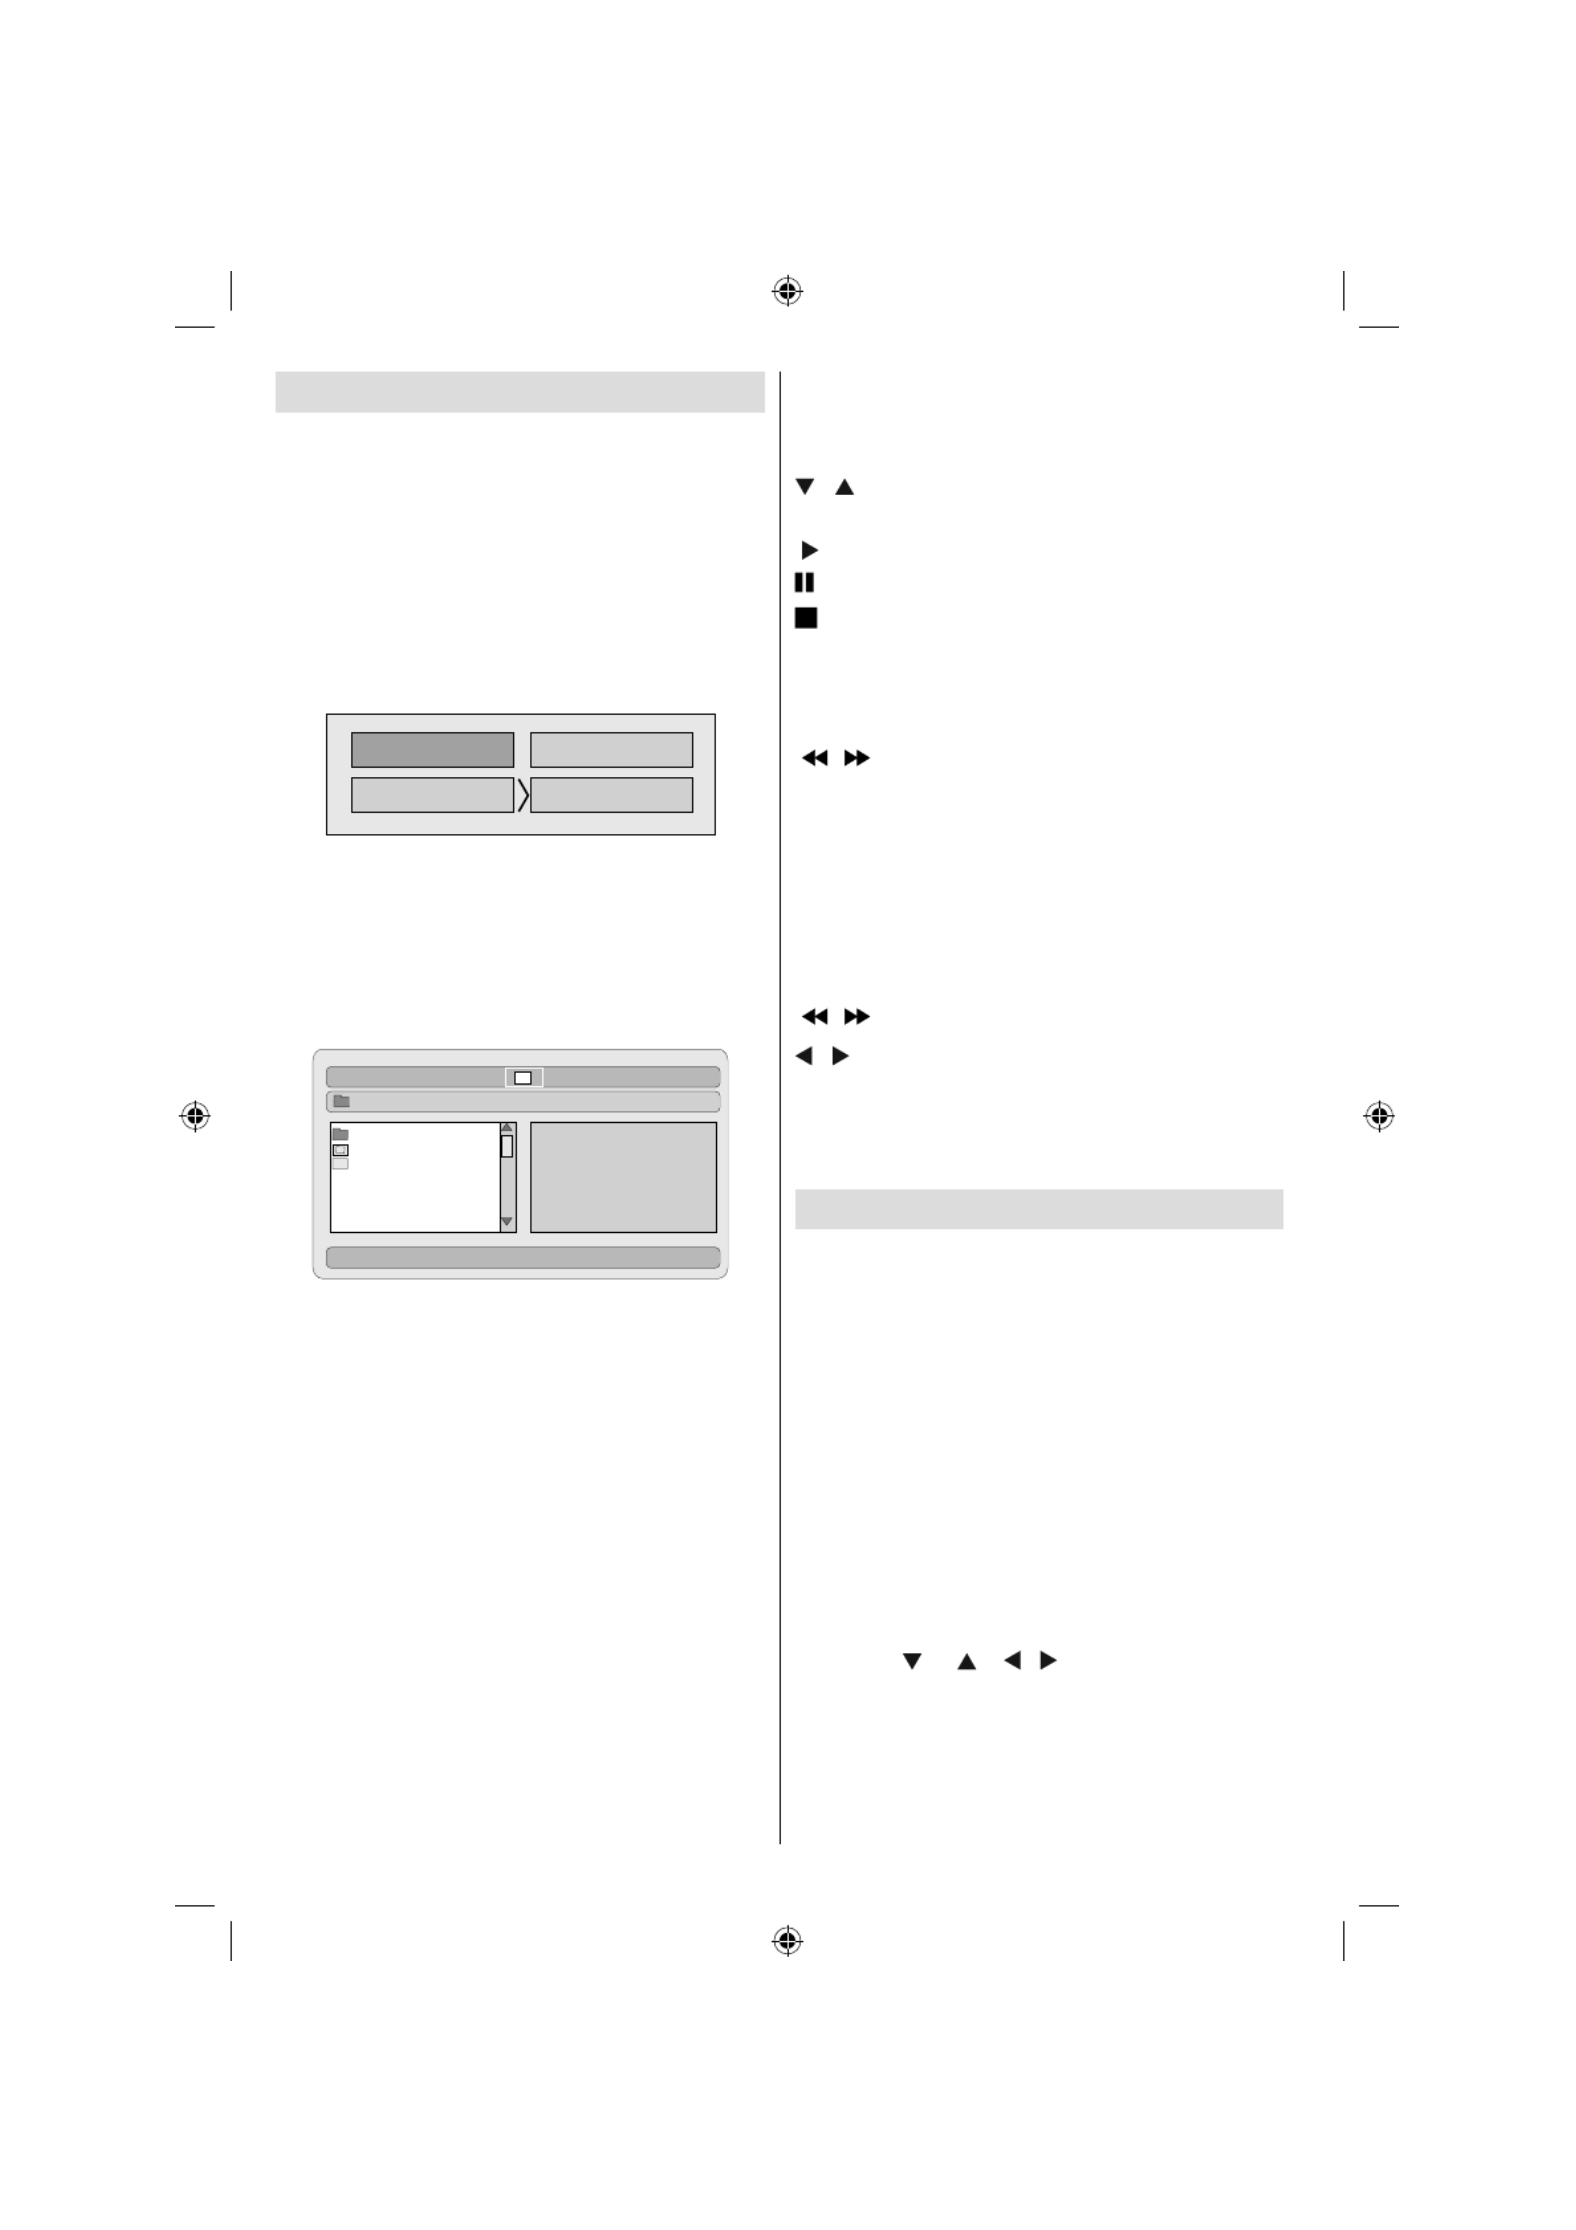
English - 110 -
USB & MC Modes Playback
Switch to DVD source by using the SOURCE or
PLAY button on the remote control.
You can connect both USB and MC sources
to your TV at the same time. Media selection
OSD will automatically appear on the screen
when a USB or MC is connected. Press SWAP
button on the remote control to exit. Whenever
you press SWAP button again, media selection
OSD will appear on the screen.
DVD
MEDIAMEDIA CARD
USB
Select the desired input by using the cursor
button and then press button to view OK
contents. After OK button is pressed, the
following screen (depending on the make and
contents of the device) will appear after a short
while:
CARD
DIVX
DCIM
TRACK 9
NEW FILE
\
Dir:001
You can view or play contents of your device by
using the related remote control buttons. See,
General Control Buttons for Media Mode and
Control Buttons for Video Playback.
Note:
• Whenever you press the SWAP key, available
media sources will be listed.
• If there is an active playback, you have to press
STOP button rst and then SWAP key to list
available DMP inputs.
• If you have plugged only one source, then only
that source will be available to be selected.
• Do not pull out the MC module while playing
a le.
• It is possible that certain types of MC or USB
devices may not be compatible with this TV.
General Control Buttons for Media
Mode
OK / SELECT > Enter/View
/ > Highlight an item
by moving up or down.
> Play
> Pause
> Stop
RETURN > M e d i a s o u r c e
selection.
Control Buttons for Playback
/ > Rapid reverse /
rapid advance/ .
SEARCH > Search for a
speci c time.
DISPLAY > Displays time.
ZOOM > Zooms picture.
Picture Playback
/ > Previous - next picture.
/ > Rotate picture
REPEAT > Displays repeat options.
ZOOM > Zooms picture.
ROOT > Go back to root folder.
DVD Playback
Basic Play
1. Press on the power button
2. Please insert a disc to the loader.
The disc will be automatically loaded and play
commences if the disc does not have any menus
recorded on it.
A menu may appear on the TV screen after a
few moments or the lm may start immediately
after the introduction of the Film Company. This
behaviour depends on the disc content and
may change.
NOTE: Step 3 and 4 is available only when a menu
is recorded on the disc.
3. Press “ ” / “ ” / / or the number button
(s) to select the preferred title.
4. Press SELECT.
Play of the selected items now starts.The played
item may be a motion picture, a still picture or
another submenu depending on the disc.
03_[GB]_MB25_(02-DVD)_32883W_1900UK_ANALOG_BRONZE9_DIVX_WOVCD_10064228_50152513.indd 110
03_[GB]_MB25_(02-DVD)_32883W_1900UK_ANALOG_BRONZE9_DIVX_WOVCD_10064228_50152513.indd 110
03_[GB]_MB25_(02-DVD)_32883W_1900UK_ANALOG_BRONZE9_DIVX_WOVCD_10064228_50152513.indd 110
03_[GB]_MB25_(02-DVD)_32883W_1900UK_ANALOG_BRONZE9_DIVX_WOVCD_10064228_50152513.indd 11003_[GB]_MB25_(02-DVD)_32883W_1900UK_ANALOG_BRONZE9_DIVX_WOVCD_10064228_50152513.indd 110 17.08.2009 09:11:08
17.08.2009 09:11:08
17.08.2009 09:11:08
17.08.2009 09:11:0817.08.2009 09:11:08

English - 111 -
For your reference:
If an action corresponding to a button is prohibited the
“ ” symbol appears.
Stopping Play
Press stop ( ) twice (only for videos).
To stop the play permanently, press STOP ( )
twice. When the STOP( ) button is pressed for
the fi rst time, a message “PRESS PLAY KEY
TO CONTINUE” will appear on the screen to
remind you if you want to continue the play. To
stop the play, press the STOP ( ) button again
or you can press to continue.SELECT
Stopping Play and Returning To The Menu
Screen
(When a menu is available on the disc)
Press MENU or TITLE button depending on
the disc. Play is suspended, and the Disc menu
screen is displayed.
Rapid Advance (Rapid Reverse)
Press SEARCH/SLOW ( ) on the remote
control during play.
Normal play is resumed when the SELECT button
or PLAY/PAUSE ( ) button is pressed.
The speed of advance ( 2x, 4x, 8x,
16x, 32x) or reverse ( 2x,
4x, 8x, 16x, 32x) changes for every
press of the or button.
To return to normal play, press PLAY ( ).
Note: No sound will be heard during Rapid advance
or Rapid reverse.
Skipping Ahead or Back to Chapters
Skipping ahead
Press SKIP/ FRAME ( ) on the remote
control during play.
A chapter is skipped forward each time the
button is pressed.
Skipping back
Press SKIP/ FRAME ( ) on the remote
control during play.
When the button is pressed once midway
through a chapter, play returns to the previous
chapter.
Still Picture (PAUSE)
Press PAUSE ( ) once during play.
The screen freezes.
To return to normal play press PLAY ( ).
Frame Advance (STEP FORWARD)
Press PAUSE ( ) once during play.
The screen freezes.
Press SKIP/ FRAME ( ) on the remote
control.
The next frame of the movie is displayed.
You can press SKIP/ FRAME ( ) for the
following frames.
To return to normal play press PLAY ( ).
NOTE: Reverse stepping is not available.
Slow - motion Play Forward
Press PAUSE ( ) once during play.
The screen freezes.
Press SEARCH/SLOW ( ) on the remote
control.
The unit starts playing the movie at four different
speeds ( 1/2, 1/4, 1/8 and
1/16).
You can increase or decrease the speed of the
slow-motion play by pressing SEARCH/SLOW
( or ).
The speed of slow motion play is displayed on
the screen each time you change it.
To return to normal play, press PLAY ( ).
NOTE: No sound will be heard during Slow motion
play.
NOTE: Reverse slow motion play is not available.
Direct Selection of Scenes
Selecting Scenes by Chapter Number
Press SEARCH MODE on the remote control
once during playback.
The chapter/title search box is displayed on the
screen. You can see the currently playing and
total number of chapters in right hand side of
the display bar as .-- / xx
Enter the number of the chapter using number
buttons.
The selected chapter is played just after you
enter the chapter number.
For your convenience:
03_[GB]_MB25_(02-DVD)_32883W_1900UK_ANALOG_BRONZE9_DIVX_WOVCD_10064228_50152513.indd 111
03_[GB]_MB25_(02-DVD)_32883W_1900UK_ANALOG_BRONZE9_DIVX_WOVCD_10064228_50152513.indd 111
03_[GB]_MB25_(02-DVD)_32883W_1900UK_ANALOG_BRONZE9_DIVX_WOVCD_10064228_50152513.indd 111
03_[GB]_MB25_(02-DVD)_32883W_1900UK_ANALOG_BRONZE9_DIVX_WOVCD_10064228_50152513.indd 11103_[GB]_MB25_(02-DVD)_32883W_1900UK_ANALOG_BRONZE9_DIVX_WOVCD_10064228_50152513.indd 111 17.08.2009 09:11:09
17.08.2009 09:11:09
17.08.2009 09:11:09
17.08.2009 09:11:0917.08.2009 09:11:09

English - 112 -
• If the chapter number you entered is between
0 and 9, player will automatically jump to the
related chapter.
•You can clear the fi eld by pressing the C button
if you enter a wrong number.
• If you attempt to enter a number greater than
the total number of chapters on the current
title, the search box disappears and “ Input
Invalid” message is displayed on screen.
• If you wait fi ve seconds without pressing any
key for selecting scenes by chapter number,
the operation is cancelled.
• You can press RETURN key to cancel title
search.
Selecting Scenes by Title Number
Press SEARCH on the remote control once
during playback.
The chapter/title search box is displayed on
the screen. You can see the currently playing
and total number of titles in left hand side of the
display bar as . -- / xx
Enter the number of the title using the numeric
buttons.
The selected title is played just after you enter
the title number.
Note: You can switch to title by pressing numeric
keys directly. You need to press 0 and then digit
key to switch one digit titles. (example: to select
5 press 0 and 5)
Selecting Scenes by Time
You can view the DVD starting from any time
point you want.
Press SEARCH MODE on the remote control
“twice” during playback.
The time search box is displayed on the screen
as Title xx/xx Time -- : -- : --.
Enter the time using number buttons.
The title is played beginning from the desired
time just after you enter the time. If not prohibited
by the DVD.
Press SEARCH MODE on the remote control
“three times” during playback.
The time search box is displayed on the screen
as Chapter .xx/xx Time -- : -- : --
Enter the time using number buttons.
The Chapter is played beginning from the
desired time just after you enter the time. If not
prohibited by the DVD.
For your convenience:
• You can clear the fi elds by pressing the C
button if you enter wrong numbers.
• If you attempt to enter a number greater than
the total time of the current title, the time
search box disappears, “ Input Invalid”
message is displayed on screen.
• If you wait fi ve seconds without pressing any
key to enter time, selecting scenes by time
option is cancelled.
• You can press RETURN key to cancel time
search.
Convenient Functions
Displaying the time information
Press DISPLAY during play.
Some information is displayed on TV screen
to indicate the current status of the disc. On
the display screen you can fi nd the following
information lines:
Line 1: Time Counter Mode
Line 2: Title Number, Chapter Number, Time
Counter
Line 3: Audio Number, Audio Format, Number
of Output Channels, Audio Language
Line 4: Subtitle Number & Subtitle Language
Time counter modes can be selected by
pressing INFO key consecutively.
The sequence for time counter modes is as
ollows: TITLE ELAPSED, TITLE REMAIN,
CHAPTER ELAPSED and CHAPTER
REMAIN.
• If “TITLE ELAPSED” is displayed, the elapsed
time for the title is being displayed.
• If “TITLE REMAIN” is displayed the remaining
time for the title is being displayed.
• If “CHAPTER ELAPSED” is displayed,
the elapsed time for the chapter is being
displayed.
• If “CHAPTER REMAIN” is displayed, the
remaining time for the chapter is being
displayed.
03_[GB]_MB25_(02-DVD)_32883W_1900UK_ANALOG_BRONZE9_DIVX_WOVCD_10064228_50152513.indd 112
03_[GB]_MB25_(02-DVD)_32883W_1900UK_ANALOG_BRONZE9_DIVX_WOVCD_10064228_50152513.indd 112
03_[GB]_MB25_(02-DVD)_32883W_1900UK_ANALOG_BRONZE9_DIVX_WOVCD_10064228_50152513.indd 112
03_[GB]_MB25_(02-DVD)_32883W_1900UK_ANALOG_BRONZE9_DIVX_WOVCD_10064228_50152513.indd 11203_[GB]_MB25_(02-DVD)_32883W_1900UK_ANALOG_BRONZE9_DIVX_WOVCD_10064228_50152513.indd 112 17.08.2009 09:11:11
17.08.2009 09:11:11
17.08.2009 09:11:11
17.08.2009 09:11:1117.08.2009 09:11:11

English - 113 -
Pressing the DISPLAY key for the second time
closes display menu screen. “DISPLAY OFF”
is displayed.
Displaying a scene with a larger and closer
view
The ‘zoom in’ function enables you to take a
closer look at the scene you are viewing that is
especially an impressive function when you are
seeing science fi ction or adventure fi lm.
Press ZOOM during play.
2X” is displayed on the screen and the
picture is now larger. By pressing ZOOM key
consecutively you can reach “ 3X”, “
4X, 1/2x, 1/3x 1/4x” modes.
NOTE: You can move in the picture, i.e. change
the zoomed location, by using the “ ” (Left) or
“ ” (Right) / “ ” (Down) / “ ” (Up) arrow keys.
To return to normal play
Press ZOOM again.
Displaying / Changing Subtitle
Language
It is possible to change the subtitle language
from the one selected at the initial settings to a
different language, if available.
(This operation works only with discs on which
multiple subtitle languages are recorded.)
Press SUBTITLE during play.
When no subtitles are recorded “ ” will be
displayed instead of the selected language.
Press SUBTITLE a number of times until the
preferred language is selected.
When this button is pressed once, the fi rst
subtitle recorded on the disc will display. The
rest of the subtitles recorded will display in
sequence for every press of the SUBTITLE
button
NOTE:
<?> In some cases, the subtitle language is not
changed immediately to the selected one.
For your convenience:
• When the preferred language is not selected
even after pressing the button several times,
it means that the language is not available
on the disc.
• When the player is restarted or the disc is
changed, the subtitle selection is automatically
changed back to the initial settings.
• If a language is selected, which is not
supported by the disc, the subtitle language
will automatically be set to the disc’s priority
language.
• Usually a circulation will happen while
switching to another language, that is you can
cancel the subtitle by pressing this button a
number of times until “Subtitle Off” appears
on the screen.
Changing Audio Soundtrack Language
It is possible to change the audio language
from the one selected at the initial settings to a
different language, if available.
(This operation works only with discs on which
multiple audio soundtrack languages are
recorded, if not prohibited by the DVD.)
Press LANG. during play.
Press LANG. a number of times until the
preferred language is selected.
For your convenience:
• When the preferred language is not selected
even after pressing the button several times,
it means that the language is not available
on the disc.
• When the power is turned on or the disc is
removed, the language heard is the one
selected at the initial settings. If this language
is not recorded on the disc, only the available
language on the disc will be heard.
Viewing From Another Angle
* Angle mark feature is available for all
models.
Some DVD discs may contain scenes, which
have been shot simultaneously from a number
of different angles. For these discs, the same
scenes can be viewed from each of these
different angles using the ANGLE button.
The number of recorded angles differs depending
on the disc used.
“ y/x ” is displayed shortly on the screen
during playback. This indicates that the multi-
angle scene has just started. From that moment
on, the yth angle of total x angles is played and
03_[GB]_MB25_(02-DVD)_32883W_1900UK_ANALOG_BRONZE9_DIVX_WOVCD_10064228_50152513.indd 113
03_[GB]_MB25_(02-DVD)_32883W_1900UK_ANALOG_BRONZE9_DIVX_WOVCD_10064228_50152513.indd 113
03_[GB]_MB25_(02-DVD)_32883W_1900UK_ANALOG_BRONZE9_DIVX_WOVCD_10064228_50152513.indd 113
03_[GB]_MB25_(02-DVD)_32883W_1900UK_ANALOG_BRONZE9_DIVX_WOVCD_10064228_50152513.indd 11303_[GB]_MB25_(02-DVD)_32883W_1900UK_ANALOG_BRONZE9_DIVX_WOVCD_10064228_50152513.indd 113 17.08.2009 09:11:11
17.08.2009 09:11:11
17.08.2009 09:11:11
17.08.2009 09:11:1117.08.2009 09:11:11

English - 114 -
you can change the viewing angle until the end
of the multi-angle scene.
Press ANGLE during play.
The current angle is changed.
Press ANGLE a number of times until the
preferred viewing angle is selected.
• This function will only work on discs where
different angles have been recorded.
Using a DVD Menu
Some DVD discs have unique menu structures
called DVD menus. For example, DVDs
programmed with complex contents provide
guide menus, and those recorded with various
languages provide menus for audio and subtitle
language. Although the DVD menus’ contents
and operation differ from disc to disc, the
following explains basic operation when this
feature is used.
Press TITLE on the remote control.
The DVD menu available on the disc is now
displayed.
NOTE:
• If you press MENU, the root menu of DVD is
displayed.
• If you press TITLE, the menu of the current
title is displayed.
Press “ ” / “ ” / “ ” / “ ” to select the preferred
item.
Press SELECT.
The selected item is now executed.
For your convenience:
• You can also use number keys to select a
DVD menu item. The player will automatically
execute the item. To enter an item number
which is more than 1 digit, press +10 key and
then enter the item number.
NOTE:
• Some DVDs may not contain root and/or title
menus.
• To resume the playback, select PLAY item in
DVD menu.
Movie CD Playback
Basic Play
The details differ depending on the disc
concerned. Also refer to the instructions
accompanying the disc.
Press the number button(s) to select the
preferred item and press OK button.
The player now starts to play the selected
item.
NOTE:
• “ ” / “ ” / “ ” / “ ” arrow buttons can be used
for selecting items for movie CDs.
Stopping play
• To stop the play permanently, press STOP (
) twice. When the STOP ( ) button is pressed
for the fi rst time, a message “Press Play Key To
Continue” will appear on the screen to remind
you if you want to continue the play. To stop
the play, press the STOP ( ) button again or
you can press PLAY ( ) to continue.
Rapid Advance / Rapid Reverse
Press (or) on the remote control during
play.
• Normal play is resumed when the SELECT
button or PLAY ( ) button is pressed.
• The speed of advance ( 2x, 4x,
8x, 16x, 32x) or reverse ( 2x,
4x, 8x, 16x, 32x) changes
for every press of the (or) button.
To return to normal play, press PLAY ( ).
Note: No sound will be heard during Rapid advance
or Rapid reverse.
Skipping Ahead or Back to Chapters
Skipping ahead
Press ( ) on the remote control during play.
A track is skip ahead each time the button is
pressed.
Skipping back
Press ( ) on the remote control during play.
A track is skip back each time the button is
pressed.
03_[GB]_MB25_(02-DVD)_32883W_1900UK_ANALOG_BRONZE9_DIVX_WOVCD_10064228_50152513.indd 114
03_[GB]_MB25_(02-DVD)_32883W_1900UK_ANALOG_BRONZE9_DIVX_WOVCD_10064228_50152513.indd 114
03_[GB]_MB25_(02-DVD)_32883W_1900UK_ANALOG_BRONZE9_DIVX_WOVCD_10064228_50152513.indd 114
03_[GB]_MB25_(02-DVD)_32883W_1900UK_ANALOG_BRONZE9_DIVX_WOVCD_10064228_50152513.indd 11403_[GB]_MB25_(02-DVD)_32883W_1900UK_ANALOG_BRONZE9_DIVX_WOVCD_10064228_50152513.indd 114 17.08.2009 09:11:12
17.08.2009 09:11:12
17.08.2009 09:11:12
17.08.2009 09:11:1217.08.2009 09:11:12

English - 115 -
Still Picture (PAUSE)
Press PAUSE ( ) once during play. The screen
freezes.
To return to normal play press PLAY ( )
again.
Frame Advance (STEP Forward)
Press PAUSE ( ) once during play. The screen
freezes.
Press ( ) on the remote control.
The next frame of the movie is displayed.
You can press ( ) for the following frames.
NOTE: Reverse stepping is not available.
Slow- motion Play
Press PAUSE ( ) once during play. The screen
freezes.
Press ( ) on the remote control.
You can increase or decrease the speed of the
slow-motion play by pressing SEARCH/SLOW
( (or) ). There are 4 slow motion modes
as 1/16, 1/8, 1/4, 1/2.
The speed of slow motion play is displayed on
the screen each time you change it.
To return to normal play press PLAY ( )
again.
NOTE: No sound will be heard during Slow motion
play.
NOTE: Reverse slow motion play is not available.
Direct Selection of Scenes
Selecting Scenes by Time
You can view the movie CD, starting from any
time point you want.
Press SEARCH MODE on the remote control
once time during playback.
The time search box is displayed on the screen
as SELECT :_ _ / xx
Player goes to entered track of the disc.
Press SEARCH MODE on the remote control
two times during playback.
The time search box is displayed on the screen
as GOTO:_: _ _ : _ _
Player goes to entered time of the current
track.
Enter the time using number buttons.
The title is played beginning from the desired
time just after you enter the time.
For your convenience:
• If you attempt to enter a number greater
than the total time of the current title, the
time search box disappears and “ Input
Invalid” message appears on up-left corner
of screen.
• If you give up entering the time simply
press RETURN button, and the operation is
cancelled.
Convenient Functions
Displaying the time information
Press INFO during play.
Each time this button is pressed, a different time
information box is displayed on the screen.
• If “Single elapsed” is displayed, the elapsed
time for the title which is being played will be
displayed.
• If “Single remain” is displayed, the remaining
time for the title which is being played will be
displayed.
Pressing the INFO key again closes display
menu screen. “DISPLAY OFF” is diplayed.
Displaying a scene with a larger and closer
view
CD Menu
CD Menu is used to display the directory
structure of data discs which would contain fi les
such as JPEG/MPEG/MP3/DivX and to display
the tracks of Audio CDs.
Basic Play
1.Please insert a CD-R disc to the loader.
“Loading” message appears on screen. Please
wait for a moment.
CD MENU appears. Directories and the fi les in
the root directory are listed. (For Audio CD, the
tracks are listed.)
2. Press “ ” or “ ” to select files or
directories.
In the stop mode or while playing MP3 the user
can navigate in the current directory.
3. Press SELECT, “ ” or “ ” to switch between
directories & fi les.
03_[GB]_MB25_(02-DVD)_32883W_1900UK_ANALOG_BRONZE9_DIVX_WOVCD_10064228_50152513.indd 115
03_[GB]_MB25_(02-DVD)_32883W_1900UK_ANALOG_BRONZE9_DIVX_WOVCD_10064228_50152513.indd 115
03_[GB]_MB25_(02-DVD)_32883W_1900UK_ANALOG_BRONZE9_DIVX_WOVCD_10064228_50152513.indd 115
03_[GB]_MB25_(02-DVD)_32883W_1900UK_ANALOG_BRONZE9_DIVX_WOVCD_10064228_50152513.indd 11503_[GB]_MB25_(02-DVD)_32883W_1900UK_ANALOG_BRONZE9_DIVX_WOVCD_10064228_50152513.indd 115 17.08.2009 09:11:13
17.08.2009 09:11:13
17.08.2009 09:11:13
17.08.2009 09:11:1317.08.2009 09:11:13
Termékspecifikációk
| Márka: | Salora |
| Kategória: | televízió |
| Modell: | LCD3231DVX |
Szüksége van segítségre?
Ha segítségre van szüksége Salora LCD3231DVX, tegyen fel kérdést alább, és más felhasználók válaszolnak Önnek
Útmutatók televízió Salora

27 Március 2025
25 Március 2025
16 Január 2025
16 Január 2025
14 Január 2025
13 Január 2025
12 Január 2025
11 Január 2025
11 Január 2025
14 Október 2024
Útmutatók televízió
- televízió Samsung
- televízió Sony
- televízió Beko
- televízió Fujitsu
- televízió Acer
- televízió Nedis
- televízió LG
- televízió Grundig
- televízió Marantz
- televízió Philips
- televízió Pioneer
- televízió SilverCrest
- televízió Panasonic
- televízió JVC
- televízió AEG
- televízió Sharp
- televízió Nokia
- televízió Lenovo
- televízió Casio
- televízió Toshiba
- televízió Oppo
- televízió Hyundai
- televízió Hisense
- televízió BenQ
- televízió SunBriteTV
- televízió Siemens
- televízió Medion
- televízió TCL
- televízió Xiaomi
- televízió GoGen
- televízió Insignia
- televízió Infiniton
- televízió Dell
- televízió Strong
- televízió VOX
- televízió Vivax
- televízió Thomson
- televízió Polaroid
- televízió Aiwa
- televízió Orima
- televízió V7
- televízió Clatronic
- televízió PEAQ
- televízió Qilive
- televízió Haier
- televízió Mitsubishi
- televízió Cecotec
- televízió Sencor
- televízió GPX
- televízió Küppersbusch
- televízió Innoliving
- televízió AOC
- televízió Citizen
- televízió Westinghouse
- televízió Hitachi
- televízió Continental Edison
- televízió Telefunken
- televízió Nevir
- televízió Monster
- televízió Roadstar
- televízió Optoma
- televízió CHiQ
- televízió Viewsonic
- televízió Nextbase
- televízió Denver
- televízió Bush
- televízió Trevi
- televízió Albrecht
- televízió Daewoo
- televízió Funai
- televízió Tesla
- televízió Smart Tech
- televízió Muse
- televízió Energy Sistem
- televízió OK
- televízió SVAN
- televízió Loewe
- televízió RevolutionHD
- televízió Polar
- televízió Manhattan
- televízió Kogan
- televízió Horizon
- televízió Intenso
- televízió Furrion
- televízió Teac
- televízió Aspes
- televízió Digihome
- televízió Manta
- televízió Blaupunkt
- televízió Sagem
- televízió Jay-Tech
- televízió Logik
- televízió Finlux
- televízió Peerless-AV
- televízió Abus
- televízió AG Neovo
- televízió Bang & Olufsen
- televízió Iiyama
- televízió AKAI
- televízió TechniSat
- televízió Seiki
- televízió Jensen
- televízió Pyle
- televízió Emerson
- televízió Sanyo
- televízió Kemo
- televízió Lenco
- televízió Schneider
- televízió Philco
- televízió ECG
- televízió Uniden
- televízió Technika
- televízió NEC
- televízió Element
- televízió Soundmaster
- televízió Alphatronics
- televízió AYA
- televízió MBM
- televízió Krüger&Matz
- televízió Dual
- televízió Brandt
- televízió Wharfedale
- televízió Allview
- televízió RCA
- televízió OKI
- televízió Orion
- televízió SereneLife
- televízió Schaub Lorenz
- televízió Luxor
- televízió Metz
- televízió ILive
- televízió Graetz
- televízió Tatung
- televízió Packard Bell
- televízió EasyMaxx
- televízió Orava
- televízió Arçelik
- televízió Planar
- televízió Zenith
- televízió Doffler
- televízió QBell Technology
- televízió SYLVOX
- televízió Majestic
- televízió Reflexion
- televízió FFalcon
- televízió Megasat
- televízió Sogo
- televízió United
- televízió Techwood
- televízió Newstar
- televízió Matsui
- televízió Alden
- televízió Aldi
- televízió Airis
- televízió Aristona
- televízió Apex
- televízió Icy Box
- televízió Lexibook
- televízió Palsonic
- televízió Walker
- televízió Saba
- televízió Antarion
- televízió Kernau
- televízió Tevion
- televízió Proscan
- televízió Vestel
- televízió Tucson
- televízió Sunstech
- televízió Nabo
- televízió Sylvania
- televízió Sunny
- televízió Marquant
- televízió Nordmende
- televízió AudioAffairs
- televízió Magnum
- televízió Audiosonic
- televízió Kubo
- televízió Proline
- televízió Coby
- televízió Seg
- televízió Vivo
- televízió Daitsu
- televízió Terris
- televízió Changhong
- televízió Alba
- televízió Naxa
- televízió Star-Light
- televízió Fantec
- televízió Mpman
- televízió Sweex
- televízió Vizio
- televízió Cello
- televízió Mx Onda
- televízió Nikkei
- televízió Hannspree
- televízió DGM
- televízió Yasin
- televízió Humax
- televízió XD Enjoy
- televízió MT Logic
- televízió Superior
- televízió Kunft
- televízió Difrnce
- televízió ITT
- televízió Grunkel
- televízió Avtex
- televízió Inovia
- televízió Odys
- televízió NPG
- televízió Bluesky
- televízió Videocon
- televízió Xoro
- televízió Durabase
- televízió HKC
- televízió Edenwood
- televízió Woxter
- televízió Premier
- televízió Onn
- televízió Teleco
- televízió Opera
- televízió LTC
- televízió JTC
- televízió Zalman
- televízió Ferguson
- televízió Viewpia
- televízió XS4ALL
- televízió JGC
- televízió Online
- televízió Dyon
- televízió DirecTV
- televízió Tele 2
- televízió Telesystem
- televízió EKO
- televízió E-motion
- televízió Mitsai
- televízió Selfsat
- televízió High One
- televízió Tve
- televízió ISymphony
- televízió Pantel
- televízió Magnavox
- televízió ATYME
- televízió HCI
- televízió Inno-Hit
- televízió Lin
- televízió Engel
- televízió Bang Olufsen
- televízió TechLine
- televízió Elements
- televízió Englaon
- televízió Time
- televízió Reflex
- televízió Astar
- televízió Visco
- televízió Tivax
- televízió H&B
- televízió Norcent
- televízió TELE System
- televízió TIM
- televízió Oyster
- televízió Belson
- televízió Vision Plus
- televízió Sbr
- televízió Bauhn
- televízió Voxx
- televízió Rm 2000
- televízió Hoher
- televízió Felson
- televízió Mach Power
- televízió Elbe
- televízió Axing
- televízió CGV
- televízió Séura
- televízió Mitzu
- televízió Caratec
- televízió JTC24
- televízió Coocaa
- televízió Kivi
- televízió Smart Brand
- televízió Voxicon
- televízió Aconatic
- televízió Mitchell & Brown
- televízió FOX Electronics
- televízió Mystery
Legújabb útmutatók televízió

10 Április 2025
10 Április 2025

10 Április 2025

9 Április 2025
9 Április 2025
9 Április 2025
9 Április 2025

9 Április 2025
9 Április 2025
9 Április 2025