Használati útmutató Roberts PLAY 20
Olvassa el alább 📖 a magyar nyelvű használati útmutatót Roberts PLAY 20 (3 oldal) a rádió kategóriában. Ezt az útmutatót 2 ember találta hasznosnak és 2 felhasználó értékelte átlagosan 4.5 csillagra
Oldal 1/3

Radio, mains adaptor, quick start guide and safety/warranty leaet.
Features
Controls
continued overleaf...
STEP 1 - Plug in & play DAB radioWhat is in the Box?
• Bluetooth audio streaming from smartphone, tablet or laptop
• DAB / DAB+ / FM RDS wavebands with built-in battery charger
• 20 radio station presets (10 DAB and 10 FM)
• FM RDS station name display
• Up / Down tuning buttons
• Search / manual tuning
• AC adaptor included
• Batteries 4 x AA size / LR6 or rechargeable equivalent (not included)
• Headphone socket for private listening
B - Connect to the mains
A - Lock switch
C - Switch on your radio
D - Select a DAB radio station
Please read the safety leaet provided before connecting your
radio to the mains.
1 Place your radio on a at surface.
2 Fully extend the telescopic aerial located on the rear of the radio.
3 Plug the cable from the mains adaptor into the DC input socket.
Plug the mains adaptor into a wall socket and switch on the socket.
1 Ensure the (located on the back of the radio) is in the Lock switch
‘Unlock’ position (down) before switching on your radio. The lock switch
is used to prevent unintentional operation of your radio when not in use.
• If you are not using your radio for some time, set the to Lock switch
the ‘Lock’ position (up). The power and all other buttons will be disabled,
this should prevent accidental operation when your radio is packed in a
suitcase or travel bag.
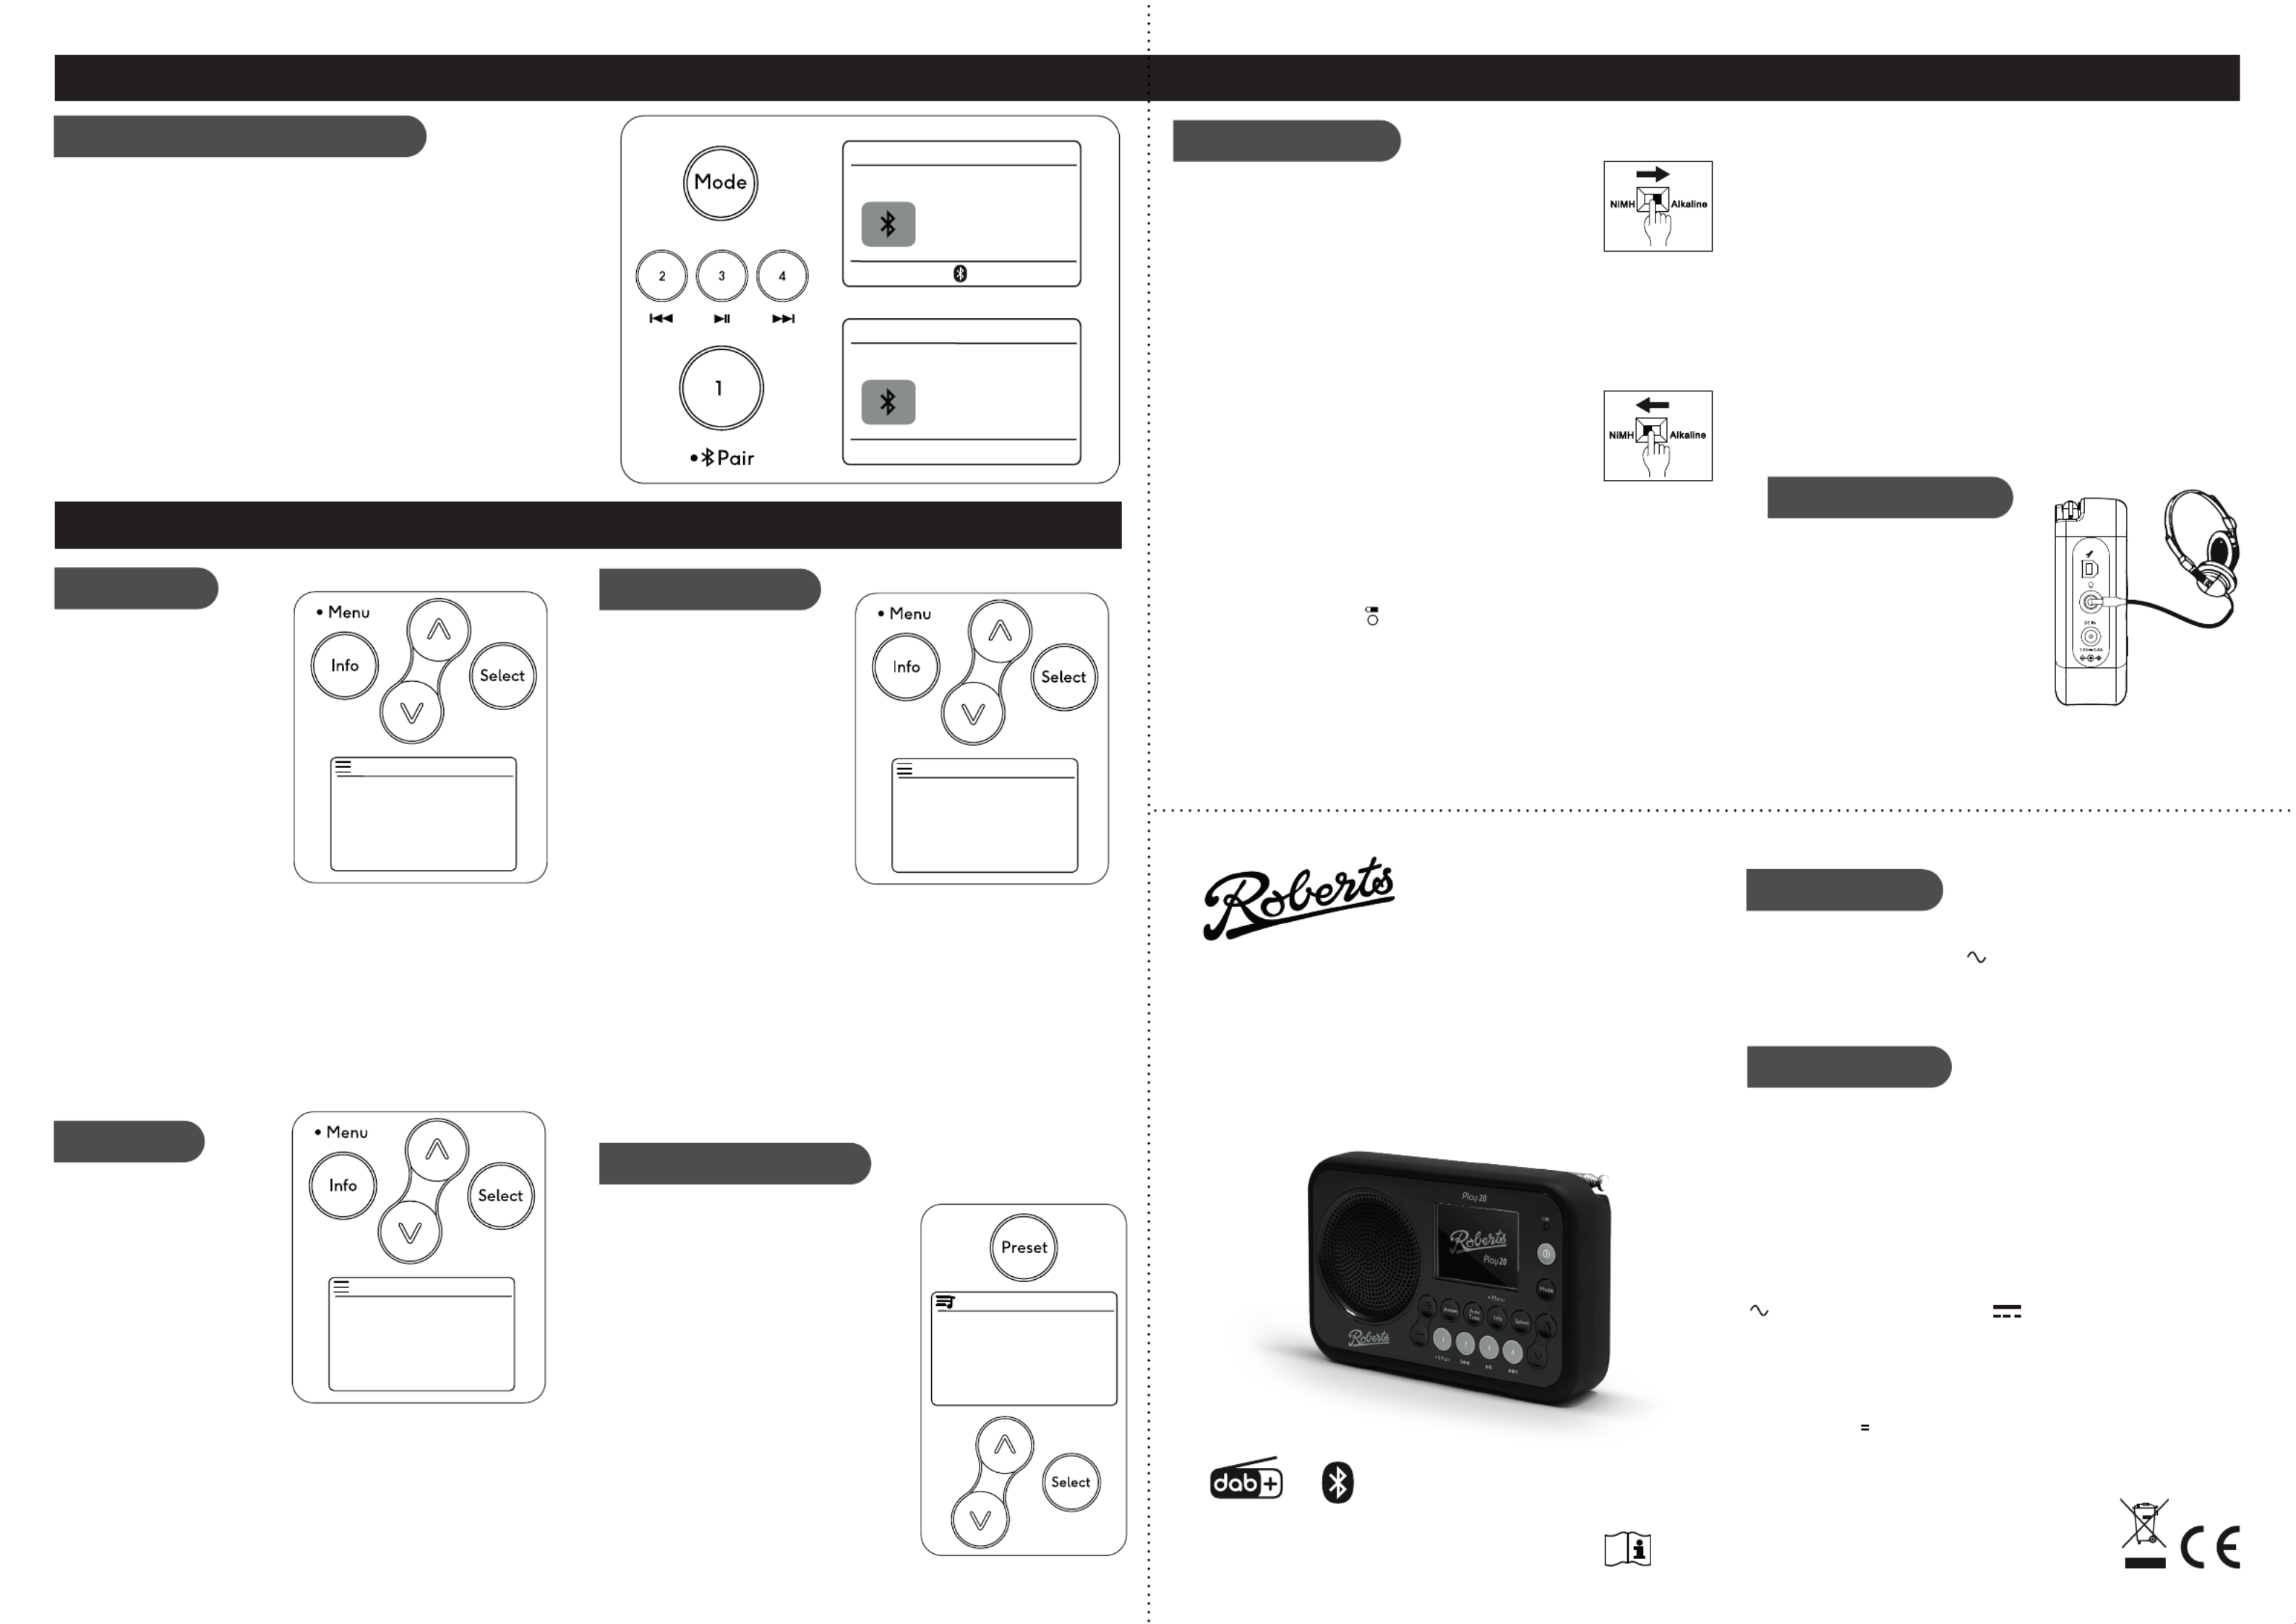
Loudspeaker1
LCD display2
Charge / Low battery indicator3
On / Off button4
Mode button5
6 Tuning Up button
Select button7
Info / Menu button8
9 Auto Tune button
10 Preset button
11 Volume Up button
12 Volume Down button
13 Preset 1 / Bluetooth Pair button
14 Preset 2 / Previous button
15 Preset 3 / Play/Pause button
16 Preset 4 / Next button
17 Tuning Down button
18 Telescopic aerial
19 Lock switch
20 Battery charge switch (inside battery
compartment) not shown
21 Battery compartment
22 USB socket (for software upgrades only)
23 Headphone socket
24 DC input socket
2
3
5
6
78
9
10
11
12
4
13 14 1615
1
17
E - Scan for DAB stations
As time passes new stations may become available or you
may have moved to a different part of the country.
1 Press and release the Auto Tune button.
2 Your radio will perform a scan of the Band III DAB
channels. As new stations are found, they will be added
to the list stored in the radio.
1 Press the On/Off button to switch on the radio. A start up screen will be
displayed and a station scan will be performed.
2 If this is the rst time the radio is used a scan of the Band III DAB channels
will be carried out. After each use the radio will remember the mode used
and then switch on in that mode the next time it is used. To switch off your
radio press the On/Off button.
3 Note: If no signals are found it may be necessary to relocate your radio
to a position giving better reception and carry out a scan for new stations.
1 If needed, press and release the button until the Mode
DAB mode is selected.
2 Press the buttons to step through Tuning Up or Down
the list of available DAB stations.
3 Press the Select button to select the station.
4 Adjust the Volume.
5 Some radio stations may have one or more additional
broadcasts associated with them. If these are available
they will appear immediately after the main station.
• If a DAB broadcast provides a slideshow image, this
may be viewed by pressing the Select button. For full-
screen, press the Select button again. Press the Select
button to exit the slideshow.
6 Press and release the button to cycle through Info / Menu
the various DAB display options. Choose from, scrolling
text, program type, multiplex name, date, bit rate, audio
type and signal strength.
A - Search tuning - FM
B - Manual tuning - FM
Menu options
1 Fully extend the telescopic aerial.
2 Press and release the button until FM is Mode
selected.
3 Press the buttons and then press Tuning Up or Down
and release the Auto Tune button. Your radio will
scan upwards (low to high frequency) or downwards
(high to low frequency) and will stop automatically
when it nds a station of sufcient strength.
4 If the signal is strong enough and there is RDS data
present then the radio will display the station name.
5 Adjust the Volume.
• Press and release the button to cycle Info / Menu
through the various FM display options. The display
options are station name, scrolling text, program type,
signal strength or date.
1 Fully extend the telescopic aerial.
2 Press and release the buttons Tuning Up or Down
to tune to a station.
3 The frequency will change in steps of 50 kHz.
4 Adjust the Volume.
1 To access your radios menu system, apply a long
press on the Info / Menu button.
2 Use the buttons to Tuning Up or Down and Select
select menu options.
3 To exit a menu, press the Info / Menu button as
needed.
STEP 2 - Play FM radio
You may store your preferred DAB or FM radio stations
to the preset station memories. There are 20 memory
presets, 10 for DAB and 10 for FM. To store presets
(5 -10) see overleaf.
Presets are remembered by the radio in the event of a
power failure.
To store a preset (1 - 4)
1 Ensure your radio is switched on.
2 Tune to the required radio station.
3 buttonApply a long press on the required Preset
1 - 4. The display will show for example, ‘Preset 01
Saved’.
4 The station will be stored under the chosen preset
button. Stations stored in the preset memory may
be overwritten by following the above procedure.
To recall a preset (1 - 4)
1 Choose DAB or FM mode.
2 Press and release the required button Preset 1 - 4.
3 Your radio will tune to the station stored in the preset
memory. The display will show Note: ‘Empty’ if no
station has been stored to that preset.
Preset radio stations
18
19
20
21
22
23
24
• It is recommended that the DAB band be used wherever
possible as better results in terms of quality and freedom
from interference will usually be obtained than on the
FM band.
BBC Radio 2
BBC Radio 3
BBC Radio 4
Daily Service
Parliament
Station list
Stations: 044
Scan
Scanning...
103.40 MHz
FM 16.34
Heart FM - The
best variety of
hits
FM
RDS
Preset 01 Saved
i
STEP 3 - Bluetooth
DAB / FM menus System settings
Other information
Circuit features
ROBERTS RADIO LIMITED
www.robertsradio.com
© 2020 Roberts Radio Limited
Issue 1
2020-12-22
DAB / DAB+ / FM portable radio with Bluetooth
Please read this guide and the safety/warranty leaet before use
Play 20
Specications
Power requirements
Mains (adaptor) AC100 - 240V 50/60Hz
Batteries 4 x AA size / LR6 Alkaline or NiMH rechargeable (not included)
Battery life Up to 25 hours using alkaline cells depending upon volume,
and operating mode.
Headphone socket - 3.5mm dia.
Aerial System - DAB / FM telescopic aerial
Bluetooth standards A2DP, AVRCP
Bluetooth codecs supported SBC and AAC
Frequency coverage FM 87.5 - 108MHz, DAB 174.928 - 239.200MHz
Bluetooth 4.1 frequencies 2.402 - 2.480GHz
Product markings
DC Power input 7.5V / 0.8A
This symbol indicates AC voltage. This symbol indicates DC voltage.
Mains adaptor
Manufacturer of AC Adaptor: Dongguan Becky Electronics Tech Co.,Ltd, Model:
BQ12E-0750800-B, Input voltage: AC100 - 240V, Input AC frequency: 50/60Hz,
Output voltage: DC7.5V, Output current: 0.8A, Output power: 6.0W, Average
active efciency:
>
79.71%, No-load power consumption: < 0.1W
DAB menu System settings
FM menu
Apply a long press on the Info /
Menu button to access the following
DAB menu options.
Scan - Choose ‘Scan’ to scan the
band III DAB channels.
Prune - Choose ‘Prune’ and then
choose ‘Yes’ to remove any stations
that are no longer available.
Manual tune - Choose ‘Manual
tune’ and then choose the desired
DAB channel. The signal strength
will be displayed.
Station order - Choose ‘Station Order’ and then choose from Multiplex,
Alphanumeric or Active (available stations).
DRC - Choose ‘DRC’ ‘Off’ then choose , ‘Low’ ‘High’ or . The DRC facility can make
quieter sounds easier to hear when your radio is used in a noisy environment.
Note: Not all DAB broadcasts use the DRC function.
Apply a long press on the Info /
Menu button to access the following
FM menu options.
Scan setting - Choose ‘Scan setting’
and then choose either ‘Distant’
(your radio will scan for both weak
and strong signals) ‘Local’ or (your
radio will scan for stations with good
reception).
Audio setting - Your radio will play
stereo broadcasts in stereo (via
headphones) so long as the received signal is of adequate strength. However,
as a stereo signal becomes weaker the audio signal will become poorer.
If a station being received is weak some hiss may be audible. To reduce the
hiss choose then choose ‘Audio setting’ ‘Mono only’. To return to stereo/mono
mode choose ‘Stereo’.
The name plate is located on the rear of the radio.
The company reserves the right to amend the specication without notice.
Connecting Bluetooth devices
1 Ensure Bluetooth is enabled on your smart device.
2 Press and release the button until the Bluetooth mode is selected Mode
on your radio.
3 The Bluetooth indicator will ash and your radio will become ‘discoverable’.
4 On your smart device select ‘Play20’. Once the connection is established
you may play your music. The Bluetooth indicator will remain steady. Adjust
the volume using the volume controls on the radio and on the connected
Bluetooth device.
5 Press and release the button to cycle through the various Info / Menu
display options.
6 The audio player in your phone, tablet or PC may be able to respond to
the Play/Pause, Next track or Previous track buttons on the radio. Note:
Not all player applications or devices may respond to all of these buttons.
7 To connect a different device apply a long press on the Bluetooth Pair
button. Your radio will become discoverable by other devices.
Headphone socket
Battery operation (Alkaline)
1 Remove the battery cover on the back of the unit by pushing
the catches in the direction of the arrows.
2 Slide the switch inside the battery compartment to the Alkaline
position (as shown) and insert four AA size alkaline batteries.
Take care to ensure all batteries are inserted with the correct polarity as shown
inside the battery compartment. Then replace the battery cover. Important:
when using alkaline batteries the battery switch must be placed in the
alkaline position. Failure to do so could result in serious damage to the
batteries or radio. If no batteries are tted then set the switch to the Alkaline
position. This minimises the power consumption when the radio is powered
from the mains.
Battery operation (Rechargeable)
1 Remove the battery cover on the back of the unit by pushing
the catches in the direction of the arrows.
2 Slide the switch inside the battery compartment to the NiMH
position (as shown).
3 Insert four identical Rechargeable AA size batteries. Take care to ensure all batteries
are inserted with the correct polarity as shown inside the battery compartment.
Then replace the cover. The radio is designed to be used with Nickel Metal Hydride
(NiMH) rechargeable batteries. No other type of rechargeable battery should be
used in the radio.
4 Plug the mains adaptor into your radio and then plug the adaptor into the mains.The
charge / battery indicator will ash green indicating the batteries are charging.
Batteries will be fully charged in around 7 hours and a message will be displayed.
The charge / battery indicator shows a steady green light when the battery charging
is complete.
5 Under some conditions the charging indicator may switch off after ashing only
briey. This may happen if the batteries are already freshly charged, or if the radio
detects that you may be attempting to recharge alkaline batteries. In these cases
the charging will be stopped. If the charge process stops this may be due to a faulty
battery. In this case the charge / battery indicator will show red and a battery fail
message will be displayed. The faulty battery will be marked with a red cross.
Battery operation Please read the safety leaet provided
before using batteries. Note: You should never attempt to recharge alkaline batteries in the radio.
Attempted recharging of alkaline batteries can be dangerous.
• Important: when using rechargeable batteries the battery switch must
be placed in the NiMH position. Batteries will only be charged when
the radio is switched off and connected to the AC adaptor.
• When the batteries are exhausted, the low battery indicator will show red
for a short while. The radio will then switch itself off. It may not be possible
to switch the radio back on until the batteries are recharged, or until the
radio is connected to the mains adaptor.
• If the radio is not to be used for any extended period of time it is recommended
that the batteries are removed from the radio.
• We would recommend for economy that the Play 20 is used via the AC
adaptor whenever possible with battery operation for occasional or standby
use only. If extended listening using batteries is anticipated, then the use
of rechargeable batteries is recommended.
Caution: Replace batteries only with the same or equivalent type.
Danger of explosion if the batteries are incorrectly replaced.
Note: Never mix alkaline and rechargeable batteries.
Today’s Date:
03/11/2020
Bluetooth 16.34
Julias iPhone
Today’s Date:
03/11/2020
Bluetooth 16.34
Disconnected
Access your radios ‘System settings’
from the current menu.
Clock format - Choose ‘System’ then
‘Clock format’ ‘12 or and then choose
24 hour’.
Backlight - Choose ‘System’ then
‘Backlight’. To adjust the display
brightness when the unit is playing
select ‘On Level’ ‘High’, then choose
‘Medium’, ‘Low’ or ‘Off’.
To change the duration for which the
display will remain bright after using any
of the controls choose then ‘System’
‘Backlight’. Choose ‘Timeout’ ‘On’ and then choose from or 10, 30, 60 or 180 seconds.
Language - Choose , ‘System’ ‘Language’ and then choose a desired language
from the list.
Factory reset - If you wish to completely reset your radio to its initial state perform a
factory reset. Choose ‘System’ then ‘Factory reset’ and then choose ‘Yes’. All user
entered settings will be erased.
SW version - The software display cannot be altered and is just for your reference.
Choose then ‘System’ ‘SW version’.
Preset radio stations
There are 20 memory presets, 10 for DAB and
10 for FM.
To store a preset 1 - 10
1 Tune to the required radio station.
2 on the button, Apply a long press Preset
‘Save to Preset’ will be displayed.
3 Use the or buttons to Tuning Up Down
scroll to an unused preset or a preset you
wish to change.
4 Press the Select button to save the preset.
To recall a preset 1 - 10
1 Choose DAB or FM mode.
2 Give a short press on the Preset button,
‘Preset Recall’ will be displayed.
3 Use the or and Tuning Up Down Select
buttons to select the desired preset station.
05. BBC Radio 2
06. BBC Radio 3
07. Empty
08. Empty
09. Capital UK
Save to Preset
A 3.5mm Headphone socket located on
the left hand side of your radio is provided
for use with headphones. Inserting a
plug automatically mutes the internal
loudspeaker.
Please be aware that the sensitivity of
headphones can vary widely. We therefore
recommend setting the volume to a low
level before connecting headphones to
the radio.
Scan
Prune
Manual Tune
Station Order
DRC
DAB menu
Clock Format
Backlight
Language
Factory Reset
SW Version
System
Scan Setting
Audio Setting
System
Back
FM menu
Note: If the unit is in the Bluetooth stop mode position for more than 15 minutes
it will automatically switch off. To use the radio again, simply press On/Off.
Termékspecifikációk
| Márka: | Roberts |
| Kategória: | rádió |
| Modell: | PLAY 20 |
Szüksége van segítségre?
Ha segítségre van szüksége Roberts PLAY 20, tegyen fel kérdést alább, és más felhasználók válaszolnak Önnek
Útmutatók rádió Roberts

8 Január 2025
31 December 2025
21 December 2024
13 Október 2024
5 Október 2024
29 Szeptember 2024
1 Szeptember 2024
28 Augusztus 2024
28 Augusztus 2024
26 Augusztus 2024
Útmutatók rádió
- rádió Sony
- rádió August
- rádió Yamaha
- rádió Moulinex
- rádió Nedis
- rádió Milwaukee
- rádió Grundig
- rádió Philips
- rádió Pioneer
- rádió Kärcher
- rádió Adler
- rádió Oregon Scientific
- rádió SilverCrest
- rádió Garmin
- rádió Bosch
- rádió Panasonic
- rádió JVC
- rádió AEG
- rádió Sharp
- rádió Einhell
- rádió Harman Kardon
- rádió Toshiba
- rádió Sven
- rádió Ozito
- rádió Makita
- rádió Hyundai
- rádió HQ
- rádió Emos
- rádió Medion
- rádió Onkyo
- rádió Motorola
- rádió Vimar
- rádió Technics
- rádió JBL
- rádió Camry
- rádió DAP-Audio
- rádió Zebra
- rádió Xiaomi
- rádió GoGen
- rádió Futaba
- rádió Boss
- rádió Be Cool
- rádió Thomson
- rádió Technaxx
- rádió Aiwa
- rádió Kenwood
- rádió Tesco
- rádió Duronic
- rádió Clatronic
- rádió Hama
- rádió PEAQ
- rádió Renkforce
- rádió Midland
- rádió Sencor
- rádió GPX
- rádió Bose
- rádió Lowrance
- rádió Hitachi
- rádió BLUEPALM
- rádió Telefunken
- rádió Nevir
- rádió Sennheiser
- rádió Tangent
- rádió Cambridge
- rádió Alpine
- rádió Acoustic Solutions
- rádió Roadstar
- rádió Logitech
- rádió Klein Tools
- rádió Parrot
- rádió Cobra
- rádió Hilti
- rádió Sonoro
- rádió Denver
- rádió Bush
- rádió Power Dynamics
- rádió Black & Decker
- rádió Trevi
- rádió Memphis Audio
- rádió Elta
- rádió Albrecht
- rádió Aluratek
- rádió Audio-Technica
- rádió NGS
- rádió Daewoo
- rádió Lenoxx
- rádió PowerPlus
- rádió Denon
- rádió Muse
- rádió OK
- rádió JL Audio
- rádió Metabo
- rádió SPC
- rádió Auna
- rádió Hitec
- rádió Mac Audio
- rádió TriStar
- rádió BaseTech
- rádió Bogen
- rádió RYOBI
- rádió Terratec
- rádió DreamGEAR
- rádió HiKOKI
- rádió Intertechno
- rádió Manhattan
- rádió Alecto
- rádió Festool
- rádió Furrion
- rádió Velleman
- rádió Teac
- rádió Clarion
- rádió Scott
- rádió Monacor
- rádió ION
- rádió Manta
- rádió Blaupunkt
- rádió Oricom
- rádió Viper
- rádió Easy Home
- rádió Sagem
- rádió Delta
- rádió Busch-Jaeger
- rádió Olympia
- rádió Logik
- rádió Tronic
- rádió Timex
- rádió La Crosse Technology
- rádió Infinity
- rádió AKAI
- rádió Porter-Cable
- rádió Konig
- rádió Stabo
- rádió TechniSat
- rádió GlobalTronics
- rádió Jensen
- rádió Pyle
- rádió Emerson
- rádió DeWalt
- rádió Sanyo
- rádió Salora
- rádió Telestar
- rádió Lenco
- rádió CRUX
- rádió Schneider
- rádió Audizio
- rádió ECG
- rádió Stanley
- rádió Uniden
- rádió Victrola
- rádió Majority
- rádió Hertz
- rádió Vonroc
- rádió Soundmaster
- rádió Monitor Audio
- rádió Cotech
- rádió Audac
- rádió Rockford Fosgate
- rádió Krüger&Matz
- rádió Dual
- rádió ICOM
- rádió Kathrein
- rádió Yaesu
- rádió RCA
- rádió Imperial
- rádió Kicker
- rádió Sangean
- rádió Topcom
- rádió Sirius
- rádió MB Quart
- rádió H-Tronic
- rádió OneConcept
- rádió ILive
- rádió Schwaiger
- rádió EasyMaxx
- rádió Orava
- rádió Lexon
- rádió Vitek
- rádió Geneva
- rádió Craftsman
- rádió Majestic
- rádió Graphite
- rádió Reflexion
- rádió Smartwares
- rádió Teufel
- rádió Sogo
- rádió Crosley
- rádió REVO
- rádió Artsound
- rádió Matsui
- rádió Quigg
- rádió Acoustic Energy
- rádió Argon
- rádió Icy Box
- rádió Brennenstuhl
- rádió Lexibook
- rádió Tevion
- rádió GPO
- rádió Caliber
- rádió Swan
- rádió Exibel
- rádió Brigmton
- rádió Sunstech
- rádió Maginon
- rádió Marquant
- rádió Nordmende
- rádió AudioAffairs
- rádió Binatone
- rádió Steren
- rádió Audiosonic
- rádió Proline
- rádió Coby
- rádió Envivo
- rádió Bigben Interactive
- rádió Technoline
- rádió Pure
- rádió Audiovox
- rádió Terris
- rádió Switel
- rádió Hager
- rádió Bigben
- rádió Sunwind
- rádió Laser
- rádió Alba
- rádió Clas Ohlson
- rádió Naxa
- rádió Ricatech
- rádió Boston Acoustics
- rádió Mpman
- rádió Sweex
- rádió Ices
- rádió Nikkei
- rádió PerfectPro
- rádió Freecom
- rádió Navman
- rádió Gira
- rádió Jung
- rádió Dnt
- rádió Balance
- rádió MT Logic
- rádió Audio Pro
- rádió Kunft
- rádió Difrnce
- rádió Noveen
- rádió Karcher Audio
- rádió Fusion
- rádió PAC
- rádió IHome
- rádió AIC
- rádió Ruarkaudio
- rádió Tivoli Audio
- rádió Go Green
- rádió Wolfgang
- rádió Linn
- rádió Numan
- rádió Iluv
- rádió TELEX
- rádió Multiplex
- rádió Clint
- rádió Soundstream
- rádió Xoro
- rádió Zolid
- rádió Sagemcom
- rádió Block
- rádió Berker
- rádió Woxter
- rádió Xhdata
- rádió View Quest
- rádió Harley Davidson
- rádió Noxon
- rádió Brionvega
- rádió Ferguson
- rádió Wet Sounds
- rádió Eissound
- rádió Dcybel
- rádió Tecsun
- rádió JGC
- rádió Scansonic
- rádió TFA Dostmann
- rádió Audisse
- rádió ETON
- rádió Kruger Matz
- rádió Equity
- rádió EKO
- rádió Pinell
- rádió Videologic
- rádió Tivoli
- rádió Mtx Audio
- rádió Aquatic AV
- rádió Roswell
- rádió Intek
- rádió Digitalbox
- rádió Whistler
- rádió Xact
- rádió Ruark Audio
- rádió Magnavox
- rádió Digitech
- rádió GME
- rádió NUVO
- rádió Narex
- rádió Tiny Audio
- rádió R-MUSIC
- rádió E-bench
- rádió Konig Electronic
- rádió Peha
- rádió SiriusXM
- rádió Sanwa
- rádió SW-Stahl
- rádió Sailor
- rádió SSV Works
- rádió Microlab
- rádió QFX
- rádió Voxx
- rádió SACK It
- rádió BasicXL
- rádió Roth
- rádió Ices Electronics
- rádió AmpliVox
- rádió Elbe
- rádió GBS Elettronica
- rádió Sang
- rádió Gewiss
- rádió Lutron
- rádió Axxess
- rádió Retekess
- rádió Wintal
- rádió Atlantis Land
- rádió Ranger
- rádió MAAS
- rádió Weather X
- rádió Aconatic
- rádió Mebby
- rádió Yamazen
- rádió Blonder Tongue
- rádió RoadKing
Legújabb útmutatók rádió

10 Április 2025
2 Április 2025
1 Április 2025
1 Április 2025
31 Március 2025
30 Március 2025
29 Március 2025
26 Március 2025

25 Március 2025
16 Január 2025