Használati útmutató Ricoh C 6045
Olvassa el alább 📖 a magyar nyelvű használati útmutatót Ricoh C 6045 (204 oldal) a nyomtató kategóriában. Ezt az útmutatót 5 ember találta hasznosnak és 2 felhasználó értékelte átlagosan 4.5 csillagra
Oldal 1/204

Paper type: OK Prince Eco G100(55kg), Paper Thickness=80 µm // Pages in book=200 // Print scale=81%
Gap (when printed at 81% scale) = Pages in book × Paper thickness / 2 = 8.000000 mm
B1328607A
Operating Instructions
General Settings Guide
Read this manual carefully before you use this machine and keep it handy for future reference. For safe and correct use, be sure to read the Safety
Information in this manual before using the machine.
Getting Started
Combined Function Operations
Document Server
User Tools (System Settings)
Troubleshooting
Remarks
Entering Text
Specifications
Type for C6045/DSc460/LD160c/Aficio 3260C
Type for SDC555/CS555/LC155/Aficio Color 5560
Printed in Japan
EN USA B132-8607A

Paper type: OK Prince Eco G100(55kg), Paper Thickness=80 µm // Pages in book=200 // Print scale=81%
Gap (when printed at 81% scale) = Pages in book × Paper thickness / 2 = 8.000000 mm
In accordance with IEC 60417, this machine uses the following symbols for the main power switch:
a
aa
a means POWER ON.
c
cc
c means STAND BY.
Introduction
This manual contains detailed instructions and notes on the operation and use of this machine. For your
safety and benefit, read this manual carefully before using the machine. Keep this manual in a handy
place for quick reference.
Important
Contents of this manual are subject to change without prior notice. In no event will the company be li-
able for direct, indirect, special, incidental, or consequential damages as a result of handling or oper-
ating the machine.
Notes:
Some illustrations in this manual might be slightly different from the machine.
Certain options might not be available in some countries. For details, please contact your local dealer.
Laser Safety:
CDRH Regulations
This equipment complies with requirements of 21 CFR Subchapter J for class 1 laser products. This
equipment contains eight AlGalnP laser diodes, 7–milliwatt, 648–660 nanometer wavelength for each
emitter. This equipment does not emit hazardous light, since the beam is totally enclosed during all cus-
tomer modes of operation and maintenance.
Caution:
Use of controls or adjustments or performance of procedures other than those specified in this manual
might result in hazardous radiation exposure.
Notes:
The model names of the machines do not appear in the following pages. Check the type of your ma-
chine before reading this manual. (For details, see P.18 “Machine Types”.)
• Type 1: C6045/DSc460/LD160c/Aficio 3260C
• Type 2: SDC555/CS555/LC155/Aficio Color 5560
Certain types might not be available in some countries. For details, please contact your local dealer.
Two kinds of size notation are employed in this manual. With this machine refer to the inch version.
For good copy quality, the supplier recommends that you use genuine toner from the supplier.
The supplier shall not be responsible for any damage or expense that might result from the use of parts
other than genuine parts from the supplier with your office products.
Power Source
120V, 60Hz, 12A or more
Please be sure to connect the power cord to a power source as above. For details about power source,
see P.151 “Power Connection”.
Copyright © 2005

i
Manuals for This Machine
The following manuals describe the operational procedures of this machine. For
particular functions, see the relevant parts of the manual.
Note
❒Manuals provided are specific to machine type.
❒Adobe Acrobat Reader / Adobe Reader is necessary to view the manuals as
a PDF file.
❒Two CD-ROMs are provided:
• CD-ROM 1 “Operating Instructions”
• CD-ROM 2 “Scanner Driver and Document Management Utility”
❖
❖❖
❖General Settings Guide (this manual)
Provides an overview of the machine and describes System Settings (such as
Tray Paper Settings), Document Server functions, and troubleshooting.
❖
❖❖
❖Security Reference
This manual is for administrators of this machine. It describes security func-
tions that the administrators can use to protect data from being tampered, or
prevent the machine from unauthorized use.
Also refer to this manual for the procedures for registering administrators, as
well as setting user and administrator authentication.
❖
❖❖
❖Network Guide (PDF file - CD-ROM1)
Provides information about configuring and operating the printer in a net-
work environment or using software.
This manual covers all models, and therefore contains functions and settings
that may not be available for your model. Images, illustrations, functions, and
supported operating systems may differ from those of your model.
❖
❖❖
❖Copy Reference
Describes operations, functions, and troubleshooting for the machine's copier
function.
❖
❖❖
❖Printer Reference
Describes system settings, operations, functions, and troubleshooting for the
machine's printer function.
❖
❖❖
❖Scanner Reference (PDF file - CD-ROM1)
Describes operations, functions, and troubleshooting for the machine's scan-
ner function.
VenusC1_EN_zen_Pre_FM.book Page i Monday, April 18, 2005 4:49 PM
ii
❖
❖❖
❖Manuals for DeskTopBinder Lite
DeskTopBinder Lite is a utility included on the CD-ROM labeled “Scanner
Driver and Document Management Utility”.
•DeskTopBinder Lite Setup Guide (PDF file - CD-ROM2)
Describes installation of, and the operating environment for DeskTop-
Binder Lite in detail. This guide can be displayed from the [Setup] display
when DeskTopBinder Lite is installed.
•DeskTopBinder Introduction Guide (PDF file - CD-ROM2)
Describes operations of DeskTopBinder Lite and provides an overview of
its functions. This guide is added to the [Start] menu when DeskTopBinder
Lite is installed.
•Auto Document Link Guide (PDF file - CD-ROM2)
Describes operations and functions of Auto Document Link installed with
DeskTopBinder Lite. This guide is added to the [Start] menu when Desk-
TopBinder Lite is installed.
❖
❖❖
❖Other manuals
•PS3 Supplement (PDF file - CD-ROM1)
•Unix Supplement (Available from an authorized dealer, or as a PDF file on
our Web site.)
VenusC1_EN_zen_Pre_FM.book Page ii Monday, April 18, 2005 4:49 PM

iii
What You Can Do with This Machine
The following introduces the functions of this machine, and the relevant manu-
als containing detailed information about them.
Products marked with * are optional. For details about optional products, see
p.167 “Options”, or contact your local dealer.
Copier, Printer, and Scanner
Functions
This machine provides copier, print-
er* and scanner* functions.
•You can make copies of originals.
With a finisher*, you can sort and
staple copies. See Copy Reference.
•You can print documents created
using applications. See Printer Ref-
erence.
•You can scan originals and send
the scan file to a computer. See
Scanner Reference.
Utilizing Stored Documents
•You can store files of originals
scanned by this machine, or files
sent from other computers, onto
the hard disk of the machine. You
can print the stored documents, as
well as change print settings and
print multiple documents (Docu-
ment Server). See p.39 “Using the
Document Server”.
•With DeskTopBinder Lite/Profes-
sional*, you can search, check,
print, and delete stored documents
using your computer. You can also
retrieve stored documents scanned
in scanner mode. With File Format
Converter*, you can even down-
load documents stored in copy and
printer functions to your comput-
er. See Network Guide and Scanner
Reference.
AFU015S
AFU016S
VenusC1_EN_zen_Pre_FM.book Page iii Monday, April 18, 2005 4:49 PM

iv
Connecting Two Machines for
Copying
You can connect two machines to-
gether with Copy Connector*. When
you set up a copy job on one machine
(the main machine), data is trans-
ferred to the other (the sub-machine)
so that copies can be made on both
machines simultaneously (Connect
Copy).
•You can complete large volume
copy runs in shorter time. See Copy
Reference.
•Even if one machine runs out of
paper, or stops because of a paper
jam, the other machine can still
continue to finish the job. See Copy
Reference.
Using the Scanner in a
Network Environment
•You can send scanned documents
to other network computers using
e-mail (Sending stored scan file by
e-mail). See Scanner Reference.
•With the ScanRouter delivery soft-
ware, you can store scanned docu-
ments in specified destinations on
network computers (File storage).
See Scanner Reference.
•You can send scanned documents
to other network folders (Scan to
Folder). See Scanner Reference.
AFU007S
AFU013S
VenusC1_EN_zen_Pre_FM.book Page iv Monday, April 18, 2005 4:49 PM

vi
TABLE OF CONTENTS
Manuals for This Machine ......................................................................................i
What You Can Do with This Machine..................................................................iii
Copier, Printer, and Scanner Functions.................................................................... iii
Utilizing Stored Documents....................................................................................... iii
Connecting Two Machines for Copying .................................................................... iv
Using the Scanner in a Network Environment .......................................................... iv
Administrating the Machine/ Protecting Documents (Security Functions) ................. v
Monitoring the Machine Via Computer....................................................................... v
Notice......................................................................................................................1
Copyrights and Trademarks .................................................................................4
Trademarks ................................................................................................................4
Information about Installed Software..........................................................................5
How to Read This Manual ...................................................................................11
Safety Information ...............................................................................................12
Safety During Operation...........................................................................................12
Positions of Labels and Hallmarks for R
RR
RWARNING and R
RR
RCAUTION............15
ENERGY STAR Program .....................................................................................16
Machine Types .....................................................................................................18
1. Getting Started
Guide To Components ........................................................................................19
External Options.......................................................................................................21
Internal Options........................................................................................................22
Control Panel........................................................................................................23
Display Panel ...........................................................................................................25
When the Authentication Screen is displayed..........................................................26
Turning On the Power .........................................................................................28
Turning On the Main Power .....................................................................................28
Turning On the Power ..............................................................................................28
Turning Off the Power ..............................................................................................29
Turning Off the Main Power .....................................................................................29
Saving Energy..........................................................................................................29
2. Combined Function Operations
Changing Modes..................................................................................................31
Job List.....................................................................................................................32
Multi-Access.........................................................................................................34
3. Document Server
Relationship between Document Server and Other Functions .......................37
Document Server Display ........................................................................................38
Using the Document Server................................................................................39
Storing Data .............................................................................................................39
Changing a Stored Document's File Name, User Name, or Password....................42
Searching for Stored Documents .............................................................................42
Printing Stored Documents ......................................................................................44
VenusC1_EN_zen_Pre_FM.book Page vi Monday, April 18, 2005 4:49 PM

vii
Deleting Stored Documents .....................................................................................46
Viewing Stored Documents Using a Web Browser ..................................................47
Downloading Stored Documents..............................................................................48
Settings for the Document Server......................................................................49
4. User Tools (System Settings)
User Tools Menu (System Settings)...................................................................51
Accessing User Tools (System Settings) ..........................................................54
Changing Default Settings .......................................................................................54
Exiting from User Tools............................................................................................54
Settings You Can Change with User Tools .......................................................55
General Features .....................................................................................................55
Tray Paper Settings .................................................................................................59
Timer Settings ..........................................................................................................64
Administrator Tools ..................................................................................................67
Address Book.......................................................................................................73
Registering Names ..............................................................................................76
Registering a Name .................................................................................................76
Changing a Registered Name..................................................................................77
Deleting a Registered Name ....................................................................................77
Authentication Information.................................................................................78
Registering a New User Code..................................................................................78
Changing a User Code.............................................................................................79
Deleting a User Code...............................................................................................80
Displaying the Counter for Each User Code ............................................................80
Printing the Counter for Each User Code.................................................................80
Clearing the Number of Prints..................................................................................81
E-mail Destination................................................................................................82
Registering an E-mail Destination............................................................................82
Changing a Registered E-mail Destination ..............................................................83
Deleting a Registered E-mail Destination ................................................................83
Registering Folders .............................................................................................85
Using SMB to Connect.............................................................................................85
Using FTP to Connect..............................................................................................89
Registering Names to a Group ...........................................................................92
Registering a New Group.........................................................................................92
Registering Names to a Group.................................................................................93
Adding a Group to Another Group ...........................................................................93
Displaying Names Registered in Groups .................................................................94
Removing a Name from a Group .............................................................................94
Deleting a Group within a Group..............................................................................95
Changing a Group Name .........................................................................................95
Deleting a Group ......................................................................................................96
Registering a Protection Code ...........................................................................97
Registering a Protection Code for a Name in the Address Book .............................97
Registering a Protection Code for a Group ..............................................................98
Registering SMTP and LDAP Authentication....................................................99
SMTP Authentication ...............................................................................................99
LDAP Authentication ..............................................................................................100
VenusC1_EN_zen_Pre_FM.book Page vii Monday, April 18, 2005 4:49 PM

ix
Other Functions .................................................................................................156
Inquiry ....................................................................................................................156
Changing the Display Language ............................................................................156
Counter ...............................................................................................................158
Displaying the Total Counter..................................................................................158
7. Entering Text
Entering Text......................................................................................................159
Available Characters ..............................................................................................159
Keys .......................................................................................................................159
Entering Text..........................................................................................................160
8. Specifications
Main Unit.............................................................................................................161
Auto Document Feeder ..........................................................................................165
Document Server ...................................................................................................166
Options ...............................................................................................................167
Mailbox...................................................................................................................167
Finisher MEC BK (Saddle Stitch) ...........................................................................167
Finisher MEC (50-Sheet-Staples) ..........................................................................169
Finisher 3000B (100-Sheet-Staples)......................................................................171
Punch Unit (Finisher MEC BK (Saddle Stitch), Finisher MEC(50-Sheet-Staples))...172
Punch Unit (Finisher 3000B) ..................................................................................173
Copy Tray...............................................................................................................174
Large Capacity Tray (LCT).....................................................................................174
Interposer ...............................................................................................................175
Output Jogger (Finisher MEC BK (Saddle Stitch), Finisher MEC (50-Sheet-Staples))
....175
Output Jogger (Finisher 3000B (100-Sheet-Staples))............................................176
Others .................................................................................................................177
Copy Paper .........................................................................................................178
Recommended Paper Sizes and Types.................................................................178
Envelopes ..............................................................................................................181
Non-recommended Paper......................................................................................183
Paper Storage ........................................................................................................184
INDEX....................................................................................................... 185
VenusC1_EN_zen_Pre_FM.book Page ix Monday, April 18, 2005 4:49 PM
x
VenusC1_EN_zen_Pre_FM.book Page x Monday, April 18, 2005 4:49 PM

1
Notice
Notice To Wireless LAN Interface (optional) Users
Notes to users
It is strictly forbidden to use antenna(s) except designated.
AThe antenna(s) of this device must not be co-located or operating in conjunc-
tion with any other antenna or transmitter.
BThis equipment complies with FCC RF radiation exposure limits set forth for
an uncontrolled environment. End users must follow the specific operating
instructions for satisfying RF exposure compliance.
Notes to users in the United States of America
Notice:
This equipment has been tested and found to comply with the limits for a Class
B digital device, pursuant to Part 15 of the FCC Rules. These limits are designed
to provide reasonable protection against harmful interference in a residential in-
stallation. This equipment generates, uses and can radiate radio frequency ener-
gy and, if not installed and used in accordance with the instructions, may cause
harmful interference to radio communications. However, there is no guarantee
that interference will not occur in a particular installation. If this equipment does
cause harmful interference to radio or television reception, which can be deter-
mined by turning the equipment off and on, the user is encouraged to try to cor-
rect the interference by one more of the following measures:
•Reorient or relocate the receiving antenna.
•Increase the separation between the equipment and receiver.
•Connect the equipment into an outlet on a circuit different from that to which
the receiver is connected.
•Consult the dealer or an experienced radio/TV technician for help.
This device complies with part 15 of the FCC Rules.
Operation is subject to the following two conditions:
(1) This device may not cause harmful interference, and (2) this device must ac-
cept any interference received, including interference that may cause undesired
operation.
Warning
Changes or modifications not expressly approved by the party responsible for
compliance could void the user's authority to operate the equipment.
VenusC1_EN_zen_Pre_FM.book Page 1 Monday, April 18, 2005 4:49 PM
3
Afin de réduire le risque d'interférence aux autres utilisateurs, le type d'antenne
et son gain doivent être choisis de façon á ce que la puissance isotrope rayonnée
équivalente (p.i.r.e.) ne soit pas supérieure au niveau requis pour obtenir une
communication satisfaisante.
Ce dispositif a été conçu pour fonctionner avec une antenne ayant un gain max-
imal de [0.45] dBi.Une antenne ayant un gain plus élevé est strictement interdite
par les réglements d'Industrie Canada.L'impédance d'antenne requise est [50]
ohms.
VenusC1_EN_zen_Pre_FM.book Page 3 Monday, April 18, 2005 4:49 PM

4
Copyrights and Trademarks
Trademarks
Microsoft®, Windows® and Windows NT® are registered trademarks of Mi-
crosoft Corporation in the United States and/or other countries.
Acrobat® is a registered trademark of Adobe Systems Incorporated.
Bluetooth™ is a registered trademark of Bluetooth-SIG Inc. worldwide.
Other product names used herein are for identification purposes only and might
be trademarks of their respective companies. We disclaim any and all rights to
those marks.
The proper names of the Windows operating systems are as follows:
•The product name of Windows® 95 is Microsoft® Windows® 95
•The product name of Windows® 98 is Microsoft® Windows® 98
•The product name of Windows® Me is Microsoft® Windows® Millennium
Edition (Windows Me)
•The product names of Windows® 2000 are as follows:
Microsoft® Windows® 2000 Advanced Server
Microsoft® Windows® 2000 Server
Microsoft® Windows® 2000 Professional
•The product names of Windows® XP are as follows:
Microsoft® Windows® XP Professional
Microsoft® Windows® XP Home Edition
•The product names of Windows Server™ 2003 are as follows:
Microsoft® Windows Server™ 2003 Standard Edition
Microsoft® Windows Server™ 2003 Enterprise Edition
Microsoft® Windows Server™ 2003 Web Edition
•The product names of Windows® NT are as follows:
Microsoft® Windows NT® Server 4.0
Microsoft® Windows NT® Workstation 4.0
VenusC1_EN_zen_Pre_FM.book Page 4 Monday, April 18, 2005 4:49 PM

7
•This product includes software developed by Jonathan Stone and Jason R.
Thorpe for the NetBSD Project.
•This product includes software developed by the University of California,
Lawrence Berkeley Laboratory and its contributors.
•This product includes software developed by Christos Zoulas.
•This product includes software developed by Christopher G. Demetriou for
the NetBSD Project.
•This product includes software developed by Paul Kranenburg.
•This product includes software developed by Adam Glass.
•This product includes software developed by Jonathan Stone.
•This product includes software developed by Jonathan Stone for the NetBSD
Project.
•This product includes software developed by Winning Strategies, Inc.
•This product includes software developed by Frank van der Linden for the
NetBSD Project.
•This product includes software developed for the NetBSD Project by Frank
van der Linden
•This product includes software developed for the NetBSD Project by Jason R.
Thorpe.
•The software was developed by the University of California, Berkeley.
•This product includes software developed by Chris Provenzano, the Univer-
sity of California, Berkeley, and contributors.
Sablotron
Sablotron (Version 0.82) Copyright © 2000 Ginger Alliance Ltd. All Rights Re-
served
a) The application software installed on this product includes the Sablotron soft-
ware Version 0.82 (hereinafter, "Sablotron 0.82"), with modifications made by
the product manufacturer. The original code of the Sablotron 0.82 is provided by
Ginger Alliance Ltd., the initial developer, and the modified code of the Sa-
blotron 0.82 has been derived from such original code provided by Ginger Alli-
ance Ltd.
b) The product manufacturer provides warranty and support to the application
software of this product including the Sablotron 0.82 as modified, and the prod-
uct manufacturer makes Ginger Alliance Ltd., the initial developer of the Sa-
blotron 0.82, free from these obligations.
c) The Sablotron 0.82 and the modifications thereof are made available under the
terms of Mozilla Public License Version 1.1 (hereinafter, "MPL 1.1"), and the ap-
plication software of this product constitutes the "Larger Work" as defined in
MPL 1.1. The application software of this product except for the Sablotron 0.82
as modified is licensed by the product manufacturer under separate agree-
ment(s).
d) The source code of the modified code of the Sablotron 0.82 is available at: ht-
tp://support-download.com/services/device/sablot/notice082.html
VenusC1_EN_zen_Pre_FM.book Page 7 Monday, April 18, 2005 4:49 PM

8
e) The source code of the Sablotron software is available at: http://www.ginger-
all.com
f) MPL 1.1 is available at: http://www.mozilla.org/MPL/MPL-1.1.html
JPEG LIBRARY
•The software installed on this product is based in part on the work of the In-
dependent JPEG Group.
SASL
CMU libsasl
Tim Martin
Rob Earhart
Rob Siemborski
Copyright © 2001 Carnegie Mellon University. All rights reserved.
Redistribution and use in source and binary forms, with or without modifica-
tion, are permitted provided that the following conditions are met:
ARedistributions of source code must retain the above copyright notice, this list
of conditions and the following disclaimer.
BRedistributions in binary form must reproduce the above copyright notice,
this list of conditions and the following disclaimer in the documentation
and/or other materials provided with the distribution.
CThe name "Carnegie Mellon University" must not be used to endorse or pro-
mote products derived from this software without prior written permission.
For permission or any other legal details, please contact:
Office of Technology Transfer
Carnegie Mellon University
5000 Forbes Avenue
Pittsburgh, PA 15213-3890
(412) 268-4387, fax: (412) 268-7395
tech-transfer@andrew.cmu.edu
DRedistributions of any form whatsoever must retain the following acknowl-
edgment:
"This product includes software developed by Computing Services at Carn-
egie Mellon University (http://www.cmu.edu/computing/)."
CARNEGIE MELLON UNIVERSITY DISCLAIMS ALL WARRANTIES WITH
REGARD TO THIS SOFTWARE, INCLUDING ALL IMPLIED WARRANTIES
OF MERCHANTABILITY AND FITNESS, IN NO EVENT SHALL CARNEGIE
MELLON UNIVERSITY BE LIABLE FOR ANY SPECIAL, INDIRECT OR CON-
SEQUENTIAL DAMAGES OR ANY DAMAGES WHATSOEVER RESULTING
FROM LOSS OF USE, DATA OR PROFITS, WHETHER IN AN ACTION OF
CONTRACT, NEGLIGENCE OR OTHER TORTIOUS ACTION, ARISING OUT
OF OR IN CONNECTION WITH THE USE OR PERFORMANCE OF THIS
SOFTWARE.
VenusC1_EN_zen_Pre_FM.book Page 8 Monday, April 18, 2005 4:49 PM

9
MD4
Copyright © 1990-2, RSA Data Security, Inc. All rights reserved.
License to copy and use this software is granted provided that it is identified as
the "RSA Data Security, Inc. MD4 Message-Digest Algorithm" in all material
mentioning or referencing this software or this function.
License is also granted to make and use derivative works provided that such
works are identified as "derived from the RSA Data Security, Inc. MD4 Message-
Digest Algorithm" in all material mentioning or referencing the derived work.
RSA Data Security, Inc. makes no representations concerning either the mer-
chantability of this software or the suitability of this software for any particular
purpose. It is provided "as is" without express or implied warranty of any kind.
These notices must be retained in any copies of any part of this documentation
and/or software.
MD5
Copyright © 1991-2, RSA Data Security, Inc. Created 1991. All rights reserved.
License to copy and use this software is granted provided that it is identified as
the "RSA Data Security, Inc. MD5 Message-Digest Algorithm" in all material
mentioning or referencing this software or this function.
License is also granted to make and use derivative works provided that such
works are identified as "derived from the RSA Data Security, Inc. MD5 Message-
Digest Algorithm" in all material mentioning or referencing the derived work.
RSA Data Security, Inc. makes no representations concerning either the mer-
chantability of this software or the suitability of this software for any particular
purpose. It is provided "as is" without express or implied warranty of any kind.
These notices must be retained in any copies of any part of this documentation
and/or software.
VenusC1_EN_zen_Pre_FM.book Page 9 Monday, April 18, 2005 4:49 PM

10
RSA BSAFE®
•This product includes RSA BSAFE® cryptographic or security protocol soft-
ware from RSA Security Inc.
•RSA and BSAFE are registered trademarks of RSA Security Inc. in the United
States and/or other countries.
•RSA Security Inc. All rights reserved.
Samba(Ver 2.2.2-ja-1.1)
For SMB transmission, this machine uses Samba ver 2.2.2-ja-1.1 (hereinafter re-
ferred to as Samba 2.2.2-ja-1.1).
Copyright © Andrew Tridgell 1994-1998
This program is free software; you can redistribute it and/or modify it under the
terms of the GNU General Public License as published by the Free Software
Foundation; either version 2 of the License, or (at your option) any later version.
This program is distributed in the hope that it will be useful, but WITHOUT
ANY WARRANTY; without even the implied warranty of MERCHANTABILI-
TY or FITNESS FOR A PARTICULAR PURPOSE. See the GNU General Public
License for more details.
You should have received a copy of the GNU General Public License along with
this program; if not, write to the Free Software Foundation, Inc., 675 Mass Ave,
Cambridge, MA 02139, USA
Note
❒The source code for SMB transmission by this machine can be downloaded
from the following website: http://support-download.com/services/scbs
VenusC1_EN_zen_Pre_FM.book Page 10 Monday, April 18, 2005 4:49 PM

12
Safety Information
When using this machine, the following safety precautions should always be fol-
lowed.
Safety During Operation
In this manual, the following important symbols are used:
R
WARNING:
Indicates a potentially hazardous situation which, if instructions
are not followed, could result in death or serious injury.
R
CAUTION:
Indicates a potentially hazardous situation which, if instructions are not
followed, may result in minor or moderate injury or damage to property.
VenusC1_EN_zen_Pre_FM.book Page 12 Monday, April 18, 2005 4:49 PM

13
R WARNING:
•Disconnect the power plug (by pulling the plug, not the cable) if the
power cable or plug becomes frayed or otherwise damaged.
•To avoid hazardous electric shock or laser radiation exposure, do not
remove any covers or screws other than those specified in this manu-
al.
•Turn off the power and disconnect the power plug (by pulling the plug,
not the cable) if any of the following occurs:
•You spill something into the machine.
•You suspect that your machine needs service or repair.
•The external housing of your machine has been damaged.
•Disposal can take place at our authorized dealer.
•Do not incinerate used toner or toner containers. Toner dust might ig-
nite when exposed to an open flame. Dispose of used toner containers
in accordance with local regulations.
•Keep the machine away from flammable liquids, gases, and aerosols.
A fire or an electric shock might occur.
•Connect the machine only to the power source described on the inside
front cover of this manual. Connect the power cord directly into a wall
outlet and do not use an extension cord.
•Do not damage, break or make any modifications to the power cord.
Do not place heavy objects on it. Do not pull it hard nor bend it more
than necessary. These actions could cause an electric shock or fire.
•Do not turn the earth leakage breaker from the off to the on position.
Otherwise it might lead to an electric shock, fire or smoke, or cause the
circuit breakers to trip.
•Do not incinerate spilled toner or used toner. Toner dust might ignite
when exposed to an open flame.
VenusC1_EN_zen_Pre_FM.book Page 13 Monday, April 18, 2005 4:49 PM

14
R CAUTION:
•Keep the machine away from humidity and dust. Otherwise a fire or an elec-
tric shock might occur.
•Do not place the machine on an unstable or tilted surface. If it topples over,
an injury might occur.
•If you use the machine in a confined space, make sure there is a continuous
air turnover.
•Unplug the power cord from the wall outlet before you move the machine.
While moving the machine, you should take care that the power cord will not
be damaged under the machine.
•When you disconnect the power plug from the wall outlet, always pull the
plug (not the cable).
•If toner or used toner is inhaled, gargle with plenty of water and move into a
fresh air environment. Consult a doctor if necessary.
•If toner or used toner gets into your eyes, flush immediately with large
amounts of water. Consult a doctor if necessary.
•If toner or used toner is swallowed, dilute by drinking a large amount of wa-
ter. Consult a doctor if necessary.
•Avoid getting toner on your clothes or skin when removing a paper jam or
replacing toner. If your skin comes into contact with toner, wash the affected
area thoroughly with soap and water.
•If toner gets on your clothing, wash with cold water. Hot water will set the
toner into the fabric and may make removing the stain impossible.
•The inside of the machine could be very hot. Do not touch the parts with a
label indicating “hot surface”. Otherwise, an injury might occur.
•The fusing section of this machine might be very hot. Caution should be tak-
en when removing misfed paper.
•Keep the waste oil bottle away from flames. There is a risk of fire or burns.
•Do not use aluminum foil, carbon paper, or similar conductive paper to avoid
a fire or machine failure.
•Keep toner (used or unused) and toner containers out of reach of children.
VenusC1_EN_zen_Pre_FM.book Page 14 Monday, April 18, 2005 4:49 PM

15
Positions of Labels and Hallmarks for
R
RR
RWARNING and R
RR
RCAUTION
This machine has labels for RWARNING and RCAUTION at the positions
shown below. For safety, please follow the instructions and handle the machine
as indicated.
AFU140S
VenusC1_EN_zen_Pre_FM.book Page 15 Monday, April 18, 2005 4:49 PM

16
ENERGY STAR Program
❖
❖❖
❖Low Power Mode
This product automatically lowers its power consumption 15 minutes after
the last copy or print job has finished. Printing is still possible in Low Power
Mode, but if you wish to make copies first press the {
{{
{Energy Saver}
}}
} key.
Reference
For details about how to change the default interval, see p.64 “Energy Sav-
er Timer”.
❖
❖❖
❖Off Mode (Copier only)
To conserve energy, this product automatically turns off 90 minutes after the
last copying or printing job has been completed. Printing is still possible in
Off Mode, but if you wish to make copies first press the operation switch.
Reference
For details about how to change the default interval, see p.64 “Auto Off
Timer”.
❖
❖❖
❖Sleep Mode (Printer, Scanner installed)
If the printer and scanner are installed, this product automatically lowers fur-
ther its power consumption 90 minutes after it has shifted to Low Power
Mode. Printing is still possible in Sleep Mode, but if you wish to make copies
first press the operation switch.
Reference
For details about how to change the default interval, see p.64 “Auto Off
Timer”.
As an ENERGY STAR Partner, we have determined
that this machine model meets the ENERGY STAR
Guidelines for energy efficiency.
The ENERGY STAR Guidelines intend to establish an international energy-saving system for
developing and introducing energy-efficient office equipment to deal with environmental is-
sues, such as global warming.
When a product meets the ENERGY STAR Guidelines for energy efficiency, the Partner shall
place the ENERGY STAR logo onto the machine model.
This product was designed to reduce the environmental impact associated with office equip-
ment by means of energy-saving features, such as Low-power mode.
VenusC1_EN_zen_Pre_FM.book Page 16 Monday, April 18, 2005 4:49 PM

17
❖
❖❖
❖Duplex Priority
The ENERGY STAR Program recommends the duplex function. By conserv-
ing paper resources this function reduces a burden to the environment. For
applicable machines, duplex function (one-sided originals→two-sided cop-
ies) can be selected preferentially when the operation switch or the main pow-
er switch is turned on, the {
{{
{Energy Saver}
}}
} key is pressed, or the machine resets
automatically.
Reference
To change the settings of the Duplex Priority mode, see “Duplex Mode Pri-
ority”in “General Features P.2/5”, Copy Reference.
Specifications
❖
❖❖
❖Recycled Paper
In accordance with the ENERGY STAR Program, we recommend use of recy-
cled paper which is environmentally friendly. Please contact your sales rep-
resentative for recommended paper.
Copier only
Type 1 Type 2
Low Power Mode Power consumption 275W or less 200W or less
Default interval 15 minutes
Recovery Time 240 seconds or less
Off Mode Power consumption 6W or less 11W or less
Default interval 90 minutes
Recovery Time 480 seconds or less
Sleep Mode Power consumption --
Default interval --
Recovery Time --
Duplex Priority One-Sided → Two-Sided
VenusC1_EN_zen_Pre_FM.book Page 17 Monday, April 18, 2005 4:49 PM

18
Machine Types
This machine comes in two models which vary in copy speed. To ascertain
which model you have, see the inside front cover.
Type 1 Type 2
Copy speed/Full Color 45 copies/minute
(A4K, 81/2" × 11"K)
55 copies/minute
(A4K, 81/2" × 11"K)
Copy speed/B&W 60 copies/minute
(A4K, 81/2" × 11"K)
60 copies/minute
(A4K, 81/2" × 11"K)
VenusC1_EN_zen_Pre_FM.book Page 18 Monday, April 18, 2005 4:49 PM

19
1. Getting Started
Guide To Components
1. Auto Document Feeder (ADF)
Load a stack of originals here. They will
be fed automatically one by one.
2. Exposure glass
Place originals face down here.
3. Main power switch
If the machine does not operate after
turning on the operation switch, check if
the main power switch is turned on.
4. Copy tray (optional)
Copied or printed paper is delivered
here.
5. Operation switch
Press this switch to turn the power on
(the On indicator lights up). To turn the
power off, press this switch again (the On
indicator goes off).
6. Control panel
See p.23 “Control Panel”.
7. Front cover
Open to access the inside of the machine.
8. Paper tray (Tray 1-3)
Load paper here.
AFU160S
VenusC1_EN_zen_Pre_FM.book Page 19 Monday, April 18, 2005 4:49 PM
Getting Started
20
1
1. Bypass tray
Use to print on OHP transparencies, label
paper (adhesive labels), translucent pa-
per, postcards and custom size paper.
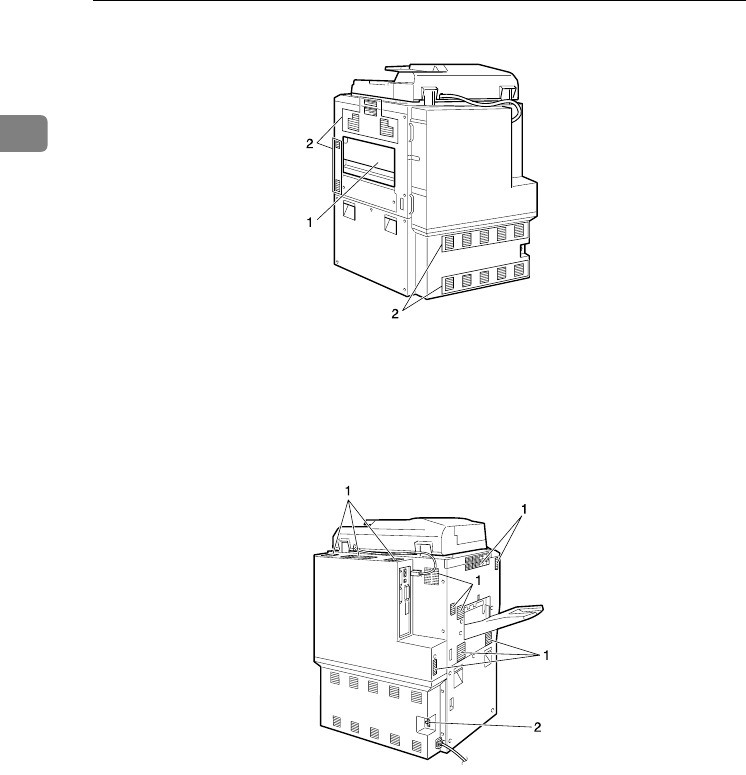
2. Ventilation holes
Prevent overheating. Do not obstruct the
ventilation holes by placing an object
near it or leaning things against it. If the
machine overheats, a fault might occur.
1. Ventilation holes
Prevent overheating. Do not obstruct the
ventilation holes by placing an object
near it or leaning things against it. If the
machine overheats, a fault might occur.
2. Earth Leakage Breaker
Prevents electric shock. See p.154 “Earth
Leakage Breaker”.
ADB023S
AFU130S
VenusC1_EN_zen_Pre_FM.book Page 20 Monday, April 18, 2005 4:49 PM

Guide To Components
21
1
External Options
1. Output Jogger Unit
Jogs the sheets delivered to the finisher
shift tray.
2. Mailbox
Sorts printed papers.
*Mailbox output trays 1-9
3. Copy tray
Copies and prints are delivered here.
4. Finisher 3000B(100-Sheet-Sta-
ples)
Sorts, stacks, staples and punches copies.
*1: Finisher upper tray
*2 Finisher shift tray
5. Finisher MEC BK (Saddle Stitch)
Sorts, stacks, staples and punches copies.
The saddle stitch function can staple the
copies in the centre and fold them into
booklets.
*3: Finisher upper tray
*4: Finisher shift tray
*5 Booklet tray
6. Finisher MEC(50-Sheet-Staples)
Sorts, stacks, staples and punches copies.
*6: Finisher upper tray
*7: Finisher shift tray
7. Interposer
Inserts cover or slip sheets into the cop-
ies.
8. Large Capacity Tray (LCT)
Holds 4000 sheets of paper.
AFU020S
VenusC1_EN_zen_Pre_FM.book Page 21 Monday, April 18, 2005 4:49 PM

Getting Started
22
1
Internal Options
APrinter/Scanner unit
Allows you to use the printer and scanner functions.
BIEEE 1394 interface board *1
Connects to an IEEE 1394 cable.
CIEEE 1284 interface board *1
Connects to an IEEE 1284 cable.
DBluetooth *1
Allows you to expand the interface.
EIEEE 802.11b Wireless LAN board *1
You can install a wireless LAN interface.
FFile Format Converter
Allows you to download documents from the Document Server stored by
copier and printer functions. See p.48 “Downloading Stored Documents”.
GCopy Connector
You can use the connect copy function.
HDataOverwriteSecurity Unit
Allows you to erase data on the hard disk.
*1 You cannot install two or more of the options below:
IEEE 1394 interface board, IEEE 1284 interface board, Bluetooth, IEEE 802.11b Wire-
less LAN board
VenusC1_EN_zen_Pre_FM.book Page 22 Monday, April 18, 2005 4:49 PM

Control Panel
23
1
Control Panel
1. Indicators
Display the status of the machine and in-
dicate errors.
d: Add Staple indicator. See p.128 “d
Adding Staples”.
D: Add Toner indicator. See p.112 “D
Adding Toner”.
B: Load Paper indicator. See p.107 “B
Loading Paper”.
L: Service Call indicator
M: Open Cover indicator
x: Misfeed indicator. See p.116 “x
Clearing Misfeeds”.
2. Screen contrast knob
Adjusts the brightness of the display pan-
el.
3. User Tools / Counter key
•User Tools
Press to change the default settings
and conditions to meet your require-
ments. See p.54 “Accessing User Tools
(System Settings)”.
•Counter
Press to check or print the total num-
ber of copies made. See p.158
“Counter”.
4. {
{{
{Job List}
}}
} key
Shows the job list.
5. {
{{
{Adjust/Program Color}
}}
} key (copier
mode)
Use this key to adjust and register colors.
See “Color Adjustment”, “User Color”,
Copy Reference.
6. Color circle
Refer to this when adjusting colors. See
“Color Adjustment”, Copy Reference.
7. Display panel
Shows the operation status, error mes-
sages, and function menus.
8. {
{{
{Check Modes}
}}
} key
Press this key to check settings.
9. {
{{
{Program}
}}
} key (copier/scanner
mode)
Press to register frequently used settings,
or to recall registered settings.
10. {
{{
{Clear Modes}
}}
} key
Press to clear previously entered copy job
settings.
11. {
{{
{Energy Saver}
}}
} key
Press to shift to and from Low Power
mode.
12. {
{{
{Interrupt}
}}
} key (copier/scanner
mode)
Press to make interrupt copies during
copying or scanning. See "Interrupt
Copy", Copy Reference.
AFU158S
VenusC1_EN_zen_Pre_FM.book Page 23 Monday, April 18, 2005 4:49 PM
Getting Started
24
1
13. Main power indicator and On
indicator
The main power indicator lights up when
the main power switch is turned on.
The On indicator lights up when the
power is turned on.
Important
❒Do not turn off the power while
the On indicator is blinking. Doing
so may damage the hard disk.
14. Operation switch
Press this switch to turn the power on
(the On indicator lights up). To turn the
power off, press this switch again (the On
indicator goes off).
15. {
{{
{Sample Copy}
}}
} key
Press to make a single set of copies or
prints to check for print quality before
making multiple sets.
16. {
{{
{Start}
}}
} key
Press to start copying, or to scan or print
documents stored on the Document Serv-
er.
17. {
{{
{Clear/Stop}
}}
} key
•Clear
Press to delete a number entered.
•Stop
Press to stop a job in progress.
18. {
{{
{#}
}}
} key
Press to enter a numerical value.
19. Number keys
Use to enter the desired number of cop-
ies, or data for a selected function.
20. Color Selection keys (copier
mode)
Switch keys depending on the type of
original, or the copying purpose:
{
{{
{Auto Color Selection}
}}
} :
{
{{
{Full Color}
}}
} :
{
{{
{Black & White}
}}
} :
{
{{
{Single Color}
}}
} :
{
{{
{Two-color}
}}
} :
See “Color Functions”, Copy Reference.
21. Function keys
Press to select the following functions:
•Copy:
•Document Server:
•Printer:
•Scanner:
22. Function Status indicator
These show the status of the above func-
tions:
•Yellow: the function is selected.
•Green: the function is active.
•Red: the function has been interrupt-
ed.
23. B
BB
B: indicator (printer mode)
The data indicator shows the status of
data reception. See “Control Panel”,
Printer Reference.
VenusC1_EN_zen_Pre_FM.book Page 24 Monday, April 18, 2005 4:49 PM

Control Panel
25
1
Display Panel
The display panel shows machine status, error messages and function menus.
The function items displayed serve as selector keys. You can select or specify an
item by lightly pressing them.
When you select or specify an item on the display panel, it is highlighted like
. Keys appearing as cannot be used.
Important
❒A force or impact of more than 30 N (about 3 kgf) will damage the display
panel.
By default the copying screen is displayed when you turn the power on.
Common Key Operations
The following keys are common to all screens.
❖
❖❖
❖Key list
[OK]Acknowledges a selected function or entered values, and then returns
to the previous display
[Cancel]Deletes a selected function or entered values, and then returns to the
previous display
[U
UU
UPrev.], [T
TT
TNext]Moves to the previous page or the next page when all functions cannot
be displayed on one page.
[OK] [Yes]Closes displayed messages.
[Clear]Clears entered values and does not change the settings.
[Exit]Returns to the previous display.
VenusC1_EN_zen_Pre_FM.book Page 25 Monday, April 18, 2005 4:49 PM

Getting Started
26
1
When the Authentication Screen is displayed
When Basic Authentication, Windows Authentication, or LDAP Authentication
is set, the authentication screen is displayed. Unless a valid user name and pass-
word are entered, operations are not possible with the machine.
Note
❒Consult the User Administrator about your login user name and login pass-
word. For details of the various types of user authentication, consult the re-
spective administrators.
❒When User Code Authentication is set, the screen for entering a user code is
displayed instead.
A
AA
APress [Enter] for Login User Name.
B
BB
BEnter a login user name, and then press [OK].
C
CC
CPress [Enter] for Login Password.
D
DD
DEnter a login password, and then press [OK].
E
EE
EPress [Login].
When the user is authenticated, the screen for the function you are using ap-
pears.
Note
❒If authentication fails, “Authentication has failed.” appears. Check the
login user name and password.
Reference
If the user code information has been specified, a different screen appears. For
details, see p.78 “Authentication Information”.
VenusC1_EN_zen_Pre_FM.book Page 26 Monday, April 18, 2005 4:49 PM

Control Panel
27
1
Log Off
Important
❒To prevent unauthorized users from using the machine, always log off when
you have finished using the machine.
A
AA
APress {
{{
{User Tools /Counter}
}}
}.
B
BB
BPress [Logout].
C
CC
CPress [Yes].
D
DD
DPress {
{{
{User Tools /Counter}
}}
}.
AFU159S
VenusC1_EN_zen_Pre_FM.book Page 27 Monday, April 18, 2005 4:49 PM

Getting Started
28
1
Turning On the Power
This machine has two power switches.
❖
❖❖
❖Operation switch (right side of the
control panel)
Press to activate the machine.
When the machine has finished
warming up, you can make copies.
❖
❖❖
❖Main power switch (left side of the ma-
chine)
Turning off this switch will com-
pletely turn off power to the ma-
chine.
Note
❒This machine automatically enters
Energy Saver Mode or turns itself
off if you do not use it for a certain
period. See p.64 “Auto Off Timer”,
p.64 “Energy Saver Timer”.
Turning On the Main Power
A
AA
AMake sure that the power cord is
firmly plugged into the wall out-
let.
B
BB
BOpen the switch cover and turn
on the main power switch.
The main power indicator turns
on.
Important
❒Do not turn off the main power
immediately after it has been
turned on. Otherwise it may re-
sult in damage to the hard disk
or memory, leading to the mal-
functioning of the machine.
Turning On the Power
A
AA
APress the operation switch.
The On indicator lights up
Note
❒If the power is not turned on
when the operation switch is
pressed, check if the main pow-
er switch is on. If not, turn it on.
AFU161S
AFU157S
VenusC1_EN_zen_Pre_FM.book Page 28 Monday, April 18, 2005 4:49 PM

Turning On the Power
29
1
Turning Off the Power
A
AA
APress the operation switch.
The On indicator goes off.
Note
❒In the following cases, the indi-
cator will not go off but will in-
stead blink when you press the
operation switch:
•During communication with
external equipment.
•When the hard disk is active.
Turning Off the Main Power
Important
❒Do not turn off the main power
switch when the On indicator is on
or blinking. Failure to observe this
may result in damage to the hard
disk or memory, leading to mal-
function.
❒Be sure to turn off the main power
switch before pulling out the pow-
er plug. Not doing this may result
in damage to the hard disk or
memory.
A
AA
AMake sure the On indicator is off.
B
BB
BOpen the switch cover, and turn
off the main power switch.
The main power indicator goes off.
Saving Energy
-
--
-Energy Saver Mode
If you do not operate the machine for
a certain period of time, or when you
press the {
{{
{Energy Saver}
}}
} key, the dis-
play disappears and the machine
goes into Energy Saver Mode. When
you press the {
{{
{Energy Saver}
}}
} key
again, the machine returns to the
ready condition. The machine uses
less electricity in Energy Saver Mode.
Note
❒You can change the amount of time
the machine waits before switch-
ing to Energy Saver Mode after
copying has finished or the last op-
eration is performed. See p.64 “En-
ergy Saver Timer”.
AFU157S
AFU162S
VenusC1_EN_zen_Pre_FM.book Page 29 Monday, April 18, 2005 4:49 PM

Getting Started
30
1
-
--
-Auto Off
The machine automatically turns it-
self off when the job is finished, after
a certain period of time has elapsed.
This function is called “Auto Off”.
Note
❒You can change the Auto Off time.
See p.64 “Auto Off Timer”.
❒The Auto Off Timer function will
not operate in the following cases:
•When a warning message ap-
pears
•When the service call message
appears
•When paper is jammed
•When the cover is open
•When the “Add Toner" message
appears
•When toner is being replen-
ished
•When the User Tools / Counter
screen is displayed
•
When fixed warm-up is in progress
•When the printer or other func-
tions are active
•When operation was suspended
during printing
•When the Data In indicator is
on or blinking
•
When the sample print or locked
print screen is displayed
VenusC1_EN_zen_Pre_FM.book Page 30 Monday, April 18, 2005 4:49 PM

31
2. Combined Function
Operations
Changing Modes
Note
❒You cannot switch modes in any of the following situations:
•When accessing User Tools
•During interrupt copying
❒The default setting is to display the screen for copying when you turn the
power on. You can change the setting. For details about settings, see p.55
“Function Priority”.
AFU154S
VenusC1_EN_zen_Pre_FM.book Page 31 Monday, April 18, 2005 4:49 PM

Combined Function Operations
32
2
-
--
-System Reset
The machine returns automatically to its initial condition when a certain period
of time has elapsed after the job is finished . This function is called “System Re-
set”. See p.55 “Function Priority”.
Note
❒You can change the System Reset time. See p.65 “System Auto Reset Timer”.
Job List
You can check the contents of jobs in printing as well as those waiting in order ,
and also delete them.
Note
❒In the Job List, jobs reserved using Copy mode and Document Server mode
are displayed. When [Print Priority] in the System Settings is set to [Job Order],
jobs reserved using Copy mode, Printer mode, Document Server mode or
Netfile mode are displayed.
❒For details on printing in the Netfile mode, see the manuals for DeskTopBind-
er Professional/Lite.
Checking the Job List
A
AA
APress the {
{{
{Job List}
}}
} key.
B
BB
BSelect the job number of the list you want to check.
The job list is displayed.
AFU156S
VenusC1_EN_zen_Pre_FM.book Page 32 Monday, April 18, 2005 4:49 PM

Changing Modes
33
2
The icons below show the operation mode of stored documents.
Note
❒If more than six jobs are registered, press the [U
UU
UPrev.] or [T
TT
TNext] to scroll
down the screen.
C
CC
CPress [Detail].
D
DD
DCheck the contents of the list.
E
EE
EPress [OK].
The display returns to the job list menu.
Deleting Jobs
Note
❒If you are unable to delete the job, contact the administrator.
A
AA
APress the {
{{
{Job List}
}}
} key.
B
BB
BSelect the job number to be deleted.
C
CC
CPress [Delete Job].
D
DD
DPress [Yes].
The display returns to the job list menu.
Job printed using
Copier mode.
Job printed using
Printer mode.
Job printed using
Document Server
mode.
Job printed using
Netfile mode.
AFU156S
VenusC1_EN_zen_Pre_FM.book Page 33 Monday, April 18, 2005 4:49 PM

Combined Function Operations
34
2
Multi-Access
You can carry out another job using a different function while the current job is
being performed. Performing multiple functions simultaneously in this manner
is called “Multi-Access”.
This allows you to handle your jobs efficiently, regardless of how the machine is
being used. For example:
•While making copies, you can scan documents to store in the Document Serv-
er.
•While printing documents stored in the Document Server, the machine can
receive print data.
•While executing print jobs, you can make operations for copying.
Note
❒See p.56 “Print Priority” to set function priority. By default, the [Display Mode]
is set to first priority.
❒When the optional finisher is installed on the machine, you can specify the
output tray to which documents are to be delivered. For more information
about how to specify the output tray for each function, see the following de-
scriptions:
•p.57 “Output: Copier”
•p.57 “Output: Document Server”
•p.58 “Output: Printer”
-
--
-Function Compatibility
The chart below shows sample operations when “Print Priority” is set to “Inter-
leave”. See p.56 “Print Priority”.
|: Simultaneous operations are possible.
$: Operation is enabled when the relevant function key is pressed and remote
switching (of the scanner) is done.
❍: Operation is enabled when the {
{{
{Interrupt}
}}
} key is pressed to interrupt the pre-
ceding operation.
→: Operation is performed automatically once the preceding operation ends.
×: The operation must be started once the preceding operation ends. (Simulta-
neous operations are not available.)
VenusC1_EN_zen_Pre_FM.book Page 34 Monday, April 18, 2005 4:49 PM

Multi-Access
35
2
Mode after you select
Copy
Interrupt Copying
Printer
Scanner
Document Server
DesktopBinder Professional/Lite
Web Document Server
Data Reception
Print
Mode before you select
Operations for Copying
Stapling
Sort
Operations for Copying
Copying
Printing
Stapling
Operations for Scanning
Scanning
Operations for Document Server
Scanning a Document to Store in Document Server
Printing from Document Server
Printing from Document Server
Printing
Copy
Operations for Copying ×××❍❍|||$$$$$||
Stapling |
*1
→
*1
→
*1
❍❍
*4
||→$$
*2
$$
*2
|
*3
|
*3
|
*3
Sort |
*1
→
*1
→
*1
❍❍|||$$
*2
$$
*2
|||
Interrupt
Copying
Operations for Copying ❍❍❍××|||×××××||
Copying ❍❍❍××|→→×××××→→
Printer
Data Reception |||||→→→|||||||
Print
Sort Print |||❍❍|→→||
*7
|||||
Stapling |→|❍❍
*4
|→→||
*7
|||
*3
|
*3
|
*3
Scanner
Operations for Scanning $$$❍❍|||××$$$||
Scanning ×××××||
*6
|
*6
××××|
*7
|
*7
|
*7
Document
Server
Operations for Document Server $$$❍❍|||$$×××||
Scanning a Document to Store in Doc-
ument Server
$××❍❍|||$××××||
Printing from Document Server $|
*3
|❍❍|||||
*7
|
*5
|
*5
|
*5
||
DesktopBinder
Professional/Lite
Printing from Document Server ||
*3
||||||||
*7
|||||
Web Document
Server
Printing ||
*3
||||||||
*7
|||||
VenusC1_EN_zen_Pre_FM.book Page 35 Monday, April 18, 2005 4:49 PM

Combined Function Operations
36
2
*1 Simultaneous operations are only available after the preceding job documents are all
scanned and [New Job] appears.
*2 You can scan a document after the preceding job documents are all scanned.
*3 When stapling, printing automatically starts after the current job.
*4 Stapling is not available.
*5 Simultaneous operations are possible once you press [New Job].
*6 Becomes an → only when scanning color.
*7 Becomes an interrupt operation by changing the function key only when scanning
color. (However, it becomes an
→
when the network Twain scanner is scanning color.)
Limitation
❒Stapling cannot be used at the same time for multiple functions.
Note
❒While printing is in progress, scanning a document using another function
may take more time.
VenusC1_EN_zen_Pre_FM.book Page 36 Monday, April 18, 2005 4:49 PM

37
3. Document Server
Relationship between Document Server
and Other Functions
The following table describes the relationship between the Document Server
and other machine functions.
*1 You can display stored documents using the scanner function. See "Displaying the
List of Stored Files", Scanner Reference.
*2 You can send stored documents using the scanner function. See "Sending Stored Files
by E-mail or Scan to Folder, or Delivering", Scanner Reference.
Function name Where to store
documents Displaying a list Printing stored
documents
Sending
documents
Copy
Copy/Document
Server Available Enabled Not Available
Printer
Personal computer
Available Enabled Not Available
Scanner Scanner Not available *1 Disabled Available *2
VenusC1_EN_zen_Pre_FM.book Page 37 Monday, April 18, 2005 4:49 PM

Document Server
38
3
Document Server Display
❖
❖❖
❖Document Server Main Display
1. Operating status and messages
are displayed.
2. The title of the currently selected
screen is displayed.
3. The numbers of originals, copies,
and printed pages are displayed.
4. The operation keys are displayed.
5. The stored operation mode is dis-
played.
The icons below show the operation mode when documents have been stored
in the Document Server.
Note
❒Depending on your security settings not all stored documents may be dis-
played.
AFU153S
Function Copier Printer Scanner
Icon --
Color Icon Full Color Black & White Single Color Two-color
VenusC1_EN_zen_Pre_FM.book Page 38 Monday, April 18, 2005 4:49 PM

Using the Document Server
39
3
Using the Document Server
Storing Data
❖
❖❖
❖File Name
Stored documents will automati-
cally be named as “COPY0001”,
“COPY0002”. You can change as-
signed file names.
❖
❖❖
❖User Name
You can register a user name to
distinguish the user or user group
that stored the documents. To reg-
ister, you can either enter a name
or use the one assigned to the user
code.
Reference
For more information about the
user name, see p.76 “Register-
ing Names”.
❖
❖❖
❖Password
You can set a password for stored
documents, and use it to prevent
others printing them. When a pass-
word is set for the documents,
mark appears next to the docu-
ments.
Reference
To store documents in a mode oth-
er than Document Server, see the
manuals for the respective modes.
Important
❒Data stored in the machine might
be lost if some kind of failure oc-
curs. The supplier shall not be re-
sponsible for any damage that
might result from the loss of data.
❒Be careful not to let anyone know
your password, especially when
entering a password or recording
it. Keep any record of your pass-
word in a secure place.
❒Avoid using a single number or
consecutive numbers for a pass-
word such as “0000” or “1234”,
since the numbers like this are easy
to guess, so using them will not
provide a worthwhile level of se-
curity.
❒A document accessed with a cor-
rect password remains selected
even after operations are complete,
and it can be accessed by other us-
ers. To stop this, be sure to press
the {
{{
{Clear Modes}
}}
} key to cancel the
document selection.
❒The user name used when adding
a document to the Document Serv-
er is to identify the document cre-
ator and type. It is not to protect
confidential documents from oth-
ers.
Note
❒Enter a four- to eight-digit pass-
word.
❒By default, data stored in the Doc-
ument Server is deleted after three
days (72 hours). You can specify
the time taken for the stored data
to be deleted automatically. See
p.71 “Auto Delete File”.
❒If you do not want stored data to
be automatically deleted, select
[No] in Auto Delete File before stor-
ing a document. If you select [Yes]
later, data stored afterward will be
automatically deleted.
❒When the machine is printing a
document stored using the copier
function, wait until printing has
finished before you store a docu-
ment in the Document Server.
❒Before scanning documents using
the scanner function, make sure all
other operations have finished.
VenusC1_EN_zen_Pre_FM.book Page 39 Monday, April 18, 2005 4:49 PM

Using the Document Server
41
3
If no names are registered in the
Address Book, the User Name en-
try display appears.
Reference
p.76 “Registering Names”.
When using a name registered in
the Address Book
ASelect a name from the list, and
then press [OK].
To change to an unregistered
user name, proceed to the next
step.
Reference
p.78 “Registering a New
User Code”.
When using an unregistered user
name
APress [Non-programmed Name].
BEnter a new user name, and
then press [OK].
Reference
p.159 “Entering Text”.
When no names are registered in
the Address Book
AEnter a new user name, and
then press [OK].
Reference
p.159 “Entering Text”.
To change a file name
A
AA
APress [Scan Original].
The Scan Original display appears.
B
BB
BPress [File Name].
The Change File Name display ap-
pears.
C
CC
CPress [Delete All] to delete the old
file name.
Note
❒You can also use [Backspace] to
delete unwanted characters.
D
DD
DEnter a new file name, and then
press [OK].
Note
❒Up to 20 characters can be en-
tered as a file name, but only 16
characters of each file name will
be displayed in the document
list.
Reference
p.159 “Entering Text”.
VenusC1_EN_zen_Pre_FM.book Page 41 Monday, April 18, 2005 4:49 PM

Document Server
42
3
To set or change a password
A
AA
APress [Scan Original].
The Scan Original display appears.
B
BB
BPress [Password].
C
CC
CEnter a four- to eight-digit pass-
word using the number keys, and
then press the {
{{
{#}
}}
} key.
D
DD
DReenter the password (four- to
eight- digits) for verification, and
then press the {
{{
{#}
}}
} key.
E
EE
EPress [OK].
Changing a Stored
Document's File Name, User
Name, or Password
A
AA
APress the {
{{
{Document Server}
}}
} key.
B
BB
BSelect the document with the user
name, file name, or password you
want to change.
Note
❒If a password has been set for
the document, enter the pass-
word and press [OK].
C
CC
CPress [File Management].
D
DD
DPress [Change File Name], [Change
User Name], or [Change Password].
E
EE
E
Enter the new file name, user name,
or password, and then press [OK].
Reference
p.40 “To register or change a
user name”.
p.41 “To change a file name”.
p.42 “To set or change a pass-
word”.
F
FF
FPress [OK].
Searching for Stored
Documents
You can use either [Search by File
Name] or [Search by User Name] to
search for documents stored in the
Document Server. You can also list
stored documents in your order of
preference.
Note
❒If you install DeskTopBinder Pro-
fessional or DeskTopBinder Lite
on your computer, you can search
and rearrange the documents from
your computer.
Reference
For more details refer to the manu-
als for DeskTopBinder Profession-
al/Lite.
VenusC1_EN_zen_Pre_FM.book Page 42 Monday, April 18, 2005 4:49 PM

Using the Document Server
43
3
To Search by File Name
A
AA
APress the {
{{
{Document Server}
}}
} key.
B
BB
BPress [Search by File Name].
C
CC
CEnter the file name, and then
press [OK].
Files beginning with the name en-
tered appear in the Select Files to
Print display.
Reference
p.159 “Entering Text”.
Note
❒To display all files stored in the
Document Server, press [File
List].
To Search by User Name
A
AA
APress the {
{{
{Document Server}
}}
} key.
B
BB
BPress [Search by User Name].
C
CC
CTo specify a registered user name,
select the user name from the dis-
played list, and then press [OK].
Note
❒To specify an unregistered user
name, go to the next step.
D
DD
DTo specify an unregistered user
name, press [Non-programmed
Name]. Enter the name, and then
press [OK].
Reference
p.159 “Entering Text”.
E
EE
EPress [OK].
Files beginning with the name en-
tered appear in the Select Files to
Print display.
Note
❒To display all files stored in the
Document Server, press [File
List].
To Check Details of Stored Documents
A
AA
ASelect the document.
Note
❒If a password has been set for
the document, enter the pass-
word, and then press [OK] or the
{
{{
{#}
}}
} key.
B
BB
BPress [Detail].
Detailed information about the
document is displayed.
VenusC1_EN_zen_Pre_FM.book Page 43 Monday, April 18, 2005 4:49 PM

Document Server
44
3
Note
❒If you have selected several doc-
uments, use [U
UU
U] and [T
TT
T] to view
the details of each.
❒Press [OK]. The Select Files to
Print display appears.
Printing Stored Documents
A
AA
ASelect the document to be printed.
Note
❒If a password has been set for
the document, enter the pass-
word and then press [OK] or the
{
{{
{#}
}}
} key.
❒You can search for a document
using [Search by User Name] or
[Search by File Name]. See p.42
“Searching for Stored Docu-
ments”.
❒You can sort document names
in the list by user name, file
name or date. To sort docu-
ments, press [User Name], [File
Name] or [Date].
❒If you cannot determine the
contents of a document by its
file name, you can print only the
first page of the document for
checking purposes. See p.46
“Printing the First Page”.
❒To cancel a selection, press the
highlighted document again.
B
BB
BTo print multiple documents, re-
peat step A
AA
A in the order that you
want to print.
Note
❒You can select up to 30 docu-
ments.
❒If sizes or resolutions of selected
documents are not the same, the
documents may not be printed.
❒If you wish to change the order
for printing, cancel the selec-
tion, and reselect in the desired
order.
❒If you press the {
{{
{Clear Modes}
}}
}
key, selection of all documents
will be canceled.
❒If you press [Printg Odr], the doc-
uments will be displayed in the
order of printing.
C
CC
CIf you need to change the print
settings, press [Print Settings].
The Print Settings display appears,
and user names, file names and
printing order of the documents
are shown.
Note
❒The print settings made for
printing in copier or printer
mode remain effective after
printing and are applied to the
next job.
❒When multiple documents are
selected, print settings made for
the first document will be effec-
tive for only that document, and
not the subsequent ones.
❒Print setting items are listed be-
low. For details about the print
results, see Copy Reference.
VenusC1_EN_zen_Pre_FM.book Page 44 Monday, April 18, 2005 4:49 PM

Using the Document Server
45
3
❖
❖❖
❖Binding format
•2 Sided Copy Top to Top
•2 Sided Copy Top to Bot-
tom
•Booklet
•Magazine
❖
❖❖
❖Cover handling
•Cover / Slip Sheet
•Edit / Stamp
•2 Sided / Book
❖
❖❖
❖Finish
•Sort
•Stack
•Staple
•Punch
❒If you print more than one set
using the Sort function, you can
check the print result by print-
ing out only the first set. See
p.45 “Sample Copy”.
❒When multiple documents are
printed at the same time, print
settings made for the first docu-
ment will apply to all the subse-
quent ones.
❒If you select multiple files, you
can confirm file names or print
order you selected in step A by
scrolling through the list with
[T
TT
T] and [U
UU
U].
❒Press [Select File] to return to the
Select Files to Print display.
D
DD
DEnter the required number of cop-
ies using the number keys.
Note
❒Up to 999 can be entered.
E
EE
EPress the {
{{
{Start}
}}
} key.
The machine starts printing.
To stop printing
APress the {
{{
{Clear/Stop}
}}
} key.
BPress [Stop].
To change the number of copies
during printing
Limitation
❒The number of copies can only
be changed when the Sort func-
tion is selected in print settings.
APress the {
{{
{Clear/Stop}
}}
} key.
BPress [Change Quantity].
CUse the number keys to enter a
new number of copies.
DPress the {
{{
{#}
}}
} key.
EPress [Continue].
Printing restarts.
Sample Copy
If you are printing multiple sets, you
can check if the print settings or sort-
ing order is correct by first printing
out a sample set.
Limitation
❒This function can be used only
when the Sort function is selected.
A
AA
ASelect the document to be printed.
VenusC1_EN_zen_Pre_FM.book Page 45 Monday, April 18, 2005 4:49 PM
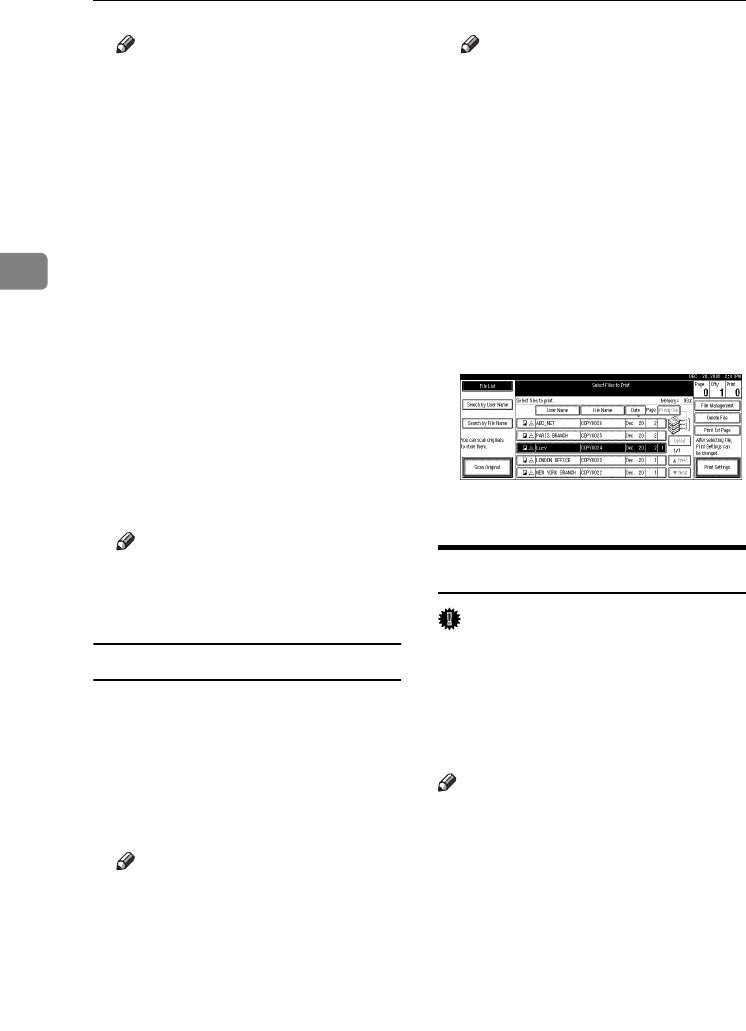
Document Server
46
3
Note
❒If a password has been set for
the document, enter the pass-
word and then press [OK] or the
{
{{
{#}
}}
} key.
❒You can search for a document
using [Search by User Name] or
[Search by File Name]. See p.42
“Searching for Stored Docu-
ments”.
❒You can sort document names
in the list by user name, file
name, or date. To do so, press
[User Name], [File Name] or [Date].
❒To cancel a selection, press the
highlighted document again.
B
BB
BPress the {
{{
{Sample Copy}
}}
} key.
The first set is printed.
C
CC
CTo print the remaining sets, press
[Print].
Note
❒To change the settings, press
[Suspend] to return to the Print
Settings menu.
Printing the First Page
You can print the first page of a docu-
ment selected in the Select Files to
Print display to check its contents.
If more than one document is select-
ed, the first page of each is printed.
A
AA
ASelect the document.
Note
❒If a password has been set for
the document, enter the pass-
word and then press [OK] or the
{
{{
{#}
}}
} key.
Note
❒You can search for a document
using [Search by User Name] or
[Search by File Name]. See p.42
“Searching for Stored Docu-
ments”.
❒You can sort document names
in the list by user name, file
name, or date. To do so, press
[User Name], [File Name], or
[Date].
❒To cancel a selection, press the
highlighted document again.
B
BB
BPress [Print 1st Page].
C
CC
CPress the {
{{
{Start}
}}
} key.
Deleting Stored Documents
Important
❒You can store up to 3,000 docu-
ments in the Document Server. No
more documents can be stored
when the limit is reached, and you
should delete unnecessary docu-
ments.
Note
❒You can delete all stored docu-
ments at once with User Tools. See
p.72 “Delete All Files”.
❒You can also delete documents via
a Web browser from a computer in
the network. For details on how to
start the Web browser, see Network
Guide.
A
AA
APress the {
{{
{Document Server}
}}
} key.
B
BB
BSelect the document.
VenusC1_EN_zen_Pre_FM.book Page 46 Monday, April 18, 2005 4:49 PM

Using the Document Server
47
3
Note
❒If a password has been set for
the document, enter the pass-
word and then press [OK] or the
{
{{
{#}
}}
} key.
Note
❒You can delete multiple docu-
ments at once.
❒You can search for a document
using [Search by User Name] or
[Search by File Name]. See p.42
“Searching for Stored Docu-
ments”.
❒You can sort document names
in the list by user name, file
name, or date. To do so, press
[User Name], [File Name] or [Date].
❒If you cannot determine the
document by its name, you can
print the first page to check its
contents. See p.46 “Printing the
First Page”.
❒To cancel a selection, press the
highlighted document again.
C
CC
CPress [Delete File].
D
DD
DPress [Delete] to delete the docu-
ment.
Viewing Stored Documents
Using a Web Browser
Reference
The Web browser's Help
A
AA
AStart a Web browser.
B
BB
BEnter “http:// (IP address of this
machine) /” in the [Address] box.
The top page appears on the Web
browser.
C
CC
CClick [Document Server].
The “Document Server File List”
appears.
Note
❒To switch the display format,
click [Details], [Thumbnails] or
[Icons] from the [Display method]
list.
D
DD
DClick the properties button of the
document you want to check.
Information about that document
appears.
E
EE
ECheck the contents of the docu-
ment.
Note
❒To enlarge the document pre-
view, click [Enlarge Image].
VenusC1_EN_zen_Pre_FM.book Page 47 Monday, April 18, 2005 4:49 PM

Document Server
48
3
Downloading Stored
Documents
Note
❒File Format Converter is required
when downloading documents
stored in copier or printer mode.
A
AA
AStart a Web browser.
B
BB
BEnter “http:// (IP address of this
machine) /” in the [Address] box.
The top page appears on the Web
browser.
C
CC
CClick [Document Server].
The “Document Server File List”
appears.
Note
❒To switch the display format,
click [Details], [Thumbnails] or
[Icons] from the [Display method]
list.
D
DD
DClick the properties button of the
document you want to download.
E
EE
ESelect [PDF], [JPEG], or [Multi-page
TIFF] in the [File Format] list.
Note
❒[JPEG] can only be selected for
documents stored in scanner
mode.
❒
[
Multi-page TIFF
] is available when
file format converter is in-
stalled.
❒[Multi-page TIFF] cannot be select-
ed for documents stored in
copier or printer mode.
F
FF
FClick [Download].
G
GG
GClick [OK].
VenusC1_EN_zen_Pre_FM.book Page 48 Monday, April 18, 2005 4:49 PM

Settings for the Document Server
49
3
Settings for the Document Server
❖
❖❖
❖Copier / Document Server Features (See “General Features P.4 /6”, and “General
Features P.5 /6”, Copy Reference.)
❖
❖❖
❖System Settings (See p.55 “General Features”, p.59 “Tray Paper Settings”, p.64
“Timer Settings”, p.67 “Administrator Tools”.)
Items Default settings
General Features P.4/6
Document Server Storage Key: F1
2 Sided Original Top to Top
Document Server Storage Key: F2
1 Sided
→
1 Sided Combine
Document Server Storage Key: F3
1 Sided
→
1 Sided Combine: 4
originals
Document Server Storage Key: F4
1 Sided
→
1 Sided Combine: 8
originals
Document Server Storage Key: F5
Create Margin
General Features P.5/6
Document Server Print Key: F1
2 Sided Top to Top
Document Server Print Key: F2
2 Sided Top to Bottom
Document Server Print Key: F3
Booklet
Document Server Print Key: F4
Magazine
Document Server Print Key: F5
Off
Items Default settings
General Features Warm Up Notice On
Copy Count Display Up
Output: Document Server Copy Tray
Tray Paper Settings
Paper Tray Priority: Document
Server
Tray 1
Front Cover Sheet Tray Off
Back Cover Sheet Tray Off
Slip Sheet Tray Off
Timer Settings Copier / Document Server
Auto Reset Timer
60 seconds
Administrator Tools Auto Delete File After 3 day(s)
Delete All Files --
VenusC1_EN_zen_Pre_FM.book Page 49 Monday, April 18, 2005 4:49 PM

Document Server
50
3
VenusC1_EN_zen_Pre_FM.book Page 50 Monday, April 18, 2005 4:49 PM

User Tools (System Settings)
52
4
❖
❖❖
❖Tray Paper Settings (See p.59 “Tray Paper Settings”.)
*1 The default switches to LCT when the optional Large Capacity Tray (LCT) is in-
stalled.
❖
❖❖
❖Timer Settings (See p.64 “Timer Settings”.)
Default
Paper Tray Priority: Copier Tray 1 *1
Paper Tray Priority: Printer Tray 1 *1
Paper Thickness Setting Normal (72-126g/m2)
Tray Paper Size: Tray 2 Auto Detect
Tray Paper Size: Tray 3 Auto Detect
Paper Type: Bypass Tray No Display
Paper Type: Tray 1 No Display/2 Sided Copy/Auto Paper Select On
Paper Type: Tray 2 No Display/2 Sided Copy/Auto Paper Select On
Paper Type: Tray 3 No Display/2 Sided Copy/Auto Paper Select On
Paper Type: LCT No Display/2 Sided Copy/Auto Paper Select On
Front Cover Sheet Tray Off
Back Cover Sheet Tray Off
Slip Sheet Tray Off
Designation Sheet 1 Tray Off
Designation Sheet 2 Tray Off
Printer Bypass Paper Size 81/2"
×
11"K
Paper Type Detect On
Double Feed Detect On
Default
Auto Off Timer 90 minute(s)
Energy Saver Timer 15 minute(s)
Panel Off Timer 60 seconds
System Auto Reset Timer 60 seconds
Copier / Document Server Auto Reset Timer 60 seconds
Printer Auto Reset Timer 60 seconds
Scanner Auto Reset Timer 60 seconds
Set Date --
Set Time --
Weekly Timer Code Off
Auto Logout Timer 60 seconds
Weekly Timer: Monday – Sunday --
VenusC1_EN_zen_Pre_FM.book Page 52 Monday, April 18, 2005 4:49 PM

User Tools Menu (System Settings)
53
4
❖
❖❖
❖Interface Settings
•For details about network settings, see “User Tools Menu (System Set-
tings)”, Network Guide.
•For details about parallel interface, see “System Settings (Parallel Connec-
tion)”, Printer Reference.
❖
❖❖
❖File Transfer
•For details about network settings, see “User Tools Menu (System Set-
tings)”, Network Guide.
❖
❖❖
❖Administrator Tools (See p.67 “Administrator Tools”.)
Default
User Authentication Management Off
Administrator Authentication Management Off
Program / Change Administrator --
Key Counter Management
Extended Security --
Display / Print Counter --
Display / Clear / Print Counter per User --
Address Book Management --
Address Book: Program / Change / Delete
Group
--
Address Book: Change Order --
Print Address Book: Destination List --
Address Book: Edit Title --
Address Book: Select Title Title 1
Auto Delete File After 3 day(s)
Delete All Files --
Program / Change / Delete LDAP Server --
Use LDAP Server Off
AOF (Always On) On
Firmware Version --
Auto Erase Memory Setting Off
Erase All Memory --
VenusC1_EN_zen_Pre_FM.book Page 53 Monday, April 18, 2005 4:49 PM

Settings You Can Change with User Tools
55
4
Settings You Can Change with User Tools
Reference
To access User Tools, see p.54 “Changing Default Settings”.
General Features
❖
❖❖
❖Panel Tone
The beeper (key tone) sounds when a key is pressed.
Note
❒Default: On
❖
❖❖
❖Warm Up Notice (Copier/Document Server)
You can set the beeper to sound when the machine becomes ready for copy-
ing after reviving from Energy Saver Mode, or when the power is turned on.
Note
❒Default: On
❒If the Panel Tone setting is “Off”, the beeper will not sound, regardless of
the Warm Up Notice setting.
❖
❖❖
❖Copy Count Display (Copier/Document Server)
The copy counter can be set to show the number of copies made (count up) or
the number of copies yet to be made (count down).
Note
❒Default: Up(count up)
❖
❖❖
❖Function Priority
You can specify the mode to be displayed immediately after the operation
switch or System Reset mode is turned on.
Note
❒Default: Copier
VenusC1_EN_zen_Pre_FM.book Page 55 Monday, April 18, 2005 4:49 PM

User Tools (System Settings)
56
4
❖
❖❖
❖Print Priority
Print priority is given to the mode selected.
Reference
p.34 “Multi-Access”.
Note
❒Default: Display Mode
❒When the optional finisher is installed, you can specify an output tray to
which documents are delivered.
•p.57 “Output: Copier”
•p.57 “Output: Document Server”
•p.58 “Output: Printer”
❖
❖❖
❖Function Reset Timer
When using the multi-access function (See p.34 “Multi-Access”), you can set
the length of time the machine waits before changing modes. This is useful if
when you are making many copies and need to change the settings for each
copy. By setting a longer reset time, you can prevent being interrupted by oth-
er functions.
Note
❒Default: 3 seconds
❒The Function Reset Timer setting will not be effective if Print Priority is
given to Interleave Print. See p.56 “Print Priority”.
❖
❖❖
❖Interleave Print
You can set the timing for changing modes when [Print Priority] has been set to
[Interleave].
Note
❒Default: 10 sheet(s)
❒Values set may change depending on the timing of printing.
❖
❖❖
❖Output Tray Setting
You can set the way or timing for switching the output tray.
•Output Tray
You can set the way in which the output tray is switched.
Note
❒Default: According to Function Setting
❒You can select Auto Change when Print Priority is set to Job Order. See
p.56 “Print Priority”.
•Change Output Tray
You can set the timing for switching the output tray.
Note
❒Default: When Tray is Full
VenusC1_EN_zen_Pre_FM.book Page 56 Monday, April 18, 2005 4:49 PM

Settings You Can Change with User Tools
57
4
❖
❖❖
❖Output: Copier
You can specify a tray to which copies are delivered.
Note
❒Default: Copy Tray, Finisher Upper Tray
❒The default settings may vary depending on the finisher installed.
❖
❖❖
❖Output: Document Server
You can specify a tray to which documents are delivered.
Note
❒Default: Copy Tray, Finisher Upper Tray
❒For details about output trays, see p.57 “Output: Copier”.
❒The default settings may vary depending on the finisher installed.
AFU045S
VenusC1_EN_zen_Pre_FM.book Page 57 Monday, April 18, 2005 4:49 PM

User Tools (System Settings)
58
4
❖
❖❖
❖Output: Printer
You can specify a tray to which prints are delivered.
Note
❒Default: Copy Tray, Finisher Upper Tray
❒The output trays set on the printer driver have priority over the output tray
specified above.
❒The default settings may vary depending on the finisher installed.
❖
❖❖
❖ADF Original Table Elevation
You can set the timing for elevating the ADF original table.
Note
❒Default: When Original is Set
❖
❖❖
❖Job List Display Time
You can set the length of time that the job list display is shown before the dis-
play reverts back to the default screen.
Note
❒Default: 15 seconds
AFU046S
VenusC1_EN_zen_Pre_FM.book Page 58 Monday, April 18, 2005 4:49 PM

Settings You Can Change with User Tools
63
4
Note
❒Default: On
❒Some paper types cannot be detected. In this case, specify “Off” for this set-
ting.
❒If you select duplex copying, the paper type of the backs of originals can-
not be detected.
❒[Paper Type Detect] works only if you select “No Display”, “Recycled Pa-
per”, “Translucent Paper”, or “OHP” in [Paper Type: ] in System Settings.
❒The following paper types cannot be detected:
•Printed paper or copies
•Colored paper
•Preprinted paper
•Bent, folded, or creased paper
•Paper with holes
•Smudged, damaged, or torn paper
•Back of paper
•Batch of more than one paper type
•Sheets shorter than 160 mm (only if loaded in the bypass tray)
❖
❖❖
❖Double Feed Detect
You can specify whether or not the machine stops if more than one sheet of
plain, thin, thick 1, thick 2, or translucent paper, or more than one OHP trans-
parency is fed simultaneously.
•On
•Off
Trays that can be specifed:
•Bypass Tray
•Tray 1
•Tray 2
•Tray 3
•LCT
Note
❒Default: On
❒With certain paper types, double feeds cannot be detected.
❒Depending on the paper type, the machine may detect double feeds even
though they have not actually occurred. In this case, specify “Off” for this
setting.
❒If you select duplex copying, the paper type of the backs of originals can-
not be detected.
❒[Double Feed Detect] works only if you select “No Display”, “Recycled Pa-
per”, “Translucent Paper”, or “OHP” in [Paper Type: ] in System Settings.
VenusC1_EN_zen_Pre_FM.book Page 63 Monday, April 18, 2005 4:49 PM

Settings You Can Change with User Tools
65
4
❖
❖❖
❖System Auto Reset Timer
The System Reset setting automatically switches to the screen of the function
set in Function Priority when no operations are in progress, or when an inter-
rupted job is cleared. This setting determines the system reset interval. See
p.55 “Function Priority”.
Note
❒Default: 60 seconds
❒The time can be set from 10 to 999 seconds, in one second increments, using
the number keys.
❖
❖❖
❖Copier / Document Server Auto Reset Timer (Copier/Document Server)
You can specify the time to elapse before copier and Document Server func-
tions are reset.
Note
❒Default: 60 seconds
❒If [Off] is selected, the machine will not automatically switch to the user
code entry screen.
❒The time can be set from 10 to 999 seconds, in one second increments, using
the number keys.
❖
❖❖
❖Printer Auto Reset Timer (Printer)
You can specify the time to elapse before the printer function is reset.
Note
❒Default: 60 seconds
❒If [Off] is selected, the machine will not automatically switch to the user
code entry screen.
❒The time can be set from 10 to 999 seconds, in one second increments, using
the number keys.
❖
❖❖
❖Scanner Auto Reset Timer (Scanner)
You can specify the time to elapse before the scanner function is reset.
Note
❒Default: 60 seconds
❒If [Off] is selected, the machine will not automatically switch to the user
code entry screen.
❒The time can be set from 10 to 999 seconds, in one second increments, using
the number keys.
❖
❖❖
❖Set Date
You can set the date for the machine's internal clock using the number keys.
Note
❒To change between year, month and day, press [←
←←
← ] and [→
→→
→ ].
VenusC1_EN_zen_Pre_FM.book Page 65 Monday, April 18, 2005 4:49 PM

Settings You Can Change with User Tools
67
4
Administrator Tools
Administrator Tools are used by the administrator. To change these settings,
contact the administrator.
We recommend specifying Administrator Authentication before using the machine.
See Security Reference.
❖
❖❖
❖User Authentication Management
•User Code Authentication
Using User Code Authentication, you can limit available functions and
monitor their usage.
When using User Code Authentication, register the user code.
See p.78 “Authentication Information”.
•Copy: Full Color/Black & White/Single Color/Two-color
•Printer: Color/Black & White/Printer: PC Control
Note
❒You can use the Printer PC Control function, to obtain print logs corre-
sponding to user codes entered using the printer driver.
❒If User Code Authentication is specified, Auto Color Selection cannot be
used.
•Other functions: Document Server/Scanner
•Basic Authentication
•Windows Authentication
•LDAP Authentication
•Off
Note
❒Default: Off
Reference
For details about Basic Authentication, Windows Authentication, and
LDAP Authentication, see Security Reference.
❖
❖❖
❖Administrator Authentication Management
See Security Reference.
❖
❖❖
❖Program / Change Administrator
See Security Reference.
❖
❖❖
❖Key Counter Management
You can specify that functions that you want to manage with the key counter.
❖
❖❖
❖Extended Security
You can specify whether or not to use extended security functions. For details
about extended security functions, contact your administrator.
VenusC1_EN_zen_Pre_FM.book Page 67 Monday, April 18, 2005 4:49 PM

Settings You Can Change with User Tools
69
4
❖
❖❖
❖Address Book Management
You can add, change or delete information registered in the Address Book.
For details, see p.73 “Address Book”.
•[Program / Change]
You can register and change names as well as user codes.
•Names
You can register a name, key display, registration number, and title selec-
tion.
•Auth. Info
You can register a user code, and specify the functions available to each
user code. You can also register user names and passwords to be used
when sending e-mail, sending files to folders, or accessing an LDAP server.
•Protection
You can register a protection code.
•E-mail
You can register an e-mail address.
•Folder
you can register the protocol, path, port number, and server name.
•Add to Group
You can put names registered in the Address Book into a group.
•[Delete]
You can delete a name from the Address Book.
Note
❒You can register up to 2,000 names.
❒You can register up to 500 user codes.
❒You can also register user codes from SmartDeviceMonitor for Admin.
❖
❖❖
❖Address Book: Program / Change / Delete Group
Names registered in the Address Book can be added into a group.
You can then easily manage the names registered in each group. For details,
see p.92 “Registering Names to a Group”.
•[Program / Change]
You can register new groups, or changes a group name, key display, title
selection or registration number.
•[Delete]
You can delete a group.
Note
❒You can register up to 100 groups.
❒You can also group users using a Web browser. For more information, see
the Web Browser help.
VenusC1_EN_zen_Pre_FM.book Page 69 Monday, April 18, 2005 4:49 PM

Settings You Can Change with User Tools
71
4
•Print in Title 3 Order
Prints a list of the names according to the order in Title 3.
•Print Group Dial List
Prints a list of the groups registered.
ASelect the print format.
BTo print on two-sided pages, select [Print on 2 Sides].
CPress the {
{{
{Start}
}}
} key.
The list is printed.
❖
❖❖
❖Address Book: Edit Title
You can edit the title to locate the desired user easily.
APress the {
{{
{User Tools/Counter}
}}
} key.
BPress [System Settings].
CPress [Administrator Tools], and then press [T
TT
TNext].
DPress [Address Book: Edit Title].
EPress the title key to be changed.
FEnter the new name, and then press [OK].
GPress [OK].
❖
❖❖
❖Address Book: Select Title
You can specify the title to select a name.
Note
❒Default: Title 1
❖
❖❖
❖Auto Delete File
You can specify whether documents stored in the Document Server will or
will not be deleted after a specified period of time.
Note
❒Default: Yes After 3 day(s)
❒If you select [Yes], documents stored subsequently will be deleted.
❒If you select [No], documents will not be deleted automatically.
❒If you select [Yes], enter a number of days in the range of 1 - 180.
❒The default setting is three days, which means documents will be deleted
three days (72 hours) after they have been stored.
VenusC1_EN_zen_Pre_FM.book Page 71 Monday, April 18, 2005 4:49 PM
Termékspecifikációk
| Márka: | Ricoh |
| Kategória: | nyomtató |
| Modell: | C 6045 |
Szüksége van segítségre?
Ha segítségre van szüksége Ricoh C 6045, tegyen fel kérdést alább, és más felhasználók válaszolnak Önnek
Útmutatók nyomtató Ricoh

14 Október 2024
11 Október 2024
27 Szeptember 2024
20 Szeptember 2024
16 Szeptember 2024
1 Szeptember 2024
31 Augusztus 2024
31 Augusztus 2024
27 Augusztus 2024
25 Augusztus 2024
Útmutatók nyomtató
- nyomtató Samsung
- nyomtató Sony
- nyomtató Fujitsu
- nyomtató LG
- nyomtató Olympus
- nyomtató Panasonic
- nyomtató Canon
- nyomtató StarTech.com
- nyomtató Sharp
- nyomtató Lenovo
- nyomtató Toshiba
- nyomtató HP
- nyomtató Roland
- nyomtató Digitus
- nyomtató Zebra
- nyomtató AVM
- nyomtató Fujifilm
- nyomtató Dell
- nyomtató Xerox
- nyomtató Primera
- nyomtató Thomson
- nyomtató Polaroid
- nyomtató Kyocera
- nyomtató Epson
- nyomtató Huawei
- nyomtató Renkforce
- nyomtató Mitsubishi
- nyomtató Godex
- nyomtató Brother
- nyomtató Citizen
- nyomtató Microboards
- nyomtató Kodak
- nyomtató MSI
- nyomtató Dymo
- nyomtató Testo
- nyomtató Konica Minolta
- nyomtató Datamax O'Neil
- nyomtató Kogan
- nyomtató Honeywell
- nyomtató Velleman
- nyomtató D-Link
- nyomtató Fargo
- nyomtató TSC
- nyomtató Sagem
- nyomtató Olympia
- nyomtató Tomy
- nyomtató Posiflex
- nyomtató ZKTeco
- nyomtató NEC
- nyomtató CUSTOM
- nyomtató Panduit
- nyomtató OKI
- nyomtató Equip
- nyomtató Pantum
- nyomtató Brady
- nyomtató Bixolon
- nyomtató CSL
- nyomtató Nilox
- nyomtató Seiko
- nyomtató Argox
- nyomtató Royal Sovereign
- nyomtató Lexmark
- nyomtató Olivetti
- nyomtató Intermec
- nyomtató Minolta
- nyomtató DNP
- nyomtató Triumph-Adler
- nyomtató Oce
- nyomtató Paxar
- nyomtató Metapace
- nyomtató Ultimaker
- nyomtató Ibm
- nyomtató Toshiba TEC
- nyomtató Frama
- nyomtató Builder
- nyomtató Star Micronics
- nyomtató Dascom
- nyomtató HiTi
- nyomtató GG Image
- nyomtató Vupoint Solutions
- nyomtató Elite Screens
- nyomtató DTRONIC
- nyomtató Phoenix Contact
- nyomtató Videology
- nyomtató Star
- nyomtató EC Line
- nyomtató Colop
- nyomtató Approx
- nyomtató Fichero
- nyomtató Raspberry Pi
- nyomtató Middle Atlantic
- nyomtató IDP
- nyomtató Evolis
- nyomtató Nisca
- nyomtató Epson 7620
- nyomtató Sawgrass
Legújabb útmutatók nyomtató

10 Április 2025
10 Április 2025

10 Április 2025
10 Április 2025
10 Április 2025

10 Április 2025

9 Április 2025

9 Április 2025

9 Április 2025
3 Április 2025