Használati útmutató QNAP TS-h3087XU-RP
Olvassa el alább 📖 a magyar nyelvű használati útmutatót QNAP TS-h3087XU-RP (79 oldal) a a kategóriában. Ezt az útmutatót 3 ember találta hasznosnak és 2 felhasználó értékelte átlagosan 4.5 csillagra
Oldal 1/79

TS-h3087XU-RP
User Guide
Document Version: 2
11/11/2022

Contents
1. Product Overview
About the TS-h3087XU-RP.........................................................................................................................................3
Hardware ............................................................................................................................................3Specications
Package Contents...................................................................................................................................................... 5
Components............................................................................................................................................................... 6
Front Panel.............................................................................................................................................................6
Rear Panel.............................................................................................................................................................. 7
System Board.........................................................................................................................................................8
Drive Numbering...................................................................................................................................................8
Network Port Numbering.....................................................................................................................................9
USB Port Numbering.......................................................................................................................................... 10
Safety Information...................................................................................................................................................10
Installation Requirements...................................................................................................................................... 11
Setting Up the NAS.................................................................................................................................................. 12
2. Installation and Conguration
Hardware Installation..............................................................................................................................................13
Drive Installation.................................................................................................................................................13
Replacing Memory Modules.............................................................................................................................. 20
Installing Expansion Cards.................................................................................................................................27
Hot-swapping Redundant Power Supplies...................................................................................................... 31
Replacing Fans.....................................................................................................................................................33
Rail Kits................................................................................................................................................................. 47
Expansion Unit Installation................................................................................................................................47
QuTS hero Installation............................................................................................................................................ 52
Initializing QuTS hero Using Pro......................................................................................................... 53Qnder
Initializing QuTS hero Using the Cloud Installation Website.........................................................................55
3. Basic Operations
Power Button........................................................................................................................................................... 58
Reset Button.............................................................................................................................................................58
LEDs...........................................................................................................................................................................59
Audio Alerts.............................................................................................................................................................. 61
4. NAS Migration
NAS Migration Requirements.................................................................................................................................63
Status and Setting Changes After NAS Migration................................................................................................63
Migrating a NAS.......................................................................................................................................................64
5. Troubleshooting
Forcing Pro or myQNAPcloud to Locate the NAS.................................................................................. 65Qnder
Hot-swapping Failed Drives....................................................................................................................................65
Recovering Unintentionally Removed Healthy Drives........................................................................................ 66
Support and Other Resources................................................................................................................................66
6. Glossary
Cloud Key.................................................................................................................................................................. 67
myQNAPcloud.......................................................................................................................................................... 67
myQNAPcloud Link..................................................................................................................................................67
Qnder Pro............................................................................................................................................................... 67
TS-h3087XU-RP User Guide
1

QuTS hero................................................................................................................................................................. 67
7. Notices
Limited Warranty..................................................................................................................................................... 68
Disclaimer................................................................................................................................................................. 68
Copyright and Trademarks.....................................................................................................................................68
GNU Public License..................................................................................................................................................69
CE Notice...................................................................................................................................................................76
UKCA Notice..............................................................................................................................................................76
FCC Notice.................................................................................................................................................................76
VCCI Notice............................................................................................................................................................... 77
BSMI Notice..............................................................................................................................................................77
SJ/T 11364-2006........................................................................................................................................................78
2
1. Product Overview
This chapter provides basic information about the QNAP device.
About the TS-h3087XU-RP
The high-capacity TS-h3087XU-RP is powered by an Intel® Xeon® E-2378 processor, supports up to 128 GB
DDR4 ECC memory, and provides an HDD/SSD hybrid storage architecture that delivers reliable server-grade
performance. Running the ZFS-based QuTS hero operating system, the TS-h3087XU-RP supports inline
data deduplication, up to 65536 snapshots, real-time SnapSync, and QSAL (QNAP SSD Antiwear Leveling)—
providing a storage solution that meets business requirements for servers, virtualization servers, VDI,le
and backup/restore.
Hardware Specications
Warning
• If your QNAP product has hardware defects, return the product to QNAP or a QNAP-
authorized service center for maintenance or replacement. Any attempt to repair or
perform maintenance procedures on the product by you or an unauthorized third
party invalidates the warranty.
• QNAP is not responsible for any damage or data loss caused by unauthorized
modications and installation of unsupported third-party applications.
• This QNAP device is warranted against defects in materials and workmanship for a
period of three (3) years. For details, see the QNAP Warranty Terms and Conditions.
Tip
Model are subject to change without prior notice. To see the latestspecications
specications, go to https://www.qnap.com.
Ordering P/N CPU Memory
TS-h3087XU-RP-E2378-64G Intel® Xeon® E-2378 64 GB
Component TS-h3087XU-RP
Processor
CPU Intel® Xeon® E-2378
Frequency 8-core/16-thread 2.6 GHz base/4.8 GHz turbo
Architecture x86 64-bit
Encryption engine AES-NI
Memory
Pre-installed memory 64 GB RAM: 4 x 16 GB DDR4 ECC UDIMM
TS-h3087XU-RP User Guide
Product Overview 3

Component TS-h3087XU-RP
External I/O Ports & Expansion Slots
PCIe slots • 2 x PCIe Gen 4.0 x4
• 1 x PCIe Gen 4.0 x8
Tip
For the list of compatible drive models and expansion
cards, go to https://www.qnap.com/compatibility.
USB ports 4 x USB 3.2 Gen 2 Type-A
Interface
Buttons • Power
• Reset
Dimensions
Form factor 4U Rackmount
Dimensions (H x W x D) 178 x 483 x 630 mm
(7.00 x 19.01 x 24.80 in)
Net weight 21.78 kg (48.01 lbs)
Others
Power supply unit 2 x 800W, 100-240V
System battery CR2032 lithium battery (3V, 225 mAh)
Warning
• This battery is a button battery. If swallowed, a lithium
button battery can cause severe or fatal injuries within
2 hours. Keep batteries out of reach of children.
• To avoid potential battery explosion, causing injury or
damage to components, ensure that you replace the
existing battery with a battery of the same type.
Fans 4 x 80 mm, 12V DC
Operating temperature 0˚C to 40˚C (32˚F to 104˚F)
Relative humidity • Non-condensing relative humidity: 5% to 95%
• Wet-bulb temperature: 27˚C (80.6˚F)
Tip
Model are subject to change without prior notice. To see the latestspecications
specications, go to https://www.qnap.com.
Package Contents
Item Quantity
TS-h3087XU-RP 1
Drive trays • 2.5-inch drive trays: 6
• 3.5-inch drive trays: 24
Power cord 2
TS-h3087XU-RP User Guide
Product Overview 5

Rear Panel
No. Component No. Component
1 Drive activity LED 9 2.5 Gigabit Ethernet ports (RJ45)
2 Drive status LED 10 2.5 Gigabit Ethernet activity LEDs
3 2.5-inch SATA drive bays 11 2.5 Gigabit Ethernet speed LEDs
4 PCIe slot 3 cover 12 10GBASE-T ports (RJ45)
5 PCIe slot 2 cover 13 10 Gigabit Ethernet activity LEDs
6 PCIe slot 1 cover 14 10 Gigabit Ethernet speed LEDs
7 Power supply units 15 Console port
Note
This port is only for engineering
purposes.
8 USB 3.2 Gen 2 Type-A ports 16 Reset button
TS-h3087XU-RP User Guide
Product Overview 7

System Board
No. Component No. Component
1 PCIe slot 1: PCIe Gen 4.0 x8 6 Memory slot 3 (Channel B, DIMM 1, black)
2 PCIe slot 2: PCIe Gen 4.0 x4 7 Memory slot 4 (Channel B, DIMM 2, blue)
3 PCIe slot 3: PCIe Gen 4.0 x4 8 2.5-inch drive bay fan
4 Memory slot 1 (Channel A, DIMM 1, black) 9 CPU fan
5 Memory slot 2 (Channel A, DIMM 2, blue) 10 System fans
Drive Numbering
2.5-inch Drive Bays
TS-h3087XU-RP User Guide
Product Overview 8

3.5-inch Drive Bays
Network Port Numbering
TS-h3087XU-RP User Guide
Product Overview 9

USB Port Numbering
Safety Information
The following instructions help ensure personal safety and environmental safety. Read these instructions
carefully before performing any operation.
General Instructions
• The device should be stored in a secure location with restricted access, controlled through the use of a
tool, lock and key, or any means of security.
• Only skilled, and authorized persons with knowledge of all restrictions, safety precautions,qualied,
and installation and maintenance procedures should have physical access to the device.
• To avoid potential injury or damage to components, ensure that the drives and other internal system
components have cooled before touching them.
• Observe electrostatic discharge (ESD) procedures to avoid potential injury or damage to components.
Power
• To reduce the risk of re or electric shock, ensure that you only connect the power cord to a properly
grounded electrical outlet.
•
Devices with redundant power supply may have one or more power supply unit (PSU) cords. To avoid
serious injuries, a trained service technician must disconnect all PSU cords from the device before
installing or replacing system components.
System Battery
• This product contains a button battery.
TS-h3087XU-RP User Guide
Product Overview 10

• If swallowed, a lithium button battery can cause severe or fatal injuries within 2 hours.
• Keep batteries out of reach of children.
• If you think batteries may have been swallowed or placed inside any part of the body, seek immediate
medical attention.
• To avoid potential battery explosion, causing injury or damage to components, ensure that you replace
the existing battery with a battery of the same type.
• Dispose of used batteries properly according to local regulations or the instructions of the battery
manufacturer.
Moving Parts
•
Moving fan blades: Keep your body parts away from moving fan blades while the device is connected
to a power source.
•
Moving components: Keep your body parts away from other moving components.
• The device is not suitable for use in locations where children are likely to be present.
Installation Requirements
Category Item
Environment • Room temperature: 0˚C to 40˚C (32˚F to 104˚F)
• Non-condensing relative humidity: 5% to 95%
• Wet-bulb temperature: 27˚C (80.6˚F)
• Flat, anti-static surface without exposure to direct sunlight, liquids,
or chemicals
• Free from objects that may obstruct device ventilation or apply
pressure to the device or power cord
Hardware and peripherals • Storage drives
For the list of compatible drive models, go to https://
www.qnap.com/compatibility.
• Network cable
Tools • Phillips #1 or #2 screwdriver
• Anti-static wrist strap
TS-h3087XU-RP User Guide
Product Overview 11

Setting Up the NAS
Important
Read all safety requirements and information carefully before setting up the NAS or
installing NAS components.
1. Place your NAS device in an environment that meets the requirements.
For details, see .Installation Requirements
2. Optional: Replace or install additional memory modules.
For details, see .Replacing Memory Modules
3. Optional: Install expansion cards.
For details, see .Installing Expansion Cards
4. Optional: Connect expansion units.
For details, see .Expansion Unit Installation
5. Install drives.
For details, see the following topics:
•Installing 3.5-inch Drives on 3.5-inch Trays
•Installing 2.5-inch Solid-State Drives on 3.5-inch Trays
•Installing 2.5-inch Solid-State Drives on 2.5-inch Trays
6. Connect the power cords and all applicable cables.
Note
To set up redundant power supply, connect power cords to both power supply units.
7. Power on the NAS.
8. Install QuTS hero.
For details, see .QuTS hero Installation
9. Log on to QuTS hero.
TS-h3087XU-RP User Guide
Product Overview 12
2. Installation and Conguration
This chapter provides hardware and installation and specic rmware conguration steps.
Hardware Installation
This section provides information on installing or replacing drives, memory modules, expansion cards,
redundant power supply units, system fans, rail kits, and expansion units.
Drive Installation
The TS-h3087XU-RP is compatible with 3.5-inch hard drives and 2.5-inch solid-state drives.
Installing 3.5-inch Drives on 3.5-inch Trays
For the list of compatible drive models, go to https://www.qnap.com/compatibility.
Warning
• Installing a drive deletes all data on the drive.
• Observe electrostatic discharge (ESD) procedures to avoid damage to components.
1. Power the NAS.o
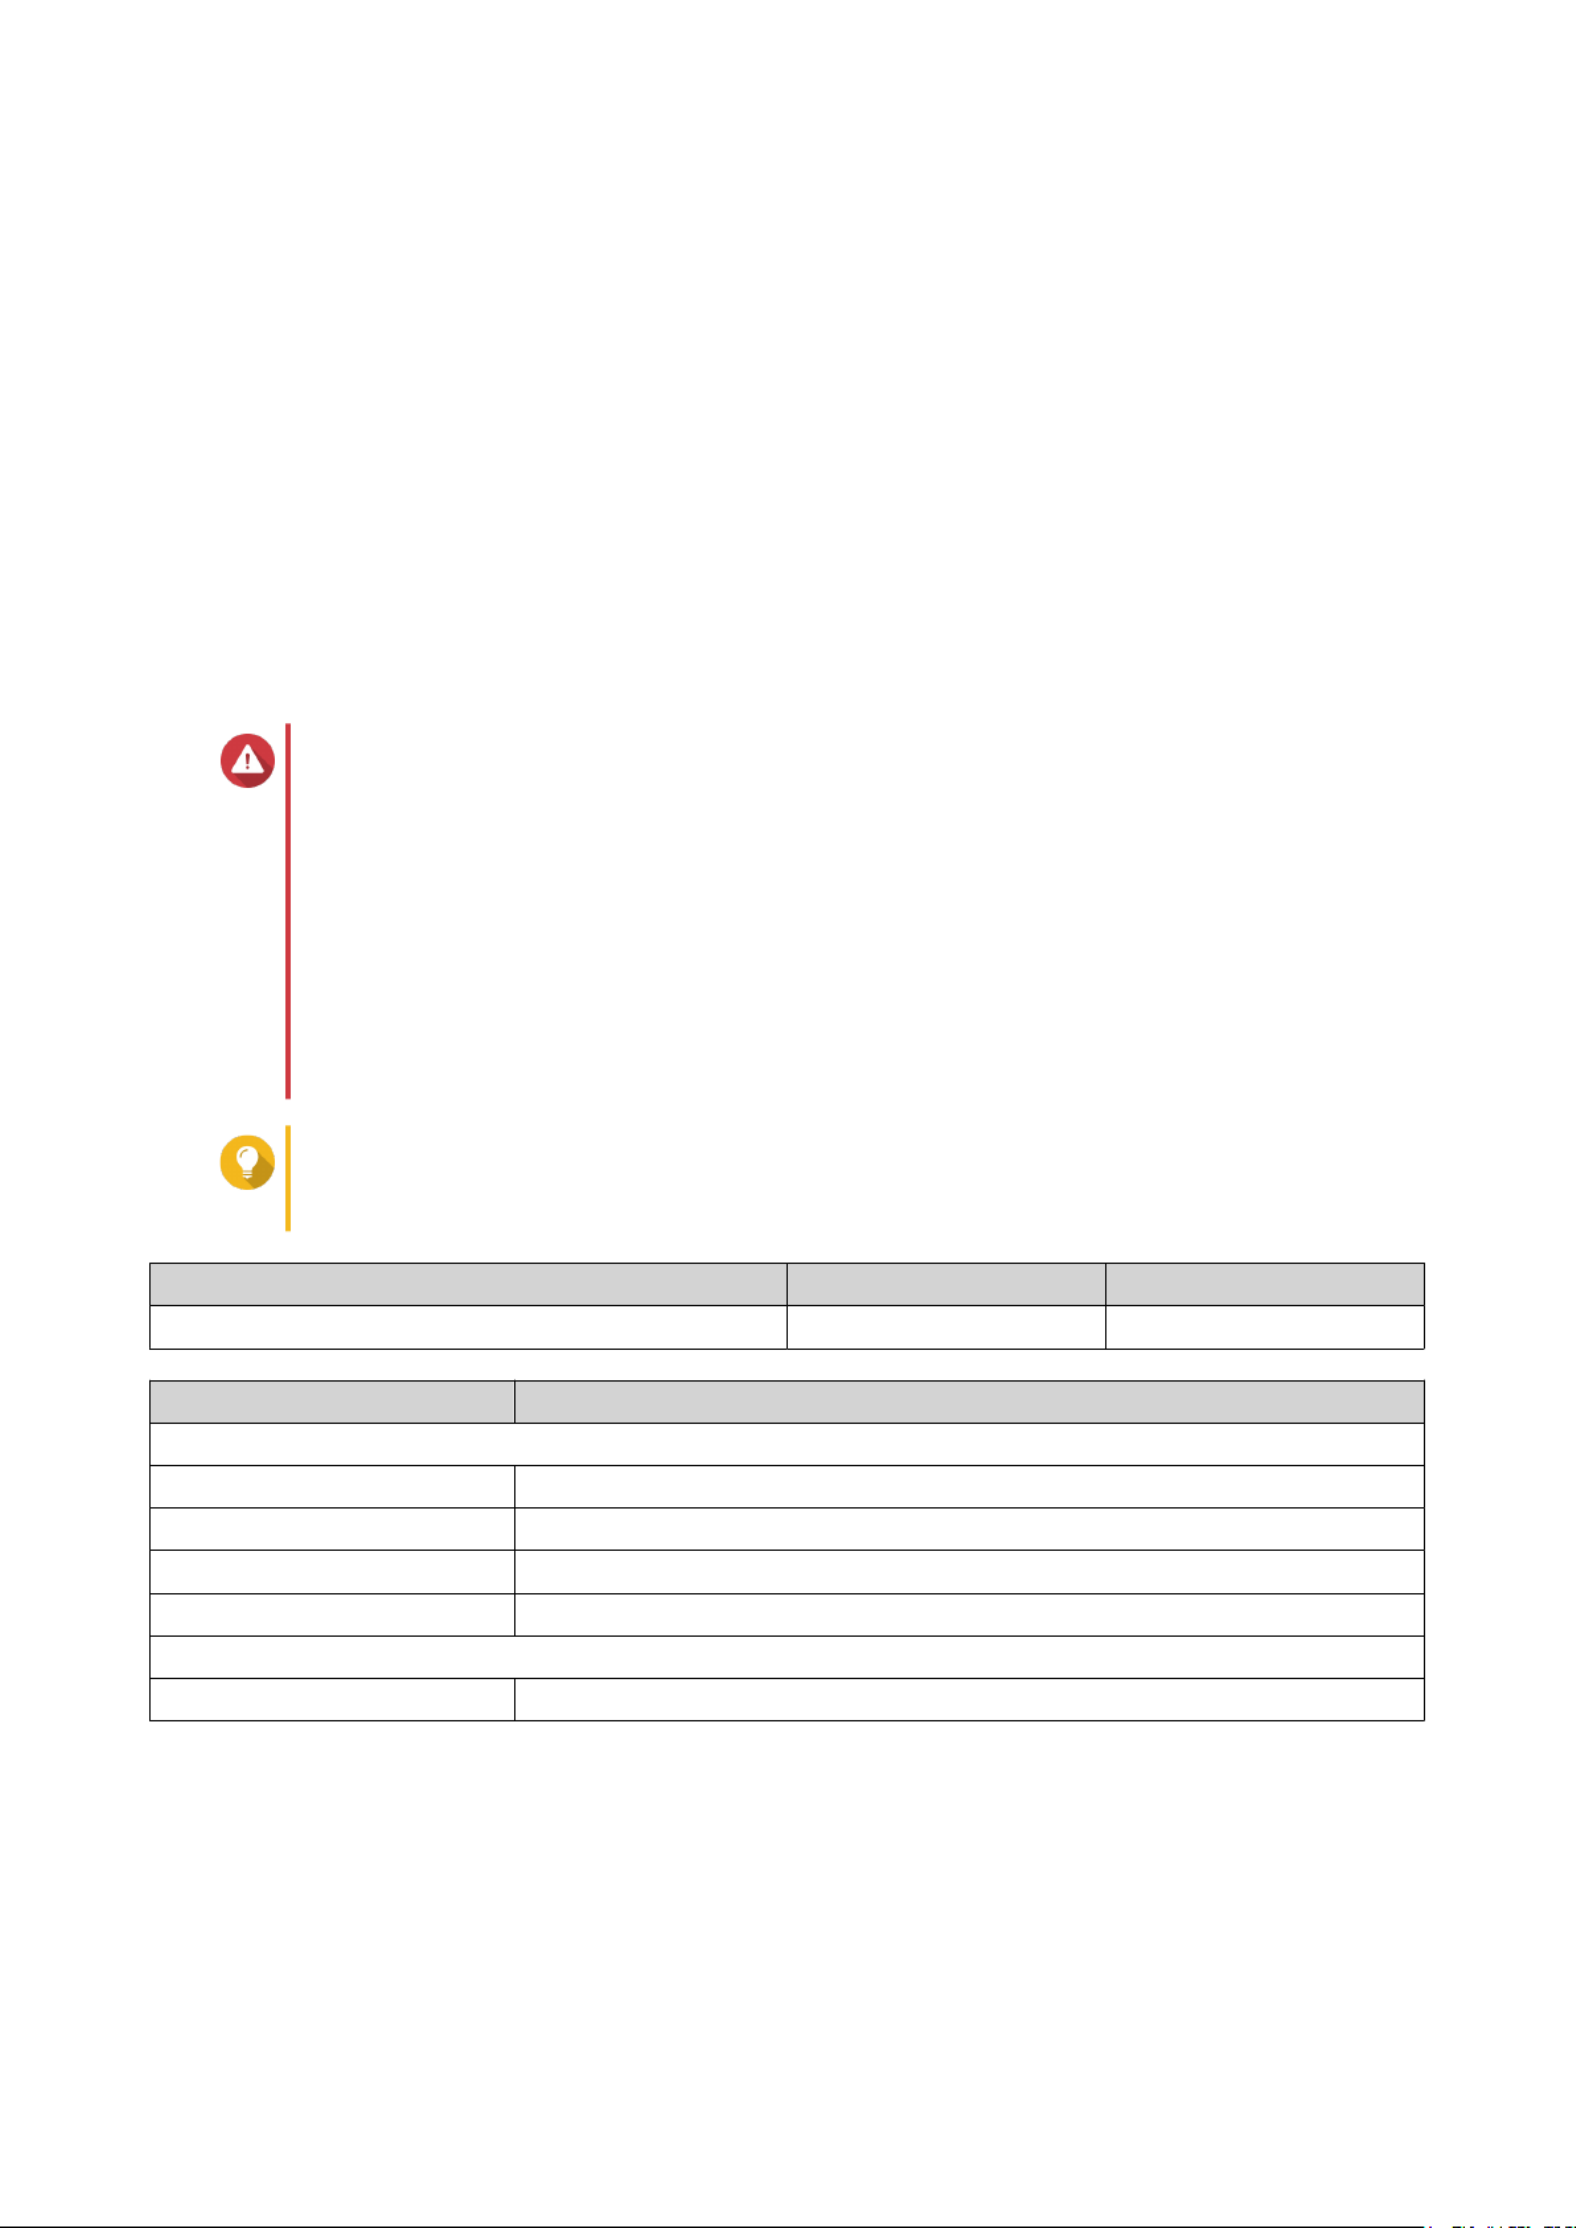
2. Remove the drive tray.
a. Slide the lock to the left.
b. Push the button to release the tray handle.
c. Pull the tray out.
TS-h3087XU-RP User Guide
Installation and Conguration 13

3. Install a drive on the tray.
a. Place the drive on the tray so that the holes on the sides of the drive are aligned with the holes on
the sides of the tray.
b. Attach the screws.
4. Load the tray into the bay.
a. Insert the tray into the bay.
b. Push the handle.
TS-h3087XU-RP User Guide
Installation and Conguration 14

c. Slide the lock to the right.
5. Power on the NAS.
Installing 2.5-inch Solid-State Drives on 3.5-inch Trays
For the list of compatible drive models, go to https://www.qnap.com/compatibility.
Warning
• Installing a drive deletes all data on the drive.
• Observe electrostatic discharge (ESD) procedures to avoid damage to components.
1. Power the NAS.o
2. Remove the drive tray.
TS-h3087XU-RP User Guide
Installation and Conguration 15

a. Slide the lock to the left.
b. Push the button to release the tray handle.
c. Pull the tray out.
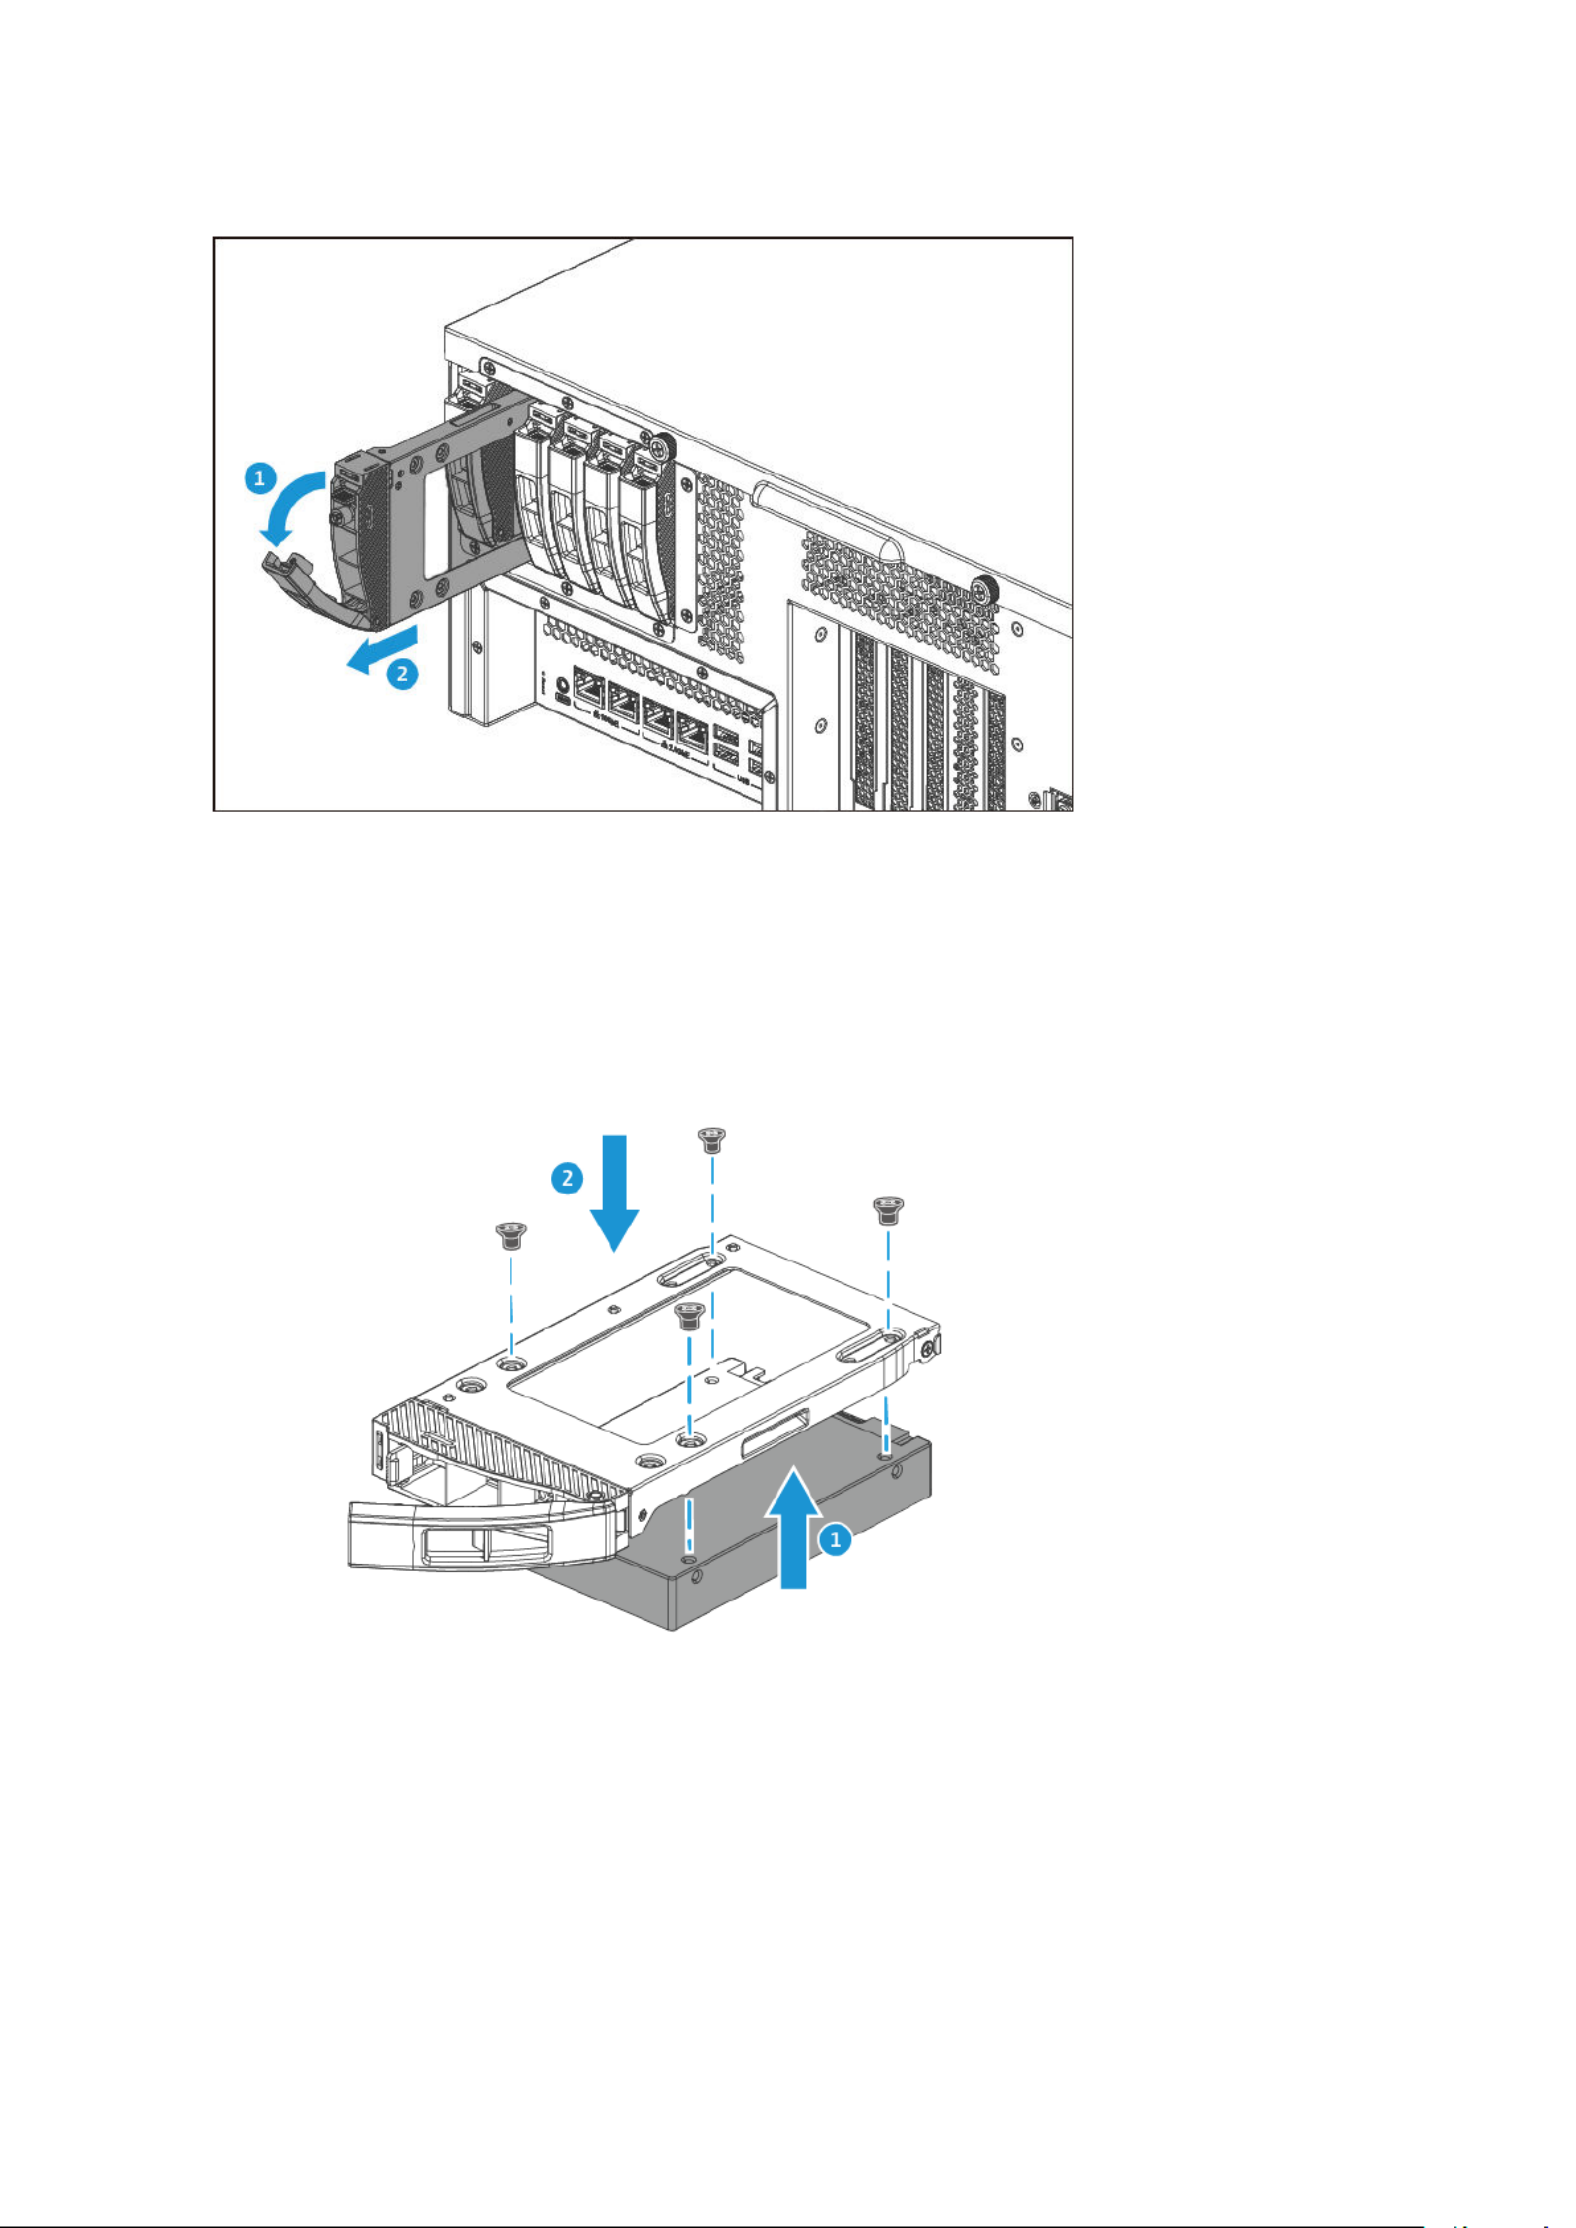
3. Install a drive on the tray.
a. Place the drive on the tray so that the holes on the bottom of the drive are aligned with the holes
on the bottom of the tray.
b. Attach the screws.
TS-h3087XU-RP User Guide
Installation and Conguration 16

4. Load the tray into the bay.
a. Insert the tray into the bay.
b. Push the handle.
TS-h3087XU-RP User Guide
Installation and Conguration 17

c. Slide the lock to the right.
5. Power on the NAS.
Installing 2.5-inch Solid-State Drives on 2.5-inch Trays
For the list of compatible drive models, go to https://www.qnap.com/compatibility.
Warning
• Installing a drive deletes all data on the drive.
• Observe electrostatic discharge (ESD) procedures to avoid damage to components.
1. Power the NAS.o
2. Remove the drive tray.
a. Pull the handle to release the tray.
b. Pull the tray out.
TS-h3087XU-RP User Guide
Installation and Conguration 18
3. Install a drive on the tray.
a. Place the drive on the tray so that the holes on the bottom of the drive are aligned with the holes
on the bottom of the tray.
b. Attach the screws.
4. Load the tray into the bay.
a. Insert the tray into the bay.
b. Push the handle.
TS-h3087XU-RP User Guide
Installation and Conguration 19

5. Power on the NAS.
Replacing Memory Modules
The NAS has four memory slots. You can increase the memory capacity of the NAS by upgrading the
memory modules.
Use only QNAP memory modules to maintain system performance and stability. For NAS devices with more
than one memory slot, use QNAP modules with identical specications.
Important
Ensure the following when replacing memory modules:
• When installing only one module, use slot 4.
• When installing two modules, use slots 2 and 4. Ensure that the modules are identical.
• When installing four modules, use slots 2 and 4 for the pair, and slots 1 and 3 forrst
the second pair. Ensure that each pair uses identical modules.
For details on slot numbering, see .System Board
Warning
• Only personnel should perform the following steps. Failure to followqualied
instructions can result in serious injury or death.
• Observe electrostatic discharge (ESD) procedures to avoid damage to components.
•
Moving fan blades: Keep your hands and other body parts away from moving fan
blades.
TS-h3087XU-RP User Guide
Installation and Conguration 20

•
Other moving components: Keep your hands and other body parts away from other
moving components.
1. Power the device.o
2. Disconnect the power cords from the electrical outlet.
3. Disconnect all cables and external attachments.
4. Remove the case cover.
Warning
To avoid potential injury or damage to components, ensure that the drives and other internal
system components have cooled before touching them.
a. Loosen the screws.
b. Slide the cover back.
c. Lift the cover the device. o
TS-h3087XU-RP User Guide
Installation and Conguration 21

5. Remove the 2.5-inch drive bay fan duct.
a. Detach the 2.5-inch drive bay fan duct from the back of the 2.5-inch drive bay enclosure.
b. Detach the 2.5-inch drive bay fan duct from the 2.5-inch drive bay fan module.
TS-h3087XU-RP User Guide
Installation and Conguration 22

7. Install a new module.
a. Align the notch with the ridge in the slot.
b. Insert the module into the slot.
c. Verify that the metal connectors are completely inserted into the slot.
d. Carefully press down on the module until the retention clips lock the module into place.
8. Attach the 2.5-inch drive bay fan duct.
a. Attach the 2.5-inch drive bay fan duct to the back of the 2.5-inch drive bay enclosure.
TS-h3087XU-RP User Guide
Installation and Conguration 24

b. Attach the 2.5-inch drive bay fan duct to the 2.5-inch drive bay fan module.
9. Attach the case cover.
a. Place the cover on the device.
b. Slide the cover forward.
TS-h3087XU-RP User Guide
Installation and Conguration 25

c. Tighten the screws.
10. Connect all cables and external attachments.
11. Connect the power cords to the electrical outlet.
12. Power on the device.
13. Verify that the module is recognized by the device.
a. Log on to QuTS hero as administrator.
b. Control Panel System System Status Hardware InformationGo to > > > .
c. Total memoryCheck the value for .
TS-h3087XU-RP User Guide
Installation and Conguration 26

Installing Expansion Cards
The NAS supports selected expansion cards, some of which require QNAP PCIe brackets. QNAP-branded
expansion cards purchased from the company website are shipped with the brackets necessary to allt
QNAP NAS models.
Warning
• Only personnel should perform the following steps. Failure to followqualied
instructions can result in serious injury or death.
• Observe electrostatic discharge (ESD) procedures to avoid damage to components.
•
Moving fan blades: Keep your hands and other body parts away from moving fan
blades.
•
Other moving components: Keep your hands and other body parts away from other
moving components.
1. Check the expansion cards and brackets supported by your model on the QNAP website.
a. Go to www.qnap.com/compatibility.
b. Search by NASClick .
c. Specify the number of bays and the model of your NAS.specic
d. CategoryUnder , select the component or device type.
e. Locate a component or device model in the list.specic
f. Optional: Click the corresponding icon to view more information.Note
2. Power the device.o
3. Disconnect the power cords from the electrical outlet.
4. Disconnect all cables and external attachments.
5. Remove the case cover.
a. Loosen the screws.
TS-h3087XU-RP User Guide
Installation and Conguration 27

b. Slide the cover back.
c. Lift the cover the device. o
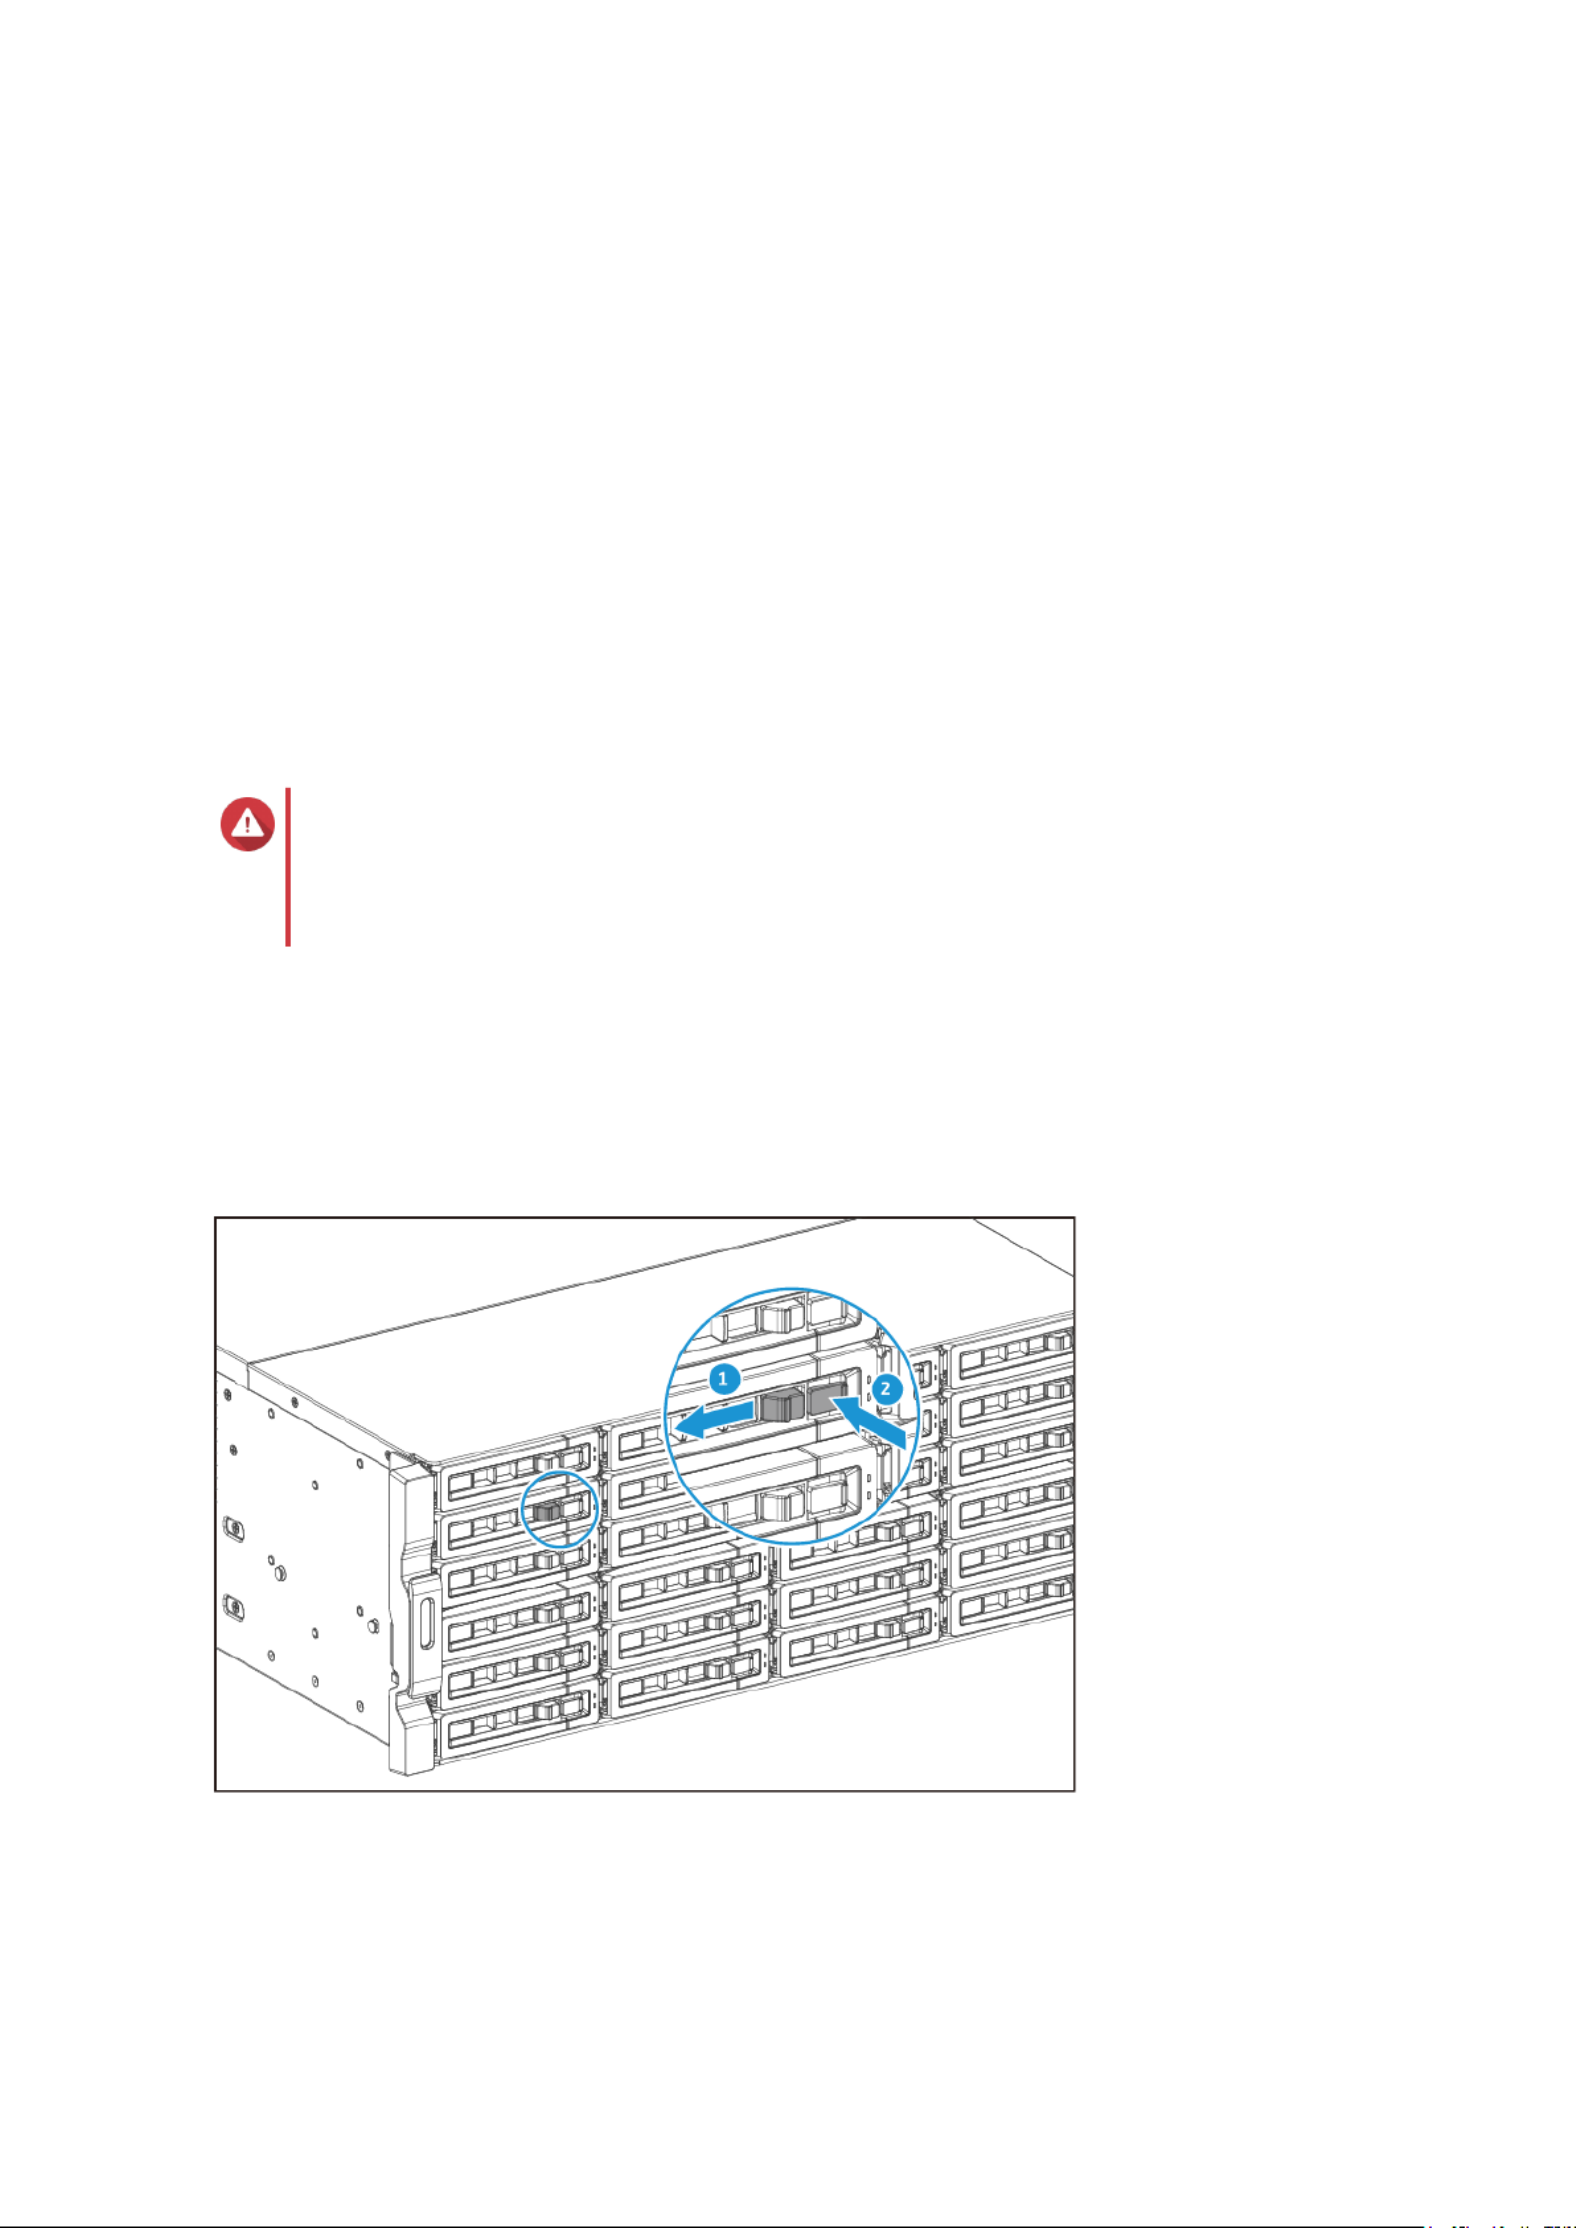
6. Remove the PCIe cover.
a. Remove the screw that secures the cover to the bracket.
b. Pull the cover away from the slot.
TS-h3087XU-RP User Guide
Installation and Conguration 28

7. Optional: Attach the QNAP bracket to the expansion card.
a. Remove all screws of the existing bracket.
b. Carefully pull the bracket away from the card.
c. Attach the QNAP bracket to the card using the same screws.
TS-h3087XU-RP User Guide
Installation and Conguration 29

c. Tighten the screws.
10. Connect all cables and external attachments.
11. Connect the power cords to the electrical outlet.
12. Power on the device.
Hot-swapping Redundant Power Supplies
NAS devices with redundant power supply units (PSUs) support hot-swapping.
Warning
Electric shock hazard.
TS-h3087XU-RP User Guide
Installation and Conguration 31

Tip
By default, the NAS issues audio alerts and desktop in case of redundant PSUnotications
failures. Redundant PSU failures include when the NAS is operating on a single healthy
PSU only. In this case, if you want to stop receiving redundant PSU failure alerts and
notications, go to > > Control Panel System Hardware General Enable > and deselect
redundant power supply mode.
1. Disconnect the power cord from the electrical outlet and the power supply unit (PSU) that you are
replacing.
2. Firmly press the latch toward the handle and then pull the PSU out.
3. Insert the new PSU.
4. Connect the power cord to the PSU and the electrical outlet.
TS-h3087XU-RP User Guide
Installation and Conguration 32
Replacing Fans
Tip
This device has transparent plastic fan ducts pre-installed on some system fans. These
fan ducts help maintain ideal operating temperatures for components. QNAP does not
recommend operating this device without these fan ducts installed.
Warning
• Only personnel should perform the following steps. Failure to followqualied
instructions can result in serious injury or death.
• Observe electrostatic discharge (ESD) procedures to avoid damage to components.
•
Moving fan blades: Keep your hands and other body parts away from moving fan
blades.
•
Other moving components: Keep your hands and other body parts away from other
moving components.
1. Power the device.o
2. Disconnect the power cords from the electrical outlet.
3. Disconnect all cables and external attachments.
4. Remove the case cover.
Warning
To avoid potential injury or damage to components, ensure that the drives and other internal
system components have cooled before touching them.
a. Loosen the screws.
TS-h3087XU-RP User Guide
Installation and Conguration 33

b. Slide the cover back.
c. Lift the cover the device. o
5. Remove the 2.5-inch drive bay fan duct.
a. Detach the 2.5-inch drive bay fan duct from the back of the 2.5-inch drive bay enclosure.
TS-h3087XU-RP User Guide
Installation and Conguration 34

b. Detach the 2.5-inch drive bay fan duct from the 2.5-inch drive bay fan module.
c. Lift the 2.5-inch drive bay fan duct out of the device.
TS-h3087XU-RP User Guide
Installation and Conguration 35
6. Remove the CPU fan duct.
a. Remove the screws securing the CPU fan duct to the system board.
b. Detach the bottom hooks of the CPU fan duct from the CPU heatsink screws.
TS-h3087XU-RP User Guide
Installation and Conguration 36

c. Lift the CPU fan duct out of the device.
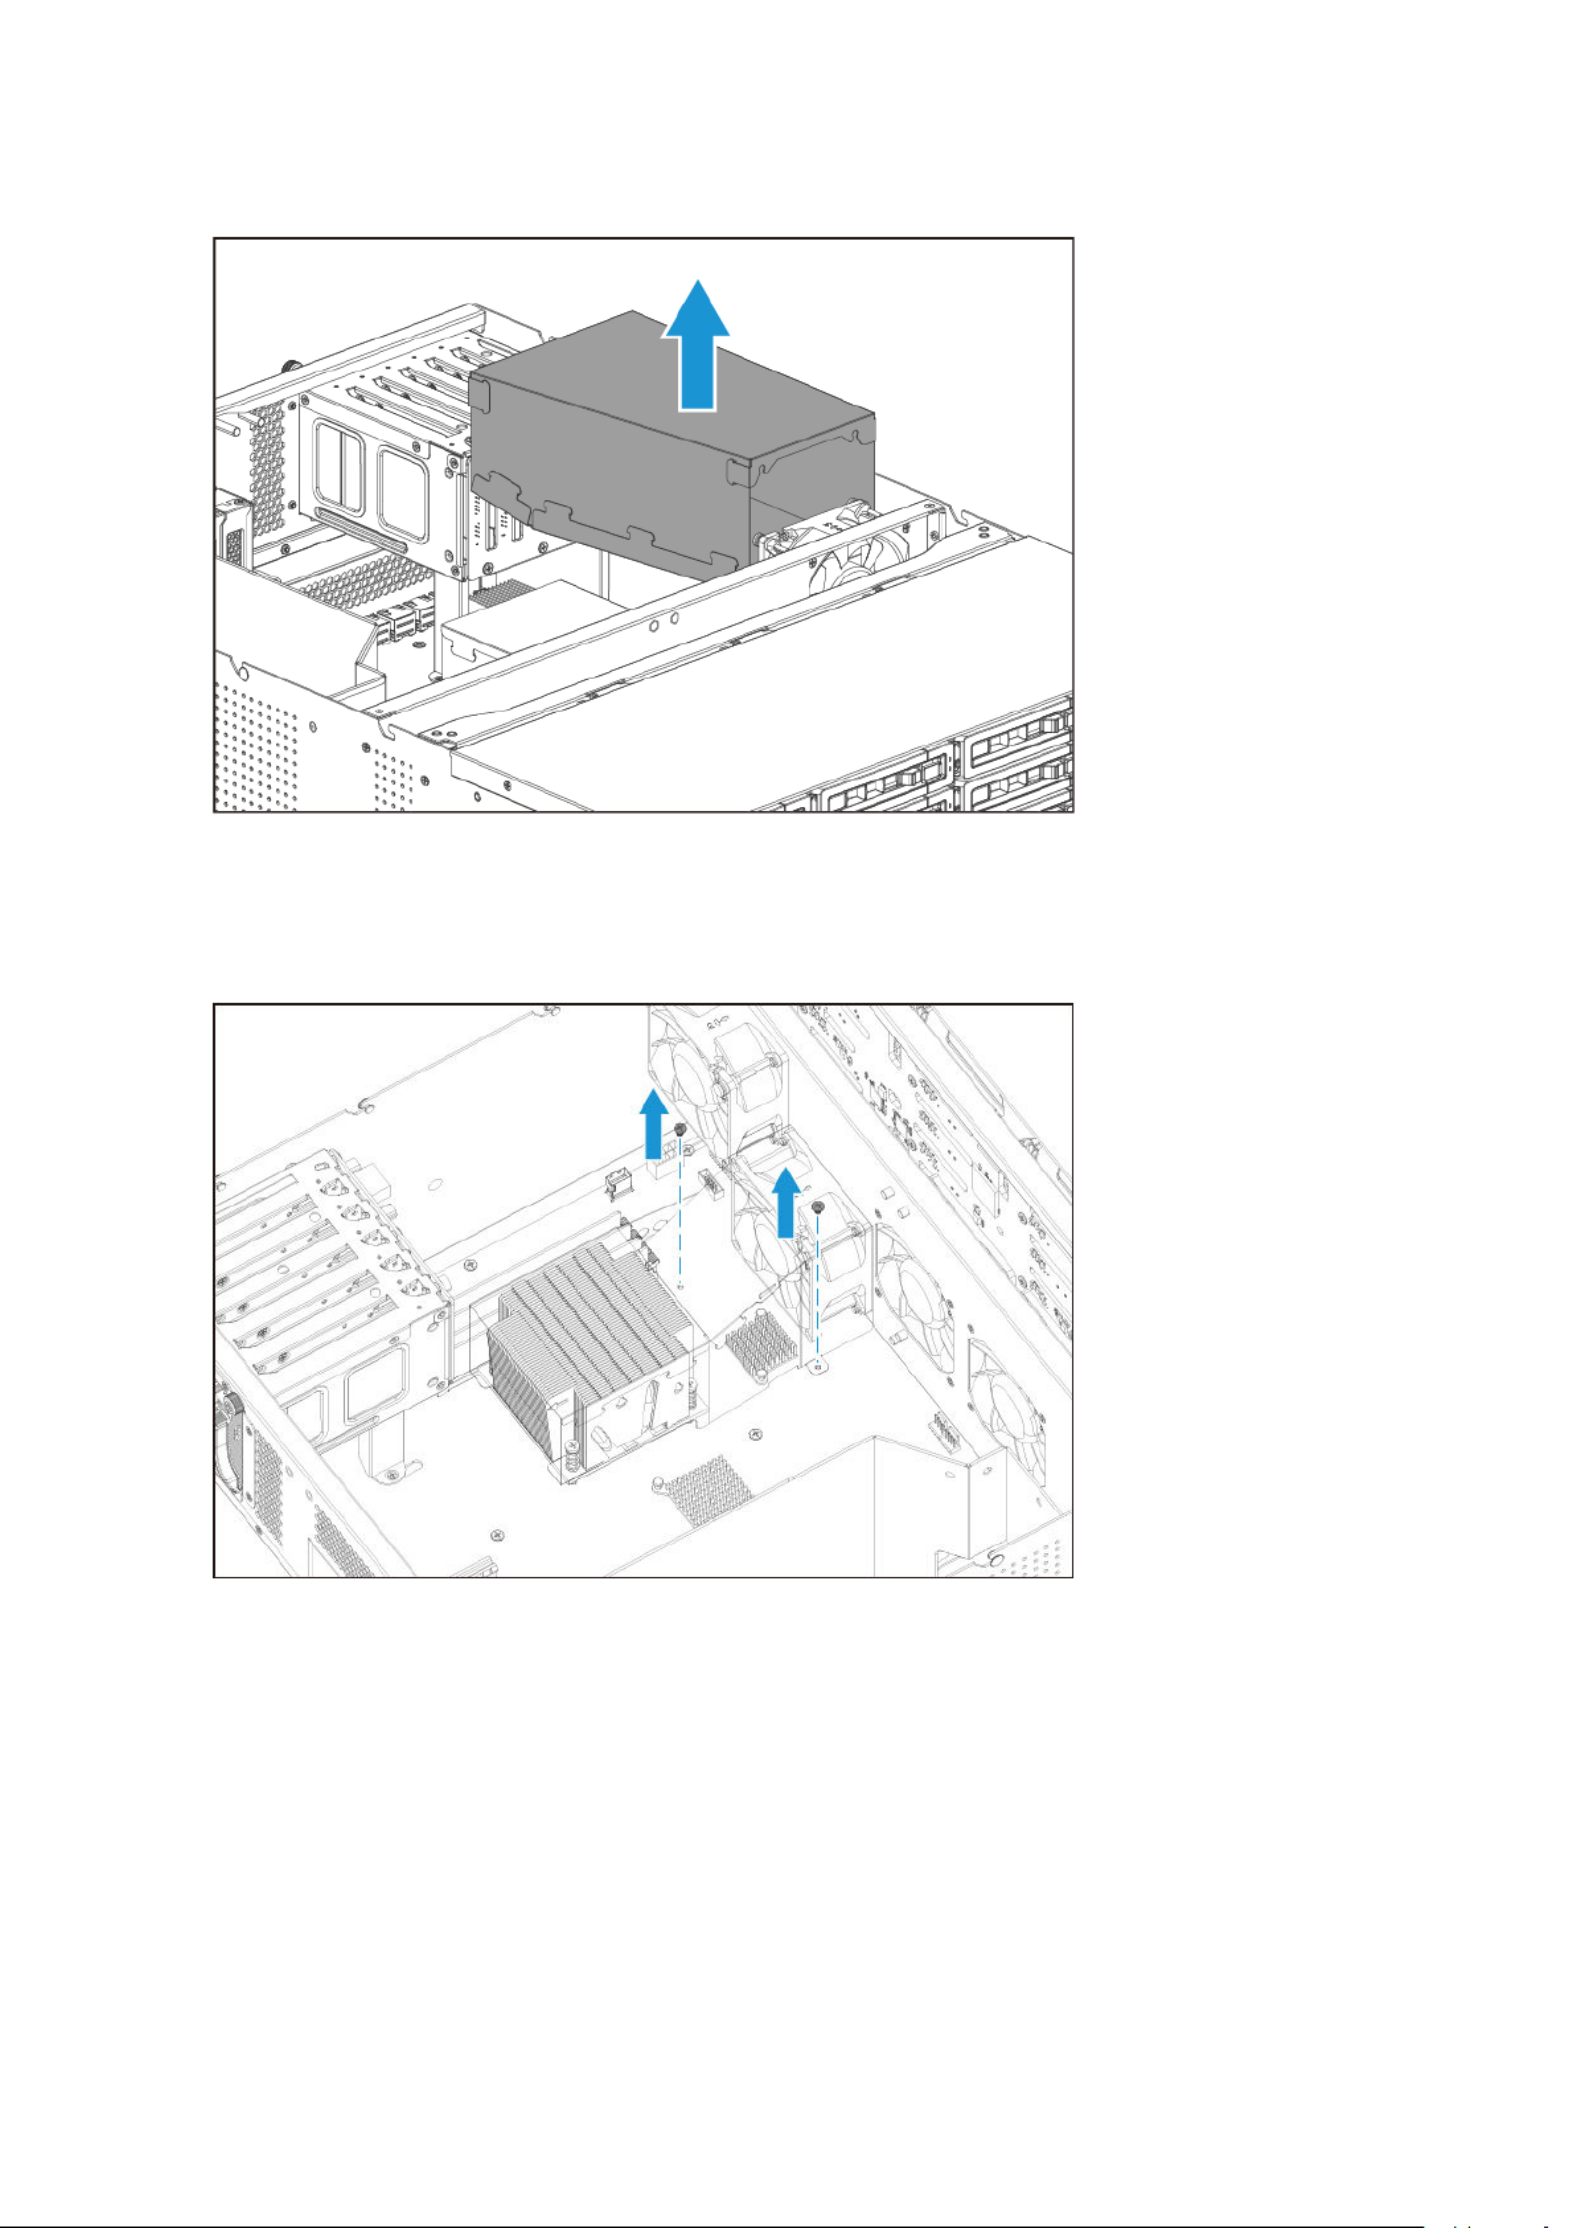
7. Remove the fan unit from the chassis.
a. Remove the screws that secure the fan unit to the chassis.
TS-h3087XU-RP User Guide
Installation and Conguration 37
Termékspecifikációk
| Márka: | QNAP |
| Kategória: | a |
| Modell: | TS-h3087XU-RP |
Szüksége van segítségre?
Ha segítségre van szüksége QNAP TS-h3087XU-RP, tegyen fel kérdést alább, és más felhasználók válaszolnak Önnek
Útmutatók a QNAP

16 Október 2024
14 Október 2024
11 Október 2024
10 Október 2024
6 Október 2024
4 Október 2024
3 Október 2024
2 Október 2024
30 Augusztus 2024
29 Augusztus 2024
Útmutatók a
- a Samsung
- a LG
- a Lenovo
- a Toshiba
- a HP
- a Sandisk
- a Medion
- a Dell
- a Netgear
- a Synology
- a Supermicro
- a ZyXEL
- a Western Digital
- a D-Link
- a Abus
- a Veritas
- a Sitecom
- a Allnet
- a Maxdata
- a Buffalo
- a LaCie
- a Asustor
- a Freecom
- a Seagate
- a Terra
- a CRU
- a Mustang
- a Raidsonic
- a Approx
- a Infortrend
- a Promise Technology
- a Origin Storage
Legújabb útmutatók a

24 Március 2025
24 Március 2025
29 December 2024
29 December 2024

11 Október 2024
10 Október 2024
3 Október 2024
27 Szeptember 2024
24 Szeptember 2024
19 Szeptember 2024