Használati útmutató QNAP TS-EC1280U
Olvassa el alább 📖 a magyar nyelvű használati útmutatót QNAP TS-EC1280U (63 oldal) a szerver kategóriában. Ezt az útmutatót 2 ember találta hasznosnak és 2 felhasználó értékelte átlagosan 4.5 csillagra
Oldal 1/63

QNAP Turbo NAS
TS- ECx80 Series Hardware User Manual
© 2014. QNAP Systems, Inc. All Rights Reserved.

Thank you for choosing QNAP products! This user manual provides description of the
hardware of the Turbo NAS and relevant guideline of certain functions. Please read
carefully and strictly adhere to the instructions of the manual.
This user manual is applicable to the following Turbo NAS models:
TS TS- EC880 Pro, -EC1080 Pro, - TS EC2480U-RP, TS-EC1680U-RP, TS- -EC1280U RP,
TS- -EC880U RP
NOTE
• The “Turbo NAS” is hereafter referred to as “NAS”.
• The product you purchased may not support certain functions dedicated to specific
models.
• All features, functionality, and other product specifications are subject to change
without prior notice or obligation.
• Information presented is subject to change without notice.
• No part of this publication may be reproduced, stored in a retrieval system, or
transmitted, in any form or by any means, mechanical, electronic, photocopying,
recording, or otherwise, without prior written permission of QNAP Systems, Inc.
• QNAP and the QNAP logo are registered trademarks of QNAP Systems, Inc. Other
products and company names mentioned herein may be the trademarks of their
respective companies.
2

DISCLAIMER
In no event shall QNAP Systems, Inc. (QNAP) liability exceed the price paid for the product
from direct, indirect, special, incidental, or consequential damages resulting from the use
of the product, its accompanying software, or its documentation. QNAP makes no
warranty or representation, expressed, implied, or statutory, with respect to its products or
the contents or use of this documentation and all accompanying software, and specifically
disclaims its quality, performance, merchantability, or fitness for any particular purpose.
QNAP reserves the right to revise or update its products, software, or documentation
without obligation to notify any individual or entity.
Note:
Back up your system periodically to avoid any potential data loss. QNAP disclaims
any responsibility of all sorts of data loss or recovery.
Should you return any components of the NAS package for refund or maintenance,
make sure they are carefully packed for shipping. Any form of damages due to
improper packaging will not be compensated.
3

Regulatory Notice
FCC Notice
The QNAP NAS complies with different FCC compliance classes. Please refer to Appendix A
for details. Once the class of the device is determined, refer to the following corresponding
statement.
=======================================================
FCC Class A Notice
This device complies with Part 15 of the FCC Rules. Operation is subject to the following two
conditions:
1. This device may not cause harmful interference.
2. This device must accept any interference received, including interference that may
cause undesired operation.
Note: This equipment has been tested and found to comply with the limits for a Class A
digital device, pursuant to Part 15 of the FCC Rules. These limits are designed to provide
reasonable protection against harmful interference when the equipment is operated in a
commercial environment. This equipment generates, uses, and can radiate radio frequency
energy, and if not installed and used in accordance with the instruction manual, may cause
harmful interference to radio communications. Operation of this equipment in a residential
area is likely to cause harmful interference, in which case the user will be required to
correct the interference at his own expense.
Modifications: Any modifications made to this device that are not approved by QNAP
Systems, Inc. may void the authority granted to the user by the FCC to operate this
equipment.
4

FCC Class B Notice
This device complies with Part 15 of the FCC Rules. Operation is subject to the following two
conditions:
1. This device may not cause harmful interference.
2. This device must accept any interference received, including interference that may
cause undesired operation.
Note: This equipment has been tested and found to comply with the limits for a Class B
digital device, pursuant to Part 15 of the FCC Rules. These limits are designed to provide
reasonable protection against harmful interference in a residential installation. This
equipment generates, uses, and can radiate radio frequency energy and, if not installed
and used in accordance with the instructions, may cause harmful interference to radio
communications. However, there is no guarantee that interference will not occur in a
particular installation. If this equipment does cause harmful interference to radio or
television reception, which can be determined by turning the equipment off and on, the
user is encouraged to try to correct the interference by one or more of the following
measures:
Reorient or relocate the receiving antenna.
Increase the separation between the equipment and receiver.
Connect the equipment into an outlet on a circuit different from that to which the
receiver is connected.
Consult the dealer or an experienced radio/television technician for help.
Modifications: Any modifications made to this device that are not approved by QNAP
Systems, Inc. may void the authority granted to the user by the FCC to operate this
equipment.
CE NOTICE
The QNAP NAS complies with different CE compliance classes. Please refer to Appendix A
for details.
5

Symbols in this document
Warning
This icon indicates the instructions must be strictly followed.
Failure to do so could result in injury to human body or death.
Caution
This icon indicates the action may lead to disk clearance or loss OR
failure to follow the instructions could result in data damage, disk
damage, or product damage.
6

Table of Contents
Safety Warnings ................................................................................................. 8
Chapter 1. CPU and Memory Specifications ..................................................... 9
Chapter 2. Power Button and Reset Button Behavior ....................................11
Chapter 3. USB One Touch Copy .................................................................... 13
Chapter 4. LED and Alarm Buzzer Specifications ........................................... 14
Chapter 5. Upgrade Memory on QNAP Turbo NAS (RAM Module Installation) 17
5.1 TS- -EC2480U RP, TS- -EC1680U RP, - TS EC1280U-RP, - TS EC880U- RP............... 17
5.2 TS- P , -EC880 RO TS EC1080 PRO ................................................................ 20
Chapter 6. Network Expansion Card Installation ........................................... 23
6.1 TS- P , -EC880 RO TS EC1080 PRO ................................................................ 23
6.2 TS- -EC2480U RP, TS- -EC1680U RP, - TS EC1280U-RP, - TS EC880U- RP............... 27
Chapter 7. Install an mSATA Flash module to the NAS. ................................. 29
7.1 TS- -EC2480U RP, TS- -EC1680U RP, - TS EC1280U-RP, - TS EC880U- RP............... 29
7.2 TS- P , -EC880 RO TS EC1080 PRO ................................................................ 33
Chapter 8. Hot-swap Hard Drives .................................................................. 36
Chapter 9. RAID Recovery ............................................................................. 38
Chapter 10. Use the LCD Panel ........................................................................ 40
Chapter 11. Install Power Supply Unit ............................................................. 46
Technical Support ............................................................................................49
Appendix A. P oduct Compliance Classr ............................................................. 50
GNU GENERAL PUBLIC LICENSE ....................................................................... 51
7

Safety Warnings
1. The NAS can operate normally in temperatures of 0ºC– -40ºC (32ºF 104ºF) and
relative humidity of 5%–95%. Please make sure the environment is well-ventilated.
2. The power cord and devices connected to the NAS must provide correct supply voltage
(100W, 90–264V).
3. Do not place the NAS in direct sunlight or near chemicals. Make sure the temperature
and humidity of the environment are in optimized level.
4. Unplug the power cord and all connected cables before cleaning. Wipe the NAS with
a dry towel. Do not use chemical or aerosol to clean the NAS.
5. Do not place any objects on the NAS for the server’s normal operation and to avoid
overheat.
6. Use the flat head screws in the product package to lock the hard disks in the NAS when
installing hard disks for proper operation.
7. Do not place the NAS near any liquid.
8. Do not place the NAS on any uneven surface to avoid falling off and damage.
9. Make sure the voltage is correct in the location where the NAS is installed. Contact
the distributor or the local power supply company for the information.
10. Do not place any object on the power cord.
11. Do not attempt to repair the NAS in any occasions. Improper disassembly of the
product may expose the users to electric shock or other risks. For any enquiries,
please contact the distributor.
12. The chassis NAS models should only be installed in the server room and maintained by
the authorized server manager or IT administrator. The server room is locked by key
or keycard access and only certified staff is allowed to enter the server room.
Warning:
Danger of explosion if battery is incorrectly replaced. Replace only with the same or
equivalent type recommended by the manufacturer. Dispose of used batteries
according to the manufacturer’s instructions.
Do NOT touch the fan inside the system to avoid serious injuries.
8

Chapter 1. CPU and Memory Specifications
Caution: Modifying the hardware, software, or firmware of the QNAP products will
void the warranty. QNAP is not responsible for any form of damage or loss of data caused
by modding the QNAP products. Users should bear their own risks of all sorts of possible
data loss or system instabilities due to changing the hardware parts, modifying the default
system firmware or installing any unauthorized third party applications on QNAP products.
System -TS EC880 Pro TS-EC1080 -Pro TS EC880U- RP
CPU
Quad-Core Intel Xeo
n
Processor E3-
1200 v3
Family
Quad-Core Intel Xeo
n
Processor E3-
1200 v3
Family
Quad-Core Intel Xeo
n
Processor E3-
1200 v3
Family
Memory 2 2 4 GB DDR3 ECC RAM GB DDR3 ECC RAM GB DDR3 ECC RAM
Flash 512MB (USB DOM) 512MB (USB DOM) 512MB (USB DOM)
CPU replaceable No No No
Memory
replaceable Yes Yes Yes
Number of
LONG-DIMM slots 4 4 4
Number of hard
drive slots 8 8 10
Number of PCIe
slots 1 1 2
Number of internal
cache ports 2 2 2
9

System -TS EC1280U-RP -TS EC1680U-RP TS-EC2480U-RP
CPU
Quad-Core Intel Xeo
n
Processor E3-
1200 v3
Family
Quad-Core Intel Xeo
n
Processor E3-
1200 v3
Family
Quad-Core Intel Xeo
n
Processor E3-
1200 v3
Family
Memory 4 4 4 GB DDR3 ECC RAM GB DDR3 ECC RAM GB DDR3 ECC RAM
Flash 512MB (USB DOM) 512MB (USB DOM) 512MB (USB DOM)
CPU replaceable No No No
Memory
replaceable Yes Yes Yes
Number of
LONG-DIMM slots 4 4 4
Number of hard
drive slots 12 16 24
Number of PCIe
slots 2 2 2
Number of internal
cache ports 2 2 2
10

Chapter 2. Power Button and Reset Button Behavior
Power button: Press to turn on or turn off.
System Power button
(Turn on)
Power button
(Hardware turn
off)
Power button
(Force turn off)
All models Press once 1.5 sec 5 sec
Reset button: Press to reset the system settings.
System Basic system reset
(1 beep)
Advanced system reset
(2 beeps)
All models 3 sec 10 sec
Basic system reset (3 sec)
Press the reset button for 3 seconds, a beep sound will be heard. The following settings
are reset to default:
System administration password: admin
TCP/IP configuration: Obtain the IP address settings automatically via DHCP
TCP/IP configuration: Disable Jumbo Frame
TCP/IP configuration: If port trunking is enabled (dual LAN models only), the port
trunking mode will be reset to “Active Backup (Failover)”.
System Port: 8080 (system service port)
Security Level: Low (Allow all connections)
LCD panel password: (blank)*
VLAN will be disabled.
Service binding: All the NAS services run on all available network interfaces.
*This feature is only provided by the NAS models with LCD panels. Please
visit http://www.qnap.com for details.
11

Advanced system reset (10 sec)
Press the reset button for 10 seconds; you will hear two beeps at the third and the tenth
seconds. The NAS will reset all the system settings to default as it does by web-based
system reset in “Control Panel” > “System Settings” > “Backup / Restore” > “Restore to
Factory Default” except all the data are reserved. The settings such as the users, user
groups, and the network share folders previously created will be cleared. To retrieve the
old data after the advanced system reset, create the same network share folders on the
NAS and the data will be accessible again.
12

Chapter 3. USB One Touch Copy
This feature is only provided by the NAS models with USB One Touch Copya button.
Please visit http://www.qnap.com for details.
System Number of seconds (press the one touch copy button
to trigger data copy)
All NAS models 0.5 sec
Data Copy by the Front USB Port
The NAS supports instant data copy backup from the external USB device to the NAS or the
other way round by the front one touch copy button. To use this function, follow the steps
below:
1. Make sure a hard drive is installed and formatted on the NAS. The default network
share Qusb or Usb is created.
2. Turn on the NAS.
3. Configure the behavior of the Copy button on “Backup Station” > “External Backup” >
“USB one touch copy” page.
4. Connect the USB storage device to the front USB port of the NAS.
5. Press the Copy button. The USB LED will flash. The data will be copied to or from
the USB device according to the NAS settings.
Note: This feature adopts incremental backup. After the first time data backup, the NAS
only copies the changed files since the last backup.
13

Chapter 4. LED and Alarm Buzzer Specifications
The LED indicators of the NAS indicate the system status and information. When the NAS
is turned on, check the following items to make sure the system status is normal. Note
that the following LED information is applicable only when users have properly installed the
hard drive, and connected the NAS to the network and the power supply.
LED Color LED Status Description
System
Status
Red/
Green
Flashes green
and red
alternately
every 0.5 sec
1. The hard drive on the NAS is being
formatted.
2. The NAS is being initialized.
3. The system firmware is being updated.
4. RAID rebuilding is in process.
5. Online RAID capacity expansion is in
process.
6.
Online RAID level migration is in process.
Red
1. The hard drive is invalid.
2. The disk volume has reached its full
capacity.
3. The disk volume is going to be full.
4. The system fan is out of function.
5. An error occurs when accessing
(read/write) the disk data.
6. A bad sector is detected on the hard
drive.
7. The NAS is in degraded read-only mode
(2 member drives fail in a RAID 5 or RAID
6 configuration, the disk data can still be
read).
8. Hardware self-test error.
Flashes red
every 0.5 sec
The NAS is in degraded mode (one member
drive fails in RAID 1, RAID 5 or RAID 6
configuration).
Flashes green
every 0.5 sec
1. The NAS is starting up.
2. The NAS is not configured.
3. A hard disk drive is not formatted.
Green The NAS is ready.
Deep flashes
of orange The NAS is in sleep mode.
Off
All the hard drives on the NAS are in standby
mode.
LAN Orange Orange
The disk data is being accessed from the
network and a read/write error occurs during
the process.
14

LED Color LED Status Description
Flashes
orange The NAS is connected to the network.
10 GbE Green
Green The 10GbE network expansion card is
installed.
Off
No 10GbE network expansion card is installed.
HDD Red/
Green
Flashes red The NAS is being accessed from the network.
Red A hard drive read/write error occurs.
Flashes green The disk data is being accessed.
Green The hard drive can be accessed.
USB Blue
Flashes blue
every 0.5 sec
1. A USB device (connected to the front USB
port) is being detected.
2. A USB device (connected to the front USB
port) is being removed from the NAS.
3. The USB device (connected to the front
USB port of the NAS) is being accessed.
4. The data is being copied to or from the
external USB or eSATA device.
Blue A front USB device is detected (after the
device is mounted).
Off
1. No USB device is detected.
2.
The NAS has finished copying the data to
or from the USB device connected to the
front USB port.
eSATA Orange
Flashes
orange The eSATA device is being accessed.
Off No eSATA device can be detected.
Storage
Expansion
Port
Status1
Orange
Off No expansion enclosures are detected.
Orange Expansion enclosures are detected.
1 The storage expansion port status LED is only supported by the TS-EC2480U-RP, TS RP- -EC1680U ,
TS-EC1280U-RP, TS-EC880U- RP.
15

Beep alarm: All NAS models
The beep alarm can be disabled in “Control Panel” > “System Settings” > “Hardware”.
Beep sound Number of Times Description
Short beep (0.5 sec) 1
1. The NAS is starting up.
2. The NAS is being shut down
(software shutdown).
3. The user presses the reset button to
reset the NAS.
4. The system firmware has been
updated.
Short beep (0.5 sec) 3
The NAS data cannot be copied to the
external storage device from the front
USB port.
Long beep (1.5 sec) 3, every 5 min The system fan is out of function.
Long beep (1.5 sec)
2
1. The disk volume is going to be full.
2.
The disk volume has reached its full
capacity.
3. The hard drives on the NAS are in
degraded mode.
4. The user starts the hard drive
rebuilding process.
5. A hard drive is plugged in or out.
1
1. The NAS is turned off by force
shutdown (hardware shutdown).
2.
The NAS has been turned on and is
ready.
16
Chapter 5. Upgrade Memory on QNAP Turbo NAS (RAM Module
Installation)
Warning:
The following instructions should only be performed by an authorized and trained
technician.
Strictly adhere to the instructions to install a RAM module on the NAS. Failure to do
so could result in injury to human body or death.
QNAP provides RAM module (optional purchase) for users to upgrade the memory of the
NAS. Insert an extra RAM module on the motherboard of the NAS to upgrade the memory.
The total memory will be shown in “System Information” of the administration page.
5.1 -TS EC2480U-RP, , TS- -EC1680U RP TS-EC1280U RP- , TS- -EC880U RP
17

1. Turn off the NAS. Disconnect the power adaptor, network cable(s), and any other
connectors or cables from the NAS.
2. Before installing the network expansion card, put on an antistatic wrist strap to
prevent electrostatic discharge. The crocodile clip should be connected to the ground.
3. Loosen the 2 screws on the rear of the NAS as shown in the illustration.
4. Hold the handle pulled backwards to remove the Motherboard Drawer.
18

5. Release the ejector clips gently by pulling them out of the sides of the RAM slot.
6. Grasp the edge of the RAM module. Align the notch on the gold edge of the RAM
module with the notch in the RAM slot. Insert the RAM module to the RAM slot until
it cannot go any further.
7. Insert the Motherboard Drawer, push the handle, locking NAS rear two screws.
19

5.2 -TS EC880 -Pro, TS EC1080 Pro
1. Turn off the NAS. Disconnect the power adaptor, network cable(s), and any other
connectors or cables from the NAS.
2. Before installing the network expansion card, put on an antistatic wrist strap to
prevent electrostatic discharge. The crocodile clip should be connected to the
ground.
3. Loosen the seven screws on the rear of the NAS.
20

4. Remove the case cover of the NAS gently.
5. Loosen the cable
21

6. Release the ejector clips gently by pulling them out of the sides of the RAM slot.
7. Grasp the edge of the RAM module. Align the notch on the gold edge of the RAM
module with the notch in the RAM slot. Insert the RAM module to the RAM slot until
it cannot go any further.
8. Installed on the NAS enclosure, locking rear of the seven screws NAS.
22

Chapter 6. Network Expansion Card Installation
Warning:
The following instructions should only be performed by an authorized and trained
technician.
Strictly adhere to the instructions to install a network expansion card on the NAS.
Failure to do so could result in injury to human body or death.
The TS-x80 series provides expansion slots for network expansion. Insert an extra
network expansion card (optional purchase) to the motherboard of the NAS to increase the
network bandwidth.
6.1 -TS EC880 Pro, TS-EC1080 Pro
Please refer to the compatibility table below and replace a proper bracket for the network
expansion card.
Bracket A Bracket B Bracket C
23

Network Expansion Card Compatibility
Bracket A (X520-T2) Intel® Ethernet Server Adapter X520-T2 (E10G42B)
Bracket B
(X520-SR2/X520- DA2)
1. Intel® Ethernet Server Adapter X520-SR2
(E10G42BFSR)
2. Intel® Ethernet Server Adapter X520-DA2
(E10G42BTDA)
Bracket C (Emulex) 1. Emulex OneConnect 10GbE Network Adapters, SFP+
Direct attach copper (OCe11102- NX)
2. Emulex OneConnect 10GbE Network Adapters, Short
reach optical (OCe11102- NM)
3. Emulex OneConnect 10GbE Network Adapters, SFP+
Direct attach copper (OCe11102- IX)
4. Emulex OneConnect 10GbE Network Adapters, Short
reach optical (OCe11102- IM)
1. Turn off the NAS. Disconnect the power adaptor, network cable(s), and any other
connectors or cables from the NAS.
2. Before installing the network expansion card, put on an antistatic wrist strap to
prevent electrostatic discharge. The crocodile clip should be connected to the
ground.
3. Loosen the seven screws on the rear of the NAS.
24

4. Remove the case cover of the NAS gently.
5. Loosen the screws and remove the expansion slot cover.
25

6. Grasp the edge of the network expansion card. Align the notch on the gold edge of
the card with the notch in the PCIe slot. Insert the network expansion card to the
PCIe slot until it cannot go any further.
7. Fasten the screws.
8. Close the case cover and fasten the screws. Connect the power adaptor and cables to
the NAS.
9. To check that the network expansion is recognized by the NAS, power up the NAS and
login the web interface as an administrator. Go to “Control Panel” > “System Settings”
> “Network” > “TCP/IP” and check the total number of network interfaces.
26

6.2 -TS EC2480U-RP, , , TS- -EC1680U RP TS- -EC1280U RP TS-EC880U-RP
1. Turn off the NAS. Disconnect the power adaptor, network cable(s), and any other
connectors or cables from the NAS.
2. Before installing the network expansion card, put on an antistatic wrist strap to
prevent electrostatic discharge. The crocodile clip should be connected to the ground.
3. Loosen the 2 screws on the rear of the NAS as shown in the illustration.
4. Hold the handle pulled backwards to remove the Motherboard Drawer.
27

5. Loosen the screw and remove the expansion slot cover.
6. Insert the network expansion card to the PCIe slot until it cannot go any further. Then
fasten the screw.
7. Push back Motherboard Drawer. Then fasten the screw.
8. Connect the power adaptor and cables to the NAS.
9. To check that the network expansion is recognized by the NAS, power up the NAS and
login the web interface as an administrator. Go to “Control Panel” > “System Settings”
> “Network” > “TCP/IP” and check the total number of network interfaces.
28

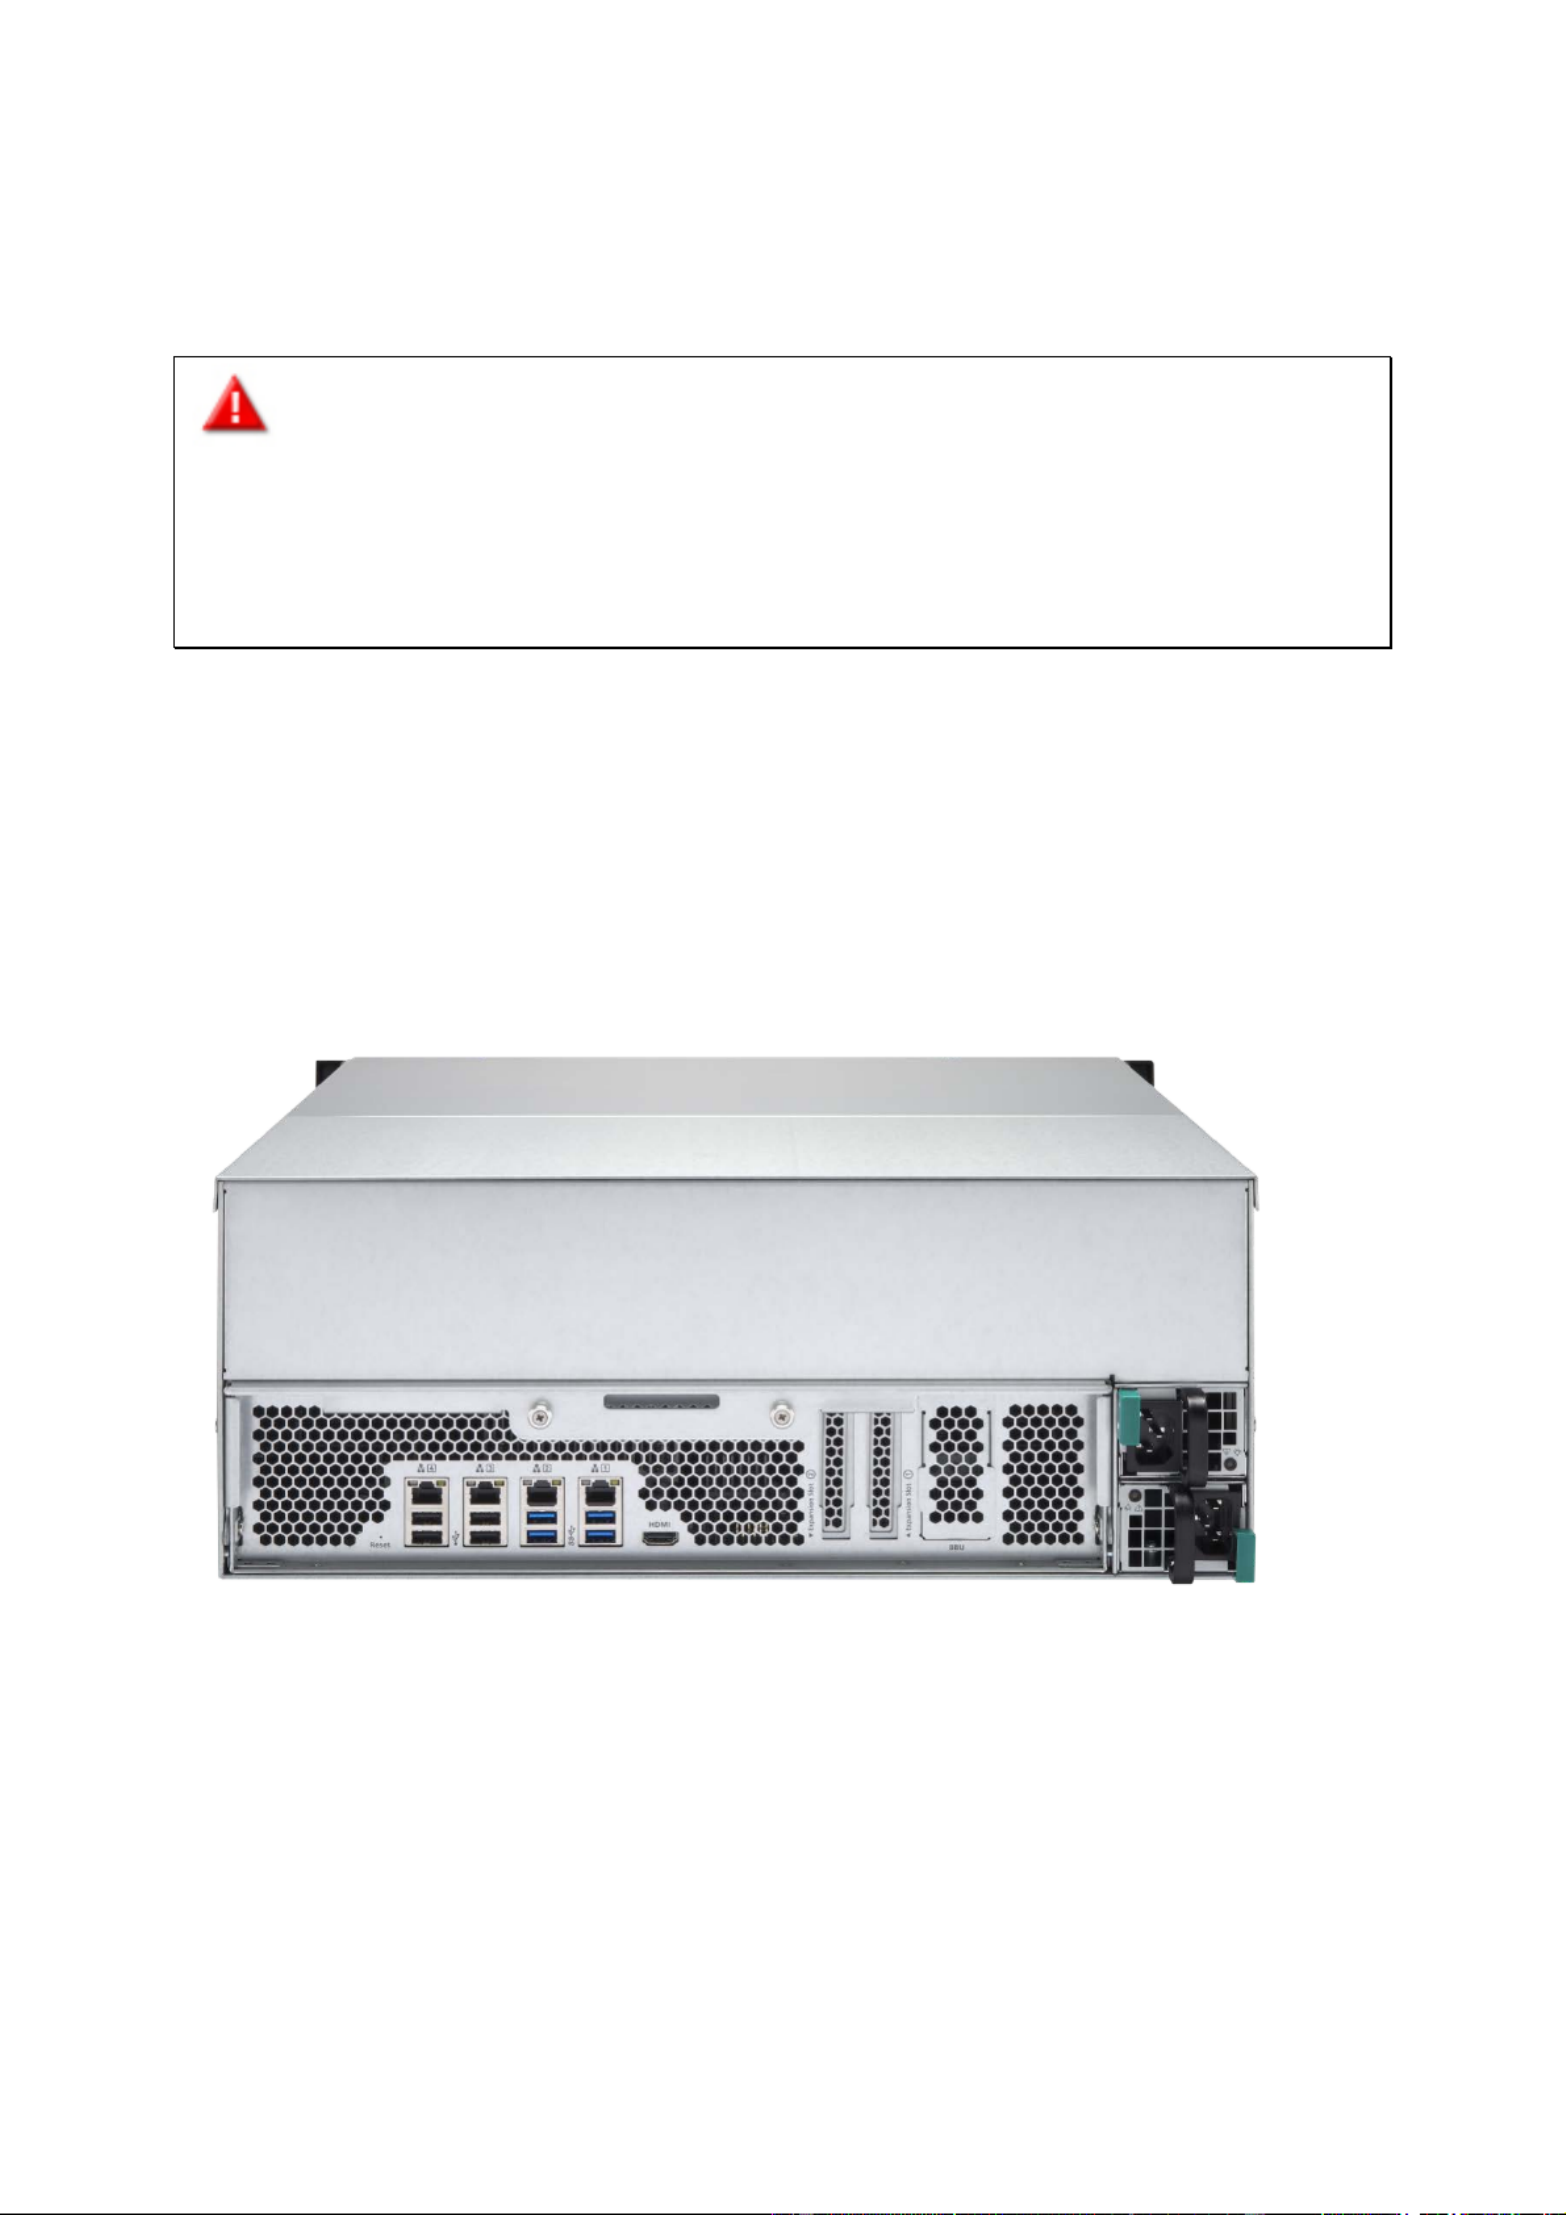
Chapter 7. Install mSATAan Flash module to the NAS.
Warning:
The following instructions should only be performed by an authorized and trained
technician.
Strictly adhere to the instructions to install a mSATA module on the NAS. Failure to
do so could result in injury to human body or death.
7.1 -TS EC2480U- - - -RP, TS EC1680U RP, TS EC1280U RP- , TS- -EC880U RP
1. Turn off the NAS. Disconnect the power adaptor, network cable(s), and any other
connectors or cables from the NAS.
29

2. Loosen the 2 screws on the rear of the NAS as shown in the illustration.
3. Hold the handle and pull backwards to remove the Motherboard Drawer.
30
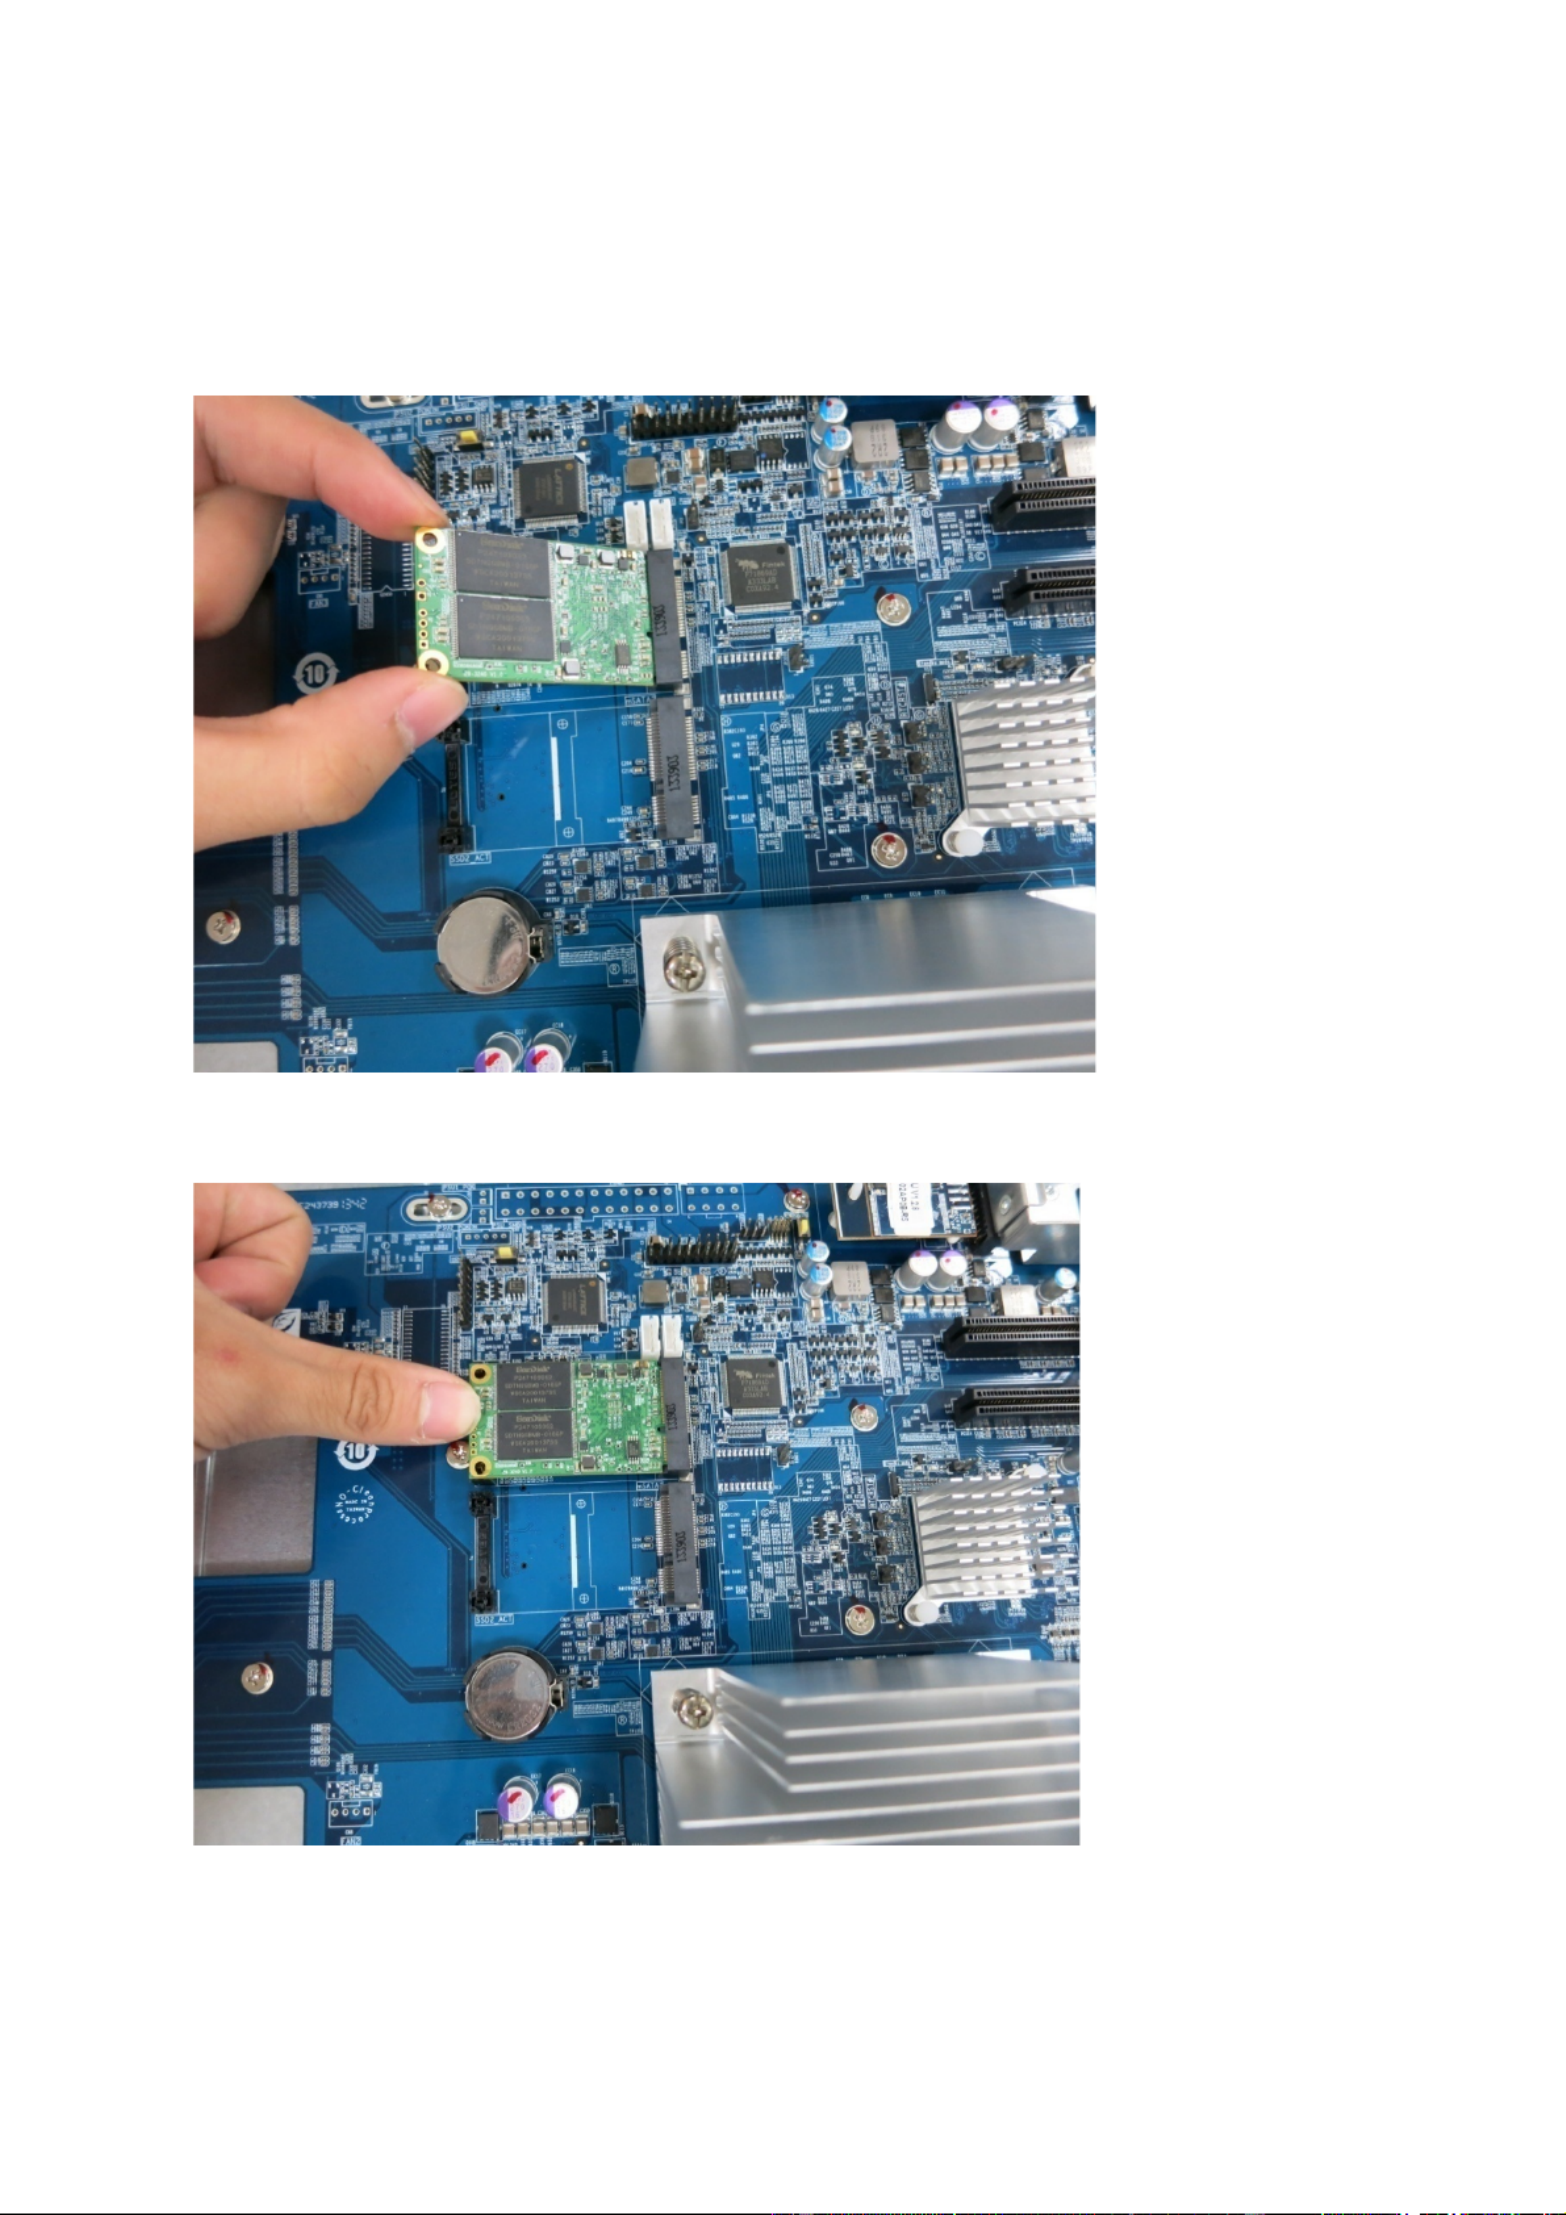
4. Carefully grasp the edge of the mSATA Flash Module. Align the notch on the gold
edge of the mSATA module with the notch in the mSATA slot. Insert the mSATA Flash
Module to the mSATA slot until it cannot go any further.
5. I nsert the module fixing
6. Return the Motherboard Drawer to its normal position.
31

7. Connect the power adaptor and cables to the NAS.
8. To check that the mSATA Flash Module is recognized by the NAS, power up the NAS
and login to the web interface as an administrator. Go to “Control Panel” > “Storage
Manager” > “Disk” and check the “Internal Cache Port”.
32

7.2 -TS EC880 -Pro, TS EC1080 Pro
1. Turn off the NAS. Disconnect the power adaptor, network cable(s), and any other
connectors or cables from the NAS.
2. Before installing the network expansion card, put on an antistatic wrist strap to
prevent electrostatic discharge. The crocodile clip should be connected to a grounded
surface.
3. Loosen the seven screws on the rear of the NAS.
4. Remove the case cover of the NAS gently.
33

5. Carefully grasp the edge of the mSATA Flash Module. Align the notch on the gold
edge of the mSATA Flash Module with the notch in the mSATA slot. Insert the mSATA
Flash Module to the mSATA slot until it cannot go any further.
6. Insert and fasten screws in place as indicated.
34

7. Close the case cover and fasten the screws. Connect the power adaptor and cables to
the NAS.
8. To check that the mSATA Flash Module is recognized by the NAS, power up the NAS
and login to the web interface as an administrator. Go to “Control Panel” > “Storage
Manager” > “Disk” and check the Internal Cache Port.
35

Chapter 8. Hot- swap Hard Drives
The QNAP NAS is compatible with 2.5-inch/3.5-inch SATA hard drives from major hard
drive brands. For the updated hard drive compatibility list, please
visit http://www.qnap.com.
Caution:
QNAP disclaims any responsibility for product damage/malfunction or data
loss/recovery due to misuse or improper installation of hard disks in any occasions for
any reasons.
Note that if a hard drive (new or used) which has never been installed on the NAS
before is installed, the hard drive will be formatted and partitioned automatically and all
the disk data will be cleared.
System
Supports
3.5-inch
SATA
Hard
Drives
Supports
2.5-inch
SATA
Hard
Drives
Supports
SSD
Supports
Hot-swap
ping
Hard
Drives
(RAID 1
or above
only)
TS- - EC880 Pro, TS EC1080 Pro,
TS- - - -EC2480U RP, TS EC1680U RP,
TS- - -EC1280U RP, TS EC880U-RP
Yes Yes Yes Yes
36

The NAS supports hot-swapping the hard drives when 1 member drive crashes in RAID 1 or
1–2 member drives crash in RAID 5 or RAID 6. Follow the steps below to hot-swap the
hard drive when a member drive fails in a RAID configuration.
1. Login the NAS and check the storage pool status in “ Storage Manager” > “Storage
Pools”.
2. The storage pool ” status should be “Warning and RAID group status should be
“Degraded”.
3. Prepare a new hard drive to replace the failed one. The capacity of the new hard drive
should be the same as or larger than the failed hard drive.
4. Unplug the failed drive from the NAS. Wait for about 20 seconds or until the server
beeps twice.
5. Remove the failed drive from the drive tray.
6. Install the new hard drive on the drive tray. Insert it to the NAS.
7. The server should beep 1.5 seconds twice.
8. Check the volume status on the web administration page. The volume should be
rebuilding.
Warning: Users are strongly recommended to turn OFF the server before replacing
the hard drive to reduce the risk of electric shock.
37

Chapter 9. RAID Recovery
The QNAP NAS supports recovery of a failed RAID group from unintentional disconnection
or removal of the hard drives from the system. Users can recover an inactive RAID 1,
RAID 5, or RAID 6 group to degraded mode, or an inactive RAID 0 and JBOD configuration
to normal.
Disk volume Supports RAID recovery Maximum number of disk
removal allowed
Single - No
JBOD Yes 1 or more
RAID 0 Yes 1 or more
RAID 1 Yes 1 or 2
RAID 5 Yes 2 or more
RAID 6 Yes 3 or more
RAID 10 - No
Follow the steps below to recover an inactive RAID group on the NAS:
1. Make sure the volume status of the RAID group is “Not active”.
2. Install the same hard drives, which have been formerly removed from the NAS, back
to the same hard drive slots.
3. Go to “Storage Manager” > “Storage Pools”. Select the degraded or inactive RAID
group. Click “Manage” > “Recover”.
4. Wait for about 1 minute for the process to complete. When finished, the NAS data
can be accessed.
Note:
• After recovering a RAID 1, RAID 5, or RAID 6 RAID group from “not active” to degraded
mode by RAID recovery, users can read or write the volume normally. The volume
status will be recovered to normal after synchronization.
• If the disconnected drive member is damaged, the RAID recovery function will not
work.
38
Termékspecifikációk
| Márka: | QNAP |
| Kategória: | szerver |
| Modell: | TS-EC1280U |
Szüksége van segítségre?
Ha segítségre van szüksége QNAP TS-EC1280U, tegyen fel kérdést alább, és más felhasználók válaszolnak Önnek
Útmutatók szerver QNAP

13 Október 2024
12 Október 2024
13 Szeptember 2024
31 Augusztus 2024
25 Augusztus 2024
20 Augusztus 2024
20 Augusztus 2024
16 Augusztus 2024
13 Augusztus 2024
11 Augusztus 2024
Útmutatók szerver
- szerver Sony
- szerver Fujitsu
- szerver Acer
- szerver StarTech.com
- szerver Lenovo
- szerver Toshiba
- szerver HP
- szerver Medion
- szerver Vimar
- szerver Technics
- szerver Rocstor
- szerver Digitus
- szerver TRENDnet
- szerver Dell
- szerver Gigabyte
- szerver Tripp Lite
- szerver Conceptronic
- szerver Blackmagic Design
- szerver Hikvision
- szerver Netgear
- szerver Asus
- szerver ELAC
- szerver Synology
- szerver Supermicro
- szerver ZyXEL
- szerver Smart-AVI
- szerver Planet
- szerver Ernitec
- szerver Black Box
- szerver MSI
- szerver Cisco
- szerver ATen
- szerver APC
- szerver SEH
- szerver Western Digital
- szerver HGST
- szerver D-Link
- szerver Monacor
- szerver Moxa
- szerver Abus
- szerver Veritas
- szerver Atlona
- szerver Lindy
- szerver Areca
- szerver NEC
- szerver Siig
- szerver Eaton
- szerver Gefen
- szerver Kathrein
- szerver IStarUSA
- szerver Lantronix
- szerver Provision-ISR
- szerver Axis
- szerver NETSCOUT
- szerver Sitecom
- szerver ACTi
- szerver Megasat
- szerver KanexPro
- szerver Kramer
- szerver Allnet
- szerver SilverStone
- szerver Maxdata
- szerver AVerMedia
- szerver Matrox
- szerver Flir
- szerver Buffalo
- szerver GeoVision
- szerver LevelOne
- szerver LaCie
- szerver Valcom
- szerver Asustor
- szerver Intel
- szerver Fantec
- szerver Freecom
- szerver Seagate
- szerver Iomega
- szerver Digi
- szerver Revox
- szerver Luxman
- szerver Ibm
- szerver Sonnet
- szerver TAIDEN
- szerver Advantech
- szerver Extron
- szerver Avocent
- szerver Intellinet
- szerver Teradek
- szerver Silex
- szerver Hanwha
- szerver In Win
- szerver Sun
- szerver MvixUSA
- szerver Dual Bay
- szerver Raidsonic
- szerver EMC
- szerver Infortrend
- szerver Opengear
- szerver G-Technology
- szerver EXSYS
- szerver Chenbro Micom
- szerver Middle Atlantic
- szerver Mr. Signal
- szerver Atlantis Land
- szerver C2G
- szerver Promise Technology
- szerver Mobotix
- szerver Origin Storage
Legújabb útmutatók szerver

9 Április 2025
3 Április 2025

2 Április 2025
29 Március 2025
29 Március 2025
29 Március 2025
24 Március 2025
24 Március 2025

15 Január 2025
15 Január 2025