Használati útmutató Panasonic Viera TX-P50ST30B
Olvassa el alább 📖 a magyar nyelvű használati útmutatót Panasonic Viera TX-P50ST30B (104 oldal) a televízió kategóriában. Ezt az útmutatót 3 ember találta hasznosnak és 2 felhasználó értékelte átlagosan 4.5 csillagra
Oldal 1/104

T
QB0E2074
Thank you for purchasing this Panasonic product.
Please read these instructions carefully before operating this
product and retain them for future reference.
The images shown in this manual are for illustrative purposes only.
English UK and Ireland model
Model No.
TX-P42ST30B
TX-P46ST30B
TX-P50ST30B
Operating Instructions
Plasma Television

2
Features
3D technology -
Viewing 3D images on the Full HD panel
You can enjoy viewing 3D images on this TV by wearing the 3D Eyewear.
RealD 3D
This TV and 3D Eyewear use the 3D technology of RealD. RealD is one of the inventors in 3D
technology.
DVB-T tuner built-in
Receives DVB (Digital Video Broadcasting) digital terrestrial broadcasts.
DVB-T2 tuner built-in
DVB-T2 is an advanced digital terrestrial system for more efficient transmission.
Available DVB-T2 broadcasts will be tuned automatically when you perform DVB Auto Setup.
GUIDE Plus+ (p. 22)
This TV supports the TV Guide services sent from the GUIDE Plus+ system.
Sharp pictures and clear sound with HDMI connection (p. 91)
Enjoy high definition digital picture and high quality sound by using an HDMI cable.
Using USB devices
Enjoy the photo, video and music in the USB Flash Memory on Media Player. (p. 59)
Wireless LAN Adaptor for the network connection. (p. 6, 12, 14)
USB keyboard, gamepad, etc. are available. (p. 92)
Timer Programming (p. 23, 51)
Timer Programming enables you to use functions such as programme reminder and programme
recording to the external recorder.
SDXC Card
This TV supports SDXC Card. SDXC is the latest standard of SD Card and a higher storage capacity
card.
VIERA Connect - Enjoy great web entertainment (p. 17, 75)
VIERA Connect allows you to access some specific websites supported by Panasonic, and enjoy
internet contents such as photos, videos, games, etc. from VIERA Connect home screen.
Link up and control the connected equipment with “Q-Link” and “VIERA Link” (p. 76)
Q-Link and VIERA Link provide easy recording and playback, creation of a home theatre without
complicated settings, etc.
VIERA TOOLS - Display special feature icons for easy accessibility (p. 34)
Special features (such as VIERA Link and Media Player) can be accessed easily by using the VIERA
TOOLS button.
Dolby Digital Plus / Dolby Pulse decoders
I
t is possibl
e to decode Dolby Digital Plus / Dolby Pulse multi-channel audio tracks and output as Dolby
Digital Bitstr
eam (multi-channel sound signal) from DIGITAL AUDIO OUT / HDMI2 (ARC function) terminals.
Owner ID (p. 56)
Owner ID is an anti-theft function. Entering the PIN number and owner’s personal information will help
the Police to determine the owner in the case of theft.
Supports Audio Description signal (p. 19, 38)
Audio Description (when broadcast) adds an additional soundtrack to describe events on screen
(narration) and aids understanding and enjoyment, particularly for visually-impaired viewers.
Digital Switchover for Terrestrial broadcasts
Starting in late 2007 and ending in 2012, TV services in the UK will go completely digital, TV region by
TV region.
If you have any questions, please call Digital UK on or visit 08456 50 50 50 www.digitaluk.co.uk
Digital Switchover will cover a period of several weeks. When it starts you will lose all Analogue TV
channels and some Digital TV channels will be missing.
You will need to retune your TV each time this happens to recover your digital channels. Analogue
channels are permanently turned off, it will not be possible to recover them.
•
To retune your TV [Auto Setup] in [DVB Tuning Menu]-DVB mode (p. 46)
Users of cable or satellite boxes should still retune the TV to continue to receive Freeview channels via
their aerial. (Your Analogue channel for viewing Cable or Satellite services will change to a new position.)
•
Due to the digital reception technologies involved, quality of the digital signals may be relatively low in
some cases, despite good reception of analogue channels.

3
Do not display a still picture for a long time
This causes the image to remain on the plasma
screen (“image retention”). This is not considered a
malfunction and is not covered by the warranty.
Typical still images
•
Channel number and other logos
•
Image displayed in 4:3 mode
•
Video game
•
Computer image
To prevent image retention, contrast is lowered
automatically after a few minutes if no signals are
sent or no operations are performed. (p. 94)
Panasonic does not guarantee operation and
performance of peripheral devices made by other
manufacturers; and we disclaim any liability or
damage arising from operation and/or performance
from usage of such other maker’s peripheral devices.
This product is licensed under the AVC patent
portfolio license for the personal and non-commercial
use of a consumer to (i) encode video in compliance
with the AVC Standard (“AVC Video”) and/or (ii)
decode AVC Video that was encoded by a consumer
engaged in a personal and non-commercial activity
and/or was obtained from a video provider licensed to
provide AVC Video. No license is granted or shall be
implied for any other use.
Additional information may be obtained from
MPEG LA, LLC.
See http://www.mpegla.com.
ROVI CORPORATION AND/OR ITS RELATED
AFFILIATES ARE NOT IN ANY WAY LIABLE
FOR THE ACCURACY OF THE PROGRAM
SCHEDULE INFORMATION PROVIDED BY THE
GUIDE PLUS+ SYSTEM. IN NO EVENT SHALL
ROVI CORPORATION AND/OR ITS RELATED
AFFILIATES BE LIABLE FOR ANY AMOUNTS
REPRESENTING LOSS OF PROFITS, LOSS
OF BUSINESS, OR INDIRECT, SPECIAL, OR
CONSEQUENTIAL DAMAGES IN CONNECTION
WITH THE PROVISION OR USE OF ANY
INFORMATION, EQUIPMENT, OR SERVICES
RELATING TO THE GUIDE PLUS+ SYSTEM.
http://www.europe.guideplus.com/
Notice for DVB / Data broadcasting /
IPTV functions
This TV is designed to meet the standards (as of
August, 2009) of digital services.
•
The compatibility with future services is not
guaranteed.
•
Check the latest information on the available
services at the following website.
http://panasonic.jp/support/global/cs/tv/
Contents
Be Sure to Read
Safety Precautions ·····································4
Quick Start Guide
Accessories / Options ·································6
Identifying Controls ·····································9
Basic Connection······································ 11
Auto Setup ················································13
Enjoy your TV!
Basic Features
Using “VIERA Connect” ····························17
Watching TV ·············································18
Using TV Guide ········································22
Viewing Teletext ········································25
Watching External Inputs ··························28
Viewing 3D images ···································30
How to Use VIERA TOOLS ······················34
How to Use Menu Function ······················35
Advanced Features
Retuning from Setup Menu·······················46
Tuning and Editing Channels ···················47
Timer Programming ··································51
Child Lock ·················································53
Input Labels ··············································54
Shipping Condition ···································55
Owner ID ··················································56
Using Common Interface ··························57
Updating the TV Software ························58
Using Media Player ··································59
Using Network Services ···························69
Link Functions
(Q-Link / VIERA Link) ·······························76
External Equipment ··································84
FAQs, etc.
Technical Information································87
FAQs·························································94
On screen messages································96
Maintenance ·············································99
Glossary ···················································99
Index ······················································· 100
Licence ···················································101
Specifications ·········································102
Safety Precautions
4
Safety Precautions
Warning
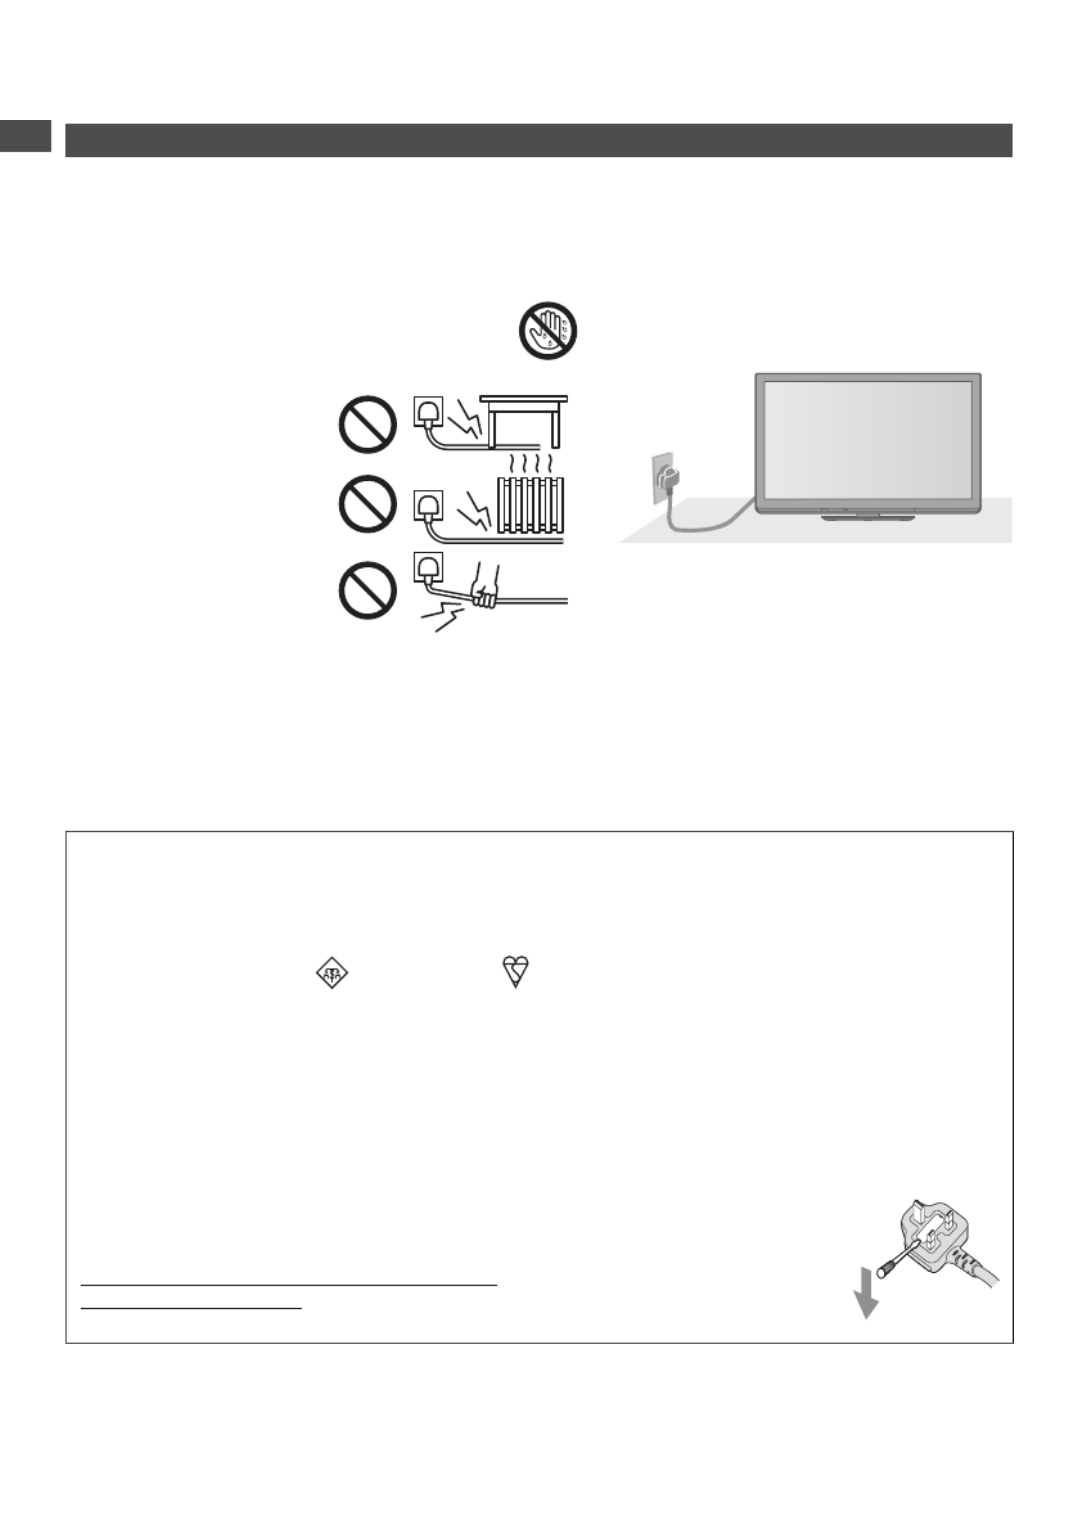
■Mains plug and lead
To help avoid risk of electrical shock, fire, damage or injury, please follow the warnings below:
•
This TV is designed to operate on AC 220-240 V, 50 / 60 Hz.
•
Insert the mains plug fully into the socket outlet.
•
Ensure that the mains plug is easily accessible.
•
Remove the mains plug when cleaning the TV.
•
Do not touch the mains plug with a wet hand.
If you detect anything unusual,
immediately switch off the mains supply
switch and remove the mains plug.
•
Do not damage the mains lead.
AC 220-240 V
50 / 60 Hz
• Do not place a heavy
object on the lead.
• Do not place the
lead near a high
temperature object.
• Do not pull on the
lead. Hold onto the
mains plug body when
disconnecting the plug.
• Do not move the TV with the lead plugged into a socket outlet.
• Do not twist the lead, bend it excessively or stretch it.
• Do not use a damaged mains plug or socket outlet.
• Ensure the TV does not crush the mains lead.
•
Ensure the earth pin on the mains plug is securely connected to prevent electrical shock.
• An apparatus with CLASS I construction shall be connected to a mains socket outlet with a
protective earthing connection.
IMPORTANT: THE MOULDED MAINS PLUG
FOR YOUR SAFETY, PLEASE READ THE FOLLOWING TEXT CAREFULLY.
This TV is supplied with a moulded three pin mains plug for your safety and convenience. A 10
amp fuse is fitted in this mains plug. Shall the fuse need to be replaced, please ensure that the
replacement fuse has a rating of 10 amps and that it is approved by ASTA or BSI to BS1362.
Check for the ASTA mark or the BSI mark on the body of the fuse.
If the mains plug contains a removable fuse cover, you must ensure that it is refitted when the fuse is
replaced.
If you lose the fuse cover the mains plug must not be used until a replacement cover is obtained.
A replacement fuse cover may be purchased from your local dealer.
Do not cut off the mains plug.
Do not use any other type of mains lead except the one supplied with this TV.
The supplied mains lead and moulded plug are designed to be used with this TV to
avoid interference and for your safety.
If the socket outlet in your home is not suitable, get it changed by a qualified
electrician.
If the plug or mains lead becomes damaged, purchase a replacement from an
authorized dealer.
WARNING: – THIS TV MUST BE EARTHED.
How to replace the fuse.
Open the fuse compartment with a screwdriver and replace the fuse.

Safety Precautions
5
Warning
■Take care
To help avoid risk of electrical shock, fire, damage or injury, please follow the warnings below:
•
Do not remove covers and never modify the TV yourself as live parts are
accessible when they are removed. There are no user serviceable parts inside.
•
Do not expose the TV to rain or excessive moisture. This TV must
not be exposed to dripping or splashing water and objects filled with
liquid, such as vases, must not be placed on top of or above the TV.
•
Do not expose the TV to direct sunlight and other sources of heat. To
prevent fire never place any type of candle or naked flame on top or
near the TV.
•
Do not place the TV on sloped or unstable surfaces, and ensure that
the TV does not hang over the edge of the base.
•
Do not insert foreign objects into the TV through the air vents.
•
Do not use an unapproved pedestal / mounting equipment. Be sure to ask your local Panasonic
dealer to perform the setup or installation of approved wall-hanging brackets.
•
Do not apply strong force or impact to the display panel.
To prevent the spread of fire, keep candles or other
open flames away from this product at all times
■Small object
This product contains possibly dangerous parts that can be breathed in or swallowed by young children accidentally.
•
Keep the dangerous parts out of reach of young children.
•
Do not allow children to handle SD Card. As with any small object, the
SD Card could be swallowed by young children. Please remove SD Card
immediately after use and store out of reach of young children.
Caution
■Ventilation
Allow sufficient space around the TV in order to help prevent excessive
heat, which could lead to early failure of some electronic components.
Minimum distance
10
10
10 7
(cm)
•
Ventilation should not be impeded by covering
the ventilation openings with items such as
newspapers, tablecloths and curtains.
•
Whether you are using the pedestal or not, always ensure the vents in the bottom of
the TV are not blocked and there is sufficient space to enable adequate ventilation.
■Moving the TV
Before moving the TV, disconnect all cables.
•
The TV is heavy. Move the TV with at least two people. Support as
shown to avoid injury by the TV tipping or falling.
•
Transport only in upright position. Transporting the TV with its display panel
facing upward or downward may cause damage to the internal circuitry.
■When not in use for a long time
This TV will still consume some power even in the Off mode, as long as the mains plug is still
connected to a live socket outlet.
•
Remove the mains plug from the wall socket when the TV is not in use for a prolonged period of time.
■Excessive volume
Do not expose your ears to excessive volume from the headphones.
Irreversible damage can be caused.

Accessories / Options
6
Accessories / Options
Standard accessories
Remote Control
•
N2QAYB000572
Batteries for the
Remote Control (2)
•
R6
(p. 7)
Pedestal
TX-P42ST30B :
•
TBL5ZX0065
•
TXFBL5Z0007
•
TXFBL5Z0017
(p. 7)
TX-P46ST30B /
TX-P50ST30B :
•
TBL5ZX0069
•
TXFBL5Z0009
•
TXFBL5Z0019
Ferrite core (2)
(Large size)
•
J0KG00000014
(p. 12, 85)
Ferrite core
(Small size)
•
J0KG00000011
(p. 86)
(TX-P42ST30B)
Use the Ferrite cores to comply with
the EMC standard.
Operating Instructions Product Registration
Leaflet
•
Accessories may not be placed all together. Take care not to throw them away unintentionally.
•
This product contains possibly dangerous parts (such as plastic bags), that can be breathed in or
swallowed by young children accidentally. Keep these parts out of reach of young children.
Optional accessories
Please contact your nearest Panasonic dealer to purchase the recommended optional accessories. For
additional details, please refer to the manual of the optional accessories.
3D Eyewear set
(Battery type) (Rechargeable type)
•
TY-EW3D10E •
TY-EW3D2LE
•
TY-EW3D2ME
•
TY-EW3D2SE
•
If you need 3D Eyewears additionally, please purchase this
optional accessory.
•
For more information :
http://panasonic.net/avc/viera/3d/eu.html
Wireless LAN Adaptor
•
DY-WL10E-K Caution
•
To use the Wireless LAN Adaptor, an access point needs to be obtained.
•
It is recommended to use the Wireless LAN Adaptor with the extension cable.
•
To avoid malfunctions caused by radio wave interference, keep the TV away from
the devices such as other wireless LAN devices, microwaves and the devices that
use 2.4 GHz and 5 GHz signals when using the Wireless LAN Adaptor.
•
Depending on the area, this optional accessory may not be available.
•
Additional information for Wireless LAN Adaptor and access point may be on the
following website.
http://panasonic.jp/support/global/cs/tv/
Communication Camera
•
TY-CC10W Caution
•
This camera can be used on VIERA Connect (p. 17, 75).
•
Please also read the manual of the camera.
•
Depending on the area, this optional accessory may not be available.
For details, consult your local Panasonic dealer.
Quick Start Guide

Accessories / Options
7
Wall-hanging bracket
•
TY-WK4P1RW
The angle of wall-hanging bracket can be adjusted in “zero tilting (vertical)” and
“15-degree tilting” for this TV.
Rear of the TV
Holes for wall-hanging
bracket installation
400 mm Depth of screw : minimum 17 mm,
maximum 22 mm
Diameter : M8
300 mm
(View from the side)
Screw for fixing the TV onto the wall-hanging
bracket (not supplied with the TV)
Warning
•
Using other wall-hanging brackets, or installing a wall-hanging bracket by yourself have the risk
of personal injury and product damage. In order to maintain the unit’s performance and safety, be
absolutely sure to ask your dealer or a licensed contractor to secure the wall-hanging brackets. Any
damage caused by installing without a qualified installer will void your warranty.
•
Carefully read the instructions accompanying optional accessories, and be absolutely sure to take
steps to prevent the TV from falling off.
•
Handle the TV carefully during installation since subjecting it to impact or other forces may cause
product damage which will void your warranty.
•
Take care when fixing wall brackets to the wall. Always ensure that there are no electrical cables or
pipes in the wall before hanging bracket.
•
To prevent fall and injury, remove the TV from its fixed wall position when it is no longer in use for an
extended period of time.
Installing / removing remote’s batteries
1
Pull open
Hook
Caution
•
Incorrect installation may cause battery leakage and
corrosion, resulting in damage to the remote control.
•
Do not mix old and new batteries.
•
Do not mix different battery types (such as alkaline and
manganese batteries).
•
Do not use rechargeable (Ni-Cd) batteries.
•
Do not burn or break up batteries.
Batteries must not be exposed to excessive heat such as
sunshine, fire, etc.
•
Make sure you dispose of batteries correctly.
•
Do not disassemble or modify the remote control.
2
Note the correct
polarity (+ or -)
Close
Attaching / removing the pedestal
To help avoid risk of damage or injury by the TV tipping or falling, please follow the warnings and
cautions below:
Warning
•
Do not disassemble or modify the pedestal.
Caution
•
Do not use any pedestal other than the one provided with this TV.
•
Do not use the pedestal if it becomes warped or physically damaged. If this occurs, contact your
nearest Panasonic dealer immediately.
•
During setup, make sure that all screws are securely tightened.
•
Ensure that the TV does not suffer any impact during installation of the pedestal.
•
Ensure that children do not climb onto the pedestal.
•
Install or remove the TV from the pedestal with at least two people.
Quick Start Guide

Accessories / Options
8
Quick Start Guide
A Assembly screw (4)
(silver)
•
XYN5+F20FN
M5 × 20
CAssembly screw
(black)
•
XSB4+8FNK
M4 × 8
EBase
•
TBL5ZX0065
(TX-P42ST30B)
•
TBL5ZX0069
( )
TX-P46ST30B
TX-P50ST30B
FCover
•
TBL5ZB3045-1
(TX-P42ST30B)
•
TBL5ZB3054-1
( )
TX-P46ST30B
TX-P50ST30B
B Assembly screw (4)
(black)
•
THEL087N
(TX-P42ST30B)
•
THEL088N
( )
TX-P46ST30B
TX-P50ST30B
M5 × 25
DPole
•
TBL5ZA3055
(TX-P42ST30B)
•
TBL5ZA3065
( )
TX-P46ST30B
TX-P50ST30B
1Assembling the pedestal
Use the assembly screws A to fasten the
pole D to the base E securely.
•
Make sure that the screws are securely tightened.
•
Forcing the assembly screws the wrong
way will strip the threads.
2Securing the TV
Use the assembly screws B to fasten securely.
•
Tighten the four assembly screws loosely at
first, then tighten them firmly to fix securely.
•
Carry out the work on a horizontal and level surface.
B
E
Hole for
pedestal
installation
(View from the bottom)
Arrow mark
A
E
D
Front
Attach the cover F with assembly screw C
FC
Removing the pedestal from the TV
Be sure to remove the pedestal in the following way when using the wall-hanging bracket or repacking the TV.
1 Remove the assembly screws
B from the TV.
2 Pull out the pedestal from the TV.
3 Remove the assembly screw
C from the cover.
4 Pull out the cover.
5 Remove the assembly screws
A from the pole.
Adjusting the panel to your desired angle
•
Do not place any objects within the full rotation range.
(View from the top)
: 15°
(TX-P42ST30B)
: 10°
(TX-P46ST30B, TX-P50ST30B)

Identifying Controls
EXIT
OPTION
TEXT
REC
PROGRAMME
STTL
INDEX HOLD
BACK/
RETURN
ASPECT
INPUT
LAST VIEW
TV
G
U
I
D
E
V
I
E
R
A
T
O
O
L
S
V
I
E
R
A
L
i
n
k
DVD/VCR
TV
AVTV
abc def
jkl
ghi
mno
tuvpqrs
wxyz
DIRECT TV REC
MENU
15
16
18
19
20
21
22
23
25
26
27
17
24
1
2
4
6
11
3
5
7
8
9
10
12
13
14
9
Identifying Controls
Remote Control
1 Standby On / Off switch
•
Switches TV On or Off
standby
2 3D button (p. 32)
•
Switches to the viewing
mode between 2D and 3D
3 [Main Menu] (p. 35)
•
Press to access Picture,
Sound, Timer and Setup
Menus
4 Aspect (p. 21)
•
Changes aspect ratio
5 Information (p. 18)
•
Displays channel and
programme information
6 VIERA TOOLS (p. 34)
•
Displays some special
feature icons and accesses
easily
7 [VIERA Link Menu]
(p. 80)
8 OK
•
Confirms selections and
choices
•
Press after selecting
channel positions to
quickly change channel
•
Displays the Channel List
9 [Option Menu] (p. 20)
•
Easy optional setting for
viewing, sound, etc.
10 Teletext (p. 25)
•
Switches to teletext mode
11 Subtitles (p. 21)
•
Displays subtitles
12 Numeric buttons
•
Changes channel and
teletext pages
•
Sets characters
•
When in Standby mode,
switches TV On (Press for
about 1 second)
13 Sound Mute
•
Switches sound mute On
or Off
14 Volume Up / Down
15 Input mode selection
•
TV - switches DVB /
Analogue mode (p. 18)
•
AV - switches to AV input
mode from Input Selection
list (p. 28)
16
Direct TV Recording
(p. 78, 80)
•
Records programme
immediately in DVD
Recorder / VCR with
Q-Link or VIERA Link
connection
17
[VIERA Connect] (p. 17, 75)
•
Displays VIERA Connect
home screen
18 Exit
•
Returns to the normal
viewing screen
19 TV Guide (p. 22)
20 Cursor buttons
•
Makes selections and
adjustments
21 Return
•
Returns to the previous
menu / page
22 Coloured buttons
(red-green-yellow-blue)
•
Used for the selection,
navigation and operation of
various functions
23 Hold
•
Freeze / unfreeze picture
(p. 20)
•
Holds the current teletext
page (teletext mode)
(p. 26)
24 Index (p. 27)
•
Returns to the teletext
index page (teletext mode)
25 Last view (p. 19)
•
Switches to previously
viewed channel or input
mode
26 Channel Up / Down
27 Connected equipment
operations
(p. 29, 60, 82)
Quick Start Guide

Identifying Controls
8
9
7
2
3
4
5
6
14
1
11 12 13 10
10
Using the On Screen Displays - Operation guide
Many features available on this TV can be accessed via the On Screen Display menu.
Operation guide
Operation guide will help you to operate
by using the remote control.
Example : [Owner ID]
0 9
* * * *
Please enter new PIN
PIN
Owner ID
EXIT PIN entry
Operation guide
How to use remote control
MENU
Open the main menu
Move the cursor / select the menu item /
select from a range of options
Move the cursor / adjust levels /
select from a range of options
Access the menu / store settings after
adjustments have been made or options
have been set
BACK/
RETURN
Return to the
previous menu
EXIT
Exit the menu system
and return to the
normal viewing screen
Auto power standby function
The TV will automatically go to Standby mode in the following conditions:
• no signal is received and no operation is performed for 30 minutes in Analogue TV mode
• [Off Timer] is active in the Timer Menu (p. 20)
• no operation is performed for the period selected in [Auto Standby] (p. 39)
•
This function does not affect the recording of Timer Programming and Direct TV Recording.
Quick Start Guide
TV
1 CI slot (p. 57)
2 SD Card slot (p. 59)
3 USB 2 port (p. 59)
4 HDMI4 terminal (p. 86)
5 Headphones jack (p. 86)
6 AV2 terminals (p. 86)
7 F
unction select
•
[Volume] / [Contrast] / [Brightness] / [Colour] /
[Sharpness] / [Tint] (NTSC signal) / [Bass]
∗ /
[Treble]∗ / [Balance] / [Auto Setup] (p. 46)
∗
[Music] or [Speech] mode in the Sound Menu
8
Channel Up / Down, Value change (when using
the F button), Switching the TV On (press either
button for about 1 second when in Standby mode)
9 Changes the input mode
10 Mains power On / Off switch
•
Use to switch the mains power.
If you turned the TV Off during Standby
mode by the remote control last time, the
TV will be in Standby mode when you
turn the TV On with Mains power On / Off
switch.
11 Remote control signal receiver
•
Do not place any objects between the TV remote
control signal receiver and remote control.
12 C.A.T.S. (Contrast Automatic Tracking
System) sensor
•
Senses brightness to adjust picture quality
when [C.A.T.S.] in the Picture Menu is set to
[On] (p. 36)
13 Power and Timer LED
•
Red : Standby
Green : On
Orange : Timer Programming On
Orange (flash) :
Recording of Timer Programming or
Direct TV Recording in progress
Red with orange flash :
Standby with Timer Programming On
or Direct TV Recording
•
The LED blinks when the TV receives a
command from the remote control.
14 Infrared transmitter for 3D Eyewear
•
Do not place any objects between the
transmitter and 3D Eyewear.

Basic Connection
11
Quick Start Guide
Note
•
To watch 3D contents (p. 30)
•
Connect to the TV’s AV1 for a DVD Recorder / VCR supporting Q-Link (p. 78).
•
For HDMI-compatible equipment, possible to connect to HDMI terminals (HDMI1 / HDMI2 / HDMI3 /
HDMI4) by using HDMI cable (p. 84).
•
Q-Link and VIERA Link connection (p. 76, 77)
•
Please also read the manual of the equipment being connected.
•
Keep the TV away from electronic equipment (video equipment, etc.) or equipment with an infrared
sensor. Otherwise, distortion of image / sound may occur or operation of other equipment may be
interfered.
Basic Connection
External equipment and cables shown are not supplied with this TV.
Please ensure that the unit is disconnected from the mains socket before attaching or disconnecting any
leads.
There are some restrictions on placement for viewing 3D images. For details (p. 30, 31)
Example 1 Example 2
Connecting aerial Connecting DVD Recorder /
VCR and Player
TV only TV, DVD Recorder / VCR and Player
RF IN
RF OUT
Rear of the TV Terrestrial aerial
AC 220-
240 V
50 / 60 Hz
Mains lead
RF cable
RF cable
DVD Recorder
or VCR
Fully wired
SCART cable
Fully wired
HDMI
compliant
cable
Player /
3D-compatible
player
Rear of the TV Terrestrial aerial
AC 220-
240 V
50 / 60 Hz
Mains lead
RF cable
Aerial input terminal
Aerial input terminal
HDMI
AV

Basic Connection
12
Quick Start Guide
Example 3
Connecting DVD Recorder / VCR and Satellite receiver
TV, DVD Recorder / VCR and Satellite
RF OUT
RF INRF OUT
RF IN
Rear of the TV
Terrestrial
aerial
Mains lead
AC 220-240 V
50 / 60 Hz
Fully wired HDMI
compliant cable
Fully wired
HDMI
compliant
cable
Fully wired
SCART
cable
Fully wired
SCART cable
Satellite receiver
DVD Recorder or VCR
RF cable
RF cable
RF cable
Recorder/
AV
HDMI AV 1 HDMI
AV 2
Aerial input terminal
■ Connecting to the network environment (Network connections)
To enable the network service functions (VIERA Connect, etc.), you need to connect the TV to a
broadband network environment.
•
If you do not have any broadband network services, please consult your retailer for assistance.
•
Connect with LAN cable (Wired connection) or Wireless LAN Adaptor (Wireless connection).
•
Setup of the network connection will start after the tuning (when first using the TV) (p. 14, 15)
Installing the Ferrite core
Pull back the tabs
(in two places)
Wind the cable
twice
Press the cable
through and close
Internet
environment
Internet
environment
Wired connection
Wireless connection
Access point
LAN cable
Wireless LAN Adaptor and Extension cable
“Optional accessories” (p. 6)
•
Connect to the USB 1 or 2 port.
Rear of the TV
Less
than
10 cm
Less
than
10 cm
Ferrite core - Large size (supplied)
Note
•
For more information of the network connections (p. 69)
Auto Setup
13
Auto Setup
Search and store TV channels automatically.
•
These steps are not necessary if the setup has been completed by your local dealer.
•
Please complete connections (p. 11, 12) and settings (if necessary) of the connected equipment before
starting Auto Setup. For details of settings for the connected equipment, read the appropriate manual.
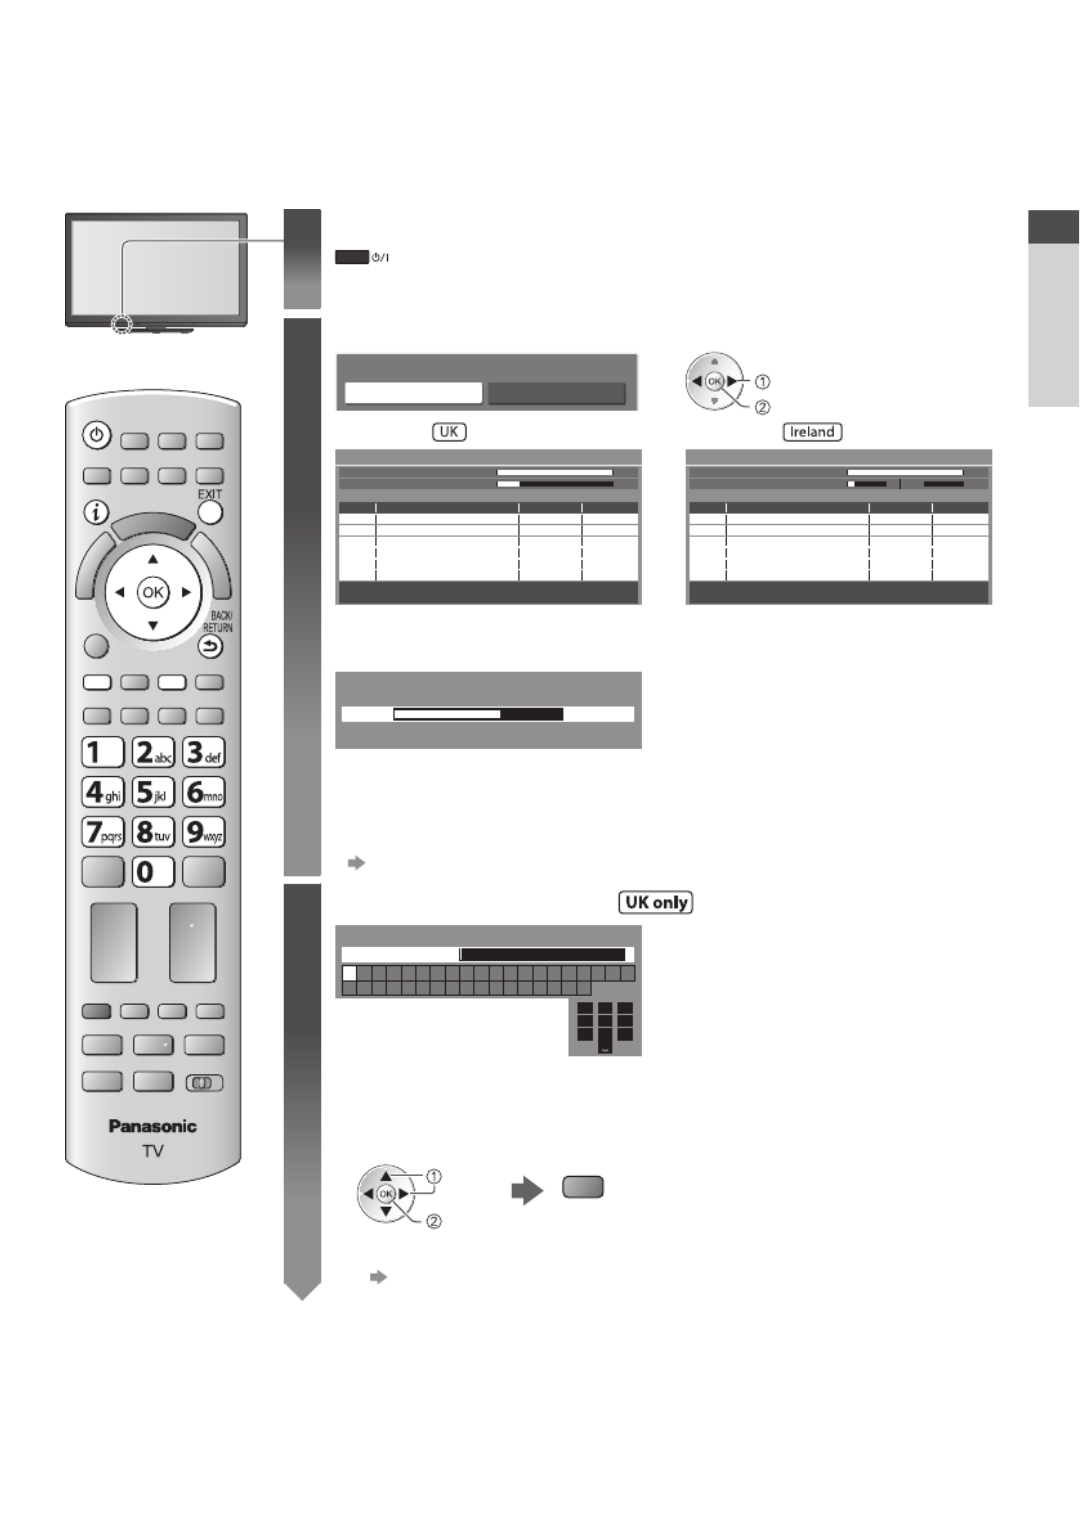
1Plug the TV into mains socket and switch On
•
Takes a few seconds to be displayed.
•
If the red LED shows on the TV, press the Standby On / Off switch
on the remote control for at least 1 second to turn the TV On.
2Select your country
Country Selection
United Kingdom Ireland
set
select
Example : Example :
CH 21 68
CH 21 68
62
62
62
10
10
CBBC Channel
BBC Radio Wales
E4
10
62 10Cartoon Nwk
29 -
33 -BBC1
Searching
CH Channel Name Type
Free TV
Free TV
Free TV
Free TV
Analogue
Analogue
Quality
Free TV: 8 Pay TV: 0 Radio: 0 Data: 0 Analogue: 2
Auto Setup - DVB and Analogue
DVB Scan
Analogue Scan
This will take about 6 minutes.
CH 5 69
62
62
62
10
10
CBBC Channel
BBC Radio Wales
E4
10
62 10Cartoon Nwk
CH29 -
CH33 -BBC1
CH 1 99 41H: 21
Searching
CH Channel Name Type
Free TV
Free TV
Free TV
Free TV
Analogue
Analogue
Quality
Free TV: 8 Pay TV: 0 Radio: 0 Analogue: 2
Auto Setup - DVB and Analogue
DVB Scan
Analogue Scan
This will take about 6 minutes.
Auto Setup will start to search for TV channels and store them.
•
Actual number of channels may differ due to channel duplication.
0% 100%
Sending Preset Data
Please wait!
Remote control unavailable
If Q-Link or similar technology (p. 78) compatible recorder with
analogue tuner is connected, analogue channel setting is automatically
downloaded to the recorder. (Digital channel setting is not downloaded.)
•
If downloading has failed, you can download later through the Setup Menu.
“Q-Link Download” (p. 39)
3Enter your postcode
1
.!:# 2
abc 3
def
4
ghi 5
jkl 6
mno
7
pqrs 8
tuv 9
wxyz
0
A B C D E F G H I J K L M N O P Q R S T
U V W X Y Z 0 1 2 3 4 5 6 7 8 9
Enter Postcode for local channels including space
Postcode •
Your postcode is required to
receive local services and sort
the channel order.
Please ensure to include a space
when entering your postcode.
•
If you skip this step, the default
postcode (central London) will
be set.
■How to enter the postcode
Set characters Exit to go to next step
select
set
(green)
•
You can set characters by using numeric buttons.
“Characters table for numeric buttons” (p. 91)
Quick Start Guide

Auto Setup
14
4Setup the network connection
Setup the network connection to enable the network service functions such as VIERA Connect, etc. (p. 17, 75).
•
To setup the wireless connection, the Wireless LAN Adaptor (optional accessory) is required.
Please note that this TV does not support wireless public access points.
•
Ensure the network connections (p. 12) and network environment are completed before starting setup.
Select the network type
Network Setup
Select Wired or Wireless
Wired Wireless Set later
[Wired] “Wired connection” (p. 12)
[Wireless] “Wireless connection” (p. 12)
access
select •
To setup later on or skip this step
Select [Set later] or
EXIT
■[Wired]
1. Select [Auto]
Check network cable connection.
Check acquired IP address.
Check for devices using same IP address.
Check gateway connection.
Check server connection for VIERA Connect.
Connection Test : succeeded
The test is
successful and the
TV is connected to
the network.
: failed
Check the settings
and connections. And
then select [Retry].
Acquire IP Address
Auto Manual
access
select
Automatically setup is done and the test of the
network connection starts.
•
To set manually, select [Manual] and set
each item. For details (p. 71)
2. Go to the next step 4
(Press twice)
■[Wireless]
Select the connection type
Connection Type
Please select network connection type.
Search for access point
WPS(Push button)
access
select
[Search for access point]
Access points found automatically are listed.
1. Select your desired access point
1
2
3
Access Point A
SSID
Access Point B
Access Point C
11n(2.4GHz)
11n(5GHz)
11n(5GHz)
Available Access Points
No. Wireless type Encrypt Reception
access
select
: Encrypted access point
•
To search access points again
(yellow)
•
For the information of the
highlighted access point •
To set manually (p. 74)
(red)
2. Access the encryption key input mode
Encryption Key Setting
Connection will be made with the following settings:-
SSID : Access Point A
Authentication type : WPA-PSK
Encryption type : TKIP
Please input the encryption key.
Encryption key
•
If the selected access point is not encrypted, the
confirmation screen will be displayed. It is recommended
to select the encrypted access point.
3. Enter the encryption key of the access point
1
.!:# 2
abc 3
def
4
ghi 5
jkl 6
mno
7
pqrs 8
tuv 9
wxyz
0
A B C D E F G H I J K L M N O P Q R S T
U V W X Y Z 0 1 2 3 4 5 6 7 8 9 ! : #
a b c d e f g h i j k l m n o p q r s t
u v w x y z ( ) + - . * _
Access Point Settings
Encryption key
Set characters Store
BACK/
RETURN
select
set
•
You can set characters by
using numeric buttons.
“Characters table for
numeric buttons” (p. 91)
Quick Start Guide

Auto Setup
15
4
4. Select [Yes]
No
Access Point Settings
Encryption key is set to:-
XXXXXXXX
Select 'Yes' to confirm.
Select 'No' to change.
Yes
set
select
•
To re-enter the encryption key, select [No].
•
If the connection has failed, check the encryption key,
settings and positions of your access point. And then,
follow the on screen instructions.
5. After the access point setting is finished, perform the connection test
Check access point connection.
Check acquired IP address.
Check for devices using same IP address.
Check gateway connection.
Check server connection for VIERA Connect.
Connection Test : succeeded
The test is successful and the TV is connected
to the network.
: failed
Check the settings and connections. And then
select [Retry].
•
To set manually, select [Manual] and set
each item. For details (p. 74)
6. Go to the next step 4
(Press twice)
[WPS(Push button)]
1. Press the WPS button on the access point until the light flashes
2. Connect the Wireless LAN Adaptor and the access point
1) Please press the ‘WPS’ button on the access
point until its light flashes.
2) When the light is flashing select ‘Connect’ on
TV.
If you are unsure, please check the instruction
manual of the access point.
WPS(Push button)
Connect
•
Ensure that your access point supports WPS for this
setup.
•
WPS : Wi-Fi Protected Setup™
•
If the connection has failed, check the settings and
positions of your access point. And then, follow the on
screen instructions.
3. After the access point setting is finished, perform the connection test
Check access point connection.
Check acquired IP address.
Check for devices using same IP address.
Check gateway connection.
Check server connection for VIERA Connect.
Connection Test : succeeded
The test is successful and the TV is
connected to the network.
: failed
4. Go to the next step 4Check the settings and connections. And then
select [Retry].
•
To set manually, select [Manual] and set
each item. For details (p. 74)
(Press twice)
5Input Owner ID
* * * *
Please enter new PIN
PIN
Owner ID Please enter your own choice of PIN number, name, etc. to
help the police to crack crime.
•
Make a note of the PIN number in case you forget it. The PIN number cannot be reset.
•
You can input or change the Owner ID later. [Owner ID] (p. 56)
•
To skip this step
EXIT
•
This step will be skipped in the Auto Setup after [Shipping Condition] (p. 55) is performed.
Quick Start Guide

Using “VIERA Connect”
17
Using “VIERA Connect”
VIERA Connect is a gateway to the internet services unique to Panasonic and has expanded VIERA
CAST features greatly.
VIERA Connect allows you to access some specific websites supported by Panasonic, and enjoy
internet contents such as photos, videos, games, etc. from VIERA Connect home screen.
•
This TV has no full browser function and all features of websites may not be available.
1Turn power on •
Press for about 1 second
•
Mains power On / Off switch should be
On. (p. 10)
Every time you turn on the TV, VIERA Connect
introduction banner appears. The banner is
subject to change.
Enjoy selected internet content with VIERA Connect.
Simply press the OK / INTERNET button
2Access VIERA Connect
While the banner is displayed •
The button marking
varies depending on the
remote control supplied
with your TV.
or
INTERNET
Example :
Welcome to VIERA Connect™
VIERA Co nnect™ h ome scree n is sub ject to chan ge with out notice .
The servi ces throu gh VIERA C onne ct™ are ope rated by the ir respe ctive servi ce provi ders, and service may
be di scontin ued ei ther tempo rarily o r perman ently wi thout noti ce. Therefore , Panaso nic wil l make n o
warra nty for the con tent or the con tinuity of the se rvices.
All fea tures of web sites or con tent of the servi ce may no t be avail able .
Some co ntent may b e inap propri ate for some viewe rs.
Some co ntent may o nly be a vaila ble for spe cific cou ntries an d may be presente d in spe cific lan guag es.
ENTER
Don ’t show thi s message agai n
•
Depending on the usage conditions, it may
take a while to read all the data.
•
Messages might be displayed before
VIERA Connect home screen.
Please read these instructions carefully and
follow the on screen instructions.
Example : VIERA Connect home screen
MORE
BACK
•
To go to the next level
[MORE]
•
To back to the previous level
[BACK]
■To exit from
VIERA Connect
EXIT
•
To set the VIERA
Connect instruction
banner display off
[VIERA Connect
Banner] (p. 41)
■How to operate VIERA Connect (current as of January, 2011)
•
To move the cursor / select the item
•
When the key words are displayed on colour bar
(red) (green) (yellow) (blue)
•
To access
•
When options with
numbers are displayed
abc def
jkl
ghi
mno
tuvpqrs
wxyz
•
To return to the previous screen
BACK/
RETURN
•
To return to VIERA Connect
home screen
INTERNET
•
Video communication (ex. Skype™) requires an exclusive Communication Camera TY-CC10W.
“Optional accessories” (p. 6)
For details, read the manual of the Communication Camera.
•
You can connect a keyboard and a gamepad via USB port for character input and playing games in VIERA Connect.
You can also operate the TV with a keyboard or a gamepad other than VIERA Connect features.
For more information “USB connection” (p. 92)
Note
•
If you cannot access VIERA Connect, check the network connections (p. 12) and settings (p. 14, 15).
•
For more information of VIERA Connect (p. 75)

Watching TV
18
Watching TV
Volume
1Turn power on
•
Press for about 1 second
•
Mains power On / Off switch should be On.
(p. 10)
■VIERA Connect introduction banner appears
You can access to VIERA Connect and enjoy the various contents.
(p. 17)
•
To remove this banner, leave for about 5 seconds or press
any buttons (except the buttons to access VIERA Connect).
•
To set this banner display off [VIERA Connect Banner] (p. 41)
2Select DVB or Analogue
TV •
Also possible to select the mode pressing the TV
button repeatedly on the remote control or side
panel of the TV (p.10).
1
BBC ONE WALES
Coronation Street
20:00 - 20:55
20:35
Now Info
All DVB Channels
Select favourites Information banner (p. 19)
3Select a channel
up
down
or
abc def
jkl
ghi
mno
tuvpqrs
wxyz
DVB channel position numbers run from 1
onwards.
Analogue channel position numbers run in the
ranges 0 - 99.
•
To select a two or three-digit channel position
number, e.g. 399
def
wxyz
wxyz
■Select a channel using Information banner (p. 19)
It is possible to confirm the channel name and programme information by using the Information banner
before changing channels.
1 Display Information banner if it is not
displayed
2 While the banner is displayed, select the
channel
watch
select channel
■Select a channel using TV Guide (p. 22)
It is possible to confirm the channel and programme information by using the TV Guide (EPG)
before changing channels.
1 Display TV
Guide
2 Select a current programme
or channel
3 Select [View] (DVB mode)
G
U
I
D
E
select
access
Eastender
19:30- 20:00
View Timer Programming watch
select
Note
•
To watch pay-TV “Using Common Interface” (p. 57)

Watching TV
19
Other useful functions
Display Information banner
Display Information banner
•
Also appears when changing a channel
1
ZDF
Coronation Street
HDTV
20:00 - 20:55
Mute STTLAD TEXTMulti Audio
20:35
45
Now
All DVB Channels
Select favouritesInfo
Bad signal
Example : DVB
12 3 6 7 45
1Channel position and name
2Channel type
([Radio], [Data], [HDTV], etc.) /
Encrypted channel ( ) / TV mode ( , )
3Programme
4Current time
5Programme Start / Finish time (DVB)
Channel number, etc. (Analogue)
6
Progress time indicator of the selected programme (DVB)
7[All DVB Channels] or [Favourites1-4] (p. 48) (DVB)
•
To switch
(blue)
Features available / Message meanings
[Mute]
Sound mute On
[Bad signal]
Poor TV signal quality
[Also in ]
Same programme available as HD
broadcast
•
To display the extra information for
details
[AD]
Audio Description service
available
•
This function can aid visually-
impaired viewers by adding
an additional audio track to
describe events on screen.
•
For settings (p. 38)
[STLL]
Subtitle service available
[TEXT]
Teletext service available
[Multi Audio]
Multiple audio available
[Stereo], [Mono], [NICAM]
Audio mode
1 - 90
Off Timer remaining time
•
For settings (p. 20)
•
To confirm another tuned
channel name •
To watch the channel listed in
the banner •
Information on the next
programme (DVB)
•
To hide •
Extra information (DVB) •
To set display timeout
EXIT
(Press again to hide the
banner)
[Banner Display Timeout]
(p. 41)
•
[AD], [STTL], [TEXT], [Multi Audio] indications are displayed as available on particular programmes,
but may not be available for all individual programmes being broadcast. Display the extra information
to confirm availability of these functions.
Example :
1
BBC ONE WALES
Coronation Street
20:00 - 20:55
20:35
Now
All DVB Channels
Select favourites
[AD]
AD
Last view
Switch to previously viewed channel or input mode easily
LAST VIEW
•
Press again to return to the present view.
Note
•
Switching channel is not available while the recording of Timer Programming or Direct TV Recording is
in progress.
•
Watching less than 10 seconds is not regarded as the previously viewed channel or input mode.
Watching TV
20
Hold
Freeze / unfreeze picture
HOLD
Display the selectable settings for the current status
Check or change the current status instantly
OPTION
•
To change
access
select select / change
store
[Audio Description]
(DVB mode)
Set to [Auto] if the programme
has Audio Description service,
then you will hear an additional
audio track to describe events
on screen
•
To adjust the volume for Audio
Description
[Audio Description Menu]
(p. 38)
[Multi Audio]
(DVB mode)
Allows you to select between
alternative language for sound
tracks (if available)
•
This setting is not memorized
and it will return to the default
setting once you exit the
current programme.
[Monaural Audio]
(DVB mode)
Allows you to select stereo /
monaural (if available)
•
This setting is not memorized
and it will return to the default
setting once you exit the current
programme.
[Subtitle Language]
(DVB)
Allows you to select the language
in which subtitles should appear
(if available)
•
This setting is not memorized
and it will return to the default
setting once you exit the current
programme.
[Teletext Character Set]
Sets the teletext language font
[Setup Menu] (p. 40)
[Teletext Language]
(DVB)
Allows you to select between
alternative language for teletext
(if available)
[NICAM]
(Analogue mode)
Switches NICAM sound
(if available)
[Sound Menu] (p. 38)
[Volume Correction]
Adjusts volume of individual
channel or input mode
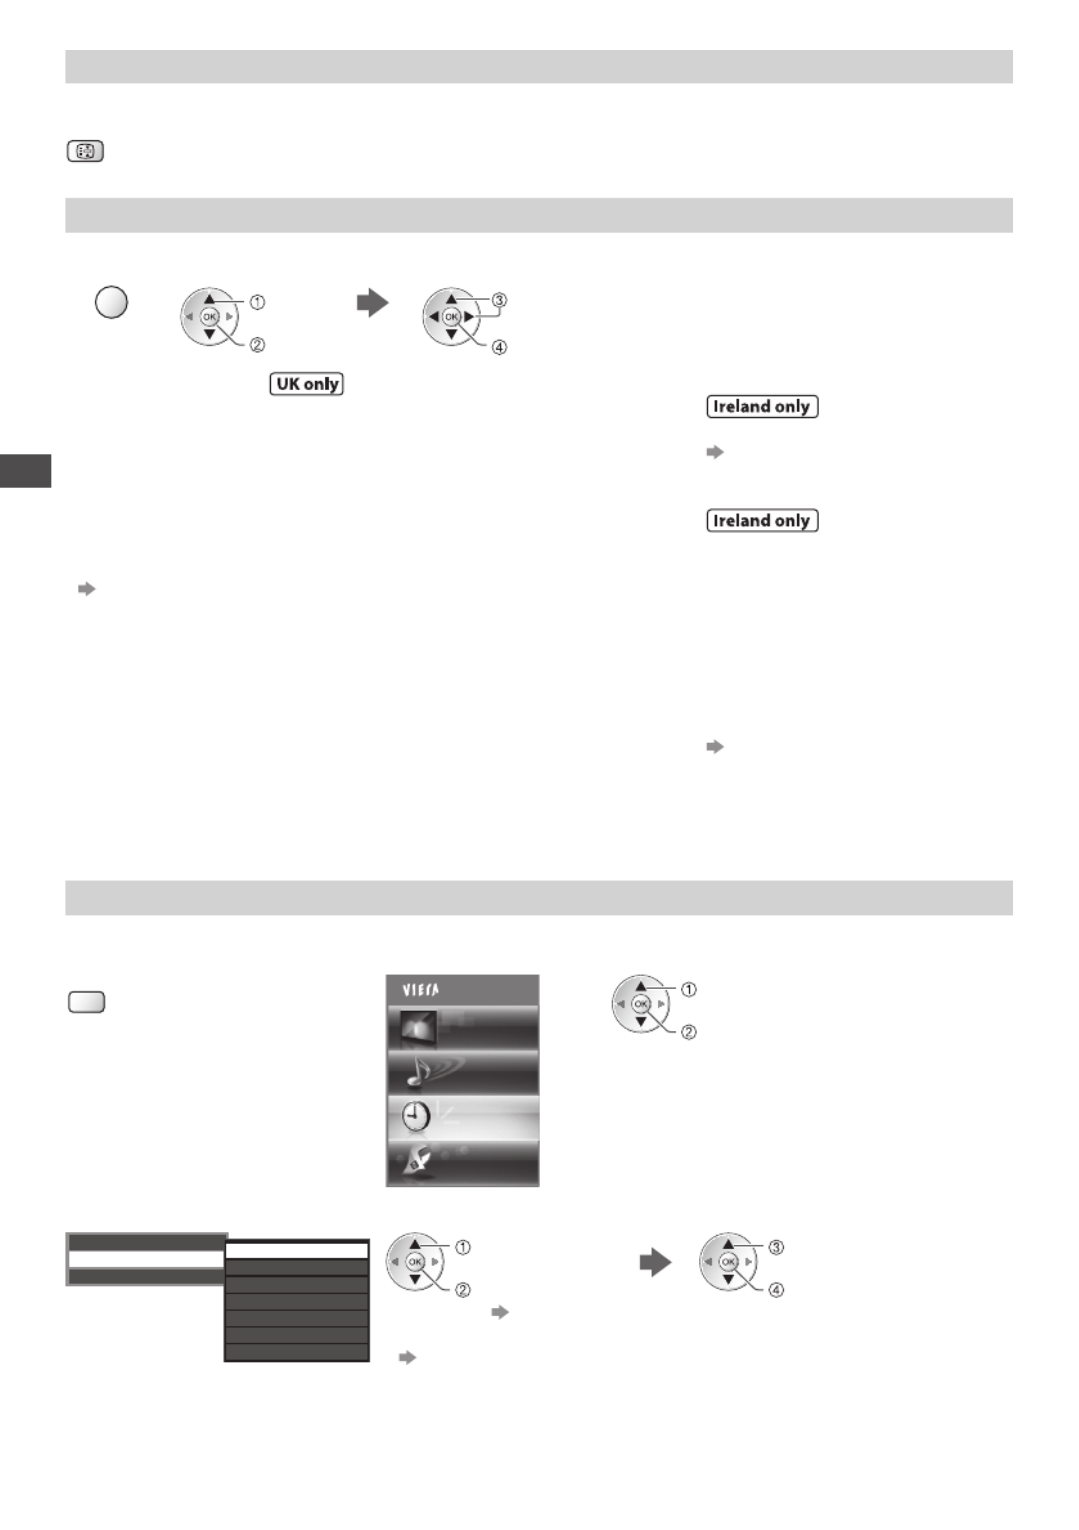
Off Timer
Turn the TV off automatically after a fixed period (Off / 15 / 30 / 45 / 60 / 75 / 90 minutes)
1 2 Display the menu Select [Timer]
MENU
Main Menu
Picture
Sound
Timer
Setup
access
select
3 Select [Off Timer] and set the time
15
30
45
60
75
90
Off
minutes
Timer Programming
Off Timer
Auto Standby minutes
minutes
minutes
minutes
minutes
access
select
[Off Timer]
store
select the time
•
To cancel Set to [Off] or turn the TV off.
•
To display the remaining time
“Display Information banner” (p. 19)
•
When the remaining time is within 3 minutes, the remaining time
will flash on the screen.

Watching TV
21
Aspect
Change the aspect ratio (image size)
ASPECT
Enjoy viewing the image at its optimum size and aspect.
Programmes usually contain an “Aspect Control Signal” (Widescreen signal, etc.), and the TV
will choose the aspect ratio automatically according to the “Aspect Control Signal” (p. 87).
■If you would like to change the aspect ratio manually
1 Display Aspect Selection list While the list is displayed, select the mode 2
ASPECT
Aspect Selection
Auto
16:9
14:9
4:3
Zoom1
Zoom2
Zoom3
Select EXIT
RETURN
Change
Aspect Selection list
store
select •
You can also change the mode
only using the ASPECT button.
ASPECT
(Press repeatedly until
you reach the desired
mode)
[Auto]
The best ratio is chosen and the image expanded to fill the screen.
For details (p. 87)
[16:9] [Zoom1]
Directly displays the image at 16:9
without distortion (anamorphic).
Displays a 16:9 letterbox or 4:3
image without distortion.
[14:9] [Zoom2]
Displays the image at the
standard 14:9 without distortion.
Displays a 16:9 letterbox
(anamorphic) image full-screen
without distortion.
[4:3] [Zoom3]
Displays the image at the
standard 4:3 without distortion.
Displays a 2.35:1 letterbox
(anamorphic) image full-screen
without distortion. At 16:9,
displays the image at its maximum
(with slight enlargement).
Note
•
Aspect is fixed to [16:9] when [Viewing Mode] is set to [Game] in the Picture Menu.
•
Aspect cannot be changed in teletext service and 3D mode (except for [2D 3D] mode in [3D Mode
Selection] (p. 32)).
•
Aspect mode can be memorized separately for SD (Standard definition) and HD (High definition)
signals.
Display subtitles
•
Subtitles may not be displayed properly in 3D images.
■DVB mode
Display / hide subtitles (if available)
STTL
•
To change the language for DVB (if available)
[Preferred Subtitles] (p. 40)
■Analogue mode
Display subtitles Hide subtitles
STTL
EXIT
Note
•
This is the same as switching to Analogue teletext service and selecting “P888” (subtitle service). (p. 27)
•
You cannot change the channel when this function is active.

Using TV Guide
22
Using TV Guide
TV Guide Electronic Programme Guide (EPG) provides an on screen listing of the programmes currently −
broadcast and the forthcoming broadcasts over the next seven days (depending on the broadcasters).
•
This TV supports the GUIDE Plus+ system.
•
The Rovi branding partner will supply the rating information in the programme information and the
recommended group in the Search list.
•
DVB and Analogue channels are displayed on the same TV Guide screen. [D] means DVB channel
and [A] means Analogue channel. There will be no programme listings for Analogue channels.
•
When this TV is turned on for the first time, or the TV is switched off for more than a week, it may take
some time before TV Guide is completely shown.
■To return to TV
EXIT
or
G
U
I
D
E
1Select DVB or Analogue
(p. 18)
TV
2View TV Guide
G
U
I
D
E
GUIDE
OPTION
Das Erste DIY SOS Holiday News
19:30 20:00 20:30 21:00
The Bill
Good bye
Hot Wars Holiday Program
Pepsi Char.
Emmerdal.
10 O’ clock News BBC
CoastSpring watchPanorama
NewsPop IdolI’m A Celebrity
Sports15 To 1Rugby
D
D
D
D
D
D
D
BBC ONE
20:00 - 20:30 DIY SOS : We open in the Battersbys
1 BBC ONE
BBC THREE
E4
BBC FOUR
BBC 2W
BBCi
BBC Radi
1
7
14
70
72
105
719
Coronation Street
0 9
Time:
TV Guide
Wed 27 Oct 2010
10:46 Wed 27 Oct Search All Channels
Select channel
Timer Programming
EXIT
Select programme
RETURN
-24 hours +24 hours Search Category
Info
RETURN
Select Advert
Page up
Page down
Also in
Enter Channel
Example :
2
1
6 7 8 9
3
4
5
1
Current date and time
2TV Guide time
3Advertisement
4[D] : DVB
[A] : Analogue
5Channel position
and name
6TV Guide date
7Some programmes may also be broadcast in HD
•
You can select HD or SD broadcast before viewing or setting Timer Programming.
8Programme
9Logo of the Rovi branding partner
■To change the layout of TV Guide [TV Guide View] (p. 39)
■To watch the programme
1
Select a current
programme or channel
2 Select [View] (DVB mode)
Eastender
19:30- 20:00
View Timer Programming
watch
select
•
If a programme exists in both HD and SD
broadcasts, the [View Options] screen
will be displayed to select HD or SD
broadcast. (DVB mode)
select
access
or
abc def
jkl
ghi
mno
tuvpqrs
wxyz
101 BBC ONE 19:30-20:00 Wed 27 Oct 2010
119 BBC HD 19:30-20:00 Wed 27 Oct 2010
View Options
DIY SOS
watch
select
•
To use Timer Programming
(p. 23)
■To the previous day (DVB mode) ■
To view a channel list of the selected category
(red) (blue)
■To the next day (DVB mode)
Ca teg o r y
Al l C ha nne ls
Al l C ha nne ls
Al l D V B C han nel s
All HD Channels
Al l A na log ue Ch ann e ls
Fr ee D V B C ha nne ls
TV /D ata D V B Ch ann e ls
Fav our it es1
Fav our it es2
Fav our it es3
Fav our it es4
(Category list)
•
To list favourite
channels (p. 48)
Only Analogue
channels are listed
(green)
■View details of the programme (DVB mode)
1 Select the
programme
2 View details
select •
Press again to return to
TV Guide.

Using TV Guide
24
Note
•
This function is not available in Analogue mode.
•
Timer Programming reminder messages will remain displayed until one of the following occurs:
• You press the OK button to view the programme or the EXIT button to cancel the reminder.
• The timer programming event that the reminder is set for ends.
•
No other channel can be selected while the recording of Timer Programming is in progress.
•
When recording programmes, be sure to make the proper settings on the recorder connected to the TV. (p. 51)
Guide link programming (Timer Programming from the TV Guide signal)
Guide link programming is Timer Programming which is controlled by information from the TV Guide; if programme
start and end times are changed by the broadcaster, the timer programming event will follow the change.
A Split Programme programming is a Guide link programming which is interrupted by one or more
other programmes.
Note that Guide link programming (including Split Programme programming) only works reliably if
correct information is received from broadcasters.
(Timer Programming screen)
---
------
0
7 BBC ONE
DIY SOS
The Bill
Red Cap
20:00 20:30
14 E4 21:00 22:30
72 BBC 2W
BBC ONE1
22:45 23:00
10:30 11:30
--:----:-- --:--
91/1
S/P
Guide
Guide
D
D
D
D
Timer Programming
Function No. Date Start EndChannel Name
Wed 27 Oct 2010 10:46
Ext Rec.
Ext Rec.
Reminder
Ext Rec. Wed 27 Oct
(30 min.)
(90 min.)
(15 min.)
(60 min.)
(--- min.)
Wed 27 Oct
Wed 27 Oct
Thu 28 Oct
<TIMER>
Change function
EXIT
Select
RETURN
Store timer
“S/P” is displayed if the timer is set from the TV
Guide and the programme is a Split Programme
“Guide” is displayed if the timer is set from the
TV Guide (Guide link programming)
Das Erste DIY SOS Holiday News
19:30 20:00 20:30 21:00
The Bill
Good bye
Hot Wars Holiday Program
Pepsi Char.
Emmerdal.
10 O’ clock News BBC
CoastSpring watchPanorama
NewsPop IdolI’m A Celebrity
Sports15 To 1Rugby
D
D
D
D
D
D
D
BBC ONE
20:00 - 20:30 DIY SOS : We open in the Battersbys
1 BBC ONE
BBC THREE
E4
BBC FOUR
BBC 2W
BBCi
BBC Radi
1
7
14
70
72
105
719
Coronation Street
Time:
TV Guide
Wed 27 Oct 2010
10:46 Wed 27 Oct Search All Channels
Example :
“ ” or “ ” will be displayed in the TV
Guide if Timer Programming is set as
the Guide link programming.
Note
•
If you edit the start time or end time of a Guide link programming event by more than 10 minutes, it will no
longer follow the broadcaster’s changes to the start or end time. The start and end times will become fixed.
•
Whilst making the Split Programme programming event for [Ext Rec.], you cannot record any
channels between the interrupted programmes.
•
The Split Programme programming event for Reminder will be cleared by pressing the OK button once to view.
•
The Split Programme programming event for Reminder will switch to the programmed channel by
pressing the OK button even if it is between the interrupted programmes.
•
The Split Programme programming does not work if the separated parts are broadcast on different channels.
View advertisement
Enter your postcode when using this function for the first time
[Guide Plus+ Postcode] in [TV Guide Settings] (p. 39)
If you have already entered your postcode in “Auto Setup” - when first using the TV (p. 13 - 16), you do
not have to enter it again.
If you enter an incorrect postcode for your area, or no postcode is entered, advertisements may not be
displayed correctly.
Display advertisement information
OPTION
•
To display the latest advertisement, you will need to update the information.
To update the information continuously, the TV must be left in Standby mode
.
■To change advertisements ■To return to TV Guide
OPTION
or
BACK/
RETURN
Note
•
Some advertisements are for future programmes.
In this case it is possible to use the Guide link programming function.
•
The advertisements displayed on the TV Guide are sent from the GUIDE Plus+ system so that they cannot
be deleted manually or will not be lost even when the TV is turned Off with Mains power On / Off switch.

Viewing Teletext
26
Analogue teletext
Analogue teletext services are the text information provided by the broadcasters.
The features may vary depending on the broadcasters.
What is FASTEXT mode?
In FASTEXT mode, four differently coloured subjects are situated at the bottom of the screen. To access
more information about one of these subjects, press the appropriately coloured button. This facility
enables fast access to information on the subjects shown.
What is List mode?
In List mode, four differently coloured page numbers are situated at the bottom of the screen. Each of these
numbers can be altered and stored in the TV’s memory. “Store frequently viewed pages” (p. 27)
■
To change mode
[Teletext] (p. 40)
■To return to TV
EXIT
1Select Analogue
(p. 18)
TV
2Switch to Teletext
TEXT
•
Displays the index page (content varies
depending on the broadcasters)
<< 01 02 03 04 05 06 07 >>
TELETEXT
INFORMATION
17:51 28 Feb
Time /
date
Sub page number
Colour bar
Current page number
3Select the page
abc def
jkl
ghi
mno
tuvpqrs
wxyz
or
up
down or
Coloured button
(Corresponds to the colour bar)
■To adjust contrast
MENU
(Press twice)
As the blue bar is displayed
FULL / TOP / BOTTOM
MENU
(green)
(TOP) (BOTTOM) Normal (FULL)
(Expand the TOP half)
(Expand the BOTTOM half)
Reveal hidden data HOLD
Reveal hidden words e.g. quiz page answers Stop automatic updating
MENU
(red) •
Press again to
rehide
(If you wish to hold the current page without
updating)
HOLD
•
Press again to resume

Viewing Teletext
27
INDEX Subtitles
Return to the main index page View a favourite page stored
INDEX
STTL
•
Factory setting is
“P888” (subtitle
service) on the blue
button (List mode).
View in multi window
Watch TV and Teletext in two windows at once
TEXT
•
Operations can be made only in Teletext screen.
•
Each time pressed: Teletext TV and Teletext
TV
Store frequently viewed pages
Store frequently viewed pages in the colour bar (List mode only)
As page is displayed
(Corresponding
coloured button)
press and hold
The number changes to white.
•
If you wish to use
Subtitles, do not
change number on
blue button.
■To change stored pages
Coloured button you want to
change
Enter new page number
press and hold
abc def
jkl
ghi
mno
tuvpqrs
wxyz
View sub page
View sub page (Only when teletext is more than one page)
Appears at top of the
screen
•
The number of sub pages varies depending
on the broadcasters (up to 79 pages).
•
It may take some time for searching, during
which time you can watch TV.
■To view specific sub page
MENU
(blue)
Enter the 4-digit number
example : P6
mno
Watch TV while waiting for update
View the TV picture while searching for a teletext page
Teletext automatically updates itself when new information becomes available.
MENU
(yellow)
Changes to TV screen temporarily View the
updated page
P108 Appears when
updating is
completed
(yellow)
(You cannot change the channel.)
•
The news page provides a function that indicates arrival of latest news (“News Flash”).
Watching External Inputs
28
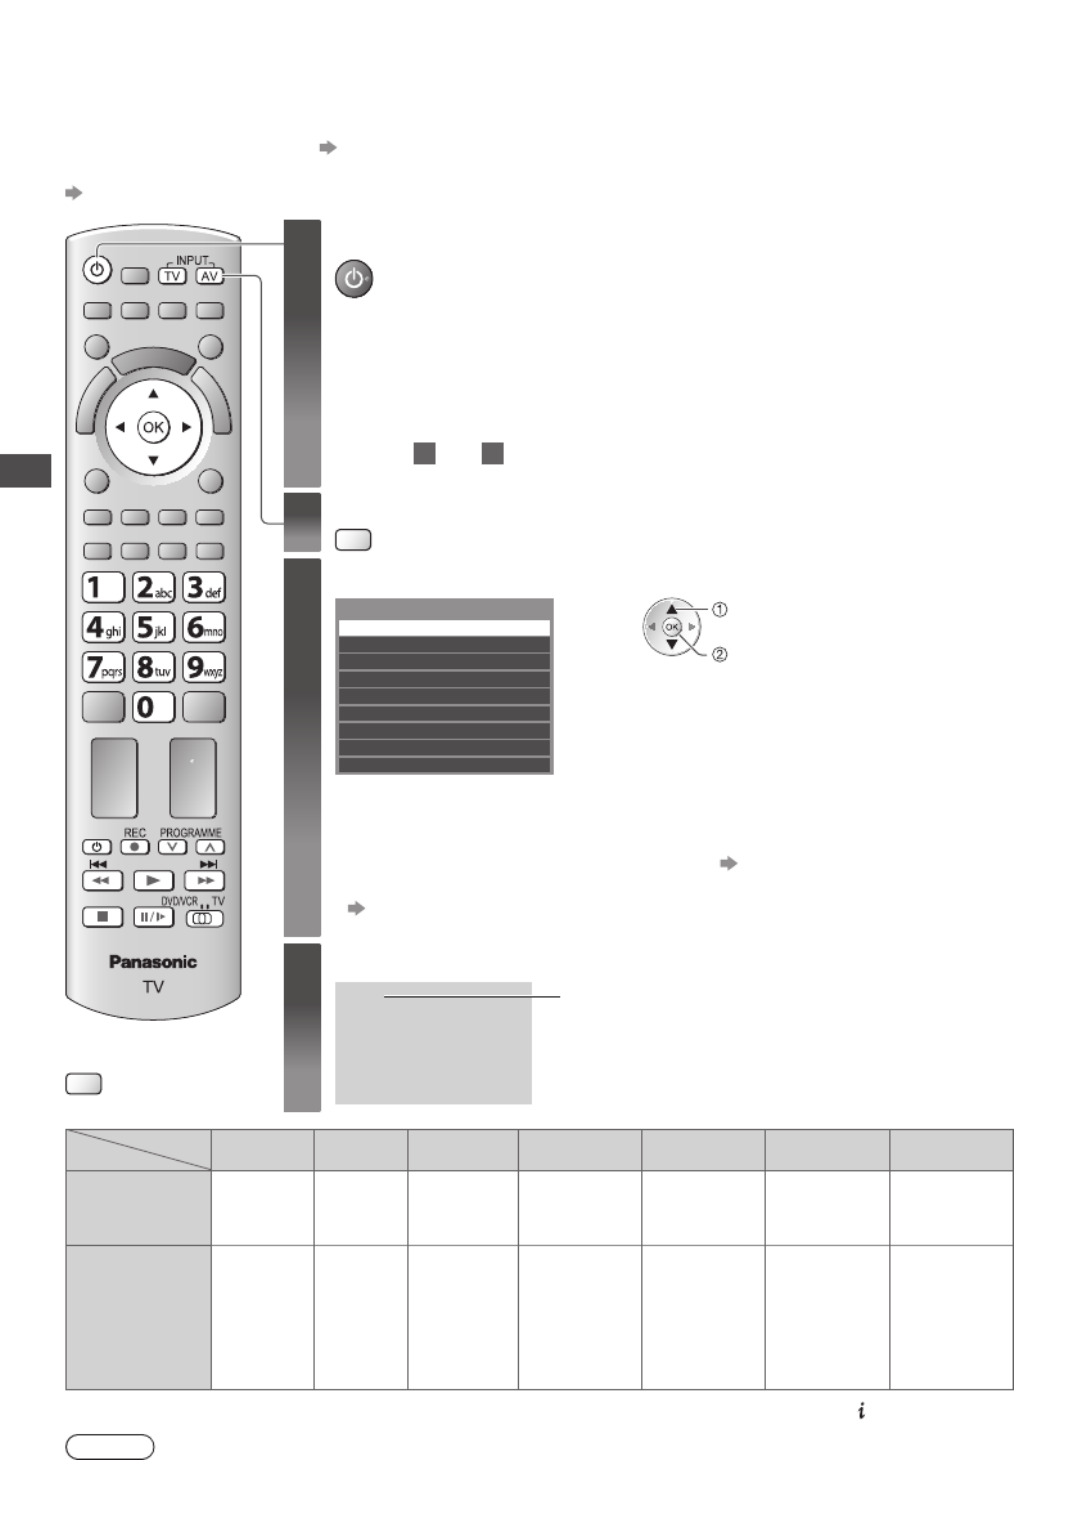
Watching External Inputs
Connect the external equipment (VCRs, DVD equipment, etc.) and you can watch through the AV input.
•
To connect the equipment (p.11, 12, 84 - 86)
The Remote Control is capable of operating some functions of selected external equipment.
“Operating the equipment with the TV remote control” (p. 29)
■To return to TV
TV
1Turn the TV on
When connecting with SCART as example 2 or 3 (p. 11, 12)
Receives input signals automatically when playback starts
•
Input signals are automatically identified by the SCART (pin 8) terminal.
•
This function is also available for HDMI connections (p. 91).
If input mode is not switched automatically
Perform 2 and 3
•
Check the setup of the equipment.
2Display the input selection menu
AV
3
Select the input mode connected to the equipment
AV1
AV2
COMPONENT
HDMI1
HDMI2
HDMI3
HDMI4
TV
Input Selection
SD Card/USB
select
watch
•
You can also select the input using the AV button on the remote control
or the side panel of the TV (except [SD Card/USB]).
Press the button repeatedly until the desired input is selected.
•
[SD Card/USB] : Switches to Media Player [Using Media Player] (p. 59)
•
You can label or skip each input mode (except [SD Card/USB]).
“Input Labels” (p. 54)
Skipped inputs will not be displayed when the AV button is pressed.
4View
AV1 Displays the selected mode
Terminal
AV1 AV2
COMPONENT
HDMI1 HDMI2 HDMI3 HDMI4
Manual input
(default setting
in “Input Labels”)
AV1
AV1-RGB AV2
COMPONENT
HDMI1 HDMI2 HDMI3 HDMI4
Auto input
(EC mode or
VIERA Link)
EC/AV1
EC/AV1-
RGB
− −
EC/HDMI1
Applicable
for
EC mode
and
VIERA Link
EC/HDMI2
Applicable
for
VIERA Link
EC/HDMI3
Applicable
for
VIERA Link
EC/HDMI4
Applicable
for
VIERA Link
•
If the above information is permanently displayed on the top left of the screen, press the button to clear.
Note
•
If the external equipment has an aspect adjustment function, set it to [16:9].
•
For details, see the manual of the equipment or ask your local dealer.

Watching External Inputs
29
Operating the equipment with the TV remote control
The equipment connected to the TV can be directly operated with the below buttons of this TV remote
control.
DVD/VCR
TV
Selection Switch for operating the connected equipment
Select “DVD/VCR” to operate Panasonic DVD Recorder, DVD Player, Player
theatre, Blu-ray Disc theatre or VCR
“How to change the code for the type of the equipment” (see below)
Select “TV” to use Media Player or VIERA Link
“Media Player” (p. 60)
“VIERA Link Control” (p. 82)
Standby
Set to Standby mode / Turn on
Play
Playback videocassette / DVD / video content
Stop
Stop the operations
Rewind / Skip / Search
VCR :
Rewind, view the picture rapidly in reverse
DVD / video content :
Skip to the previous track, title or chapter
Press and hold to search backward
Fast-forward / Skip / Search
VCR :
Fast-forward, view the picture rapidly forward
DVD / video content :
Skip to the next track, title or chapter
Press and hold to search forward
Pause
Pause / Resume
DVD : Press and hold to play at slow speed
PROGRAMME
Channel Up / Down
Select channel
REC
Record
Start recording
How to change the code for the type of the equipment
Each type of the Panasonic equipment has its own remote control code.
Please change the code according to the equipment you want to operate.
1 Set the position to “DVD/VCR”
DVD/VCR
TV
2 Press and hold during the following operations
Enter the appropriate
code, see table below
abc def
jkl
ghi
mno
tuvpqrs
wxyz
Press
Type of the equipment Code
DVD Recorder, DVD Player, Blu-ray Disc Player 70 (default)
Player theatre, Blu-ray Disc theatre 71
VCR 72
Note
•
Confirm if the remote control works correctly after changing the code.
•
The codes may be reset to default values if batteries are replaced.
•
Some operations may not be possible on some equipment models.

Viewing 3D images
30
Viewing 3D images
You can enjoy viewing 3D images with contents or programmes corresponding to the 3D effect by
wearing the 3D Eyewear. “Optional accessories” (p. 6)
This TV supports [Frame Sequential]
∗1, [Side by Side]∗2 and [Top and Bottom]∗3 3D formats.
∗1 : The 3D format that the images for the left and right eyes are recorded with the high definition quality
and alternately played back
∗2, ∗3 : Other available 3D formats
•
How to view the 3D images (see below)
Caution
To enjoy 3D images safely and comfortably, please read these instructions fully.
Viewing 3D Content
•
Do not use the 3D Eyewear if you have a history
of over-sensitivity to light, heart problems, or
have any other existing medical conditions.
•
Please stop using the 3D Eyewear immediately,
if you feel tired, are not feeling well or
experience any other uncomfortable sensation.
•
When you set the effect by using [3D
Adjustment], take into account that the vision of
3D images varies among different individuals.
•
Take an appropriate break after viewing a 3D movie.
•
Take a break of between 30 - 60 minutes after
viewing 3D content on interactive devices such
as 3D games or computers.
•
Be careful not to strike the TV screen or other people
unintentionally. When using the 3D Eyewear the distance
between the user and screen can be misjudged.
•
The 3D Eyewear must only be worn when
viewing 3D content.
•
If you do not look toward the TV screen for a
while when viewing 3D images, the 3D Eyewear
may be turned off automatically.
•
If you suffer from any eyesight problems (short /
far-sighted, astigmatism, eyesight differences
in left and right), please ensure to correct your
vision before using the 3D Eyewear.
•
Stop using the 3D Eyewear if you can clearly
see double images when viewing 3D content.
•
Do not use the 3D Eyewear at a distance less
than the recommended distance.
The recommended viewing distance is at least 3
times of image height.
TX-P42ST30B : 1.6 m or more
TX-P46ST30B : 1.7 m or more
TX-P50ST30B : 1.9 m or more
When the top and bottom area of the screen is
blackened, such as movies, view the screen at a
distance at least 3 times further than the height
of the actual image. (That makes the distance
closer than above recommended figure.)
3D Eyewear Use
• Pay special attention when children are using
the 3D Eyewear.
3D Eyewear should not be used by children
younger than about 5 - 6 years old, as a guideline.
All children must be fully supervised by parents or
guardians who must ensure their safety and health
throughout the using 3D Eyewear.
• Before using the 3D Eyewear, ensure no
breakable objects surrounding the user to avoid
any accidental damage or injury.
• Remove the 3D Eyewear before moving around
to avoid falling or accidental injury.
• Always store the 3D Eyewear in the case
supplied with the 3D Eyewear when not in use.
• Use the 3D Eyewear only for the intended
purpose and nothing else.
• Do not use 3D Eyewear in the condition of high
temperature.
•
Do not use if the 3D Eyewear is physically damaged.
• Do not use any devices that emit the infrared
signals near the 3D Eyewear, as this may cause
the 3D Eyewear false operations.
• Do not use devices (such as mobile phones
or personal transceivers) that emit strong
electromagnetic waves near the 3D Eyewear as
this may cause the 3D Eyewear to malfunction.
• Do not expose the infra-red receiver section
to bright light such as direct sunshine and
fluorescent light. The 3D image may not be
displayed correctly.
• Stop using the 3D Eyewear immediately if a
malfunction or fault occurs.
• Stop using the 3D Eyewear immediately if you
experience any redness, pain, or skin irritation
around the nose or temples.
• In rare cases, the materials used in the 3D
Eyewear may cause an allergic reaction.
To view the 3D images
You can enjoy the 3D images in a variety of ways.
(Frame Sequential, Side by Side and Top and Bottom are the supported 3D format.)
■ Playing back 3D-compatible Blu-ray disc (Frame Sequential format)
•
Connect the 3D-compatible player via a fully wired HDMI compliant cable.
•
If input mode is not switched automatically, select the input mode connected to the player. (p. 28)
•
If you use the non 3D-compatible player, the images will be displayed on 2D mode.
■ 3D-supported broadcast
•
Please consult the suppliers of contents or programmes for availability of this service.

Viewing 3D images
32
Changing 2D - 3D mode
You can easily change the viewing mode between 2D and 3D using the 3D button.
Select the mode
2D
3D
3D
2D
3D Mode Selection
set
select •
Items of [3D Mode Selection]
vary depending on the condition.
[3D] / [2D] / [2D 3D] :
Displays the appropriate image that you desire without selecting 3D format
•
This mode may not work properly depending on the source image format. In this case, select the
appropriate 3D format manually.
■ To change 3D format manually
When the image is not changed properly using [3D], [2D] or [2D 3D] mode, use this manual setting.
During the above operation Select the mode
(red)
2D 3D
3D Mode Selection (Manual)
Top and Bottom - 2D
Top and Bottom - 3D
Side by Side - 2D
Side by Side - 3D
Frame Sequential - 2D
Frame Sequential - 3D
Original
set
select
[Original] :
Displays the source image as it is
•
Use to identify the format type of the source image.
“Table of images that can be seen for each [3D Mode Selection (Manual)] and the source image format” (see below)
[Frame Sequential - 3D] / [Frame Sequential - 2D] / [Side by Side - 3D] / [Side by Side - 2D] /
[Top and Bottom - 3D] / [Top and Bottom - 2D] :
Displays the mode you select
•
Not valid on Analogue and AV mode
[2D 3D] :
Converts 2D images into 3D
•
For DVB, Analogue, AV, Component, HDMI, Media Player and VIERA Connect
•
On-screen displays are also seen in 3D in this mode.
•
Please note the 3D images appear slightly different from the originals.
•
Using this function for profit-making purposes, or publically showing images converted from 2D to 3D in places
such as shops or hotels etc. may infringe on the rights of the copyright holder protected under copyright law.
T
able of images that can be seen for each [3D Mode Selection (Manual)] and the source image format
If the picture appears to be abnormal, refer to the table below to choose the correct 3D mode.
[3D Mode Selection]
Source
image format
[Original]
[Frame
Sequential - 3D]
[Side by
Side - 3D]
[Top and
Bottom - 3D] [2D 3D]
Frame Sequential
Normal 3D∗1
Side by Side (Full)
Normal 3D∗1
Side by Side
Normal 3D∗1
Top and Bottom
Normal 3D∗1
Normal format (2D)
Normal 3D
∗1 :
When selecting [Frame Sequential - 2D], [Side by Side - 2D] or [Top and Bottom - 2D], the images will be
displayed without 3D effect.
•
Depending on the player or broadcasts, the image may be different from the above illustrations.
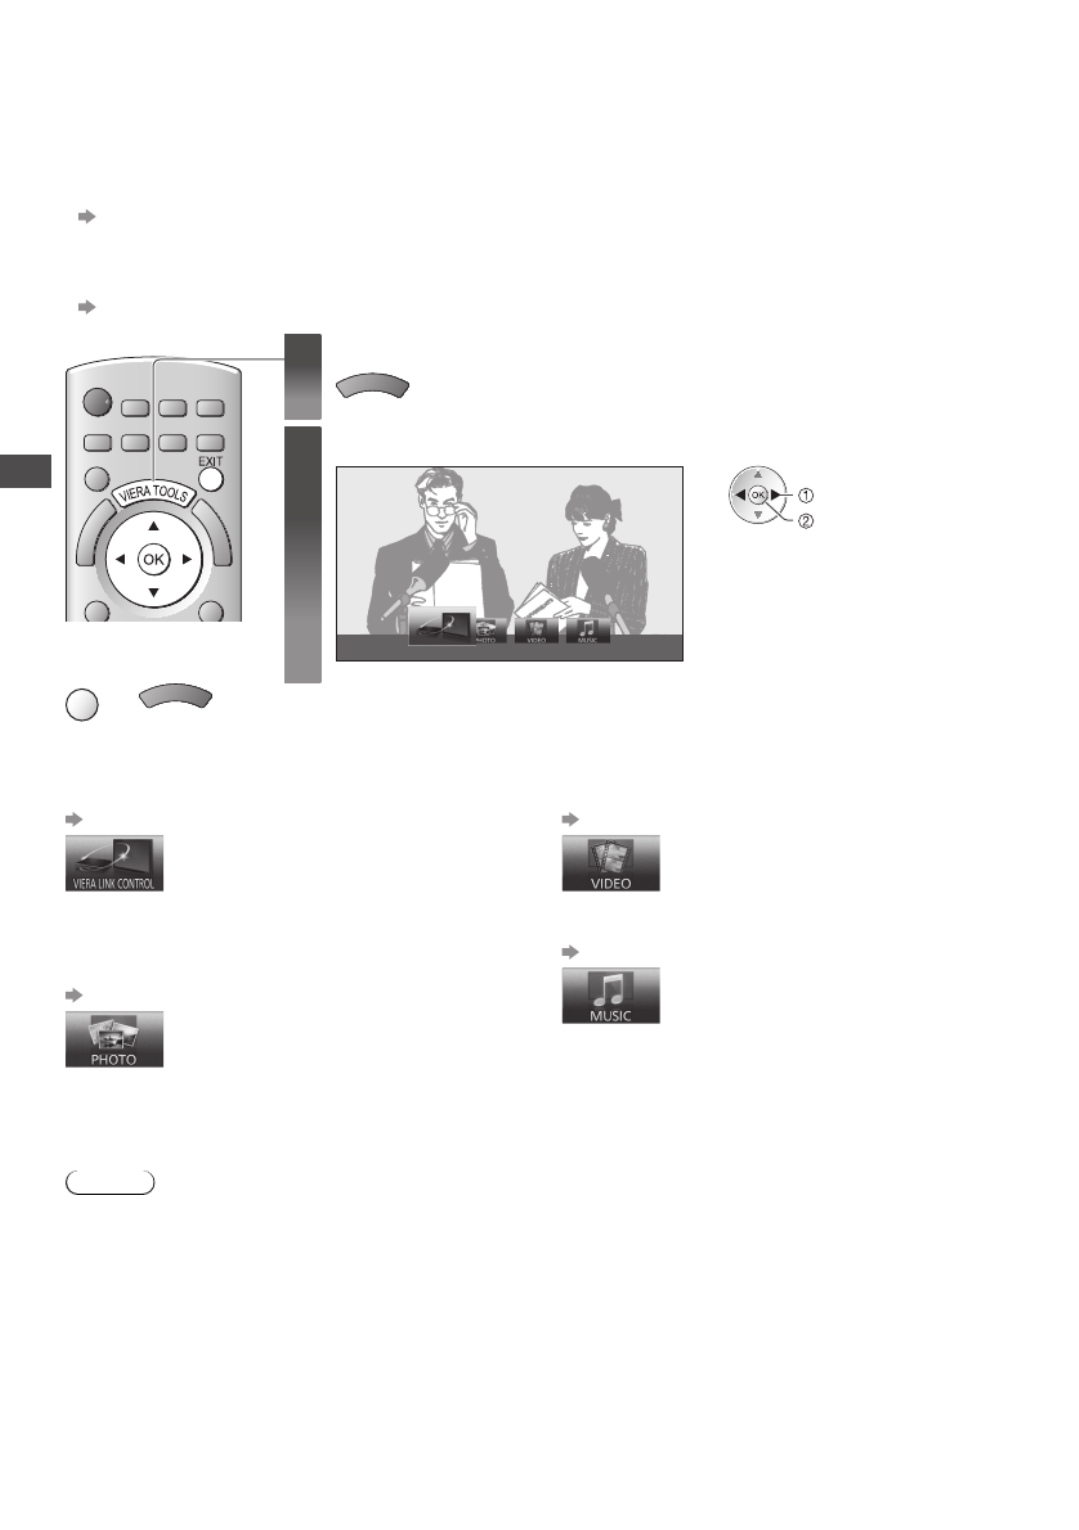
How to Use VIERA TOOLS
34
How to Use VIERA TOOLS
You can access some special features easily by using the VIERA TOOLS function.
•
For [VIERA Link Control] and [Pause Live TV] functions to operate correctly, ensure the connections
and settings are completed.
“Summary of Q-Link and VIERA Link features” (p. 76, 77), “Preparations” (p. 79)
After connection, turn the equipment on and then switch the TV on.
•
For [Photo], [Video] and [Music] functions to operate correctly, ensure the device has photo or video
data on it and insert it into the SD Card slot or USB port properly.
”Using Media Player” (p. 59)
■To return to TV
EXIT
or
V
I
E
R
A
T
O
O
L
S
1Display icons of the feature
V
I
E
R
A
T
O
O
L
S
2Select a feature
VIERA Link Control
access
select
■Follow the operations of each feature
[VIERA Link Control]
“VIERA Link Control” (p. 81)
When two or more compatible
equipment are connected, a selection
screen will be displayed.
Please select the correct description
and access.
[Photo]∗
“Photo mode” (p. 60)
[Video]∗
“Video mode” (p. 65)
[Music]∗
“Music mode” (p. 67)
∗ When two or more available devices are connected, a selection screen will be displayed.
Please select the correct description and access.
Note
•
If the selected feature is not available, the demonstration to explain how to use it can be displayed.
Press the OK button to view the demonstration after selecting the unavailable feature.
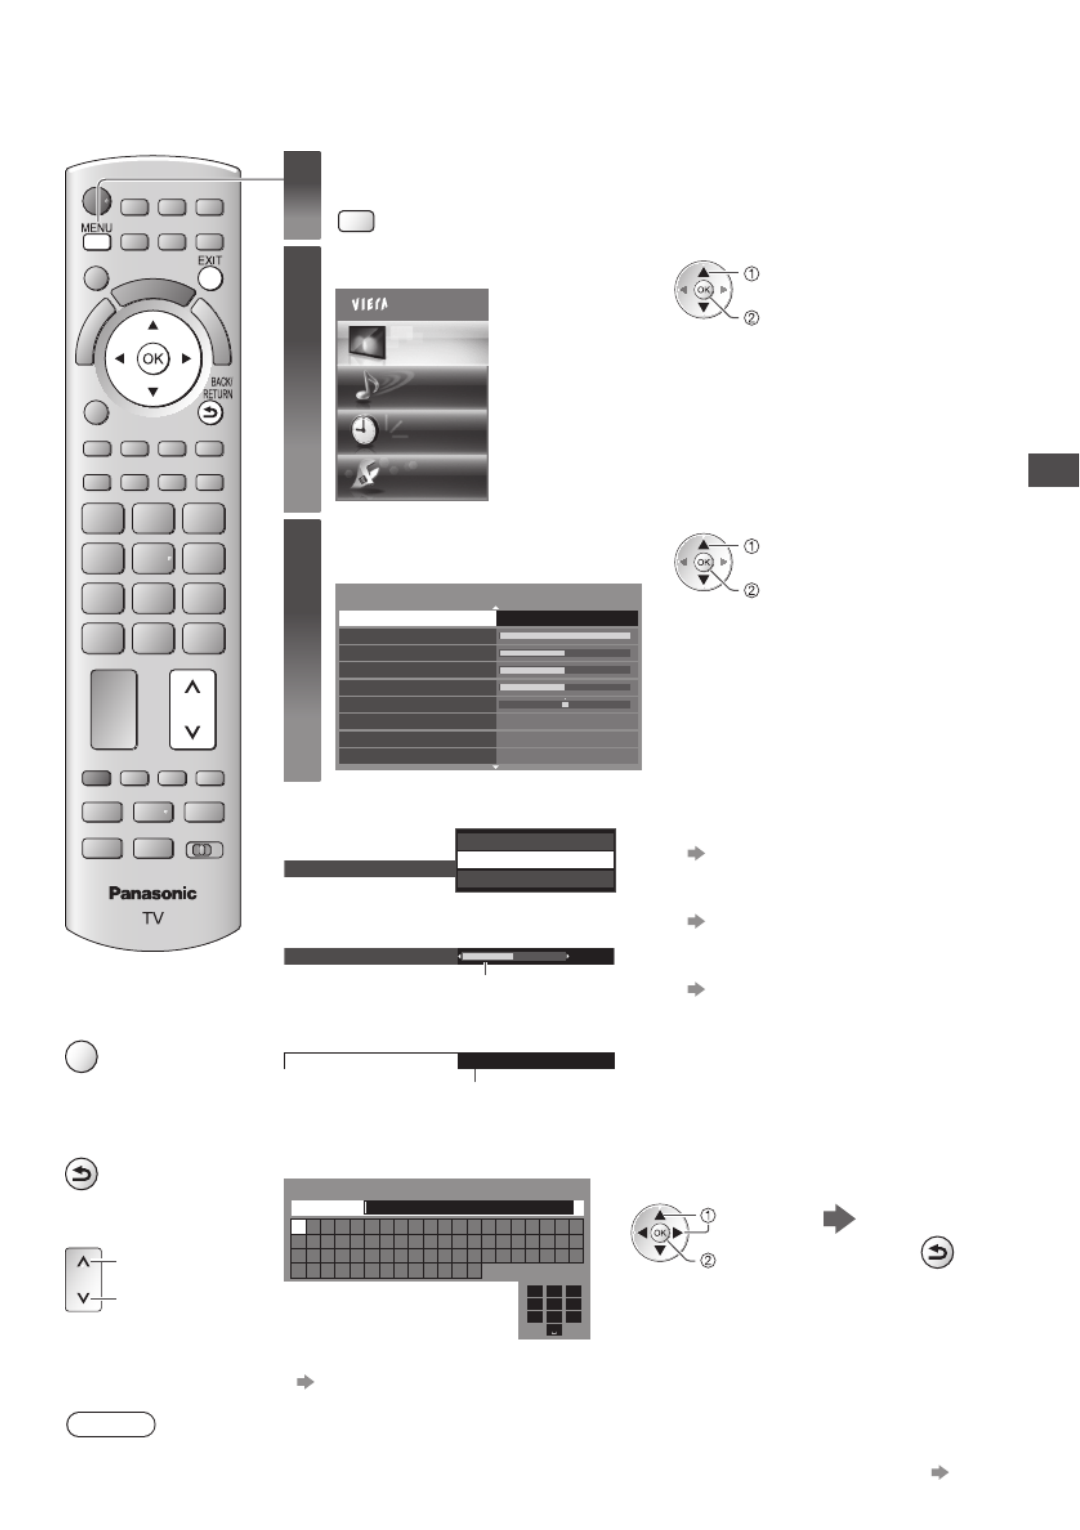
How to Use Menu Functions
35
How to Use Menu Functions
Various menus allow you to make settings for the picture, sound, and other functions.
■To return to TV
at any time
EXIT
■To return to the
previous screen
BACK/
RETURN
■To change menu
pages
up
down
1Display the menu
MENU
•
Displays the functions that can be set (varies according to the
input signal)
2Select the menu
Main Menu
Picture
Sound
Timer
Setup
access
select
3Select the item
Example : [Picture Menu]
access
select
1/2
Viewing Mode Dynamic
Contrast
Brightness
Colour
Sharpness
Tint
Colour Balance
Vivid Colour
C.A.T.S. Off
Off
Warm
■Choose from among alternatives ■To reset the settings
•
To reset the picture settings only
[Reset to Defaults] in the
Picture Menu (p. 37)
•
To reset the sound settings only
[Reset to Defaults] in the
Sound Menu (p. 38)
•
To initialise all settings
[Shipping Condition] in the
Setup Menu (p. 41)
Colour Balance Normal
Cool
Warm
■Adjust using the slide bar
5Sharpness
Moved
■Go to the next screen
Child Lock Access
Displays the next screen
■ Enter characters by free input menu
You can enter names or numbers freely for some items.
1
.!:# 2
abc 3
def
4
ghi 5
jkl 6
mno
7
pqrs 8
tuv 9
wxyz
0
A B C D E F G H I J K L M N O P Q R S T
U V W X Y Z 0 1 2 3 4 5 6 7 8 9 ! : #
a b c d e f g h i j k l m n o p q r s t
u v w x y z ( ) + - . * _
User input
Name
Set characters Store
BACK/
RETURN
select
set
•
You can set characters by using numeric buttons.
“Characters table for numeric buttons” (p. 91)
Note
•
If “Demo Settings” item is displayed in the Setup Menu, the TV is in “Shop” viewing environment.
To return to “Home” viewing environment initialise all settings by accessing Shipping Condition. (p. 55)

How to Use Menu Functions
37
Menu
Item Adjustments / Configurations (alternatives)
Picture
Advanced Settings
Intelligent Frame
Creation
Automatically compensates the picture frame rate and removes
juddering movements to make the images smooth [Off] / [Mid] / [Max]
•
Depending on the contents, images may be noisy. To prevent the
noise, change the setting.
•
This function is not available for selection (default to [Off]) when [Viewing
Mode] is set to [Game] or in the mode of VIERA Connect.
24p Smooth Film
Automatically compensates the picture frame rate to make the 24p
source movie images smooth [Off] / [Mid] / [Max]
•
This is available only for 24p signal input and displayed instead of
[Intelligent Frame Creation].
•
This function is not available for selection (default to [Off]) when [Viewing
Mode] is set to [Game] or in the mode of VIERA Connect.
Clear Cinema
Improves vertical resolution for movie images [Off] / [On]
•
This function is available for the interlaced signal (except when
[Viewing Mode] is set to [Game]).
3D Refresh Rate
Reduces juddering and flicker noises of the 3D images [Auto] / [100Hz]
•
If the room is lit by fluorescent lights / dimmers (50 Hz) and light
appears to flicker when using the 3D Eyewear, set to [100Hz].
Resolution
Enhancer
Enhances the picture resolution to make the image sharper [Off] / [Mid] / [Max]
•
This function is available for SD (Standard definition) signal.
•
As for HD (High definition) signal, this function is available when aspect
mode is set to [16:9] ([16:9 Overscan] is set to [On]) or [Zoom].
•
Not valid on Media Player and VIERA Connect
Side Panel Increases the brightness of the side panel [Off] / [Low] / [Mid] / [High]
•
The recommended setting is [High] to prevent panel “image retention”.
16:9 Overscan
Selects the screen area displaying the image [Off] / [On]
[On] : Enlarges the image to hide the edge of the image.
[Off] : Displays the image in the original size.
•
Set to [On] if noise is generated on the edge of the screen.
•
This function is available when aspect is set to [Auto] (16:9 signal only) or [16:9].
•
This function can be memorized separately for SD (Standard
definition) and HD (High definition) signals.
•
Not valid on VIERA Connect
DVI Input Setting
Changes the black level in the image for HDMI input mode with DVI
input signal manually [Normal] / [Full]
•
When the DVI input signal from the external equipment, especially from PC,
is displayed, the black level may not be suitable. In this case, select [Full].
•
The black level for HDMI input signal will be adjusted automatically.
•
For HDMI input mode with DVI input signal only
Pixel Orbiter
Selects the mode for wobbling of the image to prevent panel “image
retention” [Auto] / [On]
[Auto] : Automatically works only for the appropriate images and you
rarely recognise the wobbling.
Scrolling Bar
Scrolls the vertical bar to prevent panel “image retention”
•
Press the OK button to start scrolling and press any buttons (except
Standby) to exit this mode.
Reset to Defaults
Press the OK button to reset the present Picture Viewing Mode to the default settings
Sound
Mode
Selects the basic sound mode [Music] / [Speech] / [User]
•
The selected mode affects all input signals.
[Music] : Improves sound quality for watching music videos, etc.
[Speech] : Improves sound quality for watching news, drama, etc.
•
In Music and Speech modes, you can adjust [Bass] and [Treble]
settings, and those settings will be stored for each mode.
[User] : Adjusts the sounds manually by using the equaliser to suit your
favourite sound quality.
•
For the User mode, [Equaliser] will appear on the Sound Menu instead
of [Bass] and [Treble]. Select the [Equaliser] and adjust the frequency.
[Equaliser] (p. 38)
Bass
Increases or decreases level to enhance or minimise lower, deeper sound output
Treble
Increases or decreases level to enhance or minimise sharper, higher sound output
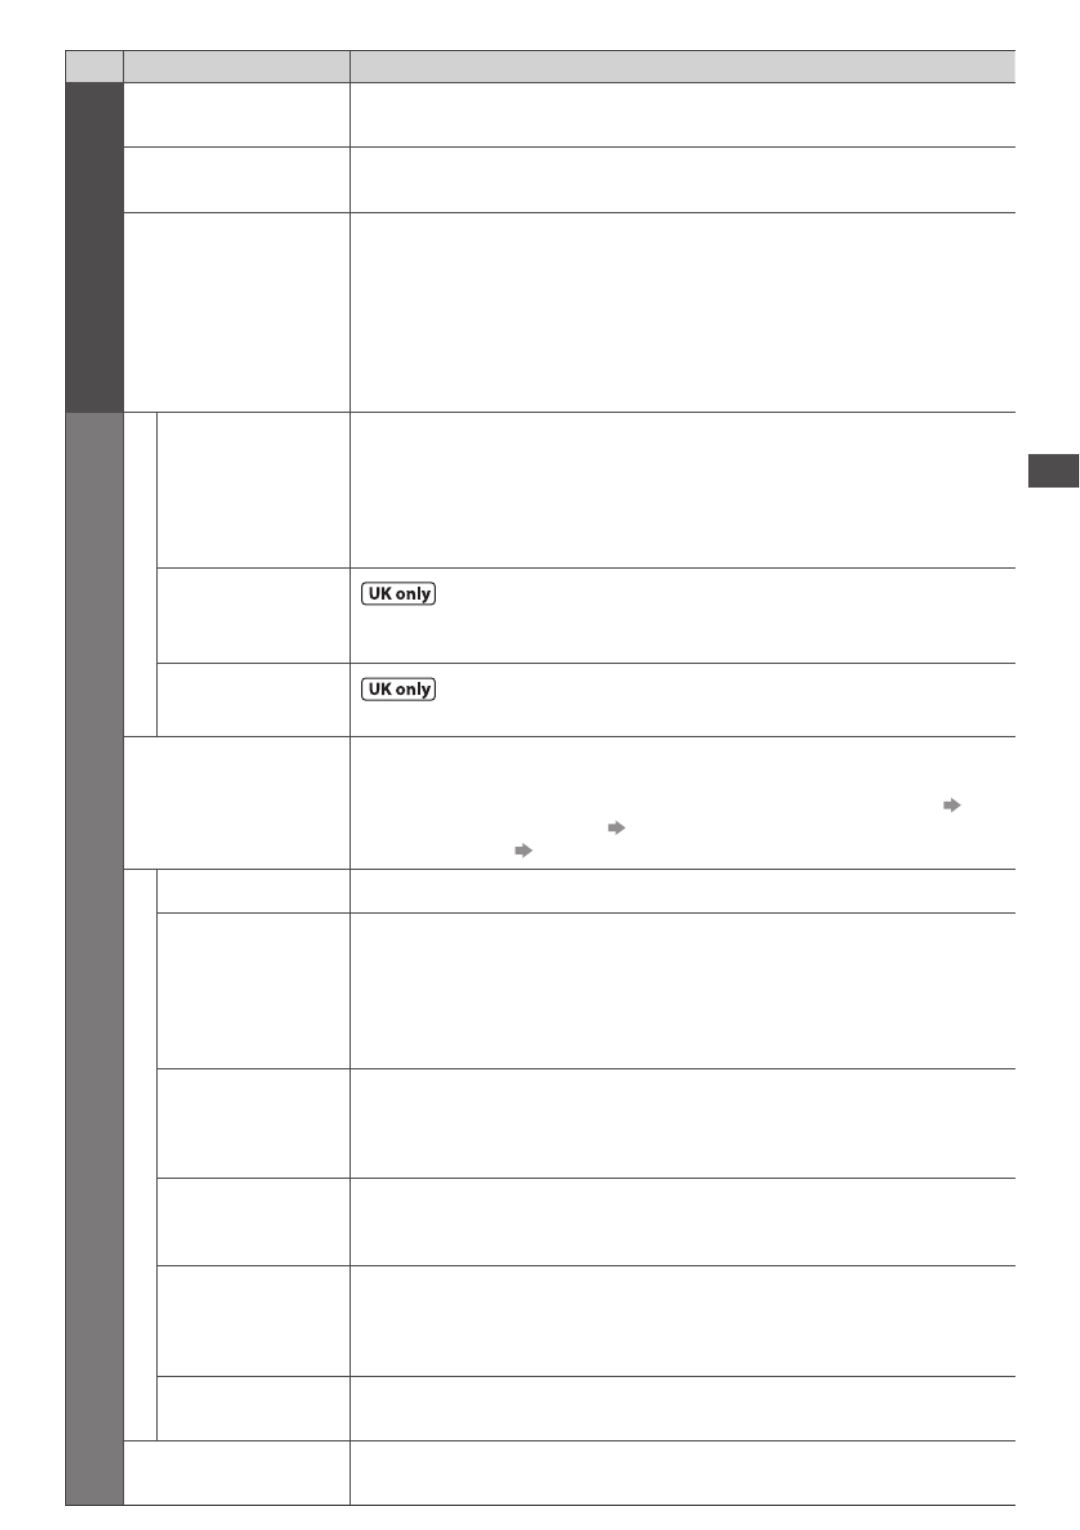
How to Use Menu Functions
39
Menu
Item Adjustments / Configurations (alternatives)
Timer
Timer Programming Sets programme reminders and records forthcoming programmes
(p. 51)
Off Timer Sets the time until the TV automatically goes to Standby mode
[Off] / [15] / [30] / [45] / [60] / [75] / [90] (minutes) (p. 20)
Auto Standby
Sets the duration of time that the TV will remain On when no operation
is received from the user [Off] / [2] / [4] (hours)
•
Starting Timer Programming automatically does not affect this
function.
•
Automatic input switching with the connected equipment affects this
function and time-count will be reset.
•
The notification message will appear 3 minutes before going to
Standby mode.
Setup
TV Guide Settings
TV Guide View
Changes the layout of TV Guide [Normal] / [Full] / [Info]
[Normal] : Default TV Guide screen
[Full] : Displays channels and programmes full-screen without the
operation guide
[Info] : Displays details of the selected programme at the bottom
without the operation guide
GUIDE Plus+
Postcode Sets your postcode to display advertisements in the GUIDE Plus+
system (p. 24)
GUIDE Plus+
Information Displays the system information of the GUIDE Plus+ system
Eco Navigation
Automatically sets the TV to the most suitable energy-saving mode
•
If you press the OK button, the following items are set as below :
[C.A.T.S.], [VIERA Link], [Standby Power Save], [Power Save] [On]
[Intelligent Auto Standby] [On (No reminder)]
[Auto Standby] [2 hours]
Link Settings
VIERA Link Settings for VIERA Link functions (p. 79)[Off] / [On]
HDMI Content
Detection
Automatically adjusts picture according to received HDMI content
[Off] / [Auto]
•
This function is available if the connected equipment supports HDMI
Content Type.
•
The content type information will be displayed for several seconds
when this function works.
AV1 out
Chooses the signal to be transmitted from the TV to Q-Link
[TV] / [AV2] / [Monitor]
[Monitor] : Image displayed on screen
•
Component and HDMI signals cannot be output.
Standby Power
Save
Controls the connected equipment to reduce power consumption in
Standby (p. 80)[Off] / [On]
•
This function is available when [VIERA Link] is set to [On].
Intelligent Auto
Standby
Makes non-watched or non-used connected equipment go into Standby
mode to reduce the power consumption
[Off] / [On (With reminder)] / [On (No reminder)] (p. 80)
•
This function is available when [VIERA Link] is set to [On].
Q-Link
Download
Downloads analogue channel information to a Q-Link compatible
equipment connected to the TV
Child Lock Applies access control for channels or AV inputs to prevent unwanted
access (p. 53)
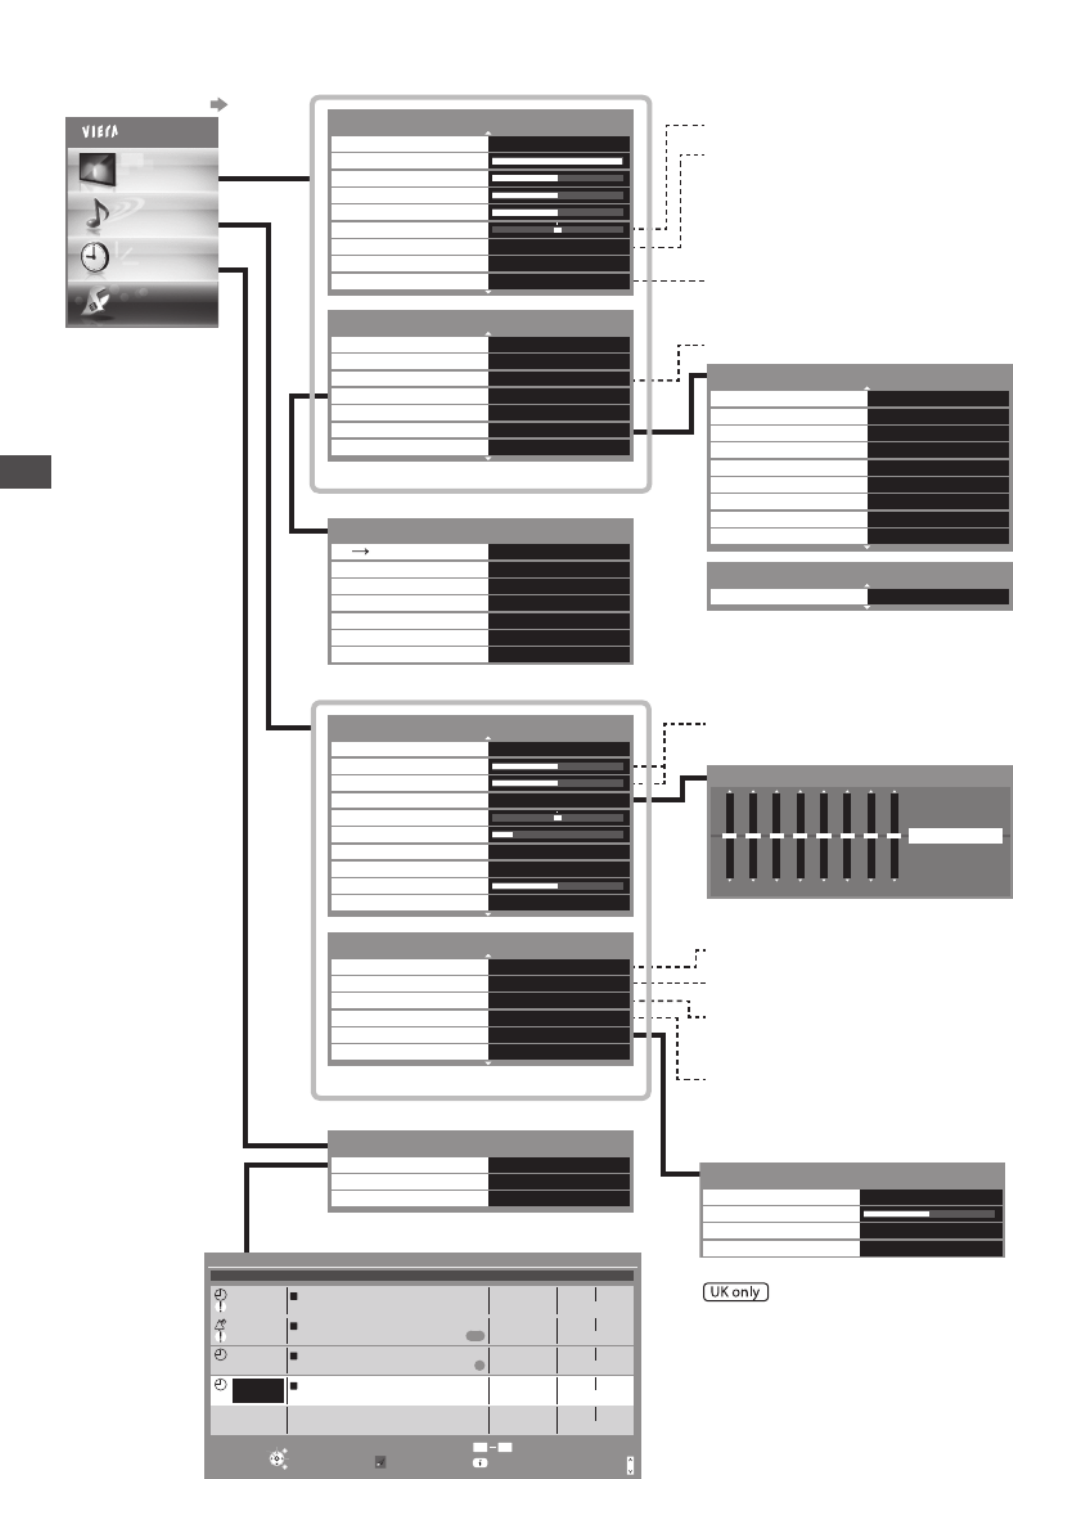
How to Use Menu Functions
42
Not available when
[Viewing Mode] is set to
[True Cinema]
Available when [Viewing Mode] is
set to [Photo]
Available in NTSC
Available in NTSC / PAL
How to operate (p. 35)
Overview (Picture, Sound, Timer, Setup)
Available when [Mode] is
set to [Music] or [Speech]
Available in DVB, VIERA
Connect or Video mode
Available in HDMI input
Audio Description
Off
Off
Volume
Speakers
Headphones
Audio Description Menu
Off
Available in DVB (p. 38)
Available in DVB
Available in Analogue
1/2
Intelligent Frame Creation Off
Off
Off
Auto
Off
Off
Off
Normal
24p Smooth Film
Clear Cinema
3D Refresh Rate
Resolution Enhancer
Side Panel
16:9 Overscan
DVI Input Setting
Advanced Settings
AutoPixel Orbiter
2/2
Advanced Settings
StartScrolling Bar
(p. 37)
150 250 500 1k 2k 4k 8k 12k Hz
Equaliser
Reset to Defaults
Available when [Mode] is set to [User]
Main Menu
Picture
Sound
Timer
Setup
AccessTimer Programming
Off Timer
Auto Standby
Off
Off
(p. 39)
0
72 BBC 2W 20:00 21:30
14 E4
STTL
21:00 22:00
1 BBC ONE
DIY SOS
The Bill
BBC ONE
22:45 23:00
10:30 11:30
------ --:----:-- --:--
91/1
500GB (50%)
S/P
Guide
D
D
D
D
Timer Programming
Function No. Date Start EndChannel Name
Wed 27.10.2010 10:46
Ext Rec.
Ext Rec.
Reminder
Ext Rec.
Wed 27 Oct
(90 min.)
(60 min.)
(60 min.)
(15 min.)
Wed 27 Oct
Wed 27 Oct
Thu 28 Oct
<TIMER>
<TIMER>
Change function Remaining Capacity:
EXIT
Select
RETURN
Store timer
(p. 51)
1/2
Viewing Mode Dynamic
Contrast
Brightness
Colour
Sharpness
Tint
Colour Balance
Vivid Colour
Reversal Film Effect Off
Off
Warm
2/2
C.A.T.S. Off
Off
Off
On
Reset
P-NR
3D-COMB
Screen Display
Reset to Defaults
Access3D Settings
AccessAdvanced Settings
(p. 36, 37)
1/2
Mode Music
Bass
Treble
Balance
Headphone Volume
Surround
Equaliser
Auto Gain Control
Volume Correction
Speaker Distance to Wall Over 30cm
Off
Off
Access
2/2
Preferred Multi Audio English
Off
Auto
Digital
Access
NICAM
SPDIF Selection
HDMI1 Input
Audio Description
Reset to Defaults Reset
(p. 37, 38)
3D Adjustment
Off
On
On
Access
Picture Sequence
Edge Smoother
3D Detection
3D Signal Message
Safety Precautions
3D Settings
Access
Normal
2D 3D Depth Mid
(p. 33)

How to Use Menu Functions
43
1/2
DivX® VOD
TV Guide Settings Access
Access
Access
Access
Access
Access
Access
Access
Access
Eco Navigation
Link Settings
Child Lock
DVB Tuning Menu
Analogue Tuning Menu
Display Settings
Network Setup
(p. 39 - 41)
Main Menu
Picture
Sound
Timer
Setup
TV Guide View
Access
GUIDE Plus+ Postcode
GUIDE Plus+ Information
TV Guide Settings Menu
Access
Normal
(p. 39)
1
.!:# 2
abc 3
def
4
ghi 5
jkl 6
mno
7
pqrs 8
tuv 9
wxyz
0
A B C D E F G H I J K L M N O P Q R S T
U V W X Y Z 0 1 2 3 4 5 6 7 8 9
Enter Postcode
Postcode
(p. 39)
VIERA Link
TV
On
On (No reminder)
Access
HDMI Content Detection
AV1 out
Standby Power Save
Intelligent Auto Standby
Q-Link Download
Link Settings
Off
On
(p. 39)
0% 100%
Sending Preset Data
Please wait!
Remote control unavailable
(p. 39)
Change PIN
No limit
Child Lock List
Parental Rating
Child Lock
Access
Access
Available in DVB (p. 53)
101 BBC 1 Wales
7 BBC THREE
14 E4C
VCR
1 BBC1
2 *****
AV1
AV2
AV
AV
Child Lock List - TV and AV
Name Input
DVB
DVB
DVB
Analogue
Analogue
Analogue
External
External
Type
Free TV
Free TV
Free TV
Analogue
Analogue
Analogue
Lock
(p. 53)
* * * *
Please enter new PIN
PIN
Child Lock-PIN Entry
(p. 53)

How to Use Menu Functions
44
Overview (Setup)
How to operate (p. 35)
Main Menu
Picture
Sound
Timer
Setup
CH 21 68
DVB Update Channel List
Progress
This will take about 3 minutes.
CH Channel Name Type Quality
Free TV: 0 Pay TV: 0 Data: 0Radio: 0
Searching
(p. 49)
Shipping Condition
All tuning data will be erased
Are you sure ?
Are you sure ?
(p. 55)
Slot 1:
Common Interface
Module inserted
Available in DVB (p. 57)
* * * *
Please enter new PIN
PIN
Owner ID
(p. 56)
Auto Update Search in Standby
System Update Search Now
System Update
Access
Off
(p. 58)
USB Keyboard Layout
Access
Access
Access
Access
Access
Shipping Condition
Owner ID
Common Interface
System Update
Software Licence
System Information
System Menu
Access
English(UK)
(p. 41)
1/2
DivX® VOD
TV Guide Settings Access
Access
Access
Access
Access
Access
Access
Access
Access
Eco Navigation
Link Settings
Child Lock
DVB Tuning Menu
Analogue Tuning Menu
Display Settings
Network Setup
2/2
Access
AccessOther Settings
System Menu
(p. 39 - 41)
ab-cd-ef-gh-ij-kl
Network Type Wired
Access
Access Point Settings
IP/DNS Settings
Connection Test
Software Update
MAC Address
Network Setup
Network Link Settings
Access
Access
Access
Access
(p. 70)
Power on Preference
Off
Power on Channel List
USB Charge in Standby
Other Settings
Last
TV
OffPower Save
(p. 41)
Available
in DVB
Favourites Edit
Access
Access
Channel List
Auto Setup
Channel Sorting by Region
Manual Tuning
Update Channel List
New Channel Message
Signal Condition
On
DVB Tuning Menu
Access
Access
Access
Access
Access
Available in DVB
(p. 46 - 49)
Channel List
Access
Auto Setup
Manual Tuning
Analogue Tuning Menu
Access
Access
Available in Analogue
(p. 46, 49, 50)

How to Use Menu Functions
45
1 BBC One Wales
7 BBC THREE
14 E4
CBBC Channel70
72 Cartoon Nwk
105
719
720
BBCi
BBC Radio Wales
BBC Radio Cymru
DVB Favourites Editor
All DVB Channels Favourites1
(p. 48)
Channel Sorting by Region
GBR>
Best signal quality (All Regions)
England Regions>
Region choice available
(p. 47)
CH 21 68
62
62
62
10
10
CBBC Channel
BBC Radio Wales
E4
10
62 10Cartoon Nwk
DVB Auto Setup
Progress
This will take about 3 minutes.
CH Channel Name Type
Free TV
Free TV
Free TV
Free TV
Quality
Free TV: 4 Pay TV: 0 Data: 0Radio: 0
Searching
(p. 46)
70 CBBC Channel
72 Cartoon Nwk
105 BBCi
719 BBC Radio Wales
720 BBC Radio Cymru
1 BBC ONE Wales
7 BBC THREE
All DVB Channels
(p. 49)
1 BBC1
2 *****
3 *****
4 *****
5 *****
6 *****
7 *****
Analogue Channel List
(p. 50)
29
30
CH 21 68
CH Channel Name
Analogue Auto Setup
Scan
This will take about 3 minutes.
Analogue: 2
Searching
(p. 46)
CH331 BBC1
Store
21 68
Analogue Manual Tuning
Manual Tuning
(p. 50)
Available in Analogue
Available in DVB
Available DVB
Teletext
Irish
English
Access
3 seconds
On
Off
Teletext Character Set
Preferred Teletext
Preferred Subtitles
Input Labels
Banner Display Timeout
Playing Time Display
Radio Mode
Display Settings
West
FASTEXT
OnVIERA Connect Banner
(p. 40, 41)
AV1
AV2
COMPONENT
HDMI1
HDMI2
HDMI3
DVD
AV2
COMPONENT
HDMI1
HDMI2
HDMI3
HDMI4
DVB
HDMI4
DVB
Analogue Analogue
Input Labels
(p. 54)
10
[CH21] 474,00 MHz
10
0
0
DVB Manual Tuning
Frequency
Signal Quality
Signal Strength
No. Channel Name Type New
Free TV: 0 Pay TV: 0 Data: 0Radio: 0
Stopped
(p. 47)

Tuning and Editing Channels
47
Tuning and Editing Channels (DVB)
You can retune channels or make your favourite channel lists, skip unwanted channels, etc.
■To return to TV
EXIT
1Select DVB
(p. 18)
TV
2Display the menu
MENU
3Select [Setup]
Main Menu
Picture
Sound
Timer
Setup
access
select
4Select [DVB Tuning Menu]
DVB Tuning Menu Access
access
select
5Select one of the following functions
Favourites Edit
Access
Access
Channel List
Auto Setup
Channel Sorting by Region
Manual Tuning
Update Channel List
New Channel Message
Signal Condition
On
DVB Tuning Menu
Access
Access
Access
Access
Access
access / store
select
•
[Auto Setup] “Retuning from
Setup Menu”
(p. 46)
Sort DVB channels according to the region [Channel Sorting by Region]
You can sort DVB channels so that those with the best signal quality, or those for your preferred region,
appear nearer the top of your Channel List.
Normally, you should select [Best signal quality (All Regions)].
Channel Sorting by Region
GBR>
Best signal quality (All Regions)
England Regions>
Region choice available
access
select region
(select repeatedly until you reach the available region)
•
If you choose to select your preferred region, you could find
channels with a weaker signal appear nearer the top of your
Channel List. If you have any image or sound problems, select
[Best signal quality (All Regions)] instead.
Set DVB channel manually [Manual Tuning]
Normally use [Auto Setup] or [Update Channel List] to retune DVB channels.
If tuning has not been done completely or for adjusting the direction of the aerial, use this function.
10
[CH21] 474,00 MHz
10
0
0
Stopped
DVB Manual Tuning
Frequency
Signal Quality
Signal Strength
No. Channel Name Type New
Free TV: 0 Pay TV: 0 Radio: 0 Data: 0
search
select
frequency
1 Adjust frequency for
each channel
2 Search
adjust frequency
select channel
•
Set where the level of [Signal
Quality] becomes the maximum.
•
All channels found will be added to the Channel List.
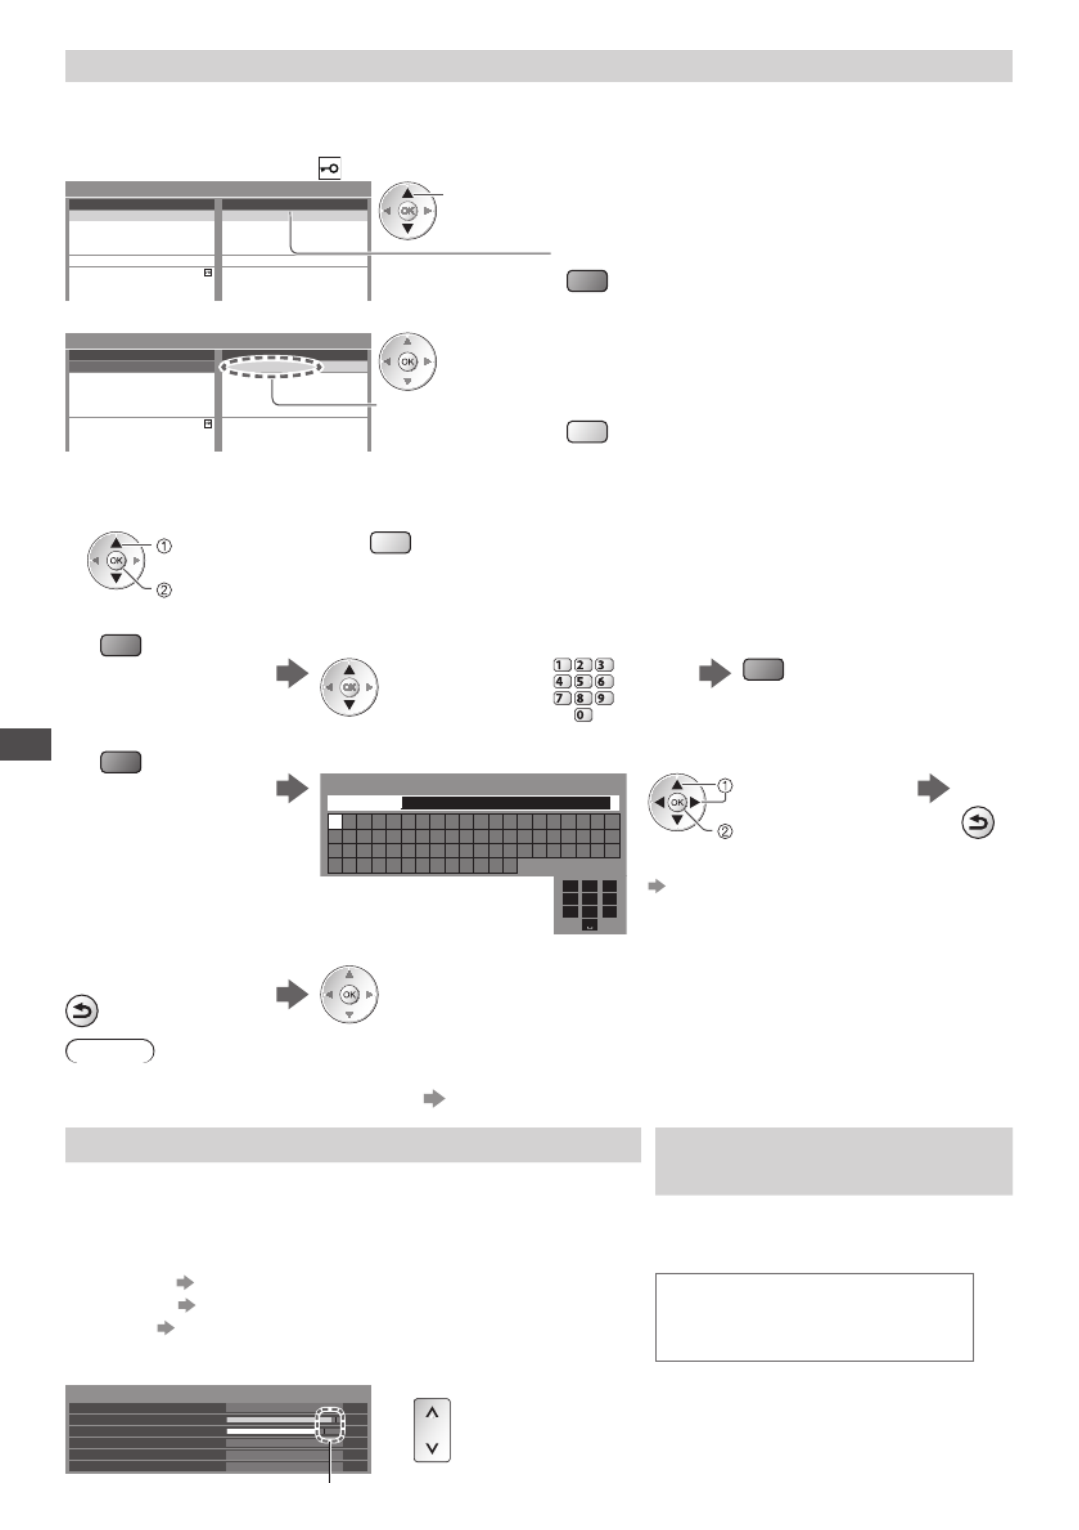
Tuning and Editing Channels
48
List favourite DVB channels [Favourites Edit]
Create your favourite channel lists from various broadcasters (up to 4: [Favourites]1 to 4).
The DVB Favourites lists are available for switching in the Information banner (p. 19) and from [Category] in
the TV Guide screen (p. 22).
1 Select a channel to list ( : Encrypted channel)
1 BBC One Wales
7 BBC THREE
14 E4
CBBC Channel70
72 Cartoon Nwk
105
719
720
BBCi
BBC Radio Wales
BBC Radio Cymru
DVB Favourites Editor
All DVB Channels Favourites1 select
•
To display other Favourites
(green)
2 Add it to the Favourites list
1 BBC One Wales
7 BBC THREE
14 E4
CBBC Channel70
72 Cartoon Nwk
105
719
720
BBCi
BBC Radio Wales
BBC Radio Cymru
1 BBC One Wales
DVB Favourites Editor
All DVB Channels Favourites1
A channel is
added
•
To add all channels to the list
(yellow)
■To edit Favourites list
While the cursor is in the Favourites field to edit
•
To delete a channel •
To delete all channels
delete
select (yellow)
•
To move the channel
(green)
Select the new position
Select the turn Store
or
abc def
jkl
ghi
mno
tuvpqrs
wxyz
(green)
•
To name the Favourites
(red) Set characters (maximum: ten characters) Store
1
.!:# 2
abc 3
def
4
ghi 5
jkl 6
mno
7
pqrs 8
tuv 9
wxyz
0
A B C D E F G H I J K L M N O P Q R S T
U V W X Y Z 0 1 2 3 4 5 6 7 8 9 ! : #
a b c d e f g h i j k l m n o p q r s t
u v w x y z ( ) + - . * _
User input
Name
select
set
BACK/
RETURN
•
To use numeric buttons
“Characters table for
numeric buttons” (p. 91)
3 Store
BACK/
RETURN
Note
•
Channel position numbers (known as logical channel numbers) can be swapped in Channel List.
To swap the channel position number [Channel List] (p. 49)
Check DVB signal [Signal Condition]
Display a notification message
[New Channel Message]
Selects a channel and checks the DVB signal condition.
A good Signal Strength is not an indication of best signal for DVB reception.
Please use the Signal Quality indicator as follows :
[Signal Quality] :
•
Green bar Good
•
Yellow bar Poor
•
Red bar Bad (Check the Terrestrial aerial)
Selects whether to give a notification
message when a new DVB channel is
found. [Off] / [On]
New channels found!
Press OK to update channel list.
Press EXIT to ignore.
70 CBBC Channel
0
0
9
8
0.00E+00
Wenvoe
802,00 MHz, 64 QAM, 6940 kS/s
DVB Signal Condition
Signal Quality
Channel Name
Signal Strength
Bit Error Rate
Network Name
Frequency
These bars show the maximum signal value of the selected channel.
Example : •
To change the channel •
Selecting OK will perform [Update
Channel List].
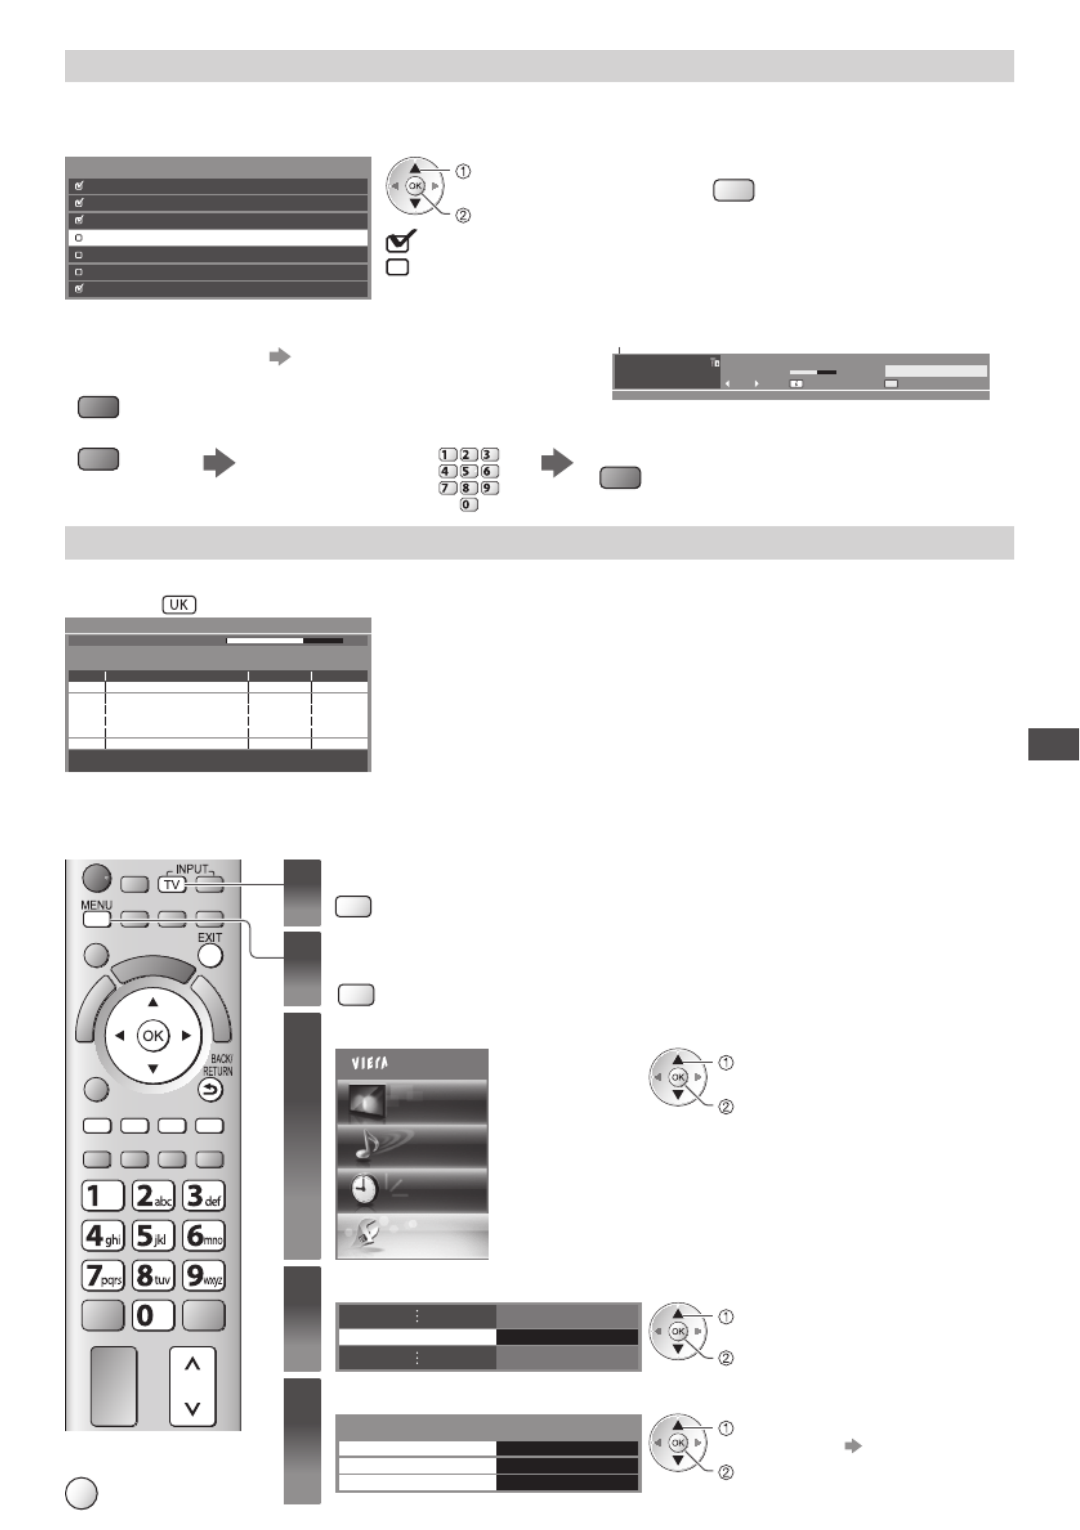
Tuning and Editing Channels
49
Skip unwanted DVB channels, Edit DVB Channels [Channel List]
You can hide unwanted DVB channels. The hidden channels cannot be displayed except in this
function. Use this function to skip unwanted channels.
Select a channel and [reveal] / [hide]
70 CBBC Channel
72 Cartoon Nwk
105 BBCi
719 BBC Radio Wales
720 BBC Radio Cymru
1 BBC ONE Wales
7 BBC THREE
All DVB Channels
[reveal] / [hide]
select
: [reveal]
: [hide] (skip)
•
To reveal all channels
(yellow)
■To edit channels
You can also edit each channel in Channel List.
1
BBC ONE WALES
Coronation Street
20:00 - 20:55
20:35
Now Info
All DVB Channels
Select favourites
Channel position number
•
To retune each
channel
[Manual Tuning] (p. 47)
(only for the revealed channels)
(red)
•
To swap the channel position number (logical channel number)
(green)
Enter the new
position number
abc def
jkl
ghi
mno
tuvpqrs
wxyz
Store
(green)
Update DVB channel automatically [Update Channel List]
You can add new channels, delete removed channels, update channel name and position automatically to Channel List.
CH 21 68
DVB Update Channel List
Progress
This will take about 3 minutes.
CH Channel Name Type Quality
Free TV: 0 Pay TV: 0 Data: 0Radio: 0
Searching
Example : •
Channel List is updated while keeping your settings in [Favourites
Edit], [Channel List], [Child Lock], [Timer Programming], etc.
•
Depending on the signal condition, the update may not work
properly.
(Analogue)
You can retune channels or skip unwanted channels, edit channels etc.
■To return to TV
EXIT
1Select Analogue
TV
2Display the menu
MENU
3Select [Setup]
Main Menu
Picture
Sound
Timer
Setup
access
select
4Select [Analogue Tuning Menu]
Analogue Tuning Menu Access
access
select
5Select one of the following functions
Channel List
Access
Auto Setup
Manual Tuning
Analogue Tuning Menu
Access
Access
access
select •
[Auto Setup]
“Retuning
from Setup
Menu” (p. 46)

Tuning and Editing Channels
50
Skip unwanted Analogue channels, Edit Analogue channels [Channel List]
You can hide unwanted Analogue channels.
The hidden channels cannot be displayed except in this function. Use this function to skip unwanted channels.
Select a channel and [reveal] / [hide]
1 BBC1
2 *****
3 *****
4 *****
5 *****
6 *****
7 *****
Analogue Channel List
[reveal] / [hide]
select •
To reveal all channels
(yellow)
: [reveal]
: [hide] (skip)
■To edit channels
You can also edit each channel in Channel List.
•
To retune each channel •
To move the channel position
([Manual Tuning]) (see below)
Select the new position
Store
(green) (green) (red)
•
To rename the channel name
Set characters (maximum: five characters) Store
(blue)
1
.!:# 2
abc 3
def
4
ghi 5
jkl 6
mno
7
pqrs 8
tuv 9
wxyz
0
A B C D E F G H I J K L M N O P Q R S T
U V W X Y Z 0 1 2 3 4 5 6 7 8 9 ! : #
a b c d e f g h i j k l m n o p q r s t
u v w x y z ( ) + - . * _
Edit channel name
Name
select
set
•
To use numeric
buttons
“Characters
table for numeric
buttons” (p. 91)
BACK/
RETURN
1CH23
ITV
23:35
All Analogue Channels
Channel position
Channel name
Note
•
If a VCR is connected only with the RF cable, edit [VCR].
Set Analogue channel manually [Manual Tuning]
[Fine Tuning]
Use to make small adjustments to the tuning of an individual programme (affected by weather
conditions, etc.)
[Manual Tuning]
Set Analogue channel manually after Auto Setup.
•
If a VCR is connected only with the RF cable, it is recommended to select channel position [0].
Example :
CH331 BBC1
Store
CH 1 99 41H: 21
Analogue Manual Tuning
Manual Tuning
Fine Tuning
1 Select the channel position Select the channel Search Select [Store]2 3 4
abc def
jkl
ghi
mno
tuvpqrs
wxyz
store
select

Timer Programming
51
Timer Programming
Timer Programming from Menu
The Timer Programming menu allows you to choose programmes that you wish to remind watching or
record to the external recorder. At the correct time, the TV will tune to the correct channel automatically
to record even if the TV is in Standby mode.
TV Guide may also be used to set timer programming event (p. 23).
•
Timer Programming can store up to 15 events.
•
For recording using Timer Programming, the TV must be either On or in standby. For reminders to be
displayed, the TV must be On.
•
No other channel can be selected while the recording of Timer Programming is in progress.
•
It may not be possible to record an encrypted programme (which is copy-protected).
•
When recording programmes to the external recorder, be sure to make the proper settings on the
recorder connected to the TV.
If a compatible recorder with Q-Link or similar technologies is connected to the TV (p. 78) and the [Link
Settings] (p. 39) are correct, no setting of the recorder is required. Also read the manual of the recorder.
•
If the recorder is not compatible with Q-Link or similar technologies, set the timer of the recorder in addition
to the Timer Programming on the TV. For preparations of a recorder, read the manual of the recorder.
•
Recordings to the external recorders are always in standard definition composite video via SCART,
even if the original programme is in high definition.
■To return to TV
EXIT
■To unlock the tuner
and stop recording
G
U
I
D
E
EXIT
1
Select the tuner you want to use (DVB or Analogue)
(p. 18)
TV
2Display the menu
MENU
3Select [Timer]
Main Menu
Picture
Sound
Timer
Setup
access
select
4Select [Timer Programming]
AccessTimer Programming
Off Timer
Auto Standby
Off
Off
access
select
Note
•
Check that the LED is orange. If not, timer programmes are not active or not stored.
•
Timer Programming reminder messages will remain displayed until one of the following occurs:
• You press the OK button to view the programme or the EXIT button to cancel the reminder.
• The timer programming event that the reminder is set for ends.
•
“!” identifies that any timer programming events have overlapped. [Ext Rec.] is given priority over
[Reminder]. As for the overlapped two or more [Ext Rec.], the first timer programming event starts and
finishes as programmed. The next timer programming event can then start.
•
2 minutes before the starting time, a reminder message appears if you are watching TV.
• To remove the message and
start the programme
• To cancel the Timer
Programming
EXIT
•
The recording of Timer Programming will automatically change to the programmed channel 10
seconds before the start time.
•
To stop recording of the timer programming event, it may be necessary to stop the recorder manually.
•
The recording of Timer Programming will be performed even if the TV is in Pause Live TV recording
(p. 81). In this case, these recordings will be cancelled.

Shipping Condition
55
Shipping Condition
Resets the TV to its original condition with no channels tuned in.
All settings other than [Owner ID] are reset (channels, picture, sound settings, etc.).
•
To retune TV channels only, e.g. after moving house “Retuning from Setup Menu” (p. 46)
■To return to TV
EXIT
1Display the menu
MENU
2Select [Setup]
Main Menu
Picture
Sound
Timer
Setup
access
select
3Select [System Menu]
AccessSystem Menu
access
select
4Select [Shipping Condition]
USB Keyboard Layout
Shipping Condition
Owner ID
Common Interface
System Update
Software Licence
System Information
System Menu
Access
English(UK)
access
select
Restore Settings [Shipping Condition]
1 Check the message and initialise Follow the on screen 2
instructions
Shipping Condition
All tuning data will be erased
Are you sure ?
Are you sure ?
1
(Confirm)
2
(Confirm)
3
(Start [Shipping Condition])
Reset to Factory Shipping Condition
Completed.
Please switch off TV.
•
[Auto Setup] will automatically
start when Mains power On / Off
switch is next turned On. (p. 13)

Using Common Interface
57
Using Common Interface
The Common Interface Module menu provides access to software contained on Common Interface (CI) Modules.
This TV works only for Pay TV modules complying with CI standard.
•
This function is not available for BskyB’s Sky channels.
•
Video and audio signals may not be output depending on broadcasts or services.
Caution
•
Turn Off Mains power On / Off switch whenever inserting or
removing the CI module.
•
If a viewing card and a card reader come as a set, first insert the
card reader, then insert the viewing card into the card reader.
•
Insert the module in the correct direction. Side of the TV
Insert or remove
straightly and
completely
CI slot
CI module
Insert the CI module (optional)
•
The features that appear on screen are dependent on the contents of the selected CI module.
•
Follow the instructions that came with the viewing card to tune in the encrypted channels. If encrypted
channels do not appear, perform the below to verify the card is recognised by the TV.
•
For more details, see the manual of the CI module, or check with the broadcaster.
■To return to TV
EXIT
1Select DVB
(p. 18)
TV
2Display the menu
MENU
3Select [Setup]
Main Menu
Picture
Sound
Timer
Setup
access
select
4Select [System Menu]
AccessSystem Menu
access
select
5Select [Common Interface]
USB Keyboard Layout
Shipping Condition
Owner ID
Common Interface
System Update
Software Licence
System Information
System Menu
Access
English(UK)
access
select
6Access Common Interface
Slot 1:
Common Interface
Module inserted
access
■How to operate services by following the on screen operation guide
(Check the instructions provided with the CI module.)
Example :
•
Select, go •
Symbol : •
Coloured characters
Coloured button
•
On screen operation guide may not correspond to the remote control buttons.

Updating the TV Software
58
Updating the TV Software
From time to time, a new version of software may become available for download to enhance the
performance or operations of the TV.
In DVB mode, a notification banner will appear when one of the BBC channels is turned to if a new available software is found.
•
To download •
If you choose not to download
EXIT
You can update any new software automatically or manually.
■To return to TV
EXIT
1Display the menu
MENU
2Select [Setup]
Main Menu
Picture
Sound
Timer
Setup
access
select
3Select [System Menu]
AccessSystem Menu
access
select
4Select [System Update]
USB Keyboard Layout
Shipping Condition
Owner ID
Common Interface
System Update
Software Licence
System Information
System Menu
Access
English(UK)
access
select
Update TV’s software system [System Update]
■To update automatically
Select [Auto Update Search in Standby] and set to [On]
Auto Update Search in Standby
System Update Search Now
System Update
Off access / store
select •
Automatically performs a search in standby
and downloads an update, if any software
updates are available.
•
The automatic updating is performed at
night under the following conditions:
• Standby (TV turned Off with the remote
control)
• Recording of Timer Programming or
Direct TV Recording is not in progress.
If System Update is performed, the software will be
updated (it may change TV functions).
If you do not wish to do so, set [Auto Update Search
in Standby] to [Off]. The notification banner will
keep appearing during the period of new software
availability, usually 2 to 3 days.
■To update immediately
1 Select [System Update Search Now] Searches for an update 2
(for several minutes) and
displays a corresponding
message if any
3 Download
Auto Update Search in Standby
System Update Search Now
System Update
Off
Access access
select
Note
•
Download may take up to 60 minutes.
•
During software download and update, DO NOT perform any operations on the TV or switch Off the TV.

Using Media Player
59
Using Media Player
Media Player allows you to enjoy photo, video or music recorded on an SD Card and a USB Flash
Memory.
VIERA IMAGE VIEWER is the function of the easy viewing for photos or videos recorded on an SD Card
on the TV screen by simply inserting into the SD Card slot.
Photo mode : Still pictures recorded by digital cameras will be displayed.
Video mode : Moving pictures recorded by digital video cameras will be played back.
Music mode : Digital music data will be played back.
•
During the operation, audio signal is output from AV1, AUDIO OUT, DIGITAL AUDIO OUT and HDMI2
(ARC function) terminals. But no video signals are output. AV1 can output audio signal if [AV1 out] is
set to [Monitor] in the Setup Menu (p. 39). To use HDMI2 with ARC function, connect an amplifier that
has ARC function (p. 77) and set to use theatre speakers (p. 83).
•
[Date] shows the date on which the recording was made by the recording equipment. The file without
record of the date is shown “**/**/****”.
•
The picture may not appear correctly on this TV depending on the recording equipment used.
•
Display may take some time when there are many files and folders.
•
Partly degraded files might be displayed at a reduced resolution.
•
Picture setting may not work depending on the conditions.
•
The folder and file names may be different depending on the digital camera or digital video camera
used.
To insert or remove the SD Card / USB Flash Memory
■ USB Flash Memory
•
Insert or remove straightly and completely.
•
Connect to the USB 1 or 2 port.
■ SD Card
To insert the SD Card To remove the SD Card
Gently insert the
SD Card label
surface facing front.
Cutout
Push until a
click is heard
Push the centre of
the card
•
For the information of the devices “Devices for recording or playing back” (p. 90)
•
For the supported file format “Supported file format in Media Player” (p. 88, 89)

Using Media Player
61
■To sort by folder, recorded date or recorded month
1 Display the view selection
(green)
2 Select the sort type
Folder view
Sort by Date
Sort by Month
[Folder view] :
Displays the thumbnail grouped by folder
•
The files which are not into a folder will be collected to the folder named “/”.
[Sort by Date] :
Displays the thumbnail grouped by the same date
•
The group of the photos without recorded date is shown as [Unknown].
[Sort by Month] :
Displays the thumbnail grouped by the same month
•
The group of the photos without recorded date is shown as [Unknown].
access
select
3 Select one of the sorted groups to display the thumbnail of the selected group
OPTION
23/10/2010 25/10/2010 01/11/2010 05/11/2010 10/11/2010 22/11/2010 23/11/2010
24/11/2010 01/12/2010 03/12/2010 20/12/2010 22/12/2010
Media Player Photo Sort by Date
SD Card
EXIT
Select RETURN
Slideshow View Select Contents Select
Info
Access
Option Menu
Drive Select
select
thumbnail of the selected
group
•
To return to the thumbnail of all photos
(green)
access
select
[All photos]
•
To display the information of the highlighted group
1/12
23/10/2010
3
Folder name
Number of files
Folder name, date or month
Group number /
Total group number
[Single view] - Photos are displayed one at a time.
Select the file from the thumbnail of photos to be viewed
select
access
Example :
Single view
Single view
Stop
EXIT
Select
RETURN
Rotate
Operation guide
•
To display / hide the
operation guide
•
To return to thumbnail
BACK/
RETURN
•
To operate Single view
To the previous photo
Slideshow
To the next photo
Stop
(return to thumbnail)
•
To rotate 90°
(blue)
[Slideshow] - Slideshow will complete when all photos have been viewed within the present
thumbnail.
1 Select the file from the thumbnail of photos
for the first view
2 Start Slideshow
(red)
select
•
To display / hide the operation
guide •
To pause (return to Single view) •
To return to thumbnail
BACK/
RETURN

Using Network Services
70
Network Setup
•
Ensure the connections are completed before starting Network Setup.
“Network connections” (p. 69)
1Display the menu
MENU
2Select [Setup]
Main Menu
Picture
Sound
Timer
Setup
access
select
3Select [Network Setup]
Network Setup Access access
select
■To return to TV
EXIT
Network Link settings
Settings which allow the TV to be controlled by the equipment connected to the network.
1 Select [Network Link Settings] Select the items and set2
ab-cd-ef-gh-ij-kl
Network Type Wired
Access
Access Point Settings
IP/DNS Settings
Connection Test
Software Update
MAC Address
Network Setup
Network Link Settings
VIERAVIERA Name
Network Remote Control
Network Link Settings
access
select select
access / store
Menu
Item Adjustments / Configurations (alternatives)
Network Link Settings
VIERA Name
Sets your favourite name for this TV
•
This name will be used as the name of this TV on the screen of the other
network equipment.
Network Remote
Control
Enables to control the TV from the network equipment (Smartphone, etc.)
[Off] / [On]
•
Depending on the area, this function may not be available. For details,
consult your local Panasonic dealer.
•
For more information of this function, visit the following website.
http://panasonic.jp/support/global/cs/tv/

Using Network Services
71
Wired connection settings
This setting is for the network connection by using the LAN cable.
1 Select [Network Type] and set to [Wired]
ab-cd-ef-gh-ij-kl
Connection Test
Network Type
Access Point Settings
IP/DNS Settings
Software Update
MAC Address
Network Setup
Wired
Network Link Settings
access / store
select
2 Select [IP/DNS Settings] and set the items
IP/DNS Settings Access
Network Setup
access
select
■[Acquire IP Address] / [Acquire DNS Address]
Sets [IP Address], [Subnet Mask], [Gateway], [Primary DNS] and [Secondary DNS].
Select [Acquire IP Address] / [Acquire DNS Address] and set to [Auto] (recommended)
Acquire IP Address Auto
IP Address
Subnet Mask
Gateway
Acquire DNS Address
DNS Address
Proxy Settings
IP/DNS Settings
Auto
•
The available settings are displayed automatically.
Manual settings
([IP Address], [Subnet Mask], [Gateway], [Primary DNS], [Secondary DNS])
access / store
select
abc def
jkl
ghi
mno
tuvpqrs
wxyz
3 Select [Proxy Settings] and set the items
Acquire IP Address
IP Address
Subnet Mask
Gateway
Acquire DNS Address
DNS Address
Proxy Settings
IP/DNS Settings
Auto
Auto
Access
access
select
•
After settings, return to [Network Setup] screen
BACK/
RETURN
■[Proxy]
Sets Proxy address.
•
This is the address of the relay server that is connected to the target server instead of the browser
and sends data to the browser. Setting is required if specified by the provider.
1. Select [Proxy] 2. Enter the address 3. Store
0
Proxy
Proxy Port
Proxy Settings
A B C D E F G H I J K L M N O P Q R S T
U V W X Y Z 0 1 2 3 4 5 6 7 8 9 ! : #
a b c d e f g h i j k l m n o p q r s t
u v w x y z ( ) + - . * _
Proxy
Host
BACK/
RETURN
access
select select
set
•
To use numeric buttons
“Characters table for numeric
buttons” (p. 91)
■[Proxy Port]
Sets Proxy port number.
•
This number is also specified by the provider with the Proxy address.
1. Select [Proxy Port] 2. Move the cursor and enter the number
0
Proxy
Proxy Port
Proxy Settings select move
abc def
jkl
ghi
mno
tuvpqrs
wxyz

Link Functions (Q-Link / VIERA Link)
76
Link Functions (Q-Link / VIERA Link)
Q-Link connects the TV and DVD Recorder / VCR, and enables easy recording, playback, etc. (p. 78)
VIERA Link (HDAVI Control™) connects the TV and the equipment with VIERA Link function, and enables easy control,
convenient recording, playback, energy saving, creation of a home theatre, etc., without complicated setting. (p. 79 - 83)
You can use Q-Link and VIERA Link functions together.
•
This TV supports “HDAVI Control 5” function. But available features are depending on the connected
equipment’s version of HDAVI Control. Please refer to the manual of the equipment to confirm the version.
•
VIERA Link features may be available even with other manufacturers’ equipment supporting HDMI CEC.
Summary of Q-Link and VIERA Link features
Q-Link (SCART connection only)
Connected equipment
Features
DVD Recorder / VCR
with Q-Link function
Analogue channel download
Easy playback
Power on link
Power off link
Direct TV Recording
Connection
SCART cable DVD Recorder /
VCR with Q-Link
function
•
Use a fully wired SCART cable.
•
Connect the DVD Recorder / VCR supporting Q-Link to
the TV’s AV1 terminal via a SCART cable.
VIERA Link (HDMI connection only)
Connected equipment
Features
DIGA Recorder with
VIERA Link function
DVD Player /
Blu-ray Disc Player with
VIERA Link function
HD Video Camera /
LUMIX Camera with
VIERA Link function
Analogue channel download – – –
Easy playback
Power on link
Power off link
Reduce unnecessary power
consumption in standby
∗3∗3–
Auto standby for unnecessary equipment
∗3∗3–
Pause Live TV programme ∗3 ∗4– –
Direct TV Recording ∗3– –
Control the menu of the connected
equipment by VIERA remote control
∗1∗1∗1
Speaker control – – –
Connection
DIGA Recorder / DVD Player /
Blu-ray Disc Player /
HD Video Camera /
LUMIX Camera with VIERA Link function
HDMI cable
•
Use a fully wired HDMI compliant cable.
•
Connect the equipment supporting VIERA Link to the TV’s HDMI1, HDMI2, HDMI3 or HDMI4 terminal via an HDMI cable.
•
For information about using HDMI cables for connecting Panasonic HD Video Camera or LUMIX
Camera, read the manual of the equipment.
VIERA Link (HDMI and SCART connections)
Connected equipment
Features
DIGA Recorder with
VIERA Link function
Analogue channel download
Easy playback
Power on link
Power off link
Reduce unnecessary power
consumption in standby
∗3
Auto standby for unnecessary equipment
∗3
Pause Live TV programme ∗2 ∗
4
Direct TV Recording ∗2
Control the menu of the connected
equipment by VIERA remote control
∗1
Speaker control –
Connection
HDMI cable
SCART cable
DIGA Recorder
with VIERA Link
function
•
Use a fully wired HDMI compliant cable.
•
Connect the equipment supporting VIERA Link
to the TV’s
HDMI1, HDMI2, HDMI3 or HDMI4
terminal via an HDMI cable.
•
Use a fully wired SCART cable.
•
Connect the equipment supporting VIERA Link
to the TV’s AV1 terminal via a SCART cable.
Termékspecifikációk
| Márka: | Panasonic |
| Kategória: | televízió |
| Modell: | Viera TX-P50ST30B |
Szüksége van segítségre?
Ha segítségre van szüksége Panasonic Viera TX-P50ST30B, tegyen fel kérdést alább, és más felhasználók válaszolnak Önnek
Útmutatók televízió Panasonic

12 Január 2025
12 Január 2025
7 Január 2025
7 Január 2025
7 Január 2025
5 Január 2025
26 December 2024
26 December 2024
26 December 2024
25 December 2024
Útmutatók televízió
- televízió Samsung
- televízió Sony
- televízió Beko
- televízió Fujitsu
- televízió Acer
- televízió Nedis
- televízió LG
- televízió Grundig
- televízió Marantz
- televízió Philips
- televízió Pioneer
- televízió SilverCrest
- televízió JVC
- televízió AEG
- televízió Sharp
- televízió Nokia
- televízió Lenovo
- televízió Casio
- televízió Toshiba
- televízió Oppo
- televízió Hyundai
- televízió Hisense
- televízió BenQ
- televízió SunBriteTV
- televízió Siemens
- televízió Medion
- televízió TCL
- televízió Xiaomi
- televízió GoGen
- televízió Insignia
- televízió Infiniton
- televízió Dell
- televízió Strong
- televízió VOX
- televízió Vivax
- televízió Thomson
- televízió Polaroid
- televízió Aiwa
- televízió Orima
- televízió V7
- televízió Clatronic
- televízió PEAQ
- televízió Qilive
- televízió Haier
- televízió Mitsubishi
- televízió Cecotec
- televízió Sencor
- televízió GPX
- televízió Küppersbusch
- televízió Innoliving
- televízió AOC
- televízió Westinghouse
- televízió Hitachi
- televízió Continental Edison
- televízió Telefunken
- televízió Nevir
- televízió Monster
- televízió Roadstar
- televízió Optoma
- televízió CHiQ
- televízió Viewsonic
- televízió Nextbase
- televízió Denver
- televízió Bush
- televízió Trevi
- televízió Albrecht
- televízió Daewoo
- televízió Funai
- televízió Tesla
- televízió Smart Tech
- televízió Muse
- televízió Energy Sistem
- televízió OK
- televízió SVAN
- televízió Loewe
- televízió RevolutionHD
- televízió Polar
- televízió Manhattan
- televízió Kogan
- televízió Horizon
- televízió Intenso
- televízió Furrion
- televízió Teac
- televízió Aspes
- televízió Digihome
- televízió Manta
- televízió Blaupunkt
- televízió Sagem
- televízió Jay-Tech
- televízió Logik
- televízió Finlux
- televízió Peerless-AV
- televízió Abus
- televízió AG Neovo
- televízió Bang & Olufsen
- televízió Iiyama
- televízió AKAI
- televízió TechniSat
- televízió Seiki
- televízió Jensen
- televízió Pyle
- televízió Emerson
- televízió Sanyo
- televízió Kemo
- televízió Salora
- televízió Lenco
- televízió Schneider
- televízió Philco
- televízió ECG
- televízió Uniden
- televízió Technika
- televízió NEC
- televízió Element
- televízió Soundmaster
- televízió Alphatronics
- televízió AYA
- televízió MBM
- televízió Krüger&Matz
- televízió Dual
- televízió Brandt
- televízió Wharfedale
- televízió Allview
- televízió RCA
- televízió OKI
- televízió Orion
- televízió SereneLife
- televízió Schaub Lorenz
- televízió Luxor
- televízió Metz
- televízió ILive
- televízió Graetz
- televízió Tatung
- televízió Packard Bell
- televízió EasyMaxx
- televízió Orava
- televízió Arçelik
- televízió Planar
- televízió Zenith
- televízió Doffler
- televízió QBell Technology
- televízió SYLVOX
- televízió Majestic
- televízió Reflexion
- televízió FFalcon
- televízió Megasat
- televízió Sogo
- televízió United
- televízió Techwood
- televízió Newstar
- televízió Matsui
- televízió Alden
- televízió Aldi
- televízió Airis
- televízió Aristona
- televízió Apex
- televízió Icy Box
- televízió Lexibook
- televízió Palsonic
- televízió Walker
- televízió Saba
- televízió Antarion
- televízió Kernau
- televízió Tevion
- televízió Proscan
- televízió Vestel
- televízió Tucson
- televízió Sunstech
- televízió Nabo
- televízió Sylvania
- televízió Sunny
- televízió Marquant
- televízió Nordmende
- televízió AudioAffairs
- televízió Magnum
- televízió Audiosonic
- televízió Kubo
- televízió Proline
- televízió Coby
- televízió Seg
- televízió Vivo
- televízió Daitsu
- televízió Terris
- televízió Changhong
- televízió Alba
- televízió Naxa
- televízió Star-Light
- televízió Fantec
- televízió Mpman
- televízió Sweex
- televízió Vizio
- televízió Cello
- televízió Mx Onda
- televízió Nikkei
- televízió Hannspree
- televízió DGM
- televízió Yasin
- televízió Humax
- televízió XD Enjoy
- televízió MT Logic
- televízió Superior
- televízió Kunft
- televízió ITT
- televízió Grunkel
- televízió Avtex
- televízió Inovia
- televízió Odys
- televízió NPG
- televízió Bluesky
- televízió Videocon
- televízió Xoro
- televízió Durabase
- televízió HKC
- televízió Edenwood
- televízió Woxter
- televízió Premier
- televízió Onn
- televízió Teleco
- televízió Opera
- televízió LTC
- televízió JTC
- televízió Zalman
- televízió Ferguson
- televízió Viewpia
- televízió JGC
- televízió Online
- televízió Dyon
- televízió DirecTV
- televízió Tele 2
- televízió Telesystem
- televízió EKO
- televízió E-motion
- televízió Mitsai
- televízió Selfsat
- televízió High One
- televízió Tve
- televízió ISymphony
- televízió Pantel
- televízió Magnavox
- televízió ATYME
- televízió HCI
- televízió Inno-Hit
- televízió Lin
- televízió Engel
- televízió TechLine
- televízió Elements
- televízió Englaon
- televízió Time
- televízió Reflex
- televízió Astar
- televízió Visco
- televízió Tivax
- televízió H&B
- televízió Norcent
- televízió TELE System
- televízió TIM
- televízió Oyster
- televízió Belson
- televízió Vision Plus
- televízió Sbr
- televízió Bauhn
- televízió Voxx
- televízió Rm 2000
- televízió Hoher
- televízió Felson
- televízió Mach Power
- televízió Elbe
- televízió Axing
- televízió CGV
- televízió Séura
- televízió Mitzu
- televízió Caratec
- televízió JTC24
- televízió Coocaa
- televízió Kivi
- televízió Smart Brand
- televízió Voxicon
- televízió Aconatic
- televízió Mitchell & Brown
- televízió FOX Electronics
- televízió Mystery
Legújabb útmutatók televízió

31 Március 2025

31 Március 2025
31 Március 2025

31 Március 2025
30 Március 2025
30 Március 2025
30 Március 2025
29 Március 2025
29 Március 2025

29 Március 2025