Használati útmutató Panasonic TX-75LX800B
Olvassa el alább 📖 a magyar nyelvű használati útmutatót Panasonic TX-75LX800B (174 oldal) a televízió kategóriában. Ezt az útmutatót 3 ember találta hasznosnak és 2 felhasználó értékelte átlagosan 4.5 csillagra
Oldal 1/174

e
HELP
English
Model No.

- 2 -
Read first
Before use
• Licence 10
Features
• 4K resolution 13
• Home 14
• Recording 15
• Chromecast built-in 16
• Data Service Application 17
Home
Home
• Information 18
• How to use 19
Apps
• How to use 21
Watching
Basic
• Basic connection 22
• Selecting channel 25
• Multi audio 27
• Subtitle 28
• Viewing Teletext 29
• Energy saving functions 30
• Adjusting time 32
• Language 33
4K resolution
• 4K-compatible equipment 34
• HDMI Auto Setting 35
• Valid 4K format 36
External equipment
• External connection 37

- 3 -
• Watching external input 41
• Operating with TV’s remote control 42
• HDMI features 43
• Valid input signals 45
For best picture
• Viewing Mode 46
• Aspect 48
• Basic settings 49
• Ambient Sensor 51
• HDR Brightness Setting 52
• Advanced Settings 53
• Option Settings 55
• Screen Settings 56
For best audio
• Sound Mode 57
• Basic settings 58
• Accessibility 61
Tuning and editing channels
• Setting menu 62
• Channel Scan 63
• Manual Service Update 64
• Digital Manual Scan 65
• Other settings 66
• Set Up Your Sources 67
• System Information 68
Recording
USB HDD setup
• Preparations 69
• Setting for USB HDD 71
Recording current programme
• How to use 72

- 4 -
Timer Programming
• Setting Timer Programming 73
• Editing Timer Programming 74
• Note 75
Technical information
• USB HDD 76
Media Player
Using Media Player
• Information 77
• Selecting mode 79
Video
• Selecting file 80
Photo
• Selecting file 81
Audio
• Selecting file 82
Connected device
• Device handling caution 83
• USB devices 84
Supported format
• Photo format 85
• Video format 86
• Music format 89
Network
Internet content
• Information 90
• Selecting internet content 91
• Note 92
Network connections
• Internet connection 93

- 5 -
• Home network connection 94
• Note 96
Network settings
• Network connection 97
• Device name 98
• Remote start via Wi-Fi / Remote start via LAN 99
• Accounts & Sign In 100
• System update 101
Functions
Voice Control
• Information 102
• How to use 103
• Pairing 104
• Note 105
Chromecast built-in
• How to use 106
HDMI CEC
• CEC connection 107
• Consumer Electronic Control (CEC) 108
• Note 109
Parental Controls
• Parental Controls 110
• PIN number 111
Data Service Application
• Using Data Service Application 112
• HBBTV Settings 113
• Note 114
Common Interface
• Caution 115
• Using Common Interface 116

- 6 -
Reset
• Reset 117
Updating the TV Software
• Information 118
Bluetooth devices
• Accessories 119
Keyboard
• Keyboard 121
Settings
General setting
• How to use 122
Channel
• Audio Language / 2nd Audio Language 123
• Channels 124
• Banner Display 125
• Auto Channel Update 126
• Channel Update Message 127
• Advanced Options 128
• Parental Controls 129
• Record Setting 130
Picture
• Viewing Mode 131
• Basic settings 132
• Ambient Sensor 134
• HDR Brightness Setting 135
• Advanced Settings 136
• Option Settings 137
• Screen Settings 138
• PICTURE Button Setting 139
Sound
• System Sounds 140
• Sound Mode 141

- 7 -
• Basic settings 142
Timer
• Power Off Timer Type Power Off Timer / 144
Power
• Off Timer 145
• Switch Off Timer 146
• Picture Off 147
• No Signal Power Off 148
Shop Mode
• Shop Mode 149
Network & Internet
• Wi-Fi 150
• Remote start via Wi-Fi / Remote start via LAN 151
• Other options 152
• Ethernet 153
Accounts & Sign In
• Accounts & Sign In 154
Apps
• Recently opened apps 155
Device Preferences
• About 156
• Date & time 157
• Language 158
• Keyboard 159
• Inputs 160
• Storage 161
• Home screen 162
• Google Assistant 163
• Google Cast 164
• Screen saver 165
• Location 166
• Usage & Diagnostics 167

- 8 -
• Accessibility 168
• Reboot 169
Remote Control
• Remote Control 170
Accessories
• Accessories 171
Support
FAQs
• Picture 172
• Digital TV 174
• Sound 175
• HDMI 176
• Network 177
• Other 178
• Detailed information 181
Maintenance
• Care and Cleaning 182
How to use
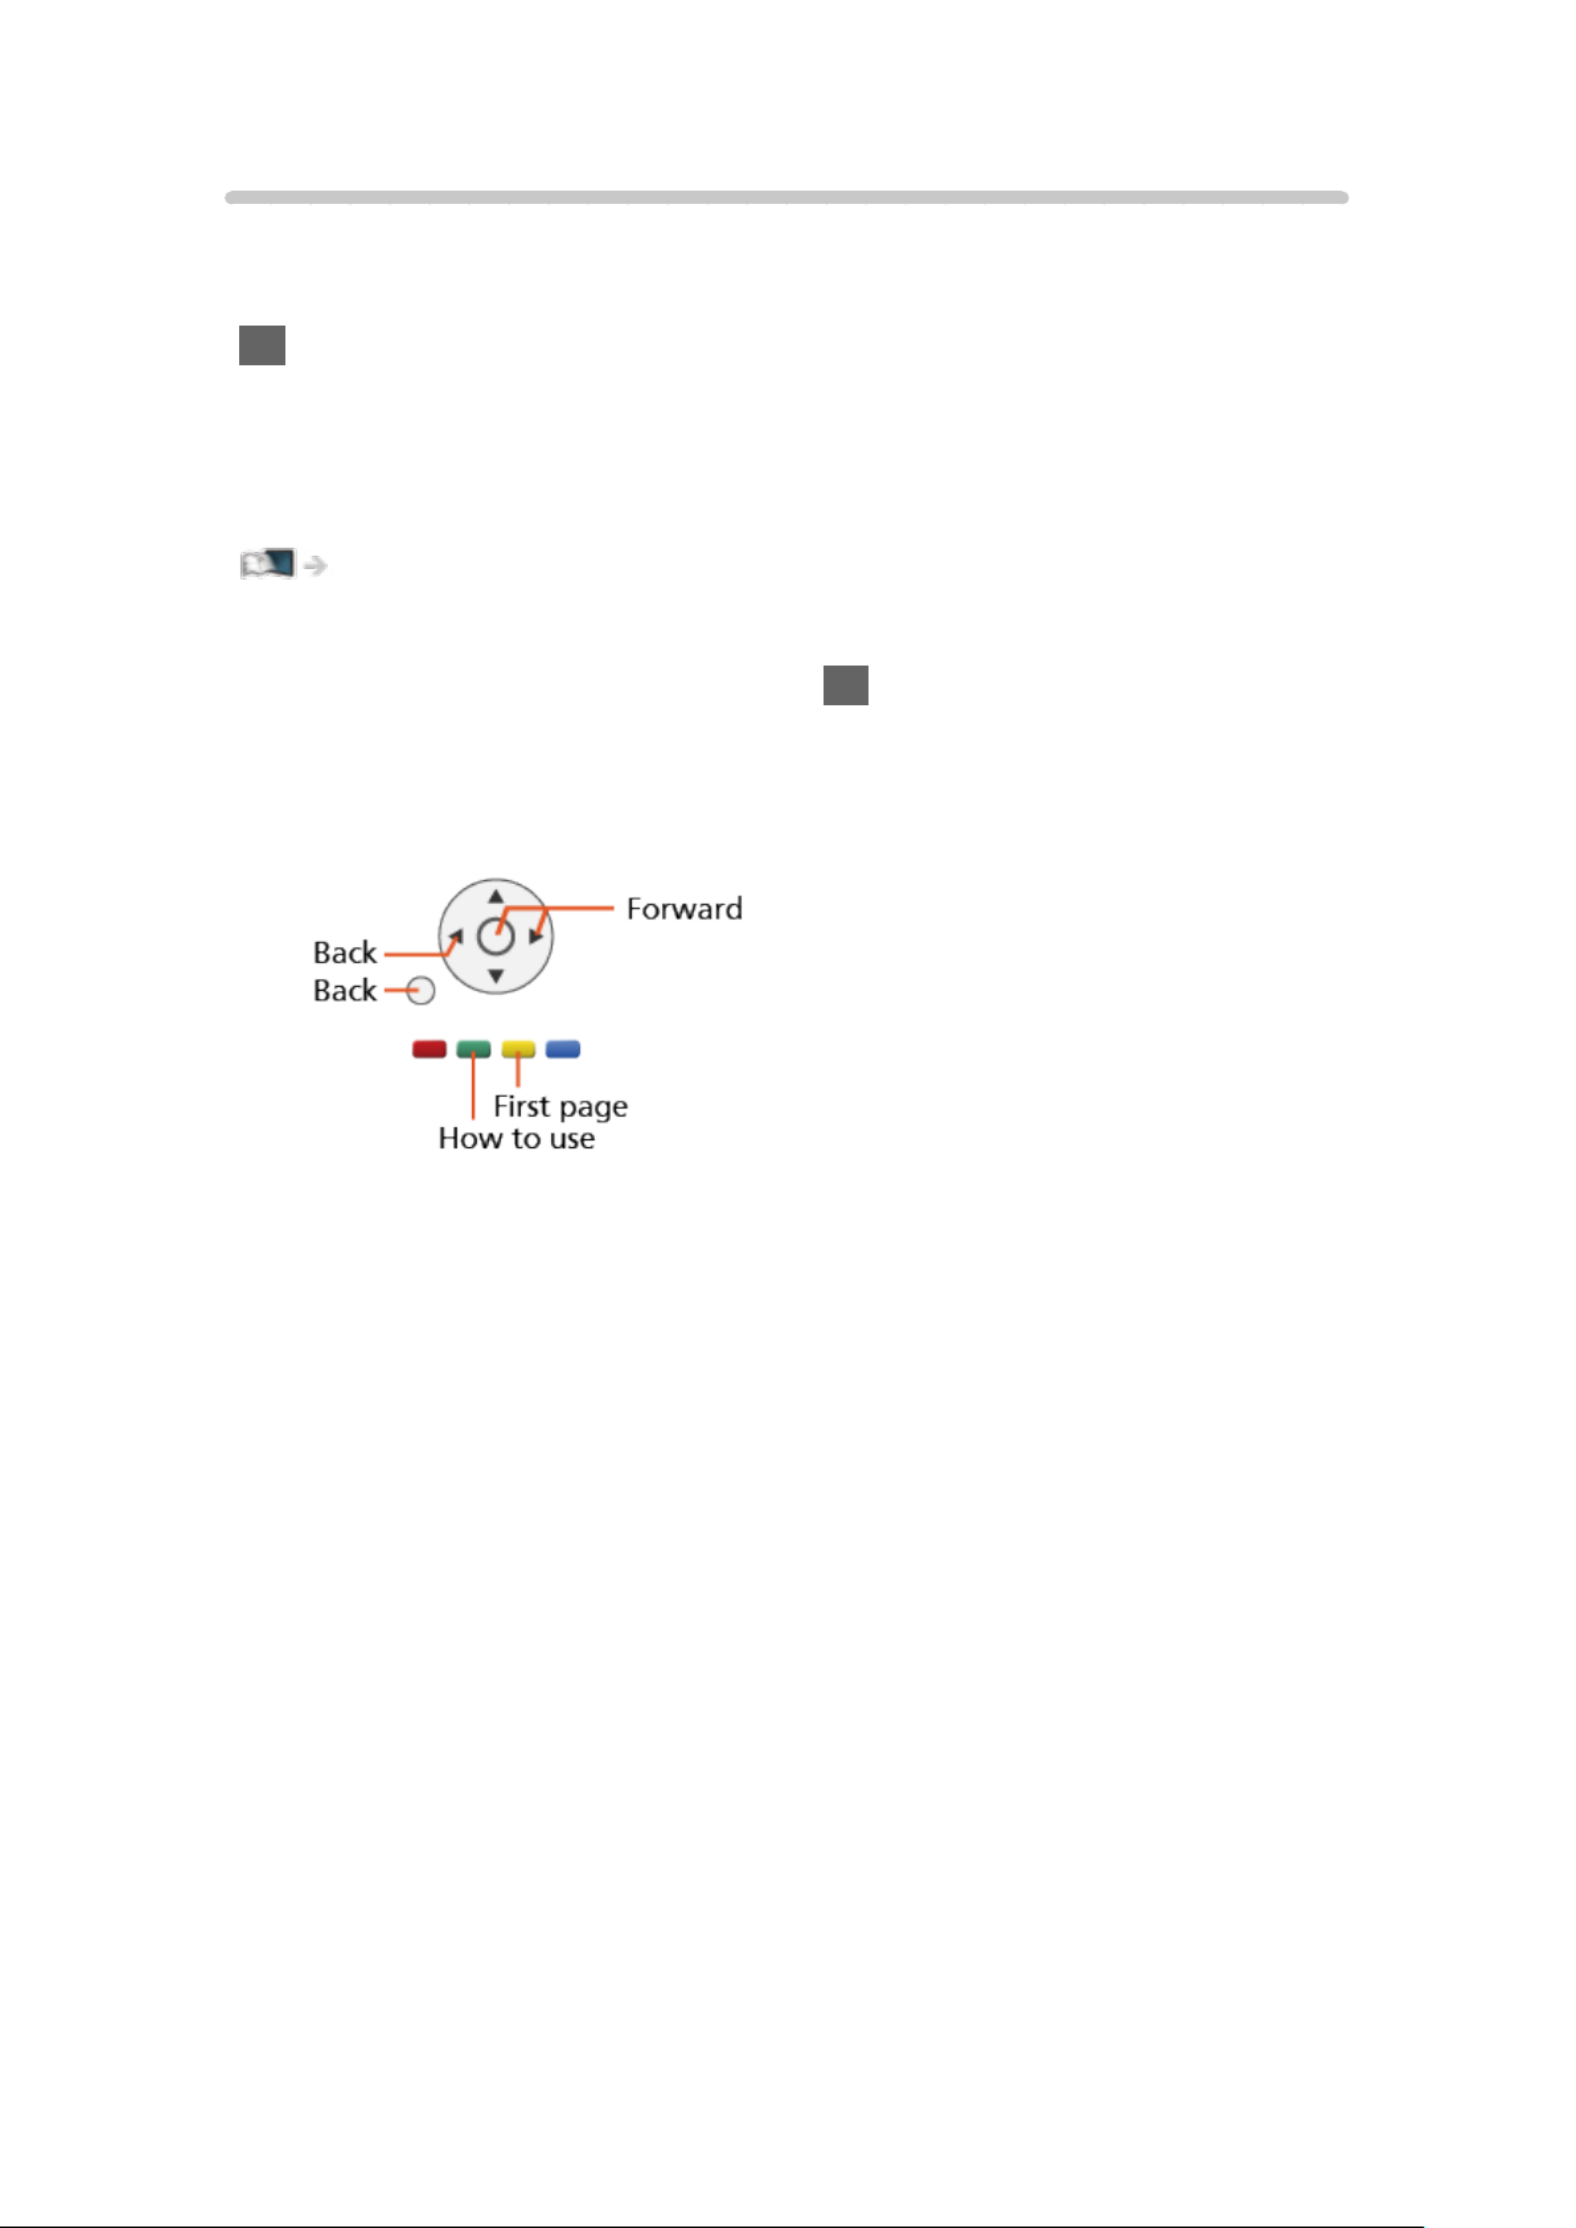
■Meaning of signs
OK :
Letters enclosed in brackets indicate remote control buttons.
Menu :
Letters in cyan indicate on-screen display items.
:
References in this eHELP
You can jump to the page by pressing while the cursor is on the OK
references.
■Operation guide
= Note =
●The design and specifications are subject to change without notice.
●The images shown in this eHELP are for illustrative purposes only.
●This eHELP covers all models, however, some features may not be
available on certain models.
●Refer to the paper manual and the actual menu in the TV etc. to confirm
your model’s features.
- 9 -

Read first
Before use
Licence
Even if no special notation has been made of company or product
trademarks, these trademarks have been fully respected.
DVB and the DVB logos are trademarks of the DVB Project.
Wi-Fi® is a registered trademark of Wi-Fi Alliance®.
WPA3™, WPA2™, WPA™ are trademarks of Wi-Fi Alliance®.
The Bluetooth® word mark and logos are registered trademarks owned
by Bluetooth SIG, Inc. and any use of such marks by Panasonic Holdings
Corporation is under license.
The terms HDMI, HDMI High-Definition Multimedia Interface, and the
HDMI Logo are trademarks or registered trademarks of HDMI Licensing
Administrator, Inc.
x.v.Colour™ is a trademark.
Dolby, Dolby Vision, Dolby Atmos, Dolby Audio, and the double-D symbol are
trademarks of Dolby Laboratories Licensing Corporation.
Manufactured under license from Dolby Laboratories.
Confidential unpublished works.
Copyright ©1992-2021 Dolby Laboratories. All rights reserved.
Google, Google Play, Chromecast built-in and Android TV are trademarks of
Google LLC.
- 10 -

“PlayReady” is a trademark registered by Microsoft. Please be aware of the
following.
(a) This product contains technology subject to certain intellectual property
rights of Microsoft. Use or distribution of this technology outside of this
product is prohibited without the appropriate license(s) from Microsoft.
(b) Content owners use Microsoft PlayReady™ content access technology to
protect their intellectual property, including copyrighted content. This device
uses PlayReady technology to access PlayReady-protected content and/or
WMDRM-protected content. If the device fails to properly enforce restrictions
on content usage, content owners may require Microsoft to revoke the
device’s ability to consume PlayReady-protected content. Revocation should
not affect unprotected content or content protected by other content access
technologies.
Content owners may require you to upgrade PlayReady to access their
content.
If you decline an upgrade, you will not be able to access content that requires
the upgrade.
This product incorporates the following software:
(1) the software developed independently by or for Panasonic Entertainment
& Communication Co., Ltd.,
(2) the software owned by third party and licensed to Panasonic
Entertainment & Communication Co., Ltd.,
(3) the software licensed under the GNU General Public License, Version 2.0
(GPL V2.0),
(4) the software licensed under the GNU LESSER GENERAL PUBLIC
LICENSE Version 2.1 (LGPL V2.1), and/or,
(5) open sourced software other than the software licensed under the GPL
V2.0 and/or LGPL V2.1.
The software categorized as (3) - (5) are distributed in the hope that it will be
useful, but WITHOUT ANY WARRANTY, without even the implied warranty of
MERCHANTABILITY or FITNESS FOR A PARTICULAR PURPOSE. Please
refer to the detailed terms and conditions thereof shown in the “Software
Licence” menu on this product.
- 11 -

At least three (3) years from delivery of this product, Panasonic will give to
any third party who contacts us at the contact information provided below,
for a charge no more than our cost of physically performing source code
distribution, a complete machine-readable copy of the corresponding source
code covered under GPL V2.0, LGPL V2.1 or the other licenses with the
obligation to do so, as well as the respective copyright notice thereof.
Contact Information: oss-cd-request@gg.jp.panasonic.com
The source code and the copyright notice are also available for free in our
website below.
https://panasonic.net/cns/oss/tv/EUIDTV22M.html
- 12 -

Features
4K resolution
You can watch content in 4K format that has twice the horizontal and vertical
resolution of the 1080p signal.
Watching > 4K resolution > 4K-compatible equipment
- 13 -

Home
“Home” is a gateway to the TV programmes, applications, etc.
It provides you an easy way to access all the features.
Home > Home > Information
- 14 -

Recording
You can record the digital TV programmes to the connected USB HDD and
enjoy playing back in various ways.
Recording > Timer Programming > Setting Timer Programming
- 15 -

Chromecast built-in
This TV is compatible with Chromecast-enabled apps. For detailed
information of Chromecast-enabled apps, visit:
g.co/cast/apps
Functions > Chromecast built-in > How to use
- 16 -

Data Service Application
You can enjoy Hybrid Broadcast Broadband TV application that is one of the
interactive data services for digital broadcasting.
Functions > > Using Data Service ApplicationData Service Application
- 17 -

Home
Home
Information
“Home” is a gateway to the TV programmes, applications, etc.
Home is displayed by pressing and it provides you an easy way to HOME
access all the features as shown below (example).
- 18 -

How to use
From Home, you can access all the features such as TV programmes,
applications, etc.
●A broadband network environment is required to use internet services.
Network > Network connections > Internet connection
1. Display Home with .HOME
(Example)
2. Select a feature and press to access.OK
●To watch full-screen TV, press EXIT, select from Live TV Apps, etc.
(Example)
= Note =
●The design and specifications are subject to change without notice.
■Freeview Play
●UK only
1. Display Home with .HOME
2. Select Freeview Play and press .OK
3. Follow the on-screen instructions.
●To display the terms of service and settings, select > > Settings Channel
Advanced Options Freeview Play Settings > and press .OK
- 19 -

■Search
You can search for content from various sources.
1. Display Home with .HOME
2. Select .
3. Follow the on-screen instructions.
●To use the voice control
Functions > Voice Control > Information
■Customize channels
You can set the channels displayed on the home screen.
1. Display Home with .HOME
2. Select Customize channels and press .OK
3. Follow the on-screen instructions.
■Preview
You can set the preview of video / audio.
1. Display the menu with .MENU
2. Select Settings Device Preferences Home screen > > and press to OK
access.
3. Follow the on-screen instructions.
- 20 -

Apps
How to use
Various applications (internet content, etc.) can be accessed easily from
Apps.
1. Display Apps with APPS.
●To exit Apps
BACK
2. Select an application and press to access.OK
3. Follow the on-screen instructions.
■My App
You can assign a favourite application to MY APP of the TV’s remote control.
1. Display Apps with APPS.
2. Select My App and press to access.OK
3. Select an application and press to assign a favourite application.OK
= Note =
●The design and specifications are subject to change without notice.
●Internet apps are provided by their respective service providers, and may
be changed, interrupted, or discontinued at any time.
●A broadband network environment is required to fully use this function.
■my Home Screen
my Home Screen can be edited to customise your favourite TV programmes,
applications, etc.
1. Display Apps with APPS.
2. Select my Home Screen and press to access.OK
3. Follow the on-screen instructions.
■Recently opened apps
1. Display the menu with .MENU
2. Select Settings > Apps and press .OK
3. Select an application from and press to access.Recently opened apps OK
4. Follow the on-screen instructions.
- 21 -
Watching
Basic
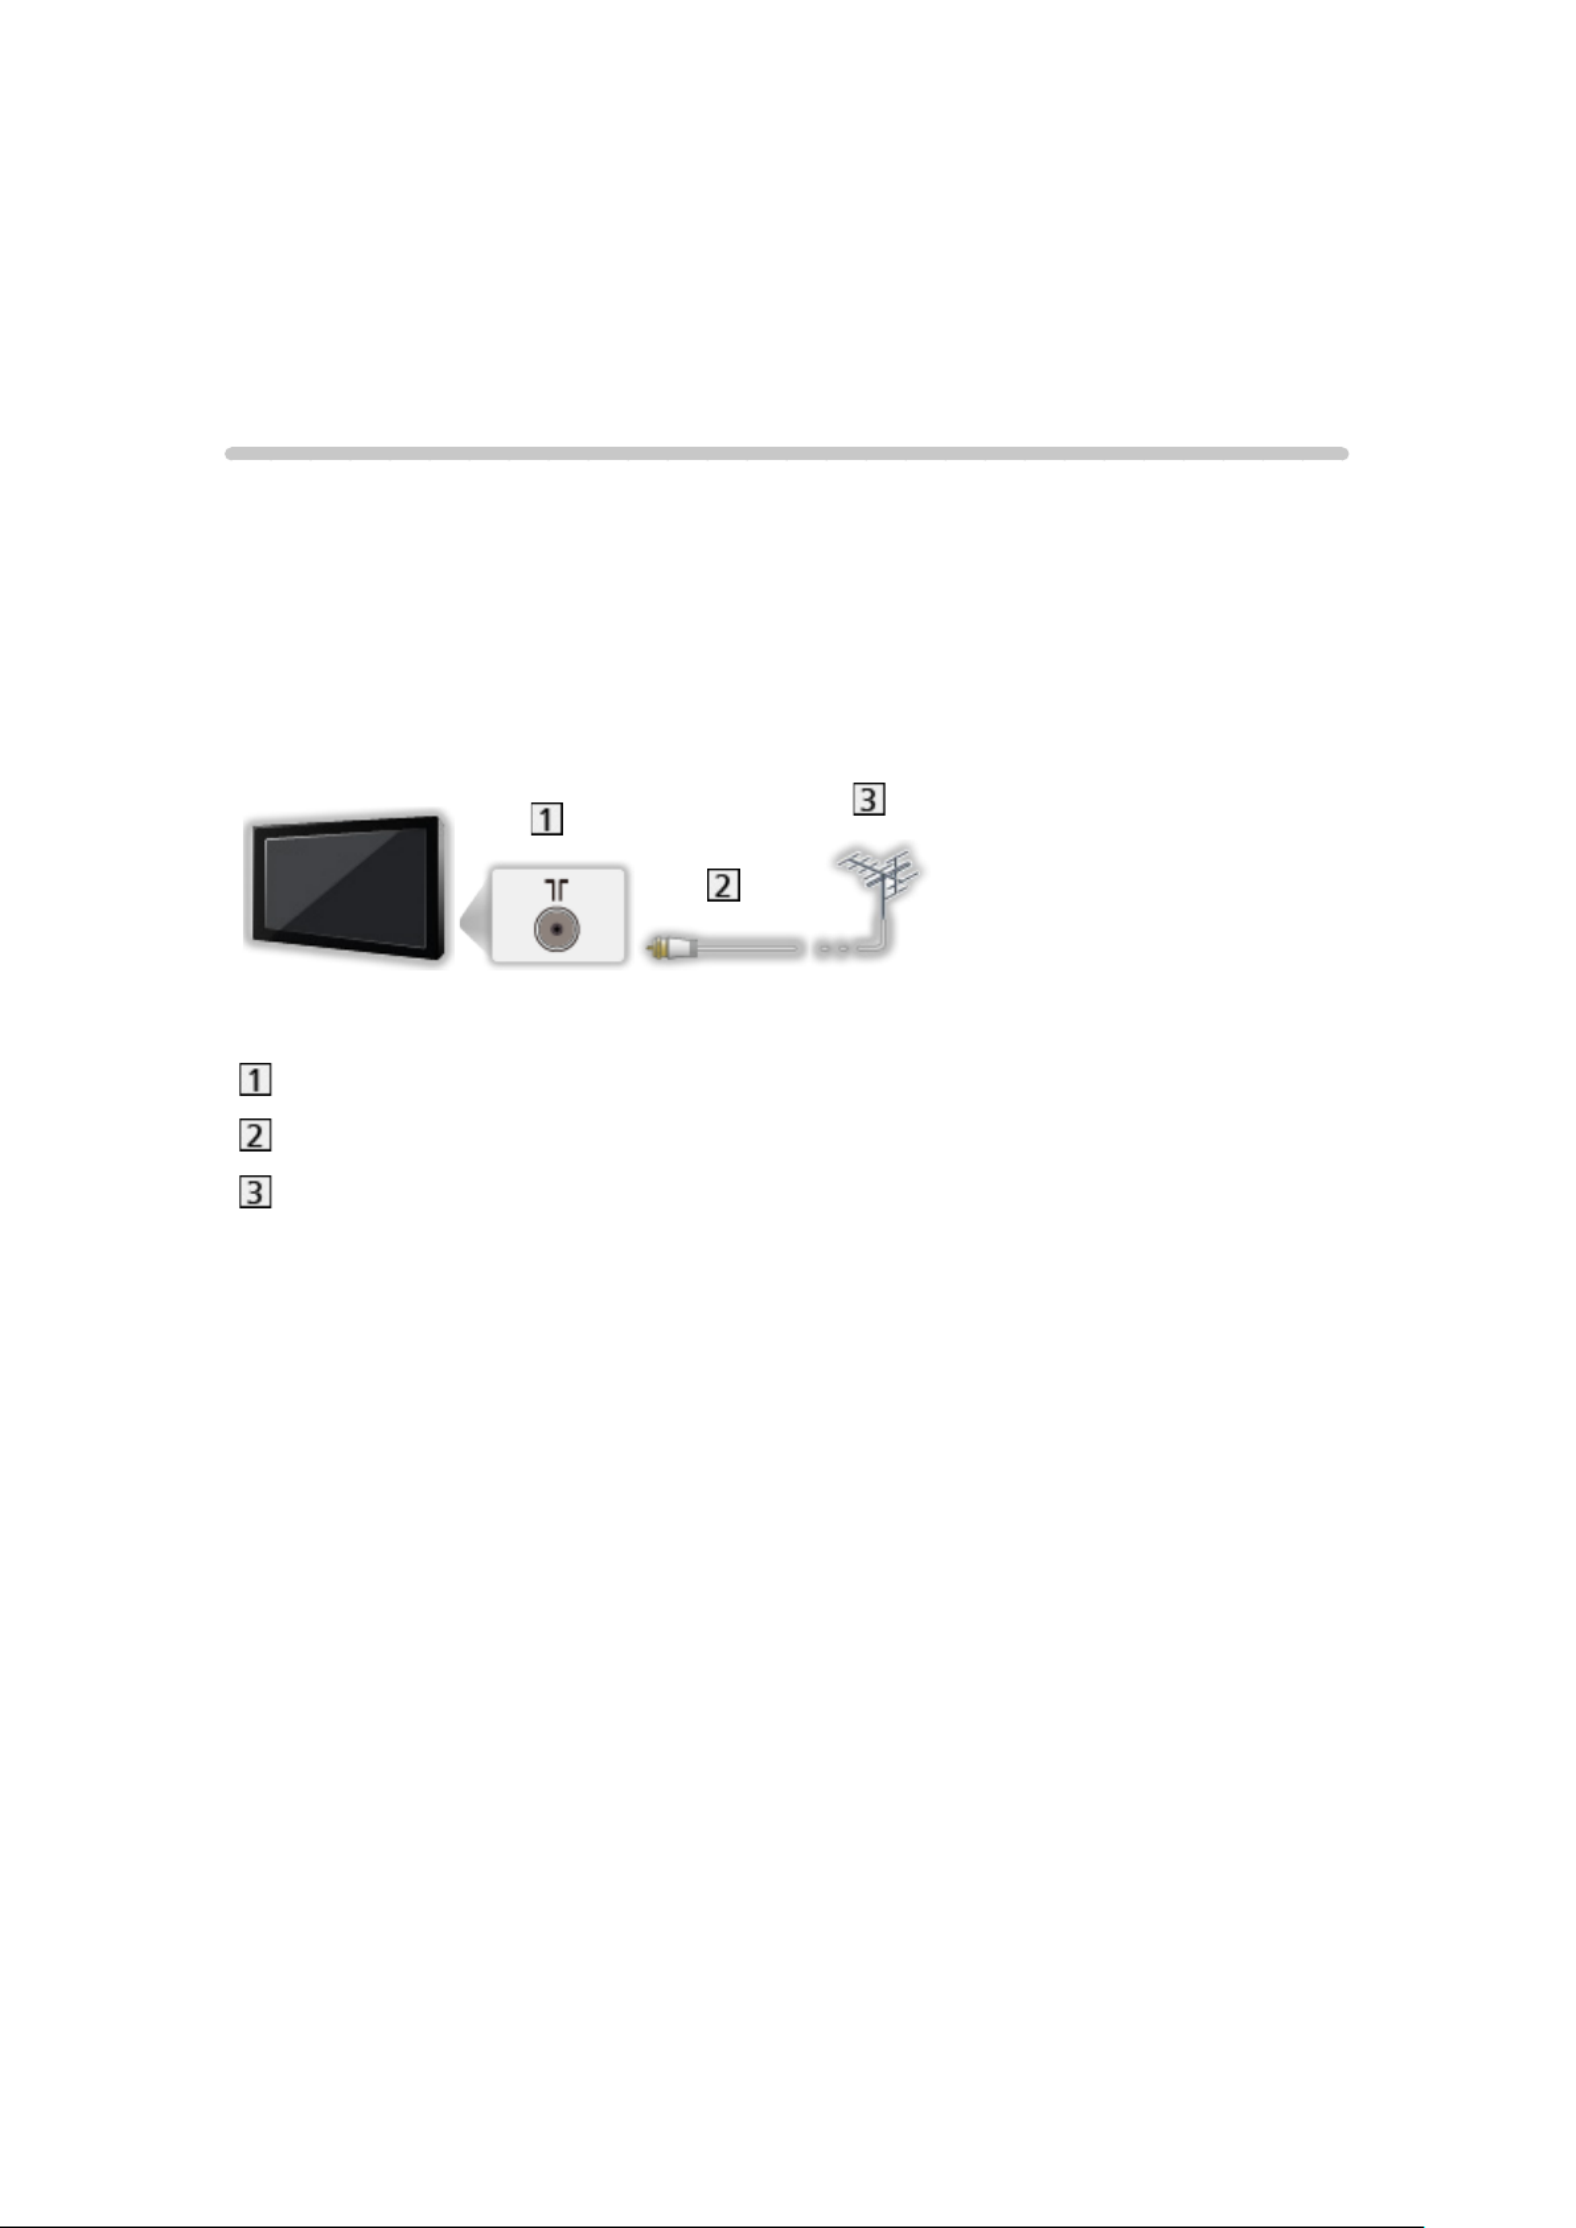
Basic connection
Please ensure that the unit is disconnected from the mains socket before
attaching or disconnecting any cables.
●External equipment and cables shown are not supplied with this TV.
■Aerial
Terrestrial terminal
RF cable
Terrestrial aerial
- 22 -
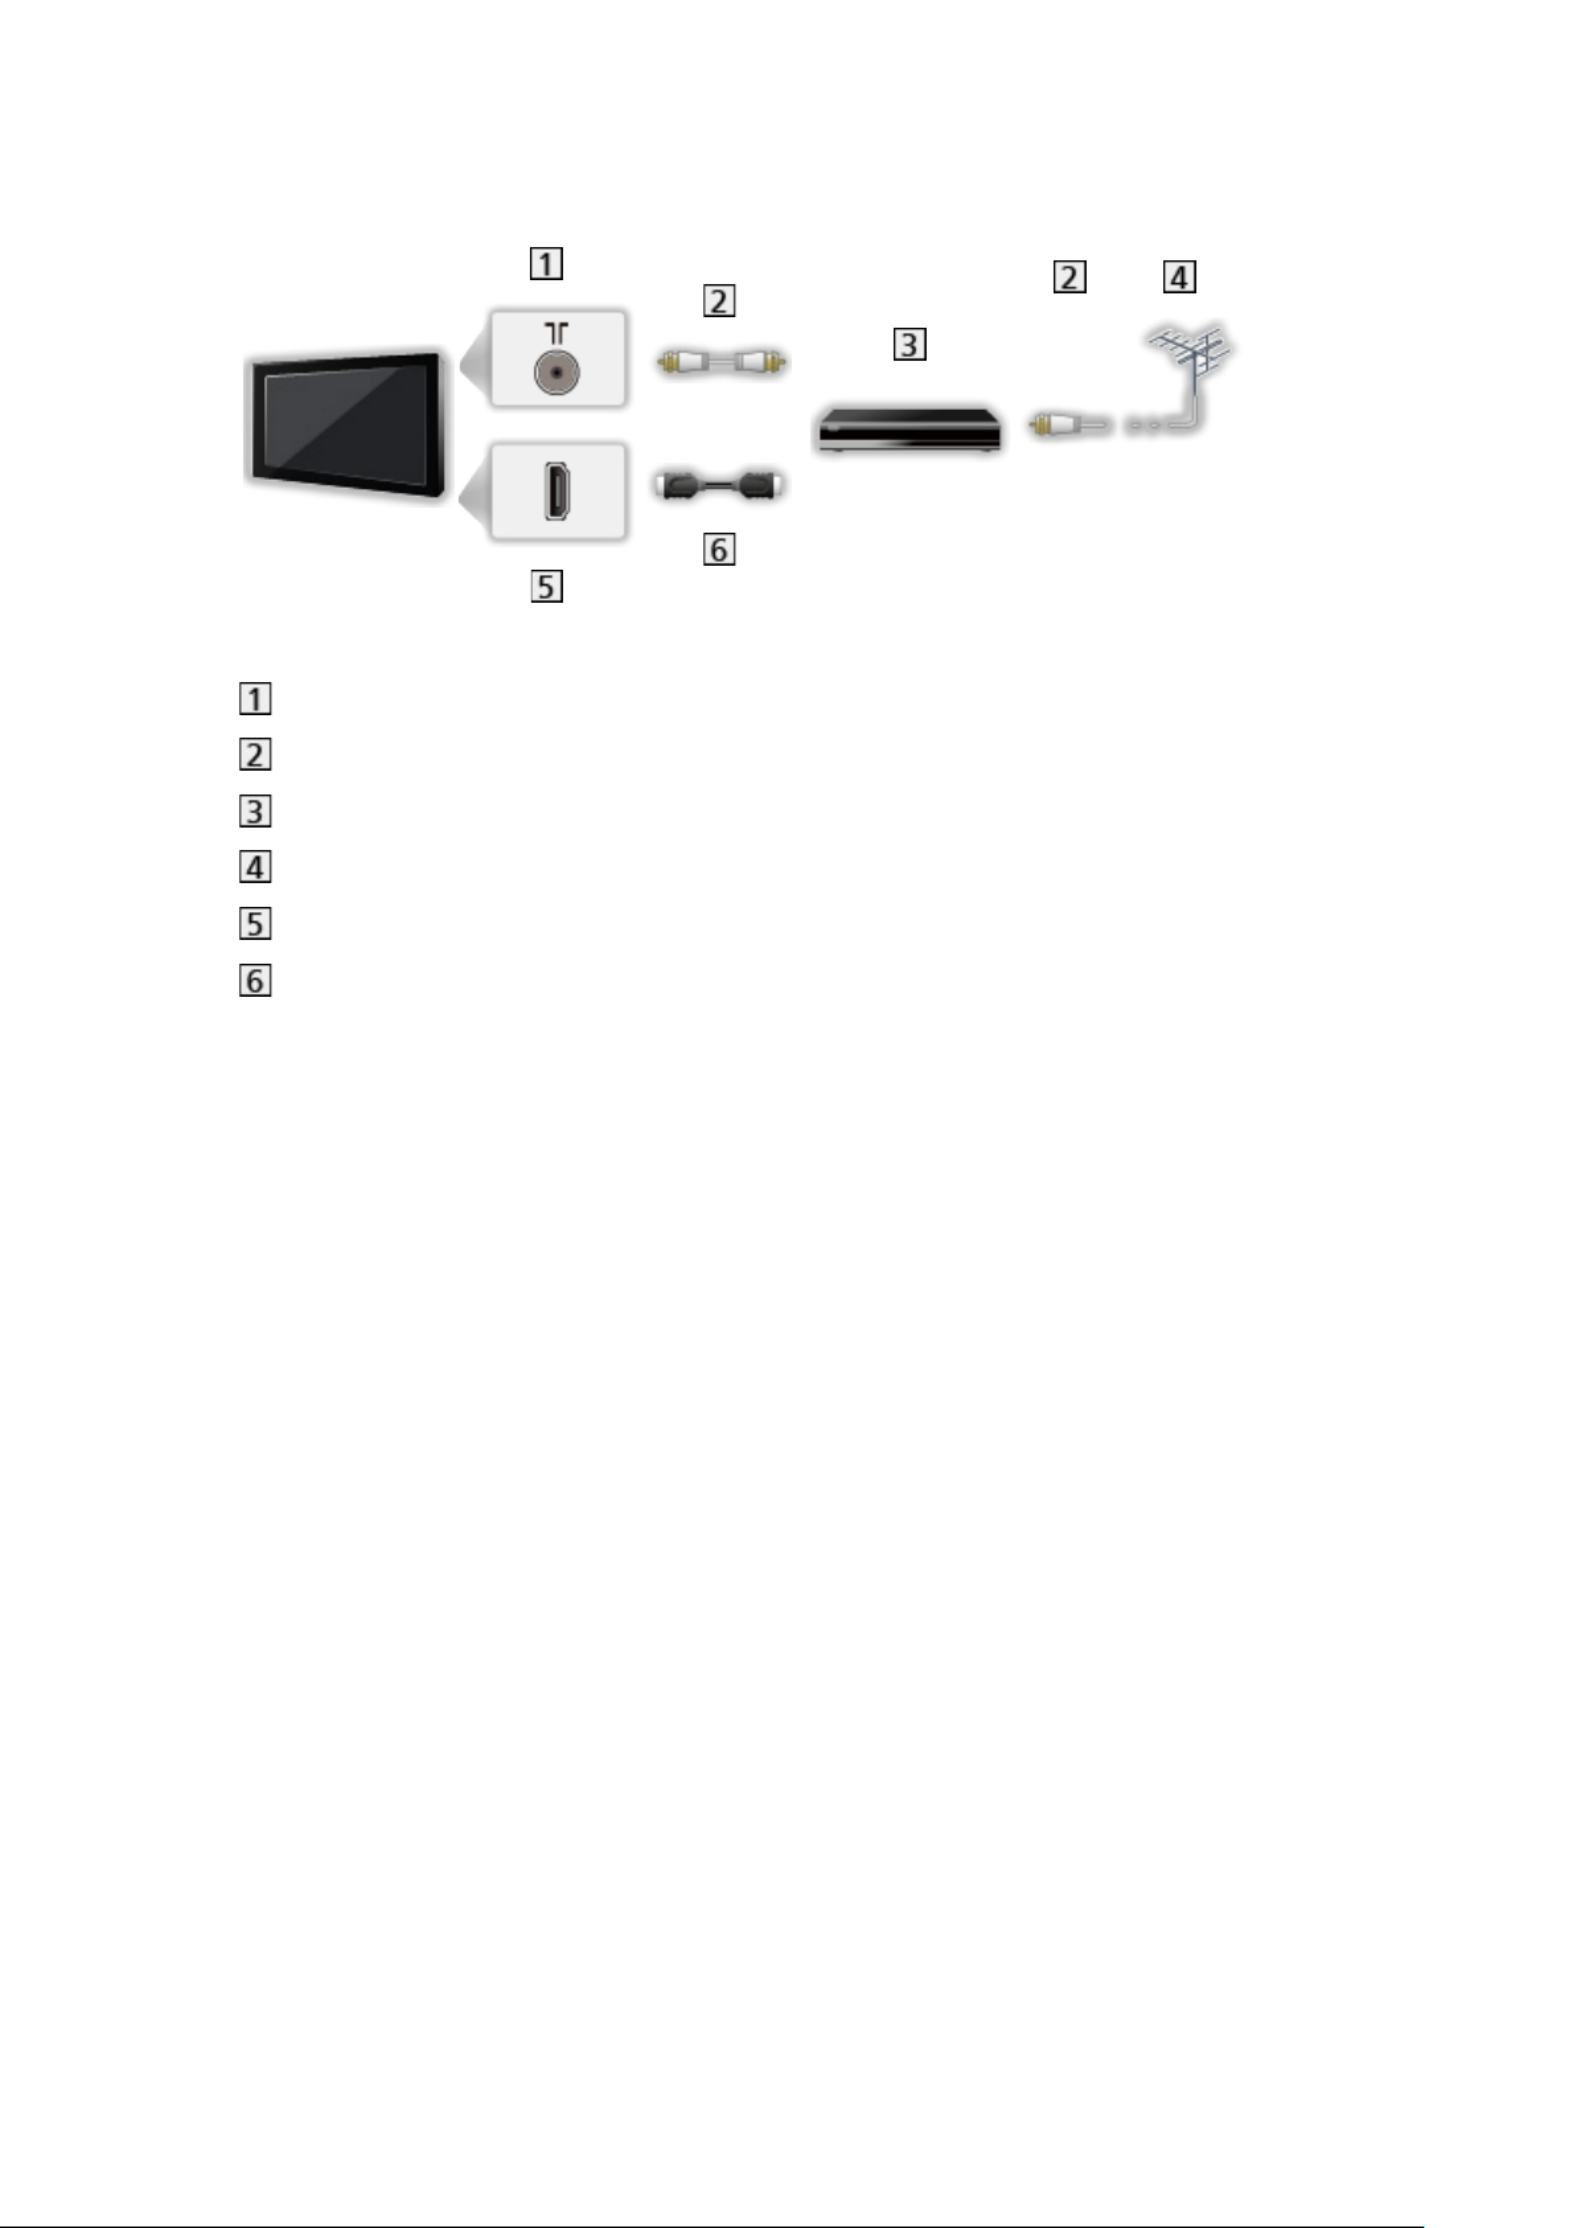
■DVD Recorder / Blu-ray Recorder, etc.
Terrestrial terminal
RF cable
DVD Recorder / Blu-ray Recorder, etc.
Terrestrial aerial
HDMI terminal
HDMI cable
- 23 -
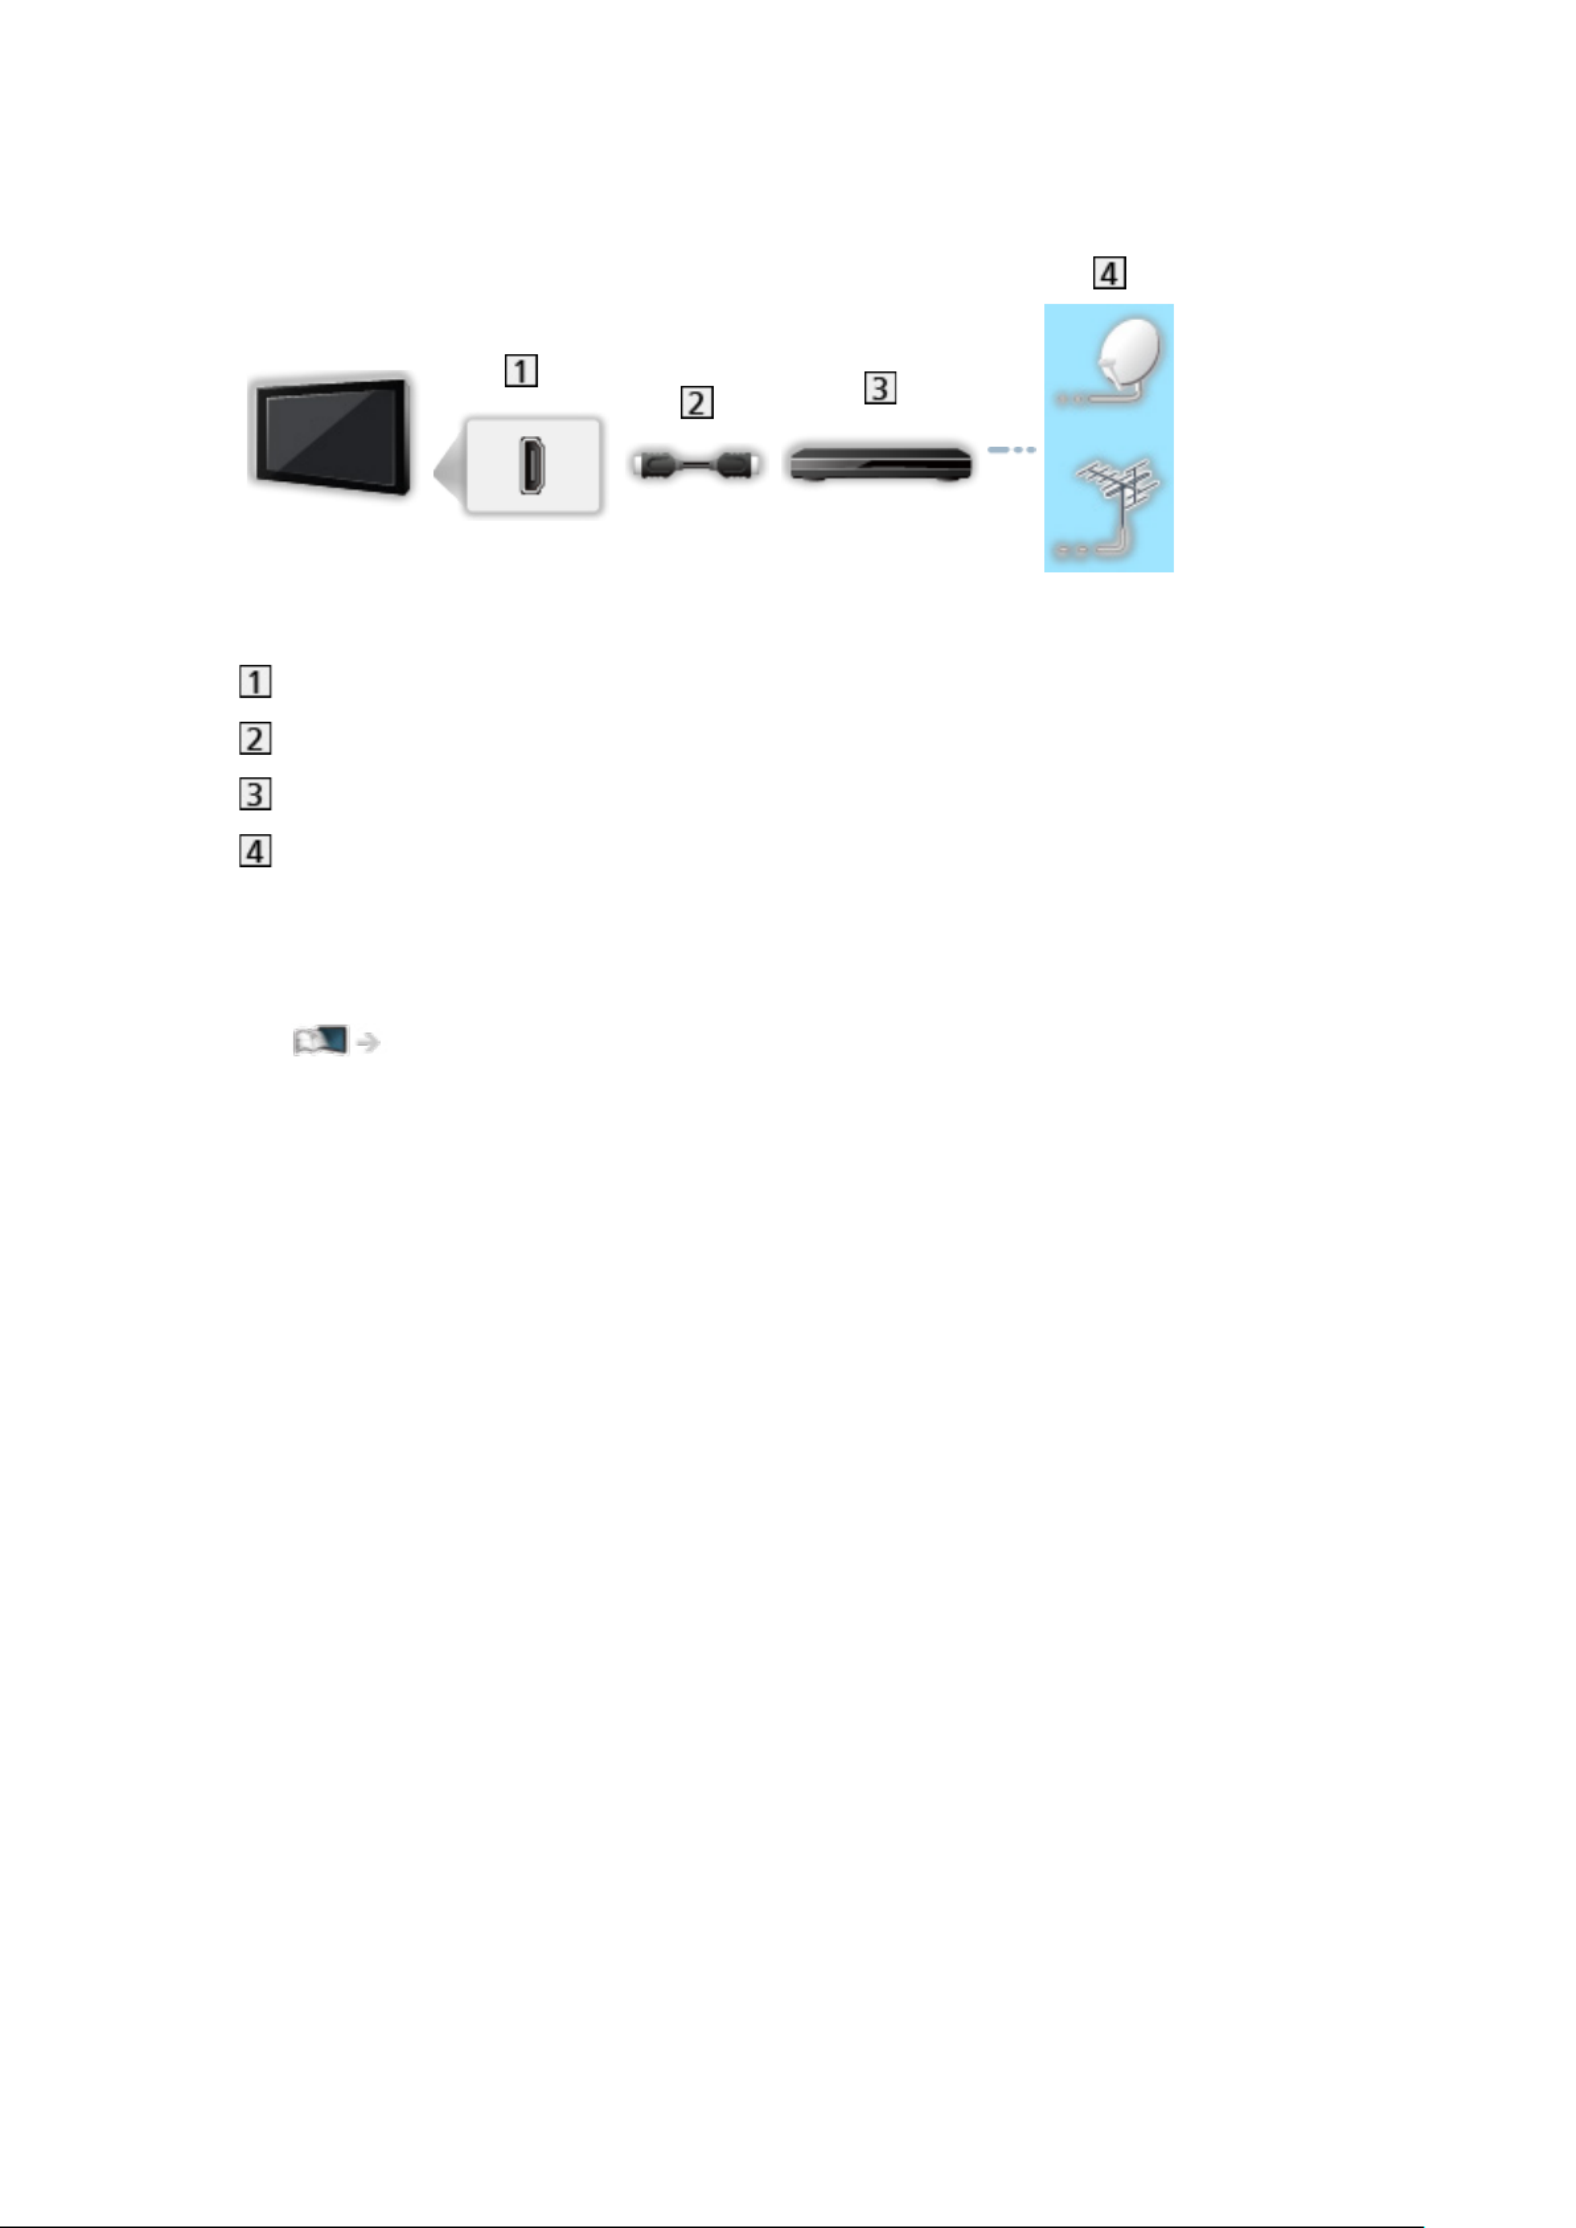
■Satellite receiver
HDMI terminal
HDMI cable
Satellite receiver
Satellite dish / Terrestrial aerial
= Note =
●For details of HDMI CEC connections
Functions > HDMI CEC > CEC connection
●Please also read the manual of the equipment being connected.
●Keep the TV away from electronic equipment (video equipment, etc.) or
equipment with an infrared sensor, otherwise distortion of image / sound
may occur or operation of other equipment may be affected.
●Use a fully wired HDMI compliant cable.
●Use a high speed HDMI cable for high resolution images.
●Use a Premium High Speed HDMI cable for the HDR images.
●Check the terminal type and cable plugs are correct for connection.
- 24 -

Selecting channel
1. Select the mode with INPUT.
●Selectable modes vary depending on the channels stored.
2. Select a channel with or .Channel Up / Down Numeric buttons
●Press to select a channel position with 2 or more-digit Numeric buttons
(e.g. 399, press ).
■Information banner
1. Display information banner with .
●Also appears when changing a channel.
■Banner Display
You can set the banner display.
1. Display the menu with .MENU
2. Select Settings Channel Banner Display > > and press .OK
■To select a channel from the channel list
1. Display the option menu with .OPTION
2. Select Channel List and press to access.OK
3. Select a channel from the list and press to watch.OK
●You can also select a channel from the channel list by pressing LIST.
●To edit the displayed channel when the TV is turned on
1) Display the menu with .MENU
2) Select Settings Channel > > Advanced Options Power On Channel >
and press .OK
3) Follow the on-screen instructions.
- 25 -

■To select a channel from the favourite list
1. Display the option menu with .OPTION
2. Select Favourite List and press to access.OK
3. Select a channel from the list and press to watch.OK
●To add a channel to the favourite list
1) Press OPTION.
2) Press .
3) Select Add to My Favourites and press to add.OK
– Press OK again to remove the channel from the favourite list.
■To display Freeview Play Mini Guide (UK and Freeview only)
1. Display Freeview Play Mini Guide with Freeview Play.
2. Select the application and press to access.OK
●For the applications, follow the on-screen instructions.
■To select a channel using TV Guide
1. Display Program Guide with .GUIDE
2. Select the current programme and press to access.OK
3. Select View and press to watch.OK
●Ireland only
●Select Timer Programming and press to record.OK
■To watch pay-TV
●For details of the encrypted channels
Functions > Common Interface > Using Common Interface
●Consult the operator / broadcaster or CI module manufacturer for more
information and conditions of the services.
■Last view
Switch to a previously viewed channel or input mode easily with LAST VIEW.
●Press again to return to the current view.
●Switching channel may not be available depending on the condition.
- 26 -

Multi audio
Selects for selectable sound tracks (if available).
■ Audio Channel / Audio Language
1. Display the menu with .MENU
2. Select Settings Channel > and press to access.OK
3. Select one of the following items and press to access.OK
Audio Channel / Audio Language / 2nd Audio Language
Audio Channel
Selects multiplex sound mode (if available).
Audio Language
Selects the preferred language for digital channel multi audio (depending on
the broadcaster).
2nd Audio Language
Selects the second preferred language for digital channel multi audio
(depending on the broadcaster).
■ Sound Tracks
Selects multiplex sound mode (if available).
1. Display the menu with .MENU
2. Select Settings Channel > > Advanced Options > Sound Tracks and press
OK to access.
3. Follow the on-screen instructions.
● You can also select multiplex sound mode from Sound Tracks by pressing
OPTION.
- 27 -

Subtitle
Display / hide subtitles (if available) with .STTL
●Select the language when the available options are displayed.
●For Digital TV
■Subtitle settings
1. Display the menu with .MENU
2. Select Settings Channel > > Advanced Options Subtitle > and press to OK
access.
3. Select one of the following items and press to access.OK
Digital Subtitle Language 2nd Digital Subtitle Language / / Subtitle Type /
Subtitle Language
Digital Subtitle Language 2nd Digital Subtitle Language Subtitle Language / /
Selects between alternative subtitle languages or types (if available).
Subtitle Type
Selects the preferred subtitle type.
- 28 -

Viewing Teletext
1. Switch to teletext with TEXT.
2. Follow the on-screen instructions.
■Digital Teletext Language / Decoding Page Language
Selects teletext language font.
●Ireland only
1. Display the menu with .MENU
2. Select Settings Channel > > Advanced Options Teletext > and press to OK
access.
3. Select Digital Teletext Language / and press Decoding Page Language OK
to access.
4. Select a language and press to set.OK
- 29 -

Energy saving functions
The TV can be eco-friendly using energy-saving functions.
The TV goes into Standby mode in the following conditions:
● Power Off Timer Type is set to / .Once On
● Off Timer Switch Off Timer / is active.
● No signal is received and no operation is performed for the set time of No
Signal Power Off.
■ Timer
1. Display the menu with .MENU
2. Select Settings Timer > > Power Off Timer Type Power Off Timer / and
press to access.OK
Power Off Timer Type Power Off Timer /
Sets the time that the TV goes into Standby mode at within 24 hours.
- 30 -

■Power
1. Display the menu with .MENU
2. Select Settings Power > > Off Timer Switch Off Timer / / / Picture Off No
Signal Power Off and press to access.OK
Off Timer
Switch to TV Standby mode automatically after a fixed period.
Switch Off Timer
Automatically turns the TV to Standby mode for energy saving when no
operation is performed for the set time.
●Changing the default configuration may result in higher energy
consumption of the product.
Picture Off
Turns the screen off.
No Signal Power Off
Automatically turns the TV to Standby mode to prevent unnecessary power
consumption when no signal is received and no operation is performed for the
set time.
●A notification message will appear 1 minute before going into Standby
mode.
●Changing the default configuration may result in higher energy
consumption of the product.
- 31 -

Adjusting time
Settings for the system time of this TV
1. Display the menu with .MENU
2. Select Settings Device Preferences Date & time > > and press to OK
access.
3. Select one of the following items and press to access.OK
Automatic date & time Set date Set time Set time zone Use 24-hour / / / /
format
4. Follow the on-screen instructions.
Automatic date & time
Automatically set the date and time via the internet.
● Set to to enable the manual setting of / .Off Set date Set time
Set date
Sets the current date manually.
Set time
Sets the current time manually.
Set time zone
Adjusts the time data.
● The time data are corrected based on GMT.
Use 24-hour format
Select the 24-hour notation.
- 32 -

Language
1. Display the menu with .MENU
2. Select Settings Device Preferences Language > > and press to OK
access.
3. Select the language for on-screen displays.
■ Audio Language
1. Display the menu with .MENU
2. Select Settings Channel > and press to access.OK
3. Select one of the following items and press to access.OK
Audio Language / 2nd Audio Language
Audio Language
Selects the preferred language for digital channel multi audio (depending on
the broadcaster).
2nd Audio Language
Selects the second preferred language for digital channel multi audio
(depending on the broadcaster).
- 33 -

HDMI Auto Setting
1. Display the menu with .MENU
2. Select Settings Device Preferences Inputs > > and press to access.OK
3. Set the item and press to store.OK
HDMI Auto Setting
Reproduces the image more precisely with the expanded colour gamut when
connecting the 4K-compatible equipment. is a mode that supports Mode2
higher definition signals than . Set to when the image or sound Mode1 Mode1
in HDMI input is not played properly.
Mode1:
For better compatibility. Set to when the image or sound in Mode1
HDMI input is not played properly.
Mode2:
For the 4K-compatible equipment that has the function to output the
image precisely with the expanded colour gamut
●The setting can be stored for each HDMI input.
●Valid format (4K)
– : 4:4:4 / 4:2:2 (30p, 25p, 24p), 4:2:0 (60p, 50p)Mode1
– : 4:4:4 / 4:2:2 (30p, 25p, 24p), 4:4:4 / 4:2:2 / 4:2:0 (60p, 50p)Mode2
- 35 -

Valid 4K format
■ Valid 4K format (HDMI)
● 4K UHD
3 840 × 2 160 (60p, 50p, 30p, 25p, 24p)
● DCI 4K
4 096 × 2 160 (60p, 50p, 30p, 25p, 24p)
– Actual resolution is 3 840 × 2 160p.
= Note =
● The above signals are reformatted for optimal viewing on your display.
● For details of aspect
Watching > For best picture > Aspect
- 36 -
External equipment
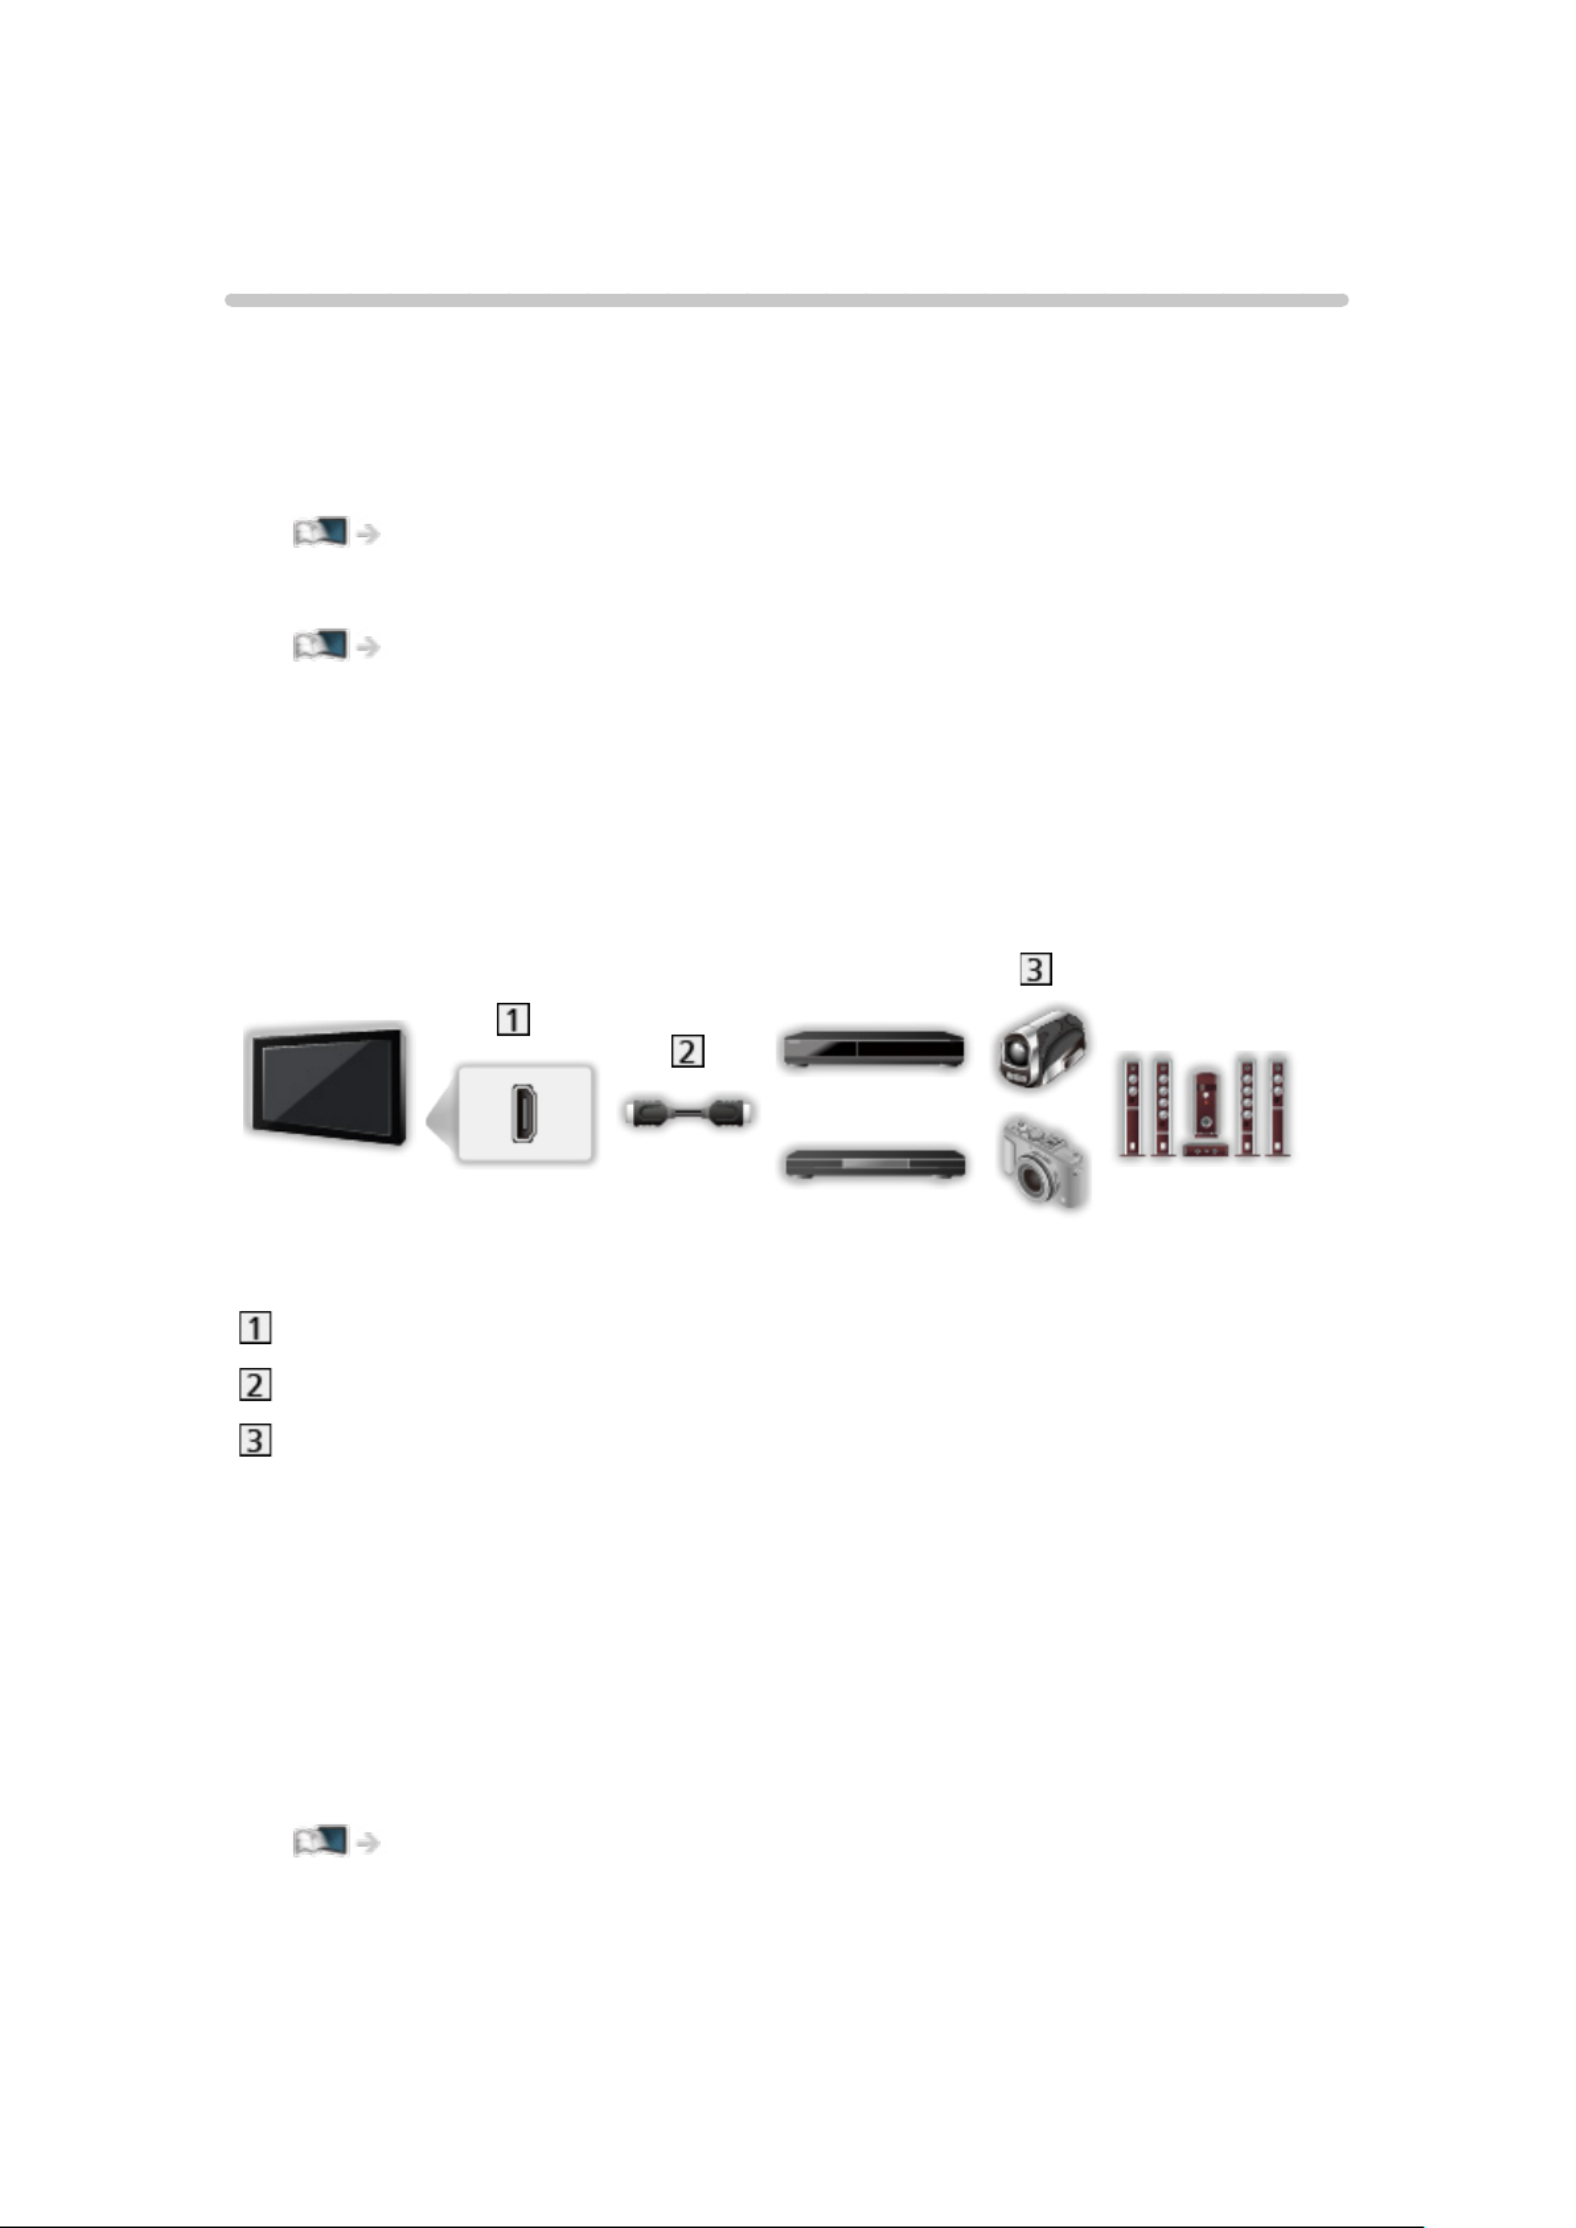
External connection
These diagrams show our recommendations for connection of your TV to
various pieces of equipment. For other connections, consult the instructions
for each piece of equipment.
●For details of basic connection
Watching > Basic > Basic connection
●To use the specific devices supporting Bluetooth wireless technology
Functions > Bluetooth devices
●Check the terminal type and cable plugs are correct for connection.
●External equipment and cables shown are not supplied with this TV.
■HDMI equipment
HDMI terminal
HDMI cable
Recorder / Player / Set top box / Camcorder / Amplifier with speaker
system
= Note =
●Use a fully wired HDMI compliant cable.
●Use a high speed HDMI cable for high resolution images.
●Use a Premium High Speed HDMI cable for the HDR images.
●For details of HDMI CEC connections
Functions > HDMI CEC > CEC connection
●Use HDMI2 to connect the TV to an amplifier which has ARC (Audio
Return Channel) function.
- 37 -
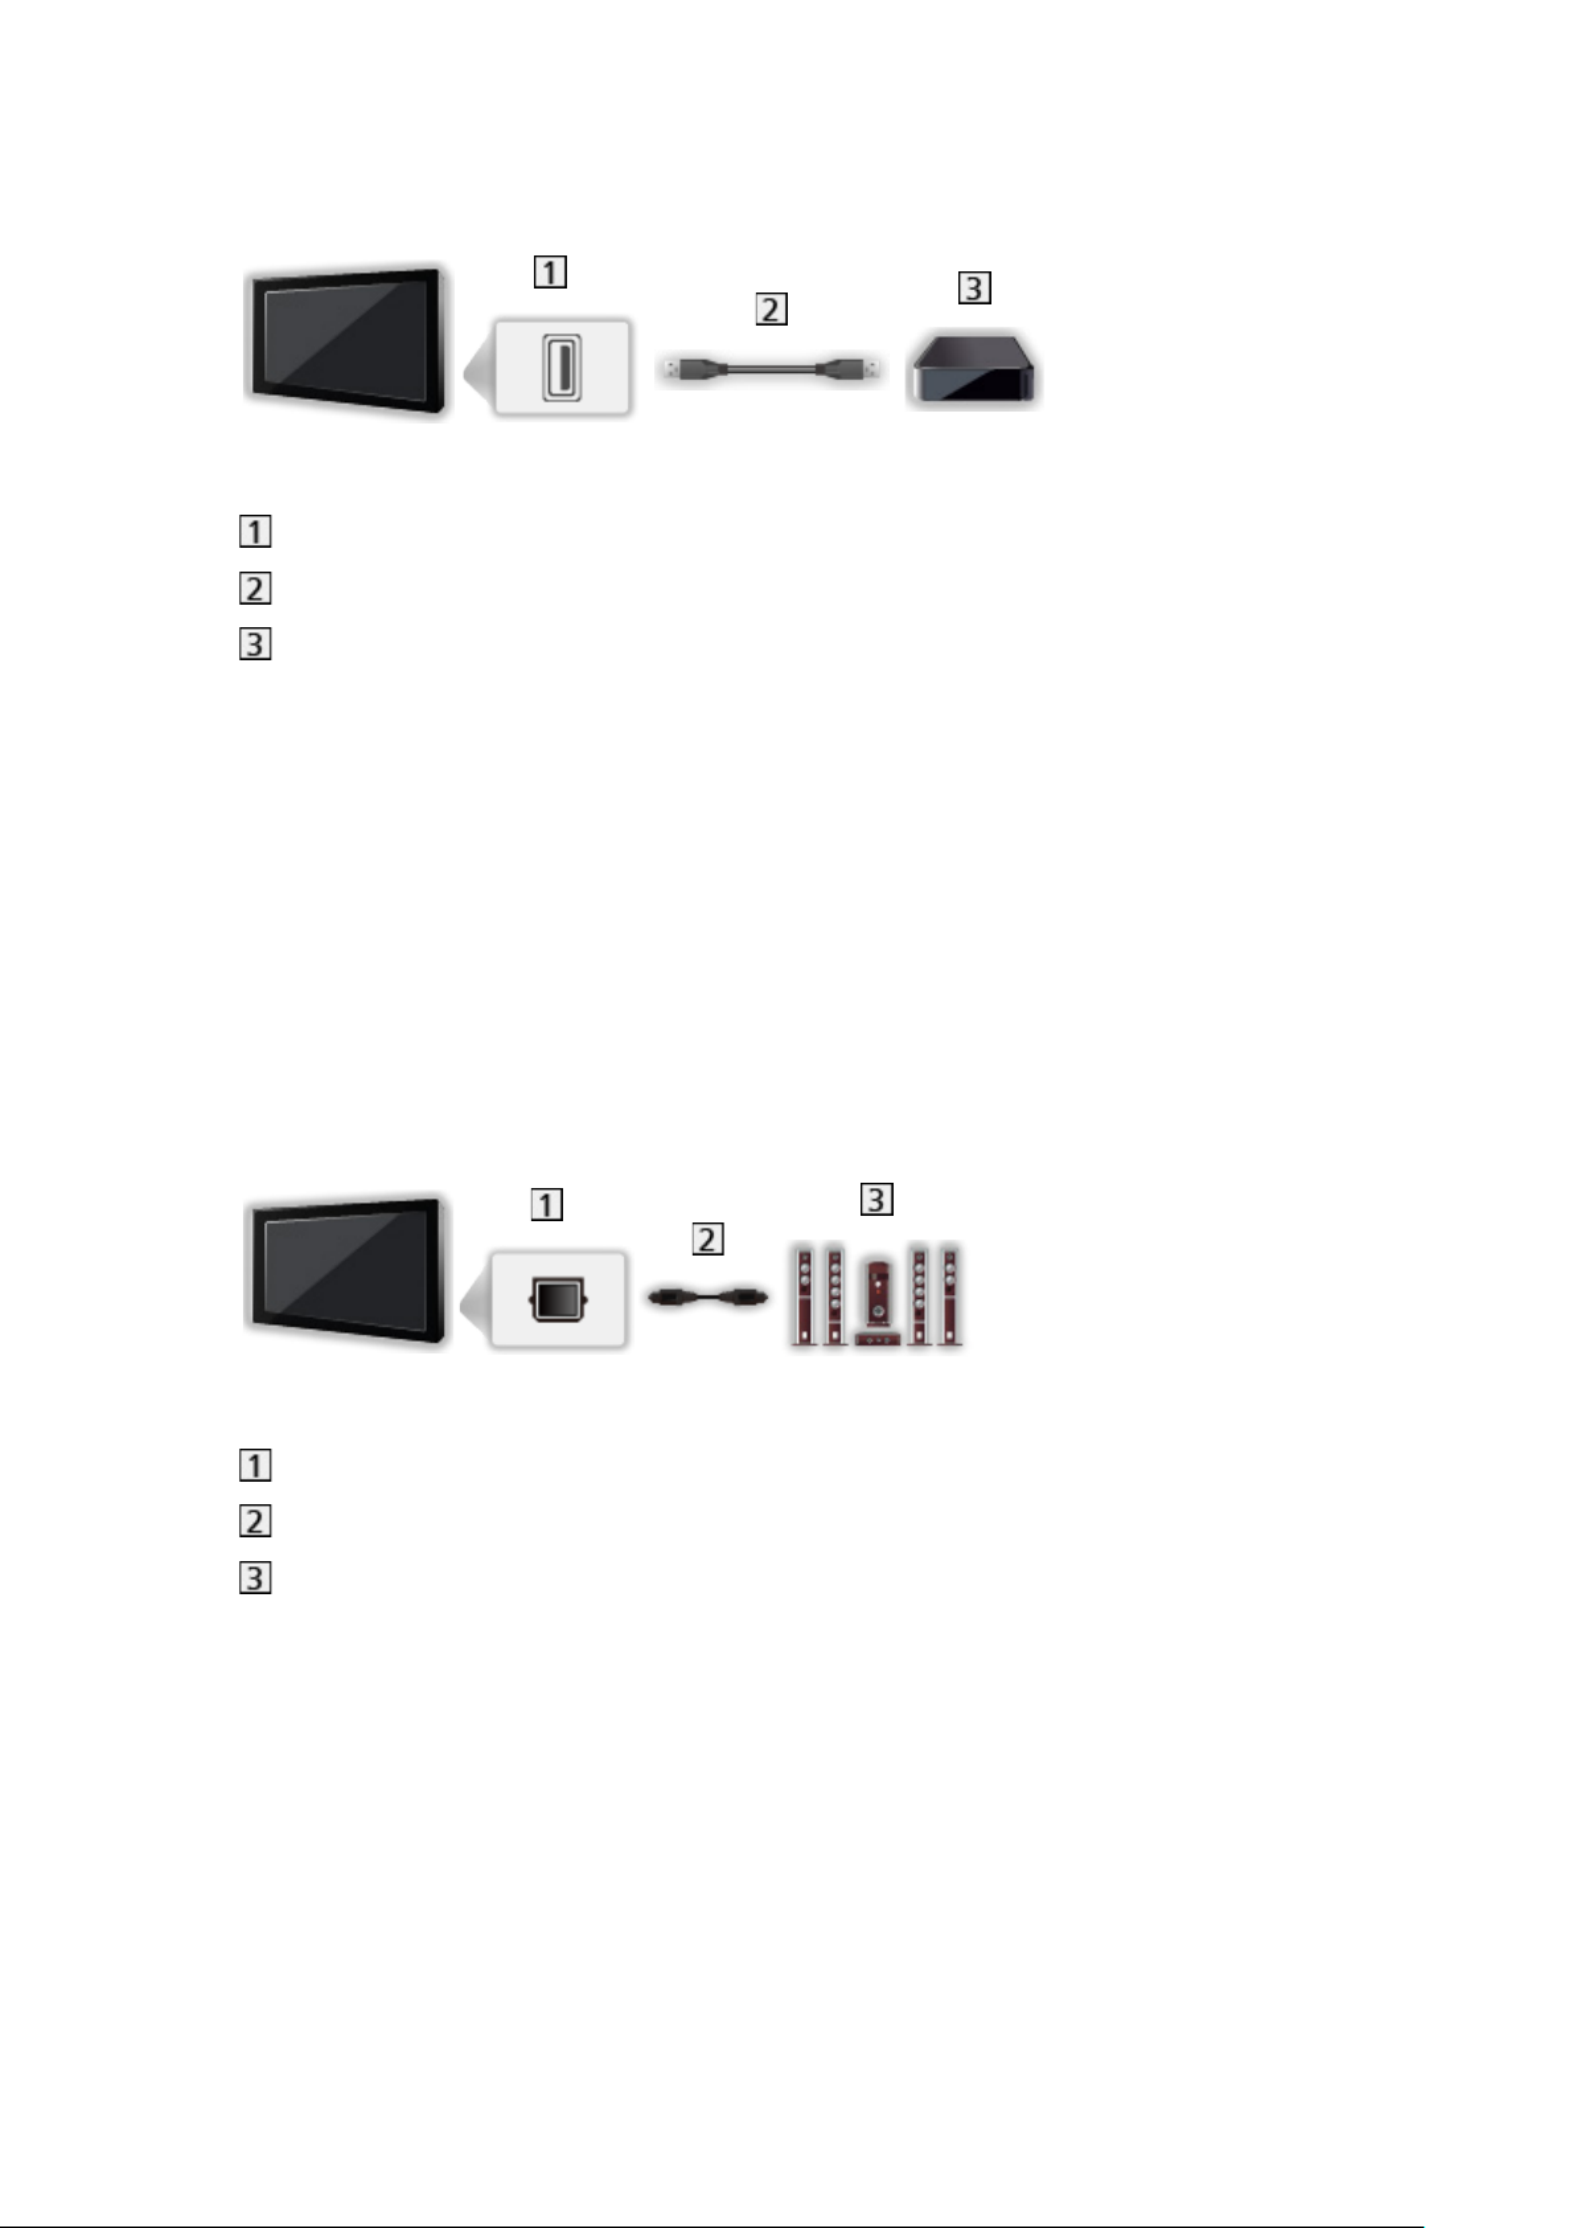
■ USB devices
USB port
USB cable
USB HDD, etc.
= Note =
● It is recommended to connect the device to the TV’s USB port directly.
● Use USB 1 port for connecting the USB HDD. USB 2 port is not available
for connecting the USB HDD. (Refer to the terminal indication of TV set.)
● Some USB devices or USB HUB may not be used with this TV.
● You cannot connect any devices by using USB card reader.
■ Listening with external speakers
DIGITAL AUDIO
Optical digital audio cable
Amplifier with speaker system
● To enjoy multi-channel sound from external equipment (e.g. Dolby
Audio (Dolby Digital) 5.1ch), connect the equipment to the amplifier. For
information about the connections, read the manuals of the equipment and
amplifier.
- 39 -
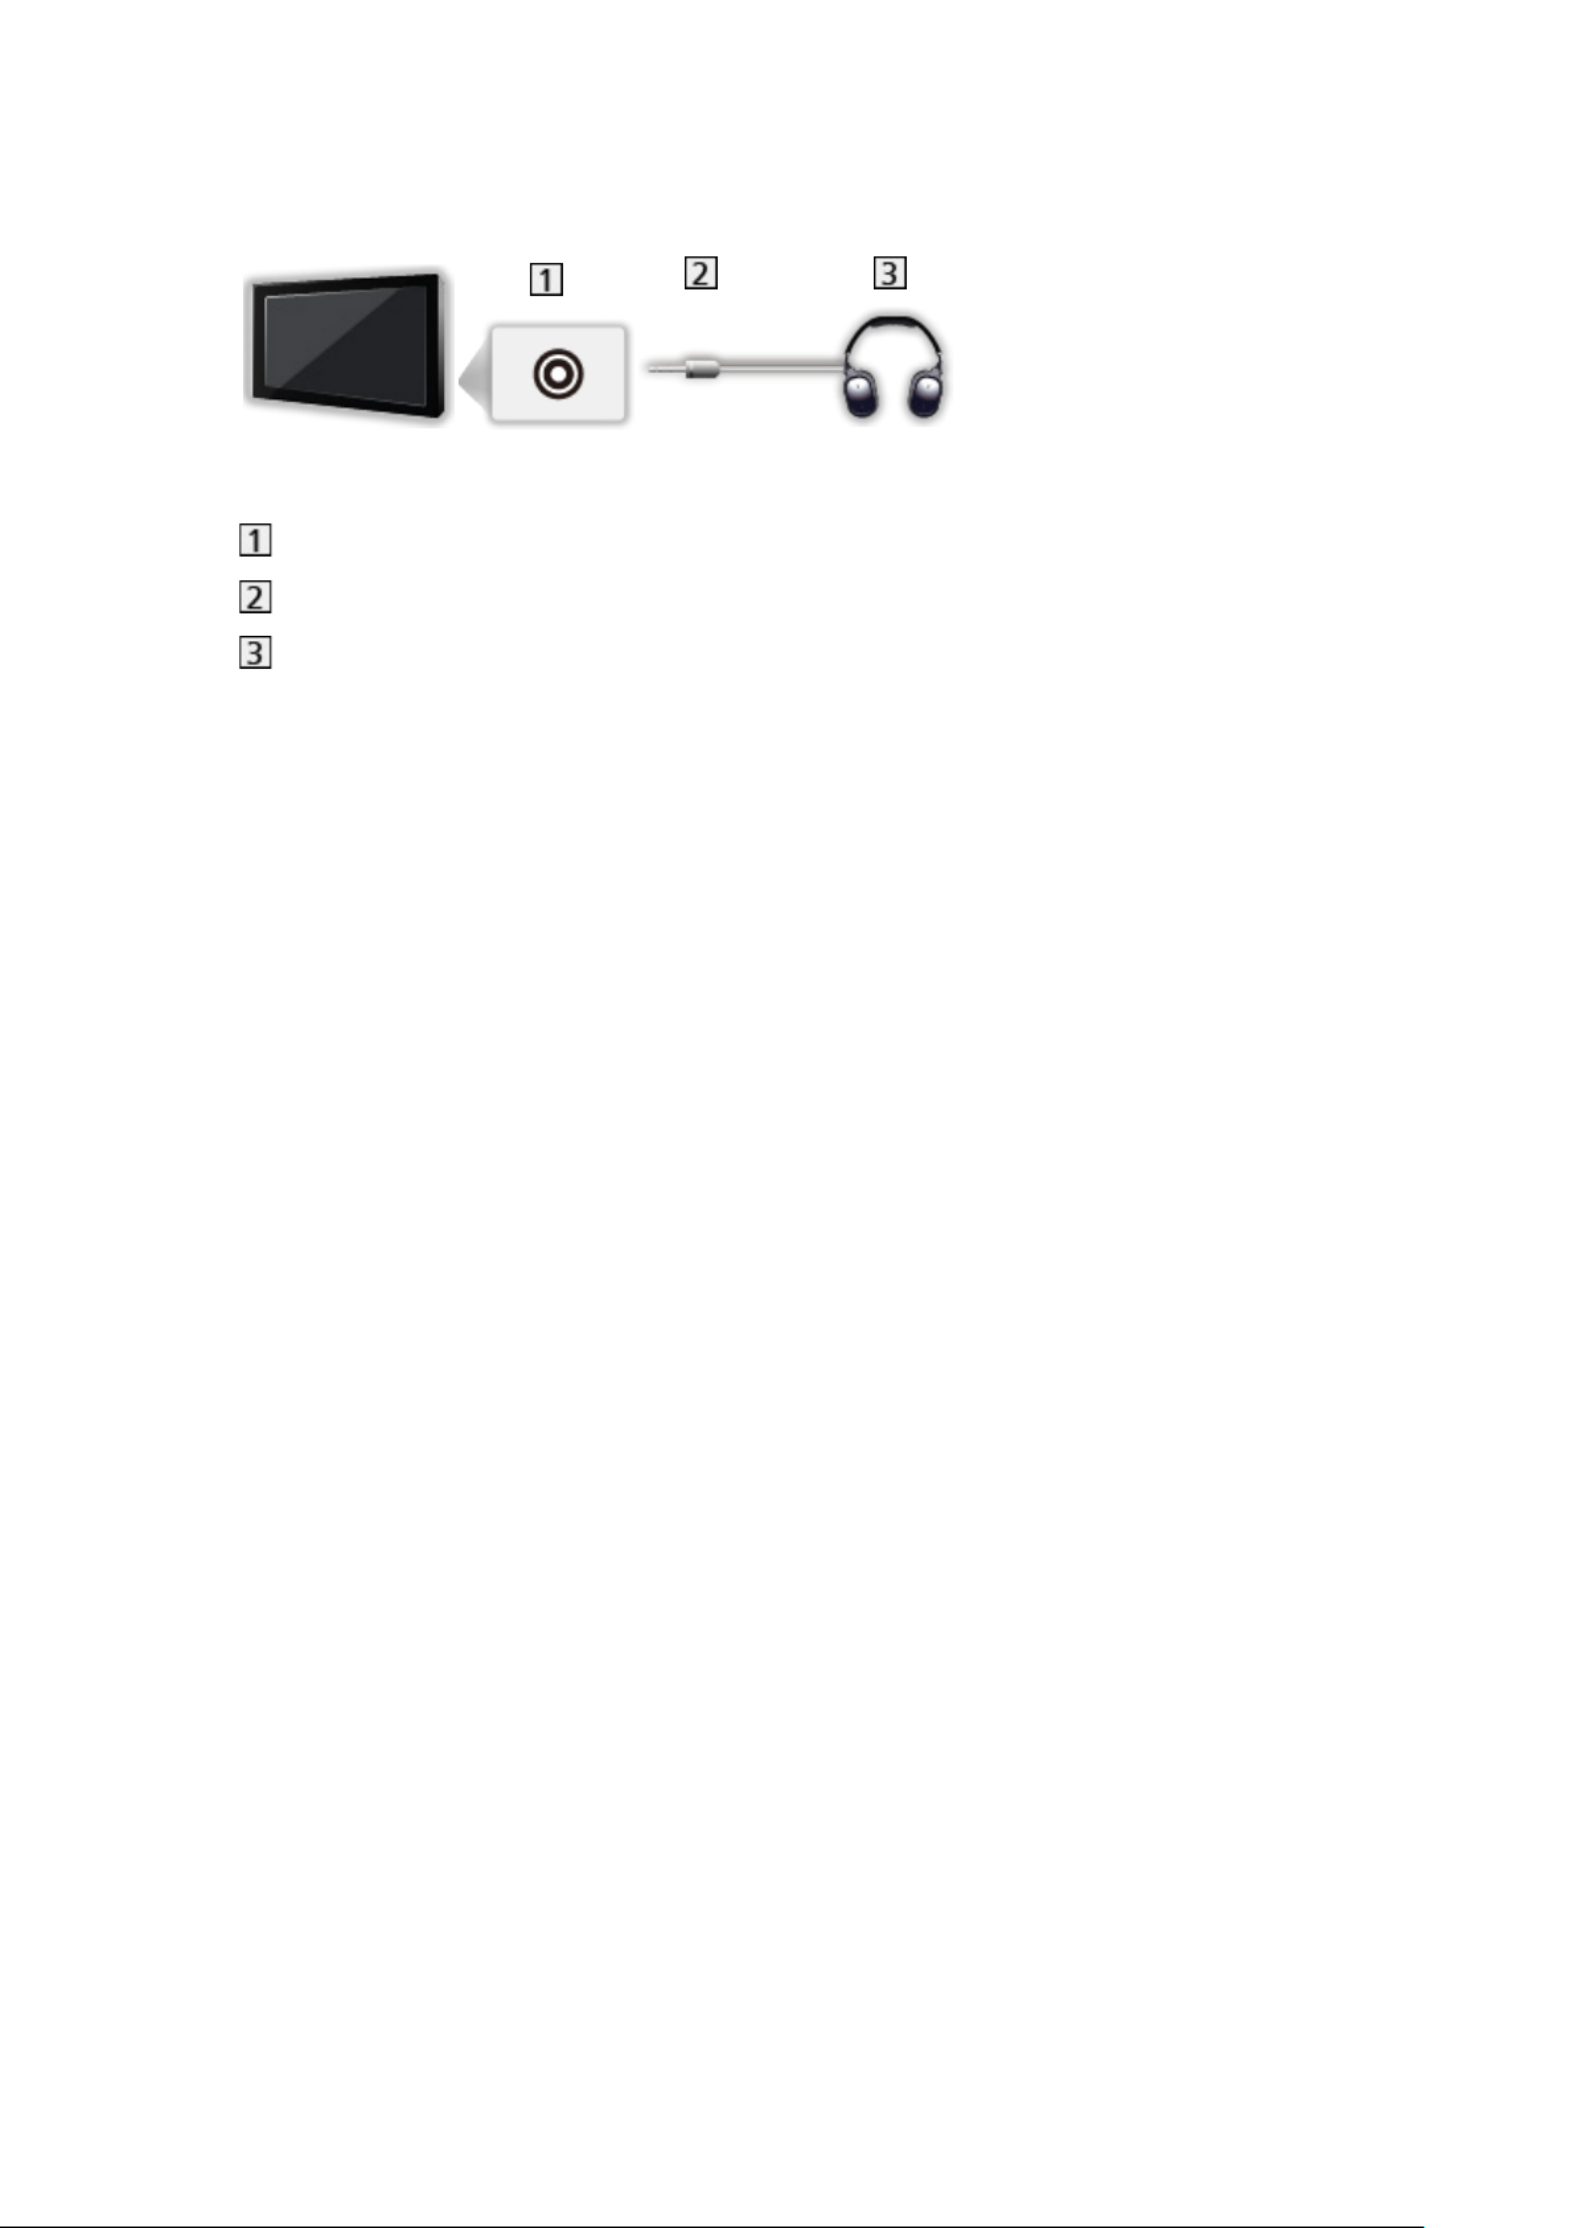
■ Headphones
Headphone jack
3.5 mm stereo mini plug
Headphones
- 40 -

Watching external input
Connect the external equipment and you can watch through the input.
1. Display the input selection menu with INPUT.
2. Select the input mode connected to the equipment and press to watch. OK
(The selected mode is displayed on the top right of the screen.)
●You can also select the input pressing INPUT. Press repeatedly until the
desired input is selected.
●The remote control is capable of operating the content or external
equipment.
Watching > External equipment > Operating with TV’s remote control
●To return to TV mode
INPUT
■Standby Inputs
Accessing the input labels list allows you to change the input name or skip the
input if unconnected, improving identification.
1. Display the menu with .MENU
2. Select Settings Device Preferences Inputs > > and press to access.OK
3. Select the input to edit and press .OK
4. Follow the on-screen instructions.
= Note =
●For details, read the manual of the equipment or ask your local dealer.
- 41 -

Operating with TV’s remote control
You can operate the content in Media Player, recording functions or the
connected equipment with the following buttons of this TV’s remote control.
:
Playback
:
Stop the operations
:
Search backward
:
Search forward
:
Pause
:
Start recording
= Note =
● Some operations may not be available depending on the equipment.
- 42 -

HDMI features
HDMI (high-definition multimedia interface) is the world’s first complete digital
consumer AV interface complying with a non-compression standard.
HDMI allows you to enjoy high-definition digital images and high-quality
sound by connecting the TV to external equipment.
HDMI-compatible equipment* with an HDMI or DVI output terminal, such as a
DVD player, a set top box or game equipment, can be connected to the HDMI
terminal using a fully wired HDMI compliant cable.
Watching > External equipment > External connection
* : The HDMI logo is displayed on HDMI-compliant equipment.
■Applicable HDMI features
●Input audio signal:
LPCM, Dolby Audio (Dolby Digital, Dolby Digital Plus, Dolby TrueHD),
Dolby Atmos
●Input video signal:
Matches the output setting of the digital equipment.
Watching > External equipment > Valid input signals
●HDMI CEC
Functions > HDMI CEC > CEC connection
●Content Type
●Deep Colour
●ARC (Audio Return Channel)
– ARC (Audio Return Channel) is a functions to send digital sound
signals via an HDMI cable.
– For HDMI2
●x.v.Colour™
●4K
Watching > 4K resolution > Valid 4K format
- 43 -

■DVI connection
If the external equipment has only a DVI output, connect to the HDMI terminal
via a DVI to HDMI adaptor cable.
●Depending on the model, composite cable (not supplied) may be
necessary to connect to the audio input terminals.
●Enquire HDMI adaptor cable at your local digital equipment retailer shop.
= Note =
●If the connected equipment has an aspect adjustment function, set the
aspect ratio to “16:9”.
●These HDMI connectors are “type A”.
●These HDMI connectors are compatible with HDCP (High-Bandwidth
Digital Content Protection) copyright protection.
●Equipment having no digital output terminal may be connected to the
analogue input terminals to receive analogue signals.
●This TV incorporates HDMI™ technology.
- 44 -

Valid input signals
■ HDMI
Signal name
525 (480) / 60p
625 (576) / 50p
750 (720) / 60p, 50p
1 125 (1 080) / 60i, 50i
1 125 (1 080) / 60p, 50p, 24p
3 840 × 2 160 / 60p, 50p, 30p, 25p, 24p
4 096 × 2 160 / 60p, 50p, 30p, 25p, 24p
= Note =
● Signals other than those above may not be displayed properly.
● The above signals are reformatted for optimal viewing on your display.
● For details of valid 4K format
Watching > 4K resolution > Valid 4K format
- 45 -

For best picture
Viewing Mode
1. Display the menu with .MENU
2. Select Settings Picture Viewing Mode > > and press to access.OK
3. Select the mode and press to set.OK
Viewing Mode
( / / / / Dynamic Normal Cinema Filmmaker True Cinema Sport Game / / /
Dolby Vision Vivid Dolby Vision Bright Dolby Vision Dark / / )
Selects your favourite picture mode for each input.
Dynamic:
Improves contrast and sharpness for viewing in a bright room.
Normal:
Normal use for viewing in a normal lighting condition.
Cinema:
Improves the performance of contrast, black and colour reproduction
for watching a film in a darkened room.
Filmmaker:
Reproduces the original image quality precisely. Reacts to room
brightness.
True Cinema:
Reproduces the original image quality precisely without any revision.
Sport:
Improves picture quality for watching sports, etc.
●The sound mode is automatically set to when Sports Viewing Mode
is set to . To cancel the linkage of the sound and viewing Sport
mode, set to .Sport Link Off
Watching > For best audio > Basic settings
Game:
Improves picture quality for playing games, etc.
Dolby Vision Vivid:
Reproduces Dolby Vision content precisely in a bright room.
Dolby Vision Bright:
Reproduces Dolby Vision content precisely in a normal lighting
condition.
- 46 -

Aspect
Changes the aspect ratio (image size).
■ To change the aspect ratio manually
1. Display the menu with .MENU
2. Select Settings Picture Screen Settings > > and press to access.OK
3. Select Aspect and press to access.OK
4. Set the item and press to store.OK
Auto:
The best ratio is selected automatically (if available).
16:9:
Directly displays the image at 16:9 without distortion (anamorphic).
4:3:
Displays a 4:3 image enlarged horizontally to fit the screen.
Zoom:
Displays a 16:9 letterbox or 4:3 image without distortion.
= Note =
● Display the image full-screen to use this function completely.
- 48 -

Resolution Remaster
Enhances picture resolution to make the image sharper.
Dynamic Range Remaster
Enhances bright areas of the image closer to the original luminance making
improved picture impact.
Clear Motion
Makes the moving pictures clearer by controlling the level of backlight.
Copy Adjustment
Copies the picture settings of Filmmaker, True Cinema Dolby Vision Bright, or
Dolby Vision Dark to those of the other input mode or Viewing Mode.
●Option Settings Screen Settings and are not copied.
Reset to Default
Resets the current Picture Viewing Mode to the default settings.
- 50 -

Ambient Sensor
1. Display the menu with .MENU
2. Select Settings Picture > > Ambient Sensor and press to access.OK
3. Select On / Off and press to set.OK
Ambient Sensor
●Automatic Brightness Control function
Adjusts picture settings automatically depending on ambient lighting
condition.
- 51 -

For best audio
Sound Mode
1. Display the menu with .MENU
2. Select Settings Sound Sound Mode > > and press to access.OK
3. Select the mode and press to set.OK
Sound Mode
( / / / / / / )User Standard Vivid Sports Movie Music News
●User is available when Dolby Audio Processing is set to Off.
- 57 -

Basic settings
1. Display the menu with .MENU
2. Select Settings Sound > and press to access.OK
3. Select one of the following items and press to access.OK
Balance Bass Treble Sound Surround Equalizer Detail Sport Link / / / / /
/ / / Speakers Speaker Delay Audio Output Speaker Volume Digital / /
Output SPDIF Delay / / Auto Volume Control / Dolby Audio Processing /
Reset to Default
4. Set the item and press to store.OK
Balance
Adjusts the volume level of right and left speakers.
●This function is available when is set to .Dolby Audio Processing Off
Bass
Adjusts level to enhance or minimise lower, deeper sound output.
●This function is available when is set to .Dolby Audio Processing Off
Treble
Adjusts level to enhance or minimise sharper, higher sound output.
●This function is available when is set to .Dolby Audio Processing Off
Sound Surround
Provides a dynamic enhancer of width to simulate improved spatial effects.
●This function is available when is set to .Dolby Audio Processing Off
Equalizer Detail
Adjusts the frequency level to suit your favourite sound quality.
●This function is available when is set to and Sound Mode User Dolby
Audio Processing is set to Off.
●Select the frequency and adjust the frequency level.
●To enhance the bass sound, raise the level of the lower frequency. To
enhance the treble sound, raise the level of the higher frequency.
- 58 -

Tuning and editing channels
Setting menu
Some features are not available on all models. Available menu items are displayed on your TV screen.
You can retune channels, skip unwanted channels, etc.
1. Select the mode with INPUT.
2. Display the menu with .MENU
3. Select Settings Channel Channels > > and press to access.OK
4. Select one of the functions and press to access.OK
Channel Scan Manual Service Update Digital Manual Scan Favourite / / /
Network Select Logical Channel Numbers Channel Skip Channel / / /
Move Channel Swap Channel Edit Clear Channel List / / /
- 62 -
Termékspecifikációk
| Márka: | Panasonic |
| Kategória: | televízió |
| Modell: | TX-75LX800B |
Szüksége van segítségre?
Ha segítségre van szüksége Panasonic TX-75LX800B, tegyen fel kérdést alább, és más felhasználók válaszolnak Önnek
Útmutatók televízió Panasonic

9 Április 2025
9 Április 2025
9 Április 2025
9 Április 2025
9 Április 2025
4 Április 2025
4 Április 2025
4 Április 2025
12 Január 2025
12 Január 2025
Útmutatók televízió
- televízió Samsung
- televízió Sony
- televízió Beko
- televízió Fujitsu
- televízió Acer
- televízió Nedis
- televízió LG
- televízió Grundig
- televízió Marantz
- televízió Philips
- televízió Pioneer
- televízió SilverCrest
- televízió JVC
- televízió AEG
- televízió Sharp
- televízió Nokia
- televízió Lenovo
- televízió Casio
- televízió Toshiba
- televízió Oppo
- televízió Hyundai
- televízió Hisense
- televízió BenQ
- televízió SunBriteTV
- televízió Siemens
- televízió Medion
- televízió TCL
- televízió Xiaomi
- televízió GoGen
- televízió Insignia
- televízió Infiniton
- televízió Dell
- televízió Strong
- televízió VOX
- televízió Vivax
- televízió Thomson
- televízió Polaroid
- televízió Aiwa
- televízió Orima
- televízió V7
- televízió Clatronic
- televízió PEAQ
- televízió Qilive
- televízió Haier
- televízió Mitsubishi
- televízió Cecotec
- televízió Sencor
- televízió GPX
- televízió Küppersbusch
- televízió Innoliving
- televízió AOC
- televízió Citizen
- televízió Westinghouse
- televízió Hitachi
- televízió Continental Edison
- televízió Telefunken
- televízió Nevir
- televízió Monster
- televízió Roadstar
- televízió Optoma
- televízió CHiQ
- televízió Viewsonic
- televízió Nextbase
- televízió Denver
- televízió Bush
- televízió Trevi
- televízió Albrecht
- televízió Daewoo
- televízió Funai
- televízió Tesla
- televízió Smart Tech
- televízió Muse
- televízió Energy Sistem
- televízió OK
- televízió SVAN
- televízió Loewe
- televízió RevolutionHD
- televízió Polar
- televízió Manhattan
- televízió Kogan
- televízió Horizon
- televízió Intenso
- televízió Furrion
- televízió Teac
- televízió Aspes
- televízió Digihome
- televízió Manta
- televízió Blaupunkt
- televízió Sagem
- televízió Jay-Tech
- televízió Logik
- televízió Finlux
- televízió Peerless-AV
- televízió Abus
- televízió AG Neovo
- televízió Bang & Olufsen
- televízió Iiyama
- televízió AKAI
- televízió TechniSat
- televízió Seiki
- televízió Jensen
- televízió Pyle
- televízió Emerson
- televízió Sanyo
- televízió Kemo
- televízió Salora
- televízió Lenco
- televízió Schneider
- televízió Philco
- televízió ECG
- televízió Uniden
- televízió Technika
- televízió NEC
- televízió Element
- televízió Soundmaster
- televízió Alphatronics
- televízió AYA
- televízió MBM
- televízió Krüger&Matz
- televízió Dual
- televízió Brandt
- televízió Wharfedale
- televízió Allview
- televízió RCA
- televízió OKI
- televízió Orion
- televízió SereneLife
- televízió Schaub Lorenz
- televízió Luxor
- televízió Metz
- televízió ILive
- televízió Graetz
- televízió Tatung
- televízió Packard Bell
- televízió EasyMaxx
- televízió Orava
- televízió Arçelik
- televízió Planar
- televízió Zenith
- televízió Doffler
- televízió QBell Technology
- televízió SYLVOX
- televízió Majestic
- televízió Reflexion
- televízió FFalcon
- televízió Megasat
- televízió Sogo
- televízió United
- televízió Techwood
- televízió Newstar
- televízió Matsui
- televízió Alden
- televízió Aldi
- televízió Airis
- televízió Aristona
- televízió Apex
- televízió Icy Box
- televízió Lexibook
- televízió Palsonic
- televízió Walker
- televízió Saba
- televízió Antarion
- televízió Kernau
- televízió Tevion
- televízió Proscan
- televízió Vestel
- televízió Tucson
- televízió Sunstech
- televízió Nabo
- televízió Sylvania
- televízió Sunny
- televízió Marquant
- televízió Nordmende
- televízió AudioAffairs
- televízió Magnum
- televízió Audiosonic
- televízió Kubo
- televízió Proline
- televízió Coby
- televízió Seg
- televízió Vivo
- televízió Daitsu
- televízió Terris
- televízió Changhong
- televízió Alba
- televízió Naxa
- televízió Star-Light
- televízió Fantec
- televízió Mpman
- televízió Sweex
- televízió Vizio
- televízió Cello
- televízió Mx Onda
- televízió Nikkei
- televízió Hannspree
- televízió DGM
- televízió Yasin
- televízió Humax
- televízió XD Enjoy
- televízió MT Logic
- televízió Superior
- televízió Kunft
- televízió Difrnce
- televízió ITT
- televízió Grunkel
- televízió Avtex
- televízió Inovia
- televízió Odys
- televízió NPG
- televízió Bluesky
- televízió Videocon
- televízió Xoro
- televízió Durabase
- televízió HKC
- televízió Edenwood
- televízió Woxter
- televízió Premier
- televízió Onn
- televízió Teleco
- televízió Opera
- televízió LTC
- televízió JTC
- televízió Zalman
- televízió Ferguson
- televízió Viewpia
- televízió XS4ALL
- televízió JGC
- televízió Online
- televízió Dyon
- televízió DirecTV
- televízió Tele 2
- televízió Telesystem
- televízió EKO
- televízió E-motion
- televízió Mitsai
- televízió Selfsat
- televízió High One
- televízió Tve
- televízió ISymphony
- televízió Pantel
- televízió Magnavox
- televízió ATYME
- televízió HCI
- televízió Inno-Hit
- televízió Lin
- televízió Engel
- televízió Bang Olufsen
- televízió TechLine
- televízió Elements
- televízió Englaon
- televízió Time
- televízió Reflex
- televízió Astar
- televízió Visco
- televízió Tivax
- televízió H&B
- televízió Norcent
- televízió TELE System
- televízió TIM
- televízió Oyster
- televízió Belson
- televízió Vision Plus
- televízió Sbr
- televízió Bauhn
- televízió Voxx
- televízió Rm 2000
- televízió Hoher
- televízió Felson
- televízió Mach Power
- televízió Elbe
- televízió Axing
- televízió CGV
- televízió Séura
- televízió Mitzu
- televízió Caratec
- televízió JTC24
- televízió Coocaa
- televízió Kivi
- televízió Smart Brand
- televízió Voxicon
- televízió Aconatic
- televízió Mitchell & Brown
- televízió FOX Electronics
- televízió Mystery
Legújabb útmutatók televízió

10 Április 2025

10 Április 2025

10 Április 2025

9 Április 2025
9 Április 2025
9 Április 2025
9 Április 2025

9 Április 2025
9 Április 2025
9 Április 2025