Használati útmutató Panasonic TH-55LX650K
Olvassa el alább 📖 a magyar nyelvű használati útmutatót Panasonic TH-55LX650K (24 oldal) a televízió kategóriában. Ezt az útmutatót 7 ember találta hasznosnak és 2 felhasználó értékelte átlagosan 4.5 csillagra
Oldal 1/24

LED TV
Operating Instructions
English
Thank you for purchasing this Panasonic product.
Please read these instructions carefully before operating
this product and retain them for future reference.
Illustrations shown may be different between models
and countries.
The images shown in this manual are for illustrative
purposes only.
Some illustrations are presented as conceptual images
and may be different from the actual products.
The illustrations for 50-inch model is used in this
manual unless otherwise mentioned.
Transport only in upright position
Model No.
TH-43LX650K/KX
TH-50LX650K/KX
TH-55LX650K/KX
TH-65LX650K/KX
TH-75LX650K/KX
43-inch model 50-inch model
55-inch model 65-inch model
75-inch model
Dolby, Dolby Audio, and the double-D symbol are
trademarks of Dolby Laboratories Licensing Corporation.
Manufactured under license from Dolby Laboratories.
Confidential unpublished works. Copyright 1992-2019
Dolby Laboratories. All rights reserved.

2
Contents
WARNING To reduce the risk of fire or electric shock.:
This equipment is a Class II or double insulated
electrical appliance. It has been designed in such
a way that it does not require a safety connection
to electrical earth.
Panasonic does not guarantee operation and
performance of peripheral devices made by other
manufacturers; and we disclaim any liability or damage
arising from operation and/or performance from usage of
such other maker’s peripheral devices.
Notice for Digital terrestrial broadcasting
functions
Function related to Digital broadcasting will work in
the areas where the digital terrestrial broadcasting
services are received. Consult your local Panasonic
Dealer with coverage areas.
Not all the features are available depending on the
country, area, broadcaster and service provider.
This TV has the capability for Digital broadcasting
specifications. But future Digital broadcasting
services cannot be guaranteed.
Even if no special notation has been made of company
or product trademarks, these trademarks have been fully
respected.
- This lightning flash with arrowhead symbol within an
equilateral triangle is intended to alert the user to the
presence of non-insulated “dangerous voltage” within
the product’s enclosure that may be of sufficient
magnitude to constitute a risk of electric shock.
- Warning: To reduce the risk of electric shock, do not
remove cover (or back) as there are no user-serviceable
parts inside. Refer servicing to qualified personnel.
- The exclamation point within an equilateral triangle is
intended to alert the user to the presence of important
operating and maintenance instructions in the literature
accompanying the appliance.
1. The mains plug/appliance coupler is used as
disconnect device, the disconnect device shall remain
readily operable.
2. The battery (battery or batteries or battery pack) shall
not be exposed to excessive heat such as sunshine,
fire or the like.
3. To prevent injury, this apparatus must be securely
attached to the floor/wall in accordance with the
installation instruction.
Safety Precautions ···································· 3
Setting Up the TV ·······································4
Connecting the TV ···································· 6
Initial Setup ················································ 8
Operating the TV ········································10
Watching External Inputs ························· 13
Using Media Player ································· 17
Using Homepage-Apps
·························· 13
Using the Menu Functions ····················· 14
Additional Information ····························· 18
Troubleshooting ····································· 19
Maintenance ············································ 20
Specifications·········································· 21
3
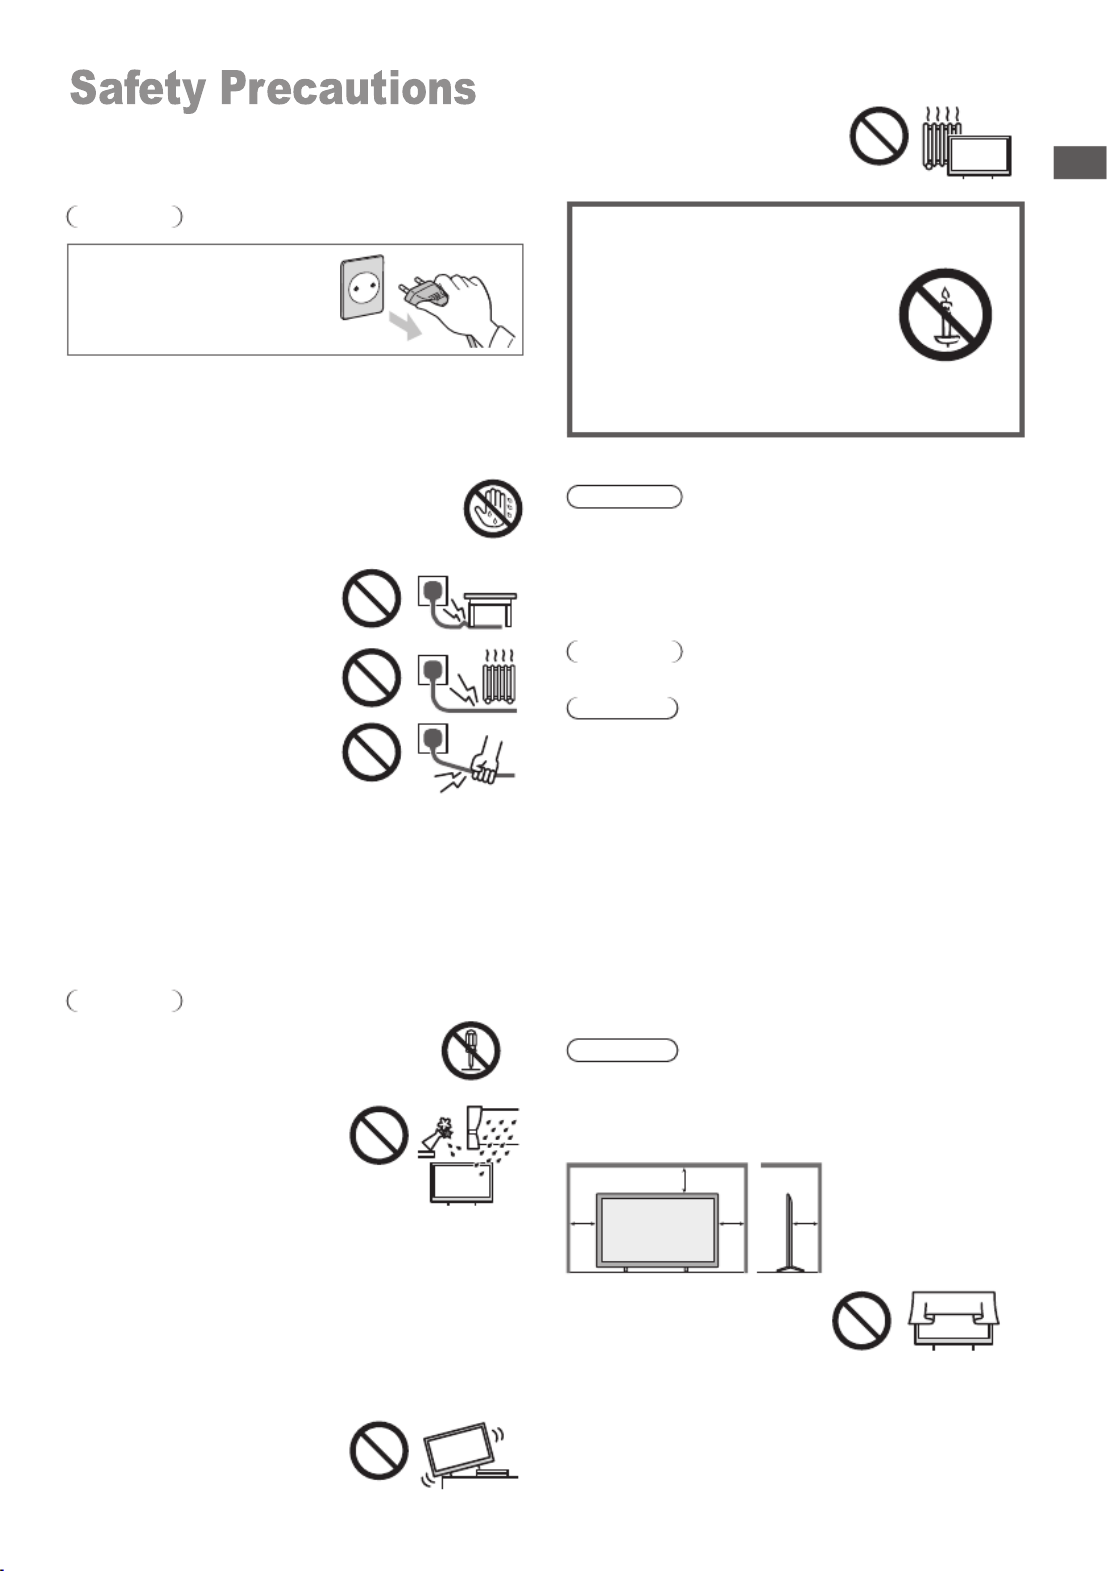
To prevent the
spread of fire, keep
candles or other
open flames away
from this product at
all times
■Dangerous part / Small object
Warning
●This product contains possibly dangerous parts such
as plastic bags, that can be breathed in or swallowed
by young children accidentally. Keep these parts out of
reach of young children.
■Pedestal
Warning
●Do not disassemble or modify the pedestal.
Caution
●Do not use any pedestal other than the one provided
with this TV.
●Do not use the pedestal if it becomes warped or
physically damaged. If this occurs, contact your
nearest Panasonic dealer immediately.
●During setup, make sure that all screws are securely
tightened.
●Ensure that the TV does not suffer any impact during
installation of the pedestal.
●Ensure that children do not climb onto the pedestal.
●Install or remove the TV from the pedestal with at least
two people.
●Install or remove the TV by the specified procedure.
■Ventilation
Caution
Allow sufficient space around the TV in order to help
prevent excessive heat, which could lead to early failure
of some electronic components.
Minimum distance (cm)
10
10
10 10
●Ventilation should not be
impeded by covering the
ventilation openings with
items such as newspapers,
tablecloths and curtains.
●Whether you are using a pedestal or not, always
ensure the vents at the bottom of the TV are not
blocked and there is sufficient space to enable
adequate ventilation.
Safety Precautions
TV is designed for table-top use.
●This
●Do not expose the TV to direct
sunlight and other sources of
heat.
To help avoid risk of electrical shock, fire, damage or
injury, please follow the warnings and cautions below:
■Mains plug and lead
Warning
If you detect anything unusual,
immediately remove the mains
plug.
●Mains plug types vary
between countries.
●This TV is designed to operate on AC 100 - 240 V,
50/60 Hz.
●Insert the mains plug fully into the socket outlet.
●Ensure that the mains plug is easily accessible.
●Disconnect the mains plug when cleaning the TV.
●Do not touch the mains plug with wet hands.
●Do not damage the mains lead.
• Do not place a heavy object
on the lead.
• Do not place the lead near a
high temperature object.
• Do not pull on the lead. Hold
onto the mains plug body
when disconnecting the plug.
• Do not move the TV with the lead plugged into a
socket outlet.
• Do not twist the lead, bend it excessively or stretch it.
• Do not use a damaged mains plug or socket outlet.
• Ensure the TV does not crush the mains lead.
●Do not use any mains lead other than that provided
with this TV.
■Take care
Warning
●Do not remove covers and never modify
the TV yourself as live parts are accessible
when they are removed. There are no user
serviceable parts inside.
●Do not expose the TV to rain
or excessive moisture. This TV
must not be exposed to dripping
or splashing water and objects
filled with liquid, such as vases,
must not be placed on top of or
above the TV.
●Do not insert foreign objects into the TV through the
air vents.
●Do not use an unapproved pedestal / mounting
equipment. Be sure to ask your local Panasonic dealer
to perform the setup or installation of approved wall-
hanging brackets.
●Do not apply strong force or impact to the display
panel.
●Do not place the TV on sloped
or unstable surfaces, and
ensure that the TV does not
hang over the edge of the base.

4
■Moving the TV
Caution
Before moving the TV, disconnect all cables.
●Move the TV with at least two
people. Support as shown to
avoid injury by the TV tipping
or falling.
■When not in use for a long time
Caution
This TV will still consume some power even in the Off
mode, as long as the mains plug is still connected to a
live socket outlet.
●Remove the mains plug from the wall socket when the
TV is not in use for a prolonged period of time.
■Use conditions
Caution
●This appliance is intended for use in tropical climates.
Setting Up the TV
Safety Precautions |
Acces ie not be placed all togethesor s may r. Take ca re
not to throw them away unintentionally.
(p.5)
RC700P
■ Built-in wireless LAN
Caution
● Do not use the built-in wireless LAN to connect to any
wireless network (SSID*) for which you do not have
usage rights. Such networks may be listed as a result
of searches. However, using them may be regarded
as illegal access.
*
SSID is a name for identifying a particular wireless
network for transmission.
● Do not subject the built-in wireless LAN to high
temperatures, direct sunlight or moisture.
● Data transmitted and received over radio waves may
be intercepted and monitored.
● The built-in wireless LAN uses 2.4 GHz and 5 GHz
frequency bands. To avoid malfunctions or slow
response caused by radio wave interference when
using the built-in wireless LAN, keep the TV away
from other devices that use 2.4 GHz and 5 GHz
signals such as other wireless LAN devices,
microwave ovens, and mobile phones.
● When problems occur due to static electricity, etc., the
TV might stop operating to protect itself. In this case,
turn the TV off at the Mains power On / Off switch,
then turn it back on.
■ Bluetooth® wireless technology
Caution
● The TV use the 2.4 GHz radio frequency ISM band
(Bluetooth ®). To avoid malfunctions or slow response
caused by radio wave interference, keep the TV away
from the devices such as other wireless LAN devices,
other Bluetooth devices, microwaves, mobile phones
and the devices that use 2.4 GHz signal.
■Battery for the Remote Control
Caution
●Incorrect installation may cause battery leakage,
corrosion and explosion.
●Replace only with the same or equivalent type.
●Do not mix old and new batteries.
●Do not mix different battery types (such as alkaline and
manganese batteries).
●Do not use rechargeable batteries (Ni-Cd, etc.).
●Do not burn or break up batteries.
●Do not expose batteries to excessive heat such as
sunshine, fire or the like.
●Make sure you dispose of batteries correctly.
•
43-inch model
●Assembly screws
(ST4 × 20) × 4
●Base
●Assembly screws
●Base
(ST5 x 25) × 4
50-inch model
55-inch model
●
Assembly screws
●Base
(ST5 x 25) × 4
●Adapter AV
(p.8)
<650K model only>

5
Setting Up the TV
1 Assemble the pedestal
Be sure to remove the pedestal in the following way when
using the wall-hanging bracket or repacking the TV.
Removing the pedestal from the TV
Preparation
1 Lay the TV on a foam mat or thick soft cloth on a
table.
2 Remove the assembly screws from the TV.
Inserting remote’s batteries
Note the correct
polarity (+ or -)
push down
the cover
65-inch model
●
Assembly screws
●Base
75-inch model
●
Assembly screws
(M6 × 35) × 4
●Base
(M5 × 25) × 4
Illustrations shown may be different between models
and countries.
Note
b
a
Please contact your local Panasonic dealer to purchase the
recommended wall-hanging bracket.
Rear of the TV
of
(View from the side)
Depth
screw
Screw for fixing the TV onto the
wall-hanging bracket (not supplied)
■
Holes for wall-hanging bracket installation
Model a b
43-inch 300 mm 300 mm
50-inch 300 mm 300 mm
55-inch 300 mm 300 mm
65-inch 400 mm 300 mm
75-inch 400 mm 300 mm
■
Model Type
43-inch M6 12 mm 15 mm
50-inch M6 12 mm 15 mm
55-inch M6 12 mm 15 mm
65-inch M6 12 mm 15 mm
75-inch M6 12 mm 15 mm
Depth of screw
Minimum Maximum

6
(eARC)
9
Connecting the TV
●Please ensure the TV is disconnected from the
mains socket/ power point before attaching or
disconnecting any RF/ AV leads.
●External equipment and cables are for illustrative
purposes only and not supplied with this TV.
●Check the type of terminals and cable plugs are
correct when connecting.
●When using an HDMI cable, use the fully wired one.
●Keep the TV away from electronic equipment (video
equipment, etc.) or equipment with an infrared
sensor. Otherwise, distortion of image/ sound may
occur or operation of other equipment may be
interfered.
●Also read the manual of the equipment being
connected.
Rear of the TV
7
8
9
5
2
3
USB 3.0
1 USB 2.0
4
ETHERNET
5
HDMI 2
6
7
9
10
DIGITAL AUDIO OUT
HDMI 1(eARC)
HEADPHONE
AV IN
ANTENNA
6
3
4
2
1
●Keep RF (aerial) cable away from the mains lead to
avoid and minimise mains interference pickup.
●Do not place the RF cable under the TV.
●An aerial, correct cable (75 coaxial) and correct Ω
terminating plug are required to obtain optimum quality
picture and sound.
●If a communal aerial system is used, you may require
the correct connection cable and plug between the wall
aerial socket and the TV.
●Your local Television Service Centre or dealer may be
able to assist you in obtaining the correct aerial system
for your particular area and the accessories required.
●Any matters regarding aerial installation, upgrading
of existing systems or accessories required, and
the costs incurred, are the responsibility of you, the
customer.
●If the aerial is placed in the wrong location, interference
might happen.
RF cable
Aerial
ANT
●When optional accessories such as wall brackets etc.
are used, always read and follow the manufacturer
installation and usage instructions.
●Do not mount the unit directly below ceiling lights
(such as spotlights or halogen lights) which typically
give off high heat. Doing so may warp or damage
plastic cabinet parts.
●When installing wall brackets you must ensure the
wall bracket is not electrically grounded to metal wall
studs. Always ensure that there are no electrical
cables, pipes etc. in the wall before you begin the
wall bracket installation.
●To prevent fall and injury, remove the TV from its
fixed wall position when it is no longer in use.
Warning
HDMI 3
8
10

7
Connecting the TV
HDMI 1/2/3
HDMI 1/2/3
HDMI 1/2/3
DVD Recorder / VCR
DVD Recorder /
VCR
TV
HDMI cable
HDMI 1/2/3
■Using AV terminals
Equipment
MiNi AV Cable
TV
AV in
Set top box
TV Set top box
HDMI cable
Satellite dish
Speaker system
Optical cable
TV Amplifier with
speaker system
read the manuals of the equipment and amplifier.
●To enjoy the sound from the external equipment in
multi-channel sound (e.g. Dolby Digital 5.1ch), connect
the equipment to the amplifier. For the connections,
●
Blu-Ray Player
Blu-Ray Player
TV
HDMI cable
AV / Game equipment
■ Using HDMI terminal
TV
HDMI cable Equipment
Amplifier
Equipment
TV
HDMI cable
HDMI 1
(eARC)
Amplifier with
speaker system
Use HDMI1 to connect the TV to an amplifier which has
eARC/ARC(Audio Return Channel) function.
If connecting to an amplifier without eARC/ARC function,
use DIGITAL AUDIO OUT.
DIGITAL
AUDIO OUT

8
Initial Setup
Initial Setup
When you first turn on the TV, a series of steps will pop-
up to guide you to setup your TV.
●These steps are not necessary if the setup has been
completed by your local dealer.
1 Plug the mains plug into the socket
outlet and turn on the TV.
It may take a few seconds before the screen is
displayed.
AC 100 - 240 V,
50/60 Hz
Note: If you have connected the TV to the WI-FI network,
it will check for updates like Google service updates and
so on. Then please select whether or not to sign in to your
Google account.
When you turn on the TV for the first time,there will show
a wizard to guide you to finish the following initial settings:
Step 1: Select the menu language as you need.
Note: English(United States) is recommended.
Step 2: (Only for some countries) Select whether or not
to use and Android device to setup the TV.
Google - Initial Setup
Note: If you don’t want to use your Android device to
setup the TV,you will skip to Step 3.If you want to use
your Android device to setup the TV, please turn on the
Bluetooth functions of your Android phone, then find and
open “Google” application on your phone. Follow the
instruction tips to set device.
Step 3: Select whether or not to connect your TV set to
the Wi-Fi network.
English(United States)
Tap
llustrations within this publication are provided for reference only.
WIFI
Step 4:
Read to accept the Google terms of service and
privacy policy.
Step 5:
Terms of Service
Accept
By continuing, you agree to the Google Terms of Service, the Google
Privacy Policy, and the Google Play Terms of Service.
This device may also receive and install updates and apps from Google,
your device's manufacturer, or your operator. Some of these apps may
offer optional in-app purchases. You can remove them or adjust their
permissions at any time from the device settings.
Google also collects and temporarily stores the voice and audio history
from microphone use to improve the product experience.
Terms of Service
Privacy Policy
Play Terms of Service
Sign in to get new apps, recommendations,
movies, the Assistant,and more from Google.
PANASONIC TV(486)on the list

9
Initial setup involves selecting all the settings required
to be able to search for and store all the analogue
channels you can receive.
Make sure that the television is switched on and follow
wi ar open whic guide hroug inz d s, h s you t h the itial
setup process.
Step 2: Where are you?
Press ▲/▼ to select your Country/Region.Press to
confirm and move to next step.
OK
Note: u m e t e ePict re od setting will no b accessibl
when you select Shop Mode.
Home Mode: You ould W be able to view he andar t st d
settings for Picture and sound mode s.
Shop Mode: Y cou an enjo y enhanced se ing tt for Picture
and ound S modes.
Step 1: Environment
Press ▲/▼ to select your environment.Then press to
enter next step.
OK
Step 3: Terms & Conditions
Use ▲/▼ to T t ,read erms & Condi ions then press OK to
confirm and move to next step.
Step 4: Channel installation
Use ▲/▼ to ct nt ; sele Tunner mode: A enna, Cable etc
Type Digi al: t , Analogue ,and All then press OK to confirm and
move to next step.
Step 5: Please check settings
When all setup is done, the [Please check settings] interface
displays on the screen, and press OK to finish the initial setup.
You can also go back to former step and make any changes
by using button. Country/Region MALAYSIA
Environment Home
Step 1:
Step 2:
Step 3:
Step 4:
Step 5:
Next
Environment
Please choose your Environment
Home
Shop
Where are you?
We will provide you with the local time,climate
and more information.
Country/Region
Terms & Conditions
Please read the terms & conditions and agree.
Terms and Conditions
Terms and Conditions
The contents and services collectively the(
“Licensed Application” made available to you)
through this TV set (this “Device” ) are licensed, not
sold, to you for use only under these terms and
conditions. The providers of the Lisensed Application
(each an “Application Provider”) reserve all rights not
expressly granted to you.
1.Scope of License
The license granted to you for a Licensed
Application by the relevant Application Provider
is limited to a non-transferable license to use the
Licensed Application on the Device that you own or
Next
Channel installation
Tuner mode
ANTENNA
Type
Digital
Scan Skip
Please verify settings in system settings.
Please check settings
Start now
Initial Setting
Setup is now complete and your TV is ready for viewing.
Note
●If tuning has failed, check the connection of the RF cable, then follow the on-screen instructions.
Initial Setup
MALAYSIA
KYRGYZSTAN
LAO PDR
LEBANON
MALDIVES

10
Operating the TV
Operating the TV
Using the remote control
Remote Control Functions
Most of your television's functions are available via the menus that appear on the
screen. The remote control supplied with your set can be used to navigate through
the menus and to configure all the general settings.
POWER
(On/Off button) Turns the TV on or off
Goes to the smart TV homepage
Press to display the electronic programme guide
Display to the information
To exit the program
Goes to the NETFLIX homepage
Performs multiple operations which correspond to the
operation guide displayed on the menu screen
Colour buttons
Goes to the YouTube homepage
To open the settings menu
MENU
To enter the picture mode.
PICTURE
To enter the sleep timer.
OFF TIMER
To enter source selection interface
INPUT
Goes to the AUDIO LINK homepage
Goes to the prime video homepage
To select the apps
Goes to the Google Play homepage
EXIT
Exit the menu and return to the previous menu
(Mic)
(Available only when the network connection is normal.)
Displays the options menu of selected functions
OPTION
To enter the channel list
FAV
BACK
To open the apps,move the apps or remove from favorites
To fast backward
To fast forward
To play
To end the running program
To pause
Start recording
Increases or decreases the volume
To mute and un-mute the sound
To show the subtitles
+ -
MUTE
TEXT
STTL
Confirms your selection.
(up, down, left and right direction buttons) Highlights
different items in the menu system and adjusts the
menu controls.
OK
◄/►
▲/▼
To show the text

11
Operating the TV
Select the digital key number
To enter the media player
Audio description
MEDIA PLAYER
0~9
AD
Channel up / down
Step 1: Press button to enter the home page.
Step 2: Press button to enter the “RC pairing”.
Step 3: OKFollow the “Settings tips page” Press , and together.
Step 4: The screen will display “Pairing...”, Pair finished the screen will
display “Success!”.
NOTE:If you wait more than 2 minutes and it can’t pair,
please repeat the above steps for pairing again.
If you want to unpair the Bluetooth remote, As follow:
Step 1: Press button to enter the home page.
Step 2: OKPress to choose ,and then press to enter.
Step 3: Press to select “Remotes & Accessories” and then to chooe
the Bluetooth remote name to enter next steps.
Step 4: Press unpair and then choose OK button.
How to Pair Remote Control with the TV
This is a Bluetooth remote control, and before using it,
please pair it with the TV firstly.The following steps are for
your reference:
▲/▼ ◄/►
2. Aim remote control reception and unpair by following below.
When remote control does not respond
1. Press and hold the button as shown below for 3 seconds to reset
remote control.
Home > Setting > Remotes & accessories > RCU03 > Unpair
13
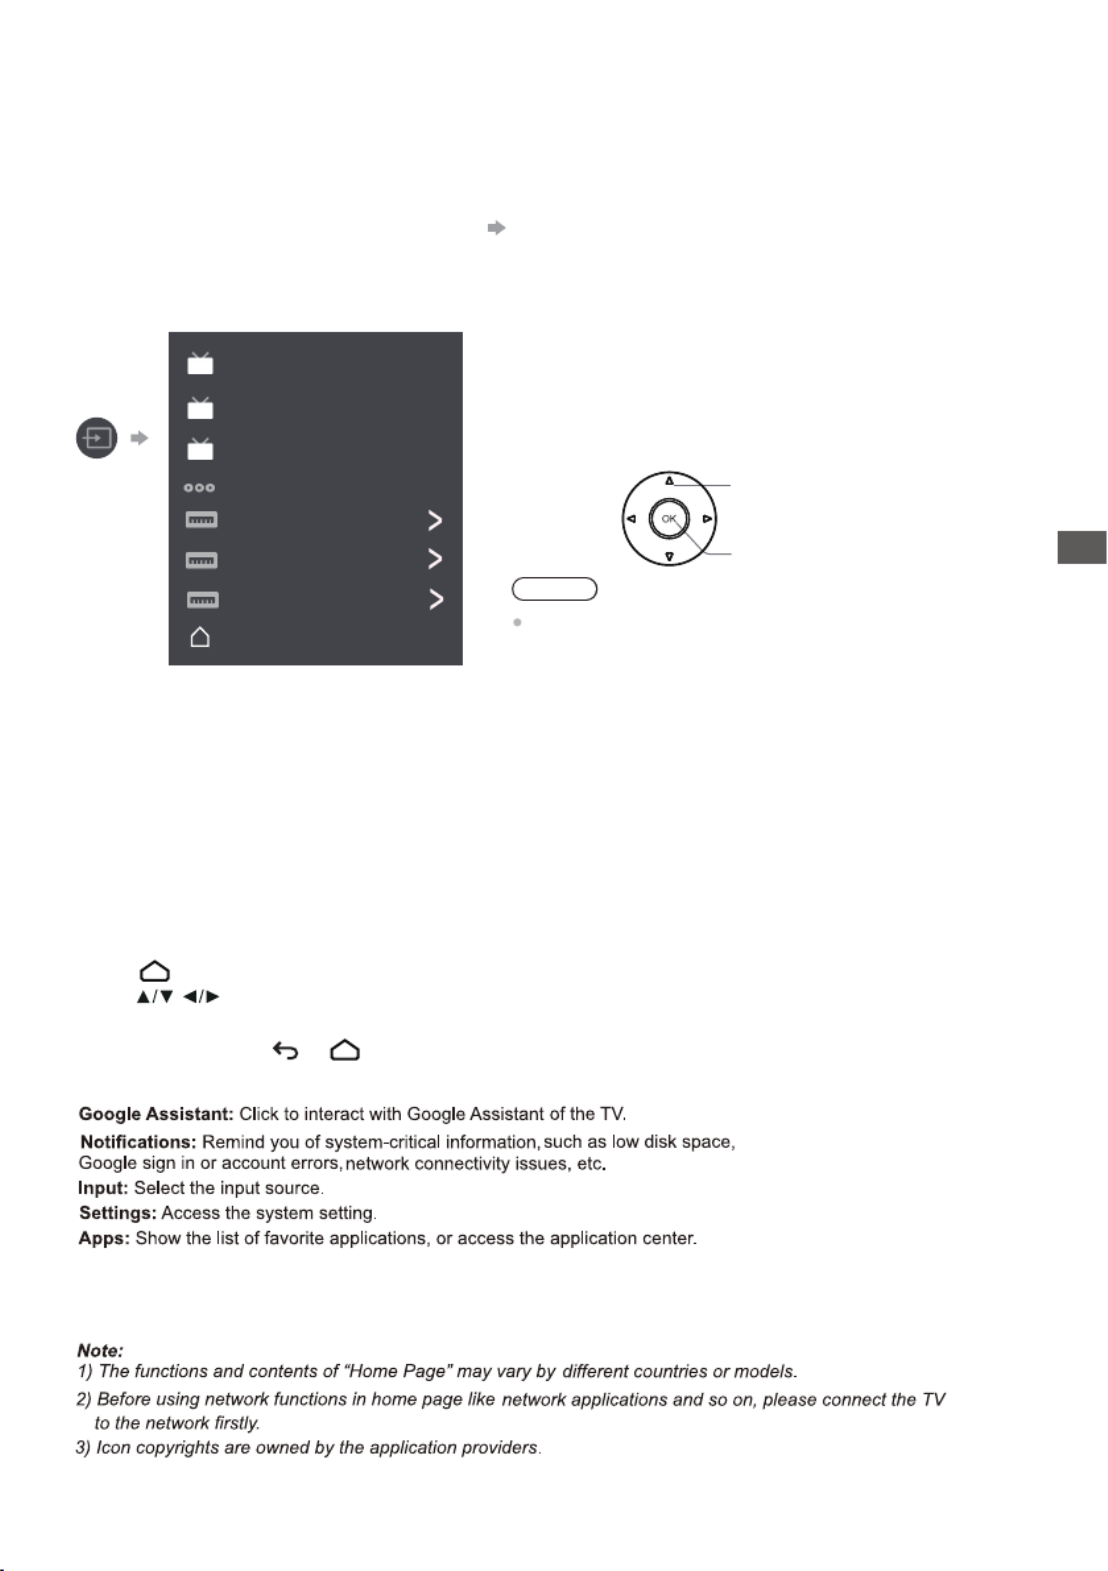
Watching External Inputs | Using Homepage - Apps
Watching External
Inputs
1 Connect the external equipment. (p. 6 - 7)
2 Display the [Input] menu, then select the input of the connected equipment.
Note
If the external equipment has an aspect adjustment
function, set it to “16:9”.
Press OK key access.
OK
Select
Note: This manual is for common use. Figures and illustrations in this User Manual are provided for reference only
and may differ from actual product appearance. And for some models, certain options are not available.
You can select all the features from homepage.
Press to display homepage.
Press /to select icons from the screen list.
Press to enter each option.OK
Customize channels: Add and remove channels from your Home screen.
Using Homepage - Apps
To exit the APP, press or .
ATV
ANTENNA
CABLE
AV
HDMI 1
HDMI 2
HDMI 3
Android TV Home
14
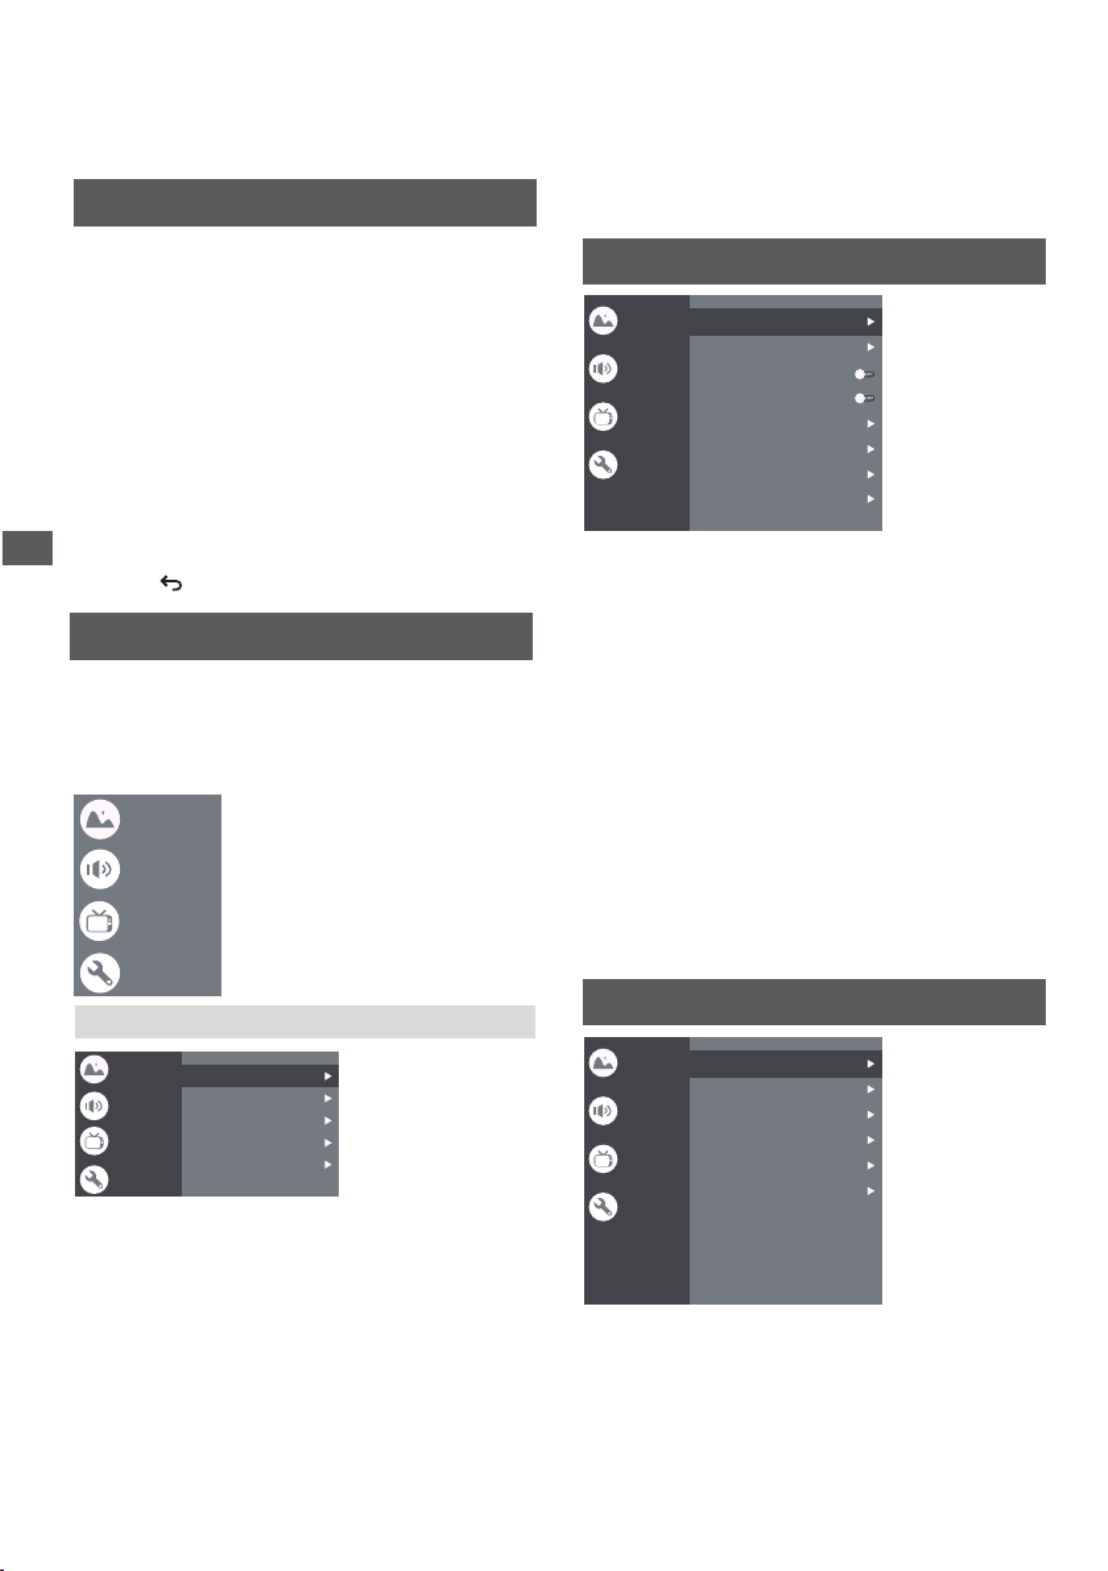
Using the Menu Functions
Using the Menu
Functions
Note: Some of the functions might be unavailable
in certain sources. And for some models, certain
options are not available.
This section explores the menus and settings of your
TV. Each menu is outlined and detailed to help you get
the most from your TV. To access the menu system:
1. In TV mode, press MENU
on the remote control to
display the quick access list.
2. Press to select the desired item, then press ▲/▼
OK to open the corresponding submenu.
3. In submenu, use to make ◄/► and buttons OK
the adjustments, or use to select an item, use ▲/▼
OK to enter and operate according to the on-screen
display or guide.
4. Press to return to the previous menu.
Using Quick Access Menu
Picture:Enter to adjust picture mode or advanced settings.
Channel: Select this option to adjust the channel.
System: Select this option to adjust the settings.
Sound:
Select this option to set the sound adjustments.
Picture Mode: To select the mode of Normal,Dynamic,
Filmmaker, Sport,Game and Custom.
Channel Scan:
Allows you to scan for all available analog
and digital channels.
To select the option to adjust the Subtitle Setup, Teletext
Setup, Audio Setup, LCN, Auto Service Update,
Update Scan(Auto Scan) .
Digital Channel Setup:
ECO Setting:
To select the Off,Low and High.
Advanced Setting:
Color Temperature:To select the Normal,Cool,Warm.
Dynamic Contrast:To select ON or OFF.
Aspect Ratio:
Displays the [Aspect Ratio] screen. Follow the operation
guide to select the mode. [16:9] / [4:3] / Auto / Original.
Backlight: Select the level of 0-100.
Picture
Sound
Menu
Picture
Sound
System
Picture
Sound
System
Channel
Channel
Picture Mode Normal
100
High
16:9
Backlight
ECO Setting
Aspect Ratio
Advanced Settings
Sound Mode: To select the mode of Standard,Speech,
Music,Stadium and User.
Night Mode: Select ON or OFF.
Dolby Audio Processing: Select ON or OFF.
Select the PCM, ByPass, Auto.
Output Device:
Digital Output :
Advanced Settings:
To select the TV Speaker, SPDIF/Optical
and HDMI-ARC.
Select it and the TV screen will turn off in
9 seconds.
Sound Only:
Surround Mode: Select OFF Pure Sound and Surround.,
Sound Mode
Surround Mode
Night Mode
Sound Only
Output Device
Digital Output
Advanced Settings
Standard
Tv Speaker
Off
PCM
HDMI PC/ AV Mode: Video/PC/Auto
Overscan:To select ON or OFF
Noise Reduction:To select Off,Low,Middle,High and Auto.
Picture Reset:To reset the picture.
Motion Estimate and Motion Compensation(MEMC):
To select Off,Low,Middle and High.
Gamma:Select 2.2 or 2.4.
1.DAC-4 Dialogue Enhancer
2.DAC-4 Dialogue Enhancer Level
3.Balance
5.Digital Audio Volume
4.Digital Audio Delay (ms)
6.eARC
7.Sound Reset
Picture
Sound
System
Channel
Channel
Channel Scan
Digital Channel Setup
EPG
Favorite
Channel Diagnostic
Channel Organizer
Picture
Sound
System
Channel
Note: This function is only available in TV mode.
Dolby Audio Processing

15
Using the Menu Functions
Press
OK
/
►
to enter the Program Guide menu.
EPG:
TV Placement:To select Desktop and Wallmount.
Environment:To select Home and Shop.
Shop Mode:To select E-Sticker.
Settings:
Idle TV Standby:To select After 1 hour of inactivity, After
2 hour of inactivity,After 4 hour of inactivity,After 24 hour
of inactivity or off.
The input
Press then press to select your
desired source, and then press OK to confirm.
System
HDMI CEC Settings:
CEC control: To select on or off.
HDMI Signal Format:To select HDMI 1.4 / HDMI 2.0.
Sleep Timer:To select 15min,30min,45min,60min,90min,
120min or off.
Device Auto Power Off: To select on or off.
TV Auto Power On: To select on or off.
CEC Device List: Turn devices on and select [Enable] to
enable control of HDMI devices.
Setup favorite channel list.
Favorite:
Press
OK
/
►
to display some signal information
on current digital channel, such as signal strength,
Frequency, etc.
Channel Diagnostic:
This option allows you to organize channels.
Channel Organizer:
1.Lock: Click and lock the TV.
2.Power: Turn the Wake On Network and Network
Standby on or off.
3.Recording Storage: Put the storage device and record
the storage files.
4.OSS License: The content about oss license.
Software update: To select off,once and Always.
(This function is only for OAD)
HDMI CEC Settings
HDMI Signal Format
Sleep Timer
Idle TV Standby
TV Placement
Environment
Shop Mode
Off
Off
Desktop
Home
Settings
Picture
Sound
System
Channel
Software Update
(2)Primary Preferred Language:Press OK and then use
▲/▼ to select Primary Preferred Language.
(3)Secondary Preferred Language:Press OK and then use
▲/▼ to select Sencond Preferred Language.
Analogue setup:Select ATV and enter.
- Analogue Auto Tuning: Press OK to start the automatic
search process. The search may take a few minutes.
- Analogue Manual Tuning: Press OK to enter the
interface.
Press to set program, Audio system or color system
item, then Press select frequency and press OK to
search channel.
- Teletext Setup: Press OK and then use to select
preferred teletext.
Digital Cable Tuning:Select Cable and enter.
Manual Tune: Select the channel number and start to scan
LCN: Select on or off.
Auto service Update: Select on or off.
Auto tuning: Press OK to start the automatic
search process. The search may take a few minutes.
During the process, you can press Back and choose
YES to exit .
Digital Antenna Tuning:Select Antenna and enter.
Manual Scan: Select the channel number and start to scan
Auto Scan: Press OK to start the automatic
search process. The search may take a few minutes.
During the process, you can press Back and choose
YES to exit .
▲/▼
▲/▼
▲/▼
Press MENU button, then select Channel and press OK to
enter Digital Channel setup, press OK to select Subtitle
Setup.
Subbtitle Setup:
(1)Subtitle Setting:Include off,Basic,Hearing impaired.
ATV
ANTENNA
CABLE
AV
HDMI 1
HDMI 2
HDMI 3
Android TV Home
Channels setup (ATV, CABLE and Antenna )

Using the Menu Functions
16
LCN: Select on or off.
Press MENU button, then select Channel and press OK to
enter Digital Channel setup, press OK to select Audio Setup.
Audio Setup:
Auto service Update: Select on or off.
Update Scan(Auto Scan):Include Off and On.
(5)Secondary Preferred Language:Press OK and then use
▲/▼ to select Sencond Preferred Language.
Press MENU button, then select Channel and press OK to
enter Digital Channel setup, press OK to select Teletext
Setup.
Teletext Setup: Press OK and then use to select▲/▼
preferred teletext or Decoding Page Language.
(1)Audio Description:Include Off and On.
(2)Audio Description Mixing Level:Press OK and then use
◄/► to set Audio Description Mixing Level.
(3)Audio Type: You can set the audio type.
(4)Primary Preferred Language:Press OK and then use
▲/▼ to select Primary Preferred Language.

1 Insert the USB Flash Memory.
2 Select the mode.
[PHOTO]:Displays the thumbnail of all photos in the
USB Flash Memory.
[DOCUMENT]: Displays the thumbnail of all documents
in the USB Flash Memory.
[MUSIC]:Displays the thumbnail of music folders in
the USB Flash Memory.
[VIDEO]: Displays the thumbnail of video titles in the
[DISK]: Displays the thumbnail of all document in
the USB Flash Memory.
USB Flash Memory.
[Contents Display]
Follow the operation guide to perform
available operations.
When the cursor stays on the icon,it displays the
information of the highlighted content.
reyalP aideM gnisU
Media Player allows you to enjoy photo, music or video
recorded on a USB Flash Memory.
The picture may not appear correctly on this TV
depending on the digital cameras used.
Display may take some time when there are many files
and folders in the USB Flash Memory.
Partly degraded files might be displayed at a reduced
resolution.
The folder and file names may be different depending
on the digital camera used.
Starting Media Player
Inserting / Removing the USB Flash
Memory
TV
Insert or remove
straight and
completely.
VideoDocument Photo Music Disk
1. S ect icon tel Disk , he prn ess button to c se f r. OK hoo olde
2. Press Up, Down, Le or ft Right dire ioct n button to esel ct y r ou
des d fire il ane d s to Play.pres OK
3. Press Ret n y of ur ke remote to Stop ay g.pl in
Disk:
500mA
MAX
5V
900mA
MAX
5V
1. S ect el Document
2. Press Up, Down, Le or ft Right dire ioct n button to esel ct y r ou
des d fire il ane d s to Play.pres OK
3. Use OK key to e se more opt nio : ZO +, ZOOM OM-.
4. Press Ret n y of ur ke remote to Stop ay g.pl in
Document:
icon.
Access
Select
Photo:
1 i. S ct Pele cture icon , then ss o hepre OK button t view t
pi urect .
2. Press Up Down Le, , ft or Righ direc ion t t bu ontt to select
y our de ired pic ure iles t f and press OK to show.
3. While showing pi ure press ct , OK to s di play the pla con oley s .
For Pre iou and Nexv s t use te remo le andft Righ keyt .
4. Use OK key to see more op ion t : Le roft tation Righ, t rotation,
ZOOM , uto +, ZOOM- Manual play/A play, Inf torma ion, P y la
mode, Pla in ery t val on,BGM: or o .ff
Video:
1 Video o . Select icon, then press OK button t view movie file.
2. Press Up Down Le, , ft or Righ dire ion bu on t ct tt to t selec
y our de ired ile ands f press o OK t Play.
3 . While pla ingy a Video pre, ss OK Menu of remote to display
t he pla on ole or he la onsole resy c s . F t P y c , P s Ok okey f remote
to P Pla andy au hese t video ile Le ey f . ft k o te of remo t Fast
ba ward Righck . t key f o remote o t Fa .st forward
4 Us . e OPTION key to see more op ion ho t : P to scale, Looping
mode ub, S tit title, Sub le code, Audio track, in ormation andf
video list.
5. Press Re urn keyt o tef remo to Stop playing and re P ss
Re urnt to it. Ex
1 . Select Music icon, then press OK button to li enst to c.Musi
2. Press Up Down Le, , ft or Righ direc ion t t bu ontt to sele ourct y
de ireds file and pre ss OK to . Play
3. The Pla con oley s include revious lay auses P , P /P ,Fast
ba ward as orward Nexck /F t f , t.
P eress OPTION k y to s Pee la Lisy t .
4. Press Re urnt key f o remote o t Stop y .pla ing
Music:
Using Media Player
17

Additional Information
USB Flash Memory
For playing back in Media Player
Format: FAT32
Compliance:
USB2.0 port: Supports only USB1.1 or USB2.0 standard.
USB3.0 port: Supports only USB1.1 or USB2.0 or
USB3.0 standard.
Maximum USB capacity supported is 1TB.
Note
●Data modified with a PC may not be displayed.
●Do not remove the device while the TV is accessing
data. Otherwise this can damage the device or TV.
●Do not touch the pins on the device.
●Insert the device in the correct direction. Otherwise this
can damage device or TV.
●Electrical interference, static electricity, or erroneous
operation may damage the data or device. Panasonic
is not liable for any deterioration or damage of data or
device during operations with the TV.
●It is recommended to connect the USB Flash Memory
directly to the TV’s USB port.
●Some USB devices or USB HUB may not be used with
this TV.
●You cannot connect any devices by using the USB port.
●Additional information for USB devices may be on the
following website. (English only)
http://panasonic.jp/support/global/cs/tv/
Additional
Information
Auto power standby function
The TV will automatically go into Standby mode in the
following conditions:
●No signal is received for 15 minutes.
●[Sleep timer ] is active in the [System] menu (p. 15).
Input signal that can be displayed
Mark : Applicable input signal
●Signals other than above may not be displayed
properly.
●The above signals are reformatted for optimal viewing
on your display.
HDMI connection
This TV incorporates HDMI™ technology. HDMI
(high-definition multimedia interface) is the world’s first
complete digital consumer AV interface complying with
a non-compression standard.
HDMI allows you to enjoy high-definition digital images
and high-quality sound by connecting the TV and the
equipment.
■Applicable HDMI features
●Input audio signal:
2ch Linear PCM (sampling frequencies - 48 kHz,
44.1 kHz, 32 kHz)
●Input video signal:
“Input signal that can be displayed” (p. 18)
Match the output setting of the digital equipment.
Signal name HDMI
525 (480) / 60i, 60p
625 (576) / 50i, 50p
750 (720) / 60p, 50p
1,125 (1,080) / 60i, 50i
1,125 (1,080) / 60p, 50p, 24p
2,250 (2,160) / 60p, 50p, 24p
18
Supported file format in Media Player
■Image Decoder
JPEG; PNG; BMP; GIF
■Audio Decoder
PCM; LPCM; MPEG1/2/4; AAC; WMA; AC3; EAC3;
FLAC
■Subtitles
–The video file and subtitles text file are inside the
same folder, and the file names are the same except
for the file extensions.
–If there are more than one subtitles text file inside
the same folder, they are displayed in the following
order of priority: “.srt”, “.sub”.
Note
●Even if these conditions are fulfilled, some files may
not play depending on how they are encoded.
●Do not use two-byte characters or other special codes
for data.
●Connected devices may become unusable with this
TV
if the file or folder names are changed.
■
MPEG1/2/4; H.264; H.265; AVI; WMV; VP8 ; M-JPEG
Video Decoder

19
Troubleshooting
Sound
No sound is produced.
Check the sound mute setting (p. 14) and volume.
Low level or distorted sound.
Sound signal reception may be deteriorated.
Sound output via HDMI connection is
unusual.
Set the sound setting of the connected equipment to
“2ch L.PCM”.
Troubleshooting
Before requesting service or assistance, please follow
these simple guides to resolve the problem.
If an error message appears, follow the message’s
instructions.
If the problem still persists, please contact your local
Panasonic dealer for assistance.
Screen
Red, blue, green or black spots on the
screen.
This is the characteristic of liquid crystal panels. The
liquid crystal panel is built with very high precision
technology. Occasionally, a few non-active pixels
may appear on the screen as points of red, green,
blue or black. This does not affect the performance
of your TV and it is not a quality problem.
Chaotic image, noisy.
Set [Noise reduction] in the [Picture] menu to remove
noise (p. 14).
Check nearby electrical products (car, motorcycle,
fluorescent lamp).
No image is displayed.
Check the settings of [Contrast] or [Brightness] in the
[Picture] menu (p. 14).
Check the TV is in AV mode. If the TV is in AV mode,
check the selected input mode match the output of
the external equipment (p.
Unusual image is displayed.
Turn the TV off with Mains power On / Off switch
(p. 12), then turn it on again.
Pictures from equipment connected via
HDMI are unusual.
Check the HDMI cable is connected properly.
Turn the TV and equipment off, then turn them on
again.
Check an input signal from the equipment (p. 18).
Use equipment compliant with EIA/CEA-861/861D.
General
The TV goes into Standby mode.
This TV is equipped with auto power standby
function (p. 18).
The remote control does not work or is
intermittent.
Replace the batteries (p. 5).
Point the remote control directly at the remote
control signal receiver of the TV (within about 7 m
and 30 degree angle).
Situate the TV away from sunshine or block sources
of bright light from shining on the remote control
signal receiver of the TV.
Parts of the TV become hot.
Even if the temperature of parts of the front, top and
rear panels has risen, these temperature rises do
not cause any problems in terms of performance or
quality.
The TV panel moves slightly when it is
pushed with a finger.
Clattered sound might be heard.
There is some flexibility around the panel to prevent
damage. This is not a malfunction.
Overcurrent error message appears.
The connected USB device might cause this error.
Remove the device and turn the TV off with Mains
power On / Off switch, then turn it on again.
Check foreign objects are not inside the USB port.
13).
Termékspecifikációk
| Márka: | Panasonic |
| Kategória: | televízió |
| Modell: | TH-55LX650K |
Szüksége van segítségre?
Ha segítségre van szüksége Panasonic TH-55LX650K, tegyen fel kérdést alább, és más felhasználók válaszolnak Önnek
Útmutatók televízió Panasonic

12 Január 2025
12 Január 2025
7 Január 2025
7 Január 2025
7 Január 2025
5 Január 2025
26 December 2024
26 December 2024
26 December 2024
25 December 2024
Útmutatók televízió
- televízió Samsung
- televízió Sony
- televízió Beko
- televízió Fujitsu
- televízió Acer
- televízió Nedis
- televízió LG
- televízió Grundig
- televízió Marantz
- televízió Philips
- televízió Pioneer
- televízió SilverCrest
- televízió JVC
- televízió AEG
- televízió Sharp
- televízió Nokia
- televízió Lenovo
- televízió Casio
- televízió Toshiba
- televízió Oppo
- televízió Hyundai
- televízió Hisense
- televízió BenQ
- televízió SunBriteTV
- televízió Siemens
- televízió Medion
- televízió TCL
- televízió Xiaomi
- televízió GoGen
- televízió Insignia
- televízió Infiniton
- televízió Dell
- televízió Strong
- televízió VOX
- televízió Vivax
- televízió Thomson
- televízió Polaroid
- televízió Aiwa
- televízió Orima
- televízió V7
- televízió Clatronic
- televízió PEAQ
- televízió Qilive
- televízió Haier
- televízió Mitsubishi
- televízió Cecotec
- televízió Sencor
- televízió GPX
- televízió Küppersbusch
- televízió Innoliving
- televízió AOC
- televízió Westinghouse
- televízió Hitachi
- televízió Continental Edison
- televízió Telefunken
- televízió Nevir
- televízió Monster
- televízió Roadstar
- televízió Optoma
- televízió CHiQ
- televízió Viewsonic
- televízió Nextbase
- televízió Denver
- televízió Bush
- televízió Trevi
- televízió Albrecht
- televízió Daewoo
- televízió Funai
- televízió Tesla
- televízió Smart Tech
- televízió Muse
- televízió Energy Sistem
- televízió OK
- televízió SVAN
- televízió Loewe
- televízió RevolutionHD
- televízió Polar
- televízió Manhattan
- televízió Kogan
- televízió Horizon
- televízió Intenso
- televízió Furrion
- televízió Teac
- televízió Aspes
- televízió Digihome
- televízió Manta
- televízió Blaupunkt
- televízió Sagem
- televízió Jay-Tech
- televízió Logik
- televízió Finlux
- televízió Peerless-AV
- televízió Abus
- televízió AG Neovo
- televízió Bang & Olufsen
- televízió Iiyama
- televízió AKAI
- televízió TechniSat
- televízió Seiki
- televízió Jensen
- televízió Pyle
- televízió Emerson
- televízió Sanyo
- televízió Kemo
- televízió Salora
- televízió Lenco
- televízió Schneider
- televízió Philco
- televízió ECG
- televízió Uniden
- televízió Technika
- televízió NEC
- televízió Element
- televízió Soundmaster
- televízió Alphatronics
- televízió AYA
- televízió MBM
- televízió Krüger&Matz
- televízió Dual
- televízió Brandt
- televízió Wharfedale
- televízió Allview
- televízió RCA
- televízió OKI
- televízió Orion
- televízió SereneLife
- televízió Schaub Lorenz
- televízió Luxor
- televízió Metz
- televízió ILive
- televízió Graetz
- televízió Tatung
- televízió Packard Bell
- televízió EasyMaxx
- televízió Orava
- televízió Arçelik
- televízió Planar
- televízió Zenith
- televízió Doffler
- televízió QBell Technology
- televízió SYLVOX
- televízió Majestic
- televízió Reflexion
- televízió FFalcon
- televízió Megasat
- televízió Sogo
- televízió United
- televízió Techwood
- televízió Newstar
- televízió Matsui
- televízió Alden
- televízió Aldi
- televízió Airis
- televízió Aristona
- televízió Apex
- televízió Icy Box
- televízió Lexibook
- televízió Palsonic
- televízió Walker
- televízió Saba
- televízió Antarion
- televízió Kernau
- televízió Tevion
- televízió Proscan
- televízió Vestel
- televízió Tucson
- televízió Sunstech
- televízió Nabo
- televízió Sylvania
- televízió Sunny
- televízió Marquant
- televízió Nordmende
- televízió AudioAffairs
- televízió Magnum
- televízió Audiosonic
- televízió Kubo
- televízió Proline
- televízió Coby
- televízió Seg
- televízió Vivo
- televízió Daitsu
- televízió Terris
- televízió Changhong
- televízió Alba
- televízió Naxa
- televízió Star-Light
- televízió Fantec
- televízió Mpman
- televízió Sweex
- televízió Vizio
- televízió Cello
- televízió Mx Onda
- televízió Nikkei
- televízió Hannspree
- televízió DGM
- televízió Yasin
- televízió Humax
- televízió XD Enjoy
- televízió MT Logic
- televízió Superior
- televízió Kunft
- televízió ITT
- televízió Grunkel
- televízió Avtex
- televízió Inovia
- televízió Odys
- televízió NPG
- televízió Bluesky
- televízió Videocon
- televízió Xoro
- televízió Durabase
- televízió HKC
- televízió Edenwood
- televízió Woxter
- televízió Premier
- televízió Onn
- televízió Teleco
- televízió Opera
- televízió LTC
- televízió JTC
- televízió Zalman
- televízió Ferguson
- televízió Viewpia
- televízió JGC
- televízió Online
- televízió Dyon
- televízió DirecTV
- televízió Tele 2
- televízió Telesystem
- televízió EKO
- televízió E-motion
- televízió Mitsai
- televízió Selfsat
- televízió High One
- televízió Tve
- televízió ISymphony
- televízió Pantel
- televízió Magnavox
- televízió ATYME
- televízió HCI
- televízió Inno-Hit
- televízió Lin
- televízió Engel
- televízió TechLine
- televízió Elements
- televízió Englaon
- televízió Time
- televízió Reflex
- televízió Astar
- televízió Visco
- televízió Tivax
- televízió H&B
- televízió Norcent
- televízió TELE System
- televízió TIM
- televízió Oyster
- televízió Belson
- televízió Vision Plus
- televízió Sbr
- televízió Bauhn
- televízió Voxx
- televízió Rm 2000
- televízió Hoher
- televízió Felson
- televízió Mach Power
- televízió Elbe
- televízió Axing
- televízió CGV
- televízió Séura
- televízió Mitzu
- televízió Caratec
- televízió JTC24
- televízió Coocaa
- televízió Kivi
- televízió Smart Brand
- televízió Voxicon
- televízió Aconatic
- televízió Mitchell & Brown
- televízió FOX Electronics
- televízió Mystery
Legújabb útmutatók televízió

31 Március 2025

31 Március 2025
31 Március 2025

31 Március 2025
30 Március 2025
30 Március 2025
30 Március 2025
29 Március 2025
29 Március 2025

29 Március 2025