Használati útmutató Olympus Tough TG-6
Olvassa el alább 📖 a magyar nyelvű használati útmutatót Olympus Tough TG-6 (166 oldal) a kamera kategóriában. Ezt az útmutatót 10 ember találta hasznosnak és 2 felhasználó értékelte átlagosan 4.5 csillagra
Oldal 1/166

Before You Begin
Table of Contents
Quick Task Index
1. Preparation
2. Shooting
3. Playback
4. Menu Functions
5. Connecting the camera to a
smartphone
6. Using Field Sensor Data
7. Connecting to a Computer
8. Cautions
9. Troubleshooting
10. Information
11. SAFETY PRECAUTIONS
Model No. : IM015
TG-6
Instruction Manual
DIGITAL CAMERA
Thank you for your purchase of an Olympus digital camera. Consult this manual while
operating the camera to ensure that you are using the product safely and correctly.
Be sure you have read and understood the contents of “11. SAFET Y PRECAUTIONS”,
before using this product. Keep these instructions available for future reference.
We recommend that you take test shots to get accustomed to your camera before taking
important photographs.
The screen and camera illustrations shown in this manual were produced during the
development stages and may differ from the actual product.
If there are additions and/or modifications of functions due to firmware update for the
camera, the contents will differ. For the latest information, please visit the Olympus website.

Before You Begin
2
EN
Before You Begin
Read and Follow Safety Precautions
To prevent incorrect operation resulting in fi re or other damage to property or harm to
yourself or to others, read “11. SAFETY PRECAUTIONS” (P. 148) in its entirety before
using the camera.
While using the camera, consult this manual to ensure safe and correct operation. Be
sure to keep the manual in a safe place once it is read.
Olympus will not be held liable for violations of local regulations arising from use of this
product outside the country or region of purchase.
Wireless LAN and GPS
The camera features built-in wireless LAN and GPS. Use of these features outside the
country or region of purchase may violate local wireless regulations; be sure to check
with local authorities before use. Olympus will not be held liable for the user’s failure to
comply with local regulations.
Disable wireless LAN and GPS in areas where their use is prohibited.
g “5. Connecting the camera to a smartphone” (P. 106), “6. Using Field Sensor
Data” (P. 111)
User Registration
Visit the OLYMPUS website for information on registering your OLYMPUS products.

Before You Begin
3
EN
Product Manuals
In addition to the “Instruction Manual” (this pdf), the documentation available for this
product includes “Maintaining Water Resistance” (supplied). Consult these manuals
when using the product.
Instruction Manual (this pdf)
A how-to guide to the camera and its features. The Instruction
Manual can be downloaded from the OLYMPUS website or directly
using the “OLYMPUS Image Share” (OI.Share) smartphone app.
Maintaining Water Resistance
This document lists precautions regarding water resistance. Read
these instructions together with “Important Information about Water
and Shock Resistant Features” (P. 123).
Indications used in this manual
The following symbols are used throughout this manual.
$ Notes Points to note when using the camera.
gReference pages describing details or related information.

Table of Contents
4
EN
Table of Contents
Matching Settings to the Scene
( mode) ................................28SCN
[Live Composite]:
Live composite photography.....31
Panorama .................................32
Shooting at Very Close Range
( mode) .....................................33k
Matching Settings to Underwater
Scenes ( mode) ....................34^
Letting the Camera Select
Aperture and Shutter Speed
( mode) .....................................35P
Selecting Aperture (A mode) ....36
Custom Modes (Custom mode
C1 C2/ ) ......................................... 37
Saving settings .........................37
Recalling settings .....................37
Recording Movies ......................38
Recording Movies in Photo
Shooting Modes .........................38
Recording Movies in Movie Mode
( mode) ....................................39n
Using Various Settings ..............40
Settings Accessible via Direct
Buttons ........................................ 41
Controlling exposure
(Exposure F) ...........................41
Zoom (Digital teleconverter) .....42
Performing the sequential/
self-timer shooting ....................42
Pro Capture ..............................44
Using a fl ash
(Flash photography) .................45
Focus lock ................................46
Using the LED illuminator .........47
Before You Begin 2
Quick Task Index 8
Names of parts 10
1. Preparation 12
Unpacking the Box Contents ....12
Inserting and Removing the
Battery and Card ........................13
Removing the battery ...............14
Removing the card ...................15
Usable cards.............................15
Charging the Battery ..................16
Turning the Camera On ..............17
Initial Setup .................................18
Camera Displays Unreadable/
not in the Selected Language ...20
Formatting the Card ...................21
2. Shooting 22
Information Displays while
Shooting ...................................... 22
Switching the information
display ......................................24
Basic Photography .....................25
Taking photographs
(AUTO mode) ...........................25
Using the zoom.........................26
Selecting a Shooting Mode .......27
Types of shooting modes..........27

Table of Contents
5
EN
Settings Accessible via Live
Controls .......................................48
Processing options
(Picture mode) ..........................50
Changing ISO sensitivity
(ISO) .........................................52
Adjusting color
(White balance) ........................53
Selecting a focus mode
(AF mode).................................55
Setting the image aspect ..........55
Selecting image quality
(Still image quality) ...................56
Selecting image quality
(Movie quality) ..........................57
Reducing camera shake
(Image stabilizer) ......................59
Adjusting fl ash output
(Flash intensity control) ............59
Selecting how the camera
measures brightness
(Metering) .................................60
Automatic face detection
(Face priority) ...........................60
Using optional accessories
(Accessory)...............................61
3. Playback 62
Information Display during
Playback ...................................... 62
Playback image information .....62
Switching the information
display ......................................63
Viewing Photographs and
Movies .........................................64
Index display/Calendar
display ......................................65
Close-up playback ....................65
Movie playback .........................66
Erasing images during
playback ...................................66
Using the Playback Menu ..........67
Play H ......................................67
RAW Data Edit/JPEG Edit ........68
Play Movie ................................69
Movie Edit .................................69
Share Order ..............................71
0 ...........................................71
R ..............................................72
Rotate .......................................72
y .............................................73
Image Overlay ..........................74
< .............................................75
Erase ........................................75
Selecting images
( , Erase Selected, 0
Share Order Selected) ................76
Scrolling Panoramas ..................77
4. Menu Functions 78
Basic menu operations ..............78
Using Shooting Menu 1/
Shooting Menu 2 ........................80
Restoring default settings/
saving settings
(Reset/Assign Custom Modes) .80
Processing options
(Picture Mode) ..........................81
Selecting the focusing area
(AF Area) ..................................82
Shooting automatically with
a fi xed interval
(Intrvl. Sh./Time Lapse) ............84
Varying focus little-by-little
over a series of pictures
(Focus BKT) .............................85
Increasing depth of fi eld
(Focus Stacking Settings).........86
Date stamps (Date Stamp) .......86

Table of Contents
6
EN
Using the Video Menu ................87
Using the Playback Menu ..........88
Displaying images rotated
(R) .......................................... 88
Retouching pictures (Edit) ........88
Creating movie stills
(In-Movie Image Capture).........92
Trimming movies
(Movie Trimming) ......................93
Canceling all protections ..........93
Using the Setup Menu ................94
Deleting all images
(Card Setup) .............................95
Selecting a language (W) ......95
Using the Custom Menus ..........96
a AF/MF..................................96
M Disp/ /PC ........................968
C Exp/ISO ...............................97
D Custom ...........................98#
b K/WB/Color ......................98
W Record.................................99
X Field Sensor ......................100
c K Utility ...........................100
Improving focus in dark
surroundings
(AF Illuminator) .......................101
MF Assist ................................101
Adding information displays....102
Viewing camera images
on TV ......................................104
Combinations of JPEG image
sizes and compression
rates........................................105
5. Connecting the camera
to a smartphone 106
Adjusting Settings for
Connection to
a Smartphone ...........................107
Transferring Images to
a Smartphone ...........................108
Shooting Remotely with
a Smartphone ...........................108
Changing Connection
Method .......................................109
Resetting Wireless LAN
Settings .....................................109
Changing the Password .......... 110
Cancelling a Share Order ........ 110
6. Using Field Sensor
Data 111
GPS: Precautions for use ....... 111
Before using GPS function
(A-GPS data) .......................... 111
Using GPS ..............................112
Displaying tracked movement of
GPS logs ................................ 112
Recording and Saving Logs ....113
Using Buffered and Saved
Logs ...........................................114
Viewing Location Data .............115
Location data displays ............115

Quick task index
8
EN
Shooting g
Just shoot without making any dif cult
settings AUTO mode ( )B 25
Photographing light trails (lighten
blending) Live Composite (SCN) 31
Taking close-ups of small objects/
macro (close range) photography Microscope mode ( )k 33
Keeping both foreground and
background in focus Focus Stacking 33
Taking stylish pictures/
taking monotone pictures ART (Picture mode) 50
Adjusting settings for underwater
photography Underwater mode ( )^ 34
Adjusting the brightness of highlights
and shadows Exposure compensation 41
Recording GPS location data, air and
water temperature, altitude (depth),
and heading
Field sensors 111
Taking pictures with colors at the same
shade as they appear White balance 53
Changing an aspect ratio Aspect ratio 55
When the camera will not focus on
your subject/Focusing on one area AF target settings 82
Keeping a moving subject in focus Tracking 83
Taking photos in the dark/
taking photos under low light conditions
LED lluminator 47i
AF Illuminator 101
Capturing eeting moments Pro Capture 44
Checking horizontal or vertical
orientation before shooting Level Gauge 24, 102
Shooting with deliberate composition Displayed Grid 96
Optimizing the monitor/
adjusting monitor hue Monitor brightness adjustment 94
Increasing the number of pictures that
can be taken Still image quality mode 56
Using a remote control Shooting remotely with a
smartphone 108
Quick Task Index

Quick task index
9
EN
Playback/Retouch g
Viewing images on a TV/
viewing images with high picture
quality on a highde nition TV
HDMI 97
Viewing camera images on TV 104
Brightening shadows Shadow Adj (JPEG Edit) 68, 90
Dealing with red-eye Redeye Fix (JPEG Edit) 68, 90
Printing made easy Creating a print order 75
Erasing the sound recorded to a still
image R72
Changing the number of frames or
adding frames to the index playback
display
G/Info Settings 102
Camera Settings g
Synchronizing the date and time Setting the date/time 18, 94
Restoring default settings Reset 80
Changing the menu display language W95
Turning off the auto focus sound 8 (Beep sound) 97
Saving settings Custom mode ( /C1 C2) 37
Putting date stamps on photos Date Stamp 86
Hiding menu guides Basic menu operations 78

Names of parts
10
EN
Names of parts
Connector cover
(P. 16)
Connector cover lock
(P. 16)
LOCK knob (P. 16)
HDMI micro connector (P. 104)
Speaker
Micro-USB connector (P. 16, 116)
Lens
Self-timer lamp / LED Illuminator /
AF illuminator
(P. 42 / P. 47 / P. 101)
Lens ring release button
(P. 127)
Lens ring (removable)
(P. 127)
Monitor
Internal ash (P. 45)
Strap eyelet (P. 12)
Tripod socket
Battery/card compartment
cover lock (P. 13)
Battery/card compartment cover
(P. 13)
LOCK knob (P. 13)

Names of parts
11
EN
* In this manual, the icons represent operations performed using the arrow pad.FGHI
F (Up) / (Exposure compensation) button (P. 41)F
G (Down) / (Sequential shooting/Self-timer) (P. 42) / (Erase) button (P. 66)jY
H (Left) / u (mode function)
button (P. 30, 33, 34)
I (Right) / # (Flash) button
(P. 45)
Q button / Live Control (P. 48)
Arrow pad* ( )FGHI
INFO button
(P. 24, 63, 115)
R (Movie) / select button
(P. 38 / P. 76)
MENU / Wi-Fi button
(P. 78 / P. 107)
q (Playback) button
(P. 64)
Mode dial (P. 27)
Stereo microphone
ON/OFF button (P. 17)
Zoom lever (P. 26, 65)
LOG switch (P. 113) GPS antenna (P. 112)
Indicator lamp (P. 16)
Shutter button (P. 25)
Control dial ( )P

Preparation
1
13
EN
Inserting and Removing the Battery and Card
Turn off the camera before opening the battery/card compartment cover.
In this manual, all storage devices are referred to as “cards.”
The following types of SD card (commercially available) can be used with this camera:
SD, SDHC, and SDXC.
Cards must be formatted with this camera before rst use or after being used with
other cameras or computers. “Formatting the Card” (P. 21)g
1
Opening the battery/card compartment cover.
3
1
2
LOCK knob
Battery/card compartment lockBattery/card compartment cover
2
Loading the battery.
• Use only LI-92B batteries (P. 12, 147).
• Insert the battery as illustrated with the C
mark toward the battery lock knob.
• If you insert the battery in the wrong
direction, the camera is not turned on. Be
sure to insert it in the correct direction.
Battery lock knob
3
Loading the card.
• Slide the card in until it is locked into
place. “Usable cards” (P. 15)g
Terminal area
• Do not forcibly insert a damaged or deformed card. Doing so may damage the card
slot.

Preparation
1
15
EN
Removing the card
Press the inserted card lightly and it will be
ejected. Pull out the card.
• Do not remove the card while the card write
indicator is displayed (P. 14).
Usable cards
In this manual, all storage devices are referred to as “cards.” The
following types of SD card (commercially available) can be used with
this camera: SD, SDHC, and SDXC. For the latest information, please
visit the Olympus website.
SD card write protect switch
The SD card body has a write protect switch. Setting the switch to
“LOCK” prevents data being written to the card. Return the switch to
the unlock position enable writing.
LOCK
• Cards must be formatted with this camera before rst use or after being used with other
cameras or computers. “Formatting the Card” (P. 21)g
• The data in the card will not be erased completely even after formatting the card or
deleting the data. When discarding, destroy the card to prevent leakage of personal
information.
File storage locations
Data on the card are stored in the following folders:
DCIM 100OLYMP: Images
999OLYMP: Images
Folder name Folder name: Data type
Automatic le numbering
GPSLOG:
GPS logs
SNSLOG:
Sensor logs

Preparation
1
16
EN
Charging the Battery
The battery is not fully charged at shipment. Charge the battery before use, not
stopping until the indicator lamp has turned off to show that the battery is fully charged.
1
Check that the battery is in the camera, and connect the USB cable and
USB-AC adapter.
1
2
3
AC outlet
USB cable (supplied)
Connector cover
or
USB-AC adapter
(supplied)
Micro-USB connector
2
Highlight [Charge] using the buttons on the arrow pad and press the FG Q
button.
USB
Set
Charge
Exit
MTP
Storage
• The indicator lamp will light and charging will begin.
• The indicator lamp turns off when charging is
complete.
• Charging takes about 3 hours. Charging times may
increase at high ambient temperatures.
Indicator lamp
• Be sure to unplug the power plug of the USB-AC adapter from the wall outlet when
the charging is complete.
• For charging the battery abroad, see “Using Your Charger Abroad” (P. 118).
• Never use any cable other than supplied or Olympus-designated USB cable. This may
cause smoking or burning.
• The included F-5AC USB-AC adapter (hereafter referred to as USB-AC adapter) differs
depending on the region where you purchased the camera. If you received a plug-in type
USB-AC adapter, plug it directly into AC outlet.
• For details on the battery, see “SAFETY PRECAUTIONS” (P. 148). For details on the
USB-AC adapter, see “SAFETY PRECAUTIONS” (P. 148).

Preparation
1
17
EN
• If the indicator lamp does not light, reconnect the USB cable and USB-AC adapter to the
camera.
• If the message “No Connection” is displayed in the monitor, disconnect and reconnect the
cable.
• A charger (UC-92: sold separately) can be used to charge the battery.
When to charge the batteries
If the camera displays the message shown in the illustration, charge the battery.
125 F5.6
IS O - A
200
L
N
S-IS
ON
S-IS
ON
0.00.0 01:02:0301:02:03
10231023
P
FHD
30p30p
F
Flashes in red Error message
Battery Empty
Turning the Camera On
1
Press the button to turn on the camera.ON/OFF
• The camera will turn on and the indicator lamp and monitor will light.
ON/OFF button Monitor
Battery level
The battery level icon will be displayed.
7 (green): The camera is ready to shoot.
8 (green): The battery is not full.
9 (blinks red): Charge the battery.
125 F5.6
IS O - A
200
L
N
S-IS
ON
S-IS
ON
0.00.0 01:02:0301:02:03
10231023
P
FHD
30p30p
F
Camera sleep operation
If no operations are performed for a minute, the camera enters “sleep” (stand-by) mode to
turn off the monitor and to cancel all actions. The camera activates again when you touch
any button (the shutter button, button, etc.). The camera will turn off automatically if q
left in sleep mode for 5 minutes. Turn the camera on again before use. You can select how
long the camera remains idle before entering sleep mode. [Sleep] (P. 100)g

Preparation
1
18
EN
Initial Setup
After turning the camera on for the fi rst time, perform the initial setup by selecting a
language and setting the camera clock.
• Date and time information is recorded on the card together with the images.
• The fi le name is also included with the date and time information. Be sure to set the
correct date and time before using the camera. Some functions cannot be used if the date
and time have not been set.
1
Press the button when the initial setup dialog Q
is displaying prompting you to select a language. Please select your language.
Por favor, selecciona tu idioma.
Veuillez choisir votre langue.
Bitte wählen Sie Ihre Sprache.
2
Highlight the desired language
using the control dial or the
FGHI buttons on the arrow
pad.
• The language-selection dialog has two pages of
options. Use the control dial or the buttons FGHI
on the arrow pad to move the cursor between pages. W
Hrvatski
Dansk
Eesti
Deutsch
Indonesia
Norsk
ýHVN\
English
Suomi
ǼȜȜȘȞȚțȐ
Italiano
Latviski
Polski
Ȼɴɥɝɚɪɫɤɢ
Nederlands
Français
0DJ\DU
/LHWXYLǐN
Português(Pt)
Set
Cursor
W
Romanian
Español
Viet Nam
Ɋɭɫɫɤɢɣ
Slovensky
Svenska
Türkçe
Srpski
6ORYHQãþLQD
ɍɤɪɚʀɧɫɶɤɚ
Setare

Preparation
1
19
EN
3
Press the button when the desired language Q
is highlighted.
• If you press the shutter button before pressing the Q
button, the camera will exit to shooting mode and no
language will be selected. You can perform the initial
setup by turning the camera off and then on again
to display the initial setup dialog and repeating the
process from Step 1.
W
Hrvatski
Dansk
Eesti
Deutsch
Indonesia
Norsk
ýHVN\
English
Suomi
ǼȜȜȘȞȚțȐ
Italiano
Latviski
Polski
Ȼɴɥɝɚɪɫɤɢ
Nederlands
Français
0DJ\DU
/LHWXYLǐN
Português(Pt)
Set
• The language can be changed at any time from the setup menu. “Selecting a eg
language ( )” (P. 95)W
4
Set the date, time, and date format.
• Use the HI buttons on the arrow pad to highlight
items.
• Edit the highlighted item using the control dial or the
FG buttons on the arrow pad.
• Press the Q button to set the clock.
• The clock can be adjusted at any time from the
e setup menu. [ Settings] (P. 94)gX
X
Y M D Time
2019
Y/M/D
Cancel
The time is displayed using a
24-hour clock.
5
Highlight a time zone using the control dial or the
FG buttons on the arrow pad and press the Q
button.
• Daylight saving time can be turned on or off using the
INFO button.
Time Zone
Seoul
Tokyo
UTC+09:00 (12:30)
Set
• If the battery is removed from the camera and the camera is left for a while, the date and
time may be reset to the factory default setting.
• You may also need to adjust the frame rate before shooting movies. [Video Frame g
Rate] (P. 87)
Preparation
1
20
EN
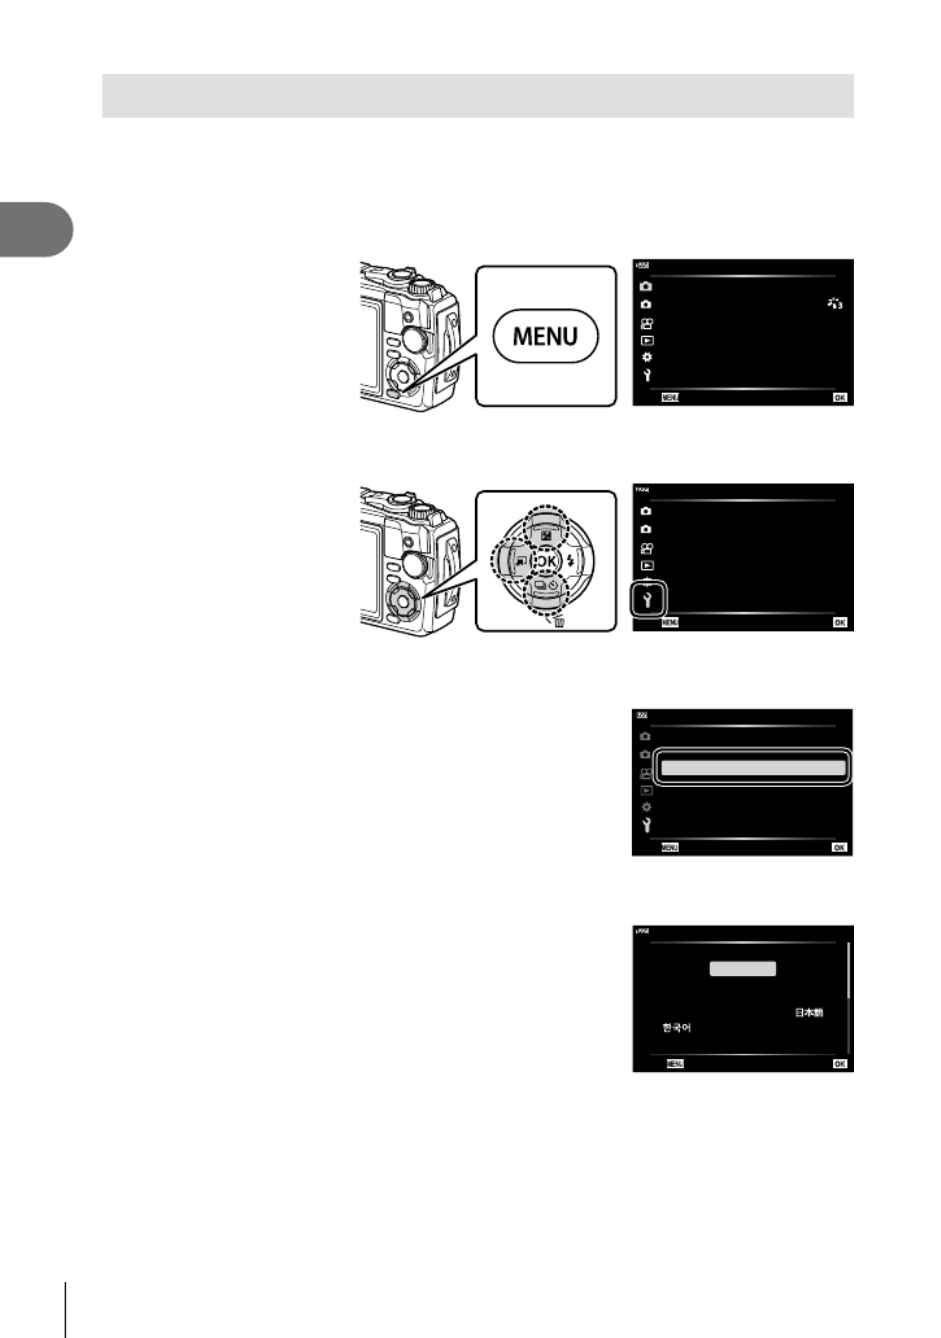
Camera Displays Unreadable/not in the Selected Language
If the camera displays are in an unfamiliar language or use characters you are unable
to read, you may have accidentally selected the wrong language in the language-
selection dialog. Follow the steps below to change languages.
1
Press the button to display the menus.MENU
2
1
1
ѯєьѬщҕѥѕѓѥё
дј Ѥэ ш Ѥҟкзҕѥ
ёѪ
ҟ
ьъѨѷдіѠэ$)
ѱўєчѓѥё
I
іѨѯо
Ѷ
шѯјѪѠдѱўєчд ѥўьчѯѠкѼ
2
Highlight the tab using the buttons on the arrow pad and press the e FGH
Q button.
2
1
ѯєьѬшѤҟкзҕѥ
дј Ѥэ ш Ѥҟкзҕѥ
Wi-Fi дѥішѤҟкзҕѥ
чѬѓѥёэ Ѥьъѩд
s
W
Xдѥіш Ѥҟкзҕѥ
0.5 њѧьѥъѨ
k±0
ѳъѕ
шѤҟкзҕѥдѥіҙч
3
Highlight [ ] using the buttons on the arrow pad and press the W FG Q
button.
2
1
ѯєьѬшѤҟкзҕѥ
дј Ѥэ ш Ѥҟкзҕѥ
Wi-Fi дѥішѤҟкзҕѥ
чѬѓѥёэ Ѥьъѩд
s
W
0.5 њѧьѥъѨ
ѳъѕ
шѤҟкзҕѥдѥіҙч
Xдѥіш Ѥҟкзҕѥ
k±0
4
Highlight the desired language using the buttons on the arrow pad FGHI
and press the button.Q
W
Back Set
Hrvatski
Dansk
Eesti
Deutsch
Indonesia
Norsk
ýHVN\
English
Suomi
ǼȜȜȘȞȚțȐ
Italiano
Latviski
Polski
Ȼɴɥɝɚɪɫɤɢ
Nederlands
Français
0DJ\DU
/LHWXYLǐN
Português(Pt)

Preparation
1
21
EN
Formatting the Card
Cards must be formatted with this camera before fi rst use or after being used with
other cameras or computers.
All data stored on the card, including protected images, is erased when the card is
formatted.
When formatting a used card, confi rm there are no images that you still want to keep
on the card. “Usable cards” (P. 15)g
1
Press the button to display the menus.MENU
2
1
1
Shooting Menu 1
AF Area
Picture Mode
I
Reset/Assign Custom Modes
Back Set
2
Highlight the tab using the buttons on the arrow pad and press the eFGH
Q button.
2
1
Setup Menu
Wi-Fi Settings
Rec View
s
W
X Settings
0.5 sec
k±0
English
Card Setup
Back Set
3
Highlight [Card Setup] using the buttons on the arrow pad and press FG
the button.Q
• If there is data on the card, menu items appear.
Highlight [Format] and press the button.Q
Card Setup
Format
All Erase
Back Set
4
Highlight [Yes] and press the button.Q
• Formatting is performed.

Shooting
2
22
EN
2
Information Displays while Shooting
Monitor display during still photography
FHD
125 F5.6
ISO-A
200
L
N
4:3
S-IS
ON
S-IS
ON
+
2.0
+
2.0 01:02:0301:02:03
10231023
HDRDate FD-1FD-1
C1
AFAF
WB
AUTO
WB
AUTO
1.4
x
1.4
x
FocusFocus
LOG
P
30p30p
F
2
d e g ha
1.4
x
1.4
x2.0
x
2.0
x
2 2
6 7 8 9
BKT
HDR
21
F
G
H
I
J
E
D
B
A
34 0 b i
xy w v u t
f5 c
z
C
n
o
p
q
r
s
m
l
k
j
Monitor display during movie mode
M-IS ONM-IS ON
L
R
L
R
1:02:03
1.4
x
1.4
x
ISO-A
200
L
N
16:9
AFAF
WB
AUTO
WB
AUTO
n+
2.0
+
2.0
FHD
30p30p
F
K
Shooting

Shooting
2
23
EN
1 Card write indicator .........................P. 14
2 Wireless LAN connection status
............................................. P. 106 – 110
3 Date stamp .....................................P. 86
4 AF ne-tuning guide..................P. 46, 55
5 Af target ....................................P. 25, 82
6 HDR ..........................................P. 29, 34
7 Bracketing icon .........................P. 33, 85
8 Handheld starlight ...........................P. 28
9 Focus stacking ................................P. 33
0 Accessory ...............................P. 61, 126
a Digital teleconverter*1 .....................P. 42
b Time lapse shooting ........................P. 84
c Face priority ....................................P. 60
d Movie sound .......................P. 38, 72, 87
e Wind noise reduction ......................P. 87
f Level gauge (tilt) .....................P. 24, 102
g Optical zoom ratio/
magni cation*1 ..........................P. 26, 33
h Internal temperature warning ........P. 134
i Flash ...............................................P. 45
(blinks: charging in progress, lights up:
charging completed)
j AF con rmation mark......................P. 25
k Picture mode.............................P. 50, 81
l ISO sensitivity .................................P. 52
m White balance .................................P. 53
n AF mode .........................................P. 55
o Aspect ratio .....................................P. 55
p Image quality (still images) .............P. 56
q Record mode (movies) ...................P. 57
r Available recording time ...............P. 119
s Number of storable still pictures ...P. 119
t Level gauge (horizon) .............P. 24, 102
u Top: Flash intensity control .............P. 59
Bottom: Exposure compensation ....P. 41
v Exposure compensation value........P. 41
w Aperture value ................................P. 36
x Shutter speed .................................P. 35
y Histogram .......................................P. 24
z Grid guide .......................................P. 96
A Shooting mode.........................P. 27 – 39
B Custom mode .................................P. 37
C LOG icon/warning .........................P. 113
D GPS icon.......................................P. 111
E Metering mode ................................P. 60
F Sequential shooting/Self-timer ........P. 42
Pro Capture shooting ......................P. 44
G Flash intensity control .....................P. 59
H Flash mode .....................................P. 45
I Image stabilizer...............................P. 59
J Battery level ....................................P. 17
K Recording level meter .....................P. 39
*1 Displayed at all times if [ Microscope Control] (P. 33) is in use.n

Shooting
2
24
EN
Switching the information display
You can switch the information displayed in the monitor
during shooting using the INFO button.
INFO
Level Gauge display
(Custom2)
250 F5.6
IS O - A
200
S-IS
ON
S-IS
ON
0.00.0
01:02:0301:02:03
10231023
P
INFO
Image Only
Histogram display
(Custom1)
Basic Information*
250 F5.6
IS O - A
200
S-IS
ON
S-IS
ON
0.00.0
01:02:0301:02:03
10231023
P
250 F5.6
IS O - A
200
L
N
S-IS
ON
S-IS
ON
0.00.0
01:02:0301:02:03
10231023
P
FHD
30p30p
F
INFO INFO
* Not displayed in mode (movie mode) unless recording is in progress.n
• You can change Custom1 and Custom2 settings. [ /Info Settings] > [LV-Info] g G
(P. 102)
• The information display screens can be switched in either direction by rotating the control
dial while pressing the button.INFO
Histogram display
A histogram showing the distribution of
brightness in the image is displayed. The
horizontal axis gives the brightness, the vertical
axis the number of pixels of each brightness in
the image. During shooting, overexposure is
indicated in red, underexposure in blue, and the
range metered using spot metering in green.
More
Less
Dark Bright
Level gauge display
The orientation of the camera is indicated. The “tilt” direction is indicated on the vertical
bar and the “horizon” direction on the horizontal bar. The camera is level and plumb
when the bars turn green.
• Use the indicators on the level gauge as a guide.
• Error in the display can be corrected via calibration (P. 100).

Shooting
2
26
EN
4
Release the shutter.
• Press the shutter button all the way (fully).
• The camera will release the shutter and take a
picture.
• The shot image will be displayed on the monitor.
Press the shutter button all the
way.
$ Notes
• To exit to shooting mode from menus or playback, press the shutter button halfway.
Using the zoom
Zoom in to photograph distant objects or zoom out to increase the area visible in the
frame. Zoom can be adjusted using the zoom lever.
W side T side
60 F2.0
ISO - A
200
L
N
S-IS
ON
S-IS
ON
0.00.0 01:02:0301:02:03
10231023
P
FHD
30p30p
F
1.0
x
1.0
x
50 F3.2
ISO - A
200
L
N
S-IS
ON
S-IS
ON
0.00.0 01:02:0301:02:03
10231023
P
FHD
30p30p
F
2.0
x
2.0
x

Shooting
2
27
EN
Selecting a Shooting Mode
Use the mode dial to select the shooting mode, and then shoot the image.
Mode iconIndicator
Types of shooting modes
For how to use the various shooting modes, see the following.
Shooting mode Description g
B The camera automatically selects the most appropriate shooting
mode. 25
SCN The camera automatically optimizes settings for the subject or
scene. 28
k
Images can be taken from up to 1 cm away from the subject. In
this mode you can shoot images with a large depth of eld, and
perform focus bracket shooting of a set number of images.
33
^
Only by selecting a sub mode according to the subject or the
scene, you can shoot underwater photographs with a proper
setting.
34
PThe camera meters subject brightness and automatically adjusts
shutter speed and aperture for optimal results. 35
AYou select the aperture and the camera automatically adjusts
shutter speed for optimal results. 36
C1 Use custom modes to save and recall settings.
• Different settings can be stored in each of the two custom
modes ( and ).C1 C2
37
C2
nShoot movies. 39
Functions that cannot be selected from menus
Some items may not be selectable from the menus when using the arrow pad.
• Items that cannot be set with the current shooting mode. g “List of Settings Available
in each Shooting Mode” (P. 136)
• Items that cannot be set because of an item that has already been set:
Settings such as picture mode are unavailable when the mode dial is rotated to .B

Shooting
2
28
EN
Matching Settings to the Scene ( mode)SCN
Just rotate the mode dial to and select the scene mode of your choice to shoot SCN
with the camera settings optimized by the subject or scene.
• The procedures for using [Live Composite] and [Panorama] differ from the other scene
modes; for more information, see “[Live Composite]: Live composite photography”
(P. 31) and “Panorama” (P. 32).
Subject type Scene mode Description
People
BPortrait Suitable for portrait shooting. Brings out skin texture.
ee-Portrait
Smooths out skin tones and texture. This mode is suitable
when viewing images on a high-de nition TV. The camera
records two pictures: one with the effect applied and one
without.
DPortrait +
Landscape
Suitable for portraits featuring a landscape in the
background.
Blues, greens, and skin tones are captured beautifully.
U Portrait +
Nightscape
Suitable for portrait shooting against a background of night
view.
Use of a tripod and remote control via OI.Share is
recommended (P. 107, 108).
mChildren Suitable for photographs of children and other active
subjects.
Nightscapes
G Nightscape
Suitable for tripod shooting of night scenes.
Use of a tripod and remote control via OI.Share is
recommended (P. 107, 108).
UPortrait +
Nightscape
Suitable for portrait shooting against a background of night
view.
Use of a tripod and remote control via OI.Share is
recommended (P. 107, 108).
H Handheld
Starlight
Suitable for shooting night scenes without a tripod. Reduces
blur when shooting low light/illuminated scenes.
The camera makes eight exposures and combines them
into a single photograph.
X Fireworks
Suitable for shooting reworks at night.
Use of a tripod and remote control via OI.Share is
recommended (P. 107, 108).
d Live
Composite
The camera automatically shoots multiple images, takes
newly bright areas only, and composites them into a single
image.
With normal long exposure, an image of light trace such as
star trails with bright buildings tends to get too bright. You
can capture them without over exposure while checking the
progress.
• For information on taking photos using this feature, see
“[Live Composite]: Live composite photography” (P. 31).

Shooting
2
29
EN
Subject type Scene mode Description
Motion
CSport
Suitable for fast action shooting.
The camera will take photos while the shutter button is
pressed.
mChildren Suitable for photographs of children and other active
subjects.
Scenery
FLandscape Suitable for landscape shooting.
`Sunset Suitable for shooting the sunset.
g
Beach &
Snow
Suitable for shooting at snow-capped mountains, seascapes
in the sun, and other whitish scenes.
s Panorama
Shoot a series of images that combine to create a
panorama.
• For information on taking photos using this feature, see
“Panorama” (P. 32).
E Backlight
HDR
Suitable for high-contrast scenes. Each time the shutter
button is pressed, the camera takes four shots and
subsequently merges them into one, correctly exposed
image.
Indoors
WCandlelight Suitable for shots of candlelit scenes. Warm colors are
preserved.
BPortrait Suitable for portrait shooting.
Brings out skin texture.
ee-Portrait
Smooths out skin tones and texture. This mode is suitable
when viewing images on a high-de nition TV. The camera
records two pictures: one with the effect applied and one
without.
mChildren Suitable for photographs of children and other active
subjects.
E Backlight
HDR
Suitable for high-contrast scenes. Each time the shutter
button is pressed, the camera takes four shots and
subsequently merges them into one, correctly exposed
image.
• To maximize the bene ts of the scene modes, some of the shooting function settings are
disabled.
• Some time may be needed to record pictures taken using [e-Portrait]. In addition, when
the image quality mode is [RAW], the image is recorded in RAW+JPEG.
• [Handheld Starlight] pictures taken with [RAW] selected for image quality will be recorded
in RAW+JPEG format, with the rst frame recorded as a RAW image and the nal
composite as a JPEG image.
• [Backlight HDR] records HDR-processed images in JPEG format. When the image quality
mode is set to [RAW], the image is recorded in RAW+JPEG.
- Noise may be more noticeable in photos taken in conditions associated with slow
shutter speeds.
- For best results, secure the camera by, for example, mounting it on a tripod.
- The image displayed on the monitor while shooting will differ from the HDR-processed
image.
- The picture mode is xed to [Natural] and the color space is xed to [sRGB].

Shooting
2
34
EN
Matching Settings to Underwater Scenes ( mode)^
Only by selecting a sub mode according to the subject or the scene, you can shoot
underwater photographs with a proper setting.
Sub mode Application
]Underwater
Snapshot Optimized for underwater photography that uses natural light.
EUnderwater Wide Suitable for shooting underwater.
wUnderwater Macro Suitable for shooting close-up view underwater.
fUnderwater
Microscope
Suitable for shooting subjects under water from distances as
close as 1 cm.
_ Underwater HDR
Suitable for contrasting underwater scenes. This mode captures
multiple images and merges them into one, properly exposed
image. This mode may not function well for shooting a fast-
moving subject.
1
Rotate the mode dial to .^
2
Highlight a secondary (“sub”) mode using HI
or the control dial and press the button.Q
Underwater Snapshot
3
Shoot.
• To take a series of shots at the same focus distance, use focus lock (P. 46) or MF
(P. 55).
$ Notes
• When the mode dial is , the secondary ("sub") mode selection screen is displayed by ^
pressing the u ( ) button.H
Termékspecifikációk
| Márka: | Olympus |
| Kategória: | kamera |
| Modell: | Tough TG-6 |
Szüksége van segítségre?
Ha segítségre van szüksége Olympus Tough TG-6, tegyen fel kérdést alább, és más felhasználók válaszolnak Önnek
Útmutatók kamera Olympus

31 December 2025
3 Október 2024
20 Augusztus 2024
13 Augusztus 2024
7 Augusztus 2024
6 Augusztus 2024
4 Augusztus 2024
3 Augusztus 2024
2 Augusztus 2024
1 Augusztus 2024
Útmutatók kamera
- kamera Samsung
- kamera Sony
- kamera Braun
- kamera National Geographic
- kamera Acer
- kamera Nedis
- kamera Philips
- kamera Reolink
- kamera Oregon Scientific
- kamera SilverCrest
- kamera Panasonic
- kamera Canon
- kamera JVC
- kamera Lenovo
- kamera Casio
- kamera Toshiba
- kamera Ozito
- kamera HP
- kamera BenQ
- kamera TP-Link
- kamera Medion
- kamera Vimar
- kamera Xiaomi
- kamera Fujifilm
- kamera EZVIZ
- kamera Prixton
- kamera Polaroid
- kamera Kyocera
- kamera Technaxx
- kamera GoPro
- kamera Speco Technologies
- kamera Ricoh
- kamera Hikvision
- kamera Epson
- kamera Netgear
- kamera Vtech
- kamera Rollei
- kamera Agfa
- kamera Lamax
- kamera Hitachi
- kamera Kodak
- kamera Ring
- kamera Nikon
- kamera Alpine
- kamera Logitech
- kamera Bresser
- kamera Dahua Technology
- kamera Viewsonic
- kamera Cobra
- kamera Scosche
- kamera Denver
- kamera Minox
- kamera Trevi
- kamera Joy-It
- kamera Daewoo
- kamera Gembird
- kamera GE
- kamera SPC
- kamera Powerfix
- kamera Eufy
- kamera Avaya
- kamera Levenhuk
- kamera Konica Minolta
- kamera Mamiya
- kamera Lorex
- kamera Foscam
- kamera Kogan
- kamera SJCAM
- kamera Imou
- kamera AgfaPhoto
- kamera Sigma
- kamera Pentax
- kamera Velleman
- kamera D-Link
- kamera Blaupunkt
- kamera InfiRay
- kamera Fluke
- kamera Arlo
- kamera Trust
- kamera Konig
- kamera ARRI
- kamera Pyle
- kamera Emerson
- kamera MuxLab
- kamera Lumens
- kamera Sanyo
- kamera DataVideo
- kamera Lenco
- kamera Leica
- kamera Azden
- kamera Vemer
- kamera Burris
- kamera Marshall Electronics
- kamera Getac
- kamera AViPAS
- kamera Creative
- kamera EverFocus
- kamera SereneLife
- kamera Swann
- kamera Anker
- kamera Microtek
- kamera Linksys
- kamera Elmo
- kamera UniView
- kamera Laserliner
- kamera IGET
- kamera Vivitar
- kamera PTZ Optics
- kamera BZBGear
- kamera Argus
- kamera Lexibook
- kamera Bushnell
- kamera Easypix
- kamera Maginon
- kamera AVerMedia
- kamera Celestron
- kamera Yashica
- kamera Flir
- kamera Daitsu
- kamera Nest
- kamera Ansco
- kamera Sygonix
- kamera Intel
- kamera Zenit
- kamera EVE
- kamera Fuji
- kamera Minolta
- kamera Zorki
- kamera RunCam
- kamera SeaLife
- kamera FIMI
- kamera Liiv360
- kamera Watec
- kamera Meade
- kamera Contax
- kamera Sinji
- kamera Traveler
- kamera Exakta
- kamera Digital Watchdog
- kamera ZeissIkon
- kamera Silvergear
- kamera Dorr
- kamera Spypoint
- kamera HOLGA
- kamera Praktica
- kamera Hasselblad
- kamera Moto Mods (Motorola)
- kamera Fantasea Line
- kamera Brinno
- kamera Z CAM
- kamera General
- kamera Ergoguys
- kamera Strex
- kamera General Electric
- kamera Berger & Schröter
- kamera Leitz Focomat IIc
- kamera Syrp
- kamera Cosina
- kamera Hanwha
- kamera Videology
- kamera Pelco
- kamera Videotec
- kamera Cambo
- kamera Kobian
- kamera Kyocera Yashica
- kamera Red Digital Cinema
- kamera Bauhn
- kamera Konica
- kamera Akaso
- kamera Seek Thermal
- kamera Aida
- kamera Ikegami
- kamera Ikelite
- kamera Adeunis
- kamera Hoppstar
- kamera IOptron
- kamera Moultrie
- kamera PatrolEyes
- kamera Camouflage
- kamera HuddleCamHD
- kamera Aplic
- kamera Linhof
- kamera GoXtreme
- kamera KanDao
- kamera Aquapix
Legújabb útmutatók kamera

3 Április 2025
1 Április 2025
29 Március 2025
29 Március 2025
28 Március 2025
27 Március 2025
27 Március 2025

20 Március 2025

14 Január 2025

14 Január 2025