Használati útmutató OKI ML690
Olvassa el alább 📖 a magyar nyelvű használati útmutatót OKI ML690 (99 oldal) a nyomtató kategóriában. Ezt az útmutatót 3 ember találta hasznosnak és 2 felhasználó értékelte átlagosan 4.5 csillagra
Oldal 1/99

User's Guide
59101601 my.okidata.com
RT322
ML690/ML691

ML690/ML691 User’s Guide 2

ML690/ML691 User’s Guide 3

ML690/ML691 User’s Guide 4

ML690/ML691 User’s Guide 5
Chapter 1:
Introduction
Printer Features
Super reliable, durable operation: 25,000 hours
Mean Time Between Failures (MTBF) at 25% duty
cycle and 35% page density
Advanced paper handling, with built-in rear push
tractor and zero-tear forms capability.
Blazing print speeds, in characters per second:
High Speed Draft (HSD) Mode: 480/576 cps
Draft Mode: 360/540 cps
Letter Quality (LQ) Mode: 120 cps
This rugged 24 pin printer can meet the needs of
harsh and demanding environments.
Five methods of loading paper and printing:
Continuous Forms Rear Feed (Push), Continuous
Forms Front Feed (Push), Continuous Forms
Bottom Feed (Pull), Cut Sheet (Top), Cut Sheet
(Front)
Oki Data on the Internet
The Oki Data Web Sites provide the most current
information available on your printer.
On-line documents are available for viewing and
downloading via Oki Data’s Web Sites.
You may reach Oki Data via the Internet at:

ML690/ML691 User’s Guide 6
Parts Identication: Front View
Sheet Guide, Rear
Paper Type Lever
Platen Knob
Sheet Guide, Front (open to t the front feed
paper tray or the tractor)
Control Panel
On-Off Switch
Access Cover
1.
2.
3.
4.
5.
6.
7.

ML690/ML691 User’s Guide 7
Parts Identication: Rear View
USB connector
Parallel connector
Optional Serial/Network connector
Ventilation
Power Connector
Optional Cut Sheet Feeder/Roll Paper Stand
connector
Note: The serial number of your printer is on a label on
the back, beside “S/N.”
1.
2.
3.
4.
5.
6.
Parts Identication: Inside View
Paper Thickness Lever
Ribbon Cartridge
Print Head
Pull-up Guide Assembly
1.
2.
3.
4.

ML690/ML691 User’s Guide 8
The Control Panel
Keys work differently according to which “mode” is active.

ML690/ML691 User’s Guide 9
Control Panel Indicator Light Functions
Red ON The paper is at its end; i.e., no paper present.
OFF Paper is present.
Flashing : unrecoverable status alarm. Turn the When ashing with
power OFF, verify that the carriage moves properly, then turn
power ON again. May indicate: a paper jam, media alarm,
thermal alarm (head/space/feed)
When ashing together with the light, indicates high
temperature alarm status.
Green ON Printer is online; ready to receive data and print.
OFF Printer is ofine; not ready to receive data and print.
Flashing : unrecoverable status alarm. Turn When ashing with
the power OFF, verify that the carriage moves properly, then
turn power ON again.
When ashing together with the light, indicates the Top
Cover is open.
Green ON Printer is in Menu mode.
OFF Printer is in Tear down position.
Flashing Printer is in Tear up position.

ML690/ML691 User’s Guide 10
Control Panel Indicator Light Functions
Green ON
> LED 1
> LED 2
> LED 1 and 2
With light ashing:
> Indicates paper park/eject jam.
> Indicates paper loading jam.
> Indicates incorrect media setting.
ON
> LED 3
> LED 2
> LED 2 and 3
> LED 1
> LED 1 and 3
> LED 1 and 2
> LED 1, 2 and 3
> Indicates HSD is selected.
> Indicates DRAFT is selected.
> Indicates COURIER is selected.
> Indicates ROMAN is selected.
> Indicates SWISS is selected.
> Indicates SWISS-B is selected.
> Indicates ORATOR is selected.
Flashing
> LED 3
> LED 2
> LED 2 and 3
> LED 1
> Indicates GOTHIC is selected.
> Indicates PRESTIGE is selected.
> Indicates OCR-A is selected.
> Indicates OCR-B is selected.
Flashing
> LED 2
With light ashing:
> Indicates an incorrect Paper Lever setting.

ML690/ML691 User’s Guide 11
Control Panel Indicator Light Functions
Green ON
> LED 2
With light ON:
> Printer is in .
ON
> LED 2
> LED 1
> LED 1 and 2
Without light ashing:
> 10 CPI is selected.
> 12 CPI is selected.
> 15 CPI is selected.
Flashing
> LED 2
> LED 1
> LED 1 and 2
Without light ashing:
> 17 CPI is selected.
> 20 CPI is selected.
> PROP (Proportional) is selected.
Green ON
> LED 2
> LED 1
> LED 1 and 2
With light OFF:
> NORM (Normal Speed) is selected.
> HIGH SPEED is selected.
> QUIET print is selected.
Flashing
> LED 2 > HIGH COPY is selected.
Green Flashing Low power consumption mode.

ML690/ML691 User’s Guide 12
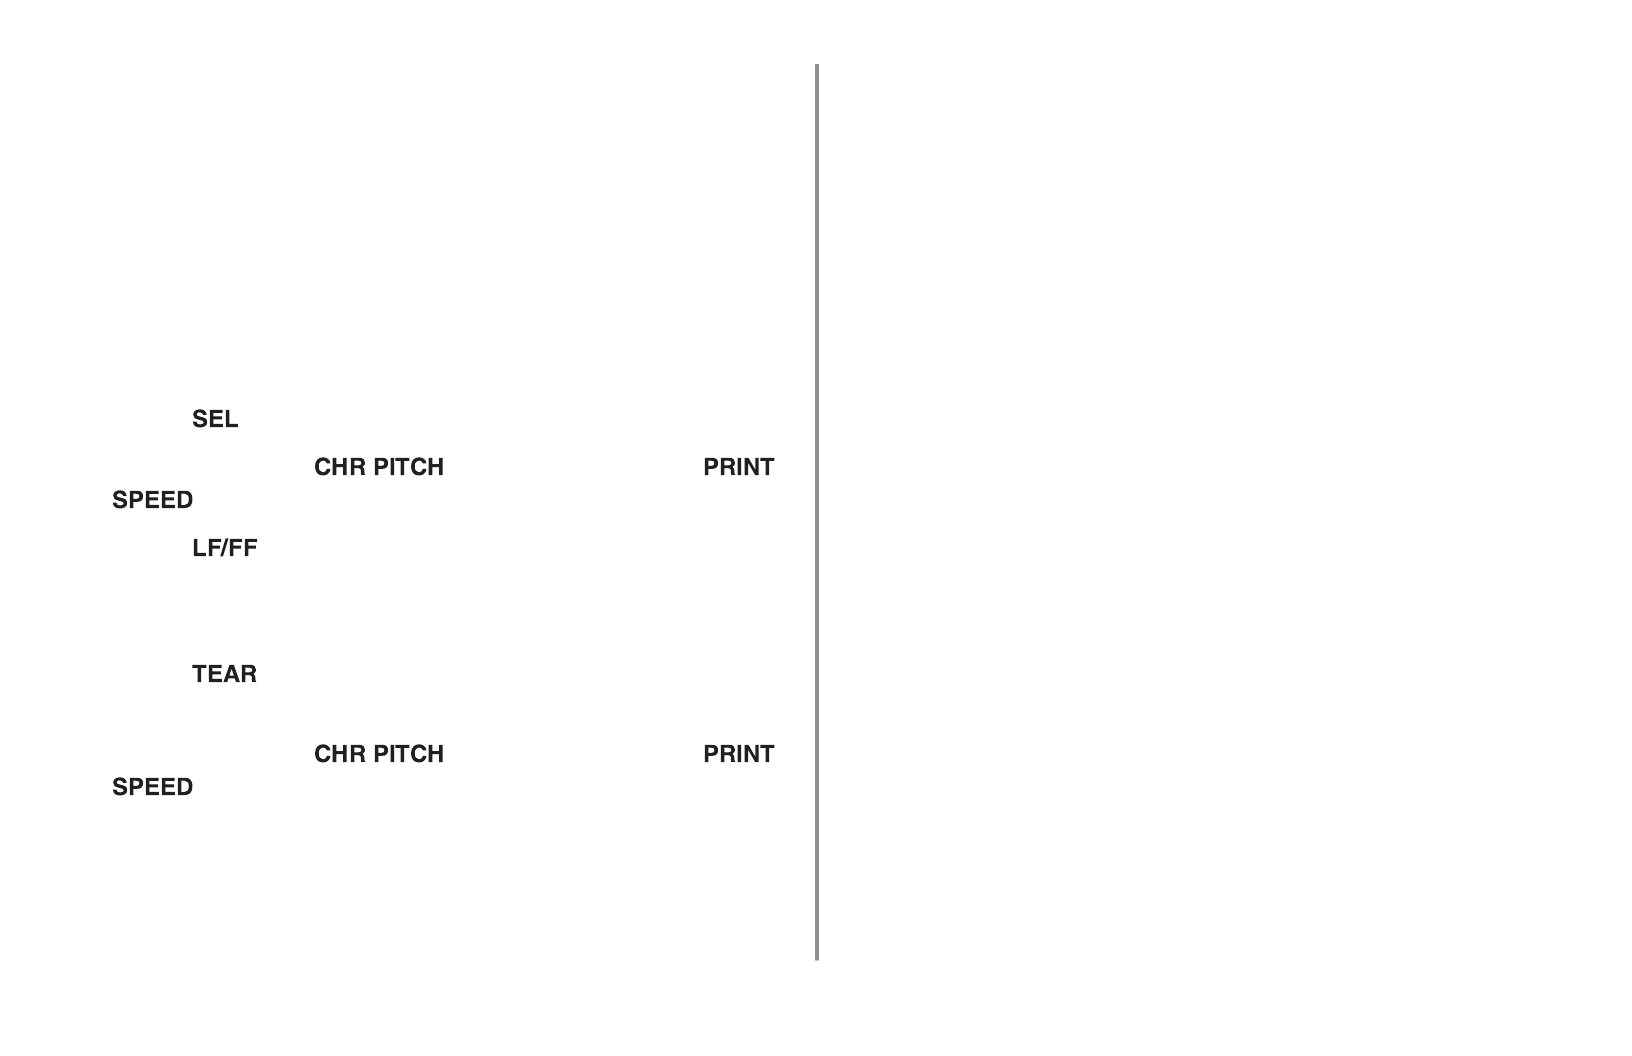
Print Mode Key Functions
Function of Keys in PRINT MODE
On-line Takes the printer off-line.
Off-line Takes the printer on-line.
On-line For continuous forms: when paper is loaded, performs a form feed.
For cut sheets: to eject the cut sheet hold the button down.
Off-line For a line feed: press once
For a form feed: press and hold (for more than 400 ms)
On-line / Off-line When no paper loaded: performs a paper load.
When paper is loaded:
- Continuous forms: Retracts the form to the Pin Tractor (i.e., reverses
and moves paper out of the printer).
- Cut sheet paper: Ejects the cut sheet.
- Pull feed: no effect.
On-line / Off-line Continuous forms only: moves the paper to its cut position.
Pull feed: no effect.
On-line / Off-line Press the key to toggle through the font options.
On-line / Off-line Press the key to toggle through the character pitch options.
On-line / Off-line Press the key to toggle through the print speed options.
On-line / Off-line No effect.

ML690/ML691 User’s Guide 13
Function of Keys in PRINT MODE
On-line No effect.
Off-line Pressing these keys at the same time the printer to the original
factory defaults.
On-line No effect.
Off-line Selects a Menu conguration.
On-line / Off-line Performs a forward line feed of 1/180” when paper is loaded.
On-line / Off-line Performs a reverse line feed of 1/180” when paper is loaded.
On-line / Off-line Performs a forward line feed of 1/180” when paper is in the tear
position.
On-line / Off-line Performs a reverse line feed of 1/180” when paper is in the tear position.
Online / Ofine Enters/Exits Menu Mode.

ML690/ML691 User’s Guide 14
Chapter 2:
Paper Handling
This chapter describes how to use continuous forms
and cut sheet paper in the printer, including:
Loading Continuous Forms Paper
Rear Feed
Front Feed
Bottom Feed (optional pull tractor)
Managing Continuous Forms Paper
Tearing Off Continuous Forms Paper
Aligning the Tear-Off Perforations
Removing Continuous Forms Paper
Loading Cut Sheet Paper
Cut Sheet Paper, Top and Front Feed
Ejecting Cut Sheet Paper
Notes on Different Types of Paper
ML690/ML691 User’s Guide 16
Note: These instructions assume you have ready access
to the back of the printer. If you do not, skip
down to “Front Feed.”
Make sure the printer is turned ON.
Make sure the Paper Type lever is in the REAR
feed position:
Open the access cover (1) and set the Paper
Thickness lever to suit the paper. Close the cover.
1.
2.
3.
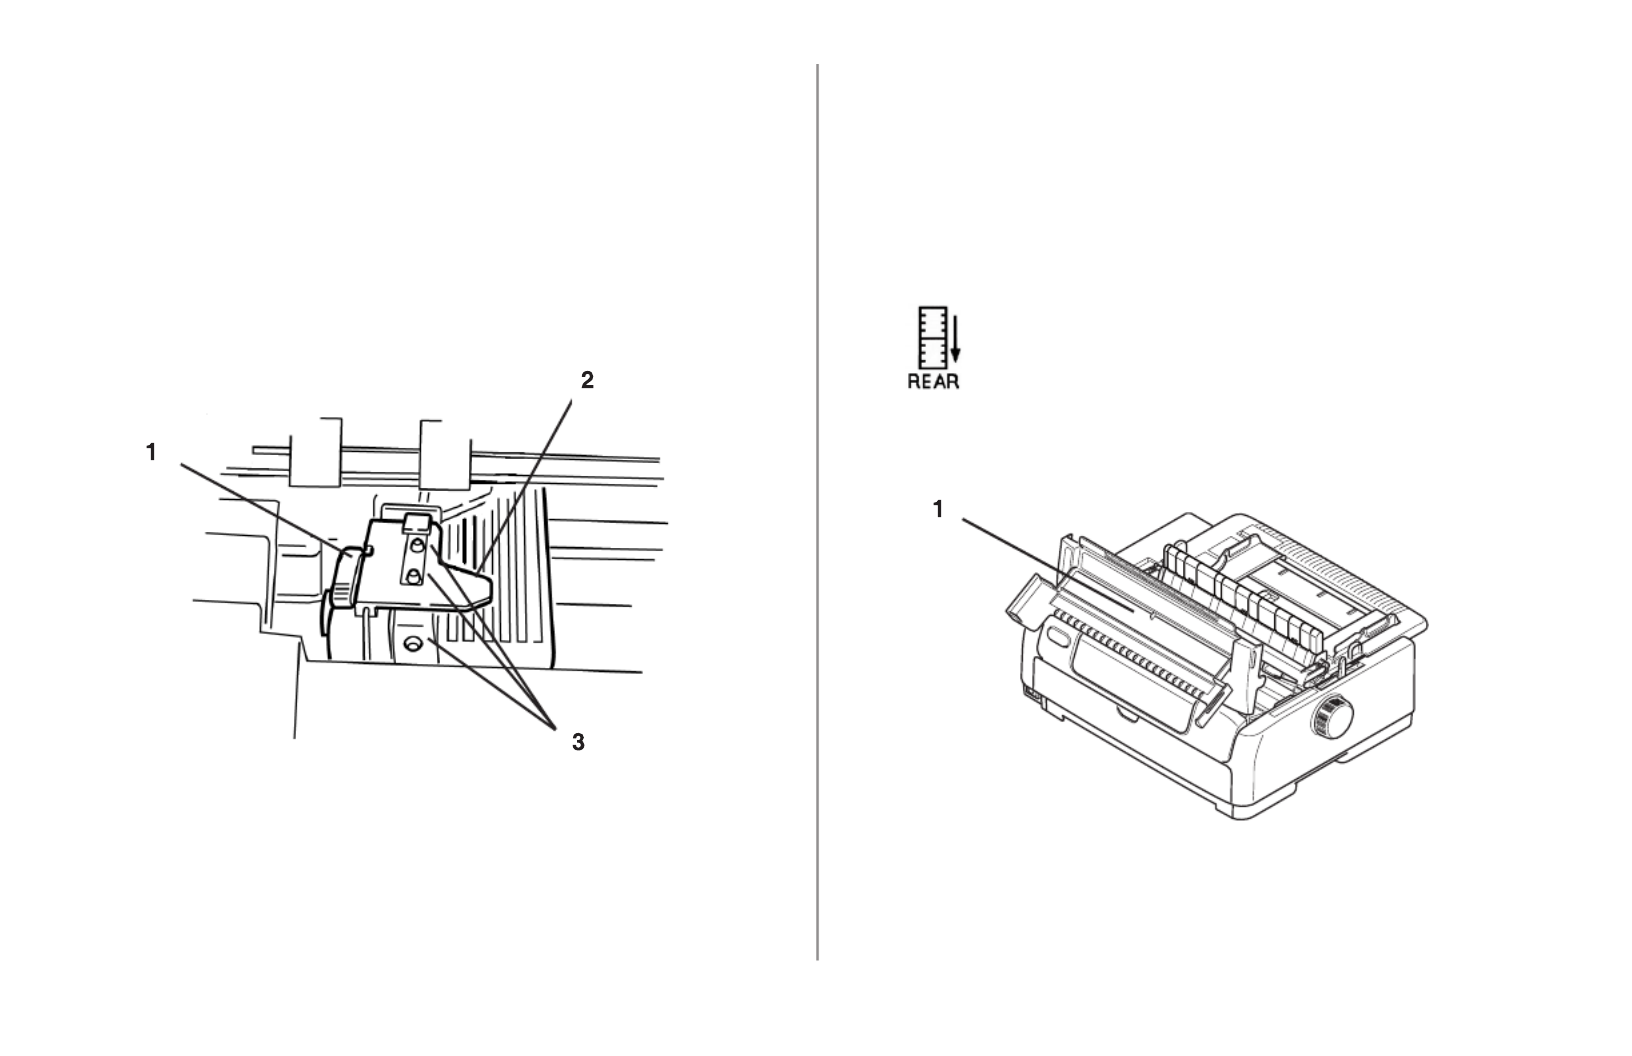
Rear Feed
Note: If you have any paper in the paper path, remove
it before installing rear feed paper.
1 Lock Lever
2 Upper Tractor Cover
3 Pins
ML690/ML691 User’s Guide 17
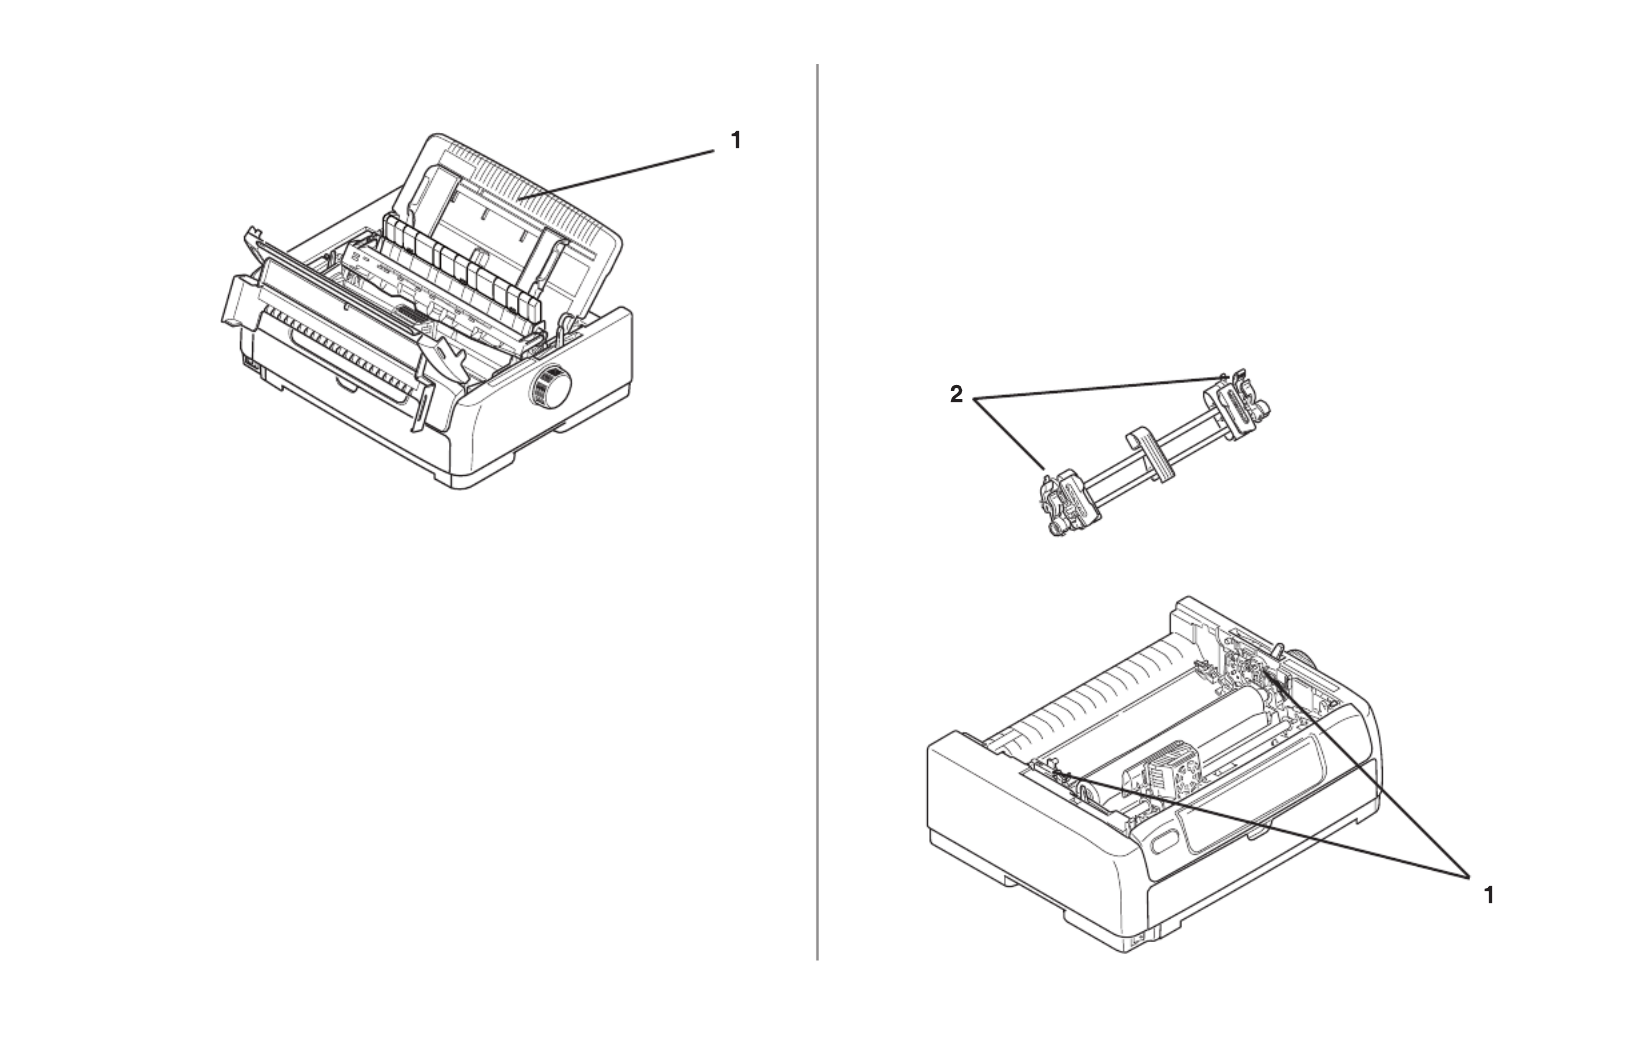
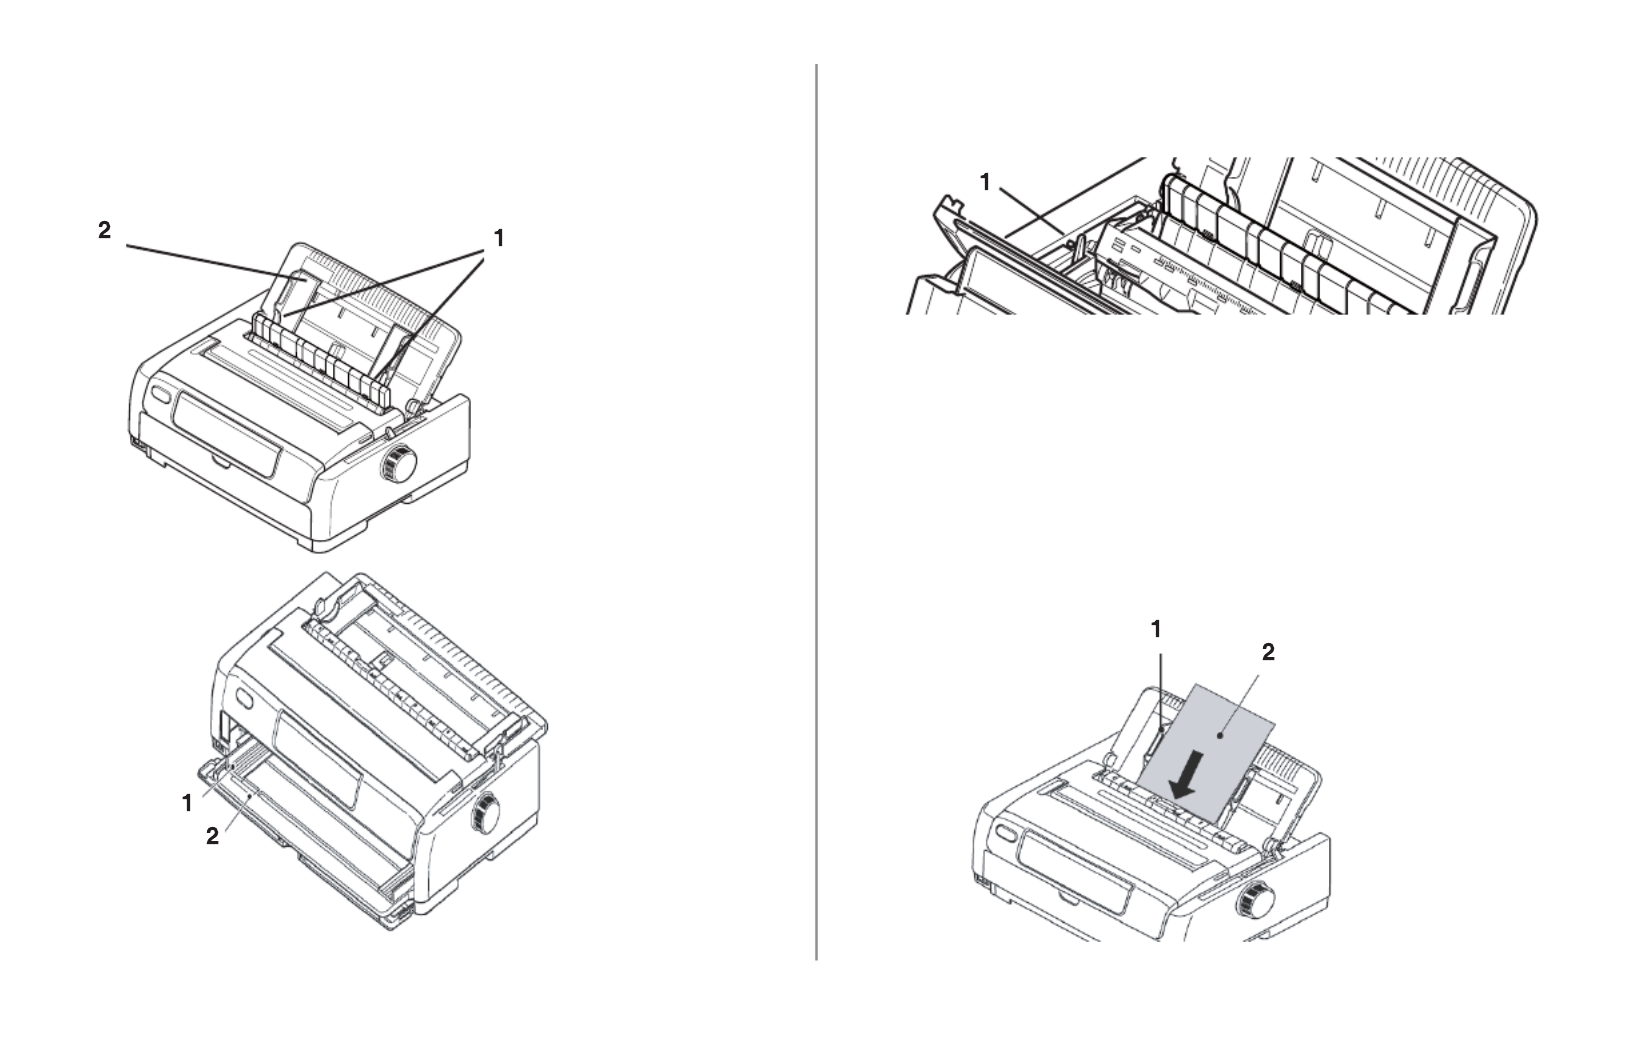
Grasp the sheet guide (1). Lift it slightly, then
slide it off the printer.
4. From the back of the printer, locate the tractors
(1).
NOTE: If the tractor assembly is in the front of
the printer, open the front access door, grab the
nger guides (2) on each side and pinch them
together to release the guide. Remove it from the
front and insert it into the back feed and when it
is seated, push down to snap the guides in place.
Close the front access door.
5.
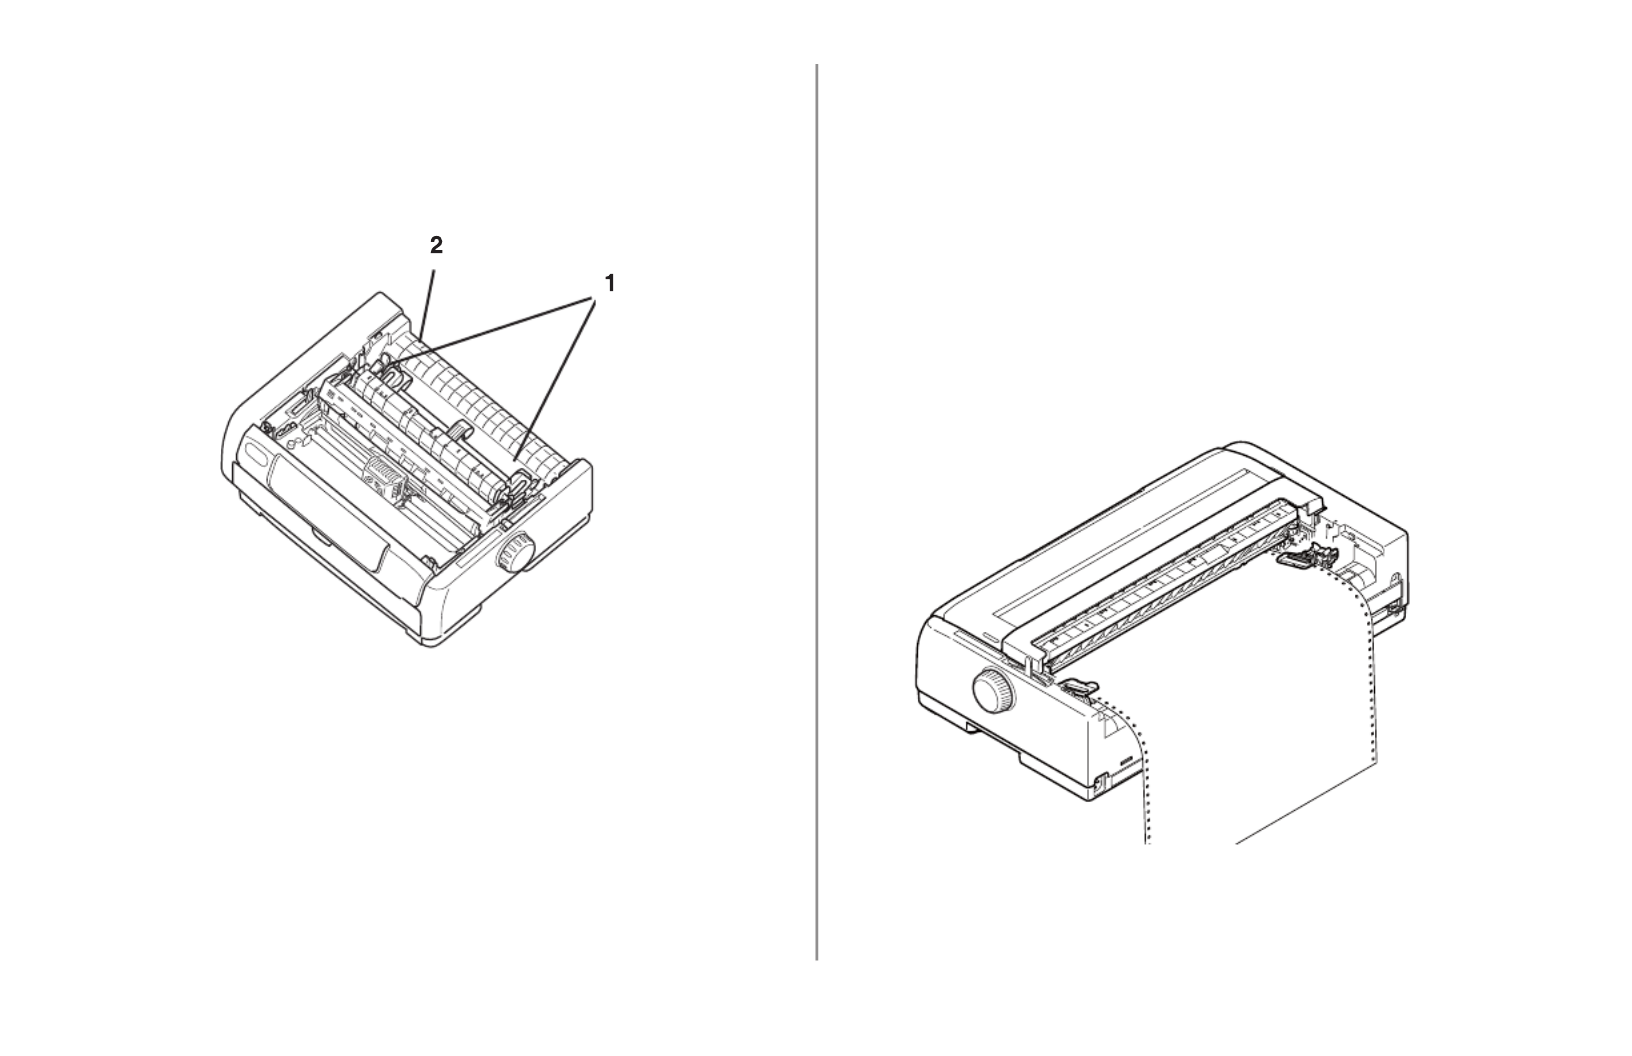
ML690/ML691 User’s Guide 18
Open the lock levers (1) and move the right
tractor (as viewed from the back of the
printer) to the reference mark (2) matching the
width of the paper you are loading. Then close
the lock lever on the right tractor.
Move the rear paper guide to midway between
the left and right tractor pins.
Open the tractor covers.
Place continuous forms paper on the rst two
pins of either tractor.
6.
7.
8.
9.
Important!
Be sure that both sides of the paper have the same
number of paper holes engaged on the sprocket pins.
If you don’t, the paper will skew and jam.
Close the right tractor cover.
Adjust the left tractor until the holes in the paper
are centered on the pins then lock the lever and
close the left tractor cover.
Note: If the paper is too loose or too tight it can cause
jams.
Lower the top paper tray and slide it towards the
front of the printer until the marks align.
10.
11.
12.

ML690/ML691 User’s Guide 19
Press and hold the key to advance
the paper.
Note: The factory default setting for the Top of Form
(where the printing should begin) is 11/12” down
from the top of the page. To change the setting,
see “Top of Form (TOF)”.
Front Feed
1 Lock Lever
2 Upper Tractor Cover
3 Pins
13. Make sure the printer is turned ON.
Make sure the Paper Type lever is in the FRONT
feed position.
Open the access cover (1) and set the Paper
Thickness lever to suit the paper. Close the cover.
Pull down the door to open the front sheet guide
(2).
1.
2.
3.
4.

ML690/ML691 User’s Guide 21
Press and hold the key to advance
the paper.
Note: The factory default setting for the Top of Form
(where the printing should begin) is 11/12”
(23.28 mm) down from the top of the page. To
change the setting, see “Top of Form (TOF)”.
Bottom Feed (optional pull tractor)
Make sure the printer is turned OFF.
Open the access cover.
Adjust the Paper Thickness Lever to suit the
paper.
Make sure the Paper Type Lever is in the PULL
position.
Place the printer on a slotted printer stand,
carefully aligning the slot in the stand with the
slot in the base of the printer.
Place the paper through the slot in the base of
the printer.
Bring the paper through the slot in the base of
the printer.
11.
1.
2.
3.
4.
5.
6.
7.
Lift the locking lever of the left Pin Tractor and
slide the Pin Tractor as required to adjust the
paper position. Then press the locking lever back
down to lock the Pin Tractor.
Lift the locking lever of the right pin tractor and
slide the Pin Tractor to the required position to
accommodate the width of the continuous forms
to be used. Move the paper guide to midway
between the left and right Pin Tractors.
Open the left and right Pin Tractor covers and
feed the continuous forms in the direction of the
arrow, loading the sprocket holes in the forms
onto the sprocket pins.
NOTE: Make sure that paper is fed straight into the
printer to avoid the possibility of skew printing,
irregular line feeding and paper jams.
Make sure that the forms are properly aligned
on the sprocket pins, then close the Pin
Tractor covers. Adjust the right Pin Tractor to
accommodate the width of the continuous forms,
taking care that the forms are held neither too
loosely nor too tightly between the Pin Tractors.
Press the locking lever down to lock the right Pin
Tractor in the desired position.
NOTE: Make sure that the continuous form is pulled
8.
9.
10.
11.

ML690/ML691 User’s Guide 22
down to take up slack. Slack will cause the line
spacing to be inconsistent. Turn the platen to
help remove the slack.
Close the access cover.
Turn the printer ON.
Press the key to feed paper to the tractor.
NOTE: If the TOF position shifts because of taking
up slack, press the LF/FF key to set the TOF
position. Do not use the platen knob for this
option as this will cause irregular line spacing.
12.
13.
14.
Tearing Off Continuous Forms Paper
With the indicator illuminated, press the
key to feed the continuous forms to the tear-off
position.
Carefully tear off the forms along the tear-off
perforations in the direction shown.
When data is received by the printer or when
the key is pressed to select the printer, the
continuous forms is repositioned to the rst line
print position.
Aligning the Tear-Off Perforations
If the tear-off perforations are not aligned with the
paper cutter on the access cover, align them as
follows:
With the indicator illuminated, press the
button to move the tear-off perforations to the
paper cutter on the access cover.
Check the position of the tear-off perforations
relative to the paper cutter. Adjust to the desired
tear-off position using the 1/180” line feeds (LF).
- To move the form forward, press and hold the
and keys at the same time, then
release the keys.
- To move the form backward, press and hold the
1.
2.
3.
1.
2.
ML690/ML691 User’s Guide 23
and keys at the same time, then
release the keys.
Continue until the tear-off perforations have been
aligned with the paper cutter.
When data is received by the printer or when the
key is pressed to select the printer, the paper will
retract to the new position.
Removing Continuous Forms Paper
Tear off the continuous forms.
Press the key to move the front edge
of the continuous forms backwards to the Pin
Tractors.
NOTE:
The printer switches to ofine mode. The
ALARM indicator illuminates to indicate that
there is no paper present. If sprocket holes
of the last page of the forms disengage from
the sprocket pins, do not attempt to eject the
paper to avoid the possibility of a paper jam.
Lift the pin tractor covers and remove the forms.
Close the pin tractor covers.
3.
1.
2.
3.
4.
Loading Cut Sheet Paper
There are two methods of loading single sheets of
cut sheet paper, top feed and front feed. See the
following pages for instruction.
Cut Sheet Paper, Top and Front Feed
Make sure the printer is turned ON.
Note: If there is any continuous forms paper in the
printer, eject it as described in “Removing
Continuous Forms Paper”.
Make sure that the Pin Tractor covers are closed to
avoid the possibility of paper jams.
Place the Paper Type lever in the cut sheet position:
To load the cut sheet in the Top Feed Paper tray,
raise the top tray.
To load the cut sheet in the Front Feed Paper tray,
open the front cover and install the front paper tray.
1.
2.
3.
4.
ML690/ML691 User’s Guide 24
Set the left margin of the paper by adjusting the
appropriate Paper Guides (1) along the scale (2)
relative to the start of the printed line marker
arrow.
5. Open the and adjust the Paper access cover
Thickness lever (1) to suit the paper. Close the
cover.
NOTE: If the Paper Thickness lever setting does not
match the paper, paper feeding and printing
may not work properly.
With the printing side downwards for top feed
and upwards for front feed and the left edge
aligned with the Paper Guide (1), carefully insert
the paper on the Paper Tray (2) and into the
printer until it is gripped.
6.
7.

ML690/ML691 User’s Guide 25
To advance the paper in small steps, press .
NOTES:
> Make sure that the paper is accurately aligned
along the Paper Guide to avoid the possibility of
skewed printing or paper jams.
> When printing an envelope, do not open up the
ap.
> If you are feeding thick paper, push it in
sufciently until it touches the feed roller to avoid
the possibility of skewed printing or paper jams.
8.
Ejecting Cut Sheet Paper
When the printer reaches the end of the cut sheet
page it automatically ejects the page. If required,
add another sheet for the printer to continue printing
from where it left off.
To eject a cut sheet left in the printer, follow these
steps:
Press the button to take the printer off-line.
Press to eject the paper to the paper
tray.
1.
2.

ML690/ML691 User’s Guide 26
Notes on Different Types of Paper
Narrow paper: When printing on very narrow
paper (e.g., three inches), change the Centering
position (see the Menu Settings Table in Chapter
3) to “Mode1”. Failure to change the Centering
position can result in paper jams.
Envelopes: When printing envelopes be sure to
adjust the Paper Thickness Lever to include the
thickness of the overlapped and glue parts of the
envelope — that is, the maximum thickness. If
the Paper Thickness Lever is set for the thinnest
part of the envelope the print density may
uctuate.
Glossy paper: Test paper with a glossy nish
thoroughly before using. A glossy surface can
absorb marks from the paper feed roller or from
rubbing. Also, glossy paper may slip causing
erratic line spacing.
Seal-type cards: Test seal-type cards thoroughly
before using. This type of card can cause ink to
transfer.
Labels:
Always feed labels from the — FRONT never
from the top — labels fed from the top will
peel off, causing paper jams.
The adhesive strength of labels can vary — if
the adhesive is not strong enough labels can
peel off and cause jams.
Do not use labels on individual sheets.

ML690/ML691 User’s Guide 27
Top of Form (TOF)
Important!
If you turn the platen knob when the printer is on,
the Top of Form misaligns. Always shut the printer off
before turning the platen knob.
Note: The factory default setting for the Top of Form
(where the printing should begin) is 11/12”
(23.28 mm) down from the top of the page.
Top of Form sets the print start position for the
printer. It is adjustable in increments of 1/180 of an
inch.
The rst line prints at the default top of form.
Top of Form (TOF) and Forms Tear-Off
Note: Your software may print the rst line of print
above or below where TOF is set. You may
need to adjust the TOF to meet your software’s
requirements.
The Top of Form and Forms Tear-Off settings of
your printer interact. How you set the Top of Form
depends on whether Forms Tear-Off is ON (set to
500 ms, 1 sec, or 2 sec) or OFF (the factory default
setting).

ML690/ML691 User’s Guide 28
Determining if Forms Tear-Off is Off or
On
When the TEAR light is blinking, it indicates that the
printer is in TEAR position (i.e., the paper is ready to
be torn off).
There are two ways to determine the status of the
Forms Tear-Off menu setting:
Print the Menu
Use the TEAR key
To print the Menu:
Make sure paper is loaded.
Press the key (1).
Hold down the (2) key and press the
key (3).
Press the (4) key to print the
menu.
1.
2.
3.
4.
Look for the Form Tear-Off setting in the paper
feed group you are using.
To use the TEAR key:
Make sure paper is loaded.
Press (5).
If the paper moves , Forms Tear-off is .up off
If the paper moves , Forms Tear-off is . down on
5.
1.
2.

ML690/ML691 User’s Guide 29
Setting Top of Form (TOF):
Notes:
Adjusting the TOF can be done in cut sheet or
continuous forms mode.
If necessary, print the menu settings to
determine where the current TOF is set.
The default TOF is set at 11/12” (23.28 mm).
With paper loaded and the printer on and selected:
Align the paper with the rst print line position as
follows:
To set the TOF lower (the rst line of print on
the page moves down), press and hold down
the and keys at the same SEL
time.
To set the TOF higher (the rst line of print on
the page moves up), press and hold down the
and LF/FF keys at the same time.
The paper moves in increments of 1/180”.
When you have the TOF set where you want it,
press and hold , then press to save the
new setting.
Note: To reset the Top of Form to the factory default,
see “Resetting Top of Form to the Factory
Default” later in this chapter.
1.
2.

ML690/ML691 User’s Guide 30
Resetting Top of Form to the Factory
Default
The factory default setting for the Top of Form
(where the printing should begin) is 11/12”
(23.28 mm) down from the top of the page.
To reset the Top of Form to the factory default:
Remove paper from the paper path.
Turn the printer .off
Press and hold while turning on the
printer.
Reload paper.
1.
2.
3.
4.
Temporarily Changing the Top of Form
Position
Important
Do use the platen knob to change the Top of Form. not
If you turn the platen knob when the printer is turned
ON, the Top of Form misaligns. Always turn the printer
OFF before turning the platen knob!
To move the Top of Form position lower for one page
only:
Press to deselect the printer.
Press to lower the position of the Top of Form.
1.
2.

ML690/ML691 User’s Guide 32
Changing the Forms Tear-Off Setting
Note: The default setting for Forms Tear‑Off is OFF.
To change the Forms Tear-Off setting:
Hold down the key and press the
key.
Press repeatedly until the Rear Feed or
Bottom Feed group shows in the rst column of
the printed line, depending on which paper feed
you are using.
Press repeatedly until Form Tear-Off appears
in the second column:
Rear Feed Form Tear‑Off Manual
Press until the time interval you wish to
select appears in the third column:
Rear Feed Form Tear‑Off 1 Sec
1.
2.
3.
4.
Hold down the key and press the
key to exit Menu Mode and save the
setting.
Manual Forms Tear Off
If you don’t wish to engage the Forms Tear-Off
feature, you can advance
rear-feed continuous forms loaded on the
built-in tractor
or
bottom-feed continuous forms loaded on the
optional push tractor
up to the tear off position manually by pressing the
LF/FF key and then pressing .
5.

ML690/ML691 User’s Guide 33
Paper Park
Important!
Never park labels!
Paper park allows you to switch to single-sheet
printing without removing continuous feed paper
from the printer.
To print single cut sheets:
Tear off the last page of the continuous form
paper.
Press the key; this causes a Paper
Empty alarm.
Move the Paper Type lever to the Cut Sheet
position.
Load the cut sheet of paper.
To activate the continuous form paper again:
Remove cut-sheet paper from the printer.
Move the Paper Type lever to Continuous.
Press the key.
1.
2.
3.
4.
1.
2.
3.
Setting the Paper Thickness Lever
There are 8 lever positions to adjust printing for the
thickness of the paper.
CAUTION!
Make sure the printer is turned off before you open the
access cover.
To adjust the lever, open the access cover and move
the lever (1) to the recommended setting from the
following tables.

ML690/ML691 User’s Guide 34
Paper Type Table
PAPER
TYPE
LEVER POSITION
12345678
Cut Sheet Paper
52-81 g/m2Χ
81-128 g/m2Χ
128-156 g/m2Χ
Post Card Χ
Envelope Χ
Continuous Paper
52-81 g/m2Χ
81-128 g/m2Χ
Carbon Paper or Pressure-Sensitive Paper (40
g/m2)
2-part Χ
3-part Χ
4-part Χ
5-part Χ
6-part Χ
7-part Χ
Set the Paper Thickness lever for overall thickness as
show below:
Overall Paper
Thickness
Lever
Position
0.06 - 0.10 mm 1
0.11 - 0.15 mm 2
0.16 - 0.20 mm 3
0.21 - 0.25 mm 4
0.26 - 0.30 mm 5
0.31 - 0.35 mm 6
0.36 - 0.40 mm 7
0.41 - 0.45 mm 8

ML690/ML691 User’s Guide 35
Chapter 3:
Print Settings
This section describes how to set and manage:
Print Quality
Character Pitch
Print Speed
Emulations
For more print setting options, see the Menu settings
in chapter 4.

ML690/ML691 User’s Guide 36
Print Quality
Important!
Front panel settings for print quality and character
pitch are normally overridden by software commands.
Draft: the default
Medium quality, medium speed (360/540 cps)
Gothic typeface only
HSD: High Speed Draft
Lower quality, higher speed (480 cps)
Gothic typeface only
LQ: Letter Quality
Highest quality, slowest speed (120 cps)
Courier, Roman, Swiss, Orator, Gothic, Prestige,
OCR-A, or OCR-B
Note: Available Print Quality settings depend on which
Character Pitch setting is selected.
There are three indicator lights:
The sequence of lights shows which print quality
setting is active:
HSD
Draft
Courier
Roman
Swiss
Swiss-B
Orator
Gothic
Prestige
OCR-A
OCR-B
( = light off, = light on, = blinking light)
The default is “Courier.”PRINT QUALITY
To change the press the
key. Each time the key is pressed the light sequence
above the key changes until all the
options have been cycled through.

ML690/ML691 User’s Guide 37
There are two indicator lights:
The sequence of lights shows which character pitch is
active:
10 CPI
12 CPI
15 CPI
17 CPI
20 CPI
PROPORTIONAL
( = light off, = light on, = blinking light)
The default is “10 CPI.”
To change the press the
key. Each time the key is pressed the light sequence
above the key changes until all the
options have been cycled through.
Character Pitch
Important!
Front panel settings for character pitch are normally
overridden when the SI command is received from
your software.
Character pitch determines how many characters will
print on each line. You can choose a specic xed
width for each character in characters per inch (CPI),
or Proportional. The higher cpi settings are often
used for spreadsheets.
Proportional (PROP) sets character widths based on
the character itself: e.g., the letter is assigned a i
narrower width than the letter . This provides a m
more polished, typeset appearance.
To select Proportional, press the
key until of the lights are both
ashing.
To select non-proportional, press the
key until the printer shows the light sequence
for the cpi value you want to use.

ML690/ML691 User’s Guide 38
Print Speed
There are two indicator lights:
The sequence of lights shows which print speed is
active:
Normal
HIGH-SPEED
QUIET
HIGH-COPY
( = light off, = light on, = blinking light)
The default is “Normal.”
To change the press the
key. Each time the key is pressed the light sequence
above the key changes until all the
options have been cycled through.
Printer Reset
Clearing some error conditions requires that you
reset (reinitialize) the printer. To do this:
Press and release to take the printer off-line.
The light goes out.
Hold down the key and press the
key.
Important!
Pressing reinitializes the printer, but
does affect any menu settings and does reset not not
the printer to the factory defaults. For information
on resetting the printer to the factory defaults, see
“Resetting the Menu to the Factory Defaults” in chapter
4.
1.
2.
ML690/ML691 User’s Guide 39
Emulations
Epson LQ— factory setting
IBM® PPR
IBM® AGM (combines the IBM Proprinter
emulation with Epson LQ graphics for special
graphics applications)
Changing Emulations
Make sure paper is loaded.
Press .
Hold down the key and press the
key.
Press .
The following line prints:
Printer Control Emulation Mode EPSON LQ
Press repeatedly until the emulation you
wish to select prints in the right-hand column.
Hold down the key and press the
key to exit Menu Mode.
1.
2.
3.
4.
5.
6.

ML690/ML691 User’s Guide 41
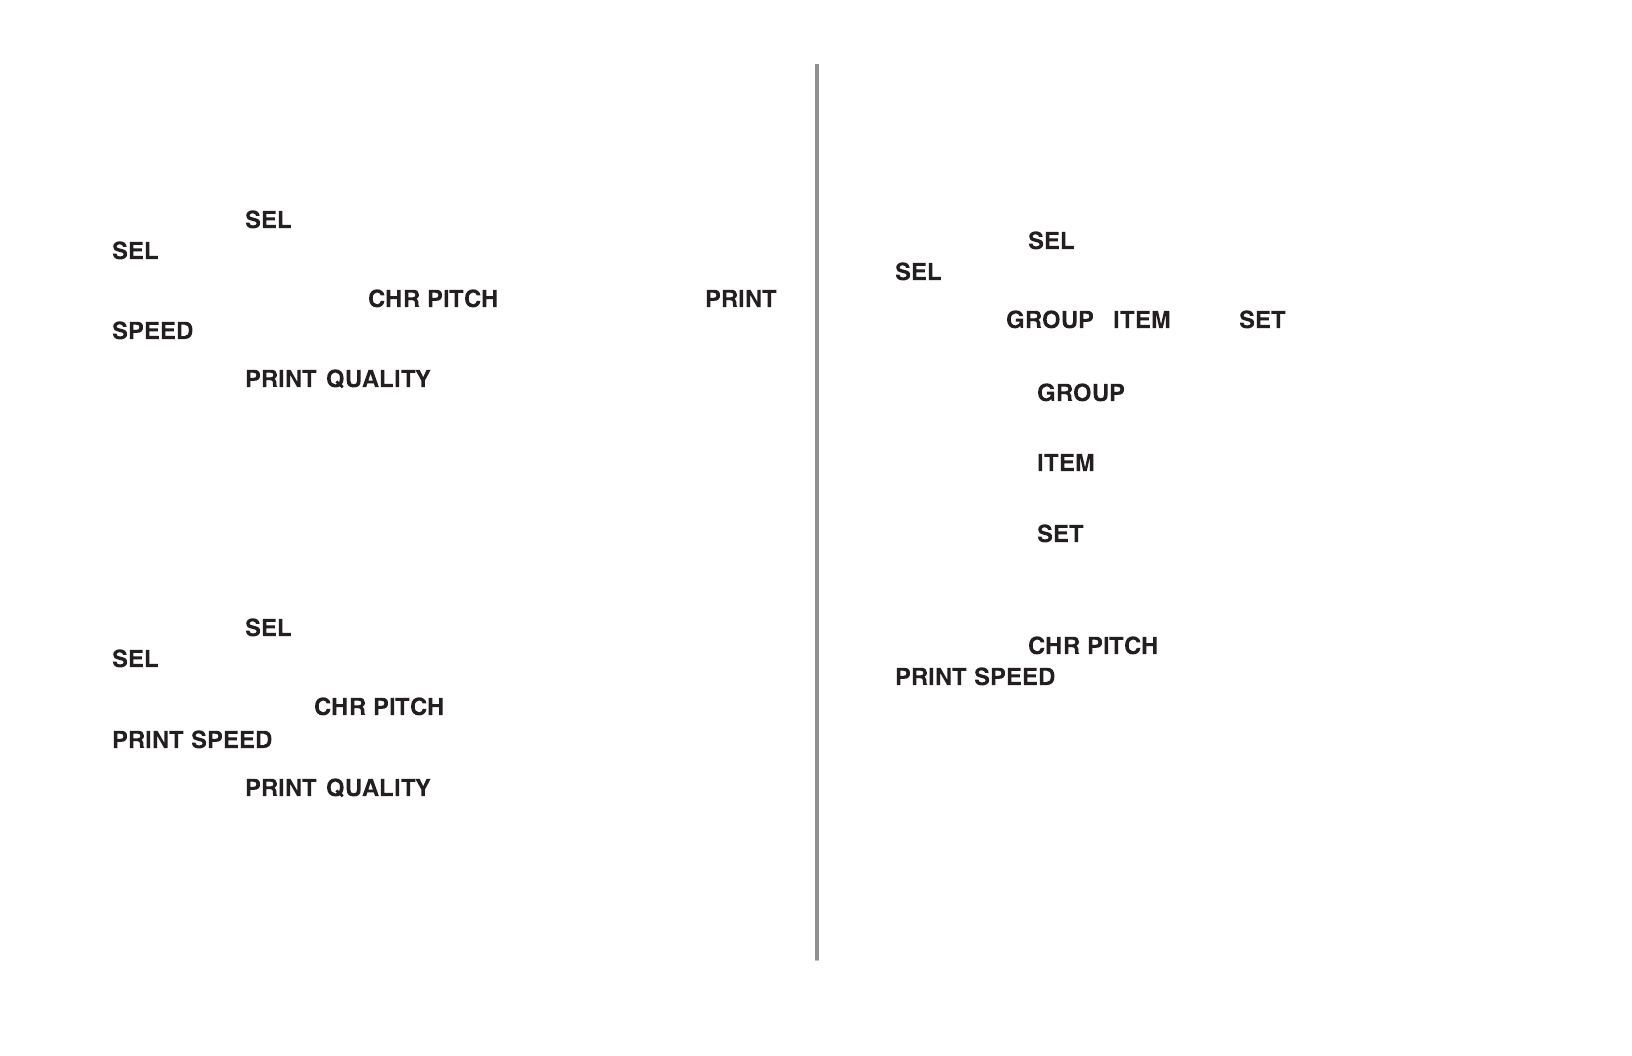
Menu Mode Keys and Functions
The following table describes the function of the keys
in Menu Mode.
Menu Mode Keys and Functions
A is a general categorization
of functions/features.
Use the key to cycle forward
through the options. Each time
is pressed the next Group
menu option is printed. When
the group you want to change is
displayed, use the key to cycle
through that group’s items.
An is a direct name of
functions/features.
Use the key to cycle forward
through the options. Each time
is pressed the next Item menu is
printed. When the item you want to
change is displayed, use the key
to cycle through that item’s options.
Menu Mode Keys and Functions
A is a value (setting) for an .
Use the key to cycle forward
through the options. Each time is
pressed the next Setting menu option
is printed. When the setting you want
to change is displayed, you can go
back to the or keys to
change additional menu options or
exit Menu Mode.
Prints a list of the current Menu
settings.
Use this key sequence to cycle
backward through the Group options.
Use this key sequence to cycle
backward through the Item options.
Use this key sequence to cycle
backward through the Set options.
Exits MENU mode.
* Press the key together with the key to select SHIFT
items in the reverse direction (i.e., to cycle backward
through the options). Items not related to currently set
emulations and options are not printed.

ML690/ML691 User’s Guide 42
Resetting the Menu to the Factory
Defaults
Note: Please print the current Menu Mode settings
before you reset or change them. This is the only
way to have a record of the settings.
To reset the Menu to the standard settings (factory
defaults):
Turn the printer off.
Press and hold down the and keys at SEL LF/FF
the same time while turning the printer ON.
The SEL light will ash.
Press and hold down the key and then TEAR
press the key again to put the printer online.SEL
1.
2.
3.
Entering and Exiting Menu Mode
To activate Menu Mode:
Press the key to take the printer ofine (the
light will turn off).
Hold down the key and press the
key. This toggles the menu on (i.e.,
“enters” the menu) and makes the , ,
, and keys active.
Use the , , , and keys to
perform the functions as described in the Menu
Mode Keys and Functions table.
To turn Menu Mode off:
Hold down the key and press the
key. This toggles the menu off (i.e., “exits”
the Menu).
1.
2.
3.
1.
ML690/ML691 User’s Guide 43
Printing the Menu Settings
Printing the Current Menu Settings
Make sure paper is loaded in the printer.
Press the key to take the printer ofine (the
light will turn off).
While pressing the key, press the
key.
Press the key.
Printing All Menu Settings
To print out a listing of the settings for all menu
items, regardless of the emulation selected or the
accessories installed:
Make sure paper is loaded in the printer.
Press the key to take the printer ofine (the
light will turn off).
Hold down the key and then press the
key.
Press the key.
1.
2.
3.
4.
1.
2.
3.
4.
Changing the Menu Settings
Note: Please print the current Menu Mode settings
before you reset or change them. This is the only
way to have a record of the settings.
Press the key to take the printer ofine (the
light will turn off).
Use the , and keys to make your
changes:
a Press until the Group you wish to
change appears in the rst column.
b Press until the Item you wish to change
appears in the second column.
c Press until the setting you want appears in
the third column.
When you have nished making changes, hold
down the key and then press the
key to exit Menu Mode and save the
settings.
Important!
If you turn off the printer without rst exiting the Menu
Mode, the changes you have made will be lost.
1.
2.
3.

ML690/ML691 User’s Guide 44
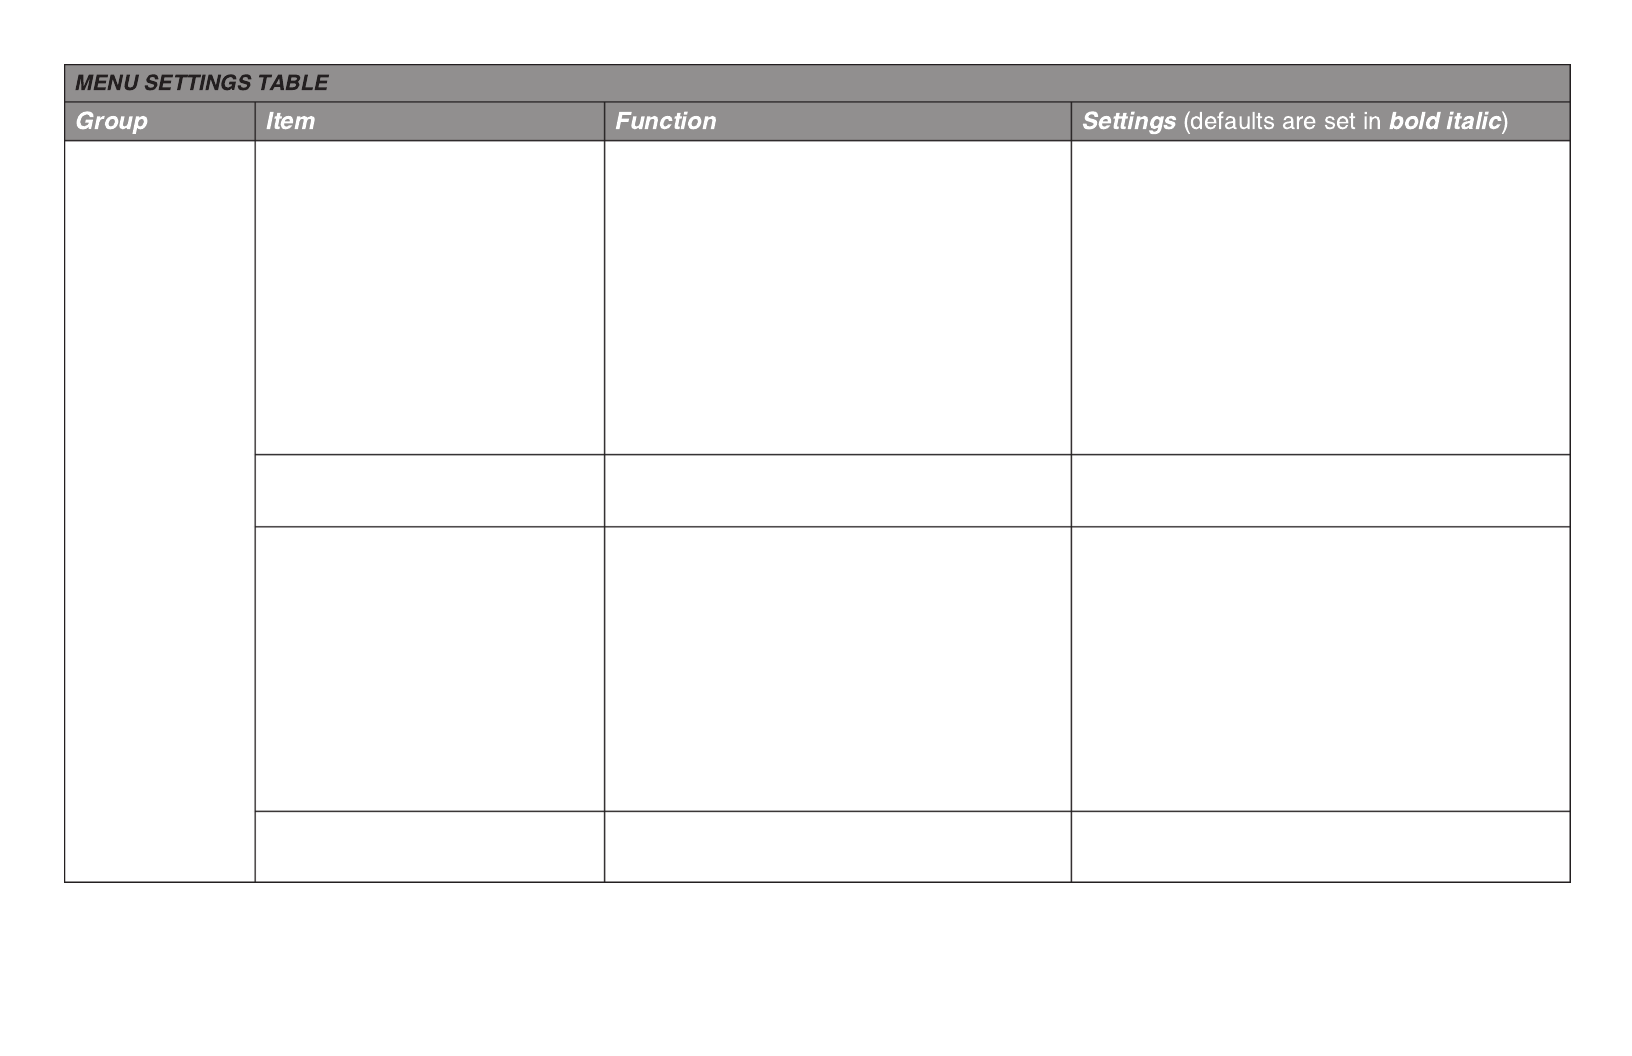
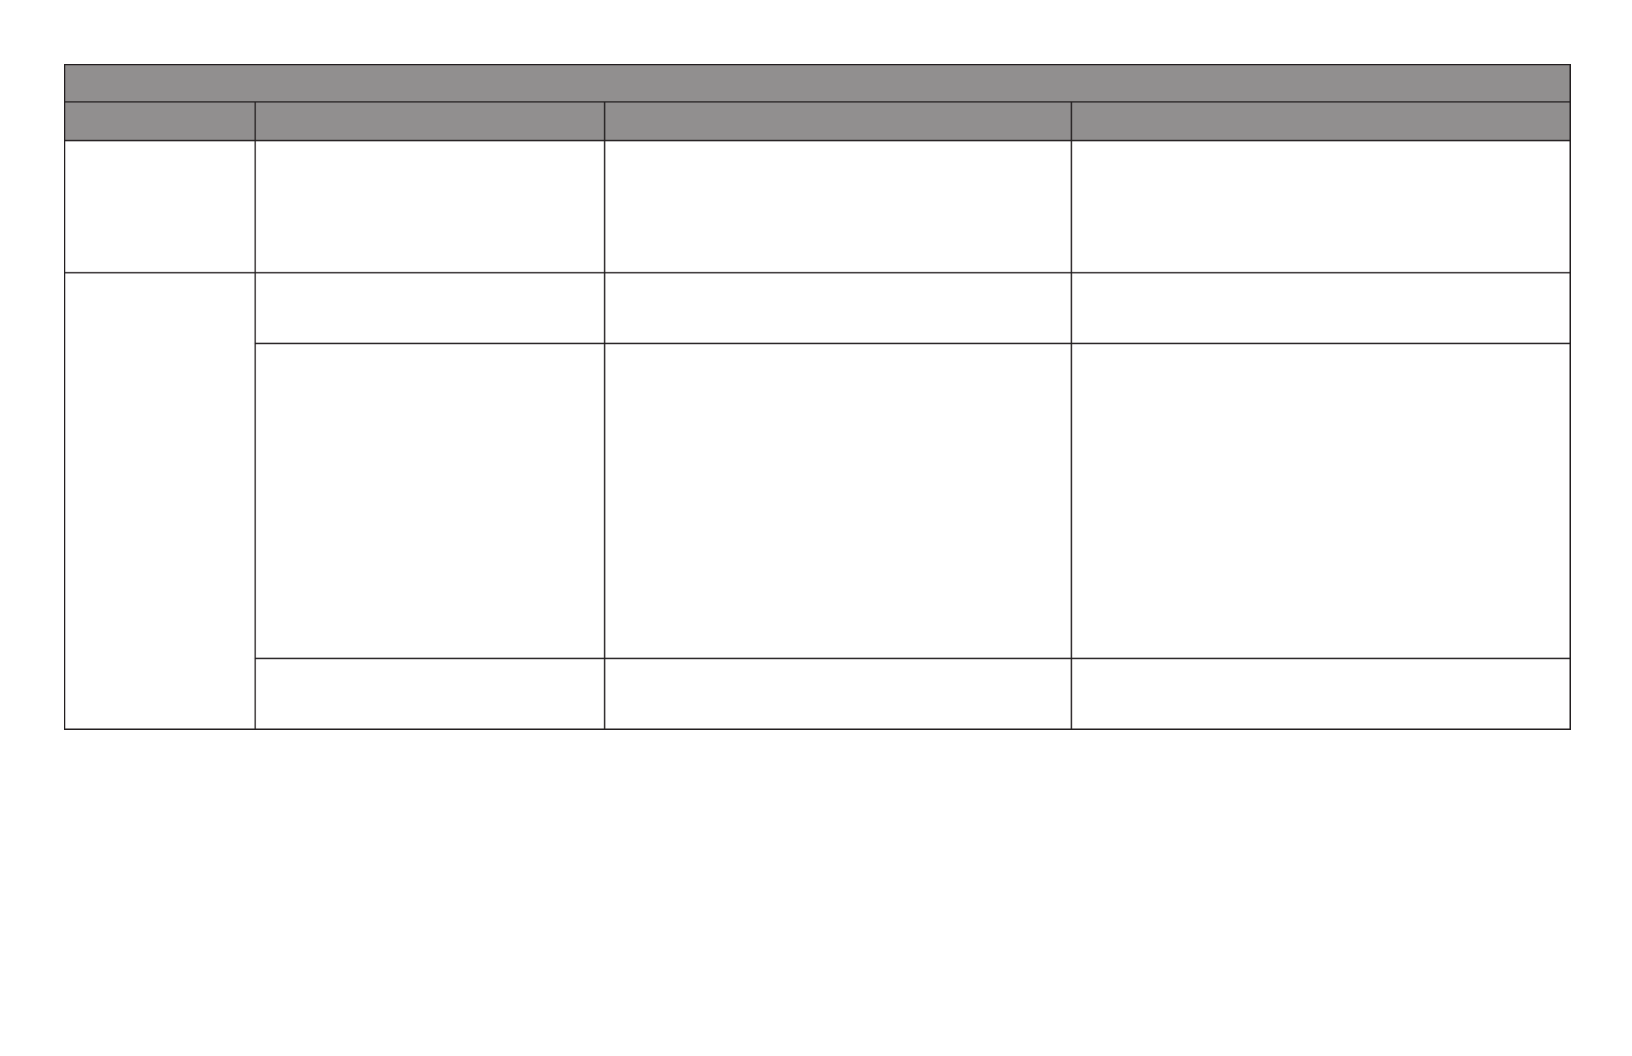
Menu Settings Table
For a complete explanation of each menu item, see “Explanations of Menu Items” later in this chapter.
The table below shows the items which may appear in the menu. Settings which are engaged at the factory
(defaults) are set in bold italic. Some groups or entries will only appear when a specic emulation is engaged,
as noted.
Printer
Control
Emulation Mode Selects the printer command set
(emulation) you want to engage.
Epson LQ, IBM PPR, IBM AGM
Font Print Mode Choose the quality and typeface of
printing. If you are printing draft-
type documents, select DRAFT or
HSD.
LQ Courier, LQ Roman, LQ Swiss,
LQ Swiss Bold, LQ Orator, LQ Gothic,
LQ Prestige, LQ OCR-A, LQ OCR-B,
Draft, HSD
Pitch Choose the character width, in
characters per inch (cpi).
10 cpi, 12 cpi, 15 cpi, 17.1 cpi, 20
cpi
Proportional Spacing Change the setting to Yes to
engage proportional spacing of
characters.
No, Yes
Style Change to italics if you want the
printed characters to be slanted.
Normal, Italics

ML690/ML691 User’s Guide 45
Font
(cont.)
Size 1Change to Double for double width
and height printing.
Single, Double
Symbol Sets Character Set Select the character code table.
The default is Set II. Use Set I for
Epson and IBM emulations only.
Set I, Set II
Language Set Replaces certain standard symbols
with special characters used in
foreign languages.
American, French, German, British,
Danish I, Swedish, Italian, Spanish
I, Japanese, Norwegian, Danish II,
Spanish II, Latin American, French
Canadian, Dutch, Publisher
Zero Character If you do not want the printer
to use a slash to distinguish the
number zero from the capital
letter O, change the setting to
Unslashed.
Slashed, Unslashed

ML690/ML691 User’s Guide 47
Rear Feed
(Push)
(cont.)
Form Tear-Off 5Specify manual form paper
advancement or select a time;
when printer is idle for .5, 1 or
2 seconds, paper is advanced
from the current print position to
the tear position. When data is
received, paper is moved to its
original printing position.
Manual, 0.5 sec, 1 sec, 2 sec
Skip Over Perforation Specify whether to skip over
perforations or not. When a skip-
over command is received, it is
given priority. If your software has
its own page formatting controls,
leave the default setting. To set
the printer to go to the next page
when it comes within 1” (25 mm)
of the bottom of the page, change
the setting.
No, 25.4 mm (1”)
Page Width 4 (only
displayed for ML691)
Change to 8” to print on narrow
paper.
13.6”, 8”

ML690/ML691 User’s Guide 48
Rear Feed
(Push)
(cont.)
Page Length Specify the length of a continuous
form.
3” (76.2 mm), 3.25” (82.6 mm),
3.33” (84.7 mm), 3.5” (88.9 mm),
3.66” (993.1 mm), 4” (101.6 mm),
5” (127 mm), 5.5” (139.7 mm), 6”
(152.4 mm), 7” (177.8 mm), 8”
(203.2 mm), 8.5” (215.9 mm), 11”
(279.4 mm), 11.7” (296.3 mm),
12” (304.8 mm), 14” (355.6 mm),
17” (431.8 mm)
Initial Position Paper position (print or cut) when
printer is powered on.
Print position, Cut position
Cut Position Adjust Specify an adjustment value
for where to cut the end of a
continuous form.
–30 ~ –1, , +1 ~ +300
TOF Adjust Specify an adjustment value for
the reference position for the Top
of Form position of a continuous
form.
The position moves to the bottom
edge of the page (+) and to the
top edge of the page (–) in 1/180”
increments.
–30 ~ –1, , +1 ~ +300

ML690/ML691 User’s Guide 49
Rear Feed
(Push)
(cont.)
Continuous Paper Top of
Form
For continuous forms, sets a TOF
in small increments.
1/12” (2.12 mm), 2/12” (4.23 mm),
3/12” (6.35 mm), 4/12” (8.47 mm),
5/12” (10.58 mm), 6/12” (12.70
mm), 7/12” (14.82 mm), 8/12”
(16.93 mm), 9/12” (19.05 mm),
10/12” (21.17 mm), 11/12” (23.28
mm), 12/12” (25.40 mm), 13/12”
(27.52 mm), User Top of Form
LF Revise (Continuous
Paper Line Feed Adjust)
For continuous feed, adjusts the
line feed to the specied amount.
–2, –1, , +1, +20
Centering Position Used to limit printhead travel
when printing narrow columns.
Select Mode 1 for ML690. Select
Mode 1 or Mode 2 for the ML691.
Default, Mode1, Mode2
Front Feed
(Push)
Line Spacing Change to 8 lines per inch (lpi) to
get more lines on a page.
6 LPI, 8 LPI
Form Tear-Off 5Specify manual form paper
advancement or select a time;
when printer is idle for .5, 1 or
2 seconds, paper is advanced
from the current print position to
the tear position. When data is
received, paper is moved to its
original printing position.
Manual, 0.5 sec, 1 sec, 2 sec
ML690/ML691 User’s Guide 50
Front Feed
(Push)
(cont.)
Skip Over Perforation Specify whether to skip over
perforations or not. When a skip-
over command is received, it is
given priority. If your software has
its own page formatting controls,
leave the default setting. To set
the printer to go to the next page
when it comes within 1” (25 mm)
of the bottom of the page, change
the setting.
No, 25.4 mm (1”)
Page Width 4 (only
displayed for ML691)
Change to 8” to print on narrow
paper.
13.6”, 8”
Page Length Specify the length of a continuous
form.
3” (76.2 mm), 3.25” (82.6 mm),
3.33” (84.7 mm), 3.5” (88.9 mm),
3.66” (993.1 mm), 4” (101.6 mm),
5” (127 mm), 5.5” (139.7 mm), 6”
(152.4 mm), 7” (177.8 mm), 8”
(203.2 mm), 8.5” (215.9 mm), 11”
(279.4 mm), 11.7” (296.3 mm),
12” (304.8 mm), 14” (355.6 mm),
17” (431.8 mm)
Initial Position Paper position (print or cut) when
printer is powered on.
Print position, Cut position

ML690/ML691 User’s Guide 51
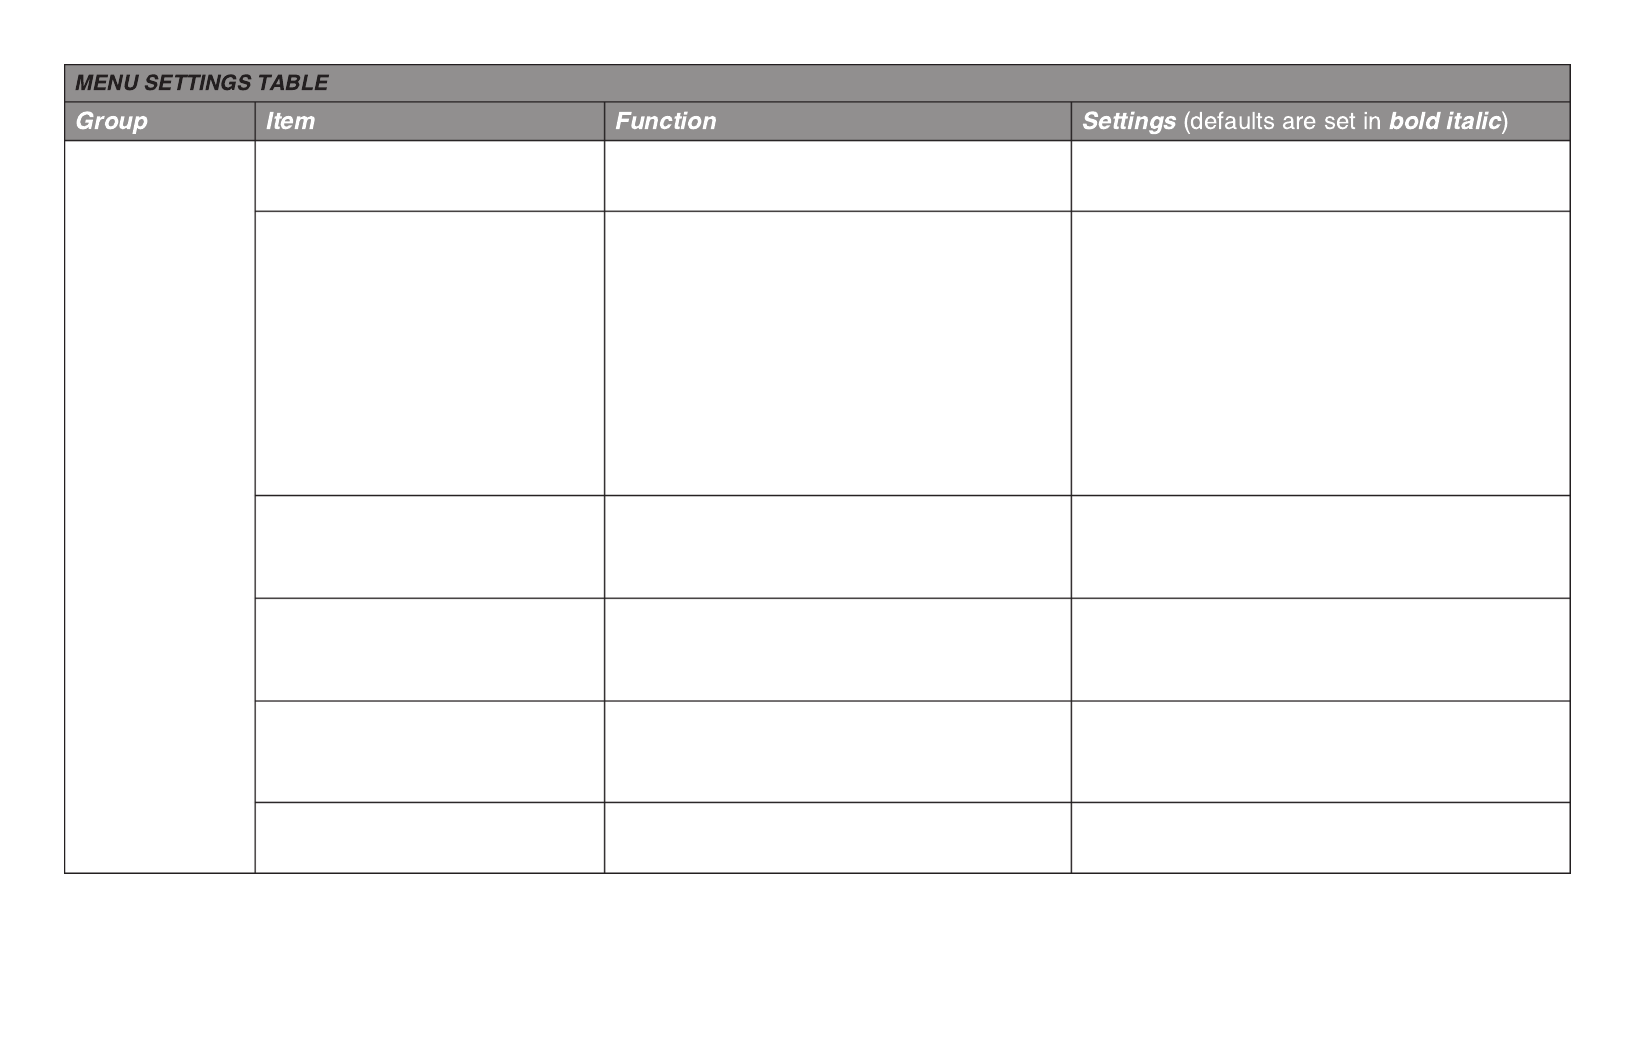
MENU SETTINGS TABLE
Group Item Function Settings bold italic(defaults are set in )
Front Feed
(Push)
(cont.)
Cut Position Adjust Specify an adjustment value
for where to cut the end of a
continuous form.
–30 ~ –1, , +1 ~ +300
TOF Adjust Specify an adjustment value for
the reference position for the Top
of Form position of a continuous
form.
The position moves to the bottom
edge of the page (+) and to the
top edge of the page (–) in 1/180”
increments.
–30 ~ –1, , +1 ~ +300
Continuous Paper Top of
Form
For continuous forms, sets a TOF
in small increments.
1/12” (2.12 mm), 2/12” (4.23 mm),
3/12” (6.35 mm), 4/12” (8.47 mm),
5/12” (10.58 mm), 6/12” (12.70
mm), 7/12” (14.82 mm), 8/12”
(16.93 mm), 9/12” (19.05 mm),
10/12” (21.17 mm), 11/12” (23.28
mm), 12/12” (25.40 mm), 13/12”
(27.52 mm), User Top of Form
LF Revise (Continuous
Paper Line Feed Adjust)
For continuous feed, adjusts the
line feed to the specied amount.
–2, –1, , +1, +20
ML690/ML691 User’s Guide 52
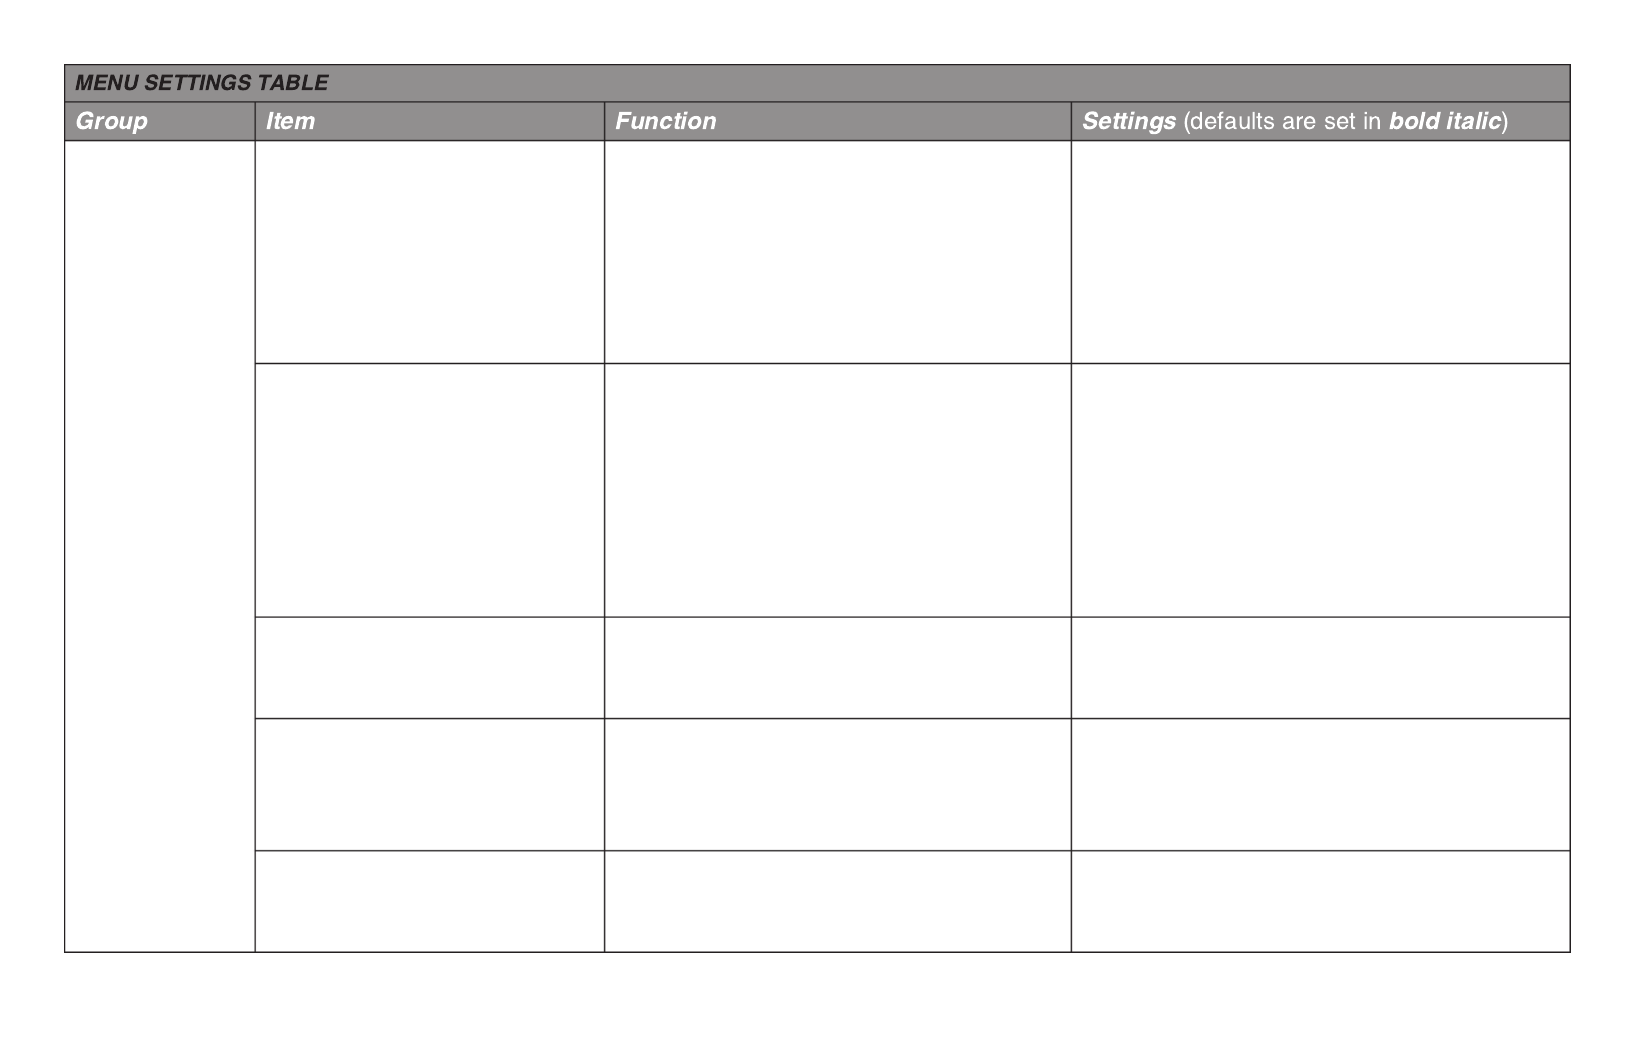
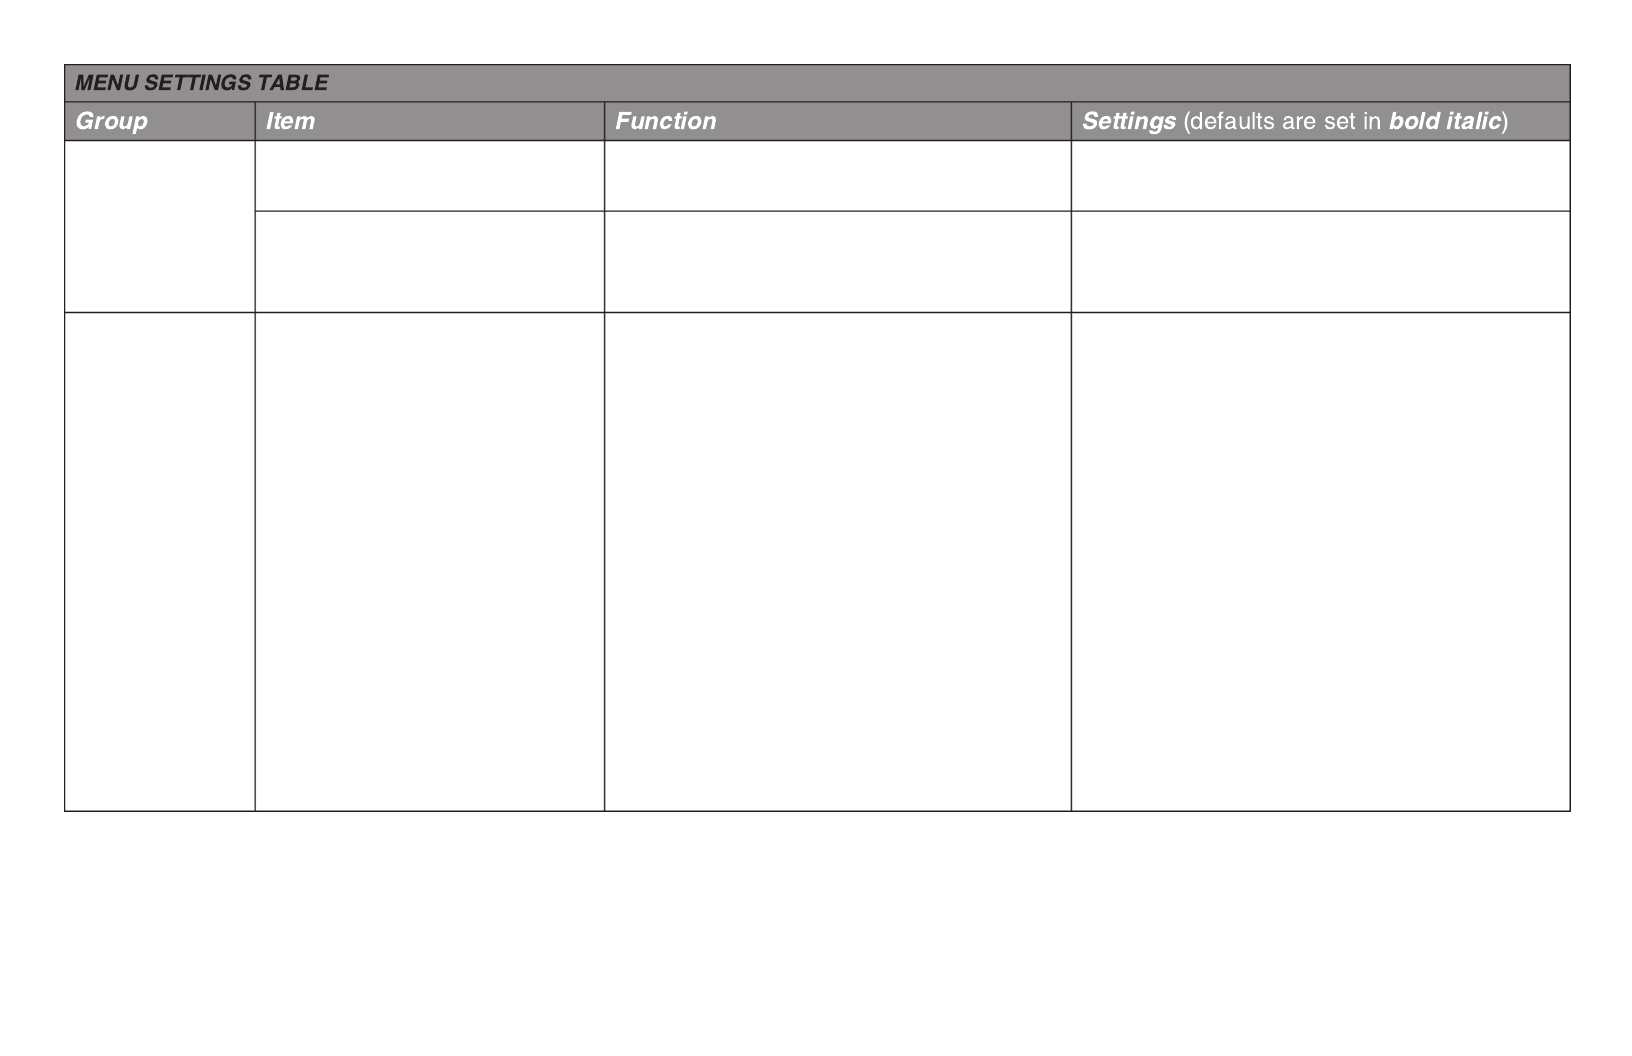
MENU SETTINGS TABLE
Group Item Function Settings bold italic(defaults are set in )
Front Feed
(Push)
(cont.)
Centering Position Used to limit printhead travel
when printing narrow columns.
Select Mode 1 for ML690. Select
Mode 1 or Mode 2 for the ML691.
Default, Mode1, Mode2
Pull Line Spacing Change to 8 lines per inch (lpi) to
get more lines on a page.
6 LPI, 8 LPI
Skip Over Perforation Specify whether to skip over
perforations or not. When a skip-
over command is received, it is
given priority. If your software has
its own page formatting controls,
leave the default setting. To set
the printer to go to the next page
when it comes within 1” (25 mm)
of the bottom of the page, change
the setting.
No, 25.4 mm (1”)
Page Width (only
displayed for ML691) 4
Change to 8” to print on narrow
paper.
13.6”, 8”

ML690/ML691 User’s Guide 53
Pull
(cont.)
Page Length Specify the length of a continuous
form.
3” (76.2 mm), 3.25” (82.6 mm),
3.33” (84.7 mm), 3.5” (88.9 mm),
3.66” (993.1 mm), 4” (101.6 mm),
5” (127 mm), 5.5” (139.7 mm), 6”
(152.4 mm), 7” (177.8 mm), 8”
(203.2 mm), 8.5” (215.9 mm), 11”
(279.4 mm), 11.7” (296.3 mm),
12” (304.8 mm), 14” (355.6 mm),
17” (431.8 mm)
LF Revise (Continuous
Paper Line Feed Adjust)
For continuous feed, adjusts the
line feed to the specied amount.
–2, –1, , +1, +20
Centering Position Used to limit printhead travel
when printing narrow columns.
Select Mode 1 for ML690. Select
Mode 1 or Mode 2 for the ML691.
Default, Mode1, Mode2
Cut Sheet
Top Feed
Line Spacing Change to 8 lines per inch (lpi) to
get more lines on a page.
6 LPI, 8 LPI
Form Tear-Off 5, 6
(Displayed when
connected to RPS)
Specify manual form paper
advancement or select a time;
when printer is idle for .5, 1 or
2 seconds, paper is advanced
from the current print position to
the tear position. When data is
received, paper is moved to its
original printing position.
Manual, 0.5 sec, 1 sec, 2 sec
ML690/ML691 User’s Guide 54
Cut Sheet
Top Feed
(cont.)
Page Width (only
displayed for ML691) 4
Change to 8” to print on narrow
paper.
13.6”, 8”
Page Length Specify the length of a cut sheet
page.
3” (76.2 mm), 3.25” (82.6 mm),
3.33” (84.7 mm), 3.5” (88.9 mm),
3.66” (993.1 mm), 4” (101.6 mm),
5” (127 mm), 5.5” (139.7 mm), 6”
(152.4 mm), 7” (177.8 mm), 8”
(203.2 mm), 8.5” (215.9 mm), 11”
(279.4 mm), 11.7” (296.3 mm),
12” (304.8 mm), 14” (355.6 mm),
17” (431.8 mm)
Initial Position 6
[Displayed when connected
to RPS]
Paper position (print or cut) when
printer is powered on.
Print position, Cut position
Cut Position Adjust 6
[Displayed when connected
to RPS]
Specify an adjustment value for
where to cut the roll paper.
–30 ~ –1, , +1 ~ +300
Wait Time Specify the wait time from when
the paper is set on the tray to
when the printer feeds it.
Invalid, 0.5 sec, , 1.5 sec, 2 1 sec
sec, 3 sec
Paper Length Control Specify the page length of a cut
sheet.
by Menu Setting, by Actual Page
Length

ML690/ML691 User’s Guide 55
Cut Sheet
Top Feed
(cont.)
Cut Sheet Auto Eject
Position
For cut sheets, when it reaches
the selected measurement,
measured from the bottom of the
page, it ejects the paper.
.25” (6.35 mm), .5” (12.7 mm),
7/12” (14.82 mm), Invalid
TOF Adjust Specify an adjustment value for
the reference position for the Top
of Form position.
The position moves to the bottom
edge of the page (+) and to the
top edge of the page (–) in 1/180”
increments.
–30 ~ –1, , +1 ~ +300
Cut Sheet Top of Form Specify an adjustment value for
the reference position for the
Top of Form when feeding a cut
sheet (up to the mid-section of
characters in the rst line).
1/12” (2.12 mm), 2/12” (4.23 mm),
3/12” (6.35 mm), 4/12” (8.47 mm),
5/12” (10.58 mm), 6/12” (12.70
mm), 7/12” (14.82 mm), 8/12”
(16.93 mm), 9/12” (19.05 mm),
10/12” (21.17 mm), 11/12” (23.28
mm), 12/12” (25.40 mm), 13/12”
(27.52 mm), User Top of Form
LF Revise Adjust the line feed in cut sheet
mode.
–14 ~ –1, , +1 ~ +140

ML690/ML691 User’s Guide 56
Cut Sheet
Top Feed
(cont.)
Centering Position Used to limit printhead travel
when printing narrow columns.
Select Mode 1 for ML690. Select
Mode 1 or Mode 2 for the ML691.
Default, Mode1, Mode2
Cut Sheet
Front Feed
Line Spacing Change to 8 lines per inch (lpi) to
get more lines on a page.
6 LPI, 8 LPI
Page Width (only
displayed for ML691) 4
Change to 8” to print on narrow
paper.
13.6”, 8”
Page Length Specify the length of a cut sheet
page.
3” (76.2 mm), 3.25” (82.6 mm),
3.33” (84.7 mm), 3.5” (88.9 mm),
3.66” (993.1 mm), 4” (101.6 mm),
5” (127 mm), 5.5” (139.7 mm), 6”
(152.4 mm), 7” (177.8 mm), 8”
(203.2 mm), 8.5” (215.9 mm), 11”
(279.4 mm), 11.7” (296.3 mm),
12” (304.8 mm), 14” (355.6 mm),
17” (431.8 mm)
Wait Time Specify the wait time from when
the paper is set on the tray to
when the printer feeds it.
Invalid, 0.5 sec, 1 sec, , 2 1.5 sec
sec, 3 sec

ML690/ML691 User’s Guide 57
Cut Sheet
Front Feed
( .)cont
Paper Length Control If you are printing single sheets
no longer than 17 inches and wish
the printer to acknowledge the
menu setting for Top Feed Page
Length, change the setting to “by
Menu Setting.”
by Menu Setting, by Actual Page
Length
Cut Sheet Auto Eject
Position
For cut sheets, when it reaches
the selected measurement,
measured from the bottom of the
page, it ejects the paper.
.25” (6.35 mm), .5” (12.7 mm),
7/12” (14.82 mm), Invalid
TOF Adjust Specify an adjustment value for
the reference position for the Top
of Form position.
The position moves to the bottom
edge of the page (+) and to the
top edge of the page (–) in 1/180”
increments.
–30 ~ –1, , +1 ~ +300
Cut Sheet Top of Form Specify an adjustment value for
the reference position for the
Top of Form when feeding a cut
sheet (up to the mid-section of
characters in the rst line).
1/12” (2.12 mm), 2/12” (4.23 mm),
3/12” (6.35 mm), 4/12” (8.47 mm),
5/12” (10.58 mm), 6/12” (12.70
mm), 7/12” (14.82 mm), 8/12”
(16.93 mm), 9/12” (19.05 mm),
10/12” (21.17 mm), 11/12” (23.28
mm), 12/12” (25.40 mm), 13/12”
(27.52 mm), User Top of Form

ML690/ML691 User’s Guide 58
Cut Sheet
Front Feed
( .)cont
LF Revise Adjust the line feed in cut sheet
mode.
–14 ~ –1, , +1 ~ +140
Centering Position Used to limit printhead travel
when printing narrow columns.
Select Mode 1 for ML690. Select
Mode 1 or Mode 2 for the ML691.
Default, Mode1, Mode2
Set-Up Graphics Set the printing direction when a
line has double-height print data.
Specify uni-directional graphics
for better registration, but slower
printing.
Bi-directional, Uni-directional
Receive Buffer Size 2Selects the amount of memory
devoted to holding received data.
Choosing “1 Line” will tie up your
computer while printing, but if you
abort the print job, the printer will
stop much sooner.
0 K, 1 Line, 32 K, 64 K, 128 K
Paper End Detection Set whether to detect paper end
or not. To override the sensor and
print closer to the bottom of the
page, set to OFF.
On, Off

ML690/ML691 User’s Guide 59
Set-Up
(cont.)
Print Registration 1 Adjust the print starting position
on printing in the reverse
direction. The position moves
to the right or left in 1/720”
increments.
–10 ~ –1, , +1 ~ +100
Print Registration 2 Adjust the print starting position
on printing in the reverse
direction. The position moves
to the right or left in 1/720”
increments.
–10 ~ –1, , +1 ~ +100
Print Registration 3 Adjust the print starting position
on printing in the reverse
direction. The position moves
to the right or left in 1/720”
increments.
–10 ~ –1, , +1 ~ +100
Print Registration 4 Adjust the print starting position
on printing in the reverse
direction. The position moves
to the right or left in 1/720”
increments.
–10 ~ –1, , +1 ~ +100
Operator Panel Function 3Set control panel operation.
Limited operation locks functions
on the control panel; only SEL,
LOAD/EJECT, and TEAR keys work.
Full Operation, Limited Operation
ML690/ML691 User’s Guide 61
Set-Up
( .)cont
Time Out Print If your software spends a long
time processing between portions
of data it feeds to the printer,
change the setting to Invalid to
keep your printer from dumping
the received data while it is
waiting for more.
Valid, Invalid
Auto Select Determines whether or not your
printer will automatically be
selected after you load in paper.
If you always use the same Top
of Form position, keep the default
setting of “Yes”. When set to “No”,
the printer will be deselected so
that you can set the Top of Form.
No, Yes
Host Interface Set which interface the printer
uses to receive printing
commands.
Auto Interface, Parallel, USB,
Optional
I/F Time Out Sets the length of time before the
interface switches to idle status
when no printing commands have
been received.
15 sec, 30 sec, 45, sec, 1 min, 2
min, 3 min, 4 min, 5 min
ESC SI Pitch 7 (only
displayed for IBM
Emulation)
Sets the character pitch used
when the ESC SI command is
received.
17.1 cpi, 20 cpi

ML690/ML691 User’s Guide 63
Set-Up
( .)cont
Sleep Mode Default setting saves power by
having the printer go into sleep
mode; when disabled the printer
never goes into sleep mode.
Enable, Disable
Sleep Time Set the idle time before the printer
enters sleep mode (when Sleep
Mode is enabled).
5 min, 10 min, 15 min, 30 min, 60
min
Pin Control Regulates the striking force for
multi-part forms. For single
sheets, use “Standard”; for multi-
part forms, use “Special.”
Standard, Special
Pin Control Select Regulates the striking force for
multi-part forms. For single
sheets, use “Mode1”; for multi-
part forms, use “Mode2.”
Mode1, Mode2
Paper End In default setting when paper end
is detected, printer remains on-
line; if set to Off-line, when paper
end is detected, printer goes off-
line.
On-line, Off-line
FF Function Set the feeding operation upon
receiving an FF code after cut
sheet paper is fed.
Eject, Form Feed
ML690/ML691 User’s Guide 64
Set-Up
( .)cont
Cut Sheet Park Function To enable paper feed out of the
cut sheet feeder, set to Valid.
Invalid, Valid
Feed Up when Menu
Printing
To move the paper to the Access
Cover to see the Menu printing,
set to Yes.
No, Yes
Parallel I/F I-Prime Determines what the printer will
do when it receives the I-Prime
signal from the software.
Buffer Print: prints out the buffer
contents before resetting.
Buffer Clear: dumps the buffer
contents immediately.
Invalid: causes the printer to
ignore the I-Prime command.
Select this setting if you wish
to enter settings through the
printer’s control panel which will
not be automatically overridden by
the software’s settings when the
I-Prime signal is sent.
Buffer Print, Buffer Clear, Invalid
ML690/ML691 User’s Guide 65
Parallel I/F
(cont.)
Auto Feed XT 8 (only
displayed for EPSON
Emulation)
If your system uses pin 14 of
the parallel interface to control
automatic line feed, change the
setting to Valid.
Invalid, Valid
Bi-Direction Set whether to return a device
ID or not in accordance with IEEE
1284.
Enable, Disable
Serial IF
(Appears only
when the
optional Serial
Interface is
installed.)
Parity Selects the type of parity your
system uses: None, Odd, or
Even, Ignore (do not convert the
character to ox40 in case of parity
error).
None, Odd, Even, Ignore
Serial Data 7/8 Bits Change to 7 Bits if your systems
uses a 7-bit data format.
8 Bits, 7 Bits
Protocol Set the communications control
method.
Ready/Busy, X-On / X-Off, Ready/
Busy & X-On / X-Off
Diagnostic Test To perform input/output diagnosis
of RS-232C interface signals, set
to Yes.
No, Yes
Busy Line If Ready/Busy protocol (factory
default) is selected, you can
choose which line your system
monitors for a busy signal.
SSD–, SSD+, , RTSDTR

ML690/ML691 User’s Guide 66
Serial I/F
(cont.)
Baud Rate Set this to match your system’s
transmission speed.
19200 bps, , 4800 bps, 9600 bps
2400 bps, 1200 bps, 600 bps, 300
bps
DSR Signal Used with the Ready/Busy
protocol (factory default) to select
the way your system handles the
DSR signal.
Valid, Invalid
DTR Signal Change to Ready on Select if the
DTR signal is required when the
printer is selected (leave as Ready
on Power Up if the DTR signal
is required when the printer is
turned on).
Ready on Power Up, Ready on
Select
Busy Time Sets the length of the busy signal
when the Ready/Busy protocol
(factory default) is engaged,
0.2 sec, 1 sec
Stop Bit Set the stop bit length. , 2 bit1 bit
Receive Error When “checked” is selected the
printer checks for the correct
number of bits and sends an error
if an incorrect number is found.
Checked, Unchecked
Termékspecifikációk
| Márka: | OKI |
| Kategória: | nyomtató |
| Modell: | ML690 |
Szüksége van segítségre?
Ha segítségre van szüksége OKI ML690, tegyen fel kérdést alább, és más felhasználók válaszolnak Önnek
Útmutatók nyomtató OKI

10 Április 2025
10 Április 2025
10 Április 2025
16 Október 2024
16 Október 2024
14 Október 2024
13 Október 2024
5 Október 2024
2 Október 2024
24 Szeptember 2024
Útmutatók nyomtató
- nyomtató Samsung
- nyomtató Sony
- nyomtató Fujitsu
- nyomtató LG
- nyomtató Olympus
- nyomtató Panasonic
- nyomtató Canon
- nyomtató StarTech.com
- nyomtató Sharp
- nyomtató Lenovo
- nyomtató Toshiba
- nyomtató HP
- nyomtató Roland
- nyomtató Digitus
- nyomtató Zebra
- nyomtató AVM
- nyomtató Fujifilm
- nyomtató Dell
- nyomtató Xerox
- nyomtató Primera
- nyomtató Thomson
- nyomtató Polaroid
- nyomtató Kyocera
- nyomtató Ricoh
- nyomtató Epson
- nyomtató Huawei
- nyomtató Renkforce
- nyomtató Mitsubishi
- nyomtató Godex
- nyomtató Brother
- nyomtató Citizen
- nyomtató Microboards
- nyomtató Kodak
- nyomtató MSI
- nyomtató Dymo
- nyomtató Testo
- nyomtató Konica Minolta
- nyomtató Datamax O'Neil
- nyomtató Kogan
- nyomtató Honeywell
- nyomtató Velleman
- nyomtató D-Link
- nyomtató Fargo
- nyomtató TSC
- nyomtató Sagem
- nyomtató Olympia
- nyomtató Tomy
- nyomtató Posiflex
- nyomtató ZKTeco
- nyomtató NEC
- nyomtató CUSTOM
- nyomtató Panduit
- nyomtató Equip
- nyomtató Pantum
- nyomtató Brady
- nyomtató Bixolon
- nyomtató CSL
- nyomtató Nilox
- nyomtató Seiko
- nyomtató Argox
- nyomtató Royal Sovereign
- nyomtató Lexmark
- nyomtató Olivetti
- nyomtató Intermec
- nyomtató Minolta
- nyomtató DNP
- nyomtató Triumph-Adler
- nyomtató Oce
- nyomtató Paxar
- nyomtató Metapace
- nyomtató Ultimaker
- nyomtató Ibm
- nyomtató Toshiba TEC
- nyomtató Frama
- nyomtató Builder
- nyomtató Star Micronics
- nyomtató Dascom
- nyomtató HiTi
- nyomtató GG Image
- nyomtató Vupoint Solutions
- nyomtató Elite Screens
- nyomtató DTRONIC
- nyomtató Phoenix Contact
- nyomtató Videology
- nyomtató Star
- nyomtató EC Line
- nyomtató Colop
- nyomtató Approx
- nyomtató Fichero
- nyomtató Raspberry Pi
- nyomtató Middle Atlantic
- nyomtató IDP
- nyomtató Evolis
- nyomtató Nisca
- nyomtató Epson 7620
- nyomtató Sawgrass
Legújabb útmutatók nyomtató

10 Április 2025
10 Április 2025

10 Április 2025

9 Április 2025

9 Április 2025

9 Április 2025
3 Április 2025
3 Április 2025
3 Április 2025

2 Április 2025