Használati útmutató OKI B930DN
Olvassa el alább 📖 a magyar nyelvű használati útmutatót OKI B930DN (79 oldal) a nyomtató kategóriában. Ezt az útmutatót 11 ember találta hasznosnak és 2 felhasználó értékelte átlagosan 4.5 csillagra
Oldal 1/79

B930n
User’s Guide
B930n

Preface > 2
P
REFACE
Every effort has been made to ensure that the information in this document is complete,
accurate, and up-to-date. The manufacturer assumes no responsibility for the results of
errors beyond its control. The manufacturer also cannot guarantee that changes in software
and equipment made by other manufacturers and referred to in this guide will not affect
the applicability of the information in it. Mention of software products manufactured by
other companies does not necessarily constitute endorsement by the manufacturer.
While all reasonable efforts have been made to make this document as accurate and helpful
as possible, we make no warranty of any kind, expressed or implied, as to the accuracy or
completeness of the information contained herein.
The most up-to-date drivers and manuals are available from:
http://www.okiprintingsolutions.com
Copyright © 2009 Oki Europe Ltd. All rights reserved.
Oki, Oki Printing Solutions and Microline are registered trademarks of Oki Electric Industry
Company, Ltd.
Energy Star is a trademark of the United States Environmental Protection Agency.
Microsoft, MS-DOS and Windows are registered trademarks of Microsoft Corporation.
Other product names and brand names are registered trademarks or trademarks of their
proprietors.
B930 Printer Model No: ELB-1
As an ENERGY STAR Program Participant, the manufacturer has determined
that this product meets the ENERGY STAR guidelines for energy efficiency.
This product complies with the requirements of the Council Directives 89/
336/EEC (EMC), 73/23/EEC (LVD) and 1999/5/EC (R&TTE), as amended
where applicable on the approximation of the laws of the member states
relating to electromagnetic compatibility, low voltage and radio &
telecommunications terminal equipment.
B930n B930dn

Emergency first aid > 3
E
MERGENCY
FIRST
AID
Take care with toner powder:
If swallowed, give small amounts of cold water and seek medical
attention. DO NOT attempt to induce vomiting.
If inhaled, move the person to an open area for fresh air. Seek medical
attention.
If it gets into the eyes, flush with large amounts of water for at least 15
minutes keeping eyelids open. Seek medical attention.
Spillages should be treated with cold water and soap to help reduce risk
of staining skin or clothing.
M
ANUFACTURER
Oki Data Corporation
4-11-22, Shibaura, Minato-ku
Tokyo 108-8551,
Japan
I
MPORTER
TO
THE
EU/
AUTHORISED
REPRESENTATIVE
Oki Europe Limited (trading as OKI Printing Solutions)
Blays House
Wick Road
Egham, Surrey
TW20 0HJ
United Kingdom
For all sales, support and general enquiries contact your local distributor.
E
NVIRONMENTAL
INFORMATION

Contents > 4
C
ONTENTS
Preface . . . . . . . . . . . . . . . . . . . . . . . . . . . . . . . . . . . . . . . . . . . . . . . . . . .2
Emergency first aid . . . . . . . . . . . . . . . . . . . . . . . . . . . . . . . . . . . . . . . . . .3
Manufacturer. . . . . . . . . . . . . . . . . . . . . . . . . . . . . . . . . . . . . . . . . . . . . . .3
Importer to the EU/authorised representative. . . . . . . . . . . . . . . . . . . . .3
Environmental information . . . . . . . . . . . . . . . . . . . . . . . . . . . . . . . . . . . .3
Contents . . . . . . . . . . . . . . . . . . . . . . . . . . . . . . . . . . . . . . . . . . . . . . . . . .4
Notes, cautions and warnings. . . . . . . . . . . . . . . . . . . . . . . . . . . . . . . . . .7
Basic operations . . . . . . . . . . . . . . . . . . . . . . . . . . . . . . . . . . . . . . . . . . . .8
Main components and their functions. . . . . . . . . . . . . . . . . . . . . . . . . . . . 8
Standard configuration. . . . . . . . . . . . . . . . . . . . . . . . . . . . . . . . . . . . 8
With optional accessories . . . . . . . . . . . . . . . . . . . . . . . . . . . . . . . . . . 9
Internal view . . . . . . . . . . . . . . . . . . . . . . . . . . . . . . . . . . . . . . . . . .10
Settings on the control panel . . . . . . . . . . . . . . . . . . . . . . . . . . . . . . . . .11
About this chapter . . . . . . . . . . . . . . . . . . . . . . . . . . . . . . . . . . . . . . . . .11
Control panel features . . . . . . . . . . . . . . . . . . . . . . . . . . . . . . . . . . . . . .11
LCD display . . . . . . . . . . . . . . . . . . . . . . . . . . . . . . . . . . . . . . . . . . .12
Print screen . . . . . . . . . . . . . . . . . . . . . . . . . . . . . . . . . . . . . . . . . . .12
Menu screen . . . . . . . . . . . . . . . . . . . . . . . . . . . . . . . . . . . . . . . . . . .12
Navigating the control panel menus. . . . . . . . . . . . . . . . . . . . . . . . . . . . .12
Changing the display and reporting language . . . . . . . . . . . . . . . . . . . .13
Switching on and off the power . . . . . . . . . . . . . . . . . . . . . . . . . . . . . . .14
Switching on the power . . . . . . . . . . . . . . . . . . . . . . . . . . . . . . . . . . . . .14
Switching off the power . . . . . . . . . . . . . . . . . . . . . . . . . . . . . . . . . . . . .14
Power save modes. . . . . . . . . . . . . . . . . . . . . . . . . . . . . . . . . . . . . . . . .15
Exiting the power save mode . . . . . . . . . . . . . . . . . . . . . . . . . . . . . . .15
Cancelling/checking printing . . . . . . . . . . . . . . . . . . . . . . . . . . . . . . . . . .15
Cancelling printing. . . . . . . . . . . . . . . . . . . . . . . . . . . . . . . . . . . . . . .15
Checking status of print data . . . . . . . . . . . . . . . . . . . . . . . . . . . . . . .15
Displaying optional accessory configuration and paper tray settings . . . . . .17
Printing . . . . . . . . . . . . . . . . . . . . . . . . . . . . . . . . . . . . . . . . . . . . . . . . . .18
Printing options. . . . . . . . . . . . . . . . . . . . . . . . . . . . . . . . . . . . . . . . . . .18
Printing a test page . . . . . . . . . . . . . . . . . . . . . . . . . . . . . . . . . . . . . . . .18
Printing a menu map . . . . . . . . . . . . . . . . . . . . . . . . . . . . . . . . . . . . . . .18
Printing from the computer. . . . . . . . . . . . . . . . . . . . . . . . . . . . . . . . . . .19
Basic print features in properties dialog box . . . . . . . . . . . . . . . . . . . . . . .19
Setting media types. . . . . . . . . . . . . . . . . . . . . . . . . . . . . . . . . . . . . . . .19
Envelopes. . . . . . . . . . . . . . . . . . . . . . . . . . . . . . . . . . . . . . . . . . . . . . .19
Loading and printing on envelopes . . . . . . . . . . . . . . . . . . . . . . . . . . .20
Printing on transparencies . . . . . . . . . . . . . . . . . . . . . . . . . . . . . . . . . . .21
Loading and printing on transparencies . . . . . . . . . . . . . . . . . . . . . . . .21
Printing on postcards . . . . . . . . . . . . . . . . . . . . . . . . . . . . . . . . . . . . . . .22
Loading and printing on postcards . . . . . . . . . . . . . . . . . . . . . . . . . . . .22
Printing on labels . . . . . . . . . . . . . . . . . . . . . . . . . . . . . . . . . . . . . . . . .23
Loading and printing on labels . . . . . . . . . . . . . . . . . . . . . . . . . . . . . .23
Printing on custom size paper . . . . . . . . . . . . . . . . . . . . . . . . . . . . . . . . .24
Loading and printing on custom size paper . . . . . . . . . . . . . . . . . . . . . .24
Printing on custom size paper . . . . . . . . . . . . . . . . . . . . . . . . . . . . . . .25
Advanced printing features. . . . . . . . . . . . . . . . . . . . . . . . . . . . . . . . . . .25
Cover pages . . . . . . . . . . . . . . . . . . . . . . . . . . . . . . . . . . . . . . . . . . .25
Separator page . . . . . . . . . . . . . . . . . . . . . . . . . . . . . . . . . . . . . . . . .25
Multiple pages on one sheet (N-up) . . . . . . . . . . . . . . . . . . . . . . . . . . .25
Image options. . . . . . . . . . . . . . . . . . . . . . . . . . . . . . . . . . . . . . . . . .25
Automatically resize paper . . . . . . . . . . . . . . . . . . . . . . . . . . . . . . . . .26

Contents > 5
Watermarks . . . . . . . . . . . . . . . . . . . . . . . . . . . . . . . . . . . . . . . . . . .26
Poster print . . . . . . . . . . . . . . . . . . . . . . . . . . . . . . . . . . . . . . . . . . .26
Fit to page . . . . . . . . . . . . . . . . . . . . . . . . . . . . . . . . . . . . . . . . . . . .26
Booklets . . . . . . . . . . . . . . . . . . . . . . . . . . . . . . . . . . . . . . . . . . . . . .26
Secure print- print confidential document. . . . . . . . . . . . . . . . . . . . . . .26
Stored job . . . . . . . . . . . . . . . . . . . . . . . . . . . . . . . . . . . . . . . . . . . .26
Proofprint - print after checking printing result . . . . . . . . . . . . . . . . . . .26
Print at a specified time - timed job. . . . . . . . . . . . . . . . . . . . . . . . . . .26
Direct printing of PDF files . . . . . . . . . . . . . . . . . . . . . . . . . . . . . . . . .27
eForms . . . . . . . . . . . . . . . . . . . . . . . . . . . . . . . . . . . . . . . . . . . . . .27
Overlays. . . . . . . . . . . . . . . . . . . . . . . . . . . . . . . . . . . . . . . . . . . . . .27
Job accounting . . . . . . . . . . . . . . . . . . . . . . . . . . . . . . . . . . . . . . . . .27
Sending files . . . . . . . . . . . . . . . . . . . . . . . . . . . . . . . . . . . . . . . . . . .27
E-mail notifications . . . . . . . . . . . . . . . . . . . . . . . . . . . . . . . . . . . . . .27
Barcode printing . . . . . . . . . . . . . . . . . . . . . . . . . . . . . . . . . . . . . . . .27
Loading paper . . . . . . . . . . . . . . . . . . . . . . . . . . . . . . . . . . . . . . . . . . . . .29
Loading trays 1-4 . . . . . . . . . . . . . . . . . . . . . . . . . . . . . . . . . . . . . . . . .29
Loading mpf (tray 5) . . . . . . . . . . . . . . . . . . . . . . . . . . . . . . . . . . . . . . .30
Loading high capacity feeder (tray 6) and two tandem tray (ttm) . . . . . . . .31
Tray settings . . . . . . . . . . . . . . . . . . . . . . . . . . . . . . . . . . . . . . . . . . . .32
Source . . . . . . . . . . . . . . . . . . . . . . . . . . . . . . . . . . . . . . . . . . . . . . .32
Output destination. . . . . . . . . . . . . . . . . . . . . . . . . . . . . . . . . . . . . . .32
Input tray linking . . . . . . . . . . . . . . . . . . . . . . . . . . . . . . . . . . . . . . .32
Output bin linking . . . . . . . . . . . . . . . . . . . . . . . . . . . . . . . . . . . . . . .33
Manual feed . . . . . . . . . . . . . . . . . . . . . . . . . . . . . . . . . . . . . . . . . . .33
Media check . . . . . . . . . . . . . . . . . . . . . . . . . . . . . . . . . . . . . . . . . . .33
Job offset . . . . . . . . . . . . . . . . . . . . . . . . . . . . . . . . . . . . . . . . . . . . .33
Driver settings . . . . . . . . . . . . . . . . . . . . . . . . . . . . . . . . . . . . . . . . .33
Hole puncher . . . . . . . . . . . . . . . . . . . . . . . . . . . . . . . . . . . . . . . . . . . .34
Emptying the punch waste box . . . . . . . . . . . . . . . . . . . . . . . . . . . . . .34
Stapler. . . . . . . . . . . . . . . . . . . . . . . . . . . . . . . . . . . . . . . . . . . . . . . . .35
Adding staples . . . . . . . . . . . . . . . . . . . . . . . . . . . . . . . . . . . . . . . . .35
Installing accessories . . . . . . . . . . . . . . . . . . . . . . . . . . . . . . . . . . . . . . .36
Troubleshooting . . . . . . . . . . . . . . . . . . . . . . . . . . . . . . . . . . . . . . . . . . .37
When paper jams . . . . . . . . . . . . . . . . . . . . . . . . . . . . . . . . . . . . . . . . .37
Jam area locations. . . . . . . . . . . . . . . . . . . . . . . . . . . . . . . . . . . . . . . . .37
Inside cover A. . . . . . . . . . . . . . . . . . . . . . . . . . . . . . . . . . . . . . . . . .37
Inside cover B. . . . . . . . . . . . . . . . . . . . . . . . . . . . . . . . . . . . . . . . . .38
Inside cover C. . . . . . . . . . . . . . . . . . . . . . . . . . . . . . . . . . . . . . . . . .40
Inside cover D (duplex unit) . . . . . . . . . . . . . . . . . . . . . . . . . . . . . . . .41
Inside cover E . . . . . . . . . . . . . . . . . . . . . . . . . . . . . . . . . . . . . . . . . .42
Inside cover F . . . . . . . . . . . . . . . . . . . . . . . . . . . . . . . . . . . . . . . . . .43
Inside cover G . . . . . . . . . . . . . . . . . . . . . . . . . . . . . . . . . . . . . . . . .44
Inside cover H. . . . . . . . . . . . . . . . . . . . . . . . . . . . . . . . . . . . . . . . . .45
Jam at the stacker upper tray . . . . . . . . . . . . . . . . . . . . . . . . . . . . . . .46
Paper jams in trays 1-4 . . . . . . . . . . . . . . . . . . . . . . . . . . . . . . . . . . .46
Paper jam in multi purpose feeder (tray 5) . . . . . . . . . . . . . . . . . . . . . .48
Paper jam in high capacity feeder (tray 6)/ two tandem trays. . . . . . . . .48
When problems occur . . . . . . . . . . . . . . . . . . . . . . . . . . . . . . . . . . . . . .49
When the print quality is poor. . . . . . . . . . . . . . . . . . . . . . . . . . . . . . . . .53
Network related troubles . . . . . . . . . . . . . . . . . . . . . . . . . . . . . . . . . . . .55
Using TCP/IP. . . . . . . . . . . . . . . . . . . . . . . . . . . . . . . . . . . . . . . . . . .55
Replacing consumables . . . . . . . . . . . . . . . . . . . . . . . . . . . . . . . . . . . . . .56
Drum unit and toner cartridge . . . . . . . . . . . . . . . . . . . . . . . . . . . . . . . .56
Drum unit. . . . . . . . . . . . . . . . . . . . . . . . . . . . . . . . . . . . . . . . . . . . . . .56
Caution on handling the drum unit . . . . . . . . . . . . . . . . . . . . . . . . . . .56
Replacing the drum unit . . . . . . . . . . . . . . . . . . . . . . . . . . . . . . . . . . .57

Contents > 6
Toner cartridge . . . . . . . . . . . . . . . . . . . . . . . . . . . . . . . . . . . . . . . . . . .59
Caution on handling the toner cartridge . . . . . . . . . . . . . . . . . . . . . . . .59
Replacing the toner cartridge . . . . . . . . . . . . . . . . . . . . . . . . . . . . . . .59
Fuser unit. . . . . . . . . . . . . . . . . . . . . . . . . . . . . . . . . . . . . . . . . . . . . . .61
Replacing the fuser unit . . . . . . . . . . . . . . . . . . . . . . . . . . . . . . . . . . .61
Transfer roll cartridge . . . . . . . . . . . . . . . . . . . . . . . . . . . . . . . . . . . . . .62
Replacing the transfer roll cartridge. . . . . . . . . . . . . . . . . . . . . . . . . . .62
Maintenance kit. . . . . . . . . . . . . . . . . . . . . . . . . . . . . . . . . . . . . . . . .62
Daily care . . . . . . . . . . . . . . . . . . . . . . . . . . . . . . . . . . . . . . . . . . . . . . . .63
Cleaning the printer. . . . . . . . . . . . . . . . . . . . . . . . . . . . . . . . . . . . . . . .63
Cleaning the exterior . . . . . . . . . . . . . . . . . . . . . . . . . . . . . . . . . . . . .63
Cleaning the interior . . . . . . . . . . . . . . . . . . . . . . . . . . . . . . . . . . . . .63
When moving the printer . . . . . . . . . . . . . . . . . . . . . . . . . . . . . . . . . . . .64
Menu functions . . . . . . . . . . . . . . . . . . . . . . . . . . . . . . . . . . . . . . . . . . . .66
Print jobs menu. . . . . . . . . . . . . . . . . . . . . . . . . . . . . . . . . . . . . . . . . . .66
Information menu . . . . . . . . . . . . . . . . . . . . . . . . . . . . . . . . . . . . . . . . .66
Print menu . . . . . . . . . . . . . . . . . . . . . . . . . . . . . . . . . . . . . . . . . . . . . .66
Media menu . . . . . . . . . . . . . . . . . . . . . . . . . . . . . . . . . . . . . . . . . . . . .68
System configuration menu . . . . . . . . . . . . . . . . . . . . . . . . . . . . . . . . . .69
PCL emulation. . . . . . . . . . . . . . . . . . . . . . . . . . . . . . . . . . . . . . . . . . . .70
Fx emulation. . . . . . . . . . . . . . . . . . . . . . . . . . . . . . . . . . . . . . . . . . . . .70
Parallel menu . . . . . . . . . . . . . . . . . . . . . . . . . . . . . . . . . . . . . . . . . . . .71
Serial menu . . . . . . . . . . . . . . . . . . . . . . . . . . . . . . . . . . . . . . . . . . . . .71
USB menu . . . . . . . . . . . . . . . . . . . . . . . . . . . . . . . . . . . . . . . . . . . . . .72
Network menu . . . . . . . . . . . . . . . . . . . . . . . . . . . . . . . . . . . . . . . . . . .72
System adjustment menu . . . . . . . . . . . . . . . . . . . . . . . . . . . . . . . . . . .73
Date/time menu . . . . . . . . . . . . . . . . . . . . . . . . . . . . . . . . . . . . . . . . . .73
Maintenance menu . . . . . . . . . . . . . . . . . . . . . . . . . . . . . . . . . . . . . . . .74
Usage menu . . . . . . . . . . . . . . . . . . . . . . . . . . . . . . . . . . . . . . . . . . . . .74
Flash menu. . . . . . . . . . . . . . . . . . . . . . . . . . . . . . . . . . . . . . . . . . . . . .75
Disk menu . . . . . . . . . . . . . . . . . . . . . . . . . . . . . . . . . . . . . . . . . . . . . .75
Job accounting . . . . . . . . . . . . . . . . . . . . . . . . . . . . . . . . . . . . . . . . . . .75
Spooling menu . . . . . . . . . . . . . . . . . . . . . . . . . . . . . . . . . . . . . . . . . . .75
Index . . . . . . . . . . . . . . . . . . . . . . . . . . . . . . . . . . . . . . . . . . . . . . . . . . . .76
Oki contact details. . . . . . . . . . . . . . . . . . . . . . . . . . . . . . . . . . . . . . . . . .78

Notes, cautions and warnings > 7
N
OTES
,
CAUTIONS
AND
WARNINGS
For the protection of your product, and in order to ensure that you benefit from its full
functionality, this model has been designed to operate only with genuine original toner
cartridges. Any other toner cartridge may not operate at all, even if it is described as
“compatible”, and if it does work, your product's performance and print quality may be
degraded.
Specifications subject to change without notice. All trademarks acknowledged.
NOTE
A note provides additional information to supplement the main text.
CAUTION!
A caution provides additional information which, if ignored, may
result in equipment malfunction or damage.
WARNING!
A warning provides additional information which, if ignored, may
result in a risk of personal injury.

Basic operations > 8
B
ASIC
OPERATIONS
M
AIN
COMPONENTS
AND
THEIR
FUNCTIONS
S
TANDARD
CONFIGURATION
NO NAME DESCRIPTION
1 Control panel Consists of the essential operation buttons, indicators and
display.
2 Power switch Switches the power of the printer on and off. Pressing the
switch to the <|> position switches it on and pressing it to the
<0> position switches it off.
3 Standard top bin
output tray
Print jobs are output here with the printed side facing down.
4 Front Cover Consists of the drum unit and toner cartridge and other internal
parts of the printer.
5 Tray 1 & 2 500- sheet feeders.
6 Multi Purpose
Feeder Tray 5
For both manual and automatic feeds.
7 Parallel connector,
IEEE 1284
For connecting the parallel cable.
8 Ethernet 10/100
BaseT connection
For connecting the ethernet cable.
9 USB 2.0 connector For connecting the USB cable.
10 Serial RS232
connector
For connecting the serial cable.
11 Ground Fault
Interrupter (GFI)
reset
For resetting the power if it trips.
12 Power cord cable
connector
For connecting the power cord cable.
13 Finisher power cord
connection
For connecting the optional finisher power cable.
14 2000- sheet feeder
tray 6 connector
For connecting the optional high capacity feeder.

Basic operations > 9
W
ITH
OPTIONAL
ACCESSORIES
15 Finisher connection For connecting the optional finisher cable.
16 1000 (2000 sheets
for TTM)-sheet
feeder trays 3 & 4
For connecting the optional trays cable.
17 Duplex unit
connector
For connecting the optional duplex unit.
NO NAME DESCRIPTION
1 Duplex unit Enables 2 sided printing.
2 Exit 2 Used in conjunction with duplex unit and finisher, comes with a
duplex unit.
3 High Capacity
Feeder Tray 6
2000 sheet Feeder.
4 Trays 3 & 4 2 x 500-sheet A3 trays (2TM) or 2000-sheet A4/Letter dual
input trays; tray 3 - 800 sheets and tray 4 - 1200 sheets (TTM).
5 Finisher 3500-sheet finisher (2 possible configurations- stacker and 2-4
hole puncher).
6 Stacker upper bin 500 sheet stacker.
7 Stacker main bin 3000 sheet stacker.
8 Transport to finisher Serves as a transport to the finisher.
NO NAME DESCRIPTION

Basic operations > 10
I
NTERNAL
VIEW
NO NAME DESCRIPTION
1 Toner cartridge Contains the toner.
2 Drum unit Contains the photosensitive drum.
3 Fuser unit Fixes the toner on the paper. Do not touch this when using the
printer as it is hot.
4 Transfer roller Transfers the toner image on the surface of the photosensitive
drum to the paper.

Settings on the control panel > 11
S
ETTINGS
ON
THE
CONTROL
PANEL
A
BOUT
THIS
CHAPTER
This chapter introduces the control panel and its functions, and also demonstrates how to
navigate through the control panel menus and submenus that allow you to view and change
the printer settings.
Full details of the menu system are given in the Reference Guide. You can print a menu
map showing all current printer settings by pressing the Info button on the control panel.
C
ONTROL
PANEL
FEATURES
The control panel is located on the front of the printer and contains the display (see “LCD
display” on page 12), indicators and push buttons that allow you to view and change the
printer settings.
NAME DESCRIPTION
<Menu> button Press to move to the menu operation. Once in the menu operation,
repeatedly pressing the menu button moves down the menu list.
<Info> button Press to print the menu map. The menu map (2 pages) will print with
all the current printer settings.
<Ready> indicator When the light is on, the printer is ready to receive data from the
computer.
LCD display Displays the setting items, machine status, and messages.
<Attention> indicator When the light is on, there is a malfunction in the printer.
<On-Line> button/
indicator
When online, press to enter the off-line status. When in the off-line
status, the machine cannot receive data or process printing. Press
again to exit the off-line status and enter the on-line status (where
the machine can receive data from the computer).
<Cancel> button Press to cancel printing.
Press to exit the menu mode.
<Select> button Press to activate the displayed setting. When you are changing the
candidate values, pressing the Select button runs the currently
displayed activity or saves the currently displayed candidate.
< > < > < > < >
buttons
Press these to move to the required menu, item and candidate value
on the display.
Settings on the control panel > 12
LCD
DISPLAY
The LCD display shows status and error messages that inform you of the current status of
the printer, and also displays menus, submenus and printer settings when you are in the
menu system.
There are two types of screens shown: Print screen (for displaying printer status) and Menu
screen (for setting configuration). The message displayed differs according to the options
installed and setting status.
P
RINT
SCREEN
The Print screen appears when the machine is printing or waiting for data. The following
contents are shown on the screen.
* When the current status is Printing, the following information is also displayed:
Port receiving data—Shown at bottom left. Which printer port is currently receiving print
data, e.g. USB, Net, etc.
Emulation—Shown at bottom right. Which page description language emulation is currently
in use, e.g. PCL, PS, etc.
M
ENU
SCREEN
Screen for configuring settings related to the printer.
This screen appears when you press the MENU button. The first of a list of menus appears.
Further depressions of the MENU button or the < > < > buttons cycle through the
available printers menus.
N
AVIGATING
THE
CONTROL
PANEL
MENUS
When you press the MENU button on the control panel, you enter the printer’s menu
system. At that point, the first line of the display lists the active menu. You can change the
active menu by pressing the < > or < > button or by pressing the MENU button.
To move to a sub-menu or to the available settings for the item selected press the < >
button.
To cycle through the available settings for the currently selected item use the < > and
< > buttons, then press the SELECT button to choose the setting you want.
To move back up a menu level, press the < > button and ultimately to exit the menu
system press the or CANCEL ON-LINE button.
NO STATUS DESCRIPTION
1 Online The printer is currently not printing any job.
2 Warming up The fuser is heating up for printing.
3 Receiving data The printer is receiving a print job.
4 Printing* The printer is printing.
5 Waiting The printer displays this message while printing
a large file.

Settings on the control panel > 13
C
HANGING
THE
DISPLAY
AND
REPORTING
LANGUAGE
The default language for display messages and printed reports is English. You can change
this to a different language as follows.
1. Press the MENU button on the control panel.
2. Press the < > button repeatedly to display the “System Configuration Menu”.
3. Press the < > button to enter the “System Configuration Menu”.
4. Press the < > button repeatedly to display the “Language” sub-menu.
5. Press the < > button to modify the current language setting.
6. Press the < > or < > button repeatedly until the language you want is displayed.
7. Press the SELECT button to choose your preferred language, then press the
CANCEL button to exit the menu system.

Switching on and off the power > 14
S
WITCHING
ON
AND
OFF
THE
POWER
S
WITCHING
ON
THE
POWER
1. Press the power switch of the printer to the <|> position.
When the power is switched on, various screens will be displayed on the control panel.
Check that this display changes to “Online”.
S
WITCHING
OFF
THE
POWER
1. By checking the display on the control panel, confirm that the printer is not
processing any data.
2. Press the power switch to the <O> position to switch the power off.
NOTE
When “WARMING UP…” is displayed, the printer is unavailable for printing.
When the printer is ready for printing, “ONLINE” will be displayed.
NOTE
>Do not switch off the printer power when printing is in progress. It may
lead to a paper jam.
>Once the power is switched off, print data remaining in this printer or
information saved in the memory of this printer will be deleted.

Switching on and off the power > 15
P
OWER
SAVE
MODES
The printer is equipped with a Power Save mode to reduce power consumption when it is
left idle. The default idle time from last print activity until the printer enters Power Saver
mode is 5 minutes. This time can be adjusted by the operator to any of the following times:
5, 15, 30, 60 or 120 minutes.
When no print data is received within 5 minutes (default) since the last page is printed, the
printer will enter Power Saver mode. An informative message is displayed on the operator
panel LCD indicating Power Saver Mode. In this mode, the printer allows the fuser to cool,
but power is still supplied to the mechanical parts of the printer. Consumption of power
during Power Saver mode is 50 Watts or less, and the time required to exit from Power
Saver mode to a print-ready status can be up to 45 seconds.
There is a second stage of power reduction called Sleep mode. The default idle time from
last print activity until the printer transitions from Power Saver mode to Sleep mode is 30
minutes. This time can be adjusted by the operator to any of the following times: 30, 60,
120, or 180 minutes. In this mode, the printer will turn off all power to the mechanical
components of the printer and installed options. Consumption of power during Sleep mode
is less than 8 Watts, and the time required to exit from Sleep mode to a print-ready status
can be up to 45 seconds plus the time to reinitialise mechanical options.
E
XITING
THE
POWER
SAVE
MODE
The printer automatically cancels its power save status once it receives data from the
computer. You can press any button to exit the sleep mode.
C
ANCELLING
/
CHECKING
PRINTING
C
ANCELLING
PRINTING
To cancel printing, you can either cancel the print job at this printer or at the computer.
Cancelling a Print Job at the Printer
Press the CANCEL button then press the ON-LINE button on the control panel. However,
pages being printed at the moment will continue to be printed.
Cancelling Print Jobs at the Computer
Double-click the printer icon at the bottom right of the taskbar in Windows.
From the displayed window, click the document name that you wish to delete and press the
Delete key.
C
HECKING
STATUS
OF
PRINT
DATA
Checking in Windows
Double-click the printer icon on the task bar at the bottom right of the screen.

Switching on and off the power > 16
From the displayed window, check the column, Status.

Switching on and off the power > 17
D
ISPLAYING
OPTIONAL
ACCESSORY
CONFIGURATION
AND
PAPER
TRAY
SETTINGS
When using this printer as a network printer and with SNMP protocol enabled, you can
display on the printer driver, the optional accessory configuration and settings configured
at the control panel such as paper type or size. These settings are displayed on the Options
tab. This section explains the procedure using Windows XP as an example.
Important:
>When using USB or Parallel connection to this printer, this feature cannot be used.
You have to manually set the items on the printer driver.
>The rear tray information cannot be obtained. You have to manually set the item.
>For paper size and paper type settings, you must configure them at the control panel
beforehand. Even if you change the settings here, they will not be reflected on the
printer itself.
1. From the Start menu, click Printers and Faxes and then display the properties of
the printer to be used.
2. Click the Device Options tab.
3. Click Get Information from Printer.
4. Click OK. The contents of the Device Options tab will be updated based on the data
obtained from the printer.
NOTE
>When using this feature, you have to activate the SNMP port (default:
Enable) on the printer using the control panel.
>For Windows 2000/Windows XP/ Windows 2003/Windows Vista, only
users with administrator’s rights can change the settings. Users without
administrator’s rights can only check the contents.
NOTE
The properties of the printer can be displayed on the printer driver.

Printing > 18
P
RINTING
P
RINTING
OPTIONS
This printer offers three ways to modify the printing options:
>Control Panel
>Printer Driver
>Embedded Web Server
The printing options on the printer driver can be accessed through the application you are
using or through the Printer and Faxes Menu (on Windows). The Embedded Web Server
(EWS) contains access to all printer features and presents them as HTML pages. EWS can
be accessed from any remote station via HTTP access. Refer to the Reference Guide for
details on how to access each of the above Printing Options.
P
RINTING
A
TEST
PAGE
You can print a test page to verify the printer connectivity and operation. You can enable
this feature using your Printer Properties. You can also enable this at the control panel or
using the EWS.
To print a test page through the driver:
1. Select the Device options tab within the driver.
2. Click Demo Print.
3. Click OK.
P
RINTING
A
MENU
MAP
This printer can print a menu map that lists the currently selected status of menu options,
media selections in trays, options installed and other relevant information about your
printer. To print a menu map, press the INFO button on the control panel. A two-page
summary is printed.
NOTE
If there is a conflict between settings in the Control Panel, Printing Preferences
or Embedded Web Server and printer settings set via your application, the
application settings supersede any other setting.

Printing > 19
P
RINTING
FROM
THE
COMPUTER
This section explains the basic flow when printing from application software in a Windows®
environment.The procedure may differ according to the computer or system configuration
used.
This section explains printing with the PCL driver as an example.
1. From the File menu of the application software, select Print.
2. Select this printer as the printer to be used to start printing. To use the various print
features of this printer, display the printer properties dialog box to set the necessary
items.
For details on each item and how to set them, refer to the Online Help for the printer
driver.
B
ASIC
PRINT
FEATURES
IN
PROPERTIES
DIALOG
BOX
The following selections are available in the Setup tab: Paper Size, Media Type, Paper
Source, Paper Destination Paper Feed Options, Finishing Mode, and Duplex (2-sided
Printing).
>Paper Feed Options include: Auto Resize, Fit to page, Covers, Auto Tray Change,
Media Check, Skip Blank Pages, and Multipurpose Tray Settings.
>Finishing Mode includes: Standard, 2-up, 4-up, 6-up, 8-up, 9-up, 16-up,
PosterPrint, and Booklet (available if Duplex option is installed).
Detailed instructions on how to use the following options are contained in the Reference
Guide:
Selecting Paper Size, Selecting Number of Copies, Collating Copies, Setting Orientation,
Skip Blank Pages, Printing in Reverse Order, Duplex Printing and Binding Preferences.
S
ETTING
MEDIA
TYPES
The printer can accommodate a variety of special media. Each media type requires special
handling. The most convenient way to enable this feature is using the Printer Properties in
your computer. You can also enable this feature at the control panel or using the EWS.
E
NVELOPES
Envelopes can be printed using the MPF, see “Loading mpf (tray 5)” on page 30. For details
on the envelopes that can be used, refer to “Usable Paper” in the Reference Guide.
NOTE
Do not switch off the power to the printer when printing is in progress. It may
lead to a paper jam.
NOTE
If the paper tray information is not correct, change the settings on the Set Up
tab of the printer driver before continuing. For details on how to do the
settings, refer to the Online Help for the printer driver.
NOTE
You can set the print features in the properties dialog box from the printer icon
by selecting Printers and Faxes (or Settings) > Printers depending on the OS.
Printing > 20
L
OADING
AND
PRINTING
ON
ENVELOPES
Take note of the following points when loading an envelope:
>Use envelopes specifically made for laser printers.
>Do not use padded envelopes.
>Avoid printing over the area where the envelope seams meet.
>Never use envelopes with windows or metal clasps; they can damage the printer.
>Ensure that the envelopes are stored in a cool and dry place and in their original
packaging. If not, heat and humidity can cause the envelopes to seal before or
during printing.
>Load a maximum stack height of 10mm (.4 in).
>Close the flaps of the envelopes and load them with the address side facing down.
>Remove excess air from envelopes before loading into the MPF.
>When using commercial flap envelopes with side seams (vs. diagonal seams), verify
that the side seams are cut all the way to the corner of the envelope.
1. Load the envelopes with the following considerations:
>Place C4 envelopes short-edge feed in the tray.
>Place Monarch, “10, C5 and DL envelopes long-edge feed in the tray.
>Place the side to be printed facedown.
>Place the envelope with the flap entering the printer first.
2. Slide the length guide and right width guide to the size of the loaded envelopes.
3. On the control panel, change the paper type to ENVELOPE.
4. On the control panel, change the paper size of the tray to match the type of
envelope loaded.
5. From the File menu, select Print.
6. Select this printer from the drop down list and click Properties.
7. Select the loaded paper tray from Source or click the Media Type and then select
Envelope.
8. Click OK.
9. Click Print in the Print dialog box to start printing.
NOTE
The reverse side of the envelope cannot be printed on.

Printing > 21
P
RINTING
ON
TRANSPARENCIES
You can print transparencies from any tray.
L
OADING
AND
PRINTING
ON
TRANSPARENCIES
The way to load transparencies in the paper tray is the same as the way to load standard
size paper. For details, refer to “Loading paper” on page 29. However, before loading
transparencies, consider the following points:
>Remove all other media before loading transparencies into the tray.
>Do not load transparencies above the fill line; this may cause the printer to jam.
>Handle transparencies by the edges to avoid fingerprints and creases that can cause
poor print quality.
>Do not use transparencies with the stripes side down.
You must also set paper type for the paper tray to Transparency on the control panel.
1. Fan the transparencies to ensure that all sheets are separated.
2. Insert them with the long-edge feed.
3. Adjust the paper guides to the size of the transparencies, if required.
4. On the control panel, change the paper type to TRANSPARENCY.
5. From the File menu, select Print.
6. Select this printer as the printer to be used and click Properties.
7. Click the Media Type drop down box and click on transparencies.
8. Select the loaded paper tray from Source Drop down and click on the tray that
contains the transparencies.
9. Click the Paper Size drop down.
10. From Paper Size, select the size of the original document.
NOTE
Printing transparencies continuously may lead to the output transparencies
sticking to each other. As a guide, remove the transparencies from the output
tray after about 20 sheets and then fan them to lower their temperatures.

Printing > 22
11. Click OK.
12. Click Print in the Print dialog box to start printing.
P
RINTING
ON
POSTCARDS
Postcards can be printed using the MPF (Tray 5).
L
OADING
AND
PRINTING
ON
POSTCARDS
Before loading the postcards in the tray, consider the following points:
>Ensure that the postcards are stored in a cool dry place and in their original
packaging. If not heat and humidity can cause the postcards to curl.
>Load a maximum stack height of 10mm (.4 in), no higher than the fill line.
1. Insert the postcards in the tray with the following considerations:
>Insert large postcards long- edge feed and facedown. Place the top of the
postcard to enter the printer first (left side of the printer).
>Insert small postcards short-edge feed and facedown. Place the top of the
postcard towards the rear of the printer.
2. Adjust the paper guides to the size of the postcards.
3. On the control panel, change the paper type to POSTCARDS.
4. From the File menu, select Print.
5. Select this printer as the printer to be used and click Properties.
6. Click the Media Type drop down box and click on postcards.
7. Click the Paper Size drop down.
8. From Paper Size select the size of the original document.
9. Click OK.
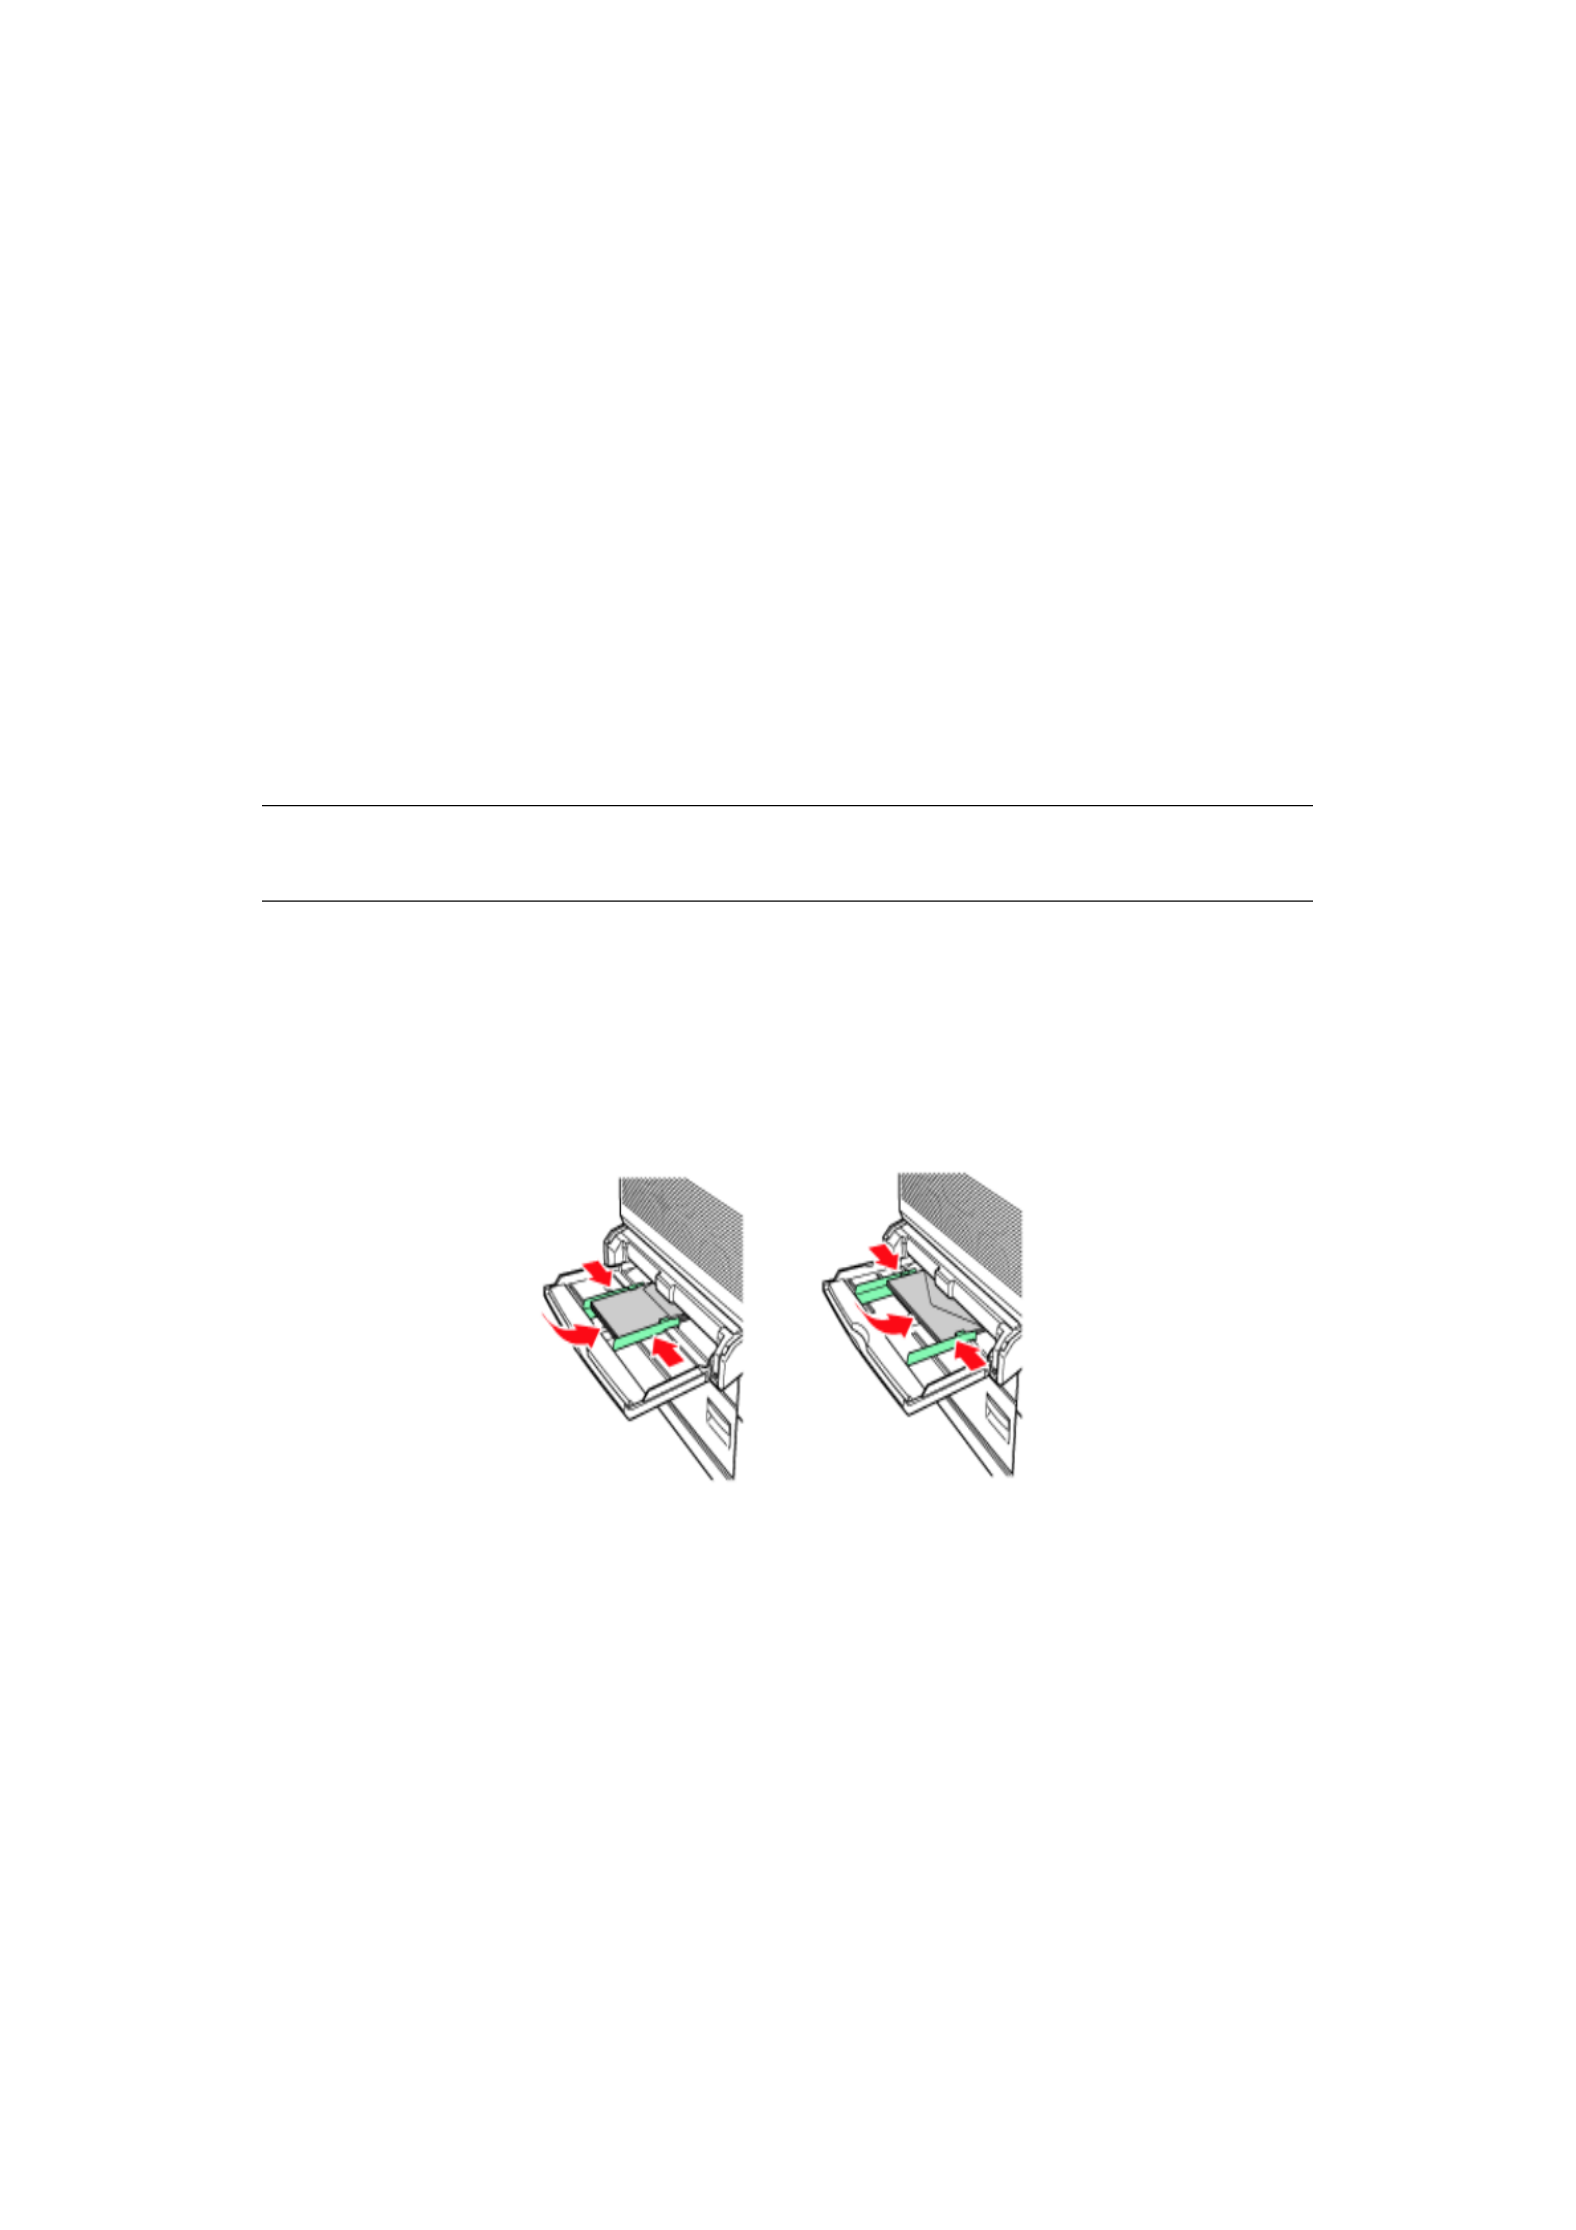
10. Click Print in the Print dialog box to start printing.
Large Postcards Small Postcards
Long-edge Feed Short-edge Feed

Printing > 23
P
RINTING
ON
LABELS
Labels can be printed from all trays.
L
OADING
AND
PRINTING
ON
LABELS
Before loading the labels in the tray, consider the following points:
>Do not use vinyl labels.
>Do not use any labels on a sheet where items are missing; it may damage the
printer.
>Print only on one side of the sheet of labels.
>Ensure that the labels are stored in a cool dry place and in their original packaging.
Storing them in extreme conditions can cause jams, curls or poor print quality.
1. Insert the labels in the tray, with the following considerations:
>Trays 1-4 - Insert the label sheets long-edge feed and face up. Place the top of
the page toward the front of the paper.
>MPF Tray 5 - Insert the label sheets long-edge feed and face down. Place the top
of the page toward the front of the printer.
>HCF Tray 6 - Insert the label sheets long-edge feed and face down. Place the top
of the page toward the front of the printer.
2. Adjust the paper guides to fit the size of the label sheets.
3. On the control panel, change the paper type to LABELS.
4. From the File menu, select Print.
5. Select this printer as the printer to be used and click Properties.
6. Click the Media Type drop down box and click on labels.
7. Click the Paper Size drop down.
8. From Paper Size select the size of the original document.
9. Click OK.
10. Click Print in the Print dialog box to start printing.
Trays 1-4 Multi Purpose Feeder Tray 5 High Capacity Feeder Tray 6

Printing > 24
P
RINTING
ON
CUSTOM
SIZE
PAPER
This section explains how to print on custom size paper. You can print custom size paper
from Trays 1-5. Tray 6 (HCF) can only print standard paper.
The paper sizes that can be set on this printer are as follows:
L
OADING
AND
PRINTING
ON
CUSTOM
SIZE
PAPER
1. From the File menu, click Print.
2. Select Properties then select the Setup tab.
3. Select Option as needed: Source, Media Type, etc.
4. You may select a previously stored custom size from the list or you may add an
additional custom size.
5. To add a new custom size:
(a) Select paper feed options.
(b) Select Custom Size.
(c) In the Name Field, Type a name for your custom size.
(d) Click on the Unit of measure radio button for the units you would like to use
(mm for millimetres or inch for inches.)
(e) In the Width field, enter the width of the custom size paper.
(f) In the Length field, enter the length of the custom size paper.
(g) Click add to store the new custom size.
(h) Click OK to close the Dialog Box.
INPUT TRAY OUTPUT TRAY
TRAY 5 TRAYS 1-4 STANDARD STACKER
UPPER
STACKER
LOWER
WIDTH 89 - 297mm
(3.5 - 11.70 in)
140 - 297mm
(5.5 - 11.70in)
89 - 297mm
(3.5 - 11.70in)
203 - 297mm
(7.9 - 11.70in)
203 - 297mm
(7.9 - 11.70in)
HEIGHT 98 - 432mm
(3.87 - 17in)
182 - 297mm
(7.16 - 11.70in)
98 - 432mm
(3.87- 17.0 in)
182 - 432mm
(7.16 - 17.0 in)
182 - 432mm
(7.16 - 17.0 in)
CAUTION!
When setting the paper size on the printer driver and the control
panel, specify the size of the actual paper used. Setting the wrong
size for printing will cause jam detection. This is especially true if
you configure a bigger size when using a narrow width paper.
NOTE
>You may use the Modify selection to change a previously stored custom
size.
>You may use the Delete selection to delete a previously stored custom
size.

Printing > 25
P
RINTING
ON
CUSTOM
SIZE
PAPER
The procedure to print on custom size paper is as follows.
1. From the File menu, select Print.
2. Select this printer as the printer to be used and click Preferences.
3. Click the Setup tab.
4. Select the appropriate tray from Source.
5. From Paper Size, select the size of the original document.
6. From Media Types, select the registered custom size, and then click OK.
7. Click Print in the Print dialog box to start printing.
A
DVANCED
PRINTING
FEATURES
Detailed instructions on how to use the advanced printing features are contained in the
Reference Guide.
C
OVER
PAGES
Cover page is when the first page (cover) of a print job is fed from one paper tray, and the
remaining pages of the print job are fed from another paper tray.
S
EPARATOR
PAGE
When you share a printer with other users it can be useful to print a special page between
print jobs to help locate each user’s job in a paper stack at the printer. You can enable
separator pages via the control panel’s PAPER menu.
M
ULTIPLE
PAGES
ON
ONE
SHEET
(N-
UP
)
This feature scales the page size of your document for printing and reproduces several
pages per sheet.
This is useful when you simply want to proof your page layout, or distribute your document
in a more compact format. It saves paper, bulk, weight and cost.
I
MAGE
OPTIONS
You can use the Graphics option to improve the clarity of the print job by adjusting the
Brightness and Contrast and Quality settings.
NOTE
The way to display the printer properties dialog box differs according to the
application software. Refer to the manual of your respective application
software.
NOTE
>Use of some of these features requires the optional hard disk or compact
flash to be installed in the printer.
>The hard disk may be damaged and erase important data saved in the
hard disk. We recommend you back up your data

Printing > 26
A
UTOMATICALLY
RESIZE
PAPER
The printer can automatically select from the paper, which is closest to the paper requested
for the print job. The printer will then scale the job to fit the available paper.It includes
scaling A4 to letter and letter to A4; and A3 to Tabloid and Tabloid to A3. You can enable
this at the control panel’s Paper menu.
W
ATERMARKS
A watermark is typically faint text that is superimposed on a printed document. This can
used to indicate that the document is “Draft”, or perhaps “Confidential”.
P
OSTER
PRINT
This option allows you to print posters by dividing a single document page into multiple
pieces (sometimes called “tiles”). Each piece prints, enlarged, on a separate sheet. Then,
you combine the separate sheets to create a poster.
F
IT
TO
PAGE
Scale to Page allows you to print data formatted for one size page onto a different size
page, without modifying the print data.
B
OOKLETS
Booklet printing allows printing of multipage documents with their pages ordered and
arranged so that final printed output can be folded into a booklet. Typically, A4 (or A3)
pages would be reduced to A5 (or A4) and printed side by side on both sides of A4 (or A3)
paper, so that the paper can be folded into a booklet.
S
ECURE
PRINT
-
PRINT
CONFIDENTIAL
DOCUMENT
Secure Print is a feature that allows you to attach a PIN to a print job on the computer,
send it to the printer for temporary storage, and then print the job from the printer control
panel. When the printing of a Secure Print job is complete, the job is automatically deleted.
S
TORED
JOB
A stored job is the same as a secure print job except that it is not deleted from the storage
device after it is printed unless you specifically ask for this at the printer control panel. By
storing frequently-used data in the printer, you can print the job from the printer control
panel, without sending it from the computer again and again.
P
ROOFPRINT
-
PRINT
AFTER
CHECKING
PRINTING
RESULT
You can select this option when the optional hard disk or compact flash has been installed.
Proof Print is a feature that allows you to store the print data of multiple copies in the hard
disk or compact flash, print out only the first set to check the print result and if satisfactory,
print the remaining copies from the control panel. You can select these jobs for printing by
entering a PIN at the control panel.
P
RINT
AT
A
SPECIFIED
TIME
-
TIMED
JOB
You can select this option when the optional hard disk or compact flash has been installed.
The delayed print feature allows you to store the data in the printer beforehand and then
print it out automatically at the specified time.

Printing > 27
D
IRECT
PRINTING
OF
PDF
FILES
The printer’s PDF Direct feature allows you to send a Version 1.3 PDF file directly to the
printer without the use of Adobe Acrobat on the host computer. You can send a PDF file
directly to the printer for printing without using the printer driver. As the print data is sent
directly to the printer, the printing process is simpler than printing with the printer driver
and it is done at a faster speed.
E
F
ORMS
eForms is a firmware based feature, which allows you to store a print job upto 20 pages
long. The job is stores as a compressed raster image in a permanent storage. eForms
enables the stored print job to be electronically merged with subsequent print jobs. You
can enable this feature on your Printer Properties.
O
VERLAYS
The Overlay function allows you to print overlays. Using the Overlay window, you can
create, delete and edit behaviour of overlays.An overlay is a portion of the document that
is added to each page of a print job such as a letterhead or standard form. You must create
overlays using the application of your choice. Options are available for you to define if an
Overlay should be printed for:
>All Pages
>First Page Only
>All But First Page
J
OB
ACCOUNTING
Job Accounting stores information about each print job received by the printer.You can set
this feature using your Printer Properties, at the control panel or Embedded Web Server
(EWS).
S
ENDING
FILES
Accessed via the Send File menu in the EWS. You can use this option to select a file from
the client computer or any file servers attached to the client computer and send it to the
printer. Select the file by typing the file name or by browsing to locate the file. Click the
Send button to send it to the printer.
E-
MAIL
NOTIFICATIONS
You can choose to be notified by e-mail when your job has been successfully printed.You
can enable this feature using the Printer Properties or EWS. Using the EWS, you must have
enabled e-mail send and set the e-mail server address for this feature to work.
B
ARCODE
PRINTING
This printer uses standard PCL font selection commands to enable printing of algorithm
generated bar codes.
Benefits:
>Any size barcode generation
>Automatically generates checksums
>Automatically adds stop and start characters

Printing > 28
Intelligent barcoding
Unlike some barcode solutions, which merely add fonts to a PC or printer, this printer
actually extends the PCL5 language. Barcode formatting, error detection and checksum
calculation are performed by the printer, reducing the load on the host and the network.
Barcodes can be printed in almost any size or rotation, bar width and height. Caption text
can be embedded in the bars or printed above or below the bars in a variety of fonts and
sizes.
See the Reference Guide for detailed use information.

Loading paper > 29
L
OADING
PAPER
L
OADING
TRAYS
1-4
1. Open the paper tray.
2. Fan the paper to ensure that all sheets are separated.
3. Insert the paper into the tray. Adjust the paper guides to the size.
CAUTION!
Do not place paper over the right width guide.
Do not load paper exceeding the maximum fill line or the maximum
capacity allowed.
Align the right width guide with the paper width correctly. If the
right width guide is not in place, the paper will not be properly fed
and this may cause paper jams.

Loading paper > 30
4. Push the tray completely into the printer.
5. Configure the paper size when custom size paper is loaded.
L
OADING
MPF
(
TRAY
5)
The Multiple Paper Feed (MPF) tray can be used for both manual and automatic feeds.
Labels on the tray indicate the long-edge and short- edge orientation of the paper.
1. Lower the MPF Tray.
2. Fan the paper to ensure that all sheets are separated.
NOTE
Depending on the types and sizes of the loaded paper, you need to configure
settings on the control panel. Change the paper type when non-plain paper
such as recycled paper, heavyweight paper or transparencies are loaded.
Configure the paper size when custom size paper is loaded.

Loading paper > 31
3. Insert the paper into the tray, and if required, adjust the paper guides to the size of
the paper.
L
OADING
HIGH
CAPACITY
FEEDER
(
TRAY
6)
AND
TWO
TANDEM
TRAY
(
TTM
)
1. Pull out the tray.
2. Adjust the length and width guides to the size of the paper.
3. Fan the paper to ensure that all sheets are separated.

Loading paper > 32
4. Insert the paper into the tray.
5. Push the tray completely into the printer.
T
RAY
SETTINGS
You can configure a variety of settings for your input trays and output bins. The default
settings for the source input tray and output bin are configured through the control panel’s
PAPER MENU DEFAULT SOURCE OUTPUT TRAY, and selections.
S
OURCE
You can select the input tray from which the paper is to be used for the print job. Select
the desired paper source through the Source drop down from printer properties or also
enable it at the control panel or use the EWS.
O
UTPUT
DESTINATION
You can choose the output bin for your print job to be placed, if the finisher or stacker is
installed. Select the destination through the Destination drop down from printer
properties or enable it at the control panel or use the EWS.
I
NPUT
TRAY
LINKING
When a chosen input tray is out of paper, auto tray changing enables the printer to switch
to another available tray that contains the same size and paper type.
NOTE
If there are no paper trays that match the automatic tray selection, an error
message prompting for replenishment of paper will be displayed on the control
panel.

Loading paper > 33
O
UTPUT
BIN
LINKING
When the output bin reaches its full capacity, the tray’s full sensors are activated and an
error message is displayed on the control panel. If the finisher or stacker is installed, you
can select output bin linking to have the remaining pages sent to an open bin. This option
is turned on by default. You can set this option at the control panel.
M
ANUAL
FEED
The MPF (tray 5) can be used for manual feed. You must change the settings to Manual
Feed on your printer properties. Tray 5 MPF normally operates in multi-purpose mode,
where multiple sheets can be loaded and printed continuously. When in manual mode, you
are prompted to press the start key for each sheet to be printed.
M
EDIA
CHECK
When Media check is enabled (default), the printer first checks the default input source to
see if it has media loaded that matches both the driver requested media type and paper
size. If the default input tray does not contain the requested media, the printer searches
the other input trays to find one that has media matching the requirements. If none is
found, the printer stops and asks you to load the requested media in the default input tray.
You can acknowledge this by pressing On-line whether the correct media is in place or not.
Or you can put the correct media in a tray and then use the control panel to set the media
type for that tray. If it is Tray MPF or the size is not auto detectable, you can also set the
paper size. Otherwise, the printer can auto detect the paper size.
When media check is disabled, the default paper tray will be used to print the document.
The size or type of media in the tray is not a factor in paper tray selection.
The most convenient way to enable this feature is by using your Printer Properties. You may
also enable it at the control panel or use the EWS.
J
OB
OFFSET
The Stacker Main and Standard Top Bin can place sheets in alternate positions to separate
one print job from another. This is called Job Offsetting. When selected, the output position
changes after the final sheet of a print job is printed. Select Job Offset through your printer
properties or enable it at the control panel or use the EWS.
D
RIVER
SETTINGS
When you create groups of settings in your printer properties, you can save those settings
under a name defined by you. You can then use the same settings under the defined name
for other print jobs and save time and effort.
Detailed instructions on how to set these options are contained in the Reference Guide.

Loading paper > 35
S
TAPLER
There are several stapling options available. You can decide to staple at different locations
depending on whether one or two staples used. You can choose to staple for Potrait and
Landscape orientation from the following options:
>Upper-left
>Bottom-left
>Dual
To turn on stapling on your Printer Properties:
1. Select the Paper Feed button in the Setup tab within your Printer Properties.
The Paper Feed option is displayed.
2. Select the desired stapling type from the Staple drop down.
3. Click OK.
A
DDING
STAPLES
1. Open door G.
2. Slide the stapler towards you, then to the right.
3. Remove the staple unit by lifting it up and out.
4. Remove the depleted staple cartridge, if it is present.
5. Insert a new staple cartridge.
NOTE
See instructions on the side of door G.

Loading paper > 36
6. Insert the staple unit into the Finisher.
7. Close door G.
I
NSTALLING
ACCESSORIES
For detailed information on installing optional accessories, hard disk, memory option and
compact flash, refer to the “Installing Accessories” section in the Reference Guide.
Troubleshooting > 37
T
ROUBLESHOOTING
W
HEN
PAPER
JAMS
Following the messages on the control panel, open the cover and remove the jammed
paper. If paper is torn, check for any remaining torn pieces of paper.
J
AM
AREA
LOCATIONS
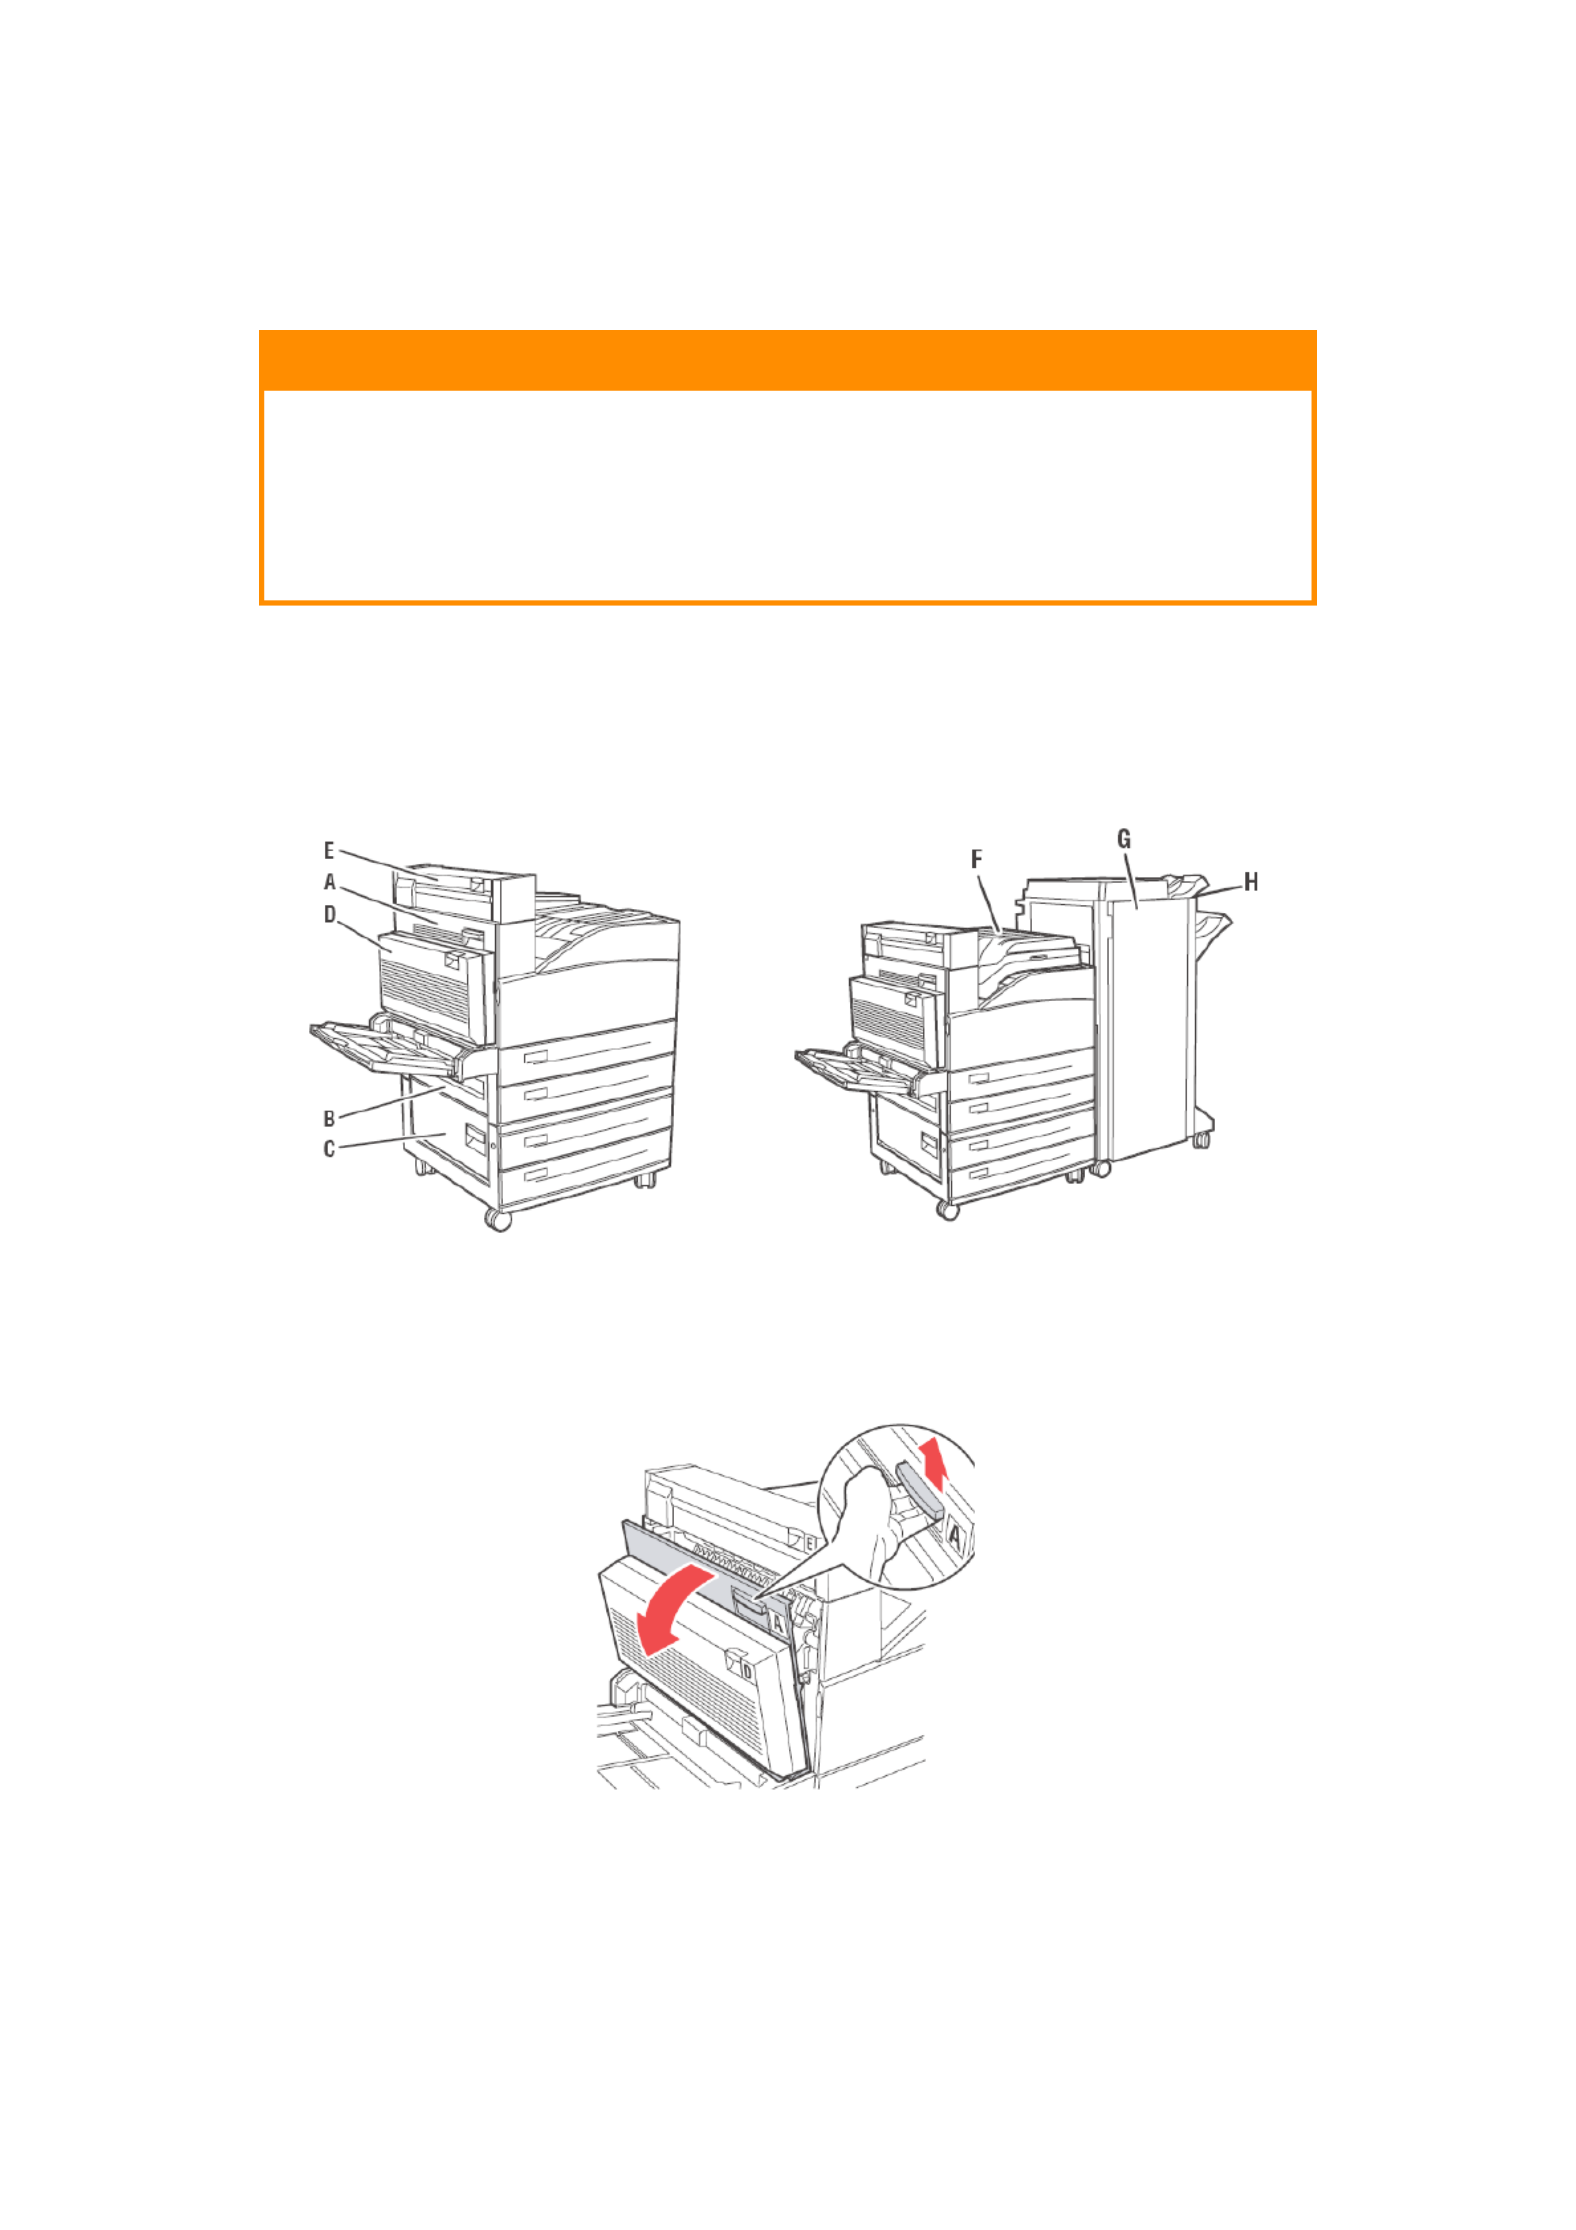
I
NSIDE
COVER
A
1. Open cover A.
CAUTION!
When removing jammed paper, make sure that no pieces of torn
paper are left in the machine. If a sheet of paper is wrapped around
the heat roller, or when clearing a jammed paper that is difficult or
impossible to see, do not try to remove it by yourself. Doing so can
cause injuries or burns. Switch off the machine immediately, and
contact your dealer or service.

Troubleshooting > 38
2. Remove any jammed paper. If required, press the green lever to move the paper to
make it easier to remove. Ensure that all paper fragments are removed.
3. Close cover A.
I
NSIDE
COVER
B
1. Remove the High Capacity Feeder (tray 6), if installed to the printer by sliding it
away from the printer.

Troubleshooting > 39
2. Open cover B.
3. Remove the jammed paper and ensure that all paper fragments are removed.
4. Close cover B.
5. Slide back the High Capacity Feeder (tray 6) firmly against the printer.

Troubleshooting > 40
I
NSIDE
COVER
C
1. Remove the High Capacity Feeder (tray 6), if installed to the printer by sliding it
away from the printer.
2. Open cover C.
3. Remove the jammed paper and ensure that all paper fragments are removed.

Troubleshooting > 41
4. Close cover C.
5. Slide back the High Capacity Feeder (tray 6) firmly against the printer.
I
NSIDE
COVER
D (
DUPLEX
UNIT
)
1. Open cover D.
2. Remove the jammed paper and ensure that all paper fragments are removed.
Termékspecifikációk
| Márka: | OKI |
| Kategória: | nyomtató |
| Modell: | B930DN |
Szüksége van segítségre?
Ha segítségre van szüksége OKI B930DN, tegyen fel kérdést alább, és más felhasználók válaszolnak Önnek
Útmutatók nyomtató OKI

10 Április 2025
10 Április 2025
10 Április 2025
16 Október 2024
16 Október 2024
14 Október 2024
13 Október 2024
5 Október 2024
2 Október 2024
24 Szeptember 2024
Útmutatók nyomtató
- nyomtató Samsung
- nyomtató Sony
- nyomtató Fujitsu
- nyomtató LG
- nyomtató Olympus
- nyomtató Panasonic
- nyomtató Canon
- nyomtató StarTech.com
- nyomtató Sharp
- nyomtató Lenovo
- nyomtató Toshiba
- nyomtató HP
- nyomtató Roland
- nyomtató Digitus
- nyomtató Zebra
- nyomtató AVM
- nyomtató Fujifilm
- nyomtató Dell
- nyomtató Xerox
- nyomtató Primera
- nyomtató Thomson
- nyomtató Polaroid
- nyomtató Kyocera
- nyomtató Ricoh
- nyomtató Epson
- nyomtató Huawei
- nyomtató Renkforce
- nyomtató Mitsubishi
- nyomtató Godex
- nyomtató Brother
- nyomtató Citizen
- nyomtató Microboards
- nyomtató Kodak
- nyomtató MSI
- nyomtató Dymo
- nyomtató Testo
- nyomtató Konica Minolta
- nyomtató Datamax O'Neil
- nyomtató Kogan
- nyomtató Honeywell
- nyomtató Velleman
- nyomtató D-Link
- nyomtató Fargo
- nyomtató TSC
- nyomtató Sagem
- nyomtató Olympia
- nyomtató Tomy
- nyomtató Posiflex
- nyomtató ZKTeco
- nyomtató NEC
- nyomtató CUSTOM
- nyomtató Panduit
- nyomtató Equip
- nyomtató Pantum
- nyomtató Brady
- nyomtató Bixolon
- nyomtató CSL
- nyomtató Nilox
- nyomtató Seiko
- nyomtató Argox
- nyomtató Royal Sovereign
- nyomtató Lexmark
- nyomtató Olivetti
- nyomtató Intermec
- nyomtató Minolta
- nyomtató DNP
- nyomtató Triumph-Adler
- nyomtató Oce
- nyomtató Paxar
- nyomtató Metapace
- nyomtató Ultimaker
- nyomtató Ibm
- nyomtató Toshiba TEC
- nyomtató Frama
- nyomtató Builder
- nyomtató Star Micronics
- nyomtató Dascom
- nyomtató HiTi
- nyomtató GG Image
- nyomtató Vupoint Solutions
- nyomtató Elite Screens
- nyomtató DTRONIC
- nyomtató Phoenix Contact
- nyomtató Videology
- nyomtató Star
- nyomtató EC Line
- nyomtató Colop
- nyomtató Approx
- nyomtató Fichero
- nyomtató Raspberry Pi
- nyomtató Middle Atlantic
- nyomtató IDP
- nyomtató Evolis
- nyomtató Nisca
- nyomtató Epson 7620
- nyomtató Sawgrass
Legújabb útmutatók nyomtató

10 Április 2025
10 Április 2025

10 Április 2025

9 Április 2025

9 Április 2025

9 Április 2025
3 Április 2025
3 Április 2025
3 Április 2025

2 Április 2025