Használati útmutató Numark NS7
Numark
keverőpult
NS7
Olvassa el alább 📖 a magyar nyelvű használati útmutatót Numark NS7 (120 oldal) a keverőpult kategóriában. Ezt az útmutatót 12 ember találta hasznosnak és 2 felhasználó értékelte átlagosan 4.5 csillagra
Oldal 1/120

User Guide
English ( 2 – 23 )
Guía del usuario
Español ( 24 – 45 )
Guide d’utilisation
Français ( 47 – 70 )
Guida per l’uso
Italiano ( 71 – 93 )
Benutzerhandbuch
Deutsch ( 94 – 117 )
Appendix
English ( 118 – 119 )

2
User Guide ( )English
Introduction
Box Contents
NS7III
2 Platter Assemblies
• Aluminum Platter
• Slipmat
• Vinyl
• 45 RPM Adapter (attached)
Spindle Screw
Allen Wrench
Display Unit
Display USB Cable
Display Power Cable
Serato DJ™ Software (download)
USB Cable
Power Cable
Quickstart Guide
User Guide (download)
Safety & Warranty Manual
Support
For the latest information about this product (system requirements, compatibility information,
etc.) and product registration, visit numark.com.
For additional product support, visit numark.com/support.

3
Setup
Before getting started:
• Read the Safety & Warranty Manual before using NS7III.
• Make sure all items listed in Introduction > Box Contents are included.
1. Assemble the Platters
1. Remove NS7III from the packaging. Remove the two platter assemblies from package
(underneath NS7III). Place NS7III on a flat, stable surface for operation. Ensure unit has
adequate air flow to all ventilation ports (especially if installed in a case).
2. Place the platter onto NS7III by aligning the pins in the bottom of the
platter with the holes in NS7III’s motor.
3. Place the slipmat onto the platter, then place the vinyl over the
slipmat.
4. Line up the notch in the spindle with the screw in the vinyl’s 45
RPM adapter. Use the allen wrench (included) to tighten the
screw, locking the adapter to the spindle.

4
2. Attach the Display Unit
1. With the screens facing up and slightly toward you, place the display unit over the two
brackets on the rear panel (which would typically hold a laptop computer stand). Make
sure the two brackets are securely inserted into the holes under the display unit.
2. Using the small display USB cable (included), connect the “NS7” USB port on the display
unit to the USB port on NS7III’s rear panel.
3. Using the small display power cable (included), connect the display power input (DC In)
to the display power output (DC Out) on NS7III’s rear panel.
3. Install the Drivers and Software
Drivers (Windows users only): Download and install the latest drivers from numark.com.
Software: Download and install the latest version of Serato DJ from serato.com.

5
4. Connect and Start DJing!
Follow this sequence of steps whenever you use NS7III:
1. Make sure all devices are off and all faders and gain knobs are set to “zero.”
2. Connect input sources (microphones, turntables, CD players, etc.) to NS7III.
3. Connect output devices (headphones, power amplifiers, sub-mixer, recorders, etc.) to NS7III.
4. Plug all devices into power sources, and turn on devices in proper order:
• When starting a session, turn on (1) input sources, (2) NS7III and display unit, (3) output
devices.
• When ending a session, turn off (1) output devices, (2) NS7III and display unit, (3) input
sources.
5. Using a standard USB cable (included), connect the “To PC” USB port on NS7III’s display
unit to your computer.
6. Open Serato DJ and go! For more information on how to use Serato DJ with NS7III, visit
serato.com support/dj/ and select Numark NS7III.
Connection Diagram ( )example :
00.0%
Any items shown here but not mentioned in Introduction > Box Contents are sold separately.
Computer
Headphones
(on front panel)
Turntable
Smartphone,
tablet, etc.
Power
Loudspeakers
Microphone
(on front panel)
USB thumb drive

7
General Controls
1. Displays: Use the screens to view performance information, waveforms, and your library.
See Displays for more information.
2. View: Press this button to cycle through the available NS7III display modes. See Displays
for more information.
3. Shift: Press and hold this button to access secondary functions (in red lettering) of other
controls on NS7III.
4. Touch Mode: Press and hold this button to activate Touch Mode, which lets you access
the touch-capacitive functions of NS7III’s FX 1 Knob, FX 2 Knob, and FX 3 Knob.
Press and hold Shift and then press this button to access the touch-capacitive functions
of the same knobs as above plus the EQ Knobs (Channel Treble, Channel Mid, and
Channel Bass). These functions are momentary, not “latching.”
5. Layer: Selects which Layer in the software is controlled by that hardware Deck. Deck A
can control Layer 1 or 3; Deck B can control Layer 2 or 4.
6. USB Indicator: This LED lights up when NS7III is successfully connected to and
communicating with your computer.
Mixer Controls
7. Input Selector: Set this switch to the desired audio source from this channel: PC (a track
playing on that layer in the software), Mic 2 or Line (a device connected to the Mic 2 Input
or Line Input on NS7III’s rear panel). Please note that the Line/Phono selector switches on
NS7III’s rear panel must also be set properly. Also, a channel’s controls will only send MIDI
information when its Input Selector
is set to
PC.
Important: Do not set more than one channel’s Input Selectors to Mic2; doing so can
cause unwanted feedback or distortion.
8. Gain Trim: Adjusts the pre-fader, pre-EQ audio level of the corresponding channel in the
software.
9. LED Meters: Monitors the audio levels of the corresponding channel.
10. Channel Treble: Adjusts the high (treble) frequencies. When Touch Mode is activated,
touching this knob will mute the corresponding channel’s high frequencies (an “EQ kill”).
11. Channel Mid: Adjusts the mid-range frequencies. When Touch Mode is activated, touching
this knob will mute the corresponding channel’s mid-range frequencies (an “EQ kill”).
12. Channel Bass: Adjusts the low (bass) frequencies. When Touch Mode is activated,
touching this knob will mute the corresponding channel’s low frequencies (an “EQ kill”).
13. Channel Fader: Adjusts the audio level on the corresponding channel in the software.
14. PFL: Press this button to send this channel’s pre-fader signal to the Cue Channel for
monitoring. When engaged, the button will be lit. By pressing one PFL button at a time, you
will cue that channel alone (and deactivate PFL monitoring for the other channels). To cue to
multiple channels simultaneously, press the PFL buttons for those channels at the same time.
15. Crossfader: Blends audio between the channels assigned to the left and right side of the
crossfader.
16. Master Volume: Adjusts the output volume of the Program Mix.
17. Booth Volume: Adjusts the output volume of the Booth Output mix.
9
Pad Mode Controls
26. Pads: These pads have different functions on each Deck depending on the current Pad
Mode. These pads are the same pads used with Akai Professional MPCs
®, so they are
velocity-sensitive (in certain modes only), durable, and easy to play. In this User Guide,
when referring to specific pads, it will refer to the numbers as shown here.
27. Parameter < / > : Use these buttons for various functions in each Pad Mode. Press and
hold Shift and use these buttons to access secondary parameters.
28. Cues: This Pad Mode button switches the pads between two modes: Hot Cue Mode (red)
and Hot Cue Auto-Loop Mode (orange). When the button is unlit, the first press will always
select Hot Cue Mode.
• Hot Cue Mode: Each pad assigns a Hot Cue Point or returns the track to that Hot
Cue Point. When a pad is unlit, you can assign a Hot Cue Point by pressing it at the
desired point in your track. Once it is assigned, the pad will light. Press and hold Shift
and then press a pad to delete its assigned Hot Cue Point.
• Hot Cue Auto-Loop Mode: Each pad assigns a Hot Cue Point or returns the track to
that Hot Cue Point, but in both cases, it also creates an Auto-Loop at that point. The
Auto-Loop’s length is set in the software, but you can decrease or increase it with the
Parameter < Parameter > or button.
Hot Cue 1
Hot Cue 2
Hot Cue 3
Hot Cue 4
Hot Cue 5
Hot Cue 6
Hot Cue 7
Hot Cue 8
Pad 1
Pad 2
Pad 3
Pad 4
Pad 5
Pad 6
Pad 7
Pad 8

10
29. Auto / Roll: This Pad Mode button puts the pads in two modes: Auto-Loop Mode (dark
blue) and Loop Roll Mode (light blue). When the button is unlit, the first press will always
select Auto-Loop Mode.
Note: The pad layouts here match the software’s default Auto-Loop time division layout. If
you shift the range of time divisions displayed in the software, the pad layout will change
to match it.
• Auto-Loop Mode: Each pad triggers or releases an Auto-Loop of a different length.
Press and hold Shift and then press the Parameter < or Parameter > button to shift
the Auto-Loop backward or forward.
• Loop Roll Mode: Each pad triggers a momentary Loop Roll. Press the Parameter <
or Parameter > button to change the Loop Roll’s time division.
30. Loop: This Pad Mode button switches the pads between two banks of saved loops and
loop controls. When the button is unlit, the first press will always select the first bank.
•
Saved Loop Mode:
Pads 1-4 (the top row) return the track to one of your saved
loops. You create and save a loop using Pads 5-8 (the bottom row). The pad layouts
for the two banks are identical.
o To create a loop, press Pad 5 to set the Loop In Point, and then press Pad 6 to
set the Loop Out Point and trigger the loop.
o To save a loop, while a loop is active, press any one of Pads 1-4 (the top row)
that does not have a loop assigned to it. You can do this regardless of how the
loop was created (Saved Loop Mode, Auto-Loop Mode, Loop Roll Mode, etc.).
o To trigger a saved loop, press any one of Pads 1-4 (the top row) that has a
loop saved to it. Press Pad 7 to activate or deactivate the loop. Press Pad 8 to
return the track to the last triggered loop and reactivate it (“reloop”).
o To delete a saved loop, press and hold Shift and then press the corresponding
pad (of Pads 1-4).
o To halve or double the length of a loop, press the Parameter < or Parameter
> button.
o To shift a loop backward or forward, press and hold Shift and then press the
Parameter < Parameter > or button.
Loop 1
Loop 2
Loop 3
Loop 4
Set Loop In
Set Loop Out
Loop On/Off
Reloop
1/8-beat
1/4-beat
1/2-beat
1-beat
2-beat
4-beat
8-beat
16-beat
11
31. Sampler: This Pad Mode button switches the pa ds between two modes: Sample Player
Mode and Sample Velocity Trigger Mode). When the button is unlit, the first press will
always select Sample Player Mode.
• Sample Player Mode: Pads 1-6 each trigger a sample, which you can assign in the
software (the volume level is also set in the software). Unlit pads have no sample
assigned to them. To stop playback of a sample, press and hold Shift and then press
the corresponding pad (of Pads 1-3 or Pads 4-6).
• Sample Velocity Trigger Mode: The pads behave identically to the pads in Sample
Player Mode, except they are velocity-sensitive, so triggered samples will play back
at a volume level proportional to how heavily you pressed the pads. This mode can
give your performance more of a “human feel.”
32. Slicer: This Pad Mode button switches the pads between two modes: Slicer Mode and
Slicer Loop Mode. When the button is unlit, the first press will always select Slicer Mode.
Important: Your track must have a set Beat Grid for Slicer Mode or Slicer Loop Mode to work.
• Slicer Mode: The eight pads represent eight sequential beats—”Slices”—in the Beat
Grid. The currently playing Slice is represented by the currently lit pad; the light will
“move through the pads” as it progresses through each eight-Slice phrase. Press a
pad to play that Slice—hold it down if you want to keep looping it. When you release
the pad, the track will resume normal playback from where it would have been if you
had never pressed it (i.e., as if the track had been playing forward the whole time).
Press the Parameter < or Parameter > button to decrease or increase the Slice
quantization. Press and hold Shift and then press the Parameter < or Parameter >
button to decrease or increase the Slice Domain size.
• Slicer Loop Mode: The pads behave identically to the pads in Slicer Mode, except the
eight-Slice phrase will loop rather than moving forward continuously through the track.
Slice 1
Slice 2
Slice 3
Slice 4
Slice 5
Slice 6
Slice 7
Slice 8
Sample 1
Sample 2
Sample 3
Play Mode
Sample 4
Sample 5
Sample 6
Player
Repeat

13
42. BPM Meter: This meter is an aid for matching the tempo of both decks. When the white
center LED is lit, the BPMs are matched. Otherwise, the meter will tend towards the faster
deck. The further from center, the greater the difference between the two BPMs.
The meter is also an aid while adjusting Loop In or Loop Out points. If you are making fine
adjustments to your Loop In or Loop Out points using the platters, the lit LED will “wrap
around” the meter. It will rest on the white center LED whenever the loop’s length has
been doubled or halved exactly.
Note: The BPM Meter will aid in loop adjustments only if (1 ) a BPM reading has been
entered for that track and (2) the two Decks’ tempos have been synchronized.
Navigation Controls
43. Scroll Knob: Use this knob to scroll through lists of tracks, Crates, etc. in the software.
You can also press it to move between the panels shown in the software.
44. Fwd / Back: These buttons move the selector between various panels in the software.
Press and hold Shift and then press Fwd to sort the current Library/Crate/Panel View by
album. Press and hold Shift and then press Back to sort the current Library/Crate/Panel
View by track number.
45. Crates: Press this to move the selector to the Crates Panel in the software. Press and hold
Shift and then press this button to sort the current Library/Crate/Panel View by song.
46. Prepare: Press this to move the selector to the Prepare Panel in the software. Press and
hold Shift and then press this button to sort the current Library/Crate/Panel View by artist.
47. Files: Press this to move the selector to the Files Panel in the software. Press and hold
Shift and then press this button to sort the current Library/Crate/Panel View by BPM.
48. Load A / Load B: Press one of these buttons while a track is selected to assign it to Deck
A or Deck B, respectively.
49. Load Prepare: Press this to add a selected track to the list of tracks in the Prepare Panel
in the software.
50. Panel / View: Press this to toggle through the Recording (Rec), Effects (FX), and Sampler
(SP-6) panels. Press and hold Shift and then press this button to toggle through the
available software display modes (e.g., Vertical, Horizontal, Extended, Library).

15
Displays
NS7III’s full-color displays provide real-time feedback of the software. The left and right
displays can show Performance View 1 or Performance View 2. The center display can
show Library View or Waveform View.
To switch views, press the View button next to the display on either deck.
To enter Library View immediately, turn the Scroll Knob. After not touching the Scroll Knob
for 5 seconds, the display will return to Waveform View.
To load a track to a deck from Library View, press the Load button for the desired deck.
Each view shows the current settings of various controls, which you can adjust as described in
the following sections. Click one below to jump to that section.
Performance View 1 Library View
Performance View 2 Waveform View

16
Performance View 1
This view provides an alternative display of information about the current track, effects, hot
cues, and loops.
1. Deck: This is the currently selected Layer in the software controlled by that hardware
deck. Press the Deck button to switch between the Layers. Deck A controls Layer 1 or 3;
Deck B controls Layer 2 or 4.
2. Track Name: This is the title the currently loaded track, which will scroll by. See Library
View to learn how to select tracks.
3. Track Key: This is the key of the currently loaded track. This is the track’s key with a 0%
pitch adjustment.
4. Track BPM: This is the tempo (in beats per minute or BPM) of the currently loaded track
with a 0% pitch adjustment. To see the BPM at which it is currently playing, see Deck
BPM below.
5. Deck BPM: This is the current BPM at which the currently loaded track is playing. To
adjust this value, move the deck’s Pitch Fader. This number is not affected by temporary
pitch bends (using the Pitch Bend -/+ buttons or the platter).
6. Remaining Time: This is how much time is left of the currently loaded track.
7. Pitch Range: This is the current range of the deck’s Pitch Fader. Press Range / Keylock
on that deck to adjust the range of its Pitch Fader to +8% +16%, , or +50%.
8. Pitch Adjustment: This is the current setting of the Pitch Fader. To adjust this setting,
move the deck’s Pitch Fader.
9. Track Overview: This is the currently loaded track’s waveform, which is color-coded
according to the frequency of each area: red indicates low (bass) frequencies, green
indicated mid-range frequencies, and blue indicates high (treble) frequencies.
In the waveform, hot cue points are represented by triangles at the bottom of the
waveform, and loop regions are represented by shaded-blue sections.
10. Main Waveform: This is the currently playing segment of the track’s waveform, which will
scroll by as the audio playhead moves through the track. The waveform is color-coded
according to the frequency of each area: red indicates low (bass) frequencies, green
indicated mid-range frequencies, and blue indicates high (treble) frequencies.
In the waveform, hot cue points are represented by triangles at the top and bottom of the
waveform, and loop regions are represented by shaded-blue sections.
1 2 3
5
78
9
11
12 13 12 13 12 13
6
4
10
14
18
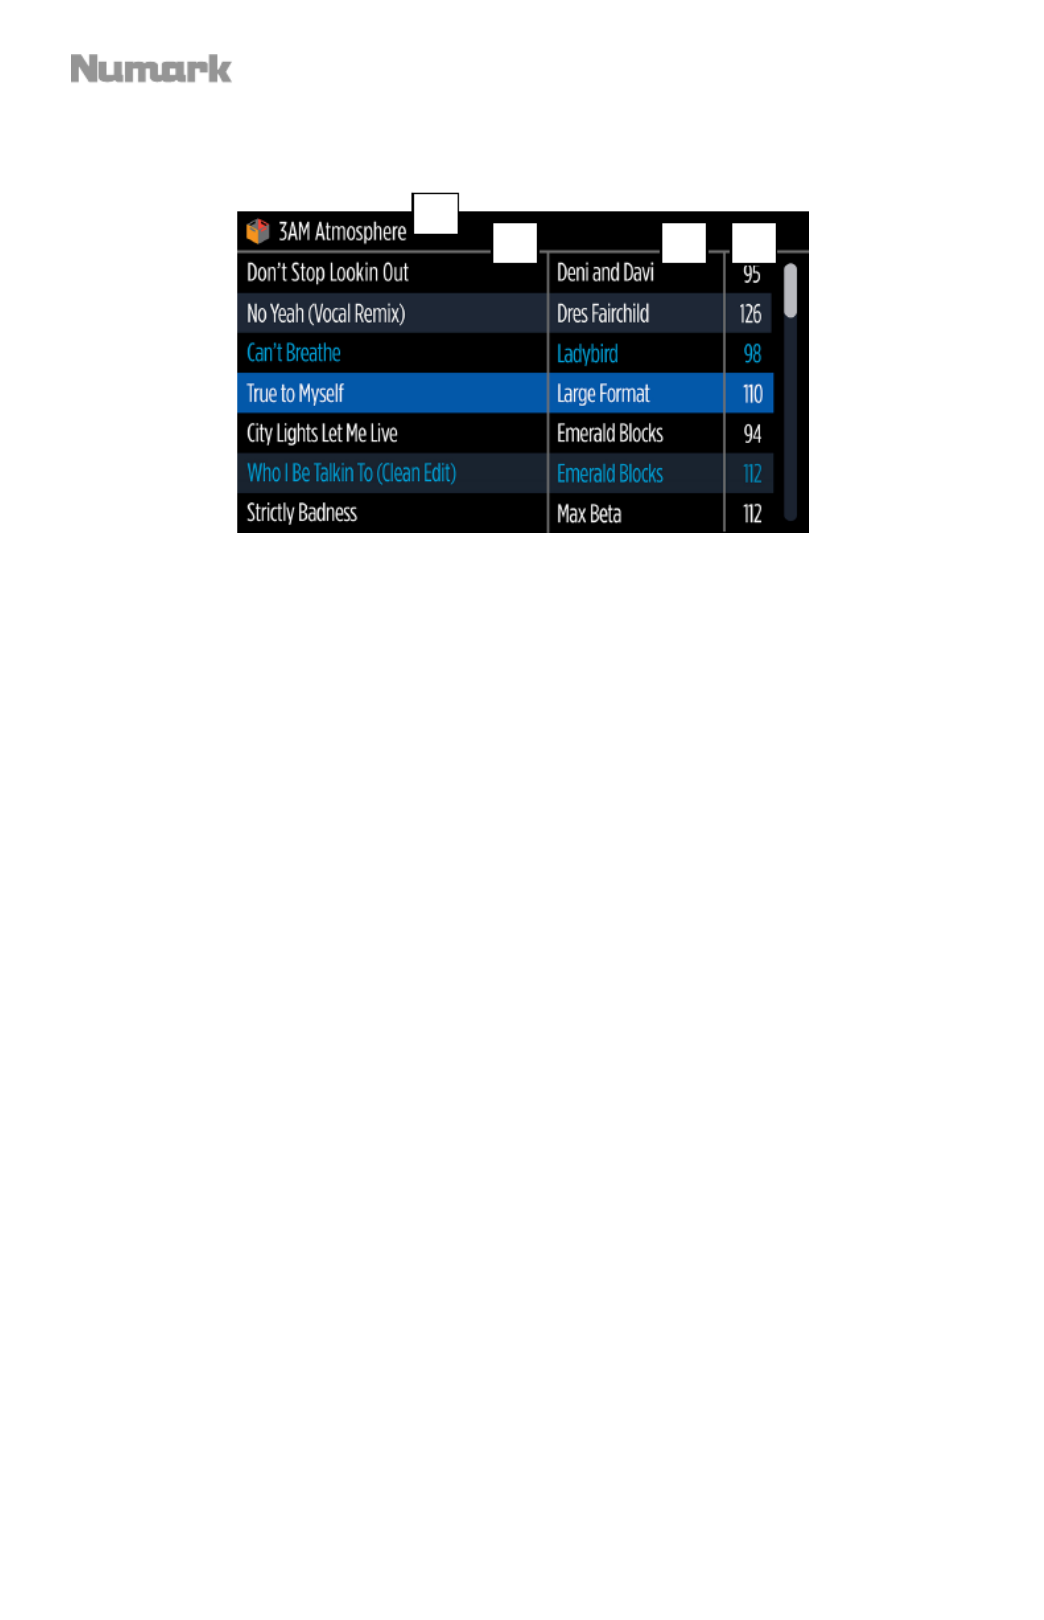
Library View
This view lets you browse through your library, including crates and subcrates, and load a
track to either deck.
To move through the list of tracks, turn the Scroll Knob.
To load the currently selected track, press the Load button on the desired deck.
To switch between the track list and crate list, press the Scroll Knob or use the Back /
Fwd button.
To expand or collapse a crate (that has subcrates) in the crate list, press the Back / Fwd
button.
1. Crate/List Name: This is the crate, subcrate, or other track list (e.g., All) that you are
currently viewing.
2. Track Name: This is the title of the currently loaded track.
3. Artist Name: This is the artist of the currently loaded track.
4. Track BPM: This is the tempo (in beats per minute or BPM) of the track.
1
2 3 4

19
Performance View 2
This view contains information about the current track, effects, hot cues, and loops.
1. Deck: This is the currently selected Layer in the software controlled by that hardware
deck. Press the Deck button to switch between the Layers. Deck A controls Layer 1 or 3;
Deck B controls Layer 2 or 4.
2. Track Name: This is the title of the currently loaded track. See Library View to learn how
to select tracks.
3. Artist Name: This is the artist of the currently loaded track. See Library View to learn how
to select tracks.
4. Track BPM: This is the tempo (in beats per minute or BPM) of the currently loaded track
with a 0% pitch adjustment. To see the BPM at which it is currently playing, see Deck
BPM below.
5. Track Key: This is the key of the currently loaded track. This is the track’s key with a 0%
pitch adjustment.
6. Deck BPM: This is the current BPM at which the currently loaded track is playing. To
adjust this value, move the deck’s Pitch Fader. This number is not affected by temporary
pitch bends (using the Pitch Bend -/+ buttons or the platter).
7. Remaining Time: This is how much time is left of the currently loaded track. The ring
around the virtual platter is a visual representation of this value (the complete circle being
the entire track).
8. Pitch Range: This is the current range of the deck’s Pitch Fader. Press Range / Keylock
on that deck to adjust the range of its Pitch Fader to +8% +16%, , or +50%.
9. Pitch Adjustment: This is the current setting of the Pitch Fader. To adjust this setting,
move the deck’s Pitch Fader.
10. Track Overview: This is the currently loaded track’s waveform, which is color-coded
according to the frequency of each area: red indicates low (bass) frequencies, green
indicated mid-range frequencies, and blue indicates high (treble) frequencies.
In the waveform, hot cue points are represented by triangles at the bottom of the
waveform, and loop regions are represented by shaded-blue sections.
1 2 4
3
11
6
7
8
9
10
12 13 12 13 12 13
5
14

20
11. Auto-Loop Buttons: These eight buttons correspond to the deck’s eight pads while in
Auto-Loop Mode. In that mode, press one of the pads to trigger an auto-loop of the
corresponding length. See Top Panel > Pad Mode Controls > Auto / Roll to learn more.
12. Effect Name: In Multi-FX Mode, the view will show three effects with one parameter knob
each.
In Single-FX Mode, the view will show one effect name with three parameter knobs.
To switch between Single-FX Mode and Multi-FX Mode, press and hold Shift and press
the Beat button.
To move to the next effect (in either mode), press and hold Shift and then press the FX
Button under the effect name. Alternatively, press and hold Shift and then turn the FX
Knob under the effect name to move quickly through the list.
13. Effect Parameter: In Multi-FX Mode, the view will show three effects with one parameter
knob each, which corresponds to the main parameter of that effect. To adjust each effect,
turn the FX Knob below it.
In Single-FX Mode, the view will show one effect name with three parameter knobs. To
adjust each parameter, turn the FX Knob below it.
To switch between Single-FX Mode and Multi-FX Mode, press and hold Shift and press
the Beat button.
14. Effect Beats Multiplier: This number determines the timing or rate of the effects, based
on the BPM.
Waveform View
This view contains the currently playing segments of the waveforms on the active decks. To
switch which waveform is shown, press the Layer button for each deck. The waveforms will
scroll by as the audio playhead moves through the track.
The waveforms are color-coded according to the frequency of each area: red indicates low
(bass) frequencies, green indicated mid-range frequencies, and blue indicates high (treble)
frequencies.
In each waveform, hot cue points are represented by triangles at the top and bottom of the
waveform, and loop regions are represented by shaded-blue sections.

21
Front Panel
12345555
78
96
10 11
1. Headphones ( / /1 4”, 1 8”) ( ) 6.35 mm, 3.5 mm : Connect your 1/4” or 1/8” (6.35 mm or 3.5
mm) headphones to this output for cueing and mix monitoring.
2. Headphone Volume: Adjusts the volume level of the headphone output.
3. Split Cue: When this switch is in the on position, the headphone audio will be “split” such
that all channels sent to Cue are mixed to mono and applied to the left headphone channel
and the Program mix is mixed to mono and applied to the right channel. When the switch
is in the off position, Cue and Program audio will be “blended” together.
4. Cue Blend: Turn to mix between Cue and Program in the Headphone channel. When all
the way to the left, only channels routed to Cue will be heard. When all the way to the
right, only the Program mix will be heard.
5. Crossfader Assign: Routes the audio playing on the corresponding channel to either side
of the crossfader (A or B), or bypasses the crossfader and sends the audio directly to the
Program Mix (center, Off).
6. Crossfader Slope: Adjusts the slope of the crossfader curve. Turn the knob to the left for
a smooth fade (mixing) or to the right for a sharp cut (scratching). The center position is a
typical setting for club performances.
7. Mic 1 Input ( / / )1 4” 6.35 mm : Connect a 1/4” (6.35 mm) micr ophone to this input. This
input’s audio signal is routed directly to the Program Mix and Cue Mix.
8. Mic 1 On/Off: When set to on, the Mic 1 Input is active, and its audio signal is routed
directly to the Program Mix and Cue Mix. When set to off, the Mic 1 Input is disabled.
9. Mic Gain: Adjusts the gain of the microphone channel.
10. Mic Bass: Adjusts the low (bass) frequencies of the audio signal coming from the
microphone input.
11. Mic Treble: Adjusts the high (treble) frequencies of the audio signal coming from the
microphone input.

22
Rear Panel
12
3
4
5
6
78 9
11
20 12 13
141416
17 18
19
16
15
10
1. NS7III Power Input: Use the included power cable to connect NS7III to a power outlet.
While the power is switched off, plug the cable into NS7III first, then plug the cable into a
power outlet.
2. NS7III Power Switch: Powers NS7III on and off. Power on NS7III after all input devices
have been connected and before you turn on amplifiers. Turn off amplifiers before you turn
off NS7III.
3. USB Port: Use the included small display USB cable to connect this USB port to the
“ NS7” USB port on the display.
4. Power Output ( )DC Out : Use the included small display power cable to connect this
output to the display power input (DC In).
5. Display Power Input (DC In): Use the included small display power cable to connect this
input to the power output (DC Out) on NS7III.
6. Cable Restraint: You can secure the display power cable to this restraint to help prevent
disconnecting it accidentally.
7. Display Power Switch: Powers the display unit on and off.
8. USB Port ( )NS7 : Use the included small display USB cable to connect this USB port to the
USB port on NS7III.
9. USB Port ( )USB In : You can connect an optional USB hard drive (not included) to this
powered USB port.
10. Display USB Port ( )To PC : Use the included USB cable to connect this USB port to your
computer.
11. Master Output ( )XLR : Connect this low-impedance XLR output to a PA system or powered
monitors. The level of this output is controlled with the Master knob on the top panel.
12. Master Output ( )RCA : Use standard RCA cables to connect this output to a speaker or
amplifier system. The level of this output is controlled by the Master knob on the top panel.
13. Booth Output ( )RCA : Use standard RCA cables to connect this output to a booth monitoring
system. The level of this output is controlled by the Booth knob on the top panel.
14. Line/ ( )Phono Inputs RCA : Connect your audio sources to these inputs. These inputs can
accept both line and phono-level signals.
15. Line/Phono Switch: Flip this switch to the appropriate position, depending on the device
connected to the Line/Phono Inputs. If you are using phono-level turntables, set this
switch to Phono to provide the additional amplification needed for phono-level signals. If
using a line-level device, such as a CD player or sampler, set this switch to Line.
16. Line Inputs ( )RCA : Connect line-level devices, such as CD players, samplers or audio
interfaces, to these inputs.
Termékspecifikációk
| Márka: | Numark |
| Kategória: | keverőpult |
| Modell: | NS7 |
Szüksége van segítségre?
Ha segítségre van szüksége Numark NS7, tegyen fel kérdést alább, és más felhasználók válaszolnak Önnek
Útmutatók keverőpult Numark

5 Október 2024
5 Október 2024
1 Október 2024
22 Szeptember 2024
22 Szeptember 2024
21 Szeptember 2024
19 Augusztus 2024
16 Augusztus 2024
14 Augusztus 2024
13 Augusztus 2024
Útmutatók keverőpult
- keverőpult Braun
- keverőpult Yamaha
- keverőpult Electrolux
- keverőpult Moulinex
- keverőpult Nedis
- keverőpult Philips
- keverőpult Gorenje
- keverőpult Pioneer
- keverőpult Adler
- keverőpult SilverCrest
- keverőpult RCF
- keverőpult Bosch
- keverőpult Emerio
- keverőpult Hyundai
- keverőpult Siemens
- keverőpult Exquisit
- keverőpult Technics
- keverőpult Roland
- keverőpult JBL
- keverőpult Camry
- keverőpult DAP-Audio
- keverőpult DeLonghi
- keverőpult Krups
- keverőpult Sunbeam
- keverőpult Boss
- keverőpult Crestron
- keverőpult Ariete
- keverőpult Instant
- keverőpult Allen & Heath
- keverőpult Fagor
- keverőpult Bifinett
- keverőpult Cuisinart
- keverőpult Speco Technologies
- keverőpult Kenwood
- keverőpult Clatronic
- keverőpult Bomann
- keverőpult Zoom
- keverőpult Korg
- keverőpult Bose
- keverőpult Inventum
- keverőpult Aurora
- keverőpult BeamZ
- keverőpult Domo
- keverőpult Roadstar
- keverőpult Caso
- keverőpult Omnitronic
- keverőpult Solac
- keverőpult SPL
- keverőpult TOA
- keverőpult Power Dynamics
- keverőpult Black & Decker
- keverőpult Dynacord
- keverőpult Turmix
- keverőpult Severin
- keverőpult Audio-Technica
- keverőpult Hanseatic
- keverőpult Dash
- keverőpult Denon
- keverőpult ATen
- keverőpult Concept
- keverőpult Auna
- keverőpult KitchenAid
- keverőpult Behringer
- keverőpult TriStar
- keverőpult Zelmer
- keverőpult Bogen
- keverőpult Showtec
- keverőpult Koenic
- keverőpult Shure
- keverőpult PreSonus
- keverőpult Peavey
- keverőpult Alecto
- keverőpult Stirling
- keverőpult Mesko
- keverőpult Alesis
- keverőpult Velleman
- keverőpult Russound
- keverőpult Scott
- keverőpult ProfiCook
- keverőpult TC Helicon
- keverőpult Røde
- keverőpult Monacor
- keverőpult Melissa
- keverőpult ION
- keverőpult Efbe-Schott
- keverőpult LD Systems
- keverőpult Proel
- keverőpult Blaupunkt
- keverőpult Korona
- keverőpult Taurus
- keverőpult Comfee
- keverőpult Samson
- keverőpult Mackie
- keverőpult Soundcraft
- keverőpult Vonyx
- keverőpult Alto
- keverőpult AKAI
- keverőpult Konig
- keverőpult Pyle
- keverőpult Kalorik
- keverőpult Rolls
- keverőpult DataVideo
- keverőpult Dangerous Music
- keverőpult Alpina
- keverőpult Philco
- keverőpult Atlas Sound
- keverőpult Ashly
- keverőpult Martin
- keverőpult Yorkville
- keverőpult IdeenWelt
- keverőpult Warm Audio
- keverőpult Wharfedale
- keverőpult HQ Power
- keverőpult Arendo
- keverőpult Bestron
- keverőpult DBX
- keverőpult Tascam
- keverőpult Nektar
- keverőpult Alfatron
- keverőpult Sound Devices
- keverőpult Advance Acoustic
- keverőpult Reloop
- keverőpult Chandler
- keverőpult Flama
- keverőpult Rupert Neve Designs
- keverőpult Kramer
- keverőpult OWI
- keverőpult ART
- keverőpult Allen-Heath
- keverőpult American Audio
- keverőpult ADB
- keverőpult Nordland
- keverőpult Fritel
- keverőpult Gemini
- keverőpult Marquant
- keverőpult Steren
- keverőpult Proline
- keverőpult Envivo
- keverőpult AV:link
- keverőpult Pyle Pro
- keverőpult Valcom
- keverőpult Midas
- keverőpult Blaze
- keverőpult IDance
- keverőpult Primo
- keverőpult QTX
- keverőpult RDL
- keverőpult Fredenstein
- keverőpult Swissonic
- keverőpult Team
- keverőpult Aviom
- keverőpult QSC
- keverőpult CaterChef
- keverőpult Golden Age Project
- keverőpult Apart
- keverőpult Radial Engineering
- keverőpult Skytec
- keverőpult Waves
- keverőpult Home Electric
- keverőpult Monoprice
- keverőpult Ibiza Sound
- keverőpult Elysia
- keverőpult Solid State Logic
- keverőpult OSD Audio
- keverőpult Adastra
- keverőpult Zolid
- keverőpult Stanton
- keverőpult TeachLogic
- keverőpult Citronic
- keverőpult Lindell Audio
- keverőpult Audiophony
- keverőpult JB Systems
- keverőpult Sonifex
- keverőpult Manley
- keverőpult Redmond
- keverőpult Extron
- keverőpult NutriBullet
- keverőpult Venga
- keverőpult Crown
- keverőpult Dateq
- keverőpult Avid
- keverőpult M-GAME
- keverőpult Ecler
- keverőpult Icon
- keverőpult Stagg
- keverőpult Santos
- keverőpult Fun Generation
- keverőpult Karma
- keverőpult ANT
- keverőpult IMG Stage Line
- keverőpult Rane
- keverőpult Phonic
- keverőpult Koda
- keverőpult JTS
- keverőpult RCS
- keverőpult Klark Teknik
- keverőpult DAP
- keverőpult CAD Audio
- keverőpult Trident
- keverőpult Heritage Audio
- keverőpult Audibax
- keverőpult IMG Stageline
- keverőpult The T.mix
- keverőpult Inter-M
- keverőpult Cloud
- keverőpult Bellari
- keverőpult Glemm
- keverőpult DNA
- keverőpult Analogue Solutions
- keverőpult Auna Pro
Legújabb útmutatók keverőpult
4 Április 2025
4 Április 2025
3 Április 2025
3 Április 2025
31 Március 2025
28 Március 2025
28 Március 2025
27 Március 2025
23 Március 2025
19 Március 2025