Használati útmutató Neff B 45E42 N0
Olvassa el alább 📖 a magyar nyelvű használati útmutatót Neff B 45E42 N0 (218 oldal) a sütő kategóriában. Ezt az útmutatót 6 ember találta hasznosnak és 2 felhasználó értékelte átlagosan 4.5 csillagra
Oldal 1/218

© 2001 Sony Corporation
Operating
Instructions
Chapter 1
Chapter 2
Chapter 3
Chapter 4
Chapter 5
Chapter 6
Personal Entertainment Organizer
PEG-N710C
Basic operations of your
Sony CLIE Handheld
Using basic applications
Exchanging and updating
data using a HotSync®
operation
Communicating using
your Sony CLIE Handheld
Customizing your Sony
CLIE Handheld
(Preferences)
Additional information

2
WARNING
To prevent fire or shock hazard, do
not expose the unit to rain or
moisture.
To avoid electrical shock, do not
open the cabinet. Refer servicing
to qualified personnel only.
Owner’s Record
The model number and serial number are
located at the rear of the product. Record the
serial number in the space provided below.
Refer to them whenever you call upon your
Sony dealer regarding this product.
Model No. PEG-N710C
Serial No.______________
The outlet shall be installed near the
equipment and shall be easily accessible.
CAUTION
You are cautioned that any changes or
modifications not expressly approved in this
manual could void your authority to operate
this equipment.
NOTE
This equipment has been tested and found
to comply with the limits for a Class B
digital device, pursuant to Part 15 of the
FCC Rules. These limits are designed to
provide reasonable protection against
harmful interference in a residential
installation. This equipment generates, uses,
and can radiate radio frequency energy and,
if not installed and used in accordance with
the instructions, may cause harmful
interference to radio communications.
However, there is no guarantee that
interference will not occur in a particular
installation. If this equipment does cause
harmful interference to radio or television
reception, which can be determined by
rotating the equipment off and on, the user
is encouraged to try to correct the
interference using one or more of the
following measures:
– Reorient or relocate the receiving
antenna.
– Increase the separation between the
equipment and receiver.
– Connect the equipment into an outlet on
a circuit different from that to which the
receiver is connected.
– Consult the dealer or an experienced
radio/TV technician for help.
If you have question about this product, call
the Sony Customer Information Center at
keep on next line 1-877-760-7669; or write to
the Sony Customer Information Center at
12451 Gateway Boulevard, Fort Myers, FL
33913. The number below is for FCC-related
matters only.
Declaration of Conformity
Trade Name: SONY
Model No.: PEG-N710C
Responsible Party: Sony Electronics Inc.
Address: 680 Kinderkamack Road,
Oradell, NJ 07649 USA
Telephone No.: 201-930-6972
This device complies with part 15 of the
FCC Rules.
Operation is subject to the following two
conditions:
(1) This device may not cause harmful
interference, and
(2) This device must accept any
interference received, including
interference that may cause
undesired operation.
The supplied interface cable must be used
with the equipment in order to comply with
the limits for a digital device pursuant to
Subpart B of Part 15 of FCC Rules.
On the supplied software
• Copyright laws prohibit reproducing
the software or the software manual in
whole or in part, or renting the software
without the permission of the copyright
holder.
• In no event will SONY be liable for any
financial damage or loss of profits,
including claims made by third parties,
arising out of the use of the software
supplied with this player.
• In the event a problem occurs with this
software as a result of defective
manufacturing, SONY will replace it at
SONY’s option or issue a refund.
However, SONY bears no other
responsibility.
• The software provided with this
product cannot be used with equipment
other than that which it is designated
for use with.
• Please note that, due to continued
efforts to improve quality, the software
specifications may be changed without
notice.
Program © 2001 Sony Corporation, © 2001
Palm, Inc. or its subsidiaries. All rights
reserved.
Documentation © 2001 Sony Corporation

3
Sony, Memory Stick, the Memory Stick logo,
Jog Dial, OpenMG, and PictureGear are
trademarks of Sony Corporation.
Graffiti, HotSync, Palm Modem, and Palm
OS are registered trademarks, and the
HotSync logo and Palm are trademarks of
Palm, Inc. or its subsidiaries.
IBM and PC/AT are registered trademarks
of International Business Machines
Corporation.
Microsoft, Windows, Outlook and the
Windows 98 logo are registered trademarks
of Microsoft Corporation.
MMX and Pentium are registered
trademarks of Intel Corporation.
AvantGo, the AvantGo Client and the
AvantGo logo are registered trademarks of
AvantGo, Inc.
Pumatech, the Pumatech logo, Intellisync
and Intellisync Lite are trademarks of
Pumatech, Inc. that may be registered in
some jurisdictions.
Adobe and Adobe Acrobat Reader are
trademarks of Adobe Systems Incorporated.
QuickTime and the QuickTime logo are
trademarks used under license. QuickTime
is registered in the U.S. and other countries.
This product includes fonts owned by
TypeBank Co., Ltd. under license.
RealJukebox is copyrighted by
RealNetworks, Inc.
All other trademarks are trademarks of their
respective owners.
CAUTION
Please contact your nearest Sony dealer
regarding the problem you are experiencing
with your Sony product.
Notes
• Sony does not support third-party add-
on applications. If you are having a
problem with a third-party application,
please contact the developer or
publisher of that software.
• The illustrations in this manual may
differ from the actual software.
• Explanations in this manual assume that
you are familiar with basic operations of
Windows®. For how to use your
computer and operating system, please
refer to their respective manuals.
Before using your CLIE handheld, be sure to
read the accompanying
End-User’s License Agreement.

4
About this manual ............................ 7
Chapter 1
Basic operations of your Sony CLIE
Handheld
Turning on and off your Sony CLIE
Handheld ........................................... 9
Using the stylus ............................... 10
Using the Jog Dial™ navigator....... 12
Entering data into your Sony CLIE
Handheld ......................................... 13
Using Graffiti® writing to
enter data ......................................... 13
Using the onscreen keyboard ............ 22
Using your computer keyboard ......... 24
Changing the frontlight level ......... 25
Resetting your
Sony CLIE Handheld ........................ 26
Performing a soft reset ..................... 26
Performing a hard reset .................... 27
Chapter 2
Using basic applications
Managing schedules and events
(Date Book) ............................. 29
Scheduling an event ......................... 29
Checking schedules .......................... 36
Editing Date Book events.................. 42
Using the Date Book menus ............. 47
Managing addresses and phone
numbers (Address Book) ......... 49
Creating a new Address Book entry .. 49
Viewing Address Book entries .......... 51
Editing Address Book entries ............ 55
Using the Address Book menus ........ 61
Managing tasks and things to do
(To Do List) .............................. 63
Creating To Do List items .................. 63
Viewing To Do List items .................. 64
Checking off a To Do List item .......... 65
Working with To Do List ................... 66
Using the To Do List menus .............. 70
Creating memos
(Memo Pad) ............................. 71
Creating a new memo ...................... 71
Reviewing memos............................. 73
Editing memos .................................. 76
Using the Memo Pad menus ............. 78
Managing expenses
(Expense) ................................. 79
Recording a new Expense item ......... 79
Editing Expense items ....................... 81
Using the Expense menus ................. 88
Using Calculator (Calc) ............. 89
Calculating with Calculator............... 89
Using the Calculator buttons ............ 90
Using the Calculator menus .............. 90
Performing common tasks .............. 91
Using the Application Launcher ........ 91
Categorizing records ......................... 95
Finding records ................................. 98
Protecting your data (Security) ....... 102
Attaching notes .............................. 108
Purging records............................... 109
Using the Edit menu ....................... 110
Choosing fonts ................................ 111
Continued on next page
Table of contents

5
Chapter 3
Exchanging and updating data using
a HotSync® operation
What is a HotSync® operation? .... 113
Performing a local HotSync® operation
with the cradle .............................. 114
Using the Palm™ Desktop for CLIE
software ........................................ 116
Starting the Palm Desktop for CLIE
software.......................................... 116
Basic operations of the Palm Desktop
for CLIE software ............................ 116
Locating the Palm Desktop for CLIE
components .................................... 117
Advanced HotSync® operations ... 118
Setting the HotSync ®
setup options .................................. 118
Customizing HotSync application
settings (Conduit) ........................... 120
Creating a user profile to control
multiple CLIE handhelds ................. 122
Conducting an IR
HotSync operation .......................... 124
Conducting a HotSync operation
via modem ...................................... 127
Conducting a HotSync operation
via a network .................................. 133
Importing data from a Windows
application ...................................... 136
Synchronizing with external data
(File Link) ........................................ 138
Chapter 4
Communicating using your Sony
CLIE Handheld
Beaming between your Sony CLIE Handheld
and another Palm OS
®
PDA ................
140
What you can do with beaming ...... 140
Beaming information ...................... 141
Receiving beamed information ....... 142
Tips on beaming information .......... 142
Using “Memory Stick®” media ..... 143
What is “Memory Stick
®
” media? ....
143
Inserting and removing “Memory Stick”
media.............................................. 144
Protecting the data in “Memory Stick”
media.............................................. 146
Starting an application automatically when
“Memory Stick” media is inserted.......
146
Formatting “Memory Stick” media ...
147
Exchanging data via “Memory Stick®”
media ............................................ 149
Starting Memory Stick Gate
(MS Gate) ....................................... 149
Creating the default folder in “Memory
Stick” media ................................... 152
Copying your CLIE handheld data to
“Memory Stick” media ................... 153
Copying data in “Memory Stick” media
to your CLIE handheld..................... 155
Deleting data in “Memory Stick”
media.............................................. 157
Using the MS Gate menus .............. 159
How to read the online manual ...... 160
Table of contents
Continued on next page

6
Chapter 5
Customizing your Sony CLIE
Handheld (Preferences)
What you can do with
Preferences ............................ 162
Changing the Buttons
preferences ................................... 164
Assigning applications to buttons ... 164
Changing the full-screen pen stroke
activities ......................................... 165
Assigning applications to HotSync®
buttons ........................................... 166
Changing the Jog Dial™ navigator
preferences ................................... 167
Setting the display format of the time,
date, and numbers (Formats) ........ 168
Selecting a country default ............. 168
Selecting the time, date, and numbers
formats ........................................... 169
Setting the General preferences ... 170
Setting the time .............................. 170
Setting the date .............................. 171
Setting the automatic
shut-off time ................................... 172
Setting sounds ................................ 173
Turning on or off the Beam Receive
feature ............................................ 174
Entering owner information ......... 175
Creating Graffiti® ShortCuts ........ 176
Setting the High Resolution Assist
function ......................................... 178
Chapter 6
Additional information
Backing up data of your Sony CLIE
Handheld ....................................... 180
Backing up data in your computer using
a HotSync operation ....................... 180
Backing up your CLIE handheld data
using “Memory Stick” media ......... 181
Using data of another Sony CLIE
Handheld ....................................... 183
Using the Palm Desktop for CLIE software
to transfer data ............................... 183
Using “Memory Stick” media to
transfer data ................................... 185
Precautions ................................... 187
Notes on use ................................... 187
Battery considerations .................... 188
Troubleshooting–Frequently Asked
Questions ...................................... 190
If you cannot perform a HotSync
operation ........................................ 203
Getting Help.................................. 207
Specifications ................................ 208
Limited Warranty Statement ........ 209
Index ............................................. 213
Table of contents

7
About this manual
Welcome to the Sony Personal Entertainment Organizer (referred to as the
“CLIE handheld” in this manual).
Your CLIE handheld comes with three manuals:
Read This First
Read This First gives an overview of your CLIE handheld’s features,
hardware and software setup, installation instructions, and other important
details. Before reading the rest of the manuals, read the Read This First
manual.
Operating Instructions (this manual)
This manual describes all you need to know about how to use your CLIE
handheld and the Personal Information Management applications that come
with it.
The manual shows you how to:
■Turn your CLIE handheld on and off, reset your CLIE handheld, and
enter data, explained in greater detail (Chapter 1)
■Use Personal Information Management applications: Date Book,
Address Book, To Do List, Memo Pad, Expense, and Calculator
(Chapter 2)
■Perform a HotSync® operation with your computer (Chapter 3)
■Exchange data with another handheld by beaming or via “Memory
Stick®” media (Chapter 4)
■Personalize your CLIE handheld with your own preferences settings
(Chapter 5)
■Maintain your CLIE handheld and work with the Troubleshooting
guide and other technical information (Chapter 6)
Add-on Application Guide
The Add-on Application Guide describes how to install and use the supplied
add-on applications which include:
■Audio Player/OpenMG Jukebox/RealJukebox
■PictureGear Pocket/PictureGear 4.3Lite
■gMovie
■MS Autorun

Chapter 1
Basic operations of your Sony CLIE Handheld
This chapter explains how to turn on and off your CLIE handheld, enter data, and
perform other basic operations.
Contents
Turning on and off your Sony CLIE Handheld ................................................9
Using the stylus ...........................................................................................10
Using the Jog Dial™ navigator ...................................................................12
Entering data into your Sony CLIE Handheld ...............................................13
Using Graffiti® writing to enter data ......................................................13
Using the onscreen keyboard .................................................................22
Using your computer keyboard ..............................................................24
Changing the frontlight level ......................................................................25
Resetting your Sony CLIE Handheld ............................................................26
Performing a soft reset ..........................................................................26
Performing a hard reset .........................................................................27

Chapter1 Basic operations of your Sony CLIE Handheld 9
Turning on and off your Sony CLIE Handheld
Turning on your CLIE handheld
Press the POWER button.
Your CLIE handheld is turned on, and the last screen you viewed is
displayed.
When you turn on your CLIE handheld for the first time, the Setup screen
appears.
Note
If the power is not turned on, make sure that the HOLD switch is not in the protect
position.
Turning off your CLIE handheld
Press the POWER button again.
The power is turned off. You do not have to save data, quit an application
or perform any of the other shutdown procedures that your computer
requires.
Note
If you press the POWER button and hold it down for two seconds or longer, you can
turn the frontlight on the screen on or off.
Press the POWER button.
HOLD switch

Chapter1 Basic operations of your Sony CLIE Handheld 10
Using the stylus
Press lightly (tap) on the screen
With your CLIE handheld, you can use the supplied stylus to enter
characters or specify an application you want to run.
Taking out the stylus
The stylus is stored in the holder on the back panel of your CLIE handheld.
Pull it out when using your CLIE handheld.
To avoid losing the stylus, always put it back into its holder on your CLIE
handheld after use.
Tapping
When you enter characters on the screen keyboard of your CLIE handheld,
open an application, or select an item, press lightly on the desired button or
icon with the stylus.
This action is called “tapping.”
Take out the stylus.
Chapter1 Basic operations of your Sony CLIE Handheld 11
Using the stylus
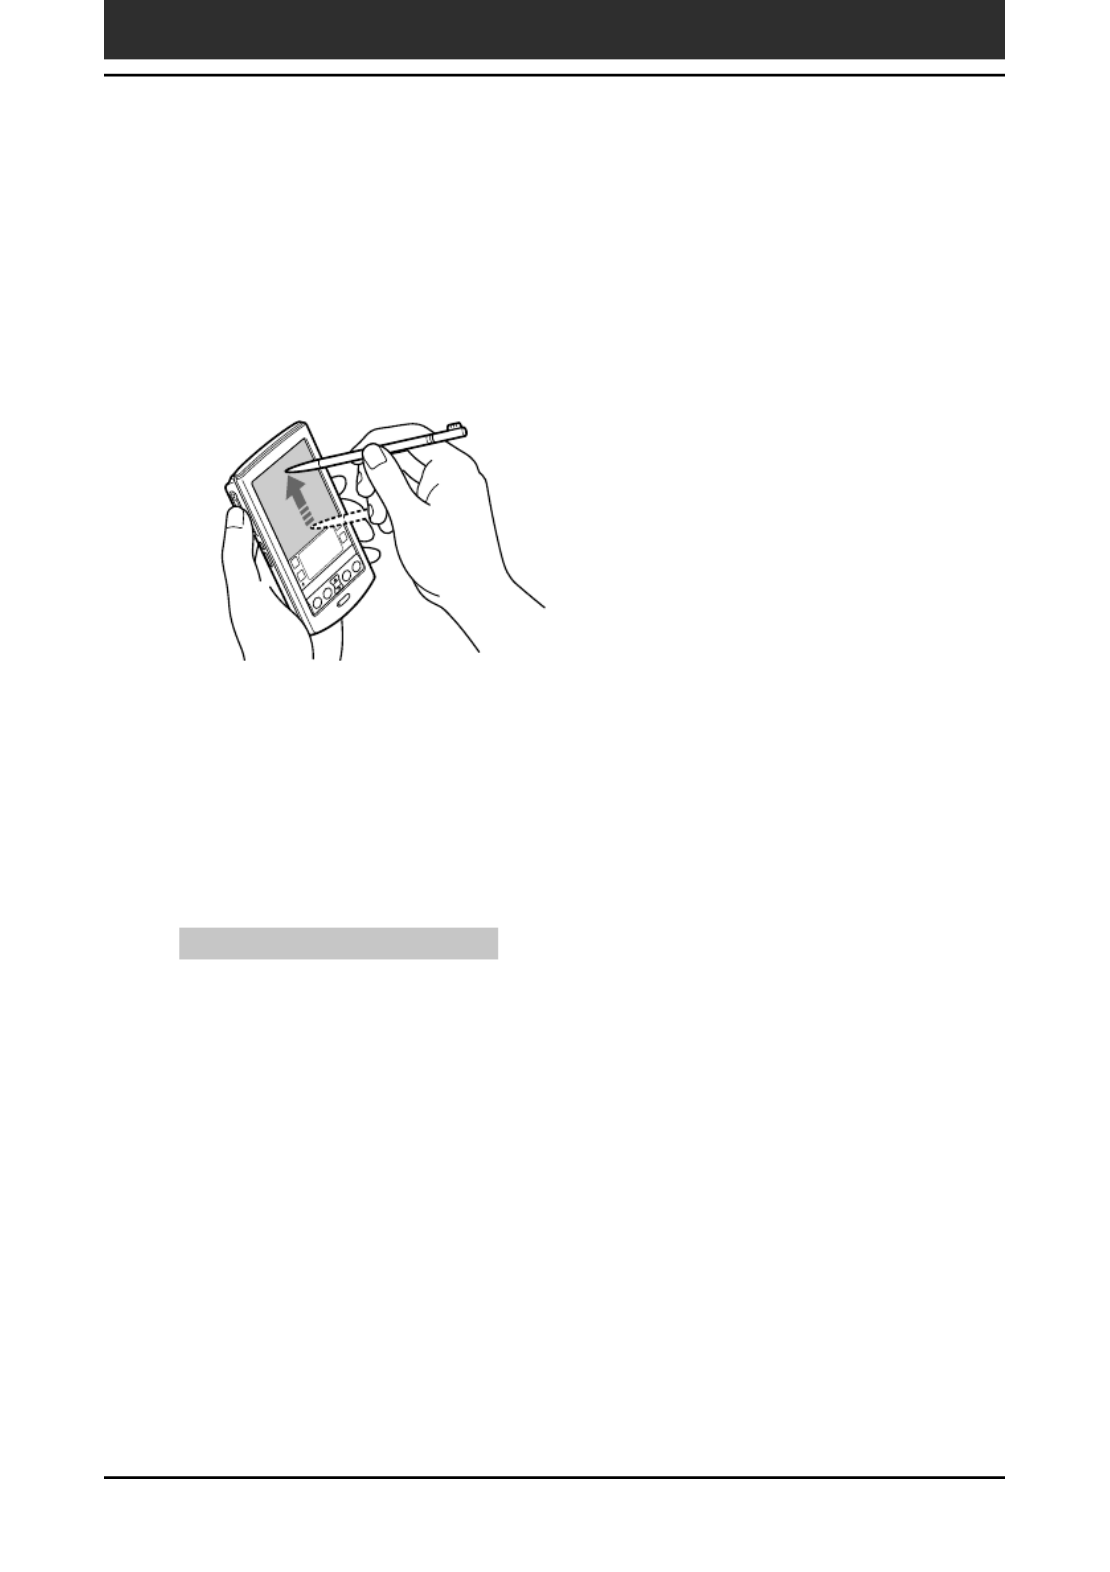
Dragging
Just as you can drag the mouse to select (and drag) text or move objects on
your computer, you can also use the stylus to drag an item on the screen of
your CLIE handheld. Press the stylus lightly on the item and move it along
the screen surface.
Examples of dragging:
To display data above or below the current viewing area on the screen, use
the stylus to drag the slider of any scroll bar.
To select multiple characters or items together, use the stylus to drag along
the desired characters or items.
Tip on full-screen dragging
By default, full-screen dragging from the bottom of the writing area to the
top of the screen displays the Graffiti® Help on the screen. You can assign
the full-screen dragging to another activity. See page 165 for details.
Touch the desired item on the screen
with the stylus and move it along the
screen surface (drag).

Chapter1 Basic operations of your Sony CLIE Handheld 12
Using the Jog Dial™ navigator
Your CLIE handheld is equipped with a Jog
DialTM navigator, which allows you to perform all
major operations without the stylus. You can
operate your CLIE handheld using the Jog Dial
navigator with just one hand.
The icon of any application that supports Jog Dial
navigator operations is marked with the Jog
Dial navigator mark.
For other applications, you can also use the JogAssist function to enable Jog
Dial navigator operations. For details, see “Changing the Jog Dial™
navigator preferences” on page 167.
Rotating the Jog Dial navigator
Rotate the Jog Dial navigator to select various
items in succession or to select an application to
start.
The operations you can perform by rotating the
Jog Dial navigator differ depending on the
application you are using. For details, refer to
the instructions for each application.
Pressing the Jog Dial navigator
Press the Jog Dial navigator to highlight the
item selected by rotating the Jog Dial navigator,
or to run the selected application.
The operations you can do by pressing the Jog
Dial navigator differ depending on the
application you are using. For details, refer to
the instructions for each application.
Rotating while holding down the Jog Dial navigator
Some applications support operations executed by rotating and pressing the
Jog Dial navigator. For details, refer to the instructions for each application.
mark

Chapter1 Basic operations of your Sony CLIE Handheld 13
Entering data into your Sony CLIE Handheld
Using Graffiti® writing to enter data
This section explains the procedures for creating letters, numbers, punctuation,
and symbols, as well as teaching you some Graffiti
®
tips and tricks.
What is Graffiti writing?
Most people find they can enter text quickly and accurately with only
minutes of practice. Graffiti writing includes any character you can type on a
standard keyboard. The Graffiti strokes closely resemble the upper case
letters of the regular alphabet, which makes Graffiti writing easy to learn.
There are four basic concepts for success with Graffiti writing:
• If you draw the character shape exactly as shown in the tables later in this
chapter (like the shapes shown in the following diagram), you can
achieve 100% accuracy.
• The heavy dot on each shape shows where to begin the stroke. Certain
characters have similar shapes, but different beginning and end points.
Always begin the stroke at the heavy dot (you should not create the
heavy dot; it is only there to show you where to begin the stroke).
• Most characters require only a single stroke. When you lift the stylus from
the Graffiti writing area, your CLIE handheld recognizes and displays the
text character immediately.
To allow you to write an entire character with a single stroke, some
Graffiti strokes are portions of the regular alphabet equivalents.
• The Graffiti writing area is divided into two parts: one for writing the
letters of the alphabet and one for writing numbers. The small marks at
the top and bottom of the Graffiti writing area separate the two areas.
Division marks
Write letters here Write numbers here
Graffiti writing examples:
A, B, C, D, and E

Chapter1 Basic operations of your Sony CLIE Handheld 14
Entering data in your Sony CLIE Handheld
Writing Graffiti letters
1Tap where you want your text to go.
Note
You need to tap above the Graffiti writing area, and you must see a flashing
cursor before you write the text.
2Use the tables on the following pages to find the stroke
shape for the letter you want to create. For example, the
stroke shown below creates the letter "n".
Note
There are two different stroke shapes available for some letters. For these letters,
choose the one that's easiest for you.
As you will see later, you use the same shape to create both the upper
case and lower case version of a letter.
3Position the stylus in the left-hand side of the Graffiti writing
area.
4Start your stroke at the heavy dot and draw the stroke shape
as it appears in the tables.
5Lift the stylus from the screen at the end of the stroke shape.
That is all there is to it. When you lift the stylus from the screen, your
CLIE handheld recognizes your stroke immediately and prints the letter
at the insertion point on the screen.
As soon as you lift the stylus from the screen, you can begin the stroke for
the next character you want to write.
Lift stylus here
Start stroke at heavy dot
Position the stylus
Continued on next page

Chapter1 Basic operations of your Sony CLIE Handheld 15
Note
You must begin the character strokes in the Graffiti writing area. If you do not
make Graffiti strokes in the Graffiti writing area, your CLIE handheld does not
recognize them as text characters.
Tips on Graffiti writing
• Accuracy improves when you write large characters, You should draw strokes that
nearly fill the Graffiti writing area.
• To delete characters, simply set the insertion point to the right of the character you
want to delete and make the backspace stroke (a line from right to left) in the
Graffiti writing area.
• Write at natural speed. Writing too slowly can generate recognition errors.
• Do not write on a slant. Vertical strokes should be parallel to the sides of the Graffiti
writing area.
• Press firmly.
To display the Graffiti onscreen help
Drag the stylus from the bottom of the writing area to the top of the screen. Graffiti
Help opens a series of screens that show the complete Graffiti character set.
Entering data in your Sony CLIE Handheld

Chapter1 Basic operations of your Sony CLIE Handheld 16
Writing Graffiti alphabet
Draw Graffiti letters according to the following alphabet in the left-hand
side of the Graffiti writing area.
A N
B O
C P
D Q
E R
F S
G T
H U
I V
J W
K X
L Y
M Z
Space BackSpace
CarriageReturn Period Tap twice
Entering data in your Sony CLIE Handheld

Chapter1 Basic operations of your Sony CLIE Handheld 17
To write capital letters
Shift to caps and then you can make capital letters with the same stroke
shapes as the basic alphabet characters.
■ To draw the first letter of a word as a capital letter
Use the Caps Shift stroke .
To return to the lower case, use the Backspace stroke .
Note
When you create a new sentence or a new record (by tapping New or a blank
line), the first letter is automatically capitalized.
■ To enter only capital letters (Caps Lock)
Use the Caps Lock stroke .
To return to the lower case, use the CapsShift stroke .
Writing numbers
Write the following numbers on the right-hand side (numbers side) of the
Graffiti writing area.
0 5
1 6
2 7
3 8
4 9
Caps Shift
Caps Lock
Entering data in your Sony CLIE Handheld

Chapter1 Basic operations of your Sony CLIE Handheld 18
Writing punctuation marks
Make a single tap on the Graffiti writing area to activate Punctuation Shift.
The next stroke you make anywhere in the Graffiti area (the letters or
numbers side) creates a punctuation mark.
(.) Period (—) Dash
(,) Comma ( ( ) Left Paren
( ( ) ) Right Paren‘) Apostrophe
(?) Question (/) Slash
(!) Exclamation ($) Dollar
(@) At (\) Back slash
(#) Number ({) Left brace
(%) Percent (}) Right brace
(^) Circumflex ([)
Left square bracket
(&) Ampersand (])
Right square bracket
(*) Asterisk (-) Swung dash
(<)
Left angle bracket
(\) Grave accent
(>)
Right angle bracket
(;) Semicolon
(_) Under bar (:) Colon
(“) Ditto Tab
Punctuation Shift
Entering data in your Sony CLIE Handheld

Chapter1 Basic operations of your Sony CLIE Handheld 19
Writing symbols and extended characters
Make a Symbol Shift stroke on the Graffiti writing area to activate
Symbol Shift. The next stroke you make creates a symbol or extended
character.
( x•) Bullet
(™) Trademark ÷
( =®) Registered
(©) Copyrighted (¢) Cent
( ) ‘
Left single quotation
(¥) Yen
(’) Right
single quotation
(£) Pound
( ) “
Left double quotation
¿
( ) ”
Right double quotation
¡
(§) Section ß
( µº) Degree
+ƒ
±ø
Symbol Shift
Entering data in your Sony CLIE Handheld

Chapter1 Basic operations of your Sony CLIE Handheld 20
Writing accented characters and non-English characters
To create accented characters, draw the stroke normally used to create the
letter, followed by an accent stroke. Graffiti writing then adds the accent to
the letter.
To enter “é,” for example, draw and then .
à è ì ò ù á é í ó ú ´ y
â ê î ô û ã õ ñ
ä ï ö ü ÿ å
To write non-English characters
You can write the following characters without any special punctuation or
shifting:
ç æ
Note
You must write these non-English characters on the left side of the Graffiti writing
area.
Entering data in your Sony CLIE Handheld

Chapter1 Basic operations of your Sony CLIE Handheld 21
Entering data in your CLIE handheld
Using Navigation strokes
In addition to character symbols, Graffiti writing includes special strokes
that you can use to navigate within text or fields in your applications.
Move cursor right
Move cursor left
Go to the previous field (Address Book only)
Go to the next field (Address Book only)
Open Address Record (Address Book only)
Using Graffiti ShortCuts
Graffiti ShortCuts, similar to the glossary or autotext features of some word
processors, allow you to enter commonly used words or phrases quickly and
easily. In addition to the following predefined ShortCuts, you can create
your own ShortCuts for your name or the header of a memo (page 176).
Each ShortCut can represent up to 45 characters.
To use a ShortCut, draw the ShortCut stroke followed by the ShortCut
characters. When you draw the ShortCut stroke, the ShortCut symbol
appears at the insertion point to show that you are in ShortCut mode.
When you enter and dts ( , , and ) , you can enter date and time
stamps.
Data stamp ds Breakfast br
Time stamp ts Lunch lu
Date/time stamps dts Dinner di
Meeting me
Chapter1 Basic operations of your Sony CLIE Handheld 22
Using the onscreen keyboard
You can open the onscreen keyboard any time you need to enter text or
numbers into your CLIE handheld. Note that you cannot enter Graffiti
characters while using the onscreen keyboard.
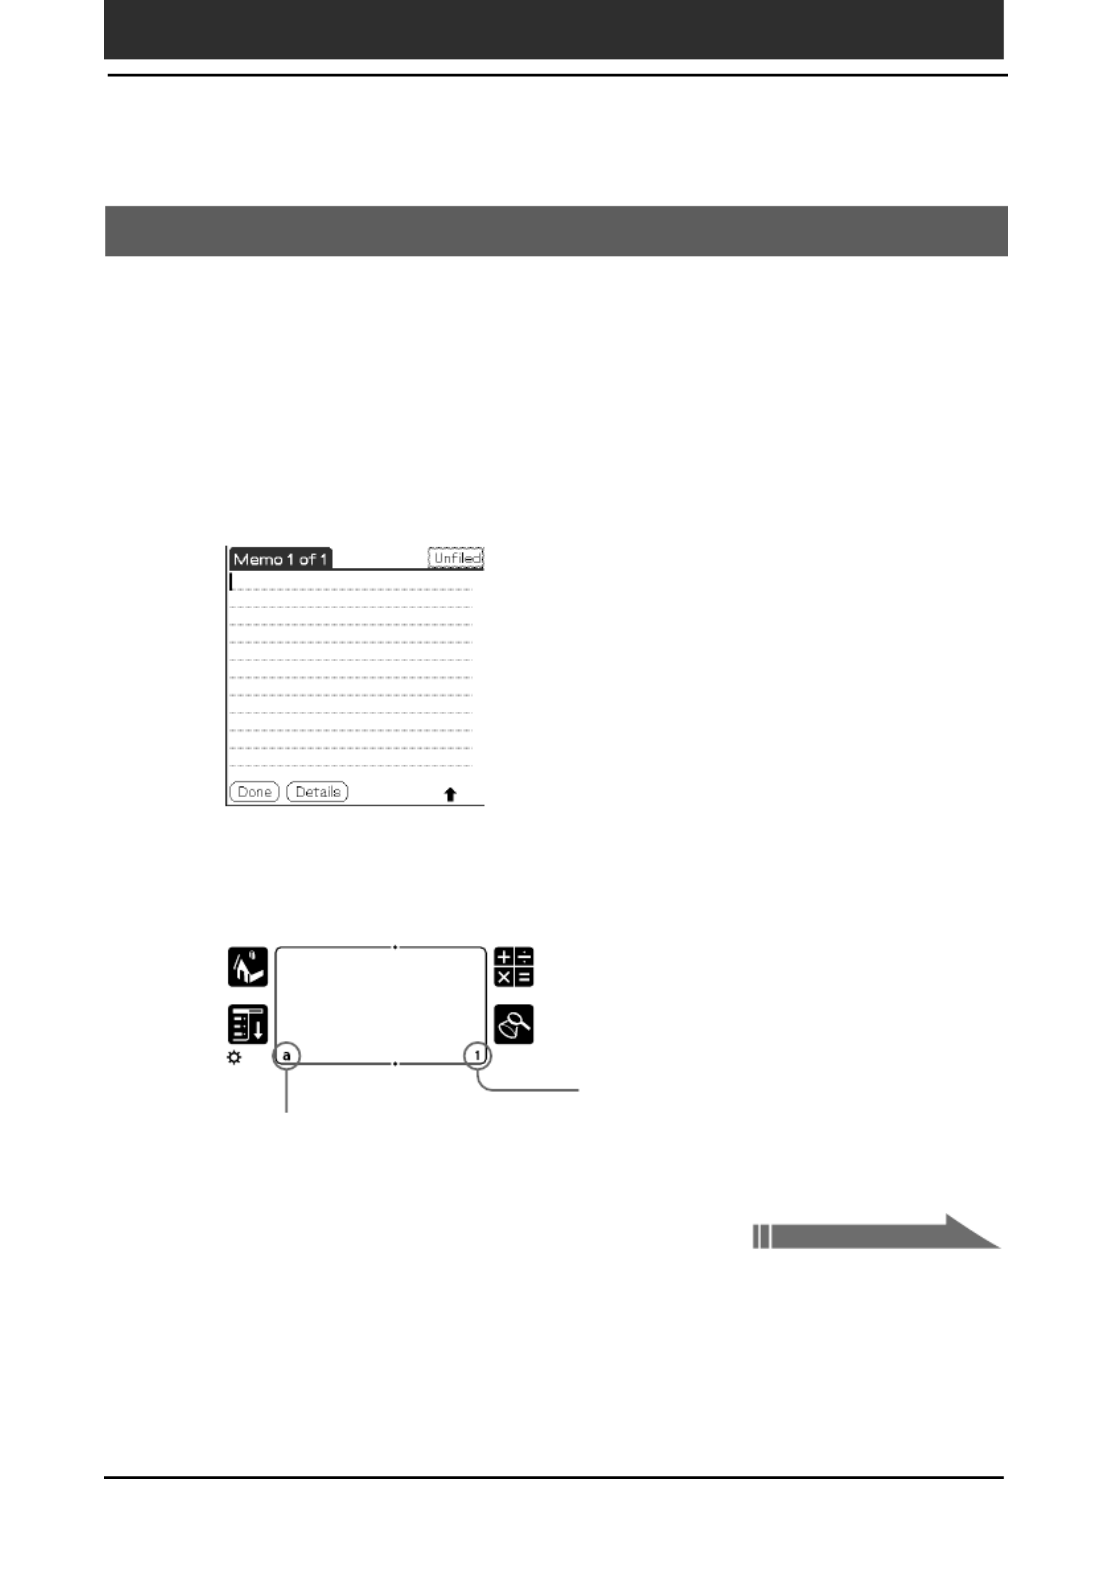
To use the onscreen keyboard:
1Open any application (such as Memo Pad).
2Tap any record, or tap New.
3Tap "a" to open the alphabetic keyboard, or tap "1" to open
the numeric keyboard.
The selected keyboard is displayed.
Tap here for the numeric keyboard
Entering data in your Sony CLIE Handheld
Tap here for the alphabetic keyboard
Continued on next page
Chapter1 Basic operations of your Sony CLIE Handheld 23
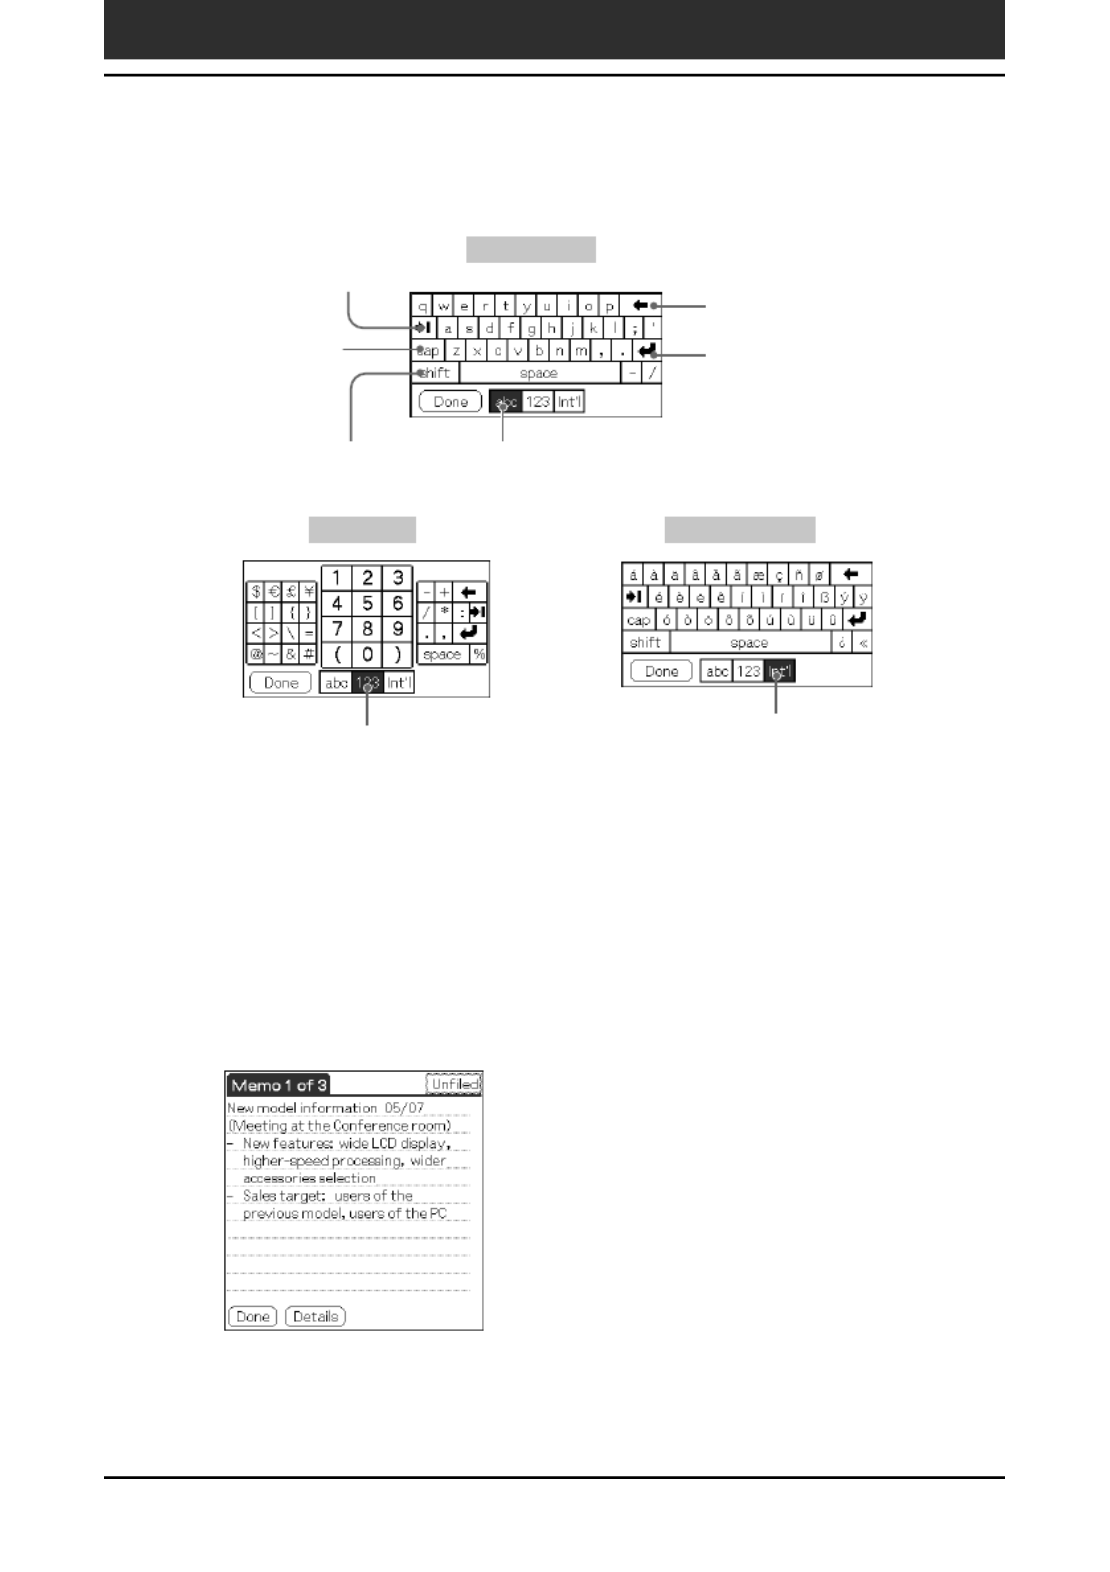
4Select the desired keyboard and tap the characters to enter
text and numbers.
You can use the online keyboard in the same way as in the keyboard of
your computer. To enter capital letter, tap cap and then tap the character
button. To delete a character, tap .B
5After you finish, tap Done to close the onscreen keyboard
and place the text in the record.
Tab
Caps shift
Caps lock
Backspace
Tap here to display alphabetic keyboard
Tap here to display international
keyboard
Tap here to display numeric
keyboard
Carriage return
Entering data in your Sony CLIE Handheld
Alphabetic
Numeric International

Chapter1 Basic operations of your Sony CLIE Handheld 24
Using your computer keyboard
If you have a lot of data to enter, or prefer to use the computer keyboard,
you can use Palm™ Desktop for CLIE software or any other supported
personal information manager (PIM), such as Microsoft Outlook ®, to enter
information. You can then perform a HotSync ® operation to synchronize the
information on your computer with the information on your CLIE handheld.
All the main applications on your CLIE handheld are also available in Palm
Desktop for CLIE software and in most PIMs, so you don't need to learn
different applications.
Refer to the Palm Desktop for CLIE software online Help for more
information on entering data on your computer.
To import data from your computer or another handheld
If you have data stored in computer applications such as spreadsheets, databases, or if
you want to import data from another handheld, you can transfer the data to your
CLIE handheld and use it without entering data manually. Save the data in a
compatible file format (.csv, .txt, .tab, .tsv, .dba, .aba, .tda, .mpa), import it into your
Palm Desktop for Sony software, and then perform a HotSync operation to transfer
the data to your CLIE handheld. For details, see “Chapter 3: Exchanging and
updating data using a HotSync ® operation.”
Entering data in your Sony CLIE Handheld

Chapter1 Basic operations of your Sony CLIE Handheld 25
Changing the frontlight level
Tap this icon.
You can turn the frontlight on the screen off or on or adjust the frontlight
level according to the lighting conditions or temperature of the environment
where you use your CLIE handheld.
Turning the frontlight off and on
Press and hold down the POWER button for more than two seconds to turn
the frontlight off or on.
Adjusting the frontlight level
Even with the frontlight on, you may need to further adjust the brightness
on the screen.
You can use the onscreen brightness control to adjust the frontlight level.
1Tap .8
The adjustment control screen is displayed.
2To change the level in small increments, tap to the left or
right.
To change the brightness level in larger increments, drag the
slider to the left or right.
Tip
You can also press the scroll button to move the slider incrementally.
3Tap Done.

Chapter1 Basic operations of your Sony CLIE Handheld 26
Resetting your Sony CLIE Handheld
Under normal circumstances, you will not have to reset your CLIE
handheld.
On rare occasions, however, your CLIE handheld may no longer respond to
buttons or the screen due to insufficient memory or other reasons. In this
case, you need to perform a reset to get your CLIE handheld running again.
Performing a soft reset
A soft reset tells your CLIE handheld to stop what it’s doing and start over
again. All records and entries stored in your CLIE handheld are retained
with a soft reset.
1Take out the reset tip by unscrewing the metal barrel from
the stylus quill.
2Use the reset tip to gently press the reset button inside the
hole on the back panel of your CLIE handheld.
The system shuts down and then restarts.
After restarting, the system displays “Palm Computing Platform,”
“CLIE,” and “Sony,” followed by the preferences screen for setting the
time and date.

Chapter1 Basic operations of your Sony CLIE Handheld 27
Performing a hard reset
If the soft reset does not solve the problem, you need to perform a hard reset
to restart your CLIE handheld.
Note
With a hard reset, all records and entries stored in your CLIE handheld are erased.
Only perform a hard reset if a soft reset does not solve your problem.
If you save a backup of your CLIE handheld data on your computer, you can restore
any data previously synchronized with your computer during the next HotSync ®
operation.
1Hold down the POWER button on your CLIE handheld.
2While holding down the POWER button, use the reset tip to
gently press and release the reset button.
The Palm Computing Platform window is displayed
3Release the POWER button.
A message warning that you are about to erase all the data stored on
your CLIE handheld is displayed.
4Press the upper half of the scroll button on the front panel of
your CLIE handheld.
Your CLIE handheld undergoes a hard reset.
After a hard reset, only the current data and time are retained. Formats,
Preferences, and other settings are restored to their factory default
settings.
Note
If the scroll button was used just prior to hard-resetting, the hard-reset may not be
performed.
Resetting your Sony CLIE Handheld

Chapter 2
Using basic applications
This chapter describes how to do tasks that are specific or common to the basic
applications of your CLIE handheld: Date Book, Address Book, To Do List, Memo Pad,
Expense, and Calculator.
Contents
Managing schedules and events (Date Book) ......................................29
Managing addresses and phone numbers (Address Book) ...................49
Managing tasks and things to do (To Do List) ...................................... 63
Creating memos (Memo Pad) ............................................................... 71
Managing expenses (Expense) .............................................................79
Using Calculator (Calc)......................................................................... 89
Performing common tasks ...........................................................................91
Using the Application Launcher ............................................................. 91
Categorizing records.............................................................................. 95
Finding records...................................................................................... 98
Protecting your data (Security) .............................................................102
Attaching notes ................................................................................... 108
Purging records ...................................................................................109
Using the Edit menu ............................................................................110
Choosing fonts ....................................................................................111
Chapter2 Using basic applications 29
Managing schedules and events (Date Book)
Date Book lets you quickly and easily schedule appointments or any activity
associated with a date or a date and time. A record in Date Book is called an
“event.”
Note
If the HOLD switch is in the protect position, you cannot operate your CLIE handheld.
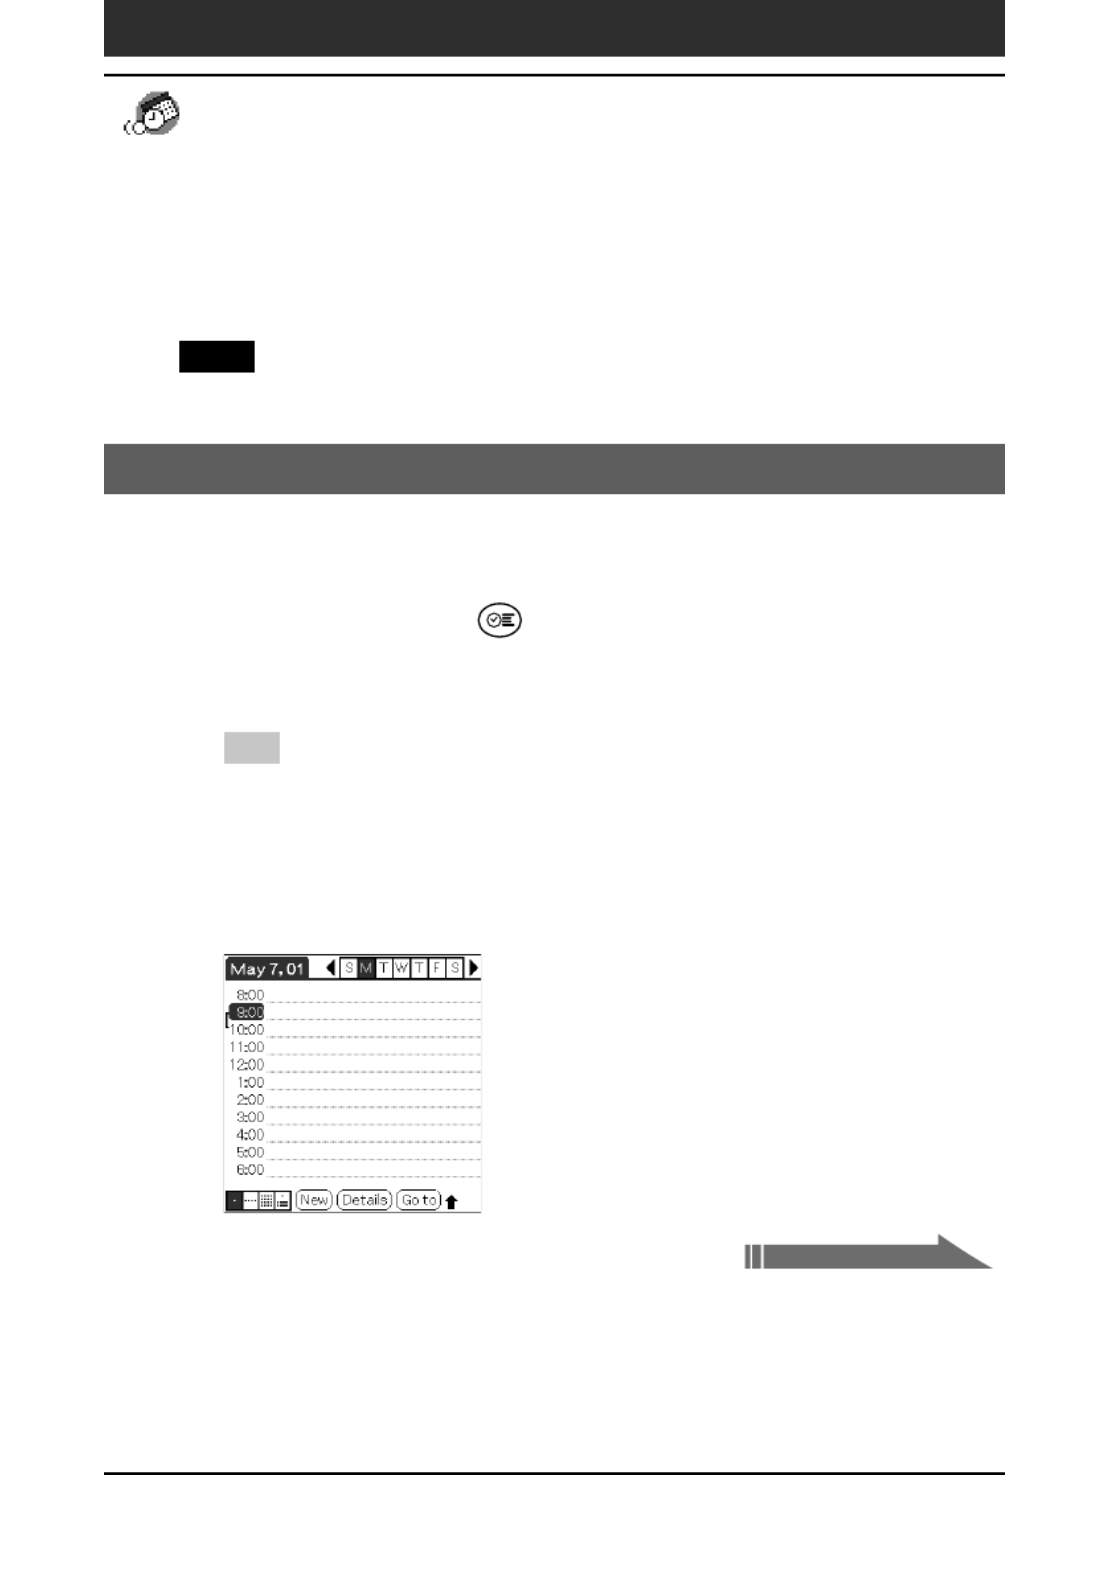
Scheduling an event
Scheduling an event for the current date
1Press the Date Book button on the front panel.
Date Book starts up. Today’s schedule is displayed with a list of times for
a standard business day.
Tip
Press the Date Book button repeatedly to cycle through the Day, Week, Month,
and Agenda views. The Date Book views are displayed at the bottom left of the
screen.
2Tap the time line that corresponds to the beginning of the
event.
Continued on next page

Chapter2 Using basic applications 31
Tip
You can open the Set Time dialog box (to select a start time) by writing a number on
the number side of the Graffiti writing area and making sure no event is selected.
To schedule an untimed event
In step 5, tap No Time. A new untimed event is displayed in the first line in
Date Book with a mark.♦
Scheduling a timed event for another date
1Press the Date Book button on the front panel.
Date Book starts up.
2
Do one of the following to select the date you want for the
event:
• Tap the day of the week on top of the Date Book screen.
To move to another week, tap one of the scroll arrows of either side
of the day of the week area.
• Tap Go to at the bottom of the screen.
The Go to Date dialog box appears. Select a date by tapping a year,
month, and day in the calendar.
3Follow the steps for Scheduling an event for the current“
date.”
Managing schedules and events (Date Book)
Continued on next page

Chapter2 Using basic applications 32
Tip
You can also use the scroll button on the front panel to move forward or backward
one day or one month at a time.
To schedule an untimed event
In step 3, tap New and then tap No Time. Then follow the steps for
“Scheduling an event for the current date.”
Tip
You can create a new untimed event by making sure no event is selected and then
writing letters in the Graffiti writing area. When you start writing, the untimed event
appears at the top of the screen.
Scheduling repeating or continuous events
The Repeat function lets you schedule events that recur at regular intervals
or extend over a period of consecutive days.
Examples of repeating or continuous events
• Birthday: an event that repeats annually
• Weekly guitar lesson: an event that falls on the same day of the week and
the same time of day
• Business trip or vacation: a continuous event
1Press the Date Book button on the front panel.
Date Book starts up.
2Tap the description of the event.
3Tap Details.
The Event Details dialog box appears.
Managing schedules and events (Date Book)
Continued on next page

Chapter2 Using basic applications 33
4Tap Repeat.
The Change Repeat dialog box appears.
5Tap Day, Week, Month, or Year to set how often the event
repeats.
For a continuous event, tap Day.
6Enter a number that corresponds to how often you want the
event to repeat on the Every line.
■ When you tap Week: Tap a letter representing each day of the week on
Repeat on line to specify the day you want the event to repeat.
Managing schedules and events (Date Book)
Continued on next page

Chapter2 Using basic applications 34
■ When you tap Month: On the Repeat by line, tap Day to repeat the
event on the specified day of the same week each month, or tap Date to
repeat the event on the specified date each month.
7To specify an end date for the repeating or continuous event,
tap the arrow next to End on to display the drop-down listV
and then tap Choose Date.
The Ending On screen appears.
8Tap the end date on the screen.
The Change Repeat screen appears again.
9Tap OK.
The Event Details screen appears again.
Managing schedules and events (Date Book)
Continued on next page

Chapter2 Using basic applications 35
10
Tap OK.
The Date Book screen is displayed again.
Make sure that the repeat icon is displayed to the far right of the
event.
Notes
• If you change the start date of a repeating event, your CLIE handheld
calculates the number of days you moved the event. Your CLIE handheld
then automatically changes the end date to maintain the duration of the
repeating event.
• If you change the repeat interval (e.g., daily to weekly) of a repeating
event, past occurrences (prior to the day on which you change the setting)
are not changed, and your CLIE handheld creates a new repeating event.
• If you change the date of an occurrence of a repeating event (e.g., from
January 14 to January 15) and apply the change to all occurrences, the new
date becomes the start date of the repeating event. Your CLIE handheld
adjusts the end date to maintain the duration of the event.
• If you change other repeat settings (e.g., time, alarm, private) of a
repeating event and apply the change to all occurrences, your CLIE
handheld creates a new event. The start date of this new event is the day
on which the setting is changed. Past occurrences (prior to the day of the
change) are not changed.
• If you apply a change to a single occurrence of a repeating event (e.g.,
time), that occurrence no longer shows the repeat icon.
Managing schedules and events (Date Book)

Chapter2 Using basic applications 36
Checking schedules
Displaying the Day view
You can display and check the events for a specific day.
1Press the Date Book button on the front panel.
Date Book starts. Today’s schedule is displayed.
2Rotate the Jog Dial navigator to display the events for™
yesterday or tomorrow.
You can display the schedule for a specific day and time.
To change the Date Book view
In addition to displaying the time list for a specific day, you can also display
a whole week, a month, or an agenda.
To display the next view, press the Jog Dial navigator repeatedly.
Tip
You can also select the Date Book view by tapping an icon on the Date Book screen.
Tap one of the following icons to rotate to the corresponding calendar view:
• : Day view
• : Week view
• : Month view
• : Agenda view
Managing schedules and events (Date Book)
Tap the desired view icon.
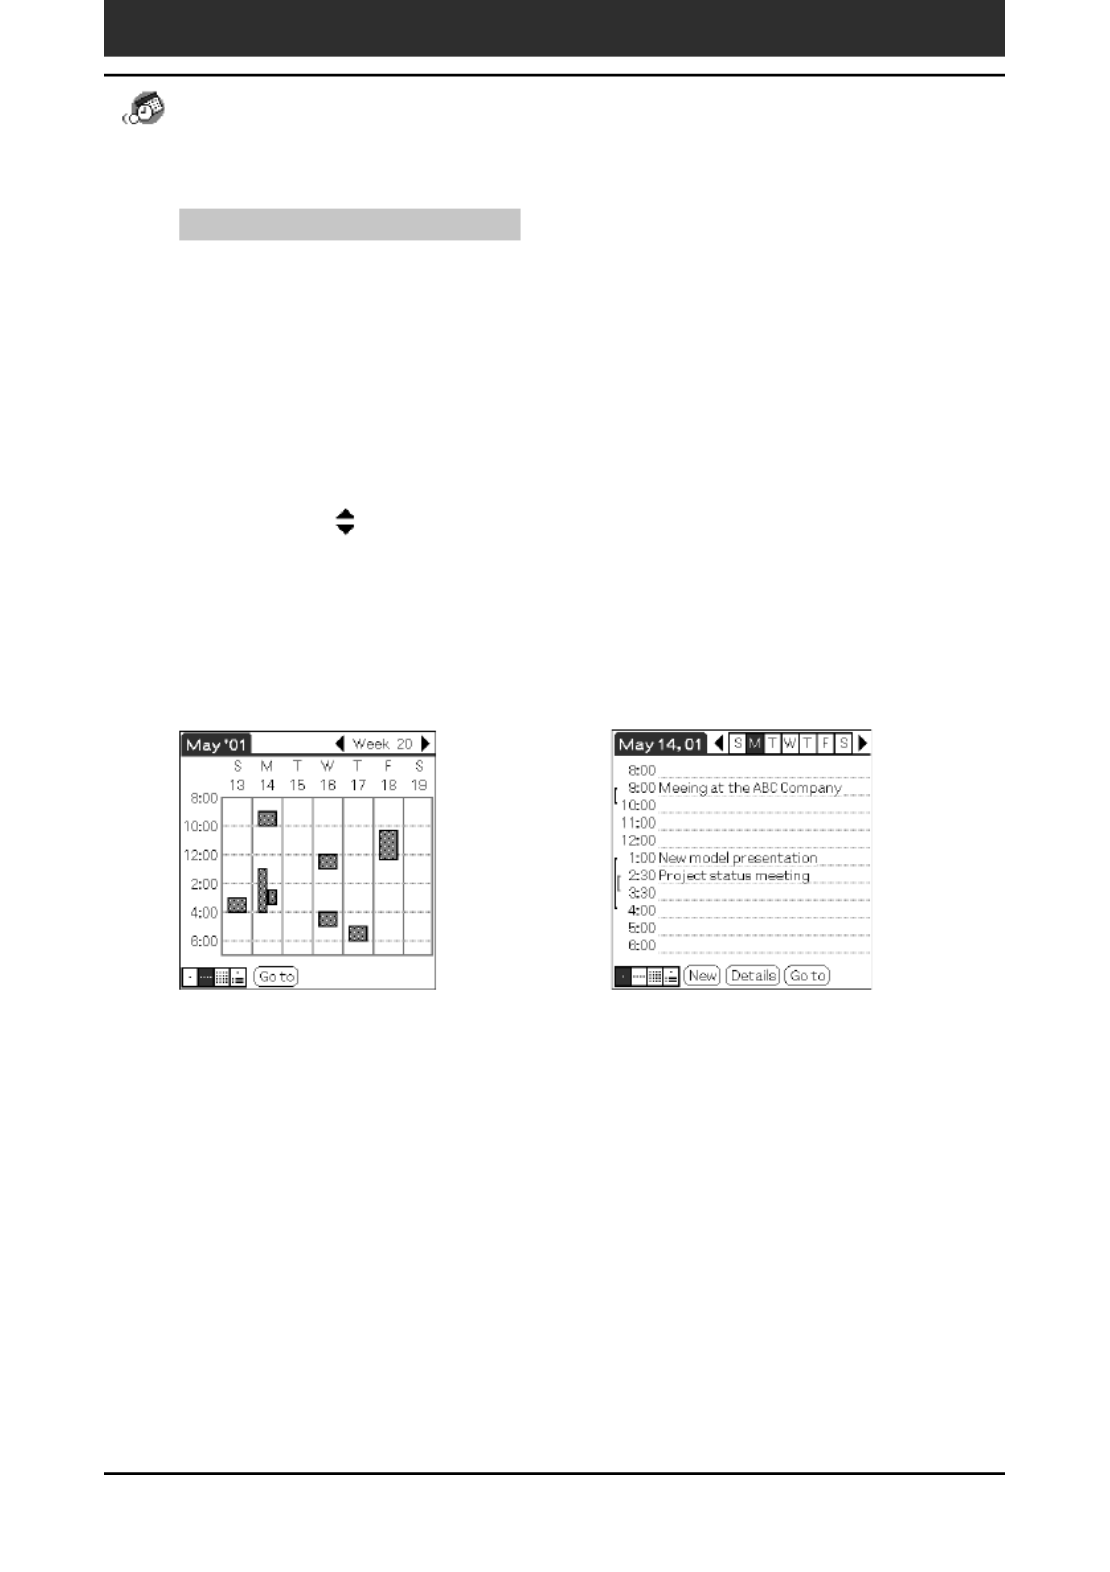
Chapter2 Using basic applications 38
Tips for using the Week view
• To reschedule an event while in the Week view, tap and drag the event to a
different time or day.
• Tap a blank time on any day to move to that day and have the time selected for a
new event.
• Tap any day or date that appears at the top of the Week view to move directly to
that day without selecting an event.
• The Week view displays the time span defined by the Start Time and End Time in
the Date Book Preferences settings. If you have an event before or after this time
span, a bar appears at the top or bottom of that day’s column. Use the onscreen
scroll arrows to scroll to the event.
To spot event conflicts
An event conflict (time overlap) appears in the Week view as overlapping
time bars and in the Day view as overlapping brackets to the left of the
conflicting times.
b
Managing schedules and events (Date Book)
Chapter2 Using basic applications 39
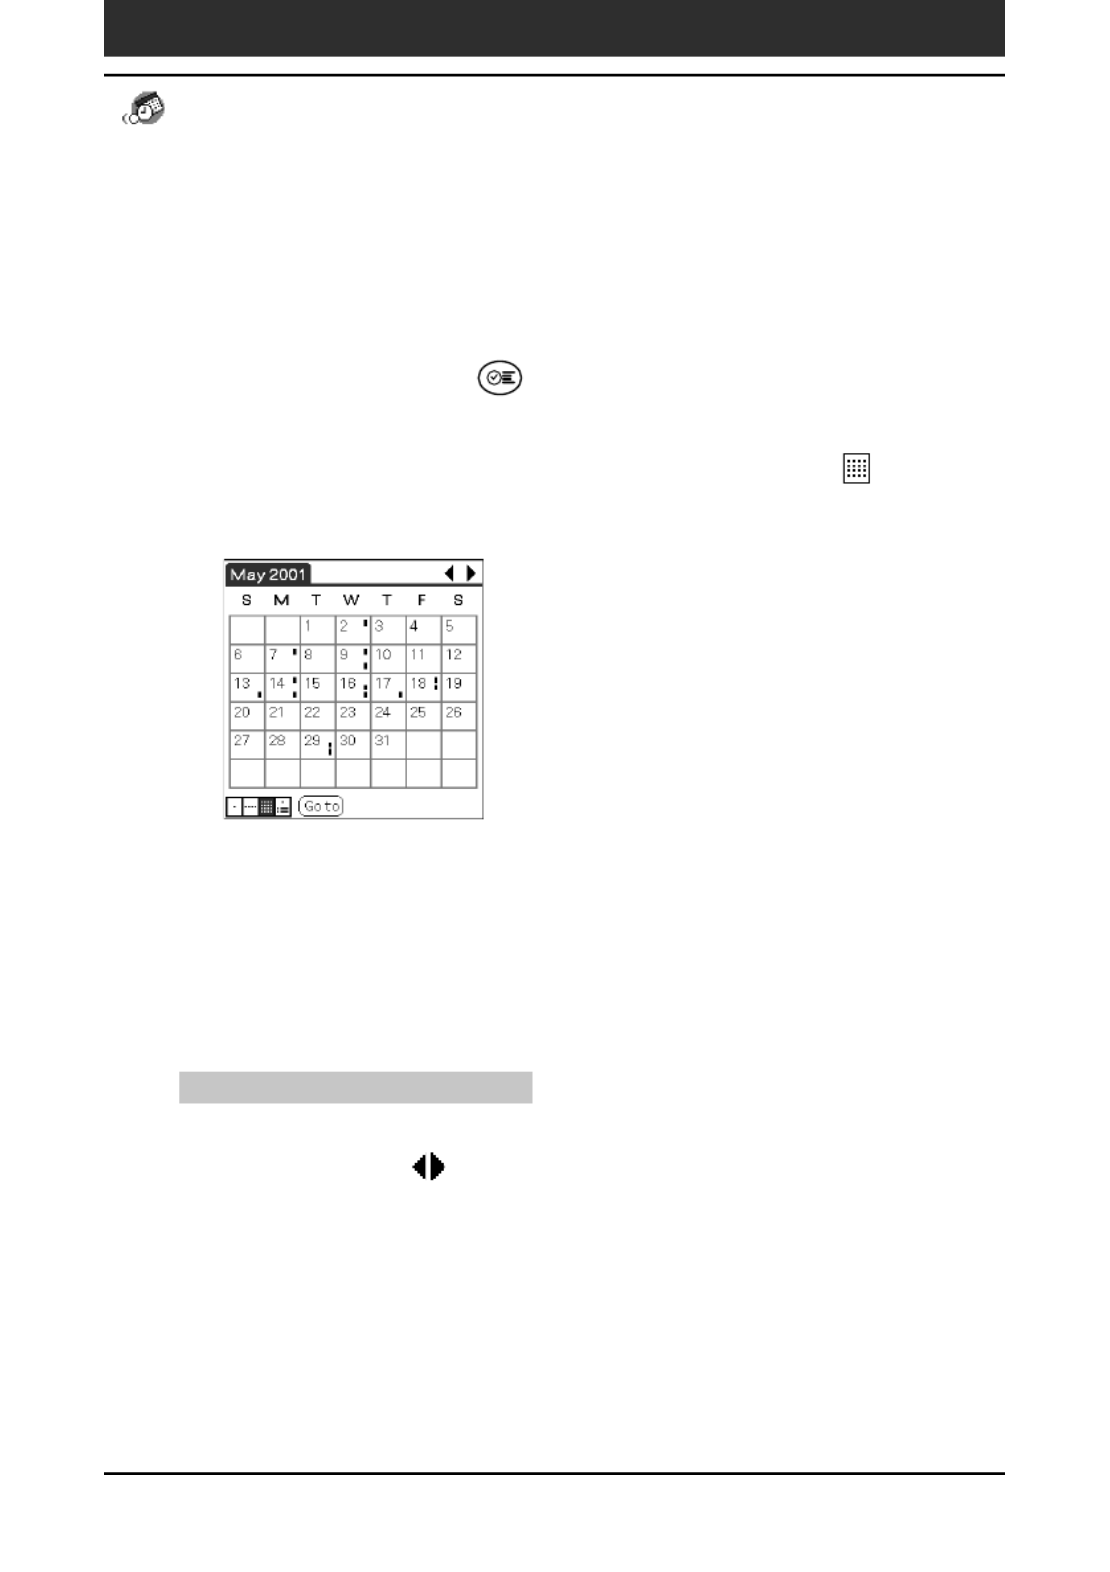
Displaying the Month view
The Month view screen shows which days have events scheduled. Dots and
lines in the Month view indicate events, repeating events, and untimed
events.
1Press the Date Book button on the front panel.
Date Book starts up.
2Press the Jog Dial navigator repeatedly or tap the Month
view icon.
The Month view screen appears.
3Rotate the Jog Dial navigator to select the day that you want
to review.
To select the next day, rotate the Jog Dial navigator.
4Press the Jog Dial navigator.
The details of the selected day are displayed.
Tips for using the Month view
• Tap a day in the Month view to display that day in the Day view.
• Tap the scroll arrows in the upper right corner to move forward or backward a
month.
• Tap Go to to open the Go to Date dialog box to select a different month.
• Use the scroll buttons on the front panel of your CLIE handheld to move between
months. Press the upper half of the scroll button to display the previous month, the
lower half of the scroll button to display the next month.
Managing schedules and events (Date Book)
Chapter2 Using basic applications 40
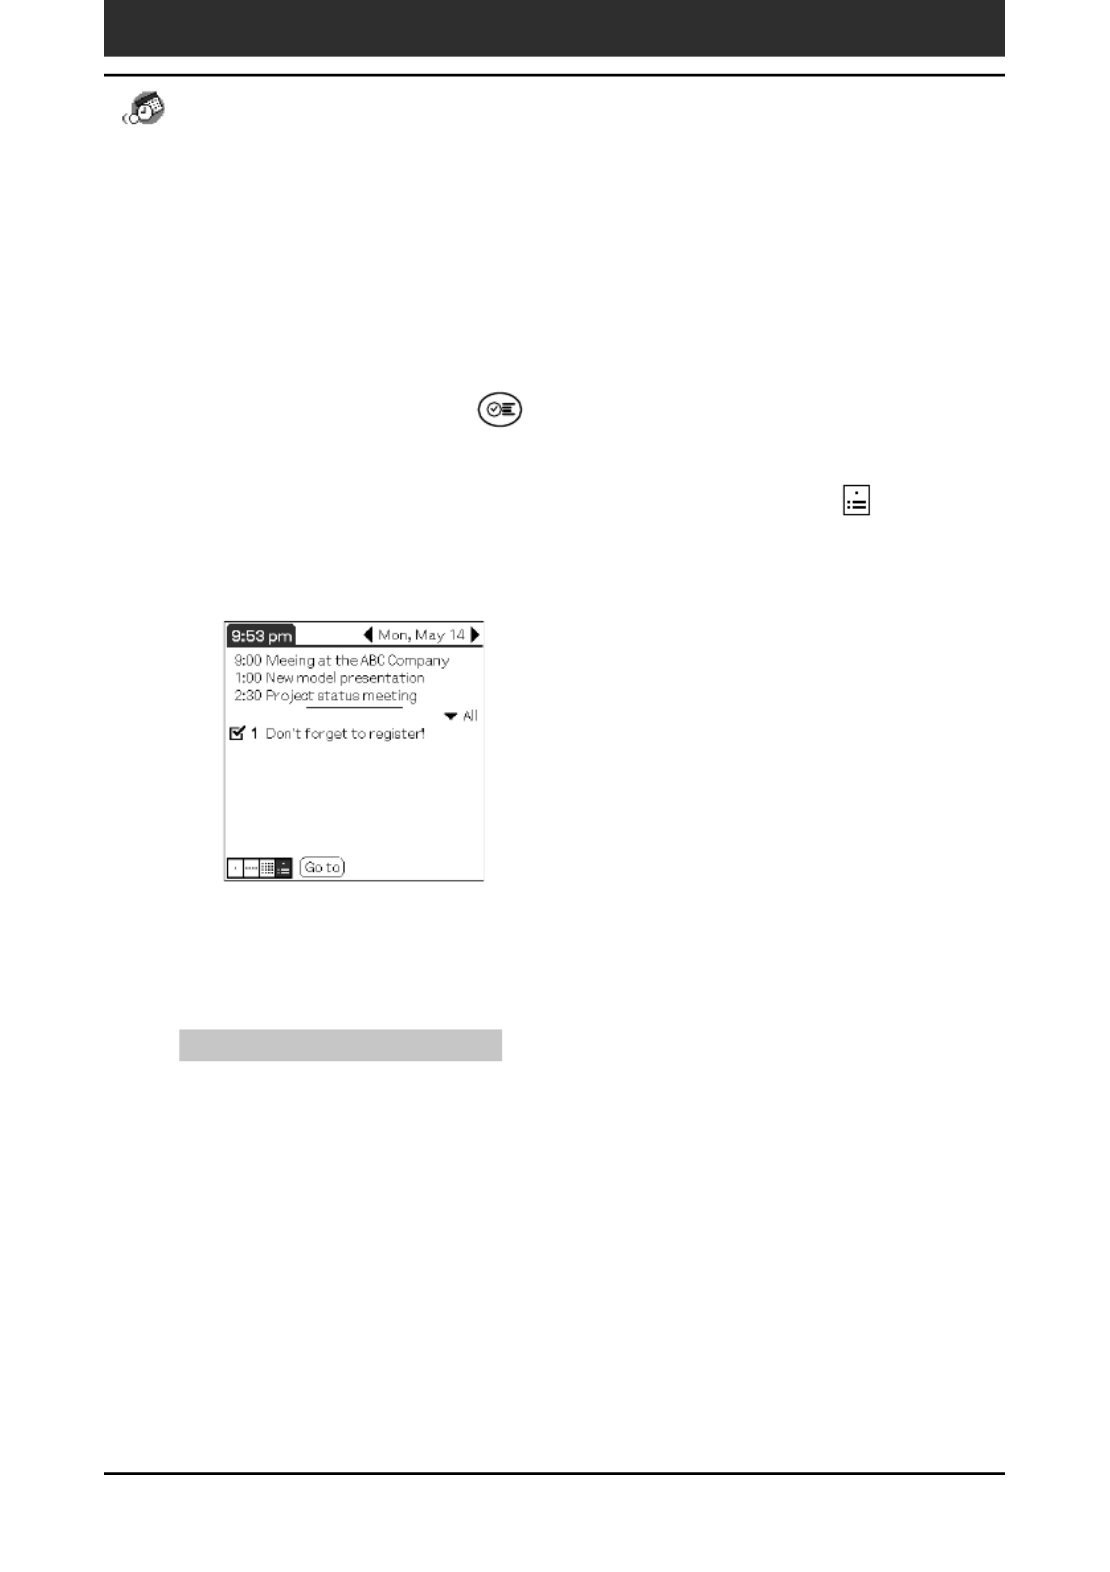
Displaying the Agenda view
The Agenda view shows you your appointments, untimed events, and To
Do List items in a single screen. As well as checking the detailed information
on an event, you can also use the Agenda view to check off completed To Do
List items.
1Press the Date Book button on the front panel.
Date Book starts up.
2Press the Jog Dial navigator repeatedly or tap the Agenda
view icon.
The Agenda view screen appears. Today’s schedule and To Do List is
displayed.
3Rotate the Jog Dial navigator to select the day that you want
to review.
To select the next day, rotate the Jog Dial navigator.
Tips for using Agenda view
• Tap any appointment while in Agenda view to display the Day view of the
appointment.
• Check off completed To Do List items in the Agenda view, or tap a description of
an item to go directly into the To Do List application.
Managing schedules and events (Date Book)

Chapter2 Using basic applications 41
Changing Date and Time view
Tap and hold the date in the title bar of Date Book.
The current time appears.
b
When you release the stylus, the menu bar appears. If you want to avoid
displaying the menu when releasing the stylus, drag the stylus away from
the date indication after the current time appears.
Managing schedules and events (Date Book)

Chapter2 Using basic applications 42
Editing Date Book events
Changing a date or time for an event
1On the Date Book screen, tap the event you want to edit.
2Tap Details.
The Event Details dialog box appears.
3• To change the time, tap the Time box and select a new
time.
The Set Time dialog box appears. Tap the Set Time and the End Time.
• To change the date, tap the Date box and select a new
date.
The Set Date dialog box appears. Specify the year, month, and day in
the calendar.
4Tap OK.
Managing schedules and events (Date Book)

Chapter2 Using basic applications 43
Changing a timed event to an untimed event
1On the Date Book screen, tap the event you want to edit.
2Tap Details.
3Tap the Time box.
The Set Time screen appears.
4Tap No Time and then tap OK.
The Event Details screen appears.
5Tap OK.
The untimed event is displayed in the first line with the untimed mark.◆
Managing schedules and events (Date Book)

Chapter2 Using basic applications 44
Setting an alarm for an event
The Alarm setting enables you to set an audible alarm for events in your
Date Book. You can set an alarm to sound minutes, hours, or days before an
event. The default Alarm setting is 5 minutes before the time of the event,
but you can change this to any number of minutes, hours, or days.
When you set an alarm, an alarm icon appears to the far right of the event
with the alarm.
1On the Date Book screen, tap the event to which you want to
assign an alarm.
2Tap Details.
The Event Details dialog box appears.
3Tap the Alarm check box to select it.
The alarm is set.
4Tap the arrow V to select the time unit from among Minutes,
Hours, or Days.
5Tap the next to the Alarm check box and enter any“ ”5
number from 0 to 99 as the number of time units.
6Tap OK.
Managing schedules and events (Date Book)
Continued on next page

Chapter2 Using basic applications 45
Setting an alarm for an untimed event
You can set a silent alarm for an untimed event. In this case, the alarm
triggers at the specified period of minutes, hours, or days before midnight
(beginning) of the day of the untimed event. No audible alarm sounds for an
untimed event. The reminder message appears onscreen instead.
Example: When you set an alarm for an untimed event that occurs on
February 4 and if the alarm is set for 5 minutes, the reminder message
appears at 11:55 PM on the night of February 3. The reminder remains
onscreen until you turn on your handheld and tap OK to erase it.
Making an event private
You can hide records that you mark as private. If you define a password for
your CLIE handheld, you must enter it to display private records.
1On the Date Book screen, tap the event you want to mark as
private.
2Tap Details.
The Event Details dialog box appears.
3Tap the Private check box.
4Tap OK.
The event is marked as private. For hiding or masking private events, see
“Protecting your data (Security)” on page 102.
Managing schedules and events (Date Book)

Chapter2 Using basic applications 46
Deleting events
You can delete existing events in Date Book.
Note
If you delete the contents of a repeating event, all the related events will be deleted.
When deleting an event in Delete Event dialog box, you can delete a single event as an
exception or all the related events.
1On the Date Book screen, tap the event you want to delete.
2Tap Details.
3Tap Delete.
The Delete Event dialog box appears.
4Tap OK to delete the event.
The selected event is deleted. To cancel deletion, tap Cancel.
Tip
If you select the “Save archive copy on PC” check box, the deleted date will be
saved onto the Palm™ Desktop for CLIE software on your computer during the
next HotSync ® operation.
Managing schedules and events (Date Book)

Chapter2 Using basic applications 47
Using the Date Book menus
This section explains the menu commands specific to Date Book. For the Edit
menu, see “Using the Edit menu” on page 110.
Record menus
New Event Creates a new event. The Set Time dialog box for selecting the start
and end times is displayed.
Delete Event Deletes the currently selected event. The Delete Event dialog box
appears.
Attach Note Attaches notes to the current event. This menu opens up a dialog box
for entering comments.
Delete Note Deletes notes from the current event. The Delete Note dialog box is
displayed.
Purge You can specify a certain period based on the current date and discard
any events that were formed before the specified date. Use this
function to save memory space.
Notes
• A repeating event will not be deleted.
• By default, the events that you purge are restored and saved in the
Palm Desktop for CLIE software on your computer at the next
HotSync operation. To delete the events completely, deselect the
check box ( ) for “Save archive copy on PC” in the Purge dialog
box .
Beam Event Sends the current event to another CLIE handheld via the infrared
communications port.
Managing schedules and events (Date Book)

49
Chapter2 Using basic applications
Managing addresses and phone numbers
(Address Book)
Address Book lets you keep names, addresses, telephone numbers, and
other information about your personal or business contacts.
An item in Address Book is called an “entry.”
Note
If the HOLD switch is in the protect position, you cannot operate your CLIE
handheld.
Creating a new Address Book entry
1Press the Address Book button on the front panel.
The Address screen is displayed.
Note
Press the Address Book button repeatedly to cycle through the categories in
which you have entries.
2Tap New.
The Address Edit screen appears.
b
3Enter the last name of the person you want to add to Address
Book.
The first letter of each field (except numeric and e-mail fields) is
automatically capitalized.
4Tap First name.
The cursor shifts to the first name field.
You can also use the Graffiti software to move the cursor to the next field
by entering .
Continued on next page

51
Chapter2 Using basic applications
Viewing Address Book entries
1Press the Address Book button on the front panel.
The Address screen is displayed, listing your current entries.
2Rotate the Jog Dial navigator to select the address record™
you want to view.
If the desired address record is not displayed, rotate the Jog Dial
navigator further to scroll up or down the entire list.
3Press the Jog Dial navigator.
The Address View screen of the selected record is displayed.
4To return to the list of address entries, press the Jog Dial
navigator again or press BACK.
The Address screen is displayed again.
Tips on navigating among your address entries
•If there are multiple pages of information, the scroll button moves up or down an
address list or the Address View screen. If you hold down the scroll button, you
accelerate the scrolling and display every third screen.
•You can also use the stylus to tap the onscreen scroll arrows to scroll to the entry.
To view an image pasted to an address record
Tap an image on the Address View screen. The image is displayed across the
whole screen. To return the Address View screen, tap the image again.
To view the next page of the Address View screen
Rotate the Jog Dial navigator On the Address View screen. The next or
previous page within the data is displayed.
Managing addresses and phone numbers (Address Book)

54
Chapter2 Using basic applications
Looking up an address record
The Look Up feature helps you to quickly scroll to any of your address
entries.
1On the Address Book list screen, enter the first letter of the
entry you want to find.
The list scrolls to the first entry that begins with that letter. If you write
another letter, the list scrolls to the first entry that starts with those two
letters.
For example, writing an “s” scrolls to “Sands,” and writing “sm” scrolls
further to “Smith.” If you sort the list by company name, the Look Up
feature scrolls to the first letter of the company name.
2Tap the entry you want to view or press the Jog Dial
navigator.
The entry you selected is shown.
Managing addresses and phone numbers (Address Book)

55
Chapter2 Using basic applications
Editing Address Book entries
Pasting an image to an address record
You can paste an image to the address information. Paste a photograph of a
person or restaurant, for example, as a reminder of an address record.
To paste an image, install the PictureGear™ Pocket software onto your CLIE
handheld. For installation, see “Installing add-on applications onto your
Sony CLIE Handheld” in the Read This First manual.
1Tap the address record to which you want to paste an image
in the address list.
The Address View screen of the selected address record appears.
2Tap Edit.
The Address Edit screen appears.
3Tap No Image in the upper right of the screen.
The PG Pocket screen appears.
Managing addresses and phone numbers (Address Book)
Tap No Image.
Continued on next page
57
Chapter2 Using basic applications
Modifying an address record
You can modify part of the address record.
1On the Address Book list screen, tap the entry you want to
modify.
The Address View screen of the selected record appears.
2Tap Edit.
The Address Edit screen appears.
3Tap the field that you want to edit.
You can edit the tapped field.
4Edit the entry.
5When modification is complete, tap Done.
The Address screen is displayed again.
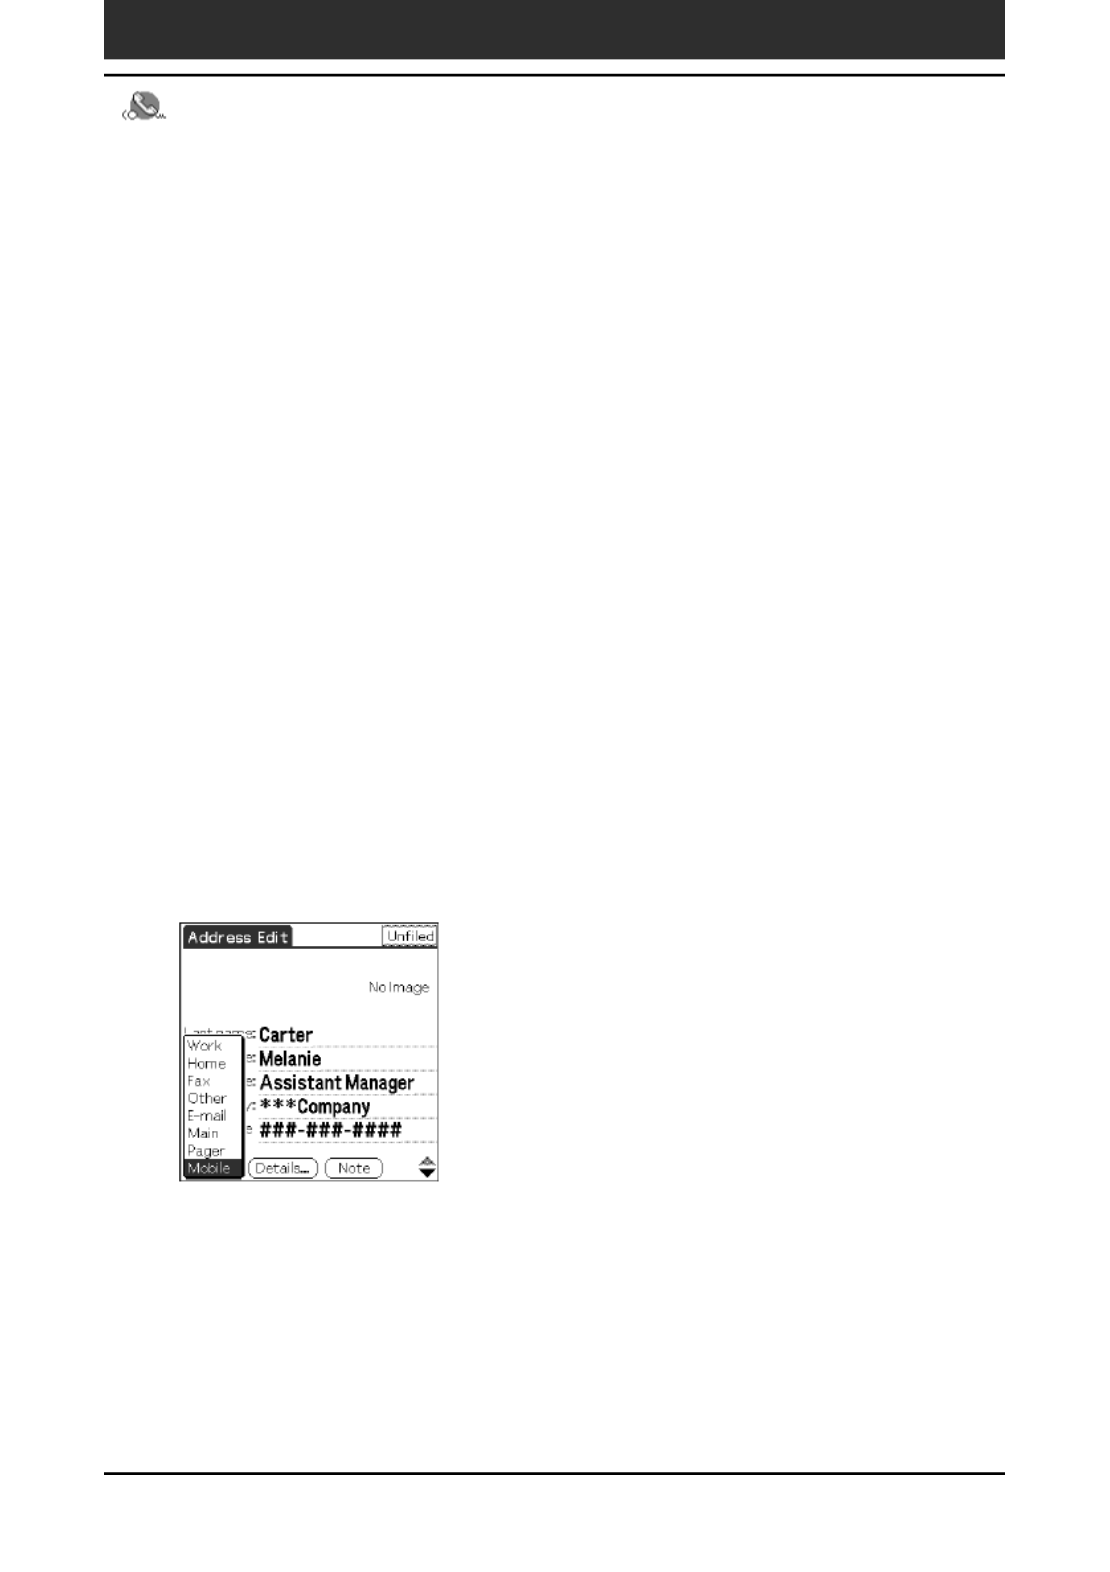
To select types of phone numbers
You can select the types of phone numbers or e-mail addresses that you
associate with an Address Book record. Any changes you make apply only
to the current entry. To select other types of phone numbers in an entry, tap
the arrow and select the desired label from the drop-down list.V
Managing addresses and phone numbers (Address Book)

60
Chapter2 Using basic applications
Changing the address record details
You can change the type of information that appears in the address list
screen, categorize an entry, and hide an entry for security reasons. You can
also delete entries.
1
On the Address Book list screen, tap the entry you want to change.
The Address View appears.
2Tap Edit.
The Address Edit screen appears.
3Tap Details.
The Address Entry Details dialog box appears.
4Change desired settings.
Show in List: Select which type of entries or other information appears in
the Address list screen. Tap the arrow and select from Work, Home,V
Fax, Other, or E-mail.
Category: Assign the entry to a category.
Private: Select the Private check box to hide the current entry when
Security is turned on. For details on Security, see “Protecting your data
(Security)” on page 102.
5Tap OK.
The address record details are saved.
Managing addresses and phone numbers (Address Book)

61
Chapter2 Using basic applications
Using the Address Book menus
This section explains the menu commands specific to Address Book. For the
Edit menu, see “Using the Edit menu” on page 110. The Record and Options
menus differ depending on whether you are displaying the Address List
screen or the Address View screen.
Record menus
Duplicate Address Makes a copy of the current record and displays the copy in Address
Edit so you can make changes to the copied record. The copy has the
same category and attached notes as the original record.
Beam Address
Sends all the address entries in the currently selected category to
another Sony handheld via the infrared communications port.
Beam Business Card Sends the current business card to another Sony handheld via the
infrared communications port. You can also send a business card via
the infrared communications port by pressing and holding down the
Address Book button for longer than 2 seconds. This menu item is
highly useful because you can exchange business cards with other
Sony handhelds with ease.
Delete Address Deletes the current address record. The Delete Address dialog box
appears.
Note
By default, the records that you delete are restored and saved in Palm
Desktop for CLIE software on your computer at the next HotSync
operation. To delete the records completely, deselect the check box
( ) for “Save archive copy on PC” in the Delete Event dialog box .
Attach Note Adds comments to the current address record. Choosing this menu
opens up a screen for entering comments.
Delete Note Deletes comments from the current address record. Choosing this
menu opens up the Delete Note dialog box. Tap Yes to delete
comments and No to cancel the delete function.
Select Business Card
Defines the current address record on a business card.
Managing addresses and phone numbers (Address Book)

63
Chapter2 Using basic applications
Managing tasks and things to do
(To Do List)
A To Do List is a reminder of some task you have to complete. A record in
To Do List is called an “item.”
Note
If the HOLD switch is in the protect position, you cannot operate your CLIE
handheld.
Creating To Do List items
1Press the To Do List button on the front panel.
To Do List opens and displays the category of items you last viewed.
Note
Press the To Do List application button repeatedly to cycle through the categories
in which you have items.
2Tap New.
A new To Do item is added to To Do List.
b
3Enter the text of the To Do item.
You can enter multiple lines of text.
4Tap anywhere onscreen to deselect the To Do List item.
The item is deselected and the new item is recorded to To Do List.
Tips
• If no To Do List item is currently selected, writing in the Graffiti writing area
automatically creates a new item.
• To display text that does not fit on the screen, tap the text line.

64
Chapter2 Using basic applications
Viewing To Do List items
You can check the items you recorded in To Do List.
1Press the To Do List button on the front panel.
The To Do screen appears.
2Rotate the Jog Dial navigator to select the To Do List item™
that contains the note you want to view.
3Press the Jog Dial navigator.
The notes of the selected item are displayed. If the item does not fit on the
screen, rotate the Jog Dial navigator to scroll the screen.
4Press the Jog Dial navigator.
The To Do List box reappears.
Viewing To Do List items by category
Press the Jog Dial navigator when To Do List is displayed but no
To Do item is selected.
Each time you press the Jog Dial navigator, the display toggles through all
the available categories.
Tip on selecting the desired category from the categories list
Tap the arrow at the upper right corner of the screen to display the category list.V
You can select the desired category from the list.
Managing tasks and things to do (To Do List)
65
Chapter2 Using basic applications
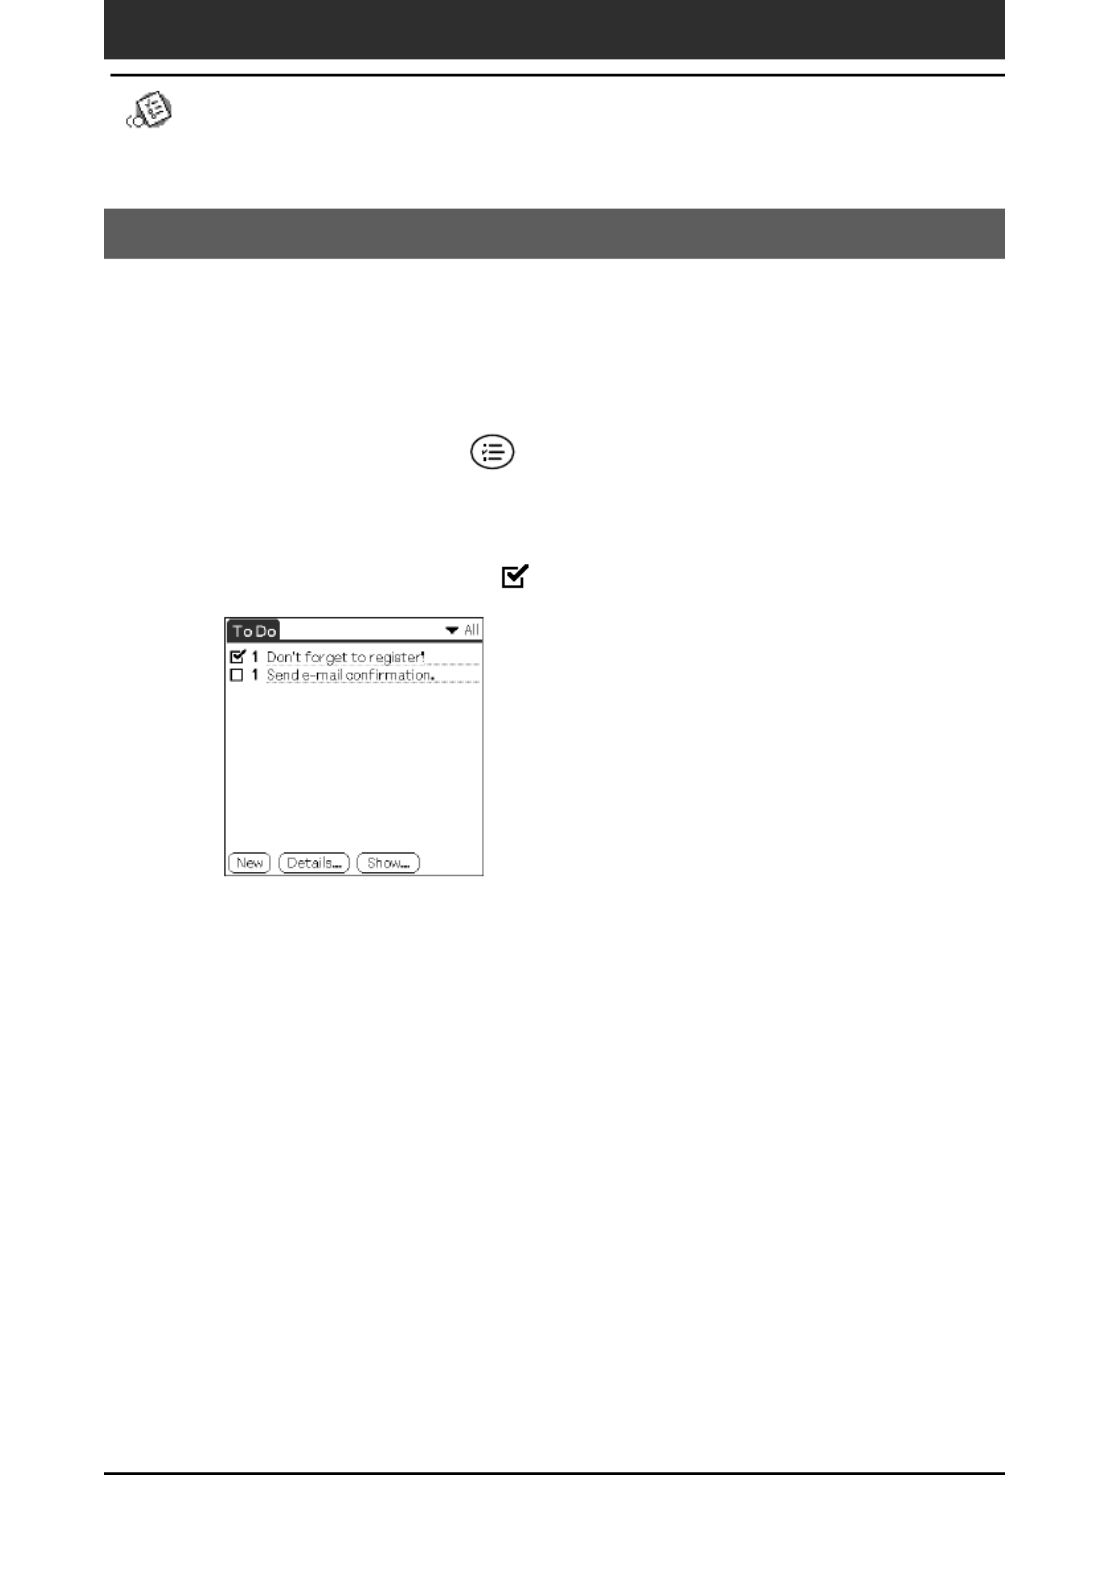
Checking off a To Do List item
You can check off a To Do List item to remind you that you’ve completed it.
You can set To Do List to record the date that you complete the To Do item,
and you can choose to show or hide completed items. For details, see
“Changing the appearance of To Do List” on page 69.
1Press the To Do List button on the front panel.
The To Do screen appears.
2Tap to select the check box on the left side of the item.
The check box changes to .
Managing tasks and things to do (To Do List)
67
Chapter2 Using basic applications
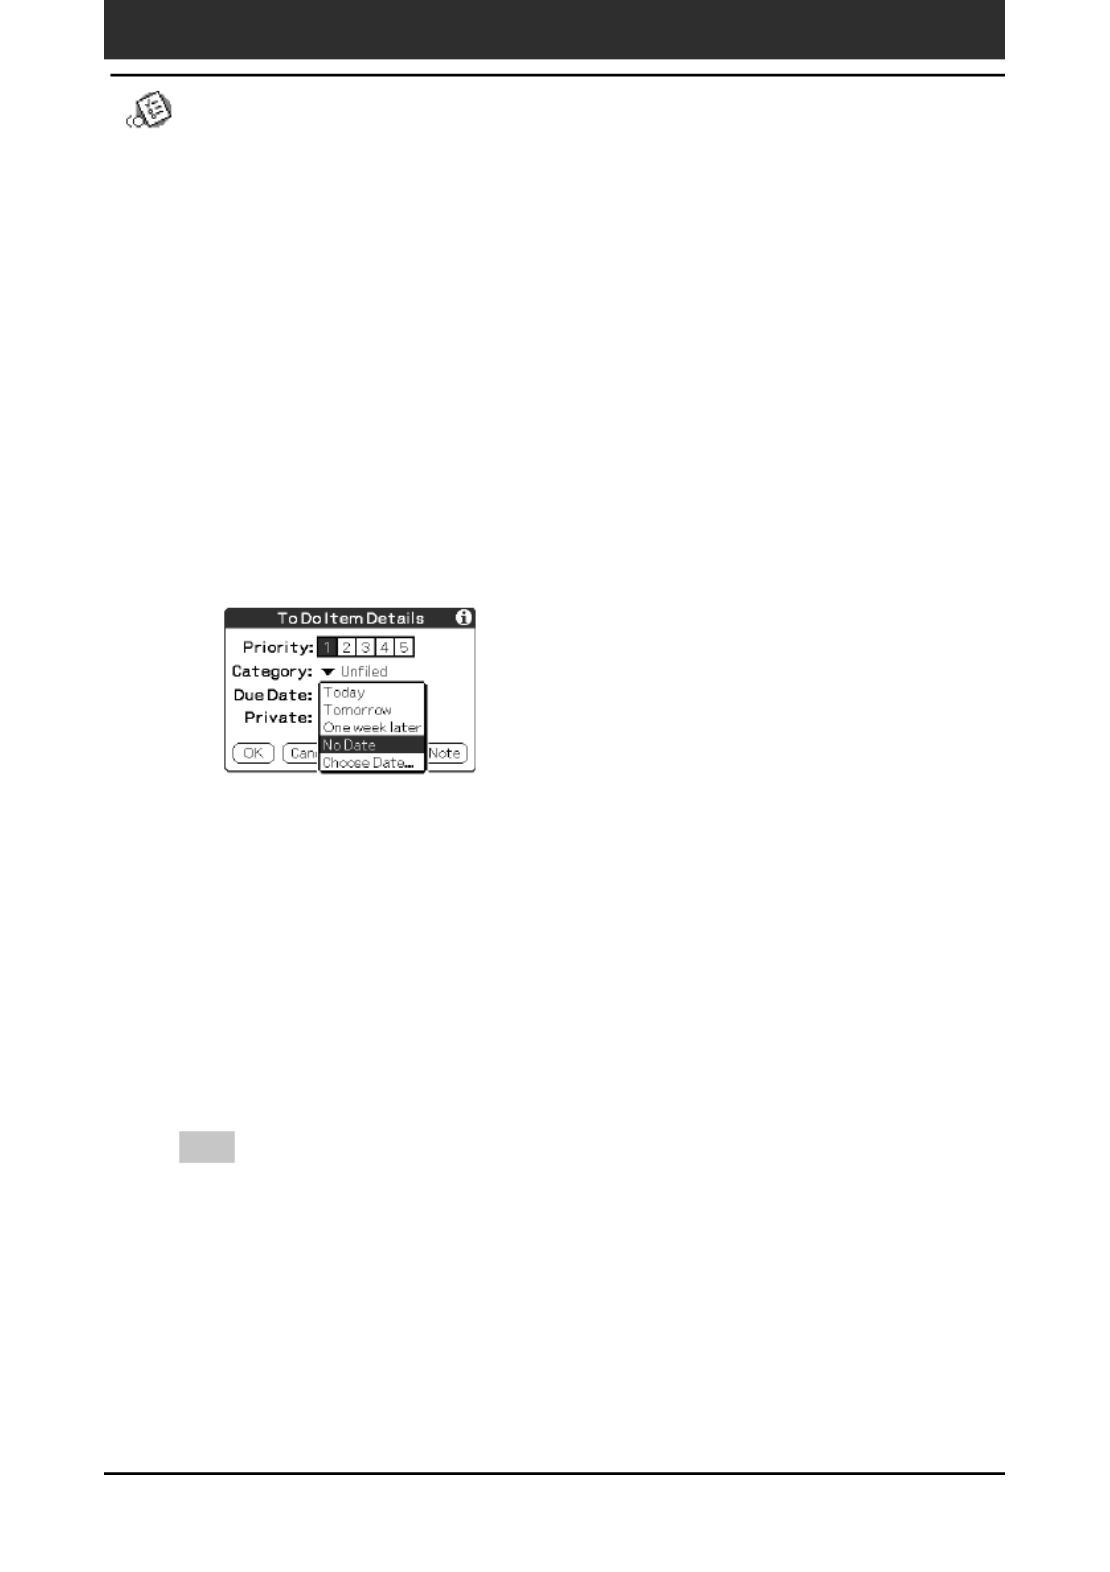
Setting the due date for an item
You can associate a due date with any To Do List item. You can also sort the
items that appear in the list based on their due date.
1On the To Do List screen, tap the text of the item whose due
date you want to set.
2Tap Details.
3Tap the arrow next to Due Date and then tap a desired dueV
date from the drop-down list.
You can select one of the following options:
•Today: Assigns the current date.
•Tomorrow: Assigns the next day’s date.
•One week later: Assigns the date exactly one week from the
current date.
•No date: Assigns no due date.
•Choose Date: Opens the Due Date screen, where you can choose
any date from the calendar.
4Tap OK.
Tip
If you turn on the Show Due Dates option in the To Do Show options dialog box, you
can tap directly on the due date in To Do List to select a desired due date.
Managing tasks and things to do (To Do List)

71
Chapter2 Using basic applications
Creating memos (Memo Pad)
You can use Memo Pad to make brief memos on your CLIE handheld. You
can also display TXT or CSV (Comma Separated Value) document files
created on your computer. A record in Memo Pad is called a “memo.”
Note
If the HOLD switch is in the protect position, you cannot operate your CLIE handheld.
Creating a new memo
A memo can contain up to 4,000 characters. The number of memos you can
store is limited only by the memory available on your Sony handheld.
1Press the Memo Pad button on the front panel.
Memo Pad starts up. Memo Pad opens to display the last Memo Pad
screen that you viewed.
Tip
Press the Memo Pad button repeatedly to cycle through the categories in which
you have memos.
2Tap New.
A new memo is created.
Continued on next page

72
Chapter2 Using basic applications
3Enter the text you want to appear in the memo.
To move down to a new line, tap the Enter key when using the software
keyboard or write when using Graffiti writing.
4Tap Done or press the BACK button when you finish.
The first line of the memo is displayed.
Tips
• You can also create a new memo by beginning your memo in the Graffiti writing
area on the Memo screen. The first letter is automatically capitalized and begins
your new memo.
• While entering text, the text may overlap the Done or Details buttons. After you
finish entering the text, the overlap disappears.
Creating memos (Memo Pad)
Termékspecifikációk
| Márka: | Neff |
| Kategória: | sütő |
| Modell: | B 45E42 N0 |
Szüksége van segítségre?
Ha segítségre van szüksége Neff B 45E42 N0, tegyen fel kérdést alább, és más felhasználók válaszolnak Önnek
Útmutatók sütő Neff

28 Március 2025
28 Március 2025
28 Március 2025
28 Március 2025
22 Március 2025
16 Március 2025
15 Január 2025
14 Január 2025
12 Január 2025
4 Január 2025
Útmutatók sütő
- sütő Mestic
- sütő Ikea
- sütő Samsung
- sütő Beko
- sütő Dometic
- sütő Electrolux
- sütő Moulinex
- sütő Whirlpool
- sütő Nedis
- sütő LG
- sütő Grundig
- sütő Ariston Thermo
- sütő Husqvarna
- sütő Candy
- sütő Lamona
- sütő Philips
- sütő Gorenje
- sütő Euro Appliances
- sütő Adler
- sütő Princess
- sütő SilverCrest
- sütő Bosch
- sütő Indesit
- sütő Panasonic
- sütő Zanussi
- sütő MPM
- sütő AEG
- sütő Emerio
- sütő Sharp
- sütő Teka
- sütő Hoover
- sütő Toshiba
- sütő Ardo
- sütő Bartscher
- sütő Hyundai
- sütő Hisense
- sütő Cookology
- sütő Scarlett
- sütő Tefal
- sütő Siemens
- sütő Medion
- sütő Exquisit
- sütő Corbero
- sütő Miele
- sütő Camry
- sütő V-Zug
- sütő Danby
- sütő DeLonghi
- sütő Insignia
- sütő Krups
- sütő Classique
- sütő Liebherr
- sütő Heinner
- sütő Infiniton
- sütő Sunbeam
- sütő Cramer
- sütő Ariete
- sütő Wilfa
- sütő Klarstein
- sütő Amica
- sütő VOX
- sütő Instant
- sütő Gourmetmaxx
- sütő Tripp Lite
- sütő Vivax
- sütő Omega
- sütő Thomson
- sütő Esperanza
- sütő Smeg
- sütő Fagor
- sütő Unold
- sütő DPM
- sütő Sage
- sütő Brentwood
- sütő Bifinett
- sütő Ardes
- sütő Cuisinart
- sütő Baumatic
- sütő Orima
- sütő Rommelsbacher
- sütő Kenwood
- sütő Jocel
- sütő Duronic
- sütő Bimar
- sütő Etna
- sütő Café
- sütő Ribimex
- sütő Clatronic
- sütő Bomann
- sütő Bauknecht
- sütő Amana
- sütő Ambiano
- sütő Ninja
- sütő Hotpoint
- sütő Haier
- sütő Bröhn
- sütő Frigidaire
- sütő Mitsubishi
- sütő Cecotec
- sütő Dacor
- sütő Navitel
- sütő Sencor
- sütő Pelgrim
- sütő Qlima
- sütő Privileg
- sütő Benavent
- sütő Küppersbusch
- sütő CATA
- sütő Innoliving
- sütő Brother
- sütő Summit
- sütő Rowenta
- sütő TurboTronic
- sütő Westinghouse
- sütő Thomas
- sütő Güde
- sütő Hitachi
- sütő Inventum
- sütő Xblitz
- sütő Aurora
- sütő Continental Edison
- sütő Eta
- sütő Atag
- sütő Izzy
- sütő Telefunken
- sütő Nevir
- sütő Hiberg
- sütő Cambridge
- sütő Domo
- sütő Russell Hobbs
- sütő Roadstar
- sütő Helkama
- sütő Thor
- sütő Emilia
- sütő Caso
- sütő Solac
- sütő JennAir
- sütő Coyote
- sütő Create
- sütő Edesa
- sütő Nextbase
- sütő Mora
- sütő Bush
- sütő Black & Decker
- sütő G3 Ferrari
- sütő Hamilton Beach
- sütő Severin
- sütő Orbegozo
- sütő Respekta
- sütő Hanseatic
- sütő Daewoo
- sütő Lenoxx
- sütő GYS
- sütő Livoo
- sütő Tesla
- sütő Viking
- sütő Dash
- sütő Gram
- sütő Elica
- sütő Balay
- sütő Hotpoint Ariston
- sütő OK
- sütő GE
- sütő Guzzanti
- sütő Concept
- sütő SVAN
- sütő Bellini
- sütő Caple
- sütő CDA
- sütő KitchenAid
- sütő Asko
- sütő Rosieres
- sütő Consul
- sütő TriStar
- sütő Biltema
- sütő Zelmer
- sütő ELIN
- sütő Novy
- sütő Rommer
- sütő Atlantic
- sütő Tower
- sütő Ignis
- sütő Wolkenstein
- sütő Hobart
- sütő Koenic
- sütő Nodor
- sütő Artusi
- sütő Midea
- sütő Steba
- sütő Eudora
- sütő Trisa
- sütő Electroline
- sütő Heller
- sütő Blomberg
- sütő Progress
- sütő Kogan
- sütő Profilo
- sütő Falmec
- sütő PKM
- sütő Stirling
- sütő Mesko
- sütő PowerXL
- sütő Furrion
- sütő Dimplex
- sütő Aspes
- sütő Avanti
- sütő ProfiCook
- sütő Saturn
- sütő Fisher & Paykel
- sütő Kenmore
- sütő Cylinda
- sütő Thermex
- sütő DCG
- sütő Hestan
- sütő Melissa
- sütő Sauter
- sütő Efbe-Schott
- sütő Bourgini
- sütő Manta
- sütő Blaupunkt
- sütő Chefman
- sütő SIBIR
- sütő Veripart
- sütő Ilve
- sütő Witt
- sütő Korona
- sütő Conrad
- sütő Bertazzoni
- sütő Foster
- sütő Studio
- sütő Hansa
- sütő Thetford
- sütő Elektra Bregenz
- sütő Taurus
- sütő Comfee
- sütő Cosori
- sütő Signature
- sütő Delta
- sütő Logik
- sütő Junker
- sütő Fiap
- sütő Hendi
- sütő Finlux
- sütő Maytag
- sütő AFK
- sütő KKT Kolbe
- sütő Fulgor Milano
- sütő BEEM
- sütő Barazza
- sütő Konig
- sütő H.Koenig
- sütő Seiki
- sütő Everdure
- sütő Sôlt
- sütő Kalorik
- sütő Morphy Richards
- sütő Sanyo
- sütő Constructa
- sütő Frilec
- sütő Laica
- sütő Rangemaster
- sütő Vedette
- sütő Alpina
- sütő Schneider
- sütő Gastroback
- sütő Linarie
- sütő Philco
- sütő ECG
- sütő Gaggenau
- sütő Technika
- sütő Arctic Cooling
- sütő Romo
- sütő Kaiser
- sütő Esatto
- sütő Franke
- sütő Element
- sütő Ufesa
- sütő Meireles
- sütő Proctor Silex
- sütő Ernesto
- sütő Thane
- sütő Silverline
- sütő BlueStar
- sütő Trebs
- sütő Galanz
- sütő Scandomestic
- sütő New Pol
- sütő Rinnai
- sütő Cotech
- sütő AYA
- sütő MBM
- sütő WMF
- sütő Wolf
- sütő Brandt
- sütő Edilkamin
- sütő Chef
- sütő RCA
- sütő Mach
- sütő Arendo
- sütő Outwell
- sütő Axis
- sütő Capital
- sütő Bestron
- sütő Breville
- sütő Lofra
- sütő Imperial
- sütő Ravanson
- sütő BLANCO
- sütő Bizerba
- sütő Rex
- sütő Luxor
- sütő Flavel
- sütő Emeril Lagasse
- sütő Scancool
- sütő Becken
- sütő Sirius
- sütő Weber
- sütő OneConcept
- sütő Haeger
- sütő ILive
- sütő Comelec
- sütő Zerowatt
- sütő De Dietrich
- sütő Belling
- sütő Mistral
- sütő Maxxmee
- sütő Orava
- sütő Arçelik
- sütő Eurom
- sütő Campingaz
- sütő Zenith
- sütő Magic Chef
- sütő Sauber
- sütő IFB
- sütő Sogo
- sütő Crosley
- sütő George Foreman
- sütő Nutrichef
- sütő Apelson
- sütő Techwood
- sütő Glem Gas
- sütő Euromaid
- sütő Tepro
- sütő Char-Broil
- sütő Flama
- sütő ARC
- sütő Emax
- sütő Quigg
- sütő Zanker
- sütő Acec
- sütő Airlux
- sütő Aga
- sütő Ariston
- sütő Aroma
- sütő Salton
- sütő Arthur Martin
- sütő Tiger
- sütő Zanussi-electrolux
- sütő Waring Commercial
- sütő Tomado
- sütő Kernau
- sütő Thermador
- sütő Oster
- sütő Vestel
- sütő Sinbo
- sütő Jata
- sütő Swan
- sütő Fritel
- sütő Landmann
- sütő Mabe
- sütő Monogram
- sütő Iberna
- sütő Valberg
- sütő Scholtes
- sütő Gemini
- sütő Berg
- sütő Mellerware
- sütő Castor
- sütő Termozeta
- sütő Bella
- sütő Palson
- sütő Eldom
- sütő Hoover-Helkama
- sütő Juno
- sütő Nabo
- sütő Defy
- sütő Maginon
- sütő Premium
- sütő Blokker
- sütő Ferroli
- sütő First Austria
- sütő Nordmende
- sütő Friac
- sütő Binatone
- sütő Boretti
- sütő Eico
- sütő Drew & Cole
- sütő Kubo
- sütő Elba
- sütő Proline
- sütő WLA
- sütő Kelvinator
- sütő SEB
- sütő Champion
- sütő Everglades
- sütő Steel Cucine
- sütő Buffalo
- sütő Jenn-Air
- sütő Limit
- sütő Freggia
- sütő Listo
- sütő Milectric
- sütő Leonard
- sütő Presto
- sütő Zavor
- sütő New World
- sütő Leisure
- sütő Kayoba
- sütő Bompani
- sütő FriFri
- sütő Viva
- sütő Nova
- sütő M-System
- sütő Koblenz
- sütő Primo
- sütő Barbecook
- sütő German Pool
- sütő Creda
- sütő Clas Ohlson
- sütő Falcon
- sütő Saro
- sütő Airforce
- sütő Godrej
- sütő Matrix
- sütő Ices
- sütő Mx Onda
- sütő Napoleon
- sütő Kleenmaid
- sütő Essentiel B
- sütő RGV
- sütő Montiss
- sütő Team
- sütő Schock
- sütő Stoves
- sütő Faber
- sütő Edy
- sütő Tracer
- sütő Altus
- sütő CaterChef
- sütő Kambrook
- sütő Parmco
- sütő Zephir
- sütő Eurotech
- sütő Cadac
- sütő Carrefour Home
- sütő Equator
- sütő Brixton
- sütő Vestfrost
- sütő Superior
- sütő Kunft
- sütő Day
- sütő Dualit
- sütő Koenig
- sütő Outdoorchef
- sütő Smev
- sütő Upo
- sütő ZLine
- sütő Grunkel
- sütő Belion
- sütő Nesco
- sütő Waves
- sütő Unox
- sütő Coline
- sütő White And Brown
- sütő Eccotemp
- sütő Home Electric
- sütő Bora
- sütő Ellrona
- sütő Lynx
- sütő Optimum
- sütő Bluesky
- sütő Burco
- sütő Tecnolux
- sütő Micromaxx
- sütő Fratelli Onofri
- sütő Ronco
- sütő Eurochef
- sütő Premier
- sütő Weasy
- sütő Atlas
- sütő Marynen
- sütő Opera
- sütő Therma
- sütő La Germania
- sütő Luxell
- sütő Krefft
- sütő Westfalia
- sütő Solitaire
- sütő Oranier
- sütő Leventi
- sütő Rösle
- sütő James
- sütő Roadeyes
- sütő Jamie Oliver
- sütő Globe
- sütő Esmaltec
- sütő Riviera And Bar
- sütő Dominox
- sütő Thermomate
- sütő Redmond
- sütő Melchioni
- sütő Fine Dine
- sütő Venga
- sütő OBU
- sütő Rival
- sütő Tisira
- sütő Steelmatic
- sütő Supra
- sütő Wells
- sütő Kucht
- sütő Avantco
- sütő Mibrasa
- sütő Vulcan
- sütő Lacanche
- sütő Traeger
- sütő Sam Cook
- sütő Verona
- sütő Riviera Bar
- sütő Khind
- sütő LERAN
- sütő LotusGrill
- sütő APW Wyott
- sütő Ursus Trotter
- sütő Cuckoo
- sütő General Electric
- sütő MSR
- sütő SPT
- sütő Pit Boss
- sütő Hatco
- sütő High One
- sütő WestBend
- sütő Companion
- sütő XO
- sütő NU-VU
- sütő Curtiss
- sütő Blodgett
- sütő Nemco
- sütő K&H
- sütő Winia
- sütő Bakers Pride
- sütő Alto-Shaam
- sütő TurboChef
- sütő Simfer
- sütő Firefriend
- sütő Merrychef
- sütő Robinhood
- sütő LAFE
- sütő Promis
- sütő Inno-Hit
- sütő Fisher Paykel
- sütő Brock
- sütő Arda
- sütő Casselin
- sütő Girmi
- sütő Ferrari
- sütő Campart
- sütő Americana
- sütő Petromax
- sütő YUNA
- sütő Spring USA
- sütő BioChef
- sütő Cosmo
- sütő Elements
- sütő Forge Adour
- sütő Blow
- sütő Chef-Master
- sütő UGo
- sütő Eltac
- sütő Kitchenware
- sütő FAURE
- sütő Novamatic
- sütő VENINI
- sütő Buschbeck
- sütő Blackstone
- sütő Beautiful
- sütő BSK
- sütő New.Up!
- sütő Roller Grill
- sütő Germanica
- sütő Adora
- sütő Sunpentown
- sütő Backyard Pro
- sütő Brastemp
- sütő Royal Catering
- sütő BAXTER
- sütő Atosa
- sütő Vitrokitchen
- sütő Gasmate
- sütő Arthur Martin-Electrolux
- sütő Triomph
- sütő PITT
- sütő KB Elements
- sütő InAlto
- sütő TZS First Austria
- sütő Porter & Charles
- sütő Pyramis
- sütő Pando
- sütő Wiggo
- sütő Nestor Martin-Electrolux
- sütő Kluge
- sütő Imarflex
- sütő Mayer
- sütő Acros
- sütő Thermarest
- sütő HomeCraft
- sütő La Cornue
- sütő Master Kitchen
- sütő Goldbrunn
- sütő Platypus
- sütő Yamazen
- sütő Masterpro
- sütő Fratelli
- sütő St George
- sütő Pitsos
- sütő Lacunza
- sütő Globe Fire
- sütő Radiola
- sütő Premiere
Legújabb útmutatók sütő

10 Április 2025

10 Április 2025

10 Április 2025
10 Április 2025

10 Április 2025
10 Április 2025

10 Április 2025
10 Április 2025

9 Április 2025
9 Április 2025