Használati útmutató NEC UM301X
Olvassa el alább 📖 a magyar nyelvű használati útmutatót NEC UM301X (151 oldal) a Beamer kategóriában. Ezt az útmutatót 4 ember találta hasznosnak és 2 felhasználó értékelte átlagosan 4.5 csillagra
Oldal 1/151

Portable Projector
UM351W/UM301W/
UM361X/UM301X
User’s Manual
The UM301W and UM301X are not distributed in North America.
Model No.
NP-UM351W, NP-UM301W, NP-UM361X, NP-UM301X

Ver. 1 10/14
• Apple,Mac,MacOS,MacBook,andiMacaretrademarksofAppleInc.registeredintheU.S.andothercountries.
• Microsoft,Windows,WindowsVista, Internet Explorer,.NETFramework andPowerPoint are eitheraregistered
trademarkortrademarkofMicrosoftCorporationintheUnitedStatesand/orothercountries.
• IntelandIntelCorearetrademarksofIntelCorporationintheU.S.and/orothercountries.
• PowerPCisaregisteredtrademarkoftheInternationalBusinessMachinesCorporation.
• MicroSaverisaregisteredtrademarkofKensingtonComputerProductsGroup,adivisionofACCOBrands.
• VirtualRemoteToolusesWinI2C/DDClibrary,©NicomsoftLtd.
• HDMI,theHDMILogoandHigh-DenitionMultimediaInterfacearetrademarksorregisteredtrademarksofHDMI
LicensingLLC.
• MHLandtheMHLlogoareatrademark,registeredtrademarkorservicemarkofMHL,LLCintheUnitedStates
and/or other countries.
• TrademarkPJLinkisatrademarkappliedfortrademarkrightsinJapan,theUnitedStatesofAmericaandother
countries and areas.
• Wi-Fi®,Wi-Fi Alliance®,andWi-FiProtected Access (WPA,WPA2)®are registered trademarksof theWi-Fi Alli-
ance.
• Blu-rayisatrademarkofBlu-rayDiscAssociation
• CRESTRONandROOMVIEWareregisteredtrademarksofCrestronElectronics,Inc.intheUnitedStatesandother
countries.
• EthernetiseitheraregisteredtrademarkortrademarkofFujiXeroxCo.,Ltd.
• Otherproductandcompanynamesmentionedinthisuser’smanualmaybethetrademarksorregisteredtrademarks
oftheirrespectiveholders.
• GPL/LGPLSoftwareLicenses
TheproductincludessoftwarelicensedunderGNUGeneralPublicLicense(GPL),GNULesserGeneralPublic
License(LGPL),andothers.
Formoreinformationoneachsoftware,see“readme.pdf”insidethe“aboutGPL&LGPL”folderonthesuppliedCD-
ROM.
NOTES
(1)Thecontentsofthisuser’smanualmaynotbereprintedinpartorwholewithoutpermission.
(2)Thecontentsofthisuser’smanualaresubjecttochangewithoutnotice.
(3)Greatcarehasbeentakeninthepreparationofthisuser’smanual;however,shouldyounoticeanyquestionable
points,errorsoromissions,pleasecontactus.
(4)Notwithstandingarticle(3),NECwillnotberesponsibleforanyclaimsonlossofprotorothermattersdeemed
toresultfromusingtheProjector.

i
Important Information
Safety Cautions
Precautions
PleasereadthismanualcarefullybeforeusingyourNECprojectorandkeepthemanualhandyforfuturereference.
CAUTION
Toturnoffmainpower,besuretoremovetheplugfrompoweroutlet.
Thepoweroutletsocketshouldbeinstalledasneartotheequipmentaspossible,andshouldbeeasily
accessible.
CAUTION
TOPREVENTSHOCK,DONOTOPENTHECABINET.
THEREAREHIGH-VOLTAGECOMPONENTSINSIDE.
REFERSERVICINGTOQUALIFIEDSERVICEPERSONNEL.
Thissymbolwarnstheuserthatuninsulatedvoltagewithintheunitmaybesufcienttocauseelectrical
shock.Therefore,itisdangeroustomakeanykindofcontactwithanypartinsideoftheunit.
Thissymbolalertstheuserthatimportantinformationconcerningtheoperationandmaintenanceofthis
unithasbeenprovided.
Theinformationshouldbereadcarefullytoavoidproblems.
WARNING:TOPREVENTFIREORSHOCK,DONOTEXPOSETHISUNITTORAINORMOISTURE.
DONOTUSETHISUNIT’SPLUGWITHANEXTENSIONCORDORINANOUTLETUNLESSALLTHEPRONGS
CANBEFULLYINSERTED.
DOC Compliance Notice (for Canada only)
This Class B digital apparatus meets all requirements of the Canadian Interference-Causing Equipment Regula-
tions.
Machine Noise Information Regulation - 3. GPSGV,
Thehighestsoundpressurelevelislessthan70dB(A)inaccordancewithENISO7779.
CAUTION
Avoiddisplayingstationaryimagesforaprolongedperiodoftime.
DoingsocanresultintheseimagesbeingtemporarilysustainedonthesurfaceoftheLCDpanel.
Ifthisshouldhappen,continuetouseyourprojector.Thestaticbackgroundfrompreviousimageswill
disappear.
Disposing of your used product
EU-widelegislationasimplementedineachMemberStaterequiresthatusedelectricalandelectronicprod-
uctscarryingthemark(left)mustbedisposedofseparatelyfromnormalhouseholdwaste.Thisincludes
projectorsandtheirelectricalaccessoriesorlamps.Whenyoudisposeofsuchproducts,pleasefollowthe
guidanceofyourlocalauthorityand/orasktheshopwhereyoupurchasedtheproduct.
Aftercollectingtheusedproducts,theyarereusedandrecycledinaproperway.Thiseffortwillhelpus
reducethewastesaswellasthenegativeimpactsuchasmercurycontainedinalamptothehumanhealth
andtheenvironmentattheminimumlevel.
ThemarkontheelectricalandelectronicproductsonlyappliestothecurrentEuropeanUnionMember
States.

ii
Important Information
WARNING TO CALIFORNIA RESIDENTS:
Handlingthecablessuppliedwiththisproductwillexposeyoutolead,achemicalknowntotheStateofCalifornia
tocausebirthdefectsorotherreproductiveharm.WASHHANDSAFTERHANDLING.
RF Interference (for USA only)
WARNING
TheFederalCommunicationsCommissiondoesnotallowanymodicationsorchangestotheunitEXCEPTthose
speciedbyNECDisplaySolutionsofAmerica,Inc.inthismanual.Failuretocomplywiththisgovernmentregu-
lationcouldvoidyourrighttooperatethisequipment.Thisequipmenthasbeentestedandfoundtocomplywith
thelimitsforaClassBdigitaldevice,pursuanttoPart15oftheFCCRules.Theselimitsaredesignedtoprovide
reasonableprotectionagainstharmfulinterferenceinaresidentialinstallation.Thisequipmentgenerates,uses,and
canradiateradiofrequencyenergyand,ifnotinstalledandusedinaccordancewiththeinstructions,maycause
harmfulinterferencetoradiocommunications.However,thereisnoguaranteethatinterferencewillnotoccurina
particularinstallation.
Ifthisequipmentdoescauseharmfulinterferencetoradioortelevisionreception,whichcanbedeterminedby
turningtheequipmentoffandon,theuserisencouragedtotrytocorrecttheinterferencebyoneormoreofthe
followingmeasures:
• Reorientorrelocatethereceivingantenna.
• Increasetheseparationbetweentheequipmentandreceiver.
• Connecttheequipmentintoanoutletonacircuitdifferentfromthattowhichthereceiverisconnected.
• Consultthedealeroranexperiencedradio/TVtechnicianforhelp.
ForUKonly:InUK,aBSapprovedpowercordwithmouldedplughasaBlack(veAmps)fuseinstalledforusewith
thisequipment.Ifapowercordisnotsuppliedwiththisequipmentpleasecontactyoursupplier.
Important Safeguards
Thesesafetyinstructionsaretoensurethelonglifeofyourprojectorandtopreventreandshock.Pleasereadthem
carefullyandheedallwarnings.
Installation
• Donotplacetheprojectorinthefollowingconditions:
- on an unstable cart, stand, or table.
- nearwater,baths,ordamprooms.
- indirectsunlight,nearheaters,orheatradiatingappliances.
- inadusty,smokyorsteamyenvironment.
- onasheetofpaperorcloth,rugsorcarpets.
• Ifyouwishtohavetheprojectorinstalledontheceiling:
- Donotattempttoinstalltheprojectoryourself.
- Theprojectormustbeinstalledbyqualiedtechniciansinordertoensureproperoperationandreducetherisk
ofbodilyinjury.
- Inaddition,theceilingmustbestrongenoughtosupporttheprojectorandtheinstallationmustbeinaccordance
withanylocalbuildingcodes.
- Pleaseconsultyourdealerformoreinformation.

iii
Important Information
WARNING
• Donotplaceanyobjects,whichareeasilyaffectedbyheat,infrontoftheprojectionwindow.Doingsocould
leadtotheobjectmeltingfromtheheatthatisemittedfromthelightoutput.
• Donotuseaspraycontainingammablegastogetridofaccumulateddustanddirtontheltersandtheprojection
window.Itmaycauseofre.
Place the projector in a horizontal position
Thetiltangleoftheprojectorshouldnotexceed10degrees,norshouldtheprojectorbeinstalledinanywayother
thanthedesktopandceilingmount,otherwiselamplifecoulddecreasedramatically.
+10˚
10˚
Fire and Shock Precautions
• Ensurethatthereissufcientventilationandthatventsareunobstructedtopreventthebuild-upofheatinsideyour
projector.Allowatleast4inches(10cm)ofspacebetweenyourprojectorandawall.
• Donottrytotouchtheexhaustventasitcanbecomeheatedwhiletheprojectoristurnedonandimmediatelyafter
theprojectoristurnedoff.Partsoftheprojectormaybecometemporarilyheatediftheprojectoristurnedoffwith
thePOWERbuttonoriftheACpowersupplyisdisconnectedduringnormalprojectoroperation.
Usecautionwhenpickinguptheprojector.
• Preventforeignobjectssuchaspaperclipsandbitsofpaperfromfallingintoyourprojector.Donotattempttoretrieve
anyobjectsthatmightfallintoyourprojector.Donotinsertanymetalobjectssuchasawireorscrewdriverintoyour
projector.Ifsomethingshouldfallintoyourprojector,disconnectitimmediatelyandhavetheobjectremovedbya
qualiedservicepersonnel.
• Donotplaceanyobjectsontopoftheprojector.
• Donottouchthepowerplugduringathunderstorm.Doingsocancauseelectricalshockorre.
• Theprojectorisdesignedtooperateonapowersupplyof100-240VAC50/60Hz.Ensurethatyourpowersupply
tsthisrequirementbeforeattemptingtouseyourprojector.
• Donotlookintotheprojectionwindowwhiletheprojectorison.Seriousdamagetoyoureyescouldresult.
• Keepanyitemssuchasmagnifyingglassoutofthelightpathoftheprojector.Thelightbeingprojectedfromthe
projectionwindowisextensive,thereforeanykindofabnormalobjectsthatcanredirectlightcomingoutofthe
projectionwindow,cancauseunpredictableoutcomesuchasreorinjurytotheeyes.
• Donotplaceanyobjects,whichareeasilyaffectedbyheat,infrontofaprojectorexhaustvent.
Doingsocouldleadtotheobjectmeltingorgettingyourhandsburnedfromtheheatthatisemittedfromtheex-
haust.
• Donotsplashwaterovertheprojector.Doingsocancauseelectricalshockorre.Iftheprojectorgetswet,turnoff

iv
Important Information
theprojector,unplugthepowercordandhavetheprojectorservicedbyaqualiedservicepersonnel.
• Handlethepowercordcarefully.Adamagedorfrayedpowercordcancauseelectricshockorre.
- Donotuseanypowercordotherthantheonesuppliedwiththeprojector.
- Donotbendortugthepowercordexcessively.
- Donotplacethepowercordundertheprojector,oranyheavyobject.
- Donotcoverthepowercordwithothersoftmaterialssuchasrugs.
- Donotheatthepowercord.
- Donothandlethepowerplugwithwethands.
• Turnofftheprojector,unplugthepowercordandhavetheprojectorservicedbyaqualiedservicepersonnelunder
thefollowingconditions:
- Whenthepowercordorplugisdamagedorfrayed.
- Ifliquidhasbeenspilledintotheprojector,orifithasbeenexposedtorainorwater.
- Iftheprojectordoesnotoperatenormallywhenyoufollowtheinstructionsdescribedinthisuser’smanual.
- Iftheprojectorhasbeendroppedorthecabinethasbeendamaged.
- Iftheprojectorexhibitsadistinctchangeinperformance,indicatinganeedforservice.
• Disconnectthepowercordandanyothercablesbeforecarryingtheprojector.
• Turnofftheprojectorandunplugthepowercordbeforecleaningthecabinetorreplacingthelamp.
• Turnofftheprojectorandunplugthepowercordiftheprojectorisnottobeusedforanextendedperiodoftime.
• WhenusingaLANcable(onlymodelswiththeRJ-45LANport):
Forsafety,donotconnecttotheterminalforperipheraldevicewiringthatmighthaveexcessivevoltage.
CAUTION
• Besuretotightenthescrewsafterattachingthecablecover.Failuretodosomaycausethecablecovertocome
offandfall,resultingininjuryordamagetothecablecover.
• Donotputbundledcablesinthecablecover.Doingsomaydamagethepowercord,resultinginare.
• Donotholdthecablecoverwhilemovingtheprojectorordonotapplyexcessiveforcetothecablecover.Doing
somaydamagethecablecover,resultingininjury.
• Donotusethefeetforpurposesotherthanoriginallyintended.Misusessuchasgrippingthetilt-footorhanging
onthewallcancausedamagetotheprojector.
• Donotsendtheprojectorinthesoftcasebyparceldeliveryserviceorcargoshipment.Theprojectorinsidethe
softcasecouldbedamaged.
• Select[HIGH]inFanmodeifyoucontinuetousetheprojectorforconsecutivedays.(Fromthemenu,select
[SETUP] [OPTIONS(1)] [FANMODE] [HIGH].)→ → →
• DonotturnofftheACpowerfor60secondsafterthelampisturnedonandwhilethePOWERindicatorisblink-
ingblue.Doingsocouldcauseprematurelampfailure.
Remote Control Precautions
• Handletheremotecontrolcarefully.
• Iftheremotecontrolgetswet,wipeitdryimmediately.
• Avoidexcessiveheatandhumidity.
• Donotshort,heat,ortakeapartbatteries.
• Donotthrowbatteriesintore.
• Ifyouwillnotbeusingtheremotecontrolforalongtime,removethebatteries.
• Ensurethatyouhavethebatteries’polarity(+/−)alignedcorrectly.
• Donotusenewandoldbatteriestogether,orusedifferenttypesofbatteriestogether.
• Disposeofusedbatteriesaccordingtoyourlocalregulations.

viii
Table of Contents
Pincushion ............................................................................................................. 31
PreventingtheUnauthorizedUseoftheProjector[SECURITY] ...................................... 33
UsingtheComputerCable(VGA)toOperatetheProjector(VirtualRemoteTool) ..... 36
OperatingYourComputer’sMouseFunctionsfromtheProjector’sRemoteControl
viatheUSBCable(RemoteMouseFunction) ..........................................................42
ProjectingYourComputer’sScreenImagefromtheProjectorviatheUSBCable
(USBDisplay) ........................................................................................................ 43
ControllingtheProjectorbyUsinganHTTPBrowser ................................................. 45
ControllingtheProjectoroveraLAN(PCControlUtilityPro4/Pro5) .............................52
ProjectingYourComputer’sScreenImagefromtheProjectoroveraLAN(Image
ExpressUtilityLite) ................................................................................................ 56
StartingImageExpressUtilityLitefromaUSBMemoryorSDCard .................... 59
ProjectinganImagefromanAngle(GeometricCorrectionToolinImageExpress
UtilityLite) .............................................................................................................. 61
WhatyoucandowithGCT .................................................................................... 61
ProjectinganImagefromanAngle(GCT) ............................................................. 61
ConnectingYourMicrophone ....................................................................................... 63
4. Using the Viewer ............................................................................................. 64
❶WhatyoucandowiththeViewer ................................................................................. 64
❷ProjectingimagesstoredinaUSBmemorydevice .................................................... 66
5. Using On-Screen Menu ................................................................................ 72
1UsingtheMenus .......................................................................................................... 72
MenuElements ............................................................................................................ 37
ListofMenuItems ....................................................................................................... 47
MenuDescriptions&Functions[SOURCE] ................................................................ 77
COMPUTER .......................................................................................................... 77
HDMI1/MHLandHDMI2 ........................................................................................ 77
VIDEO .................................................................................................................... 77
USB-A .................................................................................................................... 77
LAN ........................................................................................................................ 77
USB-B .................................................................................................................... 77
MenuDescriptions&Functions[ADJUST] .................................................................. 87
[PICTURE] ............................................................................................................. 87
[IMAGEOPTIONS] ................................................................................................ 81
[AUDIO] .................................................................................................................. 85
MenuDescriptions&Functions[SETUP] .................................................................... 86
[GENERAL] ............................................................................................................ 86
[MENU] .................................................................................................................. 88
[INSTALLATION] .................................................................................................... 09
[OPTIONS(1)] ........................................................................................................ 92
[OPTIONS(2)] ........................................................................................................ 49
SettinguptheProjectorforaWiredLANConnection[WIREDLAN] ..................... 69
SettinguptheProjectorforaWirelessLANConnection(withtheoptionalUSB
WirelessLANUnitequipped)[WIRLESSLAN] ...................................................... 97
MenuDescriptions&Functions[INFO.] ...................................................................... 99
[USAGETIME] ....................................................................................................... 99

ix
Table of Contents
[SOURCE(1)] ....................................................................................................... 100
[SOURCE(2)] ....................................................................................................... 100
[WIREDLAN] ....................................................................................................... 100
[WIRELESSLAN] ................................................................................................ 101
[VERSION] ........................................................................................................... 101
[OTHERS] ............................................................................................................ 101
MenuDescriptions&Functions[RESET] .................................................................. 102
ReturningtoFactoryDefault[RESET] ................................................................. 102
6. Installation and Connections ................................................................. 103
1SettingUptheScreenandtheProjector ................................................................... 103
MakingConnections .................................................................................................. 106
ConnectingYourComputer .................................................................................. 106
ConnectinganExternalMonitor .......................................................................... 108
ConnectingYourDVDPlayerorOtherAVEquipment .......................................... 109
ConnectingComponentInput .............................................................................. 110
ConnectingHDMIInput........................................................................................ 111
Connectingasmartphoneandatabletterminal ................................................. 112
Connectingyourdocumentcamera ..................................................................... 113
Tableprojection .................................................................................................... 113
ConnectingtoaWiredLAN ................................................................................. 114
ConnectingtoaWirelessLAN(Optional:NP05LMseries) .................................. 115
7. Maintenance .................................................................................................... 118
1CleaningtheFilters.................................................................................................... 118
CleaningtheProjectionWindow ................................................................................ 112
CleaningtheCabinet ................................................................................................. 112
ReplacingtheLampandtheFilters ........................................................................... 122
8. Appendix ............................................................................................................. 812
1Troubleshooting ......................................................................................................... 812
IndicatorMessages .............................................................................................. 812
CommonProblems&Solutions ........................................................................... 129
Ifthereisnopicture,orthepictureisnotdisplayedcorrectly. .............................. 130
Specications ............................................................................................................ 131
CabinetDimensions .................................................................................................. 133
PinAssignmentsofD-SubCOMPUTERInputTerminal ........................................... 134
CompatibleInputSignalList ...................................................................................... 135
PCControlCodesandCableConnection ................................................................. 136
TroubleshootingCheckList ........................................................................................ 137
TCOCertication ....................................................................................................... 139
REGISTERYOURPROJECTOR!(forresidentsintheUnitedStates,Canada,and
Mexico) ................................................................................................................ 140

1
Projector
Cable cover (24FU2001)
(attached to the projector
at the time of shipment →
page )5
1. Introduction
1 What’s in the Box?
Makesureyourboxcontainseverythinglisted.Ifanypiecesaremissing,contactyourdealer.
Pleasesavetheoriginalboxandpackingmaterialsifyoueverneedtoshipyourprojector.
Power cord
(US: 7N080240/7N080243)
(EU: 7N080027/7N080029)
Computer cable (VGA)
(7N520089)
Wireless receiver strap
NEC Projector CD-ROM
User’s manual (PDF) and the utility
software
(7N952071)
For North America only
Limited warranty
For customers in Europe:
You will find our current valid
Guarantee Policy on our Web
Site:
www.nec-display-solutions.com
• ImportantInfomation(ForNorth
America: 7N8N5231) (For Other
countries than North America:
7N8N5231 and 7N8N5241)
• QuickSetupGuide(7N8N5251)/
(7N8N5261)
Remote control
(7N901051)
Batteries (AAA × 2)
Unless otherwise described in the user’s manual, the drawings for the projector cabinet show examples of the
UM351W.

2
1. Introduction
Introduction to the Projector
Thissectionintroducesyoutoyournewprojectoranddescribesthefeaturesandcontrols.
Features you’ll enjoy:
• Ultrashortthrowdistances
Ultrashortfocallensesprovideforalargerimageusingashorterthrowdistance whencomparedtoatypical
projectorlens.
UM361X/UM301X:Max116.6"(UM351W/UM301W:Max110"),throwdistance:51cm/20inches
(Thethrowdistancereferstothedistancebetweenthescreenandthescreensideoftheprojector)
• Quickstart(6seconds*1),QuickPowerOff,DirectPowerOff
6 seconds*1afterturningonthepower,theprojectorisreadytodisplayPCorvideoimages.
Theprojectorcanbeputawayimmediatelyaftertheprojectorispowereddown.Nocooldownperiodisrequired
aftertheprojectoristurnedofffromtheremotecontrolorcabinetcontrolpanel.
Theprojectorhasafeaturecalled“DirectPowerOff”.Thisfeatureallowstheprojectortobeturnedoff(evenwhen
projectinganimage)byusingtheMainPowerSwitchordisconnectingtheACpowersupply.
ToturnofftheACpowersupplywhentheprojectorispoweredon,useapowerstripequippedwithaswitchand
abreaker.
*1 Thequickstarttimeisonlywhen[STANDBYMODE]issetto[NETWORKSTANDBY]intheon-screenmes-
sage.
• 0.22W(100-130VAC)/0.39W(200-240VAC)instandbyconditionwithenergysavingtechnology
Selecting[NORMAL]for[STANDBYMODE]fromthemenucanputtheprojectorinpower-savingmodethatcon-
sumesonly0.22W(100-130VAC)/0.39W(200-240VAC).
• CarbonMeter
Thisfeaturewillshowenergy-savingeffectintermsofCO2emissionreduction(kg)whentheprojector’s[ECO
MODE]issetto[AUTOECO],[NORMAL],or[ECO].
TheamountofCO2emissionreductionwillbedisplayedintheconrmationmessageatthetimeofpower-offand
intheINFOoftheon-screenmenu.
• Lamplifeupto8000hours*2
UsinginEcoMode(ECO)allowsyoutoprolongtheprojector’slamplifeupto8000hours(upto4000hoursin
ECOMODEOFF).
*2 UM351W/UM361X:6000hours(upto3800hoursinECOMODEOFF)
• TwoHDMIinputssupportsdigitalsignals
ThetwoHDMIinputsprovideHDCPcompatibledigitalsignals.TheHDMIinputalsosupportsaudiosignal.
• Projecttheimageonasmartphoneandatablet
SincetheprojectorsupportsMHL(MobileHigh-denitionLink),itcanprojectvideosandphotosonasmartphone
andatabletterminalbyconnection,andoutputtheirsoundfromthebuilt-inspeaker.
• 20Wbuilt-inspeakerforanintegratedaudiosolution
Powerful20wattmonauralspeakerprovidesvolumeneedforlargerooms.
• MICInputprovided
AMICinputjackforacommerciallyavailabledynamicmicrophoneisusefulforyourpresentationinaconference
room or lecture in a classroom.
• Theoptionalinteractivewhiteboardkit(NP03Wi,soldseparately)andtheprojectorcanbeusedtoconvert
yourwhiteboardintoavirtualtouchscreen.
Bytheoptionalstyluspen,it'sabletodirectlywrite-intotheprojectedimagethatrealizesmoreeffectivepresenta-
tion and lecture.

3
1. Introduction
• Correspondtovariousinstallation
Besidesinstallationonthewall,itcancorrespondvariousinstallationasprojectingimageupontotheceiling,onto
thetable,andontotheoor,etc.
• ThesuppliedremotecontrolallowsyoutoassignaCONTROLIDtotheprojector
Multipleprojectorscanbeoperatedseparatelyandindependentlywiththesamesingleremotecontrolbyassigning
anIDnumbertoeachprojector.
• USBDisplay
UsingacommerciallyavailableUSBcable(compatiblewithUSB2.0specications)toconnectthecomputerwith
theprojectorallowsyoutosendyourcomputerscreenimagetotheprojectorwithouttheneedofatraditional
computercable(VGA).
• IntegratedRJ-45terminalforwirednetworkingcapabilityalongwithwirelessnetworkingcapabilities
AnRJ-45terminalisstandard.AnoptionalUSBWirelessLANUnitisrequiredforwirelessLANconnection.
• Softwareprograms(UserSupportware)containedinthesuppliedCD-ROM
ThesuppliedNECProjectorincludesthreeprograms:VirtualRemoteTool,ImageExpressUtilityLite(forWindows/
MacOS),andPCControlUtilityPro4(forWindows)/5(forMacOS).
ImageExpressUtilityLite(forWindows)canbestartedfromacommerciallyavailableUSBmemoryorSDcard
withouttheneedofinstallingonyourcomputer.
• AUTOPOWERONandAUTOPOWEROFFfeatures
TheDIRECTPOWERON,AUTOPOWERON,AUTOPOWEROFF,andOFFTIMERfeatureseliminatetheneed
toalwaysusethePOWERbuttonontheremotecontrolorprojectorcabinet.
• Preventingunauthorizeduseoftheprojector
Enhancedsmartsecuritysettingsforkeywordprotection,cabinetcontrolpanellock,securityslot,andsecurity
chainopeningtohelppreventunauthorizedaccess,adjustmentsandtheftdeterrence.
• HighresolutionuptoWUXGA*3
Highresolutiondisplay-uptoWUXGAcompatible,XGA(UM361X/UM301X)/WXGA(UM351W/UM301W)native
resolution.
*3 WhenWXGAMODEissettoON.
• CRESTRONROOMVIEWcompatibility
TheprojectorsupportsCRESTRONROOMVIEW,allowingmultipledevicesconnectedinthenetworktobeman-
agedandcontrolledfromacomputerorcontroller.
About this user’s manual
Thefastestwaytogetstartedistotakeyourtimeanddoeverythingrightthersttime.Takeafewminutesnowto
reviewtheuser’smanual.Thismaysaveyoutimelateron.Atthebeginningofeachsectionofthemanualyou’llnd
anoverview.Ifthesectiondoesn’tapply,youcanskipit.

5
1. Introduction
Removing and Attaching the Cable Cover
Afternishingconnections,attachthesuppliedcablecovertoproperlyhidethecables.
CAUTION:
• Besuretotightenthescrewsafterattachingthecablecover.Failuretodosomaycausethecablecovertocome
offandfall,resultingininjuryordamagetothecablecover.
• Donotputbundledcablesinthecablecover.Doingsomaydamagethepowercord,resultinginare.
• Donotholdthecablecoverwhilemovingtheprojectorordonotapplyexcessiveforcetothecablecover.Doingso
maydamagethecablecover,resultingininjury.
Removingthecablecover
Toolneeded:
• Phillipsscrewdriver(plus-head)about9cm/4inchesinlength
9 cm/4 inches
1. Loosen the cable cover screws until the Phillips screw-
driver goes into a freewheeling condition.
•Thesescrewsremaintostay.
2. Remove the cable cover.
1Push up the cable cover slightly and rotate it to release.
Pull the cable cover while pushing and holding the arrow
part
Ifyoundittohardtoreleasethecablecover,tryholdingit
slightly up.
1
2

6
1. Introduction
Attachingthecablecover
1. Align four tabs of the cable cover with grooves of the pro-
jector and push the cable cover until you click it.
NOTE:
• Becarefulnottogetcablescaughtinbetweenthecablecoverandthe
projector.
2. Tighten the cable cover screws.
• Besuretotightenthescrews.

7
1. Introduction
Top Features
1, 2
7
4 8
9
11
5
6
10
3
1. (POWER)Button( page )→14 4, 2
2. POWER Indicator ( page )→13 14 4 8, , 2, 12
3. STATUSIndicator( page )→128
4. LAMPIndicator( page )→122, 128
5. ECOButton( page )→27
6. SOURCEButton( page )→16
7. AUTOADJ.Button( page )→23
8. MENUButton( page )→72
9. /VolumeButtons /KeystoneButtons
( page )→15 1 3, 2, 2, 72
10.ENTERButton( page )→72
11.EXITButton( page )→72

8
1. Introduction
Terminal Panel Features
1. COMPUTERIN/ComponentInputTerminal(Mini
D-Sub15Pin)( page )→106 110 113, ,
2. COMPUTERAUDIOINMiniJack(StereoMini)
(→page )106 10 110, 7,
3. HDMI1/MHLINTerminal(TypeA)
(→page )106 10 111 11, 7, , 2
4. HDMI2INTerminal(TypeA)
(→page )106 10 111, 7,
5. USB(PC)Port(TypeB)
(→page )4 43 1062, ,
6. MONITOROUT(COMPUTER)Terminal(MiniD-Sub
15Pin)( page )→108
7. AUDIO OUT Mini Jack (Stereo Mini) (→ page
108)
8. VIDEOINTerminal(RCA)( page )→10 1139,
9. VIDEO/S-VIDEOAUDIOINL/MONO,R(RCA)
(→page )109
10.MICInputJack(MonauralMini)
(→page )63
11.LANPort(RJ-45)( page )→114
12.USB(WirelessLAN)Port
(→page )115
13.USBPort(TypeA)( page )→66
14.PCCONTROL[PCCONTROL]Port(D-Sub9Pin)
(→page )136
Use this port to connect a PC or control system.
Thisenablesyoutocontroltheprojectorusingserial
communicationprotocol.Ifyouarewritingyourown
program,typicalPCcontrolcodesareonpage136.
1
2
45
7
6 9
14
8 10
111312 3
9
1. Introduction
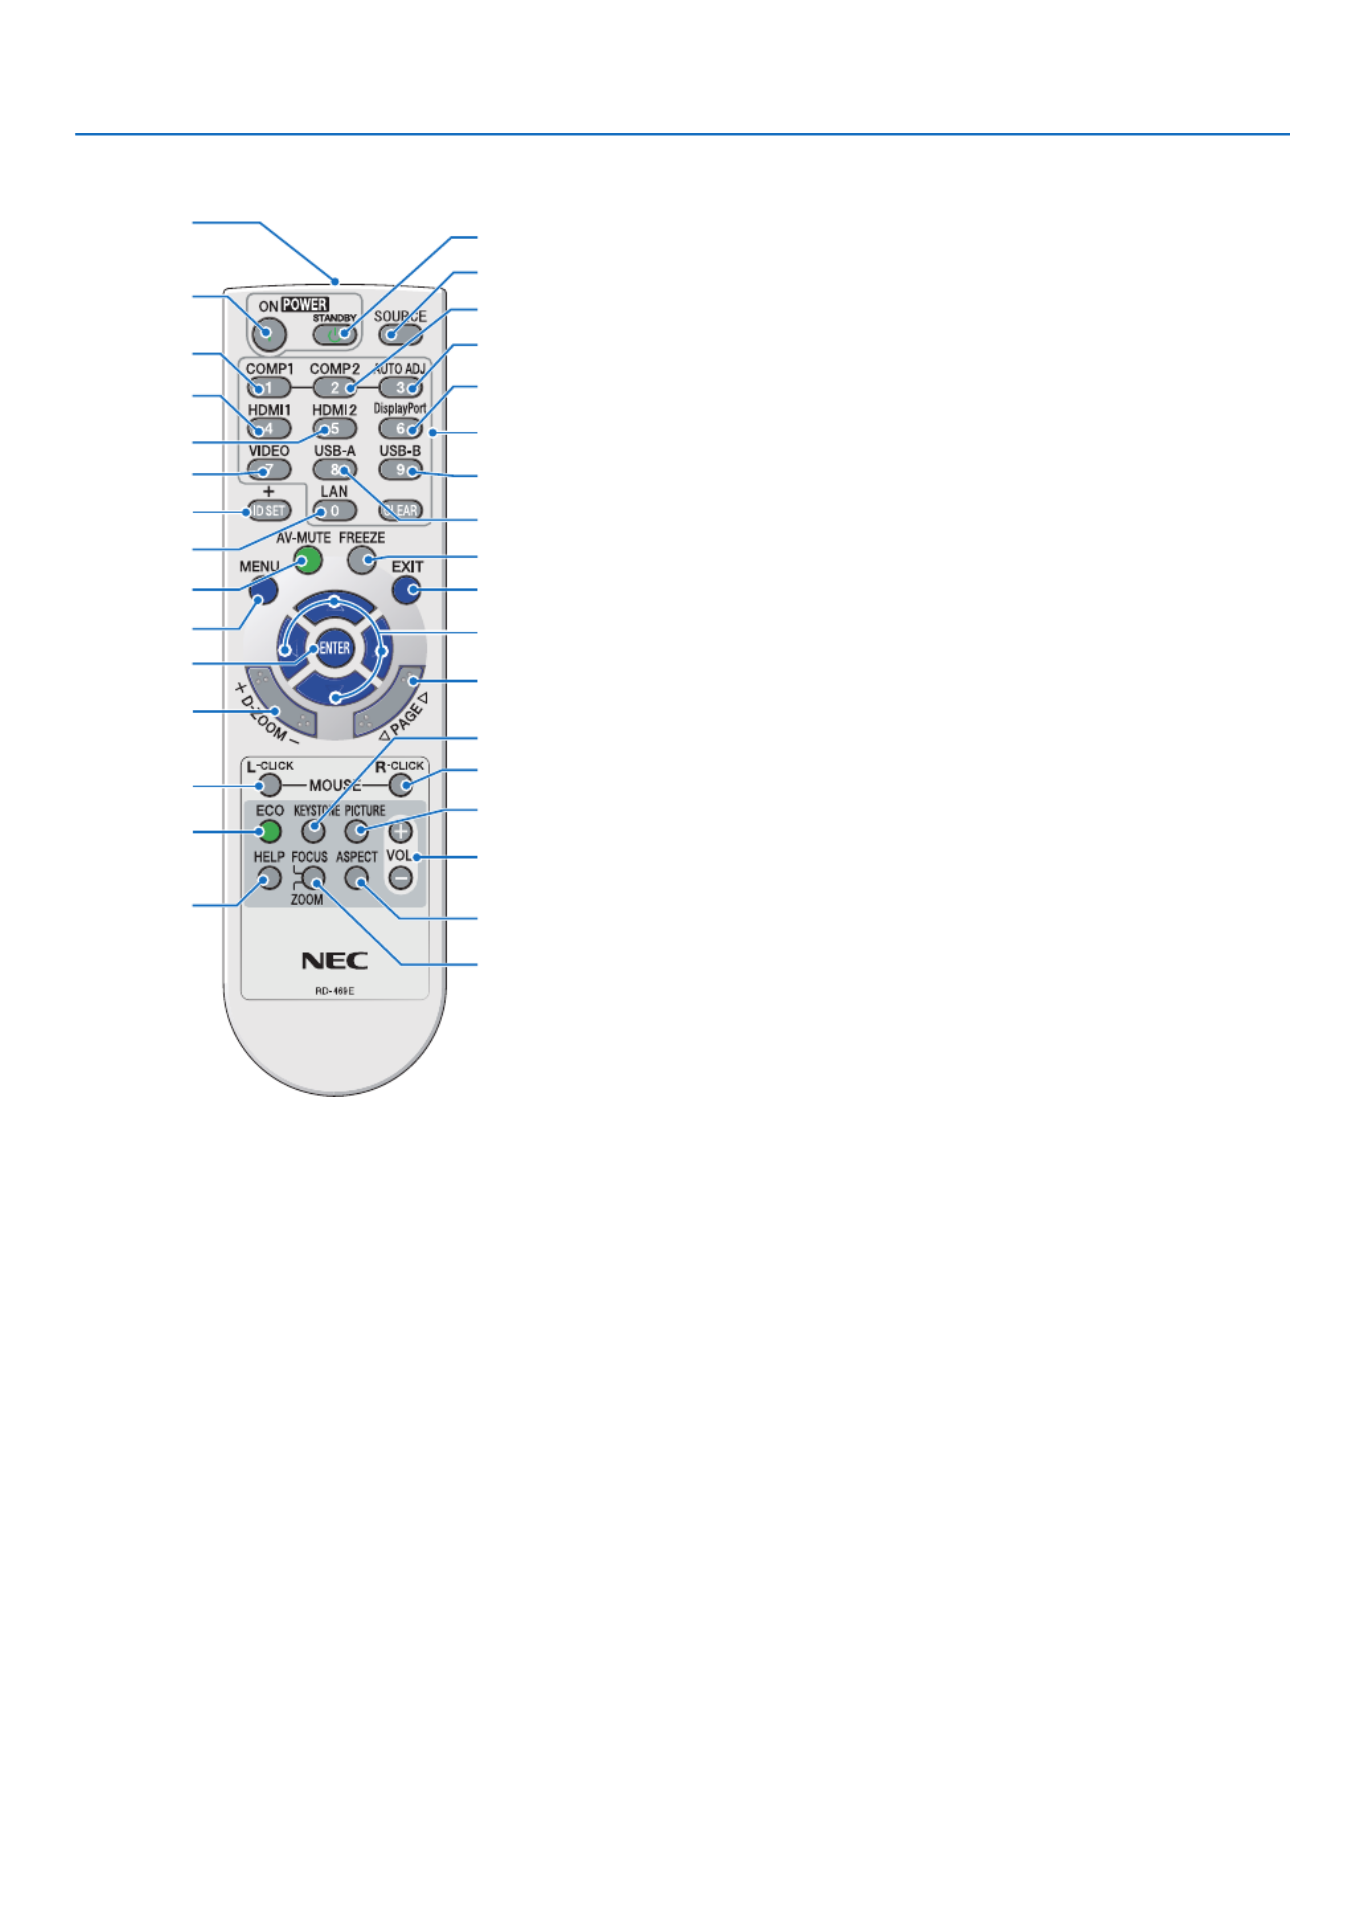
Part Names of the Remote Control
3
4
6
7
1
2
10
16
17
15
14
9
5
8
13
30
31
32
20
21
26
28
29
25
24
23
22
27
33
19
18
12
11
1. Infrared Transmitter
(→page )10
2. POWERONButton
(→page )14
3. POWERSTANDBYButton
(→page )24
4. SOURCEButton
(→page )16
5. COMPUTER1Button
(→page )16
6. COMPUTER2Button
(Thisbuttondoesnotworkinthisseriesofprojectors)
7. AUTOADJ.Button
(→page )23
8. HDMI1/MHLButton
(→page )16
9. HDMI2Button
(→page )16
10.DisplayPortButton
(→page )16
11.VIDEOButton( page )→16
12.USB-AButton( page )→16 66 68, ,
13.USB-BButton( page )→16 106,
14.LANButton( page )→16
15.IDSETButton
(→page )91
16.NumericKeypadButton/CLEARButton
(→page )91
17.FREEZEButton
(→page )26
18.AV-MUTEButton
(→page )26
19.MENUButton
(→page )72
20.EXITButton( page )→72
21. Button( page )→72
22.ENTERButton( page )→72
23.D-ZOOM(+)(–)Button
(→page )2 276,
24.MOUSEL-CLICKButton*
(→page )42
25.MOUSER-CLICKButton*
(→page )42
26.PAGE / Button
(→page )42
27.ECOButton( page )→27
28.KEYSTONEButton
(→page )29
29.PICTUREButton
(→page )78 80,
30.VOL.(+)(–)Button
(→page )23
31.ASPECTButton
(→page )83
32.FOCUS/ZOOMButton
TheZOOMbuttonwilldisplaytheDIGITALZOOMbar.
( page )TheFOCUSbuttondoesnotwork→20 86,
onthisseriesofprojectors.
33.HELPButton
(→page )99
* TheMOUSEL-CLICKandMOUSER-CLICKbuttonsworkonlywhenaUSBcableisconnectedwithyourcom-
puter.

10
1. Introduction
Remote Control Precautions
• Handletheremotecontrolcarefully.
• Iftheremotecontrolgetswet,wipeitdryimmediately.
• Avoidexcessiveheatandhumidity.
• Donotshort,heat,ortakeapartbatteries.
• Donotthrowbatteriesintore.
• Ifyouwillnotbeusingtheremotecontrolforalongtime,removethebatteries.
• Ensurethatyouhavethebatteries’polarity(+/−)alignedcorrectly.
• Donotusenewandoldbatteriestogether,orusedifferenttypesofbatteriestogether.
• Disposeofusedbatteriesaccordingtoyourlocalregulations.
Operating Range for Wireless Remote Control
30°
30°
30°
30°
60°
22 feet/7 m
19.7 feet/6 m
Remote sensor on projector cabinet
Remote sensor on projector cabinet
Remote control
Remote control
• Theinfraredsignaloperatesbyline-of-sightuptoadistanceofabout22feet/7mandwithina60-degreeangleof
theremotesensorontheprojectorcabinet.
• Theprojectorwillnotrespondifthereareobjectsbetweentheremotecontrolandthesensor,orifstronglightfalls
onthesensor.Weakbatterieswillalsopreventtheremotecontrolfromproperlyoperatingtheprojector.
1Pressrmlyandslidethebattery
coveroff.
2Installnewbatteries(AAA).Ensure
thatyouhavethebatteries’polarity
(+/−)alignedcorrectly.
Battery Installation
3
Slip the cover back over the bat-
teriesuntilitsnapsintoplace.Do
notmixdifferenttypesofbatteries
ornewandoldbatteries.
OPEN
OPEN

11
1. Introduction
Software Included on CD-ROM
NamesandFeaturesofBundledSoftwarePrograms
Nameofsoftwareprogram Features
VirtualRemoteTool
(Windowsonly)
ThisisasoftwareprogramusedtocontrolthepowerON/OFFandsourceselec-
tionoftheprojectorfromyourcomputerbyusingthesuppliedcomputercable
(VGA)andothers.( page )→36
Nameofsoftwareprogram Features
ImageExpressUtilityLite
ImageExpressUtilityLitefor
MacOS
• Thisisasoftwareprogramusedtoprojectyourcomputer’sscreenoverthe
USBcableorthewired/wirelessnetwork.Thecomputercable(VGA)isnot
required.( page )→56 60,
• ThissoftwareprogramcanbeusedtocontrolthepowerON/OFFandsource
selectionoftheprojectorfromyourcomputer.
• TheGeometricCorrectionTool(GCT)functionallowsyoutocorrectdistortion
ofimagesprojectedonacurvedwall.( page )→61
* “USBDisplay”and“GCT”functionsarenotsupportedbyMac.
Nameofsoftwareprogram Features
PCControlUtilityPro4
PCControlUtilityPro5(forMac
OS)
Thisisasoftwareprogramusedtooperatetheprojectorfromthecomputerwhen
thecomputerandtheprojectorareconnectedwithLAN(wiredorwireless)or
aserialcable.( page )→52
NOTE:
• ImageExpressUtilityLitedoesnotsupport“MeetingMode”inImageExpressUtility2.0suppliedwithourothermodels.
DownloadServiceandOperatingEnvironment
Pleasevisitourwebsiteaboutoperatingenvironmentanddownloadserviceforeachsoftware:
VisitURL:http://www.nec-display.com/dl/en/index.html
Download-Projector Software&Driver→

12
Thissectiondescribeshowtoturnontheprojectorandtoprojectapictureontothescreen.
1 Flow of Projecting an Image
Step 1
• Connectingyourcomputer/Connectingthepowercord(→ page )13
Step 2
• Turningontheprojector(→ page )14
Step 3
• Selectingasource(→ page )16
Step 4
• Adjustingthepicturesizeandposition(→ page )17
• Correctingkeystonedistortion[KEYSTONE](→ page )21
Step 5
• Adjustingapictureandsound
- Optimizing a computer signal automatically ( page )→23
- Turning up or down volume ( page )→23
Step 6
• Makingapresentation
Step 7
• Turningofftheprojector(→ page )24
Step 8
• WhenMovingtheProjector(→ page )25
2. Projecting an Image (Basic Operation)
13
2. Projecting an Image (Basic Operation)
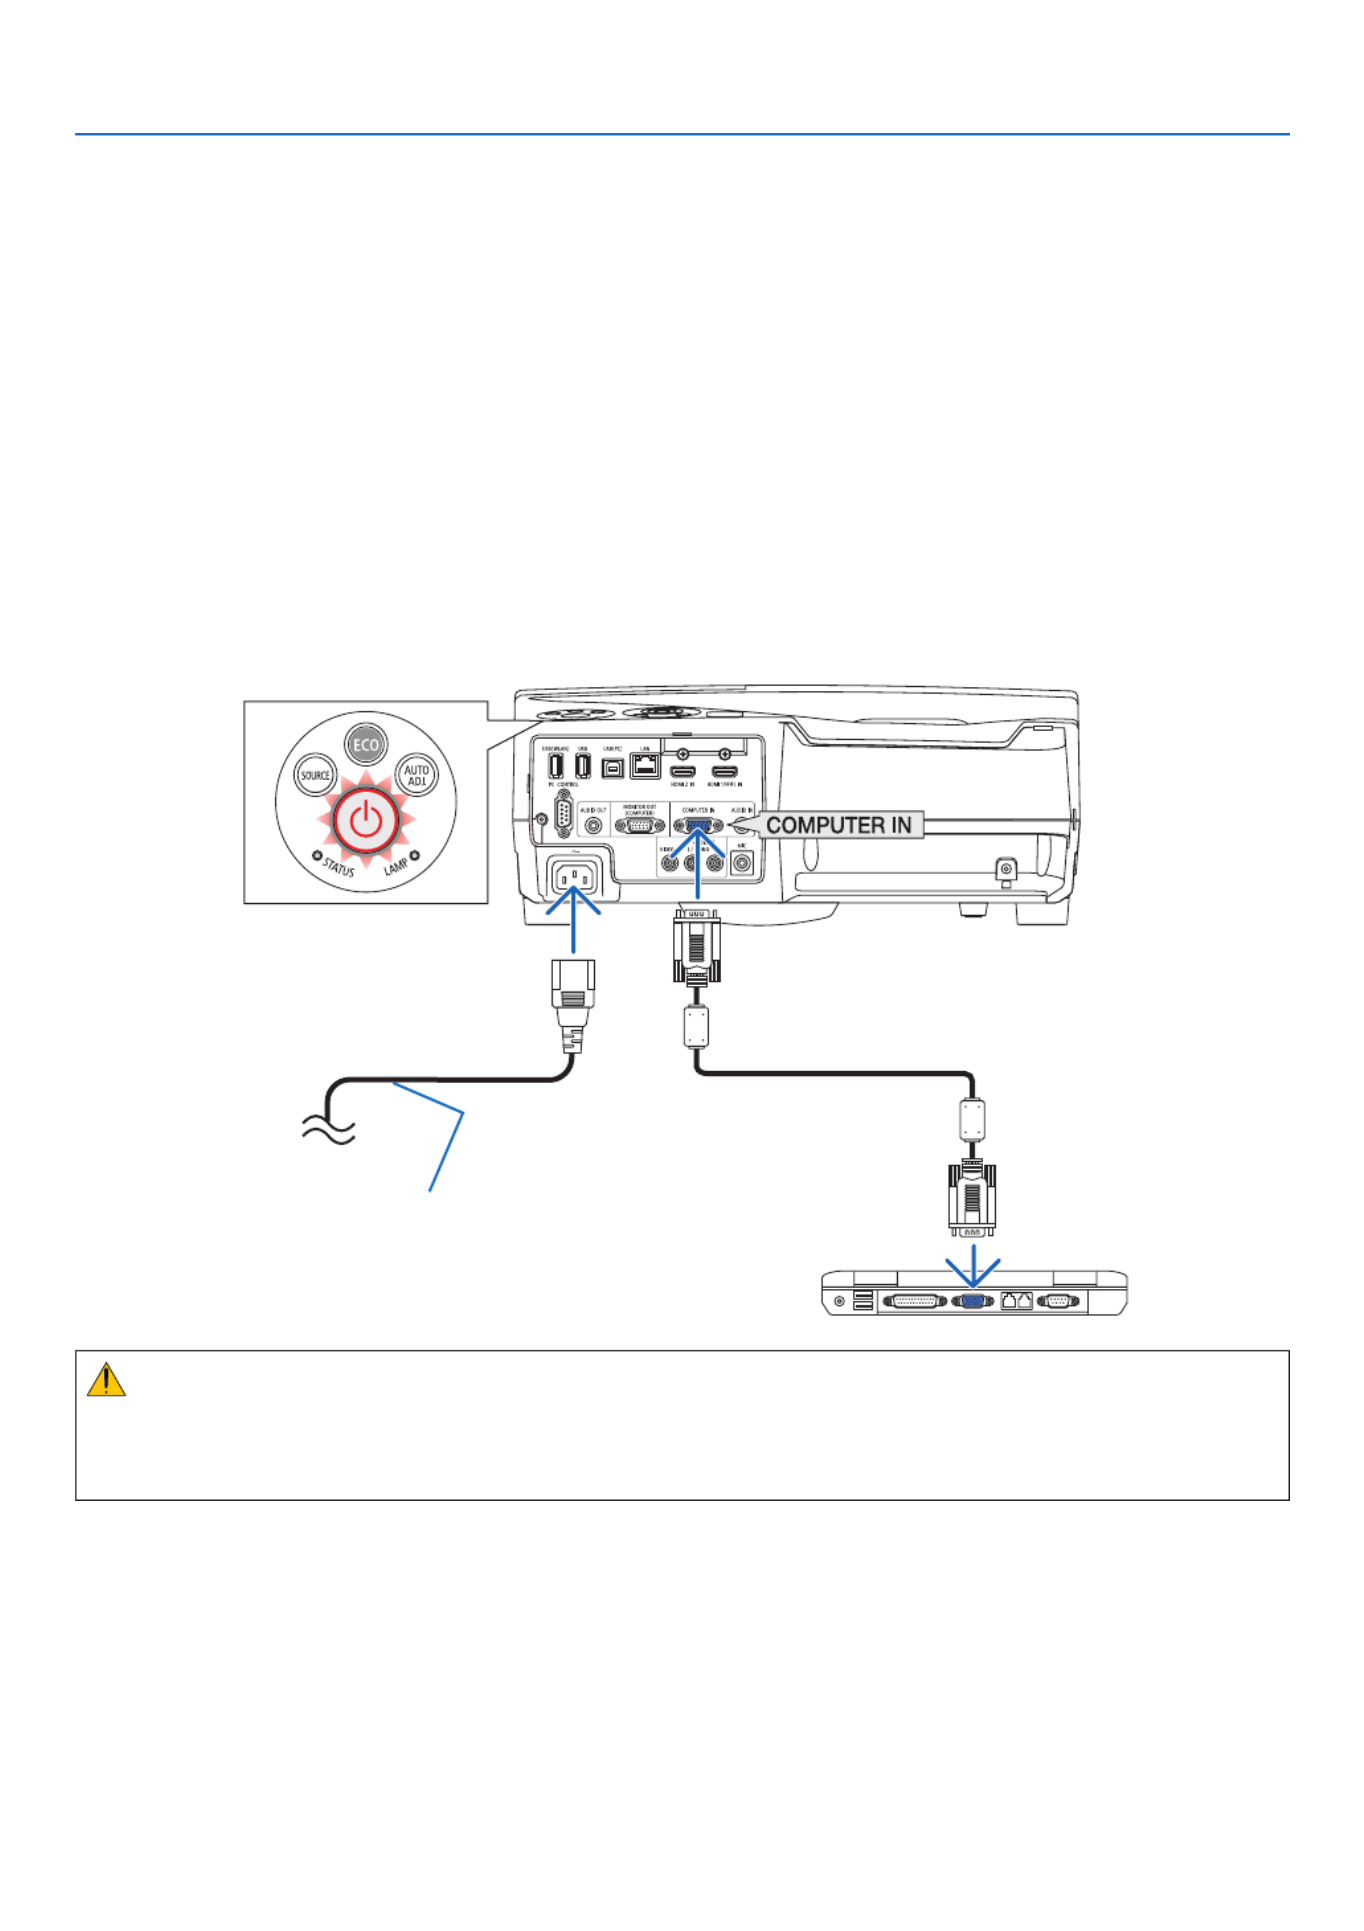
Connecting Your Computer/Connecting the Power Cord
1. Connectyourcomputertotheprojector.
This section will show you a basic connection to a computer. For information about other connections, see “6.
InstallationandConnections”onpage106.
Connectthecomputercable(VGA)betweentheprojector’sCOMPUTERINterminalandthecomputer’sport(mini
D-Sub 15 Pin). Turn two thumb screws of both terminals to fix the computer cable (VGA).
2. Connectthesuppliedpowercordtotheprojector.
Firstconnectthesuppliedpowercord’sthree-pinplugtotheACINoftheprojector,andthenconnecttheother
plug of the supplied power cord in the wall outlet.
The projector’s power indicator will flash for a few seconds and then will light red* (standby mode).
*Thiswillapplyforbothindicatorswhen[NORMAL]isselectedfor[STANDBYMODE].SeethePowerIndicator
section.( page ) →128
Makesurethattheprongsarefullyinsertedinto
boththeACINandthewalloutlet.
To wall outlet ←
CAUTION:
PartsoftheprojectormaybecometemporarilyheatediftheprojectoristurnedoffwiththePOWERbuttonorifthe
ACpowersupplyisdisconnectedduringnormalprojectoroperation.
Becarefultohandletheprojector.

14
2. Projecting an Image (Basic Operation)
Turning on the Projector
• Pressthe (POWER) button on the projector cabinet
or the POWER ON button on the remote control.
ThePOWERindicatorwillblinkandtheprojectorwillbe-
come ready to use.
TIP:
• Whenthemessage“Projectorislocked!Enteryourpassword.”
isdisplayed,itmeansthatthe[SECURITY]featureisturnedon.
( page )→33
After you turn on your projector, ensure that the computer
or video source is turned on.
NOTE:Whennoinputsignalispresent,theno-signalguidanceis
displayed(factorymenusetting).
( page )→128
Standby Blinking PowerOn
Steady red light Blinking blue light Steady blue light

15
2. Projecting an Image (Basic Operation)
Note on Startup screen (Menu Language Select screen)
Whenyourstturnontheprojector,youwillgettheStartupmenu.Thismenugivesyoutheopportunitytoselectone
ofthe30menulanguages.
Toselectamenulanguage,followthesesteps:
1. Use the or button to select one of the 30 , ,
languages from the menu.
2. Press the ENTER button to execute the selection.
After this has been done, you can proceed to the menu
operation.
Ifyouwant,youcanselectthemenulanguagelater.
( [LANGUAGE]onpage )→74 88 and
NOTE:
• IftheprojectorisshutoffbyDIRECTPOWEROFF(pullingoutthepowercord)duringprojection,waitfor1secondatleastfor
reconnectthepowercordforturningontheprojector.
Failingtodosocouldresultinnopowertotheprojector.(Therewillbenostand-byLED)
Shouldthishappen,unplugthepowercordandplugitinagain.Turnonthemainpower.
• Ifoneofthefollowingthingshappens,theprojectorwillnotturnon.
- Iftheinternaltemperatureoftheprojectoristoohigh,theprojectordetectsabnormalhightemperature.Inthisconditionthe
projectorwillnotturnontoprotecttheinternalsystem.Ifthishappens,waitfortheprojector’sinternalcomponentstocool
down.
- Whenthelampreachesitsendofusablelife,theprojectorwillnotturnon.Ifthishappens,replacethelamp.
- IftheSTATUSindicatorlightsorangewiththepowerbuttonpressed,itmeansthatthe[CONTROLPANELLOCK]isturnedon.
Cancelthelockbyturningitoff.( page )→90
- Ifthelampfailstolight,andiftheSTATUSindicatorashesonandoffinacycleofsixtimes,waitafullminuteandthenturn
onthepower.
• WhilethePOWERindicatorisblinkingblueinshortcycles,thepowercannotbeturnedoffbyusingthepowerbutton.
• Immediatelyafterturningontheprojector,screenickermayoccur.Thisisnormal.Wait3to5minutesuntilthelamplightingis
stabilized.
• Whentheprojectoristurnedon,itmaytakesometimebeforethelamplightbecomesbright.
• Ifyouturnontheprojectorimmediatelyafterthelampisturnedofforwhenthelamptemperatureishigh,thefansrunwithout
displayinganimageforsometimeandthentheprojectorwilldisplaytheimage.

16
2. Projecting an Image (Basic Operation)
Selecting a Source
Selecting the computer or video source
NOTE:Turnonthecomputerorvideosourceequipmentconnectedtotheprojector.
DetectingtheSignalAutomatically
PresstheSOURCEbuttononce.Theprojectorwillsearchfortheavailable
inputsourceanddisplayit.Theinputsourcewillchangeasfollows:
COMPUTER HDMI1/MHL HDMI2 VIDEO USB-A LAN→ → → → → →
USB-B
• Withthe SOURCEscreendisplayed,youcanpresstheSOURCE
buttonafewtimestoselecttheinputsource.
TIP:Ifnoinputsignalispresent,theinputwillbeskipped.
UsingtheRemoteControl
PressanyoneoftheCOMPUTER1,HDMI1/MHL,HDMI2,VIDEO,USB-
A,USB-B,orLANbuttons.
SelectingDefaultSource
Youcansothatitwillbedisplayedeachtimetheprojectoristurnedon.
1. Press the MENU button.
The menu will be displayed.
2. Press the button or buttontwicetoselect[SETUP]andthe
theENTERbuttontoselect[GENERAL].
3.
Press the
buttonfourtimestoselect[OPTIONS(2)].
4. Press the buttonvetimestoselect[DEFAULTSOURCESE-
LECT]andpresstheENTERbutton.
The [DEFAULT SOURCE SELECT] screen will be displayed.
(→ page )95
5.
Select a source as the default source, and press the ENTER button.
6. PresstheEXITbuttonafewtimestoclosethemenu.
7. Restart the projector.
The source you selected in step 5 will be projected.
TIP:
• Whentheprojectorisin Standbymode,applyingacomputersignalfroma
computerconnectedtotheCOMPUTERINinputwillpowerontheprojector
andsimultaneouslyprojectthecomputer’simage.
([AUTOPOWERON] page )→95
• OnWindows7,acombinationoftheWindowsandPkeysallowsyoutosetup
externaldisplayeasilyandquickly.

17
2. Projecting an Image (Basic Operation)
Adjusting the Picture Size and Position
Usetheadjustabletiltfoot,thezoomfunctionorthefocusringtoadjustthepicturesizeandposition.
Inthischapterdrawingsandcablesareomittedforclarity.
Adjustinghorizontal/verticalposition
( page )→18
Adjustingthefocus[Focusring]
( page )→18
Finelyadjustingtheleftandrighttilt[TiltFoot]
( page )→19
Adjustingthesize[DigitalZoom]
( page )→20
Correctingthekeystonedistortion[Keystone]*
( page )→21
* Toperformkeystonecorrectionmanually,see“6.CorrectingKeystoneDistortion[KEYSTONE]”onpage21.
18
2. Projecting an Image (Basic Operation)
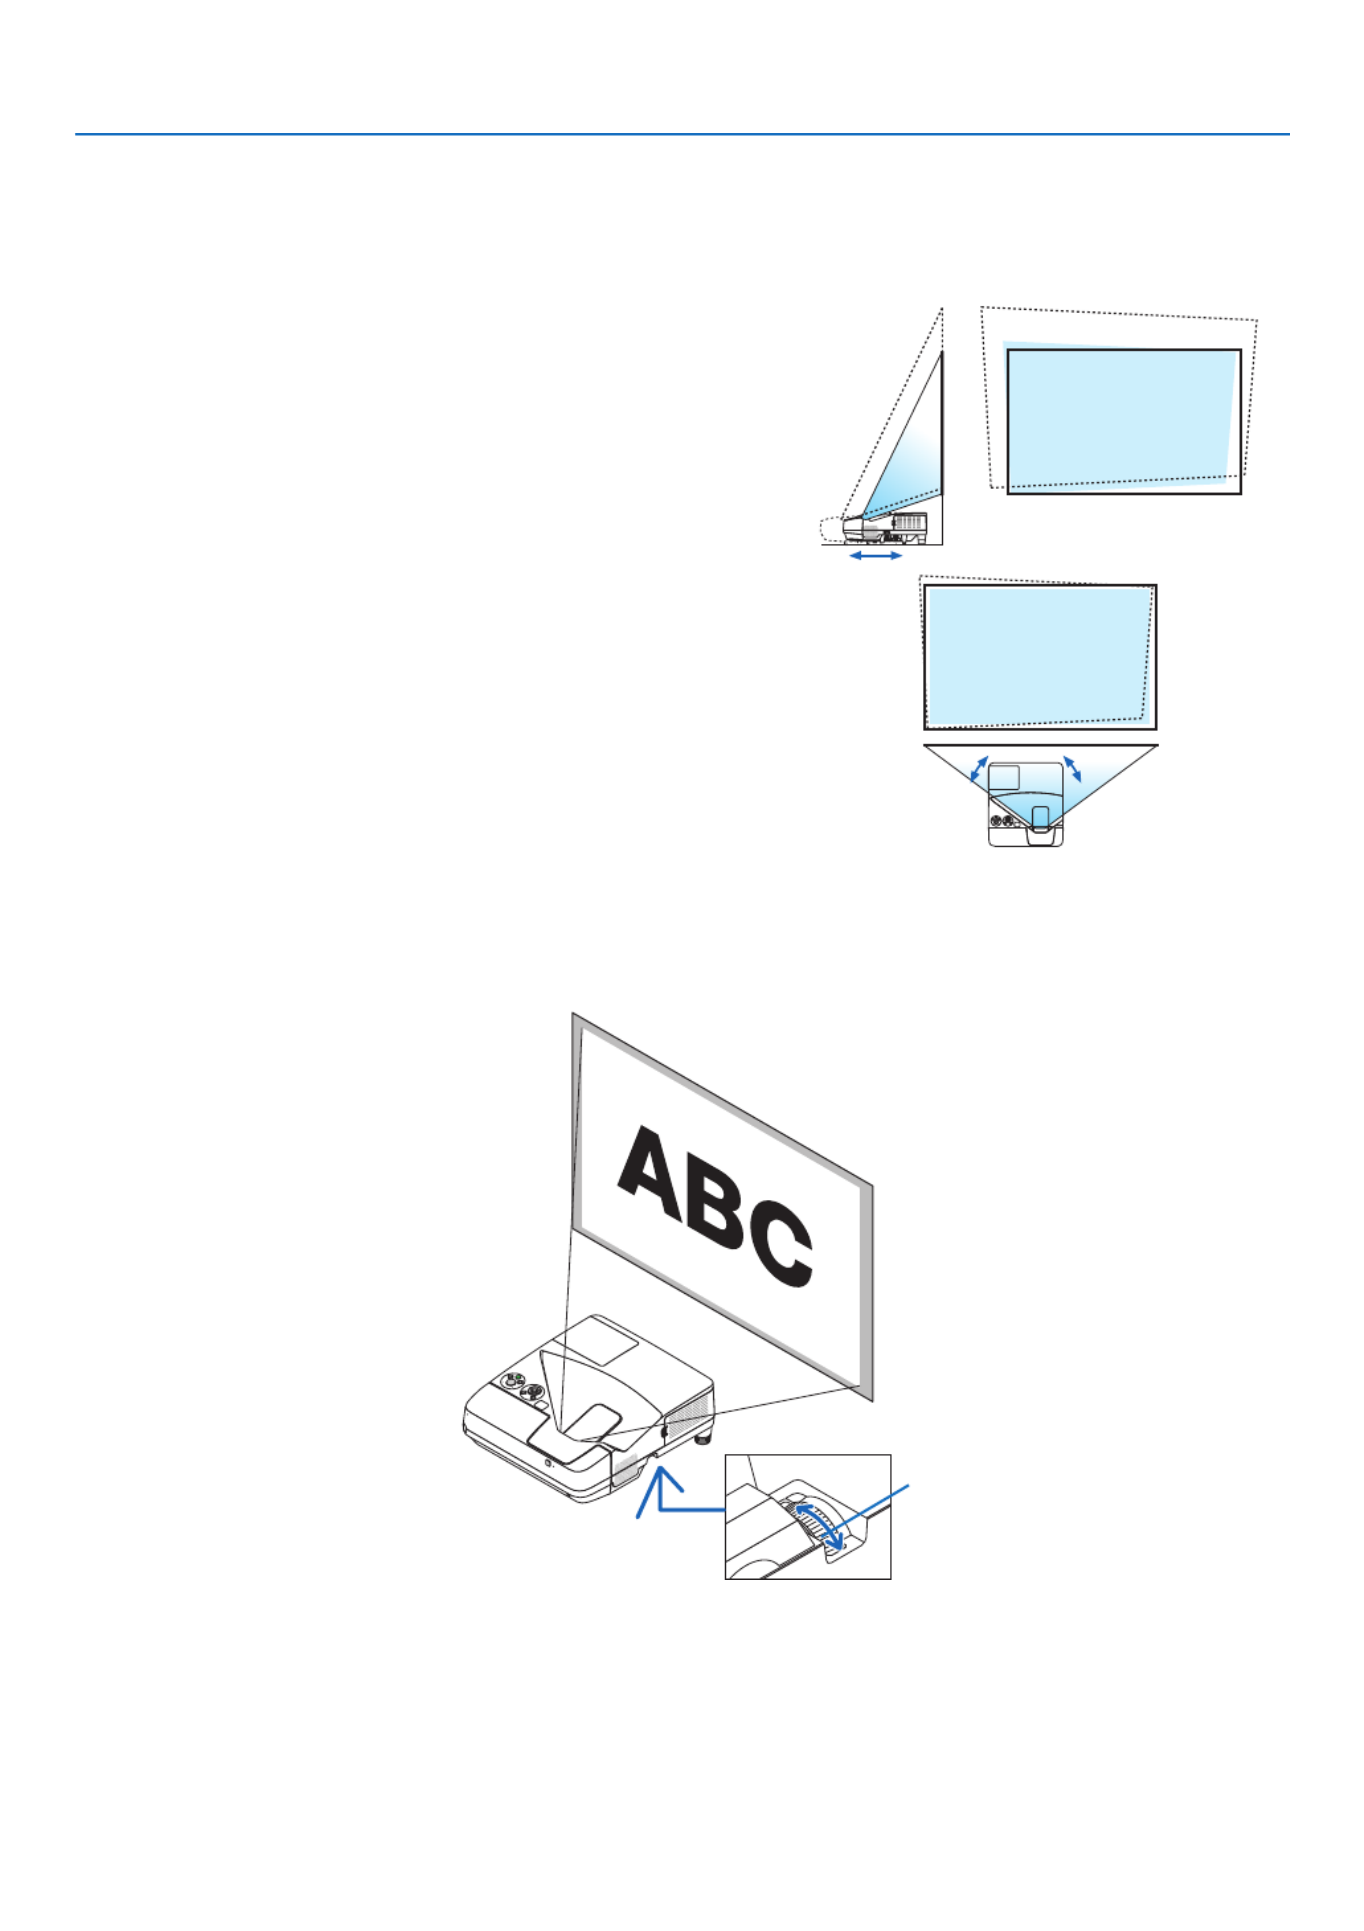
Adjusting horizontal/vertical position
Thethrowdistancecanaffectthesizeandtheheightoftheprojectedimage.Beforeinstallingtheprojector,decide
thethrowdistanceaccordingto“SettingUptheScreenandtheProjector”( page )→103 104,
Itisrecommendedtodisplaythetestpatternwhileadjustingtheimage.( page )→92
1. Move the projector back and forth and left and right so that
the image fits the screen width.
Youcanreducetheimagesizeto70%byusing[DIGITALZOOM]
from the menu.
2. Place the projector so that it is parallel with the screen.
Ifthetopsideoftheimageisnotparallelwithitsbottomside,rotate
the projectorslightlytoadjustit. Iftheside oftheimageshows
outside the screen, move it to the center line of the screen.
Adjusting the focus (Focus ring)
• Rotatethefocusringuntilyouobtainthebestfocus.
Focus ring
(view from the bottom)

19
2. Projecting an Image (Basic Operation)
Adjusting the tilt (Tilt foot)
Adjustingtheleftandrighttilt.
1. Rotate the tilt foot to adjust the left and right tilt.
The tilt foot is equipped at the left and the right front bottom of the
projector.
Iftheprojectedimageistilted,rotateoneofthetiltfoottoadjust
the angle to project.
Ifkeystonedistortionisappeared,adjustiteitherbythe button
onthecabinetorkeystonebuttonontheremotecontrol
NOTE:
• Donotextendthetiltfootbeyonditsheightlimit(18mm/0.7inches).Doing
somaycausethetiltfoottocomeoutoftheprojector.
• Donotusethetilt-footforpurposesotherthanoriginallyintended.
Misusessuchasusingthetiltfoottocarryorhang(fromthewallorceiling)
theprojectorcancausedamagetotheprojector.
Up
Down

21
2. Projecting an Image (Basic Operation)
❻ Correcting Keystone Distortion [KEYSTONE]
Whentheprojectorisnotexactlyperpendiculartothescreen,keystonedistortionoccurs.Toovercomeit,youcanuse
the“Keystone”function,adigitaltechnologythatcanadjustforkeystone-typedistortion,resultinginacrisp,square
image.
Thefollowingprocedureexplainshowtousethe[KEYSTONE]screenfromthemenutocorrecttrapezoidaldistor-
tions.
Whentheprojectorisplaceddiagonallytothescreen,
Whentheprojectorissetupatanangleinrelationtothescreen,adjusttheHorizontaloptionoftheKeystonemenu
sothatthetopandbottomofsidesoftheprojectedimageareparallel.
1. Press the button on the projector cabinet.▼
The Keystone screen will be displayed on the screen.
• PresstheKEYSTONEbuttonwhenusingtheremotecontrol.
• SeepageforPINCUSHION.
• SeepageforCORNERSTONE.
• SeepageforRESET.
2. Press the ▼buttontoselect[VERTICAL]andthenusethe◀ or ▶
so that the left and right sides of the projected image are paral-
lel.
* Adjusttheverticalkeystonedistortion.
Projected area
Screen frame
3. Align the left (or right) side of the screen with the left (or right)
side of the projected image.
• Usetheshortersideoftheprojectedimageasthebase.
• Intherightexample,usetheleftsideasthebase.
Align left side

22
2. Projecting an Image (Basic Operation)
4. Press the ▲buttontoselect[HORIZONTAL]andthenusethe◀
or so that the top and bottom sides of the projected image are ▶
parallel.
• Adjustthehorizontalkeystonedistortion.
5. Repeat steps 2 and 4 to correct keystone distortion.
6. AftercompletingKeystonecorrection,presstheEXITbutton.
The Keystone screen will disappear.
• ToperformKeystonecorrectionagain,pressthe▼ button to display
the Keystone screen and repeat above steps 1 to 6.
Toreturnthekeystoneadjustmentstodefault:
1. Press the ▼buttontoselect[RESET]andpresstheENTERbutton.
2. Press the or ◀ ▶buttontoselect[YES]andpresstheENTERbutton.
The adjustments will be reset.
All the adjustments for all the five items will be reset at the same time.
• TheKEYSTONEfeaturecancauseanimagetobeslightlyblurredbecausethecorrectionismadeelectroni-
cally.
23
2. Projecting an Image (Basic Operation)
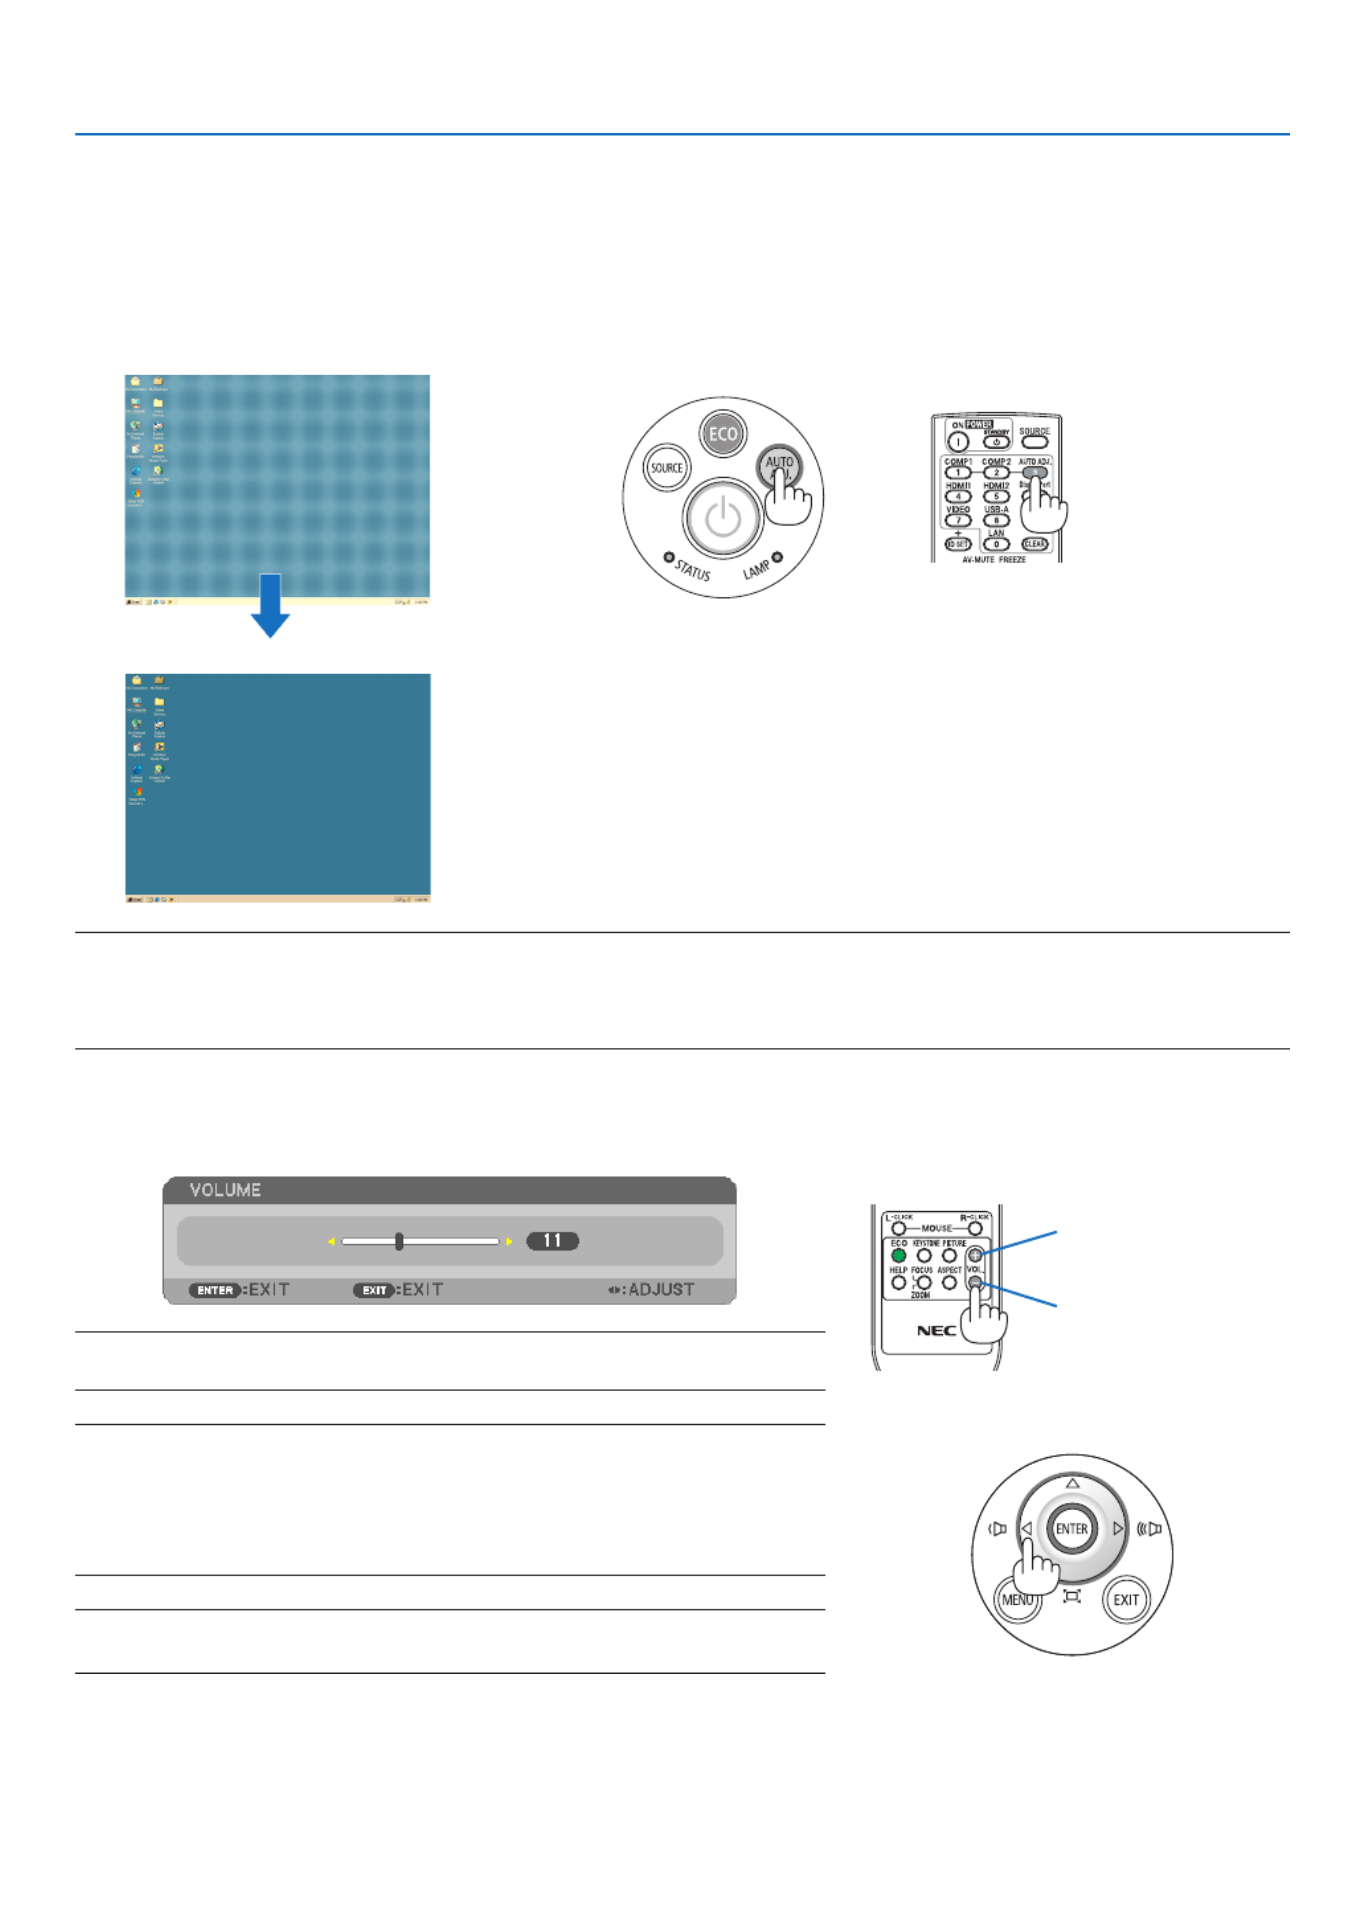
Optimizing Computer Signal Automatically
Adjusting the Image Using Auto Adjust
Optimizingacomputerimageautomatically.(COMPUTER)
PresstheAUTOADJ.buttontooptimizeacomputerimageautomatically.
Thisadjustmentmaybenecessarywhenyouconnectyourcomputerforthersttime.
[Poor picture]
[Normal picture]
NOTE:
Somesignalsmaytaketimetodisplayormaynotbedisplayedcorrectly.
• IftheAutoAdjustoperationcannotoptimizethecomputersignal,trytoadjust[HORIZONTAL],[VERTICAL],[CLOCK],and[PHASE]
manually.( page , )→81 82
Turning Up or Down Volume
Soundlevelfromthespeakeroraudiooutputcanbeadjusted.
TIP:Whennomenusappear,the and buttonsontheprojectorcabinetwork
asavolumecontrol.
NOTE:
• Volumecontrolisnotavailablewiththeorbuttonwhenanimageismagni-
edbyusingtheD-ZOOM(+)buttonorwhenthemenuisdisplayed.
• Volume control is not available with the or buttonwhenVIEWER is
used.
TIP:The[BEEP]soundvolumecannotbeadjusted.Toturnoffthe[BEEP]sound,
fromthemenu,select[SETUP] [OPTIONS(1)] [BEEP] [OFF].→ → →
Increasevolume
Decrease volume

24
2. Projecting an Image (Basic Operation)
Turning off the Projector
Toturnofftheprojector:
1. First, press the (POWER) button on the projector
cabinet or the STANDBY button on the remote con-
trol.
The confirmation message will be displayed.
2. Secondly, press the ENTER button or press the
(POWER) or the STANDBY button again.
The lamp will turn off and the projector will go into standby
mode. When in standby mode, the POWER indicator will
light red and the STATUS indicator will turn off when [NOR-
MAL] is selected for [STANDBY MODE].
CAUTION:
PartsoftheprojectormaybecometemporarilyheatediftheprojectoristurnedoffwiththePOWERbuttonorifthe
ACpowersupplyisdisconnectedduringnormalprojectoroperation.
Usecautionwhenpickinguptheprojector.
NOTE:
• Whilethepowerindicatorisblinkingblueinshortcycles,thepowercannotbeturnedoff.
• Youcannotturnoffthepowerfor60secondsimmediatelyafterturningitonanddisplayinganimage.
• DonotdisconnecttheACpowersupplytotheprojectorwithin10secondsofmakingadjustmentorsettingchangesandclosing
themenu.Doingsocancauselossofadjustmentsandsettings.
PowerOn
Steady blue light
Standby
Steady
red light

25
2. Projecting an Image (Basic Operation)
When Moving the Projector
Preparation:Makesurethattheprojectoristurnedoff.
1. Remove the cable cover.
(→ page )5
2. Unplug the power cord.
3. Disconnect any other cables.
• RemovetheUSBmemoryorthewirelessLANUnitifitisinsertedintotheprojector.
(→ page , )66 116

26
1 Turning off the Image and Sound
PresstheAV-MUTEbuttontoturnofftheimageandsoundforashortperiodoftime.
Pressagaintorestoretheimageandsound.
Theprojector’spower-savingfunctionwillwork10secondsaftertheimageisturned
off.
Asaresult,thelamppowerwillbereduced.
NOTE:
• Eventhoughtheimageisturnedoff,themenustillremainsonthescreen.
• SoundfromtheAUDIOOUTjack(Stereomini)canbeturnedoff.
• Evenwhenthepower-savingfunctionworks,thelamppowermayberestoredtoitsoriginal
leveltemporarily.
• Torestoretheimage,evenifyoupresstheAV-MUTEbuttonimmediatelyafterthestartof
thepower-savingfunction,thelampbrightnessmaynotberestoredtoitsoriginallevel.
Freezing a Picture
PresstheFREEZEbuttontofreezeapicture.Pressagaintoresumemotion.
NOTE:Theimageisfrozenbuttheoriginalvideoisstillplayingback.
• ThisfeaturecannotbeusedwhenUSB-Aisselectedastheinputterminal.
Magnifying a Picture
Youcanenlargethepictureuptofourtimes.
NOTE:
• Themaximummagnicationmaybelessthanfourtimesdependingonthesignal.
• ThisfeaturecannotbeusedwhenLAN,andUSB-Bisselectedastheinputterminal.
Todoso:
1. PresstheD-ZOOM(+)buttontomagnifythepicture.
To move the magnified image, use the , , or button.
3. Convenient Features

27
3. Convenient Features
Changing Eco Mode/Checking Energy-Saving Effect
Using Eco Mode [ECO MODE]
TheECOMODE(NORMALandECO)increaseslamplife,whileloweringpowerconsumptionandcuttingdownon
CO2 emissions.
Fourbrightnessmodesofthelampcanbeselected:[OFF],[AUTOECO],[NORMAL]and[ECO]modes.
[ECOMODE] Description StatusofLAMPindicator
[OFF] Thelampbrightnessis100%. Off
[AUTOECO] Lamppowerconsumptionwillbechangedbetween
[OFF] and [NORMAL] automatically according to
picturelevel
NOTE:Abrightgradationmaybelessvisibledepending
ontheimage.
[NORMAL] Lamppowerconsumption:approx.80%brightness.
The lamp life will extend by lowering the lamp
power.
SteadyGreen
light
[ECO] Lamppowerconsumption(approx.60%brightness).
The lamp life will extend longer than the one on
NORMALmodebycontrollingpowerappropriatefor
thelamp.Themaximumpowerbecomesequivalent
tothepowerinNORMAL.
Toturnonthe[ECOMODE],dothefollowing:
1. PresstheECOButtonontheremotecontroltodisplay[ECOMODE]screen.
2. PresstheECObuttonagaintoselectamodeyouwish.
• EachtimetheECObuttonispressed,thechoiceswillbechanged:
OFF AUTO ECO NORMAL ECO OFF→ → → →
TIP:
• TheleafsymbolatthebottomofthemenushowsthecurrentselectionofECOmode.
2. Press the button.
The area of the magnified image will be moved
3. PresstheD-ZOOM(−)button.
EachtimetheD-ZOOM(−)buttonispressed,theimageisreduced.
NOTE:
• Theimagewillbemagniedordemagniedatthecenterofthescreen.
• Displayingthemenuwillcancelthecurrentmagnication.

28
3. Convenient Features
NOTE:
• The[ECOMODE]canbechangedbyusingthemenu.
Select[SETUP] [GENERAL] [ECOMODE].→ →
• Thelampliferemainingandlamphoursusedcanbecheckedin[USAGETIME].Select[INFO.] [USAGETIME].→
• Theprojectorisalwaysin[NORMAL]for90secondsafterthelampisturnedonandwhilethePOWERindicatorisblinkinggreen.
Thelampconditionwillnotbeaffectedevenwhen[ECOMODE]ischanged.
• Afteralapseof1minutefromwhentheprojectordisplaysno-signalguidance,ablue,blackorlogoscreen,[ECOMODE]will
automaticallyswitchto[ECO].Theprojectorwillreturntoitsoriginalsettingonceasignalisaccepted.
• Iftheprojectorisoverheatedin[OFF]mode,theremaybeacasewherethe[ECOMODE]automaticallychangesto[NORMAL]
modetoprotecttheprojector.Whentheprojectorisin[NORMAL]mode,thepicturebrightnessdecreases.Whentheprojector
comesbacktonormaltemperature,the[ECOMODE]returnstoitsoriginalsetting.
Thermometersymbol[ ]indicatesthe[ECOMODE]isautomaticallysetto[NORMAL]modebecausetheinternaltemperature
istoohigh.
• Immediatelyafter[ECOMODE]ischangedfrom[ECO]tooneof[OFF],[AUTOECO],or[NORMAL],thelampbrightnessmay
decreasetemporarily.Thisisnotamalfunction.
Checking Energy-Saving Effect [CARBON METER]
Thisfeaturewillshowenergy-savingeffectintermsofCO2emissionreduction(kg)whentheprojector’s[ECOMODE]
issetto[AUTOECO],[NORMAL],or[ECO].Thisfeatureiscalledas[CARBONMETER].
Therearetwomessages:[TOTALCARBONSAVINGS]and[CARBONSAVINGS-SESSION].The[TOTALCARBON
SAVINGS]messageshowsthetotalamountofCO2emissionreductionfromthetimeofshipmentuptonow.Youcan
checktheinformationon[USAGETIME]from[INFO.]ofthemenu.( page )→99
The[CARBONSAVINGS-SESSION]messageshowstheamountofCO
2emissionreductionbetweenthe timeof
changingtoECOMODEimmediatelyafterthetimeofpower-onandthetimeofpower-off.The[CARBONSAVINGS-
SESSION]messagewillbedisplayedinthe[POWEROFF/AREYOUSURE?]messageatthetimeofpower-off.
TIP:
• TheformulaasshownbelowisusedtocalculatetheamountofCO 2emissionreduction.
AmountofCO2emissionreduction=(PowerconsumptioninOFFforECOMODE−PowerconsumptioninAUTOECO/NORMAL/
ECOforECOMODE)×CO2conversionfactor.*WhentheimageisturnedoffwiththeAV-MUTEbutton,theamountofCO2em-
missionreductionwillalsoincrease.
*CalculationforamountofCO2emissionreductionisbasedonanOECDpublication“CO2EmissionsfromFuelCombustion,2008
Edition”.
• The[TOTALCARBONSAVINGS]iscalculatedbasedonsavingsrecordedin15minutesintervals.
• Thisformulawillnotapplytothepowerconsumptionwhichisnotaffectedbywhether[ECOMODE]isturnedonoroff.

29
3. Convenient Features
❺ Using 4-Point Corner to Correct Keystone Distortion
[CORNERSTONE]
Usethe[CORNERSTONE]and[PINCUSHION]featurestocorrectkeystone(trapezoidal)distortiontomakethetop
orbottomandtheleftorrightsideofthescreenlongerorshortersothattheprojectedimageisrectangular.
Cornerstone
1. PresstheKEYSTONEbuttonwithnomenudisplayed.
The KEYSTONE screen will be displayed.
• PresstheKEYSTONEbuttonwhenusingtheremotecontrol.
• SeepageforPINCUSHION.
2. Press the ▼buttontoselect[CORNERSTONE]andpresstheENTERbutton.
The drawing shows the upper left icon ( ) is selected.
The CORNERSTONE screen will be displayed.
3. Project an image so that the screen is smaller than the area of the raster.
4. Pick up any one of the corners and align the corner of the image with a corner of the screen.
Projected image
The drawing shows the upper right corner.
TIP:Ifyouareadjusting[KEYSTONEHORIZONTAL],[KEYSTONEVERTICAL],[PINCUSHIONLEFT/RIGHT],or[PINCUSHION
TOP/BOTTOM],the[CORNERSTONE]itemwillnotbeavailable.Ifthishappens,resetthe[KEYSTONE]adjustments.
5. Use the ▲▼◀▶ button to select one icon ( ) which points in the direction you wish to move the projected ▲
image frame.
6. Press the ENTER button.

31
3. Convenient Features
Pincushion
1. PresstheKEYSTONEbuttonwithnomenudisplayed.
The KEYSTONE screen will be displayed.
• PresstheKEYSTONEbuttonwhenusingtheremotecontrol.
2. Press the buttontoselecteitherPINCUSHIONADJUSTMENTLEFT/RIGHTorPINCUSHIONADJUSTMENT
TOP/BOTTOM.
3. Press either or button to reform pincushion distortion.
4. PresstheEXITwhenPINCUSHIONadjustmentiscompleted.
NOTE:
• Evenwhentheprojectoristurnedon,thelastusedcorrectionvaluesareapplied.
• [PINCUSION]and[CORNERSTONE]correctionscancausetheimagetobeslightlyblurredbecausethecorrectionismadeelec-
tronically.
Resetthekeystoneadjustmenttotheinitialvalue
1. PresstheKEYSTONEbuttonwithnomenudisplayed.
ON the displayed KEYSTONE menu, set the cursor at RESET using the button and press ENTER button.
• Conrmationmessageisdisplayedon.

32
3. Convenient Features
2. Move the cursor onto YES using either or button and then press the ENTER.
NOTE:
• AlladjustedvaluessetintheKEYSTONEadjustmentareresettoinitialvalues
TIP:
AdjustablerangeoftheKEYSTONEandtheCORNERSTONE:
HorizontalDirection VerticalDirection
CORNERSTONE Approx.±10°(Max) Approx.±10°(Max)
KEYSTONE
Adjustablerangemaybenarrowerdependingoninputsignal.

33
3. Convenient Features
Preventing the Unauthorized Use of the Projector [SECURITY]
AkeywordcanbesetforyourprojectorusingtheMenutoavoidoperationbyanunauthorizeduser.Whenakeyword
isset,turningontheprojectorwilldisplaytheKeywordinputscreen.Unlessthecorrectkeywordisentered,thepro-
jectorcannotprojectanimage.
• The[SECURITY]settingcannotbecancelledbyusingthe[RESET]ofthemenu.
ToenabletheSecurityfunction:
1. Press the MENU button.
The menu will be displayed.
2. Press the buttontwicetoselect[SETUP]andpressthe buttonortheENTERbuttontoselect[GEN-
ERAL].
3. Press the buttontoselect[INSTALLATION].
4. Press the buttonthreetimestoselect[SECURITY]andpresstheENTERbutton.
The OFF/ON menu will be displayed.
5. Press the buttontoselect[ON]andpresstheENTERbutton.
The[SECURITYKEYWORD]screenwillbedisplayed.
6. Type in a combination of the four buttons and press the ENTER button.
NOTE:Akeywordmustbe4to10digitsinlength.
The[CONFIRMKEYWORD]screenwillbedisplayed.

34
3. Convenient Features
7. Type in the same combination of buttons and press the ENTER button.
The confirmation screen will be displayed.
8. Select[YES]andpresstheENTERbutton.
TheSECURITYfunctionhasbeenenabled.
Toturnontheprojectorwhen[SECURITY]isenabled:
1. Press the POWER button.
Theprojectorwillbeturnedonanddisplayamessagetotheeffectthattheprojectorislocked.
2. Press the MENU button.
3. Type in the correct keyword and press the ENTER button. The projector will display an image.
NOTE:Thesecuritydisablemodeismaintaineduntilthemainpoweristurnedofforunpluggingthepowercord.

35
3. Convenient Features
TodisabletheSECURITYfunction:
1. Press the MENU button.
The menu will be displayed.
2.Select[SETUP] [INSTALLATION] [SECURITY]andpresstheENTERbutton.→ →
The OFF/ON menu will be displayed.
3. Select[OFF]andpresstheENTERbutton.
TheSECURITYKEYWORDscreenwillbedisplayed.
4. Type in your keyword and press the ENTER button.
Whenthecorrectkeywordisentered,theSECURITYfunctionwillbedisabled.
NOTE:Ifyouforgetyourkeyword,contactyourdealer.Yourdealerwillprovideyouwithyourkeywordinexchangeforyourrequest
code.YourrequestcodeisdisplayedintheKeywordConrmationscreen.Inthisexample[NB52-YGK8-2VD6-K585-JNE6-EYA8]
isarequestcode.

36
3. Convenient Features
Using the Computer Cable (VGA) to Operate the
Projector (Virtual Remote Tool)
Usingtheutilitysoftware“VirtualRemoteTool”includedonthecompanionNECProjectorCD-ROM,VirtualRemote
screen(ortoolbar)canbedisplayedonyourcomputerscreen.
Thiswillhelpyouperformoperationssuchasprojector’spoweronoroffandsignalselectionviathecomputercable
(VGA),serialcable,orLANconnection.OnlyviaserialorLANconnectionitisalsousedtosendanimagetothe
projectorandregisteritasthelogodataoftheprojector.Afterregisteringit,youcanlockthelogotopreventitfrom
changing.
ControlFunctions
PowerOn/Off,signalselection,picturefreeze,picturemute,audiomute,Logotransfertotheprojector,andremote
controloperationonyourPC.
VirtualRemotescreen Toolbar
ThissectionprovidesanoutlineofpreparationforuseofVirtualRemoteTool.
ForinformationonhowtouseVirtualRemoteTool,seeHelpofVirtualRemoteTool.( page )→41
Step1:InstallVirtualRemoteToolonthecomputer.( page )→37
Step2:Connecttheprojectortothecomputer.( page )→39
Step3:StartVirtualRemoteTool.( page )→40
TIP:
• VirtualRemoteToolcanbeusedwithaLANandaserialconnection.USBconnectionisnotsupportedbyVirtualRemoteTool.
• ForupdateinformationonVirtualRemoteTool,visitourwebsite:
http://www.nec-display.com/dl/en/index.html

37
3. Convenient Features
NOTE:
• When[COMPUTER]isselectedfromyoursourceselection,theVirtualRemotescreenorthetoolbarwillbedisplayedaswellas
yourcomputerscreen.
• Usethesuppliedcomputercable(VGA)toconnecttheCOMPUTERINterminaldirectlywiththemonitoroutputterminalofthe
computertouseVirtualRemoteTool.
Usingaswitcherorothercablesthanthesuppliedcomputercable(VGA)maycausefailureinsignalcommunication.
VGAcableterminal:
PinNos.12and15arerequiredforDDC/CI.
• VirtualRemoteToolmaynotworkdependingonyourcomputer’sspecicationsandversionofgraphicadaptersordrivers.
• TorunVirtualRemoteToolonWindows8.1,Windows8andWindowsXP,“Microsoft.NETFrameworkVersion2.0”isrequired.
TheMicrosoft.NETFrameworkVersion2.0,3.0or3.5isavailablefromMicrosoft’swebpage.Downloadandinstallitonyour
computer.
• Logodata(graphics)thatcanbesenttotheprojectorwithVirtualRemoteToolhasthefollowingrestrictions:
(OnlyviaserialorLANconnection)
- Filesize:Lessthan1MB
- Imagesize(resolution):
UM361X/UM301X:Horizontal1024×vertical768dotsorless
UM351W/UM301W:Horizontal1280×vertical800dotsorless
- Numberofcolors:256colorsorless
• Toputthedefault"NEClogo"backinthebackgroundlogo,youneedtoregisteritasthebackgroundlogobyusingtheimagele
(UM351W/UM301W:/Logo/necpj_bbwx.bmp,UM361X/UM301X:/Logo/necpj_bb_x.bmp)incluldedonthesuppliedNECProjector
CD-ROM.
TIP:
• Theprojector’s COMPUTERINterminalsupportsDDC/CI (DisplayData ChannelCommand Interface).DDC/CIisa standard
interfaceforbidirectionalcommunicationbetweendisplay/projectorandcomputer.
Step 1: Install Virtual Remote Tool on the computer
NOTE:
• ToinstallVirtualRemoteTool,theWindowsuseraccountmusthave“Administrator”privilege(Windows8.1,Windows8,Windows
7,andWindowsVista)or"ComputerAdministrator"privilege(WindowsXP).
• ExitallrunningprogramsbeforeinstallingVirtualRemoteTool.Ifanotherprogramisrunning,theinstallationmaynotbecom-
pleted.
1 InserttheaccompanyingNECProjectorCD-ROMintoyourCD-ROMdrive.
The menu window will be displayed.

38
3. Convenient Features
TIP:
Ifthemenuwindowwillnotbedisplayed,trythefollowingprocedure.
ForWindows7
1. Click“start”onWindows.
2. Click“AllPrograms” “Accessories” “Run”.→ →
3. Type your CD-ROM drive name (example:“Q:\”) and“LAUNCHER.EXE” in“Name”. (example: Q:\
LAUNCHER.EXE)
4. Click“OK”.
The menu window will be displayed.
2 Click“InstallVirtualRemoteTool”onthemenuwindow.
The installation will start.
When the installation is complete, the Welcome window will be displayed.
3 Click“Next”.
“ENDUSERLICENSEAGREEMENT”screenwillbedisplayed.
Read“ENDUSERLICENSEAGREEMENT”carefully.
4 Ifyouagree,click“Iacceptthetermsinthelicenseagreement”andthenclick“Next”.
• Followtheinstructionsontheinstallerscreenstocompletetheinstallation.
• Whentheinstallationiscomplete,youwillreturntothemenuwindow.

39
3. Convenient Features
TIP:
UninstallingVirtualRemoteTool
Preparation:
ExitVirtualRemoteToolbeforeuninstalling.TouninstallVirtualRemoteTool,theWindowsuseraccountmusthave
“Administrator” privilege (Windows 8.1, Windows 8,Windows 7 andWindowsVista) or “Computer Administrator”
privilege(WindowsXP).
•ForWindows8.1,Windows8,Windows7andWindowsVista
1 Click“Start”andthen“ControlPanel”.
The Control Panel window will be displayed.
2 Click“Uninstallaprogram”under“Programs”
The“ProgramsandFeatures”windowwillbedisplayed.
3 SelectVirtualRemoteToolandclickit.
4 Click“Uninstall/Change”or“Uninstall”.
•Whenthe“UserAccountControl”windowsisdisplayed,click“Continue”.
Follow the instructions on the screens to complete the uninstallation.
•ForWindowsXP
1 Click“Start”andthen“ControlPanel”.
The Control Panel window will be displayed.
2 Double-click“Add/RemovePrograms”.
The Add / Remove Programs window will be displayed.
3 ClickVirtualRemoteToolfromthelistandthenclick“Remove”.
Follow the instructions on the screens to complete the uninstallation.
Step 2: Connect the projector to the computer
1 Usethesuppliedcomputercable(VGA)toconnecttheCOMPUTERINterminaloftheprojectordirectly
with the monitor output terminal of the computer.
2 ConnectthesuppliedpowercordtotheACINoftheprojectorandthewalloutlet.
The projector is in the standby condition.
ACInput
Supplied computer cable (VGA)
→ To wall outlet
Power cord (supplied)
TIP:
• WhenVirtualRemoteToolstartsforthersttime,“EasySetup”windowwillbedisplayedtonavigateyourconnections.

40
3. Convenient Features
Step 3: Start Virtual Remote Tool
Startusingtheshortcuticon
• Double-clicktheshortcuticon on the Windows Desktop.
StartfromtheStartmenu
• Click[Start]→[AllPrograms]or[Programs]→[NECProjectorUserSupportware] [VirtualRemoteTool]→
→[VirtualRemoteTool].
WhenVirtualRemoteToolstartsforthersttime,“EasySetup”windowwillbedisplayed.
Follow the instructions on the screens
When“EasySetup”iscompleted,theVirtualRemoteToolscreenwillbedisplayed.
NOTE:
• When[NORMAL]isselectedfor[STANDBYMODE]fromthemenu,theprojectorcannotbeturnedonviathecomputercable
(VGA)ornetwork(wiredLAN/wirelessLAN)connection.
TIP:
• TheVirtualRemoteToolscreen(orToolbar)canbedisplayedwithoutdisplaying“EasySetup”window.
Todoso,clicktoplaceacheckmarkfor“ DonotuseEasySetupnexttime”onthescreenatStep6in“EasySetup”.
41
3. Convenient Features
ExitingVirtualRemoteTool
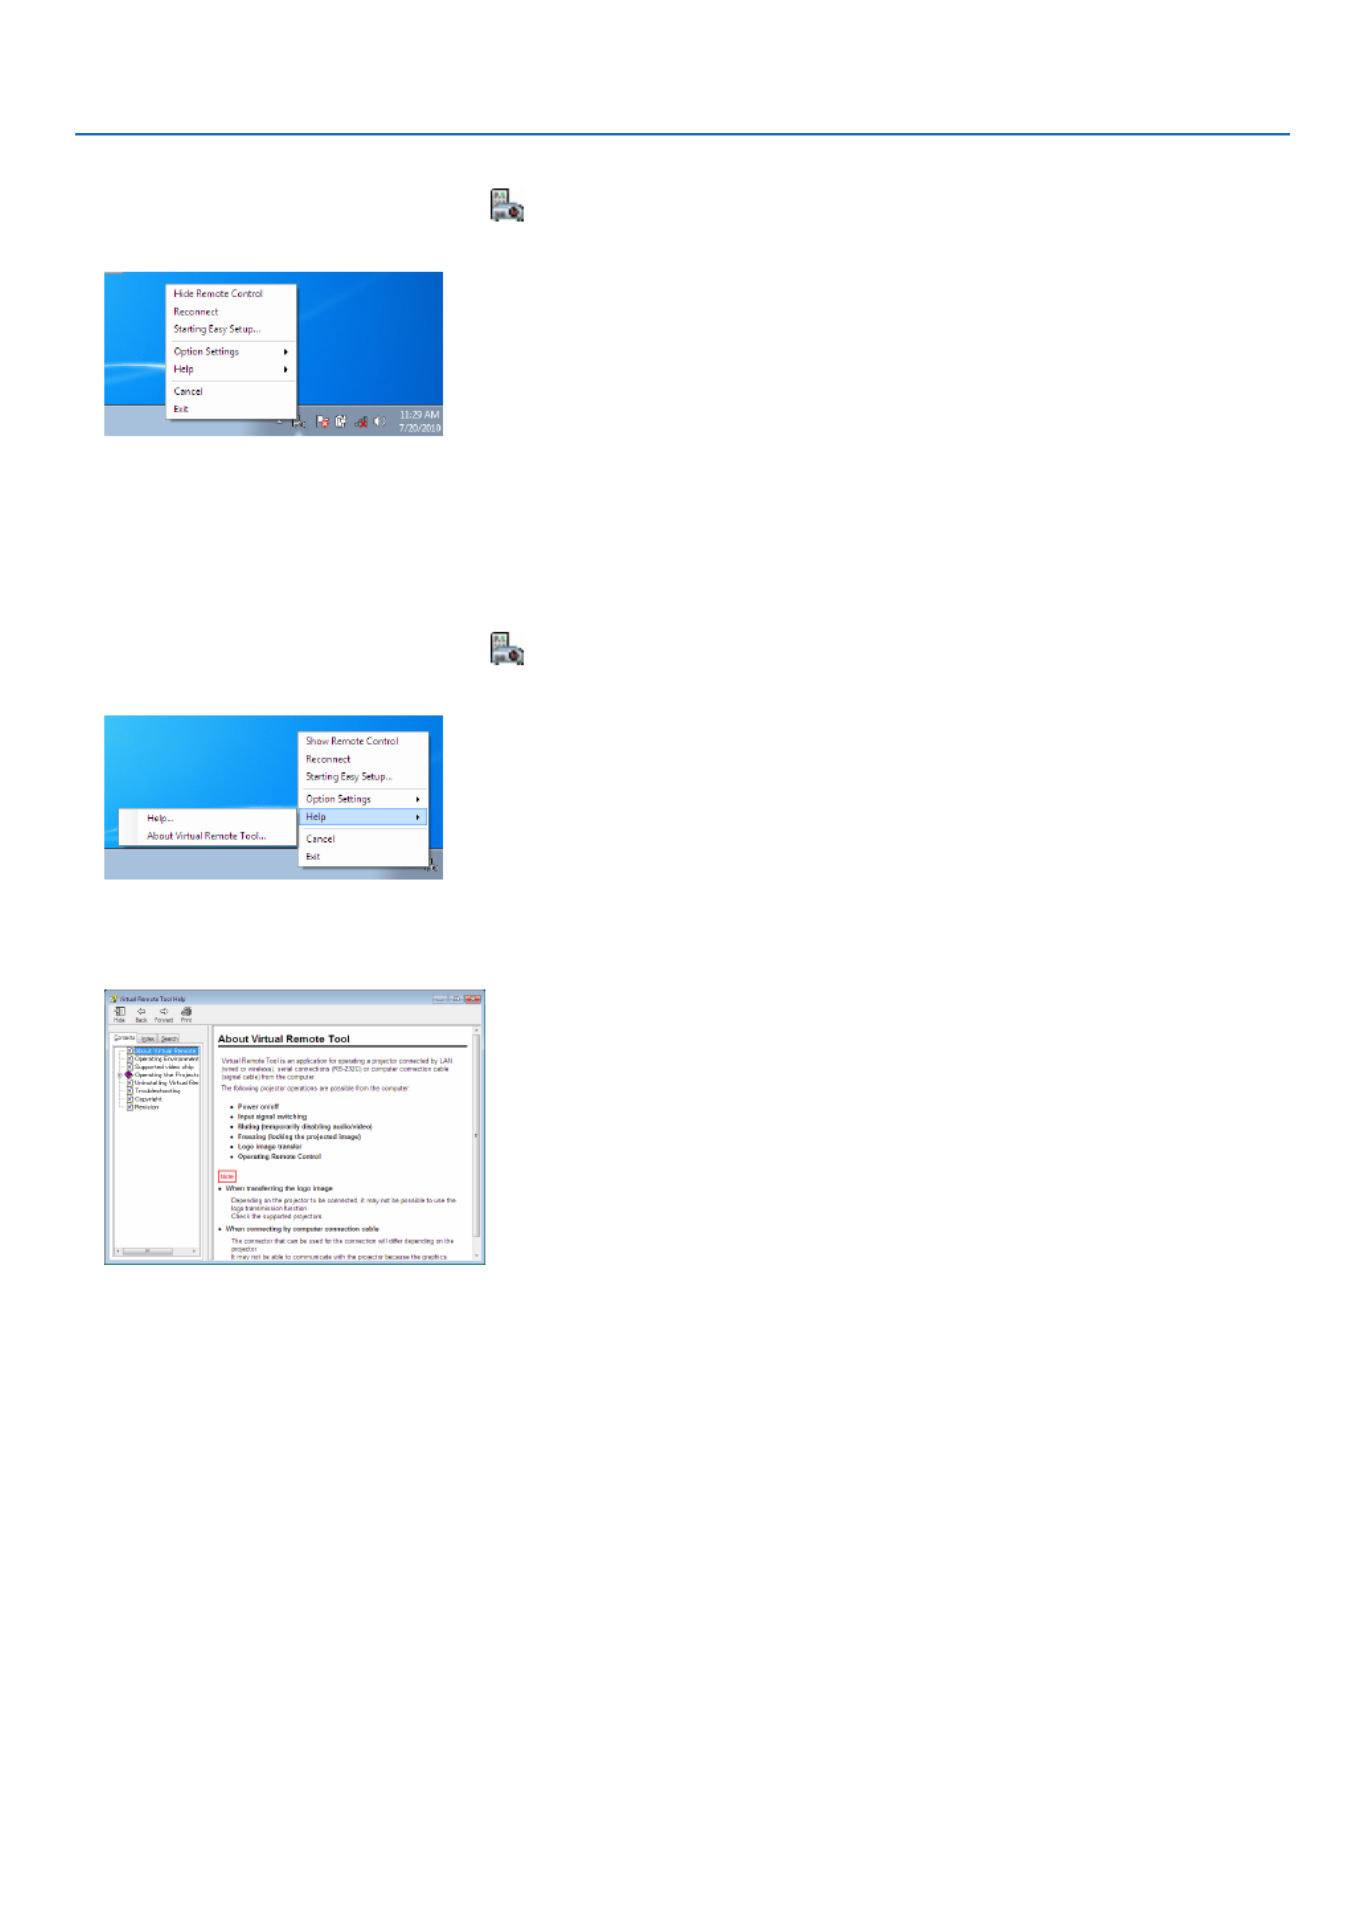
1 ClicktheVirtualRemoteToolicon on the Taskbar.
The pop-up menu will be displayed.
2 Click“Exit”.
The Virtual Remote Tool will be closed.
ViewingthehelpleofVirtualRemoteTool
•Displayingthehelpleusingthetaskbar
1 ClicktheVirtualRemoteToolicon onthetaskbarwhenVirtualRemoteToolisrunning.
The pop-up menu will be displayed.
2. Click“Help”.
The Help screen will be displayed.
•DisplayingthehelpleusingtheStartMenu.
1. Click“Start” “Allprograms” or“Programs” “NECProjectorUserSupportware” “VirtualRemote→ → →
Tool” andthen“VirtualRemoteToolHelp”inthisorder.→
The Help screen will be displayed.

42
3. Convenient Features
Operating Your Computer’s Mouse Functions from the
Projector’s Remote Control via the USB Cable (Remote Mouse
Function)
Thebuilt-inremotemousefunctionenablesyoutooperateyourcomputer’smousefunctionsfromthesuppliedremote
controlwhentheprojectorisconnectedtoacomputerviaacommerciallyavailableUSBcable(compatiblewithUSB
2.0specications).
TheRemoteMousefunctionworksfortheCOMPUTERinputwhilethecomputerscreenisdisplayed.
TheRemoteMousefunctionwillnotworkwhileyoufreezeormagnifyanimage.
• UsingtheUSBcabletoconnecttheprojectorandthecomputerwillalsostartUSBDisplayfunction.
USB cable (not supplied)
NOTE:
• AUSBcablemustsupporttheUSB2.0Specications.
• Themousefunctioncanbeusedwiththefollowingoperatingsystems:
Windows7,WindowsXP,orWindowsVista
• InSP2orolderversionofWindowsXP,ifthemousecursorwillnotmovecorrectly,dothefollowing:
CleartheEnhancepointerprecisioncheckboxunderneaththemousespeedsliderintheMousePropertiesdialogbox[Pointer
Optionstab].
• Waitatleast5secondsafterdisconnectingtheUSBcablebeforereconnectingitandviceversa.Thecomputermaynotidentify
theUSBcableifitisrepeatedlyconnectedanddisconnectedinrapidintervals.
• ConnecttheprojectortothecomputerwithaUSBcableafterstartingthecomputer.Failuretodosomayfailtostartthecom-
puter.
Operatingyourcomputer’smousefromtheremotecontrol
Youcanoperateyourcomputer’smousefromtheremotecontrol.
PAGE / Button ��������������������������� scrolls the viewing area of the window or to move to the previous or next slide in PowerPoint
on your computer�
Buttons ������������������������������moves the mouse cursor on your computer�
MOUSE L-CLICK/ENTER Button ������works as the mouse left button�
MOUSE R-CLICK Button ������������������works as the mouse right button�
NOTE:
• Whenyouoperatethecomputerusingthe or buttonwiththemenudisplayed,boththemenuandthemousepointer
willbeaffected.Closethemenuandperformthemouseoperation.
TIP:YoucanchangethePointerspeedontheMousePropertiesdialogboxontheWindows.Formoreinformation,seetheuser
documentationoronlinehelpsuppliedwithyourcomputer.

43
3. Convenient Features
Projecting Your Computer’s Screen Image from the
Projector via the USB Cable (USB Display)
UsingacommerciallyavailableUSBcable(compatiblewithUSB2.0specications)toconnectthecomputerwiththe
projectorallowsyoutosendyourcomputerscreenimagetotheprojectorfordisplaying.PowerOn/Offandsource
selectionoftheprojectorcanbedonefromyourcomputerwithoutconnectingacomputercable(VGA).
NOTE:
• TomakeUSB-BavailableonWindowsXP,theWindowsuseraccountmusthave“Administrator”privilege.
• USBDisplayusesfunctionsofImageExpressUtilityLitecontainedonNECProjectorCD-ROM( page ).→56
StartingUSBDisplay,however,willnotinstallImageExpressUtilityLiteonyourcomputer.ThisisbecauseUSBDisplayexecutes
theprojector’sprogramonly.
• USBDisplaywillnotworkin[NORMAL]of[STANDBYMODE].( page )→94
• WhenUSBDisplayisused,thesoundisoutputfromtheCOMPUTERAUDIOINMiniJack(StereoMini).Imageandsoundmay
notbesynchronized.
1. Start the computer.
2. Connecttheprojector’spowercordtothewalloutletandputtheprojectorintostandbycondition.
3. Use the USB cable to connect the computer with the projector.
USB cable (not supplied)
→ To wall outlet
Power cord (supplied)
Themessage“Theprojectorisinstandbymode.Connectit?”willbedisplayedonthecomputerscreen.
• ThecontrolwindowofImageExpressUtilityLitewillbedisplayedonthetopofthescreen.
NOTE: Dependingon thecomputer setting,the“AutoPlay”windowmay bedisplayedwhen the
computerdetectstheconnection tothe projector.If thishappens,clickthe “StartUSB Display”
window.
4. Click“Yes”.
Theprojectorwillturnonandthemessage“Theprojectorisgettingready.Pleasewait.”willbedisplayedonthe
computer screen. This message will disappear in a few seconds.
44
3. Convenient Features
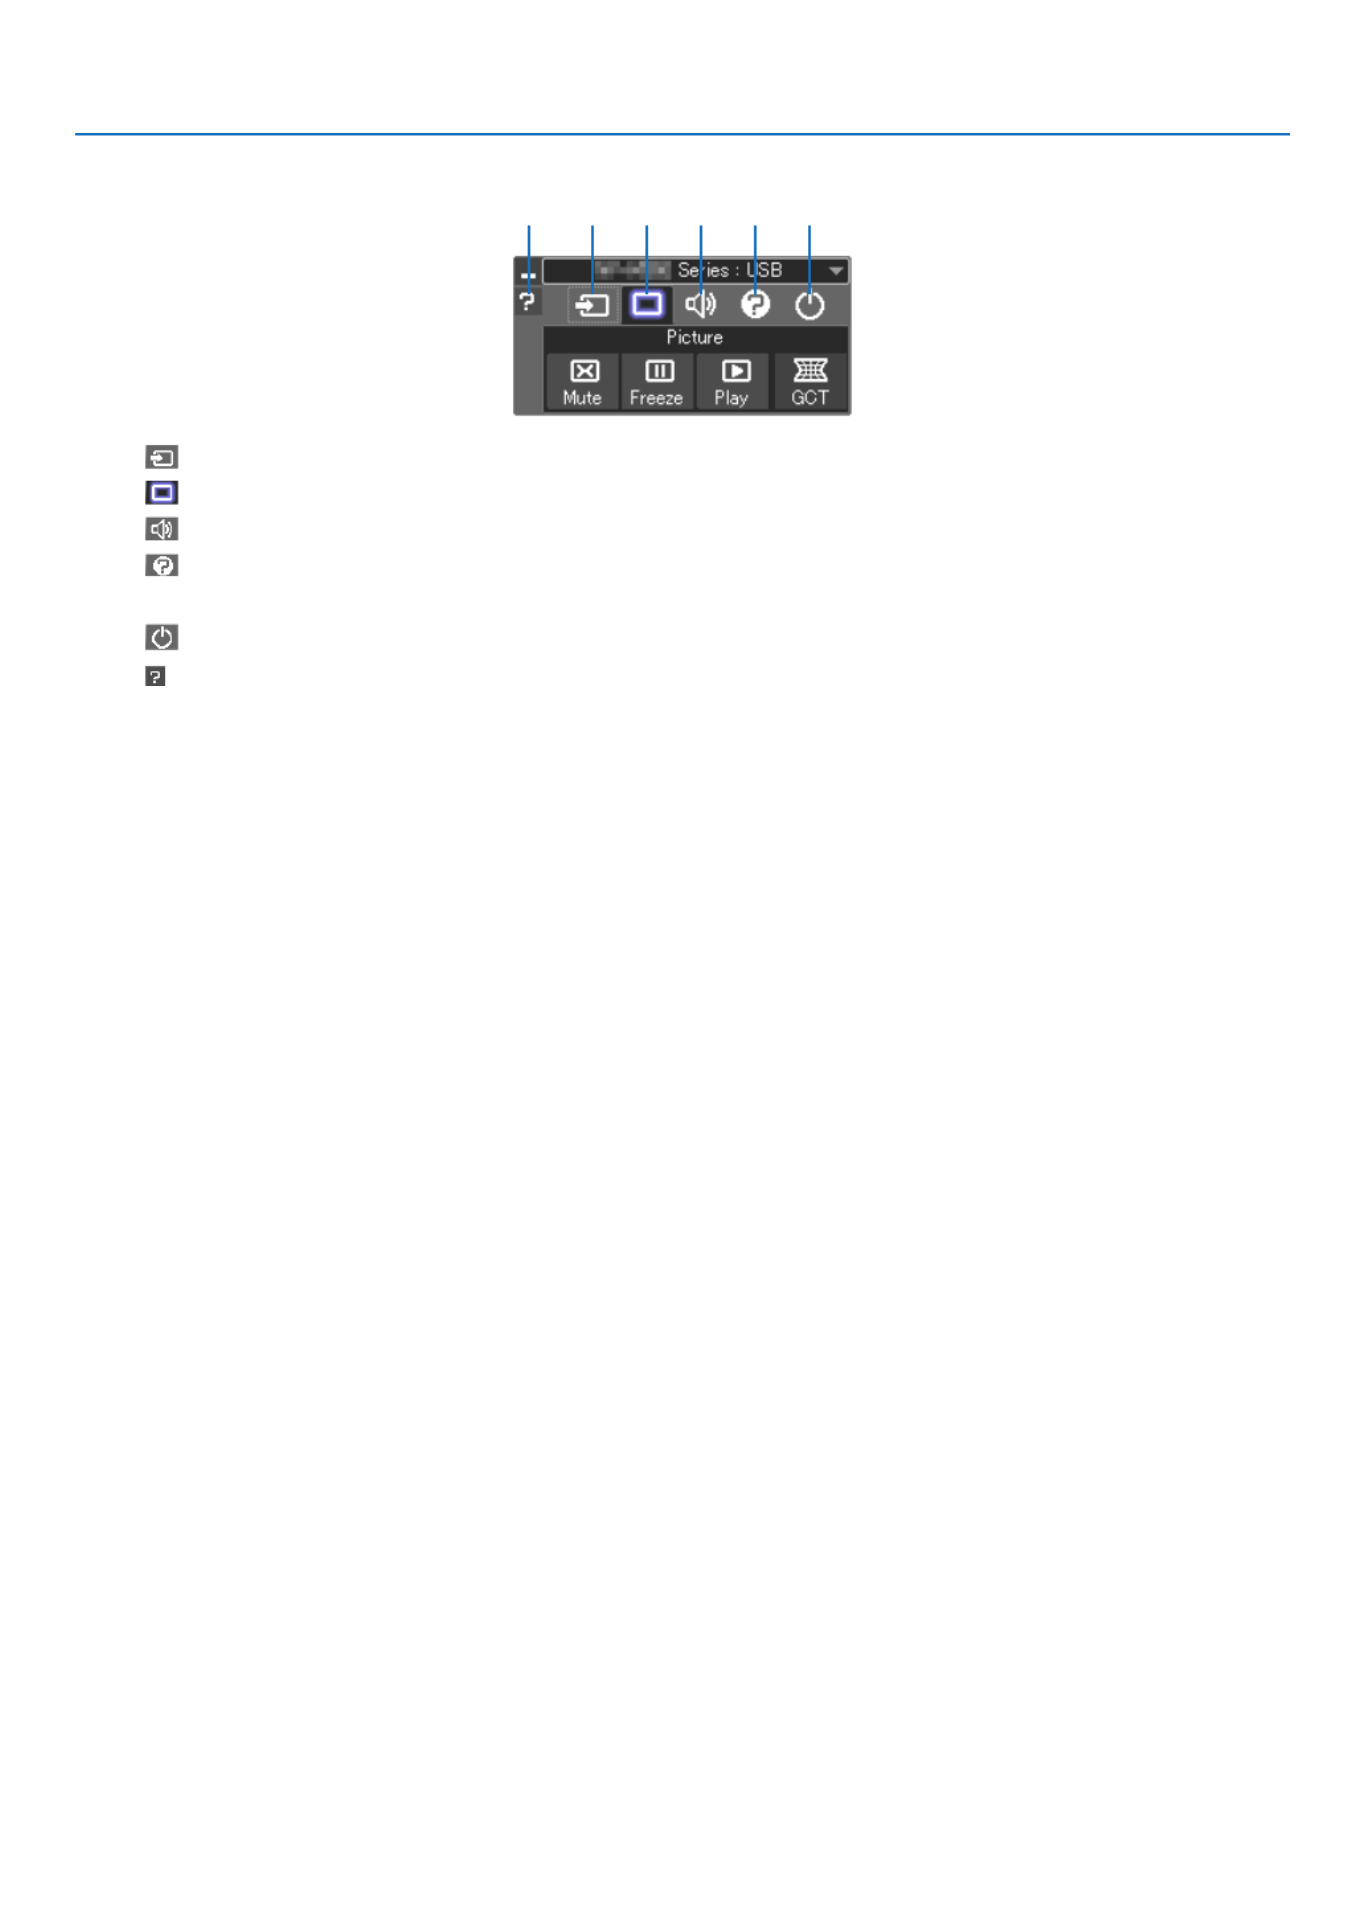
5. Operate the control window.
(1) (Source) ����� Selects an input source of the projector�
(2) (Picture) ���� Turns on or off AV-MUTE (Picture mute), and turns on or off FREEZE (Freeze a picture)�
(3) (Sound) ����� Turns on or off AV-MUTE (Sound mute), play the sound and turns up or down the volume�
(4) (Others) ����� Uses “Update”, “HTTP Server”*, “Settings” and “Information”�
* The HTTP Server cannot be selected when a USB cable is connected�
(5) (Exit) ���������� Exit Image Express Utility Lite� You can also turn off the projector at the same time�
(6) (Help) ����������� Displays the help of Image Express Utility Lite�
(1) (2) (3) (4) (5)(6)

45
3. Convenient Features
Controlling the Projector by Using an HTTP Browser
Overview
TheHTTPServerfunctionprovidessettingsandoperationsfor:
1. Settingforwired/wirelessnetwork(NETWORKSETTINGS)
To use wireless LAN connection, the optional USB Wireless LAN Unit is required. ( page )→115
To use wired/wireless LAN connection, connect the projector to the computer with a commercially available LAN
cable. ( page )→114
2. SettingAlertMail(ALERTMAIL)
Whentheprojectorisconnectedtoawired/wirelessnetwork,lampreplacetimeorerrormessageswillbesentvia
e-mail.
3. Operating the projector
Power on/off, selecting input, volume control and picture adjustments are possible.
4. SettingPJLinkPASSWORDandAMXBEACON
Thisdeviceuses“JavaScript”and“Cookies”andthebrowsershouldbesettoacceptthesefunctions.Thesetting
methodwillvarydependingontheversionofbrowser.Pleaserefertothehelplesandtheotherinformationprovided
inyoursoftware.
TwowaysofaccesstotheHTTPserverfunctionareavailable:
• StarttheWebbrowseronthecomputerviathenetworkconnectedtotheprojectorandenterthefollowing
URL :
http://<theprojector’sIPaddress>/index.html
• UseImageExpressUtilityLitecontainedonthesuppliedNECProjectorCD-ROM.
TIP:ThefactorysettingIPaddressis[DHCPON].
NOTE:
• Tousetheprojectorinanetwork,consultwithyournetworkadministratoraboutnetworksettings.
• Thedisplay’sorbutton’sresponsecanbesloweddownoroperationmaynotbeaccepteddependingthesettingsofyournet-
work.
Shouldthishappen,consultyournetworkadministrator.Theprojectormaynotrespondifitsbuttonsarerepeatedlypressedin
rapidintervals.Shouldthishappen,waitamomentandrepeat.Ifyoustillcan’tgetanyresponse,turnoffandbackontheprojec-
tor.
• IfthePROJECTORNETWORKSETTINGSscreendoesnotappearinthewebbrowser,presstheCtrl+F5keystorefreshyourweb
browser(orclearthecache).
Preparation before Use
ConnecttheprojectortoacommerciallyavailableLANcablebeforeengaginginbrowseroperations.( page )→114
Operationwithabrowserthatusesaproxyservermaynotbepossibledependingonthetypeofproxyserverandthe
settingmethod.Althoughthetypeofproxyserverwillbeafactor,itispossiblethatitemsthathaveactuallybeenset
willnotbedisplayeddependingontheeffectivenessofthecache,andthecontentssetfromthebrowsermaynotbe
reectedinoperation.Itisrecommendedthataproxyservernotbeusedunlessitisunavoidable.
46
3. Convenient Features
Handling of the Address for Operation via a Browser
RegardingtheactualaddressthatisenteredfortheaddressorenteredtotheURLcolumnwhenoperationofthepro-
jectorisviaabrowser,thehostnamecanbeusedasitiswhenthehostnamecorrespondingtotheIPaddressofthe
projectorhasbeenregisteredtothedomainnameserverbyanetworkadministrator,orthehostnamecorresponding
totheIPaddressoftheprojectorhasbeensetinthe“HOSTS”leofthecomputerbeingused.
Example1:Whenthehostnameoftheprojectorhasbeensetto“pj.nec.co.jp”,accessisgainedtothenetwork
settingbyspecifying
http://pj.nec.co.jp/index.html
fortheaddressortheentrycolumnoftheURL.
Example2:WhentheIPaddressoftheprojectoris“192.168.73.1”,accessisgainedtothenetworksettingby
specifying
http://192.168.73.1/index.html
fortheaddressortheentrycolumnoftheURL.
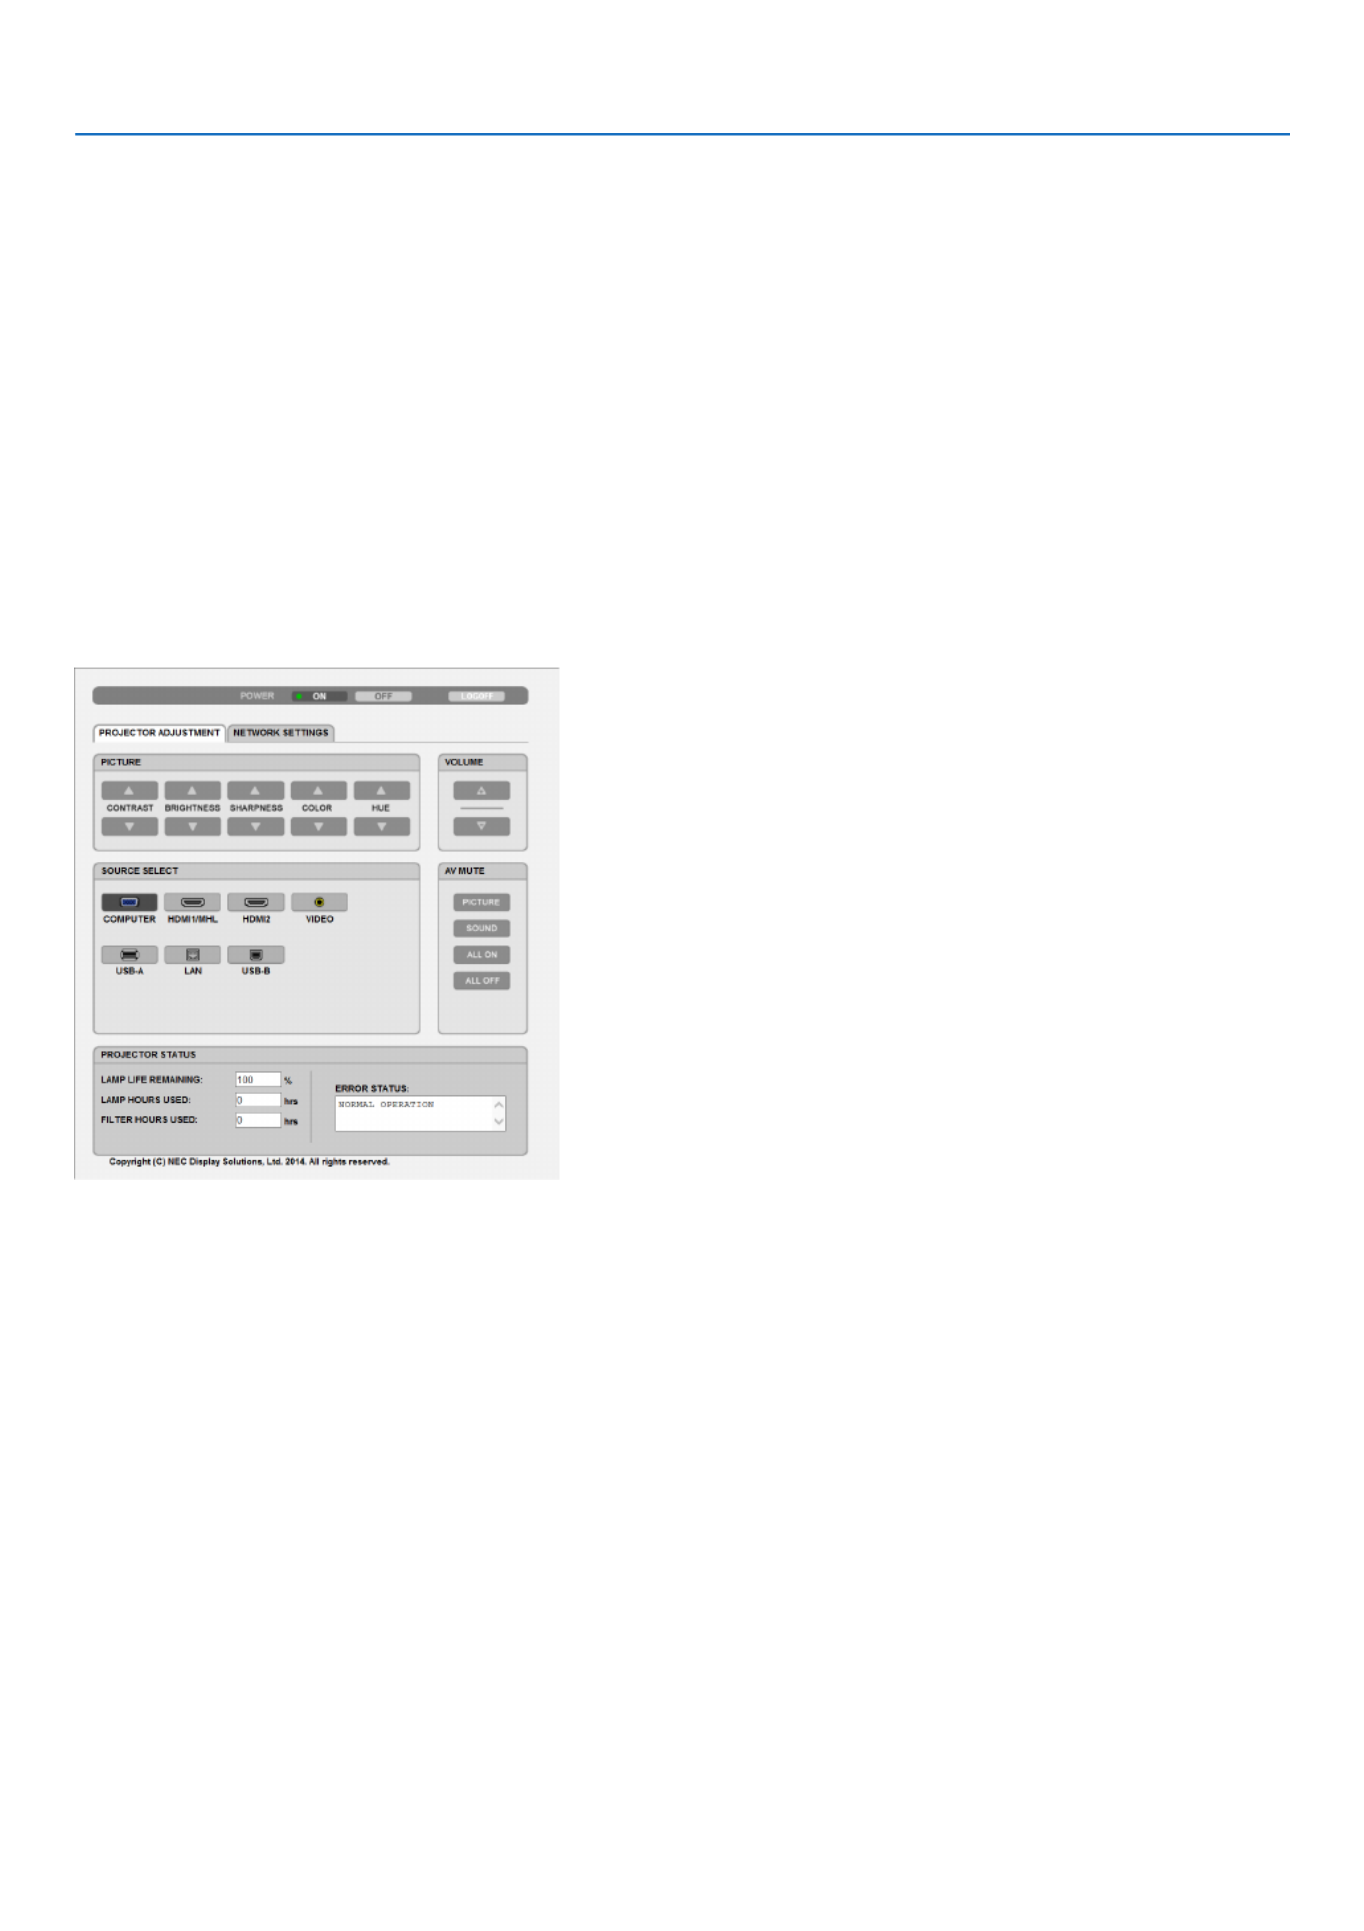
PROJECTOR ADJUSTMENT
POWER:Thiscontrolsthepoweroftheprojector.
ON ������������������������� Power is switched on�
OFF ������������������������ Power is switched off�
VOLUME:Thiscontrolsthevolumeoftheprojector.
��������������������������� Increases the volume adjustment value�
��������������������������� Decreases the volume adjustment value�
AV-MUTE:Thiscontrolsthemutefunctionoftheprojector.
PICTURE ON ���������� Mutes the video�
PICTURE OFF ��������� Cancels the video muting�
SOUND ON ������������ Mutes the audio�
SOUND OFF ����������� Cancels the audio muting�
ALL ON ������������������ Mutes each of the video, and audio functions�
ALL OFF ����������������� Cancels the muting of each of the video, and audio functions�

49
3. Convenient Features
SITESURVEY DisplaysalistofavailableSSIDsforwirelessLANonsite.SelectanSSIDwhichyou
can access.
SECURITYTYPE Turnonorofftheencryptionmodeforsecuretransmission.Whenturnontheencryp-
tionmode,setWEPkeyorencryptedkey.
DISABLE Willnotturnontheencryptionfeature.Yourcommunications
maybemonitoredbysomeone.
WEP64bit Uses64-bitdatalengthforsecuretransmission.
WEP128bit Uses128-bitdatalengthforsecuretransmission.Thisoptionwill
increaseprivacyandsecuritywhencomparedtouseof64-bit
datalengthencryption.
WPAPSK-TKIP/
WPAPSK-AES/
WPA2PSK-TKIP/
WPA2PSK-AES
TheseoptionsprovidestrongersecuritythanWEP.
NOTE:
• TheWEPsettingsmustbethesameascommunicationdevicessuchasPCoraccesspointin
yourwirelessnetwork.
• WhenyouuseWEP,yourimagetransmissionspeedwillslowdown.
INDEX Selectencryptionkeywhenselecting[WEP64bit]or[WEP128bit]in[SECURITY
TYPE].
WEP key is xed at "1" eitherWEP64bit orWEP128bit is selected as SECURITY
TYPE.
KEY Whenselecting[WEP64bit]or[WEP128bit]in[SECURITYTYPE]:
EnterWEPkey.
Select Characters(ASCII) Hexadecimaldigit(HEX)
WEP64bit Upto5characters Upto10characters
WEP128bit Upto13characters Upto26characters
When selecting [WPA PSK-TKIP], [WPA PSK-AES], [WPA2 PSK-TKIP] or [WPA2
PSK-AES]:
Enterencryptionkey.Keylengthmustbe8orgreaterand63orless.
•NAME
PROJECTORNAME Enteranameforyourprojectorsothatyourcomputercanidentify theprojector.A
projectornamemustbe16charactersorless.
TIP:Projectornamewillnotbeaffectedevenwhen[RESET]isdonefromthemenu.
HOSTNAME Enterthehostnameofthenetworkconnectedtotheprojector.Ahostnamemustbe
15 or less.
DOMAINNAME Enterthe domainnameofthenetworkconnectedtotheprojector.Adomainname
must be 60 characters or less.

50
3. Convenient Features
•ALERTMAIL
ALERTMAIL(English
only)
Thisoptionwillnotifyyourcomputeroflampreplacetimeorerrormessagesviae-mail
whenusingwirelessorwiredLAN.
PlacingacheckmarkwillturnontheAlertMailfeature.
ClearingacheckmarkwillturnofftheAlertMailfeature.
Sampleofamessagetobesentfromtheprojector:
Thelampandltersareattheendofitsusablelife.Pleasereplacethelampand
lters.
ProjectorName:NECProjector
LampHoursUsed:100[H]
SENDER’SADDRESS Entersender’saddress.
SMTPSERVERNAME EntertheSMTPservernametobeconnectedtotheprojector.
RECIPIENT’SADDRESS
1,2,3
Enteryourrecipient’saddress.Uptothreeaddressescanbeentered.
TESTMAIL Sendatestmailtocheckwhetheryoursettingsarecorrectornot
NOTE:
• Ifyouexecuteatest,youmaynotreceiveanAlertmail.Shouldthishappen,checkifnetwork
settingsarecorrect.
• Ifyouenteredanincorrectaddressinatest,youmaynotreceiveanAlertmail.Shouldthis
happen,checkiftheRecipient’sAddressiscorrect.
SAVE Clickthisbuttontoreecttheabovesettings.
•NETWORKSERVICE
PJLinkPASSWORD SetapasswordforPJLink*.Apasswordmustbe32charactersorless.Donotforget
yourpassword.However,ifyouforgetyourpassword,consultwithyourdealer.
HTTPPASSWORD SetapasswordforHTTPserver.Apasswordmustbe10charactersorless.
AMXBEACON TurnonorofffordetectionfromAMXDeviceDiscoverywhenconnectingtothenetwork
supportedbyAMX’sNetLinxcontrolsystem.
TIP:
WhenusingadevicethatsupportsAMXDeviceDiscovery,allAMXNetLinxcontrolsystemwillrec-
ognizethedeviceanddownloadtheappropriateDeviceDiscoveryModulefromanAMXserver.
PlacingacheckmarkwillenabledetectingtheprojectorfromAMXDeviceDiscovery.
ClearingacheckmarkwilldisabledetectingtheprojectorfromAMXDeviceDiscovery.
*WhatisPJLink?
PJLinkisastandardizationofprotocolusedforcontrollingprojectorsofdifferentmanufacturers.Thisstandardproto-
colisestablishedbyJapanBusinessMachineandInformationSystemIndustriesAssociation(JBMIA)in2005.
TheprojectorsupportsallthecommandsofPJLinkClass1.
SettingofPJLinkwillnotbeaffectedevenwhen[RESET]isdonefromthemenu.
CRESTRONROOMVIEWcompatibility
TheprojectorsupportsCRESTRONROOMVIEW,allowingmultipledevicesconnectedinthenetworktobemanaged
andcontrolledfromacomputeroracontroller.
Formoreinformation,visithttp://www.crestron.com
<SettingProcedure>
AccesstotheHTTPserverfunction,andmakenecessarysettingsfor[CRESTRON]in[NETWORKSETTINGS].

51
3. Convenient Features
•ROOMVIEWformanagingfromthecomputer.
DISABLE DisablesROOMVIEW.
ENABLE EnablesROOMVIEW.
•CRESTRONCONTROLformanagingfromthecontroller.
DISABLE DisablesCRESTRONCONTROL.
ENABLE EnablesCRESTRONCONTROL.
IPADDRESS SetyourIPaddressofCRESTRONSERVER.
IPID SetyourIPIDofCRESTRONSERVER.
TIP:TheCRESTRONsettingsarerequiredonlyforusewithCRESTRONROOMVIEW.
Formoreinformation,visithttp://www.crestron.com
•INFORMATION
WIREDLAN DisplayalistofsettingsofwiredLANconnection.
WIRELESSLAN DisplayalistofsettingsofwirelessLANconnection.
UPDATE Reectsettingswhentheyarechanged.
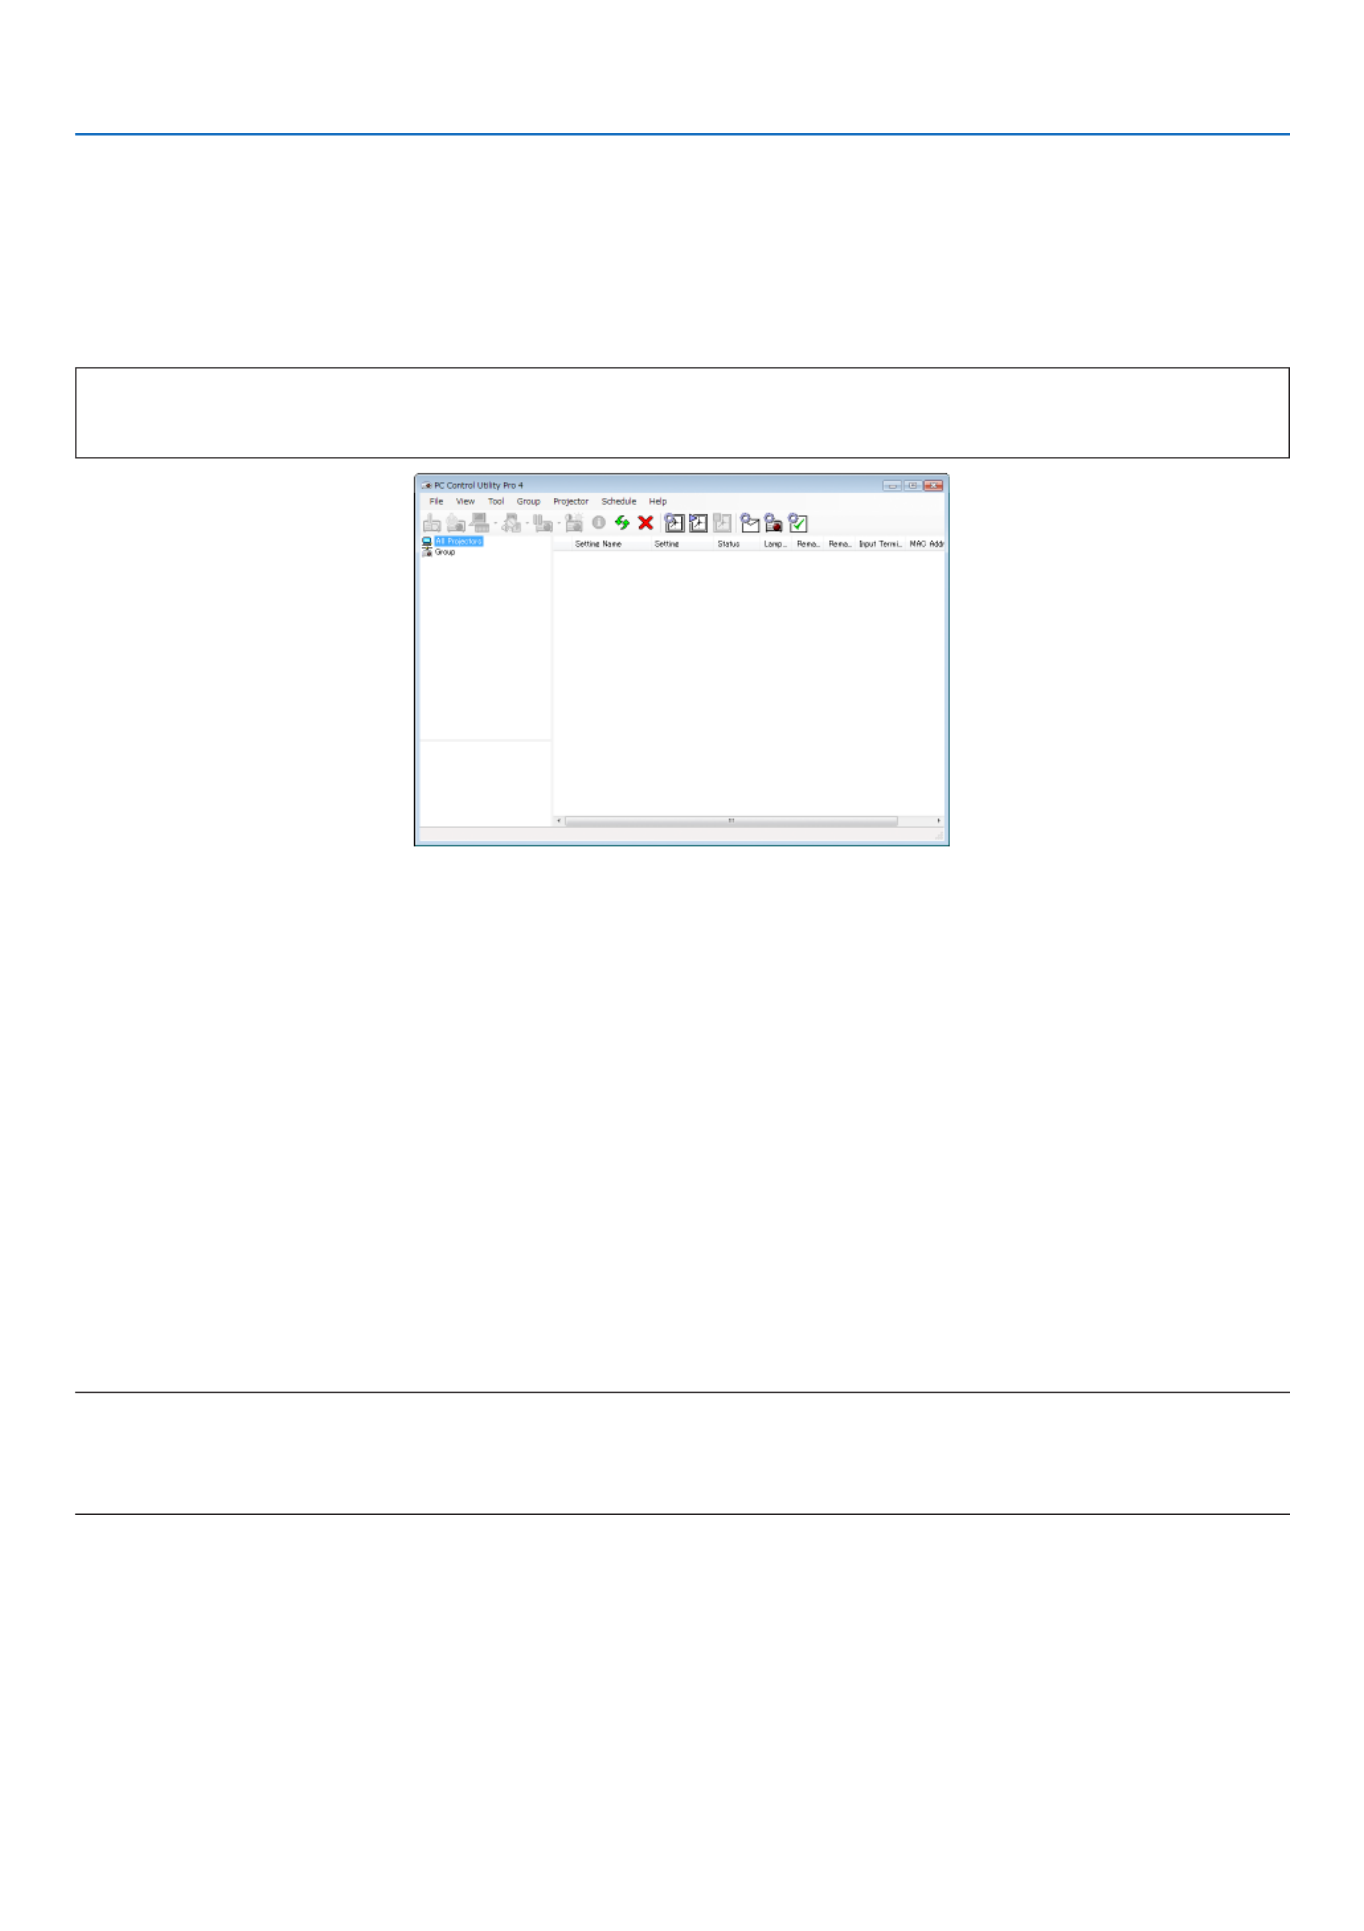
52
3. Convenient Features
Controlling the Projector over a LAN (PC Control Utility Pro 4/
Pro 5)
Usingtheutilitysoftware“PCControlUtilityPro4”and“PCControlUtilityPro5”includedonthecompanionNEC
ProjectorCD-ROM,theprojectorcanbecontrolledfromacomputeroveraLAN.
PCControlUtilityPro4isaprogramcompatiblewithWindows.( thispage)→
PCControlUtilityPro5isaprogramcompatiblewithMacOS.( page )→55
ControlFunctions
PowerOn/Off,signalselection,picturefreeze,picturemute,audiomute,adjusting,errormessagenotication,event
schedule.
ScreenofPCControlUtilityPro4
ThissectionprovidesanoutlineofpreparationforuseofPCControlUtilityPro4/Pro5.Forinformationonhowtouse
PCControlUtilityPro4/Pro5,seeHelpofPCControlUtilityPro4/Pro5.( page )→54 55,
Step1:InstallPCControlUtilityPro4/Pro5onthecomputer.
Step2:ConnecttheprojectortoaLAN.
Step3:StartPCControlUtilityPro4/Pro5.
• TorunPCControlUtilityPro4onWindows8.1,Windows8andWindowsXP,“Microsoft.NETFrameworkVersion
2.0”is required.The Microsoft .NETFrameworkVersion 2.0, 3.0or 3.5 isavailable fromMicrosoft’s webpage.
Downloadandinstallitonyourcomputer.
TIP:
• PCControlUtilityPro4canbeusedwithaserialconnection.
Using on Windows
Step 1: Install PC Control Utility Pro 4 on the computer
NOTE:
• Toinstalloruninstalltheprogram,theWindowsuseraccountmusthave[Administrator]privilege(Windows8.1,Windows8,
Windows7andWindowsVista)or[ComputerAdministrator]privilege(WindowsXP).
• Exitallrunningprogramsbeforeinstallation.Ifanotherprogramisrunning,theinstallationmaynotbecompleted.
1 InserttheaccompanyingNECProjectorCD-ROMintoyourCD-ROMdrive.
The menu window will be displayed.

53
3. Convenient Features
TIP:
Ifthemenuwindowwillnotbedisplayed,trythefollowingprocedure.
ForWindows7:
1. Click“start”onWindows.
2. Click“AllPrograms” “Accessories” “Run”.→ →
3. Type your CD-ROM drive name (example:“Q:\”) and“LAUNCHER.EXE” in“Name”. (example: Q:\
LAUNCHER.EXE)
4. Click“OK”.
The menu window will be displayed.
2 Click“PCControlUtilityPro4”onthemenuwindow.
The installation will start.
When the installation is complete, the Welcome window will be displayed.
3 Click“Next”.
“ENDUSERLICENSEAGREEMENT”screenwillbedisplayed.
Read“ENDUSERLICENSEAGREEMENT”carefully.
4 Ifyouagree,click“Iacceptthetermsinthelicenseagreement”andthenclick“Next”.
• Followtheinstructionsontheinstallerscreenstocompletetheinstallation.
• Whentheinstallationiscomplete,youwillreturntothemenuwindow.
TIP:
•UninstallingPCControlUtilityPro4
TouninstallPCControlUtilityPro4,dothesameproceduresstatedasin“UninstallingVirtualRemoteTool”.Read“VirtualRemote
Tool”as“PCControlUtilityPro4”( page )→39

54
3. Convenient Features
Step 2: Connect the projector to a LAN.
ConnecttheprojectortotheLANbyfollowingtheinstructionsin“ConnectingtoaWiredLAN”( page ),“Con→114 -
nectingtoaWirelessLAN(Optional:NP05LMseries)”( page )and“ ControllingtheProjectorbyUsingan→115
HTTPBrowser”( page )→45
Step 3: Start PC Control Utility Pro 4
Click“Start” “Allprograms”or“Programs” “NECProjectorUserSupportware” “PCControlUtilityPro4”→ → → →
“PCControlUtilityPro4”.
NOTE:
• FortheSchedulefunctionofthePCControlutilityPro4towork,youmusthaveyourcomputerrunningandnotinstandby/
sleepmode.Select“PowerOptions”fromthe“ControlPanel”inWindowsanddisableitsstandby/sleepmodebeforerunningthe
scheduler.
[Example]ForWindows7:
Select“ControlPanel”→“SystemandSecurity”→“PowerOptions”→“Changewhenthecomputersleeps”→“Putthecomputer
tosleep” “Never”.→
NOTE:
• When[NORMAL]isselectedfor[STANDBYMODE]fromthemenu,theprojectorcannotbeturnedonviathenetwork(wiredLAN/
wirelessLAN)connection.
TIP:
ViewingtheHelpofPCControlUtilityPro4
• DisplayingtheHelpleofPCControlUtilityPro4whileitisrunning.
Click“Help(H)” “Help(H)…”ofwindowofPCControlUtilityPro4inthisorder.→
The pop-up menu will be displayed.
• DisplayingthehelpleusingtheStartMenu.
Click“Start” “Allprograms”or“Programs” “NECProjectorUserSupportware” “PCControlUtilityPro4”→ → → →
“PCControlUtilityPro4Help”.
The Help screen will be displayed.

55
3. Convenient Features
Using on Mac OS
Step 1: Install PC Control Utility Pro 5 on the computer
1. InserttheaccompanyingNECProjectorCD-ROMinyourMacCD-ROMdrive.
TheCD-ROMiconwillbedisplayedonthedesktop.
2. Double-clicktheCD-ROMicon.
The CD-ROM window will be displayed.
3. Double-clickthe“MacOSX”folder.
4. Double-click“PCControlUtilityPro5.pkg”.
The installer will start.
5. Click“Next”.
“ENDUSERLICENSEAGREEMENT”screenwillbedisplayed.
6. Read“ENDUSERLICENSEAGREEMENT”andclick“Next”.
The confirmation window will be displayed
7. Click“Iacceptthetermsinthelicenseagreement”.
Follow the instructions on the installer screens to complete the installation.
Step 2: Connect the projector to a LAN
ConnecttheprojectortotheLANbyfollowingtheinstructionsin“ConnectingtoaWiredLAN”( page ),“Con→114 -
nectingtoaWirelessLAN(Optional:NP05LMseries)”( page )and“ ControllingtheProjectorbyUsingan→115 ❿
HTTPBrowser”( page )→45
Step 3: Start PC Control Utility Pro 5
1. Open your Applications folder in Mac OS.
2. Clickthe“PCControlUtilityPro5”folder.
3. Clickthe“PCControlUtilityPro5”icon.
PC Control Utility Pro 5 will start.
NOTE:
• FortheSchedulefunctionofthePCControlutilityPro5towork,youmusthaveyourcomputerrunningandnotinsleepmode.
Select“EnergySaver”fromthe“SystemPreferences”inMacanddisableitssleepmodebeforerunningthescheduler.
• When[NORMAL]isselectedfor[STANDBYMODE]fromthemenu,theprojectorcannotbeturnedonviathenetwork(wiredLAN/
wirelessLAN)connection.
TIP:
ViewingtheHelpofPCControlUtilityPro5
•DisplayingtheHelpleofPCControlUtilityPro5whileitisrunning.
• Fromthemenubar,click“Help” “Help”inthisorder.→
The Help screen will be displayed.
•DisplayingtheHelpusingtheDock
1. Open“ApplicationFolder”inMacOS.
2. Clickthe“PCControlUtilityPro5”folder.
3. Clickthe“PCControlUtilityPro5Help”icon.
The Help screen will be displayed.
Termékspecifikációk
| Márka: | NEC |
| Kategória: | Beamer |
| Modell: | UM301X |
Szüksége van segítségre?
Ha segítségre van szüksége NEC UM301X, tegyen fel kérdést alább, és más felhasználók válaszolnak Önnek
Útmutatók Beamer NEC

9 Április 2025
9 Április 2025
12 Január 2025
18 December 2024
14 Október 2024
10 Október 2024
5 Október 2024
22 Szeptember 2024
15 Szeptember 2024
14 Szeptember 2024
Útmutatók Beamer
- Beamer Samsung
- Beamer Sony
- Beamer Yamaha
- Beamer Acer
- Beamer LG
- Beamer Marantz
- Beamer Philips
- Beamer Panasonic
- Beamer Canon
- Beamer JVC
- Beamer Sharp
- Beamer Lenovo
- Beamer Casio
- Beamer Toshiba
- Beamer HP
- Beamer Hisense
- Beamer BenQ
- Beamer Medion
- Beamer Xiaomi
- Beamer Dell
- Beamer Klarstein
- Beamer Prixton
- Beamer Polaroid
- Beamer Technaxx
- Beamer Ricoh
- Beamer Eurolite
- Beamer Epson
- Beamer Asus
- Beamer Hama
- Beamer Renkforce
- Beamer Mitsubishi
- Beamer GPX
- Beamer Hitachi
- Beamer Kodak
- Beamer Optoma
- Beamer Smart
- Beamer Dahua Technology
- Beamer Viewsonic
- Beamer Livoo
- Beamer Smart Tech
- Beamer XGIMI
- Beamer OK
- Beamer Auna
- Beamer Nebula
- Beamer ZTE
- Beamer Showtec
- Beamer Futurelight
- Beamer Overmax
- Beamer Kogan
- Beamer D-Link
- Beamer ION
- Beamer Blaupunkt
- Beamer 3M
- Beamer Pyle
- Beamer Sanyo
- Beamer Steinel
- Beamer Salora
- Beamer Lenco
- Beamer Maxell
- Beamer Leica
- Beamer Barco
- Beamer Cameo
- Beamer Krüger&Matz
- Beamer RCA
- Beamer OKI
- Beamer Adj
- Beamer Anker
- Beamer Microtek
- Beamer Celexon
- Beamer Vivitek
- Beamer EasyMaxx
- Beamer Elmo
- Beamer Planar
- Beamer Smartwares
- Beamer Speaka
- Beamer Vogel's
- Beamer Acco
- Beamer Aiptek
- Beamer ASK Proxima
- Beamer Reflecta
- Beamer Yaber
- Beamer Da-Lite
- Beamer Steren
- Beamer Eiki
- Beamer Derksen
- Beamer InFocus
- Beamer Bauer
- Beamer Naxa
- Beamer Emtec
- Beamer Celly
- Beamer Promethean
- Beamer Odys
- Beamer Stairville
- Beamer Laserworld
- Beamer Ibm
- Beamer La Vague
- Beamer Tzumi
- Beamer EKO
- Beamer MicroVision
- Beamer Elite Screens
- Beamer Fun Generation
- Beamer Christie
- Beamer PLUS
- Beamer Varytec
- Beamer AOpen
- Beamer Ultimea
- Beamer Dracast
- Beamer Dukane
- Beamer Dream Vision
- Beamer Knoll
- Beamer DTS
- Beamer Touchjet
- Beamer Boxlight
- Beamer AAXA Technologies
- Beamer Miroir
- Beamer Vankyo
- Beamer Mimio
- Beamer AWOL Vision
- Beamer Atlantis Land
- Beamer KickAss
- Beamer VAVA
- Beamer Beghelli
- Beamer Panamorph
- Beamer Mirabella Genio
Legújabb útmutatók Beamer

10 Április 2025
10 Április 2025
10 Április 2025

2 Április 2025

15 Január 2025

14 Január 2025
13 Január 2025

12 Január 2025
12 Január 2025

11 Január 2025