Használati útmutató Motorola AHX01
Olvassa el alább 📖 a magyar nyelvű használati útmutatót Motorola AHX01 (59 oldal) a telefon kategóriában. Ezt az útmutatót 9 ember találta hasznosnak és 2 felhasználó értékelte átlagosan 4.5 csillagra
Oldal 1/59

Motorola AX Series
Wireless Home Telephone
with Alexa built-in
Full User Guide
For use with models:
• Motorola AXH01
• Motorola AXH02
• Motorola AXH03
• Motorola AXH04
• Motorola AXH
The features described in this User
Guide are subject to modifications
without prior notice.

Welcome...
to your new Motorola AX Series Wireless Home Telephone with Alexa
built-in!
This User Guide provides you with all the information you need to get
the most from your phone.
Before you make your first call or use Alexa you will need to set up
your phone. Follow the simple instructions in ‘Getting started’, on the
next few pages.
Got everything?
• Handset
• Charger cradle
• Base
• AC power adaptor for the base / Rating 5.0V - 1A
• AC power adaptor for the charger cradle / Rating 6.0V - 400mAh
• 2 x rechargeable Ni-MH battery cells
• Ethernet cable
• Telephone line cord
• Quick start guide
If you have purchased a multi-pack, you will find one or more additional handsets,
chargers with power adapters and additional rechargeable batteries.
Before you can use Alexa you will need
• An active landline home telephone service.
• An active Caller Display subscription.
• An active internet connection and Wi-Fi router.
• An Amazon account.
• The Amazon Alexa app.
• The Motorola hellovoice app.
Important
Use only the adapter and telephone line cord provided in the box.
Please note that this equipment is not designed for making emergency telephone
calls when the power fails. Alternative arrangements should be made for access to
emergency services.

3
1. Getting started 8
..............................................................................
1.1 Installing the base 9 .......................................................................................................
1.2 Installing and charging the handset batteries 10 ...............................................
2. Getting to know your phone 11
.....................................................
2.1 Overview of the handset 11
.........................................................................................
2.2 Overview of the handset display 13 ........................................................................
2.3 Overview of the base...............................................................................................14
2.4 Navigating the menus 15 .............................................................................................
2.4.1 Scrolling through menus 15
........................................................................
2.4.2 Menu map 16
....................................................................................................
3. Setting up Alexa 17 ..........................................................................
3.1 Downloading the hellovoice app and signing in 17
...........................................
4. Date & time 20 .................................................................................
4.1 Set the date and time 20
.............................................................................................
5. Using the phone 21 ...........................................................................
5.1 Switch the handset on/o 21
.....................................................................................
5.2 Using Alexa 21
..................................................................................................................
5.3 Making a call 22 ..............................................................................................................
5.3.1 Landline call 22 ...............................................................................................
5.3.2 Alexa-to-Alexa call 22
...................................................................................
5.3.3 Preparatory dialing 23
..................................................................................
5.3.4 Speed dialing 23
.............................................................................................
5.3.5 Dialing from the contacts list 23
..............................................................
5.3.6 Dialing from the calls list 23
.......................................................................
5.4 Answering a call 24
.......................................................................................................
5.5 Ending a call 24
...............................................................................................................
5 25.6 Hands-free ..................................................................................................................
5.7 Adjusting the call volume 25 .....................................................................................
5.8 Muting a call 25
...............................................................................................................
5.9 Adjusting the ringer volume 25
................................................................................
5.10 Temporary tone dialing 25
..........................................................................................
5.11 Intercom .......................................................................................................................
25
5.11.1 Making an internal call 25 ...........................................................................
5.11.2 Receiving an internal call 25
......................................................................

4
5.12 Making a second call 26
...............................................................................................
5.12.1 Making a second internal call 26 ..............................................................
5.12.2 Making a second external call 26
.............................................................
5.13 Transferring a call unannounced 26
........................................................................
5.14 Receiving a second call 26 .........................................................................................
5.15 Joining a call in progress 27 .......................................................................................
5.16 Call blocking................................................................................................................27
5.16.1 Block an unknown caller ........................................................................
27
5.16.2 Unblock a number ....................................................................................
27
5.17 Handset locator 27 .........................................................................................................
6. Alexa Voice Services 29 ..................................................................
6.1 Set an Alexa alarm 29
...................................................................................................
6.2 Set an Alexa reminder 29
............................................................................................
6.3 Set an Alexa timer 29
...................................................................................................
6.4 Making an announcement 29
....................................................................................
6.5 Things to try – just tap and say 30
..........................................................................
7. Contacts ........................................................................................
32
7.1 Viewing details of a contact 32 ................................................................................
7.2 Predialing a contact 32 ................................................................................................
8. Caller ID 33
........................................................................................
8.1 Missed calls notification 33 ........................................................................................
8.2 Motorola AX calls list 33
..............................................................................................
8.2.1 View an entry 33
.............................................................................................
8.2.2 Delete an entry 34
.........................................................................................
8.2.3 Delete all calls 34
............................................................................................
8.3 Alexa-to-Alexa calls list 34
..........................................................................................
9. Call settings 35
.................................................................................
9.1 Auto hang-up 35
............................................................................................................
9.2 Auto answer 35 ...............................................................................................................
9.3 Speed dial 35 ...................................................................................................................
9.3.1 Add a speed dial number 35 .....................................................................
9.3.2 Edit or delete a speed dial number 35 ..................................................
10. Handset settings 37 .........................................................................
10.1 Sounds ...........................................................................................................................
37
10.1.1 Ringer volume ............................................................................................
37
10.1.2 Ringtone .......................................................................................................
37

5
10.1.3 Key beep 37 .......................................................................................................
10.1.4 Out of range tone 38 ....................................................................................
10.1.5 Docking tone 38
.............................................................................................
10.2 Display ..........................................................................................................................
38
10.2.1 Display contrast 38
........................................................................................
10.2.2 Wallpaper ....................................................................................................
38
10.2.3 Backlight timeout..................................................................................... 38
10 39.3 Language .....................................................................................................................
10.4 Registration ................................................................................................................
39
10.4.1 Registering a handset 39
............................................................................
10.4.2 De-registering a handset ......................................................................
39
10.5 Handset name 40 ...........................................................................................................
10.6 Restore handset default settings 40 .......................................................................
10.7 Handset version 40 ........................................................................................................
11. Advanced settings .....................................................................
41
11.1 Base settings ...............................................................................................................
41
11.1.1 Change PIN ..................................................................................................
41
11.1.2 Base version ................................................................................................
41
11.1.3 Restore base default settings ..............................................................
41
11.2 Internal names 42
...........................................................................................................
11.3 Line settings 42
...............................................................................................................
11.3.1 Intrusion call 42
...............................................................................................
11.3.2 Flash mode 42 .................................................................................................
11.3.3 Dial mode 42
....................................................................................................
11.3.4 Area code 43
....................................................................................................
12. Default settings 44
..........................................................................
13. De-registering Motorola AX device from Amazon Alexa
and hellovoice apps 45
..................................................................
14. Deleting hellovoice account 46 ...................................................
15. Technical Specifications ...........................................................
47
16. Help 48
...............................................................................................
17. General information 51 ....................................................................
18. Wall mounting .............................................................................
57

6
Safety information
Important
This equipment is not designed for making emergency telephone calls when the
power fails. Alternative arrangements should be made for access to emergency
services.
This product is intended for connection to analogue public switched telephone
networks and private switchboards in the US.
Follow these safety precautions when using your phone to reduce the risk of fire,
electric shock, and injury to persons or property:
• Keep all slits and openings of the phone unblocked. Do not set the phone on a
heating register or over a radiator. Ensure that proper ventilation is provided at
the installation site.
• Do not use while wet or while standing in water.
• Do not use this product near water (for example, near a bath tub, kitchen sink,
or swimming pool).
• Do not allow anything to rest on the power cord. Place the power cord so that it
will not be walked on.
• Never insert objects of any kind into the product vents as that may result in fire
or electric shock.
• Unplug this product from the wall outlet before cleaning. Do not use liquid
cleaners or aerosol cleaners. Use a damp cloth for cleaning.
• Do not disassemble this product. If service or repair work is required, contact
the customer service helpline found in this User Guide.
• Do not overload wall outlets and extension cords.
• Avoid using during an electrical storm. Use a surge protector to protect the
equipment.
• Do not use this phone to report a gas leak, especially if you are in the vicinity of
the gas line.
• For pluggable equipment, the socket-outlet (power adaptor) shall be installed
near the equipment and shall be easily accessible.
Save these instructions
Important
To reduce the risk of fire, use only the supplied AC power adaptor.
Unplug this phone immediately from an outlet if:
• The power cord or plug is damaged or frayed.
• Liquid has been spilled on the product.
• The product has been exposed to rain or water. Do not retrieve the base or
charger until after you have unplugged the power the wall. Then retrieve the
unit by the unplugged cords.
• The product has been dropped or the cabinet has been damaged.
• The product exhibits a distinct change in performance.

7
Installation Guidelines
• Read and understand all instructions and save them for future reference.
• Follow all warnings and instructions marked on the product.
• Do not install this product near a bath tub, sink, or shower.
• Operate this phone using only the power source that is indicated on the
marking label. If you are unsure of the power supply to your home, consult with
your dealer or local power company.
• Do not place this product on an unstable cart, stand, or table. This product may
fall, causing serious damage to the product.
• Adjust only those controls that are covered by the operating instructions.
Improper adjustment of other controls may result in damage and will often
require extensive work to restore the product to normal operation.
• Clean this product with a soft, damp cloth. Do not use chemicals or cleaning
agents to clean this phone.
• Use only the power supply that came with this unit. Using other power supplies
may damage the unit.
• Because this phone operates on electricity, you should have at least one phone
in your home that could operate without electricity in the case the power in
your home goes out.
• To avoid interference to nearby appliances, do not place the base of the phone
on or near a TV, microwave oven, or VCR.
Battery Safety Instructions
• Do not burn, disassemble, mutilate, or puncture the battery. The battery
contains toxic materials that could be released, resulting in injury.
Important
Warning! Use only the approved rechargeable Ni-MH battery cells (1.2VDC AAA
Ni-MH 750mAh rechargeable batteries) supplied.
Caution
There is a risk of explosion if you replace the battery with an incorrect battery type.
Use only the batteries that came with your phone or an authorized replacement
recommended by the manufacturer.
• Keep batteries out of the reach of children.
• Remove batteries if storing over 30 days.
• Do not dispose of batteries in fire, which could result in explosion.
• The rechargeable batteries that power this product must be disposed of
properly and may need to be recycled. Refer to your battery’s label for battery
type. Contact your local recycling center for proper disposal methods.
Save these instructions

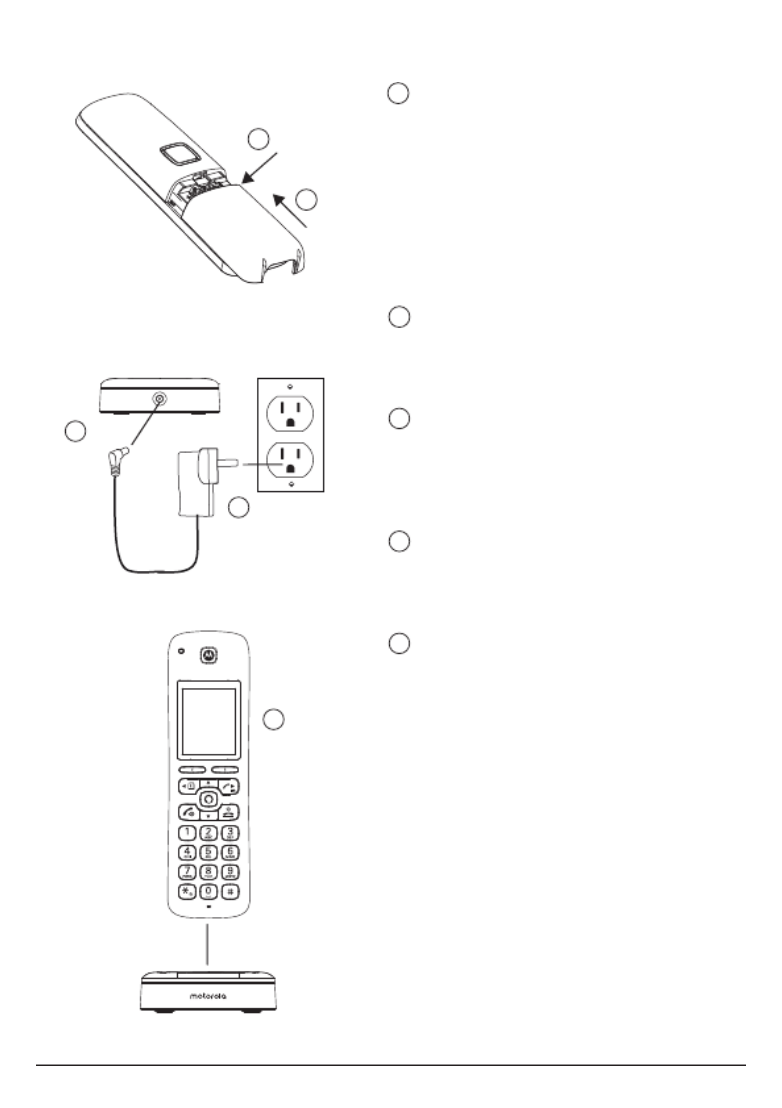
9
Plug the AC power jack into
the socket on the rear of the
base and the AC power
adaptor into the power outlet.
Plug the Ethernet cable
into the socket on the
rear of the base and
plug the other end into
any spare Ethernet port
on the router.
The telephone line cord will be pre-installed into the
socket on the rear of the base.
It is recommended to complete set-up (refer to
Section 3.1) before you plug the other end of the
telephone line cord into the telephone line wall jack.
1
2
3
1.1 Installing the base
Note
The power adapter with the smaller jack is for the base unit and the power adapter
with the bigger jack is for the charger unit.
The base station must be connected to the AC power outlet and the Ethernet cable
must be plugged into the router at all times. Use only the AC power adaptor and
telephone line cord supplied with the product.
Getting started
10
1.2 Installing and charging the handset batteries
Remove the battery cover from
the back of the handset and
insert the rechargeable Ni-MH
battery cells supplied.
Please note the ‘ ’ and ‘ ’ + -
markings inside the battery
compartment and insert in the
correct direction.
Slide the battery cover back
into place.
Plug the AC power jack into
the socket on the rear of the
charger cradle.
Plug the AC power adaptor
into the power outlet.
Place the handset on the
charging cradle to charge.
Note
To maximize battery performance
we recommend to fully charge
the batteries; place the handset
on the charger cradle and charge
for at least 16 hours continuously.
Important
Use only the approved battery
cells (2 x AAA Ni-MH 750mAh
rechargeable batteries) supplied
with your handset.
Never use alkaline batteries.
1
2
3
1
2
3
4
5
5
4
Getting started

11
2. Getting to know your phone
2.1 Overview of the handset
A Ring indicator LED
Flashes when the phone rings.
B Display
For display icons, see “Overview of the handset display” on page 13.
C Left soft key / Menu / Select / OK
In standby, press to enter the main menu.
When
Select
or
OK
is displayed on the screen, press to select or confirm the
settings.
D Scroll up / Volume up
Scroll up through lists and menu options.
During a call, press to increase the earpiece and hands-free volume.
In standby, press to enter the handset ringer volume setting.
When you have entered the handset ringer volume setting, press to increase the
handset ringer volume.
When the phone is ringing, press to increase the handset ringer volume.
E Scroll left / Contacts / Flash
In main menu, press to scroll left.
In editing mode, press to move the cursor to the left.
In standby, press to open the contacts list.
In pre-dial mode, press and hold to insert a flash (R) for switchboard / PABX
services and some network services.
F Talk / Hands-free
In standby or pre-dial mode, press to make a landline call with earpiece.
During a call, press to activate and deactivate hands-free.
A
B
C
D
E
F
G
P
O
N
M
L
K
I
J
H
Q
Getting to know your phone

12
G Scroll down / Volume down
Scroll down through lists and menu options.
During a call, press to decrease the earpiece and hands-free volume.
In standby, press to enter the handset ringer volume setting.
When you have entered the handset ringer volume setting, press to decrease
the handset ringer volume.
When the phone is ringing press to decrease the handset ringer volume.
H Speed dial keys
In standby, press and hold to add, view, edit or dial the speed dial information
for that key.
During a call, press and hold to dial the speed dial information for that key.
I * / Change case / Pulse to tone dialing / Ringer o
In standby, pre-dial or editing mode, press to insert a “*”.
In editing mode, press to toggle between Abc, ABC, abc and 123 format.
During a call, press and hold to switch from pulse to tone dialing temporarily if
pulse mode was selected before.
In standby, press and hold to turn the handset ringer on / o.
J Space / Pause
In editing mode, press to insert a space.
In pre-dial mode or during a call, press and hold to insert a pause (P).
K Earpiece
L Right soft key / All calls list / Clear / Back
In standby, press to enter the all calls list.
When
Clear
is displayed on the screen, press to delete one character or digit.
When
Clear
is displayed on the screen, press and hold to delete all characters
or digits.
When
Back
is displayed on the screen, press to select or confirm the option.
M Scroll right / Calls list / Intercom
In main menu, press to scroll right.
In editing mode, press to move the cursor to the right.
In standby, press to open the calls list menu.
In standby, press and hold for intercom.
N Alexa key
Press to activate Alexa.
O End call / Power / Exit
During a call, press to end a call.
In menu, editing or pre-dial mode, press to exit to standby screen without
making changes.
In standby, press and hold to switch the handset o.
When the handset is switched o, press to turn the handset on.
P #
In standby, pre-dial or editing mode, press to insert a “#”.
In editing mode, press to bring up symbols.
When viewing individual call details, press to toggle the caller ID display format
between 7, 10 and 11 digits.
Q Microphone
Getting to know your phone

14
2.3 Overview of the base
LED color State
Red Steady on Your Motorola AX device is connected and Alexa
service is ready.
Red Quick flashing When a handset is in use. This can be when a
handset is engaged on a landline call or on an
Alexa call.
When there is an ongoing Alexa session on a
handset.
When your Motorola AX base enters registration
mode.
Red Slow flashing Alexa service is not ready or possible network
connectivity issue.
Green Quick flashing When your Motorola AX device is updating to a
new software.
LED
Refer to table below
Handset Locator
Press to make
handsets ring so
that you can locate
a missing handset.
RESET Button
Press to restart your
Motorola AX base.
Ethernet Socket
Telephone Line
Socket
AC Power
Socket
Getting to know your phone

15
2.4 Navigating the menus
Your Motorola AX handset has an easy to use menu system.
Each menu has a list of options, which you can see on the menu map on page
16.
2.4.1 Scrolling through menus
1. From the standby screen, press
Menu
. The main menu is opened.
2. Use the / / / keys to scroll through the menu.u d t u
3. Left softkey - press to action the corresponding word prompt shown in the
lower left corner of the display.
Right softkey - press to action the corresponding word prompt in the lower
right corner of the display.
4. Press to return to standby.e
Getting to know your phone

16
Advanced Settings
Base Settings
Change PIN
Base Version
Base Reset
Internal Names
Line Settings
Intrusion Call
Flash Mode
Dial Mode
Area Code
sHandset Setting
Sounds
Ringer Volume
Ringtone
Key Beep
Out of Range Tone
Docking Tone
Display
Contrast
Wallpaper
Backlight Timeout
Language
Registration
Register
Unregister
Handset Name
Handset Reset
Handset Version
Call Settings
Auto Hang-up
Auto Answer
Speed Dial
Date/Time
Enter Date
Date Format
Enter Time
Time Format
Calls List 2
Missed Calls
Incoming Calls
Outgoing Calls
Accepted Calls
All Calls
Contacts
View
Predial
or
Press to enter the B
contacts list. 1
2.4.2 Menu map
1
You must have allowed access to your contacts in the hellovoice app for the
contacts list to be available on your Motorola AX handset(s).
2
Caller ID shows you who is calling and includes date and time of calls.
The caller ID information may not be available for every incoming call. The callers
may intentionally withheld their names and/or telephone numbers. Or they may
be calling you through a switchboard.
You must subscribe to your network provider’s Caller ID or Call Waiting service for
these features to work. Charges may apply.
Getting to know your phone

17
3. Setting up Alexa
To use Alexa Calling and Messaging you need the below on your smartphone:
Android OS 5.1 or higher
iOS 10.0 or higher
An Amazon account
Download the Amazon Alexa app
Download the hellovoice app
To download apps to your iPhone or Android smartphone, you can go to the
relevant app store for your device.
3.1 Downloading the hellovoice app and signing in
To complete the set-up of the Motorola AX device you will need to download the
hellovoice companion app, this supports set-up and interaction with the Motorola
AX series.
1. Download the hellovoice app to your smartphone.
2. Ensure your smartphone is using the same Wi-Fi network as the router your
base is connected to.
3. Once you have downloaded the app, go to your smartphone home screen and
click on the icon below.
4. Tap
Setup a new Motorola System
and follow the on-screen instructions to add
your new Motorola AX device.
5. You will be asked to sign in to Amazon account through the hellovoice app.
If you are not already signed in to your Amazon account via the Amazon
Mobile Shopping app on your smartphone, you will need to enter your Amazon
account details and select
Sign in
.
6. hellovoice will ask you to provide a one-time consent to share your Amazon
profile information. This profile will only include your name and email address
so hellovoice can uniquely identify you when you log in. You must consent to
share this information in order for the login to complete. Tap
Allow
to continue.
7. The app will then search for all active Motorola AX devices. Select the device
you want to connect to Alexa and tap
Continue
.
Note
Only one Motorola AX device can be set up at a time. If it cannot find your
Motorola AX device, check your base AC power adapter is securely connected
Setting up Alexa

18
and the Ethernet cable is plugged into the router and check your smartphone is
connected to the same Wi-Fi network the base is connected to.
8. hellovoice will ask you to allow access to your smartphone contacts. This will
allow the app to automatically synchronize the contacts in your smartphone to
the hellovoice app and Motorola AX contacts list. Tap
Allow
to continue.
9. When contacts synchronization completes, tap
Continue
.
10. To register or connect your device to the Alexa Voice Service, tap
Amazon Alexa
Login
and enter your Amazon account details and select
Sign in
.
11. You must allow Motorola AX device access to Alexa Voice Service when
prompted. Tap
Allow
to continue.
12. Once your device is connected to Alexa, tap
Start using
.
13. You will then be guided to install the Amazon Alexa app if you have not already
installed it. Tap
Continue
.
Once you have installed Amazon Alexa app, tap
Done
to return to hellovoice
app to continue with the set-up. Tap
Continue
.
14. You will be asked to sign in to Amazon Alexa app. If you are not already signed
in to your Amazon Alexa app on your smartphone, you will need to enter your
Amazon account details and select
Sign in
.
Note
You must sign up for Alexa Communication in order to use Alexa-to-Alexa
Calling and Messaging on Motorola AX devices. As part of the sign-up process,
you will be asked to enter and verify your smartphone number and to allow
access to your smartphone contacts. It is important to allow the Amazon Alexa
app to access your contacts as this will enable Alexa to call the person or
contact name.
15. Return to hellovoice app and tap
Continue
.
16. There may be updates available for your Motorola AX handsets and base,
especially if this is a first-time connection. The app will automatically check for
available software updates.
Tap
Update All
to download and install the latest software to your Motorola AX
handset and base. The update may take up to 20 minutes depending on your
Internet connection speed. Once the update is complete, your telephone will
automatically restart.
Note
The base AC power adapter and Ethernet cable must remain connected at
all times and all the handsets are placed in their cradles during the software
update. The telephone line cord can be plugged in to the telephone line wall
jack once this initial software update has completed.
It is also recommended that you do not interrupt the update process and that
you have an alternative phone connected to avoid missing important calls.
If there are no updates available for your device, you will be prompted,
You are
using the latest software available
. Tap
Done
and
Continue
.
17. You can now plug the other end of the telephone line cord into the telephone
wall jack. Your Motorola AX device is now ready to use.
Setting up Alexa

19
Note
If the Alexa key is pressed before the set up is complete the screen will display
Account error. Alexa service is not ready
and the handset will announce “Your
device isn’t registered. For help, go to its companion app.”
Setting up Alexa

20
4. Date & time
The date and time on your Motorola AX device are set automatically during set-up
with the hellovoice app. If you subscribe to caller ID service, the day, month and
time are set automatically with each incoming call, thereafter.
In the event your handset date and time get out of sync after events like power
outages or a switch to daylight-saving time, you can set the date and time
manually.
4.1 Set the date and time
1. Press
Menu
, scroll u to
Date/Time
and press
Select
.
2. The last set date is displayed. Enter the date, e.g., when set to MM/DD,
01/31/2019 for 31 January 2019 and press
OK
.
3. To change the date format, scroll d to
Date Format
and scroll or to select t u
either
MM/DD
or
DD/MM
. Press
OK
.
4. The last set time is displayed. Enter the time, e.g., when set to 24 Hours, 14:30
for 2:30pm.
If the current time format setting is 12 Hours, scroll or to select t u
AM
or
PM
.
5. Once the time is set, to change the time format, scroll d to
Time Format
and
scroll or to select either t u
12 Hours
or
24 Hours
. Press
Save
.
6. Press to return to standby.e
Date & time

21
5. Using the phone
5.1 Switch the handset on/o
1. To switch the handset on, press .e
2. When the handset is on standby screen, press and hold for about 5 seconds. e
Confirm?
is displayed, press
Yes
to confirm or
No
to cancel.
5.2 Using Alexa
1. Press , the display will show
Alexa listening...
and a beep will be heard.
2. You can then ask Alexa what you need. For example:
“Alexa, what’s the weather?” The screen will display .
Alexa thinking...
.
3. When a response is provided, the display will show
Alexa speaking...
Using the phone

22
Note
Alexa may not be able to process your request in the event of network or
connectivity issues. If you are unable to place your call via Alexa, you should dial
the number directly using the handset keypad.
Warning
You will not be able to dial 911 or 112 from this phone in the event of a power
outage, so make sure you have another way to call for help in an emergency.
5.3 Making a call
5.3.1 Landline call
The Motorola AX handset gives you direct access to your smartphone contacts.
You can now call a contact via your handset using Alexa:
1. Press .
2. After the beep, say for example “ ”.Call Mom
3. Alexa will ask you to confirm the contact, once confirmed the number will dial
automatically over the landline.
5.3.2 Alexa-to-Alexa call
To call a contact who is registered with Alexa Calling and Messaging via your
handset Alexa key:
1. Press .
2. After the beep, say for example “Call Mom’s Alexa”.
3. Alexa will ask you to confirm.
4. Once confirmed Alexa will automatically connect the call over the internet
network.
Using the phone

24
4. Scroll or to the entry you want to dial.u d
5. Press to dial.t
Note
The caller ID received on your Motorola AX base may only display 7 digits for calls
made from within your local area. However, in some area you might have to dial the
full 10-digit number for the call to connect.
To change the number format suitable for local and long distance dialing, you can
press repeatedly while viewing individual call details to add or remove 1 and #
the stored area code. For example, if a caller number is displayed as 123-4567, the
various formats will be:
123-4567
555-123-4567
1-555-123-4567
where 555 is the stored area code. To update area code setting, see page 43.
If you receive a call from outside your area code, you will see all 10 digits and
the stored area code will not be used. You can still use to change the number #
format to add or remove 1 and area code as shown.
5.3.6.2 Predial a number in the calls list
1. Press to enter the call list menu.u
2. Press , scroll or to highlight the calls list (d u d
Missed Calls
,
Incoming Calls
,
Outgoing Calls
,
Accepted Calls
,
All Calls
) you want.
3. Press
Select
, the most recent number (or name if stored in the contacts list) is
displayed.
4. Scroll or to the entry you want and press u d
Options
.
5. Scroll d to
Predial
and press
Select
. The number is displayed.
6. Press to dial.t
5.4 Answering a call
When you receive a call, the phone rings and the phone number (or name if stored
in the contacts list) is displayed.
1. Press to answer the call.t
Note
If you prefer for the call to be automatically answered when you lift the handset o
the charger, you will need to switch Auto answer on, see page .35
5.5 Ending a call
Press , or place the handset back on the charger.O
Note
You can end calls simply by placing the handset on the charger. To turn this feature
o, see Auto hang-up, on page .35
Using the phone

26
5.12 Making a second call
When on an internal or external call you can make a second internal or external call
without ending the first call.
5.12.1 Making a second internal call
1. During a call, press
Options
.
2.
Intercom
is highlighted. Press
Select
.
3. If 2 handsets are registered to the base the other handset rings automatically.
4. If 2 or more handsets are registered to the base, scroll to select the handset d
that is to be called, or
All Handsets
to ring all handsets, press
Select
.
5. When the second handset answers you can have an internal conversation.
5.12.2 Making a second external call
1. During a call, press
Options
and scroll d to
Add Call
, press
Select
.
2. You can either dial the number manually.
Or, press to dial a number in the contacts list. B
Or, press to dial a number in the calls list. u
Then press
Dial
to dial.
3. When the second call answers you can have a conversation.
Note
Depending on the type of call you are on the following in-call options are available:
Switch Call
- to switch between the 2 calls.
Conference
- to join the 2 calls to make a 3-way call.
Transfer
- to transfer the call to the second handset.
Release Active
- to end the active call.
Press
Options
, then scroll or to the required option. Press u d
Select
.
Conference
,
Transfer
and
Release Active
options are only available when you have
one internal and one external call in progress.
5.13 Transferring a call unannounced
If when transferring a call the second handset doesn’t answer, you can transfer the
call to the second handset unannounced.
1. When the second handset is ringing, press
Options
.
2. Scroll d to
Transfer
and press
Select
.
5.14 Receiving a second call
You must subscribe to your network provider’s caller ID or call waiting service for
this feature to work. Charges may apply.
When on an internal or external call you can receive a second internal or external
call without ending the first call.
When the second call comes in, you will hear the call waiting tone and the number
or contact name will be shown on the handset display screen. You can either press
Accept
to accept the second call and put your first caller on hold or
Reject
to reject
Using the phone

27
the second internal call or ignore external call.
5.15 Joining a call in progress
If intrusion call is set to allowed, see page 42, when a handset is on a call a
second handset can initiate a conference call.
1. Press on the second handset to join the call.t
2. Press on any handset to end a conference call and leave the other handset O
engaged with the caller.
5.16 Call blocking
You must subscribe to your network provider’s caller ID service for this feature to
work. Charges may apply.
You can add numbers to the call blocking list as they come through or by using the
Call Blocking
menu on the hellovoice app.
Maximum 1000 numbers can be added to the call blocking list.
5.16.1 Block an unknown caller
You can block an incoming landline call from an unknown caller, i.e. a number that
is not in your contacts list.
1. When the handset is ringing, press
Block
.
2. The ringing will be silenced and
Added to Call Blocking
will be displayed. The
incoming call screen will continue to display until the call times out or the caller
hangs up.
Note
When you receive a call from a blocked number, the ringer will be silenced.
Blocked
will be displayed followed by the caller’s number. The incoming call screen will
continue to display until the call times out or the caller hangs up.
5.16.2 Unblock a number
You can view and unblock a number via the hellovoice app.
1. Open the hellovoice app on your smartphone.
2. Tap on
Settings
.
3. Tap on
Call Blocking
.
4. Scroll or ud to the entry you want to unblock and swipe left.
5. Tap on
Unblock
to unblock the number.
5.17 Handset locator
This feature allows you to locate misplaced handsets.
1. Press p on the base. All registered handsets will ring for 30 seconds.
2. Press p on the base again to cancel the paging call.
3. Press
Ignore
or e on the handset to stop the paging call.
You can also locate misplaced handsets via the hellovoice app.
1. Open the hellovoice app on your smartphone.
Using the phone
Termékspecifikációk
| Márka: | Motorola |
| Kategória: | telefon |
| Modell: | AHX01 |
Szüksége van segítségre?
Ha segítségre van szüksége Motorola AHX01, tegyen fel kérdést alább, és más felhasználók válaszolnak Önnek
Útmutatók telefon Motorola

5 Október 2024
2 Október 2024
21 Szeptember 2024
15 Szeptember 2024
3 Augusztus 2024
2 Augusztus 2024
31 Július 2024
29 Július 2024
28 Július 2024
27 Július 2024
Útmutatók telefon
- telefon Samsung
- telefon Sony
- telefon Yamaha
- telefon Acer
- telefon LG
- telefon Grundig
- telefon Realme
- telefon Philips
- telefon Pioneer
- telefon Oregon Scientific
- telefon SilverCrest
- telefon RCF
- telefon Panasonic
- telefon AEG
- telefon Nokia
- telefon Lenovo
- telefon Evolveo
- telefon Toshiba
- telefon Oppo
- telefon Gamdias
- telefon Apple
- telefon Siemens
- telefon Medion
- telefon MyPhone
- telefon Geemarc
- telefon Vimar
- telefon Alcatel
- telefon Roland
- telefon JBL
- telefon TCL
- telefon Xiaomi
- telefon TRENDnet
- telefon Flex
- telefon AVM
- telefon CAT
- telefon Infiniton
- telefon Crestron
- telefon Gigaset
- telefon Thomson
- telefon Kyocera
- telefon Netgear
- telefon Huawei
- telefon Microsoft
- telefon Asus
- telefon Jabra
- telefon Vtech
- telefon Hama
- telefon PEAQ
- telefon Renkforce
- telefon Draytek
- telefon Hitachi
- telefon Xblitz
- telefon Alcatel-Lucent
- telefon Mikrotik
- telefon Telefunken
- telefon Sennheiser
- telefon Doro
- telefon ZyXEL
- telefon Logitech
- telefon Parrot
- telefon Scosche
- telefon Denver
- telefon Trevi
- telefon Planet
- telefon BT
- telefon Audio-Technica
- telefon Viking
- telefon Cisco
- telefon GE
- telefon Honor
- telefon SPC
- telefon Unify
- telefon TriStar
- telefon ZTE
- telefon Loewe
- telefon Bogen
- telefon Avaya
- telefon OnePlus
- telefon Archos
- telefon MaxCom
- telefon Plantronics
- telefon EnGenius
- telefon Marshall
- telefon Prestigio
- telefon Grandstream
- telefon D-Link
- telefon MXL
- telefon Blaupunkt
- telefon Oricom
- telefon Yealink
- telefon Chacon
- telefon Oukitel
- telefon Sagem
- telefon Olympia
- telefon Logik
- telefon Mackie
- telefon Bang & Olufsen
- telefon Trust
- telefon Tiptel
- telefon Marmitek
- telefon Fenton
- telefon Pyle
- telefon Cortelco
- telefon Lindy
- telefon Uniden
- telefon NEC
- telefon Fanvil
- telefon Audioline
- telefon Krüger&Matz
- telefon Allview
- telefon RCA
- telefon HTC
- telefon Topcom
- telefon Anker
- telefon Clarity
- telefon Linksys
- telefon Neat
- telefon Crosley
- telefon Tecdesk
- telefon CSL
- telefon Lewitt
- telefon Fysic
- telefon Wiko
- telefon Aastra
- telefon Amplicomms
- telefon Airlive
- telefon AGFEO
- telefon Airis
- telefon Amplicom
- telefon Ascom
- telefon Proximus
- telefon Lexibook
- telefon BeeWi
- telefon GPO
- telefon Fortinet
- telefon Sunstech
- telefon Sylvania
- telefon Patton
- telefon Swissvoice
- telefon Marquant
- telefon Jacob Jensen
- telefon Nordmende
- telefon AVerMedia
- telefon Binatone
- telefon Blackberry
- telefon Steren
- telefon KPN
- telefon Envivo
- telefon Belgacom
- telefon Auerswald
- telefon Profoon
- telefon Teledex
- telefon Valcom
- telefon Switel
- telefon RugGear
- telefon Innovaphone
- telefon AT&T
- telefon Sweex
- telefon Hagenuk
- telefon Essentiel B
- telefon Logicom
- telefon Emporia
- telefon XD Enjoy
- telefon MT Logic
- telefon Mitel
- telefon Ranex
- telefon T-Mobile
- telefon Spectralink
- telefon Gigaset Pro
- telefon VXi
- telefon Sagemcom
- telefon Yeastar
- telefon Edenwood
- telefon Telstra
- telefon JPL
- telefon Snom
- telefon Premier
- telefon OpenVox
- telefon HUMANTECHNIK
- telefon Polycom
- telefon Primare
- telefon Edge-Core
- telefon ClearOne
- telefon Syco
- telefon SMC
- telefon Pixel
- telefon Akuvox
- telefon Legrand
- telefon Digium
- telefon Davolink
- telefon KONFTEL
- telefon Mitsai
- telefon Clear Sounds
- telefon ALLO
- telefon On-Q
- telefon Canyon
- telefon Tecno
- telefon Vogtec
- telefon Olitech
- telefon Dopod
- telefon Hamlet
- telefon Sedna
- telefon AudioCodes
- telefon 3Com
- telefon British Telecom
- telefon CyberData Systems
- telefon Bintec-elmeg
- telefon CTA Digital
- telefon Wantec
- telefon Algo
- telefon Future Call
- telefon 4family
- telefon Tador
- telefon Dnake
- telefon Liam&Daan
- telefon FlyingVoice
- telefon HMD
- telefon EMeet
Legújabb útmutatók telefon

4 Április 2025

31 Március 2025
30 Március 2025
18 Március 2025
15 Január 2025

14 Január 2025

14 Január 2025
13 Január 2025
13 Január 2025
13 Január 2025