Használati útmutató Metz Fineo 49TY83
Olvassa el alább 📖 a magyar nyelvű használati útmutatót Metz Fineo 49TY83 (162 oldal) a televízió kategóriában. Ezt az útmutatót 5 ember találta hasznosnak és 2 felhasználó értékelte átlagosan 4.5 csillagra
Oldal 1/162

21/36/04
www.metz-ce.de
Operating instruction
for TV sets with the type designation „TY”

Dear Customer,
thank you very much for choosing a Metz product.
We have created menu navigation in this TV set that provides you
with an easy- to-understand user interface.
You can access the help menu during all modes of operation in order
to make adjustments to your settings.
But before switching on for the first time, you should at any rate read
chapters 1 to 5 and 9 of the user's guide.
In the box
• TV set
• Remote control + two AAA batteries
• Power cord
• Operating instructions
• Product datasheet
• Energylabel
• Unit base
Operating instructions for the following LCD TV sets:
see accompanying productdatasheet.
Explanation
Hint, note
Beware of health risks!
+
SIMPLIFIED EU DECLARATION OF CONFORMITY
The simplified EU declaration of conformity referred to in Article
10(9) shall be provided as follows:
Hereby, Metz Consumer Electronics GmbH declares that the radio
equipment type [designation of type of radio equipment] is in
compliance with Directive 2014/53/EU. The full text of the EU decla-
ration of conformity is available at the following internet address:
https://metz-ce.de/en/support/downloads/declaration-of-confor-
mity/#support-nav.
This product contains free software distributed under the GNU
General Public License (GPL) and/or the GNU Lesser General Public
License (LGPL). You may redistribute and / or publish it under the
terms of the GNU General Public License and/or the GNU Lesser
General Public License, as published by the Free Software Founda-
tion, either according to version 2 of the license, or (depending on
your option) any later version.
This programme is distributed in the hope that it will be useful, but
WITHOUT ANY WARRANTY, especially without the implied warranty of
MERCHANTABILITY or FITNESS FOR A PARTICULAR PURPOSE. Details
can be found in the GNU General Public License (GPL) and the GNU
Lesser General Public License (LGPL).
You can obtain the software from the Metz Consumer Electronics
GmbH customer service (support-CE@metz.de or by writing to
Ohmstraße 55, D-90513 Zirndorf, Germany). You can download the
GNU General Public License (GPL) and the GNU Lesser General
Public License (LGPL) from http://www.gnu.org/licenses/.
2

1 Proper use . . . . . . . . . . . . . . . . . . . . . . . . . . . . . . . . . . . . . . . . . . . . . 6
2 Installation instructions . . . . . . . . . . . . . . . . . . . . . . . . . . . . . . . . . . 6
3 Safety instructions . . . . . . . . . . . . . . . . . . . . . . . . . . . . . . . . . . . . . . 7
4 Connecting, switching on and off. . . . . . . . . . . . . . . . . . . . . . . . . . . 9
5 The remote control . . . . . . . . . . . . . . . . . . . . . . . . . . . . . . . . . . . . . 11
5.1 Remote control (RM18) . . . . . . . . . . . . . . . . . . . . . . . . . . . . . . . . 12
5.2 Remote control (RM19) . . . . . . . . . . . . . . . . . . . . . . . . . . . . . . . . 14
6 Setting the language/country . . . . . . . . . . . . . . . . . . . . . . . . . . . . 16
7 Help (Guide) . . . . . . . . . . . . . . . . . . . . . . . . . . . . . . . . . . . . . . . . . . . 17
8 Menu control . . . . . . . . . . . . . . . . . . . . . . . . . . . . . . . . . . . . . . . . . . 18
9 Channel search . . . . . . . . . . . . . . . . . . . . . . . . . . . . . . . . . . . . . . . . 19
9.1 Setting the reception type. . . . . . . . . . . . . . . . . . . . . . . . . . . . . . 19
9.2 TV standard for analogue channels . . . . . . . . . . . . . . . . . . . . . . 20
9.2.1 Analogue TV channel search . . . . . . . . . . . . . . . . . . . . . . . . . . 21
9.2.2 Colour standard for analogue channels . . . . . . . . . . . . . . . . . 22
9.3 DVB-T (T2), antenna supply . . . . . . . . . . . . . . . . . . . . . . . . . . . . . 23
9.3.1 DVB-T(T2) channel search, automatic . . . . . . . . . . . . . . . . . . . 24
9.3.2 DVB-T(T2) channel search, manual . . . . . . . . . . . . . . . . . . . . . 25
9.4 DVB-C channel search, automatic. . . . . . . . . . . . . . . . . . . . . . . . 26
9.4.1 DVB-C channel search, manual . . . . . . . . . . . . . . . . . . . . . . . . 27
9.5 Setting the SAT system, antenna system . . . . . . . . . . . . . . . . . . 28
9.5.1 Setting up the sat system, Unicable (EN50607), JESS
(EN50607) . . . . . . . . . . . . . . . . . . . . . . . . . . . . . . . . . . . . . . . . . . . . . 29
9.5.2 Setting the sat system, LNB supply voltage . . . . . . . . . . . . . . 30
9.5.3 Set SAT system, DiSEqC system. . . . . . . . . . . . . . . . . . . . . . . . 31
9.5.4 Set SAT system, selecting a satellite . . . . . . . . . . . . . . . . . . . . 32
9.6 SAT channel search, automatic. . . . . . . . . . . . . . . . . . . . . . . . . . 33
9.6.1 Automatic search . . . . . . . . . . . . . . . . . . . . . . . . . . . . . . . . . . . 33
9.6.2 SAT channel search, manual . . . . . . . . . . . . . . . . . . . . . . . . . . 34
10 List of TV Stations . . . . . . . . . . . . . . . . . . . . . . . . . . . . . . . . . . . . 35
11 Edit favourite list . . . . . . . . . . . . . . . . . . . . . . . . . . . . . . . . . . . . . . 36
11.1 Moving channels within a list . . . . . . . . . . . . . . . . . . . . . . . . . . 37
11.2 Delete channel. . . . . . . . . . . . . . . . . . . . . . . . . . . . . . . . . . . . . . 37
11.3 Import/export channel list . . . . . . . . . . . . . . . . . . . . . . . . . . . . 38
12 Programme selection and information . . . . . . . . . . . . . . . . . . . . 39
12.1 Programme selection. . . . . . . . . . . . . . . . . . . . . . . . . . . . . . . . . 39
12.2 Programme selection using the TV station list. . . . . . . . . . . . . 39
12.3 Programme information (… on now) . . . . . . . . . . . . . . . . . . . . . 40
13 Everyday handling. . . . . . . . . . . . . . . . . . . . . . . . . . . . . . . . . . . . . 41
13.1 Changing picture settings . . . . . . . . . . . . . . . . . . . . . . . . . . . . . 41
13.2 Volume settings . . . . . . . . . . . . . . . . . . . . . . . . . . . . . . . . . . . . . 41
13.3 Changing the sound settings . . . . . . . . . . . . . . . . . . . . . . . . . . 41
13.4 Virtual keyboard. . . . . . . . . . . . . . . . . . . . . . . . . . . . . . . . . . . . . 41
13.5 Search function . . . . . . . . . . . . . . . . . . . . . . . . . . . . . . . . . . . . . 42
13.5.1 Search function in the TV channel lists . . . . . . . . . . . . . . . . 42
13.5.2 EPG search function . . . . . . . . . . . . . . . . . . . . . . . . . . . . . . . . 43
13.5.3 Keyword search in video text. . . . . . . . . . . . . . . . . . . . . . . . . 43
13.6 Status display . . . . . . . . . . . . . . . . . . . . . . . . . . . . . . . . . . . . . . 44
13.7 On-screen display . . . . . . . . . . . . . . . . . . . . . . . . . . . . . . . . . . . 46
14 Time settings. . . . . . . . . . . . . . . . . . . . . . . . . . . . . . . . . . . . . . . . . 48
14.1 Setting the sleep timer . . . . . . . . . . . . . . . . . . . . . . . . . . . . . . . 48
14.2 Setting the automatic on and off times . . . . . . . . . . . . . . . . . . 49
14.3 Setting the Time and Date. . . . . . . . . . . . . . . . . . . . . . . . . . . . . 50
14.4 Recording control (setting lead and delay times) . . . . . . . . . . 51
15 Subtitles . . . . . . . . . . . . . . . . . . . . . . . . . . . . . . . . . . . . . . . . . . . . 52
15.1 Select language . . . . . . . . . . . . . . . . . . . . . . . . . . . . . . . . . . . . . 53
16 Picture settings. . . . . . . . . . . . . . . . . . . . . . . . . . . . . . . . . . . . . . . 54
16.1 Profile adjustment settings. . . . . . . . . . . . . . . . . . . . . . . . . . . . 54
16.2 Setting your own profile . . . . . . . . . . . . . . . . . . . . . . . . . . . . . . 55
16.2.1 Select profile. . . . . . . . . . . . . . . . . . . . . . . . . . . . . . . . . . . . . . 55
16.2.2 Assigning a selected profile . . . . . . . . . . . . . . . . . . . . . . . . . 57
16.2.2.1 HDR picture profiles . . . . . . . . . . . . . . . . . . . . . . . . . . . . . . 58
16.2.3 Setting zoom/automatic zoom/panorama/
image position/overscan. . . . . . . . . . . . . . . . . . . . . . . . . . . . 59
16.2.4 MPEG noise reduction . . . . . . . . . . . . . . . . . . . . . . . . . . . . . . 60
16.2.5 Noise reduction . . . . . . . . . . . . . . . . . . . . . . . . . . . . . . . . . . . 61
16.2.6 Colour impression . . . . . . . . . . . . . . . . . . . . . . . . . . . . . . . . . 62
16.3 Picture settings for program . . . . . . . . . . . . . . . . . . . . . . . . . . . 63
16.3.1 Adjusting the signal for a programme. . . . . . . . . . . . . . . . . . 64
3

16.4 PIP - Picture in picture . . . . . . . . . . . . . . . . . . . . . . . . . . . . . . . . 65
16.4.1 Split Screen - Progr.1 next to Progr.2 with Teletext. . . . . . . . 66
16.4.2 Displaying the screen of an AV device . . . . . . . . . . . . . . . . . 66
17 Sound settings . . . . . . . . . . . . . . . . . . . . . . . . . . . . . . . . . . . . . . . 67
17.1 General sound settings . . . . . . . . . . . . . . . . . . . . . . . . . . . . . . . 67
17.1.1 Volume . . . . . . . . . . . . . . . . . . . . . . . . . . . . . . . . . . . . . . . . . . 67
17.1.2 Equalizer . . . . . . . . . . . . . . . . . . . . . . . . . . . . . . . . . . . . . . . . . 68
17.1.3 Automatic volume adjustment . . . . . . . . . . . . . . . . . . . . . . . 69
17.1.4 Sound adjustment . . . . . . . . . . . . . . . . . . . . . . . . . . . . . . . . . 70
17.1.5 Headphone volume . . . . . . . . . . . . . . . . . . . . . . . . . . . . . . . . 71
17.1.6 Bluetooth®. . . . . . . . . . . . . . . . . . . . . . . . . . . . . . . . . . . . . . . 72
17.1.6.2 Bluetooth® playback via partner device „headphones“ . 72
17.1.7 Speech intelligibility generally . . . . . . . . . . . . . . . . . . . . . . . 74
17.2 Sound settings for program. . . . . . . . . . . . . . . . . . . . . . . . . . . . 75
17.2.1 Volume correction . . . . . . . . . . . . . . . . . . . . . . . . . . . . . . . . . 75
17.2.2 Sound settings for programme position . . . . . . . . . . . . . . . . 76
17.3 Program mute. . . . . . . . . . . . . . . . . . . . . . . . . . . . . . . . . . . . . . . 77
17.3.1 Two-channel selection . . . . . . . . . . . . . . . . . . . . . . . . . . . . . . 77
17.4 Audio/language selection. . . . . . . . . . . . . . . . . . . . . . . . . . . . . 78
17.4.1 Audio-Description . . . . . . . . . . . . . . . . . . . . . . . . . . . . . . . . . 78
17.5 Analogue output . . . . . . . . . . . . . . . . . . . . . . . . . . . . . . . . . . . . 79
17.6 Digital output . . . . . . . . . . . . . . . . . . . . . . . . . . . . . . . . . . . . . . . 80
17.7 Switching the loudspeaker on/off . . . . . . . . . . . . . . . . . . . . . . 82
17.7.1 Selecting the sound output . . . . . . . . . . . . . . . . . . . . . . . . . . 83
17.8 Connecting headphones . . . . . . . . . . . . . . . . . . . . . . . . . . . . . . 85
17.9 Sound 1, Sound 2 . . . . . . . . . . . . . . . . . . . . . . . . . . . . . . . . . . . 85
18 Video text. . . . . . . . . . . . . . . . . . . . . . . . . . . . . . . . . . . . . . . . . . . . 86
18.1 Calling up video text . . . . . . . . . . . . . . . . . . . . . . . . . . . . . . . . . 86
18.1.1 Double font size . . . . . . . . . . . . . . . . . . . . . . . . . . . . . . . . . . . 86
18.2 Video text comfort functions. . . . . . . . . . . . . . . . . . . . . . . . . . . 86
18.2.1 Structure . . . . . . . . . . . . . . . . . . . . . . . . . . . . . . . . . . . . . . . . . 86
18.2.2 Cursor on (cursor page selection) . . . . . . . . . . . . . . . . . . . . . 86
18.2.3 Search by keyword . . . . . . . . . . . . . . . . . . . . . . . . . . . . . . . . . 86
18.2.4 Large TV screen / Small TV screen . . . . . . . . . . . . . . . . . . . . . 87
18.2.5 Reveal hidden text . . . . . . . . . . . . . . . . . . . . . . . . . . . . . . . . . 87
18.2.6 Setting markers for a video text page . . . . . . . . . . . . . . . . . . 87
18.2.7 Select next video text page marker . . . . . . . . . . . . . . . . . . . . 87
18.2.8 Video text, delete markers . . . . . . . . . . . . . . . . . . . . . . . . . . . 87
19 Radio mode . . . . . . . . . . . . . . . . . . . . . . . . . . . . . . . . . . . . . . . . . . 88
19.1 DVB radio . . . . . . . . . . . . . . . . . . . . . . . . . . . . . . . . . . . . . . . . . . 88
19.2 Internet radio . . . . . . . . . . . . . . . . . . . . . . . . . . . . . . . . . . . . . . . 89
20 The F-button. . . . . . . . . . . . . . . . . . . . . . . . . . . . . . . . . . . . . . . . . . 90
20.1 Programming the web app function . . . . . . . . . . . . . . . . . . . . . 91
21 Start Up . . . . . . . . . . . . . . . . . . . . . . . . . . . . . . . . . . . . . . . . . . . . . 92
21.1 Initial program position. . . . . . . . . . . . . . . . . . . . . . . . . . . . . . . 92
21.2 Start-up screen. . . . . . . . . . . . . . . . . . . . . . . . . . . . . . . . . . . . . . 93
21.3 Switch-on behaviour . . . . . . . . . . . . . . . . . . . . . . . . . . . . . . . . . 94
21.4 Quick start . . . . . . . . . . . . . . . . . . . . . . . . . . . . . . . . . . . . . . . . . 95
21.5 Speakers . . . . . . . . . . . . . . . . . . . . . . . . . . . . . . . . . . . . . . . . . . 96
22 Parental control . . . . . . . . . . . . . . . . . . . . . . . . . . . . . . . . . . . . . . . 97
22.1 Blocking selected channels . . . . . . . . . . . . . . . . . . . . . . . . . . . 97
22.2 Configuring Parental Control (Basic Settings) . . . . . . . . . . . . . 98
22.3 Activate parental control . . . . . . . . . . . . . . . . . . . . . . . . . . . . . . 99
22.3.1 Activating Parental Control using the function overview . . . 99
22.3.2 Activating Parental Control using the function button . . . . . 99
22.3.3 Switching off Parental Control . . . . . . . . . . . . . . . . . . . . . . . 100
23 AV devices . . . . . . . . . . . . . . . . . . . . . . . . . . . . . . . . . . . . . . . . . . 101
23.1 AV Connecting AV units . . . . . . . . . . . . . . . . . . . . . . . . . . . . . . 101
23.2 Registering AV devices . . . . . . . . . . . . . . . . . . . . . . . . . . . . . . 103
23.2.1 Connecting UHD/4k playback devices . . . . . . . . . . . . . . . . 104
23.3 HDMI CEC function. . . . . . . . . . . . . . . . . . . . . . . . . . . . . . . . . . 105
23.4 HDMI ARC function . . . . . . . . . . . . . . . . . . . . . . . . . . . . . . . . . 105
23.5 Selecting signal source (AV devices) . . . . . . . . . . . . . . . . . . . 106
24 EPG (Electronic Programme Guide) . . . . . . . . . . . . . . . . . . . . . . 107
24.1 Collecting EPG data . . . . . . . . . . . . . . . . . . . . . . . . . . . . . . . . . 108
24.2 Exclusion of one or more channels from the EPG . . . . . . . . . 109
24.3 Sort EPG list by …(Only possible in list view). . . . . . . . . . . . . 110
24.4 EPG-Selecting a programme . . . . . . . . . . . . . . . . . . . . . . . . . . 110
24.5 EPG: Sending reminder for a programme. . . . . . . . . . . . . . . . 111
24.6 Further options, Search. . . . . . . . . . . . . . . . . . . . . . . . . . . . . . 111
4

To prevent injuries, the TV set must be fastened safely to the
floor / wall in accordance with the installation instructions.
Set up the TV set on a firm, level and stable base!
Do not place the TV set on high furniture without anchoring both
the furniture and the TV set to a suitable support.
No other materials (e.g. table runners etc.) may be placed
between the TV set and the furniture.
To prevent injury, the TV must be securely fixed to the floor/wall
in accordance with the installation instructions.
Educate children about the dangers of climbing on furniture to
reach the TV set and its controls at.
In unfavourable cases of direct sunlight, the heat generated on
the rear panel of the unit can be so great that it causes damage.
When laying the power cord make sure there are no objects
resting on it and that no-one can trip over it!
Never use cleaning solution on the screen surface! If any
cleaning solution penetrates beneath the screen's lower frame,
it will result in irreparable damage to the components.
3 Safety instructions
Your set is designed for operation in dry rooms. If, as an
exception, you operate the TV set outdoors, then please make
sure that it is protected against moisture (rain, water spray,
dew).
Do not expose TV set to dripping or splashes (e.g. rain)!
Unplug electrical equipment before cleaning!
Do not hold the remote control directly in front of your eyes and
press a key! Infrared light!
The TV set may only be run with a power voltage of
230-240V~ 50Hz.
For maintenance and repair work the mains plug or the device
plug-and-socket of the power cable of the TV set – in the
meaning of the applicable standard – are to be regarded as the
means for disconnection from the mains and kept in working
order
.
Candles and other open flames must be kept away from this
product at all times to prevent fire spreading.
The unit may only be opened and repaired by a qualified
specialist.
RISK OF FATAL INJURIES !
Please contact your authorised dealer if any repairs are
necessary.
Bluetooth®devices work with shortwave radio signals. These
can interfere with other electronic or medical devices in certain
cases.
Radio waves can interfere with pacemakers and other medical
devices. Maintain a distance of at least 20 cm!
7

• A cold device may only be turned on in a cold room once any
condensation on the screen has evaporated.
• TV sets require adequate cooling. The openings at the back may
not be covered by curtains, etc.
The ventilation slits on the bottom of the set must remain freely
accessible, since this is how the device draws in cool air.
• Make sure there is an adequate cooling air flow if you put your
device into a built-in cabinet.
• Do not set up/suspend your device directly next to or above a
heater; this could impair the device cooling.
• No burning candles or vessels with liquid may be placed on or
above the TV set.
Hot wax and liquids that get into the interior of the device destroy
the electric components of your TV set.
In these cases the electrical safety of the device can no longer be
guaranteed.
• Thunder storms are a danger for electrical devices. If lightning hits
the power cable or antenna, the device can be damaged, even if it
is switched off. During thunder storms disconnect the mains plug
and antenna plug from the socket or the TV set.
• No rechargeable batteries may be inserted in the battery
compartment of the remote control. Only two
LR03/AM4/AAA 1.5 V micro batteries may be used.
• This TV set is exclusively designed for the reception and playback
of picture and sound signals.
• Do not display still pictures, logos, 4:3 formats with margins,
etc for a long period. There is a risk that these still pictures could
lead to markings on the screen.
• Soot and dust deposits can accumulate behind the front panel
glass of the LCD TV set without a visible source of soot being
present. These soot and dust deposits are also known as
“fogging” or “magic dust”. There are scattered instances of this
phenomenon, but especially during the warm-up period and after
renovation work or in new constructions. Various factors are
mentioned as the cause, see too the reports on the Internet.
In such cases cleaning or replacement of the panel is excluded
from the guarantee, since it does not involve a set defect, but
rather an external influence.
• The screen surface should only be cleaned with a soft, dry
cleaning cloth (e.g. microfibre cloth).
• To remove stubborn dirt or smears, it is possible to clean the
screen with a slightly damp, soft cloth. Also see Chap. 29.
8

4 Connecting, switching on and off
Power connection
Connect the TV set to the wall socket with the accompanying power cord.
Switching on for the first time
Switch on the TV set with the mains switch on the set.
After a short waiting time, the Metz logo or a user-defined start-up picture (see Chapter 21.2)
appears on the screen.
The LED display lights up green for the "On" state.
When the TV set is switched on for the first time, the "Installation Wizard"
appears. It guides you through the settings that you have to make to start-up the TV set if
the settings have not been done by the dealer.
This includes the language, country, reception type and so on .
After about 10 seconds the TV set switches automatically to program position 1 or the preset
initial program position, see Chap. 21.1.
If no other command is received from the remote control, a message will appear after
approx. 10 minutes asking for one of the remote control keys to be pressed.
Unless a button is pressed on the remote control, the TV will switch to stand-by mode
after 10 minutes.
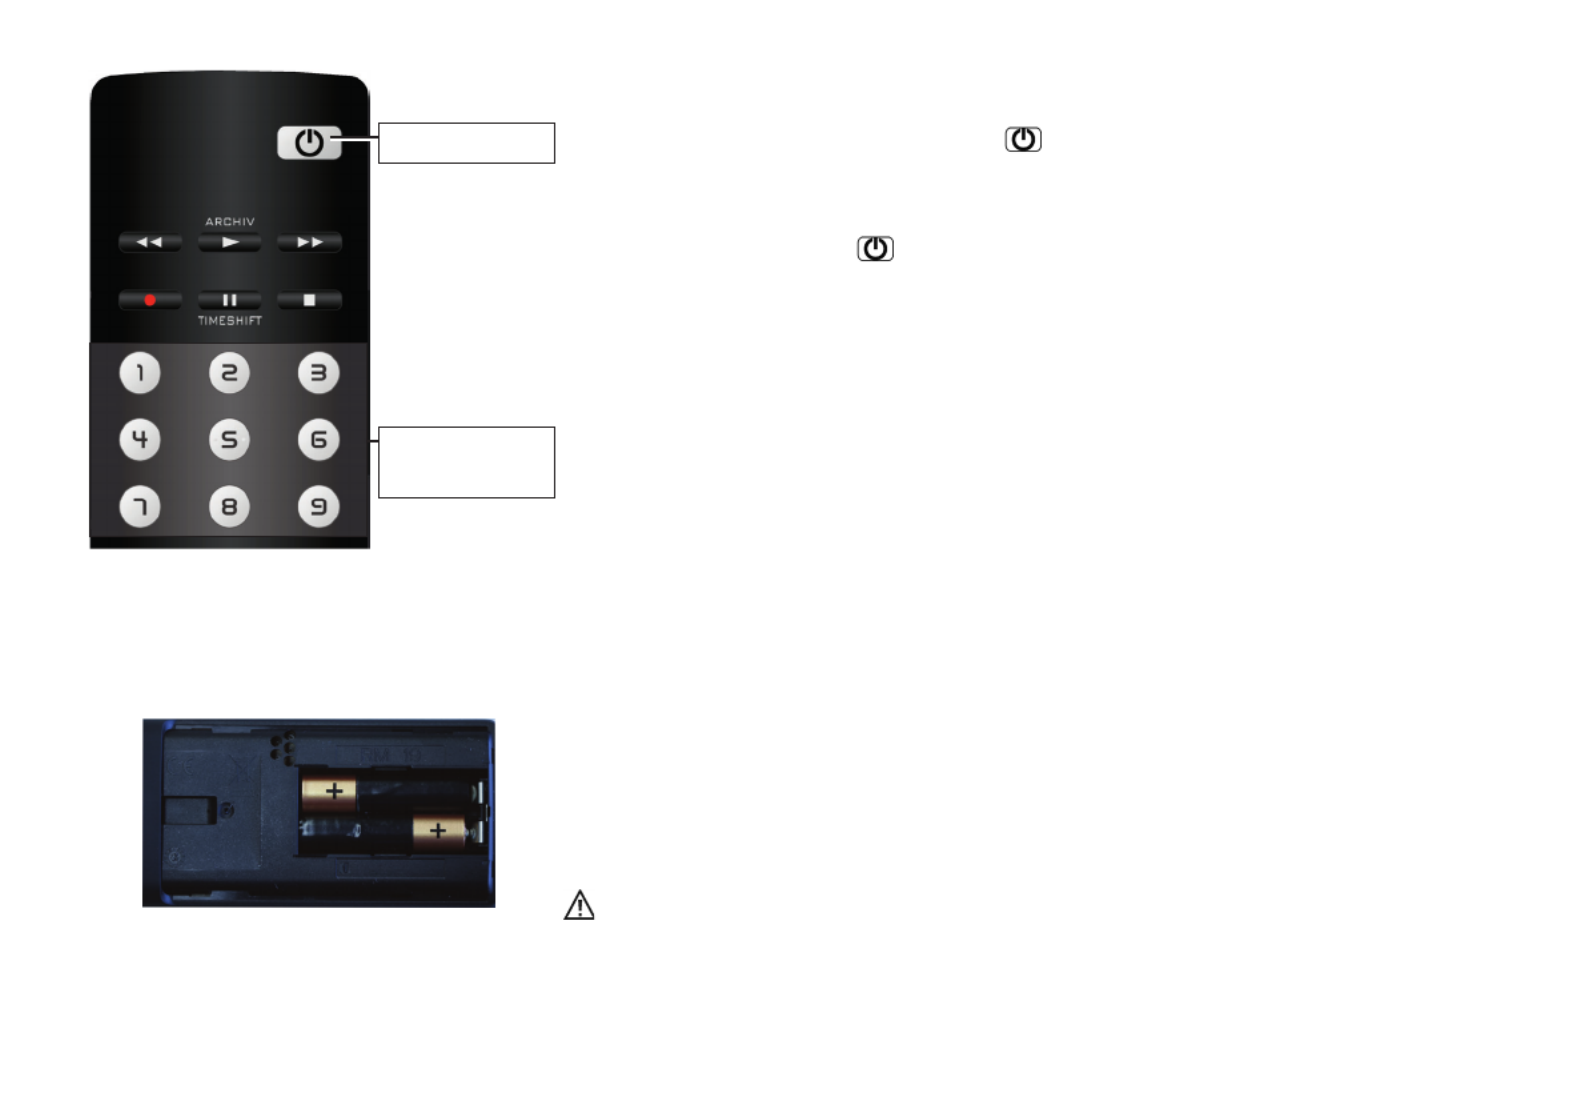
Power switch
9
+

10
Antenna connection (back of unit on the bottom)
Connect the TV to the antenna box with an antenna cable.
Reception type DVB-C, DVB-T/T2 and analogue TV
the settings for the DVB-T antenna are described in Chapter 9.3.
Reception type DVB-S and DVB-S2
when using a "normal" satellite antenna with antenna feeder lines.two
The settings for the satellite antenna are described in Chapter 9.5.
Recommended usage.
Reception type DVB-S and DVB-S2
When using a standard satellite system with an antenna feeder line. Tandem setting in
Chapter 9.5:
The same is true when using a “single cable” or a “Unicable” satellite system.
The settings for the satellite antenna are described in Chapter 9.5.
11
Switching on from stand-by mode
Use the numeric keys of the remote control to select any program.
Program position 1 is selected with the key or if programmed, there is a switch to the
initial program position, see Chapter 21.1.
Switching off with the remote control
Press the remote control key .
The TV switches to stand-by mode and the LED display lights up.
When the LED indicator is blue, the TV set is still collecting data for the electronic
programme guide or an EPG recording is in progress.
Switching off with the power switch
If the red LED display is illuminated or “EPG” appears in the display, the TV set is still
gathering data for the electronic program guide.
5 The remote control
The remote control conveys commands to the TV set via infrared light. The remote control
must always be directed at the TV set. Other infrared controlled devices or systems
(e.g. infrared headphones) within its range could be destroyed.
Direct sunlight on the TV set may lead to disruptions, because the TV set is unable to
recognise the infrared signals of the remote control. To enable the TV set to be controlled by
the remote control, it cannot be switched off with the power switch.
No rechargeable batteries may be inserted in the battery compartment of the
remote control!
Only two LR03/AM4/AAA 1.5 V micro batteries may be used.
The batteries that are used must not be exposed to excessive heat such as sunshine,
fire or the like!
On / Off
Select
programme

12
5.1 Remote control (RM18)
ON, at program position 1 or
at the programmed initial program position (Chapter 21.1)
OFF, enter stand-by setting
When set to Play:
Rewind
When set to time shift:
Skip backwards -20 seconds
Open archive / in archive: Play
When set to Play: Fast forward
When set to time shift: Skip forwards one minute
Start direct recording / EPG direct recording
In TV mode: Start time shift
In TV mode: Freeze frame, if "Timeshift" has been switched off in the function overview
When set to Play: Still picture/Pause
When set to Play
:
press and hold: slow motion
Stop (when set to Play: Return to archive / when set to time shift: Switch to “Live”)
Select internal and external signal source (AV devices)
Select HbbTV.
Call up picture settings
Call up sound settings
Display date, time info on program.
When set to time shift: Display playback position
Open "Functions" (function keys)
F
Only with integrated or external
connected hard disk
13
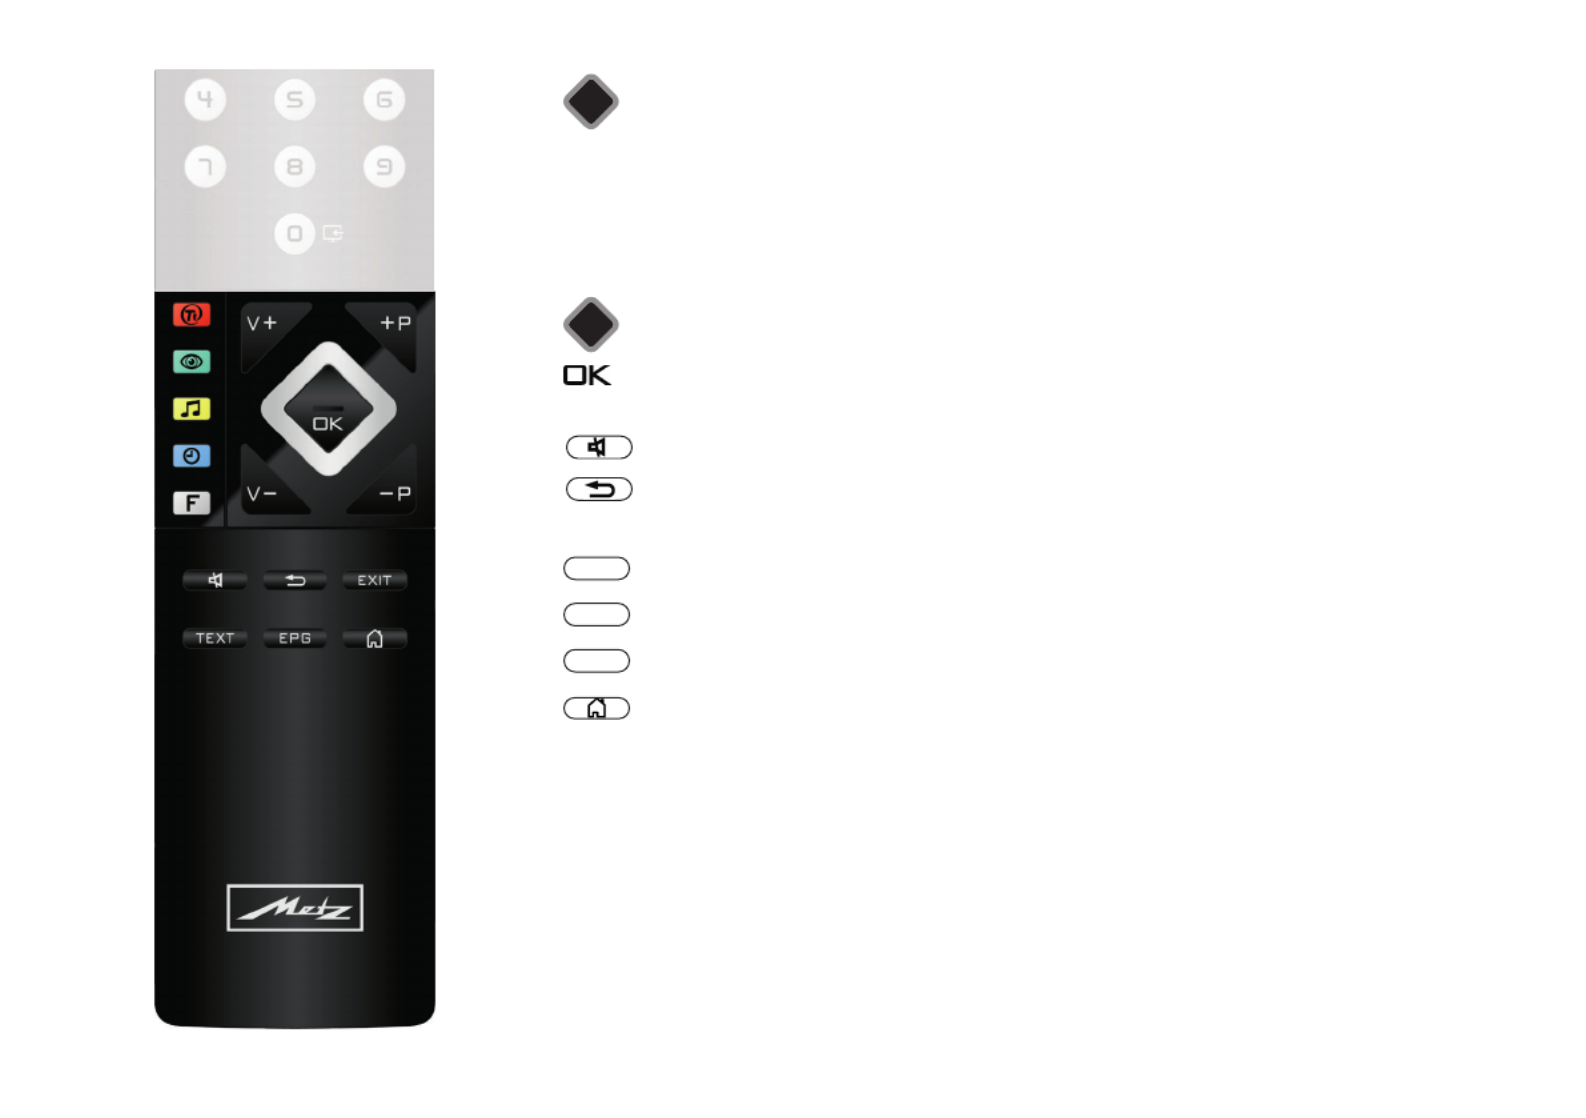
Select list of TV stations
V+ Volume +
+P Progr. +
V– Volume –
–P Progr. –
Cursor control key/Change value
Confirmation key
In the menu: Save
Mute/sound stop
Back to last program
In the menu: Go back
Leave Menu/Settings
Call up video text
Call up the electronic program guide
Open "Functional overview" menu
OK
EXIT
TEXT
EPG

14
5.2 Remote control (RM19)
ON, at program position 1 or
at the programmed initial program position (Chapter 21.1)
OFF, enter stand-by setting
When set to Play: Rewind
When set to time shift: Skip backwards -20 seconds
Open archive / in archive: Play
When set to Play: Fast forward
When set to time shift: Skip forwards one minute
Start direct recording / EPG direct recording
In TV mode: Start time shift
In TV mode: Freeze frame, if "Timeshift" has been switched off in the function o
verview
When set to Play: Still picture/Pause
When set to Play: press and hold: slow motion
Stop (when set to Play: Return to archive / when set to time shift: Switch to “Live”)
Select internal and external signal source (AV devices)
Show picture in picture
Open the menu
. . Function keys
PIP
MENU
F1 F3
Only with integrated or external
connected hard disk

15
Select HbbTV
Call up picture settings
Call up sound settings
Display date, time info on program.
When set to time shift: Display playback position
Open Smart TV internet portal
Select list of TV stations
V+ Volume +
+P Progr. +
V– Volume –
–P Progr. –
Cursor control key/Change value
Confirmation key
In the menu: Save
Mute/sound stop
Back to last program
In the menu: Go back
Leave Menu/Settings
Call up video text
Call up the electronic program guide
Open "Functional overview" menu
OK
EXIT
TEXT
EPG
16
6 Setting the language/country
Language selection in the menu
You can select the language under "Configuration".
All texts in the menus and in the Help (information) will be shown in the chosen language.
Setting the country
The se er setup location or country (e.g. Germany) must be entered aft tup. This assigns the
device its basic settings (e.g. channel raster, sequence of channel filing, etc).
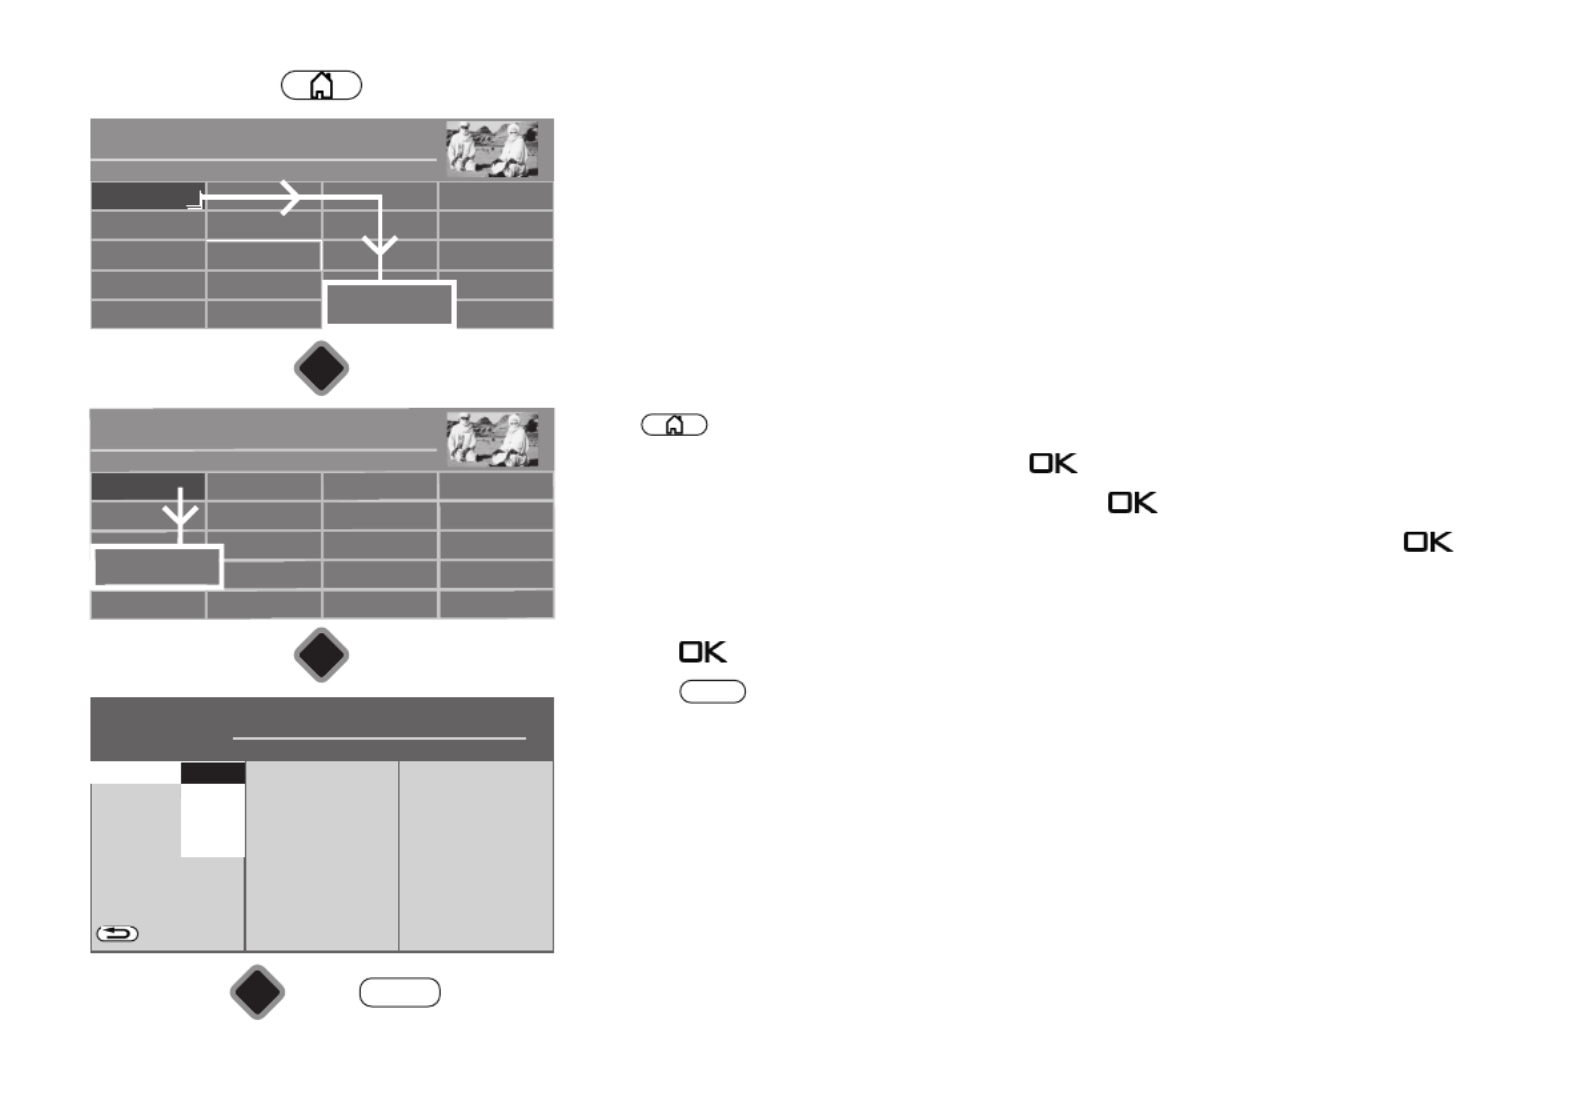
Setting the language/country:
• Press button to open the "Functional overview".
• Select "Menu" with the cursor and press the button.
• Select "Configuration" with the cursor and press the button.
• Select "Language" or "Country" with the cursor in the context menu and press the
button.
• Select your desired language or country with the cursor.
• Press the button to confirm your selection.
• Press the button to exit the menu.
EXIT
Radio Internet portal
Recordings archive
TV
Functional overview 20:10
MusicPhotosVideos
Analogue NetworkUSBHDMI
Remove USB Device
Manual
Parental control
Menu
Autom. On/Off
■ MANUAL
Network AV devices
Sound
Picture
Menu 20:10
Radio station list
TV station list
Subtitle Service
Parental control
Recordings/EPG
Bluetooth
®
Terrestrial
Analog-TV
Cable
Satellite
■ MANUAL
OK
OK
OK
Configuration
H H H EXPERT
Country
On screen displa
Opertation
Start characteristics
Time settings
State display
BACK
■ MANUAL
■ OPERATION LEVEL
Language
English
Italiano
Français
Deutsch
Configuration
EXIT
17
7 Help (Guide)
In designing the TV set we took care to configure it in a way that would make it fun for you as
a user to get to know the device in the easiest, most convenient manner possible.
The Help Guide can answer many of the questions you might encounter once you have set
up and switched on your TV.
Just press the blue button when the menu is displayed. The table of contents for the
"Guide" appears on the screen. The "Guide" can also be programmed as a function button.
The “Guide” menu or help
You can select the point you are interested in the table of contents or key word index with
the cursor control key.
Move cursor to the right or down,
browse the index forwards ...
Move cursor to the left or up,
browse the index backwards ...
... then press the key , so that you can read the explanatory text.
All underlined words, whether in the table of contents, key word index or explanatory text
can be selected with the cursor. After pressing the key , the explanation is displayed.
You can browse the pages consulted backwards with the yellow button and forwards
with the green button.
Radio Internet portal
Recordings archive
TV
Functional overview 20:10
MusicPhotosVideos
Analogue NetworkUSB
Filemanager
move USB Device
Parental control Menu
Manual
Autom. On/Off
■ MANUAL
OK

18
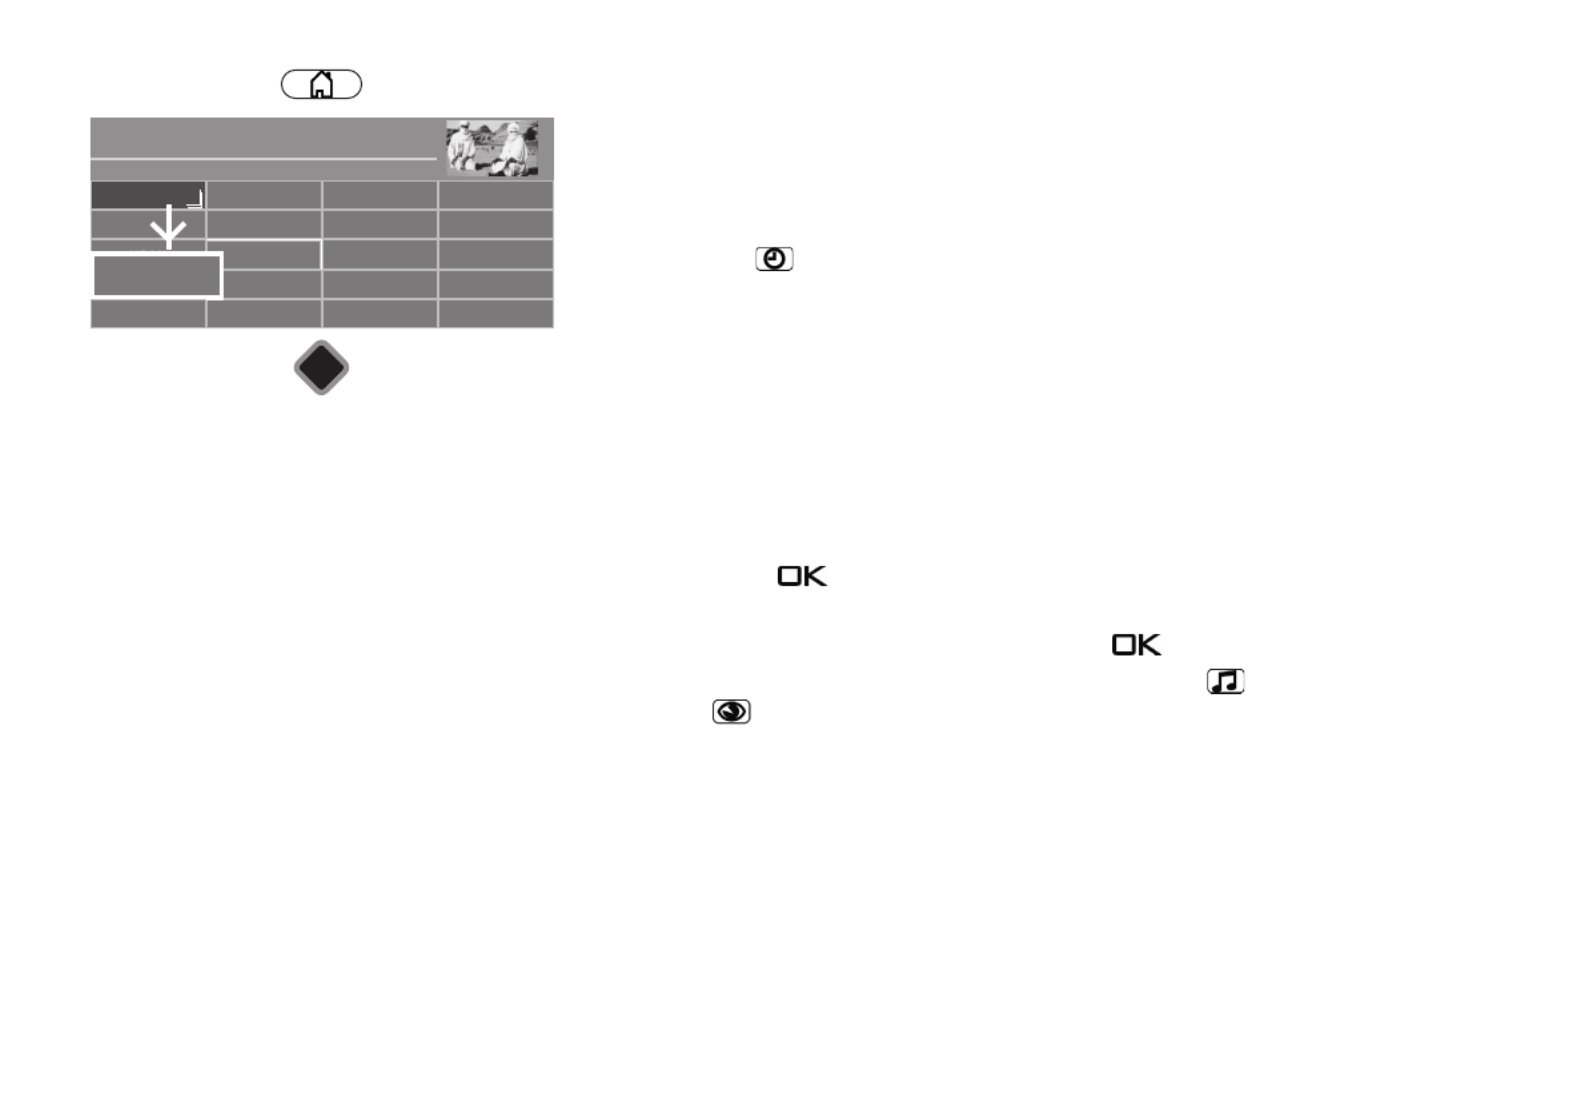
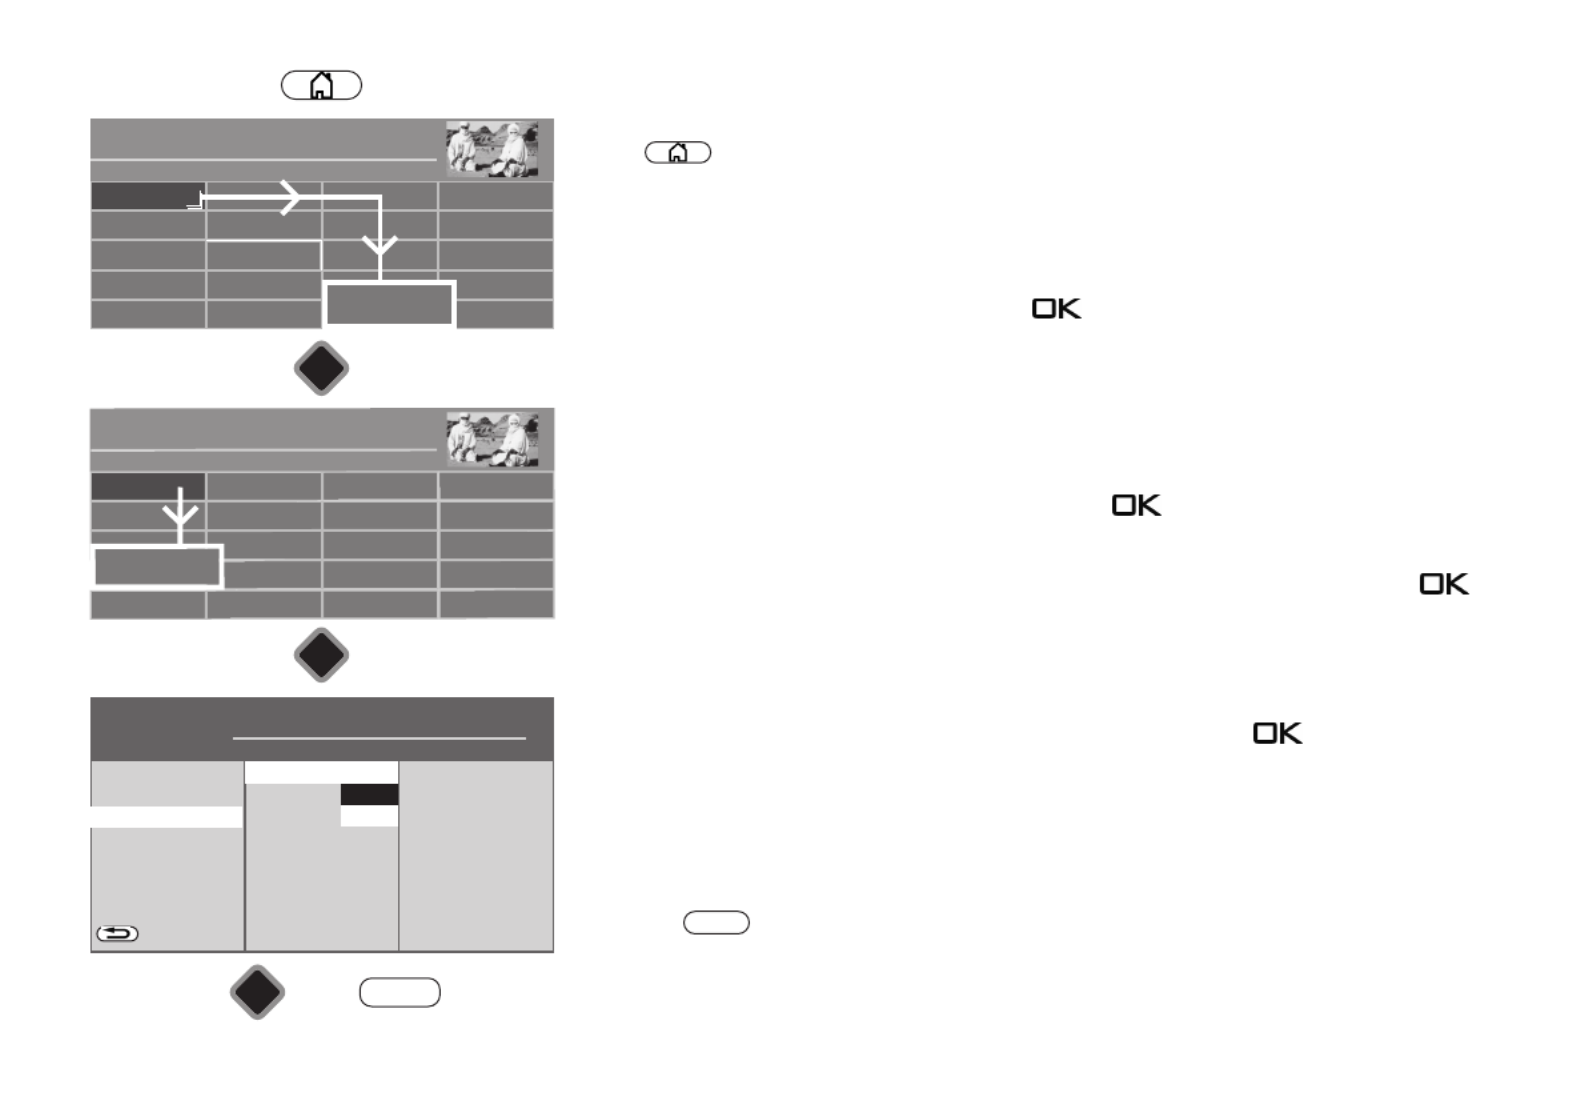
8 Menu control
See all the options available on your TV set in the "Functional overview".
Press the button to access the Functional overview.
Once you have opened the Functional overview, you can select the individual functions
using the cursor.
Confirm your choice by pressing the button.
To change your TV settings, select "Menu" in the Functional overview and open it with the
button.
Use the button on the silver remote control to open the menu.
Select the menu item that you would like to change and press the button.
Change the parameters for the selected menu item with the cursor buttons and confirm by
pressing the button.
The logo shows the values set at the factory.
To go back one level, always press the button .
Exit the menu with the button .
MENU
EXIT
Network AV devices
Sound
Picture
Menu 20:10
Radio station list
TV station list
Subtitle Service
Parental control
Recordings/EPG
Terrestrial
Analog-TV
Cable
Satellite
■ MANUAL
Configuration
Radio Internet portal
Recordings archive
TV
Functional overview 20:10
MusicPhotosVideos
Analogue NetworkUSBHDMI
Remove USB Device
Manual
Parental control
Menu
Autom. On/Off
■ MANUAL
MRNU

19
9 Channel search
9.1 Setting the reception type
This TV set is equipped for up to four different reception types:
Analog-TV: The broadcasting technology that has existed for decades and which in the
meantime can only be received via cable.
DVB-T(T2): The digital broadcasting technology that can be received via the up to now
customary house antenna or room antenna (depending on reception condi-
tions). Ask your local TV dealer about this, or find out more at
“www.ueberall-tv.de”.
DVB-C: The digital broadcasting technology that can be received via a cable connection.
Ask your local cable provider.
DVB-S(2): The digital broadcasting technology that can be received via a satellite. Ask your
local TV dealer about this, or find out more at
„www.lyngsat.com/europe.html“
Set the reception type that you have set up.
Setting reception type:
• Press button to open the "Functional overview".
• Select "Menu" with the cursor and press the button.
• Select the window with the cursor for the desired receiving mode, e.g. "Cable" and press
the button.
If they are available, it is possible to configure several types of reception.
Radio Internet portal
Recordings archive
TV
Functional overview 20:10
MusicPhotosVideos
Analogue NetworkUSBHDMI
Remove USB Device
Manual
Parental control
Menu
Autom. On/Off
■ MANUAL
Network AV devices
Sound
Picture
Menu 20:10
Radio station list
TV station list
Subtitle Service
Parental control
Recordings/EPG
Terrestrial
Analog-TV
Cable
Satellite
■ MANUAL
OK
OK
Configuration

20
9.2 TV standard for analogue channels
There are various TV standards worldwide for pictures and sound. If the TV standard is set
incorrectly, the sound reproduction is disrupted. In the case of the TV standard “L” the
picture is also broadcast according to a different standard, as a result of which the
TV standard must be selected before the channel search.
The B/G TV standard is set at the factory.
Setting the TV standard:
• Press button to open the "Functional overview".
• Select "Menu" with the cursor and press the button.
• Select "Analog-TV" with the cursor and press the button.
• Select "Search settings" or "TV-standard" with the cursor in the context menu and press
the button.
• Select the desired TV standard in the context menu with the cursor and press the
button.
Radio Internet portal
Recordings archive
TV
Functional overview 20:10
MusicPhotosVideos
Analogue NetworkUSBHDMI
Remove USB Device
Manual
Parental control
Menu
Autom. On/Off
■ MANUAL
Network AV devices
Sound
Picture
Menu 20:10
Radio station list
TV station list
Subtitle Service
Parental control
Recordings/EPG
Bluetooth
®
Terrestrial
Cable
Analog-TV
Satellite
■ MANUAL
OK
OK
Configuration
OK
Analog-TV
H H H EXPERT
BACK
Analogue station search
■ MANUAL■ OPERATION LEVEL
TV-standardSearch settingsAnalogue-TV
D/K
I
L
B/G
EXIT

21
9.2.1 Analogue TV channel search
The entire reception range is automatically searched during the channel search.
The channels found are filed in the station list, which is presented at the end of search
process. You can move or
delete channels that are found if you are not satisfied with the order.
See Chapter “11 Edit favourite list”.
Carrying out a channel search:
• Press button to open the "Functional overview".
• Select "Menu" with the cursor and press the button.
• Select "Analog-TV" with the cursor and press the button.
• Select "Analogue station search" with the cursor in the context menu and press the
button.
• Press the button and start the program search.
Once your channel search is complete the results are shown in a list of TV stations.
Radio Internet portal
Recordings archive
TV
Functional overview 20:10
MusicPhotosVideos
Analogue NetworkUSBHDMI
Remove USB Device
Manual
Parental control
Menu
Autom. On/Off
■ MANUAL
Network AV devices
Sound
Picture
Menu 20:10
Radio station list
TV station list
Subtitle Service
Parental control
Recordings/EPG
Bluetooth
®
Terrestrial
Cable
Analog-TV
Satellite
■ MANUAL
OK
OK
Configuration
OK
Analog-TV
H H H EXPERT
BACK
Search settings
■ MANUAL■ OPERATION LEVEL
Start station search
EXIT
Analogue station search
Analogue-TV

22
9.2.2 Colour standard for analogue channels
The colour standard is set to "Automatic" at the factory. Normally the TV set recognises the
colour standard automatically.
If this automatic function in rare instances does not produce a satisfactory result, the colour
standard can also be set manually for each program position.
Setting the colour standard:
• Press button to open the "Functional overview".
• Select "Menu" with the cursor and press the button.
• The "Picture" window is highlighted in red — press the button and open the context
menu.
• Select "Pict.set.,prog.posn." with the cursor in the context menu and press the
button.
• Select "Picture format" with the cursor in the context menu and press the button.
• Select colour standard from the context menu with the cursor and press the button.
• Press the button to exit the menu.
EXIT

23
9.3 DVB-T (T2), antenna supply
If an active antenna is used for the DVB-T(T2) reception, an antenna supply can be set.
On: Antenna supply is constantly switched on. This setting must be selected if the
TV set is supplied by only one active antenna.
Switched: The antenna supply is only active if a DVB-T(T2) program position has been
selected (e.g. selection of a change-over relay with simultaneous use
of DVB-T antenna & broadband cable).
Off: Setting with passive antenna or joint antenna systems.
Setting the antenna supply:
• Press button to open the "Functional overview".
• Select "Menu" with the cursor and press the button.
• Select "DVB-T" with the cursor and press the button.
• Select "Antenna" and "Supply voltage" with the cursor in the context menu
and press the button.
• Select the desired antenna source with the cursor and press the button.
• Press the button to exit the menu.
EXIT
Radio Internet portal
Recordings archive
TV
Functional overview 20:10
Music
Photos
Videos
Analogue NetworkUSBHDMI
Remove USB Device
Manual
Parental control
Menu
Autom. On/Off
■ MANUAL
Network AV devices
Sound
Picture
Menu 20:10
Radio station list
TV station list
Subtitle Service
Parental control
Recordings/EPG
Bluetooth
®
Analog-TV
C ble
Terrestrial
Satellite
■ MANUAL
OK
OK
Configuration
OK
Terrestrial
H H H EXPERT
BACK
Automatic search
Manual search
■ MANUAL■ OPERATION LEVEL
Supply voltageAntennaDVB-T
EXIT
Switched
On
Off

24
9.3.1 DVB-T(T2) channel search, automatic
The reception range is searched for TV channels and radio channels in the automatic
channel search. The channels found are stored in a TV station list and radio station list.
You can move or delete channels that are found if you are not satisfied with the order.
See Chapter "11 Edit favourite list".
Carrying out an automatic search:
• Press button to open the "Functional overview".
• Select "Menu" with the cursor and press the button.
• Select "DVB-T" with the cursor and press the button.
• Select "Automatic search" and "Start station search" with the cursor in the context menu
and press the button.
• Select "Free-to air programmes" or "All programmes" from the context menu with the
cursor and press the button to start the channel search
.
Once your channel search is complete the results are shown in a list of TV stations.
Radio Internet portal
Recordings archive
TV
Functional overview 20:10
MusicPhotosVideos
Analogue NetworkUSBHDMI
Remove USB Device
Manual
Parental control
Menu
Autom. On/Off
■ MANUAL
Network AV devices
Sound
Picture
Menu 20:10
Radio station list
TV station list
Subtitle Service
Parental control
Recordings/EPG
Bluetooth
®
Analog-TV
C ble
Terrestrial
Satellite
■ MANUAL
OK
OK
Configuration
OK
Terrestrial
H H H EXPERT
BACK
Antenna
Manual search
Sorting Standard
■ MANUAL■ OPERATION LEVEL
Start station search
EXIT
Automatic search
DVB-T

25
9.3.2 DVB-T(T2) channel search, manual
During the manual channel search the channel or frequency of the program to be set must
be known.
Carrying out a manual search:
• Press button to open the "Functional overview".
• Select "Menu" with the cursor and press the button.
• Select "DVB-T" with the cursor and press the button.
• Select "Manual search" with the cursor in the context menu and press the button.
• Select the channel number or frequency with the cursor in the context menu and press the
button.
• Enter the channel or frequency using the numeric keys and press the button.
• After entering the channel information, select "Start station search" with the cursor in the
context menu and press the button.
• Select "Free-to air programmes" or "All programmes" from the context menu with the
cursor and press the button to start the channel search
.
Once your channel search is complete the results are shown in a list of TV stations.
Radio Internet portal
Recordings archive
TV
Functional overview 20:10
MusicPhotosVideos
Analogue NetworkUSBHDMI
Remove USB Device
Manual
Parental control
Menu
Autom. On/Off
■ MANUAL
Network AV devices
Sound
Picture
Menu 20:10
Radio station list
TV station list
Subtitle Service
Parental control
Recordings/EPG
Bluetooth
®
Analog-TV
C ble
Terrestrial
Satellite
■ MANUAL
OK
OK
Configuration
OK
Terrestrial
H H H EXPERT
BACK
Antenna
Automatic search
Channel 05
Frequency 177.500 MHz
■ MANUAL■ OPERATION LEVEL
Start station search
EXIT
Manual search
DVB-T

26
9.4 DVB-C channel search, automatic
The reception range is searched for TV channels and radio channels in the automatic
channel search. The channels found are stored in a TV channel and radio station list.
See Chapter 21 for DVB radio mode. You can move or delete channels that are found if you
are not satisfied with the order. See Chapter "11 Edit favourite list".
Carrying out an automatic search:
• Press button to open the "Functional overview".
• Select "Menu" with the cursor and press the button.
• Select "DVB-C" with the cursor and press the button.
• Select "Automatic search" and "Start station search" with the cursor in the context menu
and press the button.
The symbol rates are preset for general cable networks. If you need other values, you will
receive them from your cable network provider, or you must request them.
• Select "Free-to air programmes" or "All programmes" from the context menu with the
cursor and press the button to start the channel search.
Once your channel search is complete the results are shown in a list of TV stations.
Radio Internet portal
Recordings archive
TV
Functional overview 20:10
Music Medie PlayerPhotosVideos
Analogue NetworkUSBHDMI
Remove USB Device
Manual
Parental control
Menu
Autom. On/Off
■ MANUAL
Network AV devices
Sound
Picture
Menu 20:10
Radio station list
TV station list
Subtitle Service
Parental control
Recordings/EPG
Terrestrial
Analog-TV
Cable
Satellite
■ MANUAL
OK
OK
Configuration
OK
Cable
H H H EXPERT
BACK
Manual search
General settings
Method Channel search
Symbol rate 1 6900
Symbol rate 2 - - - -
Symbol rate 3 - - - -
Sorting Standard
■ MANUAL■ OPERATION LEVEL
Start station search
EXIT
Automatic searchDVB-C

27
9.4.1 DVB-C channel search, manual
During the manual channel search the channel or frequency of the channel to be set must be
known.
Carrying out a manual search:
• Press button to open the "Functional overview".
• Select "Menu" with the cursor and press the button.
• Select "DVB-C" with the cursor and press the button.
• Select "Manual search" with the cursor in the context menu and press the button.
• Select "Channel" or "Special channel" with the cursor in the context menu and enter the
desired channel using the numeric keys.
If additional data of a programme is known, then select the corresponding menu items
“Modulation” and “Symbol rate” and change the setting using the cursor keys or with the
numeric keys.
• Select "Start station search" with the cursor in the context menu and press the
button.
• Select "Free-to air programmes" or "All programmes" from the context menu with the
cursor and press the button to start the channel search.
Once your channel search is complete the results are shown in a list of TV stations.
Radio Internet portal
Recordings archive
TV
Functional overview 20:10
MusicPhotosVideos
Analogue NetworkUSBHDMI
Remove USB Device
Manual
Parental control
Menu
Autom. On/Off
■ MANUAL
Network AV devices
Sound
Picture
Menu 20:10
Radio station list
TV station list
Subtitle Service
Parental control
Recordings/EPG
Terrestrial
Analog-TV
Cable
Satellite
■ MANUAL
OK
OK
Configuration
OK
Cable
H H H EXPERT
BACK
Automatic search
General settings
Channel 04
Special channel - -
Frequency 64.500 MHz
■ MANUAL■ OPERATION LEVEL
Start station search
EXIT
Manual search
DVB-C

28
9.5 Setting the SAT system, antenna system
The TV set must be configured for the SAT antenna system in the "DVB-S" menu.
Please ensure that the antenna connection is correct (Chap. 4.1)
Antenna system
Twin SAT
In the “2 cable” setting, the DVB-S receiver in the TV set is supplied 2 independent antenna
lines in the TV set.
Single cable (single cable distribution SDC)
With the "Single cable" setting, the DVB-S receivers have one feed line. The channel
selection is preset according to the structural conditions of the satellite system.
No antenna control signals can be sent over the feed line.
JESS (EN50607), Unicable (EN50494)
The antenna system with a channel router feeds one cable and is designed to receive the full
channel selection. F one specific or this purpose, each receiver is assigned frequency in the
satellite frequency range (950-2150 MHz). The channel router has multiple fixed frequencies
(SCR-Freq.) saved in a frequency bank, the SCR number and the SCR frequency must match;
see the instruction manual for the channel router.
Tandem (for connections with just one satellite antenna cable)
In the “Tandem” setting, the two DVB-S receivers, which are connected to the SAT bridge
cable, are supplied by feed lineone
There are limitations on recordings (PVR recording) and PIP.
It is only possible to combine stations on the same level (H/V).
Radio Internet portal
Recordings archive
TV
Functional overview 20:10
Music Medie PlayerPhotosVideos
Analogue NetworkUSBHDMI
Remove USB Device
Manual
Parental control
Menu
Autom. On/Off
■ MANUAL
Network AV devices
Sound
Picture
Menu 20:10
Radio station list
TV station list
Subtitle Service
Parental control
Recordings/EPG
Bluetooth
®
Terrestrial
Analog-TV
Cable
■ MANUAL
OK
OK
OK
Satellite
H H H EXPERT
DVB-S
BACK
Twin SAT
Tandem
JESS (EN50607)
Unicable (EN 50949)
Power compensation Aus
■ MANUAL■ OPERATION LEVEL
EXIT
Single cable
Aerial facility
Satellite
4
4
4
44
4
4
4
44
4
4
4
44

29
9.5.1 Setting up the sat system, Unicable (EN50607), JESS (EN50607)
(Jultec JESS, Inverto Unicable II, Kahtrein STCD2, DUR line -Unicable II, Fuba-Unicable II / connect to
SAT in1)
Each DVB-S receiver must be assigned a subscriber number (SCR no.) and the associated
subscriber frequency (SCR freq.) from the frequency bank (see channel router or its user’s
guide).
Each subscriber number and subscriber frequency may only be assigned once.
The DVB-S receiver in the TV set requests the data for the desired channel from the channel
router.
Setting the SCR no. and SCR freq.:
• Press button to open the "Functional overview".
• Select "Menu" with the cursor and press the button.
• Select "DVB-S" with the cursor and press the button.
• Select "Aerial facility" and "Unicable (EN50607)" or „JESS (EN50607)“ with the cursor in
the context menu and press the button.
• Select "SCR1 no." or "SCR1 freq." with the cursor in the context menu and press the
button. Enter the required data with the numeric keys.
• Press the button and confirm the data you have entered.
• Press the button to exit the menu.
+
EXIT
Radio Internet portal
Recordings archive
TV
Functional overview 20:10
MusicPhotosVideos
Analogue NetworkUSBHDMI
Remove USB Device
Manual
Parental control
Menu
Autom. On/Off
■ MANUAL
Network AV devices
Sound
Picture
Menu 20:10
Radio station list
TV station list
Subtitle Service
Parental control
Recordings/EPG
Bluetooth
®
Terrestrial
Analog-TV
Cable
■ MANUAL
OK
OK
OK
EXIT
Satellite
Satellite
H H H EXPERT
DVB-S
BACK
Twin SAT
Tandem
Unicable (EN 50949)
Single cable
Power compensation Off
LNB supply voltage On
DiSEqC system Off
Twintuner
Producer
SCR2 no.
SCR2 freq.
■ MANUAL■ OPERATION LEVEL
JESS (EN50607)
Aerial facility
SCR1 no.
SCR1 freq.
4
4
4
44
4
4
4
44
4
4
4
44
4
4
4
44
4
4
4
44
4
4
4
44

30
9.5.2 Setting the sat system, LNB supply voltage
The settings of the sat. antenna system must be reported to the TV set in the “DVB-S” menu.
The settings must be configured in the order shown in the right column:
LNB supply ,
DiSEqC system …etc.
LNB supply voltage
The LNB supply voltages are permanently set for selection of the polarisation (horizontal
H = 18V, vertical V = 14V). Normally, you do not need to carry out any change.
If the correct voltage supply of the LNB is no longer guaranteed as a result of a long antenna
cable, the supply voltage can be increased by 1V with the line compensation.
If changes are necessary, please take the following setting steps into
consideration.
Changing the settings:
• Press button to open the "Functional overview".
• Select "Menu" with the cursor and press the button.
• Select "DVB-S" with the cursor and press the button.
• Select "Aerial facility" and "LNB supply voltage" with the cursor in the context menu and
press the button.
• Select LNBsupply in the context menu, choose on or off with the cursor and press the
button.
If the TV set is connected to a ‘single-cable SAT system’, the LNB supply voltage must
always be set to ‘Off’.
+
Radio Internet portal
Recordings archive
TV
Functional overview 20:10
MusicPhotosVideos
Analogue NetworkUSBHDMI
Remove USB Device
Manual
Parental control
Menu
Autom. On/Off
■ MANUAL
Network AV devices
Sound
Picture
Menu 20:10
Radio station list
TV station list
Subtitle Service
Parental control
Recordings/EPG
Bluetooth
®
Terrestrial
Analog-TV
Cable
■ MANUAL
OK
OK
OK
Satellite
H H H EXPERT
DVB-S
BACK
Twin SAT
JESS (EN50607)
Unicable (EN50494(
Single cable
Power compensati
DiSEqC system Off
■ MANUAL
■ OPERATION LEVEL
EXIT
Aerial facility Tandem
Satellite
LNB supply voltage
Off
On
4
4
4
44
4
4
4
44
4
4
4
44
4
4
4
44

31
9.5.3 Set SAT system, DiSEqC system
With “DiSEqC” digital management of the satellite system via the existing antenna cable is
possible and is a prerequisite for the reception of more than two satellites (e.g. Astra,
Eutelsat, Hotbird).
Management of the satellite system without “DiSEqC” is no longer possible from three
satellites (e.g. ASTRA 19.2°, Eutelsat 16°, Hotbird 13°).
Switching DiSEqC system on, -off:
• Press button to open the "Functional overview".
• Select "Menu" with the cursor and press the button.
• Select "DVB-S" with the cursor and press the button.
• Select "Aerial facility" and "DiSEqC system" with the cursor in the context menu and press
the button.
• Turn on the "DiSEqC system" in the context menu using the cursor and press the
button if DiSEqC components are integrated into your SAT antenna system.
• Press the button to exit the menu.
EXIT
Radio Internet portal
Recordings archive
TV
Functional overview 20:10
MusicPhotosVideos
Analogue NetworkUSBHDMI
Remove USB Device
Manual
Parental control
Menu
Autom. On/Off
■ MANUAL
Network AV devices
Sound
Picture
Menu 20:10
Radio station list
TV station list
Subtitle Service
Parental control
Recordings/EPG
Bluetooth
®
Terrestrial
Analog-TV
Cable
■ MANUAL
OK
OK
OK
Satellite
H H H EXPERT
DVB-S
BACK
Twin SAT
JESS (EN50607)
Unicable (EN50494(
Einkabel
Power compensation Off
LNB supply voltage
■ MANUAL■ OPERATION LEVEL
EXIT
Aerial facility Tandem
Satellite
DiSEqC system Off
On
4
4
4
44
4
4
4
44
4
4
4
44
4
4
4
44
4
4
4
44

32
9.5.4 Set SAT system, selecting a satellite
Up to four satellites can be set in the “DVB-S” menu if “DiSEqC” is switched on.
The LNB frequency serves as toggle switch for the frequency band (high band - low band).
The standard factory settings are low band 9.75 GHz and high band 10.60 GHz.
Setting additional satellites:
• Press button to open the "Functional overview".
• Select "Menu" with the cursor and press the button.
• Select "DVB-S" with the cursor and press the button.
• Select the desired satellite in the context menu with the cursor and press the button.
If your satellite system is equipped to receive signals from two satellites, then you also
have to configure the second satellite.
• Press the button to exit the menu.
• Select "Low band" or "High band" with the cursor. The settings depend on the components
used of the satellite system. Please consult the data sheet or sticker of the LNB(s) used for
the settings required.
• Confirm the settings by pressing the button.
• Close "Menu" by pressing the button.
EXIT
EXIT
Radio Internet portal
Recordings archive
TV
Functional overview 20:10
MusicPhotosVideos
Analogue NetworkUSBHDMI
Remove USB Device
Manual
Parental control
Menu
Autom. On/Off
■ MANUAL
Network AV devices
Sound
Picture
Menu 20:10
Radio station list
TV station list
Subtitle Service
Parental control
Recordings/EPG
Bluetooth
®
Terrestrial
Analog-TV
Cable
■ MANUAL
OK
OK
OK
Satellite
H H H EXPERT
BACK
Hot Bird 13°
Automatic search
Manual search
Low-Band
High-Band
■ MANUAL■ OPERATION LEVEL
EXIT
Astra 19,2°DVB-S
Satellite
Satellite
Astra 28,2E
Eutelsat 10°E
Eutelsat 16°E
Eutelsat 7°E
Eutelsat 36°E
Sirius 5°E
Arabsat 26°E
Astra 19,2°

33
9.6 SAT channel search, automatic
9.6.1 Automatic search
The reception range is searched for TV channels and radio channels in the automatic
channel search. The channels found are stored in a TV station list and radio station list.
You can move or delete channels that are found if you are not satisfied with the order.
See Chapter "11 Edit favourite list".
+The search only works properly if the LNB frequencies have been correctly set and
saved.
Carrying out an automatic search:
• Press button to open the "Functional overview".
• Select "Menu" with the cursor and press the button.
• Select "DVB-S" with the cursor and press the button.
• Select "Automatic search" with the cursor in the context menu and press the button.
• Select the desired satellite in the context menu with the cursor and press the button.
• Select "Start station search" with the cursor in the context menu and press the button.
• Select "Free-to air programmes" or "All programmes" from the context menu with the
cursor and press the button to start the channel search
.
The "Method" menu item should be set to channel search (factory setting). If the station
search does not find all the stations, change the Method setting to "Precision search".
Once your channel search is complete the results are shown in a list of TV stations.
Radio Internet portal
Recordings archive
TV
Functional overview 20:10
MusicPhotosVideos
Analogue NetworkUSBHDMI
Remove USB Device
Manual
Parental control
Menu
Autom. On/Off
■ MANUAL
Network AV devices
Sound
Picture
Menu 20:10
Radio station list
TV station list
Subtitle Service
Parental control
Recordings/EPG
Bluetooth
®
Terrestrial
Analog-TV
Cable
■ MANUAL
OK
OK
OK
Satellite
H H H EXPERT
Aerial facility
BACK
Astra 19,2°
Hot Bird 13°
Manual search
Satellite Astra 19,2°
Method Fast search (NIT)
Sorting Standard
■ MANUAL■ OPERATION LEVEL
EXIT
Automatic search
DVB-S
Satellite
Start station search

34
9.6.2 SAT channel search, manual
During the manual channel search the frequency, symbol rate and polarisation of the
channel to be set must be known. Find out about the channel data e.g. at “www.lyngsat.de”.
Carrying out a manual search:
• Press button to open the "Functional overview".
• Select "Menu" with the cursor and press the button.
• Select "DVB-S" with the cursor and press the button.
• Select "Manual search" with the cursor in the context menu and press the button.
• Select the desired satellite in the context menu with the cursor and press the button.
• Use the cursor key in the context menu under "Frequency", "Symbol rates", "Polarization"
and "DVB-System" to set the values corresponding to the station to be searched for.
For the HD-SAT station search, the information for the DVB system
(for example DVB-S2) must also be entered.
• Select "Start station search" with the cursor in the context menu and press the
button.
• Select "Free-to air programmes" or "All programmes" from the context menu with the
cursor and press the button to start the channel search
.
Once your channel search is complete the results are shown in a list of TV stations.
+
Radio Internet portal
Recordings archive
TV
Functional overview 20:10
MusicPhotosVideos
Analogue NetworkUSBHDMI
Remove USB Device
Manual
Parental control
Menu
Autom. On/Off
■ MANUAL
Network AV devices
Sound
Picture
Menu 20:10
Radio station list
TV station list
Subtitle Service
Parental control
Recordings/EPG
Bluetooth
®
Terrestrial
Analog-TV
Cable
■ MANUAL
OK
OK
OK
Satellite
H H H EXPERT
Aerial facility
BACK
Astra 19,2°
Hot Bird 13°
Automatic search
Satellite Astra 19,2°
Frequency 11836 MHz
Symbol rates 27500
Polarisation H
DVB system DVB-S
■ MANUAL■ OPERATION LEVEL
EXIT
Manual search
DVB-S
Satellite
Start station search

35
10 List of TV Stations
Once you have completed the channel search, the results are presented in a list
(All TV channels) and then saved as a list of favourites as "TV List 1".
Under "Details", you can make the following changes/additions:
- Include channel in EPG yes/no (also see 24.2)
- Block channel (parental control settings) yes/no (also see 22.2)
- Delete or move channel (see Chap. 11.2)
- Search station name (see Chap. 13.5.1)
under "Details"
- Signalquality
- Image correction for colour intensity and signal contrast
- Volume correction (see Chap. 17.2.1)
- Search name
The TV station list can be opened while the TV is in use by pressing the button.
You can, if needed, create up to eight further TV/radio channel lists (see Chap. 11).
These additional channel lists can be customised to meet the personal preferences of the
users (only sports channels, documentaries, news, etc.)
TV station list
■ MANUAL
■ TV List 1 All TV stations
0
2 ZDF HD
3 BR Nord HD
4 SAT.1
5 RTL Television
6 RTL2
7 ProSieben
8 WDR HD Aachen
9 SIXX
10 hr HD
Mark block
Remove marking
Remove entries
Shift
EPG on / off
Parental control
on / off
Details
Search name
Export station list
1 Das Erste HD
2 ZDF HD
3 BR Nord HD
4 SAT.1
5 RTL Television
6 RTL2
7 ProSieben
8 WDR HD Aachen
9 SIXX
10 hr HD
1 Das Erste HD
TV station list
■ FAVOURITES
~
~
~
~~
P+
2 ZDF HD
3 BR Nord HD
4 SAT.1
5 RTL Television
6 RTL2
7 ProSieben
8 WDR Köln HD
9 kabel eins
10 hr-fernsehen HD
P+
Tagesschau 20:00-20:15 noch 5 min1 Das Erste HD
~
~
~
~~
■
Search
■
HD
AV
OK

36
11 Edit favourite list
You can edit the list on the left yourself ("TV List 1" or "Radio List 1") by moving or deleting
stations.
The list on the right shows all stations found and cannot be changed.
• Press button to open the "Functional overview".
• Select "Menu" with the cursor and press the button.
• Select "TV station list" with the cursor and press the button.
• Press the red button, use the cursor buttons to select "Add list" and press the
button.
• Enter a new name for the list using the displayed on-screen keyboard and confirm it by
pressing the green button.
• TV channels to be imported into the new list should be marked in the "All TV channels" list
on the right.
Block selection
• Use the cursor to go to the first programme position of the desired time slot and select
it with .
• Use the cursor to go to the last programme position of the desired time slot and select it
with .
• Change to the middle selection column using the cursor, select "Mark block", and press
the button.
• Use the cursor buttons to change to the middle selection column.
• Select "Add" with the cursor buttons and press the button. The marked channels are
moved to the new list.
• You can switch between the lists using the yellow button and the red button.
If a Favourites list is displayed on the left-hand side, the stations contained in the Favouri-
tes list are marked with an asterisk
H
H
H
HH
in the "All TV stations" table.
+
TV station list
■ MANUAL
■ TV List 1 All TV stations
0
1 Das Erste HD
2 ZDF HD
3 BR Nord HD
4 SAT.1
5 RTL Television
7 ProSieben
8 WDR HD Aachen
Select block
Deselect
Remove
Move
EPG on / off
Parental control
on / off
Details
Search name
Export station lists
1 Das Erste HD
2 ZDF HD
3 BR Nord HD
4 SAT.1
5 RTL Television
6 RTL2
7 ProSieben
8 WDR HD Aachen
9 SIXX
10 hr HD
9 SIXX
Radio Internet portal
Recordings archive
TV
Functional overview 20:10
MusicPhotosVideos
Analogue NetworkUSBHDMI
Remove USB Device
Manual
Parental control
Menu
Autom. On/Off
■ MANUAL
Network AV devices
Sound
Picture
Menu 20:10
adio station list
Subtitle Service
Parental control
Recordings/EPG
Bluetooth
®
Terrestrial
Analog-TV
Cable
Satellite
■ MANUAL
OK
OK
Configuration
TV station list
6 RTL2
39
TV Senderliste
■ FAVORITEN
~
~
~
~~
P+
2 ZDF HD
3 BR Nord HD
4 SAT.1
5 RTL Television
6 RTL2
7 ProSieben
8 WDR Köln HD
9 kabel eins
10 hr-fernsehen HD
P+
Tagesschau 20:00-20:15 noch 5 min1 Das Erste HD
~
~
~
~~
■
SUCHEN
■
HDAV
12 Programme selection and information
12.1 Programme selection
The TV set can administer a maximum of 10000 TV and 3000 radio programme positions.
These programme positions can be selected with the numeric keys, or using the TVP+/P–
station list.
When selecting via the numeric keys, the first numeric keys pressed indicates the fourth
position after the decimal point. If fewer than 1000 program positions exist, the entry
automatically moves to the third position after the decimal point. If fewer than 10 program
positions exist, the entry automatically moves to the first position after the decimal point.
After pressing a numeric key, you have a time window of three seconds to press additional
numeric keys. The program can be changed immediately by pressing the key.
12.2 Programme selection using the TV station list
In TV or Radio mode, press the button to display the channel list.
• Press the red button and use the cursor buttons to select the desired channel list if
favourites lists have been created.
• Use the cursor to select programmes from in the table that appears. Use the buttonP+/P–
to jump to the next or previous 10 programmes.
Press the button to display the AV programme positions.
You can display the program selected with the key.
• Pressing the yellow button displays all HD channels stored in the station list.
• Pressing the red button will display all of the lists.
Search station name
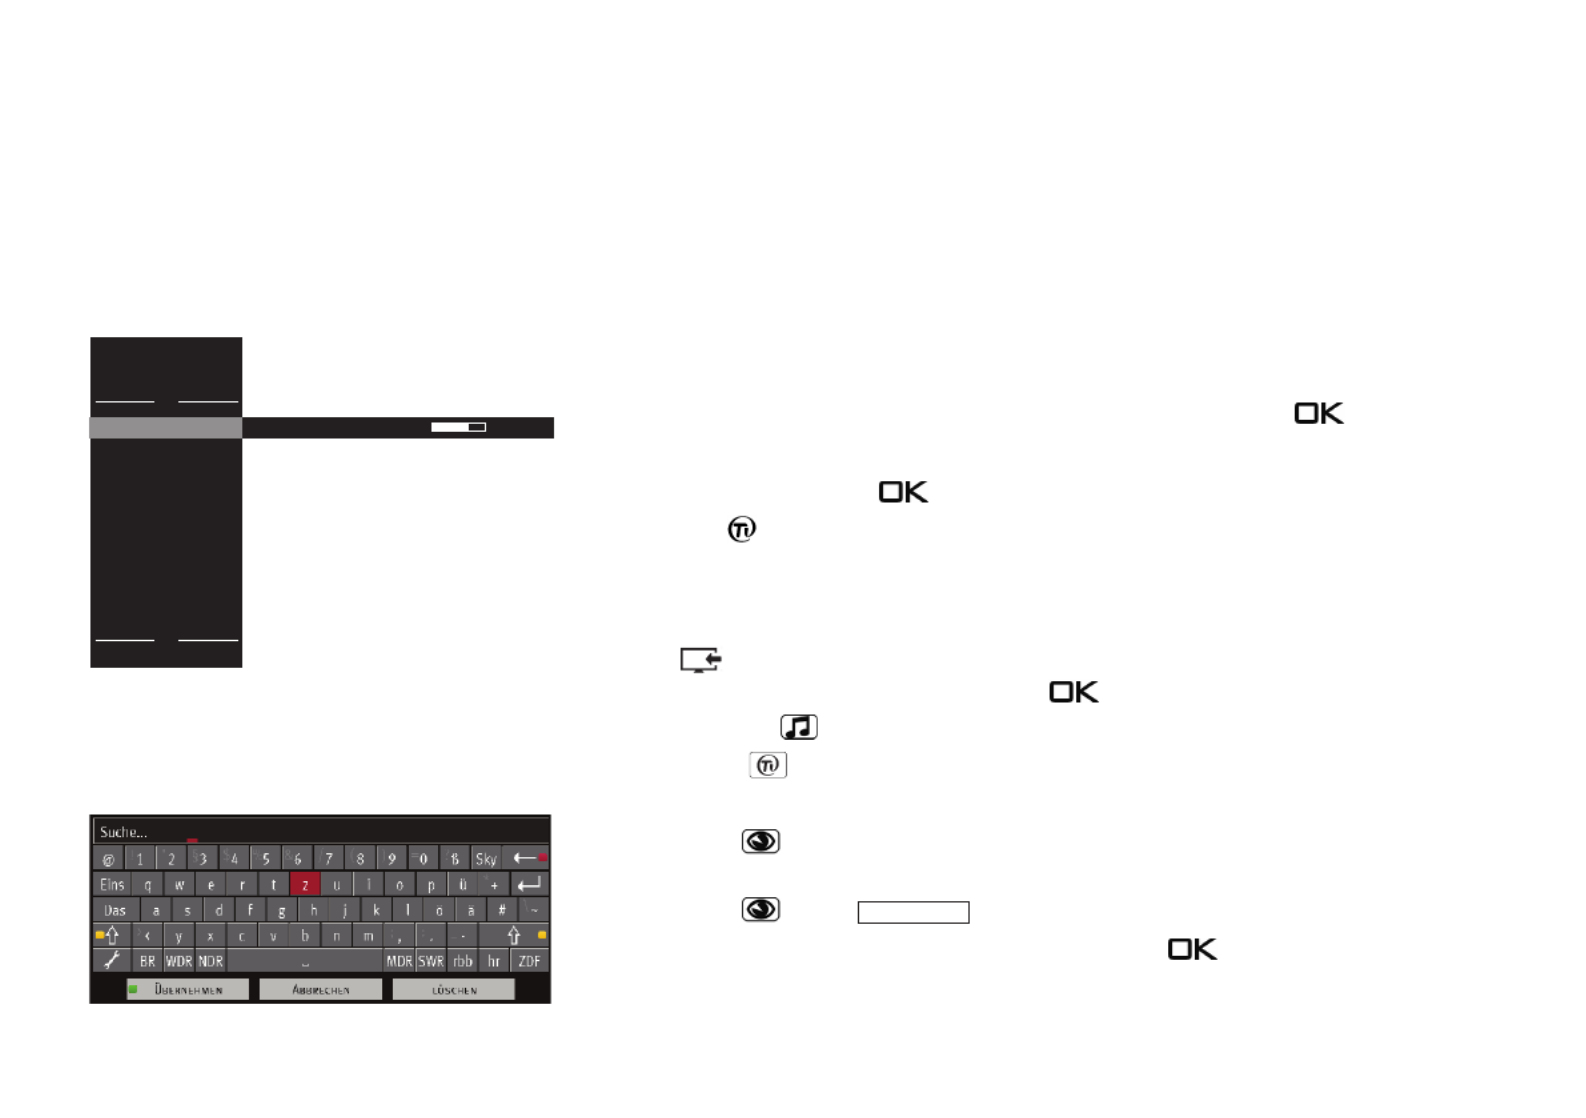
• Press the green button to open a virtual keyboard. You can enter the name of the
channel you would like to find here.
• Press the green button or
• Use the cursor to select "Cancel" or "Delete"and press the button.
Confirm

42
13.5 Search function
The TV offers a variety of search functions, which can be formulated using a virtual
keyboard.
13.5.1 Search function in the TV channel lists
(see chap. 10)
When the TV channel lists are displayed, a virtual keyboard can be opened.
The cursor key can be used to enter a channel name or the first letter of the channel name.
The TV channel list is re-sorted based on the entry.
Opening the Search function:
• Press the button.
• Press the green button to open a virtual keyboard,,
or
open the TV channel list menu (Favourites list); to do this
– Press the button to open the "Function Overview“.
– Select "Menu" with the cursor and press the button.
–
Select "TV channel list" with the cursor in the context menu and press the button
.
–
Select "Search name" with the cursor and press the button drücken.
.
• Enter the desired channel name on the virtual keyboard. The selection is displayed,
sorted based on the entry.
• Press the green button or Select the "Apply" field with the cursor and press ;
the channel or channel selection is displayed and the first channel is shown in red.
• Select the desired channel with the cursor and press the button.
TV station lists
■ MANUAL
■ TV List 1 All TV stations
0
1 Das Erste HD
2 ZDF HD
3 BR Nord HD
4 SAT.1
5 RTL Television
7 ProSieben
8 WDR HD Aachen
Select block
Deselect
Remove
Move
EPG on / off
Parental control
on / off
Details
Search name
Export station lists
1 Das Erste HD
2 ZDF HD
3 BR Nord HD
4 SAT.1
5 RTL Television
6 RTL2
7 ProSieben
8 WDR HD Aachen
9 SIXX
10 hr HD
9 SIXX
6 RTL2
OK
AlleTV stadions
Select List
~
~
~
~~
P+
2 ZDF HD
3 BR Nord HD
4 SAT.1
5 RTL Television
6 RTL2
7 ProSieben
8 WDR Köln HD
9 kabel eins
10 hr-fernsehen HD
P+
Tagesschau 20:00-20:15 noch 5 min1 Das Erste HD
~
~
~
~~
Search UHDHD

44
13.6 Status display
Depending on the equipment, some TV sets offer a status display in which various overlays
can be shown.
Display
In principle, the status display can be switched on or off.
Display brightness
When the status display is switched on, the display brightness can be adjusted in 5 steps.
TV, AV and radio permanent display
The display can be set to show either the "time" or the "logo".
Timeshift permanent display
With the "Time" setting, the time offset to live TV operation is displayed in timeshift mode.
With the setting "Symbol", the status display in the top left-hand corner:
- in timeshift recording mode TS II is displayed,
- during timeshift playback TSuis displayed.
LED brightness
If the input feedback is switched on, a blue light dot appears in the middle of the status
display with each keystroke on the remote control as feedback.
Input feedback
If "On" is selected, the blue LED of the TV set flashes briefly for feedback when a key on the
remote control is pressed.
If "Off" is selected, no feedback is given by the blue LED of the TV set.
Radio Internet inter-
Recordings archive
TV
Functional overview 20:10
MusicPhotosVideos
Analogue NetworkUSBHDMI
Remove USB Device
Manual
Parental control
Menu
Autom. On/Off
■ MANUAL
Network AV devices
Sound
Picture
Menu 20:10
Radio station list
TV station list
Subtitle Service
Parental control
Recordings/EPG
Bluetooth
®
Terrestrial
Analog-TV
Cable
Satellite
■ MANUAL
OK
OK
OK
Configuration
H H H EXPERT
Language
Country
Deutschland
On screen display
Opertation
Start characteristics
Time settings
BACK
Display brig.. 2
TV permanent display
Logo
AV permanent display
Logo
Radio permanent display
Logo
Timeshift
permanent dis...
Time
LED brightn... 5
Input feedback Off
■ MANUAL■ OPERATION LEVEL
State display
Display On
Configuration
EXIT

45
Set state display
• Press button to open the "Functional overview".
• Select "Menu" with the cursor and press the button.
• Select "Configuration" with the cursor and press the button.
• Use the cursor key to select "Status display" in the context menu and press the key.
• Use the cursor key to select the desired menu items and press the key.
Make your desired settings here.
• Press the button to exit the menu.
EXIT
Radio Internet inter-
Recordings archive
TV
Functional overview 20:10
MusicPhotosVideos
Analogue NetworkUSBHDMI
Remove USB Device
Manual
Parental control
Menu
Autom. On/Off
■ MANUAL
Network AV devices
Sound
Picture
Menu 20:10
Radio station list
TV station list
Subtitle Service
Parental control
Recordings/EPG
Bluetooth
®
Terrestrial
Analog-TV
Cable
Satellite
■ MANUAL
OK
OK
OK
Configuration
H H H EXPERT
Language
Country
Deutschland
On screen display
Opertation
Start characteristics
Time settings
BACK
Display brig.. 2
TV permanent display
Logo
AV permanent display
Logo
Radio permanent display
Logo
Timeshift
permanent dis...
Time
LED brightn... 5
Input feedback Off
■ MANUAL■ OPERATION LEVEL
State display
Display On
Configuration
EXIT
47
Set screen display
• Press button to open the "Functional overview".
• Select "Menu" with the cursor and press the button.
• Select "Configuration" with the cursor and press the button.
• Use the cursor key to select "On screen display" in the context menu and press the
key.
• Use the cursor key to select the desired menu items and press the key.
Make your desired settings here.
• Press the button to exit the menu.
EXIT
Radio Internet inter-
Recordings archive
TV
Functional overview 20:10
MusicPhotosVideos
Analogue NetworkUSBHDMI
Remove USB Device
Manual
Parental control
Menu
Autom. On/Off
■ MANUAL
Network AV devices
Sound
Picture
Menu 20:10
Radio station list
TV station list
Subtitle Service
Parental control
Recordings/EPG
Bluetooth
®
Terrestrial
Analog-TV
Cable
Satellite
■ MANUAL
OK
OK
OK
Configuration
H H H EXPERT
Language
Country
Deutschland
Opertation
Start characteristics
Time settings
State display
BACK
Program informat
Volume
CEC key forwarding
■ MANUAL■ OPERATION LEVEL
On screen display
Color Standard
Dark
Auto
Configuration
EXIT
Termékspecifikációk
| Márka: | Metz |
| Kategória: | televízió |
| Modell: | Fineo 49TY83 |
Szüksége van segítségre?
Ha segítségre van szüksége Metz Fineo 49TY83, tegyen fel kérdést alább, és más felhasználók válaszolnak Önnek
Útmutatók televízió Metz

3 Szeptember 2024
3 Szeptember 2024
1 Szeptember 2024
26 Augusztus 2024
26 Augusztus 2024
26 Augusztus 2024
26 Augusztus 2024
26 Augusztus 2024
26 Augusztus 2024
26 Augusztus 2024
Útmutatók televízió
- televízió Samsung
- televízió Sony
- televízió Beko
- televízió Fujitsu
- televízió Acer
- televízió Nedis
- televízió LG
- televízió Grundig
- televízió Marantz
- televízió Philips
- televízió Pioneer
- televízió SilverCrest
- televízió Panasonic
- televízió JVC
- televízió AEG
- televízió Sharp
- televízió Nokia
- televízió Lenovo
- televízió Casio
- televízió Toshiba
- televízió Oppo
- televízió Hyundai
- televízió Hisense
- televízió BenQ
- televízió SunBriteTV
- televízió Siemens
- televízió Medion
- televízió TCL
- televízió Xiaomi
- televízió GoGen
- televízió Insignia
- televízió Infiniton
- televízió Dell
- televízió Strong
- televízió VOX
- televízió Vivax
- televízió Thomson
- televízió Polaroid
- televízió Aiwa
- televízió Orima
- televízió V7
- televízió Clatronic
- televízió PEAQ
- televízió Qilive
- televízió Haier
- televízió Mitsubishi
- televízió Cecotec
- televízió Sencor
- televízió GPX
- televízió Küppersbusch
- televízió Innoliving
- televízió AOC
- televízió Westinghouse
- televízió Hitachi
- televízió Continental Edison
- televízió Telefunken
- televízió Nevir
- televízió Monster
- televízió Roadstar
- televízió Optoma
- televízió CHiQ
- televízió Viewsonic
- televízió Nextbase
- televízió Denver
- televízió Bush
- televízió Trevi
- televízió Albrecht
- televízió Daewoo
- televízió Funai
- televízió Tesla
- televízió Smart Tech
- televízió Muse
- televízió Energy Sistem
- televízió OK
- televízió SVAN
- televízió Loewe
- televízió RevolutionHD
- televízió Polar
- televízió Manhattan
- televízió Kogan
- televízió Horizon
- televízió Intenso
- televízió Furrion
- televízió Teac
- televízió Aspes
- televízió Digihome
- televízió Manta
- televízió Blaupunkt
- televízió Sagem
- televízió Jay-Tech
- televízió Logik
- televízió Finlux
- televízió Peerless-AV
- televízió Abus
- televízió AG Neovo
- televízió Bang & Olufsen
- televízió Iiyama
- televízió AKAI
- televízió TechniSat
- televízió Seiki
- televízió Jensen
- televízió Pyle
- televízió Emerson
- televízió Sanyo
- televízió Kemo
- televízió Salora
- televízió Lenco
- televízió Schneider
- televízió Philco
- televízió ECG
- televízió Uniden
- televízió Technika
- televízió NEC
- televízió Element
- televízió Soundmaster
- televízió Alphatronics
- televízió AYA
- televízió MBM
- televízió Krüger&Matz
- televízió Dual
- televízió Brandt
- televízió Wharfedale
- televízió Allview
- televízió RCA
- televízió OKI
- televízió Orion
- televízió SereneLife
- televízió Schaub Lorenz
- televízió Luxor
- televízió ILive
- televízió Graetz
- televízió Tatung
- televízió Packard Bell
- televízió EasyMaxx
- televízió Orava
- televízió Arçelik
- televízió Planar
- televízió Zenith
- televízió Doffler
- televízió QBell Technology
- televízió SYLVOX
- televízió Majestic
- televízió Reflexion
- televízió FFalcon
- televízió Megasat
- televízió Sogo
- televízió United
- televízió Techwood
- televízió Newstar
- televízió Matsui
- televízió Alden
- televízió Aldi
- televízió Airis
- televízió Aristona
- televízió Apex
- televízió Icy Box
- televízió Lexibook
- televízió Palsonic
- televízió Walker
- televízió Saba
- televízió Antarion
- televízió Kernau
- televízió Tevion
- televízió Proscan
- televízió Vestel
- televízió Tucson
- televízió Sunstech
- televízió Nabo
- televízió Sylvania
- televízió Sunny
- televízió Marquant
- televízió Nordmende
- televízió AudioAffairs
- televízió Magnum
- televízió Audiosonic
- televízió Kubo
- televízió Proline
- televízió Coby
- televízió Seg
- televízió Vivo
- televízió Daitsu
- televízió Terris
- televízió Changhong
- televízió Alba
- televízió Naxa
- televízió Star-Light
- televízió Fantec
- televízió Mpman
- televízió Sweex
- televízió Vizio
- televízió Cello
- televízió Mx Onda
- televízió Nikkei
- televízió Hannspree
- televízió DGM
- televízió Yasin
- televízió Humax
- televízió XD Enjoy
- televízió MT Logic
- televízió Superior
- televízió Kunft
- televízió ITT
- televízió Grunkel
- televízió Avtex
- televízió Inovia
- televízió Odys
- televízió NPG
- televízió Bluesky
- televízió Videocon
- televízió Xoro
- televízió Durabase
- televízió HKC
- televízió Edenwood
- televízió Woxter
- televízió Premier
- televízió Onn
- televízió Teleco
- televízió Opera
- televízió LTC
- televízió JTC
- televízió Zalman
- televízió Ferguson
- televízió Viewpia
- televízió JGC
- televízió Online
- televízió Dyon
- televízió DirecTV
- televízió Tele 2
- televízió Telesystem
- televízió EKO
- televízió E-motion
- televízió Mitsai
- televízió Selfsat
- televízió High One
- televízió Tve
- televízió ISymphony
- televízió Pantel
- televízió Magnavox
- televízió ATYME
- televízió HCI
- televízió Inno-Hit
- televízió Lin
- televízió Engel
- televízió TechLine
- televízió Elements
- televízió Englaon
- televízió Time
- televízió Reflex
- televízió Astar
- televízió Visco
- televízió Tivax
- televízió H&B
- televízió Norcent
- televízió TELE System
- televízió TIM
- televízió Oyster
- televízió Belson
- televízió Vision Plus
- televízió Sbr
- televízió Bauhn
- televízió Voxx
- televízió Rm 2000
- televízió Hoher
- televízió Felson
- televízió Mach Power
- televízió Elbe
- televízió Axing
- televízió CGV
- televízió Séura
- televízió Mitzu
- televízió Caratec
- televízió JTC24
- televízió Coocaa
- televízió Kivi
- televízió Smart Brand
- televízió Voxicon
- televízió Aconatic
- televízió Mitchell & Brown
- televízió FOX Electronics
- televízió Mystery
Legújabb útmutatók televízió

31 Március 2025

31 Március 2025
31 Március 2025

31 Március 2025
30 Március 2025
30 Március 2025
30 Március 2025
29 Március 2025
29 Március 2025

29 Március 2025