Használati útmutató Medion ERAZER X7813 (MD 97896)
Olvassa el alább 📖 a magyar nyelvű használati útmutatót Medion ERAZER X7813 (MD 97896) (26 oldal) a laptop kategóriában. Ezt az útmutatót 3 ember találta hasznosnak és 2 felhasználó értékelte átlagosan 4.5 csillagra
Oldal 1/26

Notebook
MEDION® ERAZER® X7813
User manual

i
Notes on This Manual
Keep these instructions with your computer at all times. The proper set up, use and
care can help extend the life of your computer. In the event that you transfer
ownership of this computer, please provide these instructions to the new owner.
This manual is divided into sections to help you find the information you require.
Along with the Table of Contents, an Index has been provided to help you locate
information.
In addition, many application programs include extensive help functions. As a
general rule, you can access help functions by pressing F1 on the keyboard. These
help functions are available to you when you use the Microsoft Windows
® operating
system or the various application programs.
This interactive manual is designed to provide additional information about your
Notebook as well as useful links accessible via the World Wide Web.
We have listed further useful sources of information starting on page 56.
Document Your Notebook
It is important to document the details of your Notebook purchase in the event you
need warranty service. The serial number can be found on the back of the
Notebook:
Serial Number ......................................
Date of Purchase ......................................
Place of Purchase ......................................
Audience
These instructions are intended for both the novice and advanced user. Regardless
of the possible professional utilization, this Notebook is designed for day-to-day
household use. The functions and applications for use with this Notebook have
been designed with the entire family in mind.

v
Windows® 7 - Help and Support ........................................................... 59
Windows® 7 – Getting Started .............................................................. 60
Windows® 7 - User Account Control ..................................................... 61
Windows® 7 – Control Panel ................................................................. 62
Windows Media Center ............................................................................. 63
Installation of Software.............................................................................. 66
How to Install your Software ............................................................... 66
Software Uninstallation ........................................................................ 67
Windows Activation .................................................................................. 68
Product activation on your Notebook .................................................. 68
The BIOS Setup Program ........................................................................... 69
Running the BIOS Setup ...................................................................... 69
First Aid ............................................................................................... 71
Data and System Security .............................................................................. 73
Data Security ............................................................................................. 73
Maintenance Programs ............................................................................. 73
System Restore .............................................................................................. 74
Correction ................................................................................................. 74
Windows® Update ..................................................................................... 75
Windows Update Information for Data Security ................................... 76
System Restore .............................................................................................. 77
Limits of the Recovery ............................................................................... 77
Carrying out a Restore ............................................................................... 78
FAQ – Frequently Asked Questions ................................................................ 79
Customer Service .......................................................................................... 80
Localize the Cause ..................................................................................... 80
Check Cables and Connections ................................................................. 80
Errors and Possible Causes ................................................................... 81
Additional Support .................................................................................... 82
Driver Support .......................................................................................... 82
Transporting the Notebook ....................................................................... 83
Maintenance ............................................................................................. 84
Care of the TFT Display ............................................................................. 84
Upgrades and Repairs.................................................................................... 85
Notes for Service Engineers .................................................................. 85
Recycling and Disposal .................................................................................. 86
Appendix ............................................................................................. 87
Information about conformity ....................................................................... 89
ISO 13406-2 Class II .................................................................................. 89
FCC Compliance Statement ...................................................................... 91
Copying this manual ........................................................................... 91
Index ............................................................................................................. 92

Safety Instructions
4
Switch off your Notebook immediately or do not switch it on at all and contact
customer service …
… if the power cord or the connectors attached to it are burnt or damaged.
Replace the defective power cord with an original power cord. Under no
circumstances may a defective power cord be repaired.
... if the housing of the Notebook is damaged or fluids have leaked into it.
Have the Notebook checked by customer service first, because the Notebook
may not be safely operated otherwise and there may be a life-threatening
risk of electrocution!
Data Security
Attention!
Every time you update your data make back-up copies on an external
storage medium. The supplier does not assume liability for data loss
or damage to data storage units, and no claims can be accepted for
damages resulting from the loss of data or consequential losses.
Set-Up Location
Keep your notebook and all connected peripherals away from moisture,
dust, heat and direct sunlight. Failure to do so can lead to Notebook
malfunction or damage.
It is highly recommended you do not use the notebook outdoors.
Operate the notebook and all peripherals on a stable, balanced and
vibration-free surface.
Do not leave the base of your notebook on your lap or any part of your body
for a long period of time. The notebook can become very warm while it is
turned on or charging and can cause discomfort or injury from heat
exposure.
In the first hours of operation, new devices may emit a typical, unavoidable
but completely harmless smell, which will decline increasingly in the course
of time. We recommend that you ventilate the room regularly, in order to
counteract the formation of the smell. During the development of this
product, we have made sure that the applicable limits are clearly lowered.

Safety Instructions
6
Working in Comfort
Sitting in one position for long periods can be uncomfortable. To minimize the
potential for physical discomfort or injury, it’s important that you maintain proper
posture.
Back – While sitting at your work surface, make sure your back is supported
by the chair’s backrest in an erect position or angled slightly backwards.
Arms – Your arms should be relaxed and loose, elbows close to your sides,
with forearms and hands approximately parallel to the floor.
Wrists – Your wrists should be as straight as possible while using the
keyboard, mouse or trackball. They should not be bent sideways, or more
than 10 degrees up or down.
Legs – Your thighs should be horizontal or angled slightly downward. Your
lower legs should be near a right angle to your thighs. Your feet should rest
flat on the floor. If necessary, use a footrest, but double check that you have
your seat height adjusted correctly before getting a footrest.
Head – Your head should be upright or tilted slightly forward. Avoid
working with your head or trunk twisted.
Overall – Change your position frequently and take regular breaks to avoid
fatigue.

Safety Instructions 7
Safety
Handling Components Aid Appendix
Connecting
Pay attention to the following information, in order to connect your notebook
correctly:
Power supply
Do not open the power adapter housing. When the housing is open there is
a danger of severe electric shock. It viceable parts. contains no user-ser
The electric outlet must be in the vicinity of the notebook and within reach
of the power adapter cables.
To disconnect your notebook from the power source, or set the notebook to
battery operation, remove the power cord from the notebook’s power
socket.
Only use the notebook with a power adaptor operating at
AC 110-240V~/50-60 Hz. For details on power consumption, please refer to
the rating plate on the rear of your notebook. If you are unsure of the type
of power supply available at the point of use, ask your local power
company.
Use only the supplied power cord and power adapter.
To provide additional protection against electric shock, power surges,
lightning strikes, or other electrical damage to your notebook, we
recommend the use of a surge protector.
Firstly remove the plug, and then the connector of the notebook, from the
power source, if you want to detach the network adapter from the mains
power supply. A reverse sequence could damage the network adapter or the
notebook. Always hold the connector firmly when removing it. Never pull
on the power cord.

Safety Instructions 9
Safety
Handling Components Aid Appendix
Information about the regulatory compliance
according to R&TTE
The following remote equipment has been supplied with this notebook:
Wireless LAN (optional)
Bluetooth (optional)
Due to the capacity of the built-in wireless LAN solution (> 100 mW) the device may
only be used within buildings in France.
Currently none of the other EU-countries have any restrictions. For use in other
countries please obtain information about the applicable regulations locally.
The company declares herewith that these devices are in agreement with the
fundamental requirements and the other relevant terms of the 1999/5/EG
Guideline. Complete declarations of conformity are available under
www.medion.com/conformity.
Touch Pad
Light pressure with the tip of your finger is all that is required to operate the
touch pad. Because the touch pad is electrostatic sensitive, objects cannot
be used in place of your fingers. Using a pen or other object can damage the
touch pad or cause the notebook to malfunction.
Views
18
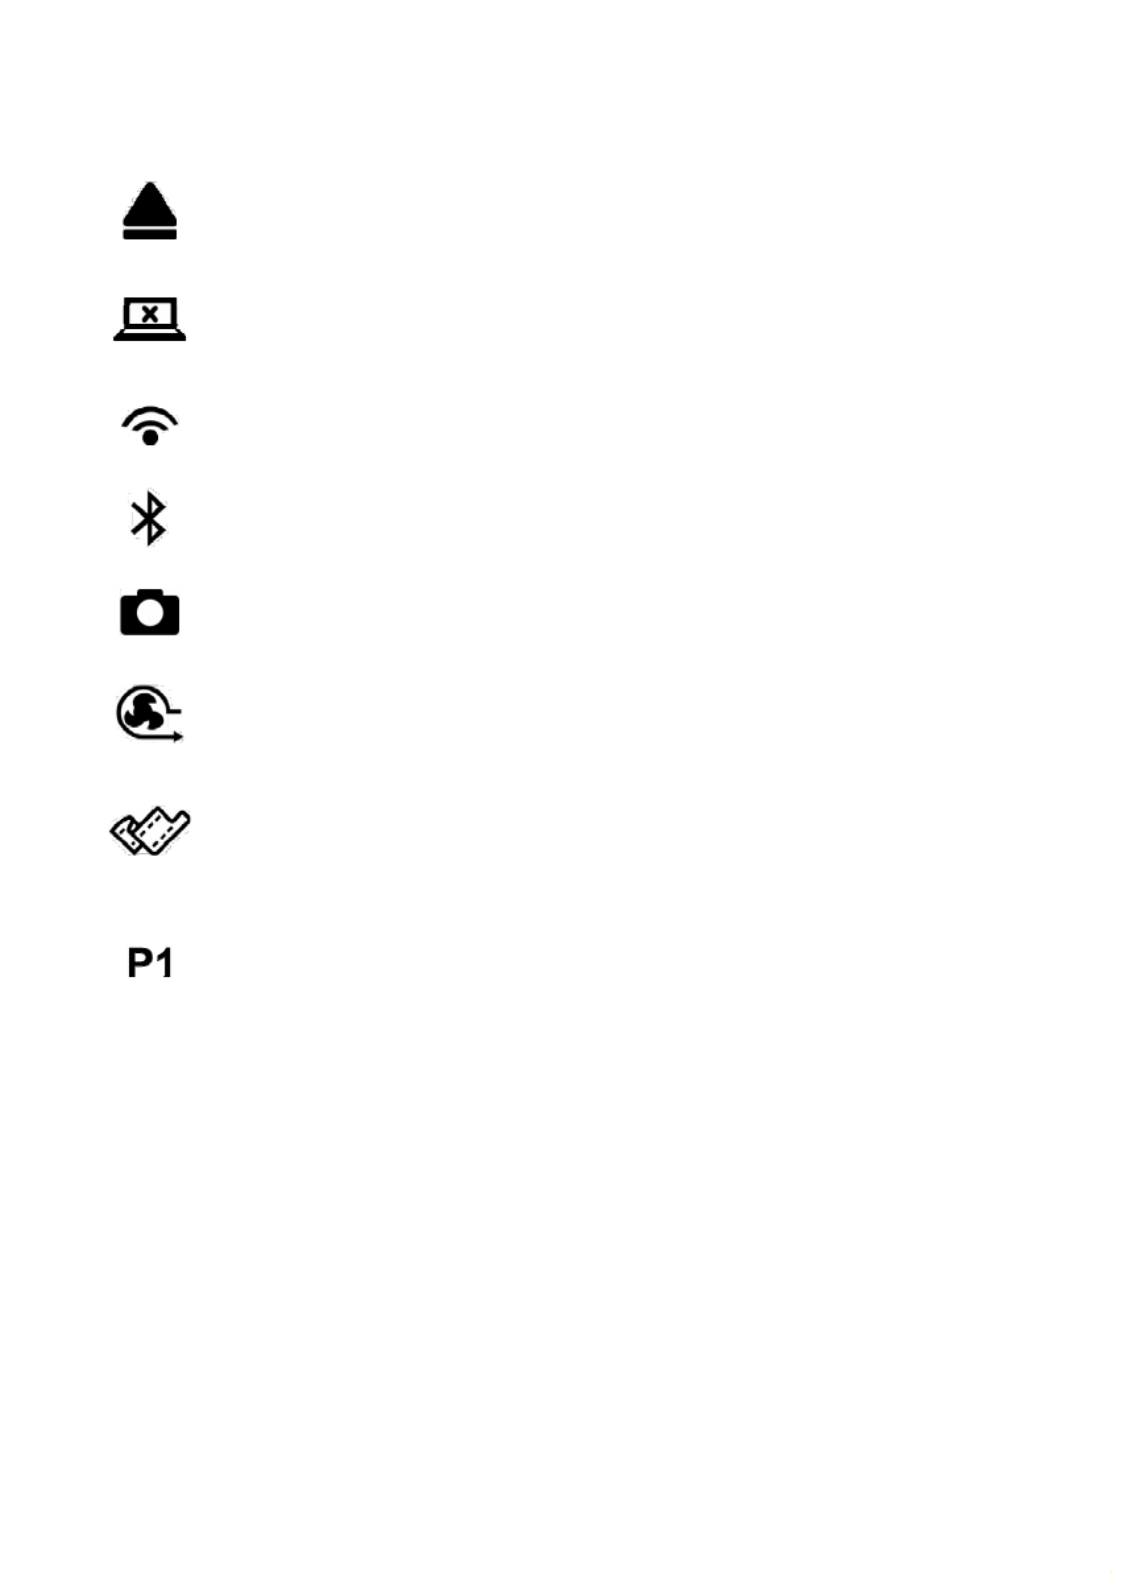
Multimedia Sensor Buttons
Eject button optical drive
Opens the optical drive.
Display
Activates or deactivates the display to conserve power. Press any key to
activate the display again.
WLAN
Enables or disables the wireless LAN function..
Bluetooth
Enables or disables the Bluetooth function.
Webcam
Enables or disables the webcam.
Cooler Boost
Increases the speed of rotation of the fan to improve the cooling of your
notebook. Press this key again to deactivate this function.
Cinema Pro
Improves the output quality of the sound system.
Press this key again to deactivate this function.
Programmable P1 key
You will activate or deactivate the user-defined P1 key with the
following key combination. Read the following section to program the
key „Programming the user-defined P1 key “ on p. 39).
Getting Started
20
The operating system is loaded from the hard disk. During the initial set-up, the loading
process takes slightly longer than normal to register the operating system and the
individual components completely. Your operating system is finished loading when a
welcome screen is shown on your display.
Note
The initial installation may take up to 30 minutes to complete. Do no
unplug the notebook from the mains or switch it off during the initial
installation. This may adversely affect the installation. Only switch the
notebook off after installation has been completed successfully and the
Windows desktop appears.
Step 2
Follow the instructions on the screen. Dialogue boxes will explain any steps that need to
be taken.
The greeting procedure will guide you through a series of dialogue boxes. The information
in each dialogue box will explain the steps that need to be taken.
Should you have any questions just click on .
License Agreement
The greeting procedure also displays the license agreement. Please read this
carefully. It contains important legal information on the use of your software. In
order to see the full text, use the mouse and the scroll bar on the right side of the
screen to move downwards until you have reached the end of the document. You
accept the agreement by clicking on the “I accept the agreement” option field.
Only by doing so will you be entitled to use the product under lawful terms and
conditions.
Step 3
After the login procedure the Windows
® desktop appears on your screen.
You will find a brief overview on the following pages.
After the login procedure the Windows
® desktop appears on your screen. This can be
adjusted so that the screen of your computer looks different.
However, basic operation is guaranteed.

Power Supply 29
Safety Handling
Components
Aid Appendix
Inserting the Battery
Insert the battery before bringing the notebook into operation by sliding the battery
pack into the compartment. The battery should remain locked in order to avoid it
falling out.
Removing the Battery
1. Please ensure that the notebook is switched off and that it is not connected
to a power outlet.
2. Turn the notebook upside down.
3. Unlock the battery by pushing the lock outwards into the Unlock position.
4. Hold the lock in the open position and remove the battery.
Warning!
Do not remove the battery while the notebook is running on
battery power, this will very likely cause data loss.
Warning!
Keep the contacts on the battery and notebook clean when
storing them. Dirty contacts might lead to malfunctions.

Power Supply
30
Charging the Battery
The battery is charged via the power adapter. If the power adapter is connected, it
charges the battery automatically, whether the notebook is turned on or not. When
the notebook is switched off, full charging takes a few hours. If the notebook is
switched on, the charging process takes a significantly longer time.
Note
The charging process will be interrupted if the temperature or the
voltage of the battery is too high.
Discharging the battery
Operate the notebook by means of the battery until it switches off independently
because of the low battery charge.
Note
Think about saving your open files in good time, to avoid a possible
loss of data.
Battery Performance
The particular operating dura the setting of the energy tion will vary according to
saving functions. You can adjust these to your requirements under Energy Options
in System Control. Apart from this, your notebook will require a higher power
demand when carrying out certain tasks.

Power Supply 31
Safety Handling
Components
Aid Appendix
Checking the Battery Level
In order to check the current level of the battery, move the cursor over the power
symbol in the taskbar.
The symbol of a battery is displayed during battery operation.
You will receive additional information about settings if you double click on this
symbol.
Note
If you ignore the warning signal when the battery level is low, your
notebook goes into hibernate mode.
Warning!
Never remove the battery while the notebook is switched on or if the
notebook has not yet gone into hibernate mode, as this may lead to
loss of data.

Display 33
Safety Handling
Components
Aid Appendix
Display
Opening and Closing the Display
The display is locked by means of a special construction of the display hinge so that
an additional lock is not necessary.
To open, lift the display with your thumb and index finger and position it as
desired.
Warning!
To avoid damage to the TFT Display, never open it more than 120º.
Do not forcibly open it.
The opening and closing of the display can be assigned various functions via the
Power management feature.
Screen Resolution
Using a higher resolution can lead to distortion of the display, especially with text.
Using a lower resolution may cause the display to use only a portion of the screen
area.
You can adjust the presentation to the mode supported with the Windows
“ Control Panel Appearance and Personalization Display Settings Adjust
screen resolution Advanced Settings“ Help Program.

Display
36
The external screen will be determined after the operating system has been loaded.
Several possibilities will be available to you. You will call them up as follows:
1. A right click on the display.
2. Select the Screen Resolution option in the selection window.
3. Select from the following options under Multiple displays
*:
Duplicate these displays
Extend these displays
Show desktop only on 1
Show desktop only on 2
* Function is limited way in the case of the Windows® 7 Starter version

Data Entry
40
Touch Pad
The touchpad is positioned in front of the keyboard.
The mouse pointer (cursor) follows the direction pre-determined on the touchpad
by the movement of your finger in the normal mode.
Caution!
Do not use a ball-point pen or other object on the touch pad, as this
could damage or cause a malfunction of your touch pad.
Below the touch pad are the left and right mouse buttons which can be used as on
a normal mouse.
You can also perform a direct click or double click using the touch pad by tapping
the surface briefly once or twice.
In the Windows® Control Panel you will eful settings that will find a number of us
make using the touch pad easier.

The Hard Drive
42
Important Directories
In the following we have listed the most important directories and described their
content.
Attention!
Do not delete or modify these directories or their contents since data
could be lost or the functionality of the system could be at risk.
C:\ The master directory of drive C: includes important files
required to start Windows®. In the factory setting these files are
hidden for safety reasons.
C:\Program Files As the name suggests, in this directory programs install the files
belonging to the application.
C:\Windows The main directory of Windows®. This is where the files of the
operating system are saved.
D:\Driver This folder includes the drivers required by your computer (pre-
installed).
D:\Tools Here you find additional programs and other documentation for
your notebook.

Universal Serial Bus (USB) Port 55
Safety Handling
Components
Aid Appendix
Universal Serial Bus (USB) Port
On the USB it is possible to connect up to 127 devices which correspond to the USB
standard (1.1 and 2.0 supported).
3.0 USB connections are completely backwards compatible with 2.0 and 1.1 USB.
Your notebook has 2 USB 3.0 connection sockets (USB 1.1 compatible) (15) and
2 USB 2.0 connection sockets (16).
Note
Some USB devices require that you reinstall software drivers when
you connect the device to a different USB port than the one
originally used. This can be avoided by always using a certain
device with the same USB port.
eSATA Port
eSATA stands for "e Sxternal erial ATA" and is used for connecting external hard
disks. Unlike common USB standards, the transmission speed of an eSATA
connection is higher than that of external USB hard disks.
This connection is a "combo slot", to which both USB and S-ATA devices can be
connected.
Remove S-ATA Devices
Before removing an S-ATA hard disk from your notebook, click on the icon "Safely
remove hardware" in the task bar and then click on the hard disk to be removed. It
is now safe to remove your S-ATA hard disk.
Termékspecifikációk
| Márka: | Medion |
| Kategória: | laptop |
| Modell: | ERAZER X7813 (MD 97896) |
Szüksége van segítségre?
Ha segítségre van szüksége Medion ERAZER X7813 (MD 97896), tegyen fel kérdést alább, és más felhasználók válaszolnak Önnek
Útmutatók laptop Medion

31 December 2025
24 December 2024
20 December 2024
8 December 2024
8 December 2024
8 December 2024
8 December 2024
8 December 2024
8 December 2024
8 December 2024
Útmutatók laptop
- laptop Samsung
- laptop Sony
- laptop Fujitsu
- laptop Acer
- laptop LG
- laptop Oregon Scientific
- laptop Panasonic
- laptop Lenovo
- laptop Toshiba
- laptop HP
- laptop Hyundai
- laptop Apple
- laptop Fellowes
- laptop Zebra
- laptop Xiaomi
- laptop Dell
- laptop Gigabyte
- laptop Tripp Lite
- laptop Prixton
- laptop Thomson
- laptop Huawei
- laptop Microsoft
- laptop Asus
- laptop PEAQ
- laptop Haier
- laptop Viewsonic
- laptop Denver
- laptop MSI
- laptop Honor
- laptop SPC
- laptop ADATA
- laptop Kogan
- laptop Razer
- laptop Jay-Tech
- laptop Pyle
- laptop Schneider
- laptop Micromax
- laptop NEC
- laptop Siig
- laptop GoClever
- laptop Getac
- laptop ECS
- laptop Packard Bell
- laptop TechBite
- laptop Alienware
- laptop Airis
- laptop Lexibook
- laptop Emachines
- laptop Trekstor
- laptop Hähnel
- laptop Sylvania
- laptop Coby
- laptop Evga
- laptop Ricatech
- laptop Mpman
- laptop Vizio
- laptop Targa
- laptop Ematic
- laptop Hannspree
- laptop XPG
- laptop Inovia
- laptop Odys
- laptop Ergotron
- laptop Ibm
- laptop Atdec
- laptop Compaq
- laptop Hercules
- laptop Vulcan
- laptop System76
- laptop General Dynamics Itronix
- laptop CTL
- laptop Everex
- laptop Olidata
- laptop Dynabook
- laptop Hamilton Buhl
- laptop AORUS
- laptop Humanscale
- laptop Aplic
- laptop Schenker
Legújabb útmutatók laptop
3 Április 2025

28 Március 2025

28 Március 2025
27 Március 2025

20 Március 2025

18 Március 2025
16 Január 2025
13 Január 2025

13 Január 2025
13 Január 2025