Használati útmutató LG RV1329C4T
LG
Szárítógép
RV1329C4T
Olvassa el alább 📖 a magyar nyelvű használati útmutatót LG RV1329C4T (204 oldal) a Szárítógép kategóriában. Ezt az útmutatót 8 ember találta hasznosnak és 2 felhasználó értékelte átlagosan 4.5 csillagra
Oldal 1/204

www.lg.com
Copyright © 2020 LG Electronics Inc. All Rights Reserved.
COMMERCIAL
DRYER
OWNER’S MANUAL
Before beginning installation, read these instructions carefully. This will
simplify installation and ensure that the product is installed correctly
and safely. Leave these instructions near the product after installation
for future reference.
RV1329C1T
RV1329C4T
RV1329C7T
RV1329CN1T
RV1329CN4T
RV1329CN7T
MFL67863739
Rev.01_090820
EN ENGLISH ES ESPAÑOL FR FRANÇAIS

2CONTENTS
EN
CONTENTS
3 PRODUCT FEATURES
4 IMPORTANT SAFETY
INSTRUCTIONS
6 BASIC SAFETY PRECAUTIONS
12 GROUNDING INSTRUCTIONS
13 SAFETY INSTRUCTIONS FOR INSTALLATION
16 SAFETY INSTRUCTIONS FOR CONNECTING
ELECTRICITY
19 INTRODUCING YOUR DRYER
19 Specification
20 Accessories
20 Control panel features
23 OPERATION YOUR DRYER
24 PROGRAMMING MODE
25 Structure of Programming mode – Card/Coin
type
26 Structure of Programming mode – OPL type
27 Programing Mode – Setup Mode
27 1. Regular Price Setup
28 2. Special Price Setup
29 3. Top Off Price Setup
30 4. Features of the Machine (1st Set)
31 4-1. Special Price Day Setup
32 4-2. Sense Dry Setup
33 4-3. Top Off Setup
34 4-4. Pause Function Setup
35 5. Special Price Day Setup
36 6. Special Price Beginning Time Setup
37 7. Special Price Ending Time Setup
38 8. Dry Time Setup
39 9. Special Day Dry Time Setup
40 10. Top Off Time Setup
41 11. Coin 1 Value Setup
42 12. Penny Increment Pricing Offset Setup
43 13. Beep Volume Setup
44 14. Standby Return Time Setup
45 15. Type
46 15-1. Product Type Setup
47 15-2. Currency Type Setup
48 15-3. Vend Type Setup
49 15-4. Card Reader Type Setup
50 15-5. Coin Drop Type Setup
51 Programing Mode – Test Mode
51 1. Test
52 2. Diagnostic Test
53 3. Factory Reset
54 4. Time Setup
55 5. Courtesy Cycle
55 6. Kill Cycle
56 7. Duck Ceck
57 8. Password Setup
58 Programing Mode – Collect Mode
59 Collect Mode Data List
61 SMART FUNCTIONS
62 MAINTENANCE
63 STACK MACHINE INSTALLATION
INSTRUCTIONS
65 ERROR MODE
65 POWER FAIL RECOVERY
65 DEFAULT DRYER SETTINGS
65 INSTALLATION GUIDE FOR
HARMONICS AND FLICKER

3
PRODUCT FEATURES EN
PRODUCT FEATURES
ARTISTIC DESIGN
Modern front panel look and big clear glass door make your dryer look stylish
EASY OF USE
An entire selection of user-friendly functions makes operating the dryer easy.
COmmERCIAl lAUNDRY APPS
- Laundry Lounge Installer : This app allows installers to register products on the server. It is only available to
authorized users.
※ Download at shared link from Official LG B2B channel.Laundry Lounge Installer
- Laundry Lounge : This app allows users to do real-time monitoring of registered stores and products.
※ Search for in the Google Play Store or Apple App Store.Laundry Lounge

4ImPORTANT SAFETY INSTRUCTIONS
EN
IMPORTANT SAFETY INSTRUCTIONS
READ ALL INSTRUCTIONS BEFORE USE
WARNING
For your safety, the information in this manual must be
followed to minimize the risk of fire or explosion, electric shock,
or to prevent property damage, Injury to persons, or death.
Your Safety and the safety of others is very important.
We have provided many important safety messages in this
manual and on your appliance.
Always read and obey all safety messages.
This is the safety alert symbol.
This symbol alerts you to potential hazards that can kill or
hurt you and others.
All safety messages will follow the safety alert symbol and either
the word DANGER, WARNING, or CAUTION.
These words mean:
DANGER
You will be killed or seriously injured if you don’t immediately
follow instructions.
WARNING
You can be killed or seriously injured if you don’t follow
instructions.
CAUTION
You may be slightly injured or cause damage to the product if
you do not follow instructions.
All safety messages will tell you what the potential hazard is, tell
you how to reduce the chance of injury, and tell you what can
happen if the instructions are not followed.

5
ImPORTANT SAFETY INSTRUCTIONS EN
This appliance can be used by children aged from 8 years and
above and persons with reduced physical, sensory or mental
capabilities or lack of experience and knowledge if they have
been given supervision or instruction concerning use of the
appliance in a safe way and understand the hazards involved.
Children shall not play with the appliance. Cleaning and user
maintenance shall not be made by children without supervision.
Children of less than 3 years should be kept away unless
continuously supervised.

6ImPORTANT SAFETY INSTRUCTIONS
EN
IMPORTANT SAFETY INSTRUCTIONS
READ ALL INSTRUCTIONS BEFORE USE
BASIC SAFETY PRECAUTIONS
WARNING
To reduce the risk of fire, electric shock, or injury to persons
when using this appliance, follow basic precautions, including
the following:
•Read all instructions before using
the dryer.
•Before use, the dryer must be
properly installed as described in
this manual.
•Do not place items exposed to
cooking oils in your dryer. Items
contaminated with cooking oils
may contribute to a chemical
reaction that could cause a load
to catch fire.
•Do not dry articles that have
been previously cleaned in,
washed in, soaked in, or spotted
with gasoline,
dry-cleaning solvents, or other
flammable or explosive
substances as they give off
vapors that could ignite or
explode.
•Do not reach into the dryer if the
drum or any other part is moving.
•Do not repair or replace any part
of the dryer or attempt any
servicing unless specifically
recommended in this Owner’s
Manual or in published
user-repair instructions that you
understand and have the skills to
carry out.
•Do not tamper with controls.
•Before the dryer is removed from
service or discarded, remove the
door to the drying compartment.
•Do not allow children to play on
or in the dryer. Close supervision
of children is necessary when the
dryer is used near children.
•Do not use fabric softeners or
products to eliminate static
unless recommended by the
manufacturer of the fabric
softener or product.
•Do not use heat to dry articles
containing foam rubber or
similarly textured rubber-like
materials.
•Keep area around the exhaust
opening and adjacent
surrounding areas free from the
accumulation of lint, dust, and
dirt.
•The interior of the dryer and
exhaust vent should be cleaned
periodically by qualified service
personnel.

7
ImPORTANT SAFETY INSTRUCTIONS EN
•Do not install or store the dryer
where it will be exposed to the
weather.
•Always check the inside of the
dryer for foreign objects.
•Clean lint screen before or after
each load.
•Do not dry unwashed items in
the tumble dryer.
•Items that have been soiled
with substances such as
cooking oil, acetone,
alcohol,petrol,kerosene,spot
removers, turpentine, waxes
and wax removers should be
washed in hot water with an
extra amount of detergent
before being dried in the
tumble dryer.
•Items such as foam
rubber(latex foam), shower
caps, waterproof textiles,
rubber backed articles and
clothes or pillows fitted with
foam rubber pads should not
be dried in the tumble dryer.
•Fabric softeners, or similar
products, should be used as
specified by the fabric softener
instructions.
•The final part of a tumble dryer
cycle occurs without heat(cool
down cycle) to ensure that the
items are left at a temperature
that ensures that the items will
not be damaged.
•If the supply cord is damaged,
it must be replaced by the
manufacturer, its service agent
or similarly qualified persons in
order to avoid a hazard.
•Never operate the dryer
without lint filter in place.
Never operate the dryer with a
wet lint filter.

8ImPORTANT SAFETY INSTRUCTIONS
EN
WARNING
Never stop a tumble dryer before the end of the drying cycle
unless all items are quickly removed and spread out so that the
heat is dissipated.
•The lint trap has to be cleaned
frequently.
•Lint must not to be allowed to
accumulate around the tumble
dryer.
•Adequate ventilation has to be
provided to avoid the back
flow of gases into the room
from appliances burning other
fuels, including open fires.
•Electric Dryer Max capacity is
10kg
•Gas Dryer Max capacity is
10,2kg
•This appliance is not intended
for use by persons (including
children) with reduced
physical, sensory or mental
capabilities, or lack of
experience and knowledge,
unless they have been given
supervision or instruction
concerning use of the
appliance by a person
responsible for their safety.
•Children should be supervised
not to play with the appliance.
•The tumble dryer is not to be
used if industrial chemicals
have been used for cleaning

9
ImPORTANT SAFETY INSTRUCTIONS EN
IMPORTANT SAFETY INSTRUCTIONS
READ ALL INSTRUCTIONS BEFORE USE
1. This crossed-out wheeled bin symbol indicates
that waste electrical and electronic products (WEEE)
should be disposed of separately from the
municipal waste stream.
2. Old electrical products can contain hazardous
substances so correct disposal of your old appliance
will help prevent potential negative
consequences for the environment and human health. Your old
appliance may contain reusable parts that could be used to
repair other products, and other valuable materials that can be
recycled to conserve limited resources.
3. You can take your appliance either to the shop where you
purchased the product, or contact your local government waste
office for details of your nearest authorised WEEE collection
point. For the most up to date information for your country
please see www.lg.com/global/ recycling
Disposal of your old appliance

10 ImPORTANT SAFETY INSTRUCTIONS
EN
WhAT IS NOT COvERED.
Service trips to your home to instruct you on the product.
If the product is connected to any voltage other than that shown
on the rating plate.
If the fault is caused by accidents, neglects, misuses of Acts of God.
If the fault is caused by reasons except for normal domestic use or
use in accordance with the owner’s manual.
If the fault is caused by pests, for example, rats or cockroaches etc..
Noise or vibration that is considered normal,for example, water
drain sound, spin sound or warning beeps.
Correcting the installation for example, leveling the product,
adjustment of drain.
Normal maintenance recommended by the owner’s manual.
Removal of foreign objects/substances from the machine including
the pump and inlet hose filter, for example, grit,nails, bra wires and
buttons etc..
Replace fuses in or correct wiring or correct house plumbing.
Correction of unauthorized repairs.
Incidental or consequential damage to personal property caused
by possible defects with this appliance.
If the product is installed outside the normal service area, any cost
of transportation involved in the repair of the products, or the
replacement of a defective part, shall be borne by the owner.

11
ImPORTANT SAFETY INSTRUCTIONS EN
READ ALL INSTRUCTIONS BEFORE USE
WARNING
For your safety, the information in this manual must be followed
to minimize the risk of fire or explosion, electric shock, or to
prevent property damage, Injury to persons, or death.
•Do not store or use gasoline or
other flammable vapors and
liquids in the vicinity of this
appliance or any other
appliances.
•Installation and service must be
performed by a qualified
installer, service agency, or the
gas supplier.

12 ImPORTANT SAFETY INSTRUCTIONS
EN
IMPORTANT SAFETY INSTRUCTIONS
READ ALL INSTRUCTIONS BEFORE USE
WARNING
For your safety, the information in this manual must be followed
to minimize the risk of fire or explosion, electric shock, or to
prevent property damage, injury to persons, or death.
GROUNDING INSTRUCTIONS
This appliance must be
grounded. In the event of
malfunction or breakdown,
grounding will reduce the risk
of electric shock by providing
a path of least resistance for
electric current. This appliance
must be equipped with a cord
having an equipmentgrounding
conductor and a grounding
plug. The plug must be plugged
into an appropriate outlet that is
properly installed and grounded
in accordance with all local codes
and ordinances. Do not use an
adapter or extension cord. Do
not remove ground prong. If you
don’t have the proper outlet,
consult an electrician.
Do not modify the plug provided
with the appliance.
If it will not fit the outlet, have
a proper outlet installed by a
qualified electrician.
This appliance must be
connected to a grounded metal,
permanent wiring system or an
equipmentgrounding conductor
must be run with the circuit
conductors and connected
to the equipmentgrounding
terminal or lead on the
appliance. Electric shock
can result if the dryer is not
properly grounded. The
appliance may only be installed
in a room if the room meets
the appropriate ventilation
requirements specified in the
national installation regulations.
Minimum required spacing of
2,54cm to adjacent appliances,
walls and furniture.

13
ImPORTANT SAFETY INSTRUCTIONS EN
WARNING
Improper connection of the equipment-grounding conductor
can result in a risk of electric shock. Check with a qualified
electrician or service person if you are in doubt as to whether the
appliance is properly grounded.
SAFETY INSTRUCTIONS FOR INSTALLATION
WARNING
To reduce the risk of fire, electric shock, or injury to persons when
using this appliance, follow basic precautions, including the
following:
•Properly ground dryer to
conform with all governing
codes and ordinances. Follow
details in the installation
instructions. Electric shock can
result if the dryer is not
properly grounded.
•Before use, the dryer must be
properly installed as described
in this manual. Electric shock
can result if the dryer is not
properly grounded.
•Install and store the dryer
where it will not be exposed to
temperatures below freezing or
exposed to the weather.
•All repairs and servicing must
be performed by an authorized
servicer unless specifically
recommended in this Owner’s
Manual. Use only authorized
factory parts. Failure to follow
this warning can cause serious
injury, fire, electric shock, or
death.
•To reduce the risk of electric
shock, do not install the dryer
in humid spaces. Failure to
follow this warning can cause
serious injury, fire, electric
shock, or death.
•Connect to a properly rated,
protected, and sized power
circuit to avoid electrical
overload. Improper power
circuit can melt, creating
electric shock and/or fire
hazard.
•Remove all packing items and
dispose of all shipping
materials properly. Failure to do
so can result in death,
explosion, fire, or burns.
•Place dryer at least 18 in. above
the floor for a garage
installation. Failure to do so can
result in death, explosion, fire,
or burns.

14 ImPORTANT SAFETY INSTRUCTIONS
EN
•Keep all packaging from
children. Packaging material
can be dangerous for children.
There is a risk of suffocation.
•Keep the area underneath and
around your appliances free of
combustible materials such as
lint, paper, rags, chemicals, etc.
Failure to do so can result in
fire.
•Do not place candles, smoking
materials, or other flammables
on to top of the product.
Dripping wax, smoke, or fire
can result.
•Remove all protective vinyl film
from the product.Failure to do
so can cause product damage,
smoke or fire.
•Means for disconnection with
contact separation at least
3mm is that the means for
disconnection must be
incorporated in the fixed wiring
according to the wiring rules.
WARNING
For your safety, the information in this manual must be followed
to minimize the risk of fire or explosion, electric shock, or to
prevent property damage, injury to persons, or death.
SAFETY INSTRUCTIONS FOR INSTALLATION
•The appliance is not to be used
by children or persons with
reduced physical, sensory or
mental capabilities, or lack of
experience and knowledge,
unless they have been given
supervision or instruction.
Children being supervised not
to play with the appliance.
•The appliance must not be
installed behind a lockable
door, a sliding door or a door
with a hinge on the opposite
side to that of the tumble dryer,
in such a way that a full
opening of the tumble dryer
door is restricted.

15
ImPORTANT SAFETY INSTRUCTIONS EN
IMPORTANT SAFETY INSTRUCTIONS
READ ALL INSTRUCTIONS BEFORE USE
Exhaust/Ducting:
•Gas dryers MUST be exhausted
to the outside. Failure to follow
these instructions can result in
fire or death.
•The dryer exhaust system must
be exhausted to the outside of
the dwelling. If the dryer is not
exhausted outdoors, some fine
lint and large amounts of
moisture will be expelled into
the laundry area. An
accumulation of lint in any area
of the home can create a health
and fire hazard.
•Use only rigid metal or flexible
metal 4-inch (10,2 cm) diameter
ductwork inside the dryer
cabinet or for exhausting to the
outside. Use of plastic or other
combustible ductwork can
cause a fire. Punctured
ductwork can cause a fire if it
collapses or becomes otherwise
restricted in use or during
installation.
•Ductwork is not provided with
the dryer, and you should
obtain the necessary ductwork
locally. The end cap should have
hinged dampers to prevent
backdraft when the dryer is not
in use. Failure to follow these
instructions can result in fire or
death.
•Exhaust air must not be
discharged into a flue which Is
used for exhausting fumes from
appliances burning gas or other
fuels.
•The exhaust duct must be 4
inches (10.2 cm) in diameter
with no obstructions. The
exhaust duct should be kept as
short as possible. Make sure to
clean any old ducts before
installing your new dryer. Failure
to follow these instructions can
result in fire or death.
•DO NOT use sheet metal screws
or other fasteners which extend
into the duct that could catch
lint and reduce the efficiency of
the exhaust system. Secure all
joints with duct tape. For
complete details, follow the
Installation Instructions. Failure
to follow these instructions can
result in fire or death.
•In the appliance enclosure or in
the built-in structure, keep
ventilation opening clear of
obstruction.
•Adequate ventilation has to be
provided to avoid the back flow
of gases into the room from
appliances burning other fuels,
including open fires Do not dry
unwashed items in the tumble
dryer.

16 ImPORTANT SAFETY INSTRUCTIONS
EN
IMPORTANT SAFETY INSTRUCTIONS
READ ALL INSTRUCTIONS BEFORE USE
WARNING
For your safety, the information in this manual must be followed
to minimize the risk of fire or explosion, electric shock, or to
prevent property damage, injury to persons, or death.
SAFETY INSTRUCTIONS FOR CONNECTING ELECTRICITY
WARNING
To reduce the risk of fire, electric shock, or injury to persons
when using this appliance, follow basic precautions, including
the following:
•Do not, under any
circumstances, cut or remove
the ground prong from the
power cord. To prevent injury
to persons or damage to the
dryer, the electrical power cord
must be plugged into a
properly grounded outlet.
•For personal safety, this dryer
must be properly grounded.
Failure to do so can result in
electric shock or injury.
•Refer to the installation
instructions in this manual for
specific electrical requirements
for your model. Failure to
follow these instructions can
create an electric shock hazard
and/or a fire hazard.
•This dryer must be plugged
into a properly grounded
outlet. Electric shock can result
if the dryer is not properly
grounded. Have the wall outlet
and circuit checked by a
qualified electrician to make
sure the outlet is properly
grounded. Failure to follow
these instructions can create
an electric shock hazard and/
or a fire hazard.
•The dryer should always be
plugged into its own individual
electrical outlet which has a
voltage rating that matches
the rating plate. This provides
the best performance and also
prevents overloading house
wiring circuits which could
cause a fire hazard from
overheated wires.
•Never unplug your dryer by
pulling on the power cord.
Always grip plug firmly and
pull straight out from the
outlet. The power cord can be
damaged, resulting in a risk of
fire and electric shock.

17
ImPORTANT SAFETY INSTRUCTIONS EN
SAvE ThESE INSTRUCTIONS
•Repair or replace immediately
all power cords that have
become frayed or otherwise
damaged. Do not use a cord
that shows cracks or abrasion
damage along its length or at
either end. The power cord can
melt, creating electric shock
and/or fire hazard.
•When installing or moving the
dryer, be careful not to pinch,
crush, or damage the power
cord. This will prevent injury
and prevent damage to the
dryer from fire and electric
shock.
•To reduce the risk of injury to
persons, adhere to all industry
recommended safety
procedures including the use of
long sleeved gloves and safety
glasses. Failure to follow all of
the safety warnings in this
manual could result in property
damage, injury to persons or
death.
•The final part of the tumble
dryer cycle occurs without heat
(cool down cycle) to ensure
that the items are left at a
temperature that ensures that
the items will not be damaged.

18 ImPORTANT SAFETY INSTRUCTIONS
EN
IMPORTANT SAFETY INSTRUCTIONS
READ ALL INSTRUCTIONS BEFORE USE
CAUTION
These instructions are only valid if the following country code is
on the appliance. If this code is not present on the appliance, it is
necessary to refer to the technical instructions which will provide
the necessary information concerning the modification of the
appliance to the condition of use for the country Before installation,
check that the local distribution conditions, nature of gas and
pressure, and the adjustment of the appliance are compatible.
•the method of connection and the installation regulations in the
country where the appliance is to be installed (if such regulations
exist); also the ventilation dimensions shall be given for the
purposes of installation in those countries where there are no
appropriate regulations.
WARNING
Never stop a tumble dryer before the end of the drying cycle unless
all items are quickly removed and spread out so that the heat is
dissipated.
SAvE ThESE INSTRUCTIONS

19
INTRODUCING YOUR DRYER EN
INTRODUCING YOUR DRYER
Specification
Type : Electric and Gas Dryer
Rating : Please refer to the rating label regarding detailed information.
Single dryer size : 686 mm(W) x 764 mm(D) x 983 mm(H)
Stack dryer size : 686 mm(W) x 764 mm(D) x 1954 mm(H)
Electric Dryer Max Capacity : 10 kg
Weight : 59,4 kg
A-weighted emission sound pressure lebel : < 70dB(A)
Specifications are subject to change by manufacturer.
Specifications subject to change by manufacturer.
NOTE

20 INTRODUCING YOUR DRYER
EN
Accessories
Control panel features
Card type
1 24
3
OPL type
- Side by Side (Rv1329C4T)
- Stack Upper (Rv1329C7T)
- Stack Lower (Rv1329C1T)
1 24
3
OPL sheet
(only for OPL type)
1. Display LED
2. Cycle button
3. Start/Pause button
4. Status LED

21
INTRODUCING YOUR DRYER EN
Control panel features
Coin type
- Side by Side (Rv1329CN4T)
1 24
3
- Stack upper (Rv1329CN7T)
1 24
3
- Stack lower (Rv1329CN1T)
1 24
3
1. Display LED
2. Cycle button
3. Start/Pause button
4. Status LED

22 INTRODUCING YOUR DRYER
EN
Display LED Cycle button
Start/Pause button
Status LED
Display LED
The Display shows the vend price, remaining time, and
programming options.
Error codes are also displayed here.
Cycle button
Press the cycle button to Select the desired cycle based
on laundry types and conditions.
High Temp.
Use this cycle to get high heat for heavy fabrics, such
as jeans corduroys or work clothes (High heat).
Med Temp.
Use for drying sturdy fabrics such as work casual
clothes (Medium heat).
Low Temp.
Use for drying synthetic fabrics,washable knit fabrics
and noiron finishes (Low heat).
No Heat
Use for items that require heat-free drying such as
plastics or rubber.
Start/Pause button
The Start LED flashes when the full vend price has been
satisfied then the cycle has been chosen or the machine
is paused.
The Start LED flashes when a card is inserted to add time
to the current cycle.
If you press the Start/Pause button while dryer is
working, machine will be paused.
Status LED
LED Description
LED flashes when the duct is blocked by
lint.
Check and clean the duct.
LED flashes whenever the heating cycle
is in operation.
LED flashes whenever the cool down
cycle is in operation.
LED flashes when the Wi-Fi is connecting.
LED stays lit when the Wi-Fi is connected.

23
OPERATING YOUR DRYER EN
OPERATING YOUR DRYER
1. Ready mode
All types of machines show ‘PUSH’
•Pricesettingvariesbycountry.
•Setyourcountryfrom mode.
(Refer How to enter the )
•AfterEEPT,resetyourcountry.
(Default country is England)
NOTE
2. Select the cycle
Press the desired button and the display will show you
the price of the cycle.(You cannot change the cycle
while the machine is running.)
When the card balance is not enough, machine
displays the balance for 5 seconds and then displays
message repetitively
NOTE
Insert a sufficient amount of change that is a more
than the programmed vend price for a selected cycle.
3. Insert Coin/Card (Not for OPL type)
Insert a sufficient amount of change that is more than
the programmed vend price for the selected cycle.
Insert a card that has a sufficient balance.
The card balance should be more than the programmed
vend price for the selected cycle.
The last 2 minutes of the remaining time are always
for the cool down portion.
NOTE
4. Top off (To add more time)
After a debit card is inserted, the operating time can
be increased to 10 minutes / 0,10 when the
Start button or the chosen course button has been
pressed.
(The card should have enough balance to satisfy
increasing time.)
The operating time can be increased to 10 minutes /
0,10 (default) by adding more coins.
Owner can control the additional time(Top Off Time)
and money setting (refer to Top off Price setting
.)
NOTE
When the COOL DOWN has been working, if time is
added, it goes back to the Dry.
Time can be added up to 99 minutes.
5. Change cycle
You can not change the cycle while the machine is
running.
6. Cycle finish
After the Cool Down of cycle, the machine stops and the
display shows ‘End’ with beep sound.

24 PROGRAmmING mODE
EN
PROGRAMMING MODE
You can check machine information or change setting on Program setup or Diagnostic test.
There are two methods that you can enter programming mode.
how to enter Programming mode:
- – Turn on/off the toggle switch.Coin type
- – Insert the service card.Card type
- – All types
1) Press the 1st & 3rd button at the same time.
2) Press the 2nd & 3rd buttons to toggle numbers.
Then, press the 4th button to move to the next digit.
3) Press the Start button to finish password input.
※ Default Password : 3000
<Control Panel >
1st
2nd
3rd
4th
Start
•Ifyouturnonthepowerwithoutconnectingthemetercaseforthefirsttime,themachinewilldisplay .
•Whenthemachinecomesfromthefactory,itissetinthecointype.YoucanchangeCard/Cointypebybutton.
(For more information refer to SETUP mode’s .)
•Themachinewilldisplay“PUSH”forOPLtype
•Pricesettingvariesbycountry.
•Setyourcountryfrom mode. (Refer How to enter the )
•AfterEEPT,resetyourcountry.(DefaultcountryisEngland)
NOTE
Coin Box Key
Coin Vault
Coin type
Insert debit card
Card type OPL type

25
PROGRAmmING mODE EN
Structure of Programing mode – Card/Coin type
Algorithm Flow Chart shows how to control programming mode.
Before program set, check the structure of programming mode.
is to set price value, time value and vend type etc.
consists of line test, reset, free cycle and kill cycle.
Is to collect the usage data.
Structure of Programming mode
•Donotuse , , .
•Itisonlyusedininspectingthemachine.
• This function is for Card type only.
NOTE

26 PROGRAmmING mODE
EN
Structure of Programing mode – OPL type
Algorithm Flow Chart shows how to control programming mode.
Before program set, check the structure of programming mode.
is to set price value, time value and vend type etc.
consists of line test, reset, free cycle and kill cycle.
Is to collect the usage data.
Structure of Programming mode
•Donotuse , , .
•Itisonlyusedininspectingthemachine.
NOTE

27
PROGRAmmING mODE EN
PROGRAMMING MODE - Setup Mode
Setup Mode : (display)
You can change dryer vend price, cycle time, and cycle parameters, etc.
How to enter Programming mode:
- Coin type – Turn on/off the toggle switch.
- Card type – Insert the service card.
- All types - Enter password.
1) Press the 1st & 3rd button at the same time.
2) Press the 2nd & 3rd buttons to toggle numbers.
Then, press the 4th button to move to the next digit.
3) Press the Start button to finish password input.
※ Default Password : 3000
<Control Panel >
1st
2nd
3rd
4th
Start
1. Regular Price Setup
This function sets the regular prices for all/each cycle.
Regular Price Setup Display
Enter SVC Mode
Press 1st button
Press 2nd button
Press Start button
Press 2nd button or 3rd button Until display shows
Press Start button
Select the price you want
Button functions :
Start button = Select
1st button = Go back a step
2nd button = Move up or Increase value
3rd button = Move down or Decrease value
Start button to select :
1st button to go back a step :
2nd button to move
up :
3rd button to move
down :
Press Start to set the price The next cycle setting will be displayed.
• Range : 0,00~10,00
• Increments : 0,10
• ALL is to select the default prices for all the cycles at
once.
• Select individual price for COS1~4
• COS1 : High Temp
• COS2 : Med Temp
• COS3 : Low Temp
• COS4 : No Heat
※ Individual cycle prices are prioritized above 'ALL'.
• Set your country from (Refer to Currency
Type Setup)
NOTE

28 PROGRAmmING mODE
EN
2. Special Price Setup
This function sets special prices for all/each cycle.
Special Price Setup Display
Enter SVC Mode
Press 1st button
Press 2nd button
Press Start button
Press 2nd button or 3rd button Until display shows
Press Start button
Select the price you want
Button functions :
Start button = Select
1st button = Go back a step
2nd button = Move up or Increase value
3rd button = Move down or Decrease value
Press Start to set the price The next cycle setting will be displayed.
• Range : 0,00~10,00
• Increments : 0,10
• ALL is to select the default prices for all the cycles at once.
• Select individual price for COS1~4
• COS1 : High Temp
• COS2 : Med Temp
• COS3 : Low Temp
• COS4 : No Heat
※ Individual cycle prices are prioritized above ‘ALL’.
• Set your country from (Refer to Currency Type Setup)
NOTE

29
PROGRAmmING mODE EN
3. Top Off Price Setup
This function sets the Top Off Price.
Top Off Price Setup Display
Enter SVC Mode
Press 1st button
Press 2nd button
Press Start button
Press 2nd button or 3rd button Until display shows
Press Start button
Select the price you want
Button functions :
Start button = Select
1st button = Go back a step
2nd button = Move up or Increase value
3rd button = Move down or Decrease value
Press Start to set the price The next menu will be displayed.
• Range : 0,10~10,00
• Increments : 0,10
• Select individual price for COS1~4
• COS1 : High Temp
• COS2 : Med Temp
• COS3 : Low Temp
• COS4 : No Heat
NOTE

30 PROGRAmmING mODE
EN
4. Features of the Machine (1st Set)
This function sets up multiple features of each machine, under FEA1.
Features of the Machine (1st Set) Display
Enter SVC Mode
Press 1st button
Press 2nd button
Press Start button
Press 2nd button or 3rd button Until display shows
Select the setting you want
Button functions :
Start button = Select
1st button = Go back a step
2nd button = Move up
3rd button = Move down
• : Special Price Day enable or disable
• :Sensor Dry enable or disable
• : Top Off enable or disable
• : Pause function enable or disable
NOTE

31
PROGRAmmING mODE EN
4-1. Special Price Day Setup
Special Price Day Setup can be used to set special prices.
Special Price Day Setup Display
Enter SVC Mode
Press 1st button
Press 2nd button
Press Start button
Press 2nd button or 3rd button Until display shows
Press Start button
Press Start button
Select the feature you want
Button functions :
Start button = Select
1st button = Go back a step
2nd button = Move up
3rd button = Move down
Press Start to enable or disable The next menu setting will be displayed.

32 PROGRAmmING mODE
EN
4-2. Sense Dry Setup
Sense Dry Setup can be used to enable/disable Sense Dry.
Sense Dry Setup Display
Enter SVC Mode
Press 1st button
Press 2nd button
Press Start button
Press 2nd button or 3rd button Until display shows
Press Start button
Press 2nd button or 3rd button Until display shows
Press Start button
Select the features you want
Button functions :
Start button = Select
1st button = Go back a step
2nd button = Move up
3rd button = Move down
Press Start to enable or disable The next menu setting will be displayed.

34 PROGRAmmING mODE
EN
4-4. Pause Function Setup
Pause Function Setup can be used ro enable/disable the ability to pause the cycle when pressing the Start/Pause
button.
Pause Function Setup Display
Enter SVC Mode
Press 1st button
Press 2nd button
Press Start button
Press 2nd button or 3rd button Until display shows
Press Start button
Press 2nd button or 3rd button Until display shows
Press Start button
Select the features you want
Button functions :
Start button = Select
1st button = Go back a step
2nd button = Move up
3rd button = Move down
Press Start to enable or disable The next menu setting will be displayed.

35
PROGRAmmING mODE EN
5. Special Price Day Setup
Special Price Day Setup can be used to select which days to apply special prices.
Special Price Day Setup Display
Enter SVC Mode
Press 1st button
Press 2nd button
Press Start button
Press 2nd button or 3rd button Until display shows
Press Start button
Press Start button
Select the setting you want
Button functions :
Start button = Select
1st button = Go back a step
2nd button = Move up
3rd button = Move down
Press Start to enable or disable The next menu setting will be displayed.
• Make sure to set up the Time feature before using this feature.
NOTE

36 PROGRAmmING mODE
EN
6. Special Price Beginning Time Setup
Special Price Beginning Time Setup can be used to set the start time of special prices.
Special Price Beginning Time Setup Display
Enter SVC Mode
Press 1st button
Press 2nd button
Press Start button
Press 2nd button or 3rd button Until display shows
Press Start button
Select the setting you want
Button functions :
Start button = Select
1st button = Go back a step
2nd button = Move up or Increase value
3rd button = Move down or Decrease value
Press Start to set time The next menu setting will be displayed.
• Make sure to set up the Time feature before using this feature.
• Range : 0~23 hr
• Increments : 1 hr
NOTE

37
PROGRAmmING mODE EN
7. Special Price Ending Time Setup
Special Price Ending Time Setup can be used to set the end time for special prices.
Special Price Ending Time Setup Display
Enter SVC Mode
Press 1st button
Press 2nd button
Press Start button
Press 2nd button or 3rd button Until display shows
Press Start button
Select the setting you want
Button functions :
Start button = Select
1st button = Go back a step
2nd button = Move up or Increase value
3rd button = Move down or Decrease value
Press Start to set the time The next menu setting will be displayed.
• Make sure to set up the Time feature before using this feature.
• Range : 1~24 hr
• Increments : 1 hr
NOTE

38 PROGRAmmING mODE
EN
8. Dry Time Setup
Dry Time Setup can be used to set the duration of drying.
Dry Time Setup Display
Enter SVC Mode
Press 1st button
Press 2nd button
Press Start button
Press 2nd button or 3rd button Until display shows
Press Start button
Select the time you want
Button functions :
Start button = Select
1st button = Go back a step
2nd button = Move up or Increase value
3rd button = Move down or Decrease value
Press Start to set the time The next cycle setting will be displayed.
• Range : 5~99 min
• Increments : 1 min
• COS1 : High Temp
• COS2 : Med Temp
• COS3 : Low Temp
• COS4 : No Heat
NOTE

41
PROGRAmmING mODE EN
11. Coin 1 value Setup
Coin 1 Value Setup can be used to set the value of each coin signal received.
Coin 1 value Setup Display
Enter SVC Mode
Press 1st button
Press 2nd button
Press Start button
Press 2nd button or 3rd button Until display shows
Press Start button
Select the price you want
Button functions :
Start button = Select
1st button = Go back a step
2nd button = Move up or Increase value
3rd button = Move down or Decrease value
Press Start to set the price The next menu setting will be displayed.
• Range : 0,10~10,00
• Increment : 0,10
NOTE

43
PROGRAmmING mODE EN
13. Beep volume Setup
Beep Volume Setup can be used to set the volume of the control and end-of-cycle sounds.
Beep volume Setup Display
Enter SVC Mode
Press 1st button
Press 2nd button
Press Start button
Press 2nd button or 3rd button Until display shows
Press Start button
Select the setting you want
Button functions :
Start button = Select
1st button = Go back a step
2nd button = Move up or Increase value
3rd button = Move down or Decrease value
Press Start to set the volume. The next menu setting will be displayed.

44 PROGRAmmING mODE
EN
14. Stanby Return Time Setup
Standby Return Time Setup can be used to set how long the input payment is held until the machine resets to
standby mode.
Stanby Return Time Setup Display
Enter SVC Mode
Press 1st button
Press 2nd button
Press Start button
Press 2nd button or 3rd button Until display shows
Press Start button
Select the length of time you want
Button functions :
Start button = Select
1st button = Go back a step
2nd button = Move up or Increase value
3rd button = Move down or Decrease value
Press Start to set the time The next menu setting will be displayed.
• 0 : Holds input payment permanently.
• 1~180 : Holds input payment for selected amount of time, then returns to standby mode.
NOTE

45
PROGRAmmING mODE EN
15. Type
Type can be used to set the machine’s various type settings.
Type Display
Enter SVC Mode
Press 1st button
Press 2nd button
Press Start button
Press 2nd button or 3rd button Until display shows
Select the setting you want
Button functions :
Start button = Select
1st button = Go back a step
2nd button = Move up
3rd button = Move down
• : Product type
• : Currency type
• : Vend type
• : Card reader type
• : Coin meter type
NOTE

46 PROGRAmmING mODE
EN
15-1. Product Type Setup
Product Type Setup can be used to set the machine’s payment type (Pay or Free).
Product Type Setup Display
Enter SVC Mode
Press 1st button
Press 2nd button
Press Start button
Press 2nd button or 3rd button Until display shows
Press Start button
Select the type you want
Button functions :
Start button = Select
1st button = Go back a step
2nd button = Move up
3rd button = Move down
Press Start to set the type Display returns to standby mode.
• PAY : Coin/Card
• FrEE : On Premise Laundry
NOTE

47
PROGRAmmING mODE EN
15-2. Currency Type Setup
Currency Type Setup can be used to set the country and its currency
Currency Type Setup Display
Enter SVC Mode
Press 1st button
Press 2nd button
Press Start button
Press 2nd button or 3rd button Until display shows
Press Start button
Press 2nd button or 3rd button Until display shows
Press Start button
Select the type you want
Button functions :
Start button = Select
1st button = Go back a step
2nd button = Move up or Increase value
3rd button = Move down or Decrease value
Press Start to set the type Display returns to standby mode.
Country (Loc1) Range Increments
England (0) 0~10,00 0,10
Australia (1) 0~10,00 1,00
USA (2) 0~9,95 0,05
China (3) 0~199 1
Korea (4) 0~9900 100
Japan (5) 0~9500 100
Canada (6) 0~9,95 0,05
Philippines (7) 0~995 5
NOTE

48 PROGRAmmING mODE
EN
15-3. vend Type Setup
Vend Type Setup can be used to set the payment type (Coin/Card).
vend Type Setup Display
Enter SVC Mode
Press 1st button
Press 2nd button
Press Start button
Press 2nd button or 3rd button Until display shows
Press Start button
Press 2nd button or 3rd button Until display shows
Press Start button
Select the type you want
Button functions :
Start button = Select
1st button = Go back a step
2nd button = Move up
3rd button = Move down
Press Start to set the type Display returns to standby mode.
• : Mobile Pay Only
NOTE

49
PROGRAmmING mODE EN
15-4. Card Reader Type Setup
Card Reader Type Setup can be used to set the card reader company.
Card Reader Type Setup Display
Enter SVC Mode
Press 1st button
Press 2nd button
Press Start button
Press 2nd button or 3rd button Until display shows
Press Start button
Press 2nd button or 3rd button Until display shows
Press Start button
Select the type you want
Button functions :
Start button = Select
1st button = Go back a step
2nd button = Move up or Increase value
3rd button = Move down or Decrease value
Press Start to set the type Display returns to standby mode.
• 0 : Greenwald
• 1 : ESD
NOTE

50 PROGRAmmING mODE
EN
15-5. Coin Drop Type Setup
Coin Drop Type Setup can be used to set the coin pulse signal setting for coin drops.
Coin Drop Type Setup Display
Enter SVC Mode
Press 1st button
Press 2nd button
Press Start button
Press 2nd button or 3rd button Until display shows
Press Start button
Press 2nd button or 3rd button Until display shows
Press Start button
Select the type you want
Button functions :
Start button = Select
1st button = Go back a step
2nd button = Move up or Increase value
3rd button = Move down or Decrease value
Press Start to set the type Display returns to standby mode.
• Coin pulse
0 : 50ms : ESD, Greenwald, Munzprufer
1 : 100ms : Korea
NOTE

51
PROGRAmmING mODE EN
Programming Mode – Test Mode
Diagnostic tests : (display)
This program has been added for testing the dryer and detecting errors.
1. Test
Test features can be used to check and change various machine settings.
Test Display
Enter SVC Mode
Select the feature you want
Button functions :
Start button = Select
1st button = Go back a step
2nd button = Move up
3rd button = Move down
• : Factory Use (Do not Use)
• : Diagnostic Test 1
• : Factory Use (Do not Use)
• : Factory Use (Do not Use)
• : Factory Reset
• : Time Setting
• : Courtesy Cycle
• : Kill cycle
• : Duct check
• : Password Setup
NOTE
how to enter Programming mode:
- – Turn on/off the toggle switch.Coin type
- – Insert the service card.Card type
- – All types
1) Press the 1st & 3rd button at the same time.
2) Press the 2nd & 3rd buttons to toggle numbers.
Then, press the 4th button to move to the next digit.
3) Press the Start button to finish password input.
※ Default Password : 3000
<Control Panel >
1st
2nd
3rd
4th
Start

52 PROGRAmmING mODE
EN
2. Diagnostic Test
Diagnostic Test can be used to check functionality of various machine parts.
Press Start to move through the check points.
Number of times the
Start button is
pressed
Check point Display
0 Enter SVC Mode
- Press 2nd button
1
Check the version and code for machine.
• Electric Coin type : P0:OE
• Electric Card type : P0:CE
• Electric OPL type : P0:PE
• Gas Coin type : P0:Og
• Gas Card type : P0:Cg
• Gas OPL type : P0:Pg
Displays , P0:XX, gU:XX, gd:XX
and gF:XX alternately (Version)
2 PDA Check
3 Motor runs Measured moisture value (70~239)
4
• Elctric type : Heater runs
(Motor + Heater 1 (2700W))
• Gas Type : Motor runs
Current temperature (5~70)
(Display shows the temperature inside the
drum in Celsius)
5
• Elctric type : Heater runs
(Motor + Heater 1+Heater 2 (5400W))
• Gas Type : Gas valve runs (Motor +Valve)
Current temperature (5~70)
(Display shows the temperature inside the
drum in Celsius)
6LED&Button Check
Press the whole course buttons.
Displays , P0:XX, gU:XX, gd:XX
and gF:XX alternately (Version)
7 Test Ends
8Door switch (Motor&Heater Off, Buzzer
beeps seven times)
dE (The door is open. Please close the door
completely)
9Test goes back at step 3. (Motor on &
Heater Off ) Measured moisture value (70~239)
• Make sure the drum is empty when diagnostic test is being performed. Do not use .
NOTE

53
PROGRAmmING mODE EN
3. Factory Reset
Factory Reset is used to reset the machine to default settings.
Factory Reset Display
Enter SVC Mode
Press 2nd button or 3rd button Until display shows
Press Start button
Press 2nd button Until display shows
Press Start button
• Default values for Card/Coin type dryer.
- Drying time : 50 minutes
- Top off time : 10 minutes
• Drying time in OPL machine can be changed from 1 to 100 minutes by pressing the cycle button.
• Price setting varies by country
• After Factory Reset, set your country from (Refer to Currency Type Setup)
NOTE

54 PROGRAmmING mODE
EN
4. Time Setup
Time Setup can be used to set the current year, month, day, hour, and minute.
Time Setup Display
Enter SVC Mode
Press 2nd button or 3rd button Until display shows
Press Start button Display shows you 2000(Year) 0101(Month/→
Date) Sat(Day) 0000(Time(24hr))→ →
Press Start button
Press 2nd button or 3rd button Until display shows the year you want (i.e. 2020)
Press Start button
Press 2nd button or 3rd button Until display shows the month you want in the
left two digits (i.e. June = 0601)
Press Start button
Press 2nd button or 3rd button Until display shows the day you want in the right
two digits (i.e. June 11th = 0611)
Press Start button
Press 2nd button or 3rd button Until display shows the hour you want (i.e. 2:00
PM = 1400)
Press Start button
Press 2nd button or 3rd button Until displays shows the minute you want (i.e.
2:15 PM = 1415)
Press Start button Display shows you 2020 0611(Month/Date) → →
tHU(Day) 1415(Time(24hr))→
Press 1st button Until display returns to standby mode
• Time is displayed in military time format.
• Time Setup must be set to use Special Day Price feature.
• When the machine is powered off, Time Setup is reset to default.
NOTE
55
PROGRAmmING mODE EN
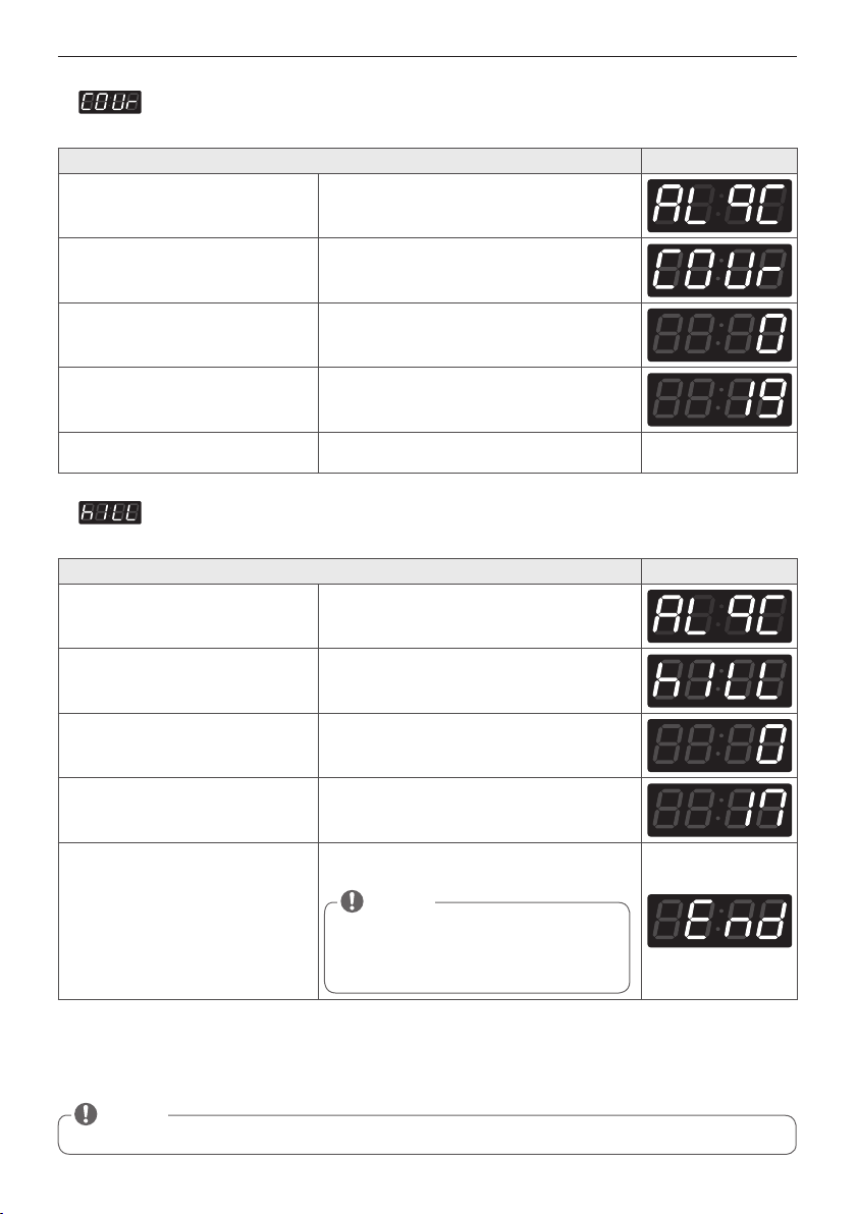
5. Courtesy Cycle
Courtesy Cycle is a free cycle given to customers for Pay Type machines.
Courtesy Cycle Display
Enter SVC Mode
Press 2nd button or 3rd button Until display shows
Press Start button
Press 2nd button Until display shows
Press Start button Machine is ready to use.
User can choose desired course and press Start.
6. Kill Cycle
Kill Cycle is used to end the currently operating cycle.
Cycle Kill Display
Enter SVC Mode
Press 2nd button or 3rd button Until display shows
Press Start button
Press 2nd button Until display shows
Press Start button
Machine ends the cycle and goes back to
standby mode.
• Only works for machine that is currently
operating.
• Cycle can be ended with Cycle Kill Card for
Card Type machines.
NOTE
• OPL type : Dryer will end the cycle by opening the door.
NOTE

56 PROGRAmmING mODE
EN
7. Duct Check
Duct Check is used to check when if duct is installed well.
Duct Check Display
Enter SVC Mode
Press 2nd button or 3rd button Until display shows
Press Start button Displays the number of duct blockages.
Press Start button
The installation check starts.
Wait for the examination to complete.
If you stop the product in the middle, the check
may not be successful.
End is displayed at normal end.
The flashes on the display when
checking for abnormalities.
Turn off the power and reconfirm the do
installation.
or

57
PROGRAmmING mODE EN
8. Password Setup
Password Setup can be used to change the password to enter Service mode.
Password Setup Display
Enter SVC Mode
Press 2nd button or 3rd button Until display shows
Press Start button
Button functions :
Start button = Select
1st button = Go back a step
2nd button = Increase value
3rd button = Decrease value
4th button = Move to next digit
Input current password
Default Password : 3000
1) Press the 2nd & 3rd buttons to toggle
numbers.
2) Press the 4th button to move to the next digit.
Press Start button
Button functions :
Start button = Select
1st button = Go back a step
2nd button = Increase value
3rd button = Decrease value
4th button = Move to next digit
Input new password (i.e. 1234)
1) Press the 2nd & 3rd buttons to toggle
numbers.
2) Press the 4th button to move to the next digit.
Press Start button New password is set

58 PROGRAmmING mODE
EN
Programing Mode – Collect Mode
Collect Information Data : (display)
The dryer collects the usage data so that the owner can check various information like number of various cycles
used, how many times card or coins used, etc.
Collect Mode
Collect Mode Display
Enter SVC Mode
Press 1st button
Press 2nd button or 3rd button Until display shows
Press Start button
Select the category you want
Button functions :
Start button = Select
1st button = Go back a step
2nd button = Move up
3rd button = Move down
Refer to the follow Collect Mode Data List
how to enter Programming mode:
- – Turn on/off the toggle switch.Coin type
- – Insert the service card.Card type
- – All types
1) Press the 1st & 3rd button at the same time.
2) Press the 2nd & 3rd buttons to toggle numbers.
Then, press the 4th button to move to the next digit.
3) Press the Start button to finish password input.
<Control Panel >
1st
2nd
3rd
4th
Start

61
SmART FUNCTIONS EN
SMART FUNCTIONS
Wireless LAN Module Specifications
Model LCW-004
Frequency
Range 2412 to 2472 MHz
Output
Power
(Max.)
IEEE 802.11b: 17.82 dBm
IEEE 802.11g: 17.72 dBm
IEEE 802.11n: 16.61 dBm
Wireless function S/W version: V 1.0
For consideration of the user, this device should be
installed and operated with a minimum distance of
20 cm between the device and the body.
Declaration of Conformity
Hereby, LG Electronics declares that the radio
equipment type Dryer is in compliance with Directive
2014/53/EU. The full text of the EU declaration of
conformity is available at the following internet address:
http://www.lg.com/global/support/cedoc/cedoc# LG
Electronics European Shared Service Centre B.V.
Krijgsman 1, 1186 DM Amstelveen, The Netherlands
Open Source Software Notice
Information
To obtain the source code under GPL, LGPL, MPL, and
other open source licenses, that is contained in this
product, please visit http://opensource.lge.com.
In addition to the source code, all referred license terms,
warranty disclaimers and copyright notices are available
for download.
LG Electronics will also provide open source code to you
on CD-ROM for a charge covering the cost of performing
such distribution (such as the cost of media, shipping,
and handling) upon email request to opensource@lge.
com. This offer is valid for a period of three years after
our last shipment of this product. This offer is valid to
anyone in receipt of this information.
Distributor
JLA
Meadowcroft Lane, Ripponden, West Yorkshire HX6
4AJ, United Kingdom
Bijelisviset
Kranjceviceva 50, Zagreb, Croatia, OIB 31225259453
IMESA FRANCE
210 RUE HENNEBIQUE - ZI LES MILLES 13796 AIX EN
PROVENCE - France
MS Group
VIA FRATELLI ROSSELLI 14/16, 20019 SETTIMO
MILANESE, Italy
GIRBAU
Carretera de Manlleu, km.1 – 08500 Vic - Spain
Merkiber
Calle del Yunque, 9 (Sector P-Norte) Poligono
Industrial Arinaga, Aguimes, 35118 Las Palmas Spain
Dormer
Brewery Street, Castlebellingham, Dundalk, County
Louth, Ireland
JESSERNIGG
Leberstrasse 20, A-1110 Vienna, Austria
Permak
Barbaros Bulvari No:93, 34357 Besiktas/Istanbul,Turke
NOTE

63
STACK mACHINE INSTAllATION INSTRUCTIONS EN
STACK MACHINE INSTALLATION INSTRUCTIONS
1. Suitable model for stacking
Stack type Upper Dryer Lower Dryer Lower Washer
Model Name
RV1329C7T
RV1329CN7T
RV1329C1T
RV1329CN1T
FH069FD2MS
FH069FD2M
FH069FDMS
FH069FDM
2. Stacking kit
- Stacking kit is provided in the upper dryer.
- Stacking kit includes the stacking bracket(1), security bracket(3), bolt(1), screw(9).
- Sliding kit includes the slide bracket(2), sliding pad(4), screw(18).
1) Stacking bracket 2) bolt 3) Screw 4) security bracket
- The machine can be stacked only on the model designated as suitable by LGE.
- Do not stack the washer on the top.
- You can order the parts for stacking from Qualified dealer or Qualified SVS agent of LGE.
NOTE
1) Stacking bracket 2) Sliding pad 3) Screw

64 STACK mACHINE INSTAllATION INSTRUCTIONS
EN
Please refer to Service Manual for detail to explain how to stack and fix the machine
NOTE
3. Stacking the machine
- Install two sliding brackets on the top plate of lower washer.
- Remove the legs from the leg brackets.
- Remove the four(4) leg brackets from the bottom of upper dryer.
- Assemble the four(4) slide pads on the base.
- Lift and stack the upper dryer on the lower washer.
- Set the rear of the upper dryer and the rear of the lower washer in the same position.
- Push the upper dryer matching the slide & stacking bracket to make upper and lower front parallel.
- Install the stacking bracket at the rear of the stacked dryer and washer.
- Assemble the six(6) screw to fix the lower machine and upper dryer.
*Security bracket installation (Only coin model)
- Install two security bracket on the panel frame and top plate in the lower
washer.
- Install one security bracket on the lower panel frame in the upper dryer.

65
ERROR mODE / POWER FAIl RECOVERY / DEFAUlT DRYER SETTINGS EN
ERROR MODE
Meaning of Error Codes that LED displays during occurrence or
problem.
Dryer error code
PROBLEM POSSIBLE CAUSE SOLUTION
It is displayed when thermistor is opened or
shorted Thermistor should be replaced.
ELECTRIC TYPE
It is displayed when thermistor temperature
have increased about 5 degrees for 3 seconds
GAS TYPE
It is displayed when thermistor temperature
have increased about 17 degrees for 10
seconds
Thermistor should be replaced.
Disconnection of card reader wire. Check the card reader wire.
POWER FAIL RECOVERY
In case of power failure the machine stops running but the time display remains on, showing the time just before
power failure.
Press the START button after the power is restored, then the machine will restart.
DEFAULT DRYER SETTINGS
Default Settings Default
Cycle Time (Minutes) 50 Minutes
Cool Down Time Cycle 2 Minutes
High Temperature 154,4° F (68° C)
Medium Temperature 140° F (60° C)
Low Temperature ELECTRIC TYPE 125,6° F (52° C)
GAS TYPE 116,6° F (47° C)
Top O Time (Minutes per coin) 10 Minutes
Coin #1 Value 0,10
Minutes/Minutes and seconds Minutes
Fahrenheit/Celsius Celsius
Error Mode On
•Pricesettingvariesbycountry.
•Setyourcountryfrom mode. (Refer How to enter the )
•AfterEEPT,resetyourcountry.(DefaultcountryisEngland)
NOTE

66 INSTAllATION GUIDE FOR HARmONICS AND FlICKER
EN
INSTALLATION GUIDE FOR HARMONICS AND FLICKER
※ The below installation guide is limited applicable only for model
Model : Rv1329CN1T, Rv1329CN4T, Rv1329CN7T, Rv1329C1T, Rv1329C4T,
Rv1329C7T
Installation Guide for harmonics (EN 61000-3-2 & EN 61000-3-12)
This equipment complies with IEC (EN) 61000-3-12 in harmonic currents emission limits corresponding Rsce=33.
Installation Guide for Flicker (EN 61000-3-3 & EN 61000-3-11)
This device is intended for the connection to a power supply system with a maximum permissible system impedance
Zmax of 0.3996(0.339+j0.212)Ω at the interface point (power service box) of the user’s supply. The user has to ensure
that this device is connected only to a power supply system which fulfills the requirement above. If neccessary, the
user can ask the public power supply company for the system impedance at the interface point.

67
EN

68
EN

www.lg.com
Copyright © 2020 LG Electronics Inc.
Todos los Derechos Reservados.
SECADORA
COMERCIAL
MANUAL DE USUARIO
Antes de empezar la instalación, lea con atención estas instrucciones.
Con ello, la instalación le resultará más sencilla y se asegurará de que
el aparato quede instalado de forma correcta y segura. Guarde estas
instrucciones cerca del aparato después de la instalación para poder
consultarlas en el futuro.

2CONTENIDO
ES
CONTENIDO
3 CARACTERÍSTICAS DEL
PRODUCTO
4 INSTRUCCIONES DE SEGURIDAD
IMPORTANTES
6 PRECAUCIONES DE SEGURIDAD BÁSICAS
12 INSTRUCCIONES DE CONEXIÓN A TIERRA
13 INSTRUCCIONES DE SEGURIDAD PARA LA
INSTALACIÓN
16 INSTRUCCIONES DE SEGURIDAD PARA LA
CONEXIÓN ELÉCTRICA
19 PRESENTACIÓN DE SU
SECADORA
19 Especificaciones
20 Accesorios
20 Funciones del panel de control
23 OPERANDO SU SECADORA
24 MODO PROGRAMACIÓN
25 Estructura del Modo de programación - Tipo
Tarjeta / Moneda
26 Estructura del Modo de programación - Tipo
OPL
27 MODO PROGRAMACIÓN - Modo
Setup (Ajustes)
27 1. Configuración de Precio Regular
28 2. Configuración de Precio Especial
29 3. Configuración de Precio Top Off
30 4. Características de la Máquina (1er set)
31 4-1. Configuración de Día de Precio Especial
32 4-2. Configuración de Sense Dry
33 4-3. Configuración de Top Off
34 4-4. Configuración de la Función de Pausa
35 5. Configuración de Día de Precio Especial
36 6. Configuración de Hora de Inicio de Precio
Especial
37 7. Configuración de Tiempo de Finalización de
Precio Especial
38 8. Configuración del Tiempo de Secado
39 9. Configuración Especial de Tiempo de
Secado de Día
40 10. Configuración de tiempo de Top Off
41 11. Configuración del Valor de la Moneda 1
42 12. Configuración de Compensación de
Precios de Incremento por Centavo
43 13. Configuración del Volumen del Pitido
44 14. Configuración de Tiempo de Retorno en
Espera
45 15. El Tipo
46 15-1. Configuración del Tipo de Producto
47 15-2. Configuración de tipo de moneda
48 15-3. Configuración de Tipo de Venta
49 15-4. Configuración del Tipo de Lector de
Tarjeta
50 15-5. Configuración del Tipo de Caída de
Moneda
51 MODO PROGRAMACIÓN - Modo
de Prueba
51 1. Prueba
52 2. Prueba de Diagnóstico
53 3. Restablecimiento de Fábrica
54 4. Configuración de Hora
55 5. Ciclo de Cortesía
55 6. Matar Ciclo
56 7. Comprobar Conducto
57 8. Configuración de Contraseña
58 Modo de Programación - Modo de
Recopilación
59 Lista de Datos del Modo de Recopilación
61 FUNCIONES INTELIGENTES
62 MANTENIMIENTO
63 INSTRUCCIONES DE
INSTALACIÓN DE SECADORA
APILABLE
65 MODO ERRORES
65 RECUPERACIÓN DESPUÉS DE
INTERRUPCIÓN ELÉCTRICA
65 AJUSTES PREDETERMINADOS
DEL SECADOR
66 GUÍA DE INSTALACIÓN DE
ARMÓNICOS Y FLICKER

3
CARACTERÍSTICAS DEL PRODUCTO ES
CARACTERÍSTICAS DEL PRODUCTO
DISEÑO ARTÍSTICO
Vista del panel frontal de diseno moderno y un cristal grande para hacer que su secadora se vea a la vanguardia.
FACILIDAD DE USO
Una seleccion completa de funciones amigables facilitan la operacion de la secadora.
COmmERCIAL LAUNDRy APPS
- Laundry Lounge Installer: Esta es una aplicación de registro para los instaladores que se utilizan para registrar el
producto en el servidor.
※
Descargue el en el enlace compartido del cacal oficial LG B2B.Laundry Lounge Installer
- Laundry Lounge: Esto es para que los usuarios finales verifiquen el monitoreo en tiempo real de las tiendas y
productos registrados.
※ Busque en Google Play Store o Apple App Store.Laundry Lounge

4INSTRUCCIONES DE SEGURIDAD ImPORTANTES
ES
INSTRUCCIONES DE SEGURIDAD IMPORTANTES
LEA TODAS LAS INSTRUCCIONES ANTES DE USAR
ADVERTENCIA
Por su seguridad, la información de este manual debe ser
seguida para minimizar el riesgo de incendio o explosión,
descarga eléctrica, o para prevenir daños a la propiedad,
lesiones a personas o la muerte.
Su seguridad y la seguridad de otras personas es muy
importante.
Hemos proporcionado muchos mensajes de seguridad
importantes en este manual y en su electrodoméstico.
Lea y obedezca siempre todos los mensajes de seguridad.
Este es un símbolo de alerta de seguridad.
Este símbolo le alerta sobre posibles peligros que pueden
provocarle la muerte o lastimarle a usted y a otras personas.
Todos los mensajes de seguridad aparecen tras el símbolo
de alerta de seguridad y la palabra PELIGRO, ADVERTENCIA o
PRECAUCIÓN.
Estas palabras significan:
PELIGRO
Usted podría morir o resultar herido de gravedad si no sigue
inmediatamente las instrucciones.
ADVERTENCIA
Usted podría morir o resultar herido de gravedad si no sigue las
instrucciones.
PRECAUCIÓN
Usted podría resultar herido leve o provocar daños al producto si
no sigue las instrucciones.
Todos los mensajes de seguridad le dirán cuál es el peligro
potencial, cómo reducir la posibilidad de lesiones y qué puede
suceder si no se siguen las instrucciones.

6INSTRUCCIONES DE SEGURIDAD ImPORTANTES
ES
INSTRUCCIONES DE SEGURIDAD IMPORTANTES
LEA TODAS LAS INSTRUCCIONES ANTES DE USAR
PRECAUCIONES DE SEGURIDAD BÁSICAS
ADVERTENCIA
Para reducir el riesgo de incendio, descarga eléctrica, lesiones
a personas al utilizar este electrodoméstico, siga precauciones
básicas, entre las que se encuentran las siguientes:
•Lea todas las instrucciones antes
de usar la secadora.
•Antes de usar, la secadora debe
instalarse correctamente como
se describe en este manual.
•No coloque prendas expuestas a
aceites de cocina en su secadora.
Las prendas contaminadas con
aceites de cocina pueden
contribuir a una reacción química
que podría provocar que una
carga se incendie.
•No seque artículos que hayan
sido previamente limpiados,
lavados, empapados o
manchados con gasolina,
solventes para limpieza en seco u
otras sustancias inflamables o
explosivas, ya que desprenden
vapores que pueden prenderse o
explotar.
•No meta la mano en la secadora
si el tambor o cualquier otra
parte se está moviendo.
•No repare ni reemplace ninguna
parte de la secadora ni intente
realizar ningún servicio a menos
que esté recomendado en este
Manual del propietario o en las
instrucciones de reparaciones
para el usuario publicadas que
usted comprenda y para cuya
realización usted tenga las
habilidades técnicas.
•No manipule los controles.
•Antes de entregar la secadora al
servicio técnico o de desecharla,
retire la puerta del
compartimento de secado.
•No permita que los niños
jueguen con la secadora o dentro
de ella. Es necesaria una estrecha
supervisión de los niños cuando
la secadora se use cerca de los
niños.
•No use suavizantes ni productos
para eliminar la electricidad
estática a menos que lo
recomiende el fabricante del
suavizante o producto.
•No use calor para secar artículos
que contengan gomaespuma o
materiales similares con textura
de goma.

7
INSTRUCCIONES DE SEGURIDAD ImPORTANTES ES
•Mantenga el área alrededor de la
abertura de salida de aire y las
áreas adyacentes alejadas de la
acumulación de pelusa, polvo y
suciedad.
•El personal de servicio
cualificado debe limpiar
periódicamente el interior de la
secadora y el conducto de salida
de aire.
•No instale ni almacene la
secadora donde quede expuesta
al clima.
•Compruebe siempre el interior
de la secadora ante la presencia
de objetos extraños.
•Limpie la pantalla de pelusas
antes o después de cada carga.
•No seque prendas sin lavar en la
secadora.
•Las prendas que se hayan
manchado con sustancias tales
como aceite para cocinar,
acetona, petróleo, queroseno,
quitamanchas, aguarrás, ceras y
productos para quitar ceras
deben lavarse en agua caliente
con una cantidad extra de
detergente antes de secarse en la
secadora.
•Las prendas tales como caucho
poroso (espuma de látex), gorros
de ducha, textiles impermeables,
prendas con refuerzo de goma y
prendas o cojines con
almohadillas de caucho poroso
no deben secarse en la secadora.
•Los suavizantes, o productos
similares, deberían usarse según
se especifique en las
instrucciones del suavizante.
•La parte final un ciclo de la
secadora se lleva a cabo sin
utilizar calor (ciclo de
enfriamiento) para que las
prendas tengan una temperatura
que garantice que las prendas no
sufrirán ningún daño.
•Si el cable de alimentación
resulta dañado, debe ser
sustituido por el fabricante, sus
técnicos de mantenimiento o
una persona con cualificación
similar, para evitar peligros.
•Nunca opere la secadora sin el
filtro para pelusas en su lugar.
Nunca opere la secadora con un
filtro para pelusas que esté
húmedo.

9
INSTRUCCIONES DE SEGURIDAD ImPORTANTES ES
INSTRUCCIONES DE SEGURIDAD IMPORTANTES
LEA TODAS LAS INSTRUCCIONES ANTES DE USAR
Eliminación de su antiguo electrodoméstico
1. El símbolo del contenedor de basura tachado con
un aspa indica que la recogida separada de
productos eléctricos y electrónicos (AEE) debe
realizarse de manera separada.
2. Los productos eléctricos antiguos pueden
contener sustancias peligrosas de modo que la
correcta eliminación del antiguo aparato ayudará a
evitar posibles consecuencias negativas para el medio ambiente
y para la salud humana. El antiguo aparato puede contener
piezas reutilizables que podrían utilizarse para reparar otros
productos y otros materiales valiosos que pueden reciclarse para
conservar los recursos limitados. Este producto contiene pilas y/o
acumuladores. Siempre que no sea necesaria la intervención de
un profesional cualificado para ello, y antes del depósito final del
producto en las instalaciones de recogida selectiva, usted debe
extraer las pilas y acumuladores de forma segura y
separadamente para su adecuada gestión.
3. Puede llevar su electrodoméstico a la tienda donde adquirió el
producto, o ponerse en contacto con la oficina de
medioambiente de su gobierno local para obtener detalles sobre
su punto de recogida autorizado AEE. Para obtener la
información más actualizada para su país por favor visite www.
lg.com/global/recycling

10 INSTRUCCIONES DE SEGURIDAD ImPORTANTES
ES
LO qUE NO EStÁ CUBIERtO.
Desplazamientos del servicio técnico a su hogar para instruirle
sobre el producto.
Si el producto está conectado a cualquier voltaje diferente al que
se muestra en la placa de características.
Si el fallo está causado por accidentes, negligencias, malos usos o
desastres naturales.
Si el fallo está causado por razones que no sean el uso doméstico
normal o el uso de acuerdo con el manual del propietario.
Si el fallo está causado por plagas, por ejemplo, ratas o cucarachas,
etc.
Ruidos o vibraciones considerados normales, como por ejemplo, el
sonido de desagüe, el sonido del giro o los avisos acústicos de
advertencia.
Corregir la instalación, por ejemplo, nivelar el producto, ajustar el
drenaje.
Mantenimiento normal recomendado por el manual del
propietario.
Eliminación de objetos/sustancias extrañas de la máquina, incluida
la bomba y el filtro del tubo de entrada, por ejemplo, arenilla,
clavos, alambres y botones de sujetadores, etc.
Reemplace los fusibles o corrija el cableado o corrija la fontanería
de la casa.
Corrección de reparaciones no autorizadas.
Daño incidental o consecuente a la propiedad personal causado
por posibles defectos con este electrodoméstico.
Si el producto se instala fuera del área de servicio normal, cualquier
coste de transporte relacionado con la reparación de los productos
o el reemplazo de una pieza defectuosa correrá a cargo del
propietario.

11
INSTRUCCIONES DE SEGURIDAD ImPORTANTES ES
LEA TODAS LAS INSTRUCCIONES ANTES DE USAR
ADVERTENCIA
Por su seguridad, la información de este manual debe ser
seguida para minimizar el riesgo de incendio o explosión,
descarga eléctrica, o para prevenir daños a la propiedad,
lesiones a personas o la muerte.
•No almacene ni use gasolina u
otros vapores y líquidos
inflamables cerca de este
electrodoméstico o de
cualesquiera otros
electrodomésticos.
•La instalación y el servicio
técnico deben ser realizados por
un instalador cualificado, una
agencia de servicio técnico o por
el proveedor de gas.

12 INSTRUCCIONES DE SEGURIDAD ImPORTANTES
ES
INSTRUCCIONES DE SEGURIDAD IMPORTANTES
LEA TODAS LAS INSTRUCCIONES ANTES DE USAR
ADVERTENCIA
Por su seguridad, la información de este manual debe ser
seguida para minimizar el riesgo de incendio o explosión,
descarga eléctrica, o para prevenir daños a la propiedad,
lesiones a personas o la muerte.
INSTRUCCIONES DE CONEXIÓN A TIERRA
Este electrodoméstico debe
estar conectado a tierra. En caso
de mal funcionamiento o avería,
la conexión a tierra reducirá el
riesgo de descarga eléctrica al
proporcionar una ruta de menor
resistencia para la corriente
eléctrica. Este electrodoméstico
debe estar equipado con un
cable que tenga un conductor
de conexión a tierra y un
enchufe con conexión a tierra. El
enchufe debe conectarse a una
toma de corriente apropiada
que esté instalada y conectada a
tierra de acuerdo con todos los
códigos y ordenanzas locales.
No use un adaptador o cable de
extensión. No quite el terminal
de tierra. Si no tiene la toma de
corriente adecuada, consulte
a un electricista. No modifique
el enchufe provisto con el
electrodoméstico.
Si no encaja en la toma
de corriente, haga que un
electricista cualificado instale
una toma de corriente adecuada.
Este electrodoméstico debe
estar conectado a un metal con
conexión a tierra, un sistema
de cableado permanente o
un conductor de conexión a
tierra que debe funcionar con
los conductores del circuito
y estar conectado al terminal
de conexión a tierra o al cable
del electrodoméstico. Se
puede producir una descarga
eléctrica si la secadora no está
correctamente conectada a
tierra. El electrodoméstico
solo puede instalarse en una
habitación si la habitación
cumple con los requisitos
de ventilación apropiados
especificados en las regulaciones
nacionales de instalación. El
espacio mínimo requerido es de
2,54 cm para electrodomésticos,
paredes y muebles adyacentes.

13
INSTRUCCIONES DE SEGURIDAD ImPORTANTES ES
ADVERTENCIA
Una conexión incorrecta del conductor de conexión a tierra
del equipo puede ocasionar riesgo de descarga eléctrica.
Si tiene dudas respecto de la conexión a tierra adecuada del
electrodoméstico, consulte a un electricista calificado o a una
persona del servicio técnico.
INSTRUCCIONES DE SEGURIDAD PARA LA INSTALACIÓN
ADVERTENCIA
Para reducir el riesgo de incendio, descarga eléctrica, lesiones
a personas al utilizar este electrodoméstico, siga precauciones
básicas, entre las que se encuentran las siguientes:
•Conecte a tierra adecuadamente la
secadora para cumplir con todos los
códigos y ordenanzas vigentes. Siga los
detalles en las instrucciones de
instalación. Se puede producir una
descarga eléctrica si la secadora no está
correctamente conectada a tierra.
•Antes de usar, la secadora debe
instalarse correctamente como se
describe en este manual. Se puede
producir una descarga eléctrica si la
secadora no está correctamente
conectada a tierra.
•Instale y almacene la secadora donde no
quede expuesta a temperaturas bajo
cero o expuesta al clima.
•Todas las reparaciones y el
mantenimiento deben ser realizados
por un técnico autorizado a menos que
se recomiende específicamente en este
Manual del propietario. Utilice solo
piezas autorizadas de fábrica. El
incumplimiento de esta advertencia
puede causar lesiones graves, incendios,
descargas eléctricas o la muerte.

14 INSTRUCCIONES DE SEGURIDAD ImPORTANTES
ES
•Para reducir el riesgo de descarga
eléctrica, no instale la secadora en
espacios húmedos. El incumplimiento
de esta advertencia puede causar
lesiones graves, incendios, descargas
eléctricas o la muerte.
•Conéctela a un circuito de alimentación
de capacidad, protección y tamaño
adecuado para evitar sobrecargas
eléctricas. Un circuito de alimentación
incorrecto podría llegar a derretirse,
creando descargas eléctricas y/o peligro
de incendio.
•Retire todos los artículos de embalaje y
deseche todos los materiales de envío
correctamente. De lo contrario, podría
provocar la muerte, explosión, incendio
o quemaduras.
•Coloque la secadora al menos a 18
pulgadas (46 cm) sobre el suelo para su
instalación en un garaje. De lo contrario,
podría provocar la muerte, explosión,
incendio o quemaduras.
•Mantenga todo el embalaje lejos del
alcance de los niños. El material de
embalaje puede ser peligroso para los
niños. Existe el riesgo de asfixia.
•Mantenga el área debajo de sus
electrodomésticos y alrededor de ellos
sin materiales inflamables, como
pelusas, papeles, trapos, productos
químicos, etc. De lo contrario, podría
provocar un incendio.
•No coloque velas, materiales para fumar
u otros productos inflamables encima
del producto. Puede producirse un
goteo de cera, humo o fuego.
•Retire todas las películas protectoras de
vinilo del producto. De lo contrario, puede
causar daños al producto, humo o fuego.
•Los medios para la desconexión con una
separación de contacto de al menos 3
mm hacen referencia a los medios para
la desconexión deben incorporarse en el
cableado fijo de acuerdo con las reglas
de cableado.
ADVERTENCIA
Por su seguridad, la información de este manual debe ser
seguida para minimizar el riesgo de incendio o explosión,
descarga eléctrica, o para prevenir daños a la propiedad,
lesiones a personas o la muerte.
INSTRUCCIONES DE SEGURIDAD PARA LA INSTALACIÓN
•Este electrodoméstico no debe ser
utilizado por niños o personas con
discapacidades físicas, sensoriales o
mentales, o falta de experiencia y
conocimientos, si no es bajo supervisión
y siguiendo instrucciones.
Los niños deben estar supervisados para
que no jueguen con el electrodoméstico.
•Este electrodoméstico no debe instalarse
detrás de una puerta con cerradura, una
puerta corrediza ni una puerta con una
bisagra en el lateral opuesto de la
secadora, de manera tal que se limite la
abertura total de la puerta de la
secadora.

15
INSTRUCCIONES DE SEGURIDAD ImPORTANTES ES
INSTRUCCIONES DE SEGURIDAD IMPORTANTES
LEA TODAS LAS INSTRUCCIONES ANTES DE USAR
Salida de aire/Conductos:
•Las secadoras de gas DEBEN contar con
una salida de aire al exterior. El
incumplimiento de estas instrucciones
puede provocar un incendio o la
muerte.
•El sistema de salida de aire de la
secadora debe contar con una salida de
aire hacia el exterior de la vivienda. Si la
secadora no tiene una salida de aire al
exterior, se expulsará una pelusa fina y
grandes cantidades de humedad al
área de lavado. Una acumulación de
pelusa en cualquier área de la casa
puede crear un riesgo de salud e
incendio.
•Use solo conductos metálicos rígidos o
flexibles de 4 pulgadas (10,2 cm) de
diámetro dentro del armario de la
secadora o para la salida de aire hacia el
exterior. El uso de plástico u otros
conductos combustibles puede
provocar un incendio. Los conductos
perforados pueden provocar un
incendio si se desmorona o queda
restringido en uso o durante la
instalación.
•Los conductos no se proporcionan con
la secadora, y debe obtener los
conductos necesarios localmente. La
tapa del extremo debe tener
amortiguadores con bisagras para
evitar la corriente de aire cuando la
secadora no esté en uso. El
incumplimiento de estas instrucciones
puede provocar un incendio o la
muerte.
•El aire de salida no debe descargarse en
una chimenea que se utilice para
expulsar los humos de los
electrodomésticos que queman gas u
otros combustibles.
•El conducto de salida de aire debe
tener 4 pulgadas (10,2 cm) de diámetro
sin obstrucciones. El conducto de salida
de aire debe mantenerse lo más corto
posible. Asegúrese de limpiar los
conductos viejos antes de instalar su
nueva secadora. El incumplimiento de
estas instrucciones puede provocar un
incendio o la muerte.
•NO use tornillos para láminas de metal
u otras sujeciones que se extiendan
dentro del conducto que puedan
atrapar pelusas y reducir la eficiencia
del sistema de salida de aire. Asegure
todas las juntas con cinta adhesiva.
Para obtener información exhaustiva al
respecto, siga las instrucciones de
instalación. El incumplimiento de estas
instrucciones puede provocar un
incendio o la muerte.
•En el armazón del electrodoméstico o
en la estructura integrada, mantenga
las aberturas para ventilación libres de
obstrucciones.
•Se debe proporcionar una ventilación
adecuada para evitar el flujo de retorno
de gases a la habitación de los
electrodomésticos que queman otros
combustibles, incluidos los fuegos
abiertos. No seque prendas sin lavar en
la secadora.

16 INSTRUCCIONES DE SEGURIDAD ImPORTANTES
ES
INSTRUCCIONES DE SEGURIDAD IMPORTANTES
LEA TODAS LAS INSTRUCCIONES ANTES DE USAR
ADVERTENCIA
Por su seguridad, la información de este manual debe ser
seguida para minimizar el riesgo de incendio o explosión,
descarga eléctrica, o para prevenir daños a la propiedad,
lesiones a personas o la muerte.
INSTRUCCIONES DE SEGURIDAD PARA CONECTAR A LA ELECTRICIDAD
ADVERTENCIA
Para reducir el riesgo de incendio, descarga eléctrica, lesiones
a personas al utilizar este electrodoméstico, siga precauciones
básicas, entre las que se encuentran las siguientes:
•Bajo ninguna circunstancia,
corte o retire el terminal de
tierra del cable de alimentación.
Para evitar lesiones a personas o
daños a la secadora, el cable de
alimentación eléctrica debe
enchufarse a una toma de
corriente con una conexión a
tierra apropiada.
•Por seguridad personal, esta
secadora debe estar
apropiadamente conectada a
tierra. De lo contrario, se pueden
producir descargas eléctricas o
lesiones.
•Consulte las instrucciones de
instalación en este manual para
conocer los requisitos eléctricos
específicos para su modelo. El
incumplimiento de estas
instrucciones puede crear un
riesgo de descarga eléctrica y/o
peligro de incendio.
•Esta secadora debe conectarse a
una toma de corriente con una
conexión a tierra apropiada. Se
puede producir una descarga
eléctrica si la secadora no está
correctamente conectada a
tierra. Haga que un electricista
cualificado revise la toma de
corriente y el circuito de pared
para asegurarse de que la toma
de corriente esté correctamente
conectada a tierra. El
incumplimiento de estas
instrucciones puede crear un
riesgo de descarga eléctrica y/o
peligro de incendio.

18 INSTRUCCIONES DE SEGURIDAD ImPORTANTES
ES
INSTRUCCIONES DE SEGURIDAD IMPORTANTES
LEA TODAS LAS INSTRUCCIONES ANTES DE USAR
PRECAUCIÓN
Estas instrucciones solo son válidas si el siguiente código de país
está en el electrodoméstico. Si este código no está presente en el
electrodoméstico, es necesario consultar las instrucciones técnicas
que proporcionarán la información necesaria sobre la modificación
del electrodoméstico a las condiciones de uso en el país. Antes de
la instalación, verifique que las condiciones de distribución locales,
la naturaleza de gas y presión, y el ajuste del electrodoméstico son
compatibles.
•el método de conexión y las regulaciones de instalación en el país
donde se instalará el electrodoméstico (si existen tales
regulaciones); además, las dimensiones de ventilación se darán a
los fines de la instalación en aquellos países donde no existan
regulaciones apropiadas.
ADVERTENCIA
No detenga nunca la secadora antes de que termine el ciclo
de secado, a menos que saque y sacuda rápidamente todas las
prendas para que se disipe el calor.
CONSERVE EStAS INStRUCCIONES

19
PRESENTACIÓN DE SU SECADORA ES
PRESENTACIÓN DE SU SECADORA
Especificaciones
Tipo : Secadora Eléctrica y de Gas
Voltaje : Por favor verifique las características eléctricas en la placa de datos
de su producto
Dimensiones : 686mm(An) x 764mm(F) x 983mm(Al)
Dimensiones Secadoras Apiladas : 686mm(An) x764mm(F) x 1954mm(Al)
Secadora eléctrica Capacidad máxima : 10 kg
Peso : 59,4 kg
Nivel de presión acústica de emisión ponderada A: <70 dB (A)
Especificaciones sujetas a cambio por el fabricante.
Especificaciones sujetas a cambio por el fabricante.
NOTA

22 PRESENTACIÓN DE SU SECADORA
ES
Display Selección de ciclos
Botón de inicio / pausa
Indicadores de proceso
Display
El display muestra el precio, el tiempo remanente y las
opciones de programación. También se muestran los
códigos de error.
Selección de ciclos
Presionar el botón del ciclo para seleccionar el ciclo
deseado basándose en el tipo de ropa y su condición.
Temp. Alta (High Temp.)
Utilizar este ciclo para tener Calor Alto para prendas
pesadas como mezclillas, panas o ropa de trabajo
(Calor alto).
Temp.Media (Med Temp.)
Utilizado para secar telas firmes como Temp.Media
(Med Temp.) de trabajo (Calor medio).
Temp. Baja (Low Temp.)
Utilizado para secar telas sintéticas, tejido de punto y
ropa que no se plancha.
Sin Calefacción (No Heat)
Para artículos que no requieren calor para el secado
como plásticos o hule.
Botón de inicio / pausa
El indicador Inicio (Start) parpadea cuando se ha
completado el precio y se ha seleccionado el ciclo o la
máquina está en pausa.
El indicador Inicio (Start) parpadea cuando una tarjeta
es insertada para agregar tiempo al ciclo actual.
Si pulsa el botón de inicio / pausa mientras la secadora
está funcionando, la máquina se detiene.
Indicadores de proceso
LED Description
El LED parpadea cuando el conducto
está bloqueada por pelusas.
Verifique y limpie el conducto.
LED parpadea cuando el ciclo de secado
está en operación.
LED parpadea cuando el ciclo de
enfriamiento está en operación.
El LED parpadea cuando se conecta el
Wi-Fi.
El LED permanece encendido cuando el
Wi-Fi está conectado.

23
OPERANDO SU SECADORA ES
OPERANDO SU SECADORA
1. Modo listo
Todos los tipos de máquinas muestran “PUSH”
•Laconfiguracióndelospreciosvaríasegúnelpaís.
•Seleccionesupaísenelmodo .
(consulte la seccion Como ingresar el ).
•DespuésdeEEPT,restablezcaelpaís.
(el país predeterminado es Inglaterra).
NOTA
2. Seleccione el ciclo
Presione el botón deseado y la pantalla le mostrará el
precio del ciclo. (No puede cambiar el ciclo mientras la
máquina está funcionando).
Cuando el credito de la tarjeta no es suficiente, la
máquina muestra el saldo de la tarjeta 5 segundos y
luego muestra repetidamente.
NOTA
Introducir la cantidad suficiente hasta completar el
precio programado para el ciclo seleccionado.
3. Insertar moneda / tarjeta
(no para el tipo OPL)
Inserte una cantidad suficiente de cambio que sea
mayor que el precio de venta programado para el ciclo
seleccionado. Inserte una tarjeta que tenga saldo
suficiente. El saldo de la tarjeta debe ser superior al
precio de venta programado para el ciclo seleccionado.
Los últimos 2 minutos del tiempo remanente siempre
son para el ciclo de enfriamiento.
NOTA
4. Top off (Para agregar tiempo)
Despues de insertar una tarjeta de debito, el tiempo
de operación puede ser incrementado a 5
minutos/0,10 cuando sea presionado el botón de
Inicio (Start) o el del ciclo seleccionado. (La tarjeta
debe tener suficiente credito para poder incrementar
el tiempo.)
El tiempo de operación puede ser incrementado a
5 minutos/0,10 agregando más monedas.
El propietario puede controlar el tiempo adicional
(Tiempo máximo) y la configuración de dinero
(consulte Configuración de precio máximo .)
NOTA
Cuando p91-ya esta en Enfriamiento, si se agrega mas
tiempo, se regresa al ciclo de Secado. El tiempo puede
ser agregado hasta 99 minutos.
5. Cambiar ciclo
No puede cambiar el ciclo mientras la máquina está
funcionando.
6. Finalizar ciclo
Después del ciclo de enfriamiento, la máquina se
detiene y la pantalla muestra “Fin” con un pitido.

24 mODO PROGRAmACIÓN
ES
MODO PROGRAMACIÓN
Usted puede cambiar informacion de la maquina o cambiar un ajuste en “Ajuste de Programa”, “Contadores”
“Diagnostico”. Hay dos metodos para entrar al modo de programacion.
•Siconectalamáquinasincolocareltragamonedasporprimeravez,eldisplaymuestra .
•Cuandolamáquinasaledefábrica,estápreparadaparatragamonedas.Puedecambiareltipo(Tarjeta/Monedas)
con un botón. (Para mayor información referirse al modo de AJUSTE, modo .)
•Lamáquinamostrará“PUSH”paralastipoOPL.
•Laconfiguracióndelospreciosvaríasegúnelpaís.
•Seleccionesupaísenelmodo (consulte la sección Cómo ingresar el ).
•DespuésdeEEPT,restablezcaelpaís(elpaíspredeterminadoesInglaterra).
NOTA
Llave de la caja
Cajon de monedas
Tipo Moneda
Insertar Tarjeta de Debito
Tipo Tarjeta Tipo OPL
Como entrar al Modo Programacion:
- - Enciende / Apaga el interruptor de palanca.Tipo Moneda
- Tipo Tarjeta - Inserte la tarjeta de servicio.
- Todos los Tipos -
1) Presione el 1er y 3er botón al mismo tiempo.
2) Presione los botones 2do y 3er para alternar los números.
Luego, presione el 4to botón para pasar al siguiente dígito.
3) Presione el botón Inicio para finalizar la entrada de contraseña.
※ Contraseña predeterminada : 3000
<Panel de control>
1er
2do
3er
4to
Inicio

25
mODO PROGRAmACIÓN ES
Estructura del Modo de programación - Tipo Tarjeta / Moneda
El diagrama de flujo muestra cómo controlar el modo de programación.
Antes de programar, revise la estructura del modo de programacion.
Es para ajustar el valor del precio, del tiempo, tipo de venta, etc.
Es para la linea de prueba, restablecer, ciclo libre y terminacion de un ciclo.
Es para colectar datos del uso del equipo.
Estructura del Modo de programación
•Noutilizar , , .
•Solamenteseusanparainspeccionarlamáquina.
• Esta función es solo para el tipo de tarjeta.
NOTA

26 mODO PROGRAmACIÓN
ES
Estructura del Modo de programación - Tipo OPL
El diagrama de flujo muestra cómo controlar el modo de programación.
Antes de programar, revise la estructura del modo de programacion.
Es para ajustar el valor del precio, del tiempo, tipo de venta, etc.
Es para la linea de prueba, restablecer, ciclo libre y terminacion de un ciclo.
Es para colectar datos del uso del equipo.
Estructura del Modo de Programación
•Noutilizar , , .
•Solamenteseusanparainspeccionarlamáquina.
NOTA

27
mODO PROGRAmACIÓN ES
MODO PROGRAMACIÓN - Modo Setup (Ajustes)
Modo Setup (Ajustes): El display indica
Puede cambiar el precio, el tiempo del ciclo, los parámetros del ciclo, etc.
1. Configuración de Precio Regular
Cómo establecer precios regulares para todos / cada ciclo.
Configuración de Precio Regular Pantalla
Ingrese al modo SVC
Presione el 1er botón
Presione el 2do botón
Presione el inicio botón
Presione el 2do o el 3er botón Hasta que la pantalla aparezca
Presione el inicio botón
Seleccione el precio que desea
Funciones del botón:
Botón de inicio = Seleccionar
1er botón = Retroceder un paso
2do botón = Subir o Incrementar el valor
3er botón = Baja o Reduce el valor
botón de inicio para seleccionar :
1er botón para retroceder un paso :
2do botón para subir :
3er botón baja :
Presione Inicio para establecer el
precio Se mostrará la siguiente configuración del ciclo.
• Distancia : 0,00~10,00
• Incrementos : 0,10
• TODO es seleccionar los precios predeterminados
para todos los ciclos a la vez
• Seleccionar precio individual para COS1 ~ 4
• COS1 : Temp. Alta
• COS2 : Temp. Media
• COS3 : Temp. Baja
• COS4 : Sin calefacción
※ Los precios de los ciclos individuales se priorizan por
encima de “TODOS”.
• Configure su país desde (consulte
Configuración de tipo de moneda)
NOTA
Como entrar al Modo Programacion:
- - Enciende / Apaga el interruptor de palanca.Tipo Moneda
- Tipo Tarjeta - Inserte la tarjeta de servicio.
- Todos los Tipos -
1) Presione el 1er y 3er botón al mismo tiempo.
2) Presione los botones 2do y 3er para alternar los números.
Luego, presione el 4to botón para pasar al siguiente dígito.
3) Presione el botón Inicio para finalizar la entrada de contraseña.
※ Contraseña predeterminada : 3000
<Panel de control>
1er
2do
3er
4to
Inicio

28 mODO PROGRAmACIÓN
ES
2. Configuración de Precio Especial
Cómo establecer precios especiales para todos / cada ciclo.
Configuración de Precio Especial Pantalla
Ingrese al modo SVC
Presione el 1er botón
Presione el 2do botón
Presione el inicio botón
Presione el 2do o el 3er botón Hasta que la pantalla aparezca
Presione el inicio botón
Seleccione el precio que desea
Funciones del botón:
Botón de inicio = Seleccionar
1er botón = Retroceder un paso
2do botón = Subir o Incrementar el valor
3er botón = Baja o Reduce el valor
Presione Inicio para establecer el
precio Se mostrará la siguiente configuración del ciclo.
• Distancia : 0,00~10,00
• Incrementos : 0,10
• TODO es seleccionar los precios predeterminados para todos los ciclos a la vez
• Seleccionar precio individual para COS1 ~ 4
• COS1 : Temp. Alta
• COS2 : Temp. Media
• COS3 : Temp. Baja
• COS4 : Sin calefacción
※ Los precios de los ciclos individuales se priorizan por encima de “TODOS”.
• Configure su país desde (consulte Configuración de tipo de moneda)
NOTA

29
mODO PROGRAmACIÓN ES
3. Configuración de Precio Top Off
Cómo configurar precio Top Off
Configuración de Precio Top Off Pantalla
Ingrese al modo SVC
Presione el 1er botón
Presione el 2do botón
Presione el inicio botón
Presione el 2do o el 3er botón Hasta que la pantalla aparezca
Presione el inicio botón
Seleccione el precio que desea
Funciones del botón:
Botón de inicio = Seleccionar
1er botón = Retroceder un paso
2do botón = Subir o Incrementar el valor
3er botón = Baja o Reduce el valor
Presione Inicio para establecer el
precio Se mostrará la siguiente menú.
• Distancia : 0,10~10,00
• Incrementos : 0,10
• TODO es seleccionar los precios predeterminados para todos los ciclos a la vez
• Seleccionar precio individual para COS1 ~ 4
• COS1 : Temp. Alta
• COS2 : Temp. Media
• COS3 : Temp. Baja
• COS4 : Sin calefacción
NOTA

30 mODO PROGRAmACIÓN
ES
4. Características de la Máquina (1er set)
Cómo configurar las funciones de la máquina. Hay múltiples funciones de configuración bajo FEA1.
Características de la Máquina (1er set) Pantalla
Ingrese al modo SVC
Presione el 1er botón
Presione el 2do botón
Presione el inicio botón
Presione el 2do o el 3er botón Hasta que la pantalla aparezca
Seleccione la configuración que desee
Funciones del botón:
Botón de inicio = Seleccionar
1er botón = Retroceder un paso
2do botón = Subir
3er botón = Baja
• : Día de precio especial habilitar o deshabilitar
• : Sentido seco habilitar o deshabilitar
• : Top Off habilitar o deshabilitar
• : Función de pausa habilitar o deshabilitar
NOTA

31
mODO PROGRAmACIÓN ES
4-1. Configuración de Día de Precio Especial
La configuración de día de precio especial se puede utilizar para habilitar / deshabilitar el uso de precios especiales.
Configuración de Día de Precio Especial Pantalla
Ingrese al modo SVC
Presione el 1er botón
Presione el 2do botón
Presione el inicio botón
Presione el 2do o el 3er botón Hasta que la pantalla aparezca
Presione el inicio botón
Presione el inicio botón
Seleccione la función que desea
Funciones del botón:
Botón de inicio = Seleccionar
1er botón = Retroceder un paso
2do botón = Subir
3er botón = Baja
Presione Inicio para habilitar o
deshabilitar Se mostrará la siguiente configuración menú.

32 mODO PROGRAmACIÓN
ES
4-2. Configuración de Sense Dry
Sense Dry Setup se puede usar para habilitar / deshabilitar sense dry.
Configuración de Sense Dry Pantalla
Ingrese al modo SVC
Presione el 1er botón
Presione el 2do botón
Presione el inicio botón
Presione el 2do o el 3er botón Hasta que la pantalla aparezca
Presione el inicio botón
Presione el 2do o el 3er botón Hasta que la pantalla aparezca
Presione el inicio botón
Seleccione la función que desea
Funciones del botón:
Botón de inicio = Seleccionar
1er botón = Retroceder un paso
2do botón = Subir
3er botón = Baja
Presione Inicio para habilitar o
deshabilitar Se mostrará la siguiente configuración menú.

33
mODO PROGRAmACIÓN ES
4-3. Configuración de Top Off
Configuración de Top Off puede usarse para habilitar / deshabilitar Top Off.
Configuración de Top Off Pantalla
Ingrese al modo SVC
Presione el 1er botón
Presione el 2do botón
Presione el inicio botón
Presione el 2do o el 3er botón Hasta que la pantalla aparezca
Presione el inicio botón
Presione el 2do o el 3er botón Hasta que la pantalla aparezca
Presione el inicio botón
Seleccione la función que desea
Funciones del botón:
Botón de inicio = Seleccionar
1er botón = Retroceder un paso
2do botón = Subir
3er botón = Baja
Presione Inicio para habilitar o
deshabilitar Se mostrará la siguiente configuración menú.

34 mODO PROGRAmACIÓN
ES
4-4. Configuración de la Función de Pausa
La configuración de la función de pausa se puede usar para habilitar / deshabilitar la capacidad de pausar el ciclo al
presionar el botón de inicio / pausa.
Configuración de la Función de Pausa Pantalla
Ingrese al modo SVC
Presione el 1er botón
Presione el 2do botón
Presione el inicio botón
Presione el 2do o el 3er botón Hasta que la pantalla aparezca
Presione el inicio botón
Presione el 2do o el 3er botón Hasta que la pantalla aparezca
Presione el inicio botón
Seleccione la función que desea
Funciones del botón:
Botón de inicio = Seleccionar
1er botón = Retroceder un paso
2do botón = Subir
3er botón = Baja
Presione Inicio para habilitar o
deshabilitar Se mostrará la siguiente configuración menú.

35
mODO PROGRAmACIÓN ES
5. Configuración de Día de Precio Especial
La configuración de día de precio especial se puede utilizar para habilitar / deshabilitar el uso de precios especiales.
Configuración de Día de Precio Especial Pantalla
Ingrese al modo SVC
Presione el 1er botón
Presione el 2do botón
Presione el inicio botón
Presione el 2do o el 3er botón Hasta que la pantalla aparezca
Presione el inicio botón
Presione el inicio botón
Seleccione la configuración que desee
Funciones del botón:
Botón de inicio = Seleccionar
1er botón = Retroceder un paso
2do botón = Subir
3er botón = Baja
Presione Inicio para habilitar o
deshabilitar Se mostrará la siguiente configuración menú.
• Asegúrese de configurar la función Hora antes de usar esta función.
NOTA

38 mODO PROGRAmACIÓN
ES
8. Configuración del Tiempo de Secado
La configuración del tiempo de secado se puede utilizar para configurar el tiempo de secado.
Configuración del Tiempo de Secado Pantalla
Ingrese al modo SVC
Presione el 1er botón
Presione el 2do botón
Presione el inicio botón
Presione el 2do o el 3er botón Hasta que la pantalla aparezca
Presione el inicio botón
Seleccione el tiempo que desea
Funciones del botón:
Botón de inicio = Seleccionar
1er botón = Retroceder un paso
2do botón = Subir o Incrementar el valor
3er botón = Baja o Reduce el valor
Presione Inicio para configurar la hora Se mostrará la siguiente configuración del ciclo.
• Distancia : 5~99 min
• Incrementos : 1
• COS1 : Temp. Alta
• COS2 : Temp. Media
• COS3 : Temp. Baja
• COS4 : Sin calefacción
NOTA

39
mODO PROGRAmACIÓN ES
9. Configuración Especial de Tiempo de Secado de Día
La configuración especial del tiempo de secado del día se puede utilizar para configurar el tiempo de secado.
Configuración Especial de Tiempo de Secado de Día Pantalla
Ingrese al modo SVC
Presione el 1er botón
Presione el 2do botón
Presione el inicio botón
Presione el 2do o el 3er botón Hasta que la pantalla aparezca
Presione el inicio botón
Seleccione el tiempo que desea
Funciones del botón:
Botón de inicio = Seleccionar
1er botón = Retroceder un paso
2do botón = Subir o Incrementar el valor
3er botón = Baja o Reduce el valor
Presione Inicio para configurar la hora Se mostrará la siguiente configuración del ciclo.
• Distancia : 5~99 min
• Incrementos : 1
• COS1 : Temp. Alta
• COS2 : Temp. Media
• COS3 : Temp. Baja
• COS4 : Sin calefacción
NOTA

14 ConsIGnes ImPoRtAntes ReLAtIVes À LA sÉCURItÉ
FR
•Enlevez tout le matériel d’emballage et
éliminez tout le matériel d’expédition
de façon appropriée. Le non-respect
de cette mise en garde peut entraîner
un décès, une explosion, un incendie
ou des brûlures.
•Si le sèche-linge est installée dans
un garage, placez-la à au moins
18 pouces au-dessus du sol. Le
non-respect de cette mise en garde
peut entraîner un décès, une
explosion, un incendie ou des
brûlures.
•Gardez tous les éléments
d’emballage hors de portée des
enfants. Le matériel d’emballage
pose un danger pour les enfants.
Il y a un risque de suffocation.
•Garder la zone sous et autour de vos
appareils exempte de matériaux
combustibles tels que des peluches, du
papier, des chiffons, des produits
chimiques, etc. Le non-respect de cette
mise en garde peut provoquer un incendie.
•Évitez de poser des bougies, des
matières en combustion, ou
d’autres objets inflammables
au-dessus du produit. Les gouttes
de cire peuvent provoquer de la
fumée ou un incendie.
•Retirez le film protecteur en vinyle du
produit. Le non-respect de cette
consigne peut provoquer des dégâts sur
l’appareil, de la fumée ou un incendie.
•Les moyens de déconnexion avec
séparation des contacts d’au moins
3 mm doivent être intégrés dans le
câblage fixe conformément aux
règles de câblage.
AVeRtIssements
Pour votre sécurité, vous devez suivre l’information contenue
dans ce manuel afin de réduire les risques d’incendie,
d’explosion et de décharge électrique ainsi que pour éviter les
dommages matériels, les blessures corporelles ou la mort.
CONSIGNES DE SÉCURITÉ POUR L’INSTALLATION
•Cet appareil ne doit pas être utilisé
par des enfants ou des personnes
ayant des capacités physiques,
sensorielles ou mentales réduites,
ou manquant d’expérience et de
connaissances, à moins qu'elles ne
soient supervisées ou aient reçu des
instructions. Les enfants doivent
être surveillés afin de s’assurer qu’ils
ne jouent pas avec l’appareil.
•L’appareil ne doit pas être
installé derrière une porte
verrouillable, une porte
coulissante ou une porte avec
une charnière du côté opposé à
celui du sèche-linge, de sorte
qu'une ouverture complète de
la porte du sèche-linge soit
restreinte.

25
moDe De PRoGRAmmAtIon FR
Structure du mode de programmation – modes pièces de
monnaie et carte
Le diagramme d’algorithmes montre comment contrôler le mode de programmation.
Avant de configurer la programmation, vérifiez la structure du mode de
programmation.
permet de définir le prix, la durée et le type de paiement, etc.
permet d’effectuer un test des conduites, une réinitialisation ou un cycle gratuit et à arrêter le cycle en court.
permet de recueillir des données sur l’utilisation.
Structure du mode de programmation
•N’utilisezpas , , .
•Ilsserventuniquementpourl’inspectiondelamachine.
•Lafonction est uniquement utilisée avec le mode cartes.
RemARQUe
Termékspecifikációk
| Márka: | LG |
| Kategória: | Szárítógép |
| Modell: | RV1329C4T |
Szüksége van segítségre?
Ha segítségre van szüksége LG RV1329C4T, tegyen fel kérdést alább, és más felhasználók válaszolnak Önnek
Útmutatók Szárítógép LG

2 Január 2025
23 December 2024
23 December 2024
20 December 2024
20 December 2024
20 December 2024
6 Szeptember 2024
30 Augusztus 2024
29 Augusztus 2024
29 Augusztus 2024
Útmutatók Szárítógép
- Szárítógép Samsung
- Szárítógép Beko
- Szárítógép Electrolux
- Szárítógép Whirlpool
- Szárítógép Nedis
- Szárítógép Grundig
- Szárítógép Ariston Thermo
- Szárítógép Candy
- Szárítógép Lamona
- Szárítógép Gorenje
- Szárítógép Euro Appliances
- Szárítógép Adler
- Szárítógép Bosch
- Szárítógép Indesit
- Szárítógép Panasonic
- Szárítógép Zanussi
- Szárítógép MPM
- Szárítógép AEG
- Szárítógép Emerio
- Szárítógép Sharp
- Szárítógép Teka
- Szárítógép Hoover
- Szárítógép Neff
- Szárítógép Ardo
- Szárítógép Bartscher
- Szárítógép Hyundai
- Szárítógép Hisense
- Szárítógép Siemens
- Szárítógép Exquisit
- Szárítógép Corbero
- Szárítógép Miele
- Szárítógép Camry
- Szárítógép V-Zug
- Szárítógép Danby
- Szárítógép DeLonghi
- Szárítógép Insignia
- Szárítógép Classique
- Szárítógép Heinner
- Szárítógép Infiniton
- Szárítógép Ariete
- Szárítógép Klarstein
- Szárítógép Amica
- Szárítógép VOX
- Szárítógép Vivax
- Szárítógép Omega
- Szárítógép Thomson
- Szárítógép Smeg
- Szárítógép Fagor
- Szárítógép Baumatic
- Szárítógép Orima
- Szárítógép AEG-Electrolux
- Szárítógép Cleanmaxx
- Szárítógép Jocel
- Szárítógép Bimar
- Szárítógép Etna
- Szárítógép Clatronic
- Szárítógép Bomann
- Szárítógép Bauknecht
- Szárítógép Amana
- Szárítógép Hotpoint
- Szárítógép Haier
- Szárítógép Frigidaire
- Szárítógép Mitsubishi
- Szárítógép Pelgrim
- Szárítógép Privileg
- Szárítógép Küppersbusch
- Szárítógép Westinghouse
- Szárítógép Thomas
- Szárítógép Inventum
- Szárítógép Continental Edison
- Szárítógép Remington
- Szárítógép Hiberg
- Szárítógép Russell Hobbs
- Szárítógép Bush
- Szárítógép G3 Ferrari
- Szárítógép Wisberg
- Szárítógép Hanseatic
- Szárítógép Daewoo
- Szárítógép Tesla
- Szárítógép Gram
- Szárítógép Balay
- Szárítógép Hotpoint Ariston
- Szárítógép OK
- Szárítógép GE
- Szárítógép SVAN
- Szárítógép Caple
- Szárítógép Simpson
- Szárítógép CDA
- Szárítógép Asko
- Szárítógép ELIN
- Szárítógép ProfiCare
- Szárítógép Rommer
- Szárítógép Ignis
- Szárítógép Koenic
- Szárítógép Artusi
- Szárítógép Midea
- Szárítógép Eudora
- Szárítógép Blomberg
- Szárítógép Kogan
- Szárítógép Profilo
- Szárítógép PKM
- Szárítógép Stirling
- Szárítógép Mesko
- Szárítógép Master
- Szárítógép Aspes
- Szárítógép Avanti
- Szárítógép Fisher & Paykel
- Szárítógép Kenmore
- Szárítógép Cylinda
- Szárítógép Leifheit
- Szárítógép Blaupunkt
- Szárítógép SIBIR
- Szárítógép Veripart
- Szárítógép Elektra Bregenz
- Szárítógép Taurus
- Szárítógép Logik
- Szárítógép Maytag
- Szárítógép AKAI
- Szárítógép Seiki
- Szárítógép Sôlt
- Szárítógép Constructa
- Szárítógép Frilec
- Szárítógép Salora
- Szárítógép Vedette
- Szárítógép Schneider
- Szárítógép Philco
- Szárítógép ECG
- Szárítógép Gaggenau
- Szárítógép Technika
- Szárítógép Romo
- Szárítógép Esatto
- Szárítógép Element
- Szárítógép Ufesa
- Szárítógép Galanz
- Szárítógép Scandomestic
- Szárítógép New Pol
- Szárítógép Rinnai
- Szárítógép AYA
- Szárítógép Brandt
- Szárítógép RCA
- Szárítógép Beper
- Szárítógép Icecool
- Szárítógép Electra
- Szárítógép Rex
- Szárítógép Lavorwash
- Szárítógép Becken
- Szárítógép Zerowatt
- Szárítógép De Dietrich
- Szárítógép SanGiorgio
- Szárítógép Mistral
- Szárítógép EasyMaxx
- Szárítógép Arçelik
- Szárítógép Zenith
- Szárítógép Magic Chef
- Szárítógép Sauber
- Szárítógép IFB
- Szárítógép Crosley
- Szárítógép Zanker
- Szárítógép Alluxe
- Szárítógép Ariston
- Szárítógép Nordland
- Szárítógép Zanussi-electrolux
- Szárítógép Tomado
- Szárítógép Kernau
- Szárítógép Sinbo
- Szárítógép John Lewis
- Szárítógép Mabe
- Szárítógép Iberna
- Szárítógép Gemini
- Szárítógép Castor
- Szárítógép Eldom
- Szárítógép Hoover-Helkama
- Szárítógép Juno
- Szárítógép Nabo
- Szárítógép Defy
- Szárítógép Schulthess
- Szárítógép Otsein-Hoover
- Szárítógép White Knight
- Szárítógép Nordmende
- Szárítógép Friac
- Szárítógép Aliomatic
- Szárítógép Elba
- Szárítógép Proline
- Szárítógép Royal Sovereign
- Szárítógép WLA
- Szárítógép Ansonic
- Szárítógép Kelvinator
- Szárítógép Everglades
- Szárítógép Heylo
- Szárítógép Listo
- Szárítógép EAS Electric
- Szárítógép Speed Queen
- Szárítógép WhiteLine
- Szárítógép Creda
- Szárítógép Kleenmaid
- Szárítógép Essentiel B
- Szárítógép Edy
- Szárítógép Altus
- Szárítógép KDK
- Szárítógép Eurotech
- Szárítógép Equator
- Szárítógép Vestfrost
- Szárítógép Kunft
- Szárítógép Upo
- Szárítógép Coline
- Szárítógép Trieste
- Szárítógép Bluesky
- Szárítógép Andis
- Szárítógép Wasco
- Szárítógép Atlas
- Szárítógép Marynen
- Szárítógép Morris
- Szárítógép Ormond
- Szárítógép Sichler
- Szárítógép LERAN
- Szárítógép General Electric
- Szárítógép Microstar
- Szárítógép Amba
- Szárítógép Winia
- Szárítógép Huebsch
- Szárítógép FAURE
- Szárítógép Novamatic
- Szárítógép T4223C
- Szárítógép Miele Professional
- Szárítógép Mio Star
- Szárítógép One Concept
- Szárítógép Dexter Laundry
- Szárítógép Arthur Martin-Electrolux
- Szárítógép TESLA Electronics
- Szárítógép Smart Brand
- Szárítógép Mybeo
- Szárítógép Ulsonix
- Szárítógép Yamazen
- Szárítógép Pitsos
Legújabb útmutatók Szárítógép

10 Április 2025
10 Április 2025

10 Április 2025

9 Április 2025
9 Április 2025

9 Április 2025

9 Április 2025

7 Április 2025

7 Április 2025
7 Április 2025