Használati útmutató Lexmark C544dn
Olvassa el alább 📖 a magyar nyelvű használati útmutatót Lexmark C544dn (180 oldal) a nyomtató kategóriában. Ezt az útmutatót 3 ember találta hasznosnak és 2 felhasználó értékelte átlagosan 4.5 csillagra
Oldal 1/180

C54x Series
User's Guide
www.lexmark.com


Contents
Safety information.............................................................................9
Learning about the printer.............................................................10
Finding information about the printer........................................................................................................................10
Printer configurations........................................................................................................................................................11
Selecting a location for the printer...............................................................................................................................12
Understanding the printer control panel...................................................................................................................14
Additional printer setup..................................................................15
Installing internal options................................................................................................................................................15
Available options ............................................................................................................................................................................ 15
Accessing the system board to install internal options.................................................................................................... 16
Installing a memory card ............................................................................................................................................................. 19
Installing a flash memory card................................................................................................................................................... 21
Installing hardware options.............................................................................................................................................23
Installing a 650-sheet duo drawer............................................................................................................................................ 23
Attaching cables..................................................................................................................................................................24
Verifying printer setup.......................................................................................................................................................25
Printing menu settings pages.................................................................................................................................................... 25
Printing a network setup page ..................................................................................................................................................26
Setting up the printer software......................................................................................................................................26
Installing printer software ........................................................................................................................................................... 26
Updating available options in the printer driver................................................................................................................. 27
Setting up wireless printing.............................................................................................................................................28
Information you will need to set up the printer on a wireless network...................................................................... 28
Installing the printer on a wireless network (Windows) ................................................................................................... 29
Installing the printer on a wireless network (Macintosh)................................................................................................. 30
Installing the printer on a wired network.............................................................................................................................. 33
Loading paper and specialty media.............................................36
Linking and unlinking trays.............................................................................................................................................36
Linking trays...................................................................................................................................................................................... 36
Unlinking trays.................................................................................................................................................................................36
Assigning a Custom Type <x> name....................................................................................................................................... 36
Setting the Paper Size and Paper Type........................................................................................................................37
Configuring Universal paper settings..........................................................................................................................37
Loading the standard 250-sheet tray...........................................................................................................................38
Loading the optional 650-sheet duo drawer............................................................................................................40
Contents
3

242 paper jam.......................................................................................................................................................................68
250 paper jam.......................................................................................................................................................................69
Understanding printer menus.......................................................70
Menus list................................................................................................................................................................................70
Supplies menu......................................................................................................................................................................71
Paper menu...........................................................................................................................................................................71
Default Source menu..................................................................................................................................................................... 71
Paper Size/Type menu .................................................................................................................................................................. 72
Paper Texture menu ...................................................................................................................................................................... 75
Paper Weight menu....................................................................................................................................................................... 76
Paper Loading menu..................................................................................................................................................................... 78
Custom Types menu...................................................................................................................................................................... 79
Universal Setup menu................................................................................................................................................................... 80
Reports....................................................................................................................................................................................81
Menu Settings Page menu.......................................................................................................................................................... 81
Device Statistics menu.................................................................................................................................................................. 81
Network Setup Page menu......................................................................................................................................................... 81
Profile List menu ............................................................................................................................................................................. 81
Print Fonts menu............................................................................................................................................................................. 81
Print Directory menu..................................................................................................................................................................... 82
Print Defects menu......................................................................................................................................................................... 82
Print Demo menu ........................................................................................................................................................................... 82
Asset Report menu......................................................................................................................................................................... 82
Network/Ports.......................................................................................................................................................................82
Active NIC menu.............................................................................................................................................................................. 82
Network menu ................................................................................................................................................................................. 83
Wireless menu..................................................................................................................................................................................84
USB menu.......................................................................................................................................................................................... 84
Settings...................................................................................................................................................................................86
General Settings menu ................................................................................................................................................................. 86
Setup menu ...................................................................................................................................................................................... 89
Finishing menu................................................................................................................................................................................ 89
Quality menu.................................................................................................................................................................................... 91
Utilities menu................................................................................................................................................................................... 94
PDF menu .......................................................................................................................................................................................... 95
PostScript menu.............................................................................................................................................................................. 95
PCL Emul menu ............................................................................................................................................................................... 96
Image menu...................................................................................................................................................................................... 98
PictBridge menu.............................................................................................................................................................................. 99
Flash drive menu...........................................................................................................................................................................100
Contents
5

Understanding printer messages...............................................101
List of status and error messages................................................................................................................................101
Maintaining the printer.................................................................111
Storing supplies.................................................................................................................................................................111
Conserving supplies.........................................................................................................................................................111
Checking the status of supplies...................................................................................................................................111
Checking the status of supplies from the printer control panel..................................................................................111
Checking the status of supplies from a network computer..........................................................................................111
Ordering supplies..............................................................................................................................................................112
Ordering toner cartridges..........................................................................................................................................................112
Ordering imaging kits .................................................................................................................................................................113
Ordering a waste toner bottle..................................................................................................................................................113
Replacing supplies............................................................................................................................................................114
Replacing the waste toner bottle ...........................................................................................................................................114
Replacing a black imaging kit ..................................................................................................................................................117
Replacing a black and color imaging kit ..............................................................................................................................123
Replacing a toner cartridge.......................................................................................................................................................128
Replacing a developer unit .......................................................................................................................................................130
Cleaning the exterior of the printer............................................................................................................................135
Recycling Lexmark products.........................................................................................................................................136
Moving the printer............................................................................................................................................................136
Before moving the printer.........................................................................................................................................................136
Moving the printer to another location................................................................................................................................136
Shipping the printer ....................................................................................................................................................................136
Administrative support.................................................................137
Restoring the factory default settings.......................................................................................................................137
Adjusting Power Saver....................................................................................................................................................137
Using the Embedded Web Server...............................................................................................................................138
Setting up e-mail alerts...................................................................................................................................................138
Configuring supply notifications.................................................................................................................................138
Copying printer settings to other printers...............................................................................................................139
Troubleshooting.............................................................................140
Solving basic printer problems....................................................................................................................................140
Solving printing problems.............................................................................................................................................140
Printer control panel display is blank or displays only diamonds...............................................................................140
Error message about reading USB drive appears..............................................................................................................140
Contents
6

Jobs do not print...........................................................................................................................................................................140
Job takes longer than expected to print..............................................................................................................................141
Job prints from the wrong tray or on the wrong paper .................................................................................................141
Incorrect characters print...........................................................................................................................................................141
Tray linking does not work........................................................................................................................................................142
Large jobs do not collate ...........................................................................................................................................................142
Unexpected page breaks occur...............................................................................................................................................142
Solving option problems................................................................................................................................................143
Option does not operate correctly or quits after it is installed ....................................................................................143
Drawers.............................................................................................................................................................................................143
Flash memory card.......................................................................................................................................................................143
Multipurpose feeder....................................................................................................................................................................144
Memory card ..................................................................................................................................................................................144
Solving paper feed problems.......................................................................................................................................144
Paper frequently jams.................................................................................................................................................................144
Paper jam message remains after jam is cleared ..............................................................................................................145
Page that jammed does not reprint after you clear the jam.........................................................................................145
Solving print quality problems....................................................................................................................................145
Isolating print quality problems..............................................................................................................................................145
Blank pages.....................................................................................................................................................................................146
Characters have jagged or uneven edges ...........................................................................................................................146
Clipped images..............................................................................................................................................................................147
Dark lines .........................................................................................................................................................................................147
Gray background ..........................................................................................................................................................................147
Incorrect margins..........................................................................................................................................................................148
Light colored line, white line, or incorrectly colored line...............................................................................................148
Paper curl.........................................................................................................................................................................................149
Print irregularities .........................................................................................................................................................................149
Print is too dark..............................................................................................................................................................................150
Print is too light .............................................................................................................................................................................151
Repeating defects.........................................................................................................................................................................152
Skewed print...................................................................................................................................................................................153
Solid color pages...........................................................................................................................................................................153
Toner fog or background shading appears on the page ...............................................................................................153
Toner rubs off.................................................................................................................................................................................153
Toner specks...................................................................................................................................................................................154
Transparency print quality is poor..........................................................................................................................................154
Uneven print density...................................................................................................................................................................155
Solving color quality problems....................................................................................................................................155
Color misregistration...................................................................................................................................................................155
FAQ about color printing...........................................................................................................................................................156
Contacting Customer Support.....................................................................................................................................159
Contents
7

Learning about the printer
Finding information about the printer
Setup
information
Description Where to find
The Setup information gives you instructions for
setting up the printer. Follow the set of instructions
for local, network, or wireless, depending on what
you need.
You can find the Setup information on the side of the printer
box or on the Lexmark Web site at www.lexmark.com.
Help
Description Where to find
The Help gives you instructions for using the software. While in any Lexmark software program, click Help,
Tips
Help, or Help
Help Topics.
Customer support
Description Where to find (North America) Where to find (rest of world)
Telephone support Call us at
•US: 1-800-332-4120
Monday–Friday (8:00 AM–11:00 PM
ET)
Saturday (Noon–6:00 PM ET)
•Canada: 1-800-539-6275
Monday–Friday (8:00 AM–11:00 PM
ET)
Saturday (Noon–6:00 PM ET)
•Mexico: 001-888-377-0063
Monday–Friday (8:00 AM–8:00 PM
ET)
Note: Telephone numbers and support
times may change without notice. For
the most recent telephone numbers
available, see the printed warranty
statement that came with your printer.
Telephone numbers and support hours
vary by country or region.
Visit our Web site at
www.lexmark.com. Select a country or
region, and then select the Customer
Support link.
Note: For additional information about
contacting Lexmark, see the printed
warranty that came with your printer.
Learning about the printer
10
Description Where to find (North America) Where to find (rest of world)
E-mail support For e-mail support, visit our Web site:
www.lexmark.com.
1Click SUPPORT.
2Click Technical Support.
3Select your printer type.
4Select your printer model.
5From the Support Tools section,
click e-Mail Support.
6Complete the form, and then click
Submit Request.
E-mail support varies by country or
region, and may not be available in some
instances.
Visit our Web site at
www.lexmark.com. Select a country or
region, and then select the Customer
Support link.
Note: For additional information about
contacting Lexmark, see the printed
warranty that came with your printer.
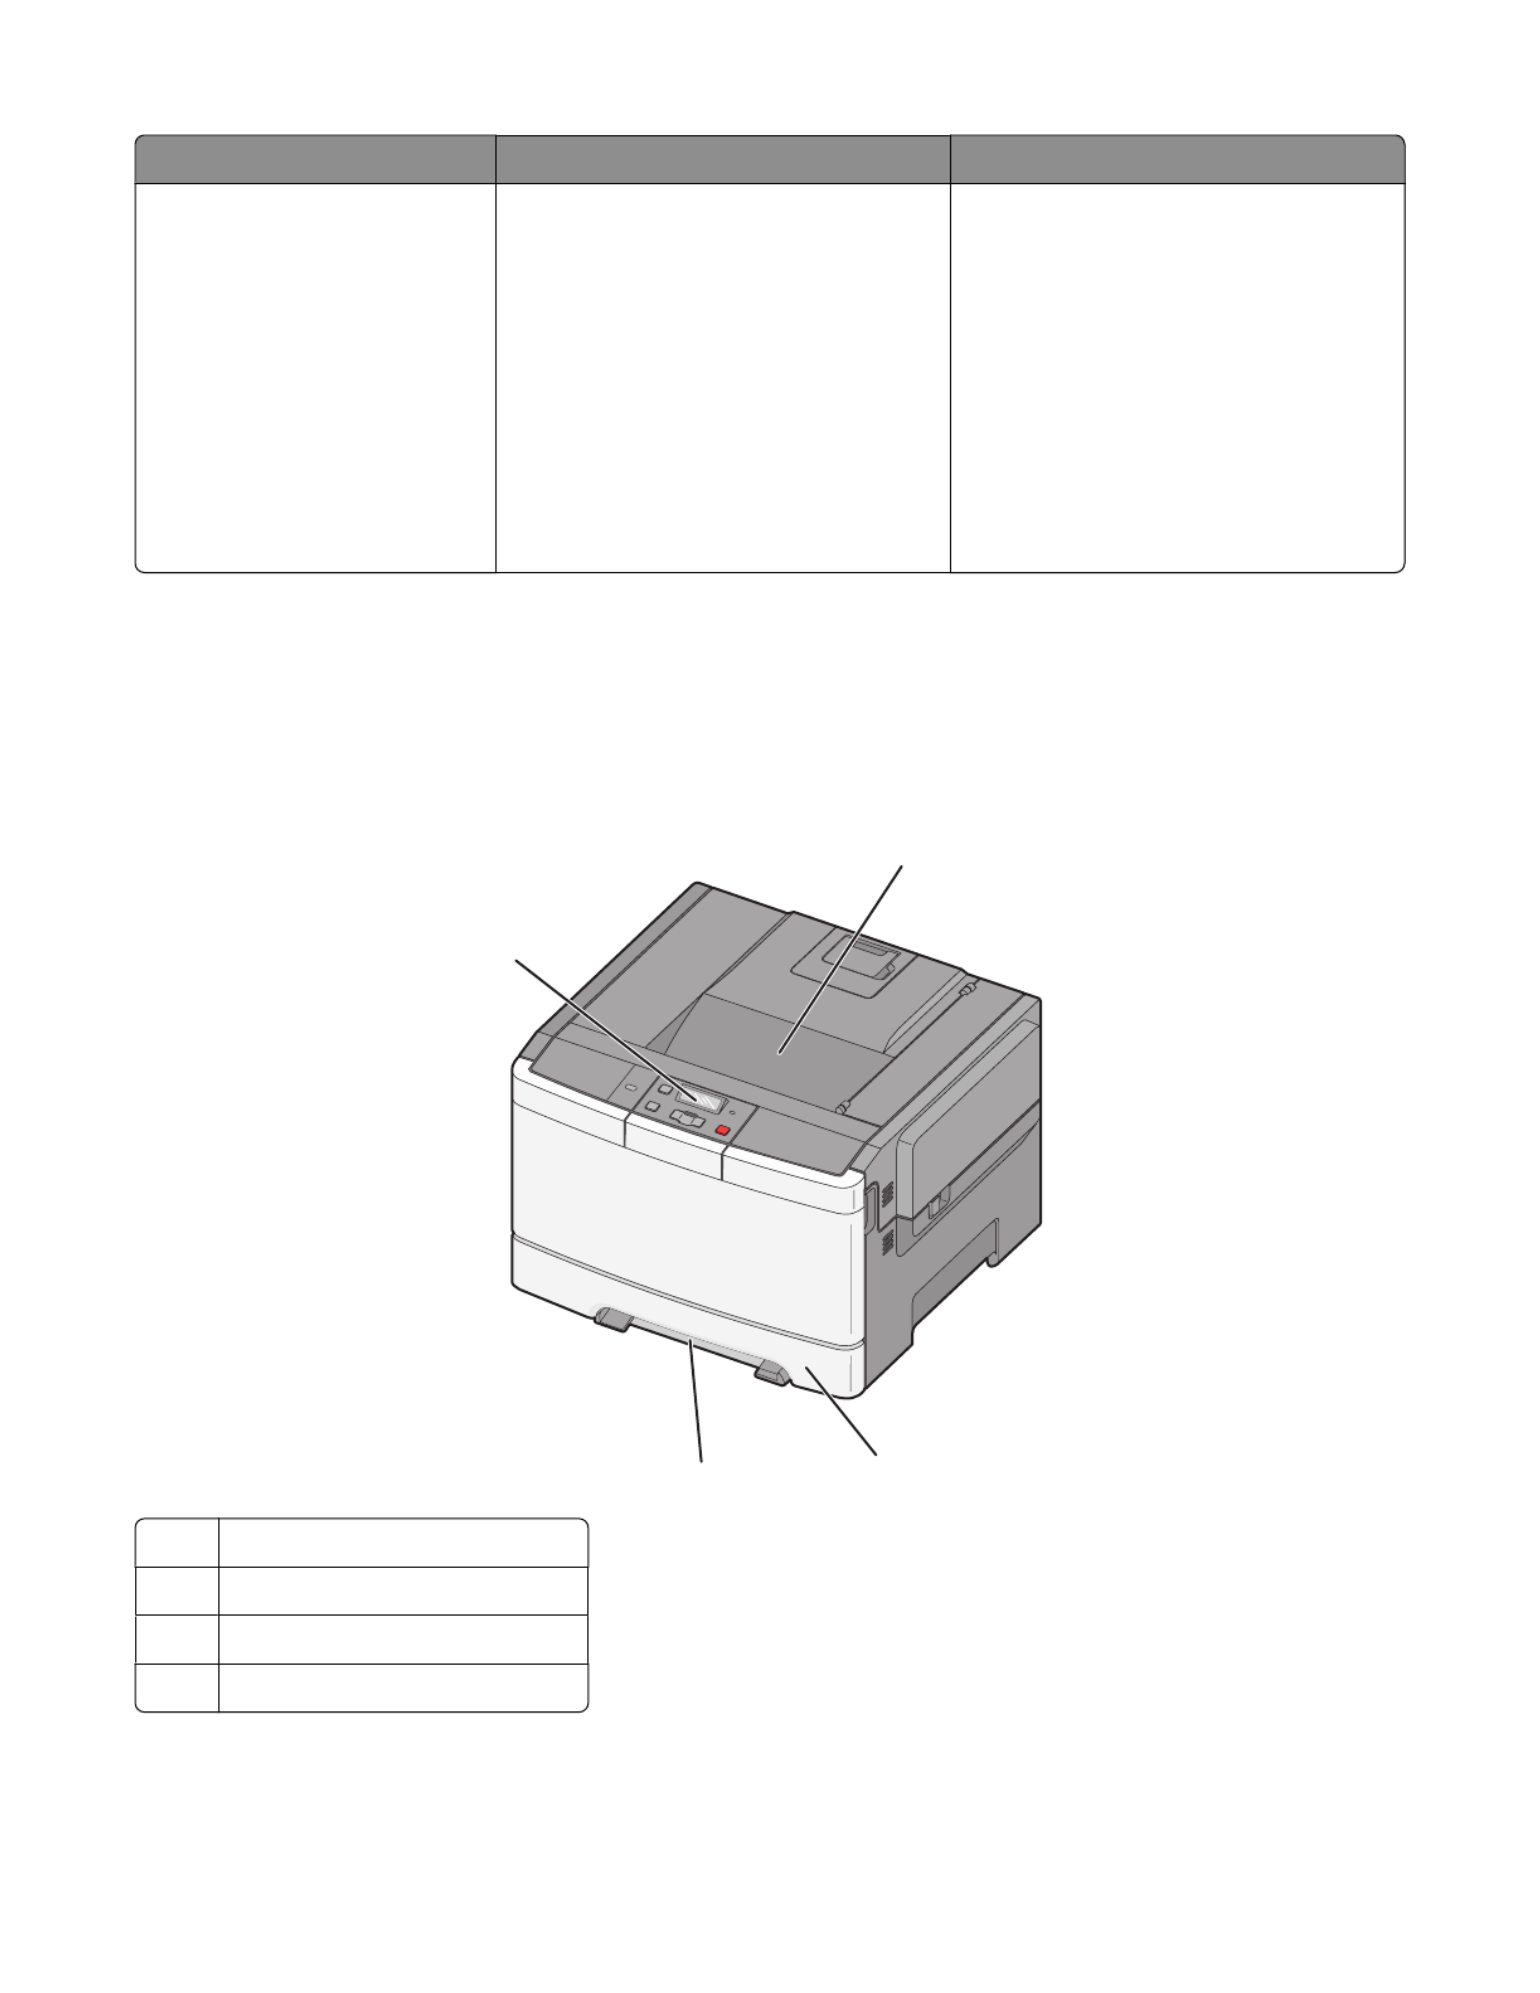
Printer configurations
Basic model
The following illustration shows the basic printer model:
1
2
3
4
1Standard exit bin
2Standard 250-sheet tray (Tray 1)
3Manual feeder
4Printer control panel
Learning about the printer
11

1
2
3
4
5
1304.8 mm (12.0 in.)
2508 mm (20.0 in.)
3304.8 mm (12.0 in.)
4304.8 mm (12.0 in.)
5508 mm (20.0 in.)
When the printer is set up, allow clearance around it as shown.
Learning about the printer
13

Understanding the printer control panel
Menus
Back Stop
1 2 3
4567
Control panel item Description
1Display Shows messages that communicate the status of the printer
2Select Press to initiate action on a menu item.
3Indicator light Indicates the printer status:
•Off—The power is off.
•Blinking green—The printer is warming up, processing data, or printing.
•Solid green—The printer is on, but idle.
•Blinking red—Operator intervention is needed.
4Stop/Cancel Stops all printer activity
A list of options is offered once Stopped appears on the display.
5Navigation buttons Press or to scroll through menu lists.
6Back Returns the display to the previous screen
7Menu Opens the menu index
Note: The menus are available only when the printer is in the Ready state.
Learning about the printer
14

Additional printer setup
Installing internal options
CAUTION—SHOCK HAZARD: If you are accessing the system board or installing optional hardware or memory
devices sometime after setting up the printer, then turn the printer off, and unplug the power cord from the
wall outlet before continuing. If you have any other devices attached to the printer, then turn them off as well,
and unplug any cables going into the printer.
You can customize your printer connectivity and memory capacity by adding optional cards. The instructions in this
section explain how to install the available cards; you can also use them to locate a card for removal.
Note: Options are available only for some printer models.
Available options
Note: Certain options are not available on selected printer models.
Memory cards
•Printer memory
•Flash memory
•Font cards
Additional printer setup
15

Accessing the system board to install internal options
CAUTION—SHOCK HAZARD: If you are accessing the system board or installing optional hardware or memory
devices sometime after setting up the printer, then turn the printer off, and unplug the power cord from the
wall outlet before continuing. If you have any other devices attached to the printer, then turn them off as well,
and unplug any cables going into the printer.
Note: This operation requires a #2 Phillips screwdriver.
1Remove the cover.
aTurn the screws on the cover counterclockwise, and then remove them.
Additional printer setup
16
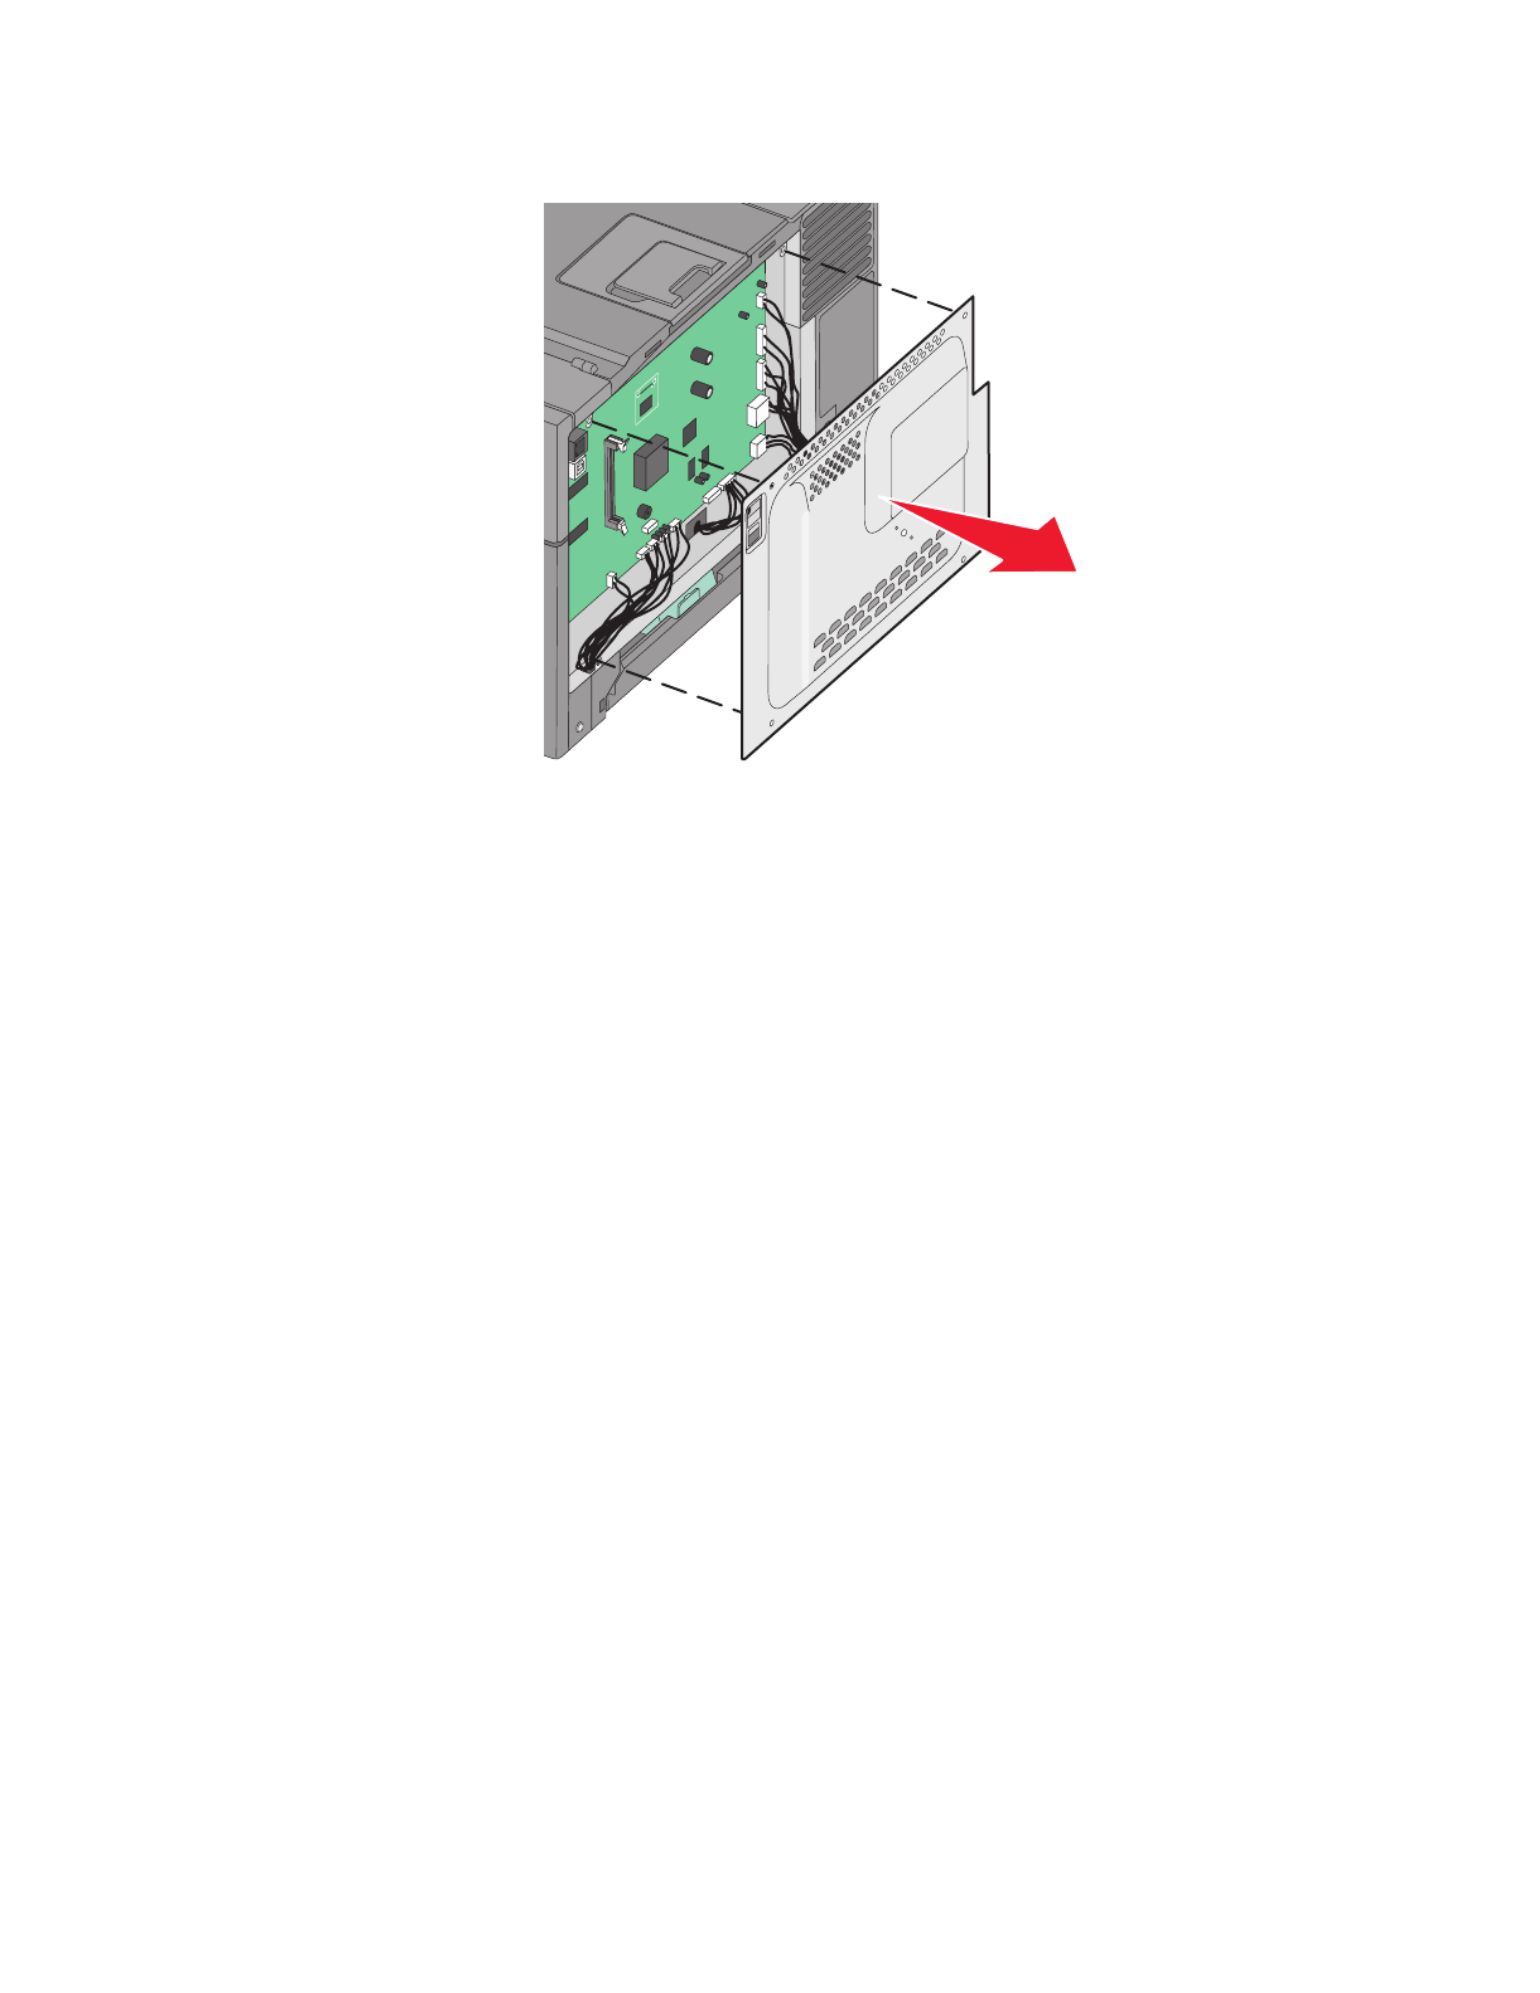
bGently pull the cover away from the printer, and then remove it.
Additional printer setup
17

2Use the illustration below to locate the appropriate connector.
Warning—Potential Damage: System board electrical components are easily damaged by static electricity.
Touch something metal on the printer before touching any system board electronic components or connectors.
1
2
1Flash memory card connector
2Memory card connector
Additional printer setup
18

Installing a memory card
The system board has one connector for an optional memory card.
CAUTION—SHOCK HAZARD: If you are accessing the system board or installing optional hardware or memory
devices sometime after setting up the printer, then turn the printer off, and unplug the power cord from the
wall outlet before continuing. If you have any other devices attached to the printer, then turn them off as well,
and unplug any cables going into the printer.
1Access the system board.
Additional printer setup
19

2Open both latches on the connector completely.
3Unpack the memory card.
Note: Avoid touching the connection points along the edge of the card.
4Align the notches on the memory card with the ridges on the connector.
5Push the memory card straight into the connector until it snaps into place. Make sure each latch fits over the
notch located on either side of the memory card.
1
2
1Notch
2Latch
Additional printer setup
20

6Reinstall the system board access cover.
Installing a flash memory card
CAUTION—SHOCK HAZARD: If you are accessing the system board or installing optional hardware or memory
devices sometime after setting up the printer, then turn the printer off, and unplug the power cord from the
wall outlet before continuing. If you have any other devices attached to the printer, then turn them off as well,
and unplug any cables going into the printer.
1Access the system board.
Additional printer setup
21

2Unpack the memory card.
Note: Avoid touching the connection points along the edge of the card.
3Holding the card by its sides, align the plastic pins on the card with the holes on the system board. This ensures
the metal pins line up correctly as well.
1
2
1
2
1
2
1Plastic pins
2Metal pins
4Push the card firmly into place.
Notes:
•The entire length of the connector on the card must touch and be flush against the system board.
•Be careful not to damage the connectors.
Additional printer setup
22

5Reinstall the system board cover.
Installing hardware options
Installing a 650-sheet duo drawer
The printer supports one optional drawer, which allows an additional 650 sheets of paper to be loaded. The drawer
includes a multipurpose feeder.
CAUTION—SHOCK HAZARD: If you are accessing the system board or installing optional hardware or memory
devices sometime after setting up the printer, then turn the printer off, and unplug the power cord from the
wall outlet before continuing. If you have any other devices attached to the printer, then turn them off as well,
and unplug any cables going into the printer.
1Unpack the 650-sheet duo drawer, and remove any packing material and the dust cover.
2Place the drawer in the location chosen for the printer.
3Align the printer with the 650-sheet duo drawer, and lower the printer into place.
CAUTION—POTENTIAL INJURY: The printer weight is great than 18 kg (40 lb) and requires two or more
trained personnel to move it safely.
Additional printer setup
23
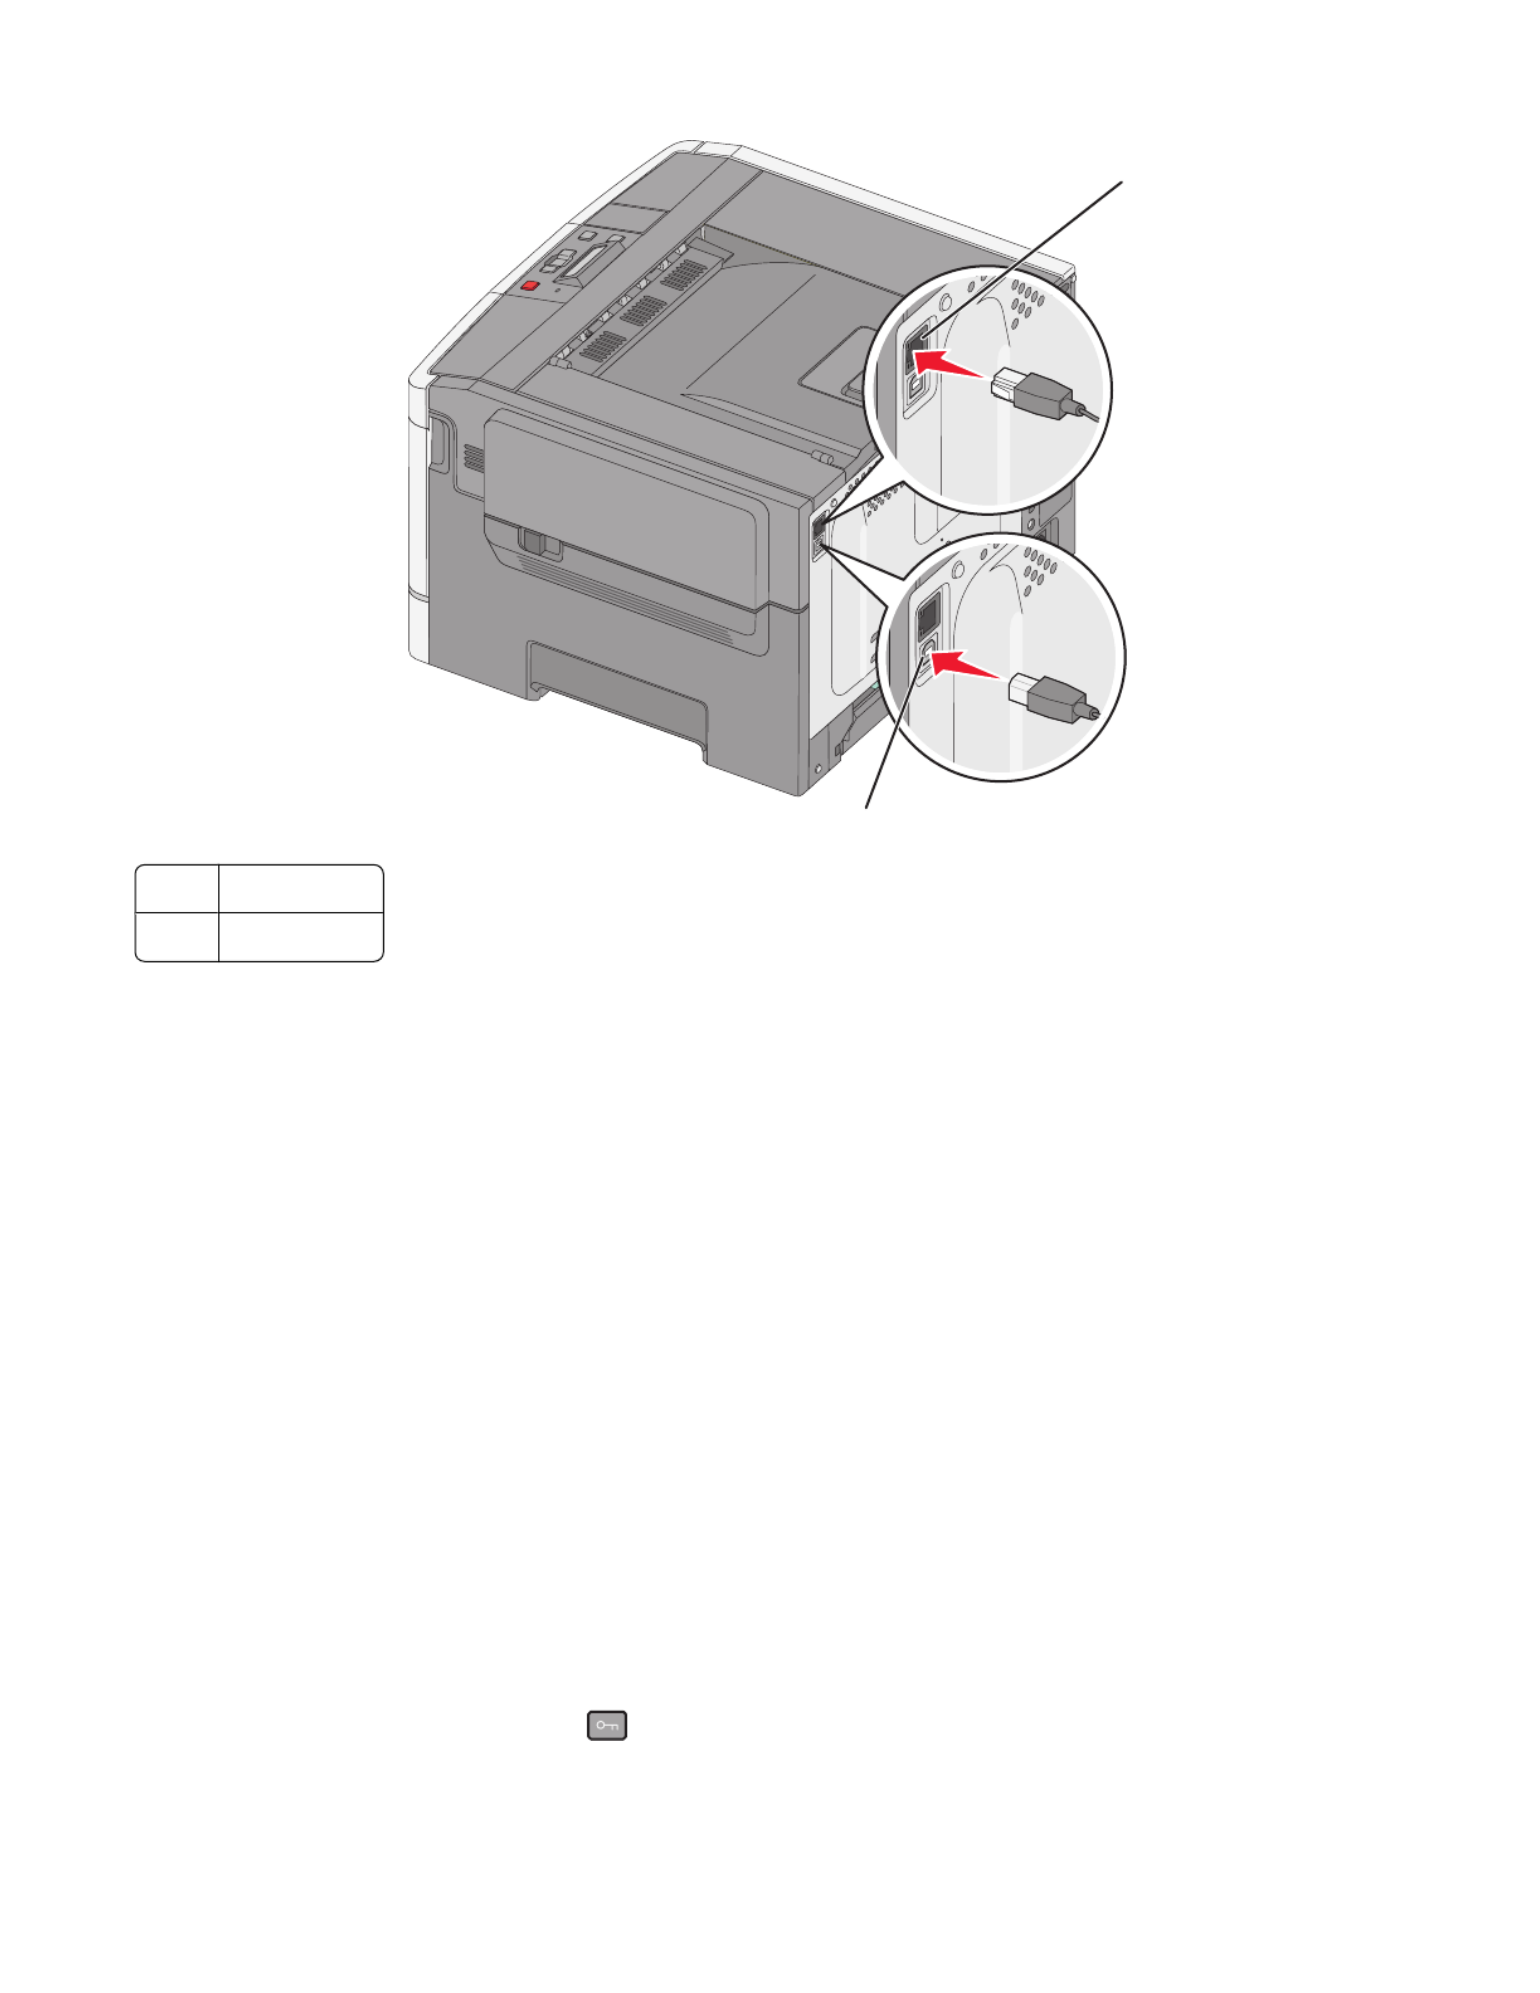
1
2
1Ethernet port
2USB port
Verifying printer setup
Once all hardware and software options are installed and the printer is turned on, verify that the printer is set up
correctly by printing the following:
•Menu settings pages—Use these pages to verify that all printer options are installed correctly. A list of installed
options appears toward the bottom of the page. If an option you installed is not listed, then it is not installed
correctly. Remove the option and install it again.
•Network setup page—If your printer is a network model and is attached to a network, print a network setup
page to verify the network connection. This page also provides important information that aids network printing
configuration.
Printing menu settings pages
Print menu settings pages to review the current menu settings and to verify printer options are installed correctly.
Note: If you have not made any menu item settings changes yet, then the menu settings pages list all the factory
default settings. Once you select and save other settings from the menus, they replace the factory default settings
as user default settings. A user default setting remains in effect until you access the menu again, choose another value,
and save it. To restore the factory default settings, see “Restoring the factory default settings” on page 137.
1Make sure the printer is on and Ready appears.
2From the printer control panel, press .
Additional printer setup
25

Using the World Wide Web
1Go to the Lexmark Web site at www.lexmark.com.
2From the Drivers & Downloads menu, click Driver Finder.
3Select your printer, and then select your operating system.
4Download the driver and install the printer software.
Updating available options in the printer driver
Once the printer software and any options are installed, it may be necessary to manually add the options in the printer
driver to make them available for print jobs.
For Windows users
1Do one of the following:
In Windows Vista
aClick .
bClick Control Panel.
cClick Hardware and Sound.
dClick Printers.
In Windows XP
aClick Start.
bClick Printers and Faxes.
In Windows 2000
aClick Start.
bClick Settings
Printers.
2Select the printer.
3Right-click the printer, and then select Properties.
4Click the Install Options tab.
5Under Available Options, add any installed hardware options.
6Click Apply.
For Macintosh users
In Mac OS X version 10.5
1From the Apple menu, choose System Preferences.
2Click Print & Fax.
3Select the printer, and then click Options & Supplies.
Additional printer setup
27

4Click Driver, and then add any installed hardware options.
5Click OK.
In Mac OS X version 10.4 and earlier
1From the Go menu, choose Applications.
2Double-click Utilities, and then double-click Print Center or Printer Setup Utility.
3Select the printer, and then from the Printers menu, choose Show Info.
4From the pop-up menu, choose Installable Options.
5Add any installed hardware options, and then click Apply Changes.
Setting up wireless printing
Information you will need to set up the printer on a wireless
network
Note: Do not connect the installation or network cables until prompted to do so by the setup software.
•SSID—The SSID is also referred to as the network name.
•Wireless Mode (or Network Mode)—The mode will be either infrastructure or ad hoc.
•Channel (for ad hoc networks)—The channel defaults to auto for infrastructure networks.
Some ad hoc networks will also require the auto setting. Check with your system support person if you are not
sure which channel to select.
•Security Method—There are three basic options for Security Method:
–WEP key
If your network uses more than one WEP key, enter up to four in the provided spaces. Select the key currently
in use on the network by selecting the Default WEP Transmit Key.
or
–WPA or WPA2 passphrase
WPA includes encryption as an additional layer of security. The choices are AES or TKIP. Encryption must be
set for the same type on the router and on the printer, or the printer will not be able to communicate on the
network.
–No security
If your wireless network does not use any type of security, then you will not have any security information.
Note: Using an unsecured wireless network is not recommended.
If you are installing the printer on an 802.1X network using the Advanced method, then you may need the following:
•Authentication type
•Inner authentication type
•802.1X username and password
•Certificates
Note: For more information on configuring 802.1X security, see the Networking Guide on the Software and
Documentation CD.
Additional printer setup
28

Installing the printer on a wireless network (Windows)
Before you install the printer on a wireless network, make sure that:
•Your wireless network is set up and working properly.
•The computer you are using is connected to the same wireless network where you want to set up the printer.
1Connect the power cable, and then turn the printer on.
1
2
Make sure the printer and computer are fully on and ready.
Do not connect the USB cable until instructed to do so on the screen
2Insert the Software and Documentation CD.
Software and
Documentation
Softwa re an dD ocu men tation
Softwa re an d
Softwa re an d
Softwa re an d
Softwa re an d
Doc u m e n ta tion
Doc u m e n ta tion
Doc u m e n ta tion
Doc u m e n ta tion
3Click Install.
4Click Agree.
5Click Suggested.
6Click Wireless Network Attach.
Additional printer setup
29

7Connect the cables in the following order:
aTemporarily connect a USB cable between the computer on the wireless network and the printer.
2
1
Note: After the printer is configured, the software will instruct you to disconnect the temporary USB cable
so you can print wirelessly.
bIf your printer has faxing capabilities, then connect the telephone cable.
8Follow the on-screen instructions to complete the software installation.
9To allow other computers on the wireless network to use the wireless printer, follow steps 2 through 6 and step
8 for each computer.
Installing the printer on a wireless network (Macintosh)
Prepare to configure the printer
1Locate the printer MAC address on the sheet that came with the printer. Write the last six digits of the MAC address
in the space provided below:
MAC address: ___ ___ ___ ___ ___ ___
2If your printer has faxing capabilities, then connect the telephone cable.
3Connect the power cable, and then turn the power on.
1
2
Enter the printer information
1Access the AirPort options.
In Mac OS X version 10.5
aFrom the Apple menu, choose System Preferences.
bClick Network.
cClick AirPort.
Additional printer setup
30

In Mac OS X version 10.4 and earlier
aFrom the Go menu, choose Applications.
bDouble-click Internet Connect.
cFrom the toolbar, click AirPort.
2From the Network pop-up menu, select print server xxxxxx, where the x’s are the last six digits of the MAC
address located on the MAC address sheet.
3Open the Safari browser.
4From the Bookmarks drop-down menu, select Show.
5Under Collections, select Bonjour or Rendevous, and then double-click the printer name.
6From the main page of the Embedded Web Server, navigate to the page where the wireless settings information
is stored.
Configure the printer for wireless access
1Type the name of your network (SSID) in the appropriate field.
2Select Infrastructure as your Network Mode if you are using a wireless router.
3Select the type of security you use to protect your wireless network.
4Enter the security information necessary for the printer to join your wireless network.
5Click Submit.
6Open the AirPort application on your computer:
In Mac OS X version 10.5
aFrom the Apple menu, choose System Preferences.
bClick Network.
cClick AirPort.
In Mac OS X version 10.4 and earlier
aFrom the Go menu, choose Applications.
bDouble-click Internet Connect.
cFrom the toolbar, click AirPort.
7From the Network pop-up menu, select your wireless network.
Configure your computer to use the printer wirelessly
To print to a network printer, each Macintosh user must install a custom PostScript Printer Description (PPD) file and
create a printer in the Print Center or Printer Setup Utility.
1Install a PPD file on the computer:
aInsert the Software and Documentation CD in the CD or DVD drive.
bDouble-click the installer package for the printer.
cFrom the Welcome screen, click Continue.
dClick Continue again after viewing the Readme file.
Additional printer setup
31

eClick Continue after viewing the license agreement, and then click Agree to accept the terms of the
agreement.
fSelect a Destination, and then click Continue.
gFrom the Easy Install screen, click Install.
hType the user password, and then click OK.
All necessary software is installed on the computer.
iClick Close when installation is complete.
2Add the printer:
aFor IP printing:
In Mac OS X version 10.5
1From the Apple menu, choose System Preferences.
2Click Print & Fax.
3Click +.
4Select the printer from the list.
5Click Add.
In Mac OS X version 10.4
1From the Go menu, choose Applications.
2Double-click .Utilities
3Locate and double-click Printer Setup Utility or Print Center.
4From the Printer List, choose Add.
5Select the printer from the list.
6Click Add.
bFor AppleTalk printing:
In Mac OS X version 10.5
1From the Apple menu, choose System Preferences.
2Click Print & Fax.
3Click +.
4Click AppleTalk.
5Select the printer from the list.
6Click Add.
In Mac OS X version 10.4
1From the Go menu, choose Applications.
2Double-click .Utilities
3Locate and double-click Print Center or Printer Setup Utility.
4From the Printer List, choose Add.
5Choose the Default Browser tab.
6Click More Printers.
7From the first pop-up menu, choose AppleTalk.
8From the second pop-up menu, select Local AppleTalk zone.
Additional printer setup
32

9Select the printer from the list.
10 Click Add.
Installing the printer on a wired network
Use the following instructions to install the printer on a wired network. These instructions apply to Ethernet and fiber
optic network connections.
Before you install the printer on a wired network, make sure that:
•You have completed the initial setup of the printer.
•The printer is connected to your network with the appropriate type of cable.
For Windows users
1Insert the Software and Documentation CD.
Wait for the Welcome screen to appear.
If the CD does not launch after a minute, then do one of the following:
In Windows Vista
aClick .
bIn the Start Search box, type D:\setup.exe, where D is the letter of your CD or DVD drive.
In Windows XP and earlier
aClick Start.
bClick Run.
cType D:\setup.exe, where D is the letter of your CD or DVD drive.
2Click Install Printer and Software.
3Click Agree to agree to the License Agreement.
4Select Suggested, and then click Next.
Note: To configure the printer using a static IP address, using IPv6, or to configure printers using scripts, select
Custom and follow the on-screen instructions.
5Select Wired Network Attach, and then click Next.
6Select the printer manufacturer from the list.
7Select the printer model from the list, and then click Next.
8Select the printer from the list of printers discovered on the network, and then click Finish.
Note: If your configured printer does not appear in the list of discovered printers, click Add Port and follow the
on-screen instructions.
9Follow the on-screen instructions to complete the installation.
Additional printer setup
33

For Macintosh users
1Allow the network DHCP server to assign an IP address to the printer.
2Print the network setup page from the printer. For information on printing a network setup page, see “Printing
a network setup page” on page 26.
3Locate the printer IP address in the TCP/IP section of the network setup page. You will need the IP address if you
are configuring access for computers on a different subnet than the printer.
4Install the drivers and add the printer.
aInstall a PPD file on the computer:
1Insert the Software and Documentation CD in the CD or DVD drive.
2Double-click the installer package for the printer.
3From the Welcome screen, click Continue.
4Click Continue again after viewing the Readme file.
5Click Continue after viewing the license agreement, and then click Agree to accept the terms of the
agreement.
6Select a Destination, and then click Continue.
7From the Easy Install screen, click Install.
8Type the user password, and then click OK.
All the necessary software is installed on the computer.
9Click Close when installation is complete.
bAdd the printer:
•For IP printing:
In Mac OS X version 10.5
1From the Apple menu, choose System Preferences.
2Click Print & Fax.
3Click +.
4Select the printer from the list.
5Click Add.
In Mac OS X version 10.4 and earlier
1From the Go menu, choose Applications.
2Double-click .Utilities
3Double-click .Printer Setup Utility or Print Center
4From the Printer List, click Add.
5Select the printer from the list.
6Click Add.
•For AppleTalk printing:
In Mac OS X version 10.5
1From the Apple menu, choose System Preferences.
2Click Print & Fax.
3Click +.
4Click AppleTalk.
Additional printer setup
34

Loading paper and specialty media
This section explains how to load the 250-sheet tray and 650-sheet duo drawer, the multipurpose feeder, and the
manual feeder. It also includes information about paper orientation, setting the Paper Size and Paper Type, and
linking and unlinking trays.
Linking and unlinking trays
Linking trays
Tray linking is useful for large print jobs or multiple copies. When one linked tray is empty, paper feeds from the next
linked tray. When the Paper Size and Paper Type settings are the same for any trays, the trays are automatically linked.
The Paper Size setting for all trays must be set manually from the Paper Size menu. The Paper Type setting must be
set for all trays from the Paper Type menu. The Paper Type menu and the Paper Size menu are both available from
the Paper Size/Type menu.
Unlinking trays
Unlinked trays have settings that are not the same as the settings of any other tray.
To unlink a tray, change the following tray settings so that they do not match the settings of any other tray:
•Paper Type (for example: Plain Paper, Letterhead, Custom Type <x>)
Paper Type names describe the paper characteristics. If the name that best describes your paper is used by linked
trays, assign a different Paper Type name to the tray, such as Custom Type <x>, or define your own custom name.
•Paper Size (for example: letter, A4, statement)
Load a different paper size to change the Paper Size setting for a tray. Paper Size settings are not automatic; they
must be set manually from the Paper Size menu.
Warning—Potential Damage: Do not assign a Paper Type name that does not accurately describe the type of paper
loaded in the tray. The temperature of the fuser varies according to the specified Paper Type. Paper may not be
properly processed if an inaccurate Paper Type is selected.
Assigning a Custom Type <x> name
Assign a Custom Type <x> name to a tray to link or unlink it. Associate the same Custom Type <x> name to each tray
that you want to link. Only trays with the same custom names assigned will link.
1Make sure the printer is on and Ready appears.
2From the printer control panel, press .
3Press the arrow buttons until Paper Menu appears, and then press .
4Press the arrow buttons until Size/Type appears, and then press .
5Press the arrow buttons, and then press to select the tray.
The Paper Size menu appears.
6Press the arrow buttons until the Paper Type menu appears.
7Press .
Loading paper and specialty media
36

8Press the arrow buttons until Custom Type <x> or another custom name appears, and then press .
Submitting changes appears, followed by Paper Menu.
9Press , and then press to return to the Ready state.
Setting the Paper Size and Paper Type
Note: Trays with matching Paper Size and Paper Type settings are automatically linked by the printer. When a linked
tray runs out of paper, the printer draws from another tray.
To change the Paper Size and Paper Type settings:
1Make sure the printer is on and Ready appears.
2From the printer control panel, press .
3Press the arrow buttons until Paper Menu appears, and then press .
4Press the arrow buttons until Size/Type appears, and then press .
5Press the arrow buttons until the correct tray appears, and then press .
6Press when Size appears.
7Press the arrow buttons until the correct size appears, and then press .
Submitting changes appears, followed by Size.
8Press the arrow buttons until Type appears, and then press .
9Press the arrow buttons until the correct type appears, and then press .
Submitting changes appears, followed by Type.
10 Press , and then press to return to the Ready state.
Configuring Universal paper settings
The Universal Paper Size is a user-defined setting that lets you print on paper sizes that are not preset in the printer
menus. Set the Paper Size for the specified tray to Universal when the size you want is not available from the Paper
Size menu. Then, specify all of the following Universal size settings for your paper:
•Units of measure (inches or millimeters)
•Portrait Height and Portrait Width
•Feed Direction
Note: The smallest supported Universal size is 76.2 x 127 mm (3 x 5 in.); the largest is 215.9 x 355.6 mm (8.5 x 14 in.).
Specify a unit of measurement
1Make sure the printer is on and Ready appears.
2From the printer control panel, press .
3Press the arrow buttons until Paper Menu appears, and then press .
4Press the arrow buttons until Universal Setup appears, and then press .
Loading paper and specialty media
37

5Press the arrow buttons until Units of Measure appears, and then press .
6Press the arrow buttons until the correct unit of measure appears, and then press .
Submitting changes Universal Setup appears, followed by the menu.
Specify the paper height and width
Defining a specific height and width measurement for the Universal paper size (in the portrait orientation) allows
the printer to support the size, including support for standard features such as duplex printing and printing multiple
pages on one sheet.
1From the Universal Setup menu, press the arrow buttons until Portrait Width or Portrait Height
appears, and then press .
Note: Select Portrait Height to adjust the paper height setting or Paper Width to adjust the paper
width setting.
2Press the arrow buttons to decrease or to increase the setting, and then press .
Submitting changes Universal Setup appears, followed by the menu.
Loading the standard 250-sheet tray
The printer has one standard 250-sheet tray (Tray 1) and may have an optional 650-sheet duo drawer. The 250-sheet
tray and 650-sheet duo drawer support the same paper sizes and types.
1Pull the tray out.
Note: Do not remove trays while a job prints or while Busy appears on the display. Doing so may cause a jam.
Loading paper and specialty media
38
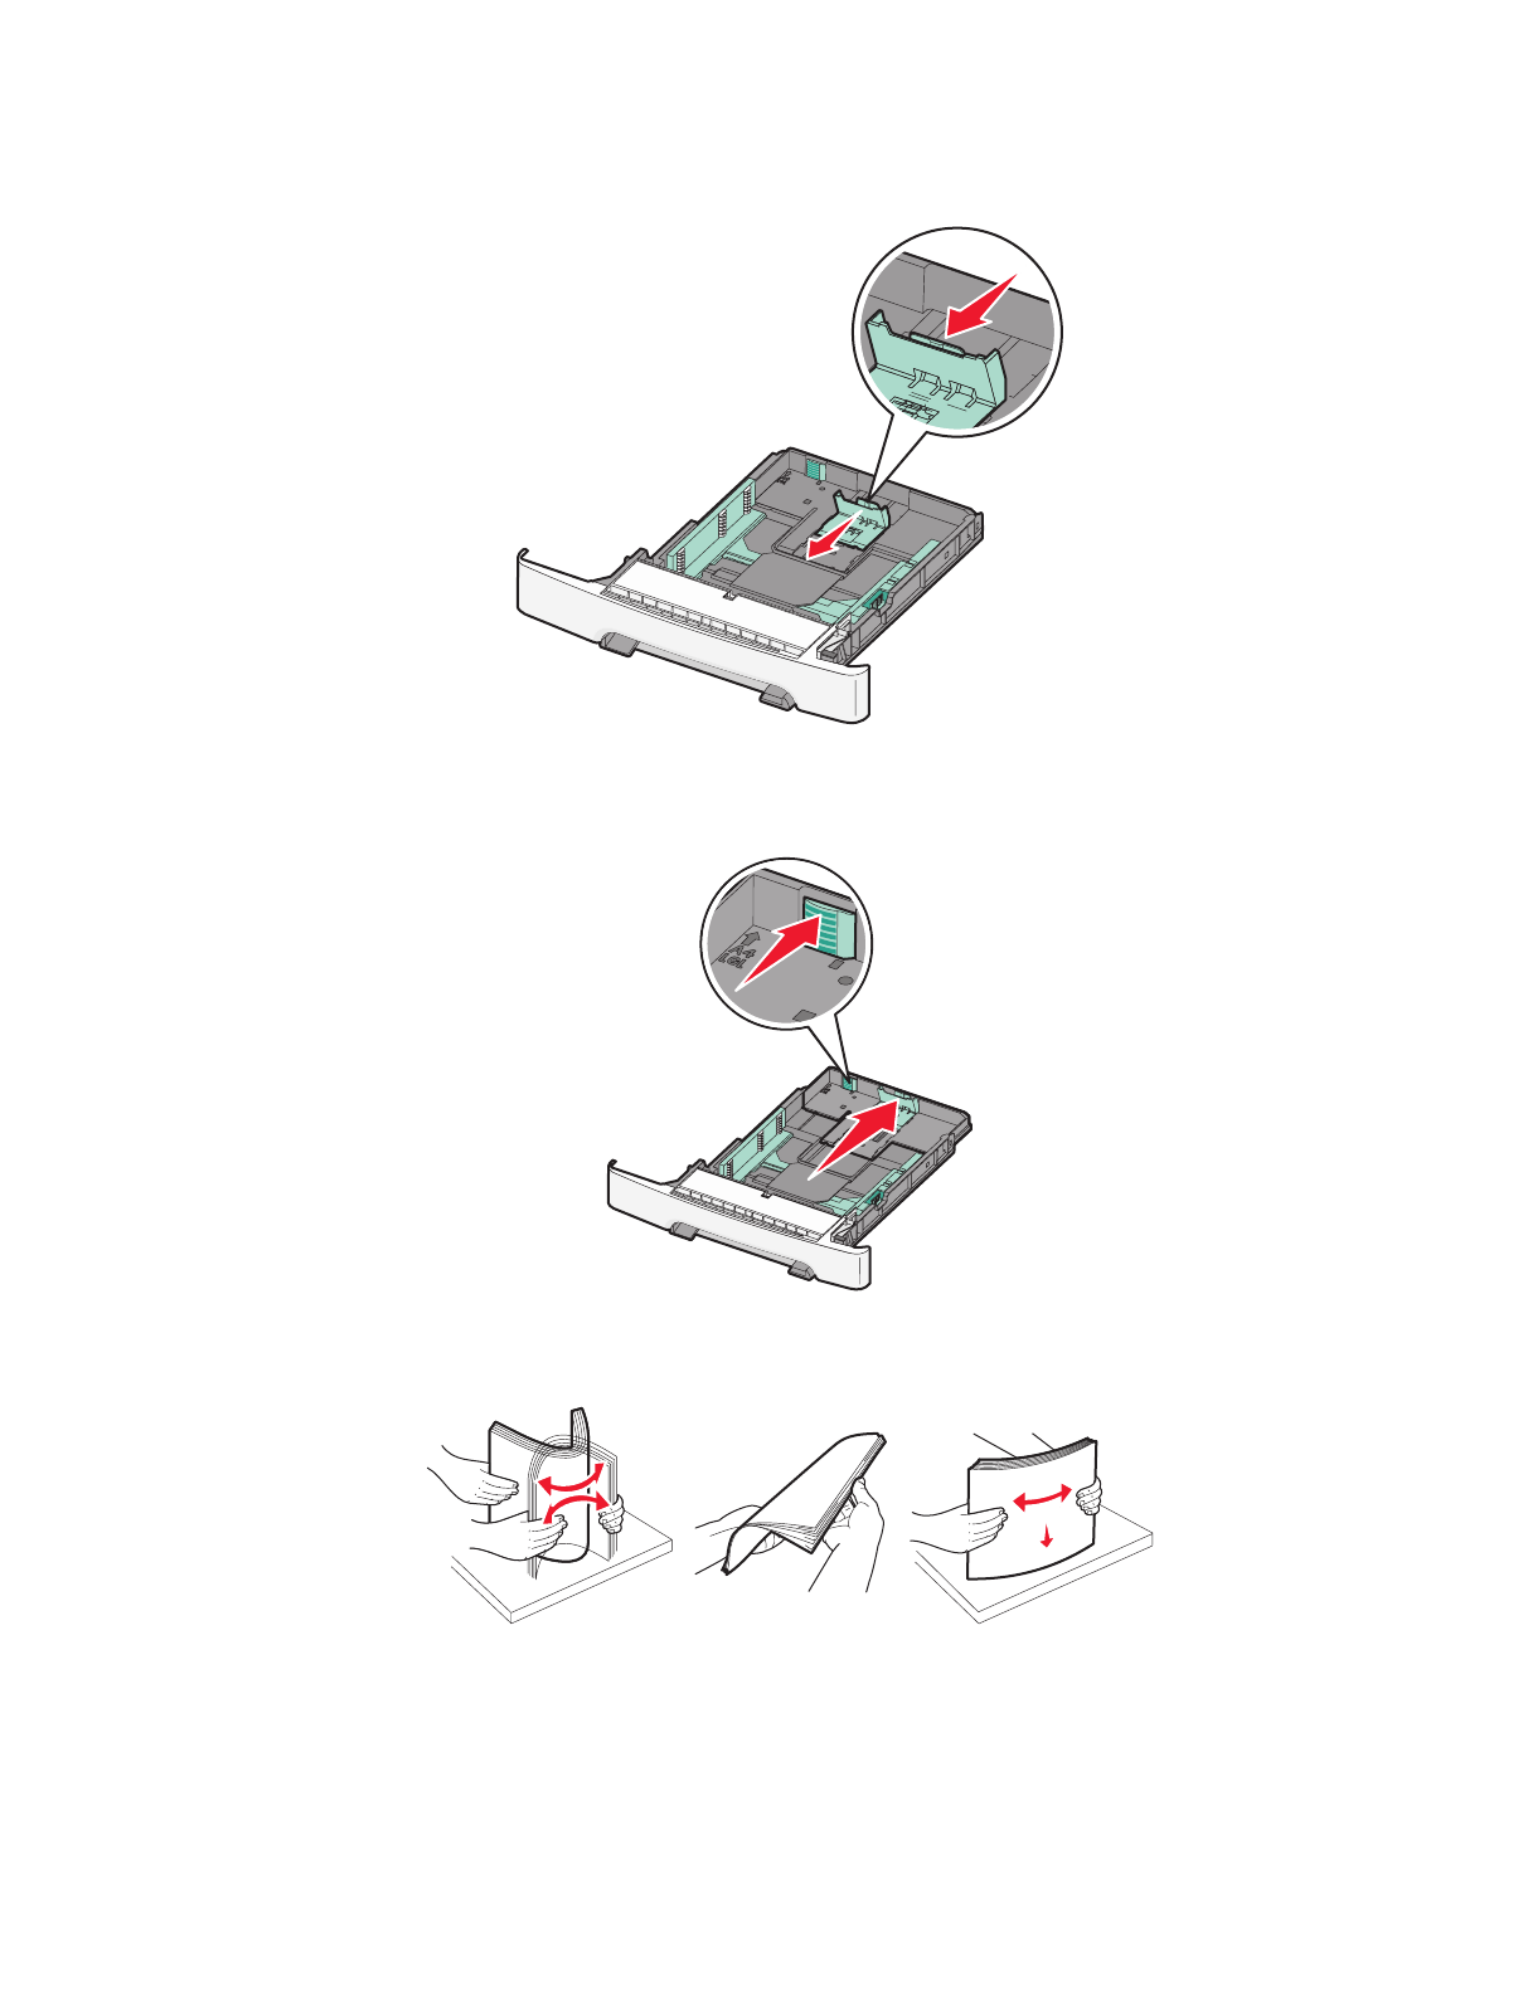
2Squeeze the length guide tab inward as shown, and slide the guide to the correct position for the paper size
being loaded.
Note: Use the size indicators on the bottom of the tray to help position the guide.
3If the paper is longer than letter-size paper, push the green tab at the back of the tray to elongate it.
4Flex the sheets back and forth to loosen them, and then fan them. Do not fold or crease the paper. Straighten the
edges on a level surface.
Loading paper and specialty media
39
5Load the paper stack with the recommended print side faceup.
6Make sure the paper guides are secure against the edges of the paper.
Note: Make sure that side guides are placed tightly against the edges of the paper so that the image is registered
properly on the page.
7Insert the tray.
8If a different type or size of paper was loaded than the type or size previously loaded in the tray, change the Paper
Type or Paper Size setting for the tray from the printer control panel.
Note: Mixing paper sizes or types in a paper tray may lead to jams.
Loading the optional 650-sheet duo drawer
The 650-sheet duo drawer consists of a 550-sheet tray and a 100-sheet multipurpose feeder. This drawer is loaded
in the same way that the standard tray is loaded. The only differences are the look of the guide tabs and the location
of the paper size indicators, as shown in the following illustration:
Loading paper and specialty media
40
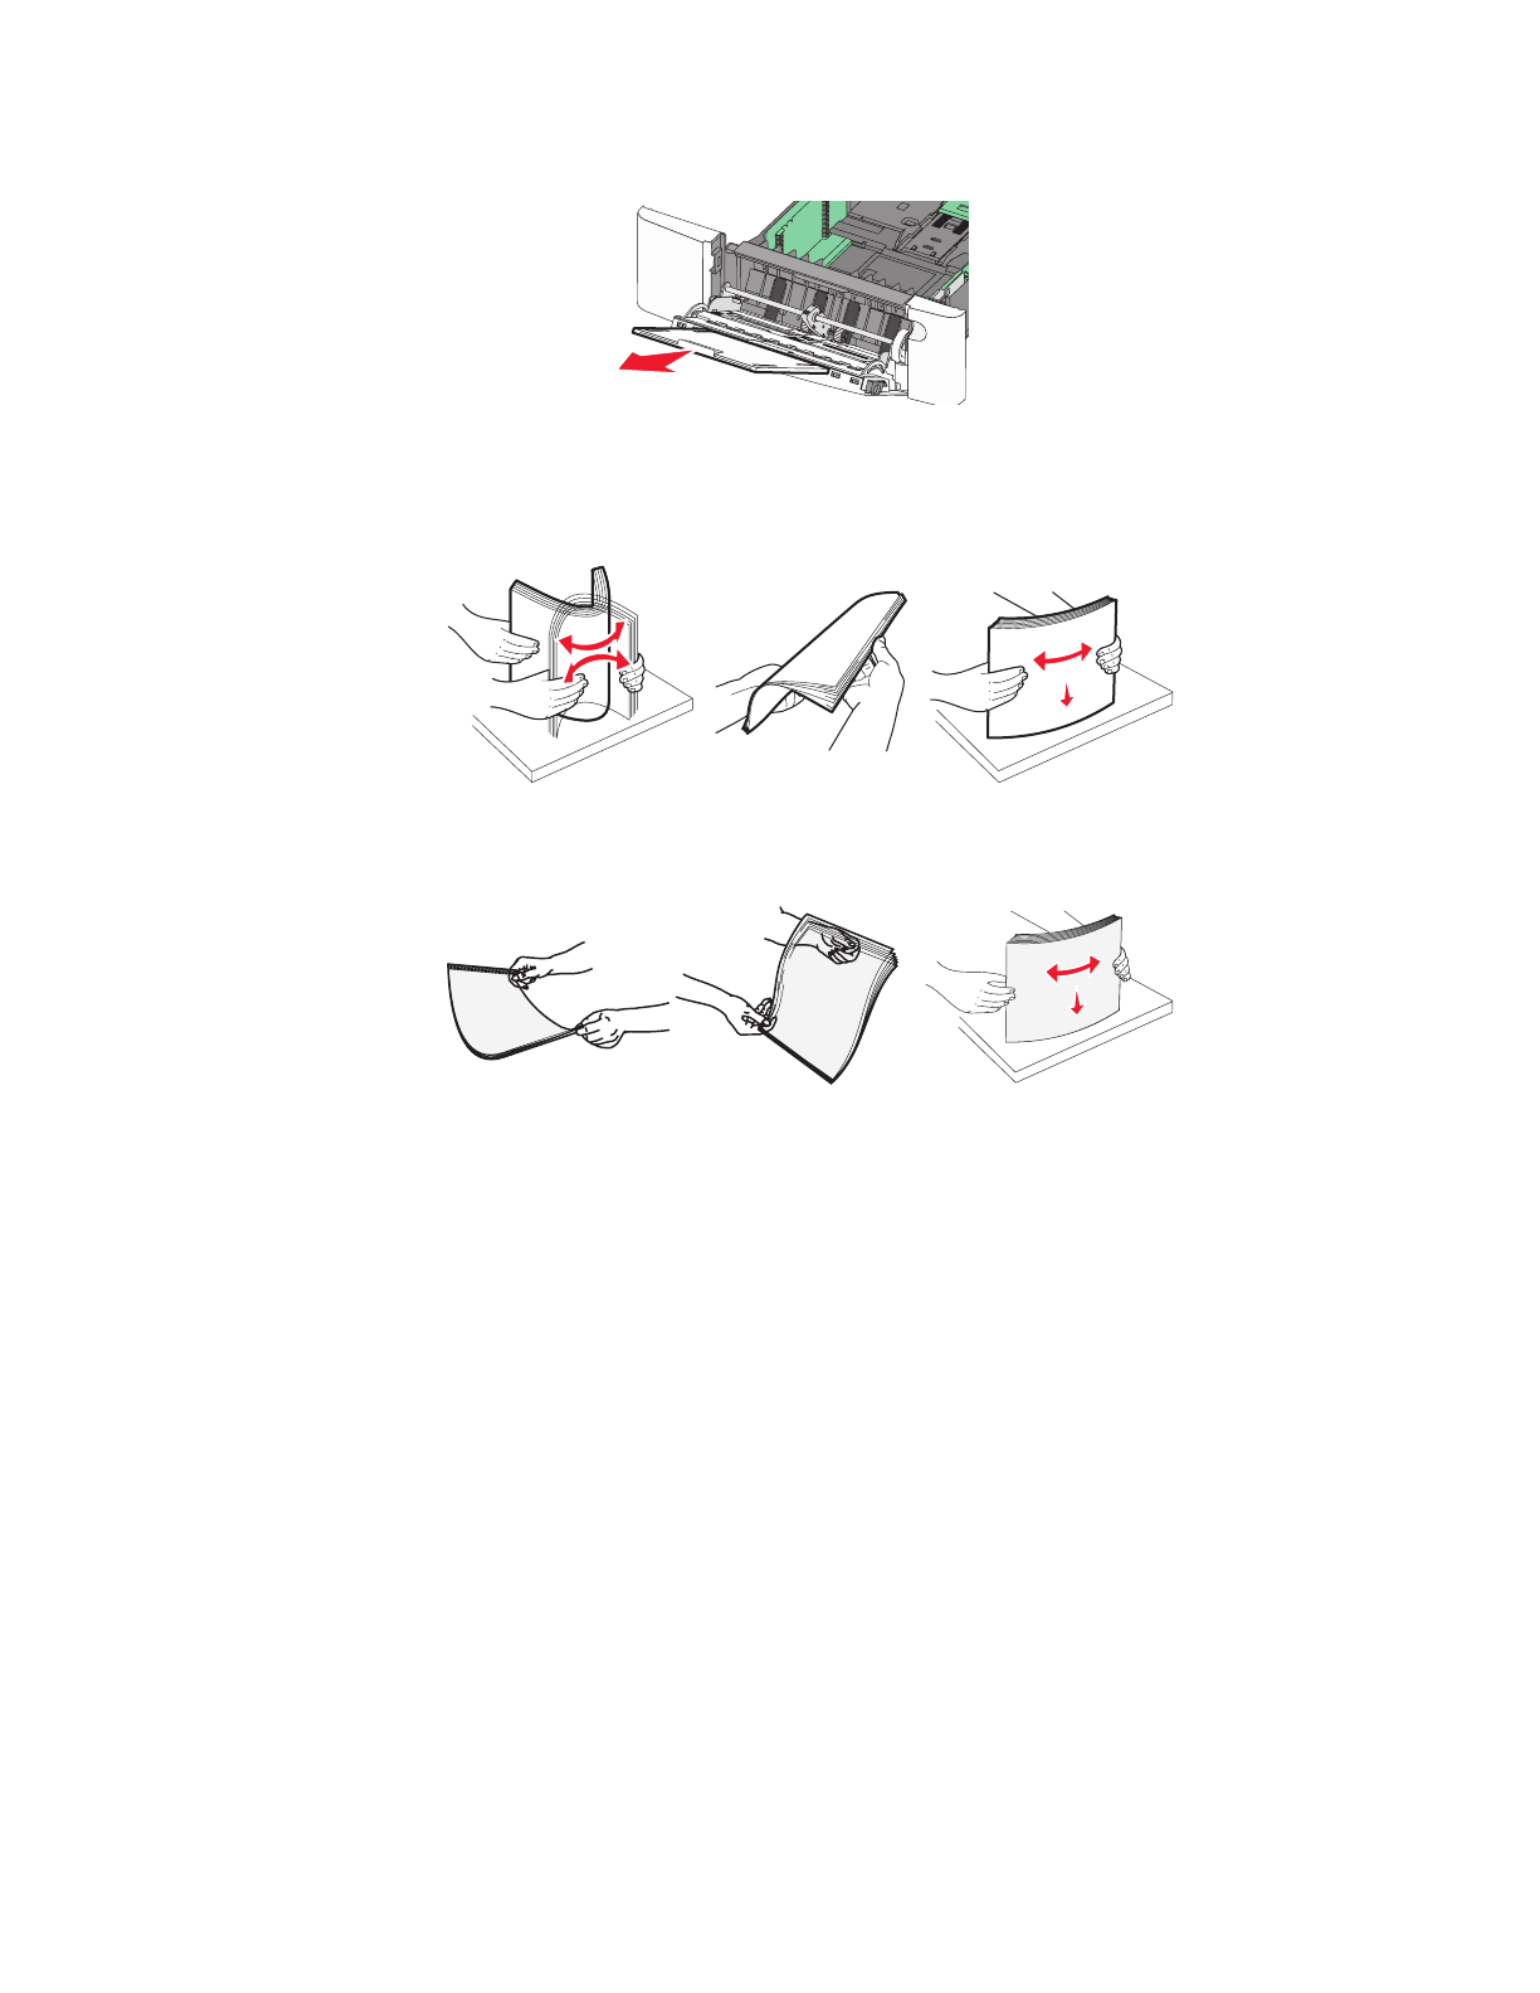
3Grasp the extension, and pull it straight out until it is fully extended.
4Prepare the paper for loading.
•Flex sheets of paper back and forth to loosen them, and then fan them. Do not fold or crease the paper.
Straighten the edges on a level surface.
•Hold transparencies by the edges and fan them. Straighten the edges on a level surface.
Note: Avoid touching the print side of transparencies. Be careful not to scratch them.
•Flex a stack of envelopes back and forth to loosen them, and then fan them. Straighten the edges on a level
surface.
Loading paper and specialty media
42

5Locate the stack height limiter and tab.
Note: Do not exceed the maximum stack height by forcing paper under the stack height limiter.
1
2
3
4
1Tab
2Stack height limiter
3Width guide
4Size indicators
6Load the paper, and then adjust the width guide to lightly touch the edge of the paper stack.
•Load paper, card stock, and transparencies with the recommended print side facedown and the top edge
entering first.
•Load envelopes with the flap side up.
Warning—Potential Damage: Never use envelopes with stamps, clasps, snaps, windows, coated linings,
or self-stick adhesives. These envelopes may severely damage the printer..
Notes:
•Do not load or close the multipurpose feeder while a job is printing.
•Load only one size and type of paper at a time.
7Make sure the paper is as far into the multipurpose feeder as it will go with very gentle pushing. Paper should lie
flat in the multipurpose feeder. Make sure the paper fits loosely in the multipurpose feeder and is not bent or
wrinkled.
8From the printer control panel, set the Paper Size and Paper Type.
Loading paper and specialty media
43

Using the manual feeder
1Send a manual print job:
For Windows users:
aWith a document open, click File
Print.
bClick Properties, Preferences, Options, or Setup.
cSelect Manual Paper.
dClick OK.
eClick OK or Print.
For Macintosh users:
aWith a document open, click File > Print.
bFrom the Copies & Pages or General pop-up menu, choose Manual Paper.
cClick OK or Print.
2When Load Manual <type> <size> appears, load the paper facedown into the manual feeder. Load
envelopes with the flap side up.
Notes:
•Align the long edge of the paper so that it is flush with the right side of the manual feeder.
•To achieve the best possible print quality, use only high-quality paper designed for laser printers.
Loading paper and specialty media
44

3Move the width guide until it lightly touches the sheet. Do not force the width guide against the paper, or it could
be damaged.
4Push the paper in until it stops. The printer pulls it in farther.
5From the printer control panel, set the Paper Size and Paper Type.
Loading paper and specialty media
45
Termékspecifikációk
| Márka: | Lexmark |
| Kategória: | nyomtató |
| Modell: | C544dn |
Szüksége van segítségre?
Ha segítségre van szüksége Lexmark C544dn, tegyen fel kérdést alább, és más felhasználók válaszolnak Önnek
Útmutatók nyomtató Lexmark

10 Április 2025
14 Január 2025
12 Január 2025
14 Október 2024
14 Október 2024
13 Október 2024
11 Október 2024
11 Október 2024
8 Október 2024
4 Október 2024
Útmutatók nyomtató
- nyomtató Samsung
- nyomtató Sony
- nyomtató Fujitsu
- nyomtató LG
- nyomtató Olympus
- nyomtató Panasonic
- nyomtató Canon
- nyomtató StarTech.com
- nyomtató Sharp
- nyomtató Lenovo
- nyomtató Toshiba
- nyomtató HP
- nyomtató Roland
- nyomtató Digitus
- nyomtató Zebra
- nyomtató AVM
- nyomtató Fujifilm
- nyomtató Dell
- nyomtató Xerox
- nyomtató Primera
- nyomtató Thomson
- nyomtató Polaroid
- nyomtató Kyocera
- nyomtató Ricoh
- nyomtató Epson
- nyomtató Huawei
- nyomtató Renkforce
- nyomtató Mitsubishi
- nyomtató Godex
- nyomtató Brother
- nyomtató Citizen
- nyomtató Microboards
- nyomtató Kodak
- nyomtató MSI
- nyomtató Dymo
- nyomtató Testo
- nyomtató Konica Minolta
- nyomtató Datamax O'Neil
- nyomtató Kogan
- nyomtató Honeywell
- nyomtató Velleman
- nyomtató D-Link
- nyomtató Fargo
- nyomtató TSC
- nyomtató Sagem
- nyomtató Olympia
- nyomtató Tomy
- nyomtató Posiflex
- nyomtató ZKTeco
- nyomtató NEC
- nyomtató CUSTOM
- nyomtató Panduit
- nyomtató OKI
- nyomtató Equip
- nyomtató Pantum
- nyomtató Brady
- nyomtató Bixolon
- nyomtató CSL
- nyomtató Nilox
- nyomtató Seiko
- nyomtató Argox
- nyomtató Royal Sovereign
- nyomtató Olivetti
- nyomtató Intermec
- nyomtató Minolta
- nyomtató DNP
- nyomtató Triumph-Adler
- nyomtató Oce
- nyomtató Paxar
- nyomtató Metapace
- nyomtató Ultimaker
- nyomtató Ibm
- nyomtató Toshiba TEC
- nyomtató Frama
- nyomtató Builder
- nyomtató Star Micronics
- nyomtató Dascom
- nyomtató HiTi
- nyomtató GG Image
- nyomtató Vupoint Solutions
- nyomtató Elite Screens
- nyomtató DTRONIC
- nyomtató Phoenix Contact
- nyomtató Videology
- nyomtató Star
- nyomtató EC Line
- nyomtató Colop
- nyomtató Approx
- nyomtató Fichero
- nyomtató Raspberry Pi
- nyomtató Middle Atlantic
- nyomtató IDP
- nyomtató Evolis
- nyomtató Nisca
- nyomtató Epson 7620
- nyomtató Sawgrass
Legújabb útmutatók nyomtató

10 Április 2025
10 Április 2025

10 Április 2025
10 Április 2025
10 Április 2025

9 Április 2025

9 Április 2025

9 Április 2025
3 Április 2025
3 Április 2025