Használati útmutató LC-Power LC-M27-QHD-240-C-K
Olvassa el alább 📖 a magyar nyelvű használati útmutatót LC-Power LC-M27-QHD-240-C-K (78 oldal) a Monitor kategóriában. Ezt az útmutatót 5 ember találta hasznosnak és 2 felhasználó értékelte átlagosan 4.5 csillagra
Oldal 1/78

LC-M27-QHD-240-C-K
GAMING MONITOR
BEDIENUNGSANLEITUNG

INHALT
1. Sicherheitshinweise
2. Wartung

3. Verpackungsinhalt
LC-M27-QHD-165-C-K
GAMING MONITOR
BEDIENUNGSANLEITUNG
Ger-3
4. Produktübersicht
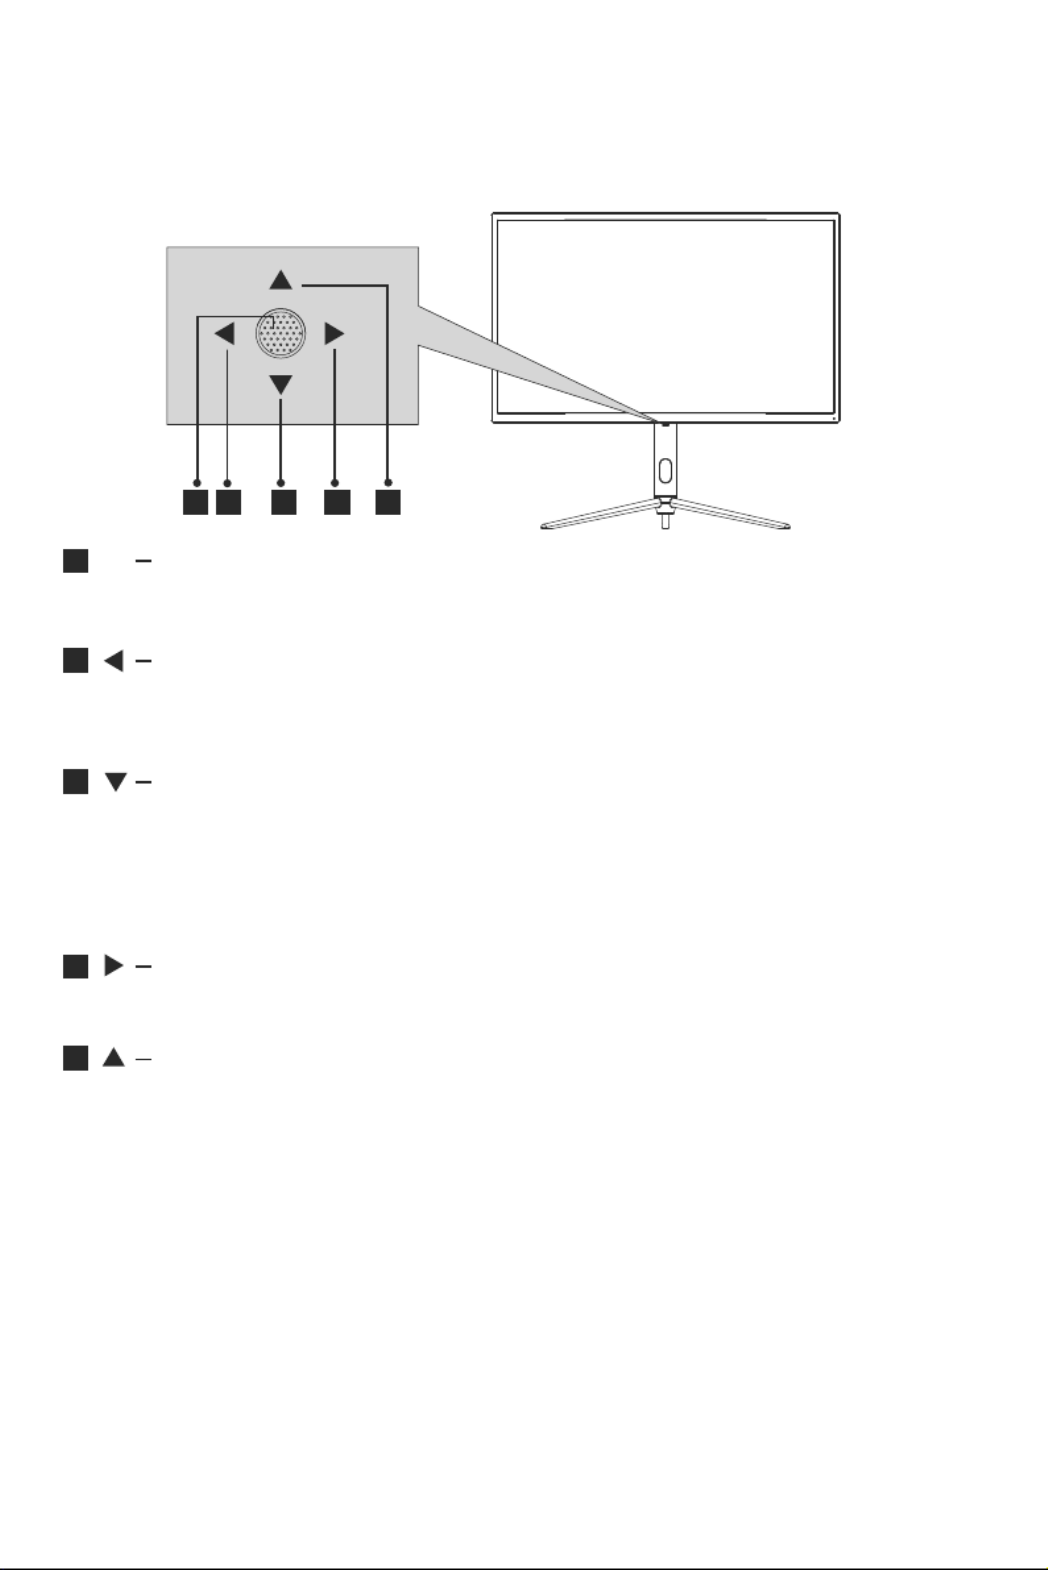
4.1 – Monitortasten
1
2
3
4
5
3 2 4 51
Wenn der Monitor ausgeschaltet ist, schalten Sie durch Drücken dieser
Taste den Monitor ein. Wenn der Monitor eingeschaltet ist, halten Sie
diese Taste zum Ausschalten des Monitors gedrückt.
●
Bei ausgeblendetem OSD drücken Sie den Joys�ck zur Anpassung
von GamePlus des Monitors von sich weg. Bei ak�vem OSD können Sie
den Joys�ck zur Aufwärtsnaviga�on in der Auswahl von sich weg drücken.
Diese Taste erhöht den Wert einer Einstellung, wenn eine Op�on ak�v ist.
Bei ausgeblendetem OSD öffnet diese Joys�ck-Richtung das
OSD-Menü. Nach Einblenden des OSD können Sie mit dem Joys�ck
Op�onen wählen und aufrufen.
Ziehen Sie den Joys�ck bei ausgeblendetem OSD nach vorne, um
den LED-Effekt zu öffnen. Dadurch können Sie die LED- Effekte-Systemkon-
sole aufrufen und eine Auswahl treffen. Ziehen Sie bei eingeblendetem
Bildschirmmenü den Joys�ck nach vorne, damit die Auswahl nach unten
navigiert. Wenn eine Op�on ak�v ist, verringert diese Taste auch den
Einstellwert.
Bei ausgeblendetem OSD schaltet diese Joys�ck-Richtung den
ECO-Modus ein. Wechseln Sie dann in den Szenenmodus. Verwenden
Sie die Joys�ck-Richtung nach Einblenden des OSD zum Verlassen des
OSD-Menüs.
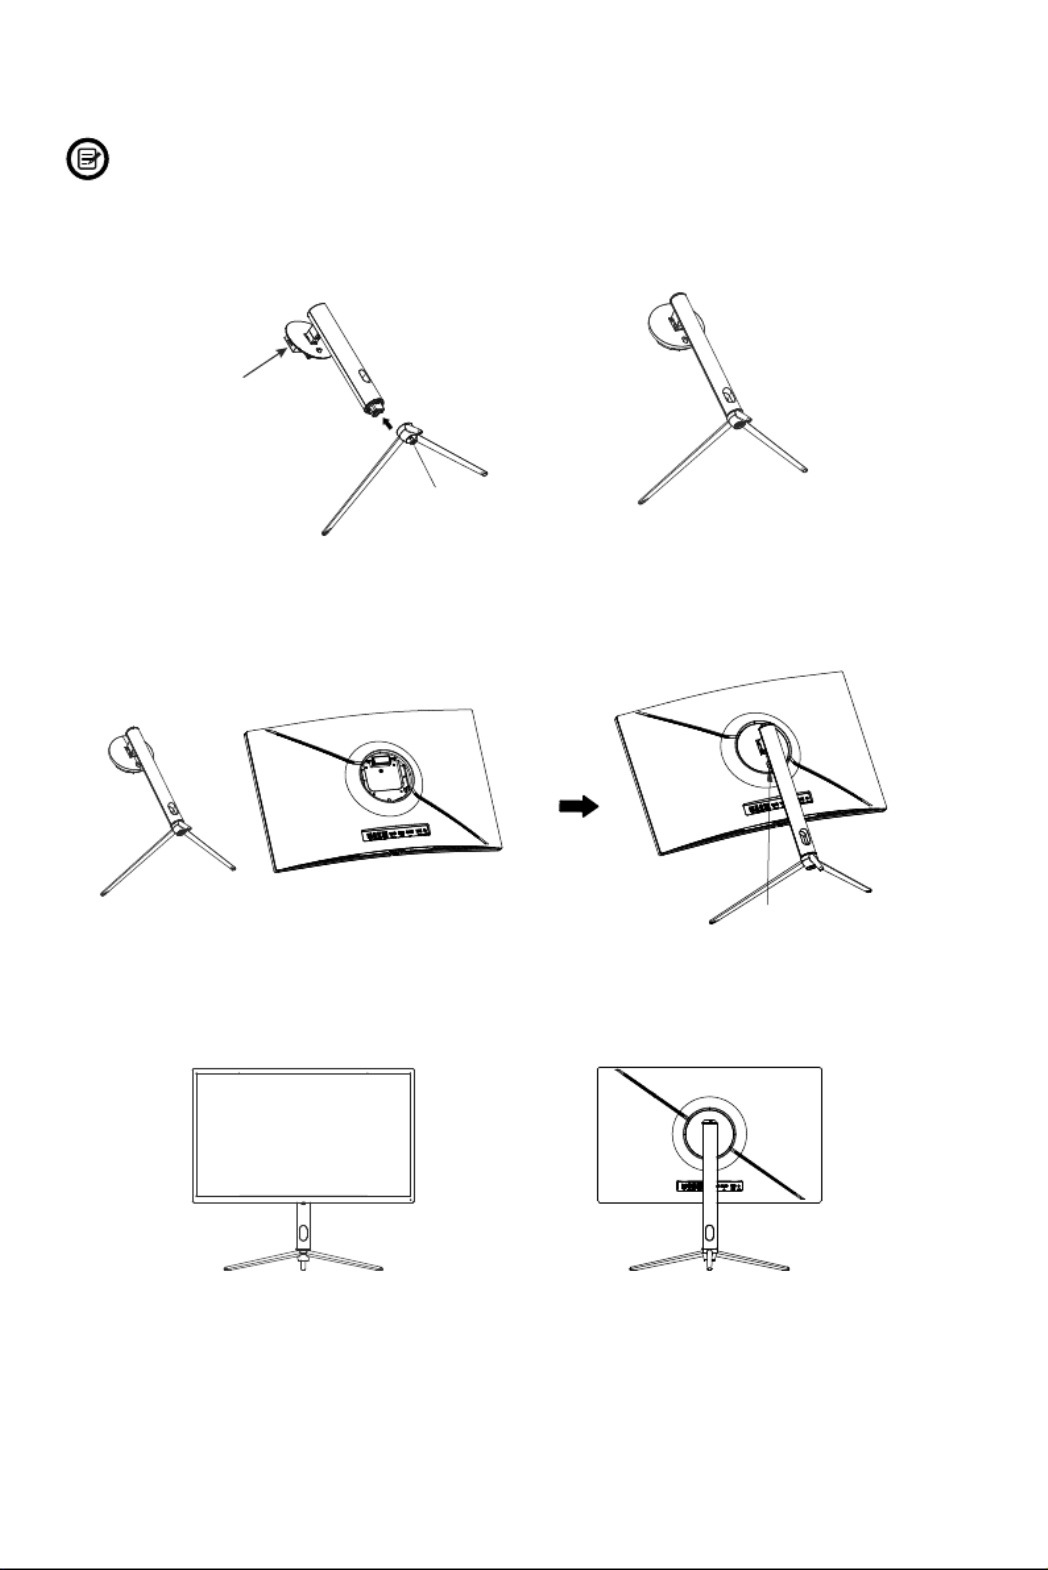
5. Standfußinstalla�on

6. Wandmontage
8. Leuchtanzeige und Lichtsensor
7. Anschließen der Kabel
Leuchtanzeige:
Lichtsensor:

LED- Effekte-Systemkonsole
9. Schnelltasten
10. OSD-Menü
LED Effects System Console
Color LedColorful
Strip Led
Strength HightLightOFF
Mode Breath
Backcolor
Frontcolor
Green
Red
DO you want to continue ?
OK Cancel
This option may result in higher energy consumption

Kollima�onsmodus
Quelle
Signal
Signaleingang wechseln oder Quelle wählen. Type-C,
DP, HDMI1, HDMI2.
Bildmodus
ECO
Bildmodus Mit der Szenenmodus-Schnelltaste können Sie den
Bildmodus direkt ändern. ECO, Standard, Photo, Film,
Spiel, Ego-Shooter und RTS
Dient der Auswahl der Fadenkreuze, die in der Mi�e des Bildschirms
angezeigt werden können.
Ger-9
Collimation Mode
Point Collimation1
Point Collimation2
Cross Collimation1
Cross Collimation2
Resolution: 2560x1440@60Hz SDR
HDMI1
Type-C
DP
HDMI1
HDMI2
InputSource: HDMI1
Resolution: 2560x1440@60Hz

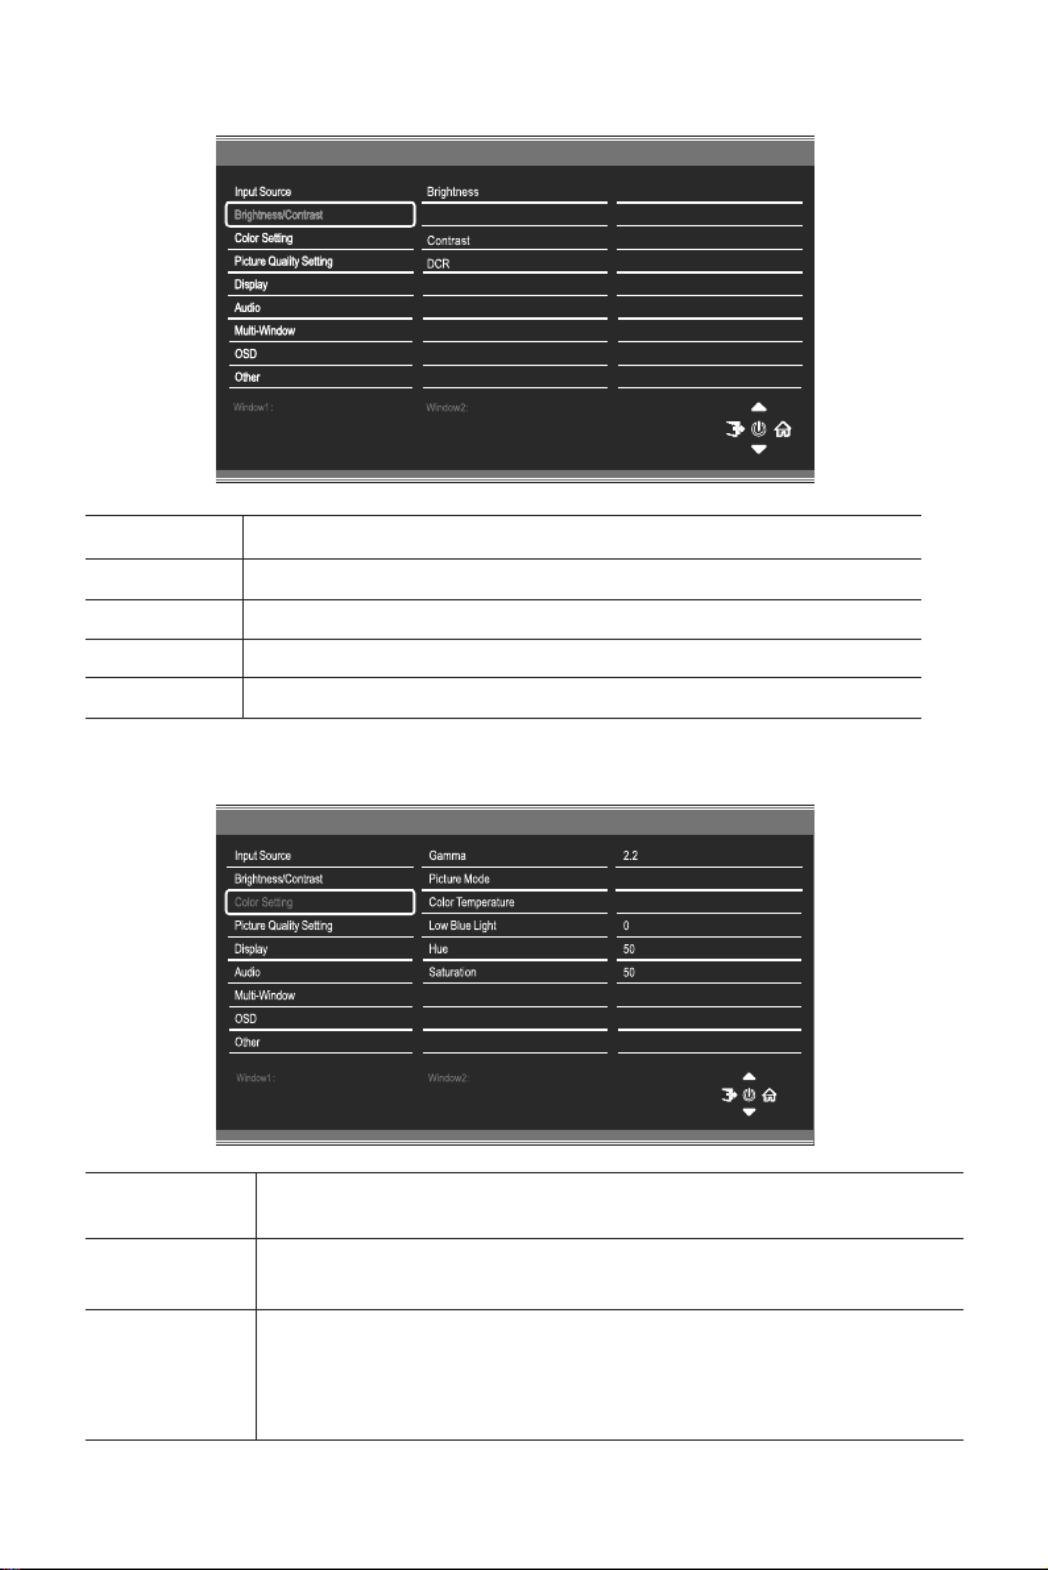
Helligkeit/Kontrast
Helligkeit
Passen Sie die Helligkeit des Displays zwischen 0 und 100 an.
Kontrast
Passen Sie den Kontrast des Displays zwischen 0 und 100 an.
Dyn. Kontrast
Schalten Sie die Funk�on Dynamisches Kontrastverhältnis
ein oder aus.
Lichtsensor Schalten Sie die Funk�on Lichtsensor ein oder aus.
Schwarzwert
Passen Sie den Schwarzpegel des Displays zwischen 0 und
100 an.
Farbeinstellungen
Gamma Ändern Sie den Gamma-Wert für das Display zwischen
1,8, 2,0, 2,2, 2,4 und 2,6
Bildmodus Ändern Sie den Bildmodus zwischen ECO, Standard, Photo,
Film, Spiel, Ego-Shooter und Echtzeitstr.
Farbtemperatur
Ändern Sie die Farbtemperatur des Displays in Normal,
Warm, Kühl oder ANWENDER. Wenn der Benutzermodus
ausgewählt ist, können Rot-, Grün- und Blau-Werte zwischen
0 und 100 individuell angepasst werden.
Ger-10
HDMI1
Blacklevel
50
60
50
Off
Off
InputSource: HDMI1
Resolution: 2560x1440@60Hz
Resolution: 2560x1440@60Hz SDR
Light Sensor
Resolution: 2560x1440@60Hz SDR
HDMI1
InputSource: HDMI2
Resolution: 2560x1440@60Hz
Warm
ECO
RGB Range Full

Bildqualität
Resolution: 2560x1440@60Hz SDR
HDMI1
Dynamic Luminous Control
Noise Reduction
MPRT Off
InputSource: HDMI1
Resolution: 2560x1440@60Hz

Anzeige
Bildformat
Ändern Sie das Bildformat in Breitbild, 4:3, Automa�sch oder 1:1.
Audio
Stumm Sie können die Stummschaltung der Audioausgabe ein-
und ausschalten.
Lautstärke Passen Sie die Ausgabelautstärke zwischen 0 und 100 an.
Audioquelle Wählen Sie die Ausgabequelle des Tons, Type-C, DP, HDMI1,
HDMI2 oder Auto-Quelle.
Ger-12
Resolution: 2560x1440@60Hz SDR
HDMI1
InputSource: HDMI1
Resolution: 2560x1440@60Hz
Resolution: 2560x1440@60Hz SDR
HDMI1
AutoSource
InputSource: HDMI1
Resolution: 2560x1440@60Hz

Mul�-Fenster
OSD
Resolution: 2560x1440@60Hz SDR
HDMI1
DP
InputSource: HDMI1
Resolution: 2560x1440@60Hz
Resolution: 2560x1440@60Hz SDR
HDMI1
InputSource: HDMI1
Resolution: 2560x1440@60Hz
OSD Rotation Normal
20
Anderes
Resolution: 2560x1440@60Hz SDR
HDMI1
InputSource: HDMI1
Resolution: 2560x1440@60Hz
USB Update FW
USB Power (sleep)
DP1.4

Ger-15
11. Technische Daten
LC-M27-QHD-240-C-K
27“
16:9
Modell
Bildschirmgröße
Bildformat
Beleuchtung
Helligkeit
Panel
Bildwiederholfrequenz
Betrachtungswinkel
Kontrastverhältnis
VESA-Montage
Farben
Signaleingang
Stromeingang
Audio
Lautsprecher
Audioausgang
Zubehör
Netzkabel
Niedrig. Blau
Abmessungen
Abmessungen (mit Ständer)
Abmessungen (ohne Ständer)
E-LED
2 2
VA
240Hz
Schnell 1 ms
100 x 100 mm
1 x DP 1.4, 2 x HDMI 2.0, 2 x USB-A,1XUSB-B,
1 x Type-C
19,5V Gleichspannung 9,23A
16 7 Mio.,
615,8*269,06*559,5mm
615,8*122,39*371,9mm
5,18Kg
8,4Kg
DP1.4: 2560 × 1440 bei 240Hz
HDMI 2.0: 2560 × 1440 bei 144Hz
Type-C: 2560 × 1440 bei 144Hz
2500:1
≥ 178° (H) / ≥ 178 °(V)
Ja
Nein
Ja
Ja
Netzteil Ja
HDMI-Kabel Ja
DP-Kabel Ja
Ja

TABLE OF CONTENTS
8.
9.
10.
1. Safety Precau�ons
2. Maintenance

3.Box Contents
Legal no�ce:
The terms HDMl and HDMI High Defini�on Mul�media lnterface, and the
HDMl logo are trademarks or registered trademarks of HDMI Licensing
Administrator, Inc. in the USA and other countries.
Eng-2
M iton or Stand stem x 1 Stand base x 1
(With Thumb Screw)
Screws x 4
(For Wall Moun�ng)
Moun�ng Plate x 1
(For Wall Moun�ng)
European Power Cable x 1
Bri�sh Power Cable x 1
HDMI Cable x 1
DP Cable x 1
Screwdriver x 1
Power Adaptor x 1
Us l x 1er Manua
LC-M27-QHD-165-C-K
GAMING MONITOR
USER MANUAL

4. Product Overview
1
2
3
4
5
3 2 4 51

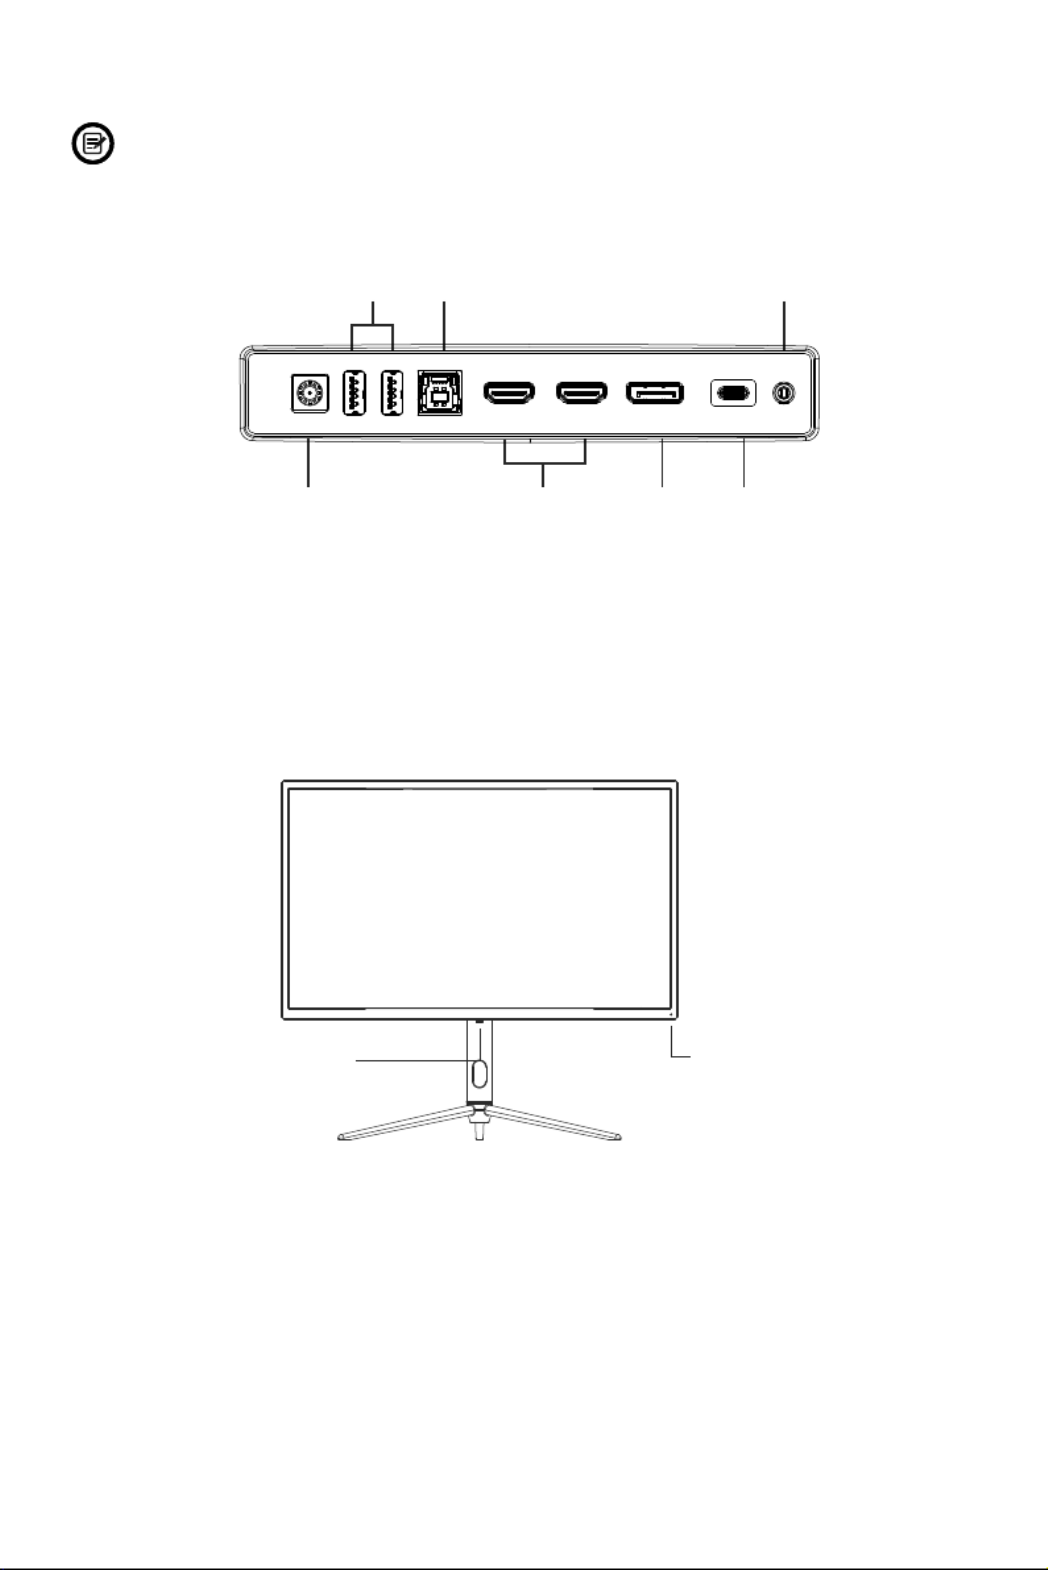
4.2 – Monitor Ports
6 9 10 11 1287
6
7
8
Power Connector: Insert the power cable to supply power to the monitor.
USB A: Connect any USB device.
USB B: Obtain a USB Type B to USB Type A up-link cable and connect
the Type B end to the back of the monitor and the other end to the back
of the computer’s USB port.
HDMI 2.0 Connectors: Insert one end of the HDMI cable into the computer’s
HDMI output and connect the other end to the monitor’s HDMI port.
DP 1.4 Connectors: Insert one end of the DP cable into the computer’s DP
output and connect the other end to the monitor’s DP port.
Type-C Connectors: Insert one end of the Type-C cable into the computer's
Type-C output and connect the other end to the monitor's Type-C port.
Audio Output: Insert the audio cable for output of audio signals.
Eng-4
9
10
11
12
DC USB-A USB-A USB-B HDMI 2 HDMI 1 DP Type-C AUDIO

1.
2.
3.
4.
5. Stand lnstalla�on

2. Take out the wall-mounted adapter four PM4*19 screws from the
accessories, assemble it in the middle of the whole machine, and
fix it by locking.
The wall-mounted adapter is assembled to the middle
of the whole machine (fixed with CM4*23 screws in the
accessory bag)
Wall adapter
PM4*19 Screws
6. Wall Moun�ng
VESA and/or moun�ng accessories not included.
1. Use a screwdriver to remove the four screws locked in the middle of the
whole machine (when disassembling the screws, the display screen can
leave the polyol foam to prevent the screen from breaking)
Disassemble the four
screws that lock the
whole machine
3. Do not pinch the screen directly with your hands during the process of
hanging the product to prevent the screen from breaking.
Wall
Mount
(Not included)
Eng-6

8. lndicator Light and Light Senor
— Light Senor
7. Basic Opera�on
1.
2.
3.

LED Effects System Console
LED Effects System Console
Color LedColorful
Strip Led
Strength HightLightOFF
Mode Breath
Backcolor
Frontcolor
Green
Red
9. Shortcut Bu�ons
10. OSD Menu
DO you want to continue ?
OK Cancel
This option may result in higher energy consumption

Collima�on Mode
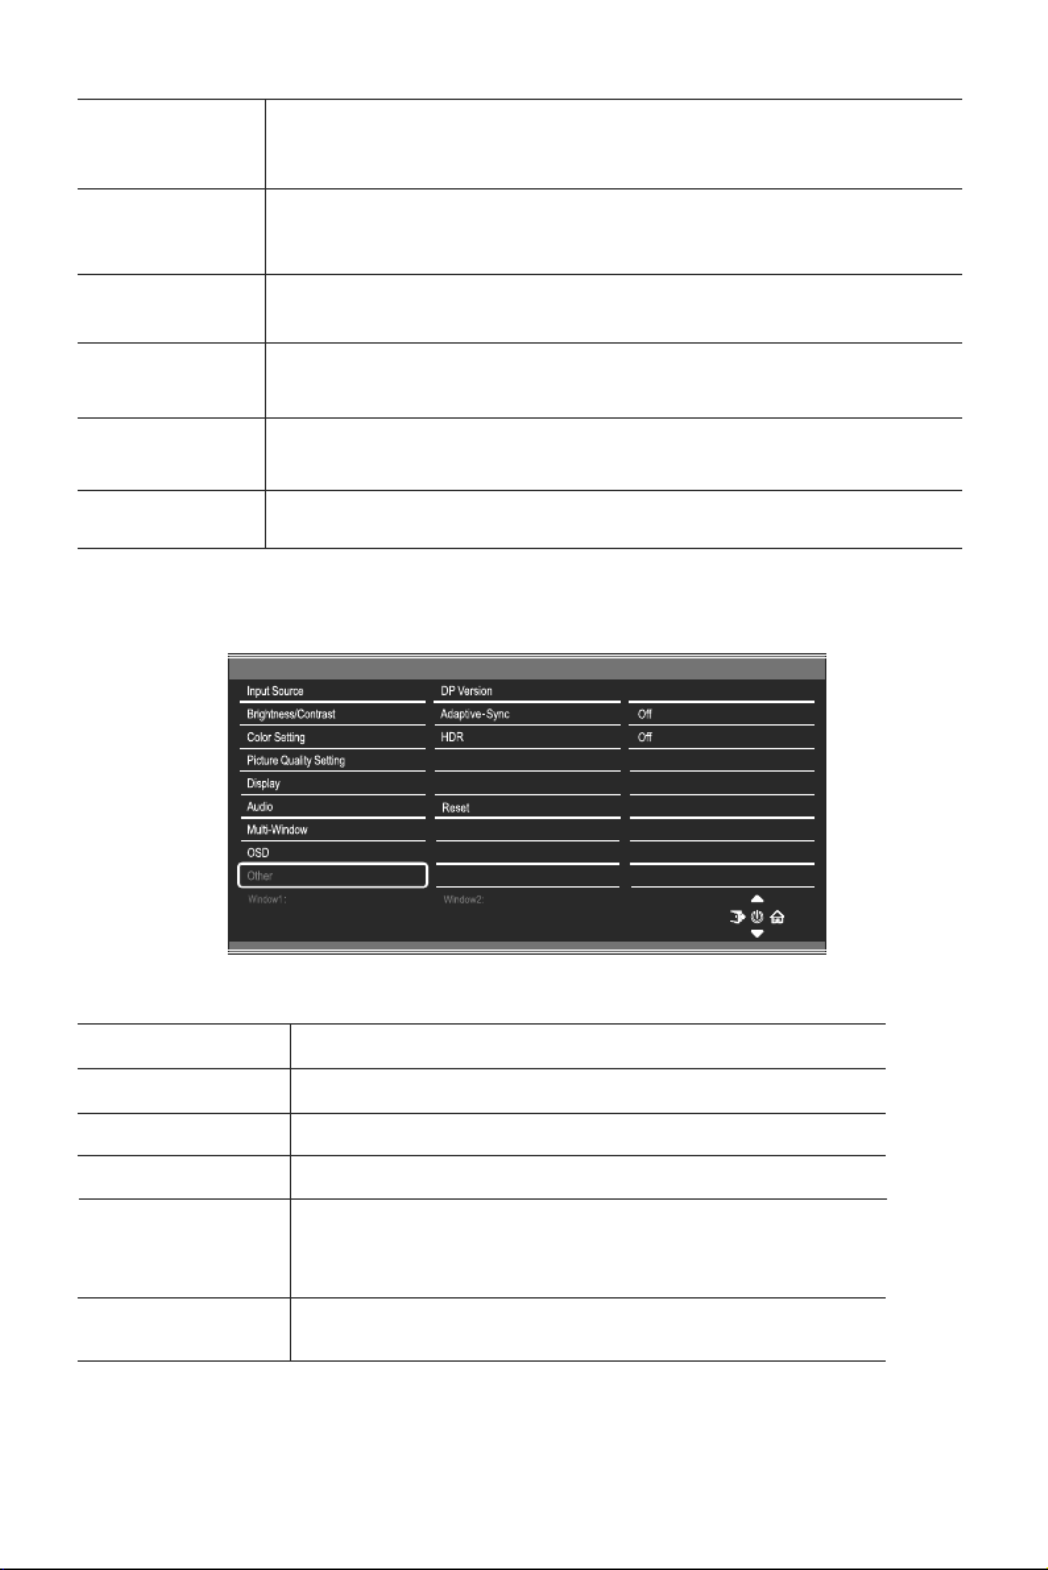
Input Source
Signal
Switch the signal input or select the source. Type-C, DP,
HDMI1, HDMI2.
Resolution: 2560x1440@60Hz SDR
HDMI1
Type-C
DP
HDMI1
HDMI2
InputSource: HDMI1
Resolution: 2560x1440@60Hz
Collimation Mode
Point Collimation1
Point Collimation2
Cross Collimation1
Cross Collimation2
Picture Mode
ECO
Picture Mode Switch the scene mode shortcut bu�on you can change the
picture mode directly: ECO, Standard, Photo, Movie, Game,
FPS and RTS.
Used to choose the Crosshairs that can be displayed in the centre of the
screen.
Eng-9
Brightness/Contrast
Brightness Adjust the brightness of the display between 0 and 100.
Contrast Adjust the contrast of the display between 0 and 100.
DCR Turn the Dynamic Contrast Ra�o Feature On or Off.
LightSensor Turn the Light Sensor Feature On or Off.
Blacklevel Adjust the black level of the display between 0 and 100.
Color Se�ng
Gamma Change the Gamma value for the display between 1.8, 2.0,
2.2, 2.4, 2.6
Picture Mode Change the picture mode between ECO, Standard, Photo,
Movie, Game, FPS and RTS.
Colour
Temperature
Change the Colour Temperature of the display to Normal,
Warm, Cool or User. When the User Mode is selected, the
Red, Green, and Blue values can be adjusted independently
between 0 and 100.
HDMI1
Blacklevel
50
60
50
Off
Off
InputSource: HDMI1
Resolution: 2560x1440@60Hz
Resolution: 2560x1440@60Hz SDR
Light Sensor
Resolution: 2560x1440@60Hz SDR
HDMI1
InputSource: HDMI2
Resolution: 2560x1440@60Hz
Warm
ECO
RGB Range Full
Eng-10
Termékspecifikációk
| Márka: | LC-Power |
| Kategória: | Monitor |
| Modell: | LC-M27-QHD-240-C-K |
Szüksége van segítségre?
Ha segítségre van szüksége LC-Power LC-M27-QHD-240-C-K, tegyen fel kérdést alább, és más felhasználók válaszolnak Önnek
Útmutatók Monitor LC-Power

12 Január 2025
22 Augusztus 2024
19 Augusztus 2024
14 Augusztus 2024
14 Augusztus 2024
13 Augusztus 2024
13 Augusztus 2024
13 Augusztus 2024
13 Augusztus 2024
12 Augusztus 2024
Útmutatók Monitor
- Monitor Samsung
- Monitor PeakTech
- Monitor Sony
- Monitor Yamaha
- Monitor Fujitsu
- Monitor Acer
- Monitor LG
- Monitor Philips
- Monitor Pioneer
- Monitor Olympus
- Monitor SilverCrest
- Monitor Garmin
- Monitor RCF
- Monitor Bosch
- Monitor Panasonic
- Monitor Canon
- Monitor JVC
- Monitor Sharp
- Monitor Lenovo
- Monitor HyperX
- Monitor Toshiba
- Monitor Neumann
- Monitor Omron
- Monitor HP
- Monitor Hyundai
- Monitor Hisense
- Monitor BenQ
- Monitor Apple
- Monitor Emos
- Monitor Medion
- Monitor Vimar
- Monitor JBL
- Monitor TCL
- Monitor OSEE
- Monitor Viessmann
- Monitor Insignia
- Monitor Dell
- Monitor Boss
- Monitor Crestron
- Monitor Gigabyte
- Monitor Tripp Lite
- Monitor Xerox
- Monitor Thomson
- Monitor Speco Technologies
- Monitor Hikvision
- Monitor Eurolite
- Monitor Epson
- Monitor V7
- Monitor Huawei
- Monitor Asus
- Monitor PEAQ
- Monitor Renkforce
- Monitor Haier
- Monitor Mitsubishi
- Monitor M-Audio
- Monitor AOC
- Monitor Citizen
- Monitor Westinghouse
- Monitor Hitachi
- Monitor Continental Edison
- Monitor Asrock
- Monitor Ring
- Monitor Alpine
- Monitor Optoma
- Monitor SPL
- Monitor Smart
- Monitor Dahua Technology
- Monitor Viewsonic
- Monitor Denver
- Monitor Dynaudio
- Monitor Ernitec
- Monitor Qian
- Monitor Joy-It
- Monitor MSI
- Monitor Daewoo
- Monitor Tesla
- Monitor Kali Audio
- Monitor Godox
- Monitor Cisco
- Monitor Newline
- Monitor Behringer
- Monitor APC
- Monitor KRK
- Monitor Cooler Master
- Monitor Chauvet
- Monitor Shure
- Monitor PreSonus
- Monitor Archos
- Monitor Deltaco
- Monitor Tannoy
- Monitor Plantronics
- Monitor Kogan
- Monitor Honeywell
- Monitor SMART Technologies
- Monitor Marshall
- Monitor Kindermann
- Monitor Alesis
- Monitor Velleman
- Monitor Prestigio
- Monitor Monacor
- Monitor IK Multimedia
- Monitor Blaupunkt
- Monitor NZXT
- Monitor Yealink
- Monitor Razer
- Monitor Samson
- Monitor Jay-Tech
- Monitor Mackie
- Monitor Posiflex
- Monitor Peerless-AV
- Monitor Abus
- Monitor AG Neovo
- Monitor Iiyama
- Monitor Konig
- Monitor Seiki
- Monitor 3M
- Monitor ARRI
- Monitor GlobalTronics
- Monitor Jensen
- Monitor Pyle
- Monitor AVer
- Monitor Sanyo
- Monitor Salora
- Monitor IFM
- Monitor DataVideo
- Monitor Maxell
- Monitor Atlona
- Monitor Schneider
- Monitor AJA
- Monitor Brandson
- Monitor Danfoss
- Monitor Vorago
- Monitor Barco
- Monitor NEC
- Monitor Element
- Monitor Marshall Electronics
- Monitor Yorkville
- Monitor Elo
- Monitor IStarUSA
- Monitor Provision-ISR
- Monitor Postium
- Monitor Orion
- Monitor Palmer
- Monitor EverFocus
- Monitor Elvid
- Monitor Gamber-Johnson
- Monitor Focal
- Monitor Adj
- Monitor Legamaster
- Monitor Wohler
- Monitor Packard Bell
- Monitor Vitek
- Monitor Planar
- Monitor Mobile Pixels
- Monitor CSL
- Monitor Newstar
- Monitor SWIT
- Monitor RGBlink
- Monitor Kramer
- Monitor ART
- Monitor AMX
- Monitor Alienware
- Monitor Emachines
- Monitor Caliber
- Monitor Maxdata
- Monitor Sunstech
- Monitor Sunny
- Monitor BlueBuilt
- Monitor Marquant
- Monitor Da-Lite
- Monitor ProXtend
- Monitor Kubo
- Monitor GeoVision
- Monitor LaCie
- Monitor InFocus
- Monitor Midas
- Monitor Festo
- Monitor Swissonic
- Monitor Waeco
- Monitor Ikan
- Monitor IHealth
- Monitor QSC
- Monitor Hannspree
- Monitor ESI
- Monitor Avocor
- Monitor Simrad
- Monitor Jung
- Monitor Genelec
- Monitor Interlogix
- Monitor Eizo
- Monitor POSline
- Monitor Peerless
- Monitor Atomos
- Monitor Mad Catz
- Monitor Krom
- Monitor Monoprice
- Monitor Promethean
- Monitor Odys
- Monitor Fostex
- Monitor Prowise
- Monitor Terra
- Monitor Neets
- Monitor Stairville
- Monitor Soundstream
- Monitor Xoro
- Monitor HKC
- Monitor I3-Technologies
- Monitor CTOUCH
- Monitor Ozone
- Monitor HoverCam
- Monitor Ibm
- Monitor BOOX
- Monitor Aputure
- Monitor Drawmer
- Monitor Blue Sky
- Monitor Zalman
- Monitor Iadea
- Monitor Advantech
- Monitor Hercules
- Monitor Sonifex
- Monitor Avantone Pro
- Monitor Ganz
- Monitor Extron
- Monitor Belinea
- Monitor Adam
- Monitor Triton
- Monitor ITek
- Monitor Akuvox
- Monitor Antelope Audio
- Monitor MicroTouch
- Monitor X-Rite
- Monitor EKO
- Monitor ONYX
- Monitor IBoardTouch
- Monitor Mirai
- Monitor Elite Screens
- Monitor Mitsai
- Monitor Skytronic
- Monitor TV One
- Monitor Christie
- Monitor Hanwha
- Monitor COMMBOX
- Monitor Yiynova
- Monitor Pelco
- Monitor Lilliput
- Monitor LightZone
- Monitor AOpen
- Monitor Planet Audio
- Monitor EC Line
- Monitor Datacolor
- Monitor Fluid
- Monitor HELGI
- Monitor Desview
- Monitor Syscom
- Monitor Allsee
- Monitor Alogic
- Monitor Night Owl
- Monitor ProDVX
- Monitor Varad
- Monitor PureTools
- Monitor DoubleSight
- Monitor CTL
- Monitor Game Factor
- Monitor Nixeus
- Monitor Chimei
- Monitor Blue Sea
- Monitor AMCV
- Monitor Faytech
- Monitor Hamlet
- Monitor Wyse - Dell
- Monitor Approx
- Monitor Bauhn
- Monitor TVLogic
- Monitor Feelworld
- Monitor GeChic
- Monitor Oecolux
- Monitor ADS-TEC
- Monitor Satco
- Monitor Casalux
- Monitor Positivo
- Monitor Jupiter
- Monitor Transvideo
- Monitor Innocn
- Monitor KeepOut
- Monitor Shimbol
- Monitor Raysgem
- Monitor Motrona
- Monitor Ikegami
- Monitor AORUS
- Monitor Portkeys
- Monitor Mimo Monitors
- Monitor Enttec
- Monitor American Dynamics
- Monitor AIS
- Monitor Eve Audio
- Monitor Wortmann AG
- Monitor Viotek
- Monitor Vidi-Touch
- Monitor KTC
- Monitor CoolerMaster
- Monitor Atlantis Land
- Monitor HEDD
- Monitor Colormetrics
- Monitor Monkey Banana
- Monitor SmallHD
- Monitor UPERFECT
- Monitor GVision
- Monitor Voxicon
- Monitor Mybeo
- Monitor Bearware
- Monitor IOIO
- Monitor DTEN
- Monitor Cocopar
- Monitor Titan Army
- Monitor Xenarc
- Monitor Delvcam
- Monitor Wimaxit
- Monitor BookIT
Legújabb útmutatók Monitor

9 Április 2025

9 Április 2025

9 Április 2025

8 Április 2025
8 Április 2025

5 Április 2025

5 Április 2025

4 Április 2025
2 Április 2025
2 Április 2025