Használati útmutató InFocus IN3146
Olvassa el alább 📖 a magyar nyelvű használati útmutatót InFocus IN3146 (75 oldal) a Beamer kategóriában. Ezt az útmutatót 3 ember találta hasznosnak és 2 felhasználó értékelte átlagosan 4.5 csillagra
Oldal 1/75

— — i
Copyright
This publication, including all photographs, illustrations and software, is protected under international
copyright laws, with all rights reserved. Neither this manual, nor any of the material contained herein, may
be reproduced without written consent of the author.
© Copyright 2017
Disclaimer
The information in this document is subject to change without notice. The manufacturer makes no
representations or warranties with respect to the contents hereof and specifically disclaims any implied
warranties of merchantability or fitness for any particular purpose. The manufacturer reserves the right to
revise this publication and to make changes from time to time in the content hereof without obligation of
the manufacturer to notify any person of such revision or changes.
Trademark Recognition
Kensington is a U.S. registered trademark of ACCO Brand Corporation with issued registrations
and pending applications in other countries throughout the world.
HDMI, the HDMI Logo, and High Definition Multimedia Interface are trademarks or -
registered trademarks of HDMI Licensing LLC in the United States and other countries.
MHL, the MHL logo, and Mobile High Definition Link are trademarks or- registered
trademarks of MHL licensing, LLC.
Apple, Macintosh, and PowerBook are trademarks or registered trademarks of Apple Computer, Inc. IBM
is a trademark or registered trademark of International Business Machines, Inc. Microsoft, PowerPoint,
and Windows are trademarks or registered trademarks of Microsoft Corporation. Adobe and Acrobat are
trademarks or registered trademarks of Adobe Systems Incorporated. DLP®, DLP Link and the DLP logo
are registered trademarks of Texas Instruments and BrilliantColor™ is a trademark of Texas Instruments.
InFocus, In Focus, and INFOCUS (stylized) are either registered trademarks or trademarks of InFocus
Corporation in the United States and other countries.
All other product names used in this manual are the properties of their respective owners and are
acknowledged.
Ver.:1

IN3144_IN3146_IN3148HD User’s Manual
— —ii
Important Safety Information
Important:
It is strongly recommended that you read this section carefully before using the projector. These
safety and usage instructions will ensure that you enjoy many years of safe use of the projector.
Keep this manual for future reference.
Symbols Used
Warning symbols are used on the unit and in this manual to alert you of hazardous situations.
The following styles are used in this manual to alert you to important information.
Note:
Provides additional information on the topic at hand.
Important:
Provides additional information that should not be overlooked.
Caution:
Alerts you to situations that may damage the unit.
Warning:
Alerts you to situations that may damage the unit, create a hazardous environment, or cause
personal injury.
Throughout this manual, component parts and items in the OSD menus are denoted in bold font as in this
example:
“Push the Menu button on the remote control to open the Main
menu.”
General Safety Information
Do not open the unit case. Aside from the projection lamp, there are no user-serviceable parts in
the unit. For servicing, contact qualified service personnel.
Follow all warnings and cautions in this manual and on the unit case.
The projection lamp is extremely bright by desig
n. To avoid damage to eyes, do not look into the
lens when the lamp is on.
Do not place the unit on an unstable surface, cart, or stand.
Avoid using the system near water, in direct sunlight, or near a heating device.
Do not place heavy objects such as books or bags on the unit.
Note:
As with any bright light source, do not stare into the beam, RG2 IEC 62471-5:2015

Preface
— —iii
Projector Installation Notice
Place the projector in a horizontal position
The tilt angle of the projector should not exceed 15 degrees. In addition, the projector should
not be installed in any other way except desktop and ceiling mount positions. Otherwise lamp life
could decrease dramatically, and may lead to other unpredictable damage.
Allow at leas
t cm (1 .69 inch) clearanc aroun the exhaust vent.
50 9 e d
Ensure that the intake vents do not recycle hot air from the exhaust vent.
When operating the projector in an enclosed space, ensure that the surrounding air temperatur e
within the enclosure does not exceed operation temperature while the projector is running, and t he
air intake and exhaust vents are unobstructed.
All enclosures should pass a certified thermal evaluation to ensure that the projector does not
recycle exhaust air, as this may cause the device to shutdown even if the enclosure temperature is
with the acceptable operation temperature range.
Minimum 500mm
(19.69 inch)
15
°
°
°
° °
-15
°
°
°
°°
Minimum 500mm
(19.69 inch)
Minimum 500mm
(19.69 inch)
Minimum 500mm
(19.69 inch)
Minimum 300mm
( inch) 11.81
Minimum 100mm
( 3.94 inch)

IN3144_IN3146_IN3148HD Manual User’s
— —iv
Power Safety
Only use the supplied power cord.
Do not place anything on the power cord. Place the power cord where it will not be in the way of
foot traffic.
Remove the batteries from the remote control when storing or not in use for a prolonged period.
Replacing the Lamp
Replacing the lamp can be hazardous if done incorrectly. See Replacing the Projection Lamp on page 46
for clear and safe instructions for this procedure. Before replacing the lamp:
Unplug the power cord.
Allow the lamp to cool for about one hour.
Cleaning the Projector
Unplug the power cord before cleaning. See Cleaning the Projector . page 50
Allow the lamp to cool for about one hour.
Regulatory Warnings
Before installing and using the projector, read the regulatory notices in the Regulatory Compliance on
page 64.
Important Recycle Instructions:
Lamp(s) inside this product contain mercury. This product may contain other electronic waste that
can be hazardous if not disposed of properly. Recycle or dispose in accordance with local, state, or federal
Laws. For more information, contact the Electronic Industries Alliance at WWW.EIAE.ORG . For lamp
specific disposal information check WWW.LAMPRECYCLE.ORG.
Symbol Explanations
DISPOSAL: Do not use household or municipal waste collection services for
disposal of electrical and electronic equipment. EU countries require the use
of separate recycling collection services.
About this Manual
This manual is intended for end users and describes how to install and operate the DLP projector.
Wherever possible, relevant information such as an illustration and its description has been kept on — —
one page. This printer friendly format is both for your convenience and to help save paper, thereby -
protecting the environment. It is suggested that you only print sections that are relevant to your needs.

Preface
— —v
Table of Contents
GETTING STARTED ........................................................................................................................................................... 1
P C ACKING HECKLIST ........................................................................................................................................................... 1
V P P IEWS OF ROJECTOR ARTS............................................................................................................................................... 2
Front-right View ............................................................................................................................................................ 2
Top view screen Display (OSD) buttons and LEDs— -On ....................................................................................... 3
Rear view ....................................................................................................................................................................... 4
Bottom view ................................................................................................................................................................... 6
R C P EMOTE ONTROL ARTS ................................................................................................................................................... 7
R C O R EMOTE ONTROL PERATING ANGE............................................................................................................................... 9
P R C B ROJECTOR AND EMOTE ONTROL UTTONS.................................................................................................................... 9
SETUP AND OPERATION ............................................................................................................................................... 10
I R C B NSERTING THE EMOTE ONTROL ATTERIES ................................................................................................................. 10
T URNING THE PROJECTOR ON AND OFF .............................................................................................................................. 11
S A P L ) ETTING AN CCESS ASSWORD (SECURITY OCK .......................................................................................................... 13
A P L DJUSTING THE ROJECTOR EVEL ................................................................................................................................... 15
A Z , F K DJUSTING THE OOM OCUS AND EYSTONE ................................................................................................................ 16
A V DJUSTING THE OLUME .................................................................................................................................................. 16
ON- SCREEN DISPLAY (OSD) MENU SETTINGS ...................................................................................................... 17
OSD ENU M CONTROLS ..................................................................................................................................................... 17
Navigating the OSD ................................................................................................................................................... 17
S L ETTING THE OSD ANGUAGE .......................................................................................................................................... 18
OSD ENU VERVIEWM O ..................................................................................................................................................... 19
I M MAGE ENU..................................................................................................................................................................... 22
Computer Menu .......................................................................................................................................................... 23
Advanced Features .................................................................................................................................................... 24
White Balance ............................................................................................................................................................. 25
Color Manager ............................................................................................................................................................ 26
S 1 M ETTINGS ENU ............................................................................................................................................................. 27
Audio ............................................................................................................................................................................ 28
Advanced 1 Features ................................................................................................................................................. 29
Advanced 2 Features ................................................................................................................................................. 31
S 2 M ETTINGS ENU ............................................................................................................................................................. 32
Status ........................................................................................................................................................................... 33
Advanced 1 Features ................................................................................................................................................. 34
Advanced 2 Features ................................................................................................................................................. 44
MAINTENANCE AND SECURITY .................................................................................................................................. 46
R P L EPLACING THE ROJECTION AMP................................................................................................................................... 46
Resetting the Lamp Timer ......................................................................................................................................... 49
C PLEANING THE ROJECTOR................................................................................................................................................ 50
Cleaning the Lens ...................................................................................................................................................... 50
Cleaning the Case ...................................................................................................................................................... 50
U C L S S B SING THE ABLE OCK YSTEM AND ECURITY AR ..................................................................................................... 51
Using the Cable Lock ................................................................................................................................................. 51
Using the Security Bar ............................................................................................................................................... 51
TROUBLESHOOTING ...................................................................................................................................................... 52
C OMMON PROBLEMS AND SOLUTIONS ............................................................................................................................... 52
T T IPS FOR ROUBLESHOOTING ............................................................................................................................................ 52
LED E M RROR ESSAGES..................................................................................................................................................... 53
I P MAGE ROBLEMS.............................................................................................................................................................. 54
L P AMP ROBLEMS ............................................................................................................................................................... 54
R C P EMOTE ONTROL ROBLEMS .......................................................................................................................................... 55
A P UDIO ROBLEMS ............................................................................................................................................................. 55
H P S AVING THE ROJECTOR ERVICED .................................................................................................................................. 55
HDMI .................................................................................................................................................................... Q & A 56

IN3144_IN3146_IN3148HD Manual User’s
— —vi
SPECIFICATIONS ............................................................................................................................................................. 57
S PECIFICATIONS................................................................................................................................................................. 57
P D . P S ROJECTION ISTANCE VS ROJECTION IZE (XGA)........................................................................................................ 58
Projection Distance and Size Table ......................................................................................................................... 58
P D . P S ( ROJECTION ISTANCE VS ROJECTION IZE WXGA)................................................................................................... 59
Projection Distance and Size Table ......................................................................................................................... 59
P D . P S )ROJECTION ISTANCE VS ROJECTION IZE (1080P....................................................................................................... 60
Projection Distance and Size Table ......................................................................................................................... 60
T M T IMING ODE ABLE ........................................................................................................................................................ 61
P D ROJECTOR IMENSIONS ................................................................................................................................................... 63
REGULATORY COMPLIANCE ....................................................................................................................................... 64
FCC ARNINGW .................................................................................................................................................................. 64
C ANADA ............................................................................................................................................................................ 64
S C AFETY ERTIFICATIONS................................................................................................................................................... 64
APPENDIX I ........................................................................................................................................................................ 65
S C ERIAL OMMUNICATION .................................................................................................................................................. 65

IN3144_IN3146_IN3148HD User’s Manual
— 1 —
G
ETTING
S
TARTED
Packing Checklist
Carefully unpack the projector and check that the following items are included:
DLP
P
ROJECTOR
R
EMOTE CONTROL
(B
ATTERIES NOT INCLUDED
)
VGA
CABLE
P
OWER CORD
CD-ROM
(T
HIS
U
SER
’
S MANUAL
)
Q
UICK
S
TART
G
UIDE
S
AFETY
&
WARRANTY BOOKLET
Contact your dealer immediately if any items are missing, appear damaged, or if the unit does not work. It
is recommended that you keep the original packing material in case you ever need to return the
equipment for warranty service.
Caution:
Do not place the project in direct sunlight, humid, greasy or dusty places or in places where the
projector may come into contact with smoke or steam.

IN3144_IN3146_IN3148HD User’s Manual
— —2
Views of Projector Parts
Front-right View
I L DTEM ABEL ESCRIPTION SEE PAGE
1. IR receiver Receive IR signal from remote control.
2. Lens Projection Lens.
3. Keypad See Top view—Keypad and LEDs. 3
4. Focus ring Focuses the projected image.
16
5. Zoom ring Enlarges the projected image.
Important:
Do not block ventilation openings. Locate the projector in a well-ventilated area without obstructions
to intake or exhaust vents. Do not or other soft covering that may place the projector on a tablecloth
block the vents. Ventilation openings on the projector allow for good air circulation.
1 2
3
4 5

IN3144_IN3146_IN3148HD User’s Manual
— 3 —
Top view—Keypad and LEDs
I L DTEM ABEL ESCRIPTION SEE PAGE
1. LAMP LED Blinking Red Error code 53
2. TEMP LED Red Over Temperature T1 53
3. POWER LED
Green Lamp Ready
53
Blinking
Green Start, Cooling or error code.
4.
Navigates the OSD.
Quick Menu – For Keystone 17
5. Menu Open and exit OSD menus. 17
6. Enter or confirm highlighted OSD menu item. 17
7.
Navigate and change settings in the OSD.
Quick Menu – For Volume 17
8.
Navigates the OSD.
Quick Menu – For Keystone 17
9. SOURCE Enter the Source menu. 17
10. AUTO Optimizes image size, position, and resolution.
11. Navigate and change settings in the OSD.
Quick Menu – For Volume 17
12. Turns the projector On or Off. 17
1 2 3
4
5
6
7
8
9
1
0
1
1
1
2

IN3144_IN3146_IN3148HD User’s Manual
— —4
Rear view
I L DTEM ABEL ESCRIPTION SEE PAGE
1. AC IN Connect a POWER cable. 11
2. RJ45 Connect a LAN cable from Ethernet.
3. 12V TRIGGER
When connected to the screen through a commercially available cable,
the screen deploys automatically on start up of the projector. The screen
retracts when the projector is powered off (see notes below).
4. HDMI1 Connect an HDMI cable from a HDMI device.
5. VIDEO Connect a COMPOSITE cable from a video device.
6. HDMI2/MHL
Connect the HDMI cable from a HDMI device.
Connect the MHL cable from a MHL-compatible device.
Note: For some MHL compatible devices, whose output is not thru
micro-USB, an extra cable adaptor may be required.
7. AUDIO IN (L and R) Connect an AUDIO cable from an audio device.
8. AUDIO IN Connect an AUDIO cable from an audio device.
9. MONITOR OUT
(COMPUTER IN 1) Connect a RGB cable to an external monitor/display.
10. COMPUTER IN 1 Connect a RGB cable from a computer.
11. COMPUTER IN 2 Connect a RGB cable from a computer.
12. Kensington Lock Secure to a permanent object with a Kensington®
Lock system. 51
13. RS-232C Connect a RS-232 serial port cable for remote control.
14. MINI USB Service use only.
15. AUDIO OUT Connect an AUDIO cable to an audio amplifier.
1 2 3 4 5 6 7 8 9 10 11
121
3
141
5
1
6
171
8

IN3144_IN3146_IN3148HD User’s Manual
— 5 —
16. MIC
Connect a Microphone for use.
Note: All other audio sources are muted when MIC is
On.
28
17. S-VIDEO Connect an S-VIDEO cable from a video device.
18. USB POWER
(5V/1.5A) Connect an USB cable for power supply.
DC12V Trigger Note:
To use this feature, you must plug in the connector before turning on/off the projector.
Screen controllers are supplied and supported by screen manufacturers.
Do not use this jack for anything other than intended use.
Connectivity Note:
If your video equipment has multiple connection options, please note that HDMI provides the
highest quality image, followed by Component and then S-video. Composite provides the least
quality image.
Warning:
As a safety precaution, disconnect all power to the projector and connecting devices before making
connections.

IN3144_IN3146_IN3148HD User’s Manual
— —6
Bottom view
I L D S TEM ABEL ESCRIPTION EE PAGE
1. Ceiling support holes Contact your dealer for information on mounting the projector on a
ceiling.
2. Tilt adjustor Rotate adjuster lever to adjust angle position. 15
Note:
It is recommended to use InFocus ceiling mount p/n PRJ-MNT-UNIV. Refer to the installation guide
that comes with the mount for more information. The warranty does not cover any damage caused
by use of non-approved ceiling mount kits or by installing in an improper location.
1
25
m
m
[
4
.
9
"
]
1
4
4
m
m
[
5
.
7
"
]
54mm [2.1"]
46mm[1.8"] 31mm [1.2"]
155mm [6.1"]
82mm [3.2"]
2
1
21
1

IN3144_IN3146_IN3148HD User’s Manual
— 7 —
Remote Control Parts
Important:
1. Avoid using the projector with bright fluorescent lighting turned on. Certain high-frequency
fluorescent lights can disrupt remote control operation.
2. Be sure nothing obstructs the path between the remote control and the projector. If the path
between the remote control and the projector is obstructed, you can bounce the signal off certain
reflective surfaces such as projector screens.
3. The buttons and keys on the projector have the same functions as the corresponding buttons on
the remote control. This user’s manual describes the functions based on the remote control.

IN3144_IN3146_IN3148HD User’s Manual
— —8
I L DTEM ABEL ESCRIPTION SEE PAGE
1. Power ON Turn the projector on. 11
2. LED indicator Only lights when the remote keys are pressed.
3. Display Mode Choose a suitable preset mode for usage environment.
4. Contrast Display the Contrast setting bar and use the right and left keys to adjust.
5. Brightness Display the Brightness setting bar and use the right and left keys to
adjust.
6. Left cursor When the OSD is displayed, this button navigates to the
left.
17
7. Menu Display the OSD menu.
8. Auto image Re-synchronize the PC image.
9. Overscan Display digital Zoom adjust bar.
10. Source-1 Computer In 1
11. Source-4 HDMI 2
12. Source-7 N/A
13. Power OFF Turn the projector off. 11
14. Source Display the source menu. 17
15. Info Display projector information.
16. Mute Mute the audio.
17. Up cursor /
Keystone+
When the OSD is displayed, this button navigates up the
menu. Otherwise it adjusts keystone.
17
18. Select Enter and confirm settings in the OSD.
19. Right cursor When the OSD is displayed, this button navigates to the
right.
20. Down cursor /
Keystone -
When the OSD is displayed, this button navigates down
the menu. Otherwise it adjusts keystone.
21. Resize Change the image aspect ratio.
22. Blank Blank the screen.
23. Volume+ Increase the volume. 16
24. Freeze Freeze video.
25. Volume- Decrease the volume. 16
26. Source-3 HDMI 1
27. Source-2 Computer In 2
28. Source-6 S-Video
29. Source-5 Composite Video
30. Light Turns the remote control backlight on or off.
31. Source-8 N/A
Note:
Mouse control function is not available in IN3144, IN3146 and IN3148HD.

IN3144_IN3146_IN3148HD User’s Manual
— — 9
Remote Control Operating Range
The remote control uses infrared transmission to control the projector. It is not necessary to point the
remote directly at the projector. Provided you are not holding the remote perpendicular to the sides or
the rear of the projector, the remote will function well within a radius of about 7 meters (23 feet) and
15 degrees above or below the projector level. If the projector does not respond to the remote control,
move a little closer.
Projector and Remote Control Buttons
The projector can be operated using the remote control. All operations can be carried out with the
remote control.

IN3144_IN3146_IN3148HD User’s Manual
— —10
S O ETUP AND PERATION
Inserting the Remote Control Batteries
1. Remove the battery compartment
cover by sliding the cover in the
direction of the arrow.
2. Insert batteries (not included) as
shown in the illustration.
3. Replace the cover.
Caution:
1. Only use AA batteries (Alkaline batteries are recommended).
2. Dispose of used batteries according to local ordinance regulations.
3. Remove the batteries when not using the projector for prolonged periods.
4. Do not mix old and new batteries, or mix battery types.
Note:
Batteries are not normally included with InFocus projectors.

IN3144_IN3146_IN3148HD User’s Manual
— 11 —
Turning the projector on and off
1. Connect the power cord to the
projector. Connect the other end to
a wall outlet.
The POWER LED on the
projector light.
2. Turn on the connected devices.
3. Ensure the POWER LED is not
flashing. Then press the POWER
button to turn on the projector.
The projector splash screen displays
and connected devices are
detected.
See Setting an Access Password
(Security Lock) on page 13 if the
security lock is enabled.
4. If more than one input device is
connected, press the SOURCE
button and use to scroll among ▲▼
the devices.
(Component is supported using a
RGB to COMPONENT ADAPTER.)
VGA1 / VGA2: Analog RGB1 / RGB2
HDMI1: High-Definition Multimedia Interface
HDMI2 /MHL: High-Definition Multimedia Interface/
Mobile High-Definition Link
Composite Video: Traditional composite video
S-Video: Super video (Y/C separated)

IN3144_IN3146_IN3148HD Manual User’s
— —12
5.
To turn the projector off, press the
POWER OFF button. When the
“Power Off? Press Power again”
message appears, press the
POWER OFF button. The projector
turns off.
Caution:
Do not unplug the power cord until the indicating the projector has POWER LED stops flashing–
cooled down.

IN3144_IN3146_IN3148HD User’s Manual
— 13 —
Setting an Access Password (Security Lock)
You can use the four arrow buttons and prevent unauthorized use of on the remote to set a password
the projector. When enabled, the password must be entered after you power on the projector. (See
Navigating the OSD on page 17 and Setting the OSD Language on page 18 for help on using OSD
menus.)
Important:
Keep the password in a safe place. Without the password, you will not be able to use the projector.
If you lose the password, contact InFocus Support for information on clearing the password.
1. Press the MENU button to open the
OSD menu.
2. Press the ◄► buttons to move to the
Settings 1 menu. Press the ▲▼
buttons to select Advanced 1.
3. Press (Enter) or to enter the ►
Advanced 1 sub menu. Press the
▲▼
buttons to select Security Lock
.
4. Press the ◄► buttons to enter and
enable or disable security lock
function.
A password dialog box automatically
appears.

IN3144_IN3146_IN3148HD Manual User’s
— —14
5.
You can use the arrow buttons
▲▼◄►
either on keypad or IR remote control
for password . You can use any entry
combination including the same arrow
five times, but five characters must be
used.
Press the buttons in any order to arrow
set the password. Push the MENU
button to exit the dialog box.
6.
If the is enabled, the Security Lock
user will be prompted to enter a
password when the projector's power
button is pressed.
Enter the password in the order you
set it step 5. you forget the on If
password, please contact InFocus.
Visit our website at
www.infocus.com/support or call us.

IN3144_IN3146_IN3148HD User’s Manual
— 15 —
Adjusting the Projector Level
Take note of the following when setting up the projector:
The projector table or stand should be level and sturdy.
Position the projector so that it is perpendicular to the screen.
Ensure the cables are in a safe location. You could trip over them.
To adjust the angle of the picture, turn the tilt-adjuster right or left until the desired
angle has been achieved.

IN3144_IN3146_IN3148HD User’s Manual
— 16 —
Adjusting the Zoom, Focus and Keystone
1. Use the Image-zoom
control (on the projector
only) to resize the
projected image and
screen size .
2. Use the Image-focus
control (on the projector
only) to sharpen the
projected image .
3. Use the KEYSTONE
buttons on the remote
control to correct
trapezoid image issues
(wider top or bottom).
4. The keystone control
appears on the display.
Adjusting the Volume
1. Press the Volume +/-
buttons on the remote
control.
2. The volume control
appears on the display.
3. Press the MUTE button
on the remote control to
turn off the volume.

IN3144_IN3146_IN3148HD User’s Manual
— 17 —
O D M S N-SCREEN ISPLAY (OSD) ENU ETTINGS
OSD Menu Controls
The projector has an OSD that lets you make image adjustments and change various settings.
Navigating the OSD
You can use the remote control arrow buttons to navigate and make changes to the OSD.
1. To enter the OSD, press the
MENU button.
2. There are three menus.
Press the ◄► buttons to
move through the menus.
3. Press the ▲▼ buttons to
move up and down in a
menu.
4. Press the ◄► buttons to
change setting values.
5. Press the MENU button to
close the OSD or leave a
submenu.
Note:
Depending on the video source, not all items in the OSD are available. For example, the
Horizontal/Vertical Position items in the Computer menu can only be modified when connected
to a PC. Items that are not available cannot be accessed and are grayed out.
3
1 2
6
4 5
7
8
9
1
1
2
2
3
4
5
6
6
7
8
9

IN3144_IN3146_IN3148HD User’s Manual
— 18 —
Setting the OSD Language
Set the OSD language to your preference before continuing.
1. Press the MENU button. Press the ◄► buttons to navigate to Settings 1. Press the ▲▼
buttons to move to the Advanced 1 menu.
2. Press (Enter) or buttons until ► to enter the Advanced 1 sub menu. Press the
▲▼
Language is highlighted.
3. Press the arrow buttons until the language you want is highlighted.
4. Press the MENU button four times to close the OSD.

IN3144_IN3146_IN3148HD User’s Manual
— — 19
OSD Menu Overview
Use the following illustration to quickly find a setting or determine the range for a setting.
MAIN
M ENU
S M UB ENU
S ETTINGS
Image Display Mode Presentation, Bright, Game,
Movie, TV, sRGB, Blackboard,
User
Brightness
0~100
Contrast
0~100
Computer
Horizontal Position
-5~5 (depend on Autolock)
Vertical Position
-5~5 (depend on Autolock)
Frequency
0~31
Tracking
- 5~5
Auto Image
Advanced
Brilliant Color
0~ 10
Sharpness
0~31
Gamma
1.8, 2.0, 2.2, 2.4, B&W, Linear
Color Temperature
Warm, Normal, Cold
Video AGC
Off, On
Video Saturation
0~100
Video Tint
0~100
White Balance
RGain
0~200
GGain
0~200
BGain
0~200
ROffset
- 256~255
GOffset
- 256~255
BOffset
- 256~255
Color Manager
Red
Hue Saturation Gain, ,
0~100
Green
Hue Saturation Gain, ,
0~100
Blue
Hue Saturation Gain, ,
0~100
Cyan
Hue Saturation Gain, ,
0~100
Magenta
Hue Saturation Gain, ,
0~100
Yellow
Hue Saturation Gain, ,
0~100
White
Red Green, , Blue
0~100

IN3144_IN3146_IN3148HD Manual User’s
— —20
MAIN
M ENU
S M UB ENU
S ETTINGS
Settings 1
Source Source reference Input Source Select (IR/Keypad)
r r Projection Normal, Rea , Ceiling, Rea +Ceiling
Aspect Ratio Fill, 4:3, 16:9, Letter Box, Native, 2.35:1
- Keystone 40~40
- Digital Zoom 10~10
0 Audio Volume ~10
Mute Off, On
MIC
Off, On
Advanced 1 Language
English, Français, Deutsch, Español,
Português, 簡体中文, 繁體中文, Italiano,
Norsk, Svenska, Nederlands, Русский,
Polski, Suomi, Dansk, 한국어, Magyar,
Čeština, ﺔﯾﺑرﻌﻟا, t, , Türkçe, Việ עברית
Indonesian, Română
Security Lock Off, On
c Blank Screen Bla k, Red, Green, Blue, White
Splash Logo Off, On
Closed Captioning Off, On
Keypad Lock Off, On
- 3D Setting 3D Off, DLP Link, IR
3D Sync Invert Off, On
3D Format Frame Sequential, Top/Bottom, Side-By-
Side, Frame Packing (3D Frame Packing
HDMI source only)
Advanced 2 Test Pattern None, Grid, White, Red, Green, Blue,
Black
- H Image Shift 50~50
-V Image Shift 50~50

IN3144_IN3146_IN3148HD User’s Manual
— — 21
MAIN
M ENU
S M UB ENU
S ETTINGS
Settings 2
Auto Source Off, On
No Signal
Power Off
0~180
Auto Power
On
Off, On
Lamp Mode ECO , Normal, Smart ECO
Reset All
Status Active Source
Video Information
Lamp Hours(ECO, Normal
,
Smart ECO )
Software Version
Advanced 1 Menu Position Center, Down, Up, Left, Right
Translucent Menu 5 5 0%, 2 %, 0%, %, 75 100%
Low Power Mode Off, , Low Power Network
Fan Speed Normal, High
Lamp Hour Reset
0- Projector ID 98
Network Network State Connect, Disconnect
DHCP On, Off
IP Address 0~255, 0~255, 0~255. 0~255
Subnet Mask 0~255, 0~255, 0~255. 0~255
Gateway 0~255, 0~255, 0~255. 0~255
DNS 0~255, 0~255, 0~255. 0~255
Apply Ok / Cancel
Advanced 2 Sleep Timer 0~600
Source Filter VGA1 Disable, Enable
VGA2 Disable, Enable
1 HDMI Disable, Enable
2 HDMI /MHL Disable, Enable
COMPOSITE
VIDEO
Disable, Enable
S- VIDEO Disable, Enable
Wall Color Off, Light Yellow, Pink, Light
Green, Blue, Blackboard
Color Space Auto, RGB, YUV
Quantization Range Auto, Full, Limited

IN3144_IN3146_IN3148HD Manual User’s
— —22
Image Menu
! Attention
When image options are changed, the Display Mode changes to User.
Press the button to open the to move to the MENU OSD menu. Press the ◄► buttons Image Menu.
Press the ▲▼ buttons to move up and down in the Image menu. Press the ◄► buttons to enter and
change setting values.
I D TEM ESCRIPTION
Display Mode
Press the ◄► buttons to enter and set the Display Mode.
Note: Display Mode must be set to in order to access the other Image menu User
items.
Brightness display brightness. s Press the ◄► button to adjust the
Contrast display contrast. s Press the ◄► button to adjust the
Computer Press (Enter) or ► to enter the Computer menu. See Computer Menu on page
23.
Auto Image Press (Enter) or ► to automatically adjustment for phase, tracking, size and
position.
Advanced Press (Enter) or ► to enter the Advanced menu. See Advanced Feature on page
24.
Color Manager Press (Enter) or ► to enter the color manager menu. See page 26 for more
information on Color Manager.
IN3144_IN3146_IN3148HD User’s Manual
— — 23
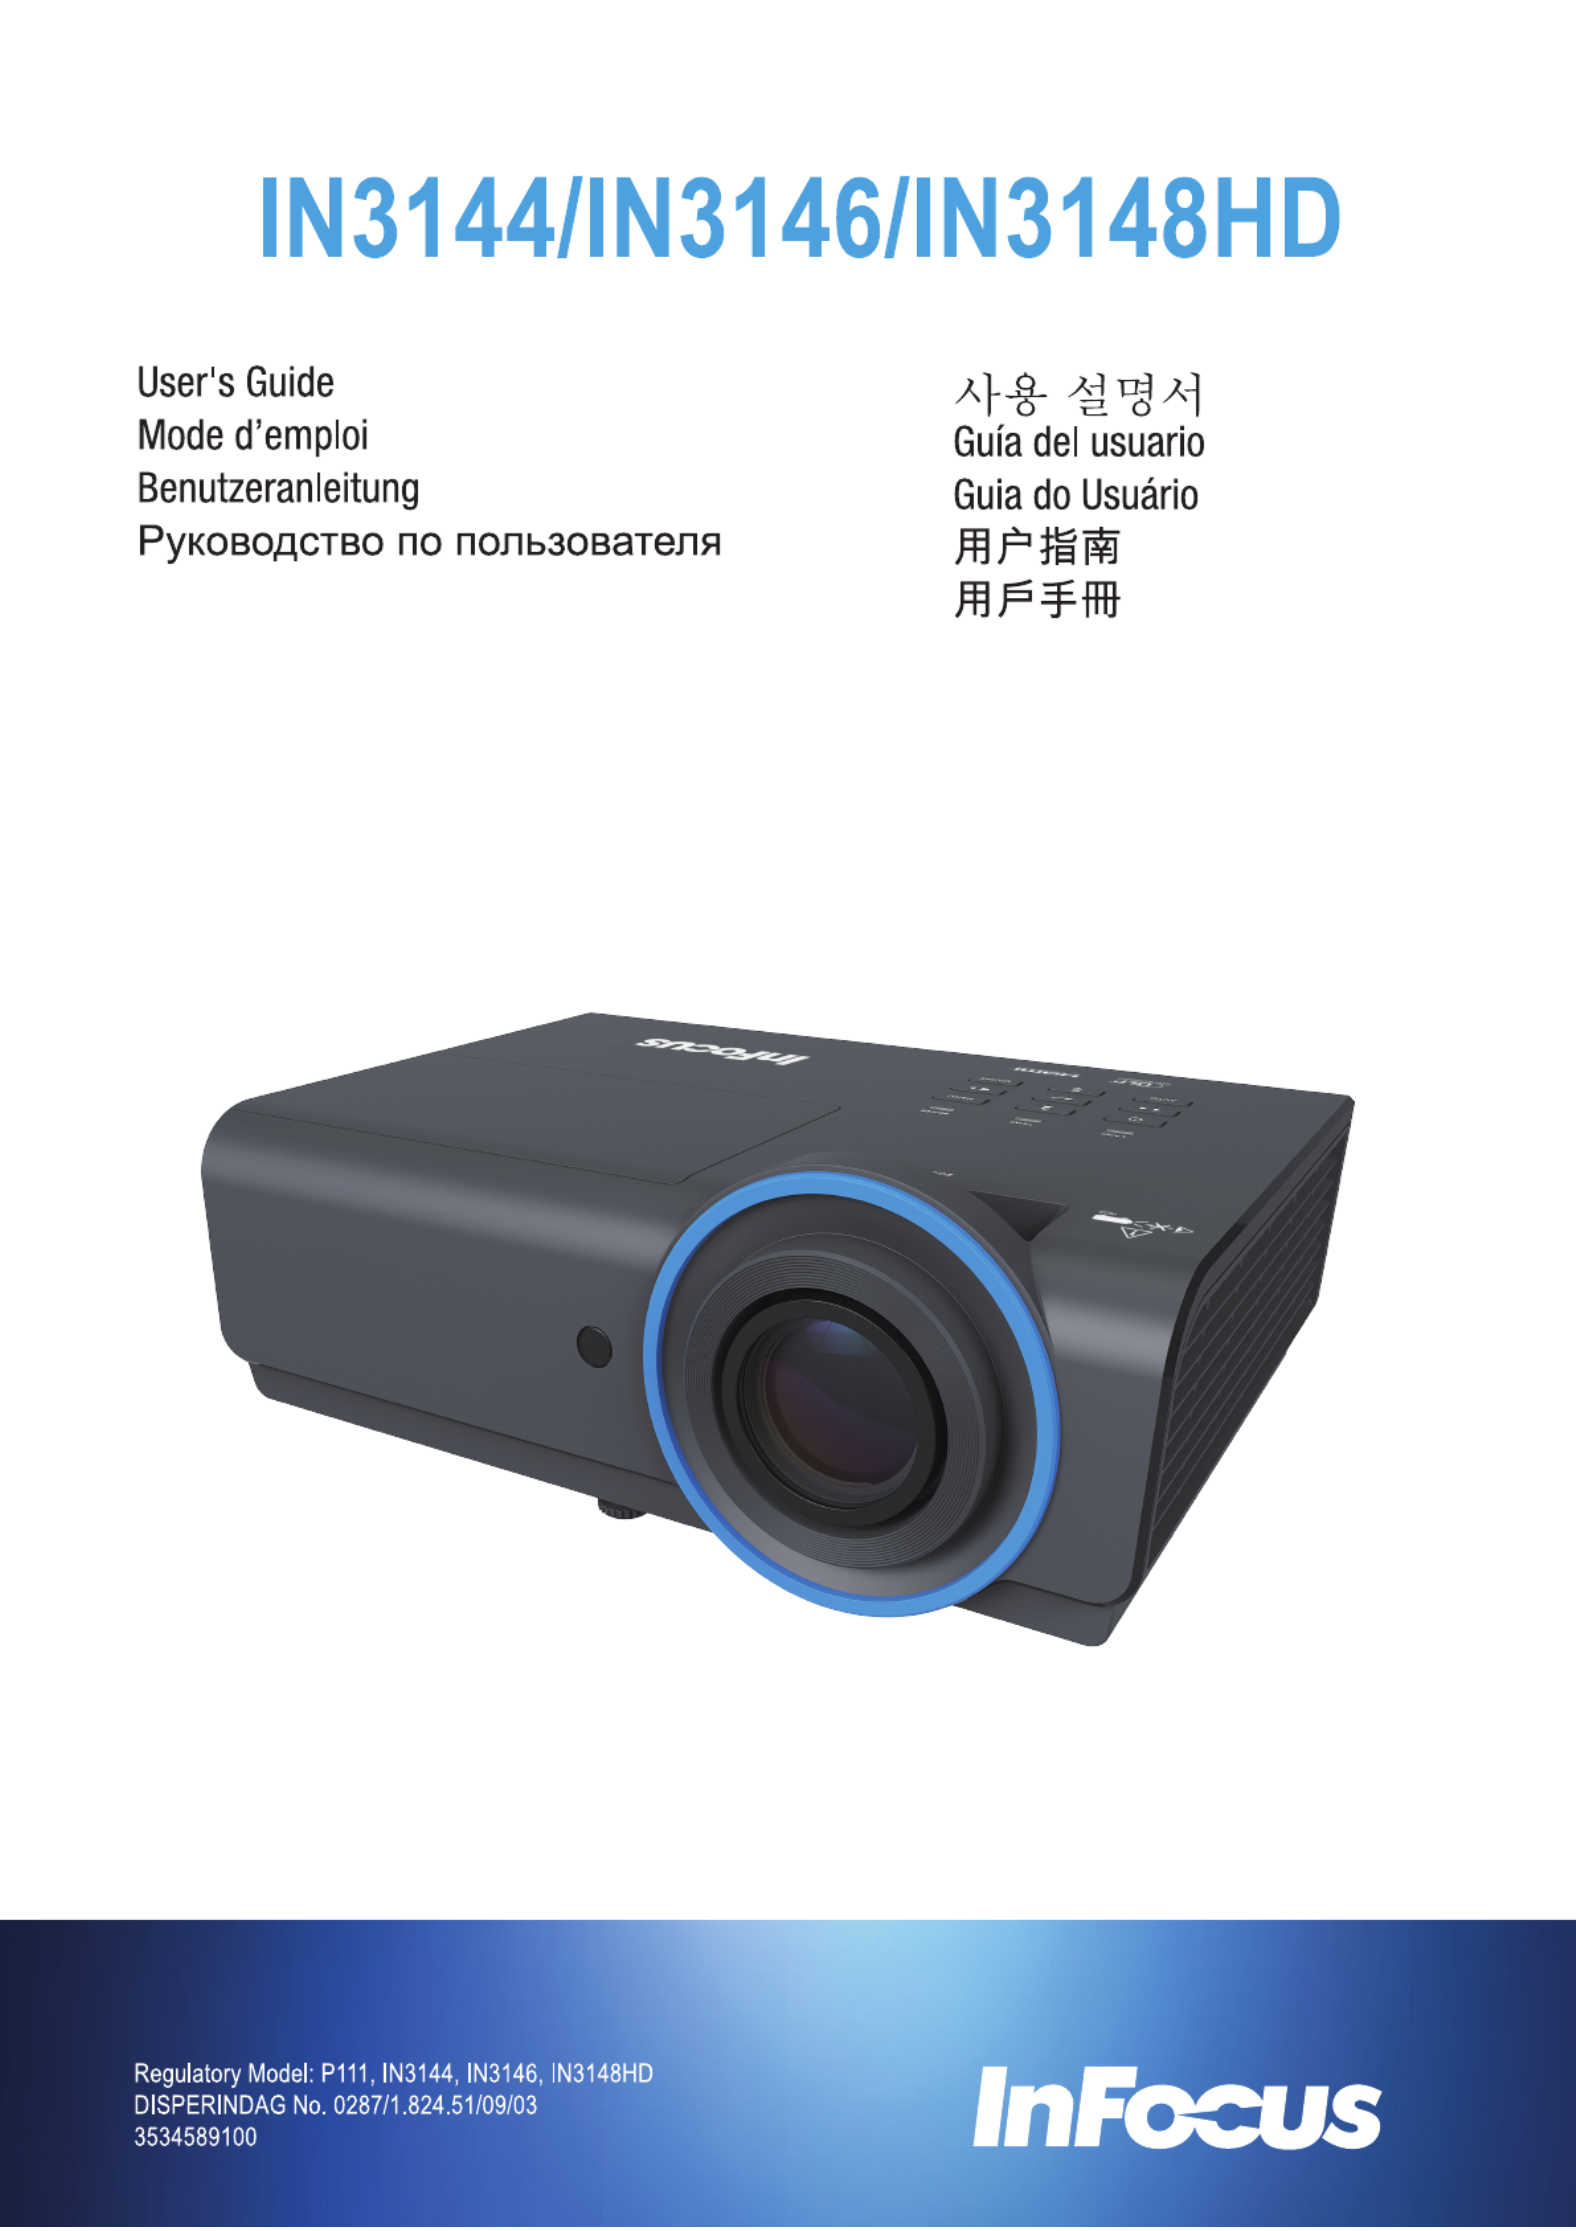
Computer Menu
Press the button to open the menu. Press to move to the MENU OSD the buttons◄► Image menu.
Press the buttons (Enter) Press the ▲▼ to move to the Computer menu and then press or ►.
▲▼ buttons menu.to move up and down in the Computer
I D TEM ESCRIPTION
Horizontal Position to adjust the display position to left or right. Press the ◄► buttons
Vertical Position Press the ◄► buttons to adjust the display position to up or down.
Frequency s Press the ◄► button to adjust the A/D sampling clock.
Tracking s Press the ◄► button to adjust the A/D sampling phase.

IN3144_IN3146_IN3148HD Manual User’s
— —24
Advanced Features
Press the button to open the menu. Press to move to the Menu OSD the buttons ◄► Image menu.
Press the buttons (Enter) Press the ▼▲ to move to the Advanced menu and then press or ►.
▼▲ buttons menu.to move up and down in the Advanced
I D TEM ESCRIPTION
Brilliant Color s Press the ◄► button to adjust the Brilliant Color value.
Sharpness display s Press the ◄► button to adjust the s . harpness
Gamma s Press the ◄► button to adjust the gamma correction of the display.
Color Temperature Press the ◄►
buttons to adjust the color temperature.
Video AGC Press the ◄► buttons to enter and enable or disable the Automatic Gain Control for
video source.
Video Saturation s Press the ◄► button to adjust the video saturation.
Video Tint adjust the video tint/hue. s Press the ◄► button to
White Balance Press the button to enter the ENTER/ ► White Balance sub menu.
See White Balance on page 25

IN3144_IN3146_IN3148HD User’s Manual
— — 25
White Balance
Press the ENTER button to enter the sub menu. White Balance
I D TEM ESCRIPTION
R Gain to adjust the Red Gain Press the ◄► buttons .
G Gain to adjust the Green Gain Press the ◄► buttons .
B Gain to adjust the Blue Gain Press the ◄► buttons .
R Offset Press the ◄► buttons . to adjust the Red Offset
G Offset to adjust the Green Offset. Press the ◄► buttons
B Offset Blue Offset. Press the ◄► buttons to adjust the

IN3144_IN3146_IN3148HD Manual User’s
— —26
Color Manager
Press the button to open the menu. Press to move to the Menu OSD the buttons ◄► Image menu.
Press the buttons (Enter) ▼▲ to move to the menu and then press Color Manager or ►. Press
the buttons menu. ▼▲ to move up and down in the Color Manager
I D TEM ESCRIPTION
Red Select to enter the Red Color Manager.
Press the to adjust the Hue, Saturation, and Gain.◄► buttons
Green Select to enter the Green Color Manager.
Press the to adjust the Hue, Saturation, and Gain.◄► buttons
Blue Select to enter the Blue Color Manager.
Press the to adjust the Hue, Saturation, and Gain.◄► buttons
Cyan Select to enter the Cyan Color Manager.
Press the to adjust the Hue, Saturation, and Gain.◄► buttons
Magenta Select to enter the Magenta Color Manager.
Press the to adjust the Hue, Saturation, and Gain.◄► buttons
Yellow Select to enter the Yellow Color Manager.
Press the◄► buttons to adjust the Hue, Saturation, and Gain.
White Select to enter the White Color Manager.
Press the to adjust the Red, Green, and Blue.◄► buttons

IN3144_IN3146_IN3148HD User’s Manual
— 28 —
Audio
Press the menu. Press the Menu button to open the OSD ◄► buttons to move to the Settings 1
menu. Press the ▼▲ buttons to move to the Audio menu and then press (Enter) or ►. Press the
▼▲ buttons to move up and down in the Audio menu.
I
TEM
D
ESCRIPTION
Volume Press the ◄► buttons to enter and adjust the audio volume.
Mute Press the ◄► buttons to enter and turn on or off the speaker.
MIC
Press the ◄► buttons to enter and turn MIC Mode Off or On.
Note: MIC can only be turned on when a MIC is plugged in. Please connect a 3.5Ø
mini jack cable microphone to the projector and condenser microphone is
recommended to use as below.
Microphone
Transducer principle
condenser
Impedance
600ohm~ 2.2Kohm
Frequency
100Hz~16KHz
Output
stereo
IN3144_IN3146_IN3148HD User’s Manual
— — 29
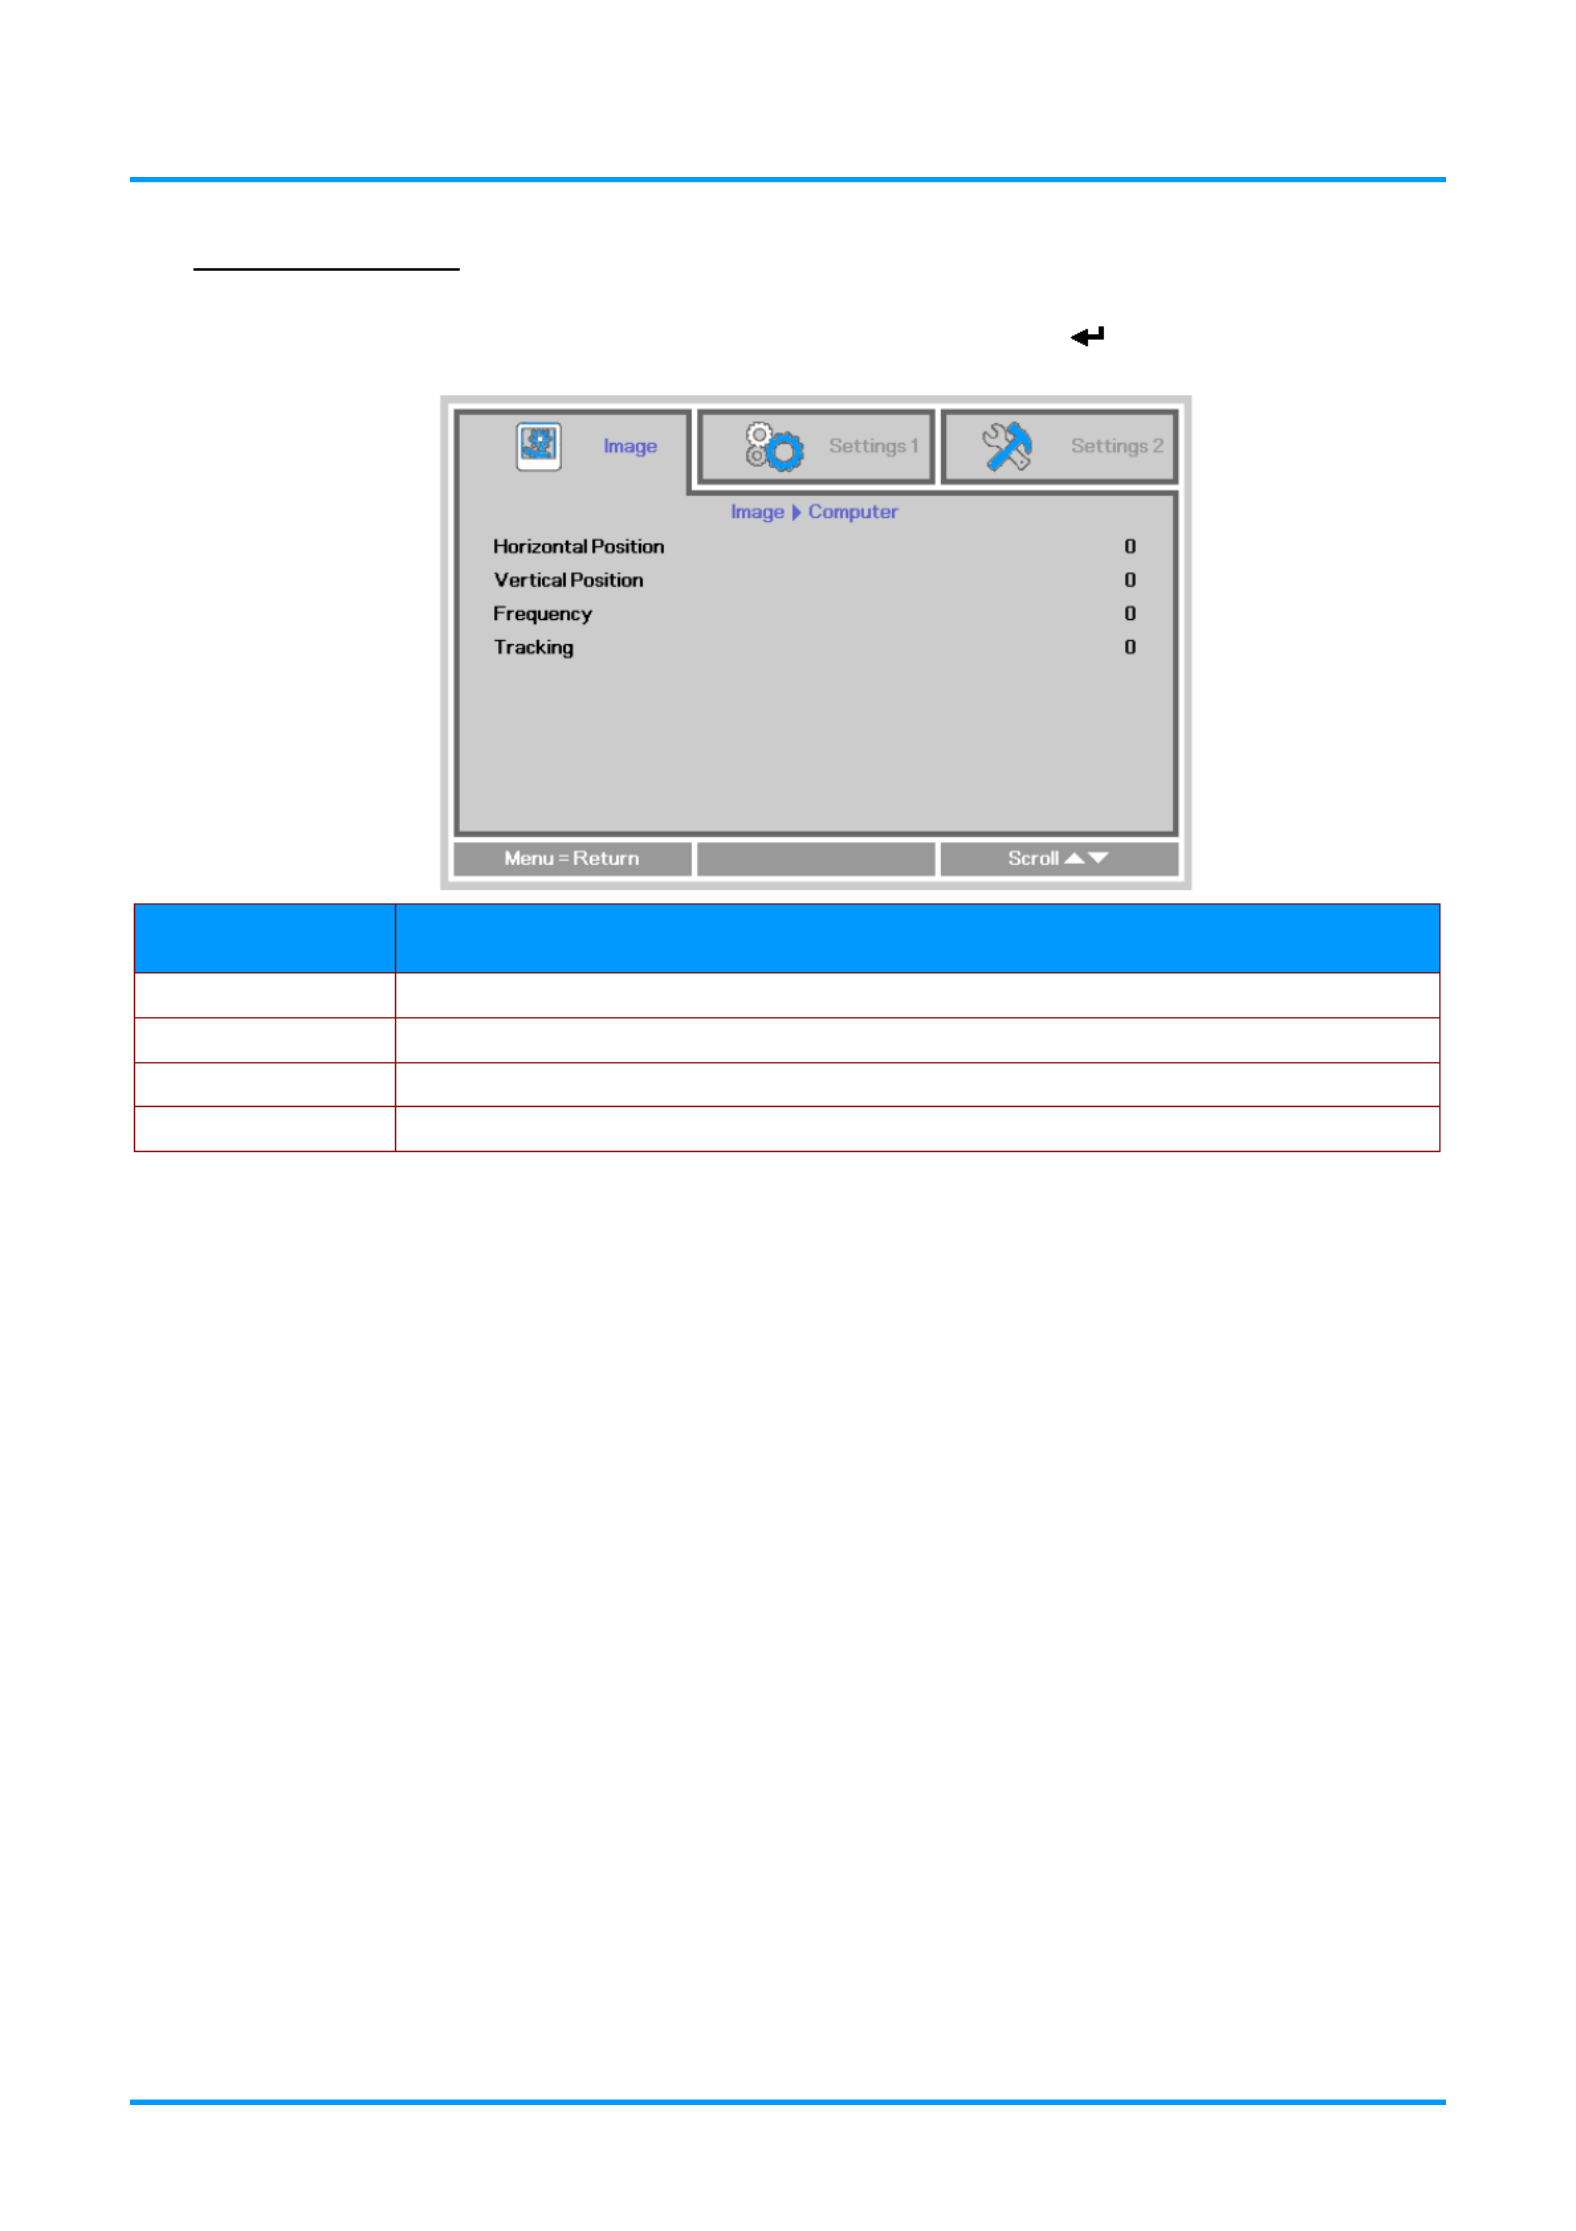
Advanced Feature 1 s
Press the button to open the menu. Press to move to the Menu OSD the buttons ◄► Settings 1
menu. Press to move to the menu and then press the buttons ▲▼ Advanced 1 (Enter) or ►.
Press the buttons the buttons ▲▼ to move up and down in the Advanced 1 menu. Press ◄► to
enter and setting values change .
I D TEM ESCRIPTION
Language s Press the ◄► button to enter and select a different localization Menu.
Security Lock s Press the ◄► button to enter and enable or disable security lock function.the
Blank Screen enter and s Press the ◄► button to select a different blank screen color.
Splash Logo button to enter and select splash logo. Press the cursor ◄►
Closed Captioning s Press the ◄► button to enter and enable or disable Closed Captioning
Keypad Lock enter and enable or disable the keypad keys. Press ◄► to
3D Setting Press (Enter) or ►to enter the 3D menu. See page 30 for more information on the
3D Setting.
Note:
To enjoy the 3D function, first enable the Play Movie in 3D setting found in your device under Blu-Ray
the 3D Disc Menu.

IN3144_IN3146_IN3148HD Manual User’s
— —30
3D Setting
I D TEM ESCRIPTION
3D s Press the ◄► button to enter and select different 3D mode s.
3D Sync Invert enter and enable or disable 3D Sync Invert. s Press the ◄► button to
3D Format enter and enable or disable different 3D s Press the ◄► button to formats.
Note:
1. By default, if no 3D source is detected, the 3D OSD menu items will not be available.
2. When the projector is connected to an appropriate 3D source, the 3D OSD menu items are available
for selection.
3. Use 3D glasses to view a 3D image.
4. You need 3D content from a 3D or 3D media file.Blu-Ray
5. You need to enable the 3D source (some 3D content may have a 3D on off selection Blu-Ray -
feature).
6. You need DLP link 3D glasses.
7. The OSD 3D mode needs to match the type of glasses (DLP link or IR).
8. Power on the glasses. Glasses normally have a power on - off switch.
Each type of glasses has their own configuration instructions. Please follow the configuration
instructions that come with your glasses to finish the setup process.

IN3144_IN3146_IN3148HD User’s Manual
— — 31
Advanced 2 Features
P ress the Menu button to open the OSD menu. Press the ◄► buttons to move to the Settings 1
menu. Press to move to the menu and then press the buttons ▲▼ Advanced 2 (Enter) or ►.
Press the buttons the buttons ▲▼ to move up and down in the Advanced 2 menu. Press ◄► to
enter and setting values change .
I D TEM ESCRIPTION
Test Pattern Press the ◄► buttons to enter and select internal test pattern.
H Image Shift enter and select H Image Shift s Press the ◄► button to .
V Image Shift Press the ◄► buttons to enter and select V Image Shift.
IN3144_IN3146_IN3148HD Manual User’s
— —32
Settings 2 Menu
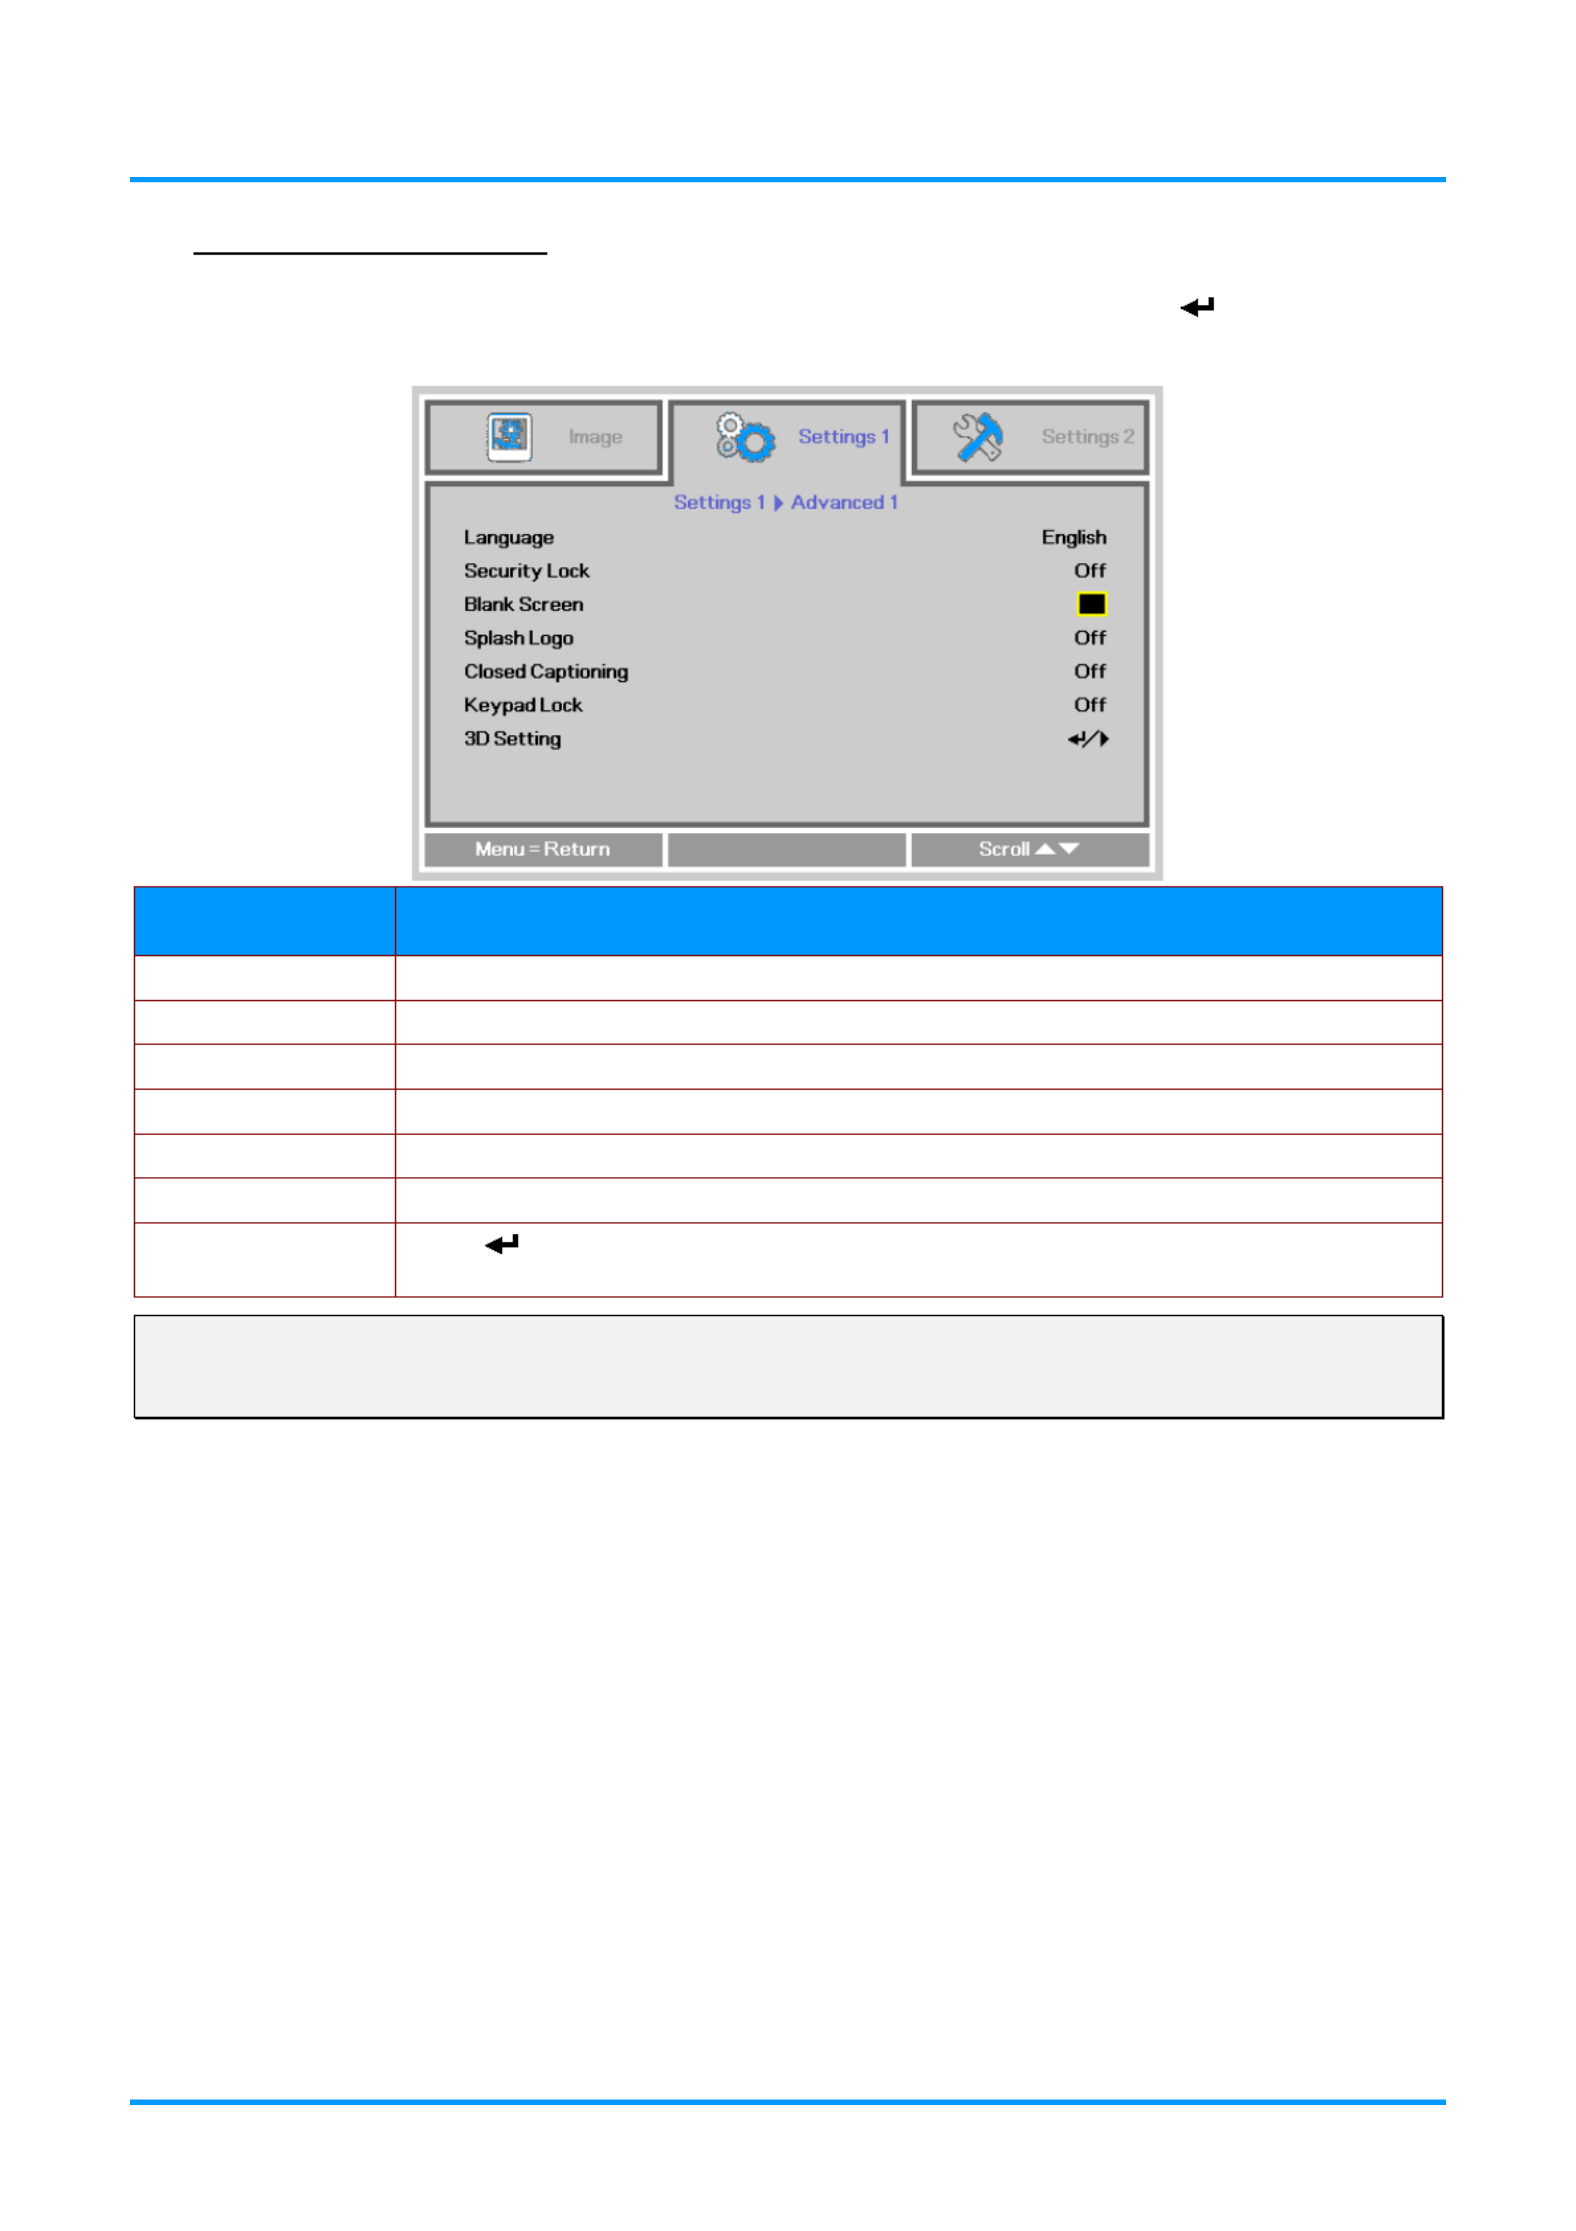
Press the button to open the to move to the MENU OSD menu. Press the ◄► buttons Settings 2
menu. Press the to move up and down in the ▲▼ buttons Settings 2 menu.
I D TEM ESCRIPTION
Auto Source enter and enable or disable automatic source detection. s Press the ◄► button to
No Signal Power
Off (min.)
Press the ◄► buttons to enter and enable or disable automatic shutdown of lamp
when no signal is detected.
Auto Power On Press the ◄► buttons to enter and enable or disable automatic power On when AC
power is supplied.
Lamp Mode Press the ◄► buttons to enter and select the lamp mode for higher brightness, or
lower brightness if you wish to save lamp life.
Reset All Press (Enter) or ►to reset all settings to default values.
Status Press (Enter) or ► to enter the Status menu. See page 33 for more information on
Status.
Advanced 1 Press (Enter) or ► to enter the Advanced 1 menu. See Advanced 1 Features on
page 34.
Advanced 2 Press (Enter) or ► to enter the Advanced 2 menu. See Advanced 2 Features on
page . 44
Note:
“ Smart ECO”: Press the Blank button to activate the Smart ECO feature, which will dim the lamp 30%
when the image is black.

IN3144_IN3146_IN3148HD User’s Manual
— — 33
Status
Press the to move up and down in the menu. Select menu and ▲▼ buttons Settings 2 the Status
p ress (Enter) or ► to enter.
I D TEM ESCRIPTION
Active Source Displays the current active source type.
Video Information Displays resolution/video information for RGB sources and color standard for Video
sources.
Lamp Hours Lamp hour information is displayed. (Eco, Normal and usage Smart ) Eco
Software version Displays system software version.

IN3144_IN3146_IN3148HD Manual User’s
— —34
Advanced 1 Features
Press the button to open the menu. Press to move to the Menu OSD the buttons ◄► Settings 2
menu. Press to move to the menu and then press the buttons ▲▼ Advanced 1 (Enter) or ►.
Press the buttons the buttons ▲▼ to move up and down in the Advanced 1 menu. Press ◄► to
enter and setting values change .
I D TEM ESCRIPTION
Menu Position Press the button◄► s to enter and select different OSD location.
Translucent Menu s Press the ◄► button to enter and select OSD background translucent level.
Low Power Mode enter and Low Power Mode Press the button◄► s to turn Off, Low Power, Network.
Fan Speed
Press the ◄► buttons to enter and toggle between Normal and High fan speeds.
Note: We recommend selecting high speed in high temperatures, high humidity, or
high altitude higher than ( 1500m/4921ft) areas.
Lamp Hour Reset After replacing the lamp, the lamp should be reset. See page for more information 35
on Lamp Hour Reset.
Projector ID
Press the button adjust ◄► s to enter and the two digit projector ID from 0 through 0
98.
Network
Press (Enter) or ► to enter the Network menu. See page 35 for more information
on Network.
Note:
When " " is enabled, VGA Out is inactive when the projector is in standby mode.Network
Both VGA OUT and Network control are active in standby when Low Power Mode is set to Off.
IN3144_IN3146_IN3148HD User’s Manual
— — 35
Lamp Hour Reset
Please refer to on page to reset the lamp hour counter.Resetting the Lamp Timer 49
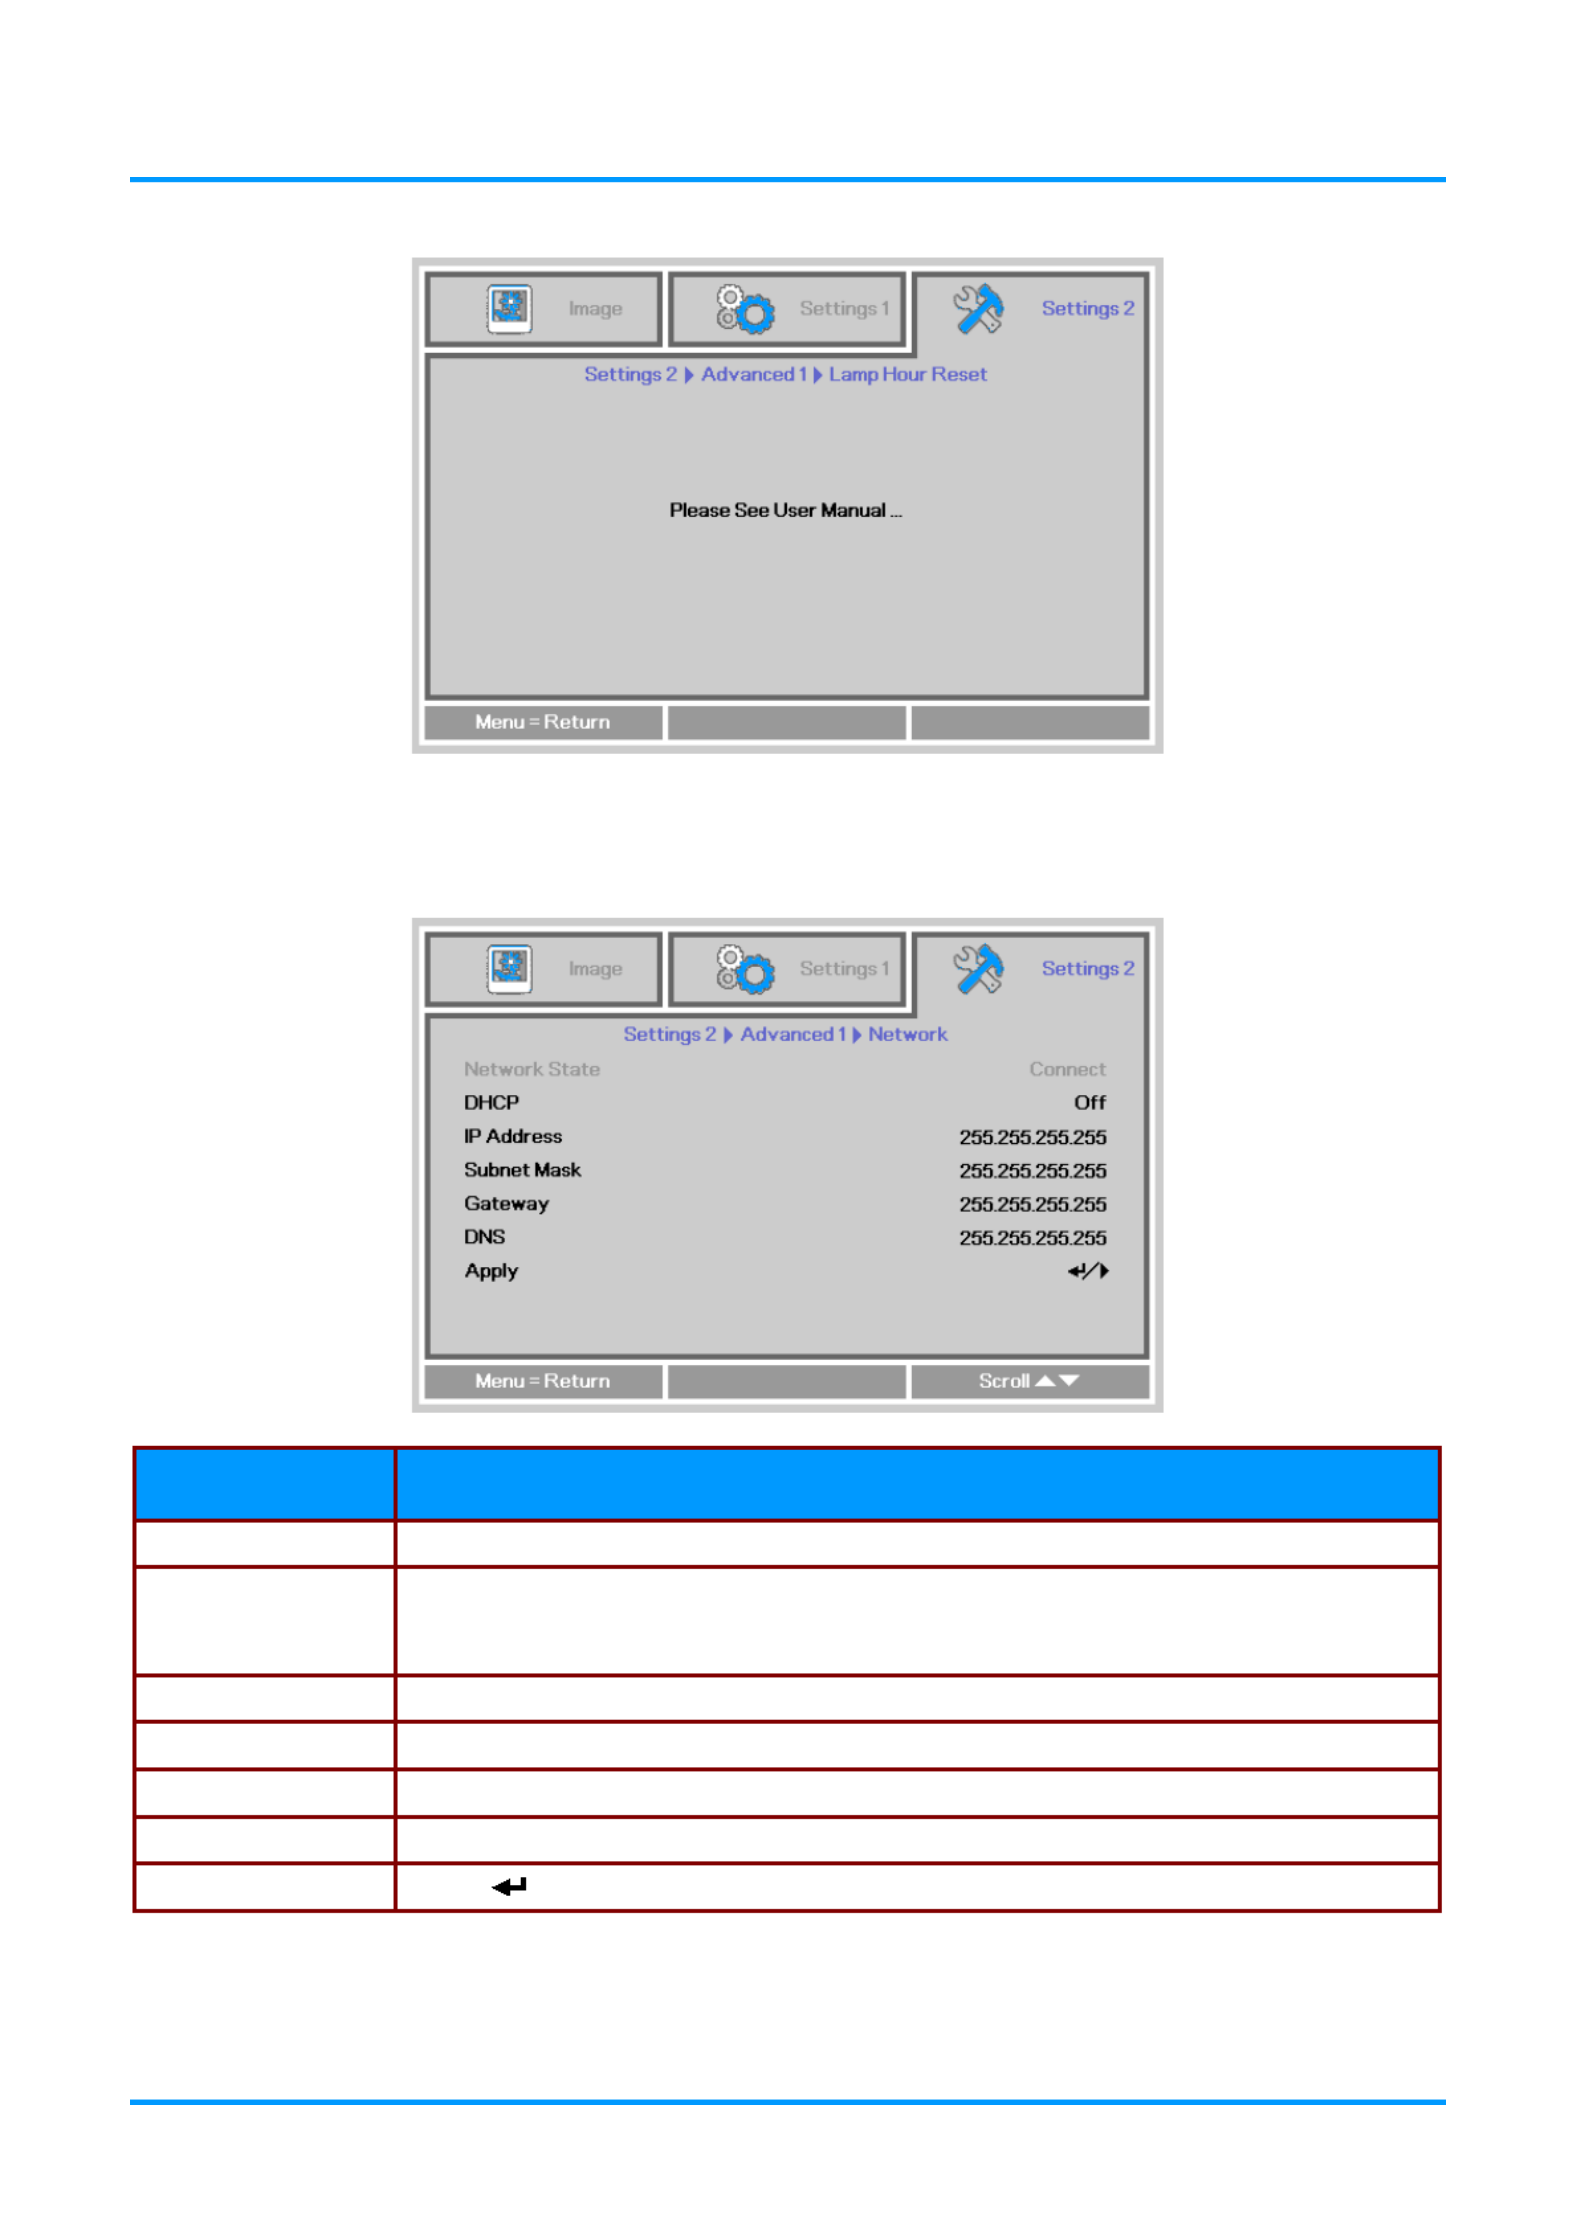
Network
I D TEM ESCRIPTION
Network State nDisplays the etwork connection status.
DHCP
Press ◄► to turn DHCP On or Off.
Note: If DHCP is turned Off, complete the IP Address, Subnet Mask, Gateway, and
DNS fields.
IP Address Enter a valid IP address DHCP is turned off.when
Subnet Mask Enter a valid Subnet Mask when DHCP is turned off.
Gateway Enter a valid Gateway address when DHCP is turned off.
DNS Enter a valid DNS name when DHCP is turned off.
Apply or Press (Enter) ►to confirm settings.

IN3144_IN3146_IN3148HD User’s Manual
— —36
LAN_RJ45
Wired LAN Terminal functionalites
Remote control and monitoring of a projector from a PC (or laptop) via wired LAN is also possible.
Compatibility with Crestron / AMX (Device Discovery) / Extron control boxes enables not only collective
projector management on a network but also management from a control panel on a PC (or laptop)
browser screen.
Crestron is a registered trademark of Crestron Electronics, Inc. of the United States.
Extron is a registered trademark of Extron
Electronics, Inc. of the United States.
AMX is a registered trademark of AMX LLC of the United States.
PJLink applied for trademark and logo registration in Japan, the United States of America, and
other countries by JBMIA.
Supported External Devices
This projector supports specified Crestron Electronics controller commands and related software (ex,
RoomView ®).
http://www.crestron.com/
This projector supports AMX ( Device Discovery ).
http://www.amx.com/
This projector supports Extron device(s).
http://www.extron.com/
This projector supports all commands of PJLink Class1 (Version 1.00).
http://pjlink.jbmia.or.jp/english/
For detailed information about the diverse types of external devices which can be connected to the
LAN/RJ45 port to control the projector, as well as related control commands, go to
www.infocus.com/support.

IN3144_IN3146_IN3148HD User’s Manual
— 37 —
LAN_RJ45
1. Connect an RJ45 cable to RJ45 ports on the projector and the PC (laptop).
2. On the PC (laptop), select Start → Control Panel →Network and Internet.

IN3144_IN3146_IN3148HD Manual User’s
— —38
3. Right -click on Local Area Connection, and select Properties.
4. In the window, select the tab, and select Properties Networking Internet Protocol (TCP/IP).
5. . Click Properties
6. Click Use the following IP address and fill in the IP address and Subnet mask, then click OK.

IN3144_IN3146_IN3148HD User’s Manual
— — 39
7. Press the button on the projector.Menu
8. Select Settings2→ Advanced1 → Network
9. gAfter etting into , input the following:Network
DHCP: Off
IP Address: 10.10.10.10
Subnet Mask: 255.255.255.0
Gateway: 0.0.0.0
DNS Server: 0.0.0.0
10. Press (Enter) / ► to confirm settings.
Open a web browser
(for example, Microsoft Internet Explorer with Adobe Flash Player 9.0 or higher).
11. In the Address bar, input the IP address: 10.10.10.10.
12. . Press (Enter) / ►
The projector is setup for remote management. The LAN/RJ45 function displays as follows.
Termékspecifikációk
| Márka: | InFocus |
| Kategória: | Beamer |
| Modell: | IN3146 |
Szüksége van segítségre?
Ha segítségre van szüksége InFocus IN3146, tegyen fel kérdést alább, és más felhasználók válaszolnak Önnek
Útmutatók Beamer InFocus

14 Január 2025
15 Október 2024
2 Október 2024
27 Szeptember 2024
24 Szeptember 2024
24 Szeptember 2024
23 Szeptember 2024
22 Szeptember 2024
21 Szeptember 2024
18 Szeptember 2024
Útmutatók Beamer
- Beamer Samsung
- Beamer Sony
- Beamer Yamaha
- Beamer Acer
- Beamer LG
- Beamer Marantz
- Beamer Philips
- Beamer Panasonic
- Beamer Canon
- Beamer JVC
- Beamer Sharp
- Beamer Lenovo
- Beamer Casio
- Beamer Toshiba
- Beamer HP
- Beamer Hisense
- Beamer BenQ
- Beamer Medion
- Beamer Xiaomi
- Beamer Dell
- Beamer Klarstein
- Beamer Prixton
- Beamer Polaroid
- Beamer Technaxx
- Beamer Ricoh
- Beamer Eurolite
- Beamer Epson
- Beamer Asus
- Beamer Hama
- Beamer Renkforce
- Beamer Mitsubishi
- Beamer GPX
- Beamer Hitachi
- Beamer Kodak
- Beamer Optoma
- Beamer Smart
- Beamer Dahua Technology
- Beamer Viewsonic
- Beamer Livoo
- Beamer Smart Tech
- Beamer XGIMI
- Beamer OK
- Beamer Auna
- Beamer Nebula
- Beamer ZTE
- Beamer Showtec
- Beamer Futurelight
- Beamer Overmax
- Beamer Kogan
- Beamer D-Link
- Beamer ION
- Beamer Blaupunkt
- Beamer 3M
- Beamer Pyle
- Beamer Sanyo
- Beamer Steinel
- Beamer Salora
- Beamer Lenco
- Beamer Maxell
- Beamer Leica
- Beamer Barco
- Beamer NEC
- Beamer Cameo
- Beamer Krüger&Matz
- Beamer RCA
- Beamer OKI
- Beamer Adj
- Beamer Anker
- Beamer Microtek
- Beamer Celexon
- Beamer Vivitek
- Beamer EasyMaxx
- Beamer Elmo
- Beamer Planar
- Beamer Smartwares
- Beamer Speaka
- Beamer Vogel's
- Beamer Acco
- Beamer Aiptek
- Beamer ASK Proxima
- Beamer Reflecta
- Beamer Yaber
- Beamer Da-Lite
- Beamer Steren
- Beamer Eiki
- Beamer Derksen
- Beamer Bauer
- Beamer Naxa
- Beamer Emtec
- Beamer Celly
- Beamer Promethean
- Beamer Odys
- Beamer Stairville
- Beamer Laserworld
- Beamer Ibm
- Beamer La Vague
- Beamer Tzumi
- Beamer EKO
- Beamer MicroVision
- Beamer Elite Screens
- Beamer Fun Generation
- Beamer Christie
- Beamer PLUS
- Beamer Varytec
- Beamer AOpen
- Beamer Ultimea
- Beamer Dracast
- Beamer Dukane
- Beamer Dream Vision
- Beamer Knoll
- Beamer DTS
- Beamer Touchjet
- Beamer Boxlight
- Beamer AAXA Technologies
- Beamer Miroir
- Beamer Vankyo
- Beamer Mimio
- Beamer AWOL Vision
- Beamer Atlantis Land
- Beamer KickAss
- Beamer VAVA
- Beamer Beghelli
- Beamer Panamorph
- Beamer Mirabella Genio
Legújabb útmutatók Beamer

10 Április 2025
10 Április 2025
10 Április 2025

9 Április 2025
9 Április 2025

2 Április 2025

15 Január 2025
13 Január 2025

12 Január 2025
12 Január 2025