Használati útmutató Iiyama ProLite T4260MTS
Olvassa el alább 📖 a magyar nyelvű használati útmutatót Iiyama ProLite T4260MTS (44 oldal) a Monitor kategóriában. Ezt az útmutatót 4 ember találta hasznosnak és 2 felhasználó értékelte átlagosan 4.5 csillagra
Oldal 1/44
ENGLISH
Thank you very much for choosing the iiyama
LCD monitor.
We recommend that you take a few minutes
to read this comprehensive manual carefully
before installing and switching on the monitor.
Please keep this manual in a safe place for
your future reference.
USER MANUAL

ENGLISH

ENGLISH
We reserve the right to change specifi cations without notice.
All trademarks used in this user manual are the property of their respective owners.
We recommend recycling of used product. Please contact your dealer or iiyama
service center. Recycle information is obtained via the Internet, using the address:
http://www.iiyama.com
You can access the Web page of different countries from there.
CE MARKING DECLARATION OF CONFORMITY
This LCD monitor complies with the requirements of the EC Directive 2004/108/EC “EMC Directive”
and 2006/95/EC “Low Voltage Directive”.
Warning
This is a class A product. In a domestic environment this product may cause radio interference in
which case the user may be required to take adequate measures.
IIYAMA CORPORATION: Breguetlaan 8, 1438BC Oude Meer The Netherlands

ENGLISH
TABLE OF CONTENTS
FOR YOUR SAFETY ..........................................................................1
SAFETY PRECAUTIONS ..............................................................1
SPECIAL NOTES ON LCD MONITORS .......................................3
CUSTOMER SERVICE .................................................................3
CLEANING ....................................................................................3
BEFORE YOU OPERATE THE MONITOR ........................................4
FEATURES ....................................................................................4
CHECKING THE CONTENTS OF THE PACKAGE ......................4
UNPACKING .................................................................................5
SPECIAL NOTES ON : ProLite T4260MTS...................................5
CONTROLS AND CONNECTORS : MONITOR ............................6
INSTALLATION .............................................................................9
CONTROLS AND CONNECTORS : REMOTE CONTROL .........10
PREPARING THE REMOTE CONTROL .....................................11
BASIC OPERATION ....................................................................12
CONNECTING YOUR MONITOR ...............................................15
COMPUTER SETTING ...............................................................17
OPERATING THE MONITOR ...........................................................18
ADJUSTMENT MENU CONTENTS ............................................20
SCREEN ADJUSTMENTS ..........................................................31
POWER MANAGEMENT FEATURE ...........................................34
TROUBLE SHOOTING ....................................................................35
RECYCLING INFORMATION ...........................................................36
APPENDIX ......................................................................................37
SPECIFICATIONS : ProLite T4260MTS ......................................37
SPECIFICATIONS : ProLite L4260S ...........................................38
DIMENSIONS .............................................................................. 39
COMPLIANT TIMING ..................................................................40

ENGLISH
FOR YOUR SAFETY 1
FOR YOUR SAFETY
WARNING
STOP OPERATING THE MONITOR WHEN YOU SENSE TROUBLE
If you notice any abnormal phenomena such as smoke, strange sounds or fumes, unplug the monitor
and contact your dealer or iiyama service center immediately. Further use may be dangerous and can
cause fi re or electric shock.
NEVER REMOVE THE CABINET
High voltage circuits are inside the monitor. Removing the cabinet may expose you to the danger of fi re
or electric shock.
DO NOT PUT ANY OBJECT INTO THE MONITOR
Do not put any solid objects or liquids such as water into the monitor. In case of an accident, unplug
your monitor immediately and contact your dealer or iiyama service center. Using the monitor with any
object inside may cause fi re, electric shock or damage.
INSTALL THE MONITOR ON A FLAT, STABLE SURFACE
The monitor may cause an injury if it falls or is dropped.
DO NOT USE THE MONITOR NEAR WATER
Do not use where water may be splashed or spilt onto the monitor as it may cause fi re or electric
shock.
OPERATE UNDER THE SPECIFIED POWER SUPPLY
Be sure to operate the monitor only with the specifi ed power supply. Use of an incorrect voltage will
cause malfunction and may cause fi re or electric shock.
PROTECT THE CABLES
Do not pull or bend the power cable and signal cable. Do not place the monitor or any other heavy
objects on the cables. If damaged, the cables may cause fi re or electric shock.
ADVERSE WEATHER CONDITIONS
It is advisable not to operate the monitor during a heavy thunder storm as the continual breaks in
power may cause malfunction. It is also advised not to touch the plug in these circumstances as it may
cause electric shock.
SAFETY PRECAUTIONS

ENGLISH
2 FOR YOUR SAFETY
CAUTION
INSTALLATION LOCATION
Do not install the monitor where sudden temperature changes may occur, or in humid, dusty or smoky
areas as it may cause fi re, electric shock or damage. You should also avoid areas where the sun
shines directly on the monitor.
DO NOT PLACE THE MONITOR IN A HAZARDOUS POSITION
The monitor may topple and cause injury if not suitably located. Please also ensure that you do not
place any heavy objects on the monitor, and that all cables are routed such that children may not pull
the cables and possibly cause injury.
MAINTAIN GOOD VENTILATION
Ventilation slots are provided to keep the monitor from overheating. Covering the slots may cause fi re.
To allow adequate air circulation, place the monitor at least 10 cm (or 4 inches) from any walls.
Do not remove the tilt stand when operating the monitor. Ventilation slots on the back of the cabinet
will be blocked and the monitor may overheat if the stand is removed. This may cause fi re or damage.
Operating the monitor on its back, side, upside down or on a carpet or any other soft material may also
cause damage.
DISCONNECT THE CABLES WHEN YOU MOVE THE MONITOR
When you move the monitor, turn off the power switch, unplug the monitor and be sure the signal cable
is disconnected. If you do not disconnect them, it may cause fi re or electric shock.
UNPLUG THE MONITOR
If the monitor is not in use for a long period of time it is recommended that it is left unplugged to avoid
accidents.
HOLD THE PLUG WHEN DISCONNECTING
To disconnect the power cable or signal cable, always pull it by the plug. Never pull on the cable itself
as this may cause fi re or electric shock.
DO NOT TOUCH THE PLUG WITH WET HANDS
Pulling or inserting the plug with wet hands may cause electric shock.
WHEN YOU INSTALL THE MONITOR ON YOUR COMPUTER
Be sure the computer is strong enough to hold the weight of the monitor, otherwise, you may damage
your computer.
ERGONOMIC RECOMMENDATIONS
To eliminate eye fatigue, do not operate the monitor against a bright background or in a dark room.
For optimal viewing comfort, the monitor should be just below eye level and 40-60 cm (16-24 inches)
away from your eyes. When using the monitor over a prolonged time, a ten minute break every hour is
recommended as looking at the screen continuously can cause eye strain.
OTHERS

ENGLISH
4 BEFORE YOU OPERATE THE MONITOR
The following accessories are included in your package. Check to see if they are enclosed with the
monitor. If anything is missing or damaged, please contact your local iiyama dealer or regional iiyama
offi ce.
*1 The rating of the Power Cable enclosed in 120V area is 10A/125V. If you are using
a power supply higher than this rating, then a power cable with a rating of 10A/
250V must be used. However, all guarantees and warranties are void for any
problems or damage caused by a power cable not supplied by iiyama.
*2 Accessory for ProLite T4260MTS.
Power Cable*1
D-Sub Signal Cable HDMI Cable
USB Cable*
2 Remote Control Touch Pen*2
iiyama Logo Sticker Safety Guide Quick Start Guide
BEFORE YOU OPERATE THE MONITOR
CHECKING THE CONTENTS OF THE PACKAGE
CAUTION
FEATURES
Supports Resolutions up to 1920 × 1080
High Contrast 4150:1 (Typical: with Touch panel) / Brightness 370cd/m2 (Typical:
with Touch panel) : ProLite T4260MTS
High Contrast 6500:1 (Typical) / Brightness 450cd/m2 (Typical) : ProLite L4260S
Digital Character Smoothing
Automatic Set-up
Stereo Speakers
2 × 10W Stereo Speakers
Plug & Play VESA DDC2B Compliant
Windows® 95/98/2000/Me/XP/Vista/7 Compliant
Power Management (VESA DPMS Compliant)
VESA Mounting Standard (400mm×200mm) Compliant
ENGLISH
BEFORE YOU OPERATE THE MONITOR 5
UNPACKING
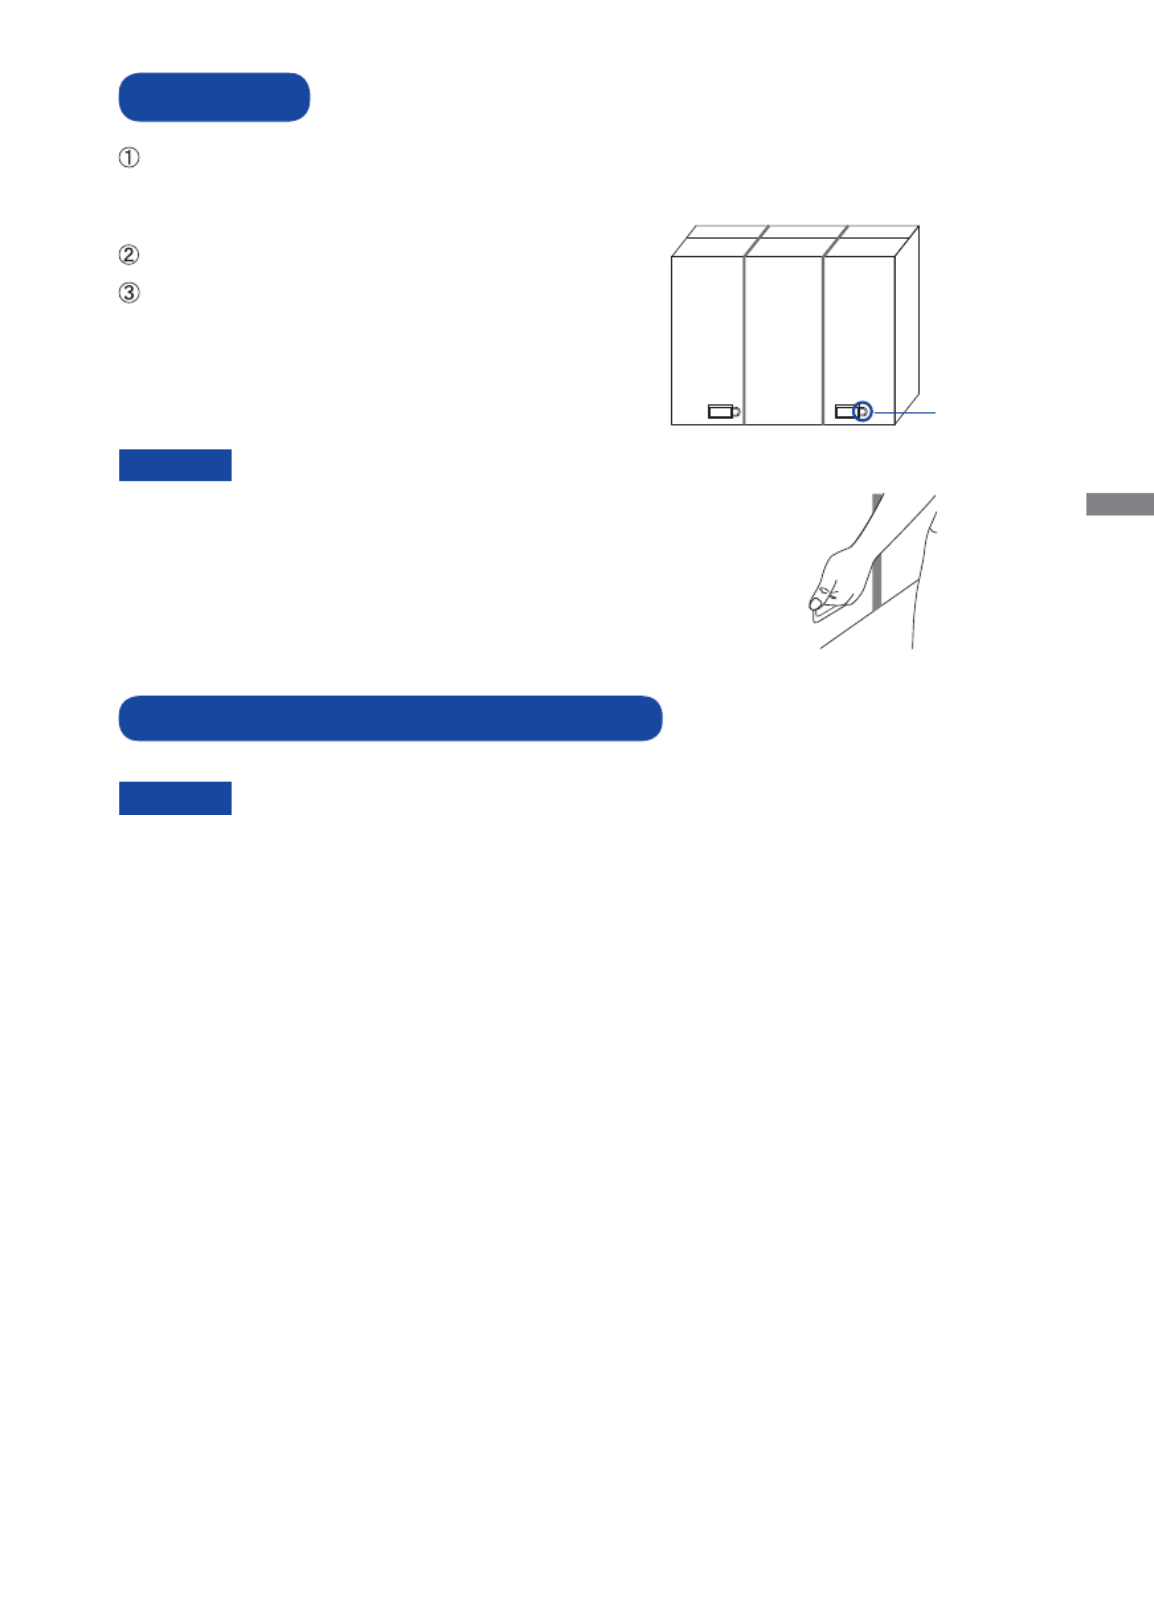
Before unpacking your monitor, prepare a stable, level, and clean surface near a wall outlet.
Set the LCD Monitor box in an upright position and open from the top of the box before removing
the top cushions.
Remove the white handle(s) and cut the banding.
Remove the top cushion and take the accessories bag
and the Monitor out.
CAUTION
Moving the monitor requires at least two people. If not, it may drop and
could result in a serious injury.
When moving/shipping the monitor, please hold by the white handles.
Pull the handle
SPECIAL NOTES ON : ProLite T4260MTS
Permanent damage can occur if Sharp Edged, Pointed or Metal items are used to activate Touch.
This could invalidate any remaining warranty.
We recommend you use a plastic stylus (tip R0.8 or over) or fi nger.
CAUTION

ENGLISH
6 BEFORE YOU OPERATE THE MONITOR
CONTROLS AND CONNECTORS : MONITOR
<Side Controller>
Power Button
SOURCE Input Select Button
Right Button
Left Button
Up Button
Down Button
MENU / EXIT Menu/Exit Button
<Front>
Power Indicator
Green Normal Operation
Orange Power Management
If power off and select LED on via menu "Front LED ON"
Off Power Off
If power on and select LED on via menu "Front LED OFF"
Remote Sensor Remote Sensor

ENGLISH
BEFORE YOU OPERATE THE MONITOR 7
<Left Side>
AC OUT AC Connector (AC-OUT)
AC IN AC Connector
(ON) / (OFF) Main Power Switch
OFF
ON
MAIN POWER AC IN
AC OUT
100-200V2A
<Right Side >
Touch
USB
Touch USB* Touch USB Connector
* Available for ProLite T4260MTS only.
ENGLISH
BEFORE YOU OPERATE THE MONITOR 9
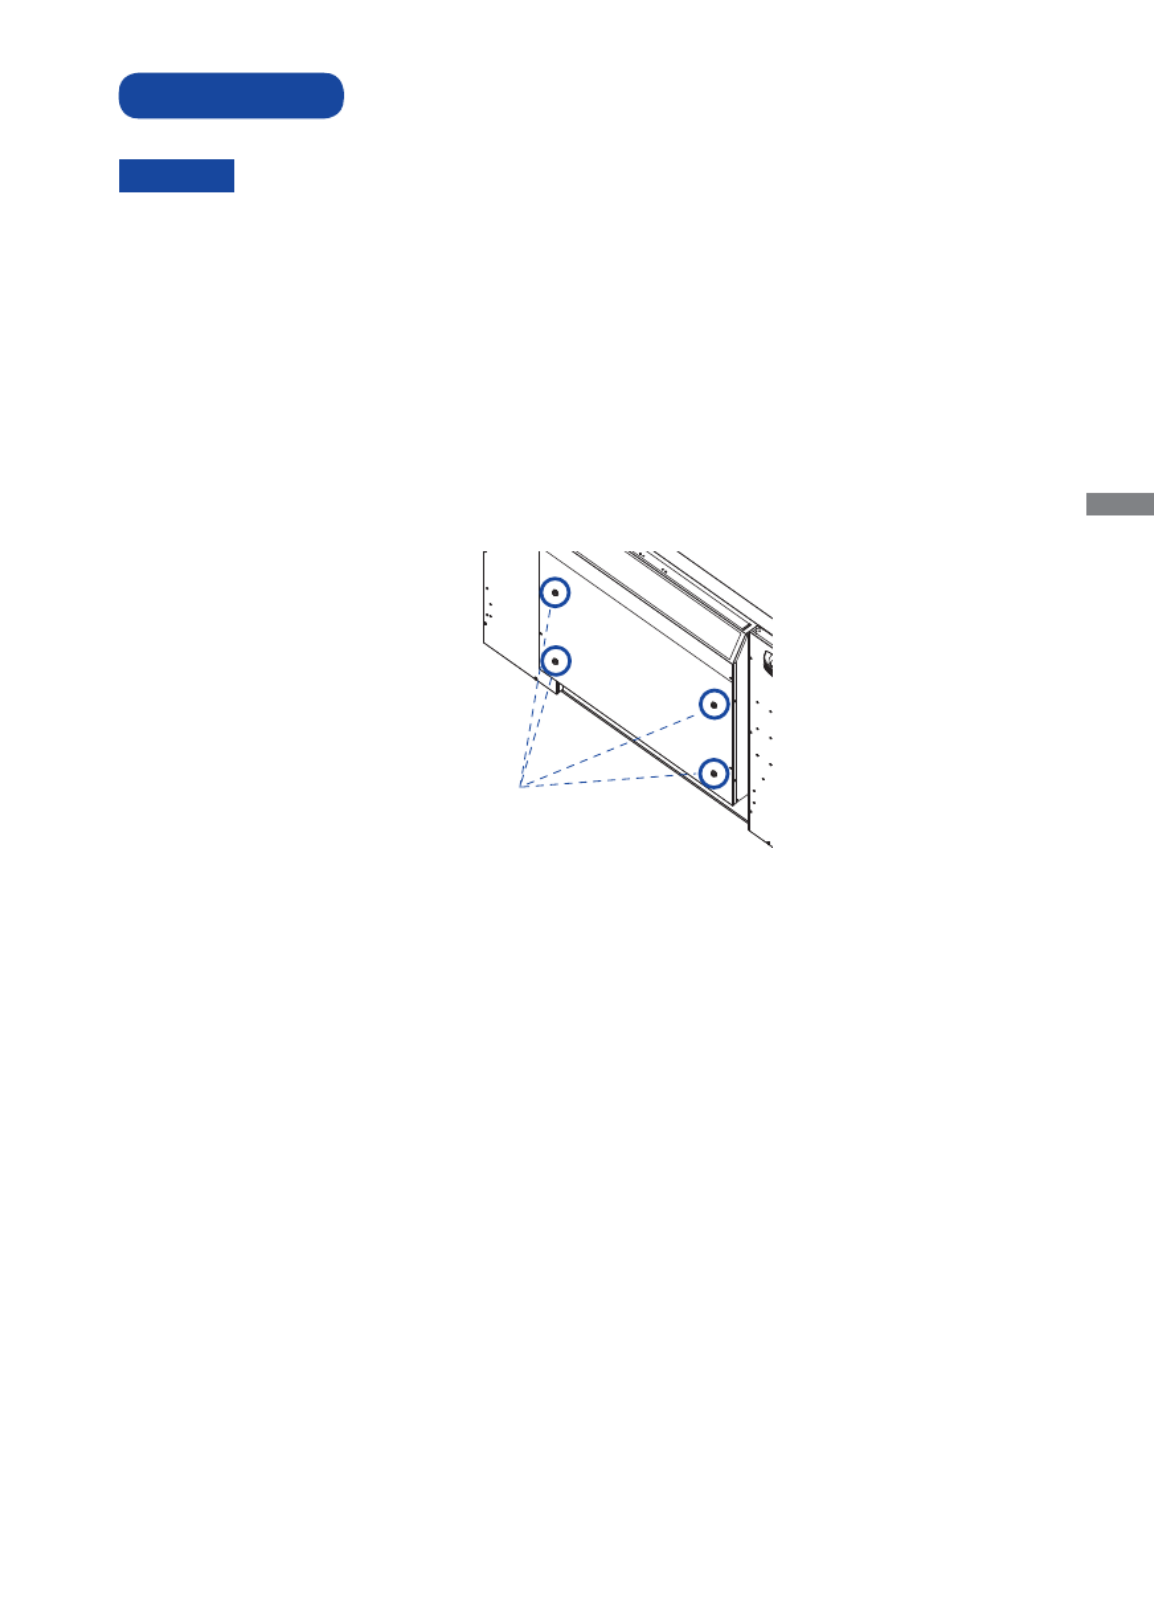
INSTALLATION
CAUTION
Follow the manual instructions for the type of mount you have selected. Refer all servicing to
qualifi ed service personnel.
Moving the monitor requires at least two people.
Before installing, please make sure the wall is strong enough to hold the necessary weight of the
display and the mount.
Using a screw longer than this may cause electric shock or damage because it may contact with the
electrical parts inside the monitor.
Remove the screws (M8x15 x4) from the back of the monitor if necessary, and please use those.
Screw (M8 x15) x4
ENGLISH
10 BEFORE YOU OPERATE THE MONITOR
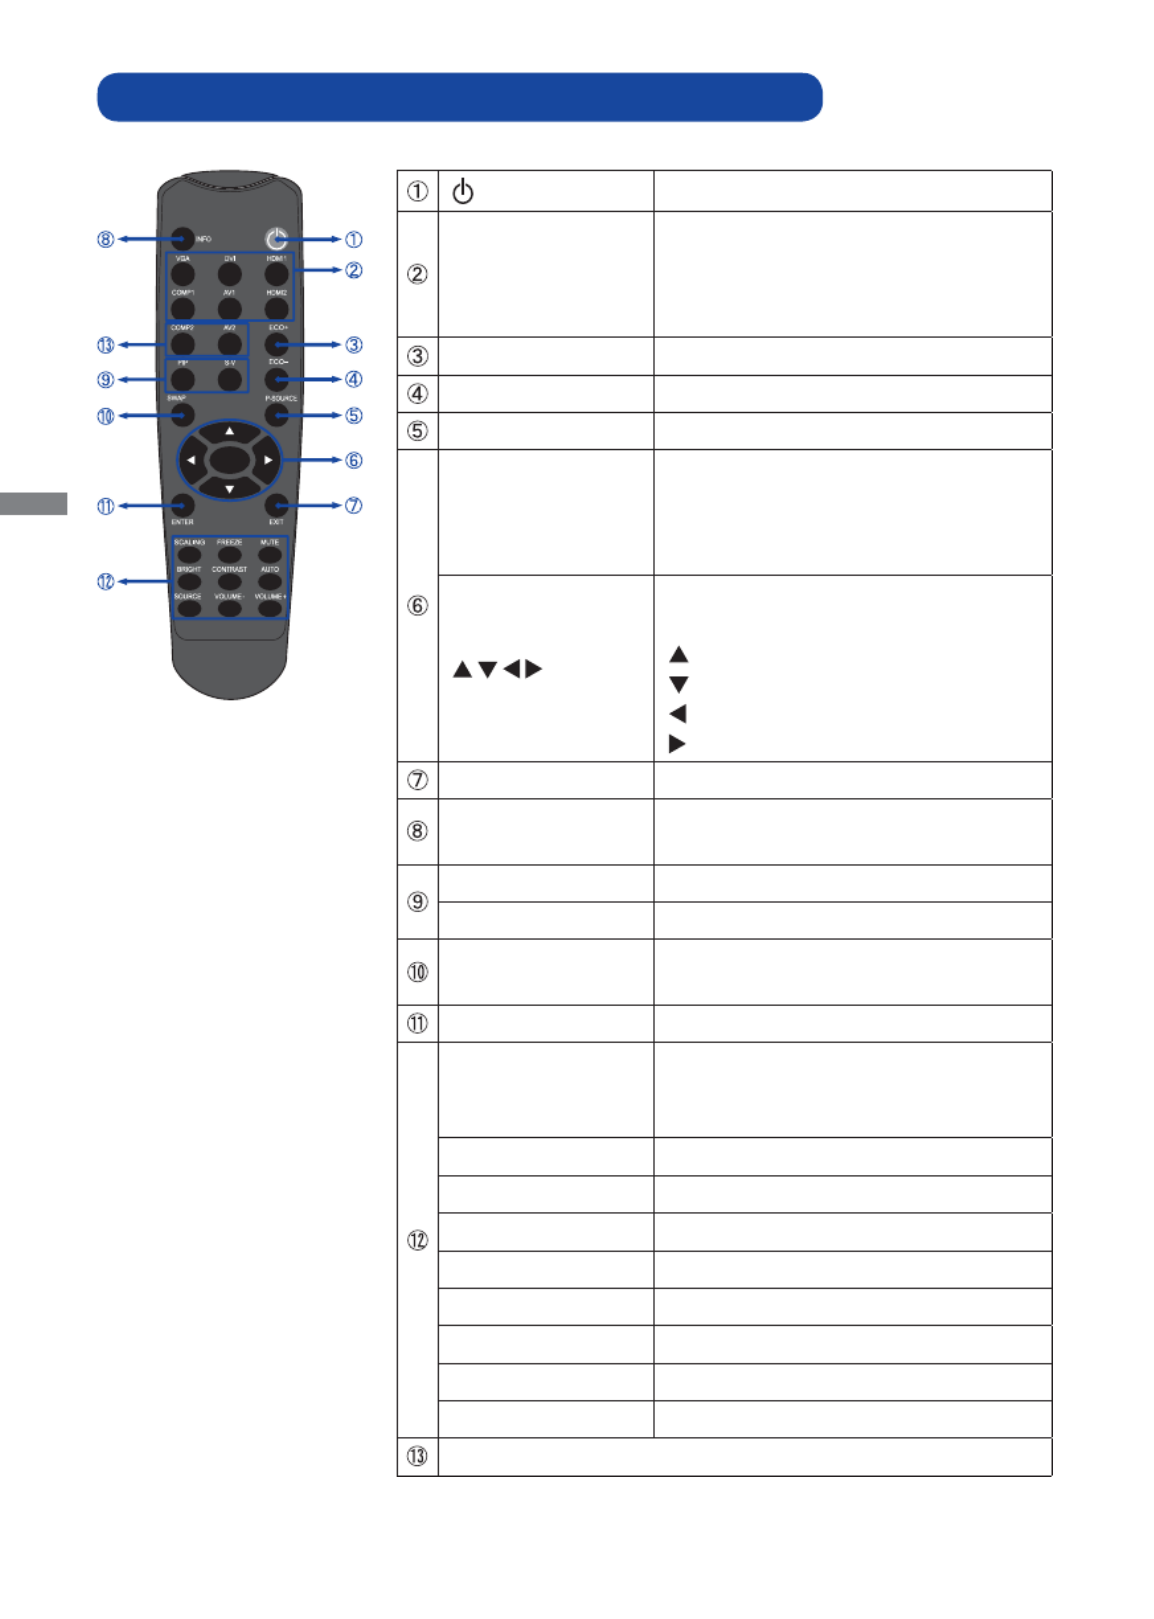
CONTROLS AND CONNECTORS : REMOTE CONTROL
Turns the monitor ON and OFF.
VGA / DVI / HDMI1 /
COMP1 /
AV1(VIDEO1) /
HDMI2
Selects the source.
ECO+ Brightness of back-light is reduced.
ECO- Brightness of back-light is increased.
P-SOURCE Selects the secondary sub source.
MENU
Opens the monitor's on-screen menu
systems. When the menu system is
already open, pressing this button will
select the previous submenu.
Navigates through submenus and
settings.
: Up Button
: Down Button
: Left Button
: Right Button
EXIT Closes the menu system.
INFO Provides source and resolution
information.
PIP Turns the PIP feature ON and OFF.
S-V Selects the S-Video source.
SWAP Swaps the main source and sub source
picture.
ENTER Selects highlighted menu choices.
SCALING
Toggles between different aspect ratios.
Auto / Native / 4x3 / 16x9 / 16x10 /
Letter Box
FREEZE Freezes the current source image.
MUTE Turns off the sound.
BRIGHT Adjusts the brightness.
CONTRAST Adjusts the contrast.
AUTO Synchronizes the monitor to the source.
SOURCE Allows selection of the different sources.
VOLUME- Decreases the sound volume.
VOLUME+ Increases the sound volume.
Not available on this model.
MENU

ENGLISH
12 BEFORE YOU OPERATE THE MONITOR
BASIC OPERATION
Turning the monitor ON
The monitor is turned O n and the Po w e r
Indicator turns to Green when you press the
Power Button on the monitor or the Remote
Control. The monitor is turned Off and the Power
Indicator turns to orange when you press the
Power Button on the monitor or the Remote
Control.
Press again to turn On the monitor.
NOTE
Even when using the power management mode
or turning OFF the Power Switch, the monitor will
consume a small amount of electricity. Disconnect
the Power Cable from the power supply whenever
the monitor is not in use or during the night, to
avoid unnecessary power consumption.
[Monitor] [Remote Control]
Display the adjustment menu page
The menu page appears on the screen when
you press the MENU Button on the monitor or
the Remote Control.
The menu page disappears when you press
the EXIT Button on the monitor or the Remote
Control again.
[Monitor] [Remote Control]
MENU
MENU

ENGLISH
BEFORE YOU OPERATE THE MONITOR 13
Move the cursor horizontally
Se le c t m e n u o r s e tt i n g , o r p er fo rm t h e
adjustment by pressing the / Button while
the menu page is displayed on the screen.
[Monitor] [Remote Control]
Move the cursor vertically
Select adjustment by pressing the / Button
while the menu page is displayed on the screen.
[Monitor] [Remote Control]
MENU
MENU

ENGLISH
14 BEFORE YOU OPERATE THE MONITOR
Adjust the volume of sound
Press the Volume+ / Volume- Button on the
Remote Control to adjust the volume of sound
when the menu page is not displayed on the
screen.
[Remote Control]
Switch the input signal
This is activated when you successively press
the Source Button on the monitor or Input Signal
Button on the Remote Control as follows:
[Monitor] [Remote Control]
MENU
MENU

ENGLISH
BEFORE YOU OPERATE THE MONITOR 15
CONNECTING YOUR MONITOR
Ensure that both the computer and the monitor are switched off.
Connect the computer to the monitor with the signal cable.
Connect the computer to the monitor with the USB Cable. *
Connect the Power Cable to the monitor fi rst and then to the power supply.
Turn on your monitor (Main Power Switch and Power Switch) and computer.
The signal cables used for connecting the computer and monitor may vary with the type of
computer used. An incorrect connection may cause serious damage to both the monitor and
the computer. The cable supplied with the monitor is for a standard 15 pin D-Sub connector.
If a special cable is required please contact your local iiyama dealer or regional iiyama
offi ce.
For connection to Macintosh computers, contact your local iiyama dealer or regional
iiyama offi ce for a suitable adaptor.
Make sure you tighten the fi nger screws at each end of the Signal.
Don't connect the RS-232C cable and the USB cable to the computer at the same time.
And cannot use those at the same time.
[Example of Connection]
<Back>
NOTE
Computer
AV Equipment
D-Sub Signal Cable
(Accessory)
DVI-D Cable
(Not Included)
HDMI Cable
(Not Included)
Power Cable
(Accessory)
GAME
Equipment
HDMI Cable (Accessory)
USB Cable
(Accessory) *
Audio Cable
(Not Included)
* Available for ProLite T4260MTS only.
ENGLISH
16 BEFORE YOU OPERATE THE MONITOR
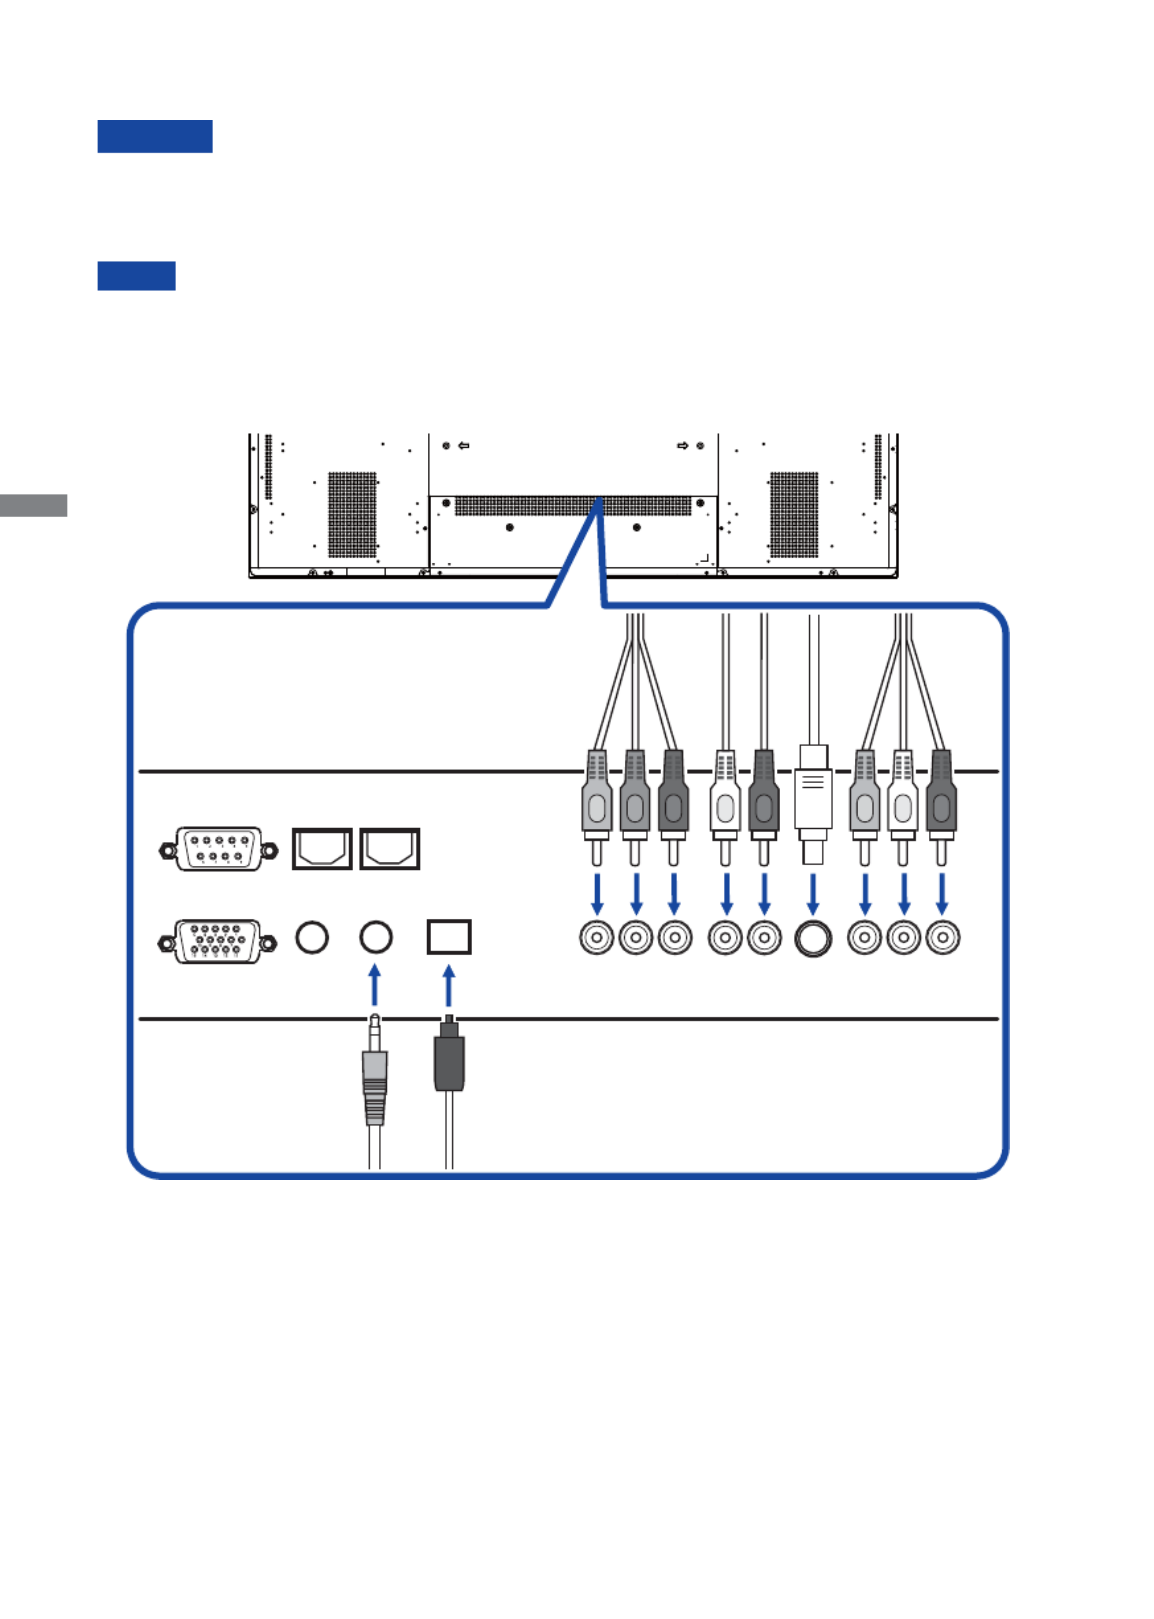
[ Connection example with the peripheral device ]
CAUTION
Turn off the power switch and unplug the monitor and peripherals before connection to avoid electric
shock or damage.
NOTE
Refer to the user manual of peripherals at the same time.
Ensure you have the necessary cables as required.
L R
Composite Audio
VideoS-Video
L R
Component Audio
Component Video
SPDIF
Out
IR
Extender
PC
Audio
In
VGA
RS232C RS485
In
RS485
Out
Red
Red
Red
White
Yellow
White
Blue
Green
S-Video

ENGLISH
BEFORE YOU OPERATE THE MONITOR 17
Procedure for turning ON the Power Switch
Turn ON the monitor fi rst, and then the computer.
MULTI-TOUCH DRIVER : ProLite T4260MTS
Please download "NW2500 (multi-touch driver)" from web site of Next Window, and install to your
PC.
http://www.nextwindow.com/nextwindow_support/windriver.html
When not install "NW2500", the multi-touch operation is unavailable.
Touch screen driver software : ProLite T4260MTS
Touch screen driver software and system may not start when you start your computer while touching
the screen.
Touch screen driver software may not run due to the power saving function depending on the BIOS
of your computer. In this case, set the power saving function to off.
Signal Timing
Change to the desired signal timing listed on page 40: COMPLIANT TIMING.
Windows 95/98/2000/Me/XP/Vista/7 Plug & Play
The iiyama LCD monitor complies with DDC2B of VESA standard. The Plug & Play function runs on
Windows 95/98/2000/Me/XP/Vista/7 by connecting the monitor to DDC2B compliant computer with
the Signal Cable supplied.
For installation on Windows 95/98/2000/Me/XP: The monitor Information File for iiyama monitors
may be necessary for your computer and obtained via the Internet, using the address:
http://www.iiyama.com
For additional information on how to download the driver for your touch screen monitor,
please access the internet site noted above.
Monitor Drivers are not required in most cases for Macintosh or Unix operating systems.
For further information, please contact your computer dealer fi rst for advice.
COMPUTER SETTING
NOTE

ENGLISH
18 OPERATING THE MONITOR
OPERATING THE MONITOR
To create the best picture, your iiyama LCD monitor has been preset at the factory
with the COMPLIANT
TIMING shown on page 40. You are also able to adjust the picture by following the button operation
shown below. For more detailed adjustments, see page 31 for SCREEN ADJUSTMENTS.
Press the MENU Button to start the On Screen Display feature. There are additional
Menu items which can be switched by using the / Buttons.
B Select the Menu item of the adjustment you want to make. Press the or ENTER
Buttons and enter the menu page. Then, use the / Buttons to highlight the
desired adjustment item.
C Press the or ENTER Buttons again. Use the Buttons to make the /
appropriate adjustment or setting.
D Press the EXIT Button to leave the menu, and the settings you just made would be
automatically saved.
The MENU Button can be used to return previous menu item.
When button operations are aborted during adjustment, On-Screen Display disappears when the
time set for the OSD Timeout has passed.
EXIT button can be used to return previous menu item.
Any changes are automatically saved in the memory when the On Screen Display
disappears.
Turning off the power should be avoided while using the Menu.
Adjustments for Image Position, Clock and Phase are saved for each signal timing. Except for these
adjustments, all other adjustments have only one setting which applies to all signal timings.
NOTE
For example, to correct for vertical position, select Menu item of Advanced Settings. Then, select
Image Position by using the Buttons.
Use the / Buttons to change the vertical position settings. The vertical position of the overall
display should be changing accordingly while you are doing this.
Press the EXIT Button lastly, it ends, any changes are saved in the memory.
Scheme
Brightness
Contrast
Sharpness
Saturation
Hue
Backlight
Colour Temperature & Gamma
User
50
50
12
100
Image Settings
Monitor ID
Image Position
Phase
Clock
Light Sensor
Baud Rate
Auto Adjustment
On
Advanced Setting
Flesh Tone
IRFM
Power LED
Factory Reset
VGA ADC Settings
Off
115200
Off
No
46
50
1
Off
No
Image Position
0
0

ENGLISH
OPERATING THE MONITOR 19
OSD LOCK MODE:
LOCK: Press ENTER, ENTER, EXIT, EXIT, ENTER and EXIT on the Remote Control in
sequence and OSD will be locked.
UNLOCK: Press ENTER, ENTER, EXIT, EXIT, ENTER and EXIT on the Remote Control in
sequence and OSD will be Unlocked.

ENGLISH
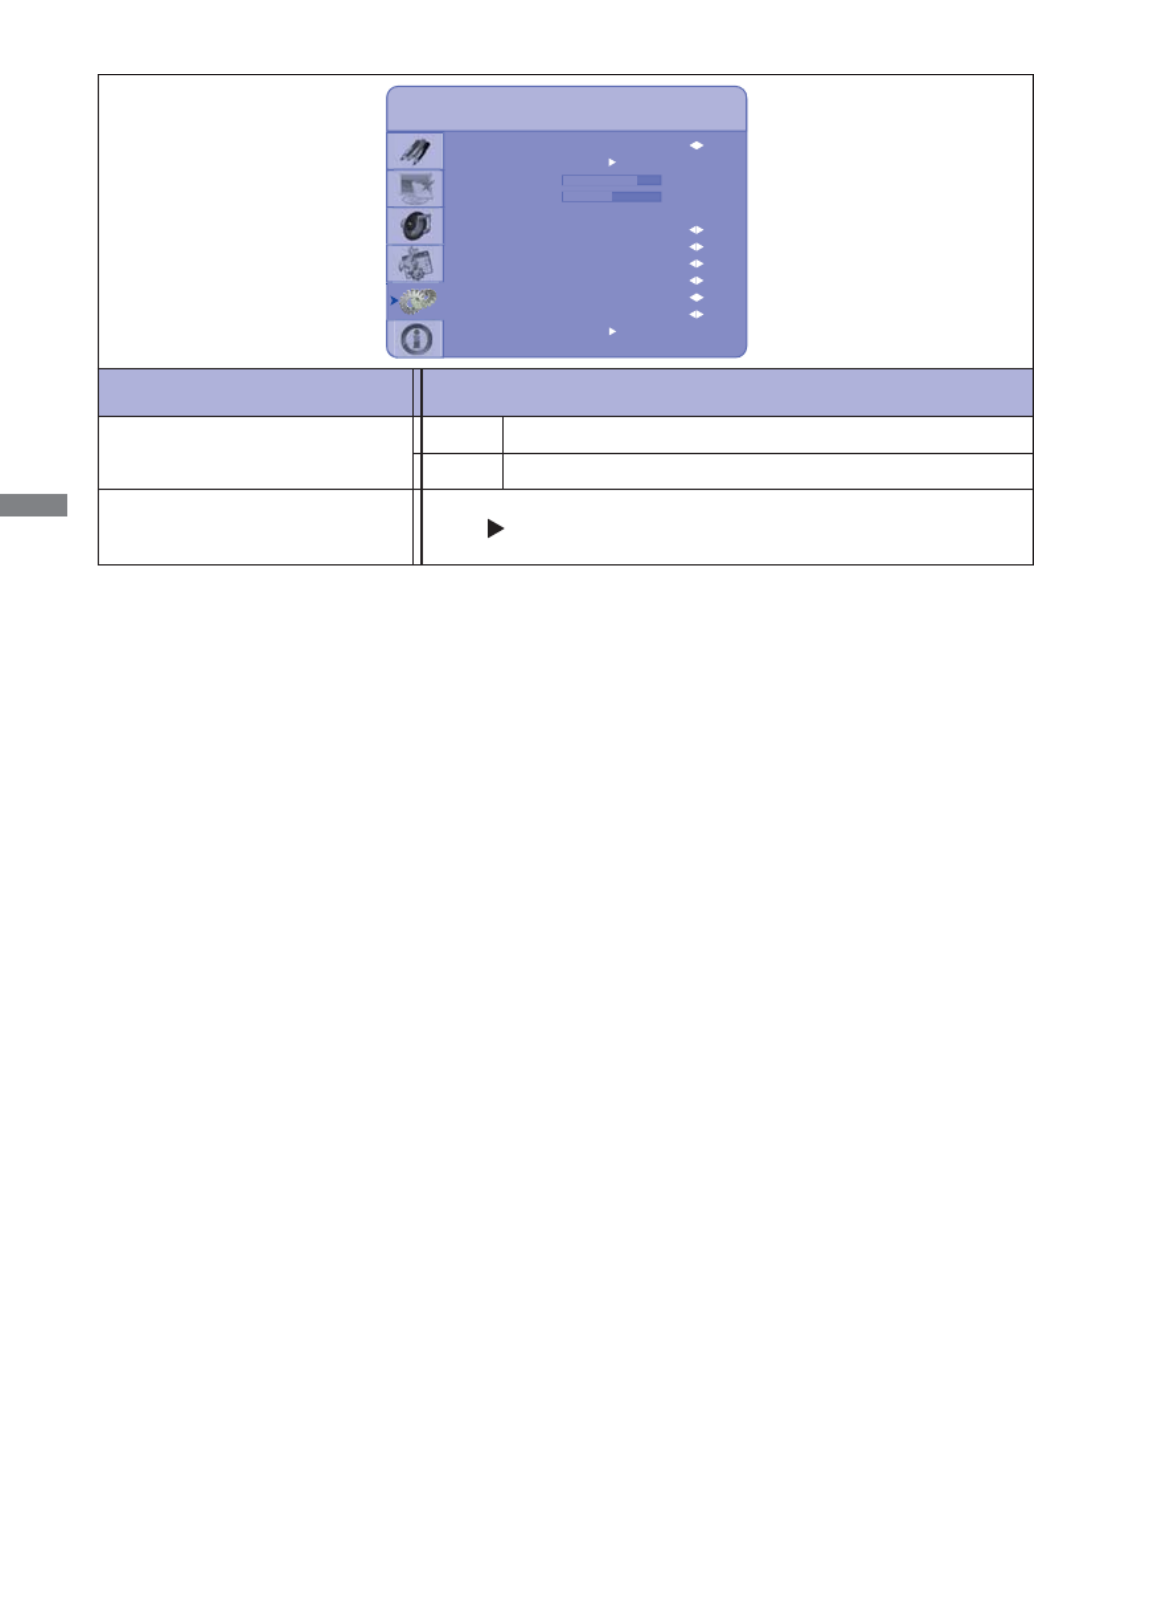
20 OPERATING THE MONITOR
ADJUSTMENT MENU CONTENTS
Adjustment Item Problem / Option Button to Press
Too dark
Too bright
Brightness *1
Contrast Too dull
Too intense
*1 Adjust the Brightness when you are using the monitor in a dark room and feel the screen is too
bright.
*2 Only COMP1, AV1 and s-v input.
You can skip the Menu items and display an adjustment scale directly by using the following button
operations.
Brightness: Press the BRIGHT Button (Remote Control) when the Menu is not displayed.
Contrast: Press the CONTRAST Button (Remote Control) when the Menu is not displayed.
Direct
Direct
Scheme
Brightness
Contrast
Sharpness
Saturation
Hue
Backlight
Colour Temperature & Gamma
User
50
50
12
100
Image Settings
Scheme *2
User
Vivid
Cinema
Game
Sport
Displays a picture on a screen set by Image
Settings adjustments.
For displaying outdoor scenery images.
For movie and video environment.
For PC game environment.
For sport environment.
Direct
Sharpness Too soft
Too sharp
Saturation *2Too week
Too strong
Hue *2Purplish
Greenish
Backlight Brightness of back light is reduced.
Colour Temperature & Gamma Press Button.
Image Settings

ENGLISH
OPERATING THE MONITOR 21
Adjustment Item Problem / Option Button to Press
To gain RedRed Gain
Green Gain To gain Green
Gamma
Colour Temerature
Red Gain
Green Gain
Blue Gain
Red Offset
Green Offset
Blue Offset
2.2
256
256
256
0
Image Settings
0
0
User
Colour Temperature
User
5000K
6500K
7500K
9300K
Go to adjustment menu of Gain and Offset.
Greenish white
Reddish white
Yellowish white
Bluish white
Blue Gain To gain Blue
Red Offset To offset Red
Green Offset To offset Green
Blue Offset To offset Blue
Image Settings
Colour Temperature &
Gamma
Gamma Off
2.2
High contrast
Normal

ENGLISH
22 OPERATING THE MONITOR
Adjustment Item Problem / Option Button to Press
Zoom in the image
Zoom out the image
Zoom
Auto Scan
Aspect Ratio
Aspect Ratio
Zoom
Auto Scan
Side By Side Scale
PIP Position
Main
Full Screen
Display Settings
Select Source
PIP Mode
PIP
Auto Scan
Select Source
Off
Off
Full Screen
Top-Left
Aspect Ratio
Full Screen
Pillar Box
Letter Box
Native
Expansion display
Portrait display
Landscape display
Displayed at the same magnifi cation.
Select Source
Display Settings
Main
On
Off
Select the signal input automatically.
Select the signal input manually.
HDMI1 Select the HDMI1 input.
HDMI2 Select the HDMI2 input.
VGA Select the VGA input.
Component Select the Component input.
S-Video Select the S-Video input.
Video Select the Video input.
When only one of the seven signal inputs is connected to the signal source, the one
connected is automatically selected. Select Source function is not available if there is no
signal input from the selected connector or during the power management mode.
NOTE
DVI Select the DVI input.

ENGLISH
OPERATING THE MONITOR 23
Adjustment Item Problem / Option Button to Press
Bottom-Right / Top-Left / Top-Right / Bottom-Left
PIP Position
Aspect Ratio
Aspect Ratio
Aspect Ratio
Zoom
Auto Scan
Side By Side Scale
PIP Position
Main
Full Screen
Display Settings
Select Source
PIP Mode
PIP
Auto Scan
Select Source
Off
Off
Full Screen
Top-Left
PIP Mode *
Off
Large PIP
Medium PIP
Small PIP
PIP function is turned off.
Sub screen is displayed at maximum size.
Sub screen is displayed at normal size.
Sub screen is displayed at minimum size.
Side by Side Scale
Display Settings
PIP
Zoom In Zoom in the image.
Zoom Out Zoom out the image.
Main Select the Main screen.
PIP Select the Sub screen.
Default Return this function to default.
Return Return to Menu.
Side by Side Main screen and sub screen are tiled.
You can move the sub screen display area to any one of the
following 4 positions within the overall display.
Full Screen
Pillar Box
Letter Box
Expansion display
Portrait display
Landscape display
When select Side by Side in
PIP Mode.
Auto Scan
Select Source
On
Off
Select the signal input automatically.
Select the signal input manually.
When only one of the seven signal inputs is connected to the signal source, the one
connected is automatically selected. Select Source function is not available if there is no
signal input from the selected connector or during the power management mode.
NOTE
NOTE
HDMI1 Select the HDMI1 input.
HDMI2 Select the HDMI2 input.
VGA Select the VGA input.
Component Select the Component input.
S-Video Select the S-Video input.
Video Select the Video input.
DVI Select the DVI input.

ENGLISH
OPERATING THE MONITOR 25
Adjustment Item Problem / Option Button to Press
HDMI Audio Input
Volume
Bass
Treble
Balance
50
10
10
Audio Settings
10
HDMI
Audio Settings
Too soft
Too loud
Volume
Bass Too weak
Too strong
Treble Too weak
Too strong
Balance Adjust the volume balance of the speaker right
and left.
HDMI Audio Input * HDMI
PC
Select the HDMI input.
Select the PC input.
* Suitable for HDMI input only.

ENGLISH
26 OPERATING THE MONITOR
Adjustment Item Problem / Option Button to Press
Too opaque
Too transparent
OSD Transparent
Start Up Logo
OSD Location
OSD Zoom
OSD Rotation
Real Time Clock
OSD Transparent
Landscape
Basic Settings
OSD Language
Sleep Timer
OSD Timeout
0
Off
English
120Sec.
Off
On
OSD Rotation
On
Off
Landscape
Portrait
Zoom in the OSD.
OSD Zoom is turned off.
Normal
Menu screen is rotated 90 degrees in counter
clockwise.
OSD Language
Basic Settings
OSD Location Adjust the menu location on the screen.
OSD Zoom
NOTE OSD Zoom disabled when setting portrait of OSD Rotation.
English Deutsch
English German
Français French
Russian
Polski Polish
Dutch Nederlands
OSD Timeout You can set the OSD display duration time
between 5 and 120 seconds.
Sleep Timer
Set a period of time after which the monitor will switch to stand by
mode automatically.
Off/15/30/60/90/120min
Real Time Clock
Set data, and switch alarm on and off.
Start Up Logo
On
Off
iiyama Logo displayed when the monitor is turned on.
iiyama Logo does not display when the monitor is
turned on.
/ Buttons : Move the cursor horizontally
/ Buttons : Number select, Move the cursor vertically
MENU Button: Return previous menu item

ENGLISH
OPERATING THE MONITOR 27
Adjustment Item Problem / Option Button to Press
Auto Adjustment *1,2,4
Monitor ID
Image Position
Phase
Clock
Light Sensor
Baud Rate
Auto Adjustment
On
Advanced Setting
Flesh Tone
IRFM
Power LED
Factory Reset
VGA ADC Settings
Off
115200
Off
No
46
50
1
Off
No
Flesh Tone *3
No
Yes
Off
Low
Return to Menu.
Adjust Position, Clock and Phase automatically.
Flesh Tone is turned off.
Emphasize fl esh color.
Power LED
Advanced Settings
Medium
High
Turn Off the power indicator when you are bothered by the light.
NOTE
Image Position *1
Too far to the left
Phase *1
Emphasize fl esh color more.
Emphasize fl esh color more than Medium.
IRFM
Baud Rate
Set the baud rate when connecting the RS232C connector and
the monitor.
9600 / 19200 / 38400 / 115200
Too far to the right
Too low
Too high
To correct fl ickering text or lines
Clock *1Too narrow
Too wide
On
Off
The power indicator is turned on.
The power indicator is turned off.
On
Off
Anti burn-in function is turned on.
Anti burn-in function is turned off.
Monitor ID Set ID to the Monitor.
1-255
On
Off
When plein air lowering brightness is gloomy. And raise
brightness when it is light.
Light sensor is turned off.
Light Sensor
ENGLISH
28 OPERATING THE MONITOR
Adjustment Item Problem / Option Button to Press
Factory Reset
Monitor ID
Image Position
Phase
Clock
Light Sensor
Baud Rate
Auto Adjustment
On
Advanced Setting
Flesh Tone
IRFM
Power LED
Factory Reset
VGA ADC Settings
Off
115200
Off
No
46
50
1
Off
No
No
Yes
Return to Menu.
Factory-preset data is restored.
Advanced Settings
VGA ADC Settings*4Press Button.
*1 Only Analog input.
*2 For best results, use the Auto Adjust in conjunction with the adjustment pattern. See page 31 for
SCREEN ADJUSTMENTS.
*3 Only COMP1, AV1 and s-v input.
*4 Auto Adjustment and VGA ADC Settings disabled when PIP Mode is active.

ENGLISH
OPERATING THE MONITOR 29
Adjustment Item Problem / Option Button to Press
ADC Mode
ADC Mode
User ADC Calibration
Advanced Setting
Restore ADC to Default
Default
Default
User
Factory Mode
User Setting Mode
Advanced Settings
VGA ADC Settings
User ADC Calibration*5Press Button.
Restore ADC to Default Press Button.
No
Yes
Return to Menu.
Set Calibration.
No
Yes
Return to Menu.
User ADC Calibration is restored to
default.
*5 User ADC Calibration
1. A warning message (see image below) will show to make sure the proper image is displayed on
screen before ADC calibration begins.
i. Image in the green boxes, displayed on both side of the screen, has to be white and black in order
to run the calibration accurately (the black and white image can be made using software such as
Microsoft PowerPoint).
ii. The white in the left green box has to be the brightest white.
iii. The black in the right green box has to be the darkest black.
2. After the proper image is displayed, click "Yes" to begin ADC calibration.
3. During calibration process, the following image will appear to notify user to wait for the calibration.
4. After calibration is completed, the display will notify user if the process has been successfully by a
different message.
Ready to run ADC Calibration?
Yes No
ENGLISH
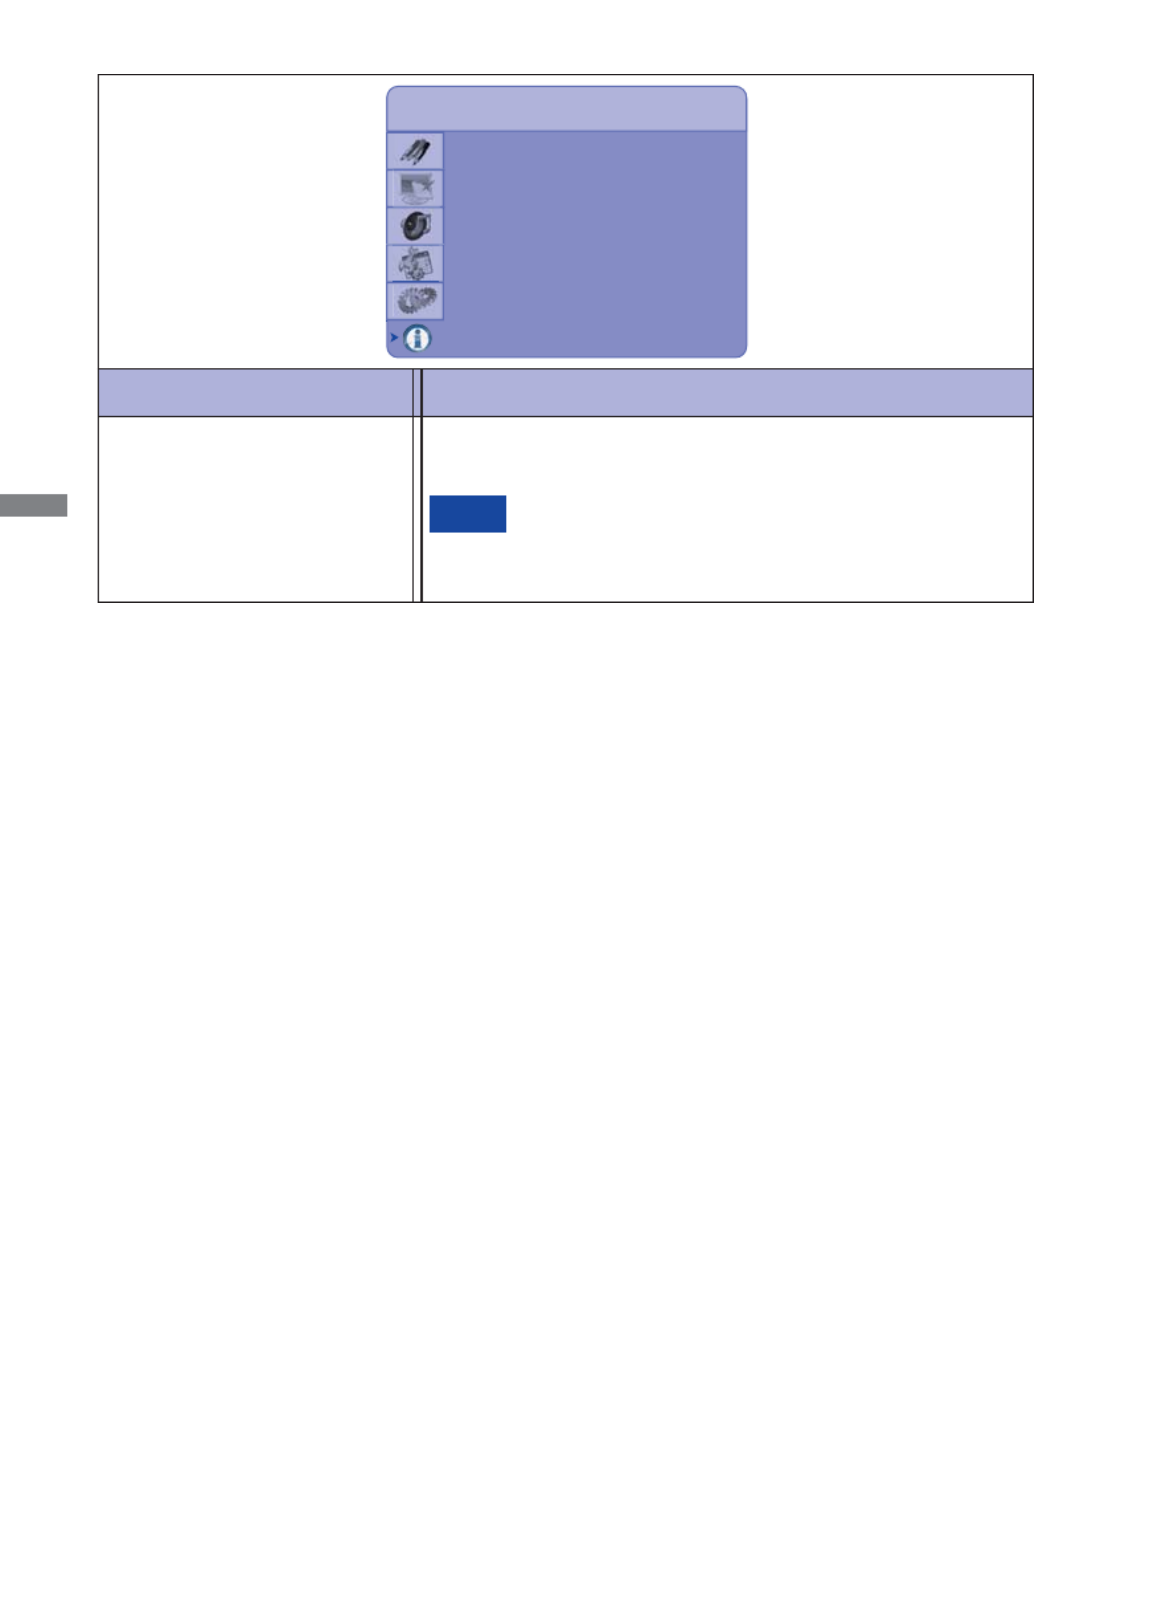
30 OPERATING THE MONITOR
Adjustment Item Problem / Option Button to Press
Firmware Version
Source
Main
Channel Information
1920x1080@60.0Hz
System Status
Resolution
V0.20d
VGA
System Status
System Status
Displays information regarding the current input signal coming
from the graphic card in your computer.
See your graphic card user guide for more information about
changing the resolution and refresh.
NOTE
ENGLISH
OPERATING THE MONITOR 31
SCREEN ADJUSTMENTS
The screen adjustments described in this manual are designed to set image position and minimize
fl icker or blur for the particular computer in use.
The monitor is designed to provide the best performance at resolution of 1920 × 1080, but can not
provide the best at resolutions of less than 1920 × 1080 because the picture is automatically stretched
to fi t the full screen. It is 920 × 1080 in normal use.recommended to operate at resolution of 1
Displayed text or lines will be blurred or irregular in thickness when the picture is stretched due to
the screen enlargement process.
It is preferable to adjust the image position and frequency with the monitor controls, rather than the
computer software or utilities.
Perform adjustments after a warm-up period of at least thirty minutes.
Additional adjustments may be required after the Auto Adjust depending on the resolution or signal timing.
The Auto Adjust may not work correctly when displaying the picture other than the screen adjustment
pattern. In this case, manual adjustments are required.
There are two ways to adjust the screen. One way is automatic adjustment for Position, Clocks and
Phase. The other way is performing each adjustment manually.
Perform the Auto Adjust first when the monitor is connected to a new computer, or resolution is
changed. If the screen has a fl icker or blur, or the picture does not fi t in the display area after performing
the Auto Adjust, manual adjustments are required. Both adjustments should be made by using the
screen adjustment pattern (Test.bmp) obtained via the IIYAMA web site (http://www.iiyama.com).
Adjust the image by following the procedure below to get the desired picture.
This manual explains adjustment under Windows 95/98/2000/Me/XP/Vista/7.
A Display the picture at the optimum resolution.
B Enter the Test.bmp (screen adjustment pattern) to wallpaper.
Consult the appropriate documentation for doing this.
Test.bmp is made at resolution of 1280 × 1024. Set the display position to center in the
wallpaper setting dialogue box. If you use Microsoft® PLUS! 95/98 cancel the setting of
“Stretch desktop wallpaper to fi t the screen”.
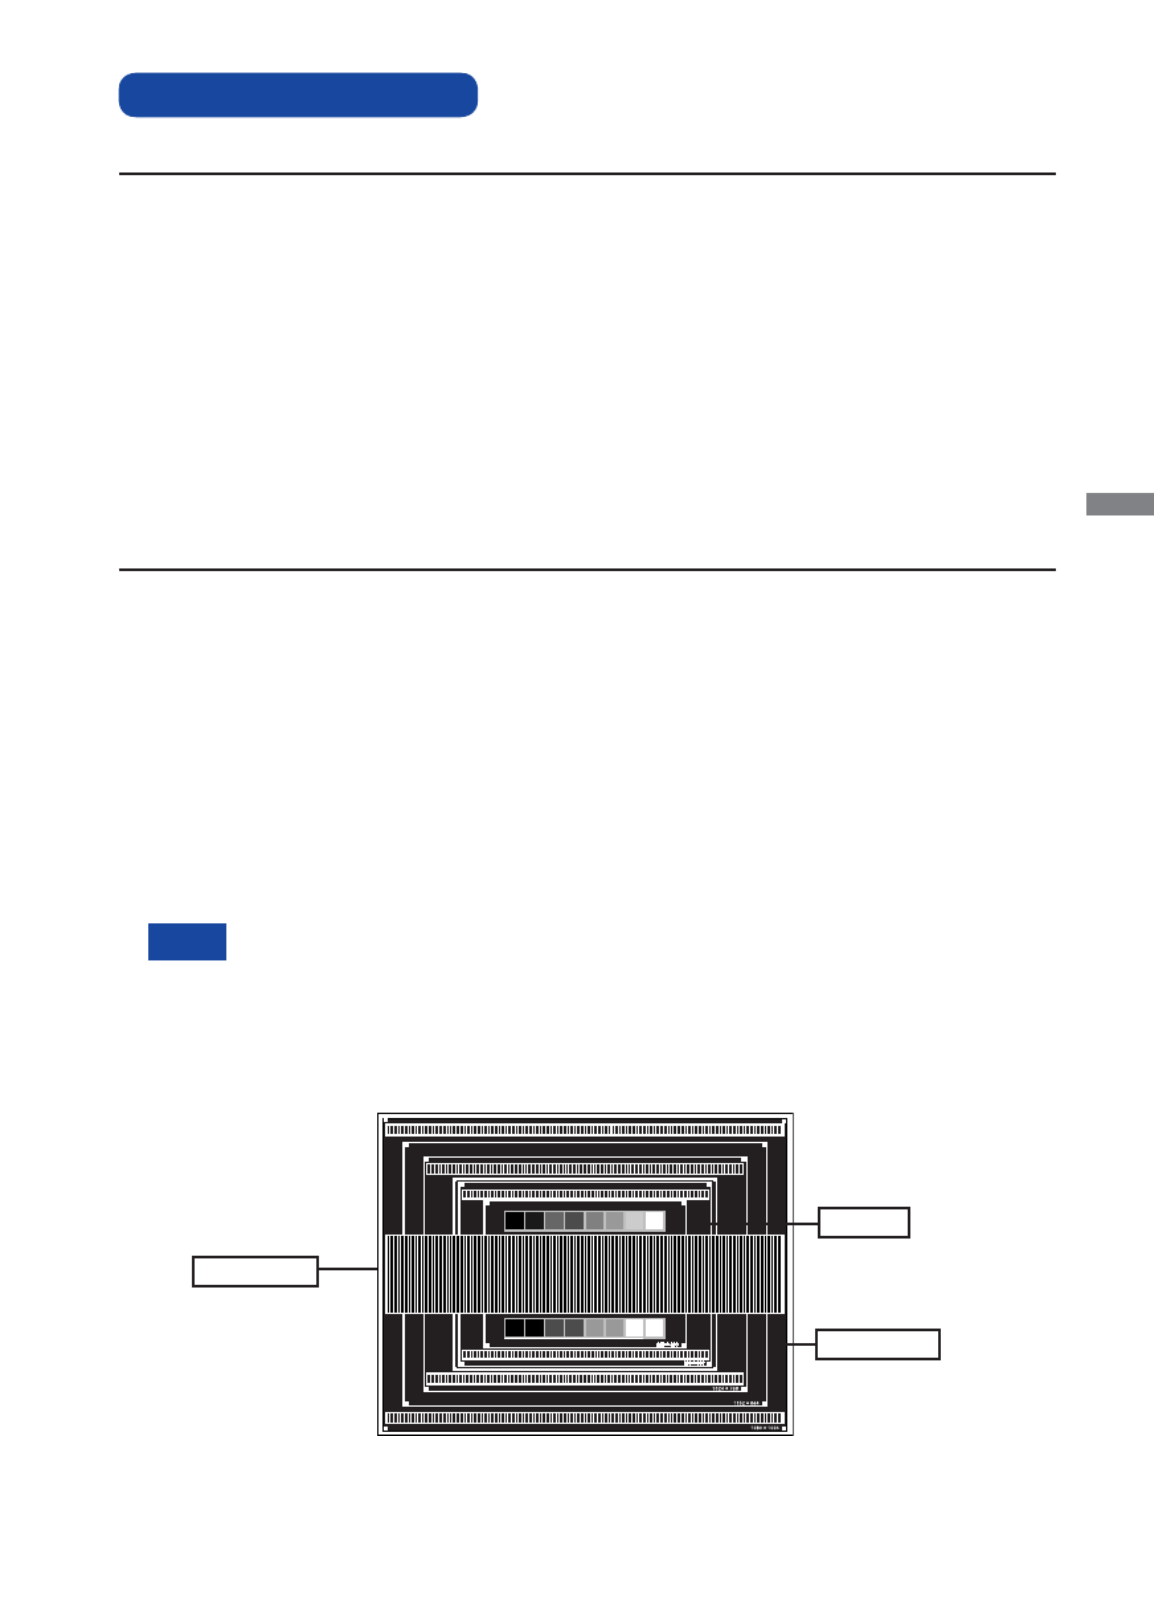
[Adjustment pattern]
Zebra pattern
Color bar
Picture frame
NOTE
Adjust the image by following the procedure below to get the desired picture when selecting Analog input.

ENGLISH
32 OPERATING THE MONITOR
F 1) Adjust the H-Position so that the left side of the picture frame will move to the left edge
of the display area.
When the left side of the picture frame moves apart from the left edge of the display
area during the Clock adjustment, adjust steps 1) and 2).
Another way to make the Clock adjustment is to correct the vertical wavy lines in the
zebra pattern.
The picture may fl icker during the Clock, H/V-Position adjustment.
In case the picture frame is bigger or smaller than the data display area after the Clock
adjustment, repeat steps from C.
2) Stretch the right side of the picture frame to the right edge of the display area by
adjusting the Clock.
C
Press the AUTO Button. (Auto Adjustment : Remote Control)
D Adjust the image manually by following procedure below when the screen has a fl icker or
blur, or the picture does not fi t in the display area after performing the Auto Adjust.
E Adjust the V-Position so that the top and bottom of the picture frame will fi t to the display
area.
NOTE

ENGLISH
OPERATING THE MONITOR 33
In case the strong fl icker or blurs remain on a part of the screen, repeat steps F and
G because the Clocks may not be adjusted correctly. If the fl icker or blurs still remain,
set the refresh rate of computer to low (60Hz) and repeat steps from C again.
Adjust the H-Position after the Phase adjustment if the horizontal position moves during
the adjustment.
H Adjust the Brightness and Color to get the desired picture after you complete the Clock and
Phase adjustments.
Put back your favorite wallpaper.
G
Adjust the Phase to correct horizontal wavy noise, fl icker or blur in the zebra pattern.
NOTE

ENGLISH
34 OPERATING THE MONITOR
Even when using the power management mode, the monitor consumes electricity. Turn off
the Power Switch whenever the monitor is not in use, during the night and weekends, to
avoid unnecessary power consumption.
It is possible that the video signal from the computer may be on while the H or V sync
signal is missing. In this instance, the POWER MANAGEMENT feature may not work
properly.
NOTE
POWER MANAGEMENT FEATURE
Power Management Mode
When the H-sync signal / V-sync signal / H and V sync signals from the computer are off, the monitor
enters into Power Management Mode which reduces the power consumption to less than 1W. The
screen becomes dark. From Power Management Mode, the image reappears in several seconds
when either the keyboard or the mouse are touched again.
The power management feature of this product complies with power saving requirement of VESA
DPMS. When activated, it automatically reduces unnecessary power consumption of the monitor when
your computer is not in use.
To use the feature, the monitor needs to be connected to a VESA DPMS compliant computer. There
is a power management step the monitor takes as described below. The power management function,
including any timer settings is configured by the operating system. Check your operating system
manual for information on how this can be confi gured.
0 1W 100%POWER
CONSUMPTION
Green
Orange
Power Indicator
NORMAL MODE
POWER MANAGEMENT MODE

ENGLISH
TROUBLE SHOOTING 35
The screen is not
synchronized.
The Signal Cable is properly connected.
The signal timing of the computer is within the specifi cation of the monitor.
The video output level of the computer is within the specifi cation of the monitor.
The picture does
not appear.
The Power Cable is fi rmly seated in the socket.
The Power Switch is turned ON.
The AC socket is live. Please check with another piece of equipment.
If the blank screen saver is in active mode, touch the keyboard or the mouse.
Increase the Contrast and/or Brightness.
The computer is ON.
The Signal Cable is properly connected.
The signal timing of the computer is within the specifi cation of the monitor.
If the monitor is in power management mode, touch the keyboard or the mouse.
T h e s c r e e n
position is not in
the center.
The signal timing of the computer is within the specifi cation of the monitor.
The screen is too
bright or too dark.
T h e s c r e e n i s
shaking.
The video output level of the computer is within the specification of the
monitor.
The power voltage is within the specifi cation of the monitor.
The signal timing of the computer is within the specifi cation of the monitor.
No sound.
The audio equipment (computer etc.) is ON.
The Audio Cable is properly connected.
The Volume is turned up.
The Mute is OFF.
The audio output level of the audio equipment is within the specifi cation of
the monitor.
The sound is too
loud or too quiet.
The audio output level of the audio equipment is within the specifi cation of
the monitor.
A strange noise is
heard.
The Audio Cable is properly connected.
T h e t o u c h
screen shows no
response.
The USB Cable is fi rmly seated in the socket.
Touch screen driver software is installed.
The touch position
does not deviate.
The calibration function set up correctly.
TROUBLE SHOOTING
Problem Check
If the monitor fails to operate correctly, please follow the steps below for a possible solution.
1. Perform the adjustments described in OPERATING THE MONITOR, depending on the problem you
have. If the monitor does not get a picture, skip to 2.
2. Consult the following items if you cannot fi nd an appropriate adjustment item in OPERATING THE
MONITOR or if the problem persists.
3. If you are experiencing a problem which is not described below or you cannot correct the problem,
discontinue using the monitor and contact your dealer or iiyama service center for further assistance.

ENGLISH
36 Recycling information
For better environment protection please don't dispose your monitor.
Please visit our web site: www.iiyama.com/recycle for monitor recycling.
RECYCLING INFORMATION
ENGLISH
APPENDIX 37
APPENDIX
SPECIFICATIONS : ProLite T4260MTS
LCD Panel Driving system a-Si TFT Active Matrix
0.1615mm H × 0.4845mm V
Response time
Pixel pitch
6.5ms (Gray to Gray Typical)
Display Colors Approx.16.7M
Sync Frequency Analog: Horizontal: 23.0-92.0kHz, Vertical: 56-85Hz
Digital: Horizontal: 23.0-92.0kHz, Vertical: 50-85Hz
Maximum Resolution 1920 × 1080, 2.1 MegaPixels
Input Connector D-Sub mini 15 pin, DVI-D 24 pin, HDMI x2
Input Sync Signal Separate sync: TTL, Positive or Negative
Plug & Play VESA DDC2BTM
242W typical, Power management mode: 1W maximumPower Consumption*
Dimensions / Net Weight 1022.0 × 615.0 × 135.5mm / 40.2 × 24.2 × 5.3" (W×H×D)
29kg / 63.9lbs
Viewable angle Horizontal : 176 degrees, Vertical: 176 degrees (Typical)
Maximum Screen Size 930.24mm W × 523.26mm H / 36.6" W × 20.6" H
Power Source 100-240VAC, 50/60Hz, 5A
Environmental
Considerations
Approvals CB, CE, TÜV
* USB peripherals / Audio equipment are not connected.
NOTE
Brightness
Contrast ratio
370cd/m2 (Typical: with Touch panel)
4150 : 1 (Typical: with Touch panel)
Analog: 0.7Vp-p (Standard), 75Positive
Digital: DVI (Digital Visual Interface Standard Rev.1.0) compliance
Digital: HDMI
Input Video Signal
Input Audio Signal 0.5Vrms maximum
Speakers 10W × 2 (Stereo speakers)
Input Audio Connector mini jack, RCA (L/R) x2
Operating: Temperature
Storage: -5 to 50°C / 23 to 122°F
Humidity:
5 to 35°C / 41 to 95°F
85% (No condensation)
Temperature
Size Category 42"
Diagonal: 42" (106.5cm)Size
Technology
Touch
Screen
Optical
Light transmission
90%
Communication
system USB serial transfer
Input Video Connector RCA, Component, S-Video
Serial Port RS-232C In, RS-485 In/Out
Output Digital Audio Connector
SPDIF
Output Infrared Ray Connector
IR Extender

ENGLISH
38 APPENDIX
SPECIFICATIONS : ProLite L4260S
LCD Panel Driving system a-Si TFT Active Matrix
0.1615mm H × 0.4845mm V
Response time
Pixel pitch
6.5ms (Gray to Gray Typical)
Display Colors Approx.16.7M
Sync Frequency Analog: Horizontal: 23.0-92.0kHz, Vertical: 56-85Hz
Digital: Horizontal: 23.0-92.0kHz, Vertical: 50-85Hz
Maximum Resolution 1920 × 1080, 2.1 MegaPixels
Input Connector D-Sub mini 15 pin, DVI-D 24 pin, HDMI x2
Input Sync Signal Separate sync: TTL, Positive or Negative
Plug & Play VESA DDC2BTM
242W typical, Power management mode: 1W maximumPower Consumption*
Dimensions / Net Weight 1022.0 × 615.0 × 135.5mm / 40.2 × 24.2 × 5.3" (W×H×D)
22kg / 48.5lbs
Viewable angle Horizontal : 176 degrees, Vertical: 176 degrees (Typical)
Maximum Screen Size 930.24mm W × 523.26mm H / 36.6" W × 20.6" H
Power Source 100-240VAC, 50/60Hz, 5A
Environmental
Considerations
Approvals CB, CE, TÜV
* Audio equipment are not connected.
NOTE
Brightness
Contrast ratio
450cd/m2 (Typical)
6500 : 1 (Typical)
Analog: 0.7Vp-p (Standard), 75Positive
Digital: DVI (Digital Visual Interface Standard Rev.1.0) compliance
Digital: HDMI
Input Video Signal
Input Audio Signal 0.5Vrms maximum
Speakers 10W × 2 (Stereo speakers)
Input Audio Connector mini jack, RCA (L/R) x2
Operating: Temperature
Storage: -5 to 50°C / 23 to 122°F
Humidity:
5 to 35°C / 41 to 95°F
85% (No condensation)
Temperature
Size Category 42"
Diagonal: 42" (106.5cm)Size
Input Video Connector RCA, Component, S-Video
Serial Port RS-232C In, RS-485 In/Out
Output Digital Audio Connector
SPDIF
Output Infrared ray Connector IR Extender
Termékspecifikációk
| Márka: | Iiyama |
| Kategória: | Monitor |
| Modell: | ProLite T4260MTS |
Szüksége van segítségre?
Ha segítségre van szüksége Iiyama ProLite T4260MTS, tegyen fel kérdést alább, és más felhasználók válaszolnak Önnek
Útmutatók Monitor Iiyama

12 Január 2025
30 December 2025
30 December 2025
30 December 2025
30 December 2025
30 December 2025
30 December 2025
30 December 2025
30 December 2025
30 December 2025
Útmutatók Monitor
- Monitor Samsung
- Monitor PeakTech
- Monitor Sony
- Monitor Yamaha
- Monitor Fujitsu
- Monitor Acer
- Monitor LG
- Monitor Philips
- Monitor Pioneer
- Monitor Olympus
- Monitor SilverCrest
- Monitor Garmin
- Monitor RCF
- Monitor Bosch
- Monitor Panasonic
- Monitor Canon
- Monitor JVC
- Monitor Sharp
- Monitor Lenovo
- Monitor HyperX
- Monitor Toshiba
- Monitor Neumann
- Monitor Omron
- Monitor HP
- Monitor Hyundai
- Monitor Hisense
- Monitor BenQ
- Monitor Apple
- Monitor Emos
- Monitor Medion
- Monitor Vimar
- Monitor JBL
- Monitor TCL
- Monitor OSEE
- Monitor Viessmann
- Monitor Insignia
- Monitor LC-Power
- Monitor Dell
- Monitor Boss
- Monitor Crestron
- Monitor Gigabyte
- Monitor Tripp Lite
- Monitor Xerox
- Monitor Thomson
- Monitor Speco Technologies
- Monitor Hikvision
- Monitor Eurolite
- Monitor Epson
- Monitor V7
- Monitor Huawei
- Monitor Asus
- Monitor PEAQ
- Monitor Renkforce
- Monitor Haier
- Monitor Mitsubishi
- Monitor M-Audio
- Monitor AOC
- Monitor Citizen
- Monitor Westinghouse
- Monitor Hitachi
- Monitor Continental Edison
- Monitor Asrock
- Monitor Ring
- Monitor Alpine
- Monitor Optoma
- Monitor SPL
- Monitor Smart
- Monitor Dahua Technology
- Monitor Viewsonic
- Monitor Denver
- Monitor Dynaudio
- Monitor Ernitec
- Monitor Qian
- Monitor Joy-It
- Monitor MSI
- Monitor Daewoo
- Monitor Tesla
- Monitor Kali Audio
- Monitor Godox
- Monitor Cisco
- Monitor Newline
- Monitor Behringer
- Monitor APC
- Monitor KRK
- Monitor Cooler Master
- Monitor Chauvet
- Monitor Shure
- Monitor PreSonus
- Monitor Archos
- Monitor Deltaco
- Monitor Tannoy
- Monitor Plantronics
- Monitor Kogan
- Monitor Honeywell
- Monitor SMART Technologies
- Monitor Marshall
- Monitor Kindermann
- Monitor Alesis
- Monitor Velleman
- Monitor Prestigio
- Monitor Monacor
- Monitor IK Multimedia
- Monitor Blaupunkt
- Monitor NZXT
- Monitor Yealink
- Monitor Razer
- Monitor Samson
- Monitor Jay-Tech
- Monitor Mackie
- Monitor Posiflex
- Monitor Peerless-AV
- Monitor Abus
- Monitor AG Neovo
- Monitor Konig
- Monitor Seiki
- Monitor 3M
- Monitor ARRI
- Monitor GlobalTronics
- Monitor Jensen
- Monitor Pyle
- Monitor AVer
- Monitor Sanyo
- Monitor Salora
- Monitor IFM
- Monitor DataVideo
- Monitor Maxell
- Monitor Atlona
- Monitor Schneider
- Monitor AJA
- Monitor Brandson
- Monitor Danfoss
- Monitor Vorago
- Monitor Barco
- Monitor NEC
- Monitor Element
- Monitor Marshall Electronics
- Monitor Yorkville
- Monitor Elo
- Monitor IStarUSA
- Monitor Provision-ISR
- Monitor Postium
- Monitor Orion
- Monitor Palmer
- Monitor EverFocus
- Monitor Elvid
- Monitor Gamber-Johnson
- Monitor Focal
- Monitor Adj
- Monitor Legamaster
- Monitor Wohler
- Monitor Packard Bell
- Monitor Vitek
- Monitor Planar
- Monitor Mobile Pixels
- Monitor CSL
- Monitor Newstar
- Monitor SWIT
- Monitor RGBlink
- Monitor Kramer
- Monitor ART
- Monitor AMX
- Monitor Alienware
- Monitor Emachines
- Monitor Caliber
- Monitor Maxdata
- Monitor Sunstech
- Monitor Sunny
- Monitor BlueBuilt
- Monitor Marquant
- Monitor Da-Lite
- Monitor ProXtend
- Monitor Kubo
- Monitor GeoVision
- Monitor LaCie
- Monitor InFocus
- Monitor Midas
- Monitor Festo
- Monitor Swissonic
- Monitor Waeco
- Monitor Ikan
- Monitor IHealth
- Monitor QSC
- Monitor Hannspree
- Monitor ESI
- Monitor Avocor
- Monitor Simrad
- Monitor Jung
- Monitor Genelec
- Monitor Interlogix
- Monitor Eizo
- Monitor POSline
- Monitor Peerless
- Monitor Atomos
- Monitor Mad Catz
- Monitor Krom
- Monitor Monoprice
- Monitor Promethean
- Monitor Odys
- Monitor Fostex
- Monitor Prowise
- Monitor Terra
- Monitor Neets
- Monitor Stairville
- Monitor Soundstream
- Monitor Xoro
- Monitor HKC
- Monitor I3-Technologies
- Monitor CTOUCH
- Monitor Ozone
- Monitor HoverCam
- Monitor Ibm
- Monitor BOOX
- Monitor Aputure
- Monitor Drawmer
- Monitor Blue Sky
- Monitor Zalman
- Monitor Iadea
- Monitor Advantech
- Monitor Hercules
- Monitor Sonifex
- Monitor Avantone Pro
- Monitor Ganz
- Monitor Extron
- Monitor Belinea
- Monitor Adam
- Monitor Triton
- Monitor ITek
- Monitor Akuvox
- Monitor Antelope Audio
- Monitor MicroTouch
- Monitor X-Rite
- Monitor EKO
- Monitor ONYX
- Monitor IBoardTouch
- Monitor Mirai
- Monitor Elite Screens
- Monitor Mitsai
- Monitor Skytronic
- Monitor TV One
- Monitor Christie
- Monitor Hanwha
- Monitor COMMBOX
- Monitor Yiynova
- Monitor Pelco
- Monitor Lilliput
- Monitor LightZone
- Monitor AOpen
- Monitor Planet Audio
- Monitor EC Line
- Monitor Datacolor
- Monitor Fluid
- Monitor HELGI
- Monitor Desview
- Monitor Syscom
- Monitor Allsee
- Monitor Alogic
- Monitor Night Owl
- Monitor ProDVX
- Monitor Varad
- Monitor PureTools
- Monitor DoubleSight
- Monitor CTL
- Monitor Game Factor
- Monitor Nixeus
- Monitor Chimei
- Monitor Blue Sea
- Monitor AMCV
- Monitor Faytech
- Monitor Hamlet
- Monitor Wyse - Dell
- Monitor Approx
- Monitor Bauhn
- Monitor TVLogic
- Monitor Feelworld
- Monitor GeChic
- Monitor Oecolux
- Monitor ADS-TEC
- Monitor Satco
- Monitor Casalux
- Monitor Positivo
- Monitor Jupiter
- Monitor Transvideo
- Monitor Innocn
- Monitor KeepOut
- Monitor Shimbol
- Monitor Raysgem
- Monitor Motrona
- Monitor Ikegami
- Monitor AORUS
- Monitor Portkeys
- Monitor Mimo Monitors
- Monitor Enttec
- Monitor American Dynamics
- Monitor AIS
- Monitor Eve Audio
- Monitor Wortmann AG
- Monitor Viotek
- Monitor Vidi-Touch
- Monitor KTC
- Monitor CoolerMaster
- Monitor Atlantis Land
- Monitor HEDD
- Monitor Colormetrics
- Monitor Monkey Banana
- Monitor SmallHD
- Monitor UPERFECT
- Monitor GVision
- Monitor Voxicon
- Monitor Mybeo
- Monitor Bearware
- Monitor IOIO
- Monitor DTEN
- Monitor Cocopar
- Monitor Titan Army
- Monitor Xenarc
- Monitor Delvcam
- Monitor Wimaxit
- Monitor BookIT
Legújabb útmutatók Monitor

9 Április 2025

9 Április 2025

9 Április 2025

8 Április 2025
8 Április 2025

5 Április 2025

5 Április 2025

4 Április 2025
2 Április 2025
2 Április 2025