Használati útmutató Hyundai i20 (2011)
Olvassa el alább 📖 a magyar nyelvű használati útmutatót Hyundai i20 (2011) (414 oldal) a autó kategóriában. Ezt az útmutatót 2 ember találta hasznosnak és 2 felhasználó értékelte átlagosan 4.5 csillagra
Oldal 1/414

OWNER'S MANUAL
Operation
Maintenance
Specications
All information in this Owner's Manual is current at the time of publication.
However, Hyundai reserves the right to make changes at any time so that
our policy of continual product improvement may be carried out.
This manual applies to all Hyundai models and includes descriptions and
explanations of optional as well as standard equipment. As a result, you
may nd material in this manual that does not apply to your specic vehi-
cle.


F2
Your Hyundai should not be modied in any way. Such modications may adversely aect the per-
formance, safety or durability of your Hyundai and may, in addition, violate conditions of the limited
warranties covering the vehicle. Certain modications may also be in violation of regulations estab-
lished by the Department of Transportation and other government agencies in your country.
Your vehicle is equipped with electronic fuel injection and other electronic components. It is possible
for an improperly installed/adjusted two-way radio or cellular telephone to adversely affect electronic
systems. For this reason, we recommend that you carefully follow the radio manufacturer's instruc-
tions or consult your Hyundai dealer for precautionary measures or special instructions if you choose
to install one of these devices.
CAUTION: MODIFICATIONS TO YOUR HYUNDAI
TWO-WAY RADIO OR CELLULAR TELEPHONE INSTALLATION


F3
This manual includes information titled as WARNING, CAUTION and NOTICE.
These titles indicate the following:
✽
✽
✽
✽ ✽ NOTICE
This indicates that interesting or helpful information is being provided.
SAFETY AND VEHICLE DAMAGE WARNING
WARNING
This indicates that a condition may result in harm, serious injury or death to you or other
persons if the warning is not heeded. Follow the advice provided with the warning.
CAUTION
This indicates that a condition may result in damage to your vehicle or its equipment if the
caution is not heeded. Follow the advice provided with the caution.


F4
FOREWORD
Thank you for choosing Hyundai. We are pleased to welcome you to the growing number of discriminating people who drive
Hyundais. The advanced engineering and high-quality construction of each Hyundai we build is something of which we're very
proud.
Your Owner's Manual will introduce you to the features and operation of your new Hyundai. It is suggested that you read it care-
fully because the information it contains can contribute greatly to the satisfaction you receive from your new car.
The manufacturer also recommends that all service and maintenance on your car be performed by an authorized Hyundai deal-
er. Hyundai dealers are prepared to provide high-quality service, maintenance and any other assistance that may be required.
HYUNDAI MOTOR INDIA
Note : Because future owners will also need the information included in this manual, if you sell this Hyundai, please leave the man-
ual in the vehicle for their use. Thank you.
Copyright 2008 Hyundai Motor India. All rights reserved. No part of this publication may be reproduced, stored in any retrieval
system or transmitted in any form or by any means without the prior written permission of Hyundai Motor India.
CAUTION
Severe engine and transaxle damage may result from the use of poor quality fuels and lubricants that do not meet Hyundai
specifications. You must always use high quality fuels and lubricants that meet the specifications listed on Page 9-4 in the
Vehicle Specifications section of the Owner's Manual.


F5
Guide to Hyundai Genuine Parts
1. What are Hyundai Genuine Parts?
Hyundai Genuine Parts are the same
parts used by Hyundai Motor
Company to manufacture vehicles.
They are designed and tested for the
optimum safety, performance, and reli-
ability to our customers.
2. Why should you use genuine parts?
Hyundai Genuine Parts are engi-
neered and built to meet rigid manu-
facturing requirements. Using imita-
tion, counterfeit or used salvage parts
is not covered under the Hyundai New
Vehicle Limited Warranty or any other
Hyundai warranty.
In addition, any damage to or failure of
Hyundai Genuine Parts caused by the
installation or failure of an imitation,
counterfeit or used salvage part is not
covered by any Hyundai Warranty.
3. How can you tell if you are pur-
chasing Hyundai Genuine Parts?
Look for the Hyundai Genuine Parts
Logo on the package (see below).
Hyundai Genuine Parts exported to
are packaged with labels written only
in English.
Hyundai Genuine Parts are only sold
through authorized Hyundai
Dealerships.
A100A01L A100A02L A100A04L
A100A03L


1
2
3
4
5
6
7
8
I
Introduction
Your vehicle at a glance
Safety system of your vehicle
Features of your vehicle
Driving your vehicle
What to do in an emergency
Maintenance
Specications & Consumer information
Index
table of contents


1
How to use this manual / 1-2
Fuel requirements / 1-2
Vehicle break-in process / 1-5
Indicator symbols on the instrument cluster / 1-6
Introduction


Introduction
21
A010000AHM
We want to help you get the greatest
possible driving pleasure from your vehi-
cle. Your Owner’s Manual can assist you
in many ways. We strongly recommend
that you read the entire manual. In order
to minimize the chance of death or injury,
you must read the WARNING and CAU-
TION sections in the manual.
Illustrations complement the words in this
manual to best explain how to enjoy your
vehicle. By reading your manual, you
learn about features, important safety
information, and driving tips under vari-
ous road conditions.
The general layout of the manual is pro-
vided in the Table of Contents. Use the
index when looking for a specific area or
subject; it has an alphabetical listing of all
information in your manual.
Sections: This manual has eight sections
plus an index. Each section begins with a
brief list of contents so you can tell at a
glance if that section has the information
you want.
You’ll find various WARNING’s,
CAUTION’s, and NOTICE’s in this manu-
al. These were prepared to enhance your
personal safety. You should carefully read
and follow ALL procedures and recom-
mendations provided in these
WARNING’s, CAUTION’s and NOTICE’s.
✽
✽
✽
✽ ✽ NOTICE
A NOTICE indicates interesting or help-
ful information is being provided.
Gasoline engine
A020101AFD
Unleaded
For Europe
For the optimal vehicle performance, we
recommend you to use unleaded gaso-
line with an octane rating of RON
(Research Octane Number) 95 /AKI (Anti
Knock Index) 91 or higher.
You may use unleaded gasoline with an
octane rating of RON 91~94/AKI 87~90
but it may result in slight performance
reduction of the vehicle.
Except Europe
Your new vehicle is designed to use only
unleaded fuel having an Octane Rating
of RON (Research Octane Number) 91 /
AKI (Anti-Knock Index) 87 or higher.
Your new vehicle is designed to obtain
maximum performance with UNLEADED
FUEL, as well as minimize exhaust emis-
sions and spark plug fouling.
HOW TO USE THIS MANUAL
WARNING
A WARNING indicates a situation in
which harm, serious bodily injury or
death could result if the warning is
ignored.
CAUTION
A CAUTION indicates a situation in
which damage to your vehicle could
result if the caution is ignored.
FUEL REQUIREMENTS


1 3
Introduction
A020102APB
Leaded (if equipped)
For some countries, your vehicle is
designed to use leaded gasoline. When
you are going to use leaded gasoline,
ask an authorized HYUNDAI dealer
whether leaded gasoline in your vehicle
is available or not.
Octane Rating of leaded gasoline is
same with unleaded one.
A020103APB
Gasoline containing alcohol and
methanol
Gasohol, a mixture of gasoline and
ethanol (also known as grain alcohol),
and gasoline or gasohol containing
methanol (also known as wood alcohol)
are being marketed along with or instead
of leaded or unleaded gasoline.
Do not use gasohol containing more than
10% ethanol, and do not use gasoline or
gasohol containing any methanol. Either
of these fuels may cause drivability prob-
lems and damage the fuel system.
Discontinue using gasohol of any kind if
drivability problems occur.
Vehicle damage or driveability problems
may not be covered by the manufactur-
er’s warranty if they result from the use
of:
1. Gasohol containing more than 10%
ethanol.
2. Gasoline or gasohol containing
methanol.
3. Leaded fuel or leaded gasohol.
(Except for vehicle designed to use
leaded gasoline for some countries)
CAUTION
NEVER USE LEADED FUEL. The
use of leaded fuel is detrimental to
the catalytic converter and will
damage the engine control sys-
tem’s oxygen sensor and affect
emission control.
Never add any fuel system cleaning
agents to the fuel tank other than
what has been specified. (Consult
an authorized HYUNDAI dealer for
details.)
WARNING
• Do not "top off" after the nozzle
automatically shuts off when
refueling.
• Always check that the fuel cap is
installed securely to prevent fuel
spillage in the event of an acci-
dent.
CAUTION
Never use gasohol which contains
methanol. Discontinue use of any
gasohol product which impairs dri-
vability.


Introduction
41
A020104AEN
Use of MTBE
HYUNDAI recommends avoiding fuels
containing MTBE (Methyl Tertiary Butyl
Ether) over 15.0% vol. (Oxygen Content
2.7% weight) in your vehicle.
Fuel containing MTBE over 15.0% vol.
(Oxygen Content 2.7% weight) may
reduce vehicle performance and produce
vapor lock or hard starting.
A020105APA
Do not use methanol
Fuels containing methanol (wood alco-
hol) should not be used in your vehicle.
This type of fuel can reduce vehicle per-
formance and damage components of
the fuel system.
A020106AEN
Gasolines for cleaner air
To help contribute to cleaner air,
HYUNDAI recommends that you use
gasolines treated with detergent addi-
tives, which help prevent deposit forma-
tion in the engine. These gasolines will
help the engine run cleaner and enhance
performance of the Emission Control
System.
A020107AUN
Operation in foreign countries
If you are going to drive your vehicle in
another country, be sure to:
• Observe all regulations regarding reg-
istration and insurance.
• Determine that acceptable fuel is avail-
able.
Diesel engine
A020201AHM
Diesel fuel
Diesel engine must be operated only on
commercially available diesel fuel that
complies with EN 590 or comparable
standard. (EN stands for "European
Norm"). Do not use marine diesel fuel,
heating oils, or non-approved fuel addi-
tives, as this will increase wear and
cause damage to the engine and fuel
system. The use of non-approved fuels
and / or fuel additives will result in a limi-
tation of your warranty rights.
CAUTION
Your New Vehicle Limited Warranty
may not cover damage to the fuel
system and any performance prob-
lems that are caused by the use of
fuels containing methanol or fuels
containing MTBE (Methyl Tertiary
Butyl Ether) over 15.0% vol.
(Oxygen Content 2.7% weight.)
CAUTION
Your New Vehicle Limited Warranty
may not cover damage to the fuel
system and performance problems
that are caused by the use of
methanol or fuels containing
methanol.


1 5
Introduction
Diesel fuel of 52 to 54 cetane is used in
your vehicle. If two types of diesel fuel
are available, use summer or winter fuel
properly according to the following tem-
perature conditions.
• Above -5°C(23°F) ... Summer type
diesel fuel.
• Below -5°C(23°F) ... Winter type diesel
fuel.
Watch the fuel level in the tank very care-
fully : If the engine stops through fuel fail-
ure, the circuits must be completely
purged to restart.
A020202AUN
Biodiesel
Commercially supplied biodiesel blends
of no more than 5% biodiesel, commonly
known as "B5 biodiesel" may be used in
your vehicle if it meets EN 14214 or
equivalent specifications. (EN stands for
"European Norm"). The use of biofuels
made from rapeseed methyl ester
(RME), fatty acid methyl ester (FAME),
vegetable oil methyl ester (VME) etc. or
mixing diesel with biodiesel will cause
increased wear or damage to the engine
and fuel system. Repair or replacement
of worn or damaged components due to
the use of non approved fuels will not be
covered by the manufactures warranty.
A030000AUN
No special break-in period is needed. By
following a few simple precautions for the
first 1,000 km (600 miles) you may add to
the performance, economy and life of
your vehicle.
• Do not race the engine.
• While driving, keep your engine speed
(rpm, or revolutions per minute)
between 2,000 rpm and 4,000 rpm.
• Do not maintain a single speed for long
periods of time, either fast or slow.
Varying engine speed is needed to
properly break-in the engine.
• Avoid hard stops, except in emergen-
cies, to allow the brakes to seat prop-
erly.
• Don't let the engine idle longer than 3
minutes at one time.
• Don't tow a trailer during the first 2,000
km (1,200 miles) of operation.
CAUTION
• Do not let any gasoline or water
enter the tank. This would make it
necessary to drain it out and to
bleed the lines to avoid jamming
the injection pump and damaging
the engine.
• In winter, in order to cut down
incidents due to freezing, paraffin
oil may be added to the fuel if the
temperature drops to below -
10°C(50°F). Never use more than
20% paraffin oil.
CAUTION
• Never use any fuel, whether
diesel or B5 biodiesel that fails to
meet the latest petroleum indus-
try specification.
• Never use any fuel additives or
treatments that are not recom-
mended or approved by the vehi-
cle manufacturer.
VEHICLE BREAK-IN PROCESS


Introduction
61
A050000APB
INDICATOR SYMBOLS ON THE INSTRUMENT CLUSTER
Door and tailgate open position
indicator*
Seat belt warning light
High beam indicator
Low beam indicator
Turn signal indicator
Front fog light indicator*
Rear fog light indicator*
ABS warning light*
Parking brake & Brake fluid
warning light
Engine oil pressure warning
light
Charging system warning light
ESP indicator*
ESP OFF indicator*
Malfunction indicator*
Air bag warning light*
Immobilizer indicator*
Low fuel level warning light
Glow indicator (Diesel only)
Fuel filter warning light
(Diesel only)
Electric power steering (EPS)
system warning light*
❈For more detailed explanations, refer to section 4, “Instrument cluster”.
* : if equipped
TPMS (Tire Pressure Monitoring
System) malfunction indicator*
Low tire pressure telltale*
Low tire pressure position tell-
tale*
Door ajar warning light*
Tailgate open warning light*
O/D OFF indicator*
O/D
OFF


2
Interior overview / 2-2
Instrument panel overview / 2-3
Engine compartment / 2-4
Your vehicle at a glance


Your vehicle at a glance
22
INTERIOR OVERVIEW
1. Door lock/unlock button ..........................4-10
2. Outside rearview mirror folding button*..4-33
3. Outside rearview mirror control switch*..4-32
4. Power window lock button*.....................4-17
5. Power window switches* ........................4-14
6. Air vent ...................................................4-66
7. Head lamp leveling device* ....................4-56
8. ESP OFF button*....................................5-20
9. Instrument panel illumination control knob*
................................................................4-36
10. Steering wheel tilt lever*.......................4-28
11. Fuse box ................................................7-60
12. Hood release lever ...............................4-19
13. Clutch pedal* ..........................................5-8
14. Brake pedal ..........................................5-15
15. Accelerator pedal....................................5-5
16. Fuel filler lid opener ..............................4-21
* : if equipped
OPB009001R
B010000APB


2 3
Your vehicle at a glance
INSTRUMENT PANEL OVERVIEW
1. Instrument cluster ...........................4-34
2. Light control / Turn signals ..............4-52
3. Wiper/Washer..................................4-57
4. Audio remote control* ....................4-89
5. Horn ................................................4-29
6. Driver’s front air bag* ......................3-39
7. Steering wheel ................................4-28
8. Ignition switch ...................................5-4
9. Multi display* .....................................4-47
10. Hazard warning flasher switch......4-51
11. Trip computer switch*....................4-48
12. Audio*............................................4-95
13. Climate control system* ................4-64
14. Multi box........................................4-82
15. Cigarette lighter.............................4-84
16. Seat warmer* ..................................3-7
17. AUX, USB and iPod port* .............4-91
18. Shift lever ........................................5-7
19. Parking brake lever .......................5-16
20. Passenger’s front air bag*.............3-39
21. Glove box......................................4-81
* : if equipped
OPB009002R
B020000APB


Your vehicle at a glance
42
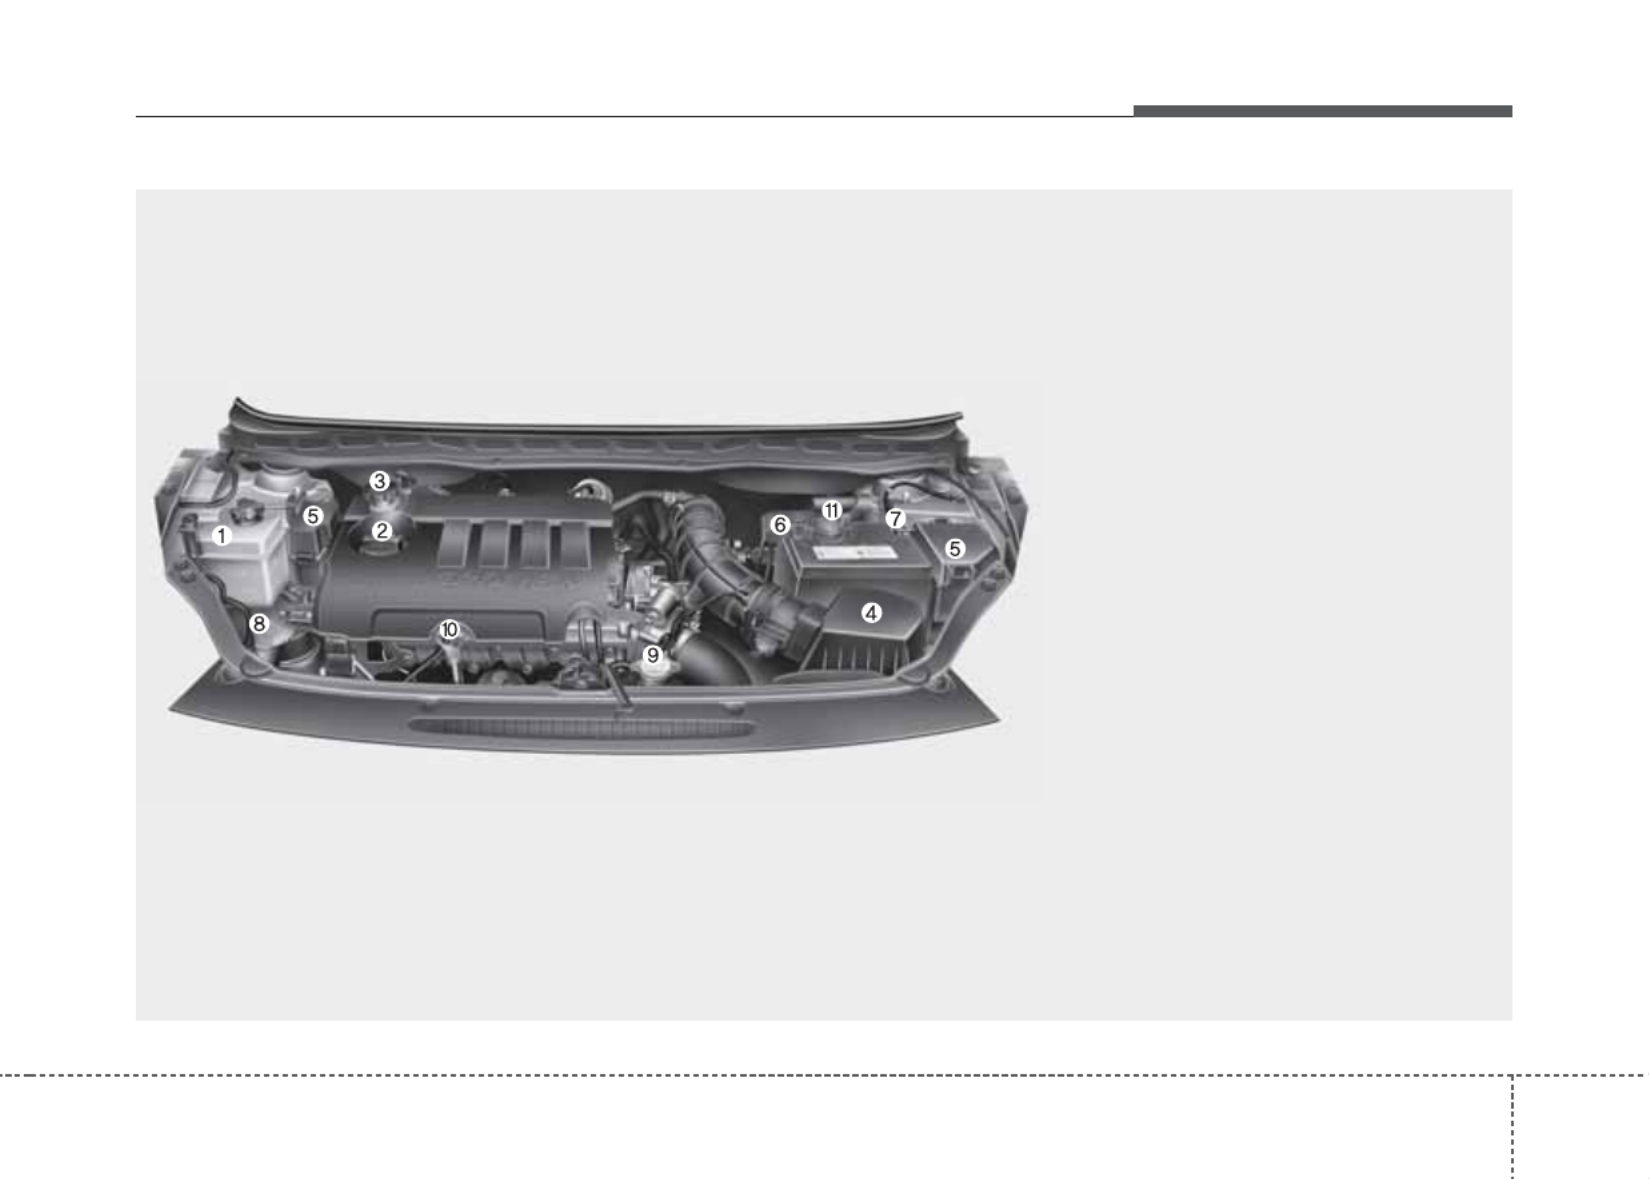
ENGINE COMPARTMENT
1. Engine coolant reservoir ...................7-32
2. Engine oil filler cap ...........................7-30
3. Brake/clutch fluid reservoir ...............7-34
4. Air cleaner.........................................7-39
5. Fuse box...........................................7-62
6. Positive battery terminal ...................7-46
7. Negative battery terminal..................7-46
8. Windshield washer fluid reservoir .....7-37
9. Radiator cap .....................................7-33
10. Engine oil dipstick ...........................7-30
11. Automatic transaxle dipstick*..........7-35
* : if equipped
B030000APB
■
■
■
■■ Gasoline Engine
OPB009003R
❈The actual engine room in the vehicle may differ from the illustration.

2 5
Your vehicle at a glance
1. Engine coolant reservoir ...................7-32
2. Engine oil filler cap ...........................7-30
3. Brake/clutch fluid reservoir ...............7-34
4. Air cleaner.........................................7-39
5. Fuse box...........................................7-61
6. Positive battery terminal ...................7-46
7. Negative battery terminal..................7-46
8. Windshield washer fluid reservoir .....7-37
9. Radiator cap .....................................7-33
10. Engine oil dipstick ...........................7-30
11. Fuel filter .........................................7-38
■
■
■
■■ Diesel Engine
OPB079001R
❈The actual engine room in the vehicle may differ from the illustration.


3
Seat / 3-2
Seat belts / 3-13
Child restraint system / 3-24
Airbag-supplemental restraint system / 3-33
Safety system of your vehicle


Safety system of your vehicle
23
C010000APB
Front seat
(1) Forward and backward
(2) Seatback angle
(3) Seat height (driver’s seat)*
(4) Headrest
(5) Walk-in seat (3door vehicle only)*
(6) Armrest (driver’s seat)*
(7) Seat warmer*
Rear seats
(8) Headrest (outboard and/or center*)
(9) Seat folding
* : if equipped
SEAT
OPB039001R


3 3
Safety system of your vehicle
WARNING - Driver’s seat
• Never attempt to adjust seat
while the vehicle is moving. This
could result in loss of control,
and an accident causing death,
serious injury, or property dam-
age.
• Do not allow anything to interfere
with the normal position of the
seatback. Storing items against a
seatback or in any other way
interfering with proper locking of
a seatback could result in seri-
ous or fatal injury in a sudden
stop or collision.
• Always drive and ride with your
seatback upright and the lap por-
tion of the seat belt snug and low
across the hips. This is the best
position to protect you in case of
an accident.
• In order to avoid unnecessary
and perhaps severe air bag
injuries, always sit as far back as
possible from the steering wheel
while maintaining comfortable
control of the vehicle. It is recom-
mended that your chest is at
least 250 mm (10 inches) away
from the steering wheel.
WARNING - Uprighting
seat
When you return the seatback to its
upright position, hold the seatback
and return it slowly and be sure
there are no other occupants
around the seat. If the seatback is
returned without being held and
controlled, the back of the seat
could spring forward resulting in
accidental injury to a person struck
by the seatback.
WARNING - Loose objects
Loose objects in the driver’s foot
area could interfere with the opera-
tion of the foot pedals, possibly
causing an accident. Do not place
anything under the front seats.
WARNING - Driver respon-
sibility for front seat pas-
senger
Riding in a vehicle with a front seat-
back reclined could lead to serious
or fatal injury in an accident. If a
front seat is reclined during an
accident, the occupant’s hips may
slide under the lap portion of the
seat belt applying great force to the
unprotected abdomen. Serious or
fatal internal injuries could result.
The driver must advise the front
passenger to keep the seatback in
an upright position whenever the
vehicle is in motion.


Safety system of your vehicle
43
Front seat adjustment
C010101AHM
Forward and backward
To move the seat forward or backward:
1. Pull the seat slide adjustment lever up
and hold it.
2. Slide the seat to the position you
desire.
3. Release the lever and make sure the
seat is locked in place.
Adjust the seat before driving, and make
sure the seat is locked securely by trying
to move forward and backward without
using the lever. If the seat moves, it is not
locked properly.
OPB039002/H
WARNING
After adjusting the seat, always
check that it is securely locked into
place by attempting to move the
seat forward or reverse without
using the lock release lever.
Sudden or unexpected movement
of the driver's seat could cause you
to lose control of the vehicle result-
ing in an accident.
(Continued)
• When resetting the seatback to
the upright position, make sure it
is securely latched by pushing it
forward and backwards.
WARNING - Rear seat-
backs
• The rear seatback must be
securely latched. If not, passen-
gers and objects could be thrown
forward resulting in serious
injury or death in the event of a
sudden stop or collision.
• Luggage and other cargo should
be laid at in the cargo area. If
objects are large, heavy, or must
be piled, they must be secured.
Under no circumstances should
cargo be piled higher than the
seatbacks. Failure to follow these
warnings could result in serious
injury or death in the event of a
sudden stop, collision or rollover.
• No passenger should ride in the
cargo area or sit or lie on folded
seatbacks while the vehicle is
moving. All passengers must be
properly seated in seats and
restrained properly while riding.
(Continued)


3 5
Safety system of your vehicle
C010102AHM
Seatback angle
To recline the seatback:
1. Lean forward slightly and lift up the
seatback recline lever.
2. Carefully lean back on the seat and
adjust the seatback of the seat to the
position you desire.
3. Release the lever and make sure the
seatback is locked in place. (The lever
MUST return to its original position for
the seatback to lock.)
C010103APB
Seat height (for driver’s seat)
(if equipped)
To change the height of the seat, move
the lever upwards or downwards.
• To lower the seat, push down the lever
several times.
• To raise the seat, pull up the lever sev-
eral times.
C010104APB
Headrest
The driver's and front passenger's seats
are equipped with a headrest for the
occupant's safety and comfort.
The headrest not only provides comfort
for the driver and front passenger, but
also helps protect the head and neck in
the event of a collision.
OPB039003/H OPB039004/H OPA039052


Safety system of your vehicle
63
Adjusting the height up and down
To raise the headrest, pull it up to the
desired position (1). To lower the head-
rest, push and hold the release button (2)
on the headrest support and lower the
headrest to the desired position (3).
Removal
To remove the headrest, raise it as far as
it can go then press the release button (1)
while pulling the headrest up (2).
To reinstall the headrest, put the head-
rest poles (3) into the holes while press-
ing the release button (1). Then adjust it
to the appropriate height.
OPB039008
WARNING
Make sure the headrest locks in
position after adjusting it to proper-
ly protect the occupants.
OPB039005
WARNING
• For maximum effectiveness in
case of an accident, the headrest
should be adjusted so the middle
of the headrest is at the same
height of the center of gravity of
an occupant's head. Generally,
the center of gravity of most peo-
ple's head is similar with the
height of the top of their eyes.
Also, adjust the headrest as
close to your head as possible.
For this reason, the use of a
cushion that holds the body away
from the seatback is not recom-
mended.
• Do not operate the vehicle with
the headrests removed as severe
injury to the occupants may
occur in the event of an accident.
Headrests may provide protec-
tion against neck injuries when
properly adjusted.
• Do not adjust the headrest height


3 7
Safety system of your vehicle
Active headrest (if equipped)
The active headrest is designed to move
forward and upward during a rear impact.
This helps to prevent the driver's and
front passenger’s head from moving
backward and thus helps prevent neck
injuries.
C010306APB
Walk-in seat (3door vehicle only)
To get in or out of the 2nd row seat, pull
up the walk-in lever on the front passen-
ger's seatback. The passenger's seat will
fold and the seat will slide forward. Move
the seat to the farthest forward position.
After getting in or out, slide the passen-
ger's seat rearward and pull the seatback
firmly backward until it clicks into place.
Make sure that the seat is locked in place.
C010107AUN
Seat warmer (if equipped)
The seat warmers are provided to warm
the front seats during cold weather. With
the ignition switch in the ON position,
push either of the switches to warm the
driver's seat or the front passenger's
seat.
During mild weather or under conditions
where the operation of the seat warmer
is not needed, keep the switches in the
"OFF" position.
✽
✽
✽
✽✽ NOTICE
With the seat warmer switch in the ON
position, the heating system in the seat
turns o or on automatically depending
on the seat temperature.
OPB039007ROPB039050/HHNF2041-1/H
WARNING
Never attempt to adjust the seat
while the vehicle is moving or when
the passenger's seat is occupied as
the seat may suddenly move and
cause the passenger on the seat to
be injured.


Safety system of your vehicle
83
C010108APB
Seatback pocket (if equipped)
The seatback pocket is provided on the
back of the front passenger’s seatback.
OMG039017
Type A
CAUTION
• When cleaning the seats, do not
use an organic solvent such as
thinner, benzene, alcohol and
gasoline. Doing so may damage
the surface of the heater or seats.
• To prevent overheating the seat
warmer, do not place blankets,
cushions or seat covers on the
seats while the seat warmer is in
operation.
• Do not place heavy or sharp
objects on seats equipped with
seat warmers. Damage to the seat
warming components could occur.
WARNING - Seat warmer
burns
Passengers should use extreme
caution when using seat warmers
due to the possibility of excess
heating or burns. In particular, the
driver must exercise extreme care
for the following types of passen-
gers:
1. Infants, children, elderly or hand-
icapped persons, or hospital out-
patients
2. Persons with sensitive skin or
those that burn easily
3. Fatigued individuals
4. Intoxicated individuals
5. Individuals taking medication
that can cause drowsiness or
sleepiness (sleeping pills, cold
tablets, etc.) OPB039012
Type B


3 9
Safety system of your vehicle
Rear seat adjustment
C010303APB
Headrest (if equipped)
The rear seat(s) is equipped with head-
rests in the outboard seating positions
(and/or center seating position) for the
occupant's safety and comfort.
The headrest not only provides comfort
for passengers, but also helps protect
the head and neck in the event of a colli-
sion.
WARNING - Seatback pocket
Do not put heavy or sharp objects in
the seatback pocket. In an accident
they could come loose from the
pocket and injure vehicle occupants.
OPA039053
WARNING
• For maximum effectiveness in
case of an accident, the headrest
should be adjusted so the middle
of the headrest is at the same
height of the center of gravity of
an occupant's head. Generally,
the center of gravity of most peo-
ple's head is similar with the
height of the top of their eyes.
Also adjust the headrest as close
to your head as possible. For this
reason, the use of a cushion that
holds the body away from the
seatback is not recommended.
• Do not operate the vehicle with
the headrests removed. Severe
injury to an occupant may occur
in the event of an accident.
Headrests may provide protec-
tion against severe neck injuries
when properly adjusted.


Safety system of your vehicle
103
Adjusting the height up and down
To raise the headrest, pull it up to the
desired position (1). To lower the head-
rest, push and hold the release button (2)
on the headrest support and lower the
headrest to the desired position (3).
Removal
To remove the headrest, raise it as far as
it can go then press the release button
(1) while pulling upward (2).
To reinstall the headrest, put the head-
rest poles (3) into the holes while press-
ing the release button (1). Then adjust it
to the appropriate height.
C010307BPB
Folding the rear seat
The rear seatbacks (or cushions) may be
folded to facilitate carrying long items or
to increase the luggage capacity of the
vehicle.
OPB039011
WARNING
Make sure the headrest locks in
position after adjusting it to proper-
ly protect the occupants.
WARNING
The purpose of the fold-down rear
seatbacks (or cushions) is to allow
you to carry longer objects that
could not be accomodated in the
luggage compartment.
Never allow passengers to sit on
top of the folded down seatback
while the vehicle is moving as this
is not a proper seating position and
no seat belts are available for use.
This could result in serious injury
or death in case of an accident or
sudden stop. Objects carried on the
folded down seatback should not
extend higher than the top of the
front seats. This could allow cargo
to slide forward and cause injury or
damage during sudden stops.
OPB039009


3 11
Safety system of your vehicle
To fold the rear seat cushion and back
(if equipped) :
1. Set the front seatback to the upright
position and if necessary, slide the
front seat forward.
2. Lift the front portion of the seat cush-
ion.
3. Lift the rear portion of the seat cushion
and stand the rear seat cushion verti-
cally.
4. Insert the rear lap/shoulder belt plate
into the holder on the side trim. It will
prevent the lap/shoulder belt from
interfering with the seatback when
folding.
5. Pull up the rear seatback folding lever
and fold the seatback to the front a lit-
tle bit.
6. Remove the headrest from the rear
seatback
7. Fold the seatback rmly all the way.
8. Stow the headrest by inserting the
headrest poles into the holder.
OPB039019
OPB039020
OPB039021
OPB039022
OPB039023


Safety system of your vehicle
123
9. To use the rear seat, lift the seatback
and replace the headrest on the seat-
back.
10. Push the seatback rmly until it clicks
into place. Make sure the seatback is
locked in place.
11. Return the seat cushion to the origi-
nal position by pushing down the seat
cushion. Make sure the seat cushion
is locked in place.
12. Return the rear seat belt to the prop-
er position.
WARNING
When you return the rear seatback
to its upright position after being
folded down:
Be careful not to damage the seat
belt webbing or buckle. Do not
allow the seat belt webbing or
buckle to get caught or pinched in
the rear seat. Ensure that the seat-
back is completely locked into its
upright position by pushing on the
top of the seatback. Otherwise, in
an accident or sudden stop, the
seat could fold down and allow
cargo to enter the passenger com-
partment, which could result in
serious injury or death.
CAUTION - Rear seat belts
When returning the rear seatbacks
to the upright position, remember
to return the rear shoulder belts to
their proper position.
WARNING - Cargo
Cargo should always be secured to
prevent it from being thrown about
the vehicle in a collision and caus-
ing injury to the vehicle occupants.
Do not place objects in the rear
seats, since they cannot be proper-
ly secured and may hit the front
seat occupants in a collision.
WARNING - Cargo loading
Make sure the engine is o, the
automatic transaxle is in P (Park)
and the parking brake is applied
whenever loading or unloading
cargo. Failure to take these steps
may allow the vehicle to move if the
shift lever is inadvertently moved to
another position.


3 13
Safety system of your vehicle
C020100AHM
Seat belt restraint system
SEAT BELTS
(Continued)
• Avoid wearing twisted seat belts.
A twisted belt can't do its job as
well. In a collision, it could even
cut into you. Be sure the belt
webbing is straight and not twist-
ed.
• Be careful not to damage the belt
webbing or hardware. If the belt
webbing or hardware is dam-
aged, replace it.
WARNING
Seat belts are designed to bear
upon the bony structure of the
body, and should be worn low
across the front of the pelvis or the
pelvis, chest and shoulders, as
applicable; wearing the lap section
of the belt across the abdominal
area must be avoided.
Seat belts should be adjusted as
firmly as possible, consistent with
comfort, to provide the protection
for which they have been designed.
A slack belt will greatly reduce the
protection afforded to the wearer.
(Continued)
(Continued)
Care should be taken to avoid con-
tamination of the webbing with pol-
ishes, oils and chemicals and par-
ticularly battery acid. Cleaning may
safely be carried out using mild
soap and water. The belt should be
replaced if webbing becomes
frayed, contaminated or damaged.
It is essential to replace the entire
assembly after it has been worn in
a severe impact even if damage to
the assembly is not obvious. Belts
should not be worn with straps
twisted. Each belt assembly must
only be used by one occupant; it is
dangerous to put a belt around a
child being carried on the occu-
pant's lap.
WARNING
No modifications or additions
should be made by the user which
will either prevent the seat belt
adjusting devices from operating to
remove slack, or prevent the seat
belt assembly from being adjusted
to remove slack.
WARNING
• For maximum restraint system
protection, the seat belts must
always be used whenever the
vehicle is moving.
• Seat belts are most effective
when seatbacks are in the
upright position.
• Children age 12 and under must
always be properly restrained in
the rear seat. Never allow chil-
dren to ride in the front passen-
ger seat. If a child over 12 must
be seated in the front seat, he/she
must be properly belted and the
seat should be moved as far back
as possible.
• Never wear the shoulder belt
under your arm or behind your
back. An improperly positioned
shoulder belt can cause serious
injuries in a crash. The shoulder
belt should be positioned mid-
way over your shoulder across
your collarbone.
(Continued)


Safety system of your vehicle
143
C020101APB
Seat belt warning
Type A
As a reminder to the driver, the seat belt
warning light will blink for approximately
6 seconds each time you turn the ignition
switch ON regardless of belt fastening.
If the driver’s seat belt is unfastened after
the ignition switch is ON, the seat belt
warning light blinks again for approxi-
mately 6 seconds.
If the driver's seat belt is not fastened
when the ignition switch is turned ON or
if it is unfastened after the ignition switch
is ON, the seat belt warning chime will
sound for approximately 6 seconds. At
this time, if the seat belt is fastened, the
chime will stop at once. (if equipped)
Type B
Front
As a reminder to the driver and front pas-
senger, the driver’s and front passen-
ger’s seat belt warning lights will illumi-
nate for approximately 6 seconds each
time you turn the ignition switch ON
regardless of belt fastening.
If the driver’s or front passenger’s seat
belt is not fastened when the ignition
switch is turned ON or if it is disconnect-
ed after the ignition switch is turned ON,
the corresponding seat belt warning light
will illuminate until the belt is fastened.
If you continue not to fasten the seat belt
and you drive over 9km/h, the illuminated
warning light will start to blink until you
drive under 6km/h.
If you continue not to fasten the seat belt
and you drive over 20km/h the seat belt
warning chime will sound for approxi-
mately 100 seconds and the correspon-
ding warning light will blink.
✽
✽
✽
✽✽ NOTICE
• You can find the front passenger’s
seat belt warning light on the center
fascia panel.
• Although the front passenger seat is
not occupied, the seat belt warning
light will blink or illuminate for 6 sec-
onds.
• The front passenger's seat belt warn-
ing may operate when luggage is
placed on the front passenger seat.
OPB039017R
1GQA2083


3 15
Safety system of your vehicle
Rear (if equipped)
If the ignition switch is turned ON(engine
is not running) when the rear passen-
ger's lap/shoulder belt is not fastened,
the corresponding seat belt warning light
will illuminate until the belt is fastened.
And then, the rear corresponding seat
belt warning light will illuminate for
approximately 35 seconds, if any of fol-
lowing occurs;
- You start the engine when the rear belt
is not fastened.
- You drive over 9km/h when the rear belt
is not fastened.
- The rear belt is disconnected when you
diver under 20km/h.
If the rear seat belt is fastened, the warn-
ing light will turn off immediately.
If the rear seat belt is disconnected when
you drive over the 20km/h, the corre-
sponding seat belt warning light will blink
and warning chime will sound for 35 sec-
onds.
But, if the rear passenger's lap/shoulder
belt is/are connected and disconnected
twice within 9 seconds after the belt is
fastened, the corresponding seat belt
warning light will not operate.
C020102APB
Lap/shoulder belt
To fasten your seat belt:
To fasten your seat belt, pull it out of the
retractor and insert the metal tab (1) into
the buckle (2). There will be an audible
"click" when the tab locks into the buckle.
The seat belt automatically adjusts to the
proper length only after the lap belt por-
tion is adjusted manually so that it fits
snugly around your hips. If you lean for-
ward in a slow, easy motion, the belt will
extend and let you move around. If there
is a sudden stop or impact, however, the
belt will lock into position. It will also lock
if you try to lean forward too quickly.
B180A01NF-E
1
2
OPB039018R


Safety system of your vehicle
163
✽
✽
✽
✽✽NOTICE
If you are not able to pull out the seat
belt from the retractor, firmly pull the
belt out and release it. Then you will be
able to pull the belt out smoothly.
Height adjustment (if equipped)
You can adjust the height of the shoulder
belt anchor to one of the 3 (or 4) posi-
tions for maximum comfort and safety.
If the height of the adjusting seat belt is
too near your neck, you will not be get-
ting the most effective protection. The
shoulder portion should be adjusted so
that it lies across your chest and midway
over your shoulder nearest the door and
not your neck.
To adjust the height of the seat belt
anchor, lower or raise the height adjuster
into an appropriate position.
To raise the height adjuster, pull it up (1).
To lower it, push it down (3) while press-
ing the height adjuster button (2).
Release the button to lock the anchor
into position. Try sliding the height
adjuster to make sure that it has locked
into position.
WARNING
• Verify the shoulder belt anchor is
locked into position at the appro-
priate height. Never position the
shoulder belt across your neck or
face. Improperly positioned seat
belts can cause serious injuries
in an accident.
• Failure to replace seat belts after
an accident could leave you with
damaged seat belts that will not
provide protection in the event of
another collision leading to per-
sonal injury or death. Replace
your seat belts after being in an
accident as soon as possible.
OPB039025


3 17
Safety system of your vehicle
When using the rear center seat belt, the
buckle with the “CENTER” mark must be
used. (if equipped)
To release the seat belt:
The seat belt is released by pressing the
release button (1) in the locking buckle.
When it is released, the belt should auto-
matically draw back into the retractor.
If this does not happen, check the belt to
be sure it is not twisted, then try again.
B210A01NF
1
B200A01NF/H
WARNING
You should place the lap belt por-
tion as low as possible and snugly
across your hips, not on your
waist. If the lap belt is located too
high on your waist, it may increase
the chance of injury in the event of
a collision. Both arms should not
be under or over the belt. Rather,
one should be over and the other
under, as shown in the illustration.
Never wear the seat belt under the
arm that is near the door.
OPB039026


Safety system of your vehicle
183
C020200APB
Pre-tensioner seat belt
(if equipped)
Your vehicle is equipped with driver's and
front passenger's pre-tensioner seat
belts. The purpose of the pre-tensioner is
to make sure that the seat belts fit tightly
against the occupant's body in certain
frontal collisions. The pre-tensioner seat
belts can be activated, where the frontal
collision is severe enough, together with
the air bags.
When the vehicle stops suddenly, or if
the occupant tries to lean forward too
quickly, the seat belt retractor will lock
into position. In certain frontal collisions,
the pre-tensioner will activate and pull
the seat belt into tighter contact against
the occupant's body.
If the system senses excessive seat belt
tension on the driver or passenger's seat
belt when the pre-tensioner activates,
the load limiter inside the pre-tensioner
will release some of the pressure on the
affected seat belt. (if equipped)
The seat belt pre-tensioner system con-
sists mainly of the following components.
Their locations are shown in the illustra-
tion:
1. SRS air bag warning light
2. Retractor pre-tensioner assembly
3. SRS control module
OMG035300/H 1KMB3311A/H


3 19
Safety system of your vehicle
✽
✽
✽
✽✽ NOTICE
• Both the driver's and front passen-
ger's pre-tensioner seat belts will be
activated in certain frontal collisions.
• When the pre-tensioner seat belts are
activated, a loud noise may be heard
and fine dust, which may appear to be
smoke, may be visible in the passenger
compartment. These are normal oper-
ating conditions and are not haz-
ardous.
• Although it is harmless, the fine dust
may cause skin irritation and should
not be breathed for prolonged peri-
ods. Wash all exposed skin areas thor-
oughly after an accident in which the
pre-tensioner seat belts were activat-
ed.
✽
✽
✽
✽✽ NOTICE
Because the sensor that activates the
SRS air bag is connected with the pre-
tensioner seat belt, the SRS air bag
warning light on the instrument panel
will illuminate for approximately 6 sec-
onds after the ignition switch has been
turned to the ON position, and then it
should turn off.
CAUTION
If the pre-tensioner seat belt does
not work properly, this warning
light will illuminate even if there is
no malfunction of the SRS air bag. If
the SRS air bag warning light does
not illuminate when the ignition
switch is turned to ON, or if it
remains illuminated after illuminat-
ing for approximately 6 seconds, or
if it illuminates while the vehicle is
being driven, please have an
authorized HYUNDAI dealer inspect
the pre-tensioner seat belt or SRS
air bag system as soon as possible.
WARNING
To obtain maximum benefit from a
pre-tensioner seat belt:
1. The seatbelt must be worn cor-
rectly and adjusted to the proper
position. Please read and follow
all of the important information
and precautions about your vehi-
cle’s occupant safety features –
including seat belts and air bags
– that are provided in this manu-
al.
2. Be sure you and your passen-
gers always wear seat belts
properly.


Safety system of your vehicle
203
C020300AUN
Seat belt precautions
(Continued)
• Do not attempt to service or
repair the pre-tensioner seat belt
system in any manner.
• Improper handling of the pre-ten-
sioner seat belt assemblies, and
failure to heed the warnings not
to strike, modify, inspect, replace,
service or repair the pre-tension-
er seat belt assemblies may lead
to improper operation or inadver-
tent activation and serious injury.
• Always wear the seat belts when
driving or riding in a motor vehi-
cle.
• If the vehicle or pre-tensioner
seat belt must be discarded, con-
tact an authorized HYUNDAI deal-
er.
WARNING
All occupants of the vehicle must
wear their seat belts at all times.
Seat belts and child restraints
reduce the risk of serious or fatal
injuries for all occupants in the
event of a collision or sudden stop.
Without a seat belt, occupants
could be shifted too close to a
deploying air bag, strike the interior
structure or be thrown from the
vehicle. Properly worn seat belts
greatly reduce these hazards.
Always follow the precautions
about seat belts, air bags and occu-
pant seat contained in this manual.
WARNING
• Pre-tensioners are designed to
operate only one time. After acti-
vation, pre-tensioner seat belts
must be replaced. All seat belts,
of any type, should always be
replaced after they have been
worn during a collision.
• The pre-tensioner seat belt
assembly mechanisms become
hot during activation. Do not
touch the pre-tensioner seat belt
assemblies for several minutes
after they have been activated.
• Do not attempt to inspect or
replace the pre-tensioner seat
belts yourself. This must be done
by an authorized HYUNDAI deal-
er.
• Do not strike the pre-tensioner
seat belt assemblies.
(Continued)


3 21
Safety system of your vehicle
C020306AUN
Infant or small child
You should be aware of the specific
requirements in your country. Child
and/or infant seats must be properly
placed and installed in the rear seat. For
more information about the use of these
restraints, refer to “Child restraint sys-
tem” in this section.
✽
✽
✽
✽✽ NOTICE
Small children are best protected from
injury in an accident when properly
restrained in the rear seat by a child
restraint system that meets the require-
ments of the Safety Standards of your
country. Before buying any child
restraint system, make sure that it has a
label certifying that it meets Safety
Standards of your country. The restraint
must be appropriate for your child's
height and weight. Check the label on
the child restraint for this information.
Refer to “Child restraint system” in this
section.
C020301AHM
Larger children
Children who are too large for child
restraint systems should always occupy
the rear seat and use the available
lap/shoulder belts. The lap portion should
be fastened and snugged on the hips
and as low as possible. Check if the belt
fits periodically. A child's squirming could
put the belt out of position. Children are
given the most safety in the event of an
accident when they are restrained by a
proper restraint system in the rear seat. If
a larger child (over age 12) must be seat-
ed in the front seat, the child should be
securely restrained by the available
lap/shoulder belt and the seat should be
placed in the rearmost position. Children
age 12 and under should be restrained
securely in the rear seat. NEVER place a
child age 12 and under in the front seat.
NEVER place a rear facing child seat in
the front seat of a vehicle.
WARNING
Every person in your vehicle needs
to be properly restrained at all
times, including infants and chil-
dren. Never hold a child in your
arms or lap when riding in a vehi-
cle. The violent forces created dur-
ing a crash will tear the child from
your arms and throw the child
against the interior. Always use a
child restraint appropriate for your
child's height and weight.


Safety system of your vehicle
223
If the shoulder belt portion slightly touch-
es the child’s neck or face, try placing the
child closer to the center of the vehicle. If
the shoulder belt still touches their face
or neck they need to be returned to a
child restraint system.
C020302AUN
Pregnant women
The use of a seat belt is recommended
for pregnant women to lessen the
chance of injury in an accident. When a
seat belt is used, the lap belt portion
should be placed as low and snugly as
possible on the hips, not across the
abdomen. For specific recommenda-
tions, consult a physician.
C020303AUN
Injured person
A seat belt should be used when an
injured person is being transported.
When this is necessary, you should con-
sult a physician for recommendations.
C020304AUN
One person per belt
Two people (including children) should
never attempt to use a single seat belt.
This could increase the severity of
injuries in case of an accident.
C020305APB
Do not lie down
To reduce the chance of injuries in the
event of an accident and to achieve max-
imum effectiveness of the restraint sys-
tem, all passengers should be sitting up
and the front seats should be in an
upright position when the vehicle is mov-
ing. A seat belt cannot provide proper pro-
tection if the person is lying down in the
rear seat or if the front seat is in a reclined
position.
WARNING - Shoulder belts
on small children
• Never allow a shoulder belt to be
in contact with a child’s neck or
face while the vehicle is in
motion.
• If seat belts are not properly worn
and adjusted on children, there is
a risk of death or serious injury.


3 23
Safety system of your vehicle
C020400AEN
Care of seat belts
Seat belt systems should never be dis-
assembled or modified. In addition, care
should be taken to assure that seat belts
and belt hardware are not damaged by
seat hinges, doors or other abuse.
C020401AEN
Periodic inspection
All seat belts should be inspected period-
ically for wear or damage of any kind.
Any damaged parts should be replaced
as soon as possible.
C020402AUN
Keep belts clean and dry
Seat belts should be kept clean and dry.
If belts become dirty, they can be
cleaned by using a mild soap solution
and warm water. Bleach, dye, strong
detergents or abrasives should not be
used because they may damage and
weaken the fabric.
C020403AFD
When to replace seat belts
Entire in-use seat belt assembly or
assemblies should be replaced if the
vehicle has been involved in an accident.
This should be done even if no damage
is visible. Additional questions concern-
ing seat belt operation should be direct-
ed to an authorized HYUNDAI dealer.
WARNING
When you return the rear seatback
to its upright position after the rear
seatback has been folded down, be
careful not to damage the seat belt
webbing or buckle. Be sure that
the webbing or buckle does not get
caught or pinched in the rear seat.
A seat belt with damaged webbing
or buckle could possibly fail during
a collision or sudden stop, result-
ing in serious injury. If the webbing
or buckles are damaged, get them
replaced immediately.
WARNING
Riding with a reclined seatback
increases your chance of serious
or fatal injuries in the event of a col-
lision or sudden stop. The protec-
tion of your restraint system (seat
belts and air bags) is greatly
reduced by reclining your seat.
Seat belts must be snugged against
your hips and chest to work prop-
erly. The more the seatback is
reclined, the greater the chance
that an occupant's hips will slide
under the lap belt causing serious
internal injuries or the occupant's
neck could strike the shoulder belt.
Drivers and passengers should
always sit well back in their seats,
properly belted, and with the seat-
backs upright.


Safety system of your vehicle
243
CHILD RESTRAINT SYSTEM
C030000BPB
Children riding in the vehicle should sit in
the rear seat and must always be prop-
erly restrained to minimize the risk of
injury in an accident, sudden stop or sud-
den maneuver. According to accident
statistics, children are safer when prop-
erly restrained in the rear seats than in
the front seat. Larger children who are
not in a child restraint should use one of
the seat belts provided.
You should be aware of the specific
requirements in your country. Child
and/or infant safety seats must be prop-
erly placed and installed in the rear seat.
You must use a commercially available
child restraint system that meets the
requirements of the Safety Standards of
your country.
Child restraint systems are designed to
be secured in vehicle seats by the lap
belt portion of a lap/shoulder belt, or by a
tether anchor and/or ISOFIX anchors (if
equipped).
Children could be injured or killed in a
crash if their restraints are not properly
secured. For small children and babies, a
child seat or infant seat must be used.
Before buying a particular child restraint
system, make sure it fits your vehicle
seat and seat belts, and fits your child.
Follow all the instructions provided by the
manufacturer when installing the child
restraint system.
WARNING
• A child restraint system must be
placed in the rear seat. Never
install a child or infant seat on the
front passenger's seat. Should an
accident occur and cause the
passenger side air bag to deploy,
it could severely injure or kill an
infant or child seated in an infant
or child seat. Thus only use a
child restraint in the rear seat of
your vehicle.
• A seat belt or child restraint sys-
tem can become very hot if it is
left in a closed vehicle on a sunny
day, even if the outside tempera-
ture does not feel hot. Be sure to
check the seat cover and buckles
before placing a child there.
• When the child restraint system
is not in use, store it in the lug-
gage area or fasten it with a seat
belt so that it will not be thrown
forward in the case of a sudden
stop or an accident.
• Children may be seriously
injured or killed by an inflating air
bag. All children, even those too
large for child restraints, must
ride in the rear seat.


3 25
Safety system of your vehicle
(Continued)
• Never leave children unattended
in a vehicle – not even for a short
time. The car can heat up very
quickly, resulting in serious
injuries to children inside. Even
very young children may inadver-
tently cause the vehicle to move,
entangle themselves in the win-
dows, or lock themselves or oth-
ers inside the vehicle.
• Never allow two children, or any
two persons, to use the same
seat belt.
• Children often squirm and reposi-
tion themselves improperly.
Never let a child ride with the
shoulder belt under their arm or
behind their back. Always proper-
ly position and secure children in
the rear seat.
• Never allow a child to stand-up or
kneel on the seat or floor of a
moving vehicle. During a colli-
sion or sudden stop, the child
can be violently thrown against
the vehicles interior, resulting in
serious injury.
(Continued)
(Continued)
• Never use an infant carrier or a
child safety seat that "hooks"
over a seatback, it may not pro-
vide adequate security in an acci-
dent.
• Seat belts can become very hot,
especially when the vehicle is
parked in direct sunlight. Always
check the seat belt buckles
before fastening them over a
child.
WARNING
To reduce the chance or serious or
fatal injuries:
• Children of all ages are safer
when restrained in the rear seat.
A child riding in the front passen-
ger seat can be forcefully struck
by an inflating air bag resulting in
serious or fatal injuries.
• Always follow the child restraint
system manufacturer’s instruc-
tions for installation and use of
the child restraint.
• Always make sure the child seat
is secured properly in the vehicle
and your child is securely
restrained in the child seat.
• Never hold a child in your arms or
lap when riding in a vehicle. The
violent forces created during a
crash will tear the child from your
arms and throw the child against
the vehicle’s interior.
• Never put a seat belt over your-
self and a child. During a crash,
the belt could press deep into the
child causing serious internal
injuries.
(Continued)


Safety system of your vehicle
263
C030100AFD
Using a child restraint system
For small children and babies, the use of
a child seat or infant seat is required.
This child seat or infant seat should be of
appropriate size for the child and should
be installed in accordance with the man-
ufacturer's instructions.
For safety reasons, we recommend that
the child restraint system be used in the
rear seats.
WARNING - Child seat
installation
• A child can be seriously injured
or killed in a collision if the child
restraint is not properly anchored
to the car and the child is not
properly restrained in the child
restraint. Before installing the
child restraint system, read the
instructions supplied by the child
restraint system manufacturer.
• If the seat belt does not operate
as described in this section, have
the system checked immediately
by your authorized HYUNDAI
dealer.
• Failure to observe this manual's
instructions regarding child
restraint system and the instruc-
tions provided with the child
restraint system could increase
the chance and/or severity of
injury in an accident.
WARNING
Never place a rear-facing child
restraint in the front passenger
seat, because of the danger that an
inflating passenger-side air bag
could impact the rear-facing child
restraint and kill the child.
CRS09
OUN026150
Rearward-facing child restraint system
Forward-facing child restraint system


3 27
Safety system of your vehicle
C030102AUN
Installing a child restraint system by
lap/shoulder belt
To install a child restraint system on the
outboard or center rear seats, do the fol-
lowing:
1. Place the child restraint system in the
seat and route the lap/shoulder belt
around or through the restraint, follow-
ing the restraint manufacturer’s
instructions. Be sure the seat belt
webbing is not twisted.
2. Fasten the lap/shoulder belt latch into
the buckle. Listen for the distinct
“click” sound.
Position the release button so that it is
easy to access in case of an emergency.
3. Buckle the seat belt and allow the seat
belt to take up any slack. After installa-
tion of the child restraint system, try to
move it in all directions to be sure the
child restraint system is securely
installed.
If you need to tighten the belt, pull more
webbing toward the retractor. When you
unbuckle the seat belt and allow it to
retract, the retractor will automatically
revert back to its normal seated passen-
ger emergency locking usage condition.
OEN036104E2MS103005 OEN036101


Safety system of your vehicle
283
C030103AFD
Securing a child restraint seat with
“Tether Anchor” system
(if equipped)
Child restraint hook holders are located
on the floor behind the rear seats.
OPB039033
Seating position
Age group
0 : Up to 10 kg U U U
(0 - 9 months)
0+ : Up to 13 kg U U U
(0 - 2 years)
I : 9 kg to 18 kg U
U U
(9 months - 4 years)
II & III : 15 kg to 36 kg U U U
(4 - 12 years)
Front
passenger
Rear
outboard
Rear
center
C030105APB
Child seat restraint suitability for seat position using the seat belt - For Europe
Use child safety seats that have been officially approved and are appropriate for your
children. When using the child safety seats, refer to the following table.
U : Suitable for "universal" category restraints approved for use in this mass group
WARNING
We recommend that a child restraint seat be installed in the rear seat, even
if the front passenger's air bag ON/OFF switch is set to the OFF position. To
ensure the safety of your child, the front passenger’s air bag must be deacti-
vated when it should be necessary to install a child restraint seat on the front
passenger seat in exceptional circumstances.


3 29
Safety system of your vehicle
1. Route the child restraint seat strap
over the seatback.
For vehicles with adjustable headrest,
route the tether strap under the head-
rest and between the headrest posts,
otherwise route the tether strap over
the top of the seatback.
2. Connect the tether strap hook to the
appropriate child restraint hook holder
and tighten to secure the seat.
WARNING - Child restraint
check
Check that the child restraint sys-
tem is secure by pushing and
pulling it in different directions.
Incorrectly fitted child restraints
may swing, twist, tip or separate
causing death or serious injury.
WARNING
- Child restraint anchorage
• Child restraint anchorages are
designed to withstand only those
loads imposed by correctly fitted
child restraints. Under no circum-
stances are they to be used for
adult seat belts or harnesses or
for attaching other items or
equipment to the vehicle.
• The tether strap may not work
properly if attached somewhere
other than the correct tether
anchor.
2GHA3300L WARNING - Tether strap
Never mount more than one child
restraint to a single tether or to a
single lower anchorage point. The
increased load caused by multiple
seats may cause the tethers or
anchorage points to break, causing
serious injury or death.
WARNING
A child can be seriously injured or
killed in a collision if the child
restraint is not properly anchored
to the car and the child is not prop-
erly restrained in the child restraint.
Always follow the child seat manu-
facturer’s instructions for installa-
tion and use.


Safety system of your vehicle
303
C030104APB
Securing a child restraint system
with “ISOFIX” system and “Tether
Anchorage” system (if equipped)
ISOFIX is a standardised method of fit-
ting child seats that eliminates the need
to use the standard adult seat belt to
secure the seat in the vehicle. This
enables a much more secure and posi-
tive location with the added benefit of
easier and quicker installation.
An ISOFIX-seat can only be installed if it
has vehicle-specific approval in accor-
dance with the requirements of ECE-
R44.
ISOFIX tags are located on the lower
portion of each side of the rear seat-
backs. These tags indicate the position
of the lower anchors for child restraints.
On each side of the rear seat, between
the cushion and backrest, are located a
pair of ISOFIX anchorage points togeth-
er with a top tether mounting on the floor
behind the rear seats. During the instal-
lation, the seat has to be engaged at the
anchorage-points in a way you can hear
it clicking (check by pulling!) and has to
be fixed with the Top Tether-belt on the
belonging point on the floor behind the
rear seats.
The installing and the use of a child-seat
has to be done according to the
installing-manual, which is added to the
ISOFIX-seat.
OPB0390351SAE3090A/H OPB039034


3 31
Safety system of your vehicle
To secure the child restraint seat
1. To engage the child restraint seat to
the ISOFIX anchor, insert the child
restraint seat latch into the ISOFIX
anchor. Listen for the audible “click”
sound.
2. Connect the tether strap hook to the
child restraint hook holder and tighten
to secure the seat. (Refer to the previ-
ous page.)
(Continued)
In a crash, the child restraint seat
ISOFIX attachments may not be
strong enough to secure the
child restraint seat properly in
the center of the rear seat and
may break, causing serious
injury or death.
• Do not mount more than one
child restraint to a child restraint
lower anchorage point. The
improper increased load may
cause the anchorage points or
tether anchor to break, causing
serious injury or death.
• Attach the ISOFIX or ISOFIX-com-
patible child restraint seat only to
the appropriate locations shown
in the illustration.
• Always follow the installation and
use instructions provided by the
manufacturer of the child
restraint.
WARNING
• Do not install a child restraint
seat at the center of the rear seat
using the vehicle's ISOFIX
anchors. The ISOFIX anchors are
only provided for the left and
right outboard rear seating posi-
tions. Do not misuse the ISOFIX
anchors by attempting to attach a
child restraint seat in the middle
of the rear seat to the ISOFIX
anchors.
(Continued)
WARNING
When using the vehicle's "ISOFIX"
system to install a child restraint
system in the rear seat, all unused
vehicle rear seat belt metal latch
plates or tabs must be latched
securely in their seat belt buckles
and the seat belt webbing must be
retracted behind the child restraint
to prevent the child from reaching
and taking hold of unretracted seat
belts. Unlatched metal latch plates
or tabs may allow the child to reach
the unretracted seat belts which
may result in strangulation and a
serious injury or death to the child
in the child restraint.
CAUTION
Do not allow the rear seat belt web-
bing to get scratched or pinched by
the ISOFIX-seat latch and ISOFIX
anchor during the installation.


Safety system of your vehicle
323
F ISO/L1 - X X -
G ISO/L2 - X X -
E ISO/R1 - IUF IUF -
E ISO/R1 - IUF IUF -
D ISO/R2 - IUF IUF -
C ISO/R3 - X X -
D ISO/R2 - IUF IUF -
C ISO/R3 - X X -
B ISO/F2 - IUF IUF -
B1 ISO/F2X - IUF IUF -
A ISO/F3 - IUF IUF -
Rear Outboard
(Passenger side)
Rear Outboard
(Driver side)
Front Passenger
FixtureSize ClassMass Group
Carrycot
0 : UP to 10kg
0+ : UP to 13kg
I : 9 to 18kg
Rear Center
vehicle ISOFIX positions
IUF = Suitable for ISOFIX forward child restraints systems of
universal category approved for use in the mass group.
X = ISOFIX position not suitable for ISOFIX child restraint sys-
tem in this mass group and/or this size class.
* Both ISO/R2 and ISO/R3 are able to be set up only at the
foremost position of the passenger seat.
* ISOFIX child restraint system size classes and fixtures
A - ISO/F3: Full-Height Forward-Facing toddler CRS (height
720mm)
B - ISO/F2: Reduced-Height Forward-Facing toddler CRS
(height 650mm)
B1 - ISO/F2X: Reduced-Height Second Version Back Surface
Shape Forward-Facing toddler CRS (height 650mm)
C - ISO/R3: Full-Size Rearward-Facing toddler CRS
D - ISO/R2: Reduced-Size Rearward-Facing toddler CRS
E - ISO/R1: Infant-Size Rearward-Facing CRS
F - ISO/L1: Left Lateral Facing position CRS (carry-cot)
G - ISO/L2: Right Lateral Facing position CRS (carry-cot)
C030106APB
Child seat restraint suitability for vehicle ISOFIX positions- For Europe


3 33
Safety system of your vehicle
C040000AUN
(1) Driver’s air bag*
(2) Passenger’s air bag*
(3) Side impact air bag*
(4) Curtain air bag*
* : if equipped
AIR BAG - SUPPLEMENTAL RESTRAINT SYSTEM (IF EQUIPPED)
OPB039036R
* The actual air bags in the vehicle may differ from the illustration.
WARNING
Even in vehicles with air bags, you
and your passengers must always
wear the safety belts provided in
order to minimize the risk and
severity of injury in the event of a
collision or rollover.


Safety system of your vehicle
343
C040900APB
How does the air bag system
operate
• Air bags are activated (able to inflate if
necessary) only when the ignition
switch is turned to the ON or START
position.
• Air bags inflate instantly in the event of
serious frontal or side collision (if
equipped with side air bag or curtain
air bag) in order to help protect the
occupants from serious physical injury.
• There is no single speed at which the
air bags will inflate.
Generally, air bags are designed to
inflate by the severity of a collision and
its direction. These two factors deter-
mine whether the sensors produce an
electronic deployment/inflation signal.
• Air bag deployment depends on a
number of factors including vehicle
speed, angles of impact and the densi-
ty and stiffness of the vehicles or
objects which your vehicle hits in the
collision. The determining, factors are
not limited to those mentioned above.
• The front air bags will completely
inflate and deflate in an instant.
It is virtually impossible for you to see
the air bags inflate during an accident.
It is much more likely that you will sim-
ply see the deflated air bags hanging
out of their storage compartments after
the collision.
• In order to help provide protection in a
severe collision, the air bags must
inflate rapidly. The speed of air bag
inflation is a consequence of extremely
short time in which a collision occurs
and the need to get the air bag
between the occupant and the vehicle
structures before the occupant impacts
those structures. This speed of inflation
reduces the risk of serious or life-
threatening injuries in a severe collision
and is thus a necessary part of air bag
design.
However, air bag inflation can also
cause injuries which can include facial
abrasions, bruises and broken bones
because the inflation speed also caus-
es the air bags to expand with a great
deal of force.
• There are even circumstances
under which contact with the steer-
ing wheel air bag can cause fatal
injuries, especially if the occupant
is positioned excessively close to
the steering wheel.
WARNING
• To avoid severe personal injury
or death caused by deploying air
bags in a collision, the driver
should sit as far back from the
steering wheel air bag as possi-
ble (at least 250 mm (10 inches)
away). The front passenger
should always move their seat as
far back as possible and sit back
in their seat.
• Air bag inflates instantly in an
event of a collision, passengers
may be injured by the air bag
expansion force if they are not in
a proper position.
• Air bag inflation may cause
injuries including facial or bodily
abrasions, injuries from broken
glasses or burns.


3 35
Safety system of your vehicle
C040902APB
Noise and smoke
When the air bags inflate, they make a
loud noise and they leave smoke and
powder in the air inside of the vehicle.
This is normal and is a result of the igni-
tion of the air bag inflator. After the air
bag inflates, you may feel substantial dis-
comfort in breathing due to the contact of
your chest to both the seat belt and the
air bag, as well as from breathing the
smoke and powder. Open your doors
and/or windows as soon as possible
after the impact in order to reduce dis-
comfort and prevent prolonged expo-
sure to smoke and powder.
Though smoke and powder are non-
toxic, it may cause irritation to the skin
(eyes, nose and throat etc). If this is the
case, wash and rinse with the cold water
immediately and consult the doctor if the
symptom persists.
C040903AEN
Do not install a child restraint on a
front passenger’s seat
Never place a rear-facing child restraint
in the front passenger’s seat. If the air
bag deploys, it would impact the rear-fac-
ing child restraint, causing serious or
fatal injury.
In addition, do not place front-facing child
restraint in the front passenger’s seat
either. If the front passenger air bag
inflates, it would cause serious or fatal
injuries to the child.
1JBH3051
WARNING
When the air bags deploy, the air
bag related parts in the steering
wheel and/or instrument panel
and/or in both sides of the roof rails
above the front and rear doors are
very hot. To prevent injury, do not
touch the air bag storage area’s
internal components immediately
after an air bag has inflated.


Safety system of your vehicle
363
C041000AEN
Air bag warning light
The purpose of the air bag warning light
in your instrument panel is to alert you of
a potential problem with your air bag -
Supplemental Restraint System (SRS).
When the ignition switch is turned ON,
the indicator light should illuminate for
approximately 6 seconds, then go o.
Have the system checked if:
• The light does not turn on briefly when
you turn the ignition ON.
• The light stays on after illuminating for
approximately 6 seconds.
• The light comes on while the vehicle is
in motion.
C040100APB
SRS components and functions
The SRS consists of the following com-
ponents:
1. Driver's front air bag module*
2. Passenger's front air bag module*
3. Side impact air bag modules*
4. Curtain air bag modules*
5. Retractor pre-tensioner assemblies*
6. Air bag warning light*
7. SRS control module (SRSCM)*
8. Front impact sensors*
9. Side impact sensors*
10. Passenger’s front air bag OFF indi-
cator (front passenger's seat only)*
11. Passenger’s front air bag ON/OFF
switch*
*: if equipped
WARNING
• Extreme Hazard! Do not use a
rearward facing child restraint on
a seat protected by an air bag in
front of it!
• Never put a child restraint in the
front passenger’s seat. If the
front passenger air bag inates, it
can cause serious or fatal
injuries.
• When children are seated in the
rear outboard seats of a vehicle
equipped with side and/or curtain
air bags, be sure to install the
child restraint system as far away
from the door side as possible,
and securely lock the child
restraint system in position.
Ination of side and/or curtain air
bags could cause serious injury
W7-147


3 37
Safety system of your vehicle
The SRSCM continually monitors all
SRS components while the ignition
switch is ON to determine if a crash
impact is severe enough to require air
bag deployment or pre-tensioner seat
belt deployment.
The SRS air bag warning light on the
instrument panel will illuminate for about
6 seconds after the ignition switch is
turned to the ON position, after which the
air bag warning light should go out.
If any of the following conditions occurs,
this indicates a malfunction of the SRS.
Have an authorized HYUNDAI dealer
inspect the air bag system as soon as
possible.
• The light does not turn on briey when
you turn the ignition ON.
• The light stays on after illuminating for
approximately 6 seconds.
• The light comes on while the vehicle is
in motion.
The air bag modules are located both in
the center of the steering wheel and in
the front passenger's panel above the
glove box. When the SRSCM detects a
suciently severe impact to the front of
the vehicle, it will automatically deploy
the front air bags.
Upon deployment, tear seams molded
directly into the pad covers will separate
under pressure from the expansion of the
air bags. Further opening of the covers
then allows full ination of the air bags.
B240B01L-R
Driver’s front air bag (1)
B240B02L-R
Driver’s front air bag (2)


Safety system of your vehicle
383
A fully inflated air bag, in combination
with a properly worn seat belt, slows the
driver's or the passenger's forward
motion, reducing the risk of head and
chest injury.
After complete inflation, the air bag
immediately starts deflating, enabling the
driver to maintain forward visibility and
the ability to steer or operate other con-
trols.
B240B03L-R
Driver’s front air bag (3)
WARNING
• Do not install or place any acces-
sories (drink holder, cassette
holder, sticker, etc.) on the front
passenger's panel above the
glove box in a vehicle with a pas-
senger's air bag. Such objects
may become dangerous projec-
tiles and cause injury if the pas-
senger's air bag inates.
• When installing a container of liq-
uid air freshener inside the vehi-
cle, do not place it near the
instrument cluster nor on the
instrument panel surface.
It may become dangerous projec-
tiles and cause injury if the pas-
senger's air bag inates.
B240B05L-R
Passenger’s front air bag
WARNING
• If an air bag deploys, there may
be a loud noise followed by a ne
dust released in the vehicle.
These conditions are normal and
are not hazardous - the air bags
are packed in this ne powder.
The dust generated during air
bag deployment may cause skin
or eye irritation as well as aggra-
vate asthma for some persons.
Always wash all exposed skin
areas thoroughly with lukewarm
water and a mild soap after an
accident in which the air bags
were deployed.
(Continued)


3 39
Safety system of your vehicle
C040400APB
Driver's and passenger's front air
bag (if equipped)
Your vehicle is equipped with a
Supplemental Restraint (Air bag)
System. The indications of the system's
presence are the letters "AIR BAG"
embossed on the air bag pad cover on
the steering wheel and the passenger's
side front panel pad above the glove box.
The SRS consists of air bags installed
under the pad covers in the center of the
steering wheel and the passenger's side
front panel above the glove box.
The purpose of the SRS is to provide the
vehicle's driver and/or the front passen-
ger with additional protection than that
oered by the seat belt system alone in
case of a frontal impact of sucient
severity.
(Continued)
• The SRS can function only when
the ignition switch is in the ON
position. If the SRS air bag warn-
ing light does not illuminate, or
continuously remains on after
illuminating for about 6 seconds
when the ignition switch is
turned to the ON position, or after
the engine is started, comes on
while driving, the SRS is not
working properly. If this occurs,
have your vehicle immediately
inspected by an authorized
HYUNDAI dealer.
• Before you replace a fuse or dis-
connect a battery terminal, turn
the ignition switch to the LOCK
position and remove the ignition
key. Never remove or replace the
air bag related fuse(s) when the
ignition switch is in the ON posi-
tion. Failure to heed this warning
will cause the SRS air bag warn-
OPB039038R
Driver’s front air bag
OPB039039R
Passenger’s front air bag


Safety system of your vehicle
403
(Continued)
• Move your seat as far back as
practical from the front air bags,
while still maintaining control of
the vehicle.
• You and your passengers should
never sit or lean unnecessarily
close to the air bags. Improperly
positioned drivers and passen-
gers can be severely injured by
inating air bags.
• Never lean against the door or
center console – always sit in an
upright position.
• Do not allow a passenger to ride
in the front seat when the pas-
senger’s front air bag OFF indica-
tor is illuminated, because the air
bag will not deploy in the event of
a moderate or severe frontal
crash. (if equipped)
(Continued)
WARNING
Always use seat belts and child
restraints – every trip, every time,
everyone! Air bags inate with
considerable force and in the blink
of an eye. Seat belts help keep
occupants in proper position to
obtain maximum benet from the
air bag. Even with air bags,
improperly and unbelted occupants
can be severely injured when the
air bag inates. Always follow the
precautions about seat belts, air
bags and occupant safety con-
tained in this manual.
To reduce the chance of serious or
fatal injuries and receive the maxi-
mum safety benefit from your
restraint system:
• Never place a child in any child or
booster seat in the front seat.
• ABC – Always Buckle Children in
the back seat. It is the safest
place for children of any age to
ride.
• Front and side air bags can injure
occupants improperly positioned
in the front seats.
(Continued)
(Continued)
• No objects should be placed over
or near the air bag modules on
the steering wheel, instrument
panel, and the front passenger's
panel above the glove box,
because any such object could
cause harm if the vehicle is in a
crash severe enough to cause
the air bags to deploy.
• Do not tamper with or disconnect
SRS wiring or other components
of the SRS system. Doing so
could result in injury, due to acci-
dental deployment of the air bags
or by rendering the SRS inopera-
tive.
• If the SRS air bag warning light
remains illuminated while the
vehicle is being driven, have an
authorized HYUNDAI dealer
inspect the air bag system as
soon as possible.
(Continued)


3 41
Safety system of your vehicle
OPA037039/H
1JBA3514/H
OED036104
Rear impact
Side impact
Rollover
(Continued)
• Air bags can only be used once –
have an authorized HYUNDAI
dealer replace the air bag imme-
diately after deployment.
• The SRS is designed to deploy
the front air bags only when an
impact is suciently severe and
when the impact angle is less
than 30° from the forward longitu-
dinal axis of the vehicle.
Additionally, the air bags will only
deploy once. Seat belts must be
worn at all times.
• Front air bags are not intended to
deploy in side-impact, rear-
impact or rollover crashes. In
addition, front air bags will not
deploy in frontal crashes below
the deployment threshold.
(Continued)
(Continued)
• A child restraint system must
never be placed in the front seat.
The infant or child could be
severely injured or killed by an air
bag deployment in case of an
accident.
• Children age 12 and under must
always be properly restrained in
the rear seat. Never allow chil-
dren to ride in the front passen-
ger seat. If a child over 12 must
be seated in the front seat, he or
she must be properly belted and
the seat should be moved as far
back as possible.
• For maximum safety protection
in all types of crashes, all occu-
pants including the driver should
always wear their seat belts
whether or not an air bag is also
provided at their seating position
to minimize the risk of severe
injury or death in the event of a
crash. Do not sit or lean unnec-
essarily close to the air bag while
the vehicle is in motion.
(Continued)


Safety system of your vehicle
423
C040501APA
Passenger’s front air bag ON/OFF
switch (if equipped)
If a child restraint should be installed on
the front passenger’s seat or if the front
passenger’s seat is unoccupied by a per-
son, turn the passenger’s front air bag
ON/OFF switch to the OFF position. The
passenger’s front air bag will be deacti-
vated.
To ensure the safety of your child, the
passenger’s front air bag must be deacti-
vated when it is necessary to install a
rearward facing child seat on the front
passenger seat in exceptional circum-
stances.
To deactivate or reactivate the passen-
ger’s front air bag:
To deactivate the passenger’s front air
bag, insert the master key into the pas-
senger’s front air bag ON/OFF switch
and turn it to the OFF position. The pas-
senger’s front air bag OFF indicator will
illuminate and stay on until the passen-
ger’s front air bag is reactivated.
To reactivate the passenger’s front air
bag, insert the master key into the pas-
senger’s front air bag ON/OFF switch
and turn it to the ON position. The pas-
senger’s front air bag OFF indicator will
go out.
(Continued)
• Sitting improperly or out of posi-
tion can result in serious or fatal
injury in a crash. All occupants
should sit upright with the seat
back in an upright position, cen-
tered on the seat cushion with
their seat belt on, legs comfort-
ably extended and their feet on
the floor until the vehicle is
parked and the ignition key is
removed.
• The SRS air bag system must
deploy very rapidly to provide
protection in a crash. If an occu-
pant is out of position because of
not wearing a seat belt, the air
bag may forcefully contact the
occupant causing serious or fatal
injuries.
OPB039051R OPB039041


3 43
Safety system of your vehicle
✽
✽
✽
✽✽ NOTICE
• When the passenger’s front air bag
ON/OFF switch is set to the ON posi-
tion, the passenger’s front air bag acti-
vates so a child or infant seat should
not be installed on the front passenger
seat.
• When the passenger’s front air bag
ON/OFF switch is set to the OFF posi-
tion, the passenger’s front air bag is
deactivated.
Passenger’s front air bag OFF indicator
(if equipped)
The passenger’s front air bag OFF indi-
cator illuminates for about 4 seconds
after the ignition switch is turned to the
ON position.
The passenger’s front air bag OFF indi-
cator also comes on when the passen-
ger’s front air bag ON/OFF switch is set
to the OFF position and goes o when
the passenger’s front air bag ON/OFF
switch is set to the ON position.
CAUTION
• If the passenger’s front air bag
ON/OFF switch does not work
properly, the air bag warning light
on the instrument panel will illu-
minate.
And, the passenger's front air bag
OFF indicator will not illuminate,
the SRS Control Module reacti-
vates the passenger’s front air
bag and the passenger’s front air
bag will inflate in frontal impact
crashes even if the passenger’s
front air bag ON/OFF switch is set
to the OFF position.
(Continued)
(Continued)
If this occurs, have an authorized
HYUNDAI dealer inspect the pas-
senger’s front air bag ON/OFF
switch, the pre-tensioner seat
belt system and the SRS air bag
system as soon as possible.
• If the SRS air bag warning light
does not illuminate when the igni-
tion switch is turned to the ON
position, or if it illuminates while
the vehicle is being driven, have
an authorized HYUNDAI dealer
inspect the passenger’s front air
bag ON/OFF switch, pre-tension-
er seat belt and the SRS air bag
system as soon as possible.
WARNING
The front air bag ON/OFF switch
could turn by using a similar small
rigid device. Always check the sta-
tus of the front air bag ON/OFF
switch and passenger's front air
bag OFF indicator.


Safety system of your vehicle
443
(Continued)
• Even though your vehicle is
equipped with the passenger's
front air bag ON/OFF switch, do
not install a child restraint sys-
tem in the front passenger's seat.
A child restraint system must
never be placed in the front seat.
Children who are too large for
child restraint systems should
always occupy the rear seat and
use the available lap/shoulder
belts. Children are given the most
safety in the event of an accident
when they are restrained by a
proper restraint system in the
rear seat.
• As soon as the child seat is no
longer needed on the front pas-
senger's seat, reactivate the front
passenger's air bag.
WARNING
• The driver is responsible for the
proper position of the passen-
ger’s front air bag ON/OFF switch.
• Deactivate the passenger's front
air bag only when the ignition
switch is switched o, or mal-
function may occur in the SRS
Control Module.
And there may be a danger that
the driver's and/or front passen-
ger’s and/or side and curtain air
bag may fail to trigger, or not trig-
ger correctly during a collision.
• Never install a rearward facing
child seat on the front passen-
ger's seat unless the passenger's
front air bag has been deactivat-
ed. The infant or child could be
severely injured or killed by an air
bag deployment in case of an
accident.
(Continued)
WARNING
• The passenger’s front air bag is
much larger than the steering
wheel air bag and inates with
considerably more force. It can
seriously hurt or kill a passenger
who is not in the proper position
and wearing the seat belt proper-
ly. The front passengers should
always move their seat as far
back as possible and sit back in
their seat.
• It is essential that the front pas-
sengers always wear their seat
belts when the vehicle is in
motion, even when the vehicle is
moving in a parking lot or up a
driveway into garage.
(Continued)


3 45
Safety system of your vehicle
C040600APB
Side impact air bag (if equipped)
Your vehicle is equipped with a side
impact air bag in each front seat. The
purpose of the air bag is to provide the
vehicle's driver and/or the front passen-
ger with additional protection than that
offered by the seat belt alone.
OPB039042
OED036107
(Continued)
• If a driver brakes the vehicle
heavily in urgent situations,
occupants will be thrown for-
ward. If front passengers are not
wearing the seat belts, they will
be directly in front of the air bags
when ination occurs. In that sit-
uation, severe injury or death is
possible.
• Never allow a front passenger to
put their hands or feet on the
instrument panel or put their face
close to the instrument panel.
The air bag will impact the front
passenger when it inates.
(Continued)
(Continued)
• Never allow children/elder
and feeble persons/pregnant
women to sit on the front passen-
ger’s seat. Do not put child
restraint system on the front pas-
senger’s seat either. They may be
seriously injured by the air bag
inflation when the air bag
deploys.
• Do not put objects or stickers on
the instrument panel. Do not
apply any accessory on the front
windshield glass or do not install
aftermarket mirrors or acces-
sories on the factory installed
rearview mirror. These may inter-
fere with the deployment of air
bag ination or could hit your
body at high speed and cause
severe bodily injury and even
death.


Safety system of your vehicle
463
The side impact air bags are designed to
deploy only during certain side impact
collisions, depending on the crash sever-
ity, angle, speed and point of impact. The
side impact air bags are not designed to
deploy in all side impact situations.
(Continued)
• Do not install any accessories on
the side or near the side impact
air bag.
• Do not place any objects over the
air bag or between the air bag
and yourself.
• Do not place any objects (an
umbrella, bag, etc.) between the
front door and the front seat.
Such objects may become dan-
gerous projectiles and cause
injury if the supplemental side
impact air bag inates.
• To prevent unexpected deploy-
ment of the side impact air bag
that may result in personal injury,
avoid impact to the side impact
sensor when the ignition switch
is on.
• If seat or seat cover is damaged,
have the vehicle checked and
repaired by an authorized
HYUNDAI dealer. Inform that your
vehicle is equipped with side
impact air bags.
WARNING
• The side impact air bag is supple-
mental to the driver's and the
passenger's seat belt systems
and is not a substitute for them.
Therefore your seat belts must be
worn at all times while the vehicle
is in motion. The air bags deploy
only in certain side impact condi-
tions severe enough to cause
signicant injury to the vehicle
occupants.
• For best protection from the side
impact air bag system and to
avoid being injured by the
deploying side impact air bag,
both front seat occupants should
sit in an upright position with the
seat belt properly fastened. The
driver's hands should be placed
on the steering wheel at 9:00 and
3:00 positions. The passenger's
arms and hands should be
placed on their laps.
• Never place accessory seat cov-
ers, blankets or aftermarket seat
warmers on the passenger seat
as these may interfere with the
side impact air bag deployment.
(Continued)


3 47
Safety system of your vehicle
C040700APB
Curtain air bag (if equipped)
Curtain air bags are located along both
sides of the roof rails above the front and
rear doors.
They are designed to help protect the
heads of the front seat occupants and
the rear outboard seat occupants in cer-
tain side impact collisions.
The curtain air bags are designed to
deploy only during certain side impact
collisions, depending on the crash sever-
ity, angle, speed and impact. The curtain
air bags are not designed to deploy in all
side impact situations, collisions from the
front or rear of the vehicle or in most
rollover situations.
WARNING
• In order for side impact and cur-
tain air bags to provide its best
protection, both front seat occu-
pants and both outboard rear
occupants should sit in an
upright position with the seat
belts properly fastened.
Importantly, children should sit in
a proper child restraint system in
the rear seat.
• When children are seated in the
rear outboard seats, they must be
seated in the proper child
restraint system. Make sure to
put the child restraint system as
far away from the door side as
possible, and secure the child
restraint system in a locked posi-
tion.
(Continued)
(Continued)
• Do not allow the passengers to
lean their heads or bodies onto
doors, put their arms on the
doors, stretch their arms out of
the window, or place objects
between the doors and passen-
gers when they are seated on
seats equipped with side and/or
curtain air bags.
• Never try to open or repair any
components of the side curtain
air bag system. This should only
be done by an authorized
HYUNDAI dealer.
Failure to follow the above men-
tioned instructions can result in
injury or death to the vehicle occu-
pants in an accident.
OPB039024
OUN026090


Safety system of your vehicle
483
C040800APA
Why didn’t my air bag go o in a
collision? (Ination and non-ina-
tion conditions of the air bag)
There are many types of accidents in
which the air bag would not be
expected to provide additional protec-
tion.
These include rear impacts, second or
third collisions in multiple impact
accidents, as well as low speed
impacts. In other words, just because
your vehicle is damaged and even if it
is totally unusable, don’t be surprised
that the air bags did not inate.
Air bag collision sensors
(1) SRS control module*
(2) Front impact sensor*
* : if equipped
(3) Side impact sensor*
OPB039044R/OPB039045/H/OPB039046/H/OPB039047/H


3 49
Safety system of your vehicle
C040801APB
Air bag ination conditions
Front air bags
Front air bags are designed to inate in a
frontal collision depending on the intensi-
ty, speed or angles of impact of the front
collision.
WARNING
• Do not hit or allow any objects to
impact the locations where air bag
or sensors are installed.
This may cause unexpected air
bag deployment, which could
result in serious personal injury
or death.
• If the installation location or
angle of the sensors is altered in
any way, the air bags may deploy
when they should not or they
may not deploy when they
should, causing severe injury or
death.
Therefore, do not try to perform
maintenance on or around the air
bag sensors. Have the vehicle
checked and repaired by an
authorized HYUNDAI dealer.
(Continued)
• Problems may arise if the sensor
installation angles are changed
due to the deformation of the
front bumper, body or B pillar
where side collision sensors are
installed. Have the vehicle
checked and repaired by an
authorized HYUNDAI dealer.
• Your vehicle has been designed
to absorb impact and deploy the
air bag(s) in certain collisions.
Installing bumper guards or
replacing a bumper with non-
genuine parts may adversely
aect your vehicles collision and
air bag deployment performance.
OPA037040/H


Safety system of your vehicle
503
Side air bags (if equipped)
Side air bags (side impact and/or curtain
air bags) are designed to inflate when an
impact is detected by side collision sen-
sors depending on the strength, speed or
angles of impact resulting from a side
impact collision.
Although the front air bags (driver’s and
front passenger’s air bags) are designed
to inflate only in frontal collisions, they
also may inflate in other types of colli-
sions if the front impact sensors detect a
sufficient impact. Side air bags (side
impact and/or curtain air bags) are
designed to inflate only in side impact
collisions, but they may inflate in other
collisions if the side impact sensors
detect a sufficient impact.
If the vehicle chassis is impacted by
bumps or objects on unimproved roads,
air bags may deploy. Drive carefully on
unimproved roads or on surfaces not
designed for vehicle traffic to prevent
unintended air bag deployment.
C040802APB
Air bag non-ination conditions
• In certain low-speed collisions the air
bags may not deploy. The air bags are
designed not to deploy in such cases
because they may not provide benefits
beyond the protection of the seat belts
in such collisions.
OSA038120
OUN026090
OPA037041/H


3 51
Safety system of your vehicle
• Front air bags are not designed to
inate in rear collisions, because occu-
pants are moved backward by the
force of the impact. In this case, inflat-
ed air bags would not be able to pro-
vide any additional benet.
• Front air bags may not inate in side
impact collisions, because occupants
move to the direction of the collision,
and thus in side impacts, front air bag
deployment would not provide addi-
tional occupant protection.
However, if equipped with side impact
or curtain air bags, the air bags may
inate depending on the intensity, vehi-
cle speed and angles of impact.
• In an angled collision, the force of
impact may direct the occupants in a
direction where the air bags would not
be able to provide any additional ben-
et, and thus the sensors may not
deploy any air bags.
1JBA3521/HOSA038121/HOPA037042/H


Safety system of your vehicle
523
• Just before impact, drivers often brake
heavily. Such heavy braking lowers
the front portion of the vehicle causing
it to “ride” under a vehicle with a high-
er ground clearance. Air bags may not
inflate in this "under-ride" situation
because deceleration forces that are
detected by sensors may be signifi-
cantly replaced by such “under-ride”
collisions.
• Air bags may not inflate in rollover
accidents because air bag deployment
would not provide protection to the
occupants.
However, side impact and/or curtain air
bags may inflate when the vehicle is
rolled over by a side impact collision, if
the vehicle is equipped with side
impact and curtain air bags.
• Air bags may not inflate if the vehicle
collides with objects such as utility
poles or trees, where the point of
impact is concentrated to one area and
the full force of the impact is not deliv-
ered to the sensors.
1JBA3522 OSA038122/HOPA037043/H


3 53
Safety system of your vehicle
C041100APB
SRS Care
The SRS is virtually maintenance-free
and so there are no parts you can safely
service by yourself. If the SRS air bag
warning light does not illuminate, or con-
tinuously remains on, have your vehicle
immediately inspected by an authorized
HYUNDAI dealer.
Any work on the SRS system, such as
removing, installing, repairing, or any
work on the steering wheel must be per-
formed by an authorized HYUNDAI deal-
er. Improper handling of the SRS system
may result in serious personal injury.
WARNING
• Modication to SRS components
or wiring, including the addition
of any kind of badges to the pad
covers or modications to the
body structure, can adversely
aect SRS performance and lead
to possible injury.
• For cleaning the air bag pad cov-
ers, use only a soft, dry cloth or
one which has been moistened
with plain water. Solvents or
cleaners could adversely aect
the air bag covers and proper
deployment of the system.
• No objects should be placed over
or near the air bag modules on
the steering wheel, instrument
panel, and the front passenger's
panel above the glove box,
because any such object could
cause harm if the vehicle is in a
crash severe enough to cause
the air bags to inate.
(Continued)
(Continued)
• If the air bags inate, they must
be replaced by an authorized
HYUNDAI dealer.
• Do not tamper with or disconnect
SRS wiring, or other components
of the SRS system. Doing so
could result in injury, due to acci-
dental ination of the air bags or
by rendering the SRS inopera-
tive.
• If components of the air bag sys-
tem must be discarded, or if the
vehicle must be scrapped, certain
safety precautions must be
observed. An authorized
HYUNDAI dealer knows these
precautions and can give you the
necessary information. Failure to
follow these precautions and pro-
cedures could increase the risk
of personal injury.
• If your vehicle was ooded and
has soaked carpeting or water on
the floor, you shouldn't try to
start the engine; have the car
towed to an authorized HYUNDAI
dealer.


Safety system of your vehicle
543
C041300AUN
Additional safety precautions
•Never let passengers ride in the
cargo area or on top of a folded-
down back seat. All occupants should
sit upright, fully back in their seats with
their seat belts on and their feet on the
oor.
•Passengers should not move out of
or change seats while the vehicle is
moving. A passenger who is not wear-
ing a seat belt during a crash or emer-
gency stop can be thrown against the
inside of the vehicle, against other
occupants, or out of the vehicle.
•Each seat belt is designed to
restrain one occupant. If more than
one person uses the same seat belt,
they could be seriously injured or killed
in a collision.
•Do not use any accessories on seat
belts. Devices claiming to improve
occupant comfort or reposition the seat
belt can reduce the protection provided
by the seat belt and increase the
chance of serious injury in a crash.
•Passengers should not place hard
or sharp objects between them-
selves and the air bags. Carrying
hard or sharp objects on your lap or in
your mouth can result in injuries if an
air bag inates.
•Keep occupants away from the air
bag covers. All occupants should sit
upright, fully back in their seats with
their seat belts on and their feet on the
oor. If occupants are too close to the
air bag covers, they could be injured if
the air bags inate.
•Do not attach or place objects on or
near the air bag covers. Any object
attached to or placed on the front or
side air bag covers could interfere with
the proper operation of the air bags.
•Do not modify the front seats.
Modication of the front seats could
interfere with the operation of the sup-
plemental restraint system sensing
components or side air bags.
•Do not place items under the front
seats. Placing items under the front
seats could interfere with the operation
of the supplemental restraint system
sensing components and wiring har-
nesses.
•Never hold an infant or child on
your lap. The infant or child could be
seriously injured or killed in the event
of a crash. All infants and children
should be properly restrained in appro-
priate child safety seats or seat belts in
the rear seat.
C041400AUN
Adding equipment to or modify-
ing your air bag-equipped vehicle
If you modify your vehicle by changing
your vehicle's frame, bumper system,
front end or side sheet metal or ride
height, this may aect the operation of
your vehicle's air bag system.
WARNING
• Sitting improperly or out of posi-
tion can cause occupants to be
shifted too close to a deploying
air bag, strike the interior struc-
ture or be thrown from the vehi-
cle resulting in serious injury or
death.
• Always sit upright with the seat-
back in an upright position, cen-
tered on the seat cushion with
your seat belt on, legs comfort-
ably extended and your feet on
the oor.


3 55
Safety system of your vehicle
C041200AHM
Air bag warning label
(if equipped)
Air bag warning label is attached to alert
the driver and passengers of the poten-
tial risk of the air bag system.
Note that these government warnings
focus on the risk of children. We also
want you to be aware of the risks which
adults are exposed to that have been
described in previous pages.
OPB039049


4
Keys / 4-2
Remote keyless entry / 4-5
Theft-alarm system / 4-7
Door locks / 4-9
Tailgate / 4-13
Windows / 4-14
Hood / 4-19
Fuel ller lid / 4-21
Sunroof / 4-24
Steering wheel / 4-28
Mirrors / 4-30
Instrument cluster / 4-34
Hazard warning asher / 4-51
Lighting / 4-52
Wipers and washers / 4-57
Interior light / 4-60
Defroster / 4-63
Manual climate control system / 4-64
Automatic climate control system / 4-72
Windshield defrosting and defogging / 4-79
Storage compartment / 4-81
Interior features / 4-84
Audio system / 4-89
Features of your vehicle


Features of your vehicle
24
D010100AFD
Record your key number
The key code number is stamped on the
bar code tag attached to the key set.
Should you lose your keys, this number
will enable an authorized HYUNDAI
dealer to duplicate the keys easily.
Remove the bar code tag and store it in
a safe place. Also, record the code num-
ber and keep it in a safe and handy
place, but not in the vehicle. D010200APB
Key operations
• Used to start the engine.
• Used to lock and unlock the doors (or
tailgate).
KEYS
WARNING - Ignition key
Leaving children unattended in a
vehicle with the ignition key is dan-
gerous even if the key is not in the
ignition switch. Children copy
adults and they could place the key
in the ignition switch. The ignition
key would enable children to oper-
ate power windows or other con-
trols, or even make the vehicle
move, which could result in serious
bodily injury or even death. Never
leave the keys in your vehicle with
unsupervised children.
OFD047001
WARNING
Use only HYUNDAI original parts
for the ignition key in your vehicle.
If an aftermarket key is used, the
ignition switch may not return to
ON after START. If this happens,
the starter will continue to operate
causing damage to the starter
motor and possible fire due to
excessive current in the wiring.
OFD047002-A
OPB049001
Type B
Type A


4 3
Features of your vehicle
D010300APB
Immobilizer system (if equipped)
Your vehicle may be equipped with an
electronic engine immobilizer system to
reduce the risk of unauthorized vehicle
use.
Your immobilizer system is comprised of
a small transponder in the ignition key
and electronic devices inside the vehicle.
With the immobilizer system, whenever
you insert your ignition key into the igni-
tion switch and turn it to ON, it checks
and determines and veries if the ignition
key is valid or not.
If the key is determined to be valid, the
engine will start.
If the key is determined to be invalid, the
engine will not start.
To deactivate the immobilizer sys-
tem:
Insert the ignition key into the key cylin-
der and turn it to the ON position.
To activate the immobilizer system:
Turn the ignition key to the OFF position.
The immobilizer system activates auto-
matically. Without a valid ignition key for
your vehicle, the engine will not start.
✽
✽
✽
✽✽ NOTICE
When starting the engine, do not use the
key with other immobilizer keys around.
Otherwise the engine may not start or
may stop soon after it starts. Keep each
key separate in order to avoid a starting
malfunction.
✽
✽
✽
✽✽ NOTICE
If you need additional keys or lose your
keys, consult an authorized HYUNDAI
dealer.
OFD047001-B
CAUTION
Do not put metal accessories near
the ignition switch.
Metal accessories may interrupt the
transponder signal and may pre-
vent the engine from starting.
WARNING
In order to prevent theft of your
vehicle, do not leave spare keys
anywhere in your vehicle. Your
immobilizer password is a cus-
tomer unique password and should
be kept condential. Do not leave
this number anywhere in your vehi-
cle.


Features of your vehicle
44
CAUTION
The transponder in your ignition
key is an important part of the
immobilizer system. It is designed
to give years of trouble-free serv-
ice, however you should avoid
exposure to moisture, static elec-
tricity and rough handling.
Immobilizer system malfunction
could occur.
CAUTION
Do not change, alter or adjust the
immobilizer system because it
could cause the immobilizer sys-
tem to malfunction and should only
be serviced by an authorized
HYUNDAI dealer.
Malfunctions caused by improper
alterations, adjustments or modi-
cations to the immobilizer system
are not covered by your vehicle
manufacturer warranty.


4 5
Features of your vehicle
REMOTE KEYLESS ENTRY (IF EQUIPPED)
Remote keyless entry system
operations
D020101APB
Lock (1)
All doors (and tailgate) are locked if the
lock button is pressed.
If all doors (and tailgate) are closed, the
hazard warning lights blink once to indi-
cate that all doors are locked.
However, if any door (and tailgate)
remains open, the hazard warning lights
will not operate. If all doors (and tailgate)
are closed after the lock button is
pressed, the hazard warning lights will
blink once.
D020102APB
Unlock (2)
All doors (and tailgate) are unlocked if
the unlock button is pressed.
The hazard warning lights will blink twice
to indicate that all doors (and tailgate)
are unlocked.
After pressing this button, the doors (and
tailgate) will lock automatically unless
you open any door within 30 seconds.
D020104APB
Tailgate unlock (3)
The tailgate is unlocked if the button is
pressed (for more than 1 second).
The hazard warning lights will blink twice
to indicate that the tailgate is unlocked.
After pressing this button, the tailgate will
lock automatically unless you open the
tailgate within 30 seconds.
Also, if the doors are locked and
unlocked with the transmitter while all
doors (and tailgate) are closed, and the
tailgate is opened within 30seconds and
then closed the tailgate will lock automat-
ically. The hazard warning lights will blink
once to indicate that the tailgate is
locked.
D020200APB
Transmitter precautions
✽
✽
✽
✽✽ NOTICE
The transmitter will not work if any of
following occurs:
• The ignition key is in the ignition
switch.
• You exceed the operating distance
limit (about 10 m [30 feet]).
• The battery in the transmitter is
weak.
• Other vehicles or objects may be
blocking the signal.
• The weather is extremely cold.
• The transmitter is close to a radio
transmitter such as a radio station or
an airport which can interfere with
normal operation of the transmitter.
When the transmitter does not work
correctly, open and close the door with
the ignition key. If you have a problem
with the transmitter, contact an author-
ized HYUNDAI dealer.
CAUTION
Keep the transmitter away from
water or any liquid. If the keyless
entry system is inoperative due to
exposure to water or liquids, it will
not be covered by your manufactur-
er’s vehicle warranty.
OPB049002


Features of your vehicle
64
D020300APB
Battery replacement
The transmitter uses a 3 volt lithium bat-
tery which will normally last for several
years. When replacement is necessary,
use the following procedure.
1. Insert a slim tool into the slot and gen-
tly pry open the transmitter center
cover (1).
2. Replace the battery with a new one.
When replacing the battery, make sure
the battery positive “+” symbol faces
up as indicated in the illustration.
3. Install the battery in the reverse order
of removal.
For transmitter replacement, see an
authorized HYUNDAI dealer to repro-
gram the transmitter.
CAUTION
• The keyless entry system trans-
mitter is designed to give you
years of trouble-free use, howev-
er it can malfunction if exposed to
moisture or static electricity. If
you are unsure how to use your
transmitter or replace the battery,
contact an authorized HYUNDAI
dealer.
• Using the wrong battery can
cause the transmitter to malfunc-
tion. Be sure to use the correct
battery.
• To avoid damaging the transmit-
ter, don't drop it, get it wet, or
expose it to heat or sunlight.
• An inappropriately disposed bat-
tery can be harmful to the envi-
ronment and human health.
Dispose the battery according to
your local law(s) or regulation.
OFD047003
CAUTION
Changes or modifications not
expressly approved by the party
responsible for compliance could
void the user’s authority to operate
the equipment. If the keyless entry
system is inoperative due to
changes or modifications not
expressly approved by the party
responsible for compliance, it will
not be covered by your manufactur-
er’s vehicle warranty.


4 7
Features of your vehicle
D030000APB
This system is designed to provide pro-
tection from unauthorized entry into the
car. This system is operated in three
stages: the first is the "Armed" stage, the
second is the "Theft-alarm" stage, and
the third is the "Disarmed" stage. If trig-
gered, the system provides an audible
alarm with the hazard warning light blink-
ing.
D030100APB
Armed stage
Park the vehicle and stop the engine.
Arm the system as described below.
1. Remove the ignition key from the igni-
tion switch and exit the vehicle.
2. Make sure that all doors (and tailgate)
and the engine hood are closed and
latched.
3. Lock the doors using the transmitter of
the keyless entry system.
After completion of the steps above, the
hazard warning lights will blink once to
indicate that the system is armed.
If any door (or tailgate) or engine hood
remains open, the hazard warning lights
will not operate and the theft-alarm will
not arm. If all doors (and tailgate) and
engine hood are closed after the lock
button is pressed, the hazard warning
lights will blink once.
Do not arm the system until all pas-
sengers have left the vehicle. If the
system is armed while a passenger(s)
remains in the vehicle, the alarm may
be activated when the remaining pas-
senger(s) leave the vehicle. If any
door (or tailgate) or engine hood is
opened within 30 seconds after the
system enters the armed stage, the
system is disarmed to prevent unnec-
essary alarm.
THEFT-ALARM SYSTEM (IF EQUIPPED)
Armed
stage
Theft-alarm
stage
Disarmed
stage


Features of your vehicle
84
D030200APB
Theft-alarm stage
The alarm will be activated if any of the
following occurs while the system is
armed.
• A front or rear door is opened without
using the transmitter.
• The tailgate is opened without using
the transmitter.
• The engine hood is opened.
The horn will sound and the hazard
warning lights will blink continuously for
approximately 27 seconds, unless the
system is disarmed. To turn off the sys-
tem, unlock the doors with the transmit-
ter.
D030400APB
Disarmed stage
The system will be disarmed if any of the
following occurs.
• The unlock button on the transmitter is
pressed. But if any door (or tailgate) is
not opened within 30 seconds, the sys-
tem will be rearmed.
• The lock button on the transmitter is
pressed, when a door (or tailgate) is
opened.
The hazard warning lights will blink twice
to indicate that the system is disarmed.
✽
✽
✽
✽✽ NOTICE - Non-immobilizer
system
• Avoid trying to start the engine while
the alarm is activated. The vehicle
starting motor is disabled during the
theft-alarm stage.
If the system is not disarmed with the
transmitter, insert the key into the
ignition switch, turn the ignition
switch to the ON position and wait for
30 seconds. Then the system will be
disarmed.
• If you lose your keys, consult your
authorized HYUNDAI dealer.
✽
✽
✽
✽✽ NOTICE - Immobilizer system
• If the system is not disarmed with the
transmitter, insert the key into the
ignition switch and start the engine.
Then the system will be disarmed.
• If you lose your keys, consult your
authorized HYUNDAI dealer.


4 9
Features of your vehicle
D050100APB
Operating door locks from out-
side the vehicle
• Turn the key toward the rear of the
vehicle to unlock and toward the front
of the vehicle to lock.
• If you lock/unlock the driver’s (or pas-
senger’s) door with a key, all vehicle
doors will lock/unlock automatically. (if
equipped with central door lock sys-
tem)
• Doors can also be locked and
unlocked with the transmitter (if
equipped).
• Once the doors are unlocked, they
may be opened by pulling the door
handle.
• When closing the door, push the door
by hand. Make sure that doors are
closed securely.
✽
✽
✽
✽✽ NOTICE
• In cold and wet climates, door lock
and door mechanisms may not work
properly due to freezing conditions.
• If the door is locked/unlocked multi-
ple times in rapid succession with
either the vehicle key or door lock
switch, the system may stop operating
temporarily in order to protect the
circuit and prevent damage to system
components.
To lock a door without the key, push the
inside door lock button (1) to the “Lock”
position and close the door (2). (if not
equipped with central door lock system)
✽
✽
✽
✽✽ NOTICE
The central door lock system will oper-
ate only when all doors and tailgate are
closed.
✽
✽
✽
✽✽ NOTICE
Always remove the ignition key, engage
the parking brake, close all windows
and lock all doors when leaving your
vehicle unattended.
DOOR LOCKS
OPB049010/H
Lock
Unlock
OPB049011R


Features of your vehicle
104
Operating door locks from inside
the vehicle
D050201APB
With the door lock button
• To unlock a door, push the door lock
button (1) to the “Unlock” position. The
red mark (2) on the button will be visi-
ble.
• To lock a door, push the door lock but-
ton (1) to the “Lock” position. If the
door is locked properly, the red mark
(2) on the door lock button will not be
visible.
• To open a door, pull the door handle
(3) outward.
• Pushing the driver's (or passenger’s)
door lock button (1) to the "Lock" or
"Unlock" position will lock or unlock all
vehicle doors. (if equipped with central
door lock system)
• If the inner door handle of the front
door is pulled when the door lock but-
ton is in the lock position, the button
will unlock and the door will open. (if
equipped)
• The driver’s (or passenger’s) doors
cannot be locked if any door (or tail-
gate) is opened. (if equipped)
✽
✽
✽
✽✽ NOTICE
The central door lock system will oper-
ate only when all doors and tailgate are
closed.
OPB049012R
Lock
Unlock
WARNING - Door lock mal-
function
If a power door lock ever fails to
function while you are in the vehi-
cle, try one or more of the following
techniques to exit:
• Operate the door unlock feature
repeatedly (both electronic and
manual) while simultaneously
pulling on the door handle.
• Operate the other door locks and
handles, front and rear.
• Lower a front window and use the
key to unlock the door from out-
side.
WARNING - Doors
• The doors should always be fully
closed and locked while the vehi-
cle is in motion to prevent acci-
dental opening of the door.
Locked doors will also discour-
age potential intruders when the
vehicle stops or slows.
• Be careful when opening doors
and watch for vehicles, motorcy-
cles, bicycles or pedestrians
approaching the vehicle in the
path of the door. Opening a door
when something is approaching
can cause damage or injury.


4 11
Features of your vehicle
D050300AHM
Impact sensing door unlock sys-
tem (if equipped)
All doors will automatically unlock when
an impact causes the air bags to deploy.
D050400APB
✽
✽
✽
✽✽ NOTICE
An authorized HYUNDAI dealer can
select some auto door lock/unlock fea-
tures as follows;
• Speed sensing auto door lock
• Auto door unlock when the ignition
key is removed from the ignition
switch
If you want this feature, consult an
authorized HYUNDAI dealer.
D050600APB
Deadlock system (if equipped)
Some vehicles are equipped with a
deadlocking system. Deadlocks prevent
opening a door from either inside or out-
side the vehicle once the deadlocks have
been activated providing an additional
measure of vehicle security.
To lock the vehicle using the deadlock
function, the doors must be locked using
the key or the Remote Keyless Entry
transmitter. To unlock the vehicle, the
key or the transmitter must be used
again.
To lock a vehicle without using the dead-
lock function, the doors should be locked
by pressing the door lock button and
closing the doors.
WARNING - Unlocked
vehicles
Leaving your vehicle unlocked can
invite theft or possible harm to you
or others from someone hiding in
your vehicle while you are gone.
Always remove the ignition key,
engage the parking brake, close all
windows and lock all doors when
leaving your vehicle unattended.
WARNING - Unattended
children
An enclosed vehicle can become
extremely hot, causing death or
severe injury to unattended chil-
dren or animals who cannot escape
the vehicle. Furthermore, children
might operate features of the vehi-
cle that could injure them, or they
could encounter other harm, possi-
bly from someone gaining entry to
the vehicle. Never leave children or
animals unattended in your vehicle.
WARNING
Do not lock the doors with the key
or the transmitter with anybody left
in the vehicle. The passenger in the
vehicle cannot unlock the doors
with the door lock button. For
example, if the door is locked with
the transmitter, the passenger in
the vehicle cannot unlock the door
without the transmitter.


Features of your vehicle
124
D050500AEN
Child-protector rear door lock
The child safety lock is provided to help
prevent children from accidentally open-
ing the rear doors from inside the vehicle.
The rear door safety locks should be
used whenever children are in the vehi-
cle.
1. Open the rear door.
2. Push the child safety lock located on
the rear edge of the door to the lock
position. When the child safety lock is
in the lock position, the rear door will
not open even though the inner door
handle (2) is pulled.
3. Close the rear door.
To open the rear door, pull the outside
door handle (1).
Even though the doors may be unlocked,
the rear door will not open by pulling the
inner door handle (2) until the rear door
child safety lock is unlocked.
WARNING - Rear door
locks
If children accidentally open the
rear doors while the vehicle is in
motion, they could fall out and be
severely injured or killed. To pre-
vent children from opening the rear
doors from the inside, the rear door
safety locks should be used when-
ever children are in the vehicle.
OPB049013


4 13
Features of your vehicle
D070100APB
Opening the tailgate
• The tailgate is locked or unlocked by
turning the key to the "Lock" or
"Unlock" position. (if equipped)
• The tailgate is locked or unlocked
when all doors are locked or unlocked
with the key, transmitter or driver's (or
passenger’s) door lock button. (if
equipped with central door lock sys-
tem)
• If unlocked, the tailgate can be opened
by pulling up the handle.
✽
✽
✽
✽✽ NOTICE
The central door lock system will oper-
ate only when all doors and tailgate are
closed.
✽
✽
✽
✽✽ NOTICE
In cold and wet climates, door lock and
door mechanisms may not work proper-
ly due to freezing conditions.
D070200APB
Closing the tailgate
To close the tailgate, lower and push
down the tailgate firmly. Make sure that
the tailgate is securely latched.
TAILGATE
OPB049014
WARNING
The tailgate swings upward. Make
sure no objects or people are near
the rear of the vehicle when open-
ing the tailgate.
CAUTION
Make certain that you close the tail-
gate before driving your vehicle.
Possible damage may occur to the
tailgate lift cylinders and attaching
hardware if the tailgate is not
closed prior to driving.
WARNING - Exhaust
fumes
If you drive with the tailgate
opened, you will draw dangerous
exhaust fumes into your vehicle
which can cause serious injury or
death to vehicle occupants.
If you must drive with the tailgate
opened, keep the air vents and all
windows open so that additional
outside air comes into the vehicle.
WARNING - Rear cargo
area
Occupants should never ride in the
rear cargo area where no restraints
are available. To avoid injury in the
event of an accident or sudden
stops, occupants should always be
properly restrained.


Features of your vehicle
144
D080000APB-EA
(1) Driver’s door power window switch*
(2) Front passenger’s door power win-
dow switch*
(3) Rear door (right) power window
switch*
(4) Rear door (left) power window
switch*
(5) Window opening and closing
(6) Automatic power window up*/down*
(7) Power window lock button*
*: if equipped
✽
✽
✽
✽✽ NOTICE
In cold and wet climates, power win-
dows may not work properly due to
freezing conditions.
WINDOWS
OPB049015R


4 15
Features of your vehicle
D080100APB
Power windows
The ignition switch must be in the ON
position for power windows to operate.
Each door has a power window switch
that controls the door’s window. The driv-
er has a power window lock button which
can block the operation of rear passen-
ger windows.
The power windows can be operated for
approximately 30 seconds after the igni-
tion key is removed or turned to the ACC
or LOCK position. However, if the front
doors are opened, the power windows
cannot be operated even within the 30
seconds period.
✽
✽
✽
✽✽ NOTICE
While driving with the rear windows-
down or with the sunroof (if equipped)
in an open (or partially open position),
your vehicle may demonstrate a wind
buffeting or pulsation noise. This noise
is a normal occurrence and can be
reduced or eliminated by taking the fol
lowing actions.
If the noise occurs with one or both of
the rear windows down, partially lower
both front windows approximately one
inch. If you experience the noise with
the sunroof open, slightly reduce the size
of the sunroof opening.
D080101AUN
Window opening and closing
(if equipped)
The driver’s door has a master power
window switch that controls all the win-
dows in the vehicle.
To open or close a window, press down
or pull up the front portion of the corre-
sponding switch to the first detent posi-
tion (5).
D080102APA
Auto down window (if equipped)
(Driver’s window)
Pressing the power window switch
momentarily to the second detent posi-
tion (6) completely lowers the driver’s
window even when the switch is
released. To stop the window at the
desired position while the window is in
operation, pull up and release the switch
to the opposite direction of the window
movement.
OPB049017ROPB049016R


Features of your vehicle
164
D080103AHM-EE
Auto up/down window (if equipped)
(Driver's window)
Pressing or pulling up the power window
switch momentarily to the second detent
position (6) completely lowers or lifts the
window even when the switch is
released. To stop the window at the
desired position while the window is in
operation, pull up or press down and
release the switch.
If the power window does not operate
normally, the automatic power window
system must be reset as follows:
1.
Turn the ignition switch to the ON posi-
tion.
2. Close the driver’s window and contin-
ue pulling up the driver’s power win-
dow switch for at least 1 second after
the window is completely closed.
Automatic reversal (if equipped)
If the upward movement of the window is
blocked by an object or part of the body,
the window will detect the resistance and
will stop upward movement. The window
will then lower approximately 30 cm (11.8
in.) to allow the object to be cleared.
If the window detects the resistance
while the power window switch is pulled
up continuously, the window will stop
upward movement then lower approxi-
mately 2.5 cm (1 in.). And if the power
window switch is pulled up continuously
again within 5 seconds after the window
is lowered by the automatic window
reversal feature, the automatic window
reversal will not operate.
✽
✽
✽
✽✽ NOTICE
The automatic reverse feature for the
driver’s window is only active when the
“auto up” feature is used by fully
pulling up the switch. The automatic
reverse feature will not operate if the
window is raised using the halfway posi-
tion on the power window switch.
WARNING
Always check for obstructions
before raising any window to avoid
injuries or vehicle damage. If an
object less than 4 mm (0.16 in.) in
diameter is caught between the
window glass and the upper win-
dow channel, the automatic reverse
window may not detect the resist-
ance and will not stop and reverse
direction.
OUN026013/HOPB049133R


Features of your vehicle
184
D080200AFD
Manual windows (if equipped)
To raise or lower the window, turn the
window regulator handle clockwise or
counterclockwise.
WARNING
When opening or closing the win-
dows, make sure your passenger's
arms, hands and body are safely
out of the way.
B050A01E/H


Features of your vehicle
204
D090200APB
Closing the hood
1. Before closing the hood, check the fol-
lowing:
• All filler caps in the engine compart-
ment must be correctly installed.
• Gloves, rags or any other com-
bustible material must be removed
from the engine compartment.
2. Return the support rod to its clip to
prevent it from rattling.
3. Lower the hood until it is about 30 cm
(1 ft.) above the closed position and let
it drop. Make sure that it locks into
place.
WARNING - Hood
• Before closing the hood, ensure
that all obstructions are removed
from the hood opening. Closing
the hood with an obstruction
present in the hood opening may
result in property damage or
severe personal injury.
• Do not leave gloves, rags or any
other combustible material in the
engine compartment. Doing so
may cause a heat-induced fire.
WARNING
• Always double check to be sure
that the hood is firmly latched
before driving away. If it is not
latched, the hood could fly open
while the vehicle is being driven,
causing a total loss of visibility,
which might result in an accident.
• The support rod must be inserted
completely into the hole whenev-
er you inspect the engine com-
partment. This will prevent the
hood from falling and possibly
injuring you.
• Do not move the vehicle with the
hood raised. The view will be
blocked and the hood could fall
or be damaged.

4 21
Features of your vehicle
D100100APB
Opening the fuel filler lid
The fuel filler lid must be opened from
inside the vehicle by pulling up the fuel
filler lid opener.
✽
✽
✽
✽✽ NOTICE
If the fuel filler lid does not open
because ice has formed around it, tap
lightly or push on the lid to break the ice
and release the lid. Do not pry on the lid.
If necessary, spray around the lid with
an approved de-icer fluid (do not use
radiator anti-freeze) or move the vehicle
to a warm place and allow the ice to
melt.
1. Stop the engine.
2. To open the fuel filler lid, pull the fuel
filler lid opener up.
3. Pull open the fuel filler lid (1).
4. To remove the cap (2), turn the fuel
filler cap counterclockwise.
5. Refuel as needed.
D100200AUN
Closing the fuel filler lid
1. To install the cap, turn it clockwise until
it “clicks”. This indicates that the cap is
securely tightened.
2. Close the fuel filler lid and push it light-
ly and make sure that it is securely
closed.
FUEL FILLER LID
OPB049023R OPB049024


Features of your vehicle
224
D100300APB
WARNING - Refueling dan-
gers
Automotive fuels are flammable
materials. When refueling, please
note the following guidelines care-
fully. Failure to follow these guide-
lines may result in severe personal
injury, severe burns or death by fire
or explosion.
• Read and follow all warning at the
gas station facility.
• Before refueling note the location
of the Emergency Gasoline Shut-
Off, if available, at the gas station
facility.
• Before touching the fuel nozzle,
you should eliminate potentially
dangerous static electricity dis-
charge by touching another metal
part of the vehicle, a safe dis-
tance away from the fuel filler
neck, nozzle, or other gas source.
(Continued)
WARNING - Refueling
• If pressurized fuel sprays out, it
can cover your clothes or skin
and subject you to the risk of fire
and burns. Always remove the
fuel cap carefully and slowly. If
the cap is venting fuel or if you
hear a hissing sound, wait until
the condition stops before com-
pletely removing the cap.
• Do not "top off" after the nozzle
automatically shuts off when
refueling.
• Always check that the fuel cap is
installed securely to prevent fuel
spillage in the event of an acci-
dent.
(Continued)
• Do not get back into a vehicle
once you have begun refueling
since you can generate static
electricity by touching, rubbing
or sliding against any item or fab-
ric (polyester, satin, nylon, etc.)
capable of producing static elec-
tricity. Static electricity discharge
can ignite fuel vapors resulting in
rapid burning. If you must re-
enter the vehicle, you should
once again eliminate potentially
dangerous static electricity dis-
charge by touching a metal part
of the vehicle, away from the fuel
filler neck, nozzle or other gaso-
line source.
• When using an approved
portable fuel container be sure to
place the container on the ground
prior to refueling. Static electrici-
ty discharge from the container
can ignite fuel vapors causing a
fire. Once refueling has begun,
contact with the vehicle should
be maintained until the filling is
complete.
(Continued)


4 23
Features of your vehicle
(Continued)
Use only approved portable plas-
tic fuel containers designed to
carry and store gasoline.
• Do not use cellular phones while
refueling. Electric current and/or
electronic interference from cel-
lular phones can potentially
ignite fuel vapors causing a fire.
• When refueling, always shut the
engine off. Sparks produced by
electrical components related to
the engine can ignite fuel vapors
causing a fire. Once refueling is
complete, check to make sure the
filler cap and filler door are
securely closed, before starting
the engine.
• DO NOT use matches or a lighter
and DO NOT SMOKE or leave a lit
cigarette in your vehicle while at
a gas station especially during
refueling. Automotive fuel is
highly flammable and can, when
ignited, result in fire.
(Continued)
(Continued)
• If a fire breaks out during refuel-
ing, leave the vicinity of the vehi-
cle, and immediately contact the
manager of the gas station and
then contact the local fire depart-
ment. Follow any safety instruc-
tions they provide.
CAUTION
• Make sure to refuel with unleaded
(or leaded for some countries)
fuel only. (Gasoline engine only)
• If the fuel filler cap requires
replacement, use only a genuine
HYUNDAI cap or the equivalent
specified for your vehicle. An
incorrect fuel filler cap can result
in a serious malfunction of the
fuel system or emission control
system.
(Continued)
(Continued)
• Do not spill fuel on the exterior
surfaces of the vehicle. Any type
of fuel spilled on painted surfaces
may damage the paint.
• After refueling, make sure the fuel
cap is installed securely to pre-
vent fuel spillage in the event of
an accident.

Features of your vehicle
244
D110000APB
If your vehicle is equipped with a sunroof,
you can slide or tilt it with the sunroof
control buttons located on the overhead
console.
1. Slide button
2. Tilt button
3. Close button
The sunroof can only be opened, closed,
or tilted when the ignition switch is in the
ON position.
✽
✽
✽
✽✽ NOTICE
• In cold and wet climates, the sunroof
may not work properly due to freez-
ing conditions.
• After a vehicle is washed or in a rain-
storm, be sure to wipe off any water
that is on the sunroof before operating
it.
✽
✽
✽
✽✽ NOTICE
The sunroof cannot slide when it is in
the tilt position nor can it be tilted while
in an open or slide position.
D110100APB
Sliding the sunroof
To open the sunroof :
• To open the sunroof (auto slide fea-
ture), press the slide button (1) on the
overhead console for more than 0.5
second. The sunroof will automatically
slide open but will not open all the way.
To stop the sunroof at any point, press
any sunroof control button.
• To open the sunroof (manual slide fea-
ture), press the slide button (1) on the
overhead console for less than 0.5
second. The sunroof will slide open a
little.
SUNROOF (IF EQUIPPED)
OPB049025
CAUTION
Do not continue to press the sun-
roof control button(s) after the sun-
roof is fully opened, closed, or tilt-
ed. Damage to the motor or system
components could occur.
WARNING
Never adjust the sunroof or sun-
shade while driving. This could
result in loss of control and an acci-
dent that may cause death, serious
injury, or property damage.
OPB049026


4 25
Features of your vehicle
To close the sunroof :
• To close the sunroof (auto slide fea-
ture), press the close button (3) on the
overhead console for more than 0.5
second. The sunroof will automatically
close all the way.
To stop the sunroof at any point, press
any sunroof control button.
• To close the sunroof (manual slide fea-
ture), press the close button (3) on the
overhead console for less than 0.5
second. The sunroof will close a little.
D110101APB
Automatic reversal
If an object or part of the body is detect-
ed while the sunroof is closing automati-
cally, it will reverse direction, and then
stop.
The auto reverse function does not work
if a tiny obstacle is between the sliding
glass and the sunroof sash. You should
always check that all passengers and
objects are not near the sunroof before
closing it.
D110200APB
Tilting the sunroof
To tilt open the sunroof :
• To open the sunroof (auto tilt feature),
press the tilt button (2) on the over-
head console for more than 0.5 sec-
ond. The sunroof will tilt open all the
way.
To stop the sunroof tilting at any point,
press any sunroof control button.
• To open the sunroof (manual tilt fea-
ture), press the tilt button (2) on the
overhead console for less than 0.5
second. The sunroof will tilt open a lit-
tle.
OPB049027OTQ047028


Features of your vehicle
264
To close the sunroof :
To close the sunroof, press the close but-
ton (3) on the overhead console and hold
it until the sunroof is closed.
D110300AEN
Sunshade
The sunshade will automatically open
when the glass panel is moved. Close it
manually if you want it closed.
OTQ047030
WARNING - Sunroof
• Be careful that no heads,hands
or body are obstructed by a clos-
ing sunroof.
• Do not extend the face, neck,
arms or body outside the sunroof
while driving.
• Make sure your hands and head
are safely out of the way before
closing a sunroof.
CAUTION
• Periodically remove any dirt that
may accumulate on the guide rail.
• If you try to open the sunroof
when the temperature is below
freezing or when the sunroof is
covered with snow or ice, the
glass or the motor could be dam-
aged.
• The sunroof is made to slide
together with the sunshade. Do
not leave the sunshade closed
while the sunroof is opened.


4 27
Features of your vehicle
D110500APB
Resetting the sunroof
Whenever the vehicle battery is discon-
nected or discharged, you must reset
your sunroof system as follows:
1. Turn the ignition switch to the ON
position.
2. According to the position of the sun-
roof, do the following.
1) In case the sunroof has been com-
pletely closed or tilted :
Press the tilt button until the sun-
roof tilts completely upward.
2) In case the sunroof has been
opened:
Press and hold the close button
until the sunroof closes completely.
Press the tilt button until the sun-
roof tilts completely upward.
3. Release the tilt button.
4. Press and hold the tilt button (for
more than 10 seconds) until the sun-
roof has returned to the original tilt
position after it is raised a little higher
than the maximum tilt position. Then,
release the button.
5. Press and hold the tilt button (for
more than 5 seconds) until the sun-
roof is operates as follows;
TILT DOWN SLIDE OPEN → →
SLIDE CLOSE
Then, release the button.
When this is complete, the sunroof sys-
tem has been reset.


Features of your vehicle
284
WARNING
• Never adjust the angle and height
of the steering wheel while driv-
ing. You may lose steering con-
trol and cause severe personal
injury, death or accidents.
• After adjusting, push the steering
wheel both up and down to be
certain it is locked in position.
D130200APB
Electric power steering
(if equipped)
Power steering uses the motor to assist
you in steering the vehicle. If the engine
is off or if the power steering system
becomes inoperative, the vehicle may
still be steered, but it will require
increased steering effort.
The motor driven power steering is con-
trolled by the power steering control unit
which senses the steering wheel torque
and vehicle speed to command the
motor.
The steering wheel becomes heavier as
the vehicle’s speed increases and
becomes lighter as the vehicle’s speed
decreases for better control of the steer-
ing wheel.
Should you notice any change in the
effort required to steer during normal
vehicle operation, have the power steer-
ing checked by an authorized HYUNDAI
dealer.
✽
✽
✽
✽✽ NOTICE
The following symptoms may occur dur-
ing normal vehicle operation:
• The EPS warning light does not illumi-
nate.
• The steering effort is high immediately
after turning the ignition switch on.
This happens as the system performs
the EPS system diagnostics. When the
diagnostics is completed, the steering
wheel will return to its normal condi-
tion.
• A click noise may be heard from the
EPS relay after the ignition switch is
turned to the ON or LOCK position.
• Motor noise may be heard when the
vehicle is at a stop or at a low driving
speed.
• The steering effort can suddenly
increase, if the operation of the EPS
system is stopped to prevent serious
accidents when it detects malfunction
of the EPS system by self-diagnosis.
• The steering effort increases if the
steering wheel is rotated continuously
when the vehicle is not in motion.
However, after a few minutes, it will
return to its normal conditions.
D130300AEN
Tilt steering (if equipped)
Tilt steering allows you to adjust the
steering wheel before you drive. You can
also raise it to give your legs more room
when you exit and enter the vehicle.
The steering wheel should be positioned
so that it is comfortable for you to drive,
while permitting you to see the instru-
ment panel warning lights and gauges.
STEERING WHEEL


4 29
Features of your vehicle
To change the steering wheel angle, pull
down the lock release lever (1), adjust
the steering wheel to the desired angle
(2) and height (if equipped) (3), then pull
up the lock-release lever to lock the
steering wheel in place. Be sure to adjust
the steering wheel to the desired position
before driving.
D130500AUN
Horn
To sound the horn, press the horn sym-
bol on your steering wheel.
Check the horn regularly to be sure it
operates properly.
✽
✽
✽
✽✽ NOTICE
To sound the horn, press the area indi-
cated by the horn symbol on your steer-
ing wheel (see illustration). The horn
will operate only when this area is
pressed.
OPB049028R
CAUTION
Do not strike the horn severely to
operate it, or hit it with your fist. Do
not press on the horn with a sharp-
pointed object.
OPB049029


Features of your vehicle
304
D140100AHM
Inside rearview mirror
Adjust the rearview mirror so that the
center view through the rear window is
seen. Make this adjustment before you
start driving.
D140101AHM
Day/night rearview mirror
Make this adjustment before you start
driving and while the day/night lever is in
the day position.
Pull the day/night lever toward you to
reduce glare from the headlights of the
vehicles behind you during night driving.
Remember that you lose some rearview
clarity in the night position.
D140200APB
Outside rearview mirror
Be sure to adjust the mirror angles
before driving.
Your vehicle is equipped with both left-
hand and/or right-hand outside rearview
mirrors. The mirrors can be adjusted
remotely with the remote switch (or
lever). The mirror heads can be folded
back to prevent damage during an auto-
matic car wash or when passing through
a narrow street.
MIRRORS
WARNING - Rear visibility
Do not place objects in the rear
seat or cargo area which would
interfere with your vision out the
rear window. OPB049030
Day
Night
WARNING
Do not adjust the rearview mirror
while the vehicle is moving. This
could result in loss of control, and
an accident which could cause
death, serious injury or property
damage.


4 31
Features of your vehicle
D140201APB
Remote control
Manual type (if equipped)
To adjust an outside mirror, move the
control lever.
WARNING - Rearview mir-
rors
• The right outside rearview mirror
is convex. In some countries, the
left outside rearview mirror is
also convex. Objects seen in the
mirror are closer than they
appear.
• Use your interior rearview mirror
or direct observation to deter-
mine the actual distance of fol-
lowing vehicles when changing
lanes.
CAUTION
Do not scrape ice off the mirror
face; this may damage the surface
of the glass. If ice should restrict
movement of the mirror, do not
force the mirror for adjustment. To
remove ice, use a deicer spray, or a
sponge or soft cloth with very warm
water.
CAUTION
If the mirror is jammed with ice, do
not adjust the mirror by force. Use
an approved spray de-icer (not radi-
ator antifreeze) to release the
frozen mechanism or move the
vehicle to a warm place and allow
the ice to melt.
WARNING
Do not adjust or fold the outside
rearview mirrors while the vehicle
is moving. This could result in loss
of control, and an accident which
could cause death, serious injury
or property damage.
B510A01E/H


Features of your vehicle
324
Electric type (if equipped)
The electric remote control mirror switch
allows you to adjust the position of the
left and right outside rearview mirrors. To
adjust the position of either mirror, move
the lever (1) to R or L to select the right
side mirror or the left side mirror, then
press a corresponding point on the mirror
adjustment control to position the select-
ed mirror up, down, left or right.
After the adjustment, put the lever in neu-
tral position to prevent inadvertent
adjustment.
✽
✽
✽
✽✽ NOTICE
To adjust the position of the mirror, the
ignition switch should be in the ACC or
ON position.
D140202AHM
Folding the outside rearview mirror
Manual type (if equipped)
To fold the outside rearview mirror, grasp
the housing of the mirror and then fold it
toward the rear of the vehicle.
OPB049032R
CAUTION
• The mirrors stop moving when
they reach the maximum adjust-
ing angles, but the motor contin-
ues to operate while the switch is
pressed. Do not press the switch
longer than necessary, the motor
may be damaged.
• Do not attempt to adjust the out-
side rearview mirror by hand.
Doing so may damage the parts.
OPB049033/H


4 35
Features of your vehicle
1. Tachometer
2. Engine temperature gauge
3. Fuel gauge
4. Speedometer
5. Turn signal indicators
6. Warning and indicator lights*
7. Odometer
8. LCD*
* : if equipped
OPB049041
❈The actual cluster in the vehicle may dier from the illustration.
For more details refer to the "Gauges" in the next pages.
■Diesel Engine


Features of your vehicle
364
D150100APB
Instrument panel illumination
(if equipped)
When the vehicle’s parking lights or head-
lights are on, rotate the illumination con-
trol knob to adjust the instrument panel
illumination intensity.
Gauges
D150201AUN-EC
Speedometer
The speedometer indicates the forward
speed of the vehicle.
The speedometer is calibrated in kilome-
ters per hour and/or miles per hour.
D150202AUN
Tachometer
The tachometer indicates the approxi-
mate number of engine revolutions per
minute (rpm).
Use the tachometer to select the correct
shift points and to prevent lugging and/or
over-revving the engine.
When the door is opened, or if the engine
is not started within 1 minute, the
tachometer pointer may move slightly in
the ON position with the engine OFF.
This movement is normal and will not
aect the accuracy of the tachometer
once the engine is running.
OPB049042R
OPB049043/OPB049044
OPB049045/OPB049046
Type C Type D
Type A Type B
OPB049047/OPB049048
Gasoline Diesel
CAUTION
Do not operate the engine within
the tachometer's RED ZONE. This
may cause severe engine damage.


Features of your vehicle
384
Odometer (km or mi)
The odometer indicates the total distance
the vehicle has been driven.
You will also nd the odometer useful to
determine when periodic maintenance
should be performed.
✽
✽
✽
✽✽ NOTICE
It is forbidden to alter the odometer of
all vehicles with the intent to change the
mileage registered on the odometer. The
alteration may void your warranty cov-
erage.
D150300APB
Warnings and indicators
All warning lights are checked by turning
the ignition switch ON (do not start the
engine). Any light that does not illuminate
should be checked by an authorized
HYUNDAI dealer.
After starting the engine, check to make
sure that all warning lights are off. If any
warning lights are still on, this indicates a
situation that needs attention. When
releasing the parking brake, the brake
system warning light should go o. The
fuel warning light will stay on if the fuel
level is low.
D150302APB
Air bag warning light
(if equipped)
This warning light will illuminate for
approximately 6 seconds each time you
turn the ignition switch to the ON position.
This light also comes on when the
Supplemental Restraint System (SRS) is
not working properly. If the air bag warn-
ing light does not come on, or continu-
ously remains on after operating for
about 6 seconds when you have turned
the ignition switch to the ON position or
started the engine, or if it comes on while
driving, have the SRS inspected by an
authorized HYUNDAI dealer.
WARNING - Fuel gauge
Running out of fuel can expose
vehicle occupants to danger.
You must stop and obtain addition-
al fuel as soon as possible after the
warning light comes on or when the
gauge indicator comes close to the
“0” level.
CAUTION
Avoid driving with a very low fuel
level. Running out of fuel could
cause the engine to misre, damag-
ing the catalytic converter.
OPB049137


4 39
Features of your vehicle
D150303APB
Anti-lock brake system
(ABS) warning light
(if equipped)
This warning light illuminates if the igni-
tion switch is turned to ON and goes o
after approximately 3 seconds if the sys-
tem is operating normally.
If the ABS warning light remains on,
comes on while driving, or does not
come on when the ignition switch is
turned to the ON position, this indicates
that the ABS may have malfunctioned.
If this occurs, have your vehicle checked
by an authorized HYUNDAI dealer as
soon as possible. The normal braking
system will still be operational, but with-
out the assistance of the anti-lock brake
system.
Electronic brake force distri-
bution (EBD) system warning
light
If the two warning lights illu-
minate at the same time
while driving, your vehicle’s
ABS and EBD system may
have malfunctioned.
In this case, your ABS and regular brake
system may not work normally. Have the
vehicle checked by an authorized
HYUNDAI dealer as soon as possible.
D150304AFD
Seat belt warning
Type A
As a reminder to the driver, the seat belt
warning light will blink for approximately
6 seconds each time you turn the ignition
switch ON regardless of belt fastening.
If the driver’s seat belt is unfastened after
the ignition switch is ON, the seat belt
warning light blinks again for approxi-
mately 6 seconds. (if equipped)
If the driver's seat belt is not fastened
when the ignition switch is turned ON or
if it is unfastened after the ignition switch
is ON, the seat belt warning chime will
sound for approximately 6 seconds. At
this time, if the seat belt is fastened, the
chime will stop at once. (if equipped)
Type B
As a reminder to the driver and front pas-
senger, the driver’s and front passen-
ger’s seat belt warning lights will illumi-
nate for approximately 6 seconds each
time you turn the ignition switch ON
regardless of belt fastening.
WARNING
If both ABS and Brake warning
lights are on and stay on, your vehi-
cle’s brake system will not work
normally during sudden braking. In
this case, avoid high speed driving
and abrupt braking. Have your
vehicle checked by an authorized
HYUNDAI dealer as soon as possi-
ble.


Features of your vehicle
404
If the driver’s or front passenger’s seat
belt is not fastened when the ignition
switch is turned ON or if it is disconnect-
ed after the ignition switch is turned ON,
the corresponding seat belt warning light
will illuminate until the belt is fastened.
If you continue not to fasten the seat belt
and you drive over 9km/h, the illuminated
warning light will start to blink until you
drive under 6km/h.
If you continue not to fasten the seat belt
and you drive over 20km/h the seat belt
warning chime will sound for approxi-
mately 100 seconds and the correspon-
ding warning light will blink.
✽
✽
✽
✽✽ NOTICE
• You can nd the front passenger’s
seat belt warning light on the center
fascia panel.
• Although the front passenger seat is
not occupied, the seat belt warning
light will blink or illuminate for 6 sec-
onds.
• The front passenger's seat belt warn-
ing may operate when luggage is
placed on the front passenger seat.
D150305AHM
Turn signal indicator
The blinking green arrows on the instru-
ment panel show the direction indicated
by the turn signals. If the arrow comes on
but does not blink, blinks more rapidly
than normal, or does not illuminate at all,
it indicates a malfunction in the turn sig-
nal system. You should consult your
dealer for repairs.
D150306AUN
High beam indicator
This indicator illuminates when the head-
lights are on and in the high beam posi-
tion or when the turn signal lever is
pulled into the Flash-to-Pass position.
D150348APB
Low beam indicator
This indicator illuminates when the head
lights are on and in the low beam posi-
tion.
D150307APB
Engine oil pressure warn-
ing light
This warning light indicates the engine oil
pressure is low.
If the warning light illuminates while driv-
ing:
1. Drive safely to the side of the road and
stop.
2. With the engine off, check the engine
oil level. If the level is low, add oil as
required.
If the warning light remains on after
adding oil or if oil is not available, call an
authorized HYUNDAI dealer.
CAUTION
If the engine is not stopped imme-
diately after the engine oil pressure
warning light is illuminated, severe
damage could result.


4 41
Features of your vehicle
D150308APB
Parking brake & brake
uid warning
This light illuminates if the ignition switch
is turned ON and goes o in approxi-
mately 3 seconds if the parking brake is
not applied.
Parking brake warning
This warning light is illuminated when the
parking brake is applied with the ignition
switch in the START or ON position. The
warning light should go o when the
parking brake is released.
Low brake uid level warning
If the warning light remains on, it may
indicate that the brake uid level in the
reservoir is low.
If the warning light remains on:
1. Drive carefully to the nearest safe
location and stop your vehicle.
2. With the engine stopped, check the
brake uid level immediately and add
uid as required. Then check all brake
components for uid leaks.
3. Do not drive the vehicle if leaks are
found, the warning light remains on or
the brakes do not operate properly.
Have it towed to any authorized
HYUNDAI dealer for brake system
inspection and necessary repairs.
Your vehicle is equipped with dual-diago-
nal braking systems. This means you still
have braking on two wheels even if one
of the dual systems should fail. With only
one of the dual systems working, more
than normal pedal travel and greater
pedal pressure are required to stop the
vehicle. Also, the vehicle will not stop in
as short a distance with only a portion of
the brake system working. If the brakes
fail while you are driving, shift to a lower
gear for additional engine braking and
stop the vehicle as soon as it is safe to
do so.
To check bulb operation, check whether
the parking brake and brake uid warn-
ing light illuminates when the ignition
switch is in the ON position.
CAUTION
If the oil pressure warning light
stays on while the engine is run-
ning, serious engine damage may
result. The oil pressure warning
light comes on whenever there is
insucient oil pressure. In normal
operation, it should come on when
the ignition switch is turned on,
then goes off when the engine
starts. If the oil pressure warning
light stays on while the engine is
running, there is a serious malfunc-
tion.
If this happens, stop the vehicle as
soon as it is safe to do so, turn o
the engine and check the oil level. If
the oil level is low, fill the engine oil
to the proper level and start the
engine again. If the light stays on
with the engine running, turn the
engine off immediately. In any
instance where the oil light stays on
when the engine is running, the
engine should be checked by an
authorized HYUNDAI dealer before
the vehicle is driven again.
WARNING
Driving the vehicle with a warning
light on is dangerous. If the brake
warning light remains on, have the
brakes checked and repaired imme-
diately by an authorized HYUNDAI
dealer.


Features of your vehicle
424
D150331AFD
Low tire pressure
telltale (if equipped)
Low tire pressure position
telltale (if equipped)
The low tire pressure and position tell-
tales come on for 3 seconds after the
ignition switch is turned to the ON posi-
tion.
If the warning lights do not come on, or
continuously remain on after coming on
for about 3 seconds when you turn the
ignition switch to the ON position, the
Tire Pressure Monitoring System is not
working properly. If this occurs, have
your vehicle checked by an authorized
HYUNDAI dealer as soon as possible.
This warning lights will also illuminate if
one or more of your tires is signicantly
under-inated. The low tire pressure posi-
tion telltale will indicate which tire is signif-
icantly under-inflated by illuminating the
corresponding position light. You should
stop and check your tires as soon as
possible. If the warning lights illuminate
while driving, reduce vehicle speed
immediately and stop the vehicle. Avoid
hard braking and overcorrecting at the
steering wheel. Inate the tires to the
proper pressure as indicated on the vehi-
cle’s tire information placard.
D150332AEN
TPMS (Tire Pressure
Monitoring System)
malfunction indicator
(if equipped)
The TPMS malfunction indicator comes
on for 3 seconds after the ignition switch
is turned to the ON position. If the warn-
ing light does not come on, or continu-
ously remains on after coming on for
about 3 seconds when you turned the
ignition switch to the ON position, the
Tire Pressure Monitoring System is not
working properly. If this occurs, have
your vehicle checked by an authorized
HYUNDAI dealer as soon as possible.
The warning light also comes on and
stays on when there is a problem with the
Tire Pressure Monitoring System.
If this happens, the system may not mon-
itor the tire pressure. Have the system
checked by an authorized HYUNDAI
dealer as soon as possible.
D150339APA
O/D OFF indicator
(if equipped)
The O/D OFF indicator will illuminate
when the ignition switch is turned ON,
but should go o after approximately 3
seconds. This indicator comes on when
the O/D system is deactivated.
WARNING - Low tire pres-
sure
Significantly low tire pressure
makes the vehicle unstable and can
contribute to loss of vehicle control
and increased braking distances.
Continued driving on low pressure
tires will cause the tires to overheat
and fail.
TPMS
WARNING - Safe stopping
• The TPMS cannot alert you to
severe and sudden tire damage
caused by external factors.
• If you feel any vehicle instability,
immediately take your foot o the
accelerator, apply the brakes
gradually and with light force,
and slowly move to a safe posi-
tion o the road.
O/D
OFF


4 43
Features of your vehicle
D150309APB
Front fog light indicator
(if equipped)
This indicator illuminates when the front
fog lights are ON.
D150310APB
Rear fog light indicator
(If equipped)
This indicator illuminates when the rear
fog lights are ON.
D150350APB
Rear fog light warning chime
(if equipped)
If the driver's door is opened while the
rear fog light switch is on, the rear fog
light warning chime will sound. The
chime sounds until the rear fog light
switch is o, the driver's door is closed or
the ignition switch is on.
D150312APB
Shift pattern indicator
(if equipped)
The indicator displays which automatic
transaxle shift lever is selected.
D150313APB
Charging system warning
light
This warning light indicates a malfunction
of either the generator or electrical
charging system.
If the warning light illuminates while the
vehicle is in motion:
1. Drive to the nearest safe location.
2. With the engine o, check the genera-
tor drive belt for looseness or break-
age.
3. If the belt is adjusted properly, a prob-
lem exists somewhere in the electrical
charging system. Have an authorized
HYUNDAI dealer correct the problem
as soon as possible.
D150315APB
Tailgate open warning light
(if equipped)
This warning light illuminates when the
tailgate is not closed securely.
D150316AUN
Door ajar warning light
(if equipped)
This warning light illuminates when a
door is not closed securely with the igni-
tion switch in any position.
D150316APB
Door and tailgate open
position indicator (if
equipped)
This indicator illuminates or blinks when
a door or tailgate is not closed securely.
The indicator displays which door or tail-
gate is opened.
D150317APB
Immobilizer indicator
(if equipped)
This indicator illuminates when the
immobilizer key is inserted and turned to
the ON position to start the engine.
At this time, you can start the engine.
The light goes o after the engine is run-
ning.
If this indicator blinks when the ignition
switch is in the ON position before start-
ing the engine, have the system checked
by an authorized HYUNDAI dealer.


Features of your vehicle
444
D150318AHM
Low fuel level warning
light
This warning light indicates the fuel tank
is nearly empty. When it comes on, you
should add fuel as soon as possible.
Driving with the fuel level warning light on
or with the fuel level below “E” can cause
the engine to misre and damage the
catalytic converter (if equipped).
D150320APB
Malfunction indicator light
(MIL) (check engine light)
This indicator is part of the Engine
Control System which monitors various
emission control system components. If
this indicator illuminates while driving, it
indicates that a potential malfunction has
been detected somewhere in the emis-
sion control system.
This indicator will also illuminates when
the ignition switch is turned to the ON
position, and will go off in a few seconds
after the engine is started. If it illuminates
while driving, or does not illuminate when
the ignition switch is turned to the ON
position, take your vehicle to the nearest
authorized HYUNDAI dealer and have
the system checked.
Generally, your vehicle will continue to
be drivable, but have the system
checked by an authorized HYUNDAI
dealer promptly.
CAUTION
• Prolonged driving with the
Emission Control System
Malfunction Indicator Light illumi-
nated may cause damage to the
emission control systems which
could affect drivability and/or fuel
economy.
•
If the
Emission
Control System
Malfunction Indicator Light illumi-
nates, potential catalytic converter
damage is possible which could
result in loss of engine power.
Have the Engine Control System
inspected as soon as possible by
an authorized HYUNDAI dealer.
CAUTION -
Diesel engine
If the Emission Control System
Malfunction Indicator Light blinks,
some error related to the injection
quantity adjustment will occur
which could result in loss of engine
power, combustion noise and poor
emission. Have the Engine Control
System inspected as soon as pos-
sible by an authorized HYUNDAI
dealer.


4 45
Features of your vehicle
D150323APB
ESP (Electronic Stability
Program) indicator
(if equipped)
The ESP indicator will illuminate when
the ignition switch is turned ON, but
should go o after approximately 3 sec-
onds. When the ESP is on, it monitors
the driving conditions. Under normal driv-
ing conditions, the ESP indicator will
remain o. When a slippery or low trac-
tion condition is encountered, the ESP
will operate, and the ESP indicator will
blink to indicate the ESP is operating.
But, if the ESP system malfunctions the
indicator illuminates and stays on. Take
your vehicle to an authorized HYUNDAI
dealer and have the system checked.
D150324APB
ESP OFF indicator
(if equipped)
The ESP OFF indicator will illuminate
when the ignition switch is turned ON,
but should go o after approximately 3
seconds. To switch to ESP OFF mode,
press the ESP OFF button. The ESP
OFF indicator will illuminate indicating
the ESP is deactivated.
ESP
OFF
CAUTION -
Diesel engine
If the malfunction indicator blinks,
have the Particulate Filter System
inspected by an authorized
HYUNDAI dealer (before driving
more than 50 km/31 miles). (if
equipped)
ESP


4 47
Features of your vehicle
D150334APB
Electric power steering
(EPS) system warning light
(if equipped)
This indicator light illuminates after the
ignition key is turned to the ON position
and then it will go o when the engine
starts.
This light also comes on when the EPS
has malfunctioned. If it comes on while
driving, have your vehicle inspected by
an authorized HYUNDAI dealer.
D150349APB
Acoustic warning chime (if equipped)
The acoustic warning chime will sound if
the driver's door is opened while the tail
lights are on. This is to prevent you from
discharging the vehicle battery. The
chime sounds until the tail lights are
turned o.
D150351APB
Door open drive warning chime
(if equipped)
The door open drive warning chime will
sound if any door (or tailgate) is opened
while driving over 9km/h. The warning
chime will sound for approximately 6 sec-
onds and then turn o for approximately
20 seconds 3 times. This is to prevent
you from driving with the door open.
Multidisplay
D150206APB
Tripmeter/Trip computer (if equipped)
The trip computer is a microcomputer-
controlled driver information system that
displays information related to driving,
such as tripmeter, distance to empty,
average fuel consumption, instant fuel
consumption and driving time on the dis-
play when the ignition switch is in ACC or
ON position. All stored driving informa-
tion (distance to empty and instant fuel
consumption) will reset if the battery is
disconnected.
EPS


Features of your vehicle
484
Press the TRIP button for less than 1
second to select tripmeter, distance to
empty, average fuel consumption, instant
fuel consumption or driving time function
as follows:
Tripmeter (km or miles)
TRIP A : Tripmeter A
TRIP B : Tripmeter B
This mode indicates the distance of indi-
vidual trips selected since the last trip-
meter reset.
The meter's working range is from 0.0 to
999.9 km (0.0 to 999.9 miles).
Pressing the TRIP button for more than 1
second, when the tripmeter (TRIP A or
TRIP B) is being displayed, clears the
tripmeter to zero (0.0).
OPB049051R
Tripmeter B*
Average fuel consumption*
Instant fuel consumption*
Driving time*
Tripmeter A
Distance to empty*
* : if equipped
OPB049053
Type A
Type B


4 49
Features of your vehicle
Distance to empty (if equipped)
(km or miles)
This mode indicates the estimated dis-
tance to empty based on the current fuel
in the fuel tank and the amount of fuel
delivered to the engine. When the
remaining distance is below 50 km (30
miles), “---” will be displayed and the dis-
tance to empty indicator will blink.
The meter’s working range is from 50 to
999 km (30 to 999 miles).
Average fuel consumption (if equipped)
(l/100 km or MPG)
This mode calculates the average fuel
consumption from the total fuel used and
the distance since the last average con-
sumption reset. The total fuel used is cal-
culated from the fuel consumption input.
For an accurate calculation, drive more
than 50 m (0.03 mile).
The meter's working range is from 0.0 to
99.9 l/100 km (0.0 to 99.9 miles per gal-
lon).
Pressing the TRIP button for more than 1
second, when the average fuel con-
sumption is being displayed, clears the
average fuel consumption to zero (---).
Instant fuel consumption (if equipped)
(l/100 km or MPG)
This mode calculates the instant fuel
consumption during the last few sec-
onds.
OPB049054
Type A
Type B
OPB049055
Type A
Type B
OPB049056
Type A
Type B


Features of your vehicle
504
Driving time (if equipped)
This mode indicates the total time trav-
eled since the last driving time reset.
Even if the vehicle is not in motion, the
driving time keeps going while the engine
is running.
The meter’s working range is from
00:00~99:59.
Pressing the TRIP button for more than 1
second, when the driving time is being
displayed, clears the driving time to zero
(00:00).
✽
✽
✽
✽✽ NOTICE
• If the vehicle is not on level ground or
the battery power has been interrupt-
ed, the “Distance to empty” function
may not operate correctly.
The trip computer may not register
additional fuel if less than 6 liters (1.6
gallons) of fuel are added to the vehi-
cle.
• The fuel consumption and distance to
empty values may vary signicantly
based on driving conditions, driving
habits, and condition of the vehicle.
• The distance to empty value is an esti-
mate of the available driving distance.
This value may dier from the actual
driving distance available.
D280600APB
Digital calendar and clock
(if equipped)
Whenever the battery terminals or relat-
ed fuses are disconnected, you must
reset the date and time.
When the ignition switch is in the ACC or
ON position, the buttons operate as fol-
lows:
OPB049057
Type A
Type B
OPB049117R
WARNING
Do not adjust the while driving. You
may lose your steering control and
cause severe personal injury or
accidents.


4 51
Features of your vehicle
D280601APB
• SET (1)
Pressing the "SET" button for more than
1 second will change the display to the
calendar/clock setup mode.
Pressing the "SET" button for less than 1
second will change the setting. The
selected setting will blink.
❈The order of the setup is DAYfi
MONTH YEAR MINUTE.fi fi HOURfi
• ▲ ▼/ (2)
Pressing the ▲ or ▼ button will change
the data of the calendar and clock.
If the ▲ ▼ or button is not pressed for
approximately 15 seconds, it will return
to the original display.
If you nish setting the date and time,
press the "SET" button for more than 1
second again. It will return to the original
display.
❈The outside ambient temperature unit
(°C«°F) and distance unit (km«mile)
can be converted the same way as
well.
D281200AHM-EE
Outside thermometer
The current outside temperature is dis-
played in 1°C (1°F) increments. The tem-
perature range is between -40°C ~ 75°C
(-40°F~167°F).
D180000AHM
The hazard warning asher should be
used whenever you nd it necessary to
stop the vehicle in a hazardous location.
When you must make such an emer-
gency stop, always pull o the road as far
as possible.
The hazard warning lights are turned on
by pushing in the hazard switch. Both
turn signal lights will blink. The hazard
warning lights will operate even though
the key is not in the ignition switch.
To turn the hazard warning lights off,
push the switch again.
HAZARD WARNING FLASHER
OPB049058ROPB049134

Features of your vehicle
524
LIGHTING
D190100APB
Battery saver function
• The purpose of this feature is to pre-
vent the battery from being dis-
charged. The system automatically
turns o the exterior lights when the
driver removes the ignition key and
opens the driver-side door.
• With this feature, the parking lights will
turn off automatically if the driver parks
on the side of road at night.
If necessary, to keep the lights on
when the ignition key is removed, per-
form the following :
1) Open the driver-side door.
2) Turn the parking lights OFF and ON
again using the light switch on the
steering column.
D190400AUN
Lighting control
The light switch has a Headlight and a
Parking light position.
To operate the lights, turn the knob at the
end of the control lever to one of the fol-
lowing positions:
(1) OFF position
(2) Parking light position
(3) Headlight position
D190401AHM
Parking light position ( )
When the light switch is in the parking
light position (1st position), the tail, posi-
tion, license and instrument panel lights
will turn ON.
OPB049059
Type A
OPB049059R
Type B
OPB049060
Type A
OPB049060R
Type B


4 53
Features of your vehicle
D190402AHM
Headlight position ( )
When the light switch is in the headlight
position (2nd position) the head, tail,
position, license and instrument panel
lights will turn ON.
✽
✽
✽
✽✽ NOTICE
The ignition switch must be in the ON
position to turn on the headlights.
D190500AUN
High beam operation
To turn on the high beam headlights, push
the lever away from you. Pull it back for
low beams.
The high-beam indicator will light when the
headlight high beams are switched on.
To prevent the battery from being dis-
charged, do not leave the lights on for a
prolonged time while the engine is not run-
ning.
To ash the headlights, pull the lever
towards you. It will return to the normal
(low-beam) position when released. The
headlight switch does not need to be on
to use this ashing feature.
OPB049061
Type A
OPB049061R
Type B
OPB049062
Type A
OPB049062R
Type B
OPB049063
Type A
OPB049063R
Type B


Features of your vehicle
544
D190600AHM
Turn signals and lane change sig-
nals
The ignition switch must be on for the
turn signals to function. To turn on the
turn signals, move the lever up or down
(A). The green arrow indicators on the
instrument panel indicate which turn sig-
nal is operating.
They will self-cancel after a turn is com-
pleted. If the indicator continues to flash
after a turn, manually return the lever to
the OFF position.
To signal a lane change, move the turn
signal lever slightly and hold it in position
(B). The lever will return to the OFF posi-
tion when released.
If an indicator stays on and does not
flash or if it flashes abnormally, one of the
turn signal bulbs may be burned out and
will require replacement.
✽
✽
✽
✽✽ NOTICE
If an indicator flash is abnormally quick
or slow, a bulb may be burned out or
have a poor electrical connection in the
circuit.
D190700APB
Front fog light (if equipped)
Fog lights are used to provide improved
visibility when visibility is poor due to fog,
rain or snow etc. The fog lights will turn
on when the fog light switch (1) is turned
to the on position (2) after the parklight is
turned on. Also, the ignition switch
should be in the ON position.
OPB049064
Type A
OPB049064R
Type B
OPB049065
Type A
OPB049065R
Type B


Features of your vehicle
564
D191000APB
Headlight leveling device
(if equipped)
To adjust the headlight beam level
according to the number of passengers
and the loading weight in the luggage
area, turn the beam leveling switch.
The higher the number of the switch
position, the lower the headlight beam
level. Always keep the headlight beam at
the proper leveling position, or headlights
may dazzle other road users.
Listed below are the examples of proper
switch settings. For loading conditions
other than those listed below, adjust the
switch position so that the beam level
may be the nearest as the condition
obtained according to the list.
Loading condition
Driver only
Driver + front passenger
Full passengers
(including driver)
Full passengers (including
driver) + full trunk loading
(or light trailer loading)
Driver + full trunk loading
(or maximum trailer load-
ing)
Switch position
0
0
1
2
3
OPB049067R


4 57
Features of your vehicle
D20000APB
A : Wiper speed control
·
– Single wipe
· O – Off
· --- – Intermittent wipe*
· 1 – Normal wiper speed
· 2 – Fast wiper speed
B : Intermittent wipe time adjustment*
C : Wash with brief wipes
D : Rear wiper/washer control*
· – Spraying washer fluid with
wiper operation
· – Normal wiper operation
· O – Off
* : if equipped
WIPERS AND WASHERS
Windshield wiper/washer
Type A
OPB049068/OPB049068R/OPB049069/OPB049069R
Rear window wiper/washer
Type B
Type A
Type B


4 59
Features of your vehicle
Without intermittent wiper function
In the O (OFF) position, pull the lever
gently towards you to spray washer fluid
on the windshield.
Use this function when the windshield is
dirty.
The spray or wiper operation will contin-
ue until you release the lever.
If the washer does not work, check the
washer fluid level. If the fluid level is not
sufficient, you will need to add appropri-
ate non-abrasive windshield washer fluid
to the washer reservoir.
The reservoir filler neck is located in the
front of the engine compartment.
D200300APB
Rear window wiper and washer
switch (if equipped)
The rear window wiper and washer
switch is located at the end of the wiper
and washer switch lever. Turn the switch
to the desired position to operate the rear
wiper and washer.
- Spraying washer fluid with wiper
operation
- Normal wiper operation
O - Wiper off
CAUTION
To prevent possible damage to the
washer pump, do not operate the wash-
er when the fluid reservoir is empty.
WARNING
Do not use the washer in freezing
temperatures without first warming
the windshield with the defrosters;
the washer solution could freeze on
the windshield and obscure your
vision.
CAUTION
• To prevent possible damage to
the wipers or windshield, do not
operate the wipers when the
windshield is dry.
• To prevent damage to the wiper
blades, do not use gasoline,
kerosene, paint thinner, or other
solvents on or near them.
• To prevent damage to the wiper
arms and other components, do
not attempt to move the wipers
manually.
OPB049072
Type A
OPB049072R
Type B

4 61
Features of your vehicle
Center (if equipped)
Type A
• ON (1)
The light stays on at all times.
• DOOR (2)
The light comes on when any door is
opened regardless of the ignition switch
position.
When doors are unlocked by the trans-
mitter, the light comes on for approxi-
mately 30 seconds as long as any door is
not opened. The light goes out gradually
after approximately 30 seconds if the
door is closed. However, if the ignition
switch is ON or all doors are locked, the
light will go out immediately.
If a door is opened with the ignition
switch in the ACC or LOCK position, the
light stays on for about 20 minutes.
However, if a door is opened with the
ignition switch in the ON position, the
light stays on continuously.
• OFF (3)
The light stays off at all times even when
a door is opened.
Type B
• ON (1)
The light stays on at all times.
• DOOR (2)
The light comes on when any door is
opened.
• OFF (3)
The light stays off at all times even when
a door is opened.
CAUTION
Do not leave the switch in this posi-
tion for an extended period of time
when the engine is not running.
OTD049086


Termékspecifikációk
| Márka: | Hyundai |
| Kategória: | autó |
| Modell: | i20 (2011) |
Szüksége van segítségre?
Ha segítségre van szüksége Hyundai i20 (2011), tegyen fel kérdést alább, és más felhasználók válaszolnak Önnek
Útmutatók autó Hyundai

14 Január 2025
13 Október 2024
4 Október 2024
4 Október 2024
4 Október 2024
3 Október 2024
23 Szeptember 2024
16 Szeptember 2024
9 Szeptember 2024
4 Szeptember 2024
Útmutatók autó
- autó Peugeot
- autó Pioneer
- autó Kia
- autó Renault
- autó Citroën
- autó Honda
- autó Opel
- autó Volvo
- autó Toyota
- autó BMW
- autó Mercedes-Benz
- autó Jeep
- autó Suzuki
- autó Ford
- autó Mazda
- autó Chrysler
- autó Fiat
- autó Volkswagen
- autó DS
- autó Chevrolet
- autó Skoda
- autó Audi
- autó Subaru
- autó Mitsubishi
- autó Seat
- autó Lexus
- autó Genesis
- autó Nissan
- autó Mercury
- autó Lancia
- autó Alfa Romeo
- autó Smart
- autó Audio-Technica
- autó MG
- autó Tesla
- autó Mini
- autó Dacia
- autó Rover
- autó Acme
- autó Saturn
- autó Land Rover
- autó Jaguar
- autó Dodge
- autó Polaris
- autó Maserati
- autó Saab
- autó Porsche
- autó Acura
- autó Vauxhall
- autó Infiniti
- autó GMC
- autó Buick
- autó Cadillac
- autó Pontiac
- autó Polestar
- autó RAM
- autó Scion
- autó Tata
- autó GEM
- autó VDL
- autó Sharper Image
- autó Abarth
- autó Lincoln
- autó Mahindra
- autó Chery
- autó Lada
- autó Aston Martin
- autó McLaren
Legújabb útmutatók autó

26 Március 2025

25 Március 2025
18 Március 2025
16 Január 2025
15 Január 2025
14 Január 2025
13 Január 2025

13 Január 2025

12 Január 2025
12 Január 2025