Használati útmutató HP Pavilion dv6-1325et
Olvassa el alább 📖 a magyar nyelvű használati útmutatót HP Pavilion dv6-1325et (129 oldal) a laptop kategóriában. Ezt az útmutatót 2 ember találta hasznosnak és 2 felhasználó értékelte átlagosan 4.5 csillagra
Oldal 1/129

HP Pavilion dv6 Entertainment PC
Maintenance and Service Guide
Document Part Number: 577850-001
September 2009
This guide is a troubleshooting reference used for maintaining and servicing the computer. It provides
comprehensive information on identifying computer features, components, and spare parts; troubleshooting
computer problems; and performing computer disassembly procedures.

© Copyright 2009 Hewlett-Packard Development Company, L.P.
AMD, AMD Athlon, AMD Sempron, AMD Turion, and ATI Mobility Radeon are trademarks of Advanced Micro Devices, Inc.
Bluetooth is a trademark owned by its proprietor and used by Hewlett-Packard Company under license. Intel is a trademark or registered
trademark of Intel Corporation or its subsidiaries in the United States and other countries. Microsoft, Windows, and Windows Vista are
U.S. registered trademarks of Microsoft Corporation. SD Logo is a trademark of its proprietor.
The information contained herein is subject to change without notice. The only warranties for HP products and services are set forth in
the express warranty statements accompanying such products and services. Nothing herein should be construed as constituting an
additional warranty. HP shall not be liable for technical or editorial errors or omissions contained herein.
First Edition: September 2009
Document Part Number: 577850-001

Safety warning notice
ÅWARNING: To reduce the possibility of heat-related injuries or of overheating the computer, do not place the computer directly
on your lap or obstruct the computer air vents. Use the computer only on a hard, flat surface. Do not allow another hard surface,
such as an adjoining optional printer, or a soft surface, such as pillows or rugs or clothing, to block airflow. Also, do not allow
the AC adapter to contact the skin or a soft surface, such as pillows or rugs or clothing, during operation. The computer and the
AC adapter comply with the user-accessible surface temperature limits defined by the International Standard for Safety of
Information Technology Equipment (IEC 60950).

Maintenance and Service GuideMaintenance and Service Guide 1
Contents
1 Product description
2 External component identification
Top components. . . . . . . . . . . . . . . . . . . . . . . . . . . . . . . . . . . . . . . . . . . . . . . . . . . . . . . . . . . . . . . . . . . . . . 2–1
TouchPad . . . . . . . . . . . . . . . . . . . . . . . . . . . . . . . . . . . . . . . . . . . . . . . . . . . . . . . . . . . . . . . . . . . . . . . 2–1
Lights . . . . . . . . . . . . . . . . . . . . . . . . . . . . . . . . . . . . . . . . . . . . . . . . . . . . . . . . . . . . . . . . . . . . . . . . . . 2–2
Buttons, speakers, and fingerprint reader . . . . . . . . . . . . . . . . . . . . . . . . . . . . . . . . . . . . . . . . . . . . . . . 2–3
Keys . . . . . . . . . . . . . . . . . . . . . . . . . . . . . . . . . . . . . . . . . . . . . . . . . . . . . . . . . . . . . . . . . . . . . . . . . . . 2–4
Front components. . . . . . . . . . . . . . . . . . . . . . . . . . . . . . . . . . . . . . . . . . . . . . . . . . . . . . . . . . . . . . . . . . . . . 2–5
Rear component . . . . . . . . . . . . . . . . . . . . . . . . . . . . . . . . . . . . . . . . . . . . . . . . . . . . . . . . . . . . . . . . . . . . . . 2–6
Right-side components. . . . . . . . . . . . . . . . . . . . . . . . . . . . . . . . . . . . . . . . . . . . . . . . . . . . . . . . . . . . . . . . . 2–6
Left-side components. . . . . . . . . . . . . . . . . . . . . . . . . . . . . . . . . . . . . . . . . . . . . . . . . . . . . . . . . . . . . . . . . . 2–7
Bottom components . . . . . . . . . . . . . . . . . . . . . . . . . . . . . . . . . . . . . . . . . . . . . . . . . . . . . . . . . . . . . . . . . . . 2–8
Display components. . . . . . . . . . . . . . . . . . . . . . . . . . . . . . . . . . . . . . . . . . . . . . . . . . . . . . . . . . . . . . . . . . . 2–9
Wireless antennas (select models only) . . . . . . . . . . . . . . . . . . . . . . . . . . . . . . . . . . . . . . . . . . . . . . . . . . . 2–10
Additional hardware components . . . . . . . . . . . . . . . . . . . . . . . . . . . . . . . . . . . . . . . . . . . . . . . . . . . . . . . 2–11
3 Illustrated parts catalog
Serial number location . . . . . . . . . . . . . . . . . . . . . . . . . . . . . . . . . . . . . . . . . . . . . . . . . . . . . . . . . . . . . . . . . 3–1
Computer major components . . . . . . . . . . . . . . . . . . . . . . . . . . . . . . . . . . . . . . . . . . . . . . . . . . . . . . . . . . . . 3–2
Display assembly components . . . . . . . . . . . . . . . . . . . . . . . . . . . . . . . . . . . . . . . . . . . . . . . . . . . . . . . . . . . 3–8
Plastics Kit . . . . . . . . . . . . . . . . . . . . . . . . . . . . . . . . . . . . . . . . . . . . . . . . . . . . . . . . . . . . . . . . . . . . . . . . . 3–9
Cable Kit . . . . . . . . . . . . . . . . . . . . . . . . . . . . . . . . . . . . . . . . . . . . . . . . . . . . . . . . . . . . . . . . . . . . . . . . . . 3–10
Miscellaneous parts . . . . . . . . . . . . . . . . . . . . . . . . . . . . . . . . . . . . . . . . . . . . . . . . . . . . . . . . . . . . . . . . . . 3–11
Sequential part number listing . . . . . . . . . . . . . . . . . . . . . . . . . . . . . . . . . . . . . . . . . . . . . . . . . . . . . . . . . . 3–12
4 Removal and replacement procedures
Preliminary replacement requirements . . . . . . . . . . . . . . . . . . . . . . . . . . . . . . . . . . . . . . . . . . . . . . . . . . . . 4–1
Tools required . . . . . . . . . . . . . . . . . . . . . . . . . . . . . . . . . . . . . . . . . . . . . . . . . . . . . . . . . . . . . . . . . . . 4–1
Service considerations . . . . . . . . . . . . . . . . . . . . . . . . . . . . . . . . . . . . . . . . . . . . . . . . . . . . . . . . . . . . . 4–1
Grounding guidelines . . . . . . . . . . . . . . . . . . . . . . . . . . . . . . . . . . . . . . . . . . . . . . . . . . . . . . . . . . . . . . 4–2
Component replacement procedures . . . . . . . . . . . . . . . . . . . . . . . . . . . . . . . . . . . . . . . . . . . . . . . . . . . . . . 4–5
Serial number location . . . . . . . . . . . . . . . . . . . . . . . . . . . . . . . . . . . . . . . . . . . . . . . . . . . . . . . . . . . . . 4–5
Computer feet . . . . . . . . . . . . . . . . . . . . . . . . . . . . . . . . . . . . . . . . . . . . . . . . . . . . . . . . . . . . . . . . . . . . 4–6
Battery. . . . . . . . . . . . . . . . . . . . . . . . . . . . . . . . . . . . . . . . . . . . . . . . . . . . . . . . . . . . . . . . . . . . . . . . . . 4–7
Webcam/microphone module . . . . . . . . . . . . . . . . . . . . . . . . . . . . . . . . . . . . . . . . . . . . . . . . . . . . . . . . 4–8
Optical drive . . . . . . . . . . . . . . . . . . . . . . . . . . . . . . . . . . . . . . . . . . . . . . . . . . . . . . . . . . . . . . . . . . . . . 4–9
Memory module . . . . . . . . . . . . . . . . . . . . . . . . . . . . . . . . . . . . . . . . . . . . . . . . . . . . . . . . . . . . . . . . . 4–11
TV tuner module . . . . . . . . . . . . . . . . . . . . . . . . . . . . . . . . . . . . . . . . . . . . . . . . . . . . . . . . . . . . . . . . . 4–13
RTC battery . . . . . . . . . . . . . . . . . . . . . . . . . . . . . . . . . . . . . . . . . . . . . . . . . . . . . . . . . . . . . . . . . . . . 4–14
Hard drive . . . . . . . . . . . . . . . . . . . . . . . . . . . . . . . . . . . . . . . . . . . . . . . . . . . . . . . . . . . . . . . . . . . . . . 4–15
WLAN module . . . . . . . . . . . . . . . . . . . . . . . . . . . . . . . . . . . . . . . . . . . . . . . . . . . . . . . . . . . . . . . . . . 4–17

2 Maintenance and Service GuideMaintenance and Service Guide
Contents
Switch cover and keyboard . . . . . . . . . . . . . . . . . . . . . . . . . . . . . . . . . . . . . . . . . . . . . . . . . . . . . . . . . 4–20
Power button board . . . . . . . . . . . . . . . . . . . . . . . . . . . . . . . . . . . . . . . . . . . . . . . . . . . . . . . . . . . . . . . 4–23
Bluetooth module . . . . . . . . . . . . . . . . . . . . . . . . . . . . . . . . . . . . . . . . . . . . . . . . . . . . . . . . . . . . . . . . 4–24
Display assembly . . . . . . . . . . . . . . . . . . . . . . . . . . . . . . . . . . . . . . . . . . . . . . . . . . . . . . . . . . . . . . . . 4–25
Speaker . . . . . . . . . . . . . . . . . . . . . . . . . . . . . . . . . . . . . . . . . . . . . . . . . . . . . . . . . . . . . . . . . . . . . . . . 4–29
Top cover . . . . . . . . . . . . . . . . . . . . . . . . . . . . . . . . . . . . . . . . . . . . . . . . . . . . . . . . . . . . . . . . . . . . . . 4–30
Modem module . . . . . . . . . . . . . . . . . . . . . . . . . . . . . . . . . . . . . . . . . . . . . . . . . . . . . . . . . . . . . . . . . . 4–33
Audio/infrared board. . . . . . . . . . . . . . . . . . . . . . . . . . . . . . . . . . . . . . . . . . . . . . . . . . . . . . . . . . . . . . 4–34
USB board. . . . . . . . . . . . . . . . . . . . . . . . . . . . . . . . . . . . . . . . . . . . . . . . . . . . . . . . . . . . . . . . . . . . . . 4–35
Power connector cable . . . . . . . . . . . . . . . . . . . . . . . . . . . . . . . . . . . . . . . . . . . . . . . . . . . . . . . . . . . . 4–36
System board. . . . . . . . . . . . . . . . . . . . . . . . . . . . . . . . . . . . . . . . . . . . . . . . . . . . . . . . . . . . . . . . . . . . 4–37
TV tuner module cable . . . . . . . . . . . . . . . . . . . . . . . . . . . . . . . . . . . . . . . . . . . . . . . . . . . . . . . . . . . . 4–39
Modem module cable . . . . . . . . . . . . . . . . . . . . . . . . . . . . . . . . . . . . . . . . . . . . . . . . . . . . . . . . . . . . . 4–40
Fan/heat sink . . . . . . . . . . . . . . . . . . . . . . . . . . . . . . . . . . . . . . . . . . . . . . . . . . . . . . . . . . . . . . . . . . . . 4–41
Processor . . . . . . . . . . . . . . . . . . . . . . . . . . . . . . . . . . . . . . . . . . . . . . . . . . . . . . . . . . . . . . . . . . . . . . . 4–44
5 Setup Utility
Starting the Setup Utility . . . . . . . . . . . . . . . . . . . . . . . . . . . . . . . . . . . . . . . . . . . . . . . . . . . . . . . . . . . . . . . 5–1
Using the Setup Utility. . . . . . . . . . . . . . . . . . . . . . . . . . . . . . . . . . . . . . . . . . . . . . . . . . . . . . . . . . . . . . . . . 5–1
Changing the language of the Setup Utility . . . . . . . . . . . . . . . . . . . . . . . . . . . . . . . . . . . . . . . . . . . . . 5–1
Navigating and selecting in the Setup Utility . . . . . . . . . . . . . . . . . . . . . . . . . . . . . . . . . . . . . . . . . . . . 5–2
Display system information . . . . . . . . . . . . . . . . . . . . . . . . . . . . . . . . . . . . . . . . . . . . . . . . . . . . . . . . . . . . 5–2
Restoring default settings in the Setup Utility . . . . . . . . . . . . . . . . . . . . . . . . . . . . . . . . . . . . . . . . . . . . . . 5–2
Exiting the Setup Utility . . . . . . . . . . . . . . . . . . . . . . . . . . . . . . . . . . . . . . . . . . . . . . . . . . . . . . . . . . . . . . . 5–3
Setup Utility menus . . . . . . . . . . . . . . . . . . . . . . . . . . . . . . . . . . . . . . . . . . . . . . . . . . . . . . . . . . . . . . . . . . . 5–3
Main menu . . . . . . . . . . . . . . . . . . . . . . . . . . . . . . . . . . . . . . . . . . . . . . . . . . . . . . . . . . . . . . . . . . . . . . 5–3
Security menu . . . . . . . . . . . . . . . . . . . . . . . . . . . . . . . . . . . . . . . . . . . . . . . . . . . . . . . . . . . . . . . . . . . . 5–3
System Configuration menu . . . . . . . . . . . . . . . . . . . . . . . . . . . . . . . . . . . . . . . . . . . . . . . . . . . . . . . . . 5–3
Diagnostics menu . . . . . . . . . . . . . . . . . . . . . . . . . . . . . . . . . . . . . . . . . . . . . . . . . . . . . . . . . . . . . . . . . 5–4
6 Specifications
Computer specifications. . . . . . . . . . . . . . . . . . . . . . . . . . . . . . . . . . . . . . . . . . . . . . . . . . . . . . . . . . . . . . . . 6–1
15.6-inch WXGA display specifications . . . . . . . . . . . . . . . . . . . . . . . . . . . . . . . . . . . . . . . . . . . . . . . . . . . 6–2
Hard drive specifications . . . . . . . . . . . . . . . . . . . . . . . . . . . . . . . . . . . . . . . . . . . . . . . . . . . . . . . . . . . . . . . 6–2
Blu-ray ROM DVD±RW SuperMulti DL Drive specification . . . . . . . . . . . . . . . . . . . . . . . . . . . . . . . . . . 6–3
DVD±RW and CD-RW SuperMulti Double-Layer Combo Drive specifications. . . . . . . . . . . . . . . . . . . . 6–4
System DMA specifications. . . . . . . . . . . . . . . . . . . . . . . . . . . . . . . . . . . . . . . . . . . . . . . . . . . . . . . . . . . . . 6–5
System interrupt specifications . . . . . . . . . . . . . . . . . . . . . . . . . . . . . . . . . . . . . . . . . . . . . . . . . . . . . . . . . . 6–5
System I/O address specifications . . . . . . . . . . . . . . . . . . . . . . . . . . . . . . . . . . . . . . . . . . . . . . . . . . . . . . . . 6–6
System memory map specifications. . . . . . . . . . . . . . . . . . . . . . . . . . . . . . . . . . . . . . . . . . . . . . . . . . . . . . . 6–7
7 Screw listing
Phillips PM2.0×3.0 screw . . . . . . . . . . . . . . . . . . . . . . . . . . . . . . . . . . . . . . . . . . . . . . . . . . . . . . . . . . . . . . 7–1
Phillips PM2.5×3.0 screw . . . . . . . . . . . . . . . . . . . . . . . . . . . . . . . . . . . . . . . . . . . . . . . . . . . . . . . . . . . . . . 7–3
Phillips PM2.5×4.0 screw . . . . . . . . . . . . . . . . . . . . . . . . . . . . . . . . . . . . . . . . . . . . . . . . . . . . . . . . . . . . . . 7–4
Phillips PM2.5×6.0 screw . . . . . . . . . . . . . . . . . . . . . . . . . . . . . . . . . . . . . . . . . . . . . . . . . . . . . . . . . . . . . . 7–6
Phillips PM2.5×5.0 screw . . . . . . . . . . . . . . . . . . . . . . . . . . . . . . . . . . . . . . . . . . . . . . . . . . . . . . . . . . . . . . 7–7
Phillips PM2.5×7.0 screw . . . . . . . . . . . . . . . . . . . . . . . . . . . . . . . . . . . . . . . . . . . . . . . . . . . . . . . . . . . . . . 7–8
Phillips PM3.0×3.5 screw . . . . . . . . . . . . . . . . . . . . . . . . . . . . . . . . . . . . . . . . . . . . . . . . . . . . . . . . . . . . . 7–11

Maintenance and Service GuideMaintenance and Service Guide 1–1
1
Product description
Category Description
Computers
with discrete
graphics
Computers
with UMA
graphics
Product Name HP Pavilion dv6 Entertainment PC
Processors AMD Turion™ II Ultra Dual-Core Mobile processors:
M640, 2.6-GHz with 2-MB L2 cache ✔ ✔
M620, 2.5-GHz with 2-MB L2 cache ✔ ✔
M600, 2.4-GHz with 2-MB L2 cache ✔ ✔
AMD Turion II Dual-Core Mobile processors:
M520, 2.3-GHz with 1-MB L2 cache ✔ ✔
M500, 2.2-GHz with 1-MB L2 cache ✔ ✔
AMD Athlon™ II Dual-Core Processor for Notebook PCs
M320, 2.1-GHz with 1-MB L2 cache ✔ ✔
M300, 2.0-GHz with 1-MB L2 cache ✔ ✔
AMD Sempron™ processor:
M100, 2.0-GHz with 512-GB L2 cache ✔ ✔
Chipset Northbridge: AMD RX881 Chipset ✔
Northbridge: AMD RX880M Chipset ✔
Southbridge: SB710 ✔ ✔
Graphics ATI Mobility Radeon™ HD 4650 (M96) with 1 GB of dedicated video
memory
✔
ATI Mobility Radeon HD 4530 (M92) with 512 MB of dedicated video
memory
✔
AMD internal graphics with 128-MB SidePort video memory ✔
Unified memory architecture (UMA) with shared video memory (ATI
Radeon HD 4200 graphics):
■Up to 251 MB for = 1024-MB system RAM
■Up to 358 MB for > 2048-MB system RAM
■Memory size changes dynamically
✔
■Support for BD playback with HD Decode, and DX10 ✔ ✔
Panel 15.6-inch WXGA (1366 × 768) BrightView LED ✔ ✔
Support for lighted logo on display enclosure ✔ ✔
Typical brightness 200 nits ✔ ✔
(Continued)

1–4 Maintenance and Service Guide
Product description
UV painted keyboard (select models only) ✔ ✔
Textured (non-painted) keyboard (select models only) ✔ ✔
Taps enabled as default ✔ ✔
Power requirements 90-W AC adapter ✔
65-W AC adapter ✔
6-cell 2.55-Ah Li-ion battery with target life of 2.75 hours ✔
6-cell 2.55-Ah Li-ion battery with target life of 3.5 hours ✔
6-cell 2.20-Ah Li-ion battery with target life of 2.2 hours ✔
6-cell 2.20-Ah Li-ion battery with target life of 3 hours ✔
12-cell 8.80-Ah Li-ion battery with target life of 4.5 hours ✔
12-cell 8.80-Ah Li-ion battery with target life of 6 hours ✔
Security Security cable slot ✔ ✔
Fingerprint reader (select models only) ✔ ✔
Operating system Preinstalled:
Windows® 7 ✔ ✔
Windows 7 Basic (32 bit) ✔ ✔
Windows 7 Basic (64 bit) ✔ ✔
Windows 7 Home Premium (32 bit) ✔ ✔
Windows 7 Home Premium (64 bit) ✔ ✔
Windows 7 Professional (64 bit) ✔ ✔
Serviceability End-user replaceable parts:
AC adapter ✔ ✔
Battery (system) ✔ ✔
Hard drive ✔ ✔
Memory module ✔ ✔
Optical drive ✔ ✔
Mini Card components ✔ ✔
Category Description
Computers
with discrete
graphics
Computers
with UMA
graphics

External component identification
Maintenance and Service Guide 2–3
Buttons, speakers, and fingerprint reader
Item Component Description
1 Speakers (2) Produce sound.
2Power button* ■When the computer is off, press the button to turn on the computer.
■When the computer is on, press the button briefly to initiate Sleep.
■When the computer is in the Sleep state, press the button briefly to exit
Sleep.
■When the computer is in Hibernation, press the button briefly to exit
Hibernation.
If the computer has stopped responding and Windows® shutdown
procedures are ineffective, press and hold the power button for at least 5
seconds to turn off the computer.
To learn more about power settings, select Start > Control Panel > System
and Security > Power Options.
3 Volume mute button Mutes and restores speaker sound.
4 Volume scroll zone Adjusts speaker volume. Slide your finger to the left to decrease volume and
to the right to increase volume. You can also tap the minus (-) sign on the
scroll zone to decrease volume, or tap the plus (+) sign on the scroll zone to
increase volume.
5 Wireless button Turns the wireless feature on or off, but does not establish a wireless
connection.
✎A wireless network must be set up in order to establish a wireless
connection.
6Fingerprint reader (select models
only)
Allows a fingerprint logon to Windows, instead of a password logon.
*This table describes factory settings. For information about changing factory settings, refer to the user guides located in Help
and Support.

2–4 Maintenance and Service Guide
External component identification
Keys
Item Component Function
1 esc key Displays system information when pressed in combination with the fn key.
2 fn key Executes frequently used system functions when pressed in combination with
a function key or the esc key.
3 Windows logo key Displays the Windows Start menu.
4 Windows applications key Displays a shortcut menu for items beneath the pointer.
5 Integrated numeric keypad keys Can be used like the keys on an external numeric keypad.
6 Function keys Execute frequently used system functions when pressed in combination with
the fn key.

2–6 Maintenance and Service Guide
External component identification
Rear component
Right-side components
Component Function
Vent Enables airflow to cool internal components.
✎The computer fan starts up automatically to cool internal components
and prevent overheating. It is normal for the internal fan to cycle on and
off during routine operation.
Item Component Function
1Optical drive light Blinking: The optical drive is being accessed.
2Optical drive Reads optical discs and, on select models, also writes to optical discs.
3USB ports (2) Connect optional USB devices.
4TV antenna/cable jack (select models
only)
Connects a TV antenna, a digital cable device, or a satellite device that
receives standard or high-definition TV broadcasts.
5 RJ-11 (modem) jack (select models
only)
Connects a modem cable.
6Security cable slot Attaches an optional security cable to the computer.
✎The security cable is designed to act as a deterrent, but it may not
prevent the computer from being mishandled or stolen.
7Power connector Connects an AC adapter.
2–10 Maintenance and Service Guide
External component identification
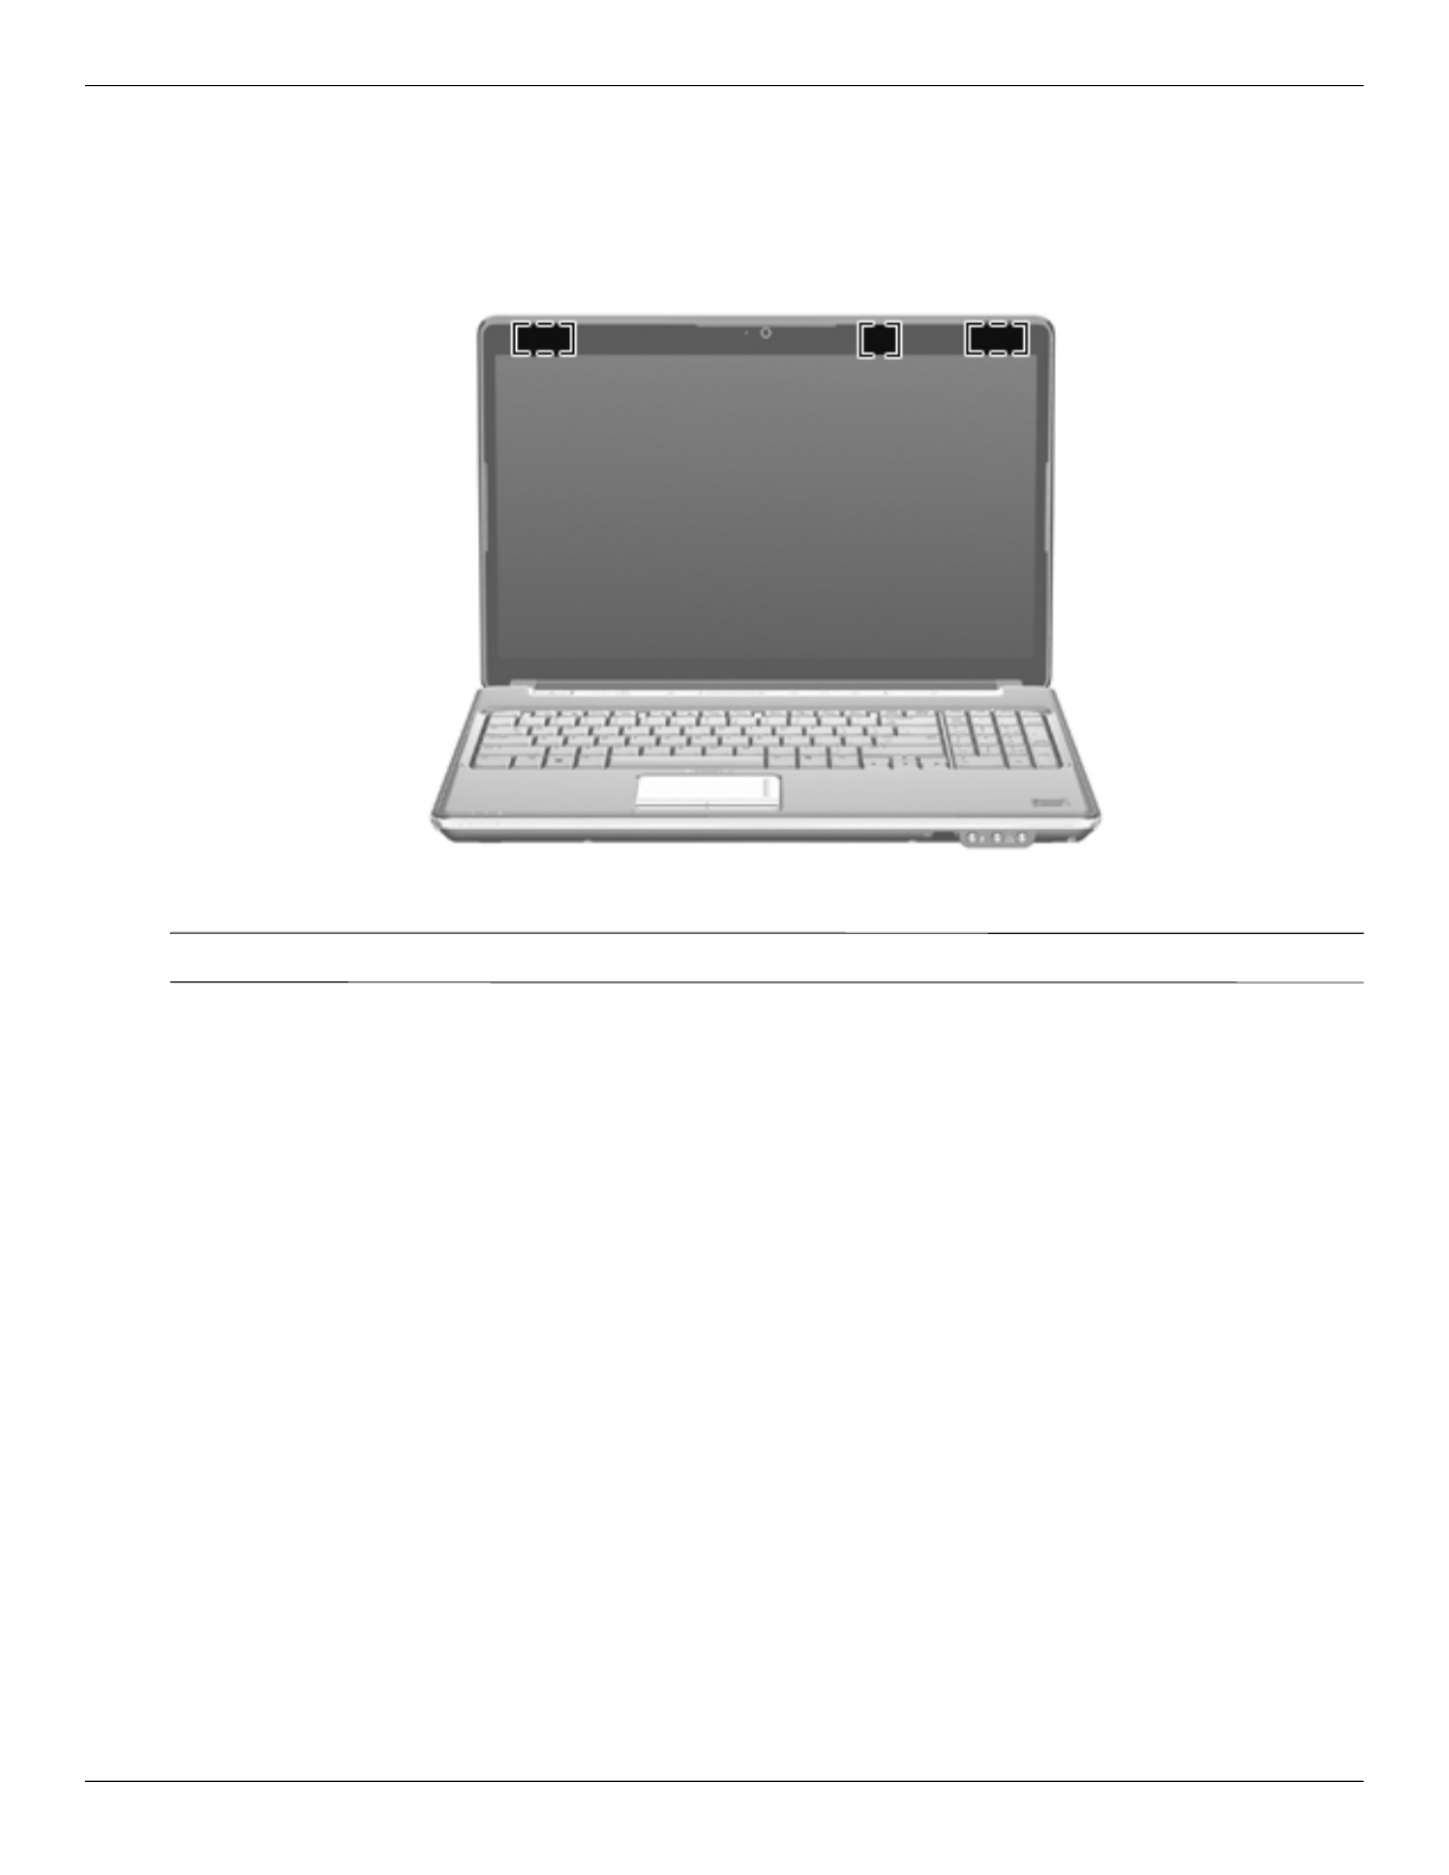
Wireless antennas (select models only)
On select computer models, at least 2 antennas send and receive signals from one or more wireless devices. These
antennas are not visible from the outside of the computer.
✎For optimal transmission, keep the areas immediately around the antennas free from obstructions.
To see wireless regulatory notices, refer to the section of the Regulatory, Safety and Environmental Notices that
applies to your country or region. These notices are located in Help and Support.
Termékspecifikációk
| Márka: | HP |
| Kategória: | laptop |
| Modell: | Pavilion dv6-1325et |
Szüksége van segítségre?
Ha segítségre van szüksége HP Pavilion dv6-1325et, tegyen fel kérdést alább, és más felhasználók válaszolnak Önnek
Útmutatók laptop HP

20 Március 2025
13 Január 2025
12 Január 2025
11 Január 2025
11 Január 2025
11 Január 2025
28 December 2024
28 December 2024
28 December 2024
22 December 2024
Útmutatók laptop
- laptop Samsung
- laptop Sony
- laptop Fujitsu
- laptop Acer
- laptop LG
- laptop Oregon Scientific
- laptop Panasonic
- laptop Lenovo
- laptop Toshiba
- laptop Hyundai
- laptop Apple
- laptop Fellowes
- laptop Medion
- laptop Zebra
- laptop Xiaomi
- laptop Dell
- laptop Gigabyte
- laptop Tripp Lite
- laptop Prixton
- laptop Thomson
- laptop Huawei
- laptop Microsoft
- laptop Asus
- laptop PEAQ
- laptop Haier
- laptop Viewsonic
- laptop Denver
- laptop MSI
- laptop Honor
- laptop SPC
- laptop ADATA
- laptop Kogan
- laptop Razer
- laptop Jay-Tech
- laptop Pyle
- laptop Schneider
- laptop Micromax
- laptop NEC
- laptop Siig
- laptop GoClever
- laptop Getac
- laptop ECS
- laptop Packard Bell
- laptop TechBite
- laptop Alienware
- laptop Airis
- laptop Lexibook
- laptop Emachines
- laptop Trekstor
- laptop Hähnel
- laptop Sylvania
- laptop Coby
- laptop Evga
- laptop Ricatech
- laptop Mpman
- laptop Vizio
- laptop Targa
- laptop Ematic
- laptop Hannspree
- laptop XPG
- laptop Inovia
- laptop Odys
- laptop Ergotron
- laptop Ibm
- laptop Atdec
- laptop Compaq
- laptop Hercules
- laptop Vulcan
- laptop System76
- laptop General Dynamics Itronix
- laptop CTL
- laptop Everex
- laptop Olidata
- laptop Dynabook
- laptop Hamilton Buhl
- laptop AORUS
- laptop Humanscale
- laptop Aplic
- laptop Schenker
Legújabb útmutatók laptop

3 Április 2025

28 Március 2025

28 Március 2025
27 Március 2025

18 Március 2025
16 Január 2025
13 Január 2025

13 Január 2025
12 Január 2025
12 Január 2025