Használati útmutató HP F2105
Olvassa el alább 📖 a magyar nyelvű használati útmutatót HP F2105 (74 oldal) a Monitor kategóriában. Ezt az útmutatót 4 ember találta hasznosnak és 2 felhasználó értékelte átlagosan 4.5 csillagra
Oldal 1/74

User’s Guide
HP f2105 LCD Monitor

The only warranties for HP products and services are set forth in the
express warranty statements accompanying such products and
services. Nothing herein should be construed as constituting an
additional warranty. HP shall not be liable for technical or editorial
errors or omissions contained herein.
HP assumes no responsibility for the use or reliability of its software
on equipment that is not furnished by HP.
This document contains proprietary information that is protected by
copyright. No part of this document may be photocopied,
reproduced, or translated to another language without the prior
written consent of HP.
Hewlett-Packard Company
P.O. Box 4010
Cupertino, CA 95015-4010
USA
Copyright © 2005 Hewlett-Packard Development Company, L.P.
Microsoft and Windows are U.S. registered trademarks of Microsoft
Corporation.
Adobe and Acrobat are trademarks of Adobe Systems Incorporated.
Bluetooth is a trademark owned by its proprietor and used by
Hewlett-Packard Company under license.
HP supports lawful use of technology and does not endorse or
encourage the use of its products for purposes other than those
permitted by copyright law.
The information in this document is subject to change without notice.

wWARNING: Text set off in this manner indicates that failure to
follow directions could result in bodily harm or loss of life.
cCAUTION: Text set off in this manner indicates that failure to follow
directions could result in damage to equipment or loss of
information.
✎Text set off in this manner indicates additional information.


User’s Guide v
Contents
1 Product Features
HP LCD Flat Panel Monitor. . . . . . . . . . . . . . . . . . 1–1
2 Safety and Maintenance Guidelines
Important Safety Information . . . . . . . . . . . . . . . . 2–1
Safety Precautions . . . . . . . . . . . . . . . . . . . . . 2–2
Maintenance Guidelines . . . . . . . . . . . . . . . . . . . 2–3
Cleaning the Monitor . . . . . . . . . . . . . . . . . . . . . 2–4
Shipping the Monitor . . . . . . . . . . . . . . . . . . . . . 2–5
Preparing the Monitor for Shipping . . . . . . . . . 2–5
3 Setting Up the Monitor
Before You Begin . . . . . . . . . . . . . . . . . . . . . . . . 3–1
Installing the Monitor . . . . . . . . . . . . . . . . . . . . . 3–2
Placing the Monitor on a Desktop . . . . . . . . . . 3–2
Wall Mounting the Monitor . . . . . . . . . . . . . . 3–5
Reinstalling the Pedestal Base . . . . . . . . . . . . . 3–7
Back and Side-Panel Connectors . . . . . . . . . . . . . 3–8
Connecting the Monitor to the PC . . . . . . . . . . 3–9
Cable Management . . . . . . . . . . . . . . . . . . 3–15
Connecting USB Devices to the Monitor . . . . . 3–16

Contents
vi User’s Guide
4 Operating the Monitor
CD Software and Utilities . . . . . . . . . . . . . . . . . . 4–1
The Information File . . . . . . . . . . . . . . . . . . . . 4–1
The Image Color Matching File . . . . . . . . . . . . 4–2
Installing INF and ICM Files . . . . . . . . . . . . . . 4–2
Installing from the CD. . . . . . . . . . . . . . . . 4–2
Downloading from the
World Wide Web . . . . . . . . . . . . . . . . . . 4–3
Using the Auto-Adjustment Function . . . . . . . . . 4–3
Front-Panel Buttons . . . . . . . . . . . . . . . . . . . . . . . 4–5
Using the Onscreen Display. . . . . . . . . . . . . . . . . 4–7
Adjusting Monitor Settings . . . . . . . . . . . . . . . 4–8
Main Menu. . . . . . . . . . . . . . . . . . . . . . . 4–8
Advanced Menu . . . . . . . . . . . . . . . . . . . 4–9
Selecting the Video Input Connectors . . . . . . . . . 4–12
Identifying Monitor Conditions . . . . . . . . . . . . . . 4–13
Adjusting Screen Quality. . . . . . . . . . . . . . . . . . 4–14
Setting Optimal Display Resolution . . . . . . . . 4–14
Enhancing the Video Function. . . . . . . . . . . . 4–15
Optimizing Analog Video . . . . . . . . . . . . . . 4–17
Entering User Modes . . . . . . . . . . . . . . . . . . 4–18
Power-Saver Feature . . . . . . . . . . . . . . . . . . . . . 4–19
A Troubleshooting
Solving Common Problems . . . . . . . . . . . . . . . . . A–1
Using the World Wide Web . . . . . . . . . . . . . A–4
Preparing to Call Technical Support . . . . . . . . . . . A–4
Locating the Rating Label . . . . . . . . . . . . . . . . A–4

Contents
User’s Guide vii
B Technical Specifications
HP f2105 LCD Monitor . . . . . . . . . . . . . . . . . . . . B–1
Preset Video Modes . . . . . . . . . . . . . . . . . . . . . . B–3
LCD Monitor Quality and Pixel Policy . . . . . . . . . . B–5
Power Cord Set Requirements . . . . . . . . . . . . . . . B–6
C Agency Regulatory Notices
Federal Communications Commission Notice. . . . . C–1
Modifications . . . . . . . . . . . . . . . . . . . . . . . . C–2
Cables. . . . . . . . . . . . . . . . . . . . . . . . . . . . . C–2
Declaration of Conformity for Products
Marked with FCC Logo, United States Only. . . . . . C–3
Canadian Notice . . . . . . . . . . . . . . . . . . . . . . . . C–4
Avis Canadien . . . . . . . . . . . . . . . . . . . . . . . . . . C–4
European Union Regulatory Notice. . . . . . . . . . . . C–4
Disposal of Waste Equipment by Users in
Private Households in the European Union . . . . C–5
Japanese Notice . . . . . . . . . . . . . . . . . . . . . . . . C–6
Japanese Power Cord Notice . . . . . . . . . . . . . C–6
Korean Notice . . . . . . . . . . . . . . . . . . . . . . . . . . C–6
Materials Disposal . . . . . . . . . . . . . . . . . . . . . . . C–7
HP Recycling Program. . . . . . . . . . . . . . . . . . . . . C–7

Contents
viii User’s Guide

User’s Guide 1–1
1
Product Features
HP LCD Flat Panel Monitor
The HP LCD Monitor (liquid crystal display) has an active matrix,
thin-film transistor (TFT) screen.
The flat-panel monitor features:
■Large 21-inch (53.3 cm) diagonal viewable area display.
■1680 × 1050 factory-set resolution, plus full-screen support for
lower resolutions.
■Dual video inputs supported:
❏VGA analog (data)
❏DVI digital (data) (select models only)

Product Features
1–2 User’s Guide
■Convenient access to two Universal Serial Bus (USB) 2.0 ports
to use with two USB devices, such as a digital camcorder or a
USB flash drive. You must connect your high-speed USB hub
cable from the monitor to the PC to enable two USB 2.0 ports
on the monitor.
■Fast response time provides better experience for gaming and
graphics.
■Easy to view from a sitting or standing position, or while
moving from one side of the monitor to the other.
■Tilt and height adjustment capabilities.
■Removable pedestal and Video Electronics Standards
Association (VESA) 100-mm standard mounting holes for
flexible mounting solutions, including wall mounting.
■Security lock slot for a Kensington lock security cable (security
cable sold separately).
■Plug and Play capability, if supported by your PC system.
■Onscreen display (OSD) adjustments for ease of setup and
screen optimization. Choose English, French, German, Italian,
Spanish, or Dutch.
■Built-in stereo speakers with a speaker mini-jack-to-mini-jack
cable.
■Audio support connections include:
❏Audio In connector.
❏Headphone jack connector.
❏Audio Out connector to use with a subwoofer and other
external speakers (sold separately).
■Integrated power supply.
■Energy Saver feature reduces power consumption.

Product Features
User’s Guide 1–3
■Compliance with the following regulated specifications:
❏European Union CE directives.
❏Swedish MPR II 1990.
❏TCO environmental requirements.
■This CD includes:
❏f2105 User Guide.
❏An Information (INF) file.
❏Image Color Matching (ICM) file.
❏Auto-adjustment pattern software.
❏Safety information.
❏TCO environmental requirements.
❏Adobe Acrobat Reader.

Product Features
1–4 User’s Guide

User’s Guide 2–1
2
Safety and Maintenance
Guidelines
Important Safety Information
The power cord is designed for use with your monitor. To use a
different cord, use only a power source and connection compatible
with this monitor. For information on the correct power cord set to
use with your monitor, see “Power Cord Set Requirements” in
Appendix B.
wWARNING: To reduce the risk of electric shock or damage to your
equipment, do not disable the power cord grounding feature. The
grounding plug is an important safety feature. Connect the
equipment to a grounded (earthed) power outlet.
wWARNING: For your safety, be sure that the grounded power outlet
you plug the power cord into is easily accessible to the operator and
located as close to the equipment as possible. To disconnect power
from the equipment, unplug the power cord from the power outlet by
grasping the plug firmly. Never pull on the cord.

Safety and Maintenance Guidelines
2–2 User’s Guide
cCAUTION: To protect your monitor, as well as your PC, connect all
power cords for your PC and its peripheral devices (such as a
monitor, printer, or scanner) to a surge protection device such as
a power strip with surge protection or uninterruptible power
supply (UPS).
Not all power strips provide surge protection; the power strips must
be specifically labeled as having this ability. Use a power strip
whose manufacturer offers a damage replacement policy so you can
replace your equipment if surge protection fails.
Safety Precautions
■Avoid applying pressure to the LCD screen; doing so can
cause damage.
■Use only a power source and connection compatible with this
monitor, as indicated on the label/back plate of the monitor.
■Be sure the total ampere rating of the products connected to
the outlet does not exceed the current rating of the electrical
outlet, and the total ampere rating of the products connected
to the cord does not exceed the rating of the cord. Look on the
power label to determine the ampere rating (Amps or A) for
each device.
■Install your monitor near an outlet that you can easily reach.
Disconnect the monitor by grasping the plug firmly and pulling
it from the outlet. Never disconnect the monitor by pulling
the cord.
■Do not allow anything to rest on the power cord. Do not walk
on the cord.

Safety and Maintenance Guidelines
User’s Guide 2–3
Maintenance Guidelines
To enhance the performance and extend the life of your monitor:
■Do not open your monitor cabinet or attempt to service this
product yourself. If your monitor is not operating properly or
has been dropped or damaged, contact your HP authorized
dealer, reseller, or service provider.
■Adjust only those controls that are described in the operating
instructions.
■Turn your monitor off when not in use. You can substantially
increase the life expectancy of your monitor by using a screen
saver and turning off the monitor when not in use.
■Keep your monitor in a well-ventilated area, away from
excessive light, heat, or moisture.
■Slots and openings in the cabinet are provided for ventilation.
These openings must not be blocked or covered. Never push
objects of any kind into cabinet slots or other openings.
■Unplug your monitor from the wall outlet before cleaning.
■Do not drop your monitor or place it on an unstable surface.
■When removing the monitor pedestal base, you must lay the
monitor face down on a soft area to prevent it from getting
scratched, defaced, or broken.

Safety and Maintenance Guidelines
2–4 User’s Guide
Cleaning the Monitor
The monitor is a high-quality optical device that requires special
care when cleaning. To clean the monitor, follow these steps:
1. Turn off the PC and the monitor.
2. Unplug your monitor from the wall outlet before cleaning.
cCAUTION: Do not use benzene, thinner, ammonia, or any volatile
substances to clean the monitor screen or cabinet. These chemicals
may damage the monitor. Do not use liquid cleaners or aerosol
cleaners. Never use water to clean an LCD screen.
3. Wipe the screen with a dry, soft, clean cloth.
❏If the screen requires additional cleaning, use an antistatic
screen cleaner.
4. Dust the monitor housing. Use a damp cloth to clean the
cabinet.
❏If the cabinet requires additional cleaning, use a clean
cloth dampened with isopropyl alcohol.
5. Plug in the monitor.
6. Turn on the monitor and the PC.

Safety and Maintenance Guidelines
User’s Guide 2–5
Shipping the Monitor
Keep the original packing box in a storage area. You may need it
later if you move or ship your monitor. When you ship the monitor,
prepare it for shipping by folding it into position.
Preparing the Monitor for Shipping
Read the following warning and caution statements before
beginning the procedure.
wWARNING: Before folding the monitor, turn off the monitor power,
USB devices, and disconnect the power, video, USB, and audio
cables. To disconnect power from the equipment, unplug the power
cord from the power outlet by grasping the plug firmly. Never pull on
the cord.
cCAUTION: Do not touch the LCD screen; doing so can cause
damage.

Safety and Maintenance Guidelines
2–6 User’s Guide
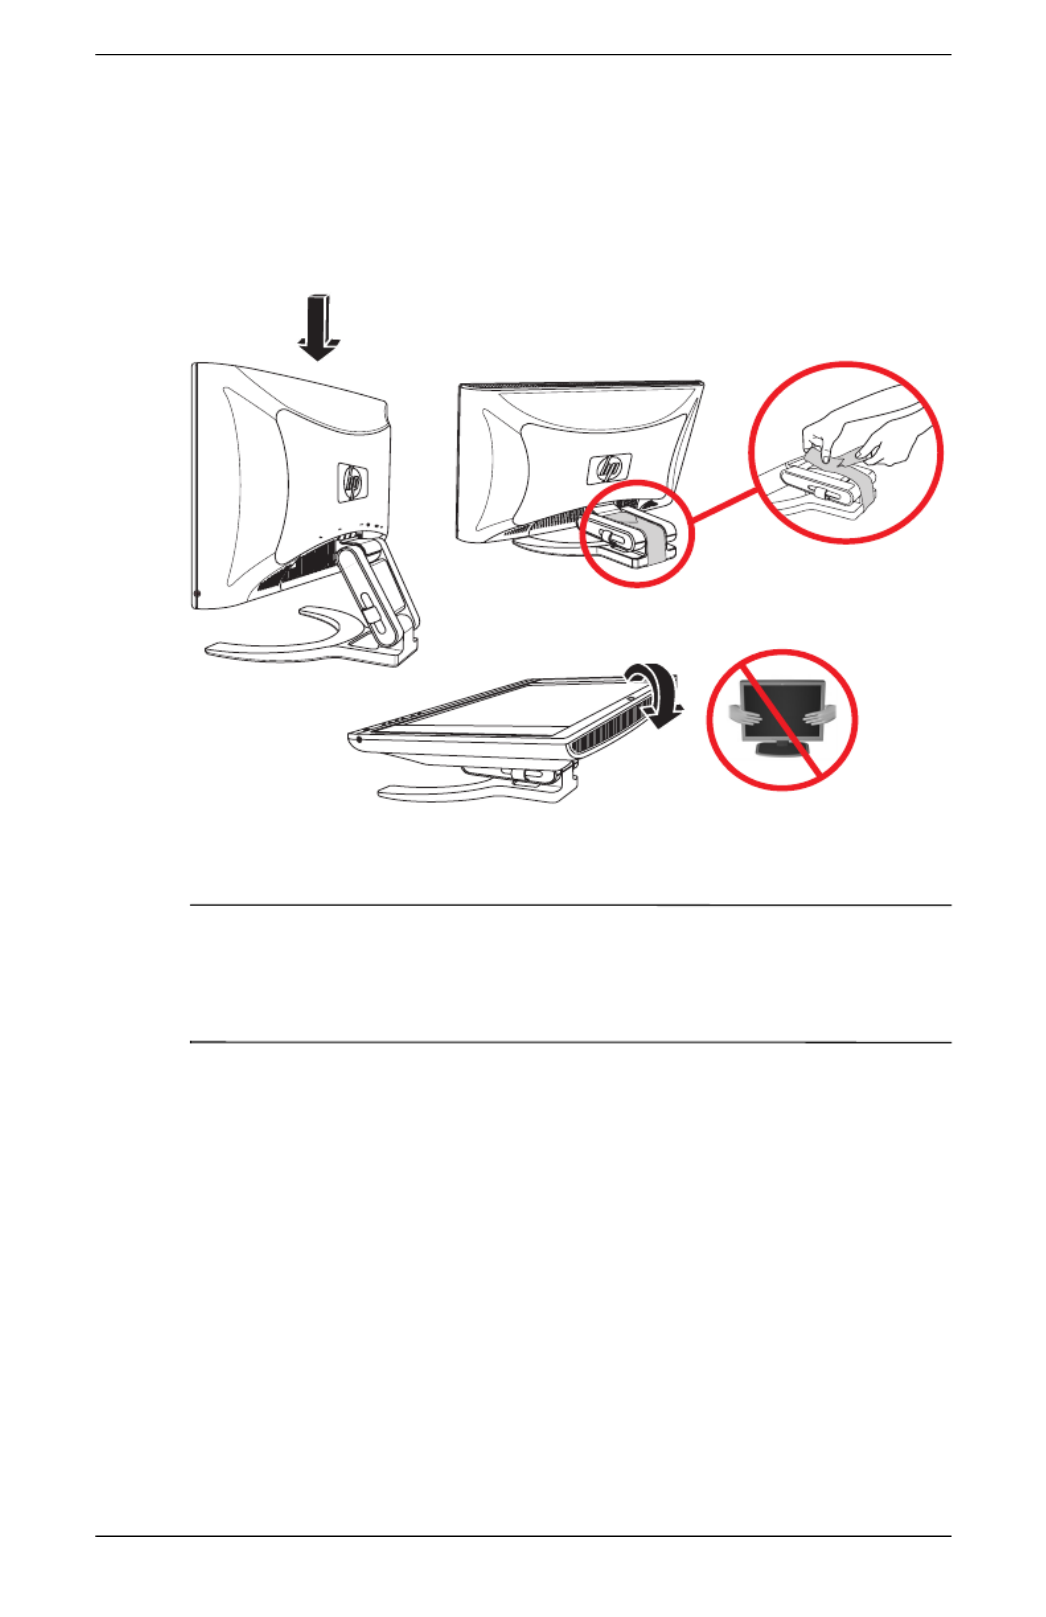
1. Disconnect the power, video, audio, and USB cables from the
side and back of the monitor.
2. Push the panel straight down to flatten the hinge (1), as shown
in the following illustration. Place the strap that came with the
monitor around the base by threading it through the hinge (2).
USB In
Audio In
Audio Out
AC VGA
DVI
PC
Safety and Maintenance Guidelines
User’s Guide 2–7
Rotate the front of the panel down to a horizontal position (3).
Avoid applying pressure to the LCD screen, doing so can
cause damage.
Folding the monitor for shipping
wWARNING: Do not lay the LCD panel of the monitor on a flat
surface while trying to attach the strap to the monitor base. The
hinge of the base can spring suddenly and this could cause damage
or injury.
USB2 IN
VGA
AC
DVI
Aud io IN
Audio OU T
3
1 2

Safety and Maintenance Guidelines
2–8 User’s Guide

User’s Guide 3–1
3
Setting Up the Monitor
Before You Begin
1. Unpack the monitor. Make sure all contents are included. Store
the box and packing foam.
2. Ensure that the power is turned off to the monitor, PC system,
and other attached devices (monitor ships in off position).
3. Determine the video cable or cables that you want to connect
from the PC video card outputs to the VGA and DVI-D (select
models only) connectors on the monitor. You can connect one
or both cables.
❏VGA cable: Standard VGA 15-pin cable.
❏DVI-D cable (select models only): For digital operation, use
the DVI-D-to-DVI-D video cable provided. The DVI-D cable
supplied with this monitor is for digital-to-digital
connection only. Your PC must have a DVI-compatible
graphics card installed for use with this cable. Your
DVI-compatible graphics card may not support the optimal
monitor resolution. Refer to the documentation that came
with your graphics card.
4. Determine if the monitor is to be desktop-mounted or
wall-mounted. See “Installing the Monitor” in this chapter.
5. Prepare a flat area to use when assembling the monitor. You
may need a flat, soft, protected area for placing the monitor
screen-down while preparing it for wall mounting.
6. You need a Phillips head screwdriver for preparing the monitor
for wall mounting. You may need a straight-slot screwdriver to
secure some cables.

Setting Up the Monitor
3–2 User’s Guide
Installing the Monitor
You can install the monitor on a desktop or wall mount (not
included with monitor). Place the monitor in a convenient,
well-ventilated location near your PC.
If the monitor is installed on a:
■ desktop or table, see “Placing the Monitor on a Desktop” in
this chapter.
■ wall, swing arm, or other mounting fixture, see “Wall
Mounting the Monitor” in this chapter.
Connect the monitor after you have installed it. See “Back and
Side-Panel Connectors” in this chapter.
Placing the Monitor on a Desktop
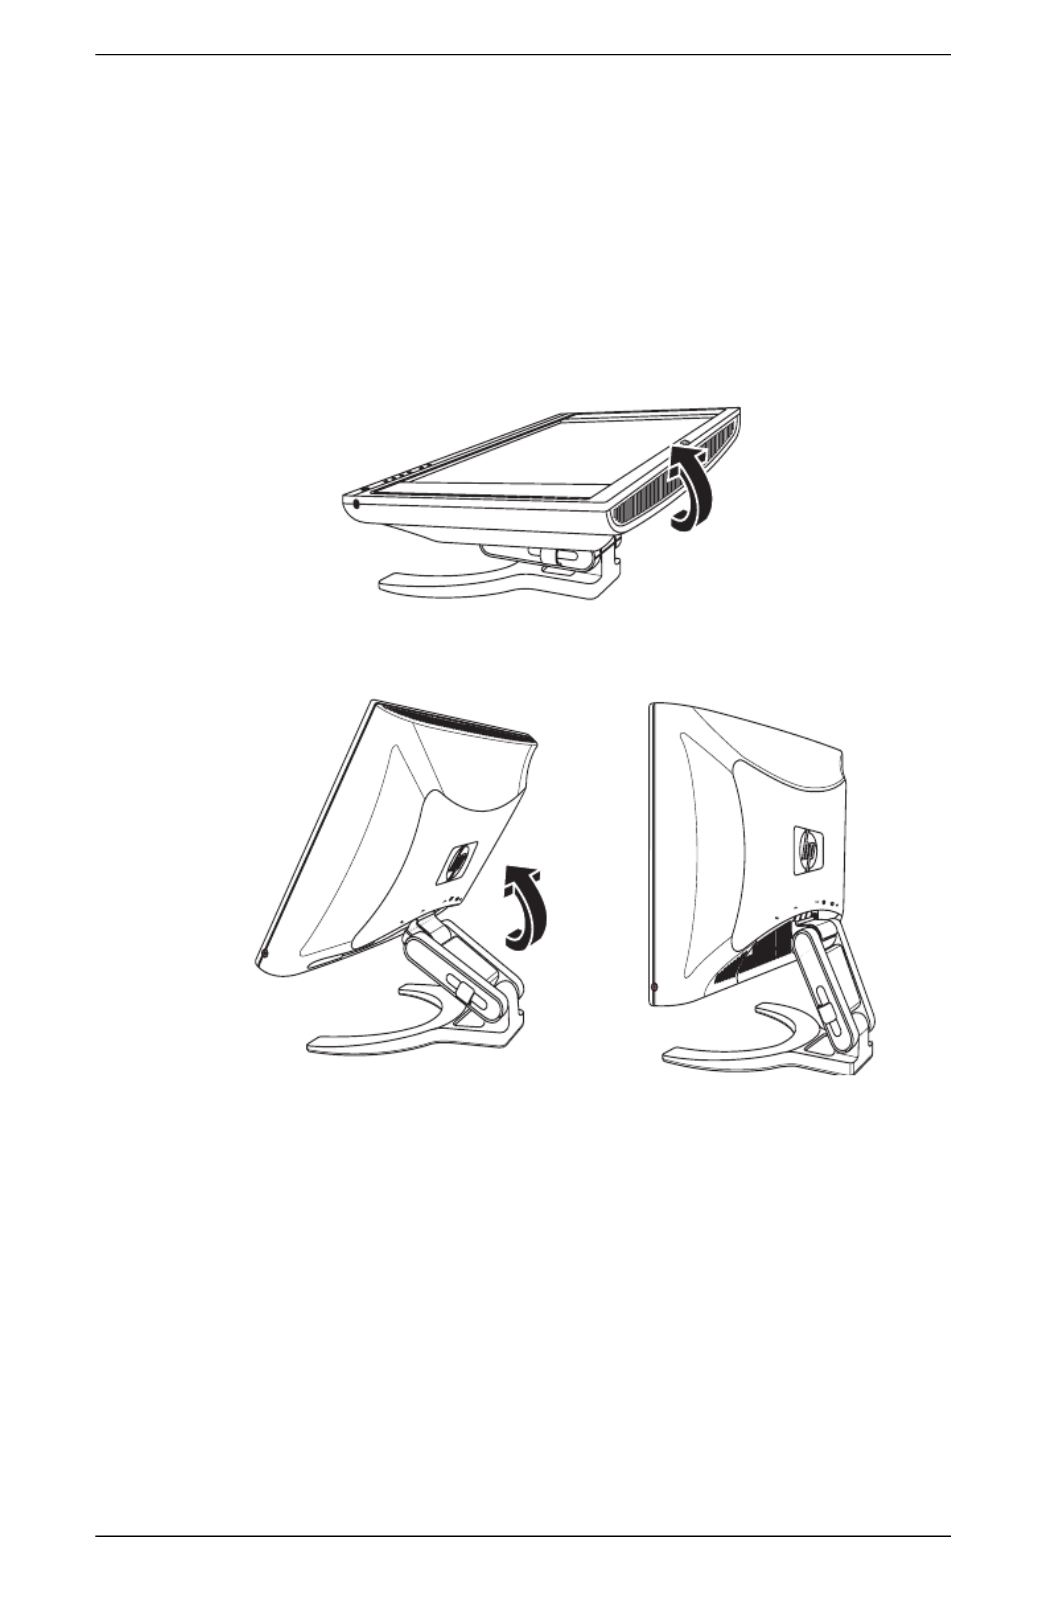
To place the monitor on a desktop or table, you must unfold the
monitor.
cCAUTION: Do not touch the LCD screen, doing so can cause
damage.
Setting Up the Monitor
User’s Guide 3–3
1. Set the monitor on a flat surface.
2. Hold the base of the monitor (1) and lift up the panel at the
top (2) without touching the LCD screen, as shown in the
following illustration.
3. Continue to lift the panel (3) to its easily adjustable position.
Opening the monitor
4. Stand the monitor in the upright position on a desktop or table.
USB2 IN
VGA
AC
DVI
Audio IN
Aud io O UT
USB2 IN
VGA
AC
DVI
Au
dio IN
Audio OUT
3
2
1

Setting Up the Monitor
3–4 User’s Guide
Tilt and adjust the height of the monitor for proper viewing. Do not
tilt the monitor beyond its easily adjustable position. You can adjust
the monitor so that the panel is fully forward and the bottom of the
panel is close to the desktop, if desired.
Adjusting the monitor tilt
cCAUTION: Avoid applying pressure to the LCD screen; doing so
can cause damage.
cCAUTION: Tilt the monitor carefully. If you tilt the monitor back
more than 30 degrees, beyond its easily adjustable position, it can
fall over. Position the monitor so that it cannot fall if bumped.
30˚
–5˚

Setting Up the Monitor
User’s Guide 3–5
Wall Mounting the Monitor
Before you mount the monitor on a wall, a swing arm, or other
mounting fixture, you must remove the monitor pedestal and back
mounting cover. You will need a Phillips head screwdriver. Read
the following warning and caution statements before beginning the
procedure.
wWARNING: Ensure that the monitor is lying flat, with the screen
down. Attempting to remove the pedestal base assembly from the
monitor while it is upright may result in injury to the user.
cCAUTION: Before disassembling the monitor, turn off the monitor
power, and disconnect all power, video, USB, and audio cables.
To install the monitor on a wall, a swing arm, or other mounting
fixture:
cCAUTION: The screen is fragile. Placing the monitor screen down
on a flat, soft area prevents scratches, defacing, and breakage.
1. Set the monitor screen down on a flat, soft, protected surface,
and turn the pedestal upright.

Setting Up the Monitor
3–6 User’s Guide
2. Pull up on the bottom edge and remove the back cover (1), as
shown in the following illustration. Set the back cover aside.
Six screws are exposed.
Wall mounting the monitor
3. Holding the pedestal base assembly so it cannot fall, remove
the six screws (2). Use a Phillips head screwdriver. Lift the
assembly (3) and set it aside.
USB2 IN
VGA
AC
DVI
A
udio IN
A
ud io OU T
3
2
1

Setting Up the Monitor
User’s Guide 3–7
4. Save the removed items (screws, back cover, and pedestal
base assembly) for future use. The four threaded mounting
holes on the monitor panel are spaced 100 mm apart and
are compliant with the VESA standard for mounting flat-panel
monitors.
5. Use the four holes to attach a swing arm or other mounting
fixture. Follow the instructions included with the mounting
fixture to ensure that the monitor is safely attached.
Reinstalling the Pedestal Base
To reinstall the desktop pedestal base assembly for the monitor:
1. Remove the mounting fixture.
2. Reverse the preceding instructions to attach the pedestal base
assembly onto the panel (be sure to insert the top two screws
first), and then replace the rectangular back cover and snap it
into place on the monitor.

Setting Up the Monitor
3–8 User’s Guide
Back and Side-Panel Connectors
Back and side-panel connectors
USB In
Audio InAudio Out
AC VGA
DVI
PC
F
E
D
G
C
B
H
A
Item Label Icon Connector Function
A (Stereo
Headphone
jack)
Connects headphones and mutes
monitor speakers
B AC (Power) Provides power to monitor
C Audio Out Connects external speakers or
subwoofer (sold separately)
D Audio In Connects monitor speakers to PC
E DVI Connects monitor to PC
(select models only)
F VGA Connects monitor to PC
G USB In Connects USB hub on monitor to
PC to enable the USB 2.0 ports
H (USB 2.0 ports) Connects two USB devices

Setting Up the Monitor
User’s Guide 3–9
Connecting the Monitor to the PC
To connect the monitor video input to the PC:
1. Place the monitor upright, as shown in the following
illustration.
2. Connect the VGA or DVI-D (select models only) video cable
from the monitor to the VGA or DVI video connector on the
back panel of the PC.
✎You can connect the VGA cable, the DVI-D cable, or both. Only
one cable is connected for typical installations. The DVI-D
connector (select models only) on the monitor is for digital-to-digital
connection only. If you connect both analog and DVI-D cables, the
PC connects through the analog cable by default. To change to
your DVI-D cable, you must change it in your monitor settings. Your
PC must have a DVI-compatible graphics card installed for use with
this DVI-D video cable. Your DVI-compatible graphics card may not
support the optimal monitor resolution. Refer to the documentation
that came with your graphics card.

Setting Up the Monitor
3–10 User’s Guide
❏Connect one end of the 15-pin VGA cable to the VGA
(analog) input connector on the monitor. Then connect
the other end to the VGA (analog) output connector on
the PC.
Connecting the VGA cable
USB In
Audio InAudio Out
AC VGA
DVI
PC
S-VIDOUT
COMPOUT
SERIAL
ETHERNET
OUT
IN
1394
VGA
VGA

Setting Up the Monitor
User’s Guide 3–11
3. Connect one end of the DVI-D cable to the DVI-D input
connector (select models only) on the monitor. Then connect
the other end to the DVI connector on the PC.
Connecting the DVI-D cable
✎The DVI-D connector (select models only) on the monitor and the
DVI-D cable is for digital-to-digital connection only. Your PC must
have a DVI-compatible graphics card and a DVI connector for use
with this DVI-D cable.
DVI
USB In
Audio InAudio Out
AC VGA
DVI
PC
S-VIDOUT
COMPOUT
SERIAL
ETHERNET
OUT
IN
1394
DVI

Setting Up the Monitor
3–12 User’s Guide
4. Connect the audio cable to the Audio Line Out connector
(green) on the PC and to the Audio In connector (green) on
your monitor to enable the built-in monitor speakers.
✎Plugging in headphones to the monitor disables the built-in monitor
speakers.
Connecting the audio cable
5. If you have external speakers or a subwoofer (sold separately),
connect your external speaker cable to the Audio Out (blue)
connector on the monitor to your speakers or subwoofer. Refer
to the documentation that came with your speakers or
subwoofer for more setup information.
6. As needed, you can connect headphones to the headphones
jack connector on the side of the monitor. The headphones
connector is item A in the illustration in the section “Back and
Side-Panel Connectors.”
Audio
USB In
Audio In
Audio Out
AC VGA
DVI
PC
S-VIDOUT
COMPOUT
SERIAL
ETHERNET
OUT
IN
1394
Audio In

Setting Up the Monitor
User’s Guide 3–13
7. Connect the USB hub cable from the PC to the USB In
connector on the monitor to enable the two USB 2.0 ports on
the side of the monitor. The USB 2.0 ports cannot work without
the USB cable attached.
Connecting the USB hub cable
USB In
Audio InAudio Out
AC VGA
DVI
PC
S-VIDOUT
COMPOUT
SERIAL
ETHERNET
OUT
IN
1394
USB
USB In

Setting Up the Monitor
3–14 User’s Guide
8. Read the following warning, and then connect the power cord
to the monitor and to an electrical wall outlet.
Connecting the power cord
wWARNING: To reduce the risk of electric shock or damage to your
equipment:
■Do not disable the power cord grounding plug. The grounding
plug is an important safety feature. Plug the power cord into a
grounded (earthed) electrical outlet.
■Be sure that the grounded power outlet you plug the power cord
into is easily accessible to the operator and located as close to
the equipment as possible. A power cord should be routed so
that it is not likely to be walked on or pinched by items placed
upon it or against it.
■Do not place anything on power cords or cables. Arrange them
so that no one may accidentally step on or trip over them. Do not
pull on a cord or cable.
■See “Power Cord Set Requirements” in Appendix B for
additional information.
USB In
Audio InAudio Out
AC VGA
DVI
PC
AC

Setting Up the Monitor
User’s Guide 3–15
9. Place the cables through the two cable management clasps on
the back of the monitor base. See illustration in “Cable
Management” in this chapter.
10. Adjust the monitor height and angle.
11. Turn on the PC, the monitor, and any other attached devices.
12. Adjust the display using the Menu button, the Adjust buttons,
and the Auto/Select button. If the monitor does not function
correctly, configure the monitor as described in “Using the
Auto-Adjustment Function” on page 4–3.
Cable Management
You can place the cables through the two cable management
clasps at the back of the monitor base to neatly organize all of the
cables of the monitor.
USB In
Audio InAudio Out
AC VGA
DVI
PC

Setting Up the Monitor
3–16 User’s Guide
Connecting USB Devices to the Monitor
You can connect two USB devices, such as a digital camcorder or
a USB flash drive, to your monitor.
✎You must connect the USB hub cable from the monitor to the PC to
enable the USB 2.0 ports on the monitor. Refer to step 7 in the
section “Connecting the Monitor to the PC.”
Connecting USB devices

User’s Guide 4–1
4
Operating the Monitor
CD Software and Utilities
The CD that comes with this monitor contains files you can install
on your PC:
■An INF file
■An ICM file
■Auto-adjustment pattern utility
■Adobe Acrobat Reader
The auto-adjustment pattern utility is a single pattern program that
helps improve the picture quality of your VGA (analog) input
monitor. See “Using the Auto-Adjustment Function” in this chapter.
Adobe Acrobat Reader can be installed from the menu.
The Information File
This monitor is Windows Plug and Play compatible, and the
monitor works correctly without installing the INF file. The INF file
enables the PC to communicate with the monitor and use all the
monitor features. The INF file defines monitor resources used by
Microsoft® Windows® operating systems to ensure monitor
compatibility with your PC’s graphics adapter.
Monitor Plug and Play compatibility requires that the PC’s graphics
card is VESA DDC2 compliant and that the monitor connects
directly to the graphics card. Plug and Play does not work through
separate BNC-type connectors or through distribution buffers or
boxes. You may have to install the INF file from the disc if these
conditions are not met.

Operating the Monitor
4–2 User’s Guide
The Image Color Matching File
The ICM files provide more accurate color representation by
supplying data to graphics programs to provide consistent color
matching from monitor screen to printer, or from scanner to the
monitor screen. The ICM files contain a monitor color system
profile. These files are activated from within graphics programs
that support this feature.
✎The ICM color profile is written in accordance with the
International Color Consortium (ICC) Profile Format Specification.
Installing INF and ICM Files
If you determine that you need to update these files, you can install
INF and ICM files from the disc, or download them from the
Internet.
Installing from the CD
To install INF and ICM files on your PC from the CD:
1. Insert the CD in your disc drive. The CD menu displays.
2. View the “INF and ICM Readme” file (in English only).
3. Select Install INF and ICM Files in the CD menu.
4. Follow the onscreen instructions.
5. After the files are installed, restart the PC.
6. Ensure that the proper resolutions and refresh rates appear in
the Display Control Panel settings. Refer to your Windows
operating system documentation for more information.
✎You may need to install the digitally signed monitor INF or ICM
files manually from the CD, in the event of an installation error.
Refer to the “INF and ICM Readme” file on the CD for instructions
(in English only).

Operating the Monitor
User’s Guide 4–3
Downloading from the World Wide Web
To download the latest version of INF and ICM files from the
HP Support Web site:
1. Refer to: http://www.hp.com/support
2. Select your country/region.
3. Select Download Drivers and Software.
4. Enter the model number for your monitor to go to the software
download pages for your monitor.
5. Download and install the INF and ICM files using the
instructions in the download pages.
Using the Auto-Adjustment Function
You can easily optimize the screen performance for the VGA
(analog) input by using the Auto/Select button on the monitor and
the auto-adjustment pattern software utility on the CD provided.
Do not use this procedure if your monitor is using a DVI input. If
your monitor is using a VGA (analog) input, this procedure can
correct the following image quality conditions:
■Fuzzy or unclear focus
■Ghosting, streaking, or shadowing effects
■Faint vertical bars
■Thin, horizontal scrolling lines
■An off-center picture

Operating the Monitor
4–4 User’s Guide
To use the auto-adjustment feature:
1. Allow the monitor to warm up for 20 minutes before adjusting.
2. Press the Auto/Select button on the monitor front panel.
❏You can also press the Menu button, then select
Auto-Adjustment from the OSD Main Menu. See
“Adjusting Monitor Settings” in this chapter.
❏If the result is not satisfactory, continue with the procedure.
3. Insert the CD in your disc drive. The CD menu launches.
4. Select Open Auto-Adjustment Software.
5. The setup test pattern displays.
Auto-adjustment setup test pattern
6. Press the Auto/Select button on the monitor front panel to
produce a stable, centered image.

Operating the Monitor
User’s Guide 4–5
Front-Panel Buttons
The monitor buttons are located on the front panel.
Front-panel buttons
A B C D E F G
Item Label Function
A/–
(Vol down/minus)
Decreases the volume level of the monitor
speakers. Does not control volume of optional
subwoofer or optional external speakers (sold
separately).
B /+
(Vol up/plus)
Increases the volume level of the monitor
speakers. Does not control volume of optional
subwoofer or optional external speakers (sold
separately).
C Menu
(Onscreen display)
OSD Menu Active
Closes OSD.
(Also closes
setting screens
on OSD menu.)
OSD Inactive
Opens OSD.

Operating the Monitor
4–6 User’s Guide
D /–
(VGA/minus)
OSD Menu Active
Navigates down or
left browse, and
adjusts settings
down.
OSD Inactive
Selects the VGA (analog)
video input.
E/+
(DVI/plus)
OSD Menu Active
Navigates up or
right browse, and
adjusts settings up.
OSD Inactive
Selects the DVI video
input (select models
only).
F Auto/Select OSD Menu Active
Acts as an Enter
(Select) key to
select setting
screen options.
OSD Inactive
Starts auto-adjustment,
which automatically
adjusts the display to the
ideal setting (VGA input
only).
G
Power
Power switch
Turns monitor on
and to standby
(sleep mode).
Power light
Displays blue when
monitor is fully powered.
Displays amber when
monitor is in sleep mode.
Item Label Function

Operating the Monitor
User’s Guide 4–7
Using the Onscreen Display
1. If the monitor is not already on, press the Power switch (G) to
turn on the monitor.
2. To access the OSD menu, press the Menu button (C). The
OSD Main Menu displays.
Auto Adjustment appears for VGA (analog) connections only.
3. To access the Advanced OSD menu, press the Menu button
again. The OSD Advanced Menu displays. See “Adjusting
Monitor Settings” in this chapter for more information.
4. To navigate through the Main or Advanced OSD menu, press
the + (Plus) button (E) on the monitor’s front panel to scroll up,
or the – D (Minus) button ( ) to scroll in reverse. Then press the
Auto/Select button (F) to select the highlighted function.
❏The menu moves to the top if you scroll down at the bottom
of the selections. The menu moves to the bottom if you
scroll up at the top of the selections.
5. To adjust the scale of a selected item, press the + or – buttons.
6. Select Save and Return.
❏If you don’t want to save the setting, select Cancel from
the Advanced Menu or Exit from the Main Menu.
7. Press the Menu button to exit the OSD.
✎If the buttons remain untouched for 30 seconds (factory default)
while displaying a menu, new adjustments and settings (except for
brightness and contrast) revert to previous settings. The menu then
closes.

Operating the Monitor
4–8 User’s Guide
Adjusting Monitor Settings
The screen adjustments are set in the OSD menus. Two OSD menus
are available:
■Main
■Advanced
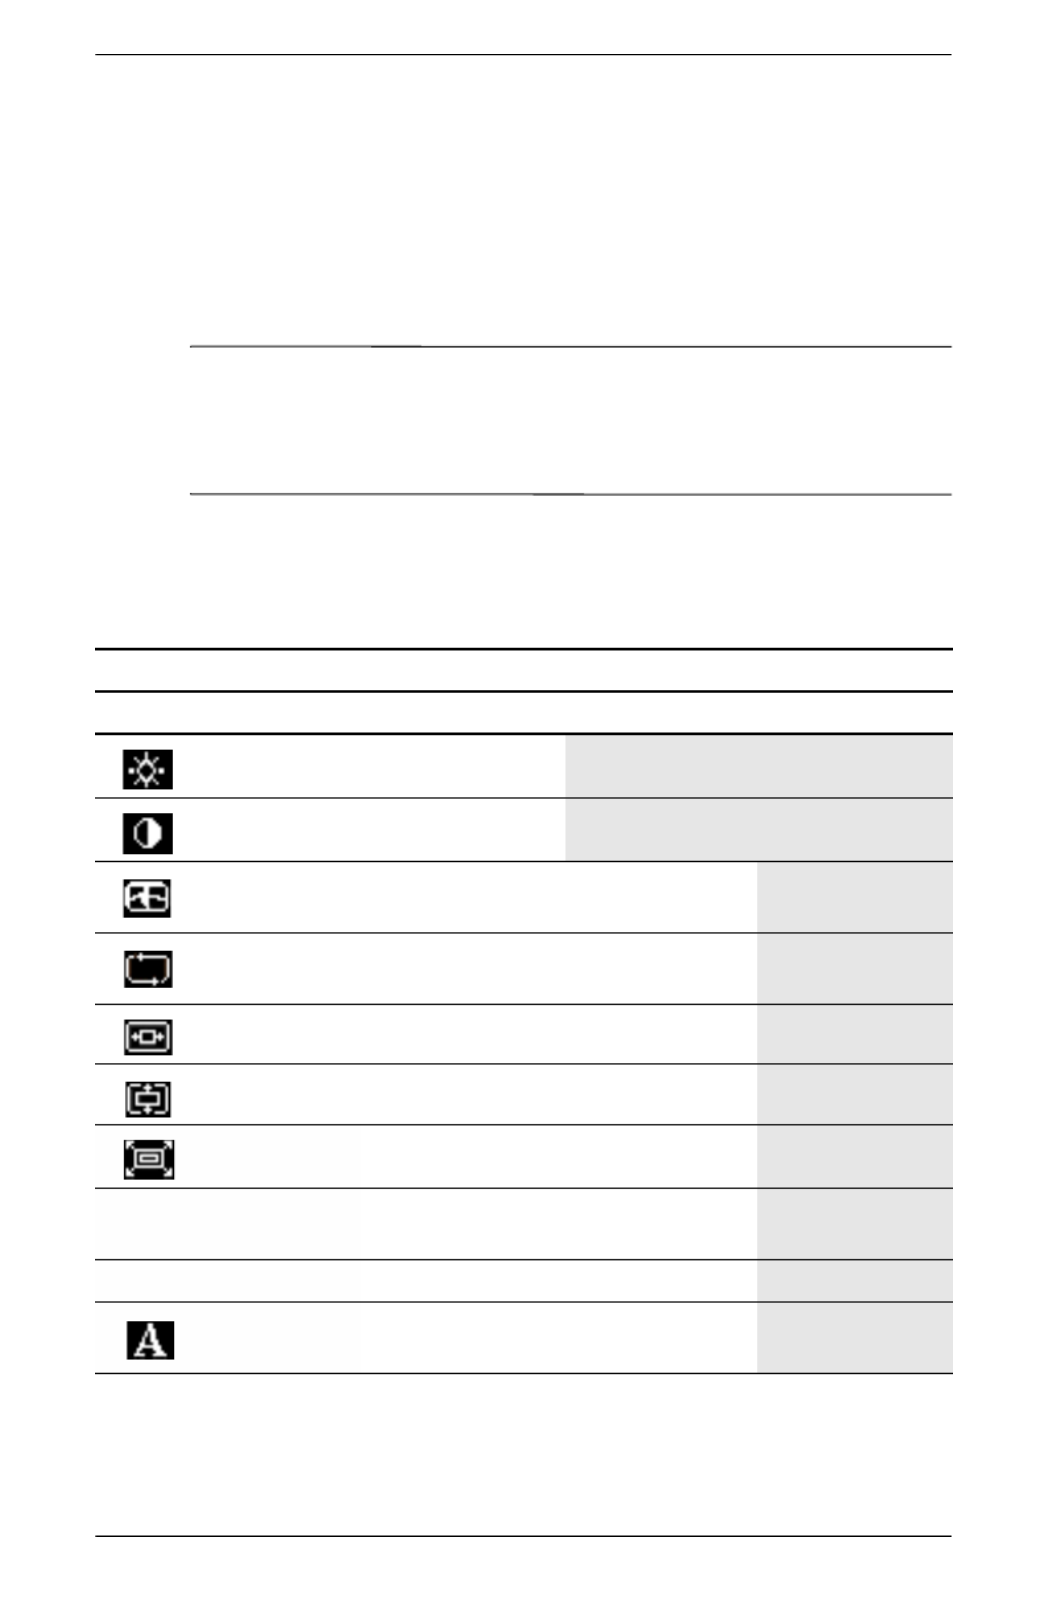
Main Menu
To access the Main Menu, press the Menu button on the monitor.
The Main Menu level 1 displays.
The following table describes Main Menu selections and levels.
*Auto Adjustment appears for VGA (analog) connections only.
Main Menu
Icon Menu level 1 Menu level 2
Brightness Adjustment Scale
Contrast Adjustment Scale
Auto Adjustment*
Advanced Menu
Exit
Operating the Monitor
User’s Guide 4–9
Advanced Menu
To access the Advanced Menu, press the Menu button again
(twice), or select Advanced Menu from the Main Menu. The
Advanced Menu level 1 displays.
✎After selecting the Advanced Menu from the Main Menu, the
Advanced Menu remains the default OSD on subsequent
power-ups of the monitor until the Main Menu is selected or factory
reset is applied.
The Advanced Menu has up to three levels and can be viewed in
one of the available languages. The following table describes
Advanced Menu selections, levels, and factory presets.
Advanced Menu
Level 1 Level 2 Level 3 Factory Preset
Brightness Adjustment Scale
Contrast Adjustment Scale
Image Control
Auto Adjustment
(VGA analog only)
Horizontal Position Adjustment Scale
Vertical Position Adjustment Scale
Custom Scaling Fill to Screen
Fill to Aspect
Ratio
One to One
Sharpness
(non-native modes)
Adjustment Scale

Operating the Monitor
4–10 User’s Guide
Clock Adjustment Scale
Clock Phase Adjustment Scale
Cancel
Save and Return
Color 9300 K
6500 K
Custom Color RGB Color
Adjustment
Custom Color
Cancel
Save and Return
Language Deutsch
English English
Español
Français
Italiano
Nederlands
Cancel
Save and Return
Management
Power Saver On/Off Selection
Power On Recall On/Off Selection
Mode Display On/Off Selection
Power On
Status Display
On/Off Selection
Advanced Menu
Level 1 Level 2 Level 3 Factory Preset

Operating the Monitor
User’s Guide 4–11
Sleep Timer Timer Menu
Video Input Select Analog (VGA)
Digital (DVI)
Auto Detect
Basic Menu
Cancel
Save and Return
OSD Control
Horizontal Position Adjustment Scale
Vertical Position Adjustment Scale
OSD Timeout Adjustment Scale
OSD Transparency Adjustment Scale
Cancel
Save and Return
Information (displays
model/input data)
Factory Reset Yes
No
Exit
Advanced Menu
Level 1 Level 2 Level 3 Factory Preset

Operating the Monitor
4–12 User’s Guide
Selecting the Video Input Connectors
The two input connectors are:
■VGA connector (analog)
■DVI-D connector (digital) (select models only)
The monitor automatically determines which inputs have valid
video signals and displays the image. The video input can be
manually selected through the OSD feature or selected using the
monitor buttons by pressing the /– (Minus) button for VGA
(analog) input or the /+ (Plus) button for DVI (digital) input.
cCAUTION: Image retention (burn-in) may occur on monitors that
display the same static image on screen for a prolonged period of
time. To avoid image retention on your monitor screen, you should
always use a screen saver or turn off the monitor when it is not in use
for a prolonged period of time.
Termékspecifikációk
| Márka: | HP |
| Kategória: | Monitor |
| Modell: | F2105 |
Szüksége van segítségre?
Ha segítségre van szüksége HP F2105, tegyen fel kérdést alább, és más felhasználók válaszolnak Önnek
Útmutatók Monitor HP

20 Március 2025
12 Január 2025
31 December 2025
31 December 2025
31 December 2025
31 December 2025
31 December 2025
31 December 2025
22 December 2024
22 December 2024
Útmutatók Monitor
- Monitor Samsung
- Monitor PeakTech
- Monitor Sony
- Monitor Yamaha
- Monitor Fujitsu
- Monitor Acer
- Monitor LG
- Monitor Philips
- Monitor Pioneer
- Monitor Olympus
- Monitor SilverCrest
- Monitor Garmin
- Monitor RCF
- Monitor Bosch
- Monitor Panasonic
- Monitor Canon
- Monitor JVC
- Monitor Sharp
- Monitor Lenovo
- Monitor HyperX
- Monitor Toshiba
- Monitor Neumann
- Monitor Omron
- Monitor Hyundai
- Monitor Hisense
- Monitor BenQ
- Monitor Apple
- Monitor Emos
- Monitor Medion
- Monitor Vimar
- Monitor JBL
- Monitor TCL
- Monitor OSEE
- Monitor Viessmann
- Monitor Insignia
- Monitor LC-Power
- Monitor Dell
- Monitor Boss
- Monitor Crestron
- Monitor Gigabyte
- Monitor Tripp Lite
- Monitor Xerox
- Monitor Thomson
- Monitor Speco Technologies
- Monitor Hikvision
- Monitor Eurolite
- Monitor Epson
- Monitor V7
- Monitor Huawei
- Monitor Asus
- Monitor PEAQ
- Monitor Renkforce
- Monitor Haier
- Monitor Mitsubishi
- Monitor M-Audio
- Monitor AOC
- Monitor Citizen
- Monitor Westinghouse
- Monitor Hitachi
- Monitor Continental Edison
- Monitor Asrock
- Monitor Ring
- Monitor Alpine
- Monitor Optoma
- Monitor SPL
- Monitor Smart
- Monitor Dahua Technology
- Monitor Viewsonic
- Monitor Denver
- Monitor Dynaudio
- Monitor Ernitec
- Monitor Qian
- Monitor Joy-It
- Monitor MSI
- Monitor Daewoo
- Monitor Tesla
- Monitor Kali Audio
- Monitor Godox
- Monitor Cisco
- Monitor Newline
- Monitor Behringer
- Monitor APC
- Monitor KRK
- Monitor Cooler Master
- Monitor Chauvet
- Monitor Shure
- Monitor PreSonus
- Monitor Archos
- Monitor Deltaco
- Monitor Tannoy
- Monitor Plantronics
- Monitor Kogan
- Monitor Honeywell
- Monitor SMART Technologies
- Monitor Marshall
- Monitor Kindermann
- Monitor Alesis
- Monitor Velleman
- Monitor Prestigio
- Monitor Monacor
- Monitor IK Multimedia
- Monitor Blaupunkt
- Monitor NZXT
- Monitor Yealink
- Monitor Razer
- Monitor Samson
- Monitor Jay-Tech
- Monitor Mackie
- Monitor Posiflex
- Monitor Peerless-AV
- Monitor Abus
- Monitor AG Neovo
- Monitor Iiyama
- Monitor Konig
- Monitor Seiki
- Monitor 3M
- Monitor ARRI
- Monitor GlobalTronics
- Monitor Jensen
- Monitor Pyle
- Monitor AVer
- Monitor Sanyo
- Monitor Salora
- Monitor IFM
- Monitor DataVideo
- Monitor Maxell
- Monitor Atlona
- Monitor Schneider
- Monitor AJA
- Monitor Brandson
- Monitor Danfoss
- Monitor Vorago
- Monitor Barco
- Monitor NEC
- Monitor Element
- Monitor Marshall Electronics
- Monitor Yorkville
- Monitor Elo
- Monitor IStarUSA
- Monitor Provision-ISR
- Monitor Postium
- Monitor Orion
- Monitor Palmer
- Monitor EverFocus
- Monitor Elvid
- Monitor Gamber-Johnson
- Monitor Focal
- Monitor Adj
- Monitor Legamaster
- Monitor Wohler
- Monitor Packard Bell
- Monitor Vitek
- Monitor Planar
- Monitor Mobile Pixels
- Monitor CSL
- Monitor Newstar
- Monitor SWIT
- Monitor RGBlink
- Monitor Kramer
- Monitor ART
- Monitor AMX
- Monitor Alienware
- Monitor Emachines
- Monitor Caliber
- Monitor Maxdata
- Monitor Sunstech
- Monitor Sunny
- Monitor BlueBuilt
- Monitor Marquant
- Monitor Da-Lite
- Monitor ProXtend
- Monitor Kubo
- Monitor GeoVision
- Monitor LaCie
- Monitor InFocus
- Monitor Midas
- Monitor Festo
- Monitor Swissonic
- Monitor Waeco
- Monitor Ikan
- Monitor IHealth
- Monitor QSC
- Monitor Hannspree
- Monitor ESI
- Monitor Avocor
- Monitor Simrad
- Monitor Jung
- Monitor Genelec
- Monitor Interlogix
- Monitor Eizo
- Monitor POSline
- Monitor Peerless
- Monitor Atomos
- Monitor Mad Catz
- Monitor Krom
- Monitor Monoprice
- Monitor Promethean
- Monitor Odys
- Monitor Fostex
- Monitor Prowise
- Monitor Terra
- Monitor Neets
- Monitor Stairville
- Monitor Soundstream
- Monitor Xoro
- Monitor HKC
- Monitor I3-Technologies
- Monitor CTOUCH
- Monitor Ozone
- Monitor HoverCam
- Monitor Ibm
- Monitor BOOX
- Monitor Aputure
- Monitor Drawmer
- Monitor Blue Sky
- Monitor Zalman
- Monitor Iadea
- Monitor Advantech
- Monitor Hercules
- Monitor Sonifex
- Monitor Avantone Pro
- Monitor Ganz
- Monitor Extron
- Monitor Belinea
- Monitor Adam
- Monitor Triton
- Monitor ITek
- Monitor Akuvox
- Monitor Antelope Audio
- Monitor MicroTouch
- Monitor X-Rite
- Monitor EKO
- Monitor ONYX
- Monitor IBoardTouch
- Monitor Mirai
- Monitor Elite Screens
- Monitor Mitsai
- Monitor Skytronic
- Monitor TV One
- Monitor Christie
- Monitor Hanwha
- Monitor COMMBOX
- Monitor Yiynova
- Monitor Pelco
- Monitor Lilliput
- Monitor LightZone
- Monitor AOpen
- Monitor Planet Audio
- Monitor EC Line
- Monitor Datacolor
- Monitor Fluid
- Monitor HELGI
- Monitor Desview
- Monitor Syscom
- Monitor Allsee
- Monitor Alogic
- Monitor Night Owl
- Monitor ProDVX
- Monitor Varad
- Monitor PureTools
- Monitor DoubleSight
- Monitor CTL
- Monitor Game Factor
- Monitor Nixeus
- Monitor Chimei
- Monitor Blue Sea
- Monitor AMCV
- Monitor Faytech
- Monitor Hamlet
- Monitor Wyse - Dell
- Monitor Approx
- Monitor Bauhn
- Monitor TVLogic
- Monitor Feelworld
- Monitor GeChic
- Monitor Oecolux
- Monitor ADS-TEC
- Monitor Satco
- Monitor Casalux
- Monitor Positivo
- Monitor Jupiter
- Monitor Transvideo
- Monitor Innocn
- Monitor KeepOut
- Monitor Shimbol
- Monitor Raysgem
- Monitor Motrona
- Monitor Ikegami
- Monitor AORUS
- Monitor Portkeys
- Monitor Mimo Monitors
- Monitor Enttec
- Monitor American Dynamics
- Monitor AIS
- Monitor Eve Audio
- Monitor Wortmann AG
- Monitor Viotek
- Monitor Vidi-Touch
- Monitor KTC
- Monitor CoolerMaster
- Monitor Atlantis Land
- Monitor HEDD
- Monitor Colormetrics
- Monitor Monkey Banana
- Monitor SmallHD
- Monitor UPERFECT
- Monitor GVision
- Monitor Voxicon
- Monitor Mybeo
- Monitor Bearware
- Monitor IOIO
- Monitor DTEN
- Monitor Cocopar
- Monitor Titan Army
- Monitor Xenarc
- Monitor Delvcam
- Monitor Wimaxit
- Monitor BookIT
Legújabb útmutatók Monitor

9 Április 2025

9 Április 2025

9 Április 2025

8 Április 2025
8 Április 2025

5 Április 2025

5 Április 2025

4 Április 2025

2 Április 2025
2 Április 2025