Használati útmutató HP EliteBook 865 G10
Olvassa el alább 📖 a magyar nyelvű használati útmutatót HP EliteBook 865 G10 (96 oldal) a laptop kategóriában. Ezt az útmutatót 9 ember találta hasznosnak és 2 felhasználó értékelte átlagosan 4.5 csillagra
Oldal 1/96

User Guide
SUMMAR
SUMMAR
SUMMAR
SUMMARSUMMARY
Y
Y
YY
This guide provides information about components, network connection, power management, security, backing
up, and more.

L
L
L
LLegal inf
egal inf
egal inf
egal infegal information
ormation
ormation
ormationormation
© Copyright 2023 HP Development
Company, L.P.
Bluetooth is a trademark owned by its
proprietor and used by HP Inc. under license.
The terms HDMI, HDMI High-Definition
Multimedia Interface, and the HDMI Logo
are trademarks or registered trademarks
of HDMI Licensing Administrator, Inc.
Intel, Celeron, Pentium, and Thunderbolt
are trademarks of Intel Corporation
or its subsidiaries in the U.S. and/or
other countries. Windows is a registered
trademark of Microsoft Corporation in
the United States and/or other countries.
NVIDIA and the NVIDIA logo are trademarks
and/or registered trademarks of NVIDIA
Corporation in the U.S. and other countries.
USB Type-C® and USB-C® are registered
trademarks of USB Implementers Forum.
DisplayPort™ and the DisplayPort™ logo are
trademarks owned by the Video Electronics
Standards Association (VESA®) in the United
States and other countries. Miracast® is a
registered trademark of Wi-Fi Alliance.
The information contained herein is subject
to change without notice. The only
warranties for HP products and services are
set forth in the express warranty statements
accompanying such products and services.
Nothing herein should be construed as
constituting an additional warranty. HP shall
not be liable for technical or editorial errors
or omissions contained herein.
First Edition: March 2023
Document Part Number: N34076-001
Pr
Pr
Pr
PrProduct notice
oduct notice
oduct notice
oduct noticeoduct notice
This user guide describes features that are
common to most models. Some features
might not be available on your computer.
Not all features are available in all
editions or versions of Windows. Systems
may require upgraded and/or separately
purchased hardware, drivers, software
or BIOS update to take full advantage
of Windows functionality. Windows is
automatically updated, which is always
enabled. High-speed internet and Microsoft
account required. ISP fees may apply and
additional requirements may apply over time
for updates. See http://www.windows.com.
If your pr
If your pr
If your pr
If your prIf your product ships with Windo
oduct ships with Windo
oduct ships with Windo
oduct ships with Windooduct ships with Windows in S
ws in S
ws in S
ws in S ws in S
Mode:
Mode:
Mode:
Mode:Mode: Windows in S Mode works exclusively
with apps from the Microsoft Store within
Windows. Certain default settings, features,
and apps cannot be changed. Some
accessories and apps that are compatible
with Windows may not work (including some
antivirus, PDF writers, driver utilities, and
accessibility apps), and performance may
vary, even if you switch out of S Mode. If you
switch to Windows, you cannot switch back
to S Mode. Learn more at Windows.com/
SmodeFAQ.
To access the latest user guides, go to
http://www.hp.com/support, and follow the
instructions to find your product. Then select
Manuals
Manuals
Manuals
ManualsManuals.
Softw
Softw
Softw
SoftwSoftware t
are t
are t
are tare terms
erms
erms
ermserms
By installing, copying, downloading, or
otherwise using any software product
preinstalled on this computer, you agree
to be bound by the terms of the HP End
User License Agreement (EULA). If you
do not accept these license terms, your
sole remedy is to return the entire unused
product (hardware and software) within 14
days for a full refund subject to the refund
policy of your seller.
For any further information or to request
a full refund of the price of the computer,
please contact your seller.

Saf
Saf
Saf
SafSafety w
ety w
ety w
ety wety warning notice
arning notice
arning notice
arning noticearning notice
Reduce the possibility of heat-related injuries or of overheating the computer by following the practices
described.
W
W
W
WWARNING!
ARNING!
ARNING!
ARNING!ARNING! To reduce the possibility of heat-related injuries or of overheating the computer, do not
place the computer directly on your lap or obstruct the computer air vents. Use the computer only on a
hard, flat surface. Do not allow another hard surface, such as an adjoining optional printer, or a soft
surface, such as pillows or rugs or clothing, to block airflow. Also, do not allow the AC adapter to come
into contact with the skin or a soft surface, such as pillows or rugs or clothing, during operation. The
computer and the AC adapter comply with the user-accessible surface temperature limits defined by
applicable safety standards.
iii

Pr
Pr
Pr
PrProcessor configur
ocessor configur
ocessor configur
ocessor configurocessor configuration setting (selec
ation setting (selec
ation setting (selec
ation setting (selecation setting (select pr
t pr
t pr
t prt products only)
oducts only)
oducts only)
oducts only)oducts only)
Important information about processor configurations.
IMPORT
IMPORT
IMPORT
IMPORTIMPORTANT
ANT
ANT
ANTANT:
:
:
:: Select computer products are configured with an Intel® Pentium® N35xx/N37xx series or
a Celeron® N28xx/N29xx/N30xx/N31xx series processor and a Windows® operating system. If your
If your
If your
If your If your
computer is configur
computer is configur
computer is configur
computer is configurcomputer is configured as described, do not change the pr
ed as described, do not change the pr
ed as described, do not change the pr
ed as described, do not change the pred as described, do not change the processor configur
ocessor configur
ocessor configur
ocessor configurocessor configuration setting in
ation setting in
ation setting in
ation setting in ation setting in
msconfig.e
msconfig.e
msconfig.e
msconfig.emsconfig.ex
x
x
xxe fr
e fr
e fr
e fre from 4 or 2 processor
om 4 or 2 processor
om 4 or 2 processor
om 4 or 2 processorom 4 or 2 processors to 1 pr
s to 1 pr
s to 1 pr
s to 1 prs to 1 processor
ocessor
ocessor
ocessorocessor.
.
.
.. If you do so, your computer will not restart. You will
have to perform a factory reset to restore the original settings.
iv Processor configuration setting (select products only)

About this guide
About this guide
About this guide
About this guideAbout this guide
This guide provides basic information for using and upgrading this product.
W
W
W
WWARNING!
ARNING!
ARNING!
ARNING!ARNING! Indicates a hazardous situation that, if not avoided, result in serious injury or death.
could
could
could
couldcould
C
C
C
CCAUTION:
AUTION:
AUTION:
AUTION:AUTION: Indicates a hazardous situation that, if not avoided, could
could
could
couldcould result in minor or moderate
injury.
IMPOR
IMPOR
IMPOR
IMPORIMPORT
T
T
TTANT
ANT
ANT
ANTANT:
:
:
:: Indicates information considered important but not hazard-related (for example,
messages related to property damage). Warns the user that failure to follow a procedure exactly as
described could result in loss of data or in damage to hardware or software. Also contains essential
information to explain a concept or to complete a task.
NO
NO
NO
NONOTE:
TE:
TE:
TE:TE: Contains additional information to emphasize or supplement important points of the main text.
TIP:
TIP:
TIP:
TIP:TIP: Provides helpful hints for completing a task.
v

T
T
T
TT
able o
able o
able o
able oable of cont
f cont
f cont
f contf conten
en
en
enents
ts
ts
tsts
1 Getting s
1 Getting s
1 Getting s
1 Getting s1 Getting start
tart
tart
tarttarted
ed
ed
eded .......................................................................................................................................................................................................................................
.......................................................................................................................................................................................................................................
.......................................................................................................................................................................................................................................
.............................................................................................................................................................................................................................................................................................................................................................................................................................................................................. 1
1
1
11
Finding information.......................................................................................................................................................................................................................1
2 Components
2 Components
2 Components
2 Components2 Components...........................................................................................................................................................................................................................................
...........................................................................................................................................................................................................................................
...........................................................................................................................................................................................................................................
...................................................................................................................................................................................................................................................................................................................................................................................................................................................................................... 3
3
3
33
Locating hardware....................................................................................................................................................................................................................... 3
Locating software......................................................................................................................................................................................................................... 3
Right........................................................................................................................................................................................................................................................ 3
Left........................................................................................................................................................................................................................................................... 4
Display .................................................................................................................................................................................................................................................. 5
Low blue light mode (select products only)..................................................................................................................................................... 5
Keyboard area ..................................................................................................................................................................................................................................7
Touchpad ..................................................................................................................................................................................................................................7
Touchpad settings ..................................................................................................................................................................................................7
Adjusting touchpad settings................................................................................................................................................................7
Turning on the touchpad.........................................................................................................................................................................7
Touchpad components.......................................................................................................................................................................................7
Lights .......................................................................................................................................................................................................................................... 8
Button and fingerprint reader ..................................................................................................................................................................................9
Special keys.........................................................................................................................................................................................................................10
Action keys ...........................................................................................................................................................................................................................12
Hot keys ..................................................................................................................................................................................................................................13
Bottom ................................................................................................................................................................................................................................................14
Rear ......................................................................................................................................................................................................................................................14
Labels ..................................................................................................................................................................................................................................................15
Using a SIM card (select products only).....................................................................................................................................................................16
Determining the correct SIM card size for your computer...............................................................................................................16
Inserting a nano SIM card ..........................................................................................................................................................................................17
3 Netw
3 Netw
3 Netw
3 Netw3 Network connections.....................................................................................................................................................................................................................
ork connections.....................................................................................................................................................................................................................
ork connections.....................................................................................................................................................................................................................
ork connections.....................................................................................................................................................................................................................ork connections.....................................................................................................................................................................................................................18
18
18
1818
Connecting to a wireless network..................................................................................................................................................................................18
Using the wireless controls......................................................................................................................................................................................18
Wireless button .....................................................................................................................................................................................................18
Operating system controls............................................................................................................................................................................18
Connecting to a WLAN ................................................................................................................................................................................................19
Using HP Mobile Broadband (select products only)...............................................................................................................................19
Locating mobile operator settings ..........................................................................................................................................................19
Connecting with HP Mobile Broadband..............................................................................................................................................20
Using eSIM (select products only)......................................................................................................................................................................20
Using GPS (select products only)........................................................................................................................................................................ 20
Using Bluetooth wireless devices (select products only)................................................................................................................... 21
vi

Connecting Bluetooth devices................................................................................................................................................................... 21
Using NFC to share information (select products only) ........................................................................................................... 21
Connecting to a wired network........................................................................................................................................................................................ 22
Connecting to a local area network (LAN) (select products only)............................................................................................... 22
Using HP LAN-Wireless Protection (select products only)................................................................................................................ 22
Using HP MAC Address Pass Through (select products only).................................................................................................................. 23
4 Navigating the scr
4 Navigating the scr
4 Navigating the scr
4 Navigating the scr4 Navigating the screen
een
een
eeneen..................................................................................................................................................................................................................
..................................................................................................................................................................................................................
..................................................................................................................................................................................................................
....................................................................................................................................................................................................................................................................................................................................................................................................................................25
25
25
2525
Using touchpad and touch screen gestures ......................................................................................................................................................... 25
Tap.............................................................................................................................................................................................................................................. 25
Two-finger pinch zoom................................................................................................................................................................................................ 25
Two-finger slide (touchpad and precision touchpad)...........................................................................................................................26
Two-finger tap (touchpad and precision touchpad).............................................................................................................................. 26
Three-finger tap (touchpad and precision touchpad)..........................................................................................................................26
Four-finger tap (touchpad and precision touchpad) ..............................................................................................................................27
Three-finger swipe (touchpad and precision touchpad).....................................................................................................................27
Four-finger swipe (precision touchpad)...........................................................................................................................................................27
One-finger slide (touch screen)............................................................................................................................................................................ 28
Using an optional keyboard or mouse........................................................................................................................................................................ 28
Using an on-screen keyboard (select products only) ...................................................................................................................................... 28
5 Ent
5 Ent
5 Ent
5 Ent5 Entertainment f
ertainment f
ertainment f
ertainment fertainment featur
eatur
eatur
eatureatures
es
es
eses...............................................................................................................................................................................................................
...............................................................................................................................................................................................................
...............................................................................................................................................................................................................
.............................................................................................................................................................................................................................................................................................................................................................................................................................. 29
29
29
2929
Using a camera (select products only).......................................................................................................................................................................29
Using audio..................................................................................................................................................................................................................................... 29
Connecting speakers.................................................................................................................................................................................................. 29
Connecting headphones ..........................................................................................................................................................................................29
Connecting headsets .................................................................................................................................................................................................30
Using sound settings ...................................................................................................................................................................................................30
Viewing or changing sound settings.....................................................................................................................................................30
Using the control panel to view and control audio settings.................................................................................................30
Using video .....................................................................................................................................................................................................................................30
Connecting a Thunderbolt device using a USB Type-C cable........................................................................................................31
Connecting video devices using an HDMI cable..................................................................................................................................... 32
Connecting a high-definition TV or monitor using HDMI ........................................................................................................ 32
Setting up HDMI audio..................................................................................................................................................................................... 32
Turning on HDMI audio .........................................................................................................................................................................33
Turning off HDMI audio.........................................................................................................................................................................33
Discovering and connecting wired displays using MultiStream Transport.........................................................................33
Connecting displays to computers with NVIDIA graphics (with an optional hub)................................................ 33
Connecting displays to computers with Intel graphics (with an optional hub).......................................................34
Connecting displays to computers with Intel graphics (with a built-in hub)..............................................................34
Discovering and connecting to Miracast-compatible wireless displays (select products only).......................... 34
Discovering and connecting to Intel WiDi certified displays (select Intel products only) .........................................35
Connecting to Intel WiDi certified displays......................................................................................................................................35
Opening Intel WiDi...............................................................................................................................................................................................35
Using data transfer................................................................................................................................................................................................................... 35
Connecting devices to a USB Type-C port (select products only)..............................................................................................35
vii

6 Managing pow
6 Managing pow
6 Managing pow
6 Managing pow6 Managing power
er
er
erer................................................................................................................................................................................................................................
................................................................................................................................................................................................................................
................................................................................................................................................................................................................................
................................................................................................................................................................................................................................................................................................................................................................................................................................................................37
37
37
3737
Using Sleep and Hibernation ............................................................................................................................................................................................37
Initiating and exiting Sleep........................................................................................................................................................................................37
Initiating and exiting Hibernation (select products only)...................................................................................................................38
Shutting down (turning off) the computer ...............................................................................................................................................................38
Using the Power icon .............................................................................................................................................................................................................. 39
Running on battery power...................................................................................................................................................................................................39
Using HP Fast Charge (select products only)............................................................................................................................................39
Displaying battery charge........................................................................................................................................................................................40
Finding battery information in HP Support Assistant (select products only).....................................................................40
Conserving battery power.......................................................................................................................................................................................40
Identifying low battery levels .................................................................................................................................................................................40
Resolving a low battery level................................................................................................................................................................................... 41
Resolving a low battery level when external power is available......................................................................................... 41
Resolving a low battery level when no power source is available....................................................................................41
Resolving a low battery level when the computer cannot exit Hibernation .............................................................. 41
Factory-sealed battery................................................................................................................................................................................................ 41
Running on external power................................................................................................................................................................................................. 42
7 Security
7 Security
7 Security
7 Security7 Security ...................................................................................................................................................................................................................................................
...................................................................................................................................................................................................................................................
...................................................................................................................................................................................................................................................
......................................................................................................................................................................................................................................................................................................................................................................................................................................................................................................43
43
43
4343
Protecting the computer ......................................................................................................................................................................................................43
Using passwords........................................................................................................................................................................................................................ 44
Setting passwords in Windows ............................................................................................................................................................................ 44
Setting passwords in Computer Setup.......................................................................................................................................................... 45
Managing a BIOS administrator password ................................................................................................................................................. 45
Setting a new BIOS administrator password.................................................................................................................................. 45
Changing a BIOS administrator password....................................................................................................................................... 46
Deleting a BIOS administrator password.......................................................................................................................................... 46
Entering a BIOS administrator password...........................................................................................................................................47
Using DriveLock Security Options ......................................................................................................................................................................47
Selecting Automatic DriveLock (select products only) ............................................................................................................47
Enabling Automatic DriveLock........................................................................................................................................................47
Disabling Automatic DriveLock......................................................................................................................................................48
Entering an Automatic DriveLock password........................................................................................................................ 48
Selecting manual DriveLock........................................................................................................................................................................ 49
Setting a DriveLock master password ..................................................................................................................................... 49
Enabling DriveLock and setting a DriveLock user password.............................................................................................. 50
Disabling DriveLock ...........................................................................................................................................................................................50
Entering a DriveLock password ................................................................................................................................................................. 51
Changing a DriveLock password ............................................................................................................................................................. 51
Windows Hello (select products only)......................................................................................................................................................................... 52
Using antivirus software....................................................................................................................................................................................................... 52
Using firewall software ..........................................................................................................................................................................................................52
Installing software updates................................................................................................................................................................................................53
Using HP Client Security (select products only)..................................................................................................................................................53
viii

Using HP TechPulse (select products only)............................................................................................................................................................. 53
Using an optional security cable (select products only)...............................................................................................................................53
Using a fingerprint reader (select products only) ..............................................................................................................................................54
8 Maint
8 Maint
8 Maint
8 Maint8 Maintenance
enance
enance
enanceenance .......................................................................................................................................................................................................................................
.......................................................................................................................................................................................................................................
.......................................................................................................................................................................................................................................
..............................................................................................................................................................................................................................................................................................................................................................................................................................................................................55
55
55
5555
Improving performance ........................................................................................................................................................................................................ 55
Using Disk Defragmenter .........................................................................................................................................................................................55
Using Disk Cleanup .......................................................................................................................................................................................................55
Using HP 3D DriveGuard (select products only) ......................................................................................................................................55
Identifying HP 3D DriveGuard status....................................................................................................................................................56
Updating programs and drivers......................................................................................................................................................................................56
Cleaning your computer.......................................................................................................................................................................................................56
Enabling HP Easy Clean (select products only)........................................................................................................................................56
Removing dirt and debris from your computer..........................................................................................................................................57
Cleaning your computer with a disinfectant................................................................................................................................................57
Caring for wood veneer (select products only) ........................................................................................................................................58
Traveling with or shipping your computer................................................................................................................................................................59
9 Backing up, r
9 Backing up, r
9 Backing up, r
9 Backing up, r9 Backing up, rest
est
est
estestoring, and r
oring, and r
oring, and r
oring, and roring, and recov
ecov
ecov
ecovecovering
ering
ering
eringering..............................................................................................................................................................................
..............................................................................................................................................................................
..............................................................................................................................................................................
............................................................................................................................................................................................................................................................................................................................................................60
60
60
6060
Backing up information and creating recovery media...................................................................................................................................60
Using Windows tools for backing up.................................................................................................................................................................60
Using the HP Cloud Recovery Download Tool to create recovery media (select products only).........................60
Restoring and recovering your system......................................................................................................................................................................60
Creating a system restore .......................................................................................................................................................................................61
Restoring and recovery methods........................................................................................................................................................................61
Recovering using HP Recovery media.............................................................................................................................................................61
Changing the computer boot order.................................................................................................................................................................. 62
Using HP Sure Recover (select products only)..........................................................................................................................................62
10 Computer Se
10 Computer Se
10 Computer Se
10 Computer Se10 Computer Setup (BIOS), TPM, and HP Sur
tup (BIOS), TPM, and HP Sur
tup (BIOS), TPM, and HP Sur
tup (BIOS), TPM, and HP Surtup (BIOS), TPM, and HP Sure Start
e Start
e Start
e Starte Start ..................................................................................................................................................
..................................................................................................................................................
..................................................................................................................................................
....................................................................................................................................................................................................................................................................................................63
63
63
6363
Using Computer Setup ..........................................................................................................................................................................................................63
Navigating and selecting in Computer Setup ..........................................................................................................................................63
Restoring factory settings in Computer Setup.........................................................................................................................................63
Updating the BIOS .........................................................................................................................................................................................................64
Determining the BIOS version ...................................................................................................................................................................64
Preparing for a BIOS update.......................................................................................................................................................................64
Downloading a BIOS update............................................................................................................................................................65
Installing a BIOS update......................................................................................................................................................................65
Changing the boot order using the f9 prompt ..........................................................................................................................................65
TPM BIOS settings (select products only) ..............................................................................................................................................................66
Using HP Sure Start (select products only).............................................................................................................................................................66
11 Using HP PC Har
11 Using HP PC Har
11 Using HP PC Har
11 Using HP PC Har11 Using HP PC Hardwar
dwar
dwar
dwardware Diagnostics
e Diagnostics
e Diagnostics
e Diagnosticse Diagnostics..................................................................................................................................................................................
..................................................................................................................................................................................
..................................................................................................................................................................................
....................................................................................................................................................................................................................................................................................................................................................................67
67
67
6767
Using HP PC Hardware Diagnostics Windows (select products only).................................................................................................67
Using an HP PC Hardware Diagnostics Windows hardware failure ID code........................................................................67
Accessing HP PC Hardware Diagnostics Windows...............................................................................................................................67
Accessing HP PC Hardware Diagnostics Windows from HP Support Assistant..................................................67
ix

Accessing HP PC Hardware Diagnostics Windows from the Start menu (select products only)............68
Downloading HP PC Hardware Diagnostics Windows........................................................................................................................68
Downloading the latest HP PC Hardware Diagnostics Windows version from HP.............................................68
Downloading the HP PC Hardware Diagnostics Windows from the Microsoft Store.......................................68
Downloading HP Hardware Diagnostics Windows by product name or number (select products
only) ...............................................................................................................................................................................................................................68
Installing HP PC Hardware Diagnostics Windows..................................................................................................................................69
Using HP PC Hardware Diagnostics UEFI ................................................................................................................................................................69
Using an HP PC Hardware Diagnostics UEFI hardware failure ID code..................................................................................69
Starting HP PC Hardware Diagnostics UEFI ...............................................................................................................................................69
Starting HP PC Hardware Diagnostics UEFI through HP Hotkey Support software (select products
only)............................................................................................................................................................................................................................................70
Downloading HP PC Hardware Diagnostics UEFI to a USB flash drive....................................................................................70
Downloading the latest HP PC Hardware Diagnostics UEFI version..............................................................................70
Downloading HP PC Hardware Diagnostics UEFI by product name or number (select products
only) ................................................................................................................................................................................................................................70
Using Remote HP PC Hardware Diagnostics UEFI settings (select products only).....................................................................71
Downloading Remote HP PC Hardware Diagnostics UEFI.................................................................................................................71
Downloading the latest Remote HP PC Hardware Diagnostics UEFI version...........................................................71
Downloading Remote HP PC Hardware Diagnostics UEFI by product name or number..................................71
Customizing Remote HP PC Hardware Diagnostics UEFI settings..............................................................................................71
12 Specifications
12 Specifications
12 Specifications
12 Specifications12 Specifications ...................................................................................................................................................................................................................................
...................................................................................................................................................................................................................................
...................................................................................................................................................................................................................................
......................................................................................................................................................................................................................................................................................................................................................................................................................................................................73
73
73
7373
Input power......................................................................................................................................................................................................................................73
Operating environment..........................................................................................................................................................................................................74
13 Electr
13 Electr
13 Electr
13 Electr13 Electros
os
os
osostatic dischar
tatic dischar
tatic dischar
tatic dischartatic discharge
ge
ge
gege..............................................................................................................................................................................................................76
..............................................................................................................................................................................................................76
..............................................................................................................................................................................................................76
..............................................................................................................................................................................................................76..............................................................................................................................................................................................................76
14 Accessibility
14 Accessibility
14 Accessibility
14 Accessibility14 Accessibility .......................................................................................................................................................................................................................................
.......................................................................................................................................................................................................................................
.......................................................................................................................................................................................................................................
..............................................................................................................................................................................................................................................................................................................................................................................................................................................................................7
7
7
777
7
7
77
HP and accessibility..................................................................................................................................................................................................................77
Finding the technology tools you need............................................................................................................................................................77
The HP commitment......................................................................................................................................................................................................77
International Association of Accessibility Professionals (IAAP)...................................................................................................78
Finding the best assistive technology..............................................................................................................................................................78
Assessing your needs ......................................................................................................................................................................................78
Accessibility for HP products......................................................................................................................................................................78
Standards and legislation ................................................................................................................................................................................................... 79
Standards............................................................................................................................................................................................................................. 79
Mandate 376 – EN 301 549 ............................................................................................................................................................................ 79
Web Content Accessibility Guidelines (WCAG)............................................................................................................................. 79
Legislation and regulations.....................................................................................................................................................................................80
Useful accessibility resources and links ..................................................................................................................................................................80
Organizations....................................................................................................................................................................................................................80
Educational institutions .............................................................................................................................................................................................80
Other disability resources ........................................................................................................................................................................................81
HP links....................................................................................................................................................................................................................................81
Contacting support...................................................................................................................................................................................................................81
x

Inde
Inde
Inde
IndeIndex................................................................................................................................................................................................................................................................
x................................................................................................................................................................................................................................................................
x................................................................................................................................................................................................................................................................
x................................................................................................................................................................................................................................................................x................................................................................................................................................................................................................................................................ 82
82
82
8282
xi

Getting s
Getting s
Getting s
Getting sGetting st
t
t
ttart
art
art
artarted
ed
ed
eded
1
1
1
11
This computer is a powerful tool designed to enhance your work and entertainment. Read this chapter to
learn about best practices after you set up your computer and where to find additional HP resources.
After you set up and register the computer, HP recommends the following steps to get the most out of
your smart investment:
TIP:
TIP:
TIP:
TIP:TIP: To quickly return to the computer Start screen from an open app or the Windows desktop, press
the Windows key on your keyboard. Pressing the Windows key again returns you to the previous screen.
●Connect t
Connect t
Connect t
Connect tConnect to the int
o the int
o the int
o the into the internet
ernet
ernet
erneternet—Set up your wired or wireless network so that you can connect to the
internet. For more information, see Network connections on page 18.
●Update y
Update y
Update y
Update yUpdate your antivirus softw
our antivirus softw
our antivirus softw
our antivirus softwour antivirus softwar
ar
ar
arare
e
e
ee—Protect your computer from damage caused by viruses. The
software is preinstalled on the computer. For more information, see Using antivirus software on
page 52.
●Get t
Get t
Get t
Get tGet to know y
o know y
o know y
o know yo know your computer
our computer
our computer
our computerour computer—Learn about your computer features. See Components on page 3
and Navigating the screen on page 25 for additional information.
●Find inst
Find inst
Find inst
Find instFind installed so
alled so
alled so
alled soalled softwar
ftwar
ftwar
ftwarftware
e
e
ee—Access a list of the software preinstalled on the computer:
Select the St
St
St
StStart
art
art
artart button, and then select .
All apps
All apps
All apps
All appsAll apps
‒ or –
Right-click the button, and then select
Start
Start
Start
StartStart Apps and Featur
Apps and Featur
Apps and Featur
Apps and FeaturApps and Features
es
es
eses.
●Back up your har
Back up your har
Back up your har
Back up your harBack up your hard driv
d driv
d driv
d drivd drive
e
e
ee—Create recovery discs or a recovery USB flash drive to back up your hard
drive. See Backing up, restoring, and recovering on page 60.
●Access HP Support Assist
Access HP Support Assist
Access HP Support Assist
Access HP Support AssistAccess HP Support Assistant app
ant app
ant app
ant appant app—For quick online support, open the HP Support Assistant
app (select products only). HP Support Assistant optimizes computer performance and resolves
problems using the latest software updates, diagnostic tools, and guided assistance. Select the
Sear
Sear
Sear
SearSearch
ch
ch
chch icon in the taskbar, type in the search box, and then select support HP Support Assist
HP Support Assist
HP Support Assist
HP Support AssistHP Support Assistant
ant
ant
antant.
Finding inf
Finding inf
Finding inf
Finding infFinding information
ormation
ormation
ormationormation
To locate resources that provide product details, how-to information, and more, use this table.
T
T
T
TT
able 1-
able 1-
able 1-
able 1-able 1-1
1
1
11 Additional inf
Additional inf
Additional inf
Additional infAdditional information
ormation
ormation
ormationormation
Resour
Resour
Resour
ResourResource
ce
ce
cece Conten
Conten
Conten
ContenContents
ts
ts
tsts
Setup Instructions
●Overview of computer setup and features
Getting started 1

T
T
T
TT
able 1-
able 1-
able 1-
able 1-able 1-1
1
1
11 Additional inf
Additional inf
Additional inf
Additional infAdditional information
ormation
ormation
ormationormation (continued)
(continued)
(continued)
(continued)(continued)
Resour
Resour
Resour
ResourResource
ce
ce
cece Conten
Conten
Conten
ContenContents
ts
ts
tsts
HP support
For HP support, go to https://www.hp.com/support, and
follow the instructions to find your product.
‒ or –
Select the Sear
Sear
Sear
SearSearch
ch
ch
chch icon in the taskbar, type in support
the search box, and then select HP Support Assist
HP Support Assist
HP Support Assist
HP Support AssistHP Support Assistant
ant
ant
antant.
‒ or –
Select the question mark icon (select products only) in
the taskbar.
●Online chat with an HP technician
●Support telephone numbers
●Replacement parts videos (select products only)
●Maintenance and service guides
●HP service center locations
Safety & Comfort Guide
To access this guide:
■Select the Sear
Sear
Sear
SearSearch
ch
ch
chch icon in the taskbar, type HP
Documentation in the search box, and then
select HP Document
HP Document
HP Document
HP DocumentHP Documentation
ation
ation
ationation.
‒ or –
■Go to http://www.hp.com/ergo.
IMPORT
IMPORT
IMPORT
IMPORTIMPORTANT
ANT
ANT
ANTANT:
:
:
:: You must be connected to the
internet to access the latest version of the user
guide.
●Proper workstation setup
●Guidelines for posture and work habits that increase your
comfort and decrease your risk of injury
●Electrical and mechanical safety information
Regulatory, Safety, and Environmental Notices
To access this document:
■Select the Sear
Sear
Sear
SearSearch
ch
ch
chch icon in the taskbar, type HP
Documentation in the search box, and then
select HP Document
HP Document
HP Document
HP DocumentHP Documentation
ation
ation
ationation.
●Important regulatory notices, including information about
Restrictions of Hazardous Substances (RoHS) and proper
battery disposal, if needed.
Limited Warranty
*
To access this document:
■Select the Sear
Sear
Sear
SearSearch
ch
ch
chch icon in the taskbar, type HP
Documentation in the search box, and then
select HP Document
HP Document
HP Document
HP DocumentHP Documentation
ation
ation
ationation.
‒ or –
■Go to http://www.hp.com/go/orderdocuments.
IMPORT
IMPORT
IMPORT
IMPORTIMPORTANT
ANT
ANT
ANTANT:
:
:
:: You must be connected to the
internet to access the latest version of the user
guide.
●Specific warranty information about this computer
*You can find your HP Limited Warranty located with the user guides on your product and/or on the CD or DVD provided in the
box. In some countries or regions, HP might provide a printed warranty in the box. For countries or regions where the warranty is
not provided in printed format, you can request a copy from http://www.hp.com/go/orderdocuments. For products purchased in
Asia Pacific, you can write to HP at POD, PO Box 161, Kitchener Road Post Office, Singapore 912006. Include your product name,
and your name, phone number, and postal address.
2 Chapter 1 Getting started

Components
Components
Components
ComponentsComponents
2
2
2
22
Your computer features top-rated components. This chapter provides details about your components,
where they are located, and how they work.
L
L
L
LLocating har
ocating har
ocating har
ocating harocating hardw
dw
dw
dwdwar
ar
ar
arare
e
e
ee
Use these instructions to find out what hardware is installed on your computer.
■Select the Sear
Sear
Sear
SearSearch
ch
ch
chch icon in the taskbar, type in the search box, and then select the device manager
Device Manager
Device Manager
Device Manager
Device ManagerDevice Manager app.
A list displays all the devices installed on your computer.
For information about system hardware components and the system BIOS version number, press
fn esc+ (select products only).
L
L
L
LLocating so
ocating so
ocating so
ocating soocating soft
ft
ft
ftftw
w
w
wwar
ar
ar
arare
e
e
ee
Use these instructions to find out what software is installed on your computer:
■Right-click the button, and then select
Start
Start
Start
StartStart Apps and Featur
Apps and Featur
Apps and Featur
Apps and FeaturApps and Features
es
es
eses.
Right
Right
Right
RightRight
Use the illustration and table to identify the components on the right side of the computer.
T
T
T
TT
able 2
able 2
able 2
able 2able 2-
-
-
--1
1
1
11 Right
Right
Right
RightRight-side components and their descriptions
-side components and their descriptions
-side components and their descriptions
-side components and their descriptions-side components and their descriptions
Component
Component
Component
ComponentComponent Description
Description
Description
DescriptionDescription
(
(
(
((1)
1)
1)
1)1) Magnetic pen attachment area (select
products only)
Holds an optional pen.
(2
(2
(2
(2(2)
)
)
)) SIM card slot (select products only) Supports a wireless subscriber identity module (SIM) card.
(3
(3
(3
(3(3)
)
)
)) Security cable slot Attaches an optional security cable to the computer.
NO
NO
NO
NONOTE:
TE:
TE:
TE:TE: The security cable is designed to act as a deterrent,
but it might not prevent the computer from being mishandled
or stolen.
Components 3
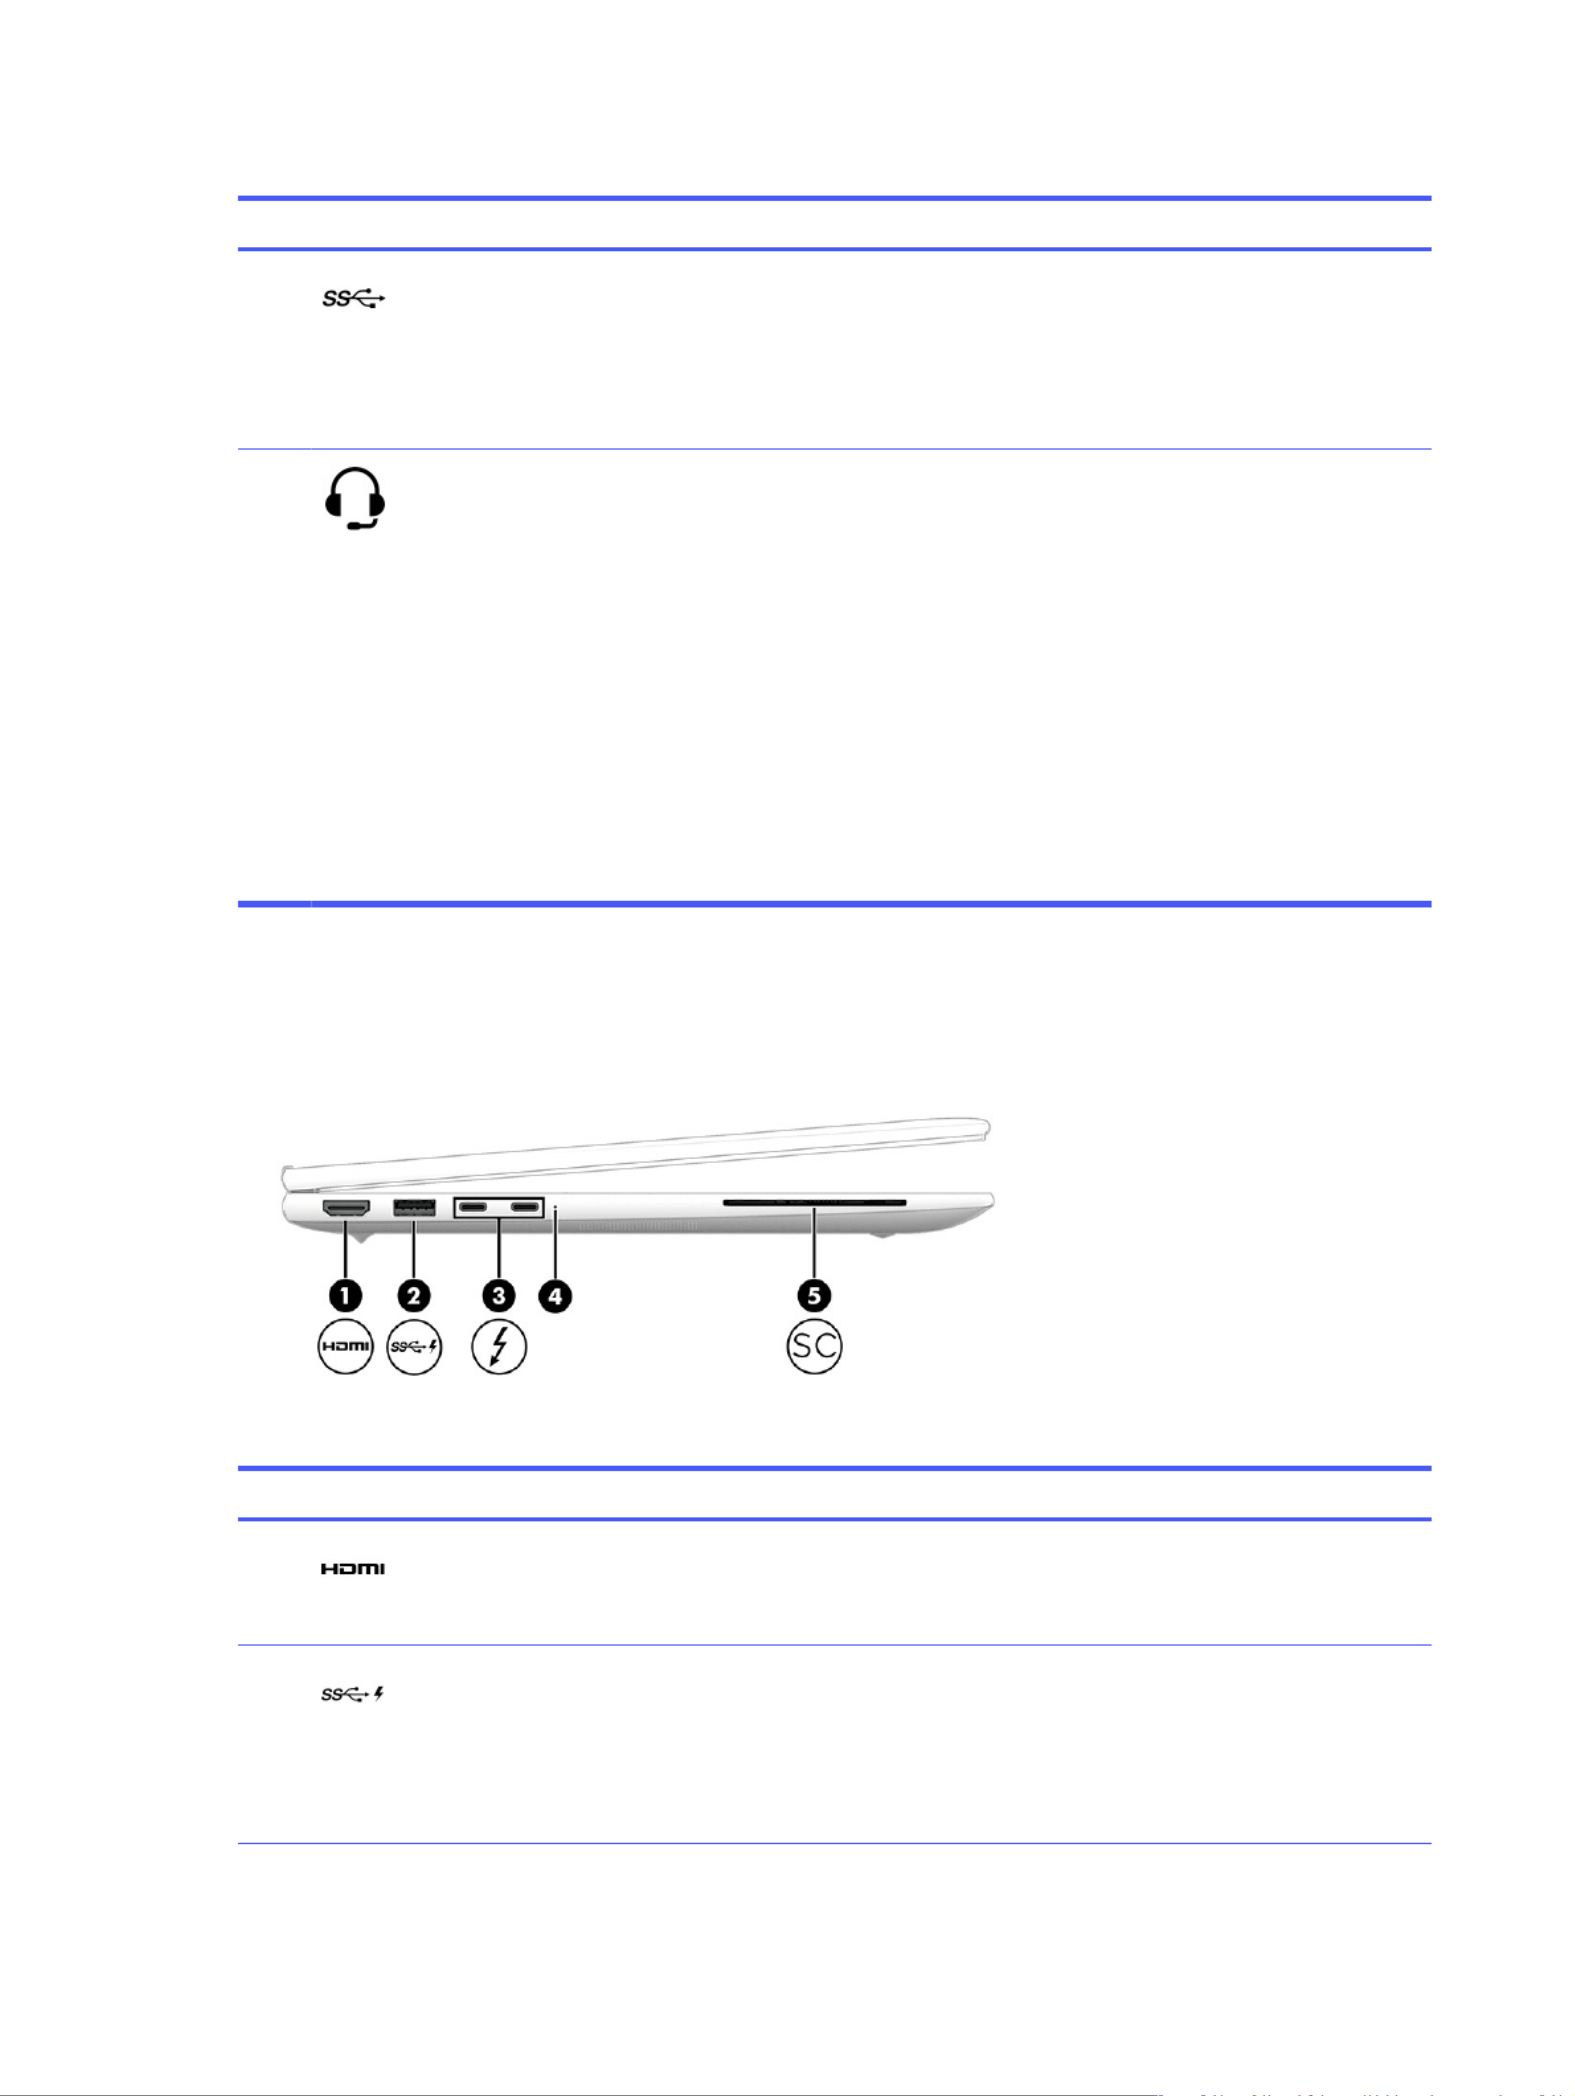
T
T
T
TT
able 2
able 2
able 2
able 2able 2-
-
-
--1
1
1
11 Right
Right
Right
RightRight-side components and their descrip
-side components and their descrip
-side components and their descrip
-side components and their descrip-side components and their descriptions
tions
tions
tionstions (continued)
(continued)
(continued)
(continued)(continued)
Component
Component
Component
ComponentComponent Description
Description
Description
DescriptionDescription
(
(
(
((4
4
4
44)
)
)
)) USB SuperSpeed port Connects a USB device, provides high-speed data transfer,
and (for select products) charges small devices (such as a
smartphone) when the computer is on or in Sleep mode.
NO
NO
NO
NONOTE:
TE:
TE:
TE:TE: Use a standard USB Type-A charging cable or cable
adapter (purchased separately) when charging a small
external device.
(5
(5
(5
(5(5)
)
)
)) Audio-out (headphone)/Audio-in
(microphone) combo jack
Connects optional powered stereo speakers, headphones,
earbuds, a headset, or a television audio cable. Also
connects an optional headset microphone. This jack does
not support optional standalone microphones.
W
W
W
WWARNING!
ARNING!
ARNING!
ARNING!ARNING! To reduce the risk of personal injury, adjust the
volume before putting on headphones, earbuds, or a
headset. For additional safety information, see the
Regulatory, Safety, and Environmental Notices
.
To access this guide:
■Select the Sear
Sear
Sear
SearSearch
ch
ch
chch icon in the taskbar, type HP
Documentation in the search box, and then select HP
HP
HP
HP HP
Documentation
Documentation
Documentation
DocumentationDocumentation.
NO
NO
NO
NONOTE:
TE:
TE:
TE:TE: When a device is connected to the jack, the
computer speakers are disabled.
L
L
L
LLe
e
e
eeft
ft
ft
ftft
Use the illustration and table to identify the components on the left side of the computer.
T
T
T
TT
able 2
able 2
able 2
able 2able 2-
-
-
--2
2
2
22 L
L
L
LLeft
eft
eft
efteft-side components and their de
-side components and their de
-side components and their de
-side components and their de-side components and their descriptions
scriptions
scriptions
scriptionsscriptions
Component
Component
Component
ComponentComponent Description
Description
Description
DescriptionDescription
(
(
(
((1)
1)
1)
1)1) HDMI® port Connects an optional video or audio device, such as a
high-definition television, any compatible digital or audio
component, or a high-speed High Definition Multimedia
Interface® (HDMI) device.
(2
(2
(2
(2(2)
)
)
)) USB SuperSpeed port with HP Sleep and
Charge
Connects a USB device, provides high-speed data transfer,
and charges small devices (such as a smartphone), even
when the computer is off.
NO
NO
NO
NONOTE:
TE:
TE:
TE:TE: Use a standard USB Type-A charging cable or cable
adapter (purchased separately) when charging a small
external device.
4 Chapter 2 Components

T
T
T
TT
able 2
able 2
able 2
able 2able 2-
-
-
--2
2
2
22 L
L
L
LLeft
eft
eft
efteft-side components and their de
-side components and their de
-side components and their de
-side components and their de-side components and their descriptions
scriptions
scriptions
scriptionsscriptions (con
(con
(con
(con(continued)
tinued)
tinued)
tinued)tinued)
Component
Component
Component
ComponentComponent Description
Description
Description
DescriptionDescription
(3
(3
(3
(3(3)
)
)
)) USB Type-C® power connector and
Thunderbolt™ ports with HP Sleep and
Charge and DisplayPort™ output (2)
Connect an AC adapter that has a USB Type-C connector,
supplying power to the computer and, if needed, charging the
computer battery.
– and –
Connect USB devices, provide high-speed data transfer, and
charge small devices (such as a smartphone), even when the
computer is off.
NO
NO
NO
NONOTE:
TE:
TE:
TE:TE: Use a standard USB Type-C charging cable or cable
adapter (purchased separately) when charging a small
external device.
– and –
Connect display devices that have a USB Type-C connector,
providing DisplayPort output.
NO
NO
NO
NONOTE:
TE:
TE:
TE:TE: Your computer might also support a Thunderbolt
docking station.
(
(
(
((4
4
4
44)
)
)
)) Battery light When AC power is connected:
●White: The battery charge is greater than 90 percent.
●Amber: The battery charge is from 0 to 90 percent.
●Off: The battery is not charging.
When AC power is disconnected (battery not charging):
●Blinking amber: The battery has reached a low battery
level. When the battery has reached a critical battery
level, the battery light begins blinking rapidly.
●Off: The battery is not charging.
(5
(5
(5
(5(5)
)
)
)) Smart card reader (select products only) Supports optional smart cards.
Display
Display
Display
DisplayDisplay
Use the illustration and table to identify the display components.
L
L
L
LLo
o
o
oow blue light mode (select pr
w blue light mode (select pr
w blue light mode (select pr
w blue light mode (select prw blue light mode (select products only)
oducts only)
oducts only)
oducts only)oducts only)
Your computer display is shipped from the factory in low blue light mode for improved eye comfort and
safety. Also, blue light mode automatically adjusts blue light emissions when you are using the computer
at night or for reading.
W
W
W
WWARNING!
ARNING!
ARNING!
ARNING!ARNING! To reduce the risk of serious injury, read the
Safety & Comfort Guide
. It describes proper
workstation setup and proper posture, health, and work habits for computer users. The
Safety &
Comfort Guide
also provides important electrical and mechanical safety information. The
Safety &
Comfort Guide
is available on the web at http://www.hp.com/ergo.
NO
NO
NO
NONOTE:
TE:
TE:
TE:TE: Refer to the illustration that most closely matches your computer.
Display 5
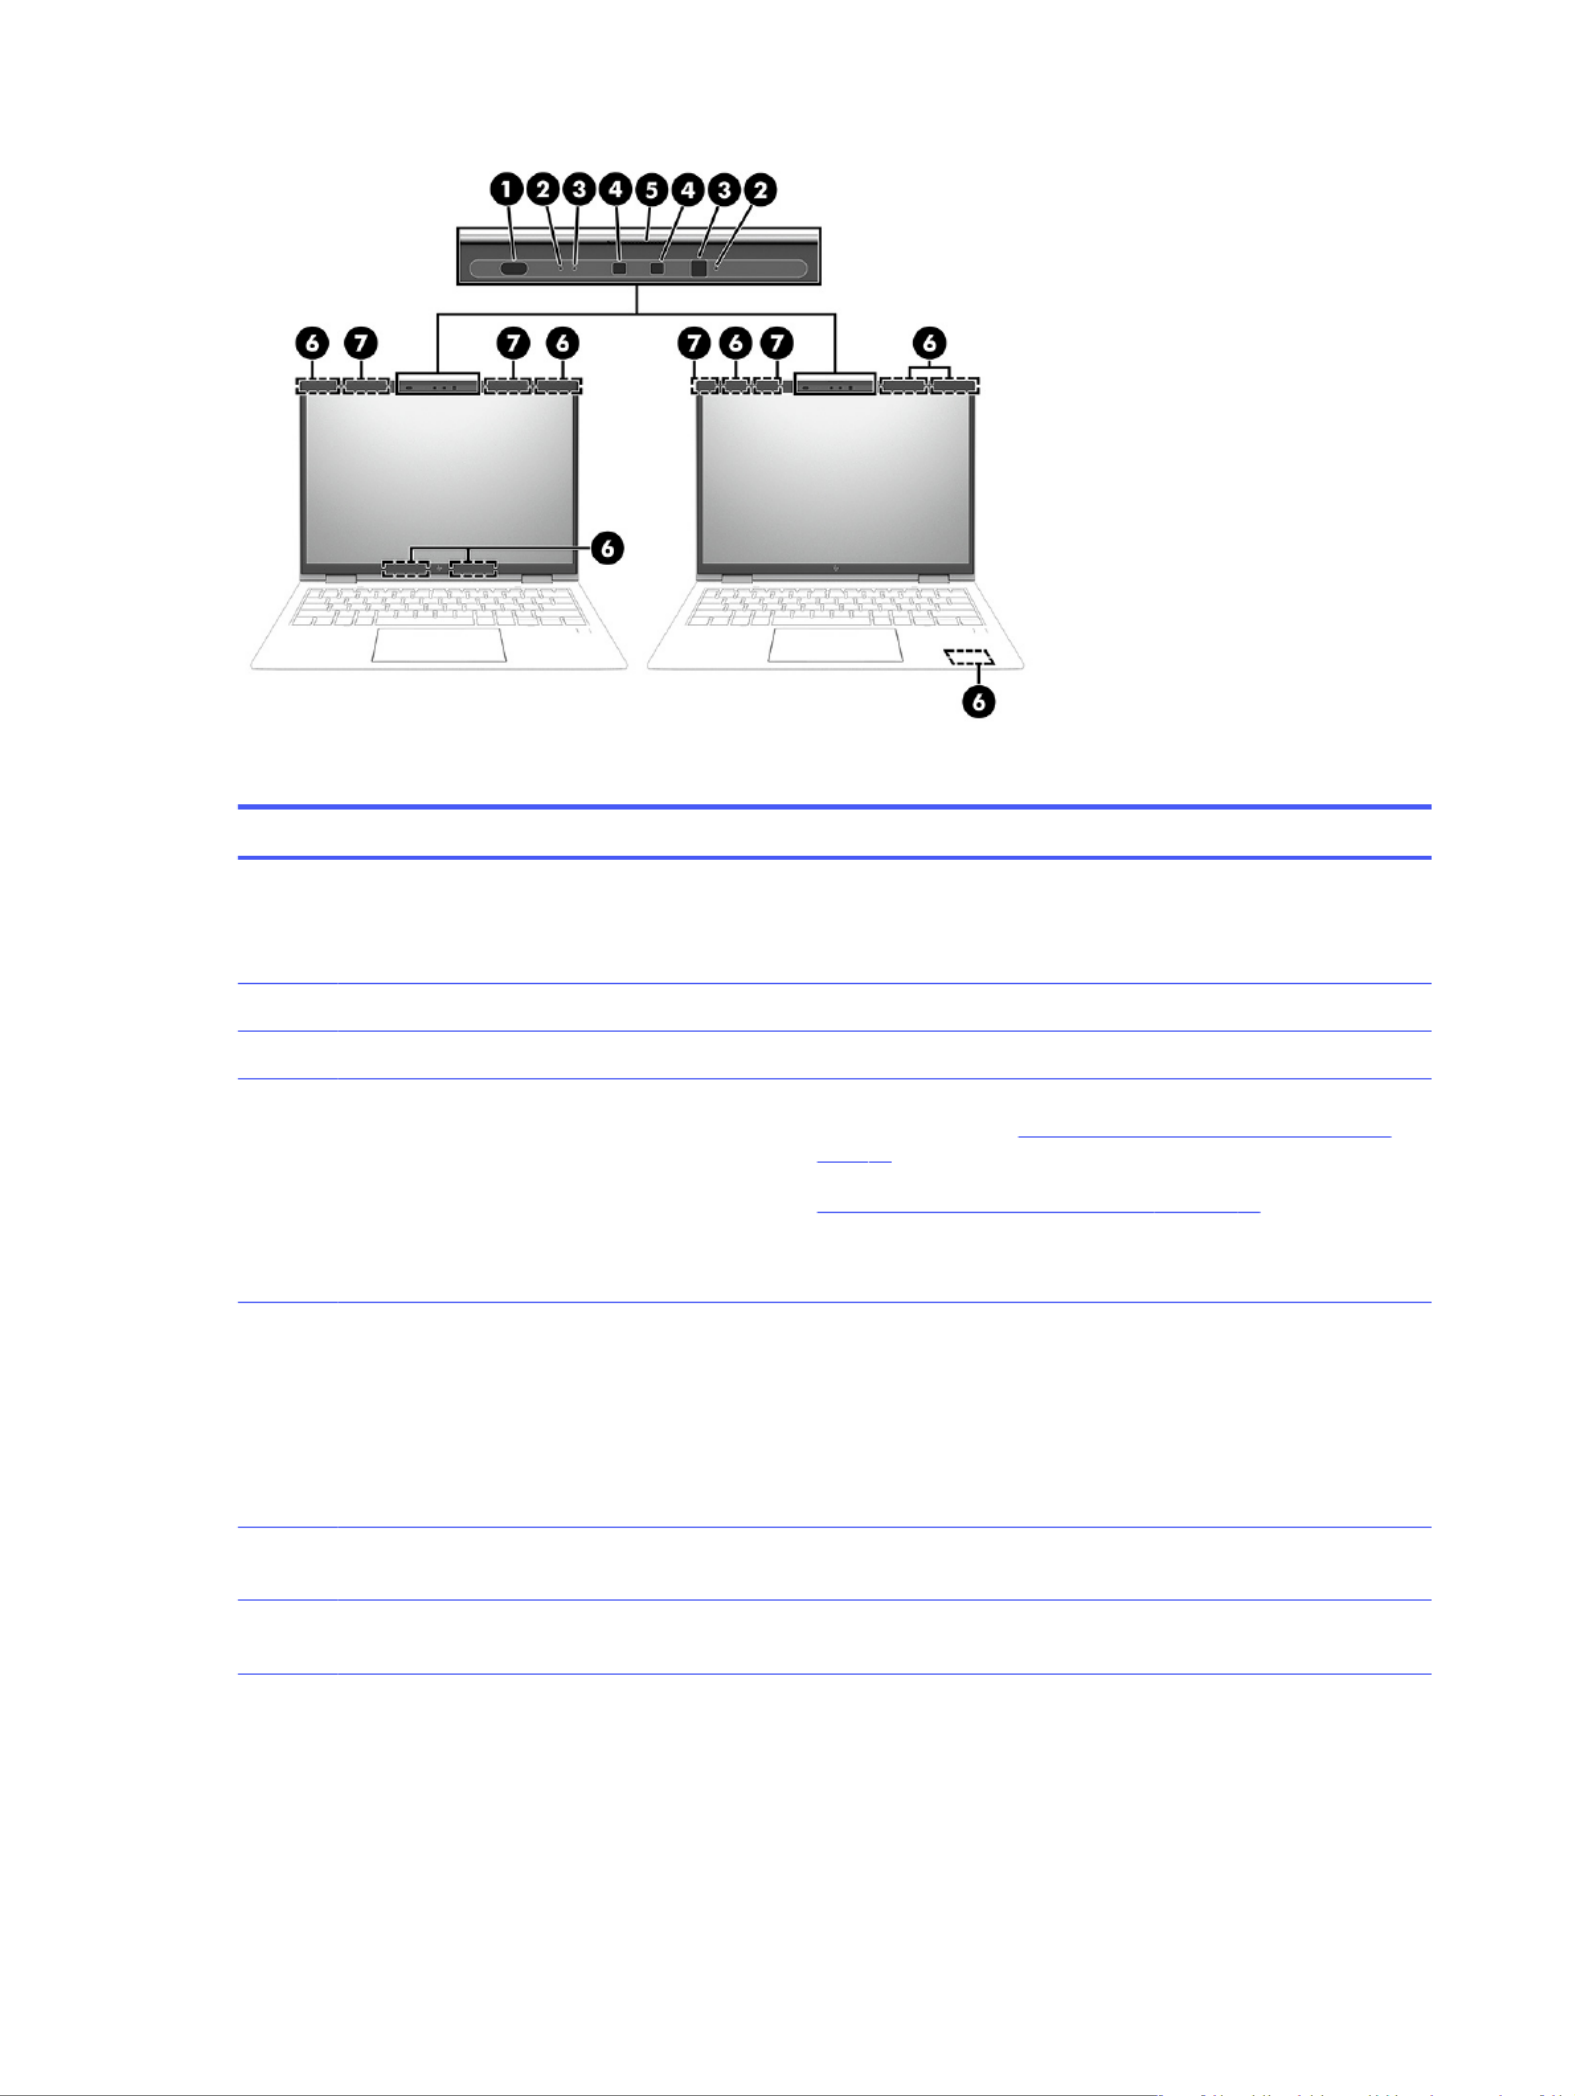
T
T
T
TT
able 2
able 2
able 2
able 2able 2-
-
-
--3
3
3
33 Display components and their descrip
Display components and their descrip
Display components and their descrip
Display components and their descripDisplay components and their descriptions
tions
tions
tionstions
Component
Component
Component
ComponentComponent Description
Description
Description
DescriptionDescription
(
(
(
((1)
1)
1)
1)1) Ambient light and color sensor Adjusts the brightness of the display, depending on the ambient
light, and manages and controls the color temperature. Color
temperature enables you to measure and adjust the warmth or
coolness of the light source.
(2
(2
(2
(2(2)
)
)
)) Internal microphones (2) (select products only) Record sound.
(3
(3
(3
(3(3)
)
)
)) Camera lights (2) (select products only) On: One or more cameras are in use.
(
(
(
((4
4
4
44)
)
)
)) Cameras (2) (select products only) Allow you to video chat, record video, and record still images. To
use your camera, see Using a camera (select products only) on
page 29. Some cameras also allow a facial recognition logon to
Windows, instead of a password logon. For more information, see
Windows Hello (select products only) on page 52.
NO
NO
NO
NONOTE:
TE:
TE:
TE:TE: Camera functions vary depending on the camera
hardware and software installed on your product.
(5
(5
(5
(5(5)
)
)
)) Camera privacy cover (select products only) By default, the camera lens is uncovered, but you can slide the
camera privacy cover to block the camera's view. To use the
camera, slide the camera privacy cover in the opposite direction
to reveal the lens.
NO
NO
NO
NONOTE:
TE:
TE:
TE:TE: If you have both front-facing and rear-facing cameras,
when one camera lens is revealed and ready to use, the other is
concealed.
(
(
(
((6
6
6
66)
)
)
)) WWAN antennas* (4) (select products only) Send and receive wireless signals to communicate with wireless
wide area networks (WWANs).
(7)
(7)
(7)
(7)(7) WLAN antennas* (2) (select products only) Send and receive wireless signals to communicate with wireless
local area networks (WLANs).
6 Chapter 2 Components

T
T
T
TT
able 2
able 2
able 2
able 2able 2-
-
-
--3
3
3
33 Display components and their descrip
Display components and their descrip
Display components and their descrip
Display components and their descripDisplay components and their descriptions
tions
tions
tionstions (continued)
(continued)
(continued)
(continued)(continued)
Component
Component
Component
ComponentComponent Description
Description
Description
DescriptionDescription
*The antennas are not visible from the outside of the computer. For optimal transmission, keep the areas immediately around
the antennas free from obstructions.
For wireless regulatory notices, see the section of the
Regulatory, Safety, and Environmental Notices
that applies to your
country or region.
To access this guide:
■Select the Sear
Sear
Sear
SearSearch
ch
ch
chch icon in the taskbar, type in the search box, and then select .HP Documentation HP Documentation
HP Documentation
HP Documentation
HP DocumentationHP Documentation
K
K
K
KKe
e
e
eeyboar
yboar
yboar
yboaryboard ar
d ar
d ar
d ard area
ea
ea
eaea
Keyboards can vary by language.
NO
NO
NO
NONOTE:
TE:
TE:
TE:TE: The keyboard, including the function keys and power key (select products only), is disabled in
stand, tent, and tablet modes. To enable the keyboard, including the power key, change to the clamshell
mode.
T
T
T
TT
ouchpad
ouchpad
ouchpad
ouchpadouchpad
The touchpad settings and components are described here.
T
T
T
TT
ouchpad settings
ouchpad settings
ouchpad settings
ouchpad settingsouchpad settings
You learn how to adjust the touchpad settings and components here.
Adjusting t
Adjusting t
Adjusting t
Adjusting tAdjusting touchpad settings
ouchpad settings
ouchpad settings
ouchpad settingsouchpad settings
Use these steps to adjust touchpad settings and gestures.
1.
1.
1.
1.1. Select the Sear
Sear
Sear
SearSearch
ch
ch
chch icon in the taskbar, type in the search box, and then touchpad settings
press enter.
2.
2.
2.
2.2. Choose a setting.
T
T
T
TTurning on the touchpad
urning on the touchpad
urning on the touchpad
urning on the touchpadurning on the touchpad
Follow these steps to turn on the touchpad.
1.
1.
1.
1.1. Select the Sear
Sear
Sear
SearSearch
ch
ch
chch icon in the taskbar, type in the search box, and then touchpad settings
press enter.
2.
2.
2.
2.2. Using an external mouse, click the T
T
T
TT
ouchpad
ouchpad
ouchpad
ouchpadouchpad button.
If you are not using an external mouse, press the Tab key repeatedly until the pointer rests on the
touchpad
touchpad
touchpad
touchpadtouchpad button. Then press the to select the button.spacebar
T
T
T
TT
ouchpad components
ouchpad components
ouchpad components
ouchpad componentsouchpad components
Use the illustration and table to identify the touchpad components.
Keyboard area 7

T
T
T
TT
able 2
able 2
able 2
able 2able 2-4
-4
-4
-4-4 T
T
T
TT
ouchpad components and their descrip
ouchpad components and their descrip
ouchpad components and their descrip
ouchpad components and their descripouchpad components and their descriptions
tions
tions
tionstions
Component
Component
Component
ComponentComponent Description
Description
Description
DescriptionDescription
(
(
(
((1)
1)
1)
1)1) Touchpad zone Reads your finger gestures to move the pointer or activate
items on the screen.
NO
NO
NO
NONOTE:
TE:
TE:
TE:TE: For more information, see Using touchpad and touch
screen gestures on page 25.
(2
(2
(2
(2(2)
)
)
)) Left touchpad button Functions like the left button on an external mouse.
(3
(3
(3
(3(3)
)
)
)) Near Field Communications (NFC) tapping
area and antenna (select products only)
Allows you to wirelessly share information when you tap it
with an NFC-enabled device.
(
(
(
((4
4
4
44)
)
)
)) Right touchpad button Functions like the right button on an external mouse.
Lights
Lights
Lights
LightsLights
Use the illustration and table to identify the lights on the computer.
NO
NO
NO
NONOTE:
TE:
TE:
TE:TE: Refer to the illustration that most closely matches your computer.
8 Chapter 2 Components
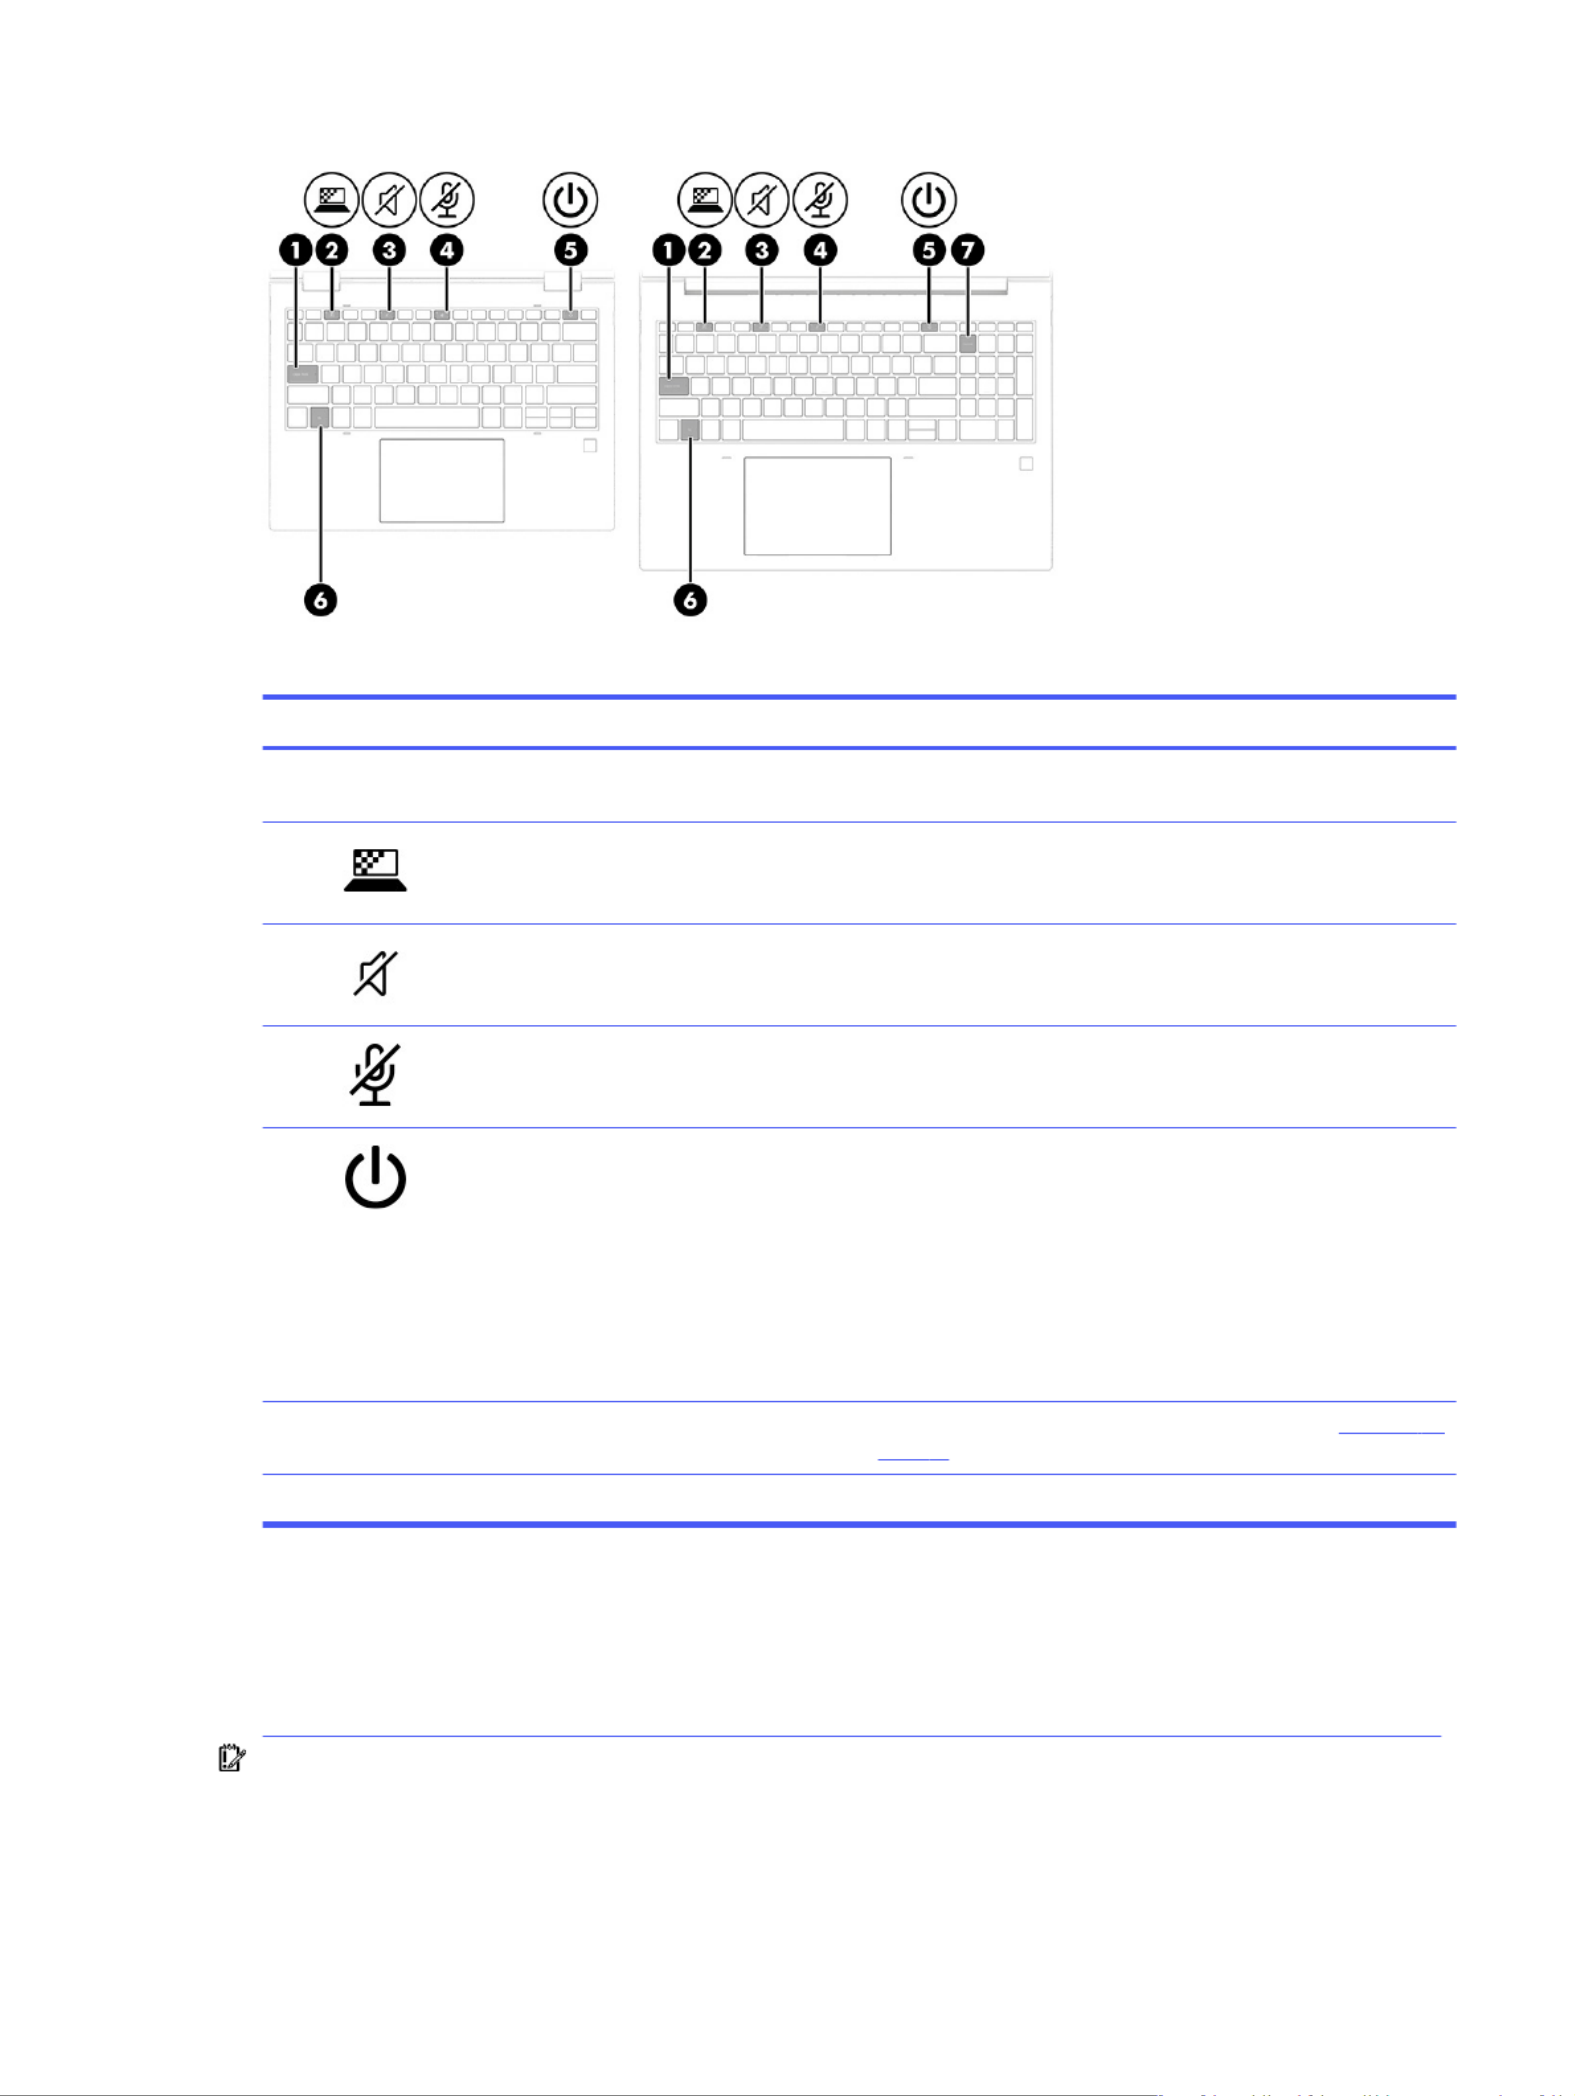
T
T
T
TT
able 2
able 2
able 2
able 2able 2-5
-5
-5
-5-5 Lights and their descrip
Lights and their descrip
Lights and their descrip
Lights and their descripLights and their descriptions
tions
tions
tionstions
Component
Component
Component
ComponentComponent Description
Description
Description
DescriptionDescription
(
(
(
((1)
1)
1)
1)1) Caps lock light On: Caps lock is on, which switches the key input to all capital
letters.
(2
(2
(2
(2(2)
)
)
)) Privacy key light (select products only) On: Privacy screen is on, which helps prevent side-angle
viewing.
(3
(3
(3
(3(3)
)
)
)) Mute light On: Computer sound is off.●
●Off: Computer sound is on.
(
(
(
((4
4
4
44)
)
)
)) Microphone mute light On: Microphone is off.●
●Off: Microphone is on.
(5
(5
(5
(5(5)
)
)
)) Power light On: The computer is on.●
●Blinking (select products only): The computer is in
the Sleep state, a power-saving state. The computer
shuts off power to the display and other unnecessary
components.
●Off: Depending on your computer model, the computer
is off, in Hibernation, or in Sleep. Hibernation is the
power-saving state that uses the least amount of power.
(
(
(
((6
6
6
66)
)
)
)) Fn lock light On: The key is locked. For more information, see fn Hot keys on
page 13.
(7)
(7)
(7)
(7)(7) Num lk light (select products only) On: Num lk is on.
Butt
Butt
Butt
ButtButton and fingerprint r
on and fingerprint r
on and fingerprint r
on and fingerprint ron and fingerprint reader
eader
eader
eadereader
Fingerprint readers can be located on the touchpad, on a side panel of the computer, or on the top cover
below the keyboard.
IMPORT
IMPORT
IMPORT
IMPORTIMPORTANT
ANT
ANT
ANTANT:
:
:
:: To verify that your computer supports fingerprint reader sign-in, select the Sear
Sear
Sear
SearSearch
ch
ch
chch icon
in the taskbar, type in the search box, and then select the Sign-in options Sign-on options
Sign-on options
Sign-on options
Sign-on optionsSign-on options app. If
Fingerprint r
Fingerprint r
Fingerprint r
Fingerprint rFingerprint recognition
ecognition
ecognition
ecognitionecognition is not listed as an option, then your notebook does not include a fingerprint
reader.
Button and fingerprint reader 9

NO
NO
NO
NONOTE:
TE:
TE:
TE:TE: Refer to the illustration that most closely matches your computer.
T
T
T
TTable 2
able 2
able 2
able 2able 2-6
-6
-6
-6-6 Button and fingerprin
Button and fingerprin
Button and fingerprin
Button and fingerprinButton and fingerprint reader and their descrip
t reader and their descrip
t reader and their descrip
t reader and their descript reader and their descriptions
tions
tions
tionstions
Component
Component
Component
ComponentComponent Description
Description
Description
DescriptionDescription
(
(
(
((1)
1)
1)
1)1) Power button When the computer is off, press the button briefly to turn ●
on the computer.
●When the computer is on, press the button briefly to
initiate Sleep.
●When the computer is in the Sleep state, press the
button briefly to exit Sleep (select products only).
●When the computer is in Hibernation, press the button
briefly to exit Hibernation.
IMPORT
IMPORT
IMPORT
IMPORTIMPORT
ANT
ANT
ANT
ANTANT:
:
:
:: Pressing and holding down the power button
results in the loss of unsaved information.
If the computer has stopped responding and shutdown
procedures are ineffective, press and hold the power button
for at least 4 seconds to turn off the computer.
To learn more about your power settings, use the Power icon.
●Right-click the Pow
Pow
Pow
PowPower
er
er
erer P
P
P
PPower
ower
ower
ower ower icon , and then select
and sleep settings
and sleep settings
and sleep settings
and sleep settingsand sleep settings.
(2
(2
(2
(2(2)
)
)
)) Fingerprint reader (select products only) Allows a fingerprint logon to Windows, instead of a password
logon.
■Touch your finger to the fingerprint reader. See Windows
Hello (select products only) on page 52 for details.
IMPORT
IMPORT
IMPORT
IMPORTIMPORT
ANT
ANT
ANT
ANTANT:
:
:
:: To prevent fingerprint logon issues, make
sure when you register your fingerprint that all sides of
your finger are registered by the fingerprint reader.
Special k
Special k
Special k
Special kSpecial ke
e
e
eeys
ys
ys
ysys
Use the illustration and table to identify the special keys.
10 Chapter 2 Components

NO
NO
NO
NONOTE:
TE:
TE:
TE:TE: Refer to the illustration that most closely matches your computer.
T
T
T
TTable 2
able 2
able 2
able 2able 2-
-
-
--7
7
7
77 Special k
Special k
Special k
Special kSpecial keys and their descrip
eys and their descrip
eys and their descrip
eys and their descripeys and their descriptions
tions
tions
tionstions
Component
Component
Component
ComponentComponent Description
Description
Description
DescriptionDescription
(
(
(
((1)
1)
1)
1)1) Action keys Execute frequently used system functions.
See Action keys on page 12.
(2
(2
(2
(2(2)
)
)
)) esc key Displays system information when pressed in combination
with the key.fn
(3
(3
(3
(3(3)
)
)
)) fn key Executes frequently used system functions when pressed in
combination with another key. Such key combinations are
called
hot keys
.
See Hot keys on page 13.
(
(
(
((4)
4)
4)
4)4) Windows key Opens the Start menu.
NO
NO
NO
NONOTE:
TE:
TE:
TE:TE: Pressing the Windows key again closes the Start
menu.
(5
(5
(5
(5(5)
)
)
)) Power button When the computer is off, press the button briefly to ●
turn on the computer.
●When the computer is on, press the button briefly to
initiate Sleep.
●When the computer is in the Sleep state, press the
button briefly to exit Sleep (select products only).
●When the computer is in Hibernation, press the button
briefly to exit Hibernation.
IMPORT
IMPORT
IMPORT
IMPORTIMPORT
ANT
ANT
ANT
ANTANT:
:
:
:: Pressing and holding down the power button
results in the loss of unsaved information.
If the computer has stopped responding and shutdown
procedures are ineffective, press and hold the power button
for at least 4 seconds to turn off the computer.
To learn more about your power settings, use the Power icon.
●Right-click the Pow
Pow
Pow
PowPower
er
er
erer P
P
P
PPower
ower
ower
ower ower icon , and then select
and sleep settings
and sleep settings
and sleep settings
and sleep settingsand sleep settings.
Special keys 11

T
T
T
TT
able 2
able 2
able 2
able 2able 2-
-
-
--7
7
7
77 Special k
Special k
Special k
Special kSpecial key
ey
ey
eyeys and their descriptions
s and their descriptions
s and their descriptions
s and their descriptionss and their descriptions (continued)
(continued)
(continued)
(continued)(continued)
Component
Component
Component
ComponentComponent Description
Description
Description
DescriptionDescription
(
(
(
((6
6
6
66)
)
)
)) num lk key (select products only) Alternates between the navigational and numeric functions
on the integrated numeric keypad.
(7)
(7)
(7)
(7)(7) Integrated numeric keypad (select products
only)
A separate keypad to the right of the alphabet keyboard.
When you press , you can use the integrated keypad num lk
like an external numeric keypad.
NO
NO
NO
NONOTE:
TE:
TE:
TE:TE: If the keypad function is active when the computer is
turned off, that function is reinstated when the computer is
turned back on.
Action k
Action k
Action k
Action kAction ke
e
e
eeys
ys
ys
ysys
Action keys perform specific functions and vary by computer. To determine which keys are on your
computer, look at the icons on your keyboard and match them to the descriptions in this table.
■To use an action key, press and hold the key.
NO
NO
NO
NONOTE:
TE:
TE:
TE:TE: On some products, you must press the key in combination with the action key.fn
T
T
T
TT
able 2
able 2
able 2
able 2able 2-8
-8
-8
-8-8 Action k
Action k
Action k
Action kAction ke
e
e
eeys and their descriptions
ys and their descriptions
ys and their descriptions
ys and their descriptionsys and their descriptions
Icon
Icon
Icon
IconIcon Description
Description
Description
DescriptionDescription
Switches the screen image among display devices connected to the system. For example, if a monitor
is connected to the computer, repeatedly pressing the key alternates the screen image from computer
display to monitor display to simultaneous display on both the computer and the monitor.
On select products, helps prevent side-angle viewing from onlookers. If needed, decrease or increase
brightness for well-lit or darker environments. Press the key again to turn off the privacy screen.
NO
NO
NO
NONOTE:
TE:
TE:
TE:TE: This feature is available only on select products. If the feature is not available on your computer,
a message is displayed when you press this key.
NO
NO
NO
NONOTE:
TE:
TE:
TE:TE: To quickly turn on the highest privacy setting, press + .fn p
Decreases the screen brightness incrementally as long as you hold down the key.
Increases the screen brightness incrementally as long as you hold down the key.
Mutes or restores speaker sound.
12 Chapter 2 Components

T
T
T
TT
able 2
able 2
able 2
able 2able 2-8
-8
-8
-8-8 Action k
Action k
Action k
Action kAction ke
e
e
eeys and their descriptions
ys and their descriptions
ys and their descriptions
ys and their descriptionsys and their descriptions (continued)
(continued)
(continued)
(continued)(continued)
Icon
Icon
Icon
IconIcon Description
Description
Description
DescriptionDescription
Decreases speaker volume incrementally while you hold down the key.
Increases speaker volume incrementally while you hold down the key.
Mutes the microphone.
Turns the keyboard backlight off or on. On select products, you can adjust the brightness of the
keyboard backlight. Press the key repeatedly to adjust the brightness from high (when you first start up
the computer), to low, to off. After you adjust the keyboard backlight setting, the backlight reverts to your
previous setting each time you turn on the computer. The keyboard backlight turns off after 30 seconds
of inactivity. To turn the keyboard backlight back on, press any key or tap the touchpad (select products
only). To conserve battery power, turn off this feature.
Turns the insert function on or off.
Turns the wireless feature on or off.
NO
NO
NO
NONOTE:
TE:
TE:
TE:TE: A wireless network must be set up before a wireless connection is possible.
Executes frequently used tasks. Some tasks might not be available on all products.
●Opens an application, file, or website
●Enters frequently used text into a permanent clipboard
●Ability to change system profiles
●Ability to change system properties
●Executes user-defined key sequences
NO
NO
NO
NONOTE:
TE:
TE:
TE:TE: The action key feature is enabled at the factory. On select products only, you can disable this
feature by pressing and holding the key and the left key. The fn lock light turns on. After you fn shift
have disabled the action key feature, you can still perform each function by pressing the key in fn
combination with the appropriate action key.
Hot k
Hot k
Hot k
Hot kHot ke
e
e
eeys
ys
ys
ysys
A hot key is the combination of the fn key and another key. Use the table to identify the hot keys.
To use a hot key:
■Press the key, and then press one of the keys listed in the following table. fn
T
T
T
TT
able 2
able 2
able 2
able 2able 2-9
-9
-9
-9-9 Hot k
Hot k
Hot k
Hot kHot ke
e
e
eeys and their descriptions
ys and their descriptions
ys and their descriptions
ys and their descriptionsys and their descriptions
K
K
K
KKey
ey
ey
eyey Description
Description
Description
DescriptionDescription
C Turns on scroll lock.
R Breaks the operation.
Hot keys 13

T
T
T
TT
able 2
able 2
able 2
able 2able 2-9
-9
-9
-9-9 Hot k
Hot k
Hot k
Hot kHot ke
e
e
eeys and their descriptions
ys and their descriptions
ys and their descriptions
ys and their descriptionsys and their descriptions (continued)
(continued)
(continued)
(continued)(continued)
K
K
K
KKey
ey
ey
eyey Description
Description
Description
DescriptionDescription
S Sends a programing query.
Bo
Bo
Bo
BoBott
tt
tt
ttttom
om
om
omom
Use the illustration and table to identify the bottom components.
T
T
T
TT
able 2
able 2
able 2
able 2able 2-
-
-
--10
10
10
1010 Bottom componen
Bottom componen
Bottom componen
Bottom componenBottom components and their descriptions
ts and their descriptions
ts and their descriptions
ts and their descriptionsts and their descriptions
Component
Component
Component
ComponentComponent Description
Description
Description
DescriptionDescription
(
(
(
((1)
1)
1)
1)1) Speakers (2) Produce sound.
(2
(2
(2
(2(2)
)
)
)) Vent Enables airflow to cool internal components.
NO
NO
NO
NONOTE:
TE:
TE:
TE:TE: The computer fan starts up automatically to
cool internal components and prevent overheating. It is
normal for the internal fan to cycle on and off during
routine operation.
R
R
R
RRear
ear
ear
earear
Use the illustration and table to identify the rear component.
14 Chapter 2 Components
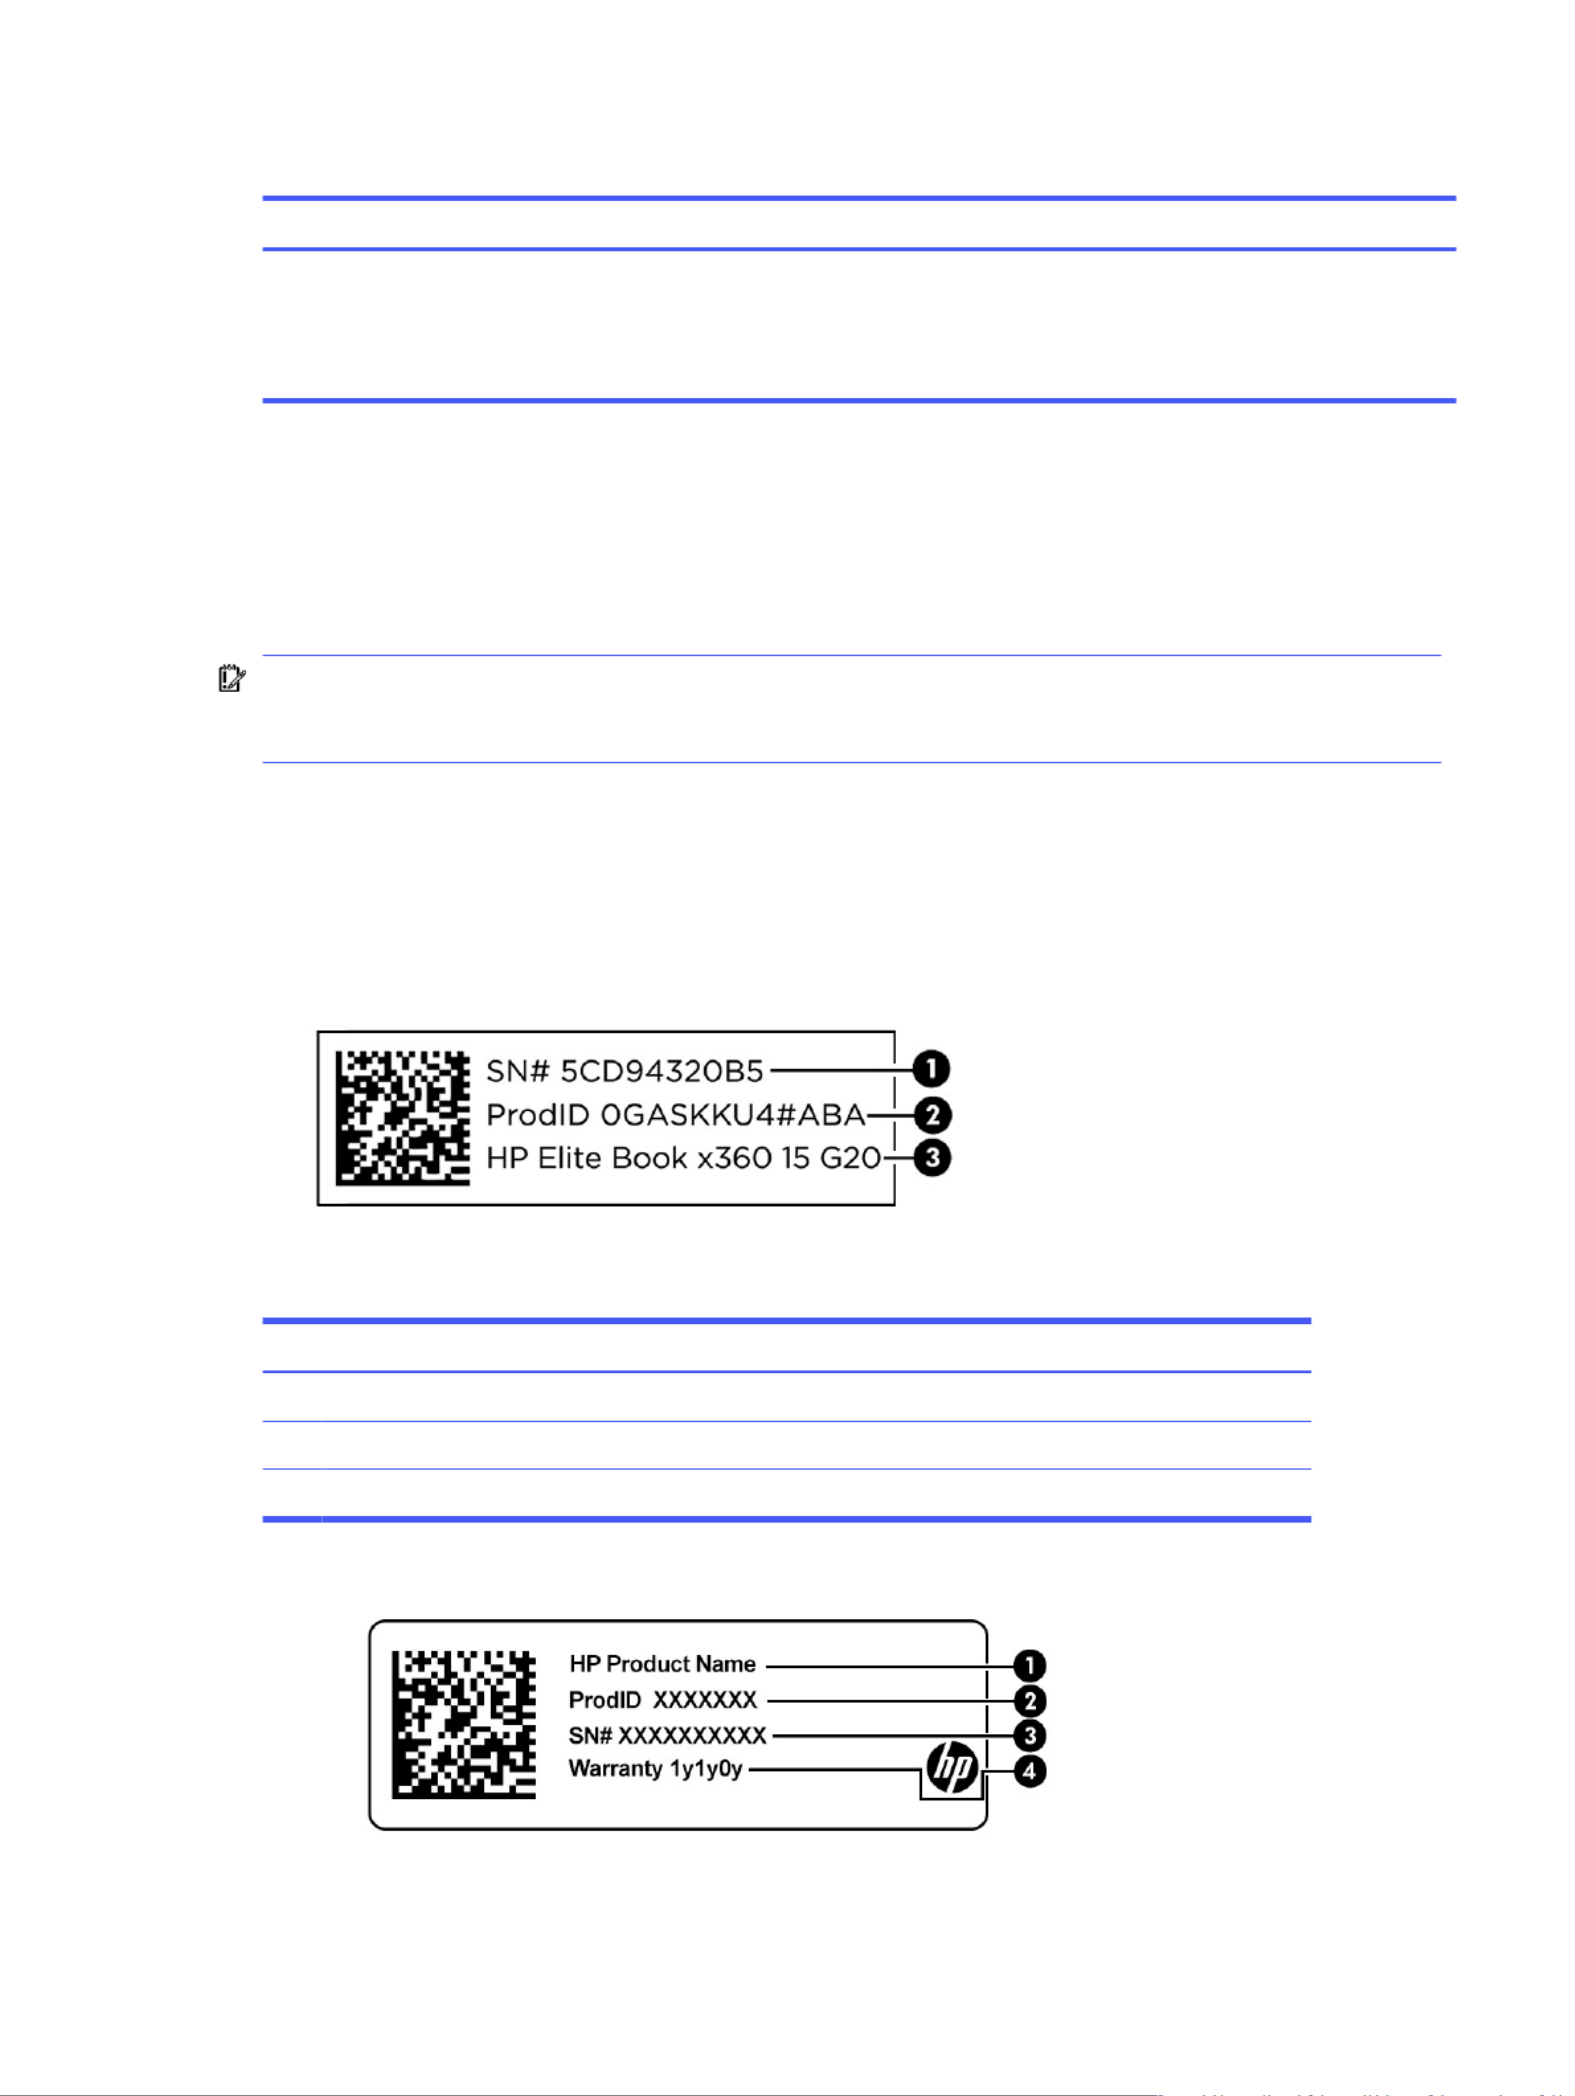
T
T
T
TT
able 2
able 2
able 2
able 2able 2-
-
-
--11
11
11
1111 Rear componen
Rear componen
Rear componen
Rear componenRear component and its descriptions
t and its descriptions
t and its descriptions
t and its descriptionst and its descriptions
Component
Component
Component
ComponentComponent Description
Description
Description
DescriptionDescription
Vent (select products only) Enables airflow to cool internal components.
NO
NO
NO
NONOTE:
TE:
TE:
TE:TE: The computer fan starts up automatically to cool
internal components and prevent overheating. It is normal for
the internal fan to cycle on and off during routine operation.
L
L
L
LLabels
abels
abels
abelsabels
The labels affixed to the computer provide information you might need when you troubleshoot system
problems or travel internationally with the computer. Labels might be in paper form or imprinted on the
product.
IMPOR
IMPOR
IMPOR
IMPORIMPORT
T
T
TTANT
ANT
ANT
ANTANT:
:
:
:: Check the following locations for the labels described in this section: the bottom of the
computer, inside the battery bay, under the service door, on the back of the display, or on the bottom of
a tablet kickstand.
●Service label—Provides important information to identify your computer. When contacting support,
you might be asked for the serial number, the product number, or the model number. Locate this
information before you contact support.
Your service label will resemble one of the examples shown below. Refer to the illustration that most
closely matches the service label on your computer.
T
T
T
TT
able 2
able 2
able 2
able 2able 2-
-
-
--12
12
12
1212 Service label components
Service label components
Service label components
Service label componentsService label components
Component
Component
Component
ComponentComponent
(
(
(
((1)
1)
1)
1)1) Serial number
(2
(2
(2
(2(2)
)
)
)) Product ID
(3
(3
(3
(3(3)
)
)
)) HP product name
Labels 15

T
T
T
TT
able 2
able 2
able 2
able 2able 2-
-
-
--13
13
13
1313 Service label components
Service label components
Service label components
Service label componentsService label components
Component
Component
Component
ComponentComponent
(
(
(
((1)
1)
1)
1)1) HP product name
(2
(2
(2
(2(2)
)
)
)) Product ID
(3
(3
(3
(3(3)
)
)
)) Serial number
(
(
(
((4
4
4
44)
)
)
)) Warranty period
T
T
T
TT
able 2
able 2
able 2
able 2able 2-
-
-
--14
14
14
1414 Service label components
Service label components
Service label components
Service label componentsService label components
Component
Component
Component
ComponentComponent
(
(
(
((1)
1)
1)
1)1) HP product name
(2
(2
(2
(2(2)
)
)
)) Warranty period
(3
(3
(3
(3(3)
)
)
)) Product ID
(
(
(
((4
4
4
44)
)
)
)) Serial number
●Regulatory labels—Provide regulatory information about the computer.
●Wireless certification labels—Provide information about optional wireless devices and the approval
markings for the countries or regions in which the devices have been approved for use.
Using a SIM car
Using a SIM car
Using a SIM car
Using a SIM carUsing a SIM card (select pr
d (select pr
d (select pr
d (select prd (select produc
oduc
oduc
oducoducts only)
ts only)
ts only)
ts only)ts only)
Use these instructions to insert a SIM card.
IMPORT
IMPORT
IMPORT
IMPORTIMPORTANT
ANT
ANT
ANTANT:
:
:
:: You can damage the SIM card if you insert the wrong size card or insert it or the SIM
card tray in the wrong direction. The card might also become stuck in the slot. Do not use SIM card
adapters. To prevent damage to the SIM card or connectors, use minimal force when inserting or
removing a SIM card.
Det
Det
Det
DetDetermining the corr
ermining the corr
ermining the corr
ermining the corrermining the correct SIM car
ect SIM car
ect SIM car
ect SIM carect SIM card size f
d size f
d size f
d size fd size for y
or y
or y
or yor your comput
our comput
our comput
our computour computer
er
er
erer
Before purchasing a SIM card, follow these instructions to determine the correct SIM card size for your
computer.
1.
1.
1.
1.1. Go to http://www.hp.com/support, and then search for your computer by product name or number.
2.
2.
2.
2.2. Select Pr
Pr
Pr
PrProduct Inf
oduct Inf
oduct Inf
oduct Infoduct Information
ormation
ormation
ormationormation.
3.
3.
3.
3.3. Refer to the listed options to determine which card to purchase.
16 Chapter 2 Components

Inserting a nano SIM car
Inserting a nano SIM car
Inserting a nano SIM car
Inserting a nano SIM carInserting a nano SIM card
d
d
dd
To insert a nano SIM card, follow these steps.
1.
1.
1.
1.1. Turn off the computer by using the command.
Shut down
Shut down
Shut down
Shut downShut down
2.
2.
2.
2.2. Position the computer display-side up on a flat surface.
3.
3.
3.
3.3. Press in gently on the SIM card access tray to disengage the SIM lock, and the tray pops out of the
slot (
(
(
((1)
1)
1)
1)1).
4.
4.
4.
4.4. Remove the tray (
(
(
((2)
2)
2)
2)2) from the computer and insert the card (
(
(
((3
3
3
33)
)
)
)).
5.
5.
5.
5.5. Replace the tray in the computer. Press in gently on the tray (4
(4
(4
(4(4)
)
)
)) until it is firmly seated.
To remove the SIM card, press in gently on the SIM card access tray to disengage the SIM lock, and the
tray pops out of the slot. Remove the SIM card. Replace the tray in the computer and press in gently on
the tray until it is firmly seated.
Inserting a nano SIM card 17

Ne
Ne
Ne
NeNetw
tw
tw
twtwork connections
ork connections
ork connections
ork connectionsork connections
3
3
3
33
Your computer can travel with you wherever you go. But even at home, you can explore the globe and
access information from millions of websites by using your computer and a wired or wireless network
connection. This chapter helps you get connected to that world.
Connecting t
Connecting t
Connecting t
Connecting tConnecting to a wir
o a wir
o a wir
o a wiro a wireless ne
eless ne
eless ne
eless neeless network
twork
twork
tworktwork
Your computer might be equipped with one or more wireless devices.
●WLAN device—Connects the computer to wireless local area networks, which are commonly
referred to as Wi-Fi networks, wireless LANs, or WLANs. These connections typically occur in
corporate offices, your home, and public places such as airports, restaurants, coffee shops, hotels,
and universities. In a WLAN, the mobile wireless device in your computer communicates with a
wireless router or a wireless access point.
●HP Mobile Broadband Module (select products only)—A wireless wide area network (WWAN) device
that gives you wireless connectivity over a much larger area. Mobile network operators install
base stations (similar to cell phone towers) throughout large geographic areas, effectively providing
coverage across entire states, regions, or even countries.
●Bluetooth® device—Creates a personal area network (PAN) to connect to other Bluetooth-enabled
devices such as computers, phones, printers, headsets, speakers, and cameras. In a PAN, each
device communicates directly with other devices, and devices must be relatively close together—
typically within 10 m (approximately 33 ft) of each other.
Using the wir
Using the wir
Using the wir
Using the wirUsing the wireless contr
eless contr
eless contr
eless contreless controls
ols
ols
olsols
You can control the wireless devices in your computer using one or both of these features.
●Wireless button (also called
airplane mode key
or
wireless key
)
●Operating system controls
Wir
Wir
Wir
WirWireless button
eless button
eless button
eless buttoneless button
The computer might have a wireless button, one or more wireless devices, and one or two wireless
lights. All the wireless devices on your computer are enabled at the factory.
The wireless light indicates the overall power state of your wireless devices, not the status of individual
devices.
Oper
Oper
Oper
OperOperating sy
ating sy
ating sy
ating syating syst
st
st
ststem contr
em contr
em contr
em contrem controls
ols
ols
olsols
The Network and Sharing Center allows you to set up a connection or network, connect to a network,
and diagnose and repair network problems.
Depending on your computer model, use one of the following methods to access operating system
controls:
●Select the Sear
Sear
Sear
SearSearch
ch
ch
chch icon in the taskbar, type in the search box, and then select control panel
Contr
Contr
Contr
ContrControl Panel
ol Panel
ol Panel
ol Panelol Panel.
18 Chapter 3 Network connections

●On the taskbar, right-click the network status icon, and then select Network and In
Network and In
Network and In
Network and InNetwork and Internet se
ternet se
ternet se
ternet seternet settings
ttings
ttings
ttingsttings.
Connecting t
Connecting t
Connecting t
Connecting tConnecting to a WL
o a WL
o a WL
o a WLo a WLAN
AN
AN
ANAN
Before you can connect to a WLAN with this procedure, you must first set up internet access.
NO
NO
NO
NONOTE:
TE:
TE:
TE:TE: When you are setting up internet access in your home, you must establish an account with an
internet service provider (ISP). To purchase internet service and a modem, contact a local ISP. The ISP
will help set up the modem, install a network cable to connect your wireless router to the modem, and
test the internet service.
1.
1.
1.
1.1. Be sure that the WLAN device is on.
2.
2.
2.
2.2. On the taskbar, select the network status icon, and then select the right arrow icon next to the Wi-Fi
button to see the available networks.
If the WLAN is a security-enabled WLAN, you are prompted to enter a security code. Enter the code,
and then select Ne
Ne
Ne
NeNext
xt
xt
xtxt to complete the connection.
NO
NO
NO
NONOTE:
TE:
TE:
TE:TE: If no WLANs are listed, you might be out of range of a wireless router or access point.
NO
NO
NO
NONOTE:
TE:
TE:
TE:TE: Depending on your computer model, if you do not see the WLAN that you want to connect
to, follow one of these methods:
●On the taskbar, right-click the network status icon, and then select Network and In
Network and In
Network and In
Network and InNetwork and Internet
ternet
ternet
ternet ternet
settings
settings
settings
settingssettings.
●Select , and then select
WiFi
WiFi
WiFi
WiFiWiFi Sho
Sho
Sho
ShoShow available ne
w available ne
w available ne
w available new available networks
tworks
tworks
tworkstworks.
A list of options is displayed, which allows you to manually search for and connect to a network
or to create a new network connection.
3.
3.
3.
3.3. Connect to one of the available networks.
After the connection is made, select the network status icon at the far right of the taskbar to verify the
name and status of the connection.
NO
NO
NO
NONOTE:
TE:
TE:
TE:TE: The functional range (how far your wireless signals travel) depends on WLAN implementation,
router manufacturer, and interference from other electronic devices or structural barriers such as
walls and floors.
Using HP Mobile Br
Using HP Mobile Br
Using HP Mobile Br
Using HP Mobile BrUsing HP Mobile Broadband (select pr
oadband (select pr
oadband (select pr
oadband (select proadband (select products only)
oducts only)
oducts only)
oducts only)oducts only)
Your HP Mobile Broadband computer has built-in support for mobile broadband service. Your new
computer, when used with a mobile operator’s network, gives you the freedom to connect to the internet,
send email, or connect to your corporate network without the need for Wi-Fi hotspots.
You might need the HP Mobile Broadband Module IMEI number, MEID number, or both to activate mobile
broadband service. The number might be printed on a label located on the bottom of your computer,
inside the battery bay, under the service door, or on the back of the display.
L
L
L
LLocating mobile oper
ocating mobile oper
ocating mobile oper
ocating mobile operocating mobile operator se
ator se
ator se
ator seator settings
ttings
ttings
ttingsttings
To locate mobile operator settings:
1.
1.
1.
1.1. On the taskbar, right-click the network status icon.
2.
2.
2.
2.2. Select Netw
Netw
Netw
NetwNetwork and Interne
ork and Interne
ork and Interne
ork and Interneork and Internet settings
t settings
t settings
t settingst settings.
Connecting to a WLAN 19

3.
3.
3.
3.3. Under the Netw
Netw
Netw
NetwNetwork & Int
ork & Int
ork & Int
ork & Intork & Internet
ernet
ernet
erneternet section, select , and then, under
Cellular
Cellular
Cellular
CellularCellular Mor
Mor
Mor
MorMore cellular se
e cellular se
e cellular se
e cellular see cellular settings
ttings
ttings
ttingsttings select
Mobile oper
Mobile oper
Mobile oper
Mobile operMobile operat
at
at
atator settings
or settings
or settings
or settingsor settings.
Some mobile network operators require the use of a subscriber identity module (SIM) card. A SIM card
contains basic information about you, such as a personal identification number (PIN), as well as network
information. Some computers include a SIM card that is preinstalled. If the SIM card is not preinstalled, it
might be included with the HP Mobile Broadband documents provided with your computer, or the mobile
network operator might provide it separately from the computer.
Connecting with HP Mobile Br
Connecting with HP Mobile Br
Connecting with HP Mobile Br
Connecting with HP Mobile BrConnecting with HP Mobile Broadband
oadband
oadband
oadbandoadband
To connect with HP Mobile Broadband:
1.
1.
1.
1.1. On the taskbar, select the network icon to open the Quick Settings menu.
2.
2.
2.
2.2. Select the arrow next to the signal bars icon to connect.
For information about HP Mobile Broadband and how to activate service with a preferred mobile
network operator, see the HP Mobile Broadband information included with your computer.
Using eSIM (select pr
Using eSIM (select pr
Using eSIM (select pr
Using eSIM (select prUsing eSIM (select product
oduct
oduct
oductoducts only)
s only)
s only)
s only)s only)
Your computer might be equipped with an eSIM. An eSIM is a programmable version of the commonly
used SIM that you can use to download different profiles from selected carriers.
An eSIM lets you connect to the internet over a cellular data connection. With an eSIM, you do not need
to get a SIM card from your mobile operator, and you can quickly switch between mobile operators
and data plans. For example, you might have one cellular data plan for work and a different plan with
another mobile operator for personal use. If you travel, you can connect in more places by finding mobile
operators with plans in that area.
You can implement eSIMs using these methods:
●Embed the eSIM chip (eUICC). The notebook then operates as a dual SIM, one as eUICC and the
second as standard micro or nano SIM card on a SIM card tray. Only one SIM can be active at a time.
●Place a removable physical eSIM on a SIM card tray, the same as a standard micro or nano SIM card.
In this case, the eSIM is not limited to a single carrier (physical blank eSIM).
You must add an eSIM profile to connect to the internet using cellular data. To add a profile, manage
SIM profiles, and learn how to use an eSIM, go to https://www.support.microsoft.com , and type Use an
eSIM in the search bar.
Using GPS (select pr
Using GPS (select pr
Using GPS (select pr
Using GPS (select prUsing GPS (select products only)
oducts only)
oducts only)
oducts only)oducts only)
Your computer might be equipped with a Global Positioning System (GPS) device. GPS satellites deliver
location, speed, and direction information to GPS-equipped systems.
To enable GPS, be sure that location is enabled under the Windows privacy setting.
1.
1.
1.
1.1. Select the Sear
Sear
Sear
SearSearch
ch
ch
chch icon in the taskbar, type in the search box, and then select location L
L
L
LLocation
ocation
ocation
ocation ocation
privac
privac
privac
privacprivacy settings
y settings
y settings
y settingsy settings. Make sure that location services are enabled.
2.
2.
2.
2.2. Enable the location settings, if they are not already enabled.
20 Chapter 3 Network connections

Using Blue
Using Blue
Using Blue
Using BlueUsing Bluet
t
t
ttoo
oo
oo
ooooth wir
th wir
th wir
th wirth wireless de
eless de
eless de
eless deeless devices (select pr
vices (select pr
vices (select pr
vices (select prvices (select products only
oducts only
oducts only
oducts onlyoducts only)
)
)
))
A Bluetooth device provides short-range wireless communications that replace the physical cable
connections that traditionally link electronic devices.
●Computers (desktop, notebook)
●Phones (cellular, cordless, smartphone)
●Imaging devices (printer, camera)
●Audio devices (headset, speakers)
●Mouse
●External keyboard
Connecting Blue
Connecting Blue
Connecting Blue
Connecting BlueConnecting Bluet
t
t
ttooth de
ooth de
ooth de
ooth deooth devices
vices
vices
vicesvices
Before you can use a Bluetooth device, you must establish a Bluetooth connection.
1.
1.
1.
1.1. Select the Sear
Sear
Sear
SearSearch
ch
ch
chch icon in the taskbar, type in the search box, and then select bluetooth Blue
Blue
Blue
BlueBluetooth
tooth
tooth
tooth tooth
and other de
and other de
and other de
and other deand other devices settings
vices settings
vices settings
vices settingsvices settings.
2.
2.
2.
2.2. Turn on Blue
Blue
Blue
BlueBluetooth
tooth
tooth
toothtooth, if it is not already turned on.
3.
3.
3.
3.3. Select Add de
Add de
Add de
Add deAdd device
vice
vice
vicevice Add a device
Add a device
Add a device
Add a deviceAdd a device, and then in the dialog box, select Blue
Blue
Blue
BlueBluet
t
t
ttooth
ooth
ooth
oothooth.
4.
4.
4.
4.4. Select your device from the list, and then follow the on-screen instructions.
NO
NO
NO
NONOTE:
TE:
TE:
TE:TE: If the device requires verification, a pairing code is displayed. On the device that you are
adding, follow the on-screen instructions to verify that the code on your device matches the pairing
code. For more information, see the documentation provided with the device.
NO
NO
NO
NONOTE:
TE:
TE:
TE:TE: If your device does not appear in the list, be sure that Bluetooth on that device is turned on.
Some devices might have additional requirements; see the documentation provided with the device.
Using NFC t
Using NFC t
Using NFC t
Using NFC tUsing NFC to shar
o shar
o shar
o sharo share inf
e inf
e inf
e infe information (select pr
ormation (select pr
ormation (select pr
ormation (select prormation (select products only)
oducts only)
oducts only)
oducts only)oducts only)
Your computer supports Near Field Communication (NFC), which allows you to wirelessly share
information between two NFC-enabled devices. Information is transferred from the tapping area
(antenna) of one device to another. With NFC and supported apps, you can share websites, transfer
contact information, transfer payments, and print on NFC-enabled printers.
NO
NO
NO
NONOTE:
TE:
TE:
TE:TE: To locate the tapping area on your computer, see Components on page 3.
1.
1.
1.
1.1. Confirm that the NFC function is enabled.
a.
a.
a.
a.a. Select the Sear
Sear
Sear
SearSearch
ch
ch
chch icon in the taskbar, type in the search box, and then select wireless T
T
T
TT
urn
urn
urn
urn urn
wir
wir
wir
wirwireless devices on or o
eless devices on or o
eless devices on or o
eless devices on or oeless devices on or off
ff
ff
ffff.
b.
b.
b.
b.b. Confirm that the selection for NFC is .
On
On
On
OnOn
2.
2.
2.
2.2. Tap the NFC tapping area with an NFC-enabled device. You might hear a sound when the devices
connect.
NO
NO
NO
NONOTE:
TE:
TE:
TE:TE: To find the location of the antenna on the other NFC device, see your device instructions.
3.
3.
3.
3.3. Follow any on-screen instructions to continue.
Using Bluetooth wireless devices (select products only) 21

Connecting t
Connecting t
Connecting t
Connecting tConnecting to a wir
o a wir
o a wir
o a wiro a wired ne
ed ne
ed ne
ed need netw
tw
tw
twtwork
ork
ork
orkork
Select products might allow a local area network (LAN) connection, which uses a network cable. The
cable is sold separately.
W
W
W
WWARNING!
ARNING!
ARNING!
ARNING!ARNING! To reduce the risk of electric shock, fire, or damage to the equipment, do not plug a
telephone cable into an RJ-45 (network) jack.
Connecting t
Connecting t
Connecting t
Connecting tConnecting to a local ar
o a local ar
o a local ar
o a local aro a local area netw
ea netw
ea netw
ea netwea network (L
ork (L
ork (L
ork (Lork (LAN) (select pr
AN) (select pr
AN) (select pr
AN) (select prAN) (select produc
oduc
oduc
oducoducts only)
ts only)
ts only)
ts only)ts only)
Use a LAN connection to connect the computer directly to a router in your home (instead of working
wirelessly) or to connect to an existing network at your office.
To connect the network cable, follow these steps:
NO
NO
NO
NONOTE:
TE:
TE:
TE:TE: A feature called HP LAN-Wireless Protection might be enabled on your computer. It closes your
wireless (Wi-Fi) or WWAN connection when you connect directly to a LAN. For more information about
HP LAN-Wireless Protection, see Using HP LAN-Wireless Protection (select products only) on page 22.
If the computer does not have an RJ-45 port, you need a network cable and a network jack or an optional
docking device or expansion product to connect to a LAN.
1.
1.
1.
1.1. Plug the network cable into the network jack (1
(1
(1
(1(1)
)
)
)) on the computer or on an optional docking device or
expansion product.
2.
2.
2.
2.2. Plug the other end of the network cable into a network wall jack (
(
(
((2)
2)
2)
2)2) or router.
NO
NO
NO
NONOTE:
TE:
TE:
TE:TE: If the network cable contains noise suppression circuitry (3
(3
(3
(3(3)
)
)
)), which prevents interference
from TV and radio reception, orient the circuitry end of the cable toward the computer.
Using HP LAN-
Using HP LAN-
Using HP LAN-
Using HP LAN-Using HP LAN-Wir
Wir
Wir
WirWireless Pr
eless Pr
eless Pr
eless Preless Pro
o
o
ootec
tec
tec
tectection (select pr
tion (select pr
tion (select pr
tion (select prtion (select product
oduct
oduct
oductoducts only)
s only)
s only)
s only)s only)
In a LAN environment, you can set HP LAN-Wireless Protection to safeguard your LAN network from
unauthorized wireless access. When HP LAN-Wireless Protection is enabled, the WLAN (Wi-Fi) or WWAN
connection is turned off when the computer is connected directly to a LAN.
To turn on and customize HP LAN-Wireless Protection:
22 Chapter 3 Network connections

1.
1.
1.
1.1. Start Computer Setup (BIOS).
●Computers or tablets with keyboards:
■Turn on or restart the computer, and before the HP logo appears, press to enter f10
Computer Setup.
●Tablets without keyboards:
■Turn on or restart the tablet, and then quickly hold down the volume down button until the
Startup menu is displayed. Tap to enter Computer Setup.
f10
f10
f10
f10f10
2.
2.
2.
2.2. Select Adv
Adv
Adv
AdvAdvanced
anced
anced
ancedanced Built
Built
Built
BuiltBuilt-in Device Options
-in Device Options
-in Device Options
-in Device Options-in Device Options, and then select .
3.
3.
3.
3.3. Select the check box for LAN
LAN
LAN
LANLAN/WLAN Auto Swit
/WLAN Auto Swit
/WLAN Auto Swit
/WLAN Auto Swit/WLAN Auto Switching
ching
ching
chingching LAN/WW
LAN/WW
LAN/WW
LAN/WWLAN/WWAN Auto Swit
AN Auto Swit
AN Auto Swit
AN Auto SwitAN Auto Switching
ching
ching
chingching, , or both to turn off
WLAN connections, WWAN connections, or both when connected to a LAN network.
4.
4.
4.
4.4. To save your changes and exit Computer Setup, select , select , and
Main
Main
Main
MainMain Save Changes and Exit
Save Changes and Exit
Save Changes and Exit
Save Changes and ExitSave Changes and Exit
then select Y
Y
Y
YY
es
es
es
eses.
NO
NO
NO
NONOTE:
TE:
TE:
TE:TE: If you are using arrow keys to highlight your choice, you must then press enter.
Your changes take effect when the computer restarts.
Using HP MAC Addr
Using HP MAC Addr
Using HP MAC Addr
Using HP MAC AddrUsing HP MAC Address P
ess P
ess P
ess Pess Pass Thr
ass Thr
ass Thr
ass Thrass Through (select pr
ough (select pr
ough (select pr
ough (select prough (select products only)
oducts only)
oducts only)
oducts only)oducts only)
MAC Address Pass Through provides a customizable way of identifying your computer and its
communications on networks. This system MAC address provides unique identification even when your
computer is connected through a network adapter. This address is enabled by default.
To customize MAC Address Pass Through:
1.
1.
1.
1.1. Start Computer Setup (BIOS).
●Computers or tablets with keyboards:
■Turn on or restart the computer, and when the HP logo appears, press to enter f10
Computer Setup.
●Tablets without keyboards:
■Turn on or restart the tablet, and then quickly hold down the volume down button until the
Startup menu is displayed. Tap to enter Computer Setup.
f10
f10
f10
f10f10
2.
2.
2.
2.2. Select Adv
Adv
Adv
AdvAdvanced
anced
anced
ancedanced MAC Addr
MAC Addr
MAC Addr
MAC AddrMAC Address Pass Thr
ess Pass Thr
ess Pass Thr
ess Pass Thress Pass Through
ough
ough
oughough, and then select .
3.
3.
3.
3.3. In the box to the right of Host Based MAC Addr
Host Based MAC Addr
Host Based MAC Addr
Host Based MAC AddrHost Based MAC Address
ess
ess
essess Sys
Sys
Sys
SysSyst
t
t
ttem Addr
em Addr
em Addr
em Addrem Address
ess
ess
essess, select either to enable MAC
address Pass Through or Cus
Cus
Cus
CusCustom Addr
tom Addr
tom Addr
tom Addrtom Address
ess
ess
essess to customize the address.
4.
4.
4.
4.4. If you selected Custom, select , enter your customized system MAC address, and
MAC ADDRESS
MAC ADDRESS
MAC ADDRESS
MAC ADDRESSMAC ADDRESS
then press enter to save the address.
5.
5.
5.
5.5. Complete one of these tasks:
●If the computer has an embedded LAN and you would like to use the embedded MAC address
as the system MAC address, select Reuse Embedded LAN Addr
Reuse Embedded LAN Addr
Reuse Embedded LAN Addr
Reuse Embedded LAN AddrReuse Embedded LAN Address
ess
ess
essess.
●Select , select
Main
Main
Main
MainMain Sav
Sav
Sav
SavSave Changes and Exit
e Changes and Exit
e Changes and Exit
e Changes and Exite Changes and Exit Y
Y
Y
YYes
es
es
eses, and then select .
Using HP MAC Address Pass Through (select products only) 23

NO
NO
NO
NONOTE:
TE:
TE:
TE:TE: If you are using arrow keys to highlight your choice, you must then press enter.
Your changes take effect when the computer restarts.
24 Chapter 3 Network connections

Navigating the scr
Navigating the scr
Navigating the scr
Navigating the scrNavigating the screen
een
een
eeneen
4
4
4
44
Depending on your computer model, you can navigate the computer screen using one or more methods.
●Use touch gestures directly on the computer screen.
●Use touch gestures on the touchpad.
●Use an optional mouse or keyboard (purchased separately).
●Use an on-screen keyboard.
●Use a pointing stick.
Using t
Using t
Using t
Using tUsing touchpad and t
ouchpad and t
ouchpad and t
ouchpad and touchpad and touch scr
ouch scr
ouch scr
ouch scrouch screen ges
een ges
een ges
een geseen gestur
tur
tur
turtures
es
es
eses
The touchpad helps you navigate the computer screen and control the pointer using simple touch
gestures. You can also use the left and right touchpad buttons as you would use the corresponding
buttons on an external mouse.
To navigate a touch screen (select products only), touch the screen directly using gestures described
in this chapter. To customize gestures and see videos of how they work, select the Search
Search
Search
SearchSearch icon in the
taskbar, type in the search box, select control panel Contr
Contr
Contr
ContrControl Panel
ol Panel
ol Panel
ol Panelol Panel, and then select Har
Har
Har
HarHardwar
dwar
dwar
dwardware and
e and
e and
e and e and
Sound
Sound
Sound
SoundSound Devices and P
Devices and P
Devices and P
Devices and PDevices and Printer
rinter
rinter
rinterrinters
s
s
ss Mouse
Mouse
Mouse
MouseMouse. Under , select .
Some products include a precision touchpad, which provides enhanced gesture functionality. To
determine if you have a precision touchpad and find additional information, follow these steps:
●Select St
St
St
StStart
art
art
artart Settings
Settings
Settings
SettingsSettings B
B
B
BBluetoo
luetoo
luetoo
luetooluetooth & devices
th & devices
th & devices
th & devicesth & devices, select , select , and then select T
T
T
TT
ouchpad
ouchpad
ouchpad
ouchpadouchpad.
NO
NO
NO
NONOTE:
TE:
TE:
TE:TE: Unless noted, you can use gestures on both the touchpad and a touch screen.
T
T
T
TT
ap
ap
ap
apap
Point to an item on the screen, and then tap one finger on the touchpad zone or touch screen to select
the item. Double-tap an item to open it.
T
T
T
TTw
w
w
wwo
o
o
oo-finger pinch z
-finger pinch z
-finger pinch z
-finger pinch z-finger pinch zoom
oom
oom
oomoom
Use the two-finger pinch zoom to zoom out or in on images or text.
●Zoom out by placing two fingers apart on the touchpad zone or touch screen and then moving your
fingers together.
Navigating the screen 25

●Zoom in by placing two fingers together on the touchpad zone or touch screen and then moving
your fingers apart.
T
T
T
TTwo-
wo-
wo-
wo-wo-finger slide (t
finger slide (t
finger slide (t
finger slide (tfinger slide (touchpad and pr
ouchpad and pr
ouchpad and pr
ouchpad and prouchpad and precision t
ecision t
ecision t
ecision tecision touchpad)
ouchpad)
ouchpad)
ouchpad)ouchpad)
Place two fingers slightly apart on the touchpad zone and then drag them up, down, left, or right to move
up, down, or sideways on a page or image.
T
T
T
TTwo-
wo-
wo-
wo-wo-finger t
finger t
finger t
finger tfinger tap (t
ap (t
ap (t
ap (tap (touchpad and pr
ouchpad and pr
ouchpad and pr
ouchpad and prouchpad and precision t
ecision t
ecision t
ecision tecision touchpad)
ouchpad)
ouchpad)
ouchpad)ouchpad)
Tap two fingers on the touchpad zone to open the options menu for the selected object.
NO
NO
NO
NONOTE:
TE:
TE:
TE:TE: The two-finger tap performs the same function as right-clicking with a mouse.
Thr
Thr
Thr
ThrThree-
ee-
ee-
ee-ee-finger t
finger t
finger t
finger tfinger tap (t
ap (t
ap (t
ap (tap (touchpad and pr
ouchpad and pr
ouchpad and pr
ouchpad and prouchpad and precision t
ecision t
ecision t
ecision tecision touchpad)
ouchpad)
ouchpad)
ouchpad)ouchpad)
By default, the three-finger tap opens the search box. Tap three fingers on the touchpad zone to perform
the gesture.
26 Chapter 4 Navigating the screen

To change the function of this gesture on a precision touchpad, select St
St
St
StStart
art
art
artart Settings
Settings
Settings
SettingsSettings, select , select
Bluet
Bluet
Bluet
BluetBluetooth & devices
ooth & devices
ooth & devices
ooth & devicesooth & devices, and then select T
T
T
TT
ouchpad
ouchpad
ouchpad
ouchpadouchpad Thr
Thr
Thr
ThrThree-finger gestur
ee-finger gestur
ee-finger gestur
ee-finger gesturee-finger gestures
es
es
eses T
T
T
TT
aps
aps
aps
apsaps. Under , in the box, select a
gesture setting.
Four
Four
Four
FourFour-finger t
-finger t
-finger t
-finger t-finger tap (t
ap (t
ap (t
ap (tap (touchpad and pr
ouchpad and pr
ouchpad and pr
ouchpad and prouchpad and precision touchpad)
ecision touchpad)
ecision touchpad)
ecision touchpad)ecision touchpad)
By default, the four-finger tap opens the Action Center. Tap four fingers on the touchpad zone to perform
the gesture.
To change the function of this gesture on a precision touchpad, select St
St
St
StStart
art
art
artart Settings
Settings
Settings
SettingsSettings, select , select
Bluet
Bluet
Bluet
BluetBluetooth & devices
ooth & devices
ooth & devices
ooth & devicesooth & devices, and then select T
T
T
TT
ouchpad
ouchpad
ouchpad
ouchpadouchpad Four
Four
Four
FourFour-
-
-
--finger gestur
finger gestur
finger gestur
finger gesturfinger gestures
es
es
eses T
T
T
TT
aps
aps
aps
apsaps. Under , in the box, select a
gesture setting.
Thr
Thr
Thr
ThrThree-finger s
ee-finger s
ee-finger s
ee-finger see-finger swipe (t
wipe (t
wipe (t
wipe (twipe (touchpad and pr
ouchpad and pr
ouchpad and pr
ouchpad and prouchpad and precision touchpad)
ecision touchpad)
ecision touchpad)
ecision touchpad)ecision touchpad)
By default, the three-finger swipe switches between open apps and the desktop.
●Swipe three fingers away from you to see all open windows.
●Swipe three fingers toward you to show the desktop.
●Swipe three fingers left or right to switch between open windows.
To change the function of this gesture on a precision touchpad, select St
St
St
StStart
art
art
artart Settings
Settings
Settings
SettingsSettings, select , select
Bluet
Bluet
Bluet
BluetBluetooth & devices
ooth & devices
ooth & devices
ooth & devicesooth & devices, and then select T
T
T
TT
ouchpad
ouchpad
ouchpad
ouchpadouchpad Thr
Thr
Thr
ThrThree-finger gestur
ee-finger gestur
ee-finger gestur
ee-finger gesturee-finger gestures
es
es
eses Swipes
Swipes
Swipes
SwipesSwipes. Under , in the box, select a
gesture setting.
Four
Four
Four
FourFour-finger swipe (pr
-finger swipe (pr
-finger swipe (pr
-finger swipe (pr-finger swipe (precision t
ecision t
ecision t
ecision tecision touchpad)
ouchpad)
ouchpad)
ouchpad)ouchpad)
By default, the four-finger swipe switches between open desktops.
●Swipe four fingers away from you to see all open windows.
●Swipe four fingers toward you to show the desktop.
●Swipe four fingers left or right to switch between desktops.
Four-finger tap (touchpad and precision touchpad) 27

To change the function of this gesture, select St
St
St
StStart
art
art
artart Se
Se
Se
SeSettings
ttings
ttings
ttingsttings Blue
Blue
Blue
BlueBluetoo
too
too
tootooth & device
th & device
th & device
th & deviceth & devices
s
s
ss, select , select , and then
select T
T
T
TT
ouchpad
ouchpad
ouchpad
ouchpadouchpad Four
Four
Four
FourFour-finger ges
-finger ges
-finger ges
-finger ges-finger gestur
tur
tur
turtures
es
es
eses Swipes
Swipes
Swipes
SwipesSwipes. Under , in the box, select a gesture setting.
One-finger slide (t
One-finger slide (t
One-finger slide (t
One-finger slide (tOne-finger slide (touch scr
ouch scr
ouch scr
ouch scrouch screen)
een)
een)
een)een)
Use the one-finger slide to pan or scroll through lists and pages, or to move an object.
●To scroll across the screen, lightly slide one finger across the screen in the direction you want to
move.
●To move an object, press and hold your finger on an object, and then drag your finger to move the
object.
Using an op
Using an op
Using an op
Using an opUsing an optional k
tional k
tional k
tional ktional ke
e
e
eeyboar
yboar
yboar
yboaryboard or mouse
d or mouse
d or mouse
d or moused or mouse
An optional keyboard or mouse allows you to type, select items, scroll, and perform the same functions
as you do using touch gestures. The keyboard also allows you to use action keys and hot keys to perform
specific functions.
Using an on-scr
Using an on-scr
Using an on-scr
Using an on-scrUsing an on-screen k
een k
een k
een keen ke
e
e
eeyboar
yboar
yboar
yboaryboard (select pr
d (select pr
d (select pr
d (select prd (select products only
oducts only
oducts only
oducts onlyoducts only)
)
)
))
These instructions help you learn to use the on-screen keyboard.
You can display the on-screen keyboard in several ways:
1.
1.
1.
1.1. Select the Sear
Sear
Sear
SearSearch
ch
ch
chch icon in the taskbar, type in the search box, and then on-screen keyboard
select On-Scr
On-Scr
On-Scr
On-ScrOn-Screen K
een K
een K
een Keen Keyboar
eyboar
eyboar
eyboareyboard
d
d
dd.
–or–
2.
2.
2.
2.2. Press the Windows key + + .ctrl o
NO
NO
NO
NONOTE:
TE:
TE:
TE:TE: Suggested words might be displayed above the on-screen keyboard. Tap a word to select it.
NO
NO
NO
NONOTE:
TE:
TE:
TE:TE: Action keys and hot keys do not display or function on the on-screen keyboard.
28 Chapter 4 Navigating the screen

Ent
Ent
Ent
EntEntert
ert
ert
ertertainment f
ainment f
ainment f
ainment fainment featur
eatur
eatur
eatureatures
es
es
eses
5
5
5
55
Use your HP computer for business or pleasure to meet with others via the camera, mix audio and video,
or connect external devices like a projector, monitor, TV, or speakers.
See to locate the audio, video and camera features on your computer.Components on page 3
Using a camer
Using a camer
Using a camer
Using a camerUsing a camera (select pr
a (select pr
a (select pr
a (select pra (select products only)
oducts only)
oducts only)
oducts only)oducts only)
Your computer has one or more cameras that enable you to connect with others for work or play. Most
cameras allow you to video chat, record video, and record still images. Cameras can be front facing or
rear facing.
To determine which camera or cameras are on your product, see . To use your Components on page 3
camera, select the Sear
Sear
Sear
SearSearch
ch
ch
chch icon in the taskbar, type in the search box, and then select camera Camer
Camer
Camer
CamerCamera
a
a
aa.
Some cameras also feature HD (high-definition) capability, apps for gaming, or facial recognition
software like Windows Hello. See Security on page 43 for details about using Windows Hello.
You can enhance your computer privacy by covering the lens with the camera privacy cover. By default,
the camera lens is uncovered, but you can slide the camera privacy cover to block the camera's view. To
use the camera, slide the camera privacy cover in the opposite direction to reveal the lens.
Using audio
Using audio
Using audio
Using audioUsing audio
You can download and listen to music, stream audio content (including radio) from the web, record audio,
or mix audio and video to create multimedia. You can also play music CDs on the computer (on select
products) or attach an external optical drive to play CDs.
To enhance your listening enjoyment, attach headphones or speakers.
Connecting speak
Connecting speak
Connecting speak
Connecting speakConnecting speakers
ers
ers
ersers
You can attach wired speakers to your computer by connecting them to a USB port or to the audio-out
(headphone)/audio-in (microphone) combo jack on your computer or on a docking station.
To connect wireless speakers to your computer, follow the device manufacturer's instructions. To
connect high-definition speakers to the computer, see Setting up HDMI audio on page 32. Before
connecting speakers, lower the volume setting.
Connecting headphones
Connecting headphones
Connecting headphones
Connecting headphonesConnecting headphones
You can connect wired headphones to the audio-out (headphone)/audio-in (microphone) combo jack on
your computer.
W
W
W
WWARNING!
ARNING!
ARNING!
ARNING!ARNING! To reduce the risk of personal injury, lower the volume setting before putting on
headphones, earbuds, or a headset. For additional safety information, see the
Regulatory, Safety, and
Environmental Notices
.
To access this guide:
Entertainment features 29

■Select the Sear
Sear
Sear
SearSearch
ch
ch
chch icon in the taskbar, type in the search box, and then select HP Documentation
HP Documentation
HP Documentation
HP Documentation
HP DocumentationHP Documentation.
To connect wireless headphones to your computer, follow the device manufacturer's instructions.
Connecting headse
Connecting headse
Connecting headse
Connecting headseConnecting headsets
ts
ts
tsts
You can connect a headset to the audio-out (headphone)/audio-in (microphone) combo jack on your
computer.
A stand-alone microphone can be plugged into a USB port. See your manufacturer's instructions.
W
W
W
WWARNING!
ARNING!
ARNING!
ARNING!ARNING! To reduce the risk of personal injury, lower the volume setting before putting on
headphones, earbuds, or a headset. For additional safety information, see the
Regulatory, Safety, and
Environmental Notices
.
To access this guide:
■Select the Sear
Sear
Sear
SearSearch
ch
ch
chch icon in the taskbar, type in the search box, and then select HP Documentation
HP Documentation
HP Documentation
HP Documentation
HP DocumentationHP Documentation.
Headphones combined with a microphone are called headsets. You can connect wired headsets to the
audio-out (headphone)/audio-in (microphone) combo jack on your computer.
To connect wireless headsets to your computer, follow the device manufacturer's instructions.
Using sound settings
Using sound settings
Using sound settings
Using sound settingsUsing sound settings
Use sound settings to adjust system volume, change system sounds, or manage audio devices.
Viewing or changing sound se
Viewing or changing sound se
Viewing or changing sound se
Viewing or changing sound seViewing or changing sound settings
ttings
ttings
ttingsttings
Use these instructions to view or change sound settings.
■Select the Sear
Sear
Sear
SearSearch
ch
ch
chch icon in the taskbar, type in the search box, and then select control panel
Contr
Contr
Contr
ContrControl Panel
ol Panel
ol Panel
ol Panelol Panel, select Har
Har
Har
HarHardwar
dwar
dwar
dwardware and Sound
e and Sound
e and Sound
e and Sounde and Sound Sound
Sound
Sound
SoundSound, and then select .
Using the contr
Using the contr
Using the contr
Using the contrUsing the control panel t
ol panel t
ol panel t
ol panel tol panel to view and contr
o view and contr
o view and contr
o view and contro view and control audio se
ol audio se
ol audio se
ol audio seol audio settings
ttings
ttings
ttingsttings
You can view or change sound settings using the audio control panel.
Your computer might include an enhanced sound system by Bang & Olufsen, DTS, Beats audio, or
another provider. As a result, your computer might include advanced audio features that can be
controlled through an audio control panel specific to your audio system.
Use the audio control panel to view and control audio settings.
■Select the Sear
Sear
Sear
SearSearch
ch
ch
chch icon in the taskbar, type in the search box, select control panel Contr
Contr
Contr
ContrControl Panel
ol Panel
ol Panel
ol Panelol Panel,
select Har
Har
Har
HarHardwar
dwar
dwar
dwardware and Sound
e and Sound
e and Sound
e and Sounde and Sound, select , and then select the audio control panel specific to your
Sound
Sound
Sound
SoundSound
system.
Using video
Using video
Using video
Using videoUsing video
Your computer is a powerful video device that enables you to watch streaming video from your favorite
websites and download video and movies to watch on your computer when you are not connected to a
network.
30 Chapter 5 Entertainment features
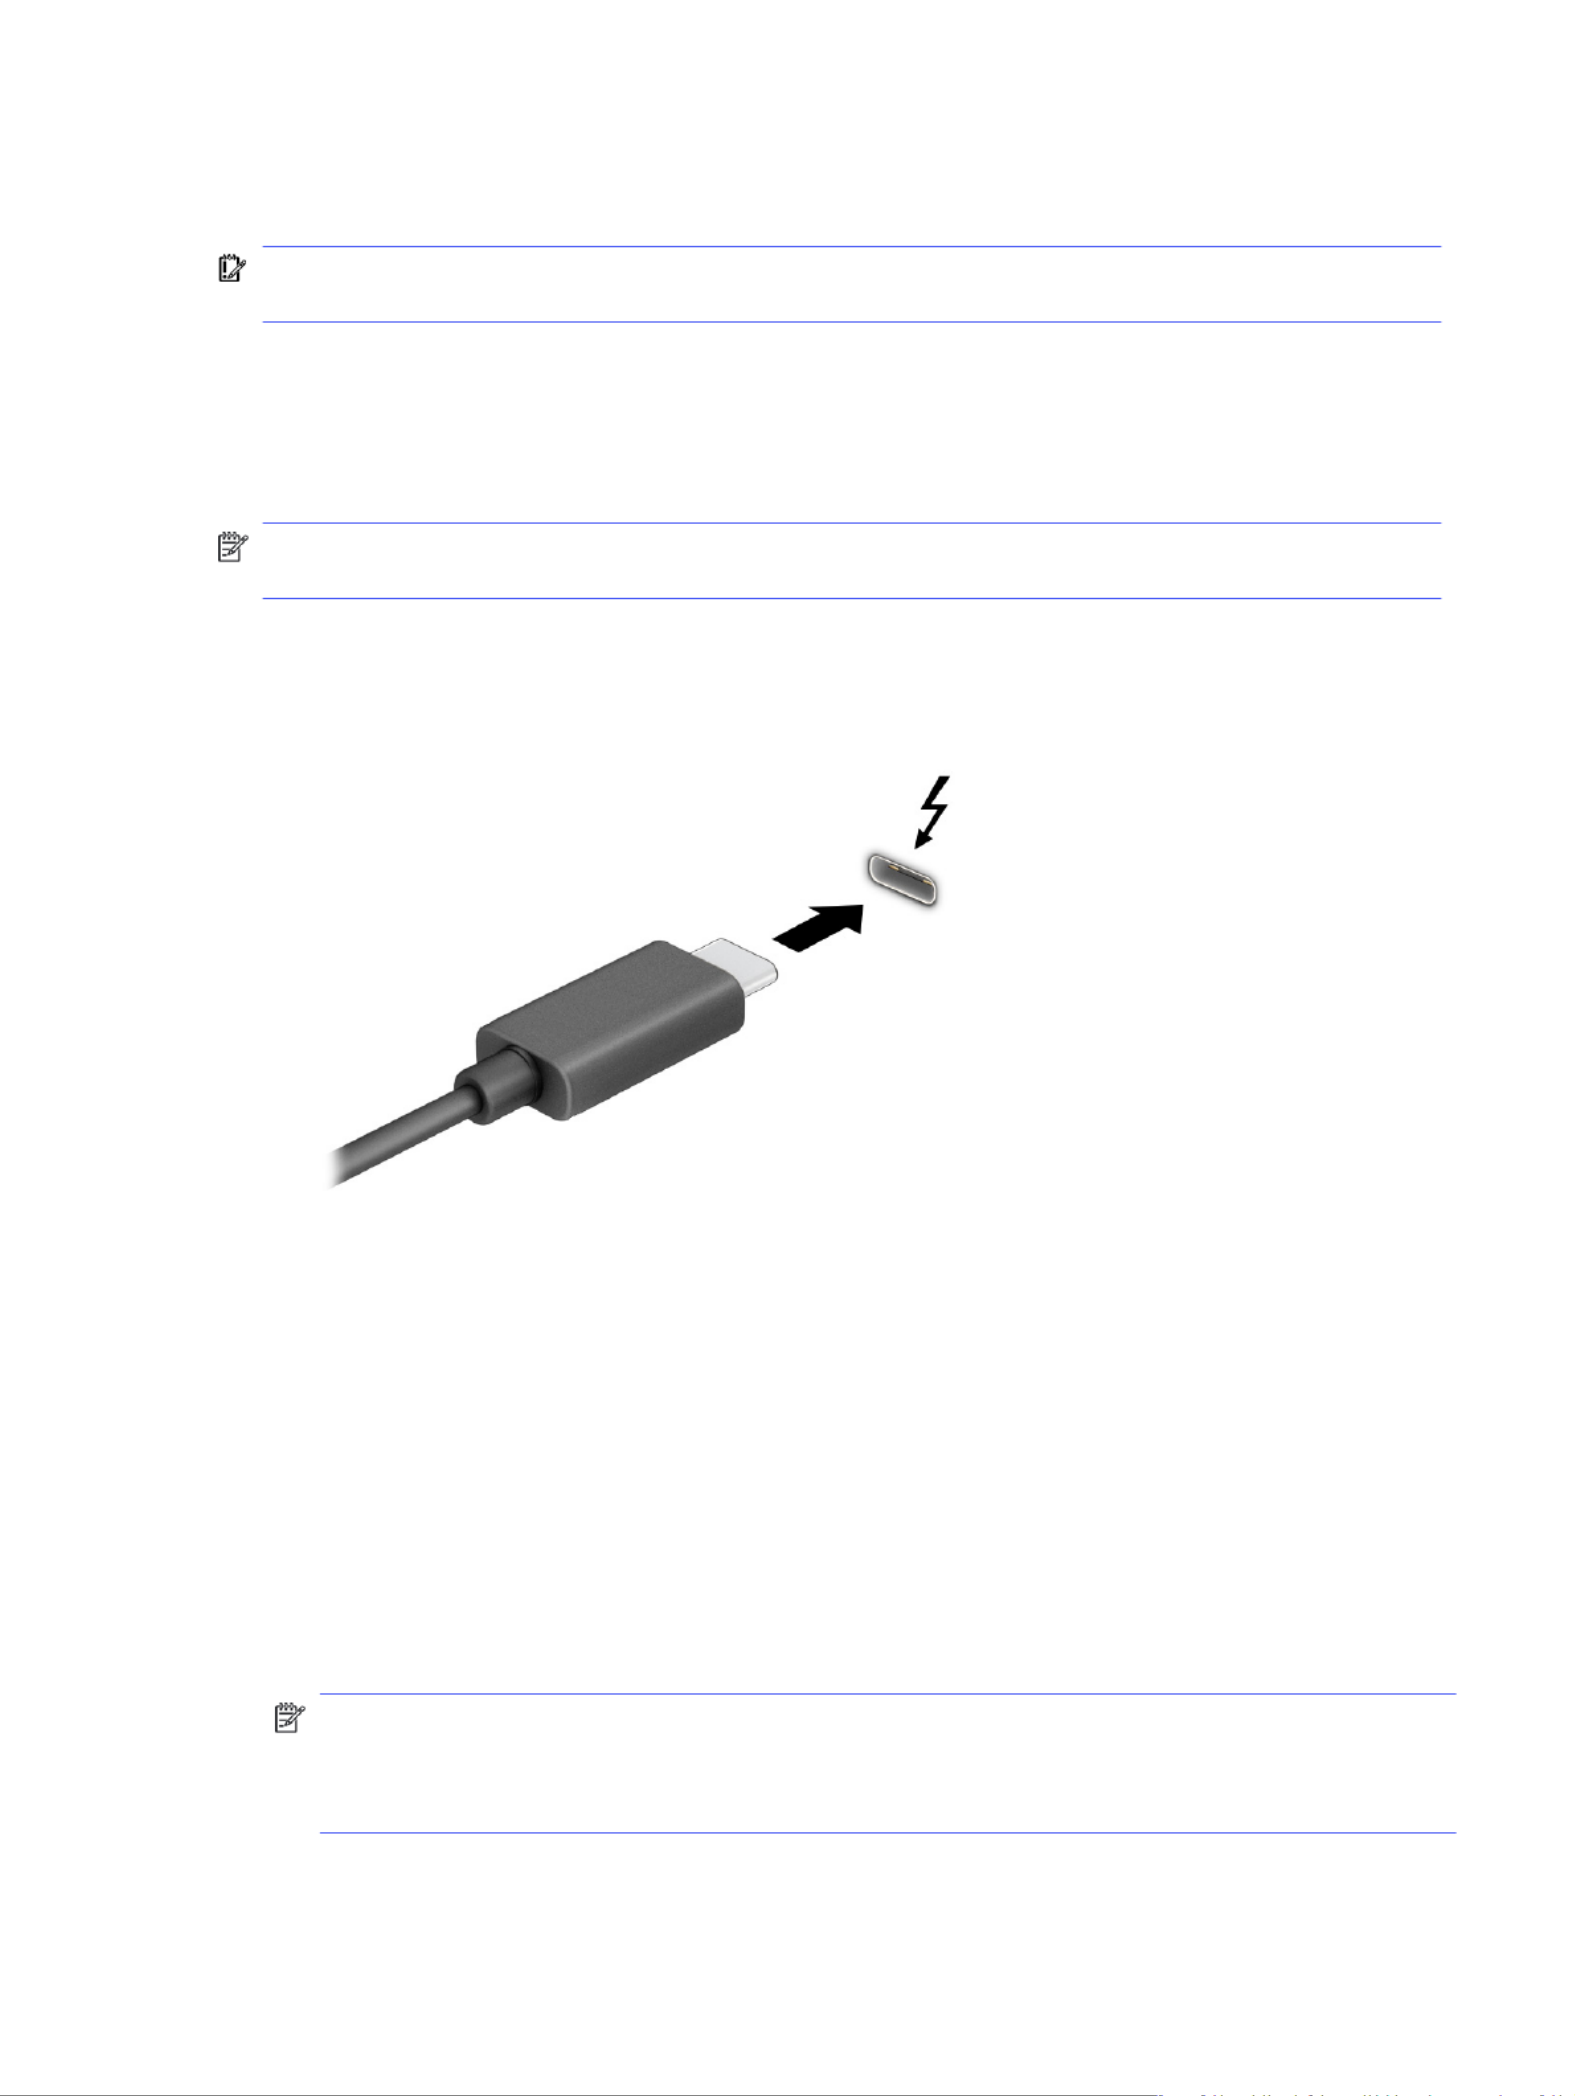
To enhance your viewing enjoyment, use one of the video ports on the computer to connect an external
monitor, projector, or TV.
IMPOR
IMPOR
IMPOR
IMPORIMPORT
T
T
TTANT
ANT
ANT
ANTANT:
:
:
:: Be sure that the external device is connected to the correct port on the computer, using
the correct cable. Follow the device manufacturer's instructions.
For information about using your video features, refer to HP Support Assistant.
Connecting a Thunderbolt de
Connecting a Thunderbolt de
Connecting a Thunderbolt de
Connecting a Thunderbolt deConnecting a Thunderbolt device using a USB T
vice using a USB T
vice using a USB T
vice using a USB Tvice using a USB Type-C cable
ype-C cable
ype-C cable
ype-C cableype-C cable
To see video or high-resolution display output on an external Thunderbolt device, follow these steps.
NO
NO
NO
NONOTE:
TE:
TE:
TE:TE: To connect a USB Type-C Thunderbolt device to your computer, you need a USB Type-C cable,
purchased separately.
Connect the Thunderbolt device according to the following instructions:
1.
1.
1.
1.1. Connect one end of the USB Type-C cable to the USB Type-C Thunderbolt port on the computer.
2.
2.
2.
2.2. Connect the other end of the cable to the external Thunderbolt device.
3.
3.
3.
3.3. Press to cycle through these display states:f1
●PC scr
PC scr
PC scr
PC scrPC screen only:
een only:
een only:
een only:een only: View the screen image on the computer only.
●Duplicate:
Duplicate:
Duplicate:
Duplicate:Duplicate: View the screen image simultaneously on both the computer and external device.
●Ext
Ext
Ext
ExtExtend:
end:
end:
end:end: View the screen image extended across both the computer and external device.
●Second scr
Second scr
Second scr
Second scrSecond screen only:
een only:
een only:
een only:een only: View the screen image on the external device only.
Each time you press the display state changes.f1
NO
NO
NO
NONOTE:
TE:
TE:
TE:TE: For best results, especially if you choose the Ext
Ext
Ext
ExtExtend
end
end
endend option, increase the screen resolution
of the external device, as follows. Select the St
St
St
StStart
art
art
artart button, select Se
Se
Se
SeSettings
ttings
ttings
ttingsttings Sy
Sy
Sy
SySyst
st
st
ststem
em
em
emem, select , and then
select . Under
Display
Display
Display
DisplayDisplay Scale & lay
Scale & lay
Scale & lay
Scale & layScale & layout
out
out
outout, select the appropriate resolution, and then select K
K
K
KKeep
eep
eep
eep eep
changes
changes
changes
changeschanges.
Connecting a Thunderbolt device using a USB Type-C cable 31
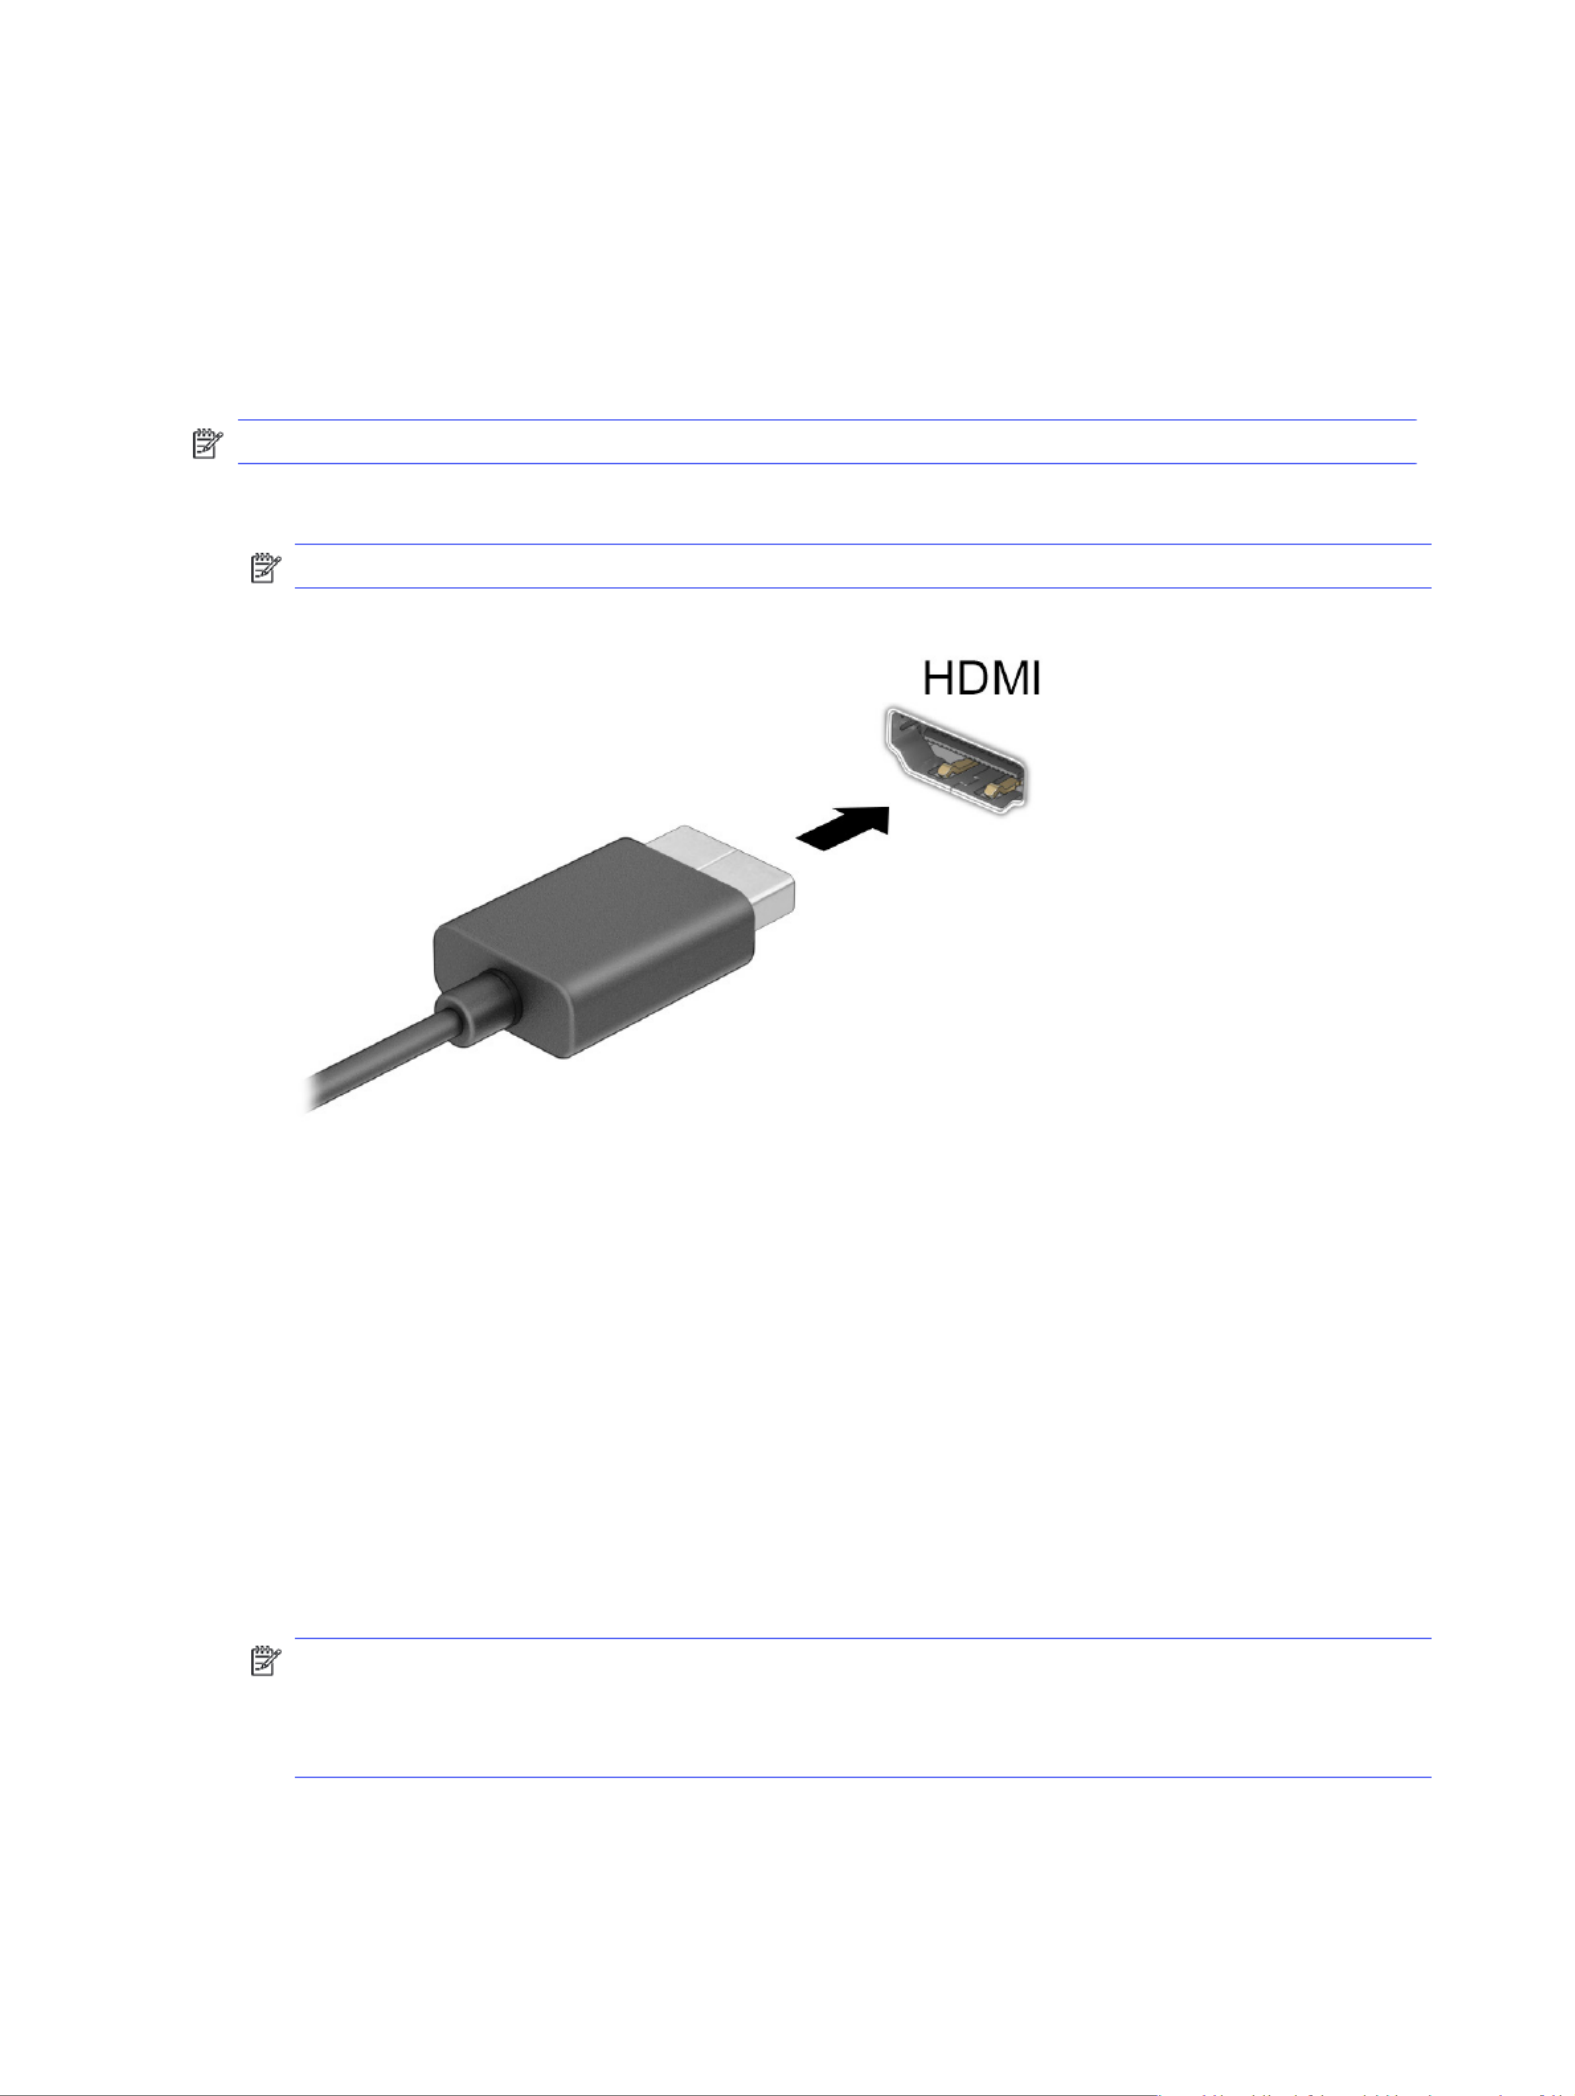
Connecting video de
Connecting video de
Connecting video de
Connecting video deConnecting video devices using an HDMI cable
vices using an HDMI cable
vices using an HDMI cable
vices using an HDMI cablevices using an HDMI cable
HDMI is the only video interface that supports high-definition video and audio.
Connecting a high-de
Connecting a high-de
Connecting a high-de
Connecting a high-deConnecting a high-definition TV or monitor using HDMI
finition TV or monitor using HDMI
finition TV or monitor using HDMI
finition TV or monitor using HDMIfinition TV or monitor using HDMI
To see the computer screen image on a high-definition TV or monitor, connect the high-definition device
according to the instructions.
NO
NO
NO
NONOTE:
TE:
TE:
TE:TE: To connect an HDMI device to your computer, you need an HDMI cable, purchased separately.
1.
1.
1.
1.1. Connect one end of the HDMI cable to the HDMI port on the computer.
NO
NO
NO
NONOTE:
TE:
TE:
TE:TE: HDMI port shapes can vary by product.
2.
2.
2.
2.2. Connect the other end of the cable to the high-definition TV or monitor.
3.
3.
3.
3.3. Press to cycle through these display states:f1
●PC scr
PC scr
PC scr
PC scrPC screen only:
een only:
een only:
een only:een only: View the screen image on the computer only.
●Duplicate:
Duplicate:
Duplicate:
Duplicate:Duplicate: View the screen image simultaneously on both the computer and the external
device.
●Ext
Ext
Ext
ExtExtend:
end:
end:
end:end: View the screen image extended across both the computer and the external device.
●Second scr
Second scr
Second scr
Second scrSecond screen only:
een only:
een only:
een only:een only: View the screen image on the external device only.
Each time you press the display state changes.f1
NO
NO
NO
NONOTE:
TE:
TE:
TE:TE: For best results, especially if you choose the Ext
Ext
Ext
ExtExtend
end
end
endend option, increase the screen resolution
of the external device, as follows. Select the St
St
St
StStart
art
art
artart Se
Se
Se
SeSettings
ttings
ttings
ttingsttings Sys
Sys
Sys
SysSystem
tem
tem
temtem button, select , select , and then
select . Under
Display
Display
Display
DisplayDisplay Scale & lay
Scale & lay
Scale & lay
Scale & layScale & layout
out
out
outout, select the appropriate resolution, and then select K
K
K
KKeep
eep
eep
eep eep
changes
changes
changes
changeschanges.
Setting up HDMI audio
Setting up HDMI audio
Setting up HDMI audio
Setting up HDMI audioSetting up HDMI audio
Use these instructions to set up HDMI audio.
32 Chapter 5 Entertainment features

T
T
T
TTurning on HDMI audio
urning on HDMI audio
urning on HDMI audio
urning on HDMI audiourning on HDMI audio
After you connect an HDMI TV to the computer, you can then turn on HDMI audio.
1.
1.
1.
1.1. Right-click the Speak
Speak
Speak
SpeakSpeakers
ers
ers
ersers icon in the notification area, at the far right of the taskbar, and then select
Sound settings
Sound settings
Sound settings
Sound settingsSound settings.
2.
2.
2.
2.2. Select Mor
Mor
Mor
MorMore sound settings
e sound settings
e sound settings
e sound settingse sound settings.
3.
3.
3.
3.3. On the tab, select
Playback
Playback
Playback
PlaybackPlayback Digit
Digit
Digit
DigitDigital Audio (HDMI)
al Audio (HDMI)
al Audio (HDMI)
al Audio (HDMI)al Audio (HDMI).
4.
4.
4.
4.4. Select Set De
Set De
Set De
Set DeSet Def
f
f
ffault
ault
ault
aultault OK
OK
OK
OKOK, and then select .
T
T
T
TTurning off HDMI audio
urning off HDMI audio
urning off HDMI audio
urning off HDMI audiourning off HDMI audio
Use these instructions to return the audio stream to the computer speakers.
1.
1.
1.
1.1. Right-click the Speak
Speak
Speak
SpeakSpeakers
ers
ers
ersers icon in the notification area, at the far right of the taskbar, and then select
Sound settings
Sound settings
Sound settings
Sound settingsSound settings.
2.
2.
2.
2.2. Select Mor
Mor
Mor
MorMore sound settings
e sound settings
e sound settings
e sound settingse sound settings.
3.
3.
3.
3.3. On the tab, select
Playback
Playback
Playback
PlaybackPlayback Speak
Speak
Speak
SpeakSpeakers
ers
ers
ersers.
4.
4.
4.
4.4. Select Set De
Set De
Set De
Set DeSet Def
f
f
ffault
ault
ault
aultault OK
OK
OK
OKOK, and then select .
Disco
Disco
Disco
DiscoDiscovering and connec
vering and connec
vering and connec
vering and connecvering and connecting wir
ting wir
ting wir
ting wirting wired displays using MultiStr
ed displays using MultiStr
ed displays using MultiStr
ed displays using MultiStred displays using MultiStream T
eam T
eam T
eam Team T
r
r
r
rransport
ansport
ansport
ansportansport
MultiStream Transport (MST) allows you to connect multiple wired display devices to your computer by
connecting to the VGA port or DisplayPort connectors on your computer and also to the VGA port or
DisplayPort connectors on a hub or an external docking station.
You can connect in several ways, depending on the type of graphics controller installed on your
computer and whether your computer includes a built-in hub. Go to Device Manager
Device Manager
Device Manager
Device ManagerDevice Manager to find out what
hardware is installed on your computer.
Connecting displays t
Connecting displays t
Connecting displays t
Connecting displays tConnecting displays to comput
o comput
o comput
o computo computers with NVIDIA gr
ers with NVIDIA gr
ers with NVIDIA gr
ers with NVIDIA grers with NVIDIA graphics (with an op
aphics (with an op
aphics (with an op
aphics (with an opaphics (with an optional hub)
tional hub)
tional hub)
tional hub)tional hub)
To set up multiple display devices, follow these steps.
NO
NO
NO
NONOTE:
TE:
TE:
TE:TE: With an NVIDIA® graphics controller and optional hub, you can connect up to four external
display devices.
1.
1.
1.
1.1. Connect an external hub (purchased separately) to the DisplayPort (DP) connector on your
computer, using a DP-to-DP cable (purchased separately). Be sure that the hub power adapter
is connected to AC power.
2.
2.
2.
2.2. Connect your external display devices to the VGA port or DisplayPort connectors on the hub.
3.
3.
3.
3.3. To see all of your connected display devices, select the Sear
Sear
Sear
SearSearch
ch
ch
chch icon in the taskbar, type device
manager in the search box, and then select the Device Manager
Device Manager
Device Manager
Device ManagerDevice Manager app. If you don't see all of your
connected displays, be sure that each is connected to the correct port on the hub.
NO
NO
NO
NONOTE:
TE:
TE:
TE:TE: Multiple display choices include Duplicat
Duplicat
Duplicat
DuplicatDuplicate
e
e
ee, which mirrors your computer screen on all
enabled display devices, or , which spans your computer screen across all enabled display
Extend
Extend
Extend
ExtendExtend
devices.
Turning on HDMI audio 33

Connecting displays t
Connecting displays t
Connecting displays t
Connecting displays tConnecting displays to comput
o comput
o comput
o computo computers with Int
ers with Int
ers with Int
ers with Inters with Intel gr
el gr
el gr
el grel graphics (with an optional hub)
aphics (with an optional hub)
aphics (with an optional hub)
aphics (with an optional hub)aphics (with an optional hub)
To set up multiple display devices, follow these steps.
NO
NO
NO
NONOTE:
TE:
TE:
TE:TE: With an Intel graphics controller and optional hub, you can connect up to three display devices.
1.
1.
1.
1.1. Connect an external hub (purchased separately) to the DisplayPort connector on your computer,
using a DP-to-DP cable (purchased separately). Be sure that the hub power adapter is connected to
AC power.
2.
2.
2.
2.2. Connect your external display devices to the VGA port or DisplayPort connectors on the hub.
3.
3.
3.
3.3. When Windows detects a monitor connected to the DisplayPort hub, the DisplayP
DisplayP
DisplayP
DisplayPDisplayPort T
ort T
ort T
ort Tort T
opology
opology
opology
opology opology
Notification
Notification
Notification
NotificationNotification dialog box is displayed. Select the appropriate options to configure your displays.
Multiple display choices include Duplicat
Duplicat
Duplicat
DuplicatDuplicate
e
e
ee, which mirrors your computer screen on all enabled
display devices, or , which extends the screen image across all enabled display devices.
Extend
Extend
Extend
ExtendExtend
NO
NO
NO
NONOTE:
TE:
TE:
TE:TE: If this dialog box does not appear, be sure that each external display device is connected
to the correct port on the hub. Select the button, select , select
Start
Start
Start
StartStart Settings
Settings
Settings
SettingsSettings Syst
Syst
Syst
SystSystem
em
em
emem, and then
select . Under
Display
Display
Display
DisplayDisplay Scale & lay
Scale & lay
Scale & lay
Scale & layScale & layout
out
out
outout, select the appropriate resolution, and then select K
K
K
KKeep
eep
eep
eep eep
changes
changes
changes
changeschanges.
Connecting displays t
Connecting displays t
Connecting displays t
Connecting displays tConnecting displays to comput
o comput
o comput
o computo computers with Int
ers with Int
ers with Int
ers with Inters with Intel gr
el gr
el gr
el grel graphics (with a built
aphics (with a built
aphics (with a built
aphics (with a builtaphics (with a built-in hub)
-in hub)
-in hub)
-in hub)-in hub)
To set up multiple display devices, follow these steps.
With your internal hub and Intel graphics controller, you can connect up to three display devices in the
following configurations:
●Two 1920 × 1200 DisplayPort monitors connected to the computer and one 1920 × 1200 VGA monitor
connected to an optional docking station
●One 2560 × 1600 DisplayPort monitor connected to the computer and one 1920 × 1200 VGA monitor
connected to an optional docking station
1.
1.
1.
1.1. Connect your external display devices to the VGA port or DisplayPort connectors on the computer
base or the docking station.
2.
2.
2.
2.2. When Windows detects a monitor connected to the DisplayPort hub, the DisplayP
DisplayP
DisplayP
DisplayPDisplayPort T
ort T
ort T
ort Tort T
opology
opology
opology
opology opology
Notification
Notification
Notification
NotificationNotification dialog box is displayed. Select the appropriate options to configure your displays.
Multiple display choices include Duplicat
Duplicat
Duplicat
DuplicatDuplicate
e
e
ee, which mirrors your computer screen on all enabled
display devices, or , which extends the screen image across all enabled display devices.
Extend
Extend
Extend
ExtendExtend
NO
NO
NO
NONOTE:
TE:
TE:
TE:TE: If this dialog box does not appear, be sure that each external display device is connected
to the correct port on the hub. Select the button, select , select
Start
Start
Start
StartStart Settings
Settings
Settings
SettingsSettings Syst
Syst
Syst
SystSystem
em
em
emem, and then
select . Under
Display
Display
Display
DisplayDisplay Scale & lay
Scale & lay
Scale & lay
Scale & layScale & layout
out
out
outout, select the appropriate resolution, and then select K
K
K
KKeep
eep
eep
eep eep
changes
changes
changes
changeschanges.
Disco
Disco
Disco
DiscoDiscovering and connec
vering and connec
vering and connec
vering and connecvering and connecting to Mir
ting to Mir
ting to Mir
ting to Mirting to Miracast
acast
acast
acastacast-compatible wir
-compatible wir
-compatible wir
-compatible wir-compatible wireless display
eless display
eless display
eless displayeless displays (select
s (select
s (select
s (select s (select
pr
pr
pr
prproduct
oduct
oduct
oductoducts only)
s only)
s only)
s only)s only)
Follow these steps to discover and connect to Miracast®-compatible wireless displays without leaving
your current apps.
NO
NO
NO
NONOTE:
TE:
TE:
TE:TE: To learn what type of display you have (Miracast-compatible or Intel WiDi), refer to the
documentation that came with your TV or secondary display.
34 Chapter 5 Entertainment features

To discover and connect to Miracast-compatible wireless displays without leaving your current apps,
follow these steps.
■Select the Sear
Sear
Sear
SearSearch
ch
ch
chch icon in the taskbar, type in the search box, and then select project Connect to a
Connect to a
Connect to a
Connect to a Connect to a
wir
wir
wir
wirwireless display
eless display
eless display
eless displayeless display Connect
Connect
Connect
ConnectConnect. Select , and then follow the on-screen instructions.
Disco
Disco
Disco
DiscoDiscovering and connec
vering and connec
vering and connec
vering and connecvering and connecting to Int
ting to Int
ting to Int
ting to Intting to Intel WiDi certified displays (select In
el WiDi certified displays (select In
el WiDi certified displays (select In
el WiDi certified displays (select Inel WiDi certified displays (select Intel pr
tel pr
tel pr
tel prtel produc
oduc
oduc
oducoducts
ts
ts
ts ts
only)
only)
only)
only)only)
Use Intel WiDi to wirelessly project individual files such as photos, music, or videos, or to duplicate your
entire computer screen to a TV or a secondary display device.
Intel WiDi, a premium Miracast solution, makes it easy and seamless to pair your secondary display
device; provides for full-screen duplication; and improves speed, quality, and scaling.
Connecting t
Connecting t
Connecting t
Connecting tConnecting to Intel WiDi certified displays
o Intel WiDi certified displays
o Intel WiDi certified displays
o Intel WiDi certified displayso Intel WiDi certified displays
Follow these steps to connect to Intel WiDi certified displays.
■Select the Sear
Sear
Sear
SearSearch
ch
ch
chch icon in the taskbar, type in the search box, and then select project Connect to a
Connect to a
Connect to a
Connect to a Connect to a
wir
wir
wir
wirwireless display
eless display
eless display
eless displayeless display Connect
Connect
Connect
ConnectConnect. Select , and then follow the on-screen instructions.
Opening Int
Opening Int
Opening Int
Opening IntOpening Intel WiDi
el WiDi
el WiDi
el WiDiel WiDi
Follow these steps to open Intel WiDi.
■Select the Sear
Sear
Sear
SearSearch
ch
ch
chch icon in the taskbar, type in the search box, and then select .Intel WiDi Intel WiDi
Intel WiDi
Intel WiDi
Intel WiDiIntel WiDi
Using dat
Using dat
Using dat
Using datUsing data tr
a tr
a tr
a tra trans
ans
ans
ansansf
f
f
ffer
er
er
erer
Your computer is a powerful entertainment device that enables you to transfer photos, videos, and
movies from your USB devices to view on your computer.
To enhance your viewing enjoyment, use one of the USB Type-C ports on the computer to connect a
USB device, such as a cell phone, camera, activity tracker, or smartwatch, and transfer the files to your
computer.
IMPOR
IMPOR
IMPOR
IMPORIMPORT
T
T
TTANT
ANT
ANT
ANTANT:
:
:
:: Be sure that the external device is connected to the correct port on the computer, using
the correct cable. Follow the device manufacturer's instructions.
For information about using your USB Type-C features, refer to HP Support Assistant.
Connecting de
Connecting de
Connecting de
Connecting deConnecting devices t
vices t
vices t
vices tvices to a USB T
o a USB T
o a USB T
o a USB To a USB Type-C port (select pr
ype-C port (select pr
ype-C port (select pr
ype-C port (select prype-C port (select products only
oducts only
oducts only
oducts onlyoducts only)
)
)
))
To connect devices to a USB Type-C port, follow these steps.
NO
NO
NO
NONOTE:
TE:
TE:
TE:TE: To connect a USB Type-C device to your computer, you need a USB Type-C cable, purchased
separately.
Discovering and connecting to Intel WiDi certified displays (select Intel products only) 35

1.
1.
1.
1.1. Connect one end of the USB Type-C cable to the USB Type-C port on the computer.
2.
2.
2.
2.2. Connect the other end of the cable to the external device.
36 Chapter 5 Entertainment features

Managing po
Managing po
Managing po
Managing poManaging pow
w
w
wwer
er
er
erer
6
6
6
66
Your computer can operate on either battery power or external power. When the computer is running
on battery power and an external power source is not available to charge the battery, it is important to
monitor and conserve the battery charge.
Some power management features described in this chapter might not be available on your computer.
Using Sleep and Hibernation
Using Sleep and Hibernation
Using Sleep and Hibernation
Using Sleep and HibernationUsing Sleep and Hibernation
Windows has two power-saving states, Sleep and Hibernation.
●Sleep—The Sleep state automatically initiates after a period of inactivity. Your work is available in
memory, allowing you to resume your work quickly. You can also initiate Sleep manually. Depending
on your computer model, the Sleep state might also support Modern Standby mode. This mode
keeps some internal operations awake and enables your computer to receive web notifications,
such as emails, while in Sleep. For more information, see Initiating and exiting Sleep on page 37.
●Hibernation—The Hibernation state is automatically initiated if the battery reaches a critical level
or the computer has been in the Sleep state for an extended period of time. In the Hibernation
state, your work is saved to a hibernation file and the computer powers down. You can also initiate
Hibernation manually. For more information, see Initiating and exiting Hibernation (select products
only) on page 38.
IMPOR
IMPOR
IMPOR
IMPORIMPORT
T
T
TTANT
ANT
ANT
ANTANT:
:
:
:: Several well-known vulnerabilities exist when a computer is in the Sleep state. To prevent
an unauthorized user from accessing data on your computer, even encrypted data, HP recommends
that you always initiate Hibernation instead of Sleep anytime the computer will be out of your physical
possession. This practice is particularly important when you travel with your computer.
IMPORT
IMPORT
IMPORT
IMPORTIMPORTANT
ANT
ANT
ANTANT:
:
:
:: To reduce the risk of possible audio and video degradation, loss of audio or video
playback functionality, or loss of information, do not initiate Sleep while reading from or writing to a disc
or an external media card.
Initiating and e
Initiating and e
Initiating and e
Initiating and eInitiating and exiting Sleep
xiting Sleep
xiting Sleep
xiting Sleepxiting Sleep
You can initiate Sleep in several ways.
●Select the St
St
St
StStart
art
art
artart P
P
P
PPower
ower
ower
owerower button, select the icon, and then select .
Sleep
Sleep
Sleep
SleepSleep
●Close the display (select products only).
●Press the Sleep hot key (select products only); for example, fn f1 fn f12+ or + .
●Briefly press the power button (select products only).
You can exit Sleep in any of the following ways:
●Briefly press the power button.
●If the computer is closed, raise the display (select products only).
●Press a key on the keyboard (select products only).
Managing power 37

●Tap the touchpad (select products only).
When the computer exits Sleep, your work returns to the screen.
IMPORT
IMPORT
IMPORT
IMPORTIMPORT
ANT
ANT
ANT
ANTANT:
:
:
:: If you have set a password to be required on exiting Sleep, you must enter your Windows
password before your work returns to the screen.
Initiating and e
Initiating and e
Initiating and e
Initiating and eInitiating and exiting Hibernation (select pr
xiting Hibernation (select pr
xiting Hibernation (select pr
xiting Hibernation (select prxiting Hibernation (select products only
oducts only
oducts only
oducts onlyoducts only)
)
)
))
You can enable user-initiated Hibernation and change other power settings and timeouts using Power
Options.
1.
1.
1.
1.1. Select the Sear
Sear
Sear
SearSearch
ch
ch
chch icon in the taskbar, type in the search box, and then select power Choo
Choo
Choo
ChooChoose a
se a
se a
se a se a
pow
pow
pow
powpower plan
er plan
er plan
er planer plan.
2.
2.
2.
2.2. In the left pane, select Choose what the pow
Choose what the pow
Choose what the pow
Choose what the powChoose what the power buttons do
er buttons do
er buttons do
er buttons doer buttons do (wording might vary by product).
3.
3.
3.
3.3. Depending on your product, you can enable Hibernation for battery power or external power in any
of the following ways:
●P
P
P
PPow
ow
ow
owower button
er button
er button
er buttoner button P
P
P
PPower and sleep butt
ower and sleep butt
ower and sleep butt
ower and sleep buttower and sleep buttons and lid settings
ons and lid settings
ons and lid settings
ons and lid settingsons and lid settings—Under (wording might vary by product),
select When I pr
When I pr
When I pr
When I prWhen I press the pow
ess the pow
ess the pow
ess the powess the power button
er button
er button
er buttoner button, and then select Hibernat
Hibernat
Hibernat
HibernatHibernate
e
e
ee.
●Sleep button
Sleep button
Sleep button
Sleep buttonSleep button (select products only)—Under P
P
P
PPow
ow
ow
owower and sleep butt
er and sleep butt
er and sleep butt
er and sleep butter and sleep buttons and lid settings
ons and lid settings
ons and lid settings
ons and lid settingsons and lid settings (wording
might vary by product), select When I pr
When I pr
When I pr
When I prWhen I press the sleep button
ess the sleep button
ess the sleep button
ess the sleep buttoness the sleep button, and then select Hibernat
Hibernat
Hibernat
HibernatHibernate
e
e
ee.
●Lid
Lid
Lid
LidLid (select products only)—Under P
P
P
PPower and sleep butt
ower and sleep butt
ower and sleep butt
ower and sleep buttower and sleep buttons and lid settings
ons and lid settings
ons and lid settings
ons and lid settingsons and lid settings (wording might vary
by product), select When I close the lid
When I close the lid
When I close the lid
When I close the lidWhen I close the lid Hibernat
Hibernat
Hibernat
HibernatHibernate
e
e
ee, and then select .
●Po
Po
Po
PoPower menu
wer menu
wer menu
wer menuwer menu Change Settings that ar
Change Settings that ar
Change Settings that ar
Change Settings that arChange Settings that are curr
e curr
e curr
e curre currently unav
ently unav
ently unav
ently unavently unavailable
ailable
ailable
ailableailable Shutdo
Shutdo
Shutdo
ShutdoShutdown
wn
wn
wn wn —Select , and then, under
settings
settings
settings
settingssettings, select the check box.
Hibernate
Hibernate
Hibernate
HibernateHibernate
The Power menu can be accessed by selecting the St
St
St
StStart
art
art
artart button.
4.
4.
4.
4.4. Select Sav
Sav
Sav
SavSave changes
e changes
e changes
e changese changes.
To initiate Hibernation, use the method that you enabled in step 3.
To exit Hibernation, briefly press the power button.
IMPORT
IMPORT
IMPORT
IMPORTIMPORT
ANT
ANT
ANT
ANTANT:
:
:
:: If you have set a password to be required on exiting Hibernation, you must enter your
Windows password before your work returns to the screen.
Shutting do
Shutting do
Shutting do
Shutting doShutting down (turning o
wn (turning o
wn (turning o
wn (turning own (turning off) the comput
ff) the comput
ff) the comput
ff) the computff) the computer
er
er
erer
The Shut down command closes all open programs, including the operating system, and then turns off
the display and the computer. Shut down the computer when it will be unused and disconnected from
external power for an extended period.
IMPORT
IMPORT
IMPORT
IMPORTIMPORT
ANT
ANT
ANT
ANTANT:
:
:
:: Unsaved information is lost when the computer shuts down. Be sure to save your work
before shutting down the computer.
The recommended procedure is to use the Windows Shut down command.
NO
NO
NO
NONOTE:
TE:
TE:
TE:TE: If the computer is in the Sleep state or in Hibernation, first exit Sleep or Hibernation by briefly
pressing the power button.
38 Chapter 6 Managing power

1.
1.
1.
1.1. Save your work and close all open programs.
2.
2.
2.
2.2. Select the St
St
St
StStart
art
art
artart P
P
P
PPow
ow
ow
owower
er
er
erer Shut down
Shut down
Shut down
Shut downShut down button, select the icon, and then select .
If the computer is unresponsive and you are unable to use the preceding shutdown procedures, try the
following emergency procedures in the sequence provided:
●Press + +ctrl alt delete, select the P
P
P
PPow
ow
ow
owower
er
er
erer Shut down
Shut down
Shut down
Shut downShut down icon, and then select .
●Press and hold the power button for at least 4 seconds.
●If your computer has a user-replaceable battery (select products only), disconnect the computer
from external power, and then remove the battery.
Using the P
Using the P
Using the P
Using the PUsing the Po
o
o
oower icon
wer icon
wer icon
wer iconwer icon
The Power icon is located on the Windows taskbar. The Power icon allows you to quickly access power
settings and view the remaining battery charge.
●To view the percentage of remaining battery charge, place the mouse pointer over the P
P
P
PPower
ower
ower
ower ower
icon .
●To view power settings, right-click the Pow
Pow
Pow
PowPower
er
er
er er P
P
P
PPower and sleep se
ower and sleep se
ower and sleep se
ower and sleep seower and sleep settings
ttings
ttings
ttingsttingsicon , and then select .
Different power icons indicate whether the computer is running on battery or external power. Placing the
mouse pointer over the icon reveals a message if the battery has reached a low or critical battery level.
Running on batt
Running on batt
Running on batt
Running on battRunning on batter
er
er
erery pow
y pow
y pow
y powy power
er
er
erer
When the computer has a charged battery and is not plugged into external power, the computer runs
on battery power. When the computer is off and unplugged from external power, the battery slowly
discharges. The computer displays a message when the battery reaches a low or critical battery level.
W
W
W
WWARNING!
ARNING!
ARNING!
ARNING!ARNING! To reduce potential safety issues, use only the battery provided with the computer, a
replacement battery provided by HP, or a compatible battery purchased from HP.
Computer battery life varies, depending on power management settings, programs running on the
computer, screen brightness, external devices connected to the computer, and other factors.
NO
NO
NO
NONOTE:
TE:
TE:
TE:TE: Select computer products can switch between graphic controllers to conserve battery
charge.
Using HP Fas
Using HP Fas
Using HP Fas
Using HP FasUsing HP Fast Char
t Char
t Char
t Chart Charge (select pr
ge (select pr
ge (select pr
ge (select prge (select products only)
oducts only)
oducts only)
oducts only)oducts only)
The HP Fast Charge feature allows you to quickly charge your computer battery. Charging time might
vary by ±10%. When the remaining battery charge is between 0 and 50%, the battery charges to 50% of
full capacity in no more than 30 to 45 minutes, depending on your computer model.
To use HP Fast Charge, shut down your computer, and then connect the AC adapter to your computer
and to external power.
Using the Power icon 39

Displaying batt
Displaying batt
Displaying batt
Displaying battDisplaying battery char
ery char
ery char
ery charery charge
ge
ge
gege
To view the percentage of remaining battery charge, place the mouse pointer over the Po
Po
Po
PoPower
wer
wer
werwer icon .
Finding batt
Finding batt
Finding batt
Finding battFinding batter
er
er
erery inf
y inf
y inf
y infy information in HP Support Assis
ormation in HP Support Assis
ormation in HP Support Assis
ormation in HP Support Assisormation in HP Support Assist
t
t
ttant (selec
ant (selec
ant (selec
ant (selecant (select pr
t pr
t pr
t prt produc
oduc
oduc
oducoducts only)
ts only)
ts only)
ts only)ts only)
Follow these steps to access battery information.
1.
1.
1.
1.1. Select the Sear
Sear
Sear
SearSearch
ch
ch
chch icon in the taskbar, type in the search box, and then select the support HP
HP
HP
HP HP
Support Assist
Support Assist
Support Assist
Support AssistSupport Assistant
ant
ant
antant app.
‒ or –
Select the question mark icon (select products only) in the taskbar.
2.
2.
2.
2.2. Select Fix
Fix
Fix
FixFixes & Diagnos
es & Diagnos
es & Diagnos
es & Diagnoses & Diagnostics
tics
tics
ticstics Check y
Check y
Check y
Check yCheck your batt
our batt
our batt
our battour battery
ery
ery
eryery L
L
L
LLaunch
aunch
aunch
aunchaunch, select , and then select . If HP Battery Check
indicates that your battery should be replaced, contact support.
HP Support Assistant provides the following tools and information about the battery:
●HP Battery Check
●Information about battery types, specifications, life cycles, and capacity
Conser
Conser
Conser
ConserConserving batt
ving batt
ving batt
ving battving battery pow
ery pow
ery pow
ery powery power
er
er
erer
Follow these steps to conserve battery power and maximize battery life.
●Lower the brightness of the display.
●Turn off wireless devices when you are not using them.
●Disconnect unused external devices that are not plugged into an external power source, such as an
external hard drive connected to a USB port.
●Stop, disable, or remove any external media cards that you are not using.
●Before you leave your work, initiate Sleep or shut down the computer.
Identifying lo
Identifying lo
Identifying lo
Identifying loIdentifying low batt
w batt
w batt
w battw batter
er
er
erery le
y le
y le
y ley lev
v
v
vvels
els
els
elsels
When a battery that is the sole power source for the computer reaches a low or critical battery level, the
computer warns you in one of several ways.
●The battery light (select products only) indicates a low or critical battery level.
– or –
●The P
P
P
PPow
ow
ow
owower
er
er
erer icon shows a low or critical battery notification.
NO
NO
NO
NONOTE:
TE:
TE:
TE:TE: For additional information about the Power icon, see Using the Power icon on page 39.
40 Chapter 6 Managing power

The computer takes the following actions for a critical battery level:
●If Hibernation is disabled and the computer is on or in the Sleep state, the computer remains briefly
in the Sleep state and then shuts down and loses any unsaved information.
●If Hibernation is enabled and the computer is on or in the Sleep state, the computer initiates
Hibernation.
R
R
R
RResolving a lo
esolving a lo
esolving a lo
esolving a loesolving a low battery lev
w battery lev
w battery lev
w battery levw battery level
el
el
elel
You can quickly resolve low battery level conditions.
R
R
R
RResolving a lo
esolving a lo
esolving a lo
esolving a loesolving a low batt
w batt
w batt
w battw battery lev
ery lev
ery lev
ery levery level when e
el when e
el when e
el when eel when ext
xt
xt
xtxternal power is av
ernal power is av
ernal power is av
ernal power is avernal power is available
ailable
ailable
ailableailable
Connect one of the following to the computer and to external power.
●AC adapter
●Optional docking device or expansion product
●Optional power adapter purchased as an accessory from HP
R
R
R
RResolving a lo
esolving a lo
esolving a lo
esolving a loesolving a low batt
w batt
w batt
w battw battery lev
ery lev
ery lev
ery levery level when no power sour
el when no power sour
el when no power sour
el when no power sourel when no power source is av
ce is av
ce is av
ce is avce is available
ailable
ailable
ailableailable
Save your work and shut down the computer.
R
R
R
RResolving a lo
esolving a lo
esolving a lo
esolving a loesolving a low batt
w batt
w batt
w battw battery lev
ery lev
ery lev
ery levery level when the computer canno
el when the computer canno
el when the computer canno
el when the computer cannoel when the computer cannot e
t e
t e
t et exit Hibernation
xit Hibernation
xit Hibernation
xit Hibernationxit Hibernation
When the battery level is low and you cannot bring the computer out of Hibernation, connect the AC
adapter.
1.
1.
1.
1.1. Connect the AC adapter to the computer and to external power.
2.
2.
2.
2.2. Exit Hibernation by pressing the power button.
Fact
Fact
Fact
FactFactor
or
or
orory
y
y
yy-sealed batt
-sealed batt
-sealed batt
-sealed batt-sealed batter
er
er
erery
y
y
yy
To monitor the status of the battery, or if the battery is no longer holding a charge, run HP Battery Check
in the HP Support Assistant app (select products only).
1.
1.
1.
1.1. Select the Sear
Sear
Sear
SearSearch
ch
ch
chch icon on the taskbar, type in the search box, and then select the support HP
HP
HP
HP HP
Support Assist
Support Assist
Support Assist
Support AssistSupport Assistant
ant
ant
antant app.
‒ or –
Select the question mark icon (select products only) on the taskbar.
2.
2.
2.
2.2. Select Fix
Fix
Fix
FixFixes & Diagnostics
es & Diagnostics
es & Diagnostics
es & Diagnosticses & Diagnostics, select Check your batt
Check your batt
Check your batt
Check your battCheck your batter
er
er
erery
y
y
yy L
L
L
LLaunch
aunch
aunch
aunchaunch, and then select . If HP Battery Check
indicates that your battery should be replaced, contact support.
The battery[ies] in this product cannot be easily replaced by users themselves. Removing or replacing
the battery could affect your warranty coverage. If a battery is no longer holding a charge, contact
support.
Resolving a low battery level 41

Running on e
Running on e
Running on e
Running on eRunning on ext
xt
xt
xtxternal po
ernal po
ernal po
ernal poernal pow
w
w
wwer
er
er
erer
For information about connecting to external power, see the
Setup Instructions
poster provided in the
computer box. The computer does not use battery power when the computer is connected to external
power with an approved AC adapter or an optional docking device or expansion product.
W
W
W
WWARNING!
ARNING!
ARNING!
ARNING!ARNING! To reduce potential safety issues, use only the AC adapter provided with the computer, a
replacement AC adapter provided by HP, or a compatible AC adapter purchased from HP.
W
W
W
WWARNING!
ARNING!
ARNING!
ARNING!ARNING! Do not charge the computer battery while you are aboard aircraft.
Connect the computer to external power under any of the following conditions:
●When charging or calibrating a battery
●When installing or updating system software
●When updating the system BIOS
●When writing information to a disc (select products only)
●When running Disk Defragmenter on computers with internal hard drives
●When performing a backup or recovery
When you connect the computer to external power:
●The battery begins to charge.
●The P
P
P
PPow
ow
ow
owower
er
er
erer icon changes appearance.
When you disconnect external power:
●The computer switches to battery power.
●The P
P
P
PPow
ow
ow
owower
er
er
erer icon changes appearance.
42 Chapter 6 Managing power

Security
Security
Security
SecuritySecurity
7
7
7
77
Computer security is essential for protecting the confidentiality, integrity, and availability of your
information. Standard security solutions provided by the Windows operating system, HP applications,
Computer Setup (BIOS), and other third-party software can help protect your computer from a variety of
risks, such as viruses, worms, and other types of malicious code.
NO
NO
NO
NONOTE:
TE:
TE:
TE:TE: Some security features listed in this chapter might not be available on your computer.
Pr
Pr
Pr
PrPro
o
o
ootec
tec
tec
tectecting the computer
ting the computer
ting the computer
ting the computerting the computer
Standard security features provided by the Windows operating system and Computer Setup (BIOS,
which runs under any operating system) can protect your personal settings and data from a variety of
risks.
NO
NO
NO
NONOTE:
TE:
TE:
TE:TE: Security solutions are designed to act as deterrents. These deterrents may not prevent a
product from being mishandled or stolen.
NO
NO
NO
NONOTE:
TE:
TE:
TE:TE: Before you send your computer for service, back up and delete confidential files, and remove
all password settings.
NO
NO
NO
NONOTE:
TE:
TE:
TE:TE: Some features listed in this chapter may not be available on your computer.
NO
NO
NO
NONOTE:
TE:
TE:
TE:TE: Your computer supports Computrace, which is an online security-based tracking and recovery
service available in select regions. If the computer is stolen, Computrace can track the computer if the
unauthorized user accesses the Internet. You must purchase the software and subscribe to the
service to use Computrace. For information about ordering the Computrace software, go to
http://www.hp.com.
T
T
T
TT
able 7
able 7
able 7
able 7able 7-
-
-
--1
1
1
11 Security solutions
Security solutions
Security solutions
Security solutionsSecurity solutions
Computer risk
Computer risk
Computer risk
Computer riskComputer risk Security featur
Security featur
Security featur
Security featurSecurity feature
e
e
ee
Unauthorized use of the computer HP Client Security software, in combination with a ●
password, smart card, contactless card, registered
fingerprints, or other authentication credential
●BIOS power-on password
Unauthorized access to Computer Setup (BIOS) BIOS administrator password in Computer Setup*
Unauthorized access to the contents of a hard drive DriveLock password (select products only) in Computer Setup*
Unauthorized startup from an optional external optical drive
(select products only), optional external hard drive (select
products only), or internal network adapter
Boot options feature in Computer Setup*
Unauthorized access to a Windows user account Windows user password
Unauthorized access to data Windows BitLocker
Unauthorized removal of the computer Security cable slot (used with an optional security cable on
select products only)
Security 43

T
T
T
TT
able 7
able 7
able 7
able 7able 7-
-
-
--1
1
1
11 Security solutions
Security solutions
Security solutions
Security solutionsSecurity solutions (continued)
(continued)
(continued)
(continued)(continued)
Computer risk
Computer risk
Computer risk
Computer riskComputer risk Security featur
Security featur
Security featur
Security featurSecurity feature
e
e
ee
*Computer Setup is an embedded, ROM-based utility that can be used even when the operating system is not working or will not
load. You can use a pointing device (touchpad, pointing stick, or USB mouse) or the keyboard to navigate and make selections in
Computer Setup.
NO
NO
NO
NONOTE:
TE:
TE:
TE:TE: On tablets without keyboards, you can use the touch screen.
Using pass
Using pass
Using pass
Using passUsing passw
w
w
wwor
or
or
orords
ds
ds
dsds
A password is a group of characters that you choose to secure your computer information. You can set
several types of passwords, depending on how you want to control access to your information. You can
set passwords in Windows or in Computer Setup, which is preinstalled on the computer.
●BIOS administrator, power-on, and DriveLock passwords are set in Computer Setup and are
managed by the system BIOS.
●Windows passwords are set only in the Windows operating system.
●If you forget both the DriveLock user password and the DriveLock master password set in Computer
Setup, the hard drive that is protected by the passwords is permanently locked and can no longer be
used.
You can use the same password for a Computer Setup feature and for a Windows security feature.
Use the following tips for creating and saving passwords:
●When creating passwords, follow requirements set by the program.
●Do not use the same password for multiple applications or websites, and do not reuse your
Windows password for any other application or website.
●Use the Password Manager feature of HP Client Security to store your user names and passwords
for your websites and applications. You can securely read them in the future if they cannot be
remembered.
●Do not store passwords in a file on the computer.
The following tables list commonly used Windows and BIOS administrator passwords and describe their
functions.
Setting pass
Setting pass
Setting pass
Setting passSetting passw
w
w
wwor
or
or
orords in Windows
ds in Windows
ds in Windows
ds in Windowsds in Windows
Windows passwords can help protect your computer from unauthorized access.
T
T
T
TT
able 7
able 7
able 7
able 7able 7-
-
-
--2
2
2
22 T
T
T
TT
ypes of Window
ypes of Window
ypes of Window
ypes of Windowypes of Windows passwor
s passwor
s passwor
s passwors passwords and their functions
ds and their functions
ds and their functions
ds and their functionsds and their functions
Pass
Pass
Pass
PassPasswor
wor
wor
worword
d
d
dd Function
Function
Function
FunctionFunction
Administrator password* Protects access to a Windows administrator-level account.
NO
NO
NO
NONOTE:
TE:
TE:
TE:TE: Setting the Windows administrator password does
not set the BIOS administrator password.
User password* Protects access to a Windows user account.
*For information about setting a Windows administrator password or a Windows user password, select the Sear
Sear
Sear
SearSearch
ch
ch
chch icon in the
taskbar, type in the search box, and then select the support HP Support Assis
HP Support Assis
HP Support Assis
HP Support AssisHP Support Assistant
tant
tant
tanttant app.
44 Chapter 7 Security

Setting pass
Setting pass
Setting pass
Setting passSetting passwor
wor
wor
worwords in Computer Se
ds in Computer Se
ds in Computer Se
ds in Computer Seds in Computer Setup
tup
tup
tuptup
Computer Setup passwords provide additional layers of security for your computer.
T
T
T
TT
able 7
able 7
able 7
able 7able 7-3
-3
-3
-3-3 T
T
T
TT
ypes of Comput
ypes of Comput
ypes of Comput
ypes of Computypes of Computer Setup passw
er Setup passw
er Setup passw
er Setup passwer Setup passwords and their func
ords and their func
ords and their func
ords and their funcords and their functions
tions
tions
tionstions
Pass
Pass
Pass
PassPasswor
wor
wor
worword
d
d
dd Function
Function
Function
FunctionFunction
BIOS administrator password* Protects access to Computer Setup.
NO
NO
NO
NONOTE:
TE:
TE:
TE:TE: If features have been enabled to prevent removing the
BIOS administrator password, you may not be able to remove
it until those features have been disabled.
Power-on password Must be entered each time you turn on or restart the ●
computer.
●If you forget your power-on password, you cannot turn on
or restart the computer.
DriveLock master password* Protects access to the internal hard drive that is protected
by DriveLock, and is set under DriveLock Passwords during
the enable process. This password is also used to remove
DriveLock protection.
DriveLock user password* Protects access to the internal hard drive that is protected by
DriveLock, and is set under DriveLock Passwords during the
enable process.
*For details about each of these passwords, see the following topics.
Managing a BIOS administr
Managing a BIOS administr
Managing a BIOS administr
Managing a BIOS administrManaging a BIOS administrat
at
at
atator passw
or passw
or passw
or passwor passwor
or
or
orord
d
d
dd
To set, change, or delete this password, follow these steps.
Setting a ne
Setting a ne
Setting a ne
Setting a neSetting a new BIOS administr
w BIOS administr
w BIOS administr
w BIOS administrw BIOS administrator pass
ator pass
ator pass
ator passator passwor
wor
wor
worword
d
d
dd
A BIOS administrator password helps prevent unauthorized access to Computer Setup. Use these
instructions to set a new BIOS administrator password.
1.
1.
1.
1.1. Start Computer Setup.
●Computers or tablets with keyboards:
■Turn on or restart the computer, and when the HP logo appears, press to enter f10
Computer Setup.
●Tablets without keyboards:
■Turn off the tablet. Press the power button in combination with the volume down button until
the Startup menu is displayed, and then tap to enter Computer Setup.
f10
f10
f10
f10f10
2.
2.
2.
2.2. Select , select
Security
Security
Security
SecuritySecurity Cr
Cr
Cr
CrCreate BIOS administr
eate BIOS administr
eate BIOS administr
eate BIOS administreate BIOS administrat
at
at
atator passw
or passw
or passw
or passwor passwor
or
or
orord
d
d
dd Set Up BIOS adminis
Set Up BIOS adminis
Set Up BIOS adminis
Set Up BIOS adminisSet Up BIOS administr
tr
tr
trtrator
ator
ator
ator ator or
Pass
Pass
Pass
PassPasswor
wor
wor
worword
d
d
dd (select products only), and then press enter.
3.
3.
3.
3.3. When prompted, type a password.
4.
4.
4.
4.4. When prompted, type the new password again to confirm.
Setting passwords in Computer Setup 45

5.
5.
5.
5.5. To save your changes and exit Computer Setup, select , select
Main
Main
Main
MainMain Save Change
Save Change
Save Change
Save ChangeSave Changes and Exit
s and Exit
s and Exit
s and Exits and Exit, and
then select Y
Y
Y
YY
es
es
es
eses.
NO
NO
NO
NONOTE:
TE:
TE:
TE:TE: If you are using arrow keys to highlight your choice, you must then press enter.
Your changes go into effect when the computer restarts.
Changing a BIOS administr
Changing a BIOS administr
Changing a BIOS administr
Changing a BIOS administrChanging a BIOS administrat
at
at
atator passw
or passw
or passw
or passwor passwor
or
or
orord
d
d
dd
Use these instructions to change a BIOS administrator password.
1.
1.
1.
1.1. Start Computer Setup.
●Computers or tablets with keyboards:
■Turn on or restart the computer, and when the HP logo appears, press f10 to enter
Computer Setup.
●Tablets without keyboards:
■Turn off the tablet. Press the power button in combination with the volume down button until
the Startup menu is displayed, and then tap to enter Computer Setup.
f10
f10
f10
f10f10
2.
2.
2.
2.2. Enter your current BIOS administrator password.
3.
3.
3.
3.3. Select , select
Security
Security
Security
SecuritySecurity Change BIOS adminis
Change BIOS adminis
Change BIOS adminis
Change BIOS adminisChange BIOS administr
tr
tr
trtrator P
ator P
ator P
ator Pator Passw
assw
assw
asswasswor
or
or
orord
d
d
dd Change Pass
Change Pass
Change Pass
Change PassChange Passwor
wor
wor
worword
d
d
dd or (select
products only), and then press enter.
4.
4.
4.
4.4. When prompted, type your current password.
5.
5.
5.
5.5. When prompted, type your new password.
6.
6.
6.
6.6. When prompted, type your new password again to confirm.
7
7
7
77.
.
.
.. To save your changes and exit Computer Setup, select Main
Main
Main
MainMain, select Sav
Sav
Sav
SavSave Changes and Exit
e Changes and Exit
e Changes and Exit
e Changes and Exite Changes and Exit, and
then select Y
Y
Y
YY
es
es
es
eses.
NO
NO
NO
NONOTE:
TE:
TE:
TE:TE: If you are using arrow keys to highlight your choice, you must then press enter.
Your changes go into effect when the computer restarts.
Deleting a BIOS adminis
Deleting a BIOS adminis
Deleting a BIOS adminis
Deleting a BIOS adminisDeleting a BIOS administr
tr
tr
trtrator pass
ator pass
ator pass
ator passator passw
w
w
wwor
or
or
orord
d
d
dd
Use these instructions to delete a BIOS administrator password.
1.
1.
1.
1.1. Start Computer Setup.
●Computers or tablets with keyboards:
■Turn on or restart the computer, and when the HP logo appears, press to enter f10
Computer Setup.
●Tablets without keyboards:
■Turn off the tablet. Press the power button in combination with the volume down button until
the Startup menu is displayed, and then tap to enter Computer Setup.
f10
f10
f10
f10f10
2.
2.
2.
2.2. Enter your current BIOS administrator password.
46 Chapter 7 Security

3.
3.
3.
3.3. Select , select
Security
Security
Security
SecuritySecurity Change BIOS adminis
Change BIOS adminis
Change BIOS adminis
Change BIOS adminisChange BIOS administr
tr
tr
trtrat
at
at
atator Pass
or Pass
or Pass
or Passor Passw
w
w
wwor
or
or
orord
d
d
dd Change P
Change P
Change P
Change PChange Passw
assw
assw
asswasswor
or
or
orord
d
d
dd or (select
products only), and then press enter.
4.
4.
4.
4.4. When prompted, type your current password.
5.
5.
5.
5.5. When prompted for the new password, leave the field empty, and then press enter.
6.
6.
6.
6.6. When prompted to type your new password again, leave the field empty, and then press enter.
7
7
7
77.
.
.
.. To save your changes and exit Computer Setup, select , select
Main
Main
Main
MainMain Sav
Sav
Sav
SavSave Changes and Exit
e Changes and Exit
e Changes and Exit
e Changes and Exite Changes and Exit, and
then select Y
Y
Y
YY
es
es
es
eses.
NO
NO
NO
NONOTE:
TE:
TE:
TE:TE: If you are using arrow keys to highlight your choice, you must then press enter.
Your changes go into effect when the computer restarts.
Ent
Ent
Ent
EntEntering a BIOS administr
ering a BIOS administr
ering a BIOS administr
ering a BIOS administrering a BIOS administrator pass
ator pass
ator pass
ator passator passwor
wor
wor
worword
d
d
dd
At the BIOS administr
BIOS administr
BIOS administr
BIOS administrBIOS administrator pass
ator pass
ator pass
ator passator passwor
wor
wor
worword
d
d
dd prompt, type your password (using the same keys that you
used to set the password), and then press enter. After two unsuccessful attempts to enter the BIOS
administrator password, you must restart the computer and try again.
Using Driv
Using Driv
Using Driv
Using DrivUsing DriveL
eL
eL
eLeLock Securit
ock Securit
ock Securit
ock Securitock Security Options
y Options
y Options
y Optionsy Options
DriveLock protection prevents unauthorized access to the contents of a hard drive.
DriveLock can be applied only to the internal hard drives of the computer. After DriveLock protection is
applied to a drive, the appropriate password must be entered to access the drive. The drive must be
inserted into the computer or an advanced port replicator for it to be unlocked.
DriveLock Security Options offers the following features:
●Automatic Driv
Automatic Driv
Automatic Driv
Automatic DrivAutomatic DriveLock
eLock
eLock
eLockeLock—See Selecting Automatic DriveLock (select products only) on page 47.
●Set Driv
Set Driv
Set Driv
Set DrivSet DriveLock Mast
eLock Mast
eLock Mast
eLock MasteLock Master Passw
er Passw
er Passw
er Passwer Password
ord
ord
ordord—See Selecting manual DriveLock on page 49.
●Enable DriveL
Enable DriveL
Enable DriveL
Enable DriveLEnable DriveLock
ock
ock
ockock—See Enabling DriveLock and setting a DriveLock user password on page 50.
Selecting Aut
Selecting Aut
Selecting Aut
Selecting AutSelecting Automatic DriveL
omatic DriveL
omatic DriveL
omatic DriveLomatic DriveLock (select pr
ock (select pr
ock (select pr
ock (select prock (select products only)
oducts only)
oducts only)
oducts only)oducts only)
You must set a BIOS administrator password before you can enable Automatic DriveLock.
When Automatic DriveLock is enabled, a random DriveLock user password and a DriveLock master
password derived from the BIOS administrator password are created. When the computer is turned on,
the random user password automatically unlocks the drive. If the drive is moved to another computer,
you must enter the BIOS administrator password for the original computer at the DriveLock password
prompt to unlock the drive.
Enabling Automatic Driv
Enabling Automatic Driv
Enabling Automatic Driv
Enabling Automatic DrivEnabling Automatic DriveLock
eLock
eLock
eLockeLock
To enable Automatic DriveLock, follow these steps.
1.
1.
1.
1.1. Start Computer Setup.
●Computers or tablets with keyboards:
a.
a.
a.
a.a. Turn off the computer.
b.
b.
b.
b.b. Press the power button, and when the HP logo appears, press to enter Computer f10
Setup.
Entering a BIOS administrator password 47

●Tablets without keyboards:
a.
a.
a.
a.a. Turn off the tablet.
b.
b.
b.
b.b. Press the power button in combination with the volume down button until the Startup
menu is displayed, and then tap to enter Computer Setup.
f10
f10
f10
f10f10
2.
2.
2.
2.2. At the BIOS administrator password prompt, enter the BIOS administrator password, and then
press .enter
3.
3.
3.
3.3. Select , select
Security
Security
Security
SecuritySecurity Har
Har
Har
HarHard Drive Utilities
d Drive Utilities
d Drive Utilities
d Drive Utilitiesd Drive Utilities, select Driv
Driv
Driv
DrivDriveLock/
eLock/
eLock/
eLock/eLock/Automatic Driv
Automatic Driv
Automatic Driv
Automatic DrivAutomatic DriveLock
eLock
eLock
eLockeLock, and then press
enter.
4.
4.
4.
4.4. Use the enter key, left mouse click, or touch screen to select the Automatic Driv
Automatic Driv
Automatic Driv
Automatic DrivAutomatic DriveLock
eLock
eLock
eLockeLock check box.
5.
5.
5.
5.5. To save your changes and exit Computer Setup, select , select
Main
Main
Main
MainMain Save Change
Save Change
Save Change
Save ChangeSave Changes and Exit
s and Exit
s and Exit
s and Exits and Exit, and
then select Y
Y
Y
YY
es
es
es
eses.
NO
NO
NO
NONOTE:
TE:
TE:
TE:TE: If you are using arrow keys to highlight your choice, you must then press enter.
Disabling Automatic Driv
Disabling Automatic Driv
Disabling Automatic Driv
Disabling Automatic DrivDisabling Automatic DriveLock
eLock
eLock
eLockeLock
To disable Automatic DriveLock, follow these steps.
1.
1.
1.
1.1. Start Computer Setup.
●Computers or tablets with keyboards:
a.
a.
a.
a.a. Turn off the computer.
b.
b.
b.
b.b. Press the power button, and when the HP logo appears, press to enter Computer f10
Setup.
●Tablets without keyboards:
a.
a.
a.
a.a. Turn off the tablet.
b.
b.
b.
b.b. Press the power button in combination with the volume down button until the Startup
menu is displayed, and then tap to enter Computer Setup.
f10
f10
f10
f10f10
2.
2.
2.
2.2. At the BIOS administrator password prompt, enter the BIOS administrator password, and then
press .enter
3.
3.
3.
3.3. Select , select
Security
Security
Security
SecuritySecurity Har
Har
Har
HarHard Drive Utilities
d Drive Utilities
d Drive Utilities
d Drive Utilitiesd Drive Utilities, select Driv
Driv
Driv
DrivDriveLock/
eLock/
eLock/
eLock/eLock/Automatic Driv
Automatic Driv
Automatic Driv
Automatic DrivAutomatic DriveLock
eLock
eLock
eLockeLock, and then press
enter.
4.
4.
4.
4.4. Select an internal hard drive, and then press enter.
5.
5.
5.
5.5. Use the enter key, left mouse click, or touch screen to clear the Aut
Aut
Aut
AutAutomatic DriveL
omatic DriveL
omatic DriveL
omatic DriveLomatic DriveLock
ock
ock
ockock check box.
6.
6.
6.
6.6. To save your changes and exit Computer Setup, select Main
Main
Main
MainMain Sav
Sav
Sav
SavSave Changes and Exit
e Changes and Exit
e Changes and Exit
e Changes and Exite Changes and Exit, select , and
then select Y
Y
Y
YY
es
es
es
eses.
NO
NO
NO
NONOTE:
TE:
TE:
TE:TE: If you are using arrow keys to highlight your choice, you must then press enter.
Ent
Ent
Ent
EntEntering an Aut
ering an Aut
ering an Aut
ering an Autering an Automatic Driv
omatic Driv
omatic Driv
omatic Drivomatic DriveL
eL
eL
eLeLock passw
ock passw
ock passw
ock passwock password
ord
ord
ordord
While Automatic DriveLock is enabled and the drive remains attached to the original computer, you will
not be prompted to enter a DriveLock password to unlock the drive.
48 Chapter 7 Security

However, if the drive is moved to another computer, or the system board is replaced on the original
computer, you will be prompted to provide the DriveLock password. If this happens, at the Driv
Driv
Driv
DrivDriveLock
eLock
eLock
eLock eLock
Pass
Pass
Pass
PassPasswor
wor
wor
worword
d
d
dd prompt, type the BIOS administrator password for the original computer (using the same kind
of keys you used to set the password), and then press to unlock the drive.enter
After three incorrect attempts to enter the password, you must shut down the computer and try again.
Selecting manual Driv
Selecting manual Driv
Selecting manual Driv
Selecting manual DrivSelecting manual DriveLock
eLock
eLock
eLockeLock
To manually apply DriveLock protection to an internal hard drive, you must set a master password, and
DriveLock must be enabled in Computer Setup.
IMPOR
IMPOR
IMPOR
IMPORIMPORT
T
T
TTANT
ANT
ANT
ANTANT:
:
:
:: To prevent a DriveLock-protected hard drive from becoming permanently unusable,
record the DriveLock user password and the DriveLock master password in a safe place away from
your computer. If you forget both DriveLock passwords, the hard drive will be permanently locked and
can no longer be used.
Note the following considerations about using DriveLock protection:
●After DriveLock protection is applied to a hard drive, you can access the hard drive only by entering
either the DriveLock user password or the master password.
●The owner of the DriveLock user password should be the day-to-day user of the protected hard
drive. The owner of the DriveLock master password may be either a system administrator or the
day-to-day user.
●The DriveLock user password and the DriveLock master password can be identical.
Setting a Driv
Setting a Driv
Setting a Driv
Setting a DrivSetting a DriveLock mast
eLock mast
eLock mast
eLock masteLock master passwor
er passwor
er passwor
er passworer password
d
d
dd
To set a DriveLock master password, follow these steps.
1.
1.
1.
1.1. Start Computer Setup.
●Computers or tablets with keyboards:
a.
a.
a.
a.a. Turn off the computer.
b.
b.
b.
b.b. Press the power button, and when the HP logo appears, press to enter Computer f10
Setup.
●Tablets without keyboards:
a.
a.
a.
a.a. Turn off the tablet.
b.
b.
b.
b.b. Press the power button in combination with the volume down button until the Startup
menu is displayed, and then tap to enter Computer Setup.
f10
f10
f10
f10f10
2.
2.
2.
2.2. Select , make the selection for
Security
Security
Security
SecuritySecurity Har
Har
Har
HarHard Driv
d Driv
d Driv
d Drivd Drive Utilities
e Utilities
e Utilities
e Utilitiese Utilities Driv
Driv
Driv
DrivDriveLock/
eLock/
eLock/
eLock/eLock/Automatic Driv
Automatic Driv
Automatic Driv
Automatic DrivAutomatic DriveLock
eLock
eLock
eLockeLock, select ,
and then press .enter
3.
3.
3.
3.3. Select the hard drive you want to protect, and then press enter.
4.
4.
4.
4.4. Select Set Driv
Set Driv
Set Driv
Set DrivSet DriveLock Mast
eLock Mast
eLock Mast
eLock MasteLock Master Passw
er Passw
er Passw
er Passwer Password
ord
ord
ordord, and then press enter.
5.
5.
5.
5.5. Carefully read the warning.
Selecting manual DriveLock 49

6.
6.
6.
6.6. Follow the on-screen instructions to set a DriveLock master password.
NO
NO
NO
NONOTE:
TE:
TE:
TE:TE: You can enable DriveLock and set a DriveLock user password before exiting from
Computer Setup. For more information, see Enabling DriveLock and setting a DriveLock user
password on page 50.
7
7
7
77.
.
.
.. To save your changes and exit Computer Setup, select , select , and
Main
Main
Main
MainMain Save Changes and Exit
Save Changes and Exit
Save Changes and Exit
Save Changes and ExitSave Changes and Exit
then select Y
Y
Y
YYes
es
es
eses.
NO
NO
NO
NONOTE:
TE:
TE:
TE:TE: If you are using arrow keys to highlight your choice, you must then press enter.
Enabling Driv
Enabling Driv
Enabling Driv
Enabling DrivEnabling DriveLock and se
eLock and se
eLock and se
eLock and seeLock and setting a DriveL
tting a DriveL
tting a DriveL
tting a DriveLtting a DriveLock user passw
ock user passw
ock user passw
ock user passwock user passwor
or
or
orord
d
d
dd
To enable DriveLock and set a DriveLock user password, follow these steps.
1.
1.
1.
1.1. Start Computer Setup.
●Computers or tablets with keyboards:
a.
a.
a.
a.a. Turn off the computer.
b.
b.
b.
b.b. Press the power button, and when the HP logo appears, press to enter Computer f10
Setup.
●Tablets without keyboards:
a.
a.
a.
a.a. Turn off the tablet.
b.
b.
b.
b.b. Press the power button in combination with the volume down button until the Startup
menu is displayed, and then tap to enter Computer Setup.
f10
f10
f10
f10f10
2.
2.
2.
2.2. Select , select
Security
Security
Security
SecuritySecurity Har
Har
Har
HarHard Driv
d Driv
d Driv
d Drivd Drive Utilities
e Utilities
e Utilities
e Utilitiese Utilities Driv
Driv
Driv
DrivDriveLock
eLock
eLock
eLockeLock/
/
/
//Automatic DriveL
Automatic DriveL
Automatic DriveL
Automatic DriveLAutomatic DriveLock
ock
ock
ockock, select , and then press
enter.
3.
3.
3.
3.3. Select the hard drive you want to protect, and then press enter.
4.
4.
4.
4.4. Select Enable DriveL
Enable DriveL
Enable DriveL
Enable DriveLEnable DriveLock
ock
ock
ockock and then press .enter
5.
5.
5.
5.5. Carefully read the warning.
6.
6.
6.
6.6. Follow the on-screen instructions to set a DriveLock user password and enable DriveLock.
7
7
7
77.
.
.
.. To save your changes and exit Computer Setup, select , select
Main
Main
Main
MainMain Sav
Sav
Sav
SavSave Changes and Exit
e Changes and Exit
e Changes and Exit
e Changes and Exite Changes and Exit, and
then select Y
Y
Y
YYes
es
es
eses.
NO
NO
NO
NONOTE:
TE:
TE:
TE:TE: If you are using arrow keys to highlight your choice, you must then press enter.
Disabling Driv
Disabling Driv
Disabling Driv
Disabling DrivDisabling DriveLock
eLock
eLock
eLockeLock
To disable DriveLock, follow these steps.
1.
1.
1.
1.1. Start Computer Setup.
●Computers or tablets with keyboards:
a.
a.
a.
a.a. Turn off the computer.
b.
b.
b.
b.b. Press the power button, and when the HP logo appears, press to enter Computer f10
Setup.
50 Chapter 7 Security

●Tablets without keyboards:
a.
a.
a.
a.a. Turn off the tablet.
b.
b.
b.
b.b. Press the power button in combination with the volume down button until the Startup
menu is displayed, and then tap to enter Computer Setup.
f10
f10
f10
f10f10
2.
2.
2.
2.2. Select , select
Security
Security
Security
SecuritySecurity Har
Har
Har
HarHard Drive Utilitie
d Drive Utilitie
d Drive Utilitie
d Drive Utilitied Drive Utilities
s
s
ss Driv
Driv
Driv
DrivDriveLock/
eLock/
eLock/
eLock/eLock/
Automatic DriveL
Automatic DriveL
Automatic DriveL
Automatic DriveLAutomatic DriveLock
ock
ock
ockock, select , and then press
enter.
3.
3.
3.
3.3. Select the hard drive you want to manage, and then press enter.
4.
4.
4.
4.4. Select Disable Driv
Disable Driv
Disable Driv
Disable DrivDisable DriveL
eL
eL
eLeLock
ock
ock
ockock, and then press enter.
5.
5.
5.
5.5. Follow the on-screen instructions to disable DriveLock.
6.
6.
6.
6.6. To save your changes and exit Computer Setup, select Main
Main
Main
MainMain Sav
Sav
Sav
SavSave Changes and Exit
e Changes and Exit
e Changes and Exit
e Changes and Exite Changes and Exit, select , and
then select Y
Y
Y
YY
es
es
es
eses.
NO
NO
NO
NONOTE:
TE:
TE:
TE:TE: If you are using arrow keys to highlight your choice, you must then press enter.
Ent
Ent
Ent
EntEntering a DriveL
ering a DriveL
ering a DriveL
ering a DriveLering a DriveLock passwor
ock passwor
ock passwor
ock passworock password
d
d
dd
Be sure that the hard drive is inserted into the computer (not into an optional docking device or external
MultiBay).
At the Driv
Driv
Driv
DrivDriveL
eL
eL
eLeLock P
ock P
ock P
ock Pock Passw
assw
assw
asswassword
ord
ord
ordord prompt, type your DriveLock user or master password (using the same kind
of keys you used to set the password), and then press enter.
After three incorrect attempts to enter the password, you must shut down the computer and try again.
Changing a Driv
Changing a Driv
Changing a Driv
Changing a DrivChanging a DriveL
eL
eL
eLeLock passwor
ock passwor
ock passwor
ock passworock password
d
d
dd
To change a DriveLock password in Computer Setup, follow these steps.
1.
1.
1.
1.1. Turn off the computer.
2.
2.
2.
2.2. Press the power button.
3.
3.
3.
3.3. At the DriveL
DriveL
DriveL
DriveLDriveLock Pass
ock Pass
ock Pass
ock Passock Passwor
wor
wor
worword
d
d
dd prompt, type the current DriveLock user password or master password
that you are changing, press enter, and then press or tap to enter Computer Setup.f10
4.
4.
4.
4.4. Select , select
Security
Security
Security
SecuritySecurity Har
Har
Har
HarHard Drive Utilities
d Drive Utilities
d Drive Utilities
d Drive Utilitiesd Drive Utilities, select Driv
Driv
Driv
DrivDriveLock/
eLock/
eLock/
eLock/eLock/Automatic Driv
Automatic Driv
Automatic Driv
Automatic DrivAutomatic DriveLock
eLock
eLock
eLockeLock, and then press
enter.
5.
5.
5.
5.5. Select the hard drive you want to manage, and then press enter.
6.
6.
6.
6.6. Make the selection for the DriveLock password that you want to change, and then follow the
on-screen instructions to enter passwords.
NO
NO
NO
NONOTE:
TE:
TE:
TE:TE: The Change Driv
Change Driv
Change Driv
Change DrivChange DriveL
eL
eL
eLeLock Master P
ock Master P
ock Master P
ock Master Pock Master Passwor
asswor
asswor
assworassword
d
d
dd option is visible only if the DriveLock master
password was provided at the DriveLock Password prompt in step 3.
7
7
7
77.
.
.
.. To save your changes and exit Computer Setup, select Main
Main
Main
MainMain Sav
Sav
Sav
SavSave Changes and Exit
e Changes and Exit
e Changes and Exit
e Changes and Exite Changes and Exit, select , and
then select Y
Y
Y
YY
es
es
es
eses.
NO
NO
NO
NONOTE:
TE:
TE:
TE:TE: If you are using arrow keys to highlight your choice, you must then press enter.
Entering a DriveLock password 51

Windo
Windo
Windo
WindoWindows Hello (selec
ws Hello (selec
ws Hello (selec
ws Hello (selecws Hello (select pr
t pr
t pr
t prt product
oduct
oduct
oductoducts only)
s only)
s only)
s only)s only)
On products equipped with a fingerprint reader or an infrared camera, Windows Hello allows you to
enroll your fingerprint and your facial ID, and set up a PIN. After enrollment, you can use your fingerprint
reader, facial ID, or PIN to sign in to Windows.
To set up Windows Hello:
1.
1.
1.
1.1. Select the St
St
St
StStart
art
art
artart button, select , select , and then select
Settings
Settings
Settings
SettingsSettings Accounts
Accounts
Accounts
AccountsAccounts Sign-in options
Sign-in options
Sign-in options
Sign-in optionsSign-in options.
2.
2.
2.
2.2. If you do not have a password set up, you must add one before you can use other sign-in options.
Select P
P
P
PPassw
assw
assw
asswasswor
or
or
orord
d
d
dd Add
Add
Add
AddAdd, and then select .
3.
3.
3.
3.3. Under Facial r
Facial r
Facial r
Facial rFacial recognition (W
ecognition (W
ecognition (W
ecognition (Wecognition (Windows Hello
indows Hello
indows Hello
indows Helloindows Hello)
)
)
)) Fingerprint r
Fingerprint r
Fingerprint r
Fingerprint rFingerprint recognition (Windows Hello)
ecognition (Windows Hello)
ecognition (Windows Hello)
ecognition (Windows Hello)ecognition (Windows Hello) or , select .
Set up
Set up
Set up
Set upSet up
4.
4.
4.
4.4. Select Get St
Get St
Get St
Get StGet Start
art
art
artarted
ed
ed
eded, and then follow the on-screen instructions to enroll your fingerprint or facial ID
and set up a PIN.
IMPORT
IMPORT
IMPORT
IMPORTIMPORT
ANT
ANT
ANT
ANTANT:
:
:
:: To prevent fingerprint logon issues, be sure when you register your fingerprint that
all sides of your finger are registered by the fingerprint reader.
NO
NO
NO
NONOTE:
TE:
TE:
TE:TE: The PIN is not limited in length. The default setting is for numbers only. To include
alphabetic or special characters, select the include lett
include lett
include lett
include lettinclude letter
er
er
erers and s
s and s
s and s
s and ss and symbols
ymbols
ymbols
ymbolsymbols check box.
Using antivirus so
Using antivirus so
Using antivirus so
Using antivirus soUsing antivirus softwar
ftwar
ftwar
ftwarftware
e
e
ee
When you use the computer to access email, a network, or the internet, you potentially expose it to
computer viruses. Computer viruses can disable the operating system, programs, or utilities, or cause
them to function abnormally.
Antivirus software can detect most viruses, destroy them, and, in most cases, repair any damage that
they cause. To provide ongoing protection against newly discovered viruses, antivirus software must be
kept up to date.
Windows Defender is preinstalled on your computer. HP strongly recommends that you continue to use
an antivirus program to fully protect your computer.
For more information about computer viruses, access the HP Support Assistant.
Using fir
Using fir
Using fir
Using firUsing fire
e
e
eew
w
w
wwall so
all so
all so
all soall softwar
ftwar
ftwar
ftwarftware
e
e
ee
Firewalls are designed to prevent unauthorized access to a system or network. A firewall can be a
software program that you install on your computer, network, or both, or it can be a solution made up of
both hardware and software.
There are two types of firewalls to consider:
●Host-based firewalls—Software that protects only the computer it is installed on.
●Network-based firewalls—Installed between your DSL or cable modem and your home network to
protect all the computers on the network.
When a firewall is installed on a system, all data sent to and from the system is monitored and compared
with a set of user-defined security criteria. Any data that does not meet those criteria is blocked.
52 Chapter 7 Security

Your computer or networking equipment may already have a firewall installed. If not, firewall software
solutions are available.
NO
NO
NO
NONOTE:
TE:
TE:
TE:TE: Under some circumstances a firewall can block access to internet games, interfere with
printer or file sharing on a network, or block authorized email attachments. To temporarily resolve the
problem, disable the firewall, perform the task that you want to perform, and then reenable the firewall.
To permanently resolve the problem, reconfigure the firewall.
Ins
Ins
Ins
InsInst
t
t
ttalling so
alling so
alling so
alling soalling softw
ftw
ftw
ftwftwar
ar
ar
arare updat
e updat
e updat
e update updates
es
es
eses
HP, Windows, and third-party software installed on your computer should be regularly updated to correct
security problems and improve software performance.
To view or change the settings:
IMPORT
IMPORT
IMPORT
IMPORTIMPORTANT
ANT
ANT
ANTANT:
:
:
:: Microsoft sends out alerts regarding Windows updates, which may include security
updates. To protect the computer from security breaches and computer viruses, install all updates
from Microsoft as soon as you receive an alert.
You can install these updates automatically.
1.
1.
1.
1.1. Select the St
St
St
StStart
art
art
artart button, select Settings
Settings
Settings
SettingsSettings Windo
Windo
Windo
WindoWindows Update
ws Update
ws Update
ws Updatews Update, and then select .
2.
2.
2.
2.2. Follow the on-screen instructions.
3.
3.
3.
3.3. To schedule a time for installing updates, select Adv
Adv
Adv
AdvAdvanced Options
anced Options
anced Options
anced Optionsanced Options, and then follow the on-screen
instructions.
Using HP Client Security (select pr
Using HP Client Security (select pr
Using HP Client Security (select pr
Using HP Client Security (select prUsing HP Client Security (select products only)
oducts only)
oducts only)
oducts only)oducts only)
HP Client Security software is preinstalled on your computer. You can access this software through the
HP Client Security icon at the far right of the taskbar or Windows Control Panel. It provides security
features that help protect against unauthorized access to the computer, networks, and critical data.
For more information, see the HP Client Security software Help.
Using HP T
Using HP T
Using HP T
Using HP TUsing HP T
echPulse (selec
echPulse (selec
echPulse (selec
echPulse (selecechPulse (select pr
t pr
t pr
t prt products only
oducts only
oducts only
oducts onlyoducts only)
)
)
))
HP TechPulse is a cloud-based IT solution that enables businesses to effectively manage and secure
their company assets.
HP TechPulse helps protect devices against malware and other attacks, monitors device health, and
helps reduce time spent solving device and security issues. You can quickly download and install the
software, which is highly cost-effective relative to traditional in-house solutions. For more information, go
to https://www.hpdaas.com/.
Using an op
Using an op
Using an op
Using an opUsing an optional security cable (select pr
tional security cable (select pr
tional security cable (select pr
tional security cable (select prtional security cable (select product
oduct
oduct
oductoducts only)
s only)
s only)
s only)s only)
A security cable (purchased separately) is designed to act as a deterrent, but it may not prevent the
computer from being mishandled or stolen. To connect a security cable to your computer, follow the
device manufacturer's instructions.
Installing software updates 53

Using a fingerprint r
Using a fingerprint r
Using a fingerprint r
Using a fingerprint rUsing a fingerprint reader (select pr
eader (select pr
eader (select pr
eader (select preader (select product
oduct
oduct
oductoducts only)
s only)
s only)
s only)s only)
Integrated fingerprint readers are available on select products. To use the fingerprint reader, you must
enroll your fingerprints in HP Client Security's Credential Manager. For more information, see the HP
Client Security software Help.
After you enroll your fingerprints in Credential Manager, you can use HP Client Security's Password
Manager to store and fill in your user names and passwords in supported websites and applications.
The fingerprint reader is a small metallic sensor that is located in one of the following areas of your
computer:
●Near the bottom of the touchpad
●On the right side of the keyboard
●On the upper-right side of the display
●On the left side of the display
●On the back of the display
Depending on your product, the reader may be oriented horizontally or vertically.
54 Chapter 7 Security

Maint
Maint
Maint
MaintMaintenance
enance
enance
enanceenance
8
8
8
88
Performing regular maintenance keeps your computer in optimal condition. This chapter explains how to
use tools like Disk Defragmenter and Disk Cleanup. It also provides instructions for updating programs
and drivers, steps to clean the computer, and tips for traveling with (or shipping) the computer.
Impr
Impr
Impr
ImprImpro
o
o
ooving perf
ving perf
ving perf
ving perfving performance
ormance
ormance
ormanceormance
You can improve the performance of your computer by performing regular maintenance tasks with tools
such as Disk Defragmenter and Disk Cleanup.
Using Disk De
Using Disk De
Using Disk De
Using Disk DeUsing Disk Defr
fr
fr
frfragmenter
agmenter
agmenter
agmenteragmenter
HP recommends using Disk Defragmenter to defragment your hard drive at least once a month.
NO
NO
NO
NONOTE:
TE:
TE:
TE:TE: It is not necessary to run Disk Defragmenter on solid-state drives.
To run Disk Defragmenter:
1.
1.
1.
1.1. Connect the computer to AC power.
2.
2.
2.
2.2. Select the Sear
Sear
Sear
SearSearch
ch
ch
chch icon in the taskbar, type in the search box, and then select defragment
Defr
Defr
Defr
DefrDefragment and Optimiz
agment and Optimiz
agment and Optimiz
agment and Optimizagment and Optimize Driv
e Driv
e Driv
e Drive Drives
es
es
eses.
3.
3.
3.
3.3. Follow the on-screen instructions.
For additional information, access the Disk Defragmenter software Help.
Using Disk Cleanup
Using Disk Cleanup
Using Disk Cleanup
Using Disk CleanupUsing Disk Cleanup
Use Disk Cleanup to search the hard drive for unnecessary files that you can safely delete to free up
disk space and help the computer run more efficiently.
To run Disk Cleanup:
1.
1.
1.
1.1. Select the Sear
Sear
Sear
SearSearch
ch
ch
chch icon in the taskbar, type in the search box, and then select disk Disk Cleanup
Disk Cleanup
Disk Cleanup
Disk CleanupDisk Cleanup.
2.
2.
2.
2.2. Follow the on-screen instructions.
Using HP 3D Driv
Using HP 3D Driv
Using HP 3D Driv
Using HP 3D DrivUsing HP 3D DriveGuar
eGuar
eGuar
eGuareGuard (select pr
d (select pr
d (select pr
d (select prd (select products only)
oducts only)
oducts only)
oducts only)oducts only)
HP 3D DriveGuard protects a hard drive by parking the drive and halting data requests under some
conditions.
●You drop the computer.
●You move the computer with the display closed while the computer is running on battery power.
A short time after one of these events, HP 3D DriveGuard returns the hard drive to normal operation.
NO
NO
NO
NONOTE:
TE:
TE:
TE:TE: Only internal hard drives are protected by HP 3D DriveGuard. A hard drive installed in an
optional docking device or connected to a USB port is not protected by HP 3D DriveGuard.
Maintenance 55

NO
NO
NO
NONOTE:
TE:
TE:
TE:TE: Because solid-state drives (SSDs) lack moving parts, HP 3D DriveGuard is unnecessary for
these drives.
Identifying HP 3D Driv
Identifying HP 3D Driv
Identifying HP 3D Driv
Identifying HP 3D DrivIdentifying HP 3D DriveGuar
eGuar
eGuar
eGuareGuard st
d st
d st
d std status
atus
atus
atusatus
The hard drive light on the computer changes color to show that the drive in a primary hard drive bay,
the secondary hard drive bay (select products only), or both are parked.
Updating pr
Updating pr
Updating pr
Updating prUpdating progr
ogr
ogr
ogrograms and driv
ams and driv
ams and driv
ams and drivams and driver
er
er
erers
s
s
ss
HP recommends that you update your programs and drivers regularly. Updates can resolve issues and
provide new features and options. For example, older graphics components might not work well with the
most recent gaming software. Without the latest driver, you do not get the most out of your equipment.
Go to http://www.hp.com/support to download the latest versions of HP programs and drivers. In
addition, register to receive automatic notifications when updates become available.
To update your programs and drivers, follow these steps.
1.
1.
1.
1.1. Select the Sear
Sear
Sear
SearSearch
ch
ch
chch icon in the taskbar, type in the search box, and then select support HP Support
HP Support
HP Support
HP Support HP Support
Assist
Assist
Assist
AssistAssistant
ant
ant
antant.
‒ or –
Select the question mark icon (select products only) in the taskbar.
2.
2.
2.
2.2. Under My not
My not
My not
My notMy notebook
ebook
ebook
ebookebook Updat
Updat
Updat
UpdatUpdates
es
es
eses, select .
3.
3.
3.
3.3. Follow the on-screen instructions.
Cleaning y
Cleaning y
Cleaning y
Cleaning yCleaning your comput
our comput
our comput
our computour computer
er
er
erer
Cleaning your computer regularly removes dirt and debris so that your device continues to operate at its
best. Use the following information to safely clean the external surfaces of your computer.
Enabling HP Eas
Enabling HP Eas
Enabling HP Eas
Enabling HP EasEnabling HP Easy Clean (select pr
y Clean (select pr
y Clean (select pr
y Clean (select pry Clean (select products only)
oducts only)
oducts only)
oducts only)oducts only)
HP Easy Clean helps you to avoid accidental input while you clean the computer surfaces. This software
disables devices such as the keyboard, touch screen, and touchpad for a preset amount of time so that
you can clean all computer surfaces.
1.
1.
1.
1.1. Start HP Easy Clean in one of the following ways:
●Select the St
St
St
StStart
art
art
artart HP E
HP E
HP E
HP EHP Easy Clean
asy Clean
asy Clean
asy Cleanasy Clean button, and then select .
– or –
●Select the HP Eas
HP Eas
HP Eas
HP EasHP Easy Clean
y Clean
y Clean
y Cleany Clean icon in the taskbar.
– or –
●Select the St
St
St
StStart
art
art
artart HP E
HP E
HP E
HP EHP Easy Clean
asy Clean
asy Clean
asy Cleanasy Clean button, and then select the tile.
2.
2.
2.
2.2. Now that your device is disabled for a short period, see Removing dirt and debris from your
computer on page 57 for the recommended steps to clean the high-touch, external surfaces
on your computer. After you remove the dirt and debris, you can also clean the surfaces with a
56 Chapter 8 Maintenance

disinfectant. See Cleaning your computer with a disinfectant on page 57 for guidelines to help
prevent the spread of harmful bacteria and viruses.
R
R
R
RRemo
emo
emo
emoemoving dirt and debris fr
ving dirt and debris fr
ving dirt and debris fr
ving dirt and debris frving dirt and debris from y
om y
om y
om yom your comput
our comput
our comput
our computour computer
er
er
erer
Here are the recommended steps to clean dirt and debris from your computer.
For computers with wood veneer, see Caring for wood veneer (select products only) on page 58.
1.
1.
1.
1.1. Wear disposable gloves made of latex (or nitrile gloves, if you are latex-sensitive) when cleaning the
surfaces.
2.
2.
2.
2.2. Turn off your device and unplug the power cord and other connected external devices. Remove any
installed batteries from items such as wireless keyboards.
C
C
C
CCAUTION:
AUTION:
AUTION:
AUTION:AUTION: To prevent electric shock or damage to components, never clean a product while it is
turned on or plugged in.
3.
3.
3.
3.3. Moisten a microfiber cloth with water. The cloth should be moist, but not dripping wet.
IMPORT
IMPORT
IMPORT
IMPORTIMPORT
ANT
ANT
ANT
ANTANT:
:
:
:: To avoid damaging the surface, avoid abrasive cloths, towels, and paper towels.
4.
4.
4.
4.4. Wipe the exterior of the product gently with the moistened cloth.
IMPOR
IMPOR
IMPOR
IMPORIMPORT
T
T
TTANT
ANT
ANT
ANTANT:
:
:
:: Keep liquids away from the product. Avoid getting moisture in any openings. If liquid
makes its way inside your HP product, it can cause damage to the product. Do not spray liquids
directly on the product. Do not use aerosol sprays, solvents, abrasives, or cleaners containing
hydrogen peroxide or bleach that might damage the finish.
5.
5.
5.
5.5. Start with the display (if applicable). Wipe carefully in one direction, and move from the top of the
display to the bottom. Finish with any flexible cables, like power cord, keyboard cable, and USB
cables.
6.
6.
6.
6.6. Be sure that surfaces have completely air-dried before turning the device on after cleaning.
7
7
7
77.
.
.
.. Discard the gloves after each cleaning. Clean your hands immediately after you remove the gloves.
See Cleaning your computer with a disinfectant on page 57 for recommended steps to clean the
high-touch, external surfaces on your computer to help prevent the spread of harmful bacteria and
viruses.
Cleaning y
Cleaning y
Cleaning y
Cleaning yCleaning your comput
our comput
our comput
our computour computer with a disinf
er with a disinf
er with a disinf
er with a disinfer with a disinfect
ect
ect
ectectan
an
an
anant
t
t
tt
The World Health Organization (WHO) recommends cleaning surfaces, followed by disinfection, as a
best practice for preventing the spread of viral respiratory illnesses and harmful bacteria.
After cleaning the external surfaces of your computer using the steps in Removing dirt and debris from
your computer on page 57 Caring for wood veneer (select products only) on page 58, , or both, you
might also choose to clean the surfaces with a disinfectant. A disinfectant that is within HP’s cleaning
guidelines is an alcohol solution consisting of 70% isopropyl alcohol and 30% water. This solution is also
known as rubbing alcohol and is sold in most stores.
Follow these steps when disinfecting high-touch, external surfaces on your computer:
1.
1.
1.
1.1. Wear disposable gloves made of latex (or nitrile gloves, if you are latex-sensitive) when cleaning the
surfaces.
Removing dirt and debris from your computer 57

2.
2.
2.
2.2. Turn off your device and unplug the power cord and other connected external devices. Remove any
installed batteries from items such as wireless keyboards.
C
C
C
CCAUTION:
AUTION:
AUTION:
AUTION:AUTION: To prevent electric shock or damage to components, never clean a product while it is
turned on or plugged in.
3.
3.
3.
3.3. Moisten a microfiber cloth with a mixture of 70% isopropyl alcohol and 30% water. The cloth should
be moist, but not dripping wet.
C
C
C
CCAUTION:
AUTION:
AUTION:
AUTION:AUTION: Do not use any of the following chemicals or any solutions that contain them, including
spray-based surface cleaners: bleach, peroxides (including hydrogen peroxide), acetone, ammonia,
ethyl alcohol, methylene chloride, or any petroleum-based materials, such as gasoline, paint thinner,
benzene, or toluene.
IMPORT
IMPORT
IMPORT
IMPORTIMPORTANT
ANT
ANT
ANTANT:
:
:
:: To avoid damaging the surface, avoid abrasive cloths, towels, and paper towels.
4.
4.
4.
4.4. Wipe the exterior of the product gently with the moistened cloth.
IMPORT
IMPORT
IMPORT
IMPORTIMPORTANT
ANT
ANT
ANTANT:
:
:
:: Keep liquids away from the product. Avoid getting moisture in any openings. If liquid
makes its way inside your HP product, it can cause damage to the product. Do not spray liquids
directly on the product. Do not use aerosol sprays, solvents, abrasives, or cleaners containing
hydrogen peroxide or bleach that might damage the finish.
5.
5.
5.
5.5. Start with the display (if applicable). Wipe carefully in one direction, and move from the top of the
display to the bottom. Finish with any flexible cables, like power cord, keyboard cable, and USB
cables.
6.
6.
6.
6.6. Be sure that surfaces have completely air-dried before turning the device on after cleaning.
7
7
7
77.
.
.
.. Discard the gloves after each cleaning. Clean your hands immediately after you remove the gloves.
Caring f
Caring f
Caring f
Caring fCaring for wood v
or wood v
or wood v
or wood vor wood veneer (select pr
eneer (select pr
eneer (select pr
eneer (select preneer (select products only)
oducts only)
oducts only)
oducts only)oducts only)
Your product might feature high-quality wood veneer. As with all natural wood products, proper care is
important for best results over the life of the product. Because of the nature of natural wood, you might
see unique variations in the grain pattern or subtle variations in color, which are normal.
●Clean the wood with a dry, static-free microfiber cloth or chamois.
●Avoid cleaning products containing substances such as ammonia, methylene chloride, acetone,
turpentine, or other petroleum-based solvents.
●Do not expose the wood to sun or moisture for long periods of time.
●If the wood becomes wet, dry it by dabbing with an absorbent, lint-free cloth.
●Avoid contact with any substance that might dye or discolor the wood.
●Avoid contact with sharp objects or rough surfaces that might scratch the wood.
See Removing dirt and debris from your computer on page 57 for the recommended steps to clean
the high-touch, external surfaces on your computer. After you remove the dirt and debris, you can also
clean the surfaces with a disinfectant. See Cleaning your computer with a disinfectant on page 57 for
sanitizing guidelines to help prevent the spread of harmful bacteria and viruses.
58 Chapter 8 Maintenance

T
T
T
TTr
r
r
rrav
av
av
avaveling with or shipping y
eling with or shipping y
eling with or shipping y
eling with or shipping yeling with or shipping your comput
our comput
our comput
our computour computer
er
er
erer
If you must travel with or ship your computer, follow these tips to keep your equipment safe.
●Prepare the computer for traveling or shipping:
–Back up your information to an external drive.
–Remove all discs and all external media cards, such as memory cards.
–Turn off and then disconnect all external devices.
–Shut down the computer.
●Take a backup of your information. Keep the backup separate from the computer.
●When traveling by air, carry the computer as hand luggage; do not check it in with the rest of your
luggage.
IMPORT
IMPORT
IMPORT
IMPORTIMPORT
ANT
ANT
ANT
ANTANT:
:
:
:: Avoid exposing a drive to magnetic fields. Security devices with magnetic fields
include airport walk-through devices and security wands. Airport conveyer belts and similar
security devices that check carry-on baggage use X-rays instead of magnetism and do not
damage drives.
●If you plan to use the computer during a flight, listen for the in-flight announcement that tells you
when you can use your computer. In-flight computer use is at the discretion of the airline.
●If you are shipping the computer or a drive, use suitable protective packaging and label the package
“FRAGILE.”
●The use of wireless devices might be restricted in some environments. Such restrictions might apply
aboard aircraft, in hospitals, near explosives, and in hazardous locations. If you are uncertain of the
policy that applies to the use of a wireless device in your computer, ask for authorization to use your
computer before you turn it on.
●If you are traveling internationally, follow these suggestions:
–Check the computer-related customs regulations for each country or region on your itinerary.
–Check the power cord and adapter requirements for each location in which you plan to use the
computer. Voltage, frequency, and plug configurations vary.
W
W
W
WWARNING!
ARNING!
ARNING!
ARNING!ARNING! To reduce the risk of electric shock, fire, or damage to the equipment, do not
attempt to run the computer with a voltage converter kit that is sold for appliances.
Traveling with or shipping your computer 59

Backing up
Backing up
Backing up
Backing upBacking up, r
, r
, r
, r, res
es
es
esest
t
t
ttoring, and r
oring, and r
oring, and r
oring, and roring, and reco
eco
eco
ecoecov
v
v
vvering
ering
ering
eringering
9
9
9
99
You can use Windows tools or HP software to back up your information, create a restore point, reset
your computer, create recovery media, or restore your computer to its factory state. Performing these
standard procedures can return your computer to a working state faster.
IMPORT
IMPORT
IMPORT
IMPORTIMPORTANT
ANT
ANT
ANTANT:
:
:
:: If you are performing recovery procedures on a tablet, the tablet battery must be at
least 70% charged before you start the recovery process.
IMPORT
IMPORT
IMPORT
IMPORTIMPORTANT
ANT
ANT
ANTANT:
:
:
:: For a tablet with a detachable keyboard, connect the tablet to the keyboard base before
beginning any recovery process.
Backing up inf
Backing up inf
Backing up inf
Backing up infBacking up information and cr
ormation and cr
ormation and cr
ormation and crormation and creating r
eating r
eating r
eating reating reco
eco
eco
ecoecov
v
v
vver
er
er
erery media
y media
y media
y mediay media
These methods of creating recovery media and backups are available on select products only.
Using Window
Using Window
Using Window
Using WindowUsing Windows tools f
s tools f
s tools f
s tools fs tools for backing up
or backing up
or backing up
or backing upor backing up
HP recommends that you back up your information immediately after initial setup. You can do this task
either using Windows Backup locally with an external USB flash drive or using online tools.
NO
NO
NO
NONOTE:
TE:
TE:
TE:TE: If computer storage is 32 GB or less, Microsoft® System Restore is disabled by default.
Using the HP Cloud R
Using the HP Cloud R
Using the HP Cloud R
Using the HP Cloud RUsing the HP Cloud Reco
eco
eco
ecoecov
v
v
vver
er
er
erery Download T
y Download T
y Download T
y Download Ty Download T
ool t
ool t
ool t
ool tool to cr
o cr
o cr
o cro create r
eate r
eate r
eate reate recov
ecov
ecov
ecovecover
er
er
erery media (select
y media (select
y media (select
y media (select y media (select
pr
pr
pr
prproducts only)
oducts only)
oducts only)
oducts only)oducts only)
You can use the HP Cloud Recovery Download Tool to create HP Recovery media on a bootable USB
flash drive.
For details:
■Go to http://www.hp.com, search for HP Cloud Recovery, and then select the result that matches the
type of computer that you have.
NO
NO
NO
NONOTE:
TE:
TE:
TE:TE: If you cannot create recovery media yourself, contact support to obtain recovery discs. Go to
http://www.hp.com/support, select your country or region, and then follow the on-screen instructions.
IMPORT
IMPORT
IMPORT
IMPORTIMPORTANT
ANT
ANT
ANTANT:
:
:
:: HP recommends that you follow the Restoring and recovery methods on page 61 to
restore your computer before you obtain and use the HP recovery discs. Using a recent backup can
return your machine to a working state sooner than using the HP recovery discs. After the system is
restored, reinstalling all the operating system software released since your initial purchase can be a
lengthy process.
R
R
R
RRest
est
est
estestoring and r
oring and r
oring and r
oring and roring and reco
eco
eco
ecoecovering y
vering y
vering y
vering yvering your s
our s
our s
our sour sys
ys
ys
ysyst
t
t
ttem
em
em
emem
You have several tools available to recover your system both within and outside of Windows if the
desktop cannot load.
60 Chapter 9 Backing up, restoring, and recovering

HP recommends that you attempt to restore your system using the Restoring and recovery methods on
page 61.
Cr
Cr
Cr
CrCreating a s
eating a s
eating a s
eating a seating a sys
ys
ys
ysyst
t
t
ttem r
em r
em r
em rem res
es
es
esest
t
t
ttor
or
or
orore
e
e
ee
System Restore is available in Windows. The System Restore software can automatically or manually
create restore points, or snapshots, of the system files and settings on the computer at a particular
point.
When you use System Restore, it returns your computer to its state at the time you made the restore
point. Your personal files and documents should not be affected.
R
R
R
RRest
est
est
estestoring and r
oring and r
oring and r
oring and roring and reco
eco
eco
ecoecov
v
v
vver
er
er
erery methods
y methods
y methods
y methodsy methods
After you run the first method, test to see whether the issue still exists before you proceed to the next
method, which might now be unnecessary.
1.
1.
1.
1.1. Run a Microsoft System Restore.
2.
2.
2.
2.2. Run Reset this PC.
NO
NO
NO
NONOTE:
TE:
TE:
TE:TE: The options R
R
R
RRemov
emov
emov
emovemove ev
e ev
e ev
e eve everything
erything
erything
erythingerything Fully clean the drive
Fully clean the drive
Fully clean the drive
Fully clean the driveFully clean the drive and then can take several hours to
complete and leave no information on your computer. It is the safest way to reset your computer
before you recycle it.
3.
3.
3.
3.3. Recover using HP Recovery media. For more information, see Recovering using HP Recovery media
on page 61.
For more information about the first two methods, see the Get Help app:
■Select the St
St
St
StStart
art
art
artart All app
All app
All app
All appAll apps
s
s
ss Get Help
Get Help
Get Help
Get HelpGet Help button, select , select the app, and then enter the task you want to
perform.
NO
NO
NO
NONOTE:
TE:
TE:
TE:TE: You must be connected to the internet to access the Get Help app.
R
R
R
RReco
eco
eco
ecoecovering using HP R
vering using HP R
vering using HP R
vering using HP Rvering using HP Reco
eco
eco
ecoecovery media
very media
very media
very mediavery media
You can use HP Recovery media to recover the operating system and drivers that were installed at the
factory. On select products, you can create recovery media on a bootable USB flash drive using the HP
Cloud Recovery Download Tool.
For details, see Using the HP Cloud Recovery Download Tool to create recovery media (select products
only) on page 60.
NO
NO
NO
NONOTE:
TE:
TE:
TE:TE: If you cannot create recovery media yourself, contact support to obtain recovery discs. Go to
http://www.hp.com/support, select your country or region, and then follow the on-screen instructions.
To recover your system:
■Insert the HP Recovery media, and then restart the computer.
NO
NO
NO
NONOTE:
TE:
TE:
TE:TE: HP recommends that you follow the Restoring and recovery methods on page 61 to restore
your computer before you obtain and use the HP recovery discs. Using a recent backup can return your
machine to a working state sooner than using the HP recovery discs. After the system is restored,
reinstalling all the operating system software released since your initial purchase can be a lengthy
process.
Creating a system restore 61

Comput
Comput
Comput
ComputComputer Se
er Se
er Se
er Seer Setup (BIOS
tup (BIOS
tup (BIOS
tup (BIOStup (BIOS), TPM, and HP Sur
), TPM, and HP Sur
), TPM, and HP Sur
), TPM, and HP Sur), TPM, and HP Sure
e
e
e e
St
St
St
StStar
ar
ar
arart
t
t
tt
10
10
10
1010
HP provides several tools to help set up and protect your computer.
Using Comput
Using Comput
Using Comput
Using ComputUsing Computer Setup
er Setup
er Setup
er Setuper Setup
Computer Setup, or Basic Input/Output System (BIOS), controls communication between all the input
and output devices on the system (such as hard drives, display, keyboard, mouse, and printer). Computer
Setup includes settings for types of devices installed, the startup sequence of the computer, and
amount of system and extended memory.
NO
NO
NO
NONOTE:
TE:
TE:
TE:TE: Use extreme care when making changes in Computer Setup. Errors can prevent the computer
from operating properly.
To start Computer Setup, turn on or restart the computer, and when the HP logo appears, press to f10
enter Computer Setup.
Navigating and selecting in Comput
Navigating and selecting in Comput
Navigating and selecting in Comput
Navigating and selecting in ComputNavigating and selecting in Computer Setup
er Setup
er Setup
er Setuper Setup
You can navigate and select in Computer Setup using one or more methods.
●To select a menu or a menu item, use the key and the keyboard arrow keys and then press tab enter,
or use a pointing device to select the item.
●To scroll up and down, select the up arrow or the down arrow in the upper-right corner of the screen,
or use the up arrow key or the down arrow key on the keyboard.
●To close open dialog boxes and return to the main Computer Setup screen, press , and then esc
follow the on-screen instructions.
To exit Computer Setup, choose one of the following methods:
●To exit Computer Setup menus without saving your changes, select , select
Main
Main
Main
MainMain Ignor
Ignor
Ignor
IgnorIgnore Changes
e Changes
e Changes
e Changes e Changes
and Exit
and Exit
and Exit
and Exitand Exit Y
Y
Y
YY
es
es
es
eses, and then select .
NO
NO
NO
NONOTE:
TE:
TE:
TE:TE: If you are using arrow keys to highlight your choice, you must then press enter.
●To save your changes and exit Computer Setup menus, select Main
Main
Main
MainMain Sav
Sav
Sav
SavSave Changes and Exit
e Changes and Exit
e Changes and Exit
e Changes and Exite Changes and Exit, select ,
and then select Y
Y
Y
YY
es
es
es
eses.
NO
NO
NO
NONOTE:
TE:
TE:
TE:TE: If you are using arrow keys to highlight your choice, you must then press enter.
Your changes go into effect when the computer restarts.
R
R
R
RRest
est
est
estestoring f
oring f
oring f
oring foring fact
act
act
actactor
or
or
orory settings in Comput
y settings in Comput
y settings in Comput
y settings in Computy settings in Computer Se
er Se
er Se
er Seer Setup
tup
tup
tuptup
To return all settings in Computer Setup to the values that were set at the factory, follow these steps.
NO
NO
NO
NONOTE:
TE:
TE:
TE:TE: Restoring defaults will not change the hard drive mode.
Computer Setup (BIOS), TPM, and HP Sure Start 63

1.
1.
1.
1.1. Start Computer Setup. See Using Computer Setup on page 63.
2.
2.
2.
2.2. Select , select
Main
Main
Main
MainMain Apply F
Apply F
Apply F
Apply FApply Fact
act
act
actactor
or
or
orory Def
y Def
y Def
y Defy Default
ault
ault
aultaults and Exit
s and Exit
s and Exit
s and Exits and Exit Y
Y
Y
YY
es
es
es
eses, and then select .
NO
NO
NO
NONOTE:
TE:
TE:
TE:TE: If you are using arrow keys to highlight your choice, you must then press enter.
NO
NO
NO
NONOTE:
TE:
TE:
TE:TE: On select products, the selections might display Res
Res
Res
ResRest
t
t
ttor
or
or
orore Def
e Def
e Def
e Defe Defaults
aults
aults
aultsaults instead of Apply Fact
Apply Fact
Apply Fact
Apply FactApply Factory
ory
ory
ory ory
Def
Def
Def
DefDefaults and Exit
aults and Exit
aults and Exit
aults and Exitaults and Exit.
Your changes go into effect when the computer restarts.
NO
NO
NO
NONOTE:
TE:
TE:
TE:TE: Your password settings and security settings are not changed when you restore the factory
settings.
Updating the BIOS
Updating the BIOS
Updating the BIOS
Updating the BIOSUpdating the BIOS
Updated versions of the BIOS might be available on the HP website. Most BIOS updates on the HP
website are packaged in compressed files called
SoftPaqs
.
Some download packages contain a file named Readme.txt, which contains information regarding
installing and troubleshooting the file.
Det
Det
Det
DetDetermining the BIOS v
ermining the BIOS v
ermining the BIOS v
ermining the BIOS vermining the BIOS version
ersion
ersion
ersionersion
To decide whether you need to update Computer Setup (BIOS), first determine the BIOS version on your
computer.
If you are already in Windows, you can access BIOS version information (also known as
ROM date
and
System BIOS
) by pressing + (select products only). Or you can use Computer Setup.fn esc
1.
1.
1.
1.1. Start Computer Setup. See Using Computer Setup on page 63.
2.
2.
2.
2.2. Select , and then select
Main
Main
Main
MainMain Sy
Sy
Sy
SySyst
st
st
ststem Inf
em Inf
em Inf
em Infem Information
ormation
ormation
ormationormation.
3.
3.
3.
3.3. To exit Computer Setup menus without saving your changes, select Main
Main
Main
MainMain Ignor
Ignor
Ignor
IgnorIgnore Changes
e Changes
e Changes
e Changes e Changes , select
and Exit
and Exit
and Exit
and Exitand Exit Y
Y
Y
YY
es
es
es
eses, and then select .
NO
NO
NO
NONOTE:
TE:
TE:
TE:TE: If you are using arrow keys to highlight your choice, you must then press enter.
To check for later BIOS versions, see Preparing for a BIOS update on page 64.
Pr
Pr
Pr
PrPreparing f
eparing f
eparing f
eparing feparing for a BIOS update
or a BIOS update
or a BIOS update
or a BIOS updateor a BIOS update
Be sure to follow all prerequisites before downloading and installing a BIOS update.
IMPORT
IMPORT
IMPORT
IMPORTIMPORT
ANT
ANT
ANT
ANTANT:
:
:
:: To reduce the risk of damage to the computer or an unsuccessful installation, download
and install a BIOS update only when the computer is connected to reliable external power using the AC
adapter. Do not download or install a BIOS update while the computer is running on battery power,
docked in an optional docking device, or connected to an optional power source. During the download
and installation, follow these instructions:
Do not disconnect power on the computer by unplugging the power cord from the AC outlet.
Do not shut down the computer or initiate Sleep.
Do not insert, remove, connect, or disconnect any device, cable, or cord.
64 Chapter 10 Computer Setup (BIOS), TPM, and HP Sure Start
Termékspecifikációk
| Márka: | HP |
| Kategória: | laptop |
| Modell: | EliteBook 865 G10 |
Szüksége van segítségre?
Ha segítségre van szüksége HP EliteBook 865 G10, tegyen fel kérdést alább, és más felhasználók válaszolnak Önnek
Útmutatók laptop HP

20 Március 2025
13 Január 2025
12 Január 2025
11 Január 2025
11 Január 2025
11 Január 2025
28 December 2024
28 December 2024
28 December 2024
22 December 2024
Útmutatók laptop
- laptop Samsung
- laptop Sony
- laptop Fujitsu
- laptop Acer
- laptop LG
- laptop Oregon Scientific
- laptop Panasonic
- laptop Lenovo
- laptop Toshiba
- laptop Hyundai
- laptop Apple
- laptop Fellowes
- laptop Medion
- laptop Zebra
- laptop Xiaomi
- laptop Dell
- laptop Gigabyte
- laptop Tripp Lite
- laptop Prixton
- laptop Thomson
- laptop Huawei
- laptop Microsoft
- laptop Asus
- laptop PEAQ
- laptop Haier
- laptop Viewsonic
- laptop Denver
- laptop MSI
- laptop Honor
- laptop SPC
- laptop ADATA
- laptop Kogan
- laptop Razer
- laptop Jay-Tech
- laptop Pyle
- laptop Schneider
- laptop Micromax
- laptop NEC
- laptop Siig
- laptop GoClever
- laptop Getac
- laptop ECS
- laptop Packard Bell
- laptop TechBite
- laptop Alienware
- laptop Airis
- laptop Lexibook
- laptop Emachines
- laptop Trekstor
- laptop Hähnel
- laptop Sylvania
- laptop Coby
- laptop Evga
- laptop Ricatech
- laptop Mpman
- laptop Vizio
- laptop Targa
- laptop Ematic
- laptop Hannspree
- laptop XPG
- laptop Inovia
- laptop Odys
- laptop Ergotron
- laptop Ibm
- laptop Atdec
- laptop Compaq
- laptop Hercules
- laptop Vulcan
- laptop System76
- laptop General Dynamics Itronix
- laptop CTL
- laptop Everex
- laptop Olidata
- laptop Dynabook
- laptop Hamilton Buhl
- laptop AORUS
- laptop Humanscale
- laptop Aplic
- laptop Schenker
Legújabb útmutatók laptop

3 Április 2025

28 Március 2025

28 Március 2025
27 Március 2025

18 Március 2025
16 Január 2025
13 Január 2025

13 Január 2025
12 Január 2025
12 Január 2025