Használati útmutató Hitachi CP-TW3005
Olvassa el alább 📖 a magyar nyelvű használati útmutatót Hitachi CP-TW3005 (159 oldal) a Beamer kategóriában. Ezt az útmutatót 4 ember találta hasznosnak és 2 felhasználó értékelte átlagosan 4.5 csillagra
Oldal 1/159

1
Projector
CP-TW2505/CP-TW3005
User's Manual (detailed)
Operating Guide
Thank you for purchasing this projector.
►Before using this product, please read all manuals for this
product. Be sure to read “ ” rst. After reading them, store them in a Safety Guide
safe place for future reference.
WARNING
• The information in this manual is subject to change without notice.
• The illustrations in this manual are for illustrative purposes. They may differ
slightly from your projector.
• The manufacturer assumes no responsibility for any errors that may appear in
this manual.
• The reproduction, transfer or copy of all or any part of this document is not
permitted without express written consent.
NOTE
Various symbols are used in this manual. The meanings of these symbols are
described below.
About this manual
WARNING
CAUTION
This symbol indicates information that, if ignored, could possibly
result in personal injury or even death due to incorrect handling.
This symbol indicates information that, if ignored, could possibly
result in personal injury or physical damage due to incorrect
handling.
Please refer to the pages written following this symbol.
NOTICE This entry notices of fear of causing trouble.

2
Contents
Introduction . 3. . . . . . . . . . . . . .
Features . . . . . . . . . . . . . . . . . . . . . . 3
Checking the contents of package
. . . 3
Part names . . . . . . . . . . . . . . . . . . . . 4
Setting up . 9. . . . . . . . . . . . . . . .
Arrangement . . . . . . . . . . . . . . . . . . . 9
Connecting with your devices
.....12
Connecting to a power supply
.....18
Using the security bar and slot . . . . 18
Using the cable cover . . . . . . . . . . . 19
Remote control . . . . . . . . . . . . 20
Interactive pen . 23. . . . . . . . . . .
Power on/off . 24. . . . . . . . . . . . .
Operating . 27. . . . . . . . . . . . . . .
Adjusting the volume . . . . . . . . . . . . 27
Temporarily muting the screen and
audio output . . . . . . . . . . . . . . . . . . 27
Selecting an input signal . . . . . . . . . 28
Selecting an aspect ratio . . . . . . . . . 28
Selecting an Interactive Function . . 29
Calibration . . . . . . . . . . . . . . . . . . . . 29
Adjusting the projector's elevator . . 30
Adjusting the zoom and focus . . . . . 30
Using the automatic adjustment feature
. . . 31
Using the TEMPLATE feature . . . . . 32
Other buttons . . . . . . . . . . . . . . . . . 32
Adjusting the position . . . . . . . . . . . 33
Correcting the keystone/perfect t
distortions
....................33
Using the magnify feature . . . . . . . . 34
Temporarily freezing the screen . . . 35
Using the menu function . . . . . . . . 36
EASY MENU. . . . . . . . . . . . . . . 38
I wb calIbrate, a spect, D-zoom,
K ,eystone
K , p eystone erfect fIt
,
p , Icture moDe
e , Ico moDe nstallatIon eset I, r , f lter me tI ,
language, aDvance menuD , exIt
IWB menu . 41. . . . . . . . . . . . . . .
PICTURE menu . 42. . . . . . . . . . .
b , c , h , rIghtness ontrast Dcr
accentualIzer amma olor temp, g , c ,
c tolor, Int harpness, s , a ctIve IrIs, m y memory
IMAGE menu . 46. . . . . . . . . . . . .
a , o , v , h , spect ver scan posItIon posItIon
h phase sIze, h , a uto aDjust execute
INPUT menu . 49. . . . . . . . . . . . .
p , v , c rogressIve IDeo nr olor space,
vIDeo format IgI format , D tal ,
DIgI range omputer In rame locKtal , c , f ,
resolutIon hl stanDby pwr, m .
SETUP menu . . . . . . . . . . . . . . 54
D- , D- , p . . ,zoom shIft Ict posIt h
K , eystone
K , p eystone erfect fIt
, s , etup memory
lamp fIlter mage optImIzer & , I , InstallatIon
,
stanDby moDe
AUDIO menu . 61. . . . . . . . . . . . .
v , s , a , olume peaKer uDIo source
mIc level Ic volume ,m
SCREEN menu . . . . . . . . . . . . . 63
l , m , b , anguage enu posItIon lanK
auto b , slanK tart , up
MyScreen,
MyScreen Lock
, m , s , essage ource name
template c, c. .
OPTION menu . 69. . . . . . . . . . . .
a , D , uto search Irect power on
auto , m , s , power off y button cheDule
servIce
NETWORK menu . . . . . . . . . . . 83
SECURITY menu . . . . . . . . . . . 84
s ecurIty passworD change ,
MyScreen
passworD In locK, p ,
my text passworD y text DIsplay , m ,
my text wrItIng lonIng locK , c
Presentation tools . 89. . . . . . . .
Interactive function . . . . . . . . . . . . . . . 89
PC-LESS Presentation . . . . . . . . . . 116
USB Display (Windows
®
computer)
. 126
USB Display (Mac computer)
...... 131
Maintenance . . . . . . . . . . . . . 135
Replacing the lamp . . . . . . . . . . . . 135
Cleaning and replacing the air lter . 137
Caring for the projection window and
camera lens
...................139
Replacing the internal clock battery
. . . 140
Other care . . . . . . . . . . . . . . . . . . . 141
Troubleshooting . 142. . . . . . . . .
Related messages . . . . . . . . . . . . 142
Regarding the indicator lamps . . . 144
Resetting all settings . . . . . . . . . . . 147
Phenomena that may be easy to
be mistaken for machine defects
. . 147
Specications ............159

3
Introduction
• Keep the original packing materials, for future reshipment. Be sure
to use the original packing materials when moving the projector. Use special
caution for the lens.
NOTE
Introduction
The projector provides you with the broad use by the following features.
Checking the contents of package
ü The unique optics system produces a large projected image in a short
distance, which provides you with various ways of use.
ü This projector has a variety of I/O ports that supposedly cover for any
business scene.
ü The port can support various image equipment which have digital HDMI/MHL
interface to get clearer pictures on a screen.
ü Has HDCR and ACCENTUALIZER features which are Hitachi's original
image stabilizer for a clearer image.
ü Has DICOM® ("Digital Imaging and Communication in Medicine") simulation
mode.This mode simulates the DICOM standard, which is a standard
applicable to digital communications in medicine.
ü This projector can be controlled and monitored via LAN connection.
Furthermore, you can use the designated USB wireless adapter (optional) to
establish wireless LAN connection.
ü The built-in 16W speaker can deliver sufcient sound volume in a large
space like a classroom without external speakers.
ü This projector's network supports the PJLink™ standard.PJLink™ is a unied
standard for operating and controlling data projectors.For specications of
PJLink™, see the web site of the PJLink™.
ü Equipped with IMAGE OPTIMIZER which is Hitachi's original function to
maintain visibility by automatic image correction in accordance with lamp
deterioration.
ü The Interactive Pen included with the projector allows you to write or draw
directly on the projected image. Also, you can control the connected computer
on the screen in the same way as using a mouse.
Please see the section in the Contents of package User’s Manual (concise)
which is a book. Your projector should come with the items shown there. Require
of your dealer immediately if any items are missing.
Features

4
Introduction
(1) Lamp cover ( ) 135
The lamp unit is inside.
(2) Control panel ( )5
(3) Elevator feet (x 2) ( )30
(4) Remote sensor (x 2)( )21
(5) Projection window ( )139
(6) Intake vents
(7) Filter cover ( ) 137
The air lter and intake vent
are inside.
(8) Speaker ( )15, 27, 61
(9) Exhaust vent
( ) 10 AC (AC inlet) ( )18
( ) Ports ( )11 6
( ) Security bar ( )12 18
( ) Security slot ( )13 18
(14) Spacer (x 2) ( )30
(15) Battery cover ( )140
(16) Camera lens ( )139
► : Do not touch around the lamp cover and the exhaust HOT!
vents during use or just after use, since it is too hot.
►Never look into the projection window while the projection lamp lights, since
the projection lamp ray may cause a trouble on your eyes.
►Do not use the security bar and slot to prevent the projector from falling down,
since it is not designed for it.
WARNING
►Maintain normal ventilation to prevent the projector from
heating up. Do not cover, block or plug up the vents. Do not place anything that
can stick or be sucked to the vents, around the intake vents. Clean the air lter
periodically.
CAUTION
Part names
Projector
(16)
(15)
(4)
(10)
HOT!
HOT!
(1) (2)
(6)
(3) (3)
(7)
(8)
(11)
(12)
(13)
(9)
(14) (14)
(5)

5
Introduction
Part names (continued)
Control panel
(1) STANDBY/ON button ( 24)
(2) button ( )INPUT 28
(3) indicator ( )POWER 24, 144
(4) indicator ( )TEMP 144
(5) indicator ( )LAMP 144
Buttons ◄/►/▲/▼
(6) FOCUS + -/ buttons
when no menu is displayed ( ), or 31
Cursor ◄/► buttons
when a menu is displayed ( ). FOCUS +/- function is invalid when the 36
USB TYPE A port is selected as the input source.
(7) MENU buttons
when no menu is displayed ( ), or 36
Cursor ▲/▼ buttons
when a menu is displayed ( ).36
The ◄/►/▲/▼ buttons on the projector work only as the cursor buttons while the
template is displayed ( ).67
(1)
(7) (2)
(3)
(5)
(4) (6)

6
Introduction
Part names (continued)
Ports (12 ~ 17)
(1) port (x2)USB TYPE A
(2) port LAN
(3) port USB TYPE B
(4) HDMI1/MHL port
(5) portHDMI2
(6) port MIC
(7) port AUDIO IN1
(8) ports AUDIO IN2(L,R)
(9) port AUDIO OUT
(10) COMPUTER IN1 port
(11) port COMPUTER IN2 / MONITOR OUT
(12) port VIDEO IN
(13) port CONTROL
(14) port *Option
(1)
(12) (8)
(6)
(11)
(10)
(2)
(3)(4)
(7)
(9)
(13)
(14)
* Option port is a port used only when using the optional part (FT-01B).
A cover is attached for protecting the port. Do not remove the cover. Refer to
the manual of the optional part (FT-01B) for detail.
NOTE
(5)
7
Introduction
Part names (continued)
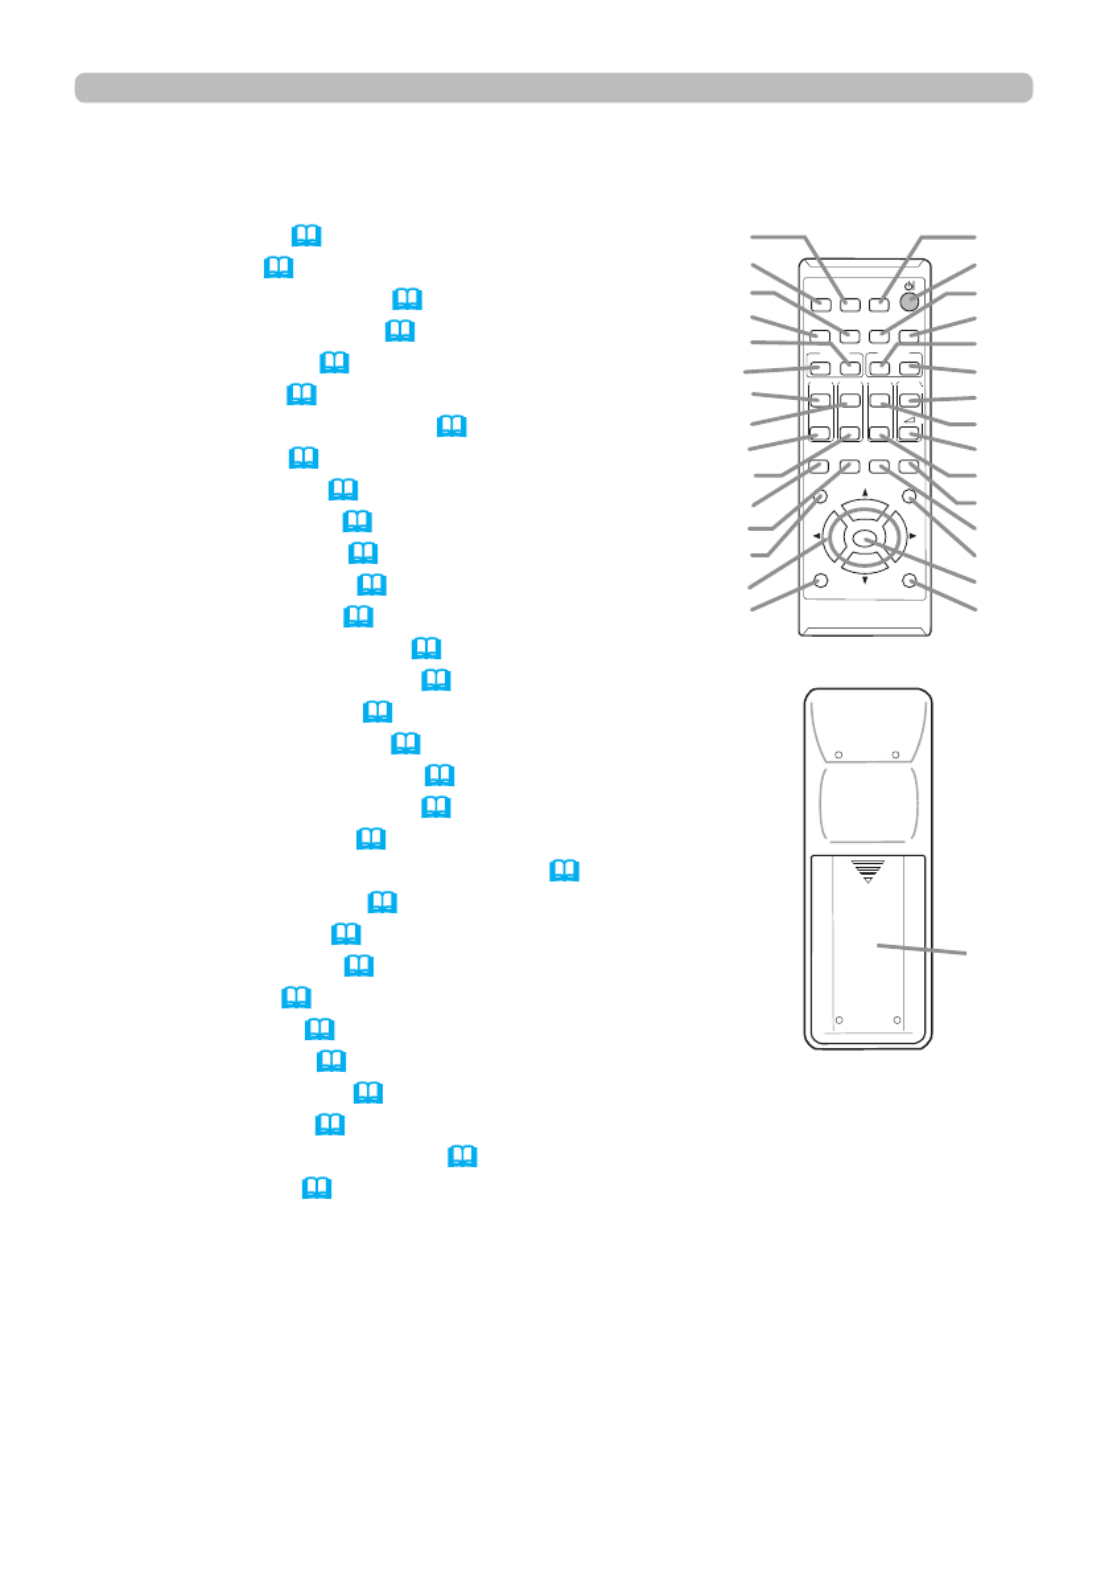
Remote control
(1) button (INPUT 28)
(2) button ( )IWB 29
(3) CALIBRATION button ( )29
(4) STANDBY/ON button ( )24
(5) button ( )ASPECT 28
(6) button ( )AUTO 31
(7) button ( )ACCENTUALIZER 32
(8) button ( )HDCR 32
(9) button ( )FOCUS - 31
(10) button ( )FOCUS + 31
(11) button ( ) D-ZOOM - 30
(12) button ( ) D-ZOOM + 30
(13) PAGE UP button ( ) 22
(14) button ( ) MAGNIFY - ON 34
(15) MY BUTTON - 1 button ( ) 71
(16) button ( ) VOLUME + 27
(17) PAGE DOWN button ( )22
(18) button ( ) MAGNIFY - OFF 34
(19) MY BUTTON - 2 button ( ) 71
(20) button ( )VOLUME - 27
(21) button ( )KEYSTONE/PERFECT FIT 33
(22) TEMPLATE button ( )32
(23) button ( )FREEZE 35
(24) AV MUTE button ( ) 27
(25) button ( ) ESC 36
(26) button ( ) MENU 36, 37
(27) button ( )ENTER 36, 37
(28) button ( )POSITION 33, 37
(29) button ( )RESET 36
(30) ▲/▼/◄/► cursor buttons ( )36
(31) Battery cover ( )20
Back of
the remote control
(31)
CALIBR ATION
KEYSTONE/
ASPECT
ACCENTU ALIZER
HDCR
AV MUTE
POSITION
ESC MEN U
RESET
IWB
AUTO
PAGE
DOWN
ON
OFF
FREEZE
UP 1
2
ENTER
FOCUS
- +
D-ZOOM
-+
+
ー
VOLUME
MAGNIFY
MYBUTTON
INPUT
PERFECT FIT
TEMPLA TE
(2)
(1)
(6)
(5)
(10)
(9)
(13)
(14)
(17)
(18)
(21)
(22)
(25)
(30)
(28)
(3)
(4)
(7)
(8)
(11)
(12)
(16)
(15)
(20)
(19)
(24)
(23)
(26)
(27)
(29)
8
Introduction
Part names (continued)
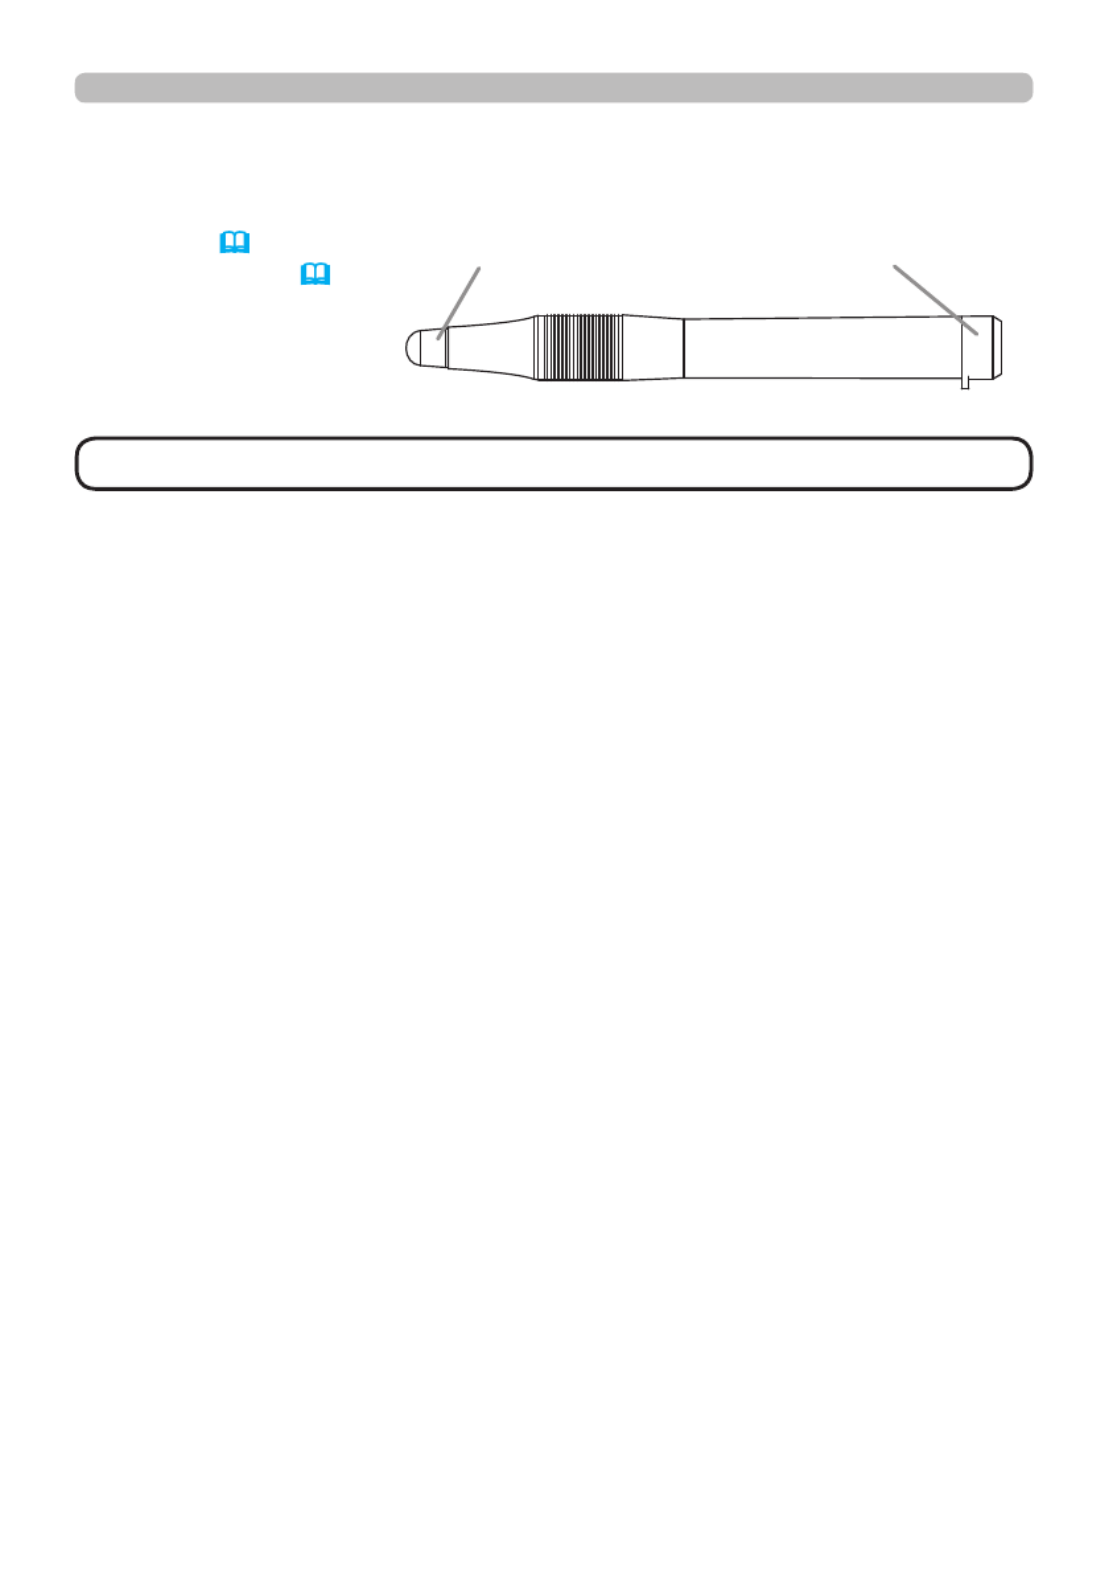
Interactive pen
(1) (Pen tip 23)
(2) ( )Battery cover 23
(1) (2)
• Interactive Pen is henceforth denoted as "pen".
NOTE

9
Setting up
Setting up
(continued on next page)
Install the projector according to the environment and manner the projector will be
used in.
Arrangement
Refer to table and gures and at the end of User’s Manual (concise) to determine T-1 F-1 F-2
the screen size and projection distance.
The values shown in the table are calculated for a full size screen.
a Screen size (diagonal)
b1 , b2 Projection distance (±8%)
c1 , c2 Screen height (±8%)
• For the case of installation in special conditions such as on the wall or ceiling, the
specied mounting accessories and service may be required. Tabletop use must be
setup with the designated optional accessories. Before installing the projector, consult
your dealer about your installation.
•
The screen position may shift after installation if the projector is mounted on locations
such as the wall or ceiling, due to the exibility of the plastic projector body. If readjustment
is necessary, consult with your dealer or service personnel.
• The projected image position and/or focus may change during warm-up (approx. 30
minutes after the lamp is turned on) or when the ambient conditions change. Readjust
the image position and/or focus as necessary.
• Since the projector features an ultra short throw, be aware that it is required to select a
screen carefully to have better performance.
- A soft screen such as a pull-down screen may cause serious distortion of a projected
image. A hard screen such as a board screen is recommended for use with this
projector.
- A high-gain screen such as a bead screen that has narrow viewing angle is not suitable
for this projector. A low-gain screen (around 1.0) such as a matte screen that has wide
viewing angle is recommended for use with this projector.
-
A screen with a weave pattern may cause moiré on the projected image, which is not a
failure of the projector. A screen that has less moiré effects is recommended for use with this
projector.
►
Place the projector in a stable horizontal position. If the
projector falls or is knocked over, it could cause injury and/or damage to the
projector. Using a damaged projector could then result in re and/or electric shock.
• Do not place the projector on an unstable, slanted or vibrational surface such
as a wobbly or inclined stand.
• Do not place the projector on its side or front position. To place the projector
on its rear position for the table top use, it is required to use the designated
optional parts. Consult with your dealer.
• Consult with your dealer before a special installation such as on the wall or
ceiling.
WARNING

10
Setting up
Arrangement (continued)
(continued on next page)
►Place the projector in a cool place, and ensure that there is
sufcient ventilation. The high temperature of the projector could cause re,
burns and/or malfunction of the projector.
• Do not stop-up, block or otherwise cover the projector's vents.
• Keep a space of 30 cm or more between the sides of the projector and other
objects such as walls.
• Do not place or attach anything that would block the projection window, camera
lens or vent holes.
• Do not place the projector on metallic thing or anything weak in heat.
• Do not place the projector on carpet, cushions or bedding.
• Do not place the projector in direct sunlight or near hot objects such as heaters.
Do not place the projector where the air from an air conditioner or similar unit
will blow on it directly.
•
Do not place anything near the projection window or vents, or on top of the
projector. It causes high temperature and could result in re or smoke.
•
Do not place anything that may be sucked into or stick to the vents on the
bottom of the projector. This projector has some intake vents also on the bottom.
►Do not place the projector anyplace where it may get wet. Getting the projector
wet or inserting liquid into the projector could cause re, electric shock and/or
malfunction of the projector.
• Do not place the projector in a bathroom or the outdoors.
• Do not place anything containing liquid near the projector.
•
Do not place the projector where any oils, such as cooking or machine oil, are used.
►
Use only the mounting accessories the manufacturer specied, and leave installing
and removing the projector with the mounting accessories to the service personnel.
• Read and keep the user’s manual of the mounting accessories used.
WARNING

11
Setting up
Arrangement (continued)
►Avoid placing the projector in smoky, humid or dusty place.
Placing the projector in such places could cause re, electric shock and/or
malfunction of the projector.
• Do not place the projector near humidiers, smoking spaces or a kitchen. Also
do not use an ultrasonic humidier near the projector. Otherwise chlorine and
minerals contained in tap water are atomized and could be deposited in the
projector causing image degradation or other problems.
►
Position the projector to prevent light from directly hitting the projector's remote sensor.
►Do not place the product in a place where radio interference may be caused.
►Do not place this product in a magnetic eld.
►
If the projector is used at an altitude of about 1600 m or higher, set ALTITUDE
of the SERVICE item in the OPTION menu to HIGH
( ). Otherwise, set it to 75
NORMAL.
If the projector is used with a wrong setting, it may cause damage to the projector
itself or the parts inside.
►Do not touch the camera lens with your ngers.
CAUTION
• The projector may make a rattling sound when tilted, moved or
shaken, since a ap to control the air ow inside of the projector has moved. Be
aware that this is not a failure or malfunction.
• The incoming light to the screen from the projector has a large angle. While
the white image is on the screen, you may see it with colors, but this is because
of the type of the screen used or the angles viewed, and it is not a malfunction.
• When the ambient temperature is around 35 to 40°C, the brightness of lamp
is reduced automatically.
NOTE

12
Setting up
Before connecting the projector to a device, consult the manual of the device to
conrm that the device is suitable for connecting with this projector and prepare
the required accessories, such as a cable in accord with the signal of the device.
Consult your dealer when the required accessory did not come with the product or
the accessory is damaged.
After making sure that the device and projector are turned off, connect them
following the instructions below.
►
Use only the appropriate accessories. Otherwise it could cause
a re or damage to the device and the projector.
- Use only the accessories specified or recommended by the projector ’s
manufacturer. Consult your dealer when the required accessory did not come
with the product or the accessory is damaged. It may be regulated under some
standard.
- For a cable with a core at only one end, connect the end with the core to the
projector. That may be required by EMI regulations.
- Neither disassemble nor modify the projector and the accessories.
- Do not use the damaged accessory. Be careful not to damage the accessories.
Route a cable so that it is neither stepped on nor pinched out.
WARNING
►Do not turn on or off the projector while connected to a device
in operation, unless that is directed in the manual of the device. Otherwise it may
cause malfunction in the device or projector.
►Be careful not to mistakenly connect a connector to a wrong port. Otherwise it
may cause malfunction in the device or projector.
- When connecting a connector to a port, make sure that the shape of the
connector ts the port.
- Tighten the screws to connect a connector equipped with screws to a port.
- Use the cables with straight plugs, not L-shaped ones, as the input ports of the
projector are recessed.
CAUTION
Connecting with your devices
(continued on next page)

13
Connecting with your devices (continued)
• When AUTO is selected for the or port in COMPUTER IN1 COMPUTER IN2
COMPUTER IN of the INPUT menu, that port will accept component video
signals (51).
•
When the port and the computer's type A USB port are connected,USB TYPE B
you can use the port as a picture input port from the computer, useUSB TYPE B
the remote control as a simple mouse and keyboard of the computer, or use the
Interactive Function (22).
Setting up
(continued on next page)
• Plug-and-Play is a system composed of a computer, its operating system
and peripheral equipment (i.e. display devices). This projector is VESA DDC
2B compatible. Plug-and-Play can be used by connecting this projector to a
computer that is VESA DDC (display data channel) compatible.
- Take advantage of this feature by connecting a computer cable to the
COMPUTER IN1 port (DDC 2B compatible). Plug-and-Play may not work
properly if any other type of connection is attempted.
-
Please use the standard drivers in your computer as this projector is a Plug-and-
Play monitor.
About Plug-and-Play capability
Computer
COMPONENT
Cb/Pb
Y
Cr/Pr
HDMI
R L
VIDEO
AUDIO
OUT
AUDIO
OUT
USB
(A)DISPLAY RS-232C
HDMI
VCR/DVD/Blu-ray Disc
player
Smartphone
Tablet

14
Connecting with your devices (continued)
(continued on next page)
• Before connecting the projector to a computer, consult the computer’s
manual and check the compatibility of the signal level, the synchronization
methods and the display resolution output to the projector.
- Some signal may need an adapter to input this projector.
- Some computers have multiple screen display modes that may include some
signals which are not supported by this projector.
- Although the projector can display signals with resolution up to UXGA
(1600X1200), the signal will be converted to the projector’s panel resolution
before being displayed. The best display performance will be achieved if the
resolutions of the input signal and the projector panel are identical.
• If you connect this projector and a notebook computer, you need output the
display to an external monitor, or output simultaneously to the internal display
and an external monitor. Consult the computer's manual for the setting.
• Depending on the input signal, the automatic adjustment function of this
projector may take some time and not function correctly.
- Note that a composite sync signal or sync-on-green signal may confuse the
automatic adjustment function of this projector ( . 51)
- If the automatic adjustment function does not work correctly, you may not see
the dialog to set the display resolution. In such a case, use an external display
device. You may be able to see the dialog and set an appropriate display
resolution.
NOTE
Setting up

15
Microphone
system
(continued on next page)
Connecting with your devices (continued)
Setting up
• If you insert a USB storage device, such as a USB memory, into the USB TYPE
A port and select the port as the input source, you can view images stored in the
device ( .116)
• You can connect a dynamic microphone to the port with a 3.5 mm mini-MIC
plug. In that case, the built-in speaker outputs the sound from the microphone,
even while the sound from the projector is output. You can input line level signal
to the port from equipment such as wireless microphone. Select HIGH in the MIC
MIC LEVEL item of the AUDIO menu when you input line level audio signal to
the port. In the normal mode, the volume of the microphone can be adjusted MIC
separately from the volume of the projector using the menu. (62)
In the standby mode, the volume of the microphone is adjustable with the
VOLUME +/- buttons on the remote control, in synchronization with the volume of
the projector. (27)
Even when the sound of projector is set to mute mode by the AUDIO SOURCE
function ( , the volume of the microphone is adjustable.61)
In both modes (standby or normal), the AV MUTE button on the remote control
works on the sounds of the microphone and the projector. (27)
• If a loud feedback noise is produced from the speaker, move the
microphone away from the speaker.
• This projector doesn't support plug-in power for the microphone.
NOTE
Monitor
R L
RGB IN
Speakers
(with an amplier)

16
Setting up
USB storage
device
Connecting with your devices (continued)
To use network functions of the projector, connect the port with the LAN
computer's LAN port, or with an access point that is connected to the computer
with wireless LAN, using a LAN cable. To use NETWORK BRIDGE function,
also connect the port and an RS-232C port of the external device to CONTROL
communicate as a network terminal. See the for User's Manual - Network Guide
details of the network functions.
►Before connecting the projector to a network system be sure
to obtain the consent of the administrator of the network.
►
Do not connect the port to any network that might have the excessive voltage.LAN
►The designated USB wireless adapter that is sold as an option is required to
use the wireless network function of this projector.
►Before removing the USB storage device from the port of the projector, be
sure to use the REMOVE USB function on the thumbnail screen to secure your
data ( .119)
►Do not use any extension cable or device when connecting the adapter to
the projector. Before you insert or pull out the USB wireless adapter from the
projector, turn off the power of the projector and pull out the power cord’s plug
from the outlet. Do not touch the USB wireless adapter while the projector is
receiving AC power.
►To connect both the LAN cable and USB device to the projector, use a LAN
cable that is at on the side where the plug’s wire is visible. Otherwise, both of
them cannot be connected correctly, or the wire may break (malfunction).
CAUTION
RS-232C USB TYPE A LAN
Access point
Computer
(continued on next page)
USB
wireless
adapter
(optional)
18
Setting up
Connecting to a power supply
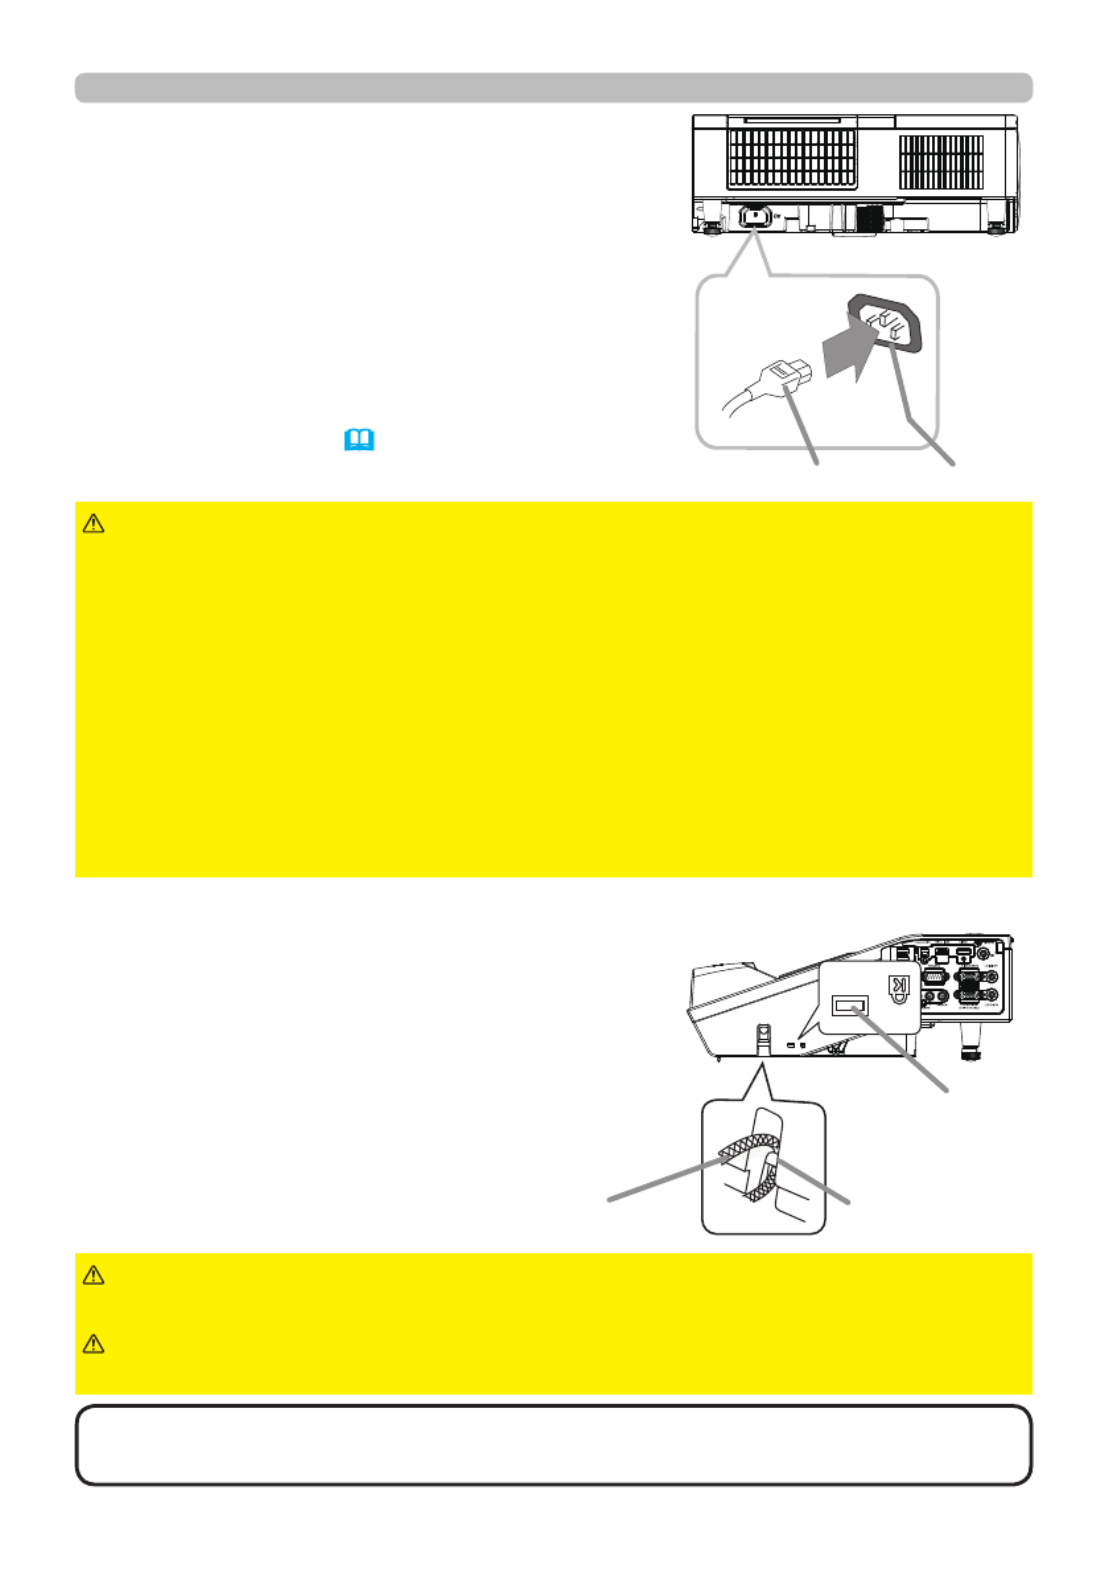
1. Put the connector of the power cord into the
AC (AC inlet) of the projector.
2. Firmly plug the power cord’s plug into the
outlet. In a couple of seconds after the
power supply connection, the POWER
indicator will light up in steady orange.
►Please use extra caution when connecting the power cord, as
incorrect or faulty connections may result in re and/or electrical shock.
• Do not touch the power cord with a wet hand.
• Only use the power cord that came with the projector. If it is damaged, consult
your dealer to get a new one. Never modify the power cord.
• Only plug the power cord into an outlet whose voltage is matched to the power
cord. The power outlet should be close to the projector and easily accessible.
Remove the power cord for complete separation.
• Do not distribute the power supply to multiple devices. Doing so may overload
the outlet and connectors, loosen the connection, or result in re, electric shock
or other accidents.
• Do not press the main body of projector on the power cord.
WARNING
Using the security bar and slot
A commercial anti-theft chain or wire up to
10 mm in diameter can be attached to the
security bar on the projector.
Also this product has the security slot for
the Kensington lock.
For details, see the manual of the security
tool.
►Do not use the security bar and slot to prevent the projector
from falling down, since it is not designed for it.
WARNING
►Do not place anti-theft chain or wire near the exhaust vents.
It may become too hot.
CAUTION
• The security bar and slot is not comprehensive theft prevention
measures. It is intended to be used as supplemental theft prevention measure.
NOTE
Please remember that when the DIRECT POWER
ON function activated (69), the connection of the
power supply make the projector turn on. AC
Power cord
Security bar
Security slot
Anti-theft chain or wire

19
Using the cable cover
Utilize the cable cover as the guard and blind for the connecting parts.
1. Connect the signal cables and the power cord to the projector rst.
2. Insert the three knobs on the cable cover into the
three holes on the projector as shown in the gure.
Pass the cables through the holes on the bottom of
the cable cover.
3
.
Fix the cover's screw.
Setting up
► Be careful not to pinch the cables in the cable cover, to
prevent damage to the cables.
► Use the cable cover that is supplied with the projector. Do not attempt any
modications to the cable cover.
CAUTION
1
3
knobs
1
23
screw
2

20
Remote control
Remote control
Installing the batteries
Please insert the batteries into the remote control before using it. If the remote control
starts to malfunction, try to replace the batteries. If you will not use the remote control for
long period, remove the batteries from the remote control and store them in a safe place.
1. Remove the battery cover.
2. Align and insert the two AA batteries (Use the appropriate
AA carbon-zinc or alkaline batteries (nonrechargeable) in
accordance with laws and regulations.) according to their
plus and minus terminals as indicated in the remote control.
3. Put the battery cover back to the former state.
►Always handle the batteries with care and use them only as
directed. Improper use may result in battery explosion, cracking or leakage,
which could result in re, injury and/or pollution of the surrounding environment.
• Be sure to use only the batteries specied. Do not use batteries of different
types at the same time. Do not mix a new battery with used one.
•
Make sure the plus and minus terminals are correctly aligned when loading a battery.
• Keep a battery away from children and pets.
• Do not recharge, short circuit, solder or disassemble a battery.
•
Do not place a battery in a re or water. Keep batteries in a dark, cool and dry place.
• If you observe battery leakage, wipe out the leakage and then replace a
battery. If the leakage adheres to your body or clothes, rinse well with water
immediately.
• Obey the local laws on disposing the battery.
WARNING

21
Changing the frequency of remote control signal
The accessory remote control has the two choices on signal
frequency Mode 1:NORMAL and Mode 2:HIGH. If the remote
control does not function properly, attempt to change the
signal frequency.
In order to set the Mode, please keep pressing the
combination of two buttons listed below simultaneously for
about 3 seconds.
(1) Set to Mode 1:NORMAL... and buttons VOLUME - RESET
(2) Set to Mode 2:HIGH... and buttonsMAGNIFY OFF ESC
Please remember that the REMOTE FREQ. in the SERVICE
item of the OPTION menu
(
77)
of the projector to be
controlled should be set to the same mode as the remote
control.
CALIBRATION
KEYSTONE/
ASPECT
ACCENTUALIZER
HDCR
AV M UTE
POSITI ON
ESC MENU
RESET
IWB
AUTO
PAGE
DOWN
ON
OFF
FREEZE
UP 1
2
ENTER
FOCUS
-+
D-ZOOM
- +
+
ー
VOLUME
MAGNIFY
MYBUTTON
INPUT
PERFECT FI T
TEMPLATE
(1)(2)
About the remote control signal
The remote control works with the projector’s remote
sensor. This projector has a remote sensor on the front.
The sensor senses the signal within the following range
when the sensor is active:
60 degrees (30 degrees to the left and right of the sensor)
within 3 meters about.
• You can deactivate one of the sensors using the REMOTE RECEIV.
item in the SERVICE menu of the OPTION menu ( ) .76
•
The remote control signal reected in the screen or the like may be available. If it is
difcult to send the signal to the sensor directly, attempt to make the signal reect.
• The remote control uses infrared light to send signals to the projector (Class 1
LED), so be sure to use the remote control in an area free from obstacles that
could block the remote control’s signal to the projector.
•
The remote control may not work correctly if strong light (such as direct sun
light) or light from an extremely close range (such as from an inverter uorescent
lamp) shines on the remote sensor of the projector. Adjust the position of
projector avoiding those lights.
NOTE
Remote
sensor
30º30º
Approx.
3 m
Remote control

23
The tip of the pen
Interactive pen
Installing the battery
Interactive pen
1. Turn the battery cover of the pen to the left to open it.
2. As illustrated in the diagram, insert the AAA battery
into the battery cover with the - end facing the front.
(Use the appropriate AAA alkaline batteries (non-rechargeable) in accordance with laws
and regulations.)
3. Attach the battery cover by turning it to the right until it is completely closed.
Exchanging the tip of the pen
When the tip of the pen is shortened due to wearing,
exchange it according to the following procedure.
1. Remove the tip of the pen referring to the
illustration.
2. Fit a new tip into the place and push it so that it
clicks.
►Always handle the batteries with care and use them only as
directed. Improper use may result in battery explosion, cracking or leakage,
which could result in re, injury and/or pollution of the surrounding environment.
• Be sure to use only the batteries speci ed.
• Do not hold a battery with tweezers or the like.
• Make sure the plus and minus terminals are correctly aligned when loading a
battery.
• Keep a battery away from children and pets.
• Do not recharge, short circuit, solder or disassemble a battery.
• Do not place a battery in a re or water. Keep batteries in a dark, cool and dry
place.
• If you observe battery leakage, wipe out the leakage and then replace a
battery. If the leakage adheres to your body or clothes, rinse well with water
immediately.
• Obey the local laws on disposing the battery.
• Keep the tip of the pen away from children and pets. Exercise care to prevent
them from swallowing the tip of the pen or the pack of spare accidentally. If
swallowed consult a physician immediately for emergency treatment.
►Do not drop the pen or mishandle it.
• Do not keep the tip of the pen directed to a bottom. It may cause
damage, trouble and the consumption of the battery.
WARNING
CAUTION
• If you will not use the pen for long period, remove the batteries from the pen and store
them in a safe place.
• If the pen do not operate properly, change the batteries to other maker's product.

26
Power on/off
►Do not touch around the lamp cover and the exhaust vents
during use or just after use, since it is too hot.
►Remove the power cord for complete separation. The power outlet should be
close to the projector and easily accessible.
WARNING
1. Press the STANDBY/ON button on the projector or the remote control.
The message “Power off?” will appear on the screen for about 5 seconds.
Turning off the power
2. Press the STANDBY/ON button again while the message appears.
The projector lamp will go off, and the indicator will begin blinking in POWER
orange. Then indicator will stop blinking and light in steady orange POWER
when the lamp cooling is complete ( ).144
Do not turn the projector on for about 10 minutes or more after turning it off.
Also, do not turn the projector off shortly after turning it on. Such operations might
cause the lamp to malfunction or shorten the lifetime of some parts including the lamp.
• Turn the power on/off in right order. Please power on the projector
prior to the connected devices.
•
This projector has the function that can make the projector automatically turn
on/off. Please refer to the DIRECT POWER ON
( )69
and AUTO POWER OFF
( )70
items of the OPTION menu.
NOTE

27
CALIBRATION
KEYSTONE/
ASPECT
ACCENTUALIZER
HDCR
AV MUTE
IWB
AUTO
PAGE
DOWN
ON
OFF
FREEZE
UP 1
2
FOCUS
-+
D-ZOOM
- +
+
ー
VOLUME
MAGNIFY
MYBUTTON
INPUT
PERFECT FIT
TEMPLATE
Operating
Operating
1.
Adjusting the volume
Use the / buttons to adjust the volume. VOLUME + VOLUME -
A dialog will appear on the screen to aid you in adjusting the
volume. If you do not do anything, the dialog will automatically
disappear after about ten seconds.
● When is selected for current picture input port, the volume adjustment is
disabled. Please see AUDIO SOURCE item of AUDIO menu ( ).61
● Even if the projector is in the standby mode, the volume is adjustable when
both of the following conditions are true:
- An option other than is selected for STANDBY in the AUDIO SOURCE
item of the AUDIO menu ( ).61
-
NORMAL is selected in the STANDBY MODE item of the SETUP menu
(60).
● In the standby mode, the volume of the microphone is adjustable with the
VOLUME +/- buttons on the remote control, in synchronization with the volume
of the projector ( ).15
1. Press the AV MUTE button on the remote control.
The BLANK screen will be displayed instead of the screen
of input signals and the sound from the port will AUDIO OUT
be muted. Please refer to the BLANK item in SCREEN menu
about the BLANK screen ( ).63
To exit from the AV MUTE mode and restore the screen and
audio, press the AV MUTE button again.
Temporarily muting the screen and audio output
CALIBRATION
ASPECT
ACCENTUALIZER
HDCR
IWB
AUTO
PAGE
DOWN
ON
OFF
UP 1
2
FOCUS
- +
D-ZOOM
- +
+
ー
VOLUME
MAGNIFY
MYBUTTON
INPUT
VOLUME + -/ button
AV MUTE button
►If you wish to have a blank screen while the projector's lamp
is on, use the AV MUTE function above . Taking any other action may cause the
damage on the projector.
Blocking the beam by something causes high temperature and could result in
re or smoke.
WARNING
• The projector automatically exits from the AV MUTE mode when
some control buttons are pressed.
•
The audio is output from the external audio system connected to the AUDIO OUT
port.
NOTE
29
Operating
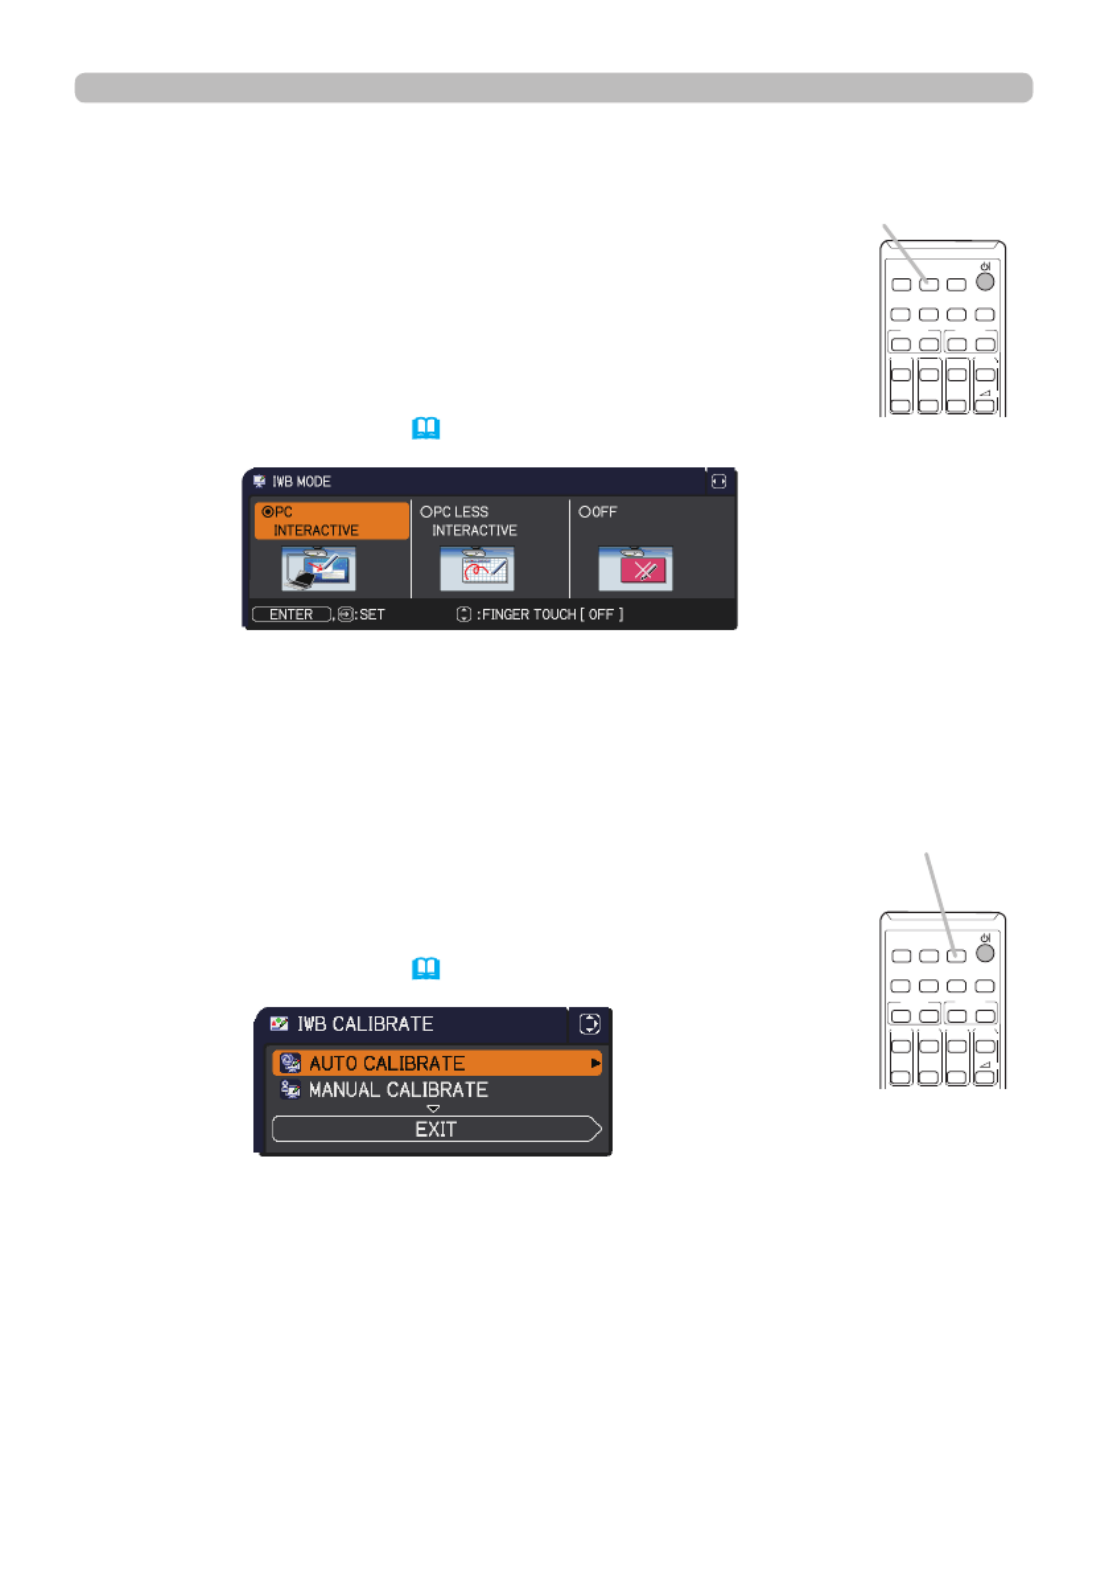
Selecting an Interactive Function
CALIBRATION
button
CALIBRATION
ASPECT
ACCENTUALIZER
HDCR
IWB
AUTO
PAGE
DOWN
ON
OFF
UP 1
2
FOCUS
- +
D-ZOOM
- +
+
ー
VOLUME
MAGNIFY
MYBUTTON
INPUT
Press the button on the remote control.IWB
Displays the IWB MODE dialog.
Use the ◄/► cursor buttons to switch IWB MODE for the currently
selected input port.
Use the ▲/▼ cursor buttons to switch ON/OFF of FINGER
TOUCH .
See the Interactive Function
( )89
.
IWB button
CALIBRATION
ASPECT
ACCENTUALIZER
HDCR
IWB
AUTO
PAGE
DOWN
ON
OFF
UP 1
2
FOCUS
- +
D-ZOOM
- +
+
ー
VOLUME
MAGNIFY
MYBUTTON
INPUT
Calibration
Press the CALIBRATION button on the remote control.
Displays the CALIBRATION dialog.
You can execute calibration of the Interactive Function in the
CALIBRATION dialog.
See the Interactive Function
( )89
.

32
Operating
1. Press the TEMPLATE button on the remote control.
Each time you press the button, the projector switches the
mode for TEMPLATE in turn.
Using the TEMPLATE feature
● The TEMPLATE button does not work when no proper signal is inputted.
TEST PATTERN DOT-LINE1 DOT-LINE2 DOT-LINE3
HAS-WM05 DOT-LINE4
HAS-WM03
MAP2
MAP1
CIRCLE2
CIRCLE1 TEMPLATE button
CALIBRATION
KEYSTONE/
ASPECT
ACCENTUALIZER
HDCR
AV MUTE
IWB
AUTO
PAGE
DOWN
ON
OFF
FREEZE
UP 1
2
FOCUS
- +
D-ZOOM
-+
+
ー
VOLUME
MAGNIFY
MYBUTTON
INPUT
PERFECT FIT
TEMPLATE
HDCR: Displays the HDCR menu ( ).42
ACCENTUALIZER: Displays the ACCENTUALIZER menu ( ).42
Other buttons
HDCR button
CALIBRATION
KEYSTONE/
ASPECT
ACCENTUALIZER
HDCR
AV MUTE
IWB
AUTO
PAGE
DOWN
ON
OFF
FREEZE
UP 1
2
FOCUS
- +
D-ZOOM
- +
+
ー
VOLUME
MAGNIFY
MYBUTTON
INPUT
PERFECT FIT
TEMPLATE
ACCENTUALIZER button

34
CALIBRATION
ASPECT
ACCENTUALIZER
HDCR
IWB
AUTO
PAGE
DOWN
ON
OFF
UP 1
2
FOCUS
- +
D-ZOOM
- +
+
ー
VOLUME
MAGNIFY
MYBUTTON
INPUT
Operating
1.
Using the magnify feature
2.
3.
4.
Press the button on the remote control. MAGNIFY ON
The picture will be magnied, and the MAGNIFY dialog will
appear on the screen. When the button is MAGNIFY ON
pressed for the rst time after the projector is turned on, the
picture will be zoomed by 1.5 times. On the dialog, triangle
marks to show each direction will be displayed.
The display magnication of the projector switches in order
with every press of the button.MAGNIFY ON
For computer signals, HDMITM (RGB) signals, input signals from the
LAN, USB TYPE A or USB TYPE B port
1.5 times 2 times 3 times 4 times 1 time
For video signals, component video signals, HDMI TM
(Component)
signals or MHL signals
1.5 times 2 times 1 time
While the triangles are displayed on the dialog, use the ▲/▼/◄/► cursor
buttons to shift the magnifying area.
Press the button on the remote control to exit magnication.MAGNIFY OFF
● The MAGNIFY dialog will automatically disappear in several seconds with no
operation. The dialog will appear again if the MAGNIFY ON button is pressed
when the dialog has automatically disappeared.
● The magnication is automatically disabled when the displaying signal or its
display condition is changed.
● While the magnication is active, the keystone distortion condition may vary.
It will be restored when the magnication is disabled.
● Some horizontal stripes might be visible on the image while magnication is
active.
● This function is not available in the following cases:
- A sync signal in the range not supported is input.
- There is no input signal.
MAGNIFY
ON/OFF button
Termékspecifikációk
| Márka: | Hitachi |
| Kategória: | Beamer |
| Modell: | CP-TW3005 |
Szüksége van segítségre?
Ha segítségre van szüksége Hitachi CP-TW3005, tegyen fel kérdést alább, és más felhasználók válaszolnak Önnek
Útmutatók Beamer Hitachi

12 Január 2025
14 Október 2024
22 Szeptember 2024
20 Szeptember 2024
16 Szeptember 2024
27 Augusztus 2024
25 Augusztus 2024
24 Augusztus 2024
17 Augusztus 2024
16 Augusztus 2024
Útmutatók Beamer
- Beamer Samsung
- Beamer Sony
- Beamer Yamaha
- Beamer Acer
- Beamer LG
- Beamer Marantz
- Beamer Philips
- Beamer Panasonic
- Beamer Canon
- Beamer JVC
- Beamer Sharp
- Beamer Lenovo
- Beamer Casio
- Beamer Toshiba
- Beamer HP
- Beamer Hisense
- Beamer BenQ
- Beamer Medion
- Beamer Xiaomi
- Beamer Dell
- Beamer Klarstein
- Beamer Prixton
- Beamer Polaroid
- Beamer Technaxx
- Beamer Ricoh
- Beamer Eurolite
- Beamer Epson
- Beamer Asus
- Beamer Hama
- Beamer Renkforce
- Beamer Mitsubishi
- Beamer GPX
- Beamer Kodak
- Beamer Optoma
- Beamer Smart
- Beamer Dahua Technology
- Beamer Viewsonic
- Beamer Livoo
- Beamer Smart Tech
- Beamer XGIMI
- Beamer OK
- Beamer Auna
- Beamer Nebula
- Beamer ZTE
- Beamer Showtec
- Beamer Futurelight
- Beamer Overmax
- Beamer Kogan
- Beamer D-Link
- Beamer ION
- Beamer Blaupunkt
- Beamer 3M
- Beamer Pyle
- Beamer Sanyo
- Beamer Steinel
- Beamer Salora
- Beamer Lenco
- Beamer Maxell
- Beamer Leica
- Beamer Barco
- Beamer NEC
- Beamer Cameo
- Beamer Krüger&Matz
- Beamer RCA
- Beamer OKI
- Beamer Adj
- Beamer Anker
- Beamer Microtek
- Beamer Celexon
- Beamer Vivitek
- Beamer EasyMaxx
- Beamer Elmo
- Beamer Planar
- Beamer Smartwares
- Beamer Speaka
- Beamer Vogel's
- Beamer Acco
- Beamer Aiptek
- Beamer ASK Proxima
- Beamer Reflecta
- Beamer Yaber
- Beamer Da-Lite
- Beamer Steren
- Beamer Eiki
- Beamer Derksen
- Beamer InFocus
- Beamer Bauer
- Beamer Naxa
- Beamer Emtec
- Beamer Celly
- Beamer Promethean
- Beamer Odys
- Beamer Stairville
- Beamer Laserworld
- Beamer Ibm
- Beamer La Vague
- Beamer Tzumi
- Beamer EKO
- Beamer MicroVision
- Beamer Elite Screens
- Beamer Fun Generation
- Beamer Christie
- Beamer PLUS
- Beamer Varytec
- Beamer AOpen
- Beamer Ultimea
- Beamer Dracast
- Beamer Dukane
- Beamer Dream Vision
- Beamer Knoll
- Beamer DTS
- Beamer Touchjet
- Beamer Boxlight
- Beamer AAXA Technologies
- Beamer Miroir
- Beamer Vankyo
- Beamer Mimio
- Beamer AWOL Vision
- Beamer Atlantis Land
- Beamer KickAss
- Beamer VAVA
- Beamer Beghelli
- Beamer Panamorph
- Beamer Mirabella Genio
Legújabb útmutatók Beamer

10 Április 2025
10 Április 2025
10 Április 2025

9 Április 2025
9 Április 2025

2 Április 2025

15 Január 2025

14 Január 2025
13 Január 2025
12 Január 2025