Használati útmutató Hikvision DS-PHA20-W2P
Hikvision
Riasztórendszer
DS-PHA20-W2P
Olvassa el alább 📖 a magyar nyelvű használati útmutatót Hikvision DS-PHA20-W2P (90 oldal) a Riasztórendszer kategóriában. Ezt az útmutatót 10 ember találta hasznosnak és 2 felhasználó értékelte átlagosan 4.5 csillagra
Oldal 1/90

Hybrid Security Control Panel
User Manual

Legal Informaon
User Manual
©2019 Hangzhou Hikvision Digital Technology Co., Ltd.
About this Manual
This Manual is subject to and copyright domesc internaonal protecon. Hangzhou Hikvision
Digital Technology Co., Ltd. ("Hikvision") reserves all rights to this manual. This manual cannot be
reproduced, changed, translated, or distributed, parally or wholly, by any means, without the
prior permission of Hikvision.wrien
Please use this user manual under the guidance of professionals.
Trademarks
and other Hikvision marks are the property of Hikvision and are
registered trademarks or the subject of applicaons for the same by Hikvision and/or its aliates.
Other trademarks in this manual are the menoned properes respecve of their owners. No right
of license is given to use such trademarks without express permission.
Disclaimer
TO THE MAXIMUM EXTENT PERMITTED BY APPLICABLE LAW, HIKVISION MAKES NO WARRANTIES,
EXPRESS OR IMPLIED, INCLUDING WITHOUT LIMITATION THE IMPLIED WARRANTIES OF
MERCHANTABILITY AND FITNESS FOR A PARTICULAR PURPOSE, REGARDING THIS MANUAL.
HIKVISION DOES NOT WARRANT, GUARANTEE, OR MAKE ANY REPRESENTATIONS REGARDING THE
USE OF THE MANUAL, OR THE CORRECTNESS, ACCURACY, OR RELIABILITY OF INFORMATION
CONTAINED HEREIN. YOUR USE OF THIS MANUAL AND ANY RELIANCE ON THIS MANUAL SHALL BE
WHOLLY AT YOUR OWN RISK AND RESPONSIBILITY.
REGARDING TO THE PRODUCT WITH INTERNET ACCESS, THE USE OF PRODUCT SHALL BE WHOLLY
AT YOUR OWN RISKS. HIKVISION SHALL NOT TAKE ANY RESPONSIBILITIES FOR ABNORMAL
OPERATION, PRIVACY LEAKAGE OR OTHER DAMAGES RESULTING FROM CYBER ATTACK, HACKER
ATTACK, VIRUS INSPECTION, OR OTHER INTERNET SECURITY RISKS; HOWEVER, HIKVISION WILL
PROVIDE TIMELY TECHNICAL SUPPORT IF REQUIRED.
SURVEILLANCE LAWS VARY BY JURISDICTION. PLEASE CHECK ALL RELEVANT LAWS IN YOUR
JURISDICTION BEFORE USING THIS PRODUCT IN ORDER TO ENSURE THAT YOUR USE CONFORMS
THE APPLICABLE LAW. HIKVISION SHALL NOT BE LIABLE IN THE EVENT THAT THIS PRODUCT IS USED
WITH ILLEGITIMATE PURPOSES.
IN THE EVENT OF ANY CONFLICTS BETWEEN THIS MANUAL AND THE APPLICABLE LAW, THE LATER
PREVAILS.
Hybrid Security Control Panel User Manual
i

Symbol Convenons
The symbols that may be found in this document are as follows.dened
Symbol Descripon
Danger
Indicates a hazardous which, if not avoided, will or couldsituaon
result in death or serious injury.
Cauon
Indicates a hazardous which, if not avoided, couldpotenally situaon
result in equipment damage, data loss, performance ordegradaon,
unexpected results.
Note Provides to emphasize or supplementaddional informaon
important points of the main text.
Hybrid Security Control Panel User Manual
ii

Contents
Chapter 1 System ..................................................................................................... 1Descripon
Chapter 2 ............................................................................................................. 2Specicaons
Chapter 3 Acvaon ................................................................................................................... 5
3.1 Acvate Device via Web Browser .......................................................................................... 5
3.2 Acvate Device via iVMS-4200 .............................................................................................. 5
3.3 Acvate via SADP ................................................................................................................... 6
Chapter 4 Conguraon ............................................................................................................. 8
4.1 Use the Client Soware ......................................................................................................... 8
4.2 Use the Web Client ................................................................................................................ 8
4.2.1 Communicaon Sengs ............................................................................................... 9
4.2.2 Device Management ................................................................................................... 22
4.2.3 Paron Sengs ......................................................................................................... 29
4.2.4 Video Management .................................................................................................... 33
4.2.5 Permission Management ............................................................................................ 36
4.2.6 Maintenance ............................................................................................................... 38
4.2.7 System Sengs ........................................................................................................... 40
4.2.8 Check Status ................................................................................................................ 46
4.3 Use Mobile Client ................................................................................................................. 46
4.3.1 Download and Login the Mobile Client ....................................................................... 46
4.3.2 Add Control Panel to the Mobile Client ...................................................................... 47
4.3.3 Add Peripheral to the Control Panel ........................................................................... 48
4.3.4 Add a Camera to the Zone .......................................................................................... 49
4.3.5 Set Zone ...................................................................................................................... 50
4.3.6 Arm/Disarm the Zone ................................................................................................. 50
4.3.7 Set Arming/Disarming Schedule ................................................................................. 51
4.3.8 Bypass Zone ................................................................................................................ 52
Hybrid Security Control Panel User Manual
iii

4.3.9 Add Card ..................................................................................................................... 53
4.3.10 Add Keyfob ................................................................................................................ 55
4.3.11 Check System Status (Zone Status/Communicaon Status) ..................................... 55
4.3.12 Check Alarm .......................................................................................... 56Nocaon
Chapter 5 Operaons ............................................................................................................... 58
5.1 Arming ................................................................................................................................. 58
5.2 Disarming ............................................................................................................................. 59
5.3 Use the Keyfob ..................................................................................................................... 59
5.4 Use the Card ........................................................................................................................ 62
5.5 Use the Client Soware ....................................................................................................... 62
5.5.1 Accessing the Page ..................................................................................... 62Operaon
5.5.2 Paron Operaon ..................................................................................................... 62
5.5.3 Zone Operang ........................................................................................................... 63
5.6 Use the Web Client .............................................................................................................. 64
5.6.1 Add/Edit/Delete Tag (Card) ......................................................................................... 64
5.6.2 Add/Edit/Delete Keyfob .............................................................................................. 65
5.6.3 Add/Edit/Delete User .................................................................................................. 66
5.6.4 Check Status ................................................................................................................ 67
Appendix A. Trouble Shoong .................................................................................................. 68
A.1 Communicaon Fault .......................................................................................................... 68
A.1.1 IP .................................................................................................................... 68Conict
A.1.2 Web Page is Not Accessible ........................................................................................ 68
A.1.3 Hik-Connect is Oine ................................................................................................. 68
A.1.4 Network Camera Drops Frequently ....................................................................... 68o
A.1.5 Failed to Add Device on APP ....................................................................................... 68
A.1.6 Alarm Informaon is Not Reported to APP/4200/Alarm Center ................................. 69
A.2 Mutual Exclusion of ............................................................................................. 69Funcons
A.2.1 Unable to Enter Registraon Mode ............................................................................ 69
Hybrid Security Control Panel User Manual
iv

A.2.2 Unable to Enter RF Signal Query Mode ...................................................................... 69
A.3 Zone Fault ............................................................................................................................ 69
A.3.1 Zone is Oine ............................................................................................................. 69
A.3.2 Zone Tamper-proof ..................................................................................................... 70
A.3.3 Zone Triggered/Fault .................................................................................................. 70
A.4 Problems While Arming ....................................................................................................... 70
A.4.1 Failure in Arming (When the Arming Process is Not Started) ..................................... 70
A.5 Failure .............................................................................................................. 70Operaonal
A.5.1 Failed to Enter the Test Mode ..................................................................................... 70
A.5.2 The Alarm Clearing on the Panel Does Not Produce the Alarm ClearingOperaon
Report .................................................................................................................................. 71
A.6 Mail Delivery Failure ............................................................................................................ 71
A.6.1 Failed to Send Test Mail .............................................................................................. 71
A.6.2 Failed to Send Mail during Use ................................................................................... 71
A.6.3 Failed to Send Mails to Gmail ..................................................................................... 71
A.6.4 Failed to Send Mails to QQ or Foxmail ........................................................................ 72
A.6.5 Failed to Send Mails to Yahoo ..................................................................................... 72
A.6.6 Mail Conguraon ...................................................................................................... 72
Appendix B. Input Types ........................................................................................................... 74
Appendix C. Output Types ........................................................................................................ 76
Appendix D. Event Types .......................................................................................................... 77
Appendix E. Access Levels ......................................................................................................... 78
Appendix F. SIA and CID Code ................................................................................................... 80
Hybrid Security Control Panel User Manual
v

Chapter 1 System Descripon
Hybrid security control panel, containing onboard zones, supports wired/wireless alarm inputs and
outputs expanding. It works with Wi-Fi, LAN, GPRS, and 3G/ 4G communicaon methods, as well
as ISAPI, Ehome 5.0, and DC09 protocol. It is applicable to the scenarios of market, store, house,
factory, warehouse, etc.oce,
• Dual path communicaon of alarm events and other signals over LAN, PSTN, Wi-Fi (-W model),
GPRS and 3G/4G a main and backup channel with priorityulizing congurable
• 4/8 on-board wired zones, and expandable with up to 20/64 wired zones
• Up to 20/64 wireless inputs, 20/64 wireless outputs, 8 keyfobs, 1 wired siren and 2 wireless
sirens
• Camera accessing (only supported by DS-PHAXX-WXX)
• Pre-alarm (5 s/2 s) and post-alarm (2 s/5 s) recording for video vericaon to the alarm receiving
email or mobile client
• Uploads alarm events to alarm receiving center or plaorm
• Supports arming/disarming via keypad, mobile client, iVMS-4200, SMS, and tag
• Conguraon via web client, Hik-Connect, or iVMS-4200
• Pushes alarm nocaon via messages and email
• AES-128-bit data encrypon
• LED indicator for system status (-P model)indicang
• Expandable PSTN, 3G/4G, and GPRS interface
• Supports RS-485 input and output expander
• Supports lithium baery (-P model) or storage (-M model)baery
• 1 manufacturer, 1 installer, 1 administrator, and 13 users (DS-PHA20)/45 users (DS-PHA64)
Hybrid Security Control Panel User Manual
1

Chapter 2 Specicaons
Model DS-PHA20-P
DS-PHA20-M
DS-PHA64-M
DS-PHA20-W2M
DS-PHA20-W2P
DS-PHA64-W4M
Device Wireless Detector Up to 16/56connecon
Wireless Output
expander
Up to 8
Siren 1 wired siren (on-board connecon)
2 wireless sirens
Keyfob 8
Alarm input Paron 4 (DS-PHA20)
8 (DS-PHA64)
Zone 4 on-board zones , and 16 wired/wireless zones
expadable (DS-PHA20)
8 on-board zones, and 56 wired/wireless zones
expadable (DS-PHA64)
Alarm output Alarm output 2 on-board outputs, and 18 wired/wireless
outputs expadable (DS-PHA20)
4 on-board outputs, and 60 wired/wireless
outputs expadable (DS-PHA64)
Funcon Scheduled arming/
disarming
Supported
SMS nocaon
(with 3G/4G/GPRS
module)
Supports up to 8 mobile phone numbers
Network camera
accessing
N/A 2 (DS-PHA20)
4 (DS-PHA64)
Applicaon & Protocol iVMS-4200 (client Applicaon soware)
Hik-Connect (mobile client)
Protocol ISAPI: Supports client soware and web client
Cloud P2P: Supports cloud P2P privacy protocol
DC09: ARC accessible (CID/SIA)
Hybrid Security Control Panel User Manual
2

Model DS-PHA20-P
DS-PHA20-M
DS-PHA64-M
DS-PHA20-W2M
DS-PHA20-W2P
DS-PHA64-W4M
Network Wired network 10M/100M Ethernet
Cellular Network
(with 3G/4G/GPRS
module)
Supports report to ARC &push-nocaon
Cloud
Wi-Fi Standard N/A 802.11b/g/n
Encrypon N/A 64/128-bit WEP,WPA/
WPA2,WPA-PSK/WPA2-
PSK,WPS
Conguraon N/A AP Mode
Distance N/A Indoor: ≤ 50 m
Outdoor: ≤ 100 m
Interface &
Component
TAMPER Switch 1, front cover tamper-proof
Network Interface 1, RJ45 10M/100M Ethernet Interface
Telephone Interface 1, PSTN expander interface
RS-485 Terminal 1, extended up to 20 inputs/outputs (with
RS-485 module), and 9 wired keypads
extendable (DS-PHA20)
1, extended up to 64 inputs/outputs (with
RS-485 module), and 9 wired keypads
extendable (DS-PHA64)
Siren Power Interface 1, 12V
Baery Interface Lithium (-P model)baery
Storage (-M model)baery
User User Installer: 1
Administrator: 1
Manufactuer:1
Operator: 13 (DS-PHA20), 45 (DS-PHA64)
Others Auxiliary Power Supply Case: 7.2W, current: 600mAPlasc
Metal Case: 13W, current: 1000mA
Siren Output Power Case: 5W, current: 400 mAPlasc
Metal Case: 8W, current: 600 mA
Hybrid Security Control Panel User Manual
3

Model DS-PHA20-P
DS-PHA20-M
DS-PHA64-M
DS-PHA20-W2M
DS-PHA20-W2P
DS-PHA64-W4M
RS-485 Device Output
Power
Plasc Case: 7.2W, current: 600mA
Metal Case: 13W, current: 1000mA
Alarm Output Rated
Current
500 mA
Operaon
Temperature
–10 °C to 55 °C (-4 °F to +122 °F)
Operaon Humidity 10% to 90% (No condensing)
Dimension (W × H × D) Case: 220 mm (8.6") × 152 mm (6.0") ×Plasc
31.5 mm(1.2")
Metal Case: 351.4 mm (13.8") × 261.4 mm
(10.3") × 93.3 mm (3.7")
Hybrid Security Control Panel User Manual
4
Chapter 3 Acvaon
In order to protect personal security and privacy and improve the network security level, you
should acvate rst me the device the you connect the device to a network.
3.1 Acvate Device via Web Browser
Use web browser to acvate soware the device. Use SADP or PC client to search the online device
to get the IP address of the device, and acvate the device on the web page.
Before You Start
Make sure your device and your PC connect to the same LAN.
Steps
1. Open a web browser and input the IP address of the device.
Note
If you connect the device with the PC directly, you need to change the IP address of your PC to
the same subnet as the device. The default IP address of the device is 192.0.0.64.
2. Create and the admin password.conrm
Cauon
STRONG PASSWORD RECOMMENDED-We highly recommend you create a strong password of
your own choosing (using a minimum of 8 characters, including upper case leers, lower case
leers, numbers, and special characters) in order to increase the security of your product. And
we recommend you reset your password regularly, especially in the high security system,
reseng the password monthly or weekly can protect your product.beer
3. Click to complete OK acvaon.
4. Edit IP address of the device.
1) Enter IP address modicaon page.
2) Change IP address.
3) Save the sengs.
3.2 Acvate Device via iVMS-4200
It is a PC client to manage and operate your devices. Security control panel is supportedacvaon
by the soware.
Hybrid Security Control Panel User Manual
5

Before You Start
• Get the client soware ocial from the supplied disk or the website hp://
www.hikvision.com/en/ . Install the soware by following the prompts.
• The device and the PC that runs the soware should be in the same subnet.
Steps
1. Run the client soware.
2. Device Management Online DeviceEnter or .
3. Check the device status from the device list, and select an inacve device.
4. Click Acvate.
5. Create and conrm the admin password of the device.
Cauon
STRONG PASSWORD RECOMMENDED-We highly recommend you create a strong password of
your own choosing (using a minimum of 8 characters, including upper case leers, lower case
leers, numbers, and special characters) in order to increase the security of your product. And
we recommend you reset your password regularly, especially in the high security system,
reseng the password monthly or weekly can protect your product.beer
6. OKClick to start acvaon.
Device status will change to successful Acve aer acvaon.
7. Edit IP address of the device.
1) Select a device and click at .Modify Nenfo Online Device
2) Change the device IP address to the same subnet with your computer by either modifying
the IP address manually or checking .DHCP
3) Input the admin password of the device and click to complete OK modicaon.
3.3 Acvate via SADP
SADP is a tool to detect, acvate and modify the IP address of the device over the LAN.
Before You Start
• Get the SADP soware from the supplied disk or the website ocial hp://
www.hikvision.com/en/ , and install the SADP according to the prompts.
• The device and the PC that runs the SADP tool should be within the same subnet.
The following steps show how to acvate a device and modify its IP address. For batch acvaon
and IP addresses refer to for details.modicaon, User Manual of SADP
Steps
1. Run the SADP soware and search the online devices.
2. Find and select your device in online device list.
3. Input new password (admin password) and the password.conrm
Hybrid Security Control Panel User Manual
6

Cauon
STRONG PASSWORD RECOMMENDED-We highly recommend you create a strong password of
your own choosing (using a minimum of 8 characters, including upper case lower caseleers,
leers, numbers, and special characters) in order to increase the security of your product. And
we recommend you reset your password regularly, especially in the high security system,
reseng the password monthly or weekly can protect your product.beer
4. Click Acvate to start acvaon.
Status of the device becomes successful Acve aer acvaon.
5. Modify IP address of the device.
1) Select the device.
2) Change the device IP address to the same subnet as your computer by either modifying the
IP address manually or checking .Enable DHCP
3) Input the admin password and click to Modify acvate your IP address modicaon.
Hybrid Security Control Panel User Manual
7
Chapter 4 Conguraon
Congure the security control panel in the web client or the remote conguraon page in client
soware.
4.1 Use the Client Soware
Steps
1. Download, install and register to the client soware.
2. Control Panel → Device Management → DeviceAdd device in .
Note
Set the device port No. as 80.
Note
The user name and password when adding device are the acvaon user name and password.
3. Remote Click Conguraon to enter the device conguraon aer page the device is
completely added,
4.2 Use the Web Client
Steps
1. Connect the device to the Ethernet.
2. Search the device IP address via the client soware soware. and the SADP
3. Enter the searched IP address in the address bar.
Note
When using mobile browser, the default IP Address is 192.168.8.1. The device must be in the AP
mode.
Note
When the network cable with computer directly, the default IP Address is 192.0.0.64connecng
4. Use the user name and password to login.acvaon
Note
Refer to chapter for the details.Acvaon
Hybrid Security Control Panel User Manual
8

4.2.1 Communicaon Sengs
Wired Network
If the device is linked to the wired network, you can set the wired network parameters when you
want to change the device IP address and other network parameters.
Steps
Note
The is not supported by some device models.funcon
1. In iVMS-4200 client soware, enter the Device Management page.
2. Select the device in the Device for Management list, click Remote Conguraon.
3. Parameters → EthernetClick Communicaon to enter the Wired Network Parameters page.
Figure 4-1 Wired Network PageSengs
4. Set the parameters.
-Automac Sengs: Enable and set the HTTP port.DHCP
-Manual Disabled and set , , Sengs: DHCP IP Address Subnet Mask Gateway Address DNS,
Server Address.
Note
By default, the HTTP port is 80.
5. Oponal: Set correct DNS server address if the device needs to visit Hik-Connect server via a
domain name.
Hybrid Security Control Panel User Manual
9

6. SaveClick .
Wi-Fi
You can set the Wi-Fi parameters if there are secure and credible Wi-Fi networks nearby.
Steps
1. Click Communicaon Parameters → Wi-Fi to enter the Wi-Fi page.
Figure 4-2 Wi-Fi PageSengs
2. Connect to a Wi-Fi.
-Manually Connect: Input the and SSID Wi-Fi Wi-Fi Password, select Encrypon Mode and
click Save.
-Select from Network List: Select a target Wi-Fi from the Network list. Click and inputConnect
Wi-Fi password and click .Connect
3. WLANClick to enter the WLAN page.
Hybrid Security Control Panel User Manual
10

Figure 4-3 WLAN PageSengs
4. IP Address Subnet Mask Gateway Address DNS Server AddressSet , , , and .
Note
If enable DHCP, the device will gain the Wi-Fi parameters automacally.
5. SaveClick .
Cellular Network
Set the cellular network parameters if you insert a SIM card inside the device. By using the cellular
network, the device can upload alarm nocaons to the alarm center.
Before You Start
Insert a SIM card into the device SIM card slot.
Steps
1. Parameters → Cellular Data Network Click Communicaon to enter the Cellular Data Network
Sengs page.
Hybrid Security Control Panel User Manual
11

Figure 4-4 Cellular Data Network PageSengs
2. Enable Wireless Dial.
3. Set the cellular data network parameters.
Access Number
Input the operator dialing number.
User Name
Ask the network carrier and input the user name.
Access Password
Ask the network carrier and input the password.
APN
Ask the network carrier to get the APN informaon informaon. and input the APN
Data Usage Limit
You can enable the and set the data threshold every month. If data usage is morefuncon
than the congured threshold, an alarm will be triggered and uploaded to the alarm center
and mobile client.
Data Used This Month
The used data will be accumulated and displayed in this text box.
4. SaveClick .
Hybrid Security Control Panel User Manual
12

Alarm Center
You can set the alarm center's parameters and all alarms will be sent to the congured alarm
center.
Steps
1. Click Communicaon Parameters → Alarm Receiving Center to enter the Alarm Receiving
Center page.
Figure 4-5 Alarm Receiving Center Parameters
2. Alarm Receiver Center 1 2Select the as or for conguraon , and slide the slider to enable the
selected alarm receiver center.
Note
Only if the alarm receiver center 1 is enabled, you can set the alarm receiver center 2 as the
backup channel and edit the channel parameters.
3. Protocol Type ADM-CID EHome SIA-DCS *SIA-DCS *ADM-CID PSTN-CIDSelect the as , , , , , or to
set uploading mode.
-ADM-CID SIA-DCS or
You should select the Alarm Receiver Type IP Domain name as or , and enter the IP/domain
name, port number, account code, meout, mes re-upload and heartbeat interval.
Hybrid Security Control Panel User Manual
13

Figure 4-6 SIA-DCS
Note
Set the heartbeat interval with the range from 10 to 3888000 seconds.
-EHome
You do not need to set the EHome protocol parameters.
Figure 4-7 EHome
-*SIA-DCS *ADM-CID or
Hybrid Security Control Panel User Manual
14
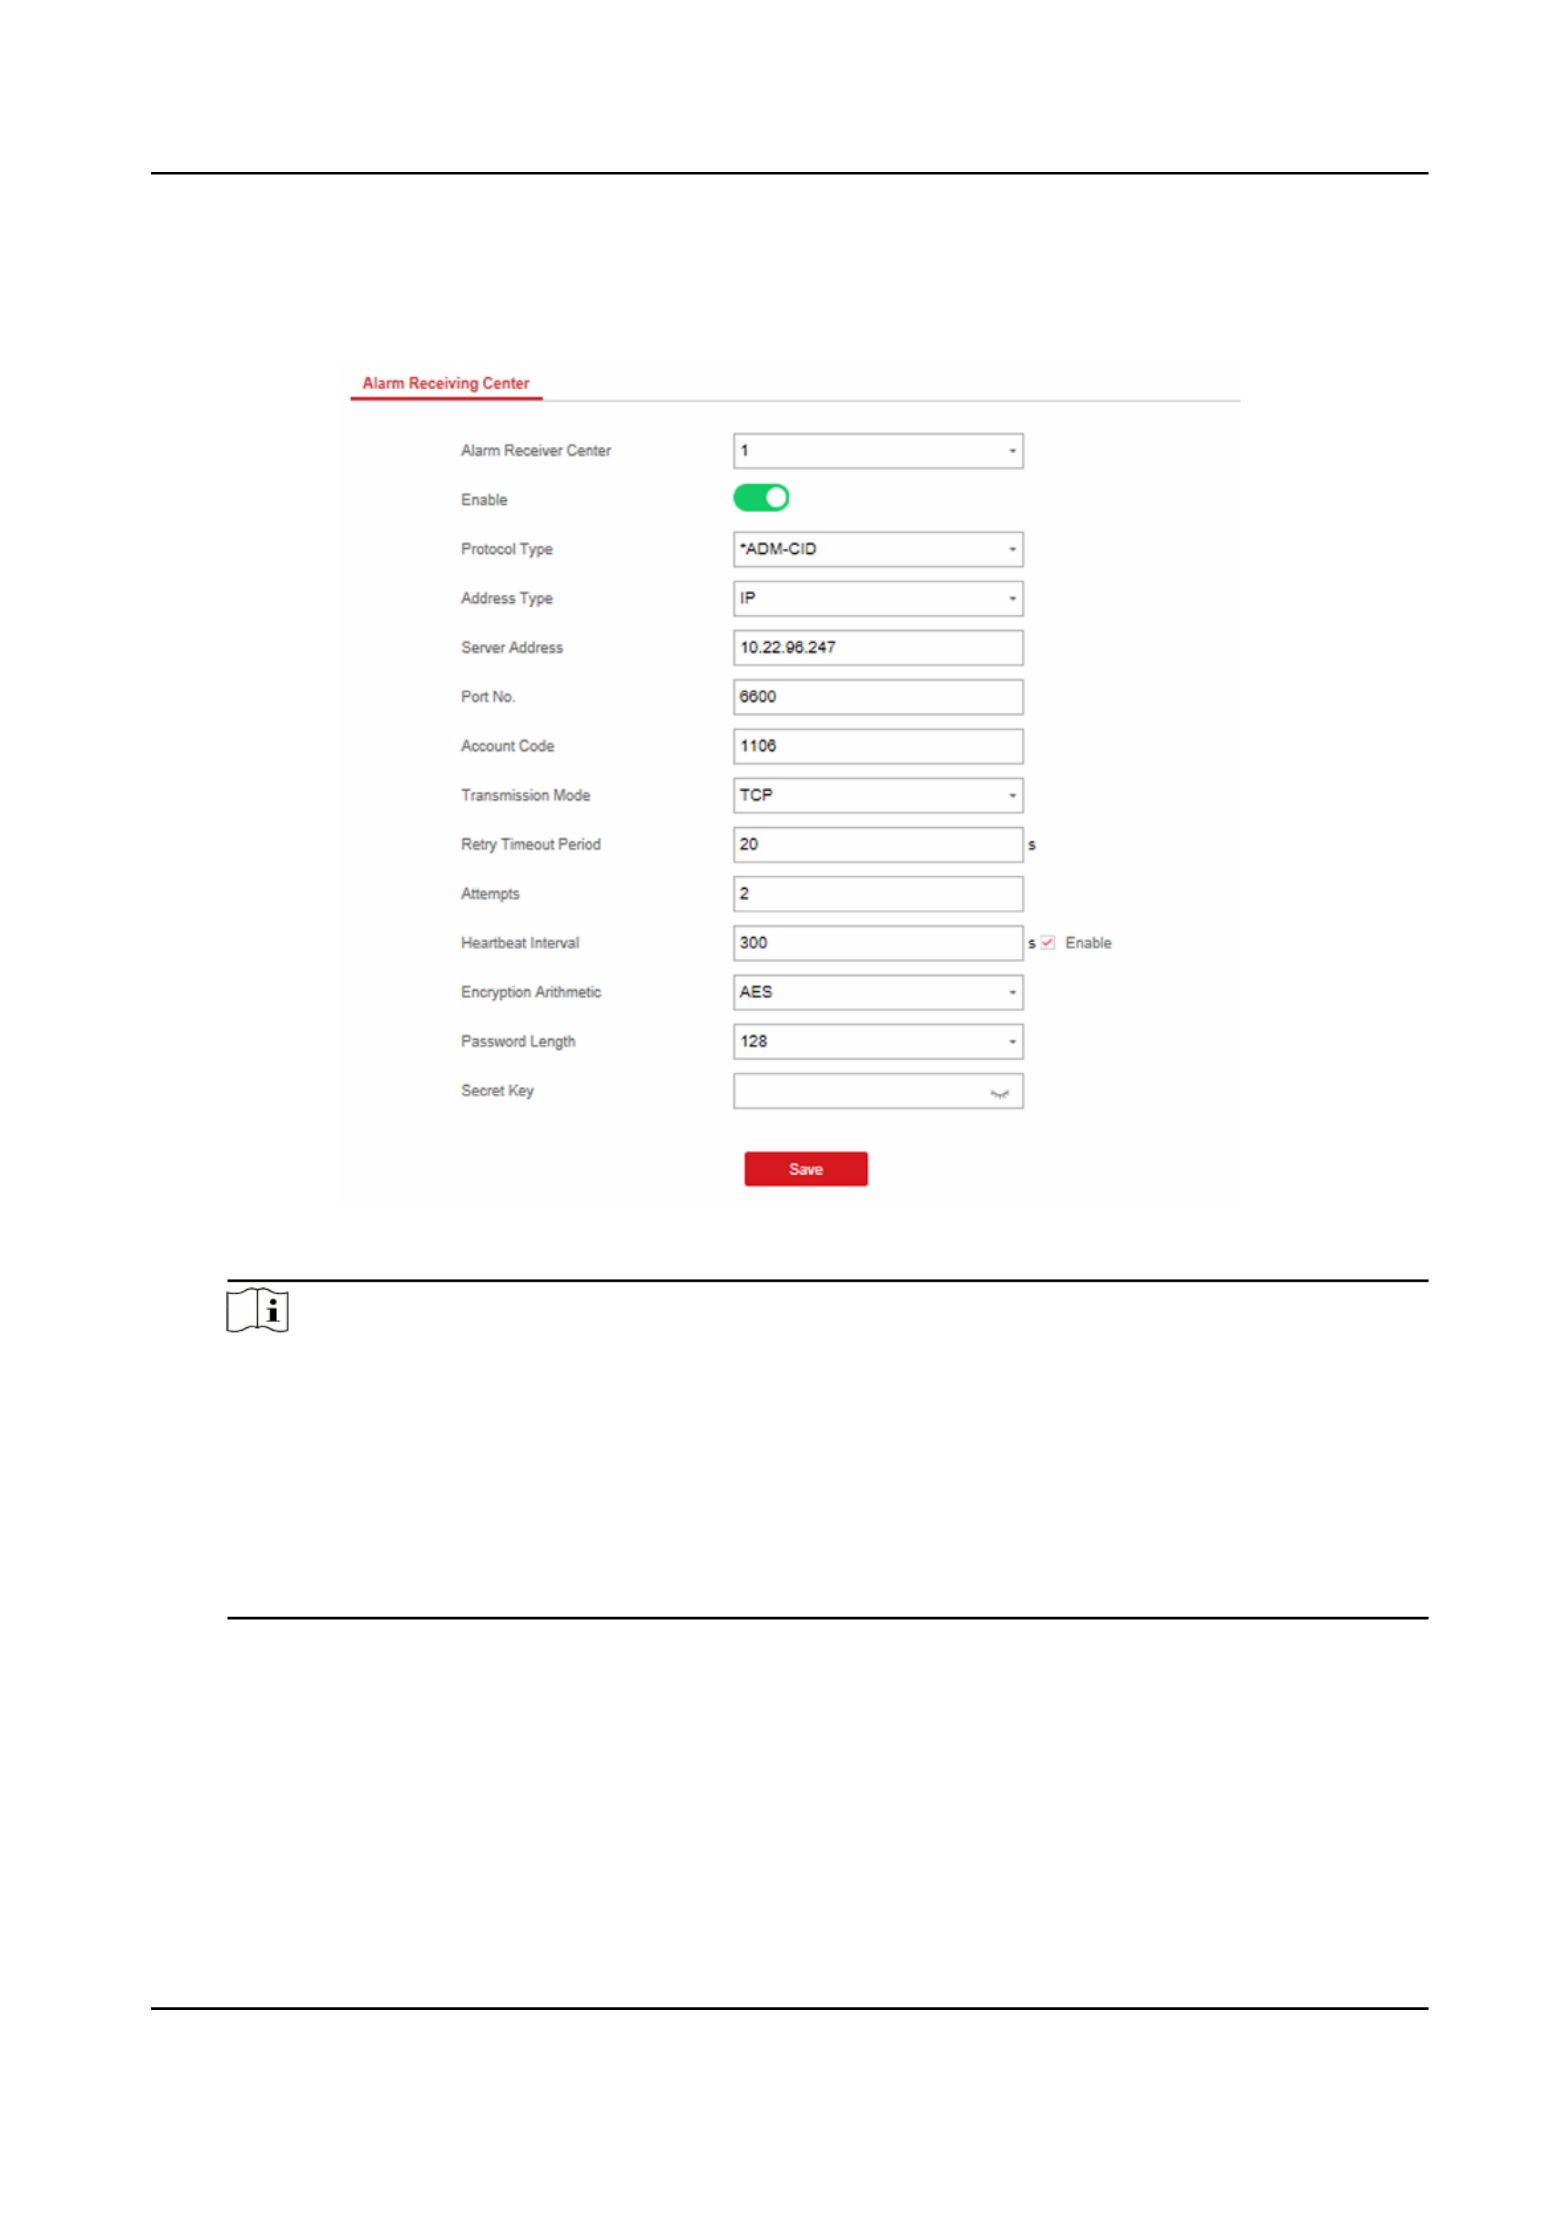
You should select the Alarm Receiver Type IP Domain name as or , and enter the IP/domain
name, port number, account code, retry period , heartbeat interval,meout aempts,
encrypon arithmec, password length and secret key.
Figure 4-8 *ADM-CID
Note
Set the heartbeat interval with the range from 10 to 3888000 seconds.
For The panel support format for encrypon arithmec: encrypon informaon security
according to DC-09, AES-128, AES-192 and AES-256 are supported when you congure the
alarm center.
For the secret key: When you use an encrypted format of DC-09, a key should be set when
you congure the ARC. The key would be issued by ARC , which would be used tooine
encrypt the message for security.substuon
-PSTN-CID
You should enter the center name, center number, dialing and select mes, communicaon
protocol, transmission mode, receiver account.
Hybrid Security Control Panel User Manual
15

Figure 4-9 PSTN-CID
4. SaveClick .
Nocaon Push
When an alarm is triggered, if you want to send the alarm to the client, alarm center,nocaon
cloud or mobile phone, you can set the push parameters.nocaon
Steps
1. Parameters → Event Click Communicaon Communicaon .
2. Enable the target nocaon.
Alarms and Tampers
The device will push when the zone alarm is triggered or the device tampernocaons
alarm is triggered or restored.
Life Safety Alarms
The device will push nocaons re when alarm, gas alarm, or medical alarm is triggered.
Maintenance and Faults
The device will push when any status in the system is changed.nocaons
Hybrid Security Control Panel User Manual
16
Termékspecifikációk
| Márka: | Hikvision |
| Kategória: | Riasztórendszer |
| Modell: | DS-PHA20-W2P |
Szüksége van segítségre?
Ha segítségre van szüksége Hikvision DS-PHA20-W2P, tegyen fel kérdést alább, és más felhasználók válaszolnak Önnek
Útmutatók Riasztórendszer Hikvision

19 December 2024
31 Augusztus 2024
31 Augusztus 2024
29 Augusztus 2024
21 Augusztus 2024
21 Augusztus 2024
21 Augusztus 2024
21 Augusztus 2024
21 Augusztus 2024
21 Augusztus 2024
Útmutatók Riasztórendszer
- Riasztórendszer Ikea
- Riasztórendszer Nedis
- Riasztórendszer RCF
- Riasztórendszer Evolveo
- Riasztórendszer Vimar
- Riasztórendszer EZVIZ
- Riasztórendszer ORNO
- Riasztórendszer Gigaset
- Riasztórendszer Vivanco
- Riasztórendszer Hama
- Riasztórendszer Renkforce
- Riasztórendszer DSC
- Riasztórendszer Kodak
- Riasztórendszer Ring
- Riasztórendszer Doro
- Riasztórendszer Dahua Technology
- Riasztórendszer Denver
- Riasztórendszer Burg Wächter
- Riasztórendszer X4 Tech
- Riasztórendszer BaseTech
- Riasztórendszer Eufy
- Riasztórendszer Honeywell
- Riasztórendszer Imou
- Riasztórendszer Velleman
- Riasztórendszer FireAngel
- Riasztórendszer Monacor
- Riasztórendszer Blaupunkt
- Riasztórendszer Chacon
- Riasztórendszer Elro
- Riasztórendszer Olympia
- Riasztórendszer Abus
- Riasztórendszer Konig
- Riasztórendszer Pyle
- Riasztórendszer Kemo
- Riasztórendszer Greisinger
- Riasztórendszer Schneider
- Riasztórendszer FBT
- Riasztórendszer M-e
- Riasztórendszer Somfy
- Riasztórendszer Optex
- Riasztórendszer Swann
- Riasztórendszer Schwaiger
- Riasztórendszer Smartwares
- Riasztórendszer Brennenstuhl
- Riasztórendszer Yale
- Riasztórendszer Eminent
- Riasztórendszer KlikaanKlikuit
- Riasztórendszer Elektrobock
- Riasztórendszer Techly
- Riasztórendszer Steren
- Riasztórendszer Grothe
- Riasztórendszer Netatmo
- Riasztórendszer Switel
- Riasztórendszer Hager
- Riasztórendszer DESQ
- Riasztórendszer Xavax
- Riasztórendszer Electia
- Riasztórendszer Gripo
- Riasztórendszer Chuango
- Riasztórendszer ETiger
- Riasztórendszer Redmond
- Riasztórendszer Werma
- Riasztórendszer Tzumi
- Riasztórendszer Woonveilig
- Riasztórendszer ConiuGo
- Riasztórendszer Indexa
- Riasztórendszer Olymp
- Riasztórendszer Pentatech
- Riasztórendszer Schabus
- Riasztórendszer Cordes
- Riasztórendszer Protector
- Riasztórendszer Qolsys
- Riasztórendszer Bearware
- Riasztórendszer Konyks
Legújabb útmutatók Riasztórendszer

2 Április 2025
2 Április 2025
2 Április 2025
2 Április 2025
22 Március 2025
11 Január 2025
5 Január 2025
5 Január 2025
5 Január 2025
5 Január 2025