Használati útmutató Grundig 40 GHF 5200
Olvassa el alább 📖 a magyar nyelvű használati útmutatót Grundig 40 GHF 5200 (50 oldal) a televízió kategóriában. Ezt az útmutatót 6 ember találta hasznosnak és 2 felhasználó értékelte átlagosan 4.5 csillagra
Oldal 1/50

Television
Brief Instruction
EN
40 GHF 5200

EN / 2
CONTENTS
------------------------------------------------------------------------------------------------------------
4 SETUP AND SAFETY
6 Cleaning the TV set
6 Disposing of the packaging
7 GENERAL INFORMATION
7 Special features of your television
7 Receiving digital channels
8 Important notes on environmental
protection
8 Notes on still pictures
9 PACKAGING CONTENTS
9 Standard accessories
10 CONNECTION/
PREPARATION
10 Setting up with stand
10 Preparing for mounting on the VESA
installation kit
11 Connecting the air and the mains
cable
12 Inserting batteries in the remote
control
13 OVERVIEW
13 Connections of the television set
14 Remote control
15 SETTINGS
15 First time installation and channel
search...
15 Selecting language, country and
operation mode
15 Searching television channels with
satellite signal
16 Searching terrestrial digital
television channels
16 Searching cable digital television
channels
17 Changing stored channels for digital
stations
19 PICTURE AND VOLUME
SETTINGS
19 Picture settings
19 Sound settings
21 FUNCTIONING OF THE TV - BASIC
FUNCTIONS
21 Basic functions
22 ELECTRONIC TV GUIDE
22 Electronic TV guide
23 TELETEXT MODE
23 Text mode
24 USB MODE
24 The file formats
25 Connecting external data media
26 The file browser
26 Playback – Basic functions
27 Additional playback functions
28 LANGUAGE SETTINGS
28 Changing the menu language
28 Changing the Teletext language
28 Changing the audio language
28 Changing the subtitle language
29 TIME SETTINGS
29 Time
29 Time Zone
29 Sleep timer
29 Auto standby
29 Sleep timer for OSD menu
30 LOCK SETTINGS
30 Menu Lock
30 Changing the PIN code
30 Blocking a television channel
31 Watching a blocked television
channel
31 Parental Guidance
31 Locking the control panel (parental
control)
32 OTHER SETTINGS
32 Software update (USB)
32 Resetting the television to its
original state

EN / 3
CONTENTS
------------------------------------------------------------------------------------------------------------
33 USING EXTERNAL DEVICES
33 HDMI CEC
33 HDMI CEC connection functions of
the television
34 High definition – HD ready
34 Connection options
35 Connecting an external device
35 Headphones
35 Hi-fi system
36 OPERATION WITH COMMON
INTERFACE
36 What is Common Interface?
36 Inserting the CA module
36 Access control for CA module and
smart cards
37 DETAILED CHANNEL
SETTINGS
37 Searching for all digital television
channels from a satellite
automatically
38 Searching for digital television
channels from a satellite manually
39 LNB Settings
40 Motorized antenna setup (DiSEqC
1.2)
41 Searching for digital television
channels through cable
automatically
42 Searching for digital television
channels through cable manually
42 Searching for digital television
channels through aerial
automatically
43 Manual searching for digital
television channels with aerial
connection
44 Tuning analogue television channels
45 Displaying signal information
46 INFORMATION
46 Service information for dealers
46 Environmental warning
47 Troubleshooting
48 GLOSSARY
49 INDEX

EN / 4
SETUP AND SAFETY
--------------------------------------------------------------------------------
About your TV set
7 In addition to DVB-S, DVB-T and DVB-C
digital TV programmes, you can also
watch analogue TV broadcasts with your
TV set.
Intended use
7 The TV set is designed for use in dry
rooms.
7 Use the TV set with the supplied stand or
a suitable VESA bracket.
7 The TV set is primarily intended for the
playback of TV programmes, streaming
content and music/video material from
external devices. Any other use is strictly
prohibited.
It is not intended as an information
display or for predominant use as a
computer monitor. If a still image or a
non-full-format image is displayed for
an extended period, visible traces may
remain on the screen for some time.
This is not a defect that can be used in
warranty request.
Moving the product
Unplug the product before moving it.
Disconnect antenna cable and other
external devices connected to the TV
set. If you have kept the original product
box, use it to pack the product. If you
have not kept the original product box,
wrap the product in bubble wrap or a
thick cardboard. Pay attention to avoid
damages during moving.
Safety
WARNING
Risk of electrical accident
7 Do not dismantle the TV set. Safety risk
may arise and also the guarantee of the
product can be void if the television set
is opened.
7 The TV set can only be operated with
the power cable or the AC/DC adapter
supplied with the product.
7 Do not operate the TV set with a
damaged power cable/AC/DC adaptor (if
supplied).
7 If the plug on the TV set has an earthing
contact, only insert the plug into a socket
with an earthing contact.
7 Plug the TV set into the mains socket
only after you have connected the
external devices and the antenna.
7 Protect the TV set from moisture. Do
not place any vessels filled with water
(such as vases) on the TV.
Fire hazard
7 To prevent the spread of
fire, keep candles or other
open flames away from
this product at all times.
7 Do not cover the
ventilation slots on the
TV set.
7 Always unplug the power plug and
antenna plug during a thunderstorm.
7 Keep candles or other open flames away
from the TV set.
7 Do not expose the batteries to extreme
heat such as sunshine, fire or the like.
7 Only use batteries of the same type
(brand, size, properties). Do not use used
and new batteries together.

EN / 5
SETUP AND SAFETY
--------------------------------------------------------------------------------
WARNING
Injuries caused by falling TV set
Never place the TV set on an unstable
surface. The TV set may fall, causing
serious injury, possibly leading to death
in isolated cases. Observe the following
precautions especially to protect the
children from such negative incidents:
7 Only use furniture that can safely
support the TV set.
7 Make sure that the TV set does not
protrude beyond the dimensions of the
furniture on which it is resting.
7 Do not place the TV set on tall furniture
that has the risk of tipping over such
as cabinets, sideboards or bookcases.
If you have no other choice, fix the
furniture and the TV set to the wall to
prevent them from tipping over.
7 Do not place the TV set on fabric or
other materials located between the TV
set and furniture.
7 Instruct children that there is danger
associated with climbing on furniture
when the TV set is to be reached.
7 Consider the above mentioned warnings
whenever you change the location of the
TV set.
CAUTION
Shortened service life due to high
operating temperature
7 Do not place the TV set next to heating
units or in direct sunlight.
7 To ensure adequate ventilation,
maintain clearance of at least 10 cm
around the TV set.
Disposing the packaging
7 The packaging materials are dangerous
for children. Keep the packaging
materials out of the reach of children.
7 The packaging of the product is
manufactured from recyclable
materials. Dispose of by classifying in
accordance with waste regulations.
Do not dispose along with normal
household waste.
Discoloration of furniture due to rubber
feet
7 Some furniture surfaces may discolor
when they come in contact with rubber.
To protect furniture, you can place a
sheet made of glass or plastic under the
stand. Do not use textile underlays or
mats such as doilies.

EN / 6
Environmental information
7 Do not dispose of batteries
in the household waste.
Used batteries must be
returned to retail stores or public
collection points. You help protect the
environment in this way.
7 Be sure to dispose of packaging
materials for your product separately
according to the guidelines of local
authorities so that they can be recycled
in an environmentally safe manner.
7 Do not dispose of the
product along with normal
household waste at the end
of its service life. Take it to a
recycling center for electrical and
electronic equipment.
Tips for power saving
7 Switch the TV set to stand-by if you
will not use it for a while. In standby
mode, the TV set uses very little energy
(≤0.5W).
If you do not use the TV set for an
extended period, turn it off with the
power switch or unplug the power
cord from the socket. If you turn off
the device or disconnect it from the
power supply, the switch-on timer and
programmed recordings will not work.
7 Select a location so that no direct
sunlight falls on the screen. Thus, you
can select a lower backlight and provide
power saving.
SETUP AND SAFETY
--------------------------------------------------------------------------------
Cleaning the TV set
Pull the power cord out of the mains socket.
Clean the appliance with a damp cloth and
a mild detergent. Do not use any detergents
containing alcohol, spirit, ammonia or scour-
ing agent.
Use a damp, soft cloth to clean the screen.
Do not use water with soap or detergent.
Disposing of the packaging
The packaging materials are dangerous for
children. Keep the packaging materials out
of the reach of children.
The packaging of the product is manufac-
tured from recyclable materials. Dispose
of by classifying in accordance with waste
regulations. Do not dispose along with nor-
mal household waste.

EN / 7
Special features of your television
7
With your TV set, you can receive and
watch digital TV programmes including
the High Resolution (HD) ones over
DVB-S/S2, DVB-T and DVB-C.
At present, reception for these digital
television channels in High Definition
is only possible in some countries in
Europe.
7
Although this TV set meets the current
DVB-S/S2, DVB-T and DVB-C standards
as of April 2013, its compatibility
with future DVB-S/S2 digital satellite
broadcasts, DVB-T digital terrestrial
broadcasts and DVB-C digital cable
broadcasts is not guaranteed.
7
This television can receive and process
all analogue and all unencrypted digital
stations. This television set has an
integrated digital and analogue receiver.
The digital receiver unit converts the
signals from digital stations to provide
outstanding audio and picture quality.
7
The TV guide (only for digital stations)
tells you of any schedule changes at
short notice, and provides an overview
of all the channels’ schedules for the
next few days.
Detailed information on the individual
channels – if it is provided by the
broadcaster – is also available in the
electronic 7 Day TV Guide.
7
You can connect various data media
such as an external hard disk, a USB
memory stick or a digital camera to the
USB socket. Using the file browser, you
can then select and play the file formats
you want (for example, MP4, MP3 or
JPEG data).
GENERAL INFORMATION
-----------------------------------------------------------------
Receiving digital channels
7
To receive digital satellite channels
(DVB-S/S2) you need a satellite antenna.
To receive digital channels (DVB-T) you
need a digital rooftop or indoor antenna
(passive or active indoor antenna with
its own power supply).
The antenna cable of the cable TV
network that broadcast in DVB-C must
be plugged into TV in order to receive
the DVB-C broadcasts.
7
Unlike analogue broadcasting, not
every channel has its own transmission
frequency. Instead, several channels
are grouped into what are known as
bouquets on a regional or national level.
7
You can find the current transmission
information on teletext from various
channels, or look at the TV guide.
7
Various digital television stations from
private broadcasters are scrambled
(DVB-S/S2, DVB-T and DVB-C). Watching
these stations and the recording and
playback functions are only possible
with the appropriate CI module and a
SmartCard. Ask your specialist dealer.

EN / 8
GENERAL INFORMATION
-----------------------------------------------------------------
Notes on still pictures
7
Watching the same picture for a
long time on the screen may cause
a still image remains feebly on the
background. Feeble picture(s) on the
background is originated from LCD/LED
technology and does not require any
action under guarantee. To avoid such
cases and/or minimize the impact, you
may observe the tips below.
7
Do not allow the same TV channel to
stay on the screen for a very long time.
Channel logos may cause this situation.
7
Do not allow the images, which are not
full screen, to constantly stay on the
screen; if not streamed in full screen
format by the broadcaster, you can
convert the images to full screen by
changing image formats.
7
Higher brightness and/or contrast
values will lead this impact to appear
faster; therefore, you are recommended
to watch your TV in the lowest
brightness and contrast levels that
would satisfy you.
Important notes on environmental
protection
7
Those items mentioned below will help
you reduce the consumption of natural
resources as well as save your money
by reducing electricity bills.
7
If you will not be using the TV set for
several days, it should be disconnected
from the mains for environmental and
safety reasons. TV will not consume
energy in this condition.
7
If the TV set has main switch, it will
be enough to turn the TV off via
main switch. TV will reduce energy
consumption almost to Zero Watt.
7
TV consumes less energy on stand-by
mode. However, some TV sets may have
features such as on timer, that require
the TV set to be left in standby to work
correctly.
7
TV consumes less energy when
brightness is reduced.
EN / 9
PACKAGING CONTENTS
--------------------------------------------------------------------
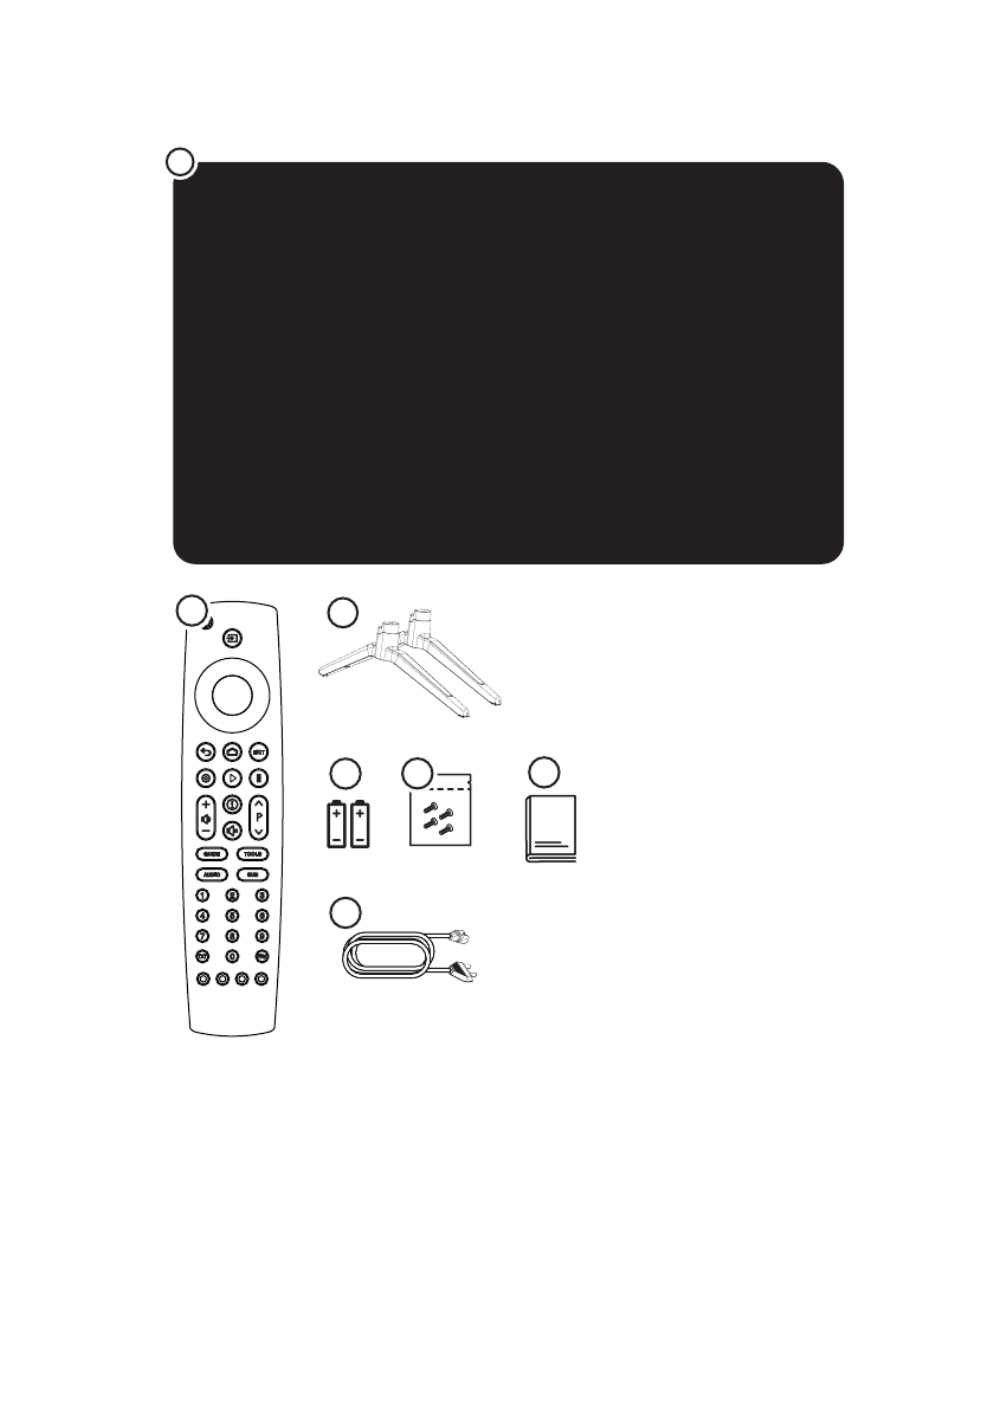
Standard accessories
1 TV
2 Stand
3 Remote control
4 Battery for remote control
5 Screws and mounting instructions for
stand
6 Quick Instruction Manual
7 Power cord
4
2
6
7
3
5
1

EN / 10
CONNECTION/PREPARATION
----------------------------------------------------
Setting up or hanging
7 Select a location so that no direct
sunlight falls on the screen.
Setting up with stand
7 To mount the stand, refer to the
installation instructions included.
7 Place the TV set on a hard, level surface.
Preparing for mounting on the
VESA installation kit
Contact authorised dealer to purchase the
bracket.
You will need the following:
7 A pair of scissors,
7 A cross-tip screwdriver.
Follow the installation instructions for the
VESA installation kit.
1 Place the TV set in the film on a
smooth surface with the screen facing
down.
2 Cut open the film on the back side
using the scissors.
3 Connect the required cables to the
connectors of television. Refer to
"Connections" section in this manual.
4 Tie the cables so they do not hang
down onto the floor.
5 Screw the VESA bracket onto the
TV set and mount it according to its
installation instructions.
VESA

EN / 11
CONNECTION/PREPARATION
----------------------------------------------------
Connecting the air and the mains cable
1 For digital satellite stations (DVB-S/
S2) plug the cable of satellite antenna
into the antenna socket SATELLITE on
the television set;
and / or
2a For terrestrial digital stations (DVB-T)
plug the cable of the rooftop, indoor
antenna (active or passive indoor
antenna with its own power supply)
into the antenna socket ANT-IN on the
television set;
or
2b For digital stations of the cable TV
network (DVB-C), plug the antenna
cable into the antenna socket ANT-IN
on the television set;
or
2c For analogue stations plug the
antenna cable into the antenna socket
ANT-IN on the television set.
Note:
7
When connecting an indoor antenna
you may have to try it out at different
positions until you get the best
reception.
3 AC-IN Plug the mains cable into the
socket.
4 Plug the mains cable into the wall
socket.
Notes:
7
Make sure that the adaptor is
connected to the TV before plugging
in the power cable
7
Only plug the device into the mains
socket after you have connected the
external devices and the antenna.
7
Do not use an adapter plug or
extension cable which does not meet
the applicable safety standards. Do
not tamper with the power cable.
ANT-IN
SATELLITE
AC IN
21
3
4

EN / 12
Inserting batteries in the remote
control
CONNECTION/PREPARATION
----------------------------------------------------
1 Open the battery compartment by
removing the lid.
2 Insert the batteries (2 x 1.5 V micro;
for example R03 or AAA). Observe the
polarity (marked on the base of the
battery compartment).
3 Close the battery compartment.
Note:
7
If the television no longer reacts
properly to remote control commands,
the batteries may be flat. Be sure to
remove used batteries.
7
The manufacturer accepts no liability
for damage resulting from used
batteries
Environmental note
7 Make sure that the
exhausted batteries are
disposed in accordance
with the local laws
and regulations. The
symbol on the battery and package
states that the battery supplied with
this product should not be considered
as a household waste. In some
cases, this symbol might be used
together with a chemical symbol. If
the batteries contain mercury more
than 0.0005% or lead more than
0.004%, a chemical symbol -Hg for
mercury and Pb for lead- will be placed
under the symbol. By ensuring proper
disposal of these batteries, you will
have contributed in prevention of
potential hazards on the environment
and human health that may arise from
inappropriate disposal of the batteries.

EN / 13
OVERVIEW
--------------------------------------------------------------------------------------------------------------
Connections of the television set
7 USB socket for data media(1A). USB:
7 SATELLITE: Satellite antenna input.
7 ANT-IN: For antenna cable (terrestrial
antenna or cable connection).
7 Optic audio output.Optic Out:
7 Input for digital audio and HDMI1 (ARC):
image data.
7 Input for digital audio and HDMI2:
image data.
7 For CA modules for receiving CI:
scramble channels.
7 U: Headphone jack or external audio
output.
7 Power cord input AC-IN:
Buttons of the remote
control
7
8: Turns on the television in the stand-
by mode and switches it to the stand-by
mode.

EN / 14
OVERVIEW
--------------------------------------------------------------------------------------------------------------
Remote control
Cursor Control
Moves the cursor up and down in the menus.
Moves the cursor left/right in menus.
Opens channel list; activates various functions.
Selects subtitles.
Selects audio channel.
Turns on/off the
television set (stand-
by) Signal source.
Sound on/off (mute).
Returns to the
previous channel
Opens the menu
Displays information.
No function
Switches between
teletext and TV
modes.
Opens the electronic
TV guide
Selects the channels
step by step
Adjusts the volume.
No function
Exits the menu.
Play, Pause
Opens the channel list
Directly selects the
channels
Opens the favorite list
Selects/activates
various functions in
menus

EN / 15
SETTINGS
---------------------------------------------------------------------------------------------------------------
First time installation and channel
search...
This TV is equipped with a function
that searches the Satellite (DVB-S/S2),
Terrestrial (DVB-T), Cable (DVB-C) and
analog channels automatically.
After you start searching and search for
TV channels, the channels are saved in
the Programme Edit and you can sort
them as you wish in the Programme Edit.
Selecting language, country and
operation mode
1 Press » « to switch on the television 8
in standby mode.
– The »First Time Installation« menu is
displayed when the TV is turned on
for the first time.
First Time Installation
Auto. Search
Menu Language English
Country Turkey
2 Select your language using »
<
« or »
>
«,
press »
V
« to select the next option.
3 Press »
<
« or »
>
« to select the country
and press »
V
« to select the next
option.
Note:
7
Following section contains
information on how to setup the
channels according to the antenna
system connected.
Searching television channels
with satellite signal
1 In the »Tuning Setup« menu, select
»Satellite« from »Scan Type« using »
<
«
or »
>
«.
Tuning Setup
Back Start
Tune Type DTV
Service Type All
Channel Type Free+Scramble
Scan Mode Default
Scan type Satellite
Satellite TURKSA...
2 Select the »Satellite« option using »
V
«
or »
Λ
« and select the satellite you
want to search with »
<
« or »
>
«.
3 Select »Channel Type« using »
V
« or
»
Λ
«.
Press »
<
« or »
>
« to select whether
you want to search for only free
digital television channels (Free),
only scrambled digital television
channels (Scramble) or the both
(Free+Scramble).
Note:
7
If some of the frequencies are not
stored completely due the changes
in satellite parameters made by the
broadcaster, it is recommended to
set the »Network Settings« option to
»Network«.
4 Select »Service Type« using »
V
« or
»
Λ
«.
Press »
<
« or »
>
« to select whether
you want to search for only television
channels (DTV), only radio (Radio) or
the both (All).
5 Press »« to start the search.
– The »Channel Tuning« menu will
be displayed and the search for TV
channels will start.
– Search may take several minutes
depending on the number of
television channels received.

EN / 16
Note:
7
The search can be aborted with
» «.EXIT
6 EXITPress » « to end searching.
Searching terrestrial digital
television channels
1 In the »Tuning Setup« menu, select
»DVB-T« from »Scan Type« using »
<
«
or »
>
«.
Tuning Setup
Back Start
Tune Type DTV
Symbol Rate Auto
Frequency Auto
Network ID Auto
Scan type DVB-T
Scan Type Full
2 Select »Tune Type« using »
V
« or »
Λ
«.
Select the tune type with »
<
« or »
>
«.
– »DTV« only searches for digital
television channels.
– »ATV« only searches for analogue
television channels.
– »DTV + ATV« searches for both
analogue and digital television
channels.
3 Press »« to start the search.
– The »Channel Tuning« menu will
be displayed and the search for TV
channels will start.
– Search may take several minutes
depending on the number of
television channels received.
Note:
7
The search can be aborted with
» «.EXIT
4 EXITPress » « to end searching.
Searching cable digital television
channels
1 In the »Tuning Setup« menu, select
»DVB-C« from »Scan Type« using »
<
«
or »
>
«.
Tuning Setup
Back Start
Tune Type DTV
Symbol Rate Auto
Frequency Auto
Network ID Auto
Scan type DVB-C
Scan Type Full
2 Select »Tune Type« using »
V
« or »
Λ
«.
Select the tune type with »
<
« or »
>
«.
– »DTV« only searches for digital
television channels.
– »ATV« only searches for analogue
television channels.
– »DTV & ATV« searches for both
analogue and digital television
channels
3 Select »Scan Type« with »
V
« or »
Λ
«
and select (»Full«, »Speed« or »Blind
Scan«) with »
<
« or »
>
«.
Note:
7
You can speed up the search. To
do this, frequency and network ID
information are required. You can
obtain such information from your
cable provider or find them in Internet
forums.
4 Press »« to start the search.
– The »Channel Tuning« menu will
be displayed and the search for TV
channels will start.
– Search may take several minutes
depending on the number of
television channels received.
SETTINGS
---------------------------------------------------------------------------------------------------------------

EN / 17
SETTINGS
---------------------------------------------------------------------------------------------------------------
Note:
7
The search can be aborted with
» «.EXIT
5 EXITPress » « to end searching.
Changing stored channels for
digital stations
Channels found at the end of the search
are stored in »Programme Edit«.
You can add the channels to your
favourite list, change the order of the
channels added to the Programme Edit,
delete the channels that you do not need
and skip certain preset channels.
In Programme Edit, press » « to switch CH-
the channel list to the next page, press
» « to switch it back to the previous CH+
page.
Opening the Programme Edit
1 Press »p« to open the menu.
2 Press »
<
« or »
>
« to select the
»Channel« menu and press »« to
confirm.
– »CHANNEL« menu is now enabled.
3 Use »
V
« to select the »Programme
Edit« and confirm your selection with
»«.
– The »Programme Edit« menu is
displayed.
Programme Edit
BackSelect Fav
MoveDelete Skip
1 Channel
6 Channels
7 Channels
9 Channels
8 Channels
10 Channels
5 Channels
4 Channels
2 Channels
3 Channels

EN / 18
SETTINGS
---------------------------------------------------------------------------------------------------------------
Creating a favourite List
You can select your favourite channels
and save them as a list.
Note:
7
Press » « to select the favourite FAV
list.
1 In the »Programme Edit« menu, press
»
V
« or »
Λ
« to select the channel to
be added to the favourite list and then
confirm with » «.FAV
–The channel will be marked with
» «.
2 EXITPress » « to end searching.
Note:
7
You can delete channels from the
favourite list. In the »Programme Edit«
menu, press »
V
« or »
Λ
« to select the
channel and confirm with » «.FAV
Deleting channels from the programme
edit
1 In the »Programme Edit« menu, use
»
V
« or »
Λ
« to select the channel to be
deleted and confirm with »« (Red).
2 EXITPress » « to quit the »Programme
Edit«.
Moving the channels in the programme
edit to a different position
(Satellite, Cable and Terrestrial channels
except from those disabled by the
broadcaster)
1 In the »Programme Edit« menu, use
»
V
« or »
Λ
« to select the channel to be
moved and confirm with »« (Yellow).
2 Use »
V
« or »
Λ
« to move the channel
to its new position and confirm with
»« (Yellow).
Note:
7
Repeat steps and to move other 2 3
channels.
3 EXITPress » « to quit the »Programme
Edit«.
Skipping television channels
You can determine the television channels
to be skipped while selecting channels
with » « or » «. It is still possible to P+ P-
select using the number buttons.
1 In the »Programme Edit« menu, use
»
V
« or »
Λ
« to select the channel to be
skipped and confirm with »« (Blue).
–The channel will be marked with » «
.
2 EXITPress » « to end searching.
Notes:
7
Channels can be enabled again. Press
»
V
« or »
Λ
« to select the channel,
press »« (Blue) to enable the channel
again.

EN / 19
PICTURE AND VOLUME SETTINGS
------------------------------------
Picture settings
1 Press »p« to open the menu.
2 Select the »PICTURE« menu using »
<
«
or »
>
« and confirm your selection with
»«.
– The »PICTURE« menu is now
enabled.
Move
PICTURE
Back Select Exit
Picture Mode Personal
Contrast 50
Brightness 50
Colour 50
Tint 50
Sharpness 50
Colour Temp. Normal
Noise Reduction Medium
HDMI MODE AUTO
3 Use »
V
« or »
Λ
« to select »Picture
Mode«, »Contrast«, »Brightness«,
»Colour«, »Sharpness«, »Colour Temp«
or »Noise Reduction«.
Select the value using »
<
« or »
>
« and
confirm your selection with »«.
Notes:
7
In the Picture Settings menu,
»Contrast«, »Brightness«, »Colour«,
»Sharpness« are active when »Picture
Mode« and »Personal« are selected.
4 EXITPress » « to finish the setting.
Sound settings
1 Press »p« to open the menu.
2 Select the »SOUND« menu using »
<
«
or »
>
« and confirm your selection with
»«.
– The »SOUND« menu is enabled.
Move
SOUND
Back Select Exit
Sound Mode Personal
Treble 50
Bass 50
Balance 0
Auto Volume Level Off
SPDIF Mode Auto
AD Switch Off
Note:
7
Additional operations are explained in
the following sections.
Treble
1 Select »Treble« with »
V
« or »
Λ
« and
adjust with »
<
« or »
>
«.
Note:
7 »Treble« is active in the menu when
the »Personal« option is selected from
»Sound Mode«.
Bass
1 Select »Bass« with »
V
« or »
Λ
« and
adjust with »
<
« or »
>
«.
Note:
7 »Bass« is active in the menu when the
»Personal« option is selected from
»Sound Mode«.
Balance
1 Select »Balance« with »
V
« or »
Λ
« and
adjust with »
<
« or »
>
«.

EN / 20
PICTURE AND VOLUME SETTINGS
------------------------------------
Automatic volume
The television channels broadcast at
different volumes. The Auto Volume
Level (AVL) Limiting function means the
volume is kept the same when you switch
between channels.
1 Select »Auto Volume Level« with »
V
«
or »
Λ
« and select »On« with »
<
« or
»
>
«.
AD Switch (audio subtitles)
AD Switch is an additional audio channel
for people who are visually impaired. The
activities, surroundings, scene changes or
the appearance, the gestures and facial
expressions of the actors are described.
This sound is transmitted at the same
time as the normal sound with digital
television stations. This depends on the
programme being broadcast.
1 Select »AD Switch« with »
V
« or »
Λ
«
and select »On« with »
<
« or »
>
«.
2 Select »AD Switch Volume« with »
V
«
or »
Λ
« and adjust with »
<
« or »
>
«.
Concluding the settings
1 EXITPress » « to finish the settings.

EN / 21
FUNCTIONING OF THE TV - BASIC FUNCTIONS
-
Basic functions
Switching on and off
1 Press » « to switch on the television 8
in standby mode.
2 Press »8« to switch on the television
in standby mode.
Selecting channels
1 1…0Use » « to select channels directly.
2 P+ P-Press » « or » « to select up and
down channels.
3 Open the channels list using »«,
select the channel using »
V
« or »
Λ
«
and confirm with »«.
Selecting channels from the favourite list
1 Press »FAV« to recall the favourite list
menu.
– »Favourite List« menu will be
displayed.
2 Select the channel using »
V
« or »
Λ
«
and confirm with »«.
Selecting AV channels
1 Open the »Input Source« menu with »
«.
2 Select the desired AV channel position
using »
V
« or »
Λ
« and confirm with
»«.
Adjusting the volume
1 – +Adjust the volume with » «.
Muting
1 Use » « to switch the sound off
(mute) and to switch it on again.
Displaying information
1 Press » « to display the information.İ
– The menu on the screen disappears
automatically after a short while.
Audio language
You can select various languages when
watching digital channels. This depends
on the programme being broadcast.
1 AUDIOPress » « to open the selection
menu.
2 Select your language using »
V
« or
»
Λ
« and confirm with »«.
Subtitles
You can select various subtitles when
watching digital channels. This depends
on the programme being broadcasted.
1 SUBPress » « to open the selection
menu.
2 Select your language using »
V
« or
»
Λ
« and confirm with »«.
SWAP function
This function allows you to switch
between the TV channel you are currently
watching and the one you have watched
before that.
1 1…0 P+ P–Use » « or » «, » « to select the
desired channel.
2 1…0 P+ P–Use » « or » «, » « to change
the channels.
3 Press » r « to return to the previous
channel.

EN / 22
Electronic TV guide
The electronic 7 Day TV Guide offers an
overview of all programmes that will be
broadcasted in the next week (for digital
channels only).
1 GUIDEPress » « to see programme
information.
Notes:
7
Not all channels provide a detailed TV
guide.
7
Many broadcasters supply the
daily programme but no detailed
descriptions.
7
There are broadcasters which do not
provide any information at all.
2 Select the television channel with »
V
«
or »
Λ
«.
– The daily broadcast of the selected
channel is displayed.
3 Press »
>
« to switch to today’s
broadcasts.
Notes:
7
You can open and close the detailed
programme information with » «.İ
7Press »« (green) to add a reminder
for the selected programme. Press
»« (green) consecutively to select the
reminder period.
4 Press »
V
« to select information on
the next broadcasts and press »
Λ
«
to return to the information for the
current broadcasts.
5 Press »« (blue) to select the next
days and press »« (yellow) to return
to today.
6 Switch back to the channel selection
by pressing »
<
«.
7 Press »p« to quit the electronic 7 Day
TV Guide.
ELECTRONIC TV GUIDE
-----------------------------------------------------------------------

EN / 23
Text mode
1 TXTPress » « to switch to the Teletext
mode.
2 You can select teletext pages directly
with » « .1...0
To return to page 100, press » «.İ
2 Press »
V
« to scroll back one page.
3 Press »
Λ
« to scroll forward one page.
Note:
7
At the bottom of the screen, you will
see an information line consisting of
a red, green and, depending on the
channel, yellow and blue text field.
Your remote control has buttons with
the corresponding colours. Select the
pages directly using these buttons.
4 TXTPress » « to exit the Teletext mode.
TELETEXT MODE
------------------------------------------------------------------------------------------

EN / 24
USB MODE
--------------------------------------------------------------------------------------------------------------
The file formats
Your television can be operated via the
USB input with the following file formats:
Video data
Video compression / decompression
(codec) is intended for decreasing the
storage area without sacrificing the
picture quality.
Your TV supports video data compressed
with XVID, H.264/MPEG-4 AVC(L4.1, Ref.
Frames:4), MPEG-4, MPEG-2, MPEG-1,
MJPEG, MOV standards.
File extensions that the device supports:
“.avi”, “mkv”, “.mp4”, “.ts”, “.mov”, “.mpg”,
“.dat”, ".vob". Format (codec) information
is embedded within the file content
and may differ depending on the file
extension. “.avi”, “.mkv” or “.divx” files
containing divx codec within are not
playbacked.
In addition to video data, these files also
contain audio data compressed and
"packaged" by using MP3.
Audio data
Your television can play audio data coded
with MP3 standards.
MP3 stands for MPEG-1 Volume Level
3 and is based on the MPEG-1 standard
developed by MPEG (Motion Picture
Expert Group).
These formats enable audio files to be
saved on storage devices with a sound
quality similar to that of a CD.
File extensions supported by the device:
".mp3", ".m4a", ".m4a"
MP3 files can be organised into folders
and subfolders similar to the files on a
computer.
Picture data
Your television can display picture data in
JPEG, PNG and BMP formats.
JPEG stands for Joint Picture Experts
Group. This process is intended to
compress picture files.
PNG and BMP standards are designed to
compress picture data without any losses.
Picture files can be saved onto a data
medium along with other file types.
Such files can be organised as folders
and subfolders.
EN / 25
USB MODE
--------------------------------------------------------------------------------------------------------------
Connecting external data media
It is advised to put the television on stand-
by mode before connecting the External
Data medium. Connect the device and
then switch the television on again.
Before disconnecting the data medium,
the television must first be switched to
standby, otherwise files can be damaged.
Note:
7
If you are using a power cable for
the external hard disk that you have
connected to the » « interface, USB
then the power cable of the external
hard disk must also be unplugged
when the TV is turned off.
7
You must not disconnect the USB
Device from the TV while a file on the
USB Device is being read by the TV.
7
A bi-directional data transfer
as defined for ITE (Information
Technology Equipment) devices in EN
55022/EN 55024 is not possible.
7
USB transfer is not an operating
mode in itself. It is only an additional
function.
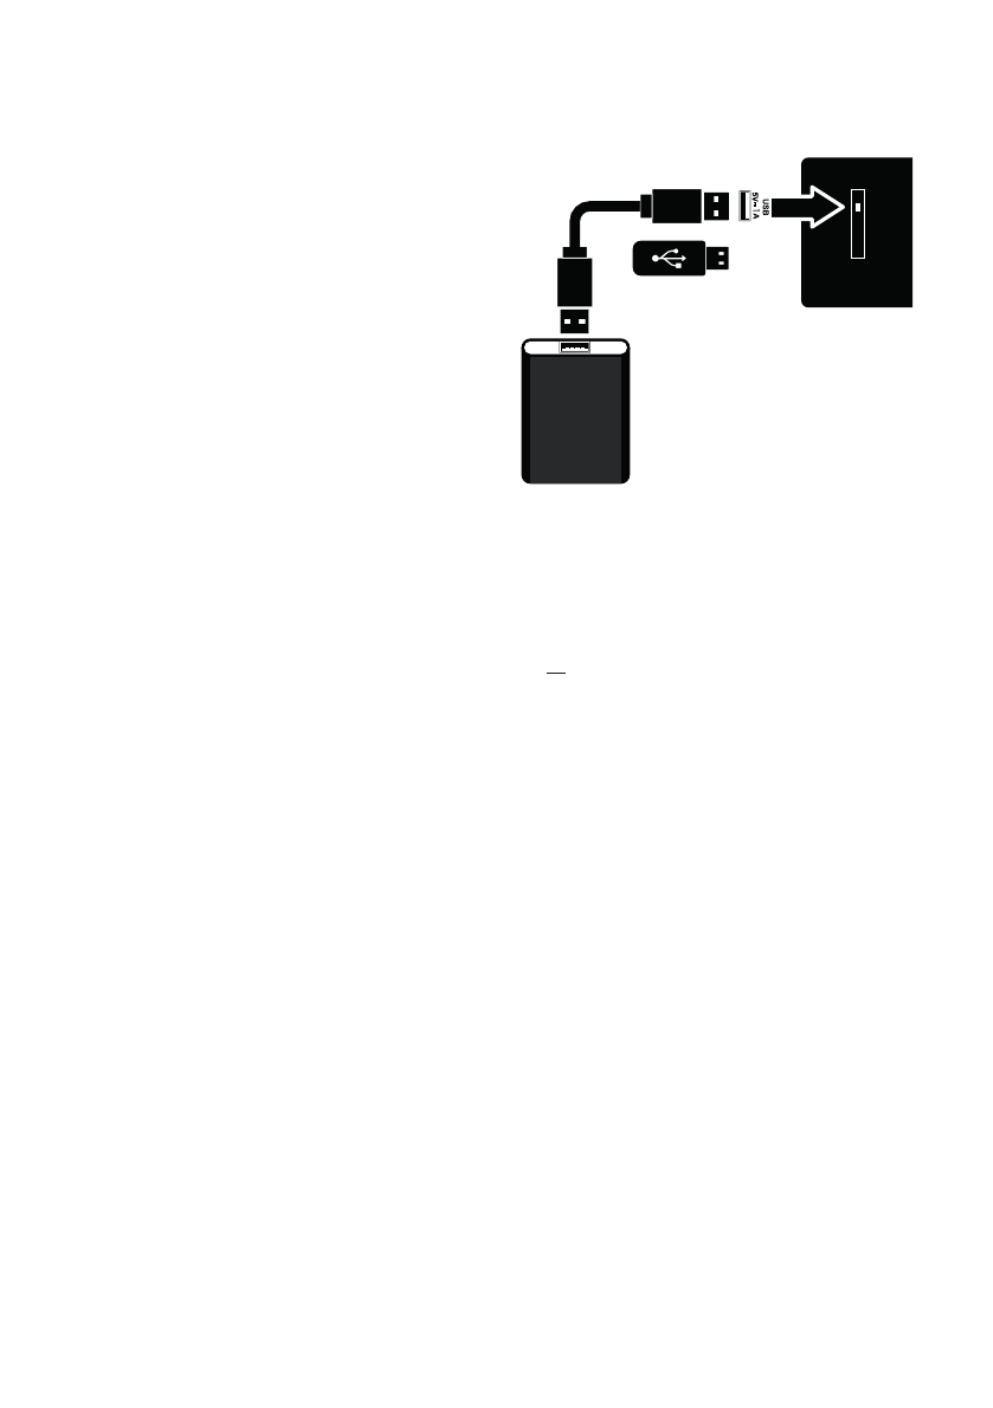
1 USBConnect the » « interface of the
television and the corresponding
socket on the data device (external
hard disk, digital camera, card reader
or MP3 player) using a USB cable.
or
plug the memory stick into the » « USB
USB interface of the television.

EN / 26
The file browser
The file browser displays the video, audio
and picture data that the external data
medium provides.
If a data medium contains different
file formats, you can deactivate data
(Video file, Audio file, Picture file) you do
not need for the playback using a filter
function.
1 2 3 4
PHOTO MUSIC MOVIE DATA
The main menu of the file browser
1 Photo data format.
2 Music data format.
3 Movie data format.
4 Text data format.
USB MODE
--------------------------------------------------------------------------------------------------------------
Playback – Basic functions
1 Press » « to select the data media
and select »USB« with »
V
« or »
Λ
« and
select »« to confirm.
– The data media file browser will be
displayed on the screen.
2 Select the format (Video file, Audio
file, Image file, Text file) with »
<
« or
»
>
«.
3 Select file overview with »«.
1 Select the external data media using
»
<
« or »
>
« and confirm your selection
with »«.
– Data media index list appears.
2 Press »
V
«, »
Λ
«, »
<
« or »
>
« to select
the desired file and press »8« to start
playing.
3 Press »!« to pause playback.
4 Press »8« to resume playback.
5 To end the playback, press »«, then
select »Stop« and press »«.
– The file browser appears.
Notes:
7
Press » « if you want to return to EXIT
the upper folder.
7
It is possible that some files that
are supported in USB mode do not
operate due to some problems that
may arise depending on how such
files are created (compression)
although they contain the supported
file extension.
7
If there are more than one audio
sources (audio stream) in the video
files that are being played, then you
can switch between the audio sources
with » « while the file is played in AUDIO
full screen mode.

EN / 27
USB MODE
--------------------------------------------------------------------------------------------------------------
Additional playback functions
Depending on the file formats used, the
following additional functions are possible.
Selecting a track or picture in steps (SKIP)
1 Press » « during playback.İ
– The control buttons will be
displayed.
2 Press »
<
« or »
>
« to select » « or » « 5 6
and press »«.
– Playback begins with the track or
picture you selected.
Searching forward
(only video and audio files)
You can select different speeds (2x, 4x,
8x, 16x and 32x forwards or backwards).
1 Press » « during playback.İ
– The control buttons will be
displayed.
2 Press »
<
« or »
>
« to select »
3
« or »
4
«
and press »«.
3 Press »8« to resume playback.
Move to desired time
(only video files)
1 Press » « during playback.İ
– The control buttons will be
displayed.
2 Press »
<
« or »
>
« to select »Goto
Time« and press »«.
3 1…0Enter the time with » « buttons and
press »«.
Selecting aspect ratio
(only video files)
1 Press » « during playback.İ
– The control buttons will be
displayed.
2 Press »
<
« or »
>
« to select the »Aspect
Ratio« and then press »« repeatedly,
set the picture ratio as »4:3«, »16:9«,
»Zoom1«, »Zoom2« or »Auto«.
Turn the picture display
(only picture files)
The pictures can be rotated by 90°.
1 During playback, press » « to rotate the İ
pictures by 90°.
– The control buttons will be
displayed.
2 Press »
<
« or »
>
« to select »Rotate«
and then press »« repeatedly, the
picture will rotate by 90° each time you
press.
Repeat functions
Options:
– »Repeat 1«, the selected track is
repeated once;
– »Repeat All«, all tracks are played
repeatedly.
– »RepeatNone«, tracks are not
repeated.
1 Press »« during playback.
– The control buttons will be
displayed.
2 Press »
<
« or »
>
« to select »Repeat«
and then press »« repeatedly to
change the function again.

EN / 28
LANGUAGE SETTINGS
-------------------------------------------------------------------------
1 Press »p« to open the menu.
2 Select the »SETUP« menu using »
<
«
or »
>
« and confirm your selection with
»«.
– The »SETUP« menu is now enabled.
Move
SETUP
Back Select Exit
Menu Language English
TT Language English
Audio Languages English
Subtitle Language English
Hearing Impaired Off
Aspect Ratio 16:9
Blue Screen On
First Time Installation
Reset
Software Update (USB)
HDMI CEC
Software Version
Note:
7
Additional operations are explained in
the following sections.
Changing the menu language
1 Press »
V
« or »
Λ
« to select the »Menu
Language« and confirm with »«.
– The Language selection menu is
displayed.
2 Select the language with »
V
«, »
Λ
«,
»
<
« or »
>
« and confirm your selection
with »«.
3 EXPress » IT« to finish setting.
Changing the Teletext language
1 Press »
V
« or »
Λ
« to select the »TT
Language« and confirm with »«.
– TT Language selection menu will be
displayed.
2 Select the language with »
V
« or »
Λ
«
and confirm your selection with »«.
3 EXITPress » « to finish setting.
Changing the audio language
(only for digital television channels)
You can assign primary and secondary
audio languages.
1 Press »
V
« or »
Λ
« to select the »Audio
Language« and confirm with »«.
– The Audio Languages selection
menu will be displayed.
2 From »Audio Languages«, select
»Primary« with »
<
« or »
>
« and select
the primary audio language with »
V
«,
»
Λ
« or »
<
«, »
>
«.
3 Select »Audio Languages« with »
p«
and select »Secondary« with »
<
« or
»
>
«.
4 Select the secondary audio language
using »
V
«, »
Λ
« or »
<
«, »
>
« and
confirm your selection with »«.
5 EXITPress » « to finish the setting.
Changing the subtitle language
(only for digital television channels)
You can disable subtitles, select subtitle
language and assign a secondary subtitle
language.
1 Press »
V
« or »
Λ
« to select the
»Subtitle Language« and confirm with
»«.
– The Subtitle Language selection
menu will be displayed.
2 From »Subtitle Language«, select
»Primary« with »
<
« or »
>
« and select
the primary audio language with »
V
«,
»
Λ
« or »
<
«, »
>
«.
3 Select »Subtitle Language« with »p«
and select »Secondary« with »
<
« or
»
>
«.
4 Select the secondary subtitle
language using »
V
«, »
Λ
« or »
<
«, »
>
and confirm your selection with »«.
5 EXITPress » « to finish the setting.

EN / 29
TIME SETTINGS
---------------------------------------------------------------------------------------------
1 Press »p« to open the menu.
2 Select the »TIME« menu using »
<
« or
»
>
« and confirm your selection with
»«.
– The »TIME« menu is now enabled.
Move
TIME
Back Select Exit
Time 13/April 13:18
Time Zone GMT+2
Sleep Timer Off
Auto Standby 4H
Sleep timer for OSD menu 30 S
Note:
7
Additional operations are explained in
the following sections.
Time
Current time and date information
is retrieved automatically from the
broadcast.
Time Zone
1 Select »Time Zone« using »
V
« or »
Λ
«
and confirm with »«.
2 Select the time zone using »
V
«, »
Λ
«,
»
<
« or »
>
« and confirm your selection
with »«.
3 EXITPress » « to finish setting.
Sleep timer
You can enter an off time for the
television to switch off. After this time
has elapsed, the television switches to
standby mode.
1 Select »Sleep Timer« using »
V
« or
»
Λ
« and confirm with »«.
2 Select the sleep timer using »
V
« or
»
Λ
« and confirm with »«.
Note:
7
Disable the function with »
V
« or »
Λ
«
by switching it to »Off« position.
3 EXITPress » « to finish the setting.
Auto standby
This function will switch the television to
stand-by mode in 4 hours if the television
does not receive any picture signals for
15 minutes or according to European
regulations, if no key on the keyboard of
the TV or the remote control is pressed.
1 Select »Auto Standby« using »
V
« or
»
Λ
« and confirm with »«.
2 Select the sleep timer using »
V
« or
»
Λ
« and confirm with »«.
Note:
7
You can disable the function with
»
V
« or »
Λ
« by switching it to »Off«
position.
3 EXITPress » « to finish the setting.
Sleep timer for OSD menu
This function allows you to specify the
time during which the OSD menu will
remain on the screen.
1 Select »Sleep timer for OSD menu«
using »
V
« or »
Λ
« and confirm with
»«.
2 Select the sleep timer using »
V
« or
»
Λ
« and confirm with »«.
3 EXITPress » « to finish the setting.

EN / 30
1 Press »p« to open the menu.
2 Select the »LOCK« menu using »
<
« or
»
>
« and confirm your selection with
»«.
– The »LOCK« menu is now enabled.
Move
LOCK
Back Select Exit
System Lock Off
Set Password
Channel Lock
Parental Guidance Off
Key Lock Off
Hotel Mode
Note:
7
Additional operations are explained in
the following sections.
Menu Lock
Using this function, you can lock »Auto.
Tuning«, »Programme Edit« and »Dish
Antenna Setup« so that they can only be
accessed by entering a PIN code.
1 In the »LOCK« menu, press »« and
enter the PIN code »0000« using
» « buttons on the displayed 1...0
password screen.
– The menu options are now enabled.
2 Select »System Lock« with »
V
« or »
Λ
«
and confirm with »
<
« or »
>
«.
3 Activate the lock with »
<
« or »
>
«.
Note:
7 Select »Off« with »
<
« or »
>
« to disable
the menu lock.
4 EXITPress » « to finish the setting.
LOCK SETTINGS
--------------------------------------------------------------------------------------------
Changing the PIN code
Instead of the default code »0000«, you
can enter a personal code.
Please take note of your personal code.
Press »
V
« or »
Λ
« to select the »Set
Password« and confirm with »«.
5 1...0Use » « to enter your current four-
digit PIN code.
– »Enter New Password« is now
enabled.
6 1...0Use » « to enter your new four-digit
personal PIN code.
7 1...0Use » « to enter your personal PIN
code again.
8 EXITPress » « to finish the setting.
Blocking a television channel
You can block individual television
channels which are not suitable for
children using a personal PIN code.
Note:
7 The »Menu Lock« must be »On« for
the programme lock to function.
1 In the »LOCK« menu, press »« and
enter the PIN code »0000« using
» « buttons on the displayed 1...0
password screen.
– The menu options are now enabled.
2 Select »Channel Lock« with »
V
« or
»
Λ
« and confirm with »«.
– »Channel Lock« menu will be
displayed.
3 Select the channel you want to block
with »
Λ
« or »
V
« and press »«
(green).
–The channel will be marked.
4 EXITPress » « to finish the setting.

EN / 31
Watching a blocked television
channel
You can watch a TV channel blocked with
PIN code by selecting the TV channel and
entering the PIN code.
1 1…0Select the blocked channel with » «
or » «, » «.P+ P–
2 Enter the PIN code »0000« using
» « buttons on the displayed 1...0
password screen.
– Blocked channel can be viewed.
Note:
7
Channel will be blocked again when
you change the channel.
Parental Guidance
There are movies which contain contents
or scenes which are not suitable for
children.
Certain programmes contain information
which identifies these contents or scenes
and have been given an access level from
3 to 18. You can select one of the access
levels and thus authorise the playback.
1 In the »LOCK« menu, press »« and
enter the PIN code »0000« using
» « buttons on the displayed 1...0
password screen.
– The menu options are now enabled.
2 Select »Parental Guidance« with »
V
«
or »
Λ
« and confirm with »
<
« or »
>
«.
3 Select the access level with »
V
« or
»
Λ
«.
4 EXITPress » « to finish the setting.
Locking the control panel
(parental control)
If the control panel lock is activated, the
buttons on the television do not work.
1 In the »LOCK« menu, press »« and
enter the PIN code »0000« using
» « buttons on the displayed 1...0
password screen.
2 Use »
V
« or »
Λ
« to select »Key Lock«
and use »
<
« or »
>
« to enable (On) or
disable (Off) the key lock.
3 EXITPress » « to finish the setting.
LOCK SETTINGS
--------------------------------------------------------------------------------------------

EN / 32
1 Press »p« to open the menu.
2 Select the »SETUP« menu using »
<
«
or »
>
« and confirm your selection with
»«.
– The »SETUP« menu is now enabled.
Move
SETUP
Back Select Exit
Menu Language English
TT Language English
Audio Languages English
Subtitle Language English
Hearing Impaired Off
PVR File System
Aspect Ratio 16:9
Blue Screen On
First Time Installation
Reset
Software Update (USB)
HDMI CEC
Software Version
Note:
7 Additional operations are explained in
the following sections.
Software update (USB)
1 USBInsert the memory stick in the
socket at the side of the TV.
2 From the »Setup« menu, select
»Software Update (USB)« with »
V
« or
»
Λ
« and confirm with »«. Press »
<
«
on the displayed warning screen.
– The software in the USB memory
stick is installed.
Resetting the television to its
original state
This function enables you to delete the
channel lists and all custom settings.
1 From the »Setup« menu, select
»Reset« line with »
V
« or »
Λ
« and
confirm with »«.
2 Press »
<
« on the warning screen.
– The »First Time Installation« menu
will be displayed after a short while.
OTHER SETTINGS
-------------------------------------------------------------------------

EN / 33
HDMI CEC
Your television is equipped with HDMI
CEC feature. This feature utilizes CEC
(Consumer Electronics Control) protocol.
CEC allows you to make an HDMI
connection between your TV and DVD
player, STB or video recorder and control
such equipment with the remote control
of the television. This feature must be
supported by the device you connect as
well.
Your television supports the following
functions. For detailed information about
this function, read the user manual of the
external device.
HDMI CEC connection functions
of the television
Switching on the external device from
standby mode
If you switch on your external device (e.g.
DVD player) from standby mode, your
television will also be switched on from
standby and switch to the HDMI source
that your television is connected to.
Depending on the features of the external
device (e.g. AV receiver) can start and
your television can stay on stand-by
mode.
Selecting the HDMI source from the
television
When you switch on your external device
(e.g. DVD player), your television will
switch to the HDMI source that the
external device is connected to (your
television must be on).
Selecting the menu language
When you select the menu language from
your television menu language of the
external device will change as well. (If
your DVD player supports)
USING EXTERNAL DEVICES
-----------------------------------------------------------
Switching off the device from standby
mode
After switching your television to standby,
your external device (e.g. DVD player) will
also switch to standby if it is on.
HDMI CEC is always active on your
television.
Refer to the user manual of your external
device to learn how to activate this feature
on it.
Searching and selecting the active
external device
1 Press » p« to open the menu.
2 Select the »SETUP« menu using »
<
«
or »
>
« and confirm your selection with
»«.
– The »SETUP« menu is now enabled.
Move
SETUP
Back Select Exit
Menu Language English
TT Language English
Audio Languages English
Subtitle Language English
Hearing Impaired Off
PVR File System
Aspect Ratio 16:9
Blue Screen On
First Time Installation
Reset
Software Update (USB)
HDMI CEC
Software Version
3 Press »
V
« or »
Λ
« to select »HDMI
CEC« and press » « to confirm.
4 Use »
<
« or »
>
« to switch »CEC
Control« to »On« position.
– The »HDMI CEC« menu is now
enabled.
5 Press »
V
« or »
Λ
« to select the
»Device List« and press » « to con-
firm.
– Existing devices will be searched
and displayed in the menu
6 Press »
V
« or »
Λ
« to select the device
you want to control and press » « to
confirm.
7 EXITPress » « to end searching.

EN / 34
USING EXTERNAL DEVICES
---------------------------------------------------------
HDMI, the HDMI logo and High-Definition
Multimedia Interface are trademarks or
registered trademarks of HDMI Licensing
LLC.
High definition – HD ready
Your television can playback high-
definition television signals (HDTV).
You can connect the input sources (HDTV
set-top box or High Definition DVD player)
to the » « socket (digital HDTV HDMI
signal).
This ensures that you can view digital
HDTV programmes, even if they are copy-
protected (HDCP High Bandwidth Digital
Content Protection).
Connection options
7
Which television socket(s) you
connect your external devices to
depends on the sockets the external
device is equipped with and the
signals which are available.
7
Note that with many external devices
the resolution of the video signal
must be adapted to the input sockets
on the television (check the external
device’s instruction manual). You can
find out which values you need to set
by referring to the guidelines in the
section about connection options.
7
Do not connect any other equipment
while the device is switched on.
Switch off the other equipment as well
before connecting it.
7
Only plug the device into the mains
socket after you have connected
external devices.

EN / 35
Connecting an external device
With a digital audio/video signal
7
Suitable devices: Digital satellite
receiver, Playstation, BluRay player, DVD
player/recorder, set-top box, notebook,
PCs.
7
Video signal: digital image; definition:
standard 576p; HDTV 720p, 1080i,
1080p.
7
Audio signal: digital audio (stereo, multi-
channel compression, uncompressed).
7
»HDMI1« or »HDMI2« channel position.
1 HDMI1 HDMI2Connect the » « or » «
socket on the television and the
corresponding HDMI socket on the
external device using a standard HDMI
cable (digital video and audio signal).
Connecting a DVD recorder, DVD player,
video recorder or set-top box
1 Switch on the video recorder, DVD
player or set-top box and select the
function you wish to use.
2 Press » «, use »
Λ
« or »
V
« to select
the input signal »AV«, »Component«,
»HDMI1« and »HDMI2« confirm with
»«.
Headphones
Connecting headphones
1 Plug the headphone jack (3.5 mm jack
plug) into the headphone socket of the
television.
Note:
7
Prolonged listening at loud volumes
with the headphones can damage your
hearing.
USING EXTERNAL DEVICES
---------------------------------------------------------
Hi-fi system
Connecting digital multi-channel
amplifier/AV receiver
1 Optic OutConnect the » « socket on the
television to the corresponding socket
on the AV receiver using a standard
coaxial cable (digital audio signal).
Adjusting the audio format
You can select whether the audio signal
emitted from the » « socket is in Optic Out
PCM data format or in AC3 format.
1 Press »p« to open the menu.
2 Select the »SOUND« menu using »
<
«
or »
>
« and confirm your selection with
»«.
– The »SOUND« menu is not enabled.
3 Select »SPDIF Mode« with »
V
« and
select the signal type (»PCM« or
»Auto«) with »
<
« or »
>
«.
4 EXITPress » « to finish the setting.
Manufactured under license from Dolby
Laboratories. Dolby, Dolby Audio, and the
double-D symbol are trademarks of Dolby
Laboratories Licensing Corporation.
EN / 36
OPERATION WITH COMMON INTERFACE
-----------------
What is Common Interface?
7
Common Interface (CI) is an interface
for DVB receivers.
7
Scrambled channels can only be viewed
with a CA module suitable for the
encoding system and the corresponding
smart card.
7
The television set is equipped with a
Common Interface slot into which CA
modules from various providers can be
inserted.
7
You can insert the provider’s smart card
into the CA module in order to enable
the scramble channels you want to see.
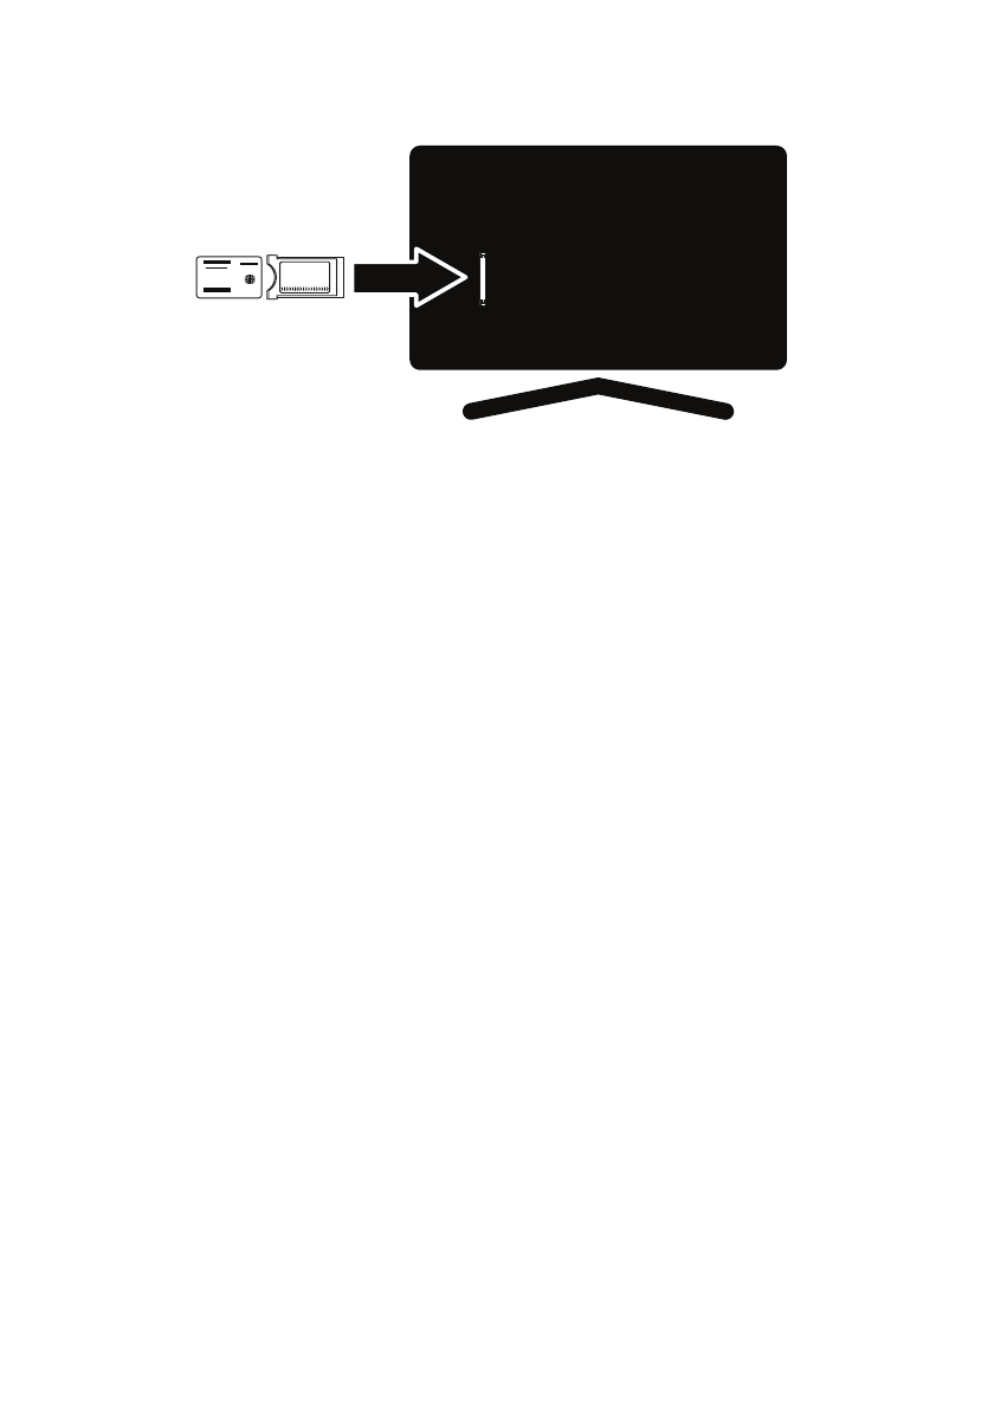
Inserting the CA module
Note:
7
Switch off the appliance before
inserting the CA module in the » « CI
slot.
1 Insert the smart card into the CA
module.
2 Insert the CA module with the
smart card into the » « slot on the CI
television.
Note:
7 When you insert a CA module into
the CI slot on the television for the
first time, wait a few moments until
the television has registered the CA
module.
Access control for CA module and
smart cards
1 Press »p« to open the menu.
2 Press »
<
« or »
>
« to select the
»Channel« menu and press »« to
confirm.
– »CHANNEL« menu is now enabled.
3 Press »
V
« or »
Λ
« to select »CI
Information« and confirm with »«.
Notes:
7
This menu give operating instructions
and – after you enter your PIN code
– access to channels of the PAY-TV
provider.
7
Other settings are described in the
manuals for your CA module and
smart card.
7
CAM is not supported in some
countries and regions. Please consult
your authorised dealer.
4 EXITPress » « to finish the settings.
CI

EN / 37
DETAILED CHANNEL SETTINGS
---------------------------------------------
Searching for all digital television
channels from a satellite
automatically
New satellite channels are added or
satellite data is changed frequently.
Therefore, we recommend you to run auto
search function from time to time.
All transponders are scanned for new
channels.
1 Open the »Input Source« menu with »
«.
2 Select »SATELLITE« using »
V
« or »
Λ
«
and confirm with »«.
3 Press »p« to open the menu.
4 Press »
<
« or »
>
« to select the
»CHANNEL« menu and press »« to
confirm.
– »CHANNEL« menu is now enabled.
5 Select »Auto Tuning« with »
V
« or »
Λ
«
and confirm with »«.
– »Tuning Setup« menu will be
displayed.
Tuning Setup
Back Start
Service Type All
Channel Type Free+Scramble
Scan Mode Default
Country Turkey
Satellite TURKSA...
6 In the »Tuning Setup« menu, select the
country from »Country« using »
<
« or
»
>
«.
7 Select the »Satellite« option using »
V
«
or »
Λ
« and select the satellite you
want to search with »
<
« or »
>
«.
8 Select »Channel Type« using »
V
« or
»
Λ
«.
Press »
<
« or »
>
« to select whether
you want to search for only free
digital television channels (Free),
only scrambled digital television
channels (Scramble) or the both
(Free+Scramble).
Note:
7
If some of the frequencies are not
stored completely due the changes
in satellite parameters made by the
broadcaster, it is recommended to
set the »Network Settings« option to
»Network«.
9 Select »Service Type« using »
V
« or
»
Λ
«.
Press »
<
« or »
>
« to select whether
you want to search for only television
channels (DTV), only radio (Radio) or
the both (All).
10 Press »« to start the search.
– The »Channel Tuning« menu will
be displayed and the search for TV
channels will start.
– Search may take several minutes
depending on the number of
television channels received.
Note:
7
The search can be ended prematurely
with »p«.
11 Press »p« to end the setting.

EN / 38
DETAILED CHANNEL SETTINGS
---------------------------------------------
Searching for digital television
channels from a satellite
manually
If a certain channel cannot be found
with automatic search, you can search it
manually by manual search function. You
must enter all parameters of the channel
correctly. You can obtain the current
transponder information from teletext
page, satellite TV magazines or Internet
or you can search by selecting from the
transponder list that already exists in the
TV.
1 Press »p« to open the menu.
2 Press »
<
« or »
>
« to select the
»CHANNEL« menu and press »« to
confirm.
– »CHANNEL« menu is now enabled.
3 Select »Dish Antenna Setup« using
»
V
« or »
Λ
« and confirm with »«.
– »Dish Antenna Setup« menu will be
displayed.
4 Display the transponder list with
» «.GUIDE
5 Press »« (yellow) to add the
transponder in which you want to
search manually.
6 Press »
V
« or »
Λ
« to select the
required items and press »« to
confirm.
Frequency
Enter the 5-digit channel frequency
using » «.1...0
Symbol Rate (Ks/s)
Enter the channel's symbol rate in 5
digits using » « buttons.1...0
Polarity
Use »
<
« or »
>
« to select the channel
polarity as »V« or »H«.
7 Select the transponder you have
added using »
V
« or »
Λ
« and confirm
with »«.
– Transponder is marked with » «
8 Press »« (blue).
– »Channel Search« menu will be
displayed.
9 Select »Channel Type« using »
V
« or
»
Λ
«.
Press »
<
« or »
>
« to select whether
you want to search for only free
digital television channels (Free),
only scrambled digital television
channels (Scramble) or the both
(Free+Scramble).
Note:
7
If some of the frequencies are not
stored completely due the changes
in satellite parameters made by the
broadcaster, it is recommended to
set the »Network Settings« option to
»Network«.
10 Select »Service Type« using »
V
« or
»
Λ
«.
Press »
<
« or »
>
« to select whether
you want to search for only television
channels (DTV), only radio (Radio) or
the both (All).
11 Press »« to start the search.
– The »Channel Tuning« menu will
be displayed and the search for TV
channels will start.
– Search may take several minutes
depending on the number of
television channels received.
Note:
7
The search can be ended prematurely
with »p«.
12 Press »p« to end the setting.
Termékspecifikációk
| Márka: | Grundig |
| Kategória: | televízió |
| Modell: | 40 GHF 5200 |
Szüksége van segítségre?
Ha segítségre van szüksége Grundig 40 GHF 5200, tegyen fel kérdést alább, és más felhasználók válaszolnak Önnek
Útmutatók televízió Grundig

31 Március 2025
24 Március 2025
22 Március 2025
16 Január 2025
16 Január 2025
16 Január 2025
16 Január 2025
16 Január 2025
16 Január 2025
16 Január 2025
Útmutatók televízió
- televízió Samsung
- televízió Sony
- televízió Beko
- televízió Fujitsu
- televízió Acer
- televízió Nedis
- televízió LG
- televízió Marantz
- televízió Philips
- televízió Pioneer
- televízió SilverCrest
- televízió Panasonic
- televízió JVC
- televízió AEG
- televízió Sharp
- televízió Nokia
- televízió Lenovo
- televízió Casio
- televízió Toshiba
- televízió Oppo
- televízió Hyundai
- televízió Hisense
- televízió BenQ
- televízió SunBriteTV
- televízió Siemens
- televízió Medion
- televízió TCL
- televízió Xiaomi
- televízió GoGen
- televízió Insignia
- televízió Infiniton
- televízió Dell
- televízió Strong
- televízió VOX
- televízió Vivax
- televízió Thomson
- televízió Polaroid
- televízió Aiwa
- televízió Orima
- televízió V7
- televízió Clatronic
- televízió PEAQ
- televízió Qilive
- televízió Haier
- televízió Mitsubishi
- televízió Cecotec
- televízió Sencor
- televízió GPX
- televízió Küppersbusch
- televízió Innoliving
- televízió AOC
- televízió Citizen
- televízió Westinghouse
- televízió Hitachi
- televízió Continental Edison
- televízió Telefunken
- televízió Nevir
- televízió Monster
- televízió Roadstar
- televízió Optoma
- televízió CHiQ
- televízió Viewsonic
- televízió Nextbase
- televízió Denver
- televízió Bush
- televízió Trevi
- televízió Albrecht
- televízió Daewoo
- televízió Funai
- televízió Tesla
- televízió Smart Tech
- televízió Muse
- televízió Energy Sistem
- televízió OK
- televízió SVAN
- televízió Loewe
- televízió RevolutionHD
- televízió Polar
- televízió Manhattan
- televízió Kogan
- televízió Horizon
- televízió Intenso
- televízió Furrion
- televízió Teac
- televízió Aspes
- televízió Digihome
- televízió Manta
- televízió Blaupunkt
- televízió Sagem
- televízió Jay-Tech
- televízió Logik
- televízió Finlux
- televízió Peerless-AV
- televízió Abus
- televízió AG Neovo
- televízió Bang & Olufsen
- televízió Iiyama
- televízió AKAI
- televízió TechniSat
- televízió Seiki
- televízió Jensen
- televízió Pyle
- televízió Emerson
- televízió Sanyo
- televízió Kemo
- televízió Salora
- televízió Lenco
- televízió Schneider
- televízió Philco
- televízió ECG
- televízió Uniden
- televízió Technika
- televízió NEC
- televízió Element
- televízió Soundmaster
- televízió Alphatronics
- televízió AYA
- televízió MBM
- televízió Krüger&Matz
- televízió Dual
- televízió Brandt
- televízió Wharfedale
- televízió Allview
- televízió RCA
- televízió OKI
- televízió Orion
- televízió SereneLife
- televízió Schaub Lorenz
- televízió Luxor
- televízió Metz
- televízió ILive
- televízió Graetz
- televízió Tatung
- televízió Packard Bell
- televízió EasyMaxx
- televízió Orava
- televízió Arçelik
- televízió Planar
- televízió Zenith
- televízió Doffler
- televízió QBell Technology
- televízió SYLVOX
- televízió Majestic
- televízió Reflexion
- televízió FFalcon
- televízió Megasat
- televízió Sogo
- televízió United
- televízió Techwood
- televízió Newstar
- televízió Matsui
- televízió Alden
- televízió Aldi
- televízió Airis
- televízió Aristona
- televízió Apex
- televízió Icy Box
- televízió Lexibook
- televízió Palsonic
- televízió Walker
- televízió Saba
- televízió Antarion
- televízió Kernau
- televízió Tevion
- televízió Proscan
- televízió Vestel
- televízió Tucson
- televízió Sunstech
- televízió Nabo
- televízió Sylvania
- televízió Sunny
- televízió Marquant
- televízió Nordmende
- televízió AudioAffairs
- televízió Magnum
- televízió Audiosonic
- televízió Kubo
- televízió Proline
- televízió Coby
- televízió Seg
- televízió Vivo
- televízió Daitsu
- televízió Terris
- televízió Changhong
- televízió Alba
- televízió Naxa
- televízió Star-Light
- televízió Fantec
- televízió Mpman
- televízió Sweex
- televízió Vizio
- televízió Cello
- televízió Mx Onda
- televízió Nikkei
- televízió Hannspree
- televízió DGM
- televízió Yasin
- televízió Humax
- televízió XD Enjoy
- televízió MT Logic
- televízió Superior
- televízió Kunft
- televízió ITT
- televízió Grunkel
- televízió Avtex
- televízió Inovia
- televízió Odys
- televízió NPG
- televízió Bluesky
- televízió Videocon
- televízió Xoro
- televízió Durabase
- televízió HKC
- televízió Edenwood
- televízió Woxter
- televízió Premier
- televízió Onn
- televízió Teleco
- televízió Opera
- televízió LTC
- televízió JTC
- televízió Zalman
- televízió Ferguson
- televízió Viewpia
- televízió JGC
- televízió Online
- televízió Dyon
- televízió DirecTV
- televízió Tele 2
- televízió Telesystem
- televízió EKO
- televízió E-motion
- televízió Mitsai
- televízió Selfsat
- televízió High One
- televízió Tve
- televízió ISymphony
- televízió Pantel
- televízió Magnavox
- televízió ATYME
- televízió HCI
- televízió Inno-Hit
- televízió Lin
- televízió Engel
- televízió TechLine
- televízió Elements
- televízió Englaon
- televízió Time
- televízió Reflex
- televízió Astar
- televízió Visco
- televízió Tivax
- televízió H&B
- televízió Norcent
- televízió TELE System
- televízió TIM
- televízió Oyster
- televízió Belson
- televízió Vision Plus
- televízió Sbr
- televízió Bauhn
- televízió Voxx
- televízió Rm 2000
- televízió Hoher
- televízió Felson
- televízió Mach Power
- televízió Elbe
- televízió Axing
- televízió CGV
- televízió Séura
- televízió Mitzu
- televízió Caratec
- televízió JTC24
- televízió Coocaa
- televízió Kivi
- televízió Smart Brand
- televízió Voxicon
- televízió Aconatic
- televízió Mitchell & Brown
- televízió FOX Electronics
- televízió Mystery
Legújabb útmutatók televízió

1 Április 2025

31 Március 2025
31 Március 2025

31 Március 2025
30 Március 2025
30 Március 2025
30 Március 2025
29 Március 2025
29 Március 2025

29 Március 2025